

Page 1

®
9-pin Dot Matrix Printer
User’s Guide
This manual is divided in two sections: English and Spanish. The
English section begins after this page. The Spanish section begins
approximately at the middle of the manual.
Este manual está dividido en dos secciones: Inglés y Español. El
manual en español comienza aproximadamente a la mitad del libro. El
manual en inglés comienza después de esta página.
Page 2

All rights reserved. No part of this publication may be reproduced, stored in a retrieval system, or
transmitted in any form or by any means, electronic, mechanical, photocopying, recording, or
otherwise, without the prior written permission of SEIKO EPSON CORPORATION. The
information contained herein is designed only for use with this EPSON printer. EPSON is not
responsible for any use of this information as applied to other printers.
Neither SEIKO EPSON CORPORATION nor its affiliates shall be liable to the purchaser of
this product or third parties for damages, losses, costs, or expenses incurred by the purchaser
or third parties as a result of: accident, misuse, or abuse of this product or unauthorized
modifications, repairs, or alterations to this product, or (excluding the U.S.) failure to strictly
comply with SEIKO EPSON CORPORATION’s operating and maintenance instructions.
SEIKO EPSON CO RPORATION shall not be liable for any damages or problems arisin g from
the use of any options or any consumable products other than those designated as Original
EPSON Products or EPSON Approved Products by SEIKO EPSON CORPORATION.
EPSON and EPSON ESC/P are registered trademarks of SEIKO EPSON CORPORATION.
EPSON Store and SoundAdvice are service marks of Epson America, Inc.
Microsoft, Windows, and Windows NT are registered trademarks of Microsoft Corporation.
IBM and ProPrinter are registered trademarks of International Business Machines
Corporation.
General Notice: Other product names used herein are for identification purposes only and may be
trademarks of their respective owners. EPSON disclaims any and all rights in those marks.
Copyright © 2001 by SEIKO EPSON CORPORATION, Nagano, Japan. 11/01
ii
Page 3

Contents
Introduction
Warnings, Cautions, and Notes. . . . . . . . . . . . . . . . . . . . . . . . . . . . 1
Where to Find Information . . . . . . . . . . . . . . . . . . . . . . . . . . . . . . . 1
Using the Online Reference Guide . . . . . . . . . . . . . . . . . . . . . . . . . 2
Viewing the Reference Guide from the CD-ROM. . . . . . . . 2
Installing and viewing the Reference Guide from
the hard disk . . . . . . . . . . . . . . . . . . . . . . . . . . . . . . . . . . . . .2
Using the Quick Guide . . . . . . . . . . . . . . . . . . . . . . . . . . . . . . . . . . . 3
Options . . . . . . . . . . . . . . . . . . . . . . . . . . . . . . . . . . . . . . . . . . . . . . . .3
Chapter 1 -
Unpacking the Printer. . . . . . . . . . . . . . . . . . . . . . . . . . . . . . . . . . . . 1-1
Choosing a Place for the Printer . . . . . . . . . . . . . . . . . . . . . . . . . . . 1-2
Installing the Ribbon Cartridge. . . . . . . . . . . . . . . . . . . . . . . . . . . . 1-3
Attaching the Paper Guide. . . . . . . . . . . . . . . . . . . . . . . . . . . . . . . . 1-7
Connecting the Printer to Your Computer . . . . . . . . . . . . . . . . . . 1-8
Using the parallel interface. . . . . . . . . . . . . . . . . . . . . . . . . . . 1-8
Using the USB interface. . . . . . . . . . . . . . . . . . . . . . . . . . . . . .1-9
Installing an optional interface card . . . . . . . . . . . . . . . . . . . 1-10
Plugging in the Printer . . . . . . . . . . . . . . . . . . . . . . . . . . . . . . . . . . . 1-11
Installing the Printer Software. . . . . . . . . . . . . . . . . . . . . . . . . . . . . 1-12
For Windows. . . . . . . . . . . . . . . . . . . . . . . . . . . . . . . . . . . . . . . 1-13
For DOS programs . . . . . . . . . . . . . . . . . . . . . . . . . . . . . . . . . .1-14
Chapter 2 -
Setting the Paper Release Lever . . . . . . . . . . . . . . . . . . . . . . . . . . . 2-1
Adjusting the Paper-Thickness Setting . . . . . . . . . . . . . . . . . . . . .2-2
Loading Continuous Paper with the Front Push Tractor . . . . . . 2-3
Loading Continuous Paper with the Rear Push Tractor . . . . . . . 2-6
Loading Continuous Paper with the Pull Tractor . . . . . . . . . . . .2-8
Removing paper from the pull tractor . . . . . . . . . . . . . . . . . 2-13
Loading Single Sheets with the Paper Guide . . . . . . . . . . . . . . . .2-13
Setting Up the Printer
Paper Handling
iii
Page 4

Loading Single Sheets with the Single-Bin Cut-Sheet Feeder . . 2-15
Loading Single Sheets with the High-Capacity
Cut-Sheet Feeder . . . . . . . . . . . . . . . . . . . . . . . . . . . . . . . . . . . . . 2-18
Loading Special Papers . . . . . . . . . . . . . . . . . . . . . . . . . . . . . . . . . . 2-22
Continuous multipart forms . . . . . . . . . . . . . . . . . . . . . . . . . 2-22
Single-sheet multipart forms . . . . . . . . . . . . . . . . . . . . . . . . . 2-22
Labels . . . . . . . . . . . . . . . . . . . . . . . . . . . . . . . . . . . . . . . . . . . . 2-23
Envelopes . . . . . . . . . . . . . . . . . . . . . . . . . . . . . . . . . . . . . . . . . 2-24
Switching Paper Types . . . . . . . . . . . . . . . . . . . . . . . . . . . . . . . . . . 2-25
Switching to printing on single sheets . . . . . . . . . . . . . . . . . 2-26
Switching to printing on continuous paper. . . . . . . . . . . . . 2-27
Using the Micro Adjust Function. . . . . . . . . . . . . . . . . . . . . . . . . . 2-27
Adjusting the tear-off position . . . . . . . . . . . . . . . . . . . . . . . 2-27
Adjusting the top-of-form position. . . . . . . . . . . . . . . . . . . . 2-29
Chapter 3 -
Buttons and Lights . . . . . . . . . . . . . . . . . . . . . . . . . . . . . . . . . . . . . . 3-1
Selecting a Font and Pitch . . . . . . . . . . . . . . . . . . . . . . . . . . . . . . . . 3-3
About Your Printer’s Default Settings. . . . . . . . . . . . . . . . . . . . . . 3-4
Changing default settings . . . . . . . . . . . . . . . . . . . . . . . . . . . 3-9
Locking the Control Panel Buttons . . . . . . . . . . . . . . . . . . . . . . . . 3-10
Turning Lock-out mode on and off . . . . . . . . . . . . . . . . . . . 3-10
Changing the Lock-out mode settings . . . . . . . . . . . . . . . . . 3-10
Emulating the Okidata Microline 320 Turbo . . . . . . . . . . . . . . . . 3-11
Chapter 4 -
Using the Error Indicators. . . . . . . . . . . . . . . . . . . . . . . . . . . . . . . . 4-1
Problems and Solutions. . . . . . . . . . . . . . . . . . . . . . . . . . . . . . . . . . 4-2
Power supply problems . . . . . . . . . . . . . . . . . . . . . . . . . . . . . 4-3
Paper loading or feeding problems . . . . . . . . . . . . . . . . . . . 4-4
Printing position problems . . . . . . . . . . . . . . . . . . . . . . . . . . 4-7
Printing or printout quality problems . . . . . . . . . . . . . . . . . 4-9
Correcting USB Problems . . . . . . . . . . . . . . . . . . . . . . . . . . . . . . . . 4-13
Clearing Paper Jams. . . . . . . . . . . . . . . . . . . . . . . . . . . . . . . . . . . . . 4-15
Aligning Vertical Lines in Your Printout . . . . . . . . . . . . . . . . . . . 4-16
Printing a Self Test . . . . . . . . . . . . . . . . . . . . . . . . . . . . . . . . . . . . . . 4-17
Printing a Hex Dump. . . . . . . . . . . . . . . . . . . . . . . . . . . . . . . . . . . . 4-18
Where To Get Help . . . . . . . . . . . . . . . . . . . . . . . . . . . . . . . . . . . . . 4-19
Using the Control Panel
Troubleshooting
iv
Page 5

Chapter 5 - Product Information
Safety Instructions. . . . . . . . . . . . . . . . . . . . . . . . . . . . . . . . . . . . . . . 5-1
Hot Parts Caution Symbol. . . . . . . . . . . . . . . . . . . . . . . . . . . . 5-1
Important Safety Instructions. . . . . . . . . . . . . . . . . . . . . . . . .5-1
ENERGY STAR Compliance. . . . . . . . . . . . . . . . . . . . . . . . . . 5-3
FCC Compliance Statement for United States Users . . . . . . . . . . 5-3
WARNING . . . . . . . . . . . . . . . . . . . . . . . . . . . . . . . . . . . . . . . . 5-4
For Canadian users. . . . . . . . . . . . . . . . . . . . . . . . . . . . . . . . . . 5-4
Declaration of Conformity . . . . . . . . . . . . . . . . . . . . . . . . . . . 5-5
v
Page 6

Introduction
This manual covers the following information:
❏ Setting Up the Printer
❏ Paper Handling
❏ Using the Control Panel
❏ Troubleshooting
❏ Product Information
Warnings, Cautions, and Notes
Warnings must be followed carefully to avoid bodily injury.
w
Cautions must be observed to avoid damage to your
c
Notes contain important information and useful tips on the operation
of your printer.
equipment.
Where to Find Information
In addition to this manual, you’ll find detailed information
about your printer in the following places:
❏ Online Reference Guide. It describes all the printer’s
functions, optional products, printer software,
troubleshooting, and technical specifications. See “Using the
Online Reference Guide” on page 2.
❏ Online
and includes the paper handling information you’ll find in
Chapter 2 of this book—all in a convenient online format.
Quick Guide
. It explains the control panel functions
Introduction
1
Page 7

❏ Online Help. Access help anytime for information and
instructions on the printer software that controls your
printer. Online help is automatically installed when you
install the printer software.
Note:
Although the illustrations in this manual show the FX-880+ printer,
the instructions apply to both the FX-880+ and the FX-1180+; the
printers work the same.
Using the Online Reference Guide
You can view the online Reference Guide directly from the
CD-ROM that comes with the printer, or install it on your hard
disk and view it from your computer.
Viewing the Reference Guide from the CD-ROM
1. Insert the printer software CD-ROM in the CD-ROM drive.
The Installation Program Screen appears. If it does not,
double-click the My Computer icon. Click the CD-ROM
icon, then double-click SETUP.EXE.
2. Double-click User Guides.
3. To open the Reference Guide, click the appropriate View
button.
Installing and viewing the Reference Guide from the hard disk
To install the Reference Guide on your hard disk, follow steps 1
and 2 in the previous section. Then click Install Reference
Guide, and follow the on-screen instructions. When the
installation is complete, the FX880P 1180P Guide icon appears
in the EPSON folder.
2
Introduction
Page 8

To view the Reference Guide, click Start, go to Programs and
select EPSON. Then, click FX880P 1180P Guide.
Note:
If your hard disk does not have enough space to install the Reference
Guide, view it directly from the CD.
Using the Quick Guide
You can view the Quick Guide from the printer software
CD-ROM, copy it to your hard disk, or print it out.
Follow these steps to view the Quick Guide from the CD-ROM:
1. Insert the printer software CD-ROM in the CD-ROM drive.
The Installation Program Screen appears. If it does not,
double-click the My Computer icon. Click the CD-ROM
icon, then double-click SETUP.EXE.
2. Double-click User Guides.
3. To open the Quick Guide, click the appropriate View button.
Options
By adding options, such as a cut-sheet feeder or roll paper
holder, you can further expand your printer’s capabilities.
Optional interface cards are also available to supplement your
printer’s built-in interfaces. (See “Options and Consumables” in
the Reference Guide for more information.)
You can purchase ribbon cartridges, paper, manuals, and
accessories from EPSON at (800) 873-7766, or visit the EPSON
SM
Store
please call (800) 873-7766 for dealer referral.
at www.epsonstore.com (U.S. sales only). In Canada,
Introduction
3
Page 9
Chapter 1
Setting Up the Printer
This chapter describes how to unpack and set up your printer.
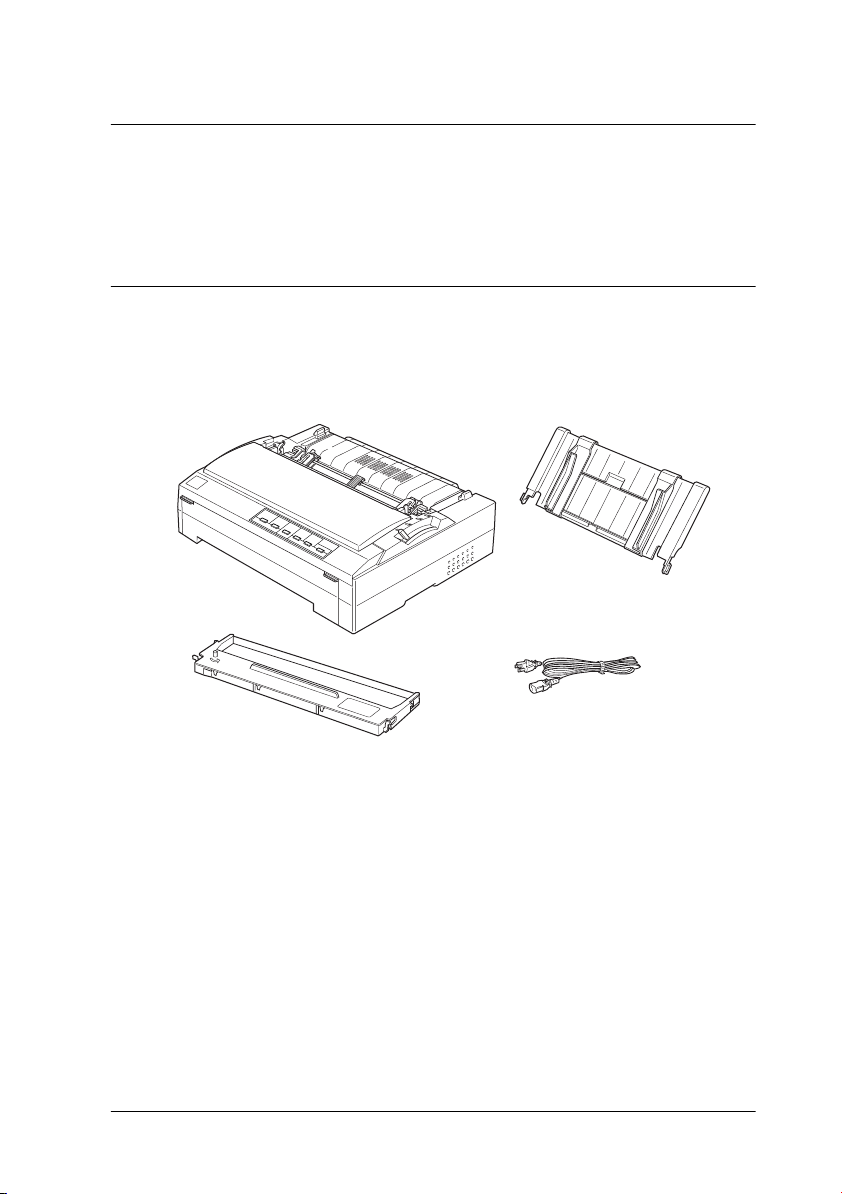
Unpacking the Printer
Besides the items shown below, the printer box should include
an EPSON printer software CD-ROM and a Notice Sheet.
printer paper guide
ribbon cartridge
Caution:
c
There are several models of the printer designed for different
voltages, and it is not possible to adjust the printer for use with
another voltage. If the label on the back of the printer does not
show the correct voltage for your country, contact your dealer.
You must remove all protective materials packed around and
inside your printer before you set it up and turn on the power.
Follow the directions on the Notice Sheet (packed with the
printer) to remove these materials. Save all packing and
protective materials in case you need to ship the printer later.
power cord
Setting Up the Printer
1-1
Page 10

Choosing a Place for the Printer
❏ Place the printer on a flat, stable surface. The printer will not
operate properly if it is tilted or placed at an angle.
❏ Place the printer where you can easily connect it to a
network interface cable, if necessary. Leave adequate room
around the printer for easy operation and maintenance.
❏ Avoid using or storing the printer in places subject to rapid
changes in temperature and humidity. Keep it away from
direct sunlight, strong light, heat sources, or excessive
moisture or dust.
❏ Avoid places subject to shocks and vibrations.
❏ Place the printer near a wall outlet where you can easily
unplug the power cord.
Note for French-speaking users:
Placez l’imprimante près d’une prise de courant où la fiche peut
être débranchée facilement.
❏ Avoid electrical outlets controlled by wall switches or
automatic timers. An interruption in power can erase
information in the memory of your printer or computer.
Also avoid outlets on the same circuit as large motors or
other appliances that can cause voltage fluctuations.
❏ Keep the entire computer system away from potential
sources of electromagnetic interference, such as
loudspeakers or the base units of cordless telephones.
❏ Use a grounded power outlet; do not use an adapter plug.
❏ If you plan to use a printer stand, make sure it does not tilt
and is strong enough to hold the printer.
❏ Position the power cord and interface cable so they do not
interfere with paper feeding.
1-2
Setting Up the Printer
Page 11
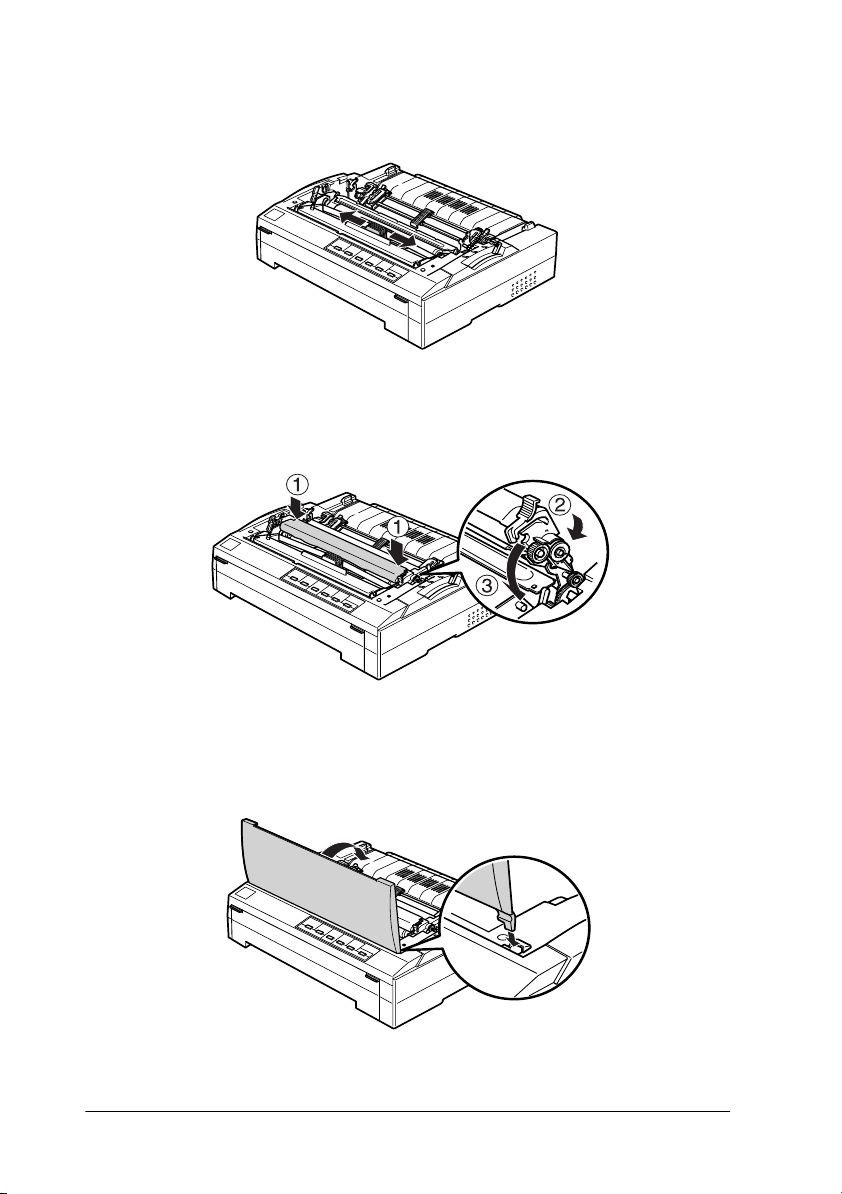
Installing the Ribbon Cartridge
EPSON recommends the use of genuine EPSON ribbon
cartridges (#8750 for the FX-880+, #8755 for the FX-1180+).
Products not manufactured by EPSON may cause damage to
your printer that is not covered by EPSON’s warranties.
Warning:
w
You need to move the print head by hand to install the ribbon
cartridge. If you have just used the printer, the print head may
be hot; let it cool for a few minutes before touching it.
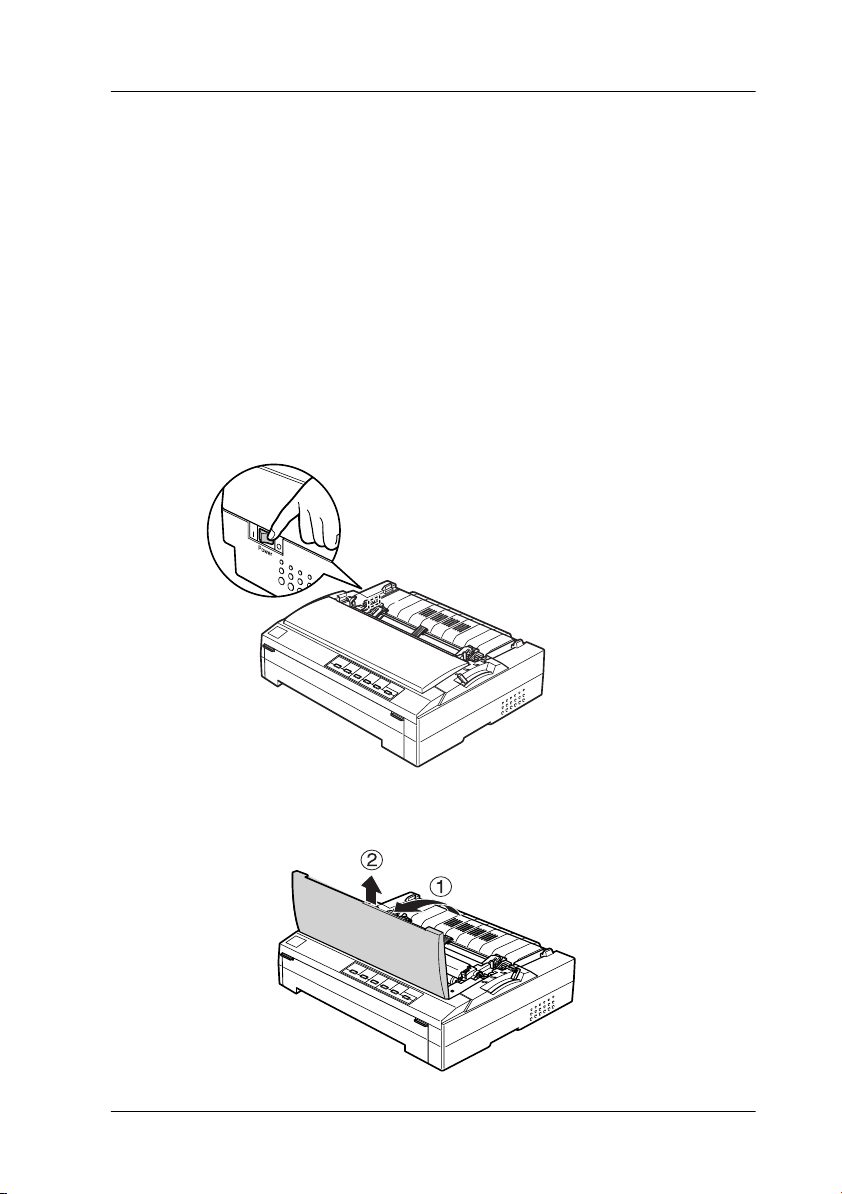
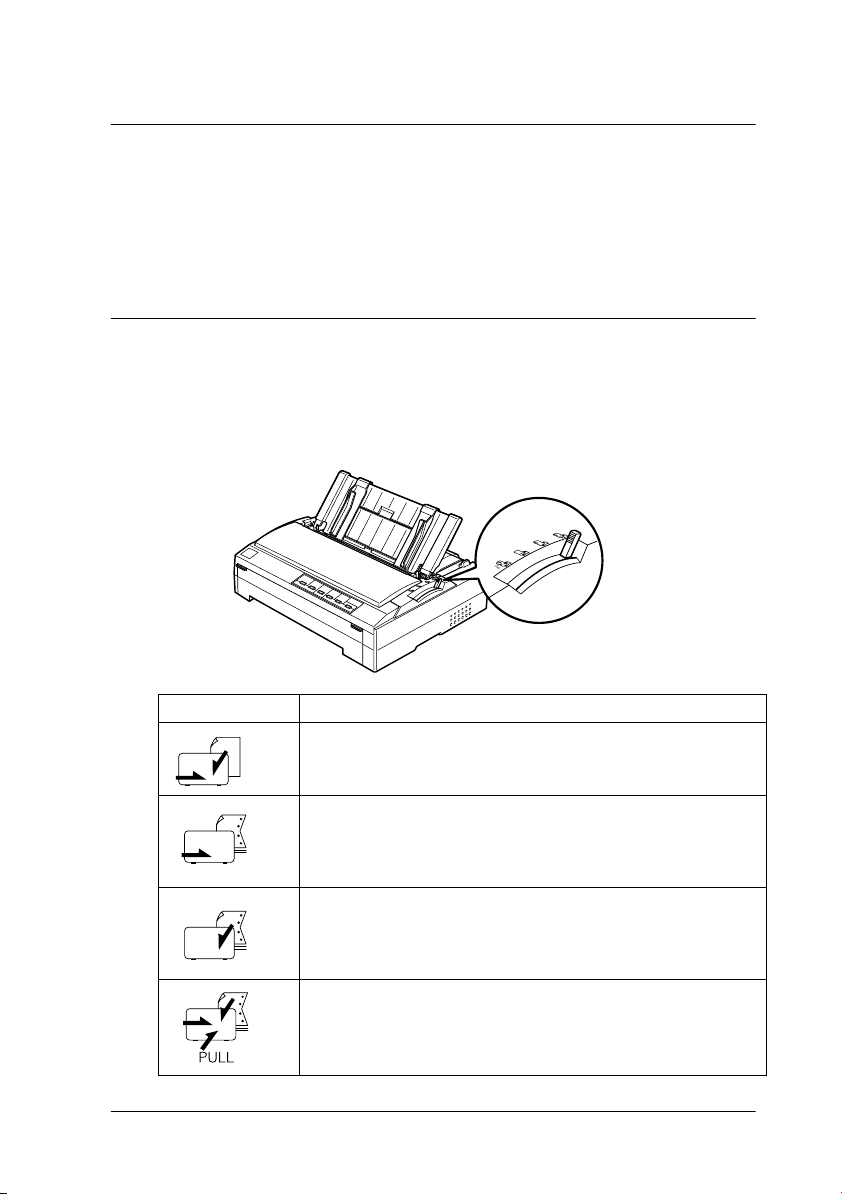
1. Make sure the printer is turned off. If it is connected to an
electrical outlet, unplug it from the outlet.
The printer is off when the
power switch is pressed
down to the N side.
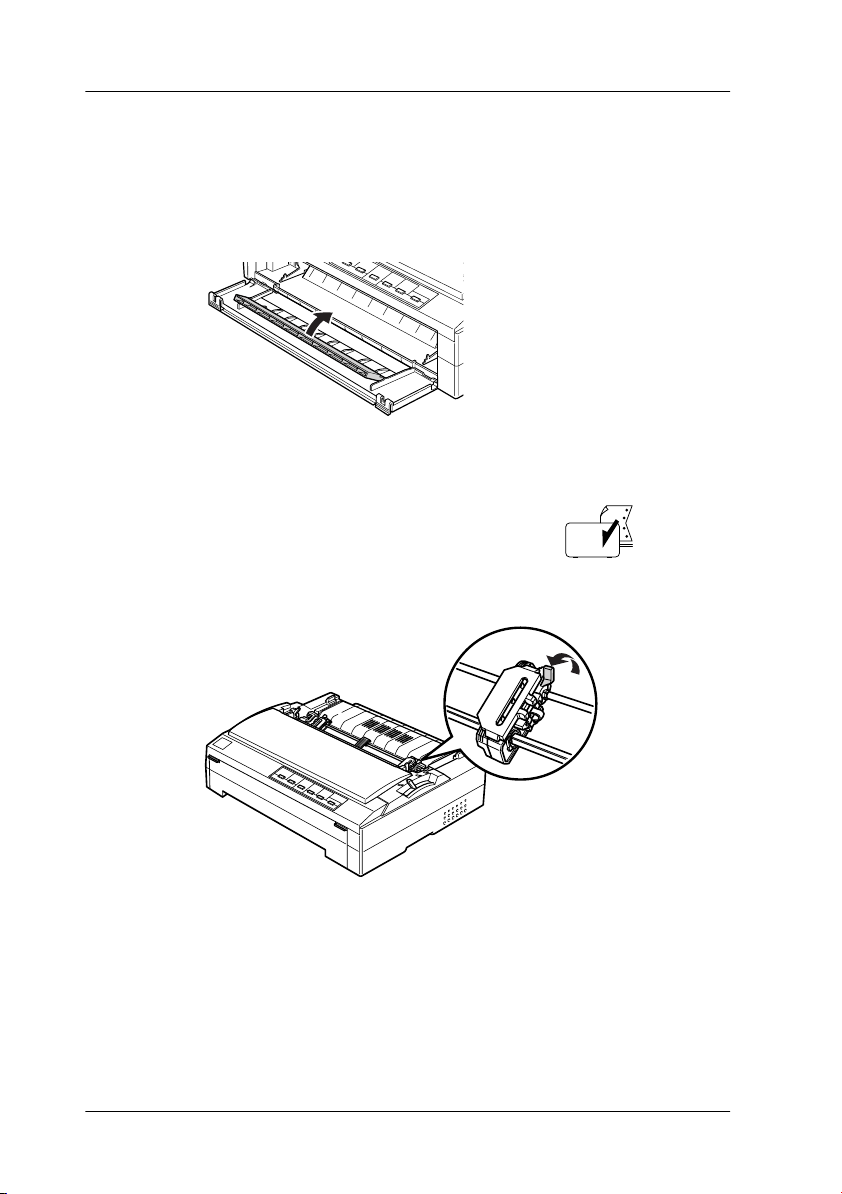
2. Open the printer cover, then pull it up to remove it.
Setting Up the Printer
1-3
Page 12
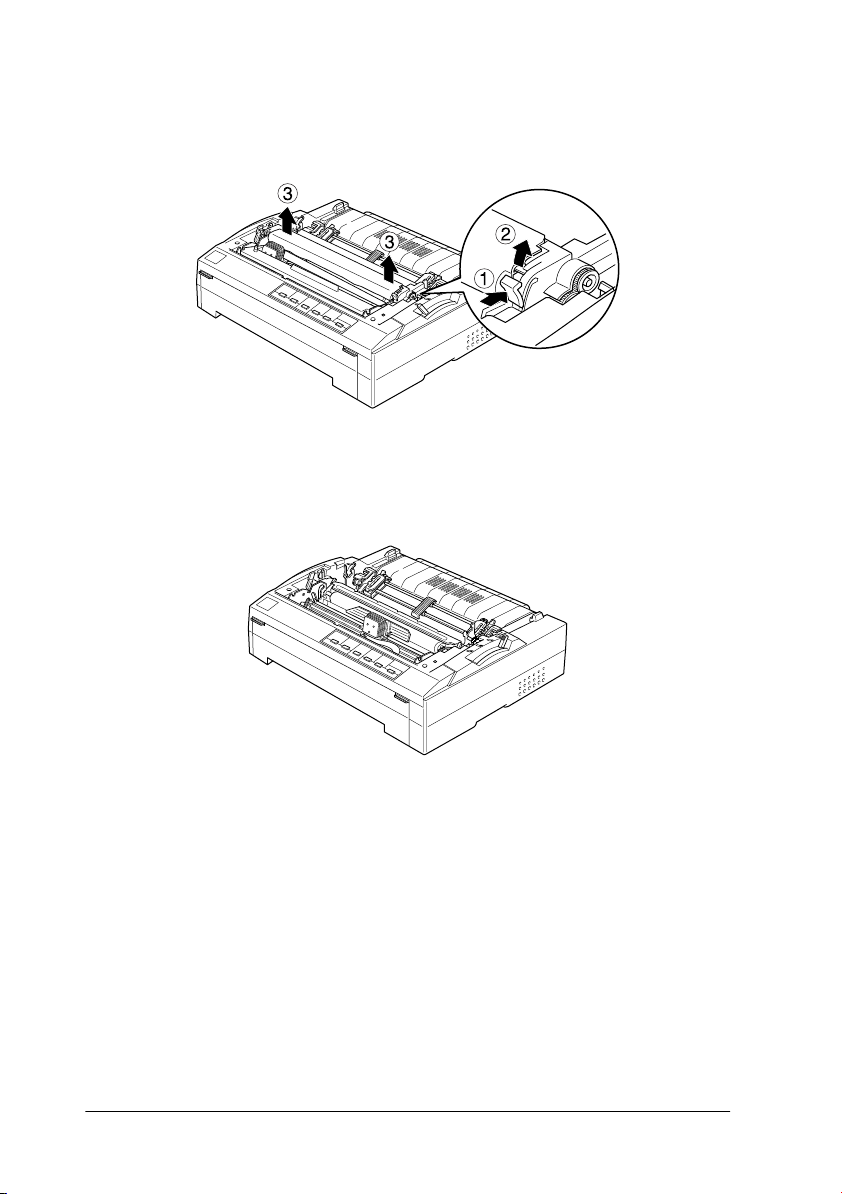
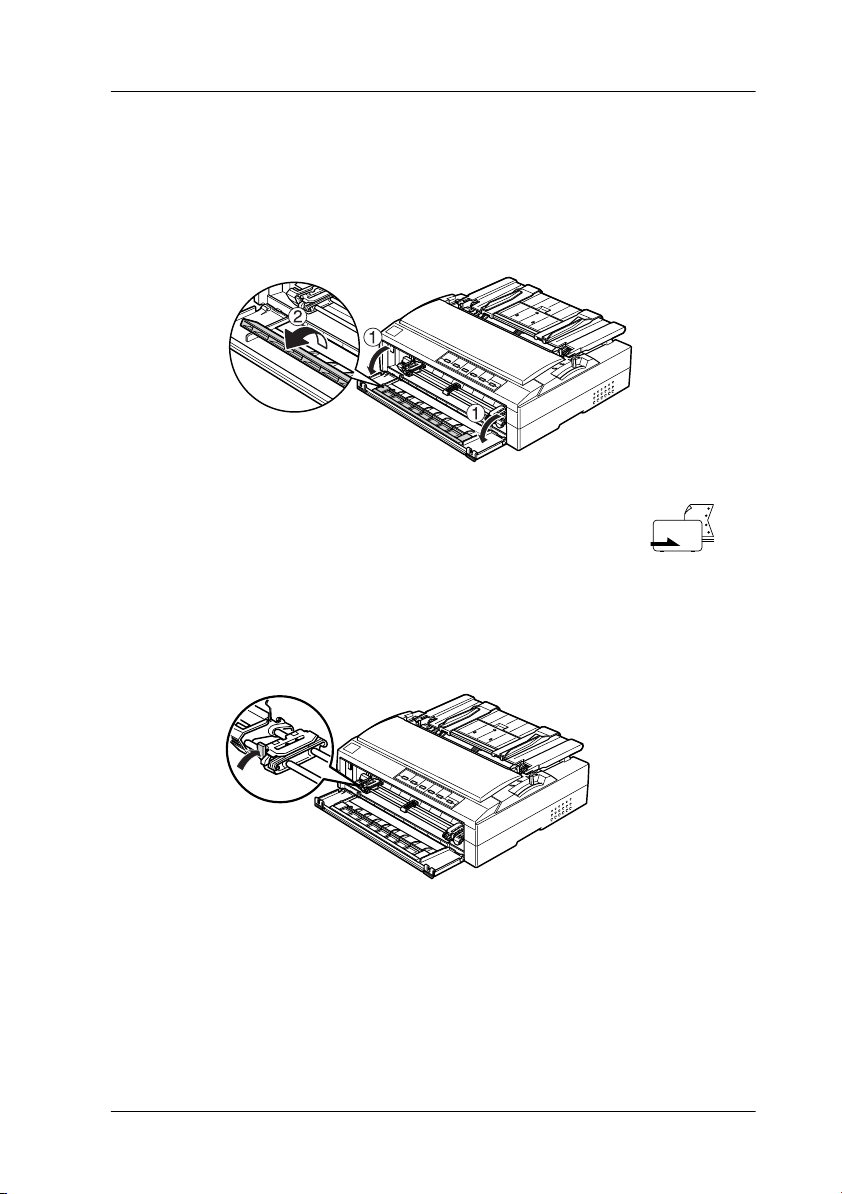
3. Press the tabs on each side of the paper tension unit as
shown, then lift the front of the unit and pull it up and out of
the printer.
4. Make sure the print head is not hot; if it is, let it cool for a
few minutes before touching it. Then slide the print head to
the middle of the printer by hand.
Caution:
c
Never move the print head while the printer is turned on;
this can damage the printer.
5. If a used ribbon cartridge is installed, grasp the cartridge by
the handle and pull it up and out of the printer.
1-4
Setting Up the Printer
Page 13
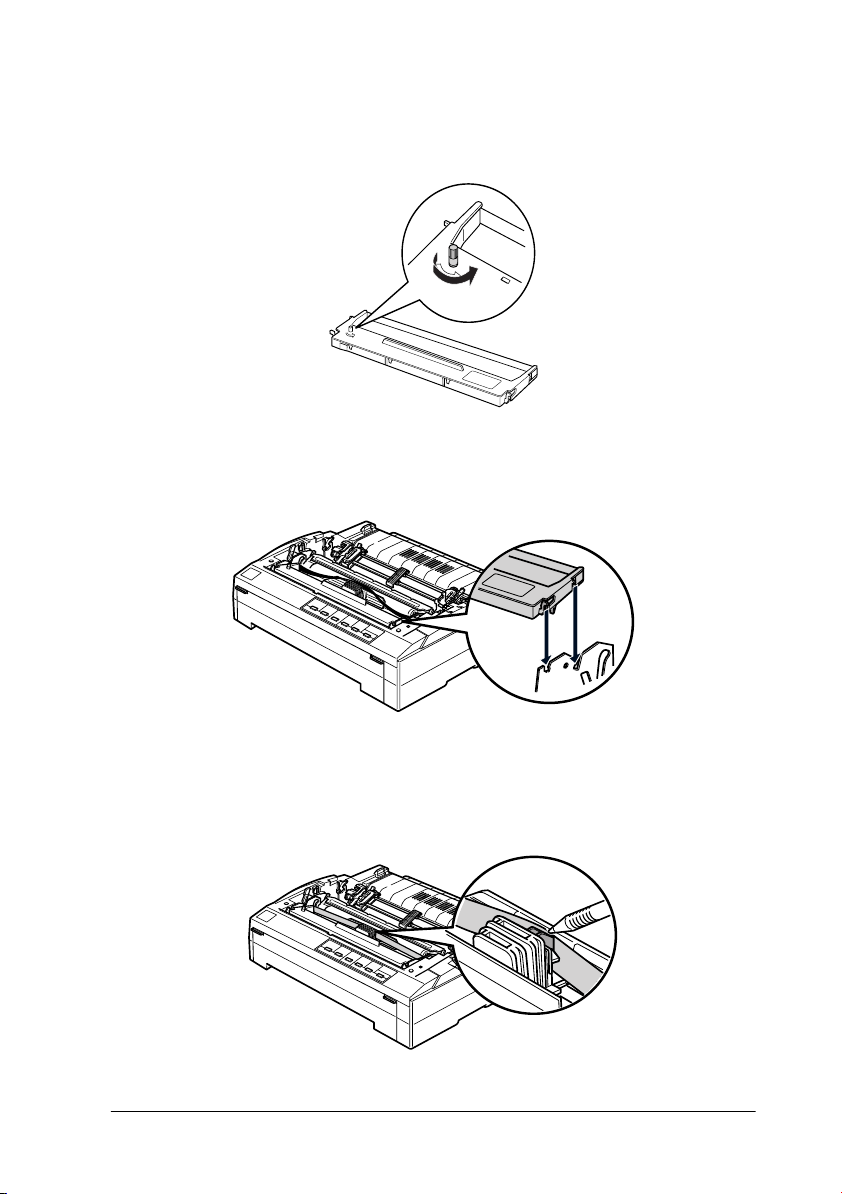
6. Remove the new ribbon cartridge from the package and turn
the ribbon-tightening knob in the direction of the arrow to
remove any slack from the ribbon so it is easier to install.
7. Hold the ribbon cartridge by its handle and insert it into the
printer as shown below; then press both sides of the
cartridge firmly to fit the plastic hooks into the printer slots.
8. Use a pointed object, such as a ball point pen, to guide the
ribbon between the print head and ribbon guide. Turn the
ribbon-tightening knob to help feed the ribbon into place; it
should not be twisted or creased.
Setting Up the Printer
1-5
Page 14
9. Slide the print head from side to side to make sure it moves
smoothly.
10. Reinstall the paper tension unit by placing it on the printer’s
mounting pegs and lowering it into place. Press down on
both sides of the unit until it clicks into place.
11. Replace the printer cover by inserting the front tabs into the
slots on the printer and lowering the cover into place. Then
push it down until it clicks.
1-6
Setting Up the Printer
Page 15
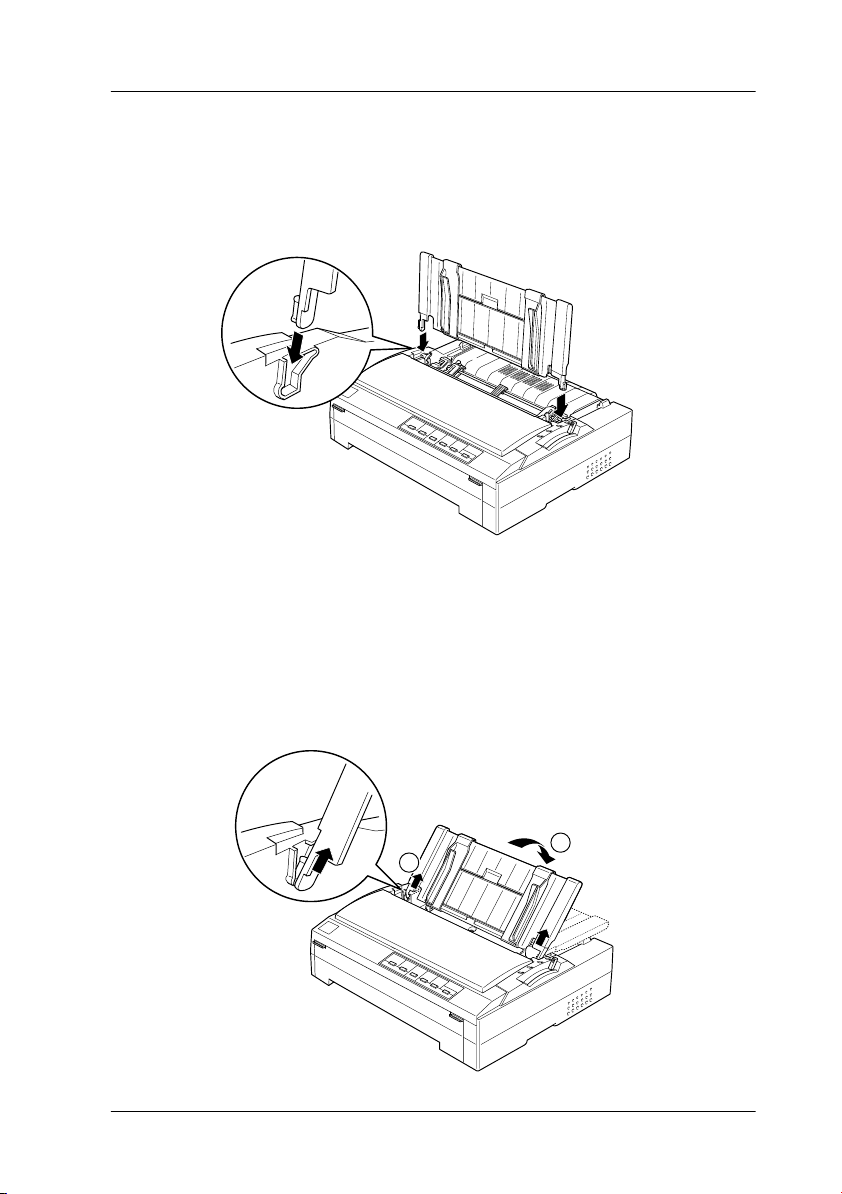
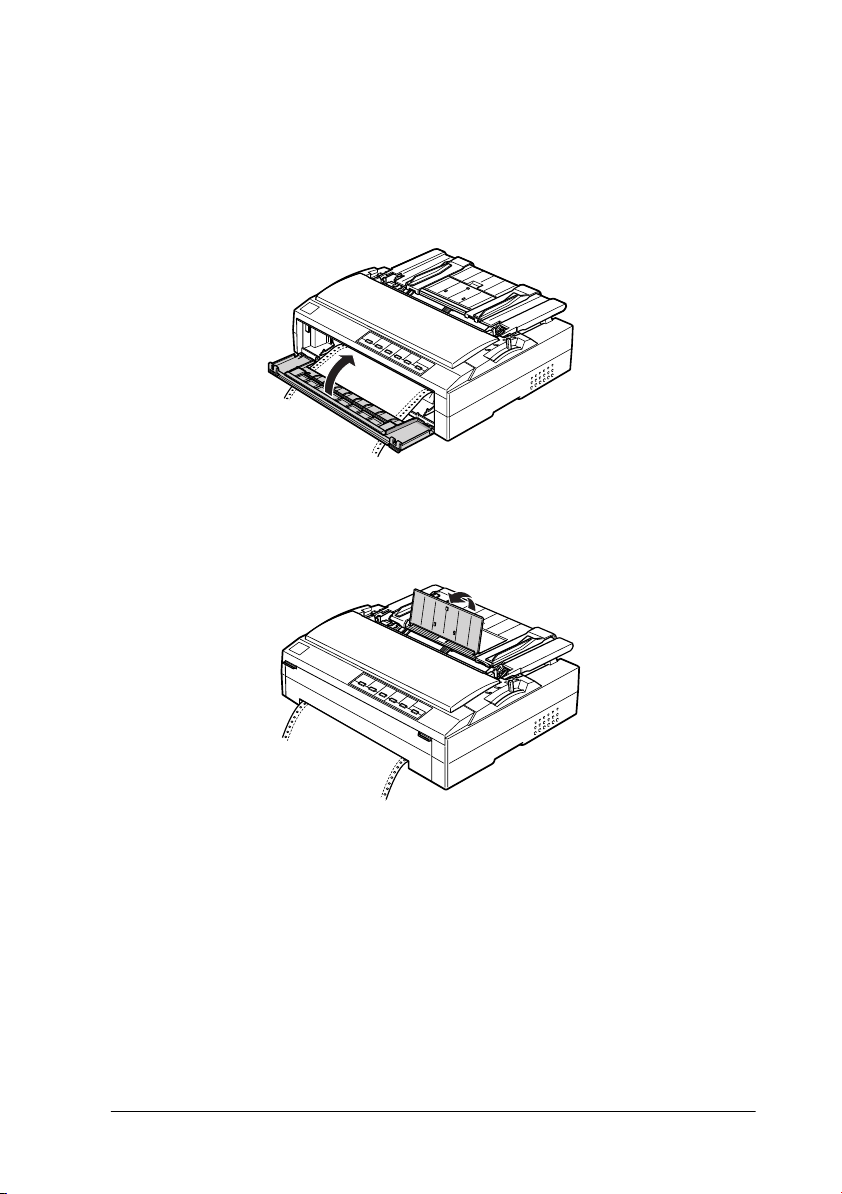
Attaching the Paper Guide
To attach the paper guide to your printer, insert the tabs straight
down into the mounting slots on the printer. Then let it rest in
the upright position.
Note:
You can use the paper guide only when the tractor is installed in the
front or rear push position.
When you are not using the paper guide, lay it flat to prevent it
from obstructing your paper or being damaged. Lift it up
slightly, then lower it until it is lying flat on top of the printer.
2
1
Setting Up the Printer
1-7
Page 16
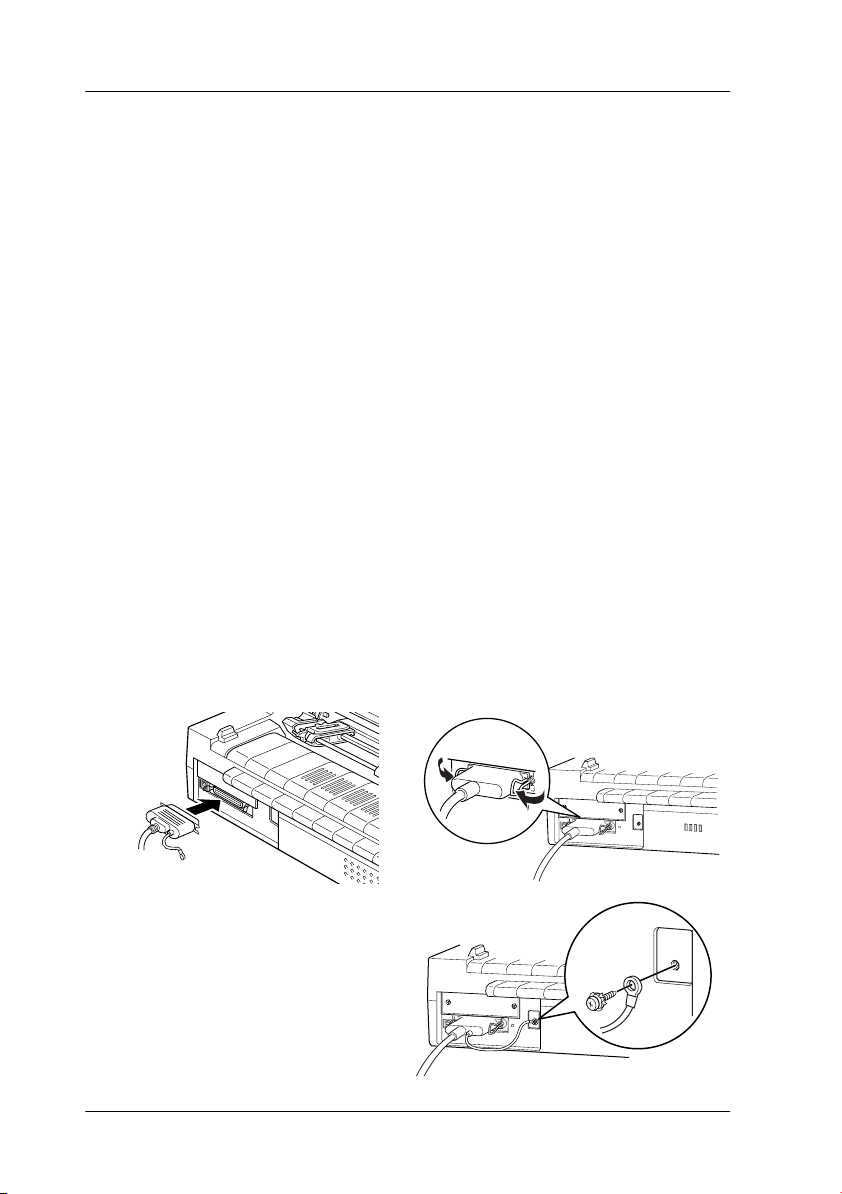
Connecting the Printer to Your Computer
Your printer is equipped with both an IEEE-1284-compatible
parallel interface and a USB (Universal Serial Bus) interface. It
also includes a Type-B optional interface slot in case your
computer requires a different type of printer interface. (See
“Installing an optional interface card” on page 1-10.) Connect
your computer to the desired interface as described below.
Note:
You can connect a cable to both interfaces; the printer switches
automatically to the appropriate interface when it receives data.
Using the parallel interface
To connect your computer to your printer’s built-in parallel
interface, you need a shielded, twisted-pair parallel cable with a
36-pin Centronics
1. Make sure the printer and computer are turned off.
2. Plug the parallel cable connector securely into the printer’s
parallel interface port. Squeeze the wire clips together until
they lock in place on both sides of the connector.
®
compatible connector for the printer.
3. If there is a ground wire
at the end of the cable,
attach it to the printer’s
ground connector as
shown below.
1-8
Setting Up the Printer
Page 17
4. Plug the other end of the cable into the computer’s parallel
interface port. (If there is a ground wire at the end of the
cable, attach it to the ground connector at the back of the
computer.)
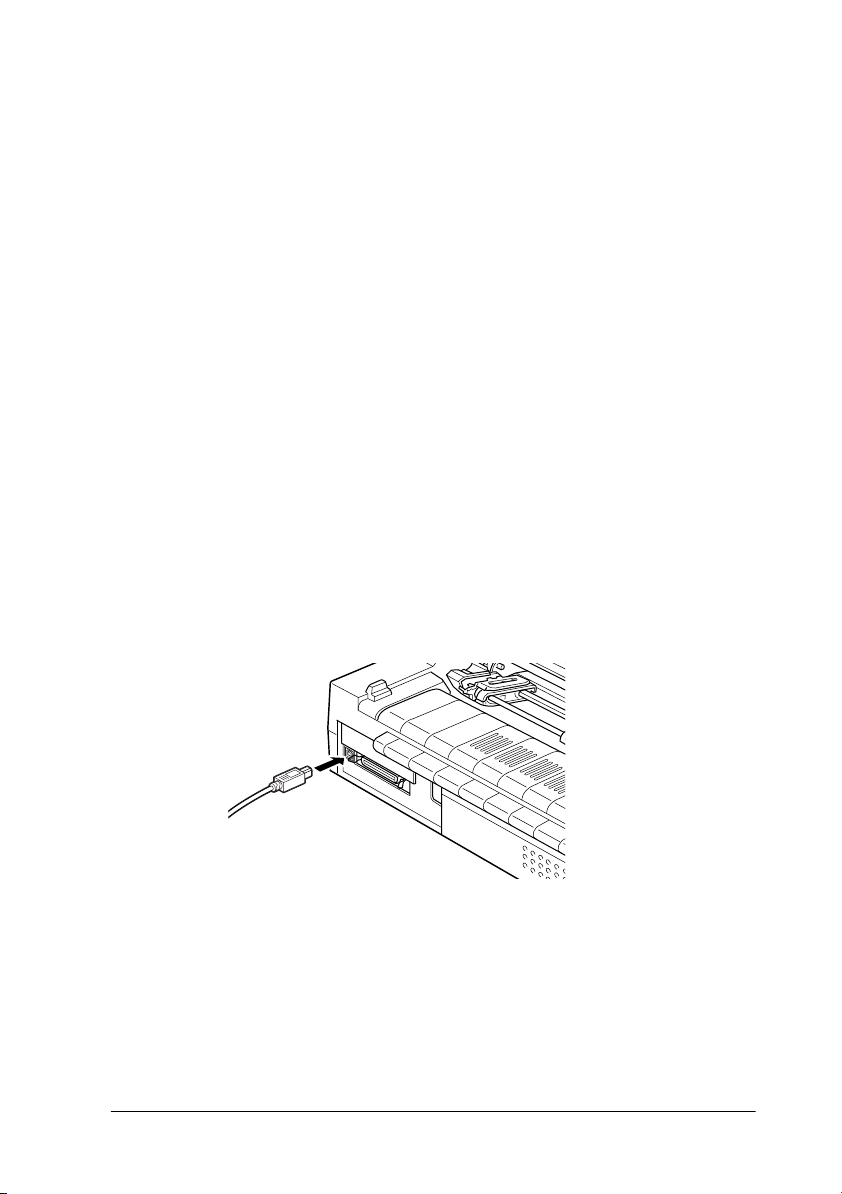
Using the USB interface
To connect the printer to a USB port, you need a standard,
shielded USB cable.
Note:
Your computer must be a Windows Me, 98, or 2000 pre-installed
model that is equipped with a USB port. If you use a USB hub, it is
recommended that you connect the printer to the first tier of the hub or
connect the printer directly to the computer’s USB port.
Follow these steps to connect the printer to your computer using
the printer’s built-in USB interface:
1. Make sure both the printer and computer are turned off.
2. Plug the appropriate end of the cable into the USB port on
the back of the printer.
3. Connect the other end of the cable to the computer’s USB
port.
Setting Up the Printer
1-9
Page 18
Installing an optional interface card
You can use optional interface cards to supplement your
printer’s built-in parallel interface. The EPSON interface cards
below are compatible with your printer. (Not all interfaces are
available worldwide.)
Model number Card type
C82305✽ / C82306✽ Serial interface
C82307✽ / C82308✽ 32 KB intelligent serial interface
C82313✽ 32 KB IEEE-488 interface
C82314✽ Coax interface
C82315✽ Twinax interface
C82345✽ IEEE-1284 parallel interface
C82363**/C82364 EpsonNet 10/100 Base Tx Int. Print Server
C82362 EpsonNet 10 Base 2/T Int. Print Server
C82384 EpsonNet 10/100 Base TX Int. Print Server
* The last digit varies by country.
** When using an optional interface adapter (C82525).
Follow these steps to install an optional interface card:
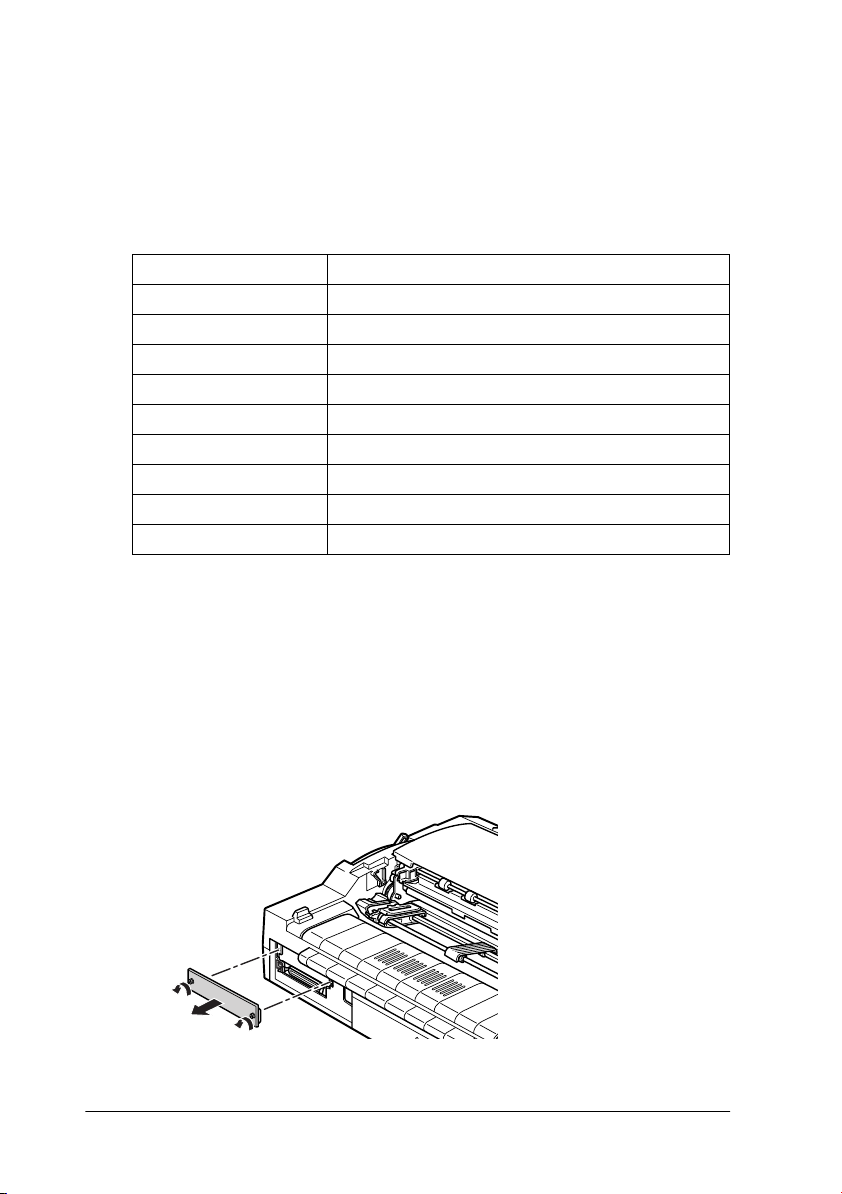
1. Make sure the printer is turned off. Unplug the printer’s
power cord and disconnect the interface cable.
2. Remove the screws securing the shield plate to the back of
the printer and remove the plate.
1-10
Setting Up the Printer
Page 19
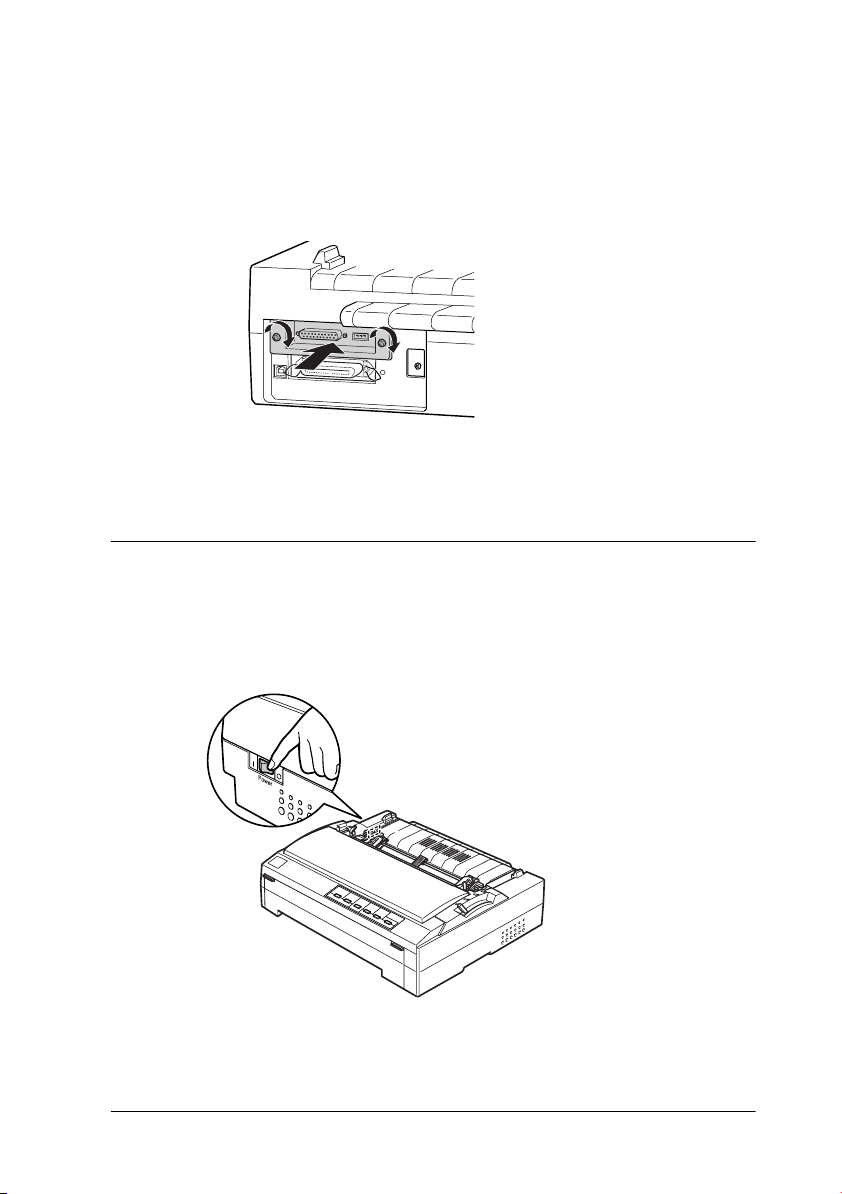
3. Slide the interface card along the slots on both sides of the
interface compartment. Firmly push in the card to make sure
the connector at the back of the card is fully inserted into the
printer’s internal socket. Then replace the screws and tighten
them.
Store the shield plate in
a safe place; you will
need to reattach it if
you remove the
interface card later.
To remove the interface card, reverse the steps above.
Plugging in the Printer
Follow these steps to plug in the printer:
1. Make sure the printer is turned off.
The printer is off when the
power switch is pressed
down to the N side.
Setting Up the Printer
1-11
Page 20

2. Check the label on the back of the printer to make sure the
voltage required by the printer matches that of your
electrical outlet. Also make sure the shape of the plug on
your printer’s power cord matches the shape of your
electrical outlet.
Caution:
c
It is not possible to change the printer’s voltage. If the rated
voltage on the printer and your outlet voltage do not match,
contact your dealer for assistance. Do not plug in the power
cord.
3. Plug the appropriate end of the power cord into the AC inlet
on the back of the printer.
4. Plug the other end of the power cord into a properly
grounded electrical outlet.
Installing the Printer Software
After you connect the printer to your computer, you need to
install the software included in the EPSON printer software
CD-ROM shipped with your printer:
❏ Printer driver
The printer driver is the software that runs, or “drives,” your
printer. With it, you can select printer settings such as print
quality, resolution, and paper size.
❏ EPSON Status Monitor 3 (Windows Me, 98, 95, 2000 or
NT 4.0)
EPSON Status Monitor 3 notifies you of printer errors and
displays printer status information. See the Reference Guide
for more information on Status Monitor 3.
When you install the printer driver on Windows Me, 98, 95, 2000
or NT 4.0, the EPSON Status Monitor 3 utility will also be
installed. For information on using the software, see “Printer
Software” in the Reference Guide.
1-12
Setting Up the Printer
Page 21

For Windows
Follow the steps below to install the printer software in
Windows Me, 98, 95, 2000, or NT 4.0.
Note:
❏ Installing the printer software for Windows 2000 or NT 4.0 may
require administrator privileges. If you have problems, ask your
administrator for more information.
❏ If you want to make a floppy disk version of the printer software on
your CD-ROM, insert the CD and run SETUP.EXE. In the
dialog box that appears, double-click Create Floppy based
printer driver/utility disks and follow the on-screen instructions.
❏ If you are using the floppy disk version of the EPSON software,
make a backup copy of the EPSON printer software disk or disks
before you begin installation.
❏ If the New Hardware Found screen or any other wizard appears
when you turn on your computer, click Cancel.
❏ If the Digital Signature Not Found screen appears, click Yes. If
you click No, you must reinstall the printer driver.
1. Make sure Windows Me, 98, 95, 2000, or NT 4.0 is running
and the printer is turned off.
2. Insert the printer software CD-ROM into the CD-ROM
drive. The Install dialog box appears. If it does not,
double-click the My Computer icon. Click the CD-ROM
icon, then double-click SETUP.EXE.
(If you are using a floppy disk, insert the disk into the floppy
disk drive. Double-click the floppy disk drive icon and then
double-click the FD_SETUP.EXE icon.)
3. Click Install to start the printer software installation.
4. Select your printer from the list, then follow the instructions
on the screen.
Setting Up the Printer
1-13
Page 22

For DOS programs
To control the printer from DOS application programs, you need
to select the printer you are using or another available printer
from the printer list in your application.
Choose the EPSON printer at the appropriate step in the
installation or setup procedure. If the list in your application
does not include your printer, choose the first available printer
from the following list:
For FX-880+:
FX-880
FX-870
FX-850
FX-800
FX-85
FX-80+
FX-80
If none of these printers is listed, choose the first one available
from the following:
FX
LX
RX
MX
EPSON printer
Standard printer
Draft printer
ASCII printer
Note:
If your application does not list a suitable alternative, contact the
software manufacturer to see if an update is available.
For FX-1180+:
FX-1180
FX-1170
FX-1050
FX-1000
FX-105
FX-100+
FX-100
1-14
Setting Up the Printer
Page 23
Chapter 2
Paper Handling
This chapter covers some important instructions you need to
load and use paper in your printer. For complete paper handling
information, see the Reference Guide.
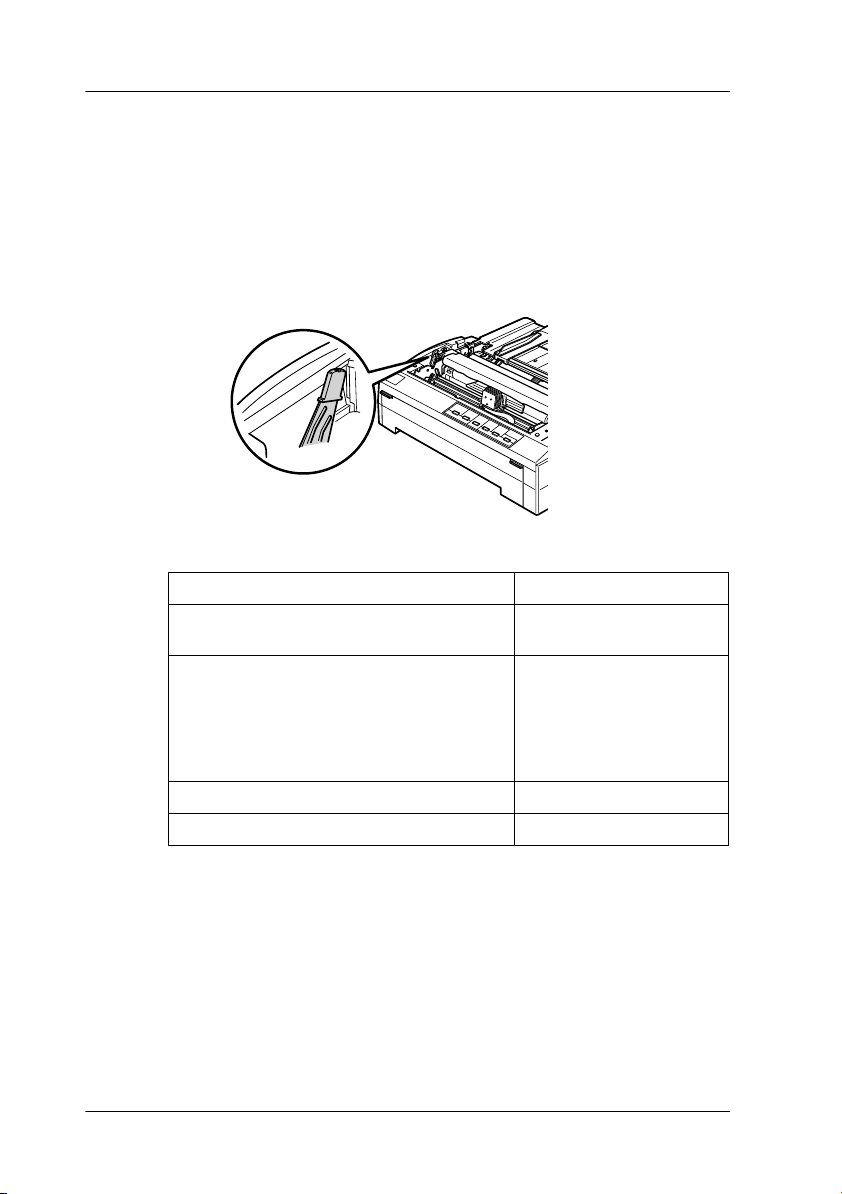
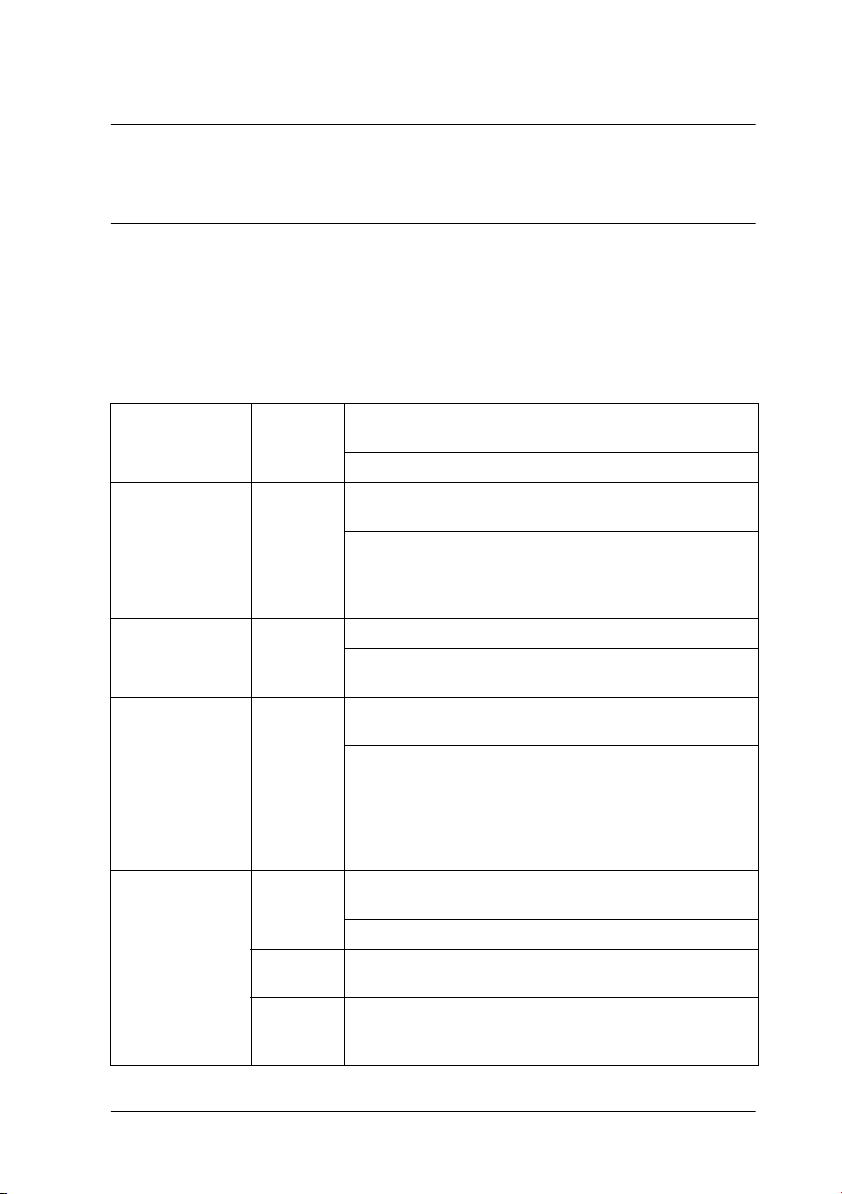
Setting the Paper Release Lever
When you load continuous paper in the printer, you need to set
the paper release lever to indicate the paper source you want to
use, as described in the table below.
Lever position Description
Single-sheet position
For loading single-sheet paper from the top or front slot.
Front push tractor position
For loading continuous paper with the tractor installed in
the front push position or when using the front push and
pull tractors in combination.
Rear push tractor position
For loading continuous paper with the tractor installed in
the rear push position or when using the rear push and pull
tractors in combination.
Pull tractor position
For loading continuous paper from the tractor installed on
top of the printer in the pull position. You can load paper
in the front, rear, or bottom slot.
Paper Handling
2-1
Page 24
Adjusting the Paper-Thickness Setting
Before you start printing, make sure the paper-thickness setting
is correct for the type of paper you are using:
1. Turn the printer off and open the printer cover. The
paper-thickness lever is located on the left side of the printer.
The numbers next to the lever indicate the thickness setting.
-1
0
1
2
3
4
5
6
2. Select the correct lever setting according to this table.
Paper type Lever position
Ordinary paper 0 or 1 (single sheets)
Carbonless multipart forms with:
2 parts (original + 1 copy)
3 parts (original + 2 copies)
4 parts (original + 3 copies)
5 parts (original + 4 copies)
6 parts (original + 5 copies)
Continuous paper with labels 2
Envelopes 2 to 6
0 (continuous paper)
1
2
3
4
5
Note:
When the temperature is 5°C (41°F) or less, set the paper-thickness
lever one position lower to improve print quality. When the
temperature is 35°C (95°F) or more, set the paper-thickness lever one
position higher to improve print quality.
2-2
Paper Handling
Page 25
Loading Continuous Paper with the Front Push Tractor
1. Make sure the printer is turned off. Then open the front
cover and the flap. Make sure the tractor is installed in the
front push position.
2. Set the paper release lever to the front push
tractor position. Also set the paper-thickness
lever to the proper position for your paper’s
thickness. See “Adjusting the Paper-Thickness
Setting” on page 2-2 for instructions.
3. Release the left and right sprockets by pushing the blue lock
levers backward.
Paper Handling
2-3
Page 26
4. Slide the left sprocket approximately 12 mm (0.5 inch) from
the far left position and pull the blue lever forward to lock it
in place. Then slide the right sprocket to match the width of
your paper, but do not lock it. Move the center support
midway between the two sprockets.
10
5
0
5. Remove the front cover by pulling it straight down, as
shown below.
6. Make sure your paper has a clean, straight edge. Then open
both sprocket covers and fit the first four holes of the paper,
with printable side up, over the tractor pins.
2-4
Paper Handling
Page 27
7. Close the sprocket covers.
8. Slide the right sprocket to remove any slack in the paper;
then lock it in place by pushing the sprocket lock down.
9. Attach the front cover with the continuous paper positioned
as shown below.
10. Make sure the paper guide is lying flat on the printer and the
edge guides are open all the way to the left and right. Then
raise the continuous paper support.
11. Turn on the printer. When the printer receives data, it
automatically loads the paper and starts printing.
If the first line on your page appears too high or low, you can
change its position by using the Micro Adjust function as
described on page 2-27.
Caution:
c
Never use the knob to adjust the top-of-form position; this may
damage the printer or cause it to lose the top-of-form position.
Paper Handling
2-5
Page 28
Loading Continuous Paper with the Rear Push Tractor
1. Close the flap on the front cover if paper is not loaded from
the front slot.
2. Make sure the printer is turned off, the tractor is installed in
the rear push position, and the paper guide is removed.
3. Set the paper release lever to the rear push
tractor position.
4. Release the left and right sprockets by
pulling the blue sprocket lock levers forward.
2-6
Paper Handling
Page 29

5. Slide the left sprocket approximately 12 mm (0.5 inch) from
the far left position and push the blue lever back to lock it in
place. Then slide the right sprocket to match the width of
your paper, but do not lock it. Move the center support
midway between the two sprockets.
The triangle mark on top of the printer indicates the point
furthest to the left where printing can begin.
6. Make sure your paper has a clean, straight edge. Then open
both sprocket covers and fit the first four holes of the paper,
with the printable side down, over the tractor pins.
7. Close the sprocket covers. Then slide the right sprocket to
remove any slack in the paper and lock it in place by
pushing the blue lock lever down.
Paper Handling
2-7
Page 30

8. Attach the paper guide and lay it flat on the printer. Open
the edge guides all the way to the left and right, then raise
the continuous paper support.
9. Turn on the printer. When the printer receives data, it
automatically loads the paper and starts printing.
If the first line on your page appears too high or low, change its
position with the Micro Adjust function. (See page 2-27.)
Caution:
c
Never use the knob to adjust the top-of-form position; this may
damage the printer or cause it to lose the top-of-form position.
Loading Continuous Paper with the Pull Tractor
1. Close the front cover flap if paper is not loaded from the
front slot.
2-8
Paper Handling
Page 31

2. Make sure the printer is turned off, and the printer cover is
removed. Also make sure the tractor is installed in the pull
position and the paper guide is lying flat on the printer.
3. Set the paper release lever to the pull
tractor position.
4. Release the sprockets by pulling the
sprocket lock levers forward.
5. Slide the left sprocket approximately 12 mm (0.5 inch) from
the far left position and push the lever back to lock it in
place. Then slide the right sprocket to match the width of
your paper, but do not lock it. Move the center support
midway between the two sprockets.
6. Make sure your paper has a clean, straight edge. Then open
the sprocket covers.
Paper Handling
2-9
Page 32

Note:
Make sure the printer is off before you insert the paper in the paper
slot. If you insert the paper while the printer is on, a paper jam
may occur.
7. Insert the paper into the front or bottom paper slot as shown
in the illustrations below until it emerges between the platen
and the ribbon guide. Then pull up the paper until the
perforation between the first and second pages is even with
the top of the printer’s ribbon.
Front slot
Before you load paper in the front slot, remove the front
cover. Then load paper with the printable side facing up.
2-10
Bottom slot
Load paper in the bottom slot with the printable side
facing up.
Paper Handling
Page 33

8. Fit four holes of the paper over the tractor pins on both
sprockets. Then close the sprocket covers.
9. Slide the right sprocket to remove any slack in the paper,
then lock it in place.
10. Open the edge guides on the paper guide all the way to the
left and right, then raise the continuous paper support.
11. If you are using the front slot, open the flap on the front
cover. Then, reattach the front cover as shown below.
12. Turn on the printer.
Paper Handling
2-11
Page 34

13. Remove any slack in the paper by pressing the LF/FF button.
(Always remove any slack from the paper; otherwise print
quality may deteriorate.)
14. When the printer receives data, it will start printing at the
current position without advancing the paper. If necessary,
follow the steps in “Using the Micro Adjust Function” on
page 2-27 to adjust the current position of the paper.
Caution:
c
Never use the knob to adjust the top-of-form position;
turning the knob when the printer is on may damage it or
cause it to lose the top-of-form position.
15. Attach the printer cover by inserting the front tabs into the
slots on the printer, then lowering the cover into place.
16. Send a print job to the printer. The printer starts printing
from the top-of-form position. After you finish printing, tear
off the printed document at the perforation nearest the
paper exit slot.
2-12
Paper Handling
Page 35

Removing paper from the pull tractor
1. After you finish printing, tear off the paper supply at the
perforation nearest the paper entry slot.
2. To feed paper forward and eject it, hold down the LF/FF
button.
Caution:
c
Never press the Load/Eject or Tear Off/Bin button when
you are using the pull tractor; the paper could come off the
pull tractor and jam the printer.
Loading Single Sheets with the Paper Guide
1. Close the flap on the front cover if paper is not loaded from
the front slot.
Paper Handling
2-13
Page 36

2. Make sure the paper guide is in the upright position. Then
set the paper-thickness lever to 0 if you are using ordinary
single-sheet paper. (If you are using envelopes, see
“Envelopes” on page 2-24 to set the lever.)
Also move the paper release lever to the
single-sheet position.
3. Turn on the printer, if necessary.
4. Slide the left edge guide until it locks in place next to the
triangle mark on the paper guide. Next adjust the right edge
guide to match the width of your paper.
5. Insert a sheet of paper with the printable side down between
the edge guides until it meets resistance. The printer feeds
the paper automatically and is ready to print.
2-14
Paper Handling
Page 37

If the first printed line on your page appears too high or low,
you can use the Micro Adjust function to adjust the top-of-form
position. See page 2-29 for more information.
Loading Single Sheets with the Single-Bin Cut-Sheet Feeder
The single-bin cut-sheet feeder holds up to 50 sheets of paper.
See the Reference Guide for instructions on installing the cut sheet
feeder.
Caution:
c
Do not load multipart forms, carbon paper, envelopes, or labels
in the single-bin cut-sheet feeder.
1. Close the flap on the front cover if paper is not loaded from
the front slot.
2. Make sure the paper guide is removed, set the paper release
lever to the single-sheet position, and set the paper-thickness
lever to 0.
-1
1
2
3
4
5
6
Paper Handling
2-15
Page 38

3. Slide the left paper guide of the cut-sheet feeder so it is
aligned with the triangle mark. Next, slide the right paper
guide to roughly match the width of your paper. Slide the
paper support midway between the paper guides.
paper guides
paper support
4. Pull both paper set levers forward until the paper guides
retract and lock open to allow paper loading.
5. Take a stack of paper (up to 50 sheets) and fan it. Next, tap
the side and bottom edges of the paper on a flat surface to
even up the stack.
2-16
Paper Handling
Page 39

6. Insert the paper stack printable side down along the left
paper guide.
7. Adjust the right paper guide so that it matches your paper’s
width. Make sure the position of the guide allows the paper
to move up and down freely.
8. Push back the paper set levers to clamp the paper against the
guide rollers.
9. Attach the stacker-support wires to the paper guide as
shown below, if necessary.
Paper Handling
2-17
Page 40

10. Install the paper guide with the attached stacker-support by
fitting the notches on the paper guide straight down over the
mounting posts on the printer. Slide the edge guides to the
middle of your paper.
The cut-sheet feeder automatically loads paper when the printer
receives data.
If the first line on your page appears too high or low, you can
adjust its position using the Micro Adjust function. See
page 2-27.
Loading Single Sheets with the High-Capacity Cut-Sheet Feeder
The high-capacity cut-sheet feeder holds up to 150 sheets of
paper or up to 25 envelopes. For instructions on installing it, see
the Reference Guide.
Caution:
c
Do not load multipart forms, carbon paper, or labels in the
high-capacity cut-sheet feeder.
2-18
Paper Handling
Page 41

1. Close the flap on the front cover if paper is not loaded from
the front slot.
2. Set the paper release lever to the single-sheet position. Also
make sure the paper-thickness lever is set to 0 if you are
using ordinary single-sheet paper. (If you are using
envelopes, see “Envelopes” on page 2-24 for instructions on
setting the paper-thickness lever.)
-1
1
2
3
4
5
6
3. Pull the lock levers on the edge guides forward to release
them.
Paper Handling
2-19
Page 42

4. Slide the left paper guide until it is aligned with the triangle
mark; then lock it in place by pushing back its lock lever.
Next, slide the right paper guide to roughly match the width
of your paper. Slide the paper support to midway between
the paper guides.
5. Pull both paper set levers forward until the paper guides
retract and lock open to allow paper loading.
6. Take a stack of paper (up to 150 sheets) and fan it. Next, tap
the side and bottom edges of the paper on a flat surface to
even up the stack.
2-20
Paper Handling
Page 43

7. Insert the paper stack printable side down along the left
paper guide.
8. Adjust the right paper guide so that it matches your paper’s
width and lock it in place. Make sure the position of the
guide allows the paper to move up and down freely.
If you are loading envelopes, push back the envelope levers
as shown below.
9. Push back the paper set levers to clamp the paper or
envelopes against the guide rollers.
The cut-sheet feeder automatically loads paper when the printer
receives data. If the first line on your page appears too high or
low, you can adjust its position using the Micro Adjust function.
See page 2-27 for more information.
Paper Handling
2-21
Page 44

Loading Special Papers
Follow the guidelines in this section when loading continuous
multipart forms, single-sheet multipart forms, labels, and
envelopes.
Continuous multipart forms
Except for setting the paper-thickness lever, you load
continuous multipart forms the same way as ordinary
continuous paper. Just keep the following in mind:
❏ Be sure your multipart forms do not exceed 0.46 mm
(0.018 inch) in thickness.
❏ Do not load paper that is curled or has been folded.
❏ Thick paper, such as multipart forms with five or six parts,
requires a straight paper path to avoid paper jams. Load
thick paper in the front or bottom slots.
Single-sheet multipart forms
To load single-sheet
multipart forms, use
the front paper
entry slot with the
optional front paper
guide or front sheet
guide installed.
Thick paper, such as
multipart forms
with five or six
parts, requires a
straight paper path
to avoid paper jams.
For more
information, see the
Reference Guide.
2-22
Paper Handling
front paper guide
front sheet guide
Page 45

Labels
When printing on labels, use only the type of labels that are
mounted on continuous backing sheets with sprocket holes for
use with a tractor feeder. Do not try to print on single sheets
with labels because the printer may not feed labels on a shiny
backing sheet properly.
Thick paper, such as continuous paper with labels, requires a
straight or almost straight paper path. You can load labels in the
front (push tractor or pull tractor) or bottom (pull tractor) paper
slot; however, for best results, use the tractor in the pull position,
and load paper in the front or bottom paper slot.
The loading procedure for continuous paper with labels is the
same as that for ordinary continuous paper, except you must set
the paper-thickness lever to 2 before printing.
Note:
❏ It is best to load continuous paper with labels on the pull tractor.
Do not load labels on the rear or front push tractor.
❏ Never feed labels backward using the Load/Eject or
Tear Off/Bin button. When fed backward, labels can easily peel off
the backing sheet and cause a paper jam.
❏ Because labels are sensitive to temperature and humidity, use them
only under normal operating conditions:
Temperature
Humidity
❏ Do not leave labels loaded in the printer between jobs; they may
curl around the platen and jam when you resume printing.
❏ Do not load continuous paper with labels from the rear paper slot.
Because the rear paper path is curved, labels may come off their
backing sheets inside the printer and cause a paper jam.
❏ Do not load paper that is curled or has been folded.
15 to 25°C (59 to 77°F)
30 to 60% RH
Paper Handling
2-23
Page 46

Removing continuous paper with labels
To prevent labels from peeling off the backing sheet and
jamming the printer, follow these steps to remove continuous
paper with labels from the printer:
1. Tear off the fresh supply of continuous labels at the
perforation nearest the paper entry slot.
2. Hold down the LF/FF button to eject the remaining labels
from the printer.
Caution:
c
Never feed labels backward using the Load/Eject or
Tear Off/Bin button. When fed backward, labels can easily come
off the backing sheet and cause a paper jam.
Envelopes
You can feed envelopes one at a time using the paper guide, or
you can load multiple envelopes using the optional
high-capacity cut-sheet feeder (bin 1 of the double-bin cut-sheet
feeder).
Before loading envelopes, set the paper-thickness lever to a
position from 2 (for thin envelopes) to 6 (for thick envelopes).
2-24
Paper Handling
Page 47

To load single envelopes, follow the instructions in “Loading
Single Sheets with the Paper Guide” on page 2-13. To load
multiple envelopes, see “Loading Single Sheets with the
High-Capacity Cut-Sheet Feeder” on page 2-18.
Note:
❏ Be sure to place the envelope printable side down and insert the top
edge of the envelope into the printer first.
❏ The print head must not print past the left or right edge of the
envelope or other thick paper. Make sure your application program
prints entirely within the printable area of your envelope. See
“Printer Specifications” in the Reference Guide for more
information on the printable area of envelopes.
❏ If you are using No. 6 envelopes, make sure the left edge guide is
aligned with the arrow on the paper guide.
Switching Paper Types
You can easily switch back and forth between printing on
continuous paper with a push tractor and printing on single
sheets without having to remove or reload the continuous
paper.
Paper Handling
2-25
Page 48

Switching to printing on single sheets
Follow the steps below to switch from printing on continuous
paper from a push tractor to printing on single sheets.
Note:
If continuous labels are loaded in the printer, remove them before
switching to single-sheet printing. See “Removing continuous paper
with labels” on page 2-24 for more information.
If the tractor is in the pull position, remove any continuous paper from
it before switching to single-sheet printing. See “Removing paper from
the pull tractor” on page 2-13 for more information.
1. If any printed pages remain in the printer, press the
Tear Off/Bin button to advance the paper to the tear-off
position. Then tear off the printed pages.
Caution:
c
Make sure you tear off your printed document before you
press the Load/Eject button in the next step. Reverse
feeding several pages at a time may cause a paper jam.
2. Press the Load/Eject button to feed the continuous paper
backward to the standby position. The paper is still attached
to the push tractor but is no longer in the paper path.
3. Lower the continuous paper support on the paper guide
until it clicks into place, then move the paper guide to the
upright position.
4. Set the paper release lever to the single-sheet
position.
5. Load single sheets as described in “Loading
Single Sheets with the Paper Guide” on page 2-13.
2-26
Paper Handling
Page 49

Switching to printing on continuous paper
Follow the steps below to switch from printing on single sheets
to printing on continuous paper with a push tractor.
Note:
To switch from printing with the optional front sheet guide to printing
with the front push tractor, you need to remove the front sheet guide.
1. If a single sheet remains in the printer, press the Load/Eject
button to eject it.
Caution:
c
Never use the knob to eject paper when the printer is on; this
may damage the printer or cause it to lose the top-of-form
position.
2. Make sure the tractor is installed in the front or rear push
position and that continuous paper is loaded on it.
3. Set the paper release lever to the front or rear push position,
depending on the tractor position you are using.
Your printer loads the continuous paper automatically when
you begin printing.
Using the Micro Adjust Function
The Micro Adjust function allows you to move the paper
forward or backward in 0.118 mm (1/216-inch) increments to
adjust the tear-off and top-of-form positions.
Adjusting the tear-off position
If your paper’s perforation is not aligned with the tear-off edge,
you can use the Micro Adjust function to move the perforation
to the tear-off position, as described below. Your tear-off
position setting remains in effect until you change it, even if you
turn off the printer.
Paper Handling
2-27
Page 50

Caution:
c
Never use the knob to adjust the tear-off position; this may
damage the printer or cause it to lose the tear-off position.
1. You may need to press the Tear Off/Bin button to advance
the paper to the tear-off position. Make sure the Tear
Off/Bin light is flashing (the paper is at the current tear-off
position).
2. Hold down the Pause button for about three seconds. The
Pause light begins flashing and the printer enters the Micro
Adjust mode.
3. Press the LF/FF
the Load/Eject
paper perforation is aligned with the tear-off edge of the
printer cover.
2-28
Paper Handling
D button to feed paper backward, or press
U button to feed paper forward, until the
tear-off edge of
the printer cover
paper perforation
Page 51

Note:
The printer has a minimum and a maximum tear-off position. If
you try to adjust the tear-off position beyond these limits, the
printer beeps and stops moving the paper.
4. Tear off the printed pages.
5. Press the Pause button to turn off Micro Adjust mode.
When you resume printing, the printer automatically feeds the
paper back to the top-of-form position and begins printing.
Adjusting the top-of-form position
The top-of-form position is the position on the page where the
printer starts printing. If your printing appears too high or low
on the page, you can use the Micro Adjust function to adjust the
top-of-form position, as described below. Your top-of-form
position setting remains in effect until you change it, even if you
turn off the printer.
Caution:
c
Never use the knob to adjust the top-of-form position; this may
damage the printer or cause it to lose the top-of-form position.
1. Make sure the printer is turned on.
2. Load paper. (If the tractor is in a push position, press the
Load/Eject button to advance continuous paper to the
current top-of-form position.) If necessary, lift up the printer
cover so you can see the paper position.
3. Hold down the Pause button for three seconds. The Pause
light flashes and the printer enters the Micro Adjust mode.
Paper Handling
2-29
Page 52

4. Press the LF/FF
up on the page, or press the Load/Eject
the top-of-form position down on the page.
5. Press the Pause button to exit the Micro Adjust mode.
Note:
❏ The printer has a minimum and a maximum top-of-form
position. If you try to adjust it beyond these limits, the printer
beeps and stops moving the paper.
❏ When the paper reaches the default top-of-form position, the
printer beeps and stops moving the paper briefly. You can use
this setting as a reference point when adjusting the position.
D button to move the top-of-form position
U button to move
2-30
❏ The top margin setting made in some software overrides the
top-of-form position setting you make with the Micro Adjust
function.
Paper Handling
Page 53

Chapter 3
Using the Control Panel
This chapter describes how to use the buttons on the control
panel to control various printer functions.
Buttons and Lights
Button/Light Function
Font button
1
Font lights
Reset
2
Pitch button
3
Tear Off/Bin button
4
Selects one of the fonts. See “Selecting a
Font and Pitch” on page 3-3.
Indicate which font is selected.
When you press both the Font and Pitch
buttons simultaneously, the printer clears the
buffer and restores its default settings.
Selects one of the pitch settings. See
“Selecting a Font and Pitch” on page 3-3.
Feeds continuous paper forward to the
tear-off position.
Feeds continuous paper backward from the
tear-off position to the top-of-form position.
Selects a cut-sheet feeder bin when the
cut-sheet feeder is installed.
Using the Control Panel
3-1
Page 54

Tear Off/Bin light
LF/FF button
5
Micro Adjust
6
Load/Eject button
7
Pause light
8
Pause button
9
Lock
10
Paper Out light
11
Flashes when continuous paper is in the
tear-off position.
On when bin 1 of the optional cut-sheet
feeder is selected.
Off when bin 2 of the optional cut-sheet
feeder is selected.
Feeds paper line by line when pressed
quickly.
Ejects a single sheet or advances
continuous paper to the next top-of-form
position when held down.
When you hold down the Pause button for
three seconds, the printer enters the micro
adjust mode. In this mode, you can press the
D and Load/Eject
LF/FF
the top-of-form or tear-off position. See
“Using the Micro Adjust Function” on
page 2-27.
Loads a single sheet of paper.
Ejects a single sheet of paper.
Loads continuous paper from the standby
position.
Feeds continuous paper backward to the
standby position if a sheet is loaded.
On when the printer is paused.
Flashes when the printer is in the Micro Adjust
mode.
Stops printing temporarily, and resumes
printing when pressed again.
When held down for three seconds, enters
the Micro Adjust mode. When pressed
again, exits the Micro Adjust mode.
When Lock-out mode is on, the Paper Out
and Pause lights flash if a locked button is
pressed.
On when no paper is loaded in the selected
paper source or paper is not loaded
correctly.
Flashes when paper has not been fully
ejected or a paper jam has occurred.
U buttons to adjust
3-2
Using the Control Panel
Page 55

Selecting a Font and Pitch
Usually, you use your application program to select the font and
pitch you want to use in a document. However, you can select
one of the printer’s five fonts (in different pitches) with the
buttons on the printer’s control panel, as described below. (The
settings you make in application programs usually override
settings you make from the printer’s control panel.) The
available pitch depends on the font you select:
Font Pitch
USD 10, 12
HSD 10, 12, 15, 17, 20
Draft 10, 12, 15, 17, 20, PS
Roman 10, 12, 15, 17, 20, PS
Sans Serif 10, 12, 15, 17, 20, PS
1. Make sure that the printer is not printing.
2. Press the Font button until the two Font lights indicate the
desired font as shown below.
o n USD
n o HSD
n
n Draft
o f Roman
f o Sans Serf
n = on
o = off
f = flashing
3. Press the Pitch button until the two Pitch lights indicate the
desired pitch.
o n 10 cpi
n o 12 cpi
n n 15 cpi
o f 17 cpi
f o 20 cpi
n f PS
Using the Control Panel
3-3
Page 56

About Your Printer’s Default Settings
The default settings control many printer functions. While you
can often set these functions through your software or printer
driver, you may sometimes need to change a default setting
from the printer’s control panel using the default-setting mode.
The following table shows the options available for each printer
setting. For instructions on changing the settings, see page 3-9.
Default-setting mode
Setting Options
Page length for front tractor Length in inches: 3, 3.5, 4, 5.5, 6, 7, 8, 8.5, 11,
Page length for rear tractor Length in inches: 3, 3.5, 4, 5.5, 6, 7, 8, 8.5, 11,
Skip over perforation Off, On
Auto tear-off Off, On
Auto tear off wait time* 0.5 second, 1 second, 2 seconds, Others
Auto line feed Off, On
Print direction Bi-D, Uni-D
Software ESC/P, IBM PPDS (same as IBM 2380 Plus),
0 slash 0,
I/F (interface) mode Auto, Parallel, USB, Option
Auto I/F (interface) wait time 10 seconds, 30 seconds
Parallel I/F bidirectional mode** Off, On
Packet mode** Off, Auto
Character table Standard model: italic, PC 437, PC 850,
70/6, 12, 14, 17
70/6, 12, 14, 17
OKI ML 320T*
0/
PC 860, PC 863, PC 865, PC 861, BRASCII,
Abicomp, Roman 8, ISO Latin 1, PC858,
ISO 8859-15
All other models: Italic, PC 437, PC 850,
PC 437 Greek, PC 853, PC855, PC 852,
PC 857, PC 866, PC 869, MAZOWIA,
Code MJK, ISO 8859-7, Bulgaria, PC 774,
Estonia, PC 866 LAT., ISO 8859-2, PC 866 UKR,
PC-APTEC, PC-771, PC-AR864, PC 708,
PC 720
3-4
Using the Control Panel
Page 57

Setting Options
International character set for
italic table (options vary
depending on the country)
Manual feed wait time 1 second, 1.5 seconds, 2 seconds, 3 seconds
Buzzer Off, On
Auto CR (carriage return)*** Off, On
IBM character table*** Table 2, Table 1
Bottom margin* 4.2 mm, 20 mm, 22 mm, 24 mm, Others
Line spacing (lines per inch)* 6 LPI, 8 LPI
Paper out override* Off, On
* Available only in Okidata mode. (See page 3-11 for more information.)
** Not available in Okidata mode.
*** Available only in IBM PPDS emulation mode.
Italic U.S.A., Italic France, Italic Germany,
Italic U.K., Italic Denmark 1, Italic Sweden,
Italic Italy, Italic Spain 1
Page length for front tractor
This setting allows you to set the page length (in inches) for the
continuous paper loaded on the front push tractor.
Page length for rear tractor
This setting allows you to set the page length (in inches) for the
continuous paper loaded on the rear push tractor.
Skip over perforation
This feature is available only when continuous paper is selected.
When you turn on this feature, the printer provides a one-inch
(25.4 mm) margin between the last line printed on one page and
the first line printed on the next page. Because most application
program margin settings override margin settings from the
control panel, you should use this setting only if you cannot set
your top and bottom margins using your application.
Using the Control Panel
3-5
Page 58

Auto tear-off
When auto tear-off is on and you are using continuous paper
with the front or rear push tractor, the printer advances the
paper perforation to the tear-off position. When the printer
receives data again, it moves the paper back to the top-of-form
position and starts printing, so you can use all of the next page.
When auto tear-off is off and you are using continuous paper
with the front or rear push tractor, you need to move the
perforation to the tear-off position manually by pressing the
Tear Off/Bin button. See “Adjusting the tear-off position” on
page 2-27 for more information.
Auto tear-off wait time
When the printer is in Okidata mode, this option lets you specify
how long to wait before the printer advances the paper
perforation to the tear-off position.
Auto line feed
When auto line feed is on, the printer accompanies each carriage
return (CR) code received with a line feed (LF) code.
Print direction
You can select auto print direction, bidirectional printing (Bi-D),
or unidirectional printing (Uni-D). Printing is normally
bidirectional; however, unidirectional printing allows for
precise vertical printing alignment.
Software
Select ESC/P to operate the printer in EPSON ESC/P mode.
Select IBM PPDS to make the printer emulate an IBM printer.
0 slash
The zero character has a slash (0/) when this feature is on; it has
no slash (0) when this feature is off. The slash allows you to
easily distinguish between the uppercase letter “O” and a zero.
3-6
Using the Control Panel
Page 59

I/F (interface) mode
The printer has a slot for an optional interface in addition to its
built-in parallel and USB interfaces. You can choose Auto
(automatic), Parallel, USB or Option for the interface mode.
When you select Auto, the printer automatically selects the
interface that is receiving data. This lets you share the printer
among multiple computers without changing the interface
mode. If only one computer is connected to the printer, you can
select Parallel, USB or Option, depending on which interface
your computer uses.
Auto I/F (interface) wait time
When the printer is in auto interface mode and it receives no
data from the currently selected interface for the amount of time
specified with this setting, it determines which interface is
receiving data and switches to that interface. You can specify
either 10 seconds or 30 seconds.
Parallel I/F bidirectional mode
The Parallel Interface bidirectional transfer mode is used when
this feature is on. If bidirectional transfer mode is unnecessary,
turn this off.
Packet mode
Make sure Auto is selected when you print from Windows
using the printer driver. If you cannot connect when printing
with DOS, turn this feature off.
Character table
You can select various standard character tables.
International character set for italic table
You can select among several international character sets for the
italic character table. Each character set contains eight characters
that vary depending on the country or language, so you can
customize the italic table to suit your printing needs.
Using the Control Panel
3-7
Page 60

Manual feed wait time
The printer is set to wait 1.5 seconds between feeding sheets
manually, but you can change it to 1, 2, or 3 seconds if necessary.
Buzzer (beeper)
The printer beeps when an error occurs. If you don’t want the
printer to beep when an error occurs, turn off this setting.
Auto CR (carriage return)
This setting is available only in IBM PPDS emulation mode.
When auto carriage return is on, each line feed (LF) code or
ESC J code is accompanied by a carriage return (CR) code so the
printer moves the next printing position to the left margin.
When this setting is off, you must send a CR code after the line
feed code to move the printing position to the left margin.
IBM character table
This setting is available only in IBM PPDS emulation mode.
When you select Table 1, hex codes 00H to 1FH and 80H to 9FH
of the character tables are used for the control codes. When you
select Table 2, hex codes 00H to 1FH are used for the control
codes and 80H to 9FH are used for characters.
Bottom margin
When the printer is in Okidata mode, you can change the length
of the bottom margin (the area between the last printable line
and the bottom of the sheet).
Line spacing
When the printer is in Okidata mode, use this setting to change
the number of lines printed per inch.
Paper out override
When the printer is in Okidata mode, you can turn this setting
on to disable the paper out function and print beyond the
bottom margin. Then you can press the LF/FF button for each
extra line you want to print until you reach the bottom limit.
3-8
Using the Control Panel
Page 61

Changing default settings
Follow these steps to enter the default-setting mode and change
the printer’s default settings:
Note:
❏ To print the language selection and default-setting mode
instructions, you need three sheets of A4 or letter size single-sheet
paper or three pages of continuous paper that is at least 279 mm
(11 inches) long and 210 mm (8.3 inches) wide.
❏ If you use single sheets, you need to load a new sheet of paper each
time the printer ejects a printed sheet from the paper guide.
1. Make sure paper is loaded and the printer is turned off.
2. Turn on the printer while holding down the Font button.
The printer enters the default-setting mode and prints the
language selection instructions (one page).
3. Press the Font button until the Font and Pitch lights indicate
the language you want, as described in the language
selection instructions.
Note:
If you want the instructions in English, there is a faster way to
enter default setting mode which skips printing the language
instruction sheet. Hold down the Tear Off and Font buttons
while you turn on the printer.
4. Press the Tear Off/Bin button to print the current default
settings and instructions in the language you selected.
5. Follow the printed instructions to change the printer’s
default settings from the control panel.
6. When you finish making settings, turn off the printer to
store your new settings and exit the default-setting mode.
Note:
You may exit the default-setting mode by turning off the printer at
any time. Any settings you have made remain in effect until you
change them again.
Using the Control Panel
3-9
Page 62

Locking the Control Panel Buttons
You can restrict the use of buttons on the control panel using
Lock-out mode. In the default Lock-out mode, you can use only
the Pause, Load/Eject and Tear off buttons. If you want to
change which functions are locked, see “Changing the Lock-out
mode settings” below.
Turning Lock-out mode on and off
1. Make sure the printer is turned off.
2. Turn on the printer while holding down the Load/Eject and
Pause buttons. The printer beeps twice, indicating that the
Lock-out mode has been turned on.
When the Lock-out mode is on, the Pause and Paper Out lights
flash simultaneously three times when any locked button is
pushed.
To turn Lock-out mode off, repeat steps 1 and 2. The printer
beeps once, indicating that Lock-out mode has been turned off.
Changing the Lock-out mode settings
You can select which printer functions you want to be locked
while Lock-out mode is on (as described below). The following
table shows which functions you can lock and their default
settings (in Lock-out mode).
Function Default setting
Load Unlocked
Eject Unlocked
LF Locked
FF Locked
Tear Off Unlocked
Bin Locked
3-10
Using the Control Panel
Page 63

Micro Adjust Locked
Font Locked
Pitch Locked
Pause Unlocked
Reset Locked
1. Make sure paper is loaded and the printer is turned off.
2. Turn on the printer while holding down the LF/FF and
Pause buttons. The printer enters the Lock-out setting mode
and prints the instructions. (You’ll need three sheets of A4 or
letter size single-sheet paper or three pages of continuous
paper that is at least 279 mm [11 inches] long and 210 mm
[8.3 inches] wide.)
3. Follow the instructions to change the settings as desired.
4. Turn off the printer.
See “Turning Lock-out mode on and off” on page 3-10 for
instructions on how to turn on Lock-out mode after you change
the Lock-out mode setting.
Emulating the Okidata Microline 320 Turbo
If you have the EPSON FX-880+, you can make it work like the
Okidata
different mode. In Okidata mode, the printer emulates Okidata
functions, and the following additional settings can be selected
in the default setting mode:
Feature Printer settings in Okidata mode
Software emulation IBM PPDS, EPSON ESC/P, Oki ML 320T
Auto tear off wait time 0.5 second, 1 second, 2 seconds,
Bottom margin 4.2 mm, 20 mm, 22 mm, 24 mm, Others
Line spacing (lines per inch) 6 LPI, 8 LPI
Paper out override Off (No), On (Yes)
®
Microline® 320 Turbo by turning the printer on in a
Others
Using the Control Panel
3-11
Page 64

The default settings (shown in bold) are consistent with Okidata
Microline 320 Turbo factory settings.
Note:
Because the ML 320T does not have a built-in USB interface, the
FX-880+ does not support the USB interface in Okidata mode.
If you want to use your printer in Okidata mode, do not install
®
the Windows
driver that came with your FX-880+. If you have
been using an Okidata driver, you can continue to use it with
your FX-880+ in Okidata mode.
If you have been using an Okidata printer, you may want to
print out its default settings for reference before changing
modes on the FX-880+. To do this on the ML 320T, press SHIFT +
SEL to enter Menu mode, and then press PRINT.
To enter Okidata mode, make sure the printer is turned off.
Then hold down the Tear Off/Bin and Pause buttons while you
turn on the printer. The printer beeps once to indicate it is now
in Okidata mode.
The printer remains in Okidata mode until you repeat the above
procedure. To return to FX-880+ mode, hold down the Tear
Off/Bin and Pause buttons while you turn on the printer. The
printer beeps twice and is now operating in FX-880+ mode.
Note:
When you switch from one mode to the other, any changes you made to
the printer’s settings in the original mode are restored to their default
values. You can print the default settings for the printer when it is in
Okidata mode to check the current settings and change them if
necessary. See “Changing default settings” on page 3-9.
3-12
Using the Control Panel
Page 65
Chapter 4
Troubleshooting
Using the Error Indicators
If your printer stops working and one or more control panel lights are
on or flashing or the printer beeps, use the following table to diagnose
and fix the problem. If you cannot fix your printer problem, see
“Problems and Solutions” on page 4-2.
Light status Beep
n Paper Out
n Pause
n Pause ••• The paper release lever is set to the wrong
f Paper Out
n Pause
pattern
••• No paper is loaded in the selected paper source.
••• The paper is not loaded correctly.
••• A single sheet of paper is not fully ejected.
••• Continuous paper is not fed to the standby
Problem
Solution
Load paper in the printer or select a different
paper source; the Paper Out light goes off. Then
press the Pause button; the Pause light goes off
and the printer starts printing.
Remove your paper and reload it correctly. See
Chapter 2 or the
position.
Set the paper release lever to the position for the
paper source you want to use. If paper from
another paper source is currently in the paper
path, press the Load/Eject button to eject the
paper; then move the paper release lever to the
desired position.
Press the Load/Eject button to eject the sheet.
position.
Tear off the printed page at the perforation; then
press the Load/Eject button. The printer feeds the
paper to the standby position.
Reference Guide
.
Troubleshooting
4-1
Page 66

Light status Beep
f Paper Out
n Pause
f Pause — The print head is overheated.
f Paper Out
f Pause
f Tear Off/Bin
f f Font light
f f Pitch light
pattern
••• Paper is jammed in the printer.
— The printer is in Micro Adjust mode
••••• An unknown or fatal printer error has occurred.
Problem
Solution
To clear the paper jam, see “Clearing Paper
Jams” on page 4-15.
Wait a few minutes; the printer resumes printing
automatically once the print head cools.
Make the adjustments as described on
page 2-27.
Turn off the printer and leave it off for several
minutes; then turn on the printer again. If the error
recurs, contact your dealer.
n = on
••• = three beeps, ••••• = five beeps
f = flashing
Problems and Solutions
Most problems you may encounter while operating your printer have
simple solutions. Use the information in this section to find the cause
of and solution to printer problems that occur. Determine the type of
problem that occurred, and see the appropriate section below:
❏ “Power supply problems” on page 4-3
❏ “Paper loading or feeding problems” on page 4-4
❏ “Printing position problems” on page 4-7
❏ “Printing or printout quality problems” on page 4-9
4-2
Troubleshooting
Page 67

You can also use the self test to determine whether the printer or the
computer is causing the problem. See “Printing a Self Test” on
page 4-17 for instructions. To pinpoint communication problems,
experienced users may want to use the printer’s hex dump mode,
described in “Printing a Hex Dump” on page 4-18.
To clear a paper jam, see “Clearing Paper Jams” on page 4-15.
Power supply problems
The control panel lights come on briefly, but then go off and
stay off.
Cause What to do
The printer’s voltage rating
does not match the voltage
of your electrical outlet.
Warning:
w
Do not reconnect the power cord to an electrical outlet that has the
wrong voltage for your printer.
Check the printer and the outlet
voltage ratings. If the voltages do not
match, unplug the printer
immediately and contact your dealer.
The printer does not work and the control panel lights are off
even when you turn on the printer.
Cause What to do
The power cord is not
properly plugged into the
electrical outlet or your
printer.
The electrical outlet does not
work.
Turn off the printer, and make sure
the power cord is firmly plugged into
the electrical outlet (and the printer, if
necessary). Then turn on the printer.
Use a different outlet.
Troubleshooting
4-3
Page 68

Paper loading or feeding problems
The printer does not load single-sheet paper or does not feed
it properly.
Cause What to do
Continuous paper is in the
paper path.
The paper release lever is set
to a tractor position.
The paper on the paper
guide is positioned too far to
the left or right for the
printer to detect that it is
there.
Single-sheet paper is not
loaded properly.
The paper-thickness lever is
not set correctly.
Press the Load/Eject button to feed
the continuous paper back to the
standby position. Set the paper
release lever to the single-sheet
position and insert a new sheet. (See
“Switching to printing on single
sheets” on page 2-26 for more
information.)
Set the paper release lever to the
single-sheet position.
Move the paper (and the edge guides)
a little to the left or right.
See Chapter 2 or the Reference Guide
for instructions on loading
single-sheet paper.
Set the paper-thickness lever to match
the thickness of your paper. See
page 2-2 for instructions.
Paper is creased, old, too
thin, or too thick.
4-4
Troubleshooting
Use new, clean sheets of paper.
Page 69

The printer does not fully eject a single sheet.
Cause What to do
Paper is too long. Press the Load/Eject button to eject
the sheet. Make sure the page length
of your paper is within the range
specified for single-sheet paper. Also
check and adjust the paper size
setting in your application or printer
driver.
The paper does not feed properly with the optional cut-sheet
feeder.
Cause What to do
The cut-sheet feeder is not
installed properly.
Too many sheets are loaded
in the cut-sheet feeder. You
cannot load more than 150
sheets of paper in the
high-capacity cut-sheet
feeder.
The edge guides of the
cut-sheet feeder are not
positioned correctly.
There is only one sheet left
in the bin.
Reinstall it as described in the online
Reference Guide.
Load less than 150 sheets of paper.
See the online Reference Guide for
more information.
Align the left edge guide with the
arrow mark, then move the right edge
guide to match your paper’s width.
Add more paper to the cut-sheet
feeder.
Troubleshooting
4-5
Page 70

The printer does not load continuous paper or does not feed it
properly.
Cause What to do
The paper release lever is
not set correctly.
Single-sheet paper is in the
paper path.
Continuous paper is not
loaded properly.
The paper-thickness lever is
not set correctly.
Set the paper release lever to the
position for the paper source you
want to use. See “Setting the Paper
Release Lever” on page 2-1.
Press the Load/Eject button to eject
the sheet.
See Chapter 2 or the online Reference
Guide for instructions on loading
continuous paper with the tractor you
want to use.
Set the paper-thickness lever to match
the thickness of your paper, as
described on page 2-2.
The printer does not feed continuous paper to the standby
position.
Cause What to do
You have not torn off the
printed pages before
pressing the Load/Eject
button.
Tear off the printed pages at the
perforation. Then press the
Load/Eject button to feed the paper
backward to the standby position.
4-6
Troubleshooting
Page 71

Printing position problems
Wrong top-of-form position
Your printing appears too high or low on the page.
Cause What to do
The paper size setting in
your application software or
printer driver does not
match the size of the paper
you are using.
The printer’s page length
settings for the front or rear
tractor do not match the size
of the continuous paper you
are using.
The top margin or
top-of-form position setting
is incorrect.
The printer driver settings
you want to use are not
selected in your software.
Check the paper size setting in your
application or printer driver.
Check the page length settings for the
front or rear tractor using the printer’s
default-setting mode. See “About
Your Printer’s Default Settings” on
page 3-4.
Check and adjust the margin or
top-of-form position settings in your
software.
You can also adjust the top-of-form
position using the Micro Adjust
function. However, settings made in
Windows applications override
settings made in the Micro Adjust
mode. See “Adjusting the top-of-form
position” on page 2-29.
Choose the correct printer driver
setting from the Windows desktop or
in your application before printing.
You moved the paper using
the knob while the printer
was on.
Adjust the top-of-form position using
the Micro Adjust function. See
“Adjusting the top-of-form position”
on page 2-29.
Troubleshooting
4-7
Page 72

Caution:
c
Never use the knob to adjust the top-of-form position; this may damage
the printer or cause it to lose the top-of-form position.
Wrong tear-off position
The printer prints on (or too far away from) the perforation of
your continuous paper.
Cause What to do
The tear-off position setting
is incorrect.
Caution:
c
Never use the knob to adjust the tear-off position; this may damage the
printer or cause it to lose the tear-off position.
You moved the paper using
the knob while the printer
was on.
The printer you want to use
is not selected in your
software.
The paper size setting in
your application or printer
driver does not match the
size of the paper you are
using.
The printer’s page length
settings for the front or rear
tractor do not match the size
of the paper you are using.
Adjust the tear-off position using the
Micro Adjust function. See
“Adjusting the tear-off position” on
page 2-27.
Adjust the tear-off position using the
Micro Adjust function. See
“Adjusting the tear-off position” on
page 2-27.
Choose the correct printer from the
Windows desktop or in your
application before printing.
Check the paper size setting in your
application or printer driver.
Check the page length settings for the
front or rear tractor using the printer’s
default-setting mode. See “About
Your Printer’s Default Settings” on
page 3-4.
4-8
Troubleshooting
Page 73

Printing or printout quality problems
The printer does not print when the computer sends data.
Cause What to do
The printer is paused. Press the Pause button to turn off the
Pause light.
The interface cable is not
plugged in securely.
Your interface cable does
not meet the printer and/or
computer specifications.
Your software is not
properly set up for your
printer.
Check that both ends of the cable
between the printer and the computer
are plugged in securely. If the cable is
connected correctly, run a self test as
described on page 4-17.
Use an interface cable that meets the
requirements of both the printer and
computer. See “Connecting the
Printer to Your Computer” on
page 1-8 and your computer
documentation.
Select your printer from the Windows
desktop or in your application. If
necessary, install or reinstall the
printer driver software as described
on page 1-12.
The printer makes noise, but nothing prints or printing stops
abruptly.
Cause What to do
The paper-thickness lever is
set incorrectly.
Set the paper-thickness lever to match
the thickness of your paper. See
“Adjusting the Paper-Thickness
Setting” on page 2-2 for instructions.
Troubleshooting
4-9
Page 74

The ribbon has too much
slack, the ribbon has come
loose, or the ribbon
cartridge is not installed
properly.
Remove any slack in the ribbon by
turning the ribbon-tightening knob,
or reinstall the ribbon cartridge as
described on page 1-3.
The printout is faint.
Cause What to do
The paper-thickness lever is
set incorrectly for your
paper.
The ribbon is worn out. Replace the ribbon cartridge as
Move the paper-thickness lever to a
lower setting. See “Adjusting the
Paper-Thickness Setting” on page 2-2
for instructions.
described on page 1-3.
Part of the printout is missing, or dots are missing in random
positions.
Cause What to do
The ribbon has too much
slack, the ribbon has come
loose, or the ribbon
cartridge is not installed
properly.
The ribbon is worn out. Replace the ribbon cartridge as
Remove any slack in the ribbon by
turning the ribbon-tightening knob,
or reinstall the ribbon cartridge as
described on page 1-3.
described on page 1-3.
4-10
Troubleshooting
Page 75

Lines of dots are missing in the printout.
Cause What to do
The print head is damaged. Stop printing and contact your dealer
to have the print head replaced.
Caution:
c
Never replace the print head yourself; you may damage the printer.
Also, other parts of the printer must be checked when the print head is
replaced.
All the text is printed on the same line.
Cause What to do
A line feed command is not
being sent at the end of each
line of text.
Turn on the auto line feed setting
using the printer’s default-setting
mode so that the printer
automatically adds a line feed code to
each carriage return. See “About Your
Printer’s Default Settings” on
page 3-4.
The printout has extra blank lines between lines of text.
Cause What to do
Two line feed commands
are being sent at the end of
each line of text, because the
printer’s auto line feed
setting is on.
The line space setting in
your application software is
incorrect.
Turn off the auto line feed setting
using the printer’s default-setting
mode. See “Changing default
settings” on page 3-9.
Adjust the line space setting in your
application software.
Troubleshooting
4-11
Page 76

The printer prints strange symbols, incorrect fonts, or other
inappropriate characters.
Cause What to do
Your printer and computer
are not communicating
correctly.
The wrong character table is
selected in your software.
The printer you want to use
is not selected in your
software.
Your application software is
not configured correctly for
your printer.
Make sure you are using the correct
interface cable and that the
communications protocol is correct.
See “Connecting the Printer to Your
Computer” on page 1-8. If you
installed an optional serial interface
card, also see “Installing an optional
interface card” on page 1-10.
Select the correct character table using
your software or the default-setting
mode. The character table setting in
your software overrides settings
made in the default-setting mode.
Choose the correct printer from the
Windows desktop or in your
application before printing.
Make sure that your application
software is configured correctly for
your printer. See your application
documentation. If necessary, install or
reinstall the printer driver software as
described on page 1-12.
Software settings override
settings you make using the
default-setting mode or the
control panel buttons.
4-12
Troubleshooting
Use your application software to
select the font.
Page 77

Vertical printed lines are not aligned.
Cause What to do
Bidirectional printing,
which is the printer’s
standard printing mode, is
out of alignment.
Use the printer’s bidirectional
adjustment mode to correct this
problem. See “Aligning Vertical Lines
in Your Printout” on page 4-16.
Correcting USB Problems
If you are having difficulty using your printer with a USB connection,
read the information in this section.
Make sure that your computer is a Windows Me, Windows 98,
or Windows 2000 pre-installed model
Your computer must be a Windows Me, Windows 98, or Windows
2000 pre-installed model. You may not be able to install or run the
USB printer driver on a computer which is not equipped with a USB
port or which has been upgraded from Windows 95 to Windows Me,
98, or 2000.
For details about your computer, contact your dealer.
Make sure that EPSON USB Printer Devices appears on the
Device Manager menu (for Windows Me and Windows 98
only)
If you canceled the plug-and-play driver installation before the
procedure was complete, either the USB printer device driver or the
printer driver may be incorrectly installed.
Follow these steps to check the installation and reinstall the drivers:
1. Turn the printer on, and plug the USB cable into the printer and
the computer.
2. Right-click the My Computer icon on your desktop, then click
Properties.
Troubleshooting
4-13
Page 78

3. Click the Device Manager tab.
If your drivers are correctly installed, EPSON USB Printer
Devices should appear on the Device Manager menu.
If EPSON USB Printer Devices does not appear on the Device
Manager menu, click the plus (+) sign beside Other devices to
view the installed devices.
If USB Printer appears under Other devices, the USB printer
device driver is not installed correctly. If EPSON FX-880+ or
EPSON FX-1180+ appears, the printer driver is not installed
correctly.
If neither USB Printer nor EPSON FX-880+ or EPSON FX-1180+
appears under Other devices, click Refresh or unplug the USB
cable from the printer, then plug it into the printer again.
4. Under Other devices, select USB Printer or EPSON FX-880+ or
EPSON FX-1180+ and click Remove. Then, click OK.
5. At the confirmation screen, click OK. Then click OK again to
close the System Properties dialog box.
6. Turn off the printer and restart your computer. Then, reinstall
the drivers from the beginning, following the instructions on
page 1-12.
Printer does not work correctly with the USB cable
If your printer does not work correctly with the USB cable, try one or
more of these solutions:
❏ Make sure that the cable you are using is a standard, shielded
USB cable.
❏ If you are using a USB hub, connect the printer to the first tier of
the hub, or connect the printer directly to the computer’s USB
port.
4-14
Troubleshooting
Page 79

❏ For Windows 98, try reinstalling the USB printer device driver
and the printer software. First, uninstall EPSON Printer
Software using the Add/Remove Programs utility in the
Control Panel, then uninstall EPSON USB Printer Devices. Next,
reinstall the software as described on page 1-12. If EPSON USB
Printer Devices is not registered in the Add/Remove Programs
list, access the CD-ROM and double-click epusbun.exe in
Win9x folder. Then follow the on-screen instructions.
Clearing Paper Jams
Follow these steps to clear a paper jam:
1. Turn off the printer.
2. Open the printer cover.
3. If continuous paper is jammed in the printer, tear off the fresh
supply at the perforation nearest the paper entry slot.
4. Turn the knob on the left side of the printer away from you to
remove the paper in the printer. Remove any remaining pieces
of paper.
If the paper is stuck where the printer ejects it, gently pull the
paper out of the printer.
Caution:
c
Use the knob on the left side of the printer to clear paper jams
only when the printer is off. Otherwise, you may damage the
printer or change the top-of-form or tear-off position.
5. Close the printer cover and turn on the printer. Make sure the
Paper Out light is not flashing and the Pause light is off.
Troubleshooting
4-15
Page 80

Aligning Vertical Lines in Your Printout
If you notice that the vertical lines in your printout are not properly
aligned, you can use the printer’s bidirectional adjustment mode to
correct this problem. During bidirectional adjustment, the printer
prints three sheets of alignment patterns, labeled High Speed Draft,
Draft, and NLQ (near letter quality). You select the best alignment
pattern from each sheet.
To print the instruction sheet and alignment patterns, you need five
single sheets or five pages of continuous paper of at least the
following sizes:
Paper type FX-880+ FX-1180+
Continuous paper (including
perforated border)
Single sheet A4 or letter size A3 landscape
241 × 279 mm
(9.5 × 11 inches)
376 × 279 mm
(14.8 × 11 inches)
If you use single sheets, you need to load a new sheet of paper each
time the printer ejects a printed sheet from the paper guide.
Follow these steps to perform the bidirectional adjustment:
1. Make sure paper is loaded, then turn off the printer.
Caution:
c
Whenever you turn off the printer, wait at least five seconds
before turning it back on; otherwise you may damage the printer.
2. While holding down the Pause button, turn on the printer. The
printer enters the bidirectional adjustment mode and then prints
instructions and the first set of alignment patterns.
3. As described in the instructions, compare the alignment patterns
and select the pattern with the best alignment. Then select the
pattern with the best alignment for each of the remaining sets of
alignment patterns.
4. After you select the best pattern in the final set of alignment
patterns, save your selection by turning off the printer.
4-16
Troubleshooting
Page 81

Printing a Self Test
Running the printer’s self test helps you determine whether the
printer or the computer is causing the problem:
❏ If the self test results are satisfactory, the printer is working
properly and the problem probably results from your printer
driver settings, application settings, computer, or interface cable.
(Be sure to use a shielded interface cable.)
❏ If the self test does not print properly, there is a problem with
the printer. See “Problems and Solutions” on page 4-2 for
possible causes and solutions to the problem.
You can print the self test using either single sheets or continuous
paper of at least the following width:
Paper type FX-880+ FX-1180+
Continuous paper
(including perforated
border)
Single sheet A4 or letter size A3 landscape
Follow these steps to perform a self test:
241 mm
(9.5 inches)
376 mm
(14.8 inches)
1. Make sure paper is loaded and the printer is turned off.
2. To run the test using the Draft font, turn on the printer while
holding down the LF/FF button. To run the test using the
printer’s near letter-quality fonts, hold down the Load/Eject
button while you turn on the printer. Either self test can help
you determine the source of your printing problem; however,
the draft self test prints faster than the near letter-quality test.
After a few seconds, the printer loads the paper automatically
and begins printing the self test. A series of characters is printed.
Note:
To temporarily stop the self test, press the Pause button. To resume
the test, press the Pause button again.
Troubleshooting
4-17
Page 82

3. To end the self test, press the Pause button to stop printing. If
paper remains in the printer, press the Load/Eject button to
eject the printed page. Then turn off the printer.
Caution:
c
Do not turn off the printer while it is printing the self test. Always
press the Pause button to stop printing and the Load/Eject button
to eject the printed page before you turn off the printer.
Printing a Hex Dump
The hex dump feature is designed for DOS-based PC connections.
If you are an experienced user or a programmer, you can print a
hexadecimal dump to isolate communication problems between the
printer and your software program. In hex dump mode, the printer
prints all data it receives from the computer as hexadecimal values.
You can print a hex dump using either single sheets or continuous
paper that is at least 210 mm (8.3 inches) wide, such as A4 or letter
size paper.
1. Make sure paper is loaded and the printer is turned off.
2. To enter hex dump mode, turn on the printer while holding
down the LF/FF and Load/Eject buttons.
3. Open a software program and send a print job to the printer.
Your printer prints all the codes it receives in hexadecimal
format, such as:
By comparing the characters printed in the right column with
the printout of the hexadecimal codes, you can check the codes
the printer is receiving. If characters are printable, they appear
in the right column as ASCII characters. Nonprintable codes,
such as control codes, are represented by dots.
4-18
Troubleshooting
Page 83

4. To turn off hex dump mode, press the Pause button, eject the
printed page(s), and then turn off the printer.
Caution:
c
Do not turn off the printer while it is printing the hex dump. Always
press the Pause button to stop printing and the Load/Eject button
to eject the printed page before you turn off the printer.
Where To Get Help
If your EPSON printer is not operating properly and you cannot solve
the problem using the troubleshooting information see the contact
information below.
EPSON provides technical assistance 24 hours a day through the
electronic support services and automated telephone services listed
below.
Service Access
World Wide Web From the Internet, you can reach EPSON Support at
Automated
Telephone Services
http://support.epson.com. At this site, you can download
drivers and other files, look at product documentation,
access troubleshooting information, and receive technical
advice through e-mail.
A variety of automated help services are available 24
hours a day, seven days a week. To use these services, you
must have a touch tone telephone and call
(800) 922-8911. Use one of the following SoundAdvice
Express Codes to quickly select your printer in
SoundAdvice: 91000 (for the FX-880+) or 91005 (for the
FX-1180+).
SM
To speak to a technical support representative, dial:
to 6PM, Pacific Time, Monday through
❏ U.S.: (562) 276-4322, 6
AM
Friday.
to 6PM, Pacific Time, Monday
❏ Canada: (905) 709-2170, 6
AM
through Friday.
Toll or long distance charges may apply.
Troubleshooting
4-19
Page 84

Before you call, please have the following information ready:
❏ Product name (EPSON FX-880+ or FX-1180+)
❏ Product serial number (located on the back of the printer)
❏ Proof of purchase (such as a store receipt) and date of purchase
❏ Computer configuration
❏ Description of the problem
You can purchase ribbon cartridges, paper, manuals, and accessories
from EPSON at (800) 873-7766, or visit the EPSON Store at
www.epsonstore.com (U.S. sales only). In Canada, please call
(800) 873-7766 for dealer referral.
4-20
Troubleshooting
Page 85

Chapter 5
Product Information
Safety Instructions
Hot Parts Caution Symbol
This symbol is placed on the print head and other parts to
K
Important Safety Instructions
indicate that they may be hot. Never touch those parts just
after the printer has been used. Let them cool for a few
minutes before touching them.
Read all of these safety instructions before using the printer. In
addition, follow all warnings and instructions marked on the
printer itself.
❏ Do not place the printer on an unstable surface or near a
radiator or heat source.
❏ Place the printer on a flat surface. It will not operate
properly if it is tilted or placed at an angle.
❏ Do not block or cover the slots and openings in the printer’s
cabinet, and do not insert objects through the slots.
❏ Use only the type of power source indicated on the printer’s
label.
❏ Connect all equipment to properly grounded electrical
outlets. Avoid using outlets on the same circuit as
photocopiers or air control systems that regularly switch on
and off.
❏ Do not use a damaged or frayed power cord.
Product Information
5-1
Page 86

❏ If you use an extension cord with the printer, make sure the
total ampere rating of all devices plugged into the extension
cord does not exceed the cord’s ampere rating. Also, make
sure the total ampere of all devices plugged into the
electrical outlet does not exceed the electrical outlet’s
ampere rating.
❏ Unplug the printer before cleaning it, and always clean it
with a piece of damp cloth only.
❏ Do not spill liquid onto the printer.
❏ Except as specifically explained in this guide, do not attempt
to service the printer yourself.
❏ Unplug the printer and refer servicing to qualified service
personnel under the following conditions:
i. If the power cord or plug is damaged.
ii. If liquid has entered the printer.
iii. If the printer has been dropped or the cabinet damaged.
iv. If the printer does not operate normally or exhibits a
distinct change in performance.
❏ Adjust only those controls that are covered by the operating
instructions.
❏ If you plan to use the printer in Germany, observe the
following:
To provide adequate short-circuit protection and
over-current protection for this printer, the building
installation must be protected by a 10- or 16-amp circuit
breaker.
Note for German-speaking users:
Bei Anschluss des Druckers an die Stromversorgung muss
sichergestellt werden, dass die Gebaudeinstallation mit einer 10 Aoder 16 A-Sicherung abgesichert ist.
5-2
Product Information
Page 87

ENERGY STAR
Compliance
®
ENERGY STAR
As an
determined that this product meets the
ENERGY STAR
efficiency.
guidelines for energy
Partner, EPSON has
The International
voluntary partnership with the computer and office equipment
industry to promote the introduction of energy-efficient
personal computers, monitors, printers, fax machines, copiers,
and scanners in an effort to reduce air pollution caused by
power generation.
ENERGY STAR
Office Equipment program is a
FCC Compliance Statement for United States Users
This equipment has been tested and found to comply with the
limits for a Class B digital device, pursuant to Part 15 of the FCC
Rules. These limits are designed to provide reasonable
protection against harmful interference in a residential
installation. This equipment generates, uses, and can radiate
radio frequency energy and, if not installed and used in
accordance with the instructions, may cause harmful
interference to radio or television reception. However, there is
no guarantee that interference will not occur in a particular
installation. If this equipment does cause interference to radio
and television reception, which can be determined by turning
the equipment off and on, the user is encouraged to try to correct
the interference by one or more of the following measures.
❏ Reorient or relocate the receiving antenna
❏ Increase the separation between the equipment and receiver
❏ Connect the equipment into an outlet on a circuit different
from that to which the receiver is connected
❏ Consult the dealer or an experienced radio/TV technician
for help.
Product Information
5-3
Page 88

WARNING
The connection of a non-shielded equipment interface cable to
this equipment will invalidate the FCC Certification of this
device and may cause interference levels which exceed the limits
established by the FCC for this equipment. It is the
responsibility of the user to obtain and use a shielded equipment
interface cable with this device. If this equipment has more than
one interface connector, do not leave cables connected to unused
interfaces.
Changes or modifications not expressly approved by the
manufacturer could void the user’s authority to operate the
equipment.
For Canadian users
This Class B digital apparatus meets all requirements of the
Canadian Interface Causing Equipment Regulations.
Cet appareil numérique de la classe B respecte toutes les
exigences du Règlement sur le matériel brouileur du Canada.
5-4
Product Information
Page 89

Declaration of Conformity
Standard model:
According to 47CFR, Part 2 and 15 for Class B Personal
Computers and Peripherals; and/or CPU Boards and Power
Supplies used with Class B Personal Computers:
We:
Located at:
Declare under sole responsibility that the product identified
herein, complies with 47CFR Part 2 and 15 of the FCC rules as a
Class B digital device. Each product marketed is identical to the
representative unit tested and found to be compliant with the
standards. Records maintained continue to reflect the
equipment being produced can be expected to be within the
variation accepted, due to quantity production and testing on a
statistical basis as required by 47CFR §2.909. Operation is subject
to the following two conditions: (1) this device may not cause
harmful interference, and (2) this device must accept any
interference received, including interference that may cause
undesired operation.
Trade Name: EPSON
Type of Product: Dot Matrix Printer
Model: P980C/P981C
EPSON AMERICA, INC.
MS 3-13
3840 Kilroy Airport Way
Long Beach, CA 90806
Telephone: (562) 290-5254
Product Information
5-5
Page 90

UPS (Universal Power Supply) model:
According to 47CFR, Part 2 and 15 for Class B Personal
Computers and Peripherals; and/or CPU Boards and Power
Supplies used with Class B Personal Computers:
We:
Located at:
Declare under sole responsibility that the product identified
herein, complies with 47CFR Part 2 and 15 of the FCC rules as a
Class B digital device. Each product marketed is identical to the
representative unit tested and found to be compliant with the
standards. Records maintained continue to reflect the
equipment being produced can be expected to be within the
variation accepted, due to quantity production and testing on a
statistical basis as required by 47CFR §2.909. Operation is subject
to the following two conditions: (1) this device may not cause
harmful interference, and (2) this device must accept any
interference received, including interference that may cause
undesired operation.
Trade Name: EPSON
Type of Product: Dot Matrix Printer
Model: P980C/P981C
EPSON AMERICA, INC.
MS 3-13
3840 Kilroy Airport Way
Long Beach, CA 90806
Telephone: (562) 290-5254
5-6
Product Information
Page 91

EPSON AMERICA, INC.
LIMITED WARRANTY
What Is Covered: Epson America, Inc. (“EPSON”) warrants to the first end user
customer of the EPSON product enclosed with this limited warranty statement
that the product, if purchased and used in the United States or Canada, conforms
to the manufacturer’s specifications and will be free from defects in
workmanship and materials for a period of two years from the date of original
purchase. EPSON also warrants that the consumable ribbon enclosed with the
product will perform to the manufacturer’s specified usage, which usage may
expire before the expiration of the limited warranty for the EPSON product.
What EPSON Will Do To Correct Problems: Should your EPSON product prove
defective during the warranty period, please call the EPSON Connection at
562-276-4322 or (905) 709-2170 (Canada) for warranty repair instructions and
return authorization, if required. EPSON will, at its option, repair or replace on
an exchange basis the defective unit, without charge for parts or labor. When
warranty service involves the exchange of the product or of a part, the item
replaced becomes EPSON property. The exchanged product or part may be new
or previously repaired to the EPSON standard of quality. Exchange or
replacement products or parts assume the remaining warranty period of the
product covered by this limited warranty. For warranty service, you must
provide proof of the date of original purchase.
What This Warranty Does Not Cover: This warranty covers only normal
consumer use in the United States and Canada. This warranty is not transferable
and will not apply to products purchased from an end user. This warranty does
not cover damage to the Epson printer caused by parts and supplies not
manufactured, distributed or certified by Epson. This warranty does not cover
ribbon or third party parts, components or peripheral devices added to the
EPSON product after its shipment from EPSON, e.g., dealer-added boards or
chips. EPSON is not responsible for warranty service should the EPSON label or
logo or the rating label or serial number be removed or should the product fail to
be properly maintained or fail to function properly as a result of misuse, abuse,
improper installation, neglect, improper shipping, damage caused by disasters
such as fire, flood, and lightning, improper electrical current, software problems,
interaction with non-EPSON products, or service other than by an EPSON
Authorized Servicer. Packaging, postage, insurance and shipping costs incurred
in presenting your EPSON product for warranty service are your responsibility.
If a claimed defect cannot be identified or reproduced in service, you will be held
responsible for costs incurred.
Product Information
5-7
Page 92

THE WARRANTY AND REMEDY PROVIDED ABOVE ARE EXCLUSIVE AND
IN LIEU OF ALL OTHER EXPRESS OR IMPLIED WARRANTIES INCLUDING,
BUT NOT LIMITED TO, THE IMPLIED WARRANTIES OF
MERCHANTABILITY OR FITNESS FOR A PARTICULAR PURPOSE. SOME
LAWS DO NOT ALLOW THE EXCLUSION OF IMPLIED WARRANTIES. IF
THESE LAWS APPLY, THEN ALL EXPRESS AND IMPLIED WARRANTIES
ARE LIMITED TO THE WARRANTY PERIOD IDENTIFIED ABOVE. UNLESS
STATED HEREIN, ANY STATEMENTS OR REPRESENTATIONS MADE BY
ANY OTHER PERSON OR FIRM ARE VOID. EXCEPT AS PROVIDED IN THIS
WRITTEN WARRANTY, NEITHER EPSON AMERICA, INC., NOR ITS
AFFILIATES SHALL BE LIABLE FOR ANY LOSS, INCONVENIENCE, OR
DAMAGE, INCLUDING DIRECT, SPECIAL, INCIDENTAL OR
CONSEQUENTIAL DAMAGES, RESULTING FROM THE USE OR INABILITY
TO USE THE EPSON PRODUCT, WHETHER RESULTING FROM BREACH OF
WARRANTY OR ANY OTHER LEGAL THEORY. IF THE REMEDY ABOVE
FAILS, EPSON’S ENTIRE LIABILITY SHALL BE LIMITED TO A REFUND OF
THE PRICE PAID FOR THE EPSON PRODUCT COVERED BY THIS LIMITED
WARRANTY.
In Canada, warranties include both warranties and conditions.
Some jurisdictions do not allow limitations on how long an implied warranty
lasts and some jurisdictions do not allow the exclusion or limitation of incidental
or consequential damages, so the above limitations and exclusions may not apply
to you.
This warranty gives you specific legal rights, and you may also have other rights
which vary from jurisdiction to jurisdiction.
5-8
Epson America, Inc., P. O. Box 93012
Long Beach, CA 90809-3012
Product Information
 Loading...