

Page 1

Buttons and Lights
EPSON FX-880+/FX-1180+ Quick Guide
1 Font button
Selects one of the fonts.
Font lights
Indicate which font is selected.
2 Reset
When you press both the Font and
Pitch buttons simultaneously, the
printer clears buffer and returns to its
default settings.
3 Pitch button
Selects one of the pitch settings.
Pitch lights
Indicate which pitch is selected.
4 Tear Off/Bin button
❏ Feeds continuous paper forward
to the tear-off position.
❏ Feeds continuous paper
backward from the tear-off
position to the top-of-form
position.
❏ Selects a cut-sheet feeder bin
when the cut-sheet feeder is
installed.
Tear Off/Bin light
❏ Flashes when continuous paper
is in the tear-off position.
❏ On when bin 1 of the optional
cut-sheet feeder is selected.
❏ Off when bin 2 of the optional
cut-sheet feeder is selected.
Buttons and Lights (1/2)
Page 2

EPSON FX-880+/FX-1180+ Quick Guide
5 LF/FF button
❏ Feeds paper line by line when
pressing shortly.
❏ Ejects a single sheet or advances
continuous paper to the next
top-of-form position when held
down.
6 Micro adjust
When you hold down the Pause
button for three seconds, the printer
enters the micro adjust mode. In this
mode, you can press the LF/FF
Load/Eject
U buttons to adjust the
top of form or tear off position. See
“Micro Adjust Function.”
7 Load/Eject button
❏ Loads a single sheet of paper.
❏ Ejects a single sheet of paper if a
sheet is loaded.
D and
9 Pause button
❏ Stops printing temporarily, and
resumes printing when pressed
again.
❏ When held down for three
seconds, enters the Micro Adjust
mode. When pressed again, exits
the Micro Adjust mode.
10 Lock
When the lock-out mode is on, the
Paper Out and Pause lights flash if
a locked button is pressed.
11 Paper Out light
❏ On when no paper is loaded in
the selected paper source or
paper is not loaded correctly.
❏ F la sh es w he n p ap er ha s n o t b ee n
fully ejected or a paper jam has
occurred.
❏ Loads continuous paper from
the standby position.
❏ Feeds continuous paper
backward to the standby
position if a sheet is loaded.
8 Pause light
❏ On when the printer is paused.
❏ Flashes when the printer is in the
Micro Adjust mode.
Buttons and Lights (2/2)
Page 3
Default Settings
EPSON FX-880+/FX-1180+ Quick Guide
The default settings control many printer
functions. While you can often set these
functions through your software or printer
driver, you may sometimes need to change
a default setting from the printer’s control
panel using the default-setting mode.
For a detailed description of the settings you
can change in the default-setting mode, see
“Understanding default settings.” For
instructions on changing the settings, see
“Changing default settings.”
Understanding default settings
This section describes the settings and
options available in the default-setting
mode. These settings are shown in the
following table and explained in detail after
the table.
To access and change a setting, see
“Changing default settings.”
Default-setting mode
Setting Options
Skip over
perforation
Auto tear-off Off, On
Auto line feed Off, On
Print direction Bi-D, Uni-D
Software ESC/P, IBM PPDS
I/F (interface)
mode
Auto I/F
(interface) wait
time
Off, On
Auto, Parallel, USB,
Option
10 seconds, 30 seconds
Setting Options
Packet mode Off, Auto
/
0 slash 0, (the zerocharacter
Buzzer Off, On
Auto CR
(carriage return)*
IBM character
table*
Page length for
front tractor
Page length for
rear tractor
Character table Standard model: italic,
International
character set for
italic table**
* This setting is available only in IBM PPDS emulation
mode.
** The options available for this setting vary
depending on the country.
0
with a slash)
Off, On
Table 2, Table1
Length in inches: 3, 3.5, 4,
5.5, 6, 7, 8, 8.5, 11, 70/6,
12, 14, 17
Length in inches: 3, 3.5, 4,
5.5, 6, 7, 8, 8.5, 11, 70/6,
12, 14, 17
PC 437, PC 850, PC 860,
PC 863, PC 865, PC 861,
BRASCII, Abicomp,
Roman 8, ISO Latin 1,
PC858, ISO8859-15
All other models: Italic,
PC 437, PC 850, PC 437
Greek, PC 853, PC855,
PC 852, PC 857, PC 866,
PC 869, MAZOWIA, Code
MJK, ISO 8859-7, Bulgaria,
PC 774, Estonia, PC 866
LAT., ISO 8859-2, PC
866 UKR, PC-APTEC,
PC-771, PC-AR864,
PC708, PC720
It al ic U. S. A ., It al ic Fr a nc e,
Italic Germany, Italic
U.K., Italic Denmark 1,
Italic Sweden, Italic Italy,
Italic Spain 1
Parallel I/F
bidirectional
mode
Off, On
Default Settings (1/4)
Page 4

EPSON FX-880+/FX-1180+ Quick Guide
Skip over perforation
This feature is available only when
continuous paper is selected. When you turn
on this feature, the printer provides a
one-inch (25.4 mm) margin between the last
line printed on one page and the first line
printed on the next page. Because most
application program margin settings
override margin settings from the control
pa ne l, yo u sh ou ld use th is se tti ng on ly i f y ou
cannot set your top and bottom margins
using your application.
Auto tear-off
When auto tear-off is on and you are using
co nt in uo us p ap er wit h t he fr ont or re ar p us h
tractor, the printer automatically advances
the paper perforation to the tear-off position,
where you can easily tear off the printed
page(s). When the printer receives data
a ga in , i t a ut o ma ti ca l ly mo ve s t he p ap er ba ck
to the top-of-form position and starts
printing, so you can use all of the next page.
Software
Whe n yo u s elec t ESC/P, the printer operates
i n th e E PS O N E S C/ P m o d e. W h e n yo u s el e c t
IBM PPDS, the printer emulates an IBM
printer.
I/F (interface) mode
The printer provides a slot for an optional
interface in addition to its built-in parallel
interface and USB interface. You can choose
Auto (automatic), Parallel, USB or Option
for the interface mode. When you select
Auto, the printer automatically selects the
interface that is receiving data, and uses that
interface until the end of the print job. The
Auto setting allows you to share the printer
among multiple computers without
changing the interface mode.
If only one computer is connected to the
printer, you can select Parallel, USB or
Option, depending on which interface your
computer uses.
When auto tear-off is off and you are using
co nt in uo us p ap er wit h t he fr ont or re ar p us h
tractor, you need to move the perforation to
the tear-off position manually by pressing
the Tear Off/Bin button.
Auto line feed
When auto line feed is on, the printer
accompanies each carriage return (CR) code
received with a line feed (LF) code.
Print direction
You can select auto print direction,
bidirectional printing (Bi-D), or
unidirectional printing (Uni-D). Printing is
normally bidirectional; however,
unidirectional printing allows for precise
vertical printing alignment.
Auto I/F (interface) wait time
When the printer is in the auto interface
mode and it receives no data from the
currently selected interface for the amount
of time specified with this setting, it
determines which inter face is recei ving data
and switches to that interface. You can
specify either 10 seconds o r 30 seconds fo r
the auto interface wait time.
Parallel I/F bidirectional mode
The Parallel Interface bidirectional transfer
mode is used when this feature is on. If
bidirectional transfer mode is unnecessary,
turn this off.
Default Settings (2/4)
Page 5

EPSON FX-880+/FX-1180+ Quick Guide
Packet mode
Make sure to select AUTO when you print
from Windows applications using the
printer driver included in the Printer
Software CD-ROM that comes with the
printer. Turn this feature off if you have
connection troubles while printing from
applications based on other operating
systems such as DOS.
0 slash
()
/
The zero character has a slash when this
feature is on; it has no slash (0) when this
feature is off. The slash allows you to easily
distinguish between the uppercase letter
“O” and a zero.
0
Buzzer (beeper)
The printer beeps when an error occurs. See
“Error Indicators” for more information on
printer errors. If you do not want the printer
to beep when an error occurs, turn off this
setting.
Page length for front tractor
T hi s s et t in g a ll o ws yo u t o se t t he p ag e l en g th
(in inches) for the continuous paper loaded
on the front push tractor.
Page length for rear tractor
T hi s s et t in g a ll o ws yo u t o se t t he p ag e l en g th
(in inches) for the continuous paper loaded
on the rear push tractor.
Character table
You can select among various character
tables.
International character set for italic table
You can select among several international
character sets for the italic character table.
Each character set contains eight characters
that vary depending on the country or
language, so you can customize the italic
table to suit your printing needs.
Auto CR (carriage return)
This setting is available only in IBM PPDS
emulation mode. When auto carriage return
is on, each line feed (LF) code or ESC J code
is accompanied by a carriage return (CR)
code so the printer moves the next printing
position to the left margin. When this setting
is off, you must send a CR cod e after the line
feed code to move the printing position to
the left margin.
IBM character table
This setting is available only in IBM PPDS
emulation mode. When you select Table 1,
hex codes 00H to 1FH and 80H to 9FH of the
character tables are used for the control
codes. When you select Table 2, hex codes
00H to 1FH are used for the control codes
and 80H to 9FH are used for characters.
Default Settings (3/4)
Page 6

EPSON FX-880+/FX-1180+ Quick Guide
Changing default settings
Follow these steps to enter the
default-setting mode and change the
printer’s default settings:
Note:
❏ To print the language selection and
default-setting mode instructions, you need
three sheets of A4 or letter size single-sheet
paper or three pages of continuous paper that
is at least 279 mm (11 inches) long and 210
mm (8.3 inches) wide. See “Continuous
Paper with the Pull Tractor” and “Single
Sheets with the Paper Guide” for
instructions on loading continuous paper
and single sheets.
❏ If you use single sheets, you need to load a
new sheet of paper each time the printer ejects
a printed sheet from the paper guide.
1. Make sure paper is loaded and the
printer is turned off.
The printed instructions list the settings
you can change, describe how to change
them, and show you how the control
panel lights help you make settings. Use
these instructions to change the printer’s
default settings from the control panel.
Note:
The arrows in the instructions indicate the
printer’s current settings.
5. When you finish making settings, turn
off the printer and exit the
default-setting mode.
Note:
You may exit the default-setting mode by
turning off the printer at any time. Any
settings you have made remain in effect until
you change them again.
Caution:
c
2. Turn on the printer while holding down
the Font button.
The printer enters the default-setting
mode and prints the language selection
instructions (one page).
3. Press the Font button until the Font and
Pitch lights indicate the language you
want, as described in the language
selection instructions.
4.Press the Tear Off/Bin button to print the
default-setting mode instructions (two
pages) in the language you selected.
Whenever you turn off the printer,
wait at least five seconds before
turning it back on; otherwise, you
may damage the printer.
Default Settings (4/4)
Page 7
EPSON FX-880+/FX-1180+ Quick Guide
Error Indicators
You can identify many common printer problems using the lights on the control panel. If your printer
stops working and one or more control panel lights are on or flashing or the printer beeps, use the
following table to diagnose and fix the problem. If you cannot fix your printer problem using this
table.
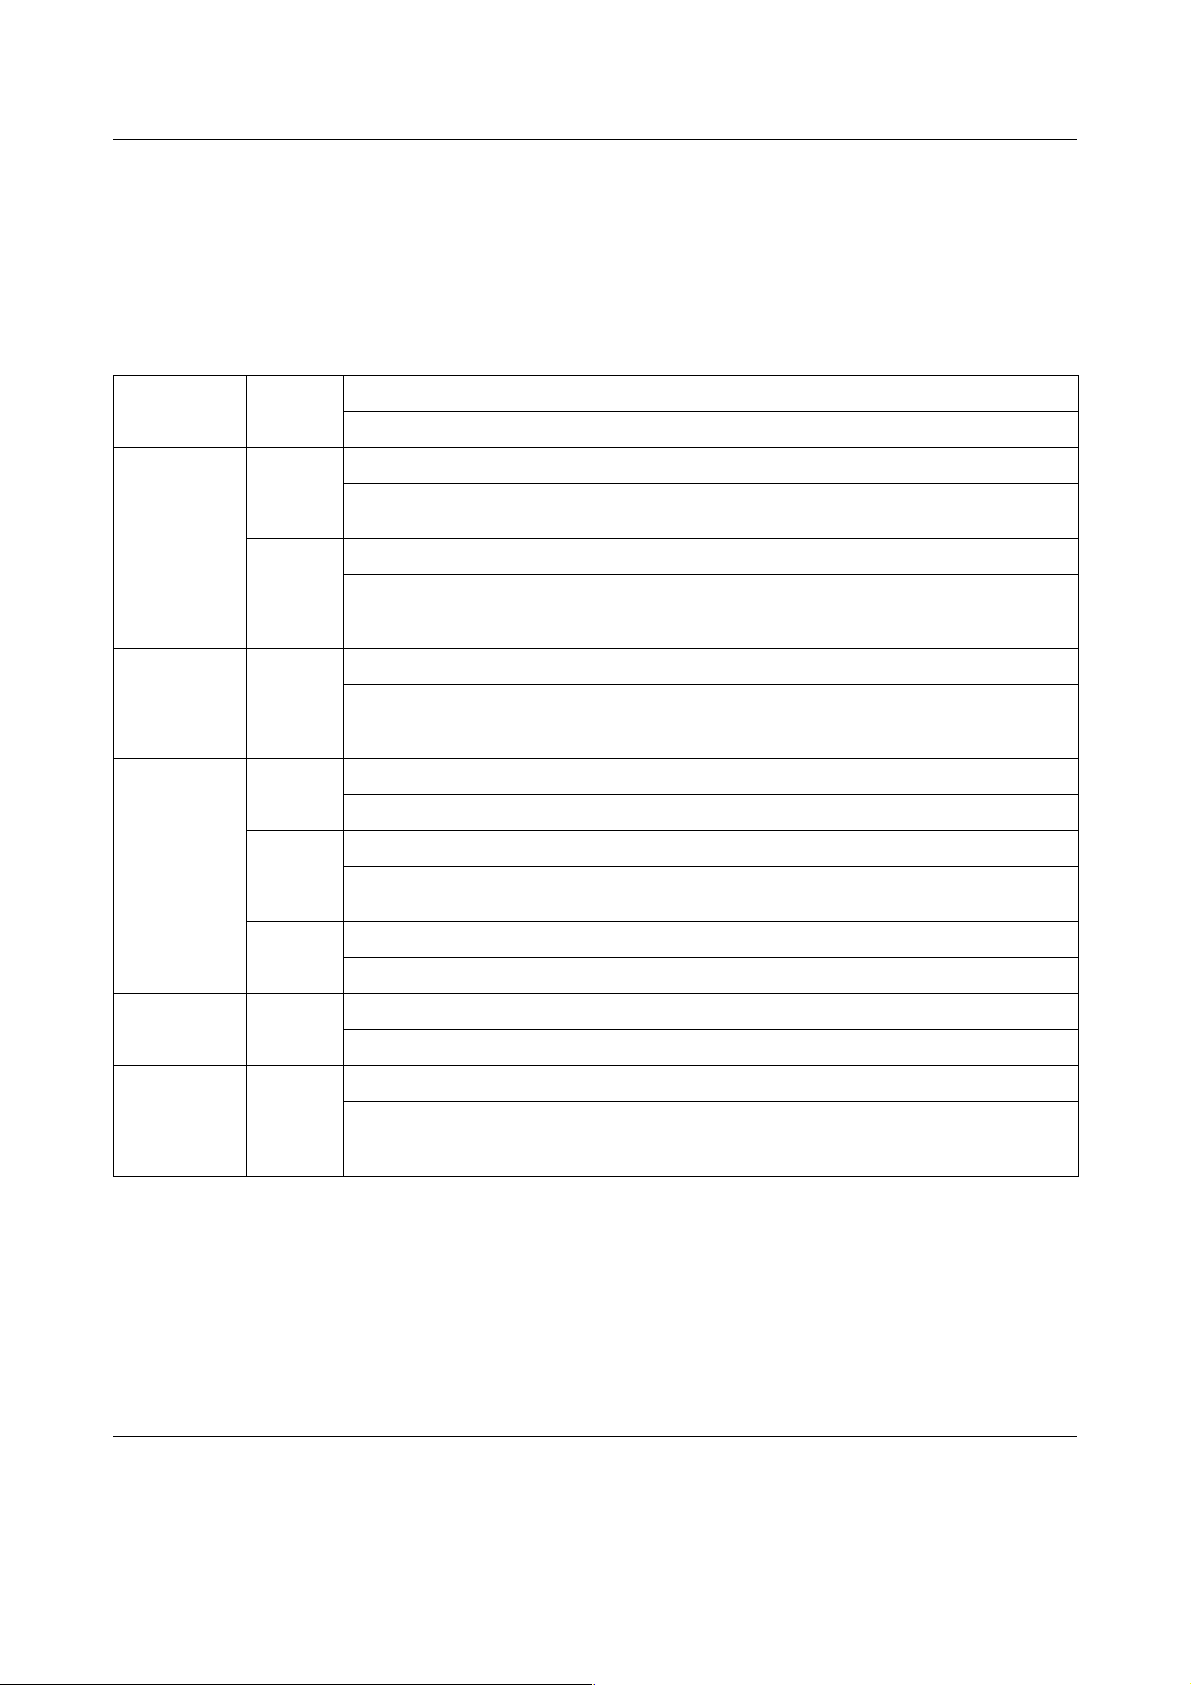
State of
panel lights
n Paper Out
n Pause
n Pause ••• The paper release lever is set to the wrong position.
f Paper Out
n Pause
Beep
pattern
••• No paper is loaded in the selected paper source.
••• The paper is not loaded correctly.
••• A single sheet of paper is not fully ejected.
••• Continuous paper is not fed to the standby position.
••• Paper is jammed in the printer.
Problem
Solution
Load paper in the printer or select a different paper source; the Paper Out light goes off.
Then press the Pause button; the Pause light goes off and the printer starts printing.
Remo ve your pape r and reloa d it corr ectly . See “Cont inu ous Pap er with the Pull Tra ctor” or
“S ing le S heet s wi th t he Pa per Gui de” for ins tru cti ons on lo adi ng t he t ype of p aper you wan t
to use.
Set the paper release lever to the position for the paper source you want to use. If paper
from another paper source is currently in the paper path, press the Load/Eject button to
eject the paper; then move the paper release lever to the desired position.
Press the Load/Eject button to eject the sheet.
Tear off the printed page at the perforation; then press the Load/ Eject button. The printer
feeds the paper to the standby position.
To clear the paper jam, see “Clearing Paper Jams” in the Reference Guide.
f Pause — The print head is overheated.
Wait for a few minutes; the printer resumes printing automatically once the print head cools.
f Paper Out
f Pause
f Tear Off/Bin
ff Pitch
ff Font
n = on,
••• = short series of beeps (three beeps), ••••• = long series of beeps (five beeps)
••••• An unknown printer error has occurred.
Turn off the printer and leave it off for several minutes; then turn on the printer again. If the
error recurs, contact your dealer.
o = off, f = flashing
Note:
The printer beeps once if you press a control panel button when the corresponding function is not available.
Error Indicators (1/1)
Page 8
Paper-Thickness Setting
EPSON FX-880+/FX-1180+ Quick Guide
Before you start printing, you may need to
change the paper-thickness setting
depending on the type of paper you are
using. Follow these steps:
1. Turn the printer off and open the printer
cover. The paper-thickness lever is
located on the left side of the printer. The
numbers next to the lever indicate the
thickness setting.
-1
0
1
2
3
4
5
6
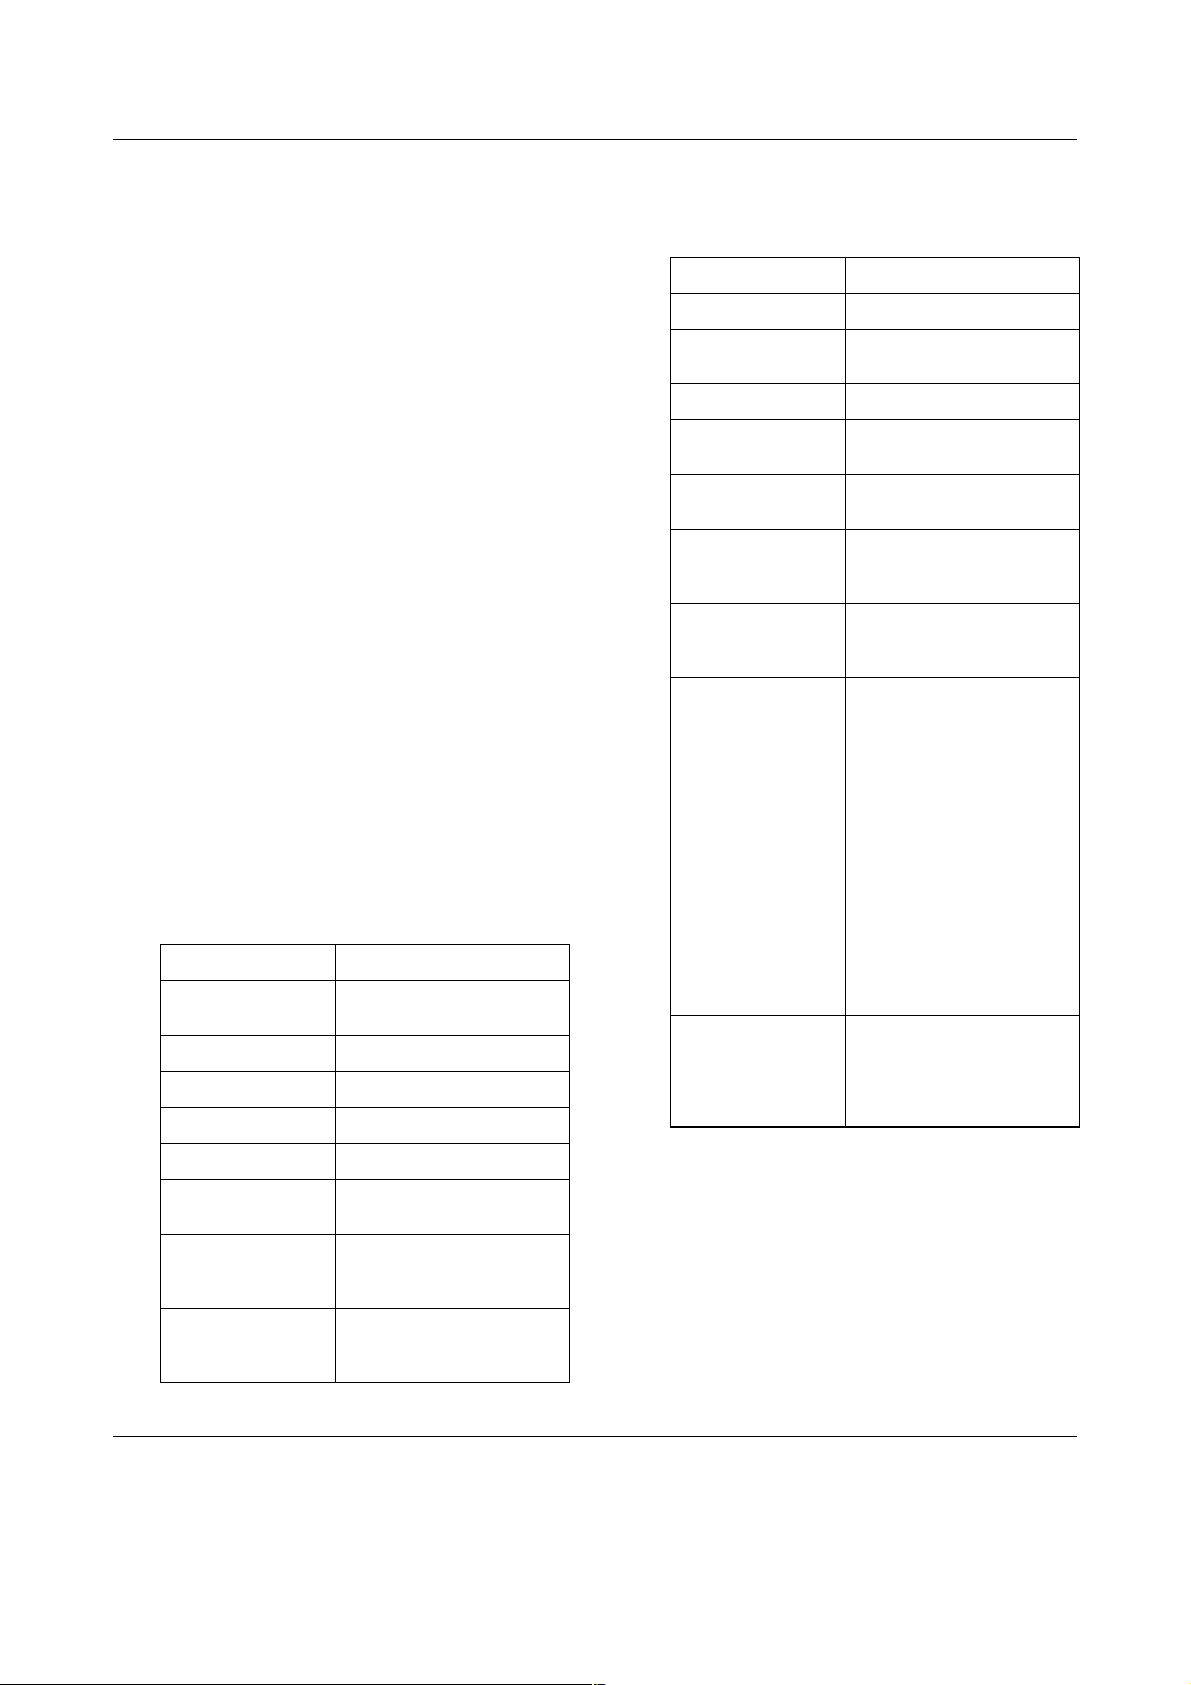
2. Use the table below to select the
appropriate paper thickness.
Paper type* Lever
Ordinary paper:
Single sheets
Continuous paper
Thin paper -1 or 0
Carbonless multipart forms with:
2 parts (original + 1 copy)
3 parts (original + 2 copies)
4 parts (original + 3 copies)
5 parts (original + 4 copies)
6 parts (original + 5 copies)
Continuous paper with labels 2
Envelopes 2 to 6
* See the paper specifications for more information.
position
0 or 1
0
1
2
3
4
5
Note:
❏ When the temperature is 5°C (41°F) or less,
set the paper-thickness lever one position
lower to improve print quality.
❏ When the temperature is 35°C (95°F) or
more, set the paper-thickness lever one
position higher to improve print quality.
Paper-Thickness Setting (1/1)
Page 9
EPSON FX-880+/FX-1180+ Quick Guide
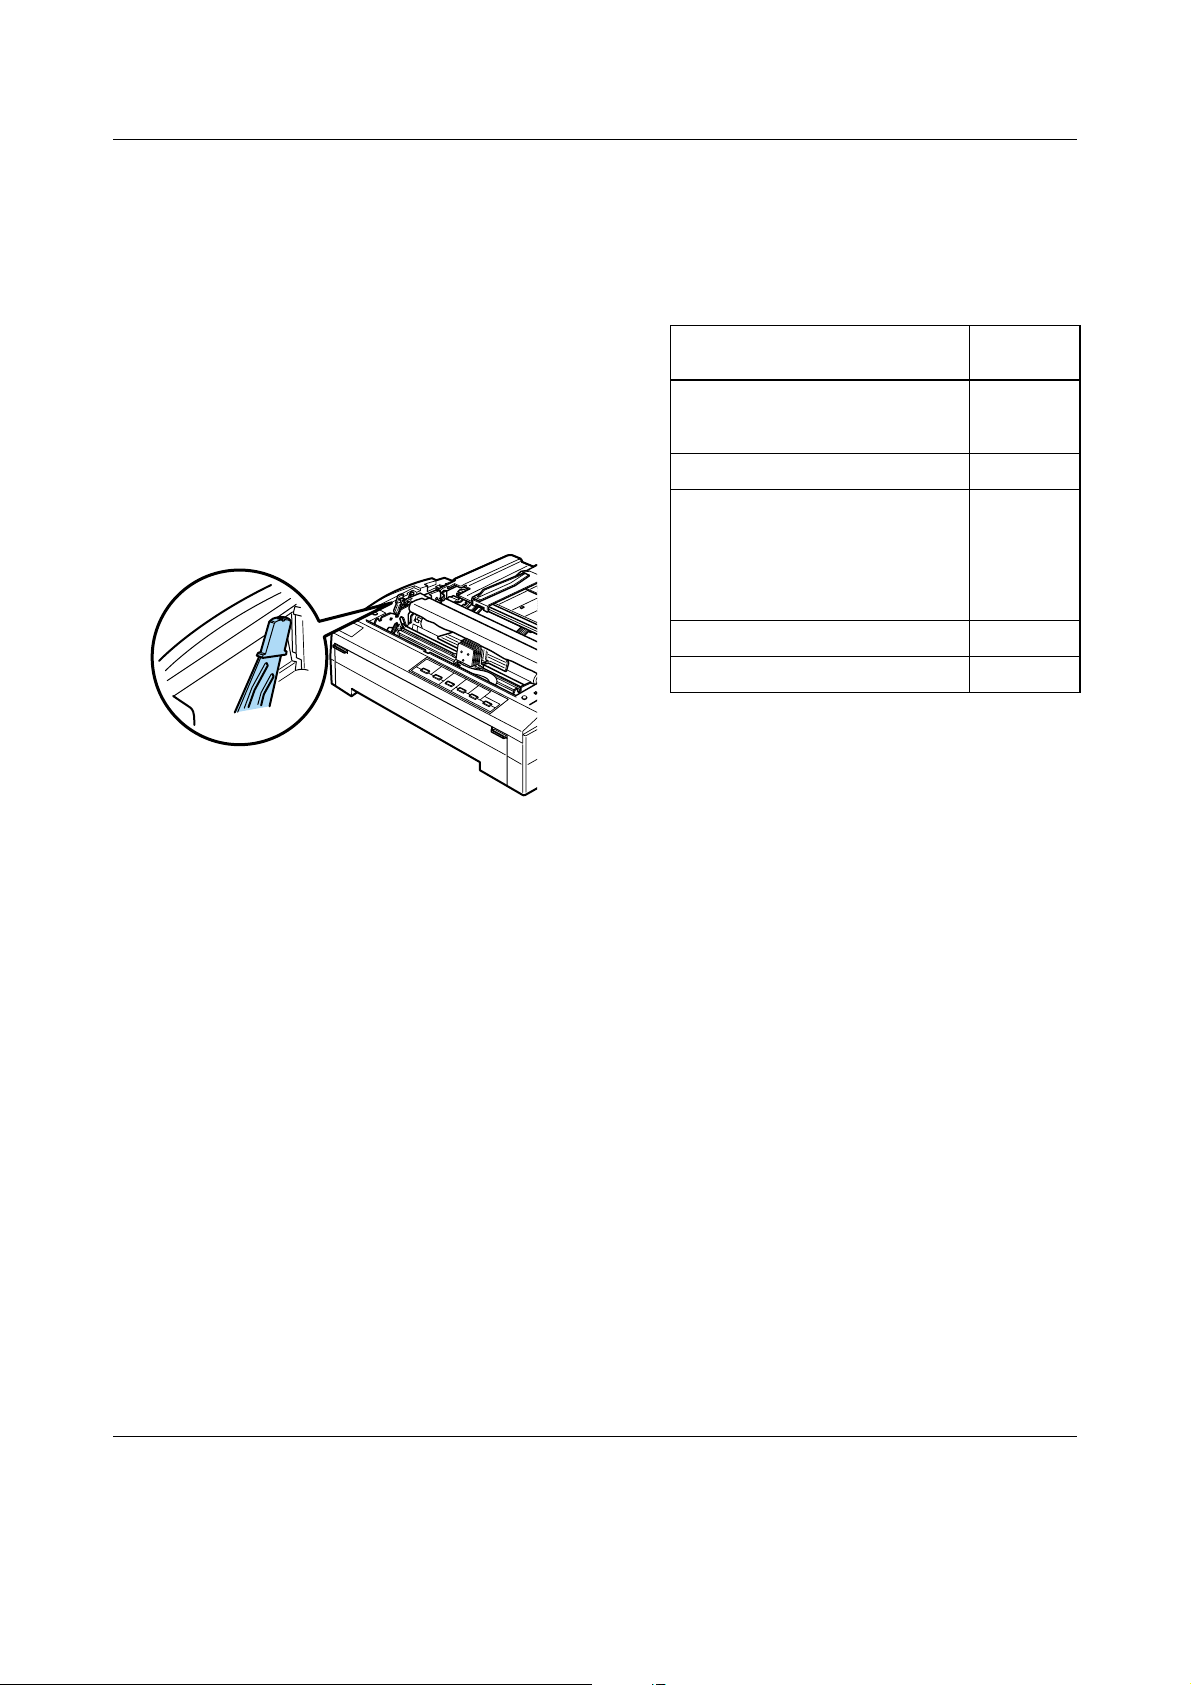
Continuous Paper with the Rear Push Tractor
Note:
It is recommended that you close the flap on the
front cover if paper is not loaded from the front
slot.
Follow these steps to load paper using the
rear push tractor:
1. Make sure the printer is turned off and
the tractor is installed in the rear push
p o s i t i o n . Al s o m a k e s u r e t h e p a p e r g u i d e
is removed.
2. Set the paper release lever to the rear
push tractor position.
3. Release the left and right sprockets by
pulling the blue sprocket lock levers
forward.
Continuous Paper with the Rear Push Tractor (1/2)
Page 10
EPSON FX-880+/FX-1180+ Quick Guide
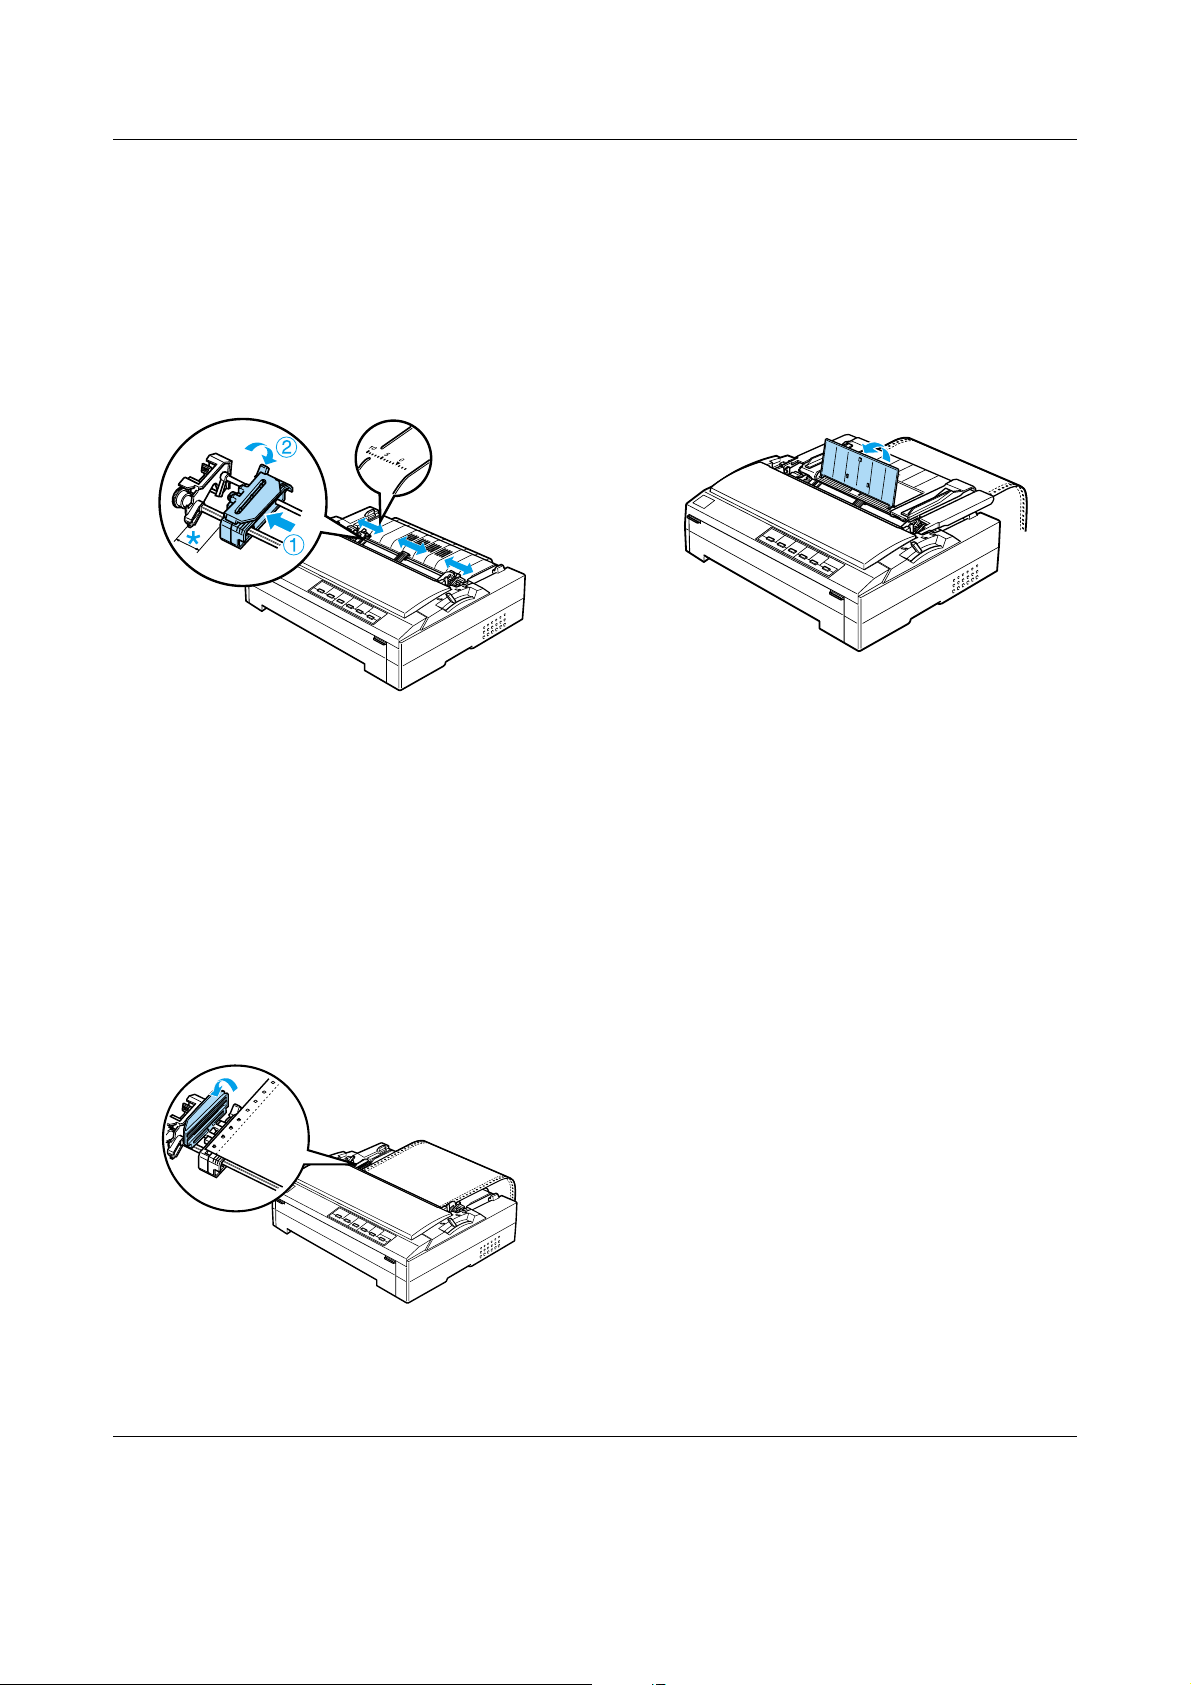
4. Slide the left sprocket approximately 12
mm (0.5 inch) from the far left position
and push the blue lever back to lock it in
place. Then slide the right sprocket to
match the width of your paper, but do
not lock it. Move the center support
midway between the two sprocke t units.
* approx. 12 mm (0.5 inch)
The triangle mark on top of the printer
indicates the point furthest to the left where
printing can begin.
5. Make sure your paper has a clean,
straight edge. Then open both sprocket
covers and fit the first four holes of the
paper, with the printable side down,
over the tractor pins.
7. Slide the right sprocket to remove any
slack in the paper; then lock it in place by
pushing the blue sprocket lock down.
8. Attach the paper guide and lay it flat on
the printer. Open the edge guides all the
way to the left and right, then raise the
continuous paper support.
9. Turn on the printer. When the printer
receives data, it automatically loads the
paper and starts printing.
I f t he fi r st li ne o n y ou r p a ge ap pe a rs to o h i gh
or low, you can change its position using the
Micro Adjust function as described in
“Micro Adjust Function.”
Caution:
c
Never use the knob to adjust the
top-of-form position; this may damage the
printer or cause it to lose the top-of-form
position.
6. Close the sprocket covers.
Continuous Paper with the Rear Push Tractor (2/2)
Page 11

EPSON FX-880+/FX-1180+ Quick Guide
Continuous Paper with the Front Push Tractor
Follow these steps to load paper using the
front push tractor:
1. Make sure the printer is turned off.
2. Open the front cover and the flap. Make
sure the tractor is installed in the front
push position.
3. Set the paper release lever to the front
push tractor position. Also set the
paper-thickness lever (located under the
printer cover) to the proper position for
your paper’s thickness. See
“Paper-Thickness Setting” for
instructions.
4. Release the left and right sprockets by
pushing the blue sprocket lock levers
backward.
5. Slide the left sprocket approximately 12
mm (0.5 inch) from the far left position
and pull the blue lever forward to lock it
in place. Then slide the right sprocket to
match the width of your paper, but do
not lock it. Move the center support
midway between the two sprocket units.
10
5
0
* approx. 12 mm (0.5 inch)
Continuous Paper with the Front Push Tractor (1/2)
Page 12

EPSON FX-880+/FX-1180+ Quick Guide
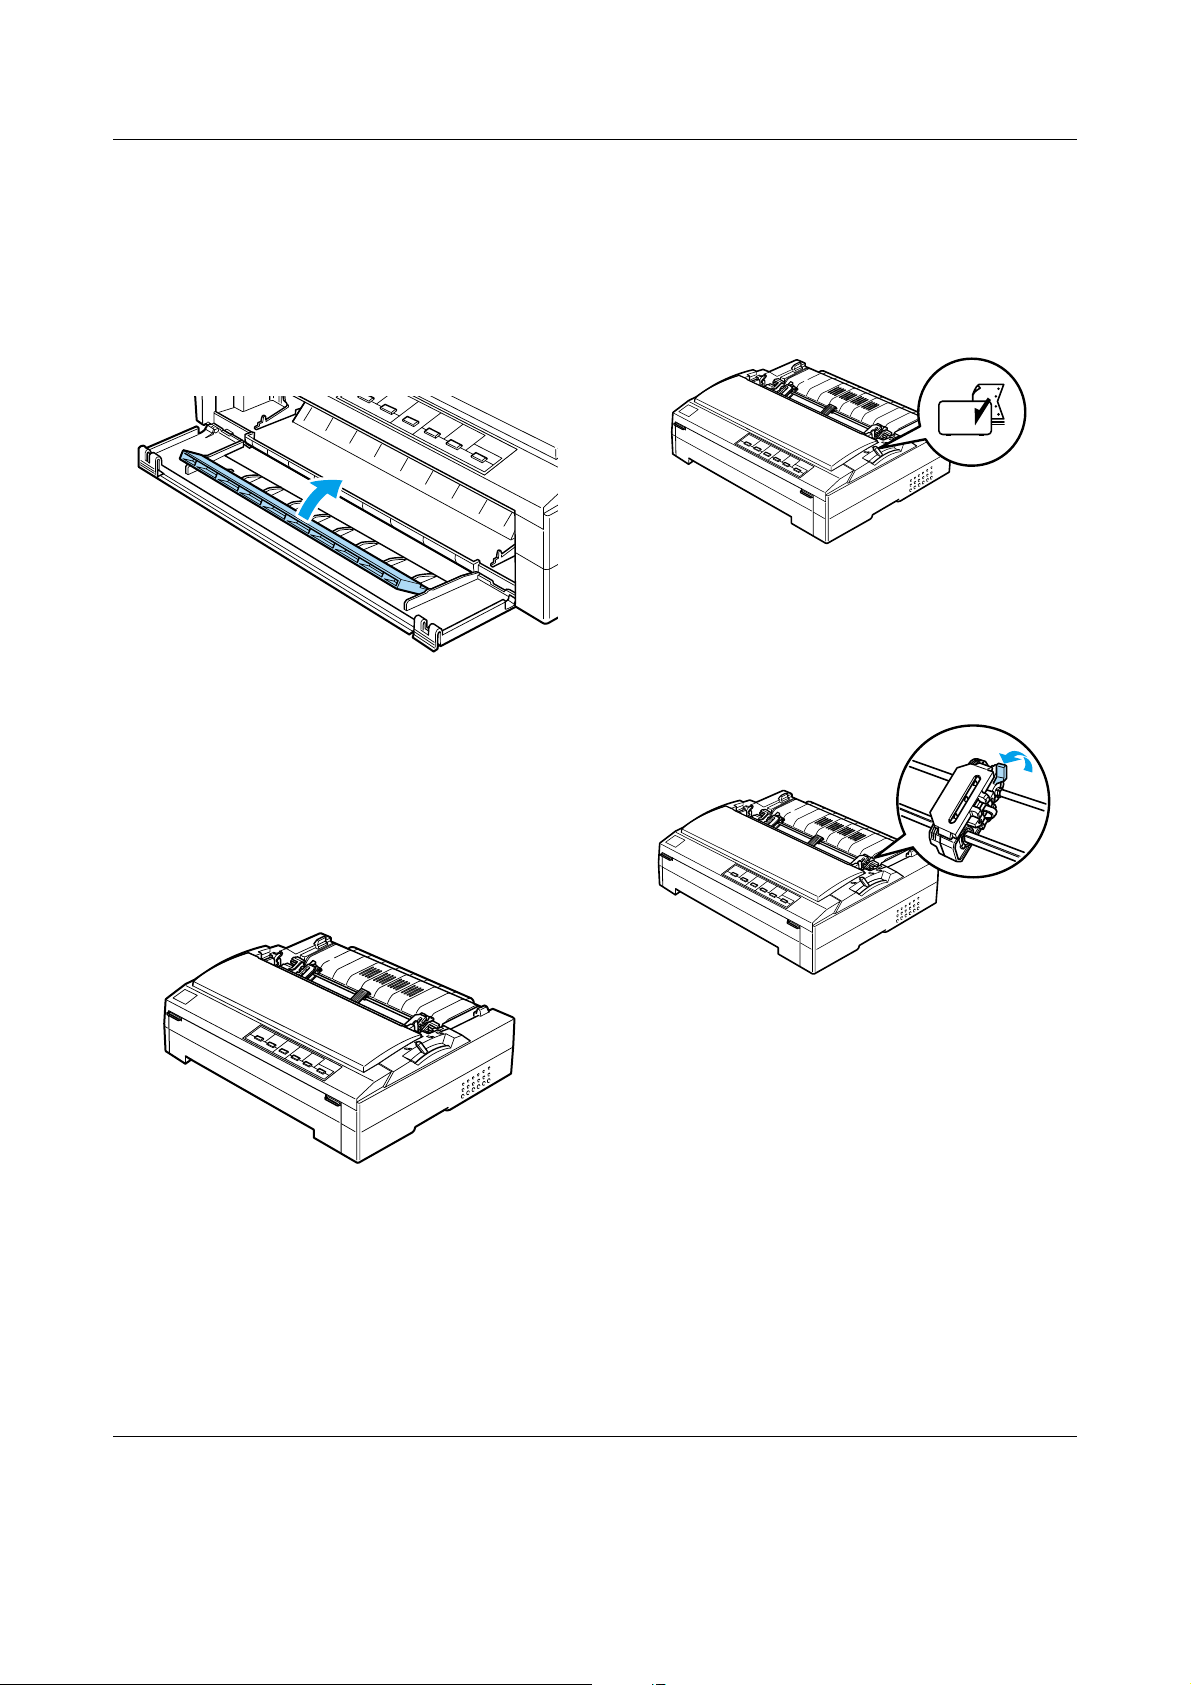
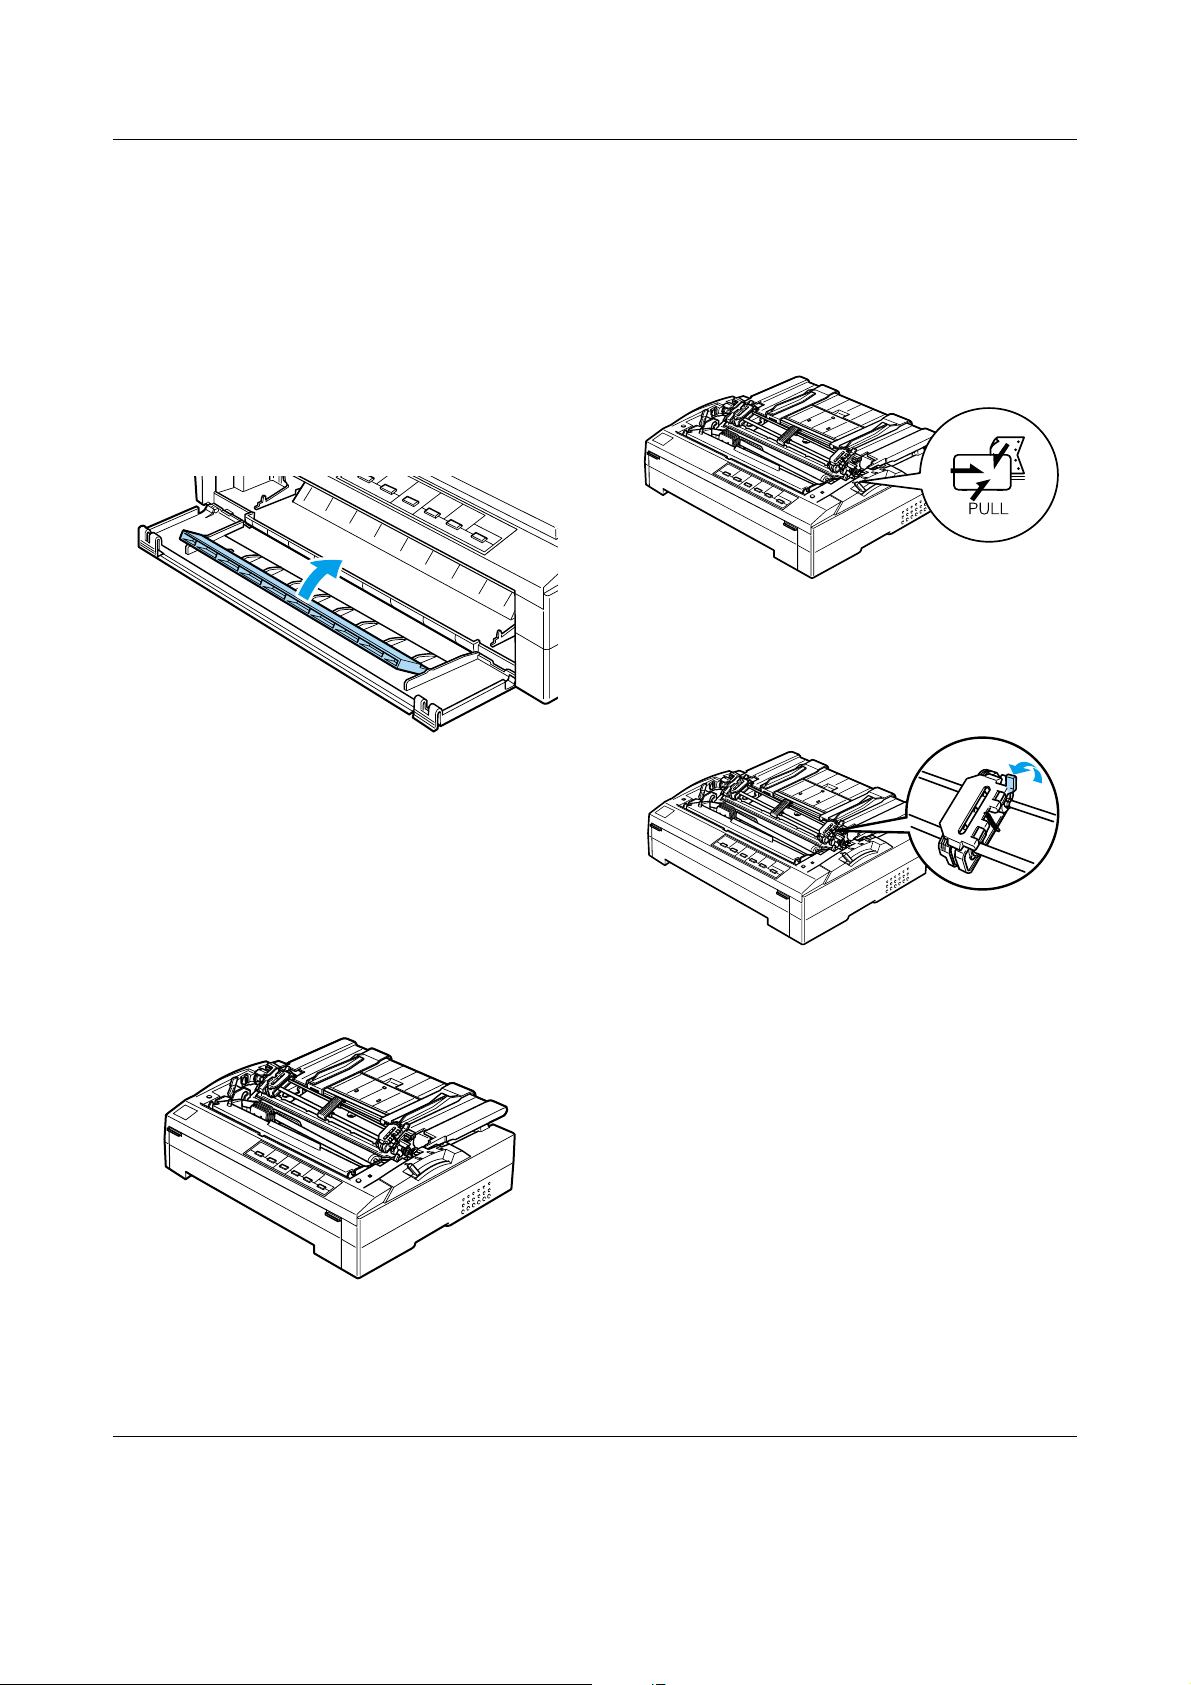
6. Remove the front cover by pushing it
straight down, as shown below.
7. Make sure your paper has a clean,
straight edge. Then open both sprocket
covers and fit the first four holes of the
paper, with printable side up, over the
tractor pins.
10. Attach the front cover with the
continuous paper positioned as shown
below.
11. Make sure the paper guide is lying flat
on the printer and the edge guides are
open all the way to the left and right.
Then raise the continuous paper
support.
8. Close the sprocket covers.
9. Slide the right sprocket to remove any
slack in the paper; then lock it in place by
pushing the sprocket lock down.
12. Turn on the printer. When the printer
receives data, it automatically loads the
paper and starts printing.
I f t he fi r st li ne o n y ou r p a ge ap pe a rs to o h i gh
or low, you can change its position by using
the Micro Adjust function as described in
“Micro Adjust Function.”
Caution:
c
Continuous Paper with the Front Push Tractor (2/2)
Never use the knob to adjust the
top-of-form position; this may damage the
printer or cause it to lose the top-of-form
position.
Page 13
EPSON FX-880+/FX-1180+ Quick Guide
Continuous Paper with the Pull Tractor
Loading paper with the pull tractor
Note:
It is recommended that you close the flap on the
front cover if paper is not loaded from the front
slot.
Follow these steps to load paper using the
pull tractor:
2. Set the paper release lever to the pull
tractor position.
3. Release the sprockets by pulling the
sprocket lock levers forward.
1. Make sure the printer is turned off, and
the printer cover is removed. Also make
sure the tractor is installed in the pull
posi tio n an d th e p ape r gu ide is lyin g fl at
on the printer.
Continuous Paper with the Pull Tractor (1/4)
Page 14
EPSON FX-880+/FX-1180+ Quick Guide
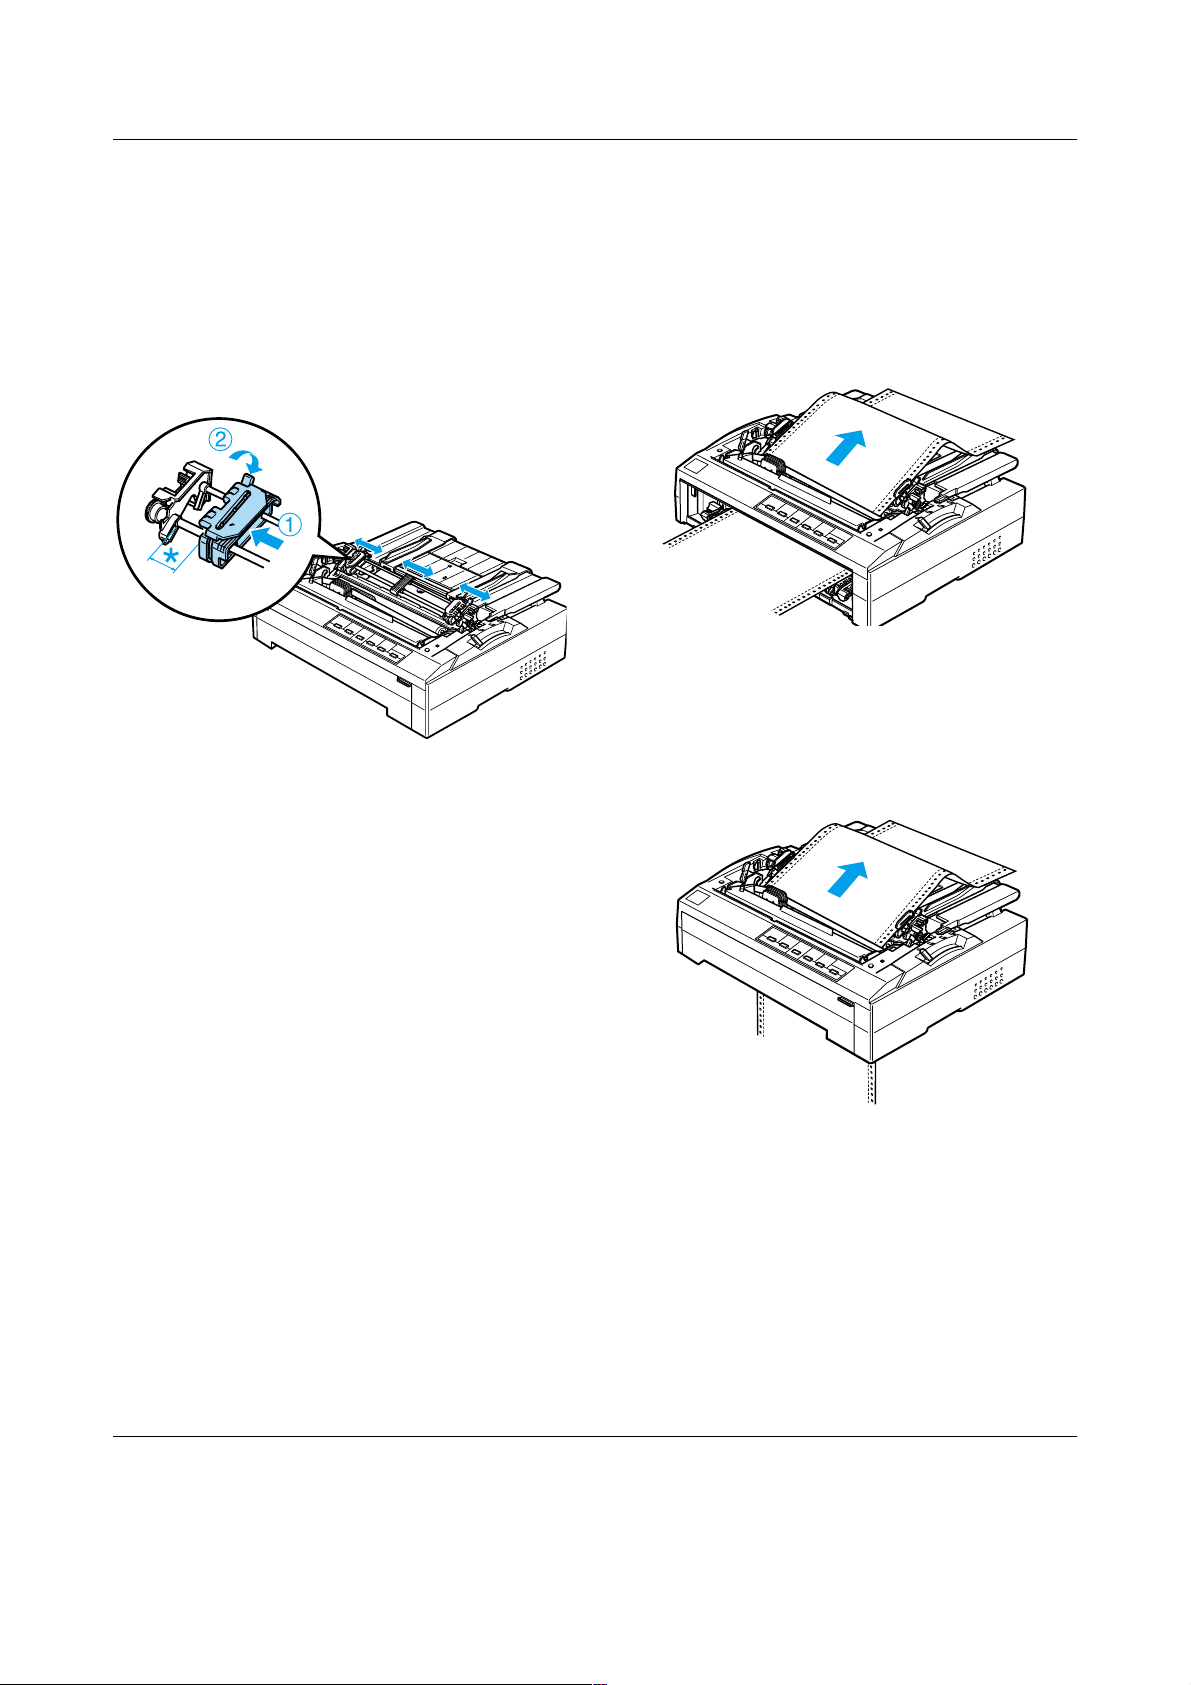
4. Slide the left sprocket approximately 12
mm (0.5 inch) from the far left position
and push the lever back to lock it in
place. Then slide the right sprocket to
match the width of your paper, but do
not lock it. Move the center support
midway between the two sprocke t units.
Front slot
Before you load paper in the front slot,
remove the front cover.
Then load paper with the printable side
facing up.
Bottom slot
Load paper in the bottom slot with the
printable side facing up.
* approx. 12 mm (0.5 inch)
5. Make sure your paper has a clean,
straight edge. Then open the sprocket
covers.
Note:
Make sure the printer is off before you insert
the paper in the paper slot. If you insert the
paper while it is on, a paper jam may occur.
6. Insert the paper into the front or bottom
paper slot as shown in the illustration
below until it emerges between the
platen and the ribbon guide. Then pull
up the paper until the perforation
between the first and second pages is
even with the top of the printer’s ribbon.
Continuous Paper with the Pull Tractor (2/4)
Page 15

EPSON FX-880+/FX-1180+ Quick Guide
7. Fit four holes of the paper over the
tractor pins on both sprockets. Then
close the sprocket covers.
8. Slide the right sprocket to remove any
slack in the paper, then lock it in place.
9. Open the edge guides on the paper guide
all the way to the left and right, then raise
the continuous paper support.
12. Remove any slack in the paper by
pressing the LF/FF button.
Caution:
c
13. When the printer receives data, it will
start printing at the current position
without advancing the paper. If
necessary, follow the steps in “Micro
Adjust Function” to adjust the current
position of the paper.
c
14. Attach the printer cover by inserting the
front tabs into the slots on the printer,
then lowering the cover into place.
Always remove any slack from the
paper; otherwise print quality may
deteriorate.
Caution:
Never use the knob to adjust the
top-of-form position; this may
damage the printer or cause it to lose
the top-of-form position.
10. If you are using the front slot, open the
f l ap o n t h e f r on t c o v er . T h en , re a tt a ch t he
front cover as shown below.
11. Turn on the printer.
15. Send a print job to the printer. The
printer starts printing from the
top-of-form position. After you finish
printing, tear off the printed document
at the perforation nearest the paper exit
slot.
Continuous Paper with the Pull Tractor (3/4)
Page 16

EPSON FX-880+/FX-1180+ Quick Guide
Removing paper from the pull tractor
Follow these steps to remove continuous
paper from the pull tractor:
1. After you finish printing, tear off the
paper supply at the perforation nearest
the paper entry slot.
2. To feed paper forward and eject it, hold
down the LF/FF button.
Caution:
c
Never press the Load/Eject or Tear
Off/Bin button when you are using
the pull tractor; the paper could come
off the pull tractor and jam the
printer.
Continuous Paper with the Pull Tractor (4/4)
Page 17

EPSON FX-880+/FX-1180+ Quick Guide
Single Sheets with the Paper Guide
Note:
It is recommended that you close the flap on the
front cover if paper is not loaded from the front
slot.
Follow these steps to load paper in the paper
guide:
1. Make sure the paper guide is in the
upright position. Then set the
paper-thickness lever (located under the
printer cover) to 0 if you are using
ordinary single-sheet paper. (If you are
using envelopes, see “Special Papers”
for instructions on setting the
paper-thickness lever.) Also move the
paper release lever to the single-sheet
position.
3. Slide the left edge guide until it locks in
place next to the triangle mark on the
paper guide. Next adjust the right edge
guide to match the width of your paper.
4. Insert a sheet of paper with the printable
side down between the edge guides until
it meets resistance. The printer feeds the
paper automatically and is ready to
print.
-1
0
1
2
3
4
5
6
2. Turn on the printer, if necessary.
If the first printed line on your page
appears too high or low, you can use the
Micro Adjust function to adjust the
top-of-form position. See “Micro Adjust
Function” for more information.
Single Sheets with the Paper Guide (1/1)
Page 18

EPSON FX-880+/FX-1180+ Quick Guide
Single Sheets with the Single-Bin Cut-Sheet Feeder
The single-bin cut-sheet feeder holds up to
50 sheets of paper. When it is installed, you
still can use the paper guide to load single
sheets and envelopes one at a time.
Note:
It is recommended that you close the flap on the
front cover if paper is not loaded from the front
slot.
Follow these steps to load paper in the
single-bin cut-sheet feeder:
Caution:
c
Do not load multipart forms, carbon
paper, envelopes, or labels in the
single-bin cut-sheet feeder.
1. Make sure the paper guide is removed,
and set the paper release lever to the
single-sheet position. Also make sure the
paper-thickness lever (located under the
printer cover) is set to 0.
-1
1
2
3
4
5
6
2. Slide the left paper guide of the cut-sheet
feeder so it is aligned with the triangle
mark. Next, slide the right paper guide
to roughly match the width of your
paper. Slide the paper support midway
between the paper guides.
1. Paper guides
2. Paper support
Single Sheets with the Single-Bin Cut-Sheet Feeder (1/2)
Page 19

EPSON FX-880+/FX-1180+ Quick Guide
3. Pull both paper set levers forward until
the paper guides retract and lock open to
allow paper loading.
4. Take a stack of paper (up to 50 sheets)
and fan it. Next, tap the side and bottom
edges of the paper on a flat surface to
even up the stack.
5. Insert the paper stack printable side
down along the left paper guide.
8. Attach the stacker-support wires to the
paper guide as shown below, if
necessary.
9. Install the paper guide with the attached
stacker-support by fitting the notches on
the paper guide straight down over the
mounting posts on the printer. Slide the
edge guides to the middle of your pape r.
6. Adjust the right paper guide so that it
matches your paper’s width. Make sure
the position of the guide allows the
paper to move up and down freely.
7. Push back the paper set levers to clamp
the paper against the guide rollers.
The cut-sheet feeder automatically loads
paper when the printer receives data.
I f t he fi r st li ne o n y ou r p a ge ap pe a rs to o h i gh
or low, you can adjust its position using the
Micro Adjust function. See “Micro Adjust
Function.”
Single Sheets with the Single-Bin Cut-Sheet Feeder (2/2)
Page 20

EPSON FX-880+/FX-1180+ Quick Guide
Single Sheets with the High-Capacity Cut-Sheet Feeder
The high-capacity cut-sheet feeder holds up
to 150 sheets of paper or up to 25 envelopes.
Note:
It is recommended that you close the flap on the
front cover if paper is not loaded from the front slot.
Follow these steps to load paper in the
high-capacity cut-sheet feeder:
Caution:
c
Do not load multipart forms, carbon
paper, or labels in the high-capacity
cut-sheet feeder.
2. Pull the lock levers on the edge guides
forward to release them.
3. Slide the left paper guide until it is
a li gn ed w it h t he t ri an gl e m ar k ; t he n l o ck
it in place by pushing back its lock lever.
Next, slide the right paper guide to
roughly match the width of your paper.
Slide the paper support to midway
between the paper guides.
1. Set the paper release lever to the
single-sheet position. Also make sure the
paper-thickness lever (located under the
printer cover) is set to 0 if you are using
ordinary single-sheet paper. (If you are
using envelopes, see “Special Papers”
for instructions on setting the
paper-thickness lever.)
-1
1
2
3
4
5
6
Single Sheets with the High-Capacity Cut-Sheet Feeder (1/2)
Page 21

EPSON FX-880+/FX-1180+ Quick Guide
4. Pull both paper set levers forward until
the paper guides retract and lock open to
allow paper loading.
5. Take a stack of paper (up to 150 sheets)
and fan it. Next, tap the side and bottom
edges of the paper on a flat surface to
even up the stack.
6. Insert the paper stack printable side
down along the left paper guide.
7. Adjust the right paper guide so that it
matches your paper’s width and lock it
in place. Make sure the position of the
guide allows the paper to move up and
down freely.
If you are loading envelopes, push back
the envelope levers as shown below.
8. Push back the paper set levers to clamp
th e p ap er o r e nve lo pe s a gai ns t t he g ui de
rollers.
The cut-sheet feeder automatically loads
paper when the printer receives data.
I f t he fi r st li ne o n y ou r p a ge ap pe a rs to o h i gh
or low, you can adjust its position using the
Micro Adjust function. See “Micro Adjust
Function” for more information.
Single Sheets with the High-Capacity Cut-Sheet Feeder (2/2)
Page 22

Special Papers
EPSON FX-880+/FX-1180+ Quick Guide
Continuous multipart forms
Except for setting the paper-thickness lever,
you load continuous multipart forms the
same way as ordinary continuous paper. See
the appropriate section of the Quick Guide
for detailed instructions.
Note:
❏ Be sure your multipart forms do not exceed
0.46 mm (0.018 inch) in thickness.
❏ Do not load paper that is curled or has been
folded.
❏ Thick paper, such as multipart forms with
five or six parts, requires a straight paper
path to avoid paper jams. Load thick paper in
the front or bottom slots.
Single-sheet multipart forms
When loading single-sheet multipart forms,
you need to use the front paper entry slot
with the optional front paper guide or front
sheet guide installed on your printer,
because thick paper, such as multipart forms
with five or six parts, requires a straight
paper path to avoid paper jams.
Labels
When printing on labels, use only the type of
labels that are mounted on continuous
backing sheets with sprocket holes for use
with a tractor feeder. Do not try to print on
single sheets with labels because the printer
may not feed labels on a shiny backing sheet
properly.
Thick paper, such as continuous paper with
labels, requires a straight or almost straight
paper path. You can load labels in the front
(push tractor or pull tractor) or bottom (pull
tractor) paper slot; however, for best results,
use the tractor in the pull position, and load
paper in the front or bottom paper slot.
The loading procedure for continuous paper
with labels is the same as that for ordinary
continuous paper, except that you must set
the paper-thickness lever to 2 before
printing. See “Continuous Paper with the
Pull Tractor” for more information.
To load singl e-sheet mult ipart form s, follow
the instructions in “Loading paper in the
front sheet guide or front paper guide”, in
the Reference Guide.
Note:
❏ Be sure your multipart forms do not exceed
0.46 mm (0.018 inch) in thickness.
❏ Do not load paper that is curled or has been
folded.
Special Papers (1/3)
Page 23

EPSON FX-880+/FX-1180+ Quick Guide
c
Temperature
Humidity
Caution:
❏ It is best to load continuous paper
with labels on the pull tractor.
Loading labels on the rear or the front
push tractor is not recommended.
❏ Never feed labels backward using the
Load/Eject or Tear Off/Bin
button. When fed backward, labels
can easily peel off the backing sheet
and cause a paper jam.
❏ Because labels are sensitive to
temperature and humidity, use them
only under normal operating
conditions described below:
15 to 25°C (59 to 77°F)
30 to 60% RH
❏ Do not leave labels loaded in the
printer between jobs; they may curl
around the platen and jam when you
resume printing.
Removing continuous paper with labels
To avoid peeling labels off the backing sheet
and jamming the printer, follow these steps
to remove continuous paper with labels
from the printer:
1. Tear off the fresh supply of continuous
labels at the perforation nearest the
paper entry slot.
❏ Do not load continuous paper with
labels from the rear paper slot.
Because the paper path from the rear
slot is curved, labels may come off
their backing sheets inside the printer
and cause a paper jam.
❏ Do not load paper that is curled or has
been folded.
* perforation nearest the paper entry slot
2. Hold down the LF/FF button to eject the
remaining labels from the printer.
Caution:
c
Never feed labels backward using the
Load/Eject or Tear Off/Bin button.
When fed backward, labels can easily
come off the backing sheet and cause a
paper jam.
Special Papers (2/3)
Page 24

EPSON FX-880+/FX-1180+ Quick Guide
Envelopes
You can feed envelopes one at a time using
the paper guide, or you can load multiple
envelopes using the optional high-capacity
cut-sheet feeder (bin 1 of the double-bin
cut-sheet feeder).
Before loading envelopes, set the
paper-thickness lever to a position from 2
(for thin envelopes) to 6 (for thick
envelopes).
To load single envelopes, follow the
instructions in “Single Sheets with the Paper
Guide.” To load multiple envelopes, see
“Single Sheets with the High-Capacity
Cut-Sheet Feeder.”
❏ If you are using No. 6 envelopes, make sure
the left edge guide is aligned with the arrow
on the paper guide.
Note:
❏ Be sure to place the envelope printable side
down and insert the top edge of the envelope
into the printer first.
❏ The print head must not print past the left or
right edge of the envelope or other thick
paper. Make sure your application program
prints entirely within the printable area of
your envelope. See “Printer Specifications”
in the Reference Guide for more information
on the printable area of envelopes.
Special Papers (3/3)
Page 25

EPSON FX-880+/FX-1180+ Quick Guide
Paper-Type Switching
You can easily switch back and forth
between printing on continuous paper with
a push tractor and printing on single sheets
without having to remove or reload the
continuous paper.
Switching to printing on single sheets
Follow the steps below to switch from
printing on continuous paper from a push
tractor to printing on single sheets.
Note:
❏ If continuous labels are loaded in the printer,
remove them before switching to single-sheet
printing. See “Special Papers” for more
information.
❏ If the tractor is in the pull position, remove
any continuous paper from it before
switching to single-sheet printing. See
“Continuous Paper with the Pull Tractor”
for more information.
3. Lower the continuous paper support on
the paper guide until it clicks into place,
then move the paper guide to the upright
position.
4. Set the paper release lever to the
single-sheet position.
5. Load single sheets as described in
“Loading Single Sheets” in the Reference
Guide.
1. If any printed pages remain in the
printer, press the Tear Off/Bin button to
advance the paper to the tear-off
position. Then tear off the printed pages.
Caution:
c
2. Press the Load/Eject button to feed the
continuous paper backward to the
standby position. The paper is still
attached to the push tractor but is no
longer in the paper path.
Make sure you tear off your printed
document before you press the
Load/Eject button in the next step.
Reverse feeding several pages at a
time may cause a paper jam.
Paper-Type Switching (1/2)
Page 26

EPSON FX-880+/FX-1180+ Quick Guide
Switching to printing on continuous paper
Follow these steps to switch from printing
on single sheets to printing on continuous
paper with a push tractor:
Note:
To switch from printing with the optional front
sheet guide to printing with the front push
tractor, you need to remove the front sheet guide.
1. If a single sheet remains in the printer,
press the Load/Eject button to eject it.
Caution:
c
Never use the knob to eject paper; this
may damage the prin ter o r cause it to
lose the top-of-form position.
2. Make sure that the tractor is installed in
the front or rear push position and that
continuous paper is loaded on it.
3. Set the paper release lever to the front or
rear push position, depending on the
tractor position you are using.
Your printer loads the continuous paper
automatically when you begin printing.
Paper-Type Switching (2/2)
Page 27

EPSON FX-880+/FX-1180+ Quick Guide
Micro Adjust Function
The Micro Adjust function allows you to
move the paper forward or backward in
0.118 mm (1/216-inch) increments so that
you can make precise adjustments to the
top-of-form and tear-off positions.
Adjusting the tear-off position
If your paper’s perforation is not aligned
with the tear-off edge, you can use the Micro
Adjust function to move the perforation to
the tear-off position.
Follow these steps to adjust the tear-off
position:
Caution:
c
Note:
Your tear-off position setting remains in effect
until you change it, even if you turn off the
printer.
Never use the knob to adjust the tear-off
position; this may damage the printer or
cause it to lose the tear-off position.
2. Hold down the Pause button for about
three seconds. The Pause light begins
flashing and the printer enters the Micro
Adjust mode.
3. Press the LF/FF
backward, or press the Load/Eject
button to feed paper forward, until the
paper perforation is aligned with the
tear-off edge of the printer cover.
1. tear-off edge of the printer cover
2. paper perforation
button to feed paper
D
U
1. Make sure the Tear Off/Bin light is
flashing (the paper is at the current
tear-off position). You may need to press
the Tear Off/Bin button to advance the
paper to the tear-off position.
Note:
The printer has a minimum and a maximum
tear-off position. If you try to adjust the
tear-off position beyond these limits, the
printer beeps and stops moving the paper.
4. Tear off the printed pages.
5. Press the Pause button to turn off Micro
Adjust mode.
When you resume printing, the printer
automatically feeds the paper back to the
top-of-form position and begins printing.
Micro Adjust Function (1/2)
Page 28

EPSON FX-880+/FX-1180+ Quick Guide
Adjusting the top-of-form position
The top-of-form position is the position on
the page where the printer starts printing. If
your printing appears too high or low on the
page, you can use the Micro Adjust function
to adjust the top-of-form position.
Follow these steps to adjust the top-of-form
position:
Caution:
c
Note:
❏ Your top-of-form position setting remains in
❏ The top margin setting made in some
1. Make sure the printer is turned on.
2. Load paper. (If the tractor is in a push
Never use the knob to adjust the
top-of-form position; this may damage the
printer or cause it to lose the top-of-form
position.
effect until you change it, even if you turn off
the printer.
application software overrides the
top-of-form position setting you make with
the Micro Adjust function. If necessary,
adjust the top-of-form position in your
software.
position, press the Load/Eject button to
advance continuous paper to the current
top-of-form position.) If necessary, lift
up the printer cover so you can see the
paper position.
4. Press the LF/FF
top-of-form position up on the page, or
press the Load/Eject
the top-of-form position down on the
page.
Note:
❏ The printer has a minimum and a
maximum top-of-form position. If you
try to adjust it beyond these limits, the
printer beeps and stops moving the
paper.
❏ When the paper reaches the default
top-of-form position, the printer also
beeps and stops moving the paper
briefly. You can use the default setting
as a reference point when adjusting the
top-of-form position.
5. After you set the top-of-form position,
press the Pause button to exit the Micro
Adjust mode.
button to move the
D
button to move
U
3. Hold down the Pause button for about
three seconds. The Pause light starts
flashing and the printer enters the Micro
Adjust mode.
Micro Adjust Function (2/2)
Page 29

EPSON FX-880+/FX-1180+ Quick Guide
Ribbon Cartridge
Genuine EPSON ribbon cartridge
When printing becomes faint, you need to
replace the ribbon cartridge. Genuine
EPSON ribbon cartridges are designed and
manufactured to work properly with your
EPSON printer. They ensure proper
operation and long life of the print head and
other printer parts.
Your printer uses the following ribbon
cartridge:
EPSON black ribbon cartridge
FX-880+:
FX-1180+:
#8750
#8755
Replacing the ribbon cartridge
Follow these steps to replace the ribbon
cartridge:
1. Make sure the printer is turned off. The
printer is off when the power switch is
pressed down to the
2. If the printer is connected to an electrical
outlet, unplug it from the outlet.
3. Open the printer cover to the upright
position, then pull it up to remove it.
side.
N
w
Warning:
You need to move the print head by hand
to replace the ribbon cartridge. If you have
just used the printer, the print head may
be hot; let it cool for a few minutes before
touching it.
Ribbon Cartridge (1/3)
Page 30

EPSON FX-880+/FX-1180+ Quick Guide
4. Press the tabs on each side of the paper
tension unit upward, then lift the front
of the unit and pull it up and out of the
printer.
5. Make sure that the print head is not hot;
if it is, let it cool fo r a few minutes before
touching it. Then slide the print head to
the middle of the printer by hand.
6. Grasp the used cartridge by its handle
and pull it up and out of the printer.
7. Remove the new ribbon cartridge from
the package and turn the
ribbon-tightening knob in the direction
of the arrow to remove any slack from
the ribbon so it is easier to install.
c
Caution:
Never move the print head while the
printer is turned on; this can damage the
printer.
Ribbon Cartridge (2/3)
Page 31

EPSON FX-880+/FX-1180+ Quick Guide
8. Hold the ribbon cartridge by its handle
and insert it into the printer as shown
below; then press both sides of the
cartridge firmly to fit the plastic hooks
into the printer slots.
9. Use a pointed object, such as a ball point
pen, to guide the ribbon between the
print head and ribbon guide. Turn the
ribbon-tightening knob to help feed the
ribbon into place; it should not be
twisted or creased.
10. Slide the print head from side to side to
make sure it moves smoothly.
11. Reinstall the paper tension unit by
lowering it onto the printer’s mounting
pegs. Then press down on both ends of
the unit until it clicks into place.
12. Replace the printer cover by inserting
the front tabs into the slots on the printer
and lowering the cover into place. Then
push it down until it clicks.
Ribbon Cartridge (3/3)
 Loading...