

Page 1
EH-QL3000W/EH-QL3000B/EH-
QL7000W/EH-QL7000B User's Guide
Page 2

Page 3

Contents
EH-QL3000W/EH-QL3000B/EH-QL7000W/EH-QL7000B User's Guide.................................................... 9
Introduction to Your Projector ................................................................................................................. 10
Setting Up the Projector ........................................................................................................................... 33
Projector Features.............................................................................................................................. 10
Product Box Contents.................................................................................................................... 11
Additional Components ................................................................................................................ 12
Optional Equipment and Replacement Parts................................................................................. 13
Warranty and Registration Information (U.S. and Canada) ........................................................... 15
Warranty and Registration Information (Latin America)................................................................. 15
Notations Used in the Documentation................................................................................................ 15
Where to Go for Additional Information .............................................................................................. 16
Additional Projector Software and Manuals........................................................................................ 16
Projector Part Locations ..................................................................................................................... 18
Projector Parts - Front/Top ............................................................................................................ 19
Projector Parts - Rear.................................................................................................................... 21
Projector Parts - Base.................................................................................................................... 27
Projector Parts - Remote Control................................................................................................... 29
Projector Placement........................................................................................................................... 33
Projector Setup and Installation Options ....................................................................................... 35
Projection Distance........................................................................................................................ 38
Attaching and Removing a Lens......................................................................................................... 39
Attaching a Lens ........................................................................................................................... 39
Removing a Lens .......................................................................................................................... 46
Installing the Safety Wire.................................................................................................................... 49
Attaching and Removing the Vanity Board ......................................................................................... 49
Attaching and Removing the Cable Cover.......................................................................................... 51
Installing Batteries in the Remote Control .......................................................................................... 53
Using the Projector on a Network ............................................................................................................ 55
Wired Network Projection................................................................................................................... 55
Connecting to a Wired Network..................................................................................................... 55
3
Page 4

Selecting Wired Network Settings ................................................................................................. 56
Selecting Other Network Settings....................................................................................................... 59
Monitoring and Controlling the Projector ............................................................................................ 61
Epson Web Control ....................................................................................................................... 61
ESC/VP21 Commands.................................................................................................................. 62
ESC/VP.net Commands................................................................................................................ 62
PJLink............................................................................................................................................ 62
Using Crestron Connected ............................................................................................................ 63
Web API ........................................................................................................................................ 63
Controlling a Networked Projector Using a Web Browser.............................................................. 63
Web Control Options................................................................................................................. 65
Controlling a Networked Projector in Content Playback Mode ...................................................... 72
Web Control Options in Content Playback Mode ...................................................................... 74
Secure HTTP................................................................................................................................. 80
Importing a Web Server Certificate Using the Projector Menus ................................................ 80
Digital Certificate Types ............................................................................................................ 81
Using Basic Projector Features ............................................................................................................... 83
Turning On the Projector .................................................................................................................... 83
Turning Off the Projector .................................................................................................................... 85
Selecting the Language for the Projector Menus................................................................................ 86
Setting the Date and Time.................................................................................................................. 86
Adjusting the Image Position Using Lens Shift ................................................................................... 87
Image Shape...................................................................................................................................... 89
Correcting Image Shape with H/V-Keystone ................................................................................. 89
Correcting Image Shape with Quick Corner .................................................................................. 92
Correcting Image Shape with Curved Surface .............................................................................. 94
Correcting Image Shape with Corner Wall..................................................................................... 98
Correcting Image Shape with Point Correction............................................................................ 103
Resizing the Image with the Zoom Button ........................................................................................ 107
Focusing the Image Using the Focus Buttons .................................................................................. 108
Focusing the Image When Using an Optional Short Throw Lens ................................................ 108
Remote Control Operation ............................................................................................................... 109
Selecting an Image Source .............................................................................................................. 110
4
Page 5

Displaying a Test Pattern ................................................................................................................. 110
Projection Modes ............................................................................................................................. 111
Changing the Projection Mode Using the Remote Control .......................................................... 112
Changing the Projection Mode Using the Menus......................................................................... 112
Image Aspect Ratio .......................................................................................................................... 113
Changing the Image Aspect Ratio............................................................................................... 113
Available Image Aspect Ratios.................................................................................................... 114
Color Mode ...................................................................................................................................... 115
Changing the Color Mode............................................................................................................ 115
Available Color Modes................................................................................................................. 115
Adjusting Image Sharpness ............................................................................................................. 116
Adjusting the Projector's Brightness Level ....................................................................................... 117
Adjusting Luminance Controls.......................................................................................................... 117
Turning On Dynamic Contrast.......................................................................................................... 119
Adjusting the Color Temperature...................................................................................................... 120
Adjusting Gamma............................................................................................................................. 122
Adjusting the Hue, Saturation, and Brightness ................................................................................. 125
Controlling the Volume with the Volume Buttons.............................................................................. 126
Projecting in Content Playback Mode............................................................................................... 126
Projecting a Playlist in Content Playback Mode........................................................................... 127
Creating a Playlist Using Epson Web Control.............................................................................. 128
Supported Content Playback File Types ..................................................................................... 129
Content Playback Mode Restrictions........................................................................................... 130
Adjusting Projector Features ................................................................................................................. 131
Operating Connected Devices Using the HDMI Link Features......................................................... 131
Shutting Off the Picture and Sound Temporarily (A/V Mute) ............................................................ 133
Projector Security Features.............................................................................................................. 134
Locking the Projector's Lens Settings and Buttons...................................................................... 134
Unlocking the Projector's Buttons................................................................................................ 135
Saving a User's Logo Image to Display ....................................................................................... 135
Using Advanced Image Adjustment Features .................................................................................. 137
Creating Image Presets............................................................................................................... 137
Using Frame Interpolation .......................................................................................................... 139
5
Page 6

Adjusting Scaled Resolution Images (Super-resolution) ............................................................. 141
Adjusting the Color Convergence (Panel Alignment)................................................................... 142
Adjusting the Color Tone (Color Uniformity) ................................................................................ 144
Running Light Source Calibration................................................................................................ 145
Saving Settings to Memory and Using Saved Settings .................................................................... 146
Copying Menu Settings Between Projectors .................................................................................... 149
Saving Settings to a USB Flash Drive.......................................................................................... 149
Transferring Settings from a USB Flash Drive............................................................................. 150
Saving Settings to a Computer.................................................................................................... 151
Transferring Settings from a Computer ....................................................................................... 152
Adjusting the Menu Settings .................................................................................................................. 154
Using the Projector's Menus............................................................................................................. 154
Using the Displayed Keyboard ......................................................................................................... 155
Available Keyboard Text ............................................................................................................. 156
Image Menu ..................................................................................................................................... 156
Signal Menu ..................................................................................................................................... 161
Settings Menu .................................................................................................................................. 164
Extended Menu................................................................................................................................ 170
Network Menu.................................................................................................................................. 178
Info Menu ......................................................................................................................................... 179
Event ID Code List....................................................................................................................... 182
Reset Menu...................................................................................................................................... 183
Maintaining and Transporting the Projector ......................................................................................... 186
Projector Maintenance ..................................................................................................................... 186
Cleaning the Lens........................................................................................................................ 186
Cleaning the Projector Case........................................................................................................ 187
Air Filter and Vent Maintenance ....................................................................................................... 187
Cleaning the Air Filter and Vents ................................................................................................. 188
Replacing the Air Filter ................................................................................................................ 193
Replacing the Remote Control Batteries .......................................................................................... 197
Updating the Firmware ..................................................................................................................... 199
Updating Projector Firmware Using a USB Storage Device ........................................................ 200
Updating Projector Firmware Using a Computer and USB Cable................................................ 201
6
Page 7

Transporting the Projector................................................................................................................ 202
Solving Problems .................................................................................................................................... 204
Projection Problem Tips ................................................................................................................... 204
Projector Light Status ....................................................................................................................... 205
Solving Image or Sound Problems................................................................................................... 211
Solutions When No Image Appears............................................................................................. 211
Solutions When "No Signal" Message Appears........................................................................... 212
Displaying From a PC Laptop ................................................................................................. 212
Displaying From a Mac Laptop ............................................................................................... 212
Solutions When "Not Supported" Message Appears ................................................................... 213
Solutions When Only a Partial Image Appears............................................................................ 213
Solutions When the Image is Not Rectangular ............................................................................ 213
Solutions When the Image Contains Noise or Static ................................................................... 214
Solutions When the Image is Fuzzy or Blurry .............................................................................. 215
Solutions When the Image Brightness or Colors are Incorrect .................................................... 215
Solutions When an Afterimage Remains On the Projected Image............................................... 216
Solutions to Sound Problems ...................................................................................................... 216
Solving Projector or Remote Control Operation Problems ............................................................... 216
Solutions to Projector Power or Shut-Off Problems..................................................................... 217
Solutions to Remote Control Problems........................................................................................ 217
Solutions to Password Problems................................................................................................. 218
Solutions When a Battery Message Appears ................................................................................... 218
Solutions to Problems Using Content Playback ............................................................................... 219
Solving Network Problems ............................................................................................................... 219
Solutions When You Cannot Access the Projector Through the Web ......................................... 219
Solutions When the Image Contains Static During Network Projection ....................................... 220
Where to Get Help (U.S. and Canada) ............................................................................................. 220
Where to Get Help (Latin America)................................................................................................... 221
Technical Specifications ........................................................................................................................ 224
General Projector Specifications ...................................................................................................... 224
Projector Light Source Specifications............................................................................................... 225
Remote Control Specifications ......................................................................................................... 226
Projector Dimension Specifications.................................................................................................. 226
7
Page 8

Projector Electrical Specifications .................................................................................................... 227
Projector Environmental Specifications............................................................................................ 228
Projector Safety and Approvals Specifications................................................................................. 229
Notices ..................................................................................................................................................... 230
Recycling (U.S. and Canada)........................................................................................................... 230
Important Safety Information ............................................................................................................ 230
Laser Safety Information .................................................................................................................. 231
Laser Safety Labels..................................................................................................................... 231
Important Safety Instructions............................................................................................................ 237
Restriction of Use ........................................................................................................................ 241
List of Safety Symbols...................................................................................................................... 241
FCC Compliance Statement............................................................................................................. 245
Binding Arbitration and Class Waiver............................................................................................... 246
Trademarks...................................................................................................................................... 249
Copyright Notice............................................................................................................................... 250
A Note Concerning Responsible Use of Copyrighted Materials................................................... 250
Copyright Attribution.................................................................................................................... 251
8
Page 9

EH-QL3000W/EH-QL3000B/EH-QL7000W/EH-QL7000B User's
Guide
Welcome to the EH-QL3000W/EH-QL3000B/EH-QL7000W/EH-QL7000B User's Guide.
For a printable PDF copy of this guide, click here.
Note: Availability of products in this guide varies by country.
9
Page 10

Introduction to Your Projector
Refer to these sections to learn more about your projector and this manual.
Projector Features
Notations Used in the Documentation
Where to Go for Additional Information
Additional Projector Software and Manuals
Projector Part Locations
Projector Features
Your projector includes these special features:
Bright, high-resolution projection system
• Laser light source with up to 6000 lumens (EH-QL3000W/EH-QL3000B) or 10000 lumens (EHQL7000W/EH-QL7000B) of equal color brightness (color light output) and white brightness (white light
output)
Note: Color brightness (color light output) and white brightness (white light output) will vary depending
on usage conditions. Color light output measured in accordance with IDMS 15.4; white light output
measured in accordance with ISO 21118.
• 4K technology for beautiful, high-definition images
• Dynamic Tone Mapping optimizes HDR brightness and contrast
• Auto Low Latency Mode (ALLM) for smoother and more responsive gaming
• Scene Adaptive Gamma, Image Enhancement, and Frame Interpolation features
• 3-chip 3LCD technology provides brighter colors and uncompromising image quality
• Projection on curved or corner surfaces and any wall or screen
Innovative design and operation features
• Multi-faceted case design can be customized for seamless integration in any home environment
• Supports a wide variety of interchangeable lenses
Flexible connectivity
• Two HDMI ports for video device or computer connections
10
Page 11
• HDMI 2.1 support for full audio and video signal bandwidth and Enhanced Audio Return Channel
(eARC) for uncompressed audio
• Support for Control4 and Crestron Connected network monitoring systems
Product Box Contents
Additional Components
Optional Equipment and Replacement Parts
Warranty and Registration Information (U.S. and Canada)
Warranty and Registration Information (Latin America)
Parent topic: Introduction to Your Projector
Product Box Contents
Save all the packaging in case you need to ship the projector. Always use the original packaging (or
equivalent) when shipping.
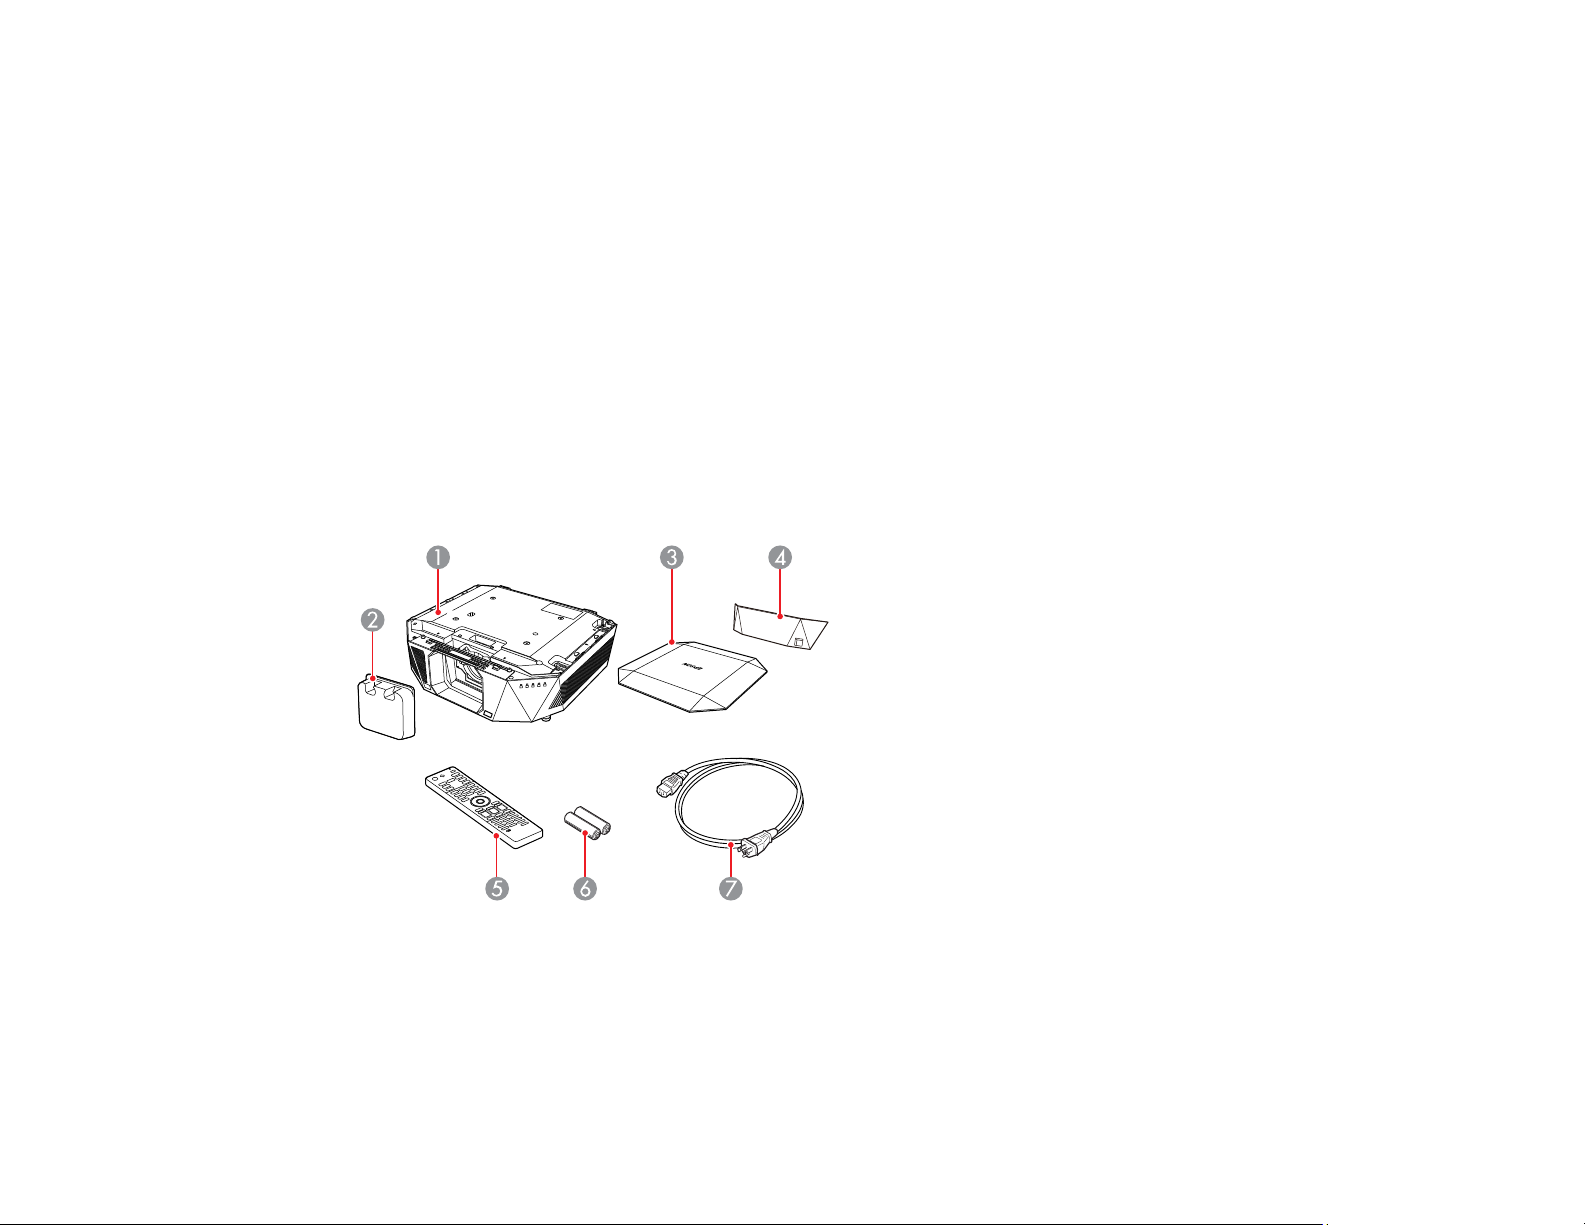
Make sure your product box includes all of these parts:
1 Projector
2 Lens cover
3 Vanity board
11
Page 12
4 Cable cover
5 Remote control
6 Remote control batteries (two AA alkaline)
7 Power cord
Parent topic: Projector Features
Related tasks
Attaching and Removing the Vanity Board
Attaching and Removing the Cable Cover
Additional Components
Depending on how you plan to use the projector, you may need to obtain additional components.
Note: To connect a Mac that does not include a compatible video output port, you need to obtain an
adapter that allows you to connect to an input port on the projector. Contact Apple for compatible
adapter options. To connect a smartphone or tablet, you may need to obtain an adapter to connect to the
projector. This allows you to mirror your smartphone or tablet screens, watch movies, and more. Contact
your device manufacturer for compatible adapter options.
Unless listed as available from Epson in this table, see your local computer or electronics dealer for
purchase information.
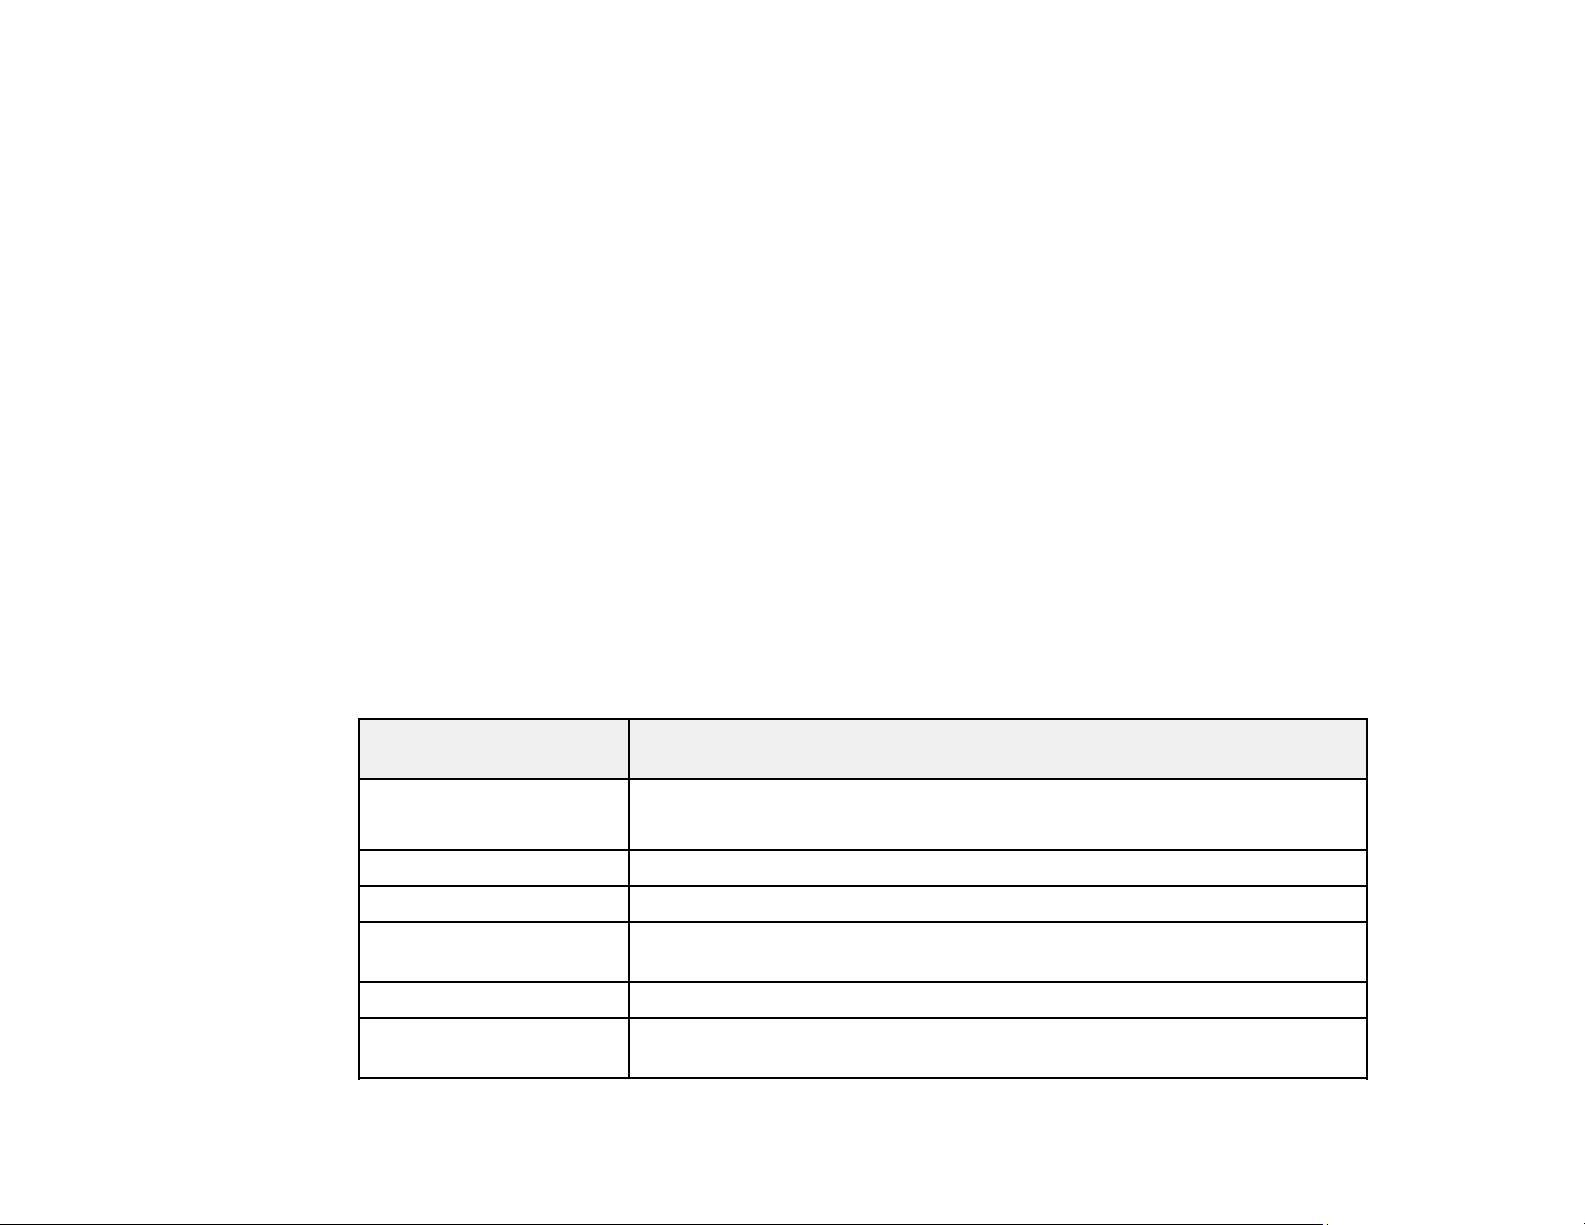
Signal or connection
type
HDMI Compatible HDMI cable or HDMI 2.1 certified cable (ultra high-speed)
HDBaseT Compatible 100Base-TX LAN cable
Audio from certain ports Commercially available audio cable compatible with your device
External audio Speakers, an audio video receiver, or a video source with speaker
USB Compatible USB cable
Controlling the projector
from a computer
Additional component necessary
Available for purchase from Epson or an authorized Epson reseller.
connections, and the cables necessary for connecting them to the projector
Mini D-Sub 9-pin (male) connector
12
Page 13

Parent topic: Projector Features
Optional Equipment and Replacement Parts
U.S. and Canada: You can purchase screens, other optional accessories, and replacement parts from
an Epson authorized reseller. To find the nearest reseller, call 800-GO-EPSON (800-463-7766) in the
U.S. or 800-807-7766 in Canada. Or you can purchase online at epsonstore.com (U.S. sales) or
epsonstore.ca (Canadian sales).
Latin America: You can purchase optional accessories and replacement parts from an Epson
authorized reseller. To find the nearest reseller, go to latin.epson.com. Or you can contact your nearest
sales office as described in "Where to Get Help."
Note: Availability of accessories varies by country.
Epson offers the following optional accessories and replacement parts for your projector:
U.S. and Canada:
Option or part Part number
Air filter (ELPAF46) V13H134A46
Adjustable ceiling mount (ELPMB67) V12HA54010
Suspension adapter (ELPFP15) V12HA55010
Vanity board - champagne gold (ELPVB05) V12H003AK0
Ultra short-throw lens (ELPLX02S) V12H004X0B
Ultra short-throw lens (ELPLX02WS) V12H004Y0B
Short-throw lens housing - white (ELPVB02W) V12H003AL0
Short-throw lens housing - black (ELPVB03B) V12H003AM0
Short-throw lens housing - champagne gold (ELPVB04C) V12H003AN0
Short-throw #1 zoom lens (ELPLU03S) V12H004UA3
Short-throw #2 zoom lens (ELPLU04) V12H004U04
Wide-throw #1 zoom lens (ELPLW05) V12H004W05
Wide-throw #2 zoom lens (ELPLW06) V12H004W06
Wide-throw #3 zoom lens (ELPLW08) V12H004W08
13
Page 14
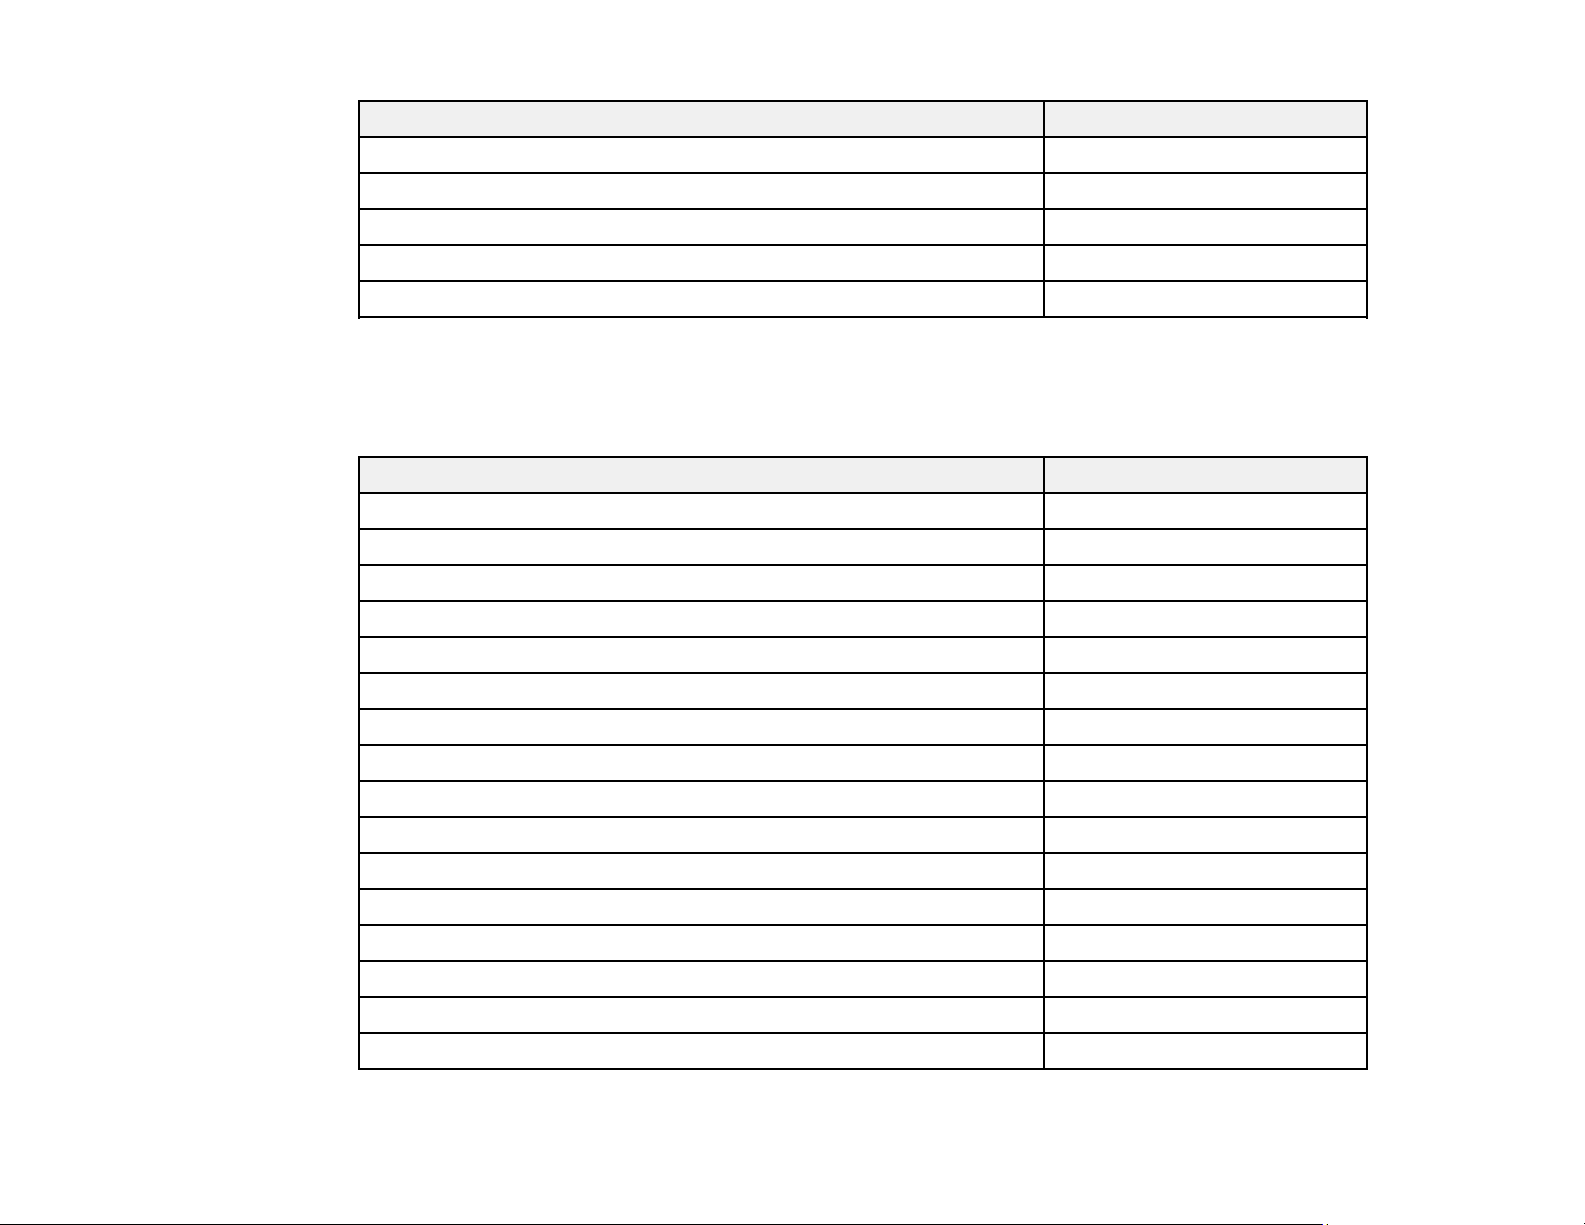
Option or part Part number
Middle-throw zoom lens #1 (ELPLM08) V12H004M08
Middle-throw zoom lens #2 (ELPLM15) V12H004M0F
Middle-throw zoom lens #3 (ELPLM10) V12H004M0A
Middle-throw zoom lens #4 (ELPLM11) V12H004M0B
Long-throw zoom lens (ELPLL08) V12H004L08
For the most recent list of accessories, visit the Epson web site and search for your product.
In addition to the accessories listed above, extended service plans are available.
Latin America:
Option or part Part number
Air filter (ELPAF46) V13H134A46
Vanity board - champagne gold (ELPVB05) V12H003AK0
Ultra short-throw lens (ELPLX02S) V12H004X0B
Ultra short-throw lens (ELPLX02WS) V12H004Y0B
Short-throw lens housing - white (ELPVB02W) V12H003AL0
Short-throw lens housing - black (ELPVB03B) V12H003AM0
Short-throw lens housing - champagne gold (ELPVB04C) V12H003AN0
Short-throw #1 zoom lens (ELPLU03S) V12H004UA3
Short-throw #2 zoom lens (ELPLU04) V12H004U04
Wide-throw #1 zoom lens (ELPLW05) V12H004W05
Wide-throw #2 zoom lens (ELPLW06) V12H004W06
Wide-throw #3 zoom lens (ELPLW08) V12H004W08
Middle-throw zoom lens #1 (ELPLM08) V12H004M08
Middle-throw zoom lens #2 (ELPLM15) V12H004M0F
Middle-throw zoom lens #3 (ELPLM10) V12H004M0A
Middle-throw zoom lens #4 (ELPLM11) V12H004M0B
14
Page 15

Option or part Part number
Long-throw zoom lens (ELPLL08) V12H004L08
For the most recent list of accessories, visit the Epson web site and search for your product.
Parent topic: Projector Features
Related references
Where to Get Help (U.S. and Canada)
Where to Get Help (Latin America)
Warranty and Registration Information (U.S. and Canada)
Your projector comes with a basic warranty that lets you project with confidence. For details, see the
warranty that came with your projector.
Note: Availability varies by region.
Register your product online at this site: epson.com/webreg
Registering also lets you receive special updates on new accessories, products, and services.
Parent topic: Projector Features
Warranty and Registration Information (Latin America)
Your projector comes with a basic warranty that lets you project with confidence. For details, see the
warranty that came with your projector.
Register your product online at latin.epson.com/registro
Registering also lets you receive special updates on new accessories, products, and services.
Parent topic: Projector Features
Notations Used in the Documentation
Follow the guidelines in these notations as you read your documentation:
• Warnings must be followed carefully to avoid bodily injury.
• Cautions must be observed to avoid damage to your equipment.
• Notes contain important information about your projector.
• Tips contain additional projection information.
15
Page 16

Parent topic: Introduction to Your Projector
Where to Go for Additional Information
Need quick help on using your projector? Here's where to look for help:
• epson.com/support (U.S.), epson.ca/support (Canada), or latin.epson.com/support (Latin America)
View FAQs (frequently asked questions) and e-mail your questions to Epson technical support 24
hours a day.
• If you still need help after checking this manual and any other sources listed here, you can use the
Epson PrivateLine Support service to get help fast (U.S. and Canada only). For details, see "Where to
Get Help."
Parent topic: Introduction to Your Projector
Related references
Where to Get Help (U.S. and Canada)
Where to Get Help (Latin America)
Additional Projector Software and Manuals
After connecting and setting up the projector, install the projector software as necessary. You may need
to install it from a software CD, if included, or download the software and manuals as necessary.
You can install the projector software programs listed here and view their manuals for instructions on
using them.
Note: If you still need help after checking this manual and the sources listed here, you can use the
Epson PrivateLine Support service to get help fast (U.S. and Canada only). For details, see "Where to
Get Help."
Projector software Manual Description
Epson iProjection
(Windows/Mac)
Epson iProjection
Operation Guide
(Windows/Mac)
16
Lets you project the computer screens of
users over a network.
You can download the latest software and
documentation from the Epson web site. Go to
epson.com/support (U.S.), epson.ca/support
(Canada), or latin.epson.com/support (Latin
America) and select your projector.
Page 17

Projector software Manual Description
Epson iProjection app Instructions are included
with the app
— Open Source Software
License
Epson Projector Content
Manager
Epson Projector Content
Manager Operation Guide
Lets you project from an iOS or Android device
if your projector is connected to a network that
includes a wireless access point.
Visit epson.com/support (U.S.),
epson.ca/support (Canada), or
latin.epson.com/support (Latin America) for
more information.
You can download this document from the
Epson web site. Go to epson.com/support
(U.S.), epson.ca/support (Canada), or
latin.epson.com/support (Latin America) and
select your projector.
Lets you add images and movies to playlists,
and save them on a USB device; insert the
USB device into the projector to project your
playlist content without using a cable
connection.
You can download the latest software and
documentation from the Epson web site. Go to
epson.com/support (U.S.), epson.ca/support
(Canada), or latin.epson.com/support (Latin
America) and select your projector.
Epson Creative Projection
(iOS only)
Instructions are included
with the app (instructions
included with the app
available only in English)
Parent topic: Introduction to Your Projector
Related references
Where to Get Help (U.S. and Canada)
Where to Get Help (Latin America)
Lets you create custom content using built-in
templates and stamps, and wirelessly transfer
it to the projector if it is connected to a network
that includes a wireless access point.
You can download the latest software and
documentation from the Apple App Store.
17
Page 18

Projector Part Locations
Check the projector part illustrations to learn about the parts on your projector.
Projector Parts - Front/Top
Projector Parts - Rear
Projector Parts - Base
Projector Parts - Remote Control
Parent topic: Introduction to Your Projector
18
Page 19
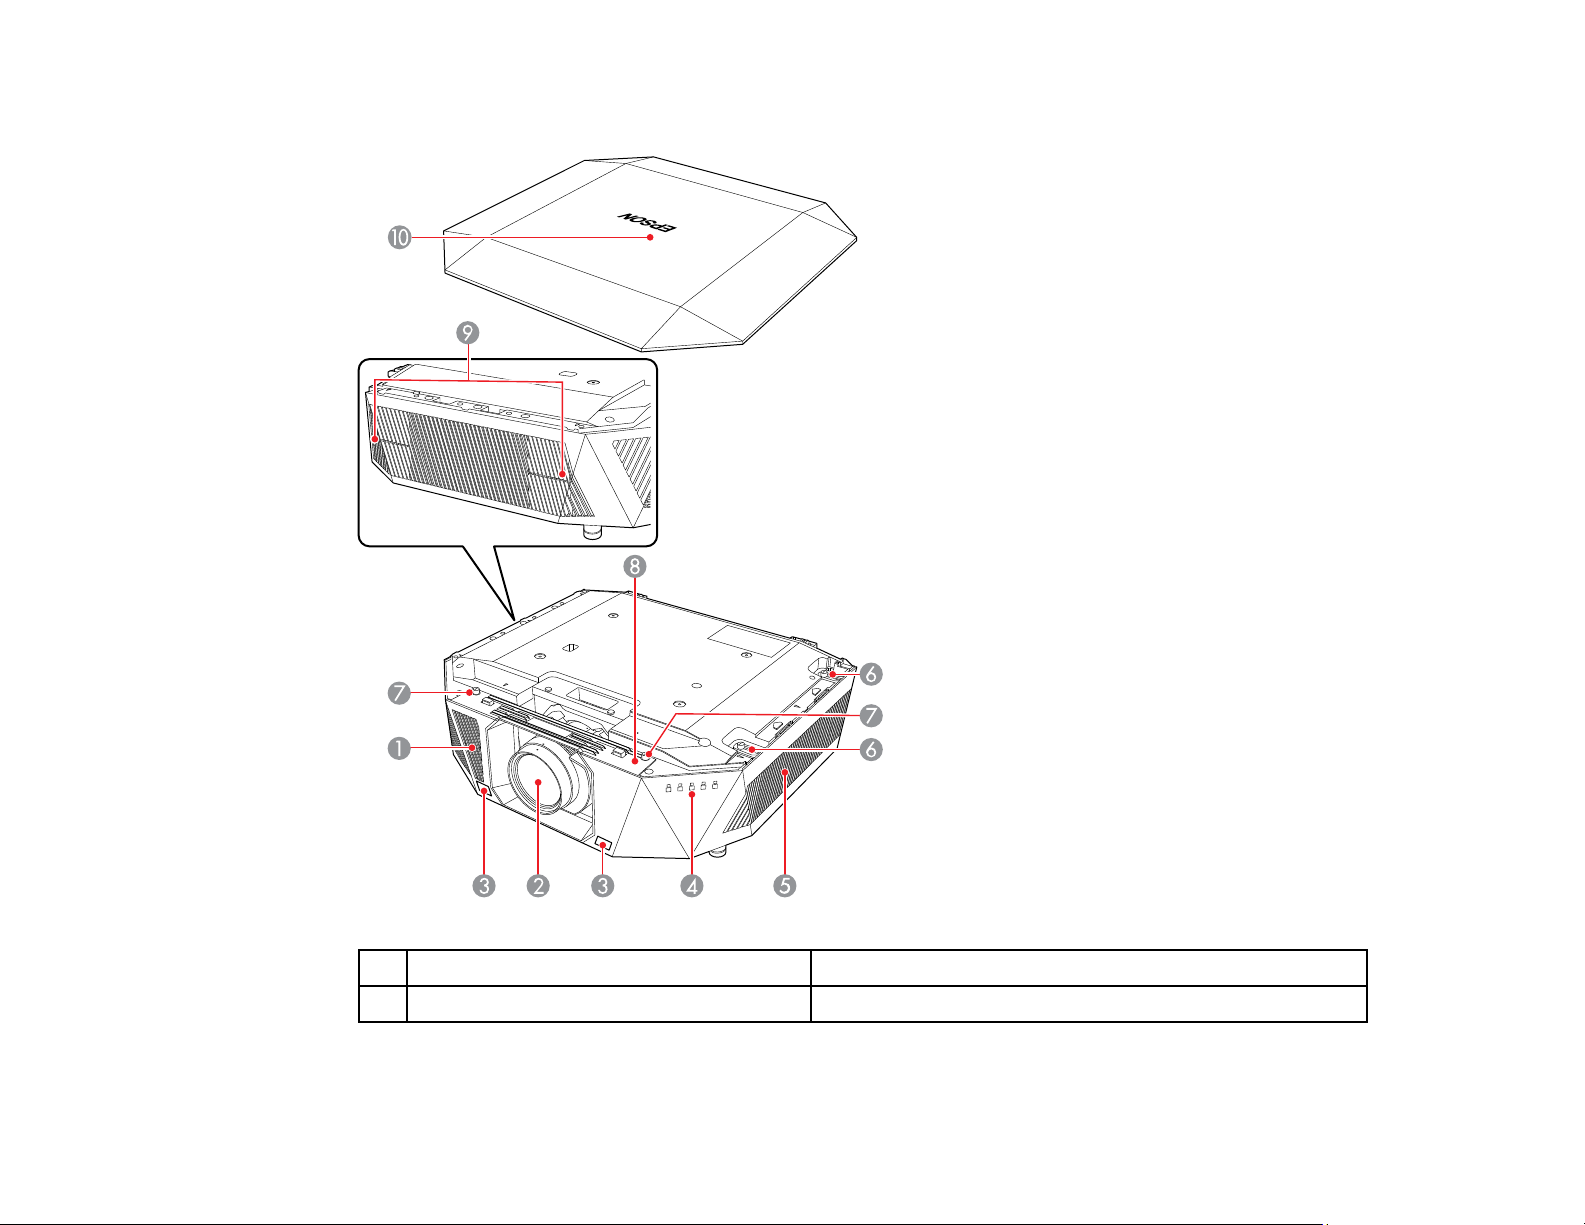
Projector Parts - Front/Top
Name Function
1 Air intake vents Takes in air to cool the projector
19
Page 20
2 Projection lens Projects images
Warning: Do not look into the projection lens while
projecting.
Caution: Do not place any objects or put your hand
near the projection lens. It could cause burns, fire, or the
object to warp because this area reaches a high
temperature due to the concentrated projection light.
3 Remote receivers Receives signals from the remote control
4 Projector status lights Indicates the projector's status
5 Air filter cover/intake vent Takes in air to cool the projector internally
6 Air filter cover screws Screws to secure the air filter cover in place
7 Lens replacement cover screw holes Attach screws to secure the lens replacement cover in
place
8 Lens replacement cover Remove while attaching or removing the lens
(ELPLX02S/ELPLX02WS only)
Caution: When moving the projector, do not hold the
lens replacement cover. The lens replacement cover
may detach and the projector may fall, which could
cause an injury.
9 Air exhaust vents Exhaust vent for air used to cool the projector internally
Caution: While projecting, do not put your face or
hands near the air exhaust vent, and do not place
objects that may become warped or damaged by heat
near the vent. Hot air from the air exhaust vent could
cause burns, warping, or accidents to occur.
10 Vanity board Covers the top of the projector
Parent topic: Projector Part Locations
20
Page 21
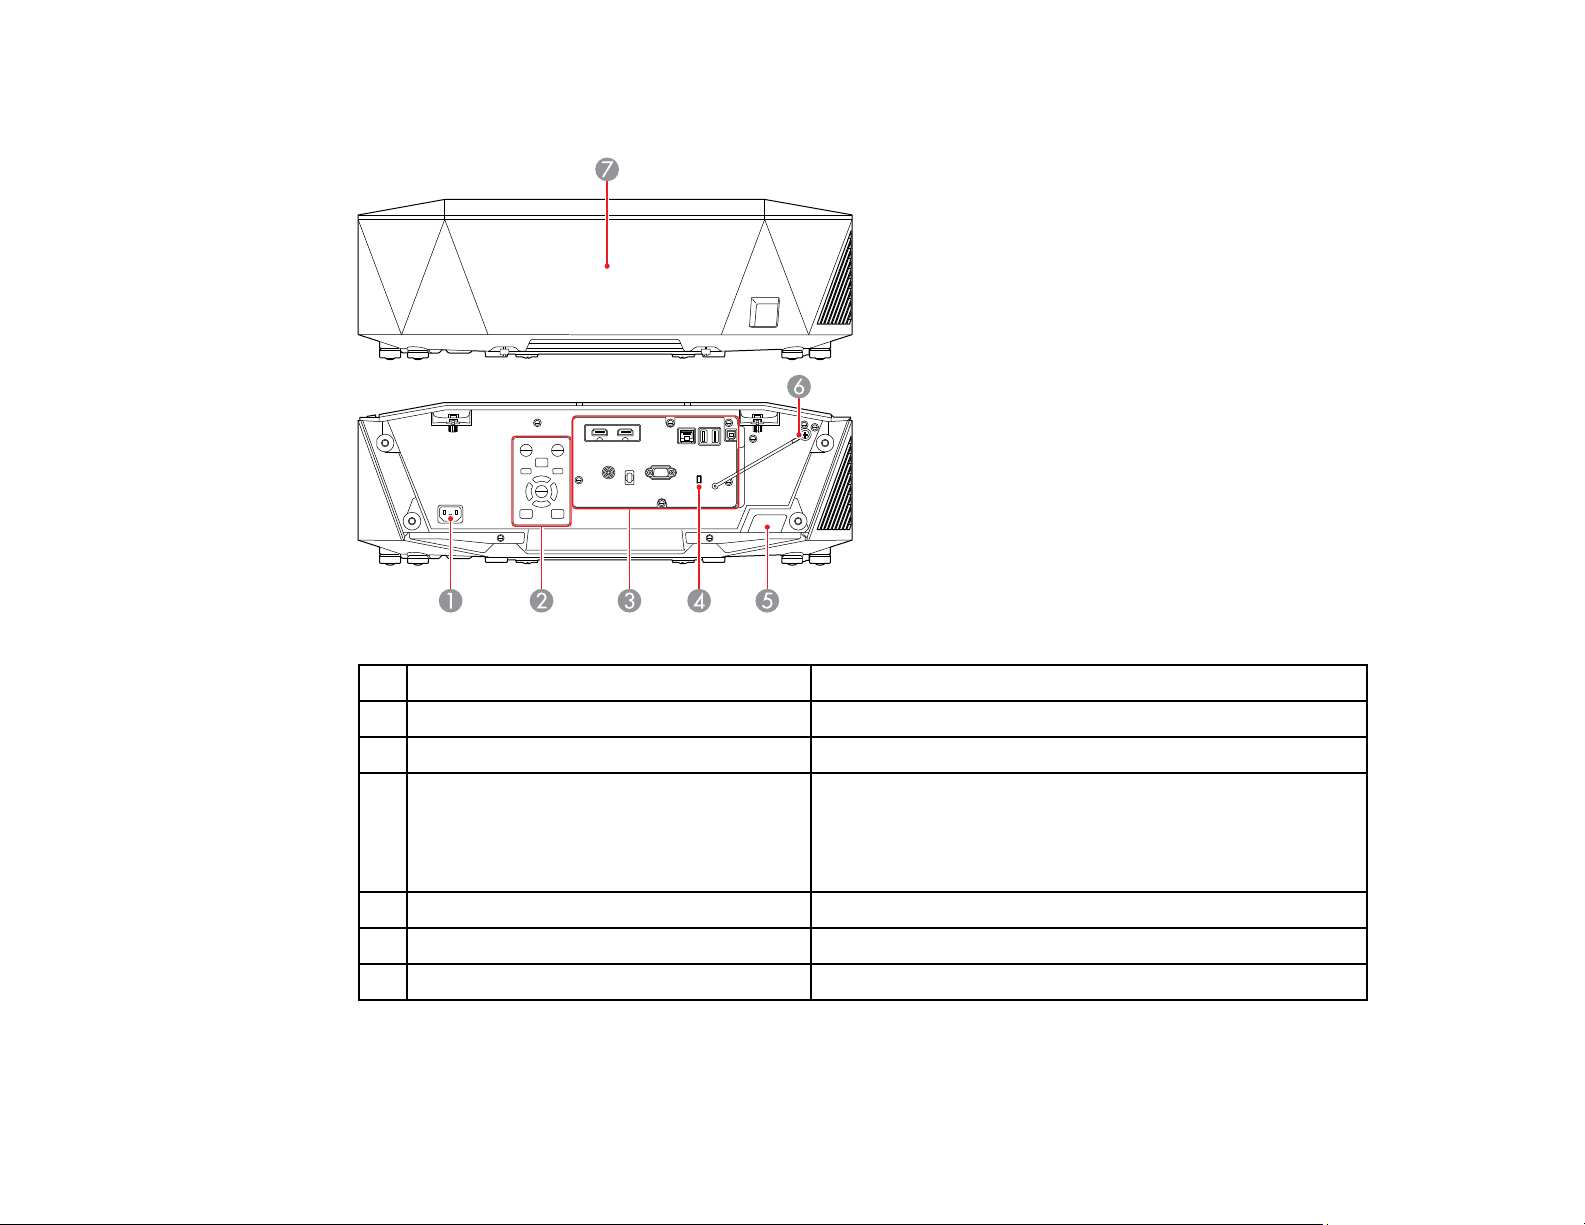
Projector Parts - Rear
1 AC power inlet Connects the power cord to the projector
2 Control panel Operates the projector
3 Interface ports Connects interface cables
4 Kensington security slot The security slot is compatible with the Microsaver
Security System manufactured by Kensington.
For more details on the Microsaver Security
System,visit the Kensington Web site.
5 Remote receiver Receives signals from the remote control
6 Vanity board fall prevention wire Secures the vanity board to the projector
7 Cable cover Cover for the rear interface ports
21
Page 22
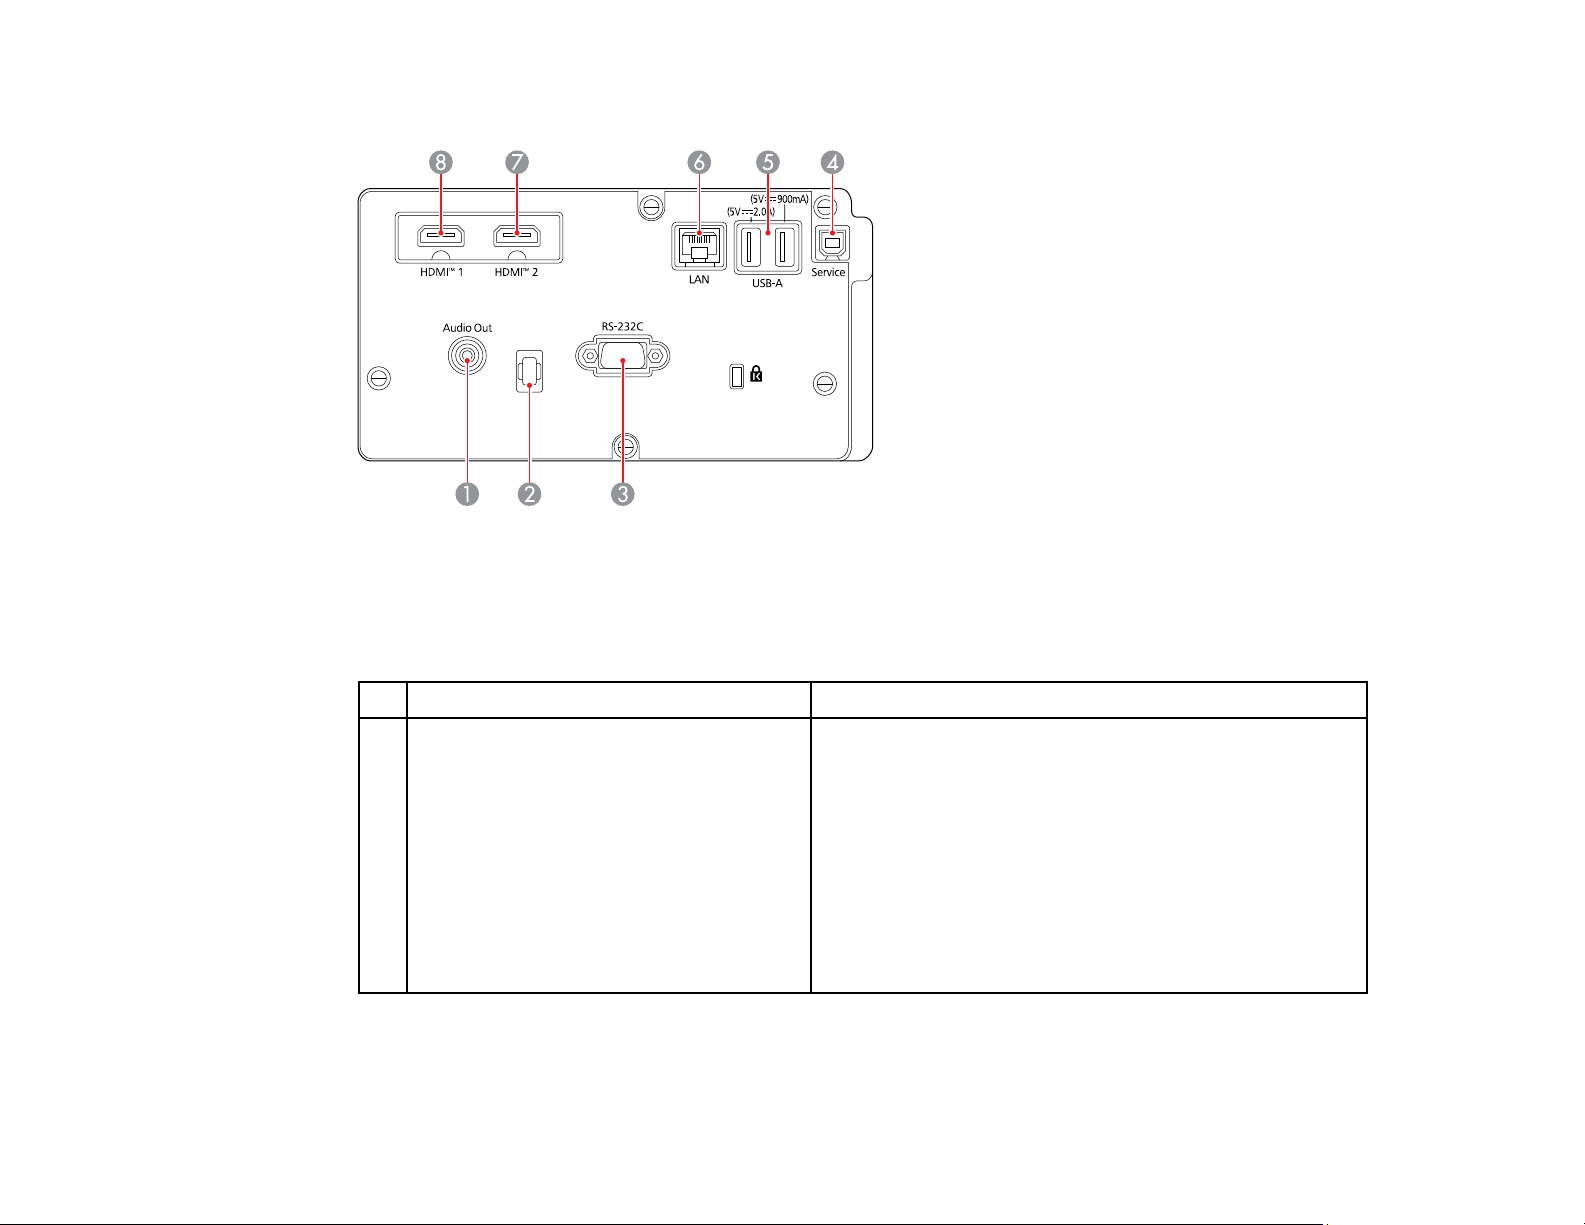
Interface ports
Note: Check the shape and orientation of the connectors on any cable you plan to connect. Do not force
a connector into a port if it does not fit; the device or your projector could be damaged or could
malfunction. Do not turn on the input source before connecting it to the projector. Doing so could
damage the projector. If necessary, use an adapter to connect to an input port on the projector.
Name Function
1 Audio Out port
(Stereo pin mini jack)
22
Outputs audio from the current input source to an
external speaker. You can also connect the projector to
an amplifier with speakers.
To output audio from the speaker connected to this port,
select Projector as the Audio Out Device setting in the
projector's Settings menu. When an audio/video
system is not connected to the projector, audio is output
from the speaker connected to this port even if Audio
Out Device is set to A/V System.
• Settings > HDMI Link > Audio Out Device
Page 23

2 Cable holder Pass a commercially available cable tie through here to
secure the cables.
Warning: Do not bundle the power cord to the other
cables. Otherwise, a fire may occur.
3 RS-232C port
(Mini D-Sub 9-pin, male)
4 Service port
(USB connector Type B)
5 USB-A port
(USB connection Type A)
6 LAN port
(RJ-45)
Use to connect an RS-232C cable to control the
projector from a computer
Used for batch settings and firmware update.
Use to connect a USB memory device for projecting
movies or images in Content Playback mode. It is also
used for batch settings and firmware update.
Provides a connection for a streaming media player to
power it.
This projector can be powered at 5 V/2 A or 5 V/
900mA.
Caution:
• Use the USB cable supplied with or specified for use
with the device.
• Do not connect a USB hub or a USB cable longer
than three meters, or the device may not operate
correctly.
Use to connect a LAN cable to connect to a network.
Use a 100Base-TX or 10Base-T network cable.
To ensure proper data transmission, use a Category 5
shielded cable or better.
7 HDMI2 port Inputs video signals from HDMI compatible video
equipment and computers.
Connects the optional base unit of the Epson Wireless
Presentation System.
This port is compatible with HDCP2.3. (Audio is only
supported by PCM)
23
Page 24
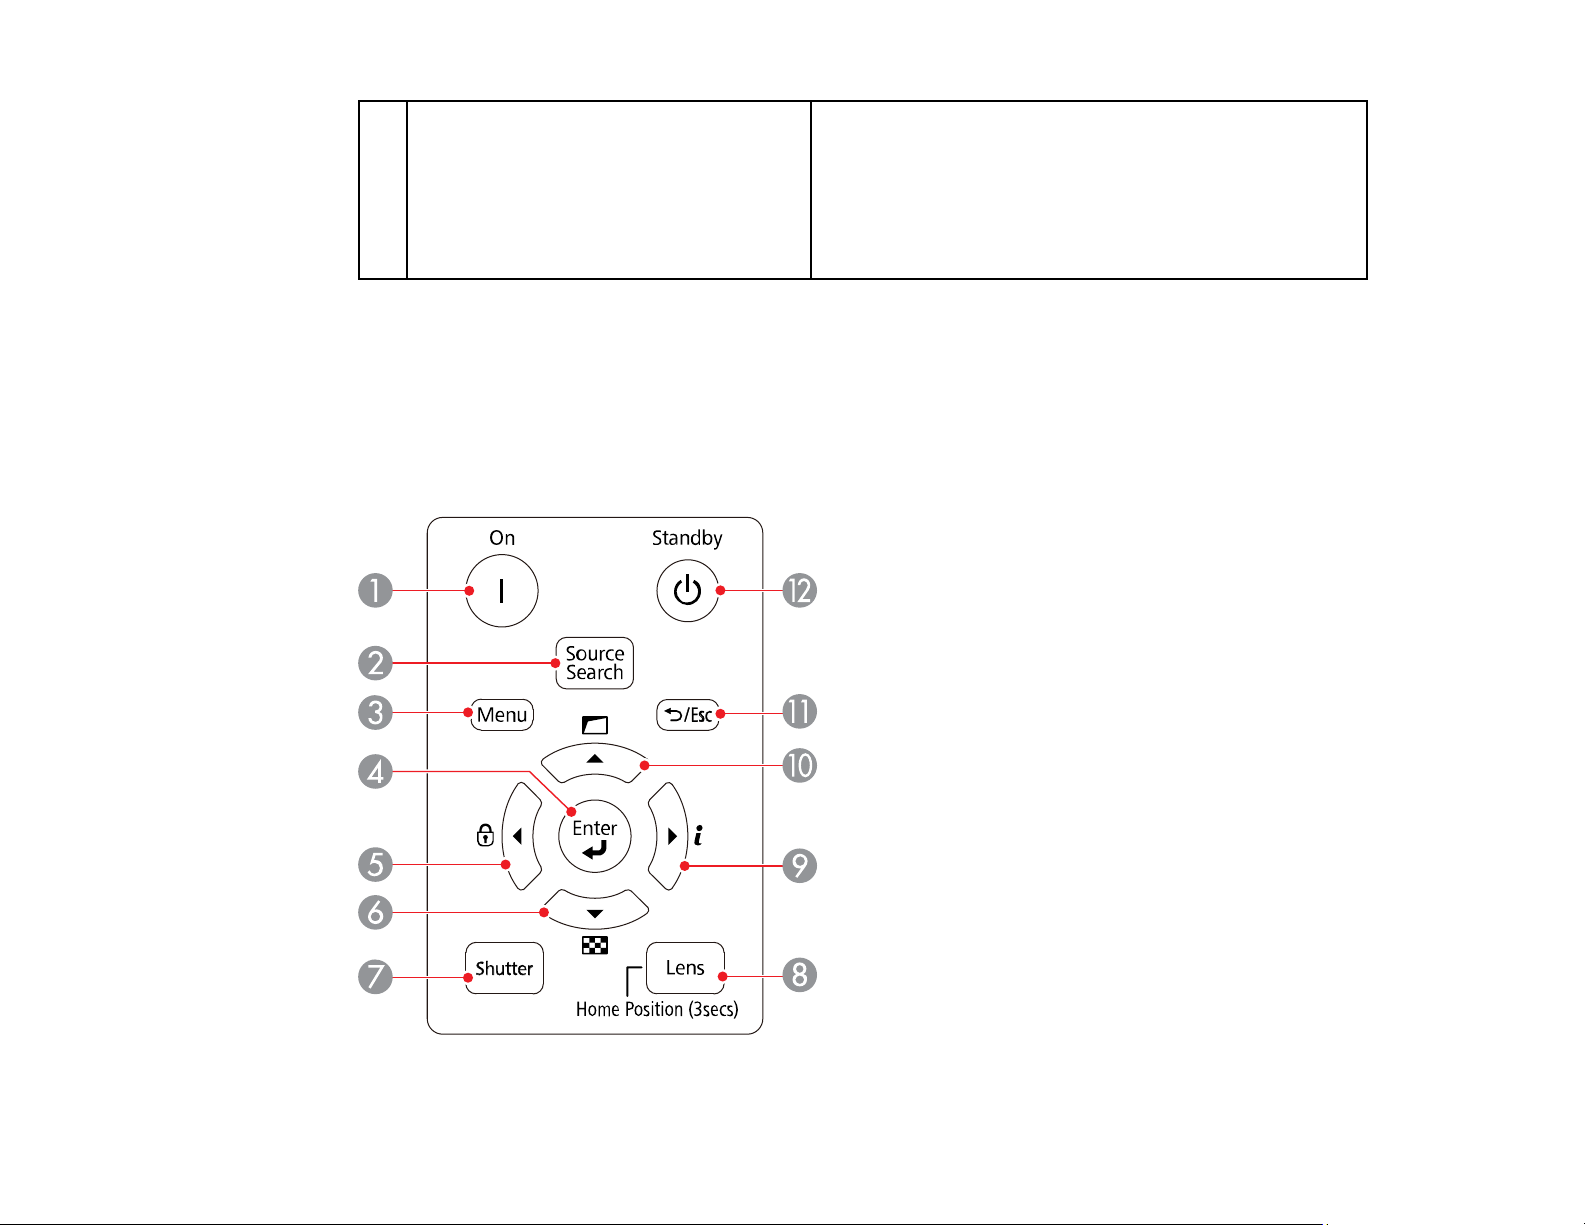
8 HDMI1 port
(HDMI)
Inputs video signals from HDMI compatible video
equipment and computers.
Connects the optional base unit of the Epson Wireless
Presentation System.
This port is compatible with HDCP2.3. (Audio is only
supported by PCM)
Note: When sending 40 Gbps images such as 4K 120Hz, use an HDMI cable (ultra-high speed). If you
use an incompatible cable, images may not be displayed correctly. If images are not displayed correctly,
you may be able to display them correctly by changing the EDID Mode setting in the projector's Signal
menu.
• Signal > Advanced > EDID
Control panel
24
Page 25
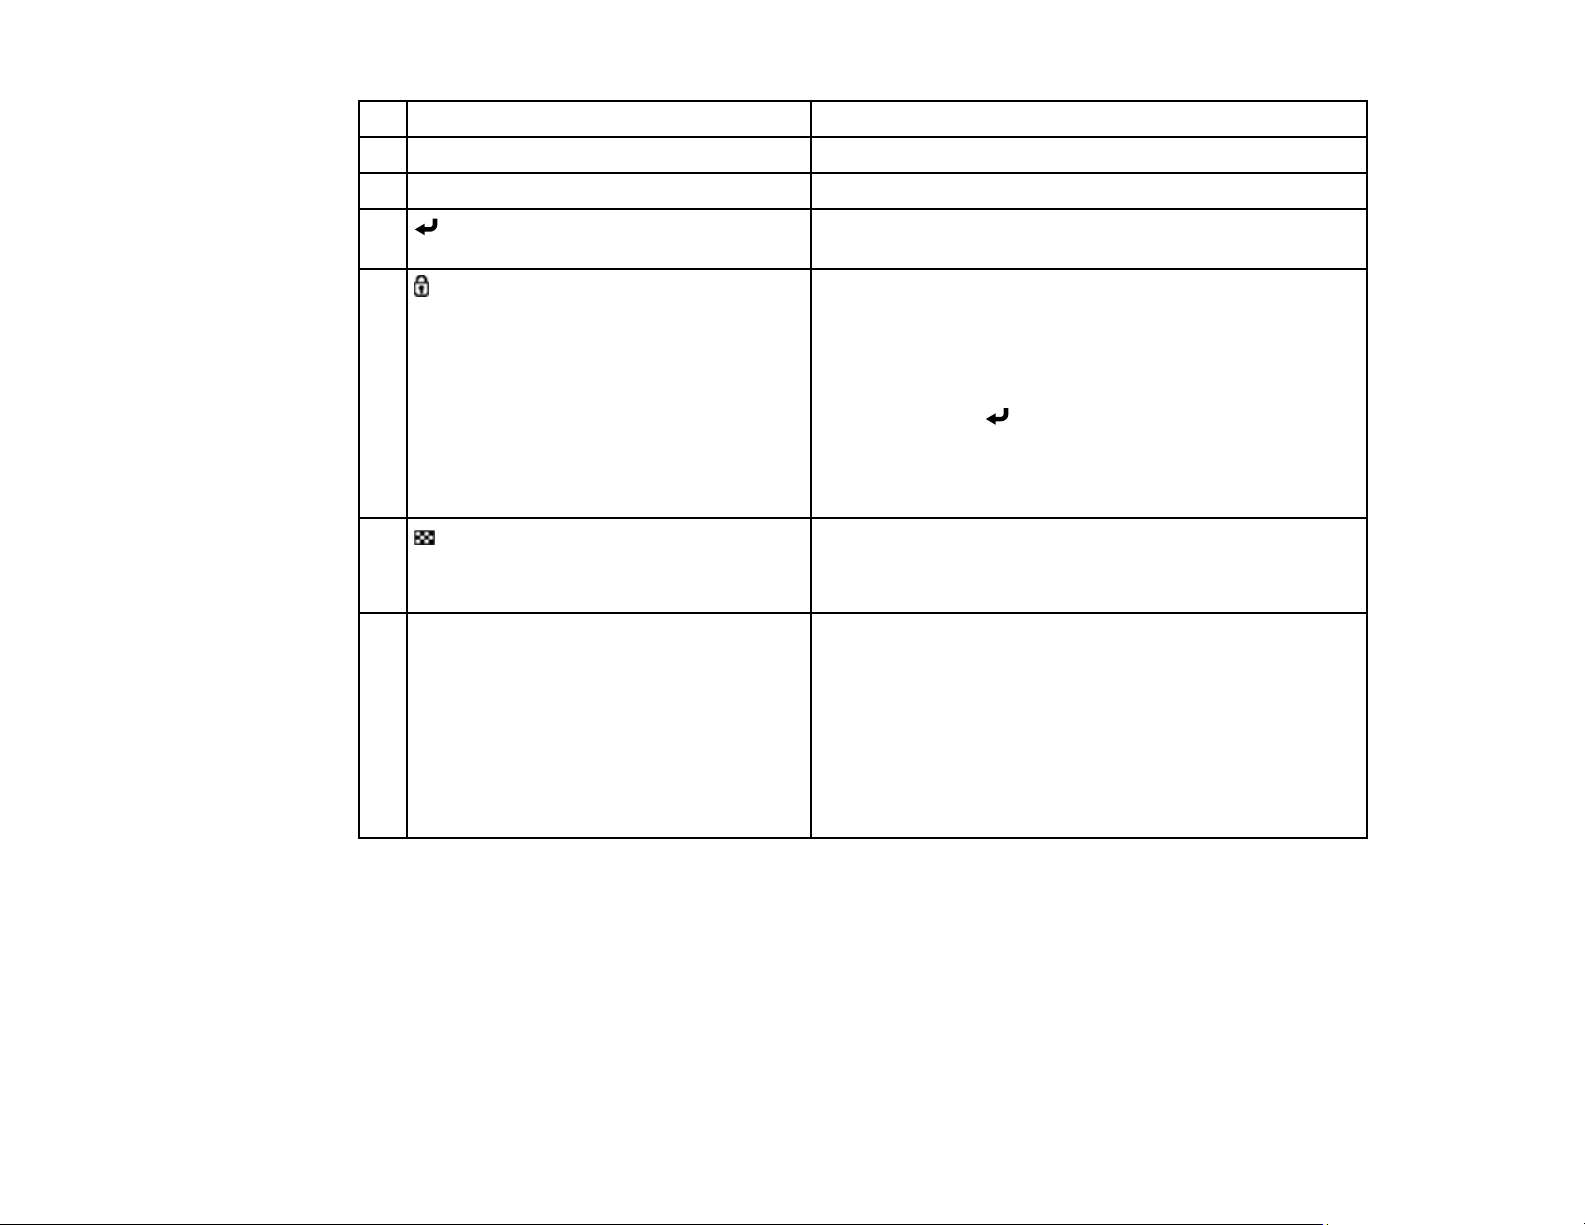
1 On button Turns the projector on
2 Source Search button Changes to the next input source
3 Menu button Displays and closes the projector's menu.
4 Enter button Enters the current selection and moves to the next level
while displaying the projector's menu
5
/Left arrow button
Displays the Control Panel Lock screen allowing you to
lock the control panel buttons.
Do one of the following to unlock them:
• Set the Control Panel Lock setting to Off
• Hold down the Enter button on the control panel
for more than seven seconds.
Selects menu items while displaying the projector's
menu.
6 /Down arrow button Displays the Test Pattern screen.
Selects menu items while displaying the projector's
menu.
7 Shutter button
Turns the video and audio on or off temporarily (A/V
Mute).
The projector's power automatically turns off two hours
after A/V Mute is enabled.
You can disable this feature.
• Extended > Operation > A/V Mute Settings > A/V
Mute Timer
25
Page 26

8 Lens button Displays the adjustment screens for lens shift, zoom,
focus, and distortion in that order each time the button is
pressed. Wait 20 minutes after turning on the projector
before setting the focus, zoom, and lens shift for
maximum accuracy.
When adjusting the image position using vertical lens
shift, adjust it by moving the image from the bottom to
the top. If you adjust it from the top to the bottom, the
image position may move down slightly after adjusting.
Hold down the button for more than three seconds to
move the lens position to the home position. Keep the
lens position in the home position for the clearest
picture.
9 Right arrow button Displays the projector's Info menu.
Selects menu items while displaying the projector's
menu.
10 /Up arrow button Corrects the shape of the image using the options in the
Geometry Correction setting.
Selects menu items while displaying the projector's
menu.
11 Esc button Stops the current function.
Moves back to the previous menu level while displaying
the projector's menu.
12 Standby button Turns the projector off
Parent topic: Projector Part Locations
Related tasks
Installing the Safety Wire
26
Page 27
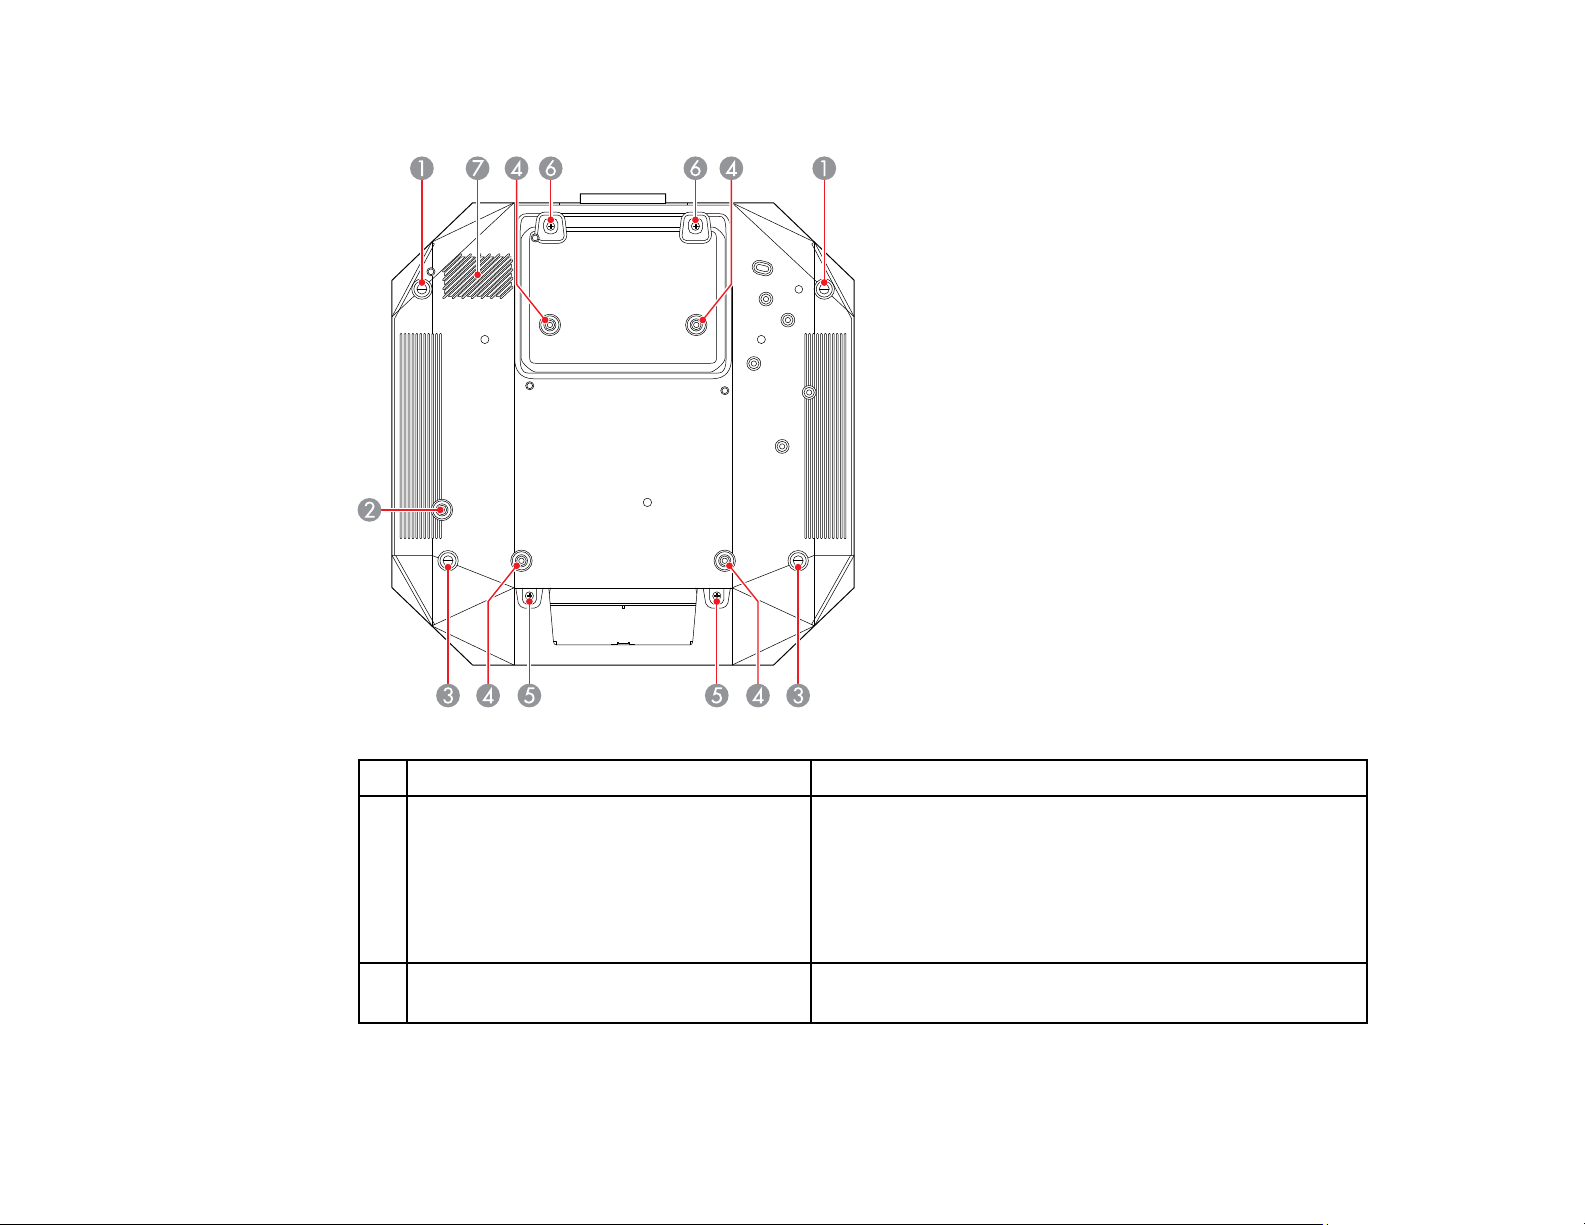
Projector Parts - Base
Name Function
1 Front adjustable feet When the projector is set up on a surface such as a
desk, turn to extend the foot to adjust the position of the
image.
You can adjust the position of the image by tilting the
projector up to 10°. The larger the angle of tilt, the
harder it becomes to focus.
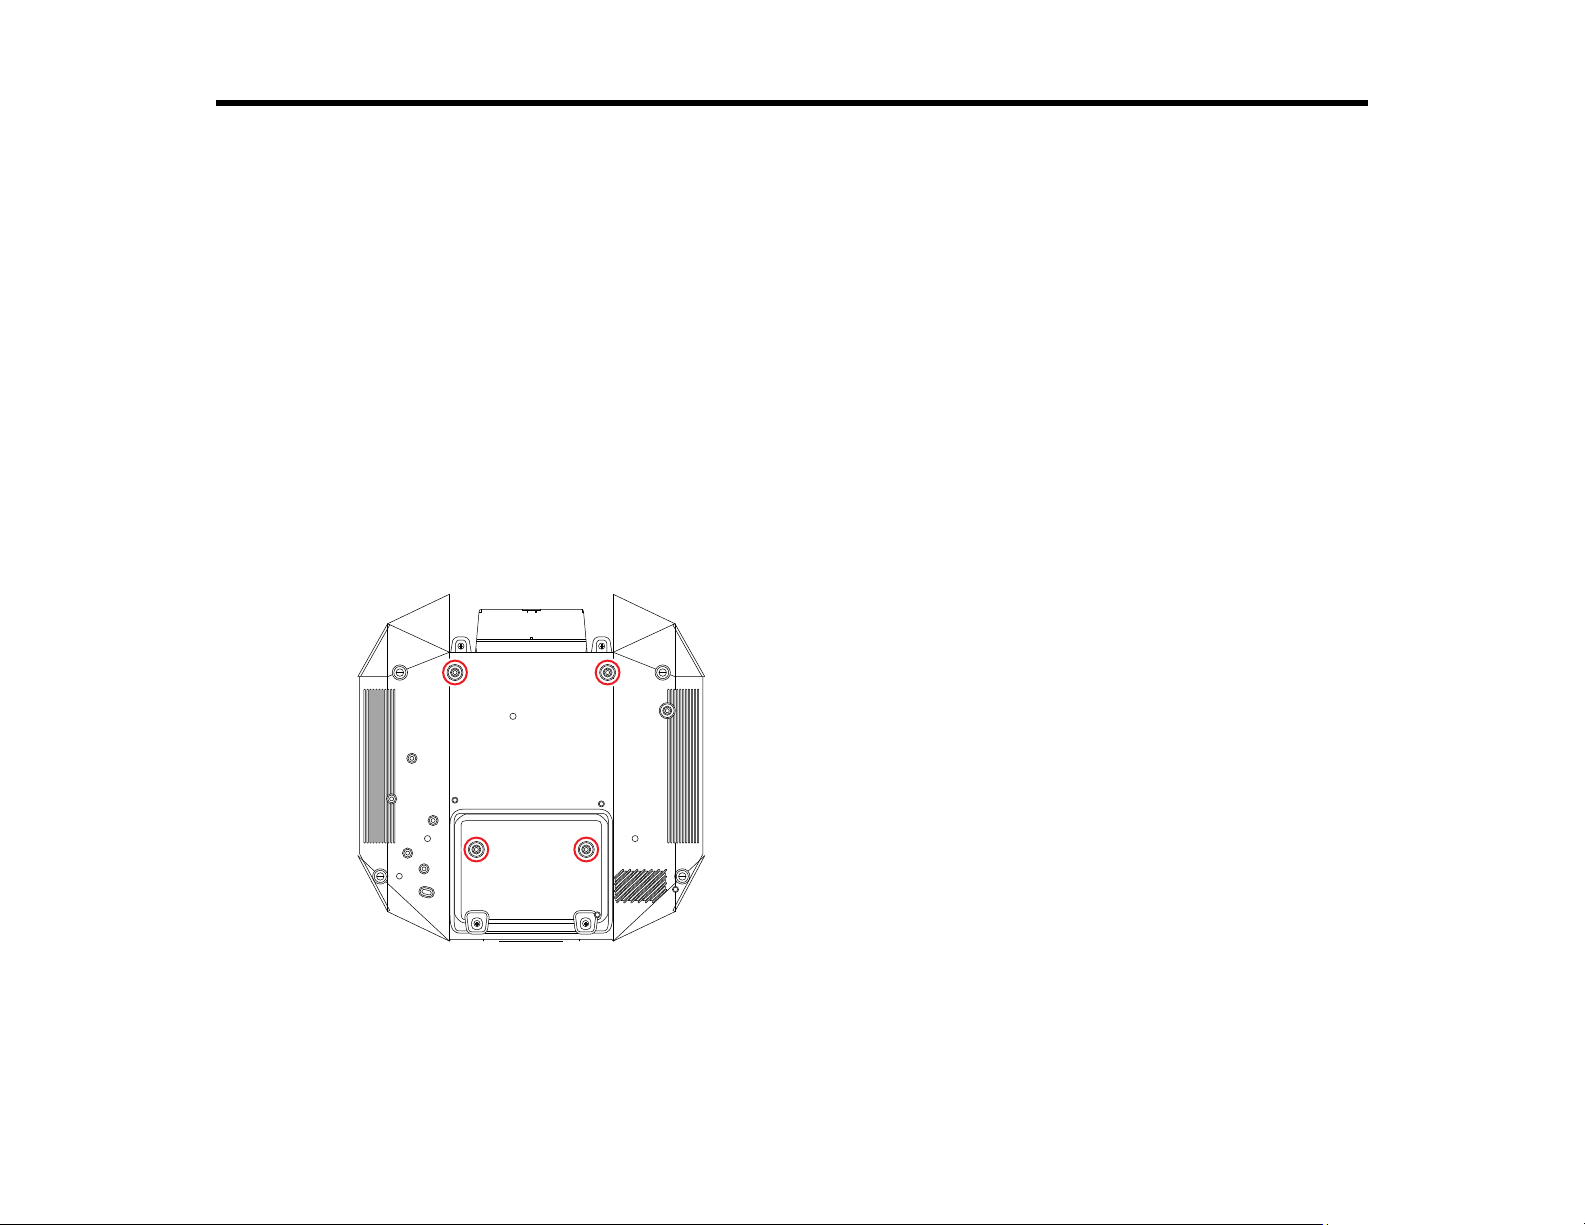
2 Safety wire screw holes Screw hole for securing the ring of the safety wire to
prevent the projector from falling from the ceiling or wall.
27
Page 28

3 Rear adjustable feet When the projector is set up on a surface such as a
desk, turn to extend and retract the feet to adjust the
horizontal tilt.
You can adjust the tilt within a range of ±1.5°. The rear
feet are detachable. You can extend the feet by
approximately 0.47 in (12 mm) before they detach.
4 Ceiling mount attachment points Use these points to attach the optional ceiling mount
when installing the projector on a wall, or mounting the
projector from a ceiling.
5 Cable cover screw holes The screw holes for securing the cable cover in place.
Make sure the cables have been passed through the
notch on the base of the cable cover before attaching
the cable cover.
6 Lens replacement cover screw holes The screw holes for securing the lens replacement
cover in place.
7 Air intake vent Takes in air to cool the projector internally.
Parent topic: Projector Part Locations
Related references
Projector Dimension Specifications
28
Page 29
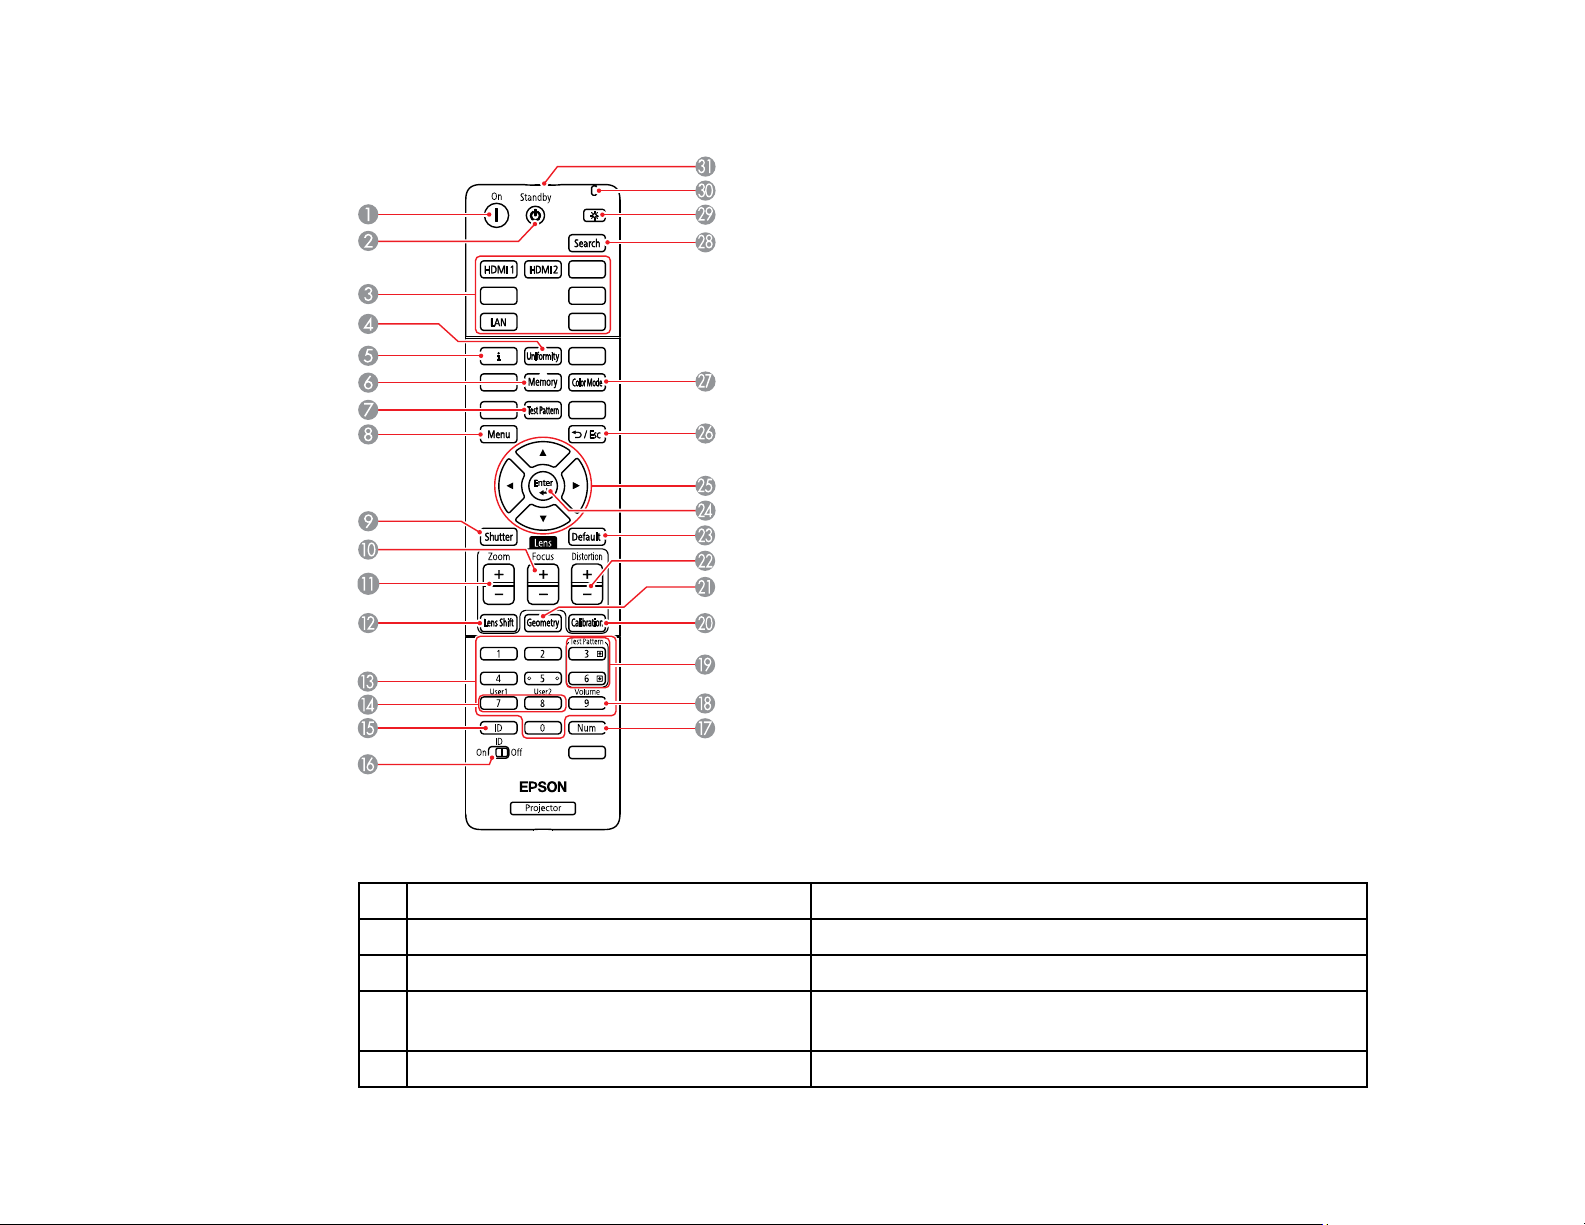
Projector Parts - Remote Control
1 On button Turns the projector on
2 Standby button Turns the projector off
3 Source buttons Switch the image source to each port.
4 Uniformity button Displays the Color Uniformity screen where you can
adjust the color tone balance of the projected image.
5 i information button Displays the projector's Info menu.
29
Page 30

6 Memory button Displays the Memory screen where you can save
customized settings and load saved settings. A memory
name that has already been used is indicated by a blue
mark. Saving over a previously saved memory
overwrites the settings with your current settings.
7 Test Pattern button Displays the Test Pattern screen.
8 Menu button Displays and closes the projector's menu.
Hold down this button for more than 15 seconds to turn
on all remote control receivers.
9 Shutter button Turns the video and audio on or off temporarily (A/V
Mute).
The projector's power automatically turns off two hours
after A/V Mute is enabled. You can disable this feature.
• Extended > Operation > A/V Mute Settings > A/V
Mute Timer
10 Focus +/- buttons Adjusts the focus in the projected image
11 Zoom +/- buttons Adjusts the image size
12 Lens Shift button Adjusts the position of the projected image. Wait 20
minutes after turning on the projector before setting the
focus, zoom, and lens shift for maximum accuracy.
When adjusting the image position using vertical lens
shift, adjust it by moving the image from the bottom to
the top. If you adjust it from the top to the bottom, the
image position may move down slightly after adjusting.
Hold down this button for more than three seconds to
move the lens position to the home position. Keep the
lens position in the home position for the clearest
picture.
13 Numeric buttons Enters numbers in the projector's menu while holding
down the Num button.
In Content Playback mode, enter numbers while holding
down the Num button to play back your favorite
playlists.
30
Page 31

14 User buttons Perform settings assigned in the User Button setting in
the projector's Settings menu.
15 ID button Press this button and press a number button within 5
seconds to select the ID for the projector you want to
operate using the remote control. (Enter a one-digit or
two-digit number.)
If you do not know the projector's ID, press this button
during projection to temporarily display the projector's
ID and the remote control's ID on the screen.
16 ID switch Enables (On) or disables (Off) ID settings for the remote
control.
17 Num button Hold down this button to enter numbers using the
numeric buttons.
18 Volume button Adjusts the volume of the Audio Out port
19 Test Pattern +/- buttons Display the previous or next test pattern while displaying
a test pattern.
Controls page up and down on your computer when you
connect a projector and computer over the network.
20 Calibration button Adjusts the lens calibration
21 Geometry button Displays the Geometry Correction screen allowing you
to correct keystone distortion of the projected image
22 Distortion +/- buttons Adjusts the distortion in the projected image
23 Default button Returns the selected setting to its default value.
Hold down this button for more than three seconds to
start the lens calibration process.
24 Enter button Enters the current selection and moves to the next
levelwhile displaying the projector's menu
25 Arrow buttons Selects menu items while displaying the projector's
menu.
26 Esc button Stops the current function.
Moves back to the previous menu level while displaying
the projector's menu.
31
Page 32
27 Color Mode button Changes the color mode
28 Search button Switches to the next input source
29 Illumination button Illuminates the buttons on the remote control for
approximately 15 seconds. This is useful when using
the remote control in the dark.
30 Indicator light Lights up when the remote is sending signals
31 Remote control signal emitter Outputs remote control signals
Parent topic: Projector Part Locations
Related references
Remote Control Operation
32
Page 33
Setting Up the Projector
Follow the instructions in these sections to set up your projector for use.
Projector Placement
Attaching and Removing a Lens
Installing the Safety Wire
Attaching and Removing the Vanity Board
Attaching and Removing the Cable Cover
Installing Batteries in the Remote Control
Projector Placement
You can place the projector on almost any flat surface to project an image.
You can also install the projector in a ceiling mount if you want to use it in a fixed location.
When using a ceiling mount, use commercially available M6 screws (up to a depth of 0.55 inches [14
mm]) to attach the mount to the projector.
33
Page 34
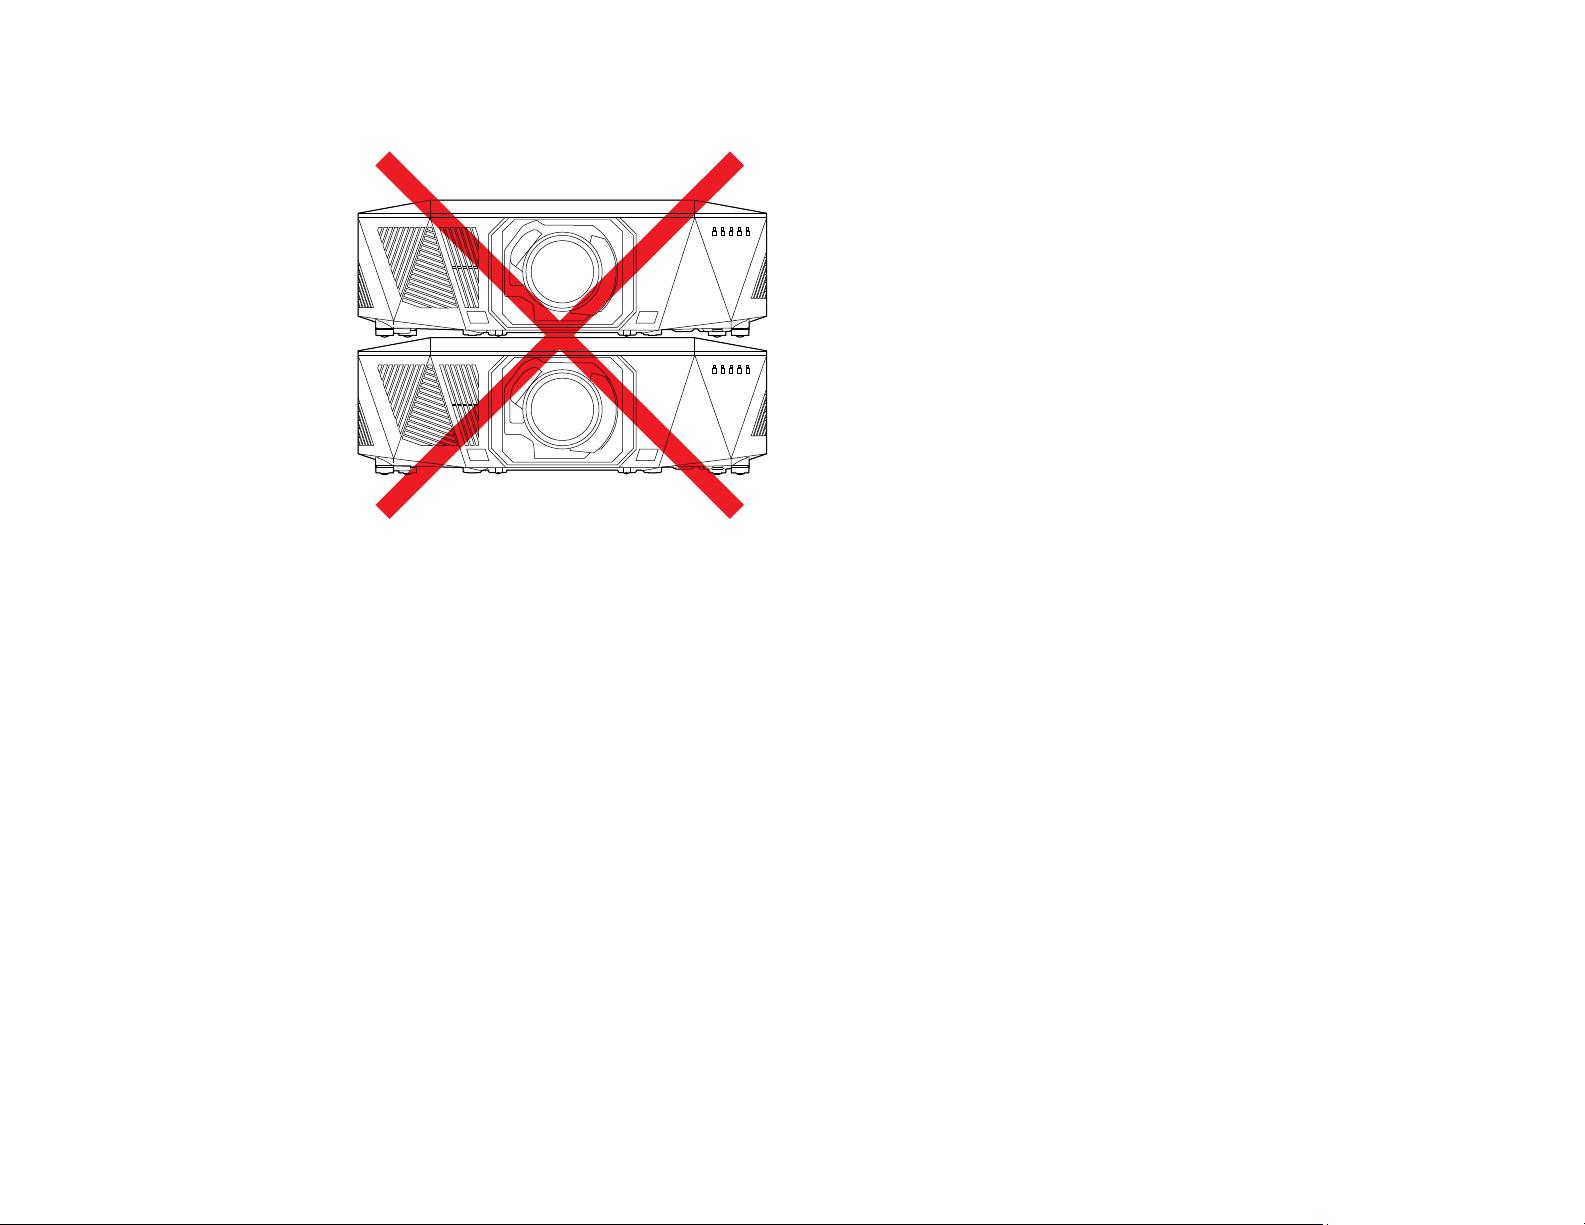
Note: Do not stack projectors directly on top of each other.
There is no vertical or horizontal limit to how the projector can be installed.
Keep these considerations in mind as you select a projector location:
• Place the projector on a sturdy, level surface or install it using a compatible mount.
• Place the projector parallel to the screen.
• If you use the projector at altitudes above 7500 feet (2286 m), turn on High Altitude Mode to ensure
the projector's internal temperature is regulated properly.
• Try not to use the projector in locations subject to high humidity and dust, or in locations subject to
smoke from fires or tobacco smoke.
• Leave plenty of space around and under the projector for ventilation, and do not place it on top of or
next to anything that could block the vents.
• If there is not enough space around the projector and the internal temperature of the projector
increases, the brightness of the light source may decrease.
• Make sure hot air from the exhaust vent does not go into the air intake vent.
• Position the projector within reach of a grounded electrical outlet or extension cord.
• Protect your hands with gloves or other safety items when installing the projector.
Make sure you read the safety instructions when placing or mounting your projector. See the link below.
34
Page 35
Projector Setup and Installation Options
Projection Distance
Parent topic: Setting Up the Projector
Related concepts
Projection Modes
Related references
Important Safety Information
Related tasks
Changing the Projection Mode Using the Remote Control
Changing the Projection Mode Using the Menus
Projector Setup and Installation Options
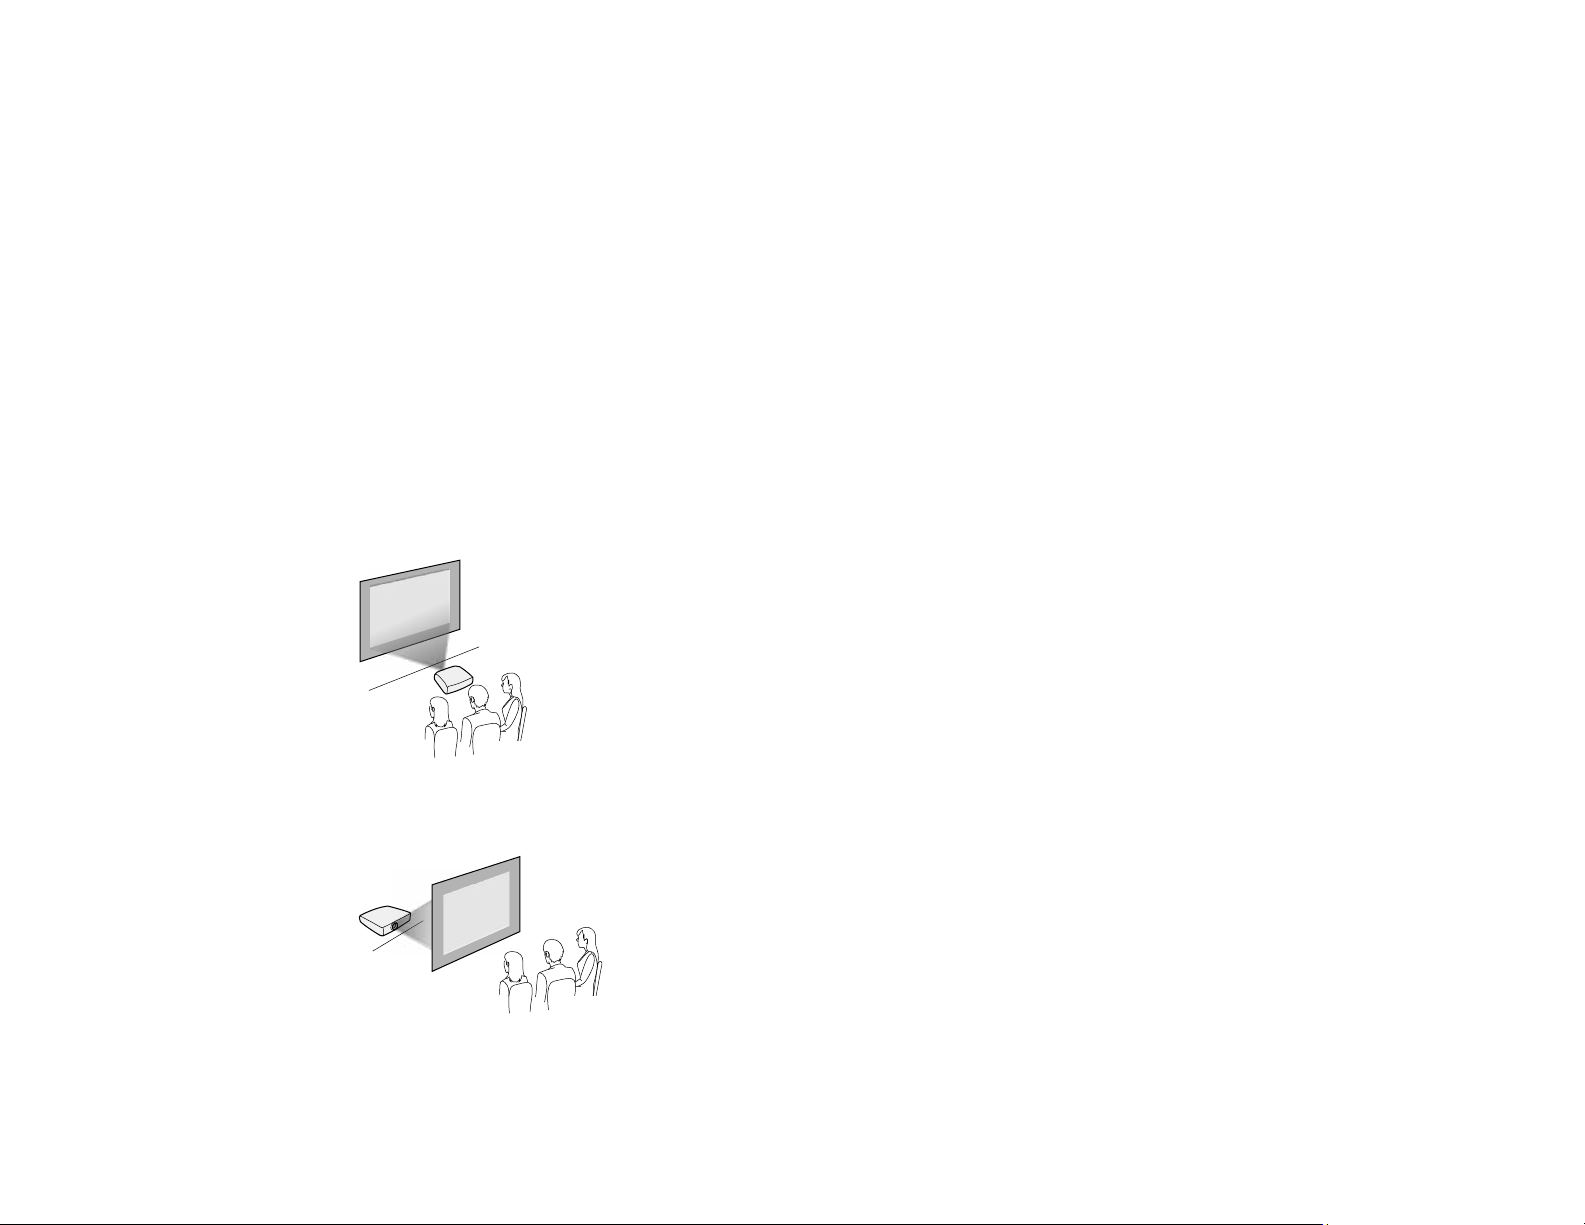
You can set up or install your projector in the following ways:
Front
Rear
35
Page 36
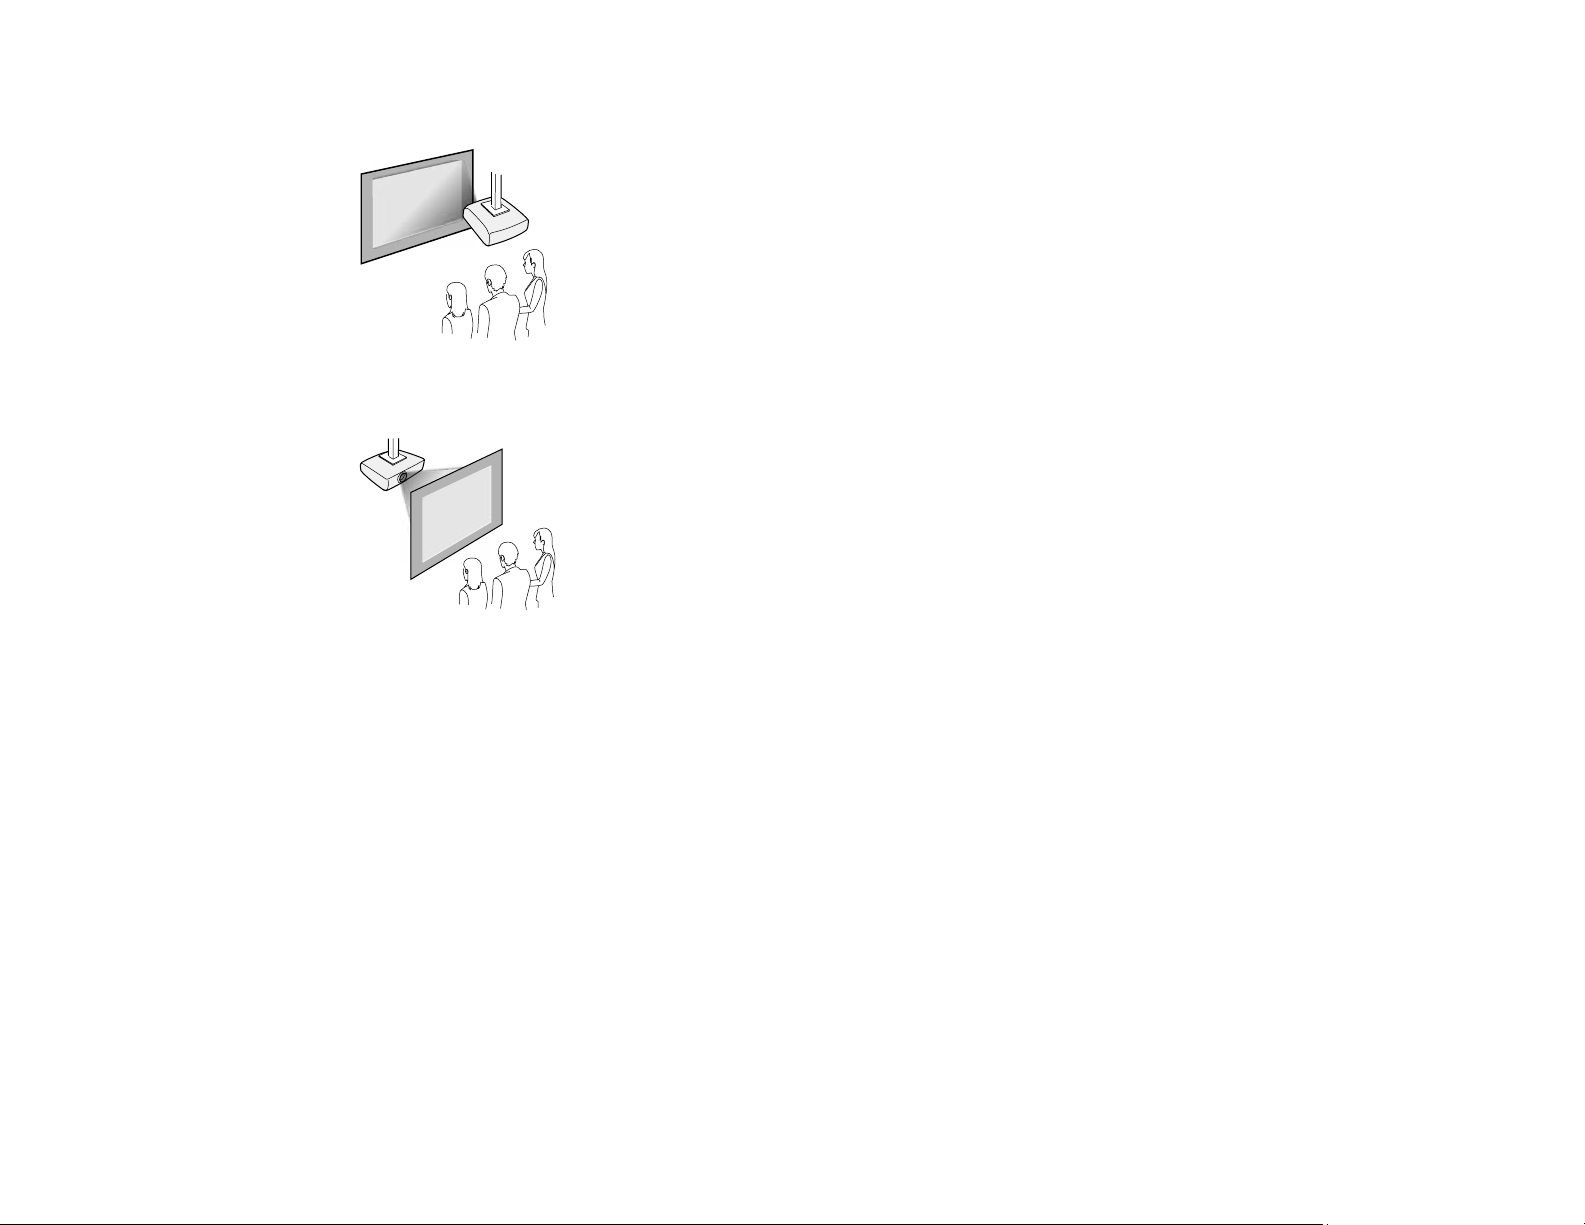
Front ceiling
Rear ceiling
Caution: Be sure to leave the following amount of space around the projector to avoid blocking the air
exhaust and intake vents. Do not install the projector in a location that does not allow air to circulate,
such as on a shelf or in a box.
36
Page 37
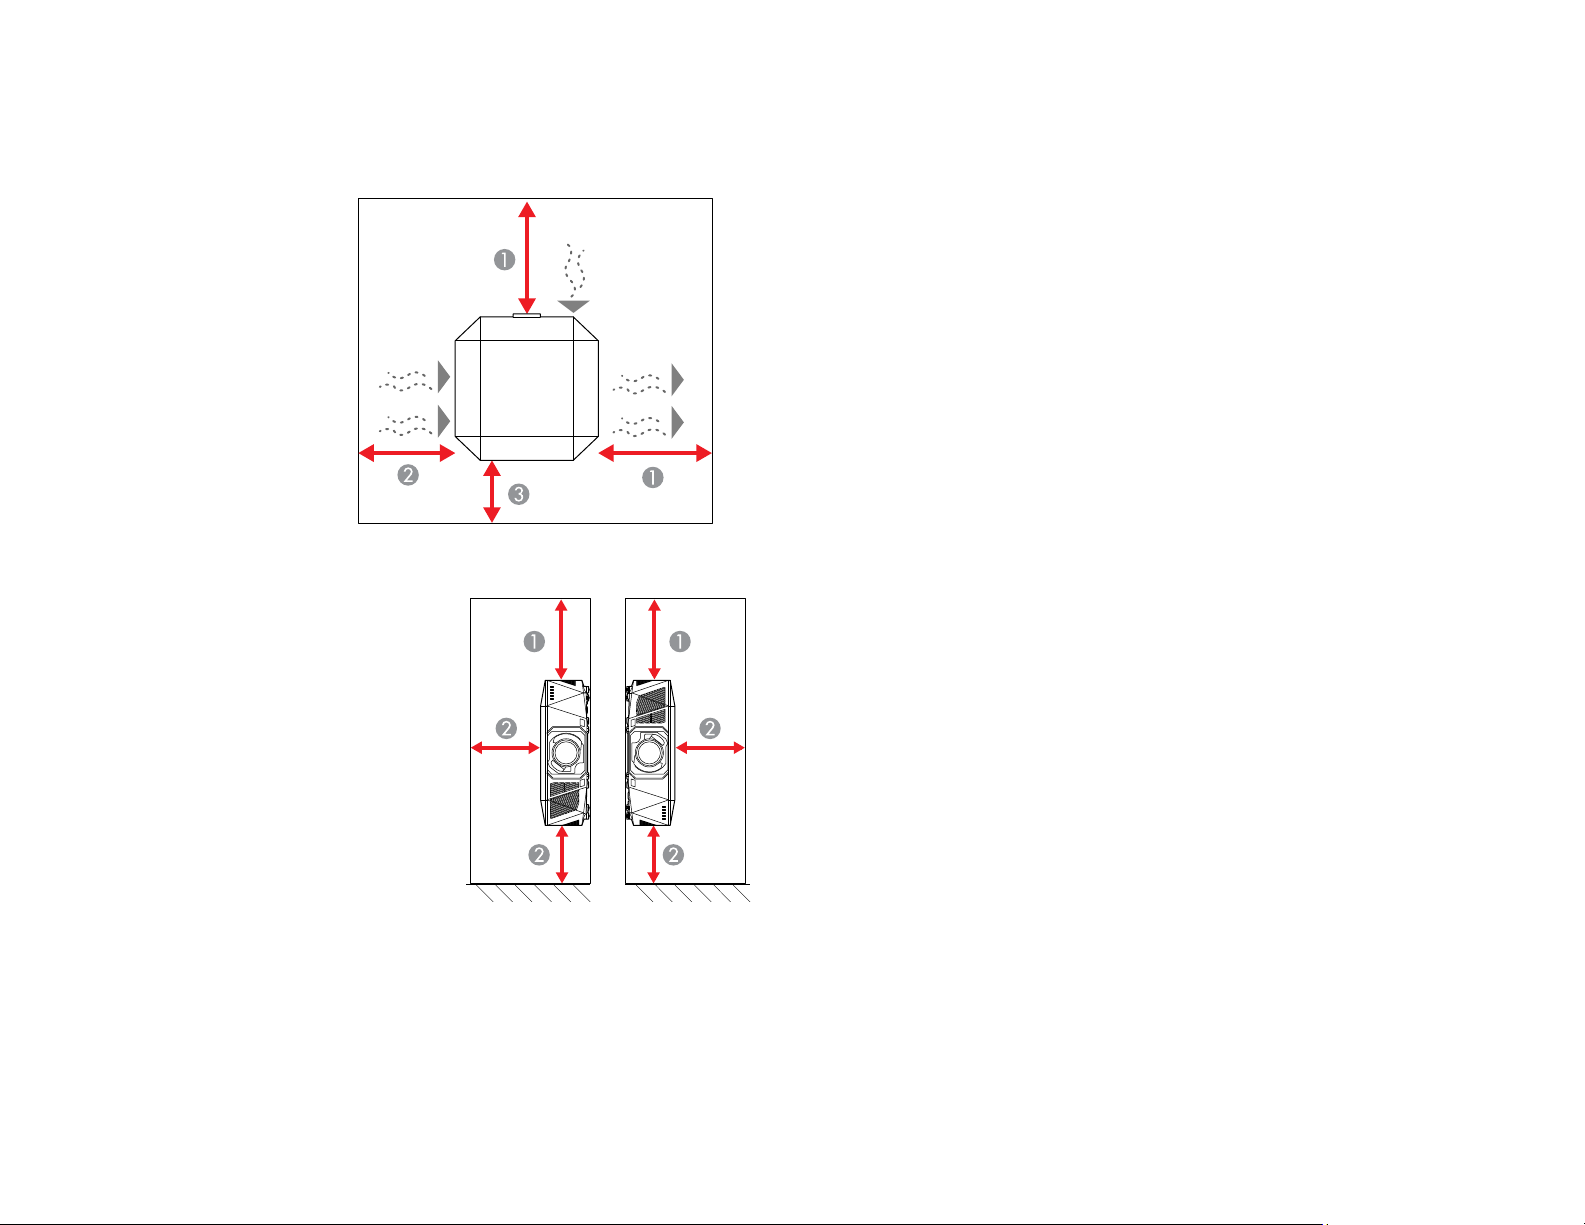
If there is not enough space around the projector and the internal temperature of the projector increases,
the brightness of the light source may decrease. Make sure hot air from the exhaust vent does not go
into the air intake vent.
1 11.8 inches (30 cm)
2 7.9 inches (20 cm)
3 3.9 inches (10 cm)
37
Page 38
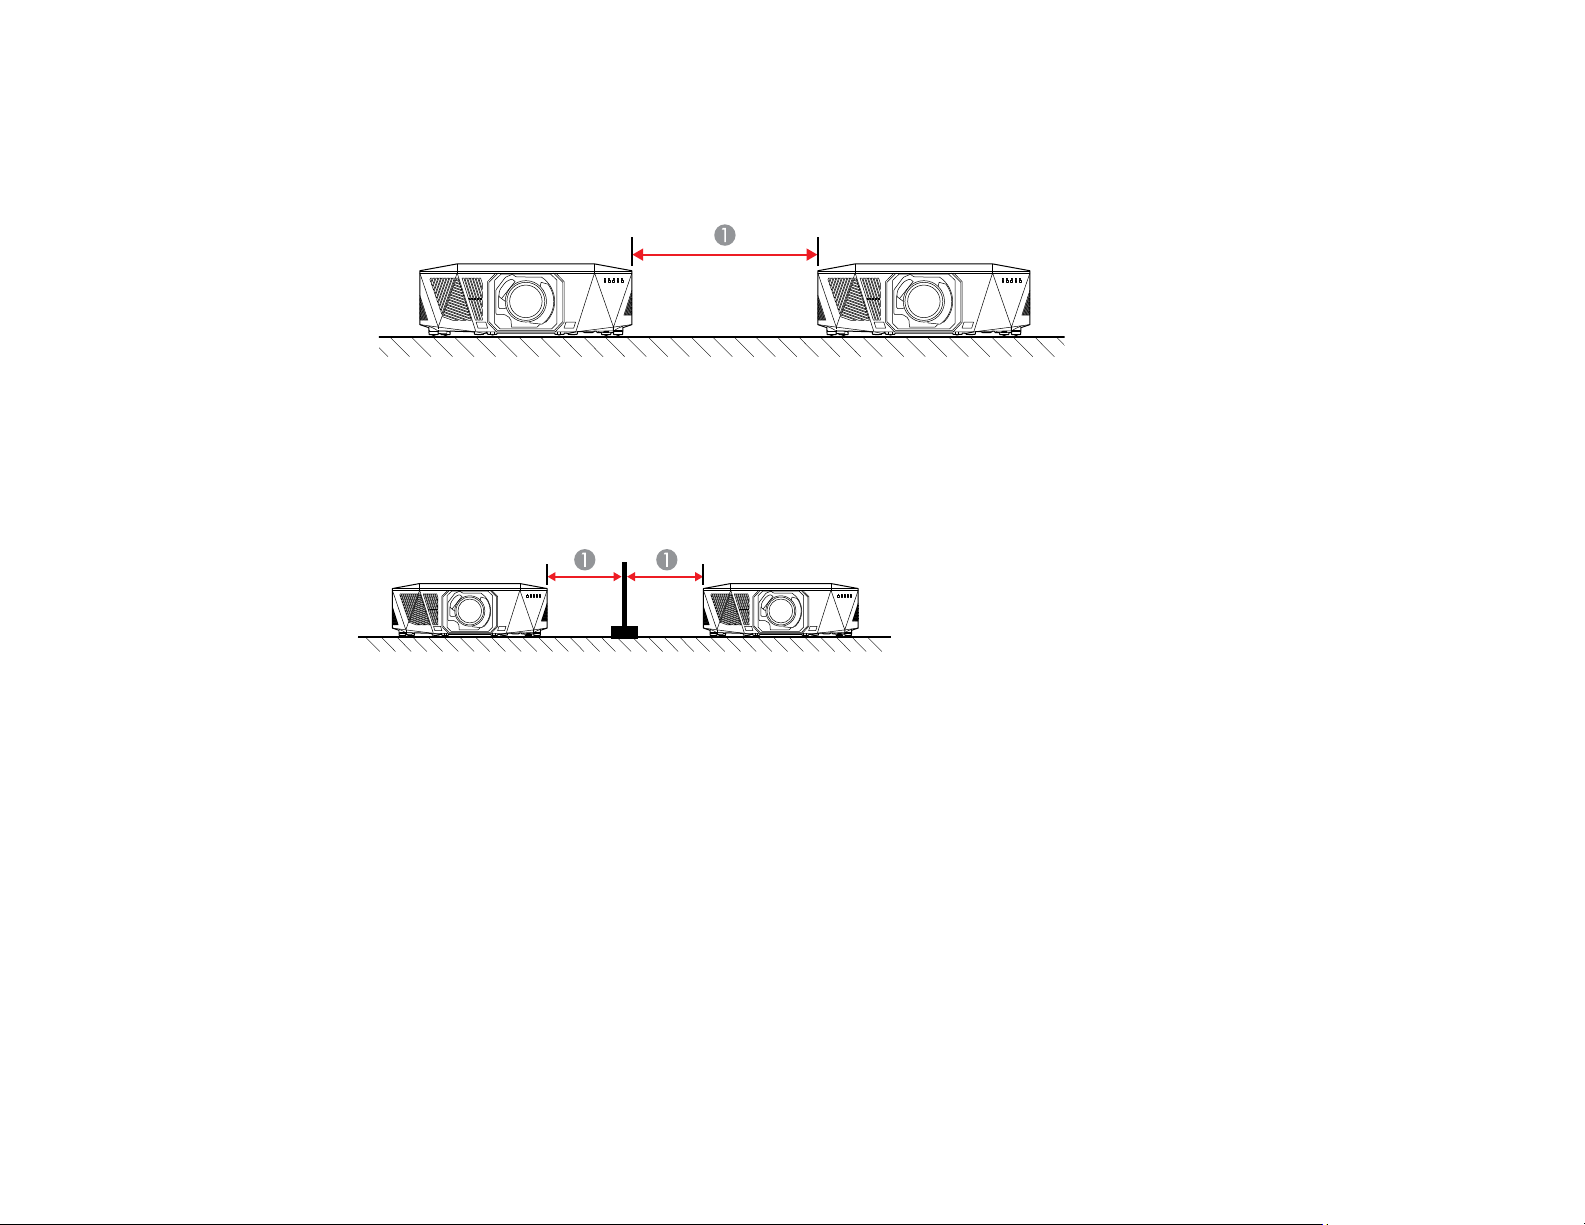
If you are installing multiple projectors next to each other, be sure to leave at least 28 inches (70 cm) of
space between the projectors. Also, make sure heated air from an exhaust vent does not go into the air
intake vent of another projector.
1 28 inches (70 cm)
If you use a partition, you can narrow the space between the projectors.
1 12 inches (30 cm)
You can mount the projector to the ceiling at any horizontal or vertical angle.
Parent topic: Projector Placement
Projection Distance
The distance at which you place the projector from the screen determines the approximate size of the
image. The image size increases the farther the projector is from the screen, but can vary depending on
the zoom factor, aspect ratio, and other settings.
Use the Projection Distance Calculator here (U.S.), here (Canada), or here (Caribbean) to determine
approximately how far to place the projector from the screen based on the size of the projected image.
Parent topic: Projector Placement
38
Page 39

Attaching and Removing a Lens
Follow the instructions in these sections to attach or remove a compatible lens.
Warning: Make sure you turn off the projector and unplug the power cord before attaching or removing a
lens. Otherwise, you may receive an electric shock.
Attaching a Lens
Removing a Lens
Parent topic: Setting Up the Projector
Attaching a Lens
You can attach a compatible lens to the projector. (For a list of available lenses, click the link at the end
of this section.)
Caution: Unplug the power cord from the projector before attaching the lens. Make sure the front of the
projector is not facing up when you attach the lens. This prevents dirt or dust from entering the projector
and lowering the projection quality. Avoid touching the lens with your bare hands to prevent fingerprints
on or damage to the lens surface.
Note: For information on installing an ultra short-throw zoom lens, see the User's Guide supplied with
the lens.
1. Turn off the projector and unplug the power cord.
39
Page 40
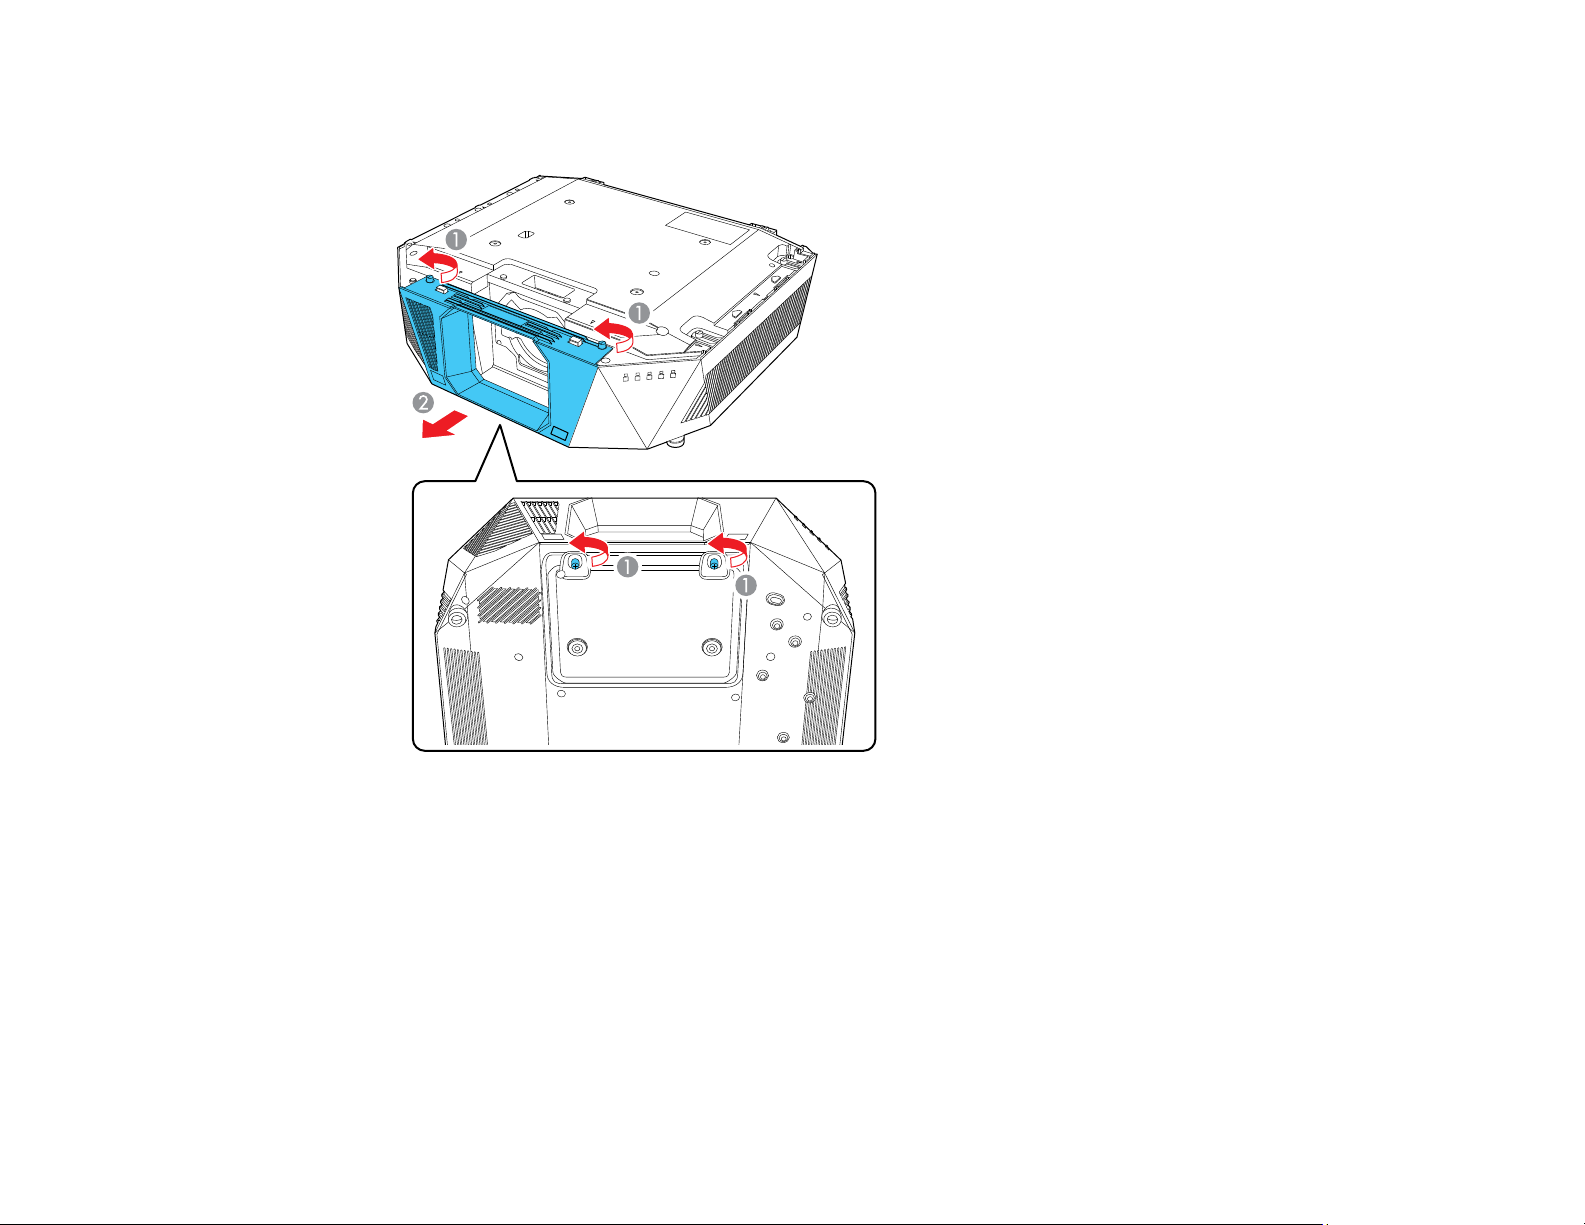
2. If you are installing the ELPLX02S or ELPLX02WS lenses, remove the lens replacement cover from
the projector.
40
Page 41
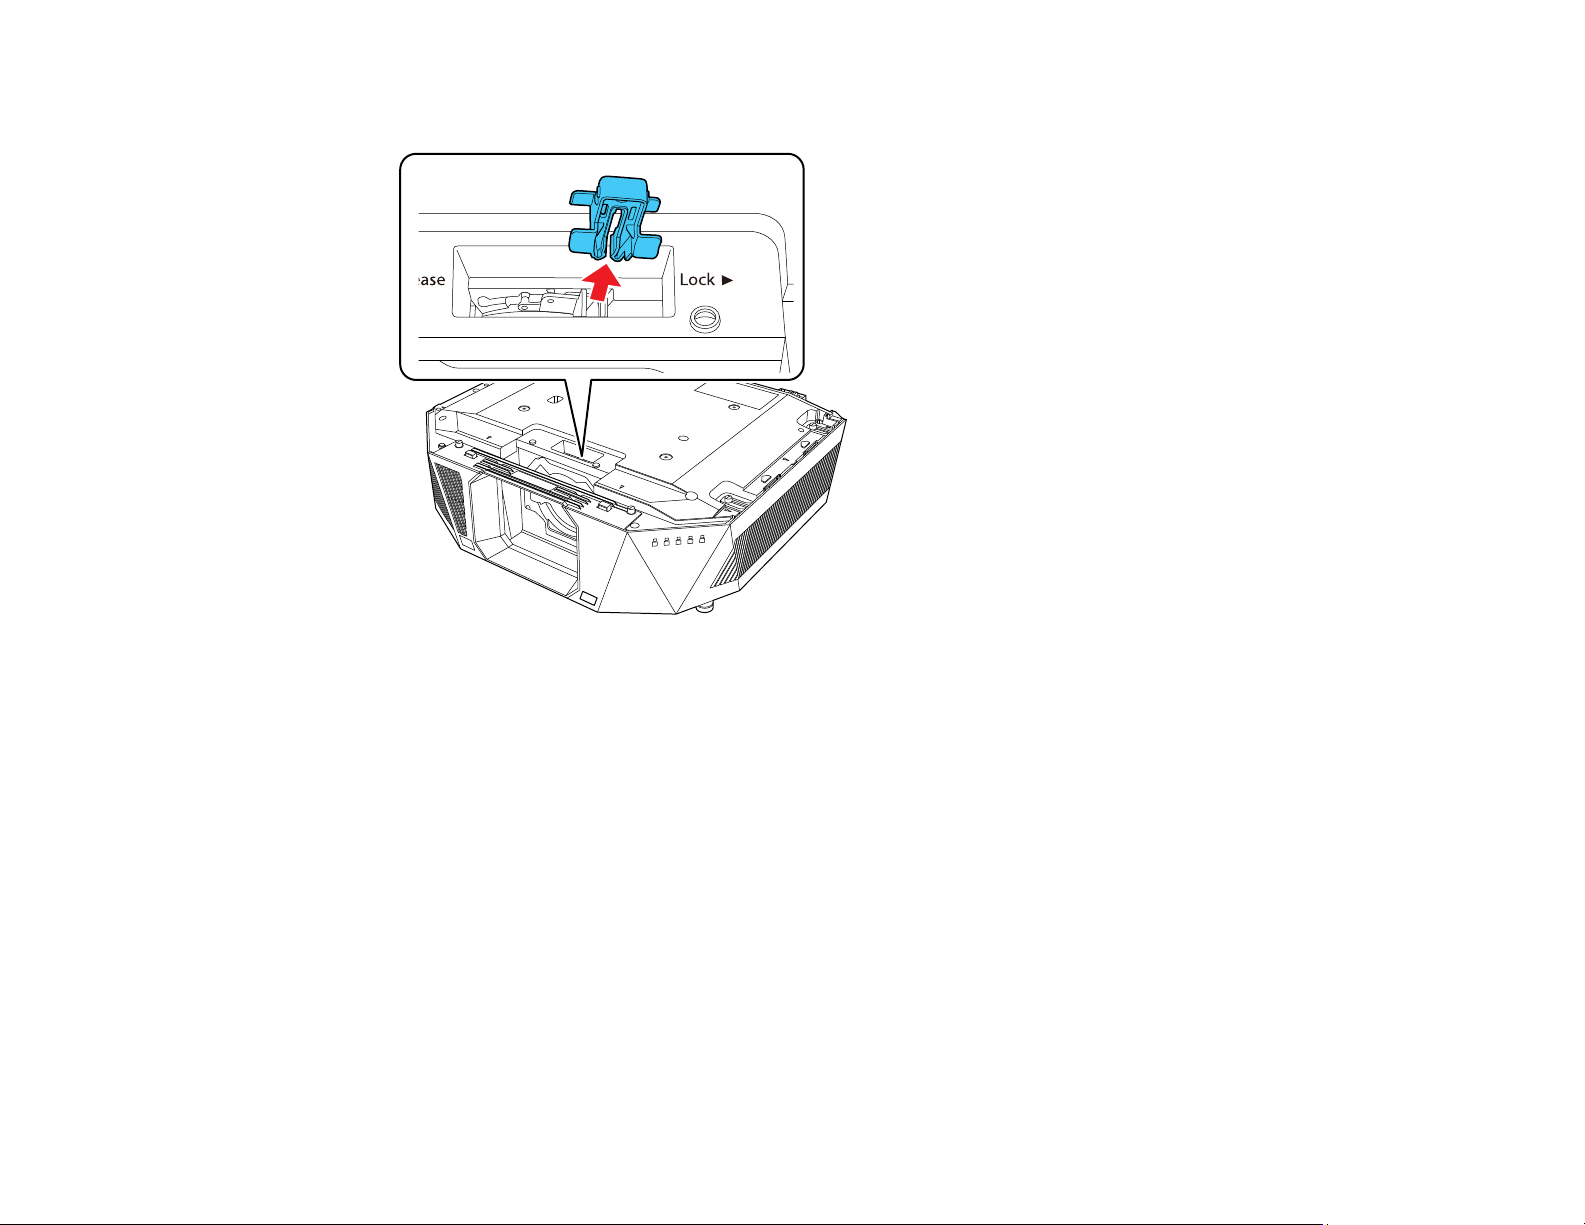
3. Remove the stopper, if necessary.
41
Page 42
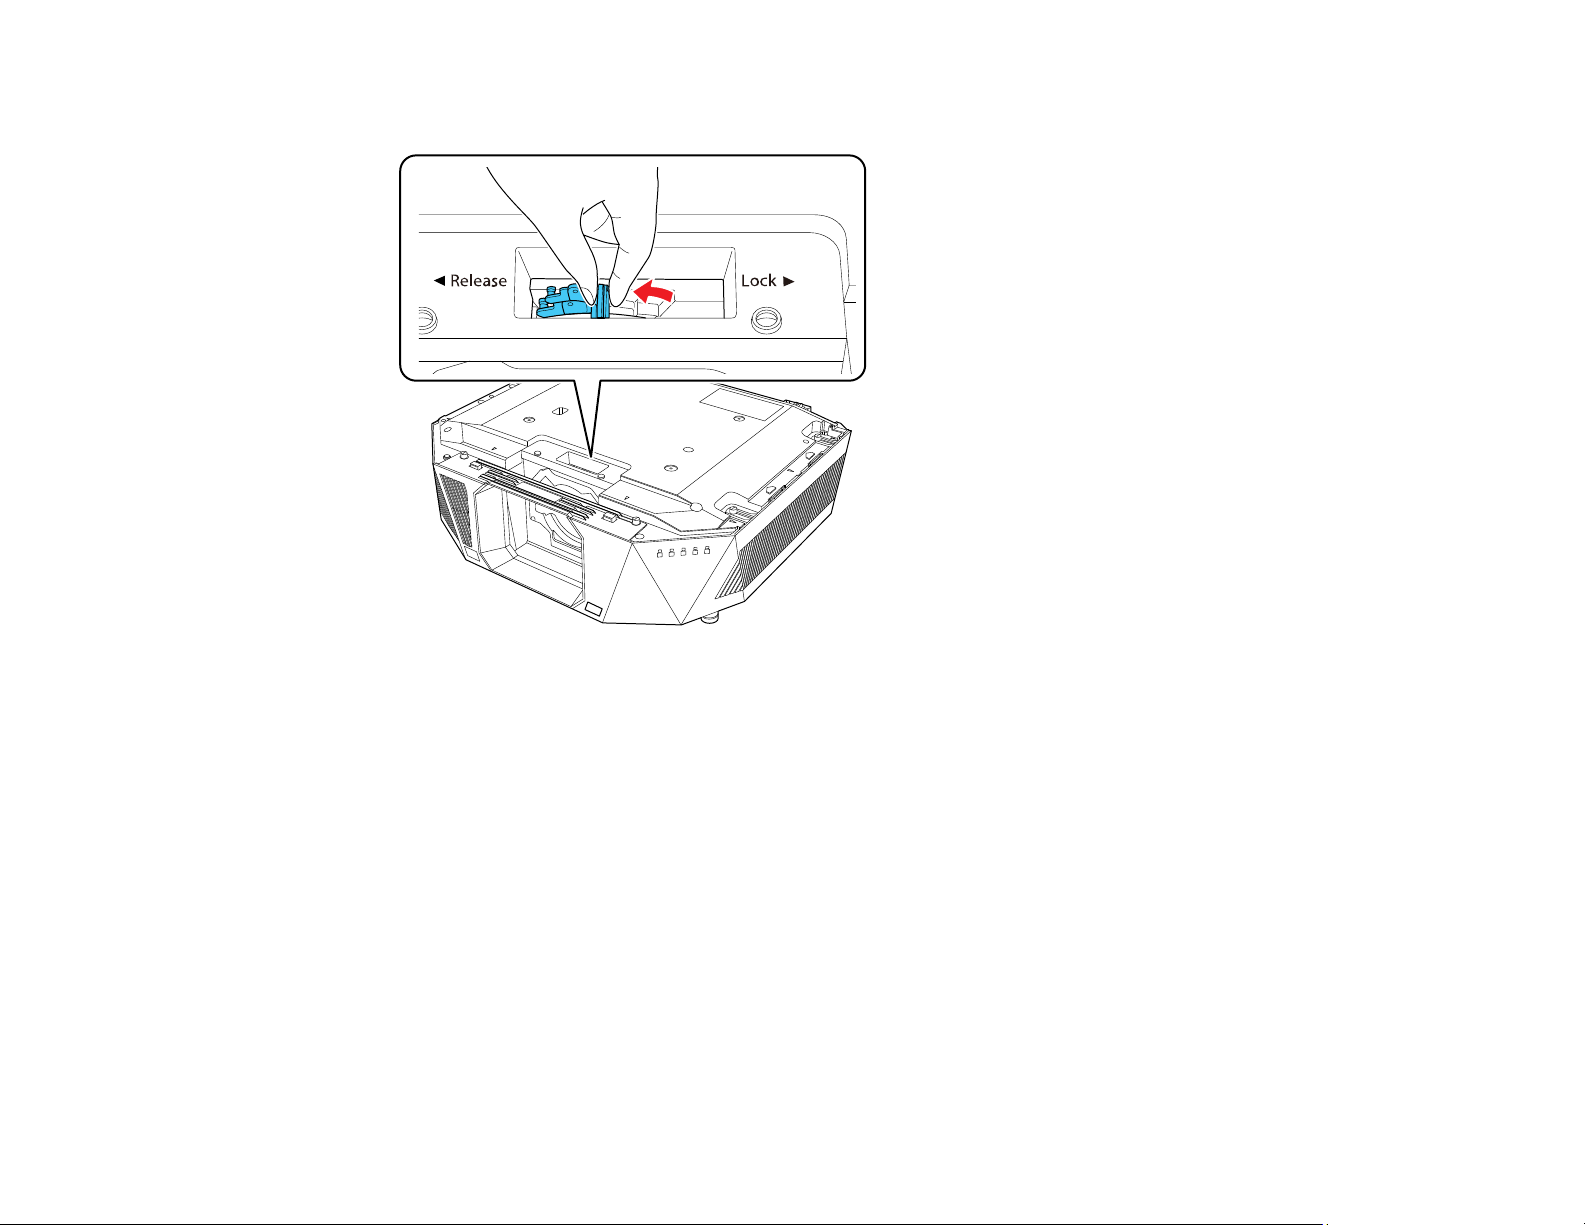
4. Pinch the lock lever and move it to the Release position.
42
Page 43
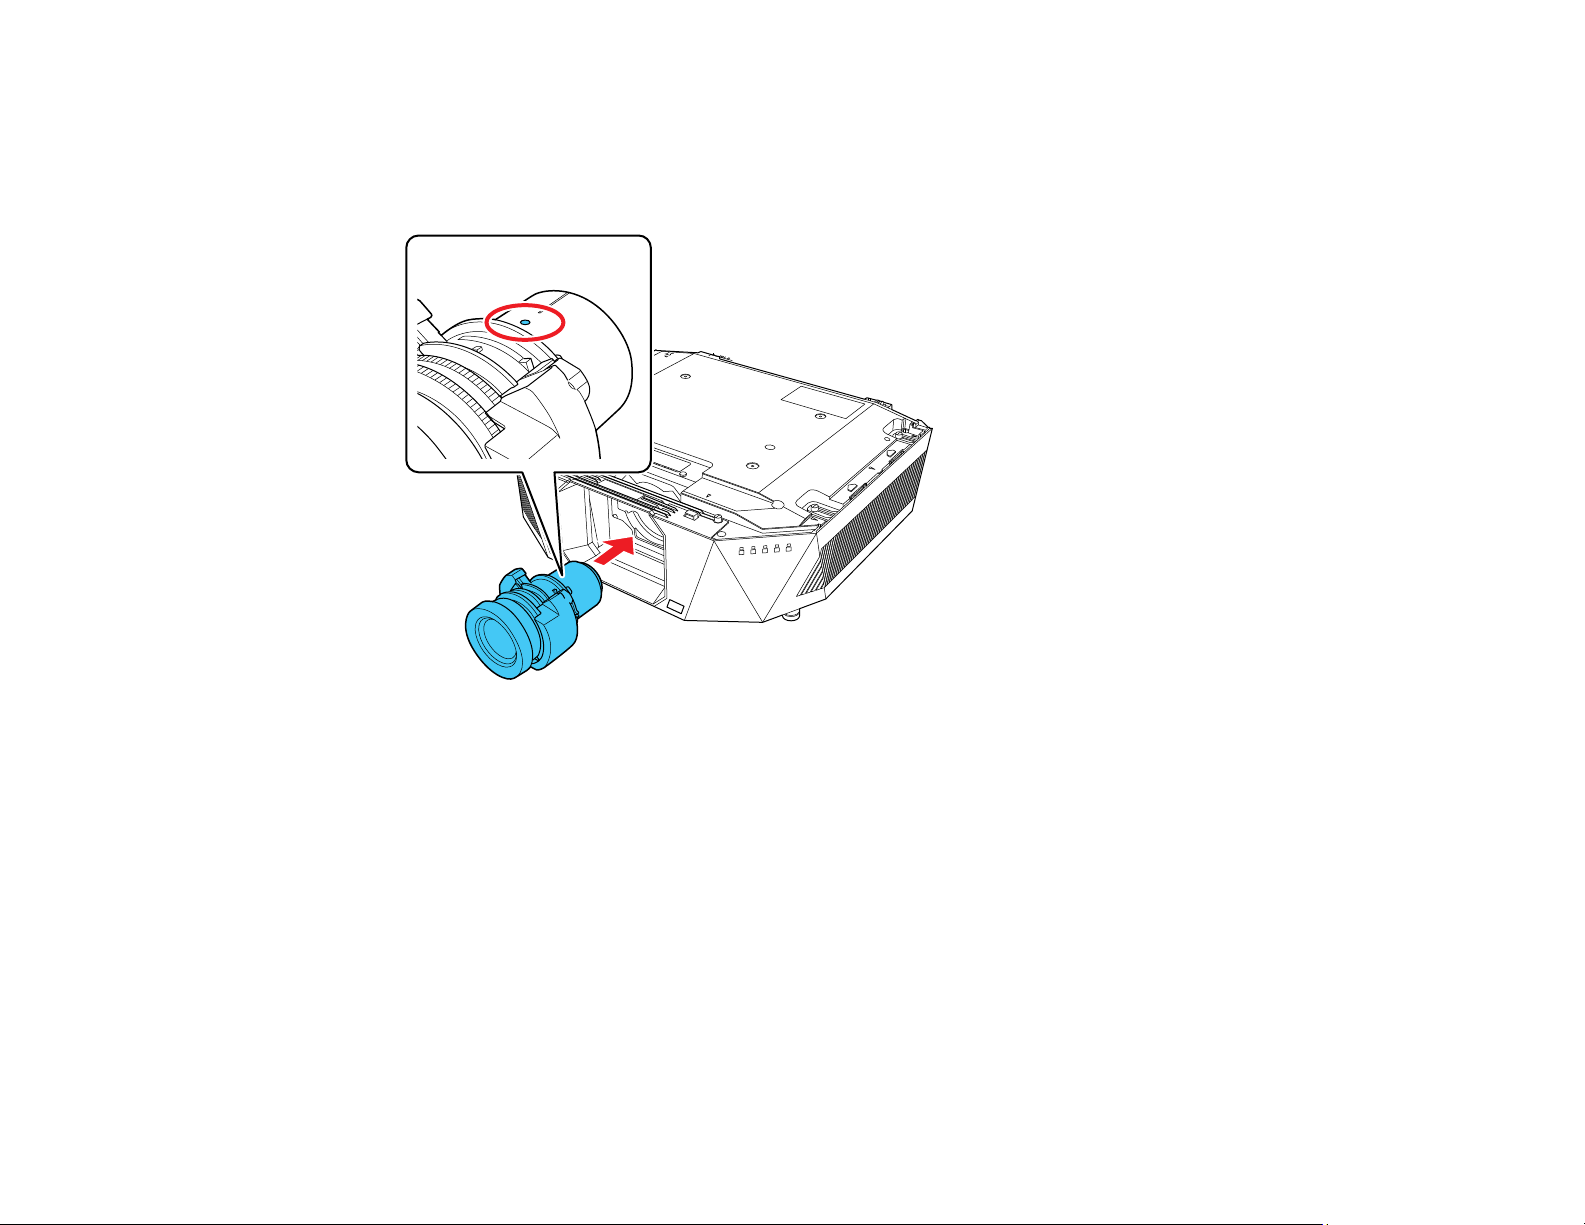
5. Insert the lens straight into the projector's lens socket with the white dot facing up.
Caution: To avoid injury, be careful not to get your fingers caught between the projector and lens.
Do not touch the glass surface of the lens.
43
Page 44
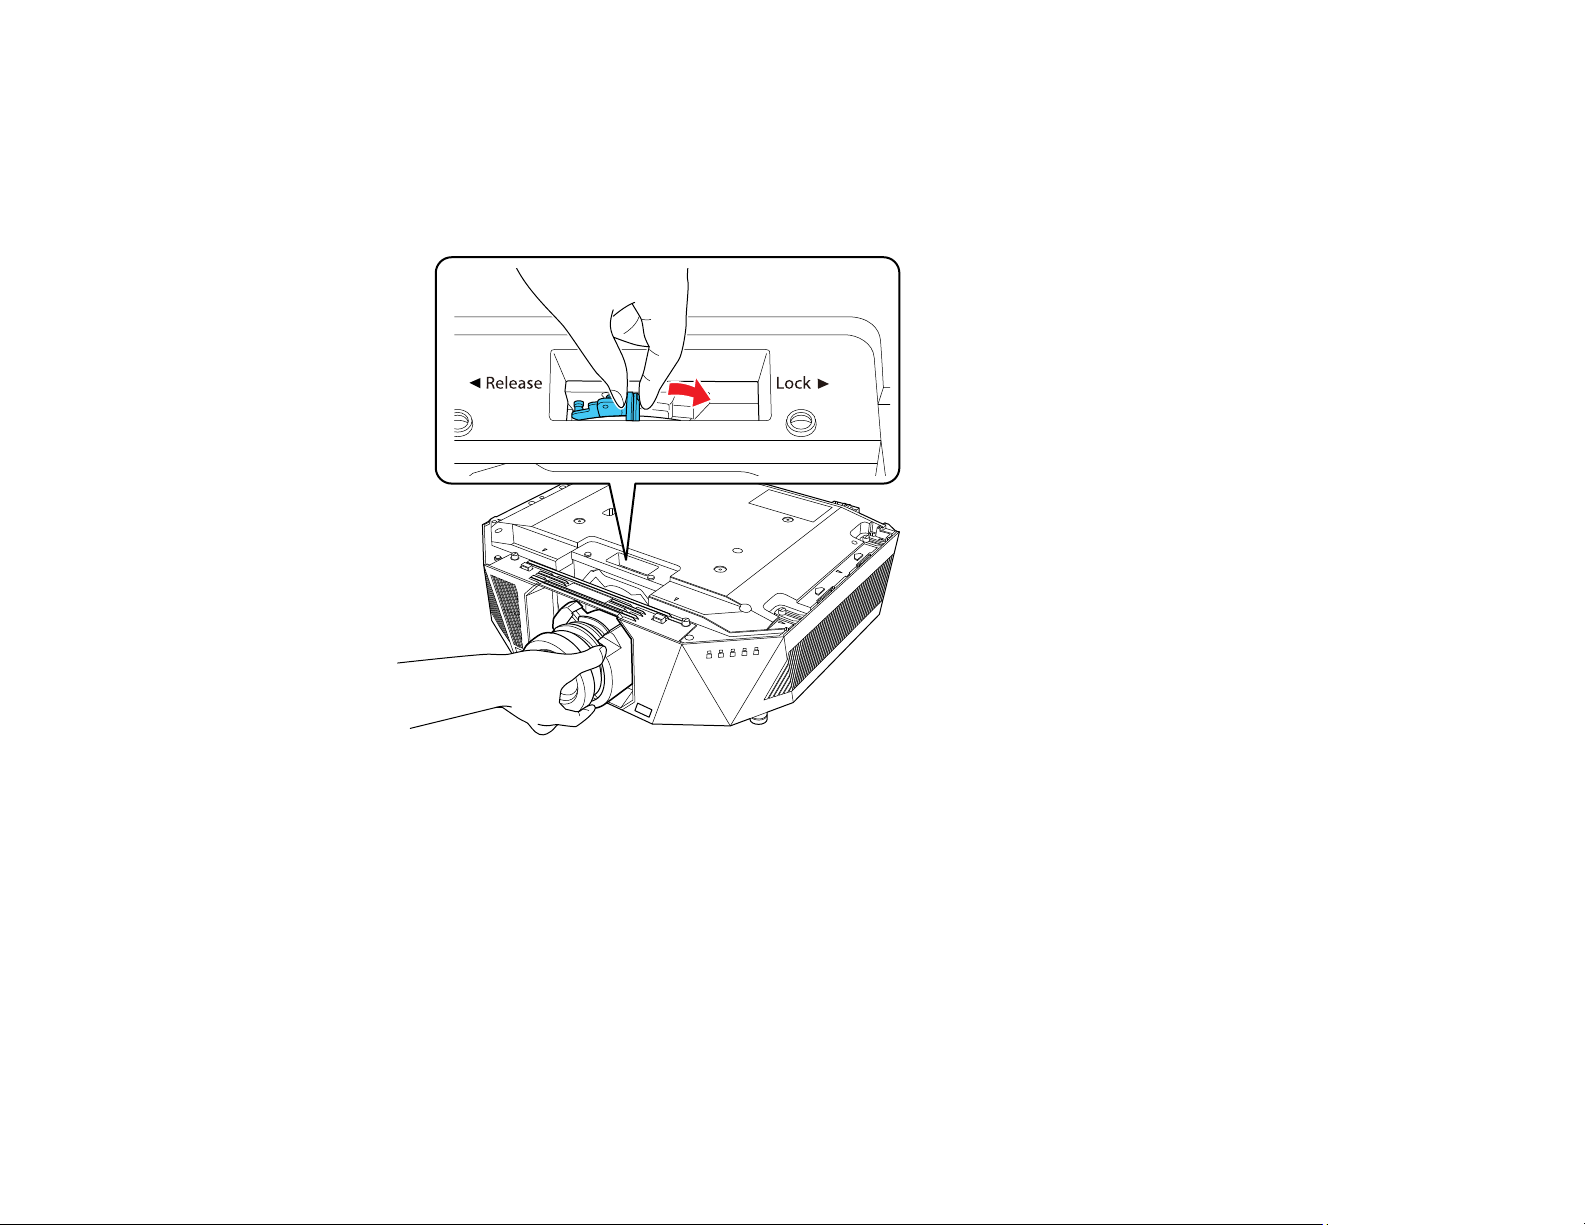
6. Hold the lens firmly after it is fully inserted, then pinch the lock lever and move it to the Lock position.
Warning: Make sure the lens is securely attached. If the lens is not secured, it may fall off and could
cause an injury when moving the projector. The lever is secured even without using the lever lock,
but the lock adds an additional measure of safety.
44
Page 45
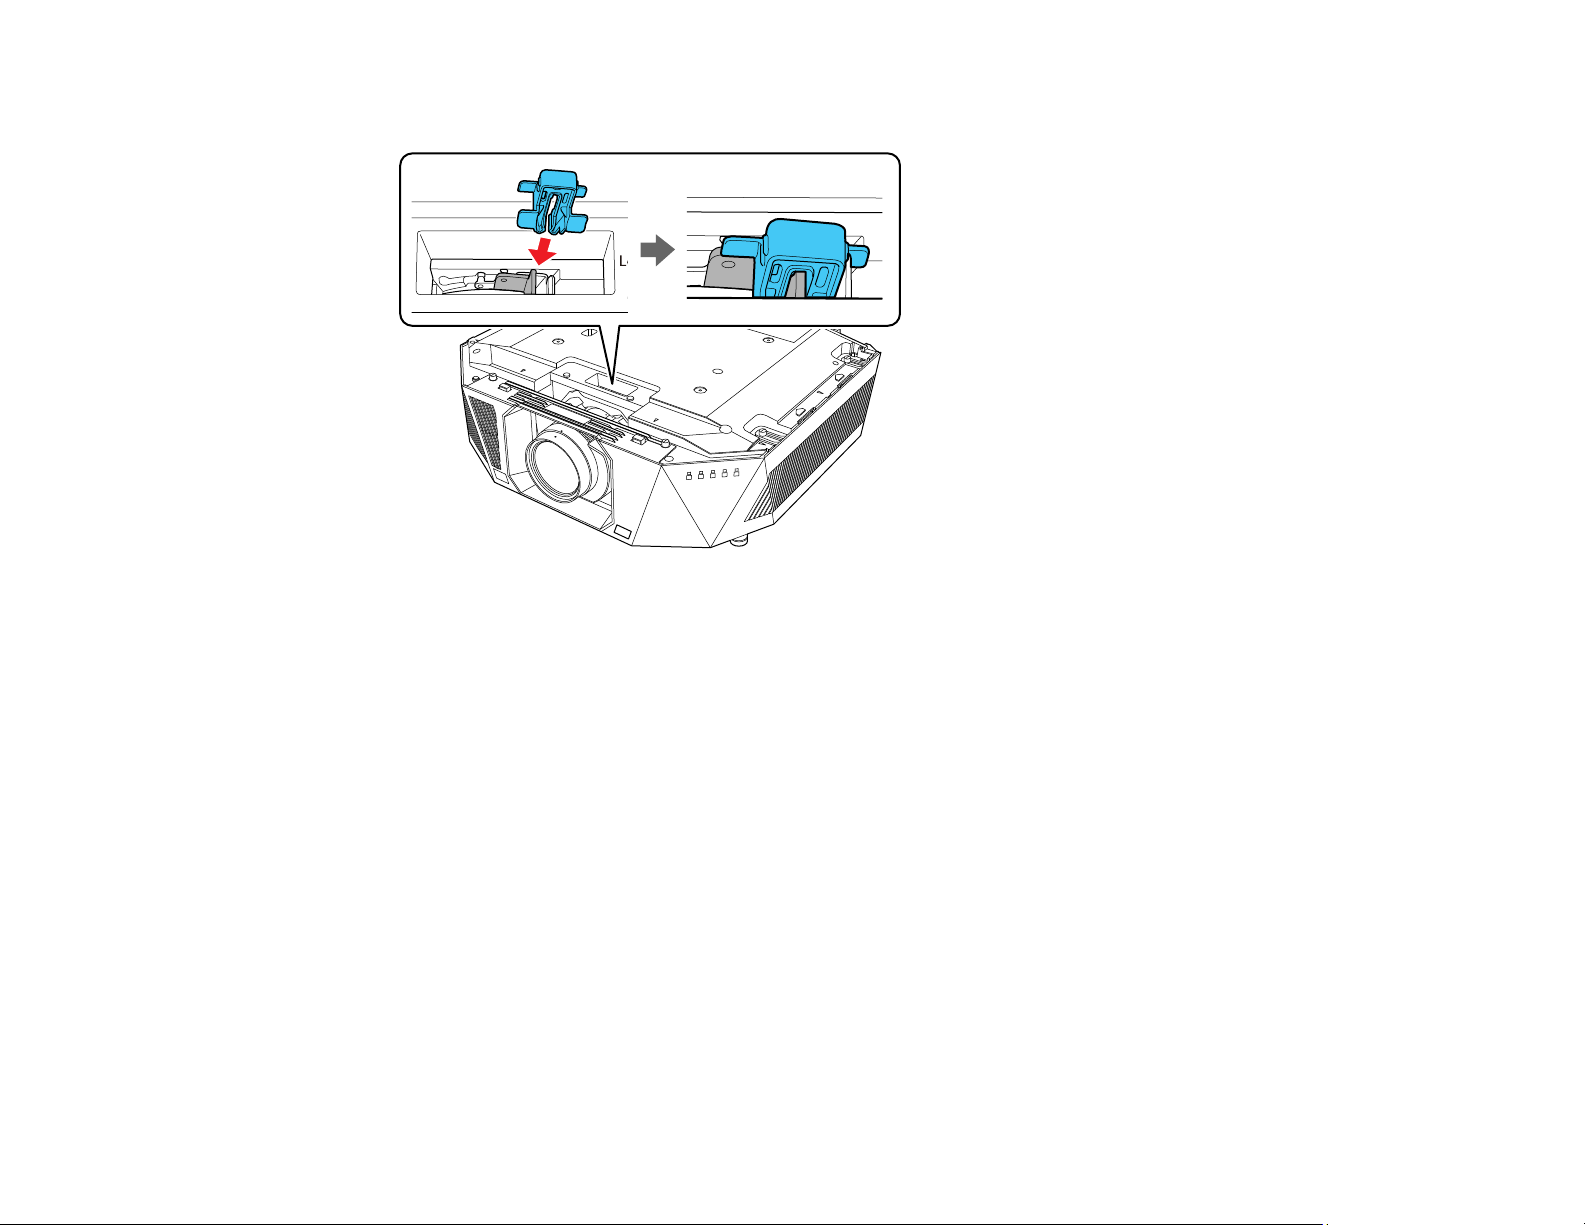
7. Reattach the stopper.
8. To perform lens calibration, turn on the projector.
9. If prompted, select Yes to calibrate the lens.
Lens calibration helps the projector to correctly acquire the lens position and adjustment range and
can take up to 100 seconds to complete. When calibration is finished, the lens returns to the same
position it was in before calibration. (The ELPLX02S and ELPLX02WS lenses return to the standard
position.)
Note: If no message appears after attaching the lens, perform lens calibration manually by pressing
the Calibration button on the remote control. You can also perform manual calibration by holding
down the Default button on the remote control for approximately 3 seconds, or you can go to
Extended > Operation > Lens Calibration in the projector menu.
If you do not calibrate the lens, the following functions may not operate correctly:
• Focus
• Distortion
• Zoom
• Lens Shift
• Memory (Lens Position)
45
Page 46

Note: If the icon indicating that lens calibration has failed is displayed, remove the lens and then reinstall
it. If the message continues to be displayed, stop using the projector, remove the power plug from the
electrical outlet, and contact Epson for help.
Parent topic: Attaching and Removing a Lens
Related references
Optional Equipment and Replacement Parts
Removing a Lens
You can remove a lens and replace it with a different lens.
Warning: Wait at least 30 minutes to remove or replace the lens after turning off the projector. Touching
the lens unit before it cools down may cause burns.
Caution: Remove the lens only when necessary, and make sure the front of the projector is not facing
up when you remove the lens. This prevents dirt or dust from entering the projector and lowering the
projection quality. Avoid touching the lens with your bare hands to prevent fingerprints on or damage to
the lens surface.
Note: The projector uses a laser as the light source. As a safety measure, the light source turns off when
the lens is removed. Attach the lens, and then press the On button to turn it back on.
1. Press and hold the Lens Shift (remote control) or Lens (control panel) button for approximately 3
seconds to move the lens to the center position.
2. Turn off the projector and unplug the power cord.
46
Page 47
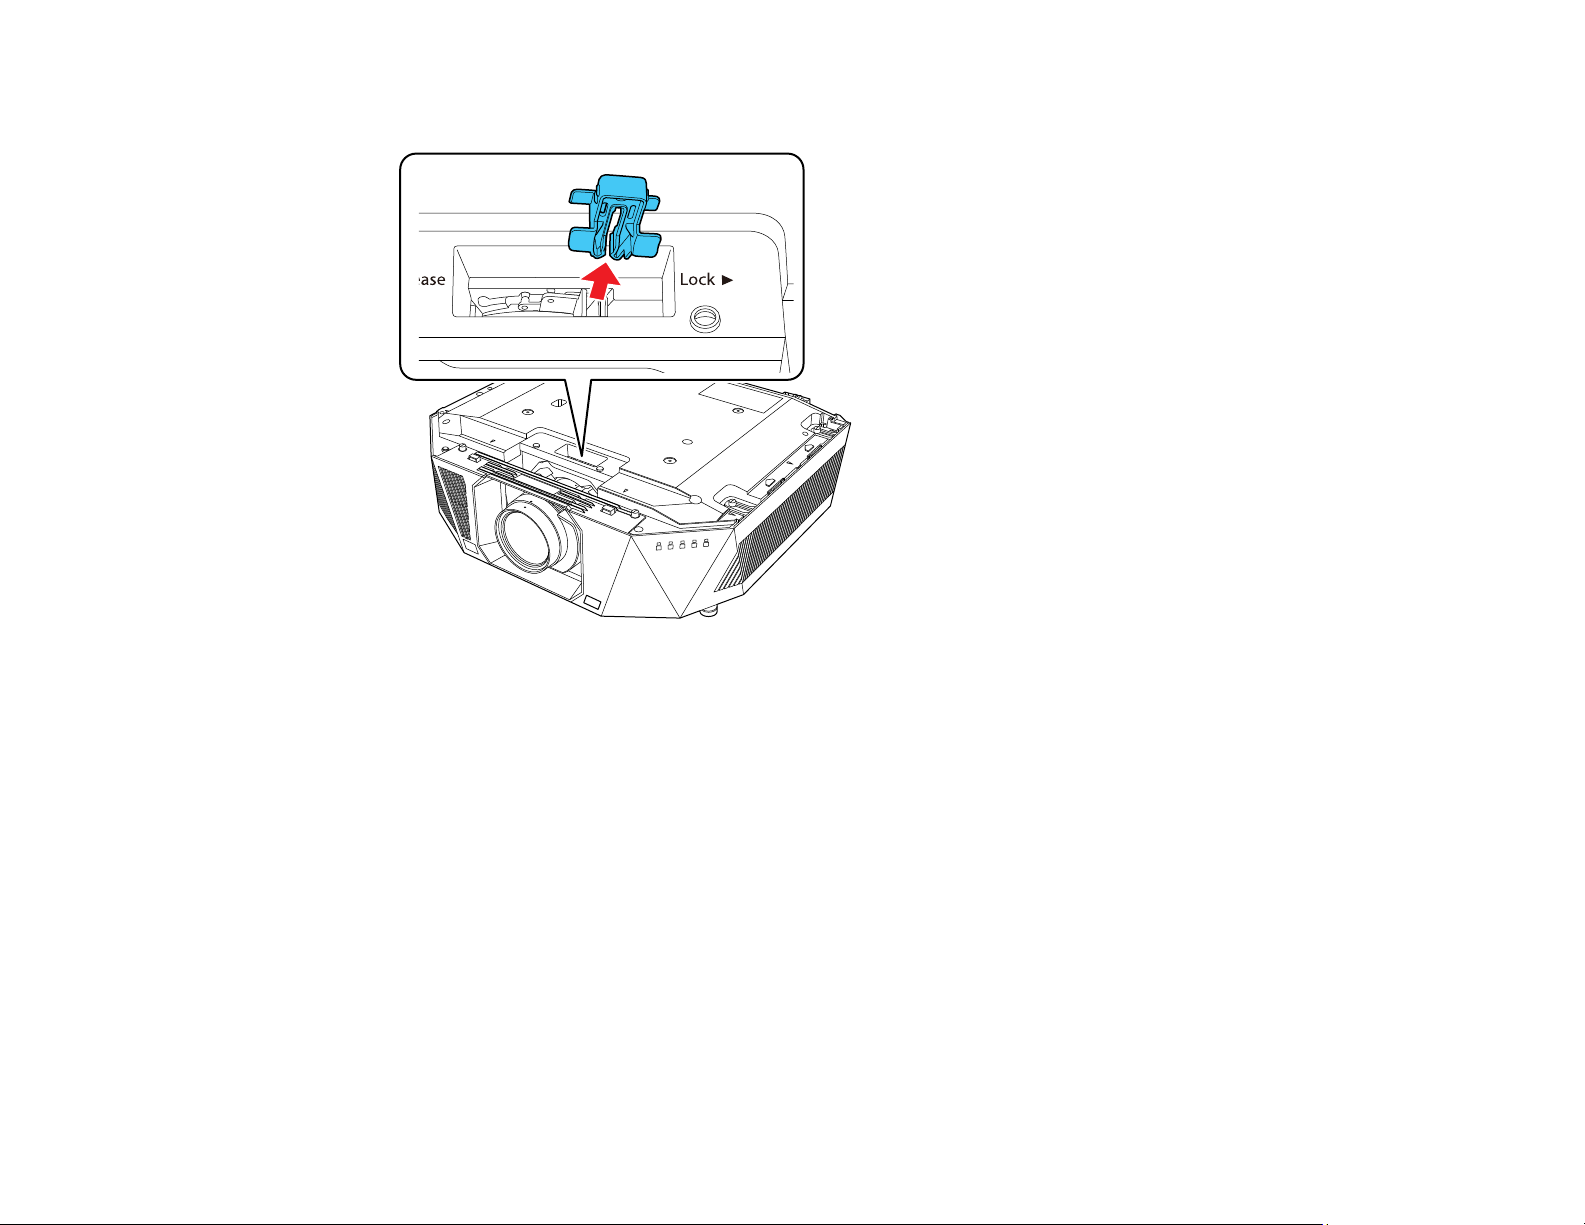
3. Remove the stopper, if necessary.
47
Page 48
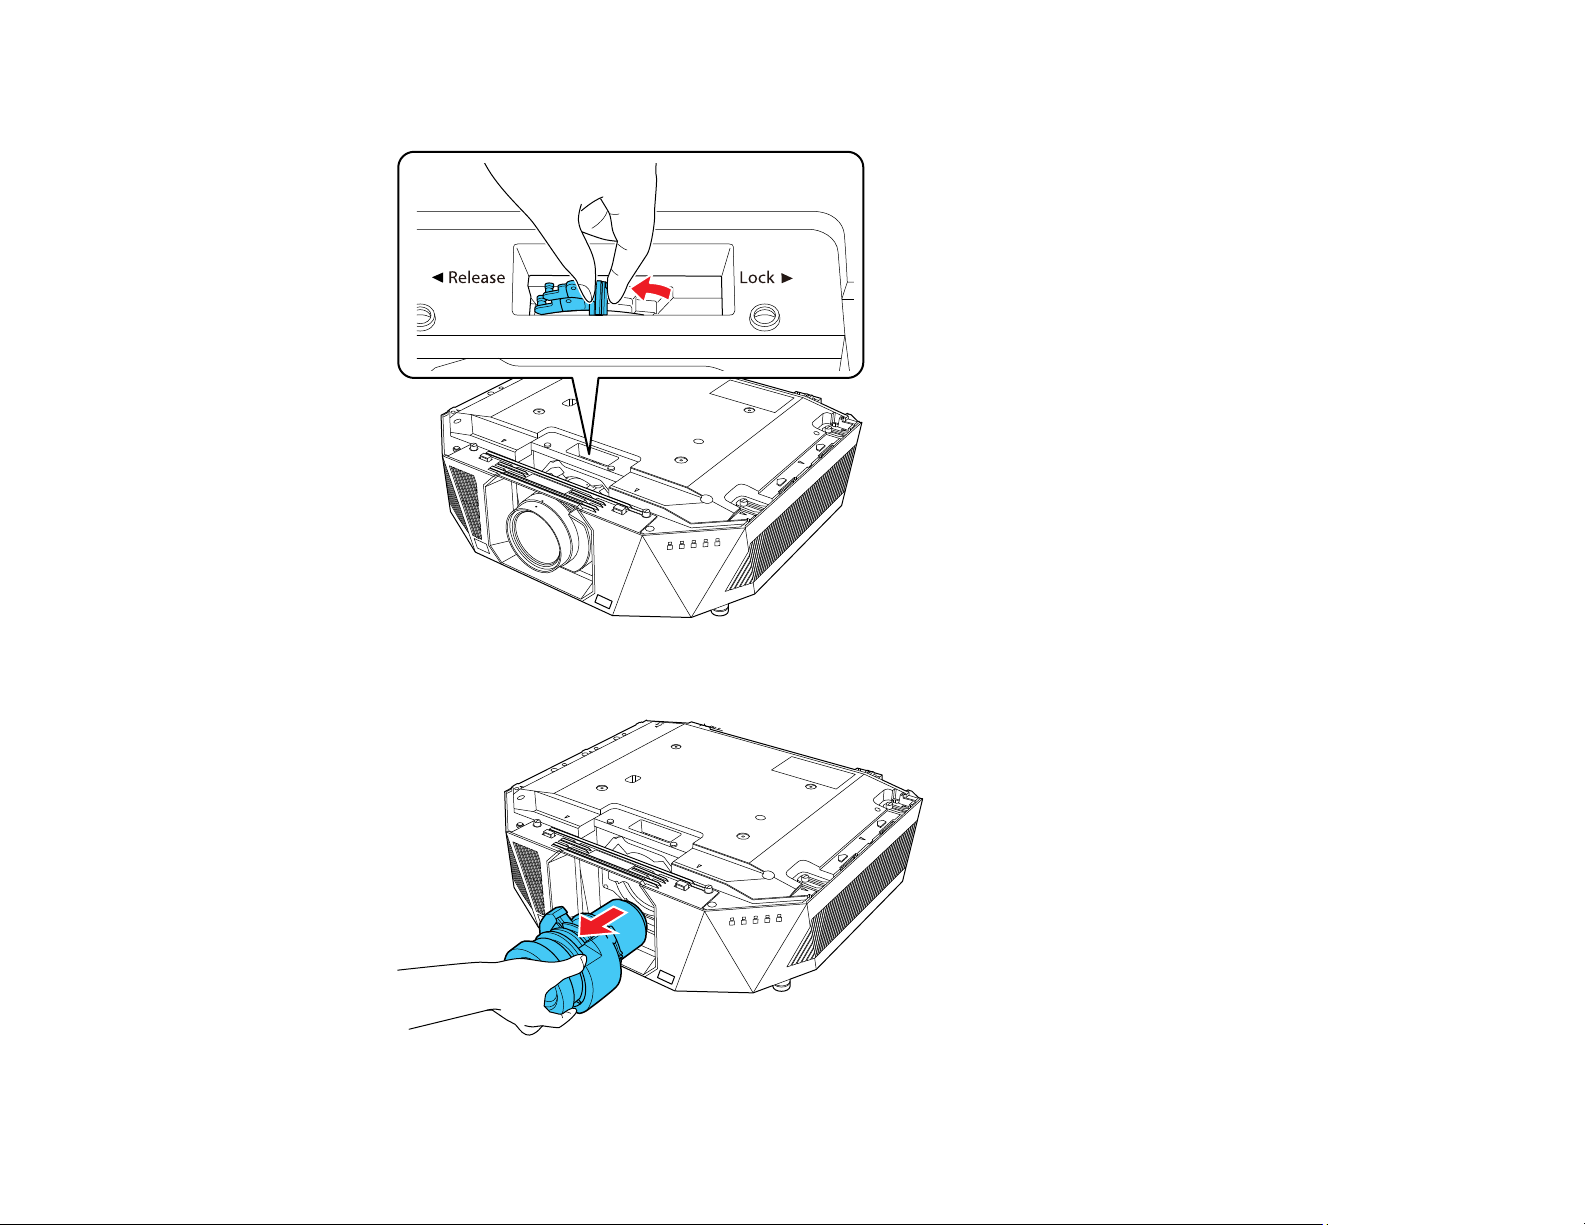
4. Hold the lens firmly as you pinch the lock lever and move it to the Release position.
5. Gently pull the lens straight out of the projector.
48
Page 49
Parent topic: Attaching and Removing a Lens
Installing the Safety Wire
When you use the optional ceiling mount, you can install the safety wire to prevent the projector from
falling from the mount.
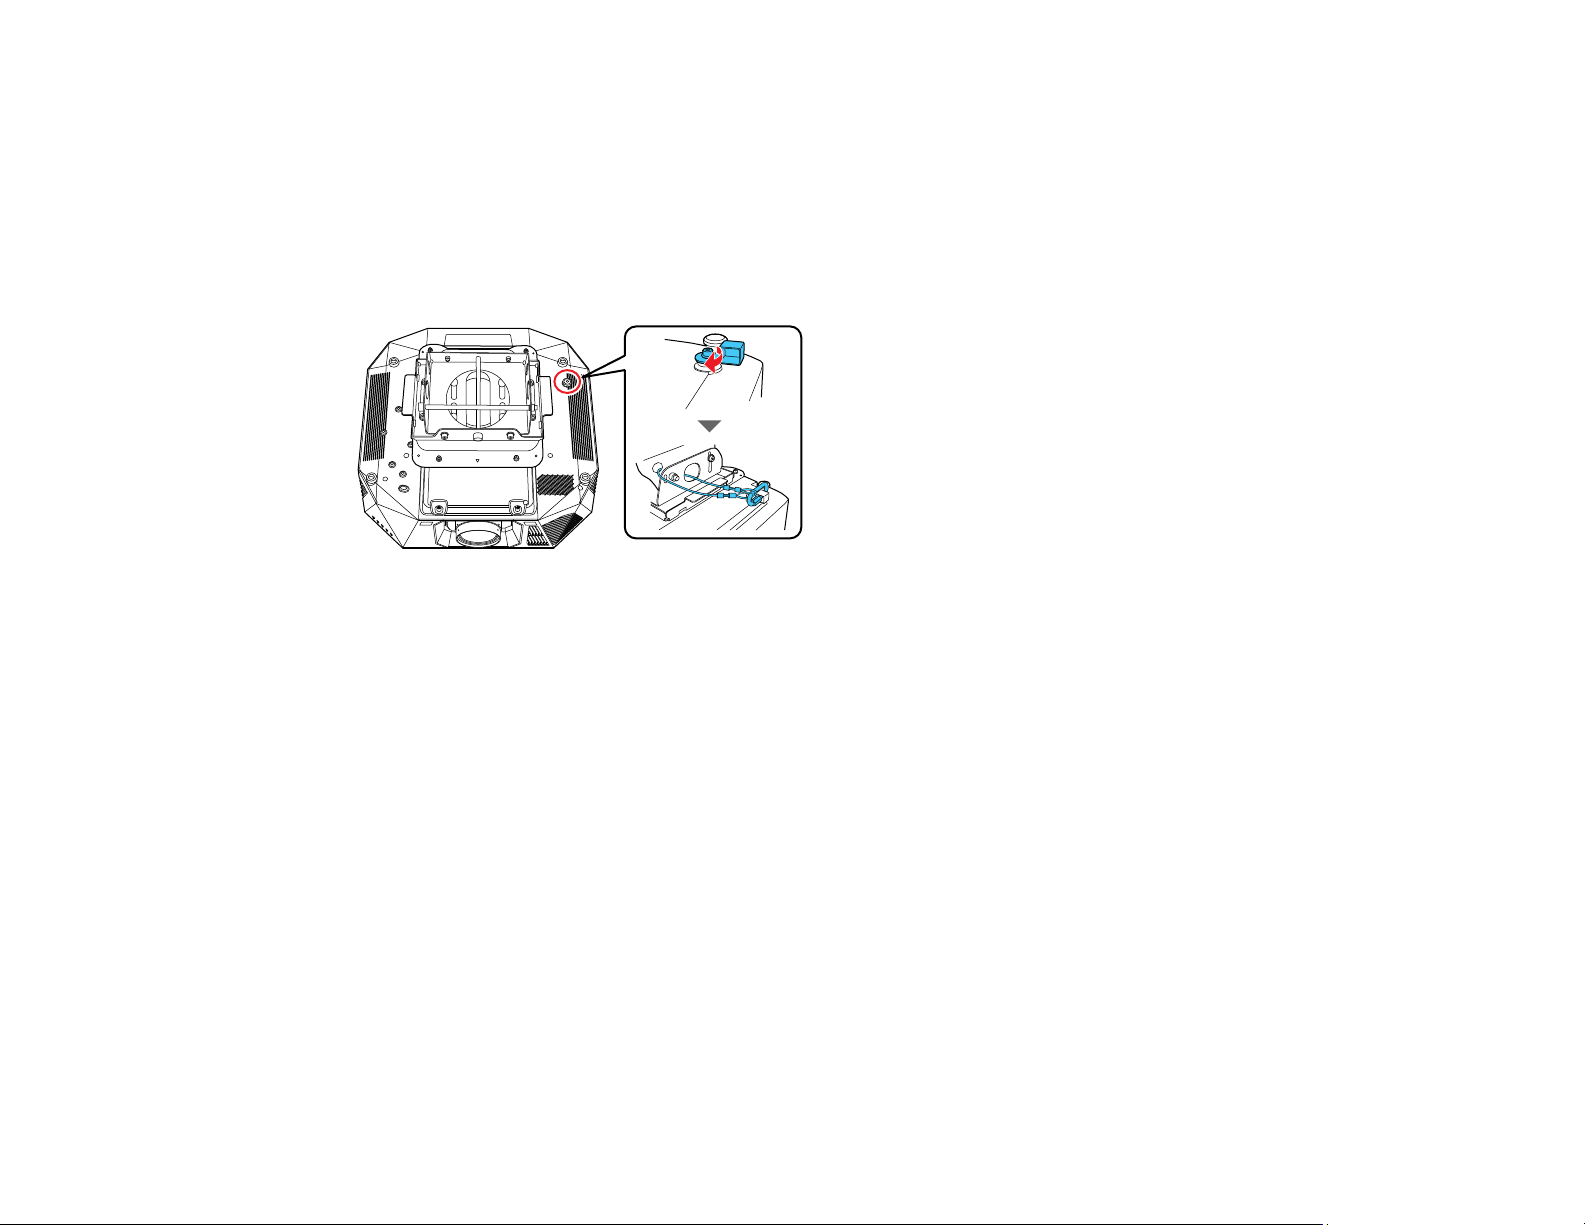
Secure the ring of the safety wire using the M6 × 15 mm bolt included with the safety wire set, and loop
the safety wire through the ceiling mount to secure it as shown.
Parent topic: Setting Up the Projector
Attaching and Removing the Vanity Board
You can attach the vanity board that came with your projector to cover the top of the projector.
1. Turn off the projector and unplug the power cord.
49
Page 50
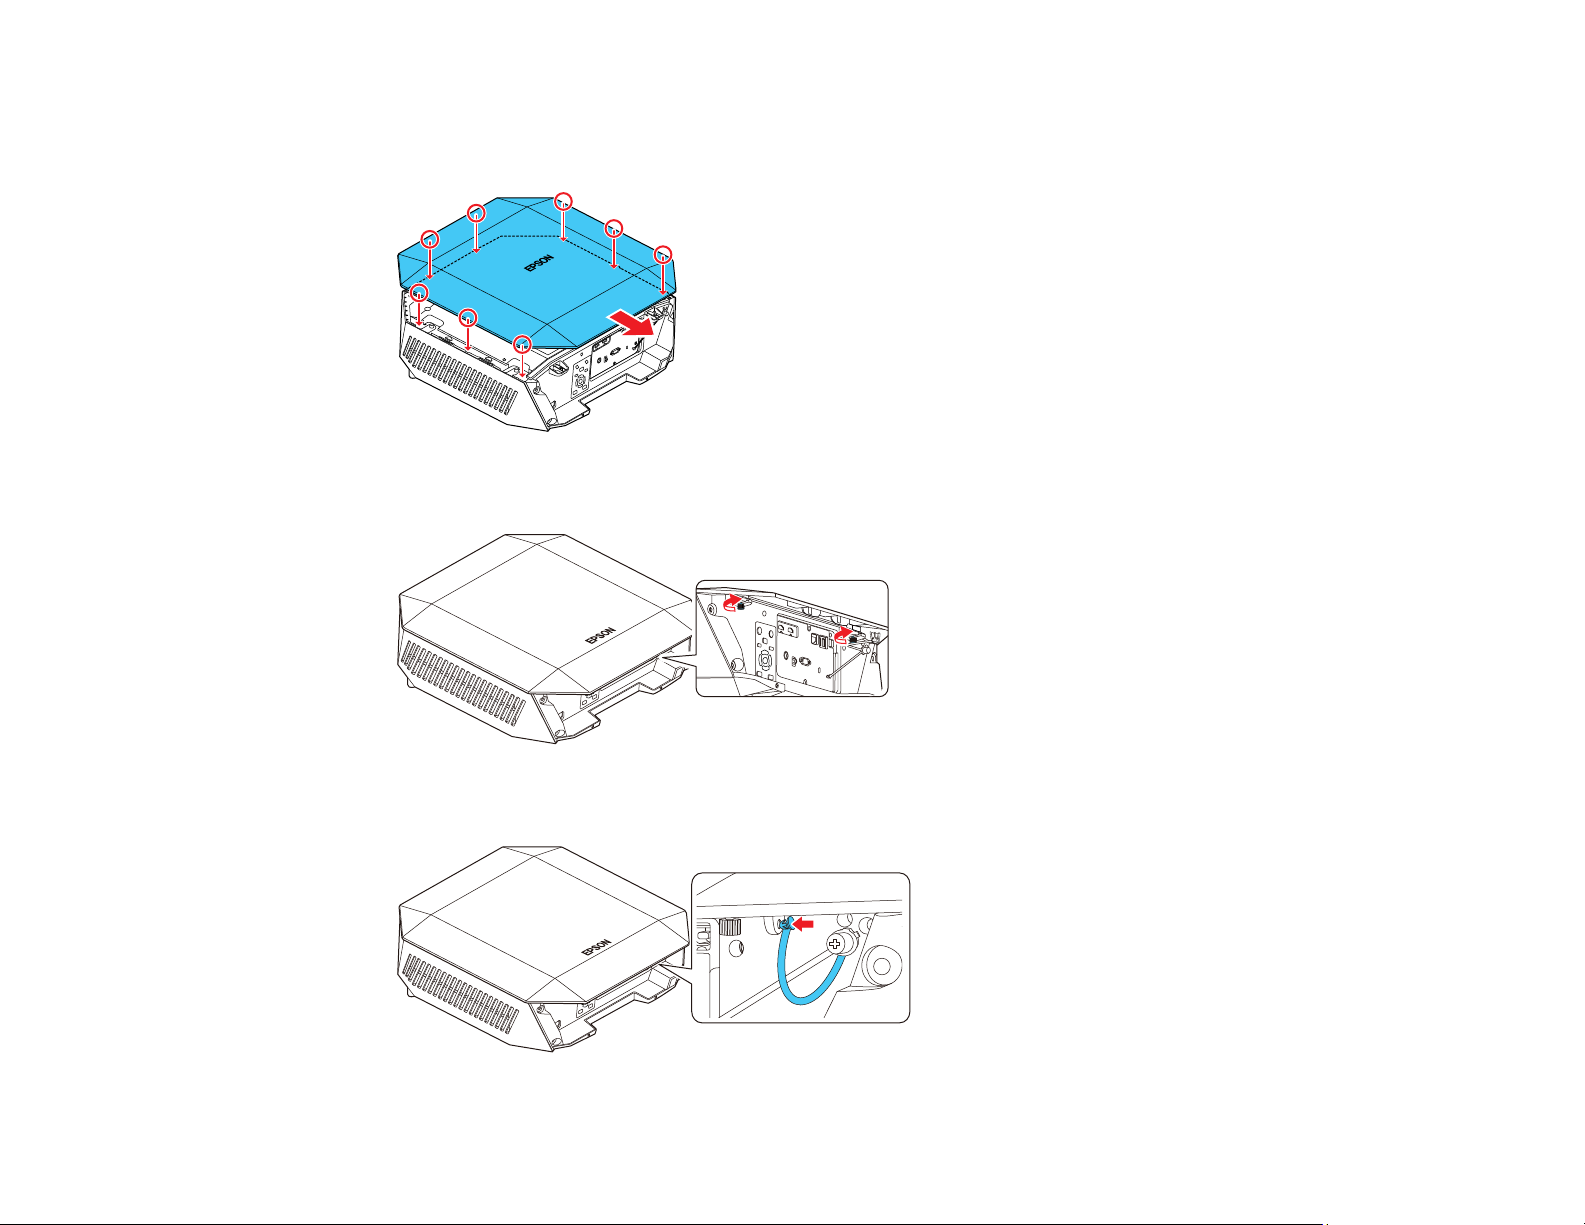
2. Align the tabs on the vanity board with the guides on the projector, place the vanity board on the
projector , and then slide it backward until it fits in place.
3. Tighten the screws.
4. Attach one end of the vanity board fall prevention wire to the vanity board.
50
Page 51
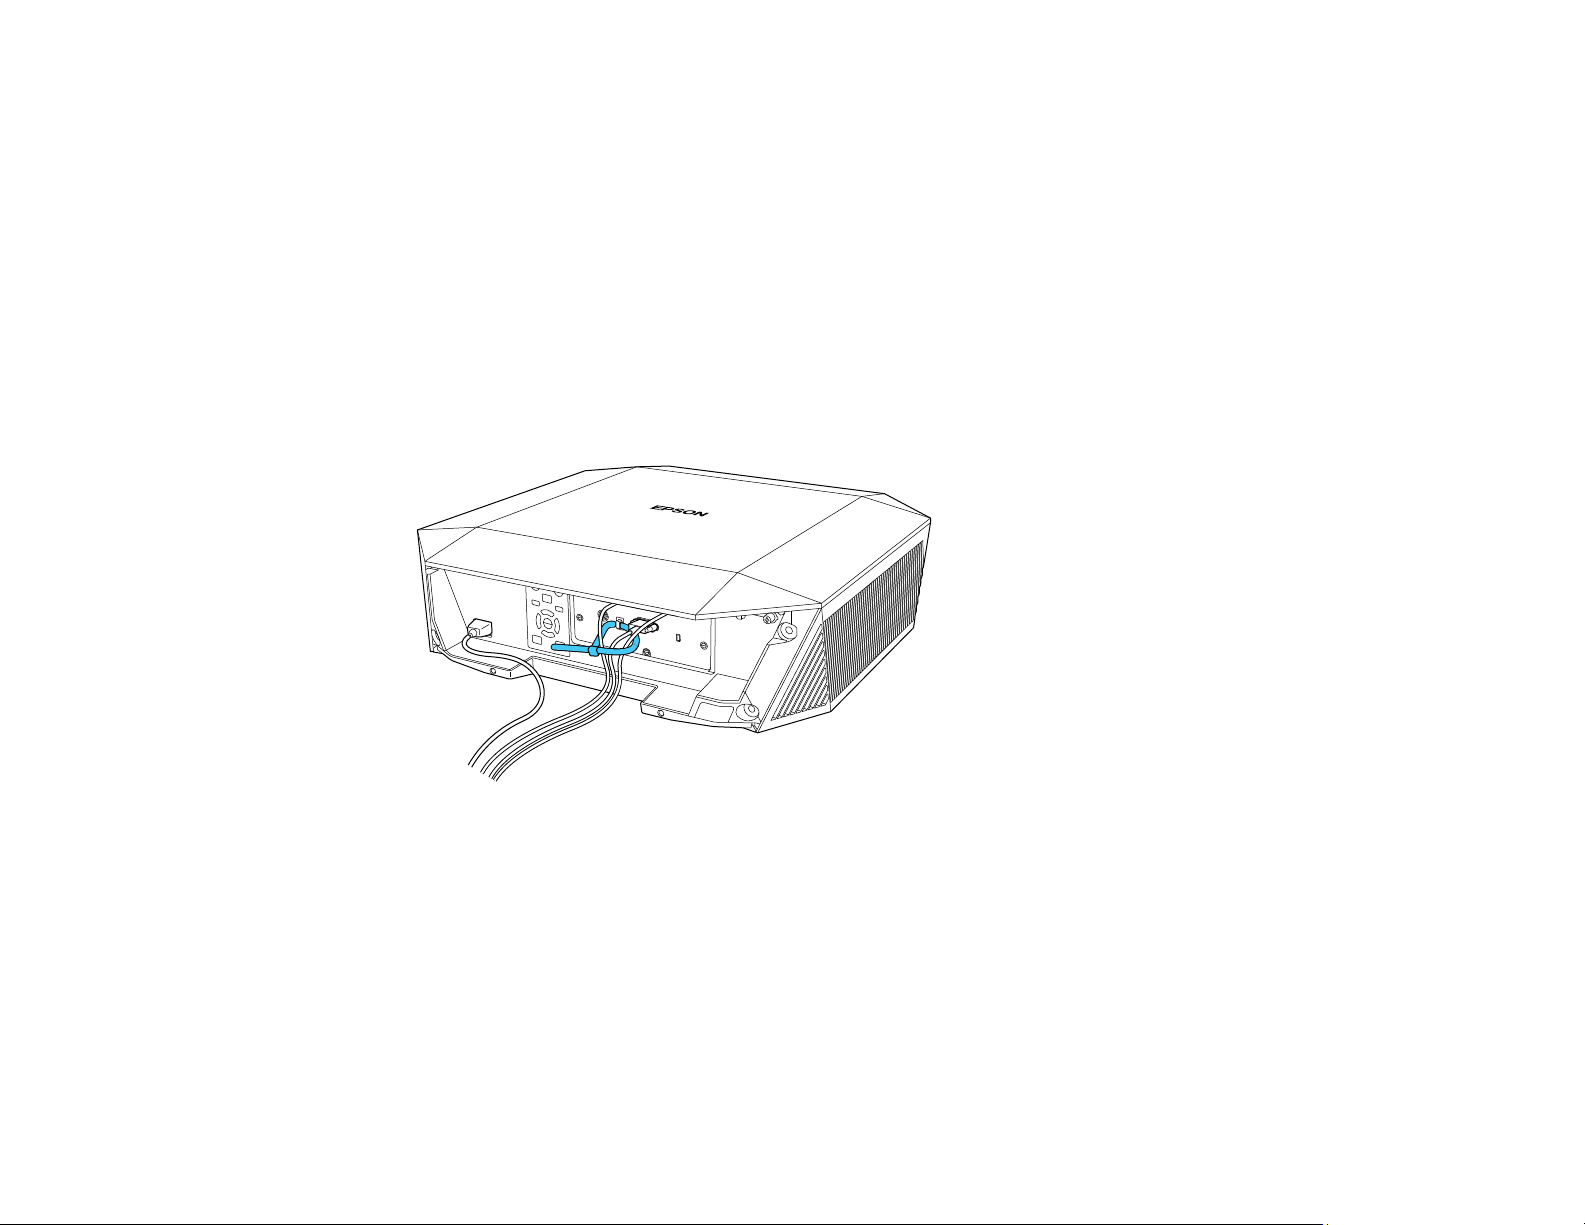
5. Remove the protective sheet from the vanity board.
When removing the vanity board, remove the screw for the vanity board fall prevention wire, and then
remove the wire from the projector.
Parent topic: Setting Up the Projector
Attaching and Removing the Cable Cover
You can attach the cable cover that came with your projector to hide the attached cables from view.
Note: Make sure to install the vanity board on the projector before attaching the cable cover.
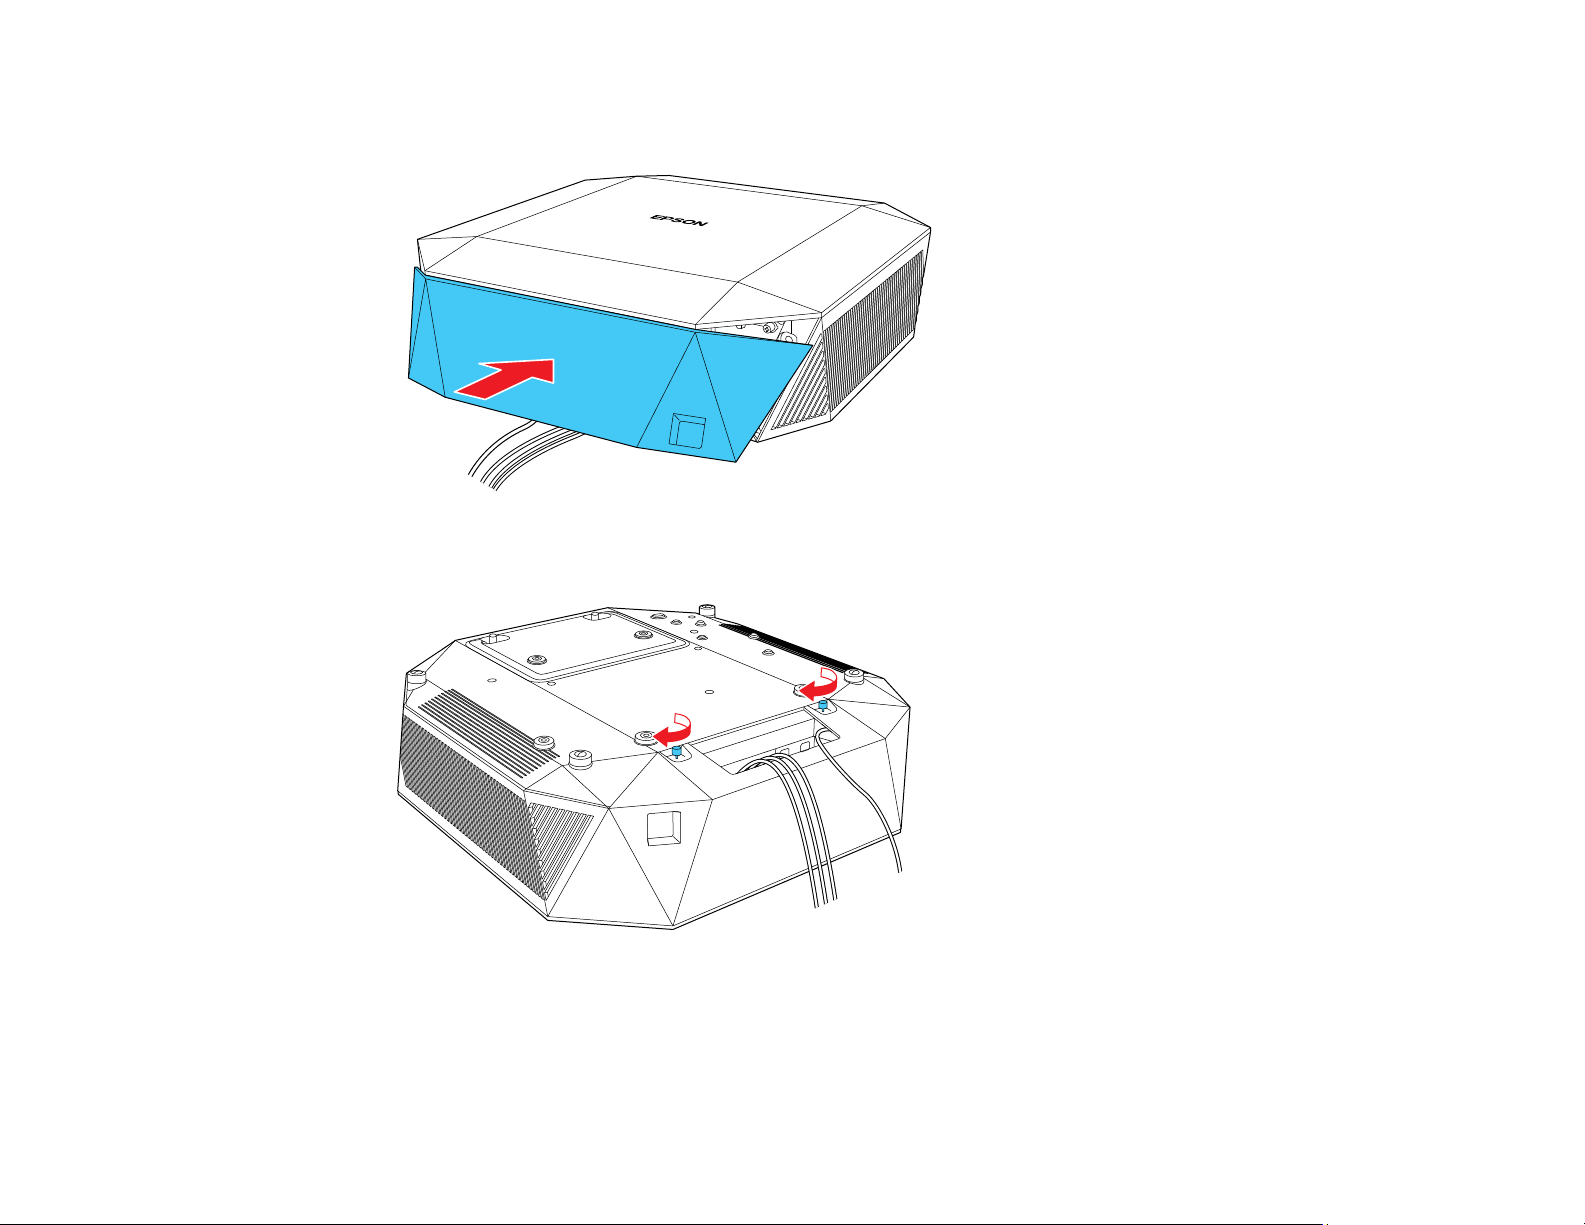
1. Bundle the cables together using a band or other fastener (not provided) and pass it through the
cable holder as shown.
Caution: Do not bundle the power cord to the other cables. Otherwise, a fire may occur.
51
Page 52
2. Place the cable cover on the projector as shown, guiding the cables through the notch on the base of
the cable cover.
3. Tighten both cable cover screws.
To remove the cover, loosen both screws and pull the cover off of the projector.
Parent topic: Setting Up the Projector
52
Page 53
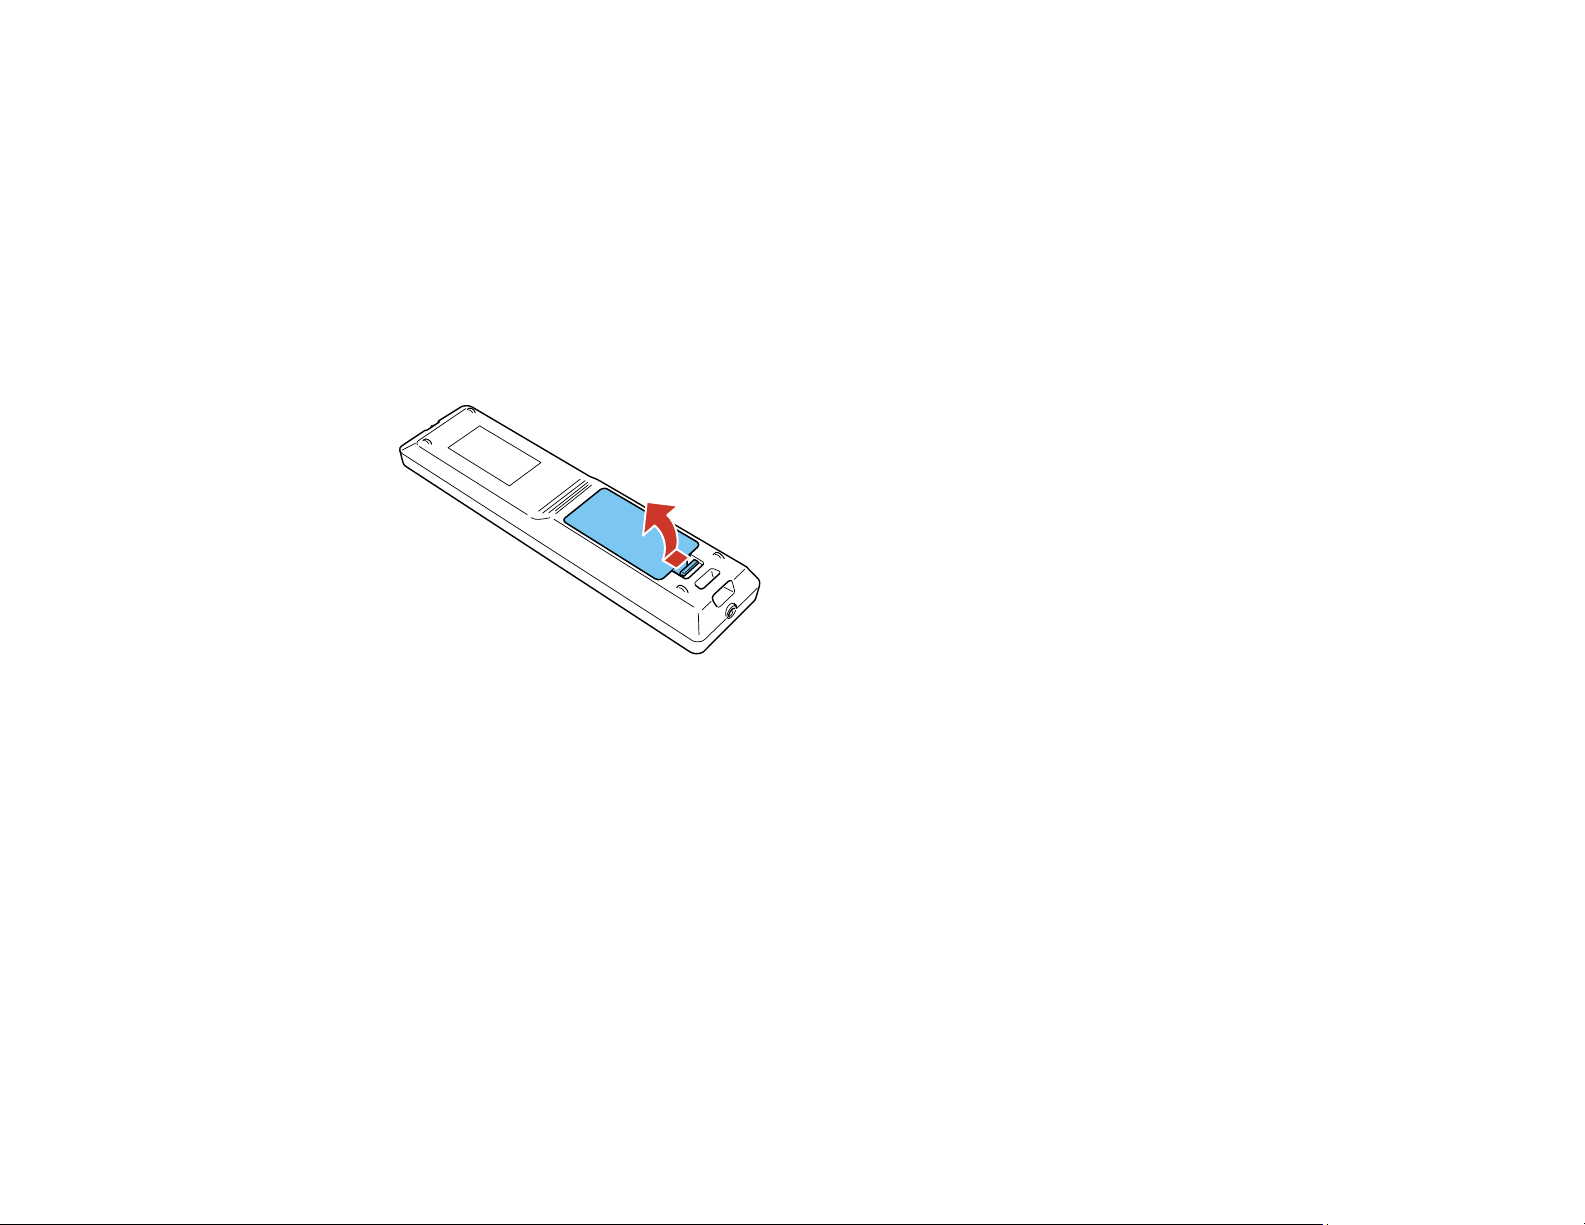
Installing Batteries in the Remote Control
The remote control uses the two AA batteries that came with the projector. Replace the batteries as soon
as they run out.
Note: Make sure you read the safety instructions in this manual before handling the batteries.
Caution: Use only the type of batteries specified in this manual. Do not install batteries of different types,
or mix new and old batteries.
1. Remove the battery cover.
2. Remove the old batteries, if necessary.
53
Page 54
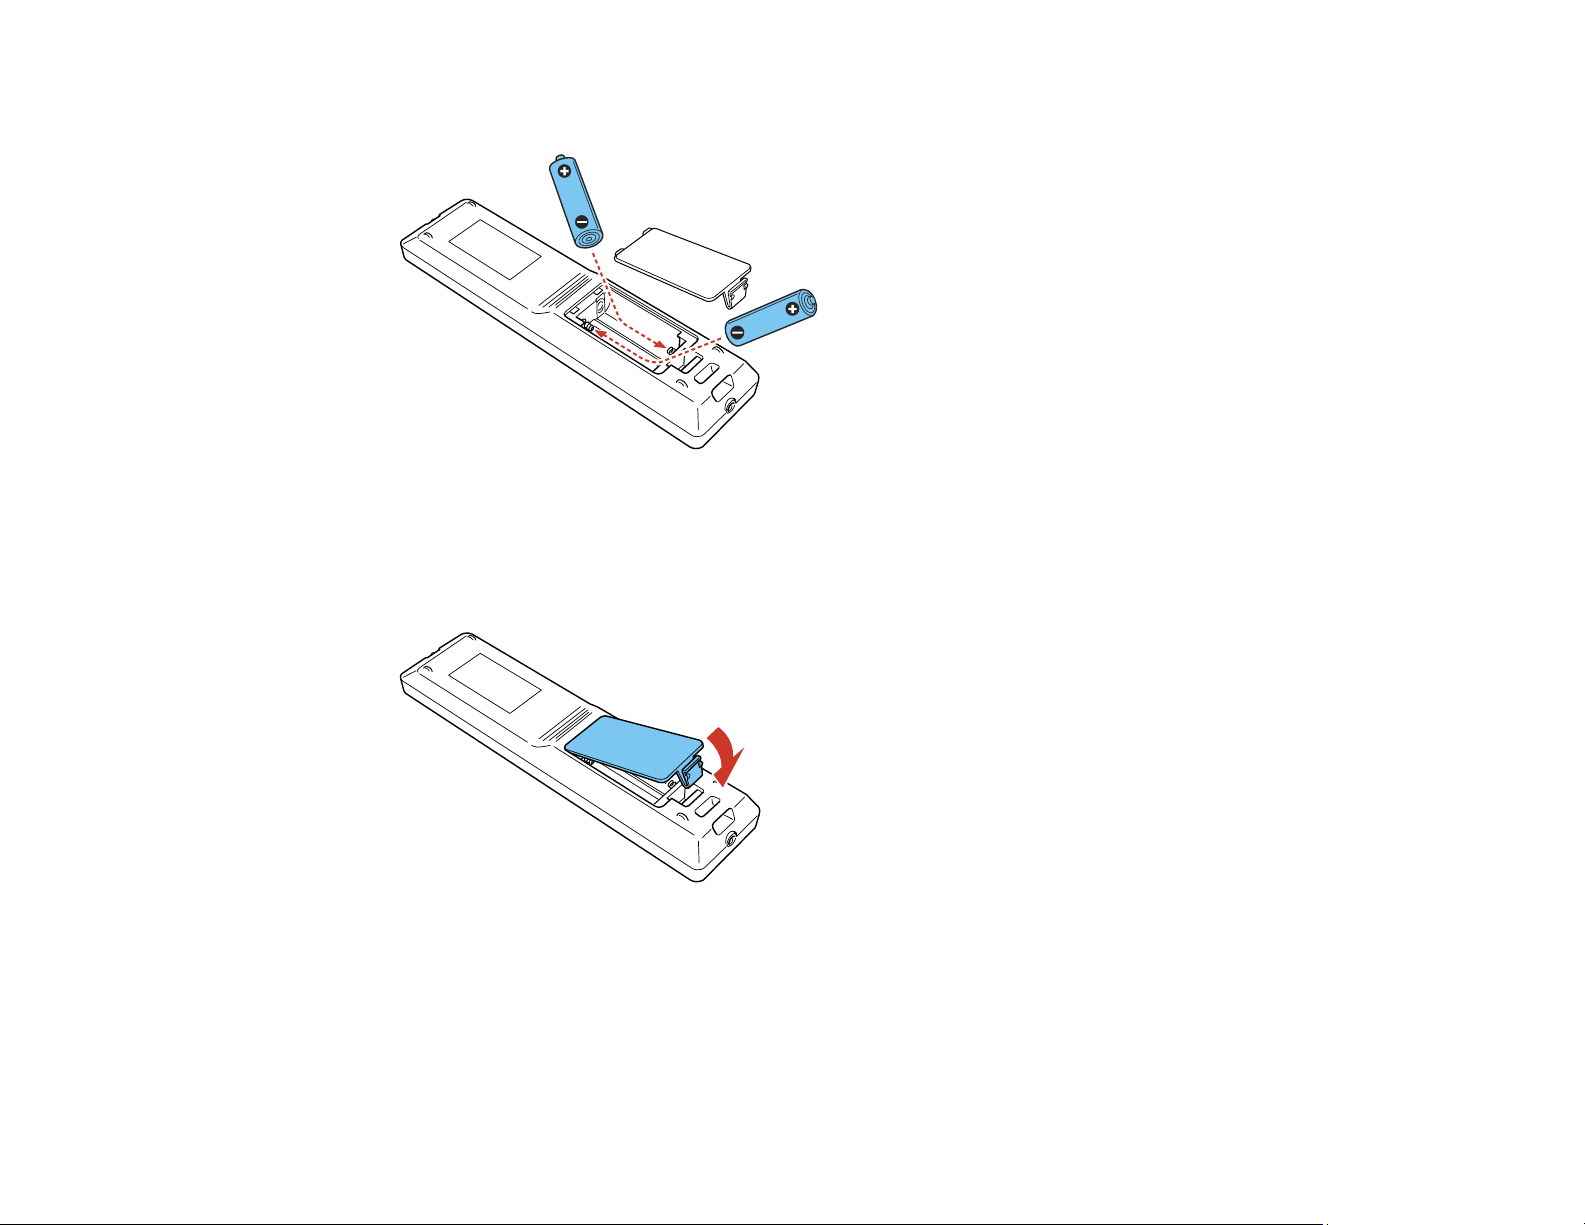
3. Insert the batteries with the + and – ends facing as shown.
Warning: Make sure the batteries are inserted in the correct positions. If the batteries are not
inserted correctly, they could explode or leak, causing a fire, injury, or damage to the product.
4. Replace the battery cover and press it down until it clicks into place.
Warning: Dispose of used batteries according to local regulations. Do not expose batteries to heat
or flame. Keep batteries out of the reach of children; they are choking hazards and are very
dangerous if swallowed.
Parent topic: Setting Up the Projector
54
Page 55

Using the Projector on a Network
Follow the instructions in these sections to set up your projector for use on a network.
Note: Epson iProjection is not recommended for use with streaming video.
Wired Network Projection
Selecting Other Network Settings
Monitoring and Controlling the Projector
Wired Network Projection
You can project through a wired network. To do this, connect the projector to your network with an
Ethernet cable, and then set up your projector and computer for network projection.
You can use Epson iProjection to project static images and presentations over a wired network.
Note: Epson iProjection is not recommended for use with streaming video.
After connecting and setting up the projector, install the projector software. You may need to install it
from a software CD, if included, or download the software and manuals as necessary.
Connecting to a Wired Network
Selecting Wired Network Settings
Parent topic: Using the Projector on a Network
Related references
Additional Projector Software and Manuals
Connecting to a Wired Network
To connect the projector to a wired local area network (LAN), use a 100Base-TX or 10Base-T network
cable. To ensure proper data transmission, use a Category 5 shielded cable or higher.
1. Connect one end of the network cable to your network hub, switch, or router.
2. Connect the other end of the cable to the projector's LAN port.
Parent topic: Wired Network Projection
55
Page 56
Selecting Wired Network Settings
Before you can project from computers on your network, you must select the network settings for the
projector using its menu system.
Note: Make sure you already connected the projector to your wired network using the LAN port.
1. Turn on the projector.
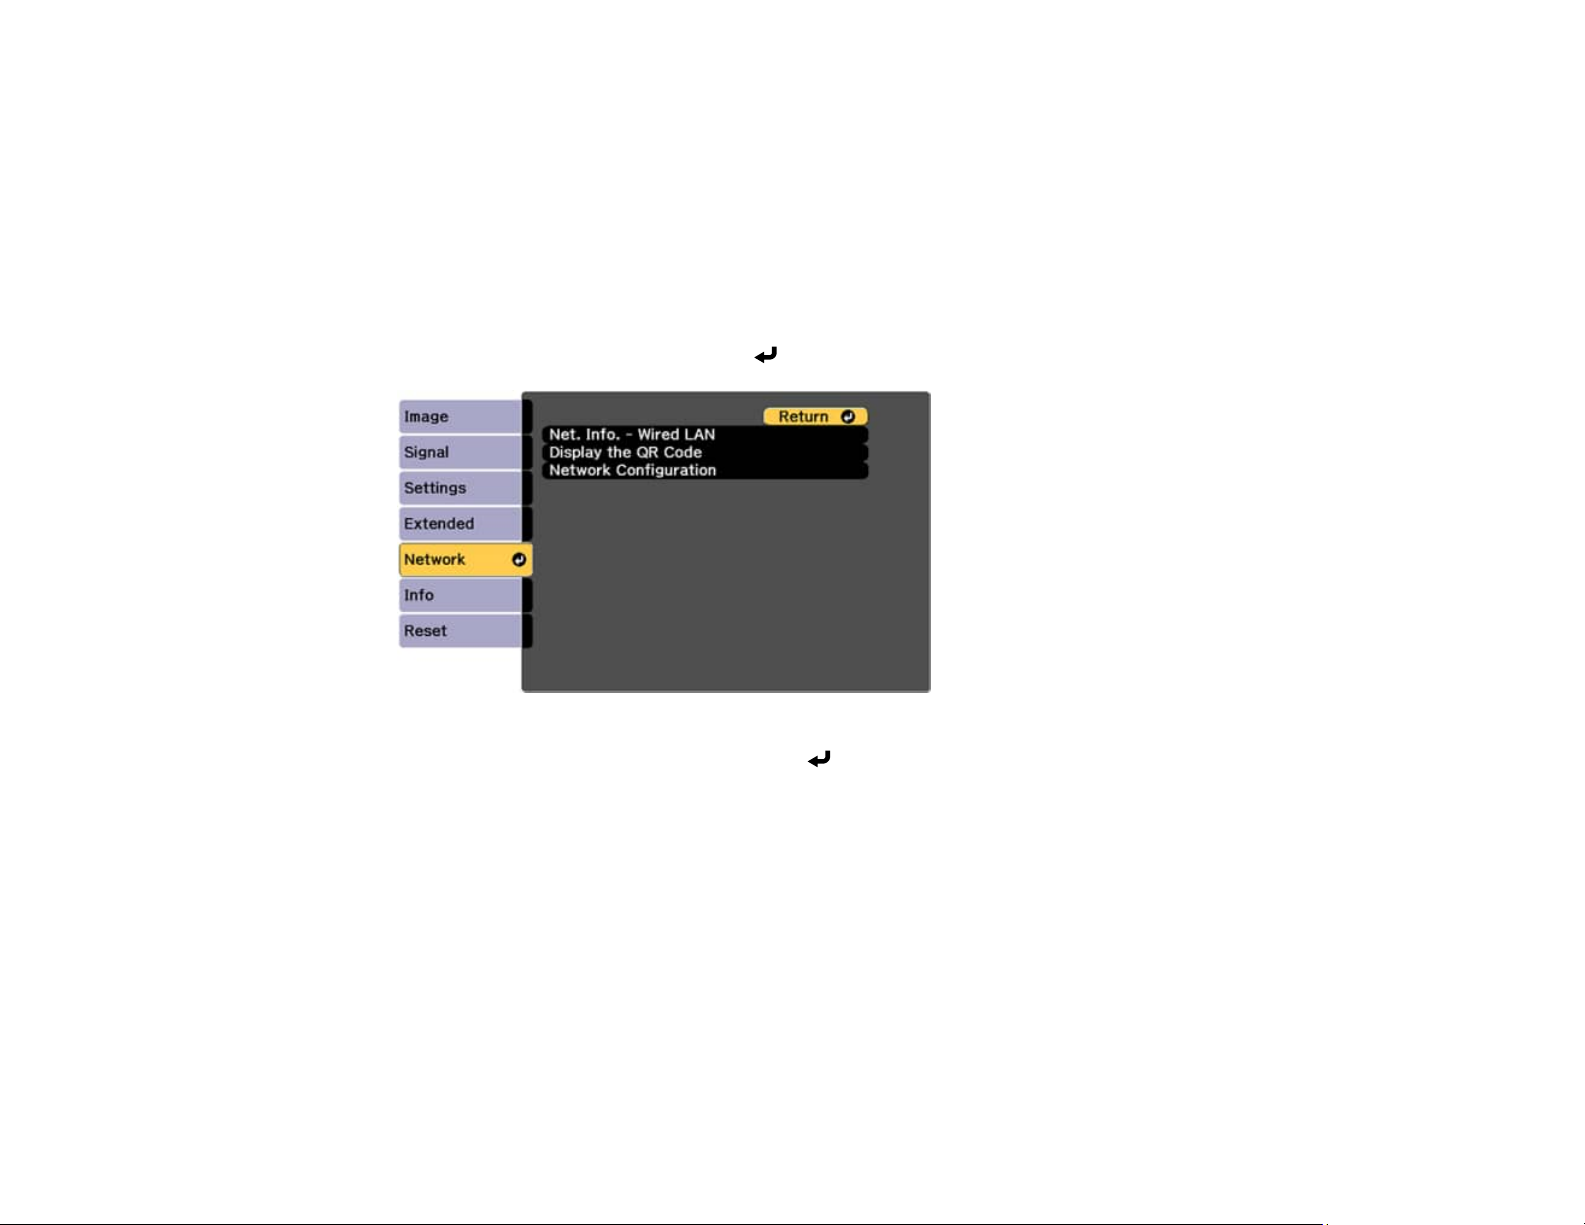
2. Press the Menu button.
3. Select the Network menu and press Enter.
4. Select Network Configuration and press Enter.
56
Page 57
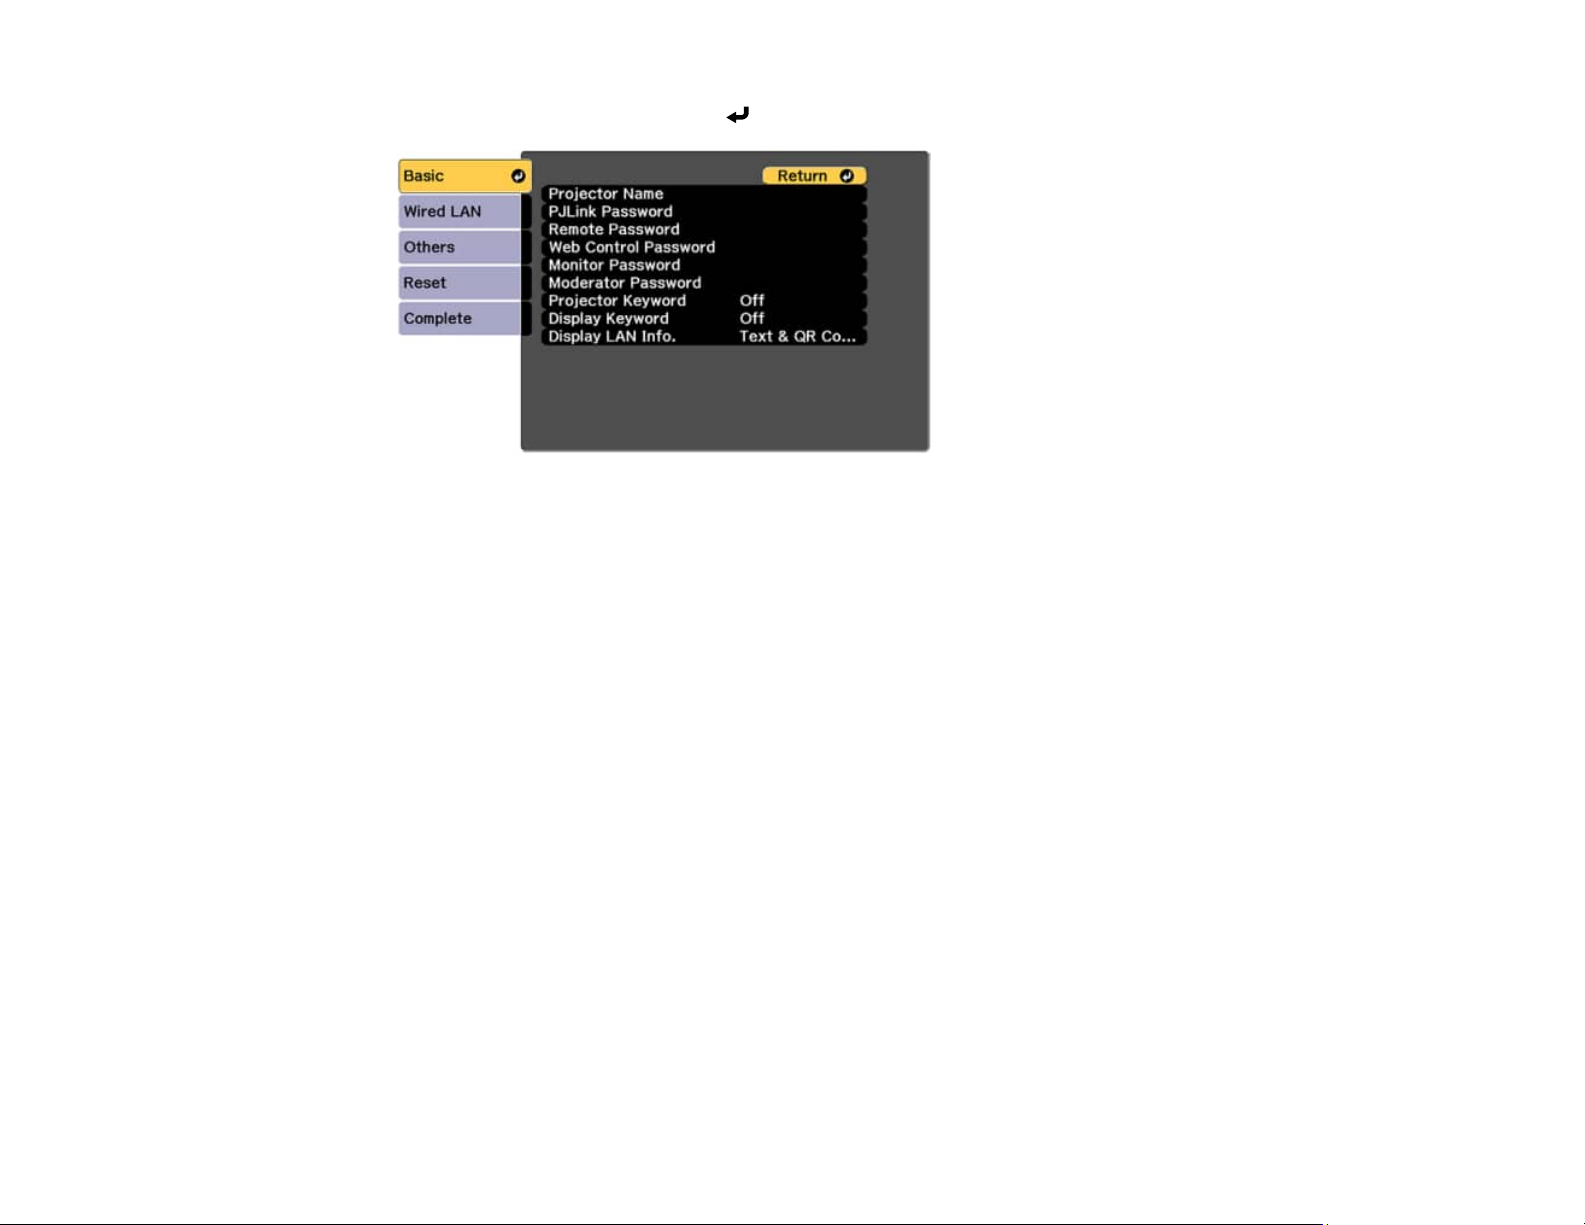
5. Select the Basic menu and press Enter.
6. Select the following basic options as necessary:
• Projector Name lets you enter a name up to 16 alphanumeric characters long to identify the
projector over the network.
• PJLink Password lets you enter a password up to 32 alphanumeric characters long for using the
PJLink protocol for projector control.
• Remote Password lets you enter a password up to 32 alphanumeric characters long for
accessing the Remote or Basic Control screen in Epson Web Control. (Default user name is
EPSONREMOTE; no default password is set.)
• Web Control Password lets you enter a password up to 32 alphanumeric characters long for
accessing Epson Web Control. (Default user name is EPSONWEB; no default password is set.)
• Monitor Password lets you enter a password up to 16 alphanumeric characters long for
monitoring projectors with a switcher and a system controller.
• Moderator Password lets you enter a password up to 4 numbers long for accessing the projector
as a moderator with the Epson iProjection (Windows/Mac) software or the Epson iProjection app.
• Projector Keyword lets you turn on a security password to prevent access to the projector by
anyone not in the room with it. You must enter a displayed, randomized keyword from a computer
using Epson iProjection to access the projector and share the current screen.
• Display Keyword lets you display a keyword on the projected image when accessing the
projector from a computer using the Epson iProjection (Windows/Mac) software or an iOS or
Android device using the Epson iProjection app.
57
Page 58
• Display LAN Info lets you select how the projector displays network information. You can select
an option to display a QR code that lets you quickly connect your iOS or Android devices using the
Epson iProjection app.
Note: Use the displayed keyboard to enter the name, passwords, and keyword. Press the arrow
buttons on the remote control to highlight characters and press Enter to select them. You can
also enter numbers by pressing the number buttons while holding down the Num button on the
remote control.
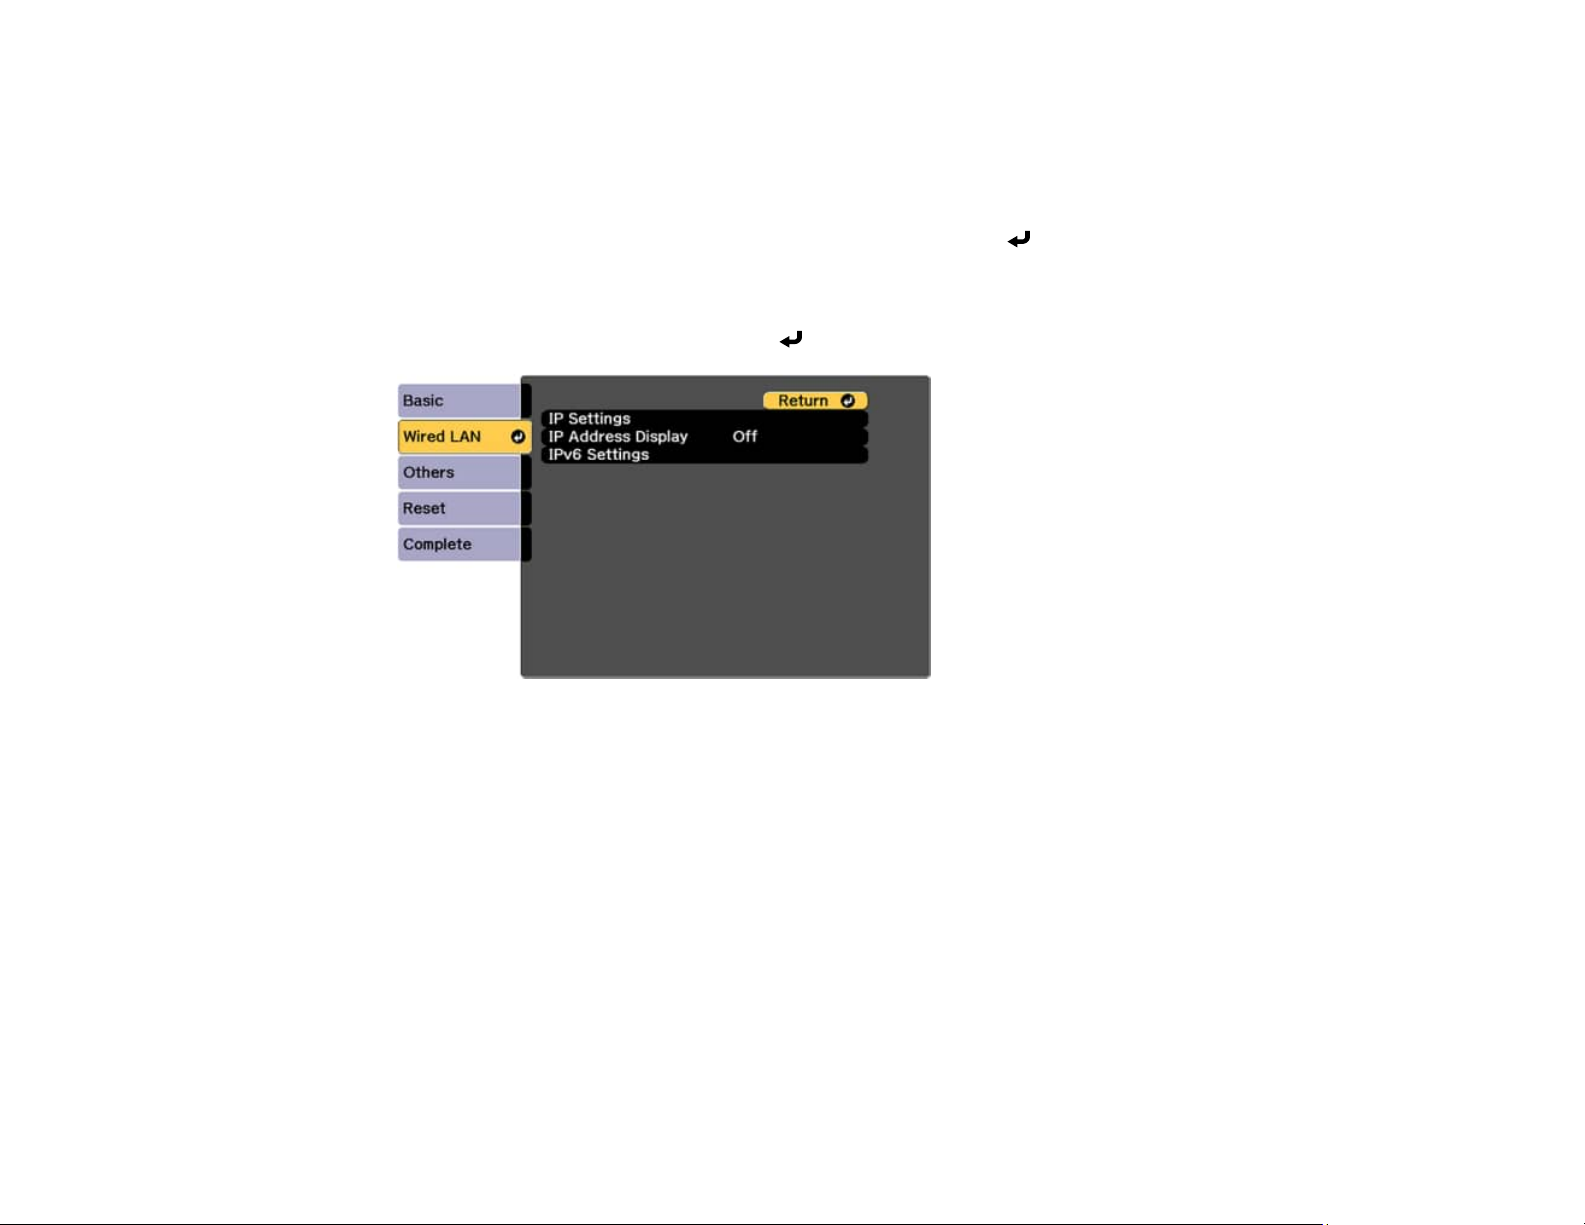
7. Select the Wired LAN menu and press Enter.
8. Select your IP Settings as necessary:
• If your network assigns addresses automatically, turn on the DHCP setting.
• If you must set addresses manually, turn off DHCP and enter the projector's IP Address, Subnet
Mask, and Gateway Address as needed.
Note: Do not use these addresses:
• for the IP Address: 0.0.0.0, 127.x.x.x, 192.0.2.x, or 224.0.0.0 through 255.255.255.255
• for the Subnet Mask: 255.255.255.255 or 0.0.0.0 through 254.255.255.255
• for the Gateway Address: 0.0.0.0, 127.x.x.x, or 224.0.0.0 through 255.255.255.255
(where x is a number from 0 to 255)
58
Page 59

Note: To highlight the numbers you want from the displayed keyboard, press the arrow buttons on
the remote control. To select a highlighted number, press Enter.
9. To prevent display of the IP address on the standby screen, turn off IP Address Display.
10. To connect the projector to the network using IPv6, select On as the IPv6 Settings option. Then
select the Auto Configuration and Use Temporary Address settings as necessary.
11. When you finish selecting settings, select Complete and follow the on-screen instructions to save
your settings and exit the menus.
Note: If the Web Control Password has not been set, a screen prompting you to set a password is
displayed. Follow the on-screen instructions to set the password.
12. Press the LAN button on the remote control to confirm that the IP address on the LAN standby
screen is correct.
Parent topic: Wired Network Projection
Related references
Network Menu
Selecting Other Network Settings
You can select optional network settings on the Others menu.
1. Press the Menu button.
2. Select the Network menu and press Enter.
3. Select Network Configuration and press Enter.
59
Page 60
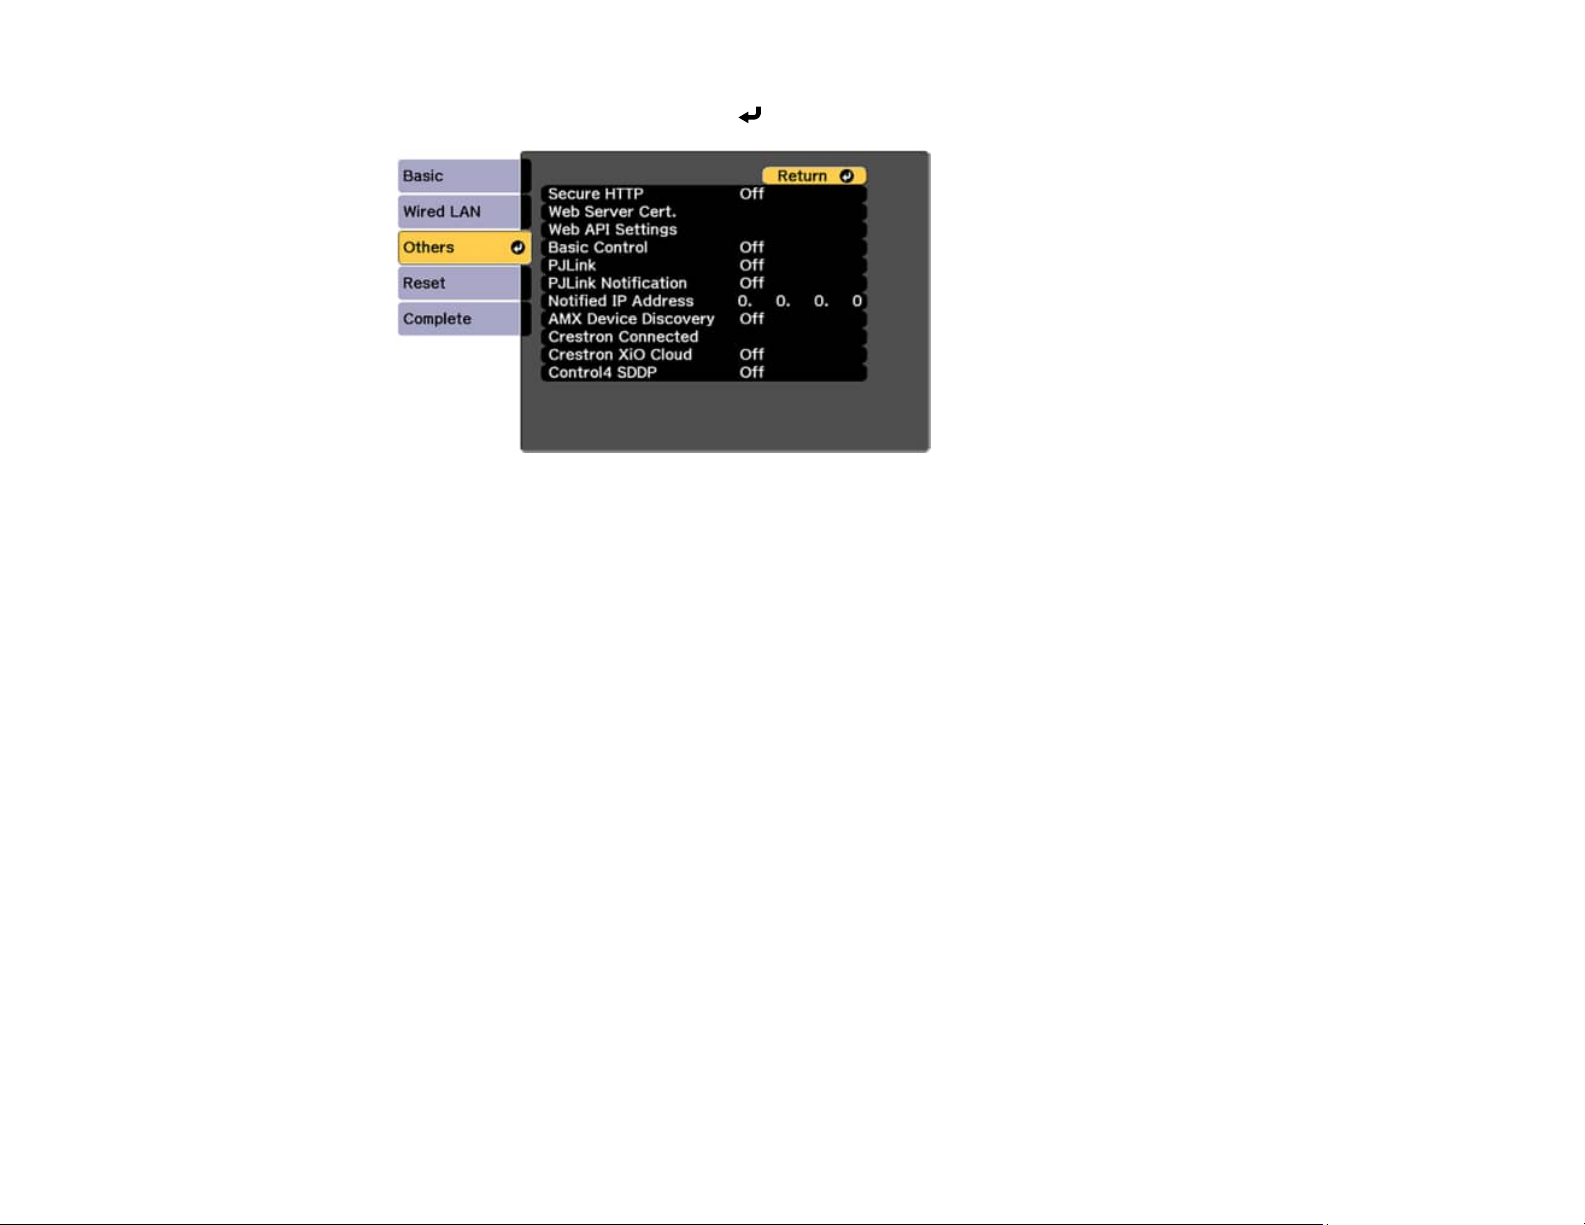
4. Select the Others menu and press Enter.
5. If you want to use the Secure HTTP protocol to encrypt communication when using Web Control,
turn on the Secure HTTP setting and import the web server certificate using the Web Server Cert.
setting.
6. If you want to operate the projector using Web API, turn on the Web API setting. The username for
API authentication is EPSONWEB; use the password that is set for the Web Control Password.
7. If you want to monitor the projector using PJLink, turn on the PJLink setting.
8. Turn on the PJLink Notification setting to enable the PJLink notification function when the PJLink
setting is enabled.
9. If your network environment uses an AMX controller, turn on the AMX Device Discovery setting to
allow the projector to be detected.
10. If your network environment uses a Crestron Connected controller, turn on the Crestron Connected
setting to allow the projector to be detected.
11. If your network environment uses Crestron Xio Cloud, turn on the Crestron Xio Cloud setting.
12. If your network environment uses a Control4 or Control4 SDDP controller, turn on the Control4
SDDP setting to allow the projector to be detected.
13. When you finish selecting settings, select Complete and follow the on-screen instructions to save
your settings and exit the menus.
Parent topic: Using the Projector on a Network
60
Page 61

Related references
Network Menu
Monitoring and Controlling the Projector
Follow the instructions in these sections to monitor and control the projector over a network.
Epson Web Control
ESC/VP21 Commands
ESC/VP.net Commands
PJLink
Using Crestron Connected
Web API
Controlling a Networked Projector Using a Web Browser
Controlling a Networked Projector in Content Playback Mode
Secure HTTP
Parent topic: Using the Projector on a Network
Epson Web Control
Once you have connected your projector to your network, you can select projector settings and control
projection using a compatible Web browser. This lets you access the projector remotely. See the link
below for more information.
In Content Playback mode, you can also edit playlists.
Note: You can use the following Web browsers.
• Microsoft Edge (Windows)
• Safari (Mac, iOS)
• Chrome (Android)
While using the Web browser, do not connect using a proxy server. You cannot select all of the projector
menu settings or control all projector functions using a Web browser.
If you set Standby Mode to Communication On, you can use a Web browser to select settings and
control projection even if the projector is in standby mode.
• Extended > Standby Mode
Parent topic: Monitoring and Controlling the Projector
61
Page 62

Related tasks
Controlling a Networked Projector Using a Web Browser
Controlling a Networked Projector in Content Playback Mode
ESC/VP21 Commands
You can control the projector from an external device using ESC/VP21.
When the power ON command is transmitted to the projector, the power turns on and enters warm-up
mode. When the projector's power has turned on, a colon ":" (3Ah) is returned.
When a command is input, the projector executes the command and returns a":", and then accepts the
next command.
If the command being processed terminates abnormally, an error message is output and a ":" is
returned.
You can also execute some of the ESC/VP21 commands by Web API.
For additional information, visit the Epson website and search for your product's support page.
Parent topic: Monitoring and Controlling the Projector
ESC/VP.net Commands
You can monitor the projector using ESC/VP.net commands. You must set the Monitor Password before
using the ESC/VP.net Commands.
For additional information, visit the Epson website and search for your product's support page.
PJLink
Parent topic: Monitoring and Controlling the Projector
PJLink was established by the JBMIA (Japan Business Machine and Information System Industries
Association) as a standard protocol for controlling network compatible projectors as part of their efforts to
standardize projector control protocols. The projector complies with the PJLink Class2 standard
established by the JBMIA. The port number used for the PJLink search function is 4352 (UDP). You
need to configure the network settings before you can use PJLink.
• Network > Network Configuration > Basic > PJLink Password
• Network > Network Configuration > Others > PJLink Notification
• Network > Network Configuration > Others > PJLink
It complies with all commands except for the following commands defined by PJLink Class2 and
confirmed by the PJLink standard adaptability verification.
62
Page 63

Non-compatible commands:
• Image muting set - AVMT 11
• Audio muting set - AVMT 21
For additional information, visit the Epson website and search for your product's support page.
Parent topic: Monitoring and Controlling the Projector
Using Crestron Connected
If you are using the Crestron Connected network monitoring and control system, you can set up your
projector for use on the system. Crestron Connected lets you control and monitor your projector using a
web browser.
You can access the Crestron Connected operation window from Epson Web Control. You need to
enable Crestron Connected in the projector's Network menu before you can use Crestron Connected.
• Network > Network Configuration > Others > Crestron Connected
To monitor devices in the system, you can use Crestron RoomView Express or Crestron Fusion
provided by Crestron. You can communicate with the help desk and send emergency messages.
For additional information on Crestron Connected, contact Crestron.
Parent topic: Monitoring and Controlling the Projector
Related references
Network Menu
Web API
You can use Web API to operate the projector.
You can authenticate Web API communications using API authentication (Digest authentication).
The user name for API authentication is EPSONWEB; use the password that is set for the Web Control
Password (Network > Network Configuration > Basic > Web Control Password).
Parent topic: Monitoring and Controlling the Projector
Controlling a Networked Projector Using a Web Browser
Once you have connected your projector to your network, you can select projector settings and control
projection using a compatible web browser. This lets you access the projector remotely. You can also
control the projector using a web browser through the Epson iProjection app on iOS or Android.
63
Page 64
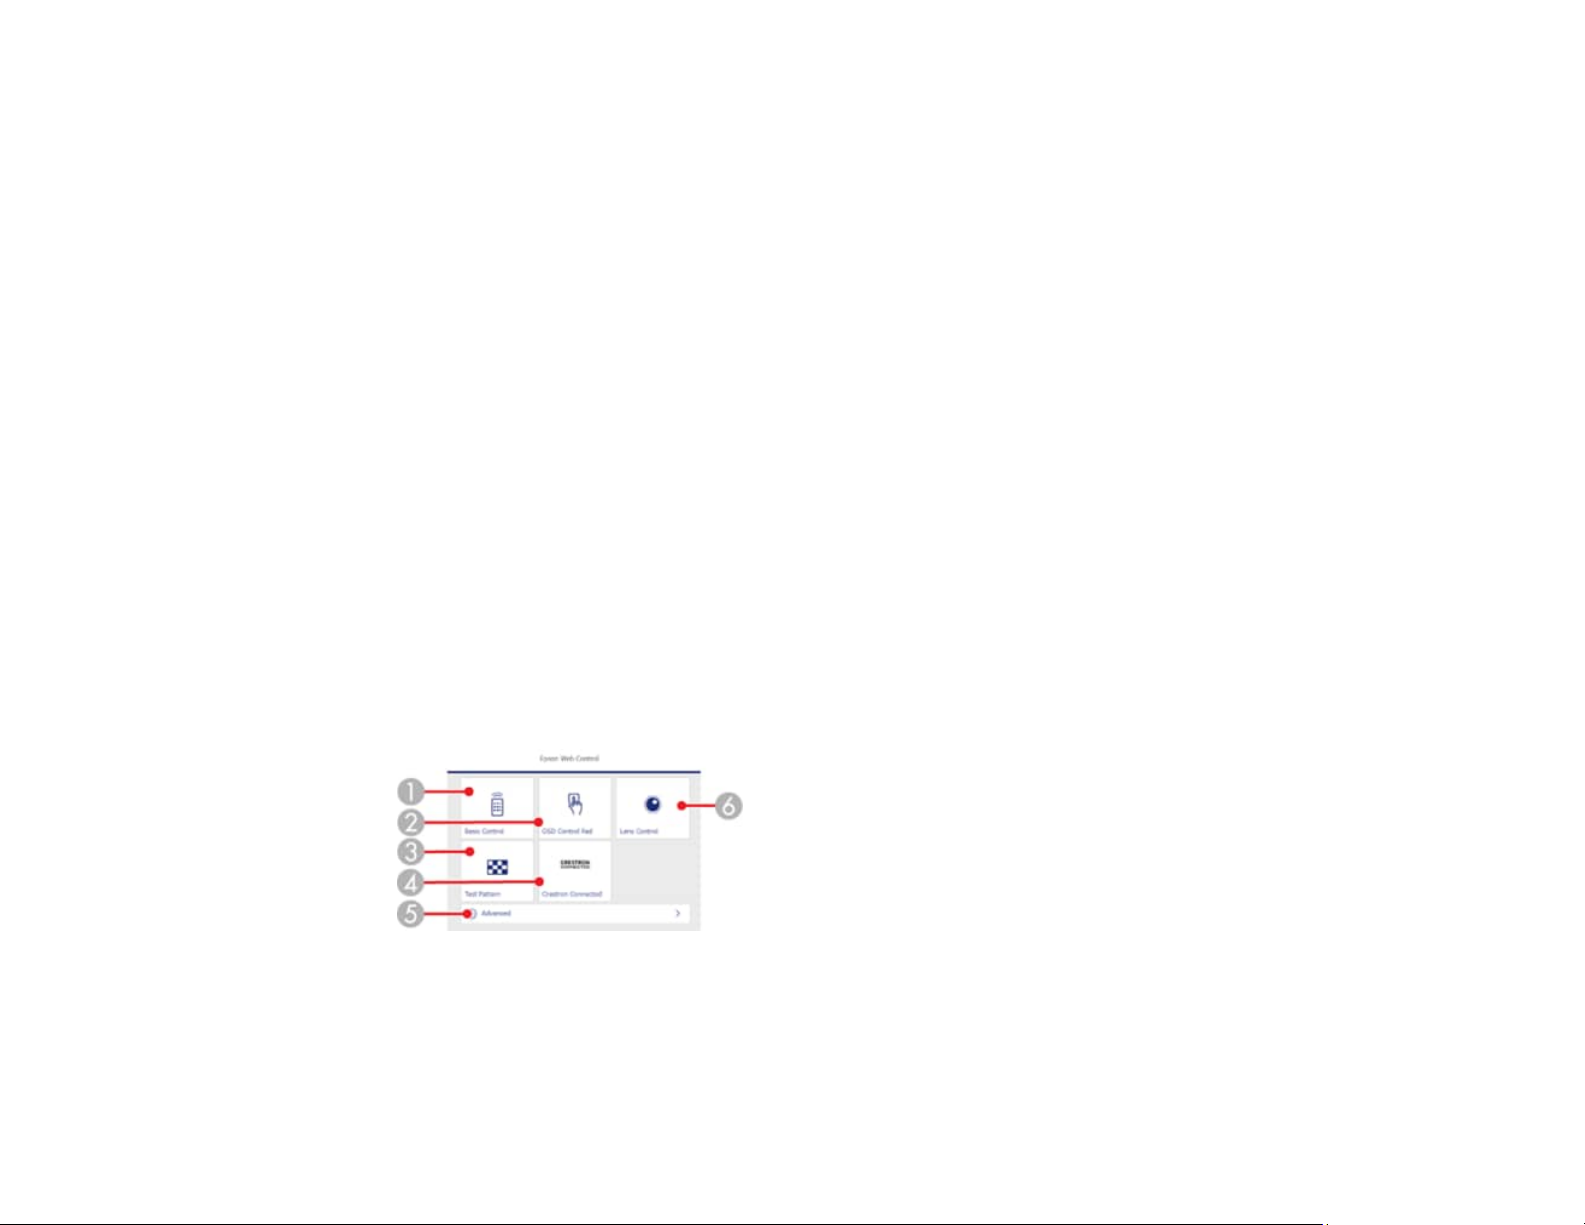
Note: Make sure that the projector and your computer or device are on the same network and that you
have set a Web Control Password in the Network Settings menu or you cannot access the Web
Control screen.
1. Make sure the projector is turned on.
2. Start your web browser on a computer or device connected to the network.
3. Enter the projector's IP address into the browser's address box (if you are entering an IPv6 address,
wrap the address with [ and ]).
Note: You can find the projector's IP address by selecting Wired LAN Info. in the projector's
Network menu.
Note: You may need to log in to access some of the options on the Web Control screen. If you see a
log in window, enter your user name and password.
• For the Basic Control option, the default user name is EPSONREMOTE. No password is set by
default.
• For all other options, the default user name is EPSONWEB. No password is set by default.
• You can change the password in the projector's Network menu:
• Network > Network Configuration > Basic > Remote Password
• Network > Network Configuration > Basic > Web Control Password
You see the Epson Web Control screen.
1 Select Basic Control to control the projector remotely.
2 Select OSD Control Pad to change the projector's menu settings.
3 Select Test Pattern to display a test pattern.
64
Page 65
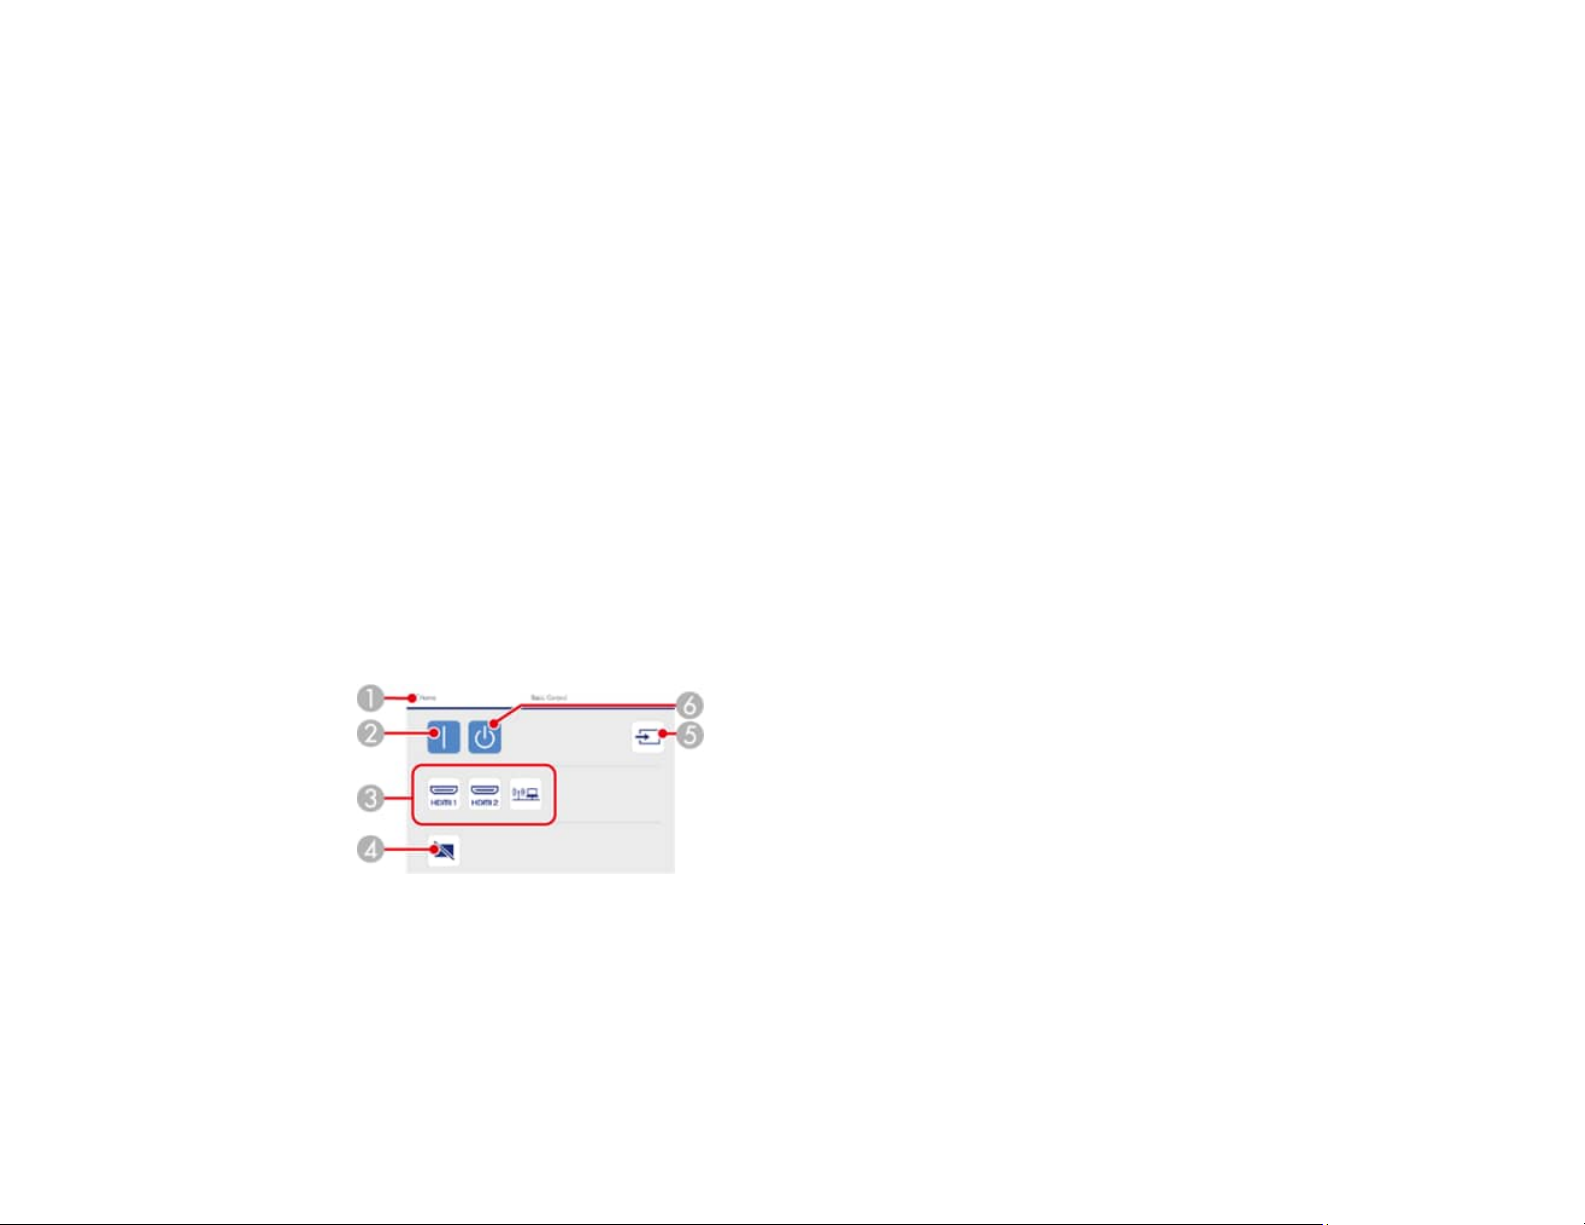
4 Select Crestron Connected to open the menu.
5 Select Advanced to open the advanced menu screen.
6 Select Lens Control to adjust the lens (focus, zoom, and lens shift).
Note: You can also check the projector's log files by entering "https://<projector's IP address>/logs/"
into your browser's URL bar when you set Log Save Destination to USB and Internal Memory in
the projector's Extended menu.
4. Select the option corresponding to the projector function you want to control.
Web Control Options
Parent topic: Monitoring and Controlling the Projector
Related references
Network Menu
Web Control Options
Basic Control
Note: If the Remote Password is set to On, you need to enter your user name and password. (The
default username is EPSONREMOTE. No password is set by default.)
1 Returns to the Home screen
2 Turns the projector on
3 Input source selection controls (available sources vary depending on projector model)
4 Turns the video and audio on or off temporarily
65
Page 66
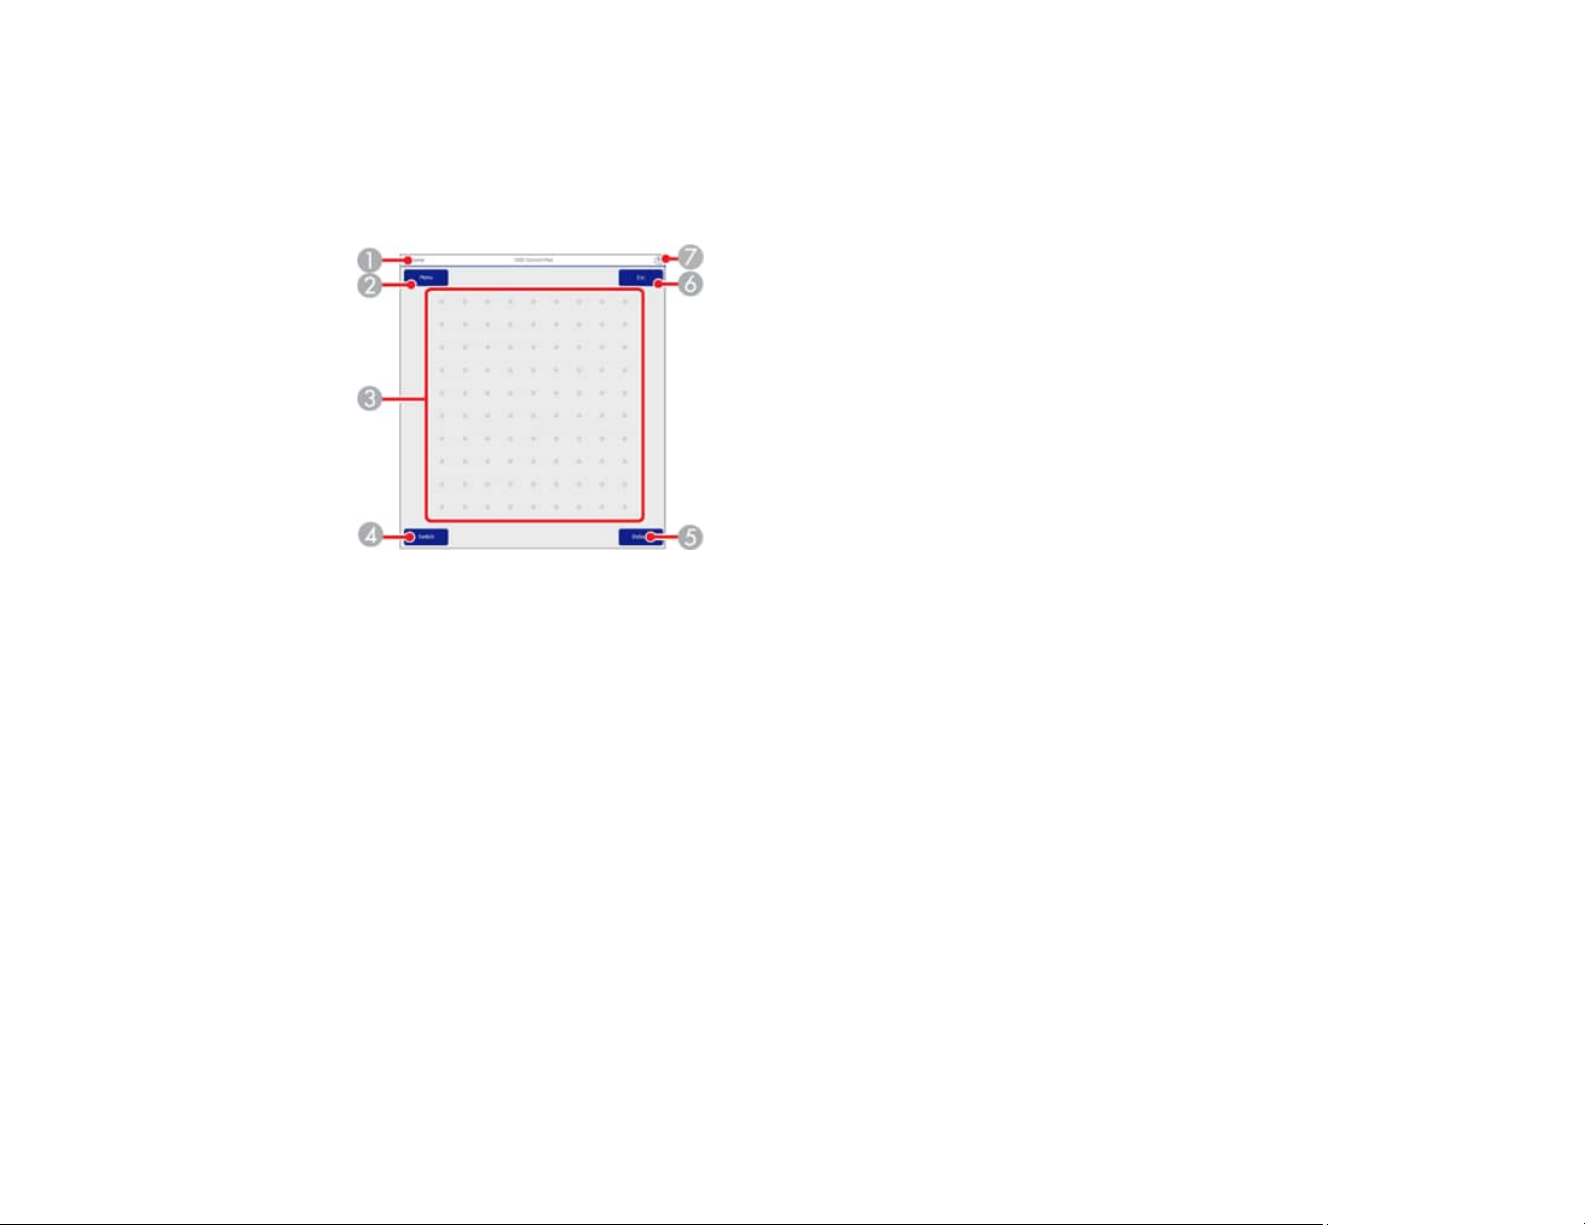
5 Searches for sources
6 Turns the projector off
OSD Control Pad
1 Returns to the Epson Web Control screen
2 Displays the projector's setting menus
3 Use your finger or mouse to navigate the menus
4 Switches the operation method to button mode
5 Resets the selected setting to its default value
6 Returns to the previous menu
7 Displays help topics
Note: You cannot change some settings using Epson Web Control.
66
Page 67
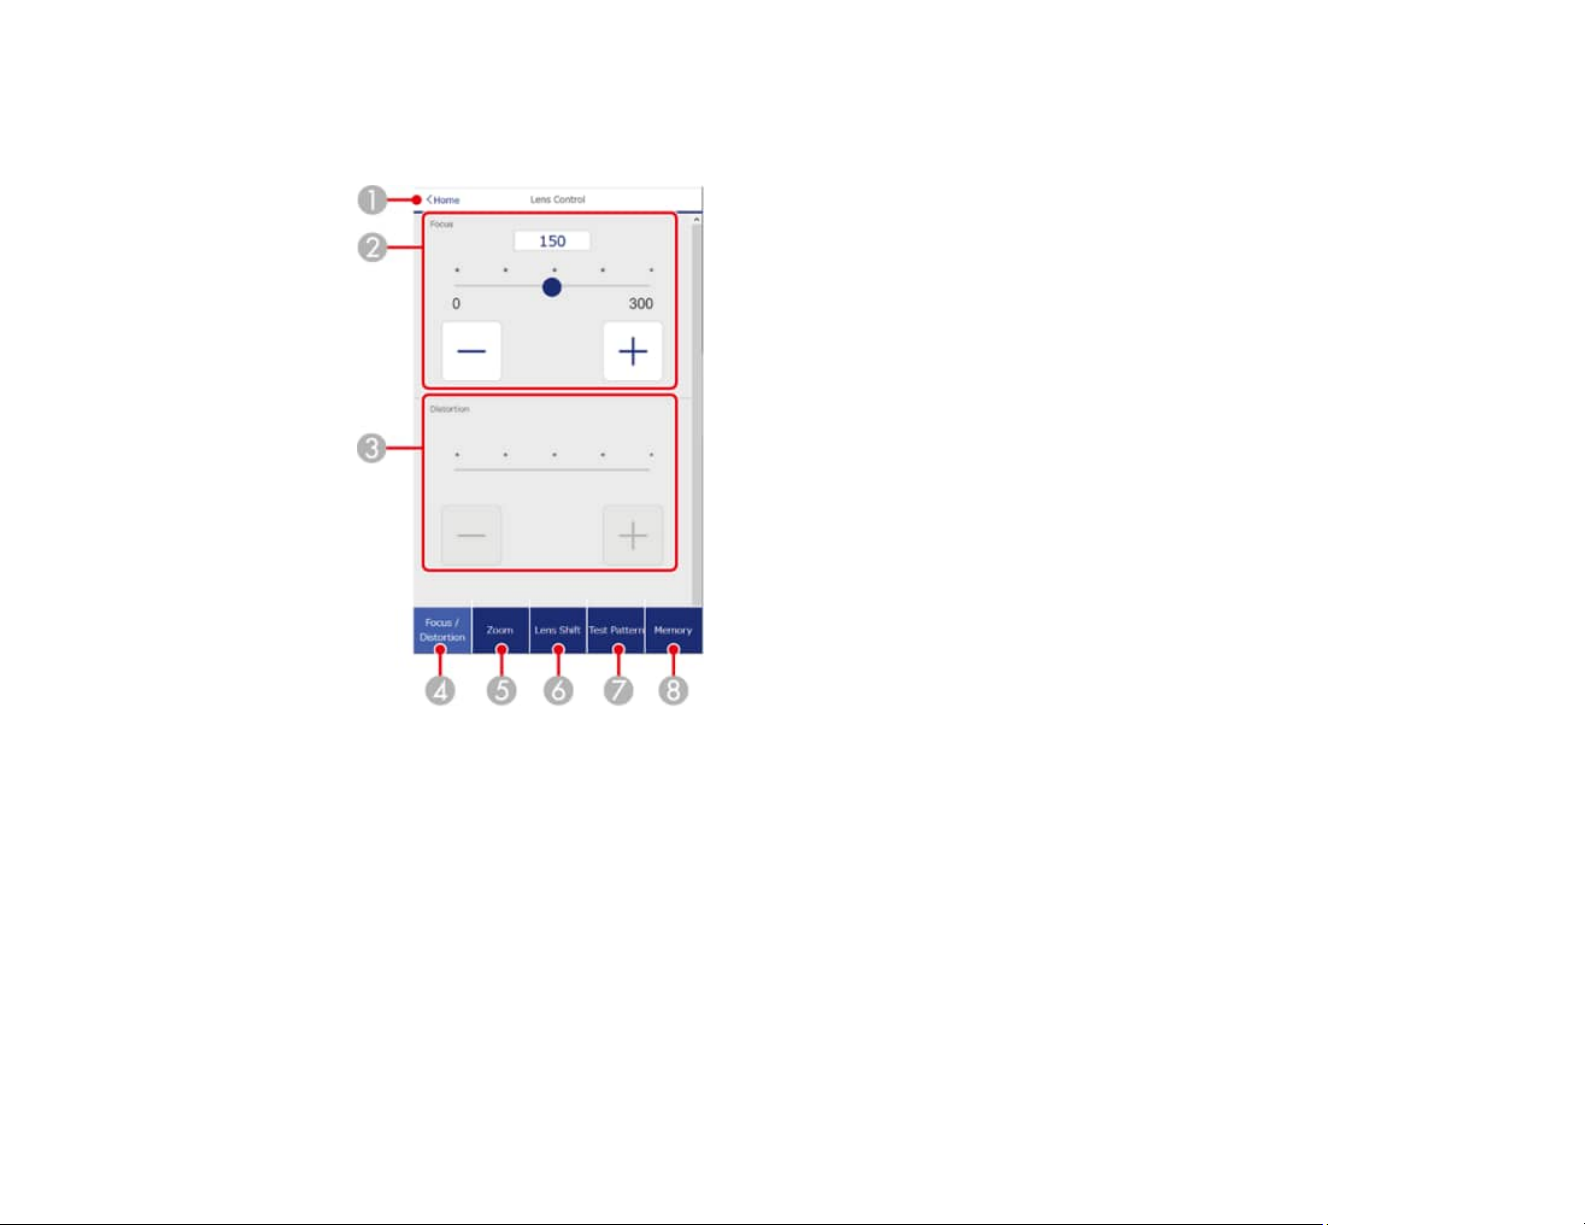
Lens Control
Focus/Distortion screen
1 Returns to the Epson Web Control screen
2 Focus adjustment slider
3 Distortion adjustment slider
4 Displays the Focus/Distortion screen
5 Displays the Zoom screen
6 Displays the Lens Shift screen
7 Displays the Test Pattern screen
8 Displays the Memory screen
Zoom screen
67
Page 68
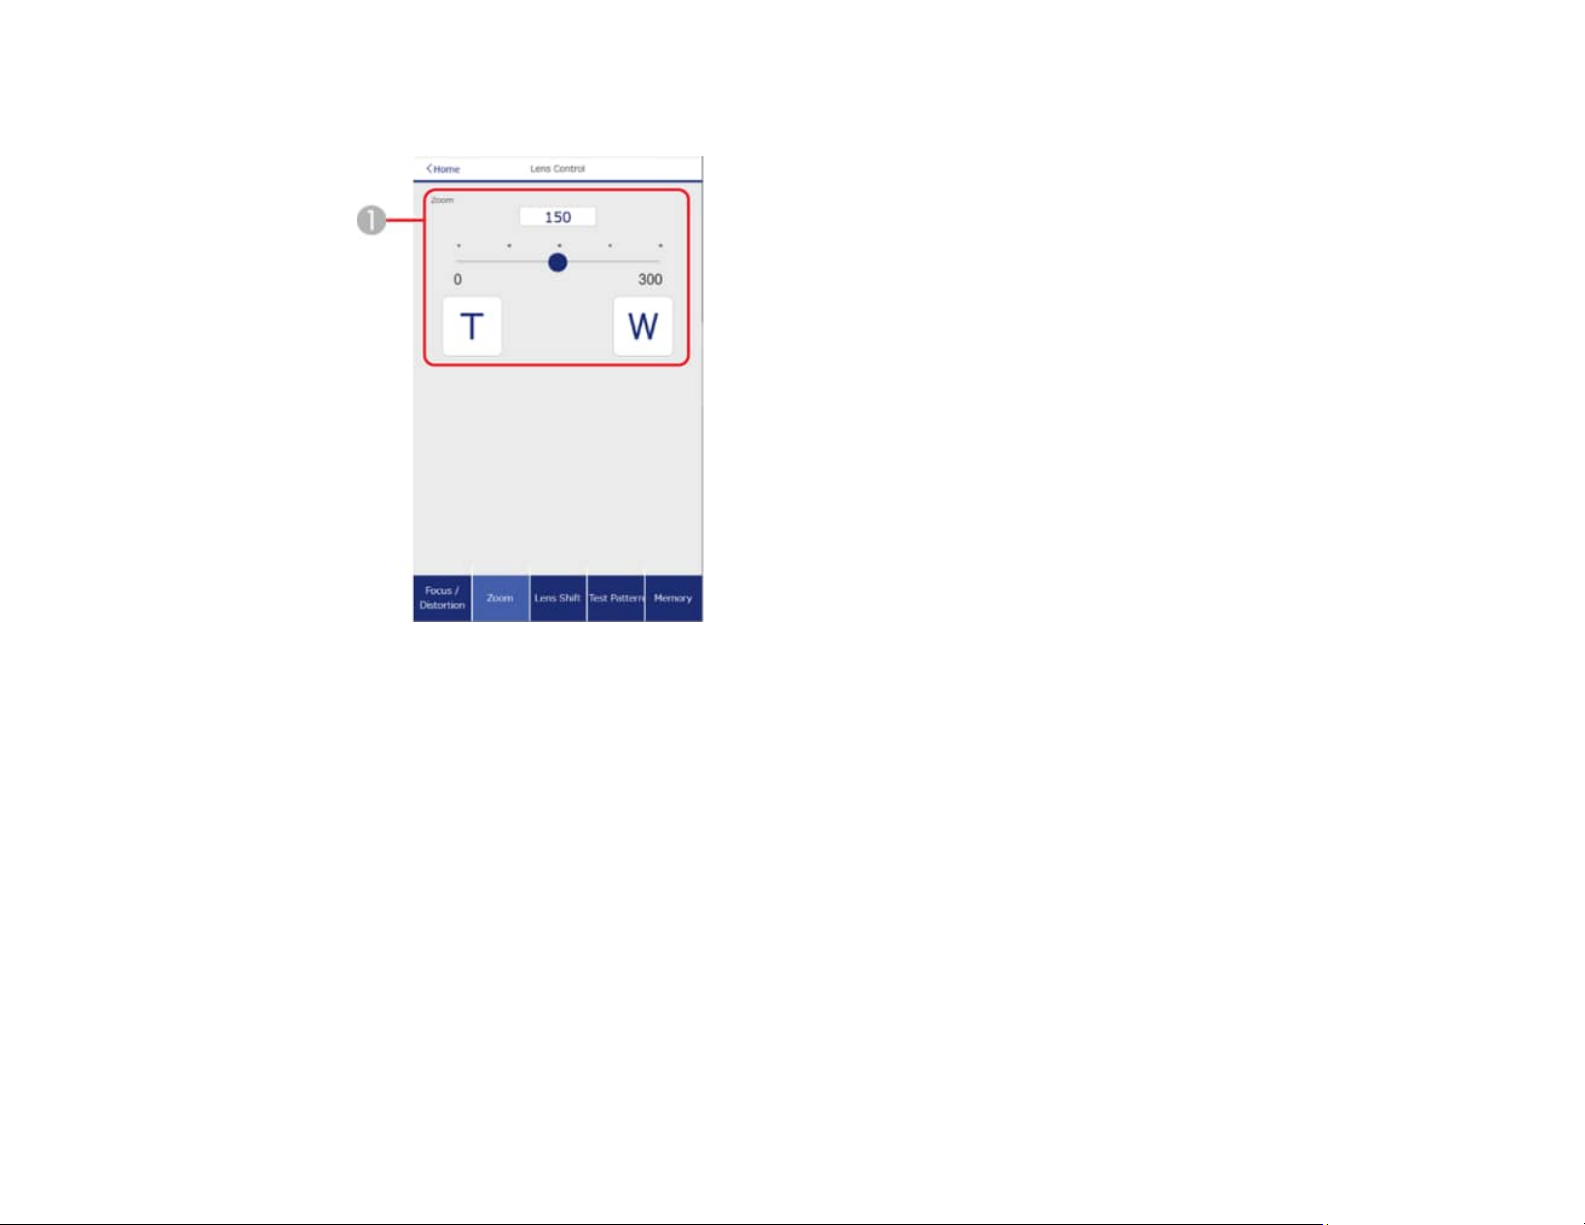
Note: Depending on the installed lens, the Zoom feature may not be available.
1 Zoom adjustment slider
T: Reduces the size of the image
W: Increases the size of the image
68
Page 69
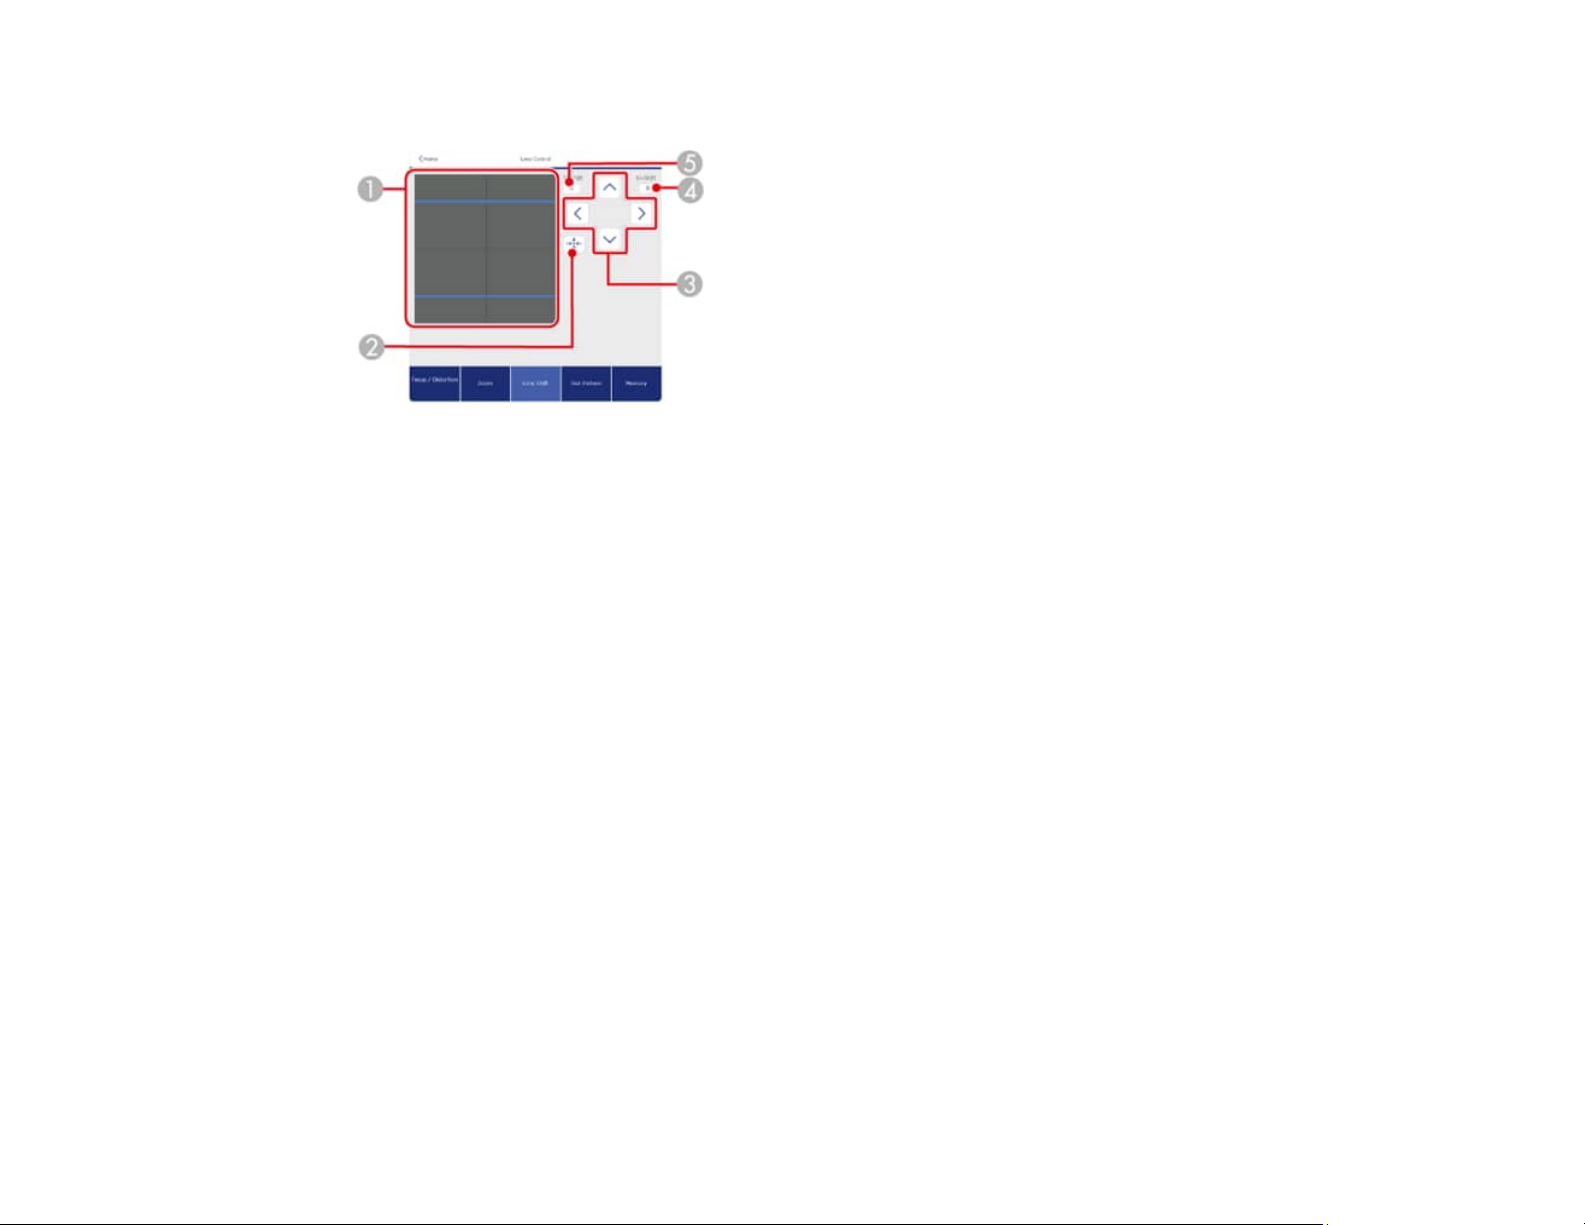
Lens Shift screen
1 The blue square displays the current image position and the red square displays the new image
position
2 Moves the lens to the home position
3 Moves the image position up, down, left, or right
4 Displays the horizontal image position; select to change the value
5 Displays the vertical image position; select to change the value
Note: Depending on the currently installed lens, this screen may look different.
69
Page 70
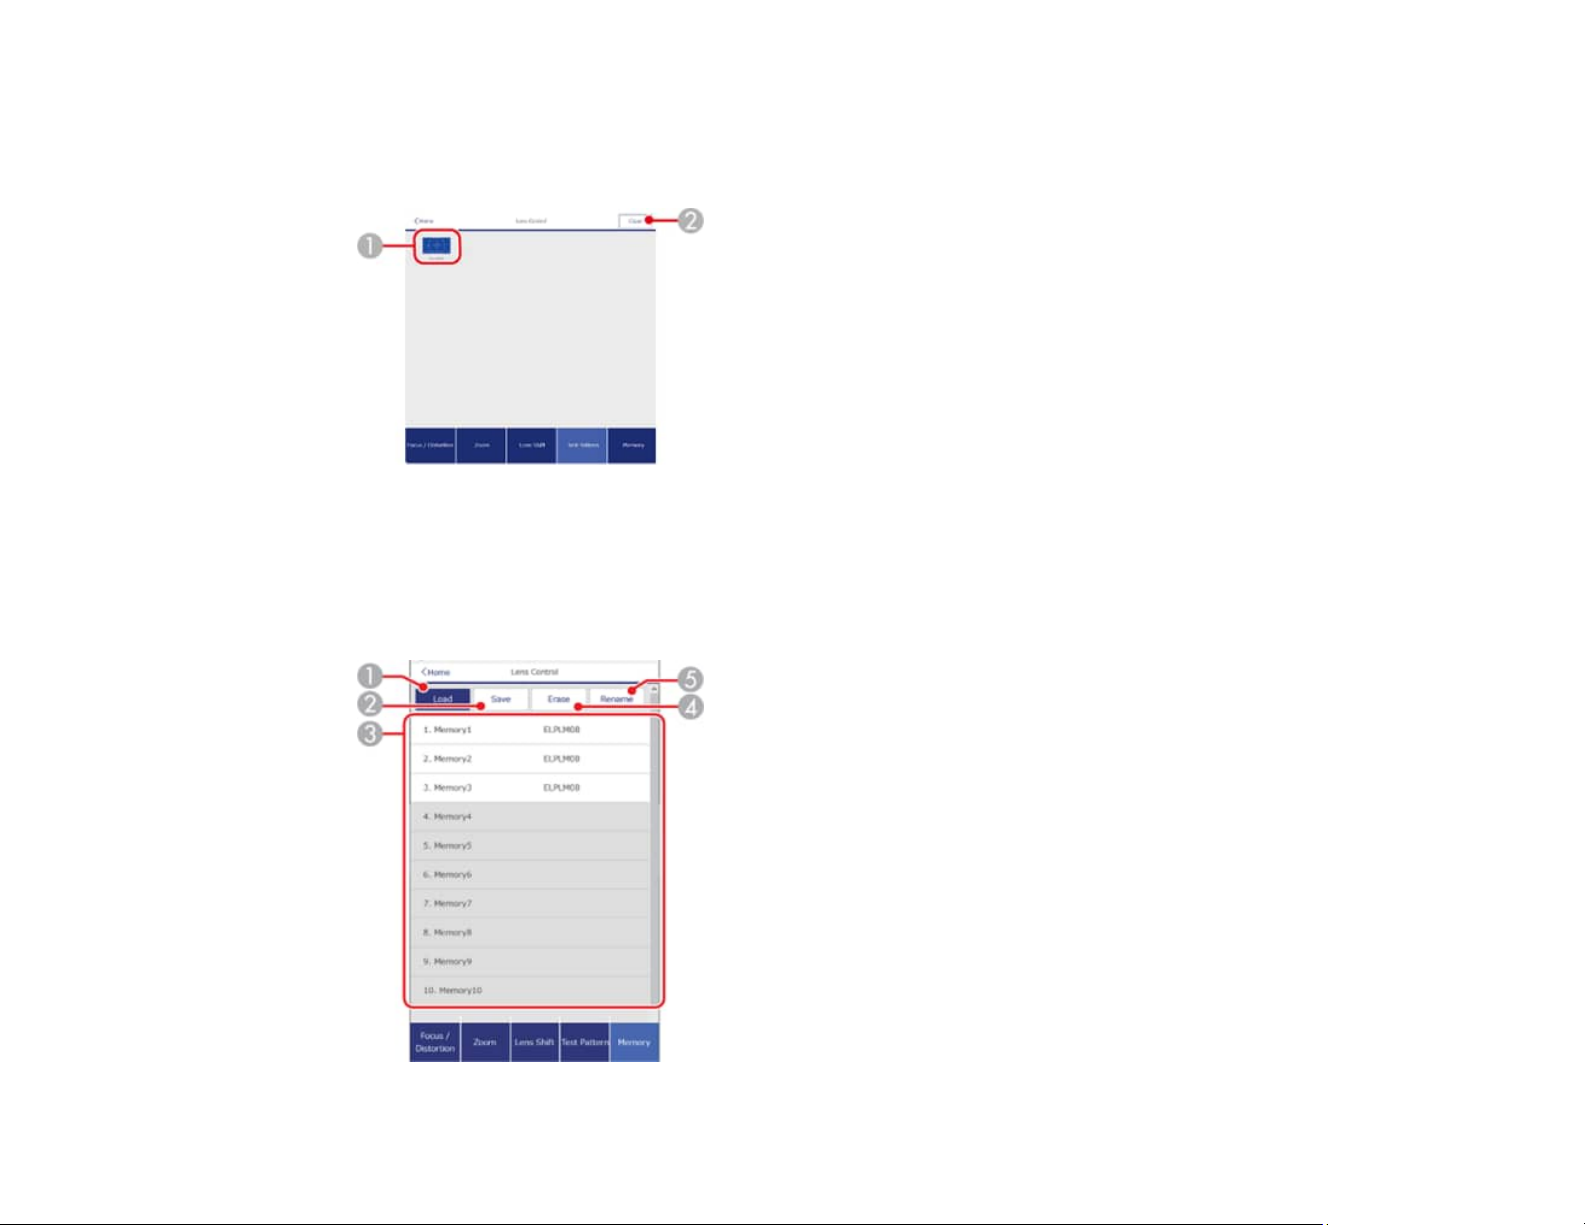
Test Pattern screen
Note: The available test patterns may differ from the ones shown here.
1 Displays available test patterns; select to project a test pattern
2 Turns off test pattern display
Memory screen
70
Page 71
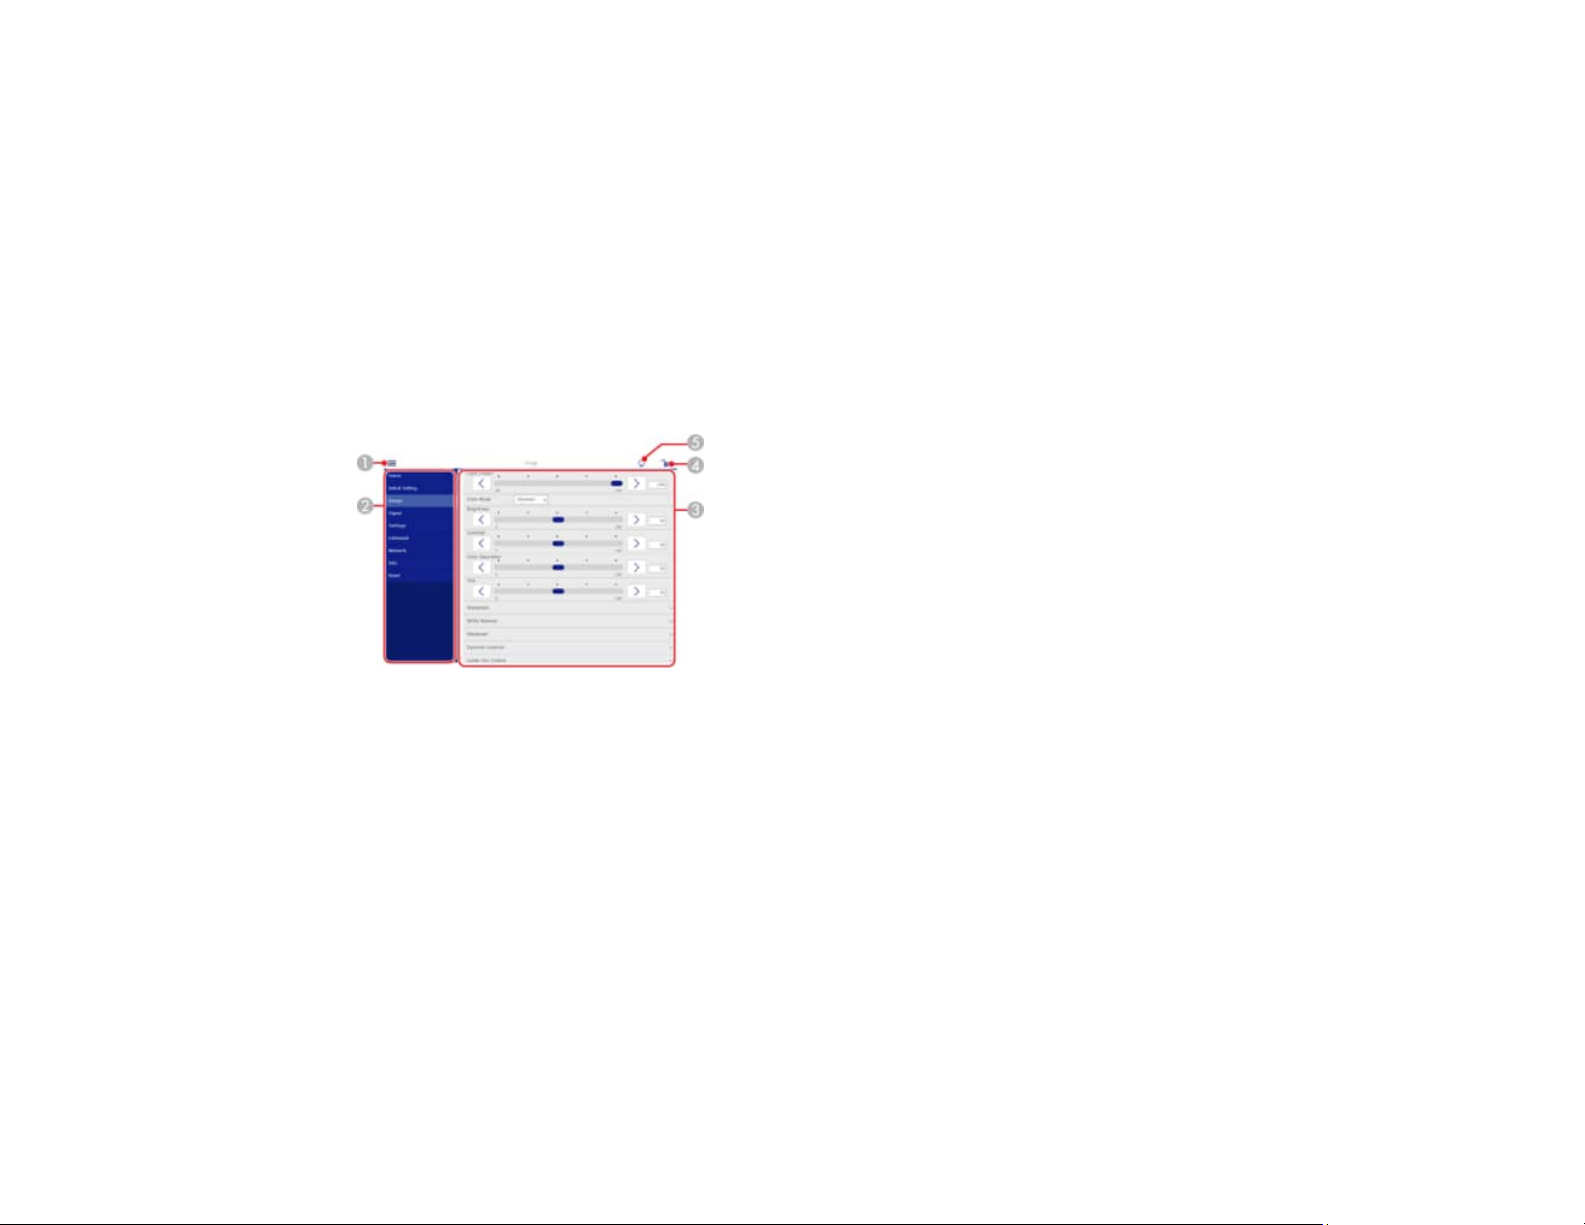
1 Overwrites your current settings with saved settings
2 Saves your current settings to memory
3 Displays a list of saved memories
4 Erases a saved memory
5 Renames a saved memory
Advanced
If the default Web Control Password is set, a screen prompting you to change the password appears
before you can view the Advanced screen. It is strongly recommended that you change the password
regularly to prevent unauthorized access to your projector.
1 Opens the menus
2 Displays the selected menu name
3 Contains the selected projector settings (available settings vary depending on projector model)
4 Locks or unlocks the projector settings
5 Updates the projector settings
Note: You cannot change the following settings using Epson Web Control:
• Custom setting for Gamma
• EDID
• HDMI Link
• User Button
71
Page 72

• Content Playback
• Message Position
• User's Logo
• Lens Calibration
• Language
• Event ID
You can only change the Display Logs settings using Epson Web Control.
Parent topic: Controlling a Networked Projector Using a Web Browser
Controlling a Networked Projector in Content Playback Mode
When Content Playback mode is turned on in the Settings menu, you can select projector settings,
control projection, and edit playlists using a web browser.
Note: You can also control the projector using a web browser through the Epson iProjection app.
Note: Do not remove any USB device connected to the projector or unplug the power cord when the
Playlists or USB Memory Device screen is displayed; data saved on the USB device may be damaged.
1. Make sure the projector is operating in Content Playback mode.
2. Make sure the projector is turned on and your computer or device is connected to the same network
as the projector.
3. Start your web browser on the computer or device.
4. Type the projector's IP address into the browser's address box and press the computer's Enter key.
72
Page 73
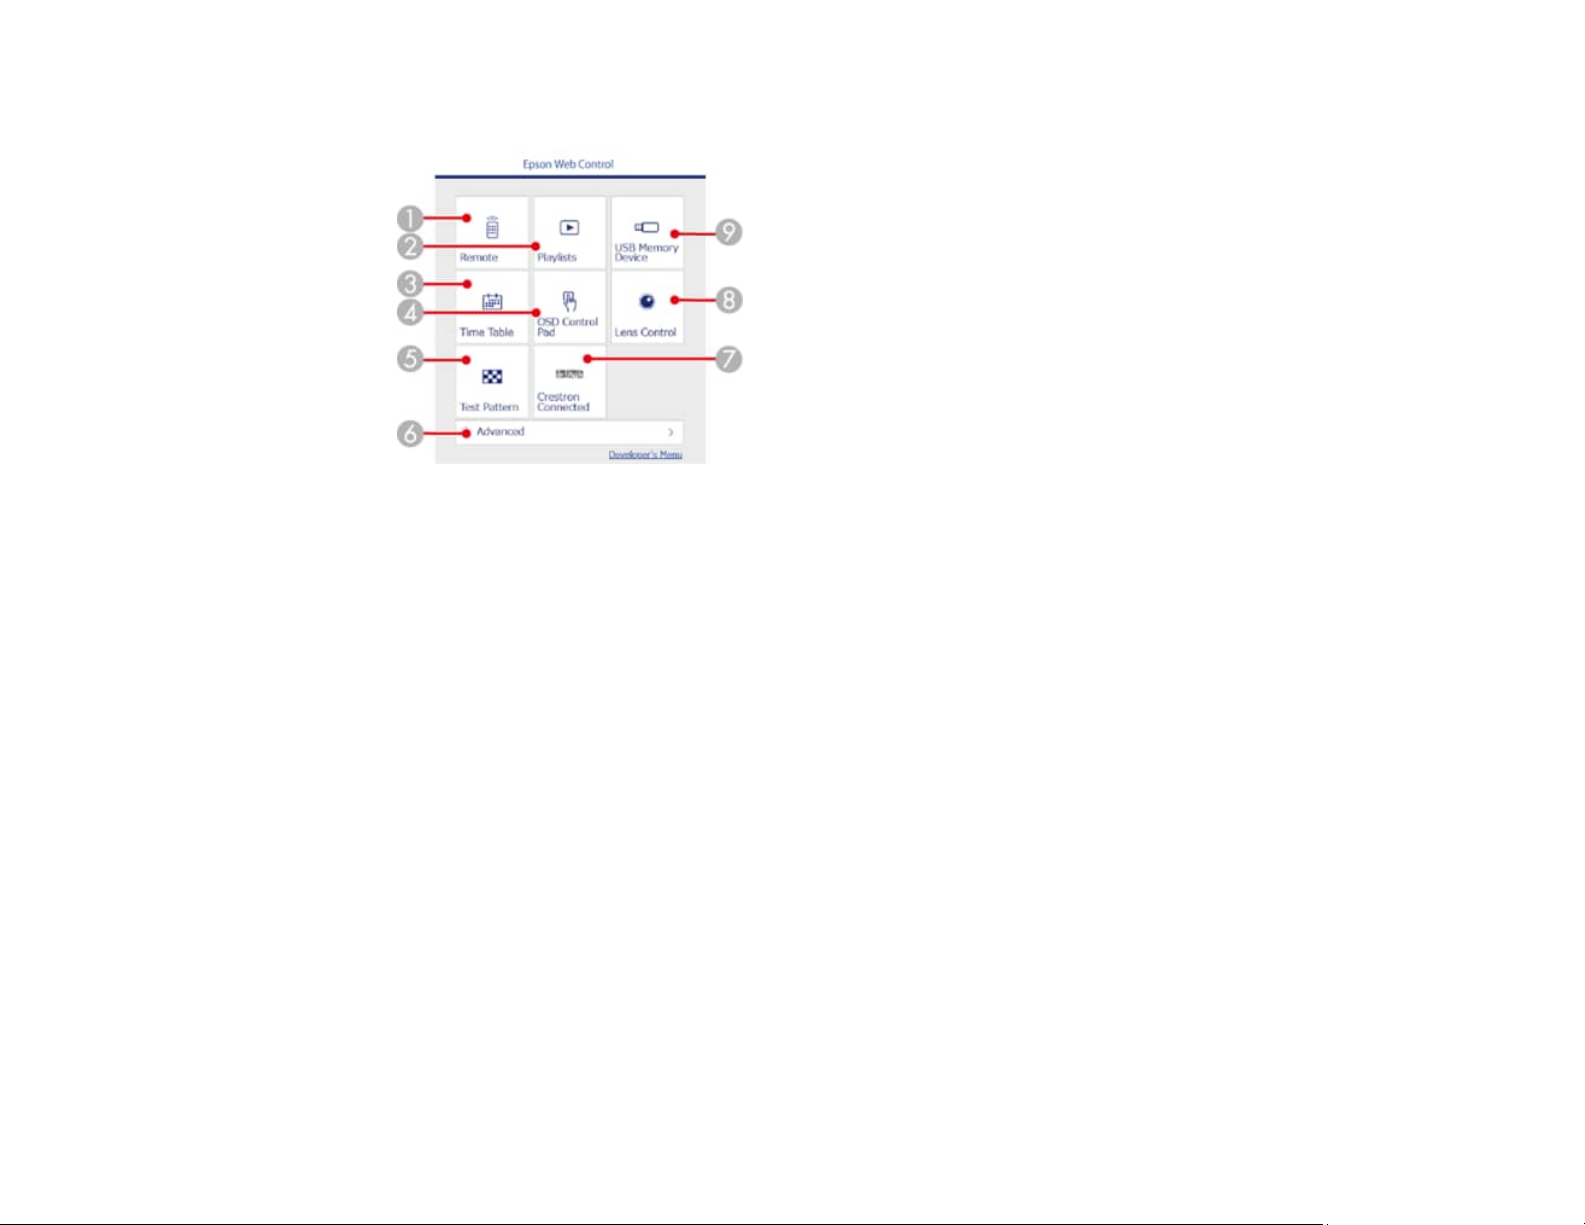
You see the Epson Web Control screen.
1 Controls the projector remotely
2 Selects the playlist you want to play and allows you to create or edit playlists
3 Opens the Time Table screen
4 Operates the projector's menus with your finger or a mouse
5 Displays a test pattern
6 Opens detailed projector settings
7 Opens the Crestron Connected window (available when Crestron Connected is turned on)
8 Operates the projector's lens
9 Registers or deletes playlist data on the USB device
5. Select the option corresponding to the projector function you want to control.
Note: You may need to log in to access some of the options on the Web Control screen. If you see a
login window, enter your user name and password. (The default user name is EPSONWEB and the
default password is not set.)
Web Control Options in Content Playback Mode
Parent topic: Monitoring and Controlling the Projector
73
Page 74
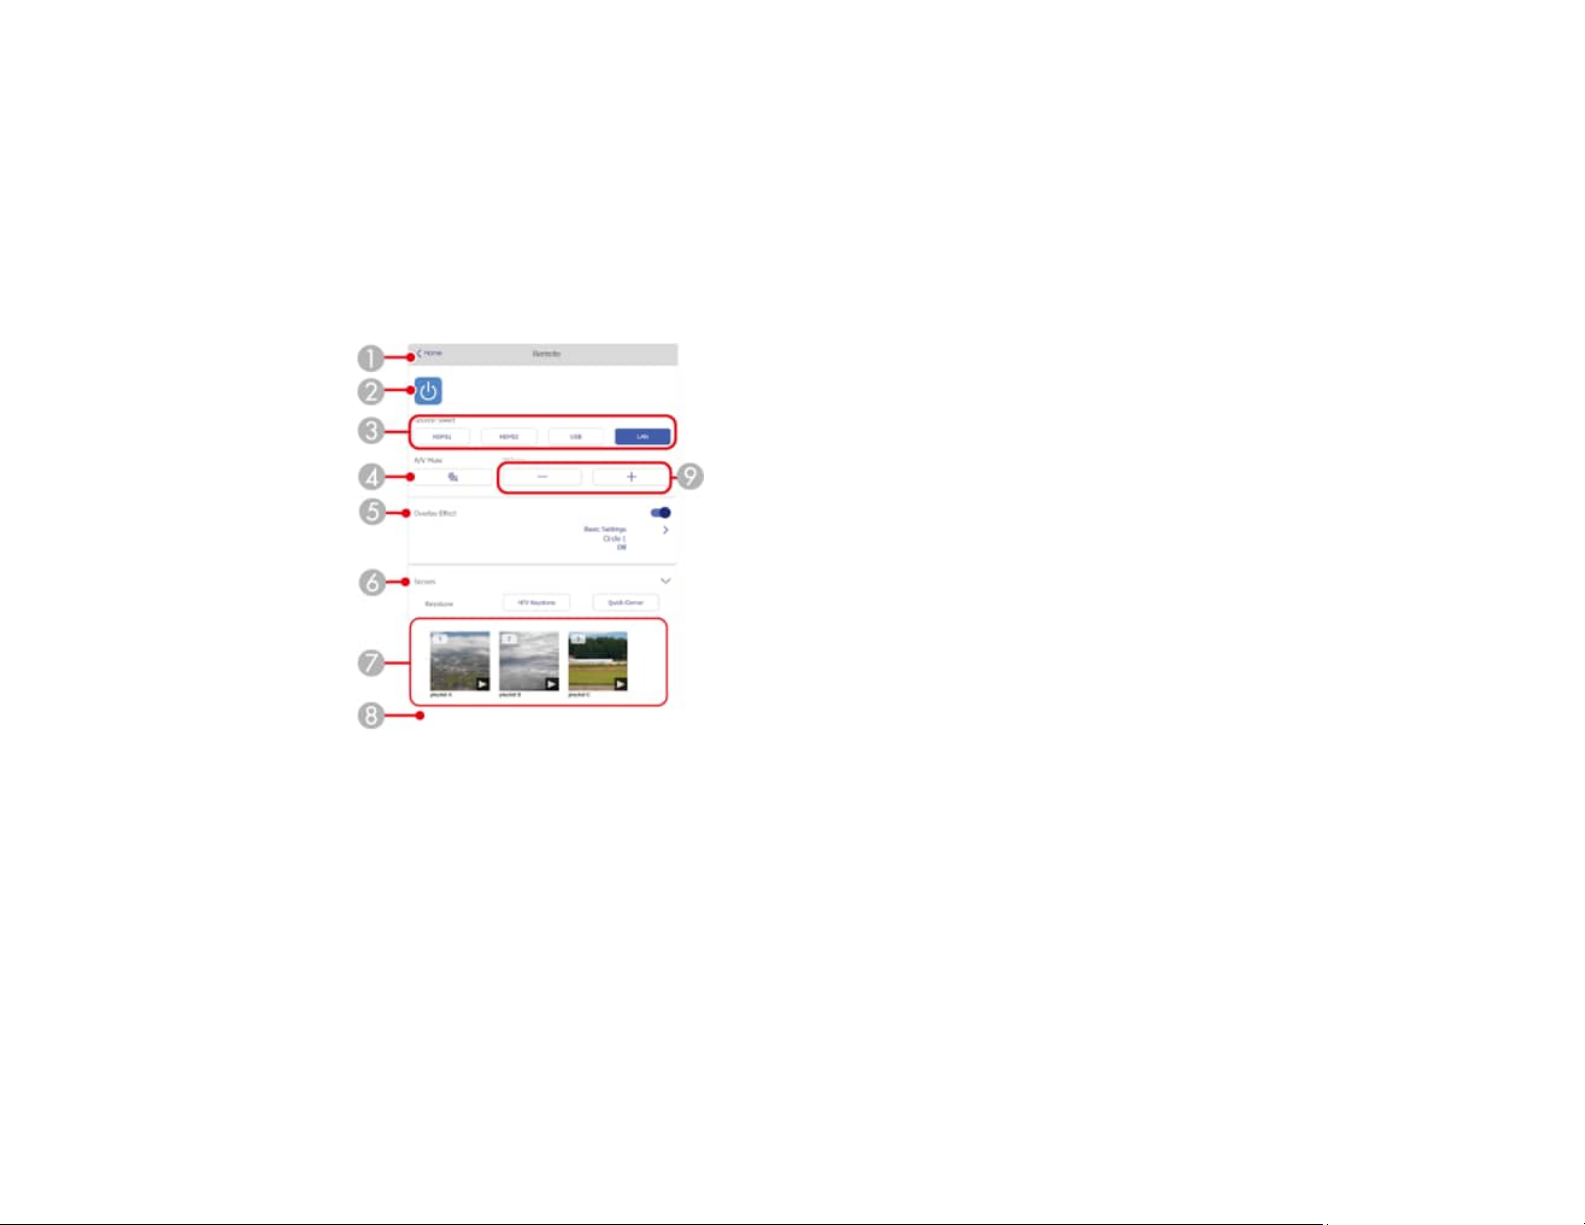
Related references
Network Menu
Web Control Options in Content Playback Mode
Remote
Note: If the Remote Password is set to On, you need to enter your user name and password. (The
default username is EPSONREMOTE. No password is set by default.)
1 Returns to the Epson Web Control screen
2 Turns the projector on or off
3 Selects the input source (available sources vary depending on projector model)
4 Turns the video and audio on or off temporarily
5 Turns Overlay Effect on or off to add color and shape effects to a playlist
When on, the Effects screen is displayed
6 Displays the screen settings
7 Displays your favorite playlists
74
Page 75
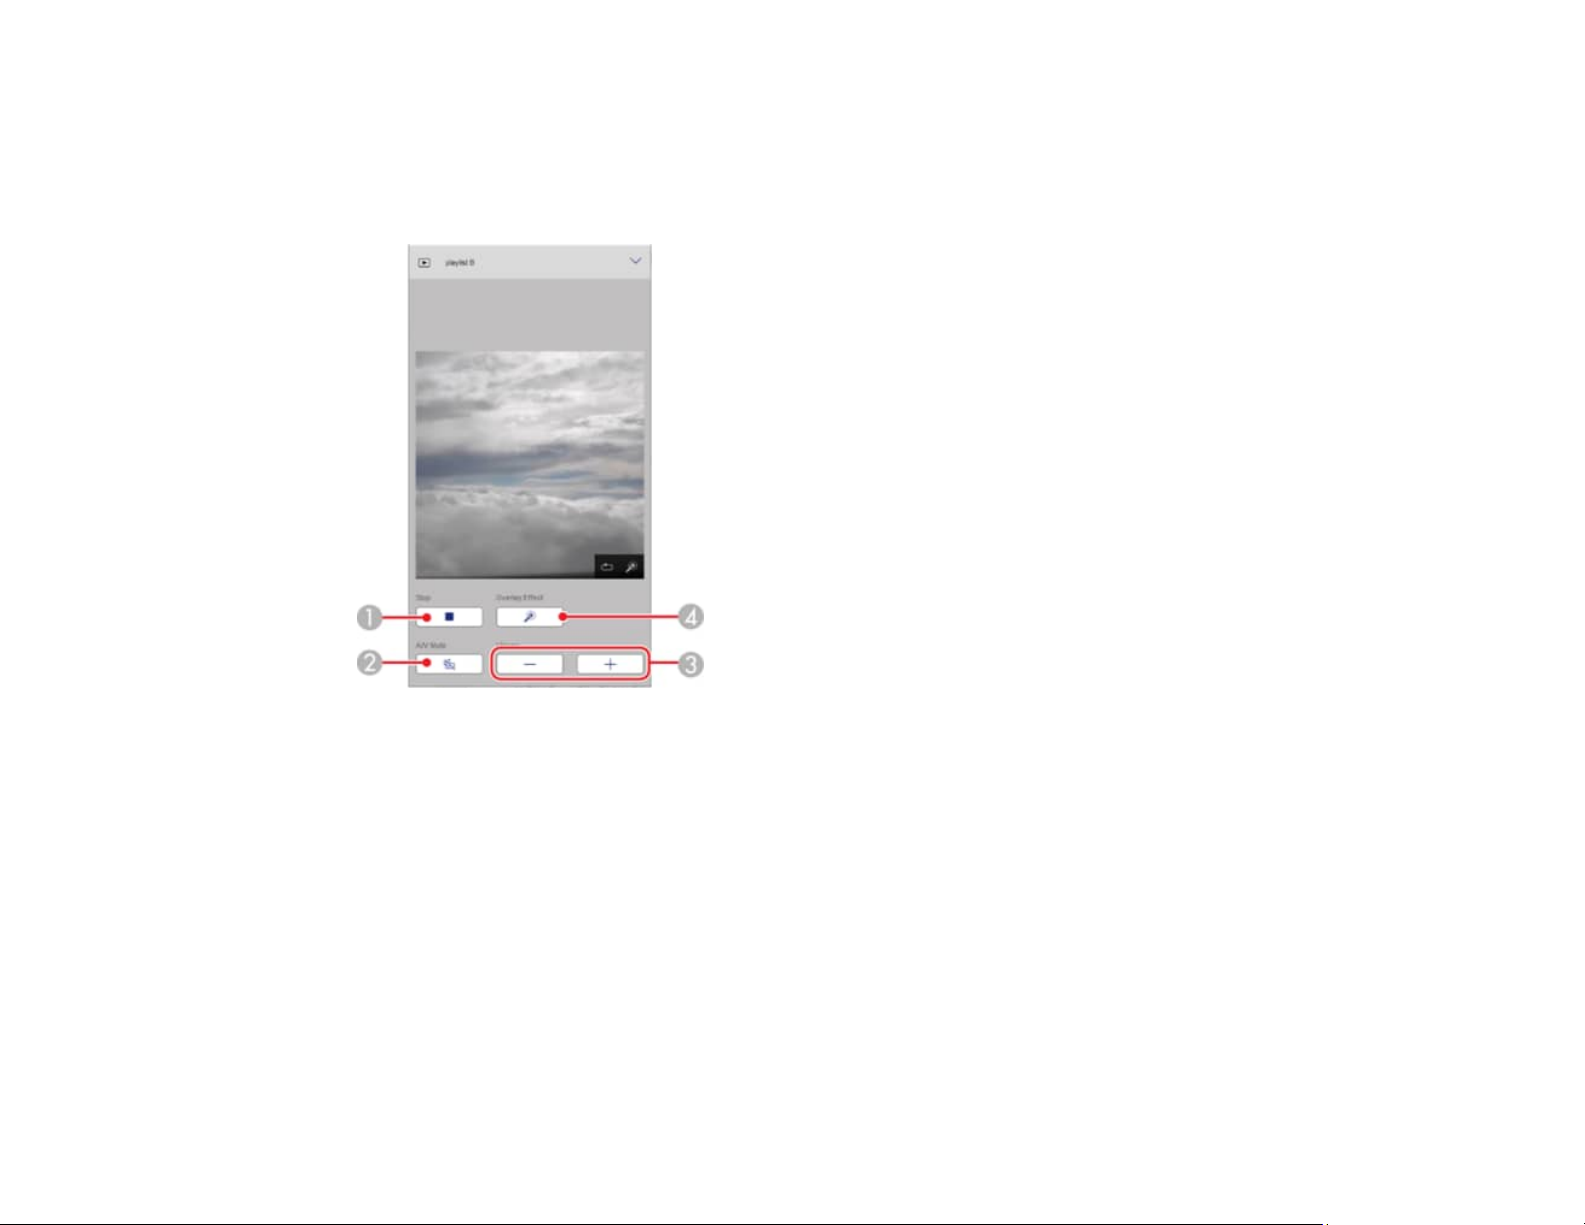
8 Displays playlist information
9 Adjusts the speaker volume
Screen displayed while projecting playlist
1 Stops projection
2 Turns the video and audio on or off temporarily, however, the audio and video continue to run so
you cannot resume projection at the point you activated this function
3 Adjusts the speaker volume
4 Displays the Effects screen; you can select preset effects or select individual brightness, color,
and shape effect filters
75
Page 76
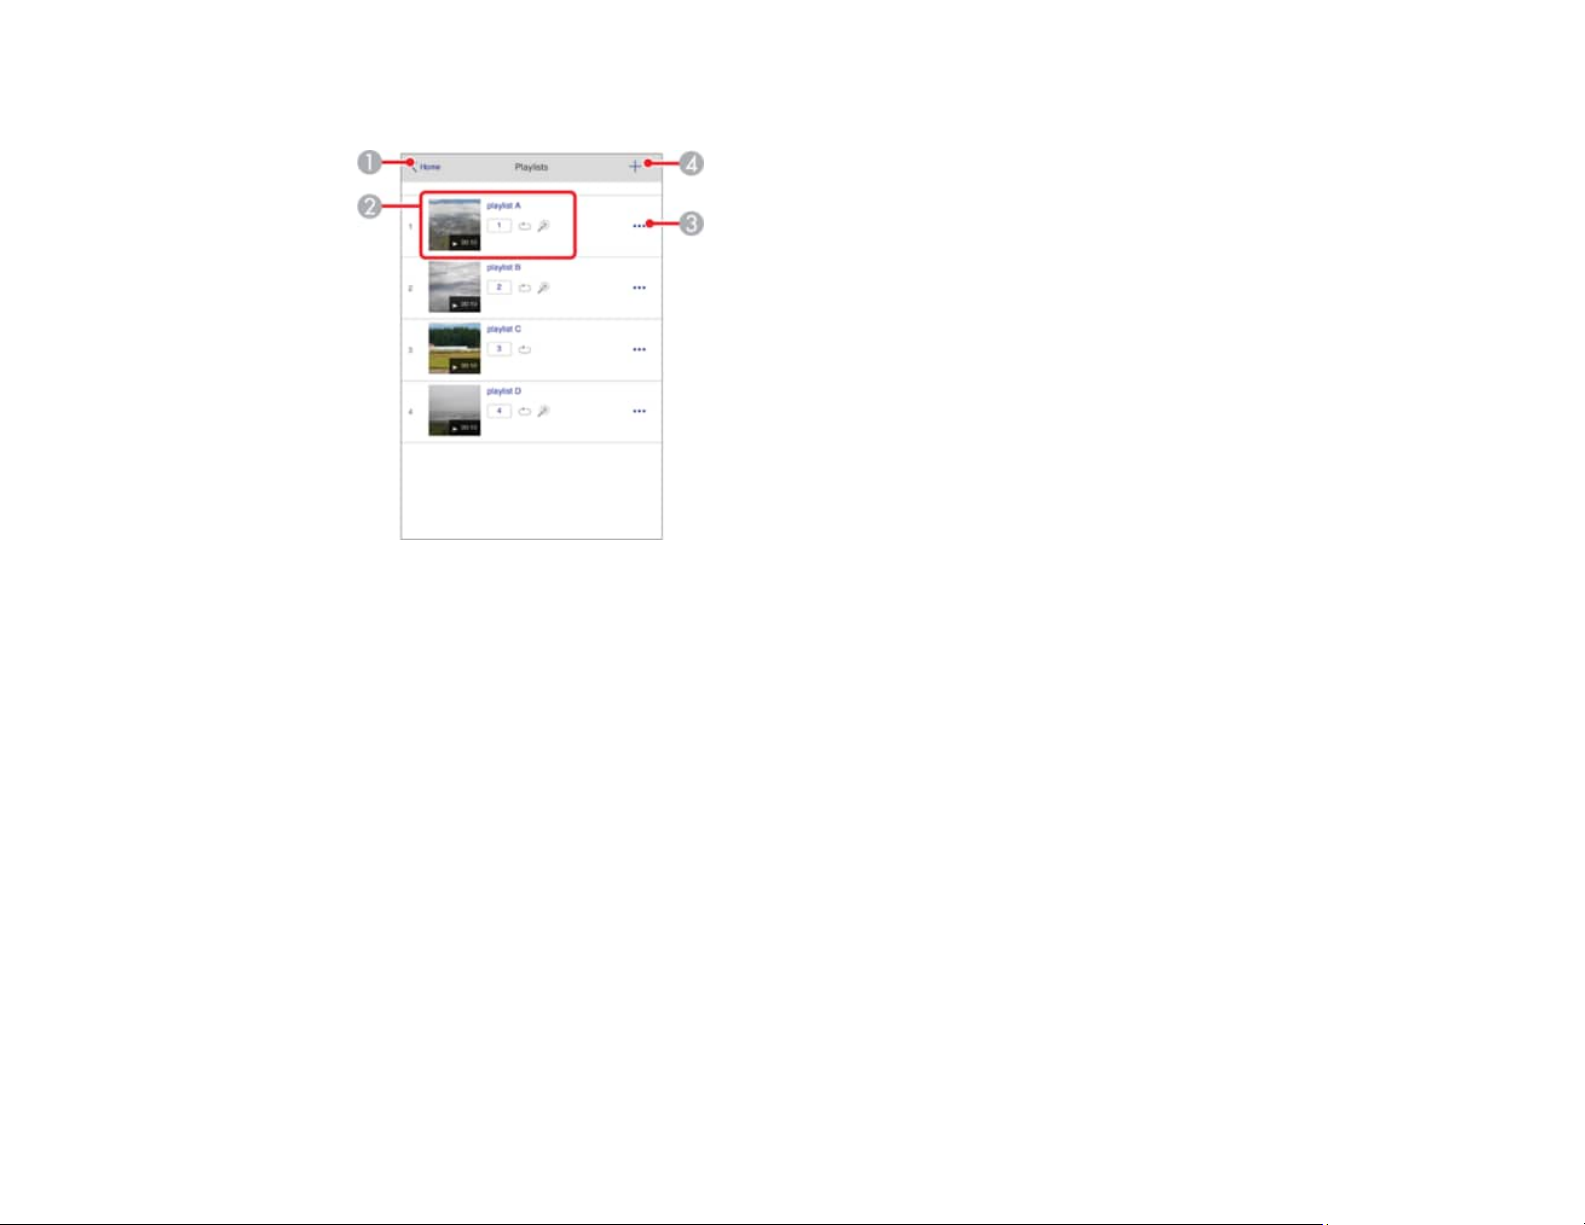
Playlists
1 Returns to the Epson Web Control screen
2 Controls playback of the playlist
3 Edits, copies, or deletes the playlist
4 Creates a new playlist
76
Page 77
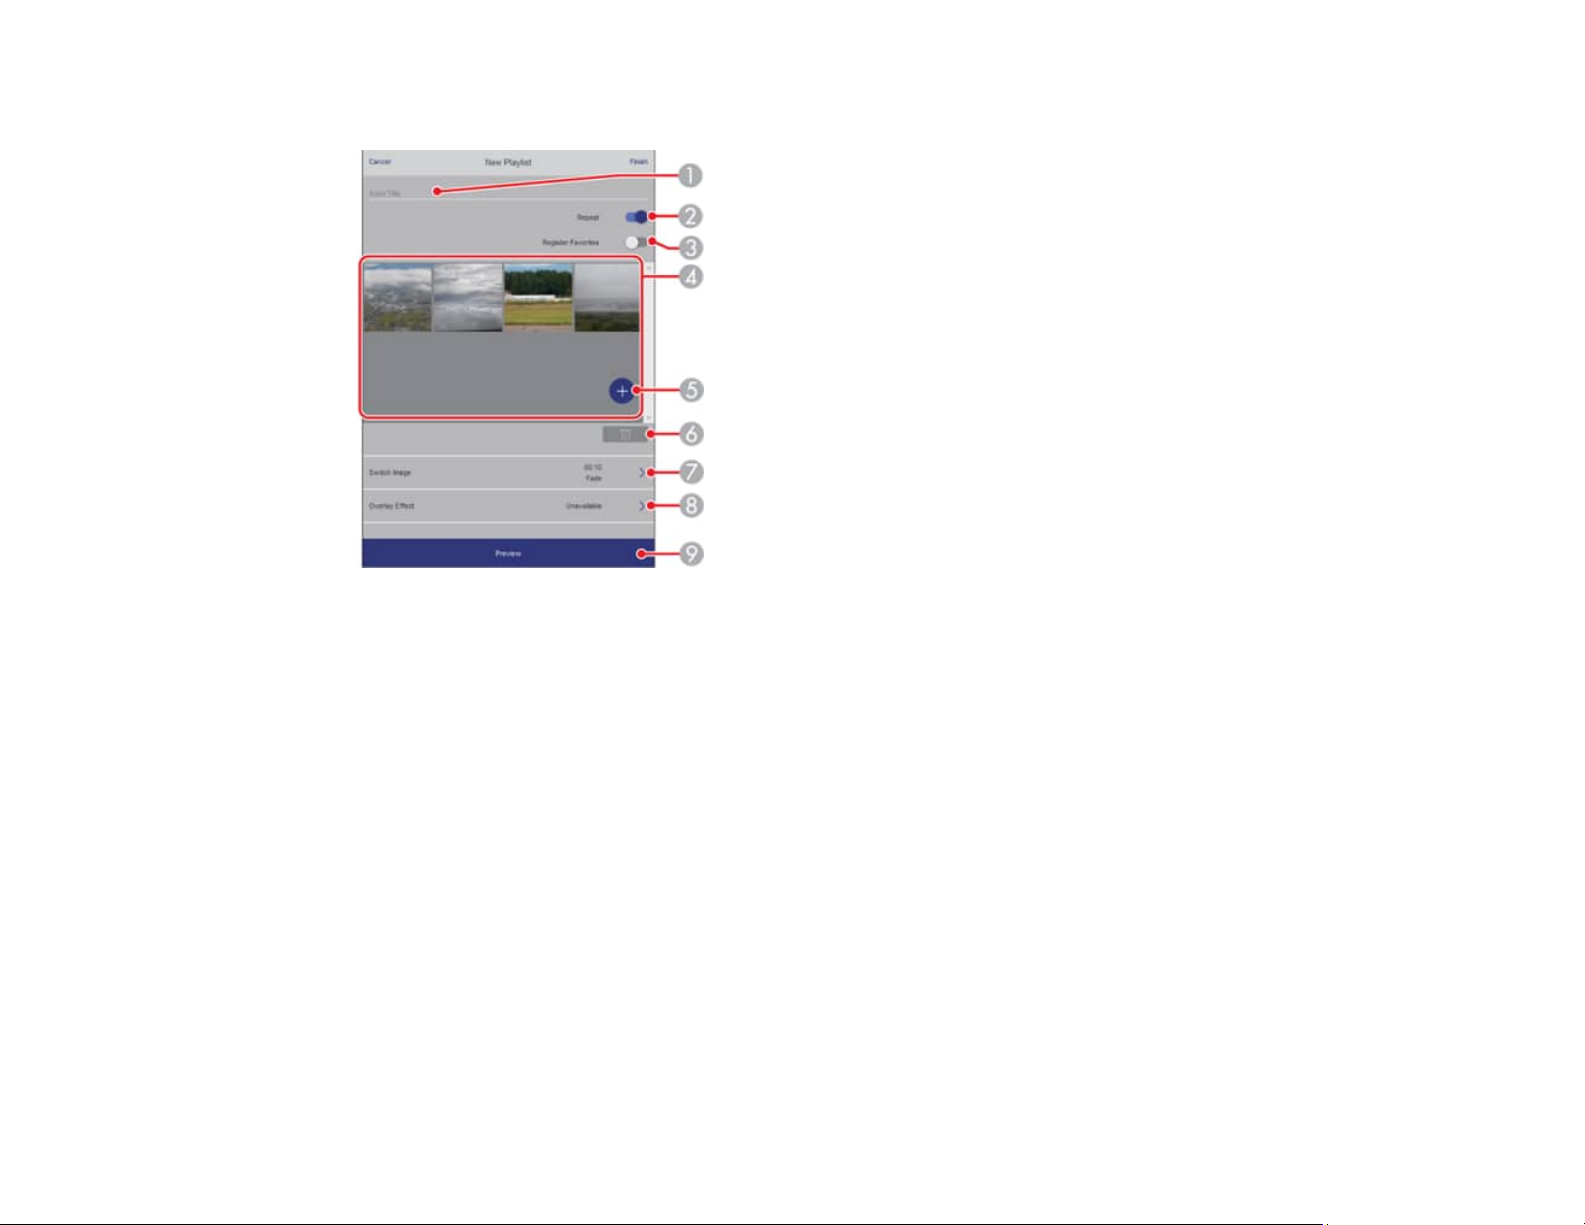
Create or Edit Playlist
1 Edits the playlist name
2 Enables repeat playback
3 Adds the playlist to your favorites list
4 Displays the images or movies in the order that they will be played
5 Adds items to the playlist
6 Deletes items from the playlist
7 Opens the Switch Image screen (specifies the time before the projector switches to the next item
in the playlist)
8 Opens the Effects screen
9 Previews the playlist
77
Page 78
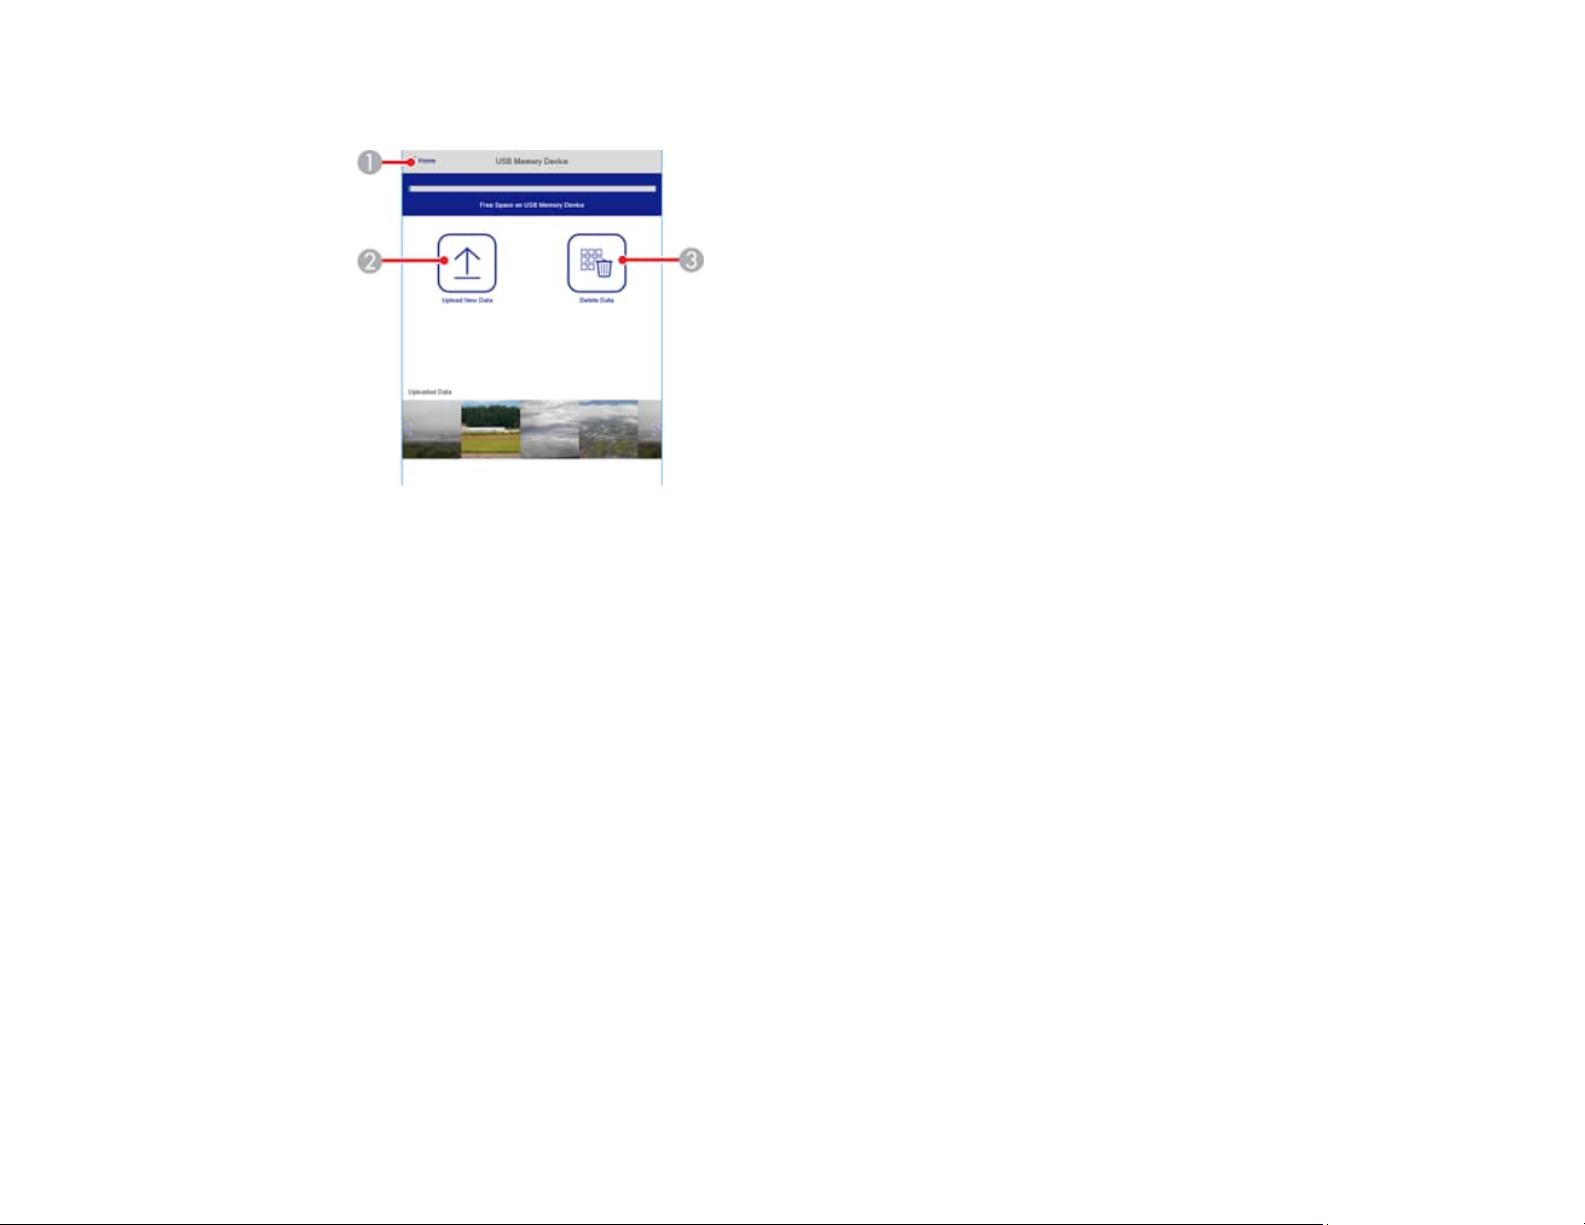
USB Memory Device
1 Returns to the Epson Web Control screen
2 Uploads images or videos to add to playlists on a USB device
3 Deletes images or videos on the USB device
Note: You can upload .avi, .jpeg (.jpg), .png, .bmp, or .gif files using Epson Web Control. If you want to
add .mp4 or .mov files to the playlist, use the Epson Projector Content Manager software or the Epson
Creative Projection app.
78
Page 79
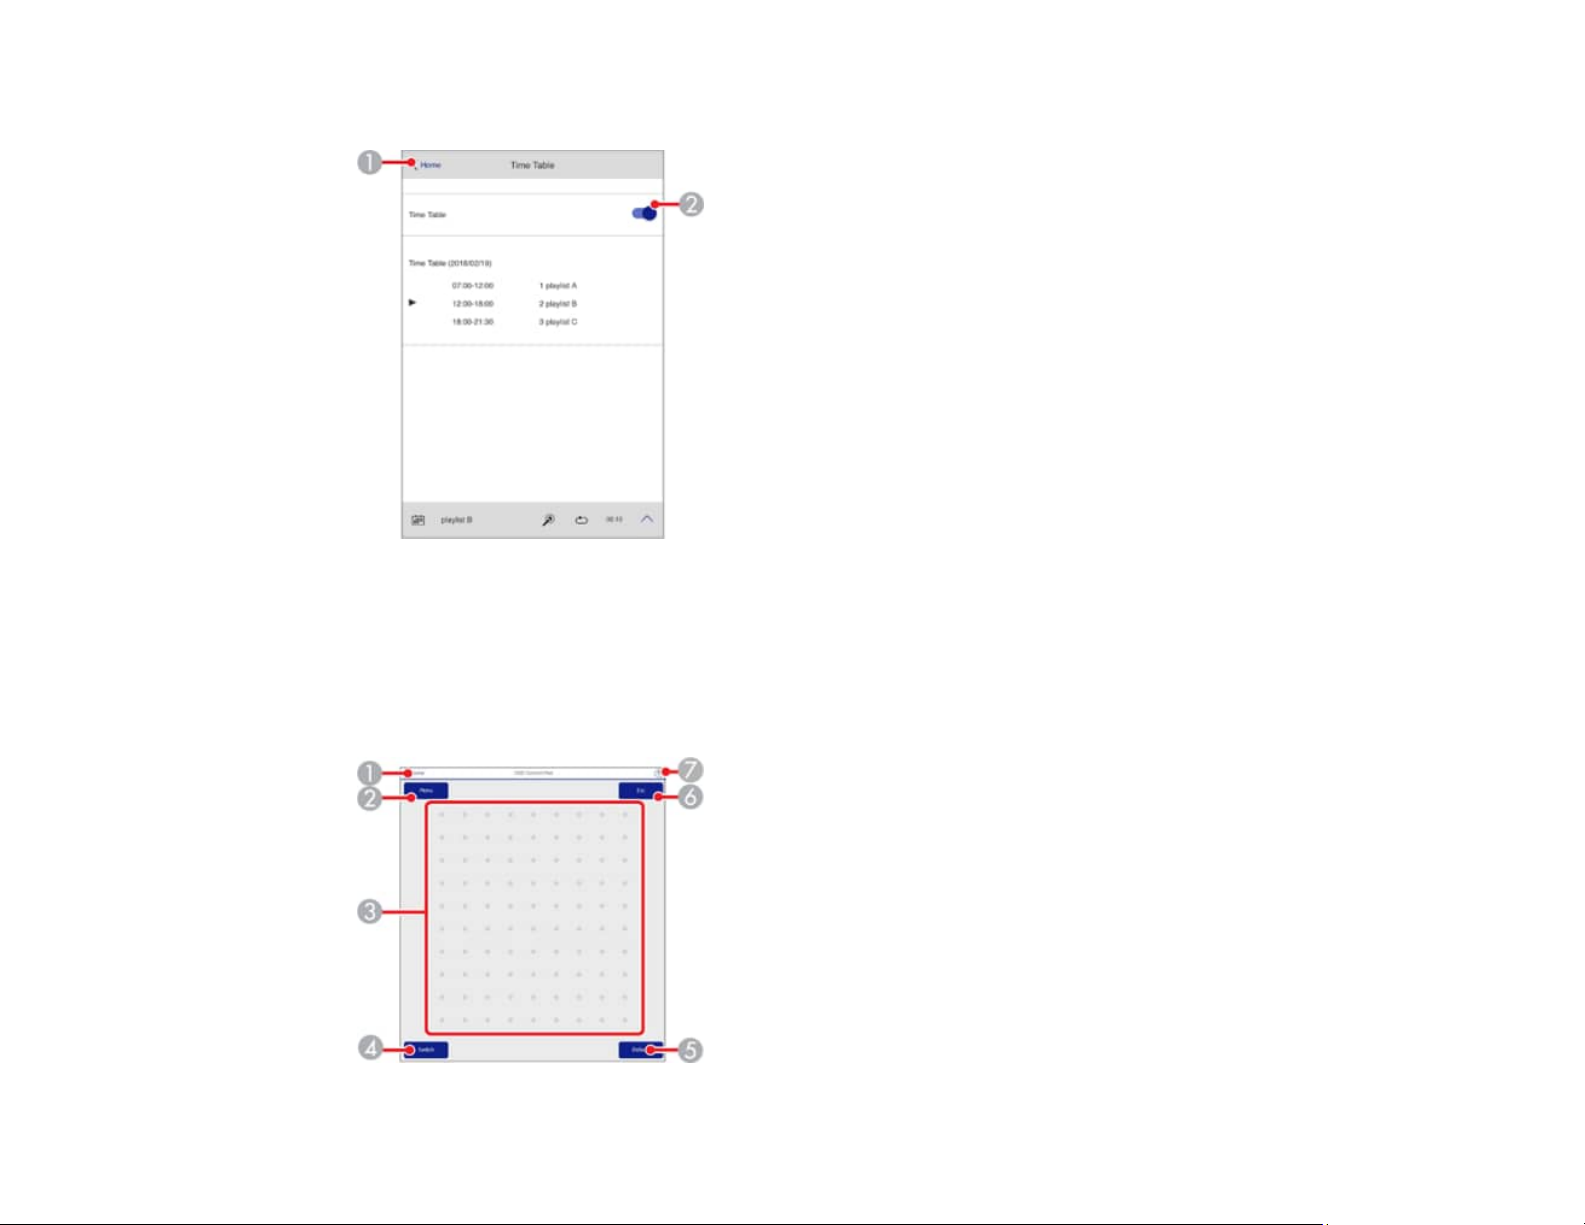
Time Table
1 Returns to the Epson Web Control screen
2 Turns the time table on or off (see the online Epson Projector Content Manager Operation Guide
for more information)
OSD Control Pad
79
Page 80

1 Returns to the Epson Web Control screen
2 Displays the projector's setting menus
3 Use your finger or mouse to navigate the menus
4 Switches the operation method to button operation.
5 Resets the selected setting to its default value.
6 Returns to the previous menu
7 Displays help topics
Note: You cannot change some settings using Epson Web Control.
Parent topic: Controlling a Networked Projector in Content Playback Mode
Secure HTTP
You can use the HTTPS protocol to increase security between the projector and a web browser
communicating with it. To do this, you create a server certificate, install it on the projector, and turn on
the Secure HTTP setting in the projector menus to verify the reliability of the web browser (Network >
Network Configuration > Others > Secure HTTP).
Even if you do not install a server certificate, the projector automatically creates a self-signed certificate
and allows communication. However, because the self-signed certificate cannot verify reliability from a
web browser, you see a warning about the server's reliability when you access the projector from a web
browser. This warning does not prevent communication.
Importing a Web Server Certificate Using the Projector Menus
Digital Certificate Types
Parent topic: Monitoring and Controlling the Projector
Related references
Network Menu
Importing a Web Server Certificate Using the Projector Menus
You can create your web server certificate and import it using the projector menus and a USB flash
drive.
Note: You can also register digital certificates from your web browser. Make sure to only register once,
or the certificate may not install correctly.
80
Page 81
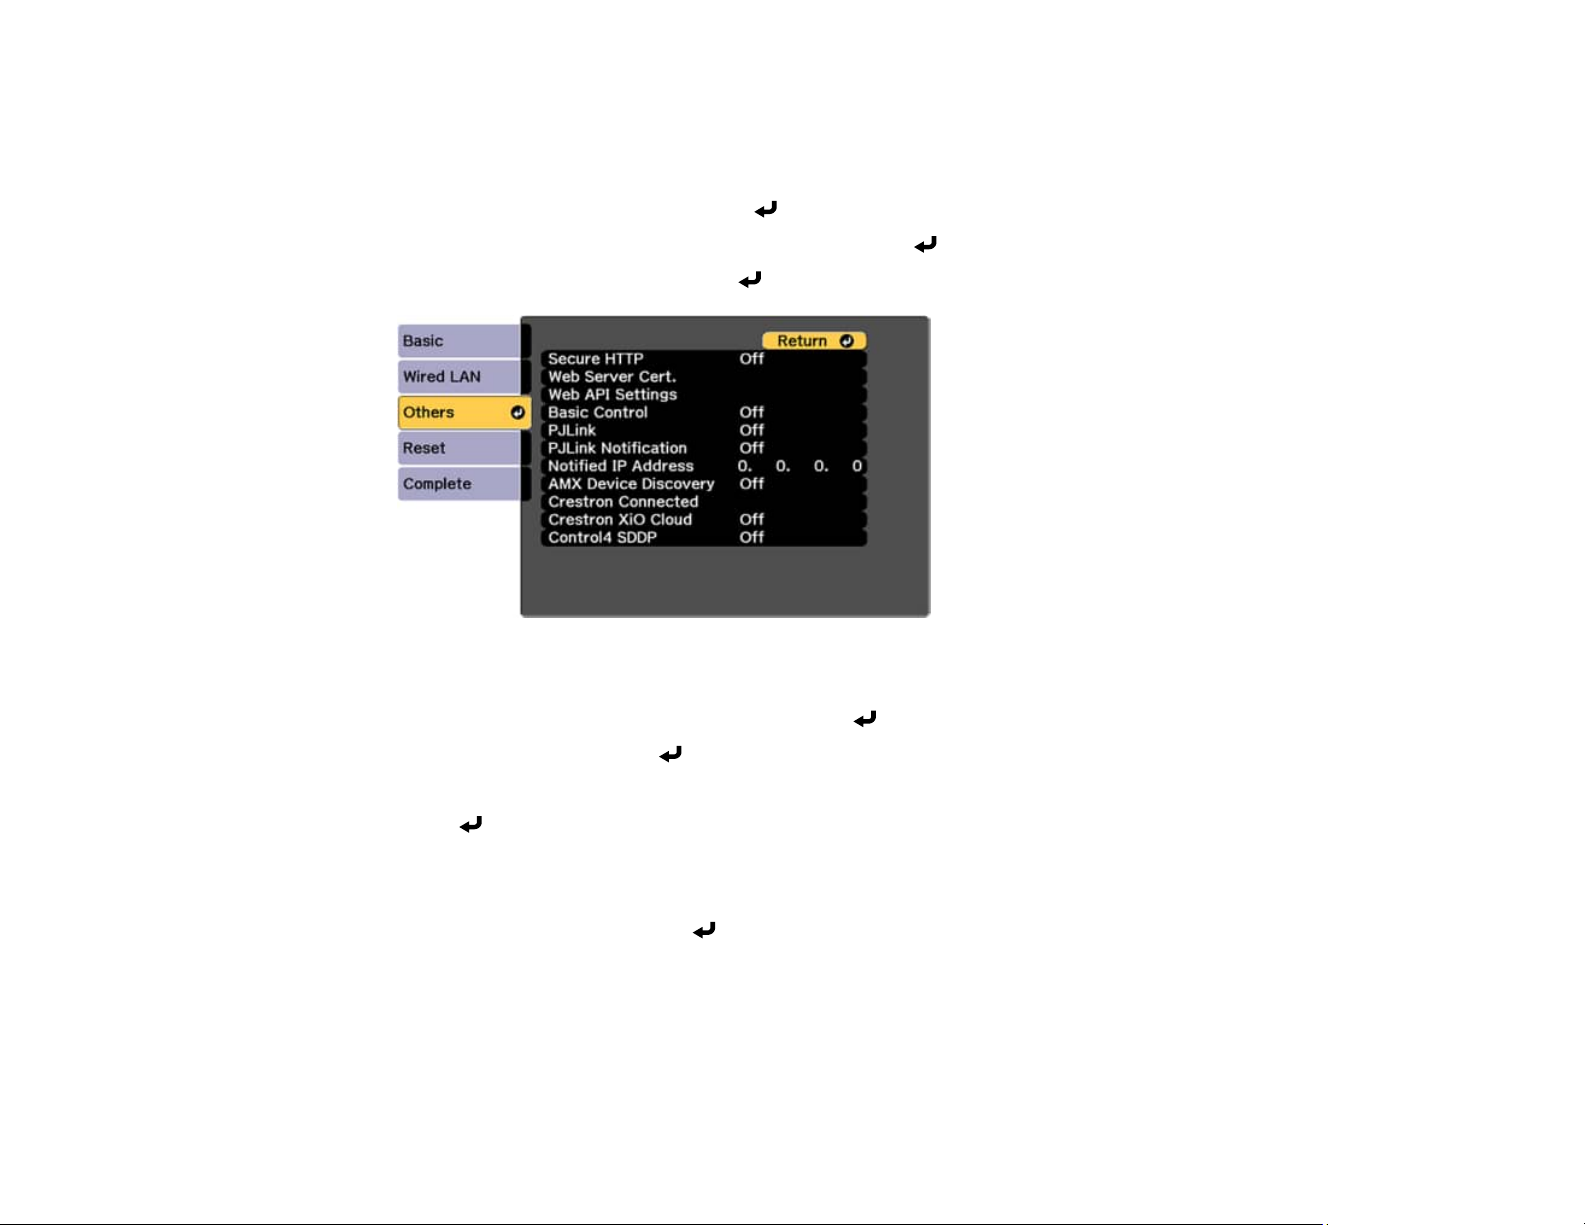
1. Make sure your digital certificate file is compatible with projector registration and saved in the root
directory of the USB flash drive.
2. Press the Menu button on the remote control.
3. Select the Network menu and press Enter.
4. Select the Network Configuration setting and press Enter.
5. Select the Others menu and press Enter.
6. Select On as the Secure HTTP setting.
7. Select the Web Server Cert. setting and press Enter.
8. Select Register and press Enter.
9. Insert a USB flash drive into the projector's USB-A port.
10. Press Enter to display the certificate list.
11. Select the certificate you want to import from the displayed list.
A message is displayed prompting you to enter the password for the certificate.
12. Enter the password and press Enter.
The certificate is imported and a completion message appears.
Parent topic: Secure HTTP
Digital Certificate Types
You can register these types of digital certificates.
81
Page 82
Web Server Certificate (Secure HTTP)
Specification Description
Format PKCS#12
Extension PFX, P12
Encryption RSA
Hashes MD5/SHA-1/SHA-256/SHA-384/SHA-512
Key length 512/1024/2048/4096 bit
Common name Network host name
Organization Optional
Password Up to 64 alphanumeric characters; required
Note: You can set a password of up to 64 characters if you use a web browser to enter the text.
Parent topic: Secure HTTP
82
Page 83

Using Basic Projector Features
Follow the instructions in these sections to use your projector's basic features.
Turning On the Projector
Turning Off the Projector
Selecting the Language for the Projector Menus
Setting the Date and Time
Adjusting the Image Position Using Lens Shift
Image Shape
Resizing the Image with the Zoom Button
Focusing the Image Using the Focus Buttons
Remote Control Operation
Selecting an Image Source
Displaying a Test Pattern
Projection Modes
Image Aspect Ratio
Color Mode
Adjusting Image Sharpness
Adjusting the Projector's Brightness Level
Adjusting Luminance Controls
Turning On Dynamic Contrast
Adjusting the Color Temperature
Adjusting Gamma
Adjusting the Hue, Saturation, and Brightness
Controlling the Volume with the Volume Buttons
Projecting in Content Playback Mode
Turning On the Projector
Turn on the projector before you turn on the computer or video equipment you want to use.
1. Connect the computer or video equipment you want to use to one of the projector's HDMI ports, if
necessary.
83
Page 84
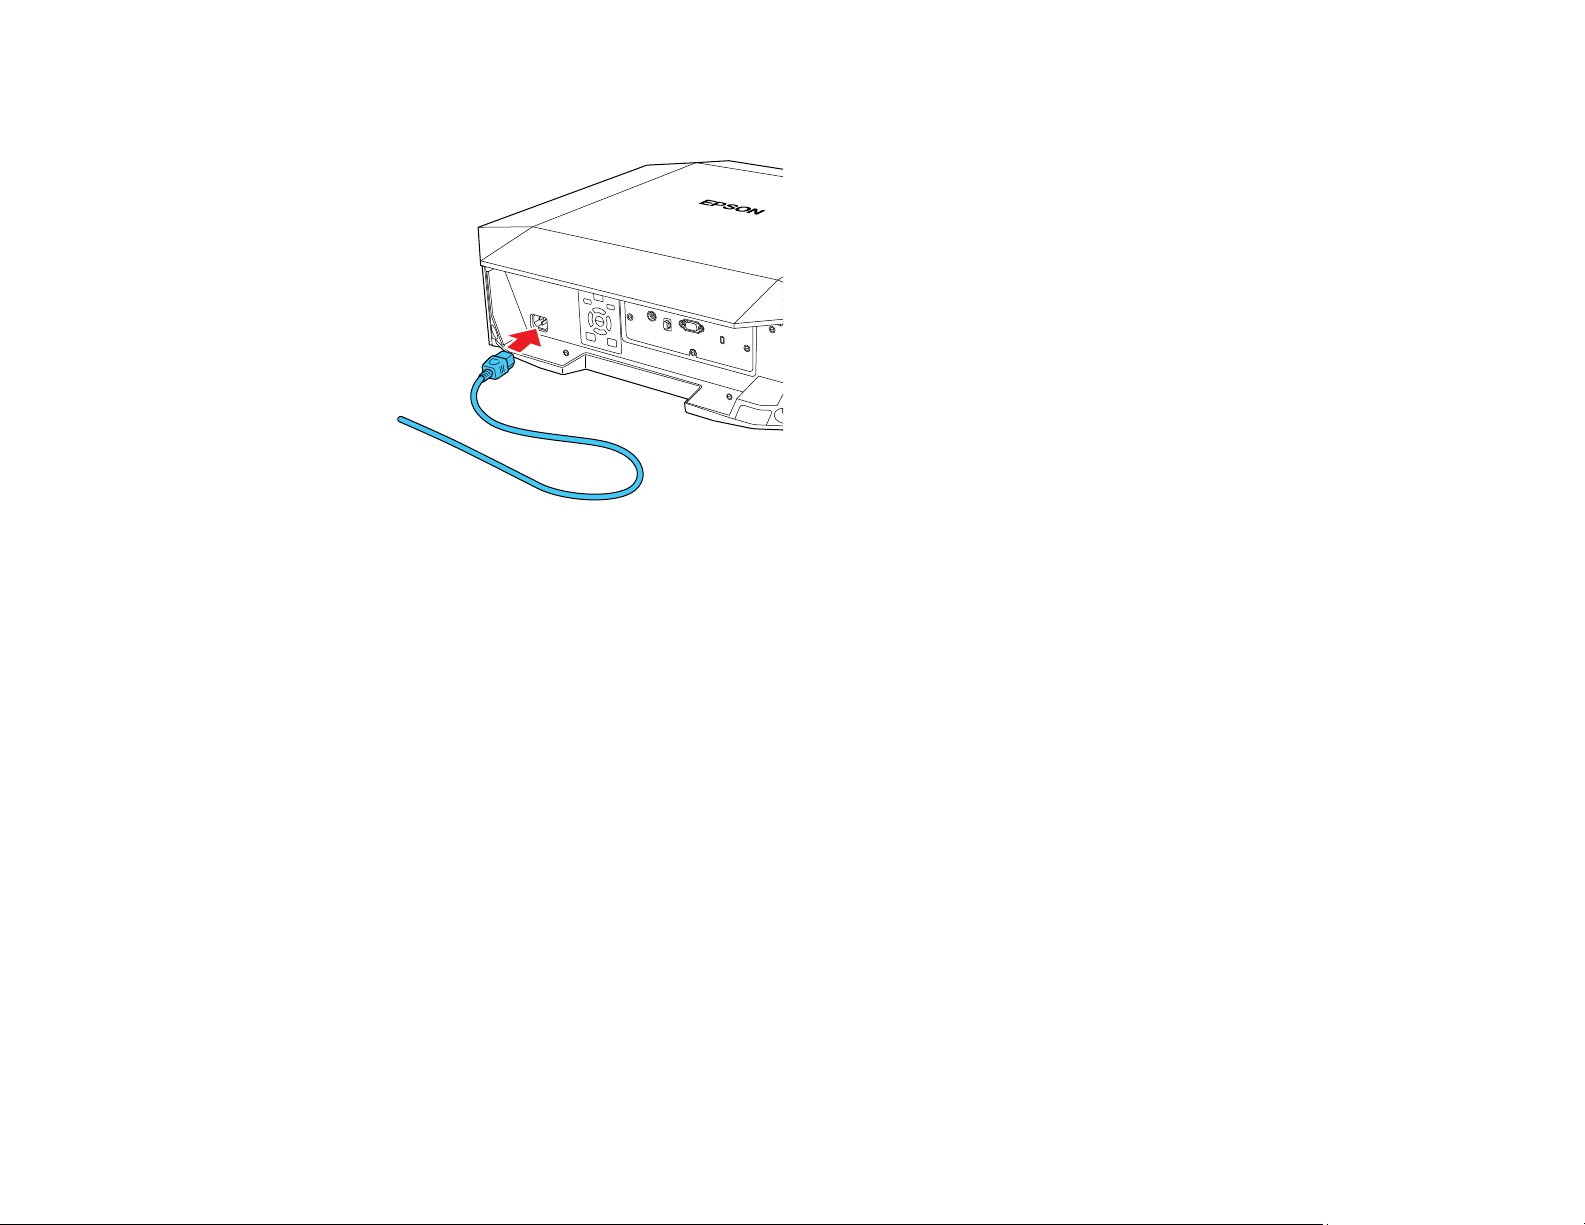
2. Connect the power cord to the projector's power inlet.
Note: Be sure to ground the power plug using a ground wire or 3-core power plug.
3. Plug the power cord into an electrical outlet.
The projector's power light turns blue. This indicates that the projector is receiving power.
Note: With Direct Power On turned on, the projector turns on as soon as you plug it in. If you enable
the Auto Power On setting in the projector's Operation menu, the projector turns on when it detects
a signal or cable connection from the selected port.
4. Press the On button on the projector or remote control to turn on the projector.
The status light flashes blue as the projector warms up. Once the projector is warmed up, the status
light stops flashing and turns blue.
Warning: Never look into the projector lens when the laser is on. This can damage your eyes and is
especially dangerous for children and pets. If you are using the remote control to turn the projector
on, make sure no one is looking into the lens or in front of the projector before turning it on.
Caution: Make sure no objects are blocking the light from the projector lens. Objects blocking the
lens for an extended time can melt and light that is reflected back into the lens can cause the
projector to malfunction. Use the A/V Mute function, or turn off the projector to stop projection.
84
Page 85

If you do not see a projected image right away, try the following:
• Turn on the connected computer or video device.
• Insert a DVD or other video media and press the play button, if necessary.
• Press the Source Search button on the projector or the Search button on the remote control to detect
the video source.
• Change the screen output from the computer when using a laptop.
• Press the button for the video source on the remote control.
Parent topic: Using Basic Projector Features
Turning Off the Projector
Before turning off the projector, shut down any computer connected to it so you can see the computer
display during shutdown.
Note: Turn off this product when not in use to prolong the life of the projector. Laser life will vary
depending upon mode selected, environmental conditions, and usage. Brightness decreases over time.
1. Press the Standby button on the projector or remote control.
2. If you see a shutdown confirmation screen, press the Standby button on the projector or remote
control again. (To leave the projector on, press any other button.)
The projector beeps twice, the laser turns off, and the Status light turns off.
Note: With Epson's Instant Off technology, there is no cool-down period so you can pack up the
projector for transport right away (if necessary).
Note: If the Light Source Calibration setting is set to Run Periodically in the projector's Reset
menu, light source calibration starts automatically if you turn off the projector and the following
conditions are present:
• 100 hours have passed since the last light source calibration.
• You have used the projector continuously for at least 20 minutes.
3. To transport or store the projector, make sure the Status light is off, then unplug the power cord.
Parent topic: Using Basic Projector Features
85
Page 86
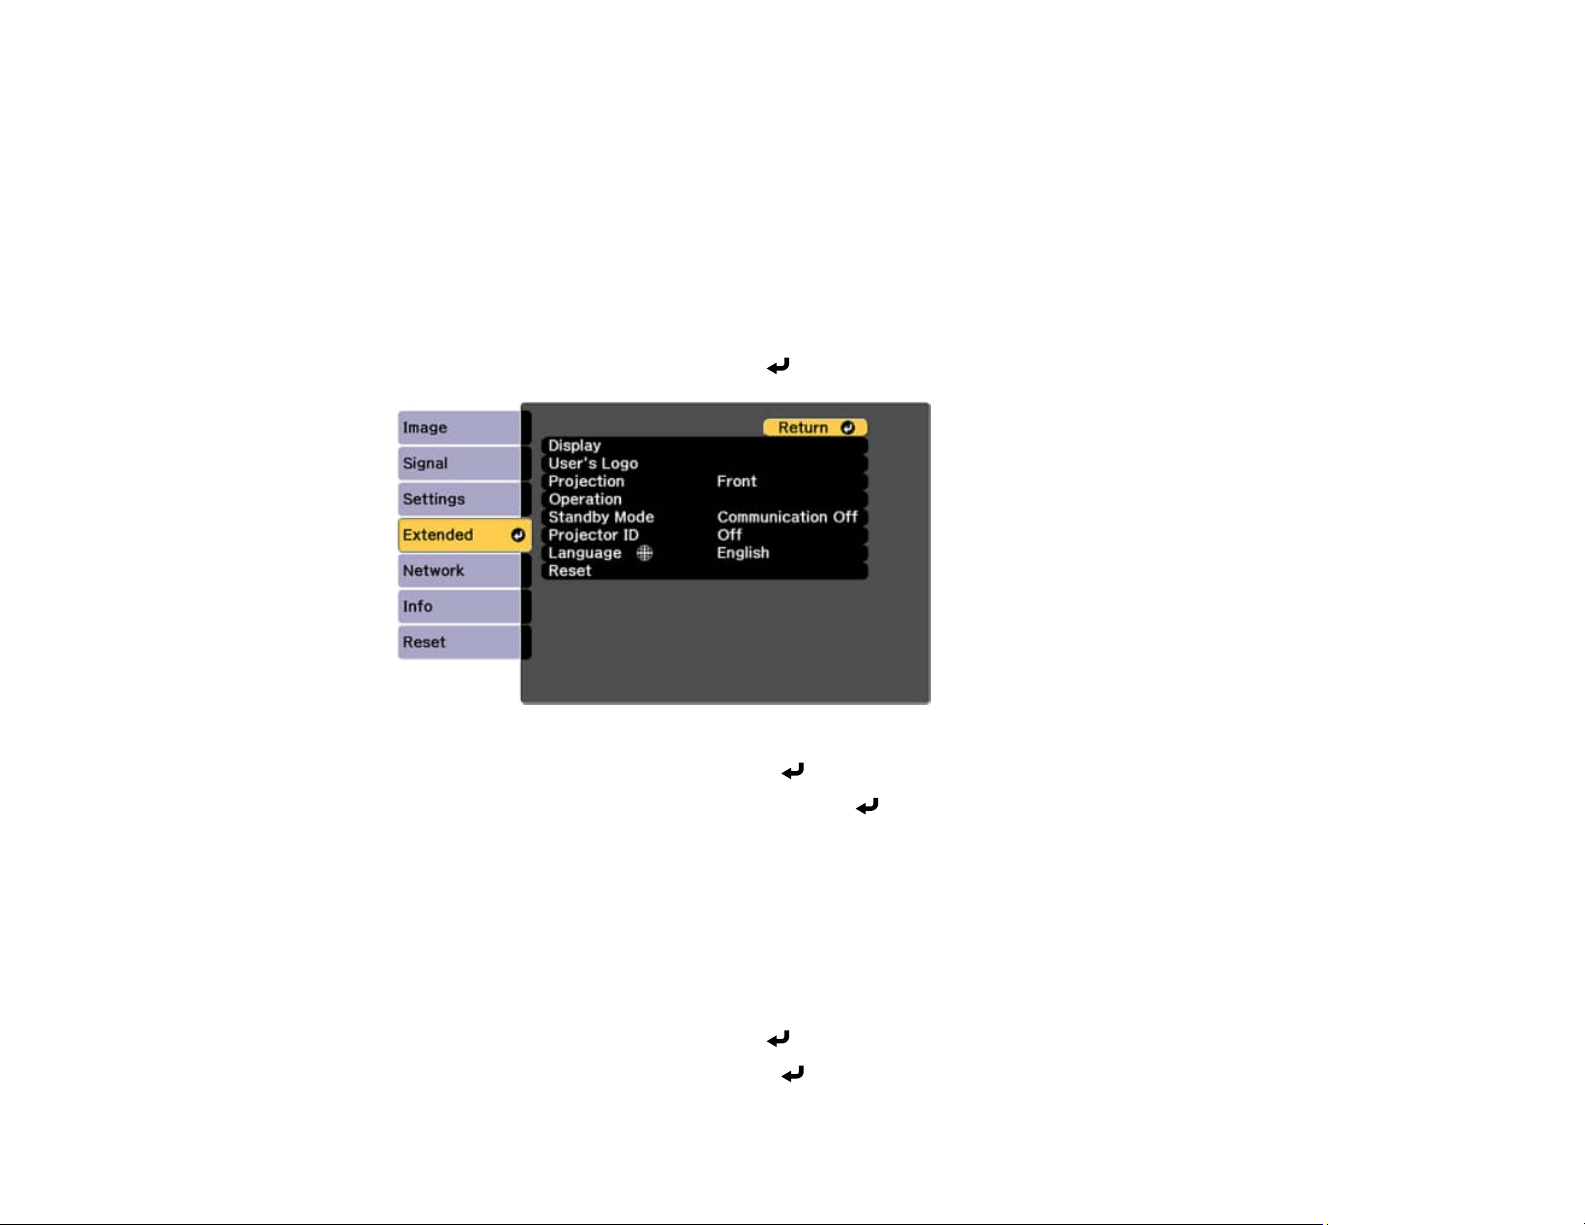
Related tasks
Running Light Source Calibration
Selecting the Language for the Projector Menus
If you want to view the projector's menus and messages in another language, you can change the
Language setting.
1. Turn on the projector.
2. Press the Menu button on the projector or remote control.
3. Select the Extended menu and press Enter.
4. Select the Language setting and press Enter.
5. Select the language you want to use and press Enter.
6. Press Menu or Esc to exit the menus.
Parent topic: Using Basic Projector Features
Setting the Date and Time
You can set the date and time for the projector.
1. Press the Menu button.
2. Select the Extended menu and press Enter.
3. Select the Operation setting and press Enter.
86
Page 87
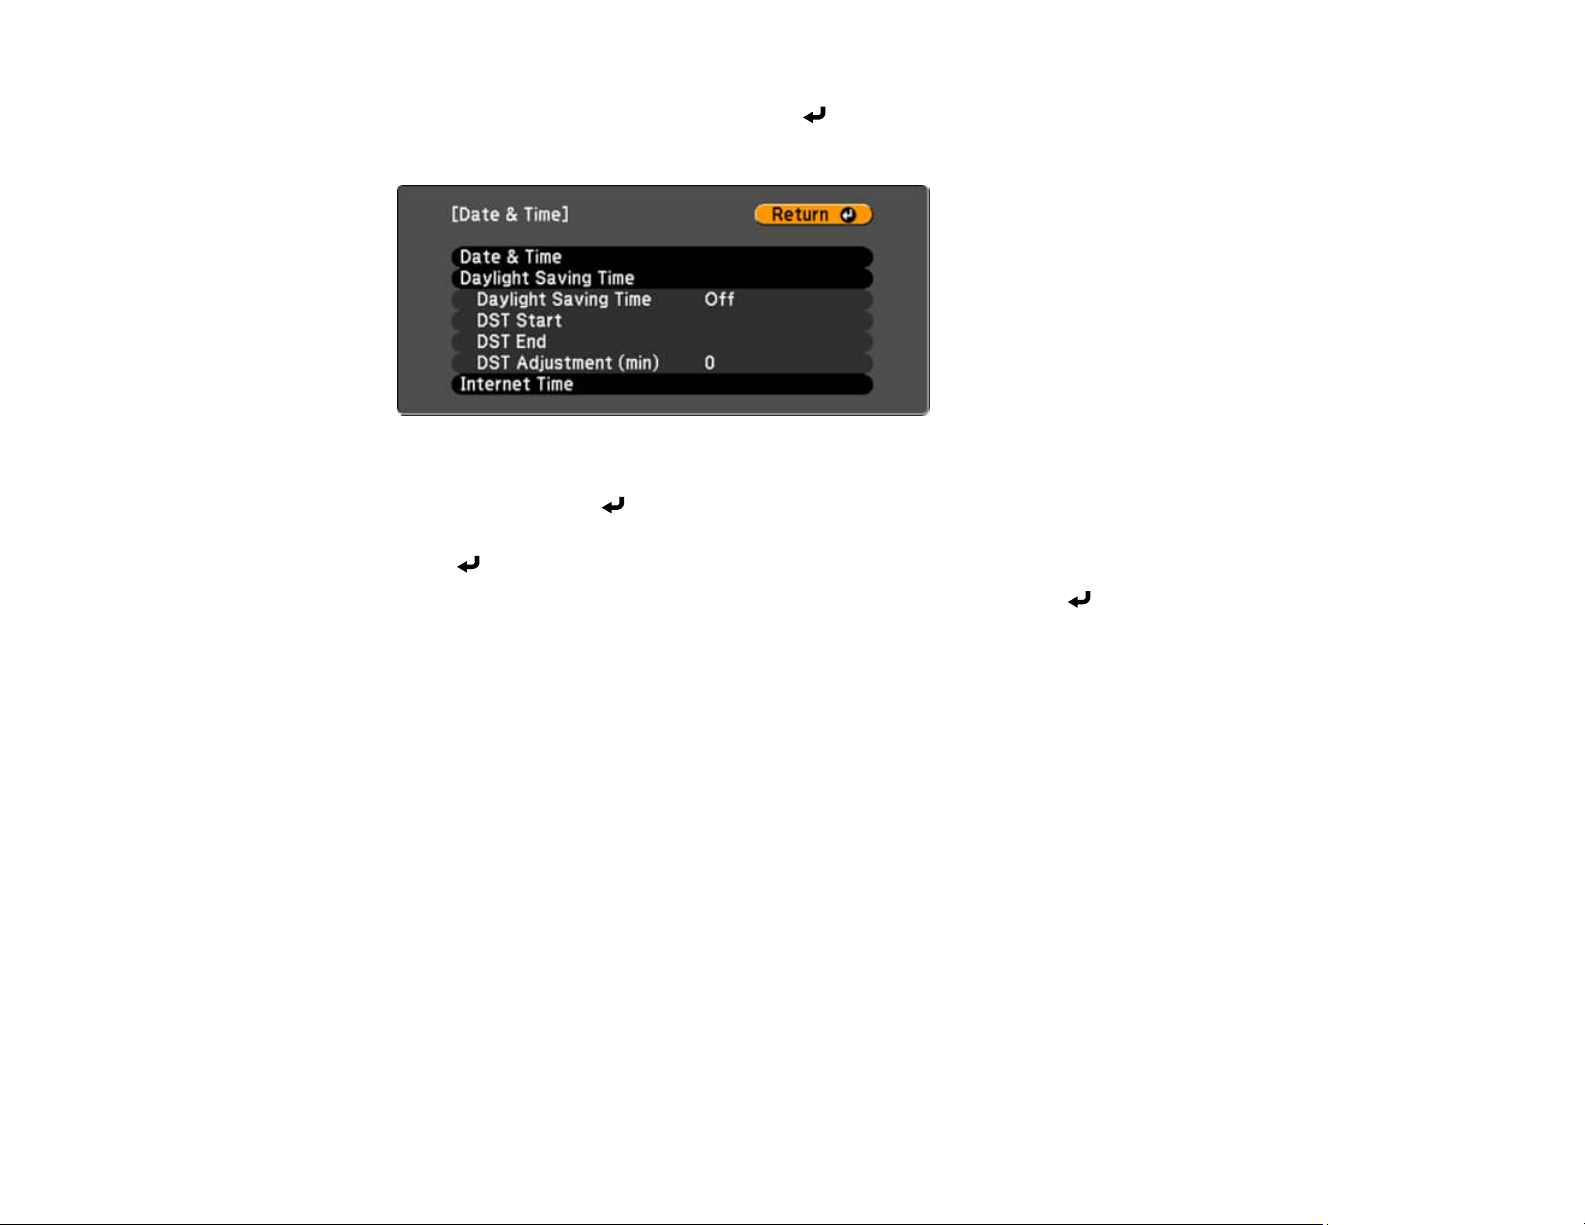
4. Select the Date & Time setting and press Enter.
You see a screen like this:
5. Select the Daylight Saving Time setting and set it to On. Select your daylight saving settings. Then
select Set and press Enter to confirm your changes.
6. To update the time automatically from an internet time server, select the Internet Time setting and
press Enter.
7. Enter the IP address of the internet time server. Select Set and press Enter to confirm your
changes.
8. When you are finished, press the Menu button to exit.
Parent topic: Using Basic Projector Features
Adjusting the Image Position Using Lens Shift
If you cannot install the projector directly in front of the screen, you can adjust the position of the
projected image using the lens shift feature.
Caution: When shifting the lens, do not put your hands near the lens unit. Your fingers may get caught
between the lens unit and the projector, and cause an injury.
Note: Wait 20 minutes after turning on the projector before setting the focus, zoom, and lens shift for
maximum accuracy.
1. Turn on the projector and display an image.
87
Page 88
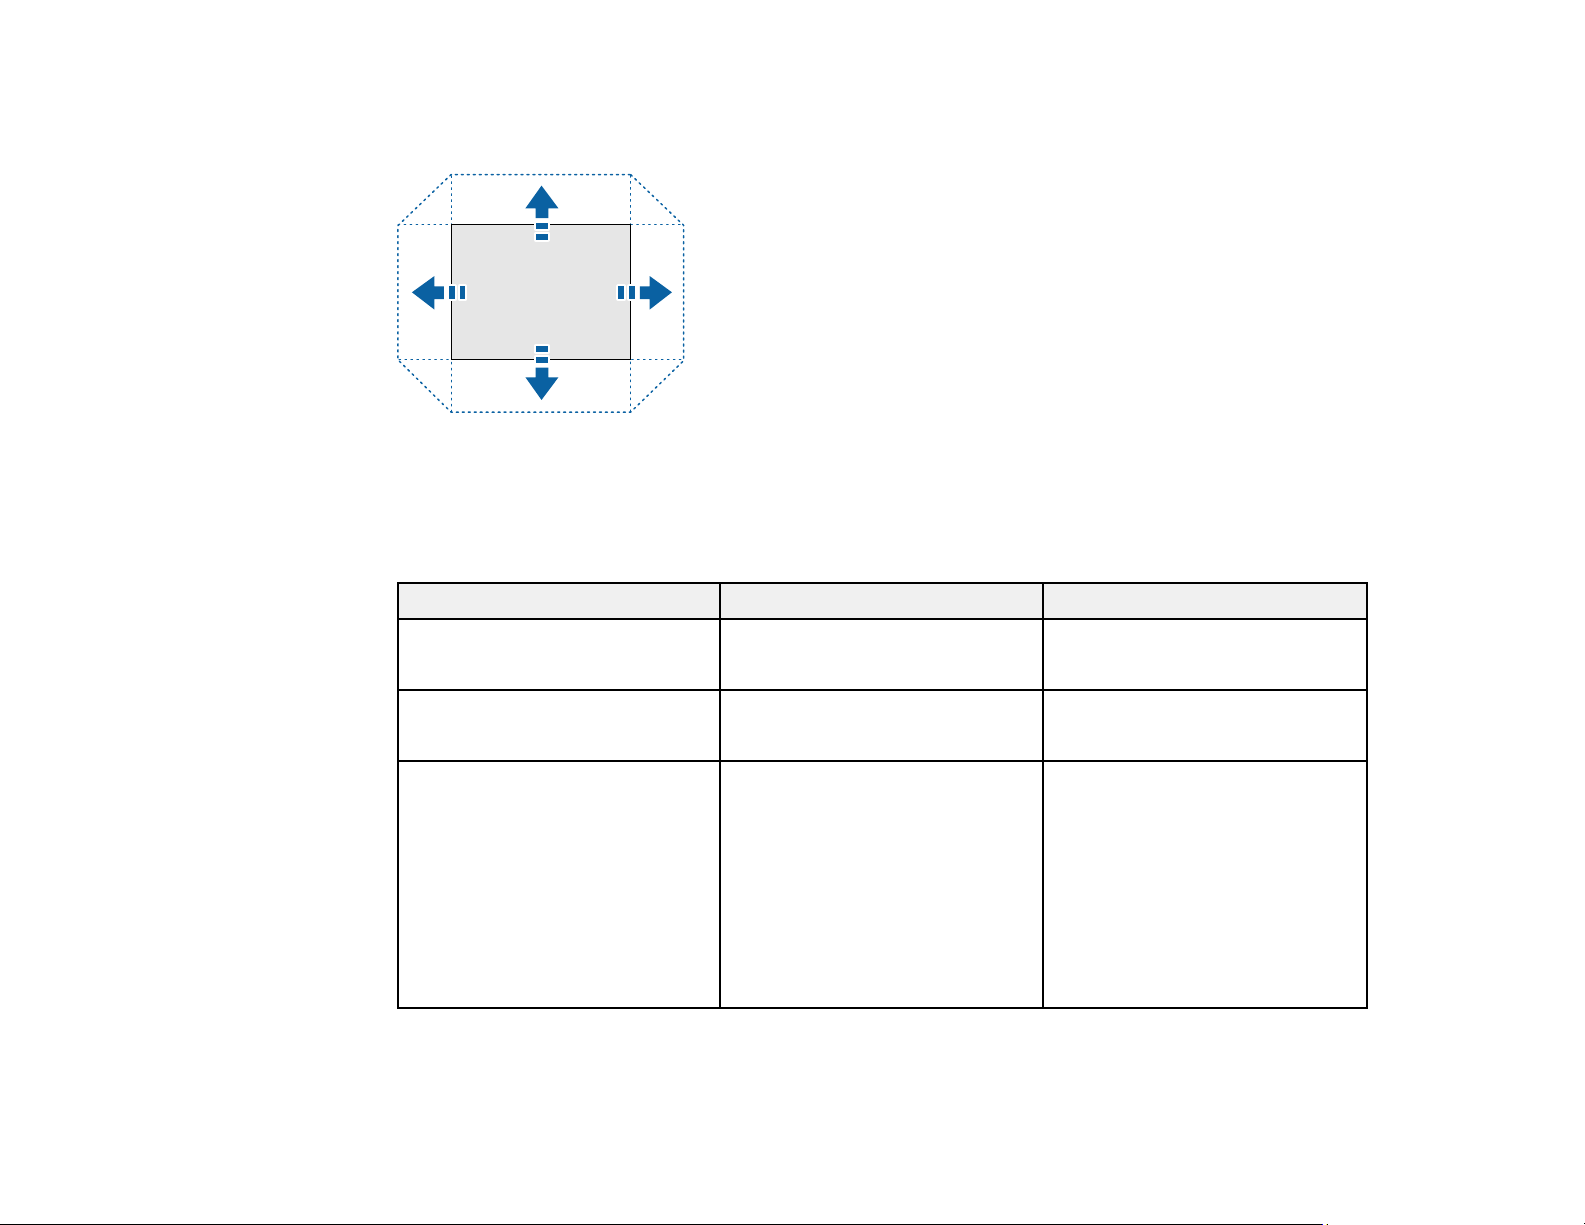
2. Press the arrow buttons on the remote control or the control panel to adjust the position of the
projected image as necessary.
The distance the image can be shifted varies depending on the installed lens. The limits are
described in the following table. You can shift the image up to the listed percentage of the image
height or width.
Lens Vertical Horizontal
ELPLX02S
+45%~75% ±13%
ELPLX02WS
ELPLU03S
±25% ±8%
ELPLW05
ELPLU04
±64% ±16%
ELPLW06
ELPLW08
ELPLM10
ELPLM11
ELPLM15
ELPLL08
3. When you are finished, press the Esc button on the control panel or remote control.
88
Page 89
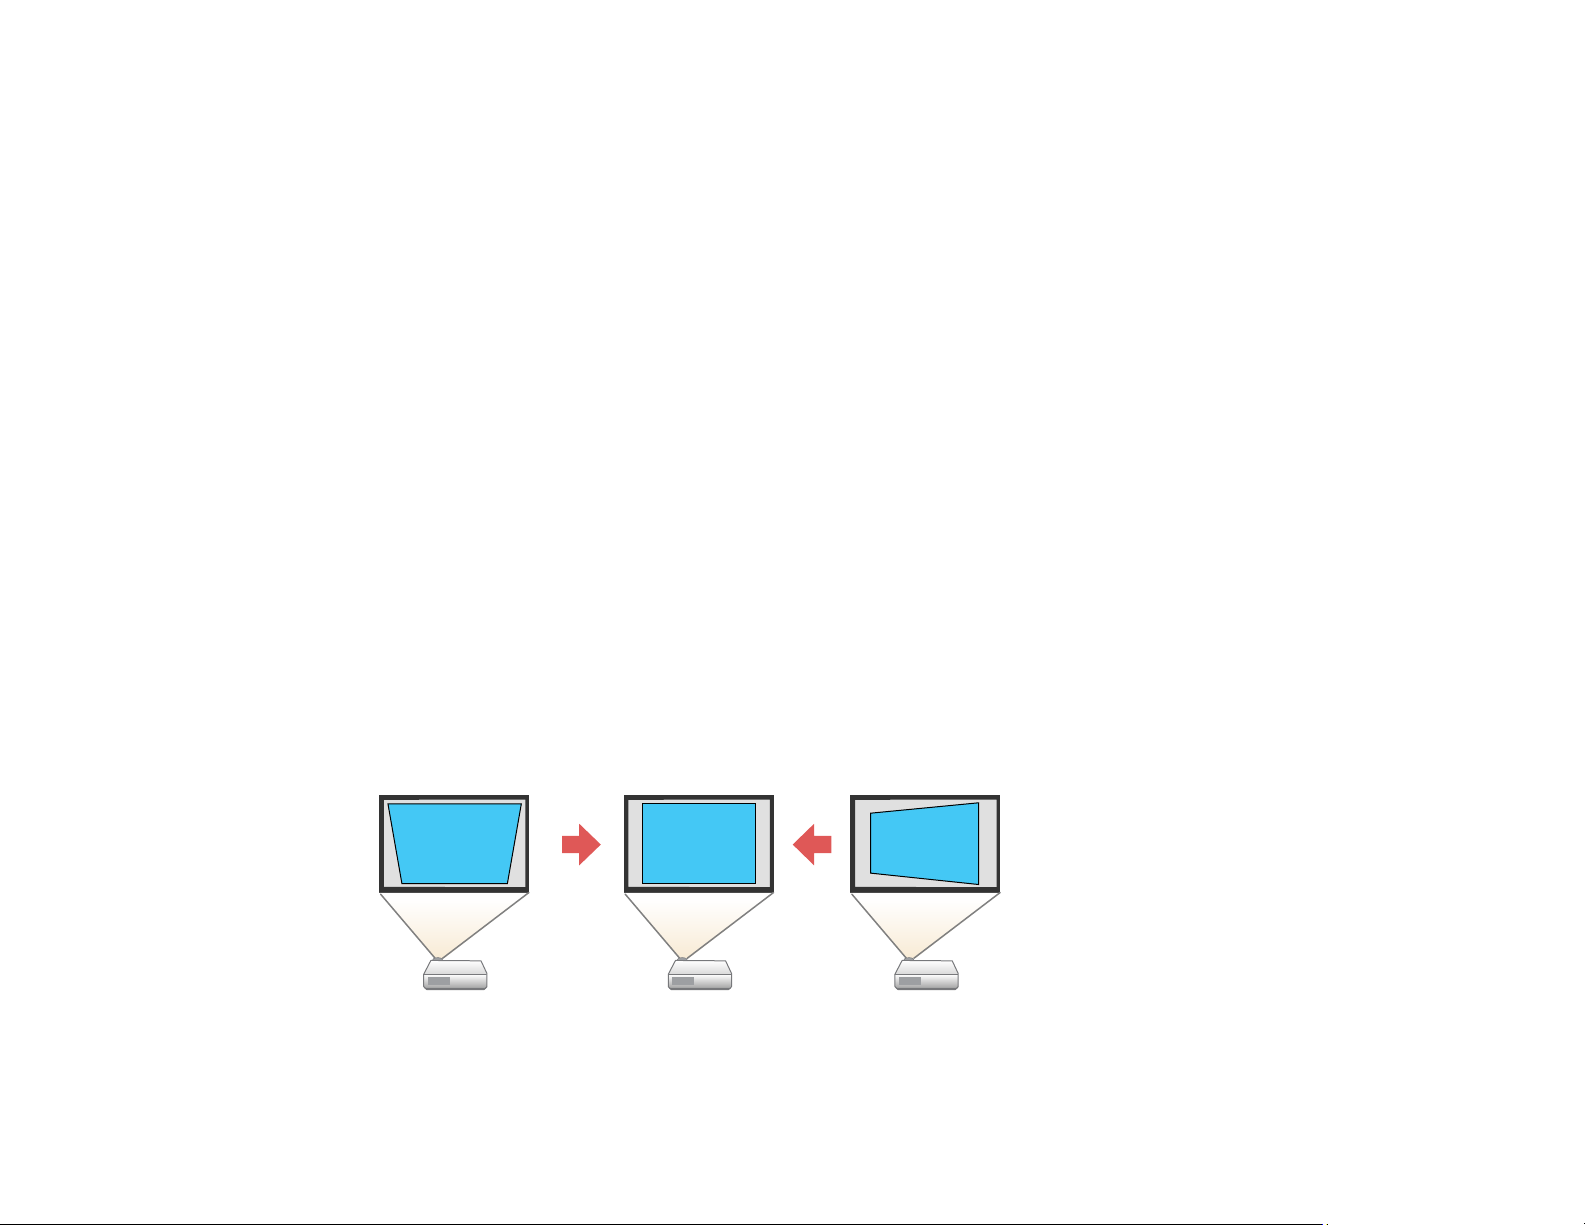
Note: When adjusting the image height, position the image lower than where you want it to be and then
move it up. This will help prevent the image from moving down after adjustment. The image is clearest
when the lens is in the home position. To move the lens to the home position, press and hold the Lens
Shift button on the remote control or the Lens button on the control panel for at least three seconds.
Parent topic: Using Basic Projector Features
Image Shape
You can project an evenly rectangular image by placing the projector directly in front of the center of the
screen and keeping it level. If you place the projector at an angle to the screen, or tilted up or down, or off
to the side, you may need to correct the image shape for the best display quality.
Correcting Image Shape with H/V-Keystone
Correcting Image Shape with Quick Corner
Correcting Image Shape with Curved Surface
Correcting Image Shape with Corner Wall
Correcting Image Shape with Point Correction
Parent topic: Using Basic Projector Features
Related references
Settings Menu
Correcting Image Shape with H/V-Keystone
You can use the projector's H/V-Keystone setting to correct the shape of an image that is unevenly
rectangular on the sides.
Note: You cannot combine H/V-Keystone correction with other image shape correction methods.
89
Page 90
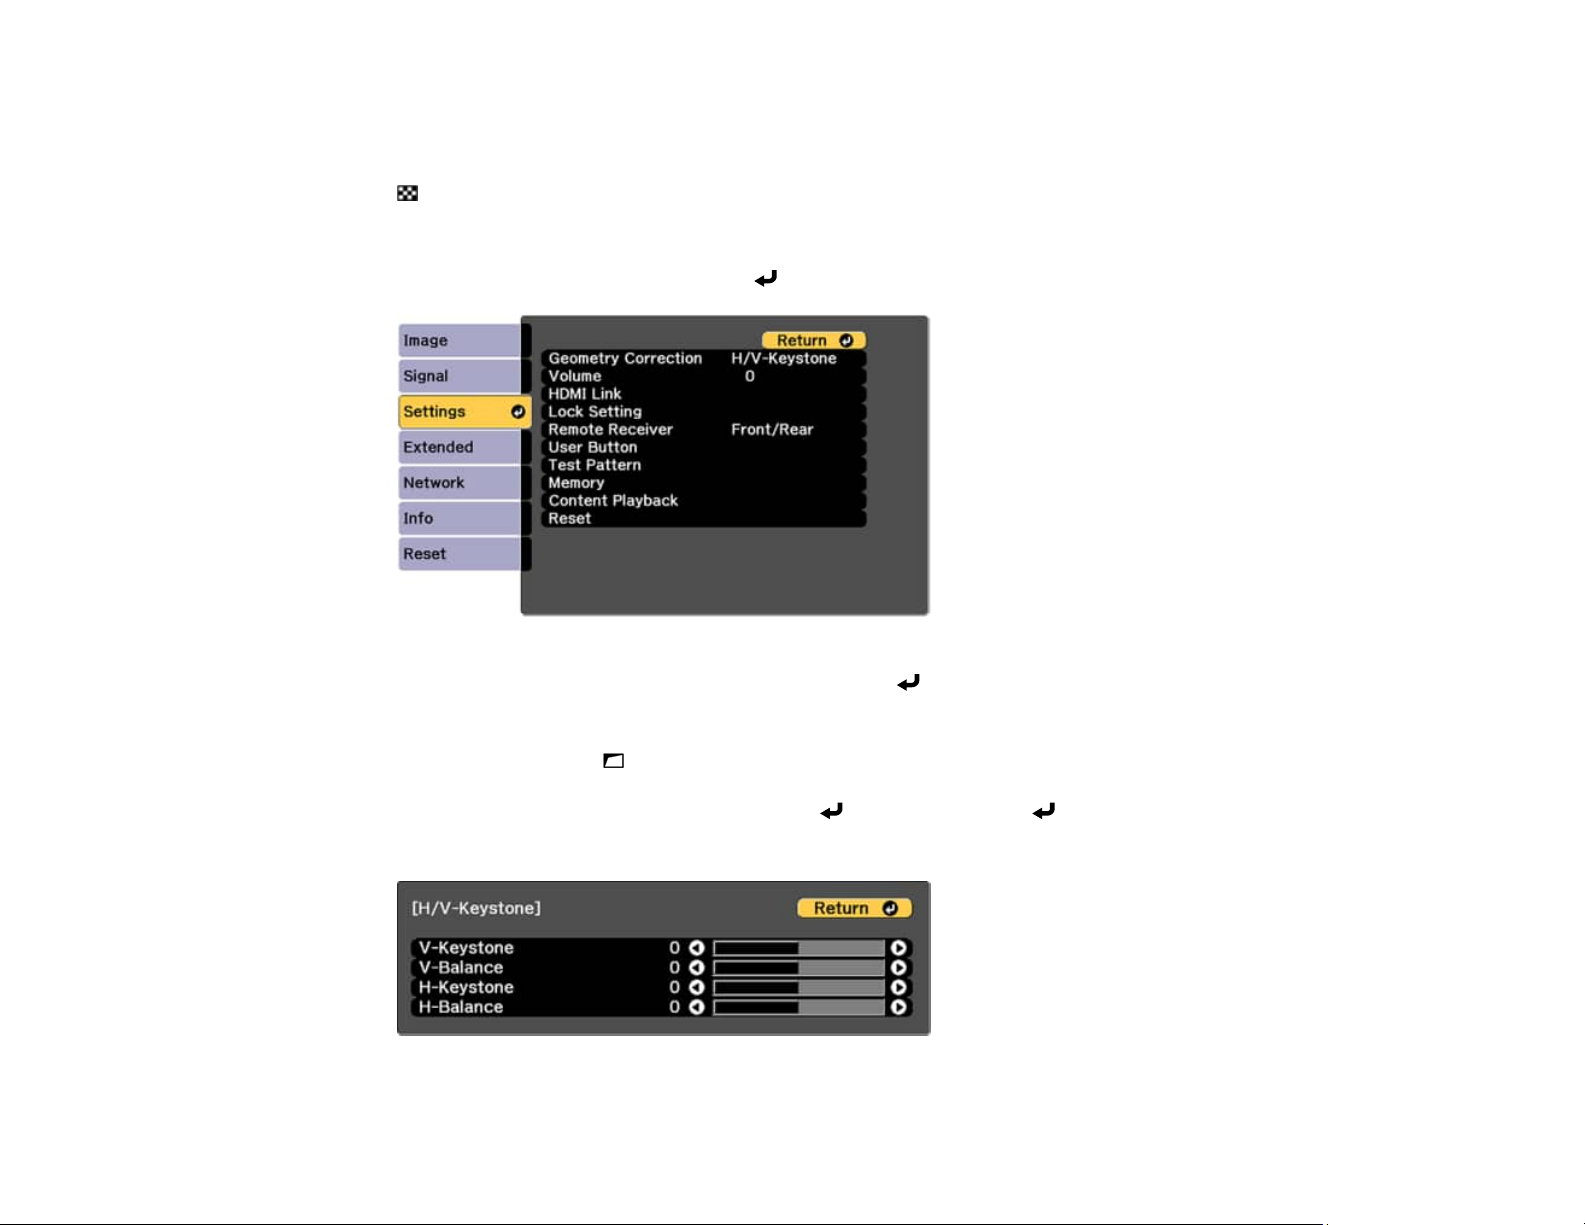
1. Turn on the projector and display an image.
Note: You can also display a test pattern using the Test Pattern button on the remote control or the
test pattern/down arrow button on the control panel.
2. Press the Menu button.
3. Select the Settings menu and press Enter.
4. Select the Geometry Correction setting and press Enter.
Note: You can also open the geometric adjustment screen using the Geometry button on the
remote control or the Geometry Correction/up arrow button on the control panel.
5. Select the H/V-Keystone setting and press Enter. Then press Enter again.
You see the H/V-Keystone adjustment screen:
90
Page 91
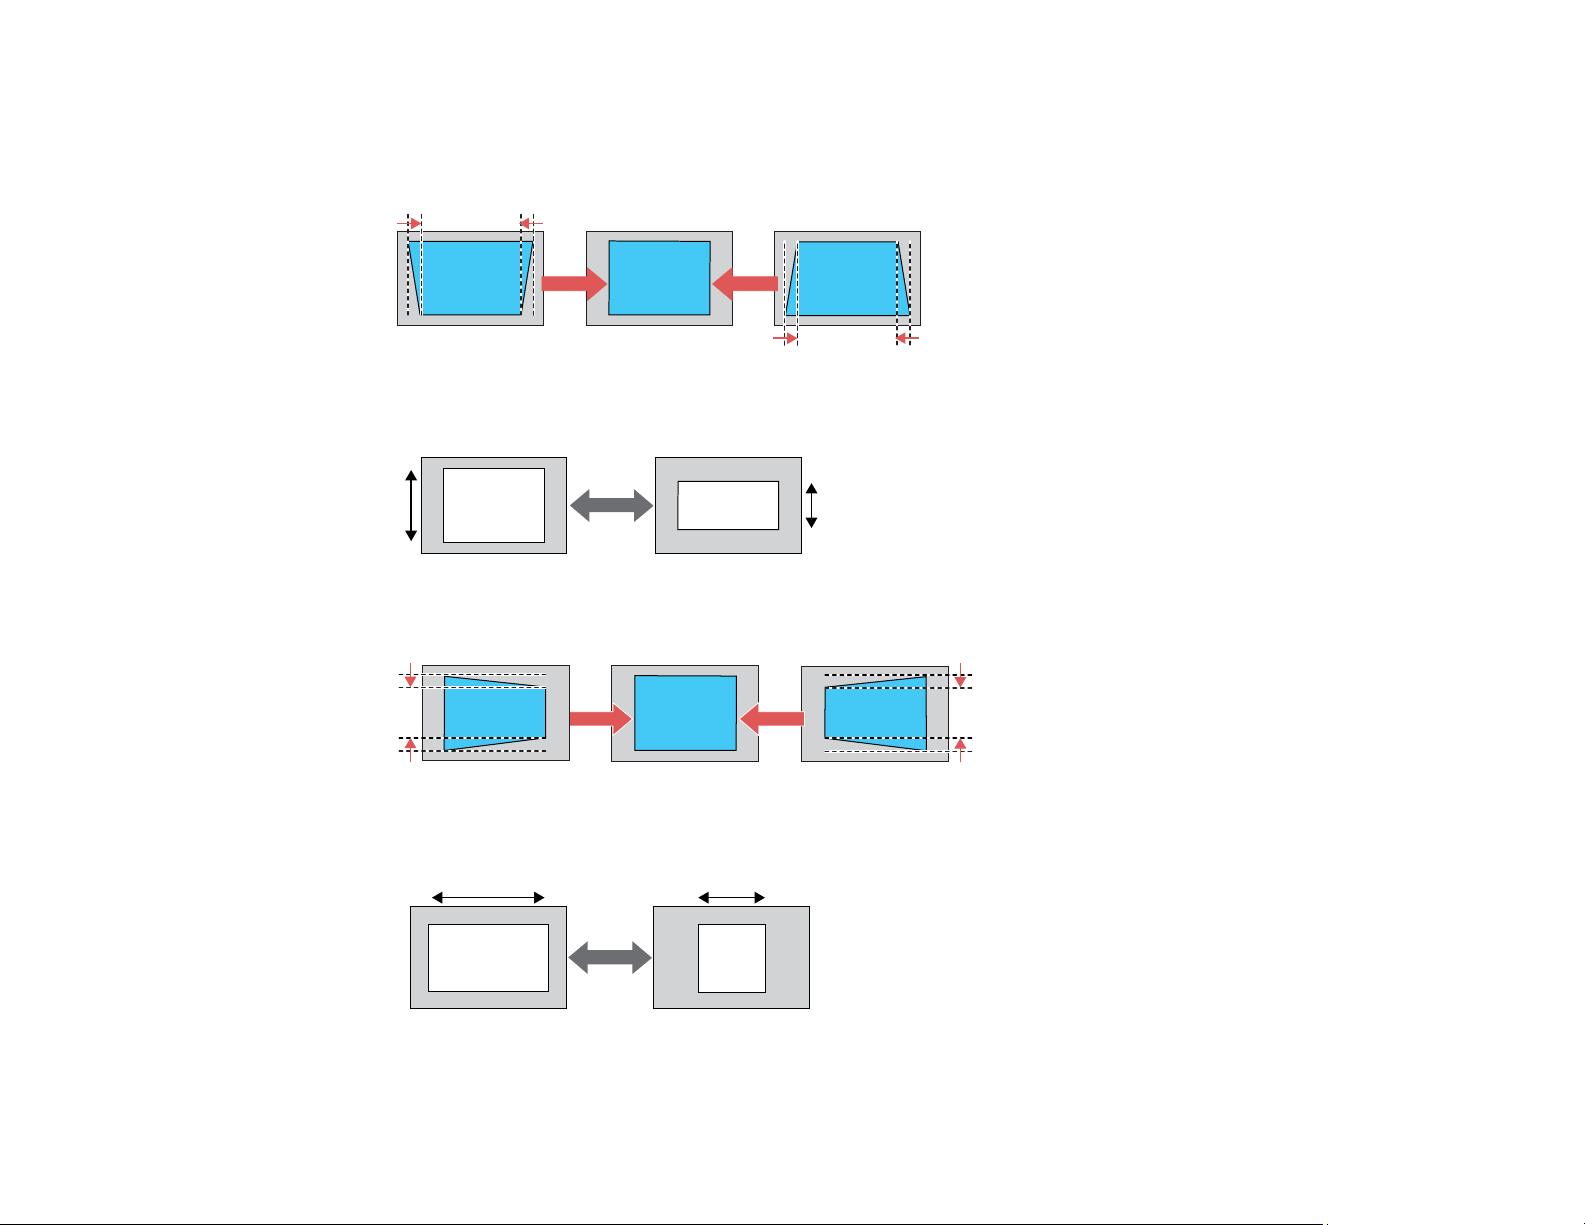
6. Use the arrow buttons on the projector or the remote control to select between vertical and
horizontal keystone or balance correction and to adjust the image shape as necessary.
V-Keystone
V-Balance
H-Keystone
H-Balance
91
Page 92
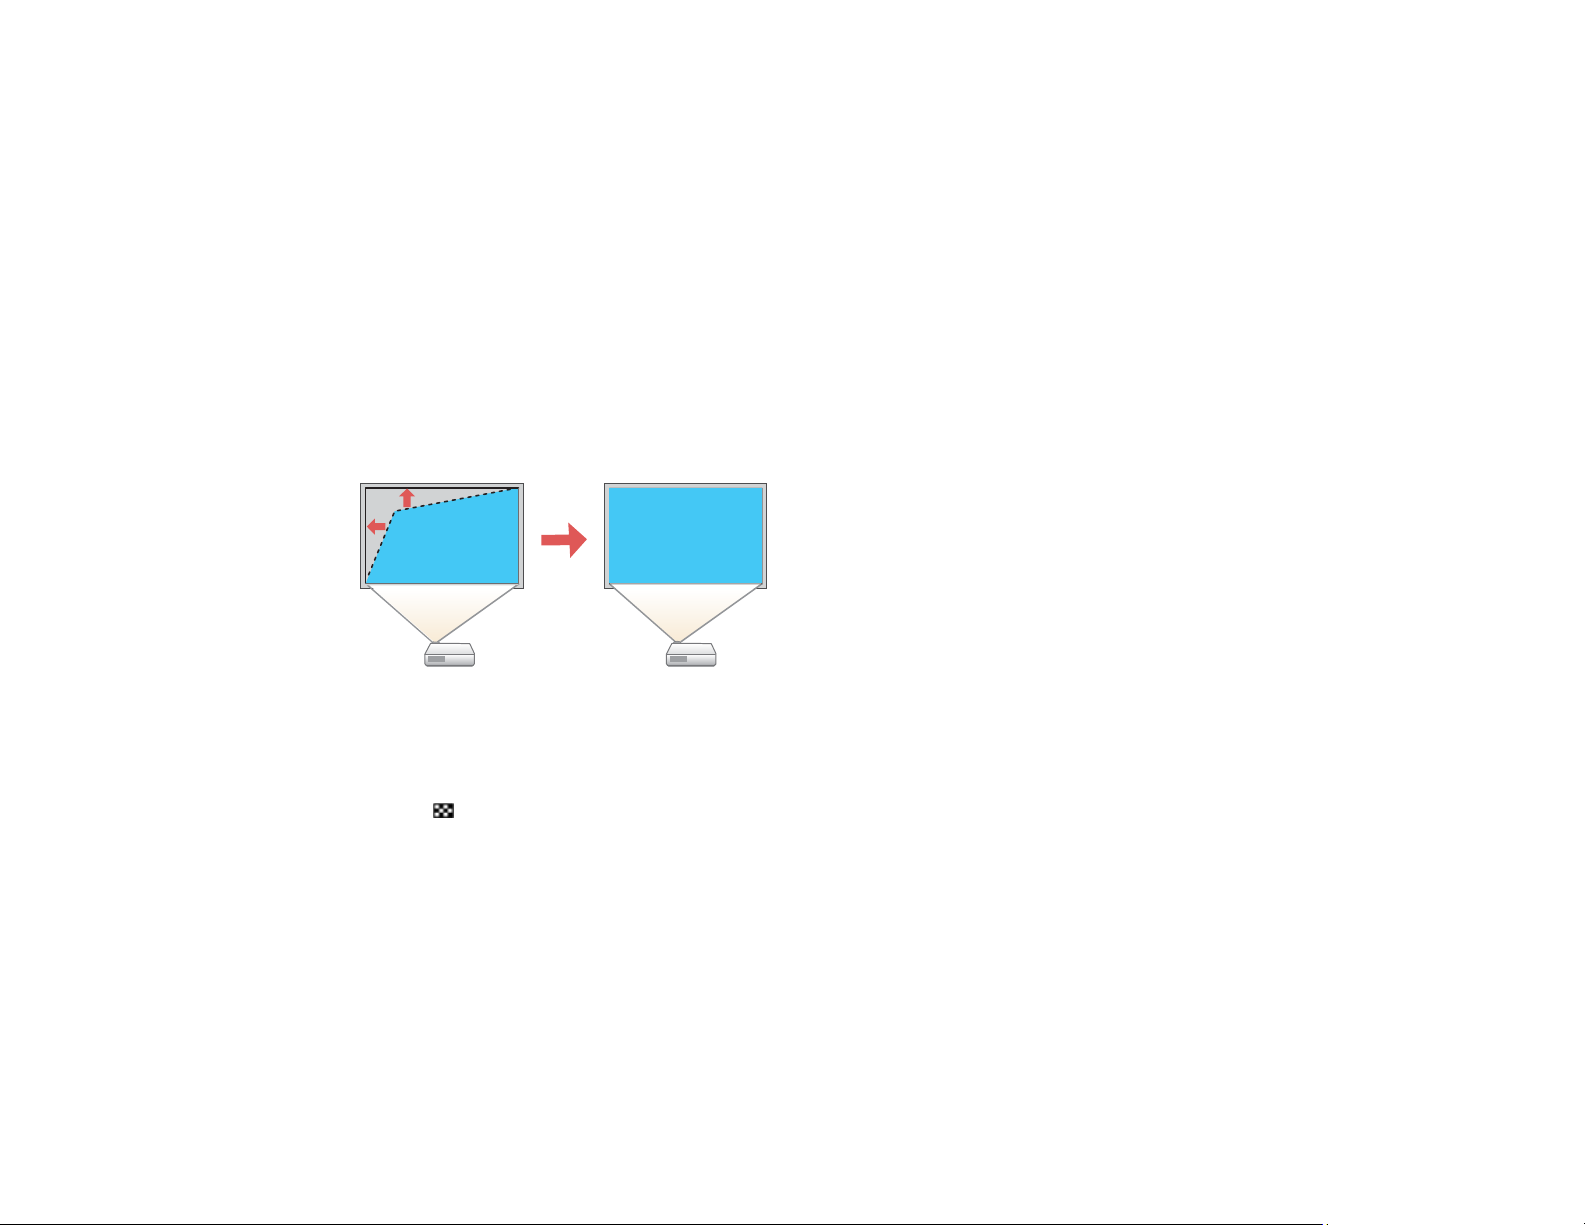
7. When you are finished, press Esc.
After correction, your image is slightly smaller.
Parent topic: Image Shape
Related references
Settings Menu
Correcting Image Shape with Quick Corner
You can use the projector's Quick Corner setting to correct the shape and size of an image that is
unevenly rectangular on all sides.
Note: To provide the best possible image quality, adjust the projector's position to correct the image
shape. If this isn't possible, use the Quick Corner setting to correct the image shape.
1. Turn on the projector and display an image.
Note: You can also display the pattern by pressing the Test Pattern button on the remote control or
the test pattern/down arrow on the control panel.
2. Press the Menu button.
92
Page 93
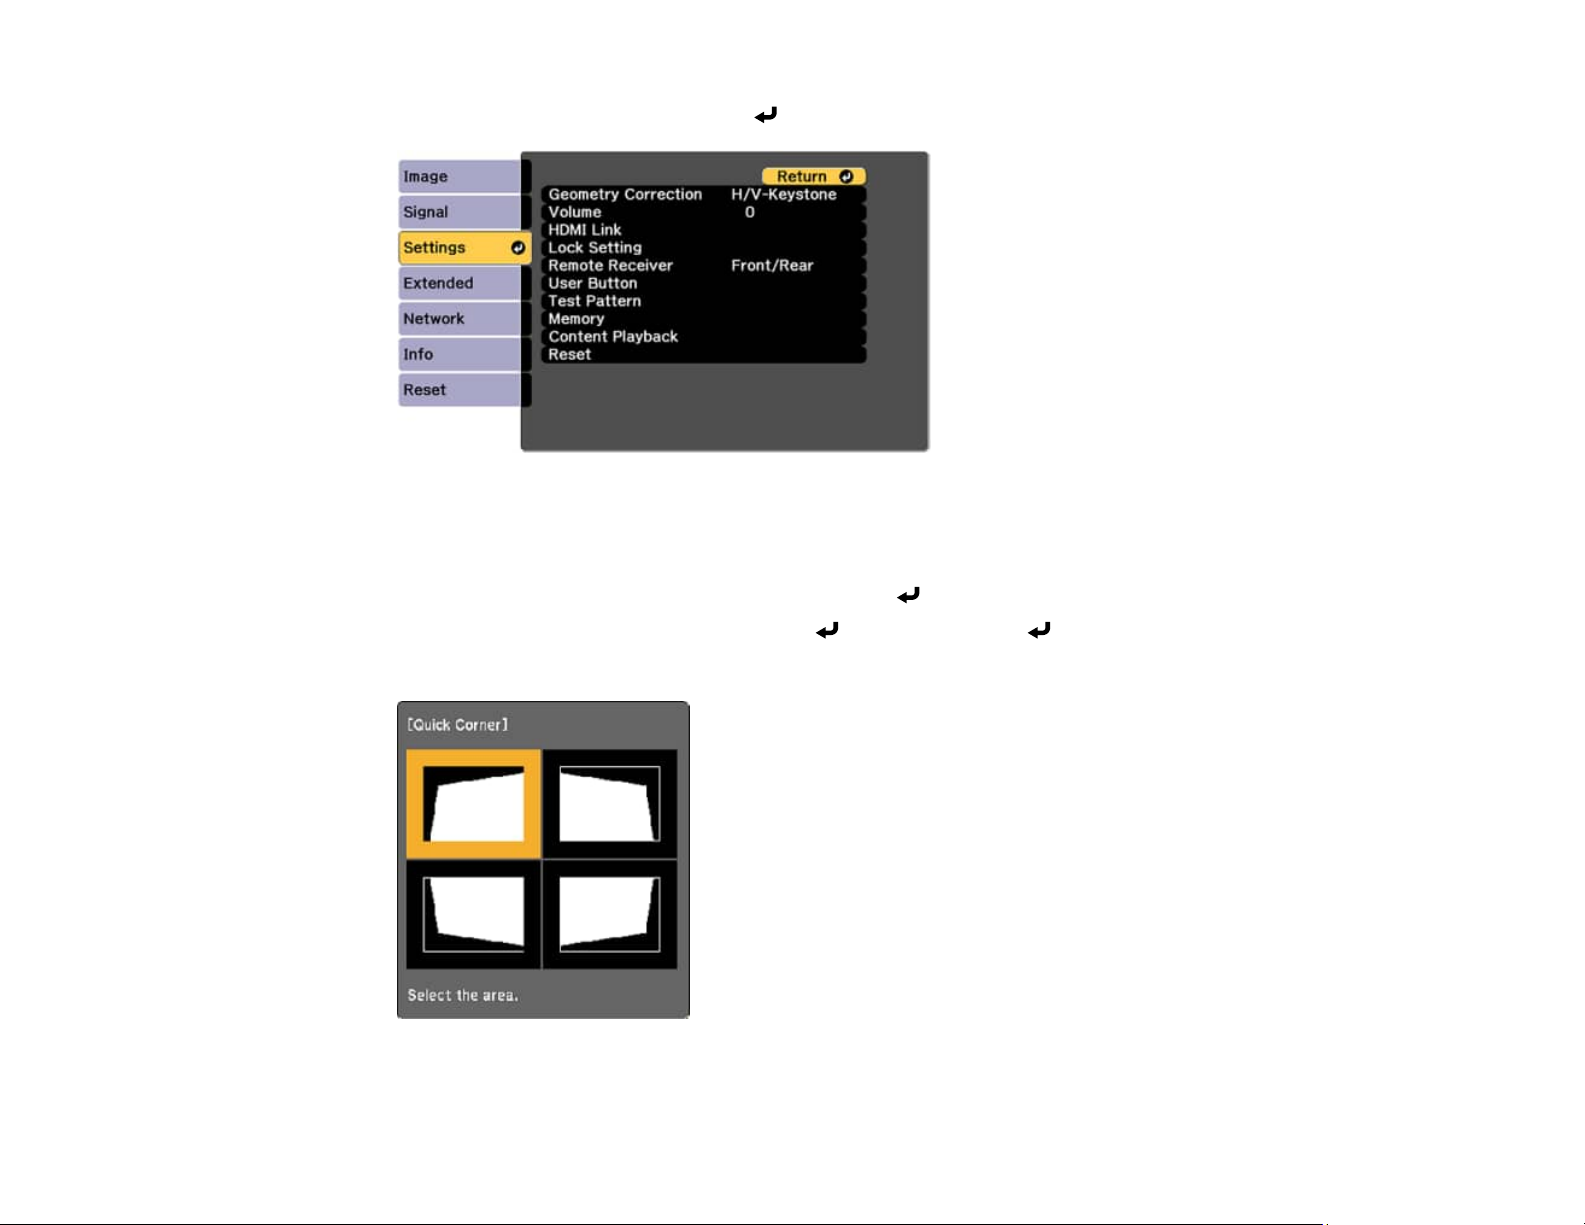
3. Select the Settings menu and press Enter.
Note: You can also press the Geometry button on the remote control to display the Geometry
Correction screen.
4. Select the Geometry Correction setting and press Enter.
5. Select the Quick Corner setting and press Enter. Then press Enter again.
You see the Quick Corner adjustment screen:
93
Page 94
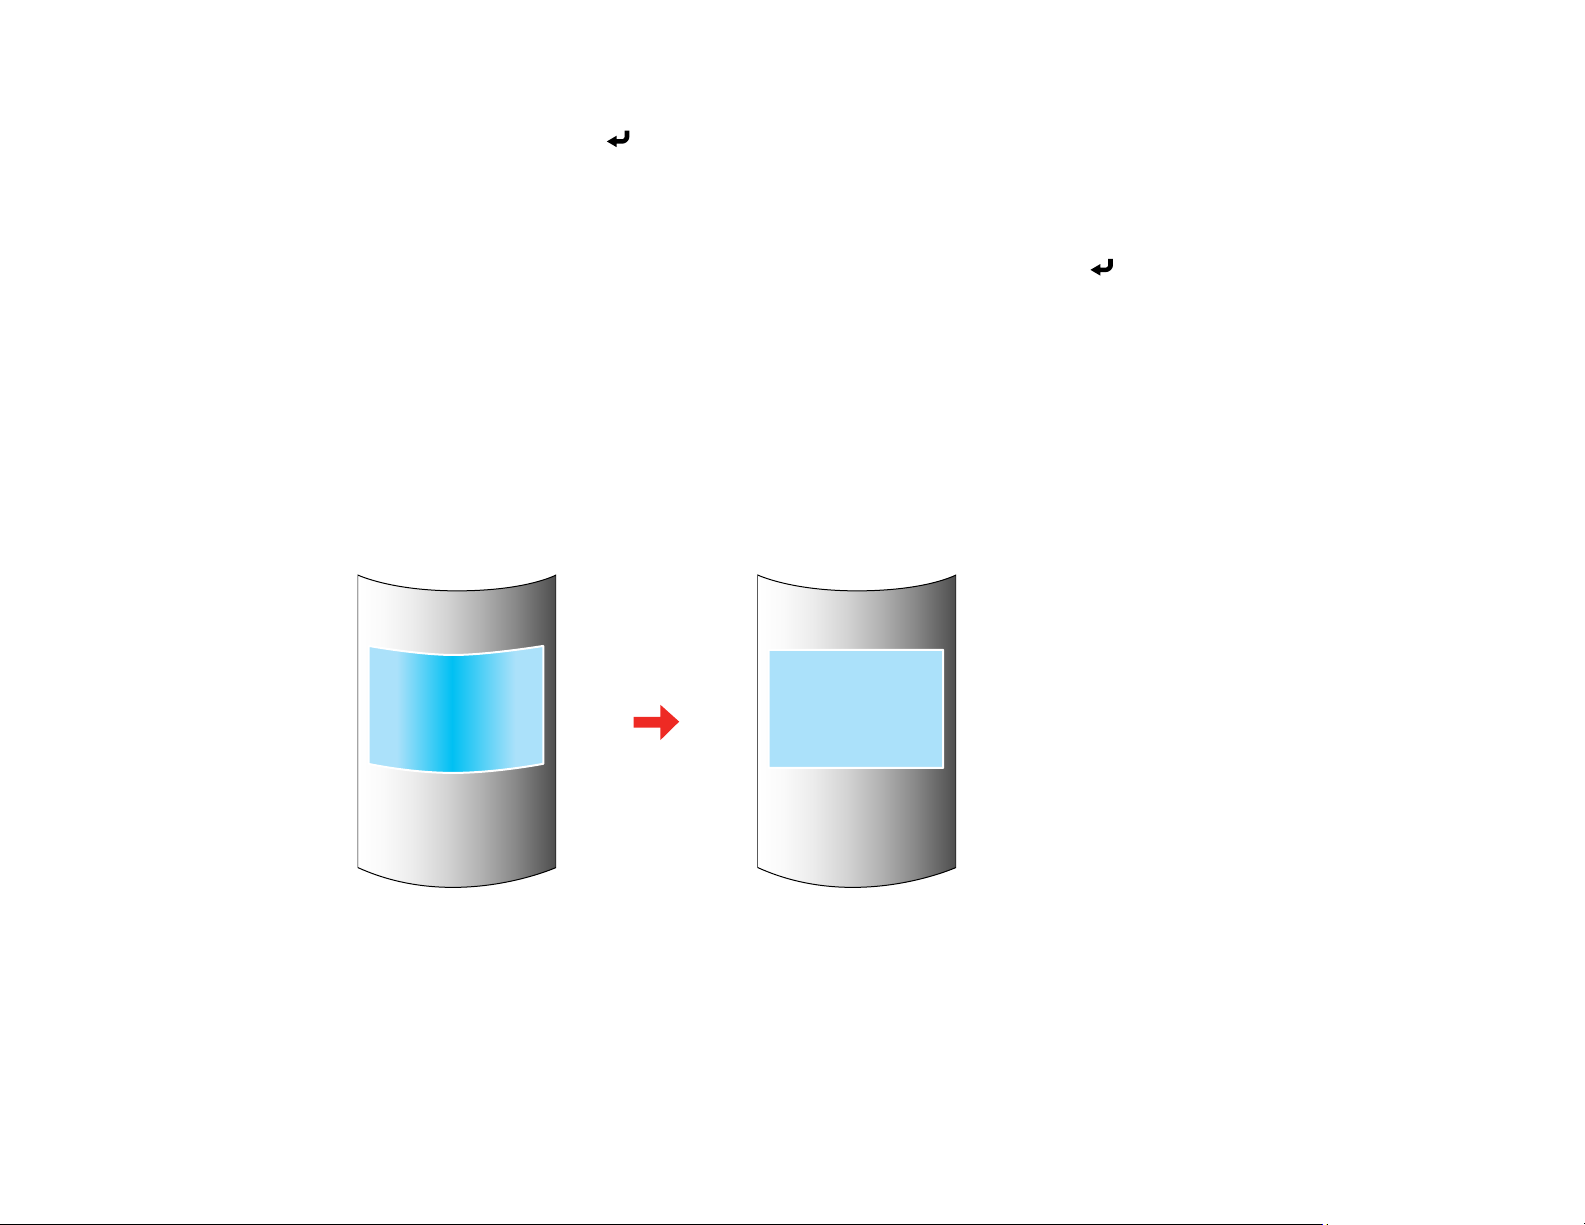
6. Use the arrow buttons on the projector or remote control to select the corner of the image you want
to adjust. Then press Enter.
Note: To reset your adjustments, press and hold the Esc button for at least 2 seconds to display a
reset screen. Then select Yes.
7. Press the arrow buttons to adjust the image shape as necessary. Press Enter to return to the
area selection screen.
8. When you are finished, press Esc.
Parent topic: Image Shape
Related references
Settings Menu
Correcting Image Shape with Curved Surface
You can use the projector's Curved Surface setting to adjust the shape of an image projected on a
curved surface.
Note: For the best results, project from the front of the screen onto a surface with a uniform arc radius
and with the lens in the home position.
94
Page 95
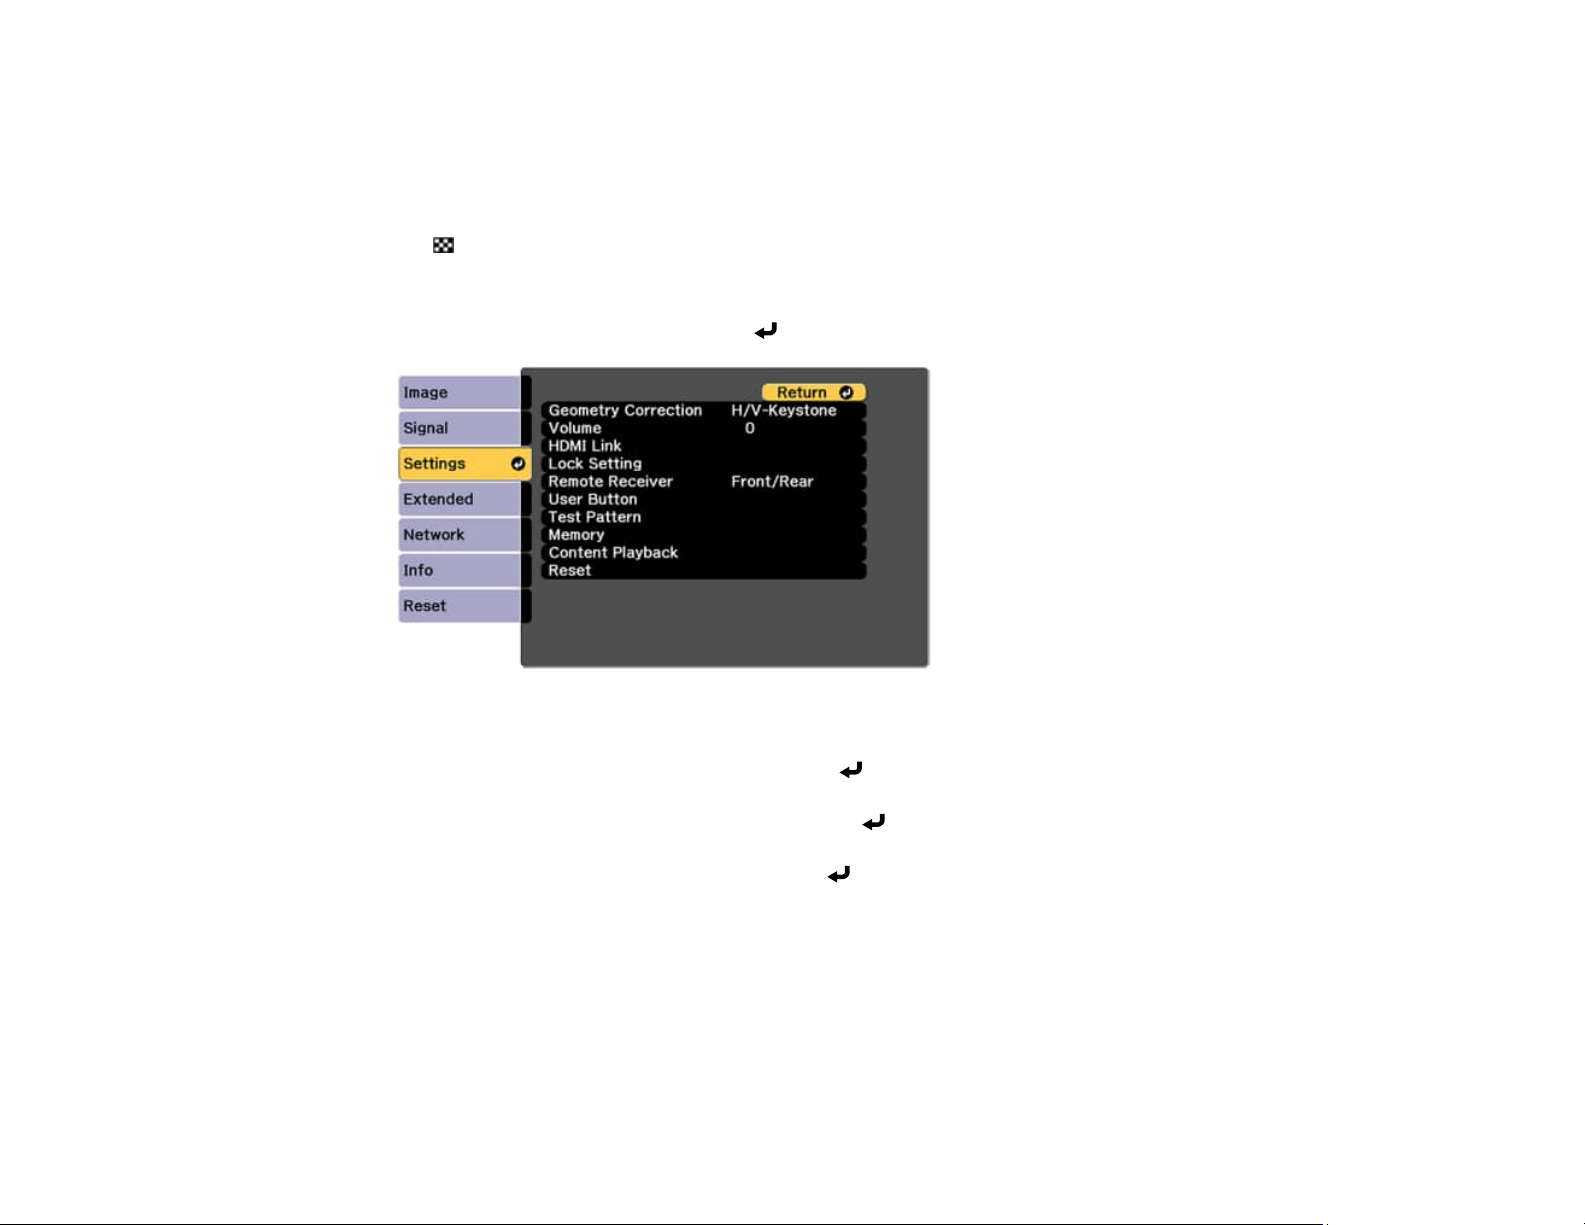
1. Turn on the projector and display an image.
Note: You can display a pattern to aid in adjusting the projected image using the Settings menu.
Note: You can also display the pattern by pressing the Test Pattern button on the remote control or
the test pattern/down arrow on the control panel.
2. Press the Menu button.
3. Select the Settings menu and press Enter.
4. Select the Geometry Correction setting and press Enter.
5. Select the Curved Surface setting and press Enter.
Note: If you see a confirmation message, press Enter.
6. Select the Correct Shape setting and press Enter.
95
Page 96
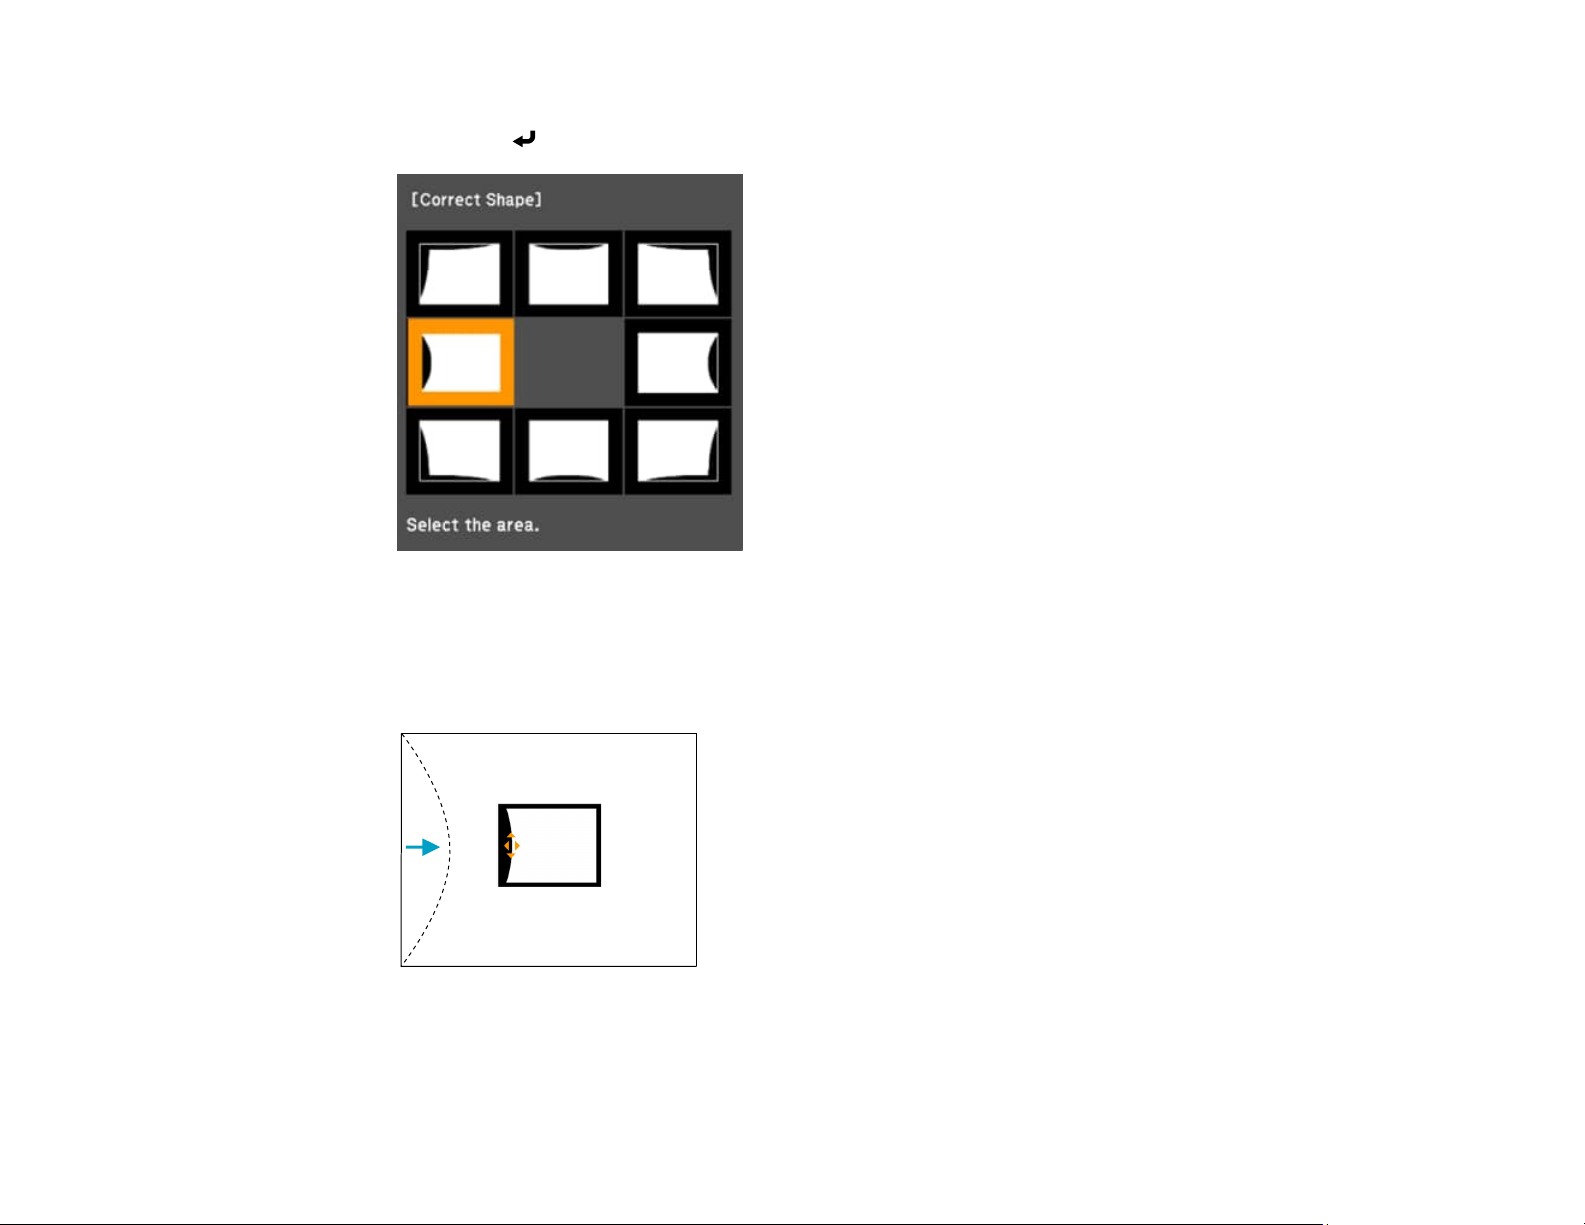
7. Use the arrow buttons on the projector or the remote control to select the area you want to adjust.
Then press Enter.
Note: To reset your adjustments, press and hold the Esc button for at least 2 seconds to display a
reset screen. Then select Yes.
8. Use the arrow buttons on the projector to adjust the image shape.
Note: If the adjustment triangle turns gray, you cannot adjust the shape any further in that direction.
96
Page 97
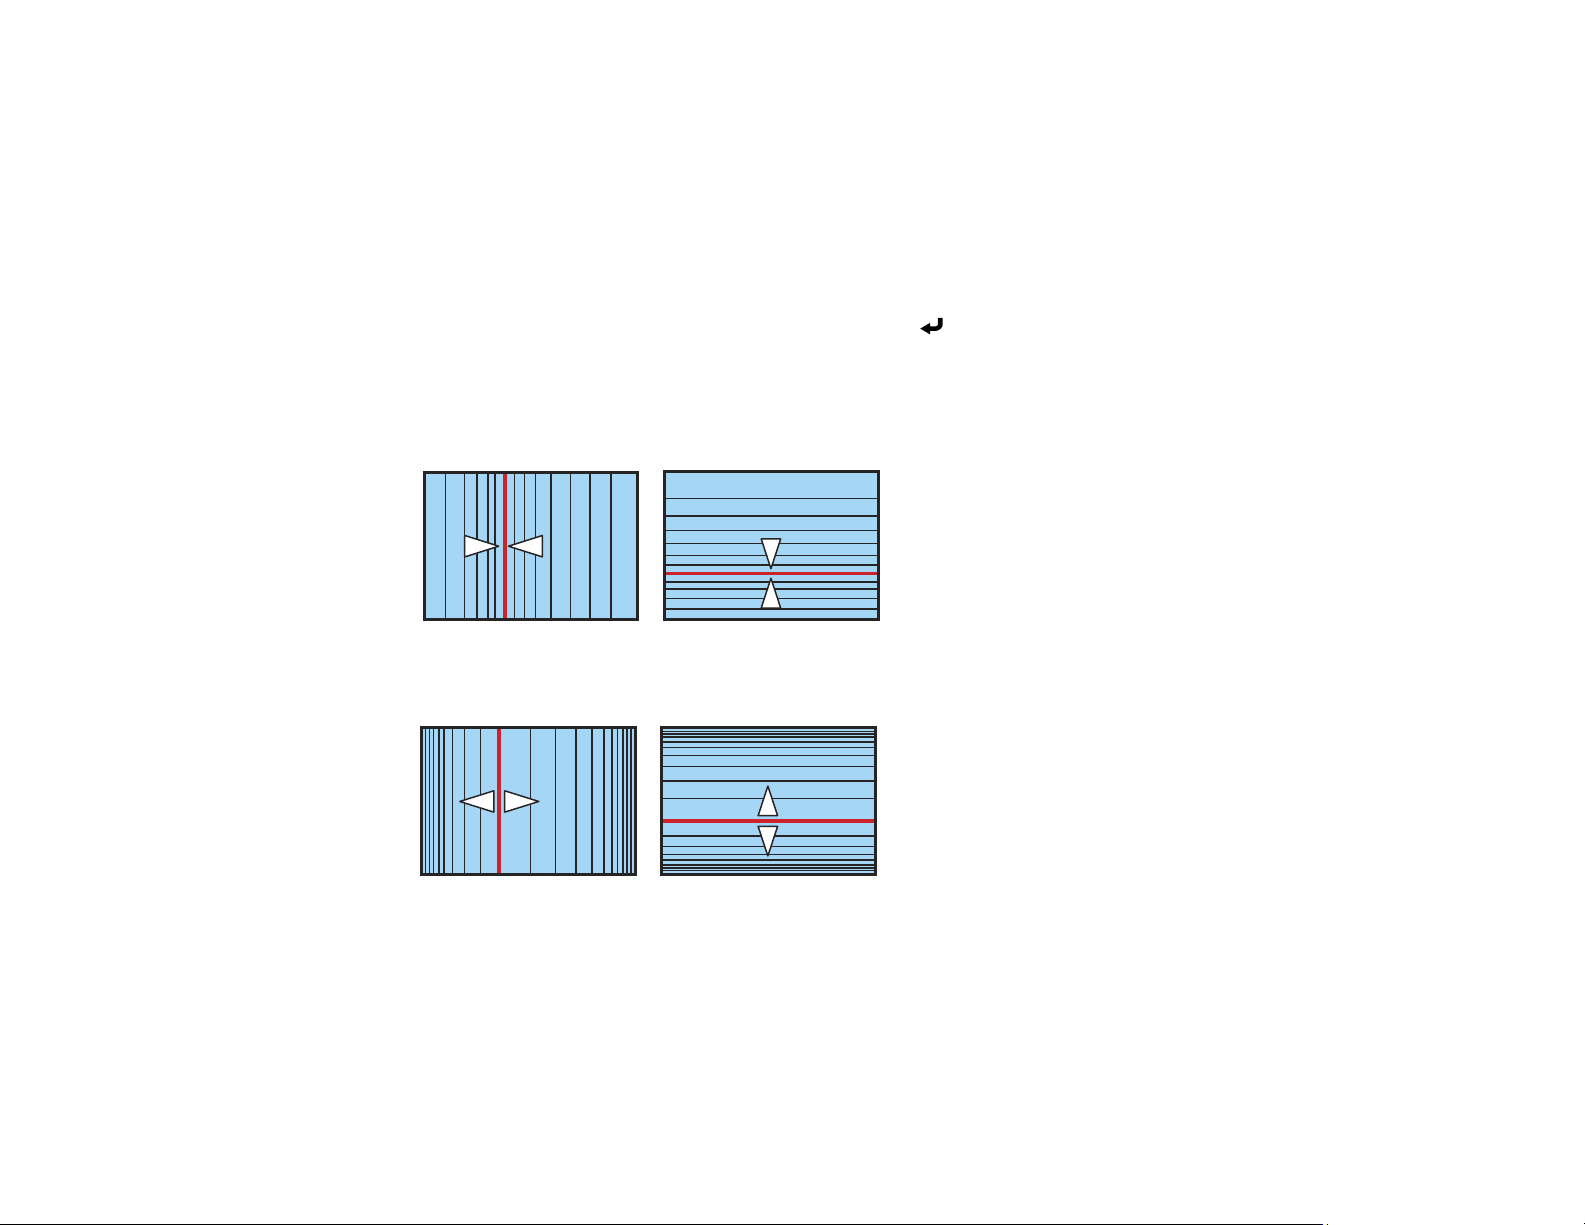
9. Press the Esc button to return to the Curved Surface menu screen.
10. Repeat the previous three steps as necessary to adjust other image areas.
If the image expands or contracts, continue with the next step to adjust the linearity.
11. Select one of the following from the Curved Surface menu screen:
• Horizontal Linearity: Adjusts horizontal expansion or contraction.
• Vertical Linearity: Adjusts vertical expansion or contraction.
12. Select a displayed line to use as a baseline and press Enter.
The selected baseline flashes orange and white.
13. Adjust the linearity by doing one of the following:
• Press the left arrow button to contract the distance between the lines closest to the baseline.
• Press the right arrow button to expand the distance between the lines closest to the baseline.
14. When you are finished, press the Menu button.
Note: If necessary, you can adjust the image tilt using the Quick Corner setting, then fine-tune your
adjustments using the Point Correction setting.
Parent topic: Image Shape
97
Page 98
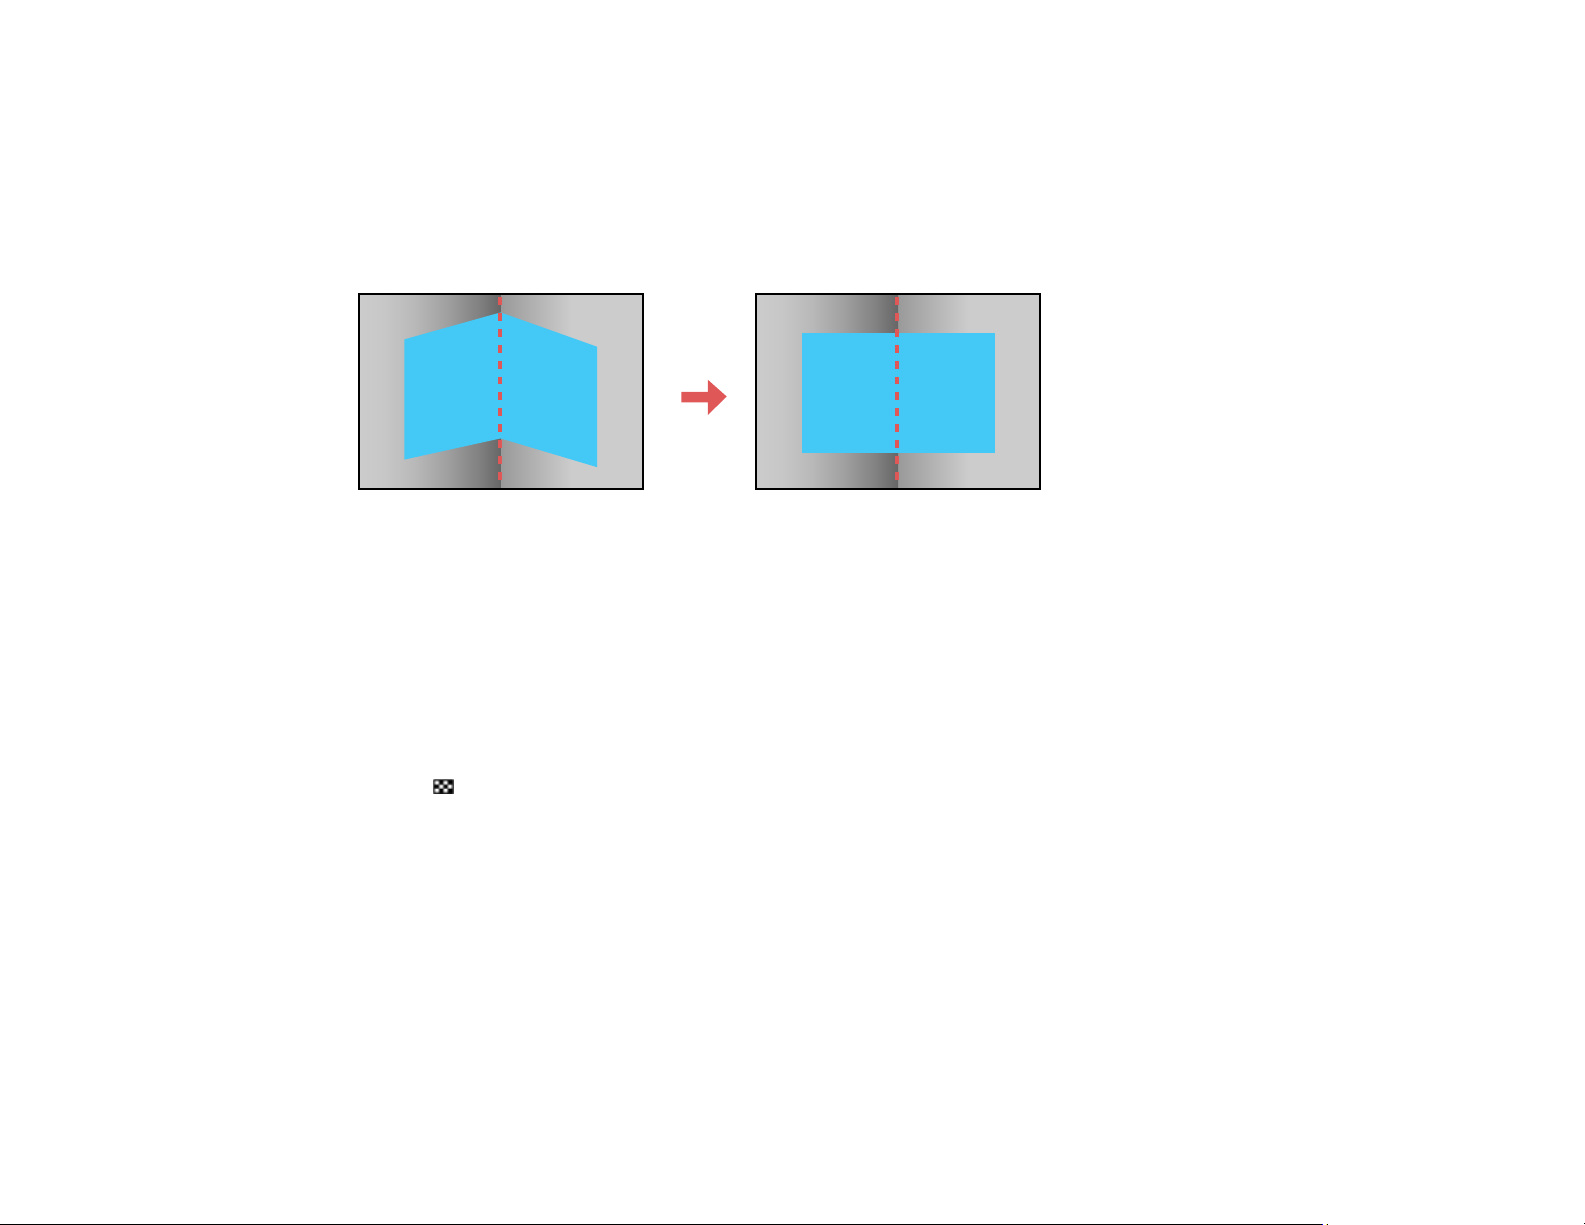
Related references
Settings Menu
Correcting Image Shape with Corner Wall
You can use the projector's Corner Wall setting to adjust the shape of an image projected on a surface
with right angles, such as a rectangular pillar or the corner of a room.
Note: For the best results, move the lens position to the home position and adjust the image shape
based on the point nearest to the center of the screen. If a large amount of adjustment is performed, the
focus may not be uniform even after making adjustments.
1. Turn on the projector and display an image.
Note: You can display a pattern to aid in adjusting the projected image using the Settings menu.
Note: You can also display the pattern by pressing the Test Pattern button on the remote control or
the test pattern/down arrow button on the control panel.
2. Press the Menu button.
98
Page 99
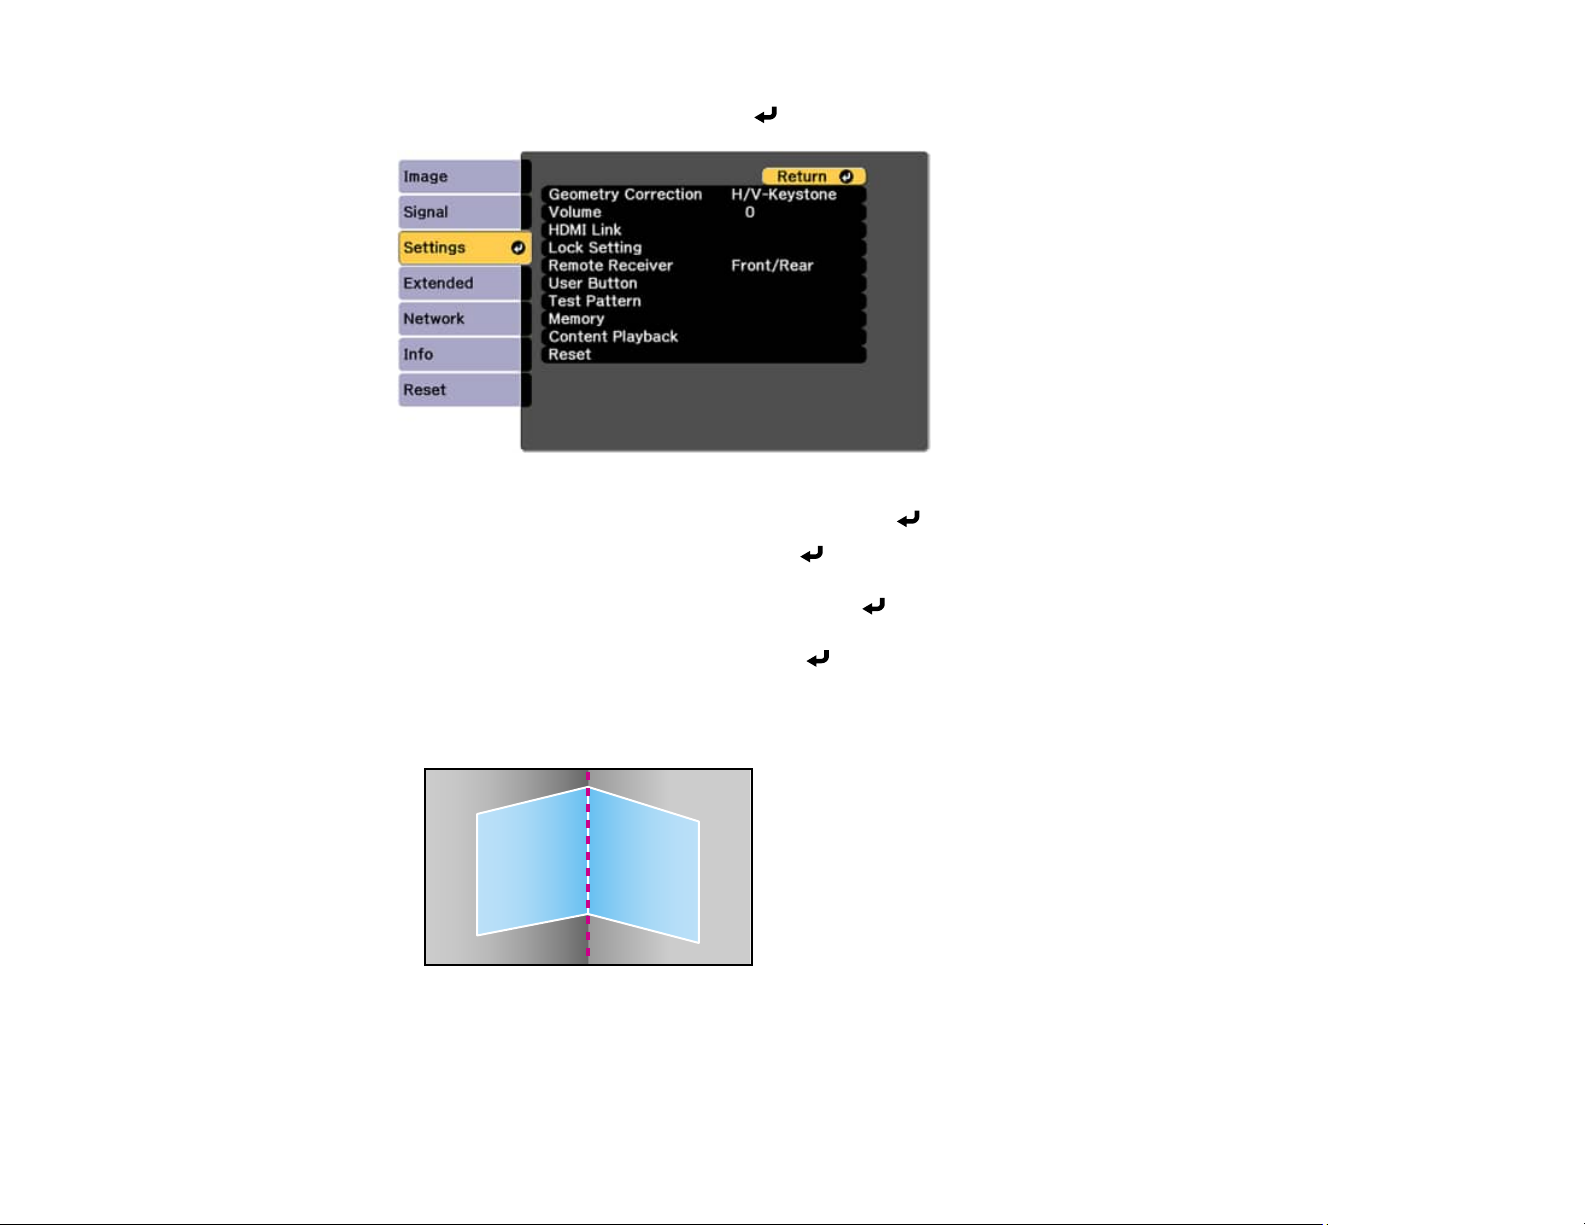
3. Select the Settings menu and press Enter.
4. Select the Geometry Correction setting and press Enter.
5. Select the Corner Wall setting and press Enter.
Note: If you see a confirmation message, press Enter.
6. Select the Corner Type setting and press Enter.
7. Select one of the following:
• Horizontal Corner when the surfaces line up horizontally
99
Page 100
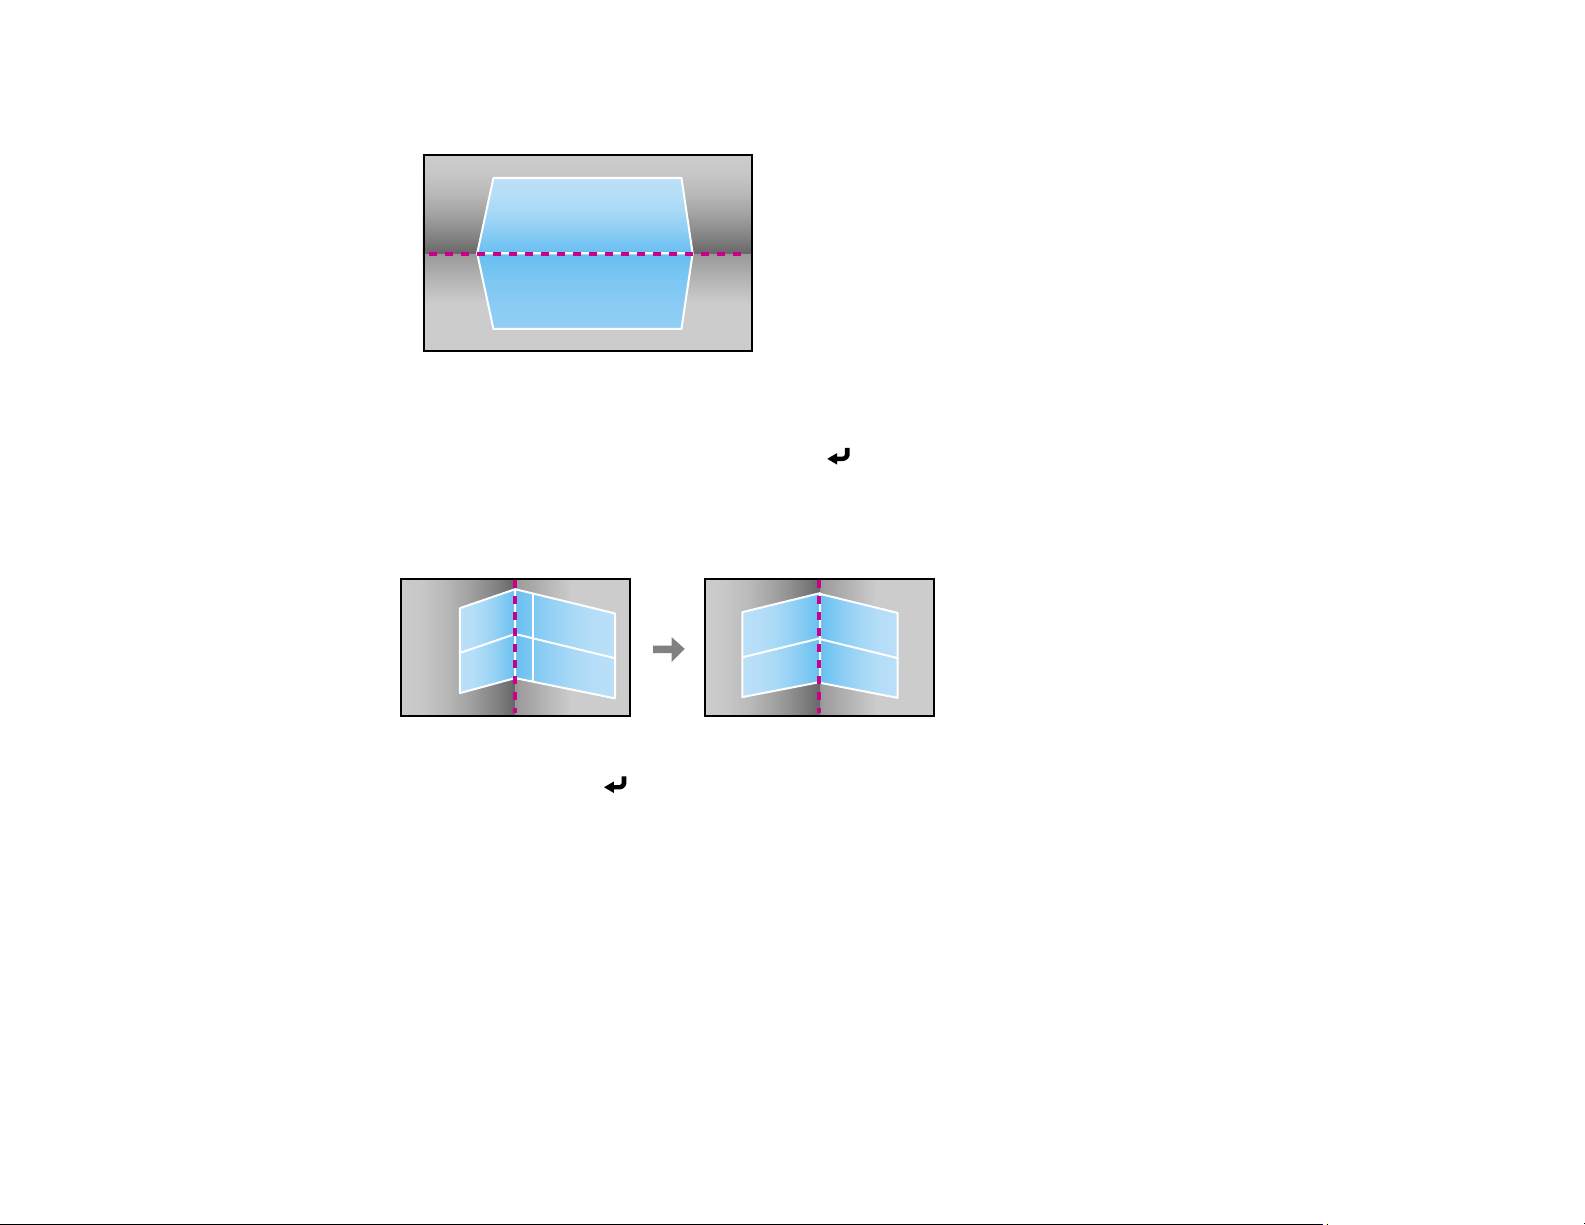
• Vertical Corner when the surfaces line up vertically
8. Press the Esc button to return to the Corner Wall menu screen.
9. Select the Correct Shape setting and press Enter.
10. Adjust the projector's position and use lens shift to center the image over the point where the two
surfaces meet. (The rest of these steps show Horizontal Corner as the selected Corner Type but the
steps are the same for Vertical Corner.)
Note: You can press Enter to show or hide the image and grid to check the results.
100
 Loading...