

Page 1

LS800BATV/LS800WATV User's Guide
Page 2

Page 3

Contents
LS800BATV/LS800WATV User's Guide ..................................................................................................... 9
Introduction to Your Projector ................................................................................................................. 10
Setting Up the Projector ........................................................................................................................... 23
Projector Features.............................................................................................................................. 10
Product Box Contents.................................................................................................................... 11
Additional Components ................................................................................................................ 11
Optional Equipment and Replacement Parts................................................................................. 12
Warranty and Registration Information (U.S. and Canada) ........................................................... 13
Warranty and Registration Information (Latin America)................................................................. 13
Notations Used in the Documentation ................................................................................................ 14
Where to Go for Additional Information .............................................................................................. 14
Additional Projector Software and Manuals........................................................................................ 14
Projector Part Locations ..................................................................................................................... 15
Projector Parts - Front ................................................................................................................... 16
Projector Parts - Top/Side ............................................................................................................. 17
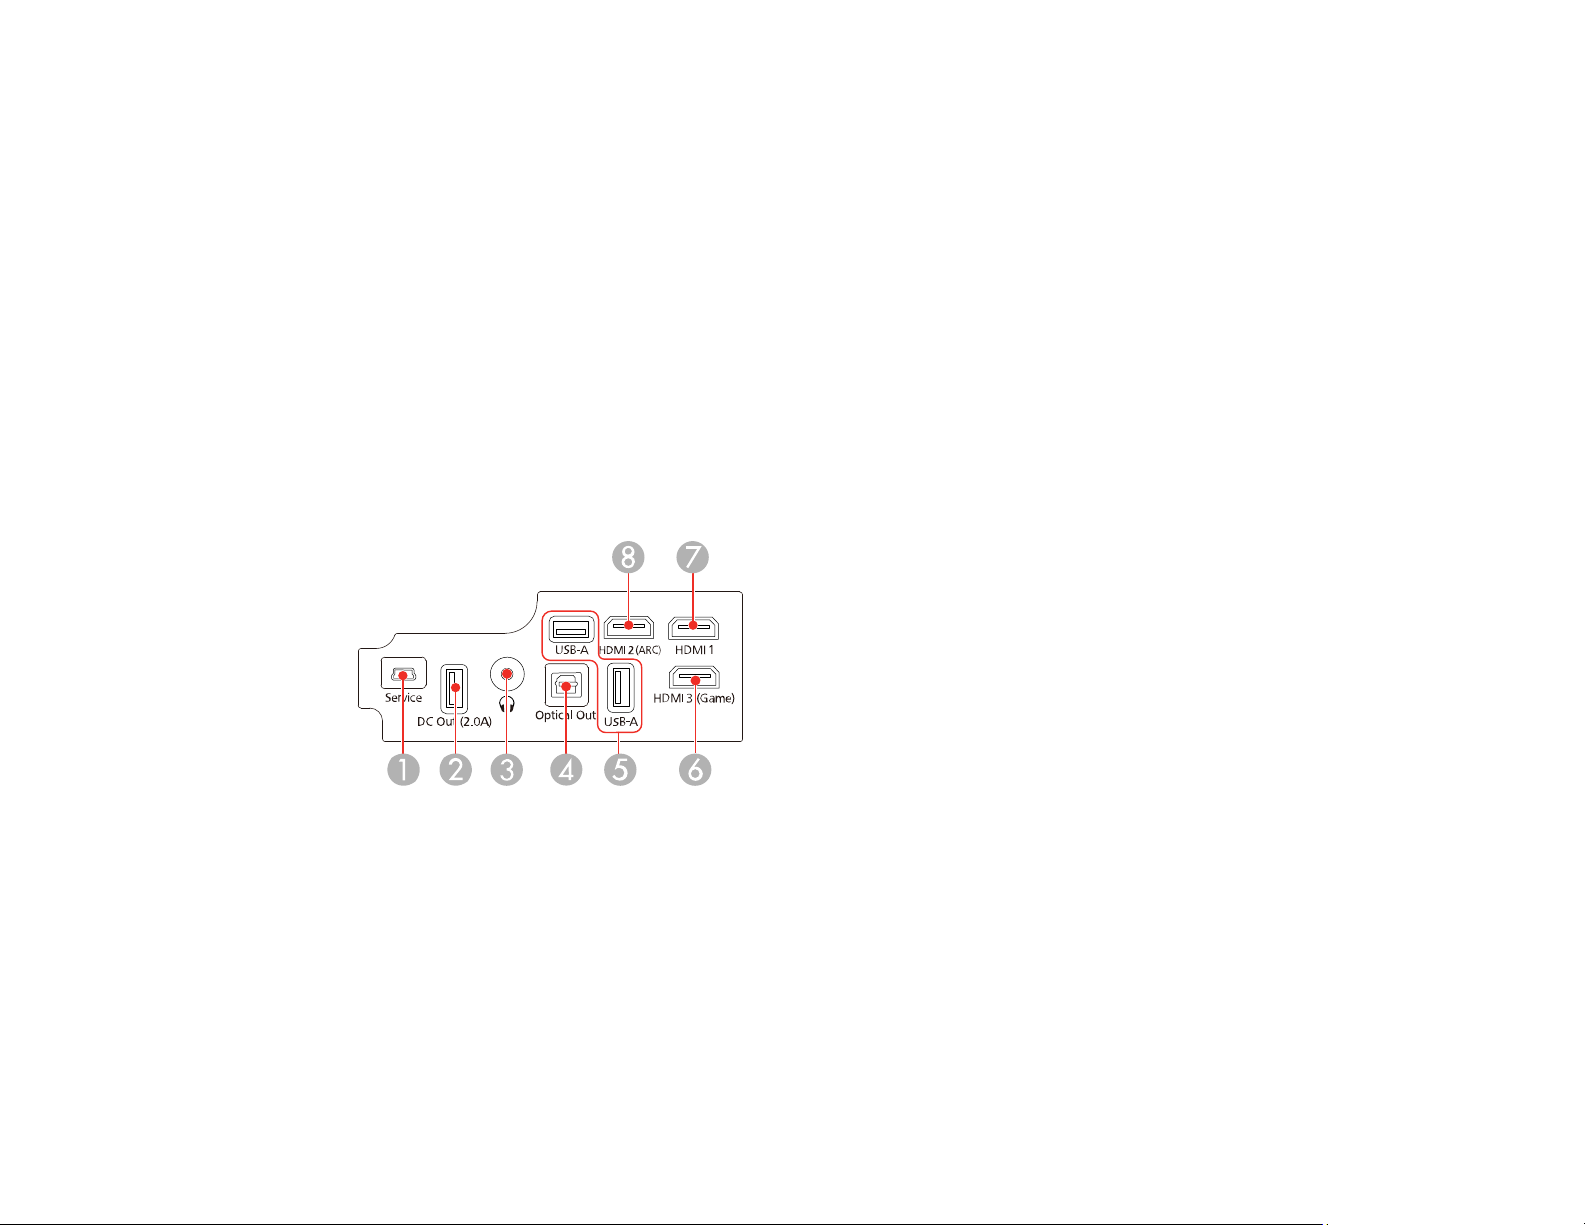
Projector Parts - Interface Ports .................................................................................................... 18
Projector Parts - Base.................................................................................................................... 19
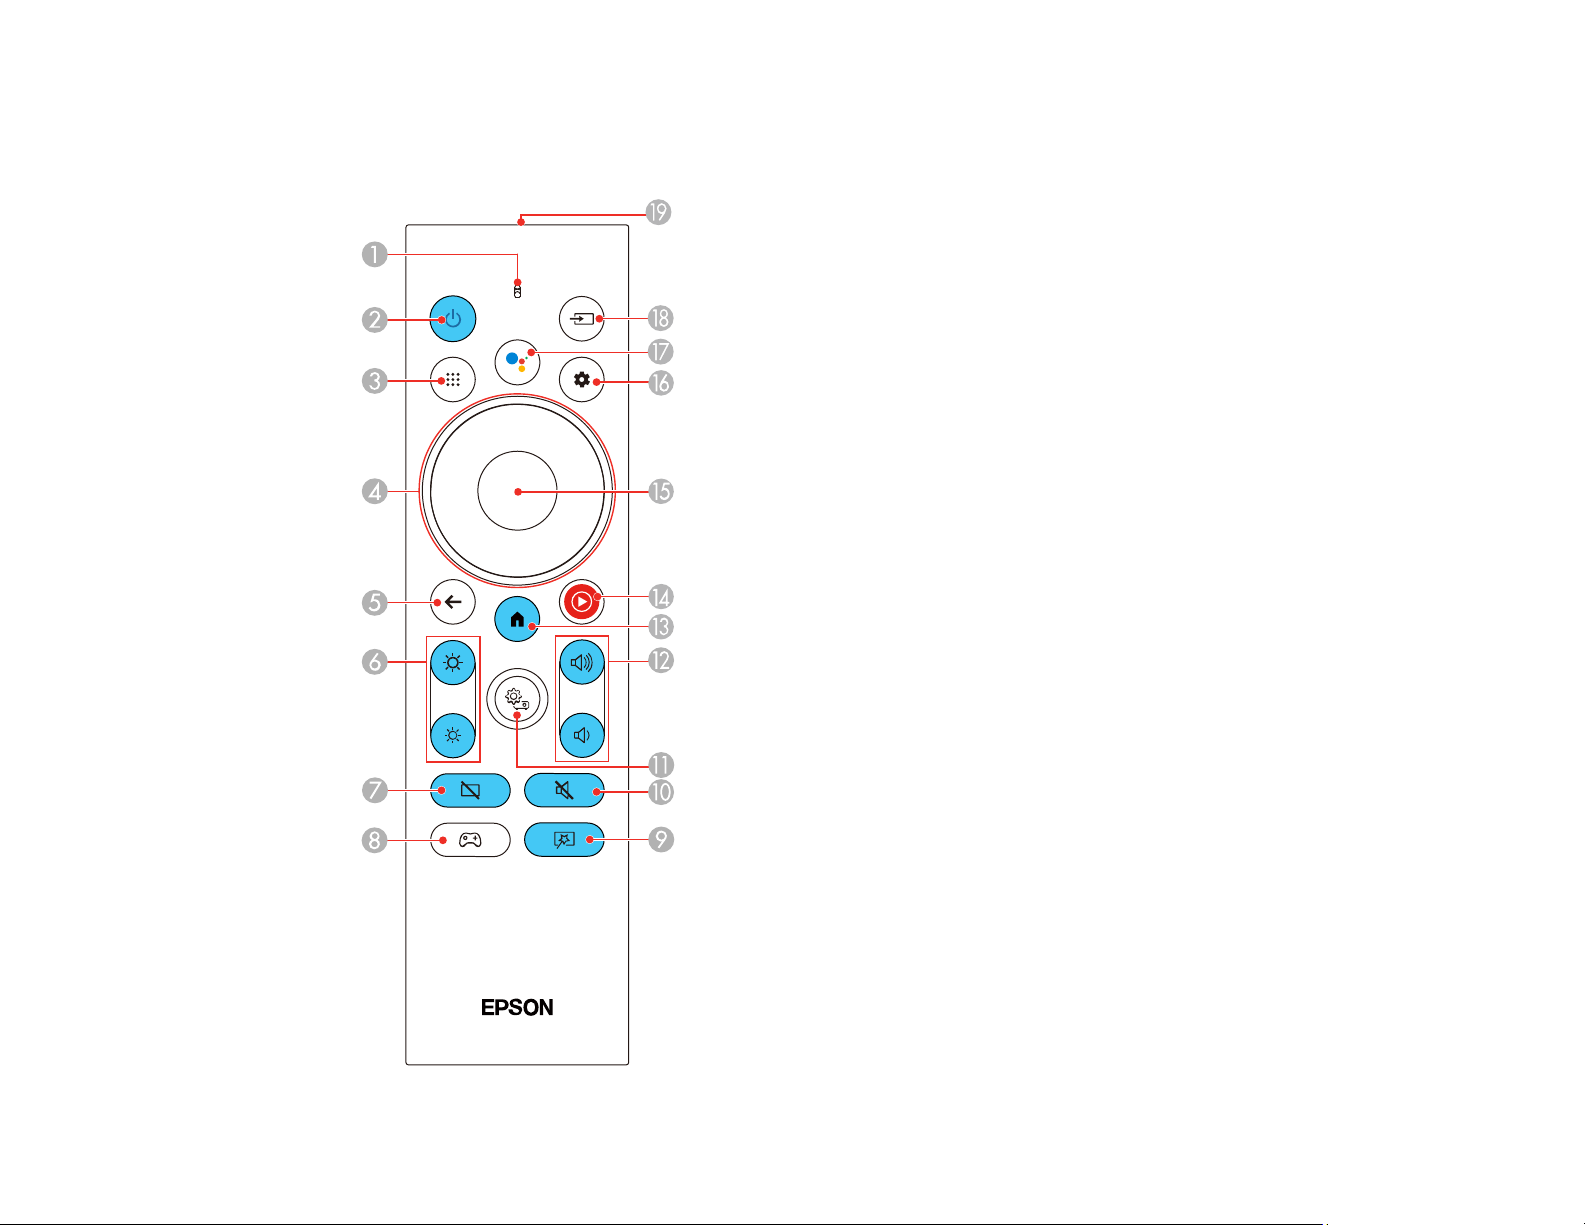
Projector Parts - Remote Control................................................................................................... 21
Projector Placement........................................................................................................................... 23
Projector Setup and Installation Options ....................................................................................... 24
Projection Distance........................................................................................................................ 27
Projector Connections........................................................................................................................ 30
Connecting to an HDMI Video Source ........................................................................................... 31
Connecting to a USB Device ......................................................................................................... 32
Connecting a Streaming Device .................................................................................................... 33
Connecting a Gaming Device........................................................................................................ 35
Connecting External Speakers Using HDMI ARC ......................................................................... 36
Connecting to External Speakers .................................................................................................. 37
Connecting to a Bluetooth Audio Device ....................................................................................... 38
Connecting Headphones............................................................................................................... 39
3
Page 4

Attaching and Removing the Side Cover............................................................................................ 40
Installing Batteries in the Remote Control .......................................................................................... 41
Setting Up Android TV........................................................................................................................ 43
Using Basic Projector Features ............................................................................................................... 45
Turning On the Projector .................................................................................................................... 45
Using the Home Screen................................................................................................................. 48
Turning Off the Projector .................................................................................................................... 49
Focusing the Image............................................................................................................................ 50
Adjusting the Image Height ................................................................................................................ 51
Adjusting Image Color when Projecting onto a Wall ........................................................................... 52
Image Shape...................................................................................................................................... 54
Correcting Image Distortion Using the Installation Menu............................................................... 54
Remote Control Operation ................................................................................................................. 55
Using Voice Commands to Control Your Projector............................................................................. 56
Pairing the Remote Control ................................................................................................................ 57
Selecting an Image Source ................................................................................................................ 57
Using Your Projector as a Chromecast .............................................................................................. 58
Projection Modes ............................................................................................................................... 59
Changing the Projection Mode Using the Menus........................................................................... 59
Image Aspect Ratio ............................................................................................................................ 60
Changing the Image Aspect Ratio ................................................................................................. 61
Available Image Aspect Ratios...................................................................................................... 62
Color Mode......................................................................................................................................... 62
Changing the Color Mode.............................................................................................................. 62
Available Color Modes................................................................................................................... 64
Turning On Automatic Luminance Adjustment .............................................................................. 64
Adjusting Image Quality in Detail........................................................................................................ 65
Adjusting the Image Resolution.......................................................................................................... 67
Using Frame Interpolation ................................................................................................................. 69
Controlling the Volume with the Volume Buttons................................................................................ 70
Changing the Sound Mode................................................................................................................. 71
Adjusting Projector Features ................................................................................................................... 73
Using the Projector as a Bluetooth Speaker....................................................................................... 73
4
Page 5

Operating Connected Devices Using the HDMI Link Features ........................................................... 75
Adjusting the Light Source Brightness Using Adaptive Light Output .................................................. 77
Muting the Sound Temporarily ........................................................................................................... 78
Shutting Off the Picture Temporarily .................................................................................................. 78
Changing the Projected Image Using Flexible Picture ....................................................................... 78
Projector Security Features................................................................................................................ 80
Installing a Security Cable ............................................................................................................. 81
Updating the Firmware ....................................................................................................................... 81
Resetting the Projector....................................................................................................................... 82
Adjusting the Menu Settings .................................................................................................................... 84
Using the Projector's Menus............................................................................................................... 84
Image Quality Settings - Picture Menu ............................................................................................... 85
Sound Quality Settings - Sound Menu................................................................................................ 90
Projector Installation Settings - Installation Menu............................................................................... 94
Projector Feature Settings - Settings Menu ........................................................................................ 95
Projector Information Settings - Information Menu ............................................................................. 98
Maintaining and Transporting the Projector ........................................................................................... 99
Projector Maintenance ....................................................................................................................... 99
Cleaning the Projection Window.................................................................................................... 99
Cleaning the Obstacle and Motion Sensors................................................................................. 100
Cleaning the Projector Case........................................................................................................ 101
Air Filter and Vent Maintenance ....................................................................................................... 101
Cleaning the Air Filter and Vents ................................................................................................. 102
Replacing the Air Filter ................................................................................................................ 105
Replacing the Remote Control Batteries .......................................................................................... 108
Transporting the Projector................................................................................................................ 109
Solving Problems .................................................................................................................................... 110
Projection Problem Tips ................................................................................................................... 110
Projector Light Status ....................................................................................................................... 111
Solving Image or Sound Problems ................................................................................................... 113
Solutions When No Image Appears............................................................................................. 113
Solutions When "No Signal" Message Appears........................................................................... 115
Displaying From a PC Laptop ................................................................................................. 116
5
Page 6

Displaying From a Mac Laptop ............................................................................................... 116
Solutions When Only a Partial Image Appears............................................................................ 116
Solutions When the Image is Not Rectangular ............................................................................ 117
Solutions When the Image Contains Noise or Static ................................................................... 117
Solutions When the Image is Flipped or Too Small ..................................................................... 118
Solutions When the Image is Fuzzy or Blurry .............................................................................. 118
Solutions When the Image Brightness or Colors are Incorrect .................................................... 119
Solutions to Sound Problems ...................................................................................................... 120
Solutions to Bluetooth Audio Problems ....................................................................................... 121
Solving Projector or Remote Control Operation Problems ............................................................... 121
Solutions to Projector Power or Shut-Off Problems ..................................................................... 122
Solutions to Remote Control Problems........................................................................................ 123
Solutions to HDMI Link Problems ................................................................................................ 124
Solving Network Problems ............................................................................................................... 124
Solutions When Wireless Authentication Fails ............................................................................ 125
Where to Get Help (U.S. and Canada) ............................................................................................. 125
Where to Get Help (Latin America)................................................................................................... 126
Technical Specifications ........................................................................................................................ 128
General Projector Specifications...................................................................................................... 128
Projector Light Source Specifications............................................................................................... 130
Remote Control Specifications ......................................................................................................... 130
Projector Dimension Specifications.................................................................................................. 131
Projector Electrical Specifications .................................................................................................... 131
Bluetooth Specifications................................................................................................................... 132
Projector Environmental Specifications............................................................................................ 132
Projector Safety and Approvals Specifications................................................................................. 133
Supported Video Display Formats.................................................................................................... 133
Notices ..................................................................................................................................................... 135
Recycling (U.S. and Canada)........................................................................................................... 135
Important Safety Information ............................................................................................................ 135
Laser Safety Information .................................................................................................................. 135
Important Safety Instructions............................................................................................................ 138
Restriction of Use ........................................................................................................................ 144
6
Page 7

List of Safety Symbols ...................................................................................................................... 144
FCC Compliance Statement............................................................................................................. 149
Binding Arbitration and Class Waiver ............................................................................................... 150
Trademarks...................................................................................................................................... 153
Copyright Notice............................................................................................................................... 153
A Note Concerning Responsible Use of Copyrighted Materials................................................... 154
Copyright Attribution.................................................................................................................... 154
7
Page 8

Page 9

LS800BATV/LS800WATV User's Guide
Welcome to the LS800BATV/LS800WATV User's Guide.
For a printable PDF copy of this guide, click here.
Note: Availability of products in this guide varies by country.
9
Page 10

Introduction to Your Projector
Refer to these sections to learn more about your projector and this manual.
Projector Features
Notations Used in the Documentation
Where to Go for Additional Information
Additional Projector Software and Manuals
Projector Part Locations
Projector Features
The LS800BATV/LS800WATV projector includes these special features:
Bright, high-resolution projection system
• Up to 4000 lumens of color brightness (color light output) and white brightness (white light output)
Note: Color brightness (color light output) and white brightness (white light output) will vary depending
on usage conditions. Color light output measured in accordance with IDMS 15.4; white light output
measured in accordance with ISO 21118.
Flexible connectivity
• Two HDMI ports for computer or video device connection
• One HDMI port with faster response time for gaming devices
• Stream content from your compatible device via Chromecast built-in
Innovative display and operation features
• Long-life laser light source
• Built-in Android TV
• Motion sensor near the projection window reduces light output to help prevent dangerous light
exposure to the eyes
• Over 2,500,000:1 contrast ratio and Dynamic Contrast control for sharp, detailed images
• Powerful 2.1 channel Yamaha stereo speaker system with optical audio out port for connecting
external speakers
• Bluetooth speaker mode
10
Page 11
Product Box Contents
Additional Components
Optional Equipment and Replacement Parts
Warranty and Registration Information (U.S. and Canada)
Warranty and Registration Information (Latin America)
Parent topic: Introduction to Your Projector
Product Box Contents
Save all the packaging in case you need to ship the projector. Always use the original packaging (or
equivalent) when shipping.
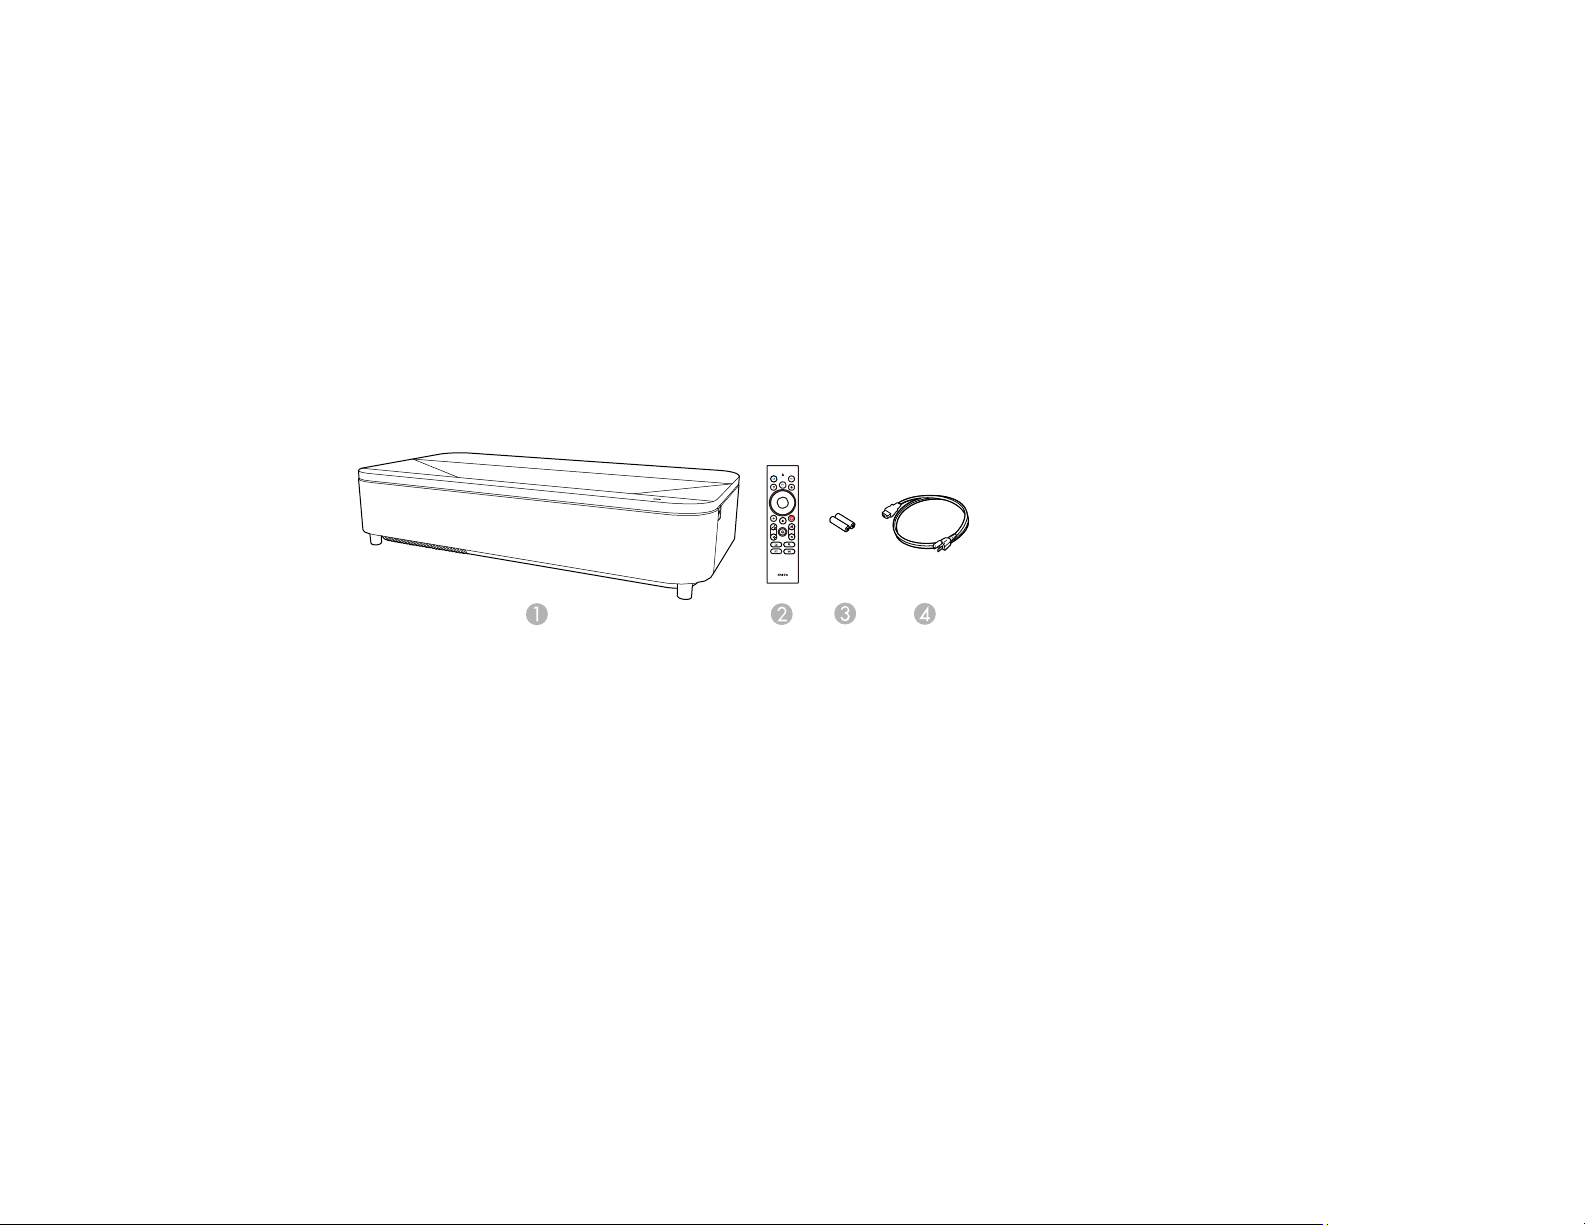
Make sure your projector box included all of these parts:
1 Projector
2 Remote control
3 Remote control batteries (2 AAA alkaline)
4 Power cord
Parent topic: Projector Features
Additional Components
Depending on how you plan to use the projector, you may need to obtain additional components.
Note: To connect a source that does not include a compatible video output port, you need to obtain an
adapter that allows you to connect to an input port on the projector. If the device is a Mac, contact Apple
for compatible adapter options. To connect a smartphone or tablet, you may need to obtain an adapter
11
Page 12

that allows you to connect to the projector. This allows you to mirror your smartphone or tablet screens,
watch movies, and more. Contact your device manufacturer for compatible adapter options.
Unless listed as available from Epson in this table, see your local computer or electronics dealer for
purchase information.
Note: Availability of accessories varies by country.
Signal or connection
type
HDMI Compatible HDMI cable
Optical digital audio cable Commercially available optical digital audio cable compatible with your
3.5 mm stereo mini jack Commercially available 3.5 mm audio cable compatible with your device
Parent topic: Projector Features
Additional component necessary
U.S. and Canada: Available for purchase from Epson or an authorized
Epson reseller.
Note: Older Mac computers (2009 and earlier) may not support HDMI
audio.
device
Optional Equipment and Replacement Parts
U.S. and Canada: You can purchase screens, other optional accessories, and replacement parts from
an Epson authorized reseller. To find the nearest reseller, call 800-GO-EPSON (800-463-7766) in the
U.S. or 800-807-7766 in Canada. Or you can purchase online at epsonstore.com (U.S. sales) or
epsonstore.ca (Canadian sales).
Latin America: You can purchase screens, other optional accessories, and replacement parts from an
Epson authorized reseller. To find the nearest reseller, go to latin.epson.com. Or you can click the
"Where to Get Help" link below to contact your nearest sales office.
Note: Availability of accessories varies by country.
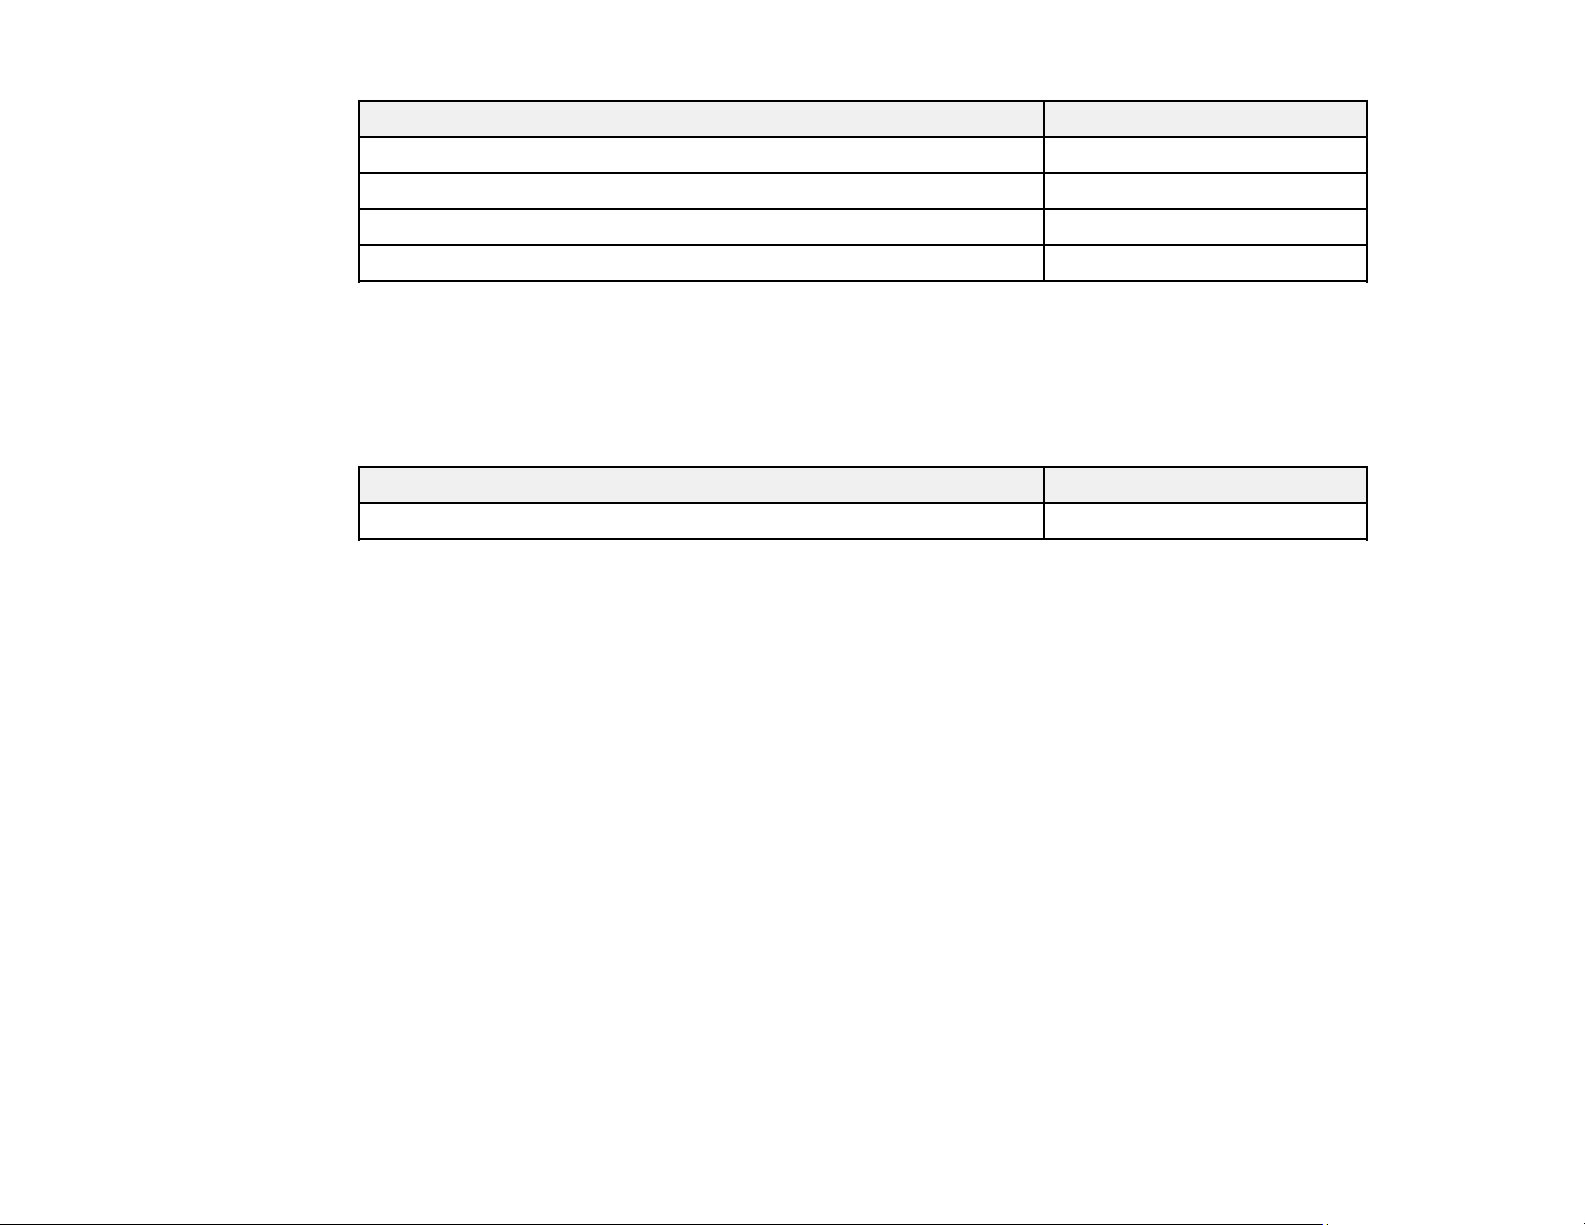
Epson offers the following optional accessories and replacement parts for your projector:
U.S. and Canada:
12
Page 13
Option or part Part number
Replacement air filter (ELPAF64) V13H134AE0
Ultra Short Throw Screen 100" (ELPSC35) V12H002AL0
Ultra Short Throw Screen 120" (ELPSC36) V12H002AM0
Safety Wire Set (ELPWR01) V12H003W01
Note: Special expertise is required to suspend the projector from a ceiling. Contact your dealer or Epson
for help.
In addition to the accessories listed above, extended service plans are available.
Latin America:
Option or part Part number
Replacement air filter (ELPAF64) V13H134AE0
Parent topic: Projector Features
Related references
Where to Get Help (U.S. and Canada)
Where to Get Help (Latin America)
Warranty and Registration Information (U.S. and Canada)
Your projector comes with a basic warranty that lets you project with confidence. For details, see the
warranty brochure that came with your projector.
Register your product online at this site: epson.com/webreg
Registering also lets you receive special updates on new accessories, products, and services.
Parent topic: Projector Features
Warranty and Registration Information (Latin America)
Your projector comes with a basic warranty that lets you project with confidence. For details, see the
warranty that came with your projector.
Register your product online at latin.epson.com/support, search for your product, and select Register.
Registering also lets you receive special updates on new accessories, products, and services.
13
Page 14

Parent topic: Projector Features
Notations Used in the Documentation
Follow the guidelines in these notations as you read your documentation:
• Warnings must be followed carefully to avoid bodily injury.
• Cautions must be observed to avoid damage to your equipment.
• Notes contain important information about your projector.
• Tips contain additional projection information.
Parent topic: Introduction to Your Projector
Where to Go for Additional Information
Need quick help on using your projector? Here's where to look for help:
• https://support.google.com/androidtv/ for Android TV support
• epson.com/support (U.S.), epson.ca/support (Canada), or latin.epson.com/support (Caribbean)
View FAQs (frequently asked questions) and e-mail your questions to Epson technical support 24
hours a day.
• If you still need help after checking this manual and any other sources listed here, you can use the
Epson PrivateLine Support service to get help fast (U.S. and Canada only). For details, see "Where to
Get Help."
Parent topic: Introduction to Your Projector
Related references
Where to Get Help (U.S. and Canada)
Where to Get Help (Latin America)
Additional Projector Software and Manuals
After connecting and setting up the projector, install the projector software as necessary. You may need
to install it from a software CD, if included, or download the software and manuals as necessary.
You can install the projector software programs listed here and view their manuals for instructions on
using them.
14
Page 15

Note: If you still need help after checking this manual and the sources listed here, you can use the
Epson PrivateLine Support service to get help fast (U.S. and Canada only). For details, see "Where to
Get Help."
Projector software Manual Description
— Open Source Software
Epson Setting Assistant
app
Parent topic: Introduction to Your Projector
Related references
Where to Get Help (U.S. and Canada)
Where to Get Help (Latin America)
Projector Part Locations
Check the projector part illustrations to learn about the parts on your projector.
License
Instructions are included
with the app
You can download this document from the
Epson web site. Go to epson.com/support
(U.S.), epson.ca/support (Canada), or
latin.epson.com/support (Caribbean) and
select your projector. (Document available
only in English.)
Lets you use the camera on your iOS or
Android device to automatically adjust the
shape of your projected image if there is any
distortion. The device and your projector must
be connected to the same network.
You can download the latest software and
documentation from the Apple App Store or
Google Play Store.
Projector Parts - Front
Projector Parts - Top/Side
Projector Parts - Interface Ports
Projector Parts - Base
Projector Parts - Remote Control
Parent topic: Introduction to Your Projector
15
Page 16
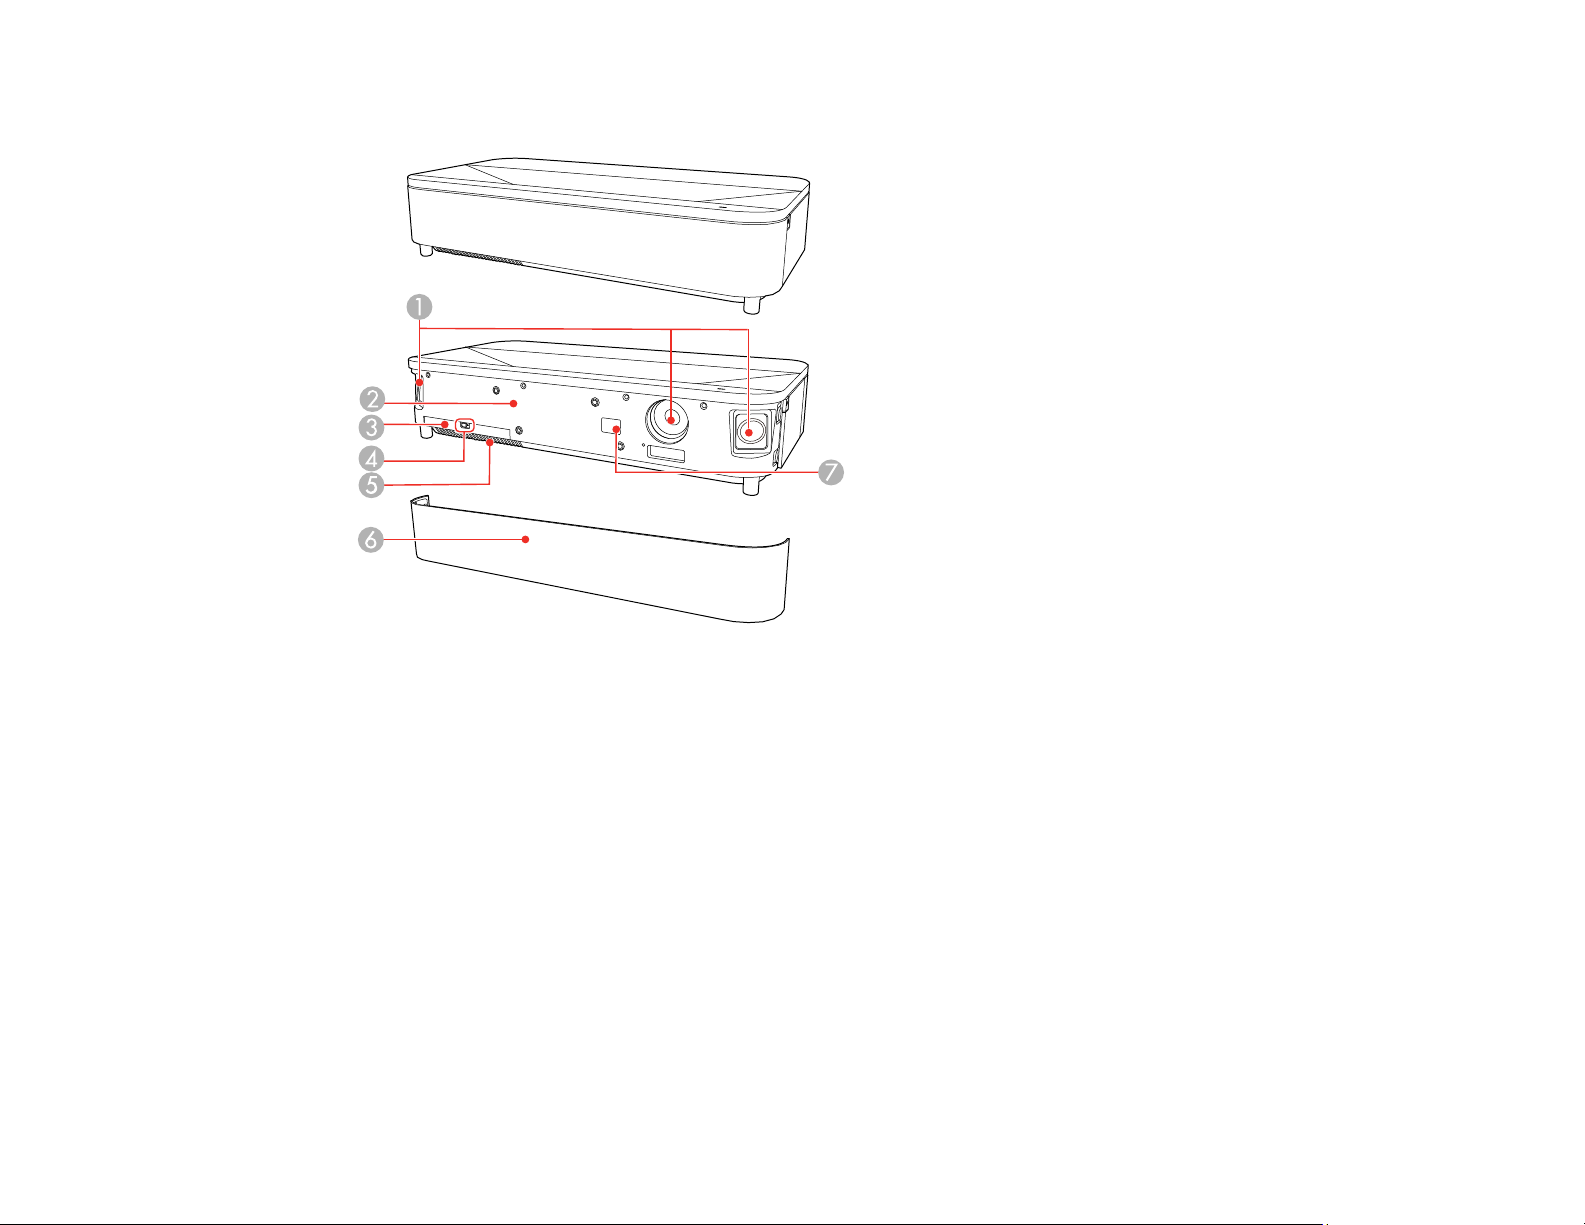
Projector Parts - Front
1 Speakers
2 Brightness sensor
3 Air filter cover
4 Air filter cover latch
5 Air intake vent (air filter)
6 Front cover
7 Remote receiver
Parent topic: Projector Part Locations
Related references
Projector Light Status
16
Page 17
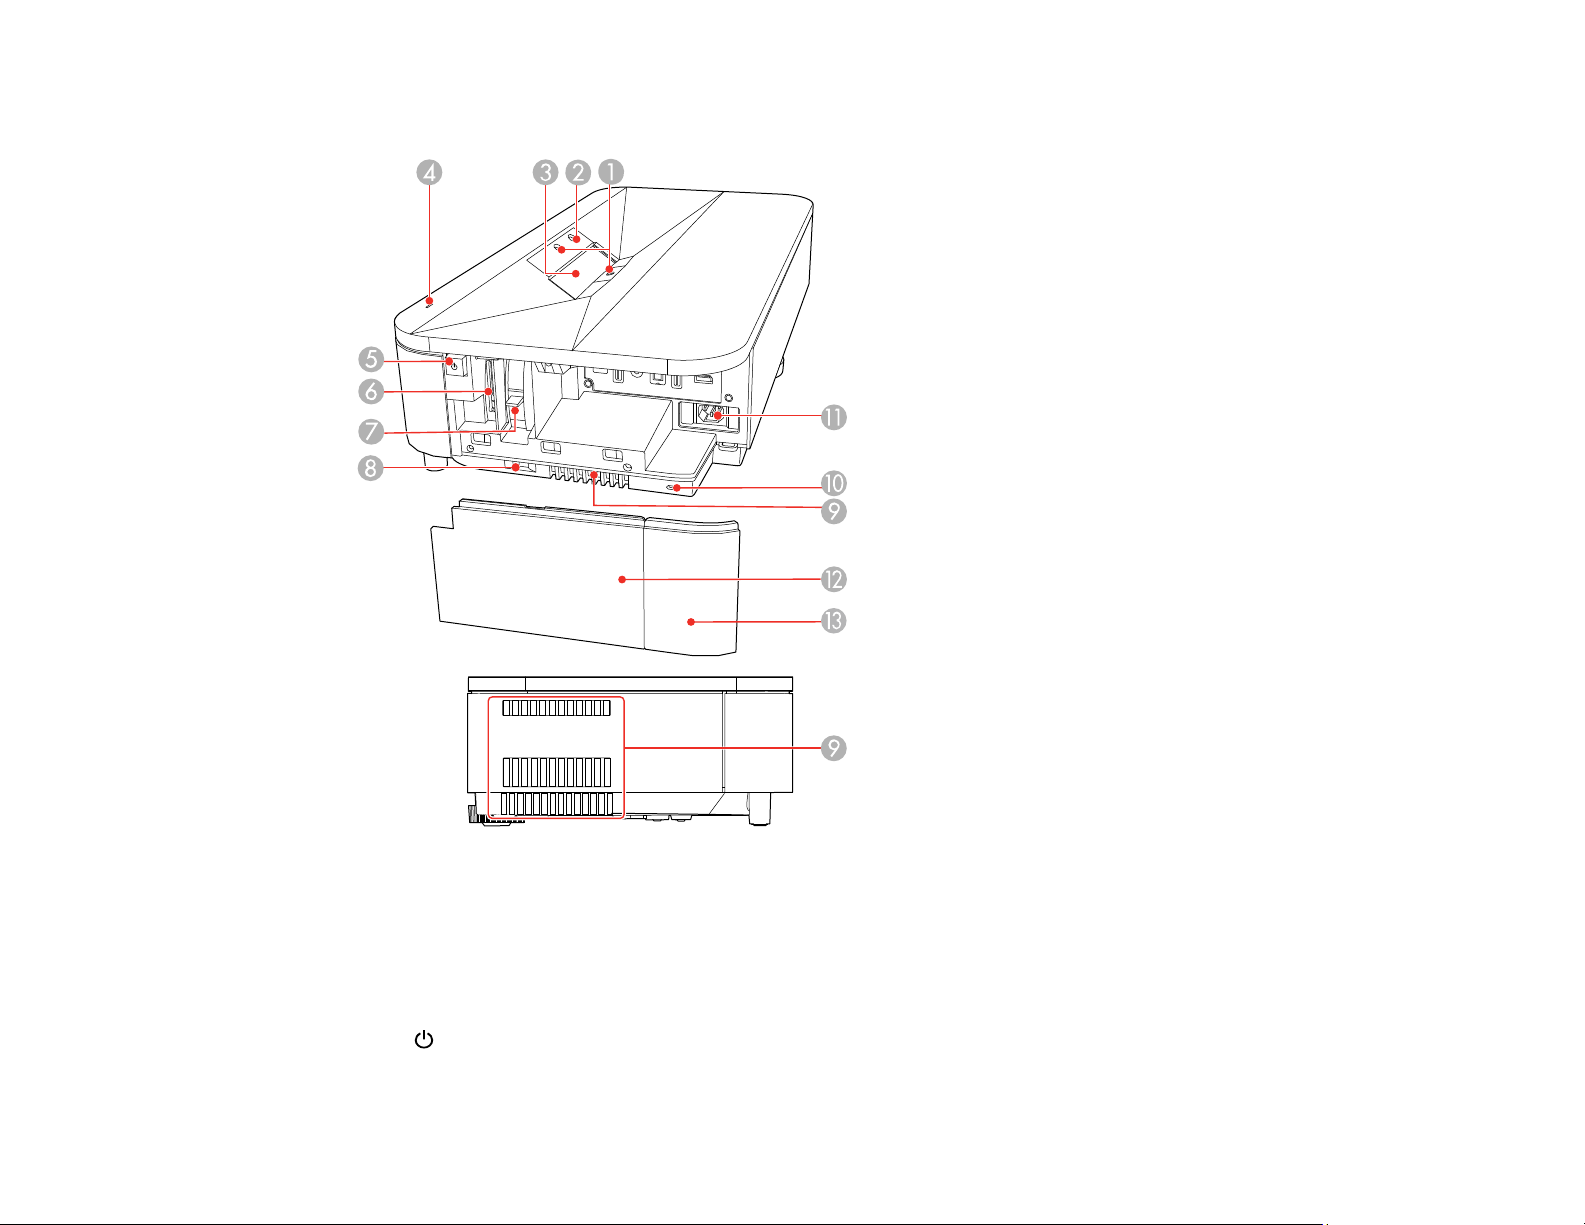
Projector Parts - Top/Side
1 Obstacle sensors
2 Motion sensor
3 Projection window
4 Status light
5
6 Side cover tether
power button
17
Page 18
7 Focus lever
8 Side cover latch
9 Exhaust vent
10 Security slot
11 Power inlet
12 Side cover A
13 Side cover B
Parent topic: Projector Part Locations
Related references
Projector Light Status
Projector Parts - Interface Ports
1 Service port
2 DC Out (2.0A) port
3 Audio out port
4 Optical Out port
5 USB-A ports
6 HDMI3 (Game) port
7 HDMI1 port
18
Page 19

8 HDMI2 (ARC) port
Parent topic: Projector Part Locations
Related concepts
Projector Connections
Projector Parts - Base
1 Front adjustable feet
2 Air intake vent (air filter)
3 Wire clamp fixing point
4 Exhaust vent
5 Air intake vent
6 Rear adjustable foot
7 Ceiling mount fixing points
Note: Remove all of the projector's feet when you mount the projector from the ceiling.
19
Page 20

Parent topic: Projector Part Locations
20
Page 21
Projector Parts - Remote Control
When you set the input source to HDMI3 (Game), only the buttons shaded in blue below are available.
21
Page 22

1 Microphone (listens for voice commands after pressing the mic button*)
2
power button
3 apps button (displays available Android TV apps)*
4 Directional pad (move through on-screen options)*
5 esc button (cancels/exits function)*
6 Brightness up and brightness down buttons
7
blank button (turns off picture)
8 gaming mode button (selects HDMI3 (Game) input source)*
9 Flexible Picture menu button (opens Flexible Picture menu)
10 mute button (turns off sound)
11
settings button (accesses projector menus)*
12 Volume up and volume down buttons
13 home button (accesses Android TV Home screen)
14
YouTube Music button (opens the YouTube Music app)*
15 Enter button (selects options)*
16 Android TV settings button (accesses Android TV menus)*
17 mic button (operates Android TV using voice commands)*
18 source search button (changes the input source)*
19 Remote control emitter
* This button function is not available when the input source is HDMI3 (Game).
Parent topic: Projector Part Locations
22
Page 23

Setting Up the Projector
Follow the instructions in these sections to set up your projector for use.
Projector Placement
Projector Connections
Attaching and Removing the Side Cover
Installing Batteries in the Remote Control
Setting Up Android TV
Projector Placement
You can place the projector on almost any flat surface to project an image.
You can also install the projector in a ceiling if you want to use it in a fixed location. An optional ceiling
mount is required when suspending the projector from a ceiling. Click the "Important Safety Instructions"
link below to read important safety instructions before mounting the projector.
There is no vertical or horizontal limit to how the projector can be installed.
Keep these considerations in mind as you select a projector location:
• Place the projector on a sturdy, level surface or install it using a compatible mount.
• Leave plenty of space around and under the projector for ventilation, and do not place it on top of or
next to anything that could block the vents.
• If you are using the projector at altitudes above 4921 feet (1500 m), set the High Altitude Mode
setting to On in the projector's Settings menu to ensure the projector's internal temperature is
regulated properly.
• Position the projector within reach of a grounded electrical outlet or extension cord.
• If installing on the ceiling, remove all projector feet.
• Place the projector so it squarely faces the screen, not at an angle. If you cannot install the projector
squarely facing the screen, correct any resulting image distortion using the projector controls.
• To change the projected image size, move the projector closer to or further away from the surface you
are projecting onto.
• Try not to set up the projector in locations subject to high humidity and dust, or in locations subject to
smoke from fires or tobacco smoke.
Projector Setup and Installation Options
Projection Distance
23
Page 24
Parent topic: Setting Up the Projector
Related references
Important Safety Instructions
Projector Setup and Installation Options
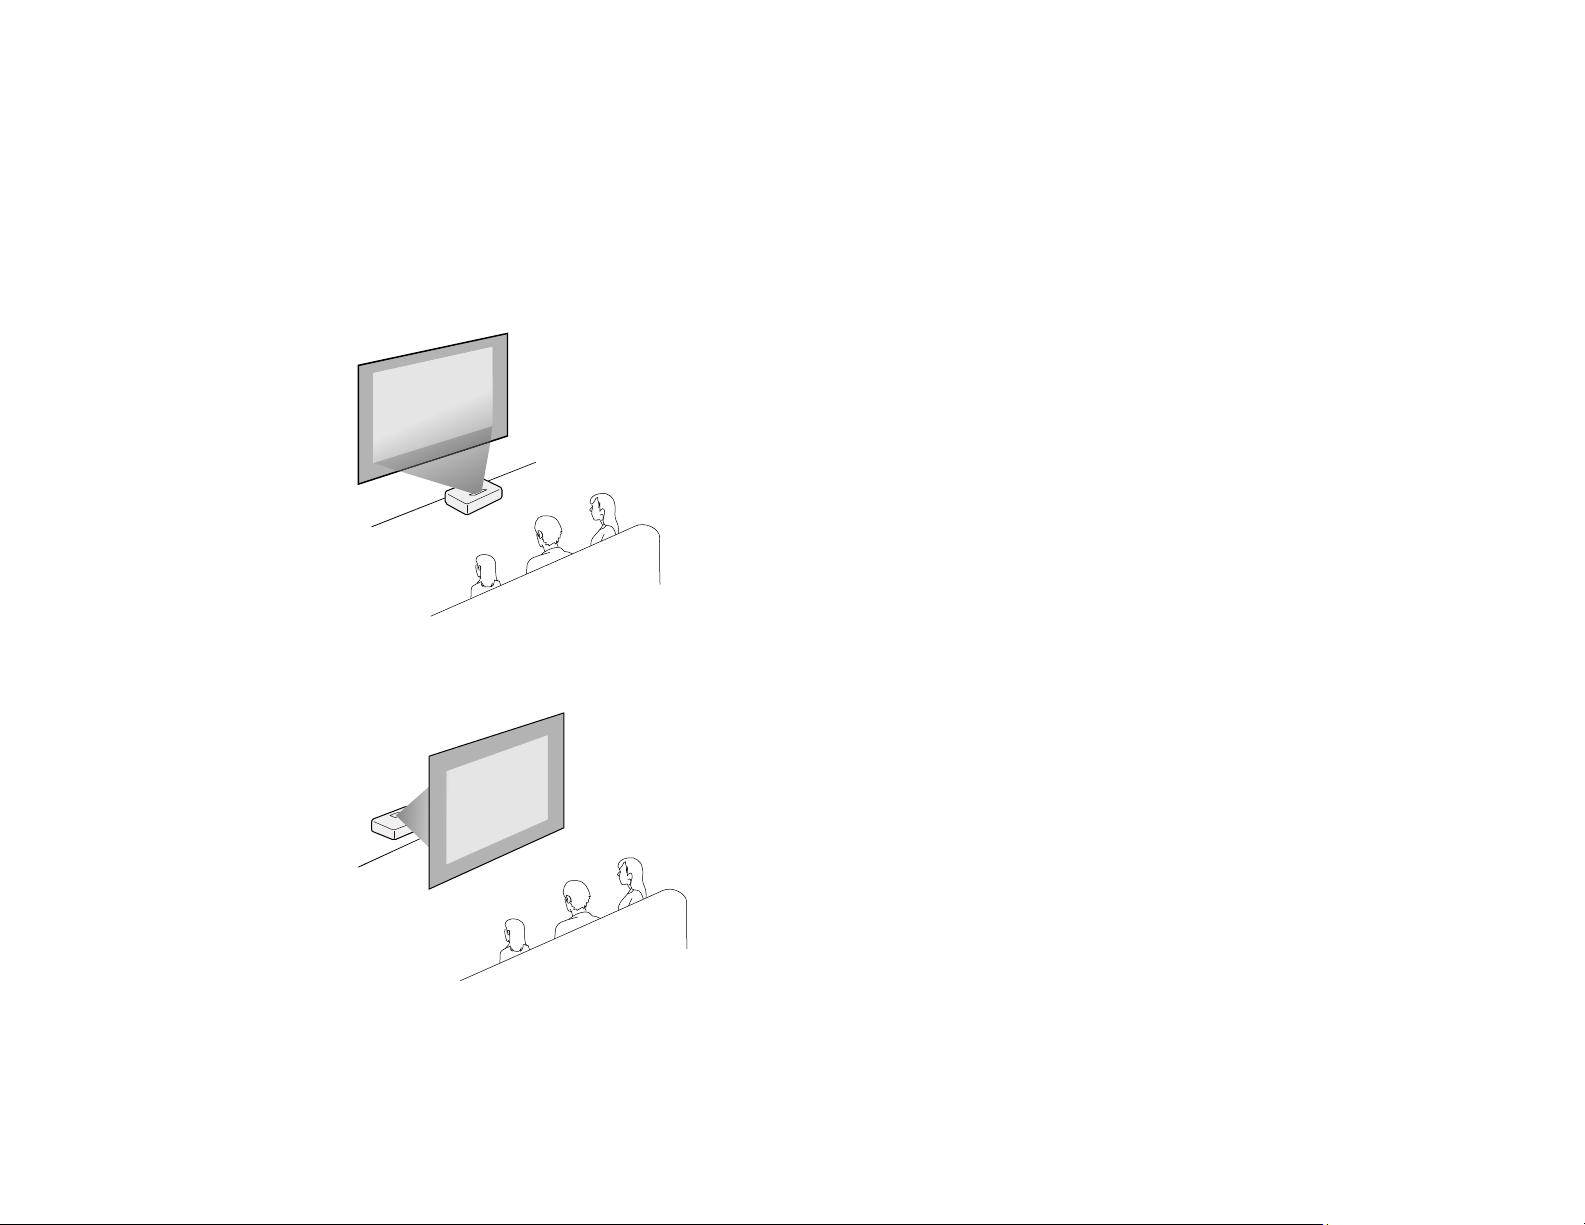
You can set up or install your projector in the following ways:
Front
Rear
24
Page 25
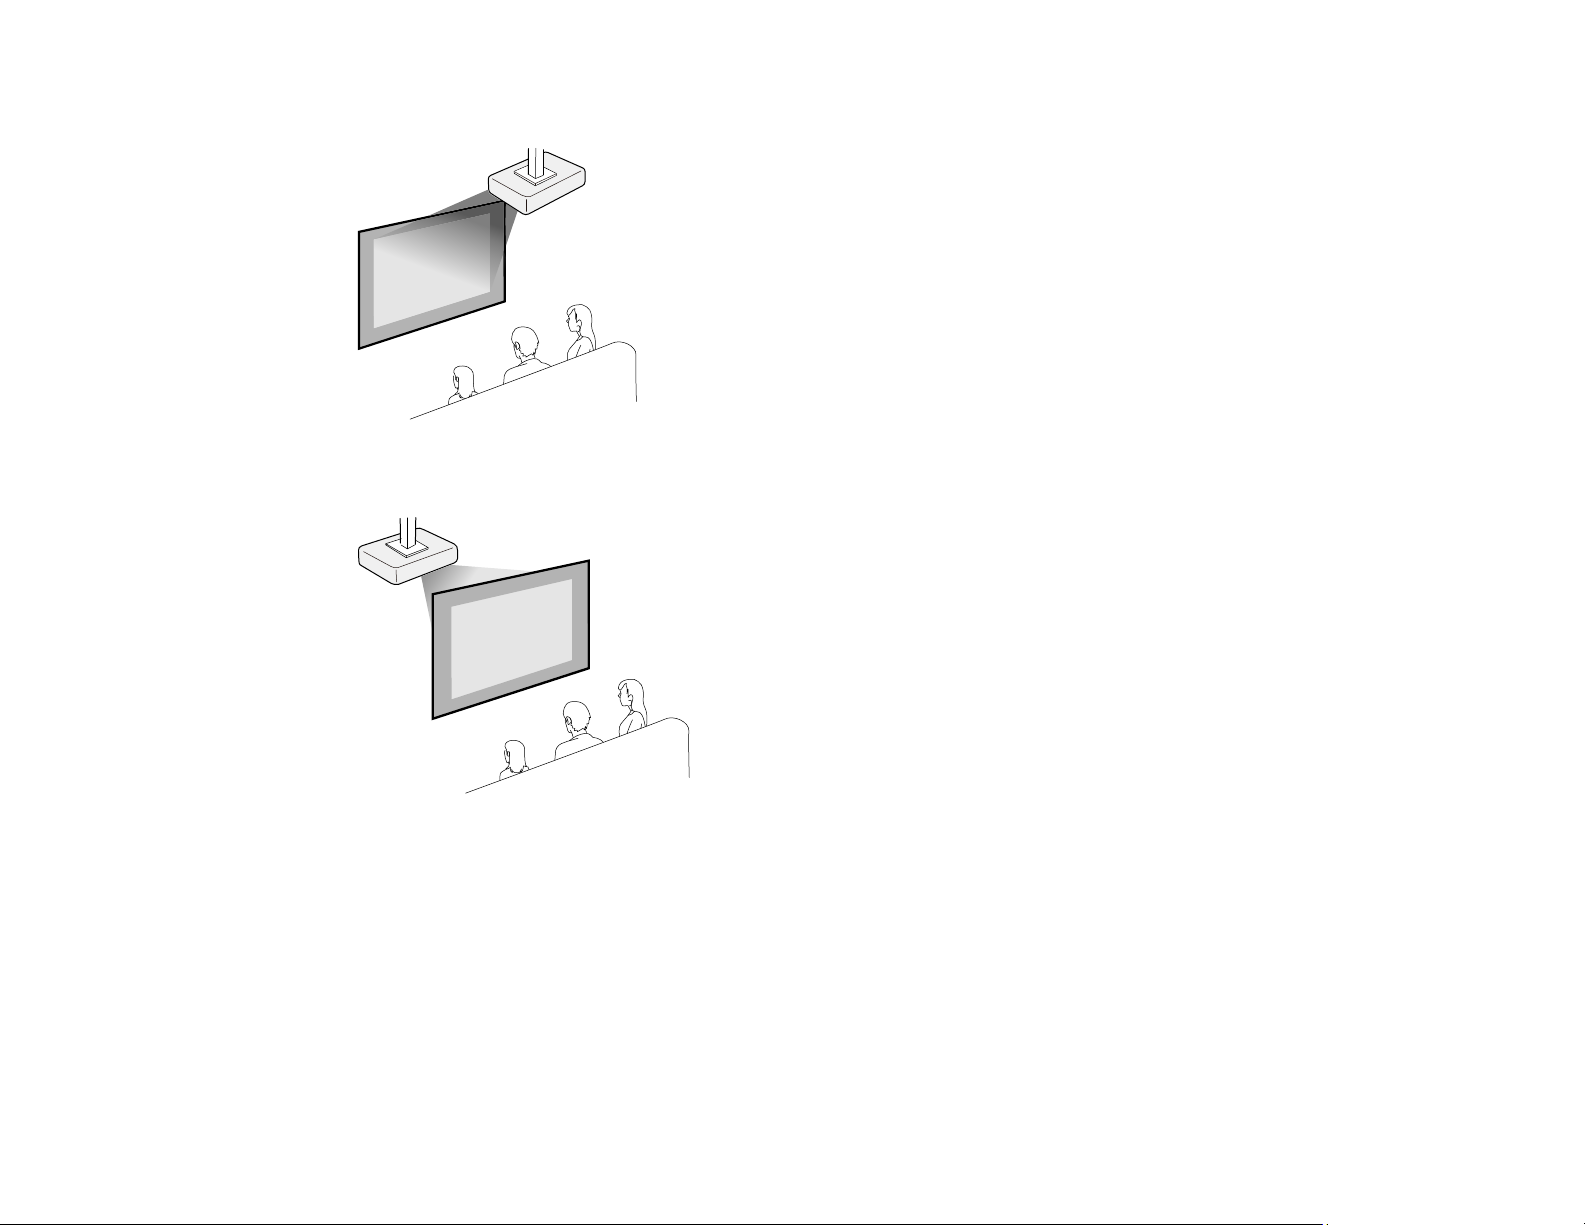
Front ceiling
Rear ceiling
Wherever you set up the projector, make sure to position it squarely in front of the screen, not at an
angle, if possible. If the projector is installed at an angle, it should be installed by qualified technicians
using mounting hardware designed for use with this projector.
If you project from the ceiling or wall, or from the rear, be sure to select the correct Projection option in
the projector's menu system.
25
Page 26
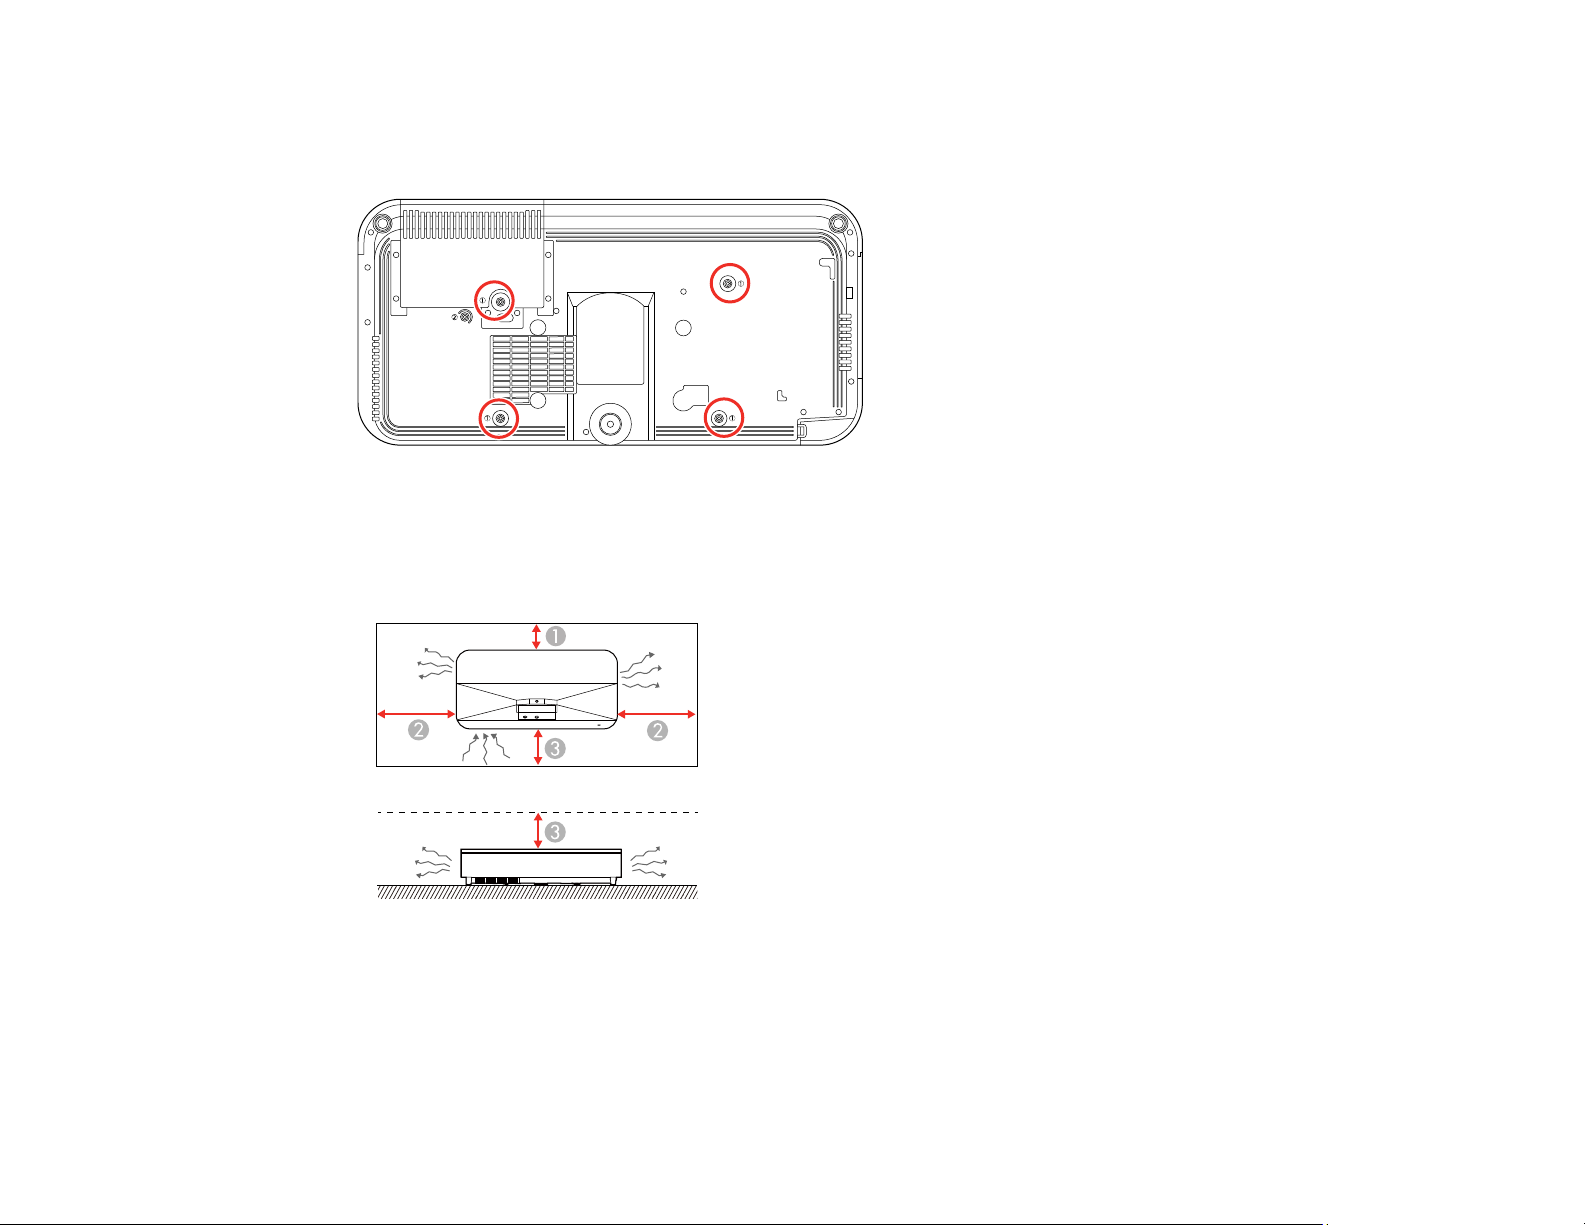
Note: Install the projector appropriately to prevent it from falling down. Use M4 screws (up to a depth of
0.35 inches [9 mm]) to fix the projector's ceiling mount fixing points and the mounting hardware at the
four points.
Installation space
Be sure to leave the following amount of space around the projector so as to not block the air exhaust or
intake vents.
1 0.9 inches (2.3 cm)
2 7.9 inches (20 cm)
3 3.9 inches (10 cm)
26
Page 27
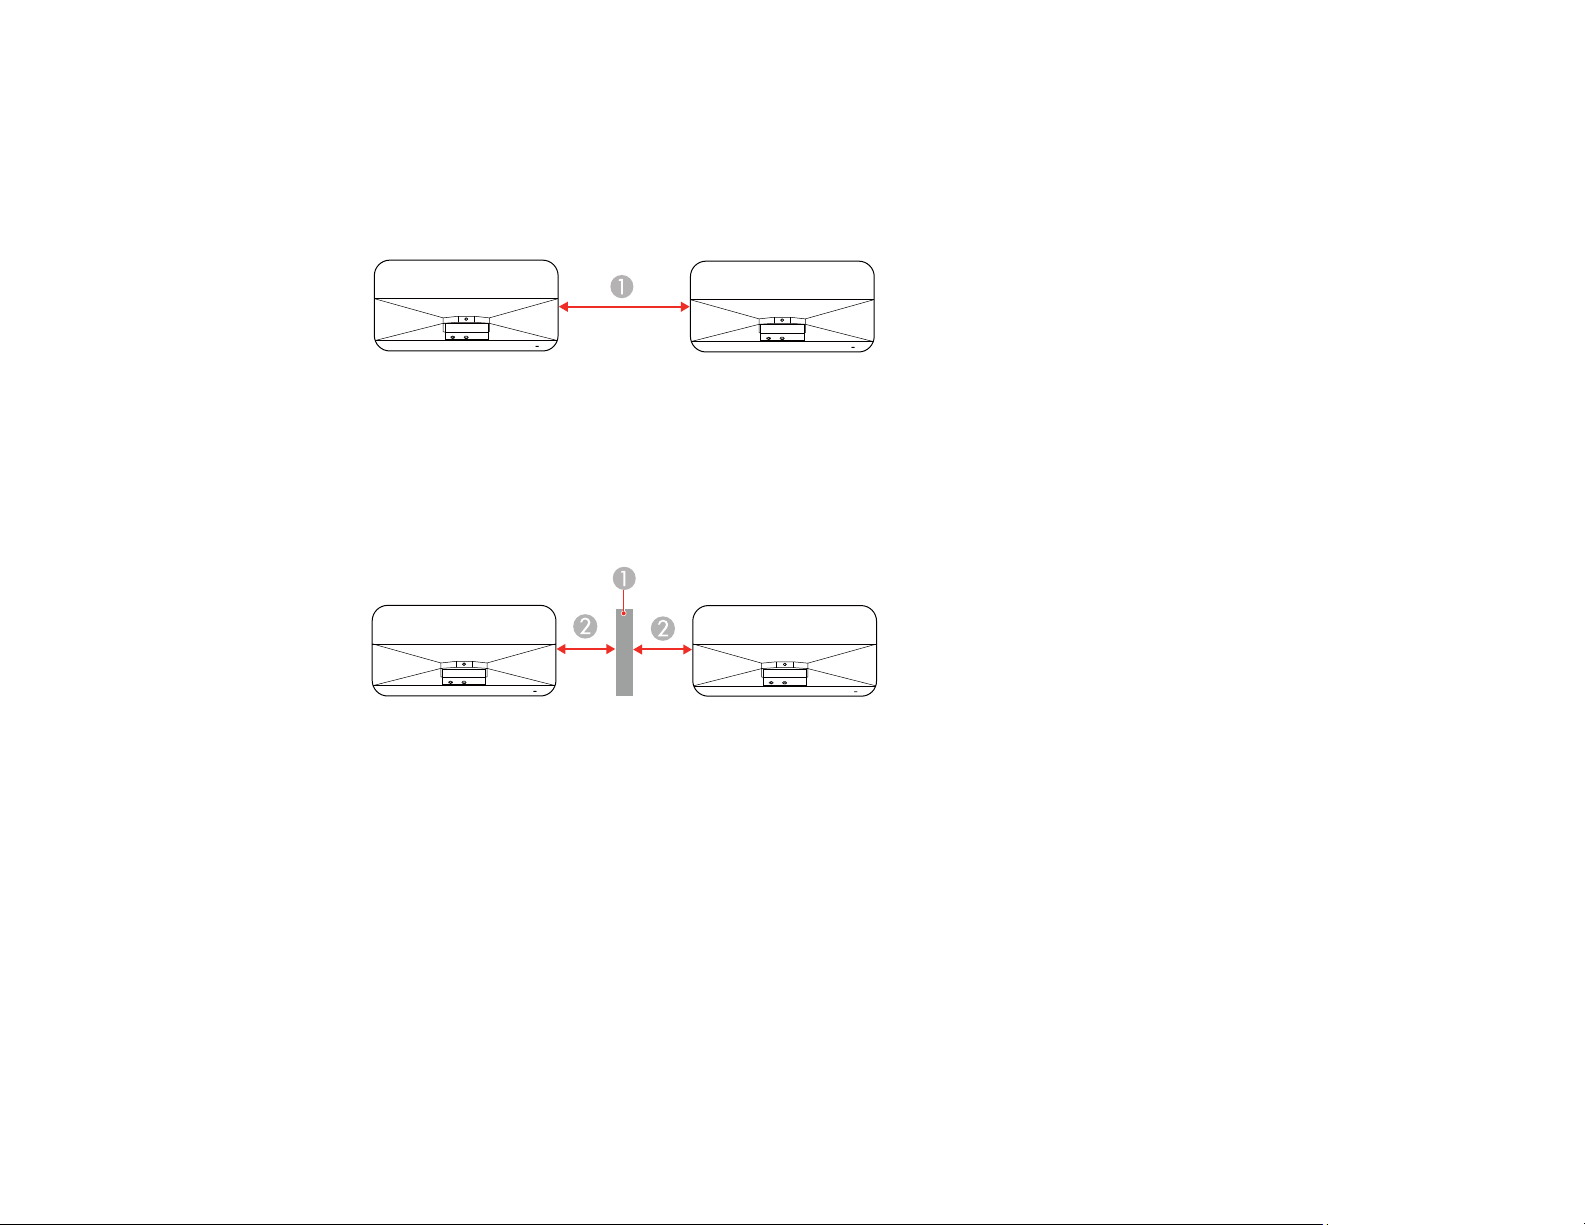
When installing multiple projectors side-by-side
Without partition
If you are installing multiple projectors next to each other, make sure hot air from the exhaust vent does
not go into the air intake vent of the other projector.
1 43.3 inches (110 cm)
With partition
If you use a partition, you can narrow the space between the projectors.
1 Partition
2 7.9 inches (20 cm)
Parent topic: Projector Placement
Projection Distance
The distance at which you place the projector from the screen determines the approximate size of the
image. The image size increases the farther the projector is from the screen, but can vary depending on
the zoom factor, aspect ratio, and other settings.
Use the tables here to determine approximately how far to place the projector from the screen based on
the size of the projected image. (Conversion figures may have been rounded up or down.)
27
Page 28
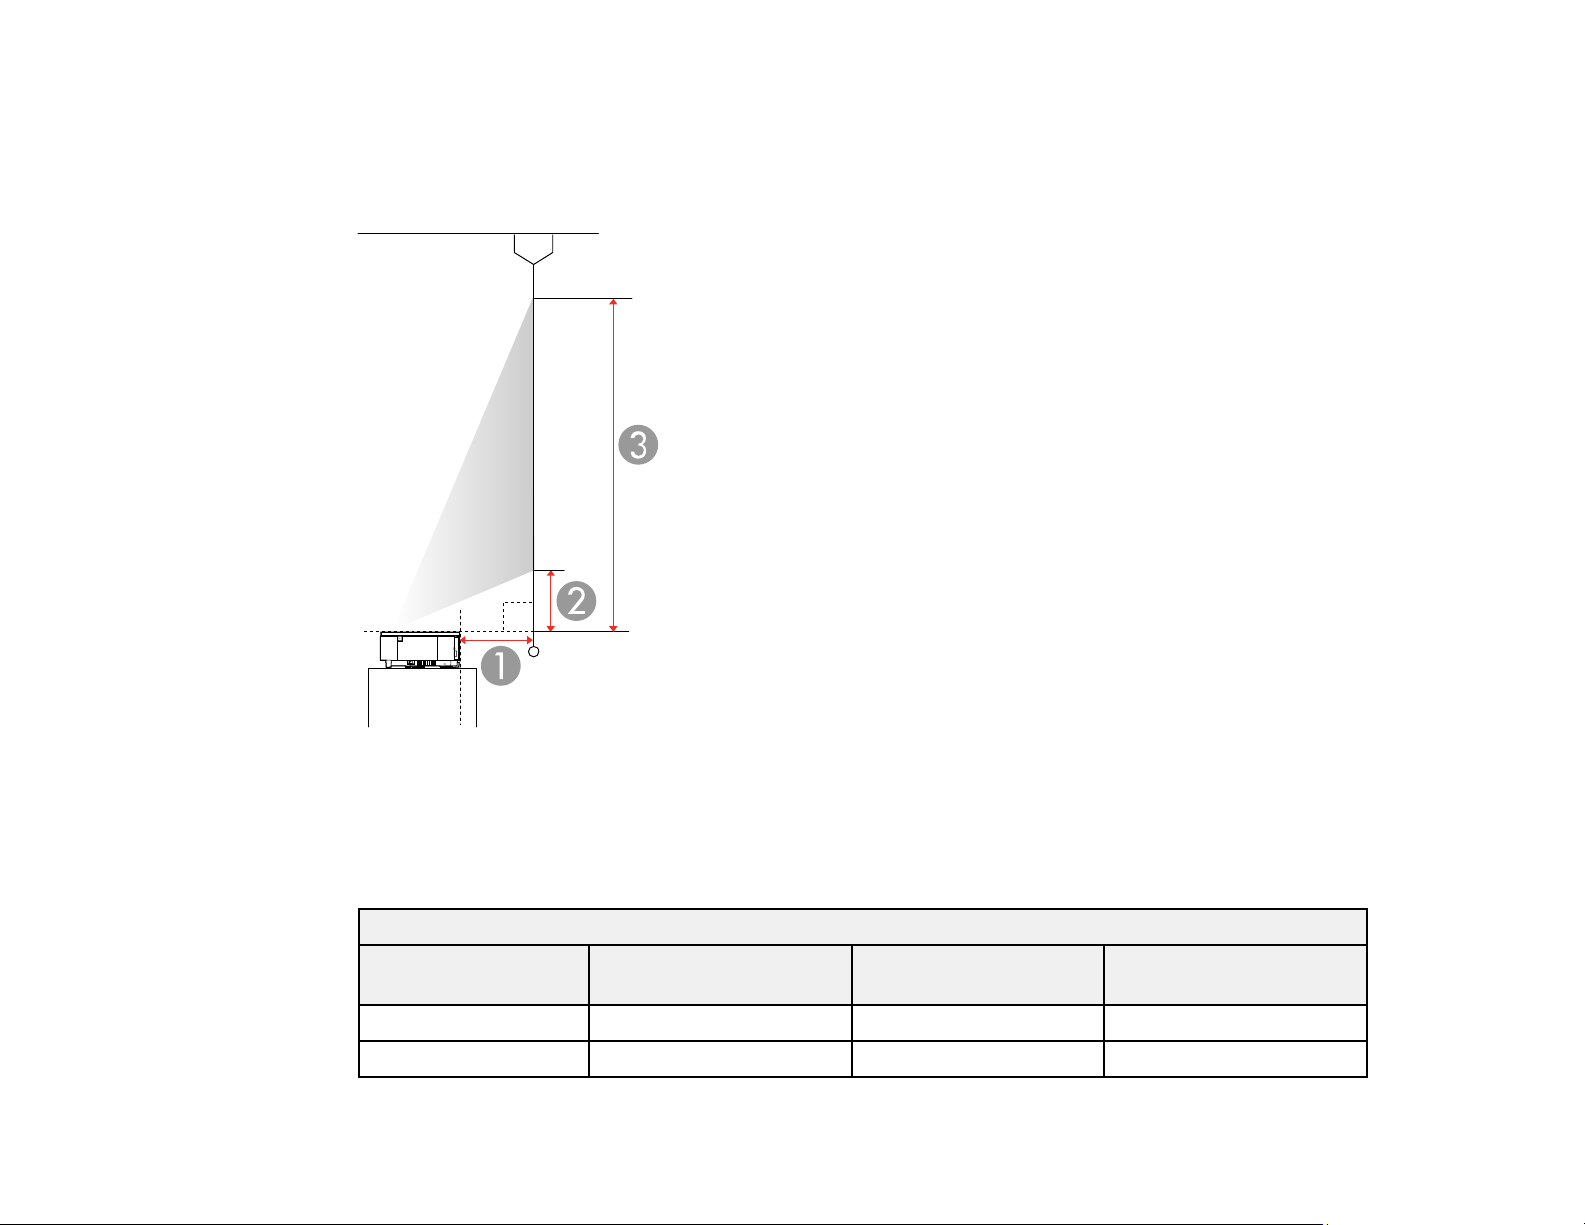
You can also use the Projection Distance Calculator here (U.S.), here (Canada), or here (Caribbean).
Note: You can use the Flexible Picture menu to reduce the projected image size and change the
position of the image without moving the projector.
1 Projection distance (from image to rear of projector)
2 Distance from top of projector to base of image
3 Distance from top of projector to top of image
16:9 Aspect Ratio Image or Screen
Screen or image size Projection distance (1) Offset from top of
projector (2)
Offset from top of
projector (3)
80 inches (203.2 cm) 0.9 inches (2.3 cm) 4.3 inches (10.8 cm) 43.5 inches (110.4 cm)
90 inches (228.6 cm) 2.4 inches (6 cm) 5.1 inches (12.9 cm) 49.2 inches (124.9 cm)
28
Page 29

16:9 Aspect Ratio Image or Screen
Screen or image size Projection distance (1) Offset from top of
projector (2)
Offset from top of
projector (3)
100 inches (254 cm) 3.9 inches (9.8 cm) 5.9 inches (14.9 cm) 54.9 inches (139.4 cm)
110 inches (279.4 cm) 5.3 inches (13.5 cm) 6.7 inches (16.9 cm) 60.6 inches (153.9 cm)
120 inches (304.8 cm) 6.8 inches (17.3 cm) 7.5 inches (19 cm) 66.3 inches (168.4 cm)
130 inches (330.2 cm) 8.3 inches (21 cm) 8.3 inches (21 cm) 72 inches (182.9 cm)
150 inches (381 cm) 11.2 inches (28.5 cm) 9.9 inches (25.1 cm) 83.4 inches (211.9 cm)
4:3 Aspect Ratio Image or Screen
Screen or image size Projection distance (1) Offset from top of
projector (2)
Offset from top of
projector (3)
66 inches (167.6 cm) 1 inch (2.6 cm) 4.3 inches (11 cm) 43.9 inches (111.6 cm)
70 inches (177.8 cm) 1.7 inches (4.4 cm) 4.7 inches (12 cm) 46.7 inches (118.7 cm)
80 inches (203.2 cm) 3.5 inches (9 cm) 5.7 inches (14.5 cm) 53.7 inches (136.4 cm)
90 inches (228.6 cm) 5.4 inches (13.6 cm) 6.7 inches (17 cm) 60.7 inches (154.1 cm)
100 inches (254 cm) 7.1 inches (18.1 cm) 7.7 inches (19.5 cm) 67.7 inches (171.9 cm)
110 inches (279.4 cm) 8.9 inches (22.7 cm) 8.7 inches (22 cm) 74.7 inches (189.6 cm)
120 inches (304.8 cm) 10.8 inches (27.3 cm) 9.7 inches (24.5 cm) 81.6 inches (207.3 cm)
122 inches (309.9 cm) 11.1 inches (28.2 cm) 9.8 inches (25 cm) 83 inches (210.9 cm)
16:10 Aspect Ratio Image or Screen
Screen or image size Projection distance (1) Offset from top of
projector (2)
Offset from top of
projector (3)
74 inches (188 cm) 0.9 inches (2.3 cm) 4.3 inches (10.8 cm) 43.5 inches (110.4 cm)
80 inches (203.2 cm) 1.9 inches (4.7 cm) 4.8 inches (12.1 cm) 47.2 inches (119.8 cm)
90 inches (228.6 cm) 3.5 inches (8.8 cm) 5.6 inches (14.3 cm) 53.4 inches (135.5 cm)
100 inches (254 cm) 5 inches (12.8 cm) 6.5 inches (16.5 cm) 59.5 inches (151.2 cm)
110 inches (279.4 cm) 6.7 inches (16.9 cm) 7.4 inches (18.8 cm) 65.7 inches (166.8 cm)
29
Page 30
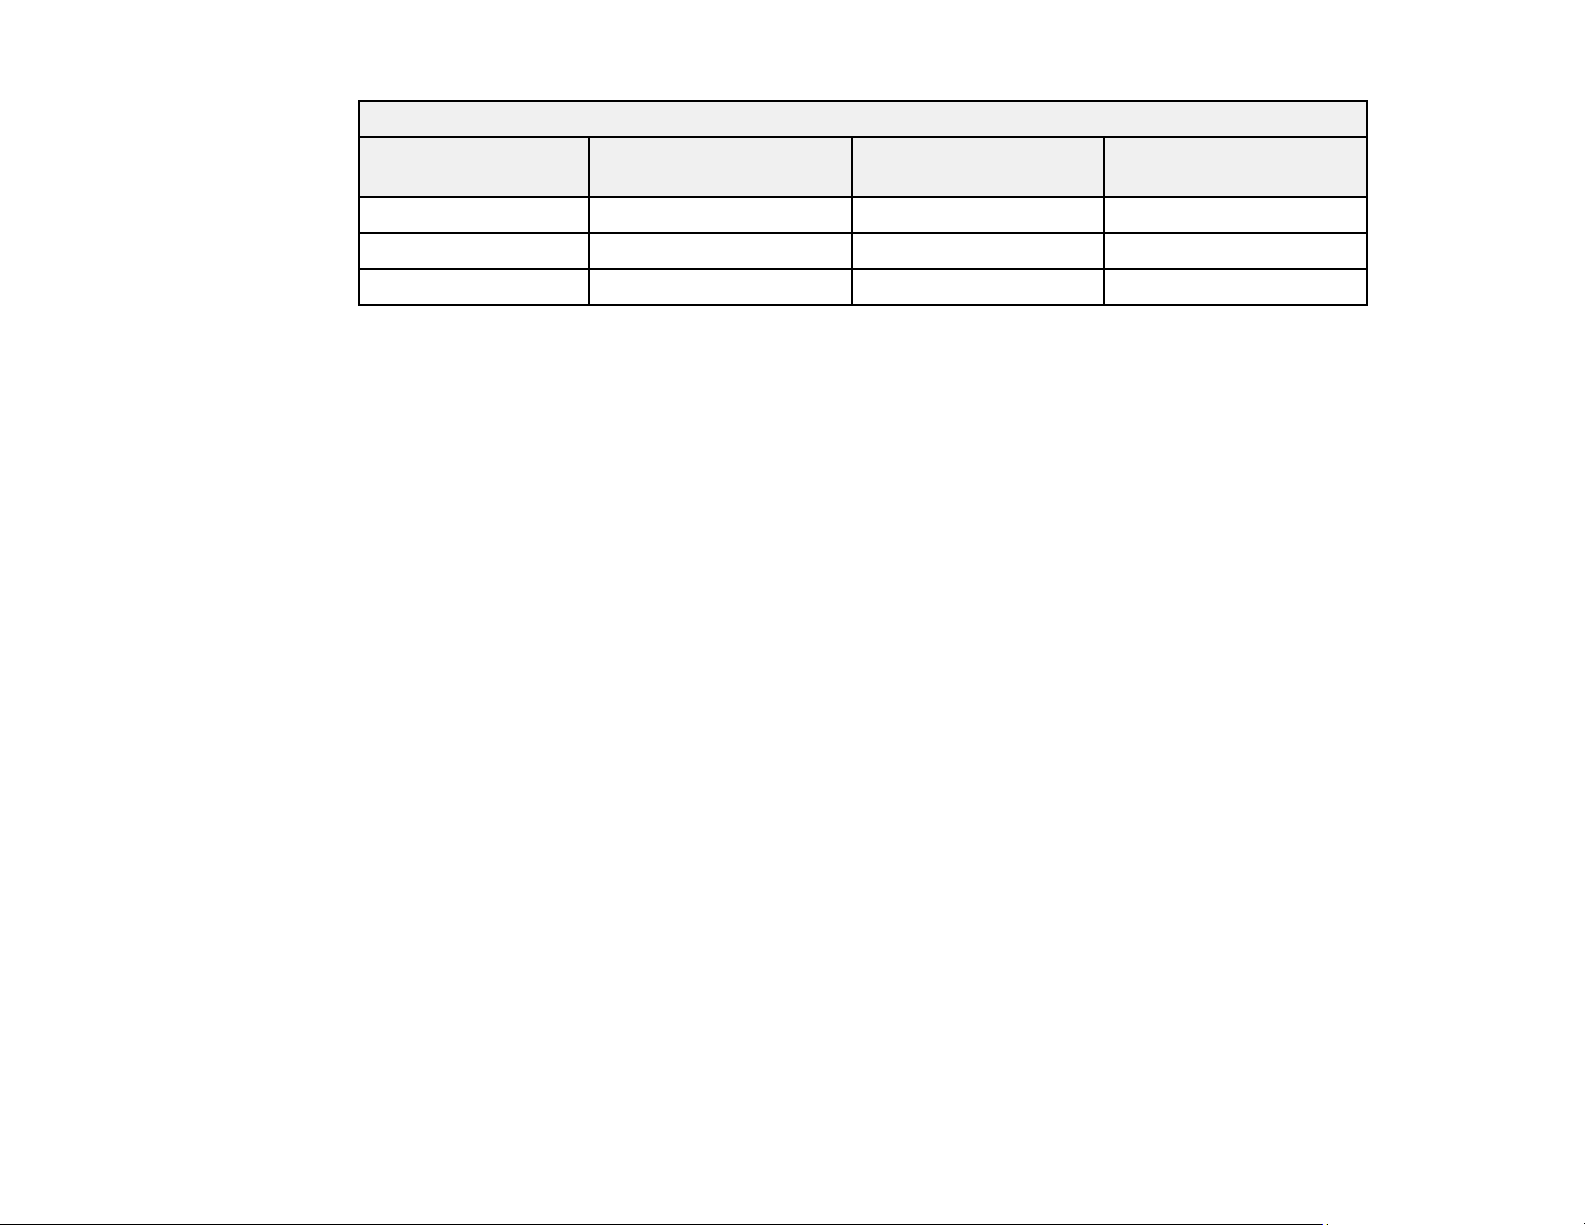
16:10 Aspect Ratio Image or Screen
Screen or image size Projection distance (1) Offset from top of
120 inches (304.8 cm) 8.2 inches (20.9 cm) 8.3 inches (21 cm) 71.9 inches (182.5 cm)
130 inches (330.2 cm) 9.8 inches (24.9 cm) 9.1 inches (23.2 cm) 78 inches (198.2 cm)
138 inches (350.5 cm) 11.1 inches (28.2 cm) 9.8 inches (24.9 cm) 83 inches (210.7 cm)
Parent topic: Projector Placement
Related tasks
Changing the Projected Image Using Flexible Picture
Projector Connections
See these sections to connect the projector to a variety of projection sources.
Caution: If you will use the projector at altitudes above 4921 feet (1500 m), turn on High Altitude Mode
to ensure the projector's internal temperature is regulated properly. See the menu link below.
Caution: Check the shape and orientation of the connectors on any cable you plan to connect. Do not
force a connector into a port if it does not fit. The device or your projector could be damaged or could
malfunction.
Caution: Depending on the connected device and the shape of the cable, you may not be able to attach
the projector's side cover. Do not force the cover into place or the device or the projector could be
damaged or could malfunction.
projector (2)
Offset from top of
projector (3)
Connecting to an HDMI Video Source
Connecting to a USB Device
Connecting a Streaming Device
Connecting a Gaming Device
Connecting External Speakers Using HDMI ARC
Connecting to External Speakers
Connecting to a Bluetooth Audio Device
Connecting Headphones
Parent topic: Setting Up the Projector
30
Page 31
Related references
Additional Components
Projector Feature Settings - Settings Menu
Connecting to an HDMI Video Source
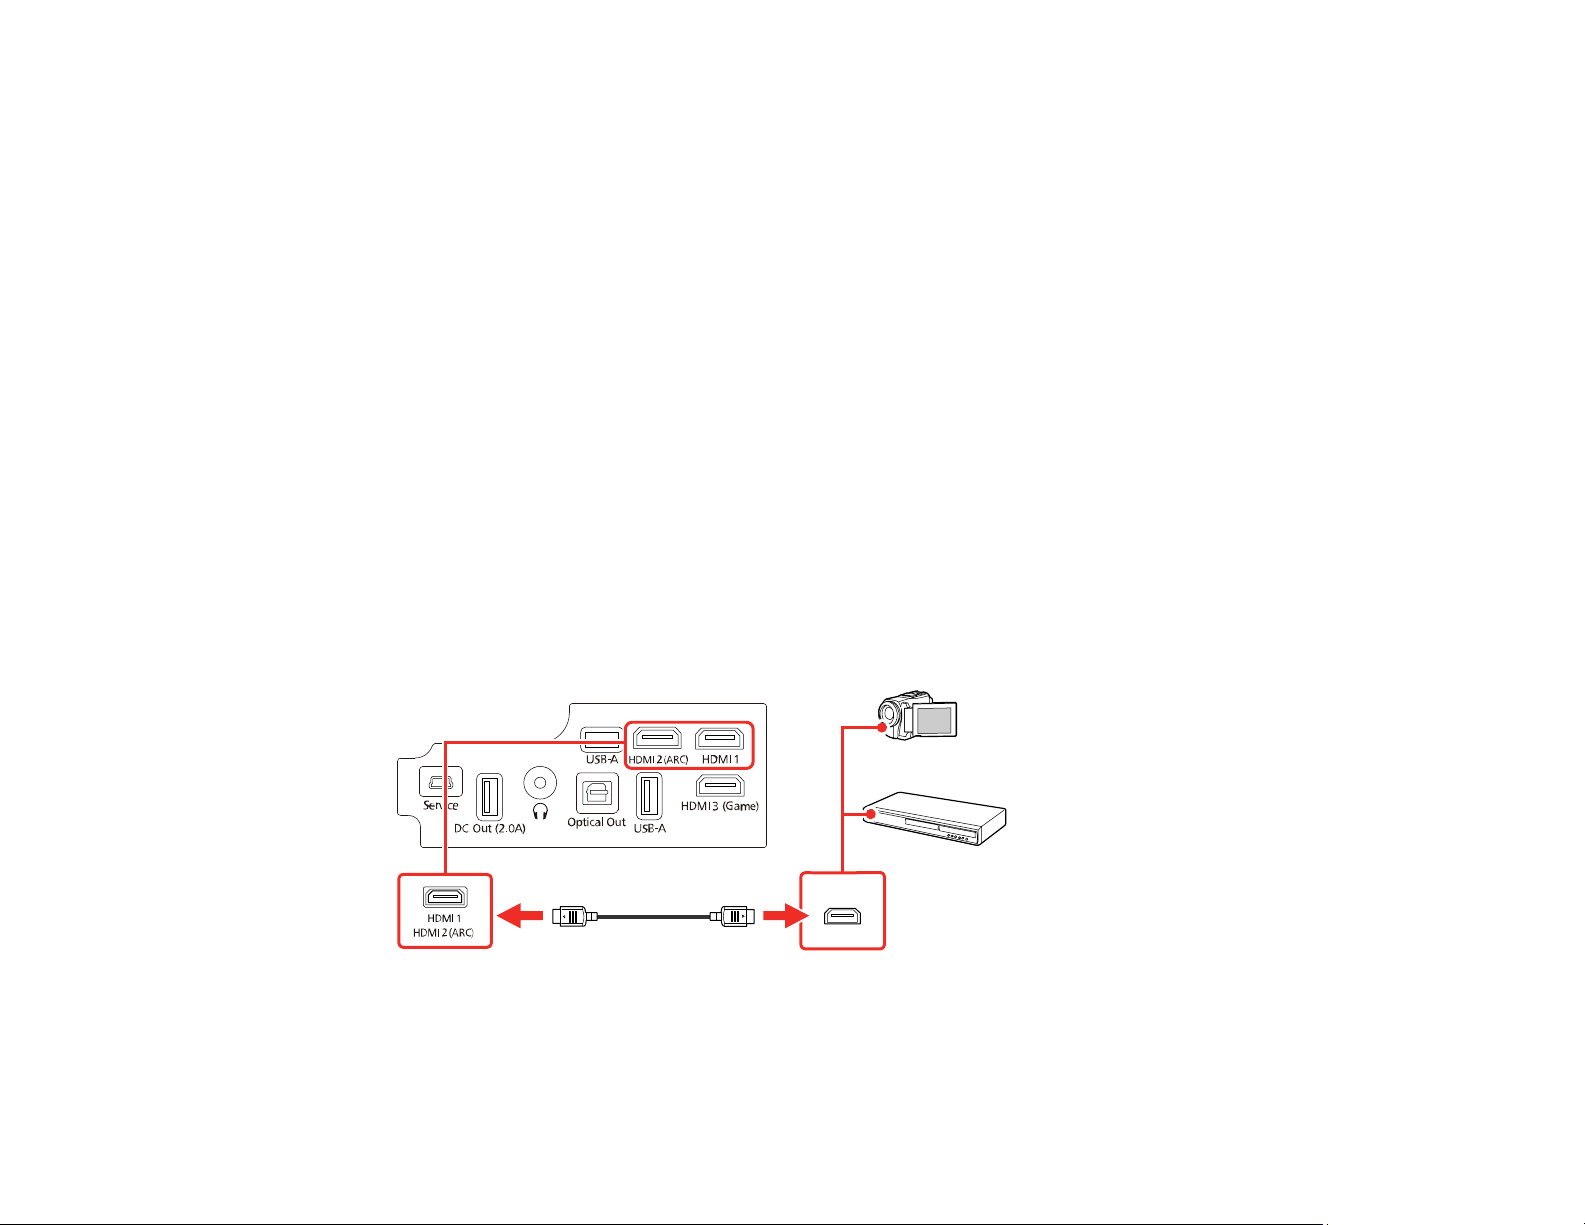
If your video source has an HDMI port, you can connect it to the projector using an optional HDMI cable.
Caution: Do not turn on the video source before connecting it to the projector. Doing so could damage
the projector.
Note: If the port on your device has an unusual shape, use the cable supplied with the device or an
optional cable to connect to the projector. Some video equipment is capable of outputting different types
of signals. See your video equipment manual to confirm what types of signals can be output.
1. Remove the projector's side cover, if necessary.
2. Connect the HDMI cable to your video source's HDMI output port.
Note: To display signals in the 18 Gbps transmission band, such as from a 4K 60 fps source, use a
cable rated for HDMI 2.0 or higher or you may have trouble displaying an image.
3. Connect the other end to one of the HDMI ports on the projector.
31
Page 32

4. Carefully replace the projector's side cover.
Note: The projector's side cover can be split into two parts to allow more space for connected
streaming devices and cables. See the link below.
Note: When an audio/video source that meets the HDMI CEC standard is connected to one of the
projector's HDMI ports, you can use the projector's remote control to control certain features of the linked
device by accessing the Settings menu and enabling the HDMI CEC setting. See the link below.
Parent topic: Projector Connections
Related references
Projector Feature Settings - Settings Menu
Related tasks
Attaching and Removing the Side Cover
Operating Connected Devices Using the HDMI Link Features
Connecting to a USB Device
You can connect a USB device or cable to the projector's USB-A port to project images from the device.
Use the USB cable supplied with the device.
You may need to use an app on the projector to project the content from your USB device. See your
device's documentation for details.
Note: Do not connect a USB hub or a USB cable longer than 9.8 feet (3 m), or the device may not
operate correctly. The USB-A port is not guaranteed to operate all devices that support USB.
Make sure the USB device meets the following requirements:
• The device must be a USB flash drive, USB hard drive, or a digital camera or microphone
• USB hard drives must be USB Mass Storage Class compliant (not all compliant devices are
supported); formatted in FAT16/32; self-powered by their own AC power supplies (bus powered drives
are not recommended); and should not have multiple partitions.
1. If your USB device came with an AC adapter, plug the device into an electrical outlet.
2. Remove the projector's side cover, if necessary.
32
Page 33
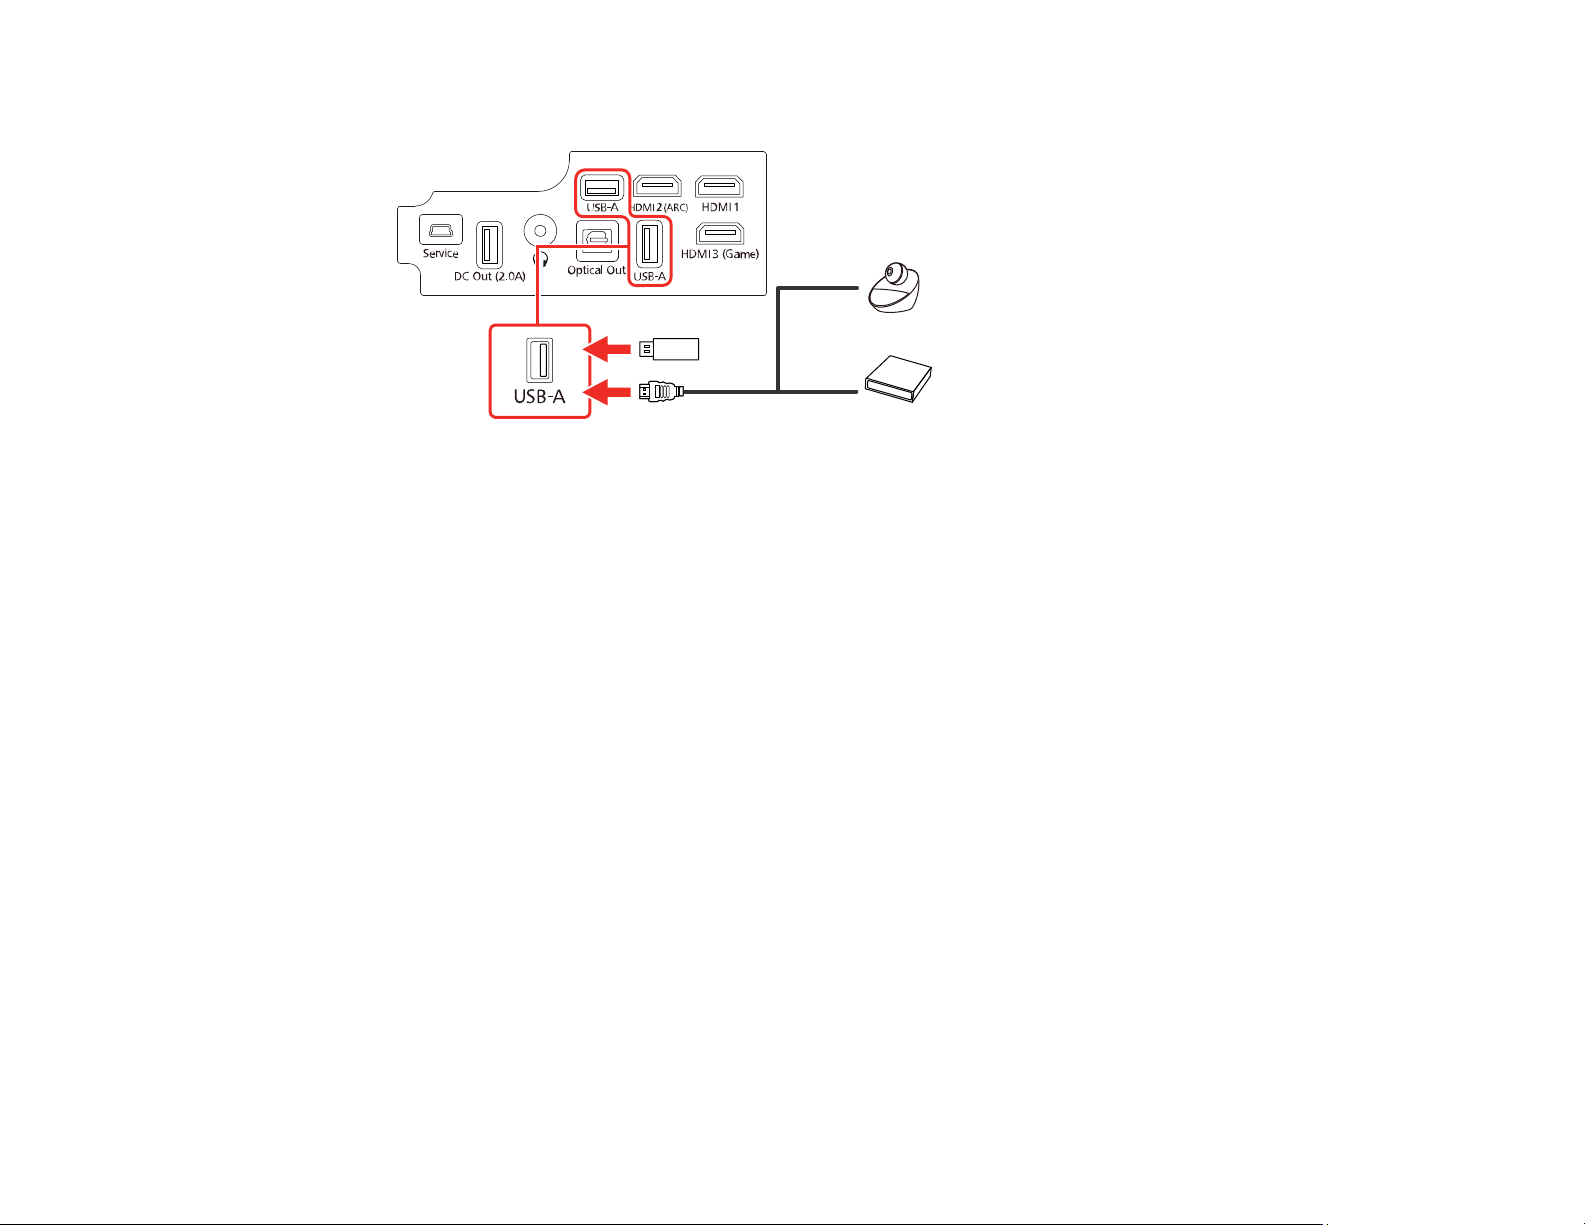
3. Connect the USB device or cable to the projector's USB-A port.
4. If you connected a USB cable, connect the other end to the USB device as necessary.
5. Carefully replace the projector's side cover.
Note: The projector's side cover can be split into two parts to allow more space for connected
streaming devices and cables. See the link below.
The projector displays images stored on the USB device.
Parent topic: Projector Connections
Related tasks
Attaching and Removing the Side Cover
Connecting a Streaming Device
You can connect a streaming device to the projector's HDMI port. Connecting the USB power cable
provides power to the streaming device.
1. Remove the projector's side cover, if necessary.
33
Page 34

2. Connect the streaming device to the projector's HDMI port.
3. Connect the device's USB power cable to the projector's DC Out (2.0A) USB power port.
4. Carefully replace the projector's side cover.
Note: The projector's side cover can be split into two parts to allow more space for connected
streaming devices and cables. See the link below.
Parent topic: Projector Connections
Related tasks
Attaching and Removing the Side Cover
34
Page 35
Connecting a Gaming Device
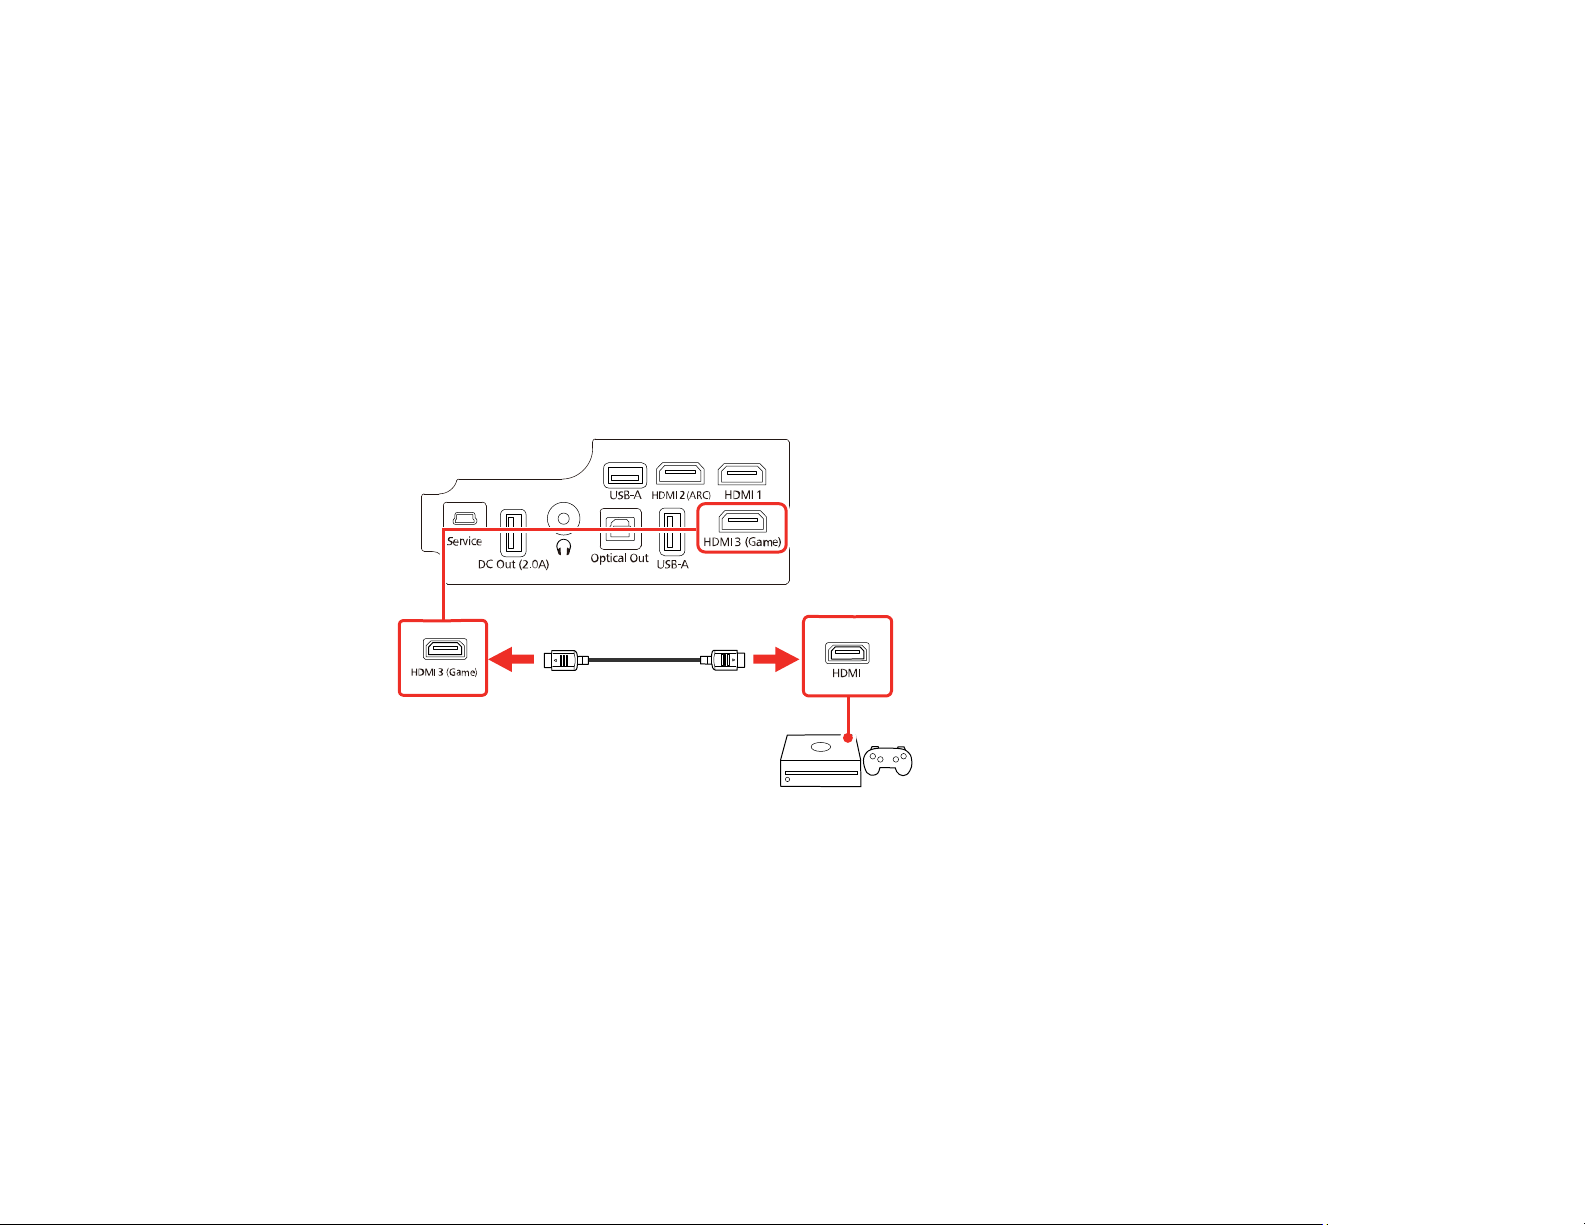
You can connect a gaming device to the projector's HDMI3 (Game) port. The HDMI3 (Game) port is
better suited to gaming devices that require fast response times.
Note: When you want to play audio on an external audio device, connect it to the projector using an
optical digital audio cable. Adjust the Sound Output setting accordingly in the projector's Sound menu.
You cannot output sound from the HDMI2 (ARC) port when the input source is HDMI3 (Game).
1. Remove the projector's side cover, if necessary.
2. Connect the HDMI cable to your gaming device's HDMI output port.
3. Connect the other end to the projector's HDMI3 (Game) port.
4. Carefully replace the projector's side cover.
Note: The projector's side cover can be split into two parts to allow more space for connected
streaming devices and cables. See the link below.
Parent topic: Projector Connections
Related tasks
Attaching and Removing the Side Cover
35
Page 36
Connecting External Speakers Using HDMI ARC
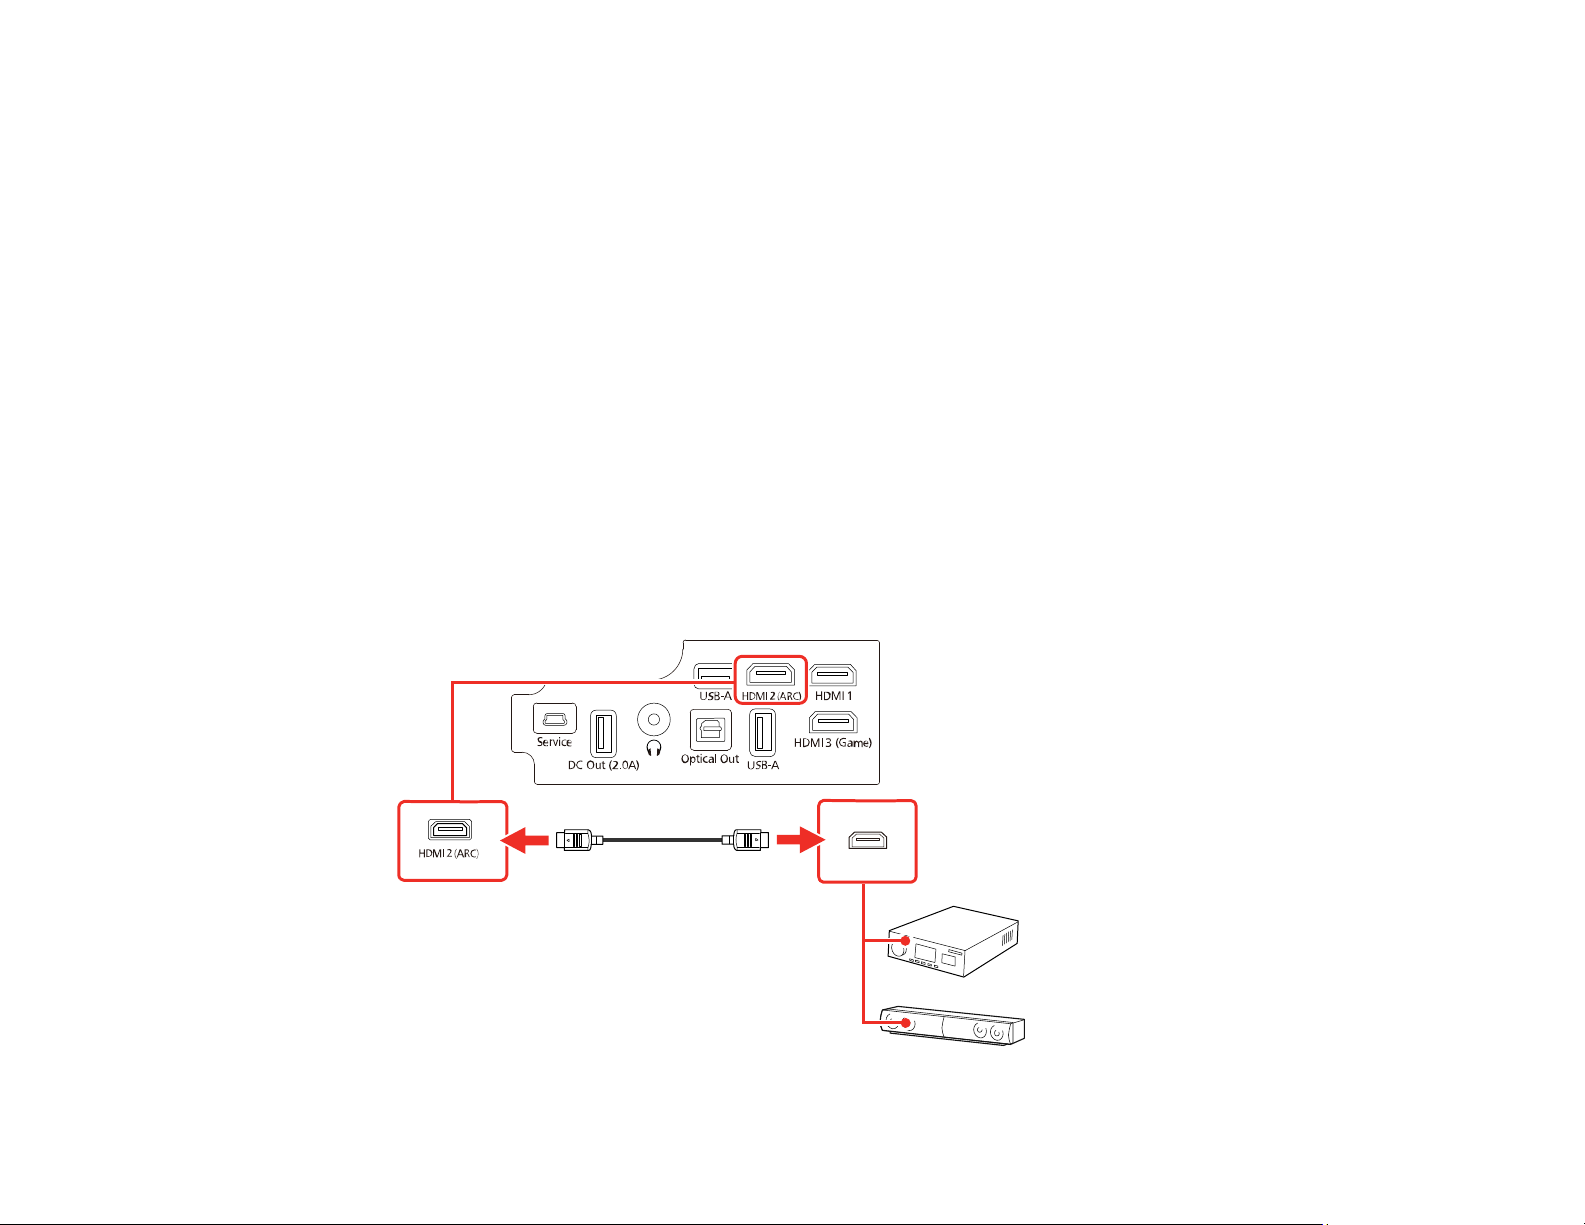
If your external speakers or A/V receiver are HDMI ARC-compatible, you can connect them to the
projector's HDMI2 (ARC) port using an optional HDMI cable.
In the projector's Settings menu, make sure the HDMI CEC setting is enabled and then enable HDMI2
ARC. In the projector's Sound menu, set Sound Output as ARC/Optical (PCM) or ARC/Optical (Auto)
in Other Than HDMI3 (Game).
Note: The projector's speakers are disabled when audio is output to a device connected to the HDMI2
(ARC) port. If you want to output higher quality audio, set Sound Output as ARC/Optical (Auto) in the
projector's Sound menu.
1. Remove the projector's side cover, if necessary.
2. Connect the HDMI cable to the ARC-compatible HDMI port on your external speakers or A/V
receiver.
Note: To display signals in the 18 Gbps transmission band, such as from a 4K 60 fps source, use a
cable rated for HDMI 2.0 or higher or you may have trouble displaying an image.
3. Connect the other end to the HDMI2 (ARC) port on the rear of the projector.
36
Page 37

4. Select any HDMI control settings on the connected speakers or receiver, as necessary. See your
device's documentation for more information.
5. Carefully replace the projector's side cover.
Note: The projector's side cover can be split into two parts to allow more space for connected
streaming devices and cables. See the link below.
Note: The audio format that is output from the projector's HDMI2 (ARC) port varies depending on the
input source. When the input source is HDMI, audio is output up to 5.1 ch (AC-3 or DTS). When playing
Android TV content, audio is output in 2 ch (PCM). You cannot output sound from the HDMI2 (ARC) port
when the input source is HDMI3 (Game).
Parent topic: Projector Connections
Related references
Projector Feature Settings - Settings Menu
Sound Quality Settings - Sound Menu
Related tasks
Attaching and Removing the Side Cover
Operating Connected Devices Using the HDMI Link Features
Connecting to External Speakers
To enhance the sound from your video source, you can connect the projector to external self-powered
speakers using the optical digital audio out port. You can also connect the projector to an amplifier with
speakers.
Note: The projector's speakers are not disabled when you connect speakers to the Optical Out port, but
you cannot control the volume of the speakers connected to the Optical Out port from the projector's
remote control. If you want to output higher quality audio, set Sound Output as Speaker/Optical (Auto)
in the projector's Sound menu.
1. Remove the projector's side cover, if necessary.
2. Make sure your computer or video source is connected to the projector via HDMI, if necessary.
3. Locate an optical digital audio cable to connect your external speakers, or another type of cable with
the appropriate adapter.
4. Connect one end of the cable to your external speakers as necessary.
37
Page 38
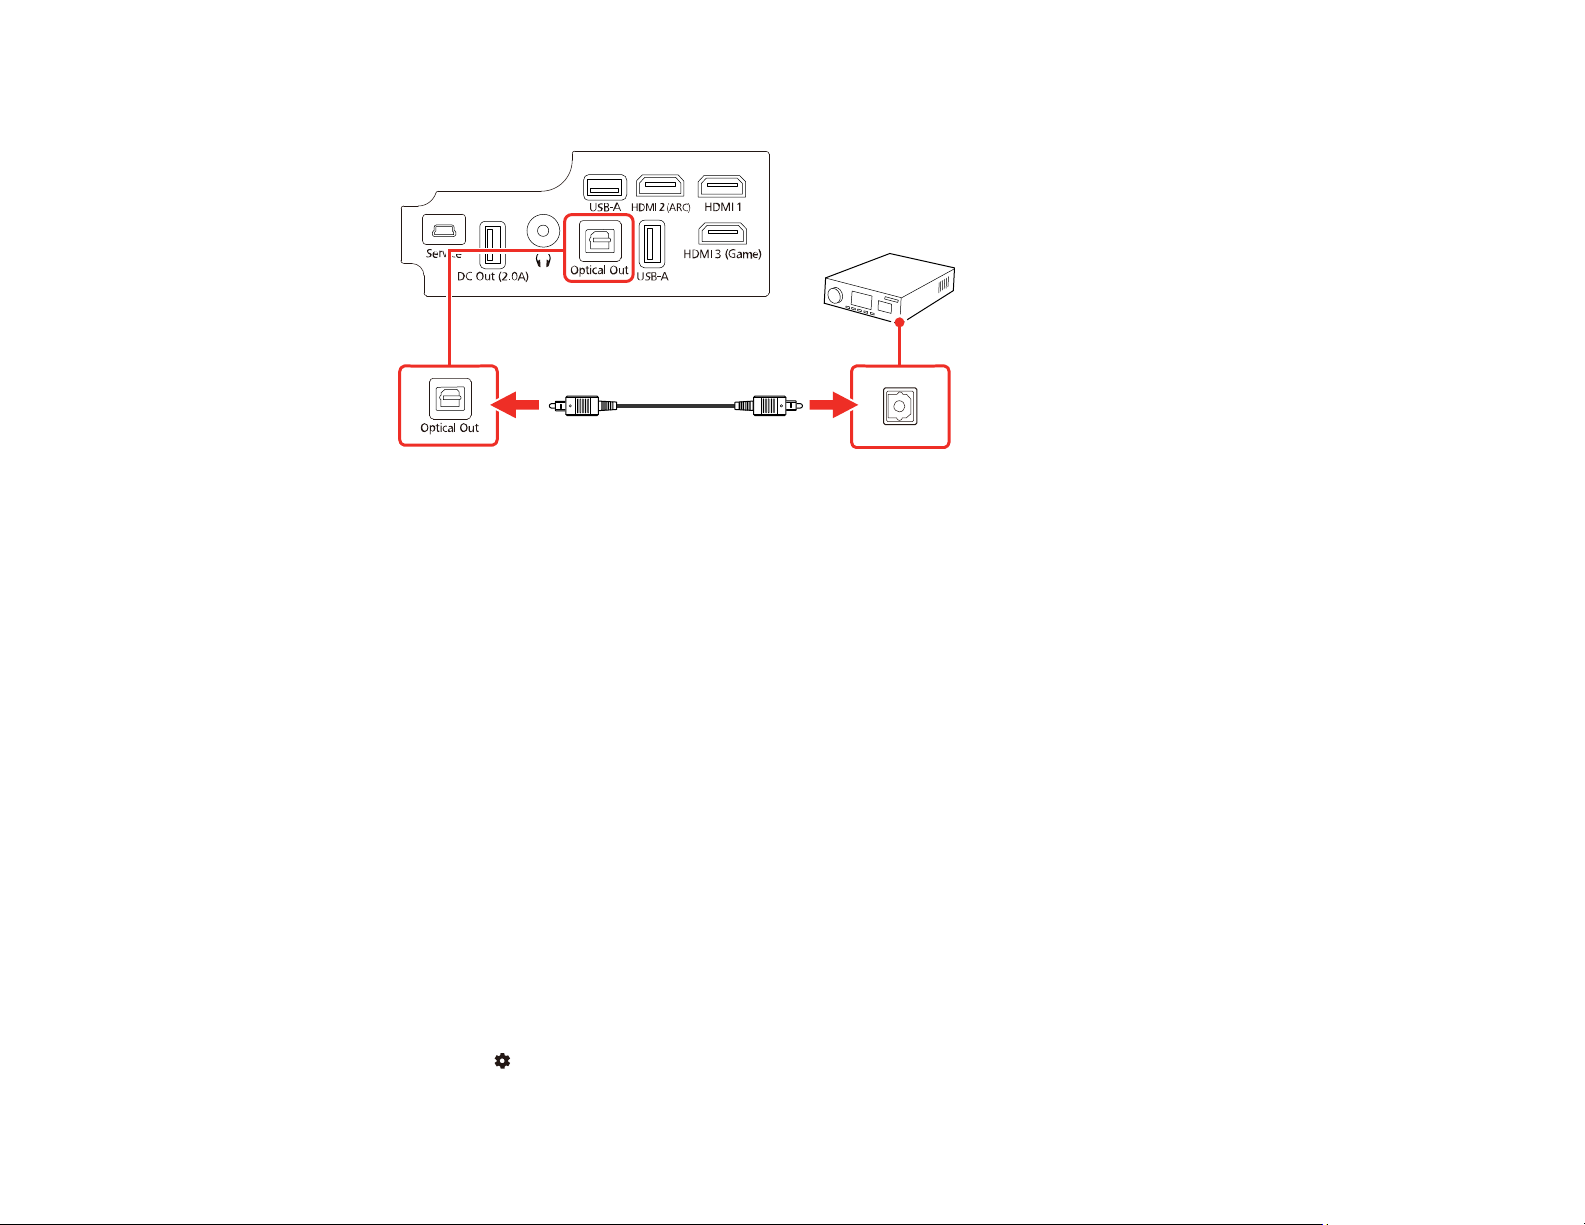
5. Connect the optical digital audio connector end of the cable to your projector's Optical Out port.
6. Carefully replace the projector's side cover.
Note: The projector's side cover can be split into two parts to allow more space for connected
streaming devices and cables. See the link below.
Parent topic: Projector Connections
Related tasks
Attaching and Removing the Side Cover
Connecting to a Bluetooth Audio Device
You can connect your projector to Bluetooth audio devices such as speakers or headphones to output
audio.
Note: There may be a slight delay in audio output. Bluetooth audio devices are not supported in some
countries and regions.
Note: When a Bluetooth audio device is paired to the projector, the built-in speaker system and the
Optical Out port are disabled.
1. Turn on the projector.
2. Press the Android TV settings button on the remote control.
38
Page 39
3. Select Remotes & Accessories and press Enter.
The projector searches for compatible Bluetooth devices.
4. Turn on your device and start the pairing process on it. See the documentation supplied with the
device for more information.
Compatible devices are displayed on-screen when discovered by the projector.
5. Select the device you want to connect to and press Enter.
6. Follow the on-screen instructions to complete pairing.
7. Press the esc button to exit the menus.
Parent topic: Projector Connections
Related tasks
Using the Projector as a Bluetooth Speaker
Connecting Headphones
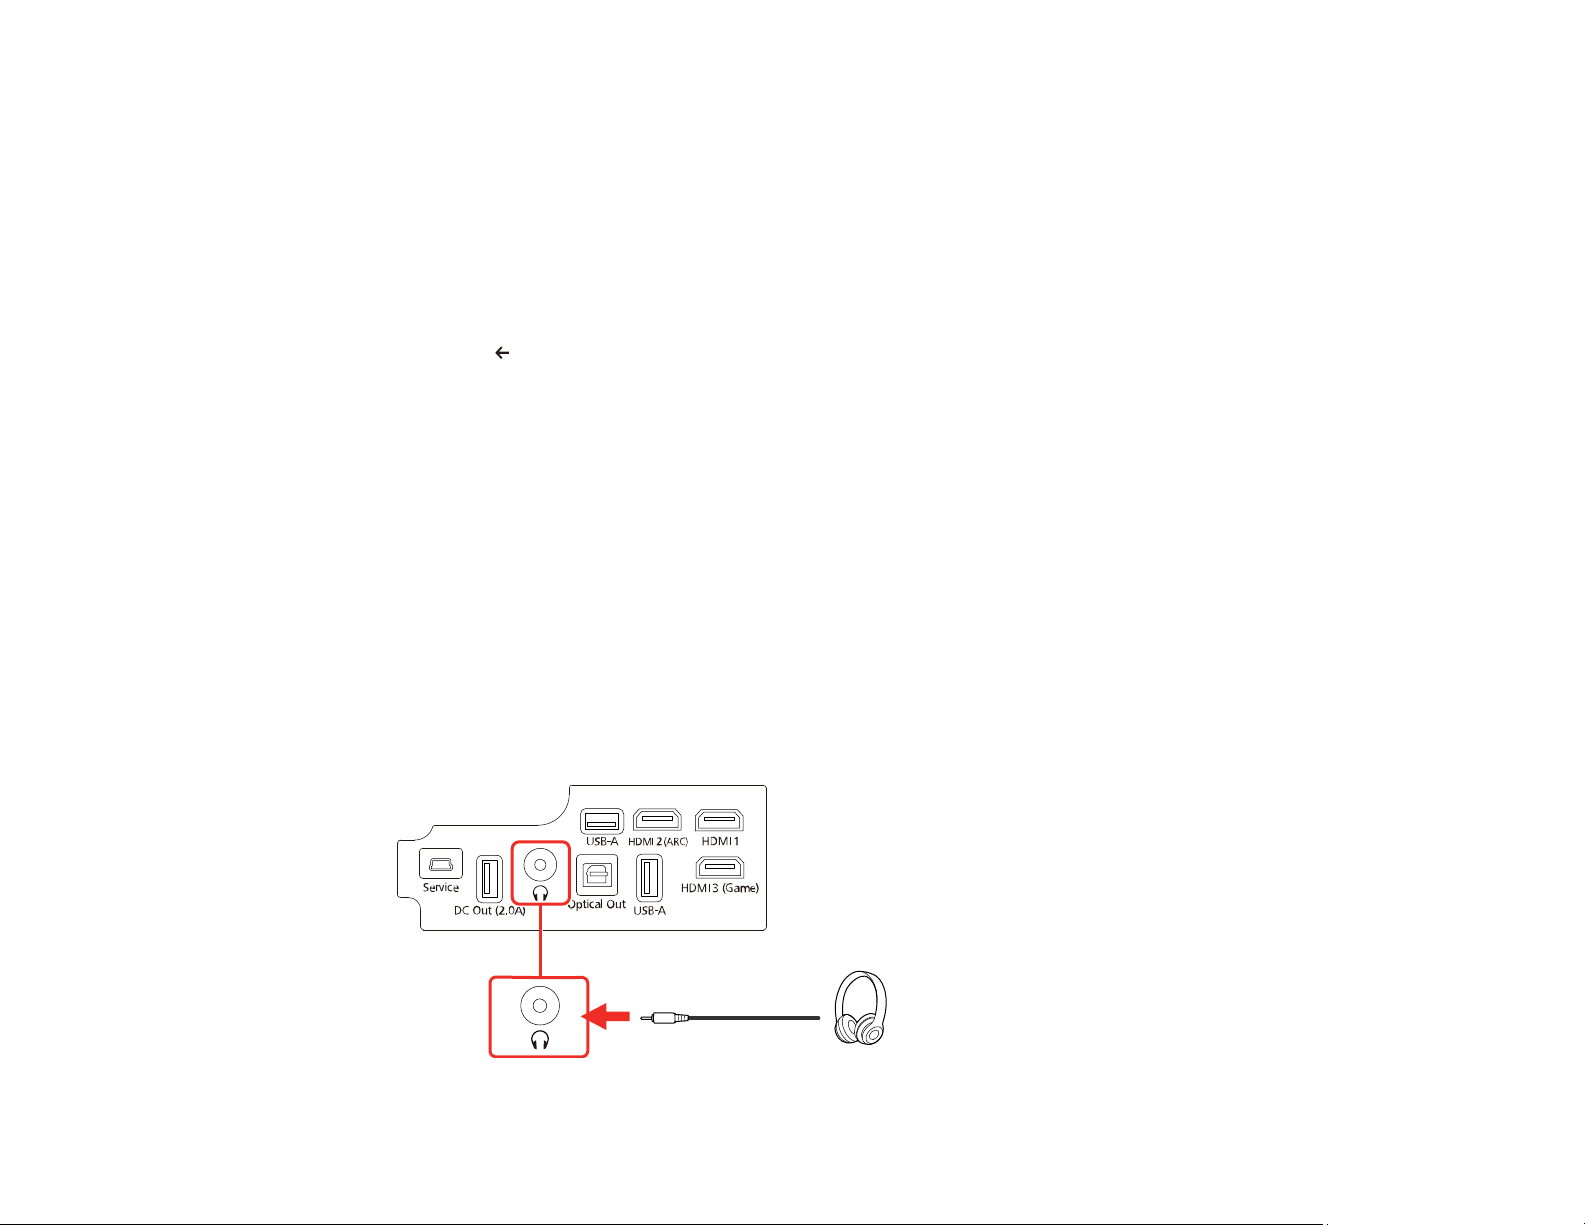
You can connect headphones to the projector's audio out port. You can control the volume using the
remote control.
Note: The projector's audio out port only supports 3.5mm stereo headphones. If you use any other type
of headphones, audio may not be output normally. The projector's speakers are disabled when
headphones are plugged into the audio out port.
1. Remove the projector's side cover, if necessary.
2. Insert the headphone jack into the projector's audio out port.
39
Page 40

Caution: Do not start playback at a high volume setting. Sudden loud noises may cause hearing
loss. Always lower the volume before turning off the projector so that you can gradually increase the
volume after turning it back on.
3. Carefully replace the projector's side cover.
Note: The projector's side cover can be split into two parts to allow more space for connected
streaming devices and cables. See the link below.
Parent topic: Projector Connections
Related tasks
Attaching and Removing the Side Cover
Attaching and Removing the Side Cover
You can remove and attach the side cover to hide the attached cables from view.
1. Remove the projector's side cover, if necessary.
40
Page 41
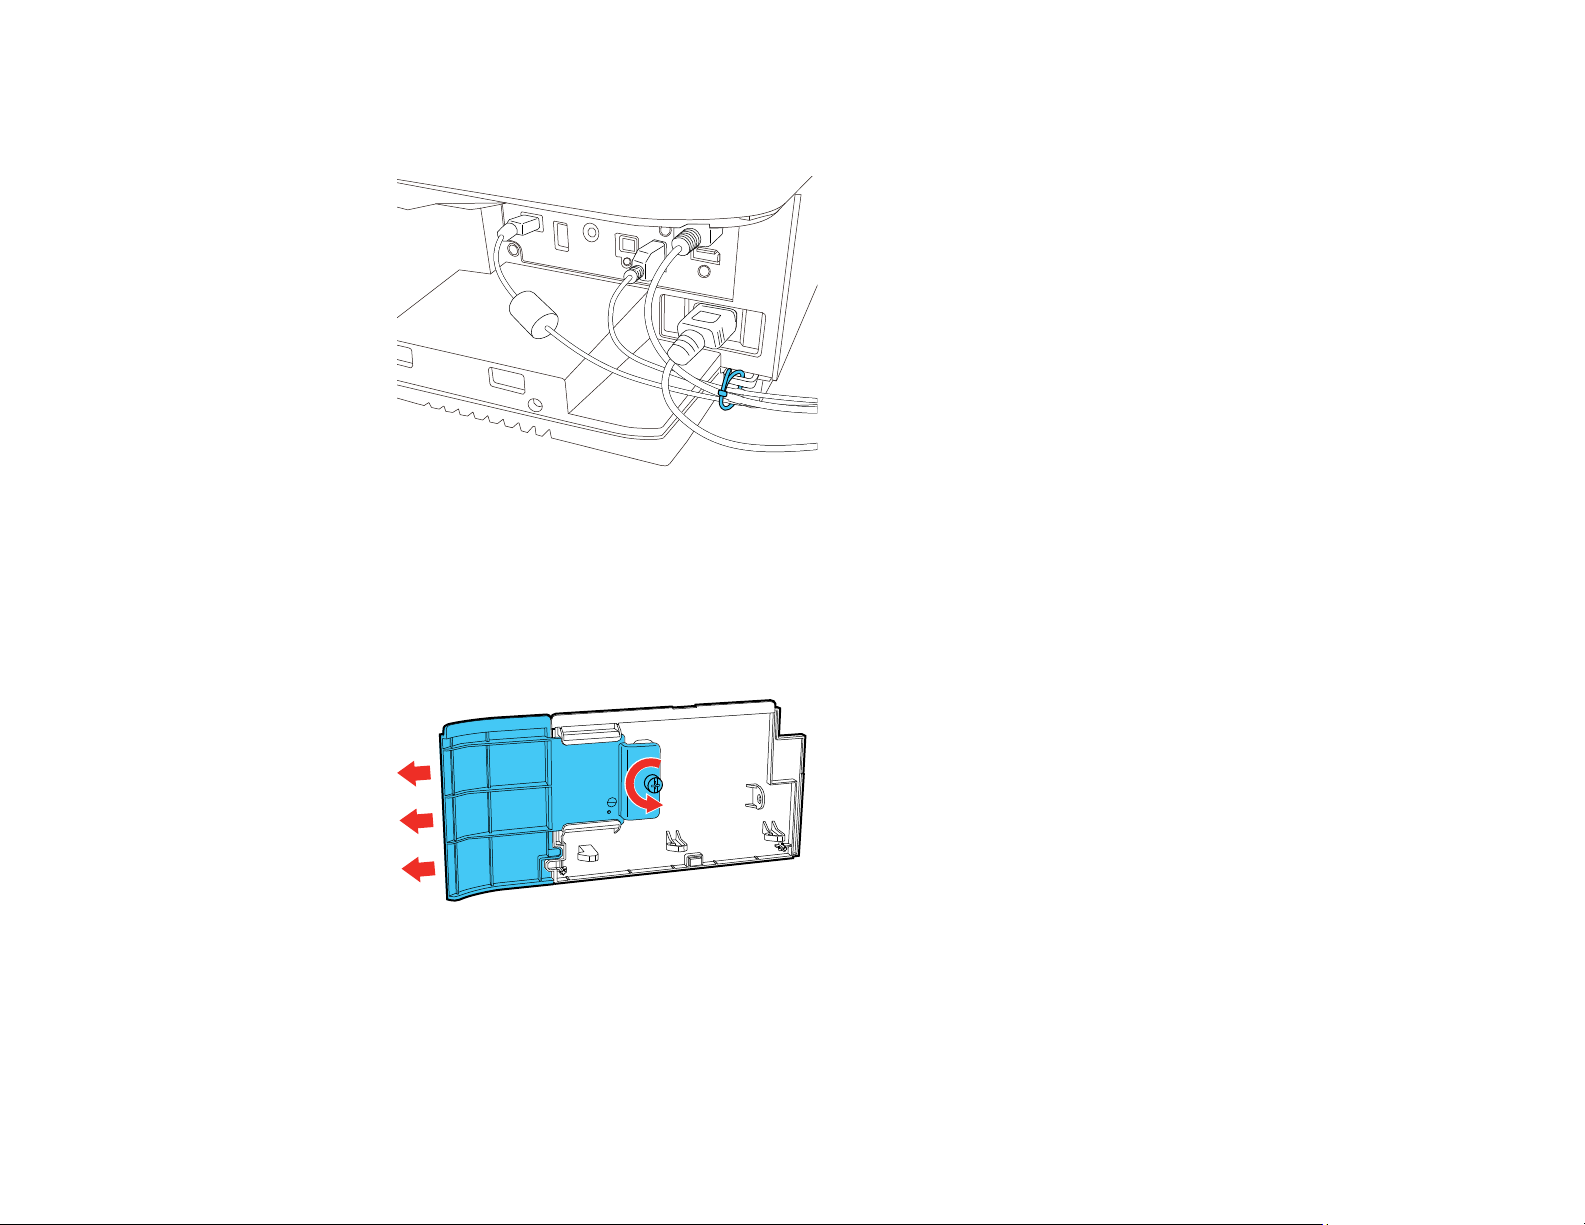
2. Bundle the cables together using a band or other fastener (not provided) and pass it through the
cable holder as shown.
Caution: Do not bundle the power cord to the other cables. Otherwise, a fire may occur.
3. Carefully replace the side cover.
Note: The projector's side cover can be split into two parts. Remove side cover B to allow more
space for connected streaming devices and cables.
Parent topic: Setting Up the Projector
Installing Batteries in the Remote Control
The remote control uses the two AAA batteries that came with the projector. Replace the batteries as
soon as they run out.
41
Page 42
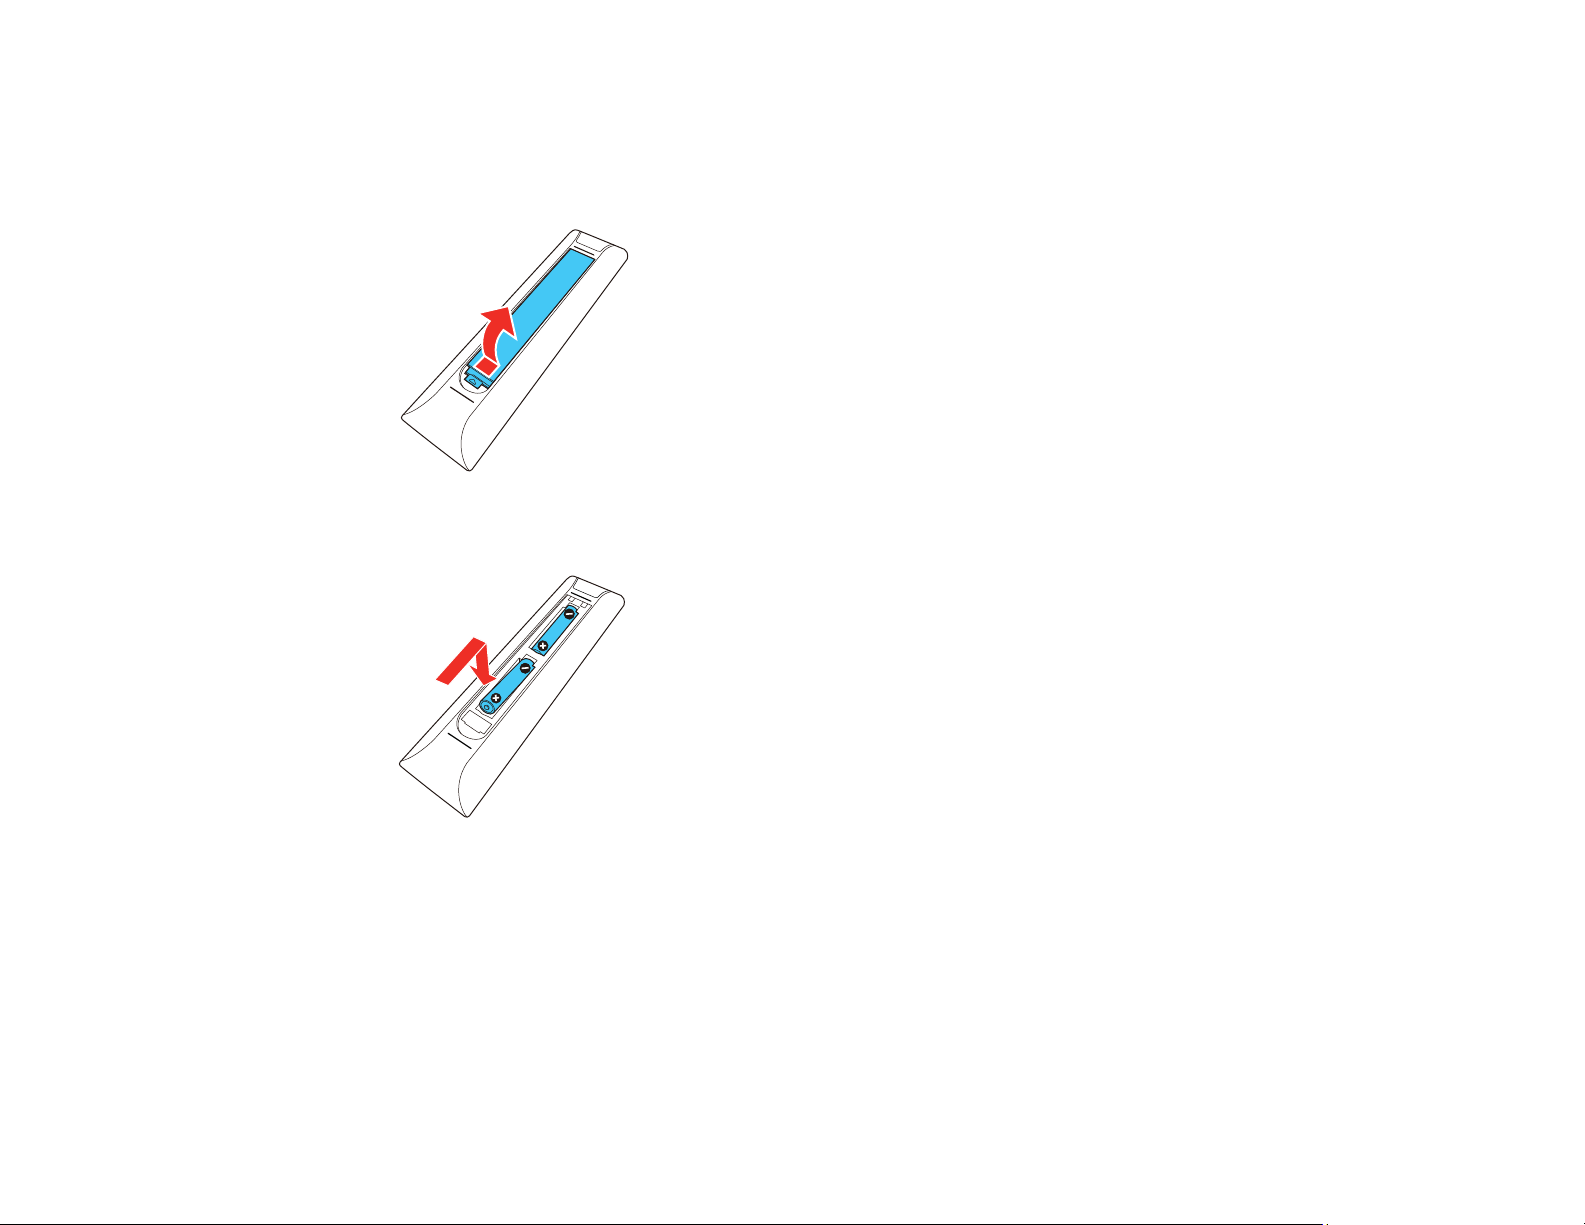
Caution: Use only the type of batteries specified in this manual. Do not install batteries of different types,
or mix new and old batteries.
1. Remove the battery cover.
2. Insert the batteries with the + and – ends facing as shown.
Warning: Make sure the batteries are inserted in the correct positions. If the batteries are not
inserted correctly, they could explode or leak, causing a fire, injury, or damage to the product.
42
Page 43
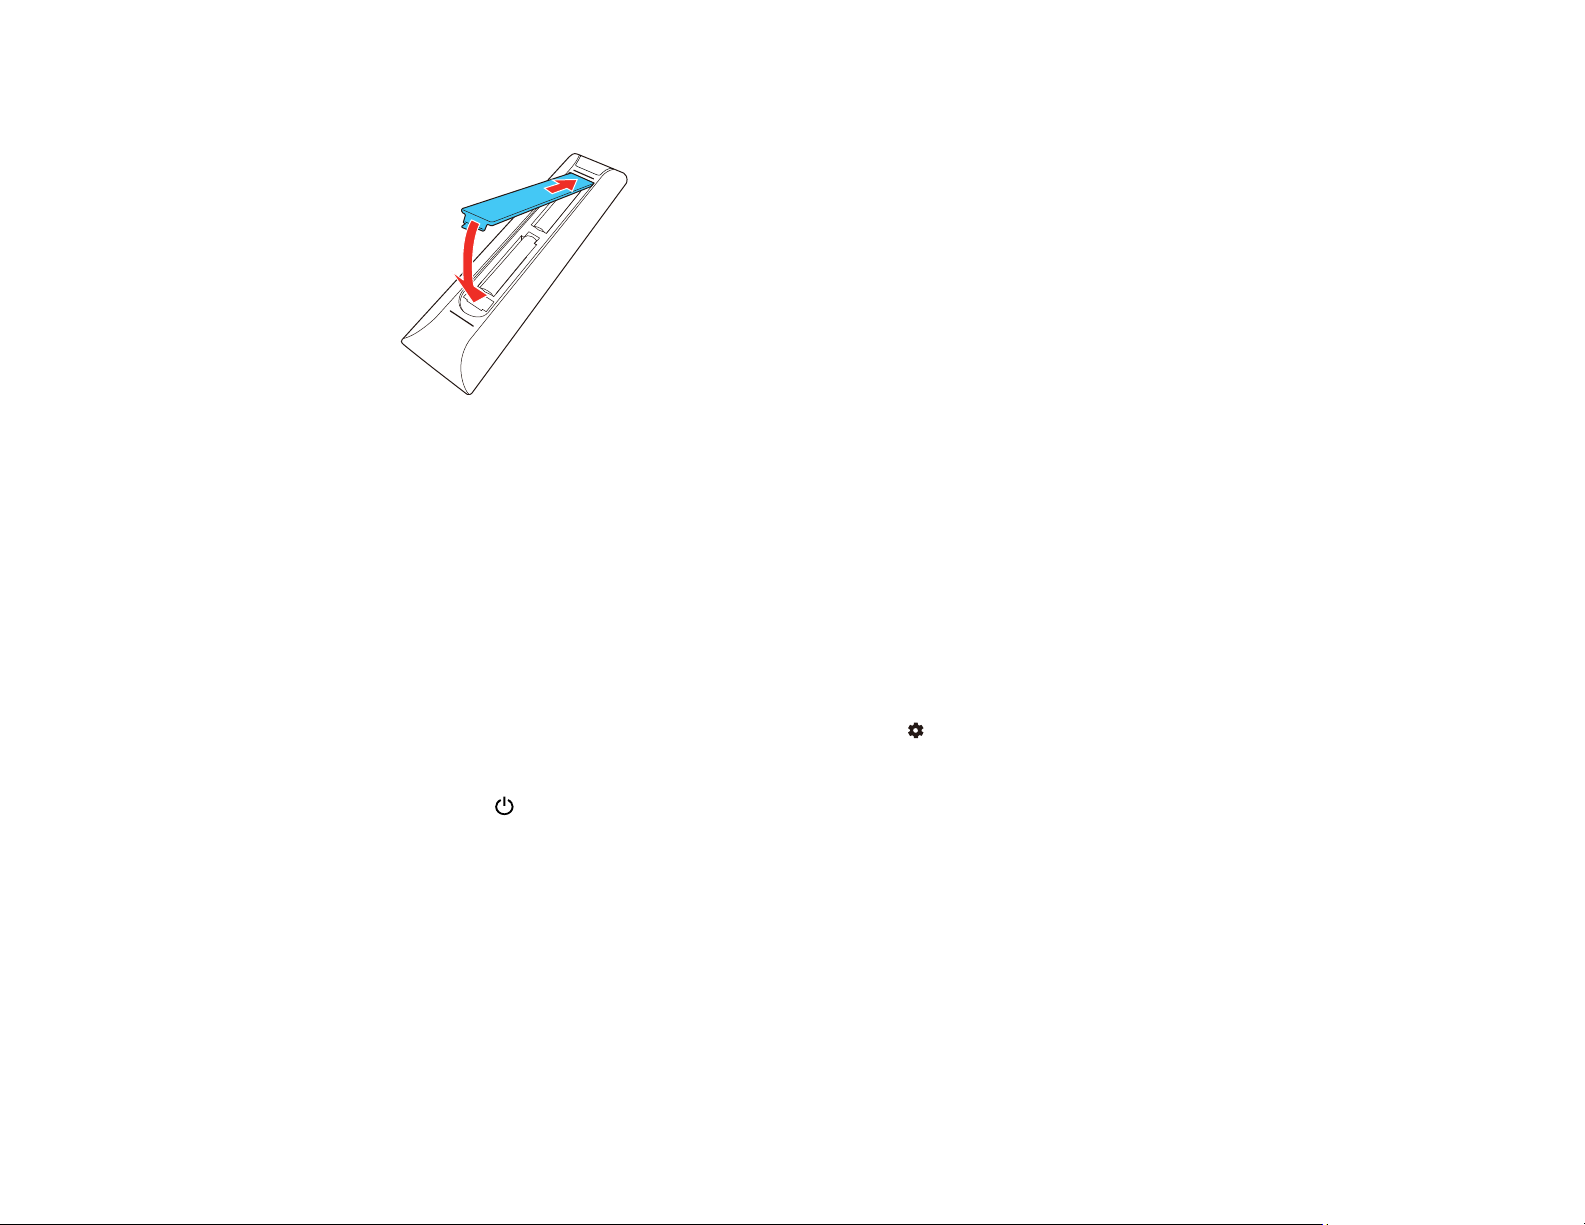
3. Replace the battery cover and press it down until it clicks into place.
Warning: Dispose of used batteries according to local regulations. Do not expose batteries to heat
or flame. Keep batteries out of the reach of children; they are choking hazards and are very
dangerous if swallowed.
Parent topic: Setting Up the Projector
Setting Up Android TV
Android TV must be set up when you turn on the projector for the first time.
Note: A Google account is required to use certain features. Some apps require a paid subscription. After
initial setup, you can change the settings by pressing the Android TV settings button the remote
control.
1. Press the Power button on the projector or remote control.
43
Page 44
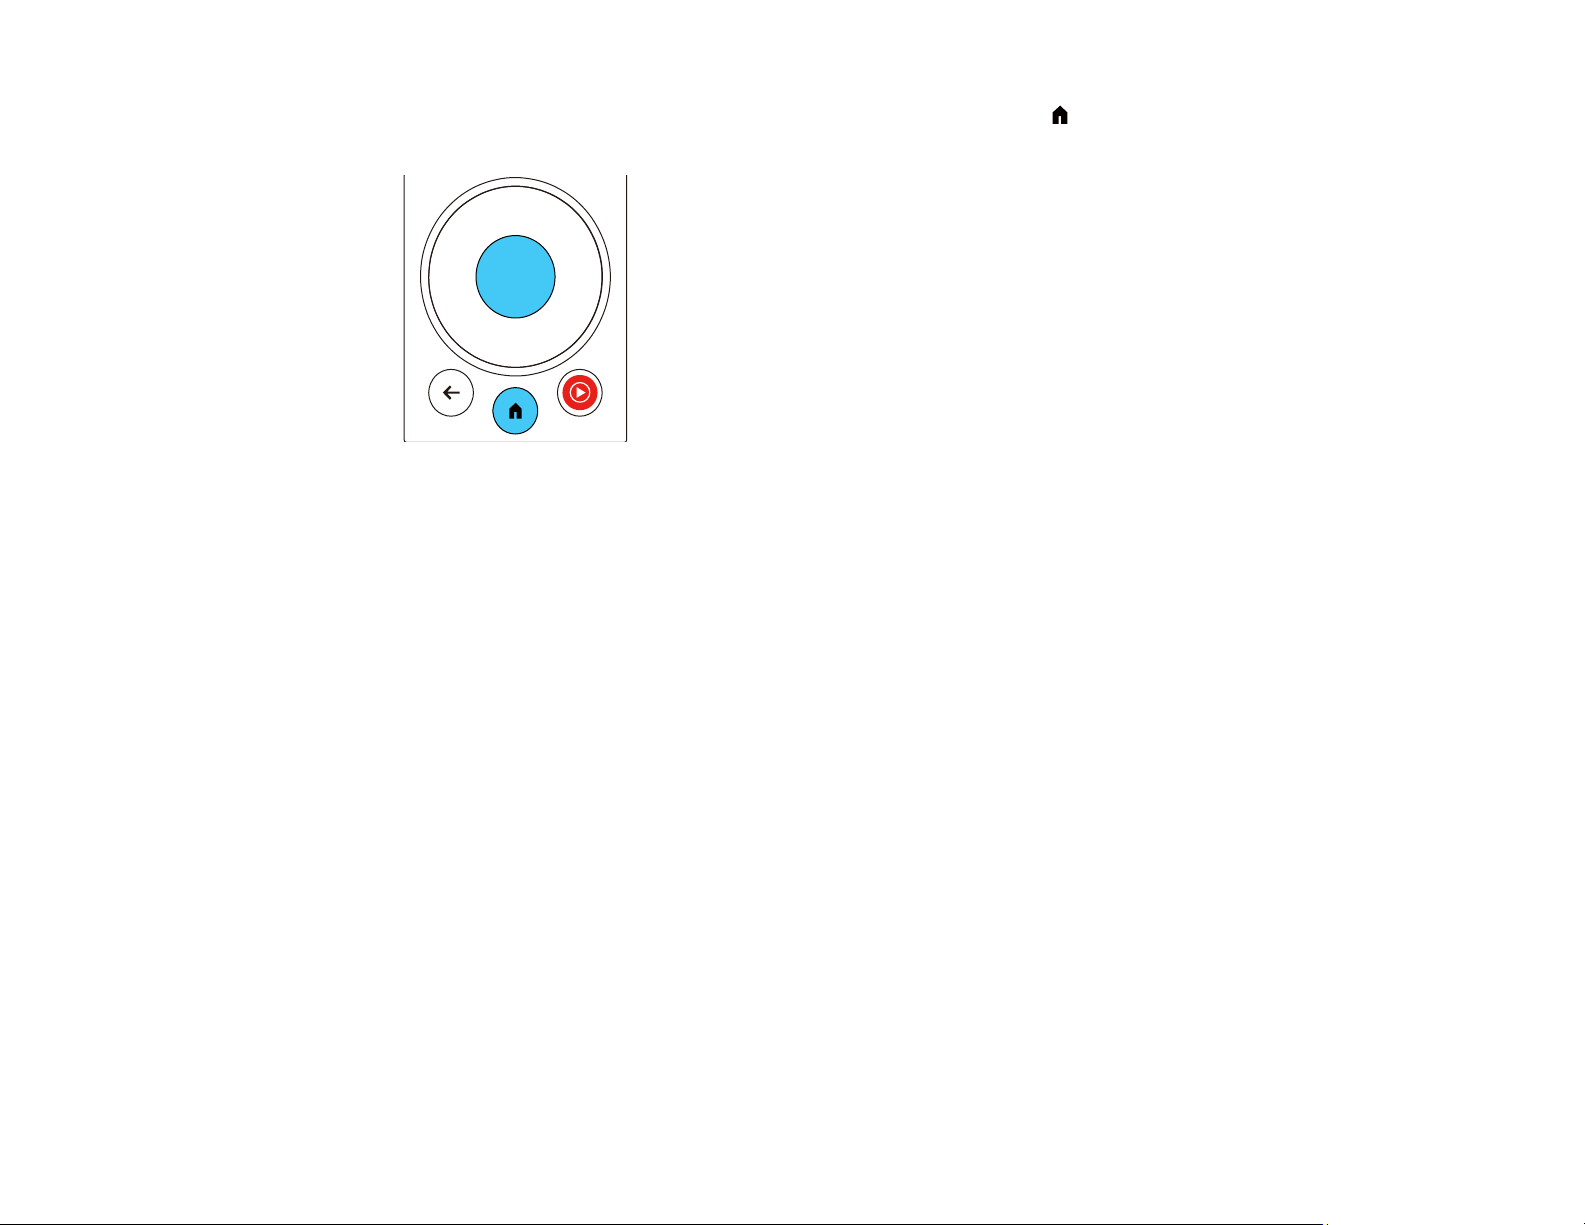
2. When the pairing screen is displayed, press and hold the Enter and home remote control buttons
at the same time.
The light on the remote control flashes until pairing is complete.
3. Use the remote control directional pad and Enter buttons to select the language you want to use
from the language selection screen.
4. Do one of the following:
• Select Continue to use an Android phone to set up the projector's Wi-Fi and Google account
settings. Follow the on-screen instructions and skip to step 7.
• Select Skip to set up the projector's Wi-Fi and Google account settings manually. Go to the next
step.
5. Select the wireless network you want to use from the Wi-Fi setting screen and then follow the onscreen instructions to enter the network password.
6. At the Google account sign-in screen, do one of the following:
• Select Sign In to sign-in to your Google account. Follow the on-screen instructions.
• Select Skip to use the projector without signing in to a Google account.
7. Follow the on-screen instructions to proceed with initial setup, selecting settings as desired.
The Home screen is displayed when initial setup is completed.
Parent topic: Setting Up the Projector
44
Page 45

Using Basic Projector Features
Follow the instructions in these sections to use your projector's basic features.
Turning On the Projector
Turning Off the Projector
Focusing the Image
Adjusting the Image Height
Adjusting Image Color when Projecting onto a Wall
Image Shape
Remote Control Operation
Using Voice Commands to Control Your Projector
Pairing the Remote Control
Selecting an Image Source
Using Your Projector as a Chromecast
Projection Modes
Image Aspect Ratio
Color Mode
Adjusting Image Quality in Detail
Adjusting the Image Resolution
Using Frame Interpolation
Controlling the Volume with the Volume Buttons
Changing the Sound Mode
Turning On the Projector
Turn on the projector before you turn on the computer or video equipment you want to use.
Note: If you will use the projector at altitudes above 4921 feet (1500 m), turn on High Altitude Mode in
the projector's Settings menu to ensure the projector's internal temperature is regulated properly.
45
Page 46
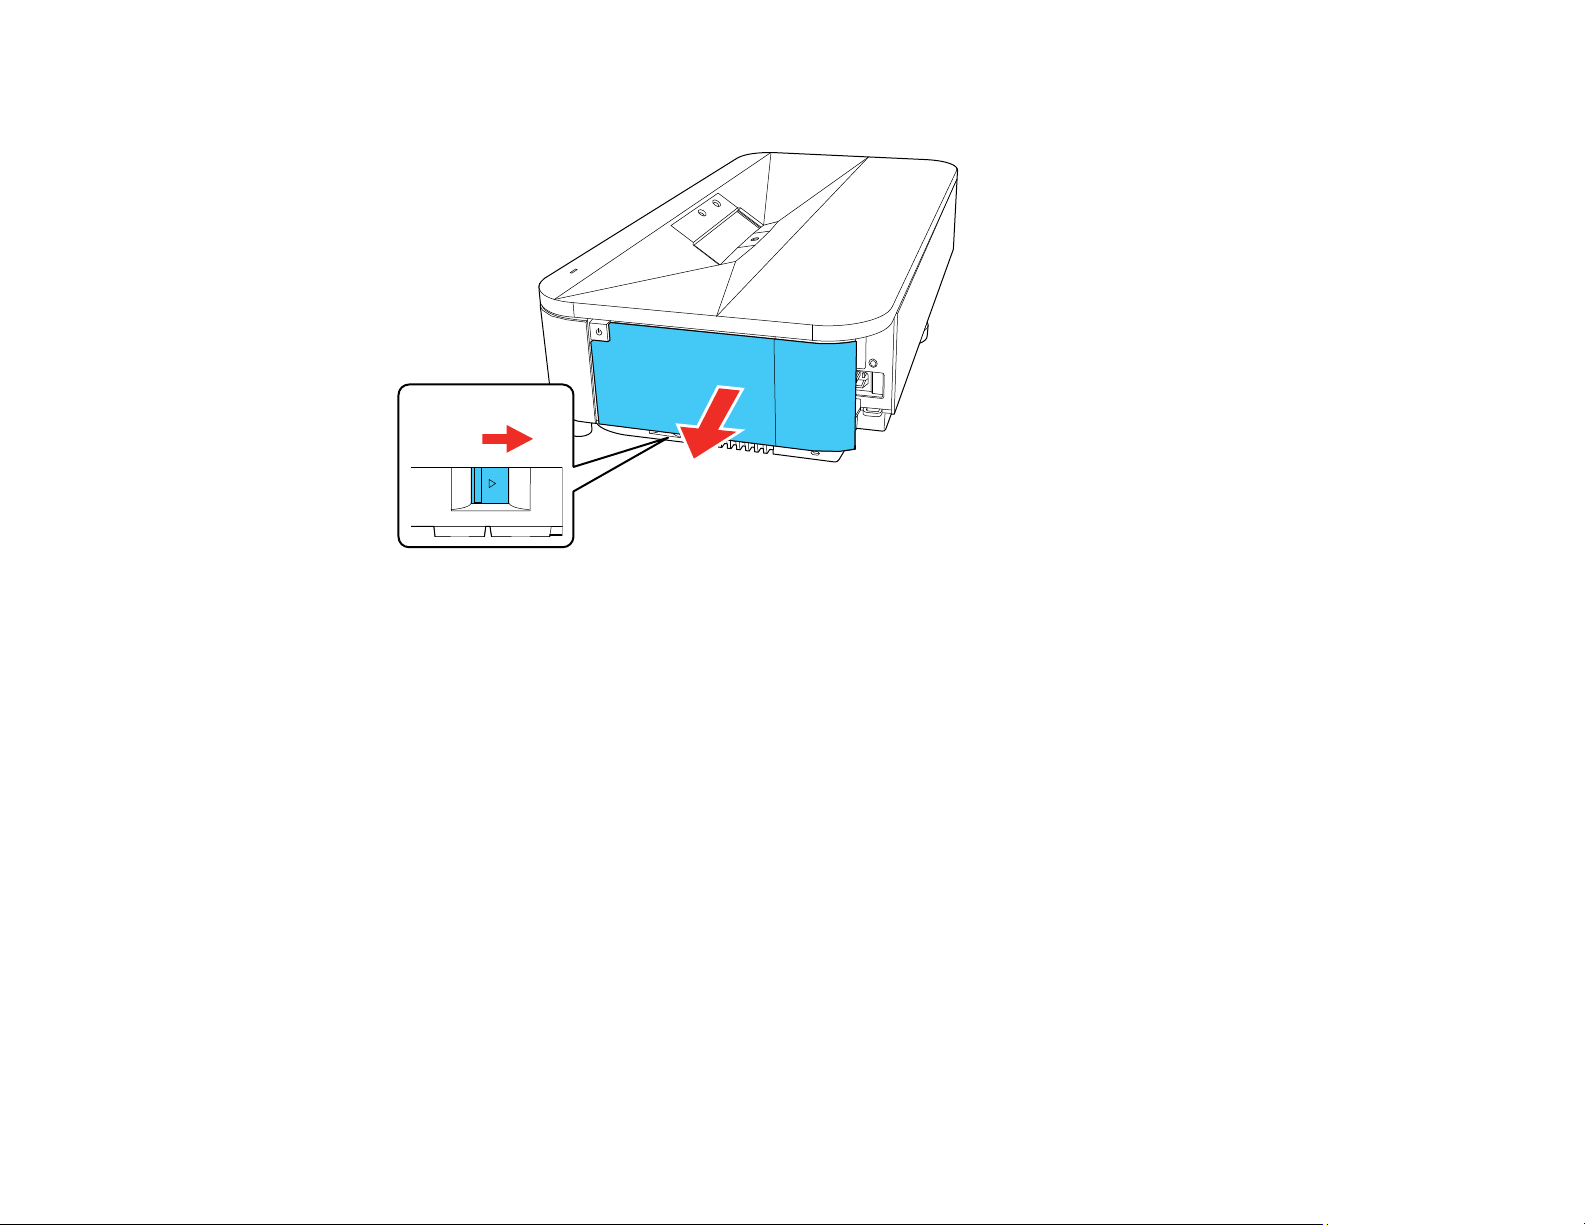
1. Remove the projector's side cover, if necessary.
2. Connect the computer or video equipment you want to use to one of the projector's HDMI ports, if
necessary.
46
Page 47
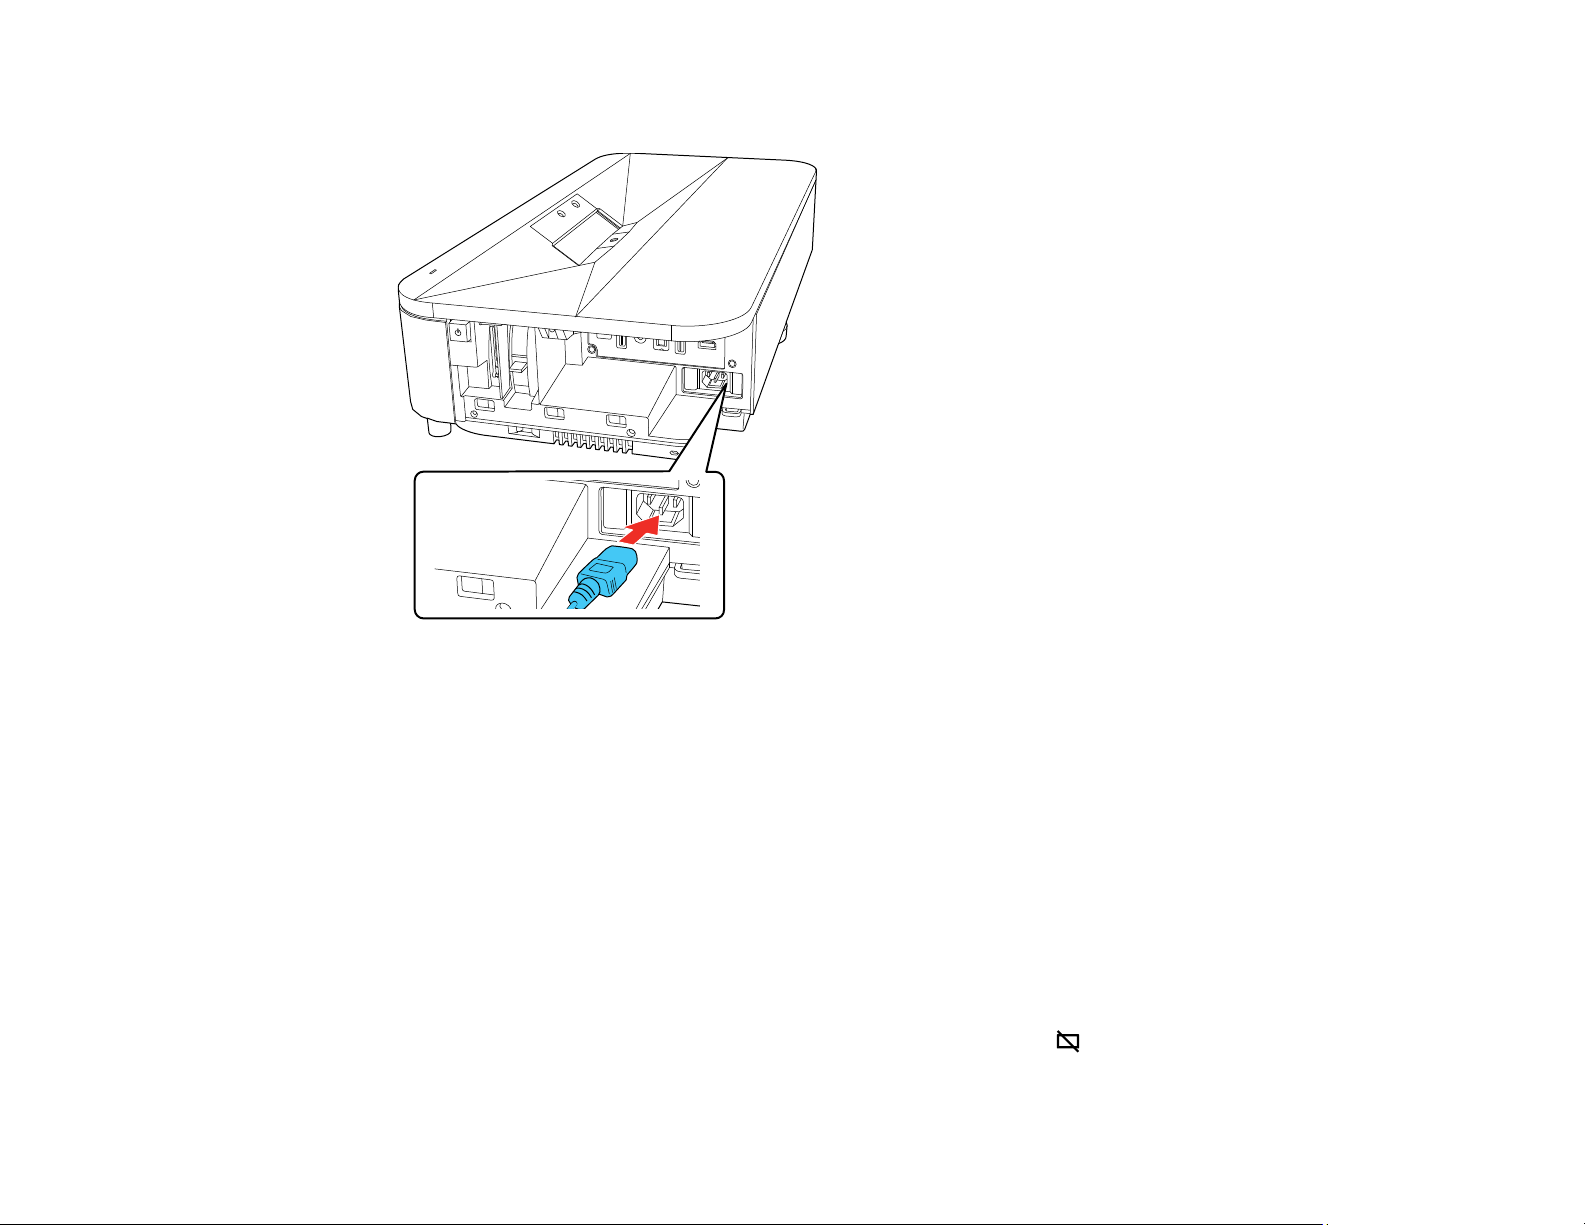
3. Connect the power cord to the projector's power inlet.
4. Plug the power cord into an electrical outlet.
The projector enters standby mode. This means the projector is receiving power, but has not yet
been turned on.
5. Press the power button on the projector or remote control to turn on the projector.
The Status light flashes blue as the projector warms up. When the projector is warmed up, the
Status light stops flashing and turns blue.
Warning: Never look into the projector lens when the laser is on. This can damage your eyes and is
especially dangerous for children and pets. If you are using the remote control to turn the projector
on, make sure no one is looking into the lens or in front of the projector before turning it on.
Caution: Make sure no objects are blocking the light from the projector lens. Objects blocking the
lens for an extended time can melt, burn, or start a fire, and light that is reflected back into the lens
can cause the projector to malfunction. To stop projection, press the blank button or turn off the
projector (blanking the screen will not pause video content).
47
Page 48

Note: If this is the first time you are turning on the projector, you need to pair the remote control and
complete initial setup. Follow any on-screen instructions to complete the settings. Make sure to point
the front of the remote at the front of the projector when attempting to pair the remote.
6. Turn on the connected video source.
7. Carefully replace the projector's side cover.
Note: The projector's side cover can be split into two parts to allow more space for connected
streaming devices and cables. See the link below.
If you do not see a projected image right away, try the following:
• Turn on the connected computer or video device.
• Insert a DVD or other video media and press the play button, if necessary.
• Press the Source Search button on the remote control and select the desired input.
• Change the screen output from the computer when using a laptop.
Using the Home Screen
Parent topic: Using Basic Projector Features
Related references
Projector Light Status
Projector Feature Settings - Settings Menu
Related tasks
Attaching and Removing the Side Cover
Using the Home Screen
You can easily access online content, applications, and projector settings from the Android TV home
screen.
1. To display the Home screen, press the home button on the remote control.
48
Page 49
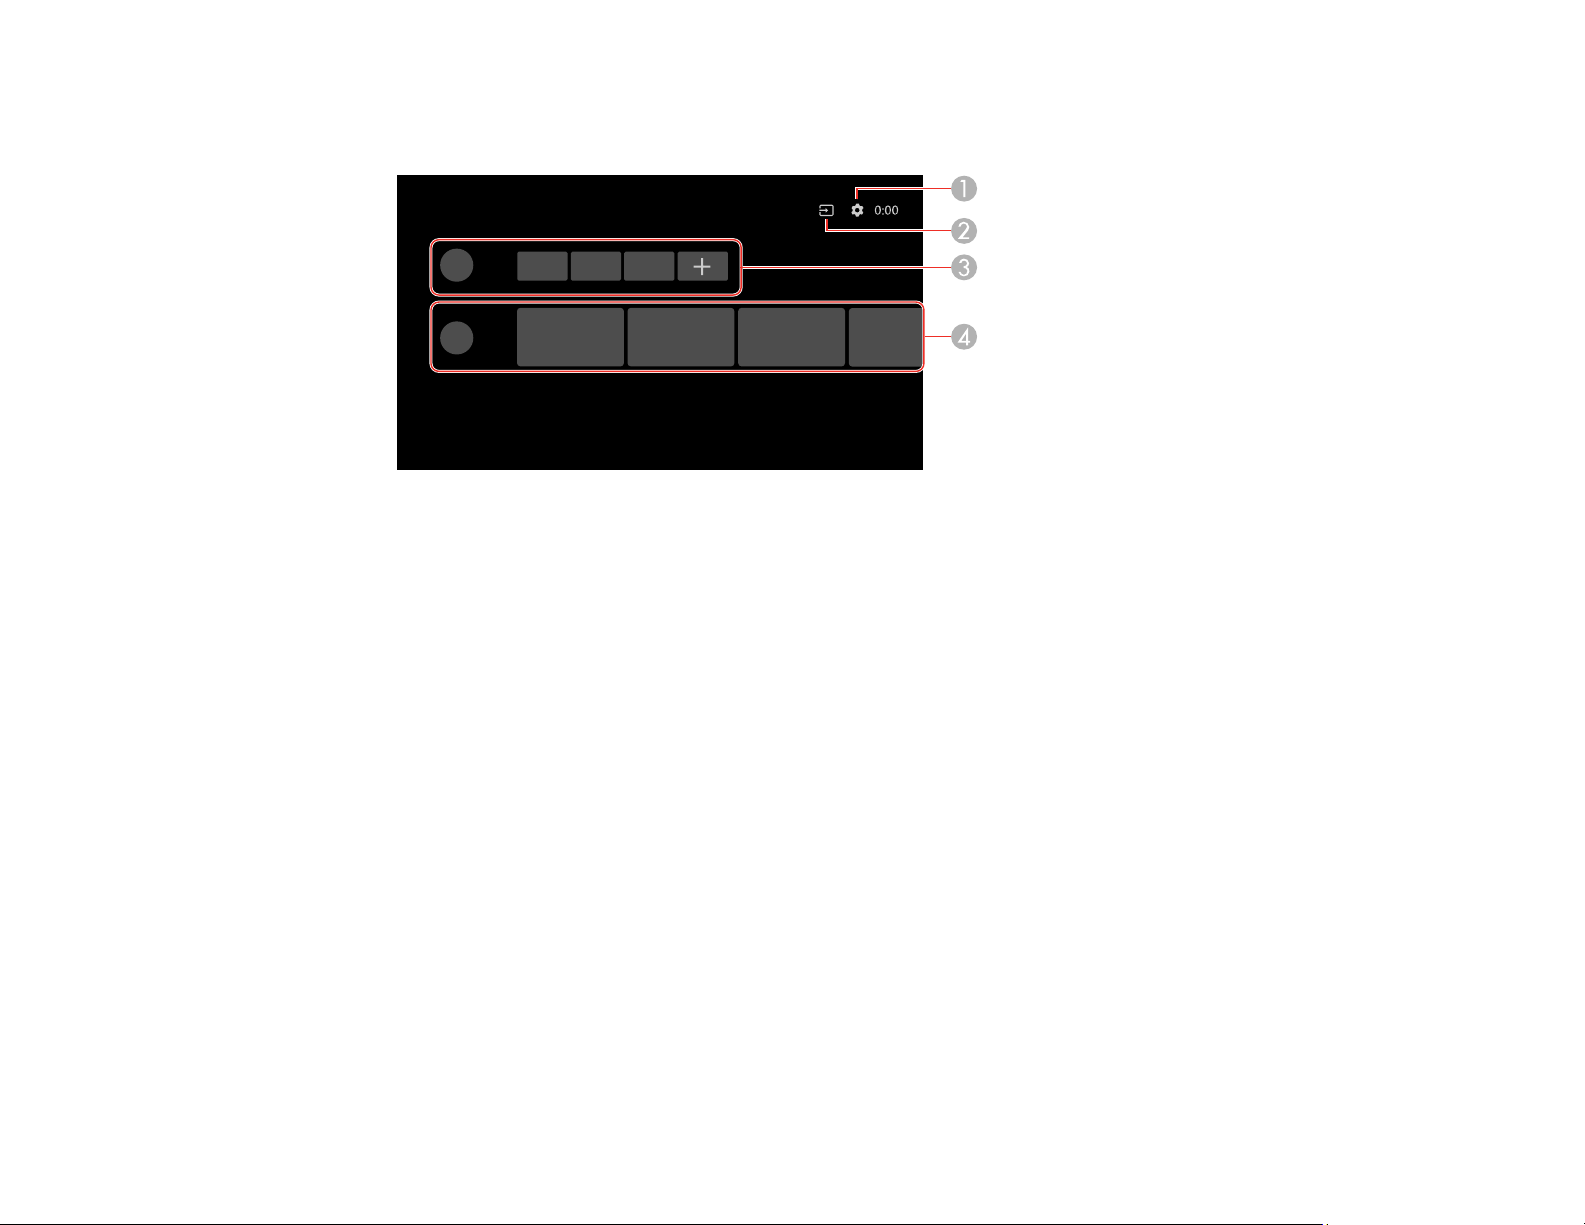
2. Use the directional pad on the remote control to navigate the screen, and press Enter to select an
option.
1 Displays the Settings menu for Android TV (you can select various settings such as Wi-Fi,
language, and Google account information)
2 Displays a list of available input sources
3 Displays the applications downloaded to your Android TV (add applications to this list by
selecting the + icon)
4 Displays recommended content from your applications
Note: The content of the Home screen may change depending on the Android TV version.
Parent topic: Turning On the Projector
Turning Off the Projector
Before turning off the projector, shut down any computer connected to it so you can see the computer
display during shutdown.
Note: Turn off this product when not in use to prolong the life of the projector. Laser life will vary
depending upon mode selected, environmental conditions, and usage. Brightness decreases over time.
1. Press the power button on the projector or remote control.
49
Page 50

The laser turns off and the Status light turns off.
Note: You can keep supplying power to the projector by setting the Power Button Setting to
Suspend in the projector's Settings menu. You can then press any button on the projector or remote
control to turn on the projector and the projector will also start up faster.
2. To transport or store the projector, make sure the Status light is off, then unplug the power cord.
Parent topic: Using Basic Projector Features
Related references
Projector Feature Settings - Settings Menu
Focusing the Image
1. Turn on the projector and display an image.
2. Remove the projector's side cover.
50
Page 51

3. Raise or lower the focus lever to sharpen the image.
4. Carefully replace the projector's side cover.
Parent topic: Using Basic Projector Features
Adjusting the Image Height
If you are projecting from a table or another flat surface, and the image is too high or low, you can adjust
the image height using the projector's adjustable feet.
Note: Make slight or minor adjustments at a time. The image shape and position are very sensitive to
any adjustment due to the short throw ratio.
1. Turn on the projector and display an image.
51
Page 52
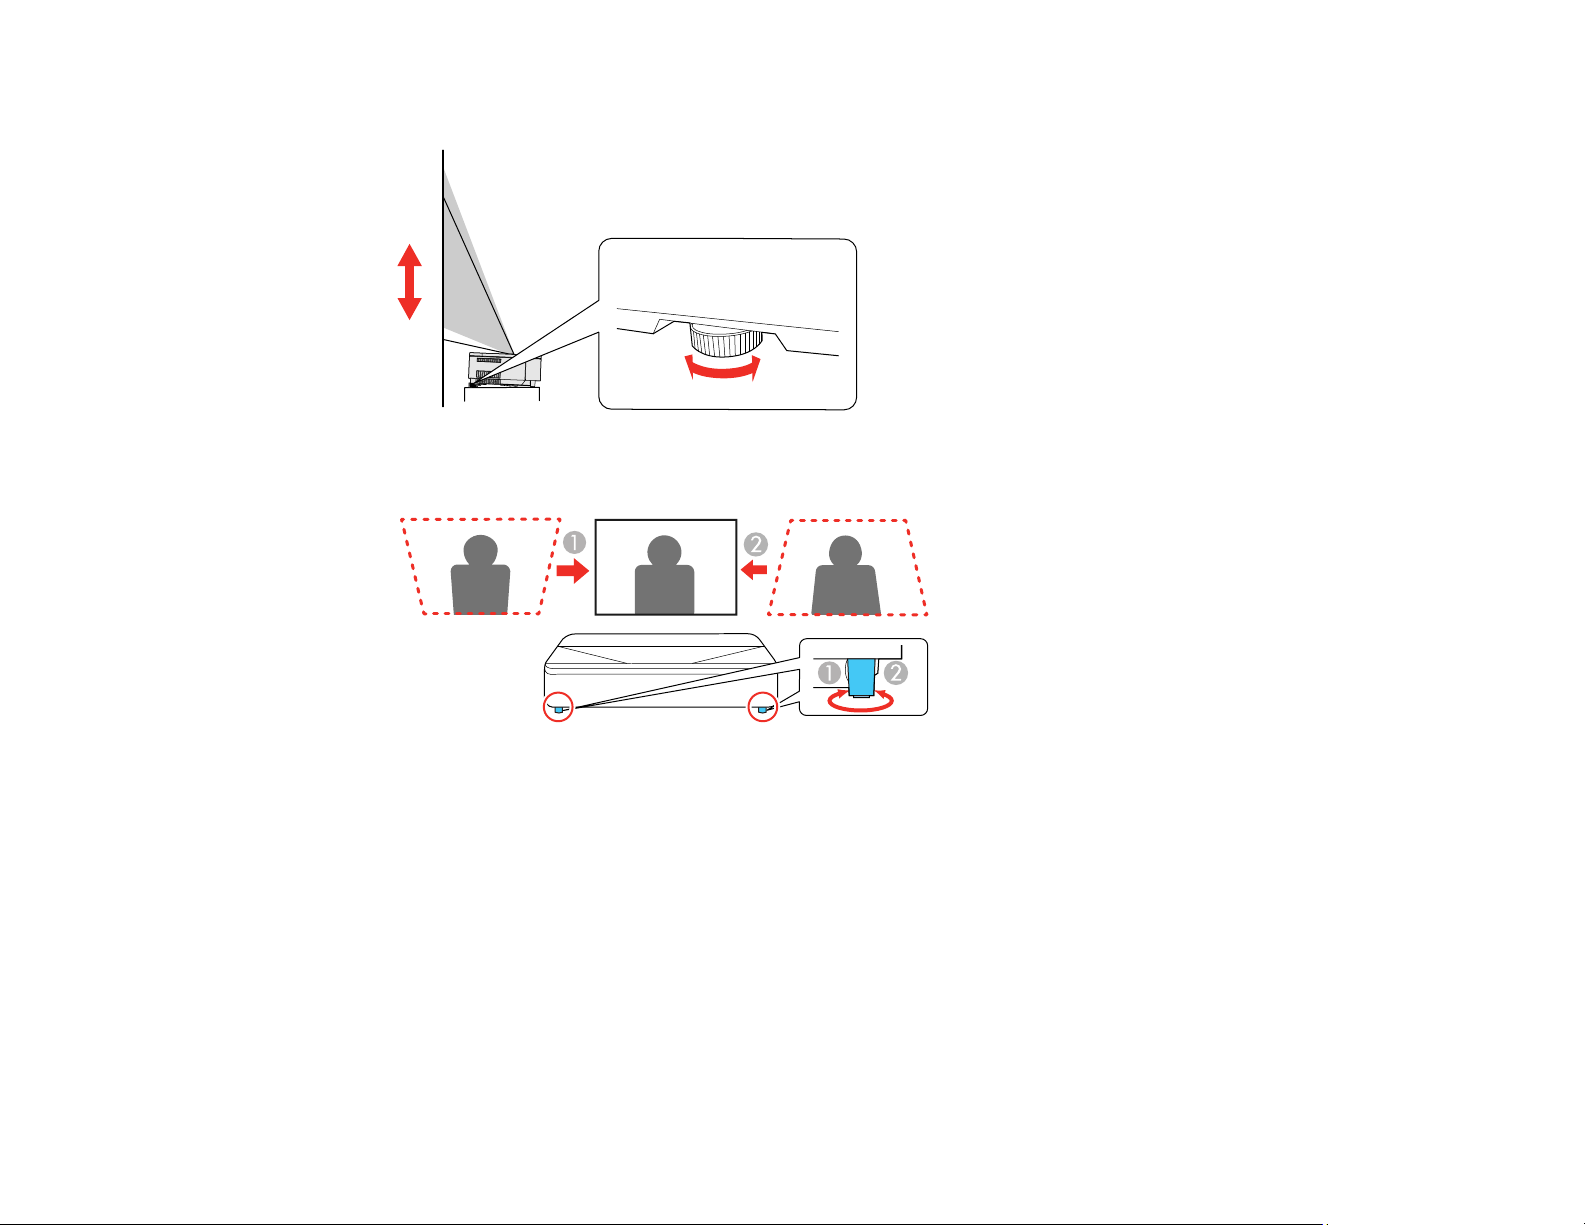
2. To adjust the image height, rotate the rear foot.
3. Rotate the front feet to adjust any tilting or vertical distortion.
If the projected image is unevenly rectangular, you need to adjust the image shape.
Parent topic: Using Basic Projector Features
Adjusting Image Color when Projecting onto a Wall
When projecting onto a wall, you can use the preset color correction to compensate for the color of the
wall.
You can make other detailed color adjustments in the projector's Picture menu.
1. Turn on the projector and display an image.
52
Page 53

2. Press the settings button on the remote control.
Note: This button is not available when the input source is HDMI3 (Game). Press the home button
on the remote control to return to the Android TV home screen first, and then perform the procedure.
3. Select the Installation menu and press Enter.
You see a screen like this:
4. Select Adjust color and press Enter.
You see a screen like this:
53
Page 54

5. Select the color that is closest to the color of the wall and select OK.
Parent topic: Using Basic Projector Features
Image Shape
You can project an evenly rectangular image by placing the projector directly in front of the center of the
screen and keeping it level. If you place the projector at an angle to the screen, or tilted up or down, or off
to the side, you may need to correct the image shape for the best display quality. After correction, your
image is slightly smaller.
Correcting Image Distortion Using the Installation Menu
Parent topic: Using Basic Projector Features
Correcting Image Distortion Using the Installation Menu
You can correct distortion when the projected image shape is curved or not rectangular by following the
on-screen instructions from the projector's Installation menu.
You can also correct image distortion using the Epson Setting Assistant app on an iOS or Android device
with a camera. You can scan the QR code on the Installation menu or download the latest version of the
app from the Apple App Store or Google Play. Follow the instructions in the app.
Note: After correction, your image is slightly smaller.
1. Turn on the projector and display an image.
2. Press the settings button on the remote control.
Note: This button is not available when the input source is HDMI3 (Game). Press the home button
on the remote control to return to the Android TV home screen first, and then perform the procedure.
3. Select the Installation menu and press the Enter button on the remote control.
54
Page 55
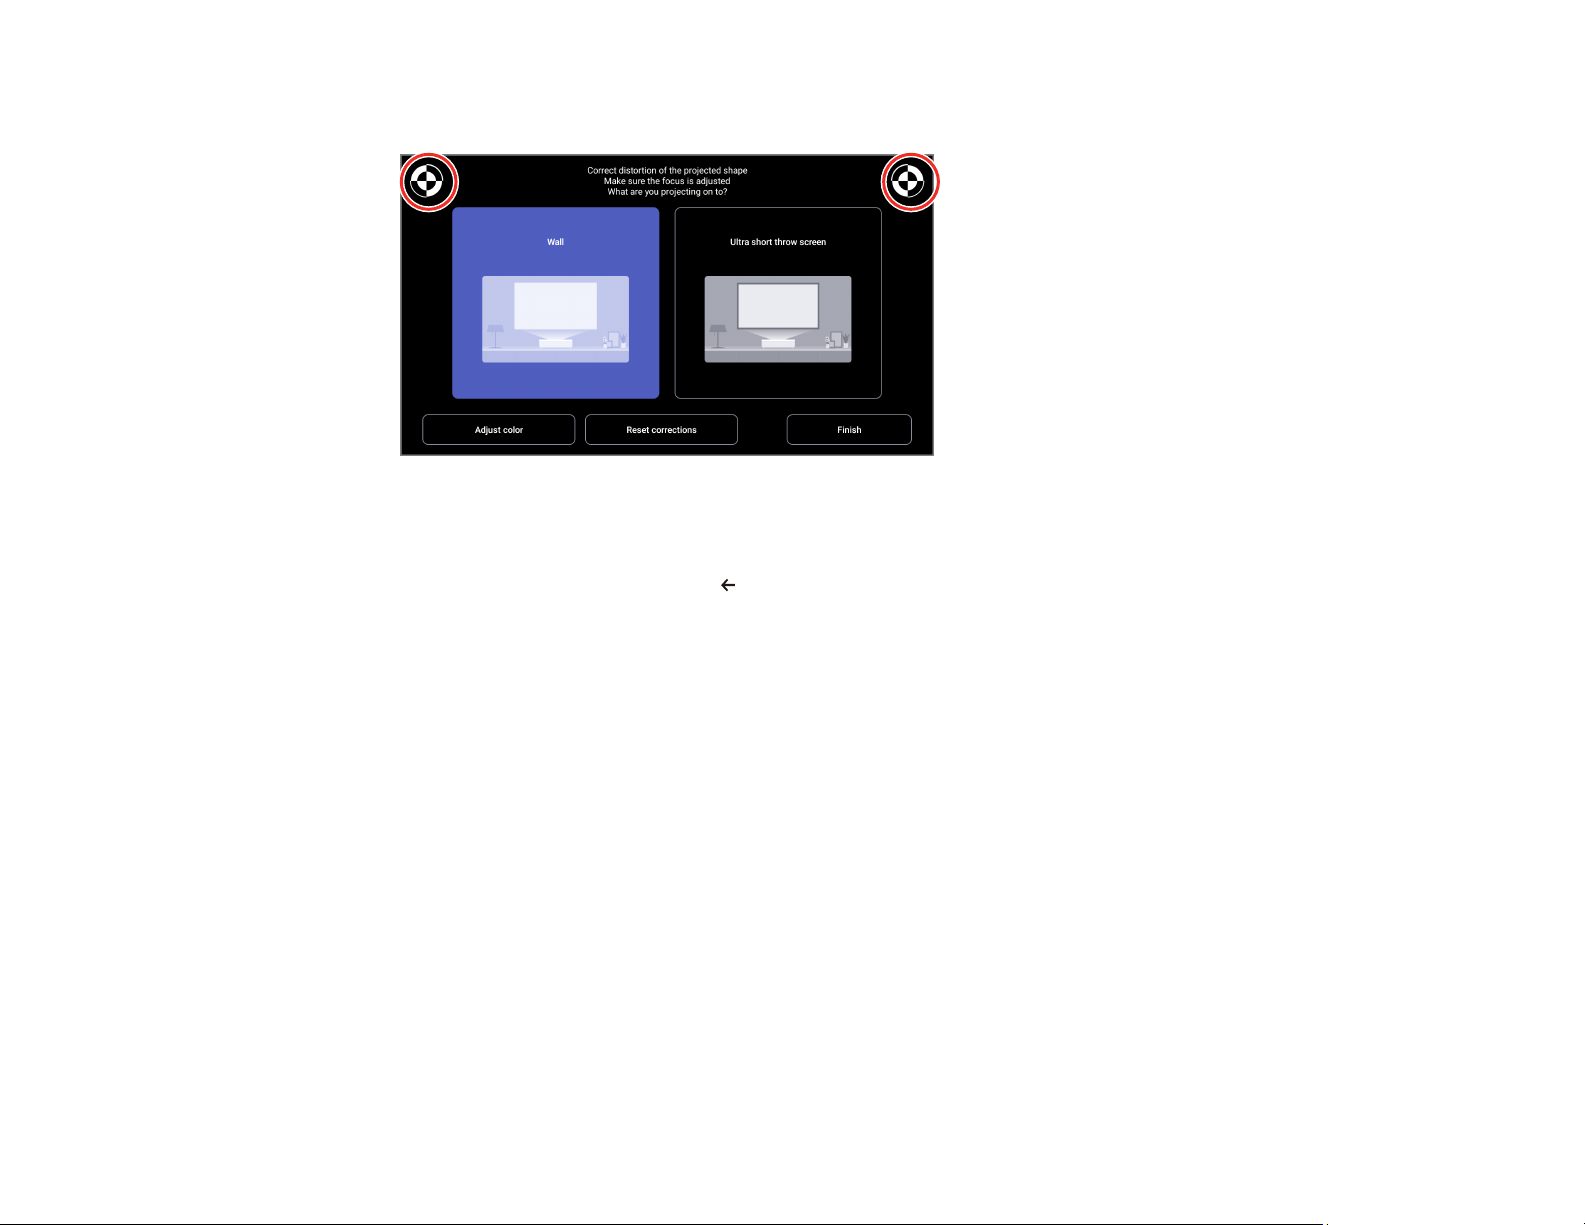
4. Use the focus lever and the reference marks on the upper corners of the image to adjust the focus.
5. Use the remote control to select the option that best suits the surface you are projecting onto and
follow the on-screen instructions to correct distortion in the image.
6. When you are finished, press the esc button on the remote control to exit the menus.
Parent topic: Image Shape
Remote Control Operation
The remote control lets you control the projector from almost anywhere in the room, up to 19.7 feet (6 m)
away.
55
Page 56
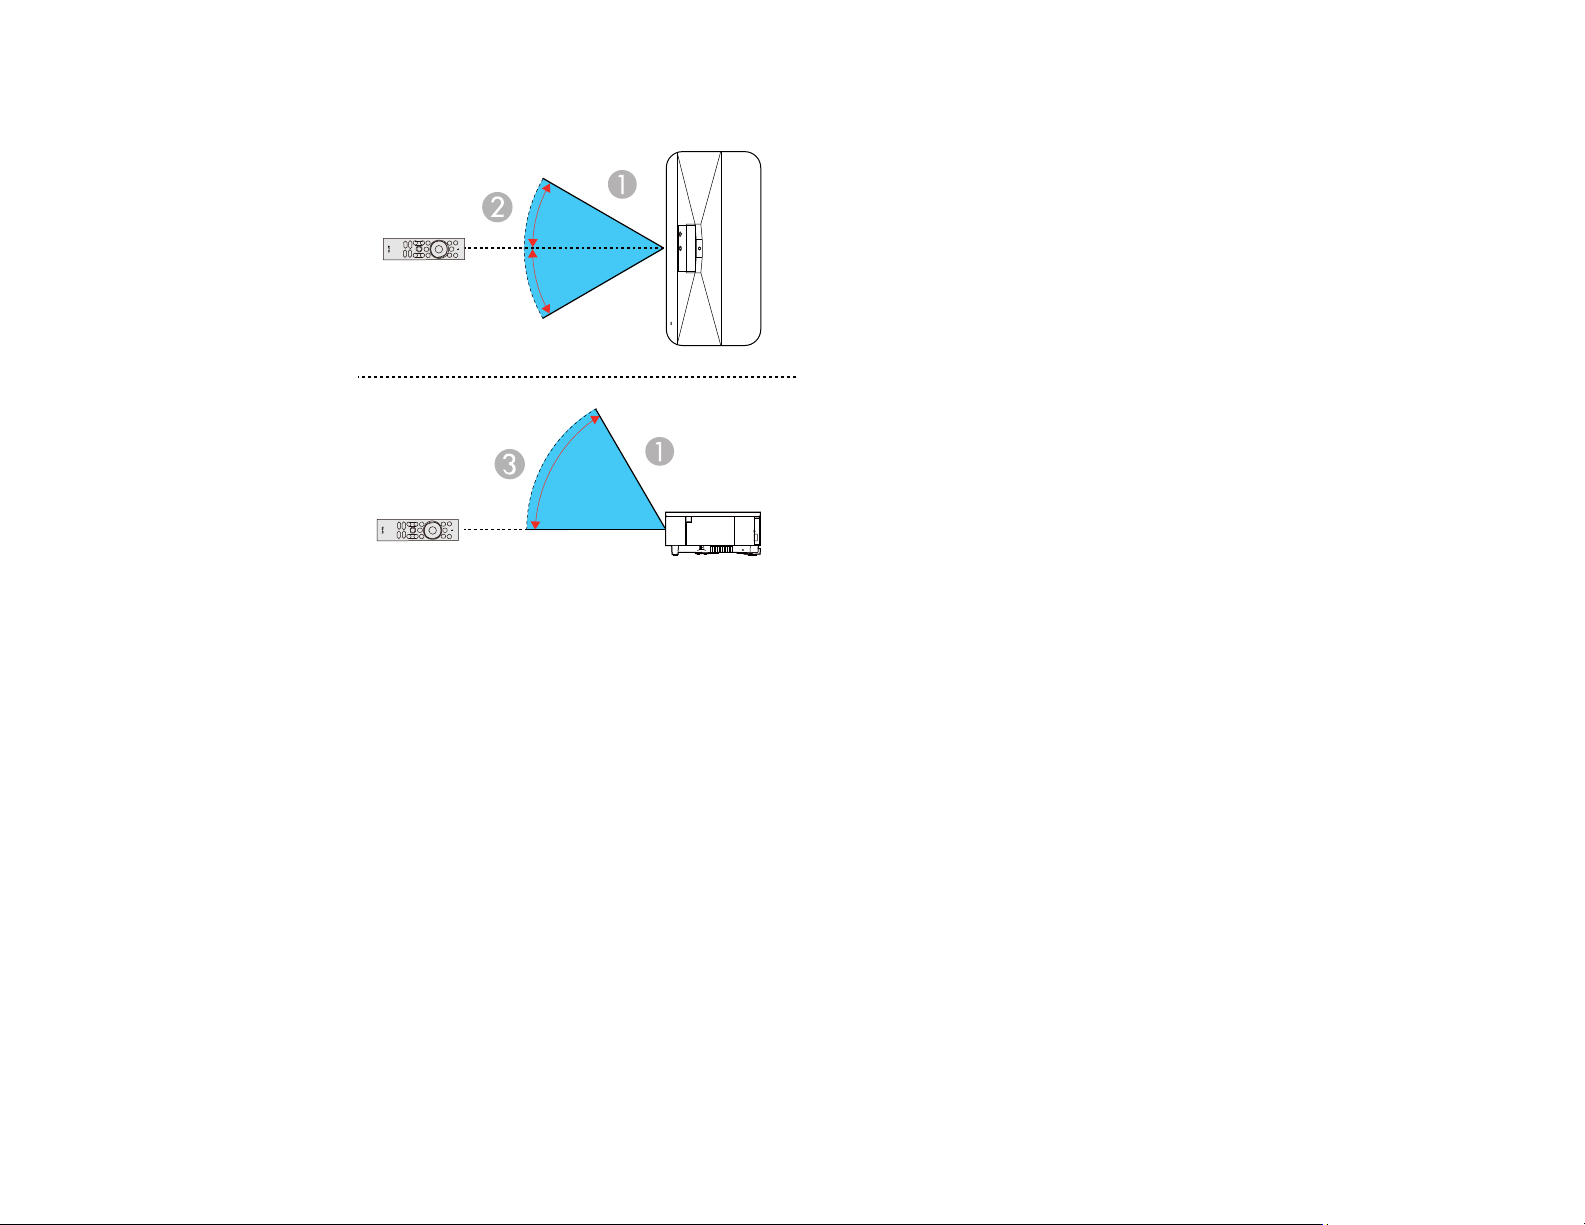
Make sure that you aim the remote control at the projector's receiver within the angles listed here.
1 19.7 feet (6 m)
2 ± 30°
3 60°
Note: Avoid using the remote control in conditions with bright fluorescent lights or in direct sunlight, or
the projector may not respond to commands. If you will not use the remote control for a long time,
remove the batteries.
Parent topic: Using Basic Projector Features
Using Voice Commands to Control Your Projector
You can use your remote control or linked Google Home device to control your projector using voice
commands.
Note: Make sure the remote control is paired to the projector.
56
Page 57

1. To use voice commands with your projector using your remote, press and release the mic button,
then say the command you want to perform.
You can use voice commands to search for actors or shows, open installed apps, and control media
playback.
2. To use a Google Home device to send voice commands to your projector, link the device with your
projector using the Google Home app. You may also need to link streaming apps to your Google
account. For detailed instructions, go to your device's support page.
Parent topic: Using Basic Projector Features
Related tasks
Pairing the Remote Control
Pairing the Remote Control
To use Android TV and video-on-demand features, you must pair the remote control to the projector.
Note: When you first turn on the projector, instructions for pairing the remote control are displayed on
the screen. Make sure to point the front of the remote at the front of the projector when attempting to pair
the remote.
1. Turn on the projector.
2. When the pairing screen is displayed, press and hold the home and Enter buttons on the remote
control until the indicator starts blinking.
A message appears on the screen and the indicator stops blinking when the remote control is
paired.
Parent topic: Using Basic Projector Features
Selecting an Image Source
If you connected multiple image sources to the projector, such as a computer and DVD player, you may
want to switch from one image source to the other.
1. Make sure the connected image source you want to use is turned on.
2. For video image sources, insert a DVD or other video media and press its play button, if necessary.
3. Do one of the following:
• Press the Source Search button on the remote control to select either the HDMI1 or HDMI2
(ARC) image source. Use the directional pad to select the image source and press Enter.
57
Page 58

• Press the gaming mode button on the remote control to select the HDMI3 (Game) image
source.
Note: When the input source is HDMI3 (Game), some buttons on the remote control are not
available.
• Press the home button on the remote control to switch the image source to the Android TV
home screen.
Note: If no image signal is detected, check the cable connections between the projector and the
image source.
Parent topic: Using Basic Projector Features
Related references
Projector Parts - Remote Control
Using Your Projector as a Chromecast
Your projector has Chromecast built-in, allowing you to cast content from Chromecast-enabled apps.
1. Connect your device or computer to the same wireless network as the projector.
2. Open the Chromecast-enabled app and press the Cast button.
3. Select your projector from the list of devices.
Note: By default, the name of the projector is Projector. To select another name or use a custom
name, press the Android TV settings button on the remote control and select Device Preferences
> About > Device name.
The app connects and starts casting to the projector.
4. To stop casting, press the Cast button in the app and choose the disconnect option.
Parent topic: Using Basic Projector Features
Related tasks
Setting Up Android TV
58
Page 59

Projection Modes
Depending on how you positioned the projector, you may need to change the projection mode so your
images project correctly.
• Front (default setting) lets you project from a table in front of the screen.
• Front/Upside Down flips the image over top-to-bottom to project upside-down from a wall or ceiling
mount.
• Rear flips the image horizontally to project from behind a translucent screen.
• Rear/Upside Down flips the image over top-to-bottom and horizontally to project from the wall or
ceiling and behind a translucent screen.
You can change the projection mode using the remote control or by changing the Projection setting in
the Settings menu.
Changing the Projection Mode Using the Menus
Parent topic: Using Basic Projector Features
Changing the Projection Mode Using the Menus
You can change the projection mode to flip the image over top-to-bottom and/or left-to-right using the
projector menus.
1. Turn on the projector and display an image.
2. Press the settings button on the remote control.
59
Page 60

3. Select the Settings menu and press Enter.
4. Select the Projection setting and press Enter.
5. Select a projection mode and press Enter.
6. Press the esc button to exit the menus.
Parent topic: Projection Modes
Image Aspect Ratio
The projector can display images in different width-to-height ratios called aspect ratios. Normally the
input signal from your video source determines the image's aspect ratio setting. However, for certain
images you can change the aspect ratio to fit your screen.
If you always want to use a particular aspect ratio for a certain video input source, you can select it using
the projector's menus.
Changing the Image Aspect Ratio
Available Image Aspect Ratios
Parent topic: Using Basic Projector Features
60
Page 61

Changing the Image Aspect Ratio
You can change the aspect ratio of the displayed image to resize it.
1. Turn on the projector and switch to the image source you want to use.
2. Press the Settings button on the remote control.
Note: This button is not available when the input source is HDMI3 (Game). Press the home button
on the remote control to return to the Android TV home screen first, and then perform the procedure.
3. Select the Picture menu and press Enter.
4. Select Aspect Ratio and press Enter.
5. Select the aspect ratio setting you want to use for your input signal and press Enter.
6. Press the esc button to exit the menus.
Parent topic: Image Aspect Ratio
61
Page 62
Related references
Image Quality Settings - Picture Menu
Available Image Aspect Ratios
You can select the following image aspect ratio settings, depending on the input signal from your image
source.
Note: You may see a light shadow around the screen or projected image. This is normal.
Note: Using the aspect ratio function to reduce, enlarge, or split the projected image for commercial
purposes or for public viewing may infringe upon the rights of the copyright holder of that image based
on copyright law.
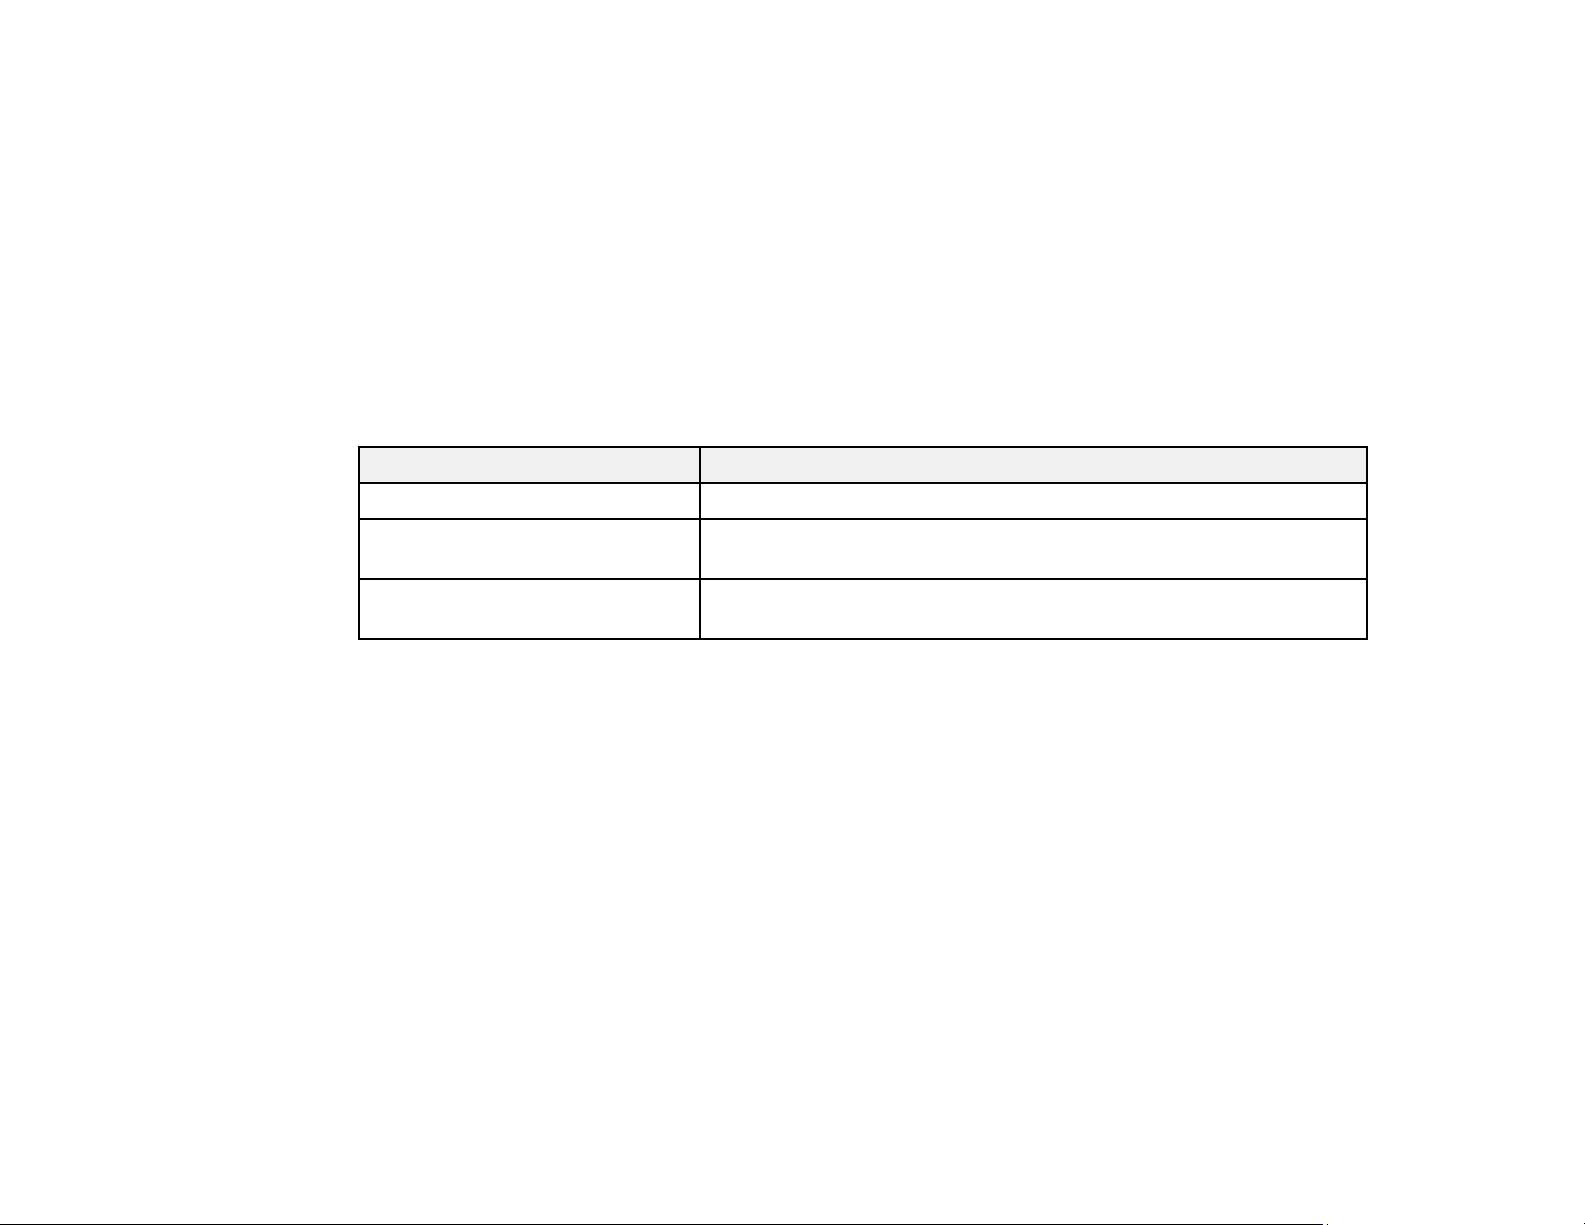
Aspect ratio setting Description
Normal Automatically sets the aspect ratio according to the input signal.
Zoom Displays images using the full width of the projection area and
Full Displays images using the full width of the projection area, but does
Parent topic: Image Aspect Ratio
maintains the aspect ratio of the image.
not maintain the aspect ratio.
Color Mode
The projector offers different Color Modes to provide optimum brightness, contrast, and color for a
variety of viewing environments and image types. You can select a mode designed to match your image
and environment, or experiment with the available modes.
Changing the Color Mode
Available Color Modes
Turning On Automatic Luminance Adjustment
Parent topic: Using Basic Projector Features
Changing the Color Mode
You can change the projector's Color Mode to optimize the image for your viewing environment.
1. Turn on the projector and switch to the image source you want to use.
62
Page 63
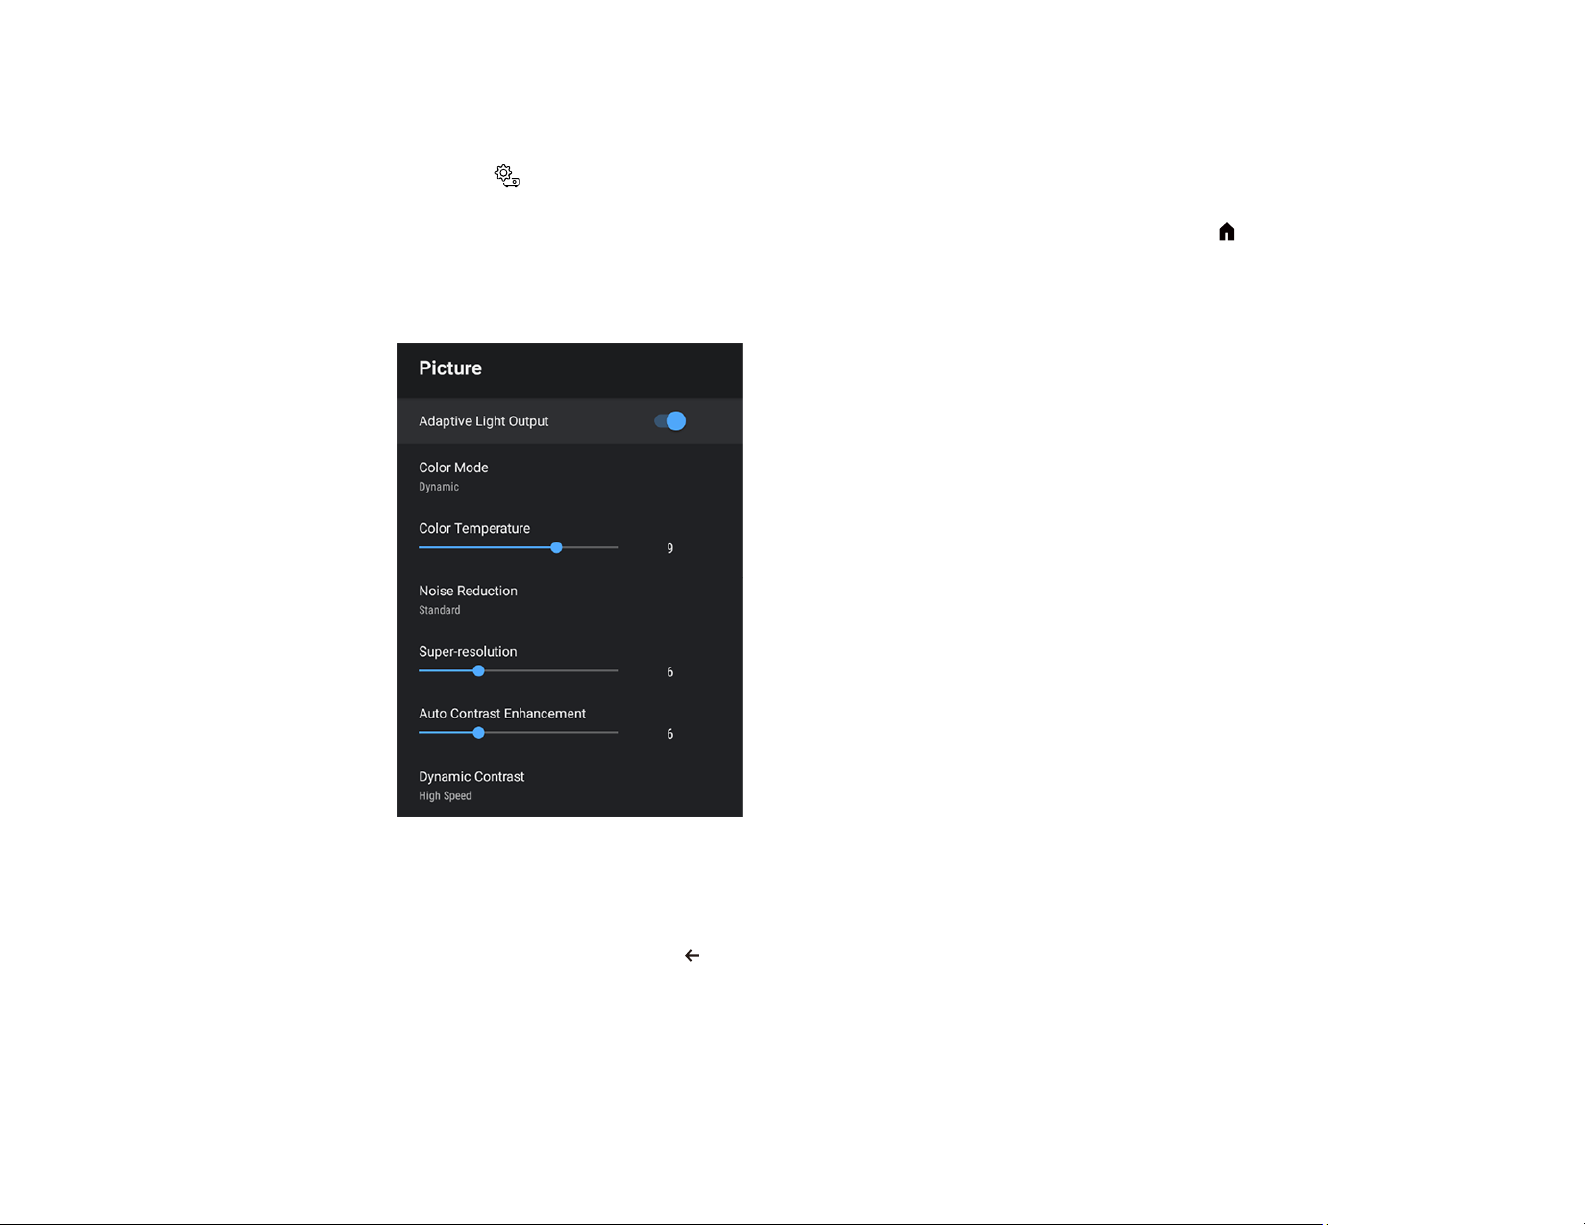
2. If you are projecting from a DVD player or other video source, insert a disc or other video media and
press the play button, if necessary.
3. Press the Settings button on the remote control.
Note: This button is not available when the input source is HDMI3 (Game). Press the home button
on the remote control to return to the Android TV home screen first, and then perform the procedure.
4. Select the Picture menu and press Enter.
5. Select Color Mode and press Enter.
6. Use the directional pad to select a color mode setting and press Enter.
7. When you are finished, press esc.
Parent topic: Color Mode
Related references
Image Quality Settings - Picture Menu
63
Page 64
Available Color Modes
You can set the projector to use these Color Modes, depending on the input source you are using:
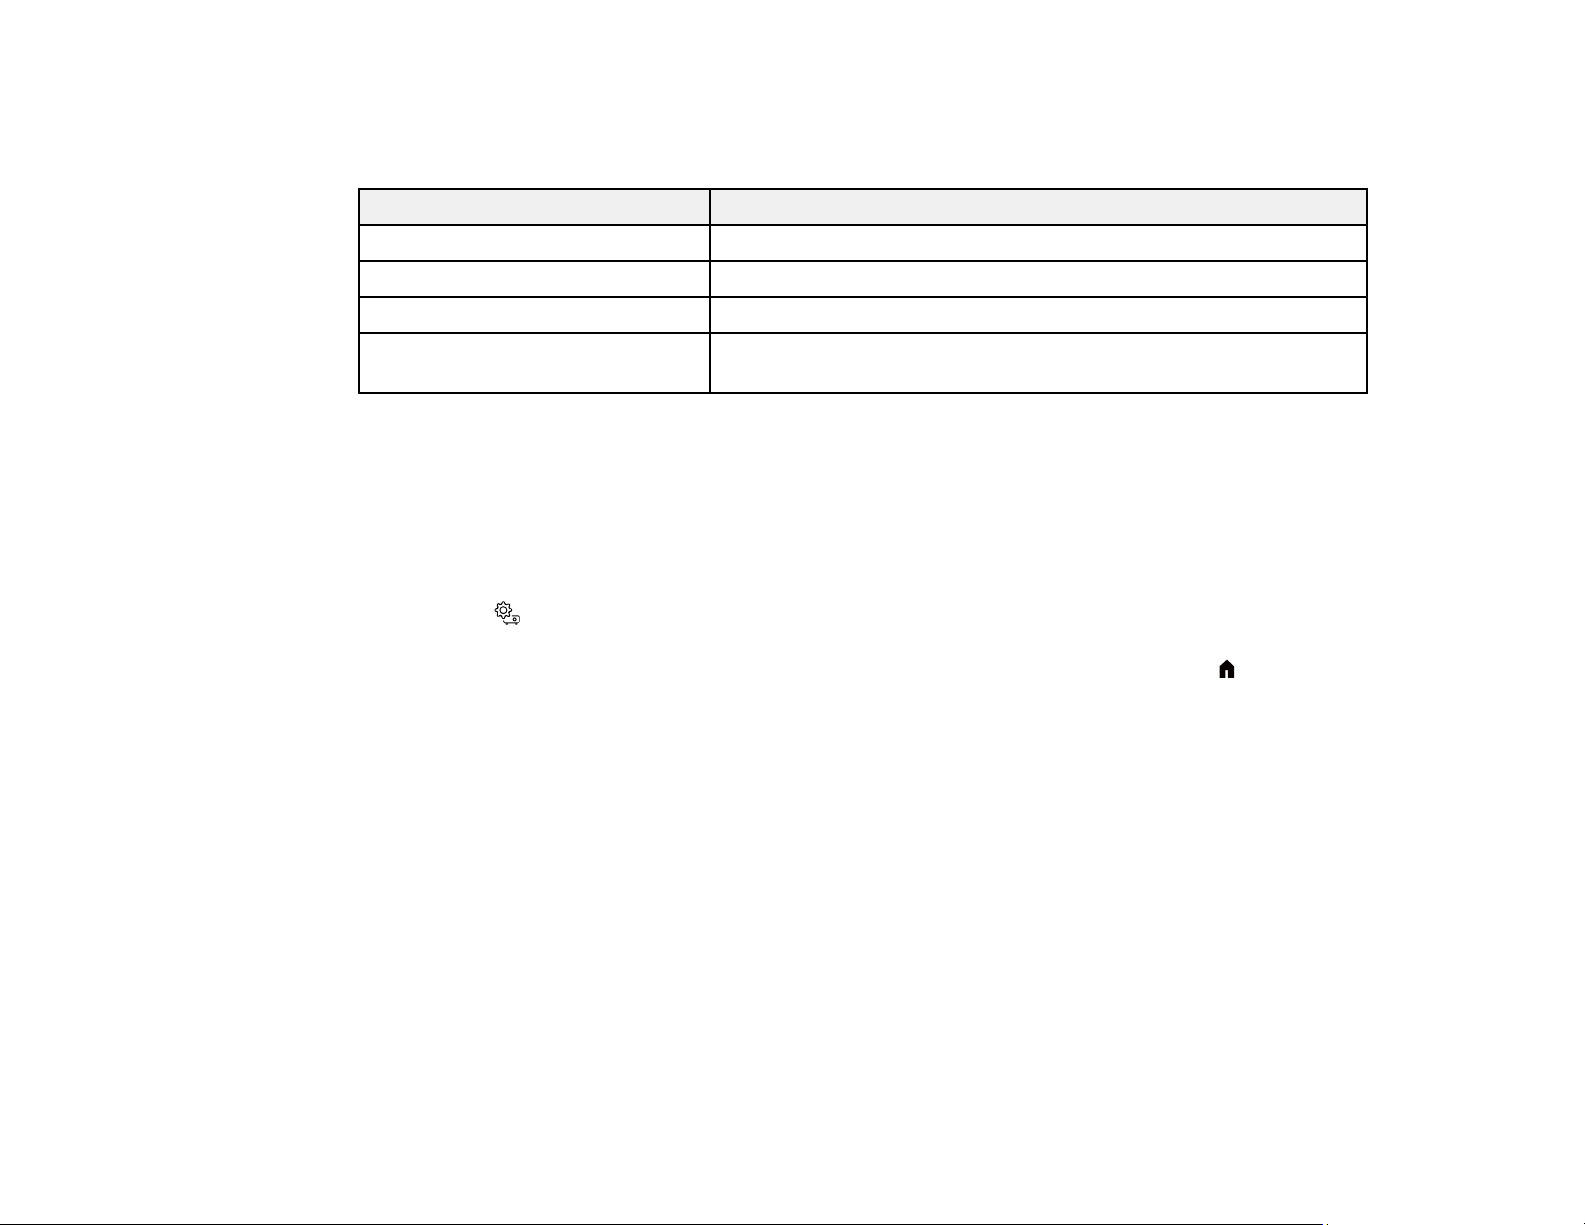
Color Mode Description
Dynamic Best for optimizing brightness
Vivid Best for enjoying content in a bright environment
Cinema Best for movies projected in a dark room with natural tone images
Natural Best for projecting the image as-is (choose this mode when
making color adjustments)
Parent topic: Color Mode
Turning On Automatic Luminance Adjustment
You can turn on the Dynamic Contrast setting to automatically optimize the image luminance. This
improves the image contrast based on the brightness of the content you project.
1. Turn on the projector and switch to the image source you want to use.
2. Press the Settings button on the remote control.
Note: This button is not available when the input source is HDMI3 (Game). Press the home button
on the remote control to return to the Android TV home screen first, and then perform the procedure.
64
Page 65
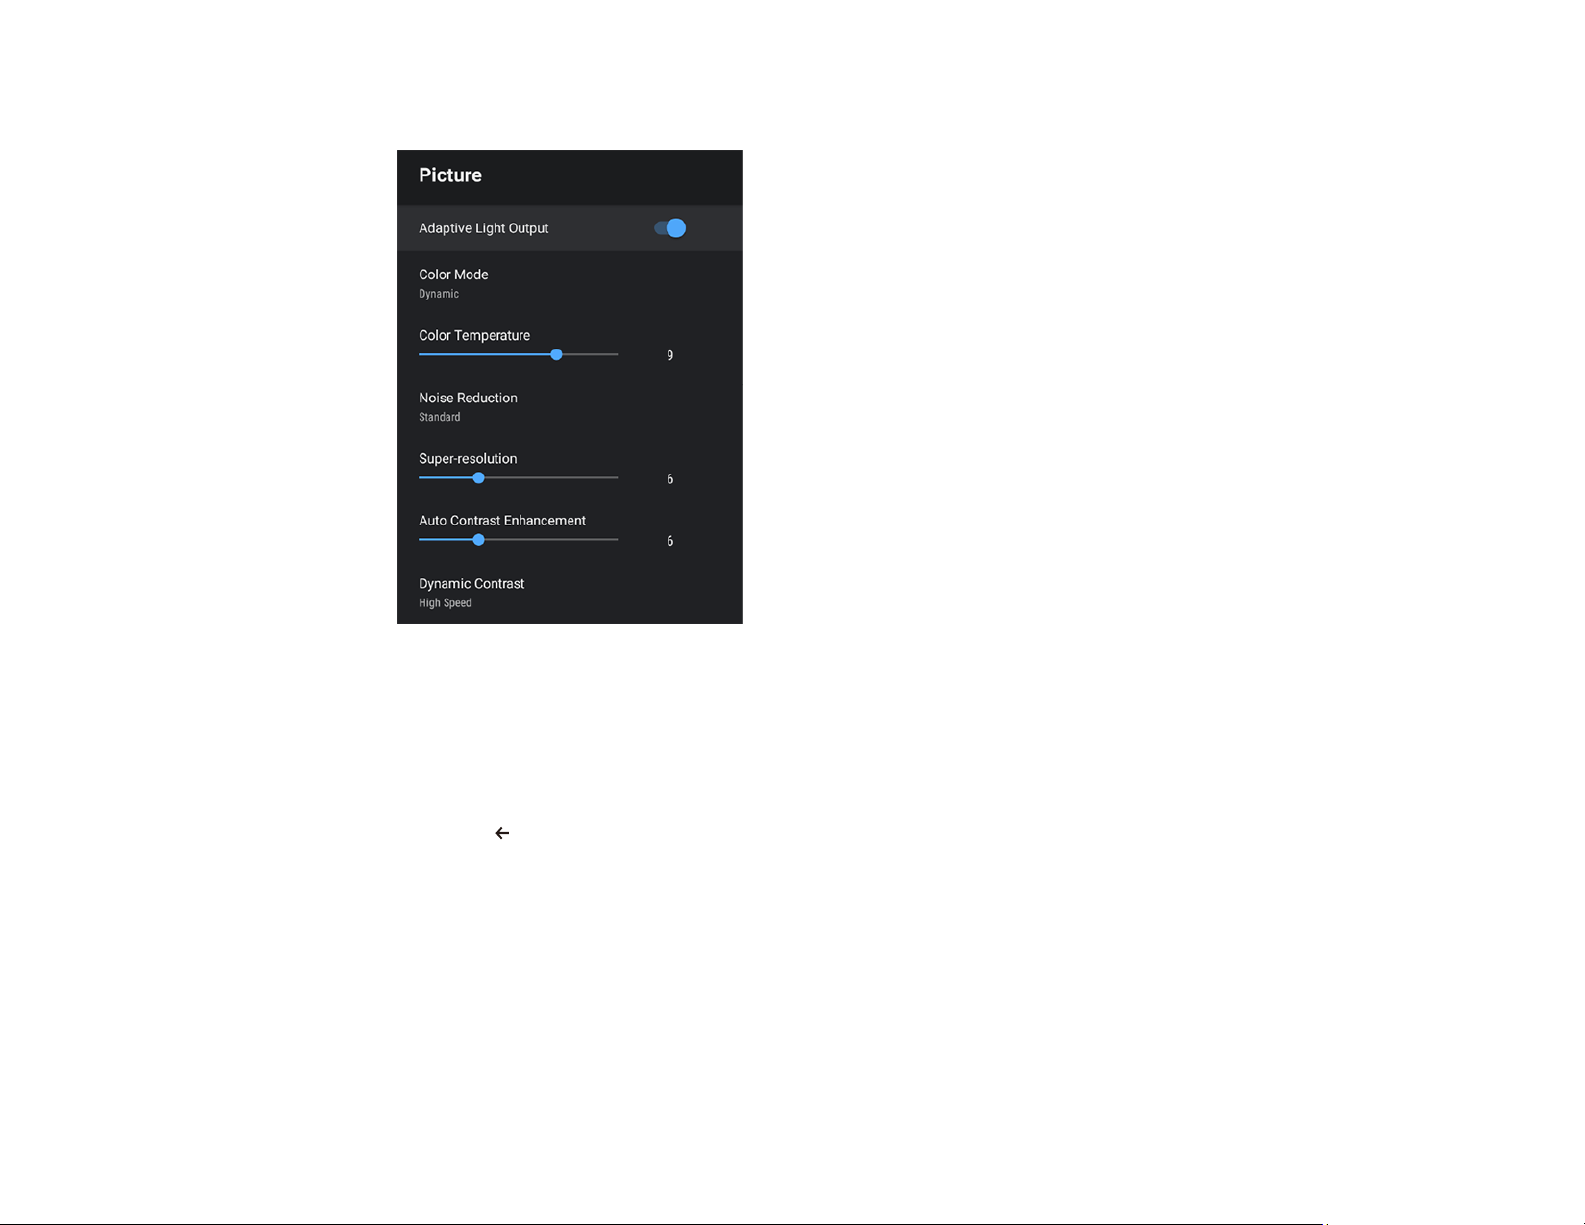
3. Select the Picture menu and press Enter.
4. Select the Dynamic Contrast setting and press Enter.
5. Select one of the following options and press Enter.
• Normal to adjust brightness at the standard speed.
• High Speed to adjust brightness as soon as the scene changes.
6. Press the esc button to exit the menus.
Parent topic: Color Mode
Related references
Image Quality Settings - Picture Menu
Adjusting Image Quality in Detail
You can fine-tune various aspects of how quality and colors are displayed in your projected images.
65
Page 66
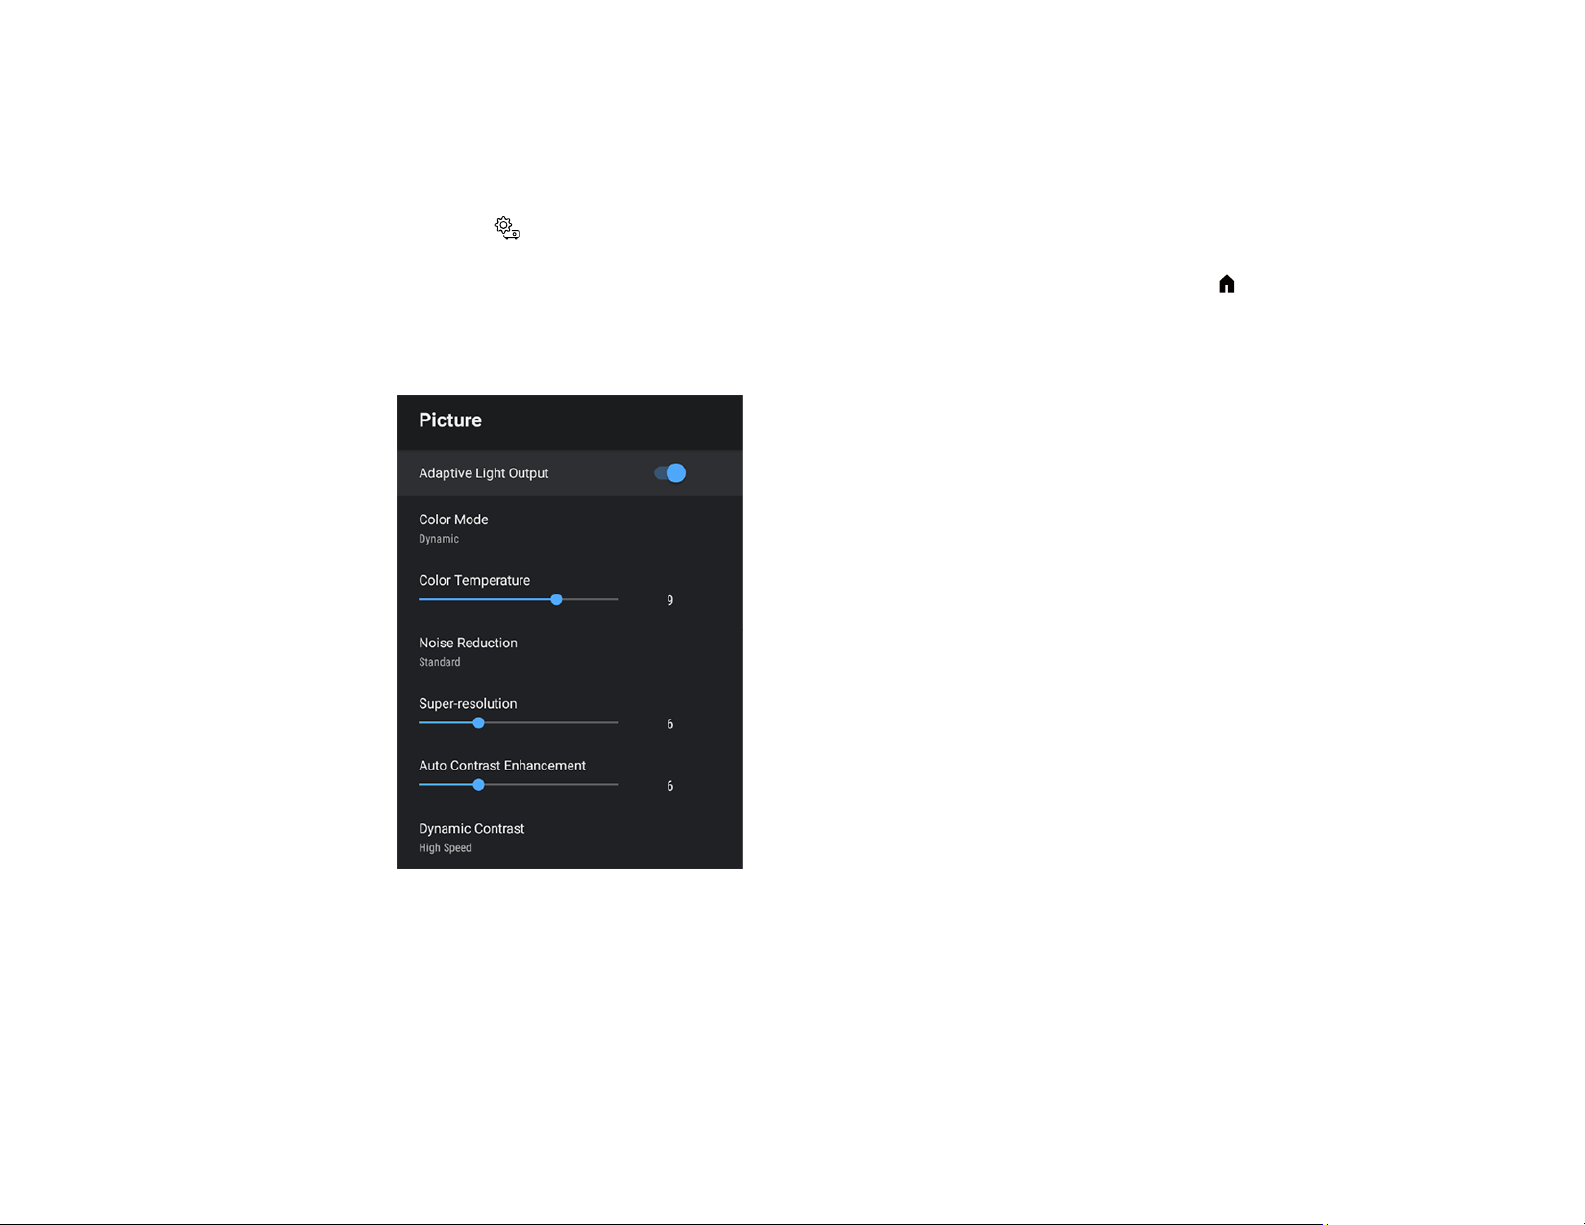
Note: To optimize the color tone according to the scene and to make the image more vivid, correct the
image by adjusting Scene Adaptive Gamma.
1. Turn on the projector and display an image.
2. Press the settings button on the remote control.
Note: This button is not available when the input source is HDMI3 (Game). Press the home button
on the remote control to return to the Android TV home screen first, and then perform the procedure.
3. Select the Picture menu and press the Enter button.
4. Select Custom Settings and press the Enter button.
5. Adjust each setting in the projector's Picture menu, as necessary:
• Adjust the Brightness setting to lighten or darken the color.
• Adjust the Contrast setting to adjust the difference between light and dark areas of the image.
• Adjust the Saturation setting to adjust the overall vividness of the colors.
66
Page 67

• Adjust the Tint setting to adjust the balance of green to magenta tones in the image.
• Adjust the Sharpness setting to adjust the outline of the image.
6. When you are finished, press the esc button to exit the menus.
Note: You can set the overall color tone by adjusting the Color Temperature setting in the Picture
menu if the image is tinted too blue or red.
Parent topic: Using Basic Projector Features
Adjusting the Image Resolution
You can adjust the image resolution to project a clear image with an emphatic texture and material feel.
1. Turn on the projector and switch to the image source you want to use.
2. Press the settings button on the remote control.
Note: This button is not available when the input source is HDMI3 (Game). Press the home button
on the remote control to return to the Android TV home screen first, and then perform the procedure.
67
Page 68
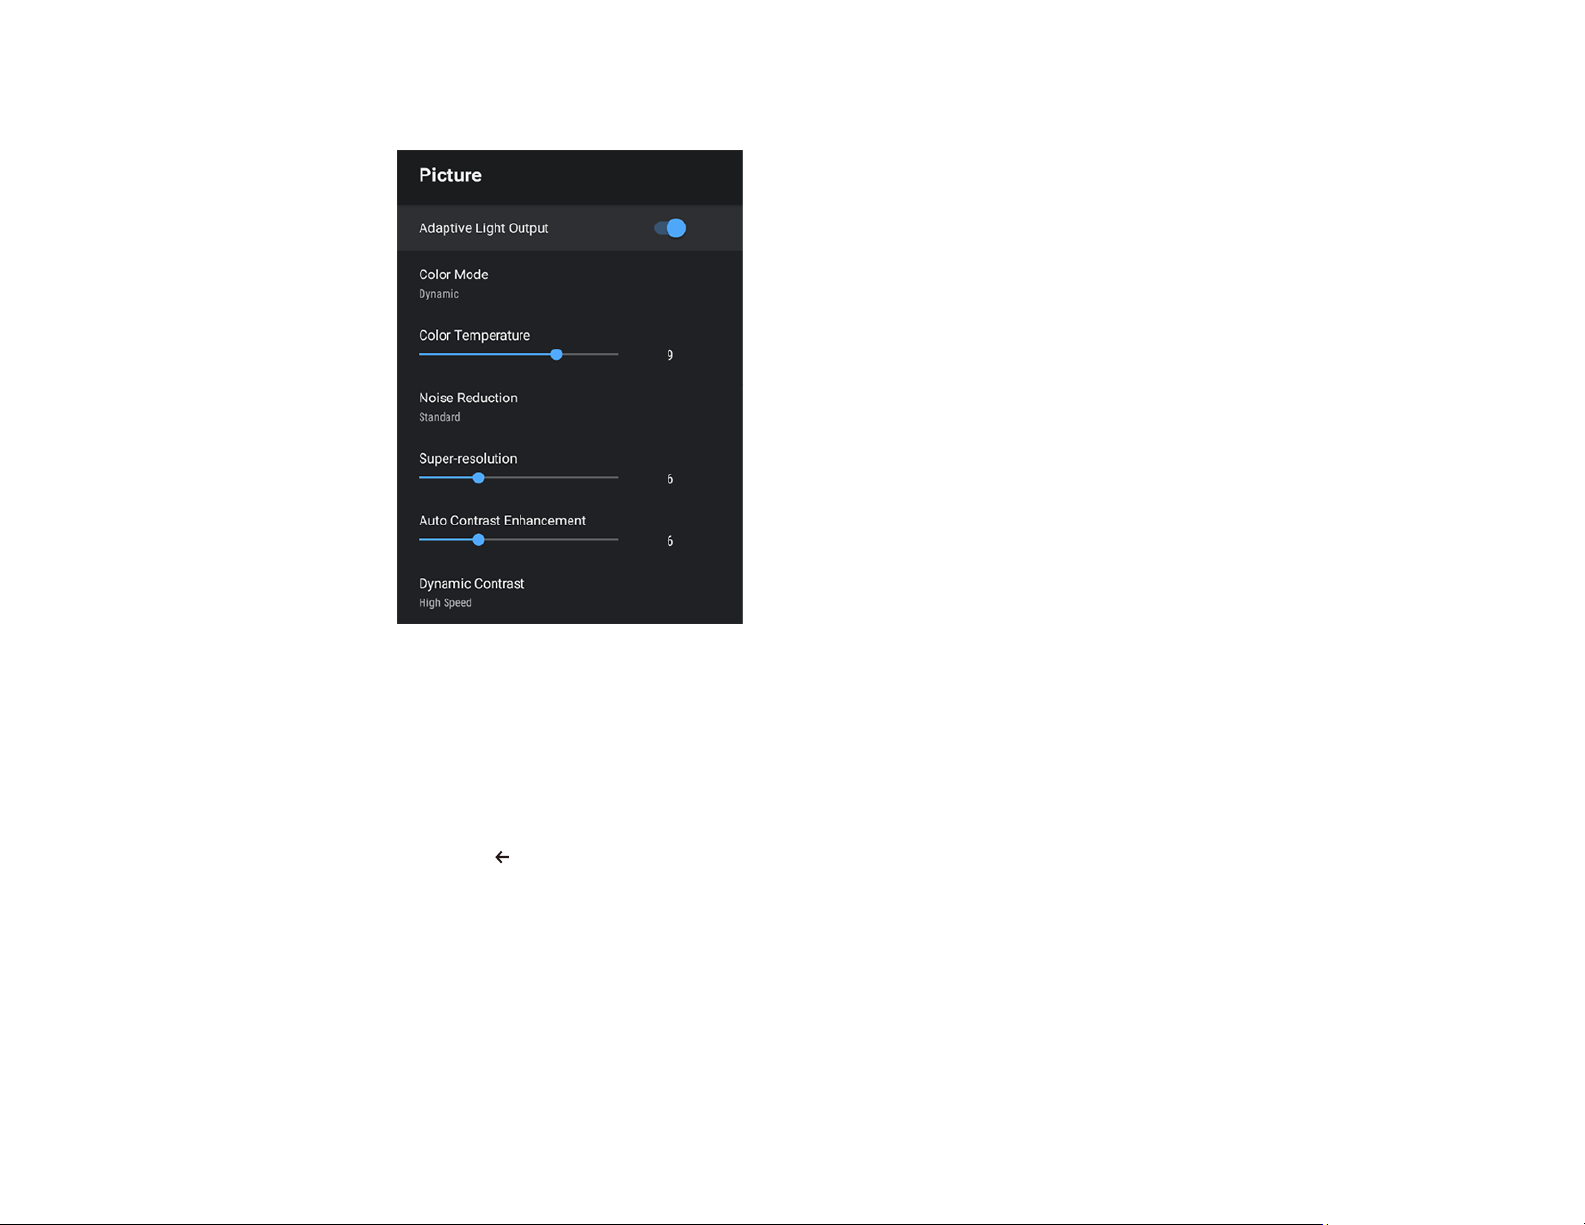
3. Select the Picture menu and press the Enter button.
4. Adjust each setting in the projector's Picture menu individually as necessary.
• Adjust the Noise Reduction setting to reduce flickering in images.
• Adjust the Super-resolution setting to reduce blurring when projecting low-resolution images.
• Adjust the Auto Contrast Enhancement setting to create a clearer and sharper image by
automatically adjusting the contrast.
5. Press the esc button on the remote control to exit the menus.
Parent topic: Using Basic Projector Features
68
Page 69
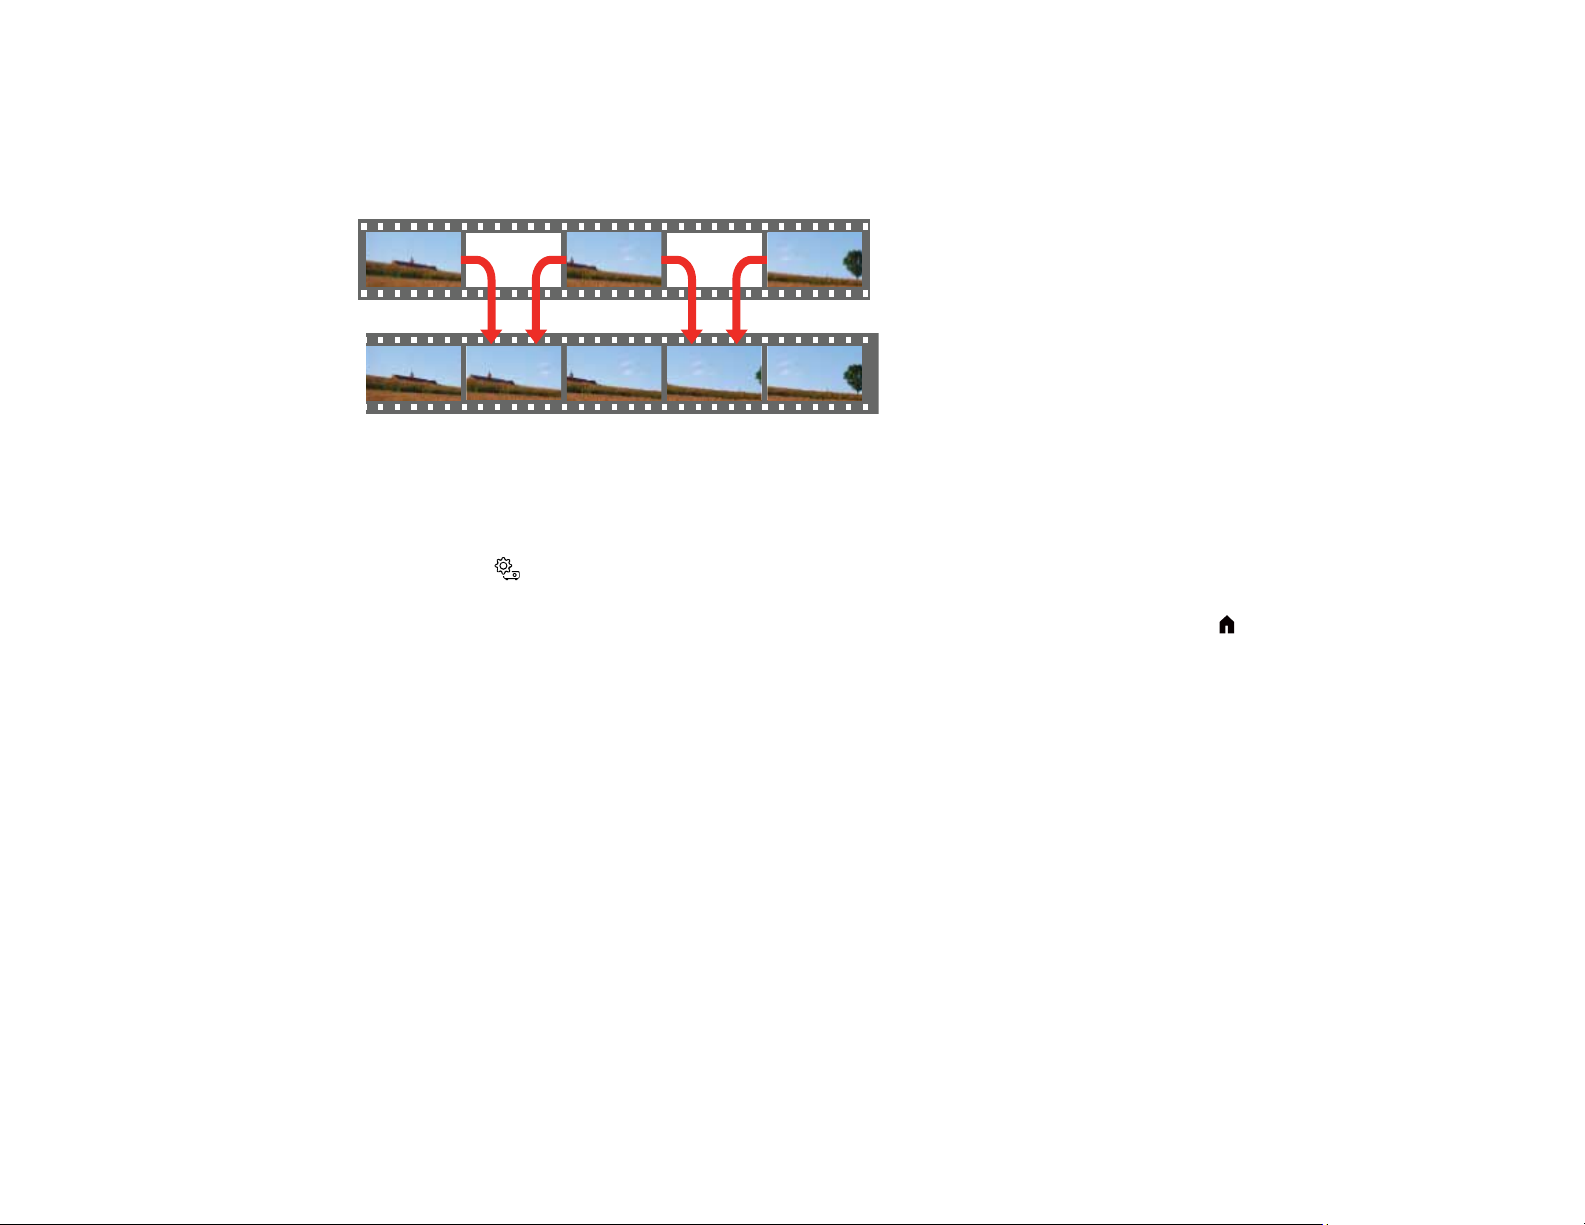
Using Frame Interpolation
You can use the projector's Frame Interpolation feature to smooth fast-moving video by comparing
consecutive image frames and inserting an intermediate image frame between them.
Note: This feature is not available for the HDMI3 (Game) input source.
1. Turn on the projector and switch to the input source you want to use.
2. Press the settings button on the remote control.
Note: This button is not available when the input source is HDMI3 (Game). Press the home button
on the remote control to return to the Android TV home screen first, and then perform the procedure.
69
Page 70
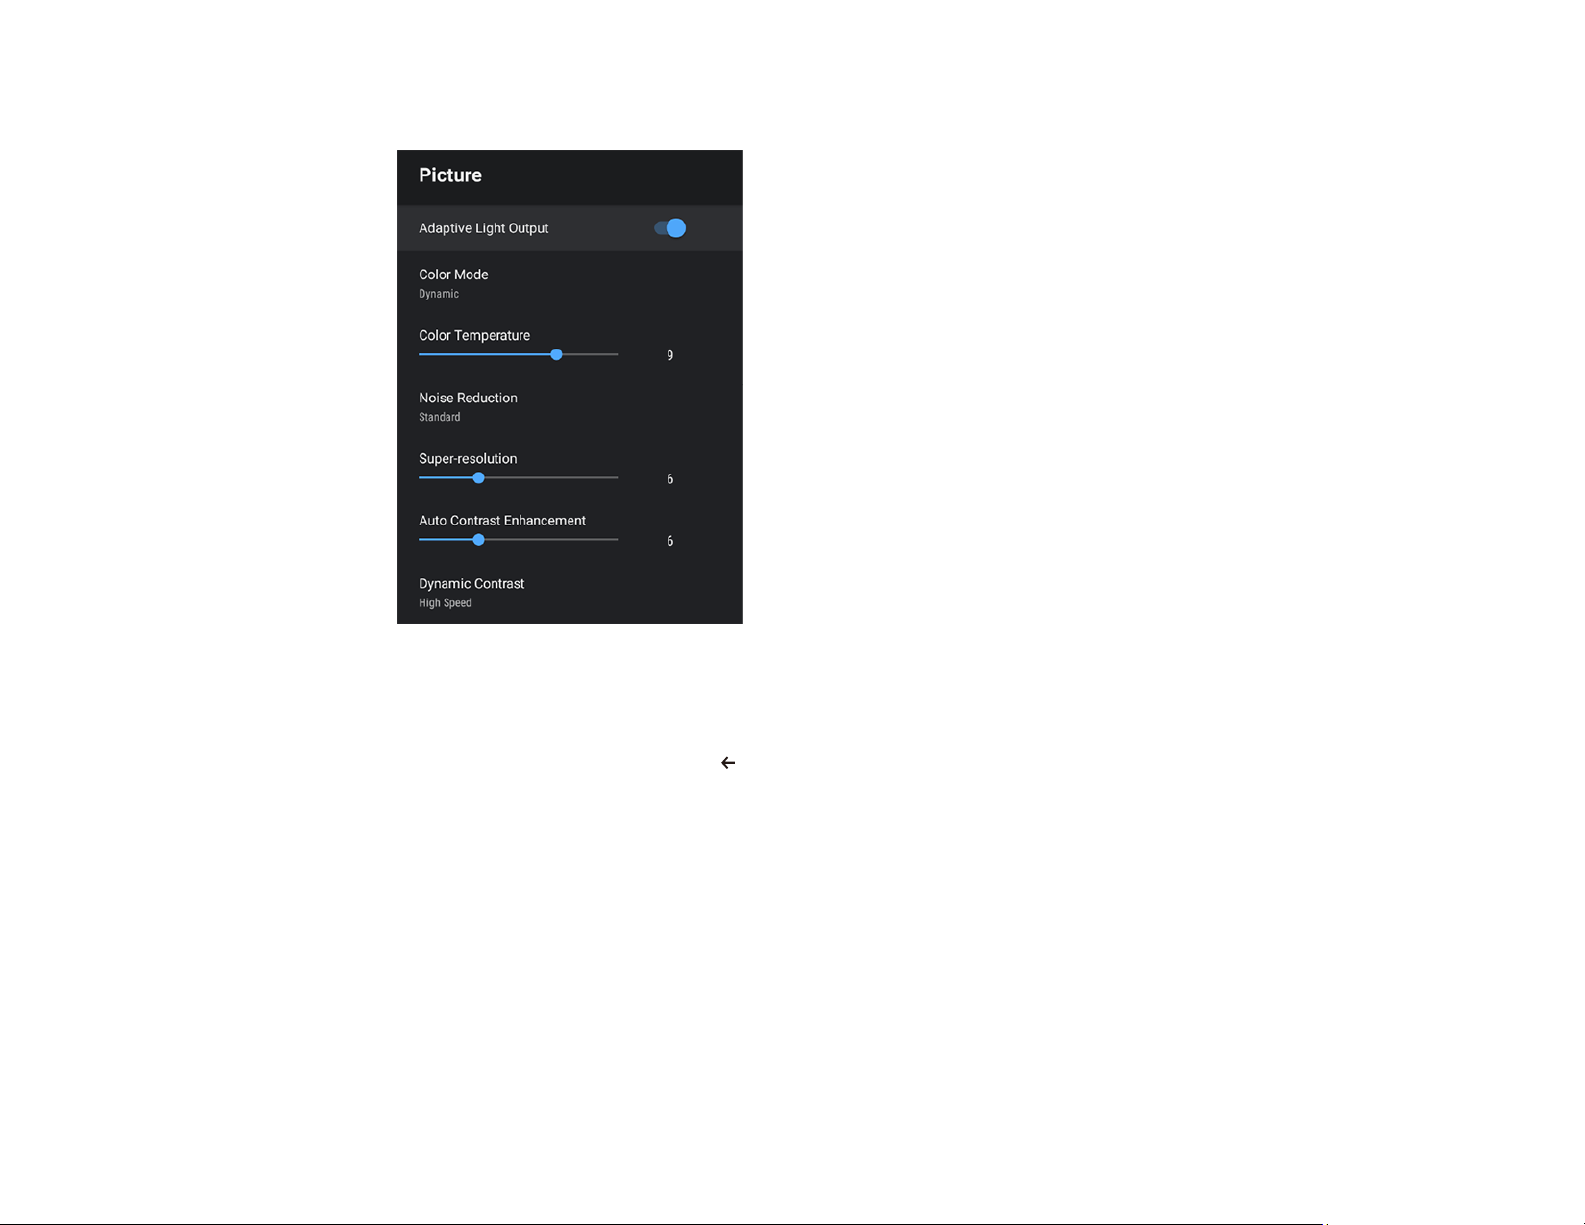
3. Select the Picture menu and press Enter.
4. Select the Frame Interpolation setting and press Enter.
5. Select the level of interpolation and press Enter.
6. When you are finished, press the esc button to exit the menus.
Parent topic: Using Basic Projector Features
Controlling the Volume with the Volume Buttons
You can use the Volume buttons on the remote control to adjust the volume of your projected content.
The volume buttons control the projector's internal speaker system or any compatible external speakers
or headphones you connected to the projector, except those connected to the Optical Out port. You can
also control the volume for Bluetooth audio devices connected to the projector.
You must adjust the volume separately for each connected input source.
70
Page 71

Warning: Do not start playback at a high volume. Sudden loud noises may cause hearing loss. Always
lower the volume before turning off the projector. Gradually increase the volume after turning the
projector on.
Note: For HDMI Link, you must use an HDMI cable that supports the CEC standard and the connected
device must also be configured. Some connected devices or functions of those devices may not operate
properly even though they meet the HDMI CEC standard. See the documentation supplied with the
device for more information.
1. Turn on the projector and start a presentation that includes audio.
2. To lower or raise the volume, press the volume buttons on the projector's remote control.
3. To lower or raise the volume, press the volume buttons on the projector's remote control.
Parent topic: Using Basic Projector Features
Related tasks
Operating Connected Devices Using the HDMI Link Features
Changing the Sound Mode
You can change the projector's sound mode to provide optimal sound for a variety of image types. These
settings are only available for sound that is output from the projector's speakers.
1. Turn on the projector and start a video.
2. Press the settings button on the remote control.
Note: This button is not available when the input source is HDMI3 (Game). Press the home button
on the remote control to return to the Android TV home screen first, and then perform the procedure.
71
Page 72

3. Select the Sound menu and press Enter.
4. Select Sound Mode and press Enter.
5. Select a sound mode and press Enter.
6. Select any additional sound settings according to your listening environment.
7. Press the esc button to exit the menus.
Parent topic: Using Basic Projector Features
72
Page 73

Adjusting Projector Features
Follow the instructions in these sections to use your projector's feature adjustments.
Using the Projector as a Bluetooth Speaker
Operating Connected Devices Using the HDMI Link Features
Adjusting the Light Source Brightness Using Adaptive Light Output
Muting the Sound Temporarily
Shutting Off the Picture Temporarily
Changing the Projected Image Using Flexible Picture
Projector Security Features
Updating the Firmware
Resetting the Projector
Using the Projector as a Bluetooth Speaker
You can use the projector's speakers to output audio from a compatible device connected by Bluetooth.
Note: Bluetooth audio devices are not supported in some countries and regions. You cannot connect
multiple audio/video devices by Bluetooth at the same time. You may not be able to connect depending
on type of device and its Bluetooth standards. Several attempts may be required before pairing is
successful. Even when connecting within the specified communication distance, connections can be lost
due to the signal status.
73
Page 74

1. Press the settings button on the remote control.
Note: This button is not available when the input source is HDMI3 (Game). Press the home button
on the remote control to return to the Android TV home screen first, and then perform the procedure.
2. Select Bluetooth Speaker Mode and press the Enter button to enable it.
3. Enable the Bluetooth function on the device you want to connect to and select Projector from the
available device list. See the documentation for the connected device for more information.
Note: You can change the name displayed for the projector. Press the Android TV settings button
on the remote control and then select Device Preferences > About > Device name. There is a
delay in the audio output from any Bluetooth audio device. If you want to temporarily turn off the
projected image, press the blank button on the projector or remote control. To cancel a Bluetooth
connection, disconnect from the connected device.
4. To exit Bluetooth Speaker mode, disable it from the projector's menu.
Note: While the projector is in Bluetooth Speaker mode, you can connect input devices such as
smartphones or tablets, but you cannot pair output devices such as headphones or external
speakers. If you are having trouble pairing speakers or headphones, make sure the Bluetooth
Speaker mode is disabled.
74
Page 75

You can also output the projector's audio to connected Bluetooth audio devices, such as speakers or
headphones. See the link below.
Parent topic: Adjusting Projector Features
Related references
Bluetooth Specifications
Related tasks
Connecting to a Bluetooth Audio Device
Operating Connected Devices Using the HDMI Link Features
You can use the remote control to control certain features of devices connected to the projector's HDMI
ports.
Note: You must use an HDMI cable that supports the CEC standard and the connected device must also
be configured. Some connected devices or functions of those devices may not operate properly even
though they meet the HDMI CEC standard. See the documentation supplied with the device for more
information.
1. Press the settings button on the remote control.
Note: This button is not available when the input source is HDMI3 (Game). Press the home button
on the remote control to return to the Android TV home screen first, and then perform the procedure.
75
Page 76
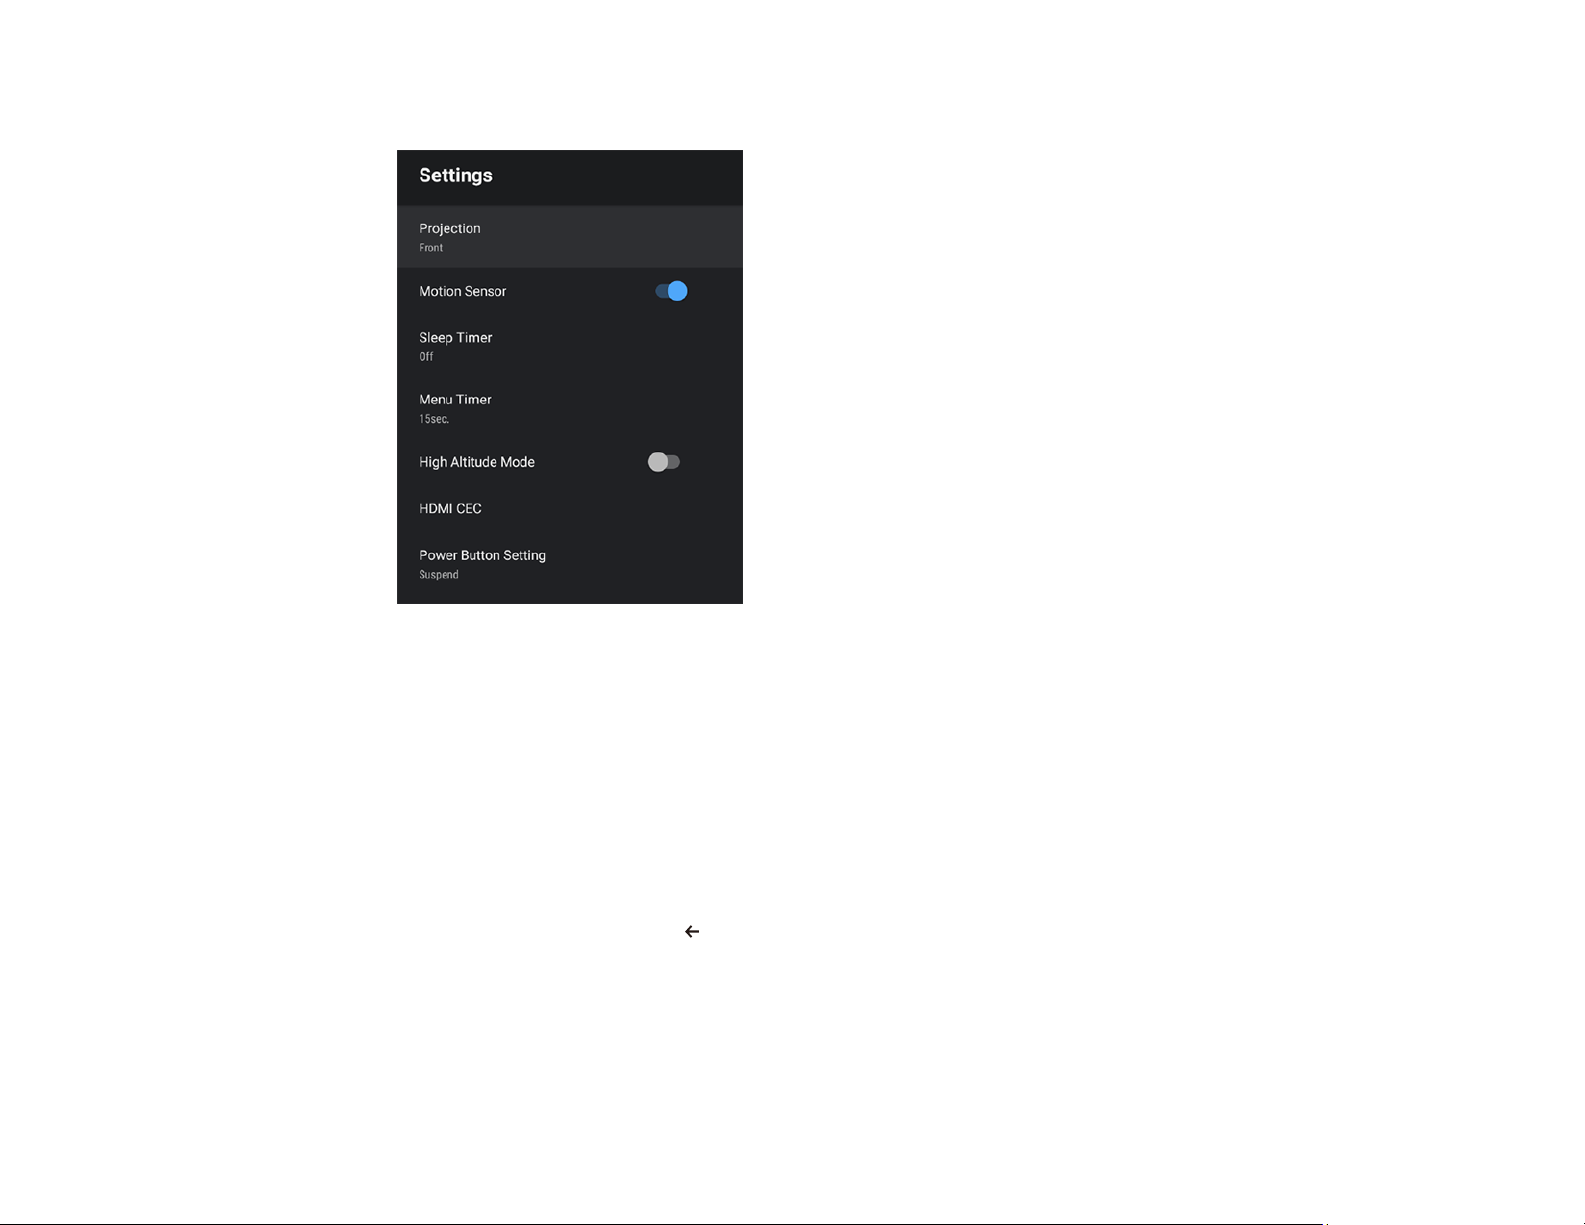
2. Select the Settings menu and press Enter.
3. Select HDMI CEC and press Enter.
4. Select the HDMI CEC setting and press Enter to enable it, if necessary.
5. Select the following HDMI Link options as necessary:
• Device Auto Power Off: select whether to automatically turn off the connected device when you
turn off the projector.
• Auto Language Change: select whether to switch the language settings of the connected device
to match the projector's language settings.
• HDMI2 ARC: select whether to output audio to an HDMI ARC compatible audio/video system.
6. When you are finished, press esc.
Parent topic: Adjusting Projector Features
Related references
Solutions to HDMI Link Problems
76
Page 77

Adjusting the Light Source Brightness Using Adaptive Light Output
You can turn on Adaptive Light Output to automatically adjust the brightness of your projector's light
source based on the brightness of the surroundings.
Note: You can also manually adjust the brightness of your projector's light source by using the
Brightness buttons on the remote control. Manually set brightness levels take priority over automatically
set levels. This setting is not an absolute value as it varies relative to the manually set brightness level.
This setting may not work properly if you use the projector in direct sunlight or with bright fluorescent
lights.
1. Turn on the projector and display an image.
2. Press the settings button on the remote control.
Note: This button is not available when the input source is HDMI3 (Game). Press the home button
on the remote control to return to the Android TV home screen first, and then perform the procedure.
3. Select the Picture menu and press Enter.
77
Page 78

4. Select Adaptive Light Output and press the Enter button to enable it.
5. When you are finished, press the esc button to exit the menus.
Parent topic: Adjusting Projector Features
Muting the Sound Temporarily
You can temporarily mute the sound from your projection.
1. Press the Mute button on the remote control to temporarily mute the audio.
The audio from the projection is interrupted.
2. To turn the audio back on, press the Mute button again.
Parent topic: Adjusting Projector Features
Shutting Off the Picture Temporarily
You can temporarily turn off the projected picture if you want to redirect your audience's attention during
a presentation. Any sound or video action continues to run, however, so you cannot resume projection at
the point that you stopped it.
1. Press the blank button on the projector or remote control to temporarily stop projection.
The light source turns off and projection is interrupted.
2. To turn the picture back on, press the blank button again.
Parent topic: Adjusting Projector Features
Changing the Projected Image Using Flexible Picture
You can use the Flexible Picture features to change the projected image without moving the projector.
1. Turn on the projector and display an image.
2. Press the Flexible Picture menu button on the remote control.
Note: This button is not available when the Installation menu is displayed.
78
Page 79
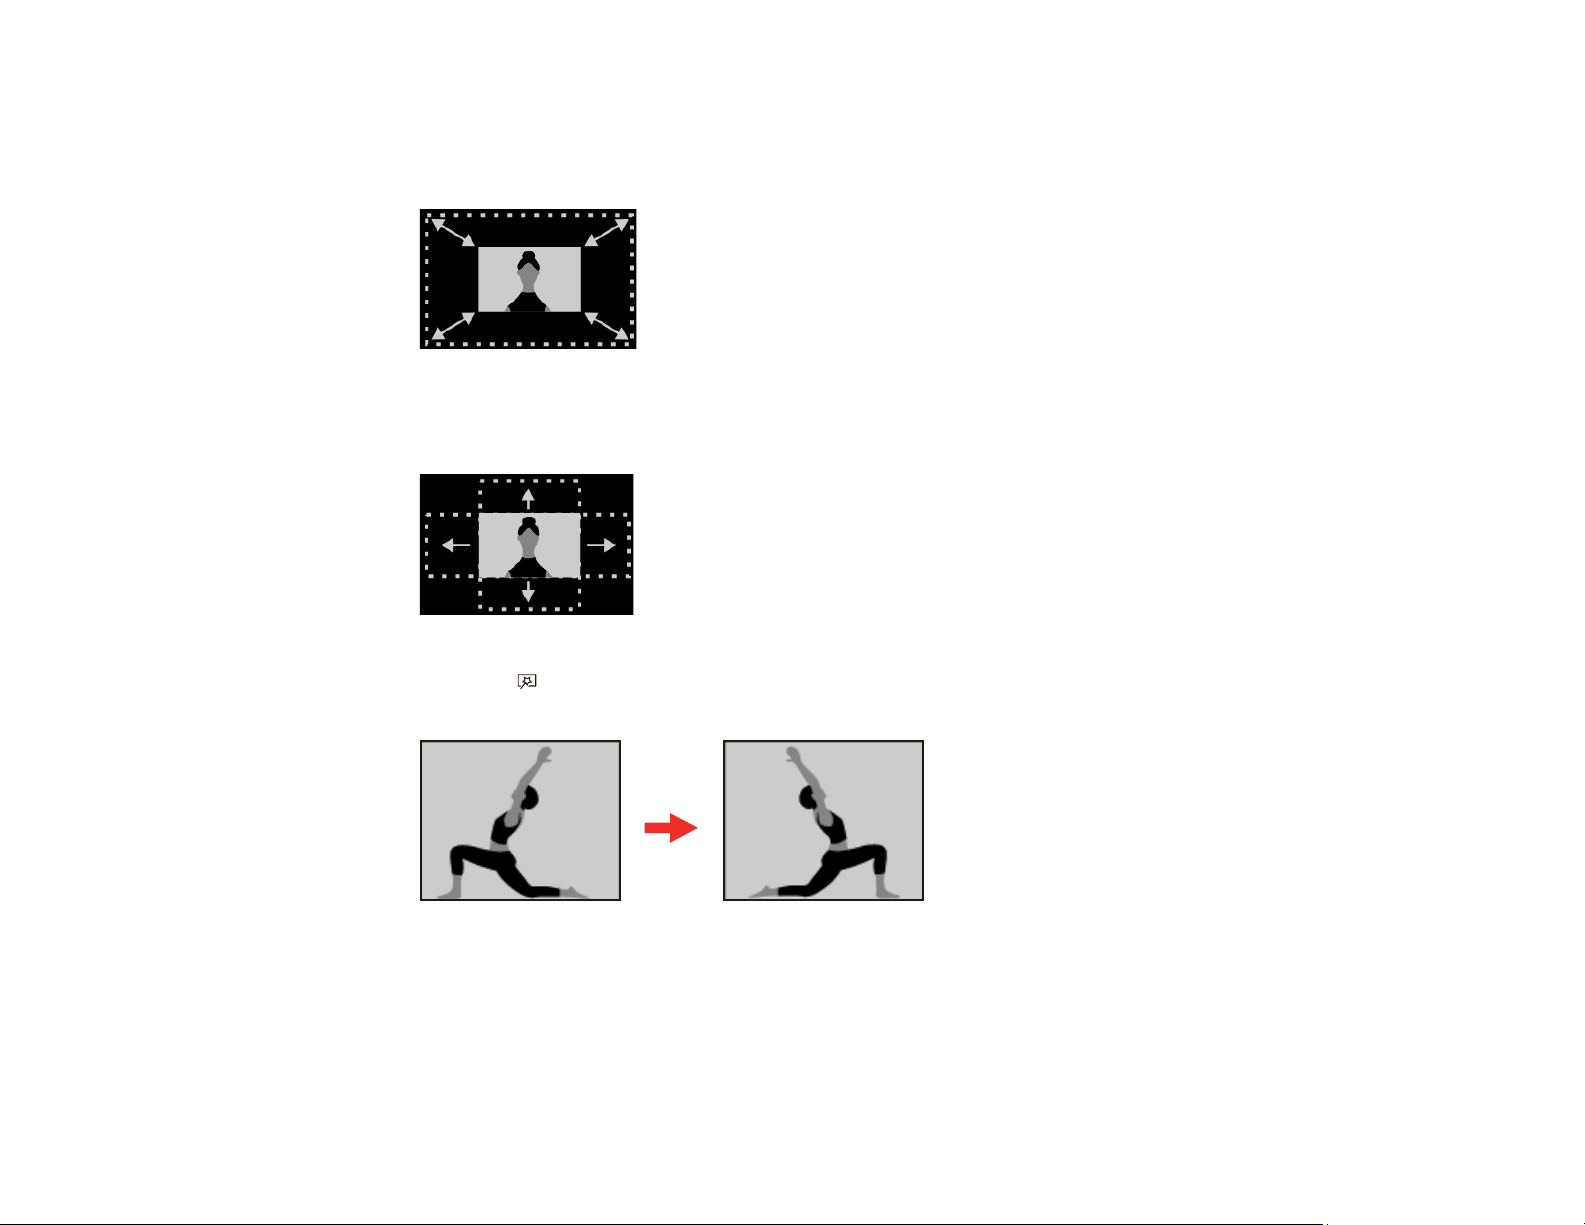
3. You can adjust the following settings:
• Use the Brightness buttons on the remote control to adjust the image size. You can reduce the
image size to about 30%.
• If you made the image smaller, use the directional pad on the remote control to change the
position of the image.
• Press the Flexible Picture menu button on the remote control to flip the image horizontally.
Press the button again to flip the image back.
79
Page 80
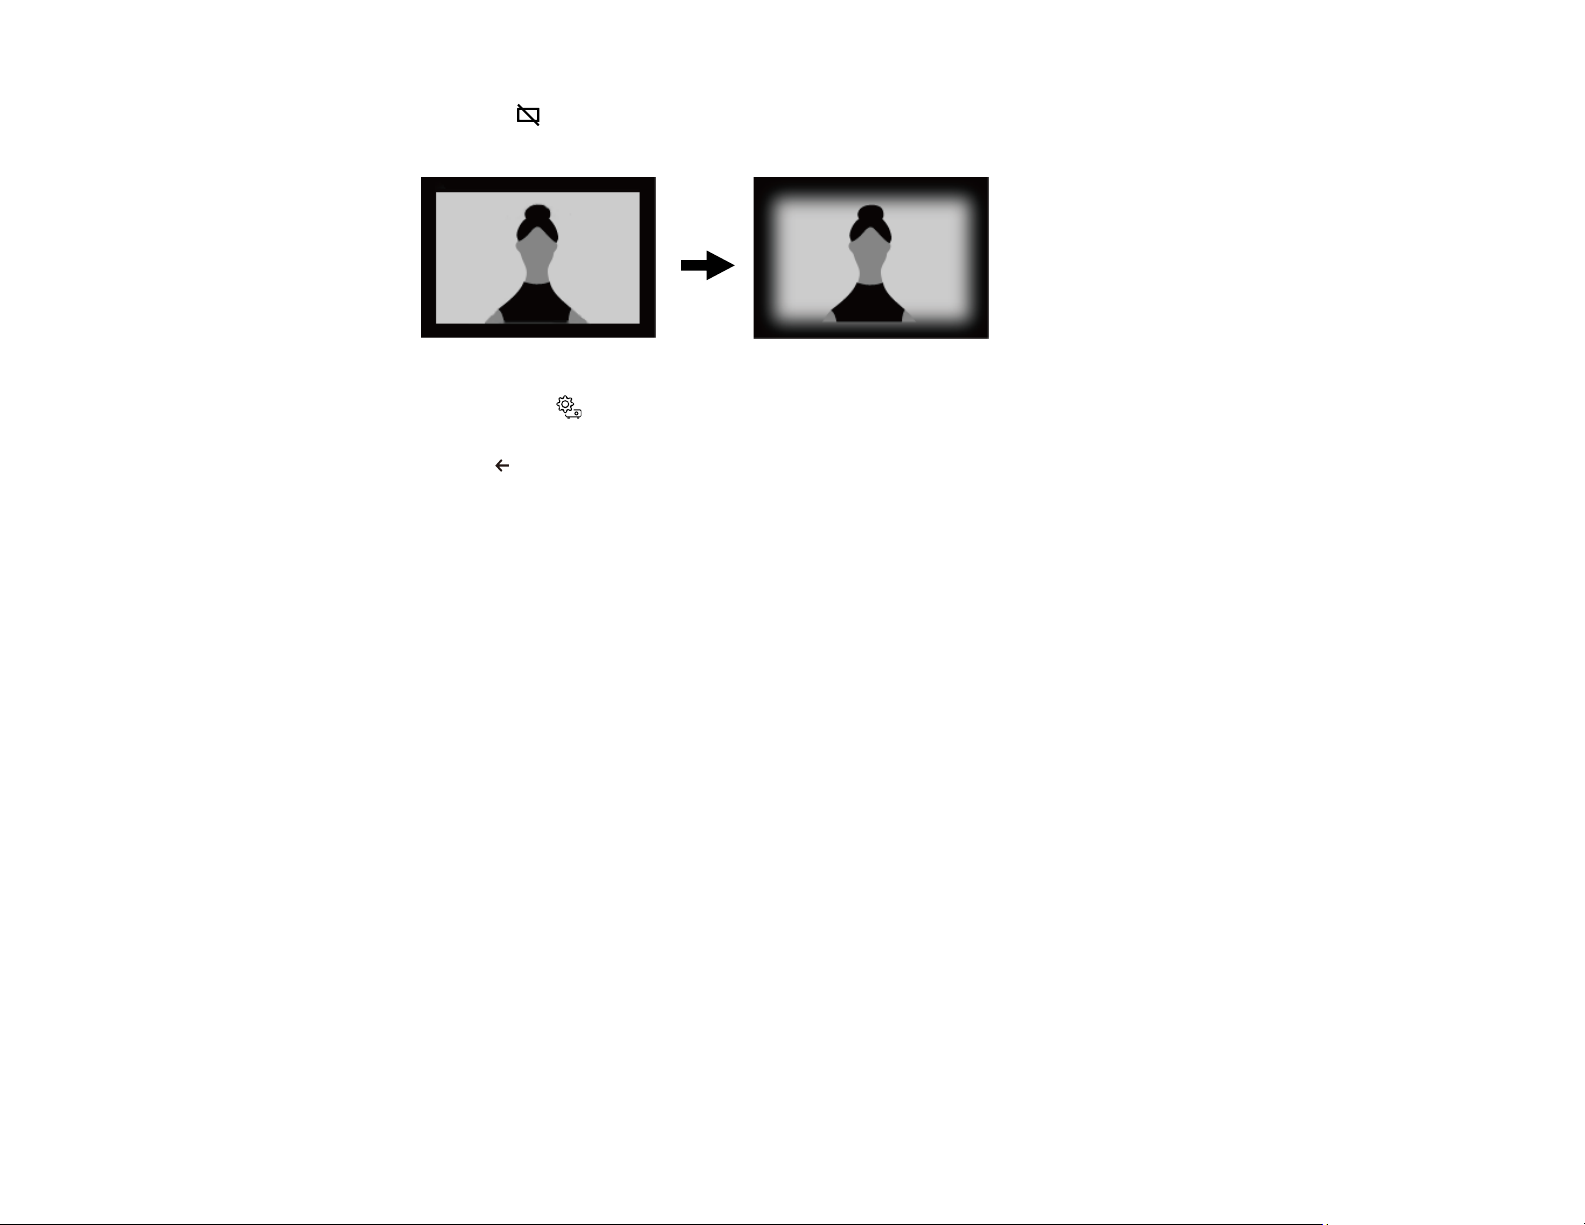
• Press the blank button on the remote control to blur the edges of the image so that it blends into
the wall you're projecting onto.
Note: Press the settings button to reset all of the Flexible Picture settings.
4. Press the esc button to exit the menu.
Parent topic: Adjusting Projector Features
Projector Security Features
You can secure your projector to deter theft or prevent unintended use by setting up the following
security features:
• Security cabling to physically cable the projector in place.
Installing a Security Cable
Parent topic: Adjusting Projector Features
80
Page 81
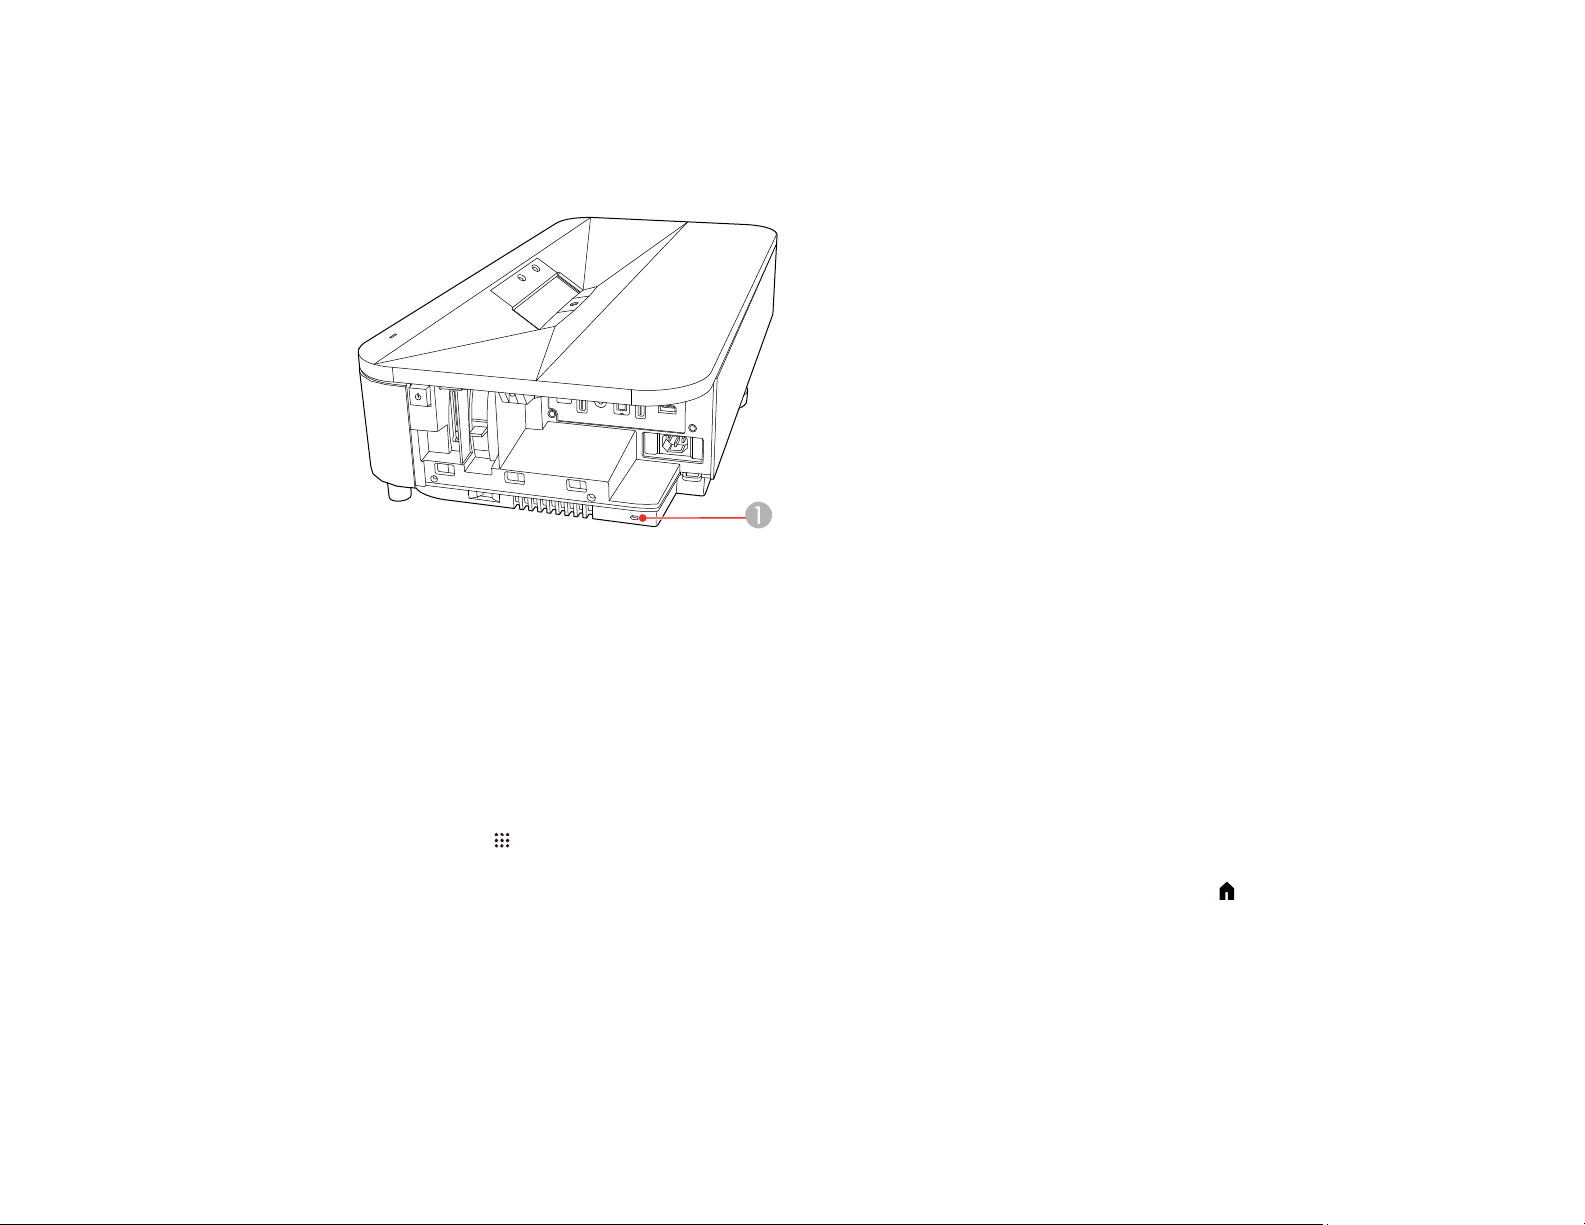
Installing a Security Cable
You can use the security slot on the side of the projector to attach a Kensington lock. See your local
computer or electronics dealer for purchase information.
1 Security slot
Parent topic: Projector Security Features
Updating the Firmware
You can get the latest version of the projector firmware over a network.
When the latest projector firmware is available, a notification is automatically displayed on the screen.
Follow the on-screen instructions to update the firmware.
1. Press the apps button on the remote control.
Note: This button is not available when the input source is HDMI3 (Game). Press the home button
on the remote control to return to the Android TV home screen first, and then perform the procedure.
81
Page 82

You see a menu like this:
2. Select Projector Firmware Update from the application list and press Enter.
3. Follow the on-screen instructions to update the firmware.
Caution: Do not turn off the projector while updating the firmware.
Parent topic: Adjusting Projector Features
Resetting the Projector
You can reset the projector and all settings to their default values.
Note: Write down the settings you do not want to lose before resetting the projector. When you reset the
projector, all information, including installed apps, Google account login information, and Projector
Settings, is deleted.
1. Press the Home button on the remote control.
2. Press the Android TV settings button on the remote control.
3. Select Device Preferences and press Enter.
4. Select About and press Enter.
5. Select Factory reset and press Enter.
A confirmation screen is displayed.
82
Page 83

6. Select Factory reset and press Enter.
7. Select Erase everything and press Enter to reset the projector.
Parent topic: Adjusting Projector Features
83
Page 84
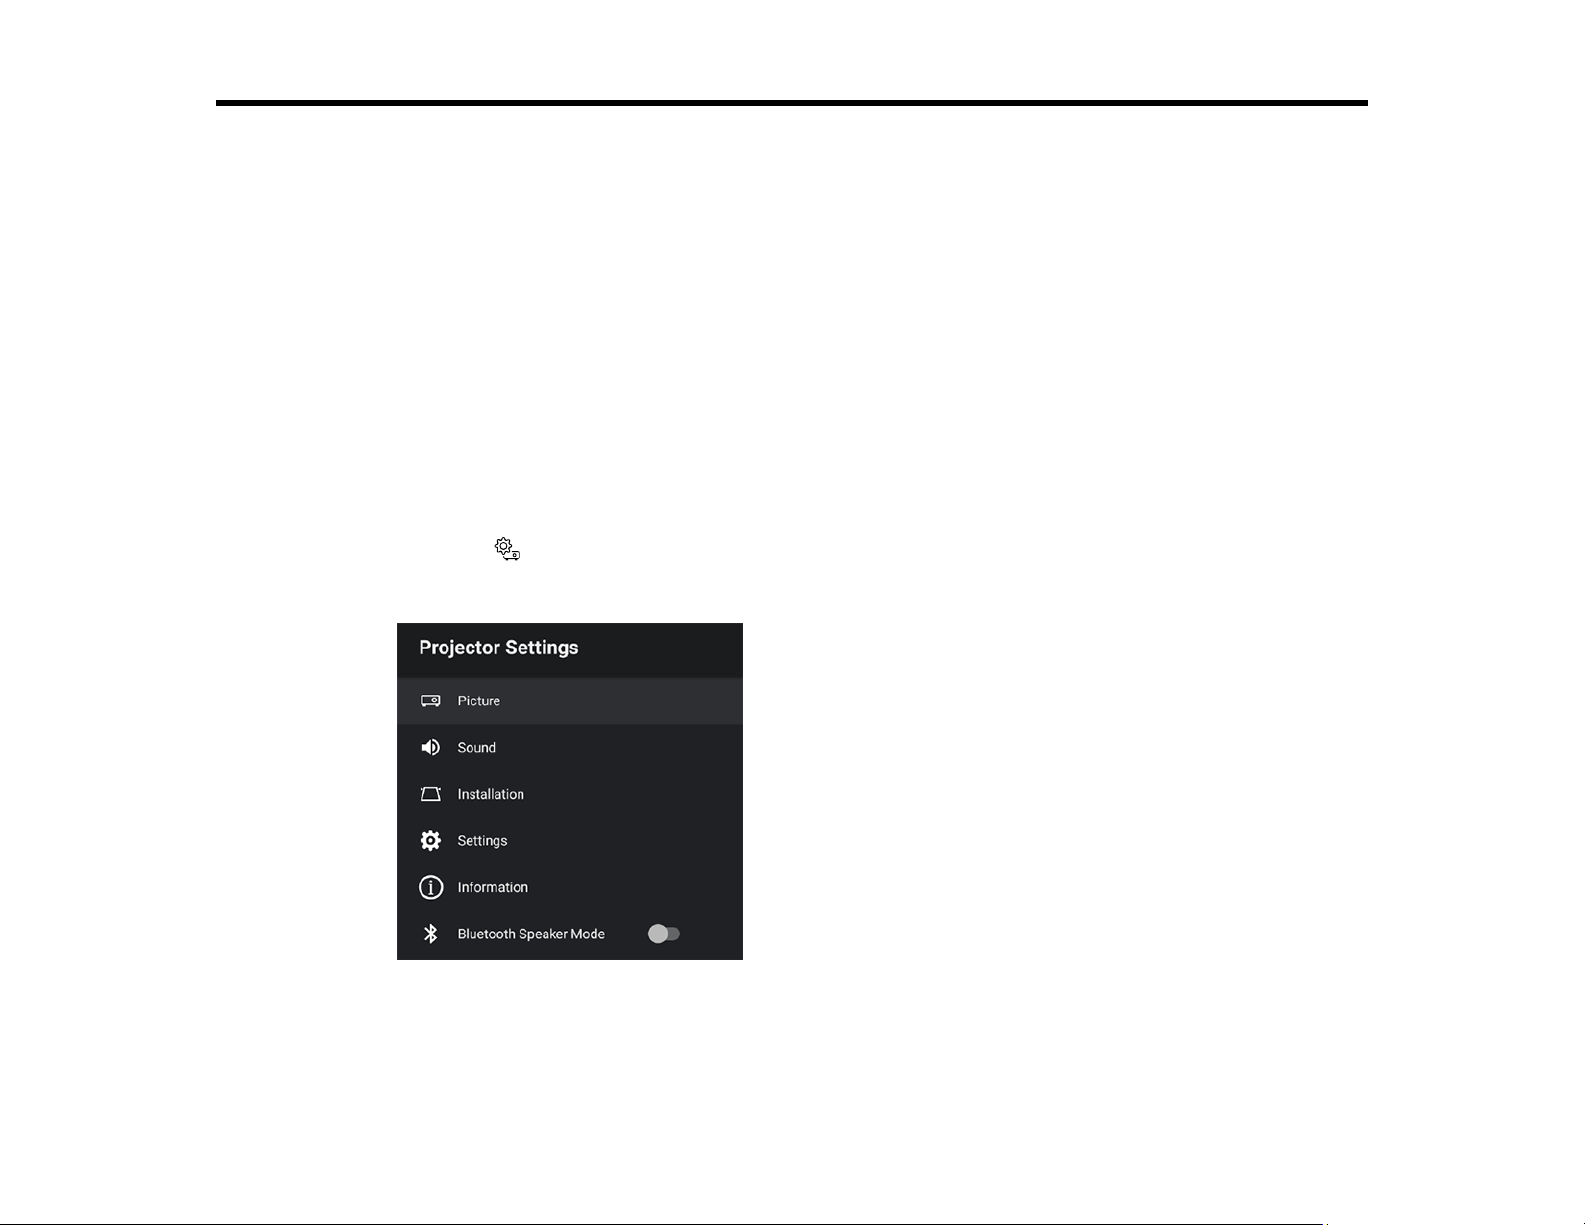
Adjusting the Menu Settings
Follow the instructions in these sections to access the projector menu system and change projector
settings.
Using the Projector's Menus
Image Quality Settings - Picture Menu
Sound Quality Settings - Sound Menu
Projector Installation Settings - Installation Menu
Projector Feature Settings - Settings Menu
Projector Information Settings - Information Menu
Using the Projector's Menus
You can use the projector's menus to adjust the settings that control how your projector works. The
projector displays the menus on the screen.
1. Press the Settings button on the remote control.
You see the Projector Settings menu.
2. Press the up or down arrow button on the remote control to move through the menu selections.
3. To change settings in the displayed menu, press Enter.
84
Page 85
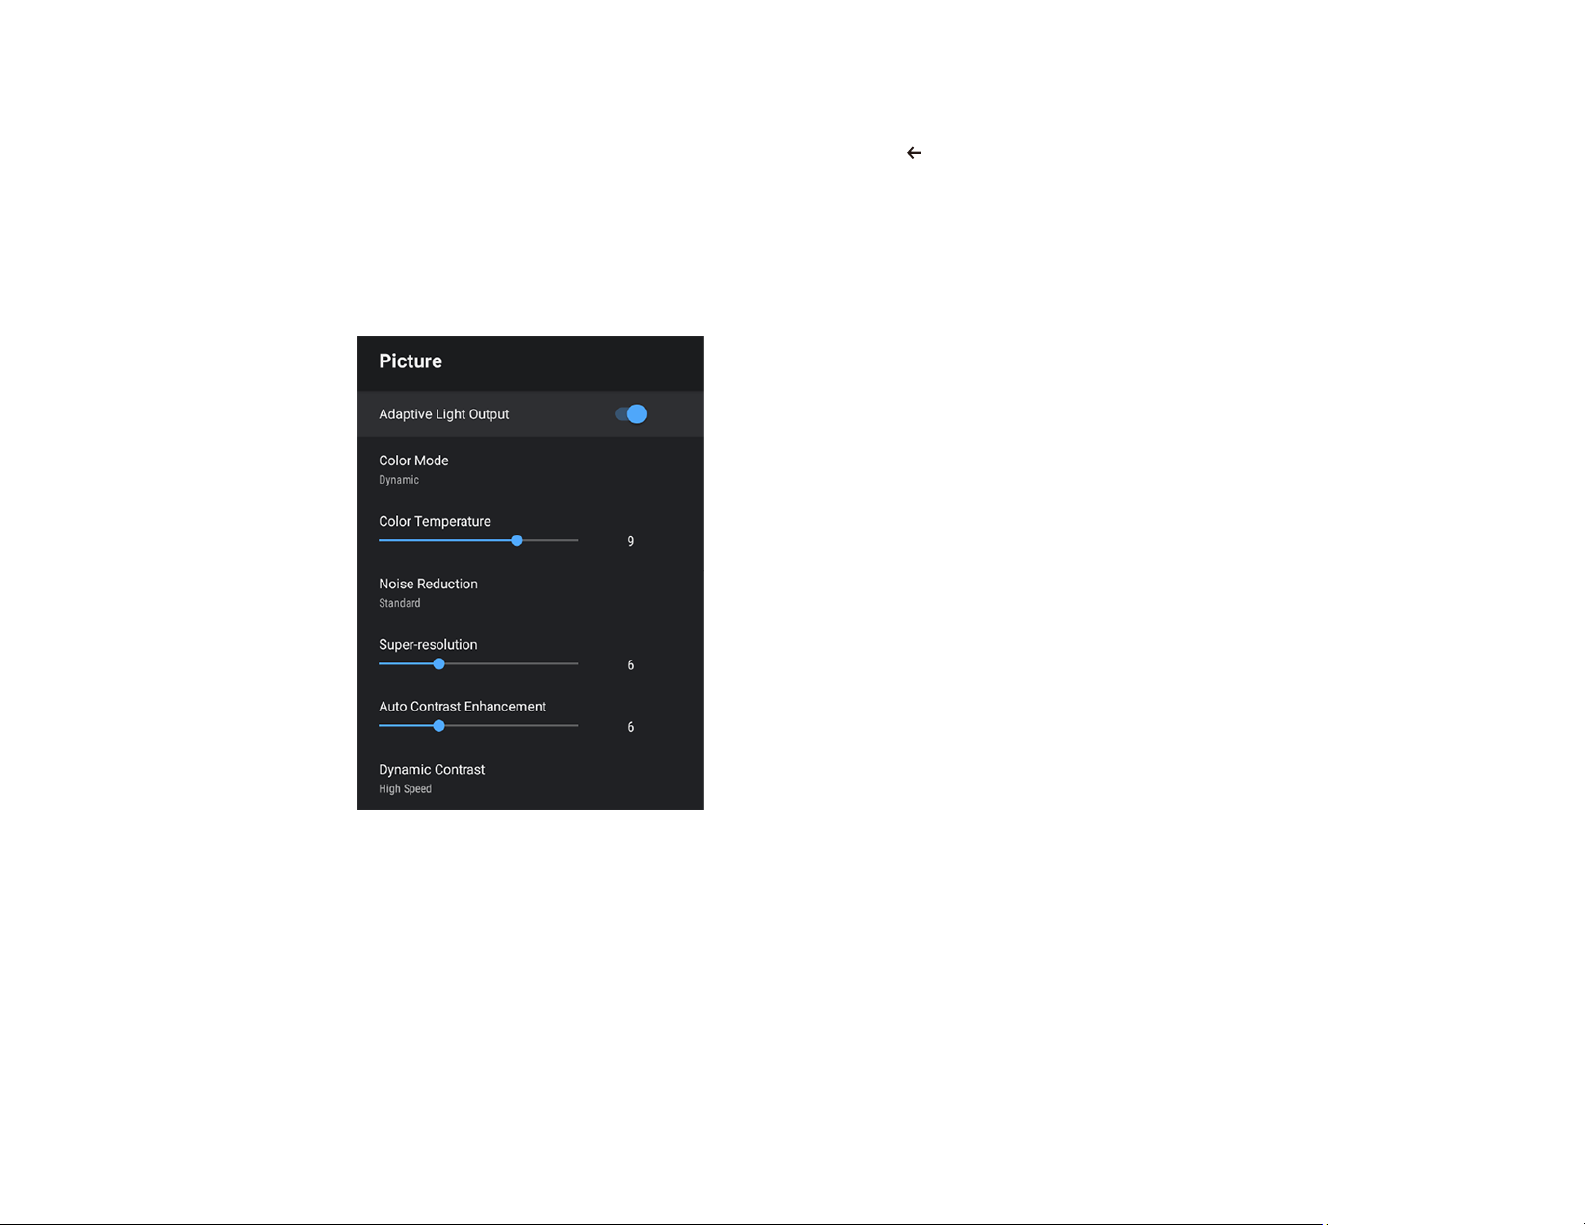
4. Use the arrow and Enter buttons to adjust the menu settings as desired.
5. When you finish changing settings on a menu, press esc to exit the menus.
Parent topic: Adjusting the Menu Settings
Image Quality Settings - Picture Menu
Settings on the Picture menu let you adjust the quality of your image for the input source you are
currently using.
85
Page 86

Setting Options Description
Adaptive Light Output On
Off
Color Mode See the list of available Color
Modes
Automatically sets the brightness
for the light source according to
the brightness of the
surroundings
Note: This function is not
available in the following
conditions:
• When the projector is
connecting to an external
device from the Installation
menu
• When the light source
brightness dims if the
surrounding temperature gets
too high
• When the motion sensor
detects any movements or
obstacles around the
projection window
Adjusts the vividness of image
colors for various image types
and environments
Color Temperature Varying levels available Sets the color temperature
according to the selected color
mode; lower values tint the image
red, and higher values tint the
image blue
Noise Reduction Strong
Standard
Weak
Off
Reduces flickering in analog
images
Note: Does not work on 4K input
signals.
Super-resolution Varying levels available Sharpens blurred images when
projecting low-resolution images
86
Page 87

Setting Options Description
Auto Contrast Enhancement Varying levels available Automatically adjusts the
contrast of the projected image to
create a clearer and sharper
image
Dynamic Contrast Off
Normal
High Speed
Adjusts the projected luminance
based on the image brightness
when certain Color Modes are
selected
Scene Adaptive Gamma Varying levels available Adjusts the coloring according to
the scene to obtain a more vivid
image; larger numbers enhance
the contrast
Frame Interpolation Off
Low
Normal
High
Adjusts the smoothness of image
movement
Note: When the input source is
HDMI3 (Game), this is set to Off.
87
Page 88

Setting Options Description
Custom Settings Brightness
Contrast
Saturation
Tint
Brightness: Lightens or darkens
the overall image
Note: This function is not
available when the light source
brightness dims because the
Sharpness
surrounding temperature gets too
high or when a problem has
occurred.
Contrast: Adjusts the difference
between light and dark areas of
the image
Saturation: Adjusts the intensity
of the image colors
Tint: Adjusts the balance of
green to magenta tones in the
image
Sharpness: Adjusts the
sharpness or softness of image
details
HDR Varying levels available Changes the range of dark and
bright areas in images
Aspect Ratio Normal
Full
Zoom
Note: When the input source is
HDMI3 (Game), this is set to 2.
Sets the aspect ratio for the
selected input source
Note: When the input source is
HDMI3 (Game), this is set to
Auto.
88
Page 89

Setting Options Description
HDMI Video Range Auto
Full
Limited
EDID HDMI1
HDMI2
HDMI3 (Game)
Parent topic: Adjusting the Menu Settings
Sets the video range to match
the setting of the device
connected to the HDMI input port
Note: When the input source is
HDMI3 (Game), this is set to
Auto.
Describes the display capabilities
of your projector when the
selected input source is HDMI.
Change this setting as necessary
according to the current input
source's resolution. You can
adjust settings for individual input
sources without changing the
input source.
89
Page 90

Sound Quality Settings - Sound Menu
Settings on the Sound menu allow you to optimize the audio for a variety of projected content. You can
select from presets or experiment with available modes.
90
Page 91

Setting Options Description
Sound Mode Theatre
TV
Studio
Stadium
Concert
Karaoke Mode
Virtual Surround High
Low
Off
Sets a sound mode for the projector's
speakers based on the type of playback
content (music, movie, etc.)
Theatre: Recreates the acoustic
environment of a movie theatre with
realistic and powerful sound.
TV: Ideal for watching news,
documentaries, and other TV shows.
Studio: Balanced sound quality to
reproduce sound as the creators and
artists intended.
Stadium: Reproduces the stadium and
crowd environment, providing clear, live
voice playback best for sports.
Concert: Reproduces the echoes and
expanse of a concert venue.
Karaoke Mode: Reproduces the echoes
and expanse of a concert venue without
sacrificing the vocal effects of a
microphone or karaoke app.
Adjusts the strength of the surround
effect. This setting is saved for each
Sound Mode
Clear Voice High
Low
Off
Auto Loudness On
Off
Bass Extension On
Off
Adjusts output so that voices can be
heard clearly. This setting is saved for
each Sound Mode
Automatically corrects the balance
between high and low tones in the audio
so that they are not out of balance, even
when playing at low volume
Emphasizes the bass levels in the audio
output
91
Page 92

Setting Options Description
Sound Space Right
Center
Left
Adjusts the sound quality to suit your
viewing position
92
Page 93

Setting Options Description
Sound Output Other than HDMI3 (Game)
HDMI3 (Game)
Selects the sound output device and
format for input sources
Note: If sound is not output correctly,
select PCM.
Speaker/Optical (PCM) or
Speaker/Optical (Auto): outputs sound
from the projector's speakers and to the
Optical Out port in PCM (2 ch) format or
higher quality (Auto).
ARC/Optical (PCM) or ARC/Optical
(Auto): outputs sound to the HDMI2
(ARC) and Optical Out ports in PCM (2
ch) format or higher quality (Auto).
(Auto) supports the PCM (2 ch), AC-3
(up to 5.1 ch), and DTS (up to 5.1 ch)
audio codecs.
Note: The output audio format of the
projector's HDMI2 (ARC) port depends
on the input source. When the input
source is HDMI, audio is output up to 5.1
ch (AC-3 or DTS). When playing Android
TV content, audio is output in PCM (2
ch).
93
Speaker (PCM) or Optical (PCM):
outputs sound in PCM (2 ch) format from
the projector's speakers or to the Optical
Out port.
Optical (Digital Audio) outputs higher
quality sound to the Optical Out port
(supports PCM (2 ch), AC-3 (up to 5.1
ch), and DTS (up to 5.1 ch) audio
codecs).
Page 94
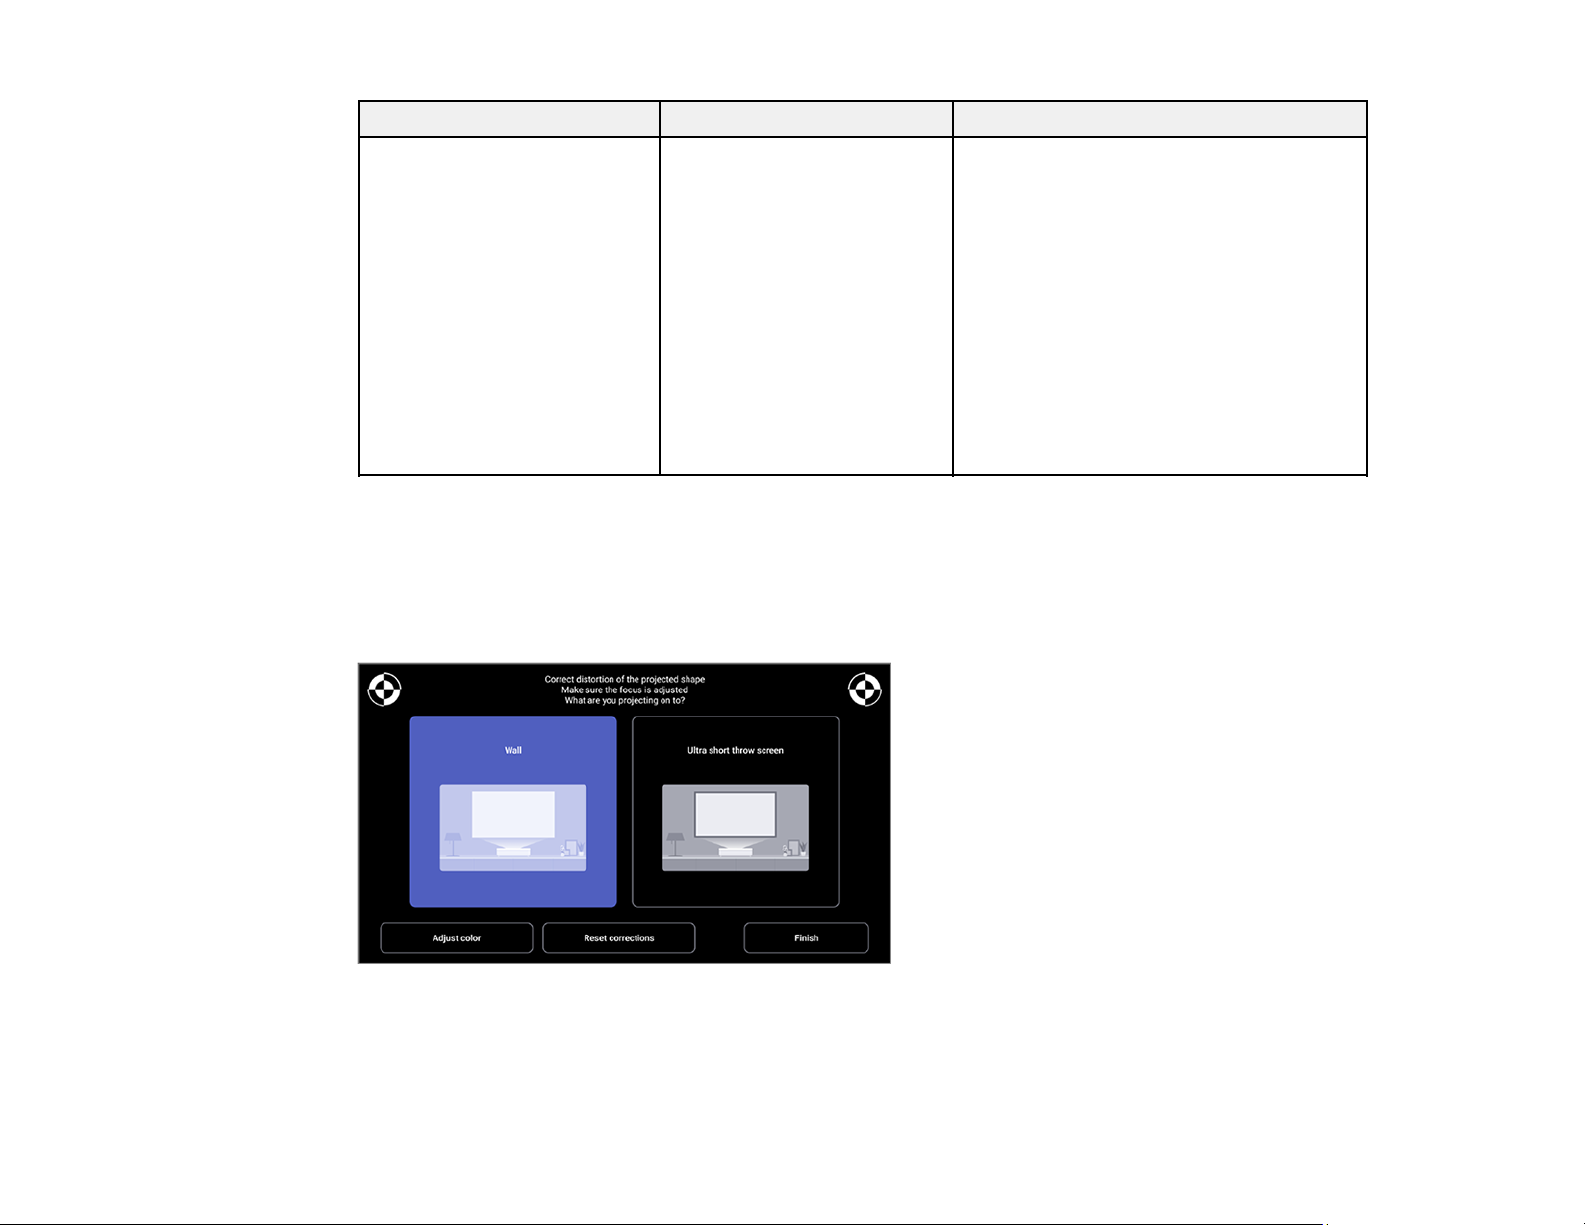
Setting Options Description
Audio Output Latency Varying levels available Adjusts the audio latency. If the audio is
Parent topic: Adjusting the Menu Settings
Projector Installation Settings - Installation Menu
Settings on the Installation menu let you correct distortion in the projected image by following the onscreen prompts.
fast, select a higher value. This setting is
only available for the following types of
audio:
• audio output from the projector's
speaker
• audio output from the HDMI2 (ARC)
port
• audio output from the Optical Out port
Note: This setting is not available when
the input source is HDMI3 (Game).
You can make the following corrections to the image shape and the projected image from this menu:
• Quickly correct distortion in the projected image using the Epson Setting Assistant app
94
Page 95
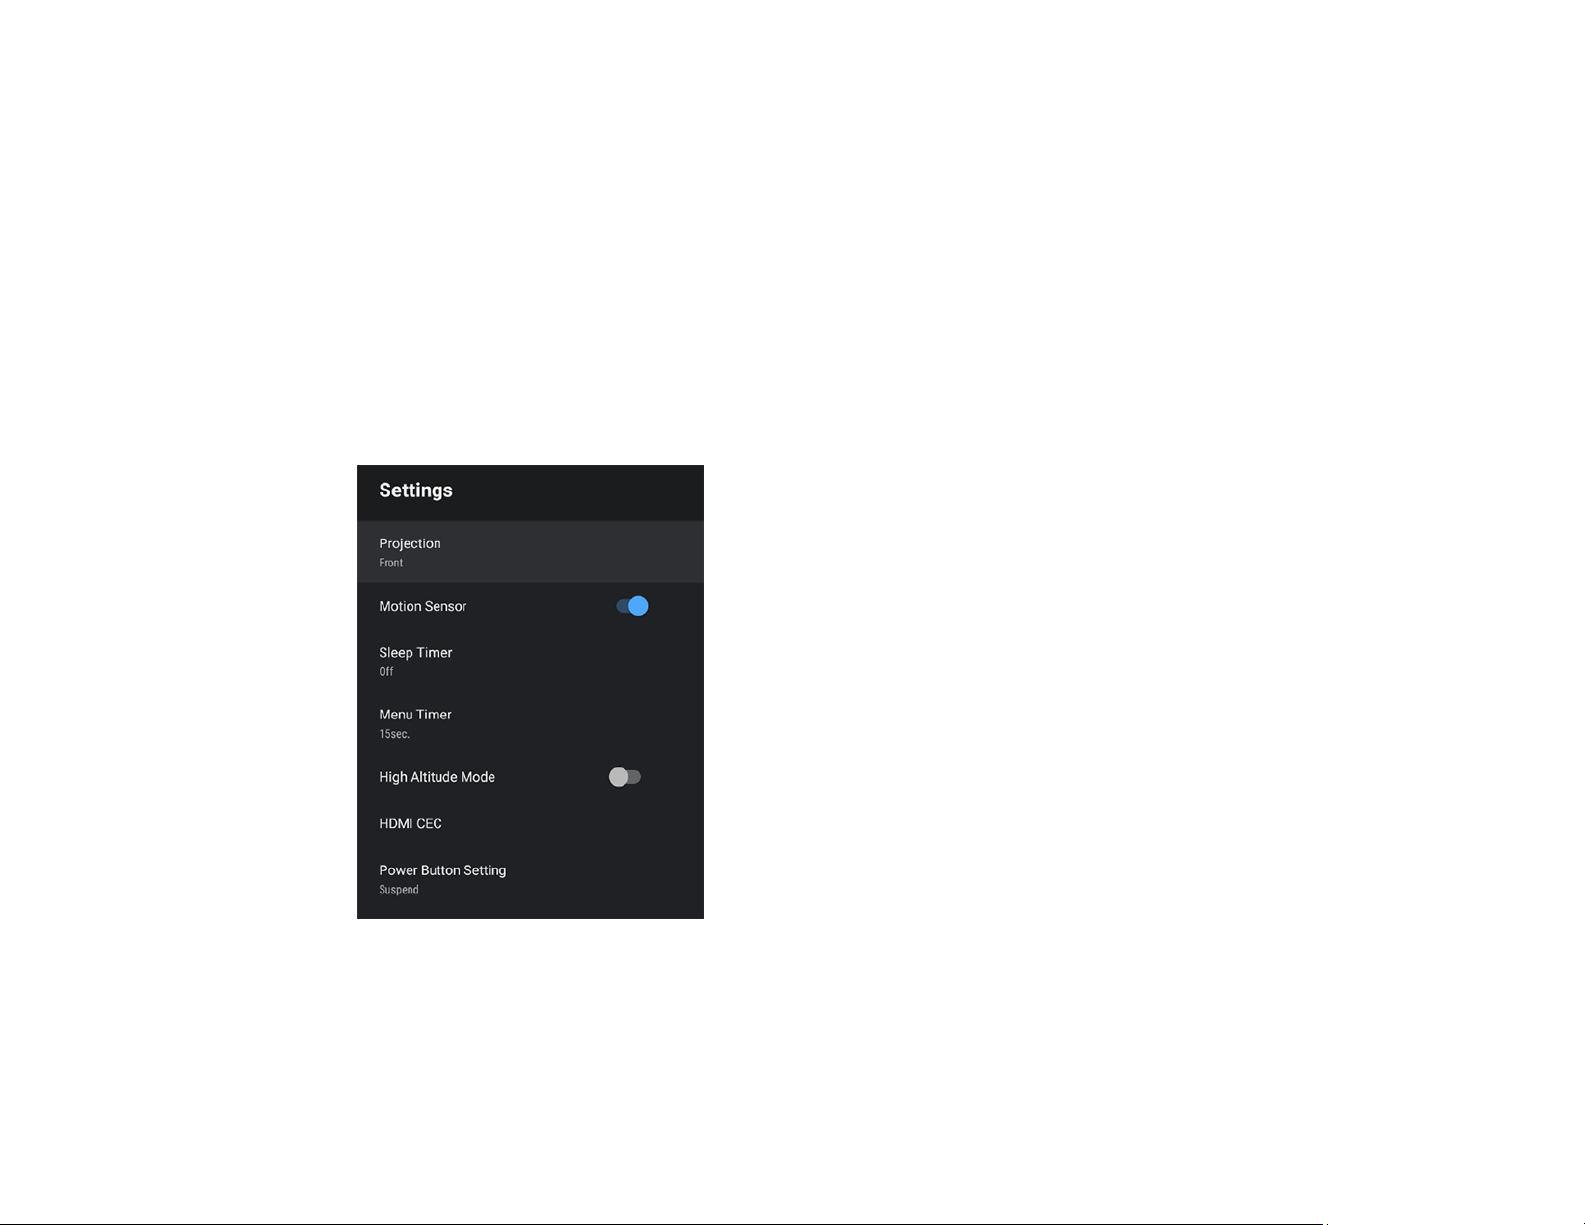
• Correct the position of the four corners of the projected image or fine-tune point correction using the
remote control
• Straighten the top of the projected image (the bottom of the projected image when the projector is
installed from the ceiling) using the remote control
• Select Adjust color to compensate the color of the projected image to match colored walls
Note: When you use the Epson Setting Assistant app, the Flexible Picture settings are reset.
Parent topic: Adjusting the Menu Settings
Projector Feature Settings - Settings Menu
Options on the Settings menu let you customize various projector features.
95
Page 96

Setting Options Description
Projection Front
Rear
Changes the orientation of the
projected image to match
projector placement
Front/Upside Down
Rear/Upside Down
Note: You may need 3rd-party IR
extenders or a control system for
a rear projection setup if the
projector's remote control cannot
communicate with the projector.
Motion Sensor On
Off
Automatically reduces the
brightness of the light source for
safety when someone comes
close to the projector window
while projecting
Sleep Timer 0 to 120 minutes Sets the interval before the
projector automatically turns off
Menu Timer 0 to 240 seconds Sets the interval before
automatically closing the
projector's menu
Note: This setting is not available
when the input source is HDMI3
(Game).
High Altitude Mode On
Off
Regulates the projector’s
operating temperature at
altitudes above 4921 feet (1500
m)
96
Page 97

Setting Options Description
HDMI CEC CEC Control Adjusts the HDMI CEC options
that allow the projector remote to
control HDMI-connected devices
that support the CEC standard
HDMI CEC: allows for control of
the connected device using the
projector's remote control. If this
setting is On, the projector
automatically turns on when the
device is turned on or playback is
started on the device
Device Auto Power Off:
automatically turns off the
connected device when you turn
off the projector
Auto Language Change:
automatically switches the
language settings of the
connected device according to
the projector's language setting
HDMI2 ARC: enables HDMI ARC
on the HDMI2 (ARC) port
Power Button Setting Suspend
Shutdown
Parent topic: Adjusting the Menu Settings
Sets the operation performed by
the projector when you press the
power button
Suspend: starts the projector
quickly from standby mode
Shutdown: minimizes power
consumption in standby mode
but takes longer to start the
projector
97
Page 98
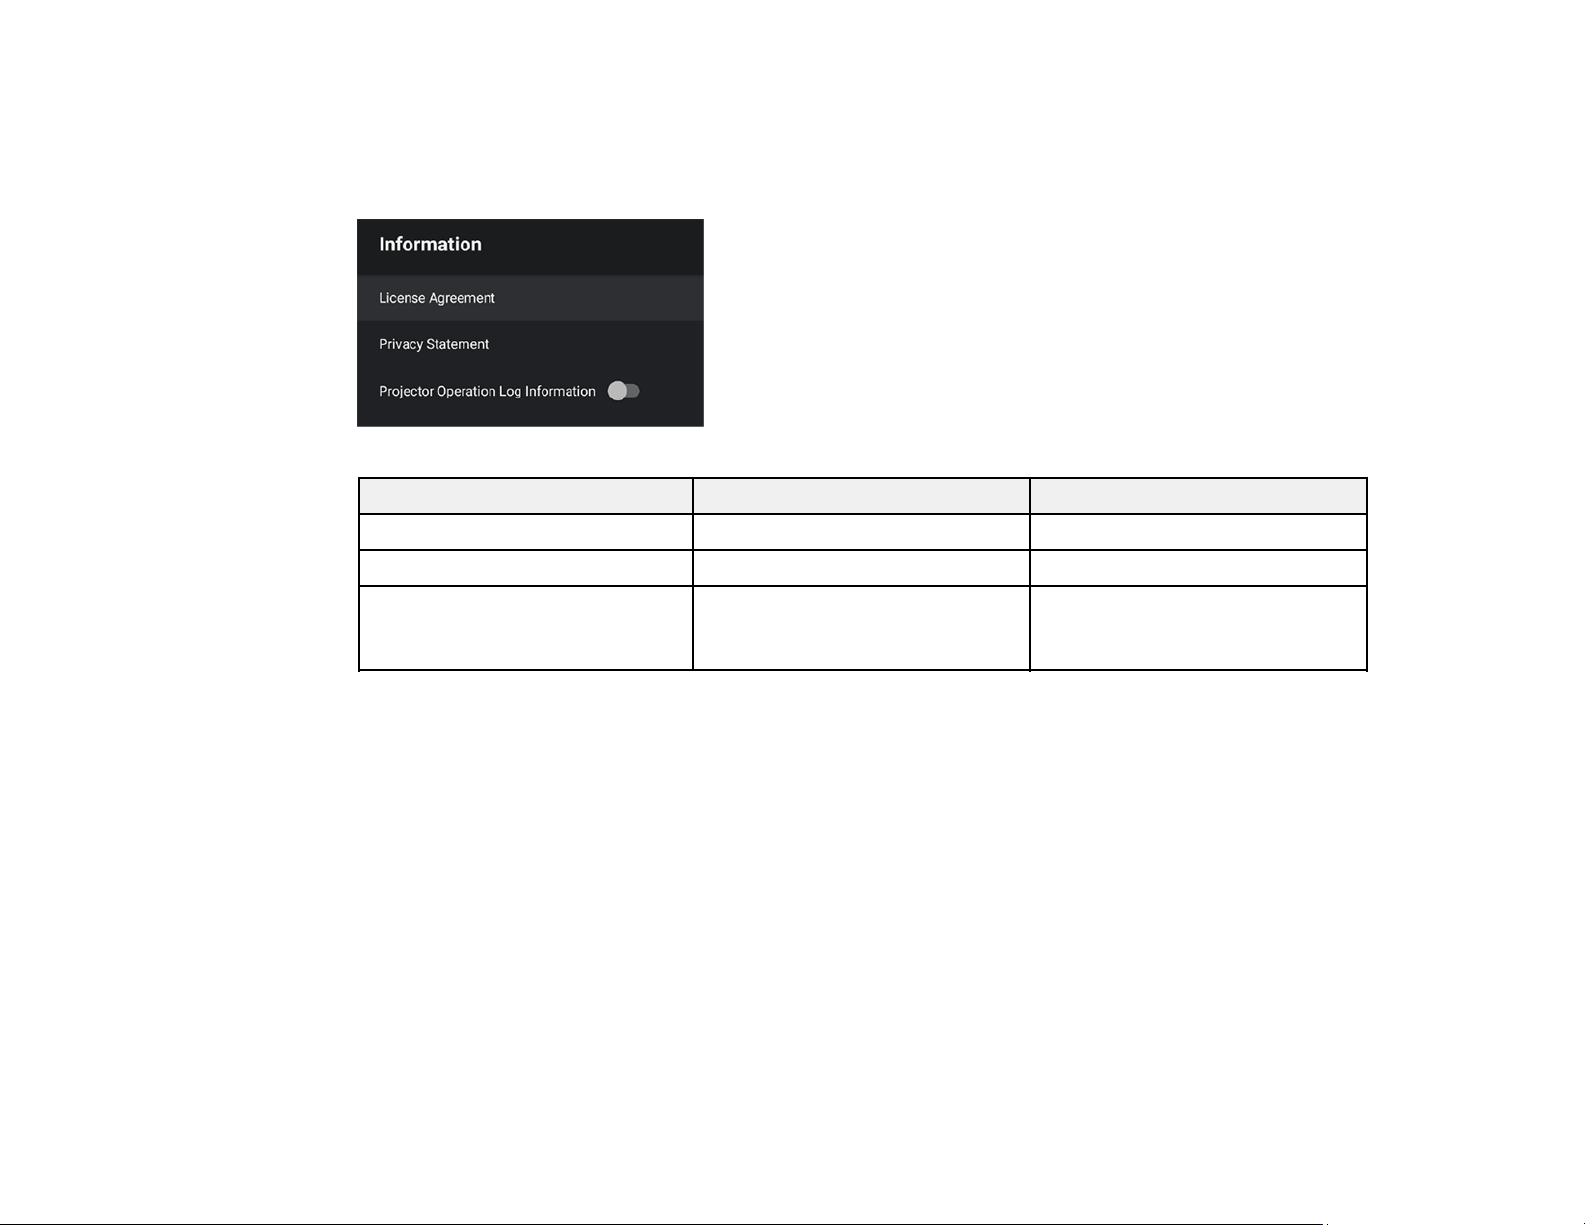
Projector Information Settings - Information Menu
Settings on the Information menu let you display information about the licenses and privacy statements,
and set whether or not to allow the acquisition of operation logs.
Setting Options Description
License Agreement — Displays the license agreement
Privacy Statement — Displays the privacy statement
Projector Operation Log
Information
Parent topic: Adjusting the Menu Settings
On
Off
Sets whether or not to allow
Epson to receive projector
operation logs
98
Page 99

Maintaining and Transporting the Projector
Follow the instructions in these sections to maintain your projector and transport it from place to place.
Projector Maintenance
Air Filter and Vent Maintenance
Replacing the Remote Control Batteries
Transporting the Projector
Projector Maintenance
Your projector needs little maintenance to keep working at its best.
You may need to clean the projection window, obstacle sensors, and motion sensor periodically, and
clean the air filter and air vents to prevent the projector from overheating due to blocked ventilation.
The only parts you should replace are the air filter and remote control batteries. If any other part needs
replacing, contact Epson or an authorized Epson servicer.
This projector uses a sealed laser light source which does not need servicing and cannot be replaced.
Warning: Before cleaning any part of the projector, turn it off, unplug the power cord, and let it cool
down. Never open any cover on the projector, except as specifically explained in this manual.
Dangerous electrical voltages in the projector can injure you severely.
Warning: Do not try to service this product yourself, except as specifically explained in this manual.
Refer all other servicing to Epson qualified servicers.
Cleaning the Projection Window
Cleaning the Obstacle and Motion Sensors
Cleaning the Projector Case
Parent topic: Maintaining and Transporting the Projector
Cleaning the Projection Window
Clean the projection window periodically, or whenever you notice dust or smudges on the surface.
Warning: Before cleaning the projection window, turn off the projector and unplug the power cord.
99
Page 100

• To remove dust or smudges, gently wipe the projection window with clean and dry lens-cleaning
paper.
Caution: Do not wipe the projection window right after you turn off the projector or you may damage it.
• If the projection window is dusty, blow off the dust and then wipe the projection window.
Warning: Do not use any flammable gas sprays such as air dusters to blow off dust. The high heat
generated by the projector may cause a fire.
Caution: Do not use canned air, or the gases may leave a flammable residue. Do not use glass
cleaner or any harsh materials to clean the projection window and do not subject the projection
window to any impacts or you may damage it.
Parent topic: Projector Maintenance
Related tasks
Turning Off the Projector
Cleaning the Obstacle and Motion Sensors
Clean the projector's obstacle and motion sensors glass (circled in red) periodically, or if you see a
message telling you to remove any obstacles that are interfering with the projection area.
• To remove dust or smudges, gently wipe the sensors with lens-cleaning paper.
100
 Loading...