

Page 1
User's Guide
Page 2

Contents
2
Notations Used in This Guide 6
Using the Manual to Search for Information .....................................7
Searching by Keyword ......................................................................................7
Jumping Directly from Bookmarks .....................................................................7
Printing Only the Pages You Need ..................................................................... 7
Getting the Latest Version of the Documents ................................... 8
List of Functions 9
Introduction to Your Projector 11
Projector Features ............................................................................. 12
Quick and Easy Setup ......................................................................................12
Easy Wireless Projection ..................................................................................12
Projector Parts and Functions .......................................................... 14
Projector Parts - Front
Projector Parts - Rear .......................................................................................15
Projector Parts - Base ...................................................................................... 17
Projector Parts - Control Panel ......................................................................... 17
Projector Parts - Remote Control ......................................................................19
.....................................................................................14
Connecting to Video Sources ...........................................................................27
Connecting to an HDMI Video Source ............................................................28
Connecting to a Composite Video Source ......................................................28
Connecting to External USB Devices .................................................................29
USB Device Projection ..................................................................................29
Connecting to a USB Device ......................................................................... 30
Disconnecting a USB Device .........................................................................30
Connecting to a Document Camera ................................................................. 30
Connecting to External Devices ....................................................................... 30
Connecting to a VGA Monitor .......................................................................31
Connecting to External Speakers .................................................................. 31
Connecting to a Streaming Media Player .......................................................32
Installing Batteries in the Remote Control ...................................... 33
Remote Control Operation ............................................................... 34
Opening the Lens Cover ....................................................................35
Using Basic Projector Features 36
Turning On the Projector .................................................................. 37
Home Screen ................................................................................................. 38
Turning O the Projector ..................................................................40
Selecting the Language for the Projector Menus ...........................
41
Setting Up the Projector 21
Projector Placement ..........................................................................22
Projector Setup and Installation Options .......................................................... 23
Projection Distance .........................................................................................23
Projector Connections .......................................................................25
Connecting to a Computer
Connecting to a Computer for VGA Video and Audio ......................................25
Connecting to a Computer for USB Video and Audio ......................................26
Connecting to a Computer for HDMI Video and Audio ....................................27
..............................................................................25
Projection Modes ...............................................................................42
Changing the Projection Mode Using the Remote Control ................................. 42
Changing the Projection Mode Using the Menus ...............................................42
Displaying a Test Pattern ..................................................................44
Adjusting the Image Height ............................................................. 45
Image Shape .......................................................................................46
Auto V-Keystone .............................................................................................46
Correcting the Image Shape with the Horizontal Keystone Slider ........................46
Correcting the Image Shape with the Keystone Buttons .....................................47
Page 3

Contents
3
Correcting the Image Shape with Quick Corner .................................................48
Resizing the Image with the Zoom Ring .......................................... 50
Focusing the Image Using the Focus Ring .......................................
51
Selecting an Image Source ................................................................52
Image Aspect Ratio ............................................................................53
Changing the Image Aspect Ratio ....................................................................53
Available Image Aspect Ratios .........................................................................53
Projected Image Appearance with Each Aspect Mode ....................................... 54
Adjusting Image Quality (Color Mode) ............................................ 56
Changing the Color Mode ............................................................................... 56
Available Color Modes .................................................................................... 56
Setting Auto Iris ..............................................................................................56
Controlling the Volume with the Volume Buttons ......................... 58
Adjusting Projector Features 59
Projecting Two Images Simultaneously .......................................... 60
Unsupported Input Source Combinations for Split Screen Projection ..................62
Split Screen Projection Restrictions .................................................................. 62
Projecting a PC Free Presentation ....................................................63
Supported PC Free File Types
Precautions on PC Free Projection ....................................................................63
Starting a PC Free Slide Show .......................................................................... 64
Starting a PC Free Movie Presentation ..............................................................65
PC Free Display Options ..................................................................................66
.......................................................................... 63
Saving a User's Logo Image .............................................................. 72
Saving a User Pattern ........................................................................ 74
Color Dierence Correction when Projecting from Multiple
Projectors ........................................................................................... 75
Setting the Projector ID ...................................................................................75
Selecting the Projector You want to Operate .................................................... 75
Matching Multiple-Projector Display Quality .....................................................76
Projector Security Features .............................................................. 78
Password Security Types .................................................................................78
Setting a Password ...................................................................................... 78
Selecting Password Security Types ................................................................79
Entering a Password to Use the Projector .......................................................80
Locking the Projector's Buttons ....................................................................... 80
Unlocking the Projector's Buttons .................................................................81
Installing a Security Cable ................................................................................81
Using the Projector on a Network 83
Wireless Network Projection ............................................................ 84
Installing the Wireless LAN Module .................................................................. 84
Selecting Wireless Network Settings Manually .................................................. 85
Selecting Wireless Network Settings in Windows ...............................................87
Selecting Wireless Network Settings in Mac ...................................................... 88
Setting Up Wireless Network Security ...............................................................88
Using a QR Code to Connect a Mobile Device ....................................................89
Using a USB Key to Connect a Windows Computer ............................................89
Shutting O the Image and Sound Temporarily .............................68
Stopping Video Action Temporarily ................................................ 69
Zooming In/Zooming Out of Images (E-Zoom) ............................... 70
Zooming Into Images ......................................................................................70
Zooming Out of Images .................................................................................. 70
Monitoring and Controlling the Projector 91
Epson Projector Management Connected / Epson Projector
Management ......................................................................................92
Controlling a Networked Projector Using a Web Browser .............
Web Control Options ......................................................................................94
93
Page 4

Contents
4
Setting Up Projector Network E-Mail Alerts ....................................97
Network Projector E-mail Alert Messages ..........................................................97
Setting Up Monitoring Using SNMP .................................................99
Using ESC/VP21 Commands ..........................................................
ESC/VP21 Command List ...............................................................................100
Cable Layouts ...............................................................................................100
100
Web API ............................................................................................ 102
Enabling Web API ......................................................................................... 102
Adjusting the Menu Settings 103
Using the Projector's Menus ...........................................................104
Using the Displayed Keyboard .......................................................105
Available Text Using the Displayed Keyboard
Image Quality Settings - Image Menu ............................................106
Input Signal Settings - Signal Menu ...............................................108
Projector Feature Settings - Settings Menu .................................. 109
..................................................105
Copying Menu Settings Between Projectors (Batch Setup) .........126
Transferring Settings From a USB Flash Drive .................................................. 126
Transferring Settings From a Computer ..........................................................127
Batch Setup Error Notication .....................................................................128
Maintaining the Projector 129
Projector Maintenance ....................................................................130
Cleaning the Lens ............................................................................ 131
Cleaning the Projector Case ...........................................................
132
Air Filter and Vent Maintenance .................................................... 133
Cleaning the Air Filter and Vents ....................................................................133
Replacing the Air Filter ..................................................................................133
Projector Lamp Maintenance ......................................................... 136
Replacing the Lamp ......................................................................................136
Resetting the Lamp Timer ..............................................................................139
Solving Problems 140
Projector Setup Settings - Extended Menu ................................... 111
Projector Network Settings - Network Menu ................................ 114
Network Menu - Basic Menu .......................................................................... 115
Network Menu - Wireless LAN Menu ...............................................................116
Network Menu - Notications Menu ...............................................................118
Network Menu - Others Menu ........................................................................119
Network Menu - Reset Menu ..........................................................................120
Projector Setup Settings - ECO Menu ............................................ 121
Projector Information Display - Info Menu ................................... 123
Info Menu - Projector Info Menu .....................................................................123
Event ID Code List ......................................................................................124
Projector Reset Options - Reset Menu ........................................... 125
Projection Problems ........................................................................141
Projector Indicator Status ...............................................................142
Using the Projector Help Displays ..................................................
145
Solving Image or Sound Problems .................................................146
Solutions When No Image Appears ................................................................ 146
Solutions When Image is Incorrect Using the USB Display Function .................. 146
Solutions When "No Signal" Message Appears .................................................147
Displaying From a Laptop ...........................................................................147
Displaying From a Mac Laptop ....................................................................148
Solutions When "Not Supported" Message Appears .........................................148
Solutions When Only a Partial Image Appears ................................................. 148
Solutions When the Image is not Rectangular ................................................. 148
Page 5

Contents
5
Solutions When the Image Contains Noise or Static .........................................149
Solutions When the Image is Fuzzy or Blurry ................................................... 149
Solutions When the Image Brightness or Colors are Incorrect ...........................150
Solutions to Sound Problems .........................................................................150
Solutions When Image File Names are not Displayed Correctly in PC Free ..........151
Solving Projector or Remote Control Operation Problems ......... 152
Solutions to Projector Power or
Solutions to Problems with the Remote Control ..............................................152
Solutions to Password Problems .................................................................... 153
Shut-O Problems ..........................................152
Solving Network Problems ............................................................. 154
Solutions When Wireless Authentication Fails ................................................. 154
Solutions When You Cannot Access the Projector Through the Web .................154
Solutions When Network Alert E-Mails are not Received ...................................154
Solutions When the Image Contains Static During Network Projection ..............155
Appendix 156
Optional Accessories and Replacement Parts ...............................157
Screens ........................................................................................................157
Mounts ........................................................................................................157
For Wireless Connection ................................................................................157
External Devices ........................................................................................... 157
Replacement Parts ........................................................................................158
Glossary ............................................................................................177
Notices ..............................................................................................179
FCC Compliance Statement ...........................................................................179
Indication of the manufacturer and the importer in accordance with requirements
of EU directive ..............................................................................................180
Restriction of Use ..........................................................................................180
Operating System References ........................................................................180
Trademarks ..................................................................................................181
Copyright Notice .......................................................................................... 181
Copyright Attribution ....................................................................................181
Screen Size and Projection Distance ..............................................159
Supported Monitor Display Resolutions .......................................
164
Projector Specications .................................................................. 165
Connector Specications ...............................................................................168
External Dimensions ....................................................................... 169
USB Display System Requirements ................................................173
Warning Label ..................................................................................174
List of Safety Symbols and Instructions ........................................ 175
Page 6
Notations Used in This Guide
ety Symbols
Saf
e projector and its manuals use graphical symbols and labels to indicate content that tells you how to use the projector safely.
Read and carefully follow the instructions that are marked with these symbols and labels to avoid injury to persons or damage to property.
is symbol indicates information that, if ignored, could possibly result in personal injury or even death.
Warning
Caution
is symbol indicates information that, if ignored, could possibly result in personal injury or physical damage due to incorrect handling.
General Information Notations
Attention
[B
utton name] Indicates the name of the buttons on the remote control or the projector.
Menu/Setting name Indicates projector menu and setting names.
s
Related Links
g
•
•
g the Manual to Search for Information" p.7
"Usin
"Getting the Latest Version of the Documents" p.8
is label indicates procedures that may result in damage or injury if sucient care is not taken.
is label indicates additional information that may be useful to know.
Exam
ple: [Esc] button
Example:
Select the Image menu
s Image > Color Mode
is label indicates links to the related pages.
s label indicates the projector's current menu level.
i
Page 7
Using the Manual to Search for Information
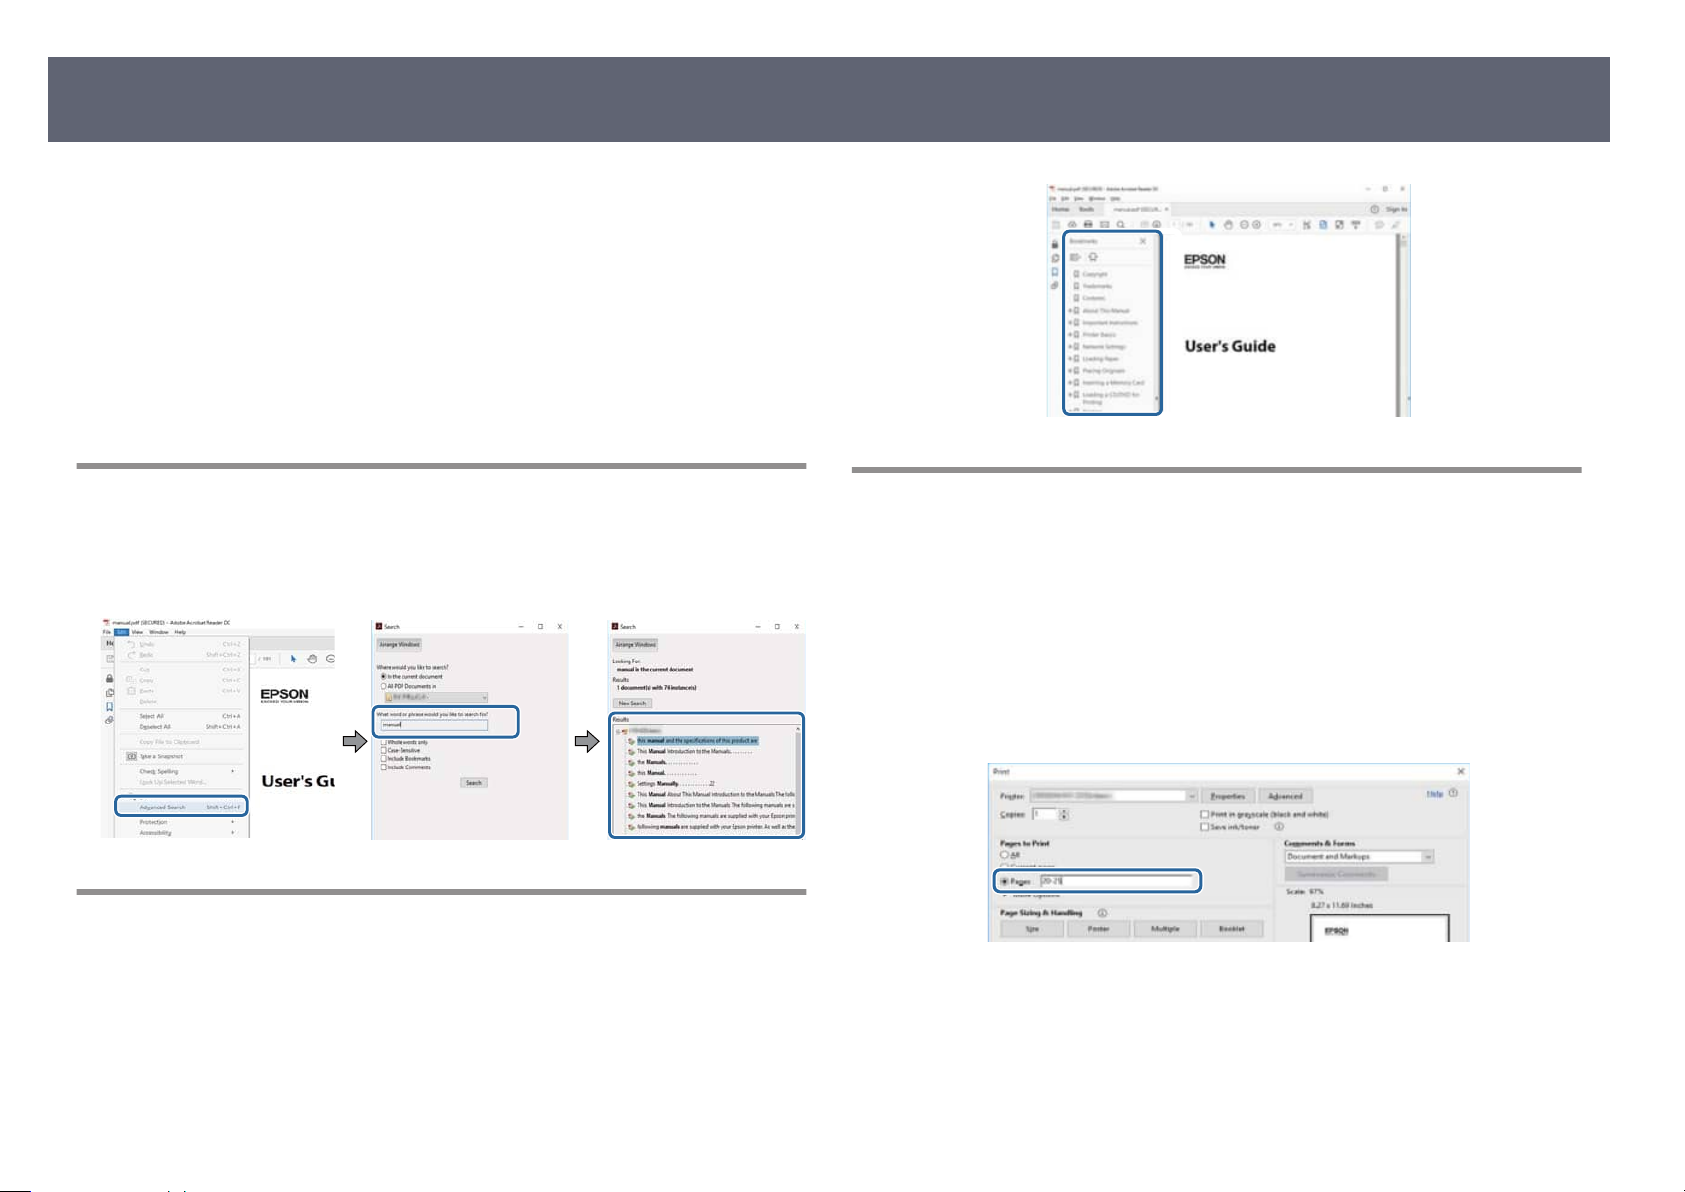
e PDF manual allows you to search for information you are looking for by
eyword, or jump directly to specic sections using the bookmarks. You can
k
also print only the pages you need. is section explains how to use a PDF
manual that has been opened in Adobe Reader X on your computer.
Related Links
g
•
"Searching by Keyword" p.7
•
"Jumping Directly from Bookmarks" p.7
•
"Printing Only the Pages You Need" p.7
7
Searching by Keyword
Click Edit > Advanced Search. Enter the keyword (text) for information you
want to nd in the search window, and then click Search. Hits are displayed as a
list. Click one of the displayed hits to jump to that page.
Jumping Directly from Bookmarks
Click a title to jump to that page. Click + or > to view the lower level titles in
t
at section. To return to the previous page, perform the following operation on
h
your keyboard.
•
Windows: Hold down Alt, and then press ←.
•
Mac OS: Hold down the command key, and then press ←.
Printing Only the Pages You Need
You can extract and print only the pages you need. Click Prin
and then specify the pages you want to print in Pages in Pages to Print.
•
To specify a series of pages, enter a hyphen between the start page and the
end page.
Example: 20-25
•
To specify pages that are not in series, divide the pages with commas.
Example: 5, 10, 15
t in the File menu,
Page 8

Getting the Latest Version of the Documents
8
You can get the latest version of the manuals and sp
Web site.
Visit epson.sn, and enter your projector's name.
ecications on the Epson
Page 9

List of Functions
llowing shows the dierences in the functions supported by each model. Supported functions are indicated by a "✓" mark.
e fo
EB-FH08 EB-W55/EB-EA55 EB-W53 EB-E24/EB-EA24 EB-X52 EB-E12/EB-EA12
Resolution Full HD WXGA WXGA XGA XGA XGA
1920×1080 1280×800 1280×800 1024×768 1024×768 1024×768
Wireless LAN (built-in) - ✓ - - - -
Wireless LAN (optional) ✓ - - - ✓ -
External Speaker (optional) - - - ✓ - -
Document camera (optional) ✓ ✓ - - ✓ -
HDMI1/HDMI2 ports ✓ ✓ ✓ - ✓ ✓
HDMI port - - - ✓ - -
Computer1/Computer2 ports - - - ✓ - -
Video port - - - ✓ - -
USB-A (
L-Audio-R ports - - - ✓ - -
Audio 1/Audio 2 ports - - - ✓ - -
Monitor Out port - - - ✓ - -
Audio Out port ✓ - - ✓ - -
RS-232C port - - - ✓ - -
Lens cover ✓ ✓ - ✓ ✓ -
Horizontal keystone slider ✓ ✓ - ✓ ✓ -
Zoom ring ✓ ✓ - - ✓ -
Wireless LAN indicator - ✓ - - - -
[Computer] button (remote control) - - - ✓ - -
) port (USB power supply)
✓ ✓ - - ✓ -
Page 10

EB-FH08 EB-W55/EB-EA55 EB-W53 EB-E24/EB-EA24 EB-X52 EB-E12/EB-EA12
Beep (Power on/Power o) ✓ ✓ - - ✓ -
uto Setup - - - ✓ - -
A
Overscan - - - ✓ - -
Scene Adaptive Gamma ✓ ✓ ✓ - ✓ ✓
Command Communication ✓ ✓ - - ✓ -
Auto V-Keystone ✓ ✓ - - ✓ -
PC Free ✓ ✓ - - ✓ -
Batch Setup (USB as
Batch Setup (USB cable) ✓ ✓ ✓ ✓ ✓ ✓
Network Protection ✓ ✓ - - ✓ -
Epson iProjection ✓ ✓ - - ✓ -
Epson Projector Management Connected ✓ ✓ - - ✓ -
Epson Projector Management ✓ ✓ - - ✓ -
Epson Web Control ✓ ✓ - - ✓ -
Mail N
otication ✓ ✓ - - ✓ -
NMP ✓ ✓ - - ✓ -
S
ESC/VP21 Commands - - - ✓ - -
Web API ✓ ✓ - - ✓ -
Firmware Update (I
drive) ✓ ✓ - - ✓ -
h
o menu) ✓ ✓ - - ✓ -
nf
Page 11

Introduction to Your Projector
er to these sections to learn more about your projector's features and part names.
Ref
Related Links
g
•
"Projector Features" p.12
•
"Projector Parts and Functions" p.14
Page 12
Projector Features
12
is projector comes with these special features. Refer to these sections for more
ails.
det
Related Links
g
•
"Quick and Easy Setup" p.12
•
"Easy Wireless Projection" p.12
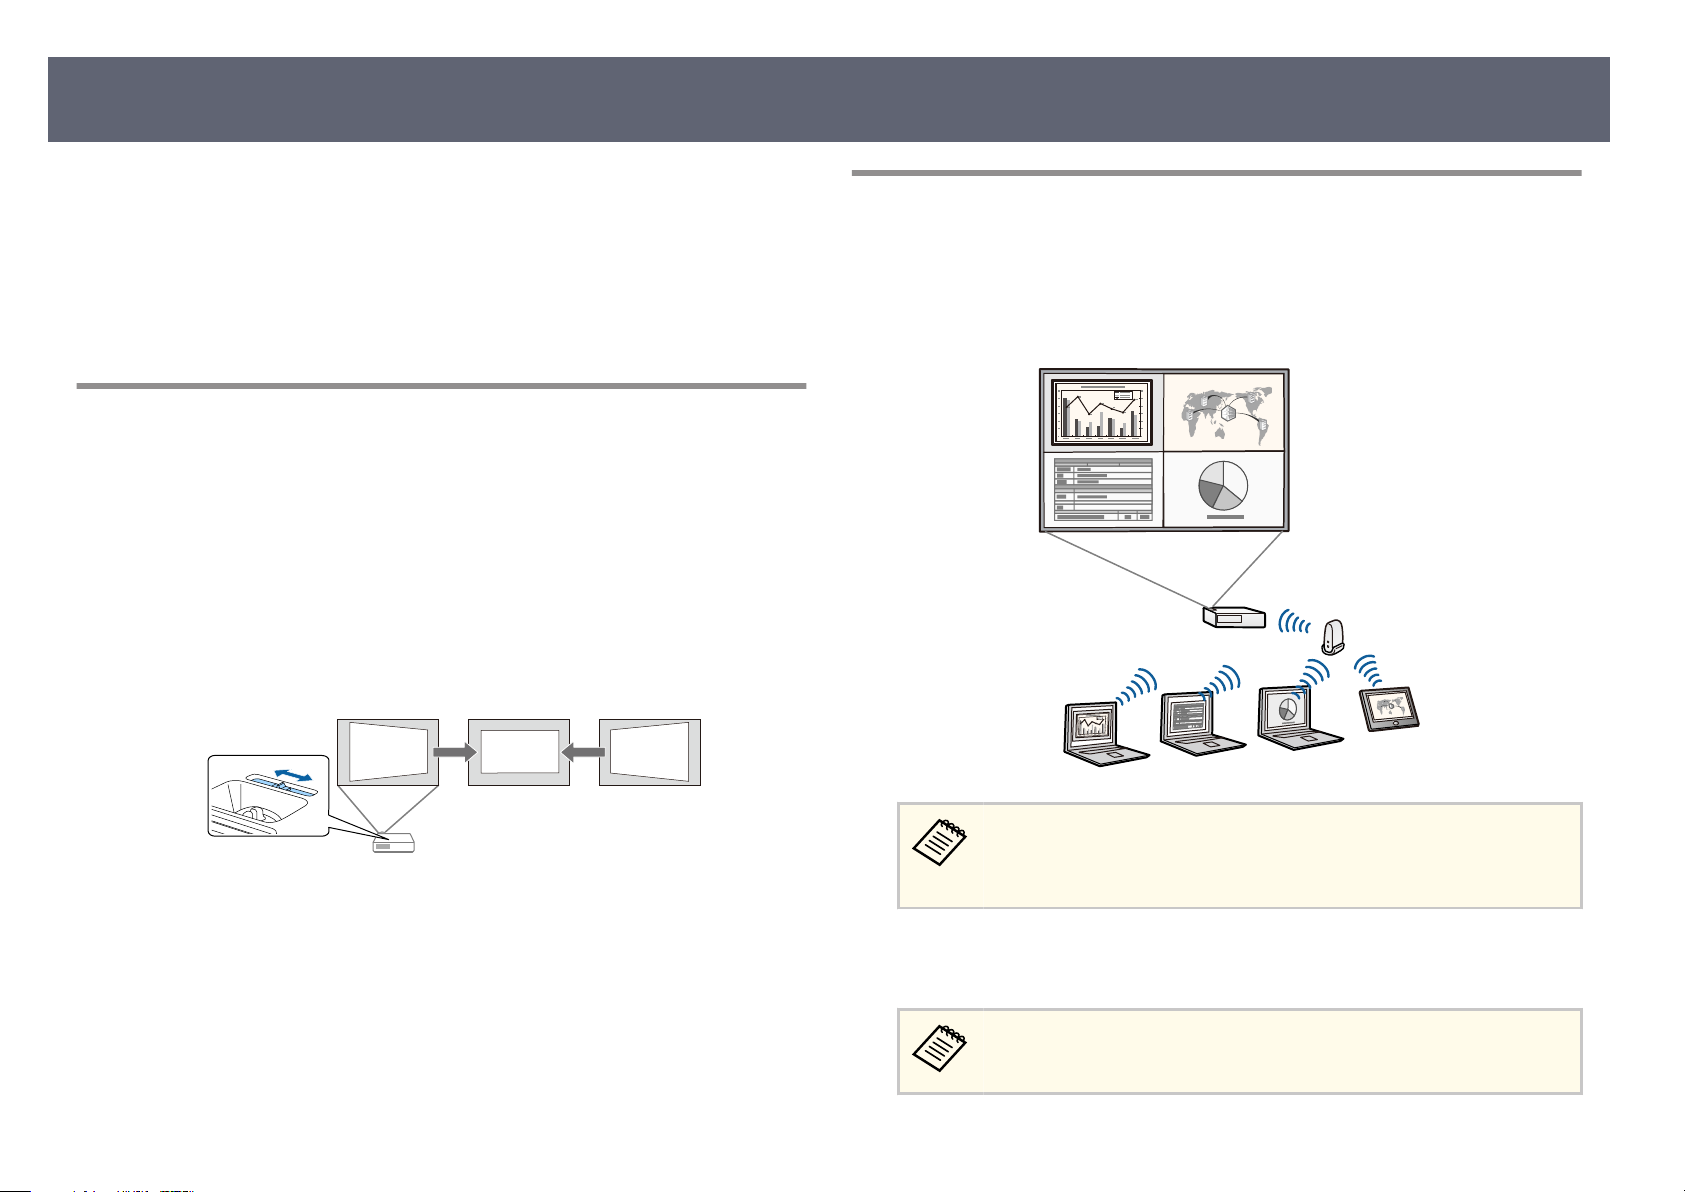
Quick and Easy Setup
•
Direct Power On feature to turn on the projector as soon as you plug it in.
•
Auto Power On feature to turn on the projector when the projector detects an
image signal from the port you specied as the Auto Power On source.
•
Home screen feature to easily select an input source and useful functions.
•
Automatic vertical keystone correction always displays a rectangular screen
( Auto V-Keystone).
•
Horizontal keystone slider allows you to quickly correct horizontal distortion
in the projected image.
Easy Wireless Projection
•
Eps
on iProjection (Windows/Mac) to project up to four images at the same
time by splitting the projected screen. You can project images from computers
on the network, or from smartphones or tablet devices.
See the Epson iProjection Operation Guide (Windows/Mac) for details.
Related Links
g
•
"T
ning On the Projector" p.37
ur
•
"Projector Setup Settings - Extended Menu" p.111
•
"Correcting the Image Shape with the Horizontal Keystone Slider" p.46
•
"Auto V-Keystone" p.46
•
"List of Functions" p.9
You can download the necessary so
following Web site:
http://www.epson.com/
•
Epson iProjection (iOS/Android) to connect your projector and mobile
device wirelessly using the app available on the App Store or Google Play.
Any fees incurred when communicating with the App Store or Google
ay are the responsibility of the customer.
Pl
ware and manuals from the
Page 13
Projector Features
•
on iProjection (Chromebook) to connect your projector and
Eps
Chromebook device wirelessly using the app available on the Chrome Web
Store.
Any fees incurred when communicating with the Chrome Web Store
are t
he responsibility of the customer.
Related Links
g
•
•
g the Projector on a Network" p.83
"Usin
"List of Functions" p.9
13
Page 14
Projector Parts and Functions
14
e following sections explain the projector parts and their functions.
ll of the features in this guide are explained using illustrations of EB-FH08
A
unless otherwise mentioned.
Related Links
g
•
"Projector Parts - Front" p.14
•
"Projector Parts - Rear" p.15
•
"Projector Parts - Base" p.17
•
"Projector Parts - Control Panel" p.17
•
"Projector Parts - Remote Control" p.19
•
"List of Functions" p.9
Projector Parts - Front
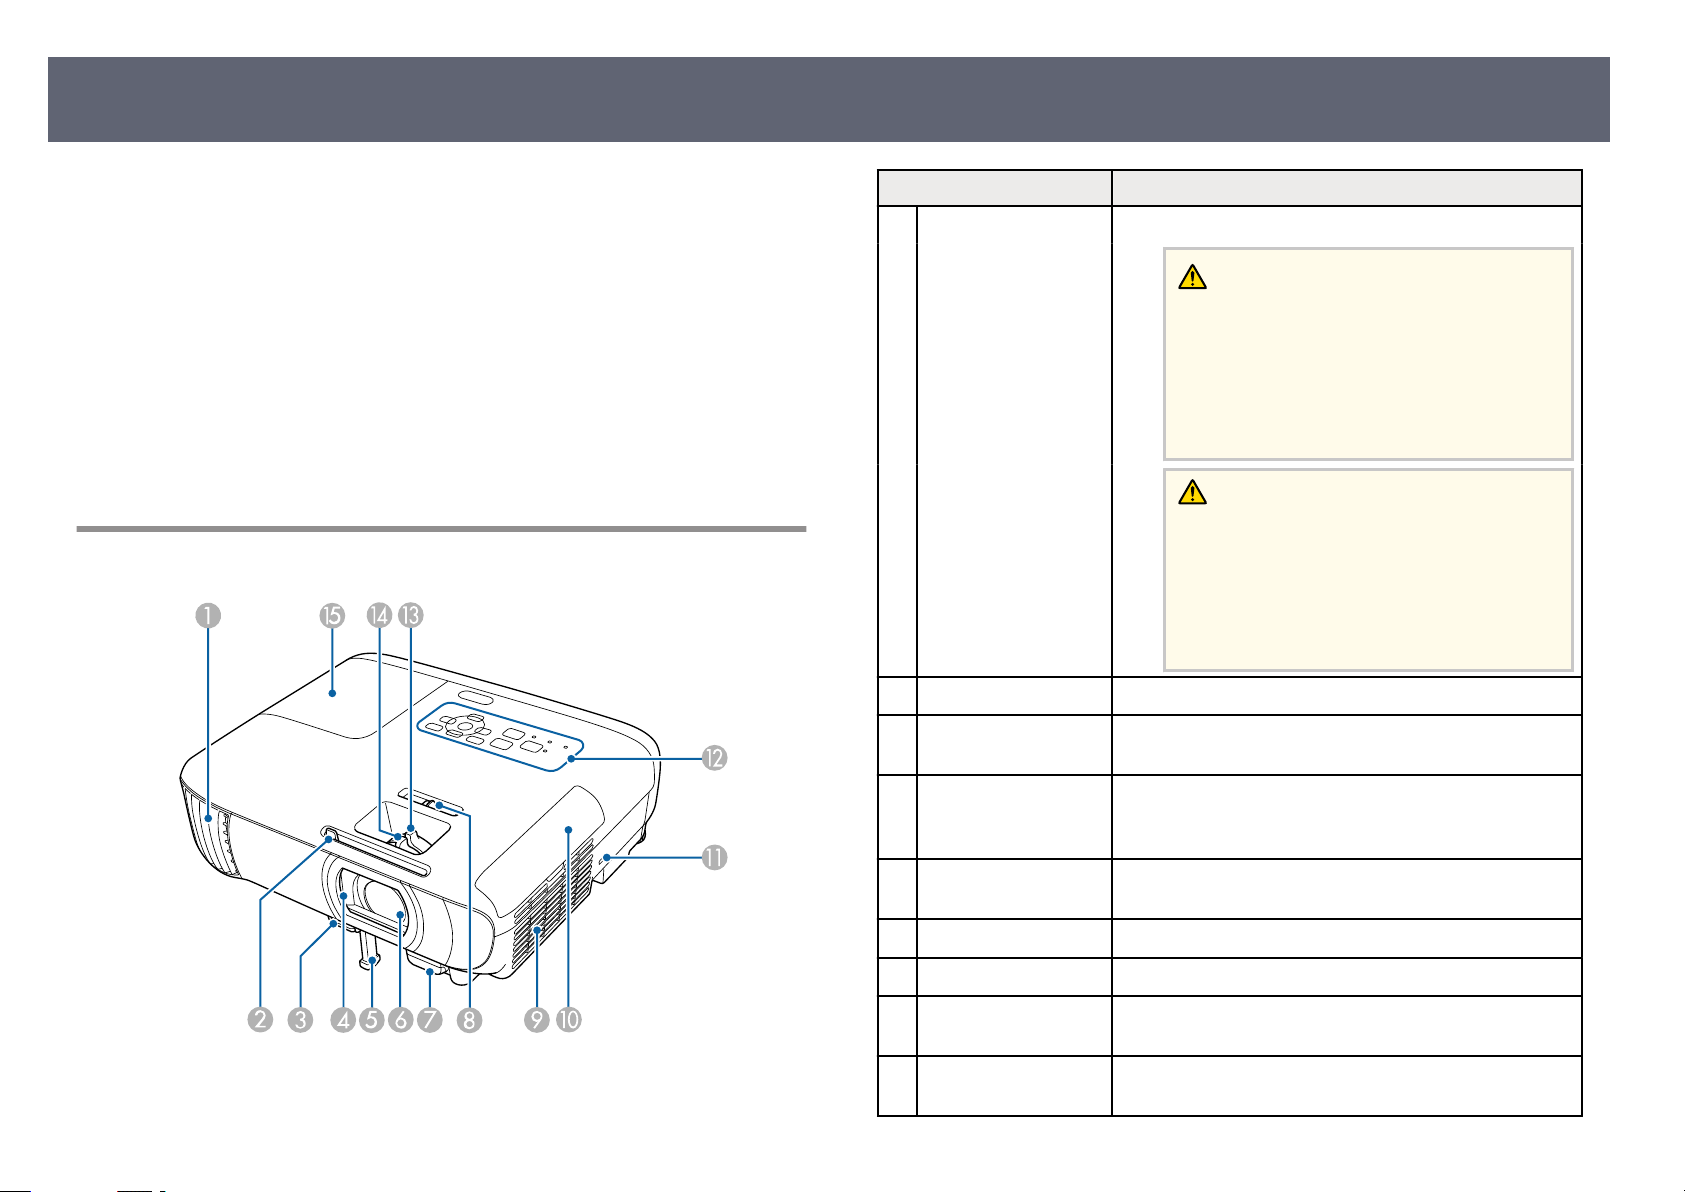
Name Function
Air exhaust vent Exhaust vent for air used to cool the projector internally.
A
Warning
Do n
ot look into the vents. If the lamp
explodes, gases may escape and small
fragments of glass may be scattered which
could cause an injury. Contact a doctor if any
fragments of broken glass are inhaled or get
into the eyes or mouth.
Caution
Whi
le projecting, do not put your face or hands
near the air exhaust vent, and do not place
objects that may become warped or damaged
by heat near the vent. Hot air from the air
exhaust vent could cause burns, warping, or
accidents to occur.
A/V Mute slide lever Slide the knob to open and close the lens cover.
B
Foot release lever Press the foot release lever to extend and retract the
C
fr
ont adjustable foot.
Lens cover Close when not using the projector to protect the lens.
D
Front adjustable foot When the projector is set up on a surface such as a desk,
E
Lens Images are projected from here.
F
Remote receiver Receives signals from the remote control.
G
Horizontal keystone
H
slider
Air intake vent (air
I
lt
er)
By c
losing it during projection you can hide the image
and the sound.
exten
d the foot to adjust the position of the image.
C
orrects horizontal distortion in the projected image.
Takes in air to cool the projector internally.
Page 15
Projector Parts and Functions
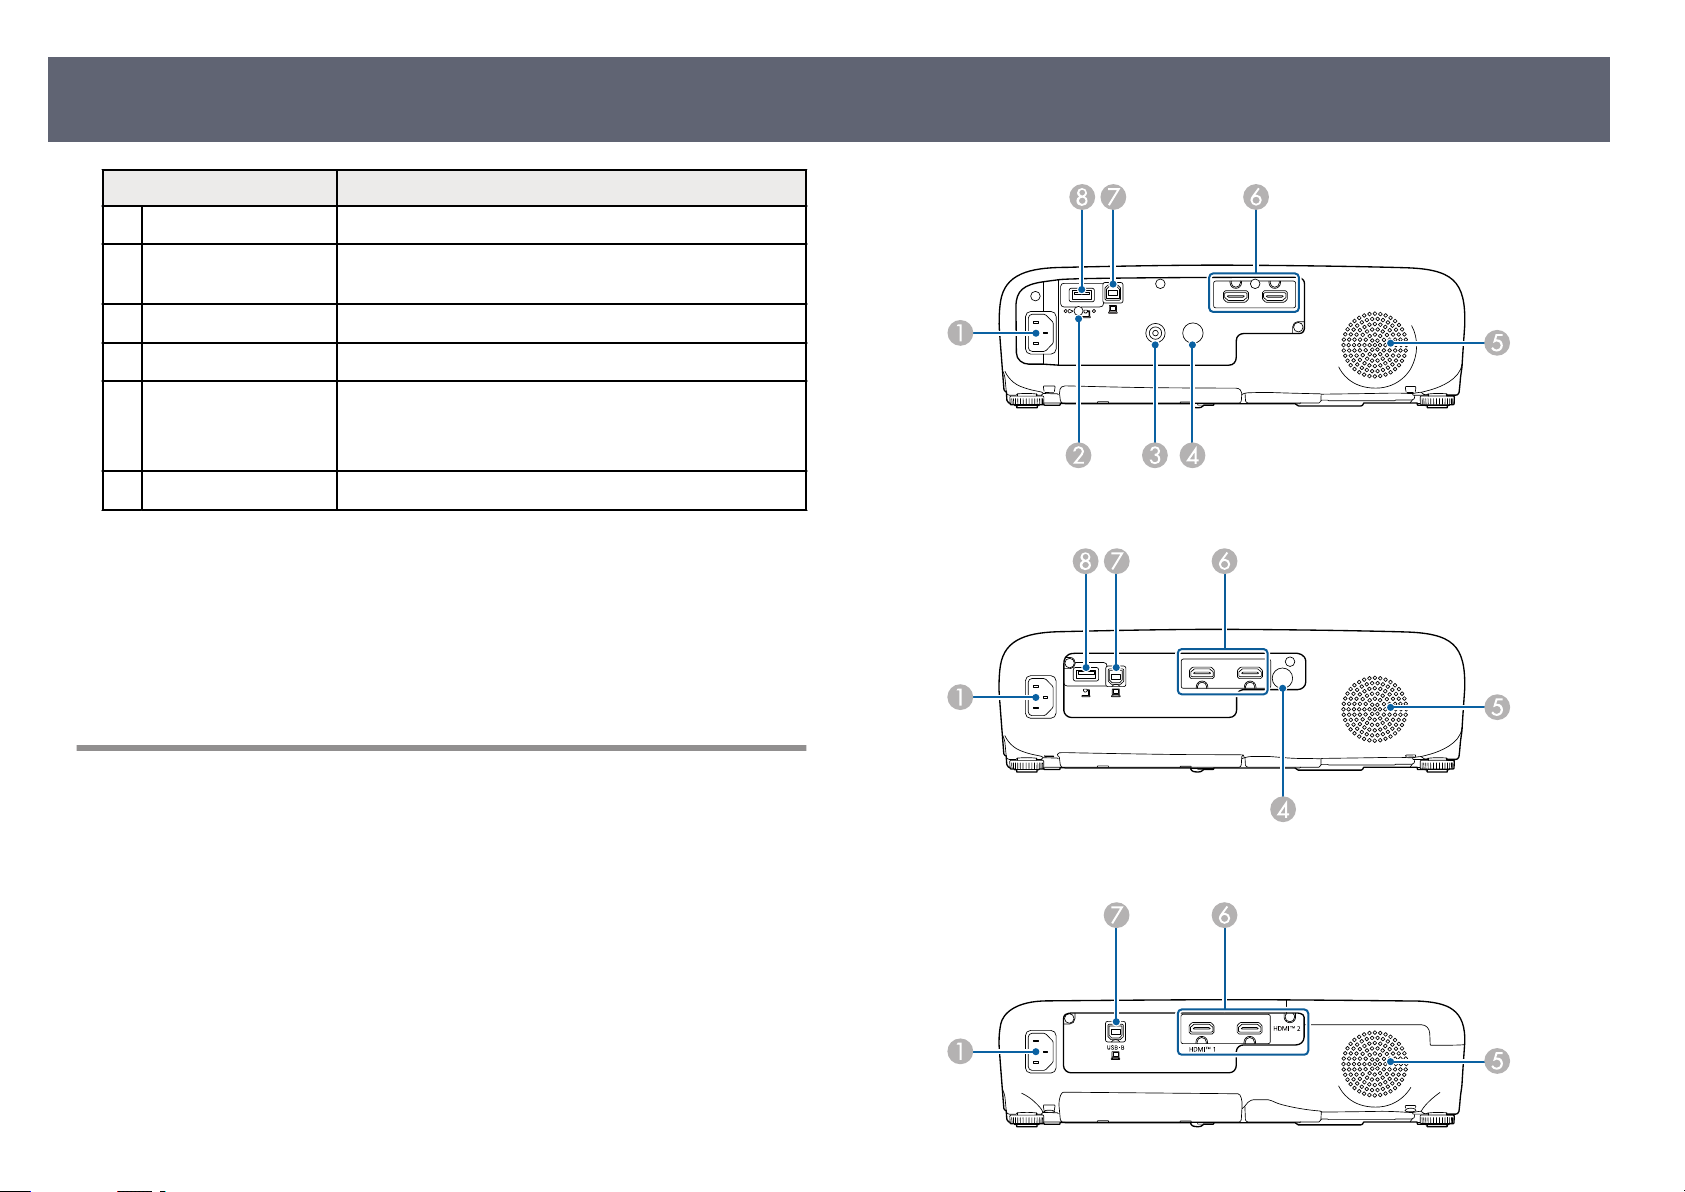
Name Function
15
Air lter cover Open to access the air lt
J
Security slot e security slot is compatible with the Microsaver
K
Control panel Operates the projector.
L
Zoom ring Adjusts the image size.
M
Focus ring Adjusts the image focus.
N
Lamp cover Open to access the projector's lamp.
O
Related Links
g
•
"Resizin
•
"Focusing the Image Using the Focus Ring" p.51
•
"Projector Indicator Status" p.142
•
"Correcting the Image Shape with the Horizontal Keystone Slider" p.46
•
"List of Functions" p.9
g the Image with the Zoom Ring" p.50
S
ecurity System manufactured by Kensington.
e sh
ape may vary depending on the model of your
projector.
er.
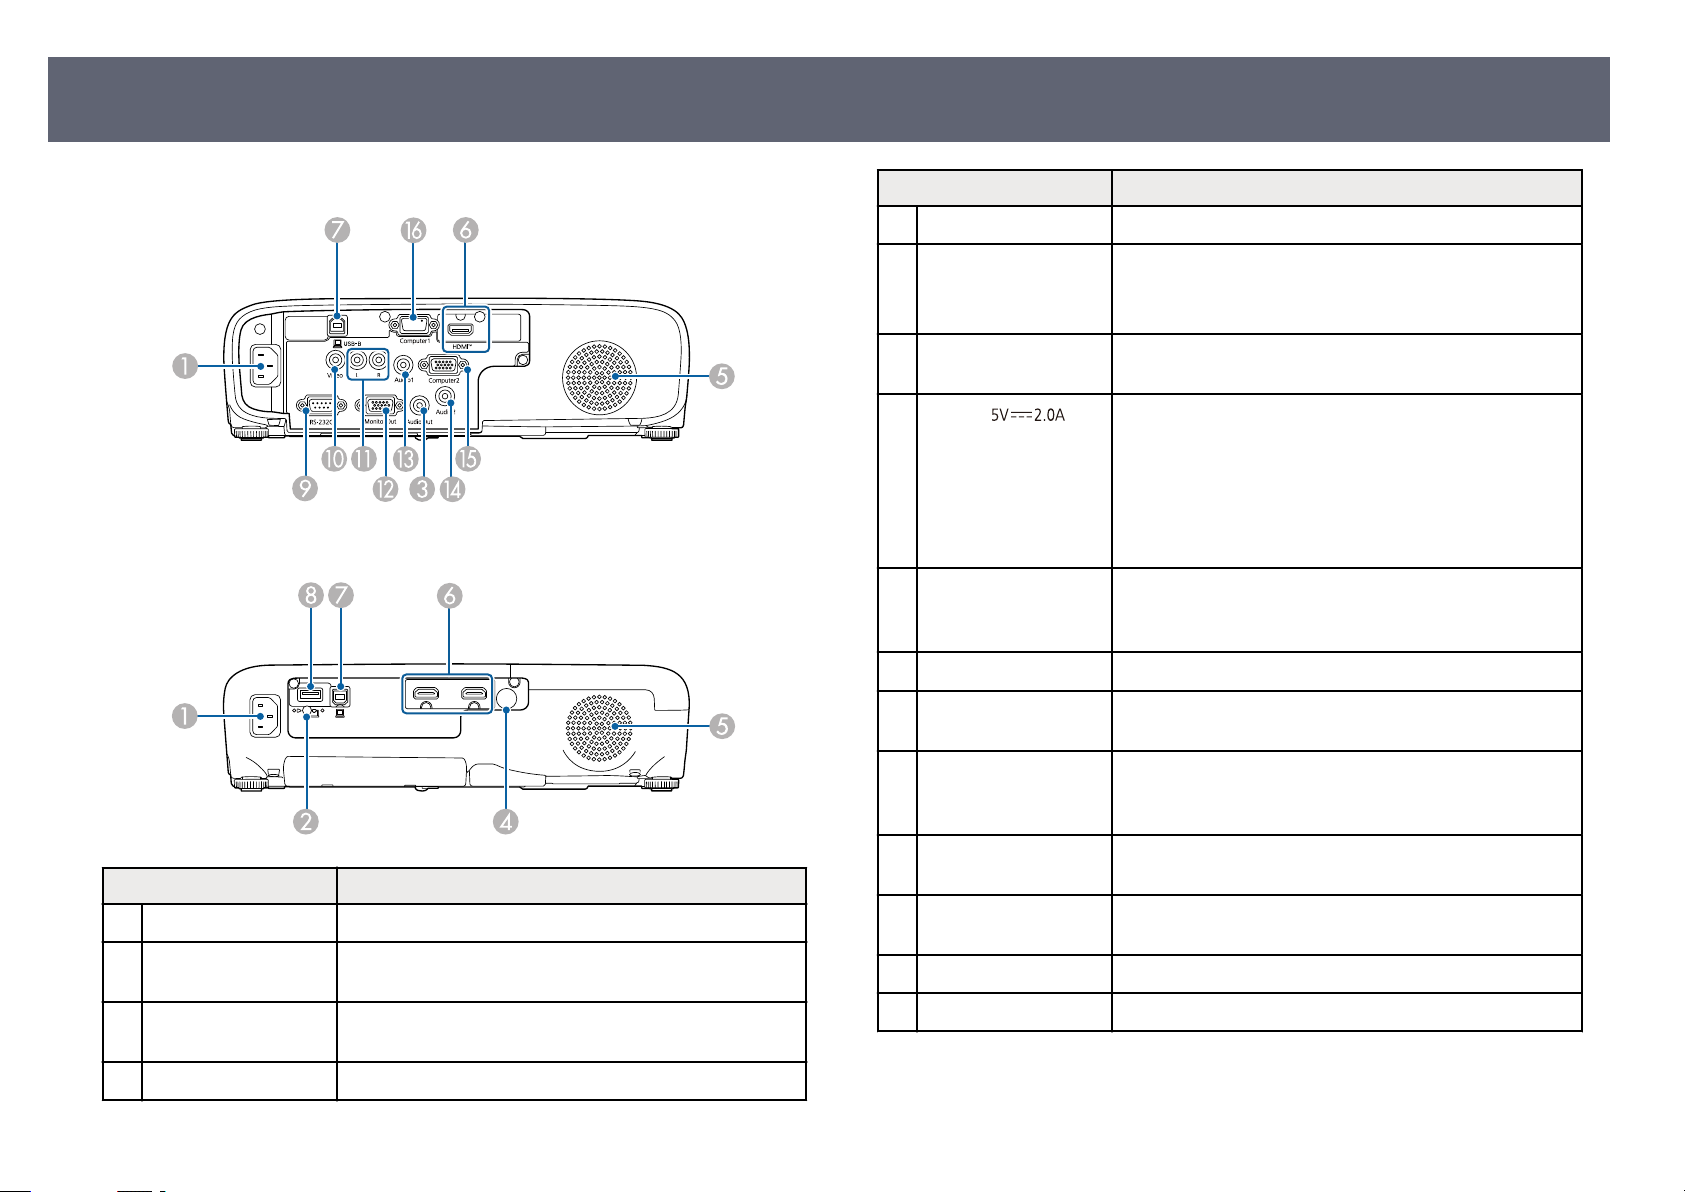
Projector Parts - Rear
EB-W55/EB-EA55
EB-FH08
EB-W53/EB-E12/EB-EA12
Page 16
Projector Parts and Functions
16
EB-E24/EB-EA24
EB-X52
Name Function
Speaker Outputs audio.
E
HDMI1, HDMI2
F
ports
HDMI port
USB-B port Connects a USB cable to the computer to project
G
USB-A (
H
po
rt
RS-232C port Connects an RS-232C cable to control the projector
I
Video port Inputs composite video signals from video sources.
J
L-Audio-R ports Inputs audio from equipment connected to the Video
K
Inputs video signals from HDMI compatible video
equipment and computers.
is projector is compatible with HDCP.
com
puter images.
Connects a USB memory device or a digital camera and
)
projects movies or images using PC Free.
Connects the optional document camera.
Connects the wireless LAN module.
Provides a connection for a commercially available
streaming media player allowing you to power it.
from a computer. (You do not need to use this port
normally.)
po
rt.
Name Function
Power inlet Connects the power cord to the projector.
A
Wireless LAN module
B
xin
screw
g
Audio Out port Outputs audio from the current input source to an
C
Remote receiver Receives signals from the remote control.
D
Secures the wireless LAN module cover.
external speaker.
Monitor Out port Outputs analog RGB signals input from the Computer1
L
Audio 1 port Inputs audio from equipment connected to the
M
Audio 2 port Inputs audio from equipment connected to the
N
Computer2 port Inputs image signals from a computer.
O
Computer1 port Inputs image signals from a computer.
P
Related Links
g
•
"Li
st of Functions" p.9
po
rt to an external monitor. You cannot output signals
input from other ports.
Computer1 port.
Co
mputer2 port.
Page 17
Projector Parts and Functions
17
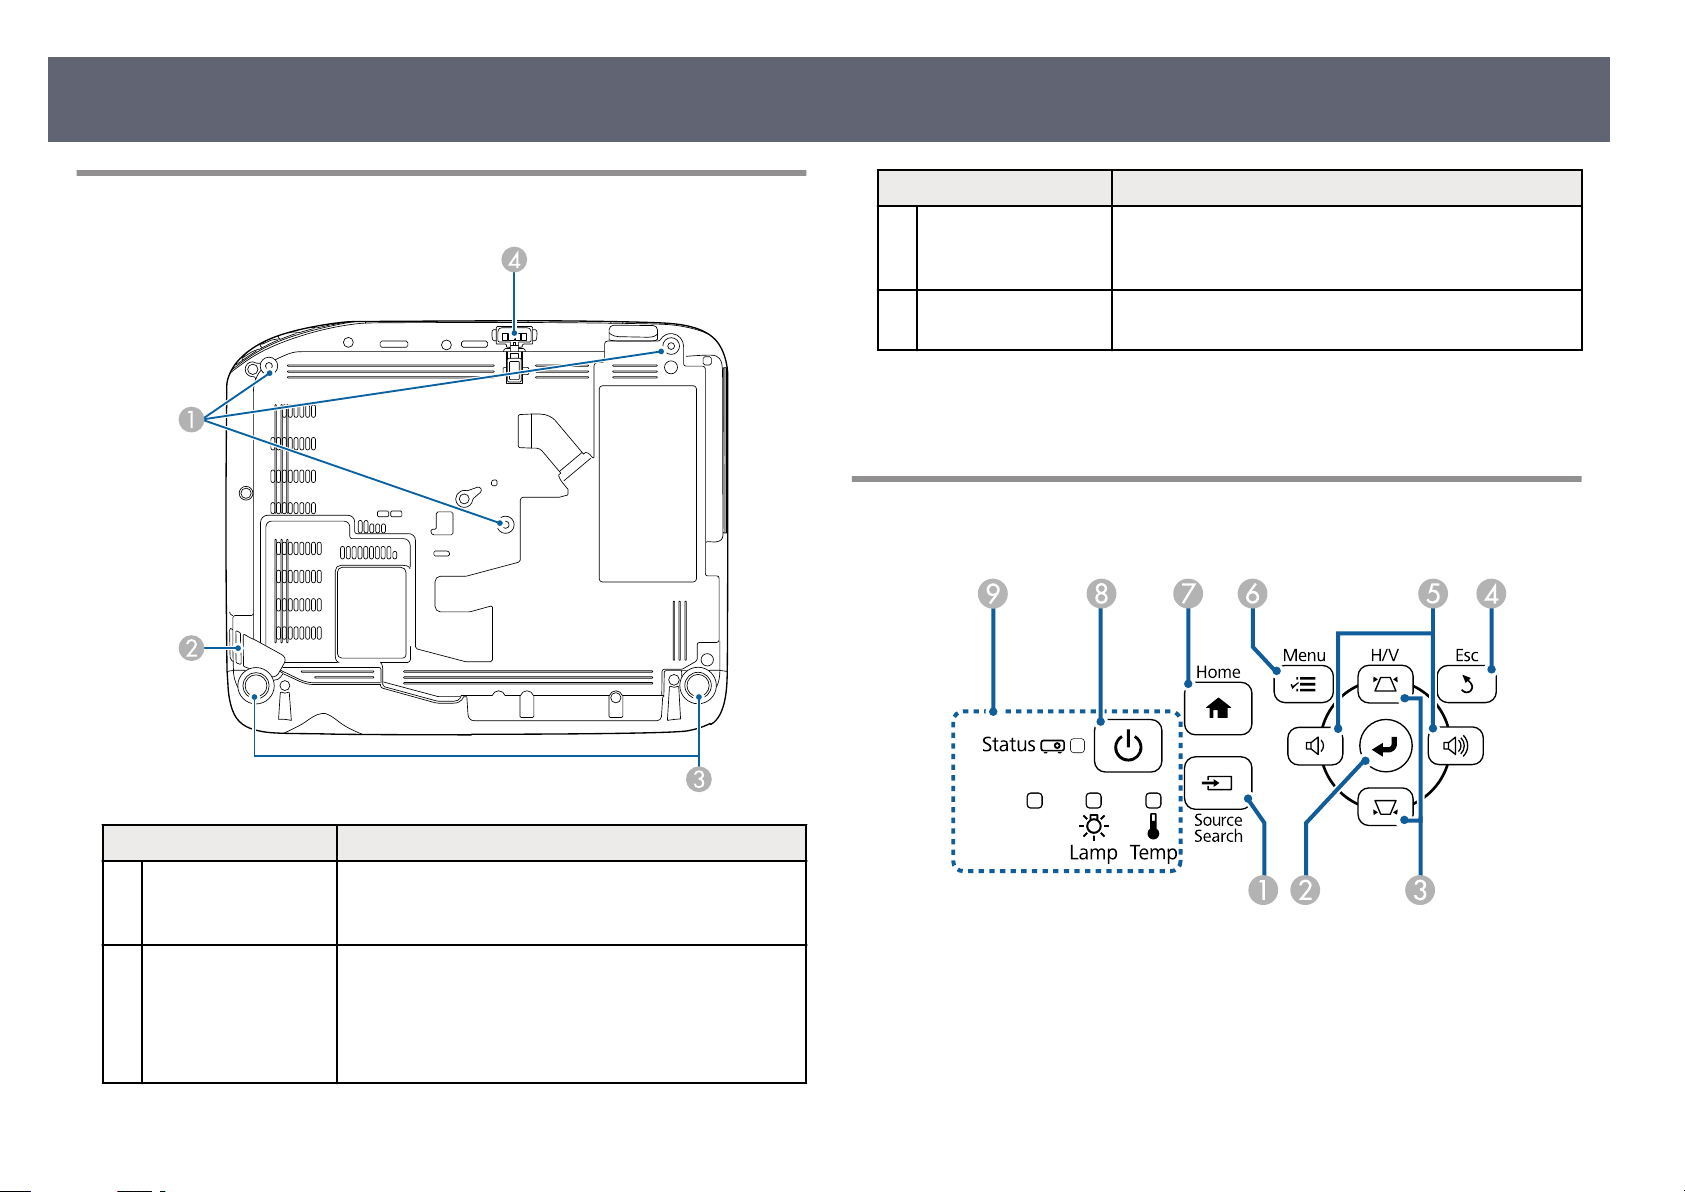
Projector Parts - Base
Name Function
Rear feet When the projector is set up on a surface such as a
C
Front adjustable foot When the projector is set up on a surface such as a desk,
D
Related Links
g
•
"In
stalling a Security Cable" p.81
desk, turn to extend and retract the feet to adjust the
horizontal tilt.
extend the foot to adjust the position of the image.
Projector Parts - Control Panel
EB-FH08/EB-X52
Name Function
Ceiling mount xin
A
oints (three points)
p
Security cable
B
att
achment point
Use all the xing points to attach the optional ceiling
g
mount here when suspending the projector from a
ceiling.
Pass a commercially available wire lock through here
and lock it in place.
You can also attach the optional safety wire here to
prevent the projector from falling from the ceiling or
wall.
EB-W55/EB-EA55
Page 18
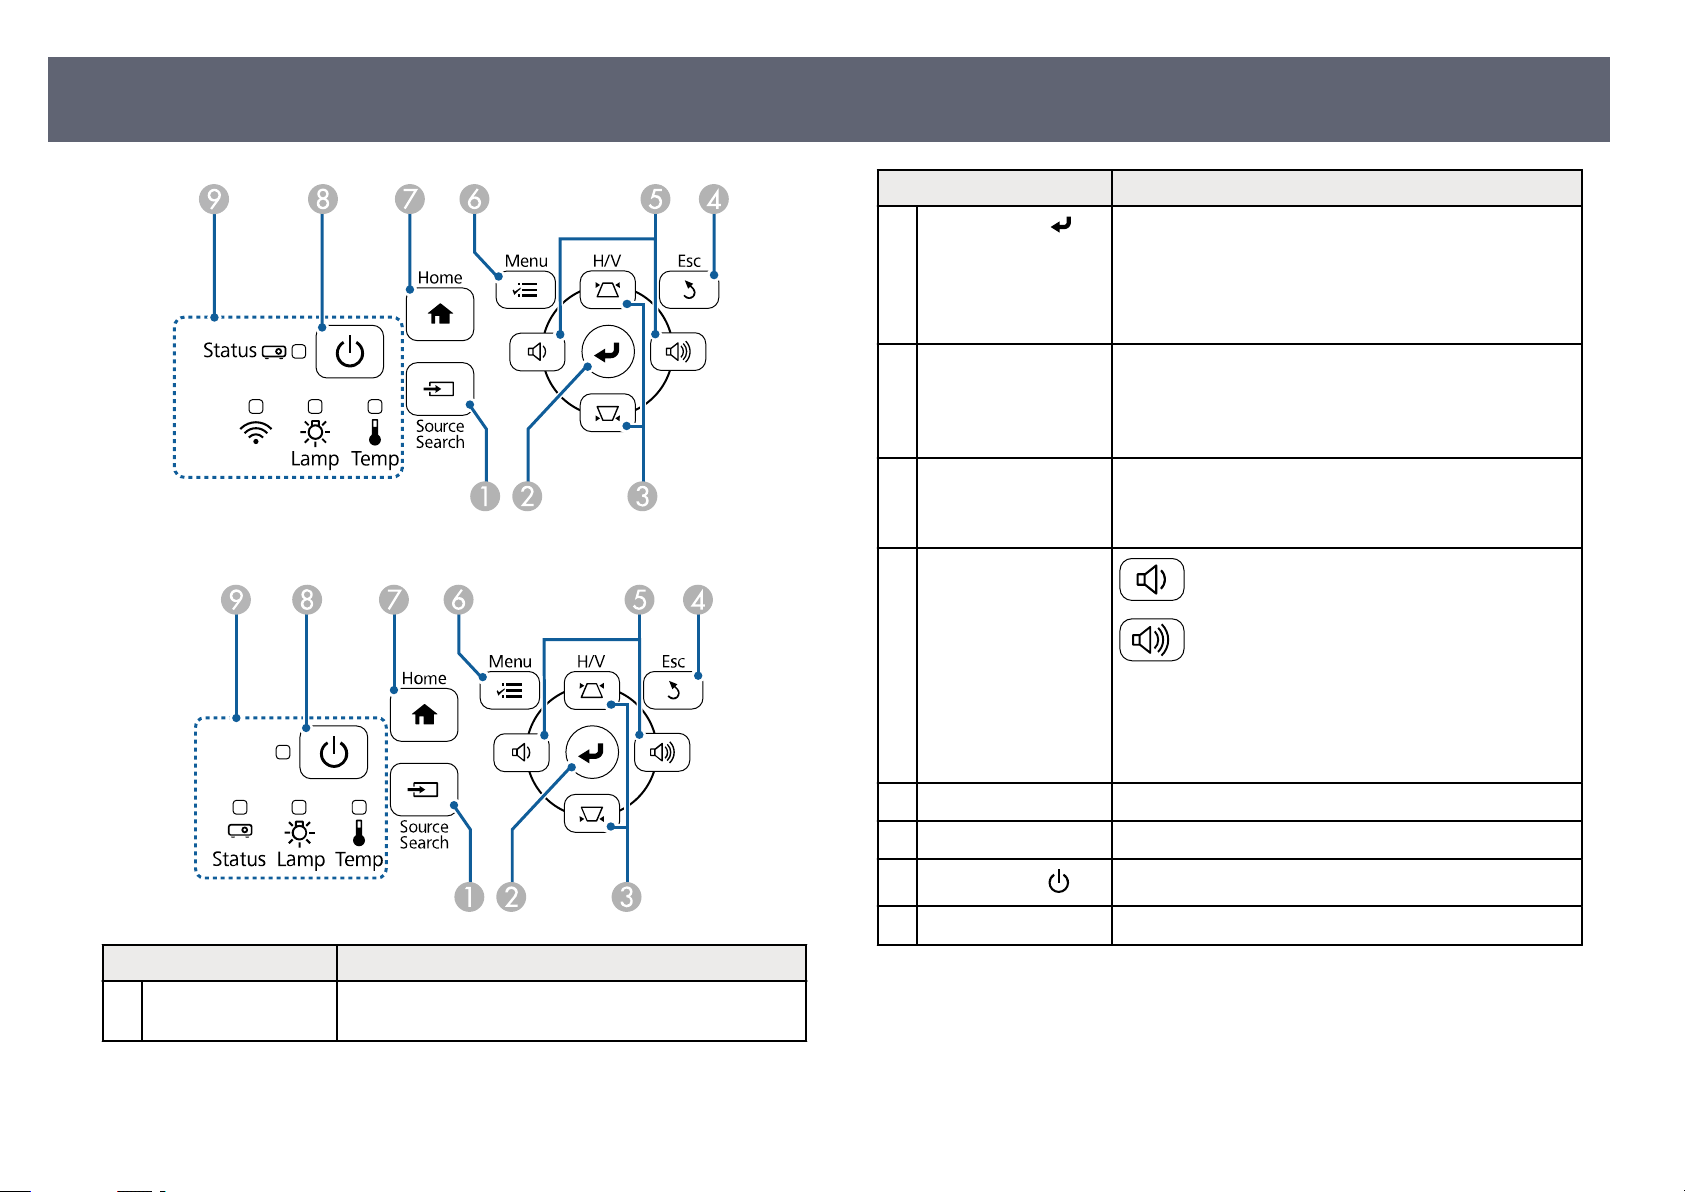
Projector Parts and Functions
18
Name Function
EB-W53/EB-E24/EB-EA24/EB-E12/EB-EA12
[Enter] button [ ]
B
Keystone adjustment
C
buttons and arrow
buttons
[Esc] button Stops the current function.
D
Volume buttons and
E
arrow buttons
[Menu] button Displays and closes the projector's menu.
F
Enters the current selection and moves to the next level
while displaying the projector's menu or help.
Optimizes Tracking, Sync., and Position in the
projector's Signal menu while projecting an analog RGB
signal from the Computer port.
Displays the Keystone screen allowing you to correct
keystone distortion.
Selects menu items while displaying the projector's
menu or help.
Mo
ves back to the previous menu level while displaying
the projector's menu.
: Decreases the volume.
: Increases the volume.
rrects keystone distortion in the horizontal direction
Co
when the Keystone screen is displayed.
Selects menu items while displaying the projector's
menu or help.
Name Function
[Source Search]
A
button
Switches to the next input source.
[Home] button Displays and closes the Home screen.
G
H
Power button [
I
ndicators Indicates the projector's status.
I
Related Links
g
•
"Input Signal Settings - Signal Menu" p.108
•
"Home Screen" p.38
•
"Projector Indicator Status" p.142
•
"Correcting the Image Shape with the Keystone Buttons" p.47
Turns the projector on or o.
]
Page 19
Projector Parts and Functions
19
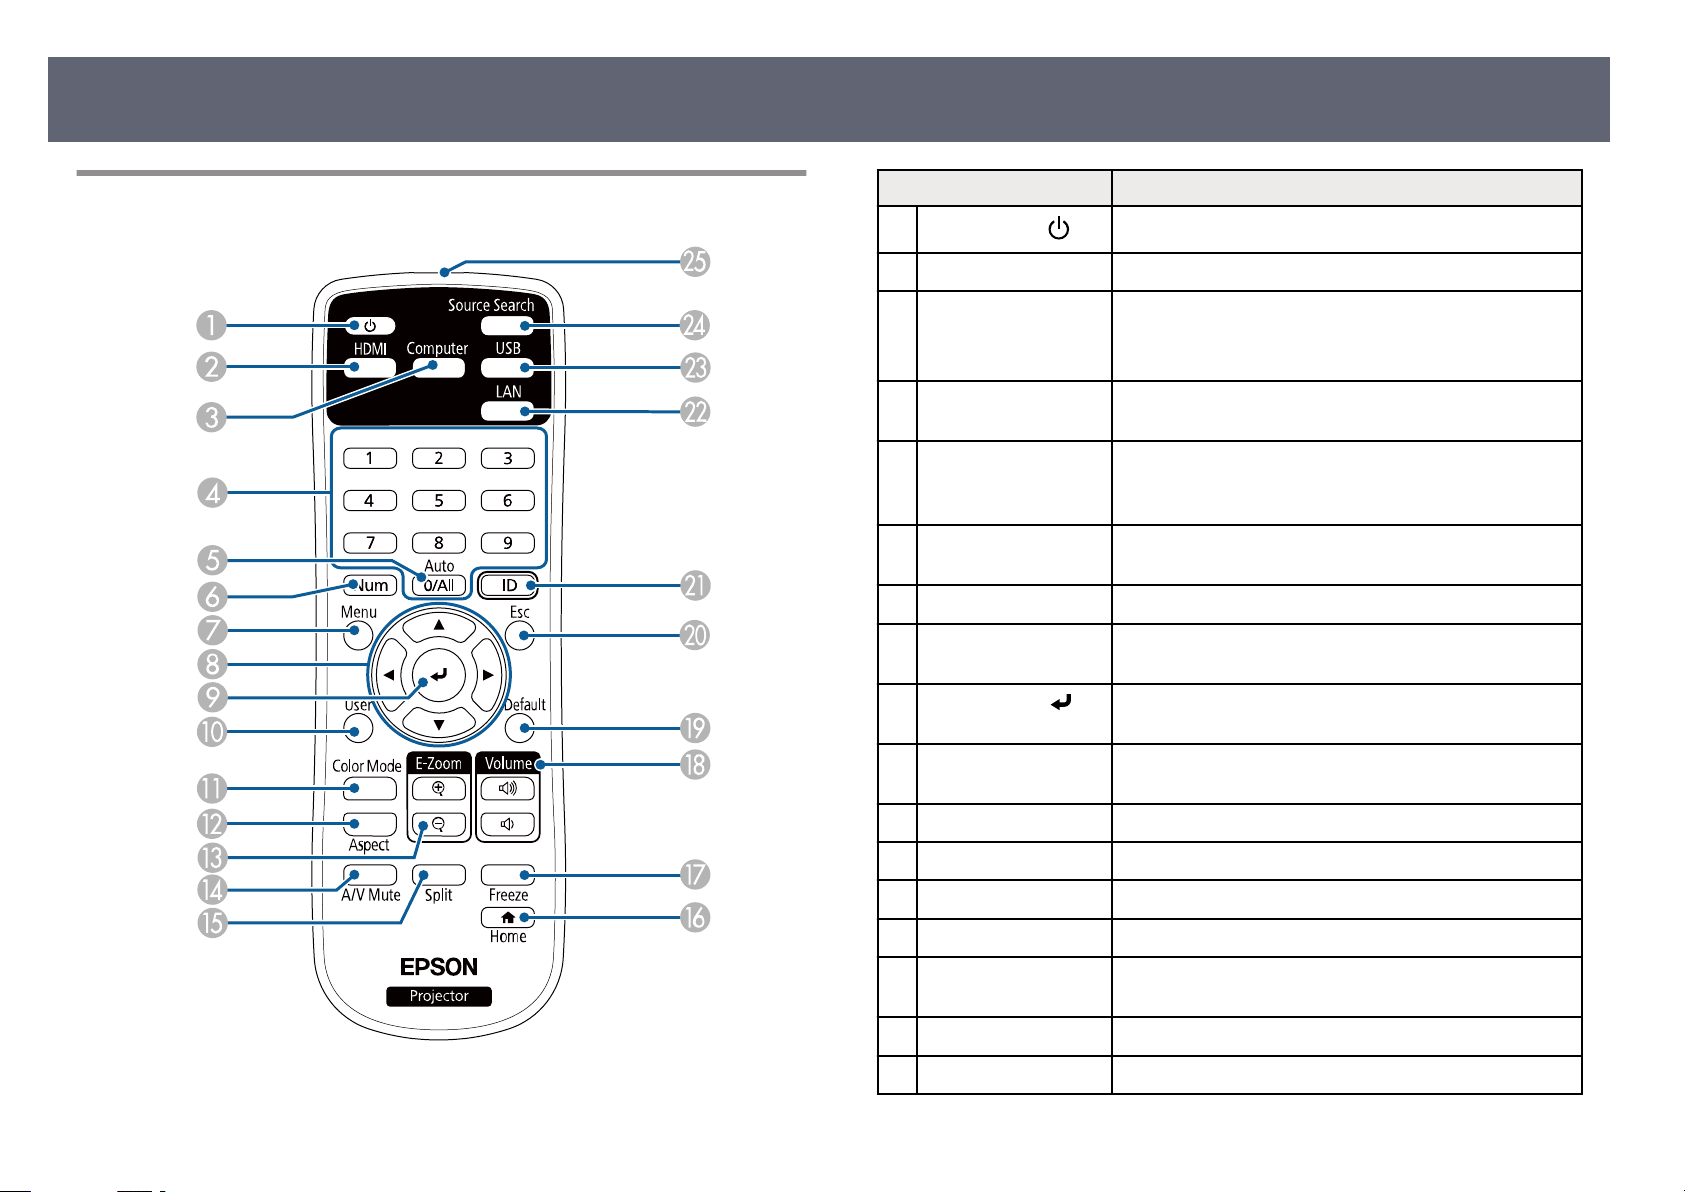
Projector Parts - Remote Control
Name Function
A
Power button [
[HDMI] button Switches the image source between the HDMI ports.
B
[Computer] button Switches the image source to the Computer ports.
C
Numeric buttons Enters numbers in the projector's menu while holding
D
[Auto] button Optimizes Tracking, Sync., and Position in the
E
[Num] button Hold down this button to enter numbers using the
F
[Menu] button Displays and closes the projector's menu.
G
Arrow buttons Selects menu items while displaying the projector's
H
[Enter] button [
I
[User] button Performs settings assigned in the User Button setting in
J
Turns the projector on or o
]
button may not be available depending on the
is
model you are using.
down the [Num] button.
p
rojector's Signal menu while projecting an analog RGB
signal from the Computer ports.
numeric buttons.
men
u.
Enters the current selection and moves to the next level
]
w
le displaying the projector's menu.
hi
the projector's Settings menu.
.
[Color Mode] button Changes the color mode.
K
[Aspect] button Changes the aspect mode.
L
[E-Zoom] +/– buttons Resizes the projected image.
M
[A/V Mute] button Turns the video and audio on or o
N
[Split] button Projects two images from dieren
O
[Home] button Displays and closes the Home screen.
P
[Freeze] button Pauses or resumes images.
Q
simultaneously by splitting the projected screen.
temporarily.
t image sources
Page 20
Projector Parts and Functions
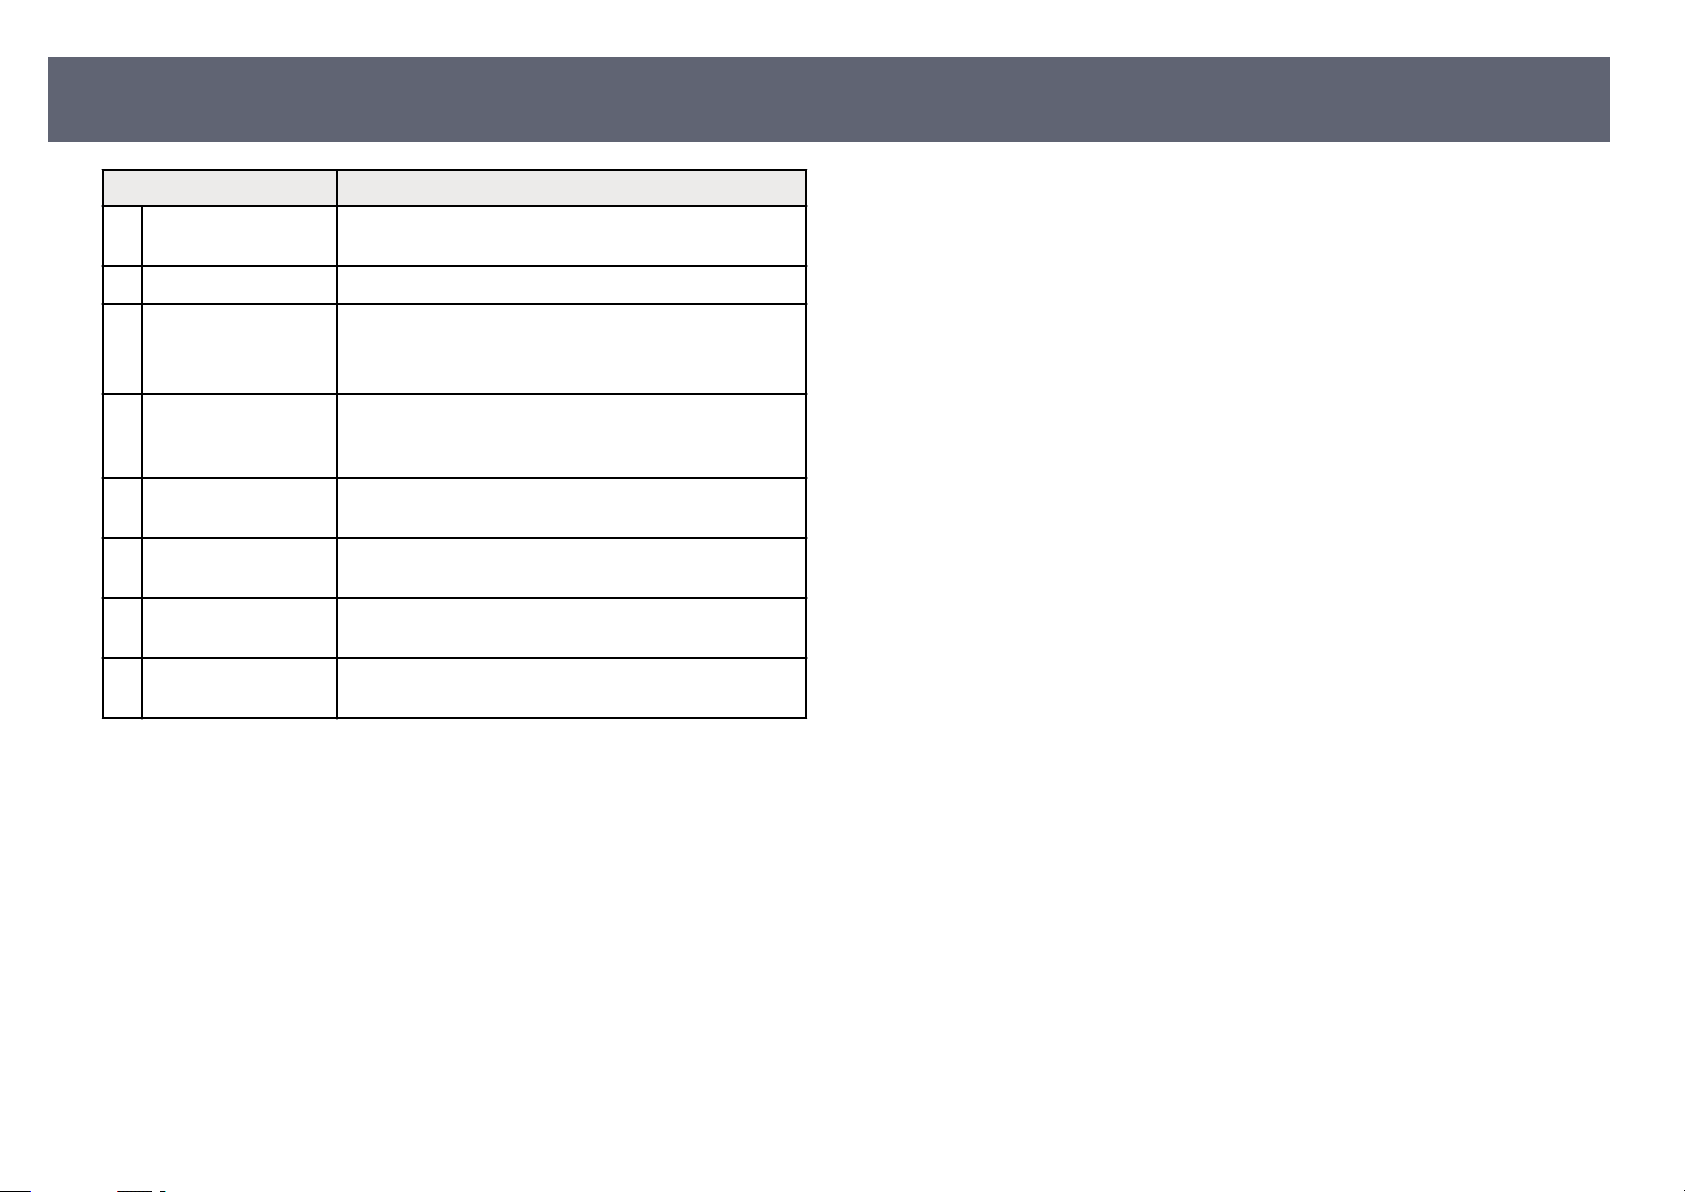
Name Function
20
[Volume] up/down
R
S
T
U
V
W
X
Y
g
•
•
•
•
•
•
•
•
•
ttons
bu
[Default] button Returns the selected setting to its default value.
[Esc] button Stops the current function.
[ID] button Hold down this button and press the numeric buttons to
[LAN] button Switches the image source between the network
[USB] button Switches the image source between the USB Display and
[Source Search]
bu
tton
Remote control light
emit
ting area
Related Links
put Signal Settings - Signal Menu" p.108
"In
"Image Aspect Ratio" p.53
"Projector Setup Settings - Extended Menu" p.111
"Projecting a PC Free Presentation" p.63
"Projecting Two Images Simultaneously" p.60
"Adjusting Image Quality (Color Mode)" p.56
"Using the Projector on a Network" p.83
"Connecting to a Computer for USB Video and Audio" p.26
"Home Screen" p.38
Adjusts the speaker volume.
Mo
ves back to the previous menu level while displaying
the projector's menu.
se
lect the ID for the projector you want to operate using
the remote control.
conn
ected devices.
USB-A p
Switches to the next input source.
Outputs remote control signals.
ort.
Page 21

Setting Up the Projector
llow the instructions in these sections to set up your projector.
Fo
Related Links
g
•
"Projector Placement" p.22
•
"Projector Connections" p.25
•
"Installing Batteries in the Remote Control" p.33
•
"Remote Control Operation" p.34
•
"Opening the Lens Cover" p.35
Page 22
Projector Placement
22
You can place the projector on almost any at sur
face to project an image.
You can also install the projector in a ceiling mount if you want to use it in
a xed location. An optional ceiling mount is required when suspending the
projector from a ceiling.
Note the following points when selecting a projector location:
•
Place the projector on a sturdy, level surface or install it using a compatible
mount.
•
Leave plenty of space around and under the projector for ventilation, and do
not place it on top of or next to anything that could block the vents.
•
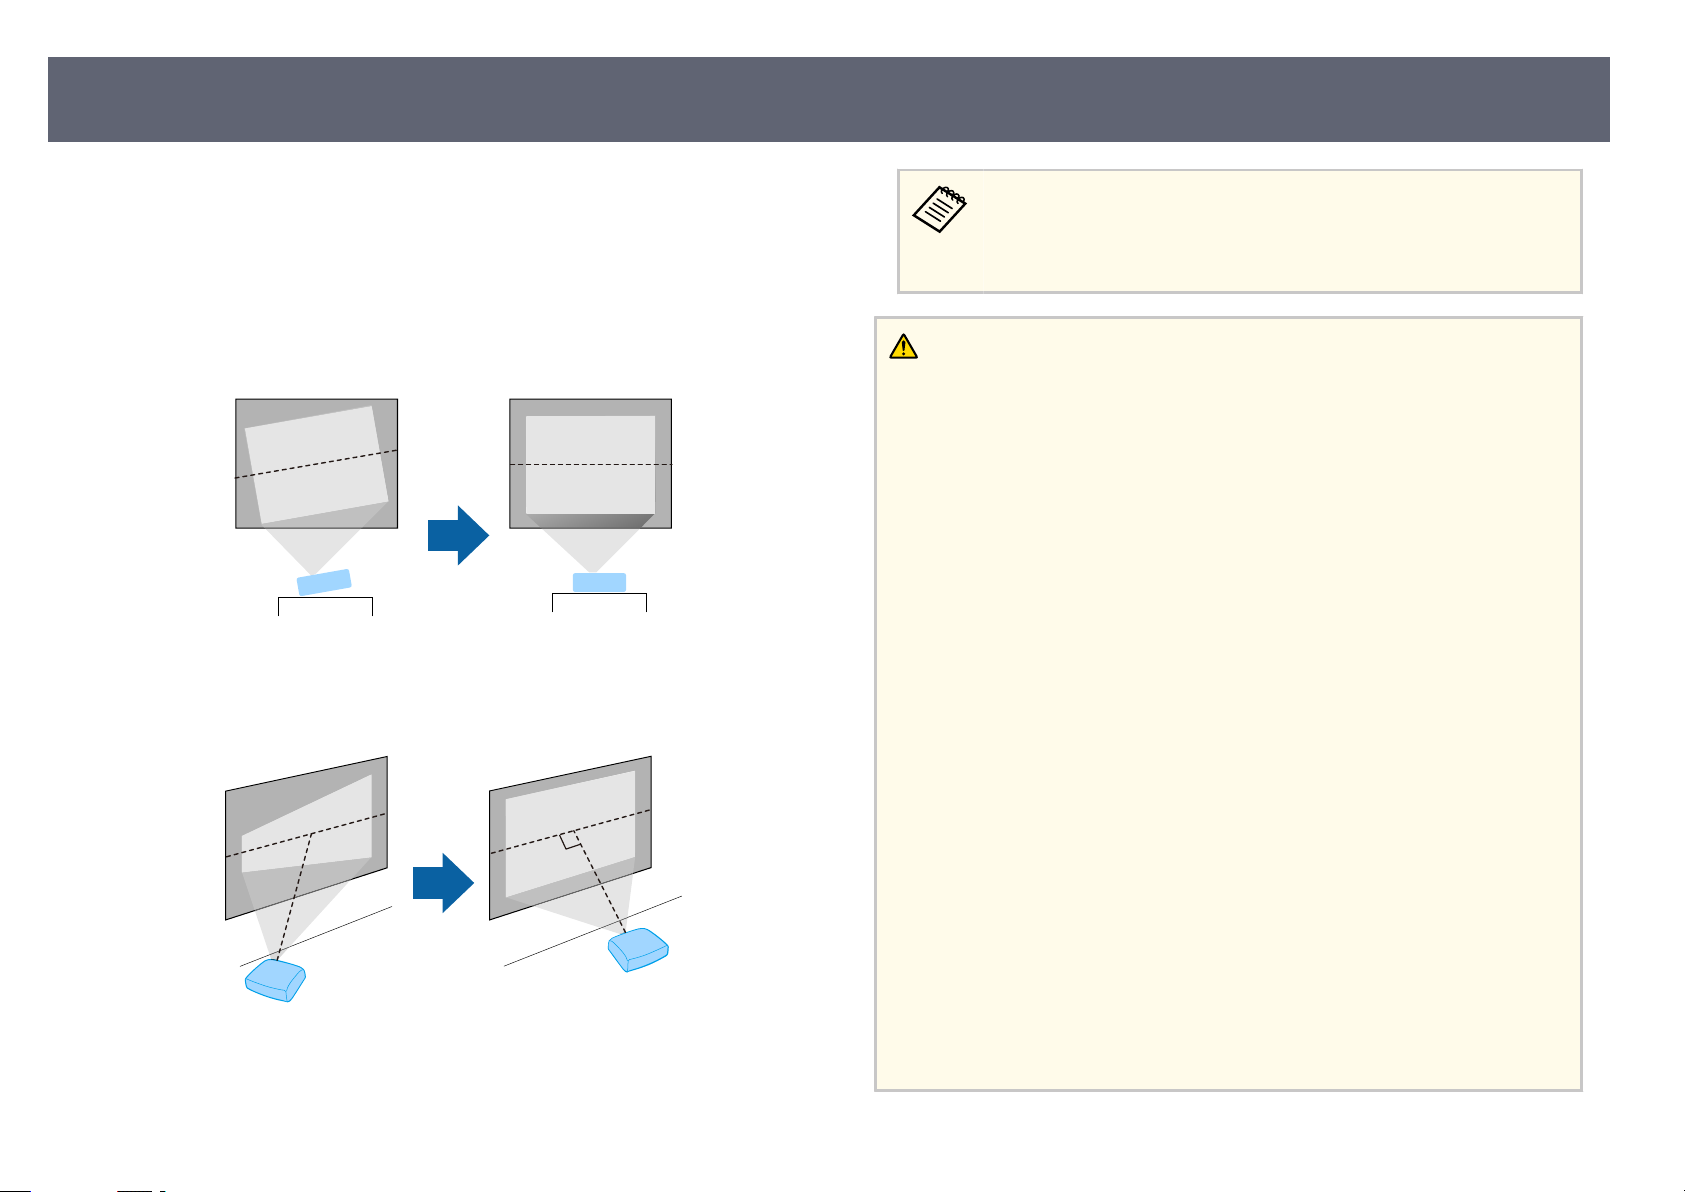
Place the projector so it squarely faces the screen, not at an angle.
If you cannot install the projector squarely facing the screen, correct
any r
esulting keystone distortion using the projector controls. For the
best quality images, we recommend adjusting the installation position
of the projector to achieve the correct image size and shape.
Warning
•
Yo
u must install a ceiling mount when suspending the projector from a ceiling. If
you do not install the projector correctly, it could fall and cause damage or injury.
•
Do not use adhesives on the ceiling mount xing points to prevent the screws
from loosening, or use lubricants, oils, or similar substances on the projector; the
projector case may crack causing it to fall from its ceiling mount. is could cause
serious injury to anyone under the ceiling mount and could damage the projector.
•
Failure to install the ceiling mount and projector may cause the projector to fall.
Secure the mount to all of the projector's ceiling mount xing points as specied
in the projector's User's Guide. Also, secure the projector and the mount using
wires that are strong enough to hold their weight. Be sure to use a mount specied
by Epson that is compatible with this projector.
•
Do not install the projector in a location subject to high levels of dust or humidity,
or in a location subject to smoke or steam. Otherwise, it could cause a re
or electric shock to occur. e projector's case could also deteriorate and be
damaged causing the projector to fall from the mount.
Examples of environments that could cause the projector to fall due to case
deterioration
•
Locations subject to excessive smoke or airborne oil particles, such as factories
or kitchens
•
Locations containing volatile solvents or chemicals, such as factories or
laboratories
•
Locations where the projector could be subjected to detergents or chemicals,
such as factories or kitchens
•
Locations in which aroma oils are oen used, such as relaxation rooms
•
Near devices that produce excessive smoke, airborne oil particles, or foam at
events
Page 23
Projector Placement
23
Warning
•
Do n
ot cover the projector's air intake or air exhaust vents. If the vents are
covered, the internal temperature could rise and cause a re.
•
Do not use or store the projector in locations where it will be subject to dust or
dirt. Otherwise, the quality of the projected image may decline, or the air lter
may become clogged, resulting in a malfunction or re.
•
Do not install the projector on an unstable surface or in a location beyond the
weight specications of the projector. Otherwise, it could fall or topple causing an
accident and injury.
•
When installing the projector in a high position, take measures to prevent falling
by using wires to ensure safety in an emergency, such as an earthquake, and to
prevent accidents. If it is not installed correctly, it could fall causing an accident
and injury.
•
Do not install in locations where salt damage could occur, or in locations subject
to corrosive gas such as sulphuric gas from hot springs. Otherwise, corrosion
could cause the projector to fall. It could also cause the projector to malfunction.
Attention
•
Do n
ot operate the projector on its side. is may cause the projector to
malfunction.
•
If you are using the projector at altitudes above 1,500 m, set the High Altitude
Mode setting to On in the projector's menu to ensure the projector's internal
temperature is regulated properly.
s Extended > Operation > High Altitude Mode
•
Try not to setup the projector in locations subject to high humidity and dust, or in
locations subject to smoke from res or tobacco smoke.
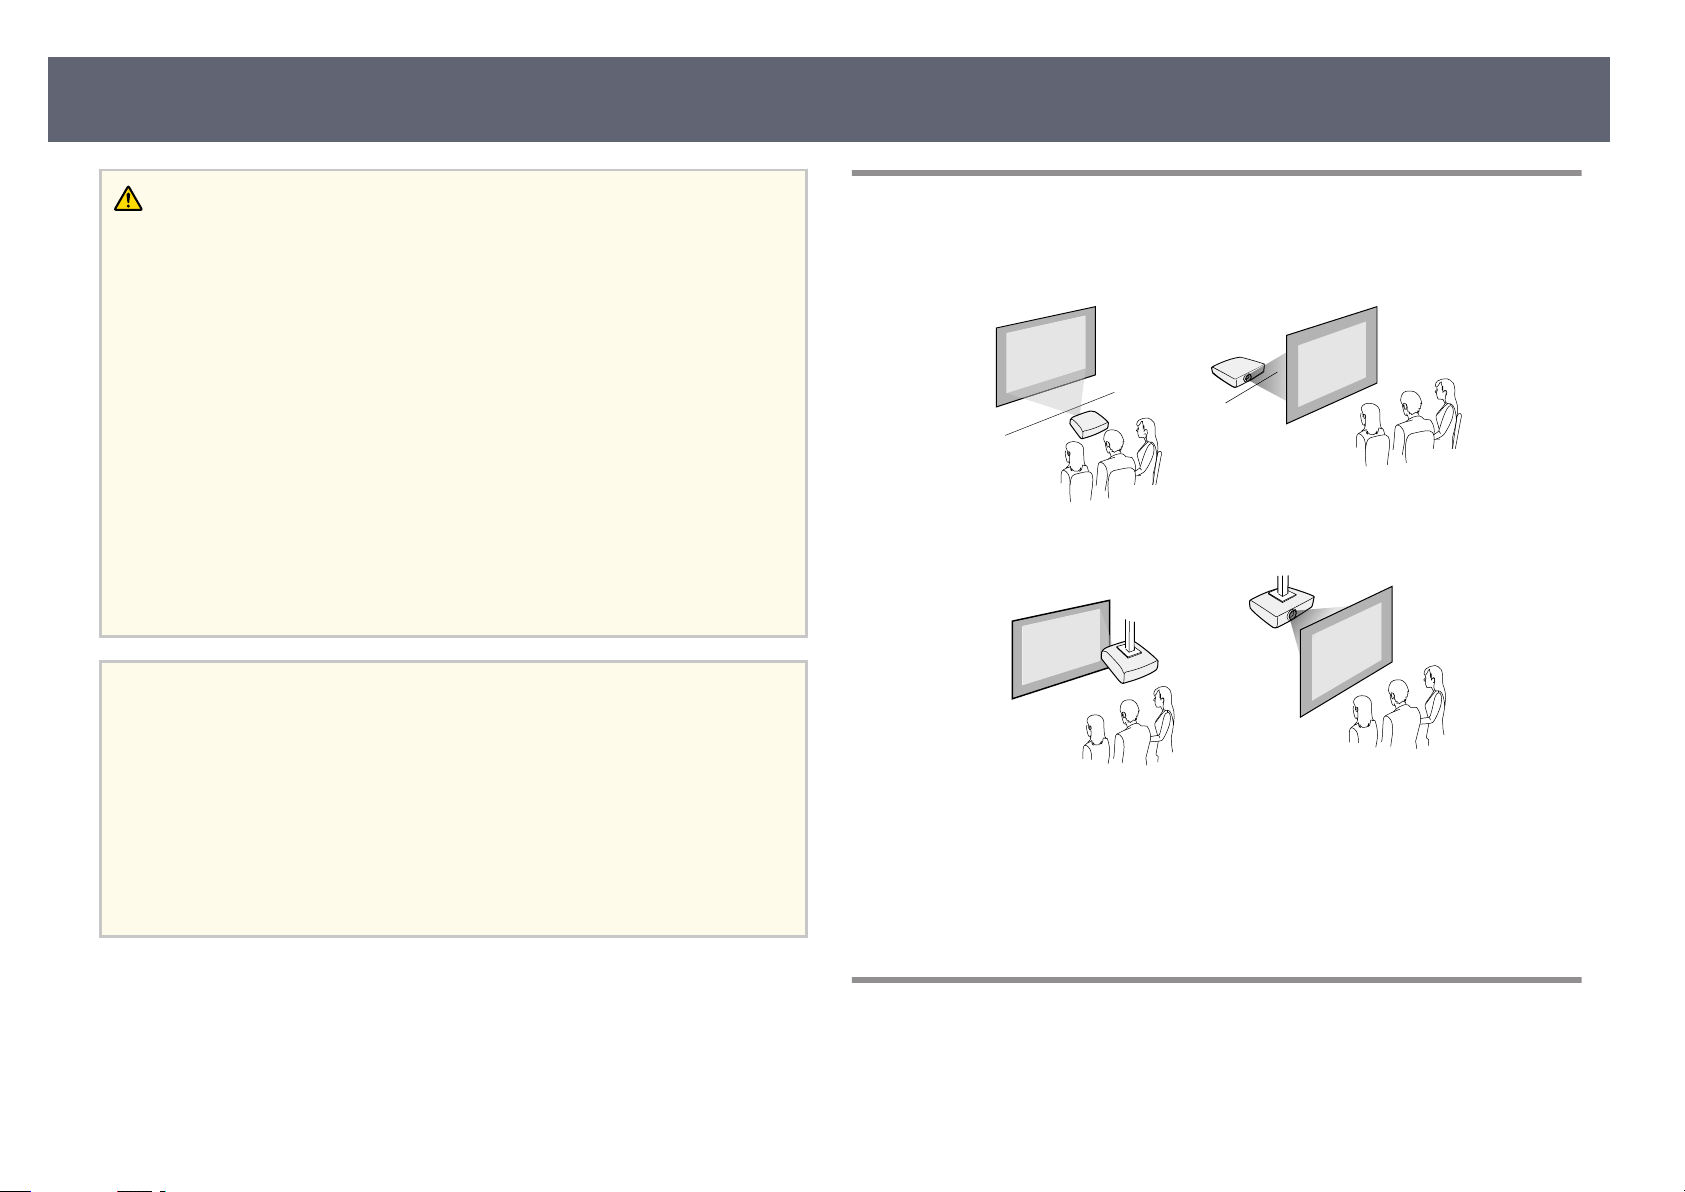
Projector Setup and Installation Options
You can set up or install your projector in the following ways:
Fr
ont/Rear
Front Ceiling/Rear Ceiling
Make sure you select the correct Pr
menu according to the installation method being used.
Related Links
g
•
"Projection Modes" p.42
ojection option in the projector's Extended
Related Links
g
•
"Pr
ojector Setup and Installation Options" p.23
•
"Projection Distance" p.23
•
"Image Shape" p.46
•
"Projector Setup Settings - Extended Menu" p.111
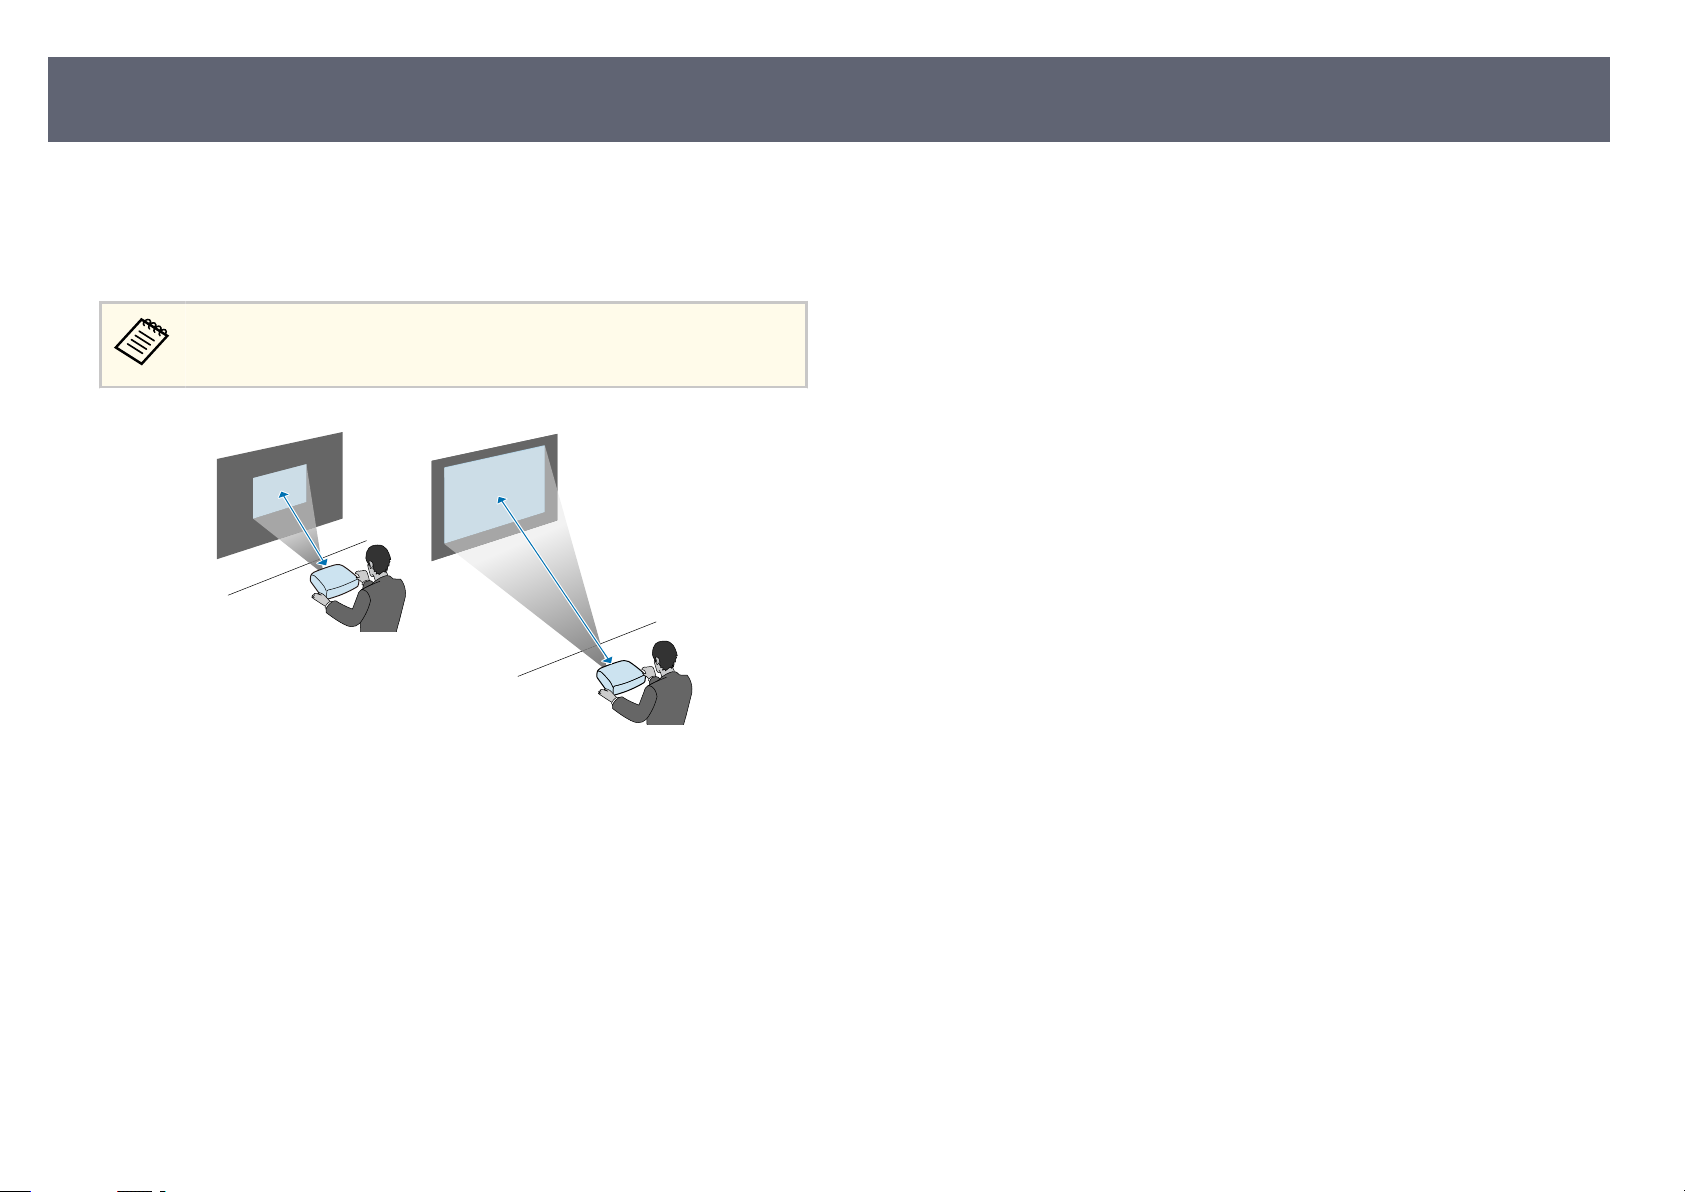
Projection Distance
e distance at which you place the projector from the screen determines the
ap
proximate size of the image. e image size increases the farther the projector
Page 24
Projector Placement
is from the screen, but can vary depending on the zoom factor, aspect ratio, and
her settings.
ot
See the Appendix for details about how far to place the projector from the
screen based on the size of the projected image.
When correcting keystone distortion, your image is slightly smaller.
24
Related Links
g
•
"Screen Size and Projection Distance" p.159
Page 25
Projector Connections
25
See these sections to connect the projector to a variety of projection sources.
Attention
Ch
eck the shape and orientation of the connectors on any cable you plan to connect.
Do not force a connector into a port if it does not t. e device or your projector
could be damaged or could malfunction.
See the Quick Start Guide for a list of cables supplied with your projector.
chase optional or commercially available cables when necessary.
Pur
Related Links
g
•
"Connecting to a Computer" p.25
•
"Connecting to Video Sources" p.27
•
"Connecting to External USB Devices" p.29
•
"Connecting to a Document Camera" p.30
•
"Connecting to External Devices" p.30
Connecting to a Computer
•
To co
nnect a computer that does not have a VGA video port, you need
an adapter that allows you to connect to the projector's VGA video
port.
•
You can also set the port used for audio input in the projector's
Extended menu.
s Extended > A/V Settings > Audio Settings > Audio Output
•
Make sure the audio cable is labeled "No resistance".
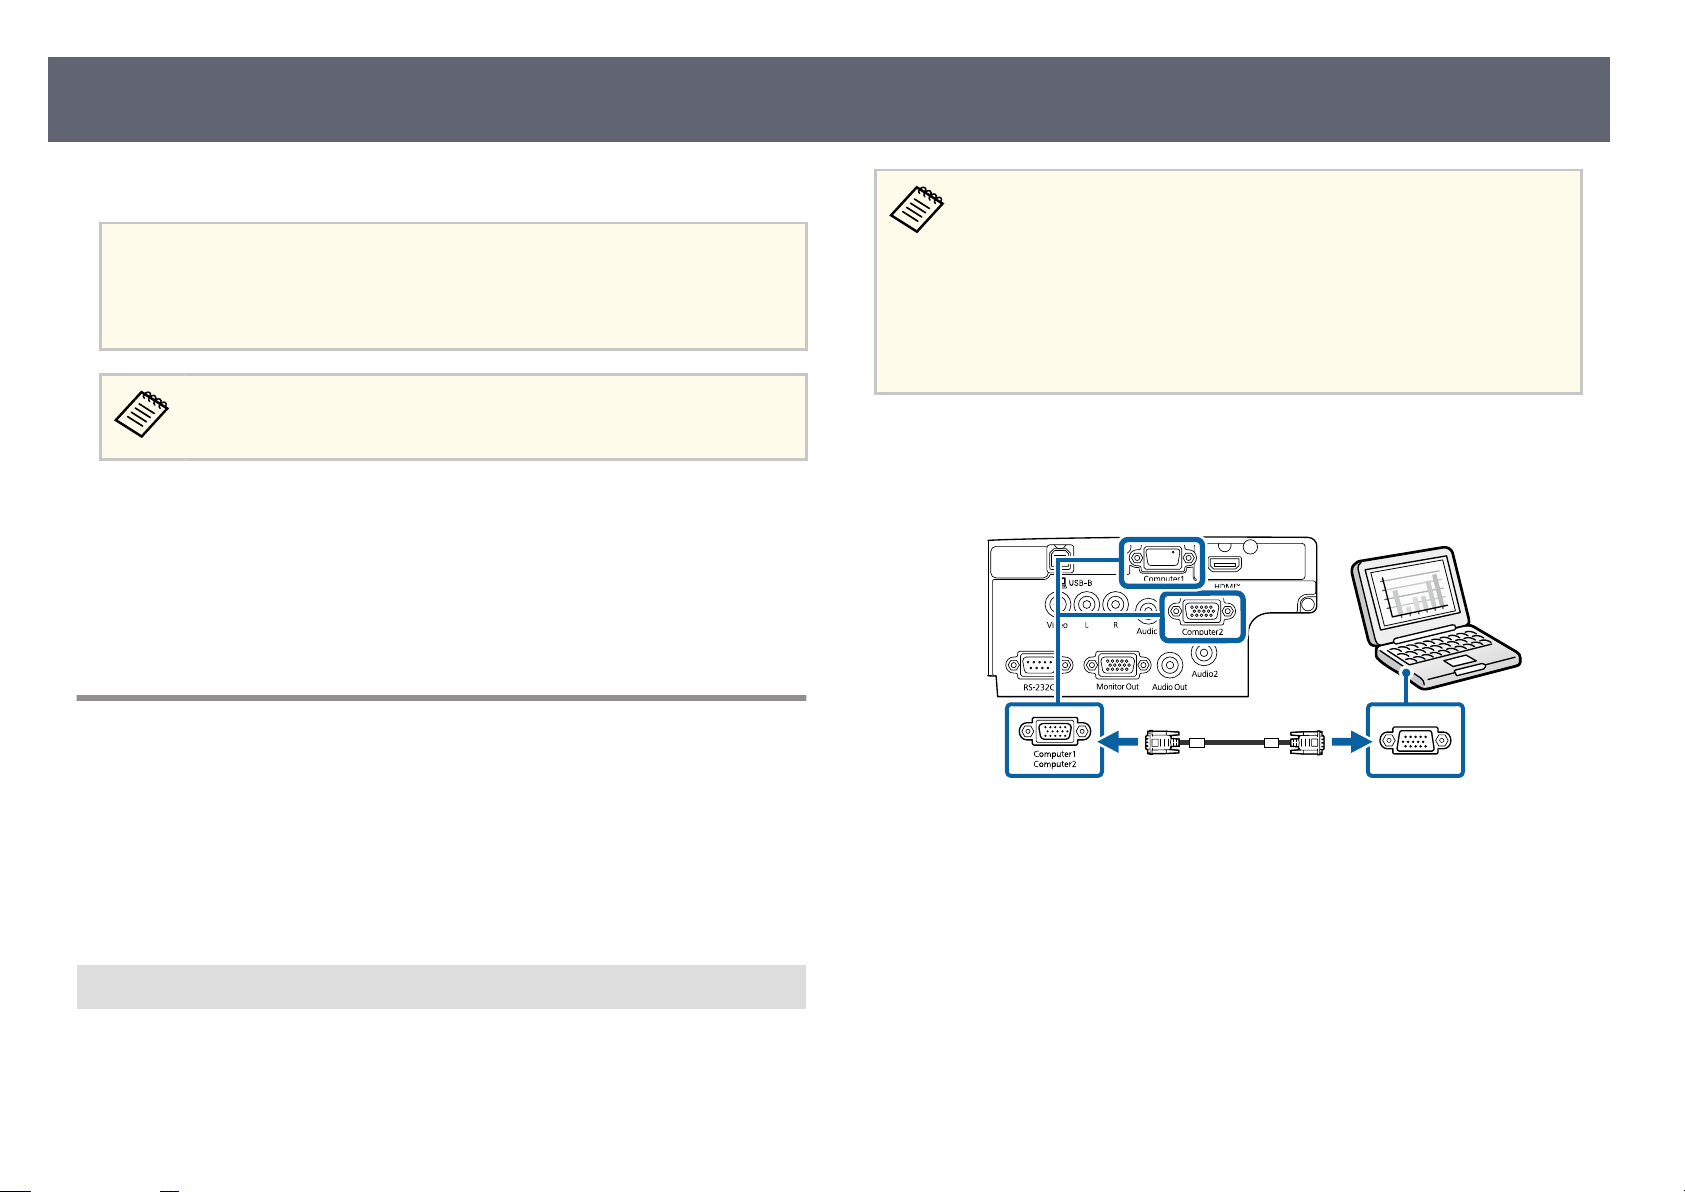
Connect the VGA computer cable to your computer's monitor port.
a
Connect the other end to a Computer port on the projector.
b
Follow the instructions in these sections to connect a computer to the projector.
Related Links
g
•
"Co
nnecting to a Computer for VGA Video and Audio" p.25
•
"Connecting to a Computer for USB Video and Audio" p.26
•
"Connecting to a Computer for HDMI Video and Audio" p.27
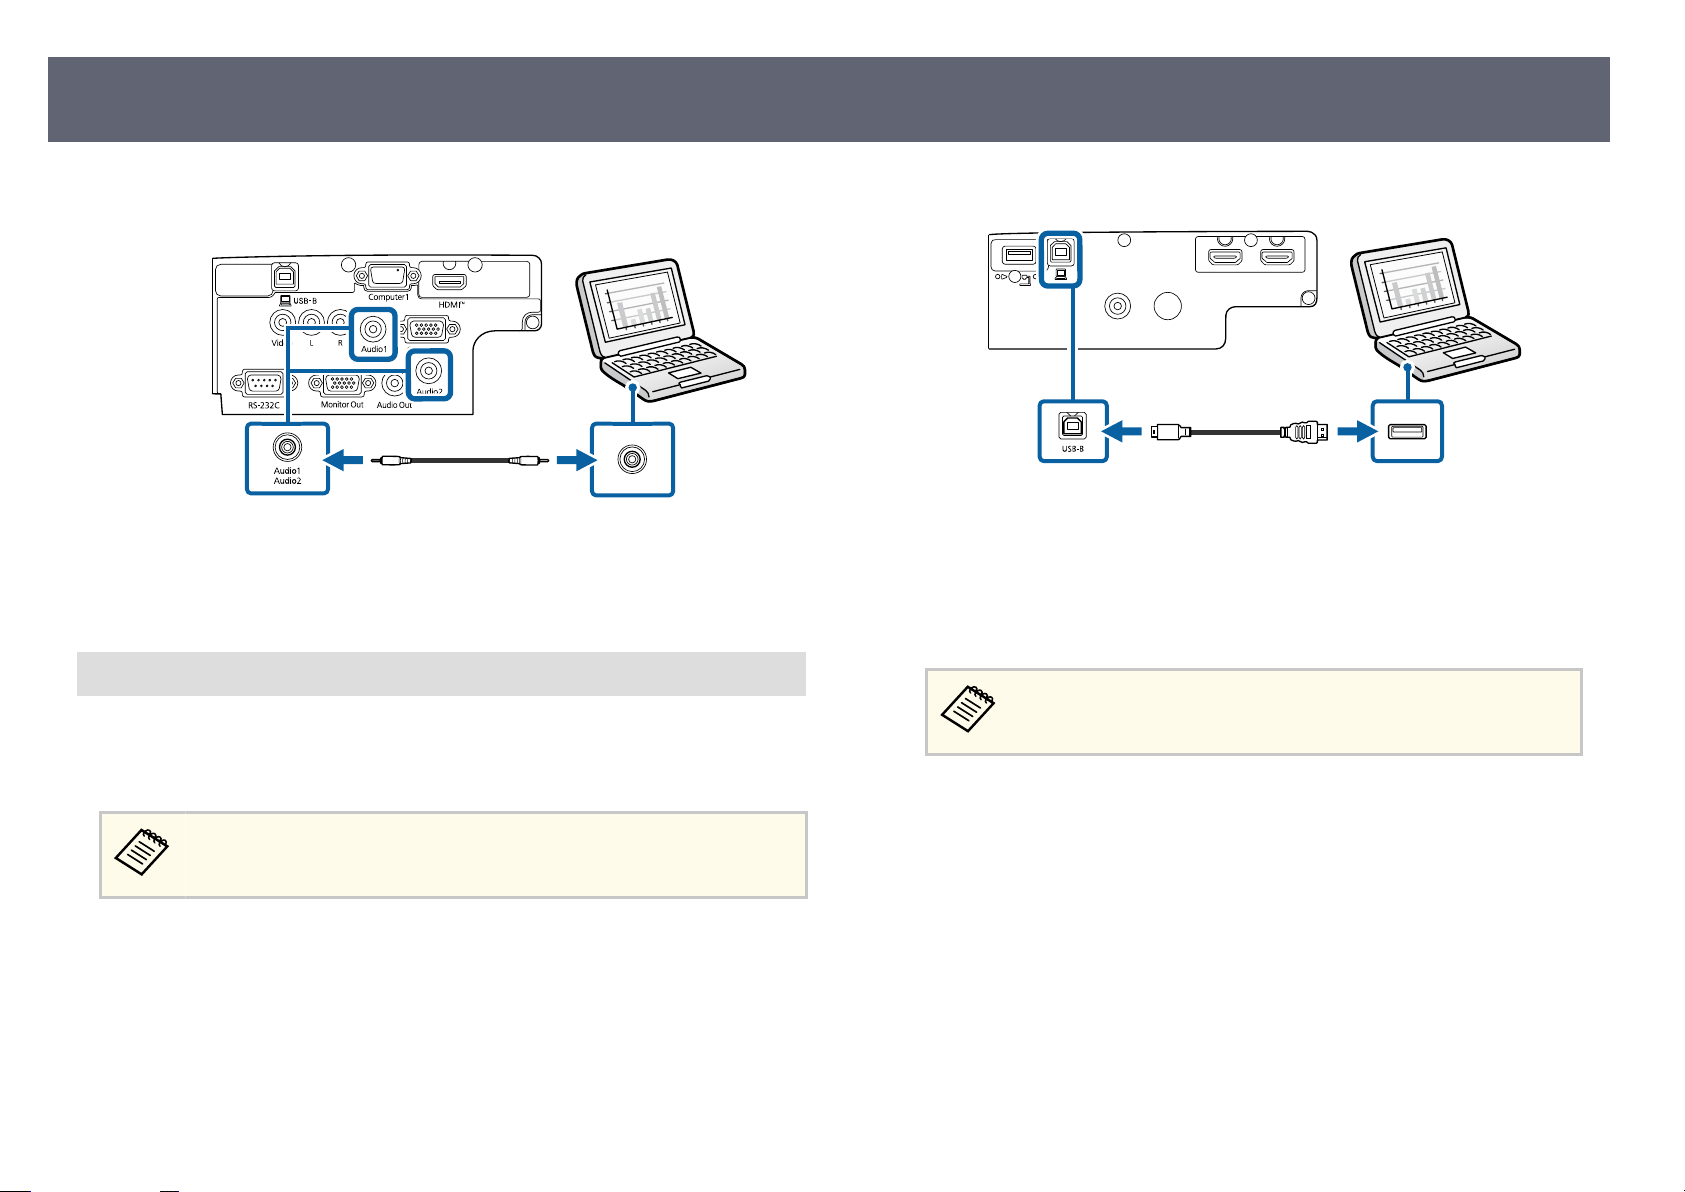
Connecting to a Computer for VGA Video and Audio
You can connect the projector to your computer using a VGA computer cable.
You can play sound through the projector's speaker system by connecting a
commercially available 3.5 mm stereo mini-jack audio cable.
Tighten the screws on the VGA connector.
c
Connect the audio cable to your laptop's headphone or audio-out jack, or
d
yo
ur desktop's speaker or audio-out port.
Page 26
Projector Connections
26
Connect the other end to the Audio port that corresponds to the
e
Computer port you are using.
Related Links
g
•
ojector Setup Settings - Extended Menu" p.111
"Pr
•
"List of Functions" p.9
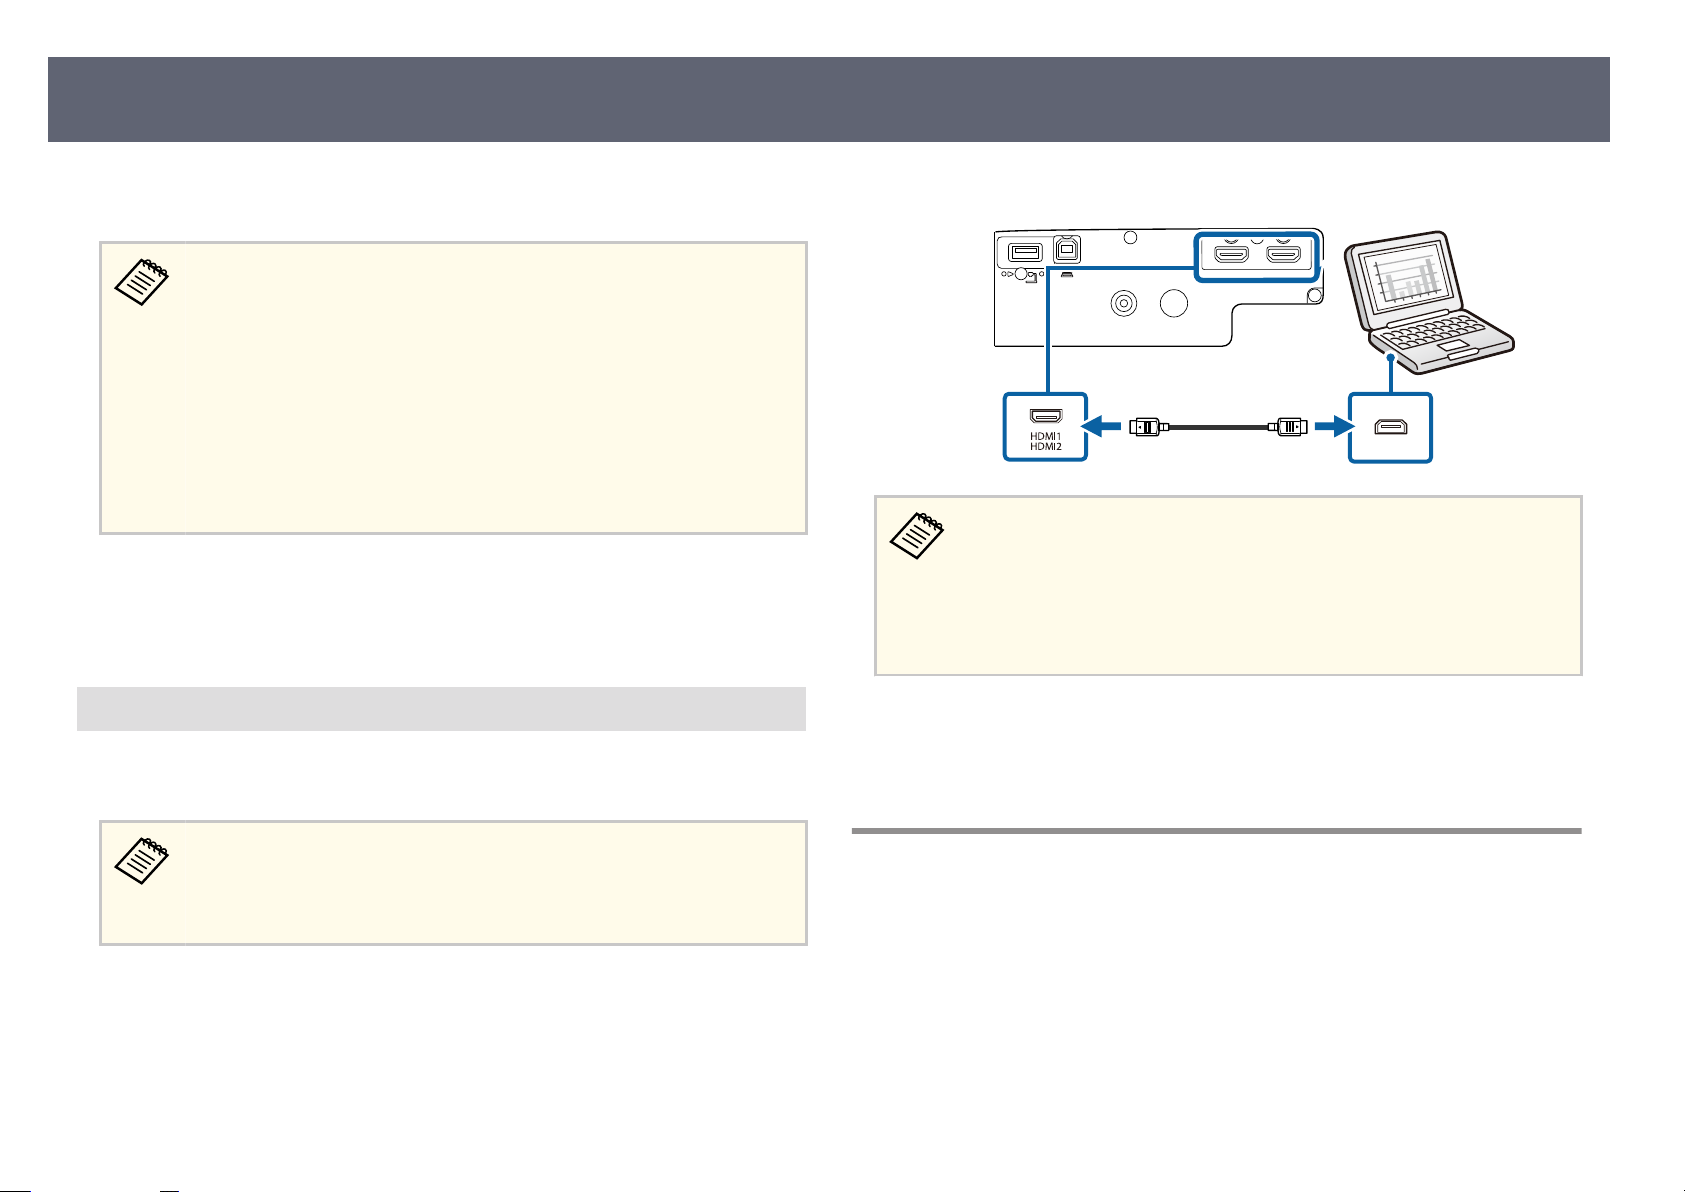
Connecting to a Computer for USB Video and Audio
our computer meets the system requirements, you can send video and audio
If y
output to the projector through the computer's USB port. is function is called
USB Display. Connect the projector to your computer using a USB cable.
If you use a USB hub, the connection may not operate correctly. Connect
th
e USB cable directly to the projector.
Connect the cable to your projector's USB-B port.
a
Connect the other end to any available USB port on your computer.
b
Turn on the projector and your computer.
c
Do one of the following to install the Epson USB Display s
d
You only need to install this soware the rst time you connect the
projector to the computer.
•
Win
dows: Select Run EMP_UDSE.EXE in the dialog box that is
displayed to install the Epson USB Display soware.
•
Mac: e Epson USB Display setup folder is displayed on your screen.
Select USB Display Installer and follow the on-screen instructions to
install the Epson USB Display soware. If the USB Display Setup folder
is not displayed automatically, double-click EPSON_PJ_UD > USB
Display Installer.
o
ware:
Follow any on-screen instructions.
e
Do n
ot disconnect the USB cable or turn o the projector until the
projector displays an image.
Page 27
Projector Connections
27
e projector displays the image from your computer's desktop and outputs
ound if your presentation contains audio.
s
•
If t
he projector does not project any images, do one of the following:
•
Windows: Click All Programs > EPSON Projector > Epson USB
Display > Epson USB Display Ver.x.xx.
•
Mac: Double-click the USB Display icon in the Application folder.
•
When you nish projection, do one of the following:
•
Windows: Disconnect the USB cable. You do not need to operate
Safely Remove Hardware.
•
Mac: Select Disconnect from the USB Display icon menu on the
menu bar or Dock, and then disconnect the USB cable.
Related Links
g
•
"USB Di
•
"List of Functions" p.9
splay System Requirements" p.173
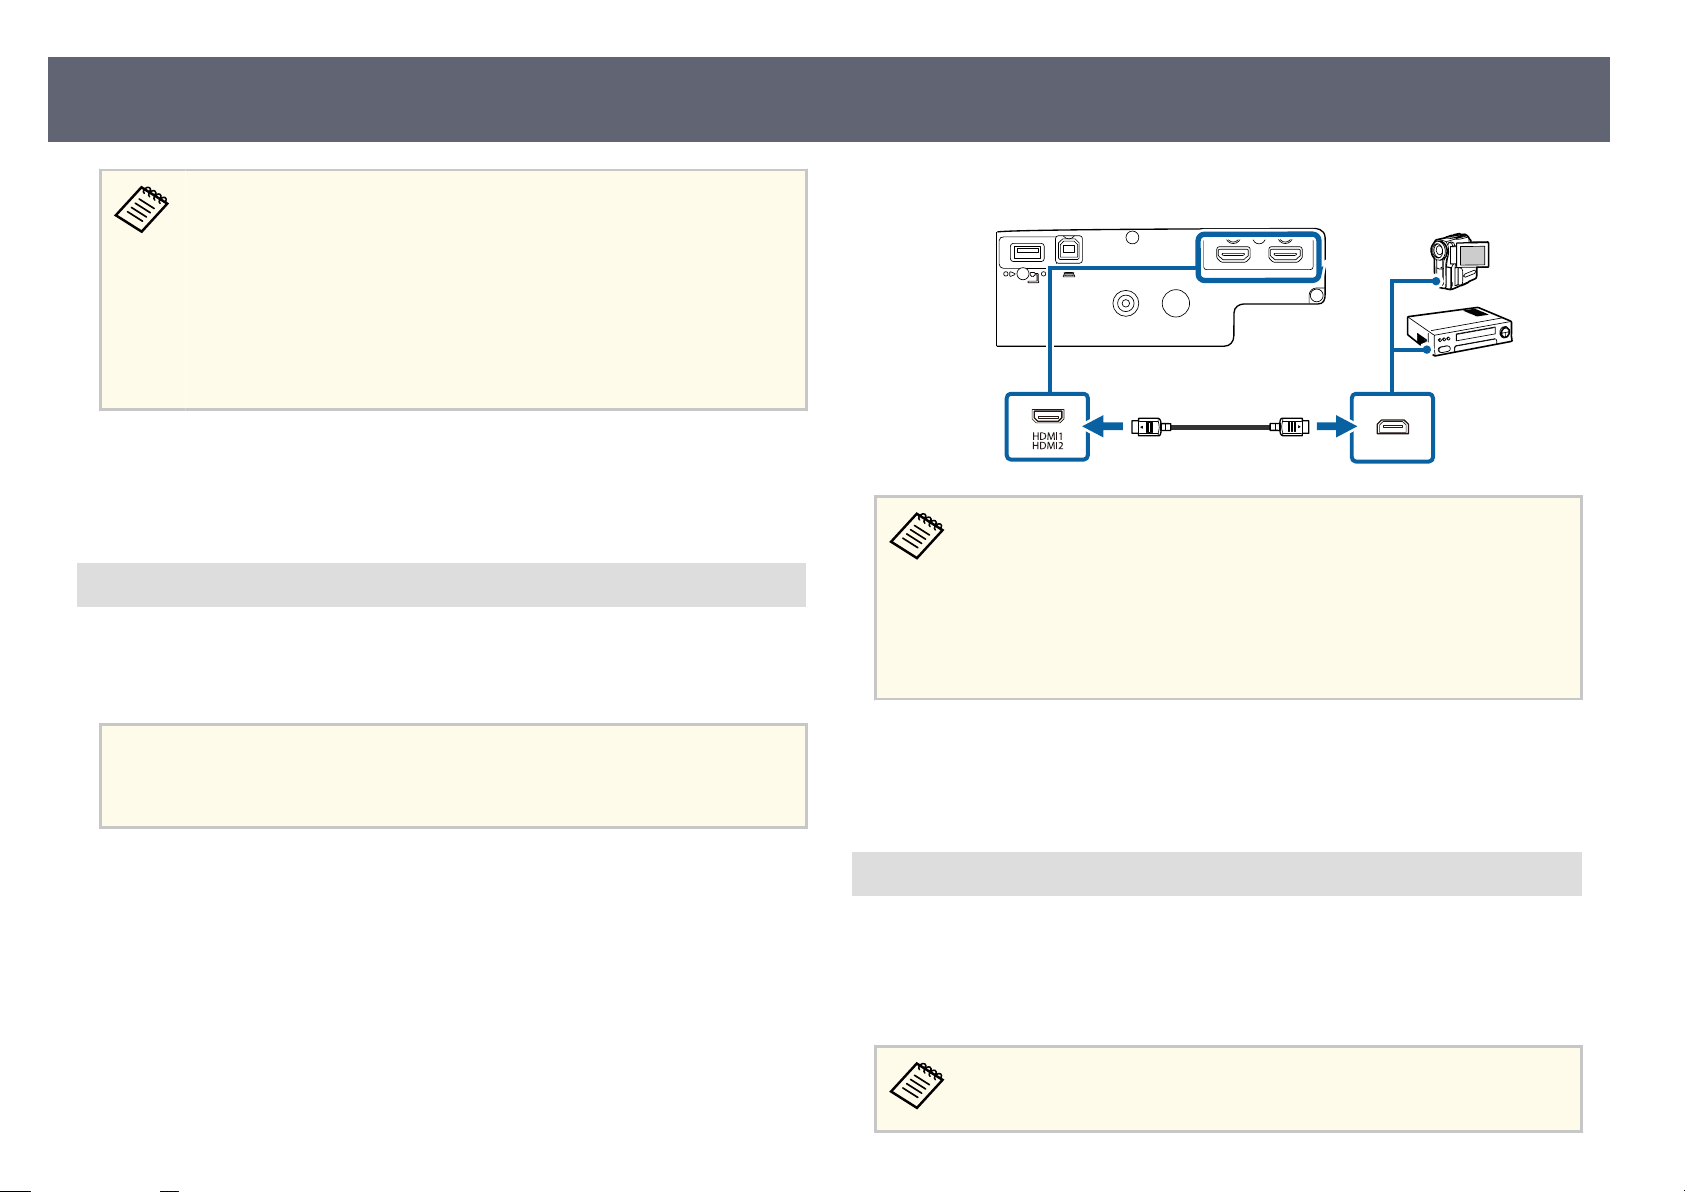
Connecting to a Computer for HDMI Video and Audio
our computer has an HDMI port, you can connect it to the projector using
If y
an HDMI cable and send the computer's audio with the projected image.
Connect the other end to the projector's HDMI port.
b
If you have problems hearing audio through the HDMI connection,
connect one end of a commercially available 3.5 mm stereo mini-jack
audio cable to the projector's Audio port and the other end to your
computer's audio out port. Select the audio input port you connected to in
the projector's Extended menu.
s Extended > A/V Settings > Audio Settings > HDMI1 Audio Output
Related Links
g
•
ojector Setup Settings - Extended Menu" p.111
"Pr
•
"List of Functions" p.9
To connect a Mac that does not have an HDMI port, you need an adapter
h
at allows you to connect to the projector's HDMI port. Contact Apple
t
for compatible adapter options. Older Mac computers (2009 and earlier)
may not support audio through the HDMI port.
Connect the HDMI cable to your computer's HDMI output port.
a
Connecting to Video Sources
Follow the instructions in these sections to connect video devices to the
ojector.
pr
Page 28
Projector Connections
28
•
If t
he port on the device you connect has an unusual shape, use the
cable supplied with the device or an optional cable to connect to the
projector.
•
e cable diers depending on the output signal from the connected
video devices.
•
Some video devices are capable of outputting dierent types of signals.
See your video device manual to conrm what type of signals can be
output.
Related Links
g
•
"Co
nnecting to an HDMI Video Source" p.28
•
"Connecting to a Composite Video Source" p.28
Connecting to an HDMI Video Source
our video source has an HDMI port, you can connect it to the projector
If y
using an HDMI cable and send the image source's audio with the projected
image.
Attention
ot turn on the video source before connecting it to the projector. Doing so could
Do n
damage the projector.
Connect the other end to the projector's HDMI port.
b
If you have problems hearing audio through the HDMI connection,
connect one end of a commercially available 3.5 mm stereo mini-jack
audio cable to the projector's Audio port and the other end to your video
source's audio out port. Select the audio input port you connected to in
the projector's Extended menu. (Available only for models that have the
Audio port.)
s Extended > A/V Settings > Audio Settings > HDMI Audio Output
Related Links
g
•
ojector Setup Settings - Extended Menu" p.111
"Pr
•
"List of Functions" p.9
Connect the HDMI cable to your video source's HDMI output port.
a
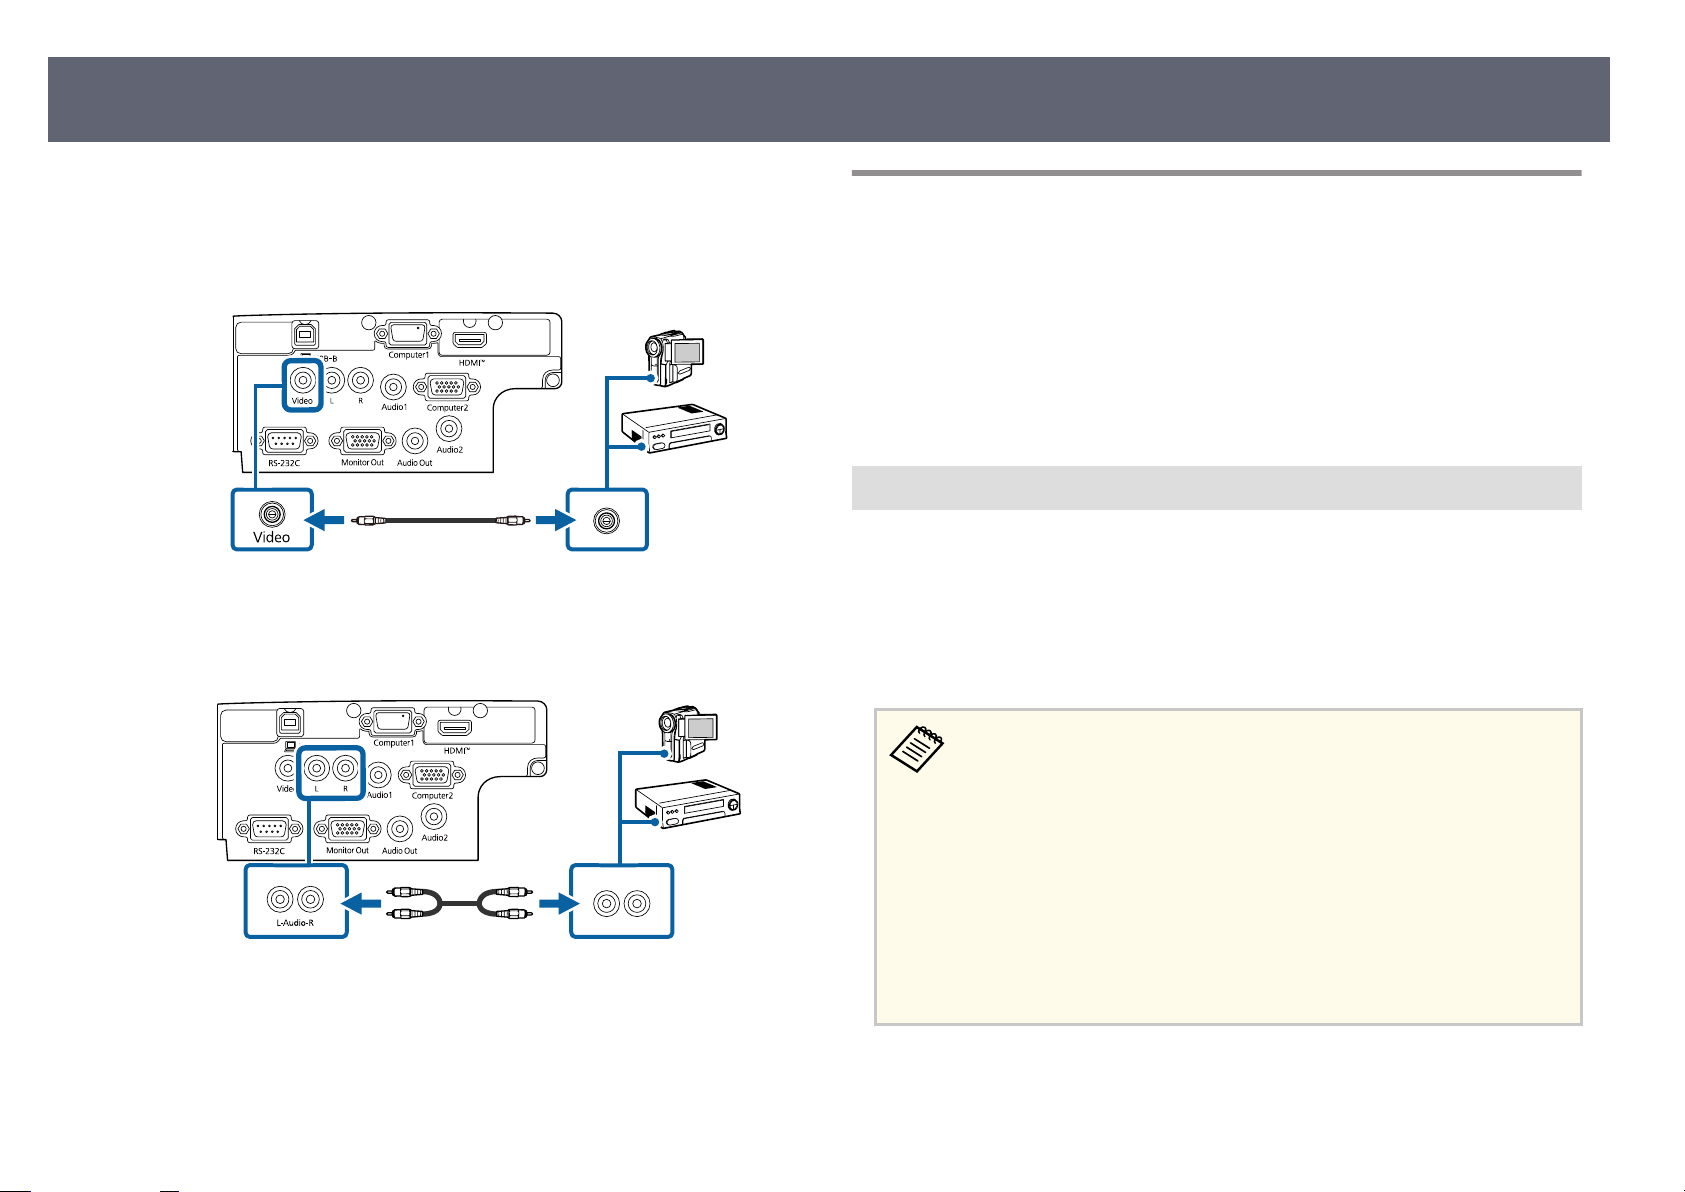
Connecting to a Composite Video Source
If y
our video source has a composite video port, you can connect it to the
projector using a RCA-style video or A/V cable.
You can play sound through the projector's speaker system by connecting a
commercially available RCA audio cable.
Make sure the audio cable is labeled "No resistance".
Page 29
Projector Connections
29
Connect the cable with the yellow connector to your video source's yellow
a
video output port.
Connect the other end to the projector's Video port.
b
Connect the audio cable to your video source's audio-out ports.
c
Connect the other end to the projector's L-Audio-R ports.
d
Related Links
g
•
"List of Functions" p.9
Connecting to External USB Devices
Follow the instructions in these sections to connect external USB devices to the
pr
ojector.
Related Links
g
•
"USB Device Projection" p.29
•
"Connecting to a USB Device" p.30
•
"Disconnecting a USB Device" p.30
USB Device Projection
You can project images and other content without using a computer or video
device by connecting any of these devices to your projector:
•
USB ash drive
•
Digital camera or smartphone
•
USB hard drive
•
tal cameras or smartphones must be USB-mounted devices, not
Digi
TWAIN-compliant devices, and must be USB Mass Storage Classcompliant.
•
USB hard drives must meet these requirements:
•
USB Mass Storage Class-compliant (not all USB Mass Storage Class
devices are supported)
•
Formatted in FAT16/32
•
Self-powered by their own AC power supplies (bus-powered hard
drives are not recommended)
•
Avoid using hard drives with multiple partitions
You can project slide shows from image les o
nnected USB device.
n a co
Page 30
Projector Connections
30
Related Links
g
•
ojecting a PC Free Presentation" p.63
"Pr
•
"List of Functions" p.9
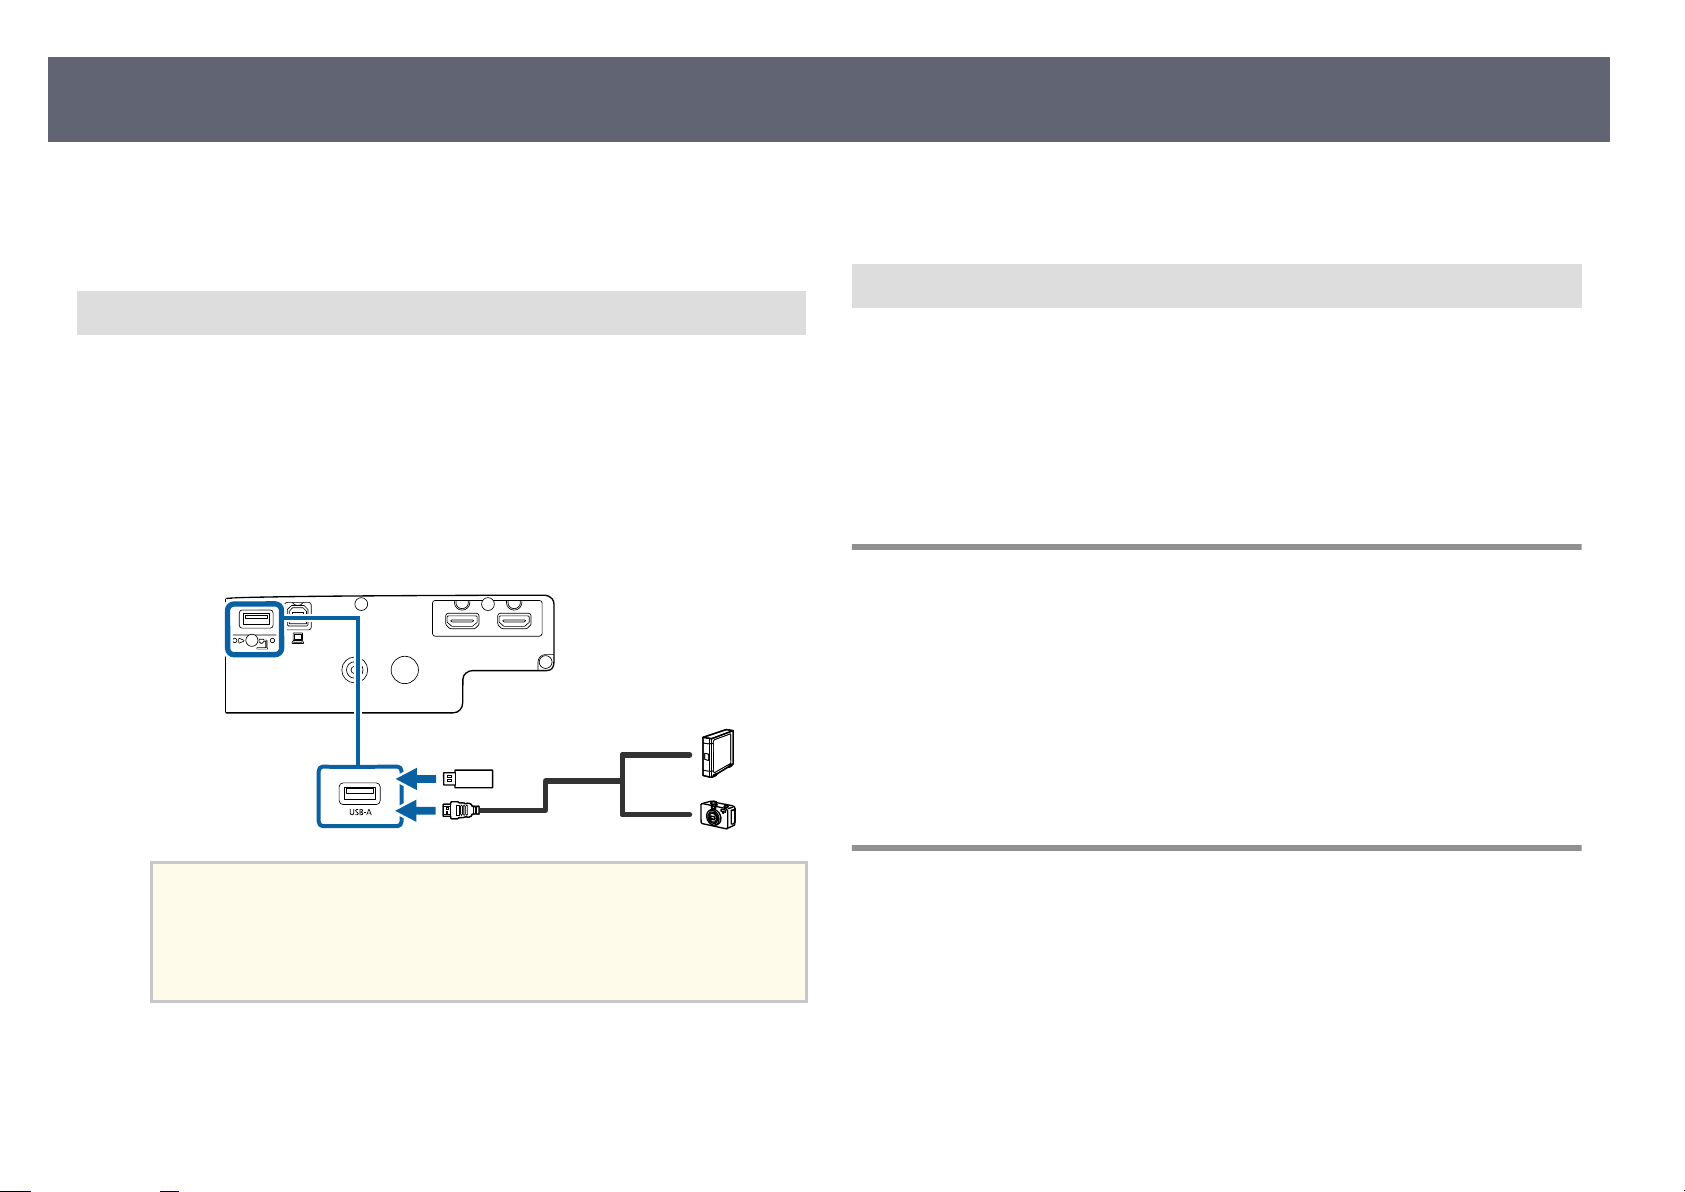
Connecting to a USB Device
o
u can connect your USB device to the projector's USB-A port and use it to
Y
project images and other content.
If your USB device came with a power adapter, plug the device into an
a
ele
ctrical outlet.
Connect the USB cable or USB ash
b
shown.
drive to the projector's USB-A port as
Related Links
g
•
"L
st of Functions" p.9
i
Disconnecting a USB Device
h
en you have nished presenting with a connected USB device, disconnect
W
the device from the projector.
Turn o and unplug the device, if necessary.
a
Di
b
sconnect the USB device from the projector.
Connecting to a Document Camera
You can connect a document camera to your projector to project images viewed
he camera.
by t
e connection method varies depending on your Epson document camera
model. See the document camera manual for details.
Attention
•
e the USB cable supplied with or specied for use with the device.
Us
•
Do not connect a USB hub or a USB cable longer than 3 meters, or the
device may not operate correctly.
Connect the other end to your device, if necessary.
c
Related Links
g
•
"List of Functions" p.9
Connecting to External Devices
Follow the instructions in these sections to connect external devices to the
pr
ojector.
Related Links
g
•
"Connecting to a VGA Monitor" p.31
•
"Connecting to External Speakers" p.31
•
"Connecting to a Streaming Media Player" p.32
Page 31
Projector Connections
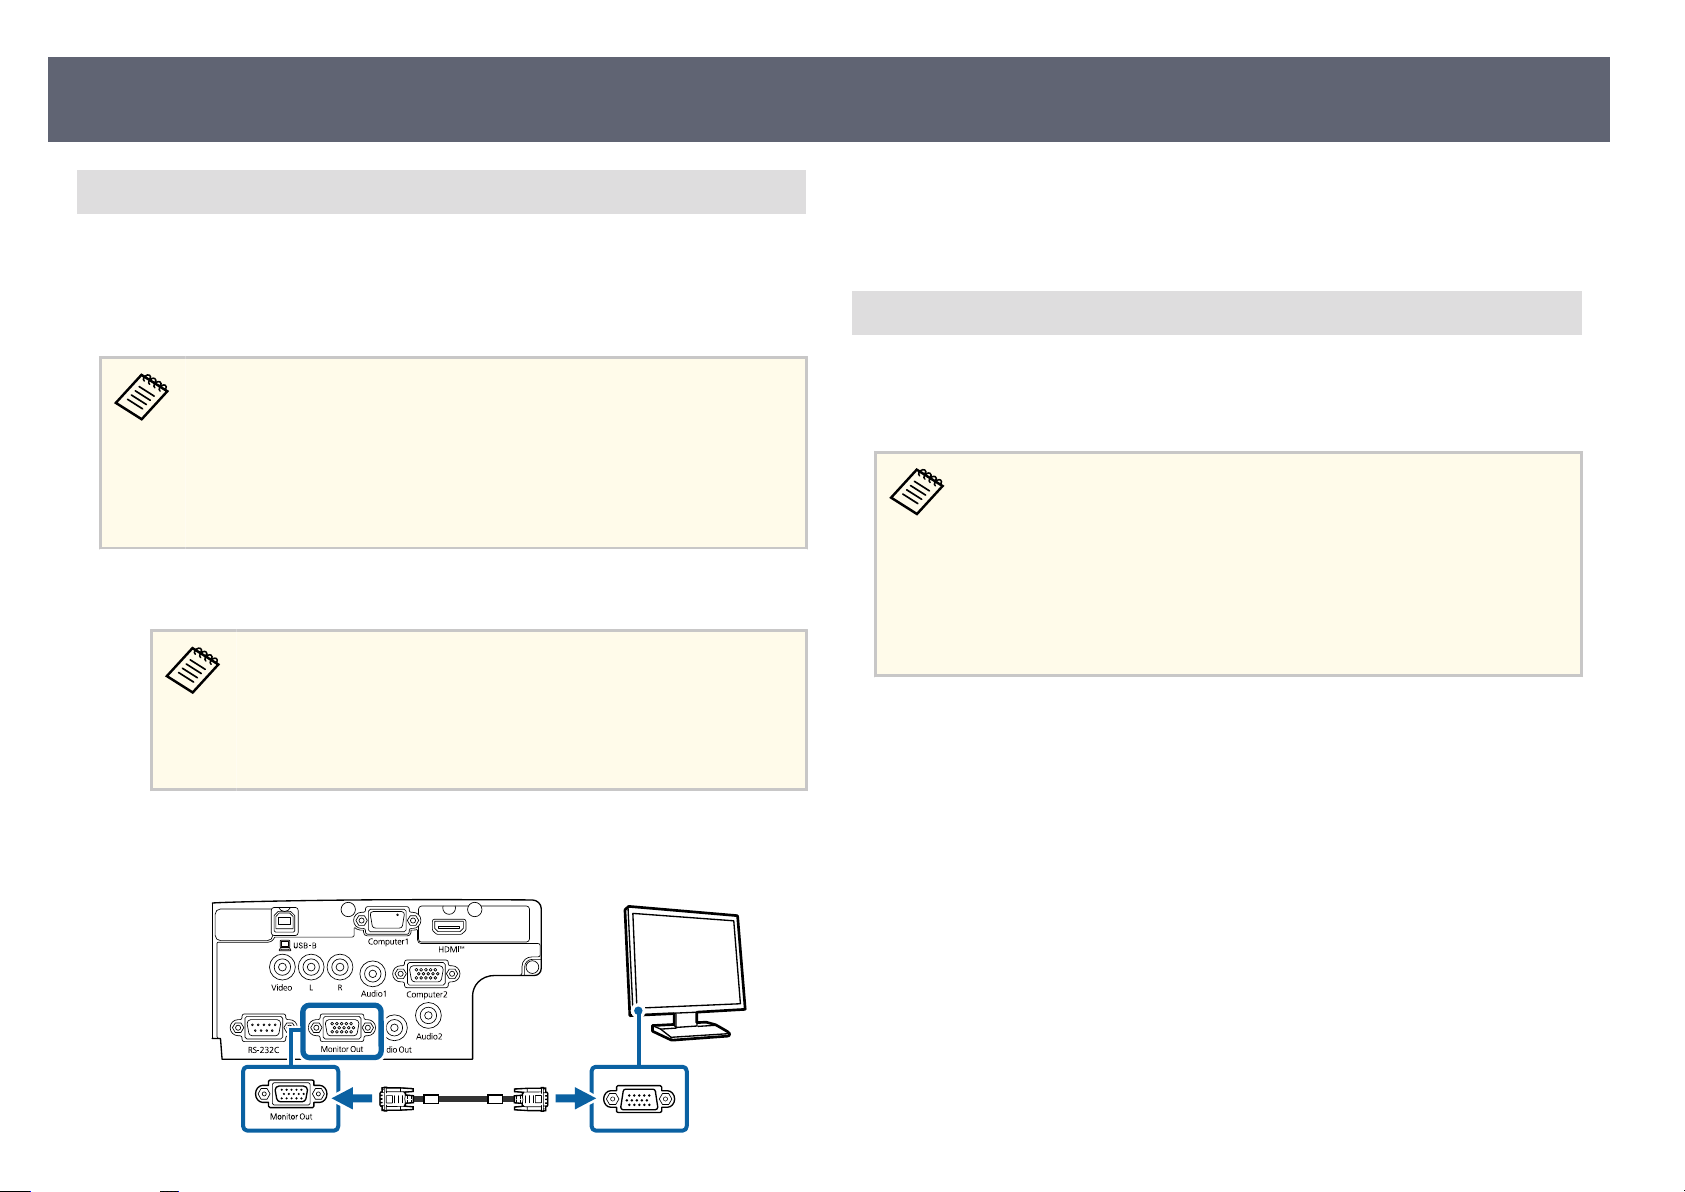
Connecting to a VGA Monitor
ou connected the projector to a computer using a Computer port, you
If y
can also connect an external monitor to the projector. is lets you see your
presentation on the external monitor even when the projected image is not
visible.
•
If y
ou want to output images to an external monitor when the projector
is turned o, select Always On as the A/V Output setting in the
projector's Extended menu.
s Extended > A/V Settings > A/V Output
•
Monitors that use a refresh rate of less than 60 Hz may not be able to
display images correctly.
Make sure your computer is connected to the projector's Computer port.
a
•
If there are two computer ports, make sure you use the
Computer1 port.
•
Only analog RGB signals from the Computer1 port can be
output to an external monitor. You cannot output signals input
from other ports.
Related Links
g
•
ojector Setup Settings - Extended Menu" p.111
"Pr
•
"List of Functions" p.9
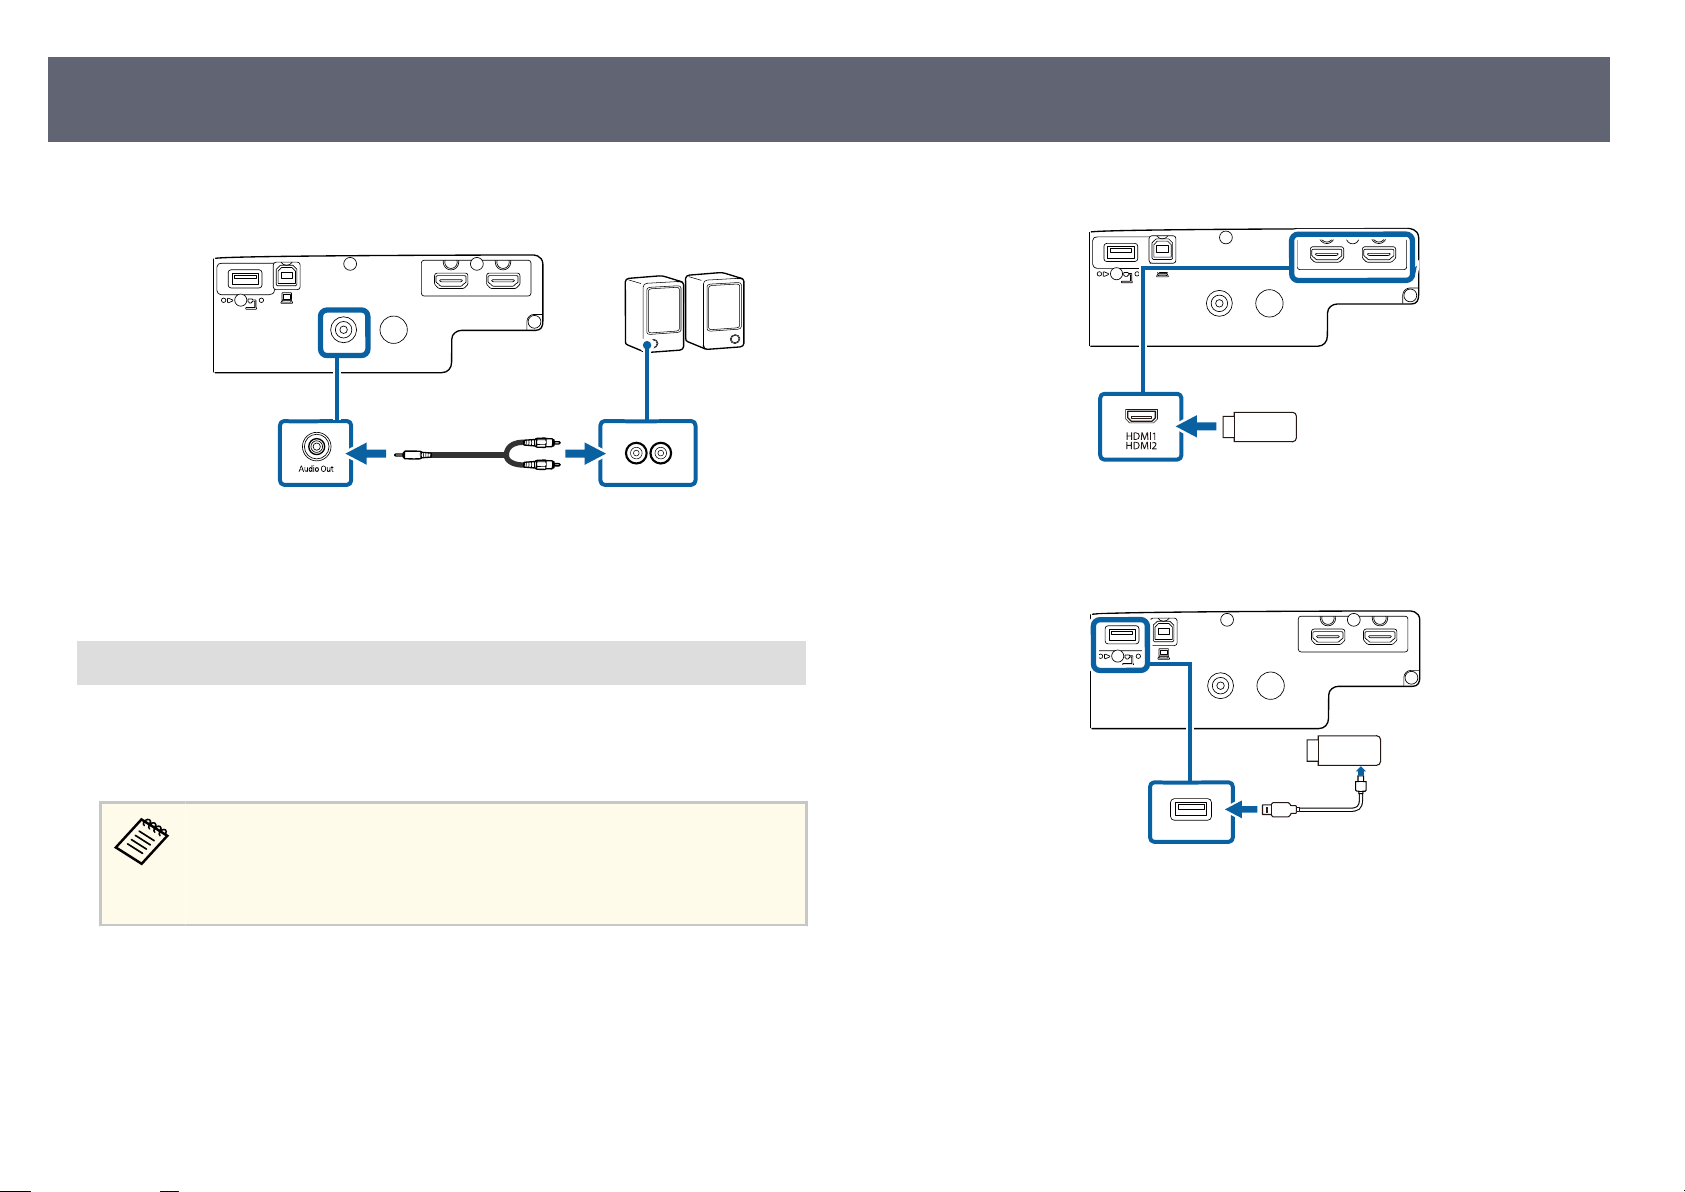
Connecting to External Speakers
o en
hance the sound from your presentation, you can connect the projector to
T
external self-powered speakers. You can control the volume using the projector's
remote control.
•
If y
ou want to output audio from the external speakers when the
projector is turned o, select Always On as the A/V Output setting in
the projector's Extended menu.
s Extended > A/V Settings > A/V Output
•
You can also connect the projector to an amplier with speakers.
•
e projector's built-in speaker system is disabled when you connect
external speakers.
Make sure your computer or video source is connected to the projector
a
wi
th both audio and video cables as necessary.
31
Connect the external monitor's cable to your projector's Monitor Out
b
po
rt.
Locate the appropriate cable to connect your external speakers, such as a
b
s
ereo mini-jack-to-pin-jack cable, or another type of cable or adapter.
t
Connect one end of the cable to your external speakers as necessary.
c
Page 32
Projector Connections
32
Connect the stereo mini-jack end of the cable to your projector's Audio
d
Out port.
Related Links
g
•
ojector Setup Settings - Extended Menu" p.111
"Pr
•
"List of Functions" p.9
Connecting to a Streaming Media Player
Y
u can connect your streaming media player to the projector's HDMI port. By
o
connecting the power supply USB cable, you can power the streaming media
player from the projector.
Connect your streaming media player to the projector's HDMI port.
a
Connect the power supply USB cable to the projector's USB-A port.
b
Connect the other end to the streaming media player.
c
e connection method and operating environment for the streaming
m
edia player vary depending on the model you are using. For details, see
the documentation supplied with your streaming media player; otherwise,
it may not operate properly.
Page 33
Installing Batteries in the Remote Control
33
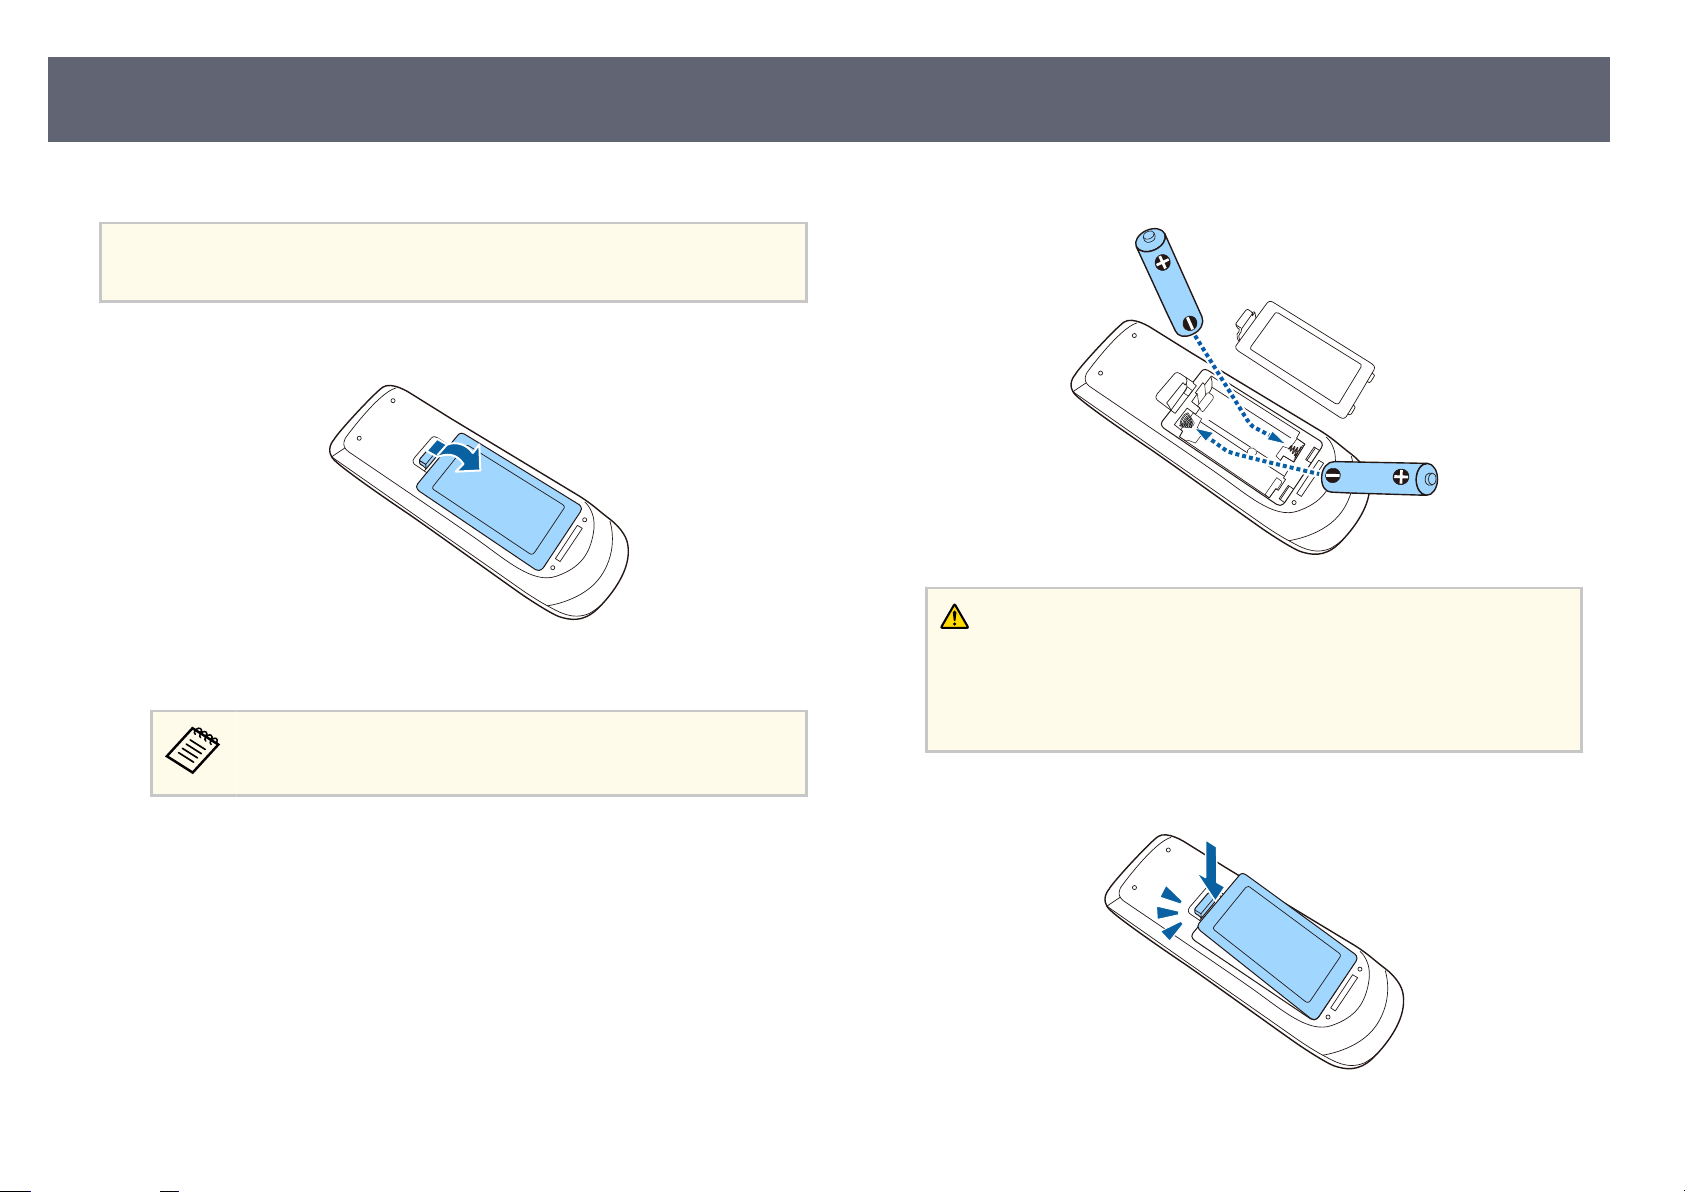
e remote control uses the two AA batteries that came with the projector.
Attention
Mak
e sure you read the Safety Instructions before handling the batteries.
Remove the battery cover as shown.
a
Remove the old batteries, if necessary.
b
Dispose of used batteries according to local regulations.
Insert the batteries with the + and – ends facing as shown.
c
Warning
eck the positions of the (+) and (–) marks inside the battery holder to
Ch
ensure the batteries are inserted the correct way. If the batteries are not used
correctly, they could explode or leak causing a re, injury, or damage to the
product.
Replace the battery cover and press it down until it clicks into place.
d
Page 34
Remote Control Operation
e remote control lets you control the projector from almost anywhere in the
oom.
r
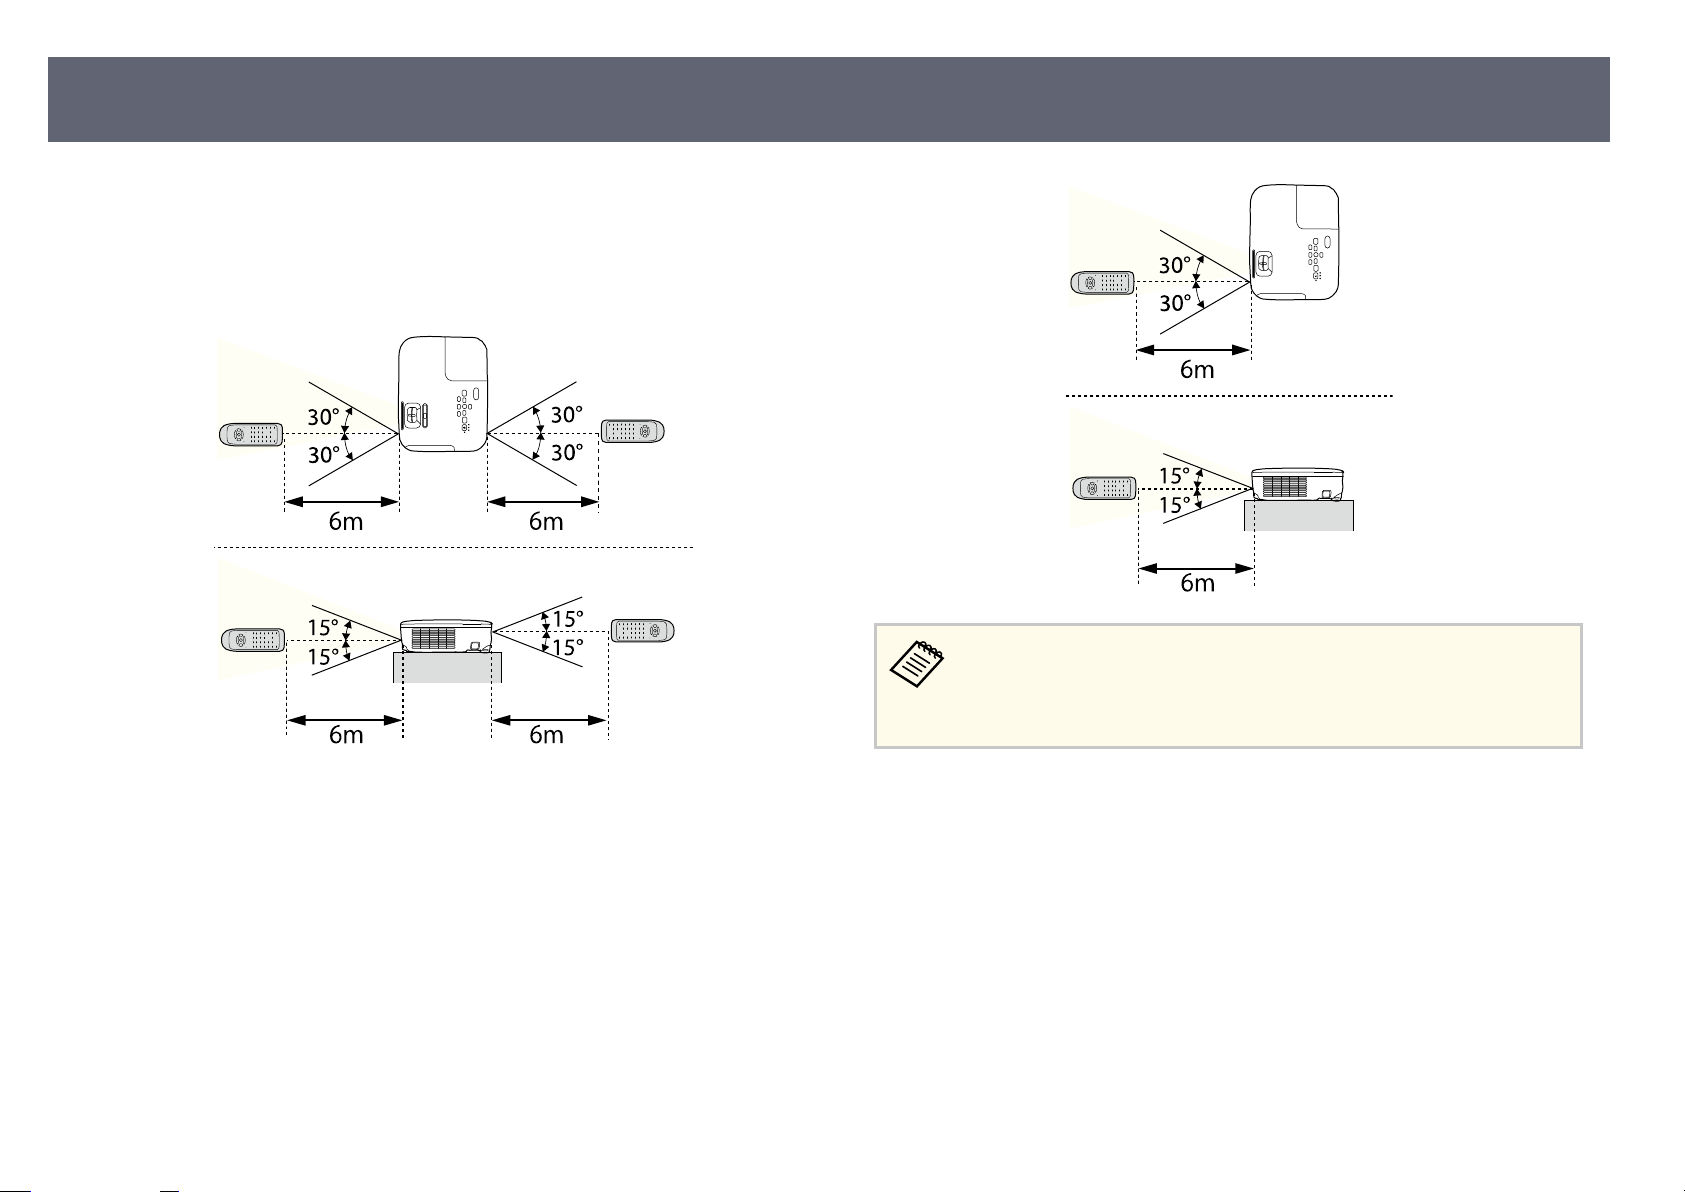
Make sure that you aim the remote control at the projector's receivers within the
distance and angles listed here.
EB-FH08/EB-W55/EB-EA55/EB-X52
34
EB-W53/EB-E24/EB-EA24/EB-E12/EB-EA12
Avoid using the remote control in conditions with bright uor
or in direct sunlight, or the projector may not respond to commands. If
you are not going to use the remote control for a long time, remove the
batteries.
escent lights
Page 35
Opening the Lens Cover
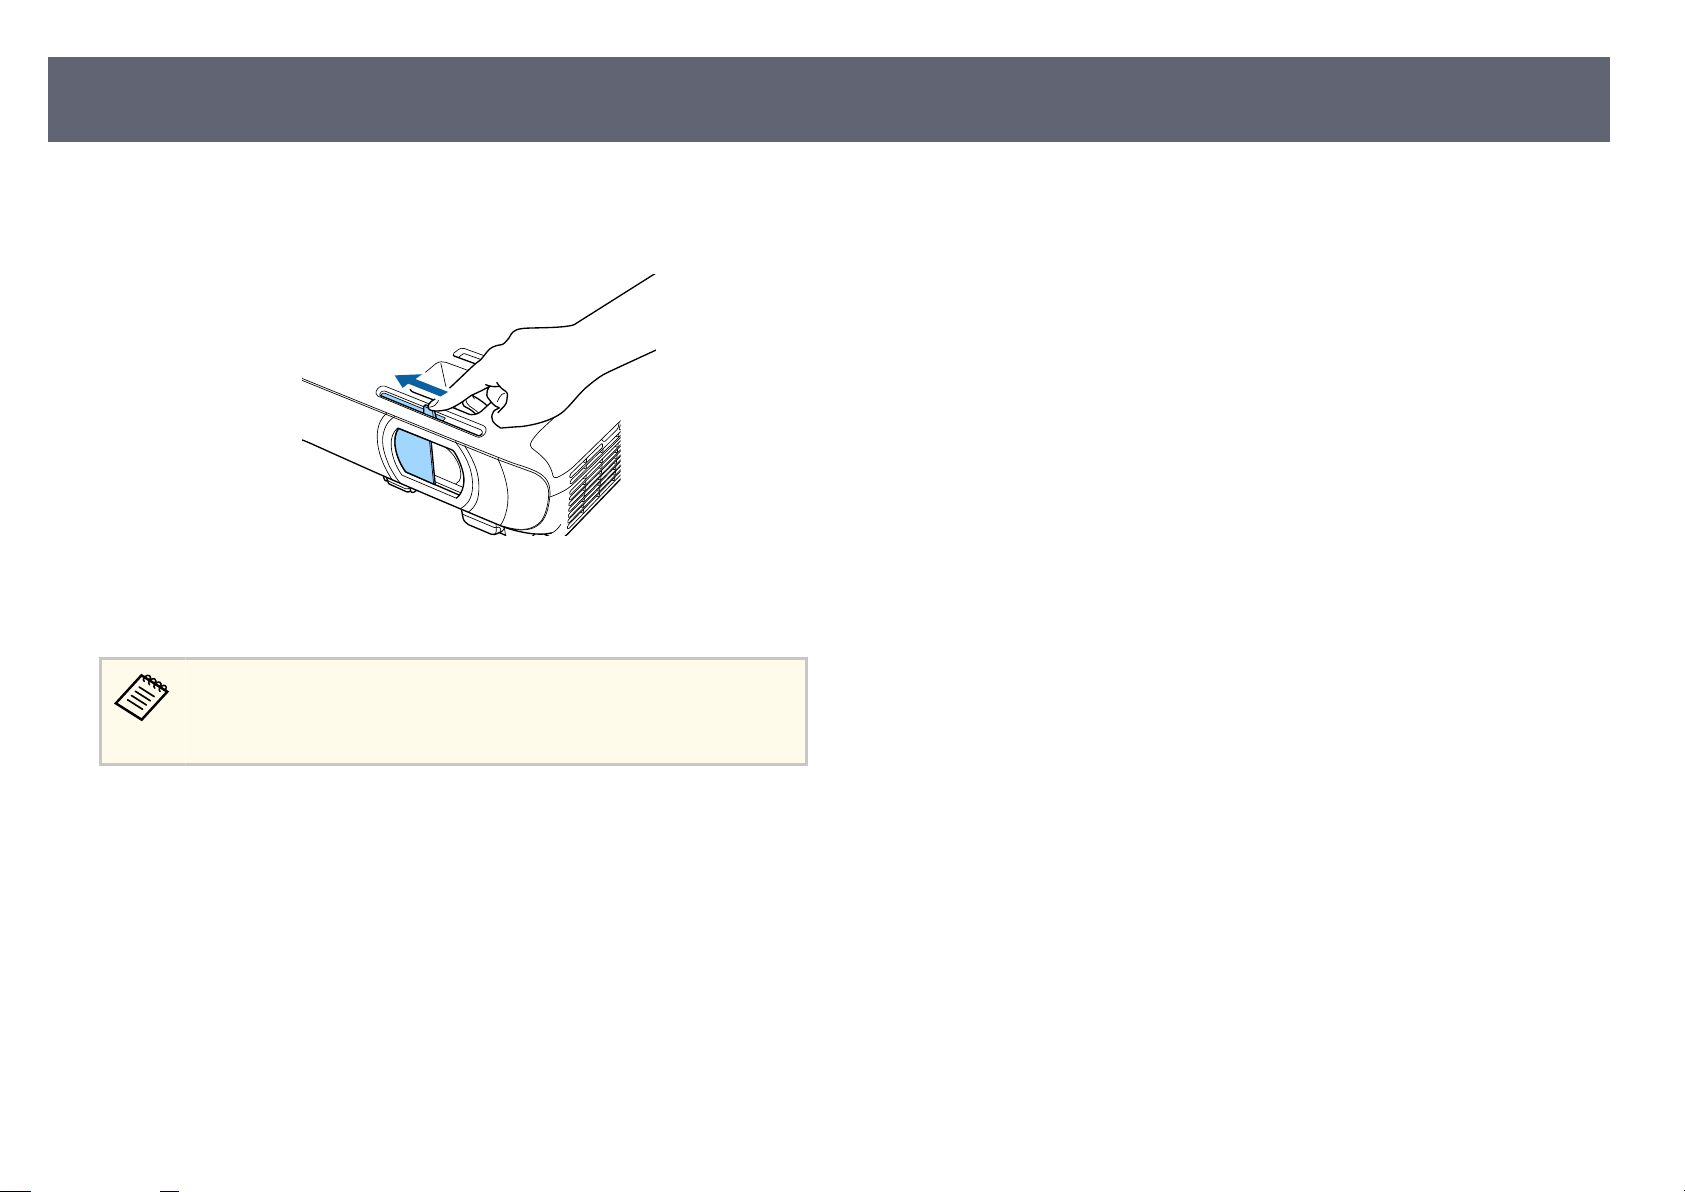
To open the projector's lens cover, slide the A/V Mute slide lever until it
a
clic
ks.
35
To cover the lens or temporarily turn o
b
close the lens cover.
rojector's power automatically turns o 30 minutes aer A/V Mute is
e p
en
abled. You can disable this feature.
s ECO > Lens Cover Timer
Related Links
g
•
"Li
st of Functions" p.9
the projected image and sound,
Page 36

Using Basic Projector Features
llow the instructions in these sections to use your projector's basic features.
Fo
Related Links
g
•
"Turning On the Projector" p.37
•
"Turning O the Projector" p.40
•
"Selecting the Language for the Projector Menus" p.41
•
"Projection Modes" p.42
•
"Displaying a Test Pattern" p.44
•
"Adjusting the Image Height" p.45
•
"Image Shape" p.46
•
"Resizing the Image with the Zoom Ring" p.50
•
"Focusing the Image Using the Focus Ring" p.51
•
"Selecting an Image Source" p.52
•
"Image Aspect Ratio" p.53
•
"Adjusting Image Quality (Color Mode)" p.56
•
"Controlling the Volume with the Volume Buttons" p.58
Page 37
Turning On the Projector
37
Turn on the computer or video equipment you want to use aer yo
projector.
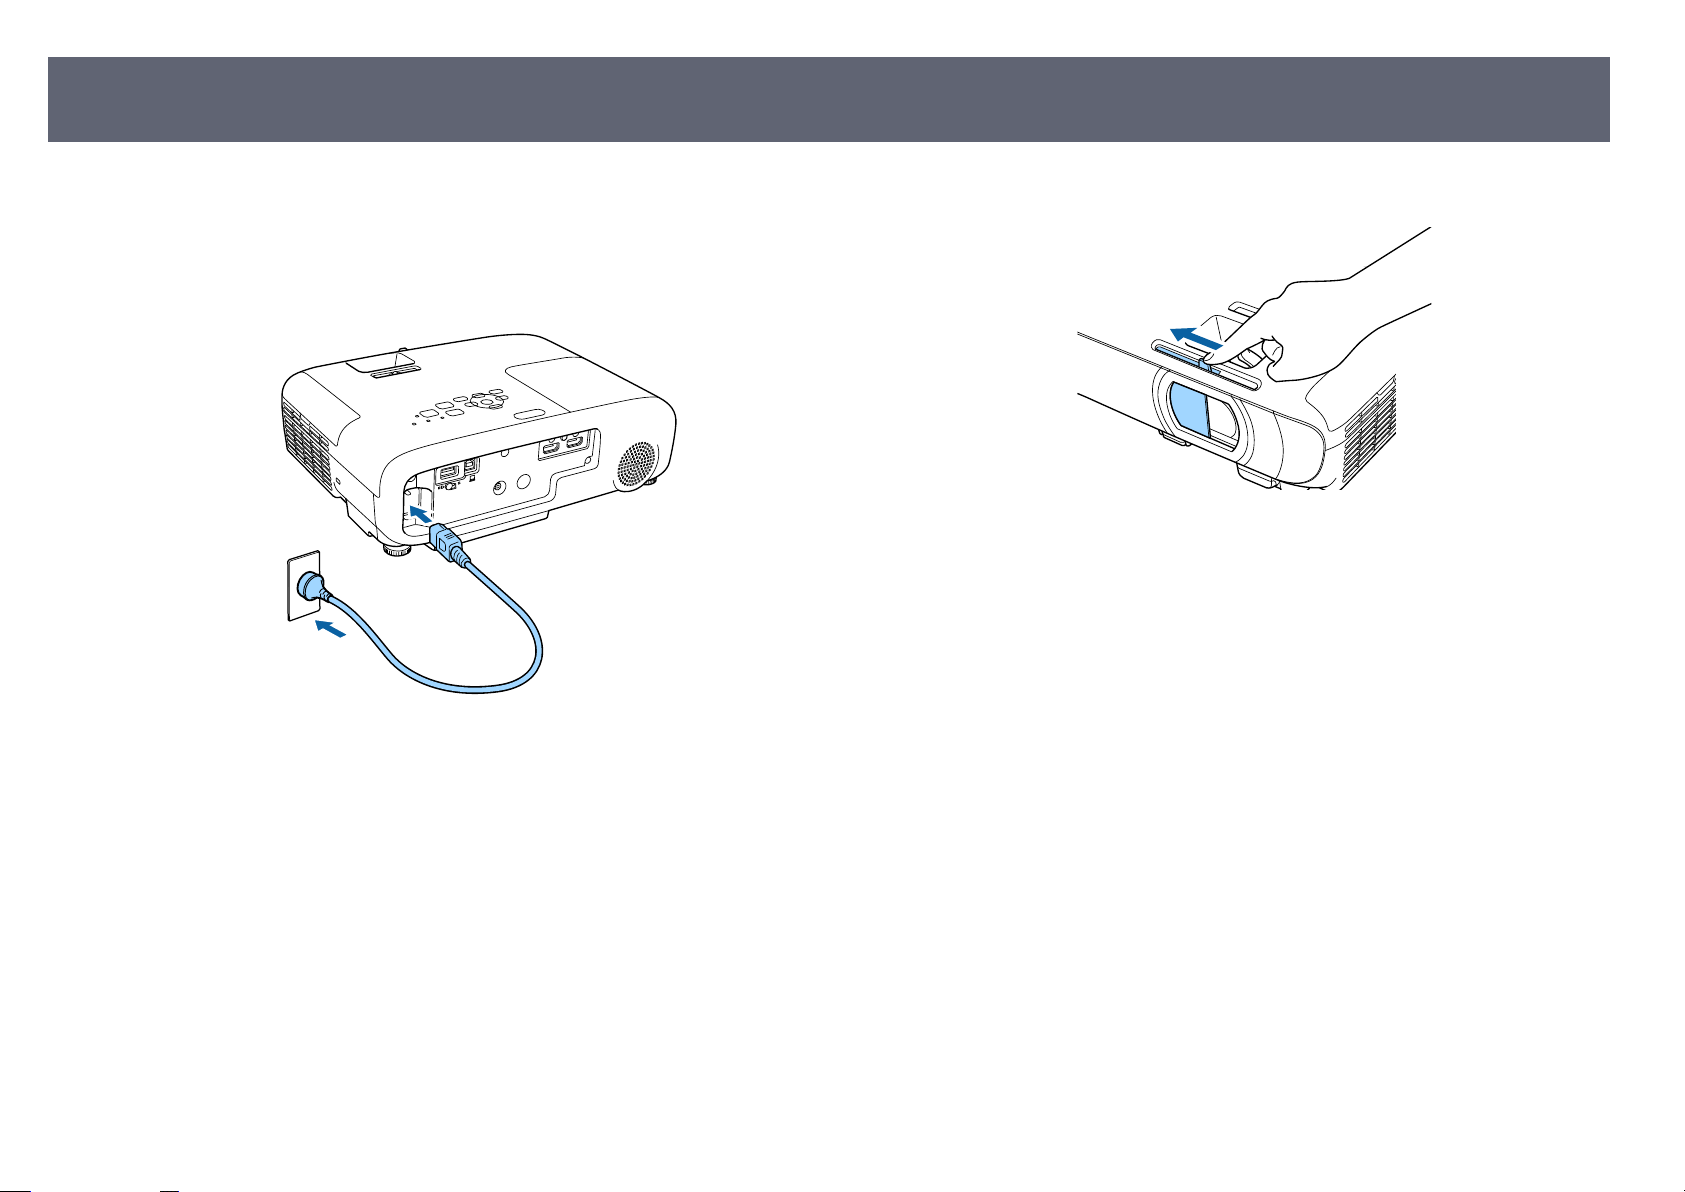
Connect the power cord to the projector's power inlet and plug it into an
a
ele
ctrical outlet.
e projector's power indicator turns blue. is indicates that the
p
rojector is receiving power, but is not yet turned on (it is in standby
mode).
u turn on the
Open the projector's lens cover.
c
Try the following if you do not see a projected image.
•
V
ify the lens cover is open all the way.
er
•
Turn on the connected computer or video device.
•
Change the screen output from the computer when using a laptop computer.
•
Insert a DVD or other video media, and press play (if necessary).
•
Press the [Source Search] button on the control panel or remote control to
detect the source.
•
Press the button for the desired video source on the remote control.
•
If the Home screen is displayed, select the source you want to project.
Press the power button on the control panel or remote control to turn on
b
th
e projector.
e projector beeps and the status indicator ashes blue as the projector
warms up. Once the projector is warmed up, the status indicator stops
ashing and turns blue.
Page 38
Turning On the Projector
Warning
•
Never look into the projector lens when the lamp is on. is can damage your
eyes and is especially dangerous for children.
•
When turning on the projector at a distance using the remote control, make sure
there is no one looking into the lens.
•
During projection, do not block the light from the projector with a book or
other objects. If the light from the projector is blocked, the area on which the
light shines becomes hot which could cause it to melt, burn, or start a re. Also,
the lens may get hot due to the reected light which could cause the projector
to malfunction. To stop projection, use the A/V Mute function, or turn o the
projector.
•
A mercury lamp with high internal pressure is used as the projector's light source.
If the lamp is subjected to vibrations or shocks, or if it is used for an overly
extended length of time, the lamp may break or it may not turn on. If the lamp
explodes, gases may escape and small fragments of glass may be scattered which
could cause an injury. Be sure to observe the instructions below.
•
Do not disassemble or damage the lamp or subject it to any impacts.
•
Do not bring your face close to the projector while it is in use.
•
Particular care should be taken when the projector is installed to a ceiling, as
small pieces of glass may fall down when the lamp cover is removed. When
cleaning the projector or replacing the lamp yourself, be very careful not to
allow such pieces of glass to get into the eyes or mouth.
If the lamp breaks, ventilate the area immediately, and contact a doctor if any
fragments of broken glass are inhaled or get into the eyes or mouth.
•
Wh
en the Direct Power On setting is set to On in the projector's
Extended menu, the projector turns on as soon as you plug it in. Note
that the projector also turns on automatically in cases such as recovery
from a power outage.
s Extended > Operation > Direct Power On
•
If you select a specic port as the Auto Power On setting in the
projector's Extended menu, the projector turns on as soon as it detects
a signal or cable connection from that port.
s Extended > Operation > Auto Power On
Related Links
g
•
"Ho
me Screen" p.38
•
"Projector Setup Settings - Extended Menu" p.111
•
"List of Functions" p.9
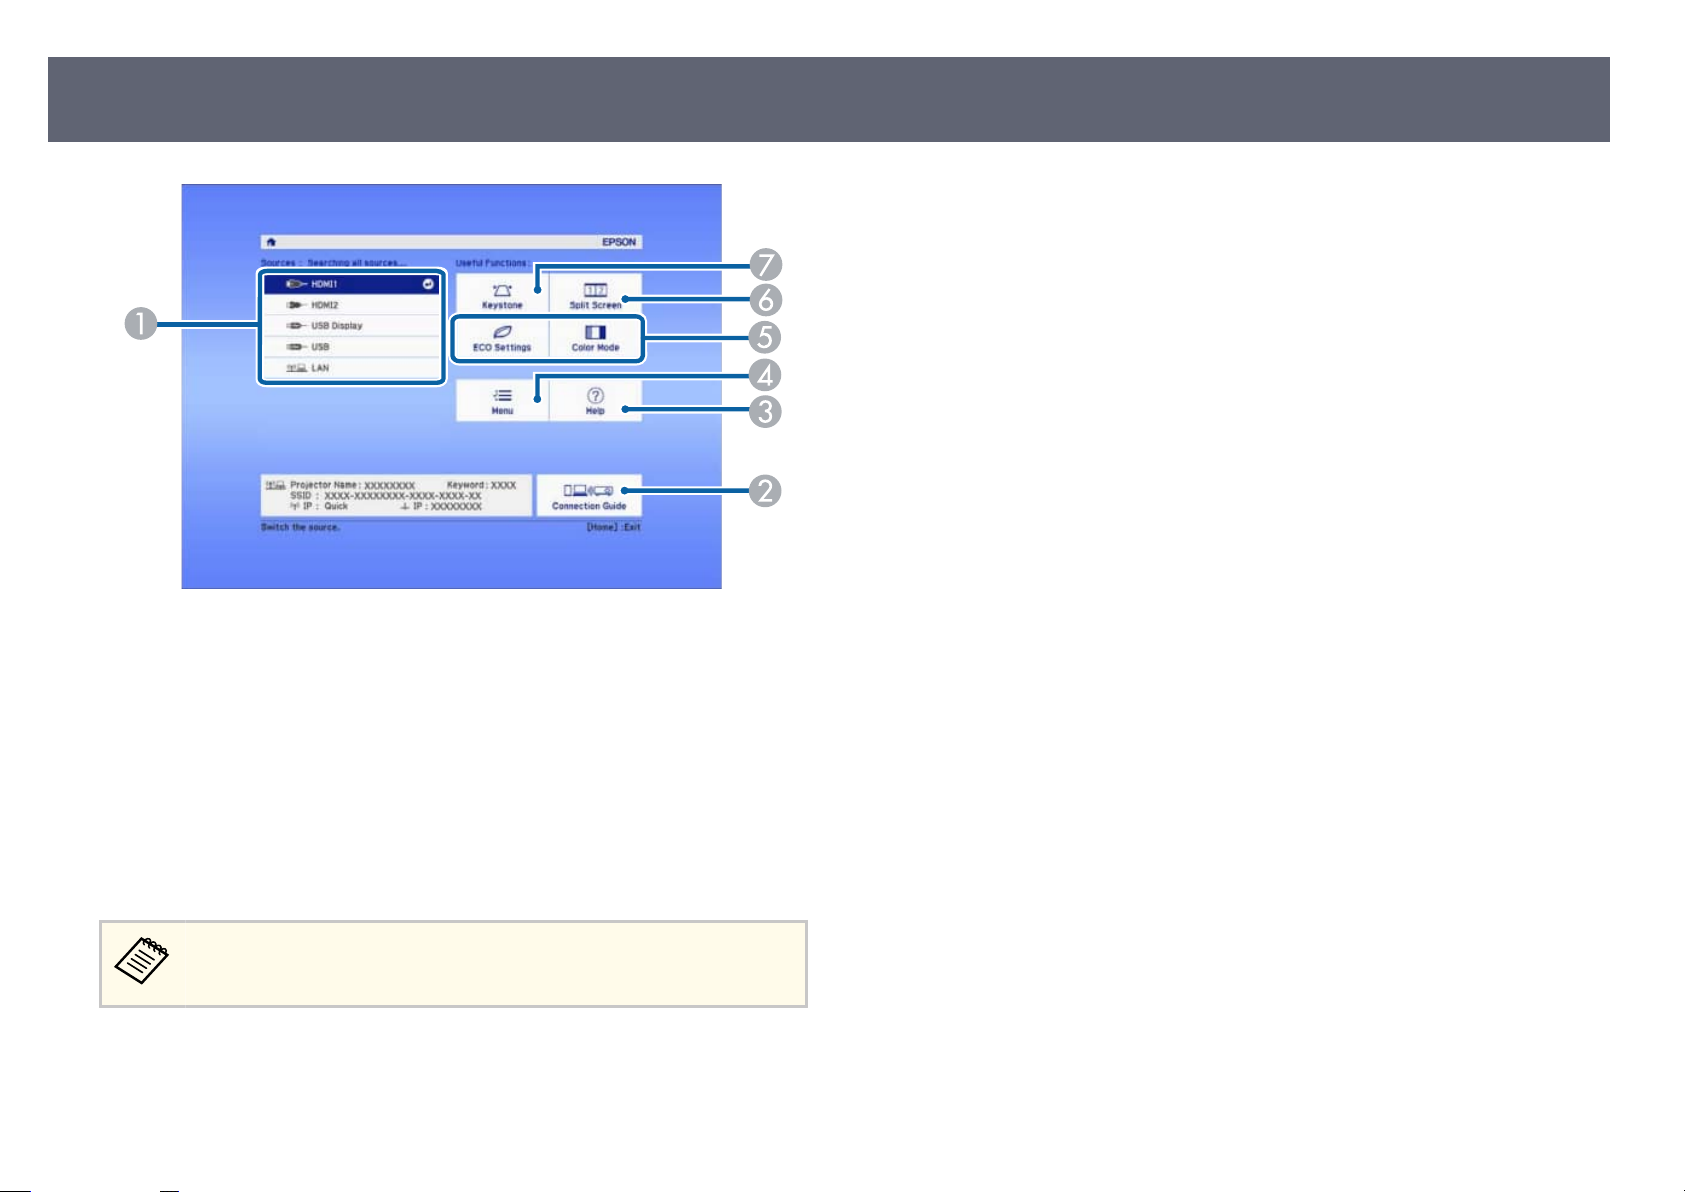
Home Screen
e Home screen feature allows you to easily select an image source and
acces
s useful functions. You can display the Home screen by pressing the
[Home] button on the control panel or remote control. e Home screen is
also displayed when you turn on the projector and no signal is being input.
Press the arrow buttons on the control panel or remote control to select a menu
item, and then press [Enter].
38
Page 39
Turning On the Projector
39
Selects the source you want to project.
A
Displays the Connection Guide. You can select the wireless connection methods
B
C
D
E
F
G
ding to the devices you are using, such as smartphones or computers.
accor
Displays the Help screen.
Displays the projector's menu.
Performs menu options assigned to Home Screen in the projector's Extended
menu.
Projects two images from dierent image sources simultaneously by splitting the
projected screen.
Corrects the shape of an image that is an uneven rectangle.
•
•
•
•
g the Projector's Menus" p.104
"Usin
"Using the Projector Help Displays" p.145
"Projecting Two Images Simultaneously" p.60
"List of Functions" p.9
ome screen disappears aer 10 minutes of inactivity.
e H
Related Links
g
•
age Shape" p.46
"Im
•
"Projector Setup Settings - Extended Menu" p.111
Page 40
Turning O the Projector
Turn o the projector aer use.
•
Tur
n o this product when it is not in use to prolong the life
of the projector. Lamp life varies depending on the mode selected,
environmental conditions, and usage. Brightness decreases over time.
•
Since the projector supports the direct shutdown feature, it can be
turned o directly using the breaker.
Press the power button on the control panel or remote control.
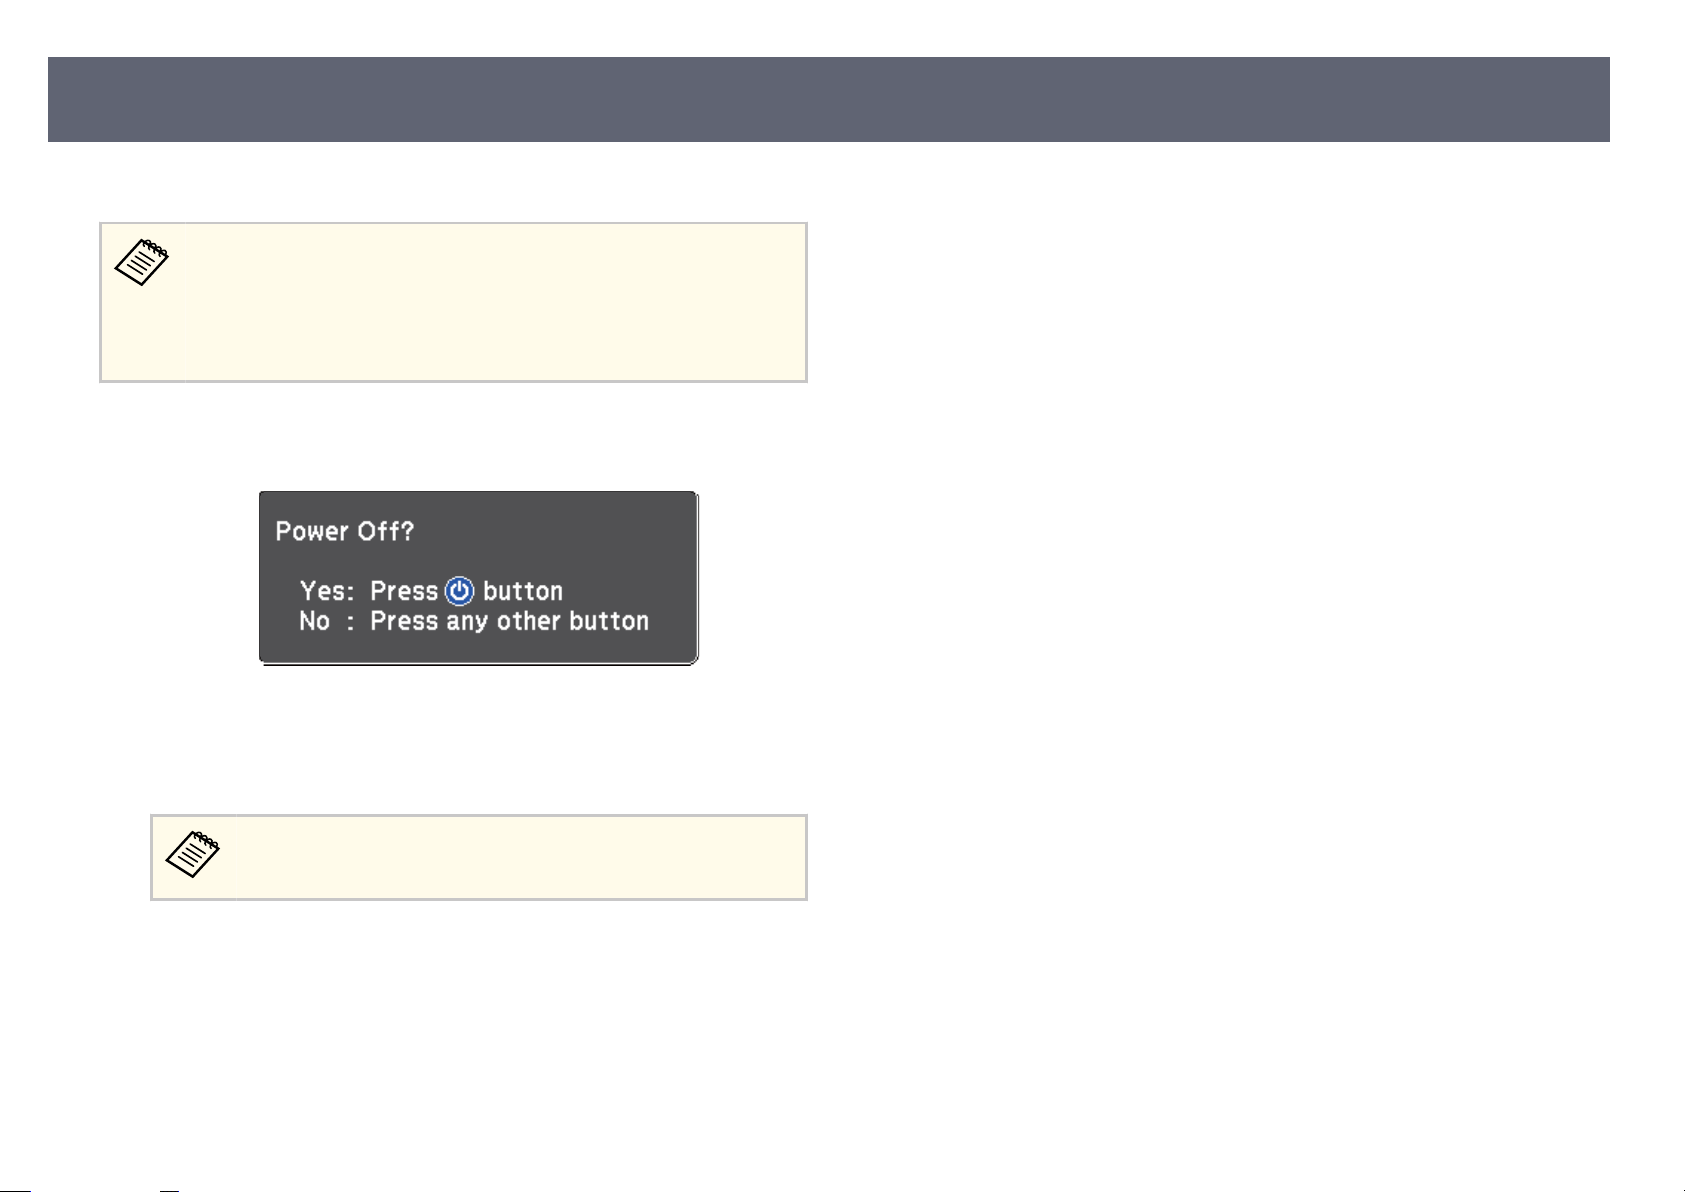
a
e pr
ojector displays a shutdown conrmation screen.
Related Links
g
•
"L
st of Functions" p.9
i
40
Press the power button again. (To leave it on, press any other button.)
b
e p
ojected image disappears, the projector beeps twice, and the status
r
indicator turns o.
With Epson's Instant O te
so you can pack up the projector for transport right away.
To transport or store the projector, make sure the power indicator is blue
c
d
t not ashing) and the status indicator is o, then unplug the power
(bu
cord.
Close the projector's lens cover.
chnology, there is no cool-down period
Page 41
Selecting the Language for the Projector Menus
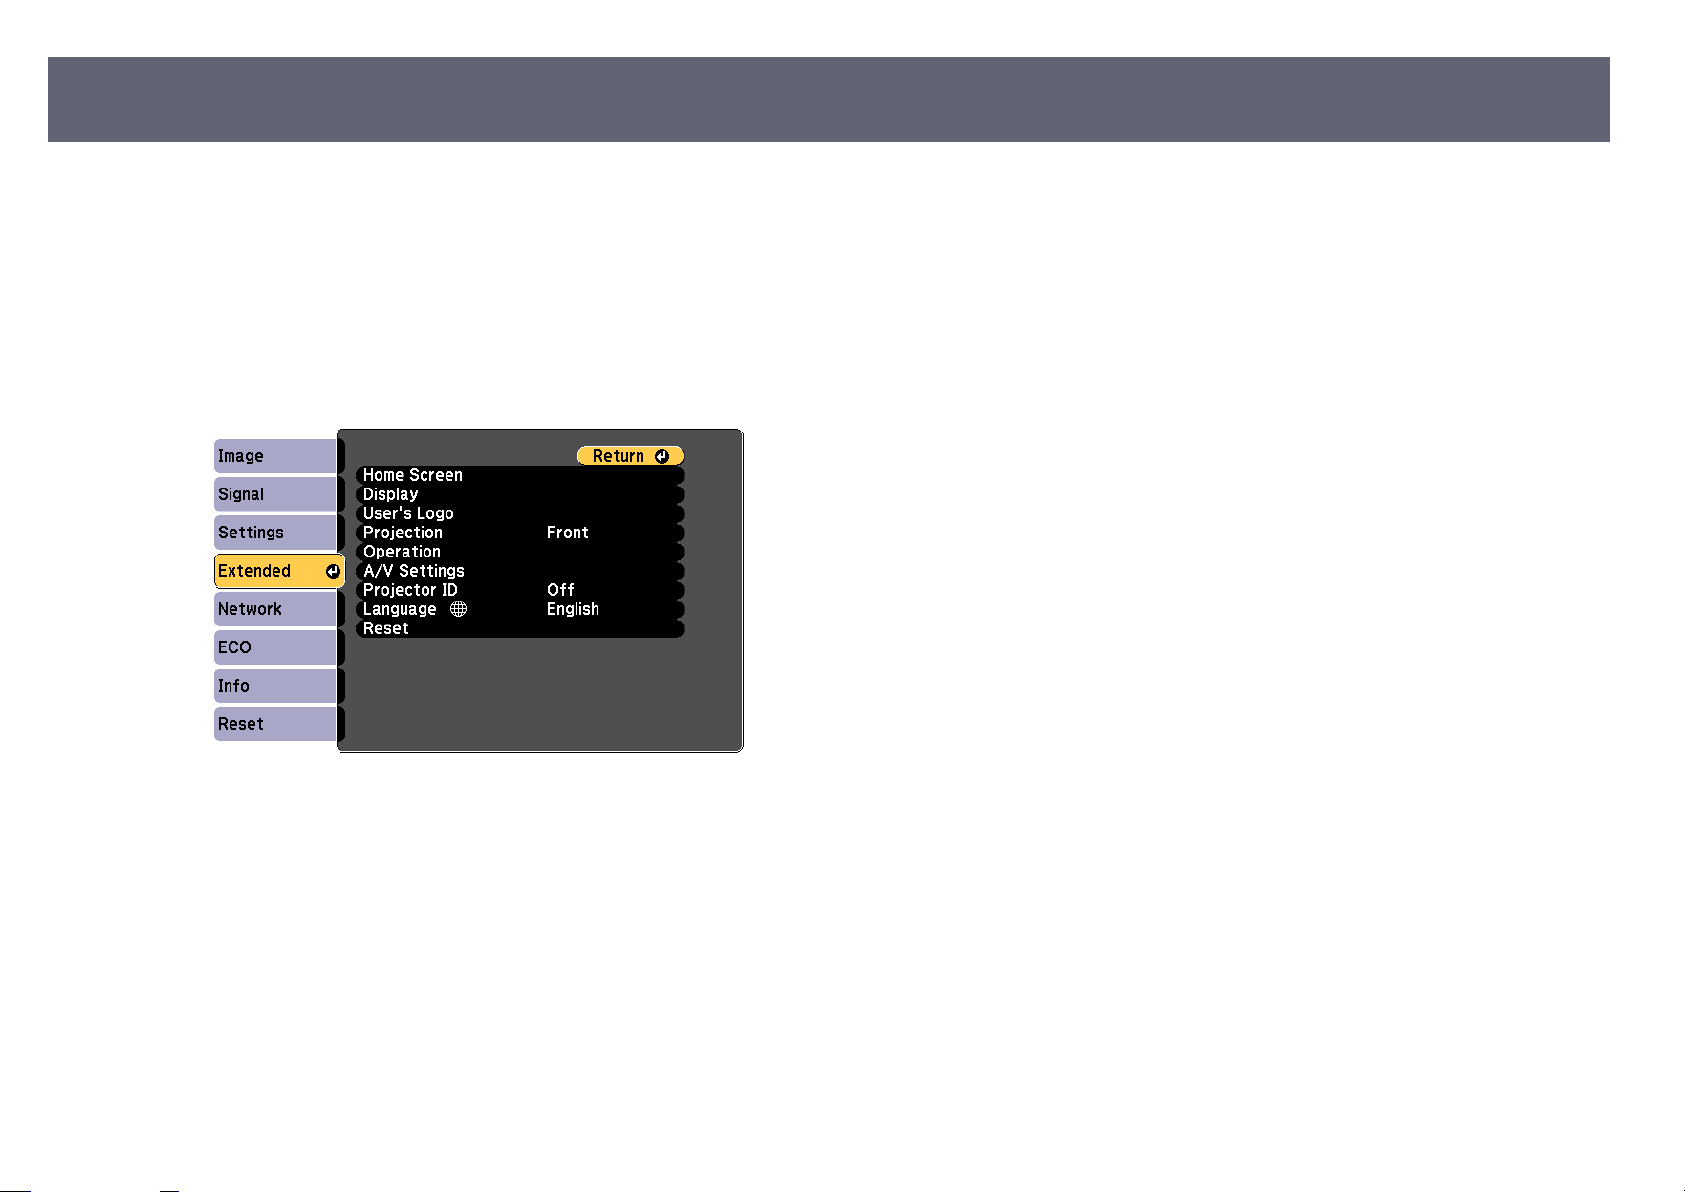
If you want to view the projector's menus and messages in another language,
u can change the Language setting.
yo
Turn on the projector.
a
Press the [Menu] button on the control panel or remote control.
b
41
Select the E
c
Select the L
d
elect the language you want to use and press [Enter].
S
e
Press [Menu] or [Esc] to exit the menus.
f
xtended menu and press [Enter].
anguage setting and press [Enter].
Page 42
Projection Modes
42
Depending on how you positioned the projector, you may need to change the
ojection mode so your images project correctly.
pr
•
Front lets you project from a table in front of the screen.
•
Front/Ceiling ips the image over top-to-bottom to project upside-down
from a ceiling or wall mount.
•
Rear ips the image horizontally to project from behind a translucent screen.
•
Rear/Ceiling ips the image over top-to-bottom and horizontally to project
from a ceiling or wall mount and behind a translucent screen.
Related Links
g
•
"Changing the Projection Mode Using the Remote Control" p.42
•
"Changing the Projection Mode Using the Menus" p.42
•
"Projector Setup and Installation Options" p.23
Changing the Projection Mode Using the Remote Control
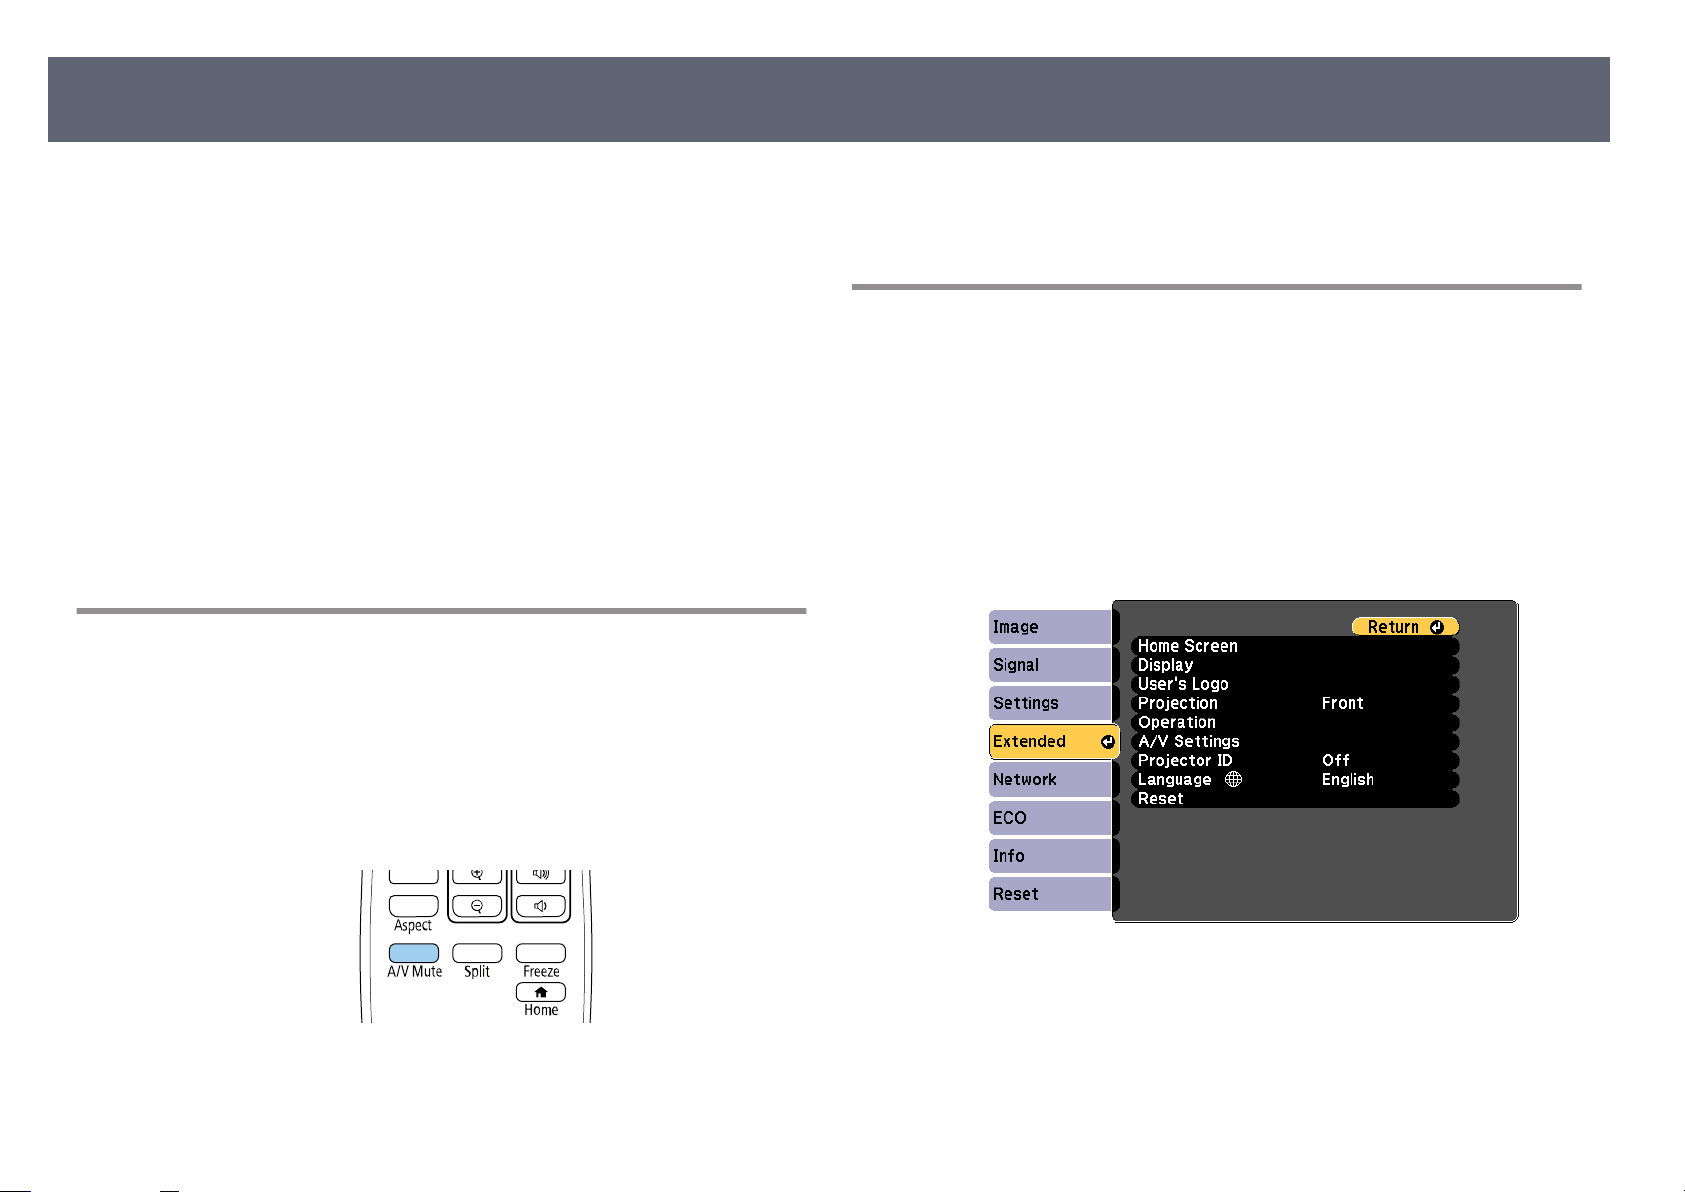
You can change the projection mode to ip the image over top-to-bottom.
o change projection back to the original mode, hold down the [A/V
T
c
Mu
te] button for 5 seconds again.
Changing the Projection Mode Using the Menus
You can change the projection mode to ip
and/or le-to-right using the projector menus.
Turn on the projector and display an image.
a
Press the [Menu] button on the control panel or remote control.
b
c
Select the E
xtended menu and press [Enter].
the image over top-to-bottom
Turn on the projector and display an image.
a
Hold down the [A/V Mute] button on the remote control for 5 seconds.
b
e image disappears briey and reappears ipped top-to-bottom.
Page 43
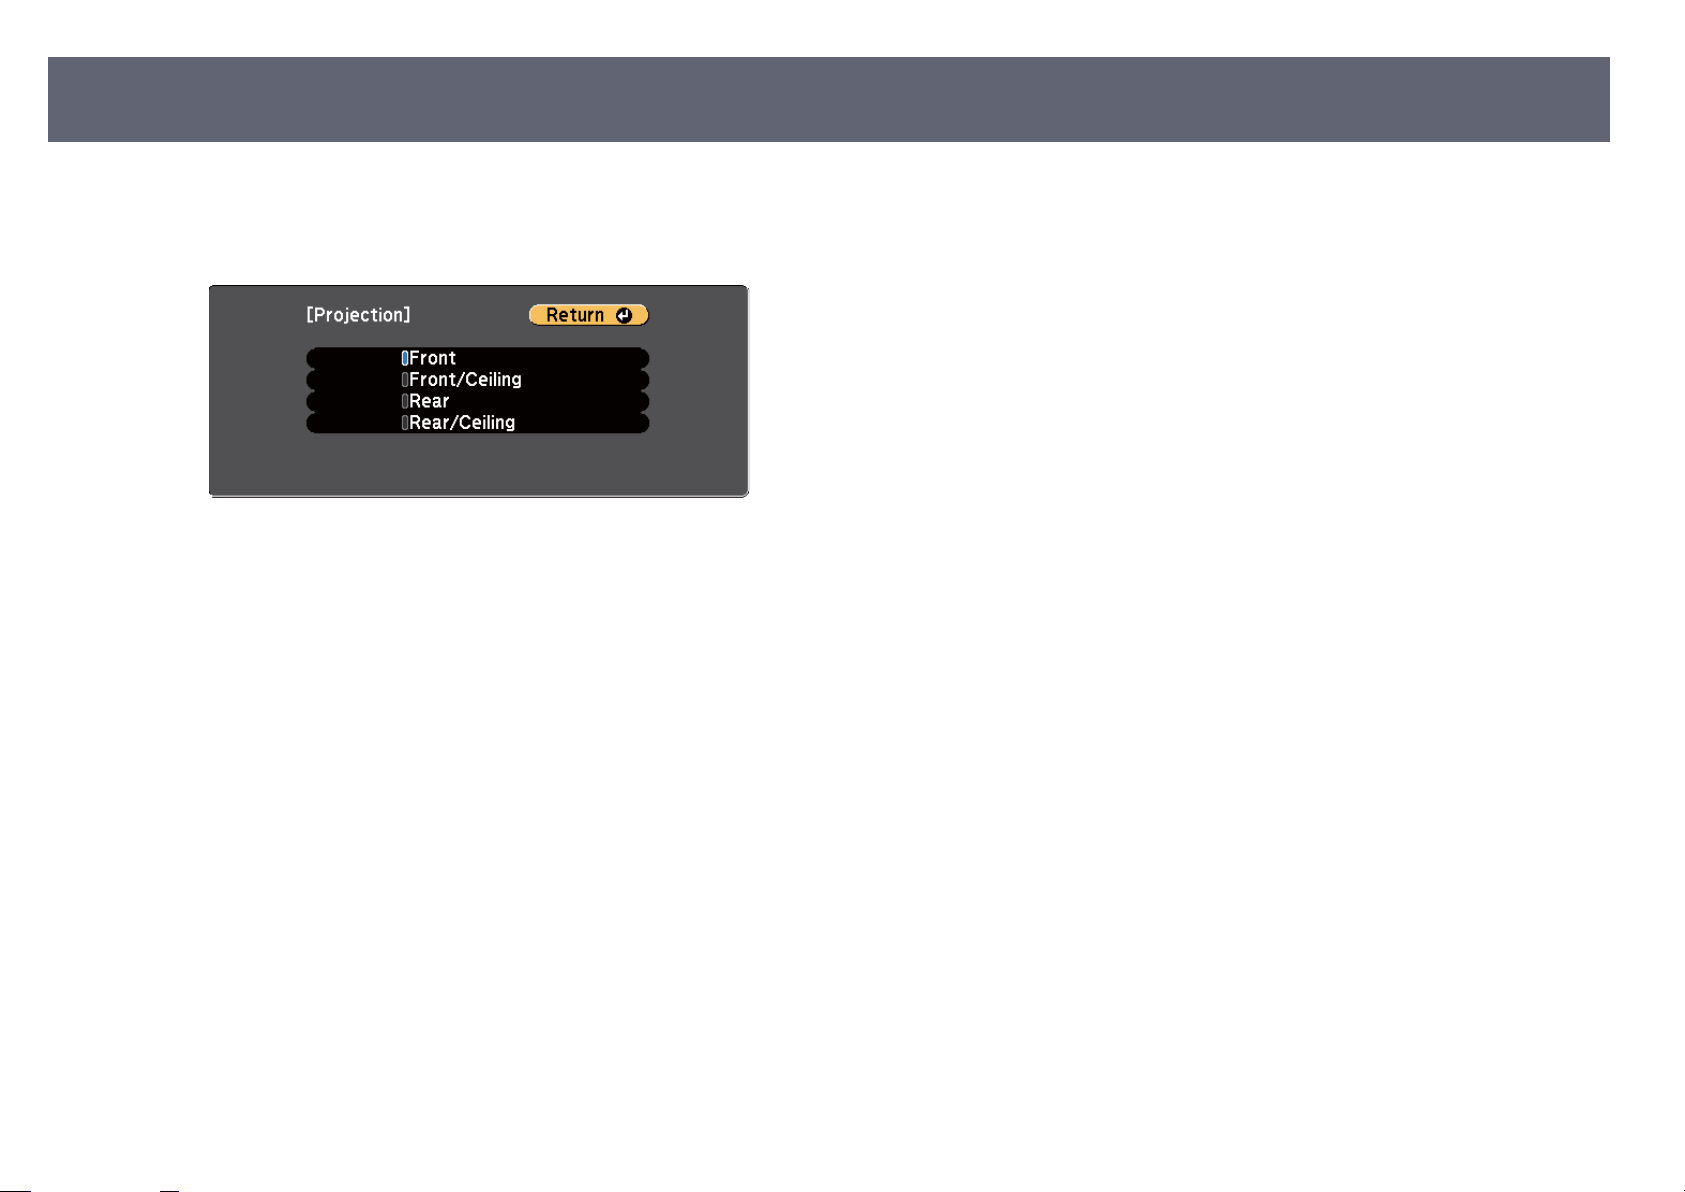
Projection Modes
Select Projection and press [Enter].
d
S
e
f
elect a projection mode and press [Enter].
Press [Menu] or [Esc] to exit the menus.
43
Page 44
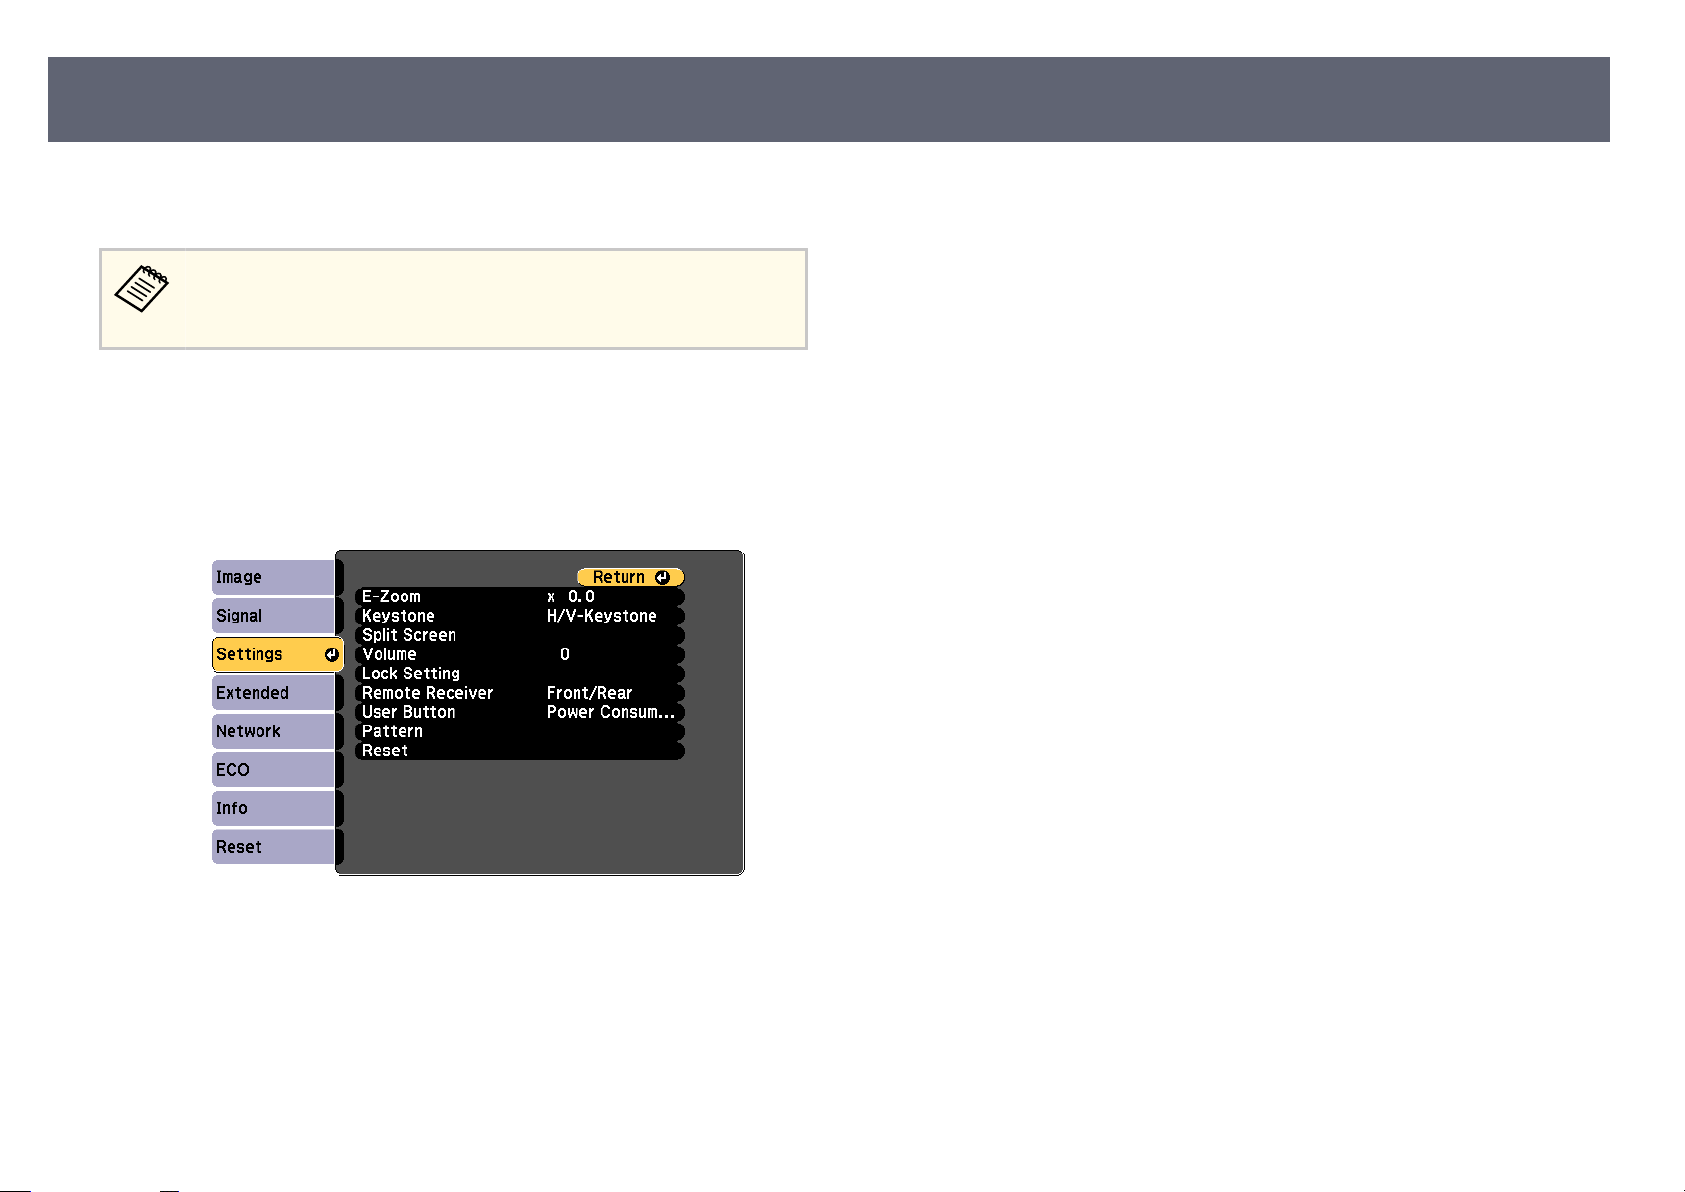
Displaying a Test Pattern
You can display a test pattern to adjust the projected image without connecting
puter or video device.
a com
To set menu items that cannot be set while the test pattern is being
dis
played or to ne-tune the projected image, project an image from the
connected device.
Turn on the projector.
a
Press the [Menu] button on the control panel or remote control.
b
44
Select the S
c
Select P
d
e
f
test pattern is displayed.
e
Adjust the image as necessary.
Press [Esc] to clear the test pattern.
ettings menu and press [Enter].
attern > Test Pattern, and press [Enter].
Page 45
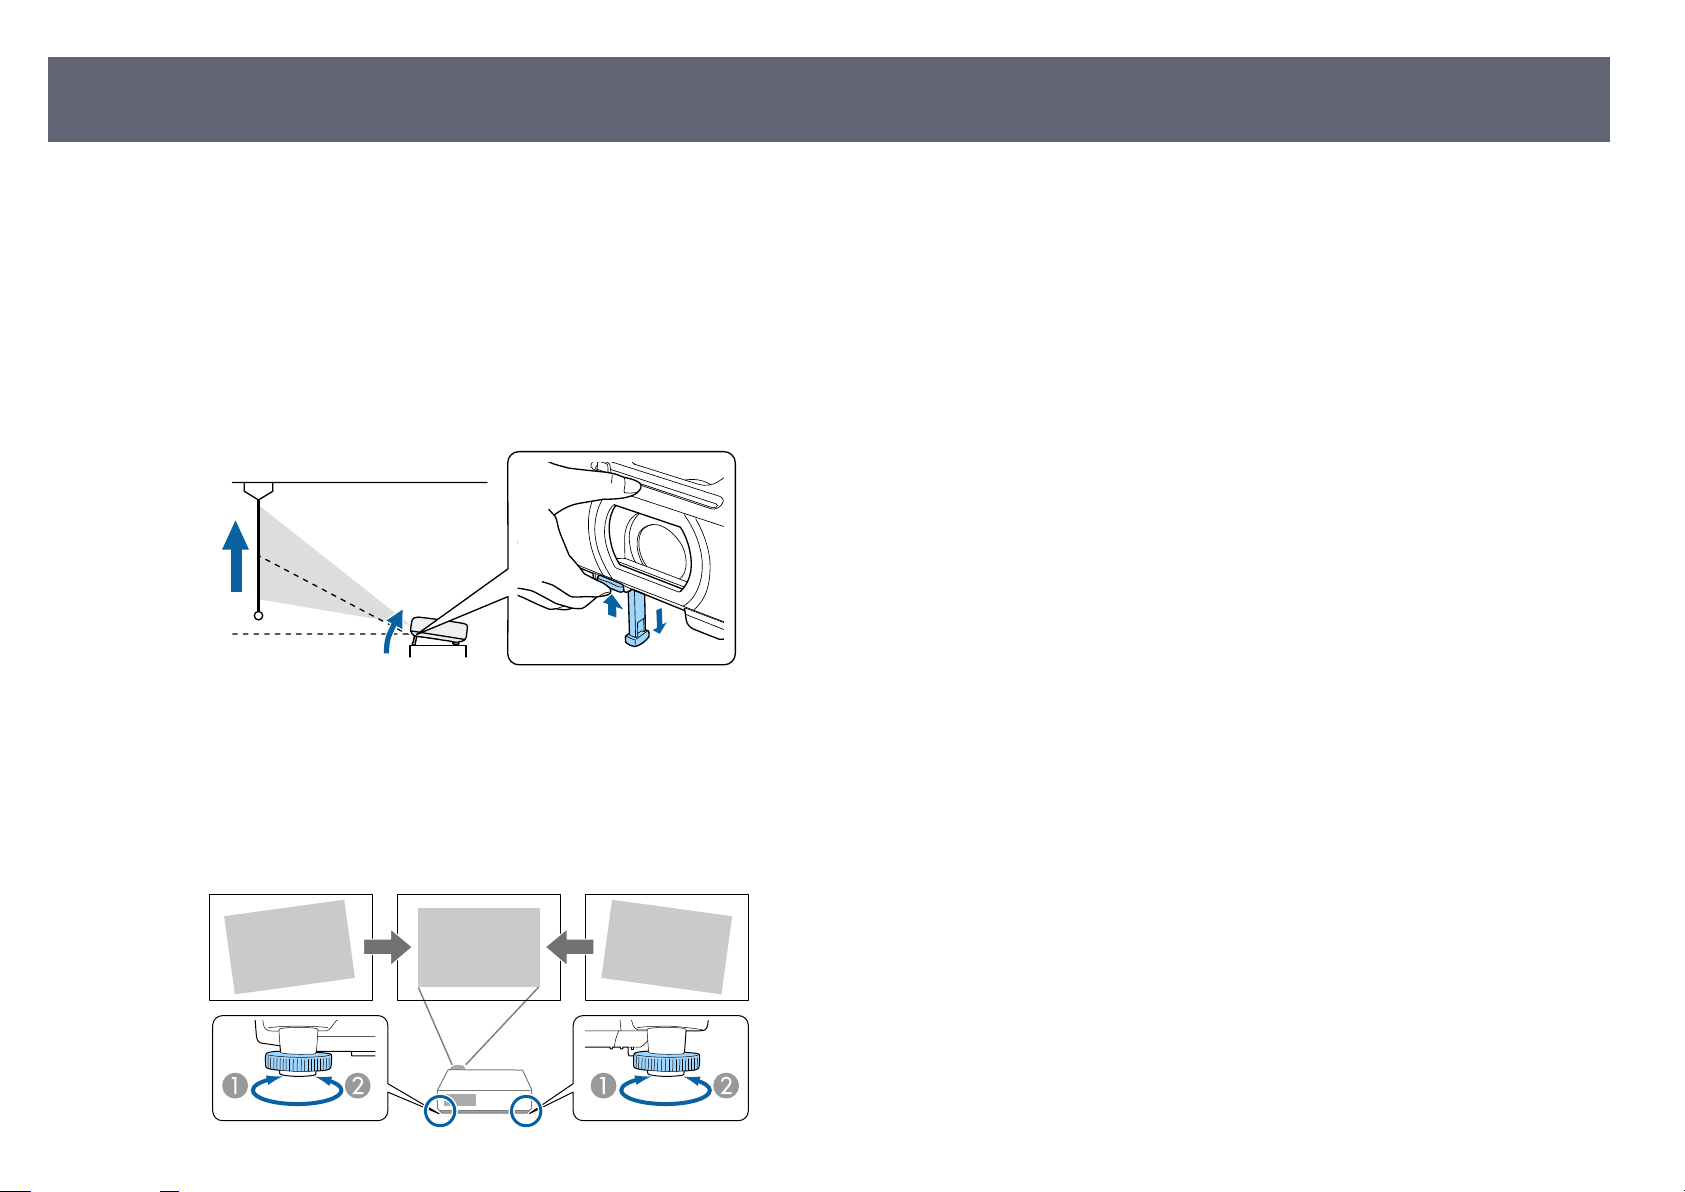
Adjusting the Image Height
If you are projecting from a table or other at surface and the image is too high
or low, you can adjust the image height using the projector's adjustable feet.
e larger the angle of tilt, the harder it becomes to focus. Locate the projector
so that it only needs to be tilted at a small angle.
Extend the rear foot
A
Retract the rear foot
B
If the projected image is unevenly rectangular, you need to adjust the image
shape.
45
Turn on the projector and display an image.
a
To adjust the front foot, pull up on the foot release lever and li the front
b
of the projector.
e foot extends from the projector.
You can adjust the position up to approximately 12 degrees.
Release the lever to lock the foot.
c
If the image is tilted, rotate the rear feet to adjust their height.
d
Related Links
g
•
"Image Shape" p.46
Page 46
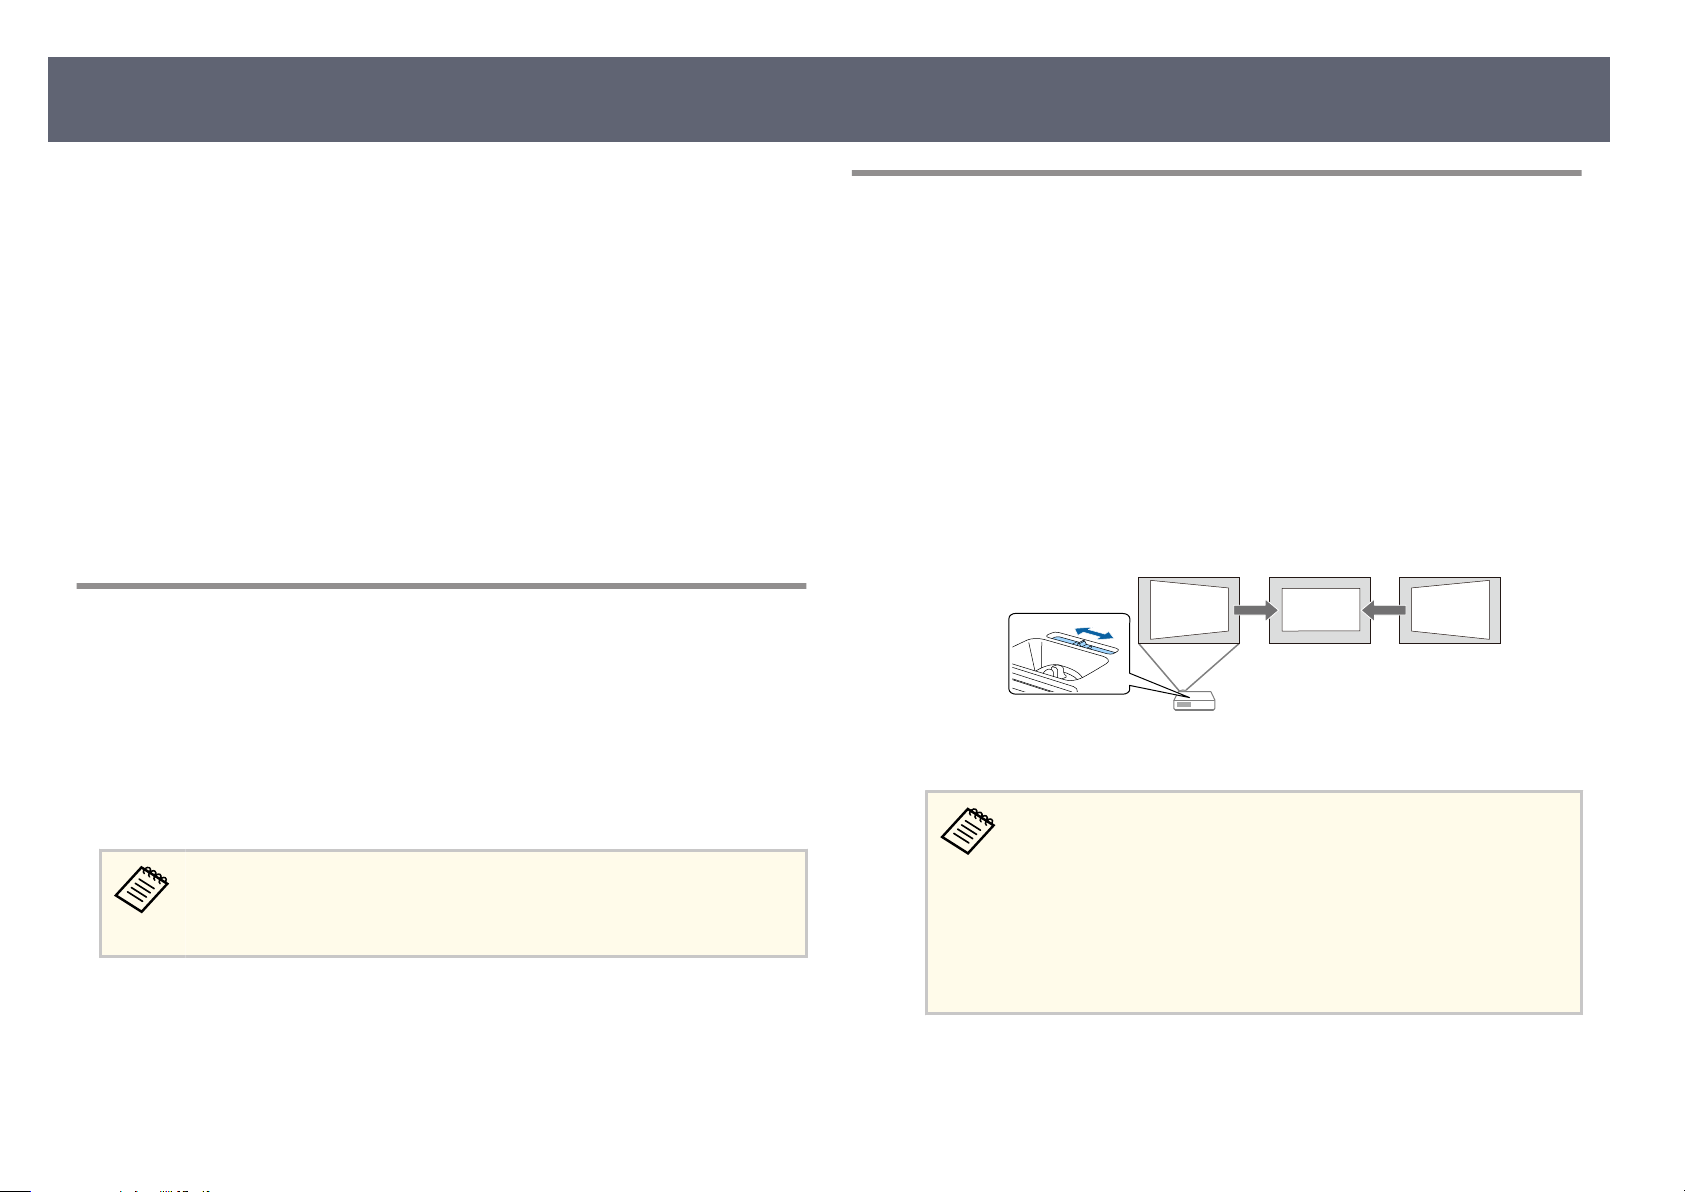
Image Shape
46
You can project an even, rectangular image by placing the projector directly in
ont of the center of the screen and keeping it level. If you place the projector at
fr
an angle to the screen, or tilt it up or down, or o to the side, you may need to
correct the image shape.
Aer correction, your image is slightly smaller.
For the best quality images, we recommend adjusting the installation position of
the projector to achieve the correct image size and shape.
Related Links
g
•
"Auto V-Keystone" p.46
•
"Correcting the Image Shape with the Horizontal Keystone Slider" p.46
•
"Correcting the Image Shape with the Keystone Buttons" p.47
•
"Correcting the Image Shape with Quick Corner" p.48
Auto V-Keystone
When the projector is moved or tilted, Auto V-Keystone automatically corrects
any vertical keystone distortion.
Auto V-Keystone can correct the projected image distortion in these
conditions:
•
Projection angle is about 30º up or down
•
e Projection setting is set to Front in the projector's Extended menu
If you do not want to use the Au
Keystone to O in the projector's menu.
s Settings > Keystone > H/V-Keystone > Auto V-Keystone
Related Links
g
•
"Pr
ojection Modes" p.42
•
"Projector Setup Settings - Extended Menu" p.111
•
"Projector Feature Settings - Settings Menu" p.109
•
"List of Functions" p.9
to V-Keystone function, set Auto V-
Correcting the Image Shape with the Horizontal Keystone Slider
You can use the projector's horizontal keystone slider to correct the shape of
an imag
placed to the side of the projection area. (Available only for models that have the
horizontal keystone slider.)
You can make eective corrections when the projection angle is about 30º right
or le.
a
b
g
•
•
e that is an uneven horizontal rectangle, such as when the projector is
Turn on the projector and display an image.
Adjust the slider until the image is an even rectangle.
Aer correction, your image is slightly smaller.
•
When you use the horizontal keystone slider, set H-Keystone
Adjuster to On in the projector's Settings menu.
s Settings > Keystone > H/V-Keystone > H-Keystone
Adjuster
•
You can also correct the shape of the image in the horizontal
direction in the projector's Settings menu.
s Settings > Keystone > H/V-Keystone
Related Links
ojector Feature Settings - Settings Menu" p.109
"Pr
"List of Functions" p.9
Page 47
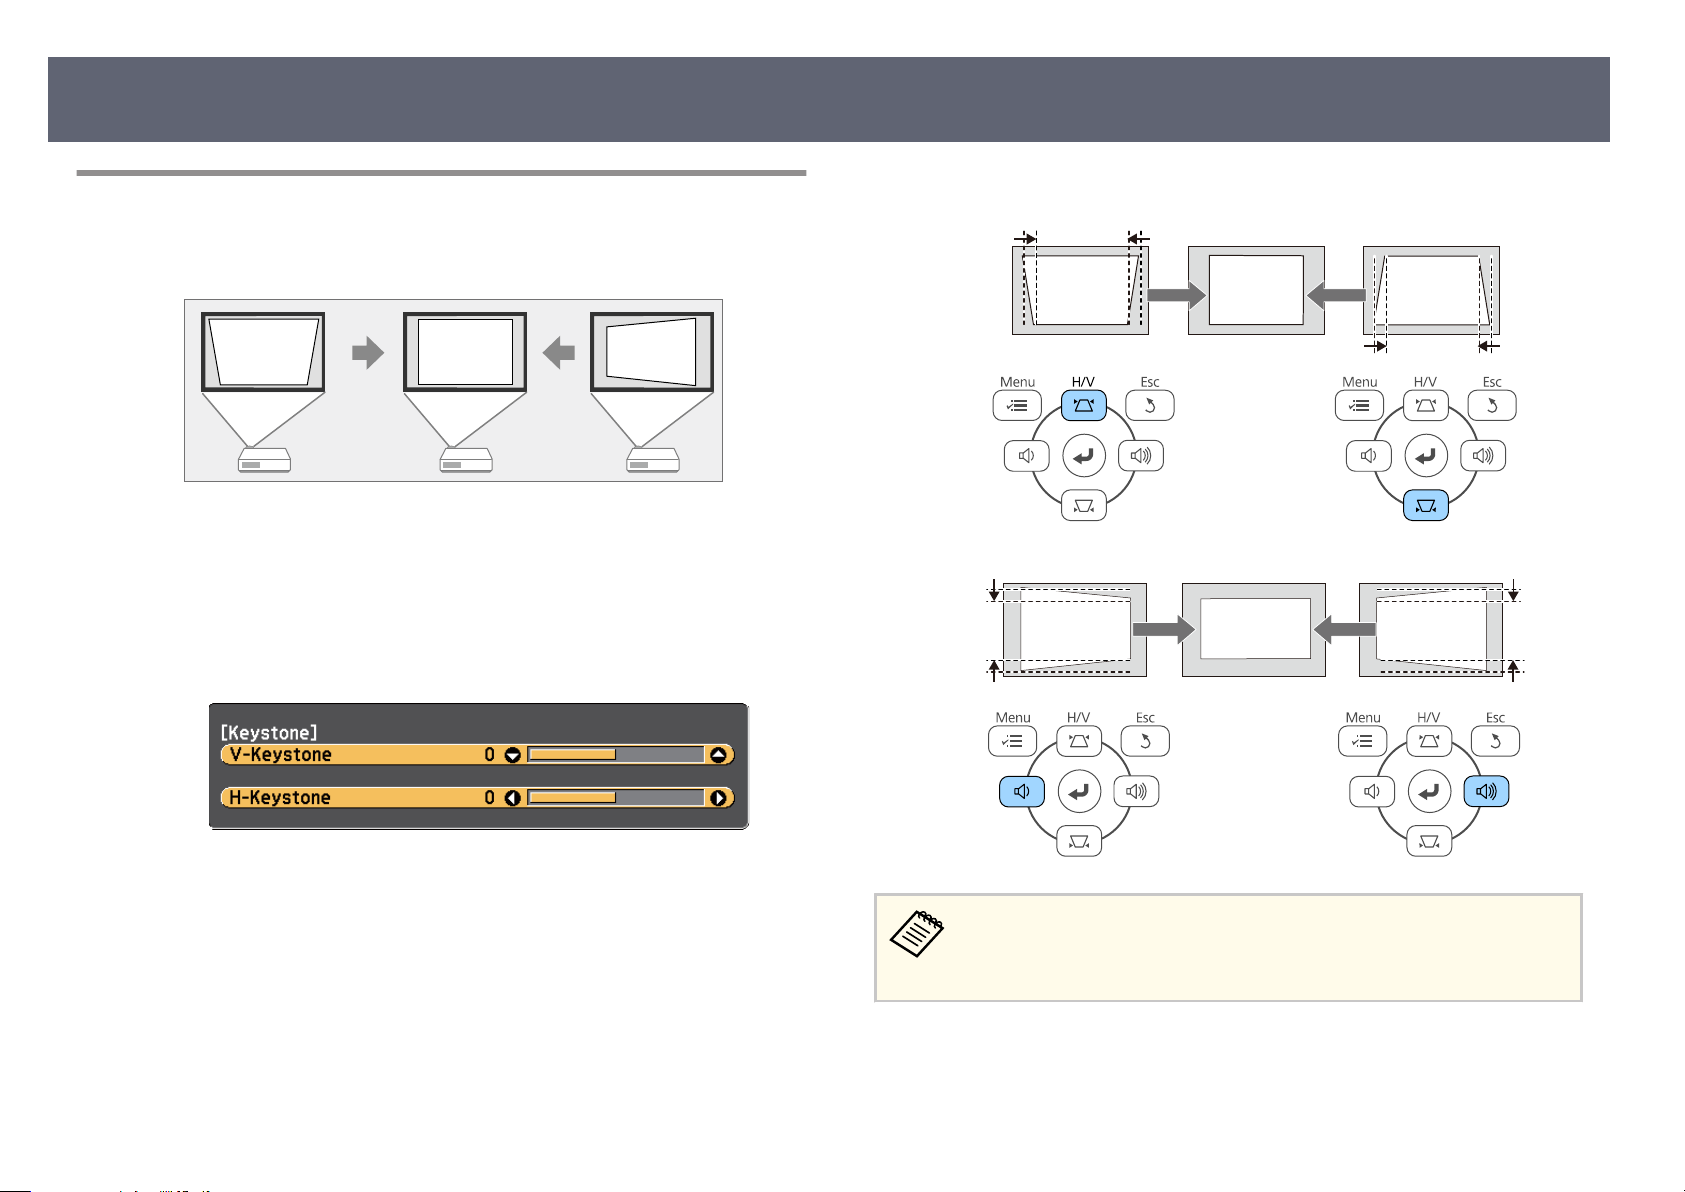
Image Shape
47
Correcting the Image Shape with the Keystone Buttons
You can use the projector's keystone correction buttons to correct the shape of
an imag
You can use keystone buttons to correct images up to 30º right, le, up, or down.
a
b
e that is unevenly rectangular.
Turn on the projector and display an image.
Press one of the keystone adjustment buttons on the control panel to
di
play the Keystone adjustment screen.
s
Press a keystone button to adjust the image shape.
c
If the projector is installed out of your reach, you can also correct the
ape of the image using the remote control.
sh
s Settings > Keystone > H/V-Keystone
Related Links
g
•
"P
ojector Feature Settings - Settings Menu" p.109
r
Page 48
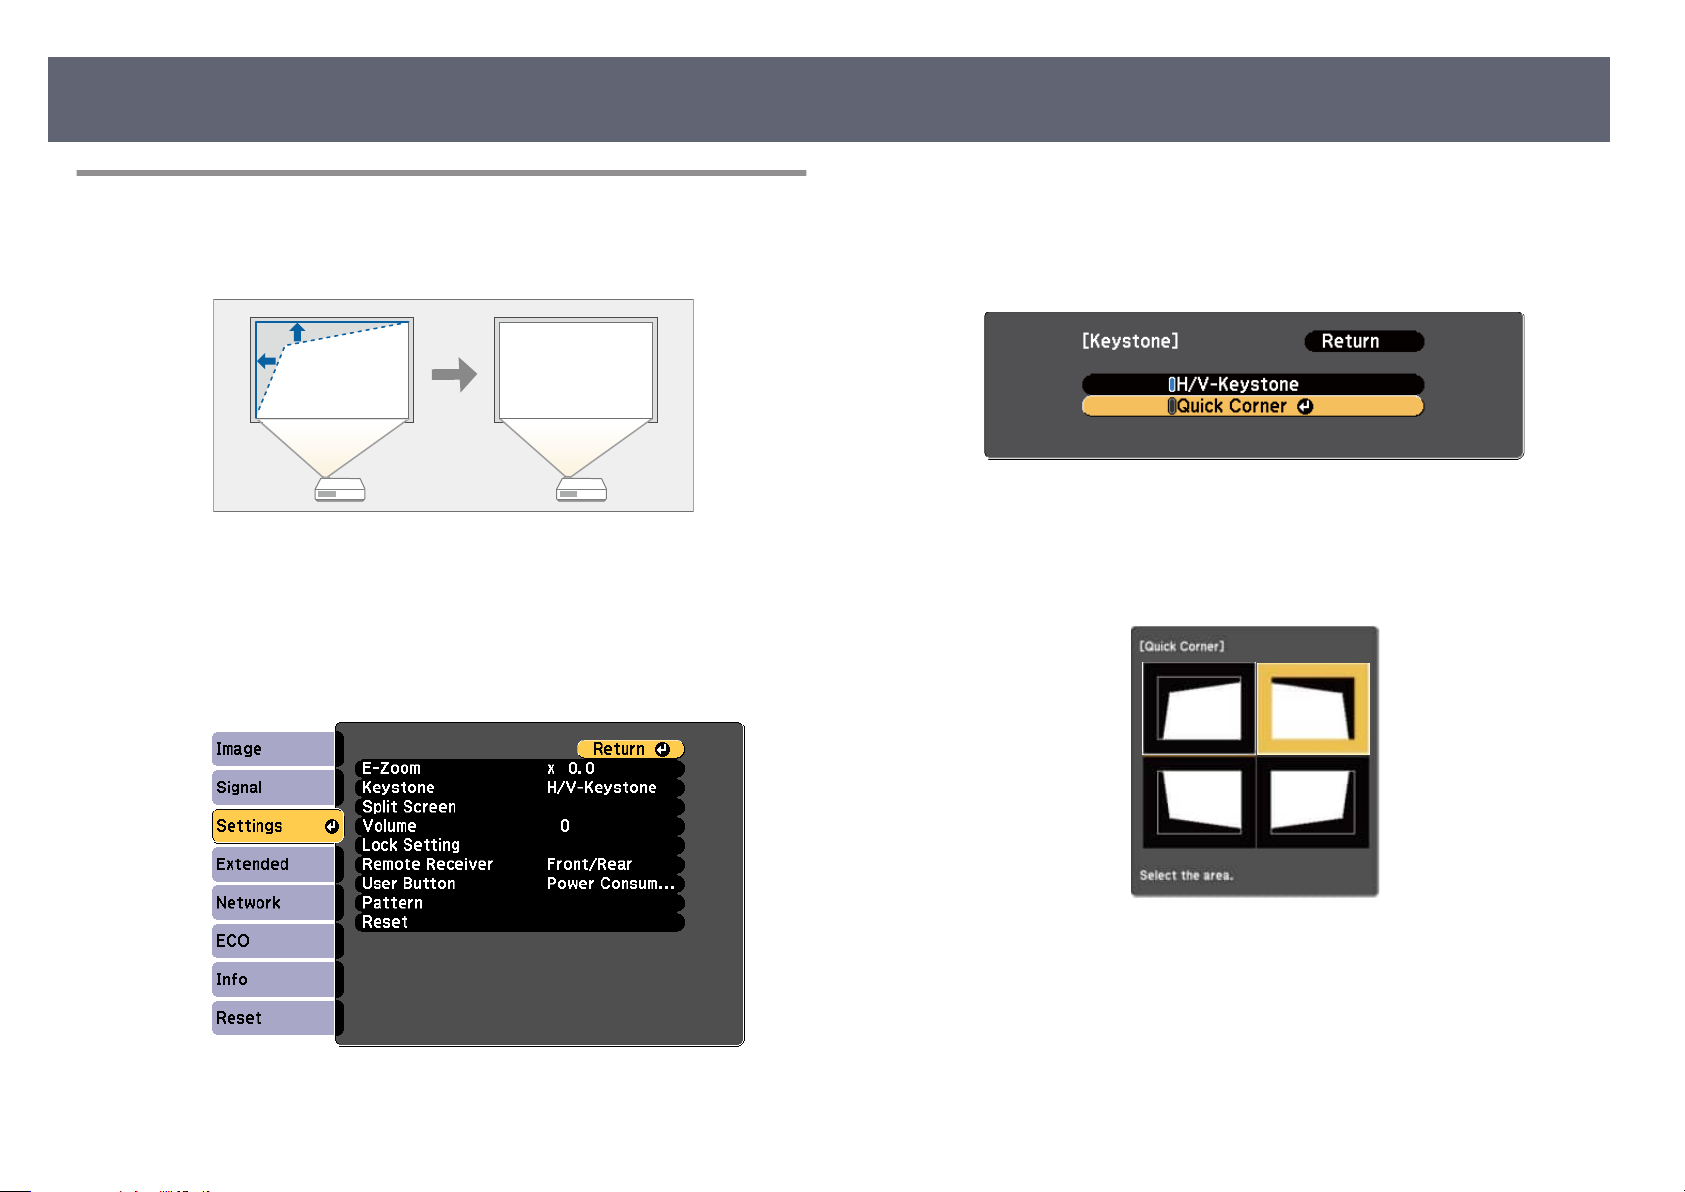
Image Shape
48
Correcting the Image Shape with Quick Corner
You can use the projector's Qui
of an image that is unevenly rectangular.
Turn on the projector and display an image.
a
Press the [Menu] button on the control panel or remote control.
b
c
Select the S
ettings menu and press [Enter].
ck Corner setting to correct the shape and size
Select Keystone and press [Enter].
d
S
e
f
elect Quick Corner and press [Enter]. en press [Enter] again if
n
ecessary.
You see the area selection screen.
Use the arrow buttons to select the corner of the image you want to adjust.
en p
ess [Enter].
r
Press the arrow buttons to adjust the image shape as necessary.
g
To return to the area selection screen, press [Enter].
Page 49
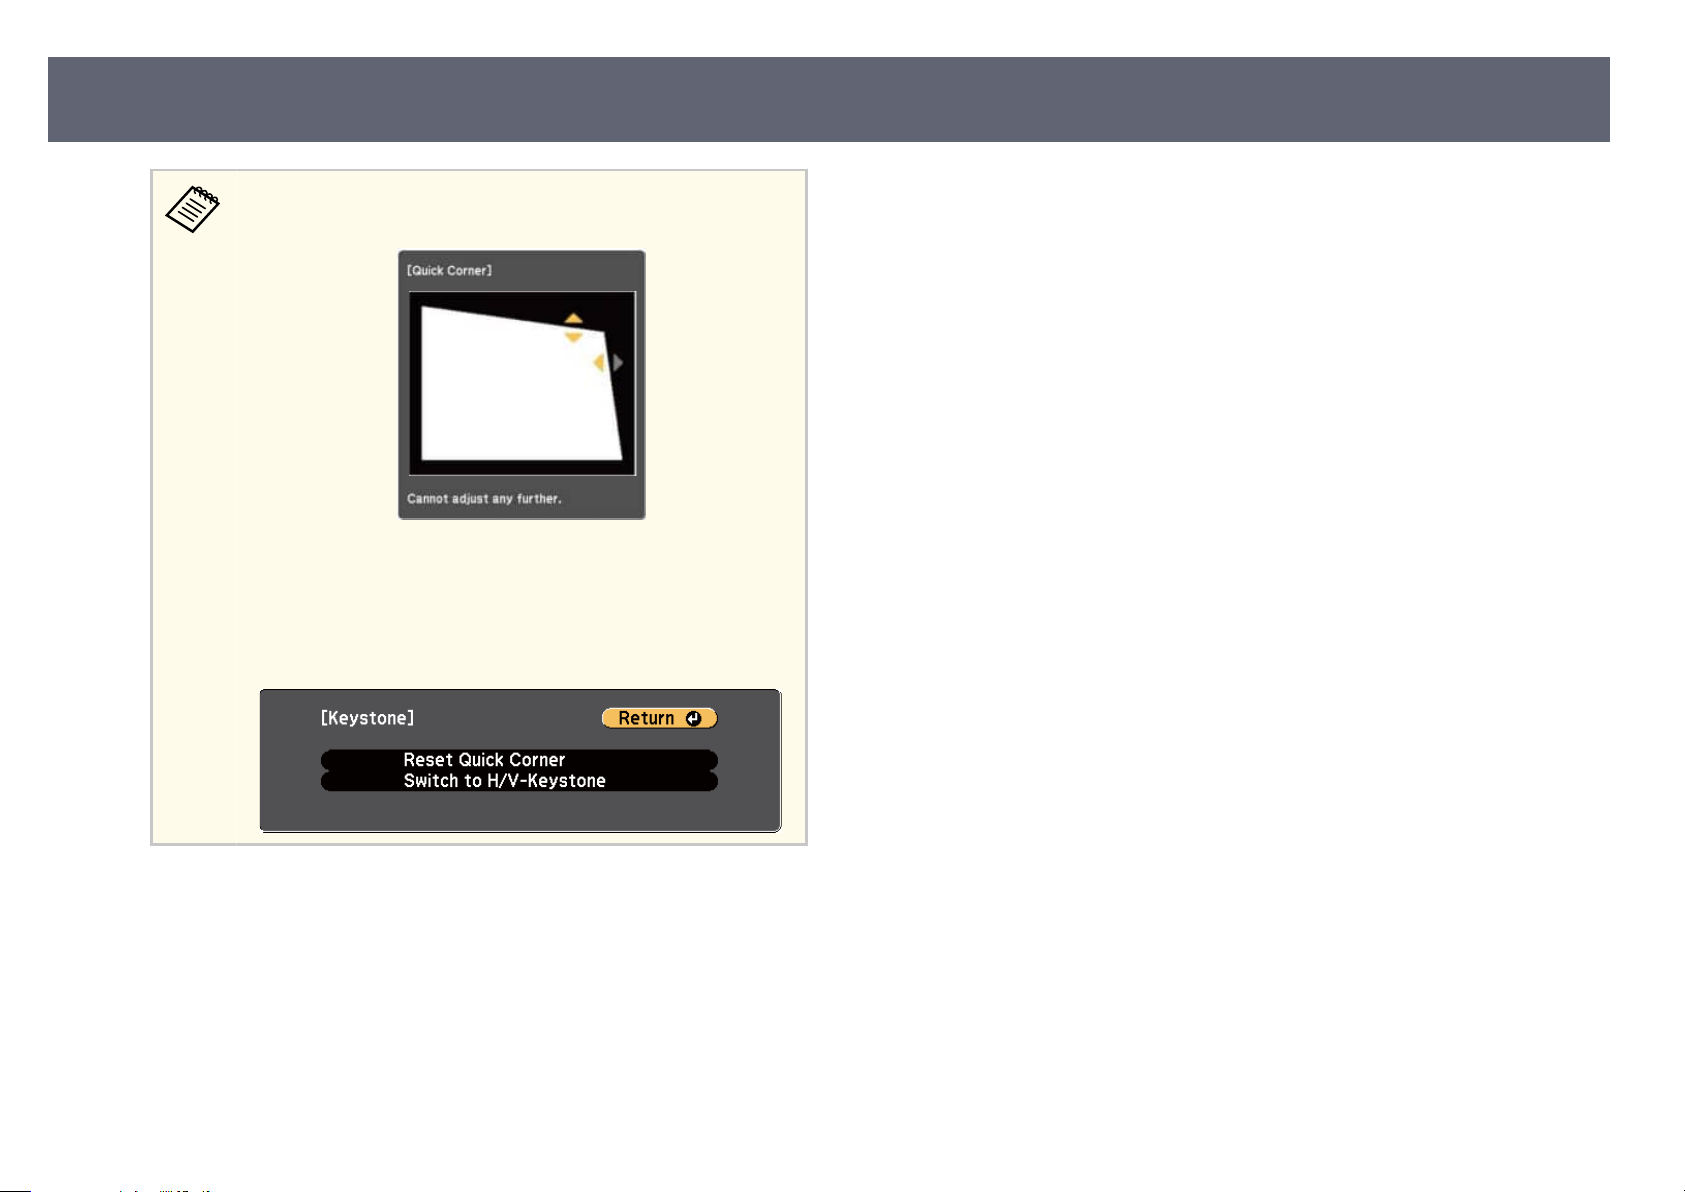
Image Shape
•
•
If y
ou see this screen, you cannot adjust the shape any further in
the direction indicated by the gray triangle.
To r
eset the Quick Corner corrections, hold down [Esc] for
about 2 seconds while the Quick Corner adjustment screen is
displayed, and select Reset Quick Corner. Select Switch to H/
V-Keystone to switch the image shape correction method to
H/V-Keystone.
Related Links
g
•
ojector Feature Settings - Settings Menu" p.109
"Pr
49
Repeat steps 6 and 7 as needed to adjust any remaining corners.
h
When you are ni
i
e Keystone setting is now set to Quick Corner in the projector's Settings
menu. e next time you press the keystone adjustment buttons on the control
panel, the area selection screen is displayed.
shed, press [Esc].
Page 50
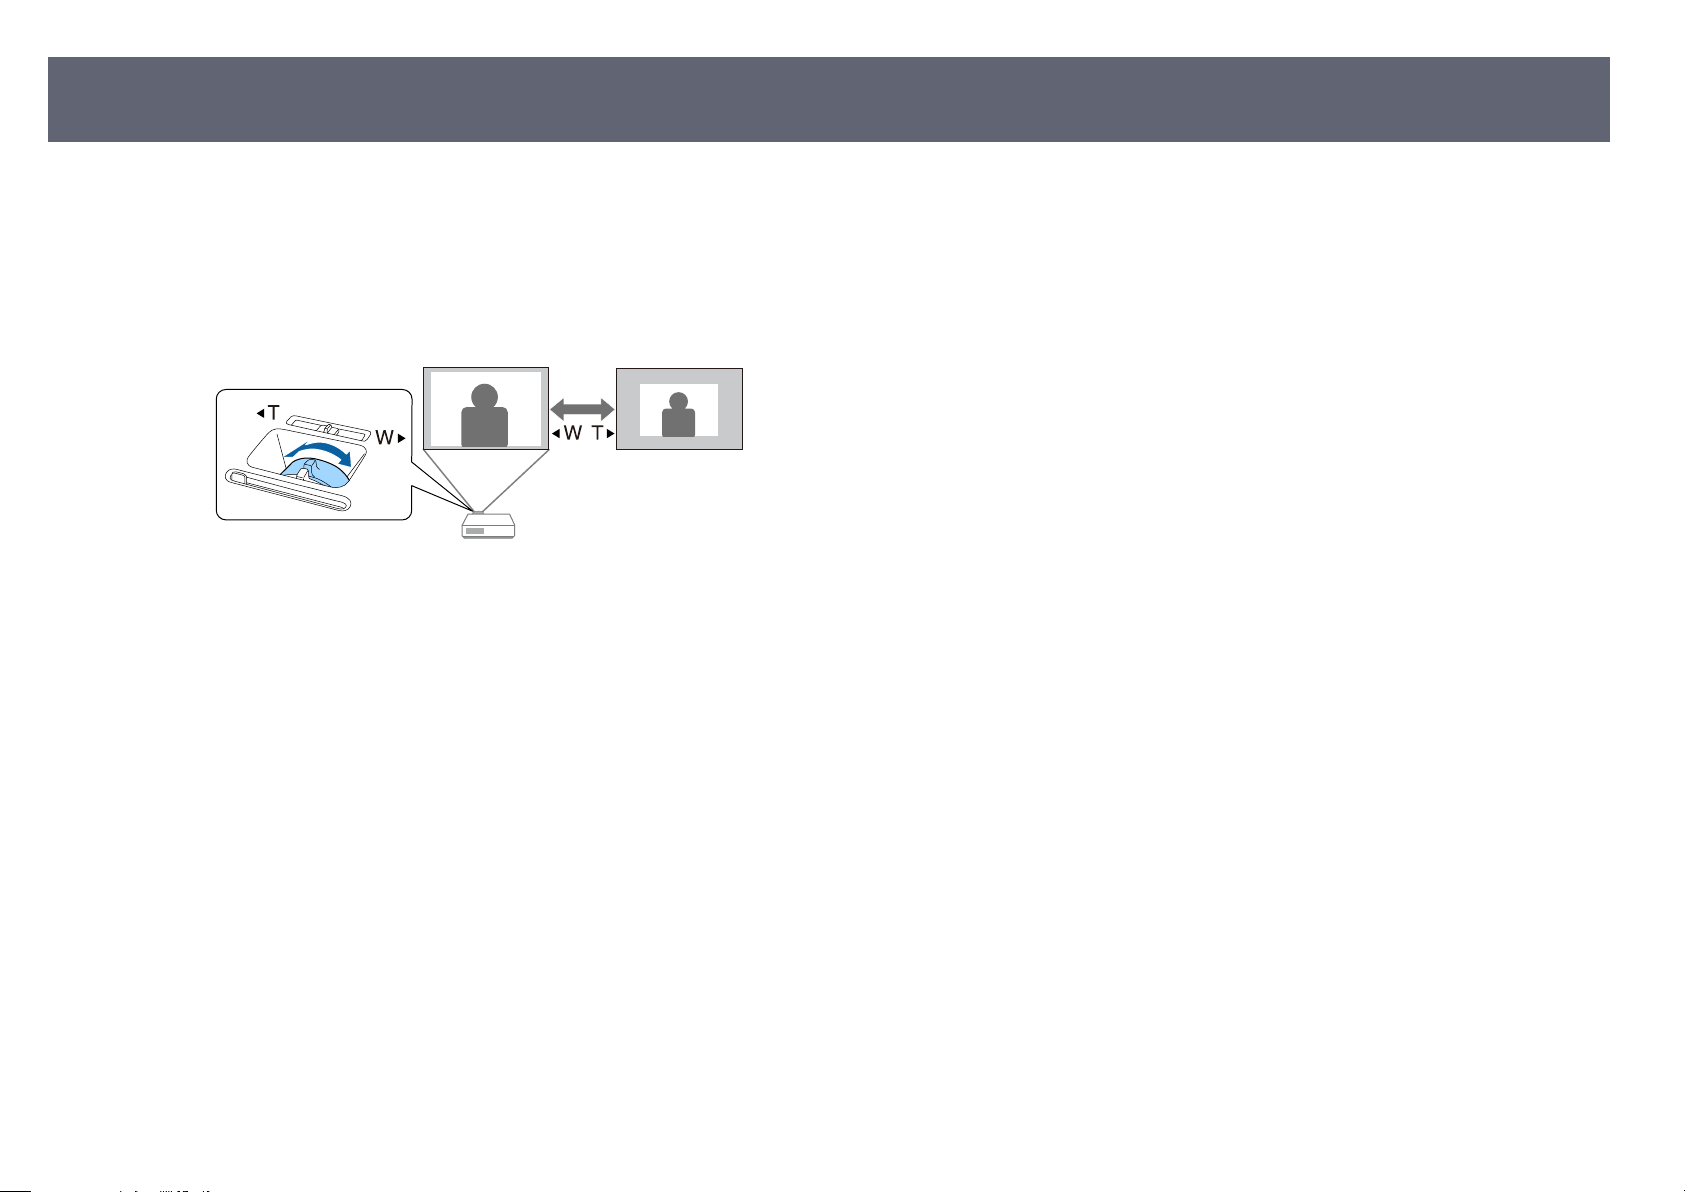
Resizing the Image with the Zoom Ring
You can resize the image using the projector's zoom ring. (Available only for
dels that have the zoom ring.)
mo
Turn on the projector and display an image.
a
Rotate the zoom ring to enlarge or reduce the image.
b
Related Links
g
•
"Li
st of Functions" p.9
50
Page 51
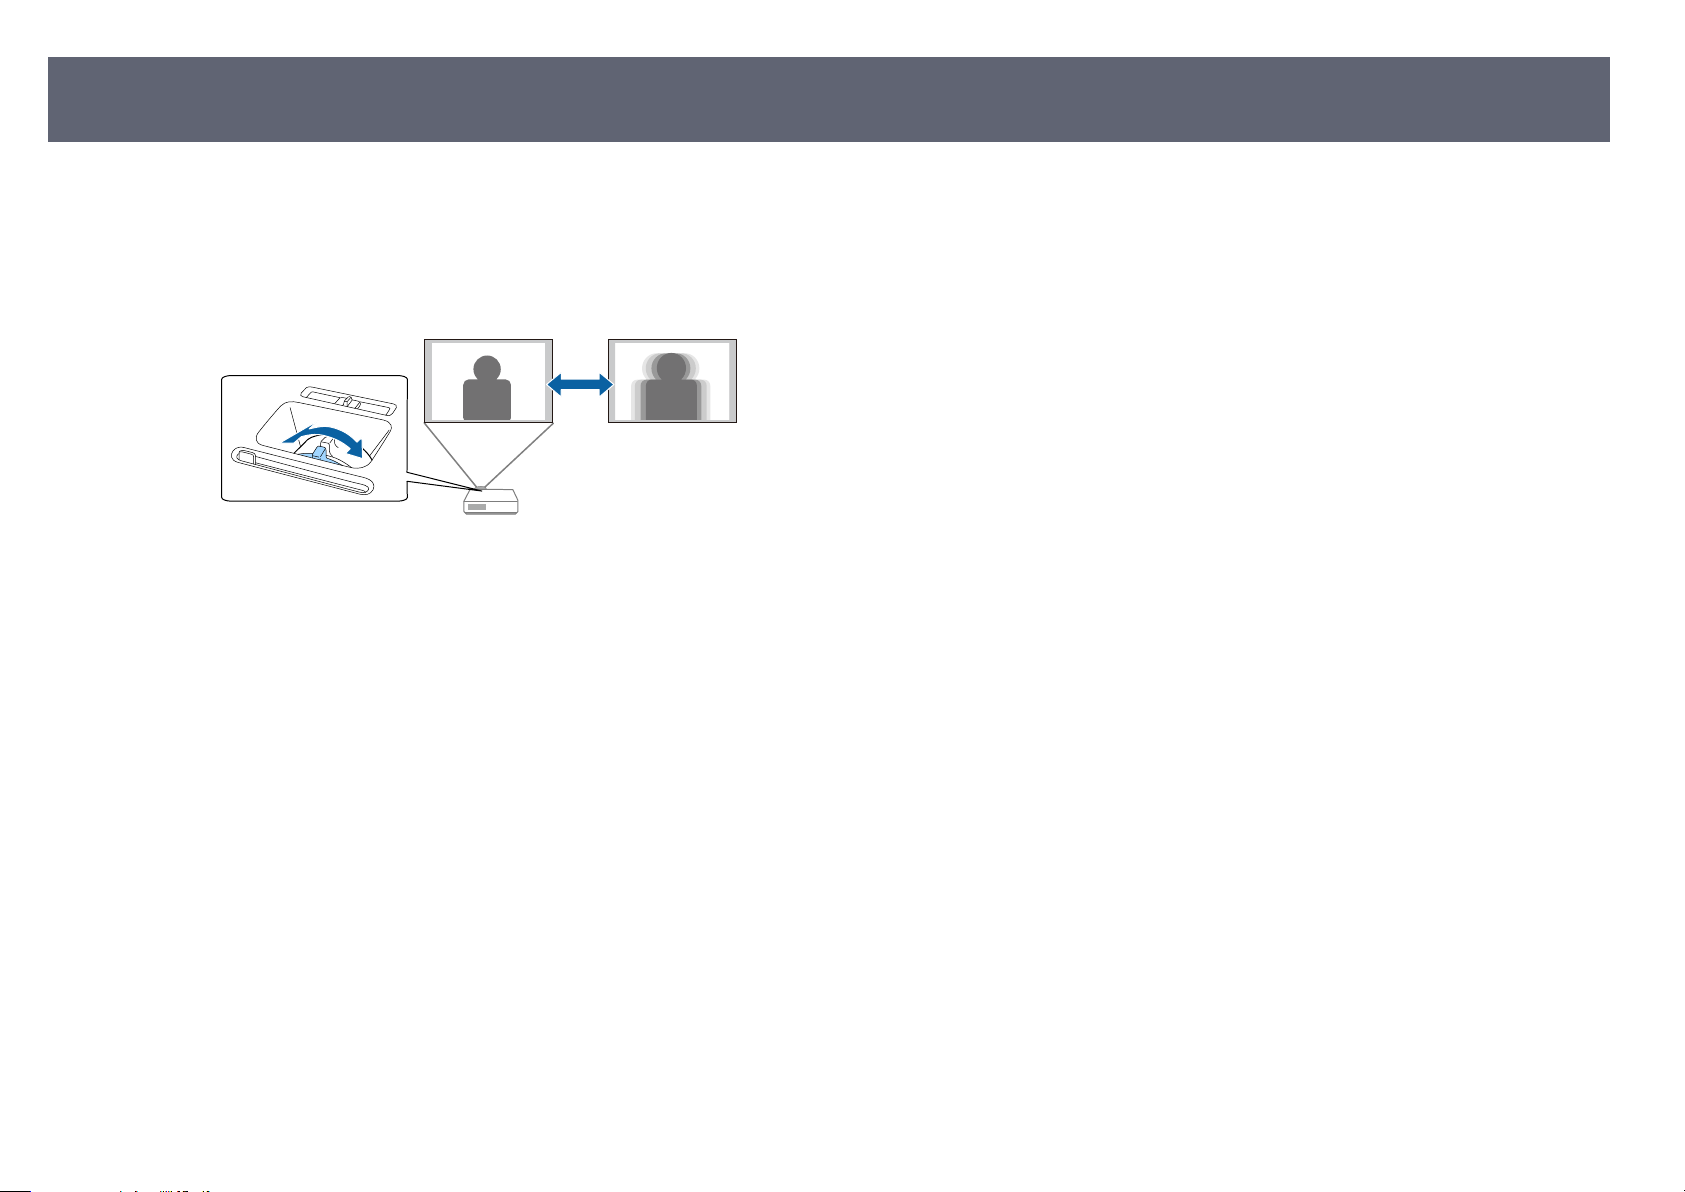
Focusing the Image Using the Focus Ring
You can correct the focus using the focus ring.
Turn on the projector and display an image.
a
Rotate the focus ring to adjust the focus.
b
51
Page 52
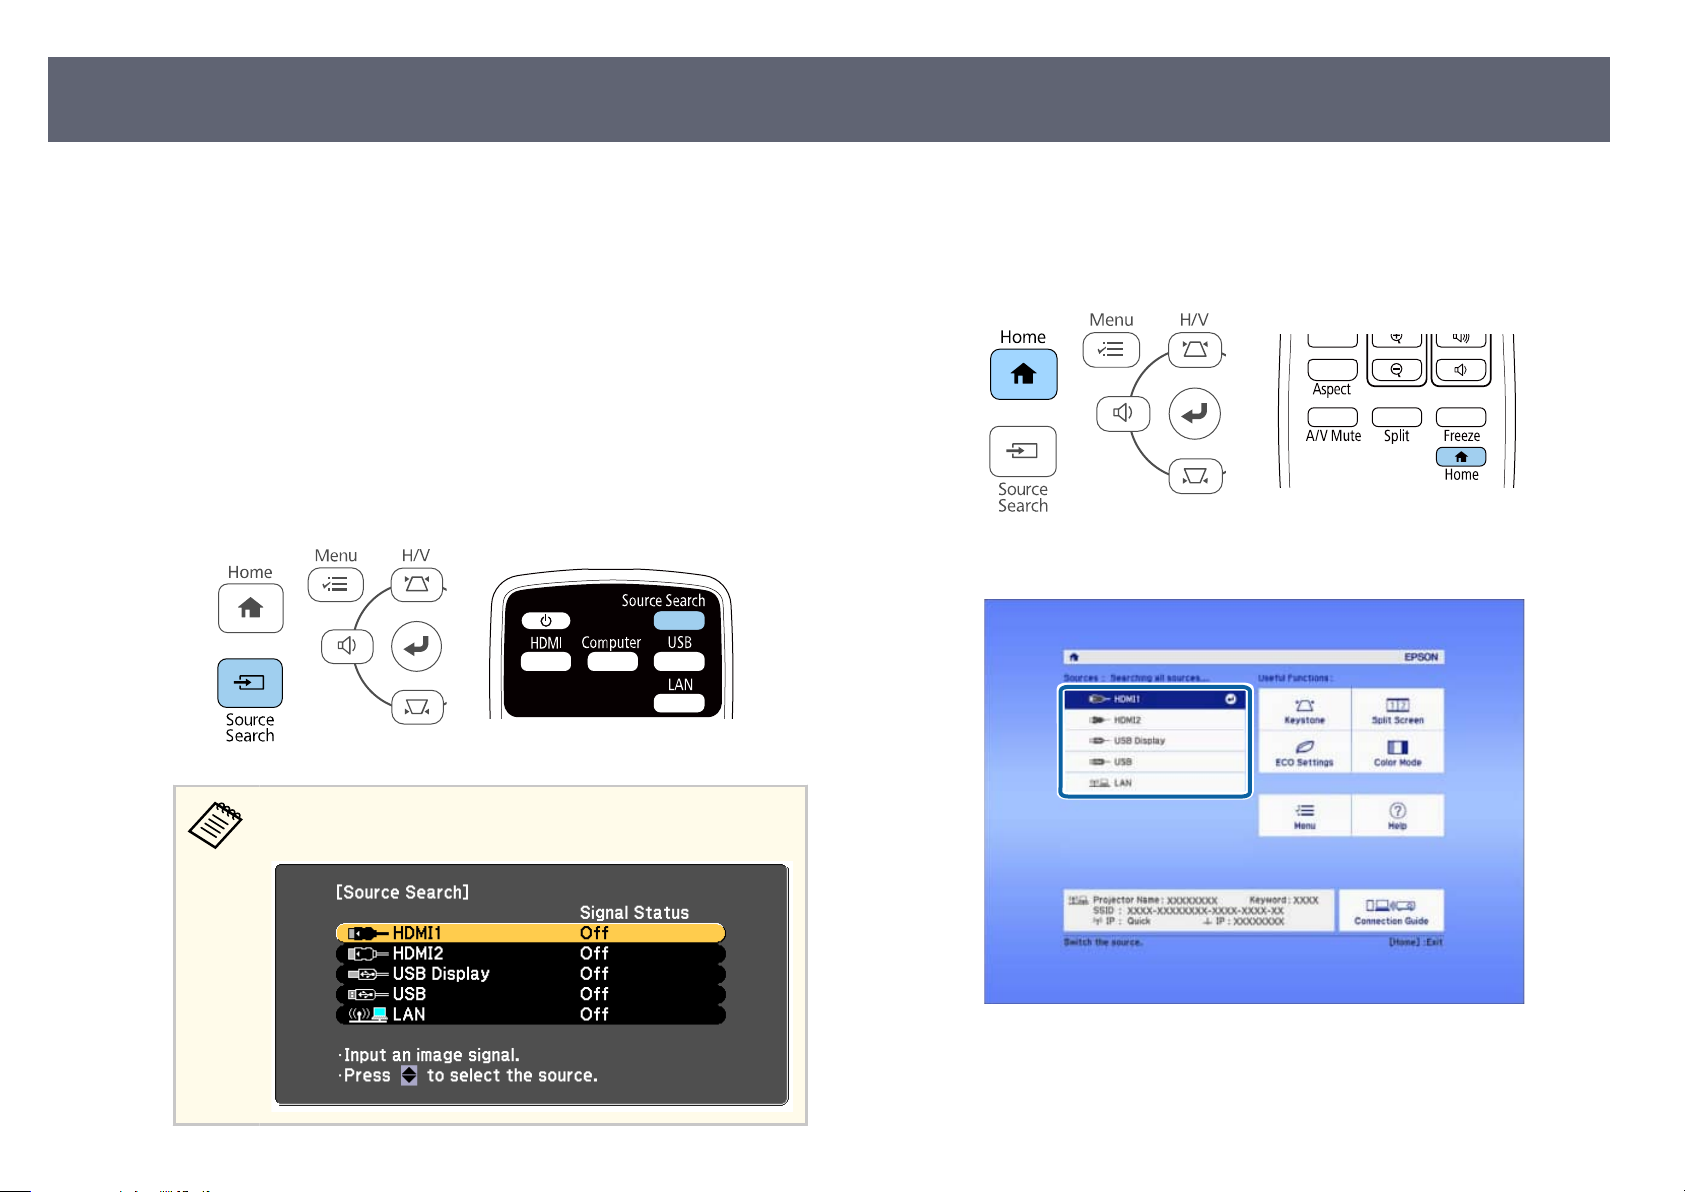
Selecting an Image Source
When multiple image sources are connected to the projector, such as a
puter and DVD player, you can switch from one image source to the other.
com
Available sources vary depending on the projector model.
Make sure the connected image source you want to use is turned on.
a
For video image sources, insert a DVD or other video media and press
b
p
ay.
l
Do one of the following:
c
•
Pr
ess the [Source Search] button on the control panel or remote control
until you see the image from the source you want.
•
ess the button for the source you want on the remote control. If there
Pr
is more than one port for that source, press the button again to cycle
through the sources.
•
Press the [Home] button on the control panel or remote control.
en select the source you want to use from the screen displayed.
52
is screen is displayed when no image signal is detected. Check
he cable connections between the projector and image source.
t
Related Links
g
•
i
st of Functions" p.9
"L
Page 53
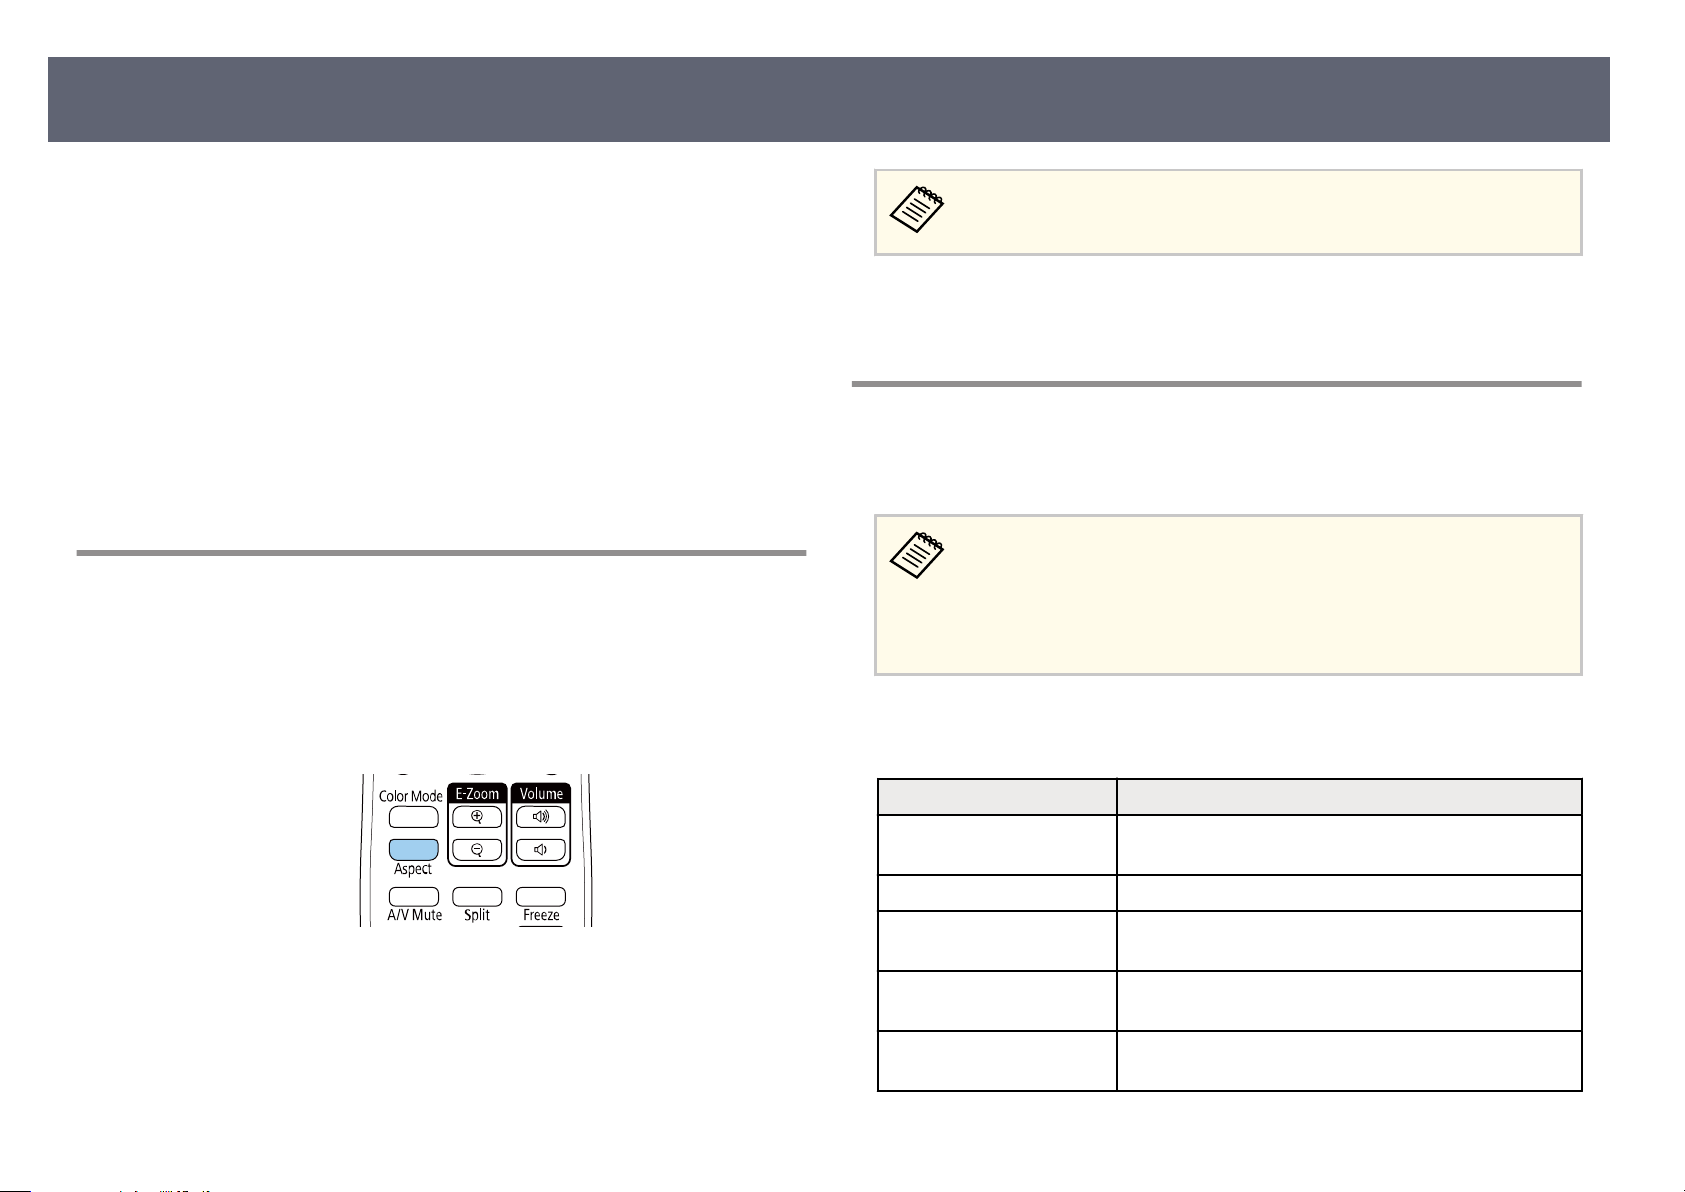
Image Aspect Ratio
53
e projector can display images in dierent width-to-height ratios called
pect ratios. Normally, the input signal from your video source determines
as
the image's aspect ratio. However, for certain images you can change the aspect
ratio to t your screen.
If you always want to use a particular aspect ratio for a certain video input
source, you can select it using the projector's Signal menu.
Related Links
g
•
"Changing the Image Aspect Ratio" p.53
•
"Available Image Aspect Ratios" p.53
•
"Projected Image Appearance with Each Aspect Mode" p.54
•
"Input Signal Settings - Signal Menu" p.108
Changing the Image Aspect Ratio
You can change the aspect ratio of the displayed image.
Turn on the projector and switch to the image source you want to use.
a
Press the [Aspect] button on the remote control.
b
To display images without black bars, set Res
in the projector’s Signal menu according to the computer’s resolution.
Related Links
g
•
put Signal Settings - Signal Menu" p.108
"In
olution to Wide or Normal
Available Image Aspect Ratios
You can select the following image aspect ratios, depending on the input signal
from your image source.
•
e avail
•
Note that using the aspect ratio function of the projector to reduce,
enlarge, or split the projected image for commercial purposes or for
public viewing may infringe upon the rights of the copyright holder of
that image based on copyright law.
For projectors with a resolution of Full HD (1920 × 1080) or WXGA (1280 ×
800)
able aspect ratio setting varies depending on the input signal.
e shape and size of the displayed image changes, and the name of the
pect ratio appears briey on the screen.
as
To cycle through the available aspect ratios for your input signal, press the
c
[As
pect] button repeatedly.
Aspect mode Description
Auto Automatically sets the aspect ratio according to the
inp
ut signal and the Resolution setting.
16:9 * Converts the aspect ratio of the image to 16:9.
Full Displays images using the full size of the projection
are
a, but does not maintain the aspect ratio.
Zoom Displays images using the full width of the projection
area and maintains the aspect ratio of the image.
Native Displays images as is (aspect ratio and resolution are
maintained).
Page 54
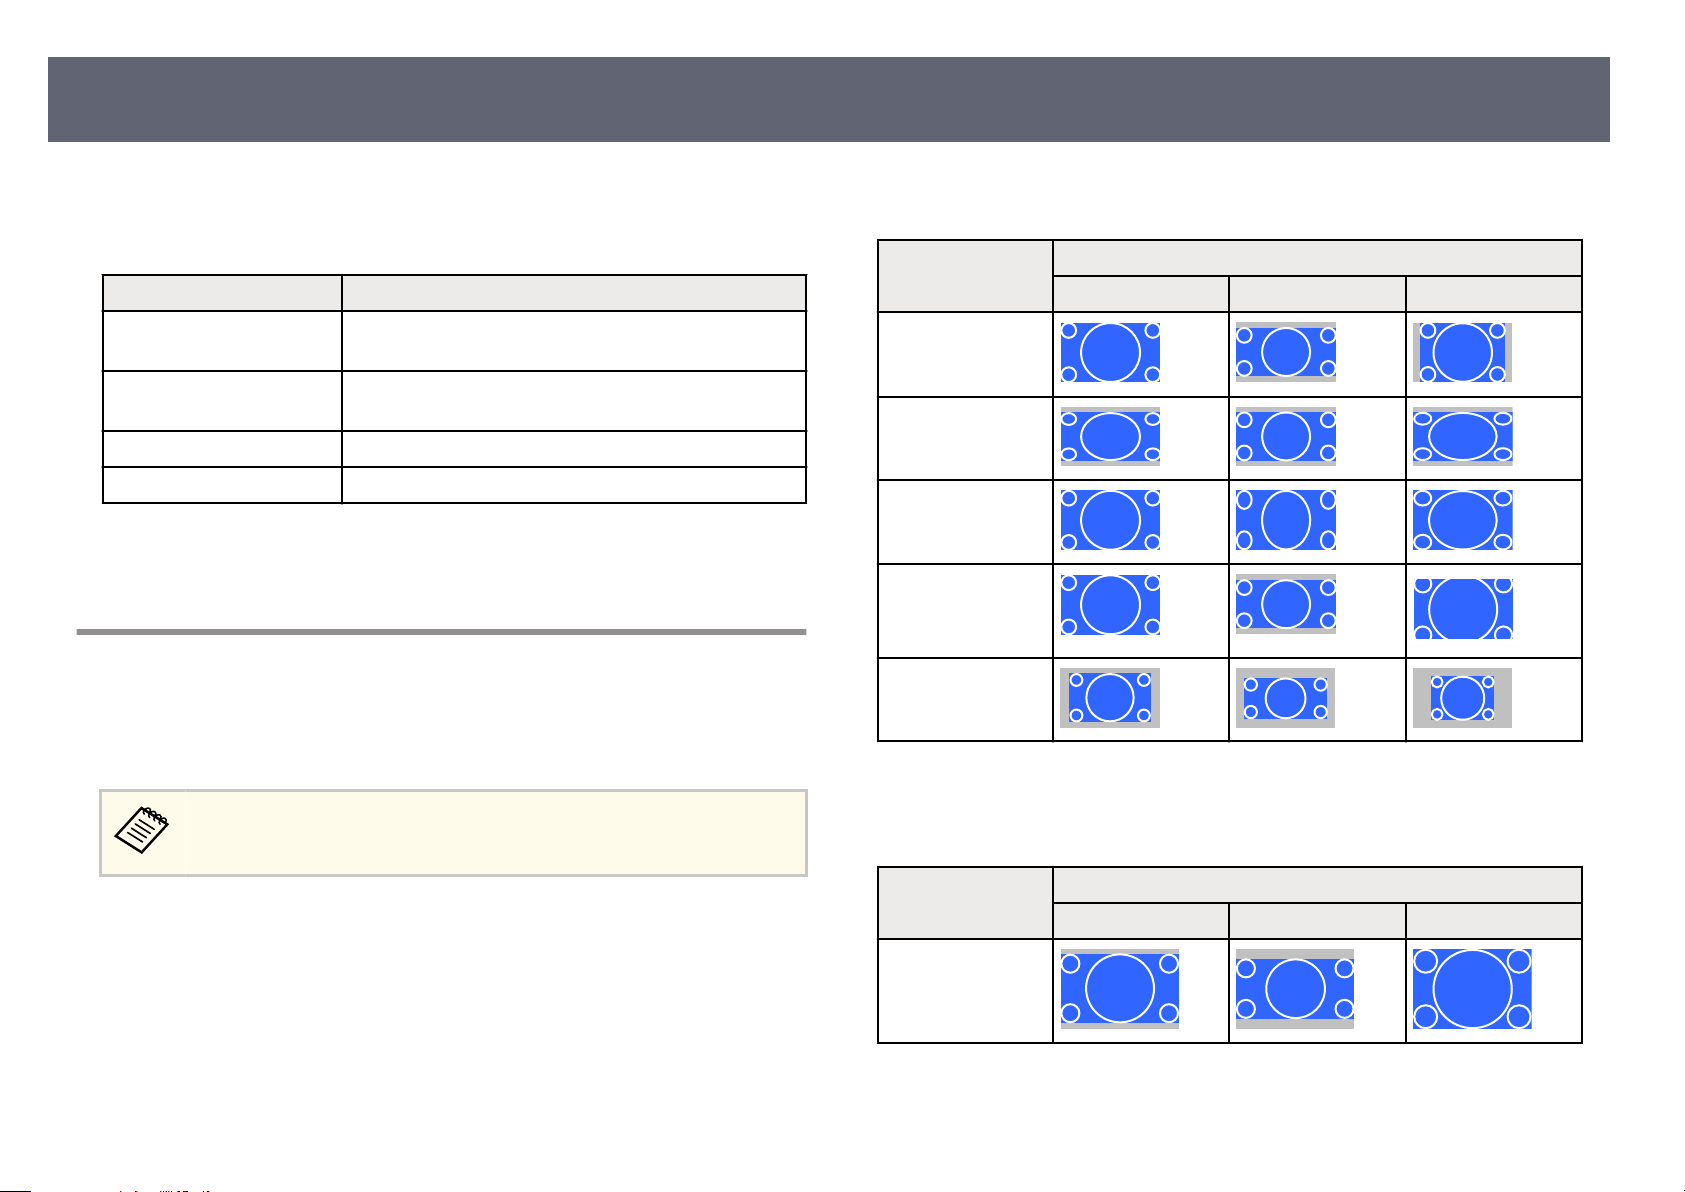
Image Aspect Ratio
54
* Available only for projectors with a resolution of WXGA (1280 × 800).
r projectors with a resolution of XGA (1024 × 768)
Fo
Aspect mode Description
Auto Automatically sets the aspect ratio according to the
ut signal and the Resolution setting.
inp
Normal Displays images using the full projection area and
maintains the aspect ratio of the image.
4:3 Converts the aspect ratio of the image to 4:3.
16:9 Converts the aspect ratio of the image to 16:9.
Related Links
g
•
"Li
st of Functions" p.9
Projected Image Appearance with Each Aspect Mode
Black bands and cropped images may project in certain aspect ratios, depending
he aspect ratio and resolution of your input signal. See the following table to
on t
conrm the position of black bands and cropped images.
For projectors with a resolution of Full HD (1920 × 1080) or WXGA (1280 ×
800)
Aspect mode Aspect ratio for input signals
16:10 16:9 4:3
Auto
16:9 *
Full
Zoom
Native
* Available only for projectors with a resolution of WXGA (1280 × 800).
e image for Native varies depending on the input signal.
r projectors with a resolution of XGA (1024 × 768)
Fo
Aspect mode Aspect ratio for input signals
16:10 16:9 4:3
Normal
to
Au
Page 55
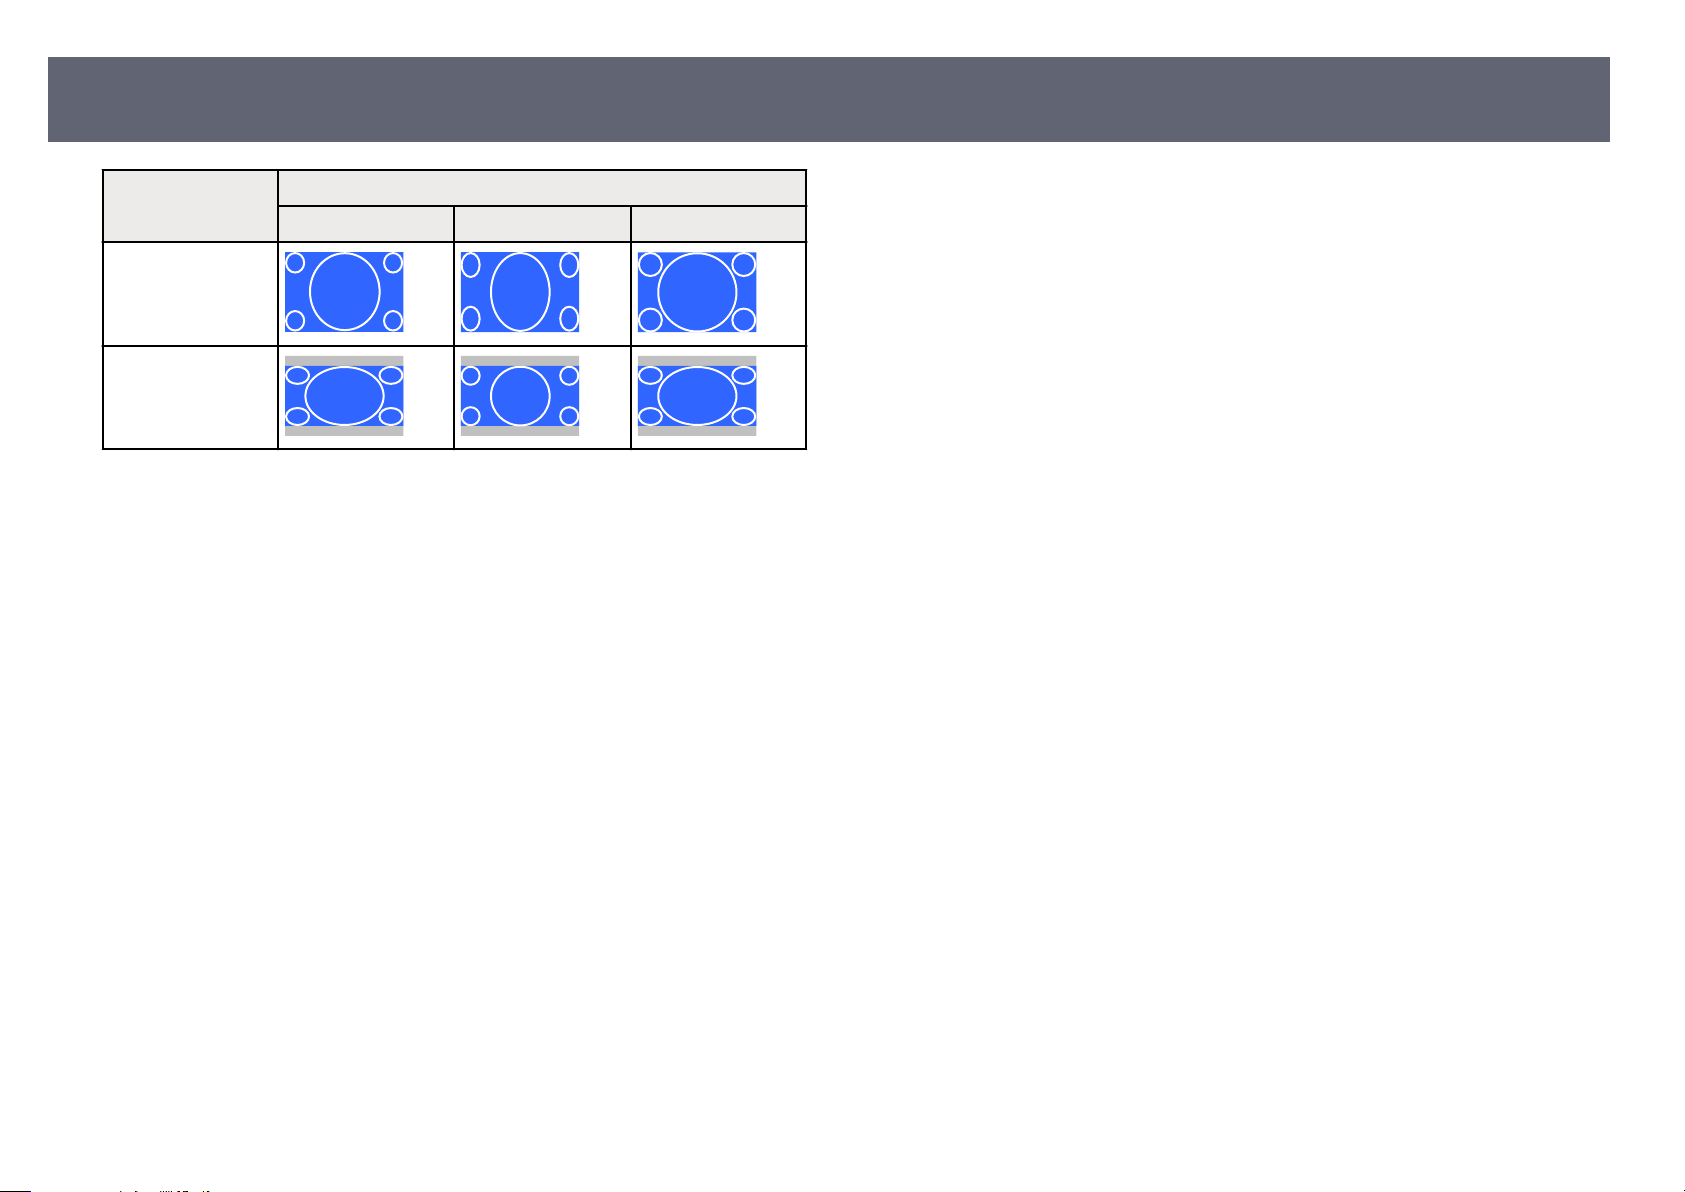
Image Aspect Ratio
Aspect mode Aspect ratio for input signals
16:10 16:9 4:3
4:3
16:9
Related Links
g
•
"Li
st of Functions" p.9
55
Page 56
Adjusting Image Quality (Color Mode)
56
e projector oers dierent color modes to provide optimum brightness,
ntrast, and color for a variety of viewing environments and image types.
co
You can select the mode designed to match your image and environment, or
experiment with the available modes.
Related Links
g
•
"Changing the Color Mode" p.56
•
"Available Color Modes" p.56
•
"Setting Auto Iris" p.56
Changing the Color Mode
You can change the projector's Color Mode using the remote control to optimize
the image for your viewing environment.
Turn on the projector and switch to the image source you want to use.
a
Press the [Color Mode] button on the remote control to change the Color
b
M
de.
o
You can also set the Co
Related Links
g
•
age Quality Settings - Image Menu" p.106
"Im
lor Mode setting in the projector's Image menu.
Available Color Modes
You can set the projector to use these color modes, depending on the input
source you are using:
Color mode Description
Dynamic is is the brightest mode. Best for prioritizing
brightness.
Presentation Best for projecting vivid images.
Cinema Best for enjoying content such as movies.
sRGB Best for faithfully reproducing the color of the source
imag
e.
Blackboard Best for projecting images directly on a green
chalkboard.
e name of the Color Mode appears briey on the screen and then image
appearance changes.
To cycle through all of the available color modes for your input signal,
c
pr
ess the [Color Mode] button repeatedly.
Setting Auto Iris
You can turn on Auto Iris to automatically optimize the image based on the
brightness of the content.
Turn on the projector and switch to the image source you want to use.
a
Page 57
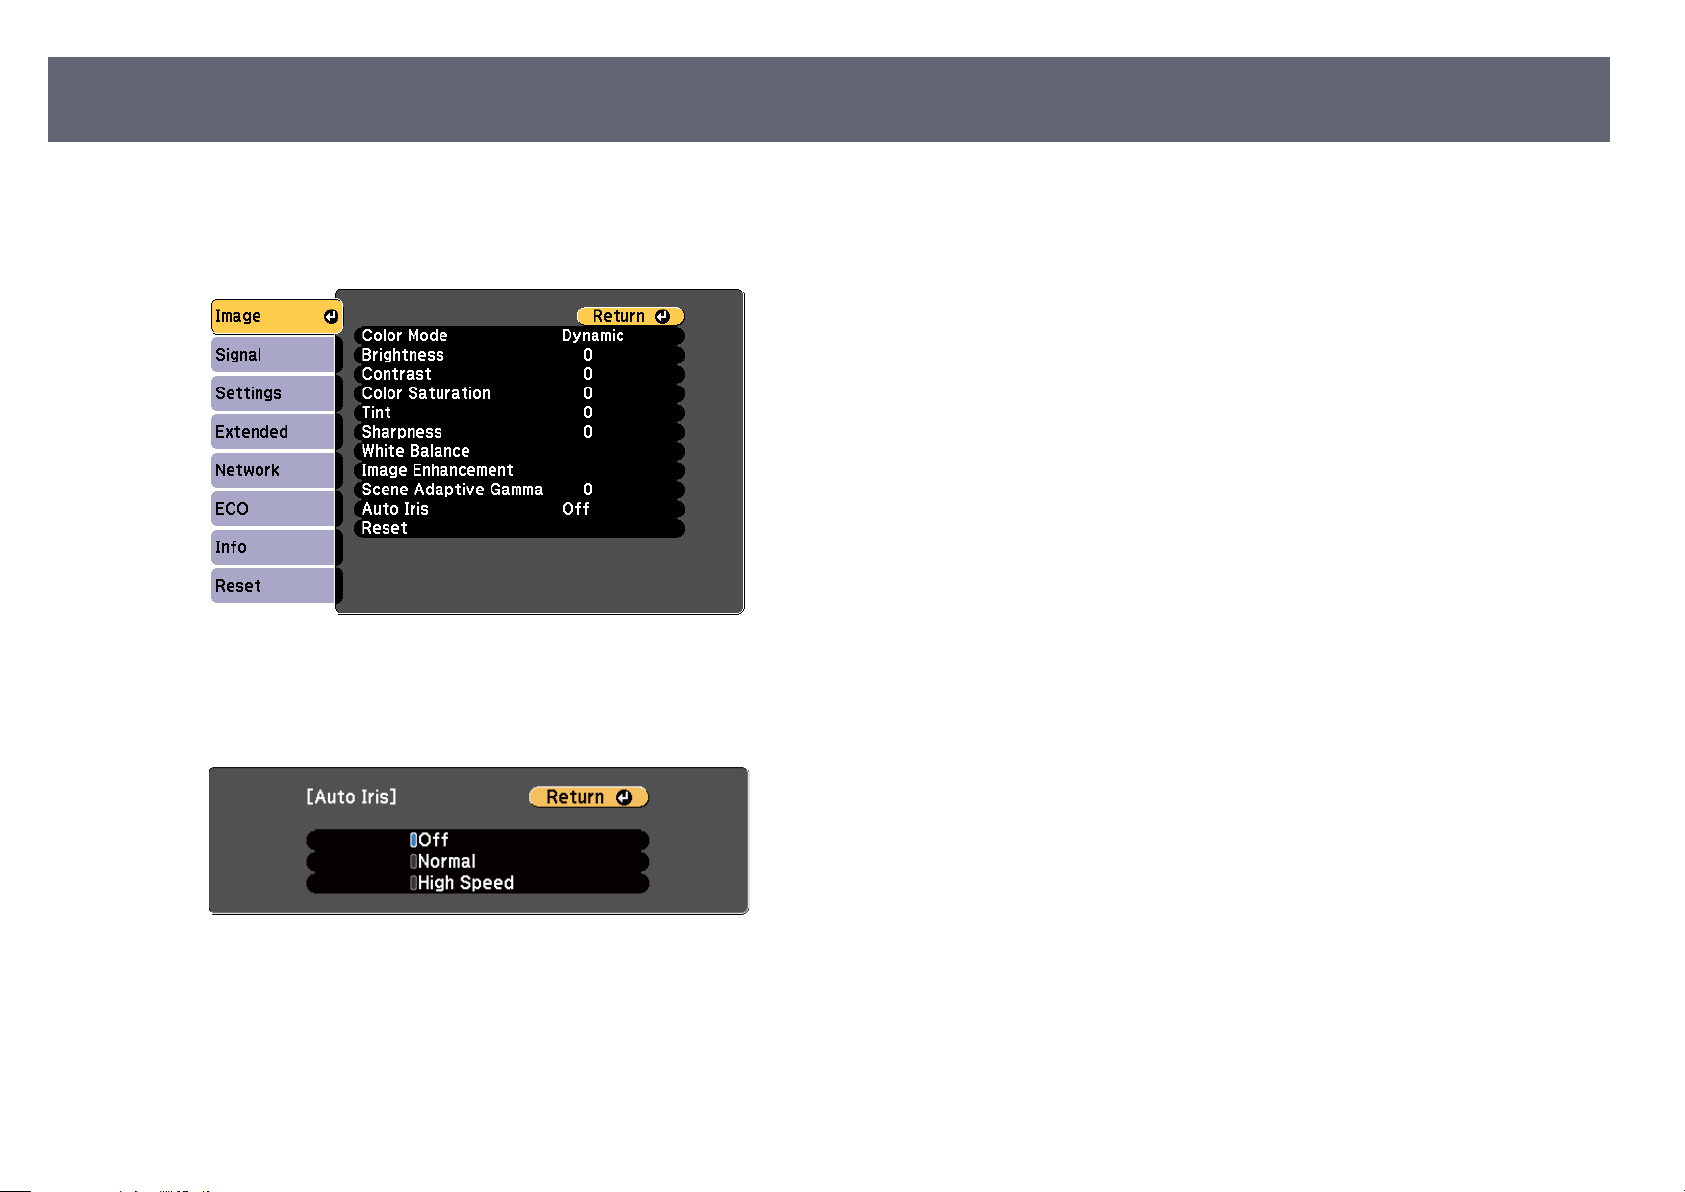
Adjusting Image Quality (Color Mode)
Press the [Menu] button on the control panel or remote control.
b
57
Select the I
c
Select Auto Iris and press [Enter].
d
C
e
hoose one of the following options and press [Enter]:
mage menu and press [Enter].
•
rmal for standard brightness adjustment.
No
•
High Speed to adjust brightness as soon as the scene changes.
Press [Menu] or [Esc] to exit the menus.
f
Page 58
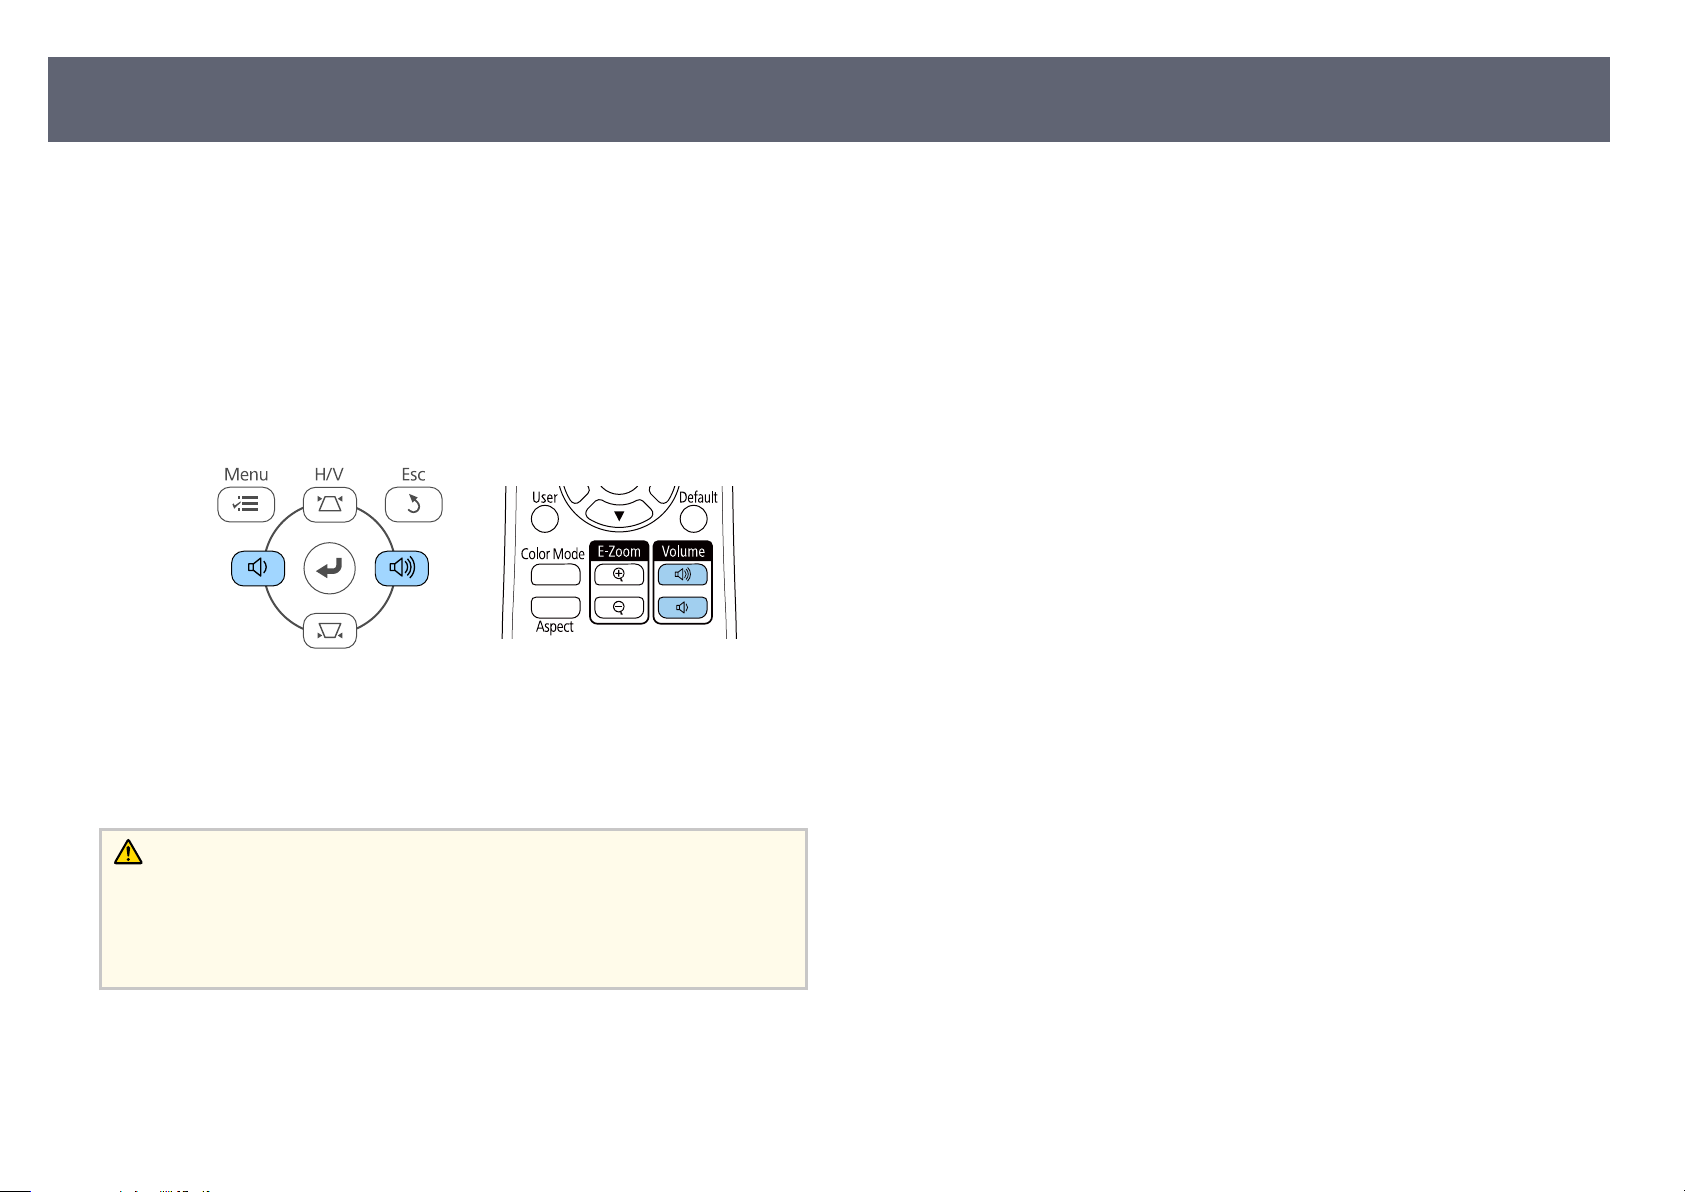
Controlling the Volume with the Volume Buttons
e volume buttons control the projector's internal speaker system.
ou can also control the volume of any external speakers you connected to the
Y
projector.
You must adjust the volume separately for each connected input source.
Turn on the projector and start a presentation.
a
To lower or raise the volume, press the [Volume] buttons on the control
b
p
el or remote control as shown.
an
58
A volume gauge appears on the screen.
To set the volume to a sp
c
the projector's Settings menu.
ecic level for an input source, select Volume in
Caution
ot start a presentation at a high volume setting. Sudden loud noises may cause
Do n
hearing loss.
Always lower the volume before powering o, so that you can power on and then
gradually increase the volume.
Related Links
g
•
"Pr
ojector Feature Settings - Settings Menu" p.109
Page 59

Adjusting Projector Features
llow the instructions in these sections to use your projector's adjustment features.
Fo
Related Links
g
•
"Projecting Two Images Simultaneously" p.60
•
"Projecting a PC Free Presentation" p.63
•
"Shutting O the Image and Sound Temporarily" p.68
•
"Stopping Video Action Temporarily" p.69
•
"Zooming In/Zooming Out of Images (E-Zoom)" p.70
•
"Saving a User's Logo Image" p.72
•
"Saving a User Pattern" p.74
•
"Color Dierence Correction when Projecting from Multiple Projectors" p.75
•
"Projector Security Features" p.78
Page 60
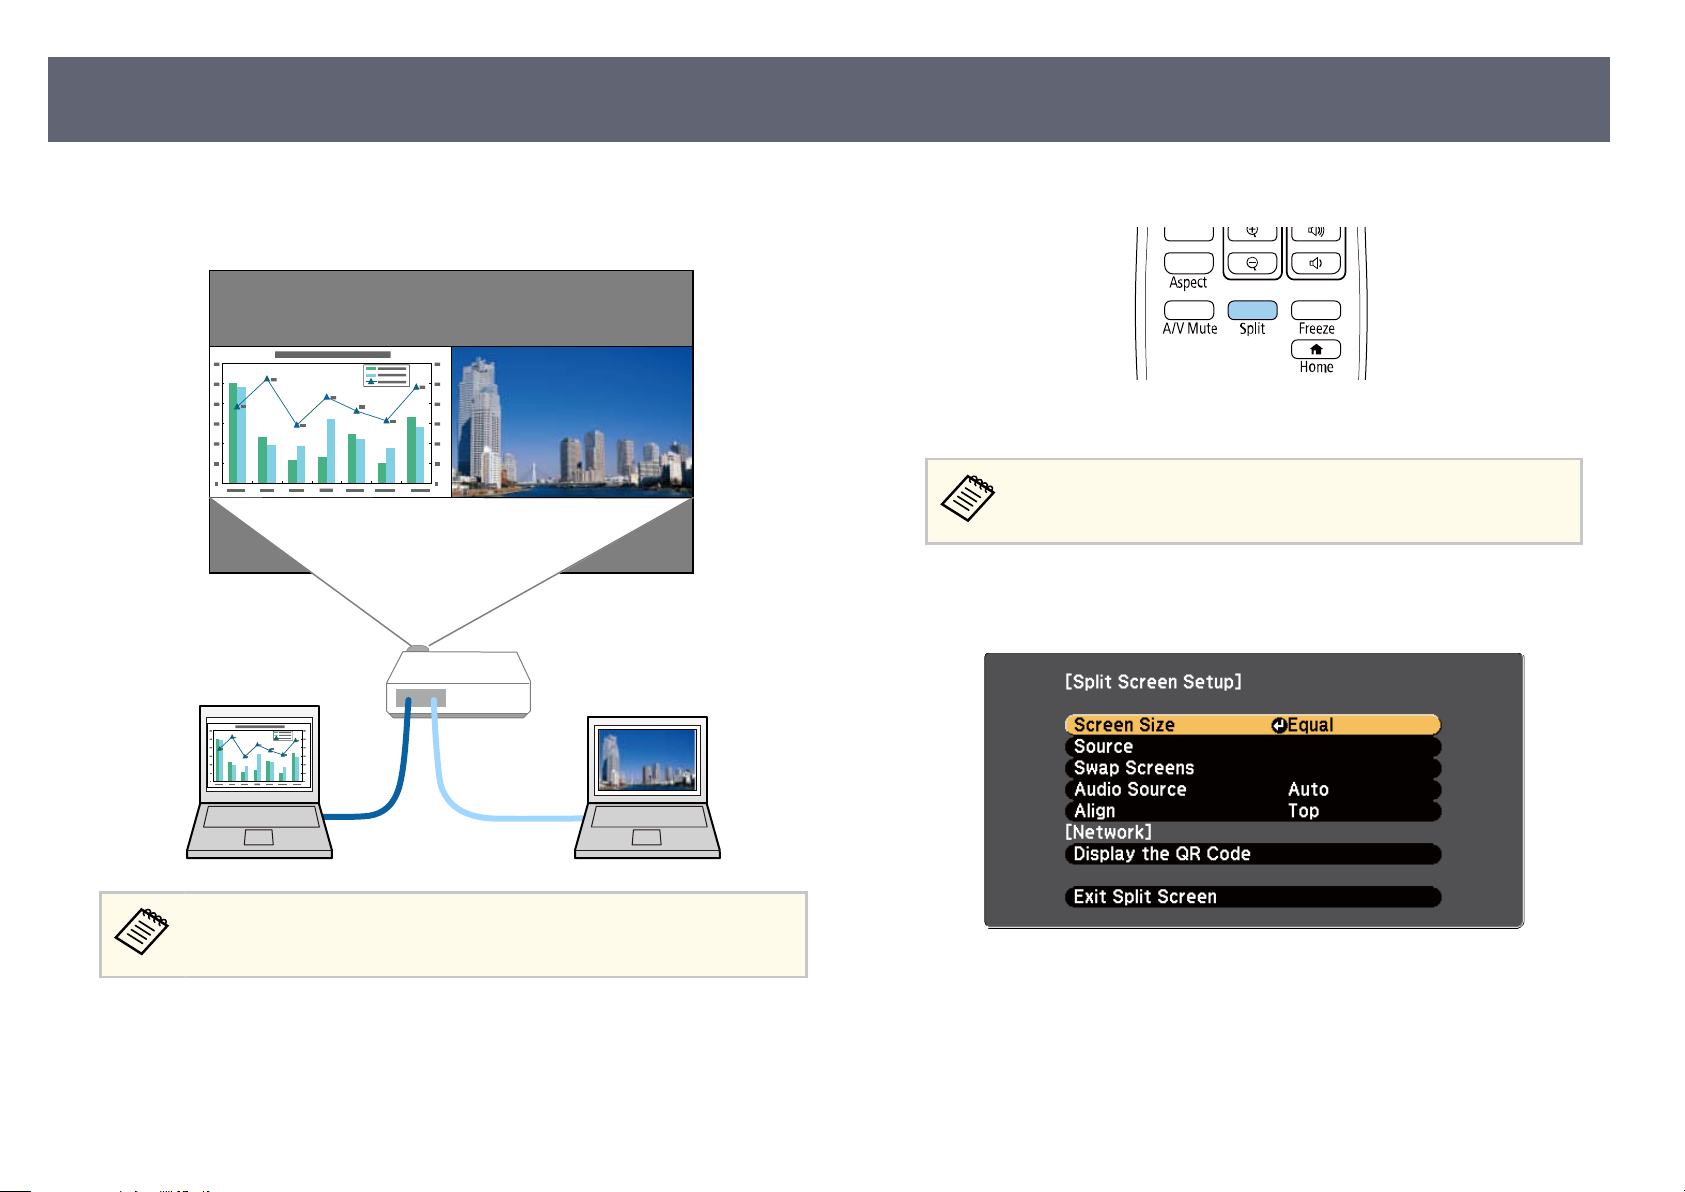
Projecting Two Images Simultaneously
60
You can use the split screen feature to simultaneously project two images from
dieren
remote control or the projector menus.
t image sources. You can control the split screen feature using the
Press the [Split] button on the remote control.
a
e currently selected input source moves to the le of the screen.
You can perform the same operations from Sp
projector's Settings menu.
Press the [Menu] button.
b
Yo
u see this screen:
lit Screen in the
While using the split screen feature, other projector features may not be
available and some settings may be automatically applied to both images.
Page 61
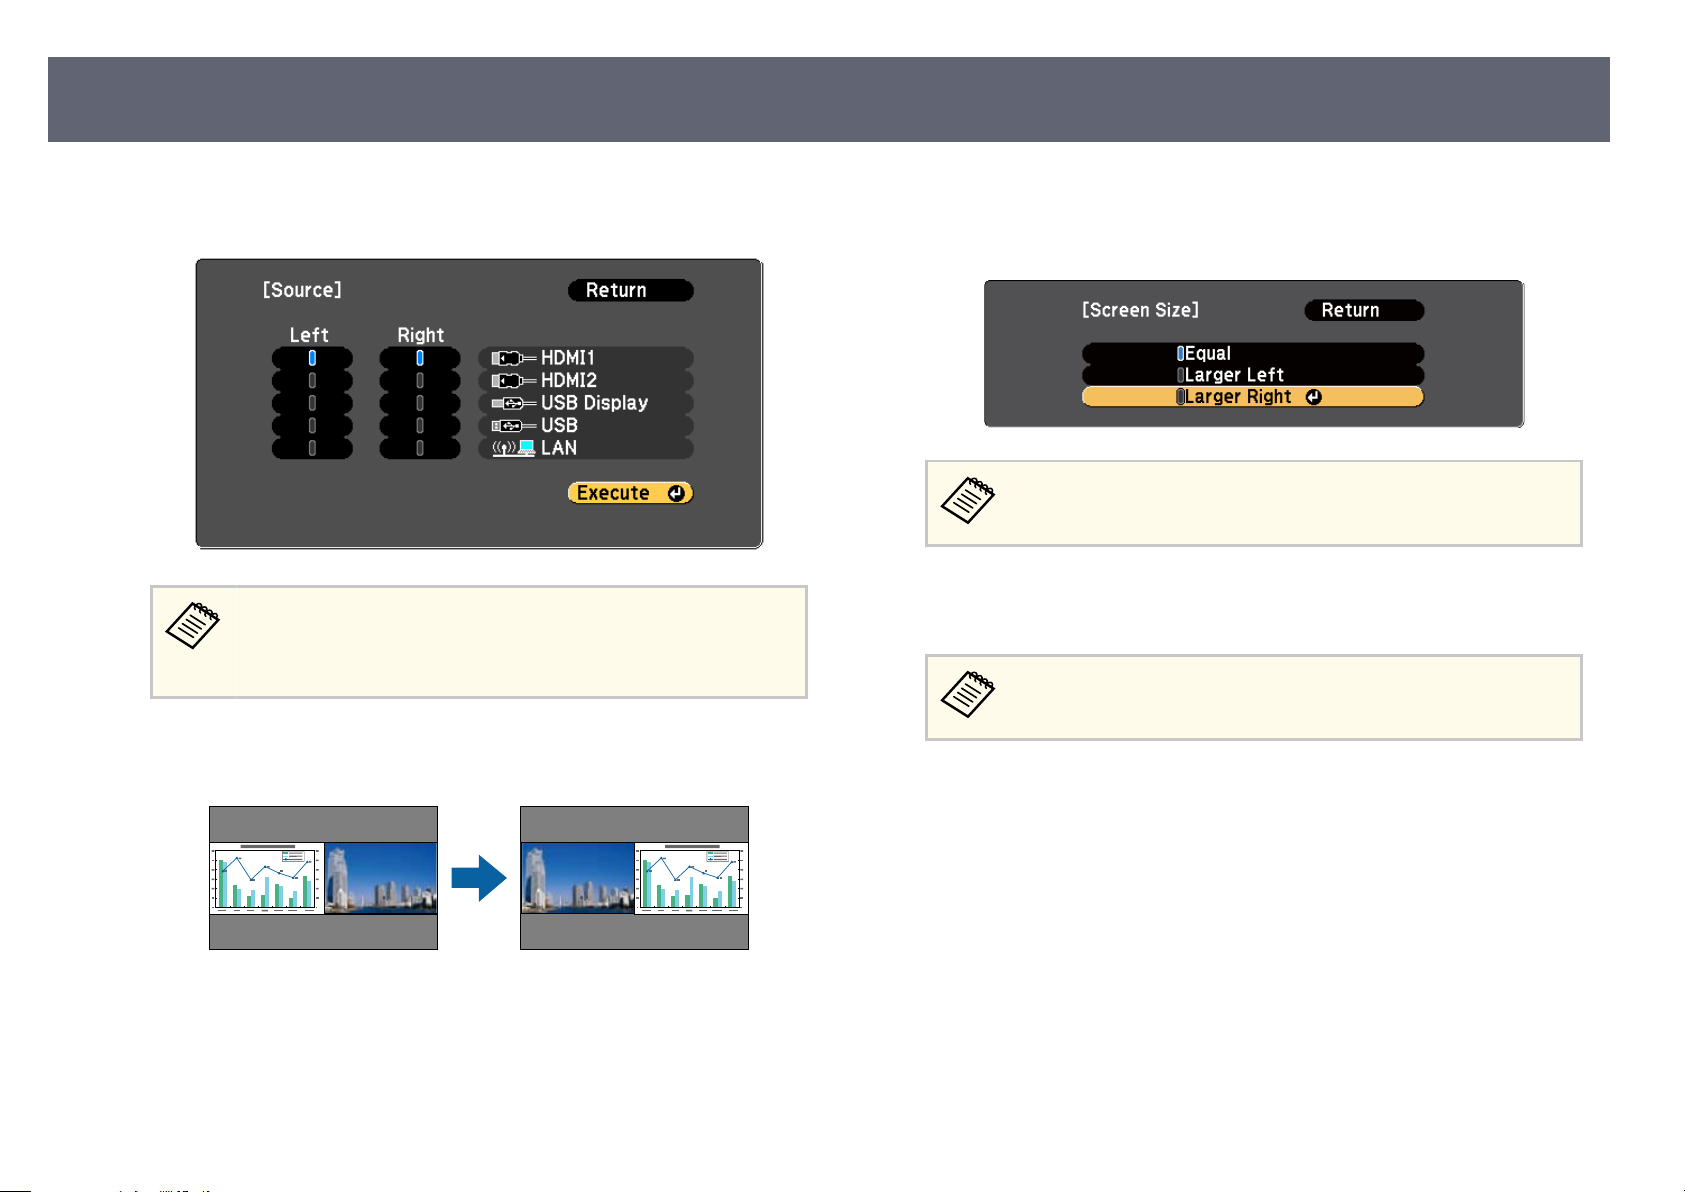
Projecting Two Images Simultaneously
61
To select an input source for the other image, select the Source setting,
c
press [Enter], select the input source, select Execute, and press [Enter].
•
Yo
u can only select input sources that can be combined.
•
While using the split screen feature, the Source screen appears
when you change the input source from the remote control.
To switch images, select Swap S
d
e projected images on the le and right are swapped.
creens and press [Enter].
To enlarge one image while reducing the other image, select Screen Size,
e
press [Enter], select a size, and press [Enter]. To exit the menu, press
[Menu].
Depending on the video input signals, the images may not appear at
e same size even if you select Equal.
th
To select the audio, select Au
f
option, and press [Enter]. To exit the menu, press [Menu].
Select Auto to hear audio from the largest screen or the le screen.
To align the projected images, select Alig
g
setting, and press [Enter] again. To exit the menu, press [Menu].
dio Source, press [Enter], select an audio
, press [Enter], select the
n
To exit the split screen feature, press [Split] or [Esc].
h
Related Links
g
•
"Un
supported Input Source Combinations for Split Screen Projection" p.62
•
"Split Screen Projection Restrictions" p.62
•
"List of Functions" p.9
Page 62

Projecting Two Images Simultaneously
62
Unsupported Input Source Combinations for Split Screen Projection
ese input source combinations cannot be projected on a split screen.
•
C
omputer1 and Computer2
•
Computer1/Computer2 and Video
•
HDMI1 and HDMI2
•
USB Display and USB/LAN
•
USB and LAN
Related Links
g
•
"List of Functions" p.9
Split Screen Projection Restrictions
Operating restrictions
e f
llowing operations cannot be performed during split screen projection.
o
•
Setting the projector's menu
•
E-Zoom
•
Switching the aspect mode
•
Operations using the [User] button on the remote control
•
Auto Iris
right. Adjustments that aec
and Color Temp. are applied for both le and right images.
•
Even if you make adjustments for Noise Reduction and Deinterlacing in the
projector's Image menu, Noise Reduction is set to 0 and Deinterlacing is set
to O for the image on the right.
•
Even if you set Display Background to Logo in the projector's Extended
menu, the blue screen appears when no image signal is being input.
Related Links
g
•
"Image Aspect Ratio" p.53
•
"Adjusting Image Quality (Color Mode)" p.56
•
"Projector Feature Settings - Settings Menu" p.109
•
"Projector Setup Settings - Extended Menu" p.111
•
"Image Quality Settings - Image Menu" p.106
•
"Zooming In/Zooming Out of Images (E-Zoom)" p.70
•
"Setting Auto Iris" p.56
t the entire projected image such as Color Mode
Image restrictions
•
If you make adjustments such as Brightness, Contrast, Color Saturation,
Tint, and Sharpness in the projector's Image menu, you can apply them only
to the image on the le. Default adjustments are applied to the image on the
Page 63
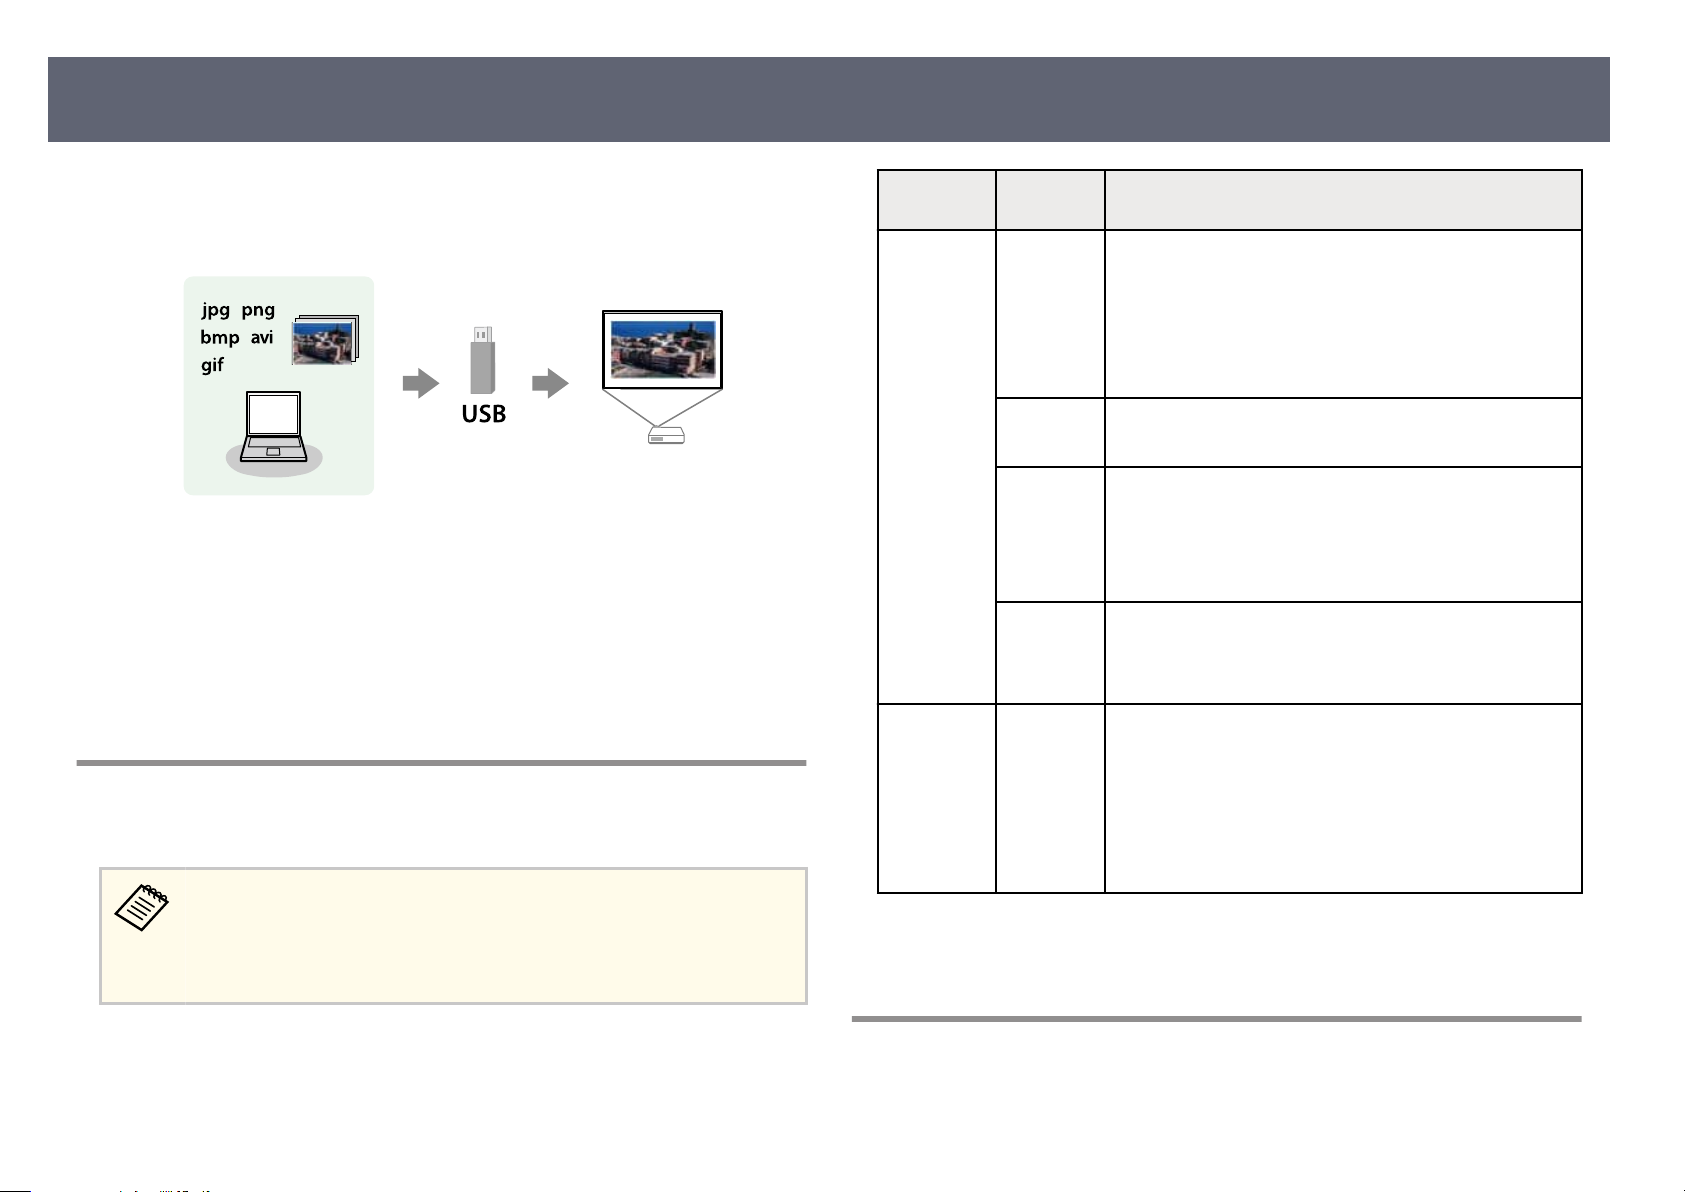
Projecting a PC Free Presentation
63
You can use your projector's PC Free feature whenever you connect a USB
ice that contains compatible presentation les. is lets you quickly and
dev
easily display a presentation and control it using the projector's remote control.
Related Links
g
•
pported PC Free File Types" p.63
"Su
•
"Precautions on PC Free Projection" p.63
•
"Starting a PC Free Slide Show" p.64
•
"Starting a PC Free Movie Presentation" p.65
•
"PC Free Display Options" p.66
•
"List of Functions" p.9
Supported PC Free File Types
You can project these types of les usin
•
F
r best results, place your les on media that is formatted in
o
FAT16/32.
•
If you have trouble projecting from media formatted for non-Windows
le systems, try formatting the media for Windows instead.
g the projector's PC Free feature.
File contents File type
(exten
Image .jpg Make sure the le is n
.bmp Make sure the le is not:
.gif Make sure the le is n
.png Make sure the le is not:
Movie .avi
(Mo
tion
JPEG)
Details
sion)
•
CMYK format
•
Progressive format
•
Highly compressed
•
Above 8192 × 8192 resolution
•
Above 1280 × 800 resolution
•
Above 1280 × 800 resolution
•
Animated
•
Interlaced
•
Above 1280 × 800 resolution *
•
Interlaced
Supports only AVI 1.0.
Make sure the le is not:
•
Saved with an audio codec other than PCM or
ADPCM
•
Above 1280 × 720 resolution
•
Larger than 2 GB
ot:
ot:
* When you use a projector with a resolution of Full HD, you can project a le
i
th a maximum resolution of 1920 × 1200.
w
Precautions on PC Free Projection
Note the following precautions when using PC Free features.
Page 64
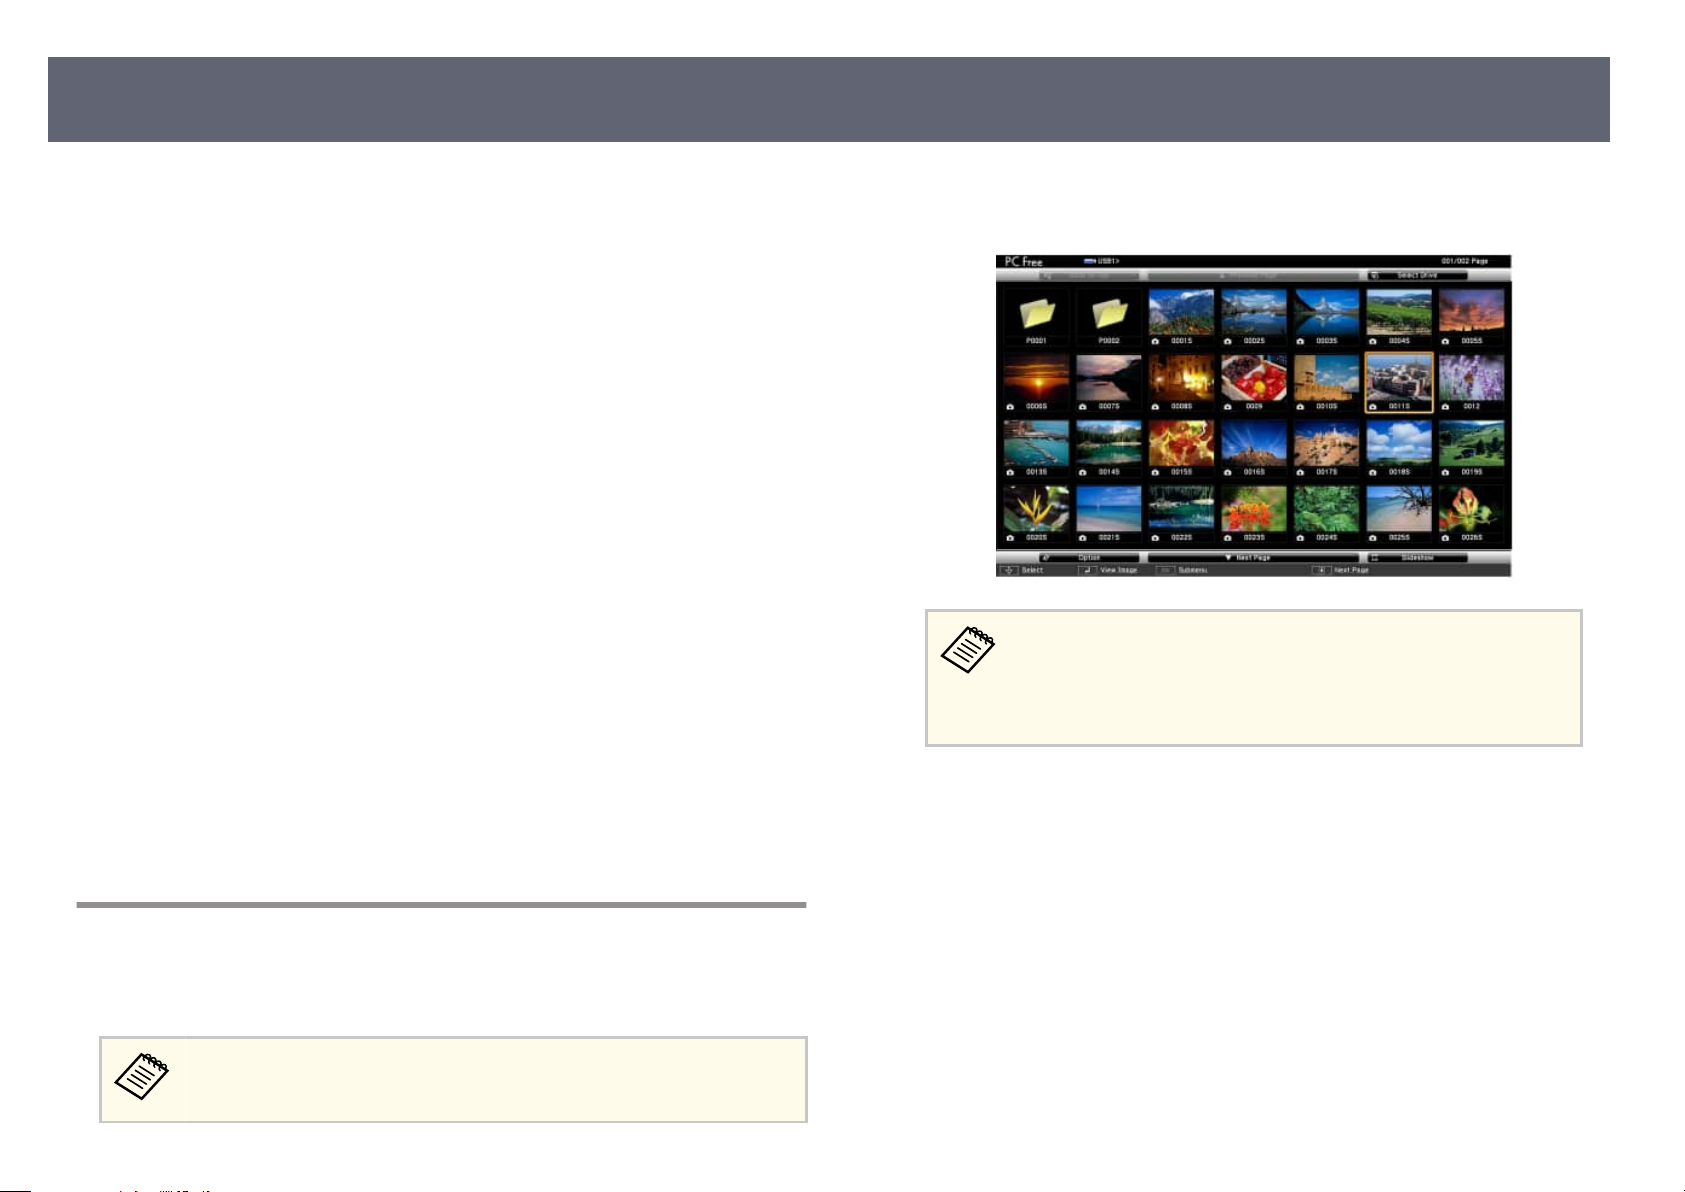
Projecting a PC Free Presentation
•
u cannot use a USB key for PC Free features.
Yo
•
Do not disconnect the USB storage device while it is being accessed;
otherwise, PC Free may not operate correctly.
•
You may not be able to use the security features on certain USB storage
devices with PC Free features.
•
When connecting a USB device that includes an AC adapter, connect the AC
adapter to an electrical outlet when you use the device with your projector.
•
Some commercially available USB card readers may not be compatible with
the projector.
•
e projector can recognize up to 5 cards inserted into the connected card
reader at one time.
•
You cannot correct keystone distortion while projecting in PC Free, so correct
the image shape before you begin your presentation.
•
You can use the following functions while projecting in PC Free.
•
Freeze
•
A/V Mute
•
E-Zoom
Press the [USB] button on the remote control.
a
e PC Free le list screen is displayed.
•
he Select Drive screen is displayed, press the arrow buttons to
If t
select the drive and press [Enter].
•
To display images on the other USB drive, highlight Select Drive
at the top of the le list screen and press [Enter].
64
Related Links
g
•
"Stopping Video Action Temporarily" p.69
•
"Shutting O the Image and Sound Temporarily" p.68
•
"Zooming In/Zooming Out of Images (E-Zoom)" p.70
Starting a PC Free Slide Show
Aer connecting a USB device to the projector, you can switch to the USB input
source and start your slide show.
You can change the PC Free operation options or add special eec
highlighting Option at the bottom of the screen and pressing [Enter].
ts by
Do one of the following to locate your les:
b
•
I
ou need to display les inside a subfolder on your device, press the
f y
arrow buttons to highlight the folder and press [Enter].
•
To move back up a folder level on your device, highlight Back to Top
and press [Enter].
Do one of the following:
c
•
To di
splay an individual image, press the arrow buttons to highlight the
image and press [Enter]. (Press the [Esc] button to return to the le list
screen.)
Page 65
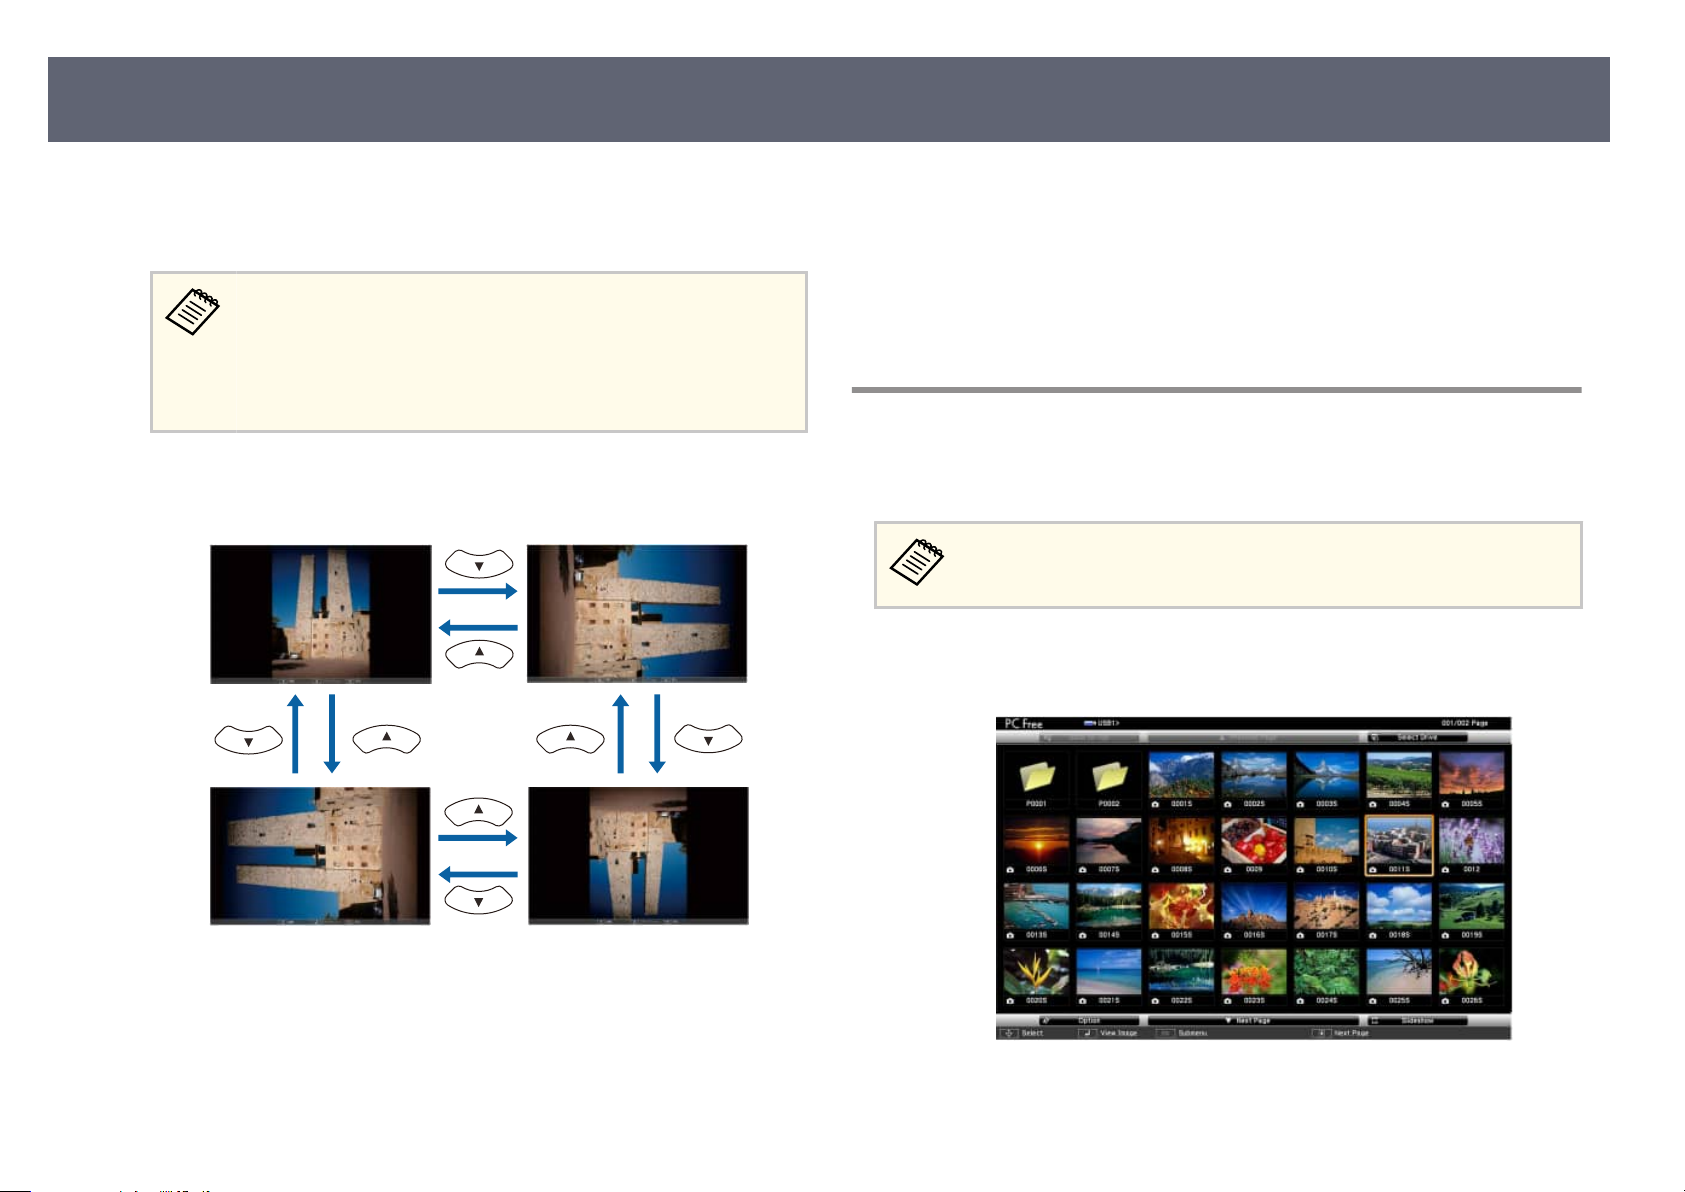
Projecting a PC Free Presentation
65
•
While projecting, use the following commands to control the display:
d
•
splay a slide show of all the images in a folder, press the arrow
To di
buttons to highlight the Slideshow option at the bottom of the screen
and press [Enter].
•
Yo
u can change the image switching time by highlighting Option
at the bottom of the screen and pressing [Enter].
•
If any le names are longer than the display area or include
unsupported symbols, the le names may be shortened or
changed only on the screen display.
To r
otate a displayed image, press the up or down arrow button.
Turn o
f
Related Links
g
•
"PC Free Display Options" p.66
•
"Connecting to a USB Device" p.30
the USB device, if necessary, and then disconnect the device from
he projector.
t
Starting a PC Free Movie Presentation
Aer connecting a USB device to the projector, you can switch to the USB input
s
ource and start your movie.
You can change the PC Free operation options by highlighting Option at
the bottom of the screen and pressing [Enter].
Press the [USB] button on the remote control.
a
e PC F
ee le list screen is displayed.
r
•
To move to the next or previous image, press the le or right arrow
button.
To stop the display, follow the on-screen instructions or press the [Esc]
e
bu
tton.
You return to the le list screen.
Page 66
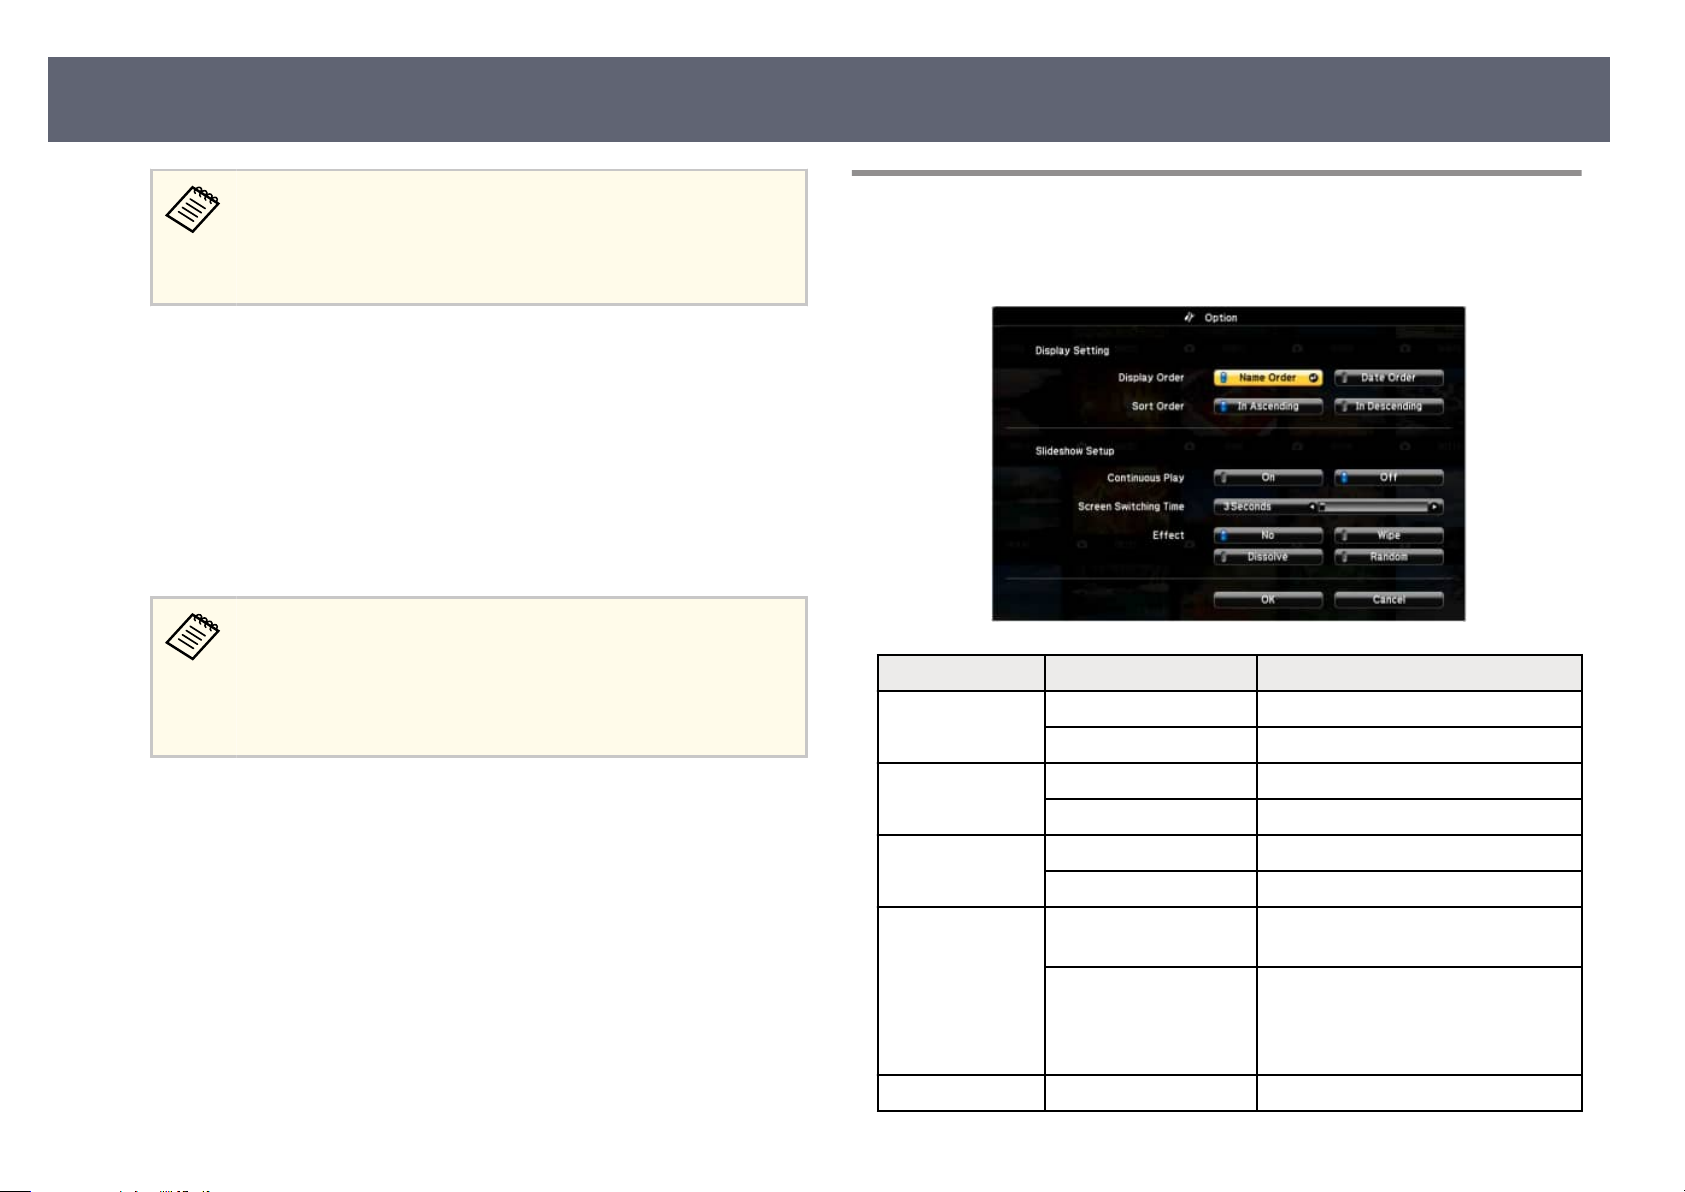
Projecting a PC Free Presentation
•
If t
he Select Drive screen is displayed, press the arrow buttons to
select the drive and press [Enter].
•
To display movie les on the other USB drive, highlight Select
Drive at the top of the le list screen and press [Enter].
Do one of the following to locate your les:
b
•
If y
ou need to display les inside a subfolder on your device, press the
arrow buttons to highlight the folder and press [Enter].
•
To move back up a folder level on your device, highlight Back to Top
and press [Enter].
PC Free Display Options
You can select these display options when using PC Free. To access this screen,
high
light Option at the bottom of the PC Free le list screen and press [Enter].
66
To play back a movie, press the arrow buttons to highlight the le an
c
d
e
g
•
•
ress [Enter].
p
•
f an
y le names are longer than the display area or include
I
unsupported symbols, the le names may be shortened or
changed only on the screen display.
•
If you want to play back all the movies in a folder in sequence,
select the Slideshow option at the bottom of the screen.
To stop movie playback, press the [Esc] button, highlight E
[Enter].
You return to the le list screen.
Turn o the USB device, if necessary, and then disconnect the device from
t
he projector.
Related Links
"PC Free Display Options" p.66
"Connecting to a USB Device" p.30
t, and press
xi
d
Setting Options Description
Display Order Name Order Displays les in n
Date Order Displays les in date order
Sort Order In Ascending Sorts les in rs
In Descending Sorts les in las
Continuous Play On Displays a slide show continuously
O Displays a slide show once
Screen Switching
Tim
e
Eect No No eect
No Does not display the next le
automatically
1 Second to 60 Seconds Displays les fo
switches to the next le automatically;
high resolution images may switch at
a slightly slower rate
e order
am
t-to-last order
t-to-rst order
r the selected time and
Page 67
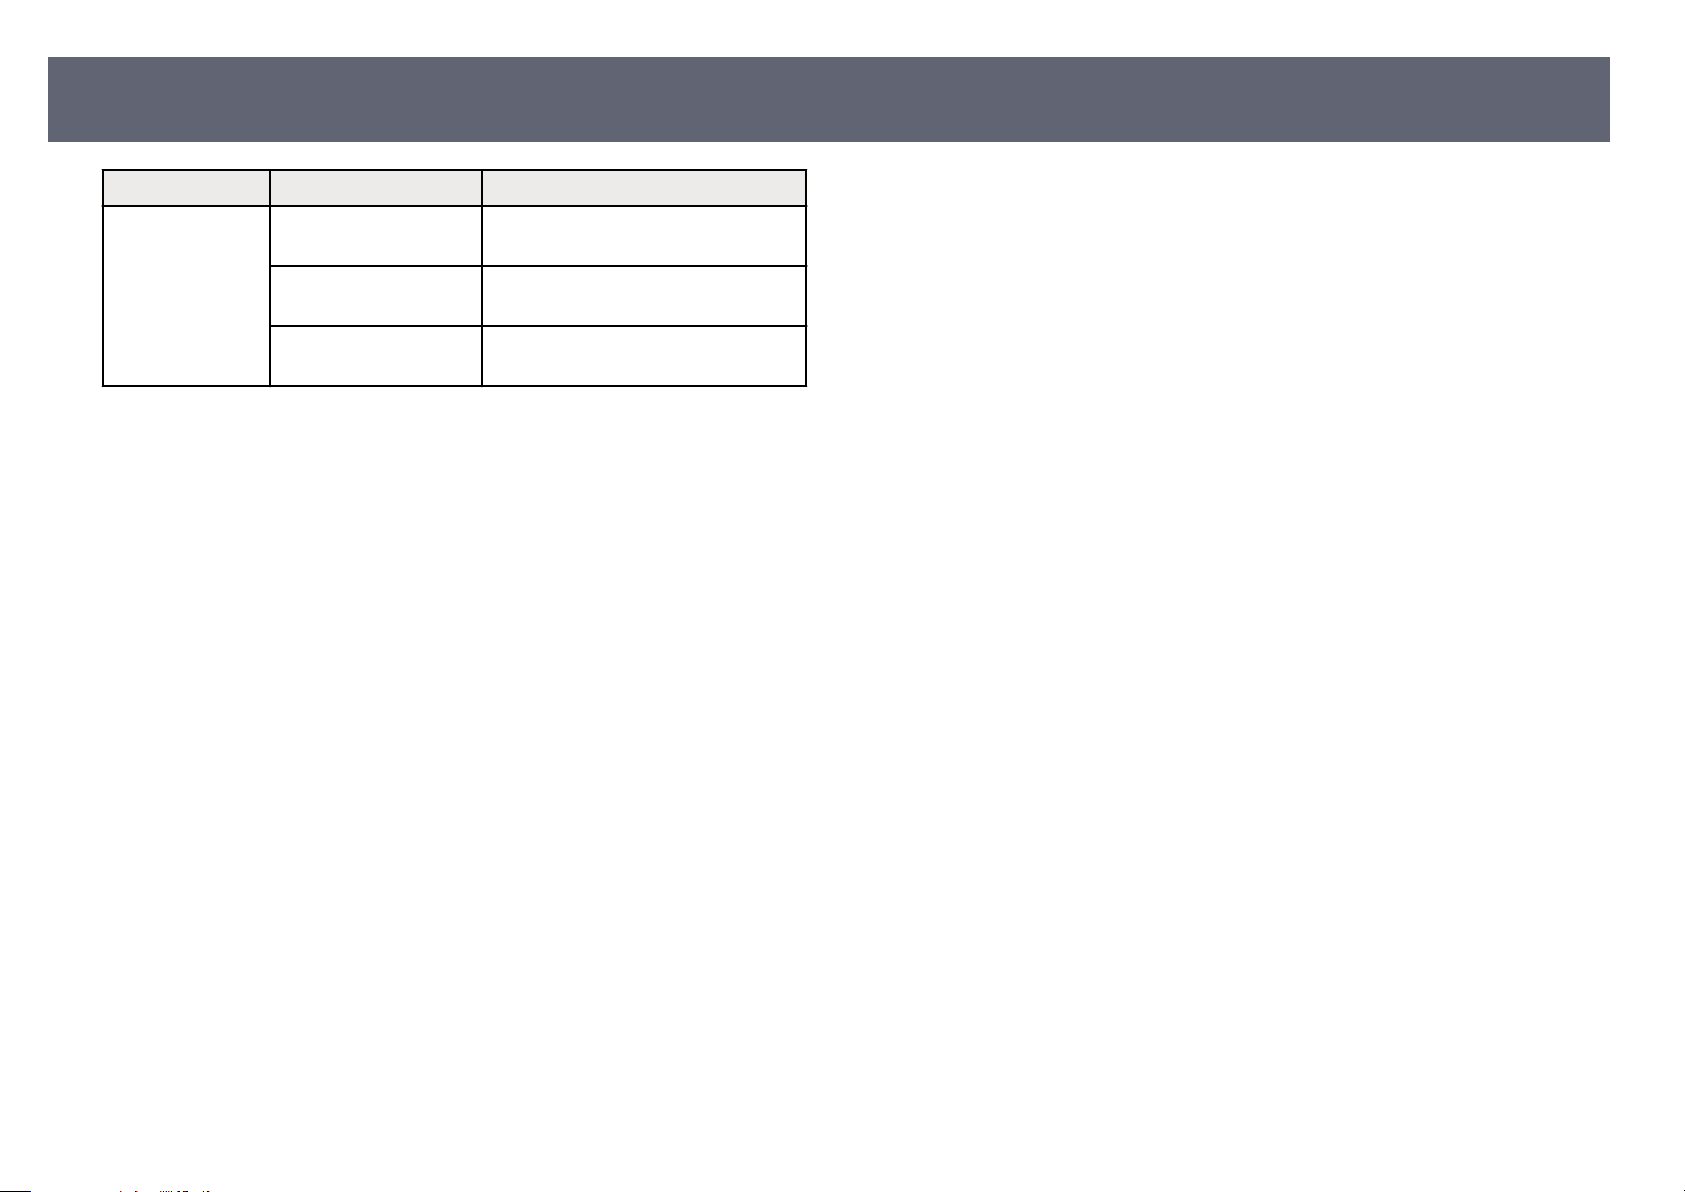
Projecting a PC Free Presentation
Setting Options Description
Wipe Transitions between images using a
pe eect
wi
Dissolve Transitions between images using a
dis
solve eect
Random Transitions between images using a
rando
m variety of eects
67
Page 68
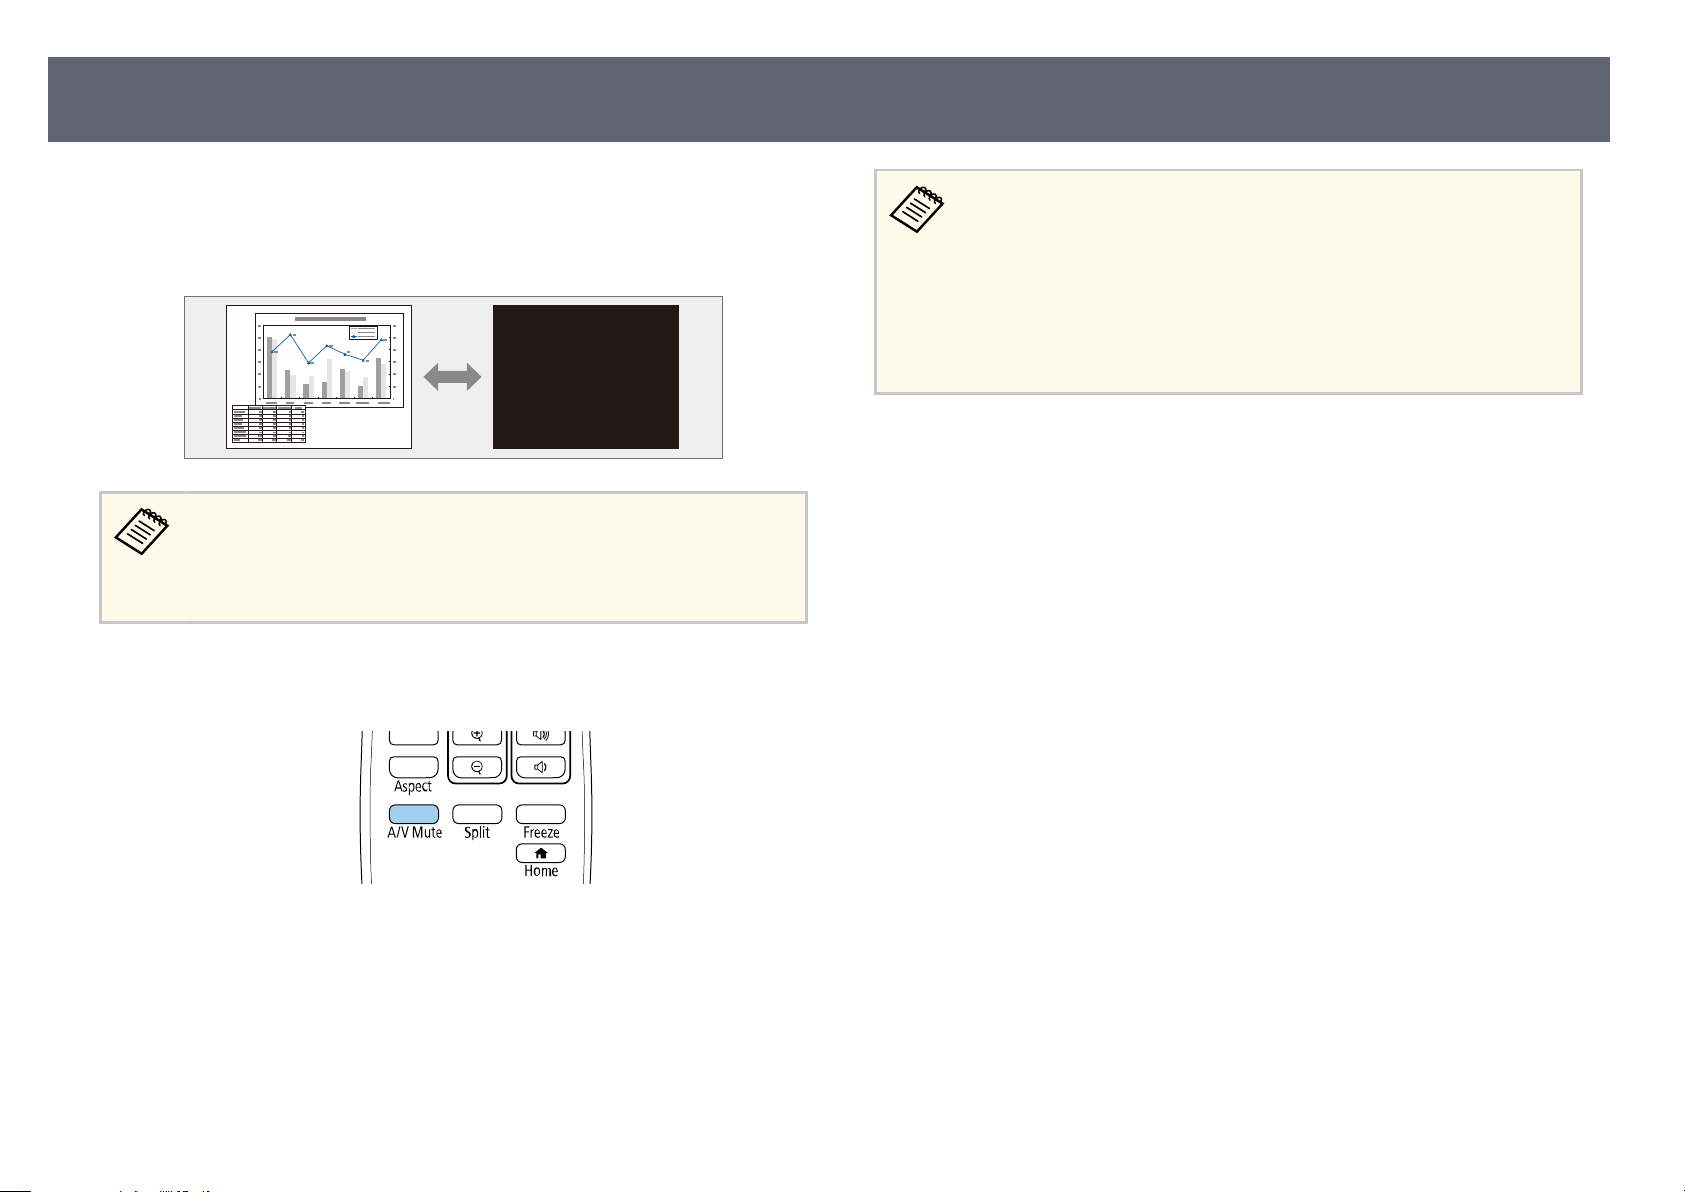
Shutting O the Image and Sound Temporarily
68
You can temporarily turn o
redirect your audience's attention during a presentation. Any sound or video
action continues to run, however, so you cannot resume projection at the point
that you shut it o.
If you want to display an image such as a company logo or picture when
th
e [A/V Mute] button is pressed, you can select the screen displayed in
the A/V Mute setting in the projector's Extended menu.
s Extended > Display > A/V Mute
Press the [A/V Mute] button on the remote control to temporarily stop
a
pr
ojection and mute any sound.
the projected image and sound if you want to
•
Yo
u can also stop projection using the A/V Mute slide lever on the
projector.
•
e projector's power automatically turns o 30 minutes aer A/V
Mute is enabled. You can disable this feature.
s ECO > A/V Mute Timer
•
e lamp is still operating during A/V Mute, so the lamp hours
continue to accumulate.
Related Links
g
•
"Pr
ojector Setup Settings - Extended Menu" p.111
•
"Projector Setup Settings - ECO Menu" p.121
To turn the image and sound back on, press [A/V Mute] again.
b
Page 69

Stopping Video Action Temporarily
You can temporarily stop the action in a video or computer presentation and
ep the current image on the screen. Any sound or video action continues to
ke
run, however, so you cannot resume projection at the point that you stopped it.
Press the [Freeze] button on the remote control to stop the video action.
a
To restart the video action in progress, press [Freeze] again.
b
69
Page 70
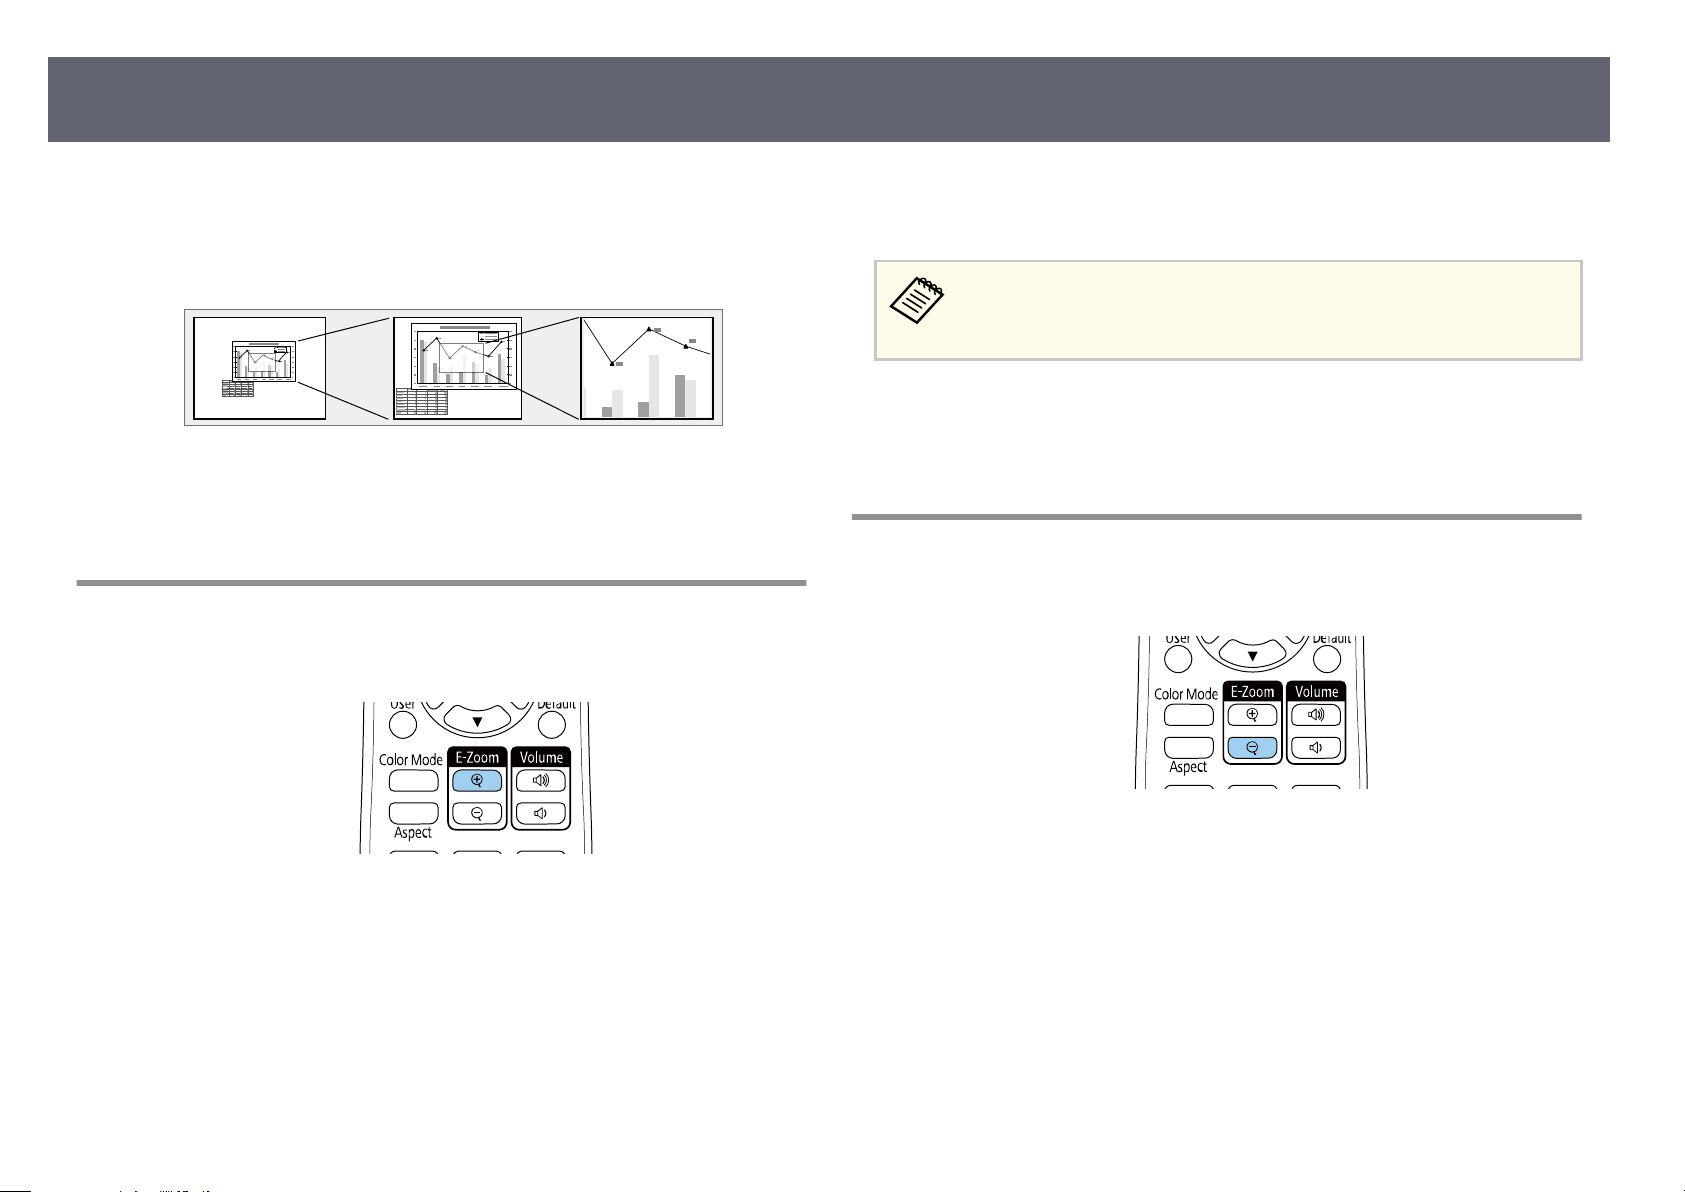
Zooming In/Zooming Out of Images (E-Zoom)
You can zoom in or zoom out of the projected image using the [E-Zoom] button
he remote control.
on t
e size and the position of the zoomed image remain even aer switching the
input source or turning o the projector.
Related Links
g
•
"Zo
oming Into Images" p.70
•
"Zooming Out of Images" p.70
•
To zo
om out of the image, press the [E-Zoom] – button.
•
To return to the original image size, press the [Default] button.
When projecting images from an Epson document camera, you can
enl
arge the image from one to eight times its size in 57 incremental steps
using the [E-Zoom] + button on the document camera.
When the zoom ratio display disappears, the size and the position of the
zoomed image will be saved. Press the [E-Zoom] +/- buttons to make
adjustment again.
Zooming Out of Images
70
Zooming Into Images
Press the [E-Zoom] + button on the remote control.
a
e projected image is enlarged focusing around the center of the image.
ou can enlarge the image between one to four times in 25 incremental
Y
steps.
Use the following buttons on the remote control to adjust the zoomed
b
imag
e while the zoom ratio is displayed:
•
Press the [E-Zoom] + button repeatedly to zoom into the image.
•
To pan around the zoomed image, use the arrow buttons.
Press the [E-Zoom] - button on the remote control.
a
e projected image is reduced. You can reduce the image between 100%
o 50% in incremental steps.
t
Use the following buttons on the remote control to adjust the zoomed-out
b
imag
e while the zoom ratio is displayed:
•
Press the [E-Zoom] - button repeatedly to zoom out of the projected
image.
•
To move the zoomed-out image in the projection area, use the arrow
buttons.
•
To zoom into the image, press the [E-Zoom] + button.
Page 71
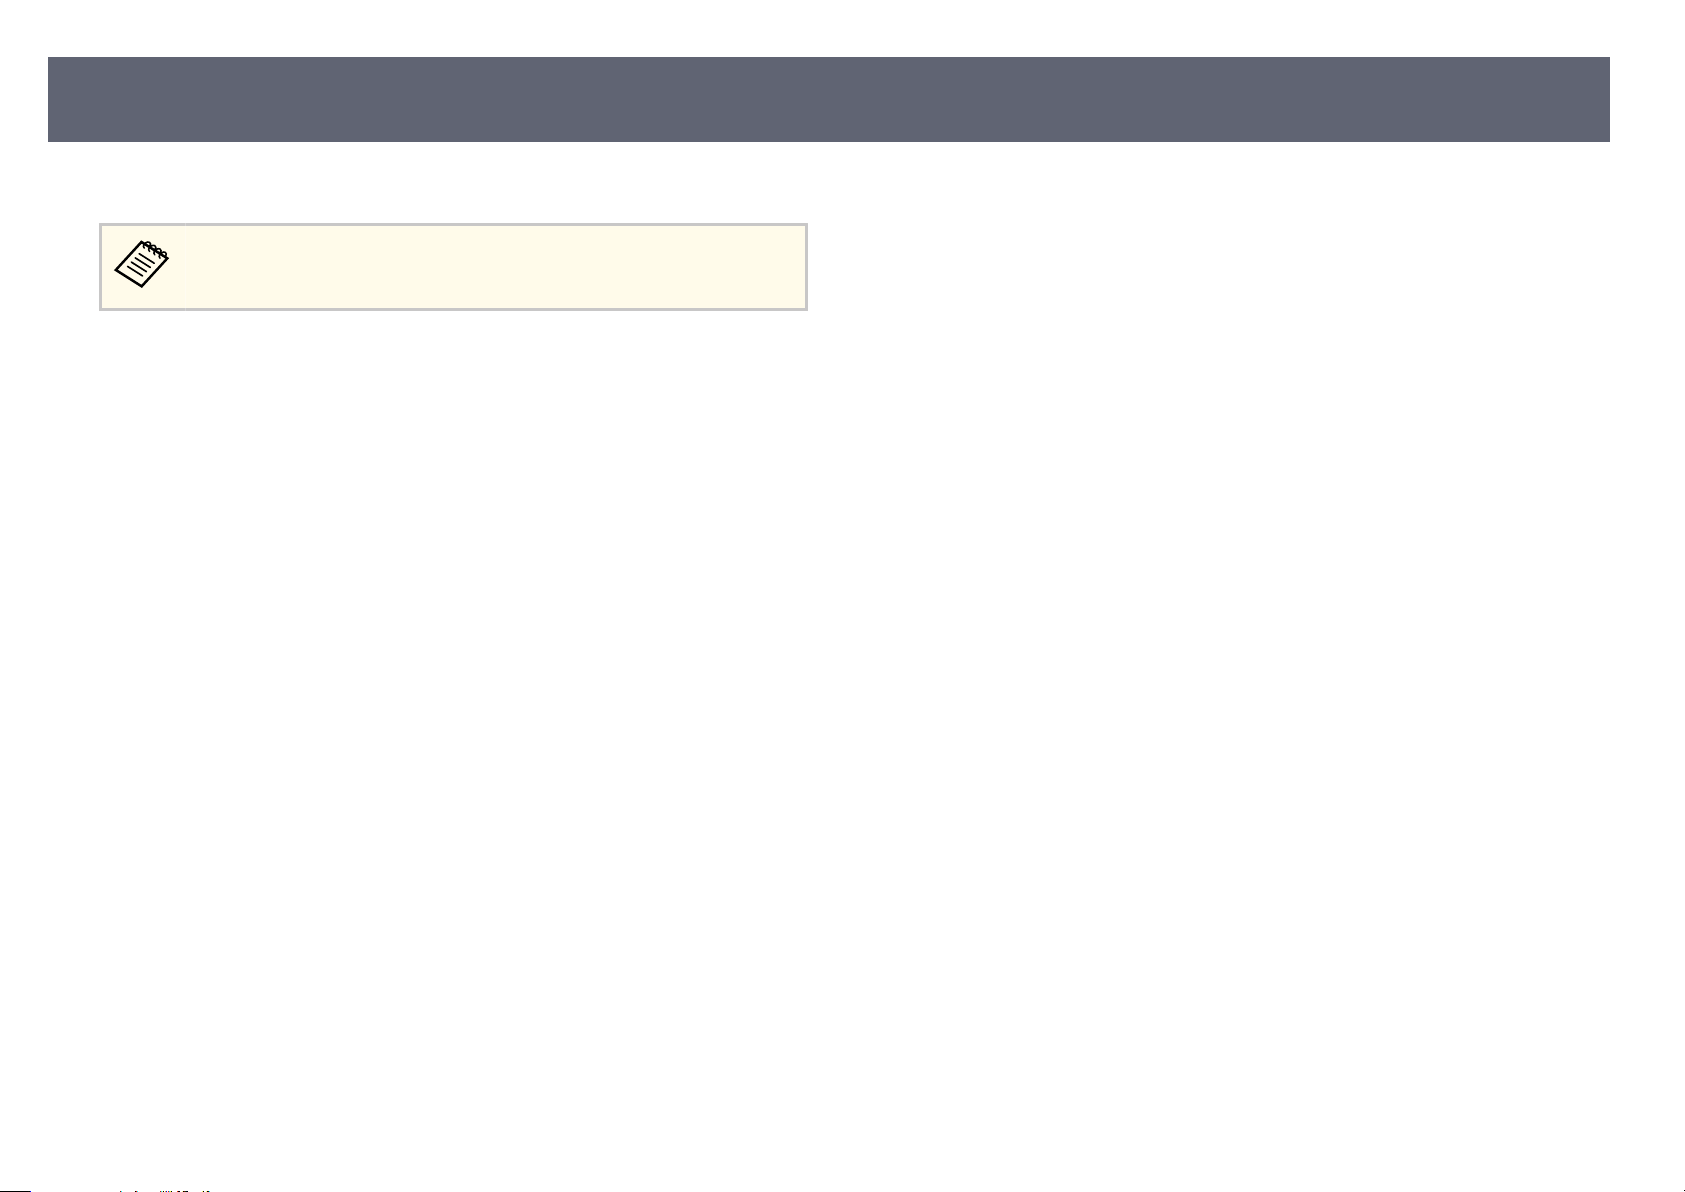
Zooming In/Zooming Out of Images (E-Zoom)
•
eturn to the original image size, press the [Default] button.
To r
When projecting image from an Epson document camera, you can also
re
duce the image using the [E-Zoom] - button on the document camera.
When the zoom ratio display disappears, the size and the position of the
med image will be saved. Press the [E-Zoom] +/- buttons to make
zoo
adjustment again.
71
Page 72
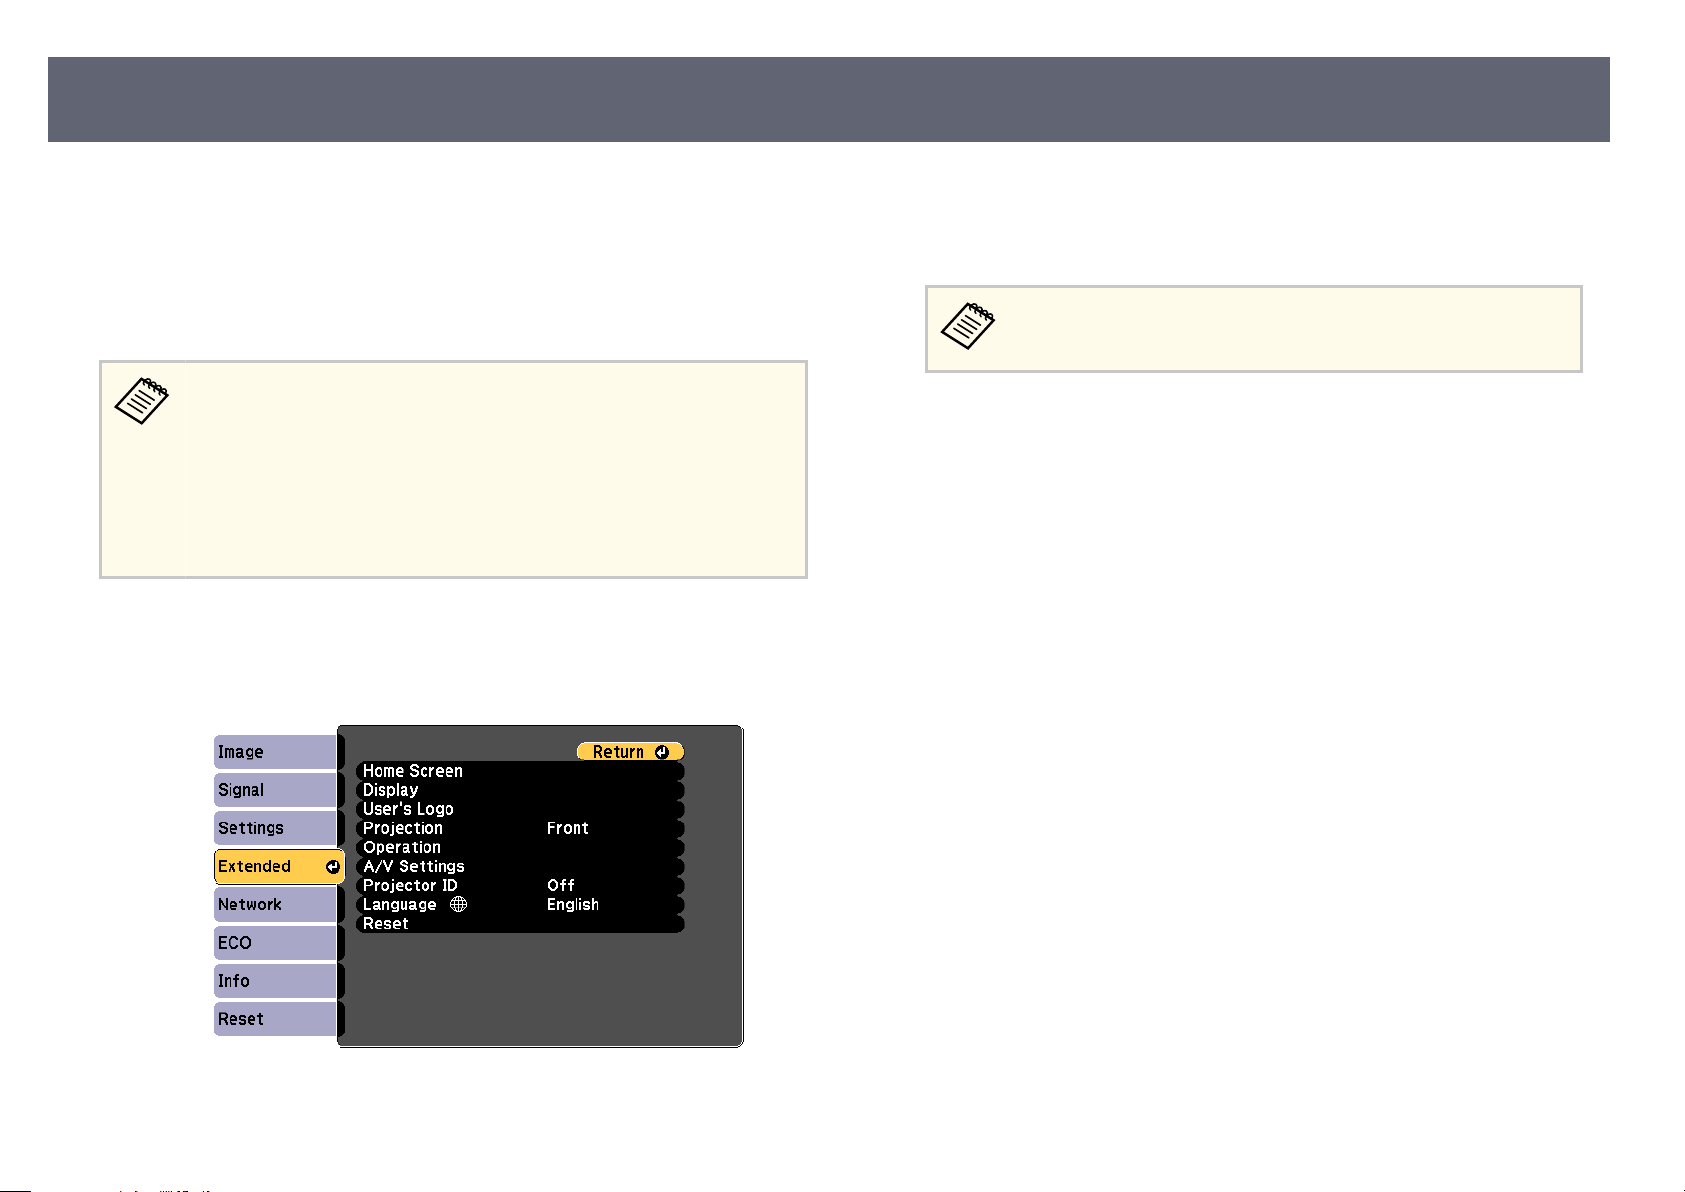
Saving a User's Logo Image
72
You can save an image on the projector and display it whenever the projector
ns on. You can also display the image when the projector is not receiving an
tur
input signal. is image is called the user's logo screen.
You can select a photo, graphic, or company logo as the user's logo, which is
useful in identifying the projector's owner to help deter the. You can prevent
changes to the user's logo by setting up password protection.
•
If t
he User's Logo Protection setting in the Password Protection
setting menu is set to On, set to O before saving the user's logo.
•
When you copy the menu settings from one projector to another using
the batch setup feature, user's logo is also copied. Do not register the
information that you do not want to share between multiple projectors
as a user's logo.
•
You cannot save content that is protected by HDCP.
Display the image you want to project as the user's logo.
a
Press the [Menu] button, select the E
b
ended menu, and press [Enter].
xt
Select User's Logo > Start Setting and press [Enter].
c
You see a prompt asking if you want to use the displayed image as a user's
logo.
Adjustments such as Keystone, E-Zoom, or Aspect are temporarily
celed when you select User's Logo.
can
Select Yes and press [Enter].
d
C
e
f
g
h
i
heck the displayed image, and then select Yes
e user's logo is overwritten and a completion message is displayed.
Press [Esc] to exit the message screen.
Select the E
elect Display and press [Enter].
S
S
elect when you want to display the User's Logo screen:
•
To di
Background and set it to Logo.
s Extended > Display > Display Background
•
To display it whenever you turn the projector on, select Startup Screen
and set it to On.
s Extended > Display > Startup Screen
•
To display it whenever you press the [A/V Mute] button, select A/V
Mute and set it to Logo.
s Extended > Display > A/V Mute
xtended menu and press [Enter].
splay it whenever there is no input signal, select Display
to save it as the user's logo.
Page 73

Saving a User's Logo Image
73
To prevent anyone from changing the User's Logo settings without rs
a password, set the User's Logo Protection setting to On in the Password
Protection setting menu and set the password.
Related Links
g
•
"Shutting O the Image and Sound Temporarily" p.68
•
"Selecting Password Security Types" p.79
t entering
Page 74
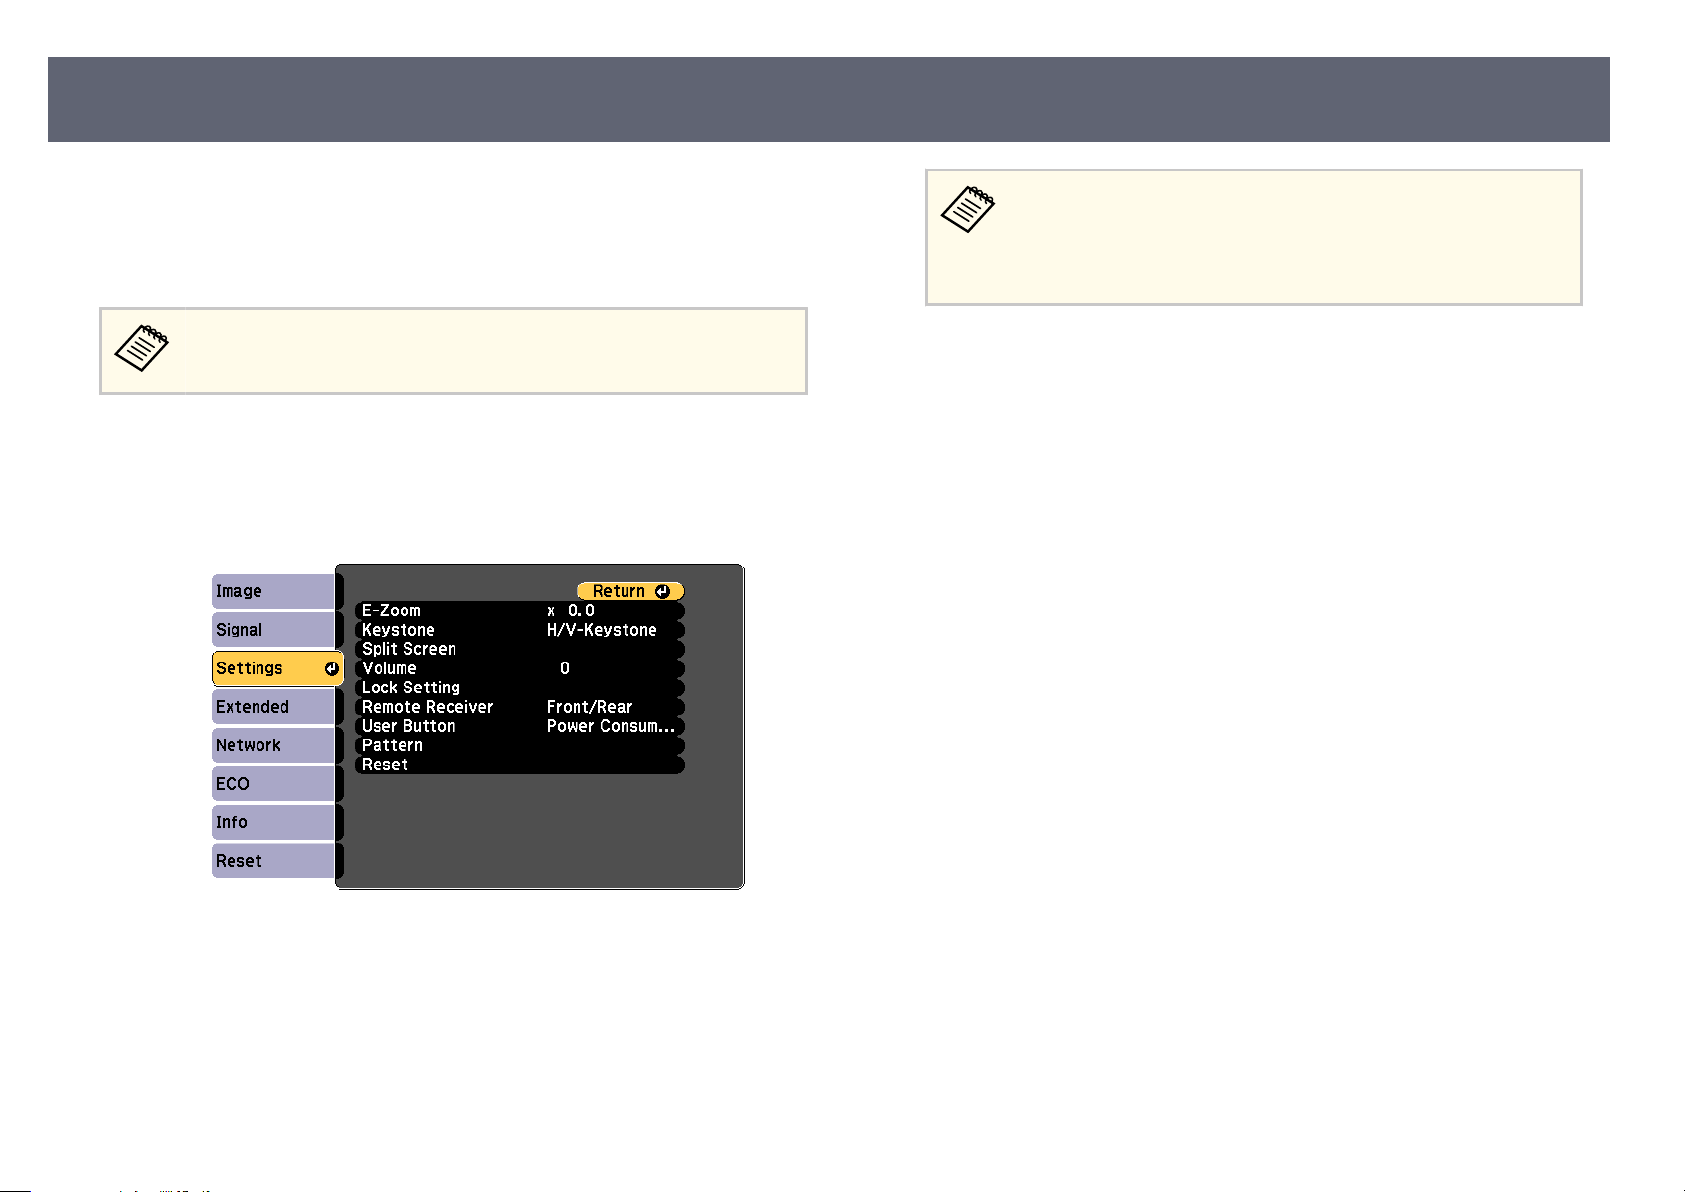
Saving a User Pattern
74
ere are four types of patterns pre-registered in the projector, such as ruled
es and grid patterns. You can project these patterns to aid in presentations
lin
using the Pattern Display settings.
You can also save the image that is currently being projected as a User Pattern.
Once you save a User Pattern, the pattern cannot be returned to the
fact
ory default.
Project the image you want to save as the User Pattern, and then press the
a
[Menu] button on the control panel or remote control.
Select the Settings menu and press [Enter].
b
•
Ad
temporarily cancelled when you select User Pattern.
•
You cannot save digital images protected by HDCP technology as
a User Pattern.
Select Yes and press [Enter].
d
P
e
f
ress [Enter].
Yo
u see a prompt asking if you want to save the image as the User Pattern.
Select Yes and press [Enter].
Y
ou see a completion message.
justments such as Keystone, E-Zoom, or Aspect are
c
Select P
Y
Pattern.
attern > User Pattern and press [Enter].
ou see a prompt asking if you want to use the displayed image as a User
Page 75
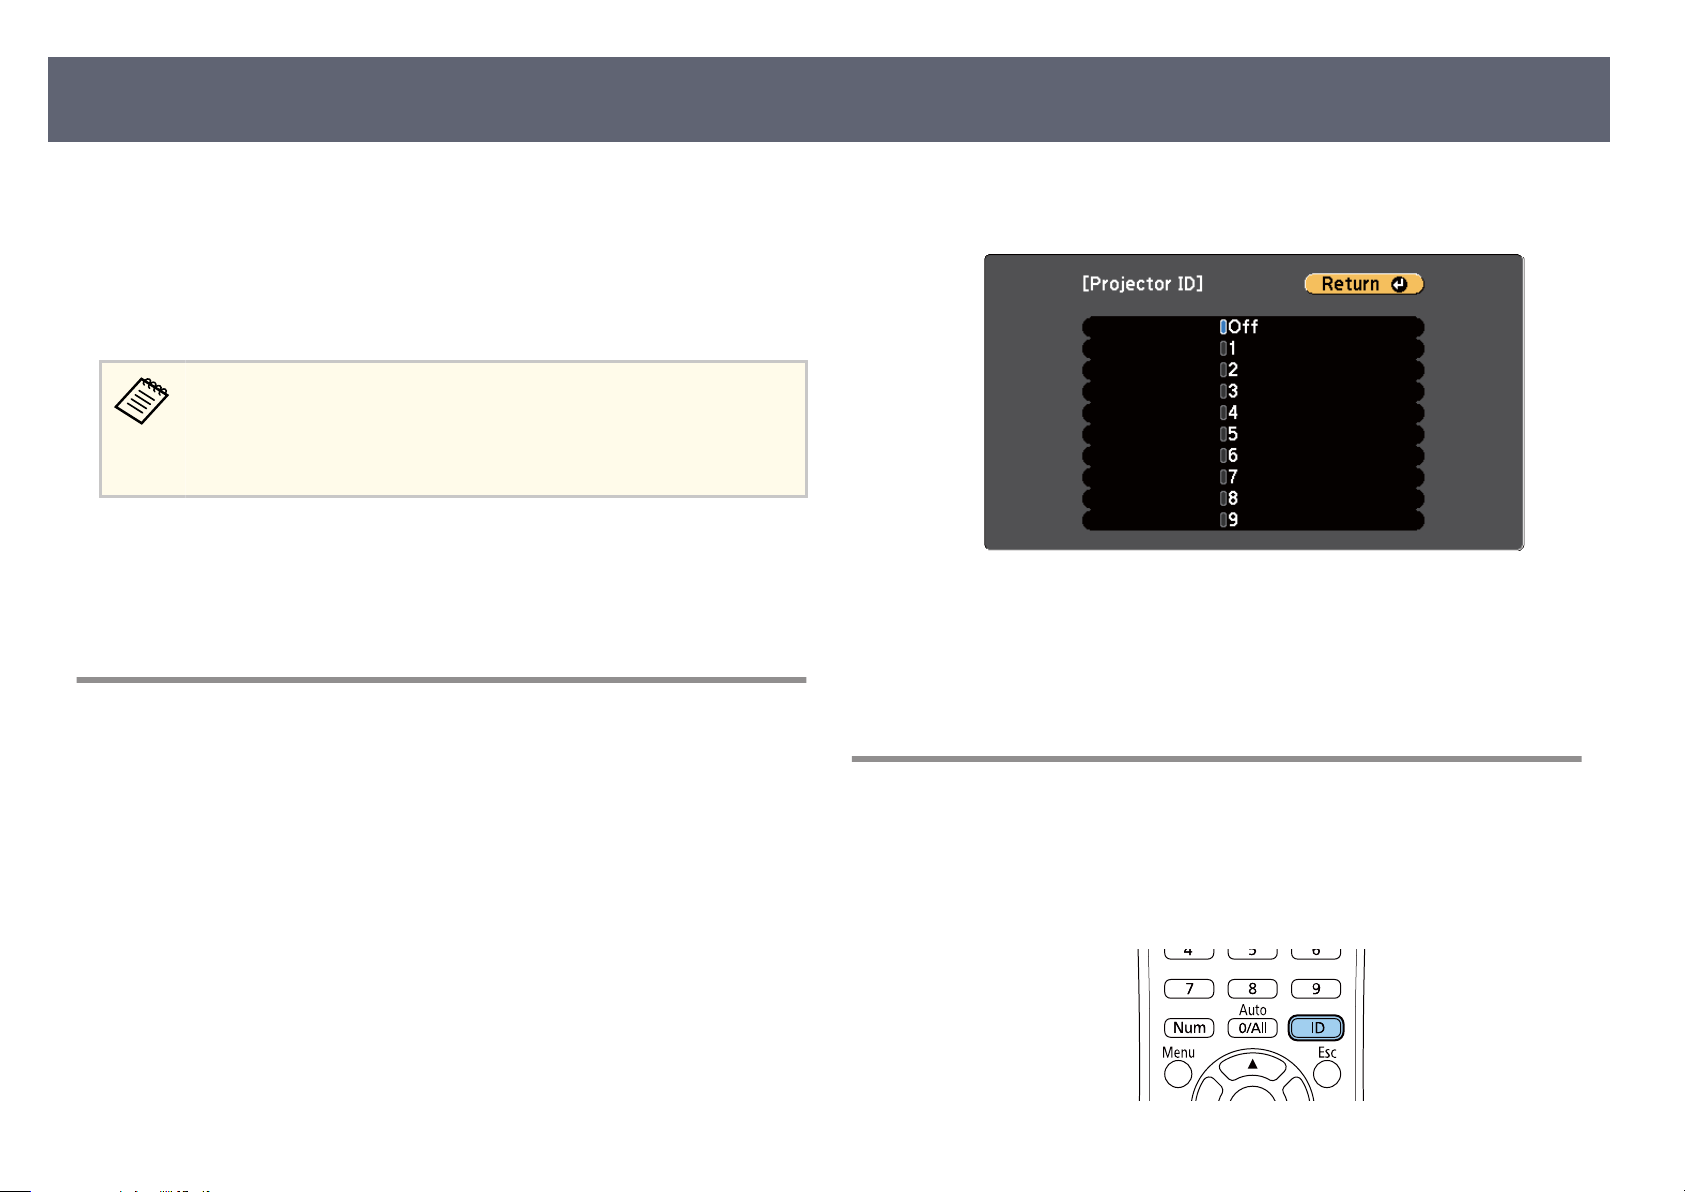
Color Dierence Correction when Projecting from Multiple Projectors
75
When lining up multiple projectors to project images, you can correct the
ightness and color tone of each projector's image so that the images match
br
closely.
You can set a unique projector ID for each projector to operate them
individually using a remote control, and then correct the brightness and color
for each projector.
•
In s
ome cases the brightness and color tone may not match completely
even aer correction.
•
If brightness and color tone dierences become more noticeable over
time, repeat the adjustments.
Related Links
g
•
"Set
ting the Projector ID" p.75
•
"Selecting the Projector You want to Operate" p.75
•
"Matching Multiple-Projector Display Quality" p.76
Setting the Projector ID
To control multiple projectors from a remote control, give each projector a
unique ID
.
U
c
d
e
se the arrow buttons to select the identication number you want to use
for the projector. en press [Enter].
Press [Menu] or [Esc] to exit the menus.
Repeat these steps for all the other projectors you want to operate from
o
e remote control.
n
Selecting the Projector You want to Operate
Press the [Menu] button, select the Ext
a
Select Projector ID and press [Enter].
b
ended menu, and press [Enter].
Aer setting the projector's ID, select the ID for the projector you want to
o
perate using the remote control.
Aim the remote control at the target projector and press the [ID] button.
a
Page 76
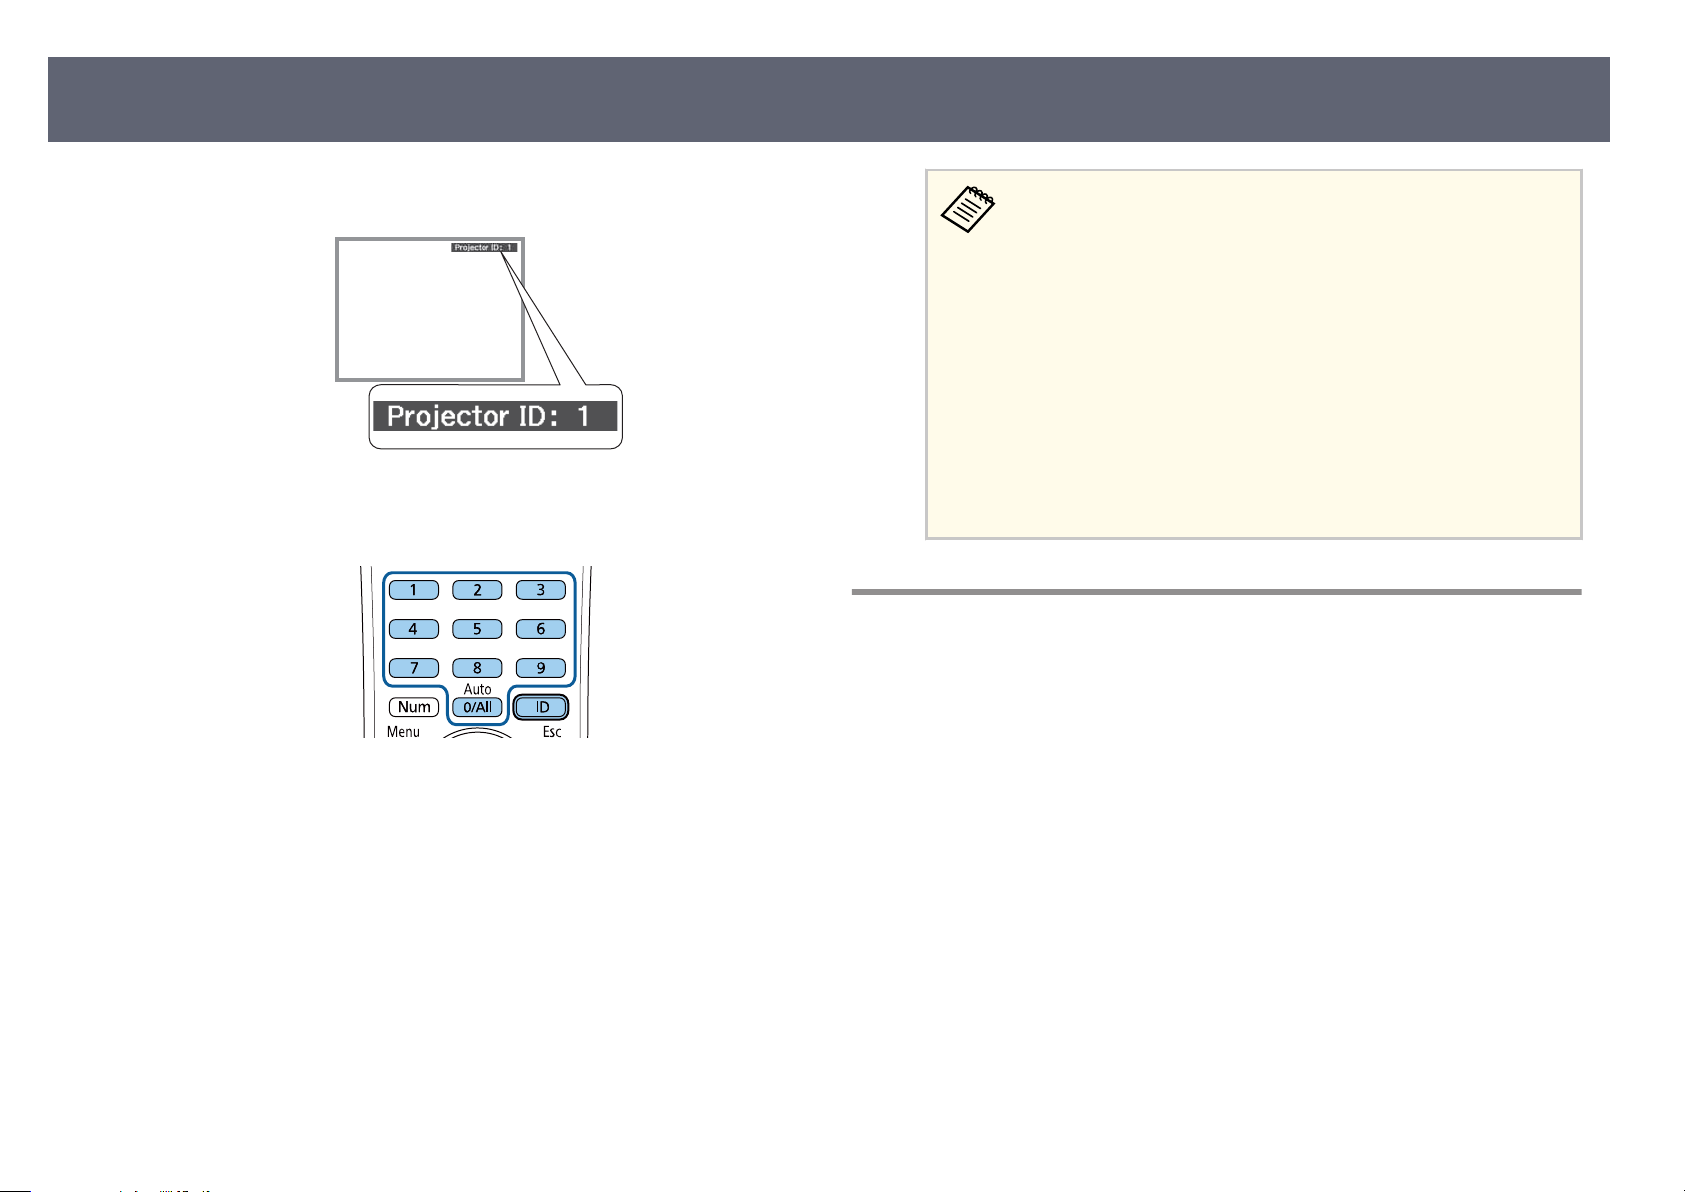
Color Dierence Correction when Projecting from Multiple Projectors
76
e current Projector ID is displayed on the projected screen. It
sappears aer about 3 seconds.
di
While holding the [ID] button, press the number button that matches the
b
ID of t
he projector you want to operate.
e projector you want to operate is selected.
•
Wh
en you select [0/All] on the remote control, you can operate
all projectors regardless the Projector ID setting.
•
When you set the Projector ID setting to O, you can operate
the projector using the remote control whichever ID you select
on the remote control.
•
e projector ID setting is saved in the remote control. Even if
the remote control batteries are removed to replace them and
so on, the saved ID setting is retained. However, if the batteries
are le out of the remote control for an extended period, the ID
returns to its default setting ( 0/All).
•
When you use multiple remote controls at the same time, you
may not be able to operate projectors as intended due to infrared
interference.
Matching Multiple-Projector Display Quality
You can match the display quality of multiple projectors that will project next to
ac
h other.
e
Turn on all the projectors on which you want to match the display quality.
a
Set ID numbers on each projector.
b
Make sure all the projectors are using the same Color Mode setting.
c
Select the remote control ID to match the r
d
t projector.
s
Page 77
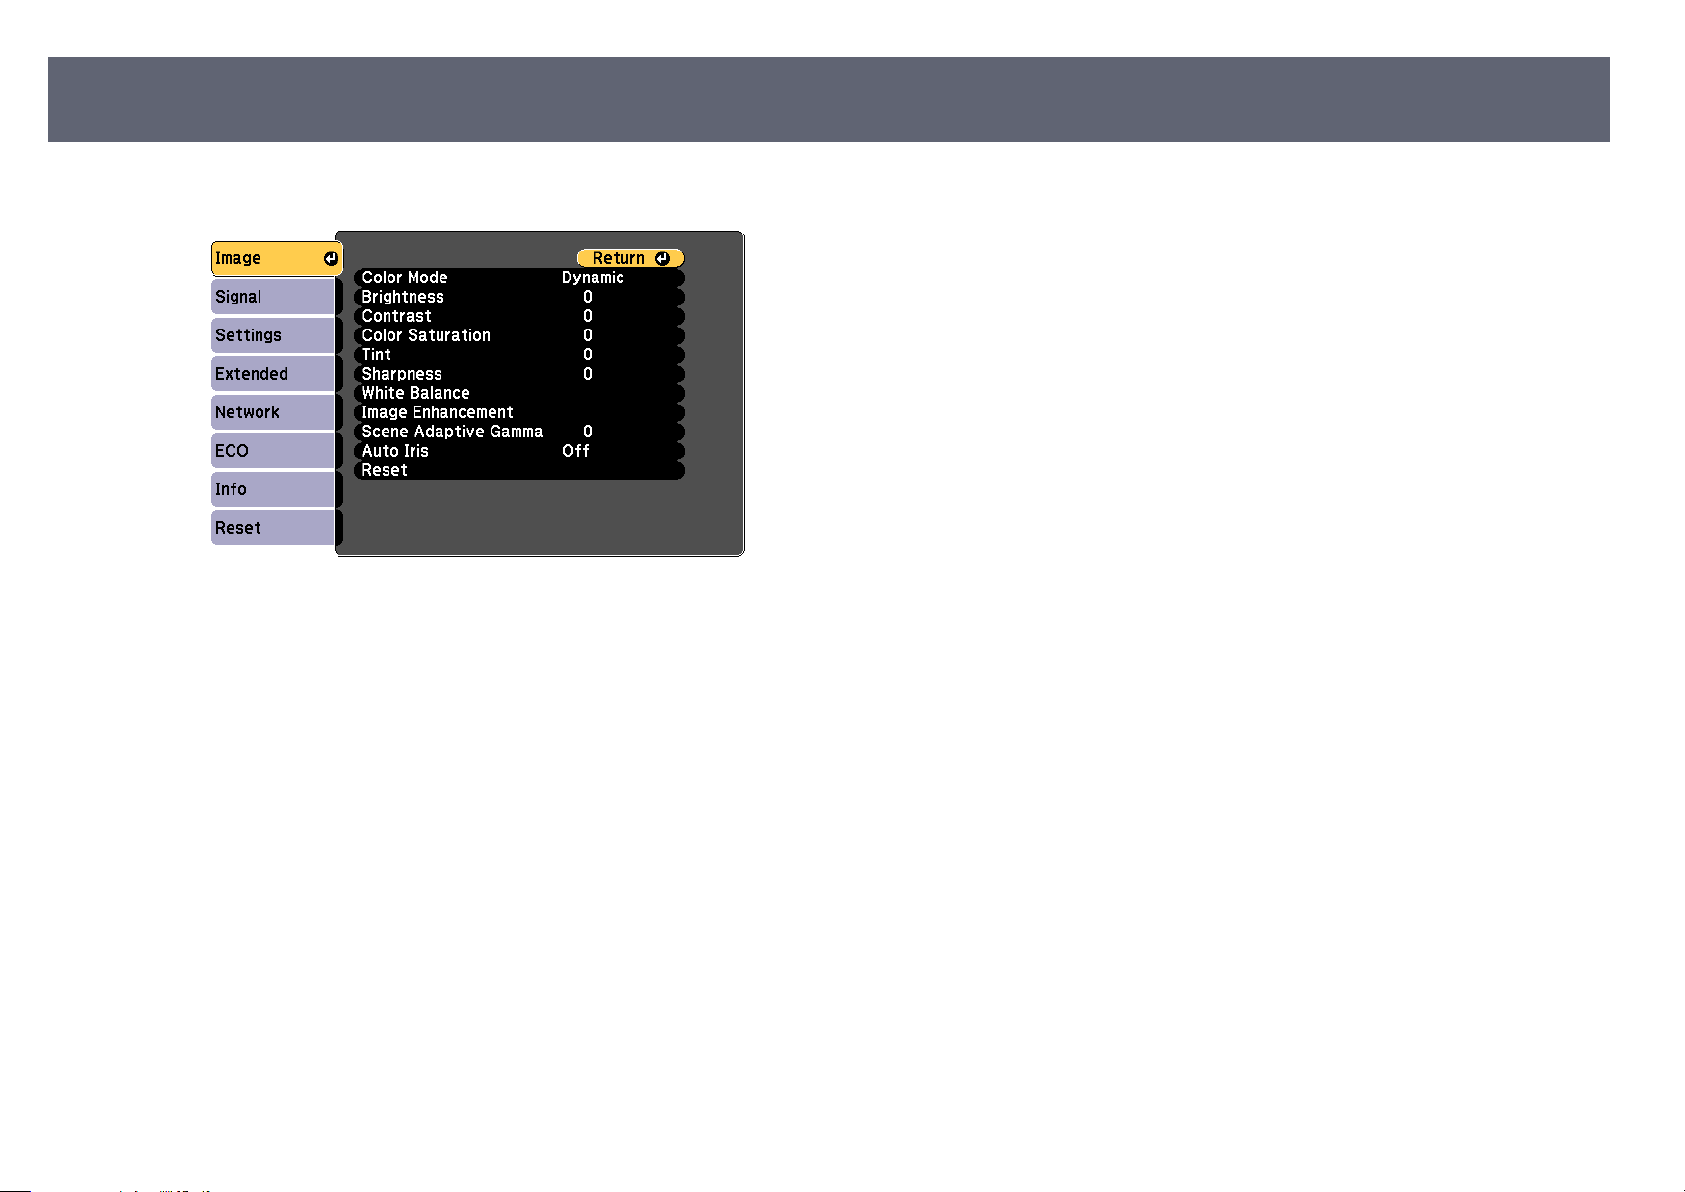
Color Dierence Correction when Projecting from Multiple Projectors
Press the [Menu] button, select the Image menu, and press [Enter].
e
Select settings as necessary.
f
Select the remote control ID to match the next projector, then repeat
g
I
m
age menu adjustments as necessary to match the projectors' displays.
77
Page 78
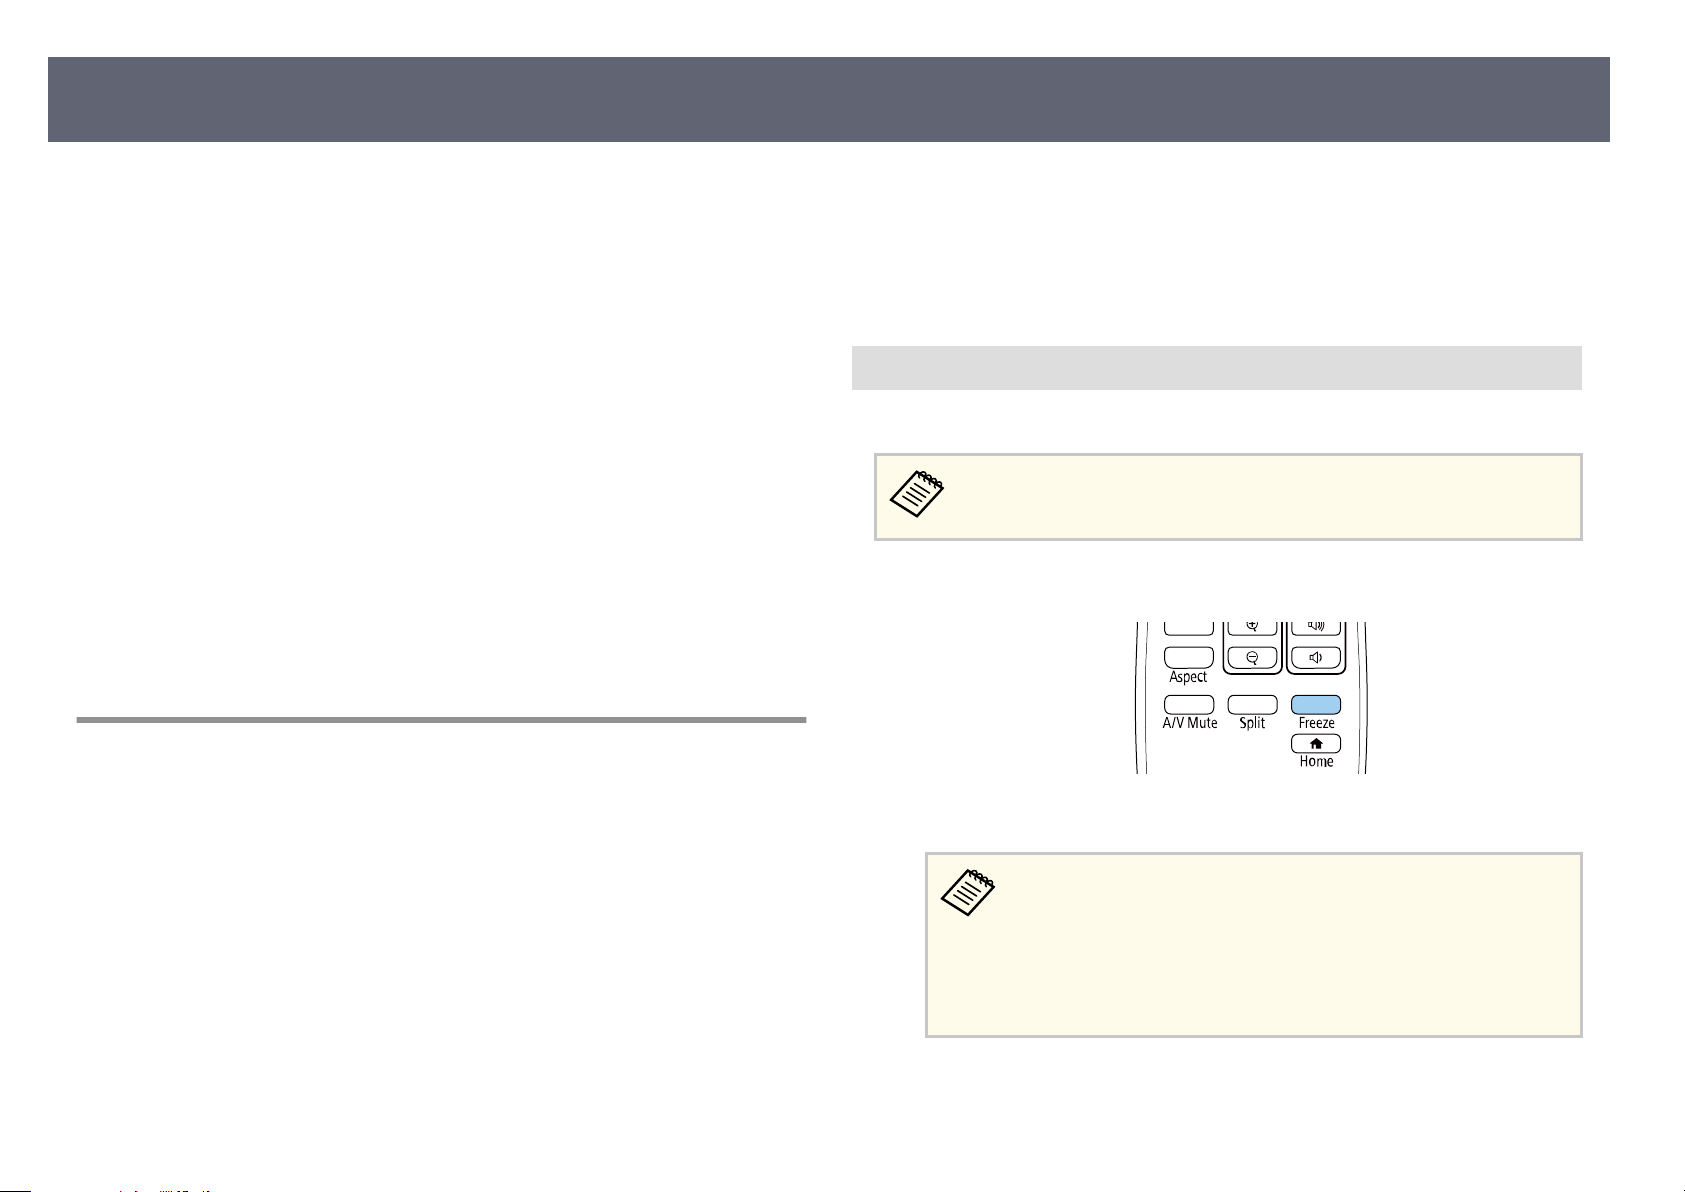
Projector Security Features
You can secure your projector to deter th
setting up the following security features:
•
Password security to prevent people who do not know the password from
using the projector, and prevent changes to the startup screen and other
settings.
is acts as an anti-the function as the projector cannot be used even if it is
stolen, and you can limit who can use the projector.
•
Button lock security to block operation of the projector using the buttons on
the control panel.
is is useful at events or shows when you want to deactivate all buttons
during projection or at schools when you want to limit button operation.
•
Security cabling to physically secure the projector in place.
Related Links
g
•
"Password Security Types" p.78
•
"Locking the Projector's Buttons" p.80
•
"Installing a Security Cable" p.81
e or prevent unintended use by
Related Links
g
•
ting a Password" p.78
"Set
•
"Selecting Password Security Types" p.79
•
"Entering a Password to Use the Projector" p.80
•
"List of Functions" p.9
Setting a Password
o
r the rst time you use the projector, you must set a password.
F
No password is set by default. You must set a password.
Hold down the [Freeze] button on the remote control for about 5 seconds.
a
78
Password Security Types
You can set up the following types of password security using one shared
password:
•
Power On Protection password prevents anyone from using the projector
without rst entering a password. When plugging the power cord and turning
on the projector at rst time, you must enter the correct password. is also
applies to Direct Power On and Auto Power On.
•
User's Logo Protection password prevents anyone from changing the custom
screen displayed when the projector turns on, when no signal is being input,
or when you use the A/V Mute feature. e custom screen discourages the
by identifying the projector's owner.
•
Network Protection password prevents anyone from changing the projector's
Network settings.
You see the Password Protection setting menu.
•
I
o password has been set, a screen prompting you to set
f n
a password is displayed before you can view the Password
Protection setting menu.
•
If Password Protection is already activated, you must enter the
correct password to display the Password Protection setting
menu.
Page 79
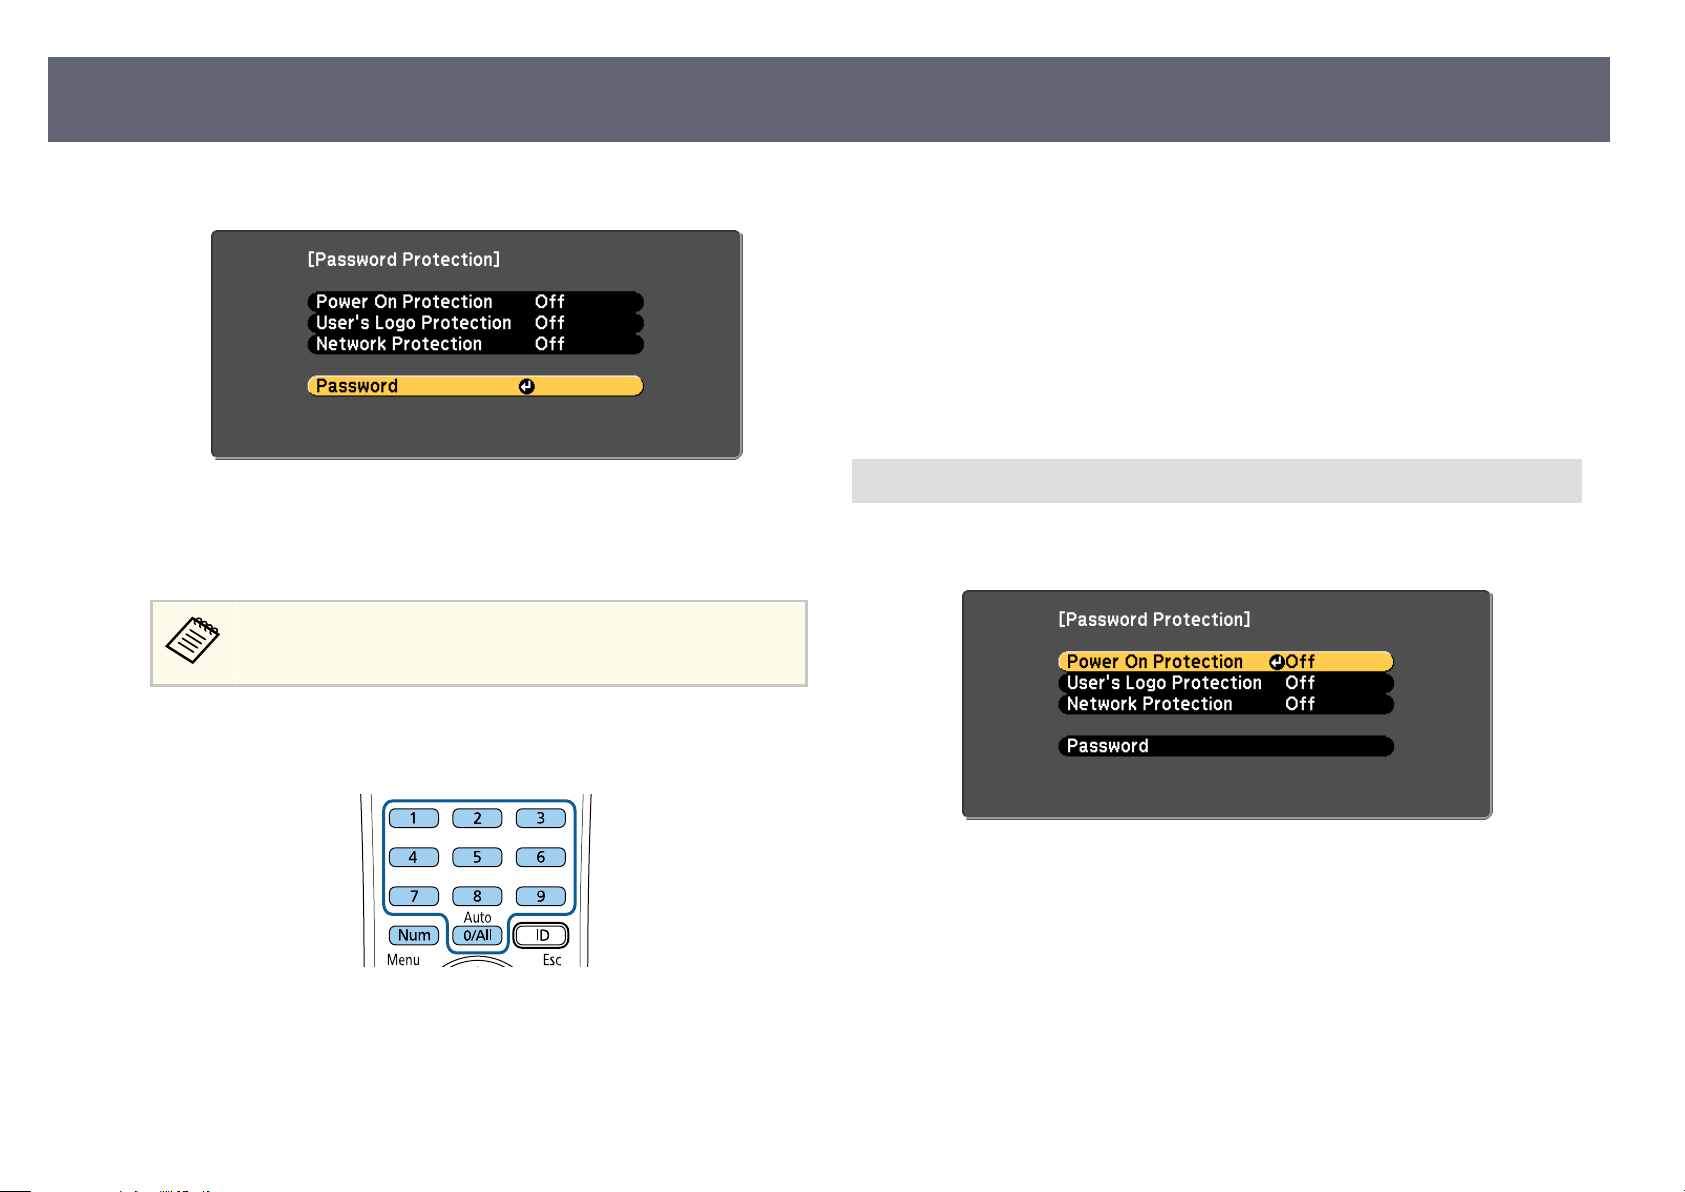
Projector Security Features
79
Select Password and press [Enter].
b
You see the prompt Chan
Select Yes and press [Enter].
c
If you select No
again.
Hold down the [Num] button on the remote control and use the numeric
d
b
ttons to set a four-digit password.
u
ge the password?.
, the Password Protection setting menu is displayed
Enter the password again.
e
Y
u see the message Password accepted. If you enter the password
o
incorrectly, a message is displayed prompting you to re-enter the
password.
Press [Esc] to return to the menu.
f
Make a note of the password and keep it in a safe place.
g
Selecting Password Security Types
setting a password, you see this menu, allowing you to select the password
Aer
security types you want to use.
e password displays as **** as it is entered. A conrmation prompt is
di
splayed when you enter the fourth digit.
If you do not see this menu, hold down the [Freeze] button on the remote
con
trol for 5 seconds until the menu appears.
•
To prevent unauthorized use of the projector, select On as the Power On
Protection setting.
•
To prevent changes to the User's Logo screen or related display settings, select
On as the User's Logo Protection setting.
•
To prevent changes to network settings, select On as the Network Protection
setting.
Page 80
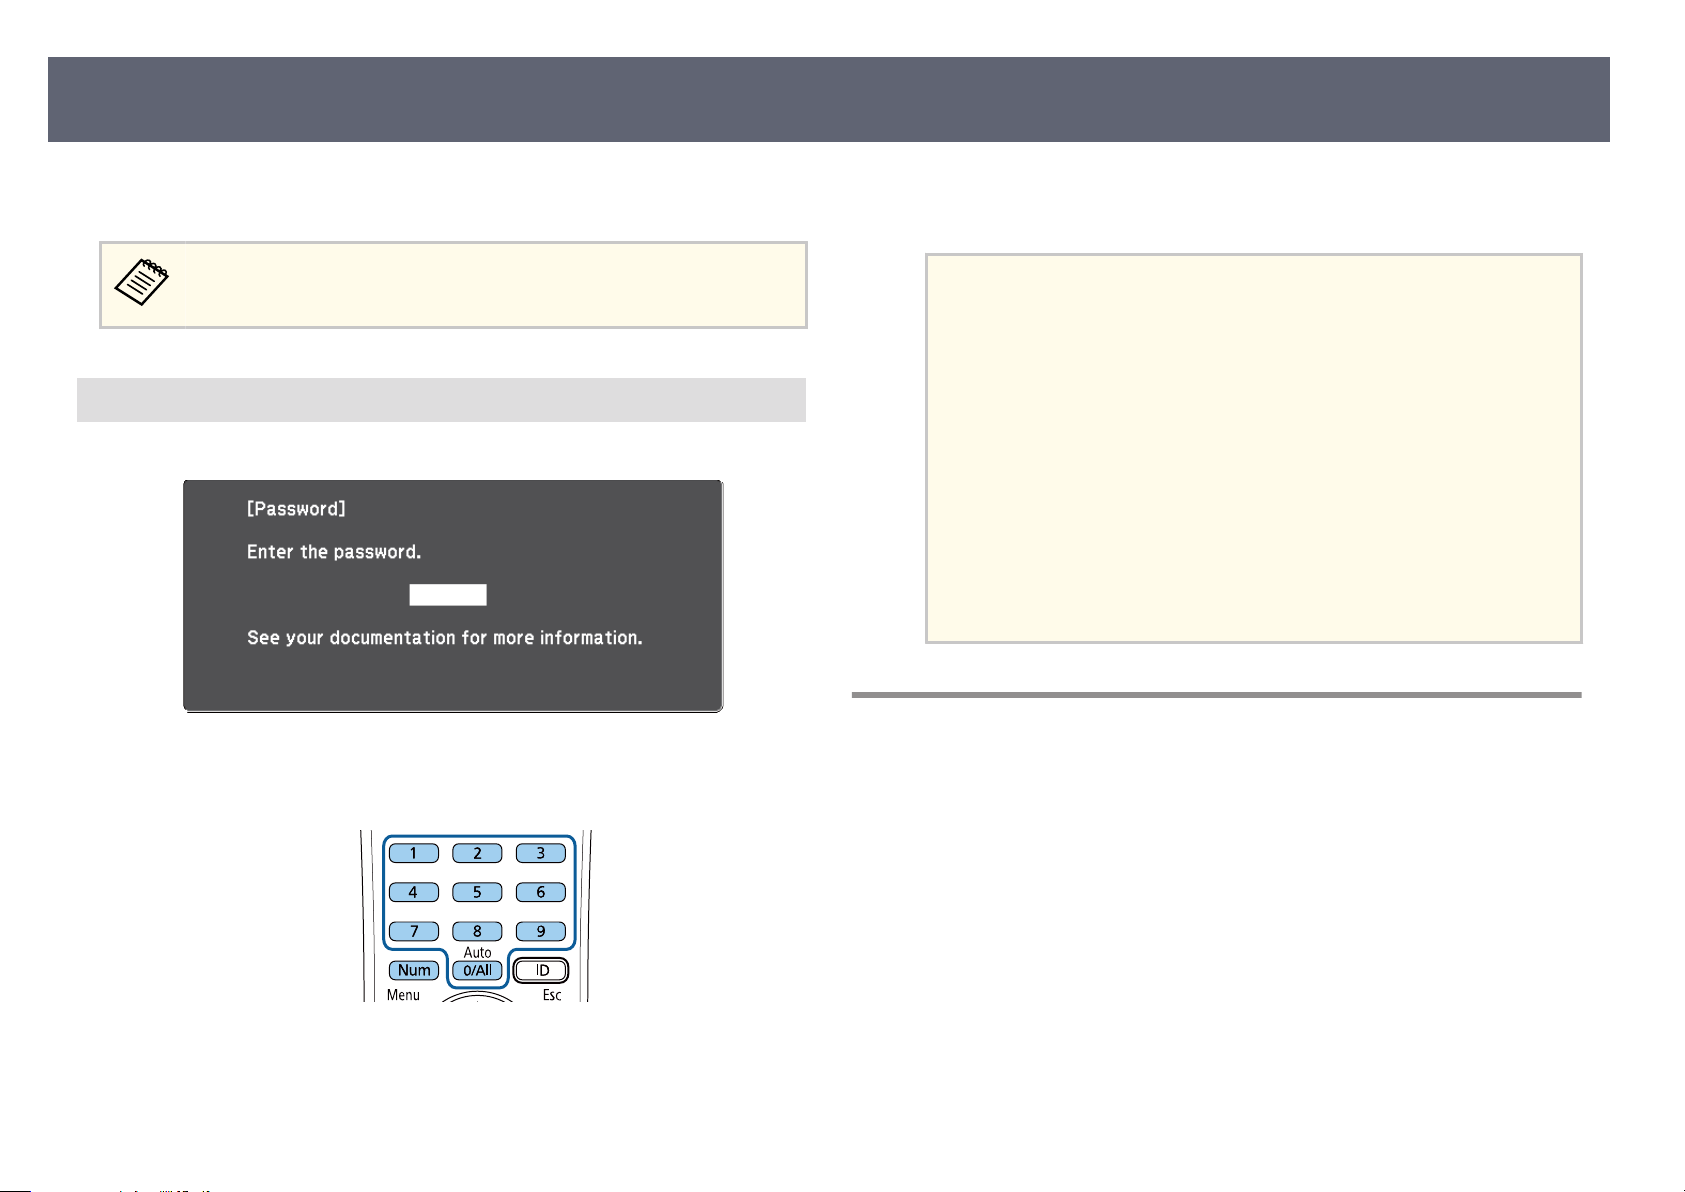
Projector Security Features
80
You can attach the password protect sticker to the projector as an additional
e deterrent.
th
Be sure to keep the remote control in a safe place; if you lose it, you will
no
t be able to enter the password.
Entering a Password to Use the Projector
en the password screen is displayed, enter the correct password.
Wh
If the password is incorrect, you see a message and a prompt to try again.
b
Ent
er the correct password to proceed.
Attention
•
•
•
correct password is entered three times in succession, the message
If an in
e projector's operation will be locked. is displayed for approximately
5 minutes, and the projector switches to standby mode. If this happens,
disconnect the power plug from the electrical outlet, reinsert it, and turn
the projector back on. e projector displays the password entry screen
again so that you can enter the correct password.
If you have forgotten the password, make a note of the " Request Code:
xxxxx" number that appears on the screen and contact Epson for help.
If you continue to repeat the above operation and input the wrong
password 30 times in succession, the message e projector's operation
will be locked. Contact Epson as described in your documentation. is
displayed and the projector does not accept any more password entries.
Contact Epson for help.
Locking the Projector's Buttons
Hold down the [Num] button on the remote control while you enter the
a
pas
sword using the numeric buttons.
e password screen closes.
You can lock the buttons on the control panel to prevent anyone from using the
projector. e projector can still be operated using the remote control.
Page 81
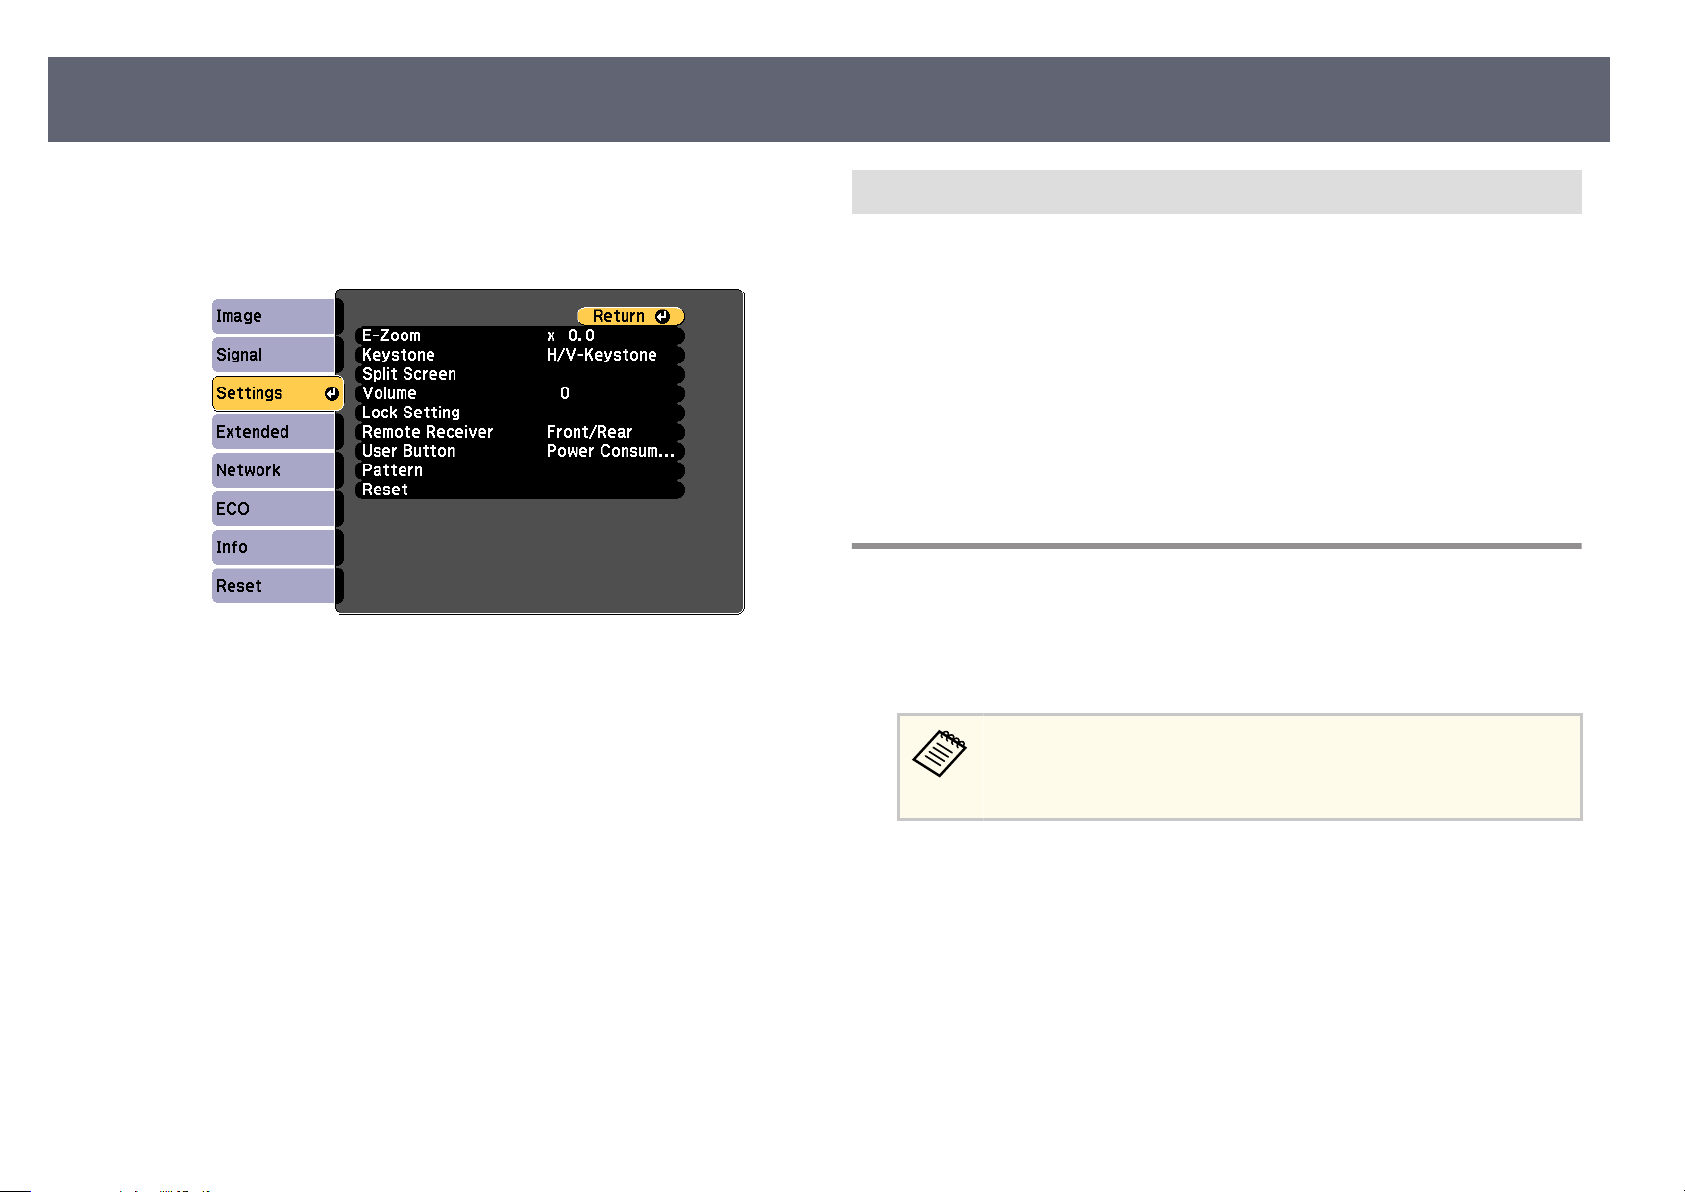
Projector Security Features
81
Press the [Menu] button on the control panel or remote control.
a
Select the S
b
Select L
c
elect one of these lock types and press [Enter]:
S
d
•
To lo
•
To lock all buttons except the power button, select Partial Lock.
You see a conrmation prompt.
Select Yes and press [Enter].
e
e
Control Panel Lock setting takes eect.
ettings menu and press [Enter].
ock Setting > Control Panel Lock, and press [Enter].
ck all of the projector's buttons, select Full Lock.
Unlocking the Projector's Buttons
he projector's buttons have been locked, do one of the following to unlock
If t
them.
•
Hold down the [Enter] button on the control panel for 7 seconds. A message
is displayed and the lock is released.
•
Select O as the Control Panel Lock setting in the projector's Settings menu.
s Settings > Lock Setting > Control Panel Lock
Related Links
g
•
"Projector Feature Settings - Settings Menu" p.109
Installing a Security Cable
You can install the security cable on the projector to deter the.
•
Use the security slot on the projector to attach a Kensington Microsaver
Security system.
For more details on the Microsaver Security System, visit the
sington Web site.
Ken
https://www.kensington.com/
•
Us
e the security cable attachment point on the projector to attach a wire cable
and secure it to a room xture or heavy furniture.
Related Links
g
•
"Unlocking the Projector's Buttons" p.81
Page 82
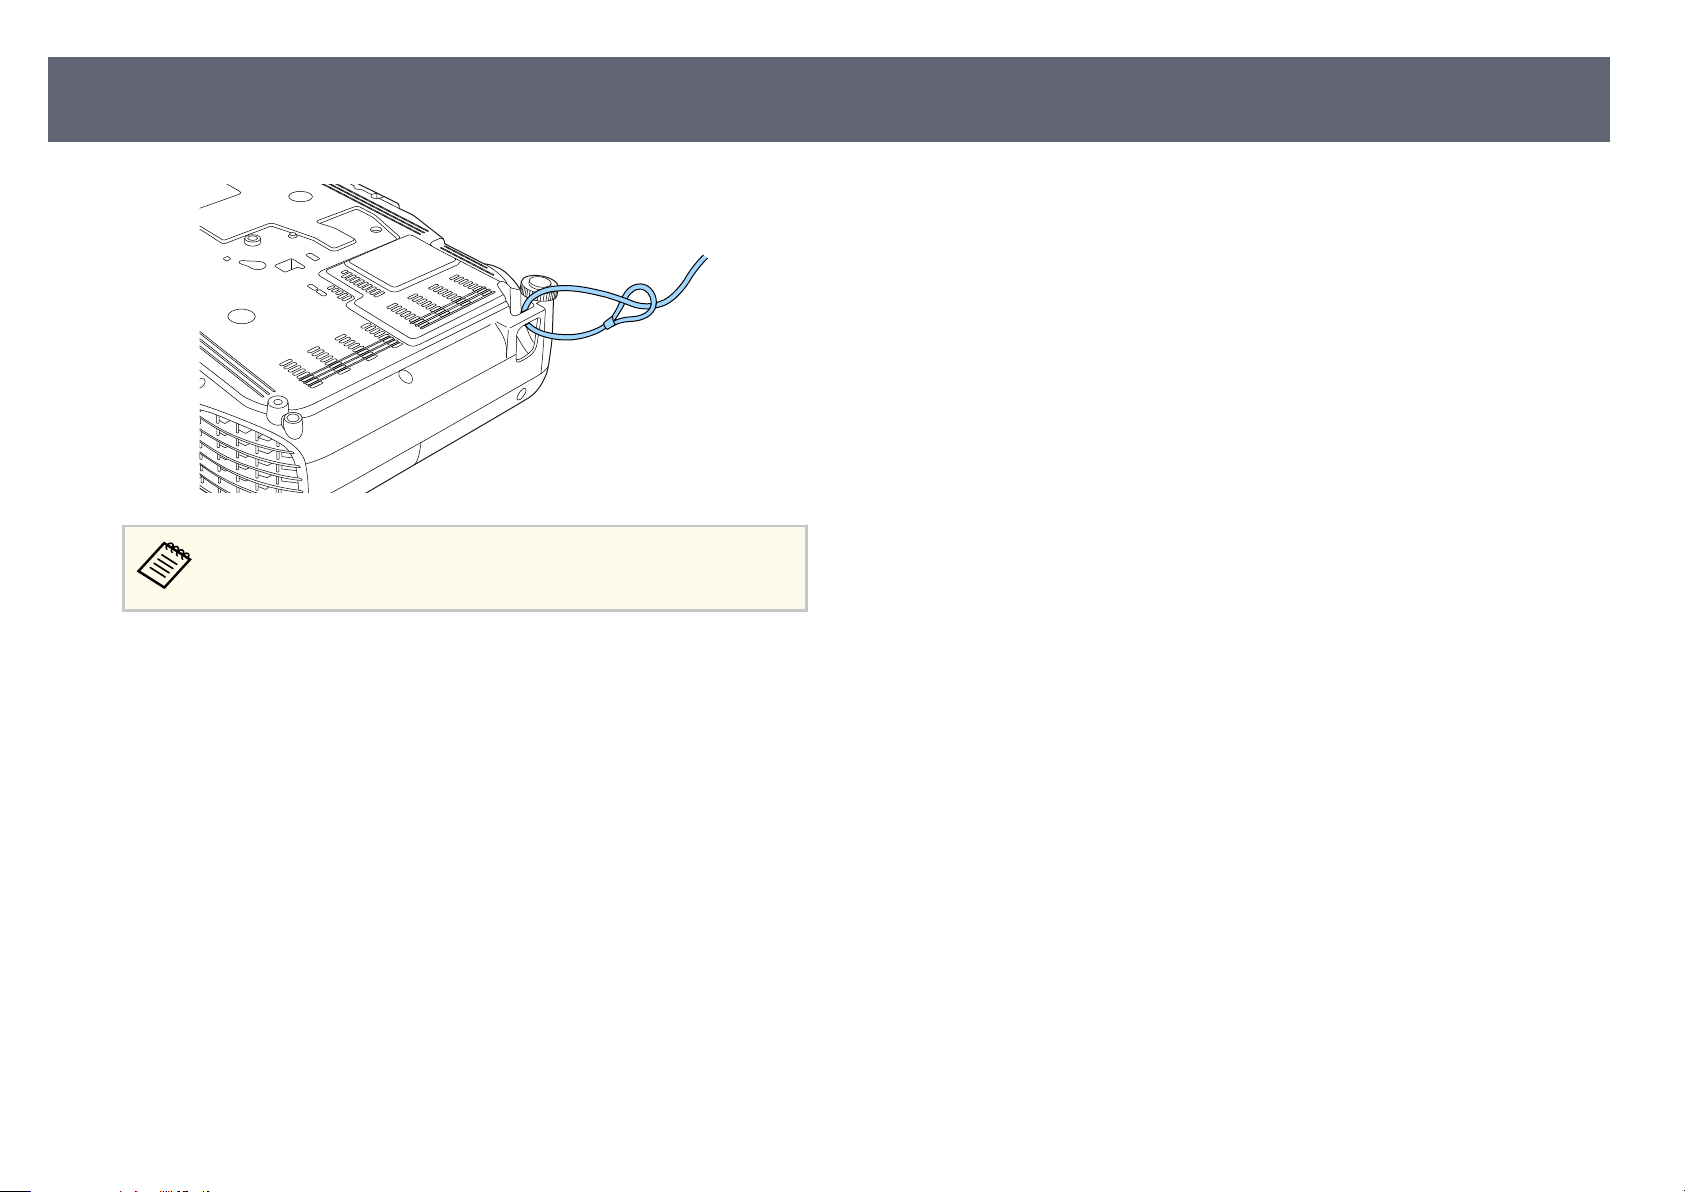
Projector Security Features
82
You can use a commercially available t
the documentation supplied with the wire lock for locking instructions.
e-prevention wire lock. See
h
Page 83

Using the Projector on a Network
llow the instructions in these sections to set up your projector for use on a network.
Fo
Related Links
g
•
"Wireless Network Projection" p.84
Page 84
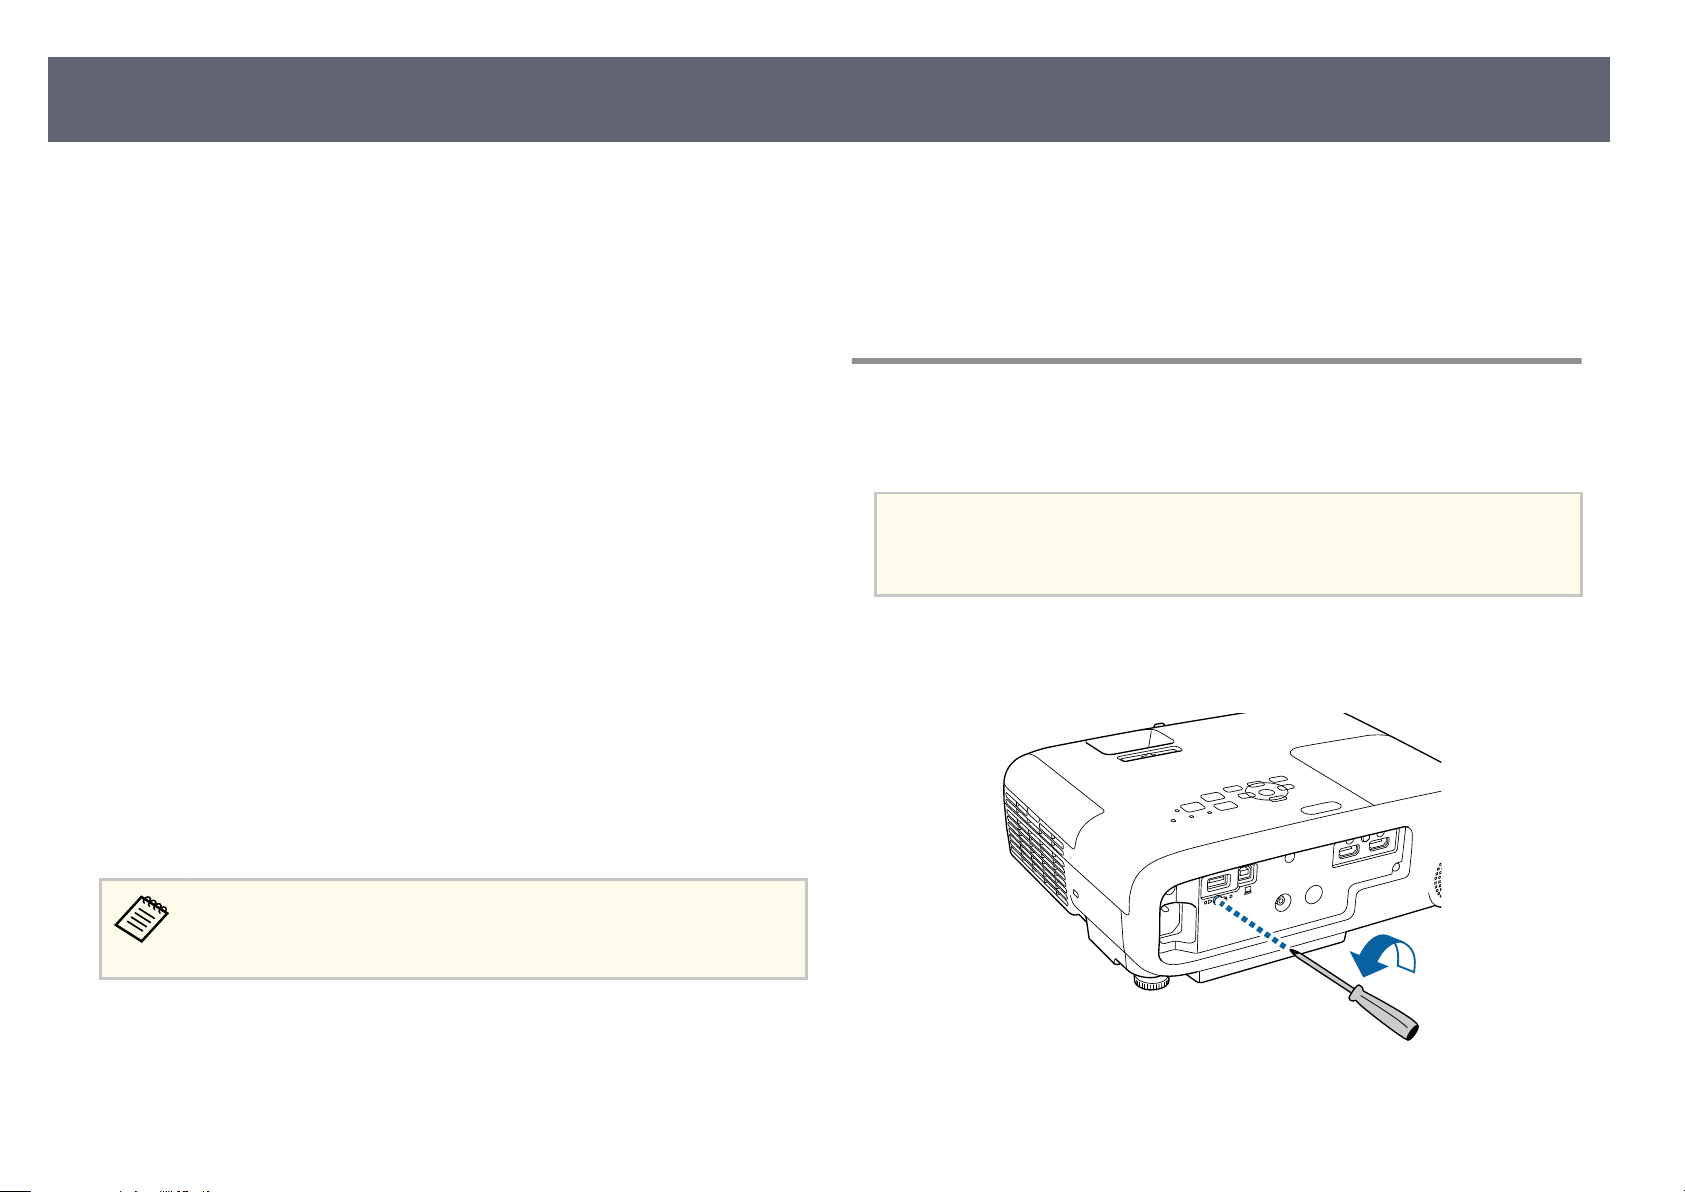
Wireless Network Projection
You can send images to your projector through a wireless network.
•
To do t
then set up your projector and computer for wireless projection.
•
Some models have built-in wireless LAN modules. You don't need to install
the Epson 802.11b/g/n wireless LAN module.
You can connect the projector to your wireless network by conguring the
connection manually using the projector's Network menus.
Aer installing the wireless LAN module and setting up the projector, download
and install the necessary network soware. Use the following soware and
documentation to set up and control wireless projection.
•
Epson iProjection (Windows/Mac) soware allows you to hold interactive
meetings by projecting the computer screens of users over a network. See the
Epson iProjection Operation Guide (Windows/Mac) for instructions.
•
Epson iProjection (iOS/Android) app allows you to project from iOS or
Android devices.
You can download Epson iProjection from the App Store or Google Play. Any
fees incurred when communicating with the App Store or Google Play are the
responsibility of the customer.
•
Epson iProjection (Chromebook) app allows you to project from
Chromebook devices.
You can download Epson iProjection from the Chrome Web Store. Any
fees incurred when communicating with the Chrome Web Store are the
responsibility of the customer.
his, you must install the Epson 802.11b/g/n wireless LAN module, and
•
e
lecting Wireless Network Settings in Mac" p.88
"S
•
"Setting Up Wireless Network Security" p.88
•
"Using a QR Code to Connect a Mobile Device" p.89
•
"Using a USB Key to Connect a Windows Computer" p.89
•
"List of Functions" p.9
Installing the Wireless LAN Module
To use the projector over a wireless network, install the Epson 802.11b/g/n
wir
eless LAN module. Do not install any other type of wireless LAN module.
Attention
ver remove the module while its indicator is blue or ashing, or while you are
Ne
projecting wirelessly. is could damage the module or lose data.
Use a cross-head screwdriver to remove the screw that secures the wireless
a
LAN m
odule cover.
84
If the W
s
on-screen instructions to set the password.
Related Links
g
•
"In
stalling the Wireless LAN Module" p.84
•
"Selecting Wireless Network Settings Manually" p.85
•
"Selecting Wireless Network Settings in Windows" p.87
eb Control Password has not been set, a screen prompting you to
et a password is displayed when you save the network settings. Follow the
Page 85
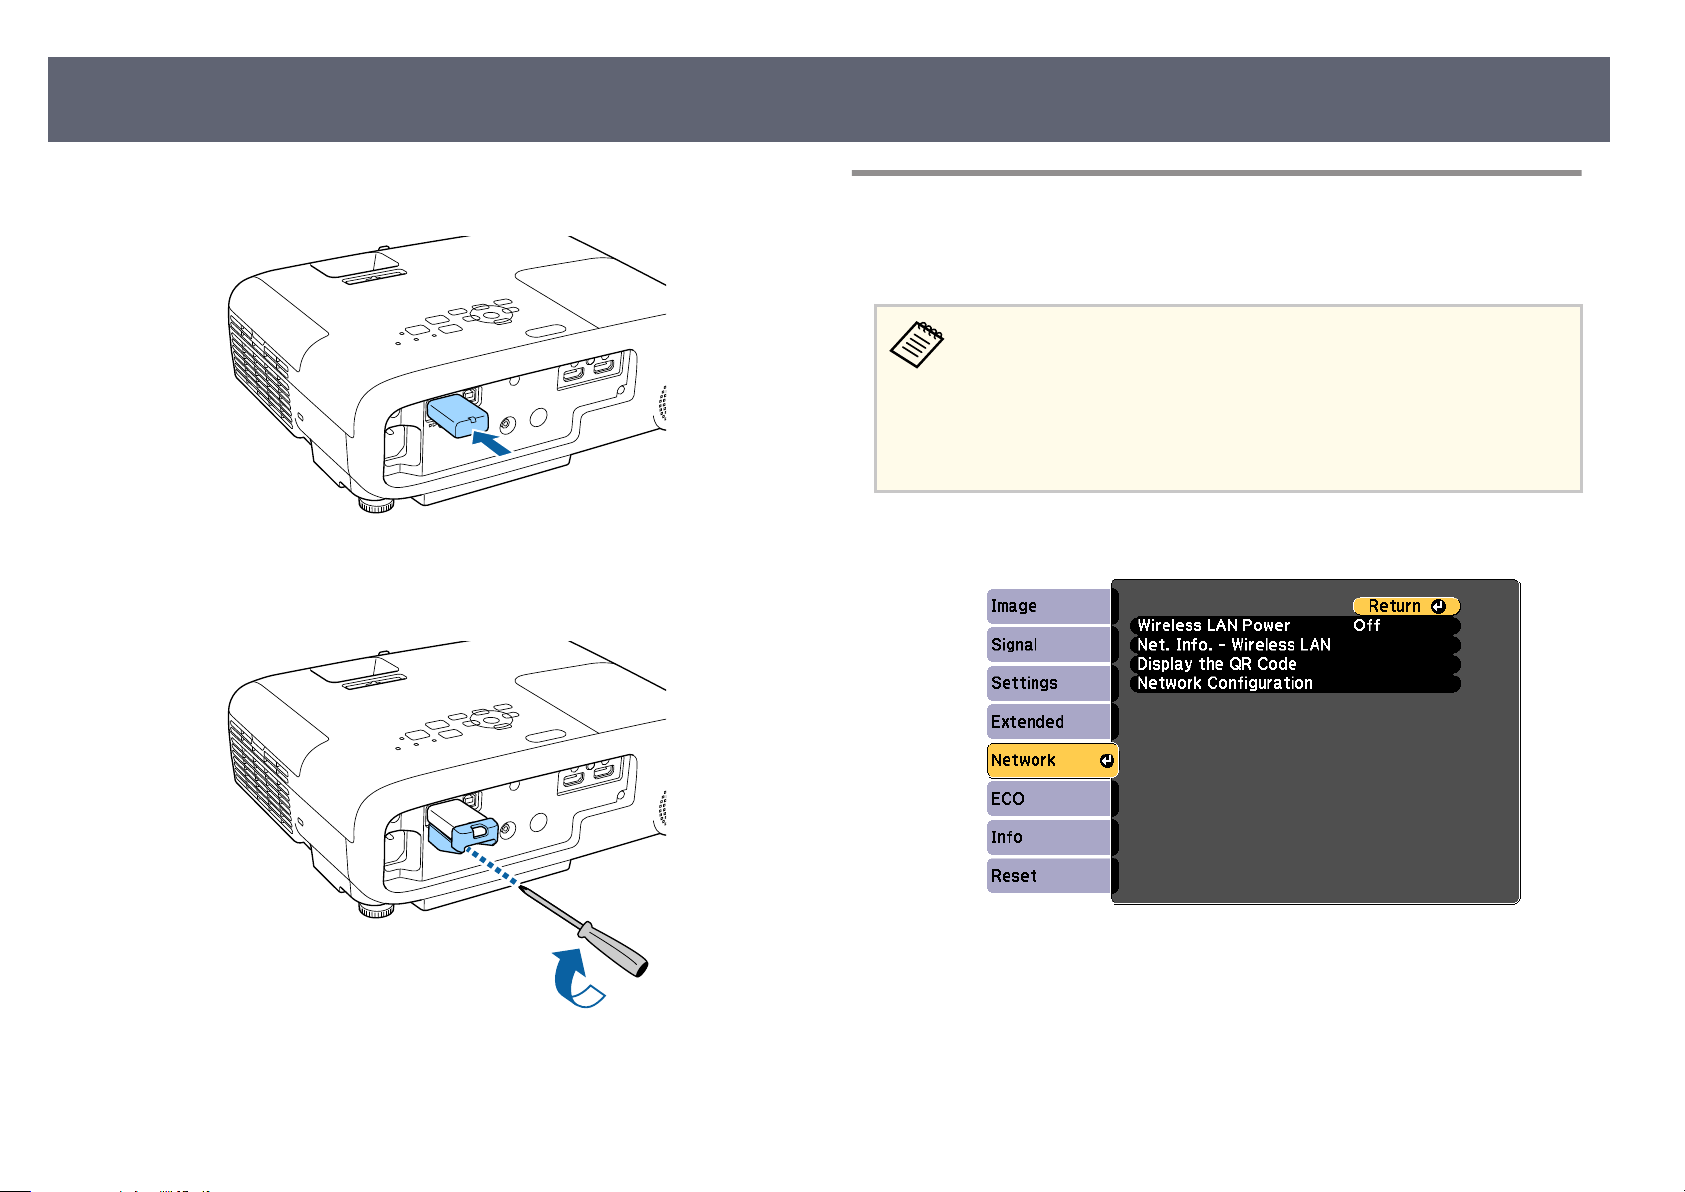
Wireless Network Projection
85
Connect the wireless LAN module to the USB-A port.
b
Attach the wireless LAN module cover, and secure it in place with the
c
screw.
Selecting Wireless Network Settings Manually
Before you can project from your wireless network, you need to select network
set
tings for the projector.
You can use the wireless LAN even when the projector is o.
follow the steps below to congure the wireless LAN, and then set A/V
Output to Always On in A/V Settings from the Extended menu or set
Standby mode to Communication On from the ECO menu.
s Extended > A/V Settings > A/V Output
s ECO > Standby Mode
Press the [Menu] button, select the Ne
a
twork menu, and press [Enter].
To do so,
Related Links
g
•
st of Functions" p.9
"Li
Select On as th
b
Select Network Conguration and press [Enter].
c
e Wireless LAN Power setting.
Page 86
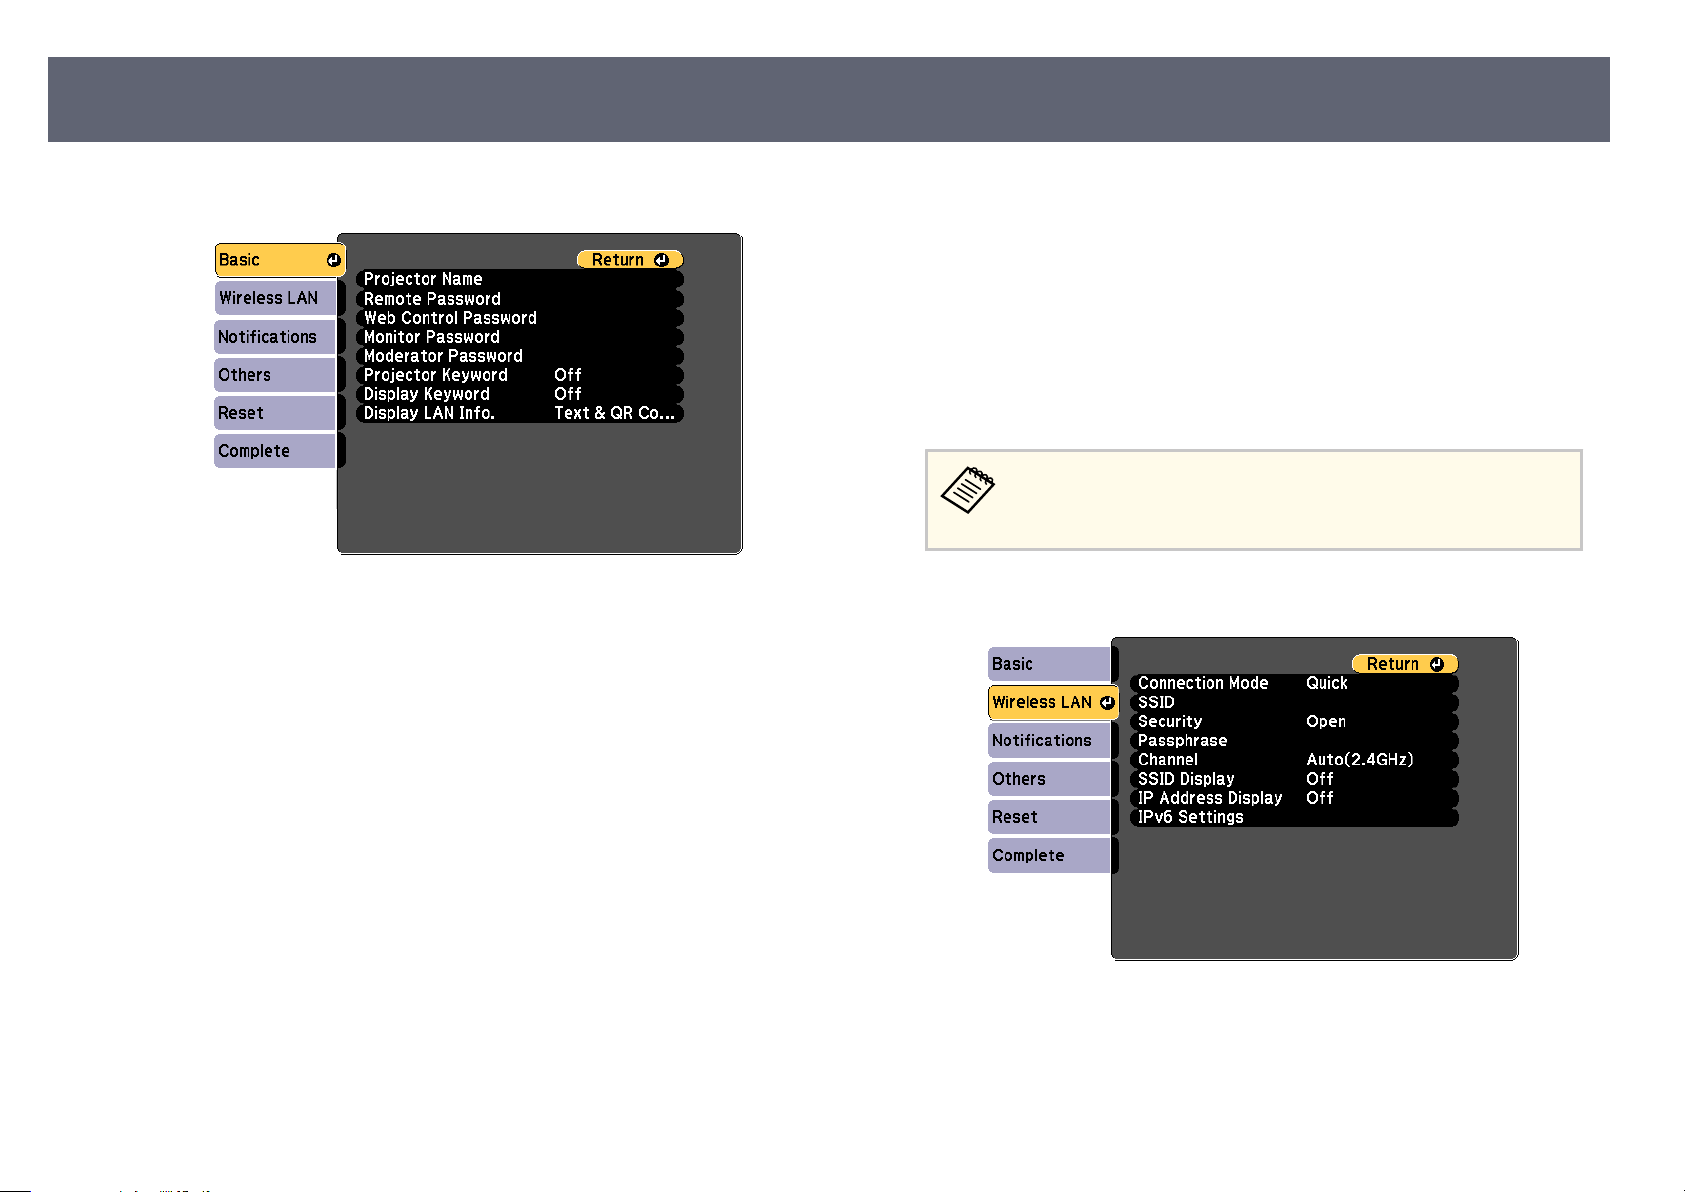
Wireless Network Projection
Select the Basic menu and press [Enter].
d
•
P
ojector Keyword lets you turn on a security password to prevent
r
access to the projector by anyone not in the room with it. You must
enter a displayed, randomized keyword from a computer using Epson
iProjection to access the projector and share the current screen.
•
Display Keyword lets you select whether to display a projector keyword
on the projected image when accessing the projector using Epson
iProjection.
•
Display LAN Info. lets you set the display format for the projector's
network information.
Use the displayed keyboard to enter numbers and characters. Press
th
e arrow buttons on the remote control to highlight characters and
press [Enter] to select them.
86
Select the basic options as necessary.
e
•
Pr
ojector Name lets you enter a name up to 16 alphanumeric
characters long to identify the projector over the network.
•
Remote Password lets you enter a password between 8 and 32
alphanumeric characters long for accessing the projector using Basic
Control. (e user name is EPSONREMOTE. No password is set by
default.)
•
Web Control Password lets you enter a password between 8 and 32
alphanumeric characters long for accessing the projector over the Web.
(e user name is EPSONWEB. No password is set by default.)
•
Monitor Password lets you enter a password up to 16 alphanumeric
characters long when using Epson Projector Management Ver.5.30
or earlier, or when monitoring the projector in combination with a
switcher or controller. (No password is set by default.)
•
Moderator Password lets you enter a four-digit number password for
accessing the projector as a moderator using Epson iProjection. (No
password is set by default.)
f
g
Select the W
Select the C
•
uick lets you connect to multiple smartphones, tablets, or computers
Q
directly using wireless communication.
ireless LAN menu and press [Enter].
onnection Mode setting.
Page 87
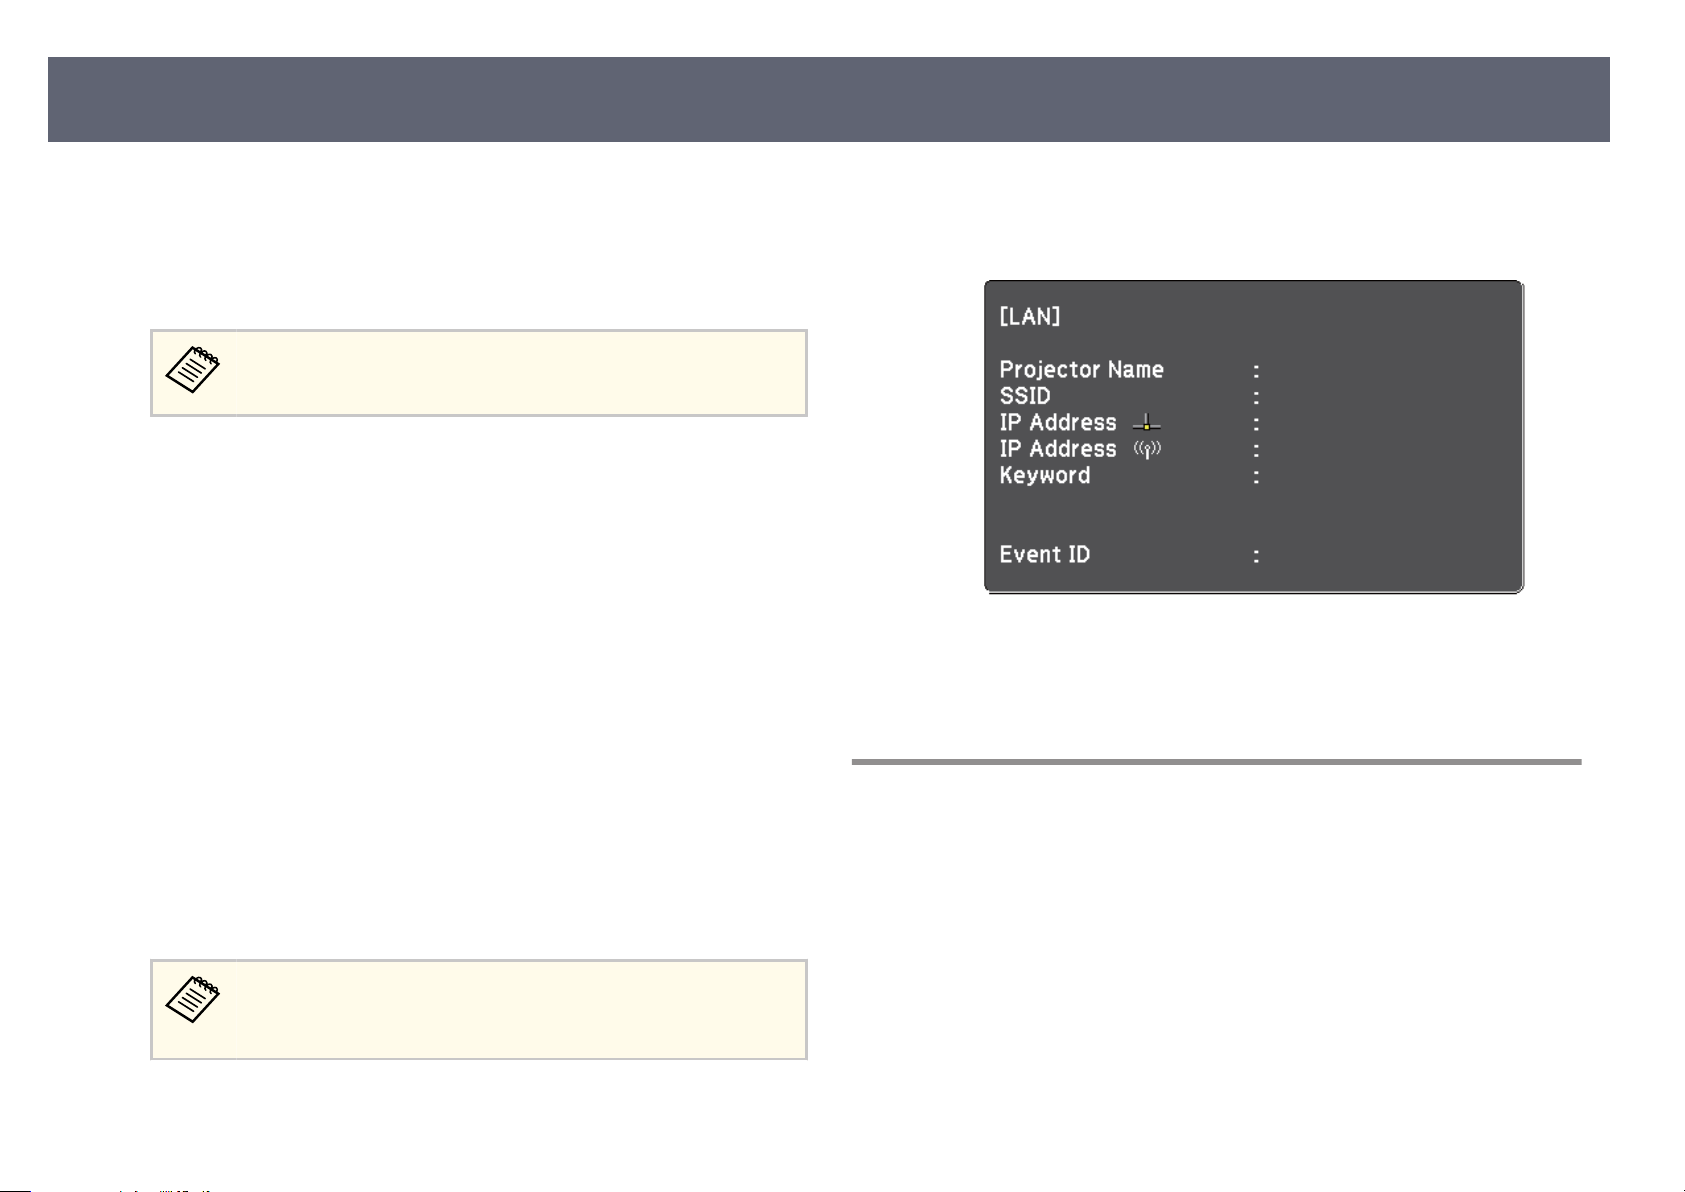
Wireless Network Projection
87
•
Advanc
wireless network access point.
If you selected the Advanc
h
Point to select the access point you want to connect to.
For the Advanced connection mode, assign the IP settings for your
i
n
etwork as necessary.
•
If your network assigns addresses automatically, select IP Settings to set
the DHCP setting to On.
•
If you must set addresses manually, select IP Settings to set the DHCP
setting to O, and then enter the projector's IP Address, Subnet Mask,
and Gateway Address as necessary.
•
If you want to connect the projector to the network using IPv6, select
IPv6 Settings to set the IPv6 setting to On, and then set the Auto
Conguration and Use Temporary Address settings as necessary.
ed lets you connect to smartphones, tablets, or computers over a
ed connection mode, select Search Access
If you need to assign the SSID manually, select SSID
SSID.
to enter the
Press the [LAN] button on the remote control.
l
e wireless network settings are complete when you see the correct IP
address on the LAN standby screen.
When you have nished making wireless settings for your projector, you need to
select the wireless network on your computer. en start the network soware
to send images to your projector through a wireless network.
To prevent the SSID or IP address from being displayed on the LAN
j
s
andby screen and Home screen, set the SSID Display setting or the IP
t
Address Display setting to O.
When you nis
k
screen instructions to save your settings and exit the menus.
h selecting settings, select Complete and follow the on-
If no Web Control Password has been set, a screen prompting
you to set a password is displayed before you can save the settings.
Follow the on-screen instructions to set the password.
Selecting Wireless Network Settings in Windows
Before connecting to the projector, select the correct wireless network on your
puter.
com
To access your wireless utility so
a
Windows taskbar.
When connecting in Advanced connection mode, select the network
b
n
e (SSID) of the network the projector is connecting to.
am
Click Connect.
c
ware, click the network icon on the
Page 88
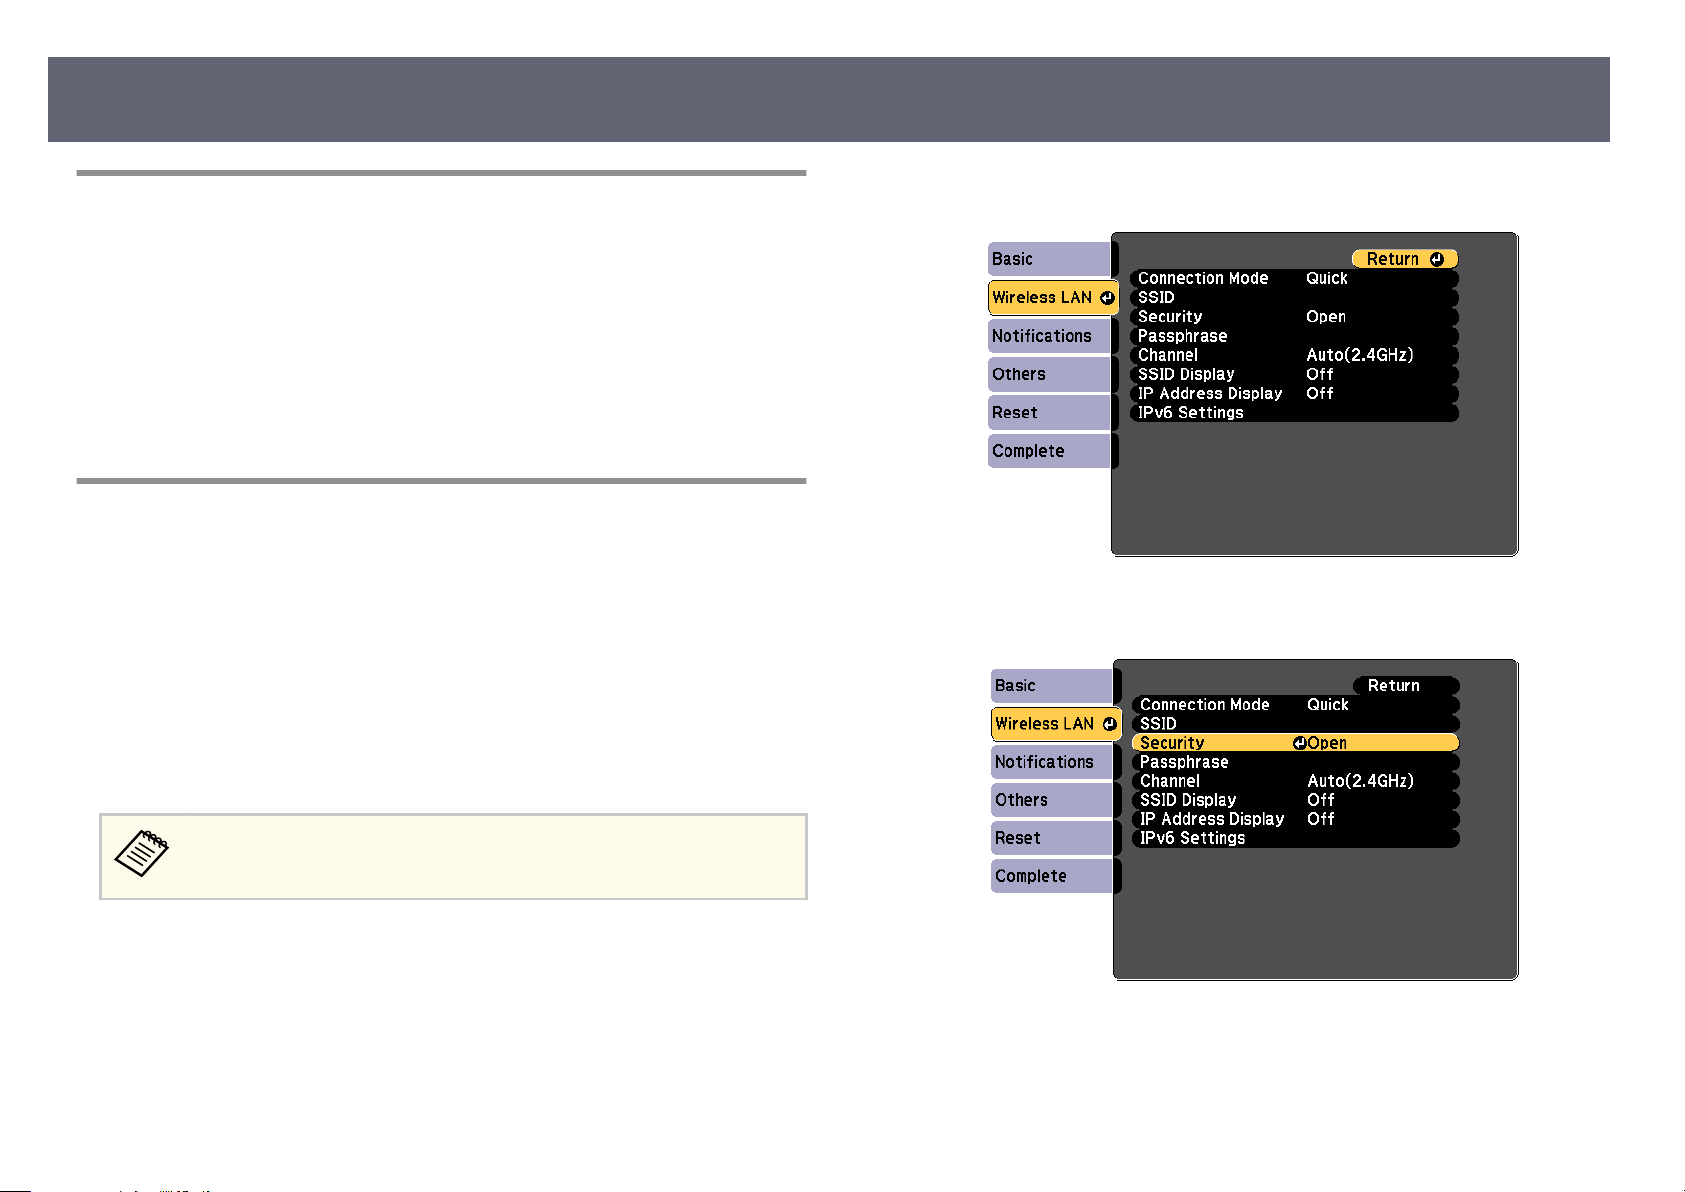
Wireless Network Projection
Selecting Wireless Network Settings in Mac
Before connecting to the projector, select the correct wireless network in Mac.
Click the Wi-Fi icon on the menu bar at the top of the screen.
a
When connecting in Advanced connection mode, make sure Wi-Fi is
b
t
urned on and select the network name (SSID) of the network the
projector is connecting to.
Setting Up Wireless Network Security
You can set up security for your projector to use on a wireless network. Set
up o
ne of the following security options to match the settings used on your
network:
•
WPA2-PSK security *
•
WPA3-PSK security **
•
WPA2/WPA3-PSK security **
* Available only for the Quick connection mode.
** Available only for the Advanced connection mode.
S
c
d
elect the Wireless LAN menu and press [Enter].
Select the Security setting and press [Enter].
88
Contact your network administrator for guidance on entering the correct
information.
Press the [Menu] button, select the N
a
Select Network Conguration and press [Enter].
b
twork menu, and press [Enter].
e
Select the security settings to match your network settings.
e
Page 89
Wireless Network Projection
89
Select Passphrase, press [Enter], and enter a passphrase from 8 to 63
f
characters long. To enter more than 32 characters, use your Web browser.
When you have nis
g
on-screen instructions to save your settings and exit the menus.
Related Links
g
•
"Network Menu - Wireless LAN Menu" p.116
hed making settings, select Complete and follow the
Using a QR Code to Connect a Mobile Device
Aer selecting the wireless network settings for your projector, you can display
R code on the screen and use it to connect a mobile device using the Epson
a Q
iProjection (iOS/Android) app.
•
M
e sure you have installed the latest version of Epson iProjection on
ak
your device.
•
You can download Epson iProjection for free from the App Store or
Google Play. Any fees incurred when communicating with the App
Store or Google Play are the responsibility of the customer.
•
When using Epson iProjection in Quick connection mode, we
recommend making security settings.
•
If y
ou do not see the QR code, set the Display LAN Info. setting
to Text & QR Code in the projector's Network menu.
s Network > Network Conguration > Basic > Display LAN
Info.
•
To hide the QR code, press [Esc].
•
When the QR code is hidden, press [Enter] to display the code.
Start Epson iProjection on your mobile device.
b
Read the projected QR code using Epson iProjection to connect it to the
c
p
ojector.
r
To correctly read the QR code, make sure you face the screen
q
uarely and closely enough so that the projected code ts into the
s
guide of the mobile device's QR code reader. If you are too far from
the screen, the code may not be read.
When a connection is established, select Contents menu from , and
then select the le you want to project.
Using a USB Key to Connect a Windows Computer
Press the [LAN] button on the remote control.
a
e Q
de is displayed on the projected surface.
R co
You can set up your USB as
projector to a wireless LAN supported Windows computer. Aer creating the
USB key, you can quickly project images from the network projector.
Set up the USB key using Epson iProjection (Windows) so
a
See the E
in
structions.
drive as a USB key to quickly connect the
h
ware.
pson iProjection Operation Guide (Windows/Mac) for
Page 90
Wireless Network Projection
90
Make sure the wireless LAN module is installed or built into your
b
projector.
Turn on the projector.
c
Press the [LAN] button on the remote control.
d
e L
are displayed.
Do one of the following to connect the USB key.
e
•
Co
built-in wireless LAN module.)
•
Remove the wireless LAN module from the projector and insert the
USB key into the same port used for the wireless LAN module. (Models
with the optional wireless LAN module installed.)
You see a projected message that the network information update is
complete.
Remove the USB key.
f
I
our projector needs the wireless LAN module, reinsert the wireless
f y
LAN module into the projector. (Models with the optional wireless LAN
module installed.)
tandby screen is displayed. Verify that an SSID and IP address
AN s
nnect the USB key to the projector's USB-A port. (Models with a
Aer a few minutes, your computer image is displayed by the projector.
hen you have nis
W
i
Hardware option in the Windows taskbar, and then remove the USB key
from your computer.
You may need to restart your computer to reactivate your wireless
LAN co
hed projecting wirelessly, select the Safely Remove
nnection.
Connect the USB key to a USB port on your computer.
g
Follow the on-screen instructions to install the necessary application.
h
•
If t
he Windows Firewall message is displayed, click Yes to disable
the rewall.
•
You need administrator authority to install the soware.
•
If it is not installed automatically, double-click MPPLaunch.exe
in the USB key.
Page 91

Monitoring and Controlling the Projector
llow the instructions in these sections to monitor and control the projector over a network.
Fo
Related Links
g
•
"Epson Projector Management Connected / Epson Projector Management" p.92
•
"Controlling a Networked Projector Using a Web Browser" p.93
•
"Setting Up Projector Network E-Mail Alerts" p.97
•
"Setting Up Monitoring Using SNMP" p.99
•
"Using ESC/VP21 Commands " p.100
•
"Web API" p.102
Page 92

Epson Projector Management Connected / Epson Projector Management
Epson Projector Management Connected and Epson Projector Management is
ware that lets you monitor and control the status of projectors connected to
so
your network.
Epson Projector Management Connected manages projector information on a
cloud server, enabling remote monitoring and control from any device.
Epson Projector Management is soware for Windows only that lets you
monitor and control projectors on the same network from a computer.
Choose the appropriate option based on your usage environment and needs. If
you use Epson Projector Management Connected, you need to install the Epson
Projector Connected Agent. For more details, visit the following website.
https://www.projection-service.epson.com/epm-connected/
e authentication method when registering projectors varies depending
o
n the version of the Epson Projector Management soware you are using.
•
Ver.5.30 or earlier: Monitor Password
•
Ver.5.40 or later: Web Control Password
For the best results, we recommend that you use the latest version of the
Epson Projector Management.
s Network > Network Conguration > Others
92
Page 93
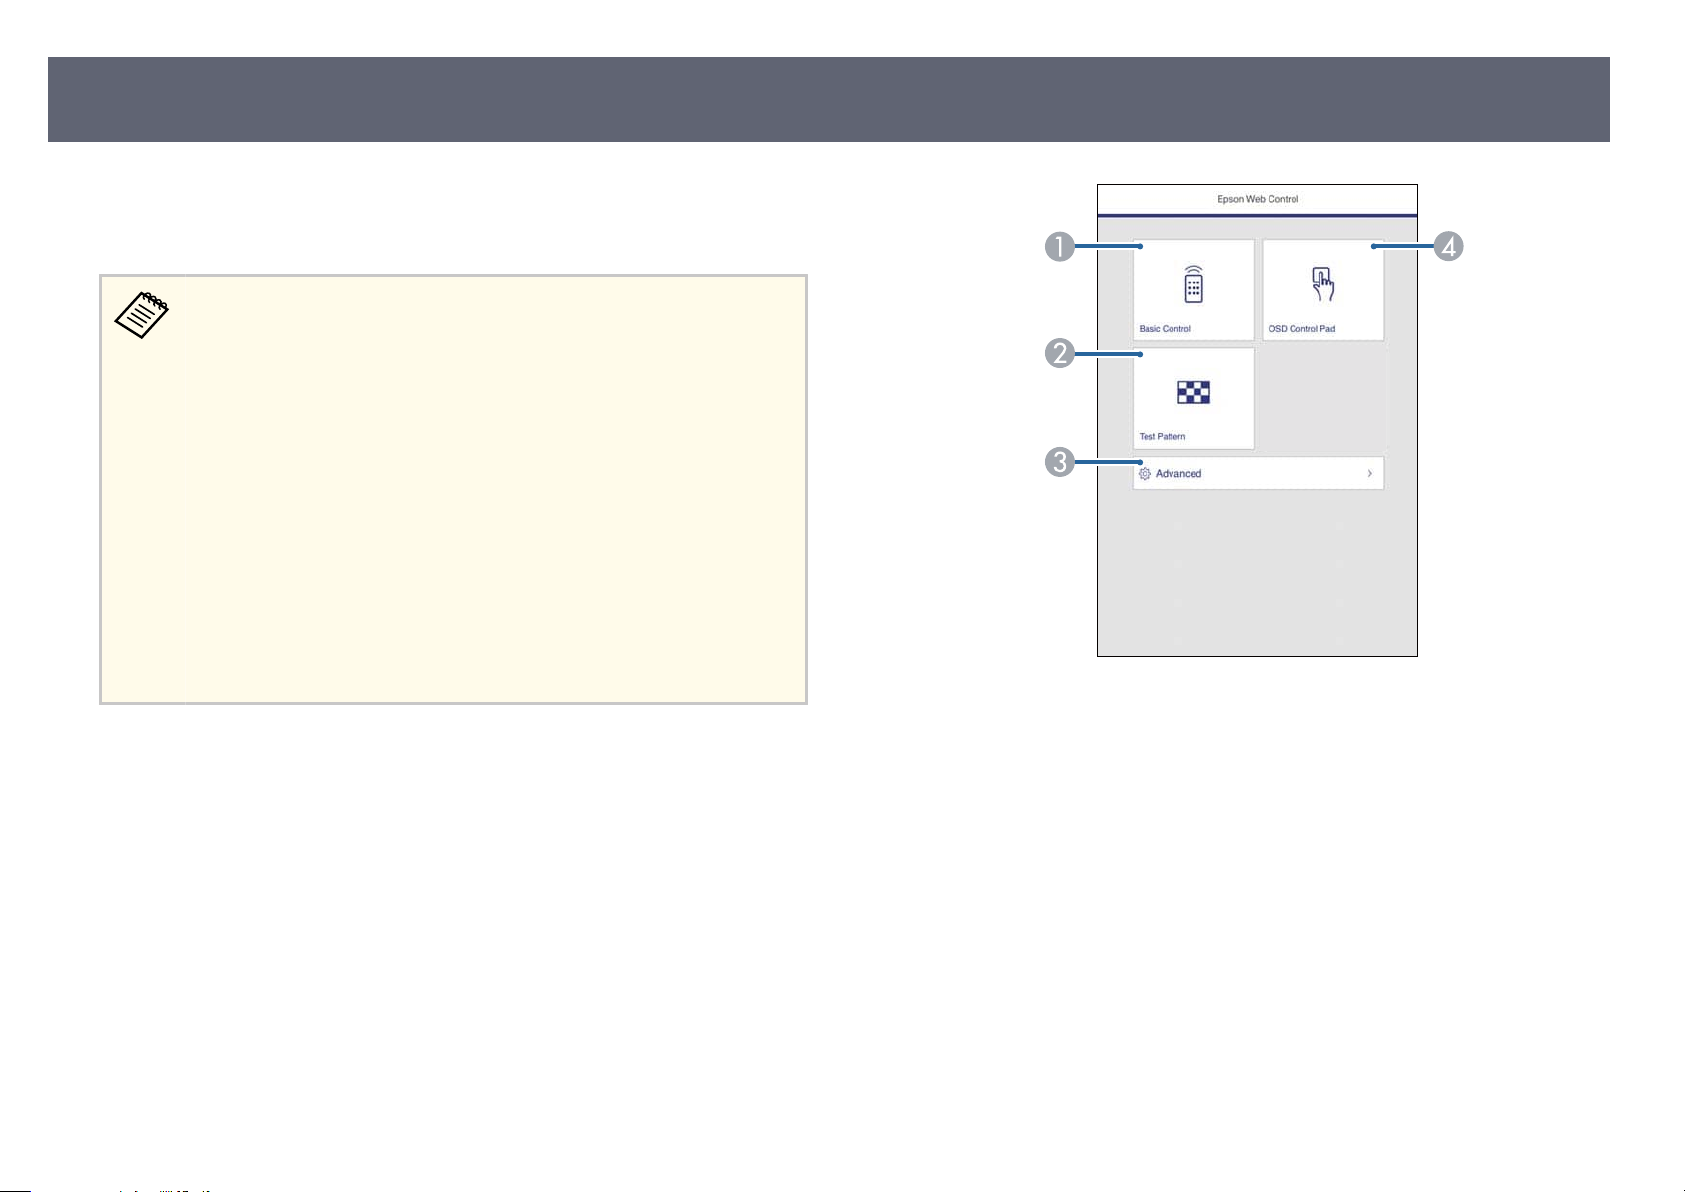
Controlling a Networked Projector Using a Web Browser
Once you have connected your projector to your network, you can select
ojector settings and control projection using a compatible Web browser. is
pr
lets you access the projector remotely.
•
Mak
e sure the computer and projector are connected to the network.
When projecting images using a wireless LAN, connect in Advanced
connection mode.
•
You can use the following Web browsers.
•
Microso Edge (Windows)
•
Safari (Mac, iOS)
•
Chrome (Android)
•
While using the Web browser, do not connect using a proxy server. You
cannot select all of the projector menu settings or control all projector
functions using a Web browser.
•
If you set Standby Mode to Communication On, you can use a Web
browser to select settings and control projection even if the projector is
in standby mode (when the power is o).
s ECO > Standby Mode
A
Make sure the projector is turned on.
a
Make sure your computer or device is connected to the same network as
b
t
e projector.
h
B
C
D
Controls the projector remotely.
Displays a test pattern.
Sets detailed projector settings.
Operates the projector's menu settings with your ng
93
er or mouse.
Start your Web browser on the computer or device.
c
Go to the Epson Web Control screen by entering the projector's IP address
d
in
o the browser's address box. When entering an IPv6 address, wrap the
t
address with [ and ].
You see the Epson Web Control screen.
Page 94
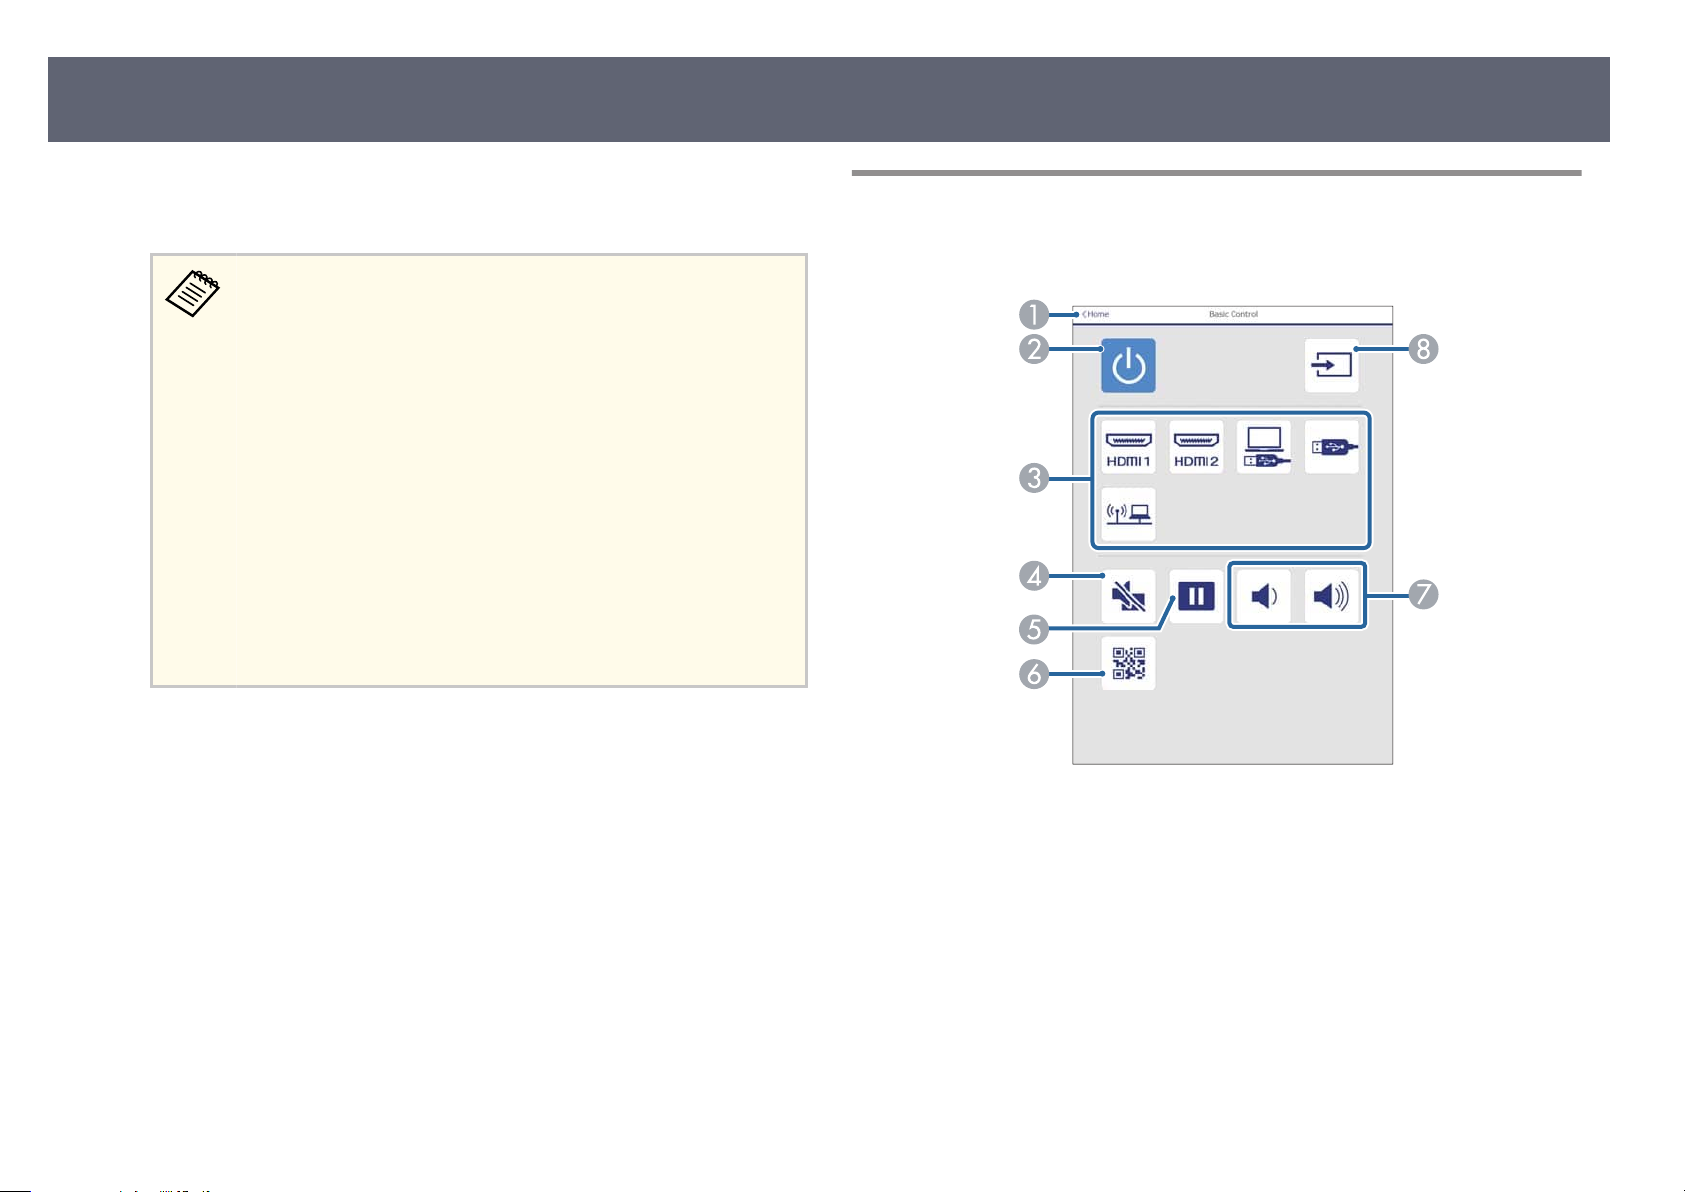
Controlling a Networked Projector Using a Web Browser
94
Select the option corresponding to the projector function you want to
e
control.
You may need to log in to access some of the options on the Eps
Web Control screen. Set the following passwords rst.
•
To access the Basic Control option, you need to log in using
EPSONREMOTE as the user name and your Remote Password.
(No password is set by default.)
Set Basic Control to On in the projector's Network menu, and
then set the password.
s Network > Network Conguration > Others > Basic
Control
•
To access other options and save settings, you need to log in
using EPSONWEB as the user name and your Web Control
Password. (No password is set by default.)
Set the password in the projector's Network menu.
s Network > Network Conguration > Basic > Web Control
Password
Related Links
g
•
"W
b Control Options" p.94
e
•
"Projector Setup Settings - ECO Menu" p.121
•
"Network Menu - Basic Menu" p.115
•
"List of Functions" p.9
on
Web Control Options
Basic Control
Returns to the Epson Web Control screen.
A
Turns the projector on or o.
B
Selects the input source.
C
Turns the video and audio on or o temporarily.
D
Pauses or resumes images.
E
Displays the QR code.
F
Adjusts the speaker volume.
G
Searches for sources.
H
Page 95
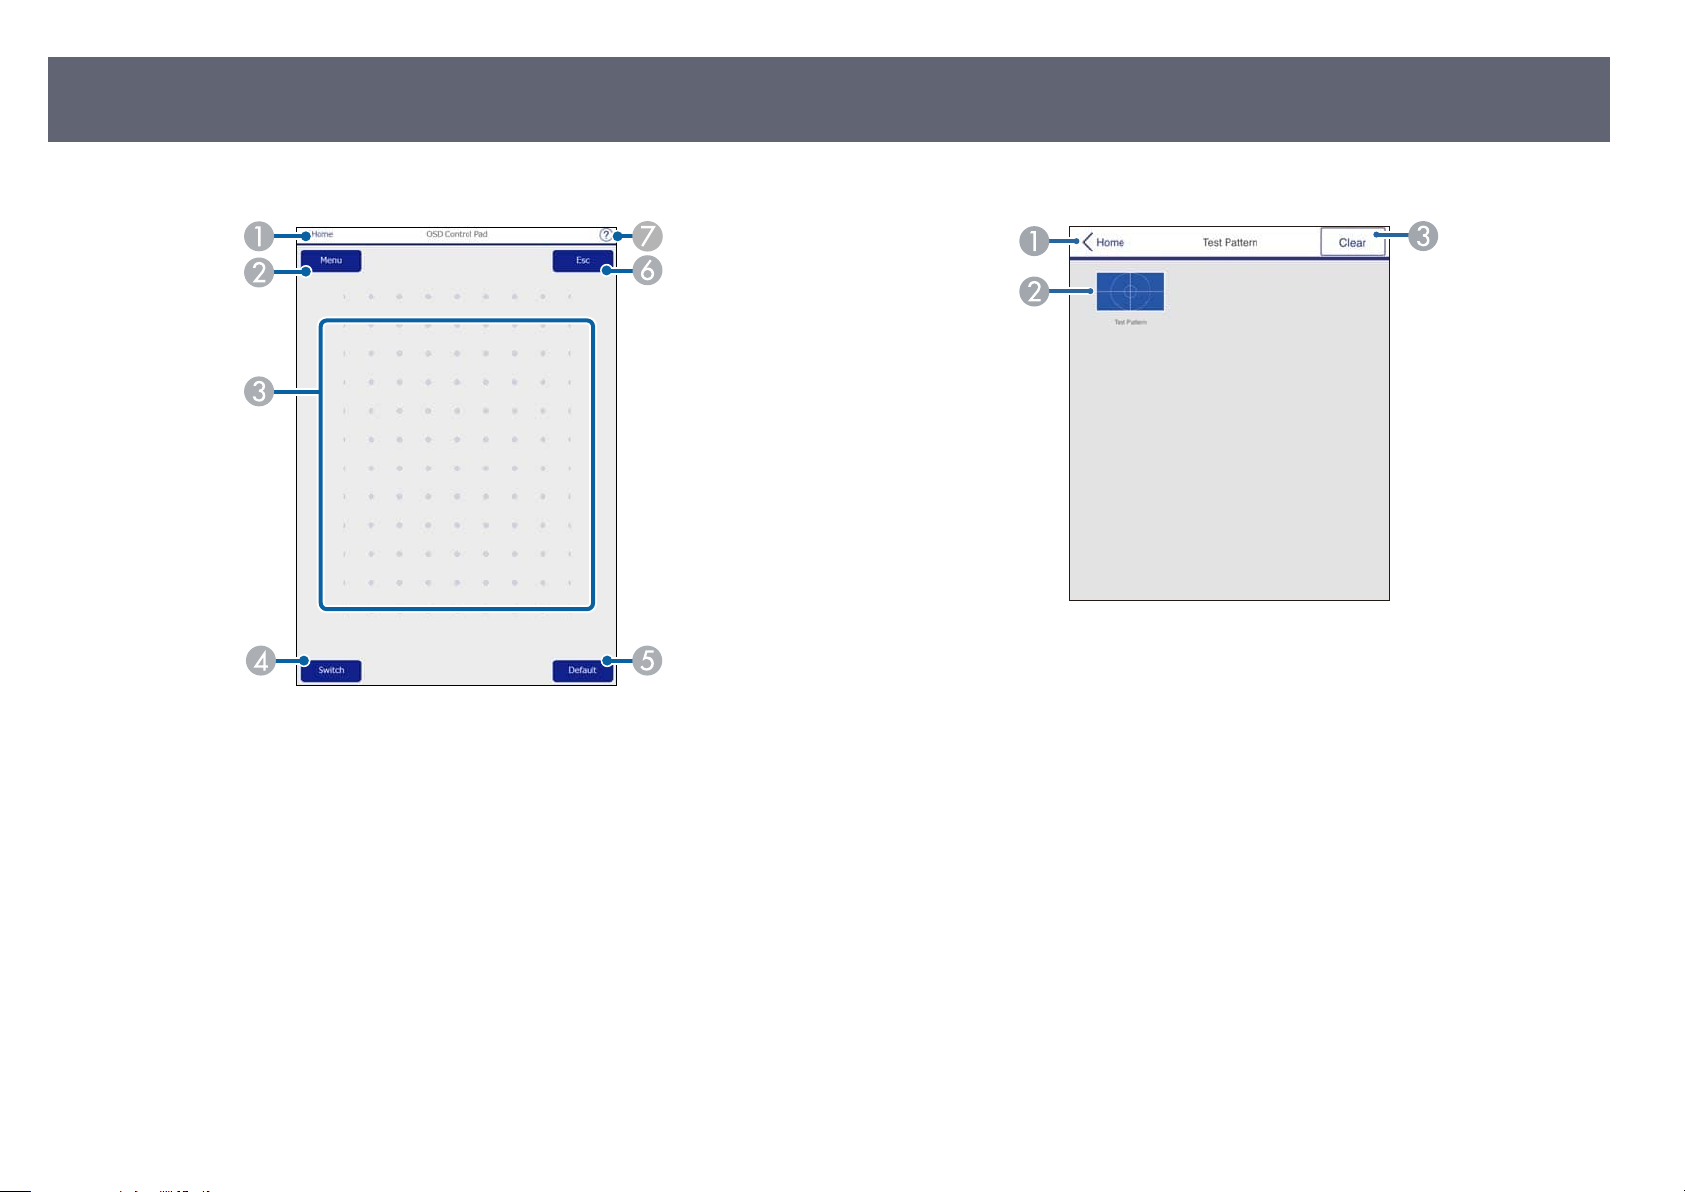
Controlling a Networked Projector Using a Web Browser
95
OSD Control Pad
Returns to the Epson Web Control screen.
A
Displays the projector's setting menus.
B
Use your nger or mouse to navigate the menus.
C
S
witches the operation method to button operation.
D
Resets the selected setting to its default value.
E
Returns to the previous menu.
F
Displays help topics.
G
Test Pattern
Returns to the Epson Web Control screen.
A
Displays available test patterns; select to project a test pattern.
B
Turns o test pattern display.
C
Page 96
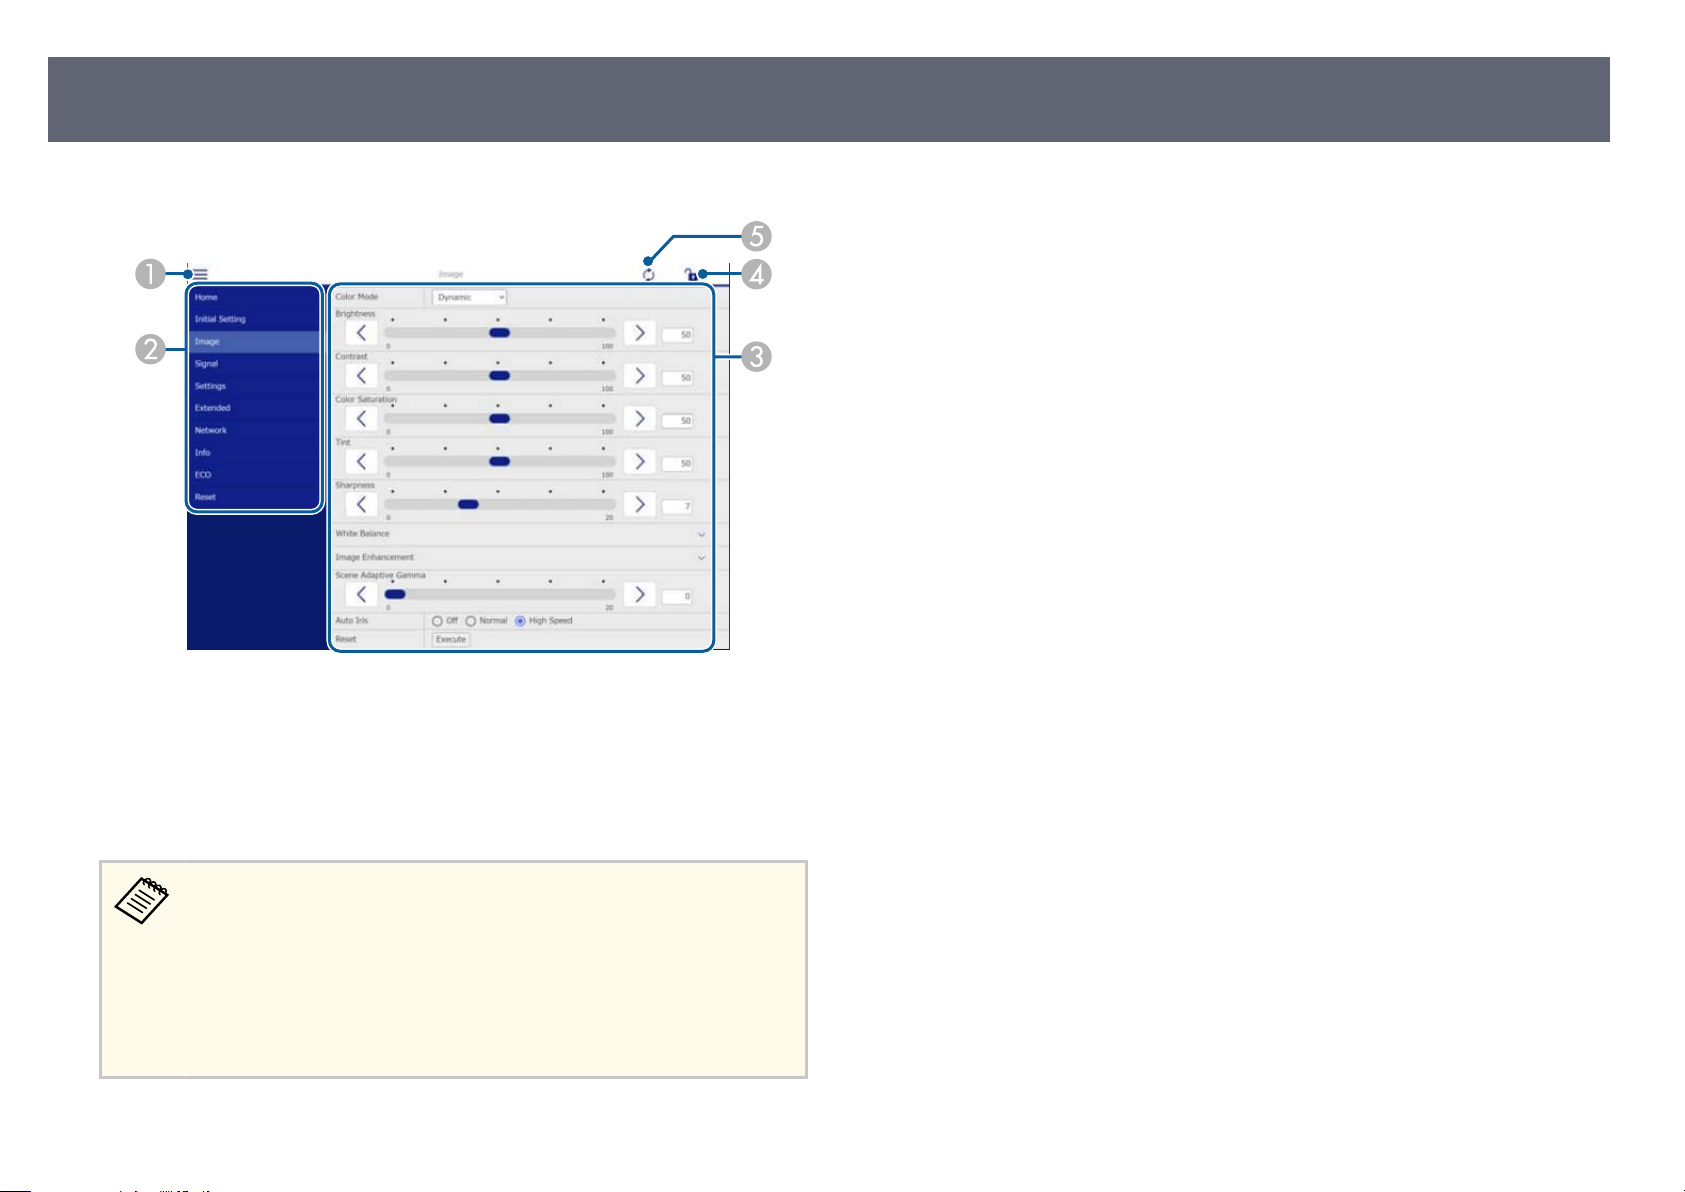
Controlling a Networked Projector Using a Web Browser
Related Links
Advanced
g
•
st of Functions" p.9
"Li
96
Opens the menus.
A
Displays the menu name you selected.
B
Species the projector settings.
C
L
ock/unlock the projector settings.
D
Updates the projector settings.
E
You cannot change the following settings using Epson Web Control.
•
Us
er Button
•
User's Logo
•
HDMI EQ Setting
•
Language
•
Reset Lamp Hours
Page 97
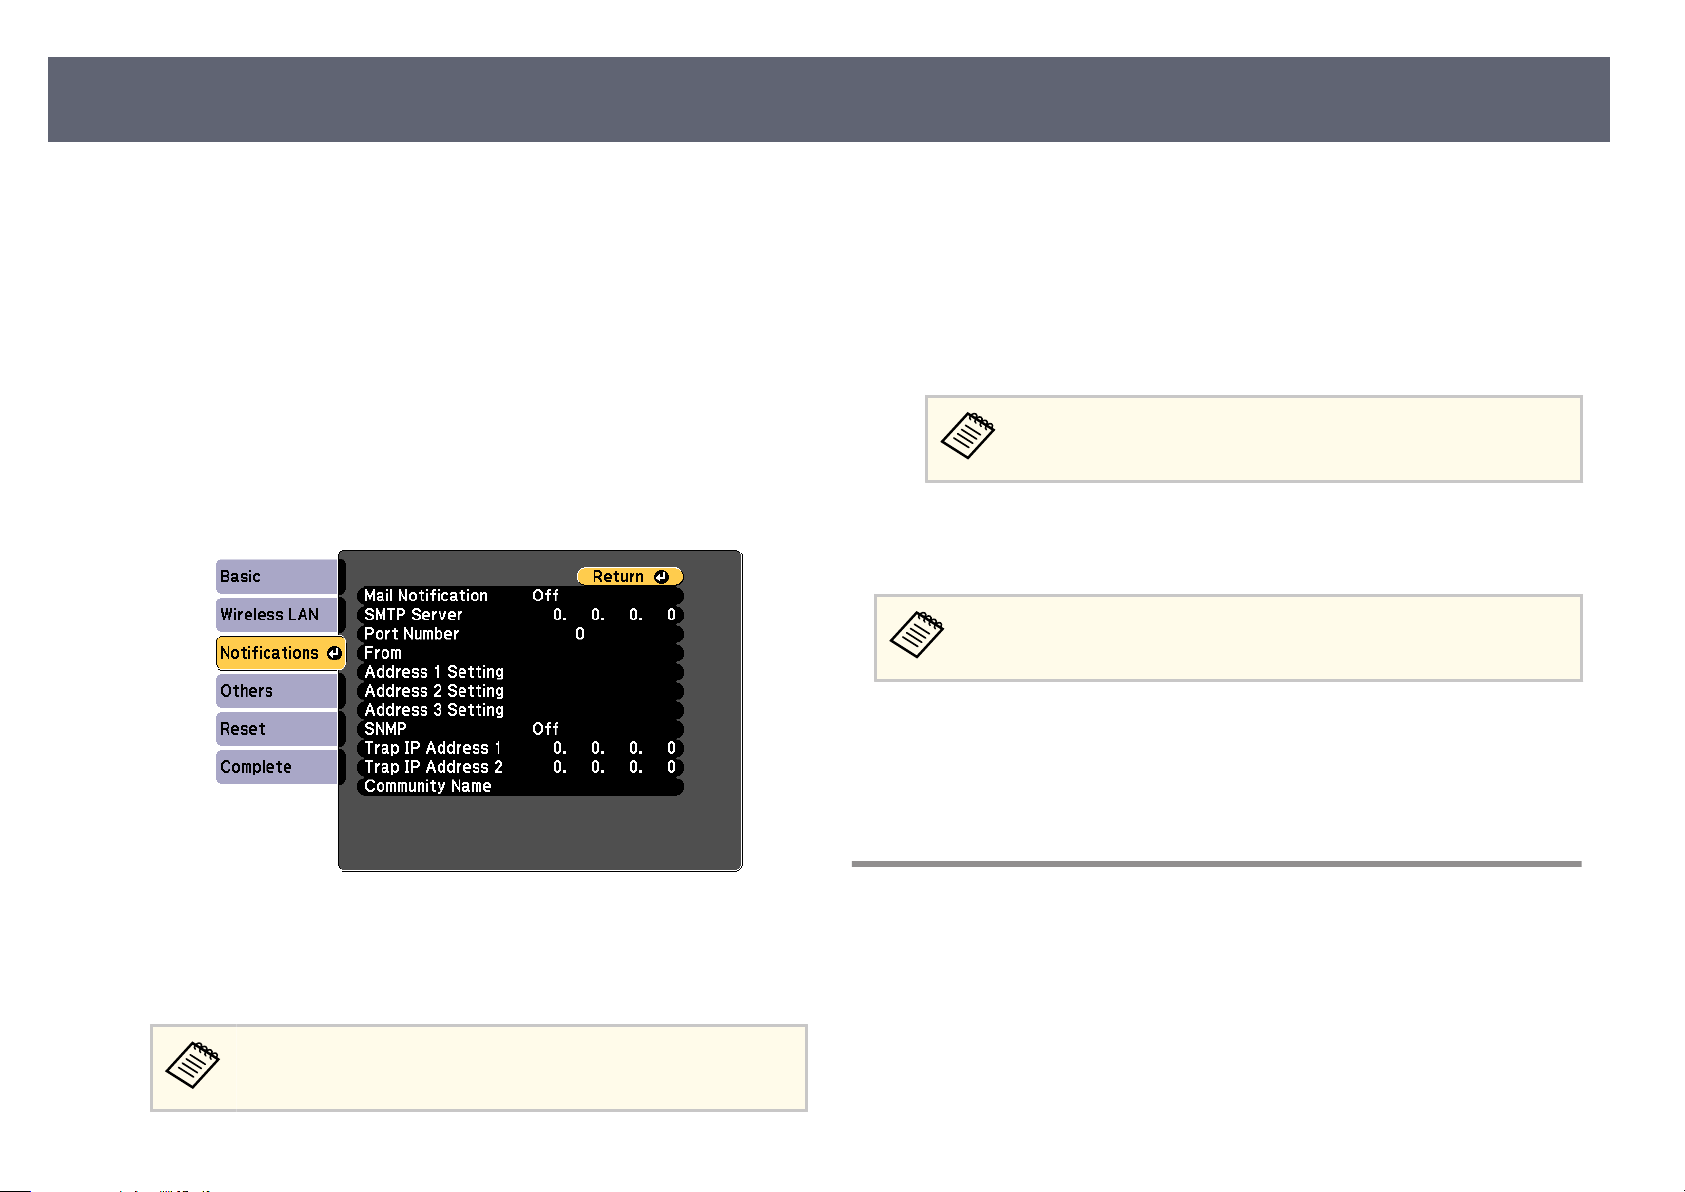
Setting Up Projector Network E-Mail Alerts
97
You can set up the projector to send you an e-mail alert over the network if
ere is a problem with the projector.
th
If you set the Standby Mode setting to Communication On, you can receive
the e-mail alerts even if the projector is in standby mode (when the power is
o).
s ECO > Standby Mode
Press the [Menu] button, select the Ne
a
Select Network Conguration and press [Enter].
b
S
c
elect the Notications menu and press [Enter].
twork menu, and press [Enter].
Select a number for the SMTP server Port Number, from 1 to 65535
f
(default is 25).
Enter the e-mail address to be indicated as the sender in Fr
g
Choose an address eld
h
want to receive. Repeat for up to three addresses.
Your e-mail address can be up to 64 alphanumeric characters long.
o en
ter more than 32 characters, use your Web browser.
T
When you nis
i
screen instructions to save your settings and exit the menus.
If a critical problem causes a projector to shut down, you may not receive
an e-mai
Related Links
g
•
"Network Projector E-mail Alert Messages" p.97
•
"Projector Setup Settings - ECO Menu" p.121
•
"List of Functions" p.9
h selecting settings, select Complete and follow the on-
l alert.
, enter the e-mail address, and select the alerts you
om.
Set the Mail Notication setting to On.
d
En
e
ter the IP address for the SMTP S
Do not use "127.x.x.x" (where x is a number from 0 to 255) for the
SMTP S
erver.
erver option.
Network Projector E-mail Alert Messages
When a problem occurs with a projector on the network, and you selected
to r
eceive e-mail alerts, you receive an e-mail containing the following
information:
•
e email address set in From as the mail sender
•
Epson Projector in the subject line
•
e name of the projector experiencing a problem
Page 98

Setting Up Projector Network E-Mail Alerts
98
•
e IP addres
•
Detailed information about the problem
s of the aected projector
Page 99
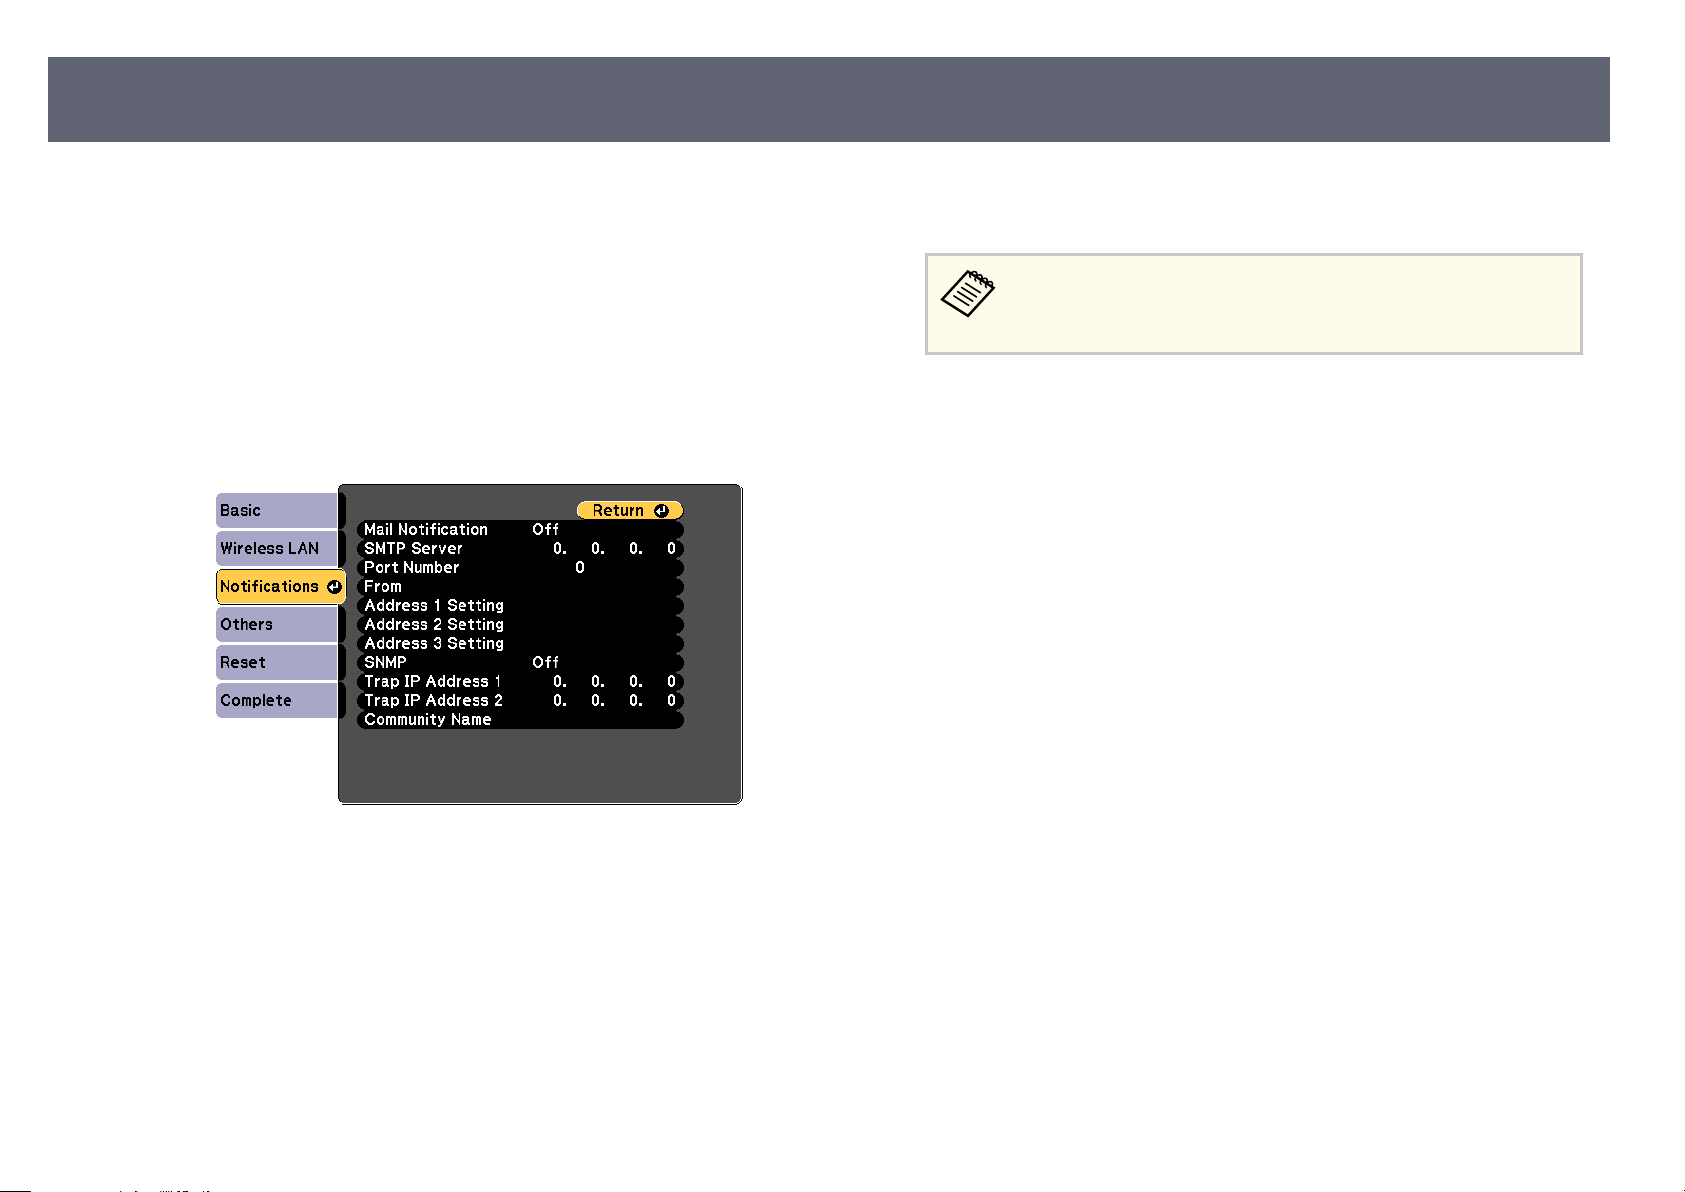
Setting Up Monitoring Using SNMP
99
Network administrators can install SNMP (Simple Network Management
otocol) soware on network computers so they can monitor projectors.
Pr
If your network uses this soware, you can set up the projector for SNMP
monitoring.
Press the [Menu] button, select the Ne
a
Select Network Conguration and press [Enter].
b
S
c
elect the Notications menu and press [Enter].
twork menu, and press [Enter].
Enter up to two IP addresses to receive SNMP n
f
for each address eld.
Do not use these addresses: 224.0.0.0 through 255.255.255.255
ere x is a number from 0 to 255). is projector supports SNMP
(wh
agent version 1 (SNMPv1).
When you ni
g
screen instructions to save your settings and exit the menus.
Related Links
g
•
"List of Functions" p.9
h selecting settings, select Complete and follow the on-
s
tications, using 0 to 255
o
Set the SNMP setting to On.
d
En
e
ter the SNMP C
long.
mmunity Name up to 32 alphanumeric characters
o
Page 100
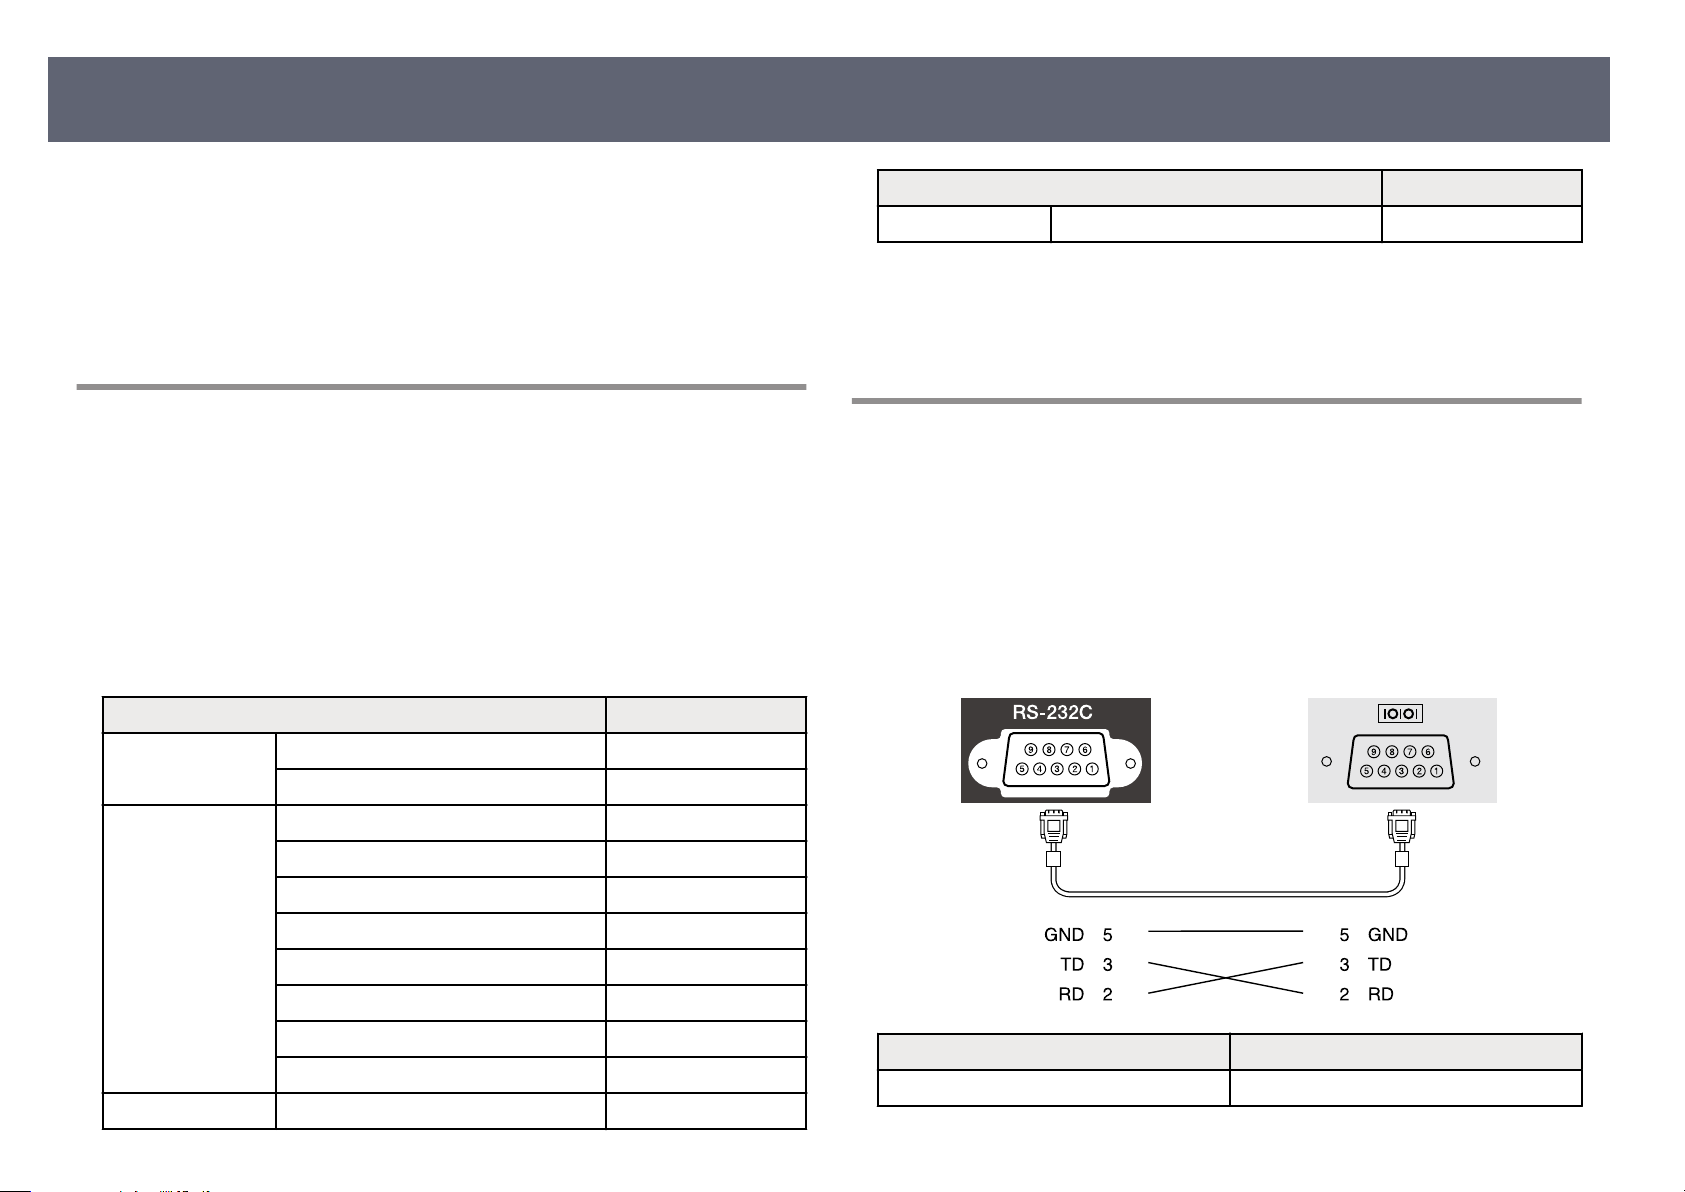
Using ESC/VP21 Commands
100
You can control the projector from an external device using ESC/VP21.
Related Links
g
•
"ESC/VP21 Co
•
"Cable Layouts" p.100
•
"List of Functions" p.9
mmand List" p.100
ESC/VP21 Command List
When the power ON command is transmitted to the projector, the power turns
on and it enters warm-up mode. When the projector's power has turned on, a
colon ":" (3Ah) is returned.
When a command is input, the projector executes the command and returns a
":", and then accepts the next command.
If the command being processed terminates abnormally, an error message is
output and a ":" is returned.
e following commands are available.
Item Command
Power On/O On PWR ON
Item Command
O MUTE OFF
Add a Carriage Return (CR) code (0Dh) to the end of each command and
transmit.
Contact Epson for more details.
Cable Layouts
Serial connection
•
Co
nnector shape: D-Sub 9-pin (male)
•
Projector input port name: RS-232C
•
Cable type: Crossover (null modem) cable
In the following illustration, the projector side is shown on the le, and the
computer side on the right:
O PWR OFF
Signal selection Computer1 SOURCE 10
Computer2 SOURCE 20
HDMI1 SOURCE 30
HDMI2 SOURCE A0
Video SOURCE 41
USB Display SOURCE 51
USB SOURCE 52
LAN SOURCE 53
A/V Mute On/O On MUTE ON
Signal name Function
GND Signal wire ground
 Loading...