

Page 1

EpsonNet 10/100 Base Tx Int. Print Server 5e
No part of this publication may be reproduced, stored in a retrieval system, or transmitted
in any form or by any means, mechanical, photocopying, recording, or otherwise, without
the prior written permission of Seiko Ep son Corporation. No patent liability is ass umed with
respect to the use of the information contained herein. Neither is any liability assumed for
damages resulting from the use of the information contained herein.
Neither Seiko Epson Corporation nor its affiliates shall be liable to the purchaser of this
product or third partie s for damages, losses, costs, or expenses incur red by purchaser or third
parties as a result of: accide nt, misuse, or abuse of this product or unauthorize d modifications,
repairs, or alterations to this product, or (excluding the U.S.) failure to strictly comply with
Seiko Epson Corporation’s operating and maintenance instructions.
Seiko Epson Corporation shall not be liable for any damages or problems arising from the
use of any options or any consumable products other than th ose designated as Original Epson
Products or Epson Approved Products by Seiko Epson Corporation.
EPSON Scan is based in part on the work of the Independent JPEG Group.
EpsonNet Easy Instal l and Epson Net Config incorporate compress ion code from the Info-ZIP
group. There are no extra charges or costs due to the use of this code, and the original
compression sources are freely available from http://www.info-zip.org on the Internet.
®
EPSON
AcuLaser™, and EPSON ESC/P 2™ are trademarks of Seiko Epson Corporation.
Speedo™, Fontware™, FaceLift™, Swiss™, and Dutch™ are trademarks of Bitstream Inc.
CG Times
Univers
and EPSON ESC/P® are registered trademarks and EPSON Stylus™, EPSON
®
and CG Omega® are registered trademarks of Miles, Inc.
®
is a registered trademark of Linotype AG and/or its subsidiaries.
Antique Olive™ is a trademark of Fonderie Olive.
Albertus™ is a trademark of Monotype Corporation plc.
Coronet™ is a trademark of Ludlow Industries (UK) Ltd.
®
and Times New Roman® are registered trademarks of Monotype Corporation plc.
Arial
Sun, Sun Microsystems, the Sun Logo, and the Java logo are trademarks or registered
trademarks of Sun Microsystems, Inc. in the United States and other countries.
®
HP
and HP LaserJet® are registered trademarks of Hewlett-Packard Company.
User’s Guide
NPD2392-00
Page 2

Microsoft®, Windows®, and Windows NT® are registered trademarks of Microsoft
Corporation.
®
Macintosh
Computer, inc.
Adobe™ and PostScript™ are trademarks of Adobe Systems Incorporated, which may be
registered in certain jurisdictions.
This product Includes software developed by the University of California, Berkeley, and Its
contributors.
General Notice: Other product names used herein are for identification purposes only and may be
trademarks of their respective owners. Epson disclaims any and all rights in those marks.
Copyright © 2006 Seiko Epson Corporation. All rights reserved.
, AppleTalk®, EtherTalk®, Bonjour® are registered trademarks of Apple
2
Page 3

Contents
Introduction
About Your Network Interface . . . . . . . . . . . . . . . . . . . . . . . . . . . . . . 7
About This Guide. . . . . . . . . . . . . . . . . . . . . . . . . . . . . . . . . . . . . . . . . . 8
Important Safety Instructions. . . . . . . . . . . . . . . . . . . . . . . . . . . . . . . . 9
Warnings, Cautions, and Notes . . . . . . . . . . . . . . . . . . . . . . . . 10
Package Contents. . . . . . . . . . . . . . . . . . . . . . . . . . . . . . . . . . . . . . . . . 11
Operating Environment . . . . . . . . . . . . . . . . . . . . . . . . . . . . . . . . . . . 12
Supported operating systems . . . . . . . . . . . . . . . . . . . . . . . . . . 12
Printing environments . . . . . . . . . . . . . . . . . . . . . . . . . . . . . . . . 12
Supported Epson Devices. . . . . . . . . . . . . . . . . . . . . . . . . . . . . . . . . . 15
Features of the Network Interface. . . . . . . . . . . . . . . . . . . . . . . . . . . 16
Network Interface Operation. . . . . . . . . . . . . . . . . . . . . . . . . . . . . . . 17
Terms and Concepts . . . . . . . . . . . . . . . . . . . . . . . . . . . . . . . . . . . . . . 20
Chapter 1 Installing Components and Setting Up the Network
Interface
Overview. . . . . . . . . . . . . . . . . . . . . . . . . . . . . . . . . . . . . . . . . . . . . . . . 21
Selecting a Printing Method. . . . . . . . . . . . . . . . . . . . . . . . . . . . . . . . 23
Printing from Windows . . . . . . . . . . . . . . . . . . . . . . . . . . . . . . . 23
Printing from Macintosh . . . . . . . . . . . . . . . . . . . . . . . . . . . . . . 24
Features of the printing methods . . . . . . . . . . . . . . . . . . . . . . . 24
Installing Components on Your Computer . . . . . . . . . . . . . . . . . . . 27
About installing components on your computer. . . . . . . . . . 27
Windows XP . . . . . . . . . . . . . . . . . . . . . . . . . . . . . . . . . . . . . . . . 27
Windows Me/98/95. . . . . . . . . . . . . . . . . . . . . . . . . . . . . . . . . . 30
Windows 2000 . . . . . . . . . . . . . . . . . . . . . . . . . . . . . . . . . . . . . . . 33
Windows Server 2003. . . . . . . . . . . . . . . . . . . . . . . . . . . . . . . . . 36
Windows NT 4.0 . . . . . . . . . . . . . . . . . . . . . . . . . . . . . . . . . . . . . 39
Macintosh. . . . . . . . . . . . . . . . . . . . . . . . . . . . . . . . . . . . . . . . . . . 42
How to Set UP the Network Interface . . . . . . . . . . . . . . . . . . . . . . . 43
Installing the network interface on the device . . . . . . . . . . . . 43
3
Page 4

Configuring the network interface for Windows. . . . . . . . . . 46
Configuring the network interface for Macintosh . . . . . . . . . 51
Installing the Printer Driver . . . . . . . . . . . . . . . . . . . . . . . . . . . . . . . . 58
About installing the printer driver. . . . . . . . . . . . . . . . . . . . . . 58
Windows XP . . . . . . . . . . . . . . . . . . . . . . . . . . . . . . . . . . . . . . . . 58
Windows Me/98/95. . . . . . . . . . . . . . . . . . . . . . . . . . . . . . . . . . 65
Windows 2000 . . . . . . . . . . . . . . . . . . . . . . . . . . . . . . . . . . . . . . . 69
Windows Server 2003. . . . . . . . . . . . . . . . . . . . . . . . . . . . . . . . . 76
Windows NT 4.0 . . . . . . . . . . . . . . . . . . . . . . . . . . . . . . . . . . . . . 83
Macintosh. . . . . . . . . . . . . . . . . . . . . . . . . . . . . . . . . . . . . . . . . . . 87
Chapter 2 About the Software
Overview. . . . . . . . . . . . . . . . . . . . . . . . . . . . . . . . . . . . . . . . . . . . . . . . 89
EpsonNet Config for Windows . . . . . . . . . . . . . . . . . . . . . . . . . . . . . 91
About EpsonNet Config for Windows . . . . . . . . . . . . . . . . . . 91
System requirements . . . . . . . . . . . . . . . . . . . . . . . . . . . . . . . . . 92
Installing EpsonNet Config for Windows. . . . . . . . . . . . . . . . 92
Accessing the EpsonNet Config for Windows
User’s Guide . . . . . . . . . . . . . . . . . . . . . . . . . . . . . . . . . . . . . . 94
EpsonNet Config for Macintosh . . . . . . . . . . . . . . . . . . . . . . . . . . . . 95
About EpsonNet Config for Macintosh. . . . . . . . . . . . . . . . . . 95
System requirements . . . . . . . . . . . . . . . . . . . . . . . . . . . . . . . . . 95
Installing EpsonNet Config for Macintosh . . . . . . . . . . . . . . . 95
Accessing the EpsonNet Config for Macintosh
User’s Guide . . . . . . . . . . . . . . . . . . . . . . . . . . . . . . . . . . . . . . 96
EpsonNet Config with Web Browser . . . . . . . . . . . . . . . . . . . . . . . . 98
About EpsonNet Config with Web Browser. . . . . . . . . . . . . . 98
Configuring the network interface using
EpsonNet Config with Web Browser . . . . . . . . . . . . . . . . . 99
Opening Screen . . . . . . . . . . . . . . . . . . . . . . . . . . . . . . . . . . . . . 104
Index Frame . . . . . . . . . . . . . . . . . . . . . . . . . . . . . . . . . . . . . . . . 105
Menu Frame. . . . . . . . . . . . . . . . . . . . . . . . . . . . . . . . . . . . . . . . 105
Information Frame . . . . . . . . . . . . . . . . . . . . . . . . . . . . . . . . . . 107
EpsonNet Print . . . . . . . . . . . . . . . . . . . . . . . . . . . . . . . . . . . . . . . . . . 120
About EpsonNet Print . . . . . . . . . . . . . . . . . . . . . . . . . . . . . . . 120
System requirements . . . . . . . . . . . . . . . . . . . . . . . . . . . . . . . . 120
Installing EpsonNet Print . . . . . . . . . . . . . . . . . . . . . . . . . . . . 121
4
Page 5

For Windows XP/2000/Server 2003/NT 4.0 Users. . . . . . . 122
For Windows Me/98/95 users . . . . . . . . . . . . . . . . . . . . . . . . 131
Configuring the printer port . . . . . . . . . . . . . . . . . . . . . . . . . . 138
EpsonNet Internet Print . . . . . . . . . . . . . . . . . . . . . . . . . . . . . . . . . . 140
About EpsonNet Internet Print. . . . . . . . . . . . . . . . . . . . . . . . 140
System requirements . . . . . . . . . . . . . . . . . . . . . . . . . . . . . . . . 141
Installing EpsonNet Internet Print . . . . . . . . . . . . . . . . . . . . . 141
Setting up your device using EpsonNet Internet Print. . . . 142
Status Alert Window . . . . . . . . . . . . . . . . . . . . . . . . . . . . . . . . 150
EpsonNet WebManager . . . . . . . . . . . . . . . . . . . . . . . . . . . . . . . . . . 151
About EpsonNet WebManager. . . . . . . . . . . . . . . . . . . . . . . . 151
System requirements . . . . . . . . . . . . . . . . . . . . . . . . . . . . . . . . 151
EpsonNet WebManager functions . . . . . . . . . . . . . . . . . . . . . 153
EpsonNet WebManager operating structure . . . . . . . . . . . . 154
Installing EpsonNet WebManager . . . . . . . . . . . . . . . . . . . . . 156
Starting EpsonNet WebManager . . . . . . . . . . . . . . . . . . . . . . 156
Opening the Online Guide . . . . . . . . . . . . . . . . . . . . . . . . . . . 158
EpsonNet SetupManager . . . . . . . . . . . . . . . . . . . . . . . . . . . . . . . . . 159
About EpsonNet SetupManager. . . . . . . . . . . . . . . . . . . . . . . 159
System requirements . . . . . . . . . . . . . . . . . . . . . . . . . . . . . . . . 160
Installing EpsonNet SetupManager. . . . . . . . . . . . . . . . . . . . 162
Accessing the User’s Guide for
EpsonNet SetupManager . . . . . . . . . . . . . . . . . . . . . . . . . . 163
Chapter 3 Tips for Administrator
Settings for NetWare Users . . . . . . . . . . . . . . . . . . . . . . . . . . . . . . . 164
Introduction to NetWare Settings. . . . . . . . . . . . . . . . . . . . . . 164
Instructions for using NetWare . . . . . . . . . . . . . . . . . . . . . . . 166
Using Bindery Print Server (NetWare 4.x) . . . . . . . . . . . . . . 168
Using NDS Print Server (NetWare 4.x/5.x/6.0). . . . . . . . . . 168
Using Bindery Remote Printer Mode (NetWare 4.x). . . . . . 169
Using NDS Remote Printer Mode
(NetWare 4.x/5.x/6.0) . . . . . . . . . . . . . . . . . . . . . . . . . . . . . 171
Using the NDPS Gateway . . . . . . . . . . . . . . . . . . . . . . . . . . . . 177
Instructions for using a Dial-Up Network . . . . . . . . . . . . . . 183
Settings for UNIX Users . . . . . . . . . . . . . . . . . . . . . . . . . . . . . . . . . . 187
Introduction to UNIX settings. . . . . . . . . . . . . . . . . . . . . . . . . 187
5
Page 6

lpr filters . . . . . . . . . . . . . . . . . . . . . . . . . . . . . . . . . . . . . . . . . . . 187
Setting up different UNIX systems using the lpr
command . . . . . . . . . . . . . . . . . . . . . . . . . . . . . . . . . . . . . . . . 188
Using the ftp command . . . . . . . . . . . . . . . . . . . . . . . . . . . . . . 194
Tips. . . . . . . . . . . . . . . . . . . . . . . . . . . . . . . . . . . . . . . . . . . . . . . . . . . . 195
Instructions on using DHCP . . . . . . . . . . . . . . . . . . . . . . . . . . 195
Setting an IP address using the arp/ping command. . . . . . 196
Instructions on using a Dial-Up Router. . . . . . . . . . . . . . . . . 199
Function of Universal Plug and Play. . . . . . . . . . . . . . . . . . . 199
Uninstalling software. . . . . . . . . . . . . . . . . . . . . . . . . . . . . . . . 200
Chapter 4 Problem Solver
General Problems. . . . . . . . . . . . . . . . . . . . . . . . . . . . . . . . . . . . . . . . 202
Problems Specific to Your Network Environment . . . . . . . . . . . . 207
Windows Me/98/95 environment. . . . . . . . . . . . . . . . . . . . . 207
Windows XP/2000/NT environment . . . . . . . . . . . . . . . . . . 208
Macintosh environment. . . . . . . . . . . . . . . . . . . . . . . . . . . . . . 209
NetWare environment . . . . . . . . . . . . . . . . . . . . . . . . . . . . . . . 210
Initializing the Network Interface. . . . . . . . . . . . . . . . . . . . . . . . . . 212
Restrictions on EPSON Status Monitor . . . . . . . . . . . . . . . . . . . . . 212
For the laser printer . . . . . . . . . . . . . . . . . . . . . . . . . . . . . . . . . 212
Chapter 5 Specifications
Network Interface Specification. . . . . . . . . . . . . . . . . . . . . . . . . . . . 214
Electrical Specifications. . . . . . . . . . . . . . . . . . . . . . . . . . . . . . . . . . . 214
Regulatory Approvals. . . . . . . . . . . . . . . . . . . . . . . . . . . . . . . . . . . . 215
Reliability . . . . . . . . . . . . . . . . . . . . . . . . . . . . . . . . . . . . . . . . . . . . . . 215
Environmental . . . . . . . . . . . . . . . . . . . . . . . . . . . . . . . . . . . . . . . . . . 216
FCC Compliance Statement for United States Users . . . . . . . . . . 216
WARNING. . . . . . . . . . . . . . . . . . . . . . . . . . . . . . . . . . . . . . . . . 217
For Canadian Users . . . . . . . . . . . . . . . . . . . . . . . . . . . . . . . . . 217
DECLARATION of CONFORMITY . . . . . . . . . . . . . . . . . . . . . . . . 218
Index
6
Page 7

Introduction
About Your Network Interface
The EpsonNet 10/100 Base Tx Int. Print Server 5e is a network
interface that plugs into an optional interface slot of an Epson
device to enable the device to connect directly to your network.
Because the network interface supports multiple protocols and
automatically detects protocols on your network, you can print
from Microsoft
®
IBM
OS/2 applications.
Use EpsonNet Config or EpsonNet Config with Web Browser, the
configuration utilities provided with your product, to quickly and
easily configure the network interface to use protocols such as
TCP/IP, NetWare, NetBEUI, IPX/SPX, AppleTalk
SNMP.
Note:
The EpsonNet Config utility configures the network interface to work
only with protocols that exist on your network. This does not imply that
you can use all of the above-mentioned protocols on your network or
operating system. The protocols that the network interface can use may
vary depending on the operating system and the network configuration.
®
Windows®, Apple® Macintosh®, UNIX®, and
®
, IPP, and
Introduction 7
Page 8

About This Guide
This User’s Guide contains information about using the network
interface on a network. It includes how to set up the network
interface, install the configuration software, and modify network
settings of your device and computer.
For information about your device, see the manual shipped with
the device.
Note:
❏ This guide is written for network administrators, and many of the
steps included here require detailed network knowledge and
administrator rights.
❏ The term “network administrator” refers to the person responsible
for maintaining the network. “Administrator” is synonymous with
“Supervisor” in this guide.
❏ The term “network interface” refers to the EpsonNet 10/100 Base
Tx Int. Print Server 5e in this guide.
❏ The term “device” refers to the printer or all-in-one that is supported
by the network interface.
❏ Some screen shots in this guide may list a device name other than
your device. This difference does not alter the instructions.
Introduction 8
Page 9

Important Safety Instructions
Read all of these instructions and save them for later reference.
Notes on installing the network interface
❏ Do not install or uninstall the network interface with wet
hands.
❏ Be careful not to drop or crush the network interface when
installing.
❏ When installing or uninstalling the network interface, be sure
to remove the Ethernet cable, turn off your device, and then
unplug the power cord to avoid electric shock.
Notes on powering on and off
❏ Do not turn off the device when changing the settings. This
may damage the device and the network interface.
❏ Do not turn off the device while printing is in progress. This
may cause operational trouble to the computer sending the
print data and suspend the printing process.
❏ Do not turn off the device during a firmware update.
Otherwise, the update cannot be completed correctly and the
network interface may not work after the update.
Others
❏ Keep the network interface away from humidity and dust.
❏ Do not allow children to handle the network interface.
Introduction 9
Page 10

❏ Avoid using the network interface if there is smoke, strange
smell, or strange sound; otherwise this could cause fire or
electric shock. Instead, immediately turn off the device,
unplug the power cord, and then contact your Epson dealer.
Do not repair it yourself because this is dangerous.
❏ Do not disassemble or modify the network interface unless
specifically instructed in the guide. This could cause injury,
electric shock, or fire.
Warnings, Cautions, and Notes
Warnings
must be followed carefully to avoid bodily injury.
w
Cautions
must be observed to avoid damage to your equipment.
c
Notes
contain important information and useful tips on the operation of this
product.
Introduction 10
Page 11

Package Contents
Your network interface package includes the following items.
❏ Network interface (The utility EpsonNet Config with Web
Browser is pre-installed on this network interface.)
❏ Software CD-ROM containing:
-- User’s Guide (PDF-format manual)
-- EpsonNet Config (for Windows)
-- EpsonNet Config (for Macintosh)
-- EpsonNet WebManager
-- EpsonNet Print
-- EpsonNet SetupManager
-- EpsonNet EasyInstall (Win/Mac)
-- EpsonNet Internet Print (Win)
❏ Online Guide Supplement Sheet
Note:
❏ The User’s Guide is a PDF file. To read the User’s Guide, you must
install Adobe Reader or Adobe Acrobat Reader on your computer.
❏ You need to supply items such as a computer with an Ethernet
network interface, an Epson device with an optional interface slot,
and an Ethernet cable (Category 5 shielded twisted-pair cable).
Introduction 11
Page 12

Operating Environment
Supported operating systems
The network interface supports the following operating systems.
Supported operating systems Windows XP
Windows Me
Windows 98 Second Edition
Windows 95 OSR2
Windows 2000
Windows Server 2003
Windows NT 4.0 (with Service Pack 6
or higher)
Mac OS X 10.2 or later
Mac OS 9.1 or later
Printing environments
The network interface receives print jobs in the following
environments.
Operating systems Version Protocol
Windows XP
(Home,
Professional)
Windows Me - TCP/IP (using EpsonNet Print)
- TCP/IP (using LPR, Standard
TCP/IP Port, or EpsonNet Print)
IPP
IPP
NetBEUI
Introduction 12
Page 13

Operating systems Version Protocol
Windows 98/95 - TCP/IP (using EpsonNet Print)
IPP
(using EpsonNet Internet Print)
NetBEUI
Windows 2000
(Professional,
Server)
Windows Server
2003
Windows NT 4.0 with
Service Pack 5 or
higher
Macintosh Mac OS X 10.2.4
or later
Mac OS X 10.2 or
later
Mac 9.1 or later AppleTalk
NetWare 4.x/IntranetWare NDS mode
- TCP/IP (using LPR, Standard
TCP/IP Port, or EpsonNet Print)
IPP
NetBEUI
- TCP/IP (using LPR, Standard
TCP/IP Port, or EpsonNet Print)
IPP
-TCP/IP
(using LPR or EpsonNet Print)
IPP
(using EpsonNet Internet Print)
NetBEUI
AppleTalk
TCP/IP
Rendezvous
AppleTalk
TCP/IP
Bindery emulation mode
OS/2 (OS/2 Warp
Connect, OS/2
Warp Server)
5.x/6.0 NDS Queue-based print
system
NDPS
V3
V4
TCP/IP (lprportd)
NetBEUI
Introduction 13
Page 14

Operating systems Version Protocol
UNIX Sun OS 4.1.4 or
later: SPARC
SunSoft Solaris 2.4
or later: SPARC
and x86
SCO UNIX 4.2 or
later
SCO UnixWare
2.01 or later
HP/UX 9.05 or
later
IBM AIX 3.2.5 or
later and 4.1.3 or
later
lpr, ftp
Note:
❏ Only the Intel version of Windows NT is supported.
❏ The multi-user environment of Mac OS 9 is not supported.
❏ If you use the device in a dial-up router environment, you must set
an IP address for the device. Make sure the IP address is suitable for
the segment; incorrect IP address may generate unexpected dial-up.
❏ See the manual shipped with your device for information on the
supported operating system of the device.
Introduction 14
Page 15

Supported Epson Devices
The network interface can be installed for the following Epson
devices (as of August, 2006).
❏ Ink Jet Printer:
EPSON Stylus Pro10600
EPSON Stylus Pro 4000
EPSON Stylus Pro 4400/4800
EPSON Stylus Pro 7600
EPSON Stylus Pro 7400/7800
EPSON Stylus Pro 9600
EPSON Stylus Pro 9400/9800
❏ Laser Printer:
EPL-N2500
EPL-N7000
EPL-N3000
EPL-N2550
EPL-6200
EPSON AcuLaser 2600
EPSON AcuLaser C7000
EPSON AcuLaser C8600
EPSON AcuLaser C9100
EPSON AcuLaser C4100
EPSON AcuLaser C1900
EPSON AcuLaser C900
EPSON AcuLaser C4200
EPSON AcuLaser C2600
❏ Impact Dot Matrix Printer:
DFX-9000
DFX-5000+
FX-2190/890
LQ-2180
LQ-2090/590
LQ-680/680pro
DLQ-3500
Introduction 15
Page 16

Features of the Network Interface
❏ Provides high performance.
❏ Connects an Epson device equipped with an optional
interface slot to the network.
❏ Supports multiple protocols, such as TCP/IP, NetWare,
NetBEUI, IPX/SPX, AppleTalk, and IPP.
❏ Supports 100Base full duplex, 100Base half duplex, 10Base full
duplex, and 10Base half duplex.
❏ Supports DHCP.
❏ Supports Automatic Private IP Addressing (APIPA) that
assigns an IP address automatically to the network interface
even if there is no DHCP server on the network.
❏ Supports the Dynamic DNS function.
❏ Supports SNMP and MIB.
❏ Support Rendezvous on Mac OS X 10.2.4 or higher.
Introduction 16
Page 17
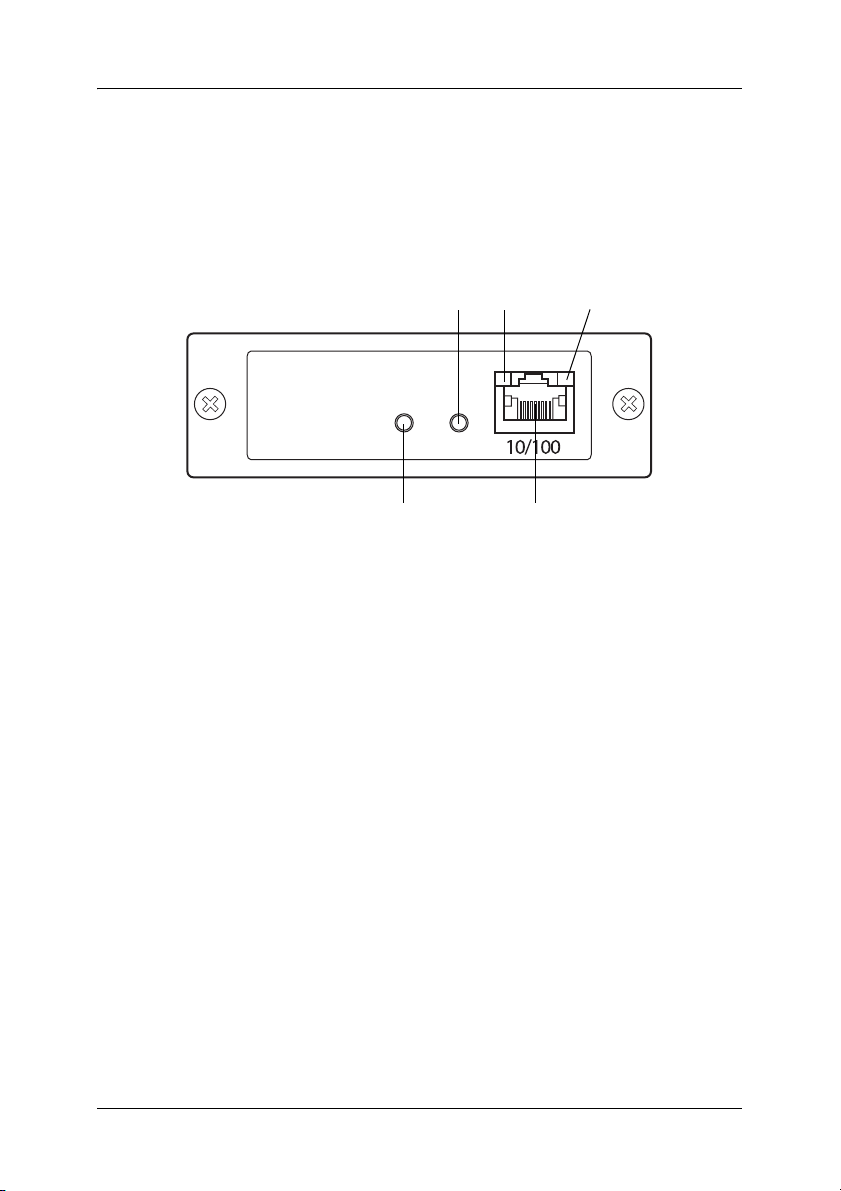
Network Interface Operation
The status lights and status sheet provide you with important
information about the operation and configuration of the network
interface.
ENSP button*
* ENSP button is not used.
Status lightStatus sheet button
RJ-45 connector
Data light
Introduction 17
Page 18

Status and Data lights
The network interface has two lights (Status and Data), which
indicate the current operating status of the network interface
when you first turn on the device, during normal operation, and
when errors occur. The status light has two colors (green and
orange). The data light is green.
The status lights indicate the network interface status, as follows:
Status light Data light Network interface status
Off On Resetting
Green flash* On* Initializing
Orange status light and green data light
flashing alternately
Green On Ready (10M link)
Green Flashing Receiving packets (10M link)
Green Off No communication is
Orange On Ready (100M link)
Orange Flashing Receiving packets (100M link)
Orange Off No communication is
Orange flash
repeated once
Orange flash
repeated twice
Orange flash
repeated three
times
Orange flash
repeated four
times
Orange flash
repeated once
On Address error
On Bus error
On TLB error
On Other errors
Off File system error
Firmware update mode
available (10M link).
available (100M link).
Introduction 18
Page 19

Orange flash
repeated twice
* Both lights turn off once and then indicate the status.
Off Flash-Rom illegal access error
Status sheet button
The first time you use the network interface after installing or
reinstalling it, turn on the device. Then, while both the status light
and the data light are off, hold down the status sheet button for
about twenty seconds to initialize the network interface. The
length of time needed to hold down the status sheet button varies
depending on the device model.
Before you start configuring the network interface, be sure to
press and hold down the status sheet button on the network
interface to print a status sheet. A status sheet provides important
information about the network interface, such as MAC address,
device settings, and the device’s current status. Press the status
sheet button once to print a simple status sheet, or twice to print
a full status sheet. You cannot print a status sheet when the device
has already started printing, or when it is offline or not ready to
print.
Note:
If the device does not print a status sheet, make sure the device is online
and no print jobs are being processed, and then wait a minute. If it still
does not print a status sheet, turn the device off, wait until the status
lights go out, and then turn it back on again. The status sheet can be
printed one minute after the device finishes warming up.
Caution:
After turning off the device, wait until the status lights go out
c
before turning the device back on; otherwise, the network interface
may not work correctly.
Introduction 19
Page 20

RJ-45 connector
This connector is used to connect an Ethernet cable to the network.
You can use this cable for both 10Base-T and 100Base-TX.
Caution:
You must use a Category 5 shielded twisted-pair cable to connect
c
the network interface to prevent malfunction.
Terms and Concepts
Configuration -- a prepared set of conditions for proper operation
of a device. Configuring the network interface is to prepare it to
work with protocols available on a network.
DHCP -- a dynamic host configuration protocol. It is a protocol
that assigns dynamic IP addresses to devices on a network.
EtherTalk -- the communication protocol of AppleTalk governing
Ethernet transmissions
ftp -- a TCP/IP application protocol for file transfer
lpd -- a TCP/IP remote printing protocol application
Print queue -- a location where a print job is stored as a file, until
the network interface sends the job to the assigned device
Protocol -- a rule that controls how data or information is
exchanged through a network. Computers and software cannot
communicate with each other using different protocols.
Remote printer -- a shared device connected elsewhere on the
network, but under the control of a NetWare network interface
TCP/IP -- Transmission Control Protocol/Internet Protocol, a
layer of protocols that provides communications between nodes
on a network
Introduction 20
Page 21

Chapter 1
Installing Components and Setting Up the Network Interface
Overview
This section describes the general procedure on how to set up the
network interface for use on a network.
1. Check the network interface operation.
Check the functions and operations of the network interface,
such as status lights, status sheet button, and the RJ-45
connector. See “Network Interface Operation” on page 17 for
details.
2. Select a printing method.
Select a printing method appropriate for your network
environment and operating system. If you are not sure, see
“Printing from Windows” on page 23 or “Printing from
Macintosh” on page 24 for details.
3. Install the necessary components on the computer.
Make sure the necessary components (such as TCP/IP,
NetBEUI, etc.) are installed on the computer, and network
settings (such as the IP address, subnet mask, etc.) of the
computer are set. See “About installing components on your
computer” on page 27 for details.
Chapter 1 Installing Components and Setting Up the Network Interface 21
Page 22

4. If necessary, install the printer driver.
Install the printer driver from the CD-ROM that comes with
the device. See “About installing the printer driver” on page
58 for details.
5. Install the network interface on the device.
Install the network interface and initialize it. See “Installing
the network interface on the device” on page 43.
6. Insert the Software CD-ROM in the CD-ROM drive to
configure the network interface
Connect the network interface to the network. For Windows
users, see “Configuring the network interface for Windows”
on page 46 for details. For Macintosh users, see “Configuring
the network interface for Macintosh” on page 51 for details.
7. If necessary, modify the network settings of the network
interface using EpsonNet Config.
Modify the network interface for TCP/IP, AppleTalk, MS
Network, etc. using EpsonNet Config. For Windows users,
see “About EpsonNet Config for Windows” on page 91 for
details. For Macintosh users, see “About EpsonNet Config for
Macintosh” on page 95.
Chapter 1 Installing Components and Setting Up the Network Interface 22
Page 23

Selecting a Printing Method
This section contains information to help you select a printing
method.
Printing from Windows
Check if there is a Windows XP/2000/Server 2003/NT print
server on your network, and then use the suggestions below.
Note:
Only the recommended printing methods are introduced here. See
“Features of the printing methods” on page 24 for information on
additional methods.
If no Windows XP/2000/Server 2003/NT print server exists
Use a printing method appropriate to your operating system:
❏ For Windows Me/98/95
We recommend TCP/IP printing via EpsonNet Print. See
“About EpsonNet Print” on page 120.
Chapter 1
❏ For Windows XP/2000/Server 2003/NT
We recommend TCP/IP printing via LPR. See “Windows XP”
on page 58, “Windows 2000” on page 69, “Windows Server
2003” on page 76, or “Windows NT 4.0” on page 83.
If a Windows XP/2000/Server 2003/NT print server exists
On the server, set the printer to connect with LPR and turn it into
a shared printer. Your clients can then print to this shared printer.
Chapter 1 Installing Components and Setting Up the Network Interface 23
Page 24

Printing from Macintosh
Mac OS X 10.2.4 or later
❏ Rendezvous
❏ EPSON TCP/IP
❏ EPSON AppleTalk
Mac OS X 10.2 or later
❏ EPSON TCP/IP
❏ EPSON AppleTalk
Mac OS 9
❏ AppleTalk
Features of the printing methods
This section describes features of the printing methods available
for you to choose.
LPR (TCP/IP) printing
Advantages
❏ No computer as a network interface is required.
❏ No special utility for Windows XP/2000/Server 2003/NT is
required.
❏ You can see the device status using EPSON Status Monitor.
❏ For Windows XP/2000/Server 2003/NT, you can create a
print log using the event viewer.
Chapter 1 Installing Components and Setting Up the Network Interface 24
Page 25

❏ You can print via a router.
Disadvantages
❏ You need to set up TCP/IP.
❏ For Windows Me/98/95, EpsonNet Print must be installed
on all computers to use for printing.
Internet printing
Advantages
❏ No proxy server (computer) is required.
❏ You can print to the device over the Internet.
Disadvantages
❏ EPSON Status Monitor cannot be used.
❏ TCP/IP and DNS settings are required.
❏ For Windows Me/98/95, EpsonNet Internet Print must be
installed on all computers used for printing.
❏ For Windows XP/2000/Server 2003, you cannot share the
Internet printer.
Microsoft Network Shared printing
Advantages
❏ Easy to set up (IP address is not required if NetBEUI protocol
is installed).
❏ No computer as a network interface is required.
❏ No special print utility is required.
Chapter 1 Installing Components and Setting Up the Network Interface 25
Page 26

Disadvantages
❏ EPSON Status Monitor cannot be used.
❏ You cannot print via a router.
❏ It takes a longer time to start printing because more time is
required to search for a network device.
Chapter 1 Installing Components and Setting Up the Network Interface 26
Page 27

Installing Components on Your Computer
About installing components on your computer
Before configuring the network interface and printing from the
computer, you need to install the necessary components (such as
TCP/IP, NetBEUI, etc.) and assign an IP address and subnet mask
for your computer, depending on the printing method you want
to use. See the section appropriate for your operating system.
“Windows XP” on page 27
“Windows Me/98/95” on page 30
“Windows 2000” on page 33
“Windows Server 2003” on page 36
“Windows NT 4.0” on page 39
“Macintosh” on page 42
Chapter 1
Windows XP
For Windows XP, use the following procedure to install the
necessary components.
Note:
❏ The Windows XP CD-ROM may be required during the
installation.
❏ When using TCP/IP or IPP for printing, you need to set the IP
address, the subnet mask, and the default gateway of the computer.
Chapter 1 Installing Components and Setting Up the Network Interface 27
Page 28
1. Click Start, highlight Control Panel, and then click Network
and Internet Connections. Select Network Connections.
2. Under LAN or High-Speed Internet, click the Local Area
Connection icon.
3. Under Network Tasks, click Change settings of this
connection.
4. Check if the following necessary components are in the list. If
they are already installed, see “How to Set UP the Network
Interface” on page 43.
The following table lists the components required for
configuring the network interface with EpsonNet Config. For
information on EpsonNet Config, see “About EpsonNet
Config for Windows” on page 91.
Chapter 1 Installing Components and Setting Up the Network Interface 28
Page 29

EpsonNet Config’s setting screens Necessary components
TCP/IP, AppleTalk, IPP, SNMP (IP trap) Internet Protocol (TCP/IP)
MS Network Internet Protocol (TCP/IP)
NetWare, SNMP (IPX trap) Latest Novell Client
downloaded from the Novell
Web site
The following table lists the components required for network
printing.
Printing method Necessary components
LPR or Internet printing Internet Protocol (TCP/IP)
Microsoft Network Shared printing Internet Protocol (TCP/IP)
Printing via NetWare server Latest Novell Client downloaded
Client for Microsoft Networks
from the Novell Web site
5. If the necessary components are not in the list, click Install to
install them, as described below.
For LPR or Internet printing:
Internet Protocol (TCP/IP) is installed by default. You cannot
add or delete it.
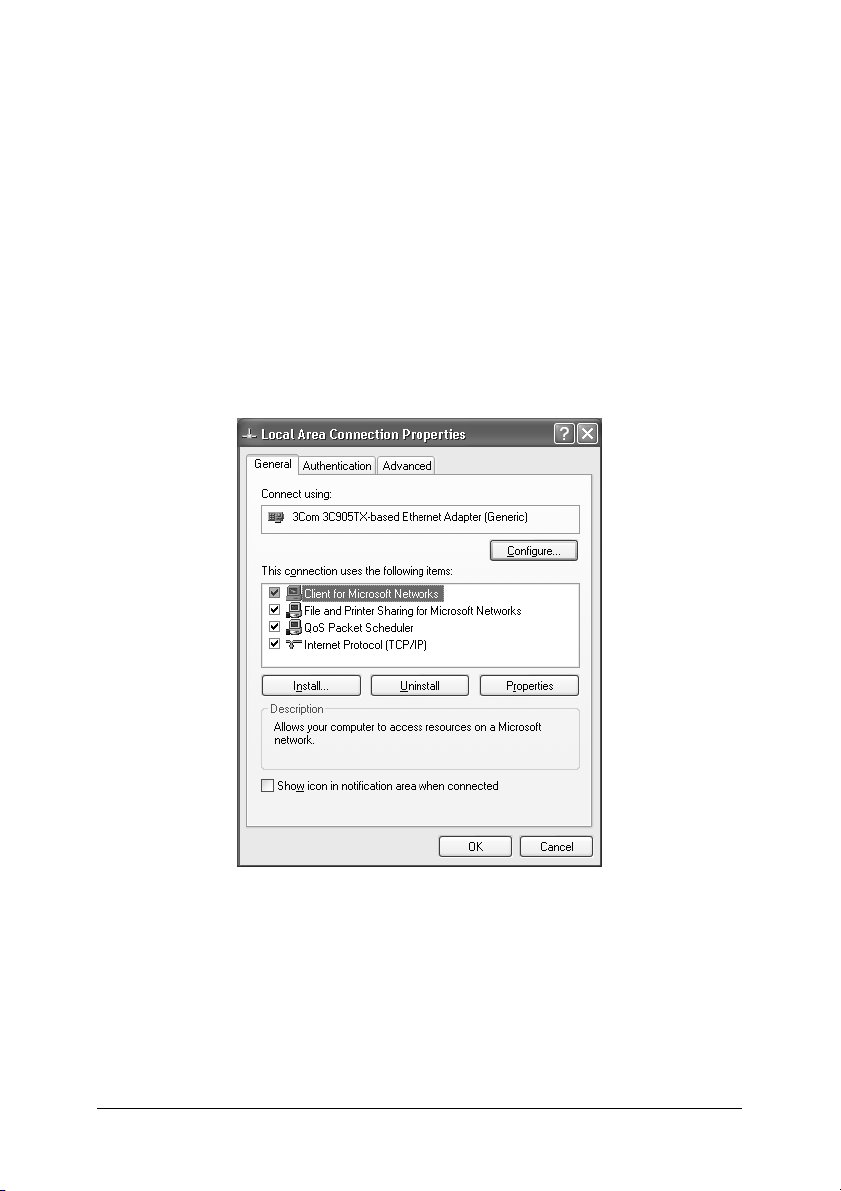
For Microsoft Network Shared printing:
Select Client and then click Add. Select Client for Microsoft
Networks and then click OK.
For printing via NetWare server:
Download the latest Novell Client from the Novell Web site
and install it on the computer. Also, be sure to install IPX. See
the Novell Web site for detailed information.
Chapter 1 Installing Components and Setting Up the Network Interface 29
Page 30

6. For LPR, Internet, or Microsoft Network Shared printing:
Double-click Internet Protocol (TCP/IP) on the Local Area
Connection Properties dialog box to open the Internet
Protocols (TCP/IP) Properties dialog box. Set the IP address,
the subnet mask, etc. and then click OK.
7. Restart the computer.
The necessary components are now installed.
Windows Me/98/95
For Windows Me/98/95, use the following procedure to install
the necessary components.
Note:
❏ The Windows Me/98/95 CD-ROM may be required during the
installation.
❏ When using TCP/IP or IPP for printing, you need to set the IP
address, the subnet mask, and the default gateway of the computer.
1. Click Start, point to Settings, and then select Control Panel.
Chapter 1 Installing Components and Setting Up the Network Interface 30
Page 31

2. Double-click the Network icon. Check if the following
necessary components are in the list of installed network
components on the Configuration menu. If they are already
installed, see “How to Set UP the Network Interface” on page
43.
The following table lists the components required for
configuring the network interface with EpsonNet Config. For
information on EpsonNet Config, see “About EpsonNet
Config for Windows” on page 91.
EpsonNet Config’s setting screens Necessary components
TCP/IP, AppleTalk, IPP, SNMP (IP trap) TCP/IP
MS Network NetBEUI or TCP/IP
NetWare, SNMP (IPX trap) Latest Novell Client
downloaded from the Novell
Web site
Chapter 1 Installing Components and Setting Up the Network Interface 31
Page 32

Note:
Do not use Novell Client for Windows 95/98 version 3.00 and
Novell Client for Windows NT version 4.50 when using the
following modes: NetWare 4.x Bindery Print Server mode, NetWare
4.x Bindery Remote Printer mode, and NetWare 4.x/5.x NDS
Remote Printer mode.
The following table lists the components required for network
printing.
Printing method Necessary components
LPR or Internet printing TCP/IP
Microsoft Network Shared
printing
Printing via NetWare server Latest Novell Client downloaded
TCP/IP or NetBEUI
Client for Microsoft Networks
from the Novell Web site
3. If the necessary components are not in the list, click Add to
install them, as described below.
For LPR or Internet printing:
Select Protocol and then click Add. Select Microsoft from the
Manufacturers list and TCP/IP from the Network Protocols
list. Then click OK.
For Microsoft Network Shared printing:
To use TCP/IP, see the description described earlier to install
TCP/IP.
To use NetBEUI, select Protocol and then click Add. Select
Microsoft from the Manufacturers list and NetBEUI from the
Network Protocols list. Then click OK.
Select Client and then click Add. Select Microsoft from the
Manufacturers list and Client for Microsoft Networks from
the Network Clients list. Then click OK.
Chapter 1 Installing Components and Setting Up the Network Interface 32
Page 33

For printing via NetWare server:
Download the latest Novell Client from the Novell Web site
and install it on the computer. Also, be sure to install IPX. See
the Novell Web site for detailed information.
4. For LPR, Internet, Microsoft Network Shared printing:
Double-click TCP/IP on the Configuration menu to open the
TCP/IP Properties dialog box. Set the IP address, the subnet
mask, etc. and then click OK.
5. Restart the computer.
The necessary components are now installed.
Windows 2000
For Windows 2000, use the following procedure to install the
necessary components.
Note:
❏ The Windows 2000 CD-ROM may be required during the
installation.
❏ When using TCP/IP or IPP for printing, you need to set the IP
address, the subnet mask, and the default gateway of the computer.
1. Click Start, point to Settings, and then select Network and
Dial-up Connections. The Network and Dial-up
Connections screen appears.
2. Right-click the desired network connection and then select
Properties.
Chapter 1 Installing Components and Setting Up the Network Interface 33
Page 34

3. Check if the following necessary components are in the list. If
they are already installed, see “How to Set UP the Network
Interface” on page 43.
The following table lists the components required for
configuring the network interface with EpsonNet Config. For
information on EpsonNet Config, see “About EpsonNet
Config for Windows” on page 91.
EpsonNet Config’s setting screens Necessary components
TCP/IP, AppleTalk, IPP, SNMP (IP trap) Internet Protocol (TCP/IP)
MS Network NetBEUI or Internet Protocol
NetWare, SNMP (IPX trap) Latest Novell Client
(TCP/IP)
downloaded from the Novell
Web site
Chapter 1 Installing Components and Setting Up the Network Interface 34
Page 35

Note:
Do not use Novell Client for Windows 95/98 version 3.00 and
Novell Client for Windows NT version 4.50 when using the
following modes: NetWare 4.x Bindery Print Server mode, NetWare
4.x Bindery Remote Printer mode, and NetWare 4.x/5.x NDS
Remote Printer mode.
The following table lists the components required for network
printing.
Printing method Necessary components
LPR or Internet printing Internet Protocol (TCP/IP)
Microsoft Network Shared
printing
Printing via NetWare server Latest Novell Client downloaded
Internet Protocol (TCP/IP) or NetBEUI
Client for Microsoft Networks
from the Novell Web site
4. If the necessary components are not in the list, click Install to
install them, as described below.
For LPR or Internet printing:
Select Protocol and then click Add. In the Select Network
Protocol dialog box, select Internet Protocol (TCP/IP) and
then click OK.
For Microsoft Network Shared printing:
To use Internet Protocol, see the description described earlier
to install Internet Protocol (TCP/IP).
To use NetBEUI, select Protocol and then click Add. Select
NetBEUI Protocol and then click OK.
Select Client and then click Add. Select Client for Microsoft
Networks and then click OK.
For printing via NetWare server:
Download the latest Novell Client from the Novell Web site
and install it on the computer. Also, be sure to install IPX. See
the Novell Web site for detailed information.
Chapter 1 Installing Components and Setting Up the Network Interface 35
Page 36

5. For LPR, Internet, or Microsoft Network Shared printing:
Double-click Internet Protocol (TCP/IP) on the
Configuration menu to open the TCP/IP Properties dialog
box. Set the IP address, the subnet mask, etc. and then click
OK.
6. Restart the computer.
The necessary components are now installed.
Windows Server 2003
For Windows Server 2003, use the following procedure to install
the necessary components.
Note:
❏ The Windows Server 2003 CD-ROM may be required during the
installation.
❏ When using TCP/IP or IPP for printing, you need to set the IP
address, the subnet mask, and the default gateway of the computer.
1. Click Start, point to Control Panel, and then select Network
Connections. Click Local Area Connections.
2. Click the Properties button.
Chapter 1 Installing Components and Setting Up the Network Interface 36
Page 37

3. Check if the following necessary components are in the list. If
they are already installed, see “How to Set UP the Network
Interface” on page 43.
The following table lists the components required for
configuring the network interface with EpsonNet Config. For
information on EpsonNet Config, see “About EpsonNet
Config for Windows” on page 91.
EpsonNet Config’s setting screens Necessary components
TCP/IP, AppleTalk, IPP, SNMP (IP trap) Internet Protocol (TCP/IP)
MS Network Internet Protocol (TCP/IP)
NetWare, SNMP (IPX trap) Latest Novell Client
downloaded from the Novell
Web site
Chapter 1 Installing Components and Setting Up the Network Interface 37
Page 38

The following table lists the components required for network
printing.
Printing method Necessary components
LPR or Internet printing Internet Protocol (TCP/IP)
Microsoft Network Shared
printing
Printing via NetWare server Latest Novell Client downloaded
Internet Protocol (TCP/IP)
Client for Microsoft Networks
from the Novell Web site
4. If the necessary components are not in the list, click Install to
install them, as described below.
For LPR or Internet printing:
Internet Protocol (TCP/IP) is installed by default. You cannot
add or delete it.
For Microsoft Network Shared printing:
Select Client and then click Add. Select Client for Microsoft
Networks and then click OK.
For printing via NetWare server:
Download the latest Novell Client from the Novell Web site
and install it on the computer. Also, be sure to install IPX. See
the Novell Web site for detailed information.
5. For LPR, Internet, or Microsoft Network Shared printing:
Double-click Internet Protocol (TCP/IP) in the Local Area
Connection Properties dialog box to open the Internet
Protocols (TCP/IP) Properties dialog box. Set the IP address,
the subnet mask, etc. and then click OK.
6. Restart the computer.
The necessary components are now installed.
Chapter 1 Installing Components and Setting Up the Network Interface 38
Page 39

Windows NT 4.0
For Windows NT 4.0, use the following procedure to install the
necessary components.
Note:
❏ The Windows NT 4.0 CD-ROM may be required during the
installation.
❏ When using TCP/IP or IPP for printing, you need to set the IP
address, the subnet mask, and the default gateway of the computer.
1. Click Start, point to Settings, and then select Control Panel.
2. Double-click the Network icon in the Control Panel, and then
select the Protocols tab from the Network dialog box.
3. Check if the following necessary components are in the list. If
they are already installed, see “How to Set UP the Network
Interface” on page 43.
Chapter 1 Installing Components and Setting Up the Network Interface 39
Page 40

The following table lists the components required for
configuring the network interface with EpsonNet Config. For
information on EpsonNet Config, see “About EpsonNet
Config for Windows” on page 91.
EpsonNet Config’s setting screens Necessary components
TCP/IP, AppleTalk, IPP, SNMP (IP trap) TCP/IP
MS Network NetBEUI or TCP/IP
NetWare, SNMP (IPX trap) Latest Novell Client
downloaded from the Novell
Web site
Note:
Do not use Novell Client for Windows 95/98 version 3.00 and
Novell Client for Windows NT version 4.50 when using the
following modes: NetWare 4.x Bindery Print Server mode, NetWare
4.x Bindery Remote Printer mode, and NetWare 4.x/5.x NDS
Remote Printer mode.
The following table lists the components required for network
printing.
Printing method Necessary components
LPR or Internet printing Protocols menu: TCP/IP
Microsoft Network
Shared printing
Printing via NetWare
server
Services menu: Microsoft TCP/IP Printing
Protocols menu: TCP/IP or NetBEUI
Services menu: Workstation
Latest Novell Client downloaded from the
Novell Web site
4. If the necessary components are not in the list, click Add to
install them, as described below.
Chapter 1 Installing Components and Setting Up the Network Interface 40
Page 41

For LPR or Internet printing:
Select the Protocols tab and then click Add. Select TCP/IP
Protocol from the list and then click OK. Set the IP address,
the subnet mask, etc. and then click OK.
Select the Services tab and then click Add. Select Microsoft
TCP/IP Printing from the list and then click OK.
For Microsoft Network Shared printing:
To use TCP/IP, see the description described earlier to install
TCP/IP.
To use NetBEUI, select the Protocols tab and then click Add.
Select NetBEUI Protocol from the list and then click OK.
Select the Services tab and then click Add. Select
Workstation from the list and then click OK.
For printing via NetWare server:
Download the latest Novell Client from the Novell Web site
and install it on the computer. Also, be sure to install IPX. See
the Novell Web site for detailed information.
Chapter 1 Installing Components and Setting Up the Network Interface 41
Page 42

5. Restart the computer.
The necessary components are now installed.
Macintosh
To assign an IP address, subnet mask, etc. to your Macintosh,
follow the steps below.
Note:
To print using the AppleTalk protocol and configure the network
interface with EpsonNet Config, select Built-in Ethernet on the
AppleTalk Control Panel. Then configure the network interface with
EpsonNet Config. For information on EpsonNet Config, see “About
EpsonNet Config for Macintosh” on page 95.
Mac OS X
1. From the Apple menu, select System Preferences.
2. Open the Network control panel. Click the TCP/IP tab.
3. Select Built-in Ethernet from the Show pull down menu.
4. Assign an IP address and other settings if necessary.
5. Click the Apply Now button to save any changes.
Mac OS 9
1. From the Apple menu, select Control Panel, and then TCP/IP.
2. Set Connect via to Ethernet.
3. Assign an IP address and other settings if necessary.
4. Close the dialog box to save any changes.
Chapter 1 Installing Components and Setting Up the Network Interface 42
Page 43

How to Set UP the Network Interface
Installing the network interface on the device
Follow the steps below to install the network interface on the
device.
Warning:
Before you install or uninstall the network interface, be sure to
w
turn off the device to prevent electric shock.
1. Make sure that the device is turned off and unplug the power
cord from the wall outlet.
2. Insert the network interface in an optional interface slot and
tighten the screws. For more details, see the manual shipped
with your device.
3. Initialize the network interface. To do this, turn on the device.
Then, while the status light and the data light are off, hold
down the status sheet button for twenty seconds.
Initialization is in progress, while the orange status light
flashes and the green data light is on.
Chapter 1
Chapter 1 Installing Components and Setting Up the Network Interface 43
Page 44

Note:
Be sure to initialize the network interface when you install or
reinstall it.
Press the status sheet button
for more than 20 seconds.
4. Turn off the device.
5. Connect an Ethernet cable (Category 5 shielded twisted-pair
cable) to the RJ-45 connector on the network interface, and
then connect its other end to the network.
Caution:
❏ You must use a Category 5 shielded twisted-pair cable to
c
connect the network interface to prevent malfunction.
❏ Do not connect or disconnect the network cable when the
device is on.
❏ Do not connect the network interface and the computer
directly. Be sure to use a hub to connect the network
interface to the network.
Note:
You can use both 10Base-T or 100Base-TX. If you print a lot of data,
we recommend that you use a high-speed network of 100Base-TX
with a light network traffic.
6. Turn on the device.
Chapter 1 Installing Components and Setting Up the Network Interface 44
Page 45

7. Check the lights on the network interface. The orange status
light flashes and the green data light goes on. After a while,
the green or orange status light turns on and the data light
flashes.
8. To print a status sheet, press the status sheet button on the
network interface. Press the status sheet button once to print
a simple status sheet, or twice to print a full status sheet.
If the status sheet prints, this indicates the network interface
has been installed correctly.
Caution:
❏ Do not press the status sheet button while the orange
c
status light flashes and the green data light is on;
otherwise, the network interface will return to its factory
default settings, and the network status sheet will not
print correctly as well.
❏ After turning off the device, wait until the status lights
go off before turning it back on or before removing the
network interface; otherwise, the network interface may
not work correctly.
Note for Mac OS X 10.2.4:
Since the device supports Rendezvous and is on by default, you can use
the device on a network just by connecting it to the network. If you want
to disable the Rendezvous setting, use EpsonNet Config.
Now, you can configure the network interface. See “Configuring
the network interface for Windows” on page 46 or “Configuring
the network interface for Macintosh” on page 51.
Chapter 1 Installing Components and Setting Up the Network Interface 45
Page 46

Configuring the network interface for Windows
Follow the steps below to connect the network interface to the
network.
Note:
❏ Make sure that the printer driver is installed on your computer
before following the steps below. See the manual shipped with your
device for instructions on how to install the printer driver.
❏ Depending on the settings of the network interface, some dialog
boxes in the following steps may not be displayed.
1. Insert the Software CD-ROM in the CD-ROM drive.
If the Installer dialog box does not appear automatically,
double-click EPSetup.exe on the CD-ROM.
2. From the Welcome screen, click Next.
Chapter 1 Installing Components and Setting Up the Network Interface 46
Page 47

3. Read the license agreement, and then click Agree.
4. Select Connect the Network Interface Card.
Chapter 1 Installing Components and Setting Up the Network Interface 47
Page 48

Note:
If the following screen appears, click the Unblock button; otherwise the
device is not listed on the screen of EpsonNet EasyInstall.
5. Select the target device on which the network interface is
installed, and then click Next.
Chapter 1 Installing Components and Setting Up the Network Interface 48
Page 49

6. Select Auto or Manual to assign the IP address to the network
interface. When you select Manual, you must enter the IP
address, subnet mask, and default gateway.
7. Confirm the settings you selected from the previous dialog
box, and then click Next.
Chapter 1 Installing Components and Setting Up the Network Interface 49
Page 50

8. Enter the printer name and select the Set as default printer
check box if necessary. Click Next.
9. Select Yes or No to print a test page, and then click Next.
Chapter 1 Installing Components and Setting Up the Network Interface 50
Page 51

10. Click Finish to complete the configuration of the network
interface.
Configuring the network interface for Macintosh
Follow the steps below to connect the network interface to the
network.
Note:
This section explains the instructions for Mac OS X. The instructions
are almost the same for Mac OS 9.
1. Insert the Software CD-ROM in the CD-ROM drive.
If the Installer dialog box does not appear automatically,
double-click the EPSON CD-ROM icon on the desktop.
Chapter 1 Installing Components and Setting Up the Network Interface 51
Page 52

2. Double-click the appropriate OS icon in the EPSON folder.
3. From the Welcome screen, click Next.
Chapter 1 Installing Components and Setting Up the Network Interface 52
Page 53

4. Read the license agreement, and then click Agree.
5. Select Connect the Network Interface Card.
Chapter 1 Installing Components and Setting Up the Network Interface 53
Page 54

6. Click Next.
7. Select the target device on which the network interface is
installed, and then click Next.
Chapter 1 Installing Components and Setting Up the Network Interface 54
Page 55

8. Select Auto or Manual to assign the IP address to the network
interface, and then click Next. When you select Manual, you
must enter the IP address, subnet mask, and default gateway.
9. Confirm the settings you selected from the previous dialog
box, and then click Next.
Chapter 1 Installing Components and Setting Up the Network Interface 55
Page 56

10. Click Finish to complete the configuration of the network
interface.
Setting up the printer
The printer driver must be installed on the computer before you
can set up the printer. See the device’s manual for information on
installing the printer driver.
Mac OS X
1. Open the Applications folder.
2. Open the Utilities folder.
3. Open Print Center (for Mac OS X 10.2 or below) or Printer
Setup Utility (for Mac OS X 10.3), and then click Add.
4. Select Rendezvous from the drop-down list.
5. Select the printer model from the list.
6. Click Add.
Chapter 1 Installing Components and Setting Up the Network Interface 56
Page 57

Mac OS 9
1. Open Chooser from the Apple menu.
2. Click the printer icon.
3. Select the zone containing the printer.
4. Select the printer name from the list.
5. Make sure AppleTalk is active.
6. Close Chooser.
Now you can use the device on the network.
Chapter 1 Installing Components and Setting Up the Network Interface 57
Page 58

Installing the Printer Driver
About installing the printer driver
To print to the network device, you need to install the printer
driver on the computer. See the section appropriate for your
operating system.
“Windows XP” on page 58
“Windows Me/98/95” on page 65
“Windows 2000” on page 69
“Windows Server 2003” on page 76
“Windows NT 4.0” on page 83
“Macintosh” on page 87
Windows XP
Chapter 1
For Windows XP, the printer driver installation procedure differs
depending on the printing method you prefer. Epson
recommends printing with EpsonNet Print. See “For Windows
XP/2000/Server 2003/NT 4.0 Users” on page 122.
LPR printing
Note:
If you are using EpsonNet Print, the setup procedure is different. See
“About EpsonNet Print” on page 120 for details.
Chapter 1 Installing Components and Setting Up the Network Interface 58
Page 59

1. Click Start, click Control Panel, click Printers and Other
Hardware, and then click Printers and Faxes.
2. Under Printer Tasks, click Add a printer to start the Add
Printer wizard, and then click Next.
3. Click Local printer attached to this computer, clear the
Automatically detect and install my Plug and Play printer
check box, and then click Next.
Note:
You must clear the Automatically detect and install my Plug
and Play printer check box because the device is attached directly
to the network, not to a Windows XP computer.
Chapter 1 Installing Components and Setting Up the Network Interface 59
Page 60

4. Select the Create a new port radio button, and then select
Standard TCP/IP Port from the list. Then click Next.
5. Enter the IP address of the network interface and then click
Next.
Chapter 1 Installing Components and Setting Up the Network Interface 60
Page 61

6. If an error occurs, the following dialog box appears. Select the
Standard radio button and then select EPSON Network
Printer. Click Next.
7. Click Finish.
8. See “Installing a printer driver” on page 63 to install the
printer driver.
Internet printing
1. Click Start, click Control Panel, click Printers and Other
Hardware, and then click Printers and Faxes.
2. Under Printer Tasks, click Add a printer to start the Add
Printer wizard, and then click Next.
3. Click A network printer, or a printer attached to another
computer, and then click Next.
4. Select the Connect to a printer on the Internet or on a
home or office network radio button.
Chapter 1 Installing Components and Setting Up the Network Interface 61
Page 62

5. Enter the URL of the target device using the format below.
The URL should be same as the URL you set on EpsonNet
Config’s IPP configuration page.
http://IP address of network interface:631/Printer name
Example: http://192.168.100.201:631/EPSON_IPP_Printer
Note:
To check the IP address of the network interface, use EpsonNet
Config. See “About EpsonNet Config for Windows” on page 91 for
details.
6. Follow the on-screen instructions to set up the device. See
“Installing a printer driver” on page 63 if necessary.
Chapter 1 Installing Components and Setting Up the Network Interface 62
Page 63

Microsoft Network Shared printing
1. Click Start, click Control Panel, click Printers and Other
Hardware, and then click Printers and Faxes.
2. Under Printer Tasks, click Add a printer to start the Add
Printer wizard, and then click Next.
3. Click A network printer, or a printer attached to another
computer, and then click Next.
4. Select the Browse for a printer radio button, and then click
Next.
5. Enter the following in the Printer box or select the device you
want to use from the Shared printers list box, and then click
Next.
\\NetBIOS name of network interface\Device name of network
interface
6. Follow the on-screen instructions to set up the device. See
“Installing a printer driver” on page 63 if necessary.
Installing a printer driver
1. Insert the Software CD-ROM shipped with the device.
2. Close the EPSON Software Installation screen if it appears.
3. Click the Have Disk button. The Install From Disk dialog box
appears.
4. Click Browse.
5. Select the CD-ROM drive for Drives, and double-click the
WINXP_2K folder. Click Open.
6. Click OK in the Install From Disk dialog box.
Chapter 1 Installing Components and Setting Up the Network Interface 63
Page 64

7. Select the model name of the device, and then click Next.
Note:
If the Add Printer wizard prompts you to select either Keep
existing driver or Replace existing driver, be sure to select the
Replace existing driver radio button.
8. Click Finish and follow the on-screen instructions to complete
the setup.
When you print using Microsoft Network Shared printing in
the Windows XP/2000/Server 2003/NT environment, see
“Using the NET USE command” on page 64 for more details.
Using the NET USE command
If you are running Windows XP/2000/Server 2003/NT and using
NetBIOS to connect to the device, we recommend that you use the
NET USE command, as follows:
1. Click Start, click Control Panel, click Network and Internet
Connections, and then select Network Connections.
2. Under LAN or High-Speed Internet, click the Local Area
Connection icon.
3. Under Network Tasks, click Change settings of this
connection.
4. Check that Client for Microsoft Networks is installed. If it is
not installed, click Install to install it.
5. Run the command prompt and enter the following command.
NET USE printer port: \\NetBIOS name of network
interface\Device name of network interface
Chapter 1 Installing Components and Setting Up the Network Interface 64
Page 65

Selecting the port
1. Click Start, click Control Panel, click Printers and Other
Hardware, and then click Printers and Faxes.
2. Right-click the printer icon and then select Properties.
3. Click the Ports tab and then select the port you have set with
the NET USE command.
Windows Me/98/95
For Windows Me/98/95, the printer driver installation procedure
differs depending on the printing method you prefer. Epson
recommends printing with EpsonNet Print. See “For Windows
Me/98/95 users” on page 131.
LPR printing
Since Windows Me/98/95 does not support LPR, standard
TCP/IP printing cannot be used. However, you can print via
TCP/IP using the EpsonNet Print utility included on the Software
CD-ROM. First, install EpsonNet Print. Then, install the printer
driver. See “About EpsonNet Print” on page 120 for more details.
Internet printing (Windows 98/95)
Internet printing is possible by using the EpsonNet Internet Print
utility included on the Software CD-ROM. First, install EpsonNet
Internet Print. Then, install the printer driver and set the printer
port. See “About EpsonNet Internet Print” on page 140 for more
details.
Chapter 1 Installing Components and Setting Up the Network Interface 65
Page 66

Internet printing (Windows Me)
Installing the IPP client
The IPP client must be installed on your computer. Follow the
steps below to install it.
1. Insert the Windows Me CD-ROM.
2. Select the add-ons folder, and then select the IPP folder.
3. Double-click wpnpins.exe. Then follow the on-screen
instructions.
4. Click OK to restart your computer.
Setting up the device
Connect your computer to a device through IPP.
1. Click Start, point to Settings, and then select Printers.
2. Double-click Add Printer, and then click Next.
3. Select the Network Printer radio button, and then click Next.
4. Type the URL of the device, and then click Next.
http://IP address of network interface:631/printer name
Example: http://192.168.100.201:631/EPSON_IPP_Printer
Note:
To check the IP address of the network interface, use EpsonNet
Config. See “About EpsonNet Config for Windows” on page 91 for
details.
5. See “Installing a printer driver” on page 68 to install the
printer driver.
Chapter 1 Installing Components and Setting Up the Network Interface 66
Page 67

Microsoft Network Shared printing
1. Click Start, point to Settings, and then select Printers.
2. Double-click Add Printer, and then click Next.
3. Select the Network Printer radio button, and then click Next.
4. Click Browse, and then select the network path from the list.
If you cannot browse, enter the following in the Network path
or queue name box.
\\NetBIOS name of network interface\
Device name of network interface
5. The Add Printer wizard appears. Click Next.
6. See “Installing a printer driver” on page 68 to install the
printer driver.
Chapter 1 Installing Components and Setting Up the Network Interface 67
Page 68

Installing a printer driver
1. Insert the Software CD-ROM shipped with the device.
2. Close the EPSON Software Installation screen if it appears.
3. Click the Have Disk button. The Install From Disk dialog box
appears.
4. Click Browse.
5. Select the CD-ROM drive for Drives, and then double-click
the WIN9X folder. Click OK.
6. Click OK in the Install From Disk dialog box.
7. Select the model name of the device, and then click Next.
Note:
If the Add Printer wizard prompts you to select either Keep
existing driver or Replace existing driver, be sure to select the
Replace existing driver radio button.
8. Click Finish and follow the on-screen instructions to complete
the setup.
When you print using Microsoft Network Shared printing in
the Windows XP/2000/Server 2003/NT environment, see
“Using the NET USE command” on page 69 for more details.
Chapter 1 Installing Components and Setting Up the Network Interface 68
Page 69

Using the NET USE command
If you are running Windows XP/2000/Server 2003/NT and using
NetBIOS to connect to the device, we recommend that you use the
NET USE command, as follows:
1. Right-click the Network Neighborhood icon or My Network
Places icon and then select Properties.
2. Check that Client for Microsoft Networks is in the
Components list. If it is not installed, click Add to install it.
3. Run the command prompt and enter the following command.
NET USE printer port: \\NetBIOS name of network
interface\Device name of network interface
Selecting the port
1. Click Start, point to Settings, and then select Printers.
2. Right-click the printer icon and select Properties.
3. Click the Details tab and select the port you have set with the
NET USE command.
Windows 2000
For Windows 2000, the printer driver installation procedure
differs depending on the printing method you prefer. Epson
recommends printing with EpsonNet Print. See “For Windows
XP/2000/Server 2003/NT 4.0 Users” on page 122.
LPR printing
Note:
If you are using EpsonNet Print, the setup procedure is different. See
“About EpsonNet Print” on page 120 for details.
Chapter 1 Installing Components and Setting Up the Network Interface 69
Page 70

1. Click Start, point to Settings, and then select Printers.
2. Double-click Add Printer to start the Add Printer wizard, and
then click Next.
3. Click Local printer, clear the Automatically detect and
install my Plug and Play printer check box, and then click
Next.
Note:
You must clear the Automatically detect and install my Plug
and Play printer check box because the device is attached directly
to the network, not to a Windows 2000 computer.
Chapter 1 Installing Components and Setting Up the Network Interface 70
Page 71

4. Select the Create a new port radio button, and then select
Standard TCP/IP Port from the list. Then click Next.
5. Enter the IP address of the network interface and then click
Next.
Chapter 1 Installing Components and Setting Up the Network Interface 71
Page 72

6. If an error occurs, the following dialog box appears. Select the
Standard radio button and then select EPSON Network
Printer. Click Next.
7. Click Finish.
8. See “Installing a printer driver” on page 74 to install the
printer driver.
Internet printing
1. Click Start, point to Settings, and then select Printers.
2. Double-click Add Printer to start the Add Printer wizard, and
then click Next.
3. Select the Network printer radio button and then click Next.
4. Select the Connect to a printer on the Internet or on your
intranet radio button.
Chapter 1 Installing Components and Setting Up the Network Interface 72
Page 73

5. Enter the URL of the target printer using the format below.
The URL should be same as the URL you set on EpsonNet
Config’s IPP configuration page.
http://IP address of network interface:631/Printer name
Example: http://192.168.100.201:631/EPSON_IPP_Printer
Note:
To check the IP address of the network interface, use EpsonNet
Config. See “About EpsonNet Config for Windows” on page 91 for
details.
6. Follow the on-screen instructions to set up the printer. See
“Installing a printer driver” on page 74 if necessary.
Microsoft Network Shared printing
1. Click Start, point to Settings, and then select Printers.
2. Double-click Add Printer to start the Add Printer wizard, and
then click Next.
3. Select the Network printer radio button and then click Next.
4. Select the Type the printer name, or click Next to browse
for a printer radio button.
5. Enter the following in the Name box or click Next to browse
for a device.
\\NetBIOS name of network interface\Device name of network
interface
6. Follow the on-screen instructions to set up the device. See
“Installing a printer driver” on page 74 if necessary.
Chapter 1 Installing Components and Setting Up the Network Interface 73
Page 74

Installing a printer driver
1. Insert the Software CD-ROM shipped with the device.
2. Close the EPSON Software Installation screen if it appears.
3. Click the Have Disk button. The Install From Disk dialog box
appears.
4. Click Browse.
5. Select the CD-ROM drive for Drives, and double-click the
WINXP_2K or WIN2000 folder. Click Open.
6. Click OK in the Install From Disk dialog box.
7. Select the model name of the device, and then click Next.
Note:
If the Add Printer wizard prompts you to select either Keep
existing driver or Replace existing driver, be sure to select the
Replace existing driver radio button.
8. Click Finish and follow the on-screen instructions to complete
the setup.
When you print using Microsoft Network Shared printing in
the Windows XP/2000/Server 2003/NT environment, see
“Using the NET USE command” on page 75 for more details.
Chapter 1 Installing Components and Setting Up the Network Interface 74
Page 75

Using the NET USE command
If you are running Windows XP/2000/Server 2003/NT and using
NetBIOS to connect to the device, we recommend that you use the
NET USE command, as follows:
1. Right-click the My Network Places icon and then select
Properties.
2. Right-click the Local Area Connections ic o n a n d t he n se le ct
Properties.
3. Check that Client for Microsoft Networks is in the
Components list. If it is not installed, click Install to install it.
4. Run the command prompt and enter the following command.
NET USE printer port: \\NetBIOS name of network
interface\Device name of network interface
Selecting the port
1. Click Start, point to Settings, and then select Printers.
2. Right-click the printer icon and then select Properties.
3. Click the Ports tab and then select the port you have set with
the NET USE command.
Chapter 1 Installing Components and Setting Up the Network Interface 75
Page 76

Windows Server 2003
For Windows Server 2003, the printer driver installation
procedure differs depending on the printing method you prefer.
Epson recommends printing with EpsonNet Print. See “For
Windows XP/2000/Server 2003/NT 4.0 Users” on page 122.
LPR printing
Note:
If you are using EpsonNet Print, the setup procedure is different. See
“About EpsonNet Print” on page 120 for details.
1. Click Start, and then select Printers and Faxes.
2. Double-click the Add Printer icon to start the Add Printer
wizard, and then click Next.
3. Click Local printer attached to this computer, clear the
Automatically detect and install my Plug and Play printer
check box, and then click Next.
Chapter 1 Installing Components and Setting Up the Network Interface 76
Page 77

Note:
You must clear the Automatically detect and install my Plug
and Play printer check box because the device is attached directly
to the network, not to a computer.
4. Select the Create a new port radio button, and then select
Standard TCP/IP Port from the list. Click Next.
Chapter 1 Installing Components and Setting Up the Network Interface 77
Page 78

5. When Add Standard TCP/IP Printer Port Wizard dialog box
appears, click Next.
6. Enter the IP address of the network interface and then click
Next.
Chapter 1 Installing Components and Setting Up the Network Interface 78
Page 79

7. If an error occurs, the following dialog box appears. Select the
Standard radio button and then select EPSON Network
Printer. Click Next.
8. Click Finish.
9. See “Installing a printer driver” on page 81 to install the
printer driver.
Internet printing
1. Click Start, and then select Printers and Faxes.
2. Double-click the Add Printer icon to start the Add Printer
wizard, and then click Next.
3. Select A network printer, or a printer attached to another
computer, and then click Next.
4. Select the Connect to a printer on the Internet or on a
home or office network radio button.
Chapter 1 Installing Components and Setting Up the Network Interface 79
Page 80

5. Enter the URL of the target device using the format below.
The URL must be the same URL you set on EpsonNet Config’s
IPP configuration page.
http://IP address of network interface:631/Printer name
Example: http://192.168.100.201:631/EPSON_IPP_Printer
Note:
To check the IP address of the network interface, use EpsonNet
Config. See “About EpsonNet Config for Windows” on page 91 for
details.
6. Follow the on-screen instructions to set up the device. See
“Installing a printer driver” on page 81 if necessary.
Microsoft Network Shared printing
1. Click Start, and then select Printers and Faxes.
2. Double-click the Add Printer icon to start the Add Printer
wizard, and then click Next.
Chapter 1 Installing Components and Setting Up the Network Interface 80
Page 81

3. Click A network printer, or a printer attached to another
computer, and then click Next.
4. Select the Browse for a printer radio button, and then click
Next.
5. Enter the following in the Printer box or select the device you
want to use from the Shared printers list box. Click Next.
\\NetBIOS name of network interface\Device name of network
interface
6. Follow the on-screen instructions to set up the device. See
“Installing a printer driver” on page 81 if necessary.
Installing a printer driver
1. Insert the Software CD-ROM shipped with the device.
2. Close the EPSON Software Installation screen if it appears.
3. Click the Have Disk button. The Install From Disk dialog box
appears.
4. Click Browse.
5. Select the CD-ROM drive for Drives, and then double-click
the WinXP_2K or WIN2000 folder. Click Open.
6. Click OK in the Install From Disk dialog box.
7. Select the model name of the device, and then click Next.
Note:
If the Add Printer wizard prompts you to select either Keep
existing driver or Replace existing driver, be sure to select the
Replace existing driver radio button.
Chapter 1 Installing Components and Setting Up the Network Interface 81
Page 82

8. Click Finish and then follow the on-screen instructions to
complete the setup.
When you print using Microsoft Network Shared printing in
the Windows XP/2000/Server 2003/NT environment, see
“Using the NET USE command” on page 82 for more details.
Using the NET USE command
If you are running Windows XP/2000/Server 2003/NT and using
NetBIOS to connect to the device, we recommend that you use the
NET USE command, as follows:
1. Click Start, point to Control Panel, and then select Network
Connections. Click Local Area Connections.
2. Click the Properties button.
3. Check that Client for Microsoft Networks is installed. If
necessary, click Install to install it.
4. Run the command prompt and then enter the following
command.
NET USE printer port: \\NetBIOS name of network
interface\Device name of network interface
Selecting the port
1. Click Start, and then select Printers and Faxes.
2. Right-click the printer icon and then select Properties.
3. Click the Ports tab and then select the port you have set using
the NET USE command.
Chapter 1 Installing Components and Setting Up the Network Interface 82
Page 83

Windows NT 4.0
For Windows NT 4.0, the printer driver installation procedure
differs depending on the printing method you prefer. Epson
recommends printing with EpsonNet Print. See “For Windows
XP/2000/Server 2003/NT 4.0 Users” on page 122.
LPR printing
Note:
If you are using EpsonNet Print, the setup procedure is different. See
“About EpsonNet Print” on page 120 for details.
1. Click Start, point to Settings, and then select Printers.
2. Double-click the Add Printer icon.
3. Select the My Computer radio button, and then click Next.
4. Click Add Port in the Add Printer wizard dialog box.
5. Select LPR Port from the Available Printer Port list, and then
click New Port.
Note:
You cannot use the Lexmark TCP/IP Network Port with the
network interface.
6. Enter the IP address of the network interface in the first text
box and the device name in the second text box. Click OK.
Chapter 1 Installing Components and Setting Up the Network Interface 83
Page 84

7. In the Printer Ports dialog box, click Close.
8. In the Add Printer Wizard dialog box, click Next.
9. See “Installing a printer driver” on page 85 to install the
printer driver.
Internet printing
1. Click Start, point to Settings, and then select Printers.
2. Double-click Add Printer to start the Add Printer wizard, and
then click Next.
3. Select the Network printer radio button and then click Next.
4. Select the Connect to a printer on the Internet or on your
intranet radio button.
5. Enter the URL of the target device using the format below.
The URL should be same as the URL you set on EpsonNet
Config’s IPP configuration page.
http://IP address of network interface:631/Printer name
Example: http://192.168.100.201:631/EPSON_IPP_Printer
Note:
To check the IP address of the network interface, use EpsonNet
Config. See “About EpsonNet Config for Windows” on page 91 for
details.
Follow the on-screen instructions to set up the device. See
“Installing a printer driver” on page 74 if necessary.
Chapter 1 Installing Components and Setting Up the Network Interface 84
Page 85

Microsoft Network Shared printing
1. Click Start, point to Settings, and then select Printers.
2. Double-click Add Printer.
3. Select the Network printer server radio button and then click
Next. The Connect to Printer dialog box appears.
4. Select the device you want to configure from the Shared
Printers list. If you cannot select the device, enter the following
in the Printer box:
\\NetBIOS name of network interface\Device name of network
interface
5. Click OK.
6. Follow the on-screen instructions to set up the device. See
“Installing a printer driver” on page 85 if necessary.
Installing a printer driver
1. Insert the Software CD-ROM shipped with the device.
2. Close the EPSON Installation Program screen if it appears.
3. Click the Have Disk button. The Install From Disk dialog box
appears.
4. Click Browse.
5. Select the CD-ROM drive for Drives, and then double-click
the WINNT40 folder. Click Open.
6. Click OK in the Install From Disk dialog box.
7. Select the model name of the device, and then click Next.
Chapter 1 Installing Components and Setting Up the Network Interface 85
Page 86

Note:
If the Add Printer wizard prompts you to select either Keep existing
driver or Replace existing driver (recommended), be sure to
select the Replace existing driver radio button.
8. Follow the on-screen instructions to complete the setup.
When you print using Microsoft Network Shared printing in
the Windows XP/2000/Server 2003/NT environment, see
“Using the NET USE command” on page 86 for more details.
Using the NET USE command
If you are running Windows XP/2000/Server 2003/NT and using
NetBIOS to connect to the device, we recommend that you use the
NET USE command, as follows:
1. Check that the following services are installed.
Right-click the Network Neighborhood icon on the desktop
and select Properties. Click the Services tab and check that
Server or Workstation is listed.
2. If it is not installed, click Add.
3. Run the command prompt and enter the following command.
NET USE printer port: \\NetBIOS name of network
interface\Device name of network interface
Selecting the port
1. Click Start, point to Settings, and then select Printers.
2. Right-click the printer icon and then select Properties.
3. Click the Ports tab and then select the port you have set using
the NET USE command.
Chapter 1 Installing Components and Setting Up the Network Interface 86
Page 87

Macintosh
Follow the steps below to set a device.
Note:
Make sure that the printer driver is installed on your Macintosh before
following the steps below. See the manual shipped with your device for
instructions on how to install the printer driver.
Mac OS X
Rendezvous printing
1. Open the Applications folder.
2. Open the Utilities folder.
3. Open Print Center (for Mac OS X 10.2 or below) or Printer
Setup Utility (for Mac OS X 10.3), and then click Add.
4. Select Rendezvous from the drop-down list.
5. Select the device model from the list.
6. Click Add.
TCP/IP printing
1. Open the Applications folder.
2. Open the Utilities folder.
3. Open Print Center (for Mac OS X 10.2 or below) or Printer
Setup Utility (for Mac OX 10.3), and then click Add.
4. Select EPSON TCP/IP from the drop down list.
5. Select the printer model from the list.
6. Click Add.
Chapter 1 Installing Components and Setting Up the Network Interface 87
Page 88

AppleTalk printing
1. Open the Applications folder.
2. Open the Utilities folder.
3. Open Print Center (for Mac OS X 10.2 or below) or Printer
Setup Utility (for Mac OS X 10.3), and then click Add.
4. Select EPSON AppleTalk from the drop down list.
5. Select the zone from the drop down list.
6. Select the printer name from the list.
7. Click Add.
Mac OS 9
AppleTalk printing
1. Open Chooser from the Apple menu.
2. Click the printer icon.
3. Select the zone containing the printer.
4. Select the printer name from the list.
5. Make sure AppleTalk is active.
6. Close Chooser.
Chapter 1 Installing Components and Setting Up the Network Interface 88
Page 89

Chapter 2
About the Software
Overview
The software described below are provided with the network
interface on the CD-ROM. They are very useful when you set up
the network interface and configure and modify the settings of
the network interface. For more information on how to use them,
see the documentation or online help for each software.
❏ EpsonNet Config for Windows is a Windows-based
configuration utility for administrators that allows you to
configure the network interface for various protocols such as
TCP/IP, NetWare, MS Network, AppleTalk, IPP, and SNMP.
See “About EpsonNet Config for Windows” on page 91.
❏ EpsonNet Config for Macintosh is a Macintosh-based
configuration utility for administrators that allows you to
configure the network interface for various protocols such as
TCP/IP, AppleTalk, and IPP. See “About EpsonNet Config
for Macintosh” on page 95.
❏ EpsonNet Config with Web Browser is a Web-based
configuration utility that allows you to configure the network
interface for various protocols such as TCP/IP, NetWare, MS
Network, AppleTalk, IPP, and SNMP. See “About EpsonNet
Config with Web Browser” on page 98.
❏ EpsonNet Print is a utility that enables TCP/IP printing for
Windows. (Windows XP/2000/Server 2003/NT 4.0 also
support OS standard LPR printing.) See “About EpsonNet
Print” on page 120.
Chapter 2 About the Software 89
Page 90

❏ EpsonNet Internet Print is a utility that supports printing
across the Internet using Internet Printing Protocol for
Windows 98/95/NT 4.0. See “About EpsonNet Internet
Print” on page 140.
❏ EpsonNet WebManager is a Web-based utility that helps
network administrators to easily manage network devices.
See “About EpsonNet WebManager” on page 151.
❏ EpsonNet SetupManager is a utility that provides a simple
printer installation and configuration tool for network
administrators, and an easy network printer installation
process for clients. See “About EpsonNet SetupManager” on
page 159.
Chapter 2 About the Software 90
Page 91

EpsonNet Config for Windows
About EpsonNet Config for Windows
EpsonNet Config for Windows is a Windows-based configuration
software for administrators to configure the network interface for
TCP/IP, NetWare, MS Network, AppleTalk, SNMP, and IPP.
Note:
❏ Be sure to use EpsonNet Config included on the Software CD-ROM
shipped with this product.
❏ EpsonNet Config installed on Windows XP/Server 2003 does not
support NetBEUI as a search protocol because officially the
NetBEUI protocol is not supported on Windows XP/Server 2003.
❏ If you are using the device in a dial-up environment not running
NetWare, clear the Use NetWare check box on the NetWare
screen. If this check box is selected, the extra account may be charged
when you use the dial-up router.
❏ When configuring the network interface for NetWare, use the IPX
protocol and log in to the NetWare server or the NDS context with
supervisor privileges.
Chapter 2
❏ When you configure the network interface for NetWare 5.x, you
must log in to the NetWare server using an IPX connection. If you
log in to the NetWare server using an IP connection, the NetWare
screen and the IPX trap setting of SNMP are not available.
Chapter 2 About the Software 91
Page 92

System requirements
The following table lists the system requirements of EpsonNet
Config.
Operating systems Windows XP Home Edition/Professional
Windows Me
Windows 98/98 Second Edition
Windows 95 OSR2 or higher
Windows NT 4.0 Server/Workstation with Service
Pack 5.0 or higher
Windows 2000 Server/Professional
Windows Server 2003
Hard disk drive space 10 MB
Installing EpsonNet Config for Windows
Follow the steps below to install EpsonNet Config on your
computer to configure the network interface.
Note:
If you add or delete protocols or services from your operating system after
installing EpsonNet Config, EpsonNet Config may not work correctly.
If this happens, uninstall EpsonNet Config and then install it again.
1. Insert the Software CD-ROM in the CD-ROM drive.
2. The Software Installation screen opens automatically.
If the Software Installation screen does not appear,
double-click EPSetup.exe on the CD-ROM.
3. Make sure that all applications are closed, and then click the
Next button.
Chapter 2 About the Software 92
Page 93

4. Read the license agreement, and then click the Agree button.
If necessary, select the model of your printer.
5. Select Install Network Utility.
6. Click the icon located next to EpsonNet Config.
7. Follow the on-screen instructions to complete the installation.
Note:
If the following screen appears after you start EpsonNet Config, click
the Unblock button; otherwise the devices are not listed on the
screen of EpsonNet Config.
Chapter 2 About the Software 93
Page 94

Accessing the EpsonNet Config for Windows User’s Guide
The EpsonNet Config for Windows User’s Guide contains detailed
information on EpsonNet Config. Follow the steps below to access
the EpsonNet Config User’s Guide.
1. Click Start, point to All Programs (for Windows XP/Server
2003 users) or Programs (for Windows Me/98/95/2000/NT
4.0 users), and then select EpsonNet. Click EpsonNet Config
to start it.
2. From the Help menu, select EpsonNet Config Help.
The EpsonNet Config User’s Guide appears. By clicking the links
on the left side of the screen, you can get information on using
EpsonNet Config.
Chapter 2 About the Software 94
Page 95

EpsonNet Config for Macintosh
About EpsonNet Config for Macintosh
EpsonNet Config for Macintosh is a Macintosh-based
configuration software for administrators that allows you to
configure the network interface for TCP/IP, AppleTalk, SNMP,
and IPP.
Note:
Be sure to use EpsonNet Config included on the Software CD-ROM
shipped with this product.
System requirements
The following table lists the system requirements of EpsonNet
Config.
Operating systems Mac OS 10.x/9.x/8.x
Models PowerPC Macintosh
Chapter 2
Hard disk drive space 10 MB
Installing EpsonNet Config for Macintosh
Follow the steps below to install EpsonNet Config to configure
the network interface.
1. Insert the Software CD-ROM in the CD-ROM drive.
2. Double-click the EPSON CD-ROM icon.
3. Double-click the appropriate OS icon in the EPSON folder.
4. From the Welcome screen, click the Next button.
Chapter 2 About the Software 95
Page 96

5. Read the license agreement, and then click the Agree button.
6. Select Install Network Utility.
7. Click the Next button
8. Click the icon located next to EpsonNet Config to install
EpsonNet Config. Follow the on-screen instructions to
complete the installation.
9. Restart your computer.
Accessing the EpsonNet Config for Macintosh User’s Guide
The EpsonNet Config for Macintosh User’s Guide contains detailed
information on EpsonNet Config. Follow the steps below to access
the EpsonNet Config User’s Guide.
1. Double-click the Macintosh HD icon. In the Applications
folder, double-click the EpsonNet folder, and then
double-click the EpsonNet Config folder. Finally,
double-click the EpsonNet Config icon.
Chapter 2 About the Software 96
Page 97

2. From the Help menu, select EpsonNet Config Help.
The EpsonNet Config User’s Guide appears. By clicking the links
on the left side of the screen, you can get information on using
EpsonNet Config.
Chapter 2 About the Software 97
Page 98

EpsonNet Config with Web Browser
About EpsonNet Config with Web Browser
EpsonNet Config with Web Browser is a Web-based utility
designed to configure the network interface for use on a network.
By typing the IP address of the network interface for the URL in
your browser, you can start EpsonNet Config to allow you to
configure the network interface for TCP/IP, NetWare, MS
Network, AppleTalk, IPP, and SNMP.
Supported Web browser
❏ Microsoft Internet Explorer version 4.0 or later
❏ Netscape Communicator version 4.0 or later
❏ Netscape Navigator version 3.02 or later
❏ Apple Safari 1.2 or later
Chapter 2
About Web browser setting
When running EpsonNet Config with Web Browser, be sure to
disable the proxy server to use the utility through the Internet. If
you use Internet Explorer as the web browser, use the following
steps to clear the Access the Internet using a proxy server check
box. For other web browsers, see the documentation or online
help of your web browser.
1. Start up Internet Explorer.
2. Select Internet Options from the Tool menu.
3. Click the Connections tab.
Chapter 2 About the Software 98
Page 99

4. Click the LAN Settings button.
5. Clear the Use a proxy server for your LAN (These settings
will not apply to dial-up or VPN connections). check box.
Configuring the network interface using EpsonNet Config with Web Browser
After you have assigned an IP address to the network interface
using EpsonNet EasyInstall, EpsonNet Config for Windows or
Macintosh, or the arp/ping command, you can configure the
network interface using EpsonNet Config with Web Browser.
Note:
❏ A Web browser must be installed on your computer.
❏ TCP/IP must be correctly set for the computer and the network
interface.
❏ Do not run both EpsonNet Config for Windows or Macintosh and
EpsonNet Config with Web Browser at the same time.
❏ Your browser may restrict some characters you can use. For details,
see your browser or operating system documentation.
❏ If you are using the dial-up environment and not using NetWare,
select Disable on the NetWare screen. If Enable is selected, the
extra account may be charged when you are using the dial-up router.
Follow the steps below to change the IP address using EpsonNet
Config with Web Browser.
1. Turn on the device.
2. Run EpsonNet Config with Web Browser using one of the
following ways.
Chapter 2 About the Software 99
Page 100

❏ Run EpsonNet Config for Windows or Macintosh. Select
the device you want to configure from the list and then
click Launch Browser.
❏ Ope n yo ur b ro wse r, a nd t hen typ e in th e IP add res s of the
network interface directly. Do not run EpsonNet Config
for Windows or Macintosh.
http://IP address of network interface/
Example: http://192.168.100.201/
Note:
To check the IP address of the network interface, use EpsonNet
Config. For details, see “About EpsonNet Config for Windows” on
page 91 for Windows users, or “About EpsonNet Config for
Macintosh” on page 95 for Macintosh users.
Note on NetWare setting:
❏ From any NetWare client, log in to the target NetWare server
or NDS context with supervisor privileges.
❏ You cannot create a print server, print queue, or printer with
EpsonNet Config with Web Browser. You must create these
objects before using EpsonNet Config with Web Browser.
3. Click TCP/IP under Network on the Configuration menu to
display the TCP/IP setting screen.
Note:
If you want to configure a protocol other than TCP/IP, see
“Configuration - Network Screens” on page 108.
4. Select a method for acquiring the IP address. When you select
Auto, an IP address is automatically assigned to the network
interface via DHCP. If you want to set the IP address
manually, select Manual.
Chapter 2 About the Software 100
 Loading...