

Page 1

C82378✽
®
EpsonNet 10/100 Base Tx External Print Server
All rights reserved. No part of this publication may be reproduced, stored in a retrieval
system, or transmitted in any form or by any means, electronic, mechanical, photocopying,
recording, or otherwise, without the prior written permission of Seiko Epson Corporation.
The information contained herein is designed only for use with this Epson product. Epson
is not responsible for any use of this information as applied to other products.
Neither Seiko Epson Corporation nor its affiliates shall be liable to the purchaser of this
product or third parties for damages, losses, costs, or expenses incurred by purchaser or third
parties as a result of: accident, misuse, or abuse of this product or unauthorized modifications,
repairs, or alterations to this product, or (excluding the U.S.) failure to strictly comply with
Seiko Epson Corporation’s operating and maintenance instructions.
Seiko Epson Corporation shall not be liable against any damages or problems arising from
the use of any options or any consumable products other than those designated as Original
Epson Products or Epson Approved Products by Seiko Epson Corporation.
EPSON, EPSON Stylus, and EPSON ESC/P are registered trademarks of Seiko Epson
Corporation.
NetWare and Novell are registered trademarks of Novell, Inc.
Apple, Macintosh, AppleShare, LaserWriter, AppleTalk, LocalTalk, EtherTalk,
OpenTransport and Kanji-Talk are registered trademarks of Apple Computer, Inc.
PostScript is a registered trademark of Adobe Systems, Inc.
Unix is a registered trademark in the United States and other countries, licensed exclusively
through X/Open Company Limited.
IBM, OS/2, OS/2 Warp, WebExplorer, NetFinity, AIX are trademarks of IBM Corp.
LANDesk, NetPort are trademarks of Intel Corp.
Microsoft, Windows, Windows NT, Internet Explorer, ActiveX are registered trademarks of
Microsoft Corp.
SPARC, SunOS, Sunsoft, Solaris, Java are trademarks of Sun Microsystems, Inc.
SCO UNIX, SCO UnixWare are registered trademarks of The Santa Cruz Operation, Inc.
HP, HP/UX, PCL, HPGL are registered trademarks of Hewlett-Packard Company.
General Notice: Other product names used herein are for identification purposes only and may be
trademarks of their respective owners. Epson disclaims any and all rights in those marks.
© 2003 by Epson America, Inc.
Administrator’s Manual
NPD0420-00
Page 2

FCC Compliance Statement
For United States Users
This equipment has been tested and found to comply with the limits for a Class B digital
device, pursuant to Part 15 of the FCC Rules. These limits are designed to provide reasonable
protection against harmful interference in a residential installation. This equipment
generates, uses and can radiate radio frequency energy and, if not installed and used in
accordance with the instructions, may cause harmful interference to radio or television
reception. However, there is no guarantee that interference will not occur in a particular
installation. If this equipment does cause interference to radio and television reception, which
can be determined by turning the equipment off and on, the user is encouraged to try to
correct the interference by one or more of the following measures.
❏ Reorient or relocate the receiving antenna
❏ Increase the separation between the equipment and receiver
❏ Connect the equipment into an outlet on a circuit different from that to which the receiver
is connected
❏ Consult the dealer or an experienced radio/TV technician for help.
WARNING
The connection of a non-shielded equipment interface cable to this equipment will invalidate
the FCC Certification of this device and may cause interference levels which exceed the limits
established by the FCC for this equipment. It is the responsibility of the user to obtain and
use a shielded equipment interface cable with this device. If this equipment has more than
one interface connector, do not leave cables connected to unused interfaces.
Changes or modifications not expressly approved by the manufacturer could void the user’s
authority to operate the equipment.
For Canadian Users
This Class B digital apparatus complies with Canadian ICES-003.
Cet appareil numérique de la classe B est conforme à la norme NMB-003 du Canada.
For European Users
This product conforms to CE marking requirements in accordance with EC Directives
89/336/EEC.
AC Adapter model A120H conforms to CE marking requirements in accordance with EC
Directives 73/23/EEC and 89/336/EEC.
ii
Page 3

DECLARATION of CONFORMITY
According to 47CFR, Part 2 and 15 for Class B Personal Computers and
Peripherals; and/or CPU Boards and Power Supplies used with Class B
Personal Computers:
We: Epson America, Inc.
Located at: MS 3-13
3840 Kilroy Airport Way
Long Beach, CA 90806
Telephone: (562)290-5254
Declare under sole responsibility that the product identified herein, complies
with 47CFR Part 2 and 15 of the FCC rules as a Class B digital device. Each
product marketed, is identical to the representative unit tested and found to
be compliant with the standards. Records maintained continue to reflect the
equipment being produced can be expected to be within the variation
accepted, due to quantity production and testing on a statistical basis as
required by 47CFR §2.909 Operation is subject to the following two
conditions: (1) this device may not cause harmful interference, and (2) this
device must accept any interference received, including interference that
may cause undesired operation.
Trade Name: EPSON
Type of Product: Print Server
Model: EU-44
iii
Page 4

iv
Page 5

Contents
Introduction
About Your Print Server. . . . . . . . . . . . . . . . . . . . . . . . . . . . . . . . . . . . .1
Important Safety Instructions . . . . . . . . . . . . . . . . . . . . . . . . . . . . . . . .2
About This Guide . . . . . . . . . . . . . . . . . . . . . . . . . . . . . . . . . . . . . . . . . .3
Warnings, Cautions, and Notes . . . . . . . . . . . . . . . . . . . . . . . . . .3
Package Contents. . . . . . . . . . . . . . . . . . . . . . . . . . . . . . . . . . . . . . . . . . .4
Operating Environment . . . . . . . . . . . . . . . . . . . . . . . . . . . . . . . . . . . . .5
Supported Epson Printers . . . . . . . . . . . . . . . . . . . . . . . . . . . . . . . . . . .6
Features of the Print Server . . . . . . . . . . . . . . . . . . . . . . . . . . . . . . . . . .7
Print Server Operation . . . . . . . . . . . . . . . . . . . . . . . . . . . . . . . . . . . . . .8
About the Software . . . . . . . . . . . . . . . . . . . . . . . . . . . . . . . . . . . . . . . .11
Terms and Concepts . . . . . . . . . . . . . . . . . . . . . . . . . . . . . . . . . . . . . . .12
Overview . . . . . . . . . . . . . . . . . . . . . . . . . . . . . . . . . . . . . . . . . . . . . . . .13
Chapter 1 Installing Components on Your Computer
About Installing Components on Your Computer. . . . . . . . . . . . . .15
Windows Me/98/95 . . . . . . . . . . . . . . . . . . . . . . . . . . . . . . . . . . . . . . .15
Windows XP. . . . . . . . . . . . . . . . . . . . . . . . . . . . . . . . . . . . . . . . . . . . . .18
Windows Server 2003 . . . . . . . . . . . . . . . . . . . . . . . . . . . . . . . . . . . . . .21
Windows 2000 . . . . . . . . . . . . . . . . . . . . . . . . . . . . . . . . . . . . . . . . . . . .23
Windows NT 4.0 . . . . . . . . . . . . . . . . . . . . . . . . . . . . . . . . . . . . . . . . . .26
Macintosh . . . . . . . . . . . . . . . . . . . . . . . . . . . . . . . . . . . . . . . . . . . . . . . .30
Mac OS 8.6 to 9.x. . . . . . . . . . . . . . . . . . . . . . . . . . . . . . . . . . . . . .30
Mac OS X . . . . . . . . . . . . . . . . . . . . . . . . . . . . . . . . . . . . . . . . . . . .30
v
Page 6

Chapter 2 How to Set Up the Print Server
Connecting the Print Server to the Network . . . . . . . . . . . . . . . . . . 31
Installing EpsonNet WinAssist/MacAssist . . . . . . . . . . . . . . . . . . . 33
For Windows . . . . . . . . . . . . . . . . . . . . . . . . . . . . . . . . . . . . . . . . 33
For Macintosh . . . . . . . . . . . . . . . . . . . . . . . . . . . . . . . . . . . . . . . 34
Setting an IP Address Using EpsonNet WinAssist . . . . . . . . . . . . . 36
Setting an IP Address Using EpsonNet MacAssist . . . . . . . . . . . . . 42
Chapter 3 EpsonNet WinAssist Configuration Utility
About EpsonNet WinAssist . . . . . . . . . . . . . . . . . . . . . . . . . . . . . . . . 49
Menu Bar . . . . . . . . . . . . . . . . . . . . . . . . . . . . . . . . . . . . . . . . . . . . . . . . 50
Timeout option . . . . . . . . . . . . . . . . . . . . . . . . . . . . . . . . . . . . . . 51
Search method . . . . . . . . . . . . . . . . . . . . . . . . . . . . . . . . . . . . . . . 52
Search options . . . . . . . . . . . . . . . . . . . . . . . . . . . . . . . . . . . . . . . 53
Firmware update . . . . . . . . . . . . . . . . . . . . . . . . . . . . . . . . . . . . . 56
Details of the Configuration Dialog Box. . . . . . . . . . . . . . . . . . . . . . 56
Information. . . . . . . . . . . . . . . . . . . . . . . . . . . . . . . . . . . . . . . . . . 56
TCP/IP . . . . . . . . . . . . . . . . . . . . . . . . . . . . . . . . . . . . . . . . . . . . . 58
NetWare . . . . . . . . . . . . . . . . . . . . . . . . . . . . . . . . . . . . . . . . . . . . 62
MS Network . . . . . . . . . . . . . . . . . . . . . . . . . . . . . . . . . . . . . . . . . 68
AppleTalk . . . . . . . . . . . . . . . . . . . . . . . . . . . . . . . . . . . . . . . . . . . 70
IPP . . . . . . . . . . . . . . . . . . . . . . . . . . . . . . . . . . . . . . . . . . . . . . . . . 72
SNMP . . . . . . . . . . . . . . . . . . . . . . . . . . . . . . . . . . . . . . . . . . . . . . 73
About Password . . . . . . . . . . . . . . . . . . . . . . . . . . . . . . . . . . . . . . . . . . 75
vi
Page 7

Chapter 4 EpsonNet MacAssist Configuration Utility
About EpsonNet MacAssist. . . . . . . . . . . . . . . . . . . . . . . . . . . . . . . . .77
Menu Bar. . . . . . . . . . . . . . . . . . . . . . . . . . . . . . . . . . . . . . . . . . . . . . . . .77
Timeout . . . . . . . . . . . . . . . . . . . . . . . . . . . . . . . . . . . . . . . . . . . . .79
Network path search setting. . . . . . . . . . . . . . . . . . . . . . . . . . . .79
Search options . . . . . . . . . . . . . . . . . . . . . . . . . . . . . . . . . . . . . . . .80
Details of the Configuration Dialog Box . . . . . . . . . . . . . . . . . . . . . .82
Information . . . . . . . . . . . . . . . . . . . . . . . . . . . . . . . . . . . . . . . . . .82
TCP/IP . . . . . . . . . . . . . . . . . . . . . . . . . . . . . . . . . . . . . . . . . . . . . .83
AppleTalk . . . . . . . . . . . . . . . . . . . . . . . . . . . . . . . . . . . . . . . . . . .87
IPP. . . . . . . . . . . . . . . . . . . . . . . . . . . . . . . . . . . . . . . . . . . . . . . . . .88
About Password . . . . . . . . . . . . . . . . . . . . . . . . . . . . . . . . . . . . . . . . . .89
Configuring the Print Server Using EpsonNet MacAssist EasySetup
90
Chapter 5 Installing the Printer Driver
Windows Me/98/95 . . . . . . . . . . . . . . . . . . . . . . . . . . . . . . . . . . . . . . .95
LPR printing . . . . . . . . . . . . . . . . . . . . . . . . . . . . . . . . . . . . . . . . .95
Internet printing (Windows 98/95) . . . . . . . . . . . . . . . . . . . . . .95
Internet printing (Windows Me) . . . . . . . . . . . . . . . . . . . . . . . .96
Microsoft Network Shared printing . . . . . . . . . . . . . . . . . . . . .97
Installing a printer driver . . . . . . . . . . . . . . . . . . . . . . . . . . . . . .98
Using the NET USE command . . . . . . . . . . . . . . . . . . . . . . . . . .99
Windows XP. . . . . . . . . . . . . . . . . . . . . . . . . . . . . . . . . . . . . . . . . . . . .100
LPR printing . . . . . . . . . . . . . . . . . . . . . . . . . . . . . . . . . . . . . . . .100
Internet printing . . . . . . . . . . . . . . . . . . . . . . . . . . . . . . . . . . . . .103
Microsoft Network Shared printing . . . . . . . . . . . . . . . . . . . .104
Installing a printer driver . . . . . . . . . . . . . . . . . . . . . . . . . . . . .105
Using the NET USE command . . . . . . . . . . . . . . . . . . . . . . . . .106
Windows Server 2003 . . . . . . . . . . . . . . . . . . . . . . . . . . . . . . . . . . . . .107
LPR printing . . . . . . . . . . . . . . . . . . . . . . . . . . . . . . . . . . . . . . . .107
Internet printing . . . . . . . . . . . . . . . . . . . . . . . . . . . . . . . . . . . . .109
Microsoft Network Shared printing . . . . . . . . . . . . . . . . . . . .111
Installing a printer driver . . . . . . . . . . . . . . . . . . . . . . . . . . . . .111
Using the NET USE command . . . . . . . . . . . . . . . . . . . . . . . . .112
vii
Page 8

Windows 2000. . . . . . . . . . . . . . . . . . . . . . . . . . . . . . . . . . . . . . . . . . . 113
LPR printing. . . . . . . . . . . . . . . . . . . . . . . . . . . . . . . . . . . . . . . . 113
Internet printing . . . . . . . . . . . . . . . . . . . . . . . . . . . . . . . . . . . . 115
Microsoft Network Shared printing . . . . . . . . . . . . . . . . . . . . 116
Installing a printer driver. . . . . . . . . . . . . . . . . . . . . . . . . . . . . 117
Using the NET USE command . . . . . . . . . . . . . . . . . . . . . . . . 118
Windows NT 4.0. . . . . . . . . . . . . . . . . . . . . . . . . . . . . . . . . . . . . . . . . 119
LPR printing. . . . . . . . . . . . . . . . . . . . . . . . . . . . . . . . . . . . . . . . 119
Internet printing . . . . . . . . . . . . . . . . . . . . . . . . . . . . . . . . . . . . 120
Microsoft Network Shared printing . . . . . . . . . . . . . . . . . . . . 120
Installing a printer driver. . . . . . . . . . . . . . . . . . . . . . . . . . . . . 121
Using the NET USE command . . . . . . . . . . . . . . . . . . . . . . . . 122
Macintosh . . . . . . . . . . . . . . . . . . . . . . . . . . . . . . . . . . . . . . . . . . . . . . 123
Mac OS 8.x to 9.x . . . . . . . . . . . . . . . . . . . . . . . . . . . . . . . . . . . . 123
Mac OS X . . . . . . . . . . . . . . . . . . . . . . . . . . . . . . . . . . . . . . . . . . 124
OS/2 . . . . . . . . . . . . . . . . . . . . . . . . . . . . . . . . . . . . . . . . . . . . . . . . . . . 125
LPR printing. . . . . . . . . . . . . . . . . . . . . . . . . . . . . . . . . . . . . . . . 125
NetBEUI printing . . . . . . . . . . . . . . . . . . . . . . . . . . . . . . . . . . . 129
Chapter 6 Settings for NetWare Server
Introduction to NetWare Settings . . . . . . . . . . . . . . . . . . . . . . . . . . 131
Supported systems . . . . . . . . . . . . . . . . . . . . . . . . . . . . . . . . . . 131
About modes . . . . . . . . . . . . . . . . . . . . . . . . . . . . . . . . . . . . . . . 132
Instructions for Using NetWare . . . . . . . . . . . . . . . . . . . . . . . . . . . . 133
Using Bindery Print Server (NetWare 3.x/4.x) . . . . . . . . . . . . . . . 135
Using NDS Print Server (NetWare 4.x/5.x/6.0) . . . . . . . . . . . . . . 136
Using Remote Printer Mode (NetWare 3.x) . . . . . . . . . . . . . . . . . . 137
Using Bindery Remote Printer Mode
(NetWare 4.x) . . . . . . . . . . . . . . . . . . . . . . . . . . . . . . . . . . . . . . . . . 141
Using NDS Remote Printer Mode (NetWare 4.x/5.x/6.0). . . . . . 144
viii
Page 9

Using the NDPS Gateway . . . . . . . . . . . . . . . . . . . . . . . . . . . . . . . . .150
Outline of settings . . . . . . . . . . . . . . . . . . . . . . . . . . . . . . . . . . .151
Making the printer environment . . . . . . . . . . . . . . . . . . . . . . .151
Creating an NDPS Manager . . . . . . . . . . . . . . . . . . . . . . . . . . .152
Creating a Printer Agent . . . . . . . . . . . . . . . . . . . . . . . . . . . . . .153
Configuring for NetWare using EpsonNet WinAssist . . . . .155
Setting the printer on client workstations. . . . . . . . . . . . . . . .156
Instructions for Using a Dial-Up Network . . . . . . . . . . . . . . . . . . .157
Using a dial-up network in each mode . . . . . . . . . . . . . . . . . .157
When there is a primary server at the dial-up destination .158
When there is a primary server in the local network . . . . . .159
Chapter 7 Settings for UNIX
Introduction to UNIX Settings. . . . . . . . . . . . . . . . . . . . . . . . . . . . . .161
lpr filters . . . . . . . . . . . . . . . . . . . . . . . . . . . . . . . . . . . . . . . . . . . . . . . .161
Setting Up Different UNIX Systems Using the lpr Command . . .162
Setting up for SunSoft Solaris 2.4 or later . . . . . . . . . . . . . . . .163
Setting up for SunOS 4.1.4 or later. . . . . . . . . . . . . . . . . . . . . .164
Setting up for IBM AIX 3.2.5 or later and 4.1.3 or later. . . . .165
Setting up for HP/UX 9.05 or later . . . . . . . . . . . . . . . . . . . . .166
Setting up for SCO UNIX 4.2 or later (Open Server). . . . . . .167
Using the ftp Command . . . . . . . . . . . . . . . . . . . . . . . . . . . . . . . . . . .169
Chapter 8 EpsonNet Direct Print
About EpsonNet Direct Print. . . . . . . . . . . . . . . . . . . . . . . . . . . . . . .171
System Requirements . . . . . . . . . . . . . . . . . . . . . . . . . . . . . . . . . . . . .172
Installing EpsonNet Direct Print . . . . . . . . . . . . . . . . . . . . . . . . . . . .172
Setting Up Your Printer Using EpsonNet Direct Print . . . . . . . . .173
Adding a printer located in the same segment . . . . . . . . . . .174
Adding a printer beyond a router . . . . . . . . . . . . . . . . . . . . . .175
Adding a printer from the Printers folder . . . . . . . . . . . . . . .177
Installing the printer driver. . . . . . . . . . . . . . . . . . . . . . . . . . . .179
Configuring the Printer Port . . . . . . . . . . . . . . . . . . . . . . . . . . . . . . .180
Windows Me/98/95 . . . . . . . . . . . . . . . . . . . . . . . . . . . . . . . . .180
ix
Page 10

Chapter 9 EpsonNet Internet Print
About EpsonNet Internet Print . . . . . . . . . . . . . . . . . . . . . . . . . . . . 183
System Requirements . . . . . . . . . . . . . . . . . . . . . . . . . . . . . . . . . . . . 183
Installing EpsonNet Internet Print. . . . . . . . . . . . . . . . . . . . . . . . . . 184
Setting Up Your Printer Using EpsonNet Internet Print . . . . . . . 184
Windows 98/95 . . . . . . . . . . . . . . . . . . . . . . . . . . . . . . . . . . . . . 185
Windows NT 4.0 . . . . . . . . . . . . . . . . . . . . . . . . . . . . . . . . . . . . 190
Status Alert Window . . . . . . . . . . . . . . . . . . . . . . . . . . . . . . . . . . . . . 193
Chapter 10 EpsonNet WebAssist
About EpsonNet WebAssist . . . . . . . . . . . . . . . . . . . . . . . . . . . . . . . 195
Supported Web browser . . . . . . . . . . . . . . . . . . . . . . . . . . . . . 195
About Web browser setting . . . . . . . . . . . . . . . . . . . . . . . . . . . 196
Configuring the Print Server Using EpsonNet WebAssist. . . . . . 196
Opening Screen. . . . . . . . . . . . . . . . . . . . . . . . . . . . . . . . . . . . . . . . . . 202
Index . . . . . . . . . . . . . . . . . . . . . . . . . . . . . . . . . . . . . . . . . . . . . . 202
Menu . . . . . . . . . . . . . . . . . . . . . . . . . . . . . . . . . . . . . . . . . . . . . . 203
Information . . . . . . . . . . . . . . . . . . . . . . . . . . . . . . . . . . . . . . . . . . . . . 204
General information . . . . . . . . . . . . . . . . . . . . . . . . . . . . . . . . . 204
Configuration - Network Screens . . . . . . . . . . . . . . . . . . . . . . . . . . 205
NetWare . . . . . . . . . . . . . . . . . . . . . . . . . . . . . . . . . . . . . . . . . . . 205
TCP/IP . . . . . . . . . . . . . . . . . . . . . . . . . . . . . . . . . . . . . . . . . . . . 206
AppleTalk . . . . . . . . . . . . . . . . . . . . . . . . . . . . . . . . . . . . . . . . . . 208
MS Network . . . . . . . . . . . . . . . . . . . . . . . . . . . . . . . . . . . . . . . . 208
IPP . . . . . . . . . . . . . . . . . . . . . . . . . . . . . . . . . . . . . . . . . . . . . . . . 209
SNMP . . . . . . . . . . . . . . . . . . . . . . . . . . . . . . . . . . . . . . . . . . . . . 210
Optional Screens. . . . . . . . . . . . . . . . . . . . . . . . . . . . . . . . . . . . . . . . . 211
Administrator . . . . . . . . . . . . . . . . . . . . . . . . . . . . . . . . . . . . . . 211
Reset . . . . . . . . . . . . . . . . . . . . . . . . . . . . . . . . . . . . . . . . . . . . . . 211
Password. . . . . . . . . . . . . . . . . . . . . . . . . . . . . . . . . . . . . . . . . . . 212
x
Page 11

Chapter 11 EpsonNet WebManager
About EpsonNet WebManager . . . . . . . . . . . . . . . . . . . . . . . . . . . . .213
System Requirements . . . . . . . . . . . . . . . . . . . . . . . . . . . . . . . . . . . . .214
EpsonNet WebManager Functions . . . . . . . . . . . . . . . . . . . . . . . . . .215
EpsonNet WebManager Operating Structure. . . . . . . . . . . . . . . . .216
Installing EpsonNet WebManager . . . . . . . . . . . . . . . . . . . . . . . . . .218
Starting EpsonNet WebManager. . . . . . . . . . . . . . . . . . . . . . . . . . . .219
Opening the Online Guide. . . . . . . . . . . . . . . . . . . . . . . . . . . . . . . . .220
Chapter 12 Troubleshooting
General Problems . . . . . . . . . . . . . . . . . . . . . . . . . . . . . . . . . . . . . . . .221
Problems Specific to Your Network Environment . . . . . . . . . . . . .225
Windows Me/98/95 environment . . . . . . . . . . . . . . . . . . . . .225
Windows XP/Server 2003/2000/NT environment. . . . . . . .226
Macintosh environment. . . . . . . . . . . . . . . . . . . . . . . . . . . . . . .227
NetWare environment . . . . . . . . . . . . . . . . . . . . . . . . . . . . . . . .227
Initializing the Print Server . . . . . . . . . . . . . . . . . . . . . . . . . . . . . . . .229
Appendix A Tips for Administrator
Selecting a Printing Method. . . . . . . . . . . . . . . . . . . . . . . . . . . . . . . .231
Printing from Windows. . . . . . . . . . . . . . . . . . . . . . . . . . . . . . .231
Printing from Macintosh . . . . . . . . . . . . . . . . . . . . . . . . . . . . . .232
Features of the Printing Methods . . . . . . . . . . . . . . . . . . . . . . . . . . .232
LPR (TCP/IP) printing . . . . . . . . . . . . . . . . . . . . . . . . . . . . . . .232
Internet printing . . . . . . . . . . . . . . . . . . . . . . . . . . . . . . . . . . . . .233
Microsoft Network Shared printing . . . . . . . . . . . . . . . . . . . .233
Setting an IP Address Using the arp/ping Command . . . . . . . . .234
Checking the LAN . . . . . . . . . . . . . . . . . . . . . . . . . . . . . . . . . . .235
Setting and checking the new IP address . . . . . . . . . . . . . . . .236
Instructions on Using a Dial-Up Router. . . . . . . . . . . . . . . . . . . . . .237
Function of Universal Plug and Play . . . . . . . . . . . . . . . . . . . . . . . .238
Uninstalling Software . . . . . . . . . . . . . . . . . . . . . . . . . . . . . . . . . . . . .239
Windows Me/98/95/2000/NT 4.0 . . . . . . . . . . . . . . . . . . . . .239
Windows XP/Server 2003. . . . . . . . . . . . . . . . . . . . . . . . . . . . .239
Macintosh . . . . . . . . . . . . . . . . . . . . . . . . . . . . . . . . . . . . . . . . . .240
xi
Page 12

Appendix B Specifications
Print Server Specification . . . . . . . . . . . . . . . . . . . . . . . . . . . . . . . . . 241
Regulatory Approvals . . . . . . . . . . . . . . . . . . . . . . . . . . . . . . . . . . . . 241
Reliability. . . . . . . . . . . . . . . . . . . . . . . . . . . . . . . . . . . . . . . . . . . . . . . 242
Environmental . . . . . . . . . . . . . . . . . . . . . . . . . . . . . . . . . . . . . . . . . . 242
Network Software . . . . . . . . . . . . . . . . . . . . . . . . . . . . . . . . . . . . . . . 242
Regulatory Approvals for AC Adapter A120H . . . . . . . . . . . . . . . 243
Regulatory Approvals for AC Adapter A192H . . . . . . . . . . . . . . . 244
Index
xii
Page 13

Introduction
About Your Print Server
The EpsonNet 10/100 Base Tx External Print Server is a print
server that lets you connect an Epson printer equipped with a
parallel interface directly to your network. Just attach the print
server to your printer’s parallel interface connector, and connect
it anywhere on your network.
Because the print server supports multiple protocols and
automatically detects protocols on your network, you can print
from Microsoft
®
OS/2TM applications.
IBM
Use EpsonNet WinAssist/MacAssist/WebAssist, the
configuration utilities provided with your product, to quickly and
easily configure the print server to use protocols such as TCP/IP,
NetWare, NetBEUI, AppleTalk
Note:
The EpsonNet WinAssist/MacAssist/WebAssist utility configures the
print server to work only with protocols that exist on your network. This
does not imply that you can use all of the above-mentioned protocols on
your network or operating system. The protocols that the print server
can use may vary depending on the operating system and the network
configuration.
®
Windows®, Apple® Macintosh®, UNIX®, and
®
, IPP, and SNMP.
Introduction 1
Page 14

Important Safety Instructions
Read all of these instructions and save them for later reference.
❏ Do not install or uninstall the print server with wet hands.
❏ Be careful not to drop or crush the print server when
installing.
❏ Keep the print server away from humidity and dust.
❏ Do not allow children to handle the print server.
❏ When installing or uninstalling the print server, be sure to
remove the Ethernet cable, turn off your printer, and then
unplug an AC adapter to avoid electric shock.
❏ Avoid using the print server if there is smoke, strange smell,
or strange sound; otherwise this could cause fire or electric
shock. Instead, immediately turn off the printer, unplug an
AC adapter, and then contact your Epson dealer. Do not
repair it yourself because this is dangerous.
❏ Do not disassemble or modify the print server unless
specifically instructed in the guide. This could cause injury,
electric shock, or fire.
2 Introduction
Page 15

About This Guide
This User’s Guide contains information about using the print
server on a network. It includes how to set up the print server,
install the configuration software, and modify network settings
of your printer and computers.
For information about your printer, see the manual shipped with
your printer.
Note:
❏ This guide is written for network administrators, and many of the
steps included here require detailed network knowledge and
administrator rights.
❏ The term network administrator refers to the person responsible for
maintaining the network. “Administrator” is synonymous with
“Supervisor” in this guide.
❏ The term “print server” refers to the EpsonNet 10/100 Base Tx
External Print Server in this guide.
❏ Some screen shots in this guide may list a printer name other than
your printer. This difference does not alter the instructions.
Warnings, Cautions, and Notes
Warnings
must be followed carefully to avoid bodily injury.
w
Cautions
must be observed to avoid damage to your equipment.
c
Notes
contain important information and useful tips on the operation of the
print server.
Introduction 3
Page 16

Package Contents
Your print server package includes the following items:
❏ Print server (The utility EpsonNet WebAssist is pre-installed
on this server.)
❏ Software CD-ROM containing:
-- EpsonNet WinAssist
-- EpsonNet MacAssist
-- EpsonNet Direct Print
-- EpsonNet Internet Print
-- EpsonNet WebManager
-- EpsonNet Install Wizard
-- Administrator’s Manual (PDF-format manual)
-- Adobe
❏ An AC adapter and cable
Caution:
Only use the AC adapter shipped with this package to supply
c
power to the print server.
®
Acrobat® Reader® (for Windows only)
Note:
You need to supply items such as a computer with an Ethernet network
interface, an Epson printer with a parallel interface, and an Ethernet
cable (Category 5 shielded twisted-pair cable).
4 Introduction
Page 17

Operating Environment
The print server supports the following environments.
OS Version Protocol
Windows 98
Windows 98 SE
Windows 95
Windows Me - TCP/IP (using EpsonNet Direct
Windows XP
(Home,
Professional)
Windows Server
2003
Windows 2000
(Professional,
Server)
Windows NT
with Support Pack 5
or higher
®
4.0
- TCP/IP (using EpsonNet Direct
Print)
IPP (using EpsonNet Internet
Print)
NetBEUI
Print)
IPP
NetBEUI
- TCP/IP (using LPR or Standard
TCP/IP Port)
IPP
- TCP/IP (using LRP)
IPP (using EpsonNet Internet
Print)
NetBEUI
Macintosh Mac OS X 10.x,
8.6 to 9.x
NetWare 3.x Bindery mode
4.x/IntranetWare NDS mode
5.x/6.0 NDS Queue-based print
AppleTalk
Bindery emulation mode
system
NDPS
Introduction 5
Page 18

OS Version Protocol
OS/2 (OS/2 WarpTM
Connect, OS/2
Warp Server)
UNIX Sun OS 4.1.4 or
V3
V4
®
9.05 or
TM
later: SPARC
SunSoft Solaris
2.4 or later:
SPARC and x86
SCO UNIX 4.2 or
later
SCO UnixWare
2.01 or later
HP/UX
later
IBM AIX 3.2.5 or
later and 4.1.3 or
later
TCP/IP (lprportd)
NetBEUI
lpr, ftp
TM
®
Note:
❏ Only the Intel version of Windows NT is supported.
❏ The multi-user environment of Mac OS 9 is not supported.
❏ If you use the printer in a dial-up router environment, you must set
an IP address for the printer. Make sure the IP address is suitable
for the segment; an incorrect IP address may generate unexpected
dial-up.
Supported Epson Printers
The print server can be installed on most Epson printers with a
parallel interface.
6 Introduction
Page 19

Features of the Print Server
❏ Connects an Epson printer equipped with a parallel interface
connector to the network.
❏ Supports multiple protocols, such as TCP/IP, NetWare,
NetBEUI, AppleTalk, and IPP.
❏ Supports 100Base full duplex, 100Base half duplex, 10Base full
duplex, and 10Base half duplex.
❏ Supports DHCP.
❏ Supports Automatic Private IP Addressing (APIPA) that
assigns an IP address automatically to the print server even if
there is no DHCP server on the network.
❏ Supports the Dynamic DNS function.
❏ Supports SNMP and MIB.
Introduction 7
Page 20
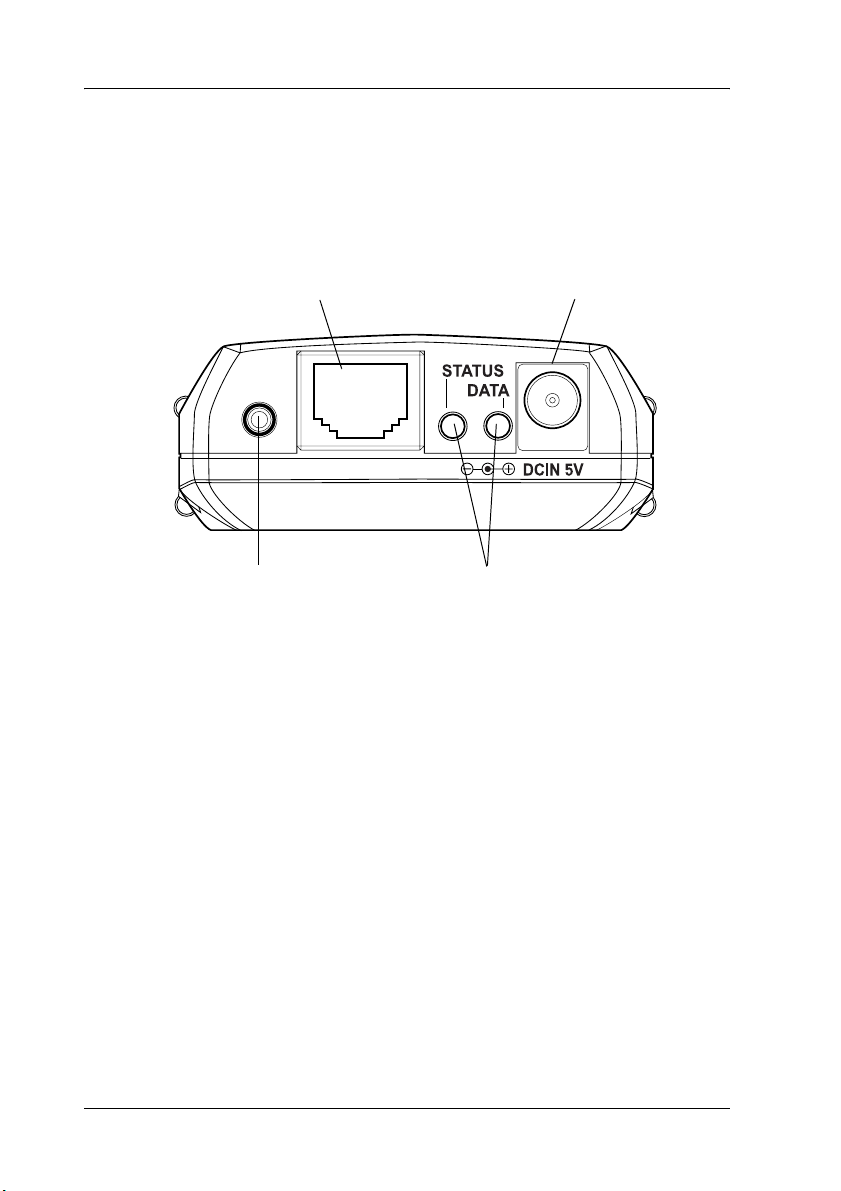
Print Server Operation
The status lights and status sheet provide you with important
information about the operation and configuration of the print
server.
RJ-45 connector
Status sheet button
DC-IN connector
Status lights
8 Introduction
Page 21

Status and Data lights
The print server has two lights (Status and Data), which indicate
the current operating status of the print server when you first turn
on the printer, during normal operation, and when errors occur.
The Status light has three colors (red, green, and orange). The Data
light is green.
The status lights indicate the print server status, as follows:
Status light Data light Print server status
Red On Initializing
Red flashing On Error status
Red Status light and green Data light
flashing alternately
Green On Ready (10M link)
Green Flashing Receiving packets (10M link)
Orange On Ready (100M link)
Orange Flashing Receiving packets (100M link)
Firmware update mode
Status sheet button
The first time you use the print server after installing or
reinstalling it, turn on the printer while holding down the status
sheet button for about ten seconds to initialize the print server.
The length of time needed to hold down the status sheet button
varies depending on the printer model.
Introduction 9
Page 22

Before you start configuring the print server, be sure to press and
hold down the status sheet button on the print server for one to
two seconds to print a status sheet. A status sheet provides
important information about the print server, such as MAC
address, printer settings, and the printer’s current status. Press
the status sheet button once to print a simple status sheet, or twice
to print a full status sheet. You cannot print a status sheet when
the printer has already started printing, or when it is offline or not
ready to print.
Note:
If the printer does not print a status sheet, make sure the printer is online
and no print jobs are being processed, and then wait a minute. If it still
does not print a status sheet, turn the printer off, wait until the status
lights go out, and then turn it back on again. The status sheet can be
printed one minute after the printer finishes warming up.
Caution:
After turning off the printer, wait until the status lights go out
c
before turning the printer back on; otherwise, the print server may
not work correctly.
10/100 connector
This connector is used to connect an Ethernet cable to the network.
You can use this cable for both 10Base-T and 100Base-TX.
Caution:
You must use a Category 5 shielded twisted-pair cable to connect
c
the print server to prevent malfunction.
DCIN connector
Plug the AC adapter into the print server’s DC-IN connector.
Caution:
You must use the AC adapter shipped with this package.
c
10 Introduction
Page 23

About the Software
❏ EpsonNet WinAssist is a Windows-based configuration
utility for administrators that allows you to configure the
print server for TCP/IP, NetWare, MS Network, AppleTalk,
IPP, and SNMP. See “About EpsonNet WinAssist” on page
49.
❏ EpsonNet MacAssist is a Macintosh-based configuration
utility for administrators that allows you to configure the
print server for TCP/IP, AppleTalk, and IPP. See “About
EpsonNet MacAssist” on page 77.
❏ EpsonNet WebAssist is a web-based configuration utility
that allows you to configure the print server for TCP/IP,
NetWare, MS Network, AppleTalk, IPP, and SNMP. See
“About EpsonNet WebAssist” on page 195.
❏ EpsonNet Direct Print is a utility that enables TCP/IP
printing for Windows Me, 98, or 95. See “About EpsonNet
Direct Print” on page 171.
❏ EpsonNet Internet Print is a utility that supports printing
across the Internet using Internet Printing Protocol for
Windows 98/95/NT 4.0. See “About EpsonNet Internet
Print” on page 183.
❏ EpsonNet WebManager is a web-based utility that helps
network administrators to easily manage network devices.
See “About EpsonNet WebManager” on page 213.
Introduction 11
Page 24

Terms and Concepts
Configuration -- a prepared set of conditions for proper operation
of a device. Configuring the print server is to prepare it to work
with protocols available on a network.
DHCP — a dynamic host configuration protocol. It is a protocol
that assigns dynamic IP addresses to devices on a network.
EtherTalk — the communication protocol of AppleTalk
governing Ethernet transmissions
ftp — a TCP/IP application protocol for file transfer
lpd — a TCP/IP remote printing protocol application
Print queue — a location where a print job is stored as a file, until
the print server sends the job to the assigned printer
Protocol — a set of rules that control how data or information is
exchanged through a network. Computers and software cannot
communicate with each other using different protocols.
Remote printer — a shared printer connected elsewhere on the
network, but under the control of a NetWare print server
TCP/IP — Transmission Control Protocol/Internet Protocol, a
layer of protocols that provides communication between nodes
on a network
12 Introduction
Page 25

Overview
This section describes the general procedure on how to set up the
print server for use on a network.
1. Check the print server operation.
Check the functions and operations of the print server, such as
status lights, status sheet button, and RJ-45 connector. See “Print
Server Operation” on page 8 for details.
2. Install the necessary components on the computer.
Make sure the necessary components (such as TCP/IP, NetBEUI,
etc.) are installed on the computer, and network settings (such as
the IP address, subnet mask, etc.) of the computer is set. See
“Installing Components on Your Computer” on page 15 for
details.
3. Connect the print server to the network.
Connect the print server to the network. See “Connecting the Print
Server to the Network” on page 31 for details.
4. Install EpsonNet WinAssist/MacAssist on the computer.
Install EpsonNet WinAssist or MacAssist on the computer to
configure the print server. See “Installing EpsonNet
WinAssist/MacAssist” on page 33 for details.
5. Set an IP address for the print server using EpsonNet
Win/MacAssist.
Assign an IP address to the print server, using EpsonNet
WinAssist or MacAssist. For Windows users, see “Setting an IP
Address Using EpsonNet WinAssist” on page 36. For Macintosh
users, see “Setting an IP Address Using EpsonNet MacAssist” on
page 42 for details.
Introduction 13
Page 26

6. Configure the network settings of the print server using
EpsonNet Win/MacAssist.
Configure the print server for TCP/IP, AppleTalk, MS Network,
etc. using EpsonNet WinAssist or MacAssist. For Windows users,
see “EpsonNet WinAssist Configuration Utility” on page 49. For
Macintosh users, see “EpsonNet MacAssist Configuration
Utility” on page 77.
7. Select a printing method.
Select a printing method appropriate for your network
environment and operating system. If you are not sure, see
“Selecting a Printing Method” on page 231 for details.
8. Install the printer driver.
Install the printer driver from the CD-ROM that comes with the
printer. See “Installing the Printer Driver” on page 95 for details.
14 Introduction
Page 27

Chapter 1
Installing Components on Your Computer
About Installing Components on Your Computer
Before configuring the print server and printing from the
computer, you need to install the necessary components (such as
TCP/IP, NetBEUI, etc.) and assign an IP address and subnet mask
for your computer, depending on the printing method you want
to use. See the section in this chapter appropriate for your
operating system.
Windows Me/98/95
For Windows Me/98/95, use the following procedure to install
the necessary components.
Note:
❏ The Windows Me/98/95 CD-ROM may be required during the
installation.
1
1
1
1
1
1
1
1
1
❏ When using TCP/IP or IPP for printing, you need to set the IP
address, the subnet mask, and the default gateway of the computer.
1. Click Start, point to Settings, and then select Control Panel.
Installing Components on Your Computer 15
1
1
1
Page 28
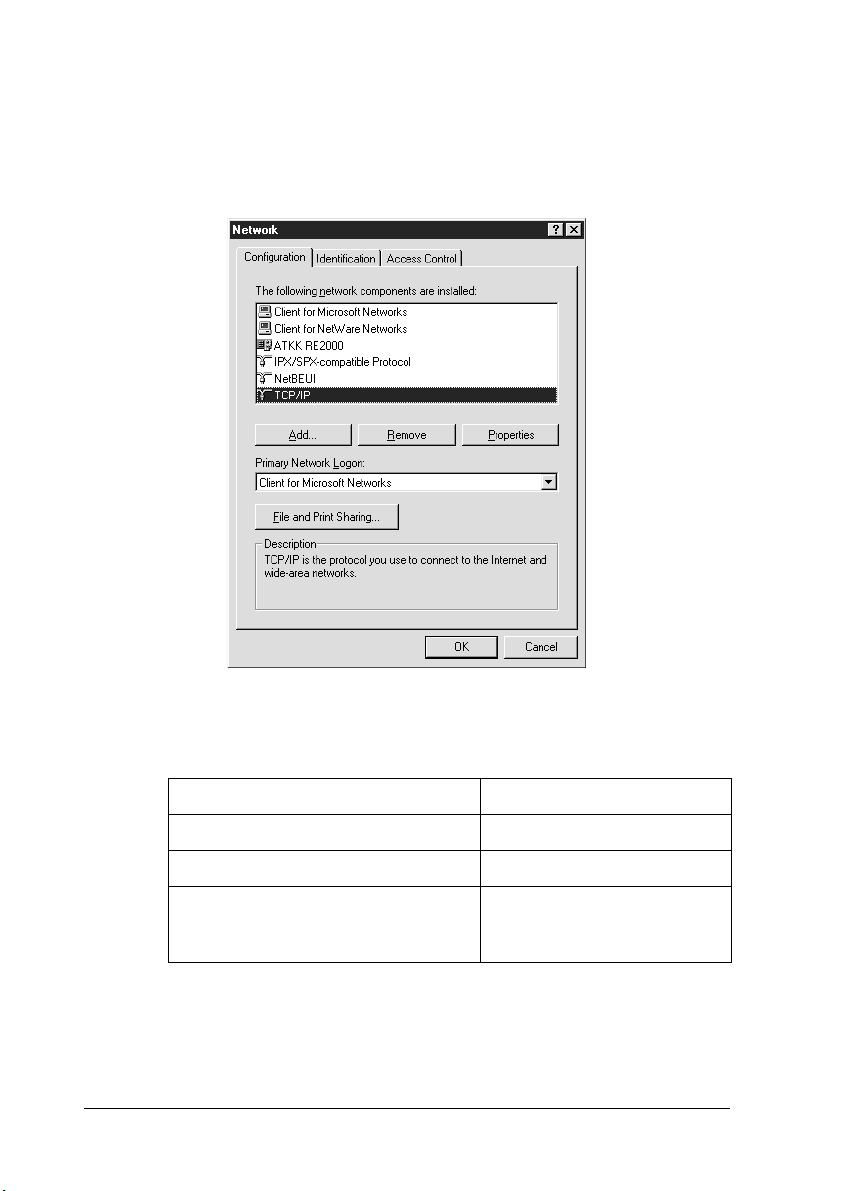
2. Double-click the Network icon. Check if the following
necessary components are in the list of installed network
components on the Configuration menu. If they are already
installed, go to the next chapter.
The following table lists the components required for
configuring the print server with EpsonNet WinAssist.
EpsonNet WinAssist’s setting screens Necessary components
TCP/IP, AppleTalk, IPP, SNMP (IP trap) TCP/IP
MS Network NetBEUI or TCP/IP
NetWare, SNMP (IPX trap) Latest Novell Client
downloaded from the Novell
Web site
16 Installing Components on Your Computer
Page 29

Note:
Do not use Novell Client for Windows 95/98 version 3.00 and
Novell Client for Windows NT version 4.50 when using the
following modes: NetWare 3.x/4.x Bindery Print Server mode,
NetWare 3.x Remote Printer mode, NetWare 4.x Bindery Remote
Printer mode, and NetWare 4.x/5.x NDS Remote Printer mode.
The following table lists the components required for network
printing.
Printing method Necessary components
LPR or Internet printing TCP/IP
1
1
1
1
Microsoft Network Shared
printing
Printing via NetWare server Latest Novell Client downloaded
3. If the necessary components are not in the list, click Add to
install them, as described below.
For LPR or Internet printing:
Select Protocol and then click Add. Select Microsoft from the
Manufacturers list and TCP/IP from the Network Protocols
list. Then click OK.
For Microsoft Network Shared printing:
Select Protocol and then click Add. Select Microsoft from the
Manufacturers list and TCP/IP from the Network Protocols
list. Then click OK.
To use NetBEUI, select Protocol and then click Add. Select
Microsoft from the Manufacturers list and NetBEUI from the
Network Protocols list. Then click OK.
Select Client and then click Add. Select Microsoft from the
Manufacturers list and Client for Microsoft Networks from
the Network Clients list. Then click OK.
TCP/IP or NetBEUI
Client for Microsoft Networks
from the Novell Web site
1
1
1
1
1
1
1
1
Installing Components on Your Computer 17
Page 30

For printing via NetWare server:
Download the latest Novell Client from the Novell Web site
and install it on the computer. Also, be sure to install IPX. See
the Novell Web site for detailed information.
4. For LPR, Internet, Microsoft Network Shared printing:
Double-click TCP/IP on the Configuration menu to open the
TCP/IP Properties dialog box. Set the IP address, the subnet
mask, etc. and then click OK.
5. Restart the computer.
The necessary components are now installed. Go to the next
chapter “How to Set Up the Print Server” on page 31.
Windows XP
For Windows XP, use the following procedure to install the
necessary components.
Note:
❏ The Windows XP CD-ROM may be required during the
installation.
❏ When using TCP/IP or IPP for printing, you need to set the IP
address, the subnet mask, and the default gateway of the computer.
1. Click Start, highlight Control Panel, and then click Network
and Internet Connections. Select Network Connections.
2. Under LAN or High-Speed Internet, click the Local Area
Connection icon.
3. Under Network Tasks, click Change settings of this
connection.
18 Installing Components on Your Computer
Page 31

4. Check if the following necessary components are in the list. If
they are already installed, go to the next chapter.
The following table lists the components required for
configuring the print server with EpsonNet WinAssist.
1
1
1
1
1
1
1
1
EpsonNet WinAssist’s setting screens Necessary components
TCP/IP, AppleTalk, IPP, SNMP (IP trap) Internet Protocol (TCP/IP)
MS Network Internet Protocol (TCP/IP)
NetWare, SNMP (IPX trap) Latest Novell Client
downloaded from the Novell
Web site
Installing Components on Your Computer 19
1
1
1
1
Page 32

The following table lists the components required for network
printing.
Printing method Necessary components
LPR or Internet printing Internet Protocol (TCP/IP)
Microsoft Network Shared
printing
Printing via NetWare server Latest Novell Client downloaded
Internet Protocol (TCP/IP)
Client for Microsoft Networks
from the Novell Web site
5. If the necessary components are not in the list, click Install to
install them, as described below.
For LPR or Internet printing:
Internet Protocol (TCP/IP) is installed by default. You cannot
add or delete it.
For Microsoft Network Shared printing:
Select Client and then click Add. Select Client for Microsoft
Networks and then click OK.
For printing via NetWare server:
Download the latest Novell Client from the Novell Web site
and install it on the computer. Also, be sure to install IPX. See
the Novell Web site for detailed information.
6. For LPR, Internet, Microsoft Network Shared printing:
Double-click Internet Protocol (TCP/IP) on the Local Area
Connection Properties dialog box to open the Internet
Protocols (TCP/IP) Properties dialog box. Set the IP address,
the subnet mask, etc. and then click OK.
7. Restart the computer.
The necessary components are now installed. Go to the next
chapter “How to Set Up the Print Server” on page 31.
20 Installing Components on Your Computer
Page 33

Windows Server 2003
For Windows Server 2003, use the following procedure to install
the necessary components.
Note:
❏ The Windows Server 2003 CD-ROM may be required during the
installation.
❏ When using TCP/IP or IPP for printing, you need to set the IP
address, the subnet mask, and the default gateway of the computer.
1. Click Start, point to Control Panel, and then point to
Network Connections. Select Local Area Connections.
2. Click the Properties button.
1
1
1
1
1
3. Check if the following necessary components are in the list. If
they are already installed, go to the next chapter.
1
1
1
1
1
1
1
Installing Components on Your Computer 21
Page 34

The following table lists the components required for
configuring the print server with EpsonNet WinAssist.
EpsonNet WinAssist’s setting screens Necessary components
TCP/IP, AppleTalk, IPP, SNMP (IP trap) Internet Protocol (TCP/IP)
MS Network Internet Protocol (TCP/IP)
NetWare, SNMP (IPX trap) Latest Novell Client
downloaded from the Novell
Web site
The following table lists the components required for network
printing.
Printing method Necessary components
LPR or Internet printing Internet Protocol (TCP/IP)
Microsoft Network Shared
printing
Printing via NetWare server Latest Novell Client downloaded
Internet Protocol (TCP/IP)
Client for Microsoft Networks
from the Novell Web site
4. If the necessary components are not in the list, click Install to
install them, as described below.
For LPR or Internet printing:
Internet Protocol (TCP/IP) is installed by default. You cannot
add or delete it.
For Microsoft Network Shared printing:
Select Client and then click Add. Select Client for Microsoft
Networks and then click OK.
For printing via NetWare server:
Download the latest Novell Client from the Novell Web site
and install it on the computer. Also, be sure to install IPX. See
the Novell Web site for detailed information.
22 Installing Components on Your Computer
Page 35

5. For LPR, Internet, Microsoft Network Shared printing:
Double-click Internet Protocol (TCP/IP) on the Local Area
Connection Properties dialog box to open the Internet
Protocols (TCP/IP) Properties dialog box. Set the IP address,
the subnet mask, etc. and then click OK.
6. Restart the computer.
1
1
The necessary components are now installed. Go to the next
chapter “How to Set Up the Print Server” on page 31.
Windows 2000
For Windows 2000, use the following procedure to install the
necessary components.
Note:
❏ The Windows 2000 CD-ROM may be required during the
installation.
❏ When using TCP/IP or IPP for printing, you need to set the IP
address, the subnet mask, and the default gateway of the computer.
1. Click Start, point to Settings, and then select Network and
Dial-up Connections. The Network and Dial-up
Connections screen appears.
2. Right-click the desired network connection and then select
Properties.
1
1
1
1
1
1
1
1
Installing Components on Your Computer 23
1
1
Page 36

3. Check if the following necessary components are in the list. If
they are already installed, go to the next chapter.
The following table lists the components required for
configuring the print server with EpsonNet WinAssist.
EpsonNet WinAssist’s setting screens Necessary components
TCP/IP, AppleTalk, IPP, SNMP (IP trap) Internet Protocol (TCP/IP)
MS Network NetBEUI or Internet Protocol
NetWare, SNMP (IPX trap) Latest Novell Client
(TCP/IP)
downloaded from the Novell
Web site
24 Installing Components on Your Computer
Page 37

Note:
Do not use Novell Client for Windows 95/98 version 3.00 and
Novell Client for Windows NT version 4.50 when using the
following modes: NetWare 3.x/4.x Bindery Print Server mode,
NetWare 3.x Remote Printer mode, NetWare 4.x Bindery Remote
Printer mode, and NetWare 4.x/5.x NDS Remote Printer mode.
The following table lists the components required for network
printing.
Printing method Necessary components
LPR or Internet printing Internet Protocol (TCP/IP)
1
1
1
1
Microsoft Network Shared
printing
Printing via NetWare server Latest Novell Client downloaded
4. If the necessary components are not in the list, click Install to
install them, as described below.
For LPR or Internet printing:
Select Protocol and then click Add. In the Select Network
Protocol dialog box, select Internet Protocol (TCP/IP) and
then click OK.
For Microsoft Network Shared printing:
Select Protocol and then click Add. In the Select Network
Protocol dialog box, select Internet Protocol (TCP/IP) and
then click OK.
To use NetBEUI, select Protocol and then click Add. Select
NetBEUI Protocol and then click OK.
Select Client and then click Add. Select Client for Microsoft
Networks and then click OK.
Internet Protocol (TCP/IP) or NetBEUI
Client for Microsoft Networks
from the Novell Web site
1
1
1
1
1
1
1
Installing Components on Your Computer 25
1
Page 38

For printing via NetWare server:
Download the latest Novell Client from the Novell Web site
and install it on the computer. Also, be sure to install IPX. See
the Novell Web site for detailed information.
5. For LPR, Internet, Microsoft Network Shared printing:
Double-click Internet Protocol (TCP/IP) on the
Configuration menu to open the TCP/IP Properties dialog
box. Set the IP address, the subnet mask, etc. and then click
OK.
6. Restart the computer.
The necessary components are now installed. Go to the next
chapter “How to Set Up the Print Server” on page 31.
Windows NT 4.0
For Windows NT 4.0, use the following procedure to install the
necessary components.
Note:
❏ The Windows NT 4.0 CD-ROM may be required during the
installation.
❏ When using TCP/IP or IPP for printing, you need to set the IP
address, the subnet mask, and the default gateway of the computer.
1. Click Start, point to Settings, and then select Control Panel.
2. Double-click the Network icon in the Control Panel.
26 Installing Components on Your Computer
Page 39

3. Check if the following necessary components are in the list. If
they are already installed, go to the next chapter.
The following table lists the components required for
configuring the print server with EpsonNet WinAssist.
1
1
1
1
1
1
1
1
EpsonNet WinAssist’s setting screens Necessary components
TCP/IP, AppleTalk, IPP, SNMP (IP trap) TCP/IP
MS Network NetBEUI or TCP/IP
NetWare, SNMP (IPX trap) Latest Novell Client
downloaded from the Novell
Web site
Installing Components on Your Computer 27
1
1
1
1
Page 40

Note:
Do not use Novell Client for Windows 95/98 version 3.00 and
Novell Client for Windows NT version 4.50 when using the
following modes: NetWare 3.x/4.x Bindery Print Server mode,
NetWare 3.x Remote Printer mode, NetWare 4.x Bindery Remote
Printer mode, and NetWare 4.x/5.x NDS Remote Printer mode.
The following table lists the components required for network
printing.
Printing method Necessary components
LPR or Internet printing Protocols menu: TCP/IP
Services menu: Microsoft TCP/IP Printing
Microsoft Network
Shared printing
Printing via NetWare
server
Protocols menu: TCP/IP or NetBEUI
Services menu: Workstation
Latest Novell Client downloaded from the
Novell Web site
4. If the necessary components are not in the list, click Add to
install them, as described below.
For LPR or Internet printing:
Select the Protocols tab and then click Add. Select TCP/IP
from the list and then click OK. Set the IP address, the subnet
mask, etc. and then click OK.
Select the Services tab and then click Add. Select Microsoft
TCP/IP Printing from the list and then click OK.
For Microsoft Network Shared printing:
Select the Protocols tab and then click Add. Select TCP/IP
from the list and then click OK. Set the IP address, the subnet
mask, etc. and then click OK.
Select the Services tab and then click Add. Select Microsoft
TCP/IP Printing from the list and then click OK.
28 Installing Components on Your Computer
Page 41

To use NetBEUI, select the Protocols tab and then click Add.
Select NetBEUI from the list and then click OK.
Select the Services tab and then click Add. Select
Workstation from the list and then click OK.
1
For printing via NetWare server:
Download the latest Novell Client from the Novell website
and install it on the computer. Also, be sure to install IPX. See
the Novell Web site for detailed information.
1
1
1
1
1
1
1
1
5. Restart the computer.
The necessary components are now installed. Go to the next
chapter “How to Set Up the Print Server” on page 31.
Installing Components on Your Computer 29
1
1
1
Page 42

Macintosh
To assign an IP address and subnet mask to your Macintosh,
follow the steps below.
Note:
You can print using only the AppleTalk protocol and configure the print
server with EpsonNet MacAssist. In Mac OS 8.6 to 9.x, select Ethernet
or Built-in Ethernet on the AppleTalk Control Panel. Then configure
the print server with EpsonNet MacAssist. In OS X, AppleTalk must
be enabled and EPSON AppleTalk must be selected in Print Center.
Mac OS 8.6 to 9.x
1. From the Apple menu, select Control Panel, and then
Appletalk.
2. Set Connect via to Ethernet.
3. Enable AppleTalk and other settings if necessary.
4. Close the dialog box to save any changes.
Now go to “How to Set Up the Print Server” on page 31.
Mac OS X
1. Select Network from System Preferences.
2. Select Built-in Ethernet from the drop-down list.
3. Enable AppleTalk and other settings if necessary.
4. Click Apply Now, then close the dialog box to save any
changes.
Now go to “How to Set Up the Print Server” on page 31.
30 Installing Components on Your Computer
Page 43

Chapter 2
How to Set Up the Print Server
This chapter explains how to set up the print server. This includes
connecting the print server to the network, installing EpsonNet
WinAssist/MacAssist, and using EpsonNet WinAssist/
MacAssist to assign an IP address to the print server.
Connecting the Print Server to the Network
Follow the steps below to connect the print server to the network.
Warning:
Before you install or uninstall the print server, be sure to turn off
w
the printer and unplug the AC adapter from the wall outlet to
prevent electric shock.
Caution:
❏ Do not place anything on top of the print server.
c
❏ Leave adequate room around the print server for easy
operation.
2
2
2
2
2
2
2
2
❏ Be sure to use the AC adapter shipped with this package.
1. Make sure the printer is turned off.
2. Plug the print server into the printer’s parallel interface
connector and secure it with the wire clips.
3. Connect the network cable to the print server, and connect the
other end to the network.
How to Set Up the Print Server 31
2
2
2
2
Page 44

Note:
❏ Use a Category 5 twisted-pair cable to connect the print server
to the network.
❏ The print server will automatically use DHCP to obtain an IP
address. If it cannot get an IP address this way, it will use the
private IP address of 192.168.192.168.
❏ Do not connect the print server and the computer directly. Be
sure to use a hub to connect the print server to the network.
4. Turn the printer on.
5. Plug the AC adapter’s power cord into a grounded electrical
outlet. Then connect it to the AC adapter. Be sure to use the
AC adapter included with the print server.
6. Press and hold down the status sheet button on the print
server, then plug the AC adapter into the DC-IN connector on
the print server. Continue to hold down the status sheet
button for about ten seconds.
Note:
It can take up to one minute to initialize the print server. When it’s done
initializing, its STATUS light turns green or orange.
7. When the print server is done initializing, press the status
sheet button again for about two seconds to print the status
sheets. If the sheets print, the print server is installed correctly.
Caution:
❏ Do not press the status sheet button while the red Status light
c
and green Data light are on; otherwise, the print server will
return to its factory default settings, and the network status
sheet will not print correctly.
❏ Before disconnecting the print server from the printer, always
turn off the printer and unplug the AC adapter.
32 How to Set Up the Print Server
Page 45

Now, you can configure the print server for the network using
EpsonNet WinAssist/MacAssist. Go to “Installing EpsonNet
WinAssist/MacAssist” on page 33.
Installing EpsonNet WinAssist/MacAssist
2
2
You need to install EpsonNet WinAssist or MacAssist to configure
the print server.
Note:
Be sure to use EpsonNet WinAssist/MacAssist included on the Software
CD-ROM shipped with this product.
For Windows
Install EpsonNet WinAssist on the computer to configure the
print server.
System requirements
The following table lists the system requirements of EpsonNet
WinAssist.
Operating systems Windows Me/98/95
Windows XP Professional/Home Edition
Windows Server 2003
Windows 2000 Server/Professional
Windows NT 4.0 Server/Workstation with Service
Pack 5.0 or higher
Hard disk drive space 10 MB
2
2
2
2
2
2
2
2
2
How to Set Up the Print Server 33
2
Page 46

Installing EpsonNet WinAssist
Follow the steps below to install EpsonNet WinAssist.
Note:
If you add or delete protocols or services from your operating system after
installing EpsonNet WinAssist, the program may not work correctly. If
this happens, uninstall EpsonNet WinAssist and then install it again.
1. Insert the Software CD-ROM in the CD-ROM drive.
2. The EPSON Installation Program starts automatically.
If the Installer dialog box does not appear, double-click
SETUP.EXE on the CD-ROM.
3. Select Install EpsonNet WinAssist, then click .
4. Follow the on-screen instructions to complete the installation.
For Macintosh
Install EpsonNet MacAssist on your Macintosh to configure the
print server.
System requirements
The following table lists the system requirements of EpsonNet
MacAssist.
Operating systems Mac OS 10.x, 8.6 to 9.x
Models Macintosh PowerPC/G3/G4/G5/iMac/eMac/
PowerBook/iBook
Hard disk drive space 10 MB
34 How to Set Up the Print Server
Page 47

Installing EpsonNet MacAssist
Follow the steps below to install EpsonNet MacAssist.
1. Insert the Software CD-ROM in the CD-ROM drive.
2. Mac OS 8.x to 9.x:
Double-click the EpsonNet MacAssist folder, then the
EpsonNet MacAssist Installer icon.
Mac OS X:
Double-click the Mac OS X folder, then the EpsonNet
MacAssist folder, then the EpsonNet MacAssist Installer
icon.
Note:
When the authentication dialog box to assign administrator rights
appears, enter the user name and password, and then click OK.
3. Follow the on-screen instructions to install the software.
4. Restart your computer.
Mac OS 8.x to 9.x:
The MacAssistxxx folder, which contains the EpsonNet
MacAssist icon and the EpsonNet MacAssist EasySetup
icon, is created in the Applications folder.
2
2
2
2
2
2
2
2
Mac OS X:
The EpsonNet MacAssist OSX x.xx folder, which contains the
EpsonNet MacAssist for OS X icon and the EpsonNet
MacAssist OSX EasySetup icon, is created in the
Applications folder.
How to Set Up the Print Server 35
2
2
2
2
Page 48

Setting an IP Address Using EpsonNet WinAssist
This section explains how to use EpsonNet WinAssist to configure
the print server.
Note:
❏ Check that the necessary protocols are installed on the computer.
❏ Make sure the printer is turned on.
❏ The computer to use for the following steps must be in the same
segment as the print server.
❏ The sample screens are taken from Windows 98 using EpsonNet
WinAssist. Other systems may differ in appearance, but the
instructions are the same, except as noted.
1. Click Start, point to Programs or All Programs
(Windows XP/Server 2003), then select EpsonNet WinAssist.
Click EpsonNet WinAssist to start it.
2. Select the printer you want to configure, then click
Configuration or double-click the printer icon.
36 How to Set Up the Print Server
Page 49

Note:
❏ If the same printer model name appears several times in the list,
you can identify the printers by checking their MAC addresses,
which are found on the status sheet.
2
❏ You can search printers in other segments by using Search
Options from the Tool menu. See “Search options” on page 53
for more information.
❏ The Launch Browser button can be used only if a valid IP
address is assigned to the printer.
❏ The print server does not have a default IP address. Be sure to
assign a valid IP address manually or by using the DHCP
server.
3. Click the TCP/IP tab.
Note:
For information on other menus, see “Details of the Configuration
Dialog Box” on page 56.
2
2
2
2
2
2
2
2
How to Set Up the Print Server 37
2
2
2
Page 50

4. Select a method for specifying the IP address. If you select
Automatic, DHCP becomes available and assigns an IP
address automatically. If you want to set the IP address
manually, select Manual instead.
Note:
❏ The network administrator must confirm any changes made to
the IP address settings.
❏ When Automatic is selected, DHCP becomes available. To use
the DHCP server, make sure it is installed on your computer
and correctly configured. See your operating system’s online
help for detailed instructions.
❏ If the Dynamic DNS function is not supported, we recommend
that you select Manual and enter an IP address. If you select
Automatic, the IP address of the print server changes every
time you turn on the printer, and you need to change the printer
port setting accordingly.
5. If you want to get a private address between 169.254.1.1 and
169.254.254.254 automatically when an IP address cannot be
obtained by the DHCP server, leave the Set using Automatic
Private IP Addressing (APIPA) check box selected.
6. When setting an IP address using the ping command, select
Set using PING. Do not select when setting an IP address with
EpsonNet WinAssist/MacAssist/WebAssist; this prevents
any unexpected change of the IP address.
Note:
Be sure not to select the check box when not using ping; this prevents
an unexpected change of the IP address by EpsonNet WebManager.
38 How to Set Up the Print Server
Page 51

7. To assign an IP address manually, enter the IP address, the
subnet mask, and the default gateway. Be sure the IP address
does not conflict with any other devices on the network.
Note:
If there is a server or a router functioning as a gateway, enter the IP
address of the server or the router for the gateway address. If there
is no gateway, leave the default values there.
8. Click the Extended Settings button if you want to make
extended settings, such as Dynamic DNS and Universal Plug
and Play functions.
Note:
The check boxes are dimmed if the print server does not support the
function.
2
2
2
2
2
2
2
How to Set Up the Print Server 39
2
2
2
2
2
Page 52

9. Select Acquire DNS server address automatically if you
want to acquire the DNS server address using the DHCP
server.
If you want to enter the DNS server address manually, click
the Add button and then enter the IP address of the DNS
server. Click OK.
10. Select Acquire host name and domain name
automatically if you want to acquire the host name and the
domain name using the DHCP server.
If you want to enter manually, enter the host name and the
domain name in the text boxes.
11. Select Register the network interface’s address to DNS
server i f y ou wa nt to re gi st er th e host name and domain name
to the DNS server through the DHCP server that supports
Dynamic DNS.
If you want to register the host name and the domain name
directly to the DNS server, select the Register directly to DNS
server check box.
12. Select Use Universal Plug and Play if you want to use the
Universal Plug and Play function on Windows Me or future
operating systems.
Change the default Universal Plug and Play device name, if
desired. This device name is used for versions of Windows
that support the Universal Plug and Play function.
13. After changing the settings, click OK.
14. In the TCP/IP dialog box, click OK. The Password dialog box
appears.
40 How to Set Up the Print Server
Page 53

15. If you set a password, enter your password (up to 20
characters) and then click OK to save the settings. If you are
entering a password for the first time, click Change and set
the password. See “About Password” on page 75 for more
information.
Follow the on-screen instructions. After the update is
complete, refresh the configuration by selecting Refresh from
the View menu.
Caution:
Since it takes 2 or 3 minutes to send new settings to the print
c
server, wait until an on-screen message appears to indicate
that you can turn off your printer.
2
2
2
2
2
2
2
How to Set Up the Print Server 41
2
2
2
2
2
Page 54

Setting an IP Address Using EpsonNet MacAssist
This section explains how to use EpsonNet MacAssist to configure
the print server.
Note:
❏ Make sure the printer is turned on.
❏ The computer to use for the following steps must be in the same
segment as the print server.
❏ Make sure that Ethernet is selected for Connect via in the
AppleTalk and TCP/IP control panels according to your network
environment.
1. Double-click the EpsonNet MacAssist icon.
2. Select the printer you want to configure from the list and click
Configure.
42 How to Set Up the Print Server
Page 55

Note:
❏ If the same printer model name appears several times in the list,
you can identify the printers by checking their MAC addresses,
which are found on the status sheet.
2
❏ You can search printers in other zones just like computers by
changing the zone setting. See “Search options” on page 80 for
more information.
❏ The Launch Browser button can be used only if a valid IP
address is assigned to the printer.
❏ The print server does not have a default IP address. Be sure to
assign a valid IP address manually or by using the DHCP
server.
3. Click the TCP/IP tab.
Note:
❏ TCP/IP is not used for printing in Macintosh networks.
❏ For information on other menus, see “Details of the
Configuration Dialog Box” on page 82.
2
2
2
2
2
2
2
2
How to Set Up the Print Server 43
2
2
2
Page 56

4. Select a method for specifying the IP address. If you select
Automatic, DHCP becomes available and assigns an IP
address automatically. If you want to set the IP address
manually, select Manual instead.
Note:
❏ The network administrator must confirm any changes made to
the IP address settings.
❏ When Automatic is selected, DHCP becomes available. To use
the DHCP server, make sure it is installed on your computer
and correctly configured. See your operating system’s online
help for detailed instructions.
❏ If the Dynamic DNS function is not supported, we recommend
that you select Manual and enter an IP address. If you select
Automatic, the IP address of the print server changes every
time you turn on the printer, and you need to change the printer
port setting accordingly.
5. When setting an IP address using the ping command, select
Set using PING. Do not select when setting an IP address with
EpsonNet WinAssist, MacAssist, or WebAssist; this prevents
any unexpected change of the IP address.
Note:
Be sure not to select the check box when not using ping; this prevents
an unexpected change of the IP address by EpsonNet WebManager.
6. If you want to get a private address between 169.254.1.1 and
169.254.254.254 automatically when an IP address cannot be
obtained by the DHCP server, leave Set using Automatic
Private IP Addressing (APIPA) selected.
44 How to Set Up the Print Server
Page 57

7. To assign an IP address manually, enter the IP address, the
subnet mask, and the default gateway. Be sure the IP address
does not conflict with any other devices on the network.
Note:
If there is a server or a router functioning as a gateway, enter the IP
address of the server or the router for the gateway address. If there
is no gateway, leave the default values there.
8. Click the Extended Settings button if you want to make
extended settings, such as Dynamic DNS and Universal Plug
and Play functions.
Note:
The check boxes are dimmed if the print server does not support the
function.
2
2
2
2
2
2
2
How to Set Up the Print Server 45
2
2
2
2
2
Page 58

9. Select Acquire DNS server address automatically if you
want to acquire the DNS server address using the DHCP
server.
If you want to enter the DNS server address manually, click
the Add button and then enter the IP address of the DNS
server. Click OK.
10. Select Acquire host name and domain name
automatically if you want to acquire the host name and the
domain name using the DHCP server.
If you want to enter manually, enter the host name and the
domain name in the text boxes.
11. Select Register the network interface’s address to DNS
server i f y ou wa nt to re gi st er th e host name and domain name
to the DNS server through the DHCP server that supports
Dynamic DNS.
If you want to register the host name and the domain name
directly to the DNS server, select Register directly to DNS
server.
12. Select Use Universal Plug and Play if you want to use the
Universal Plug and Play function in Windows Me or future
operating systems.
Change the default Universal Plug and Play device name, if
desired. This device name is used for versions of Windows
that support the Universal Plug and Play function.
13. After changing the settings, click OK.
14. In the TCP/IP dialog box, click OK. The Password dialog box
appears.
46 How to Set Up the Print Server
Page 59

15. If you set a password, enter your password (up to 20
characters), then click OK to save the settings. If you are
entering a password for the first time, click Change
Password and set the password. For more information on
passwords, see “About Password” on page 89.
Caution:
Sending new settings to the print server can take 2 or 3
c
minutes. Wait until the update is complete before turning off
your printer.
2
2
2
2
2
2
2
How to Set Up the Print Server 47
2
2
2
2
2
Page 60

48 How to Set Up the Print Server
Page 61

Chapter 3
EpsonNet WinAssist Configuration Utility
About EpsonNet WinAssist
EpsonNet WinAssist is a Windows-based configuration software
for administrators to configure the print server for TCP/IP,
NetWare, MS Network, AppleTalk, IPP, and SNMP.
Note:
❏ Be sure to use EpsonNet WinAssist included on the Software
CD-ROM shipped with this product.
❏ EpsonNet WinAssist installed on Windows XP/Server 2003 does
not support NetBEUI as a search protocol, because the NetBEUI
protocol is not officially supported on Windows XP/Server 2003.
❏ To set the IP address for OS/2 and UNIX, use the arp and ping
commands. For more information, see “Setting an IP Address Using
the arp/ping Command” on page 234.
❏ If you are using the printer in a dial-up environment not running
NetWare, clear the Use NetWare check box on the NetWare
screen. If this check box is selected, the extra account may be charged
when you use the dial-up router.
3
3
3
3
3
3
3
3
3
❏ When configuring the print server for NetWare, use the IPX
protocol and log in to the NetWare server or the NDS context with
supervisor privileges.
❏ When you configure the print server for NetWare 5.x, you must log
in to the NetWare server using an IPX connection. If you log in to
the NetWare server using an IP connection, the NetWare screen and
the IPX trap setting of SNMP are not available.
EpsonNet WinAssist Configuration Utility 49
3
3
3
Page 62

Menu Bar
EpsonNet WinAssist provides the following menus and
sub-menus.
Device menu:
❏ Configuration
Configures the print server you have selected.
❏ Launch Browser
Starts EpsonNet WebAssist to configure the print server you
have selected. EpsonNet WebAssist is a utility that runs on a
browser.
❏ Quit
Quits EpsonNet WinAssist.
View menu:
❏ Refresh
Updates to the latest information by searching for the
available printers again.
Tool menu:
❏ Timeout
Set the timeout value between 2 and 120 seconds. See
“Timeout option” on page 51 for more information.
❏ Search Method
Select the connections and protocols to use to search for a print
server. See “Search method” on page 52 for more information.
❏ Search Options
Configures the options for a search with IP or IPX. See “Search
options” on page 53 for more information.
50 EpsonNet WinAssist Configuration Utility
Page 63

❏ Firmware Update
You can update the firmware and EpsonNet WebAssist. See
the EpsonNet WinAssist online help for detailed information.
3
Help menu:
❏ Help Topic
Opens EpsonNet WinAssist help.
❏ About EpsonNet WinAssist
Displays the copyright and version information for EpsonNet
WinAssist.
Timeout option
Set the length of time before a timeout occurs (between 2 and 120
seconds). The default value is 6 seconds. A communication error
occurs if this time is exceeded. If you set a larger value, it takes
more time to search for the network printers. Therefore, change
this value only if necessary.
Select Refresh from the View menu or restart EpsonNet
WinAssist for the settings to take effect.
3
3
3
3
3
3
3
3
EpsonNet WinAssist Configuration Utility 51
3
3
3
Page 64

Search method
You can select the connections and protocols to search for a print
server. You can select from the following: LAN connection using
TCP/IP, IPX, and NetBEUI protocols, or USB connection.
Select the Select All radio button to search for print servers with
all the available connections and protocols, or select the Select
Individually radio button to select the preferred connections and
protocols.
Select Refresh from the View menu or restart EpsonNet
WinAssist for the settings to take effect.
Note:
EpsonNet WinAssist installed on Windows XP/Server 2003 does not
support NetBEUI as a search protocol because the NetBEUI protocol is
not officially supported on Windows XP/Server 2003.
52 EpsonNet WinAssist Configuration Utility
Page 65

Search options
Search Options-IP
3
To search for print servers in other segments, set the specific
network address and the subnet mask. The settings you modified
on this screen do not affect the search parameters used for
EpsonNet WinAssist EasySetup.
Select Refresh from the View menu or restart EpsonNet
WinAssist for the settings to take effect.
3
3
3
3
3
3
3
3
Item Explanation
Search specified
address
Network Address Enter the network address (valid range 0 to 255) of
Subnet Mask Enter the subnet mask of the IP address.
Select this check box to search for a print server
located outside the router.
the print server you want to find. Enter 0 for the local
address.
EpsonNet WinAssist Configuration Utility 53
3
3
3
Page 66

List box Displays network addresses and subnet masks that
have been registered.
Add button Registers a network address (up to 20 addresses).
Do not add the network address if it is in the same
segment.
Remove button Removes a network address and its subnet mask
from the List box.
Note:
❏ If you try to add an incorrect network address, the following message
appears: “The network address XXX.XXX.XXX.XXX that you
entered will be added to the list as XXX.XXX.XXX.X. Add this
address?” Check the correct network address and then click OK to
add it.
❏ If you try to add the same network address, the message “This
network address has already been registered” appears, which
indicates this address cannot be added.
Search Options-IPX
When you manage the print server with IPX (NetWare), and when
you want to configure the print server outside of the local
network, set the network address of the print server. Select
Refresh from the View menu or restart EpsonNet WinAssist for
the settings to take effect.
Note:
❏ To use this option, you need to log in to the NetWare server as a
supervisor.
❏ When using a dial-up network, delete any unnecessary addresses
from the Search Addresses list to prevent charges for any extra
accounts.
54 EpsonNet WinAssist Configuration Utility
Page 67

3
3
3
3
3
3
Item Explanation
Search specified
addresses
Network Address List Displays all current network addresses.
Search Addresses Displays the network address to be searched.
Add button Select an address in Network Address List, and then
Remove button Removes the selected address from the Search
The display time can be reduced by selecting this
check box and choosing the target networks; any
unnecessary or unwanted information is then not
obtained.
click Add to add the address to Search Addresses
(up to 256 addresses).
Addresses list.
EpsonNet WinAssist Configuration Utility 55
3
3
3
3
3
3
Page 68

Firmware update
You can update the firmware and EpsonNet WebAssist. Since the
firmware update function is for support purposes, usually you do
not need to use this function. See the EpsonNet WinAssist online
help for detailed information.
Details of the Configuration Dialog Box
Information
The Information menu shows the various print server parameters
as described below.
56 EpsonNet WinAssist Configuration Utility
Page 69

Parameters Explanations
3
MAC Address Unique hardware address of the print server.
Hardware
Version
Software Version Software version of the print server
Model Name Product name of the printer attached to the print
Location Enter the location of the print server.
Return to Default
button
Search Path Protocol used to search for the print server
OK Updates the settings.
Cancel Cancels any changes.
Help Accesses help.
You can check the MAC address on a status sheet.
Hardware version of the print server
server
Reverts to the factory default settings.
3
3
3
3
3
3
3
EpsonNet WinAssist Configuration Utility 57
3
3
3
3
Page 70

TCP/IP
To use the printer in the TCP/IP environment, configure the print
server using the following screen.
58 EpsonNet WinAssist Configuration Utility
Page 71

Items Explanations
3
Method for specifying
the IP address
Set using Automatic
Private IP Addressing
(APIPA)
Set using PING Select this check box when setting an IP address
IP Address Enter an IP address for the print server. Be sure
Select a method for specifying an IP address.
When you select Automatic, an IP address,
subnet mask, and default gateway are
automatically assigned by the DHCP server.
Note:
If the Dynamic DNS function is not supported, we
recommend that you select Manual and then
enter an IP address. This is because if you select
Automatic, the IP address of the print server
changes every time you turn on the printer so
that you need to change the printer port setting
accordingly.
Assigns a private IP address automatically even
when there is no DHCP server on your network.
It is dimmed if this function is not supported.
using the ping command. When not using the
ping command, clear this check box.
Note:
Be sure to clear the check box when not using
ping; this prevents any unexpected change of
the IP address by EpsonNet WebManager.
that the IP address is unique and does not
conflict with any other device on the network.
3
3
3
3
3
3
3
Subnet Mask Enter the subnet mask of the IP address.
Default Gateway Enter the gateway address.
Extended Settings
button
EpsonNet WinAssist Configuration Utility 59
Click this button for extended settings such as
Dynamic DNS and Universal Plug and Play. If
both functions are not supported, this button is
dimmed.
3
3
3
3
Page 72

Extended Settings dialog box
When you click the Extended Settings button on the TCP/IP
menu, the following dialog box appears.
60 EpsonNet WinAssist Configuration Utility
Page 73

Items Explanations
3
Acquire DNS server
address automatically
DNS Server Addresses Displays the DNS server address. To enter the
Acquire host name and
domain name
automatically
Host Name Enter the host name supported by the
Domain Name Leave it blank or enter two or more characters
Select this check box if you want to acquire
the DNS server address using the DHCP server.
To enter the DNS server address manually,
clear this check box. If the DNS is not
supported, this check box is dimmed.
DNS server address, click the Add button.
To edit the DNS server address, select the
address and then click the Edit button.
To delete the DNS server address, select the
address and then click the Delete button.
Select this check box if you want to acquire a
host name and domain name from the DHCP
server.
Dynamic DNS (between 2 and 63 characters).
The total number of characters of the host
name and the domain name must not
exceed 251.
of the domain name supported by Dynamic
DNS. The total number of characters of the
host name and the domain name must not
exceed 251.
3
3
3
3
3
3
3
Register the network
interface’s address to
DNS server
Register directly to DNS
server
Use Universal Plug and
Play
Device Name Enter the device name for Universal Plug and
EpsonNet WinAssist Configuration Utility 61
Select this check box if you want to register
the host name and the domain name to the
DNS server through the DHCP server that
supports Dynamic DNS.
Select this check box if you want to register
the host name and the domain name directly
on the DNS server.
Enables or disables Universal Plug and Play. It
is dimmed if this function is not supported.
Play (between 2 and 63 characters).
3
3
3
3
Page 74

NetWare
To use the printer in the NetWare environment, configure the
print server using the following screen. You can configure the
print server in either the Print Server mode or the Remote Printer
mode.
Note:
❏ When you are not using NetWare, be sure to select the Standby
mode.
❏ Log in to the NetWare server or the NDS context with supervisor
privileges.
❏ You cannot assign the print queue if you have not logged in to the
bindery or NDS in the same mode you have selected for Mode.
Print Server mode
To use the printer in the Print Server mode, configure the print
server using the following screen.
62 EpsonNet WinAssist Configuration Utility
Page 75

Note:
When you save the settings, the Printer Objects, named PR0 for the
Bindery mode or print server name_P0 for the NDS mode, are
automatically created. To change the printer name, use PCONSOLE or
NWADMIN.
3
3
3
3
3
3
3
EpsonNet WinAssist Configuration Utility 63
3
3
3
3
3
Page 76

Items Explanations
Use NetWare Select this check box when using NetWare.
Mode Select a mode: Print Server/Bindery or Print
Frame Type Leave the default frame type as it is.
Tree Name For the NDS mode only:
Context For the NDS mode only:
Browse button Browse the NDS context.
Primary File Server Name For the Bindery mode only:
Print Server Name Select or enter the print server name (up to 47
Print Server Password Enter the password to log in to the print server
Print Server Password
(again)
When you use the printer only in the NetWare
environment, it turns on automatically.
Server/NDS.
Click the Browse button and select the NDS
context so the Tree name is also selected.
Click the Browse button and select the NDS
context.
Select the server where the print server logs in.
characters).
(up to 20 characters). See the NetWare
documentation for more details. Usually you
do not need to set it.
Enter the password again.
Polling Interval Set the polling interval between 5 to 90
seconds. See the NetWare documentation
for more details. Usually you do not need to
set it.
Print Queue
Configuration button
Configure the print queue setting s. If you have
assigned the queue with PCONSOLE,
NWAdmin, or EpsonNet!2 for Windows (an
older version of the configuration utility),
reassign the print queue here.
64 EpsonNet WinAssist Configuration Utility
Page 77

Print Queue Configuration dialog box
When you click the Print Queue Configuration button on the
Print server menu, the following dialog box appears.
Note:
You can configure queue settings for a higher context than the one you
specified in the NDS context box. In this case, you must have the
supervisor privileges for the context in which you set the queue.
3
3
3
3
3
3
3
3
Items Explanations
Queue Name Displays the queue name that is assigned to
the print server by browsing the queue.
Browse button Click the Browse button to select a queue.
You can also create or delete a queue.
Queue list box Lists the print queues.
Add button Adds a print queue.
Remove button Removes a print queue.
EpsonNet WinAssist Configuration Utility 65
3
3
3
3
Page 78

❏ Selecting a queue
Click the queue and click OK to select it.
❏ Creating a queue
For Bindery mode: Click the file server where you want to
create a queue. Right-click it, and then select Create Queue.
Enter the queue name (up to 47 characters).
For NDS mode: Select the context where you want to create
a queue. Right-click it, and then select Create Queue. Type
a queue name (up to 47 characters). Browse the context, and
then select the volume name from the drop-down list. The
queue will be created under the SYS volume of the file server.
If you want to create a queue in another volume, use
PCONSOLE or NWAdmin.
❏ Deleting a queue
Select the print queue you want to delete. Right-click it, and
then select Delete Queue.
66 EpsonNet WinAssist Configuration Utility
Page 79

Remote Printer mode
To use the printer in the Remote Printer mode, configure the print
server using the following screen.
3
3
3
3
3
3
3
3
Items Explanations
Use NetWare Select this check box when using NetWare. When
you use the printer only in the NetWare environment,
it turns on automatically.
Mode Select Remote Printer.
Frame Type Leave the default frame type as it is.
EpsonNet WinAssist Configuration Utility 67
3
3
3
3
Page 80

Primary Print S erver
Name
Enter the primary print server name (up to 47
characters), which is created by PCONSOLE or
NWAdmin.
For NDPS Gateway, enter the SAP name you have
set for NetWare (up to 47 characters).
Printer Port
Number
Enter the printer port number.
For NDPS Gateway, enter the same printer number
you have set for NetWare (between 0 and 254).
MS Network
To use the printer in the Microsoft network environment,
configure the print server using the following screen.
68 EpsonNet WinAssist Configuration Utility
Page 81

Items Explanations
3
Use Microsoft
network shared
printing
Print Server
Name
Workgroup
Name
Share Name Enter the printer’s shared name on the network (up to
Select this check box when using Microsoft Shared
Network printing. This check box is selected but dimmed
when the print server’s information is acquired by the
NetBEUI protocol.
Enter the print server name (up to 15 characters). Be
sure to give a unique name that does not cause
conflicts with any other device on the network.
Enter the workgroup name or domain name used for
the Windows network environment (up to 15
characters).
12 characters). Do not use LPT1, LPT2, LPT3, or COM.
3
3
3
3
3
3
3
EpsonNet WinAssist Configuration Utility 69
3
3
3
3
Page 82

AppleTalk
To use the printer in the AppleTalk environment, configure the
print server using the following screen.
Note:
To configure AppleTalk settings using EpsonNet WinAssist, the
following conditions must be maintained;
❏ The print server must be assigned a valid IP address.
❏ You have logged in to the NetWare server or the NDS context with
supervisor privileges.
❏ The shared service is installed on the computer.
70 EpsonNet WinAssist Configuration Utility
Page 83

Items Explanations
Use AppleTalk Select this check box when using AppleTalk.
Printer Name Enter the name of the printer (up to 32 characters).
3
3
Zone Name Enter the network zone name (up to 32 characters).
Entity Type Displays the printer’s entity type. Do not change the
Entity Setting button Click this button and select the appropriate entity
Method of
specifying the
network number
Network Number for
Manual Mode
To have the zone selected automatically, select
Automatic to specify the network number and
enter an asterisk (*) in this text box.
entity type unless “epson” appears. If “epson”
appears, select an entity type by clicking the Entity
Setting button to match your printer.
Ink Jet, All in One, or Impact Dot Matrix (24 pin):
EPSONLQ2
type.
Select a method for acquiring the network number.
Automatic is usually preferred.
Enter a value between 0 and 65534 to specify the
network number, if you have selected Manual.
3
3
3
3
3
3
3
EpsonNet WinAssist Configuration Utility 71
3
3
3
Page 84

IPP
To use the printer in the IPP environment, configure the print
server using the following screen. If the print server does not
support the SNMP, all of the items are dimmed.
Items Explanations
IPP URL Displays the printer’s URL for Internet Printing.
Format:
http://IP address of print server:631/ printer
name set below
Example:
http://192.168.100.201:631/EPSON_IPP_Printer
72 EpsonNet WinAssist Configuration Utility
Page 85

Items Explanations
Printer Name Enter the name of the printer to use for Internet
Printing (up to 127 characters).
Example:
EPSON_IPP_Printer
Location Enter the name of the printer’s physical
location (up to 64 characters).
SNMP
You can use the SNMP menu to set the SNMP information.
3
3
3
3
3
3
3
3
EpsonNet WinAssist Configuration Utility 73
3
3
3
3
Page 86

Items Explanations
Read Only The word “public” always appears.
Read/Write Enter the Read/Write community name (up
Enable IP Trap 1 or/and 2 Enable or Disable IP trap 1, 2, or both.
Address Enter the IP address of the server to which the
Community Enter the community name (up to 32
Enable IPX Trap 1 or/and 2 Enable or Disable IPX trap 1, 2, or both.
Address Enter Network Address and Node Number
Community Enter the community name (up to 32
to 32 characters).
trap is transmitted.
characters).
(MAC Address) of the server to which the
trap is transmitted.
Format:
Network Address: Node Number
Suppose Network Address is A7E00BB0
(hexadecimal) and Node Number is
000048930000 (hexadecimal). In this case,
the address is A7E00BB0:000048930000.
characters).
74 EpsonNet WinAssist Configuration Utility
Page 87

About Password
If you set a password, you must enter it to configure the print
server. When you click OK in the setting dialog box or click the
Return to Default button, the Password dialog box appears.
1. To set a password or to change the current password, click
Change. The Administrator password dialog box appears.
2. When you set a password for the first time, leave the Old
Password box blank, and enter a password in the New
Password box and in the New Password (again) box (up to 20
characters). Then click OK. Passwords are case sensitive.
3
3
3
3
Note:
❏ The same password is used for EpsonNet WinAssist,
MacAssist, and WebAssist.
❏ Since the new password becomes effective after the data is sent
to the print server, enter the old password immediately after
changing the password.
❏ If you forget your password, you need to initialize the print
server. See “Initializing the Print Server” on page 229 for
instructions.
3
3
3
3
3
3
3
3
EpsonNet WinAssist Configuration Utility 75
Page 88

76 EpsonNet WinAssist Configuration Utility
Page 89

Chapter 4
EpsonNet MacAssist Configuration Utility
About EpsonNet MacAssist
EpsonNet MacAssist is a Macintosh-based configuration
software for administrators that allows you to configure the print
server for TCP/IP, AppleTalk, and IPP.
Note:
❏ Be sure to use EpsonNet MacAssist included on the Software
CD-ROM shipped with this product.
❏ Currently, EPSON printers use AppleTalk in OS 8.6 to 9.x, and
EPSON AppleTalk in OS X for printing (except for the EPSON
Stylus Photo 2200 and Stylus C82).
Menu Bar
EpsonNet MacAssist provides the following menus and
sub-menus.
4
4
4
4
4
4
4
4
4
File menu:
❏ Close
Closes EpsonNet MacAssist.
❏ Quit
Quits EpsonNet MacAssist.
Edit menu:
Use it when you edit the contents of the configuration menus.
4
4
4
EpsonNet MacAssist Configuration Utility 77
Page 90

Device menu:
❏ Configuration
Configures the print server you have selected.
❏ Launch Browser
Starts EpsonNet WebAssist to configure the print server you
have selected. EpsonNet WebAssist is a utility that runs on a
browser.
❏ Refresh
Updates to the latest information by searching for the
available printers again.
❏ Timeout Setting
Set the timeout value between 3 and 99 seconds. See
“Timeout” on page 79 for more information.
❏ Network Path Search Setting
Select connections and protocols to use to search for a print
server. See “Network path search se tt in g ” o n p a ge 7 9 f or m or e
information.
❏ Search Options
Configures the options for a search with AppleTalk or IP. See
“Search options” on page 80 for more information.
78 EpsonNet MacAssist Configuration Utility
Page 91

Timeout
Set the length of time before a timeout occurs (between 3 and 99
seconds). The default value is 5 seconds. A communication error
occurs if this time is exceeded. If you set a larger value, it takes
more time to search for the network printers. Therefore, change
this value only if necessary.
Select Refresh from the Device menu or restart EpsonNet
MacAssist for the settings to take effect.
Network path search setting
You can select the connection and protocols to use to search for a
print server. You can either use all the connection and protocols
such as AppleTalk, IP, or USB, or select the favorable ones.
4
4
4
4
4
4
4
4
Select Refresh from the Device menu or restart EpsonNet
MacAssist for the settings to take effect.
EpsonNet MacAssist Configuration Utility 79
4
4
4
4
Page 92

Search options
Search options-AppleTalk
To search for the print servers in other zones, set the specific zones
in this option.
Select Use this method to select search zones to search for a
print server in a specific zone. Clear the check box if the print
server is in the same zone; this saves time in searching.
The zones obtained from the network environment are displayed
on the Zone list. The zones to be searched are displayed on the
Search Zone list. The maximum number of zones that can be
displayed on the Zone and Search Zone lists is 2000.
To add the zone to the Search Zone list, select the zone and then
click the Add button. To delete the zone from the Search Zone list,
select the zone and then click the Del button.
Select Refresh from the Device menu or restart EpsonNet
MacAssist for the settings to take effect.
80 EpsonNet MacAssist Configuration Utility
Page 93

Search options-IP
To search for the print servers in other segments, set the specific
network address and subnet mask. The settings you modified on
this screen do not affect the search parameters used for EpsonNet
MacAssist EasySetup.
Select Use the search option to search for a print server in
another segment. Do not select it if the print server you want to
configure is located in the same segment.
Enter the network address and subnet mask (valid range 0 to 255).
Ask your network administrator for the address. Then click Add.
You can add up to 20 addresses. To remove the address from the
list, select the address and click Delete.
Select Refresh from the Device menu or restart EpsonNet
MacAssist for the settings to take effect.
4
4
4
4
4
4
4
4
Note:
❏ If you try to add an incorrect network address, the following message
appears: “The network address XXX.XXX.XXX.XXX that you
entered will be added to the list as XXX.XXX.XXX.X. Add this
address?” Check the correct network address and then click OK to
add it.
❏ If you try to add the same network address, the message“This
network address has already been registered” appears, which
indicates this address cannot be added.
EpsonNet MacAssist Configuration Utility 81
4
4
4
4
Page 94

Details of the Configuration Dialog Box
Information
The Information menu shows the various print server parameters
as described below.
Parameters Explanations
MAC Address Unique hardware address of the print server.
Hardware
Version
Software Version Software version of the print server
You can check the MAC address on a status sheet.
Hardware version of the print server
82 EpsonNet MacAssist Configuration Utility
Page 95

Model Name Product name of the printer attached to the print
server
Location Enter the location of the print server.
4
Return to Default
button
Search Path Protocol used to search for the print server
OK Updates the settings.
Cancel Cancels any changes.
TCP/IP
To use the printer in the TCP/IP environment, configure the print
server using the following screen.
Resets all configuration settings of the print server to
their defaults.
4
4
4
4
4
4
4
4
EpsonNet MacAssist Configuration Utility 83
4
4
4
Page 96

Items Explanations
Method for specifying
the IP address
Set using PING Select this check box when setting the IP address
Set using Automatic
Private IP Addressing
(APIPA)
IP Address Enter an IP address for the print server. Be sure
Subnet Mask Enter the subnet mask of the IP address.
Default Gateway Enter the gateway address. If there is a server or
Select a method for specifying an IP address.
When you select Automatic, an IP address,
subnet mask, and default gateway are
automatically assigned by the DHCP server.
Note:
If the Dynamic DNS function is not supported, we
recommend that you select Manual and then
enter an IP address. If you select Automatic, the
IP address of the print server changes every time
you turn on the printer so that you need to
change the printer port setting accordingly.
using the ping command. When not using the
ping command, clear this check box.
Assigns a private IP address automatically even
if there is no DHCP server on your network. It is
dimmed if this function is not supported.
that the IP address is unique and does not
conflict with any other device on the network.
a router that functions as a gateway, enter the
IP address of the server or the router. If there is no
gateway, leave the default values.
Extended Settings Click this button for extended settings such as
Dynamic DNS and Universal Plug and Play. If
both functions are not supported, this button is
dimmed.
84 EpsonNet MacAssist Configuration Utility
Page 97

Extended Settings dialog box
When you click the Extended Settings button on the TCP/IP
menu, the following dialog box appears.
4
4
4
4
4
4
4
4
Items Explanations
Acquire DNS server
address automatically
DNS Server Address Displays the DNS server address. To enter the
EpsonNet MacAssist Configuration Utility 85
Select this check box if you want to acquire
the DNS server address using the DHCP server.
To enter the DNS server address manually,
clear this check box. If the DNS is not
supported, this check box is dimmed.
DNS server address, click the Add button.
To edit the DNS server address, select the
address and then click the Edit button.
To delete the DNS server address, select the
address and then click the Delete button.
4
4
4
4
Page 98

Acquire host name and
domain name
automatically
Select this check box if you want to acquire a
host name and domain name from the DHCP
server.
Host Name Enter the host name supported by the
Domain Name Leave it blank or enter two or more characters
Register the network
interface’s address to
DNS server
Register directly to DNS
server
Use Universal Plug and
Play
Device Name Enter the device name for Universal Plug and
Dynamic DNS (between 2 and 63 characters).
The total number of characters of the host
name and the domain name must not
exceed 251.
of the domain name supported by Dynamic
DNS. The total number of characters of the
host name and the domain name must not
exceed 251.
Select this check box if you want to register
the host name and the domain name to the
DNS server through the DHCP server that
supports Dynamic DNS.
Select this check box if you want to register
the host name and the domain name directly
on the DNS server.
Enables or disables Universal Plug and Play. It
is dimmed if this function is not supported.
Play (between 2 and 63 characters).
86 EpsonNet MacAssist Configuration Utility
Page 99

AppleTalk
To use the printer in the AppleTalk environment, configure the
print server using the following screen.
4
4
4
4
4
4
4
4
Items Explanations
Use AppleTalk Select this box when using AppleTalk.
Printer Name Enter the name of the printer (up to 32 characters).
Zone Name Select or enter the network zone name (up to 32
characters).
To have the zone selected automatically, select
Automatic to specify the network number and
select an asterisk (*) in this text box.
To enter manually, select Manual Input and then
enter the zone name in the text box.
EpsonNet MacAssist Configuration Utility 87
4
4
4
4
Page 100

Items Explanations
Entity Type Displays the printer’s entity type. Do not change the
entity type unless “epson” appears. If “epson”
appears, select an entity type by clicking the Entity
Setting button to match your printer.
Ink Jet, All in One, or Impact Dot Matrix (24 pin):
EPSONLQ2
Method of
specifying the
network number
Network number
for manual mode
Select the method for acquiring the network
number. Automatic is usually preferred.
Enter a value between 0 and 65534 to specify the
network number, if you have selected Manual.
IPP
To use the printer in the IPP environment, configure the print
server using the following screen.
88 EpsonNet MacAssist Configuration Utility
 Loading...