

Page 1

User’s Guide Update
Notic e for C82363✽/C82364✽ Users
Use a shielded twisted-pair cable (Category-5) to connect the
interface card, otherwise the interface card may malfunction.
For C82363✽ Users
The C82363✽ Ethernet card al s o ha s a DC powe r co nnection.
You can connect the C82363✽ Ethernet card to the following
EPSON printers using AC adapter C82525✽ (Model EU-30);
EPSON Stylus COLOR 800/850
FX-880/ 1100/ 2170
DFX-8500
LQ-670/ 2070/ 2170
DLQ-3000+
Before connecting, change the power select switch on the board
to the “A” position.
For Microsoft® Windows® 98 Users
The EPSON Net!2 for Windows can be used with Windows
98. Follow the instructions for Windows 95 in the
Administrator’s Manual.
If you are using a NetWare printer, EPSON Status Monitor
2 utility is not available. Make sure to deselect the Monitor
NetWare printers check box when you install EPSON Status
Monitor 2 utility.
Deselect here.
Copyright © 1998 by SEIKO EPSON CORPORATION, Nagano, 4009275
EK2-00-EUL
Page 2

Using Bindery Emulation mode
for Netware 4.x
Follow the steps below when using Bindery Emulation mode in
Netware 4.x.
Making Settings in Print Server mode
1. Log in to the server as a SUPERVISOR. Make sure to log in
as Bindery correspondence.
2. Run PCONSOLE.
3. From the Available Options screen, select Quick Setup.
4. Type the Print Server and Print Queue name, and select
Parallel, Manual load, Polling mode, or LPT1 for the
printer type.
5. Press Esc to exit PCONSOLE.
6. Using EPSON Net!2 for Windows, configure the Ethernet
card in Print Server mode. Make sure to use the print server
created in step 4.
Note:
To configure the Ethernet card using EPSON Net!2, see
“Configuring the Ethernet card in Print Server mode” on page
4-8.
Copyright © 1998 by SEIKO EPSON CORPORATION, Nagano 4009472
xxx-00
Page 3

Making Settings in Remote Printer mode
1. Log in to the server as a SUPERVISOR. Make sure to log in
as Bindery correspondence.
2. Run PCONSOLE.
3. From the Available Options screen, select Print Queues
and press Enter. Press insert and type the print queue
names. Then press Enter
4. Press Esc.
5. From the Available Options screen, select Print Servers and
press Enter. Press Insert and type the print server name.
Then press Enter.
6. Press Esc to exit PCONSOLE, and logout from the server.
7. Then, log in to the server as an ADMIN. Make sure to log
in with NDS connection.
8. Start Nwadmin.
9. To create the Printer Object, click the container (with the
Print Server object created in step 5) specified as the
Bindery context and select Object, then Create, click OK
and then select Printer. Type the printer name and click
Create.
10. To assign the print queue, double-click the Printer object
icon (created in step 9). The Printer dialog box appears.
11. Click Assignments and then click Add. From the print
queue list, select the queue (created in step 3) and click OK.
12. Click Configuration in the Printer dialog box, and select
Parallel from the Printer type pull-down menu.
13. Then, click Communication. Select LPT1 for the Port;
check Polled for Interrupts; and check Manual load
(Remote from Print Server) as the Connection type.
14. Click OK to close the dialog box, then click OK in the
Printer dialog box.
2
Page 4

15. To assign the printer, double-click the Printer Server object
icon (created in step 5). The Print Server dialog appears.
16. Click Assignments and then click Add. From the printer
object list, select the printer object (created in step 9) and
click OK.
17. In the Print Server dialog box, select the assigned printer
from the printer object list, and click the Printer Number
button to set a printer number from 0 to 254. Then click
OK.
18. To confirm the objects you have assigned, double-click the
Print Server object icon. Click Print Layout, and check that
the print server, printer, and print queue are connected.
19. From the System Console of the file server, load the print
server module by the following command.
LOAD PSERVER print server name
20. Using EPSON Net!2 for Windows, configure the Ethernet
card in Remote Printer mode. Make sure to use the print
server name created in step 5 and the printer number set in
step 17.
Note:
To configure the Ethernet card using EPSON Net!2, see
“Configuring the Ethernet card in Remote Printer mode” on
page 4-14.
3
Page 5
Page 6

FCC Compliance Statement
For United States Users
This equipment has been tested and fo un d to comply with the limi ts f o r a Cl ass A digital
device, pursuant to Part 15 of the FCC Rules. These limits are designed to provide
reasonable protection against harmful interference when the equipment is operated in a
commercial environment. This equipment generates, uses and can radiate radio frequency
energy a nd, if not ins t alled an d us e d in accor dance with the instruction man u al, may cause
harmful interference to radio communications. Operation of this equipment in a residential
area is likely to ca us e har mful interference in which case the user will be re quired to
correct the interference at his own expense.
This device compli e s with Part 15 of the FCC Rules. Oper ation is su bject to t he following
two conditions:
(1) this device may not cause harmful interference, and
(2) this device must accep t any interferen ce received,
including interference that may cause undesired operati on .
WARNING
The connection of a no n - s hi elded equipment inter f ace cable to this equipment will
invalidate the FCC Cert if ication o f this device an d may cause interference l e vels which
exceed the li mits es tablished by the F CC for th is equipment. It i s the re s po nsibility of the
user to obtain and use a shielded equipment inter f ace cable with this dev ice. If this
equipment has more than one interface connector, do not leave cables connected to unused
interfaces.
Changes or modifications not expressly approved by the manufacturer could void the
user’ s authority to operate the equipment.
For Canadian Users
This Class A digital apparatus complies with Canadian ICES-003.
Cet appareil numérique de la classe A est conforme à la norme NMB-003 du Canada.
For European Users
This product conforms to CE marking requirements in accordance with EC Directive
89/336/EEC.
AC Adapter model EU-30 conforms to CE making requirements in accordance with EC
Directives 73/23/EEC and 89/336/EEC.
WARNING
This is a Class A product. In a domestic environment this product may cause radio
interference in which case the user may be required to take adequat e me asures .
Page 7

®
C82362]/ C82363]/ C82364]
EPSON Type B Ethernet
Interface Card
All rights reserved. No part of this publication may be reproduced, stored in a retrieval
system, or transmitted in any form or by any means, electronic, mechanical, photocopying,
recording, or otherwise, without the prior written permission of SEIKO EPSON
CORPORATION. The information contained herein is designed only for use with this
EPSON printer. EPSON is not responsible for any use of this information as applied to
other products.
Neither SEIKO EPSON CORPORATION nor its affiliates shall be liable to the purchaser of
this product or third parties for damages, losses, costs, or expenses incurred by purchaser
or third parties as a result of: accident, misuse, or abuse of this product or unauthorized
modifications, repairs, or alterations to this product, or (excluding the U.S.) failure to
strictly comply with SEIKO EPSON CORPORATION‘s operating and maintenance
instructions.
SEIKO EPSON CORPORATION shall not be liable against any damages or problems
arising from the use of any options or any consumable products other than those
designated as Original EPSON Products or EPSON Approved Products by SEIKO EPSON
CORPORATION.
EPSON and EPSON ESC/P are registered trademarks and EPSON ESC/P 2 and EPSON
Stylus are trademarks of SEIKO EPSON CORPORATION.
General Notice: Oth er pr oduct names used herein are for identification purposes only and may be
trademarks of their respective owners. EPSON disclaims any and all ri gh ts in thos e marks.
Copyright © 1998 by SEIKO EPSON CORPORATION, Nagano, Japan.
Administrator’s Manual
Page 8

Declaration of Conformity
According to ISO/ IEC Guid e 22 an d EN 45014
Manufactu re r: SEIKO EPSON CORP ORATION
Address: 3-5, Owa 3-c h ome, Suwa-shi ,
Nagano-ken 392 Japan
Represen ta tive: EPSON EUROP E B.V .
Address: Prof. J. H. Bav in c k laan 5 1183
AT Amstelveen
The Netherlands
Declares that the Product:
Product Name: EPSON Type B Ethernet
Interface Card
Model: C82362/ C8236 3/ C82364
Conforms to the following Direc t ive( s) and No rm (s) :
Directive 89/336 /EE C:
EN 55022 Class A
EN 50082-1
IEC 801-2
IEC 801-3
IEC 801-4
April 1998
Y. Ishii
President of EP SON EUROPE B.V.
ii
Page 9

Contents
Introduction
Enclosed Items . . . . . . . . . . . . . . . . . . . . . . . . . . . . 1-2
Overview of Functions . . . . . . . . . . . . . . . . . . . . . . . 1-3
Operating Environment . . . . . . . . . . . . . . . . . . . . . . 1-4
Supported operating systems and network protocols . . . 1-4
Environment for the Setup Utility . . . . . . . . . . . . . . . 1-5
EPSON Printers Supported by the Ethernet Card . . . . . . . . 1-10
Brief Overview of Installing and Configuring the Ethernet Card 1-11
Chapter 1
Ethernet Card Operation . . . . . . . . . . . . . . . . . . . . . . 1-1
Status lights . . . . . . . . . . . . . . . . . . . . . . . . . . . 1-1
Status sheet button . . . . . . . . . . . . . . . . . . . . . . . 1-2
Power select switch . . . . . . . . . . . . . . . . . . . . . . . 1-3
Hardware Installation . . . . . . . . . . . . . . . . . . . . . . . 1-4
Initializing the Ethernet Card . . . . . . . . . . . . . . . . . . . 1-7
Chapter 2
Installing EPSON Net!2 for Windows . . . . . . . . . . . . . . 2-1
For Windows 95 and Windows NT 4.0 . . . . . . . . . . . . 2-2
For Windows NT 3.51 . . . . . . . . . . . . . . . . . . . . . . 2-3
Installing EPSON Net!2 for Macintosh . . . . . . . . . . . . . . 2-4
Getting Started
Install ing EP SON Net !2
iii
Page 10

Chapter 3
Overall Steps . . . . . . . . . . . . . . . . . . . . . . . . . . . . . 3-2
Installing the TCP/IP Protocols in Your PC . . . . . . . . . . . . 3-3
Setting the IP Address Using the EPSON Net!2 for
Windows/Macintosh . . . . . . . . . . . . . . . . . . . . . . . . 3-9
Setting the IP Address Using the arp Command . . . . . . . . . 3-12
Changing the IP Address Using EPSON Net!2 for Intranet . . . 3-16
Setting the IP Address
Chapter 4
Overview . . . . . . . . . . . . . . . . . . . . . . . . . . . . . . . 4-1
Applicable systems . . . . . . . . . . . . . . . . . . . . . . . . 4-1
Overall steps . . . . . . . . . . . . . . . . . . . . . . . . . . . . 4-2
About mode . . . . . . . . . . . . . . . . . . . . . . . . . . . . 4-2
Using NetWare 3.1x . . . . . . . . . . . . . . . . . . . . . . . . . 4-4
Instructions for using NetWare . . . . . . . . . . . . . . . . . 4-4
Using the Ethernet card in Print Server mode . . . . . . . . . 4-4
Using the Ethernet card in Remote Printer mode . . . . . . . 4-11
Using NetWare 4.1x . . . . . . . . . . . . . . . . . . . . . . . . . 4-18
Instructions for using NetWare . . . . . . . . . . . . . . . . . 4-18
Using the Ethernet card in Print Server mode . . . . . . . . . 4-19
Using the Ethernet card in Remote Printer mode . . . . . . . 4-27
Configuring the Ethernet Card for NetWare Using
EPSON Net!2 for Intranet . . . . . . . . . . . . . . . . . . . . . 4-37
Create and Set the Queue Using EPSON Net!2 . . . . . . . . . . 4-39
Instructions for Using a Dial-Up Network . . . . . . . . . . . . 4-40
Chapter 5
Overview . . . . . . . . . . . . . . . . . . . . . . . . . . . . . . . 5-1
Applicable systems . . . . . . . . . . . . . . . . . . . . . . . . 5-1
Overall steps . . . . . . . . . . . . . . . . . . . . . . . . . . . . 5-2
Configuring the Ethernet Card Using EPSON Net!2
for Macintosh . . . . . . . . . . . . . . . . . . . . . . . . . . . . . 5-3
Configuring the Ethernet Card for AppleTalk Using
EPSON Net!2 for Intranet . . . . . . . . . . . . . . . . . . . . . . 5-6
Using the Ethernet Card with NetWare
Using the Ethernet Card with Macintosh
iv
Page 11

Chapter 6
Overview . . . . . . . . . . . . . . . . . . . . . . . . . . . . . . . 6-1
Applicable systems . . . . . . . . . . . . . . . . . . . . . . . 6-1
Overall steps . . . . . . . . . . . . . . . . . . . . . . . . . . . 6-2
Printing with TCP/IP . . . . . . . . . . . . . . . . . . . . . . . . 6-3
Printing method . . . . . . . . . . . . . . . . . . . . . . . . . 6-3
Printing with NetBEUI . . . . . . . . . . . . . . . . . . . . . . . 6-3
Installing NetBEUI protocol . . . . . . . . . . . . . . . . . . 6-3
Configuring the Ethernet card for NetBEUI using
EPSON Net!2 for Intranet . . . . . . . . . . . . . . . . . . . 6-5
Setting up your printer . . . . . . . . . . . . . . . . . . . . . 6-8
Using the Ethernet Card with Windows 95
Chapter 7
Overview . . . . . . . . . . . . . . . . . . . . . . . . . . . . . . . 7-1
Applicable systems . . . . . . . . . . . . . . . . . . . . . . . 7-1
Overall steps . . . . . . . . . . . . . . . . . . . . . . . . . . . 7-2
Printing with TCP/IP . . . . . . . . . . . . . . . . . . . . . . . . 7-3
Printing via the LPR port for Windows NT 3.51 . . . . . . . 7-3
Printing via the LPR port for Windows NT 4.0 . . . . . . . 7-6
Printing with NetBEUI . . . . . . . . . . . . . . . . . . . . . . . 7-8
Installing NetBEUI protocol in Windows NT 3.51 . . . . . 7-8
Installing NetBEUI protocol in Windows NT 4.0 . . . . . . 7-9
Configuring the Ethernet card for NetBEUI using
EPSON Net!2 for Intranet . . . . . . . . . . . . . . . . . . . 7-10
Setting up your printer . . . . . . . . . . . . . . . . . . . . . 7-12
Using the NET USE command . . . . . . . . . . . . . . . . . 7-13
Chapter 8
Overview . . . . . . . . . . . . . . . . . . . . . . . . . . . . . . . 8-1
Applicable systems . . . . . . . . . . . . . . . . . . . . . . . 8-1
Overall steps . . . . . . . . . . . . . . . . . . . . . . . . . . . 8-1
Printing with TCP/IP . . . . . . . . . . . . . . . . . . . . . . . . 8-2
Printing with NetBEUI . . . . . . . . . . . . . . . . . . . . . . . 8-5
Using the Ethernet Card with Windows NT
Using the Ethernet Card with OS/2
v
Page 12

Chapter 9
Setting Up Different UNIX Systems Using the lpr Command . 9-1
Setting up for SunSoft Solaris 2.4 or later . . . . . . . . . . . 9-2
Setting up for SunOS 4.1.4 or later . . . . . . . . . . . . . . . 9-3
Setting up for IBM AIX 3.2.5 or later and 4.1.3 or later . . . . 9-4
Setting up for HP-UX 9.05 or later . . . . . . . . . . . . . . . 9-5
Setting up for SCO UNIX 4.2 or later (Open Server) . . . . . 9-6
Using the Ethernet Card with UNIX
Chapter 10
EPSON Net!2 for Windows . . . . . . . . . . . . . . . . . . . . . 10-1
Menu Bar . . . . . . . . . . . . . . . . . . . . . . . . . . . . . 10-2
Setting dialog boxes . . . . . . . . . . . . . . . . . . . . . . . 10-6
EPSON Net!2 for Macintosh . . . . . . . . . . . . . . . . . . . . . 10-11
EPSON Net!2 dialog box . . . . . . . . . . . . . . . . . . . . 10-11
Setting dialog boxes . . . . . . . . . . . . . . . . . . . . . . . 10-12
EPSON Net!2 for Intranet . . . . . . . . . . . . . . . . . . . . . . 10-14
Opening screen . . . . . . . . . . . . . . . . . . . . . . . . . . 10-14
Protocol information and Setting screen . . . . . . . . . . . . 10-16
Optional screen . . . . . . . . . . . . . . . . . . . . . . . . . . 10-18
Chapter 11
Installing EPSON Status Monitor 2 . . . . . . . . . . . . . . . . . 11-2
Selecting a Printer to Monitor . . . . . . . . . . . . . . . . . . . . 11-8
Windows 95 . . . . . . . . . . . . . . . . . . . . . . . . . . . . 11-9
Making Status Monitor Settings . . . . . . . . . . . . . . . . . . 11-11
Starting EPSON Status Monitor 2 . . . . . . . . . . . . . . . . . . 11-12
From Windows 95 and NT 4.0 . . . . . . . . . . . . . . . . . 11-12
From Windows NT 3.51 . . . . . . . . . . . . . . . . . . . . . 11-13
Basic Operating Procedure . . . . . . . . . . . . . . . . . . . . . 11-14
Main window . . . . . . . . . . . . . . . . . . . . . . . . . . . 11-16
Adding uninstalled network printers . . . . . . . . . . . . . 11-21
Getting detailed information about the printer status . . . . 11-22
Setting monitoring preferences . . . . . . . . . . . . . . . . . 11-26
The EPSON Net!2 Setup Utility
EPSON Status Monitor 2 (Windows only)
vi
Page 13

Background Monitoring Icon and Status Alert . . . . . . . . . 11-27
Background monitoring icon . . . . . . . . . . . . . . . . . 11-27
Status Alert . . . . . . . . . . . . . . . . . . . . . . . . . . . 11-28
Stopping Monitoring . . . . . . . . . . . . . . . . . . . . . . . . 11-29
Uninstalling EPSON Status Monitor 2 . . . . . . . . . . . . . . 11-31
From Windows 95 and NT 4.0 . . . . . . . . . . . . . . . . . 11-31
From Windows NT 3.51 . . . . . . . . . . . . . . . . . . . . 11-33
Tips for Using EPSON Status Monitor 2 . . . . . . . . . . . . . 11-34
Controlling the packet traffic on the network . . . . . . . . 11-34
Monitoring printers beyond routers . . . . . . . . . . . . . 11-34
About uninstalled network printers . . . . . . . . . . . . . 11-35
Chapter 12
General Problems . . . . . . . . . . . . . . . . . . . . . . . . . . 12-1
Problems Specific to Your Network Environment . . . . . . . 12-3
Windows NT Environment . . . . . . . . . . . . . . . . . . 12-3
Windows 95 Environment . . . . . . . . . . . . . . . . . . . 12-4
NetWare Environment . . . . . . . . . . . . . . . . . . . . . 12-5
Macintosh Environment . . . . . . . . . . . . . . . . . . . . 12-6
Problems Using EPSON Status Monitor 2 . . . . . . . . . . . . 12-7
Appendix A
For Windows 95 Windows NT 4.0 . . . . . . . . . . . . . . . . A-1
For Windows NT3.51 . . . . . . . . . . . . . . . . . . . . . . . . A-2
Appendix B
Environmental . . . . . . . . . . . . . . . . . . . . . . . . . . . . B-1
Network Software . . . . . . . . . . . . . . . . . . . . . . . . . . B-1
Network Connectors . . . . . . . . . . . . . . . . . . . . . . . . B-1
Regulatory Approvals . . . . . . . . . . . . . . . . . . . . . . . B-2
Reliability . . . . . . . . . . . . . . . . . . . . . . . . . . . . . . . B-2
Regulatory Approvals for AC Adapter Model EU-30 . . . . . B-2
Troubleshooting
Uninstal ling EPS ON Net!2
Specifications
vii
Page 14

Index
viii
Page 15

Introduction
The C82362]/ C82363] /C82364] EPSON® Type B Ethernet
Interface Card is a combination of h ar d ware and softwar e that lets
you connect an EPSON printer equipped with an optional
interface slot directly to your network. Just install the Ethernet
card into your printer’s optional interface slot (see your printer
guide or contact your EPSON dealer for app l i cable models), and
connect it anywhere on your network.
Note:
o
This manual is written for network administrators, and many of the
steps included here require detailed network knowledge and
administrator rights. The term network administrator refer to the
person responsible for maintaining the customer network.
“Administrator” is synonymous with “Supervisor” in this manual.
o
The term “the Ethernet card” refers to C8236 2
C82364
o
The Ethernet card Model C82363
in this manua l.
]
and C82364] do not support
]
, C82363], and
]
Level 1 printers.
The Ethernet card automatically selects the correct interface when
it connects to the network. In addition, it supports IEEE 802.2,
IEEE 8 0 2.3, Ethe rnet II , and E thern et SNAP network protoc o l s.
Because the Ethernet card supports multiple protocols and
automatically detects the protocols on your network, you can print
from Micro sof t
®
Windows®, Apple® Macintosh®, UNIX, and IBM
®
OS/2 applications .
Use EPSON Net!2, the utility software provided with your printer,
to quickly and easily configure the Ethernet card to use protocols
such as Novell
EtherTalk
®
NetWare®, Microsof t IP X/ SP X, Microsoft TCP/IP,
®
, and NetBEUI and TCP/IP for OS/2 Warp and Warp
Connect.
Introduction
1
Page 16

Note:
The utility software configures the Ethernet card to work only with the
protocols that exist on your network. This does not imply that you can
use all of the above mentioned protocols in your network or operating
system. The protocols that the Ethernet card can use may vary depending
on the operating systems used and network configuration.
Cautions and Notes
Cautions must be observed to avoid damage to your equipment.
c
contain important information and useful tips on the operation of
Notes
the Ethernet card.
Enclos e d It em s
Your interface p ack age in c l ud es:
o
The Ethernet card
2
o
EPSON C82362
including:
EPSON N e t!2
For Windows
For Macintosh
For Intranet
EPSON Status Monitor 2 (Ver. 2.0)
Internet Explorer
o
This administrator manual
o
Warranty sheet (for U.S. users)
o
A coaxial Y-conn ec to r fo r 10 BA SE -2 (for C82362
o
An AC adapte r Mod e l E U- 30 (for C82364
Introduction
/C82363] /C82364] Software CD-ROM
]
only)
]
only)
]
Page 17

Caution for C82364] :
c
Note:
Your interface package requires a network connection for the Ethernet
card and a host EPSON printer. Use a 10BASE-2 or 10BASE-T cable for
C82362
Only use the AC adapter Model EU-30 to supply power to the
Ethernet card Model C82364].
, or a Category -5 ca b le fo r C82363] and C82364].
]
Overview of Functions
o
The Et hern e t card is a n i nterface card tha t plug s i nto an
EPSON printer’s optional interface slot.
o
The Ethernet card Model C82362
10BASE-2 or 10BASE-T.
o
The Ethernet card Model C82363
selects either 10 BASE-T or 100BA SE -TX when it is connected
to a network.
o
You can configure the Ethernet card for TCP/IP, NetWare, or
AppleTalk using EPSON Net!2 for Windows/Macintosh.
o
After setting the IP address for the Ethernet card, you can
check the settings of the Ether net ca rd and change them using
EPSON Net!2 for Intranet (a utility that runs on your browser).
o
You can configure the Ethernet card for all the prot oc ols
supported by the E thernet car d us in g EPSON Net!2 for
Intranet. You can also check the settings.
o
You can select to either enable or disa ble the prot ocols, ex ce pt
TCP/IP, from EPSON Net!2 for Intr an et.
o
Supporte d browsers are Microso f t I nte rne t Exp l o re r ve rsion
4.0 or later an d N ets c ap e Navigator version 3.02 or late r.
automatically selects either
]
/C82364] automatically
]
Introduction
3
Page 18

Operating Environmen t
Supported operating systems and network protocols
See the following c h apt er s for mor e in fo rm atio n .
o
NetWare 3.1x / 4.1x and IntranetWare
Print Server and Remote Printer mode
NetWare 4.1x an d IntranetWare ( N D S an d Bind ery Emulation )
o
Macintosh
System 7.1, 7. 5, 7.5 .1 , 7.5. 2, 7. 5. 3, 7. 5. 5
Mac OS 7.6, 7. 6. 1, 8. 0
AppleTalk
o
Windows 95
Printing via EPSO N St atus Monitor 2 (TCP /IP)
Microsoft Windows Network (NetBEUI)
o
Windows NT 3.51 / 4.0
LPRport (TCP/IP)
Microsoft Windows Network (NetBEUI)
o
OS/2Warp 3 / 4 (OS/2Warp Connect
and OS/2War p Ser ver)
lprport (TCP/IP)
Share Printer (NetBEUI)
o
UNIX
Sun OS 4.1.4 or later : SPARC
SunSoft Solaris 2.4 or later: SPARC and x86
SCO UNIX 4.2 or later
SCO UnixWar e 2. 01 or lat er
HP/UX 9.05 or l ater
IBM AIX 3.2.5 or later and 4.1.3 or later
lpr, ftp: Filtering operation (TCP/IP)
Chapter 4
r
Chapter 5
r
Chapter 6
r
Chapter 7
r
Chapter 8
r
Chapter 9
r
4
Introduction
Page 19

Environment for the Setup Utility
EPSON Net!2 for Windows/ Macintosh
o
EPSON Net!2 for Windows
You can configur e t h e Et h er n et card for TC P /IP and NetWare.
Applicable operating system s:
Windows 95
Windows NT 3. 51 Ser v er & Workstation
Windows NT 4. 0 Ser ver & Workstat ion
o
EPSON Net!2 fo r M ac i ntosh
You can configure t h e Eth er n et card for TC P /IP and
AppleTalk.
Applicable operating system s:
System 7.1, 7.5, 7. 5. 1, 7.5 .2 , 7.5. 3, 7. 5. 5
Mac OS 7.6, 7.6.1, 8. 0
EPSON Net!2 for Intranet
You don’t need to install this utility. You can use EPSON Net!2 for
Intranet by setting the IP address for the Ethernet card.
o
Microsoft In ter n et Explorer ver sion 4.0 or later
o
Netsca p e Navigator ve r sion 3.02 or later
You can configure the Ethernet card for TCP/IP, NetWare,
AppleTalk, and NetBEUI using EPSON Net!2 for In tran et . You can
also check the settings.
Note:
When you use a Microsoft Internet Explorer version earlier than 4.0, you
cannot use the
Configuration
scroll properly in Windows NT 3.51.
Update Home Page
menu of EPSON Net!2 for Intranet, or you cannot
under
Optional
Introduction
of the
5
Page 20
Environment for EPSON Status Monitor 2
Protocols
The protocols that must be installed to run EPSON Status Monitor
2 vary depending on your operating system and printer type. The
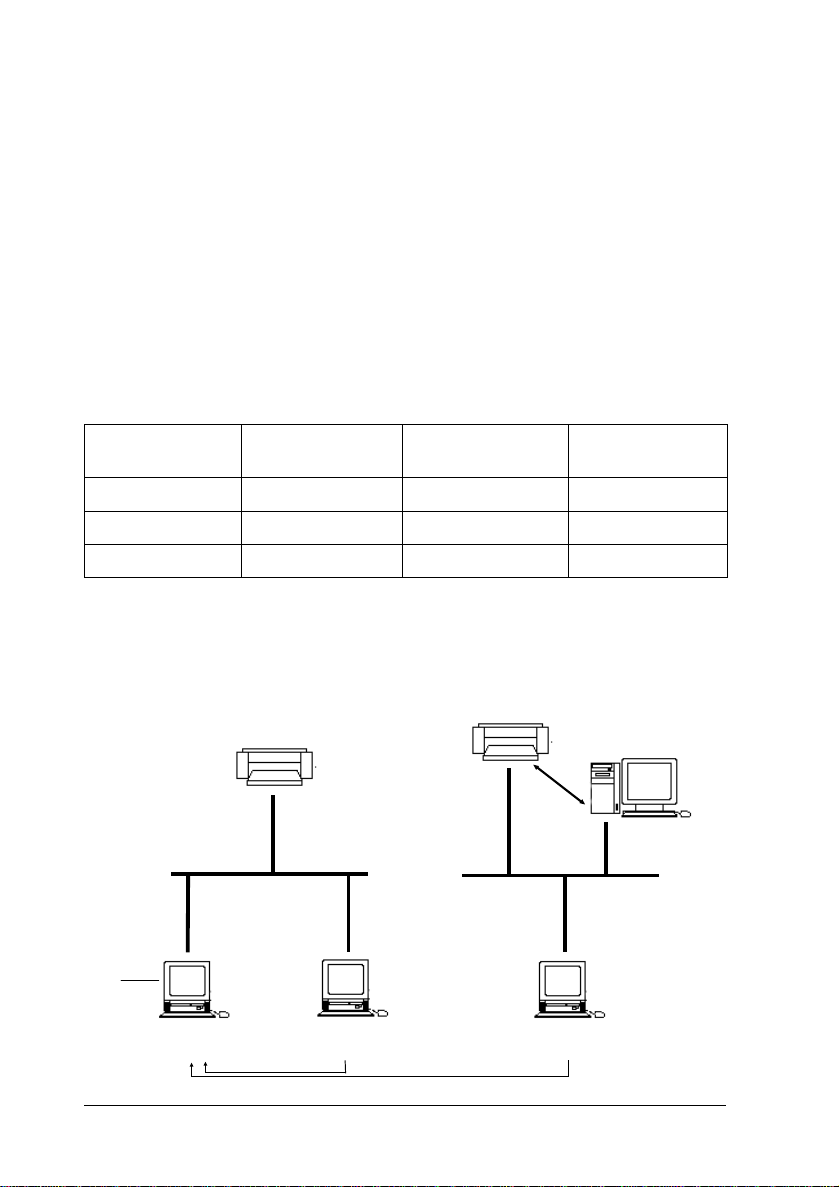
following table divides printers into three categories: LPR printers,
which use TCP/IP (generally in a Wind ows NT ne twork
environment); NetWare print ers, whic h use Nove ll’s IPX/SPX
protocol in a NetWare environment; and Windows shared
printers. Use this table to determine what protocols you need to
install according to your operating system and pr inter type , then
see the corresp onding section for your operating system.
LPR Printer
(TCP/IP)
Windows 95 TCP/IP & EPSON
Windows NT 3.51 TCP/IP & LPR
Windows NT 4.0 TCP/IP & LPR
EPSON1 = EPSON TCP/IP Printing protocol
2
LPR
= Windows NT LPR protoc ol
3
NetWare
Local
Printer
= Necessary protocols already installed
LPR printer
with the Ethern et card
TCP/IP
NetWare Printer
(IPX/SPX)
1
NetWare
2
2
NetWare
NetWare
3
3
3
NetWare printer
with the Ethern et card
IPX/SPX protocol
Windows
Shared Printers
Not available
TCP/IP & LPR
TCP/IP & LPR
NetWare server
2
2
6
Windows 95/NT 4.0
EPSON TCP/IP
Introduction
Windows NT 3.51/NT 4.0
Windows NT LPR
Windows Shared Printer
Windows 95/
NT 3.51/NT 4.0
Page 21

Note:
o
To set up the Ethernet card for use with TCP/IP, see Chapter 3. To
set up the card for use with NetWare, see your NetWare
documentation.
o
If you configure more than one interface card for one queue, the
Status Monitor cannot monitor the printer that is assigned to that
queue.
LPR printers use LPR over TCP/IP as their communication
protocol suite, and you must install both protocols to use the
Status Monitor to mon ito r a L PR p r in ter. See Chapter 3 for
installing TCP/IP.
NetWare print er p ro tocols are already in st alled in yo ur N etW ar e
network, so if you have a NetWare printer, skip to “Installing the
EPSON Status M on itor 2” on page 11- 2. Fo r an ex p lan ation of
NetWar e prin t e r p ro toc ols, see your NetWare do cumentation .
Note for Win 95:
Windows 95 does not come with LPR, so in addition to installing
TCP/IP, as described in Chapter 3, you need to install the EPSON
TCP/IP printer protocol. The Status Monitor installer program
automatically prompts you when to install EPSON TCP/IP. See
“Installing EPSON Status Monitor 2” on page 11-2 for instructions.
Introduction
7
Page 22
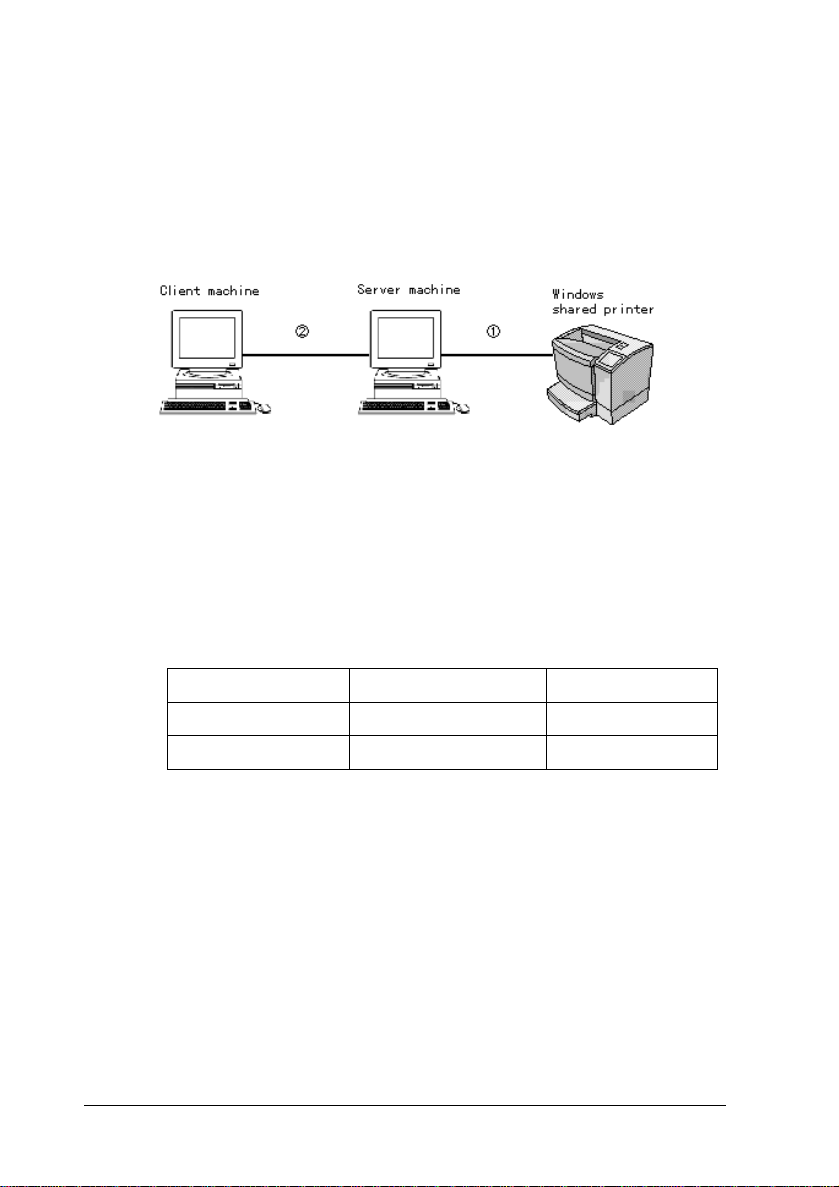
Windows shared printer (supported under Windows NT only)
To monitor a shared printer from the client through the server
machine, select
dialog box when you install EPSON Status Monitor 2 in the server
machine.
The port used for monitor in g will d iffer fr om s yst em to syst em.
À
The environment must support normal printing from the
Á
shared printer is required.
See the Readme file for mor e in formation about sup por t for
Windows shared printers.
Allow monitoring
in the Windows s h ar ed printer
8
LPT1 TCP/IP-LPR
Windows NT 3.51 X O
Windows NT 4.0 O O
Introduction
Page 23

Local P rinter
Conne ct the pr i n ter directly with th e prin ter port of your computer.
Windows 95 Windows NT 3.51 Windows NT 4.0
Bi-directional support
is necessary.
Not able to monitor. Do not need any
special settings.
For Windows 95:
You need to set the bi-directional support in the printer’s
properties dialog box. Click the
Settings
printer
. Then click the
radio butto n.
Enable bi-directional support for this
Details
tab and click
Spool
Note:
When you monitor a local printer with Windows 95, use LPT1 for the
printer por t.
TCP/IP printing printer (Windows 95) / LPR printer (Widows NT
3.51/4.0)
To connect to the printer on the network and share the printer
without using the server:
For Windows 95:
Select
to enable EPSON TCP/IP printing at the installation of
Yes
EPSON Status Monitor 2.
For Windows NT 3.51 /4.0 :
You need to set for TCP/IP printing. See “Installing the TCP/IP
Protocols in Your P C” in Ch apter 3.
Introduction
9
Page 24

EPSON Print ers Supported by t he Ethernet Card
The EPSON Etherne t card can be installed in a variet y of EPSON
laser, ink jet, and dot-matrix printers.
The Ethernet card plugs into the opt ion al inte rf ac e slot of the
following EPSON print er s.
For C82362
FX-880 / 1180 / 2180
DFX-5000+ / 8000
LQ-570+ / 1070+ / 670 / 870 / 117 0 / 20 70 / 2170
DLQ-3000 / 3000+
EPSON Stylus Pro XL+ / 5000
EPSON Stylus COLOR 800 / 850 / 15 20 / 3000
EPSON Stylus 1500
EPL-N1200 / N2000
For C82363
EPSON Stylus COLOR 1520/ 3000
EPL-N12 00/ N2000
For C82364
EPSON Stylus COLOR 800/ 850
FX-880/ 1180 / 2170
DFX-8500
LQ-670/ 2070/ 2170
DLQ-3000+
]
]
]
10
Introduction
Page 25

Brief Overview of Installing and Configuring the
Ethernet Card
You need to go through these steps to configure the Ethernet card.
See the following c h apte rs for de taile d information.
1. Install the Ethernet card in your printer. See Cha pter 1.
2. Install the protocols in your operating system if neces sa ry.
See Chapter 3 or late r.
3. Install EPSON Net!2. See C h ap te r 2.
4. Install the EPSON Sta tus Monitor 2 if necess ar y. See Ch apter 11.
5. Install Microsoft Internet Explorer or Netscape Navigator if you
use EPSON Ne t! 2 for In tran et . See y our bro ws e r man ual.
6. Set the IP address us in g EPSON Net!2 or arp c ommand.
See Chapter 3.
Configure the Ethernet card using EPSON Net!2.
7.
See Chapter 4 or later.
8. Configure your operating system to work with the printer.
See Chapter 4 or late r.
Note:
See “Supported operating systems and network protocols” in this chapter
to refer to the supported protocols for each operating system.
Introduction
11
Page 26

12
Introduction
Page 27
Chapter 1
Getting Started
This chapter explains the Ethernet card operation and
hardware installation.
Ethernet Card Operation
The LEDs and the status sheet button can provide you with
important information about the operation and configuration
of the Ethernet card.
Status lights
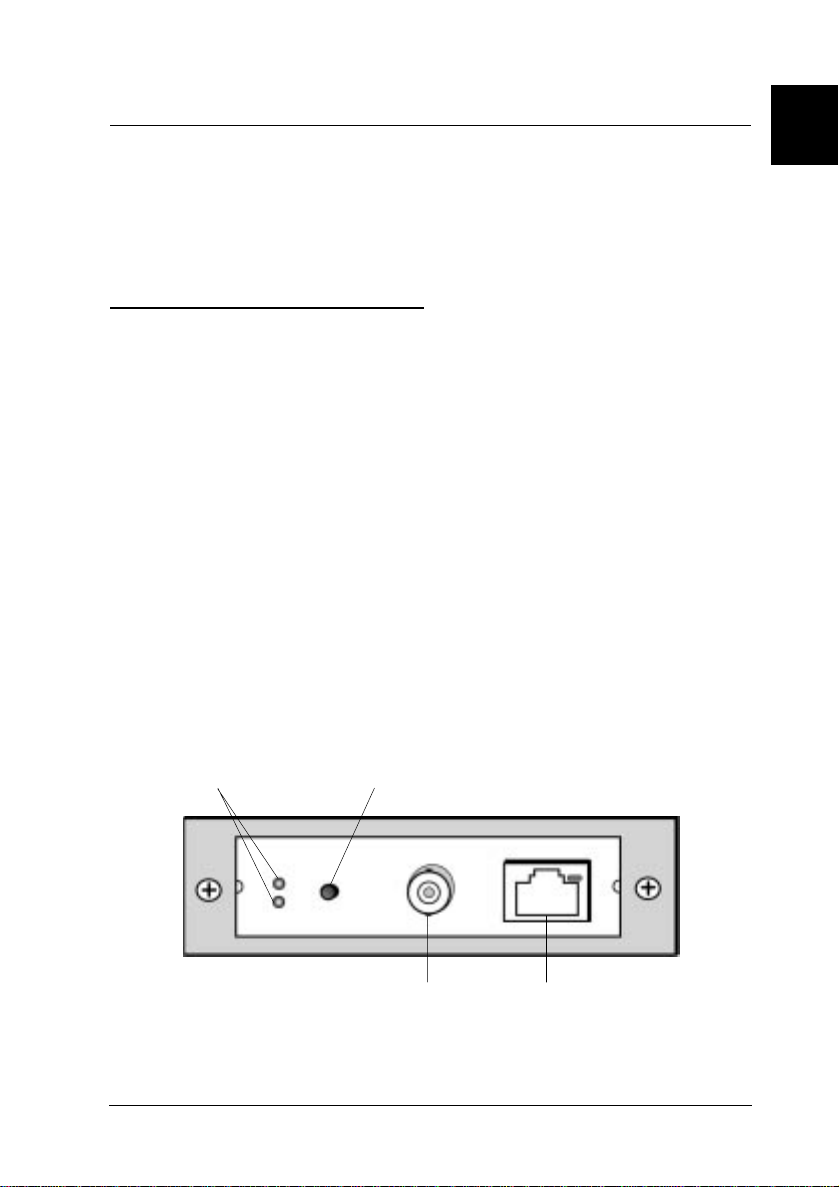
The Ethernet card has two status LEDs (1 red and 1 green) that
indicate the current operating status of the Ethernet card when
you first turn on the printer, during normal operation, and
when errors occur. The Ethernet card Model C82363] and
C82364] also has a link select LED (Yellow light) to show the
connection status, whether 10BASE-T or 100BASE-TX is used.
1
For C82362]
Status lights Status sheet button
Thin coaxial
(10BASE-2)
Twisted-pair
(10BASE-T)
Getting Star te d
1-1
Page 28
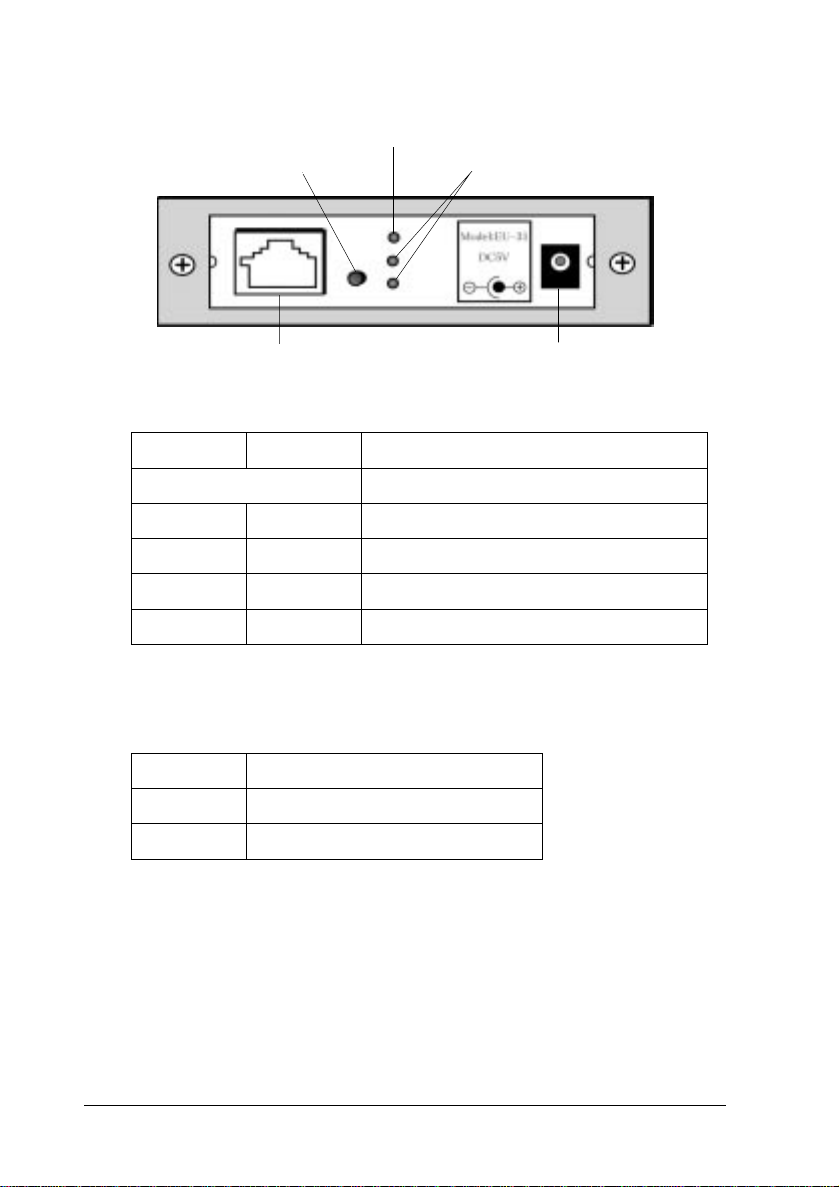
For C82363] and C82364
Link select light
Status sheet button
]
Status lights
10BASE-T/100BASE-TX
DC-IN 5V
Here is a brief explanation of the two status lights:
Red Green Status
flash si multaneously Initializing status at power on or reset
Off
Off
Off On Normal ready status
On Off Error status
flash slowly
flash rapidly
Printing data or the status sheet
Sending and receiving packets
The link select light (yellow light) on C82363]/C82364] shows
the connection status.
Light
On Connect with 100BASE-TX
Off Connect with 10BASE-T
Status
Status sheet button
The first time you use the Ethernet card after installing it in a
printer or reinstalling it in a new printer, turn on the printer
while pressing and holding down the status sheet button for
about five seconds to initialize the Ethernet card.
1-2
Getting Started
Page 29

Before you start configuring the Ethernet card, be sure to press
the status sheet button on the card for about three seconds to
print the current setting status sheet.
The status sheet will not print if the printer has started
printing, if it is off line, or if it is not ready to print.
Note:
If the printer does not print the status sheet, first make sure that the
printer is on line and no print jobs are being processed, then wait a
minute. If it still does not print the status sheet, turn it off, wait until
the status lights go out, and then turn it on again.
Caution:
c
Power select switch
There is a power select switch on the board of the Ethernet card
Model C82363] and C82364].
After turning off the printer, wait until the status lights go out
before turning it back on; otherwise the Ethernet card may not
work correctly.
1
The default position is at P for C82363], and at A for C82364].
Caution:
c
Do not change the switch. You must use the default position.
Otherwise, the Ethernet card won’t work correctly.
The power select switch for Model C82363
]
Getting Star te d
1-3
Page 30
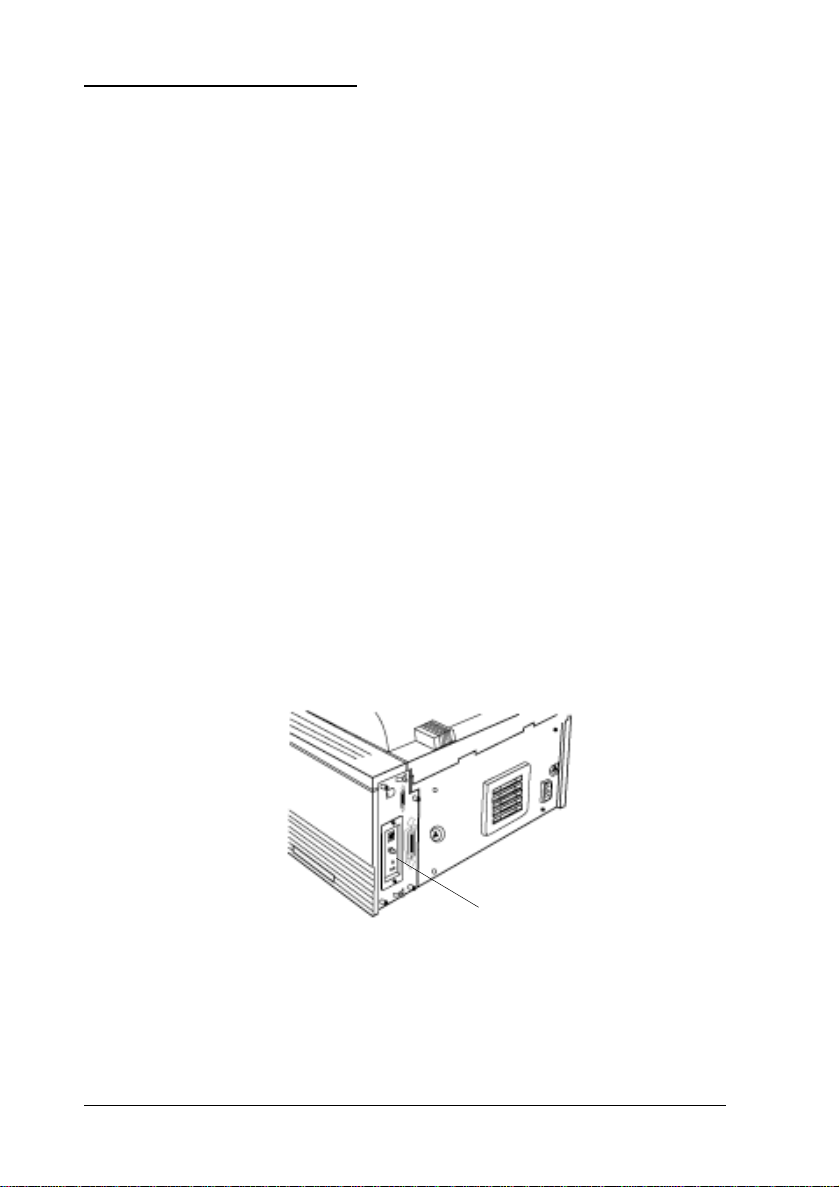
Hardware Installation
This section explains how to install the Ethernet card in your
printer. You must install the interface card in the printer,
connect it to the network, and turn on the printer before you
can set up the software.
Installing the Ethernet card in your printer
À
Before installing the Ethernet card, see the section on using
printer options in your printer manual for further specific
instructions on installing the optional interface card.
1. Turn off the printer.
2. Remove the printer’s interface slot cover.
3. Insert the card into the optional interface slot of an EPSON
printer, and fix the card in the slot using the screw.
4. If you are using the Ethernet card Model C82364], connect
the AC adapter (Model EU-30) to the Ethernet card and
plug the adapter into a wall outlet.
1-4
The Ethernet card
Getting Started
Page 31

5. Turn on the prin t er wh ile pr es si ng and holdi ng dow n the
status sheet button for about five seconds to initialize the
Etherne t card.
Caution:
c
Connecting the network cable
Á
Once the card is installed in your printer, you must attach the
network cable to the interface.
The Ethernet card can detect which kind of cable is attached.
You do not need to make any hardware or software settings to
specify the cable type. However, you must not attach more
than one cable at a time.
When you install or uninstall the Ethernet card, you must
turn off the printer and unplug the AC adapter from the wall
outlet to prevent electric shock.
1
10BASE-2 connector
Connect the Ethernet thin coaxial (10BASE-2) cable to the card
using the supplied Y-connector.
10BASE-T connector
Connect the Ethernet twisted-pair (10BASE-T) cable to the card
using the RJ-45 connector.
10BASE-T/100BAS E-TX connec tor
Connect the Ethernet twisted-pair (Category-5) cable to the
card using the RJ-45 connector. The Category-5 cable can use
for both 10BASE-T and 100BASE-TX.
DC-IN connector (C82364
Connect the AC adapter to the card.
Caution:
c
Attach only one cable at a time.
(C82362] only)
(C82362] only)
only)
]
(C82363]/C82364])
Getting Star te d
1-5
Page 32

Â
Making printer settings using the pr inter’s contro l panel
Some EPSON printers require you to use the printer’s contr ol
panel to select the interface you plan to use. See your printer
manual for instructions on making the necessary interface
settings.
Note:
If your printer automatically selects the interface and has been set to
the Auto mode, it is not necessary to make the interface settings.
Printing status sheets
Ã
Press and hold down the status sheet button for about three
seconds to print a status sheet.
If a status sheet prints, the Ethernet card has been installed
correctly.
Caution:
o
c
After turning off the printer, wait until the status lights
go out before turning it back on; otherwise the Ethernet
card may not work correctly.
o
You have to wait until the status lights go out before
pulling the card out of the printer; otherwise the Ethernet
card may not work correctly.
Note:
After installing the Ethernet card, some printers take more than 30
seconds to start initializing the Ethernet card.
1-6
Getting Started
Page 33

Initializing the Ethernet Card
In the following cases, you have to initialize the Ethernet card.
q
The first time you turn on the printer after installing the
Ethernet card
q
When you install the Ethernet card in another printer
q
When the utility does not show the Ethernet card because of
wrong settings in the Ethernet card
Follow these steps to initialize the Ethernet card.
1. Make sure that the printer with the Ethernet card is turned
off.
2. Turn on the printer while pressing and holding down the
status sheet button for about five seconds.
1
status sheet button
3. When the red and green status lights on the Ethernet card
start to flash simultaneously, you can remove your finger
from the status sheet button (the lights show the Ethernet
card is being initialized). Initialization is complete when the
status lights stop flashing.
Getting Star te d
1-7
Page 34

4. After initialization is complete, press the status sheet button
to print the status sheet. Check the information on the
status sheet.
Note:
You can also initialize the Ethernet card using EPSON Net!2. See
Chapter 10 for more information.
1-8
Getting Started
Page 35

Chapter 2
Installing EPSON Net!2
To use the Ethernet card installed in Chapter 1 for Windows 95,
Windows NT, or Macintosh, you need to install the setup
utility software, EPSON Net!2 for Windows or EPSON Net!2
for Macintosh, in your computer.
You can configure the Ethernet card for TCP/IP, NetWare, or
AppleTalk using EPSON Net!2. By setting the IP address for
the Ethernet card, you can also configure the Ethernet card
using EPSON Net!2 for Intranet, the setup utility that runs on
your browser.
Installing EPSON Net!2 for Windows
Note:
If you add or delete the protocols or services for the operating system
after installing EPSON Net!2 for Windows, EPSON Net!2 for
Windows will not start. If this happens, uninstall EPSON Net!2 for
Windows, and then reinstall it. If you haven’t installed TCP/IP or
NetBEUI, see Chapter 3 for installing TCP/IP protocol, and see
Chapter 6 or 7 for installing NetBEUI protocol.
Follow these steps to install EPSON Net!2.
2
Installing EPSON Net!2
2-1
Page 36

For Windows 95 and Windows NT 4.0
1. Insert the Software CD-ROM shipped with this package in the
CD-ROM drive.
2. The Installer screen will start automatically. If the screen does
not appear, choose Run from the Start menu.
Type D:\EPSETUP (if the CD-ROM is in drive D) and click OK.
3. Click the Install EPSON Net!2 on the installer screen, and then
click button.
4. Follow the on-s cre e n in str uct ions .
5. After installation is comp lete, click Start, point to Program and
EPSON Net!2, then click EPS ON Net! 2 t o start the u tility.
2-2
Installing EPSON Net!2
Page 37

For Windows NT 3.51
1. Insert the Software CD-ROM shipped with this package in
the CD-ROM drive.
2. Choose
dialog box. Type
D) and click OK.
3. Click the
then click button.
4. Follow the on-screen instructions.
5. After insta llation is complet e, click the
the EPSON Net!2 window to start the utility.
from the File menu of the Program Manager
Run
D:\EPSETUP
Install EPSON Net!2
(if the CD-ROM is in drive
on the installer screen, and
EPSON Net!2
2
icon in
Installing EPSON Net!2
2-3
Page 38

Installing EPSON Net!2 for Macintosh
To install EPSON Net!2 for Macintosh, follow these steps:
1. Insert the Software CD-ROM shipped with this package in the
CD-ROM drive.
2. Double-click the
3. Drag the
disk.
4. Double-click the
the utility.
EPSON Net!2
EPSON Net!2
icon from the CD-ROM to your hard
EPSON Net!2
folder .
icon on your hard disk to start
2-4
Installing EPSON Net!2
Page 39

Chapter 3
Setting the IP Address
To use the Ethernet card with TCP/IP, you need to set its IP
address using EPSON Net!2 or the arp or ping command.
The IP address should be set in the following cases:
q
When configuring the Ethernet card using EPSON Net!2
for Intranet
q
TCP/IP (via EPSON Status M onitor 2 ) print ing from Win dows 95
q
TCP/IP (LPR port) printing from Windows NT
q
TCP/IP (lpr port) printing from OS/2 Warp and UNIX
3
Setting the IP Address
3-1
Page 40

Overall Steps
The following are the overall steps for setting the IP address.
Go to the indicated chapters for more information.
1. Install TCP/IP protocol on the operating systems, if
necessary. See page 3-3.
2. Install EPSON Net!2. See Chapter 2.
3. Set the IP address using EPSON Net!2 for Windows /
Macintosh or the arp command. See page 3-9.
Note:
o
The first time you set the IP address for the Ethernet card
after installing the Ethernet card, use EPSON Net!2 for
Windows / Macintosh to set the IP address (you cannot set
the IP address using EPSON Net!2 for Intranet).
o
EPSON Net!2 cannot be used for OS/2 or UNIX. When you
set the IP address for OS/2 or UNIX, use the arp or ping
command.
4. Set up the printer. See Chapter 6 to 9.
3-2
Setting the IP Address
Page 41

Installing the TCP/IP Protocols in Your PC
Before using the Ethernet card with TCP/IP, you must make
sure that the TCP/IP protocol is installed on your operating
system. After it is installed, you can use the computer to
configure the Ethernet card for use with TCP/IP.
For Windows 95
Follow the step s b elow to in stall TCP/ IP .
1. Double-click the Network icon in the Control Panel, and
check if TCP/IP is in the list of installed network
components on the Configuration menu.
3
2. If TCP/IP is not in the list, click Add.
3. Select Protocol and click Add.
Setting the IP Address
3-3
Page 42

4. Select
Microsoft
the Network protocols list. Then click Ok.
from the Manufacturers list and
TCP/IP
from
5. Double-click
TCP/IP Properties dialog box. Make necessary settings
such as the IP address. Ask your network administrators
for your IP address.
TCP/IP
on the Configuration menu to open the
For Windows NT 3.51/4.0
Follow these steps below to install LPR software in Windows
NT. If you have already installed the TCP/IP Network Print
Service from TCP/IP Protocol and Related Components, you
can skip these steps.
1. Double-click the
if the TCP/IP Protocol and Microsoft TCP/IP Printing are
installed. If they are already installed, you can skip to the
next section (“Setting the IP Address Using EPSON Net!2
for Windows/Macintosh”).
Network
icon in the Control Panel to check
3-4
Setting the IP Address
Page 43

Windows NT 3.51
Windows NT 4.0
3
Setting the IP Address
3-5
Page 44
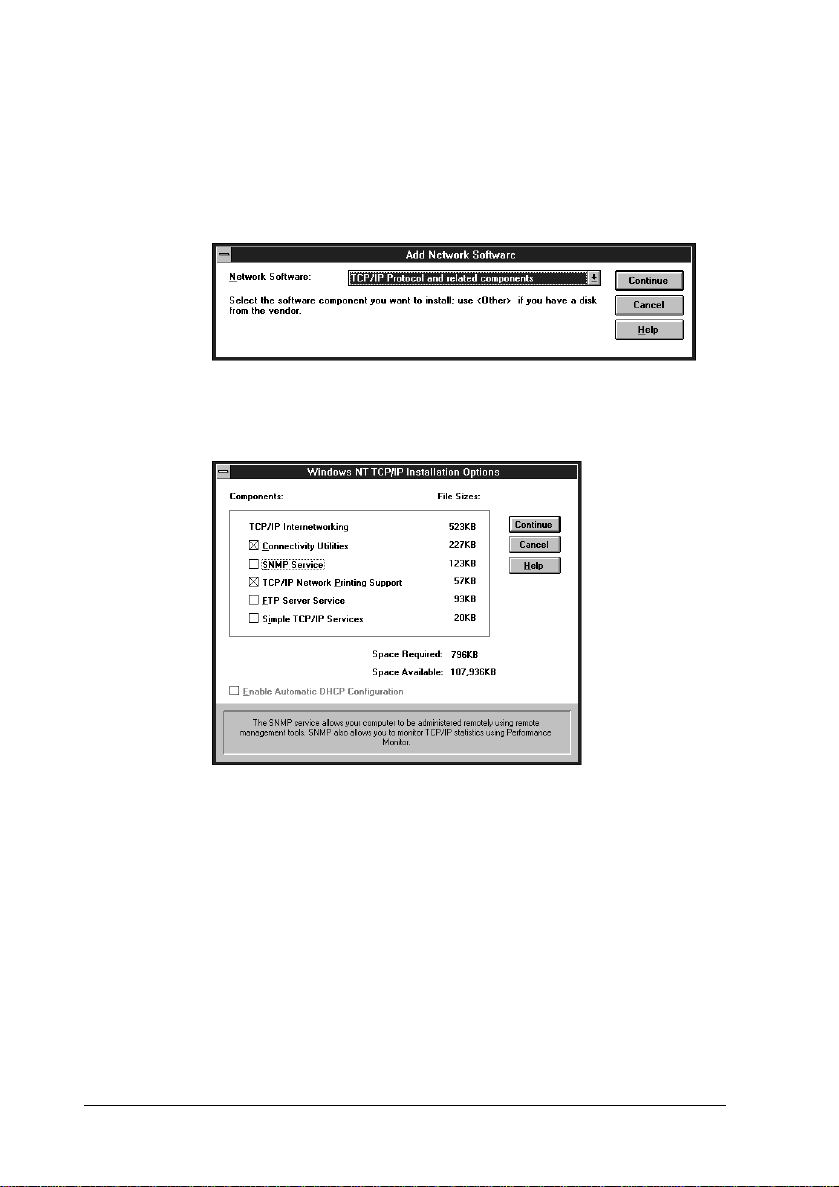
2. If the TCP/IP protocol and Microsoft TCP/IP Printing are
not listed, click
Add Software
(for NT 3.51) or
Add
(for
NT 4.0) to add them.
Windows NT 3.51
3-6
Check Conne ctivity Utilities and TCP/IP Network Printing Support
Setting the IP Address
Page 45

Windows NT 4.0
Select TCP/IP Protocol
3
Select Microsoft TCP/ IP Printing
Setting the IP Address
3-7
Page 46
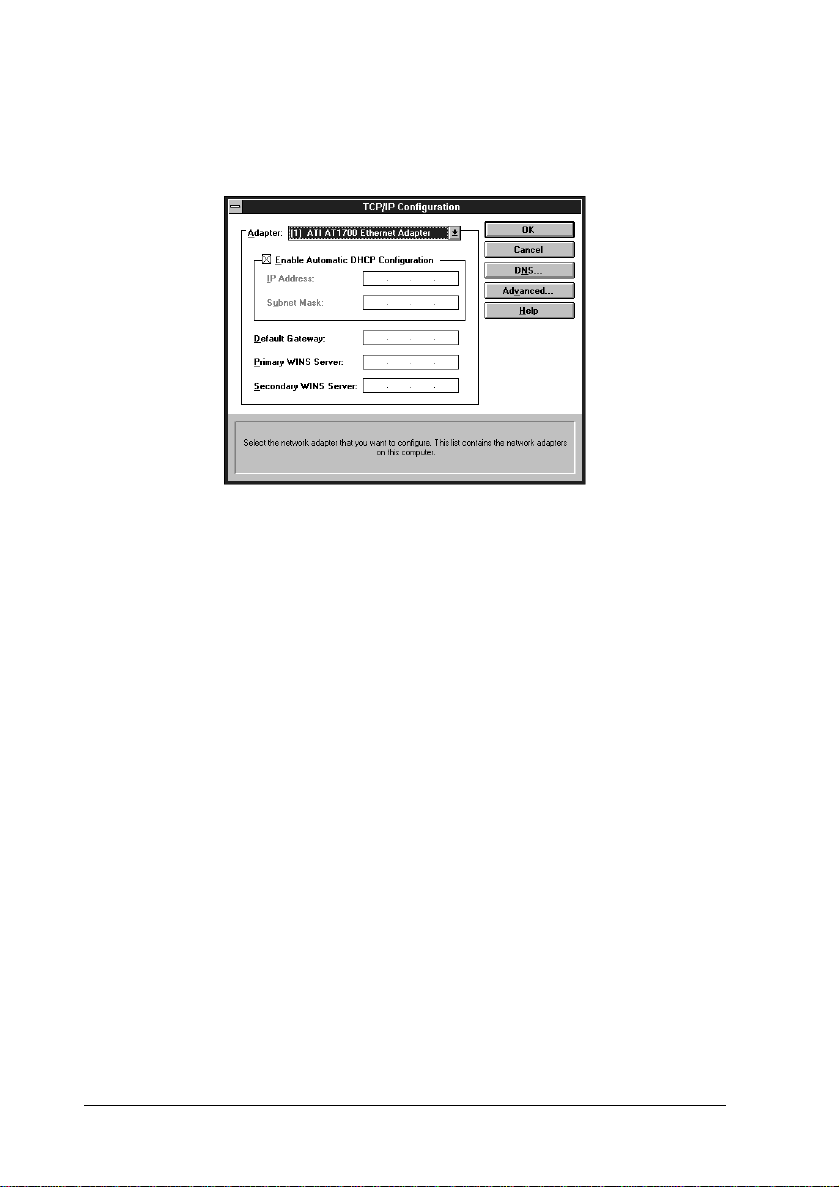
3. If you continue installing the TCP/IP protocol, the TCP/IP
Configuration dialog box appears, and you can set the IP
address.
Notes:
o
NT 3.51
To check the IP addresses which have already been assigned,
TCP/IP Protocol
select
Click the
Config ur e
in the Network Settings dialog box.
button to open the TCP/IP
Configuration dialog box.
o
NT 4.0
To check the IP addresses which have already been assigned,
click the
TCP/IP Protocol
Protocols
tab in the Network dialog box, select
, and then click the
Properties
4. When the installation is completed, check items such as the
IP address to make sure they have been entered correctly.
Ask your network administrator for your IP address.
3-8
Setting the IP Address
button.
Page 47

Setting the IP Address Using the EPSON Net!2 for
Windows/Macintosh
You can set the IP address for the Ethernet card using EPSON
Net!2 in Windows 95 and Windows NT with TCP/IP or IPX.
Also, you can set the IP address for the Ethernet card using
EPSON Net!2 in Macintosh with TCP/IP or AppleTalk.
Caution:
c
Note:
q
q
Once you make changes to the Ethernet card, you must wait
until the changes have been completely set before turning off or
sending data to the printer.
Before configuring the Ethernet card using EPSON Net!2 for
Intranet (a utililty that runs on your browser), you need to set
the IP address for the Ethernet card using EPSON Net!2 for
Windows / Macintosh.
When using TCP/IP, it shows the Ethernet card information of
the same segment as a default. To see the Ethernet card
information of the other segment, see the last page of this section
on page 3-12.
3
q
Ask your network administrator for the IP address and the
default gateway of the Ethernet card to set.
Here is an example of setting the IP address using EPSON
Net!2, running under Windows 95.
1. Make sure Windows 95 is running, the Ethernet card is
connected to the network, and the printer is turned on.
2. Click
EPSON Net!2
Start
, point to
.
Programs
and
EPSON Net!2
Setting the IP Address
, then click
3-9
Page 48

3. Click the printer where you want to set the IP address, and
then click the
Configuration
button.
Note:
o
If you have connected more than one printer with the same
type of Ethernet card to the network, you can distinguish the
cards by pressing the status sheet button on the Ethernet card
plate to print a status sheet for each printer, or by checking
the sticker on the Ethernet card. Then check the MAC address.
o
If the IP address is set to the default IP address, the printer
model might not appear.
4. Click the
3-10
TCP/IP
Setting the IP Address
tab to display the TCP/IP menu.
Page 49

5. Select
The way of acquiring an IP address
following: Manual, RARP, BOOTP, or DHCP.
Note:
To use RARP, BOOTP, or DHCP, the server for each protocol is
necessary. If there is no corresponding server, do not use them.
See your server manual for the settings.
from the
6. Assign the IP address, the Subnet mask, and the Default
gateway. If you select DHCP to acquire an IP address, you
cannot assign the IP address, the subnet mask, or the
default gateway.
Note:
o
If you will be using EPSON Net!2 for Intranet (a utility that
runs on your browser), you must assign an IP address
manually here.
o
The default IP address is 11.22.33.44, and the default su bnet
mask and the default gateway are 255.255.255.255. If you
will be using EPSON Net!2 for Intranet, change the default
IP address because these settings become invalid.
o
If there are servers or routers which become a gateway, type
the gateway address. If there is no gateway, type the IP
address of your computer .
7. Click OK to save the new settings. Updating is complete
when the message “Configuration is successfully done”
appears.
3
Caution:
After clicking OK, you must wait a while before turning off
c
the printer because the new settings are sent to the Ethernet
card.
Setting the IP Address
3-11
Page 50

To get the interface card’s infor m ation of the other segments
To get the interface card’s information of the other segments,
use the
for Windows.
1. Type the subnet address you want to search from 0 to 255 at
Subnet Settings
the box.
of the Option menu of EPSON Net!2
2. Click
interface cards in the subnet address you added are
searched and are listed on the EPSON Net!2 dialog box.
3. When you want to delete the subnet address from the list,
click the subnet address in the Subnet List box, and then
click
4. Click OK to exit.
to add the subnet in the Subnet List box. The
Add
Delete
.
Setting the IP Address Using the arp Command
If you are using UNIX or OS/2, you can use the arp command
to set the IP address of the Ethernet card, and the ping
command to check that you have set it correctly. You can also
use these commands using Windows 95 or Windows NT, if you
have correctly installed TCP/IP networking on these systems.
Before you start, you will need the following information:
A valid IP address for the Ethernet card. Ask your system
q
administrator for an IP address which will not cause
conflicts with any other device on the network. If you are
the system administrator, choose an address within your
subnet which will not conflict with any other device.
3-12
Setting the IP Address
Page 51

The MAC (Ethernet hardware) addres s of the Ethernet
q
card. This is the hardware serial number of the card, which
cannot be changed. You can check the MAC address on the
status sheet.
Note:
To print the status sheet, press the status sheet button on the
Ethernet card for about three seconds while the printer is turned
on.
If the host from which you will be setting up the Ethernet
q
card is on a different LAN segment, make sure that the
gateway to the Ethernet card (router or routing host) is
correctly configured on your machine.
Checking the LAN
First, you need to check that the Ethernet card can be reached
from the host.
1. If you have previously set the IP address of the Ethernet card
to some value other than the factory default, go to step 2.
Otherwise, go to step 3.
3
2. Re-initialize the Ethernet card by turning off the printer,
waiting at least 10 seconds, and turning on the printer
again while pressing and holding down the status sheet
button for about five seconds. A status sheet is printed.
3. The default IP address of the Ethernet card is 11.22.33.44
(decimal). Check that the card is reachable by “pinging” it
from the command line:
ping 11.22.33.44
Setting the IP Address
3-13
Page 52

4. If the card is reachable, you see results something like the
following (the exact form of the message depends on your
operating system, and the times probably vary from those
shown here):
64 bytes from 11:22:33:44:icmp_seq=0. Time=34.ms
64 bytes from 11:22:33:44:icmp_seq=1. Time=4.ms
64 bytes from 11:22:33:44:icmp_seq=2. Time=4.ms
64 bytes from 11:22:33:44:icmp_seq=3. Time=4.ms
5. If the card is unreachable, you may see something like:
PING 11:22:33:44:56 data bytes
until you press
, when you may see something like:
Ctrl-C
11:22:33:44 PING Statistics
3 packets transmitted, 0 packets received,
100% packet loss
Again, the exact working of the message you see may differ
from this, depending on your operating system. If you
cannot “ping” the Ethernet card, you should check the
following:
q
The address is correct in the ping command.
q
The Ethernet connection to the card and to the host has
been made correctly, and all hubs, routers, etc. are
switched on. If you are using 10BASE-2, make sure that
both ends of the segment are terminated.
q
The Ethernet card is operat in g n ormally (r ed LED off,
green LED on).
3-14
Setting the IP Address
Page 53

Setting and checking the new IP address
To set the new IP address which you have obtained from your
system administrator, use the arp command, with the -s flag
(create ARP entry).
Note:
In the following, we will assume that the MAC address of your
Ethernet card is 00:00:48:93:00:00 (hexadecimal), and that the IP
address which you will be assigning is 192.135.223.6 (decimal).
Substitute your values for these addresses when you type in the
commands.
1. From the command line, type:
Example
2. You can now check the new IP address, by “pinging” it:
Example:
3. The Ethernet card should now respond to the ping. If it does
not, you may have mistyped the MAC address or the IP
address in the arp -s command. Double-check and try again.
If all else fails, re-initialize the Ethernet card and try again.
: arp -s 192.135.223.6 00:00:48:93:00:00
ping 192.135.223.6
3
Note:
When you set the IP address of the Ethernet card in this way, you
cannot change the subnet mask or gateway setting of the Ethernet
card. You must use the EPSON Net!2 running on Windows (95
or NT), or Macintosh to change these parameters.
Setting the IP Address
3-15
Page 54

Changing the IP Address Using EPSON Net!2 for Intranet
After you have configured the Ethernet card for TCP/IP using
EPSON Net!2 for Windows/Macintosh or the arp command,
you can make changes to the IP address or other settings using
EPSON Net!2 for Intranet (a utility that runs on your browser).
Caution:
o
c
Note:
q
See “Setting the IP Address Using EPSON Net!2 for Windows/
Macintosh” for the cautions and notes for each step.
q
There are some restrictions on the characters you can use
depending on your browser. For details, see your browser or OS
manual.
You cannot use EPSON Net!2 for Windows/ Macintosh
and EPSON Net!2 for Intranet at the same time.
o
Once you make changes to the Ethernet card by EPSON
Net!2 for Intranet, wait until it completes the settings
before turning off or sending data to the printer.
Follow the steps below to make changes to the IP address using
EPSON Net!2 for Intranet.
Before you go through these steps, make sure to assign the IP
address for the Ethernet card on the TCP/IP menu of EPSON
Net!2 for Windows/Macintosh.
1. Click the printer you want to configure from the list in the
3-16
EPSON Net!2 dialog box and click the
button.
Or, run your browser, and type the IP address of the Ethernet
card directly. Do not run EPSON Net!2 for Windows/
Macintosh with the browser.
URL:
http://
Setting the IP Address
<the IP address of the Ethernet card>
Launch Browser
/
Page 55

2. The browser will start running.
3. Click
4. Select
5. Type the IP address, the Subnet Mask, and the Default
6. Click the
TCP/IP
view the TCP/IP setting screen.
BOOTP, or DHCP.
Gateway.
set the password in the Password under Optional, you
need to type the password to update the settings.
under Network on the Configuration menu to
Get IP Address
SUBMIT
from the following: Manual, RARP,
button to update the settings. If you have
3
7. If the message “Configuration change is complete!” appears
on your screen, the update is complete. Follow the message
appears on your screen to enable the changes by pressing
or turning your printer off and on.
RESET
Note:
Since the IP address you set becomes available by pressing the
button or turning your printer off and on, you need to restart
EPSON Net!2 for Intranet. Enter the new IP address and restart
EPSON Net!2 for Intranet.
Setting the IP Address
RESET
3-17
Page 56

3-18
Setting the IP Address
Page 57

Chapter 4
Using the Ethernet Card with NetWare
This chapter explains how to configure the Ethernet card for
NetWare to use the printer on a NetWare environment, and
how to configure the Ethernet card in one of two operating
modes, Print Server or Remote Printer with EPSON Net!2.
This chapter explains the steps for each mode.
Overview
Applicable systems
q
Server environment
NetWare 3.1/3.11/3.12 (Bindery)
NetWare 4.1/4.11 (NDS, Bindery emulation)
IntranetWare (NDS, Bindery emulation)
q
Client environment
4
The client environment must be supported by NetWare.
It is possible to use the printer driver mounted on the
Etherne t card.
Using the Ethernet Card with NetWare
4-1
Page 58

Overall steps
The following are the overall steps for using NetWare. Go to
the indicated chapters for more information.
1. Install EPSON Net!2. See Chapter 2.
2. Set the IP address when you use EPSON Net!2 for Intranet.
See Chapter 3.
3. Set up the printer environment using NetWare PCONSOLE
or Nwadmin.
4. Set the NetWare mode using EPSON Net!2.
About mode
You can choose the mode from Print Server, Remote Printer, or
Standby mode. You should select the Print Server mode unless
the number of users exceeds the limit. In this case, you should
configure the Ethernet card in the Remote Printer mode.
Features of the modes are describ ed below .
Print Ser ve r mo d e :
q
q
q
4-2
Using the Ethernet Card with NetWare
High-speed printing by controlling printing directly
Use of th e NetWa re use r a c count
Ability to register up to 32 print queues
Page 59

Remote Printer mode:
q A NetWare user account is not required.
q A print server is necessary for controlling the remote
printer.
q Printing speed is slower.
q Ability to attach up to 16 printers for NetWare 3. 1x , and
up to 255 for Ne tW ar e 4. 1x.
Note:
When you turn on the printer, the user account is temporarily
used in Remote Printer mode. If there is no room in the user
account, turn on the printer before connecting the client to the
network.
Standby mode (factory default mode):
The Standby mode is a default mode. With this mode, all
NetWare related functions will stop. Use Standby mode
when not using the Ethernet card in the NetWare
environment.
4
Using the Ethernet Card with NetWare
4-3
Page 60

Using NetWare 3.1x
Instructions for using NetWare
q
Printing a text file
When you print a text file using the NPRINT command of
NetWare or DOS redirection, misconversion or a gap in
characters might occur depending on the client
environment.
q
PCONSOLE limitation
To set up the Ethernet card in Print Server mode, you
cannot use the Print Server status display control by
PCONSOLE.
q
Time required to recognize the Ethernet card
It takes two minutes or less for the NetWare server to
recognize the Ethernet card after turning on the printer.
During this start-up time, EPSON Net!2 and the status
sheet do not show the correct information.
Using the Ethernet card in Print Server mode
See the following sections to configure the Ethernet card in
Print Server mod e.
Creating print queues in a file server
1. From any NetWare client, log in to the network with
superv iso r priv ile ge s.
2. Run PCONSOLE. From the Available Options screen, select
Print Qu eue Information and press Enter.
4-4
Using the Ethernet Card with NetWare
Page 61

3. Press the
queue name. Press
4. From the Print Queue list, select the print queue name that
you just entered and press Enter. From the Print Queue
Info rm ati on li st, sele ct
select
EVERYONE
press
Insert
Creating a print server
key on yo u r ke yb oard and enter the print
Insert
.
Enter
and p re ss
EVERYONE
from t he que u e us ers lis t.
is not in the list,
from the list. If
and select
Queue Users
EVERYONE
Enter
. Next,
1. From the Available Options screen, select
Information
2. Press the
server name. Press
the print server name for later use.
3. From the Print Server list, select the print server name that
you just entered and press
Then, from the Print Server Information list, select
Server Configuration
and press
key on your keyboard and type the print
Insert
Enter
.
Enter
. It is a good idea to write down
.
Enter
and press
Enter
Print Server
Print
.
4
Using the Ethernet Card with NetWare
4-5
Page 62
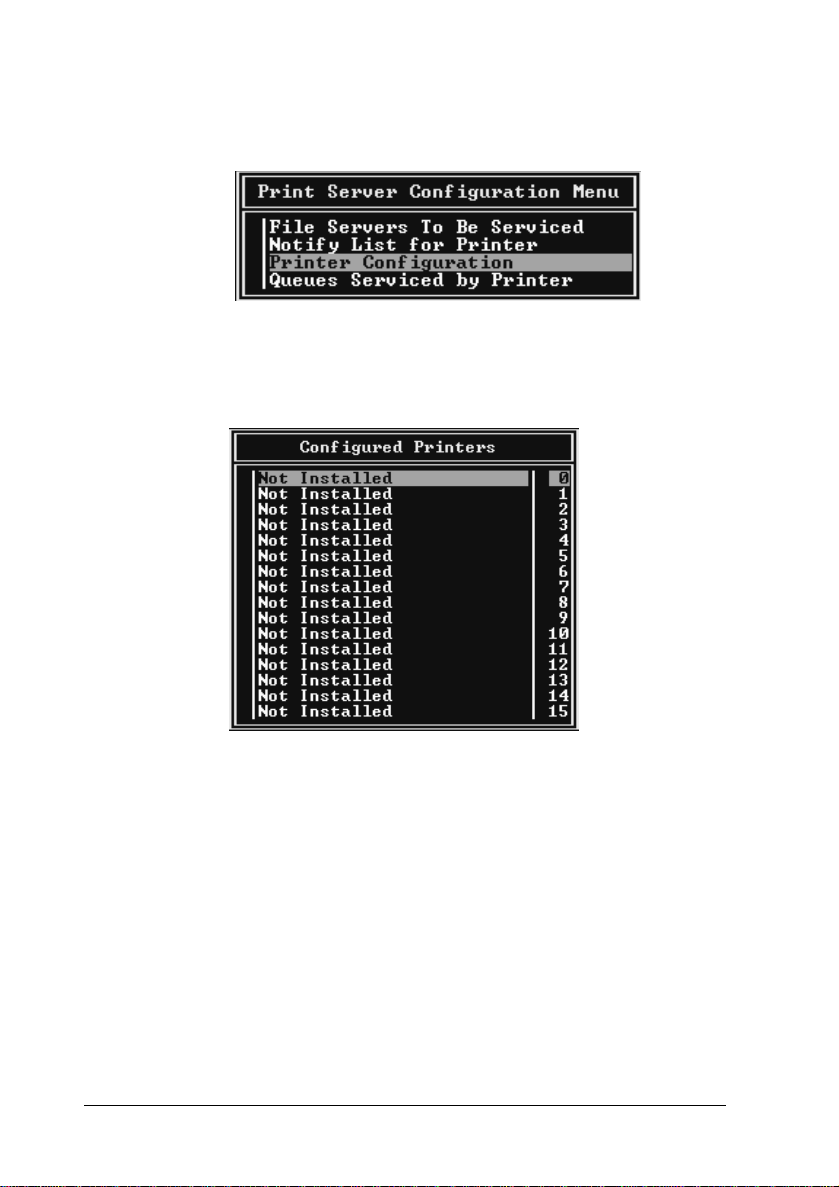
4. Select
Printer Configuration
Configuration Menu and press
from the Print Server
.
Enter
5. From the Configured Printers list, select
number = 0) and press
Enter
.
Not In stalled
(port
4-6
Using the Ethernet Card with NetWare
Page 63

6. From the Printer configuration screen, type the printer name.
Then, highlight
Parallel, LPT1
Note:
Make sure to select
.
and press
Type
Local Parallel, LPT1
Enter
. Select
.
Local
4
7. Press
8. Press
9. Select
Configuration menu and press
10. Select the printer that you want to use from the Defined
Printers list and press
11. Press the
port from the Available Queues list.
; then press
Esc
.
Esc
Queues Serviced by Pr inter
key and assign a queue to the print server
Insert
Using the Ethernet Card with NetWare
to save changes.
Enter
.
Enter
Enter
from the Print Server
.
4-7
Page 64
12. Specify the priority level between 1 to 10. One is top priority.
13. Press
to exit PCONSOLE.
Esc
Configuring the Ethernet card in Print Server mode
This section explains how to set up EPSON Net!2.
1. Turn on the printer with the Ethernet card.
2. Run EPSON Net!2 from the Start menu.
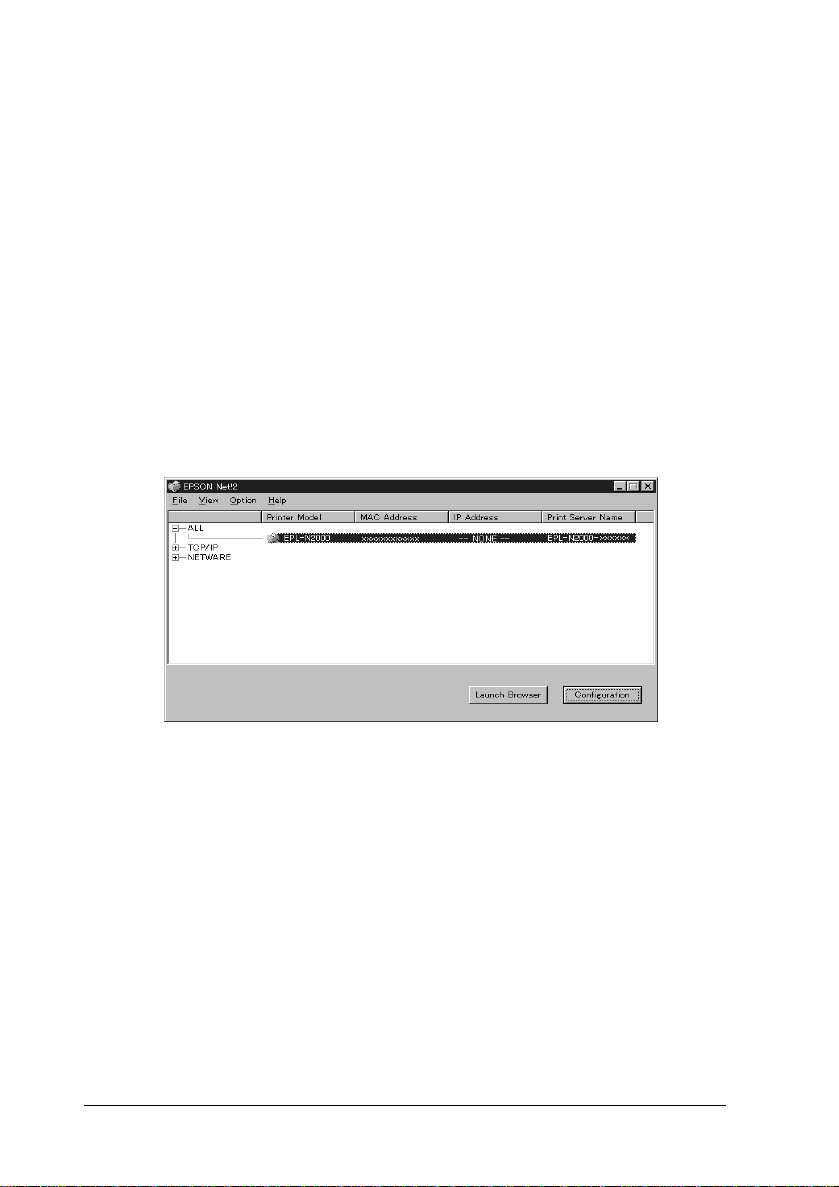
3. The EPSON Net!2 dialog box appears showing a list of
interface cards on the network. Select the printer you want
to configure from the list and click
Configuration
.
4-8
Note:
o
If you have connected more than one printer with the same
type of Ethernet card to the network, you can distinguish the
cards by pressing the status sheet button on the Ethernet card
plate to print a status sheet for each printer, or by checking
the sticker on the Ethernet card. Then check the MAC address.
o
If the IP address is set to the default IP address, the printer
model might not appear.
Using the Ethernet Card with NetWare
Page 65

4. Click the
Frame type:
You can select one from the following:
Auto, Ethernet 802.2, Ethernet 802.3, Ethernet II, or
Ethernet SNAP.
Mode:
Select
Print Server, Remote Printer, or Standby.
NetWare Basic
Print Server
from the following:
tab and make the following settings.
4
NDS:
Select
Disable
.
Using the Ethernet Card with NetWare
4-9
Page 66
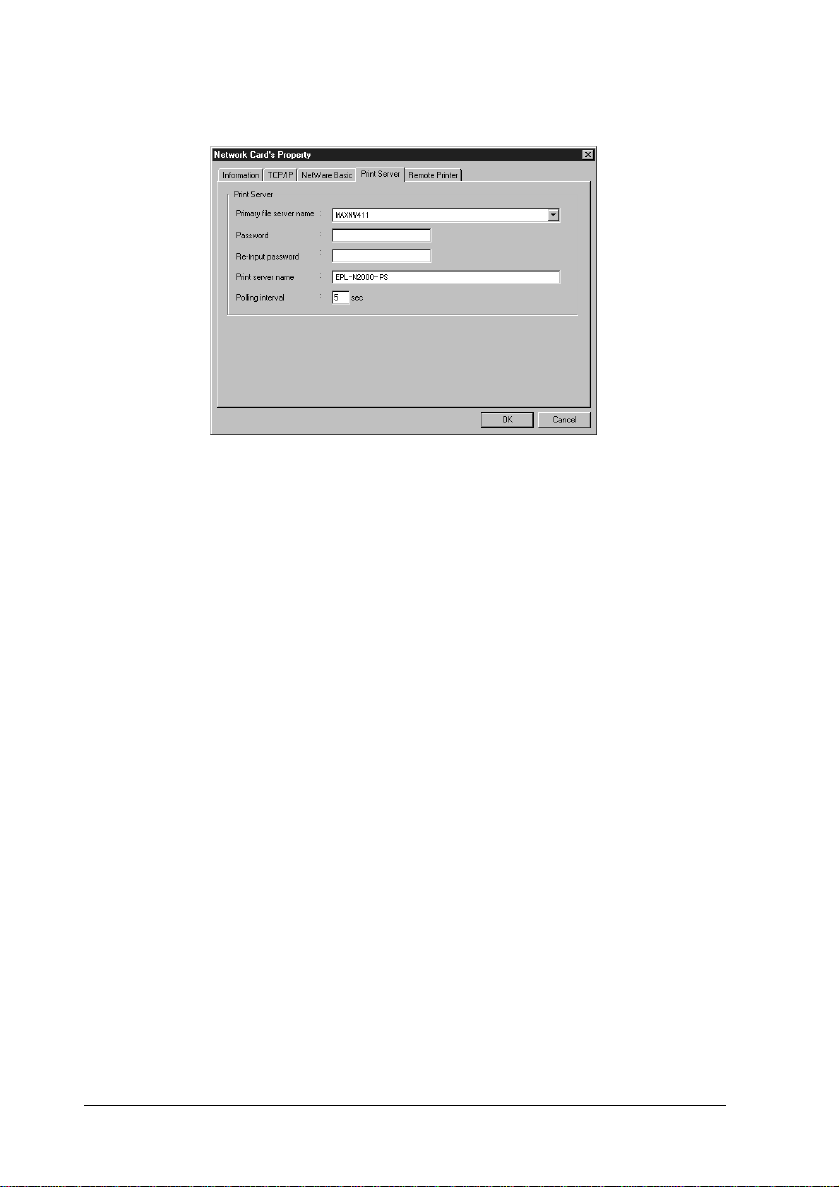
5. Click the
Primary file server name:
Password:
Print server name:
Print Server
Select the server where you created the queue.
Type any new password up to 19 characters. The characters
you entered appear as “ ]”.
Type any new name up to 47 characters. The default
name is shown below.
(Printer name) - (last 6 digits of the serial number)
tab and make the following settings.
Polling interval:
Set the polling time from 5 to 90 seconds.
6. Click OK to save changes. If the message “Configuration is
successfully done” appears on your screen, updating is
complete.
Caution:
Once you make changes to the Ethernet card, you must wait
until it completes the settings before turning off the printer.
4-10
c
Using the Ethernet Card with NetWare
Page 67

7. Select the Connection Information of File Server Console’s
MONITOR.NLM, and check if the print server name
assigned to the Ethernet card has been logged in to the
Active Connections list. It takes five minutes or less to
complete this.
Using the Ethernet card in Remote Printer mode
See the following sections to configure the Ethernet card in
Remote Printer mode.
Creating print queues in a file server
1. From any NetWare client, log in to the network with
supervisor privileges.
2. Run PCONSOLE. From the Available Options screen, select
Print Queue Information
and press
Enter
.
4
3. Press the
queue name. Press
4. Select the print queue name that you just entered and press
. From the Print Queue Information list, select
Enter
and press
Users
If
EVERYONE
EVERYONE
key on yo u r ke yb oard and enter the print
Insert
.
Enter
. Next, select
Enter
is not in the list, press
from the queue user list.
Using the Ethernet Card with NetWare
EVERYONE
and select
Insert
Queue
from the list.
4-11
Page 68

Creating a print server
1. From the Available Options screen, select
Information
2. Press the
server name. Press
the print server name for later use.
3. From the Print Server list, select the print server name that
you just entered and press
Then, from the Print Server Information list, select
Server Configuration
and press
key on your keyboard and enter the print
Insert
Enter
.
Enter
. It is a good idea to write down
.
Enter
and press
Enter
Print Server
Print
.
4. Select
4-12
Printer Configuration
Configuration Menu and press
Using the Ethernet Card with NetWare
from the Print Server
Enter
.
Page 69

5. From the Configured Printers list, select
number = 0) and press
6. From the Printer configuration screen, type the printer name.
Then, highlight
Parallel, LPT1
.
Type
and press
Enter
.
Enter
Not Installed
. Select
Remote
(port
4
Note:
Make sure to select
7. Press
Esc
Remote Parallel, LPT1
; then press
Using the Ethernet Card with NetWare
to save changes.
Enter
.
4-13
Page 70

8. Select
Queues Serviced by Printer
Configuration menu and press
from the Print Server
.
Enter
9. Select the Printer that you want to use from the Defined
Printers list and press
Enter
.
10. Press the
key and assign a queue to the print server
Insert
port from the Available Queues list.
11. Specify the priority from 1 to 10. One is top priority.
12. Press
to exit PCONSOLE.
Esc
Configuring the Ethernet card in Remote Printer mode
1. Run a print server.
q
For a file server as a print server
>LOAD PSERVER print server name
q
For a dedicated print server
> PSERVER print server name
2. Run EPSON Net!2 from the Start menu.
4-14
Using the Ethernet Card with NetWare
Page 71

3. The EPSON Net!2 dialog box appears showing a list of the
interface cards on the network. Select the printer you want
to configure from the list and click
Note:
o
If you have connected more than one printer with the same
type of Ethernet card to the network, you can distinguish the
cards by pressing the status sheet button on the Ethernet
card plate to print a status sheet for each printer, or by
checking the sticker on the Ethernet card. Then check the
MAC address.
Configuration
.
4
o
If the IP address is set to the default IP address, the printer
model might not appear.
Using the Ethernet Card with NetWare
4-15
Page 72

4. Click the
NetWare Basic
tab and make the following settings.
Frame type:
You can select one from the following: Auto, Ethernet
802.2, Ethernet 802.3, Ethernet II, or Ethernet SNAP.
Mode:
Select
Remote Printer, or Standby.
NDS:
Select
Remote Printer
Disable
from the following: Print Server,
.
4-16
Using the Ethernet Card with NetWare
Page 73

5. Click the
Primary print server:
Printer port number:
6. Click OK to save changes. If the message “Configuration is
successfully done” appears on your screen, updating is
complete.
Remote P rinter
Select the print server name you have created.
Type the same port number you assigned to the print
server (type 0).
tab and make the following settings.
4
Caution:
Once you make changes to the Ethernet card, you must wait
c
until it completes the settings before turning off the printer.
7. Switch to the Print Server screen of the File Server Console,
and check if the status is standing by the job.
Using the Ethernet Card with NetWare
4-17
Page 74

Using NetWare 4.1x
Instructions for using NetWare
Printing a text file
When you print a text file using the NPRINT command of
NetWare or DOS redirection, misconversion or a gap in
characters might occur depending on the client
environment.
Bindery an d NDS
q
When printing on the network printer from the NDS
non-correspondence client (Bindery correspondence), it is
necessary to make the object related to the print right under
the Bindery context in the directory tree.
q
Bindery context path can be confirmed from the server
console by the SET BINDE R Y CON TEXT co mman d.
q
If the bindery context path has not been set, or if you want
to use the print environment of another context from the
NDS non-correspondence client, it is necessary to specify
the context for the bindery context. Use SET BINDERY
CONTEXT command to set the context in the
AUTOEXEC.NCF file.
See your Netware 4.1x manual for more information.
4-18
Using the Ethernet Card with NetWare
Page 75

IPX routing protocol "NLSP"
It is possible to set the IPX routing protocols “NLSP” from
NetWare4.1x; however, the Ethernet card does not support
NLSP. RIP/SAP controls the communication.
You can select the routing protocol from a) NLSP with
RIP/SAP Compatibility or b) RIP/SAP Only. If you
arbitrarily remove the bind of RIP or SAP when NLSP with
RIP/SAP Compatibility is specified, the Ethernet card is
not able to communicate with the file server and NDS.
(Reference: “Protocols” and “Bindings” in the task of the
Utility INETCFG.)
Time required to recognize the Ethernet card
It takes two minutes or less for the NetWare server to
recognize the Ethernet card after turning on the printer.
During this start-up time, the EPSON Net!2 and the status
sheet do not show the correct information.
Using the Ethernet card in Print Server mode
This section explains how to configure the Ethernet card in
Print Server mode using the Nwadmin tool of NetWare 4.1x.
4
If the client who wants to print does not correspond to NDS,
make the object in the Bindery context.
1. Log in to the NDS (or Bindery context) with Admin or
supervisor privileges.
2. Run the administrator tool (Nwadmin).
Using the Ethernet Card with NetWare
4-19
Page 76

3. Create a printer:
Click the directory context icon (or Bindery context), and select
Object
, then
Create
name and click
, and then
Create
Printer
. Type the printer
.
4. Create a print server:
Click the directory context icon (or Bindery context), and select
Object
, then
Create
server name and click
, and then
Create
.
Print Server
. Type the print
4-20
Using the Ethernet Card with NetWare
Page 77

5. Create a print queue:
Click the directory context icon (or Bindery context), and
select
Object
, then
Create
, and then
Print Queue
. Type
the print queue name and select the print queue volume.
Then click
Create
.
6. The objects you have just created are added to the directory
context (or Bindery context).
4
Printer Object
Print Ser ve r Obje ct
Print Queue Object
Using the Ethernet Card with NetWare
4-21
Page 78

7. Double-click the Printer Object icon on the NetWare
Administrator screen.
8. The Printer dialog box appears. Click
click
Add.
9. From the print queue list, select the queue you want to assign
and click OK.
10. Double-click the Print Server Object icon on the NetWare
Administrator screen.
4-22
Using the Ethernet Card with NetWare
Assignments
and then
Page 79

11. The Print server dialog box appears. Click
then click
12. From the printer object list, select the printer object you want
to assign and click OK.
13. Double-click the Print Queue Object icon on the NetWare
Administrator screen.
Add.
Assignments
and
4
14. The Print Queue dialog box appears. Click
Check if the print server and the printer are assigned.
Using the Ethernet Card with NetWare
Assignments
.
4-23
Page 80

Configuring the Ethernet card in Print Server mode
This section explains how to set up EPSON Net!2.
1. Turn on the printer with the Ethernet card.
2. Run EPSON Net!2 from the Start menu.
3. The EPSON Net!2 dialog box appears showing a list of the
interface cards on the network. Select the printer you want
to configure from the list, and click
Configuration
Note:
o
If you have connected more than one printer with the same
type of Ethernet card to the network, you can distinguish the
cards by pressing the status sheet button on the Ethernet card
plate to print a status sheet for each printer, or by checking
the sticker on the Ethernet card. Then check the MAC address.
.
4-24
o
If the IP address is set to the default IP address, the printer
model might not appear.
Using the Ethernet Card with NetWare
Page 81

4. Click the
settings.
Frame type:
You can select one from the following: Auto, Ethernet
802.2, Ethernet 802.3, Ethernet II, or Ethernet SNAP.
NetWare Basic
tab and make the following
4
Mode:
NDS:
NDS Tree Name:
NDS Context:
Note:
See your NetWare manual for the available characters and
number of characters you can use.
Select
Print Server
Remote Printer, or Standby.
Select
Enable
Type the same name (up to 31 characters) as you set in
Nwadmin if it is in NDS mode.
NDS context is the Object rank in the Directory tree.
Type the container object (up to 255 characters) from
the Object to the Root. Do not type the “.” at the top.
from the following: Print Server,
or
Disable
Using the Ethernet Card with NetWare
.
4-25
Page 82

5. Click the
Primary file server name:
Password:
Print server name:
Print Server
Select the server where you created the queue.
Type any new password up to 19 characters. The
characters you entered appear as “]”.
Type any new name up to 47 characters. The default
name is shown below.
(Printer nam e) - (la st 6 digit s of the ser ia l nu mbe r)
tab and make the following settings.
Polling interval:
Set the polling time from 5 to 90 seconds.
6. Click OK to save changes. If the message “Configuration is
successfully done” appears on your screen, updating is
complete.
Caution:
Once you make changes to the Ethernet card, you must wait
until it completes the settings before turning off the printer.
4-26
c
Using the Ethernet Card with NetWare
Page 83

7. Select the Connection Information of File Server Console’s
MONITOR.NLM, and check if the print server name assigned
to the Ethernet card has been logged in to the Active
Connections list. It takes five minutes or less to complete this.
Using the Ethernet card in Remote Printer mode
This section explains how to configure the Ethernet card in
Remote Printer mode using the Nwadmin tool of NetWare 4.x.
If the client who wants to print does not correspond to NDS,
make the object in the Bindery context.
1. Log in to the NDS (or Bindery context) with Admin or
supervisor privileges.
2. Run the administrator tool (Nwadmin).
3. Create a printer:
Click the directory context icon (or Bindery context), and select
Object
name and click
, then
Create
Create
, and then
.
Printer
. Type the printer
4
Using the Ethernet Card with NetWare
4-27
Page 84

4. Create a print server:
Click the directory context icon (or Bindery context), and select
Object
, then
Create
server name and click
, and then
Create
.
Print Server
. Type the print
5. Create a print queue:
Click the directory context icon (or Bindery context), and select
Object
, then
Create
, and then
Print Queue
. Type the
print queue name and select the print queue volume. Then
click
Create
.
4-28
Using the Ethernet Card with NetWare
Page 85

6. The objects you have just created are added to the directory
context (or Bindery context).
Printer Object
Print Ser ve r Obje ct
Print Queue Object
7. Double-click the Printer Object icon on the NetWare
Administrator screen.
4
Using the Ethernet Card with NetWare
4-29
Page 86

8. The Printer dialog box appears. Click
click
9. From the print queue list, select the queue you want to assign
and click OK.
Add
.
Assignments
and then
10. Click
4-30
Configuration
Printer type box and click OK.
Using the Ethernet Card with NetWare
, and select
Other/Unknown
for the
Page 87

11. Double-click the Print Server Object icon on the NetWare
Administrator screen.
4
12. The Print Server dialog box appears. Click
then click
Add
.
Using the Ethernet Card with NetWare
Assignments
and
4-31
Page 88

13. From the printer object list, select the printer object you want
to assign and click
OK.
14. Go back to the screen in step 12, and click the
Number
15. Double-click the Print Queue Object icon on the NetWare
Administrator screen.
button to set the printer number from 0 to 254.
Printer
4-32
Using the Ethernet Card with NetWare
Page 89

16. The Print Queue dialog box appears. Click
Check if the print server and a printer are assigned.
See your NetWare 4.1x manual for more detailed information.
Configuring the Ethernet card in Remote Printer mode
1. From the System Console of the file server which you use to
set the print queue, load the print server module by the
following command. Type the print server name which you
assigned in step 4 of the previous section on page 4-28.
Assignments
.
4
>LOAD PSERVER print server name
2. Run EPSON Net!2 from the Start menu.
Using the Ethernet Card with NetWare
4-33
Page 90

3. The EPSON Net!2 dialog box appears showing a list of the
interface cards on the network. Select the printer you want
to configure from the list and click
Configuration
.
Note:
o
If you have connected more than one printer with the same
type of Ethernet card to the network, you can distinguish the
cards by pressing the status sheet button on the Ethernet card
plate to print a status sheet for each printer, or by checking
the sticker on the Ethernet card. Then check the MAC address.
o
If the IP address is set to the default IP address, the printer
model might not appear.
4-34
Using the Ethernet Card with NetWare
Page 91

4. Click the
settings.
Frame type:
You can select one from the following: Auto, Ethernet
802.2, Ethernet 802.3, Ethernet II, or Ethernet SNAP.
NetWare Basic
tab and make the following
4
Mode:
NDS:
NDS Tree Name:
NDS Context:
Note:
See your NetWare manual for the available characters and
number of characters you can use.
Select
Remote Printer
Remote Printer, or Standby.
Select
Enable
Type the same name (up to 31 characters) as you set in
Nwadmin if it is in NDS mode.
NDS context is the Object rank in the Directory tree.
Type the container object (up to 255 characters) from
the Object to the Root. Do not type the “.” at the top.
or
Using the Ethernet Card with NetWare
from the following: Print Server,
Disable
.
4-35
Page 92

5. Click the
Primary print server name:
Printer po rt numb e r:
6. Click OK to save changes. If the message “Configuration is
successfully done” appears on your screen, updating is
complete.
Remote Pr inter
Select the print server name yo u have crea ted.
Type the same port number you assigned to the print
server (type 0).
tab and make the following settings.
7. Select
8. Select
4-36
Caution:
c
server. Select a printer from the list. Then check the status.
which you set in step 5 of “Using the Ethernet card in
Remote Printer mode” exists in the Print Queues Serviced
By Printer box.
Using the Ethernet Card with NetWare
Once you make changes to the Ethernet card, you must wait
until it completes the settings before turning off the printer.
Printer Status
Queues serviced
from the Console screen of the print
. Check if the print queue name
Page 93

Configuring the Ethernet Card for NetWare Using EPSON Net!2 for Intranet
If you have set the IP address for the Ethernet card in Chapter
3, you can configure the Ethernet card for NetWare using
EPSON Net!2 for Intranet.
Caution:
o
c
You must not use EPSON Net!2 for Windows /
Macintosh and EPSON Net!2 for Intranet at same time.
o
Once you make changes to the Et hernet card, wait until
the updating is complete before turning off or sending data
to your print er.
Note:
q
See the setting procedure of EPSON Net!2 for Windows of each
section for the cautions and notes.
q
There are some restrictions on the characters you can use
depending on your browser. For details, see your browser or OS
manual.
1. Run EPSON Net!2. Select the printer you want to configure
from the list, and click the
Or start the browser and type the IP address of the Ethernet
card directly. Do not run EPSON Net!2 for Windows when
the browser is running.
URL: http:// (the IP address of the Ethernet card) /
2. EPSON Net!2 for Intranet starts running.
3. Click
NetWare
to view the NetWare setting screen.
under Network on the Configuration menu
Launch Browser
button.
4
Using the Ethernet Card with NetWare
4-37
Page 94

4. Make basic settings for NetWare.
You can select either
box. Choose
Enable
Enable
to use NetWare.
or
Disable
in the NetWare text
Note:
Disable
If
is on, all NetWare related functions will stop. Because
of that, you may not configure the Ethernet card for NetWare
using EPSON Net!2 for Windows.
5. Select the Primary Frame Type.
6. Selec t the Mode.
q
Select
NDS Print Server
you use the ND S mod e of NetWare 4.1x .
q
Select
Bindery Print Server
when you use the Bindery mode of NetWare 3.x or
NetWare 4.1 or lat e r .
q
Select
Standby
there is some inconven ienc e by setting N etW ar e to Enable.
7. When you select
when you don’t use NetWare, or when
NDS Print Server
or
NDS Remote Printer
or
Bindery Remote Printer
or
NDS Remote Printer
the Mode, enter the NDS Tree name (up to 31 characters)
and the NDS Context (up to 255 characters).
when
for
8. When you select
NDS Print Server
or
Bindary Pr int Server
the Mode, make the Print Server settings.
9. Type the Primary File Server name (up to 47 characters), Print
Server name (up to 47 characters), Polling Interval (from 5
to 90 seconds), and the NetWare Password (up to 19
characters).
10. When you select
Printer
4-38
Using the Ethernet Card with NetWare
NDS Remote Printer
for Mode, make the Remote Printer settings.
or
Bindary Remote
for
Page 95

11. Type the Primary Print Server name (up to 47 characters)
and Printer Port Number (from 0 to 254).
12. Click the
password in the Password under the Optional menu, you
need to type the password to update the settings.
13. If the message “Configuration change is complete!” appears
on your screen, updating is complete. Follow the message
appears on your screen to enable the changes by pressing
RESET
SUBMIT
or turning your printer off and on.
button to update the settings. If you set the
Create and Set the Queue Using EPSON Net!2
You can create a print queue and set the queue information to
the NetWare file server using
menu of EPSON Net!2 for Windows.
Only Bindery queue is supported. You will have to log onto the
NetWare server with supervisor privileges.
1. From any NetWare client, log in to the file server you want to
set with supervisor privileges.
2. Run EPSON Net!2 from the Start menu.
Queu e Settings
of the Option
4
3. Select the
4. The file server list which logged in appears.
5. Click the file server in which you create a queue, and click
New
6. Type the queue name and printer name (up to 47 characters),
and select the print server name you want to assign. Then
click OK.
7. When you want to delete the queue, click the queue in the
list, and click
Queu e Settings
. The setting screen appears.
Delete
Using the Ethernet Card with NetWare
from the Option menu.
.
4-39
Page 96

Instructions for Using a Dial-Up Network
This section explains about instructions for using a dial-up
network.
Note:
The primary server describes in this manual indicates a primary time
server which offers time to the workstations on the network.
Using a di al-up network in each m od e
Print Server mode
You must use a dedicated dial-up line.
Since polling is performed on the file server in the print
server mode, no vicarious response by the router is
possible. Therefore, no dial-up connection is possible in
this case.
Remote Printer mode
In Remote Printer mode, use of a router with a
vicarious response function allows the primary server
to be installed at the dial-up destination. However, an
extra account might be generated when the primary
server is down. To avoid that, it is recommend to use
connections via a dedicated dial-up line.
4-40
Follow the instructions for using a dial-up line.
Using the Ethernet Card with NetWare
Page 97

When there is a pri m ary server at dial-up destination
When local network has file server:
q
When the power is turned on
A dial-up is generated because access is made to a local file
server first and then to a primary server. There is no
problem since this dial-up occurs only once at power on.
q
When the Ethernet card is not correctly set
A dial-up is generated because access is made to a local file
server first and then to a primary server. This dial-up is
repeated at intervals of approximately 5 minutes. Make the
Ethernet card settings correctly to avoid this phenomenon.
4
q
During normal operation (standby)
A SPX Watchdog packet is sent according to the NetWare
protocol convention. Use a router with a vicarious response
function to avoid dial-up.
q
During normal operation (printing)
A dial-up is generated while the printing data is being
transferred. This is not a problem because it is a dial-up
specific to the dial-up network.
Using the Ethernet Card with NetWare
4-41
Page 98

q
When the primary server is down during operation
A dial-up is generated because connection to the primary
server is periodically attempted. Since this is attributable to
the automatic re-connection function, turn off the printer
with the Ethernet card once.
q
When the file server on the local network is down
When there is no file server on the local network, NetWare
cannot be used on the local network. In this case, also the
NetWare protocol for the Ethernet card is not available. No
dial-up is generated under this condition. When the file
server on the local network is restored, the Ethernet card is
also automatically restored.
When local network has no file server:
Depending on the router setting, the NetWare protocol can be
used without a file server on the local network. This case also
follows the first five described above.
4-42
Using the Ethernet Card with NetWare
Page 99

When the local network has a primary server
Even if a primary server is installed on the local network, an
unnecessary dial-up may be generated depending on the
configuration.
The following problems are common to the both Print Server
mode and the Remote Printer mode.
q
When the power is turned on
Since access is made only to the primary server, no dial-up is
generated.
4
q
When the Ethernet card is not correctly set
Since access is made only to the primary server, no dial-up is
generated. However, if the file server/print server of the
remote network is erroneously set as the primary server,
unnecessary dial-up might be generated. Correct the setting
error to avoid this problem.
q
During normal operation (standby)
Since access is made only to the primary server, no dial-up is
generated.
Using the Ethernet Card with NetWare
4-43
Page 100

q
During normal operation (printing)
Since access is made only to the primary server, no dial-up is
generated.
q
When the primary server is down during operation
Connection to the primary server is periodically attempted,
but no dial-up is generated. However, if the router is set to
pass SAP packets (Find Nearest Server), an unnecessary
dial-up might be generated. To avoid this, turn off the
printer once, or do not allow the router to pass SAP packets
(Find Nearest Server).
4-44
Using the Ethernet Card with NetWare
 Loading...