

Page 1

®
EPSON
Twinax
Interface
C82315*
USER’S GUIDE
REDIENUNGSANI FITUNG
MODE D'EMPLOI
GUIA DEL USUARlO
I
Card
MANUALE PER
L'UTENTE
Page 2
Errata to C82315* EPSON User’s Guide
Revised 9/321/93
for Software Revision 4.1
For all emulations
Host download is now supported on the parallel port as well as the IBM twinax port.
3812 emulation
1.2.X Point Forms XRess is now supported.
Escape character substituted when “logic¬ E” ( E) is received. Example:
PCL command for underline = ESC & d0D (lB 26 64 30 44 ) can be sent as
E&d0D
3.4.10 CPI will print as 10.3 CPI when using A4 paper
Scalable font sod point sizes can he selected using a “logical-not F F) string.
The command format is as follows:
Fnnnnn,ppp where
Example :
F5687.25 will select the Times Roman font at 25 point
ppp=desiredpointsize(11099!&
nnnnn = number of scalable font selected from the
following list
nnnnn
5687
5815
5707
5835
34103
34231
34123
34251
33335
33463
33355
33483
5.
New fonts added to support 3812 font numbers:
Typeface
Courier
Courier Bold
Sonoran-Serif*
Sonoran-Serif*
Sonoran-Serif Bold*
Sonoran-Serif Italic*
Sonoran-Serif*
Sonoran-Serif Bold*
Sonoran-Serif Bold*
Scalable Foot
Times Roman
Times Roman Italic
Ties Roman Bold
Times Roman Bold Italic
Sans Serif Medium
Sans Serif Medium Italic
Sans Serif Bold
Sans Serif Bold Italic
Sans Serif Condensed
Sans Serif Condensed Italic
Sans Serif Condensed Bold
Sans Serif Condensed Bold Italic
Symbol Set pitch point 3812#
244
245
751
1051
1053
1056
1351
1653
2103
* Uses Times Roman typeface
OMAN01
Page 3

COPYRIGHT NOTICE:
All rights reserved. No part of this publication may be reproduced, stored in a
retrieval system, or transmitted in any form or by any means, mechanical,
photocopying, recording, or otherwise, without the prior written permission of
Seiko Epson Corporation. No patent liability is assumed with respect to the use
of the information contained herein. While every precaution has been taken in the
preparation of this book, Seiko Epson Corporation assumes no responsibility for
errors or omissions. Neither is any liability assumed for damages resulting from
the use of the Information contained herein.
Neither Seiko Epson Corporation nor its affiliates shall be liable to the purchaser
of this product or third parties for damages, losses, costs, or expenses incurred
by the purchaser or third parties as a result of: accident, misuse, or abuse of this
product or unauthorized modifications, repairs, or alterations to this product, or
(excluding the U.S.) failure to strictly comply with Seiko Epson Corporation’s
operating and maintenance instructions.
Epson and Epson ESC/P are registered trademarks of Seiko Epson Corporation.
IBM is a registered trademark of International Business Machines Corporation.
HP LaserJet II is a trademark, and Hewlett-Packard and PCL are registered
trademarks of Hewlett-Packard Company.
PostScript is a trademark of Adobe Systems Incorporated.
Command-Pass-Thru is a registered trademark of I-O Corporation.
WordPerfect is a registered trademark of WordPerfect Corporation.
Microsoft Is a registered trademark of Microsoft Corporation.
Univers, Times, and Helvetica are registered trademarks of Linotype AG and its
subsidiaries.
CG Times, CG Century Schoolbook, and Microstyle are products and CG
Triumvirate Is a trademark of AGFA Compugraphic, a Division of Agfa Corporation.
Serifa is a trademark of Fundicion Tipografica Neufville, SA.
ITC Dingbats is a U.S. registered trademark of International Typeface Corporation.
General Notice: Other product names used herein are for identification purposes
only and may be trademarks of their respective companies.
Copyright © 1992 by Seiko Epson Corporation
Nagano, Japan
Page 4

FCC COMPLIANCE STATEMENT
FOR AMERICAN USERS
This equipment has been tested and found to comply with the limits for
a Class A digital device, pursuant to Pan 15 of the FCC Rules. These
limits are designed to provide reasonable protection against harmful
interference when the equipment Is operated In a commercial
environment. This equipment generates, uses, and can radiate radio
frequency energy and, if not installed and used In accordance with the
instruction manual, may cause harmful interference in which case the
user will be required to correct the interference at his own expense.
This devise complies with Pan 15 of the FCC Rules. Operation Is
subject to the following two conditions:
harmful interference. and (2) this device must accept any interference
received, including interference that my cause undesired operation.
FOR CANADIAN USERS
This digital apparatus does not exceed the Class A limits for radio noise
emissions from digitai apparatus as set out ln the radio Interference
regulations of the Canadian Department of Communications.
Le présent apparell numérique n’émet pas de bruits radioélectriques
dépassant Ies limits applicables aux appareils numériques de Class A
prescrites dans le règiment our le brouillage radioélectrique édicté par
le Ministére des Communications du Canada.
(1) This device may not cause
WARNING
The connection of a non-shielded equipment Interface cable to this
equipment will invalidate the FCC Certification of this device and may
cause lnterference levels which exceed the limits established by the
FCC for this equipment. It is the responsibility of the user to obtain and
use a shielded equipment interface cable with thfs device. When this
equipment is attached to some printers. you should not leave cables
connected to the printer’s built-in connectors. See your printer’s user’s
manual for details.
Changes or modifications not expressly approved by Seiko Epson
Corporation. could void the user’s authority to operate the equipment.
Page 5

TWINAX INTERFACE CARD C82315*
USER’S GUIDE
SCHNITTSTELLENDARTE TWINAX C82315*
BEDIENUNGSANLEITUNG.
CARTE D’INTERFACE TWINAX C82315*
MODE D’EMPLOI
TARJETA DE INTERFACE TWINAX C82315*
GUIA DEL USUARIO
SCHEDA DI INTERFACCIA TWINAX C82315*
MANUALE PER L’UTENTE
APPENDIX
ANHANG/APPENDlCE/APÉNDICE/APPENDICE
Page 6

EPSON
User’s Guide
Contents:
Twinax
Interface Card
Introduction
Setting up the interface card
Making additional settings
Printersharing
Emulation details
..............................................
Unpacking, the interface
Selecting the emulation
Preparing to install the interface card
Setting the jumpers
Installing the interface card
Setting the switches
Switch settings
Performing a self test
Connecting to the host computer system
Command-pass-thru
User-defined command-pass-thru strings
Interface setup commands
Display station setup mode
Memory setup mode
............................................
...........................................
4214/5224 emulation
Line-feed increment
Paper bins
Graphics printing
5219 emulation
3812 emulation
Paper tray or cassette
Computer output reduction
Font id.....................................
Paper size and envelopes
Justification
....................................
.....................................
.....................................
..................................
...............................
...............................
......................
............................
.............................
...................................
..............................
.................................
..................
..................................
............
.............................
.............................
.................................
.................................
............................
..................................
.............................
..........................
......................
.......................
.................................
1
2
2
2
3
4
5
7
7
8
8
9
9
10
11
14
15
16
17
17
17
17
17
18
18
18
18
20
20
20
Page 7

Interface test modes
Hex print.. ........................................
Communications test
Interface diagnostics
Interface diagnostics error messages
Interface diagnostic loopback
........................................
.................................
.................................
...............
...........................
20
21
21
21
22
24
Specifications
C82315* interface specifications
Parallel interface specifications
EBCDIC character tables
Appendix
................................................
Sample printouts - Self Test
Display Station Setup Mode
Font IDs
Sample printouts - Hex Print
Sample printouts - PC850 character set
Sample printouts - HP Roman 8 character set
.............................................
.........................
..........................
..............................
............................
............................
..........................................
............................
....................
...............
25
25
26
29
A-1
A-1
A-2
A-3
A-4
A-5
A-6
Page 8

INTRODUCTION
The Epson C82315* Twinax Interface Card allows you to connect your Epson
printer to an IBM 34/38/38 or IBM AS400 computer system or to a remote
controller connected to these systems.
This interface card provides your Epson printer with the following features:
Emulation of the IBM 5219 or 3812 letter-quality printers as well as the
IBM 4214 or 5224 matrix printers
Conformance to IBM 5250 product-attachment specifications
The ability to receive data through a multi-tap, twin-axial connected
system at a maximum burst rate of 2 million bits per second
The ability to receive data through either the twin-axial connector or
through a parallel connector, allowing you to print from both the twinaxial system and a PC system
Automatic switching between the twin-axial connector and parallel port
based on selectable time-out periods
The ability to bypass IBM emulation and send commands directly to the
printer, allowing you to take advantage of unique Epson printer capabili-
ties
A special setup mode for changing various interface settings that allows
you to make yes or no answers to printed questions
A Display Station setup mode that displays setup information on an IBM
system display station; you can then change the settings on the screen
as necessary.
You can use the Epson C82315* Twinax Interface Card in the following Epson
printers:
DLQ-2000
SQ-870/1 170
Action Printer 5000/5500
You may be able to use this interface on other Epson printers as well. For a list
of optional interfaces that can be used with your printer, see your printer’s user’s
manual.
LQ570/1070
EPL-4000/4100
ActionLaser II
1
LQ-870/1170
EPL-8000/8100
Page 9

SETTING UP THE INTERFACE CARD
Follow the instructions in this section to install this interface in your Epson printer.
UNPACKING THE INTERFACE
Check that in addition to this user’s guide, your interface kit includes all the items
listed below, and that none has been damaged during shipping.
Twinax interface card (in a plastic anti-static bag)
Twin-axial “V-cable’ connector
Parallel printer sharing cable
Caution: This interface can be harmed by static electricity. Leave the interface
card In the anti-static bag until you are ready to install it in your printer.
SELECTING THE EMULATION
Before you can use the printer, you must tell the host computer which IBM printer
the interface is emulating. Ask your system manager or operator to make the
settings for you.
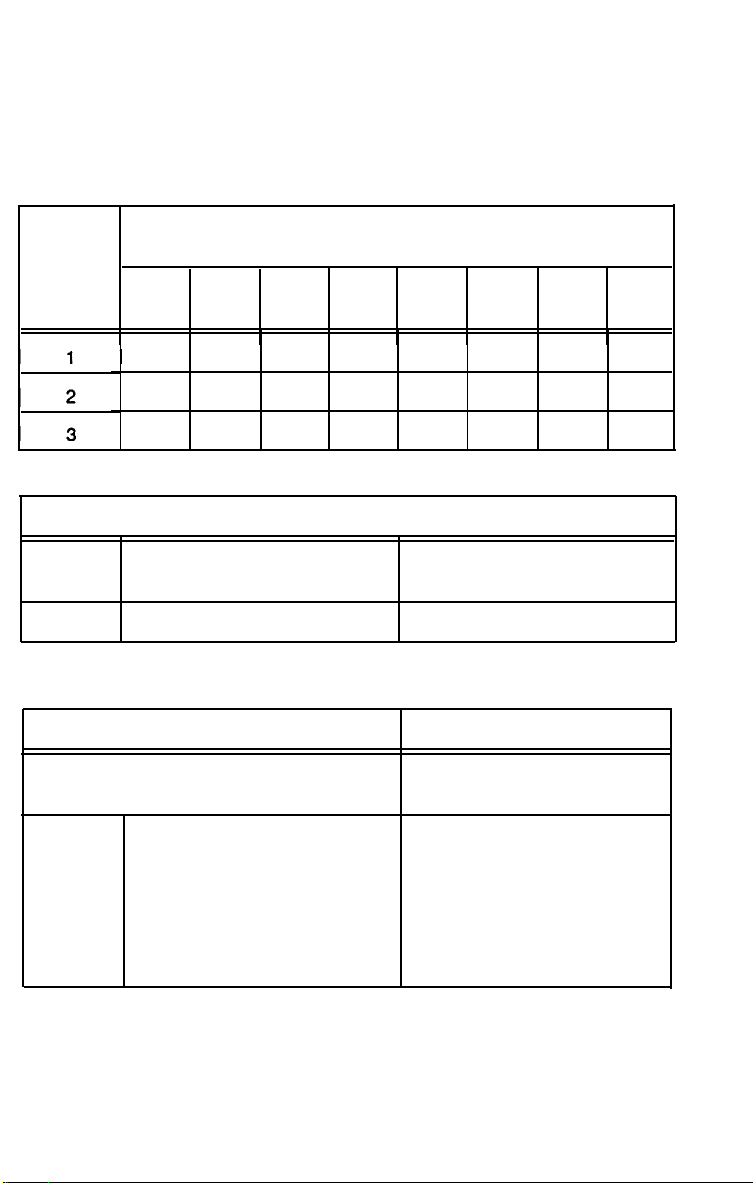
The following table shows you the recommended settings to make in your host
system:
Emulation and host system printer setting selection
If your system
is...
System 36,
System 38, AS400
and 5294 or 5394
remote controller
System 36,
System 38, AS400
and 5294 or 5394
remote controller
and the Epson
printer you are
using is...
laser printer (using
HP commands)
24148 element dot
matrix printer or
laser printer (using
ESC/P
commands)
the emulation and you
you should
select is...
3812
5219
2
should select
one of the
following
host system
settings
3812-1
5219 mdl D02
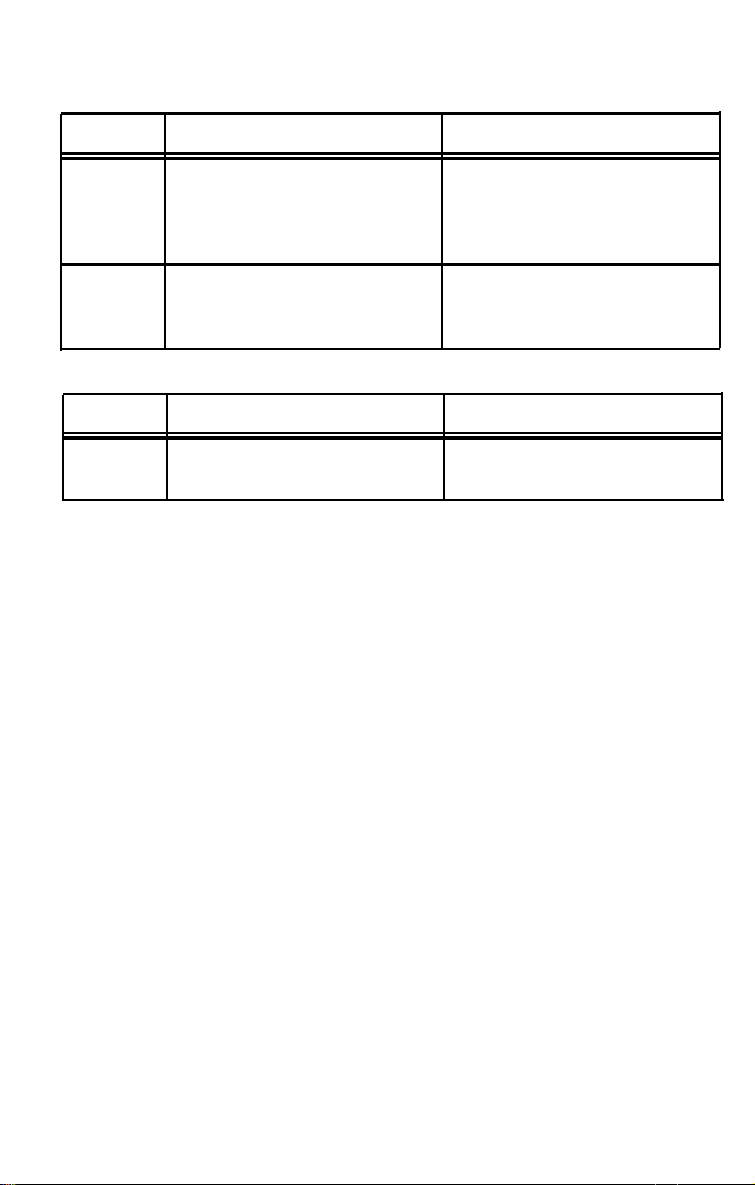
Page 10
If your system
Is...
and the Epson
printer you are
using is...
the emulation and you
you should
select is...
should select
one of the
following
host system
settings
System 36,
System 38, AS400
and 5294 or 5394
remote controller
System 34 or 5251
m12 remote
controller
You should keep the following in mind when selecting the emulation.
Only the 3812 emulation supports HP laser printer commands.
If you have a choice between the 5224 and 4214 emulations, you should select
4214. The 4214 emulation adds control of the following features: lines per inch,
pitch, graphics, print quality, and single-sheet handling.
If your printer supports Epson Job Language (EJL) commands, do not change the
printer mode using the EJL commands or the command-pass-thru feature while
the interface is installed. Also you may not be able to change the printer mode
using the control panel.
Never select the PostScript™ printer mode while this interface is installed.
9/24/48 element
dot matrix printer
or laser printer
(using ESC/P
commands)
9/24/48 element
dot matrix printer
or laser printer
(using ESC/P
commands)
4214
5224
4214 model 2
5224 (2P)
5225 (2P)
5258 (P)
PREPARING TO INSTALL THE INTERFACE CARD
Before installing this interface card you may need to set several jumpers,
depending
on
the following factors:
The type of Epson printer you are using
The type of IBM printer you want the interface to emulate
The type of twin-axial connector your host system uses
3
Page 11
Also, because this interface can be damaged by static electricity, you should
prepare the interface card for installation according to the procedure below:
1. While the interface is still in its anti-static bag, place it next to your printer.
2. Place the twin-axial cable from the host computer on top of the anti-static bag;
make sure the metal connector on the cable is in contact with the bag.
3. Remove the interface card
the twin-axial cable.
4. Set the jumpers on the interface card according to the instructions
from the
bag
and place it on top of the bag next to
in the
following section.
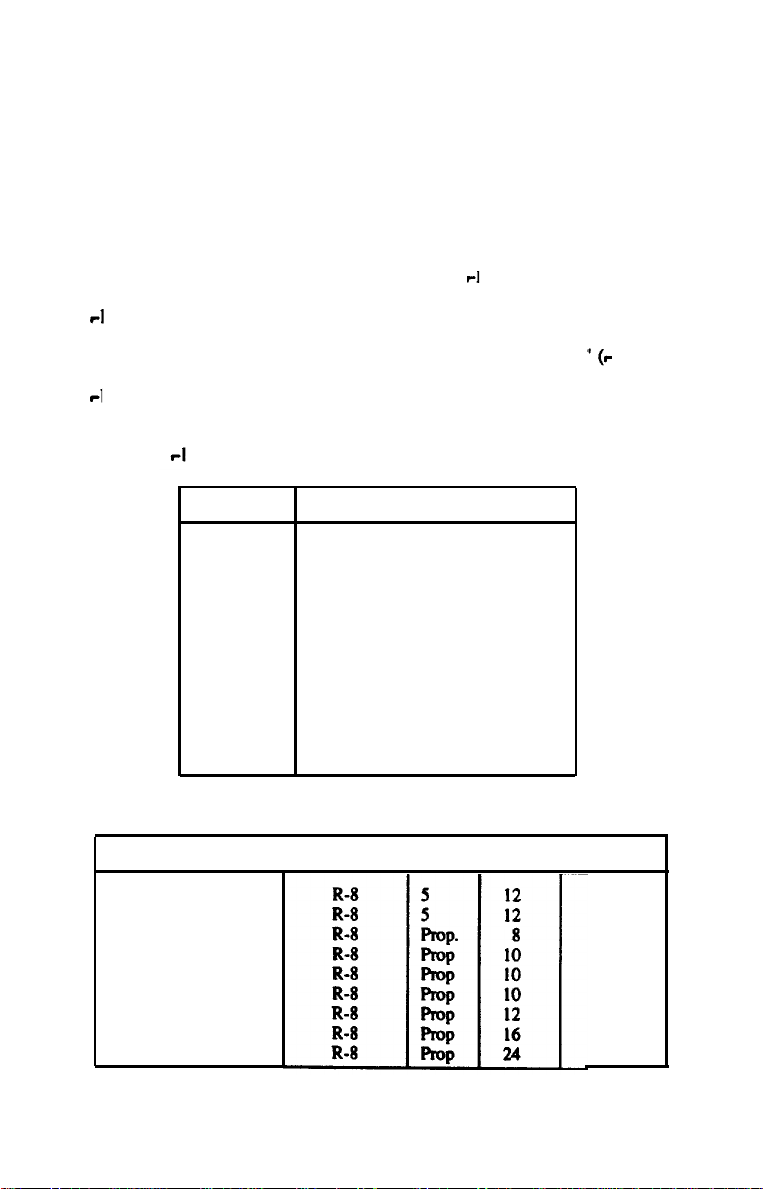
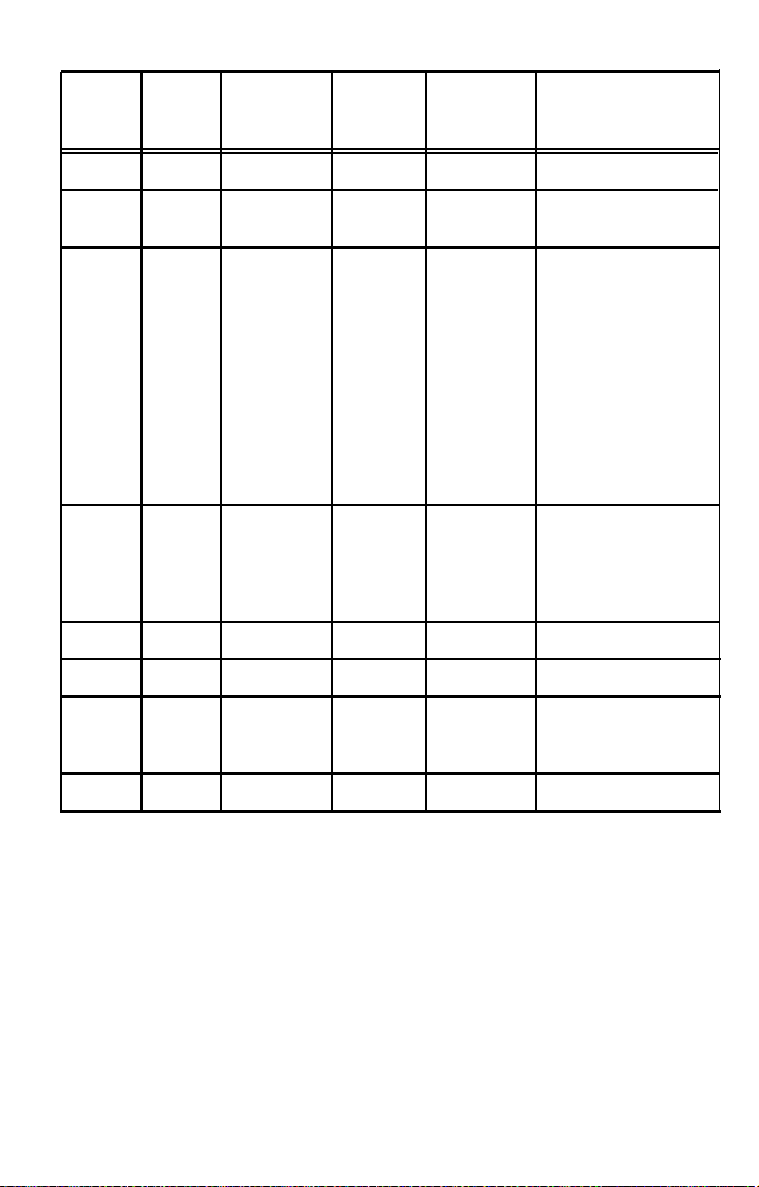
SETTING THE JUMPERS
A jumper is a small, square plastic object that fits over two terminals (prongs) on
To
the interface card.
disconnect a jumper, place it over one terminal only. All jumpers are connected
when shipped from the factory.
The C82315* interface card has three jumpers, labeled as J2, J5, and J6. The
settings for J5 and J6 are different for the different emulations. After deciding on
an emulation, set the jumpers according to the tables below.
Applies to all emulations
Jumper
J2
Dot-matrix 4214/5224 printer emulation
I
Jumper
Normal twin-axial cable
connect a jumper, place the jumper over both terminals. To
Connected
Twisted-pair ‘passive star panel’ cable
Use only if problems found on this type
of cable.
Connected
Disconnected
Disconnected
J5
J6**
Sends a printer ID code for
an IBM 4214 model 2 to the
host
Sends Epson ESC/P 9-pin
FX Commands to the printer
Sends a printer ID code for an IBM 5224
model 1 to the host
Sends Epson ESCIP 24145pin LQ commands to the printer
4
Page 12

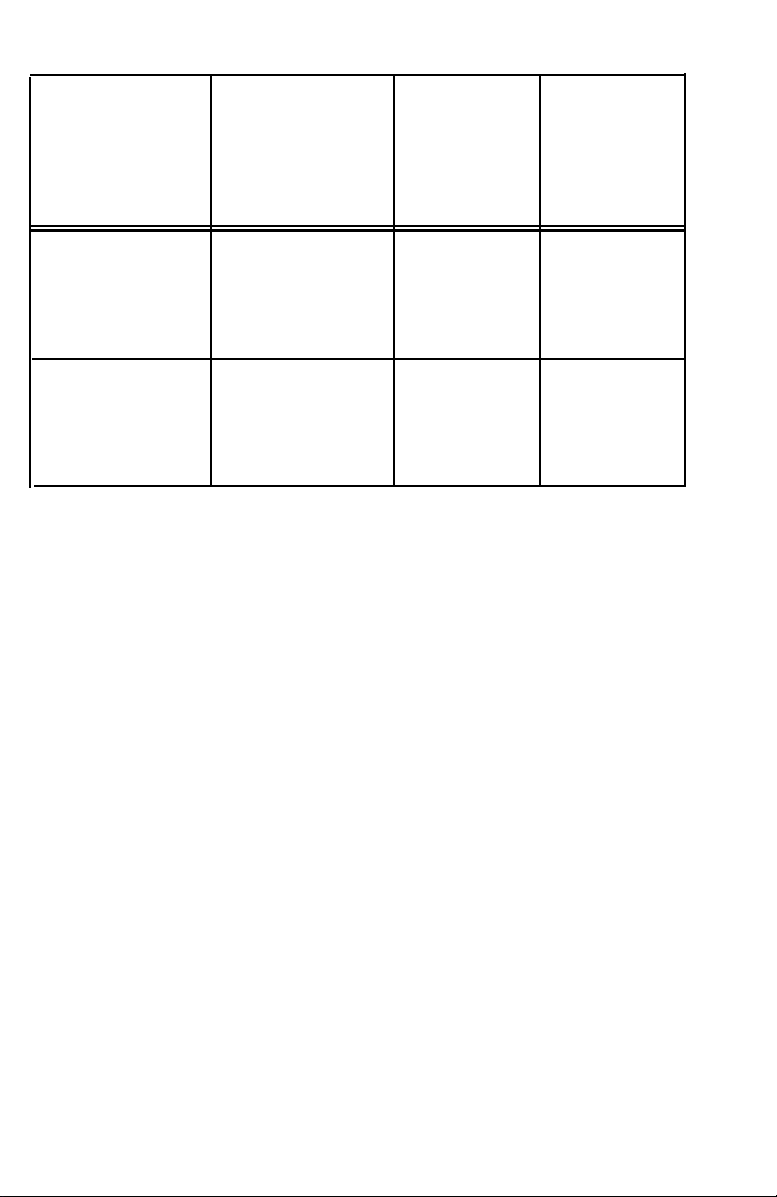
Letter Quality 5219
5
emulation
Jumper
J5
J6**
** If the interface’s self test prints a name for your printer, you do not need to
set the J6 jumper.
Letter Quality 3812/HP Laser printer emulation
Jumper
J5
J6*
*
When you choose fixed page orientation, the orientation is selected by the settings of
switches 6 and 7.
Selects 5219 ESWP letter
quality emulation
Sends Epson EWP 9-pin
PX commands to the printer
Invalid selection
Sets the page orientation au- Sets a fixed page orientation when you
tomatically when you use the use the Computer Output Reduction feaComputer Output Reduction ture
feature
Connected
lnvalid selection
Sends Epson ESC/P 24/48 -pin LQ commands to the printer
Connected
Emulates an IBM 3612 printer using HP
LaserJet II commands
Disconnected
Disconnected
INSTALLING THE INTERFACE CARD
After making any necessary changes in the jumper settings, you should install the
C82315* Twinax Interface Card in your printer.
Instructions on installing this interface card are included in your printer’s user’s
guide. Follow these steps carefully.
SETTING THE SWITCHES
The C82315* Twinax Interface Card comes with eight switches that are used to
determine many of the default settings of the interface card. Details on these
settings are listed in the following section.
You can set the switches located on the rear side of the card at any time.
However, the interface only checks these settings when the printer is first turned
on. Always turn the printer off and then back on again after changing a setting.
Page 13
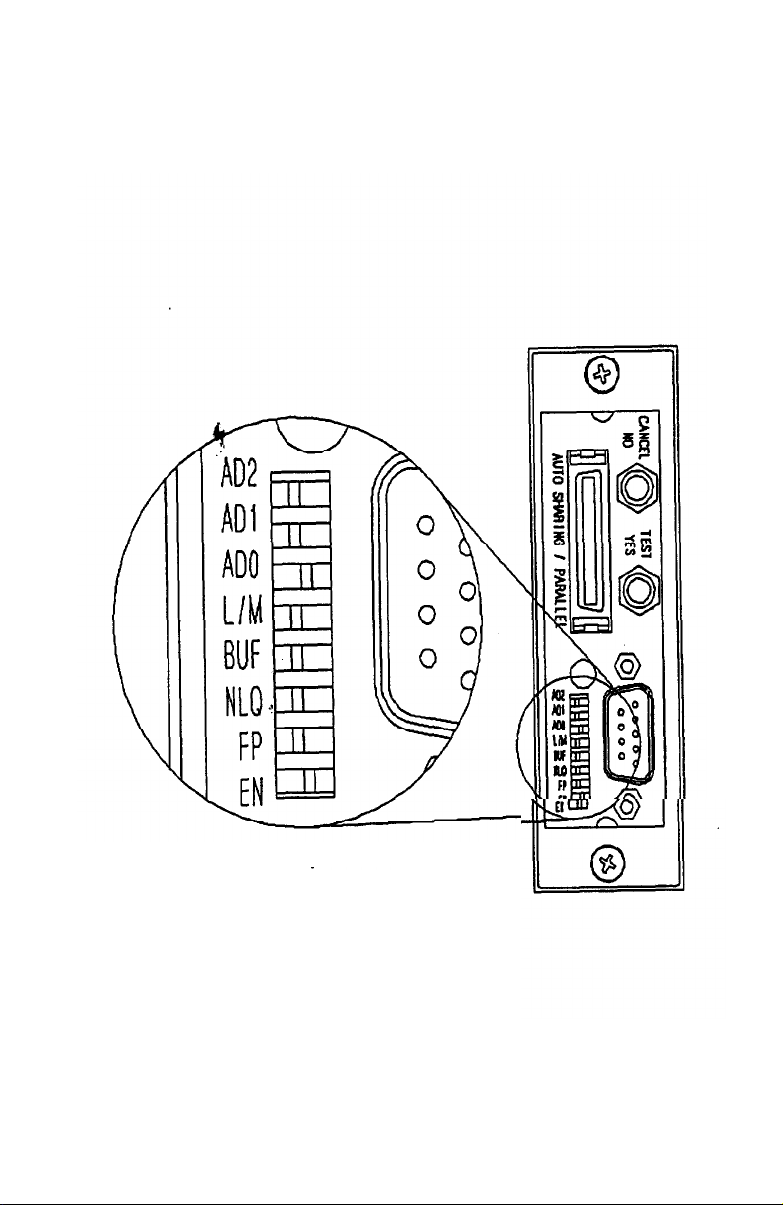
Change the switch settings with a pointed object, such as a ball-point pen. A
switch is on when in the upper position (if the interface is Installed horizontally) or
in the right position (if the interface is installed vertically), as shown below.
Active ’
Page 14
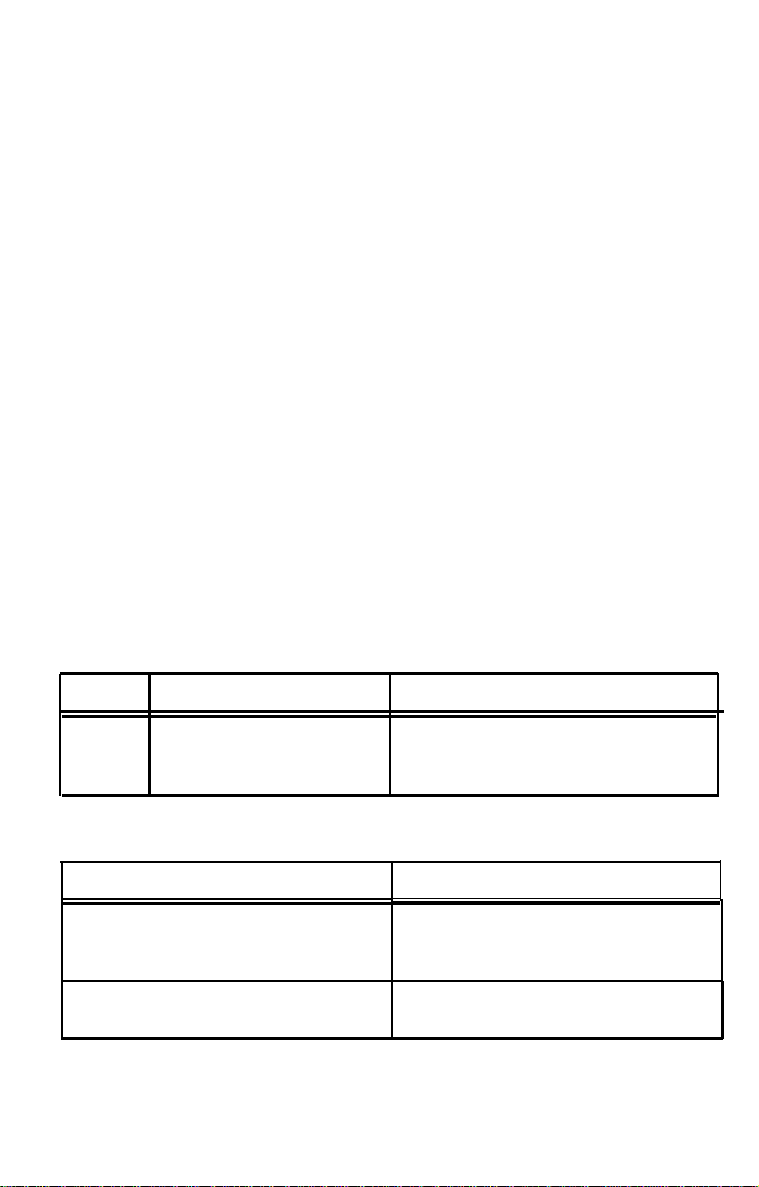
SWITCH
You can select the features listed below by changing the switches to the settings
indicated. Settings for switches 6 and 7 are different if HP LaserJet II (IBM 3812)
emulation is selected (switch 4 is on and jumper J5 is disconnected).
Switch
SETTlNGS
I
(ask the system manager for the correct address)
Cable
(Device) Address
0
Off Off
Off Off On On Off Off
Off On
Switch
4
5
Non-HP LaserJet II mode
Switch
6
7
Emulates an IBM 4214/5224 Emulates an IBM 5219/3812
printer printer
Prints normally
Selects draft printing as the
default
Passes all commands from
the host on to the printer.
Select this if you want to set
pitch and print quality from
your software.
1
2 3 4 5 6 7
Off Off On
Off On
Off
Off
Off On
Prints buffer diagnostic test
Selects LQ printing as the
default
Passes all commands from
the host on to the printer
except character pitch and
print quality commands.
Select this if you want to set
pitch and print quality from
vour orinter’s control panel.
On
On
On
Test
On On
On On
Off On
7
Page 15
HP Lase Jet II mode
8
Switch
6
7
Switch
8
Off
Sets orientation automatically
during Computer Output
Reduction
Sets orientation automatically
during Computer Output
Reduction
Off
Selects the C823W interface
card
Sets orientation to landscape
during Computer Output
Reduction
Sets orientation to Portrait
during Computer Output
Reduction
Selects the printer’s built-in
interface
On
On
PERFORMING A SELF TEST
To verify the interface is installed and the settings are correct, perform an interface
self test according to the following steps.
1. Turn on the printer and load paper. Make sure the cable address (set with
switches 1, 2, and 3) is not set to 7.
2. Press the TEST button on the interface. The printer then prints out a list of the
jumper, switch, and feature settings, similar to the self test sample printout shown
in Appendix A-l.
The name of the printer printed in the self test may differ from your
printer’s actual model name.
3. Turn the printer off to end the self test.
If the warning message is printed, it indicates the interface’s emulation mode
differs from the emulation mode selected by your printer.
CONNECTING TO THE HOST COMPUTER SYSTEM
After you confirm the interface is installed and settings are correct, you can
connect it to the host system according to the following steps.
Page 16

1.
Connect the twin-axial connectors of the twin-axial V connector to your host
computer system cable.
2. Insert the twin-axial V serial cable into the 9 pin twin-axial serial connector on
the interface.
3. Tighten the thumbscrews on both sides of the twin-axial serial cable connector
to secure it to the interface.
MAKING ADDITIONAL SETTINGS
In addition to setting the switches and jumpers described in Setting Up, you can
make interface or printer settings with the C82315* interface in four more ways:
command-pass-thru, interface setup commands, display station setup mode, and
memory setup mode.
COMMAND-PASS-THRU
This feature allows you to insert commands within your print files that are sent
directly to the printer, without being processed first by the interface. You can then
take advantage of the advanced features of Epson printers (such as color printing
and super/subscripts) that are not supported in IBM printers.
Follow the steps below to send command-pass-thru commands.
Convert the Epson printer commands you wish to send into two-digit
1.
hexadecimal codes. See your Epson printer’s user’s guide for a list of all
commands; the hexadecimal values of each command are shown there.
2. Inside the document you are sending to the printer, insert the following
characters:
&%
When the interface receives these two characters, it knows that the characters
following are commands in hexadecimal format. (These are the default characters:
you can define different characters with interface setup command 06 described
in Interface Setup Commands.)
3.
Immediately following the &% characters, insert your commands in
hexadecimal format; the interface recognizes characters from 00 to FF only
(alphabet characters must be upper case).
9
Page 17

You may insert one or several commands, as long as they are all in hexadecimal
format, and they are commands that are used by your printer in its current mode.
You may also insert spaces between hexadecimal pairs to increase visual clarity;
however, do not put any’spaces after the first &% characters or before the last
&% characters.
4. After you have inserted all your commands, insert the &% characters again.
This tells the interface that command-pass-thru Is finished and the data following
is normal print data.
Note:
Although these characters are displayed in your document on the display
screen, the interface treats them as commands and does not print them.
If part of the sequence is printed, you have made an error in entering the
codes; check your document and make sure you are using the correct
format and hexadecimal characters.
Avoid sending codes that would move the print position during
command-pass-thru. Since the interface does not process these
commands, it cannot keep track of the print position changes; this may
affect the position of following characters and page layout.
You can also send these commands by typing them on the screen and
pressing the screen print key.
Example:
To print the word ‘scalable” in the following sentence in bold using
Epson ESC/P commands, you could use command-pass-thru as follows
(the bold on/bold off commands are ESC E and ESC F):
Epson ESC/P 2 offers advanced &% 1B 45&%scalable&%1B46&% fonts
for laser-like printing at dot-matrix prices.
USER-DEFINED COMMAND-PASS-THRU STRINGS
You can define up to eight of your own custom command-pass-thru command
strings (0 to 7) to be stored in interface memory. The method of defining strings
is described in the following section.
Once you have defined these strings, you send them in the following format:
&%U1
The U1 tells the interface to send user-defined string number 1 to the printer.
10
Page 18

For example, you
turn on bold printing, as used in the example in the previous section. Then,
instead of inserting the &% 1B 45&% command in your text, you would insert only
&%U1.
could
define user-defined string 1 to be the command string to
INTERFACE SETUP COMMANDS
You send these commands in a similar manner to command-pass-thru, but the
commands are used to make interface settings instead of being sent on to the
printer. These interface settings control printing regardless of the printer model
connected.
The format of the interface setup commands is as follows:
&%Z##,P
The 8%Z indicates that an interface setup command follows. The ## is a two-digit
number, indicating the number of the command. The P is the parameter of the
command: the length of the parameter varies by command.
A table of commands and parameters, as well as a short description of each
follows.
11
Page 19

Command
12
Number
Parameters Name/Description
Command
Examples
01
02
03
Control the setup memory, Resets or saves
settings in the interface’s setup memory
1
2
Reset to factory settings
Store the current-setting in permanent
&%Z01 ,1
&%Z01,2
memory
Select the default international character set
Selects the international character set used.
See your printer’s user’s guide for a list of
characters affected by international character set
selection.
00 Multinational
01
03
04
05
06
07
08
09
10
11
12
13
14
15
UWCanadaCommand
Belgium
Brazil
Canada/French
Denmark/Norway
Finland/Sweden
France
Italy
Japan
Japan (English)
Portugal
Spain
Spanish speaking
United Kingdom
&%Z02,00
&%Z02,01
&%Z02,02
&%Z02,03
&%Z02,04
&%Z02,05
&%Z02,08
&%Z02,07
&%Z02,08
&%Z02,08
&%Z02,10
&%Z02,11
&%Z02,12
a%Z02,13
&%Z02,14
&%Z02,15
Selects the character table used
(PC 850 is the recommended setting)
04
02
03
Not used
PC850
HP Roman 8
&%Z03,02
&%Z03,03
Page 20

Command
Number
Parameters Name/Description
Command
Examples
05
06
07
Control paper size selection (laser printers only)
Makes paper size settings
01
Feeds paper size selected by the host
computer
02
03
Feeds any paper size
Feeds A4 size paper
Select alternate command-pass-thru delimeter
Selects the characters that both begin and end
the command-pass-thru feature. You can select
any two characters, as long as the first is not an
ampersand (a). The default value is the &%
characters.
xx
Selects the two characters represented
by the XX characters.
Select print-complete handling
Tells the interface when to send a print-complete signal.
(Check your self test results to see
lf your printer supports true print complete.)
1
Selects early print-complete handling
(all data has been sent to printer’s
buffer, but printer may still be printing)
2
Selects true print-complete handling
(all data has been sent to printer, and
printer has finished printing)
&%Z05,01
&%Z05,02
&%Z05,03
&%Z06,*!
&%Z07,1
&%Z07,2
08
09
Set printer sharing timeout period
Sets the amount of time (in seconds) the printer
waits for additional data before switching
between the twin-axial host system and the PC
system connected to the auto-sharing/parallel
connector (8 seconds is the default). If your
printer supports intelligent emulation switching
(IES) make sure your printer’s IES timeout
period is less than this setting.
xx
Selects a waiting period of XX seconds
Parallel port initialization string
Defines a string of characters that is sent to the
printer when the parallel port is activated (up to
25 characters can be included in the string)
13
&%Z08,05
Page 21

Command
Number
Command
Parameters Name/Description Examples
10
(HH..HH)
Defines the string of hexadecimal values that are
sent to the printer as HH..HH
Define User Custom command-pass-thru strings
for details.
Defines up to eight strings (0-7) of commands
(up to 25 characters can be included in the
string). See User-defined command-pass-thru
strings for details.
#(HH..HH)
Defines string number # to be the character
string defined by the hexadecimal values
HH..HH
&%Z09,0(1B40)
&%Z10,3(1B45)
DISPLAY STATION SETUP MODE
When the printer is connected to a twin-axial cable that is also connected to a
display station, you can display an interface setup screen showing various setup
parameters. You can then change these parameters and save them in the
interface memory.
See Appendix A-2 for an example of the setup screen.
Follow the steps below to change settings in display station setup mode.
1.
Turn off the printer and all devices connected to the same twin-axial cable.
2.
Disconnect the twin-axial cable from the IBM host computer, and make sure
that at least one display station is connected to the cable and is turned on.
Turn off switch 8 to deactivate the twinax interface. Then make sure you
3.
have set a valid address other than 7 (switches 1,2,3), and turn on the printer.
4.
Press the TEST button on the interface. The interface setup screen appears
on the display station.
5.
Use the cursor keys to move to settings you want to change. Use the
backspace to delete old settings, then type in the new settings.
14
Page 22

When you finish changing settings, press the Enter key to save the new
6.
settings in the interface memory.
Turn off the printer and return switch 8 to the on position to resume using
7.
the twinax interface.
MEMORY SETUP MODE
You can have the printer print out various interface settings one at a time and then
change them by responding to printed questions using the YES and NO buttons
on the interface.
Follow the steps below to change settings using memory setup mode.
1. Enter memory setup mode by holding down both the YES and NO buttons
while turning on the printer. The printer then prints out the first setting and asks
the following:
Do you want this changed? (Yes/No)
2. If you then press YES, the interface changes thesetting to the next available
parameter. It then prints out the new setting and asks again if you want to change
the setting. The printer repeats the question for all the parameters until you press
NO, indicating you do not want to change the current setting.
If you answer NO the first time, the printer goes on to the next setting.
3. Continue to answer the questions and make desired setting changes until the
following question is printed:
Do you wish to save current selections? (Yes/No)
4. Press YES to save the settings you have just made. Press NO to return to the
old settings and exit memory setup mode.
Note:
You may need to use the line feed button on the printer’s control panel
to advance the paper so you can see the printed messages.
This method of making settings is not recommended for laser printers;
to see the questions, you would have to eject one page every time a
question is printed.
15
Page 23

The settings you can make in memory setup mode are
details on the settings, see the descriptions for the command of the
same name in the section on interface setup commands.
Select the default international character set.
Select the character table
Control paper size selection
Select print-complete handling
listed below. For
PRINTER SHARING
If the C82315* is connected to a PC with the Parallel Sharing Cable,
the PC must be turned on.
The C62315* Interface is equipped with two interface connectors: a serial connector for connecting the twinax V-connector and a parallel connector. By connecting
a PC to the parallel connector, you can share the printer between the PC and
Twinax systems.
When you first turn the printer on, the twinax connector is selected. If the twinax
system sends no data for a certain period, and the PC system sends data, the
interface switches to the parallel connector. (The period the interface wafts before
switching can be set with Display station Setup or Command 06 described in
Interface Setup Commands--the default is 8 seconds.)
After a print job is completed from either connector, and no additional data is
received for a certain period, the interface monitors both connectors for the next
data.
Since printing alternates between the twinax and PC systems during printer
sharing, it is recommended that you reset the printer at the beginning of each
print job. Otherwise, page layout, character spacing, and other settings remain
from the previous print job.
You can use Command 09 described in Interface Setup Commands to define a
string of up to 25 characters that are sent to the printer each time the interface
switches to the parallel connector.
The interface automatically restores settings for character pitch, lines per inch, and
page length when lt returns to twinax printing.
16
Page 24

EMULATION DETAILS
The C82315* interface emulates several IBM printers. However, you should be
aware of slight differences in operation caused by mechanical and other differ-
ences between IBM and Epson printers.
The differences for each emulation are described in the following sections.
4214/5224 EMULATION
Epson printers and 4214/5224 printers have the following differences.
LINE-FEED INCREMENT
A 4214 printer advances paper in 1/120-inch increments for continuous paper, and
1/10-inch increments for single-sheet paper. 5224 printers use a 1/72-inch
increment. Epson O-pin printers advance paper in 1/216-inch increments, and
24/48 printers advance paper in 1/360-inch increments. The C82315* interface
calculates the difference in paper advancing increments and corrects for errors
as printing proceeds.
PAPER BINS
A 4214 printer can select from three paper bins; an Epson printer can select from
two. If you select bin 3, the Epson loads paper from bin 2.
GRAPHICS PRINTING
You can create graphics on the 4214 printer by sending the Load Alternate
Character (LAC) command. This is the command used by the IBM programs APF
and BGU. This command defines a pattern to be printed in place of a certain
character, similar to the Epson ESC/P user-defined character feature.
The C82315* interface accepts two variations of the LAC command: the LAC-1
and LAC-2 commands. The LAC-1 command defines a 9-dot wide by 8-dot high
pattern while the LAC-2 command defines a 10-dot wide by a 8-dot high pattern.
The C82315* interface prints graphics data using the quad-density, 240 dot per
inch graphics mode. In order to maintain the proper pitch, each character should
be defined with the following widths:
10 CPI Graphics - 24 Columns
12 CPI Graphics - 20 Columns
15 CPI Graphics - 16 Columns
17.1 CPI Graphics - 14 Columns
17
Page 25

Because the interface adjusts data to fit in the number of columns available on
Epson printers, printed characters may not be perfectly symmetrical.
NOTE: When printing high-density graphics, you may not be able to print adjacent
dots. This may cause gaps when printing bar codes, so bar code printing is not
recommended.
5219 EMULATION
The font ID numbers sent to a 5219 printer select the Epson character pitches and
typefaces shown below; the ID numbers marked with a + are the recommended
settings.
10 CPI: 12 CPI:
Roman
Sans Serif
Courier*
Script*
Prestige*
*Not available on 9-pin printers.
13+, 5+
14, 26+
11+
10,20+
12+ 86+
82, 87+
84+, 91+
85+
80+
15 CPI:
222+
224,225+ 159+
223+
220
221+
PROFIT
160+
158+
161
162
3812 EMULATION
Epson printers and 3812 printers have the following differences.
PAPER TRAY OR
If you have an optional paper tray or cassette installed in your Epson laser printer,
you should use SelecType on your printer’s control panel to select optional for the
input setting. See your printer’s user’s guide for details on using SelecType.
CASSETTE
COMPUTER OUTPUT REDUCTION
Epson laser printers cannot print on 13.2 x 11 inch paper, so you may need to
reduce or rotate the image to fit data processing reports onto the paper available.
The chart on the following page shows how to print data processing reports onto
smaller size paper.
18
Page 26

Computer Output Reduction (COR)
LANDSCAPE mode REDUCED
Verical spacing is 8LPI
0.5’ Margins top end lelt
10 pitch fonts lo 13 pitch
12 pitch fonts lo IS pitch
IS pitch fonts to 19 pinch
(I) Yield Paper size is less than or equal to 1 1/2' x 14'
(2) Portrait Orientation (lasted at COR ) can be
Selected by:
Size OCI: Text -YES or Notate-0
size CL :priority [•STD] or (•NLQ) or
AS/400 : PRIORITY (STD) and Pagrit (•COM)
19
Page 27

FONT ID
The 3812 emulation uses IBM font ID’s to switch from one HP font to another.
Only certain IBM font ID's can be used as the system default. These are noted by
an asterisk (*) in the Font ID table in Appendix A-3 of this manual.
You specify the default font ID for your printer when you configure the printer on
the IBM host. Have your system operator set your default to the font ID you use
most and then change as necessary with a printer override, OCL command, or
word processing font ID.(See Appendix A-3 for font ID table.)
PAPER SIZE AND ENVELOPES
The 3812 emulation supports the following paper sizes:
Letter
Legal
A4
Executive
Epson printers support the following envelope sizes:
Commercial
Monarch
DL
CS
You must send the paper and envelope dimensions from the IBM host to the
printer in order for the proper size to be selected. You can use interface setup
commands to select A4 size paper as the default or to feed paper regardless of
size.
JUSTIFICATION
The 3812 emulation supports right hand justification for all fixed pitch fonts as well
as proportional font ID
10
8.5 x 11 inches
8.5 x 14 inches
210 x 297 mm (8.27’x11
7.25 x 10.5 inches
9.5 x 4.125 inches
7.5 x 3.875 inches
220 x 110 mm (8.66’x4.333
229 x 162 mm (9.02’ x 6.38”)
S
158, 159, and 162 (found in the 5410 font cartridge).
.69’)
INTERFACE TEST MODES
In addition to the self-test described in the section on installing the interface, the
C82315* has four other tests you can perform: hex print, communications test,
interface diagnostics, and the interface diagnostic loopback.
20
Page 28

HEX PRINT
During hex print, the printer prints the data received in hexadecimal format. You
can then check if the data you are sending is reaching the printer.
The printer prints this hex data on a grid corresponding to the data’s position in
the buffer. If the hex data represents a printable character, that character is printed
to the right of the hex data.
Turn switch 5 on to enter hex print mode.
for
See Appendix A-4
hex print sample.
COMMUNICATIONS TEST
The C82315* can mimic a host computer and send commands to the twin-axial
cable. You can use this feature to test a second printer connected to the same
twin-axial cable.
Follow the steps below to perform the communications test.
1. Make sure that both printers are set to the same-cable address, and that the
Epson printer is turned off.
2. Make sure that the cable end attached to the second printer is set for
termination, or uses an auto-termination cable, and that the cable is not
connected to a host system.
3. Turn switch 5 on to print the buffer diagnostic test.
4. Turn on the Epson printer; then press the TEST button on the inter face.
The second printer should then print the buffer diagnostic test header, print out
any errors encountered in communications, and then print the EBCDIC character
set.
5. After completing the test,
off position.
turn
off the Epson printer and return switch 5 to the
INTERFACE DIAGNOSTICS
During interface diagnostics, the interface transmits data to itself and then
analyzes how that data is processed. If an error is detected, an error message is
printed on the printer. A list of error messages is listed at the end of this section.
Follow the steps below to perform interface diagnostics.
21
Page 29

1. Make sure the printer is turned off.
2. Disconnect the V-connector from any twin-axial cables
to the interface). Since the interface transmits data to itself during this test, leaving
it connected to the twin-axial cable could disrupt the twin-axial system.
3. Write down the positions of switches 1, 2, and 3 (you need to return them to
their initial positions after the test is completed). Then turn switches 1, 2, and 3
on. This selects cable address location 7. Address 7 is used only during interface
diagnostics and interface diagnostic loopback.
4. Turn on the printer; then press the TEST button on the interface. The printer
then performs the test and prints the following:
TEST SEQUENCE COMPLETE
The printer performs the test sequence over and over; error messages are printed
between the TEST SEQUENCE COMPLETE” messages.
5. After you are finished running the test, turn the printer off and reset switches
1, 2, and 3 to their original position.
(but leave it
connected
INTERFACE DIAGNOSTICS ERROR MESSAGES
The error messages and explanations are listed below.
If an error occurs, the following tests may not be performed.
OUTPUT TIMING ERROR
The
twin-axial output circuits are not responding
expected. This could be caused by a non-functioning circuit or by a termi-
to the microprocessor as
nated cable not being attached to the interface.
UNEXPECTED VECTOR or IMPROPER BYTE VECTOR
The interrupt handling process received an improper interrupt value.
Possible causes are initialization problems, non-functioning circuits, or
microprocessor problems.
22
Page 30

ERROR IN POLL ADDRESS X
A poll test was sent to the indicated address but was not received
properly. This could be caused by a terminated cable not being properly
installed, a circuit that is non-functioning, or intermittent connections.
INCORRECT DATA ON POLL TO ADDRESS X
A poll was sent to the indicated address and was detected as a poll;
however, the data received was not the expected data. This could be
caused by a problem with the twin-axial receiver circuitry.
NO INTERRUPT ON DATA
A byte of data (not a poll) was sent and the receiver circuitry did not
interrupt the microprocessor. This could be caused by problems in the
receiver circuitry, or problems with the microprocessor interrupts.
OUTPUT DATA AVAILABLE BIT BAD
The transmitter timing is not staying busy for the proper period. This
indicates an ASIC failure.
INPUT DATA AVAILABLE BIT BAD
The bit signaling that data was received was not set as expected. This
could be caused by not having a properly terminated cable attached, a
driver circuitry failure, a receiver circuit failure, or an ASIC failure.
NO INTERRUPT ON BAD PARITY or WRONG INTERRUPT ON BAD
PARITY
This test sends a transmission with the parity purposely invalid to test the
proper reaction. Either no interrupt or the wrong interrupt was received in
this test. This indicates an ASIC failure.
INTERRUPT W/O NMI ON POLL TO ADDRESS X
During a poll test, the transmission was received as data; not as a poll,
This indicates an ASIC failure.
23
Page 31

INPUT NOT INDICATING BUSY
This is an ASIC internal test during a transmission, and indicates an ASIC
failure.
TWO BYTE DATA CHECKS BAD
This test verifies multi-byte data transmissions for proper data. A failure
could be caused by a -5-volt supply problem, a transmitter circuit failure,
a receiver circuit failure, or an ASIC failure.
OVERFLOW COUNTER BAD
This tests the protection circuit-in the ASIC designed to prevent a host
failure from over-filling the interface buffer and causing an error in operation. This message indicates an ASIC failure.
BAD DATA, EXPECTING XX RECEIVED XX
A byte of data was sent, and the receiver circuitry interrupted the
microprocessor. However, when the data was checked, it was not the
same as when it was sent. This would indicate a problem with the
twin-axial circuitry data paths.
PARITY ERROR DETECTED or PARITY FAILURE
This error indicates that the twin-axial receiver detected a parity error on
receiving polls or data. This would indicate an error in the parity generation by the twin-axial output, malfunctioning of the parity checking circuit
of the twin-axial receiver, or a poor cable connection.
INTERFACE DIAGNOSTIC LOOPBACK
Interface
only difference is that no error messages are generated. A qualified technician can
diagnostic loopback is essentially the same as interface diagnostics; the
use this test to check the circuitry with an oscilloscope.
Interface diagnostic loopback is performed in basically the same way as interface
diagnostics; however, you must turn switch 8 off before starting. Always return
switch 8 to the on position when you are finished with interface diagnostic
loopback.
24
Page 32

SPECIFICATIONS
The C82315* interface specifications and the C82315*‘s parallel interface
specifications are listed below
C82315* INTERFACE SPECIFICATIONS
input Protocol:
Output Protocol:
Receive Data Rate:
Data Buffering:
Language Support:
Supported printer
character sets:
Connectors:
Indicators:
IBM 5250 twin-axial protocol, parallel
input data
EPSON TYPE B internal interface connection
5250 protocol =
bits/second
Effective rate: 1 million bits/second
Dual 256 byte buffers for received
twin-axial data
16-byte twin-axial command buffer
Single byte parallel data buffer
16 major language selections; same Ianguage
character sets as supported by IBM 4214
IBM Code Page 850
H.P. Roman 8
DB9 connector for twin-axial T-cable
connection.
36-pin (50 mil) parallel connector
36-pin internal printer connector
1 LED showing Line Sync.
This light indicates the following:
Maximum burst: 2 million
FLASHING - The interface card is in
a diagnostic mode.
ON - The C82315* is communicating with
the Epson printer and the host.
OFF - The C82315* and the printer are
communicating properly, but the
interface is not communicating with the
IBM host. In other words, there is no
25
Page 33

Line Sync between host and interface.
Switches:
8 SIP piano switches for device address,
emulation mode, buffer print, print quality,
and interface enable
Push Button for TEST/YES
Push Button for CANCEL/NO
Selection Jumpers: 3 hardware configuration shorting jumpers
Twin-axial Connection:
Power
Requirements:
Processor:
Memory:
Both cable-thru and automatic termination available
using provided V-connector cable
All power supplied by the printer
Z80A CMOS
8 Kbytes of static memory
PARALLEL INTERFACE SPECIFICATIONS
Signal
Pin
1
Return
Pin
19
Signal
STROBE
Parallel
Cable
Pin
1
Direction
IN
Description
Strobe pulse to read
data in. Pulse width
must be more than
.5 sec. at the interface.
2
3
4
5
6
7
8
9
20
21
22
23
24
25
26
27
DATA1
DATA2
DATA3
DATA4
DATA5
DATA6
DATA7
DATA6
2
3
4
5
6
7
8
9
IN
IN
IN
IN
IN
IN
IN
IN
These signals represent information in
bits 1 to 8 of parallel
data respectively.
Each signal is HIGH
when data is logical
1 and LOW when it
is logical 0.
26
Page 34

Signal
Pin
Return
Pin
Signal
Parallel
Cable
Pin
Direction
Description
10
11
12
13
28
29
30
ACKNLG
BUSY
PE
SLCT
10
11
12
13
OUT
OUT
OUT
OUT
A LOW pulse of
minimum width of 4
µ sec. A low indicates that data has
been received and
that the printer is
ready to accept
more data.
A
HIGH signal indi-
cates that the printer
cannot receive data.
The signal goes
HIGH in these
cases:
-Data entry, for
each character
--When off line or in
error state
-When serving the
IBM host and a byte
of parallel data is
received.
HIGH when the
printer is out of
paper.
Pulled up to +5v
through a 3.3K ohm
resistance.
16
17
AUTO
FEED
14
27
IN
THIS SIGNAL IS
NOT SUPPORTED
BY THE C82315*
INTERFACE. (Defined by many print-
a
ers to add
LF to
each CR. The IBM
Page 35
Signal Return
Pin Pin
Signal
Parallel Direction
Cable
Pin
Description
18 -
19-30 -
31
32 -
33 34 35 -
NC
GND
INIT
ERROR
GND
NC
HIGH
21-24
16 IN
15
25
OUT
Not used
Twisted
pair
ground
returns listed above
Defined to reset and
dear the printer
LOW: THE RE-
when
SET AND CLEAR
ARE NOT SUP-
PORTED BY THE
C82315*, As the IBM
host cannot be interrupted by this
signal. An ACKNLG
is generated for
handshaking.
This signal goes
LOW when the
printer is in an error
state such as out Of
paper.
Logic ground
Not
used
Pulled up to +5v
through a 3.3K ohm
resistance
36 -
NOTE:
SLCTIN
17
NOT SUPPORTED
The parallel connector is a DDK type DHA-36 or equivalent.
The column heading ‘DIRECTION’ refers to the direction of signal flow as viewed
from the C82315* interface.
‘RETURN’ denotes the twisted-pair return, to be connected at signal ground level.
For the interface wiring. be sure to use twisted-pair cable for each signal and to
complete the connection on the return side. The cable should be shielded and
connected to the chassis of the host computer and printer.
All interface conditions as based on TTL levels. Both the rise and the fall times
of each signal must be less than 0.2 u sec.
28
Page 36

TIMING
DATA IIN
STROBE-
Data transfer is carried out by observing the ACKNLG
transfer to the printer occurs only after receipt of the ACKNLG signal or when the
BUSY signal is LOW.
or BUSY signals. Data
BUSY
ACKNLG
Data must be present a minimum of 0.5 u sec before and after a minimun 0.5
µ sec STROBE Pulse. BUSY goes high before the end of the STROBE signal and
remains high until the end of an ACKNLG pulse of’ minimun 4 µ sec.
I
I-
I
t
EBCDIC CHARACTER TABLES
PC850 character table
See Appendix A-S for an example of the PC850 character table.
Note: PC850 is the recommended
HP Roman 8 character table
See Appendix A-6 for an example of the HP Roman 8 character table.
Note:
This character table is available only when HP emulation is selected
(3812 emulation).
character table for matrix emulations.
29
Page 37

APPENDIX A-1
Anhang A-1 / Appendice A-1 / Apendice A-1 / Appendice A-1
Sample printouts - Self Test
Druckmuster - Selbsttest
Exemples d’impression - Autotest
Ejemplos de impresión - Auto-test
Esempi di stampa - Test automatico
EPSON CS2315. TWIN-Ax INTERFACE
COPYRIGHT (C)1991 SHERWOOD DIGITAL ELECTRONICS
REV 3.4 SOFTWARE
INSTALLED IN EPL-4000
Switch and Jumper Selections:
Device Address . . . . . . . . . . . . . : 0
Twin-ax cable drive selected.....: Normal
Self Test (Buffer Print).........: Off
IBM-Printer Emulated...;.........: 4214
Default print quality............: DRAFT
Pitch and Print Quality.....
EPSON command set..........
Active Configuration Selections:
Language..............
02 03 -
Character Set Option..
- Printer Options.......
04
Laser Feed Options....
05 06
- Alternate Delimiters..
Print Complete method.......:Only Early Print Complete Supported
07 -
- Printer Sharing Timeout.....: 08
08
Parallel Port Initialization:
09 -
10 -
User Defined Strings......:
u0:
u1:
u2:
u3:
u4:
u5:
U6:
u7:
EBCDIC to ASCII Translate Table
405060708090
0:
2026209B9DF8
1:
20822F90616A
2:
638886D26260
3:
84898ED3636C
4:
858A07D4646D759F444D5534
5:
A0Al05Db656E
6:
C60CClD7666F
7:
66888BD86770
a:
878D80DE6871
9:
A4ElA56069727AF349525A39
A: 5B 5D 7C 3A AE A6 AD AA 2D FB FD FC
B:
2E242C23AFA7A8B39396E2EA
C: 3C2A2540DO91DlEE9481999A
D:
2629SF27EC87
E: 26 30 3E 3D ES 92 E7 EF A2 A3 EO E9
F:
21SE3F22FlCFA9F2E498ES20
RAN OK
ROM OK
WITH
CURRENT
EMULATION ESCP24-84
. . . . . . Host Control
. . . . . LQ
. . . . . . 00
. . . . . .
. . . . . . Normal
. ....
. . . . . &%
A0B0CODOLOFO
E6BD7B7DSC30
7E9C414A0031
73BE42485332
74FA434C5433
16F5454C5635
71F4464F5736
78AC47505637
79AB48515930
EDF99597E3EB
- Multinational
Code Page 850
Feed Host $election
Page 38

APPENDIX A-2
Anhang A-2 / Appendice A-2 / Appéndice A-2 / Appendice A-2
Display Station Setup Mode
Die Bildschirmanzeige sieht etwa so aus
Mode de configuration de poste d’affichage
Modo de configuración desde un terminal de pantalla
Modalità impostazione da videoterminaie
Printer Sharing Timeout (seconds) . . . . . . . . :08
Language..............................:00MULTI
Alternate Delimiters (EBCDIC).........:
Parallel port Initialization (ASCII):
User Defined String (ASSCII):
U0
U1
U2
u3
u4
u5
u6
u7
Character Set Option: Code Page 650 Print Complete: Early .
Laser Feed Options..: Normal
Address (SWI-3) ................: 4
Letter Quality Emulation (SW4).: No
Buffer Print (SW5) .............: No
Default - NLQ (SW6) ............: No
Front Panel override (SW7) .....: No
5224 Emulation (Zi) ............: No
FX Comnands (J6) ...............: Yes
Epson ESC/P2 Setup Screen Version 0.1
Up,Down Arrows = Change Selection
Field Exit, Field l = Down
Back Tab, Field - - Up
Backspace = Delete Character
Enter -
Save Parameters
Page 39

APPENDIX A-3
Anhang A-3 / Appendice A-3 / Apéndice A-3 / Appendice A-3
Font ID
S
Schrinhtypen-10
ID de police
ldentificaciòn de fonts
ldentificativi di font
Typaface
symbol Orient.
Bet
Resident
Courier R-8 P/L‘
Courier Bold R-8
Line Printer
Line Printer
Line Printer
Line Printer
5410
Time
Time R-8 P
Time Bold
Time Italic
Helvetica Bold
Epson Cartridges
R-8
R-8
R-8
R-8
R-8 P
R-8
R-8 P
R-B
5411
Courier Bold
Courier Italic
u-a
R-B
5412
Prestige
Prestige Bold
Prestige Italic
R-a
R-a
R-B
5413
Letter Gothic
Letter Gothic Bold R-B
Letter Gothic Italic R-a
R-B
P/L
P/L
P/L
P/L
P/L
P
P
P/L
P/L
P/L
P/L
P/L
P/L
P/L
P/L
Pitch Point
10
10 12
13.3
15
17.1
19
Prop.
prop.
Prop.
prop.
Prop.
1O
10
12
12
12
12
12
12 10
Size
12
8.5
8.5
8.5
8.5
8
10
10
10
14.4
12
12
10
10
10
12 87
12
Typestyle
Number
11
46
201
223
254
282
157
158
159
155
34126
46
18
86
111
112
110
112
Page 40

Typeface
Symbol
set
orient.
Pitch
Point
size Number
Typestyle
Helvetica
Helvetica
Helvetica Bold
Helvetica Bold
Helvetica Bold
Helvetica Bold
Tax Line Draw
Letter Gothic
Letter Gothic
OCR-A 10N
OCR-E 10N
Code 3-9 4.6N
Code 3-9 9.3N
EAN/UPC Bold Bar Code UPC
EAN/UPC
Procollection
Line Printer
Courier Bold
Courier Italic
Courier
Courier Bold
Courier Italic
Courier
Courier Bold
Courier Italic
Courier
Courier Bold
Courier Italic
Prestige Elite
Prestige Elite
Prestige Elite
Prestige Elite
Prestige Elite
Prestige Elite
Prestige Elite Bold
Prestige Elite Italic Legal
Letter Gothic
Letter Gothic
Letter Gothic
Letter Gothic
Letter Gothic Bold
Letter Gothic Italic ASCII
Times Roman
Tines Roman
Times Roman Bold
Times Roman Italic
Times Roman
Times Roman Bold
Times Roman Italic
Times Roman
Times Roman
Times Roman Bold
Bar Code
HP cartridges
LinDrw-7
Bold ASCII
Italic ASCII
ASCII
ASCII
ASCII
ASCII
ASCII
ASCII
R-8
R-8
OCR-A
OCR-B
3 of 9
3 of 9
UPC
ASCII
ASCII
ASCII
ASCII
ASCII.
ASCII
Legal
Legal
Legal
Legal
Legal
Legal
ASCII
ASCII
Legal
Legal
Legal
ASCII
ASCII
ASCII
ASCII
ASCII
ASCII
ASCII
ASCII
ASCII
ASCII
ASCII
ASCII
Legal
Legal
Legal
P
P
P
P
P
P
P
P
P
P
P
P
P
P
P
P/L
P/L
P/L
P/L
P/L
P/L
P
P
P
P
P
P
P/L
P/L
P/L
P/L
P
P
P
P
P/L
P/L
P/L
P/L
P/L
P/L
P
P
P
P
P
P
P
P
P
P
Prop.
Prop.
Prop.
Prop. 10
Prop. 12
Prop.
10
10
17.1
10
10 12
4.6
9.3
Prop.
Prop.
17.1
10
10
12
12
12
10
10
10
12
12
12
15
12
12
12
15
12
12
12
27
19
17.1
12
12
12
Prop.
Prop.
Prop.
Prop.
Prop.
Prop.
Prop.
Prop.
Prop.
Prop.
6
0
8
14
12
14.4 40
9.4
12 19
12
12
12
12
8.5
12
12
10
10
10
12
12
12
10
10
10
7
10
10
10
7
10
10
10
3.6
6
9.5
8
12
12
12
10
10
10
17
12
12
10
1O
181
183
182
185
188
190
34
255
3
240
61
171
170
253
45
17
85
108
92
51
52
53
93
94
95
220
83
113
114
219
97
98
99
291
281
257
66
69
69
163
164
165
166
167
168
169
173
174
175
Page 41

Typeface
Times Roman Italic
Times Roman
Times Roman Bold
Times Roman Italic
Helvetica
Helvetica
Helvetica Bold
Helvetica Italic
Helvetica
Helvetica Bold
Helvetica Italic
Helvetica Bold
Helvetica Bold
WordPerfect
---------
CG Times
CG Times
CG Times Bold
CG Times Italic
CG Times
CG Times Bold
CG Times Italic
CG Times
CG Times Bold
CG Times Italic
CG Times
CG Times Bold
CG Times Italic
CG Times Bold
CG Times Bold
Univers
Univers
Univers
icrosoft
--------Helv
Helv
Helv Bold
Helv Italic
Helv
Helv Bold
Helv Italic
Helv Sold
TmsRmn
TmsRmn
TmsRmn Bold
TmsRmn Italic
TmsRmn
TmsRmn Bold
TmsRmn Italic
TmsRmn Bold
Line Printer
symbol
set
Legal
Logal
Logal
Legal
ASCII
ASCII
ASCII
ASCII
ASCII
ASCII
ASCII
ASCII
Legal
DskTop
DskTop
DskTop
DskTop
DskTop
DskTop
DskTop
DskTop
DskTop
DskTop
DskTop
DskTop
DskTop
DskTop
DskTop
DskTop
DskTop
DskTop
R-8
R-8
R-8
R-8
R-8
R-8
R-8
R-8
R-8
R-8
R-8
R-8
R-8
R-8
R-8
R-8
R-8
Orient.
P
P
P
P
P
P
P
P
P
P
P
P
P
P
P
P
P
P
P
P
P
P
P
P
P
P
P
P
P
P
P
P
P
P
P
P
P
P
P
P
P
P
P
P
P
P
P/L
Pitch
Prop. 10
Prop.
Prop.
Prop.
prop.
Prop. 10
Prop.
Prop.
Prop.
Prop.
Prop.
Prop.
Prop.
prop.
Prop.
Prop.
Prop.
Prop.
Prop.
Prop.
Prop.
Prop.
prop.
Prop.
Prop.
Prop.
Prop.
Prop.
Prop.
Prop.
Prop.
Prop.
Prop.
Prop.
Prop.
Prop.
Prop.
Prop.
Prop.
Prop.
Prop.
Prop.
Prop.
Prop.
Prop.
Prop.
Prop.
15
Point
size
12
12
12
8
10
10
12
12 188
12 189
14
14
6
8
8
8
10
10
10
12
12
12
14
14
14
18
24
14
18
24
8
10
10
10
12
12
12
14
8
10
10
8.5
10
12
12
12
14
Typestyle
Number
176
177
170
179
183
184
185
186
187
190
191
4685
4686
4706
4814
4607
4707
4815
4688
4708
4816
4689
4709
4817
4711
4714
4709
4791
4794
34102
34103
34123
34231
34104
34124
34232
34125
5686
5607
5707
5815
5680
5708
5816
5709
223
Page 42

Typeface symbol
Polished Worksheets
------------------Prestige Elite R-8
Prestige Elite R-8
Prestige Elite Bold R-8
Prestige Elite Italic R-8
Prestige Elite Legal
Prestige Elite Legal
Prestige Elite Bold
Prestige Elite Italic Legal
Letter Gothic
Letter Gothic R-8
Letter Gothic Bold R-8
Letter Gothic Italic R-8
Letter Gothic
Letter Gothic
Letter Gothic Bold
Letter Gothic Italic Legal
Presentation Bold
Presentation Bold
Persuasive Presentations
------------------------
Letter Gothic
Letter Gothic
Presentation Bold
Presentation Bold
Presentation Bold
Presentation Bold
Presentation Bold
Presentation Bold
Presentation Bold
Presentation Bold
Helv Outline
Helv Outline
serifa
Serifa
Line Draw
PC Line Bold
Forms, Etc.
--------Univers
Univers
Univers Bold
Univers Bold
Univers Bold
Univers Bold
Helv Cond. Black Bold TaxNum
OCR-A
Tax Line Draw
Legal
R-8
Legal
Legal
Legal
ASCII
Legal
ASCII
Legal
ASCII
Legal
ASCII
Legal
ASCII
Legal
ASCII
Legal
ASCII
Legal
ASCII
Legal
LinDrw
PCLin
R-8
R-8
R-8
R-8
R-8
R-8
OCR-A
TaxLinDnd P/L
Set
Orient.
P/L
P/L
P/L
P/L
P/L
P/L
P/L
P/L
P/L
P/L
P/L
P/L
P/L
P/L
P/L
P/L
P/L
P/L
P/L
P/L
P/L
P/L
P/L
P/L
P/L
P/L
P/L
P/L
P/L
P/L
P/L
P/L
P/L
P/L
P/L
P/L
P/L
P/L
P/L
P/L
P/L
P
Pitch
15
12
12
12
15
12
12
12
27
12
12
12
27
12
12
12
8.1
8.1
10
10
10
10
8.1
8.1
6.5
6.5
5.7
5.7
Prop.
Prop.
Prop.
Prop.
10
10
Prop.
Prop.
Prop.
Prop.
Prop.
Prop.
Prop.
10 12
10
Point
Size
7
10 86
10
10 112
7
10 97
10 98
10 99
3.6 290
12 87
12
12
3.6
12
12
12
16
16
14
14 38
14
14
16
16
18
18
24
24 433
24
24
24
24
14
14
6
8
8
10
12
14
24
Typestyle
12
Number
221
111
219
110
109
292
90
107
106
434
431
39
6
7
434
431
435
432
436
34115
34116
34215
34216
31
32
33101
33102
33122
33123
33124
33125
34128
19
30
Page 43

Typeface
Dar Codes & More
_---------------
Letter Gothic
Letter Gothic
Letter Gothic
OCR-A
OCR-B
Code 3 of 9
Code 3 of 9
EAN/UPC 10 Mil
BAN/UPC 13 Mil Bold
USPS Zip
Line Draw
Text Equations
-------------Prestige Elite
Prestige Elite
Prestige Elite
Prestige Elite Bold
Prestige Elite Italic R-8
CG Times
CG Times Bold
CG Times Italic
Global Text
----------CG Century Schoolbook R-8
CG Century Schoolbook R-8
CG Century Schlbk Bld R-8
CG Century Schlbk It1 R-8
CG Triumvirate
CG Triumvirate Bold
Pretty Faces
----------Microstyle
Microstyle Bold
Hobo Medium
Hobo Medium
Thunderbird
Signet Roundhand
Signet Roundhand
ITC Dingbats
ITC Dingbats
Symbol
Set
R-8
R-8
R-8
OCR-A
OCR-B
3 of 9
3 of 9
UPC
UPC
ZIP
LinDrw
R-8
R-8
R-8
R-8
R-8
R-8
R-8
R-8
R-8
R-8
ASCII
ASCII
ASCII
ASCII
ASCII
ASCII
ASCII
ITC
ITC
Orient.
P/L
P/L
P/L
P
P
P
P
P
P/L
P/L
P
P
P
P
P
P
P
P
P
P/L
P/L
P/L
P/L
P/L
P/L
P
P
P
P
P
P
P
P
P
Pitch
15
12
10
10
10
8.1
4.6
Prop.
Prop.
Prop.
10
15
17.1
12 10
12
12
Prop.
Prop.
Prop.
Prop.
Prop.
Prop.
prop.
Prop.
Prop.
Prop.
Prop.
Prop.
Prop.
Prop.
Prop.
Prop.
Prop.
Prop.
Prop.
Point Typestyle
Size Number
9.5
12 87
14
12 19
12
12
12
12
12
12
12 33
7
7
10 111
10
8
10
10 159
10
8
10
10
10
10
14
18
36
30
14
54
18
14
36
18
230
40
3
60
240
170
171'
172
221
256
86
112
157
158
155
16950
16951
16971
17079
33335
33357
5910
5920
5930
5940
5950
5960
5970
5980
5990
Page 44

APPENDIX A-4
Anhang A-4 / Appendice A-4 / Apéndice A-4 / Appendice A-4
Sample printouts - Hex Print
Oruckmuster - Sedezimaldruck
Exemples d’impression - Impression Hexodécimale
Ejemplos de impresión - Impresión hexadecimal
Esampl di stampa - Stampa esadacimale
01 0 1 2 3 4 5 6 7 8 9 A B C D E F
0
oc
00 0 1 2 3 4 5 6 7 8 9 A B C D E F
2B C6 02 OC 2B D2 04 29 00 OA 2B D1 03 81 00 2B
0
C1 02, 04 2B C2 D2 42 2B CB 03 40 01
1
01 0
1 2 3 4 5 6 7
C1 C2 C3 C4 C5 C6 C7 C8 C9 Dl D2 D3 D4 D5 D6 D7
0
1 D8
D9 E2E3E4E5
2 40
00
00
0
c2
1
D9
2
40
40
3
4
93
5
40
6
5A
7
7B
8
40
01 0
0
C3c4C5
1
E2
2
40
3
40
4
94
5
40
6
5B
7
7c
6
40
40 40
C2
E2
40
40
94
40
51
7C
40
1 2 3
E3
FO
40
95
40
5c
7D
40
1
c4
E4
FI
40
95
40
5D
7D
Cl
FlF2F3F4F5F6F7
F0
4
2 3
C4 C5 C6
EJ E4 E5
40
40
95
40
5B
7C
40
E4
F1
40
9697
40
5D
7D
C1
2
Cb
E5
F2
40
91
40
5E
7F
c2
F1 F2
40
40
96
97
40
40
5D
SD
7E
40
Cb
ES
F3
F2
40
40
98
40
40
5F
5E
7E
9F
C2
3 4
c7 c8
E6 E7
F3 F4
81 82
99
90
40
40
60
5E
Al
7F
C3
7F
c1
4
c7
Eb
5
C7
E5
F3
40
98
40
5E
A1
5
C8
E7
F-4
81
99
40
60
Al
5
c9
E8
F5
83
A2
40
61
co
8 9
E667E8E9
6 7
8
40
4A
D3
F8
A5
4B
6C
40
9
D1
D2
E9
40
F6
F7
84
85
A3
A4
4A
40
6B
6A
DO
EO
9
6
D2
D3D4
4040
F7FB
8687
85
A4
AS
4A4B4c
6B6C
40
EO
9
D4
40
F9
97
A6
4C
6D
40
c8 69
E7 EB
F4 F5
82 83
99 A2
40 40
60 6l
A, co
6 7
C9 Dl
E8E9
F5 F6
8384
A2 A3
40
6l 6A
CO DO
6 7 8
Dl D2
E94040
F6 F7
848586
A3 A4
40
6A 6B
DO E0
A B CD
40 40
40
40
F8
F9 4040 40
A
D3
40
F8
86
A5
4B
6C
40
A
40
F9
A6
6D
40
A B C
D5
40
404040
8889
A7
4D
6E
404040
8
D4D5
4040
F940
9788
A6Al
4C
4D
6D
40
a
D5
40
40
80
AB
Al
4D
6E
40
40
D6D7
4040
91
Al
A9
4E4F
6F79
C
6E
40
C
D6
40
40
99
4E
6F
D
D6 D7
40
40
89
Al A9
4E 4F
6F
40
D
D7
40
40
9192
A9
4F
79
40
D
D8
40
40
40
40
50
7A
40
EF
40 40
E
F
D8
4040
4040
9192
40
50
7A
79
4040
E
F
D9
DO
40
40
40
40
93
40
40
SA
SO
7B
7A
40
40
E
F
D9
E2
40
40
40
40
93
94
40
40
5A
51
7B
7C
40
40
.F...K.....J.a..
A.d.B.&.H. .
01 0
1 2
0
C5 C6 C7 C8 C9 Dl D2 D3 D4 D5 D6 D7 D8 D9 E2 E3
I
E4E5E6
2
FlF2F3
3 4 5
E7E8E9
F4F5F6
6
18
404040
F7F8F9
9
A
4040
4040
CD
B
404040
40
4040
E F
40FO
4040
Page 45

APPENDIX A-5
Anhang A-5 / Appendice A-5 / Apédice A-5 / Appendice A-S
Sample printouts - PC850 character set
Druckmuster - Zeichentabelle PC850
Examples d’impression - Table de caractères PC 850
Ejemplos de impresion - Tabla de caracteres PC 850
Esempi di stampa - Tabella dei caratteri PC 850
EBCDIC
0:
1:
2:
3:
4:
5:
6:
7:
8:
9:
to ASCII Translate Table
40
50 60 70
20
26
20
82
83
88
84
89
85
8A B7 D4
A0
Al
C6
8C C7 D7
86
8B
87
8D 80
A4
El
2D 9B
2F
B6 D2
8E D3
B5
8F
A5
90
D6
D8
DE
60
80
90
9D
F8
61
6A
62 6B
63
6C
64
6D
65
6E
66
6F
67
70
68
71
72
69
A0
E6
7E 9C
73
74
75
76
77
78
79
7A
BO
BD
BE
FA
9F
F5
F4
AC
AB
F3
CO
7B
41
42
43
44
45
46
47
48
49
DO EO
7D 5C
4A
00
4B 53
4C 54
4D
55
4E
56
4F 57
50 58
51
59
5A
52
FO
30
31
32
33
34
35
36
37
38
39
A: 5B 5D 7C 3A AE A6 AD AA 2D FB FD FC
B:
C:
D:
2E
3C
28
24
2A
29
2C
25
5F
23
40
27
AF
DO
EC
A7 A8
91
Dl EE
F7
ED
B3
F9
93
96
94
81
95 97
E2
99
E3
EA
9A
EB
E: 2B 3B 3E 3D E8 92 E7 EF A2 A3 E0 E9
F:
21
5E 3F
22
Fl CF A9 F2 E4
98
E5
20
Page 46

APPENDIX A-6
Anhang A-6 / Appendice A-6 / Apéndice A-6 / Appendice A-6
Sample printouts - HP Roman 8 character set
Druckmuster - Zeichentabeile HP Roman 8
Exemples d’impression - Table de caractéres HP Roman 8
Ejemplos de impresión - Tabla de caracteres HP Roman 8
Esempi di stampa - Tabella dei caratteri HP Roman 8
EBCDIC to ASCII Translate Table
40
50
60 70
0:
20 26
1:
20
2:
CO Cl
3:
CC CD D8 A5
4:
C8 C9 Al A3
5:
C4 D5 E0
6:
E2
7:
D4 DD
8:
B5 D9 B4 E6
9:
B7 DE B6 A9
A:
BF
2D D6 D2 B3 F3 5E 7B 7D 5C
C5 2F
A2 A4
Dl
El A6
DO A7
21
7C
B: 2E 24 2C 23 FD FA B9 5D C2 C3 DF AE
C: 3C 2A 25 40 E4 D7 E3 B0 CE CF DA DB
D:
28 29
5F
E: 2B 3B 3E 3D F0 D3 Fl 27 C6 C7 E7 ED
F: 7C SE 3F 22 FE BA 20 5F EA EF E9 20
80 90
DC
61
62
63
64 6D 75
E5
65
66
67
68
69
3A
FB
27
B2
A0 BO
6A
7E
6B
73
6C
74 F2
6E 76
6F
77
70 78
71 79
72
7A F5
F9
B8 5B
20
Bl
CO
BB
41
BC
42
43
BE
44
BD
45
F4
46
F7
47
F8
48
49 52
20 31 32
AB
CA
DO EO FO
30
4A
20 31
4B
53 32
4C
54
33
4D
55 34
4E 56
4F 57
50
51
35
36
58 37
59
38
5A
39
33
CB
E8
AD
Page 47

EPSON OVERSEAS MARKETING LOCATIONS
EPSON AMERICA, INC.
20770 Madrona Avenue
Torrance CA 90503, U.S.A.
Phone: (310) 782-0770
Fax: (310) 762-5246
EPSON UK LTD.
Campus 100. Maylands Avenue.
Hemel Hempstead. Herts.
HP2 7EZ. U.K.
Phone: 442-61144
Telex: 5162467
EPSON AUSTRALIA PTY. LTD.
Unit 3, 17 Rodborough Road,
Frenchs Forest, NSW 2088, Australia
Phone: (2) 452-0666
Far (2) 975-1409
EPSON HONG KONG LTD.
25/F. Harbour Centre.
25 Harbour Road, Wenchai.
Hong Kong
Phone: 5854600
Telex: 65542
EPSON ITALIA S.p.A.
V.Ie F. lli Casiraghi 427
20099 Sesto S. Giovanni
MI. Italy
Phone: 2-262331
Fax: 2.2440750
EPSON DEUTSCHLAND GmbH
Zülpicher StraBe 6.
4000 Oüsseldorf 11 F.R.
Phone: (02 11) 56030
Telex: 9564786
Germany
EPSON FRANCE S.A.
68 bis. rue Marjolin
92300, Levallois-Perret, France
Phone: (1) 4087-3737
Telex: 610657
EPSON SINGAPORE PTE. LTD.
No. 1 Raffles Place #26-00
OUB Centre. Singapore 0104
Phone: 5330477
Fax: 5336119
EPSON ELECTRONICS TRADING LTD.
(TAIWAN BRANCH)
10F. No. 287 Nanking E. Road, Sec. 3.
Taipei. Taiwan, R.O.C.
Phone: (02) 7 17-7360
Fax: (02) 712-9I64
EPSON IBERICA S.A.
Av. de Roma. 16-26
08290 Cerdanyola del Valles
Barcelona, Spain
Phone: 562.15.00
Fax: 582.1565
SEIKO EPSON CORPORATION
(Hirooka Office)
80 Harashinden. Hirooka
Shiojiri-shi. Nagano-ken
399-07 Japan
Phone: (0263) 52-2652
1991 Nov.
Page 48

EPSON
 Loading...