

Page 1
Start Guide
Before getting started, read the "Safety Instructions" in the User's Guide
supplied with this product. The User's Guide provides detailed information
on operating and viewing movies with the product.
Information on the Moverio Website
Provides useful tips and support information.
https://moverio.epson.com/
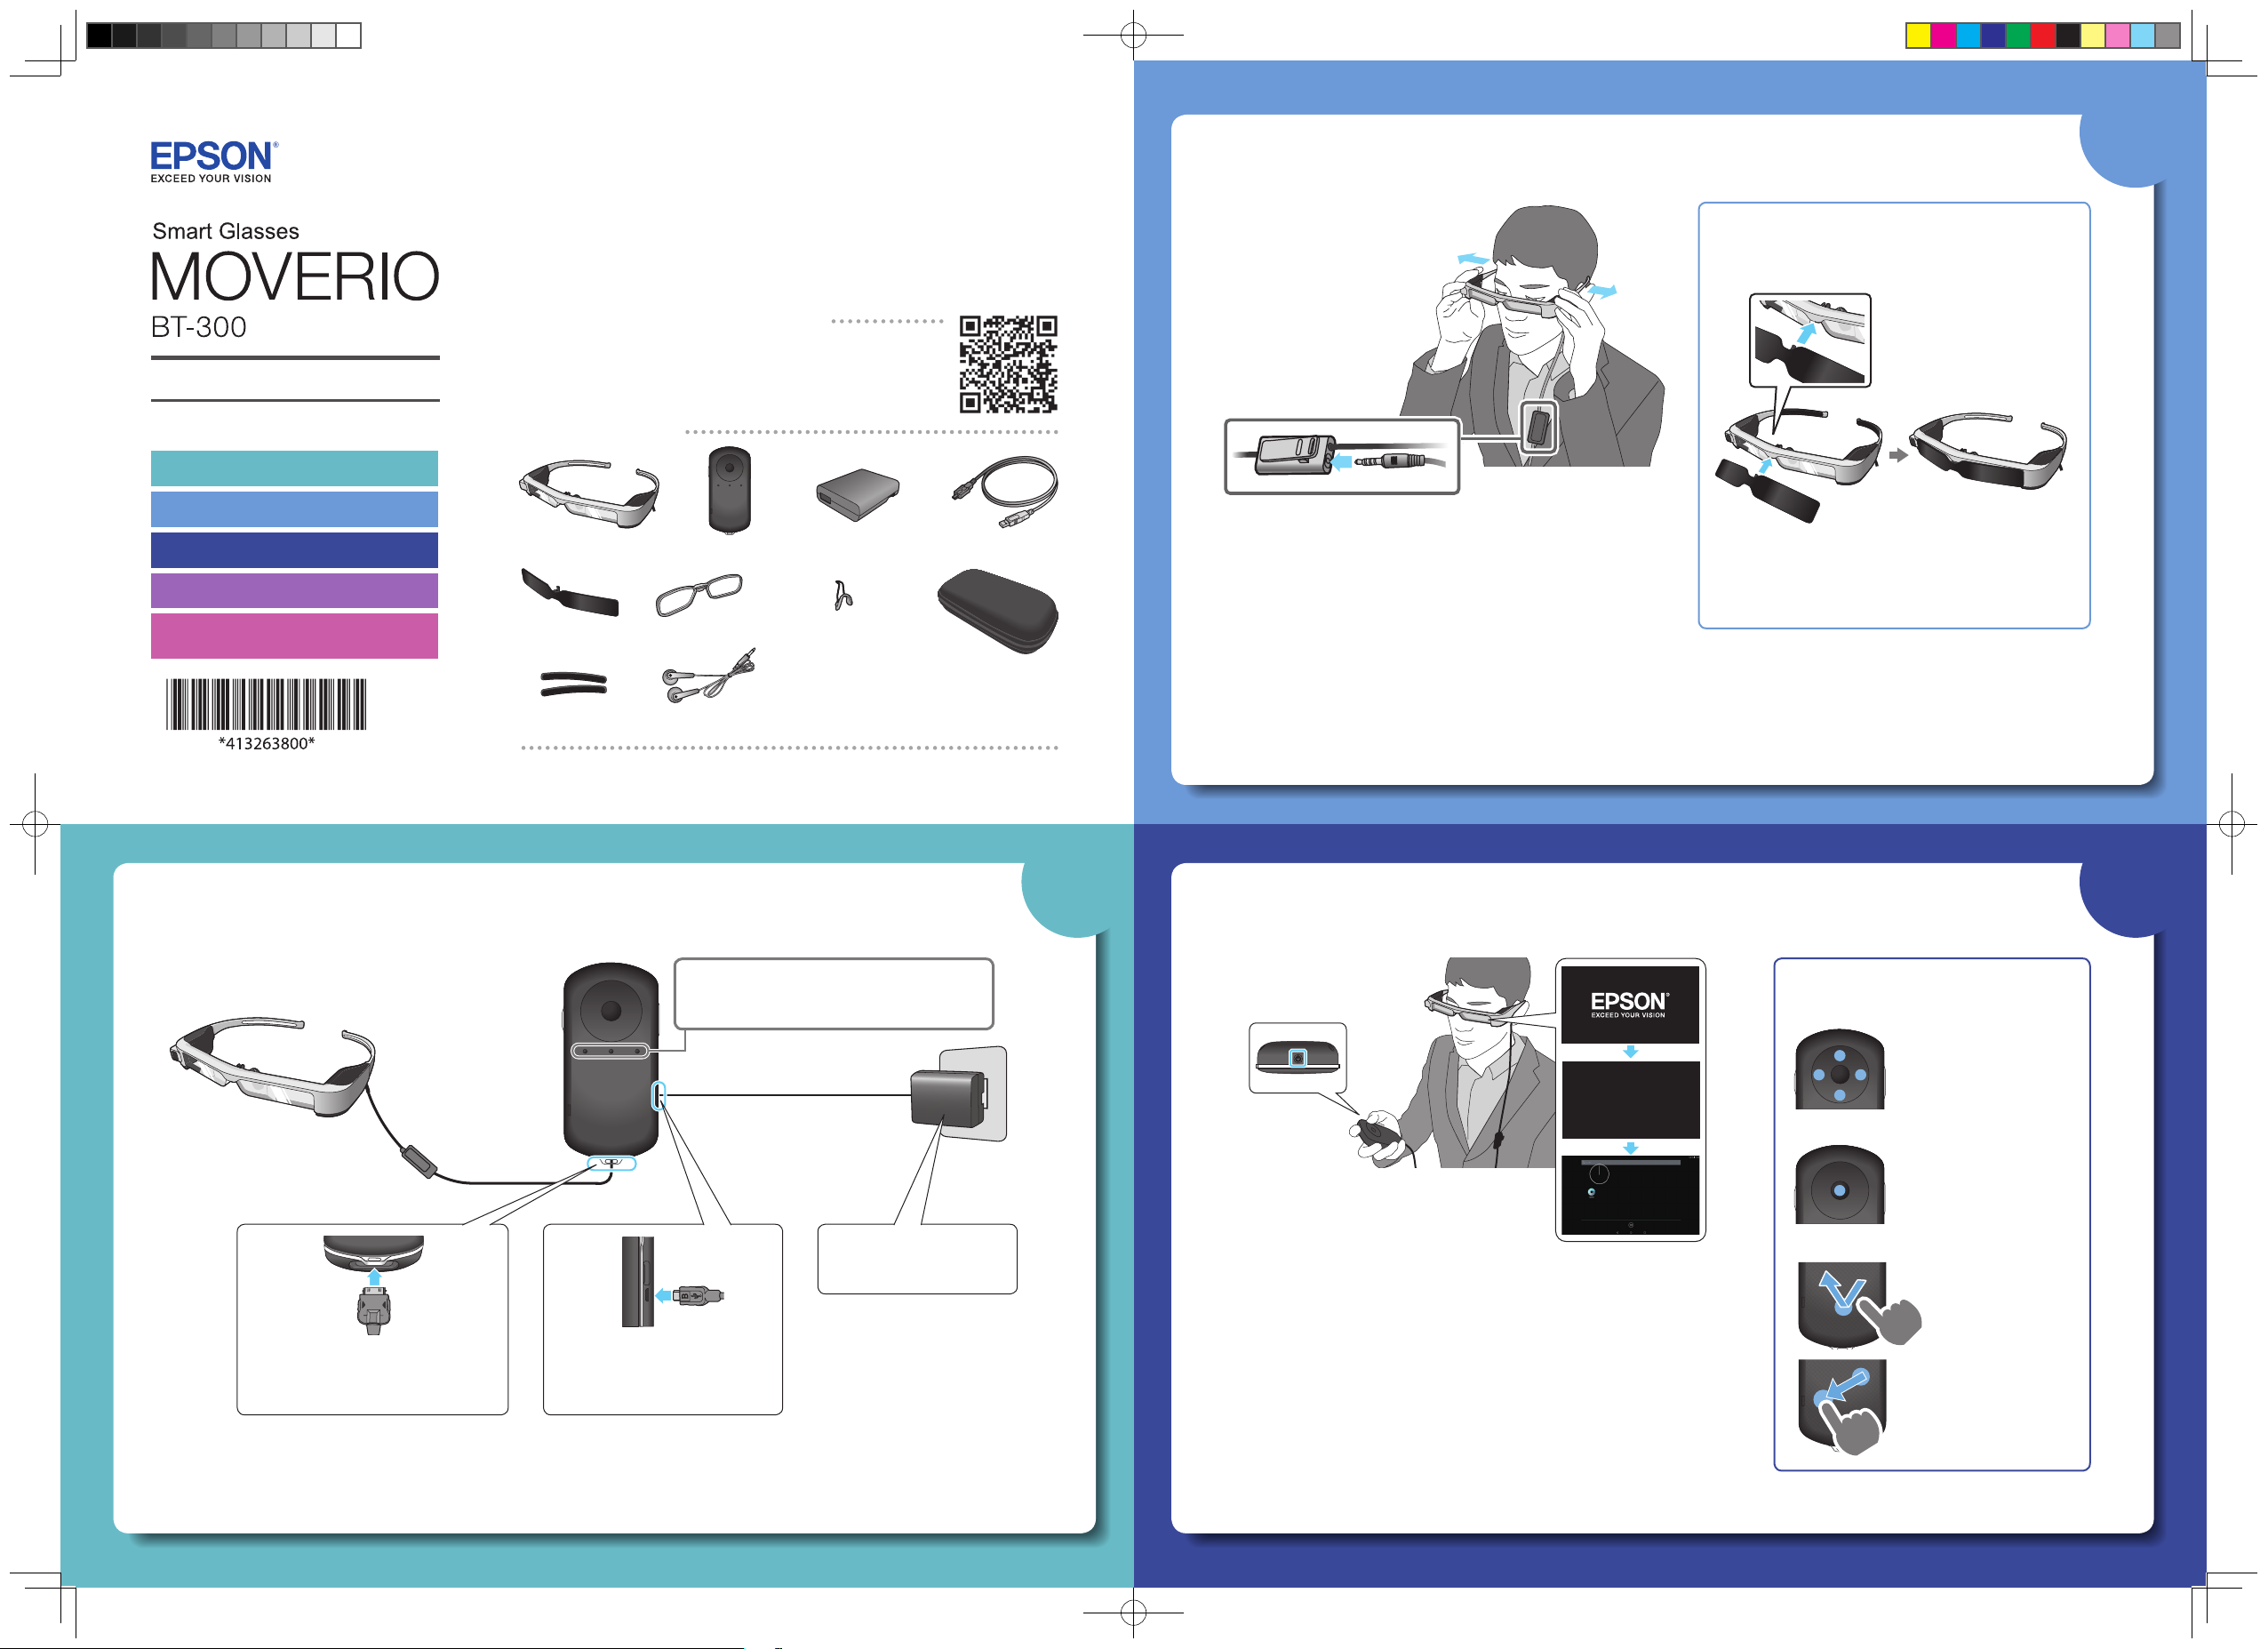
Wearing the Headset
Use both hands to open the
A
arms, and then put on the
headset.
2
Attaching the shade
Attach the shade if your view is being affected by
light from the outside.
Viewing Movies
1. Charging
2. Wearing the Headset
3. Turning On
Viewing Movies on a Website
Viewing Movies Copied from
a Computer
Package Contents
Headset
Shade Lens holder
Temple rubber
Earphone microphones
Controller
AC adapter USB cable
Nose pad for
glasses
Carrying case
Copyright©2016 Seiko Epson Corporation. All rights reserved.
Printed in China XX.XX.-XX(XXX) 2016.9
Connect the earphone microphone.
B
Wear the earphones.
C
1 3
Charging Turning On
Tilt the shade, and then push the protruding
section into the headset until it clicks into
place.
Connect the headset and the
A
controller.
Insert until you hear a click.
Connect the controller
B
and the AC adapter with
the USB cable.
Flashing light-blue : Charging starts.
Solid light-blue : Charging complete.
Plug in the AC
C
adapter.
* Initial charging takes approximately 5 hours.
Press the Power
button until the LED
indicator is lit.
MOVERIO
When the startup begins, the start screen
is displayed in the headset. When startup is
complete, the Home screen is displayed.
Turning o
Hold down the Power button for at least one second. Select [Power
off ] on the screen displayed.
Turning o the screen while the product is on (Sleep mode)
When you press the Power button briefly, the device enters Sleep
mode. Press the Power button briefly again to wake the device from
Sleep mode.
Using the controller
Cross-key (touch sensor)
Moves icons or
selected items.
Hold down to scroll.
Enter key
Selects or confirms
items or launches the
app.
Trackpad
Tap
Touch lightly.
Drag
Select the icon or
displayed item, and
then drag your finger.
413263800 Rev.0
Front
Page 2

Viewing Movies on a Website
Making network settings
Make Wi-Fi settings to access the Internet in a wireless
LAN environment.
Check the following before making settings
• The SSID (network name) for the wireless LAN access
point or public wireless LAN service you want to
connect to.
• Password to the network and security type, if security is
enabled.
Enter the password, and then select [CONNECT].
F
When [ ] is displayed on the status bar, setup is
complete.
Viewing Movies Copied from a
Computer
Copying data to this product
Windows
Windows Vista and later versions of Windows are
supported.
OS X
Install Android File Transfer from Android official
site to your computer.
Select the data you want to view.
C
Select [ ] to display the application selection
screen.
Select [Video Player] to start playing the data.
Select [ ] on the Home screen.
A
The APPS list screen is displayed.
Select [ ] on the APPS list screen.
B
The Settings screen is displayed.
Select [Wireless & networks] - [Wi-Fi].
C
Supported le format with Gallery
Using a Browser
Connect to the Internet and view movies on a Website.
Select [ ] on the APPS list screen.
A
A
The Browser screen is displayed.
Select the URL eld and then enter a search
B
keyword or a URL.
B
• Movies: MP4 (MPEG4+AAC), MPEG2
(H.264+AAC), VP8
• Still images: JPEG, PNG, BMP, GIF
Connect the USB cable to the controller and to
your computer.
The computer recognizes this product as a portable
device.
Open the portable device, and then copy data you
want to view to the internal storage or microSD
card.
Disconnect the USB cable after you are finished
copying data.
Operations while playing movies
A
B
Pause
A
The pause button is displayed when you select the
screen. Select [
Movie positioning
B
Drag [
where you want to start playing.
] to the right or left to change the position
When using a commercially available
microSD card
Insert the card in the microSD card slot on the
controller, and then copy the data.
] to pause play back.
If [O] is selected, set it to [On].
D
Available SSIDs (network names) are displayed.
Select the SSID (network name) you want to
E
connect to.
Entering text
When you select a location where text entry is possible,
the software keyboard is displayed. Enter text using the
keyboard.
Changing the text entry mode
Press the [?123] key or the [ABC] key to switch between
characters on the keyboard, and press the [
switch between upper and lower case letters.
↑ ] key to
Viewing the copied data in the Gallery
Select [ ] on the Home screen.
A
Supported memory cards
• microSD cards (up to 2 GB)
• microSDHC cards (up to 32 GB)
* A microSD card is not supplied with this product.
Removing a microSD card
The APPS list screen is displayed.
Select [ ] on the APPS list screen.
B
The Gallery's main screen is displayed.
Wi-Fi®, Wi-Fi Direct ™ , and Miracast ™ are the trademarks or registered trademarks of the Wi-Fi Alliance.
Windows, Windows Vista, and Windows Media are the registered trademarks of the Microsoft Corporation in North America and other
countries.
OS X is a registered trademark of Apple Inc.
Select [ ] on the APPS list screen, and then
A
select [Storage] - [Unmount SD card] - [OK] to
safely remove the card.
Open the cover, press the
B
microSD card once in the
direc t i on show n by the
arrow, and then remove the
card.
413263800 Rev.0
Back
 Loading...