

Page 1

Page 2
p 01
p 19
p 36
p 53
Page 3

Thank you very much for purchasing this product.
Your gateway to a freer and more comfortable entertainment experience!
Before Use
Make sure you read this guide carefully to use the product safely.
After you have read all instructions, save this information for later reference.
EN
01
Page 4

Contents
Contents ........................................................................................................02
Safety Instructions
Notes on Usage ...........................................................................................04
Getting Ready
Checking the Package Contents ...........................................................07
Charging ........................................................................................................08
Turning on .....................................................................................................09
Wearing the Headset ................................................................................10
Viewing Tips .................................................................................................12
Basic Operations
Using the Controller ..................................................................................13
Using the Home Screen ...........................................................................15
Connecting to the Internet .....................................................................16
Importing Data ............................................................................................17
Trademarks & Customer Service .........................................................18
Page 5

Safety Instructions
The following warning symbols are used in this guide to indicate possible dangerous operations or handling.
Make sure you understand these warnings before reading this guide.
Safety symbols
f
Warning
Caution
This symbol indicates information that, if ignored, could
possibly result in serious personal injury or even death due
to incorrect handling.
This symbol indicates information that, if ignored, could
possibly result in personal injury or physical damage due to
incorrect handling.
General information symbols
f
Indicates procedures which may result in damage
or injury if sucient care is not taken.
Indicates additional information and points which
may be useful to know regarding a topic.
EN 02
Page 6

Important Safety Instructions
Follow these safety instructions when setting up and using the see through mobile viewer:
• Read these instructions.
• Keep these instructions.
• Heed all warnings.
• Follow all instructions.
• Do not use this apparatus near water.
• Clean only with dry cloth.
• Use this product in accordance with the manufacturer’s instructions.
• Do not use the product near any heat sources such as radiators, heat registers, stoves, or other apparatus (including ampliers) that produce heat.
• Do not defeat the safety purpose of the polarized or grounding-type plug. A polarized plug has two blades with one wider than the other. A grounding type plug
has two blades and a third grounding prong. The wide blade or the third grounding prong are provided for your safety. If the provided plug does not t into your
Page 7

outlet, consult an electrician for replacement of the obsolete outlet.
• Protect the power cord from being walked on or pinched particularly at plugs, convenience receptacles, and the point where they exit from the apparatus.
• Only use attachments/accessories specied by the manufacturer.
• Unplug this apparatus during lightning storms or when unused for long periods of time.
• Refer all servicing to qualied service personnel. Servicing is required when the apparatus has been damaged in any way, such as the power-supply cord or plug
is damaged, liquid has been spilled or objects have fallen into the apparatus, the apparatus has been exposed to rain or moisture, does not operate normally, or
has been dropped.
• This product shall not be exposed to excessive heat such as sunshine, re or the like.
EN 03
Page 8
Notes on Usage
Safety Instructions
Warning
Only use this product at the stated power-supply voltage.
Only use the USB cable and AC adapter supplied.
Do not use the supplied AC adapter with any other device.
Note the following points when handling the AC adapter.
• Do not plug the AC adapter into an outlet being used by many other
devices.
• Do not plug in the AC adapter if there are any foreign objects such as
dust stuck to it.
• Plug in the AC adapter securely.
Risk of re, electric shock, or accident
• Do not hold the AC adapter with wet hands.
• Do not unplug the AC adapter by pulling on its cable.
Note the following points when handling the power cable (the microUSB
cable supplied).
• Do not use the cable if it is damaged.
• Do not modify the cable.
• Do not place heavy objects on the cable.
• Do not bend, twist, or pull the power cable excessively.
• Do not place the wire near an electrical heater.
Do not use the product in locations where it may get wet or be subject to
humidity such as in the rain or in a bath or shower. Do not place containers
containing water , chemicals, or other liquids near this product.
Page 9
Do not place this product in locations subject to smoke, steam, high
humidity, or dust such as kitchen counters or near humidiers.
Do not touch the AC adapter during a thunderstorm.
Do not disassemble or remodel this product (including consumable items).
In the following situations, turn o this product immediately, unplug the
AC adapter, and contact an authorized Epson dealer.
• If you see smoke, or notice any strange odors or noises.
• If any water or foreign objects get into the product.
• If the product was dropped or the case was damaged.
Warning
Do not leave this product in locations subject to extremely high
Risk of deformation due to re or heat
temperatures such as cars with the windows closed, in direct sunlight, or in
front of air-conditioning or heater outlets.
Warning
Do not cover this product or the AC adapter with a cloth or similar material
during use.
Warning
Do not clean this product with a wet cloth or solvents such as alcohol,
benzene, or thinner.
Warning
Do not start using this product at a high volume.
Risk of re or burns
Risk of malfunction or electric shock
Risk of hearing impairment
EN 04
Page 10
Permanent hearing loss may occur if earphones or headphones are
used at high volume for prolonged periods of time.
Warning
Do not disassemble or remodel this product.
Do not wear this product when driving, cooking, or performing any other
dangerous tasks.
Warning
Check that there is no medical equipment in the area before use as this
product may cause electromagnetic interference on medical equipment or
cause the equipment to malfunction.
Risk of injury or poisoning
Risk of interference with other electronic devices
When taking this product into areas in which the use of electromagnetic
waves is prohibited, such as on aircraft or in hospitals, turn o this product
or disable the wireless LAN function.
Note the following points when using the wireless LAN in medical
institutions.
• Do not bring this product into operating rooms, Intensive Care Units
(ICUs), or Cardiac Care Units (CCUs).
• When on wards, turn off this product or stop the electromagnetic
waves.
• Even when not on wards, turn off this product or stop the
electromagnetic waves if there is any electronic medical equipment in
the area.
• Follow any rules stipulated by medical institutions that prohibit the use
of devices emitting electromagnetic waves, or that prohibit entry to
certain areas with such devices.
Page 11

If you have an implanted pacemaker or implanted debrillator, make
sure you keep a distance of at least 22 cm between this product and the
implanted device when using the wireless LAN. Before use, make sure that
there is no one with a pacemaker near you, and if you are in a crowded
location such as a train, turn o this product or stop the electromagnetic
waves.
Do not use this product near automatically controlled devices such as
automatic doors or re alarms because it may cause electromagnetic
interference which could cause an accident to occur or the devices to
malfunction.
In locations where usage is restricted, such as on aircraft or in hospitals,
follow the on-site rules (such as airplane announcements).
Caution
For safety reasons, when you have nished using this product, make sure
you turn it o.
When performing maintenance, make sure you unplug the AC adapter and
disconnect all wires.
Caution
Do not touch the hot sections of the AC adapter for a while after use.
Do not use this product for extended periods of time if the controller is
touching any part of your skin.
Risk of re, electric shock, or accident
Risk of burns
EN 05
Page 12
Caution
Risk of impaired vision
Caution
Risk of deterioration in image quality
When wearing this product, do not look directly at the sun or at any bright
lights.
Caution
Do not place this product in locations subject to vibrations or impacts.
Do not use or store this product in locations subject to high or low
temperatures. Also, avoid locations subject to sudden changes in
temperature.
Do not place this product near high-voltage lines or magnetized items.
Risk of damage or malfunctions
Do not use or store this product in locations subject to smoke.
Caution
Do not drop this product or treat it with unnecessary force.
When wearing this product, please be aware of the edges of the frame.
Do not place your nger between the moving parts of this product, such
as the hinges.
Make sure you are wearing this product correctly.
Do not carry this product by its cable.
Risk of injury or feeling sick
Page 13

This product should only be used for viewing images.
If a problem or malfunction occurs, stop using this product immediately.
Stop using this product if your skin feels unusual when wearing this
product.
Always take periodic breaks when viewing images using this product.
If you feel fatigued or uncomfortable when viewing with this product, stop
viewing immediately.
Do not place any breakable or fragile objects in your immediate
surroundings when using this product.
Only wear this product when viewing images. Do not move around while
wearing this product.
Do not use this product if you are sensitive to light, or feel sick.
Children (especially under elementary school age) should not use this
product as their eyesight is still developing.
Caution
Contact an authorized Epson dealer when replacing batteries.
Dispose of this product in accordance with your local laws and regulations.
Risk of injury or poisoning
EN 06
Page 14
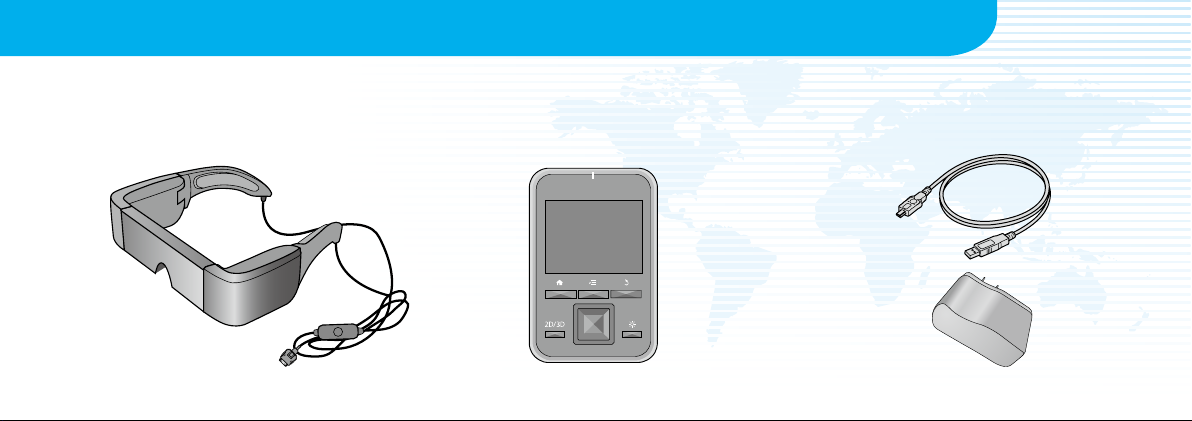
Checking the Package Contents
Check that all items are included.
Y Headset (including lens shade and nose pad) Y Controller Y USB cable (1.4 m)
Getting Ready
Y AC adapter
Page 15
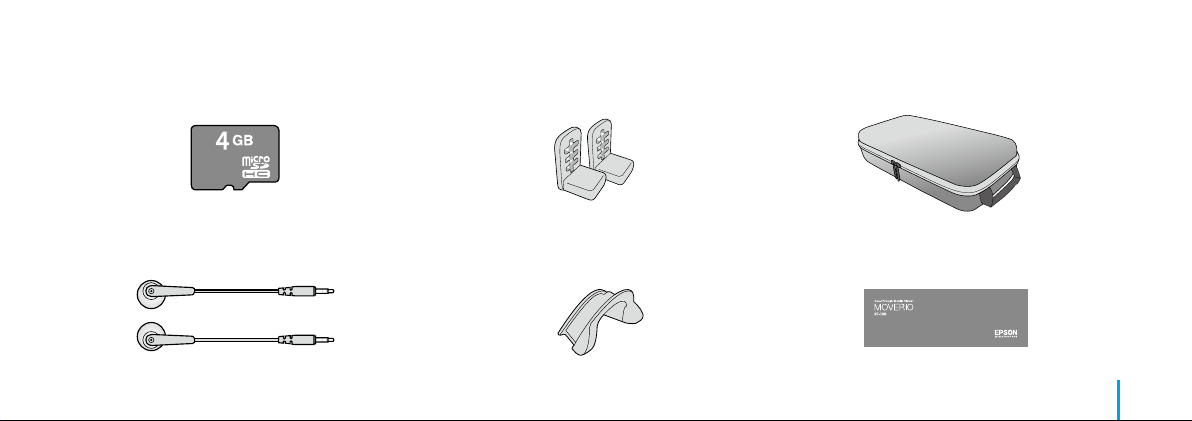
Y microSDHC card (sample)
Y Hooks for eyeglasses
Y Carrying case
Y Earphones (L and R)
Y Replacement nose pad (×2) Y User's Guide (this guide)
EN 07
Page 16
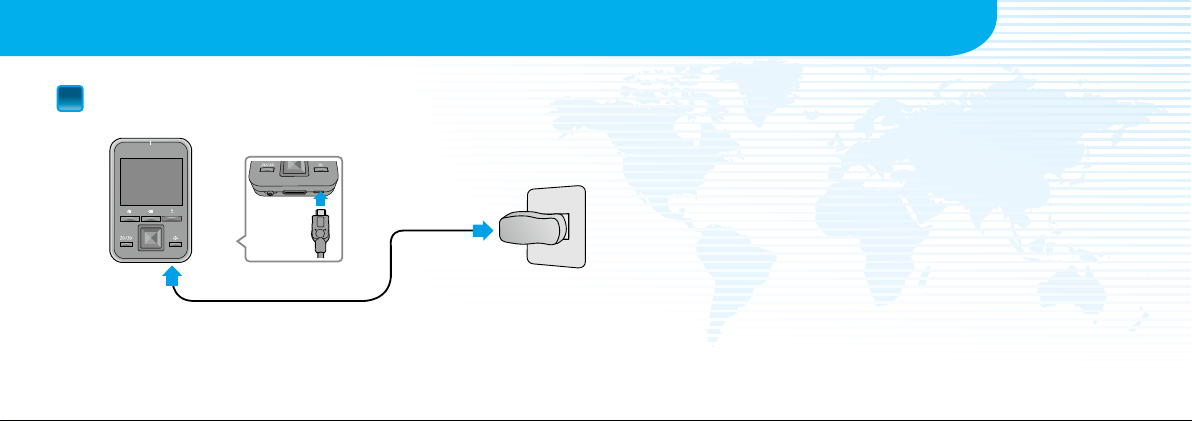
Charging
Connect the controller and AC adapter.
1
Connect the controller and the AC
adapter with the USB cable.
Plug in the AC adapter.
Getting Ready
Standard charge
• Initial charging takes approximately 5 hours.
• The LED indicator turns orange while charging.
• The LED indicator turns green when charging is complete.
Page 17
When charging is complete, remove the AC adapter.
2
• The battery is not fully charged at the time of purchase. Charge the
battery before using this product.
• Battery life is approximately 6 hours. Battery life may vary
depending on the usage conditions and the operating
environment.
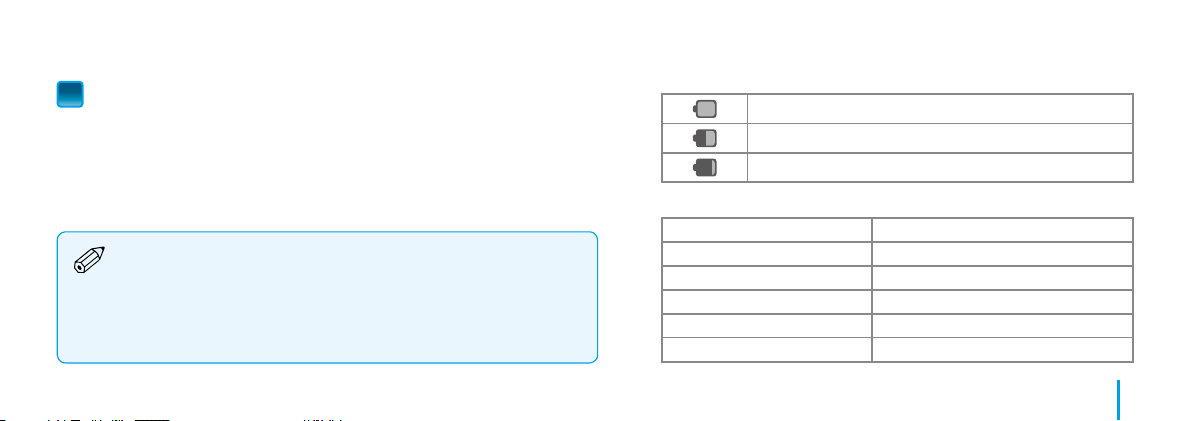
• The amount of battery remaining is displayed at the top of the
Home screen.
The battery is full
The battery is running low
The battery needs to be charged
• The LED indicates the following status.
Green Operating / Charging complete
Flashing green Starting up / Shutting down
Orange Charging
Flashing red The battery is running low
Flashing red ve times Insucient battery to start up
Blue Sleep mode
EN 08
Page 18
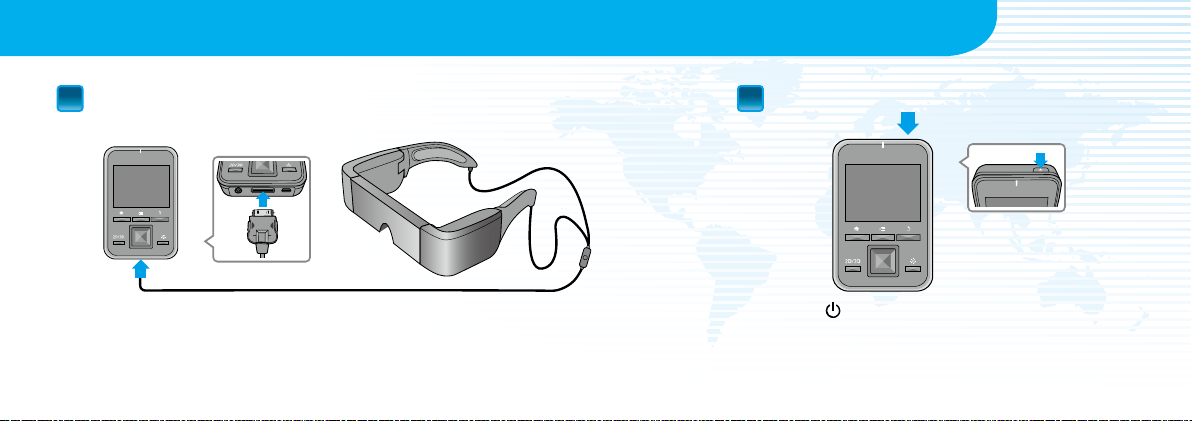
Turning on
Getting Ready
Connect the headset and the controller.
1
Insert the headset's connection cable into the controller's
headset connection port until it clicks.
Turn it on.
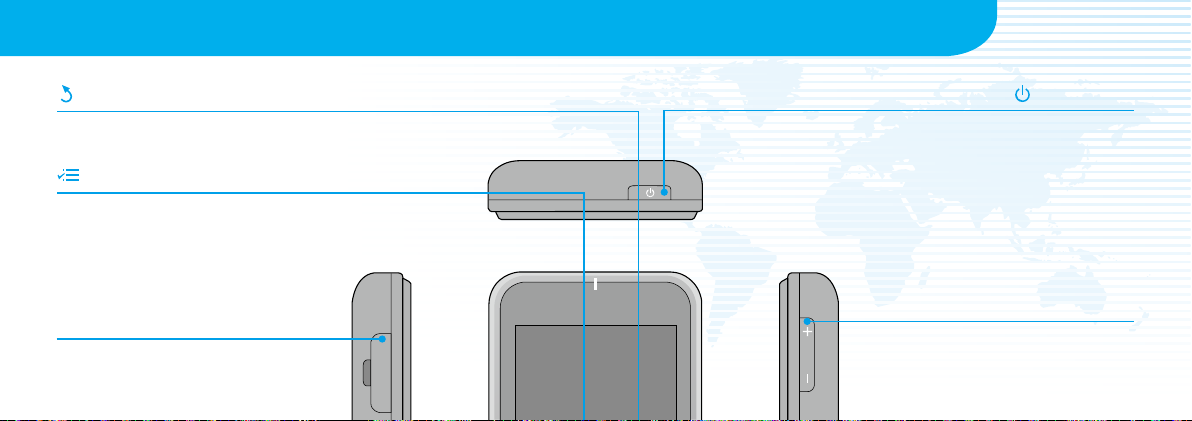
2
Press the [ ] power button on the top of the controller
The LED indicator turns green indicating the power is on.
for at least two seconds.
Page 19
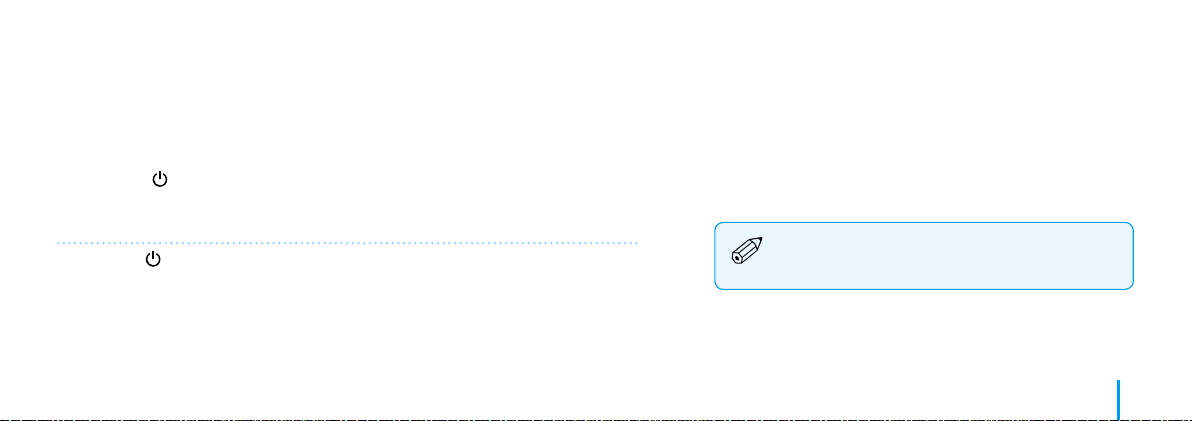
Turning O
1. Press the [ ] power button for at least two seconds.
The [Device options] menu is displayed.
2. Select [Power o] - [OK].
Pressing the [
] power button for less than two seconds turns sleep mode on or o.
Some electricity is consumed even when the
power is o.
EN 09
Page 20
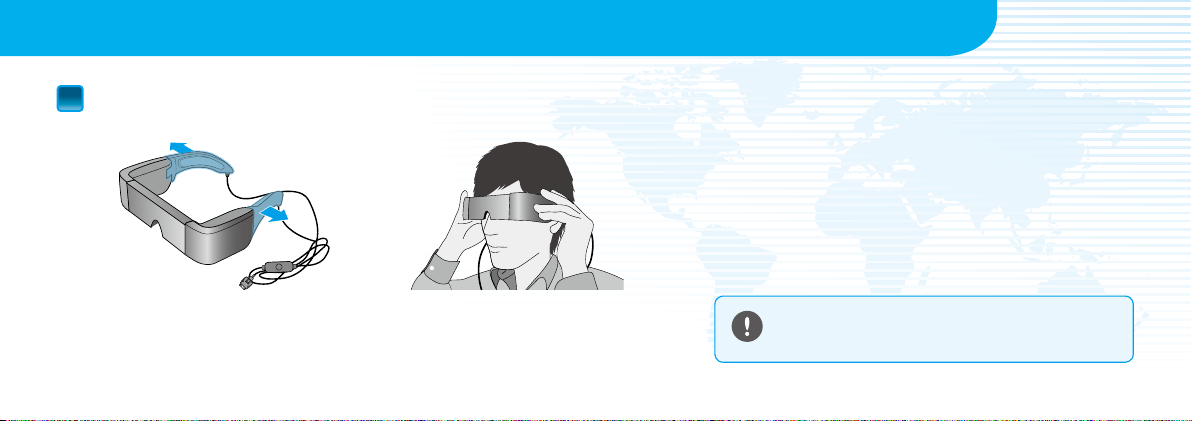
Wearing the Headset
Put on the headset and make adjustments so that you can see the whole screen.
1
Getting Ready
Use both hands to open the arms, and then put on the headset.
(The connection cable goes behind your ears.)
Do not use too much force when opening the
arms of the headset.
Page 21
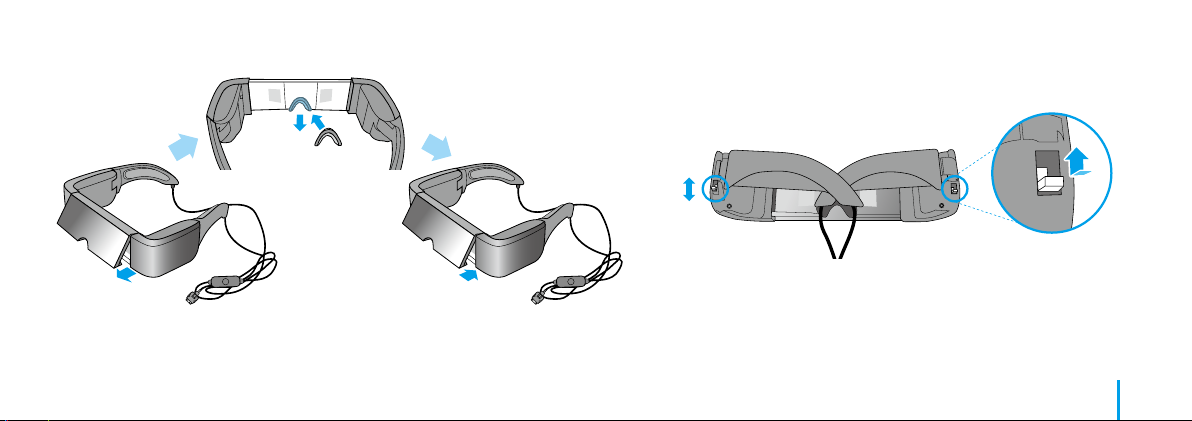
If you cannot view the top or bottom of the screen,
remove the lens shade and replace the nose pad.
Press and
slide
As shown in the illustration above, use the switches to widen
the arms to t your head.
(The switches allow you to adjust the width in three stages with
the widest setting at the top and the narrowest at the bottom.)
EN 10
Page 22
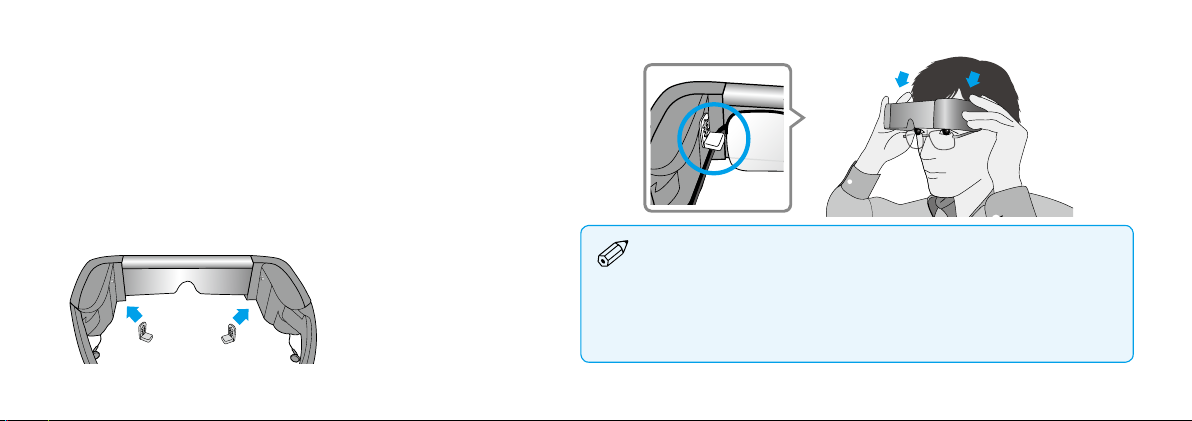
Wearing the headset over glasses
1. Remove the nose pad from the headset.
2. Attach the glasses hooks to the left and right of the headset.
3. While wearing your glasses, lower the headset from the top of your
head to put it on. The headset is supported by the glasses hooks
resting on the frame of your glasses.
If the screen height is not
correct, try adjusting the
position of the glasses hooks.
• Depending on the shape of your glasses, you may not be able to wear
the headset.
• You cannot wear the headset over glasses wider than 147 mm.
• You can use the replacement nose pad instead of the glasses hooks
when wearing the headset over glasses.
Page 23
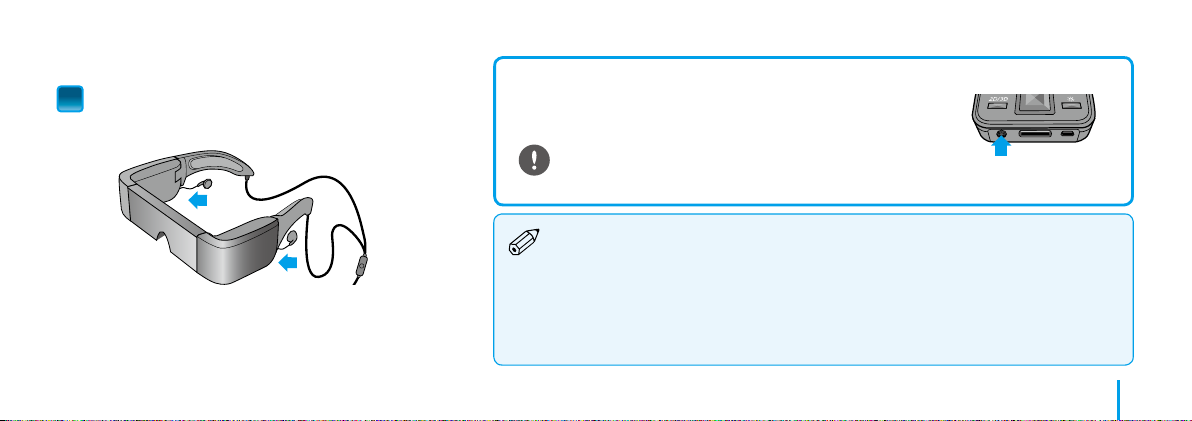
Wear the earphones.
2
Connect the earphones supplied
to the left and right of the headset.
If you have your own earphones, connect them to the controllers
headphone port and unplug the earphones that came with the
product.
Only connect earphones to this port. Do not connect
any other devices.
• Remove the earphones from your ears when connecting or disconnecting the
earphones. If you disconnect the earphones while listening to music or playing a
movie, you may hear some noise, however this is not a malfunction.
• While wearing the headset, do not touch the screen display section. Fingerprints
and so on cause the image quality to deteriorate. If the image display section
becomes dirty, wipe it gently with a commercially available glass cleaner.
EN 11
Page 24
Viewing Tips
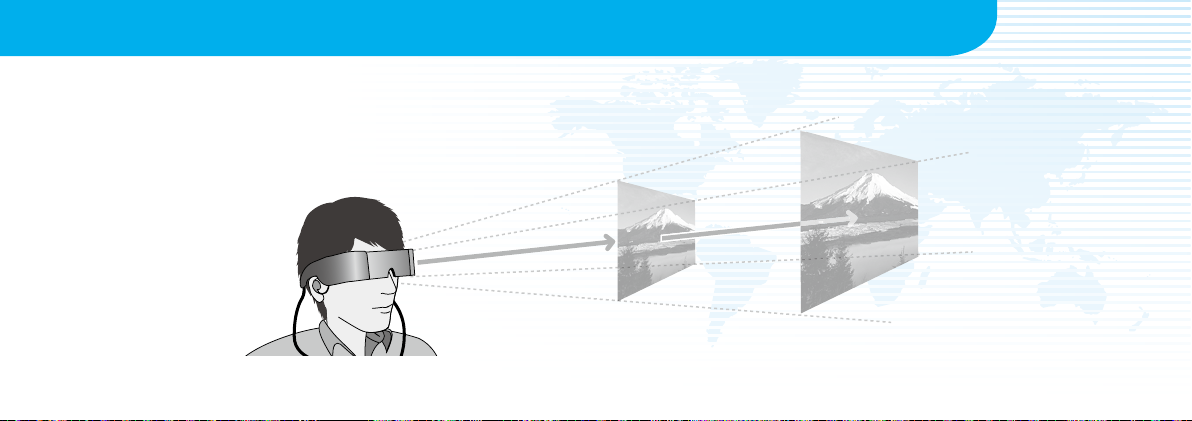
Watching the Screen
Your view of the screen size changes depending on the location of your point
of view. If your point of view is in the distance, it will feel as if the screen size is
in the distance and larger.
Getting Ready
Approx. 2.5 m
for 40 inch
Approx. 5 m
for 80 inch
Page 25

Viewing Environment
How an image is perceived may vary depending on the brightness of
your surroundings.
Caution
It is dicult to see all of your surroundings while
viewing with the product. Do not leave any fragile
items in your immediate surroundings, and do not
move around while wearing the headset.
• How an image is perceived varies depending on the
individual.
• If there is a dierence between the strength of your
eyesight in your left and right eyes, you may not be
able to view 3D contents correctly.
EN 12
Page 26
Using the Controller
Basic Operations
BACK key
Displays the previous screen.
MENU key
• Displays available menus for the
current screen.
• Shows or hides the keyboard if held
down during text input.
microSD card slot
Insert the microSD card.
Power button
Press for at least two seconds to turn on.
When the power is on:
• Press and hold: Turns o the power;
Turns on/o Airplane mode
• Short press: Turns on/o Sleep mode
Volume key
Displays the volume screen allowing
you to adjust the volume.
Page 27
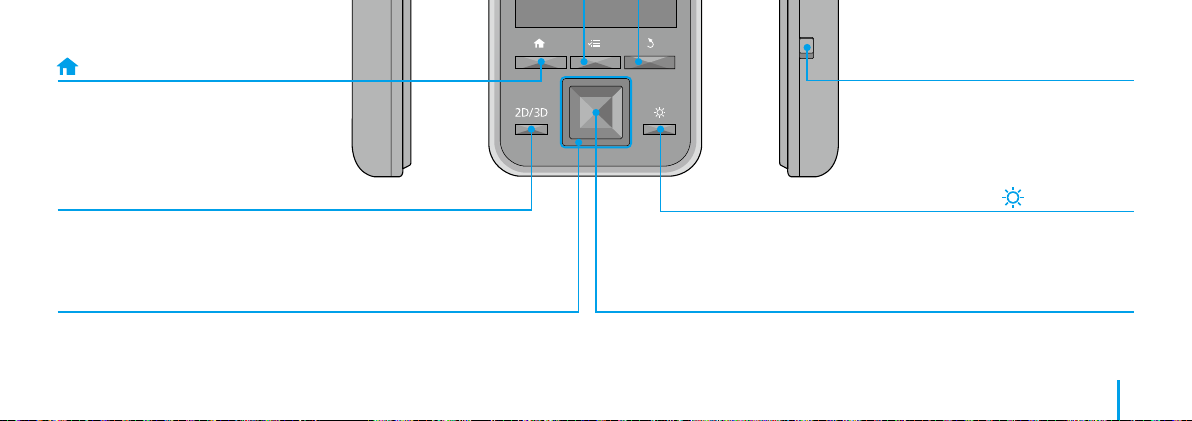
HOME key
A short press returns you to the Home
screen. Press and hold to display
recently used applications.
Key lock switch
Move the switch to the bottom to
prevent accidental operations.
2D/3D key
Changes between 2D and 3D mode.
Direction keys
• Moves the selection area up, down, left, or right.
• Scrolls the page.
Brightness key
Displays the brightness screen allowing
you to adjust the brightness.
Enter key
Makes selections or conrms your
choices.
EN 13
Page 28
Using the trackpad
Trackpad
When you touch the trackpad with your
nger, a pointer is displayed on the screen.
Touching the trackpad for about one second
enlarges the pointer, allowing you to drag.
Pointer
Page 29
Clicking
f
Move the pointer to an icon or display item, and
then tap the trackpad.
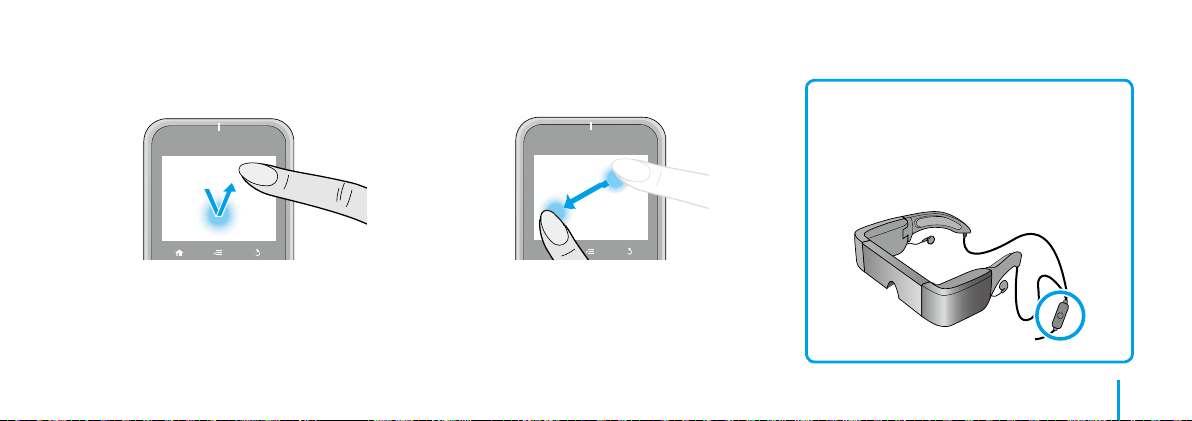
Dragging
f
Touch the track pad for about one second to select
the icon or display item, and then drag your nger
on the trackpad to move it.
Mute button
Press the Mute button on the headset's
connection cable to mute the image and
audio.
EN 14
Page 30
Using the Home Screen
Basic Operations
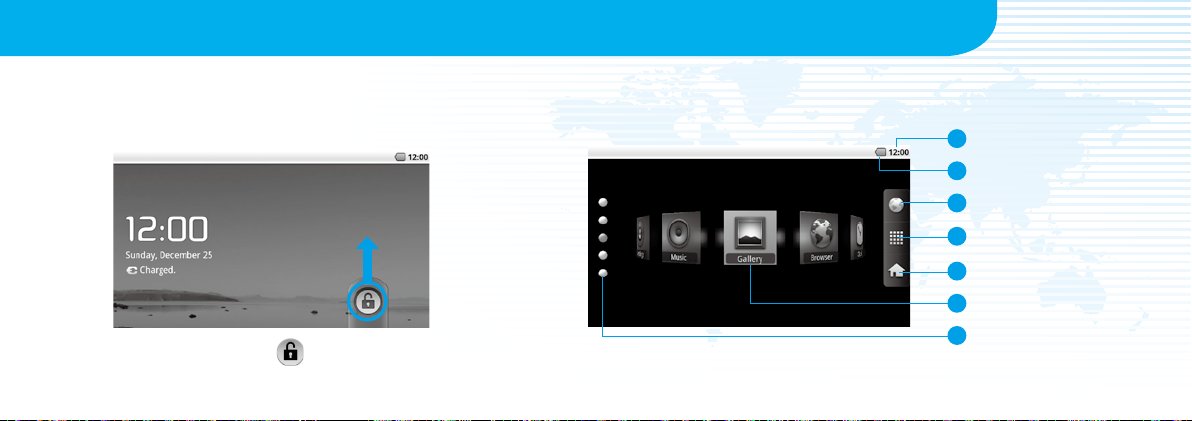
Unlocking
Drag the [ ] up.
Home screen icons
1
Time
2
Status icon
3
Browser
4
Application list
Change Home screen
5
6
Shortcuts
7
Change shortcut lists
Page 31

Launching an application from a shortcut
Use the Direction keys to select a shortcut, and then press the Enter key.
Status bar icons
[Low]
W
Playing music Dolby Mobile On
Communicating via
USB
Connecting/using
wireless LAN
Scanning microSD
card
[Full]
Battery status Charging
Alarm set
Airplane mode
Unmounting
microSD card
Download complete
EN 15
Page 32

Connecting to the Internet
You can access the Internet over a wireless LAN network.
Enable wireless LAN, and then search for available networks.
1
Basic Operations
Launch [ ] from the Home screen,
and then select [Wireless & networks].
Select [Wi-Fi settings].
Select [Wi-Fi].
Page 33

Connect to one of the displayed wireless LAN networks.
2
Select the network you want to connect to
from [Wi-Fi networks].
• If you select a security enabled network, you need to enter a
password.
• You can add a network manually if the network you want to
connect to is not found. For more details, see the digital user's
guide.
EN 16
Page 34

Importing Data
Insert the microSD card into the controller.
1
Open the cover in the
direction shown by the arrow.
Slide the card into the slot until
it clicks into place.
Basic Operations
Removing the microSD card
1. Launch [ ] from the Home screen, and then
select [SD card & device storage] - [Unmount SD
card]. The SD card can now be removed.
2. Open the cover, press
the microSD card
once in the direction
shown by the arrow,
and then remove the
card.
Page 35

Copy data to the microSD card.
2
Connect the controller to your computer
with the USB cable supplied to copy the data.
Do not remove the microSD card or turn o
the power while copying data or accessing a
le. Otherwise, the data could be corrupted.
• You can store up to 4GB of data on the
microSDHC card supplied.
• This product supports microSDHC cards up
to 32 GB.
• It may take a while to read large microSDHC
cards.
EN 17
Page 36

Trademarks & Customer Service
Digital User's Guide
A Digital User's Guide comes preinstalled with this product. When you want more detailed information, launch the Digital User's Guide from the Home screen.
Use the Direction keys to select [
], and then press the Enter key.
Page 37

Trademarks
f
Manufactured under license from Dolby Laboratories.
Dolby and the double-D symbol are trademarks of Dolby Laboratories.
iWnnIME © OMRON SOFTWARE Co., Ltd. 2011 All Rights Reserved.
Contains Adobe® Flash® Player by Adobe Systems Incorporated.
Adobe Flash Player Copyright © 1996-2011, Adobe Systems incorporated. Adobe, Flash and the Flash logo are either
registered trademarks or trademarks of Adobe Systems Incorporated in the United States and/or other countries.
microSDHC Logo is a trademark of SD-3C, LLC.
EN 18
Page 38

Customer Service
f
Notes Regarding Wireless LAN Do not use the Wireless LAN function in France unless you are indoors.
Adobe Flash Player Restrictions • Copying or distributing the software is strictly prohibited.
Internet Support
If you purchase this product outside of North America, please note that this product emits wireless LAN electromagnetic
waves on channels 1 to 13. Therefore, do not use the wireless LAN function in North America where wireless LAN channels
are limited to 1 to 11 by the Wireless Telegraphy Act.
Follow local laws and regulations when using in other regions.
• Modifying or creating derivative works based on the software is strictly prohibited.
• Reverse engineering, decompiling, disassembling, or otherwise attempting to discover the source code of the software is
strictly prohibited.
• We cannot accept liability claims due to indirect, special, incidental, exemplary, punitive, consequential, or other damages
that may result from your use of this software.
http://www.epson.com/
Page 39

Nous vous remercions d'avoir acheté cet appareil.
Votre accès à un univers de loisirs plus libre et plus confortable !
Avant l'utilisation
Assurez-vous de lire soigneusement ce guide pour utiliser l'appareil en toute sécurité.
Une fois avoir lu toutes les instructions, conservez ces informations comme référence.
FR
19
Page 40

Table des matières
Table des matières .....................................................................................20
Instructions de sécurité
Remarques sur l'utilisation ...................................................................... 21
Préparations
Vérier le contenu de l'emballage........................................................24
Charger...........................................................................................................25
Allumer l'appareil .......................................................................................26
Porter les lunettes ......................................................................................27
Conseils de visualisation ..........................................................................29
Opérations de base
Utiliser le contrôleur ..................................................................................30
Utiliser l'écran d'accueil ............................................................................ 32
Connecter à l'Internet ...............................................................................33
Importer des données ..............................................................................34
Marques commerciales et service client ............................................35
Page 41

Instructions de sécurité
Les symboles d'avertissement suivants sont utilisés dans ce guide pour indiquer des opérations ou des manipulations qui peuvent être dangereuses.
Assurez-vous de bien comprendre ces avertissements avant de lire ce guide.
Symboles de sécurité
f
Avertissement
Attention
Ce symbole indique des informations dont le non-respect
peut causer des blessures graves ou même mortelles dues à
une manipulation incorrecte.
Ce symbole indique des informations dont le non-respect
peut causer des blessures personnelles ou des dommages
physiques dus à une manipulation incorrecte.
Symboles d'informations générales
f
Indique des procédures qui peuvent causer des
dommages ou des blessures en cas de soins
inadéquats.
Indique des informations et des remarques
supplémentaires qui peuvent être utiles selon les
rubriques.
FR 20
Page 42

Remarques sur l'utilisation
Instructions de sécurité
Avertissement
Utilisez l'appareil uniquement à la tension d'alimentation indiquée.
Utilisez uniquement le câble USB et l'adaptateur secteur fourni.
N'utilisez pas l'adaptateur secteur fourni avec d'autres appareils.
Remarques sur l'utilisation de l'adaptateur secteur.
• Ne branchez pas l'adaptateur secteur dans une prise utilisée par de
nombreux autres appareils.
• Ne branchez pas l'adaptateur secteur s'il est poussiéreux ou sale.
• Branchez l'adaptateur secteur fermement.
• Ne touchez pas l'adaptateur secteur avec des mains mouillées.
• Ne débranchez pas l'adaptateur secteur en tirant sur son câble.
Risque d'incendies, de chocs électriques, ou d'accidents
Remarques sur l'utilisation du câble d'alimentation (le câble micro USB
fourni).
• N'utilisez pas le câble s'il est endommagé.
• Ne modifiez pas le câble.
• Ne placez pas des objets lourds sur le câble.
• Ne tirez pas et ne pliez pas excessivement le câble.
• Ne placez pas le câble près d'un radiateur électrique.
N'utilisez pas l'appareil dans des emplacements où il pourrait être
mouillé, par ex. sous la pluie ou dans une salle de bains. Ne placez pas des
récipients contenant de l'eau, des produits chimiques, ou d'autres liquides
près de l'appareil.
Ne placez pas l'appareil dans des emplacements sujets à de la fumée, de la
vapeur, une humidité élevée, ou de la poussière, tels qu'un plan de travail
Page 43

de cuisine ou près d'un humidicateur.
Ne touchez pas l'adaptateur secteur durant un orage.
Ne désassemblez pas et ne transformez pas l'appareil (y compris les articles
consommables).
Dans les situations suivantes, éteignez l'appareil immédiatement,
débranchez l'adaptateur secteur, et contactez un revendeur Epson
autorisé.
• Si l'appareil émet de la fumée, des odeurs ou des bruits étranges.
• Si de l'eau ou des corps étrangers pénètrent dans l'appareil.
• Si vous avez laissé tomber l'appareil ou si le boîtier est endommagé.
Avertissement
Ne laissez pas l'appareil dans des emplacements sujets à des températures
Risque de déformations dues à un incendie ou de la chaleur
extrêmement élevées, comme des voitures avec les fenêtres fermées,
directement au soleil, ou devant des sorties de radiateurs ou de systèmes
de chaleur.
Avertissement
Ne recouvrez pas l'appareil ou l'adaptateur secteur avec un tissu ou un
matériel similaire durant son utilisation.
Avertissement
Ne nettoyez pas l'appareil avec un chion mouillé ou des solvants tels que
diluants, benzène et alcool.
Avertissement
N'utilisez pas cet appareil à un volume élevé.
Risque d'incendies ou de brûlures
Risque de dysfonctionnements ou de chocs électriques
Risque de perte auditive
FR 21
Page 44

A pleine puissance, l’écoute prolongée du baladeur peut
endommager l’oreille de utilisateur.
Avertissement
Ne désassemblez pas et ne transformez pas l'appareil.
Ne portez pas l'appareil en conduisant, en faisant la cuisine, ou en
eectuant toutes autres tâches dangereuses.
Avertissement
Vériez la présence d'appareils médicaux autour de vous, cet appareil
pouvant causer des interférences électromagnétiques sur les appareils
médicaux ou causer leur dysfonctionnement.
Si vous prenez cet appareil dans des zones dans lesquelles l'utilisation
Risque de blessures ou d'empoisonnements
Risque d'interférences avec d'autres appareils électroniques
des ondes électromagnétiques est interdite, telles que des avions ou des
hôpitaux, éteignez l'appareil ou désactivez la fonction LAN sans l.
Remarques sur l'utilisation du LAN sans l dans des institutions médicales.
• N'apportez pas cet appareil dans des salles d'opération, des unités de
soins intensifs (USI), ou des unités de soins coronariens (CCU).
• Dans des salles communes ou des chambres de malades, éteignez
l'appareil ou arrêtez les ondes électromagnétiques.
• Même si vous n'êtes pas dans des salles communes ou des chambres de
malades, éteignez l'appareil ou arrêtez les ondes électromagnétiques si
des appareils médicaux électroniques sont présents.
• Respectez tous les règlements établis par les institutions médicales
qui interdisent l'utilisation d'appareils émettant des ondes
électromagnétiques, ou qui interdisent l'entrée dans certaines zones
avec ces appareils.
Si vous avez un stimulateur ou un débrillateur interne, assurez-vous
Page 45

de garder une distance d'au moins 22 cm entre cet appareil et l'appareil
interne lorsque vous utilisez le LAN sans l. Avant l'utilisation, assurez-vous
qu'aucune personne avec un stimulateur ne se trouve près de vous, et si
vous êtes dans un endroit serré, comme dans un train, éteignez l'appareil
ou arrêtez les ondes électromagnétiques.
N'utilisez pas cet appareil près d'appareils contrôlés automatiquement,
tels que des portes automatiques ou des alarmes d'incendie, car il peut
causer des interférences électromagnétiques qui pourraient provoquer un
accident ou un disfonctionnement de ces systèmes.
Dans des endroits où l'usage est restreint, comme des avions ou des
hôpitaux, respectez les règlements en vigueur (tels que les annonces dans
les avions).
Attention
Pour des raisons de sécurité, assurez-vous d'éteindre l'appareil lorsque
vous avez ni de l'utiliser.
Lorsque vous eectuez une maintenance de l'appareil, assurez-vous de
débrancher l'adaptateur secteur et de déconnecter tous les câbles.
Attention
Ne touchez pas les parties chaudes de l'adaptateur secteur directement
après son utilisation.
N'utilisez pas l'appareil pour des périodes prolongées si le contrôleur
touche une partie de votre peau.
Risque d'incendies, de chocs électriques, ou d'accidents
Risque de brûlures
FR 22
Page 46

Attention
Risque de dommages oculaires
Attention
Risque de détérioration de la qualité de l'image
Lorsque vous portez l'appareil, ne regardez pas directement le soleil ou
d'autres lumières intenses.
Attention
Ne placez pas l'appareil dans des endroits sujets à des vibrations ou des
chocs.
N'utilisez pas ou ne stockez pas l'appareil dans des emplacements sujets à
des températures élevées ou basses. Évitez aussi des emplacements sujets
à des changements soudains de température.
Ne placez pas l'appareil près de lignes à haute tension ou d'objets
aimantés.
Risque de dommages ou de dysfonctionnements
N'utilisez pas ou ne stockez pas l'appareil dans des emplacements sujets à
de la fumée.
Attention
Ne laissez pas tomber l'appareil et ne le manipulez pas avec une force
excessive.
Lorsque vous portez l'appareil, veuillez tenir compte des bords de la
monture des lunettes projecteur.
Ne placez pas les doigts entre les parties amovibles de l'appareil, telles que
les charnières.
Assurez-vous de porter l'appareil correctement.
Risque de blessures ou de malaises
Page 47

Ne transportez pas l'appareil par son câble.
Cet appareil doit être utilisé uniquement pour visualiser des images.
En cas de problème ou de dysfonctionnements, cessez immédiatement
d'utiliser l'appareil.
Arrêtez d'utiliser l'appareil si vous éprouvez une sensation particulière sur
votre peau lorsque vous portez les lunettes projecteur.
Faites toujours des pauses fréquentes lorsque vous visualisez des images
avec l'appareil.
Si vous vous sentez fatigué ou indisposé lorsque vous visualisez des
images avec cet appareil, cessez immédiatement.
Ne placez pas des objets fragiles ou cassables près de vous lorsque vous
utilisez l'appareil.
Portez cet appareil uniquement lorsque vous visualisez des images. Ne
vous déplacez pas lorsque vous portez l'appareil.
N'utilisez pas l'appareil si vous êtes sensible à la lumière, ou si vous vous
sentez indisposé.
Les enfants (spécialement en dessous de l'âge d'école primaire) ne
devrait pas utiliser cet appareil, leur acuité visuelle étant en cours de
développement.
Attention
Contactez un revendeur Epson autorisé pour remplacer les batteries.
Recyclez cet appareil en accord avec les lois et règlements locaux.
Risque de blessures ou d'empoisonnements
FR 23
Page 48

Vérifier le contenu de l'emballage
Vériez que tous les articles sont inclus.
Y Lunettes projecteur (avec viseur et plaquette nasale) Y Contrôleur Y Câble USB (1,4 m)
Préparations
Y Adaptateur secteur
Page 49

Y Carte microSDHC (échantillon)
Y Crochets pour lunettes de vue
Y Étui de transport
Y Écouteurs (G et D)
Y Plaquette nasale de rechange (x2) Y Guide de l'utilisateur (ce guide)
FR 24
Page 50

Charger
Connectez le contrôleur, et l'adaptateur secteur.
1
Connectez le contrôleur et l'adaptateur
secteur avec le câble USB.
Branchez l'adaptateur
secteur.
Préparations
Charge standard
• Le chargement initial prend environ 5 heures.
• Le voyant s'allume en orange durant le chargement.
• Le voyant s'allume en vert une fois le chargement terminé.
Page 51

Une fois le chargement terminé, retirez l'adaptateur
2
secteur.
• La batterie n'est pas complètement chargée lors de
l'achat. Chargez la batterie avant d'utiliser l'appareil.
• La durée de vie de la batterie est environ 6 heures. La
durée de vie de la batterie peut varier selon les conditions
d'utilisation et l'environnement d'opération.
• La charge restante de la batterie est achée au sommet de l'écran d'accueil.
La batterie est pleine
La batterie est faible
La batterie doit être rechargée
• Le voyant indique les états suivants.
Vert Opération / chargement terminé
Vert clignotant Démarrage / arrêt
Orange Chargement en cours
Rouge clignotant La batterie est faible
Rouge clignotant cinq fois Niveau de batterie insusant pour démarrer
Bleu Mode veille
FR 25
Page 52

Allumer l'appareil
Préparations
Connectez les lunettes et le contrôleur.
1
Insérez le câble de connexion des lunettes dans le port
lunettes du contrôleur jusqu'à ce qu'un clic soit audible.
Allumez les lunettes projecteur.
2
Appuyez au moins deux secondes sur la touche marche/arrêt [ ]
Le voyant s'allume en vert pour indiquer que l'appareil est allumé.
au sommet du contrôleur.
Page 53

Éteindre
1. Appuyez au moins deux secondes sur la touche marche-arrêt [ ]. Le menu [Options
de l'appareil] est aché.
2. Sélectionnez [Éteindre] - [OK].
Si vous appuyez moins de deux secondes sur la touche marche-arrêt [
désactivez le mode veille.
], vous activez/
L'appareil consomme de l'électricité même
lorsqu'il est éteint.
FR 26
Page 54

Porter les lunettes
Ajustez les lunettes an de pouvoir visualiser tout l'écran.
1
Préparations
Utilisez les deux mains pour ouvrir les branches, et ajustez les lunettes en place.
(Le câble de connexion passe derrière vos oreilles.)
N'utilisez pas trop de force lorsque vous ouvrez
les branches des lunettes.
Page 55

Si vous ne pouvez pas voir le sommet ou le fond de l'écran,
retirez le viseur et remplacez la plaquette nasale.
Appuyez et
faites glisser
Comme indiqué dans l'illustration ci-dessus, utilisez les boutons
pour agrandir les branches pour votre tête.
(Trois niveaux de largeur sont possibles,
du sommet (plus large) au fond (plus étroit).)
FR 27
Page 56

Porter les lunettes projecteur sur des lunettes de vue
1. Retirez la plaquette nasale des lunettes projecteur.
2. Fixez les crochets de lunettes de vue sur la gauche et la droite des
lunettes projecteur.
3. Placez les lunettes depuis le sommet de votre tête. Les crochets
reposent sur les branches de vos lunettes de vue pour supporter les
lunettes projecteur.
Si la hauteur de l'écran n'est
pas correcte, essayez d'ajuster
la position des crochets.
• Selon la forme de vos lunettes de vue, vous ne pourrez peut-être
pas porter les lunettes projecteur.
• Vous ne pouvez pas porter les lunettes projecteur sur des lunettes
de vue plus larges que 147 mm.
• Vous pouvez utiliser la plaquette nasale de rechange au lieu
des crochets lorsque vous portez les lunettes projecteur sur des
lunettes de vue.
Page 57

Insérez gentiment les écouteurs.
2
Connectez les écouteurs fournis
sur la gauche et la droite des lunettes.
Si vous voulez utiliser vos écouteurs, connectez-les au port écouteurs
du contrôleur et déconnectez les écouteurs livrés avec l'appareil.
Connectez uniquement les écouteurs à ce port. Ne
connectez pas d'autres appareils.
• Lorsque vous connectez ou déconnectez les écouteurs, retirez-le de vos oreilles. Si
vous déconnectez les écouteurs en écoutant de la musique ou en regardant une
vidéo, du bruit peut être audible ; ceci n'est pas un dysfonctionnement.
• Lorsque vous portez les lunettes projecteur, ne touchez pas la section d'achage de
l'écran. Les empreintes de doigts et d'autres traces peuvent causer une détérioration
de la qualité de l'image. Si la zone d'achage est sale, essuyez-la gentiment avec un
nettoyant pour vitres disponible dans le commerce.
FR 28
Page 58

Conseils de visualisation
Regarder l'écran
Votre vue de la taille de l'écran change selon la position de votre point de vue.
Si votre point de vue est éloigné, la taille de l'écran semblera à distance et plus
large.
Préparations
Environ 2,5 m
pour 40 pouces
Environ 5 m
pour 80 pouces
Page 59

Environnement de visualisation
La perception des images peut varier selon la luminosité de votre
environnement.
Attention
Il est dicile de voir votre environnement lorsque
vous visualisez des images avec l'appareil. Ne gardez
pas des objets fragiles autour de vous, et ne vous
déplacez pas lorsque vous portez les lunettes.
• La perception des images varie selon les personnes.
• En cas de diérence d'acuité visuelle entre votre
œil gauche et droit, vous ne pourrez peut-être pas
visualiser correctement des images 3D.
FR 29
Page 60

Utiliser le contrôleur
Opérations de base
Touche RETOUR
Ache l'écran précédent.
Touche MENU
• Ache les menus disponibles pour
l'écran actuel.
• Ache ou masque le clavier si
enfoncée durant l'entrée de texte.
Fente de la carte microSD
Insérez une carte microSD.
Touche marche/arrêt
Appuyez au moins deux secondes pour
allumer l'appareil. Lorsque l'appareil est
allumé :
• Appuyer et maintenir : Éteint l'appareil ;
Active/désactive le mode avion
• Appuyer : Active/désactive le mode
veille
Touche de volume
Permet d'ajuster le volume.
Page 61

Touche ACCUEIL
Appuyez une fois pour retourner à
l'écran d'accueil. Appuyez et maintenez
pour acher les applications utilisées
récemment.
Bouton de verrouillage des touches
Déplacez le verrou vers le bas pour
prévenir des opérations accidentelles.
Touche 2D/3D
Passe entre les modes 2D et 3D.
Touches de direction
• Déplace la zone de sélection vers le haut, le bas, la gauche, ou la droite.
• Déle la page.
Touche de luminosité
Permet d'ajuster la luminosité de l'écran.
Touche Enter
Eectue des sélections ou conrme vos
choix.
FR 30
Page 62

Utiliser le pavé tactile
Pavé tactile
Lorsque vous touchez le pavé tactile avec
votre doigt, un pointeur est aché sur l'écran.
Toucher le pavé tactile environ une seconde
agrandit le pointeur, permettant de déplacer des
éléments.
Pointeur
Page 63

Cliquer
f
Déplacez le pointeur sur une icône ou un élément
aché, puis appuyez sur le pavé tactile.
Déplacer
f
Touchez le pavé tactile environ une seconde pour
sélectionner l'icône ou l'élément aché, puis
déplacez votre doigt sur le pavé tactile.
Bouton Muet
Appuyez sur le bouton Muet sur le câble
de connexion des lunettes pour couper
l'image et le son.
FR 31
Page 64

Utiliser l'écran d'accueil
Opérations de base
Déverrouiller
Déplacez [ ] vers le haut.
Icônes de l'écran d'accueil
1
Heure
2
Icône d'état
3
Navigateur
4
Liste des applications
Modier l'écran d'accueil
5
6
Raccourcis
7
Modier les listes de
raccourcis
Page 65

Lancer une application à partir d'un raccourci
Utilisez les touches de direction pour sélectionner un raccourci, puis
appuyez sur la touche Enter.
Icônes de la barre d'état
[Faible]
W
[Pleine]
Musique en cours Dolby Mobile activé
Communication via USB Alarme réglée
Connexion/utilisation
du LAN sans l
Balayage de la carte
microSD
Mode avion
Démontage de la
carte microSD
État de la batterie Chargement en cours
Téléchargement terminé
FR 32
Page 66

Connecter à l'Internet
Vous pouvez accéder à l'Internet via un réseau LAN sans l.
Activez le LAN sans l, puis recherchez les réseaux disponibles.
1
Opérations de base
Lancez [ ] de l'écran d'accueil,
puis sélectionnez [Sans l et réseaux].
Sélectionnez [Paramètres Wi-Fi].
Sélectionnez [Wi-Fi].
Page 67

Connectez à un des réseaux LAN sans l achés.
2
Sélectionnez le réseau auquel vous voulez
vous connecter sous [Réseaux Wi-Fi].
• Si vous sélectionnez un réseau sécurisé, vous devez entrer un
mot de passe.
• Vous pouvez ajouter un réseau manuellement, si le réseau
auquel vous voulez vous connecter n'est pas détecté. Pour plus
de détails, voir le guide de l'utilisateur en-ligne.
FR 33
Page 68

Importer des données
Insérez la carte microSD dans le contrôleur.
1
Ouvrez le couvercle dans la
direction indiquée par la èche.
Insérez la carte dans la fente jusqu'à
ce que vous entendiez un clic.
Opérations de base
Retirer la carte microSD
1. Lancez [ ] de l'écran d'accueil, puis sélectionnez
[Carte SD et mémoire de l'appareil] - [Désactiver la
carte SD]. La carte SD peut-être maintenant retirée.
2. Ouvrez le couvercle,
appuyez une fois sur
la carte microSD dans
la direction indiquée
par la èche, puis
retirez la carte.
Page 69

Copiez les données sur la carte microSD.
2
Connectez le contrôleur à votre ordinateur
à l'aide du câble USB fourni pour copier les données.
Pour éviter d'endommager les données, ne
retirez pas la carte microSD ou n'éteignez
pas l'appareil durant la copie de données ou
l'accès à un chier.
• Vous pouvez stocker jusqu'à 4 Go de
données sur la carte microSDHC fournie.
• Cet appareil prend en charge des cartes
microSDHC jusqu'à 32 Go.
• La lecture de cartes microSDHC de haute
capacité peut prendre un certain temps.
FR 34
Page 70

Marques commerciales et service client
Guide de l'utilisateur en-ligne
Un guide de l'utilisateur en-ligne est préinstallé avec le produit. Pour obtenir plus d'informations, lancez l'application le guide de l'utilisateur en-ligne à partir de
l'écran d'accueil.
Utilisez les touches de direction pour sélectionner [
], puis appuyez sur la touche Enter.
Page 71

Marques commerciales
f
Fabriqué sous licence de Dolby Laboratories.
Dolby et le symbole double-D sont des marques déposées de Dolby Laboratories.
iWnnIME © OMRON SOFTWARE Co., Ltd. 2011 All Rights Reserved.
Contains Adobe® Flash® Player by Adobe Systems Incorporated.
Adobe Flash Player Copyright © 1996-2011, Adobe Systems incorporated. Adobe, Flash and the Flash logo are either
registered trademarks or trademarks of Adobe Systems Incorporated in the United States and/or other countries.
microSDHC Logo is a trademark of SD-3C, LLC.
FR 35
Page 72

Service client
f
Remarques sur le LAN sans l N'utilisez pas la fonction LAN sans l en France si vous n'êtes pas à l'intérieur.
Restrictions d'Adobe Flash Player • La copie ou la distribution du logiciel est strictement interdite.
Support Internet
Si vous achetez cet appareil en dehors de l'Amérique du Nord, veuillez noter que cet appareil émet des ondes
électromagnétiques LAN sans l sur les canaux 1 à 13. Par conséquent, n'utilisez pas la fonction LAN sans l en Amérique du
Nord où les canaux LAN sans l sont limités de 1 à 11 par la loi « Wireless Telegraphy Act ».
Respectez les lois et les règlements locaux en cas d'utilisation dans d'autres régions.
• La modication ou la création de travaux dérivés basés sur le logiciel est strictement interdite.
• L'ingénierie inversée, la décompilation, le désassemblage, ou toute autre méthode de détection du code source du logiciel
est strictement interdite.
• Nous ne pouvons pas accepter des réclamations de responsabilité en cas de dommages indirects, spéciaux, accessoires,
exemplaires, punitifs, secondaires, ou tout autre dommage qui pourrait résulter de votre utilisation de ce logiciel.
http://www.epson.com/
Page 73

Gracias por adquirir este producto.
Con él disfrutará de una experiencia de entretenimiento más cómoda y con mayor libertad.
Antes del uso
Lea detenidamente este manual para utilizar el producto con seguridad.
Después de leer todas las instrucciones, guarde esta información para su posterior consulta.
ES
36
Page 74

Contenido
Contenido .....................................................................................................37
Instrucciones de seguridad
Notas sobre el uso ...................................................................................... 38
Preparación
Comprobar el contenido del paquete ................................................41
Cargar .............................................................................................................42
Encender........................................................................................................43
Ponerse las gafas-proyector ...................................................................44
Consejos de visualización ........................................................................46
Operaciones básicas
Usar el mando .............................................................................................. 47
Usar la pantalla de inicio .......................................................................... 49
Conectarse a Internet ...............................................................................50
Importar datos.............................................................................................51
Marcas comerciales y servicio al cliente ............................................. 52
Page 75

Instrucciones de seguridad
Los siguientes símbolos de advertencia se utilizan en este manual para indicar posibles operaciones o manipulaciones peligrosas.
Asegúrese de comprender estas advertencias antes de leer este manual.
Símbolos de seguridad
f
Advertencia
Precaución
Este símbolo se aplica a información que, si se ignora, podría
dar lugar a daños personales graves o incluso la muerte como
consecuencia de una manipulación incorrecta.
Este símbolo se aplica a información que, si se ignora, podría dar
lugar a daños personales o lesiones físicas como consecuencia
de una manipulación incorrecta.
Símbolos de información general
f
Indica procedimientos que pueden provocar averías o
lesiones si no se realizan con el cuidado suciente.
Indica información adicional y aspectos cuyo
conocimiento puede resultar útil respecto a un tema.
ES 37
Page 76

Notas sobre el uso
Instrucciones de seguridad
Advertencia
Utilice este producto únicamente con el voltaje de alimentación
especicado.
Utilice únicamente el cable USB y el adaptador de CA suministrados.
No utilice el adaptador de CA suministrado con ningún otro dispositivo.
Tenga en cuenta lo siguiente al manipular el adaptador de CA.
• No enchufe el adaptador de CA en una toma de corriente en la que
estén enchufados muchos otros dispositivos.
• No enchufe el adaptador de CA si tiene pegadas materias extrañas,
como polvo.
• Enchufe el adaptador de CA firmemente.
Riesgo de incendio, descarga eléctrica o accidente
• No sujete el adaptador de CA con las manos mojadas.
• No desenchufe el adaptador de CA tirando del cable.
Tenga en cuenta lo siguiente al manipular el cable de alimentación (el
cable microUSB suministrado).
• No utilice el cable si está dañado.
• No modifique el cable.
• No coloque objetos pesados sobre el cable.
• No doble, enrolle ni tire del cable de alimentación en exceso.
• No coloque el cable cerca de un calentador eléctrico.
No utilice el producto en lugares donde pueda mojarse o estar expuesto
a la humedad, como bajo la lluvia o en una bañera o ducha. No coloque
cerca de este producto recipientes que contengan agua, productos
Page 77

químicos u otros líquidos.
No coloque este producto en lugares expuestos a humo, vapor, polvo
o altos niveles de humedad, como encimeras de cocina o cerca de
humidicadores.
No toque el adaptador de CA durante una tormenta.
No desmonte ni modique este producto (incluidos artículos consumibles).
En las situaciones siguientes, apague inmediatamente este producto,
desenchufe el adaptador de CA y póngase en contacto con un distribuidor
Epson autorizado.
• Si ve humo o percibe olores o ruidos extraños.
• Si se introduce agua u objetos extraños en el producto.
• Si el producto se cae o el maletín se daña.
Advertencia
No deje este producto en lugares expuestos a temperaturas
extremadamente altas, como coches con las ventanillas cerradas, bajo la
luz directa del sol, o delante de salidas de calentadores o aparatos de aire
acondicionado.
Advertencia
No cubra este producto ni el adaptador de CA con un paño o material
similar durante su uso.
Advertencia
No limpie este producto con un paño mojado ni con disolventes como
alcohol, benceno o diluyente.
Riesgo de deformación debido a un incendio o al calor
Riesgo de incendio o quemaduras
Riesgo de mal funcionamiento o descarga eléctrica
ES 38
Page 78

Advertencia
No utilice este producto con un volumen inicial alto.
El uso de auriculares a alto volumen durante largos periodos de
tiempo puede producir una pérdida auditiva permanente.
Advertencia
No desmonte ni modique este producto.
No lleve puesto este producto mientras conduce, cocina o realiza cualquier
otra actividad peligrosa.
Advertencia
Compruebe que no haya ningún instrumental médico en la zona antes
Riesgo de deciencia auditiva
Riesgo de lesión o intoxicación
Riesgo de interferencia con otros dispositivos electrónicos
de su uso, ya que este producto puede producir en dicho instrumental
interferencias electromagnéticas o un funcionamiento incorrecto.
Si lleva este producto a zonas en las que el uso de ondas electromagnéticas
esté prohibido, como aviones u hospitales, apáguelo o deshabilite la
función LAN inalámbrica.
Tenga en cuenta lo siguiente al utilizar la función LAN inalámbrica en
centros sanitarios.
• No introduzca este producto en quirófanos, unidades de cuidados
intensivos (UCI) o unidades coronarias (UC).
• Apague este producto o deshabilite las ondas electromagnéticas
dentro de instalaciones hospitalarias.
• Incluso aunque no se encuentre en instalaciones hospitalarias, apague
este producto o deshabilite las ondas electromagnéticas si hay algún
instrumental médico electrónico en la zona.
Page 79

• Respete las normas establecidas por los centros sanitarios que
prohíban el uso de dispositivos emisores de ondas electromagnéticas o
el acceso a determinadas áreas con dichos dispositivos.
Si tiene implantado un marcapasos o un desbrilador, mantenga
una distancia de al menos 22 cm entre este producto y el dispositivo
implantado cuando utilice la función LAN inalámbrica. Antes de usarlo,
compruebe que no haya nadie con marcapasos cerca de usted y, si se
encuentra en un lugar concurrido como por ejemplo un tren, apague este
producto o deshabilite las ondas electromagnéticas.
No utilice este producto cerca de dispositivos controlados
automáticamente, como puertas automáticas o alarmas contra incendios,
ya que puede producir interferencias electromagnéticas que pueden dar
lugar a un accidente o un funcionamiento incorrecto de los dispositivos.
En los lugares donde su uso esté restringido, como aviones u hospitales,
respete las normas correspondientes (tales como anuncios en los aviones).
Precaución
Por motivos de seguridad, apague este producto cuando haya terminado
de usarlo.
Cuando realice labores de mantenimiento, desenchufe el adaptador de CA
y desconecte todos los cables.
Precaución
No toque las secciones calientes del adaptador de CA hasta pasado un rato
después de su uso.
Riesgo de incendio, descarga eléctrica o accidente
Riesgo de quemaduras
ES 39
Page 80

No utilice este producto durante largos periodos de tiempo si el mando
está en contacto con alguna parte de su piel.
No coloque este producto cerca de líneas de alta tensión u objetos
imantados.
Precaución
Cuando lleve puesto este producto, no mire directamente al sol o a luces
intensas.
Precaución
No coloque este producto en lugares expuestos a vibraciones o golpes.
No utilice ni almacene este producto en lugares expuestos a altas o bajas
temperaturas. Evite también los lugares expuestos a cambios bruscos de
temperatura.
Riesgo de deciencia visual
Riesgo de avería o mal funcionamiento
Precaución
No utilice ni almacene este producto en lugares expuestos a humo.
Precaución
No deje caer este producto ni lo manipule con fuerza innecesaria.
Cuando lleve puesto este producto, tenga presentes los bordes de la
montura.
No ponga el dedo entre las partes móviles de este producto, como las
articulaciones.
Riesgo de deterioro de la calidad de imagen
Riesgo de lesión o malestar
Page 81

Asegúrese de ponerse este producto correctamente.
No transporte este producto agarrándolo por el cable.
Este producto sólo debe utilizarse para visualizar imágenes.
Si se produce un problema o un funcionamiento incorrecto, deje de usar
este producto inmediatamente.
Deje de usar este producto si siente alguna sensación extraña en la piel
mientras lo lleva puesto.
Tómese siempre descansos periódicos cuando visualice imágenes con este
producto.
Si se siente cansado o incómodo mientras visualiza imágenes con este
producto, deje de usarlo inmediatamente.
No coloque objetos frágiles cerca de usted cuando utilice este producto.
Póngase este producto únicamente para visualizar imágenes. No se mueva
de un lado a otro mientras lleve puesto este producto.
No utilice este producto si es sensible a la luz o siente malestar.
Este producto no debe ser usado por niños (en especial niños por debajo
de la edad escolar primaria), ya que su vista aún se está desarrollando.
Precaución
Póngase en contacto con un distribuidor Epson autorizado cuando
sustituya las baterías.
Deseche este producto de acuerdo con las leyes y reglamentos locales.
Riesgo de lesión o intoxicación
ES 40
Page 82

Comprobar el contenido del paquete
Compruebe que todos los elementos están incluidos.
Preparación
Y Gafas-proyector (incluyendo visera de lente y
almohadilla para la nariz)
Y Mando Y Cable USB (1,4 m)
Y Adaptador de CA
Page 83

Y Tarjeta microSDHC (muestra)
Y Ganchos para gafas
Y Maletín de transporte
Y Auriculares (izquierdo y derecho)
Y Repuesto de almohadilla para la nariz (×2) Y Manual de usuario (este manual)
ES 41
Page 84

Cargar
Conecte el mando y el adaptador de CA.
1
Conecte el mando y el adaptador de
CA con el cable USB.
Enchufe el adaptador de
CA.
Preparación
Carga normal
• La carga inicial tarda aproximadamente 5 horas.
• El LED indicador se ilumina en naranja durante la carga.
• El LED indicador se ilumina en verde cuando la carga se ha
completado.
Page 85

Una vez completada la carga, retire el adaptador de CA.
2
• La batería no está completamente cargada en el momento
de la compra. Cargue la batería antes de usar este
producto.
• La duración de la batería es de aproximadamente 6 horas.
Esta duración puede variar en función de las condiciones
de uso y del entorno operativo.
• En la parte superior de la pantalla de inicio se muestra la cantidad de batería restante.
La batería está llena
Queda poca batería
La batería necesita cargarse
• El LED indica los siguientes estados.
Verde En funcionamiento / Carga completada
Verde intermitente Encendiendo / Apagando
Naranja Cargando
Rojo intermitente Queda poca batería
Rojo intermitente cinco veces Batería insuciente para encender
Azul Modo reposo
ES 42
Page 86

Encender
Preparación
Conecte las gafas-proyector y el mando.
1
Inserte el cable de conexión de las gafas-proyector en el puerto
de conexión para gafas-proyector del mando hasta que haga clic.
Enciéndalo.
2
Pulse el botón de encendido [ ] situado en la parte superior
del mando durante al menos dos segundos. El LED indicador se
ilumina en verde indicando que el dispositivo está encendido.
Page 87

Apagar
1. Pulse el botón de encendido [ ] durante al menos dos segundos. Aparecerá el
menú [Opciones del dispositivo].
2. Seleccione [Apagar] - [Aceptar].
Si el botón de encendido [
desactiva el Modo reposo.
] se pulsa durante menos de dos segundos, se activa o
Se consume algo de electricidad incluso cuando
el dispositivo está apagado.
ES 43
Page 88

Ponerse las gafas-proyector
Póngase las gafas-proyector y ajústelas de forma que pueda ver toda la pantalla.
1
Preparación
Utilice ambas manos para abrir las patillas y, a continuación, póngase las gafas-proyector.
(El cable de conexión va por detrás de las orejas.)
No abra las patillas de las gafas-proyector con
demasiada fuerza.
Page 89

Si no puede ver la parte superior o inferior de la pantalla, retire
la visera de lente y vuelva a colocar la almohadilla para la nariz.
Pulsar y
deslizar
Tal como se indica en esta ilustración, utilice los interruptores
para ensanchar las patillas de modo que se ajusten a su cabeza.
(Los interruptores le permiten ajustar el ancho en tres niveles, con
el ajuste más ancho en la parte superior y el más estrecho en la
parte inferior.)
ES 44
Page 90

Ponerse las gafas-proyector encima de unas gafas
1. Retire la almohadilla para la nariz de las gafas-proyector.
2. Acople los ganchos para gafas en la parte izquierda y derecha de
las gafas-proyector.
3. Con las gafas puestas, baje las gafas-proyector desde la parte
superior de la cabeza para colocárselas. Las gafas-proyector se
apoyarán en la montura de las gafas con la ayuda de los ganchos.
Si la altura de la pantalla
no es correcta, pruebe a
ajustar la posición de los
ganchos.
• Es posible que no pueda ponerse las gafas-proyector con determinados
modelos de gafas, dependiendo de su forma.
• No es posible ponerse las gafas-proyector encima de gafas que tengan un
ancho mayor de 147 mm.
• Cuando se ponga las gafas-proyector encima de unas gafas, puede utilizar
el repuesto de almohadilla para la nariz en lugar de los ganchos para gafas.
Page 91

Póngase los auriculares.
2
Conecte los auriculares suministrados
en la parte izquierda y derecha de las gafas-proyector.
Si ya dispone de sus propios auriculares, conéctelos en el puerto para
auriculares del mando y desconecte los auriculares incluidos con el producto.
Conecte únicamente auriculares en este puerto. No
conecte ningún otro dispositivo.
• Retire los auriculares de los oídos cuando los conecte o los desconecte. Es posible que
oiga algún ruido si desconecta los auriculares mientras está escuchando música o
reproduciendo una película, pero ello no indica un funcionamiento incorrecto.
• No toque la sección de visualización de la pantalla mientras lleve puestas las gafasproyector. Las huellas dactilares y otras marcas pueden provocar un deterioro de la
calidad de imagen. Si la sección de visualización de imágenes se ensucia, límpiela
suavemente con un limpiacristales disponible en el mercado.
ES 45
Page 92

Consejos de visualización
Visualizar la pantalla
Su percepción del tamaño de la pantalla varía en función de la ubicación de su
punto de vista. Si su punto de vista está en la distancia, tendrá la sensación de
que la pantalla está a lo lejos y es más grande.
Preparación
Aprox. 2,5 m
para 40 pulgadas
Aprox. 5 m
para 80 pulgadas
Page 93

Entorno de visualización
El modo en que se percibe una imagen puede variar en función del
brillo del entorno.
Precaución
Resulta difícil ver todo el entorno mientras se está
utilizando el producto. No deje objetos frágiles cerca
de usted, ni se mueva de un lado a otro mientras lleve
puestas las gafas-proyector.
• El modo en que se percibe una imagen varía en
función del individuo.
• Si su visión es mejor en un ojo que en el otro,
es posible que no pueda ver los contenidos 3D
correctamente.
ES 46
Page 94

Usar el mando
Operaciones básicas
Tecla ATRÁS
Muestra la pantalla anterior.
Tecla MENÚ
• Muestra los menús disponibles para la
pantalla actual.
• Muestra u oculta el teclado si
se mantiene pulsada durante la
introducción de texto.
Ranura para tarjeta microSD
Permite insertar la tarjeta microSD.
Botón de encendido
Púlselo durante al menos dos segundos
para encender el dispositivo. Cuando el
dispositivo está encendido:
• Si el botón se mantiene pulsado:
el dispositivo se apaga; se activa/
desactiva el Modo avión
• Si el botón se pulsa brevemente: se
activa/desactiva el Modo reposo
Tecla Volumen
Muestra la pantalla Volumen, que le
permite ajustar el volumen.
Page 95

Tecla INICIO
Una pulsación breve le lleva de vuelta a
la pantalla de inicio. Mantenga esta tecla
pulsada para mostrar las aplicaciones
usadas recientemente.
Interruptor de bloqueo de teclas
Desplace el interruptor hacia abajo para
evitar operaciones accidentales.
Tecla 2D/3D
Alterna entre el Modo 2D y 3D.
Teclas de dirección
• Mueve el área de selección hacia arriba, abajo, izquierda o derecha.
• Desplaza la página.
Tecla Brillo
Muestra la pantalla Brillo, que le permite
ajustar el brillo.
Tecla Enter
Selecciona o conrma las opciones
elegidas.
ES 47
Page 96

Usar el trackpad
Trackpad
Al tocar el trackpad con el dedo, aparece
un puntero en la pantalla.
Si toca el trackpad durante aproximadamente
un segundo, el puntero aumenta de tamaño,
lo que le permite arrastrar.
Puntero
Page 97

Hacer clic
f
Mueva el puntero hasta un icono o elemento en
pantalla y, a continuación, toque el trackpad.
Arrastrar
f
Toque el trackpad durante aproximadamente un
segundo para seleccionar el icono o elemento en
pantalla y, a continuación, arrastre el dedo por el
trackpad para moverlo.
Botón Silencio
Pulse el botón Silencio situado en el cable
de conexión de las gafas-proyector para
silenciar la imagen y el audio.
ES 48
Page 98

Usar la pantalla de inicio
Operaciones básicas
Desbloquear
Arrastre el icono [ ] hacia arriba.
Iconos de la pantalla de inicio
1
Hora
2
Icono de estado
3
Navegador
4
Lista de aplicaciones
Cambiar la pantalla de inicio
5
6
Accesos directos
7
Cambiar las listas de accesos
directos
Page 99

Iniciar una aplicación desde un acceso directo
Utilice las teclas de dirección para seleccionar un acceso directo y,
a continuación, pulse la tecla Enter.
Iconos de la barra de estado
Reproduciendo
música
Comunicando
mediante USB
Conectando/usando
LAN inalámbrica
Examinando tarjeta
microSD
[Baja]
W
[Llena]
Estado de la batería Cargando
Descarga completada
Dolby Mobile activado
Alarma programada
Modo avión
Desactivando tarjeta
microSD
ES 49
Page 100

Conectarse a Internet
Puede acceder a Internet a través de una red LAN inalámbrica.
Habilite la función LAN inalámbrica y, a continuación, busque redes disponibles.
1
Operaciones básicas
Inicie [ ] desde la pantalla de inicio y, a continuación,
seleccione [Conexiones inalámbricas y redes].
Seleccione [Ajustes de Wi-Fi].
Seleccione [Wi-Fi].
 Loading...