

Page 1
BrightLink Solo
™
Interactive Module/Module interactif
(IU-01)
Quick Setup Guide
Guide d’installation rapide
Page 2

Safety Instructions
• Installation of the product on the wall should be performed by qualified technicians using only
approved mounting equipment.
• Incomplete or incorrect installation could cause the product to fall and cause personal injury or property damage.
• If you apply adhesives to prevent the screws from loosening, or if you use lubricants or oils on the wall
plate, the housing may crack and cause the product to fall, resulting in personal injury or property
damage.
• Handle the USB cable carefully to avoid fire or electric shock. Observe the following precautions when
handling:
Do not handle the cable with wet hands.
Do not use a cable that is damaged or modified.
Do not pull the cable with too much force when routing it or connecting it to a computer.
• Do not hang on the arm or hang a heavy object on it.
• If the product or wall plate falls, it could cause personal injury or property damage.
• When you mount the product on the wall with the wall plate, the wall requires enough strength to
hold the product and the wall plate. Confirm the weight of the product and the wall plate before
installation, and maintain the strength of the wall. If the wall is not strong enough, reinforce the wall
before installation.
• Do not install the product in a location where there is excessive humidity or dust, near cooking or heating appliances, or in a location exposed to smoke or steam. Fire or electric shock may result.
• Do not install the product in a location where it might be exposed to vibration or shock, which could
cause damage to the product or mounting surface. It could also cause the product to fall, resulting in
personal injury or property damage.
• Tighten all screws firmly after adjustment. Otherwise, the product or wall plate may fall and cause personal injury or property damage.
• Never loosen the bolts and nuts after installation.
• Confirm on a regular basis that the screws have not become loose. If you find any loose screws, tighten
them firmly. Otherwise, the product or wall plate may fall and cause personal injury or property damage.
• Follow the instructions in this guide when installing the wall plate. Otherwise, the wall plate may fall,
resulting in personal injury or property damage.
• Do not use excessive force when adjusting the product. Otherwise, the product may cause personal
injury.
2
Page 3

Contents
Safety Instructions. . . . . . . . . . . . . . . . . . . . . . . . . . . . . . . . . . . . . . . . . . . . . . . . . . . . . . . . . . . . . . 2
Contents . . . . . . . . . . . . . . . . . . . . . . . . . . . . . . . . . . . . . . . . . . . . . . . . . . . . . . . . . . . . . . . . . . . . . . . 3
Unpacking . . . . . . . . . . . . . . . . . . . . . . . . . . . . . . . . . . . . . . . . . . . . . . . . . . . . . . . . . . . . . . . . . . . . . 4
Specifications . . . . . . . . . . . . . . . . . . . . . . . . . . . . . . . . . . . . . . . . . . . . . . . . . . . . . . . . . . . . . . . . . . 4
Long Wall Plate Dimensions . . . . . . . . . . . . . . . . . . . . . . . . . . . . . . . . . . . . . . . . . . . . . . . . . . . 4
Short Wall Plate Dimensions . . . . . . . . . . . . . . . . . . . . . . . . . . . . . . . . . . . . . . . . . . . . . . . . . . . 4
Interactive Module Dimensions . . . . . . . . . . . . . . . . . . . . . . . . . . . . . . . . . . . . . . . . . . . . . . . . . 5
Positioning the Interactive Module . . . . . . . . . . . . . . . . . . . . . . . . . . . . . . . . . . . . . . . . . . . . . . . 5
Supported Image Sizes . . . . . . . . . . . . . . . . . . . . . . . . . . . . . . . . . . . . . . . . . . . . . . . . . . . . . . . . 5
Projector Position. . . . . . . . . . . . . . . . . . . . . . . . . . . . . . . . . . . . . . . . . . . . . . . . . . . . . . . . . . . . 6
Projection Surface . . . . . . . . . . . . . . . . . . . . . . . . . . . . . . . . . . . . . . . . . . . . . . . . . . . . . . . . . . . 6
Projection Angle for Ceiling Mounted Projectors. . . . . . . . . . . . . . . . . . . . . . . . . . . . . . . . . . . . 7
Determining the Height of the Interactive Module . . . . . . . . . . . . . . . . . . . . . . . . . . . . . . . . . . 7
Installation Measurements in Inches . . . . . . . . . . . . . . . . . . . . . . . . . . . . . . . . . . . . . . . . . . . . . 9
Installation Measurements in Millimeters. . . . . . . . . . . . . . . . . . . . . . . . . . . . . . . . . . . . . . . . . 10
Confirming the Projector Position . . . . . . . . . . . . . . . . . . . . . . . . . . . . . . . . . . . . . . . . . . . . . . 11
Installing the Interactive Module . . . . . . . . . . . . . . . . . . . . . . . . . . . . . . . . . . . . . . . . . . . . . . . . 13
Installing the Wall Plate . . . . . . . . . . . . . . . . . . . . . . . . . . . . . . . . . . . . . . . . . . . . . . . . . . . . . . 13
Mounting the Interactive Module . . . . . . . . . . . . . . . . . . . . . . . . . . . . . . . . . . . . . . . . . . . . . . 14
English
Using the Interactive Module . . . . . . . . . . . . . . . . . . . . . . . . . . . . . . . . . . . . . . . . . . . . . . . . . . . 15
Solving Problems. . . . . . . . . . . . . . . . . . . . . . . . . . . . . . . . . . . . . . . . . . . . . . . . . . . . . . . . . . . . . . 17
Interactive Pen Problems . . . . . . . . . . . . . . . . . . . . . . . . . . . . . . . . . . . . . . . . . . . . . . . . . . . . . 17
Battery Problems . . . . . . . . . . . . . . . . . . . . . . . . . . . . . . . . . . . . . . . . . . . . . . . . . . . . . . . . . . . 17
Where to Get Help . . . . . . . . . . . . . . . . . . . . . . . . . . . . . . . . . . . . . . . . . . . . . . . . . . . . . . . . . . . . . 18
Internet Support . . . . . . . . . . . . . . . . . . . . . . . . . . . . . . . . . . . . . . . . . . . . . . . . . . . . . . . . . . . 18
Speak to a Support Representative . . . . . . . . . . . . . . . . . . . . . . . . . . . . . . . . . . . . . . . . . . . . . . 18
Software Technical Support . . . . . . . . . . . . . . . . . . . . . . . . . . . . . . . . . . . . . . . . . . . . . . . . . . . 18
Purchase Supplies and Accessories . . . . . . . . . . . . . . . . . . . . . . . . . . . . . . . . . . . . . . . . . . . . . . 18
Limited Warranty . . . . . . . . . . . . . . . . . . . . . . . . . . . . . . . . . . . . . . . . . . . . . . . . . . . . . . . . . . . . . . 19
Copyright Notice . . . . . . . . . . . . . . . . . . . . . . . . . . . . . . . . . . . . . . . . . . . . . . . . . . . . . . . . . . . . . . 20
3
Page 4
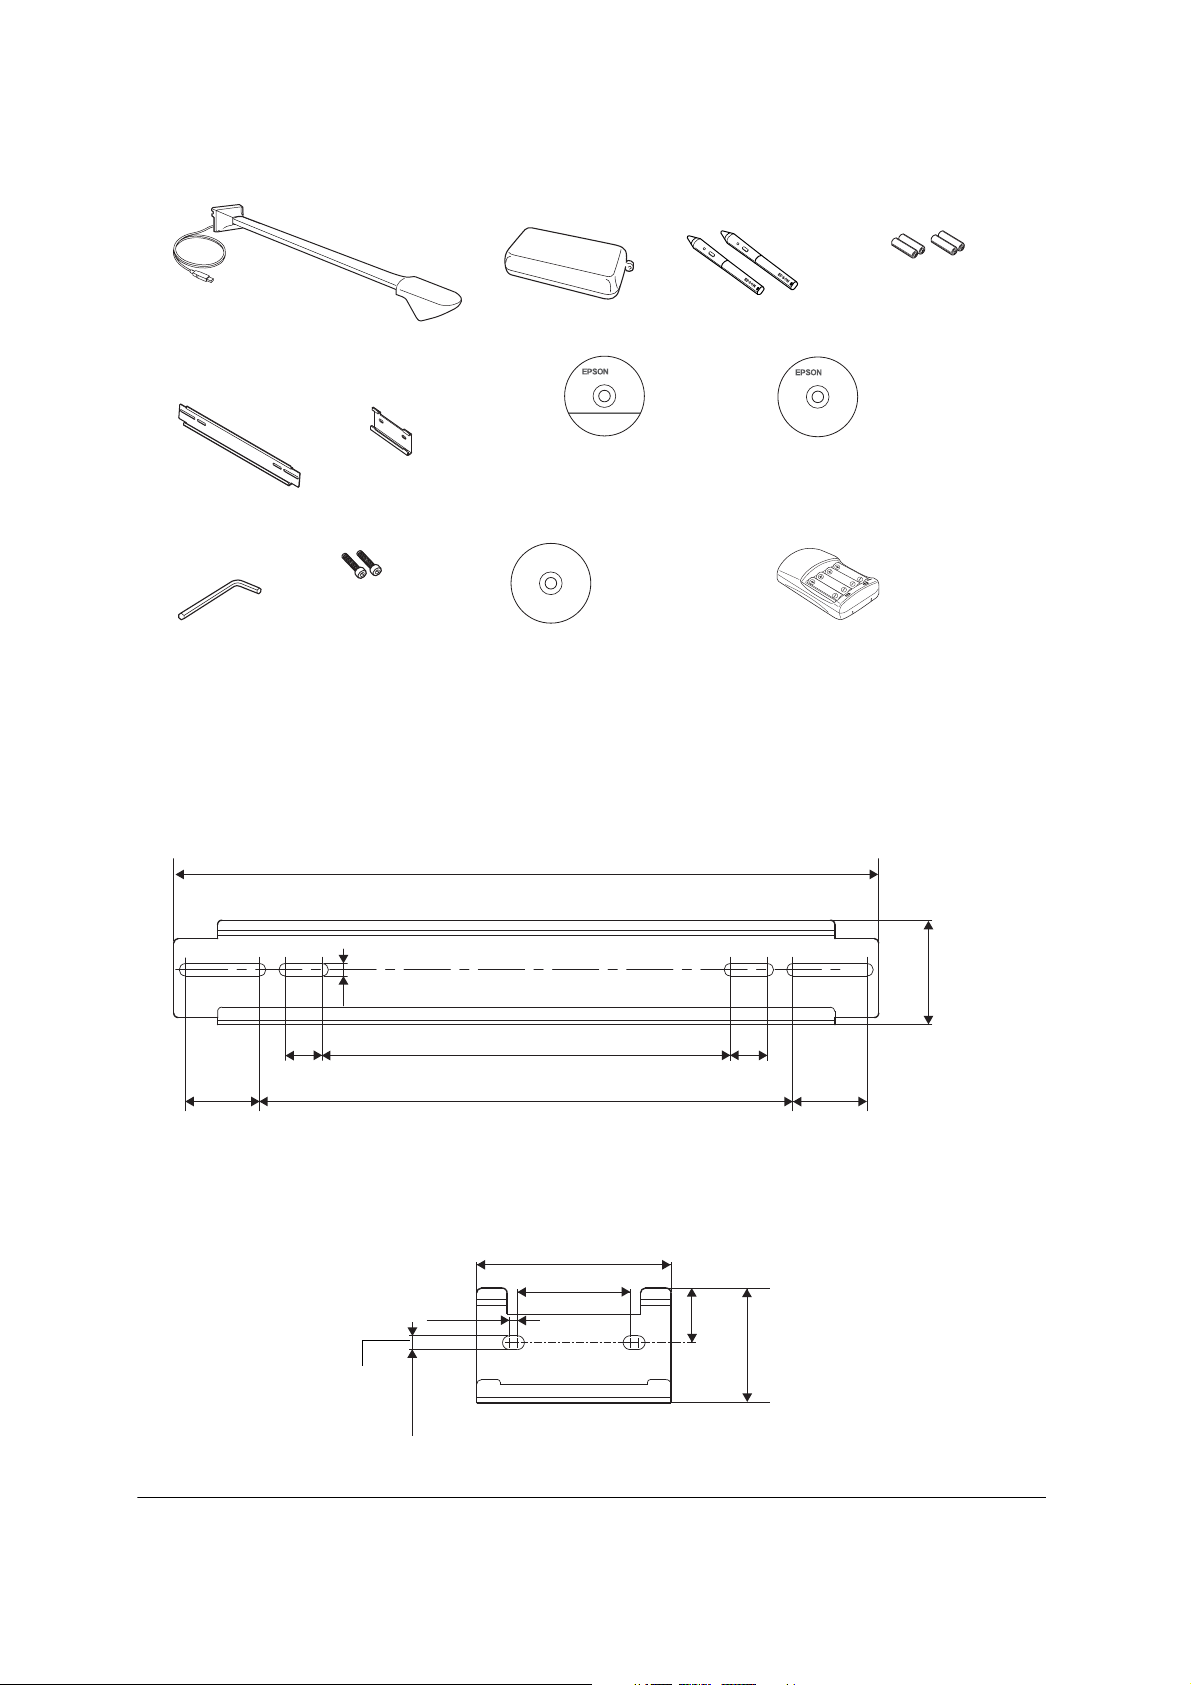
Unpacking
Interactive module with USB cable
Pen tray
4 AAA alkaline
batteries
Interactive pens
Short wall plate
Long wall plate
(double-stud)
Hexagonal
wrench
(single-stud)
Bolts
Specifications
Long Wall Plate Dimensions
.33 in. (8.5 mm)
Epson Projector
Software for Easy
Interactive Function CD
TeamBoard
Draw CD
19.0 in. (482.6 mm)
Document CD
Battery charger with 4 AAA
rechargeable batteries
2.81 in.
(71.5 mm)
1.0 in.
(25.4 mm)
2.0 in.
(50.8 mm)
Short Wall Plate Dimensions
0.2 in.
(5 mm)
0.3 in.
(8.5 mm)
11.0 in. (279.4 mm)
14.4 in. (365.1 mm)
4.8 in. (120.8 mm)
2.8 in. (70 mm)
4
1.0 in.
(25.4 mm)
1.3 in.
(33.9
mm)
2.0 in.
(50.8 mm)
2.8 in.
(71.5 mm)
Page 5
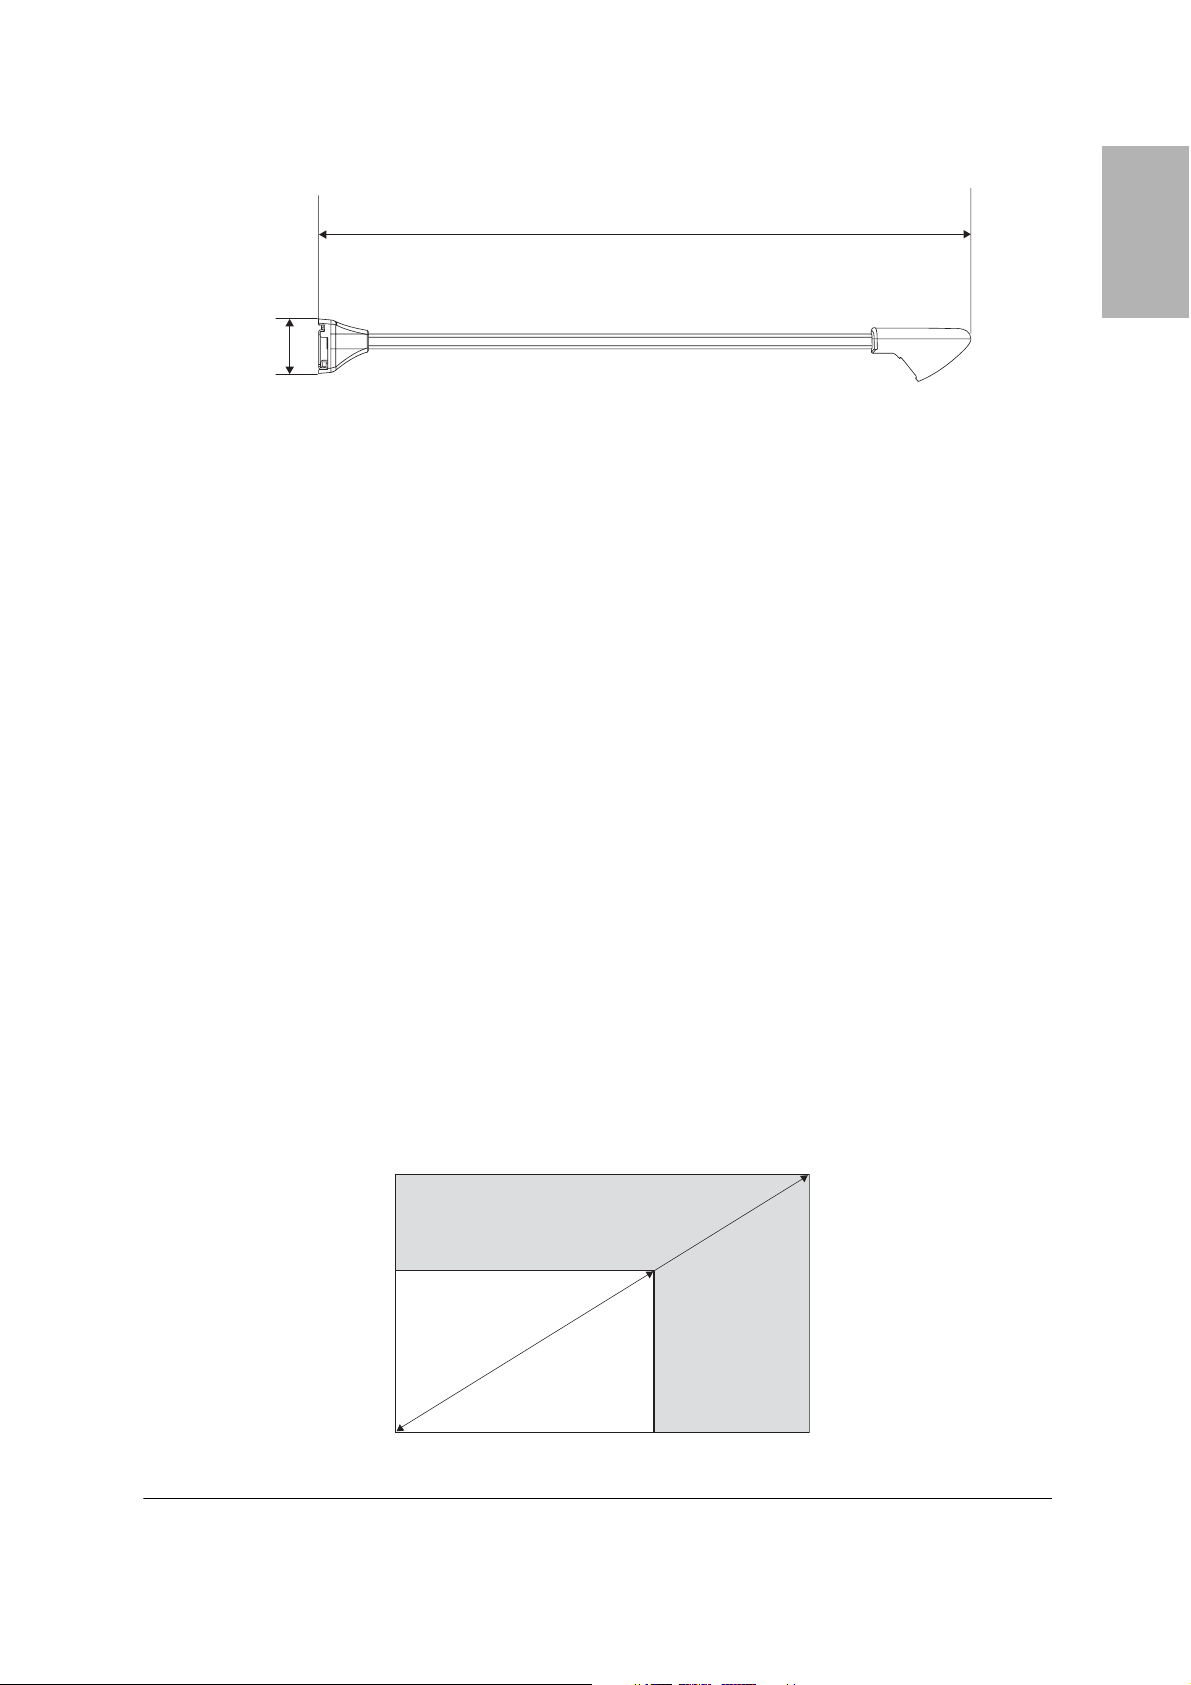
Interactive Module Dimensions
g
41.4 in. (1051 mm)
3.5 in.
(88 mm)
Positioning the Interactive Module
The interactive module mounts on a wall and works with images projected on a pre-installed whiteboard or
directly on the wall. For interactive use, your images must be projected on a hard surface, rather than a
screen.
Note
If you normally project on a screen, you need to move or retract it so that you can project directly on a wall or preinstalled whiteboard; this may require refocusing your projector.
The projected image must be between 58 and 102 inches (147 and 259 cm), measured diagonally. You may
need to adjust your image size (using your projector’s zoom feature) to work with the interactive module. If
you project on a whiteboard, the image may not fill the entire board, depending on the size and aspect
ratio.
English
Supported Image Sizes
Width and Height Measurements
• Width: from 50.4 to 81.6 inches (1280 to 2073 mm)
• Height: from 28.4 to 61.2 inches (722 to 1555 mm)
Diagonal Measurements
• 16:10 WXGA: from 60 to 96 inches (152 to 244 cm) diagonal
• 4:3 XGA: from 63 to 102 inches (160 to 259 cm) diagonal
• 16:9 Widescreen: from 58 to 93 inches (147 to 236 cm) diagonal
Height of image
area (H)
from 28.4 to 61.2 in.
(722 to 1555 mm)
58 inches (147 cm)
minimum diagonal
image size (16:9)
Width of ima
e area (W) from 50.4 to 81.6 in. (1280 to 2073 mm)
102 inches (259 cm)
maximum diagonal
image size (XGA)
5
Page 6
Note
Interactivity cannot be guaranteed if the screen is smaller than 58 inches (147 cm) measured diagonally
(minimum screen size for 16:9 widescreen aspect ratio).
Projector Position
The interactive module is designed to work with a ceiling-mounted projector. However, you can also use it
with a portable projector on a table or cart.
With any type of projector, you will need to recalibrate if you change the size, position, or resolution of the
image. This may happen more frequently when you use a portable projector.
If you use the interactive module with a portable projector, be aware of the following:
• You need to know the size, position, and location of the projected image before you can decide where
to mount the interactive module. Epson recommends that you determine the best position for your
portable projector, and mark the location on the table or floor so that you can always set it up in the
same place.
• Reflection of the light from the projector may cause the interactive module to malfunction.
• Epson recommends that you position the interactive module for the largest possible image size from
your portable projector(s).
• The person interacting with the image must avoid looking into the projector lens.
Warning
Never look into the projector lens when the lamp is turned on; the bright light can damage your eyes.
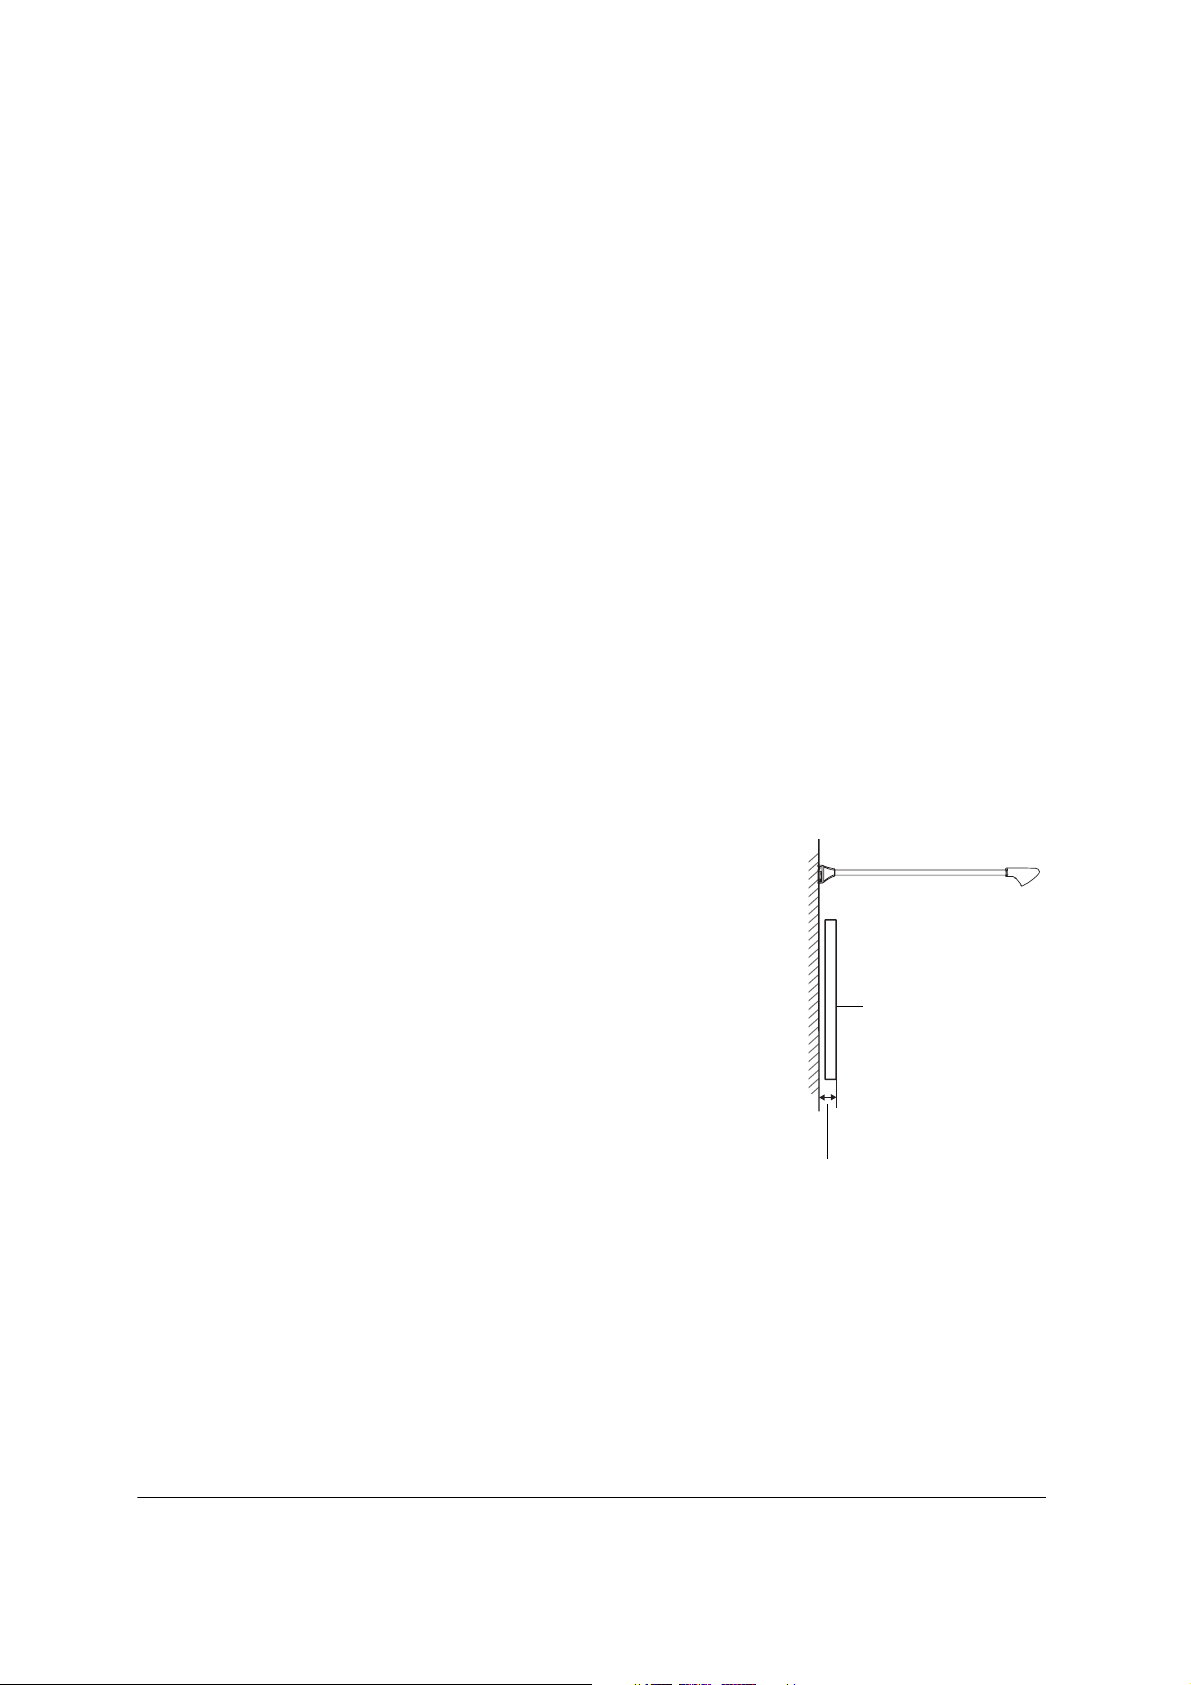
Projection Surface
• Your images must be projected on a hard surface, rather than a screen.
• If you are projecting on a wall-mounted board, make sure the distance
between the wall and the board is less than 6 inches (150 mm)
• Whether you are projecting on a wall-mounted board or a plain wall,
make sure the wall is flat and free from any obstructions, bulges, or
protrusions.
Whiteboard
Less than 6 inches
(150 mm)
6
Page 7
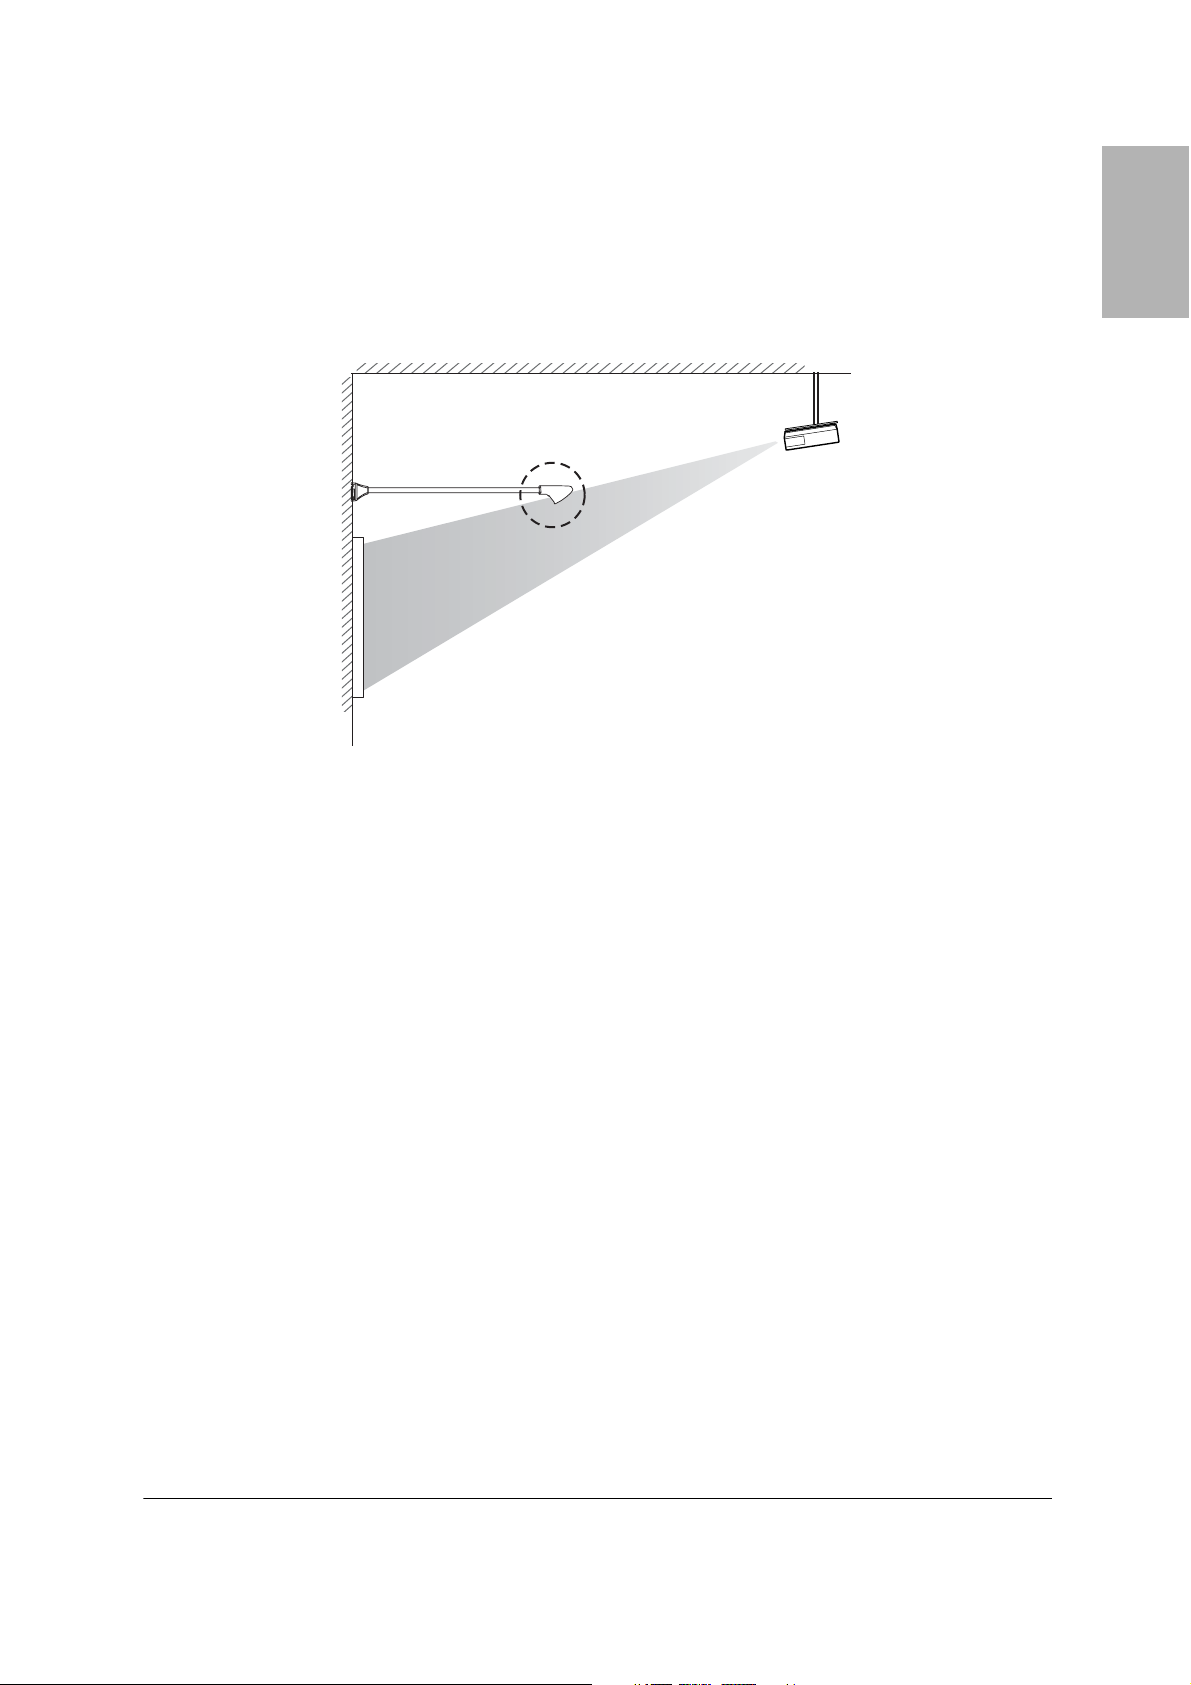
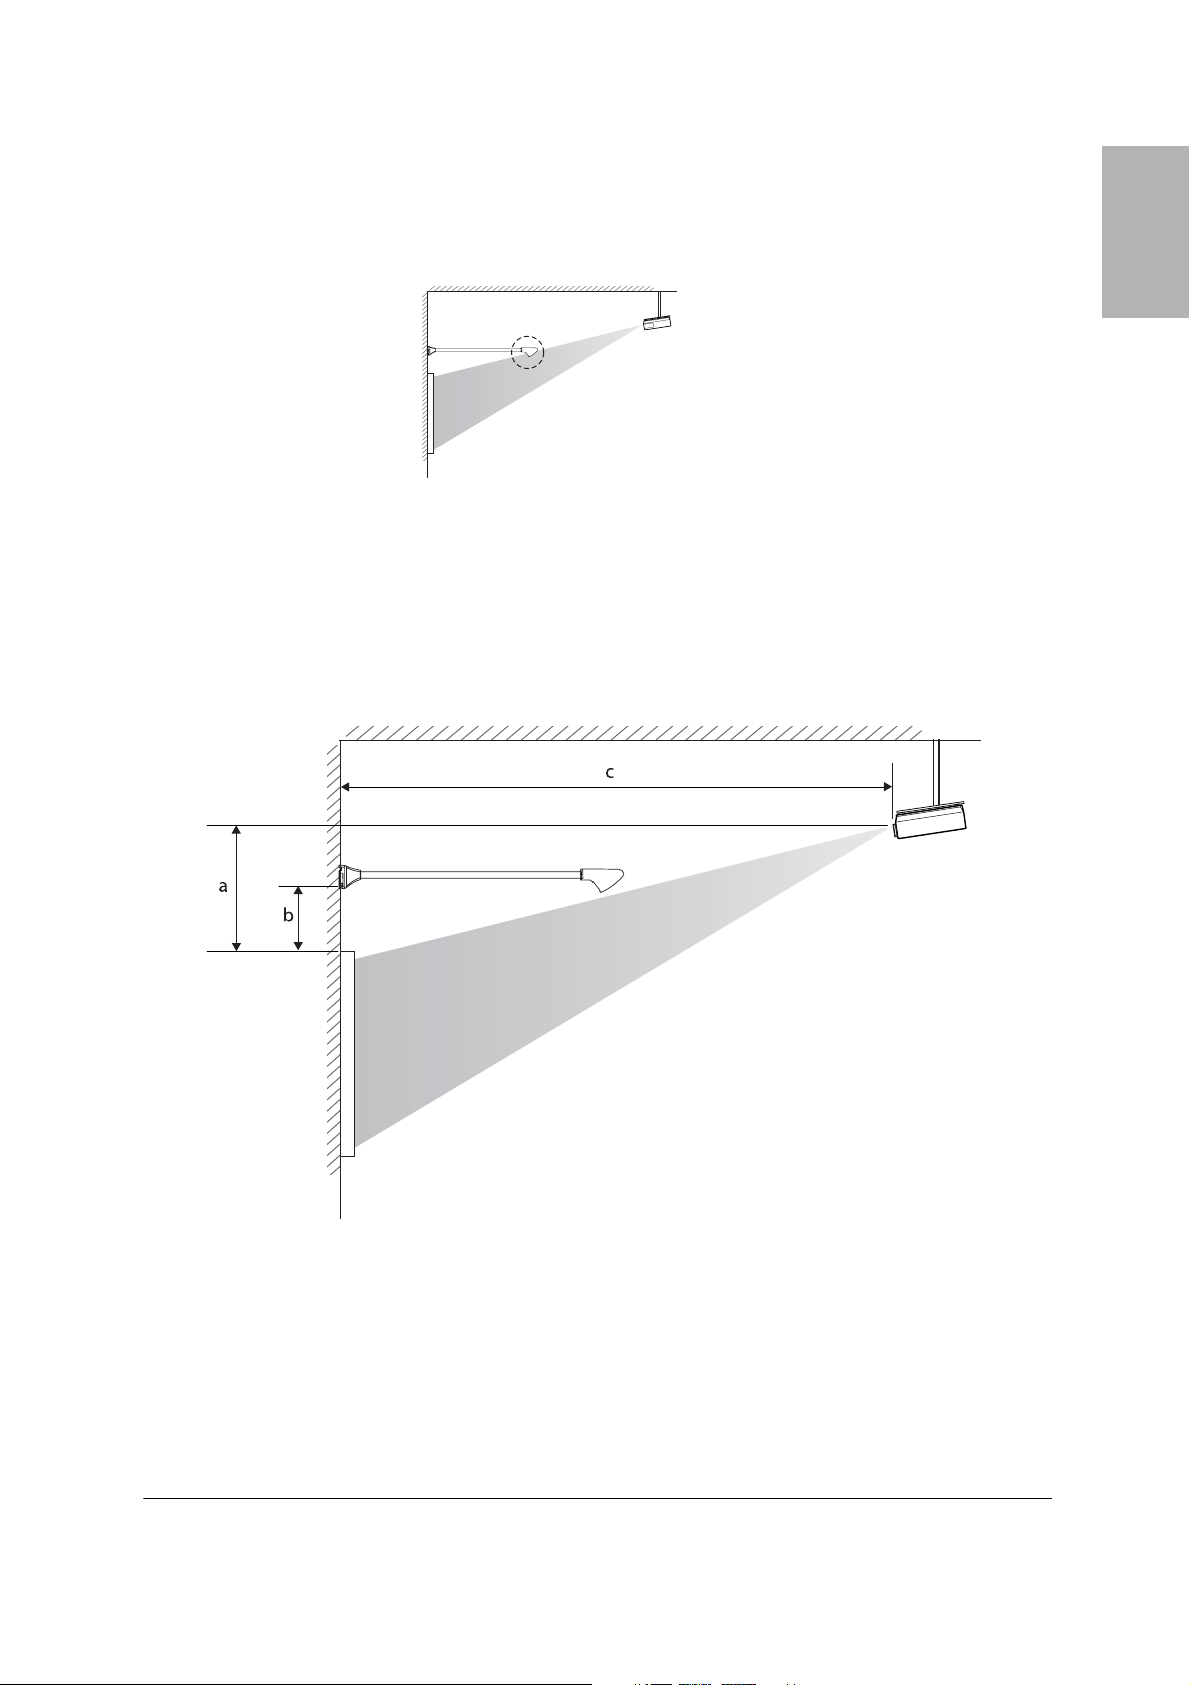
Projection Angle for Ceiling Mounted Projectors
Make sure your projector is positioned so that the interactive module will not interfere with the projected
image. You may need to adjust your projector’s position to avoid possible interference.
Refer to the table on page 9 or 10 and formulas on page 11 to determine whether you need to adjust
your ceiling-mounted projector’s position. For additional support tools and information, visit
www.epson.com/support (U.S.) or www.epson.ca/support (Canada).
AVOID
Projector
English
Note
No matter where your projector and interactive module are located, the person using the pen will cast a shadow on
the image. The shadow will not interfere with the interactive function, as long as the signal itself is not blocked.
Determining the Height of the Interactive Module
You need to determine the required distance between the top of the image area and the bottom of the wall
plate, based on the diagonal image size and aspect ratio. This distance indicates how high you need to
mount the interactive module on the wall.
1 Determine the aspect ratio of your whiteboard or projected image. For new projectors and computers,
this will most likely be WXGA (16:10). For older equipment, this will most likely be XGA (4:3).
If you are planning to project on a whiteboard, check the measurements on page 9 or 10 and select the
image size that most closely matches your whiteboard. If the size and aspect ratio of your board do not
not match any of the listed dimensions, the image may not fill the entire board.
2 Measure the size of the projection area, including the height (
size (
S).
H), width (W), and diagonal image
7
Page 8
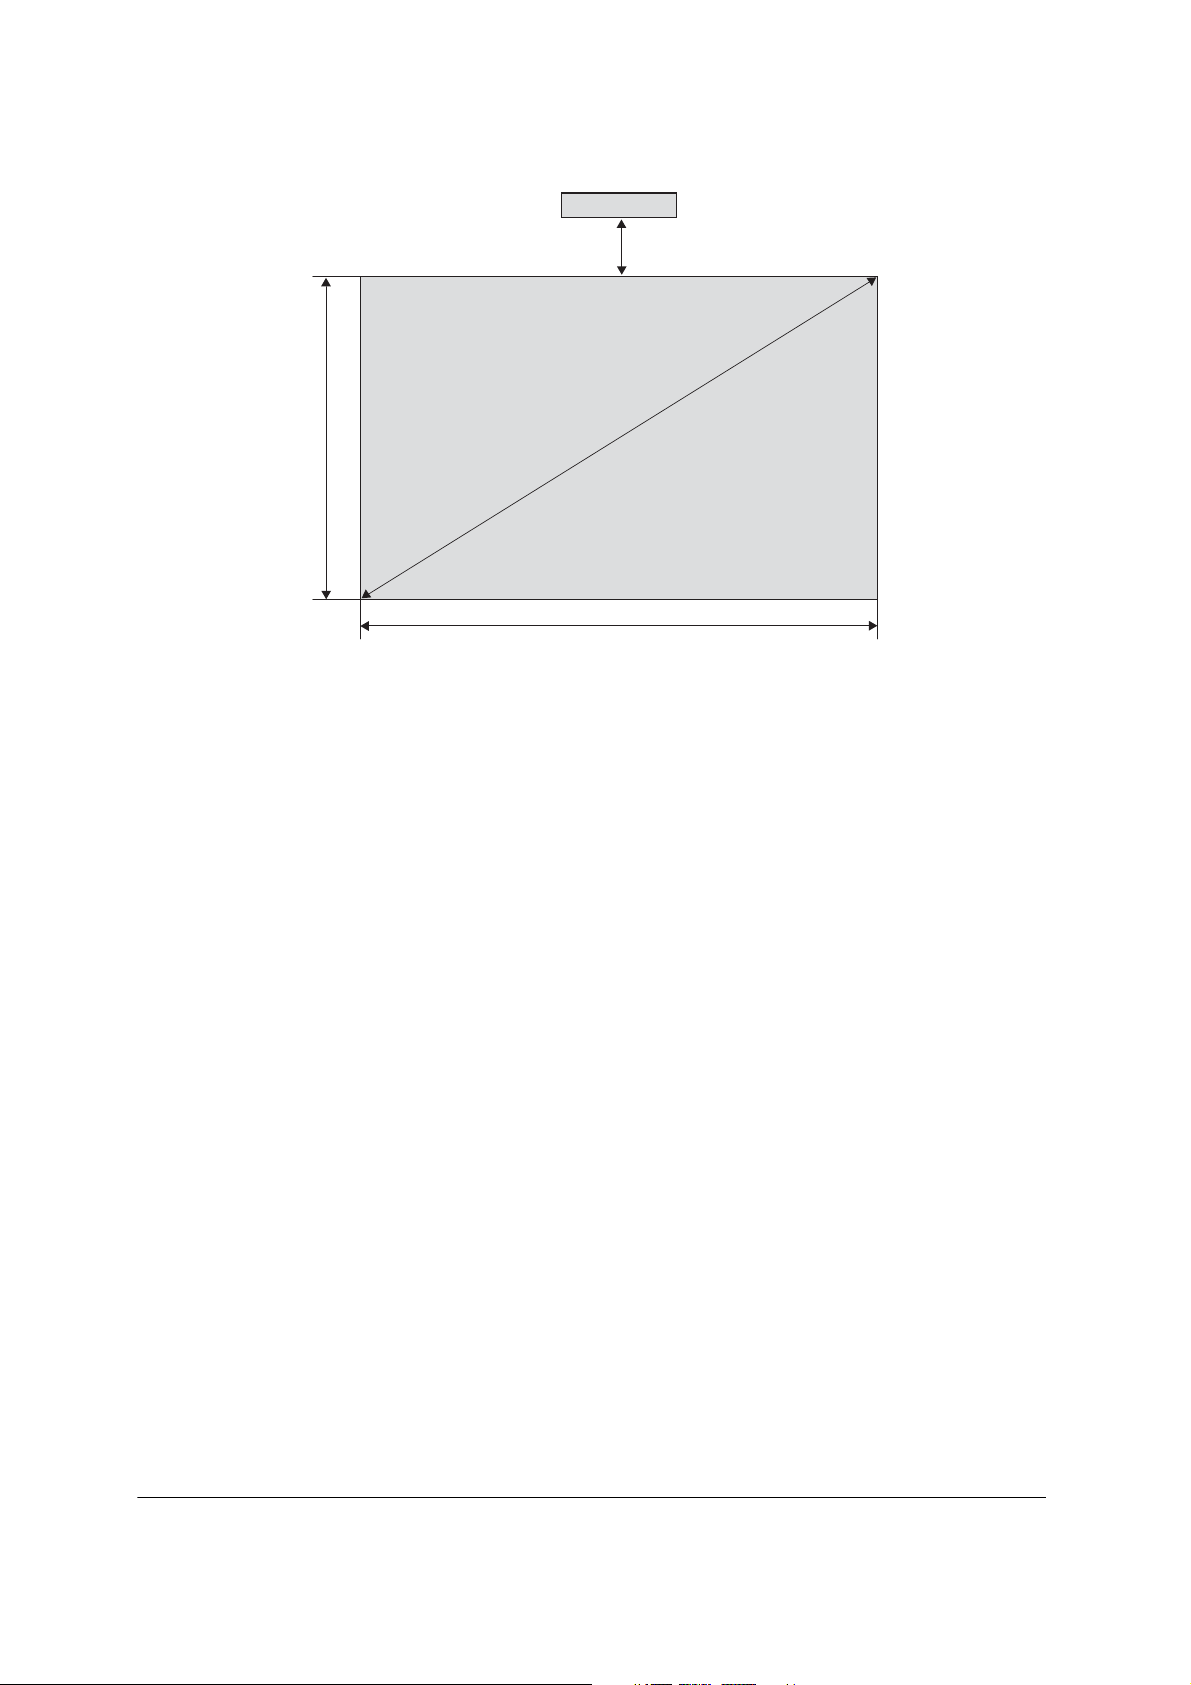
Height of image
area (
H)
Wall plate for interactive module
Required distance from top of
image area to wall plate (
b)
Diagonal
image size (
S)
Width of image area (
W)
3 Determine the required distance from the top of the image area to the wall plate (b), using the aspect
ratio and image size information and the tables on the following pages.
Note
The information in the tables on pages 9 and 10 is designed for use with ceiling-mounted projectors.
8
Page 9
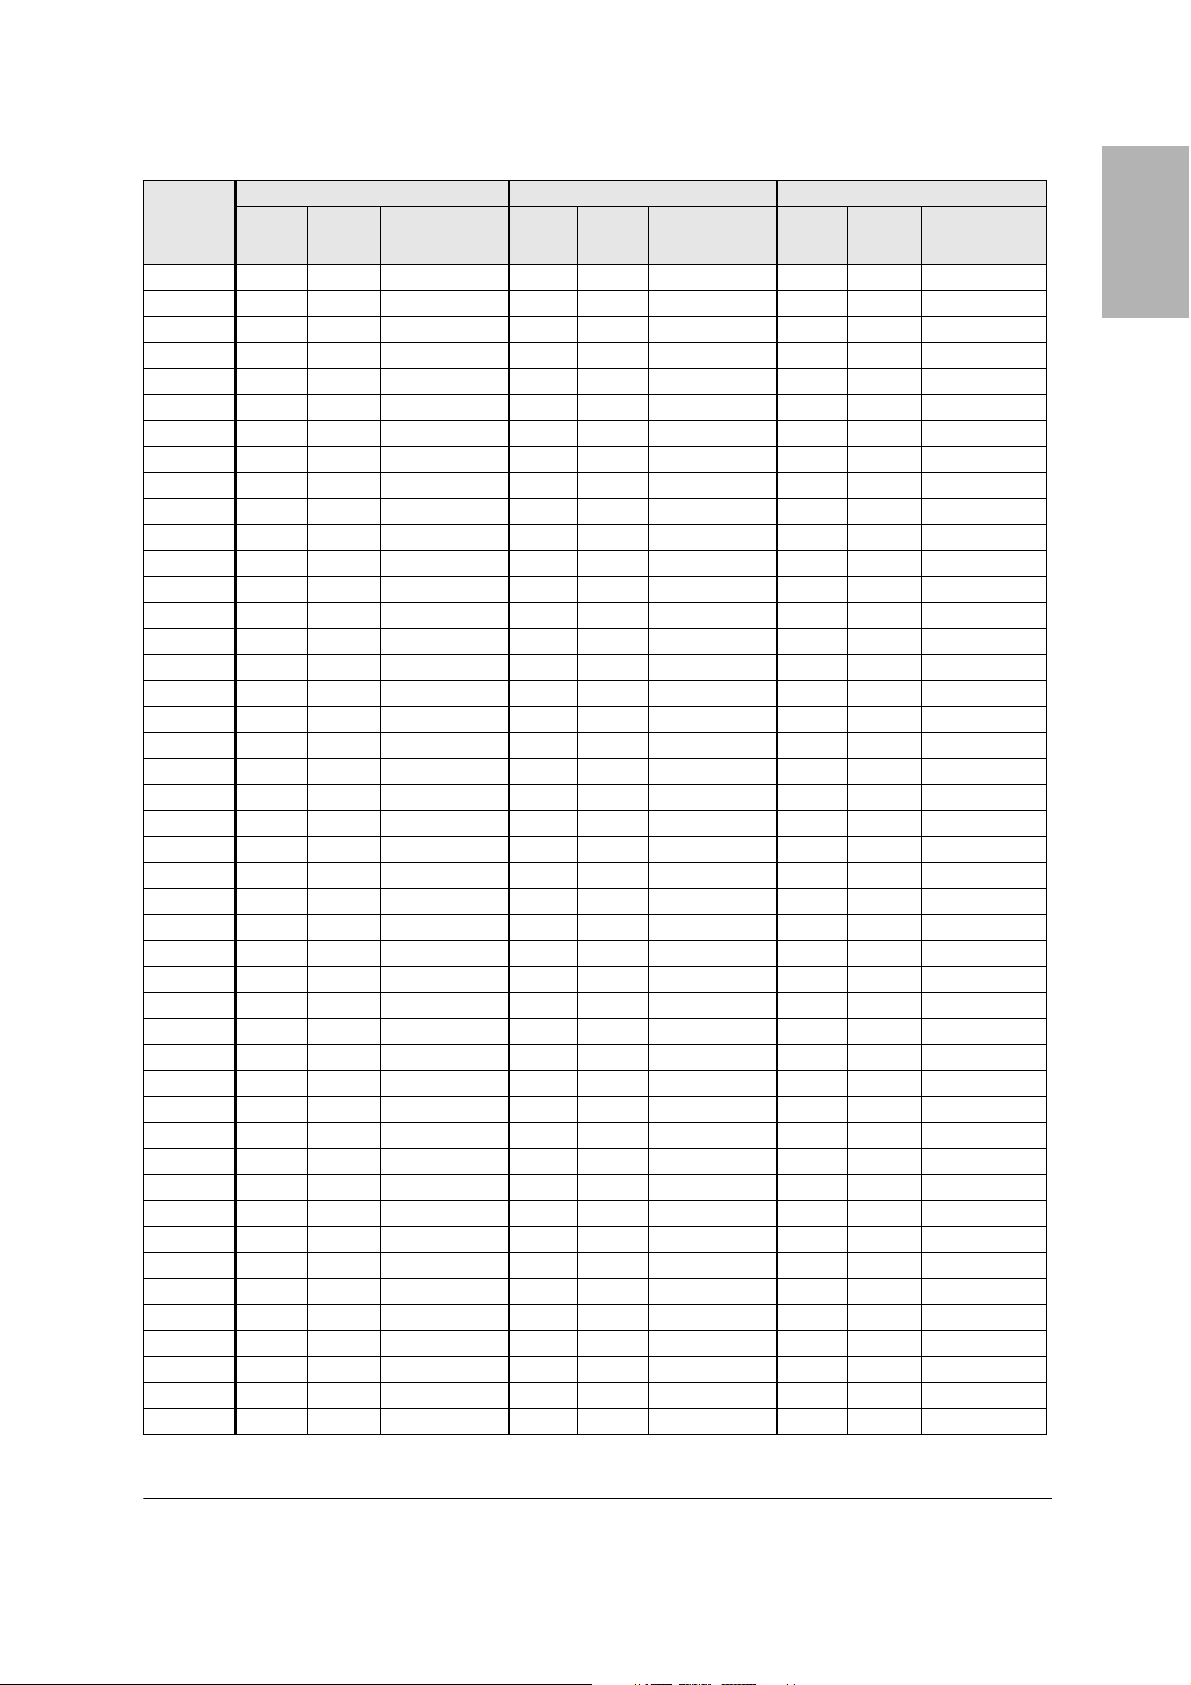
Installation Measurements in Inches
Diagonal
image size
(S)
58"
59"
60"
61"
62"
63"
64"
65"
66"
67"
68"
69"
70"
71"
72"
73"
74"
75"
76"
77"
78"
79"
80"
81"
82"
83"
84"
85"
86"
87"
88"
89"
90"
91"
92"
93"
94"
95"
96"
97"
98"
99"
100"
101"
102"
16:10 WXGA 4:3 XGA 16:9 Widescreen
Image
width
(W)
— — — — — — 50.6 28.4 26.8
— — — — — — 51.4 28.9 26.6
50.9 31.8 25.1 — — — 52.3 29.4 26.3
51.7 32.3 24.9 — — — 53.2 29.9 26.1
52.6 32.9 24.6 — — — 54.0 30.4 25.8
53.4 33.4 24.3 50.4 37.8 22.1 54.9 30.9 25.6
54.3 33.9 24.1 51.2 38.4 21.8 55.8 31.4 25.3
55.1 34.4 23.8 52.0 39.0 21.5 56.7 31.9 25.1
56.0 35.0 23.5 52.8 39.6 21.2 57.5 32.4 24.8
56.8 35.5 23.3 53.6 40.2 20.9 58.4 32.8 24.6
57.7 36.0 23.0 54.4 40.8 20.6 59.3 33.3 24.4
58.5 36.6 22.7 55.2 41.4 20.3 60.1 33.8 24.1
59.4 37.1 22.5 56.0 42.0 20.0 61.0 34.3 23.9
60.2 37.6 22.2 56.8 42.6 19.7 61.9 34.8 23.6
61.1 38.2 22.0 57.6 43.2 19.4 62.8 35.3 23.4
61.9 38.7 21.7 58.4 43.8 19.1 63.6 35.8 23.1
62.8 39.2 21.4 59.2 44.4 18.8 64.5 36.3 22.9
63.6 39.7 21.2 60.0 45.0 18.5 65.4 36.8 22.6
64.4 40.3 20.9 60.8 45.6 18.2 66.2 37.3 22.4
64.3 40.8 20.6 61.6 46.2 17.9 67.1 37.8 22.2
66.1 41.3 20.4 62.4 46.8 17.6 68.0 38.2 21.9
67.0 41.9 20.1 63.2 47.4 17.3 68.9 38.7 21.7
67.8 42.4 19.8 64.0 48.0 17.0 69.7 39.2 21.4
68.7 42.9 19.6 64.8 48.6 16.7 70.6 39.7 21.2
69.5 43.5 19.3 65.6 49.2 16.4 71.5 40.2 20.9
70.4 44.0 19.0 66.4 49.8 16.1 72.3 40.7 20.7
71.2 44.5 18.8 67.2 50.4 15.8 73.2 41.2 20.4
72.1 45.0 18.5 68.0 51.0 15.5 74.1 41.7 20.2
72.9 45.6 18.2 68.8 51.6 15.2 75.0 42.2 19.9
73.8 46.1 18.0 69.6 52.2 14.9 75.8 42.7 19.7
74.6 46.6 17.7 70.4 52.8 14.6 76.7 43.1 19.5
75.5 47.2 17.4 71.2 53.4 14.3 77.6 43.6 19.2
76.3 47.7 17.2 72.0 54.0 14.0 78.4 44.1 19.0
77.2 48.2 16.9 72.8 54.6 13.7 79.3 44.6 18.7
78.0 48.8 16.7 73.6 55.2 13.4 80.2 45.1 18.5
78.9 49.3 16.4 74.4 55.8 13.1 81.1 45.6 18.2
79.7 49.8 16.1 75.2 56.4 12.8 — — —
80.6 50.3 15.9 76.0 57.0 12.5 — — —
81.4 50.9 15.6 76.8 57.6 12.2 — — —
— — — 77.6 58.2 11.9 — — —
— — — 78.4 58.8 11.6 — — —
— — — 79.2 59.4 11.3 — — —
— — — 80.0 60.0 11.0 — — —
— — — 80.8 60.6 10.7 — — —
— — — 81.6 61.2 10.4 — — —
Image
height
(H)
Distance from
top of image to
wall plate (b)
Image
width
(W)
Image
height
(H)
Distance from
top of image to
wall plate (b)
Image
width
(W)
Image
height
(H)
Distance from
top of image to
wall plate (b)
English
9
Page 10
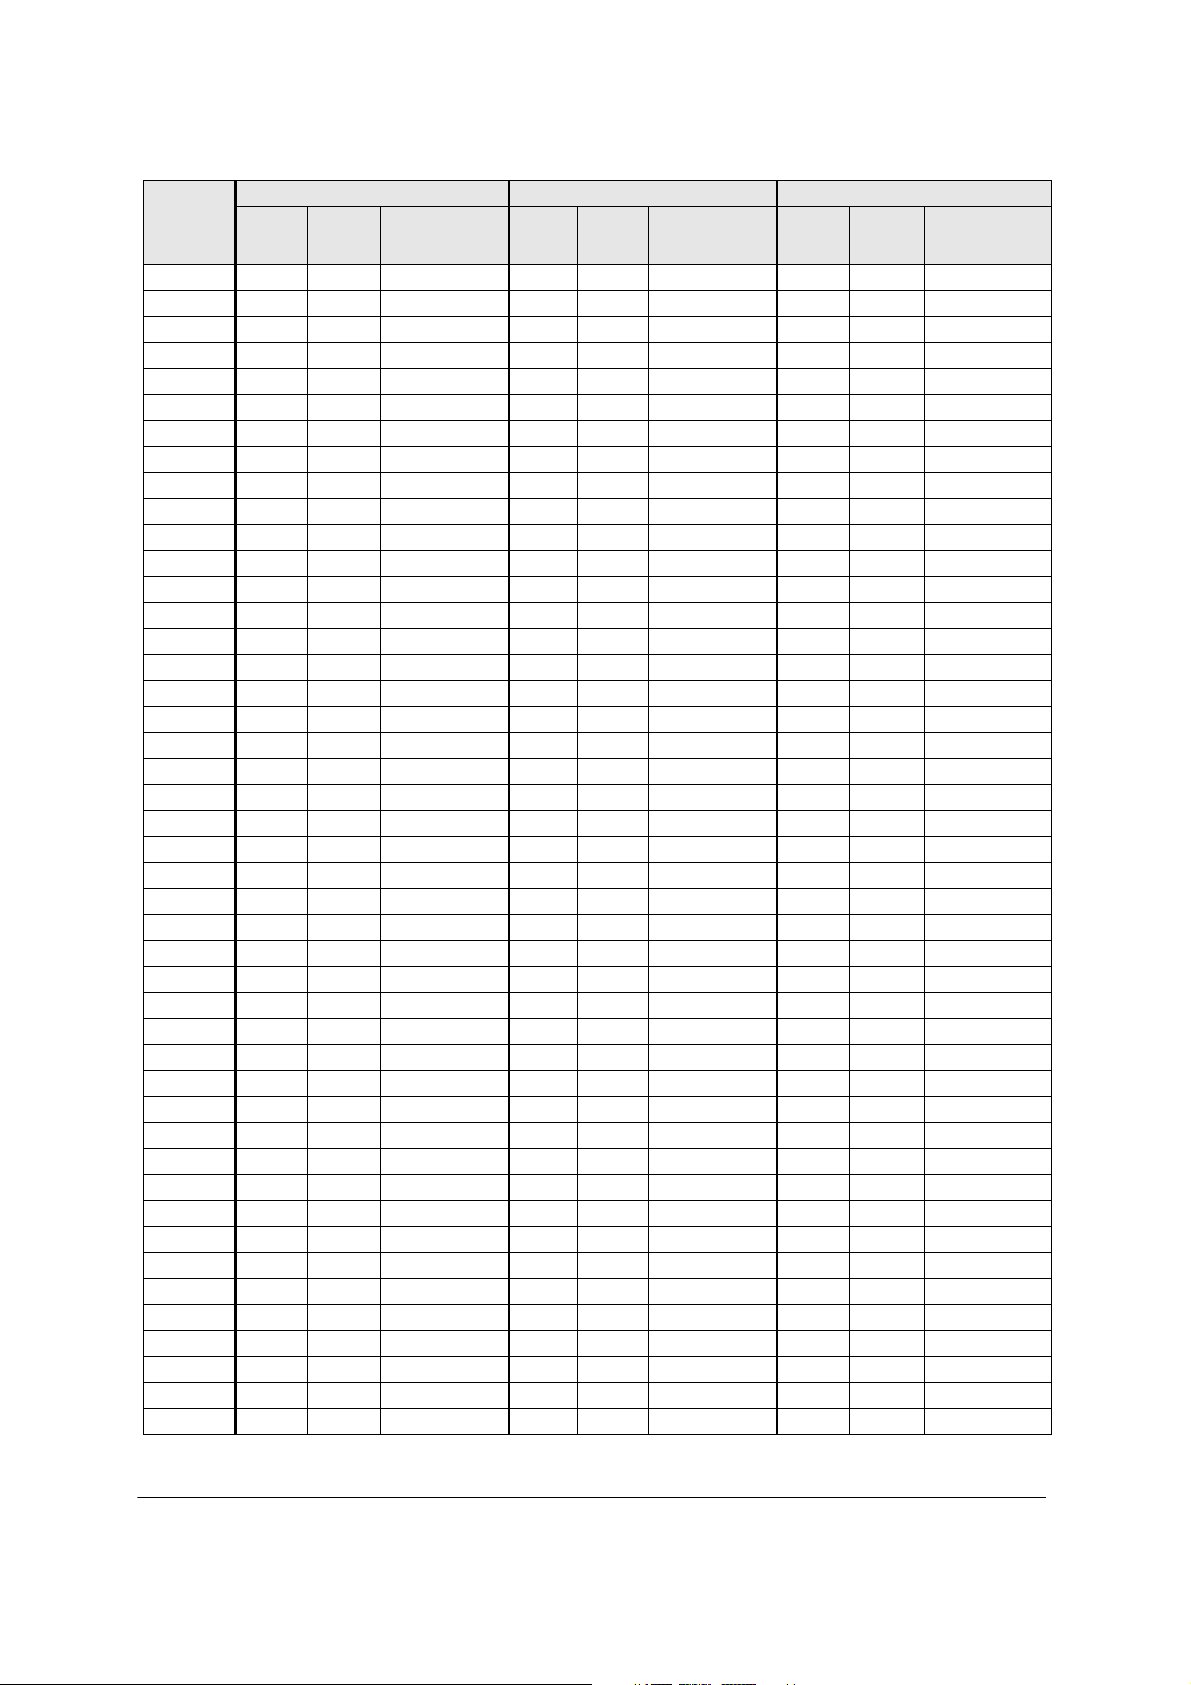
Installation Measurements in Millimeters
Diagonal
image size
(S)
inches
58"
59"
60"
61"
62"
63"
64"
65"
66"
67"
68"
69"
70"
71"
72"
73"
74"
75"
76"
77"
78"
79"
80"
81"
82"
83"
84"
85"
86"
87"
88"
89"
90"
91"
92"
93"
94"
95"
96"
97"
98"
99"
100"
101"
102"
16:10 WXGA 4:3 XGA 16:9 Widescreen
Image
width
(W)
— — — — — — 1284 722 558
— — — — — — 1306 735 550
1292 808 558 — — — 1328 747 542
1314 821 550 — — — 1350 760 535
1335 835 542 — — — 1373 772 527
1357 848 535 1280 960 565 1395 785 519
1379 862 527 1300 975 558 1417 797 512
1400 875 519 1321 991 550 1439 809 504
1422 888 512 1341 1006 542 1461 822 497
1443 902 497 1361 1021 535 1483 834 489
1465 915 489 1382 1036 527 1505 847 474
1486 929 481 1402 1052 519 1528 859 466
1508 942 474 1422 1067 512 1550 872 459
1529 956 466 1443 1082 504 1572 884 451
1551 969 459 1463 1097 497 1594 897 443
1572 983 451 1483 1113 489 1616 909 436
1594 996 443 1504 1128 481 1638 921 428
1615 1010 436 1524 1143 474 1660 934 420
1637 1023 428 1544 1158 466 1682 946 413
1659 1037 420 1565 1173 459 1705 959 405
1680 1050 413 1585 1189 451 1727 971 398
1702 1063 405 1605 1204 443 1749 984 382
1723 1077 398 1626 1219 436 1771 996 375
1745 1090 390 1646 1234 428 1793 1009 367
1766 1104 382 1666 1250 420 1815 1021 359
1788 1117 375 1687 1265 413 1837 1034 352
1809 1131 359 1707 1280 405 1860 1046 344
1831 1144 352 1727 1295 398 1882 1058 337
1852 1158 344 1748 1311 390 1904 1071 329
1874 1171 337 1768 1326 382 1926 1083 321
1895 1185 329 1788 1341 375 1948 1096 314
1917 1198 321 1809 1356 367 1970 1108 306
1939 1212 314 1829 1372 359 1992 1121 291
1960 1225 306 1849 1387 352 2015 1133 283
1982 1239 298 1869 1402 344 2037 1146 276
2003 1252 291 1890 1417 337 2059 1158 268
2025 1265 283 1910 1433 329 — — —
2046 1279 276 1930 1448 321 — — —
2068 1292 268 1951 1463 314 — — —
— — — 1971 1478 306 — — —
— — — 1991 1494 298 — — —
— — — 2018 1509 291 — — —
— — — 2032 1524 283 — — —
— — — 2052 1539 276 — — —
— — — 2073 1555 268 — — —
Image
height
(H)
Distance from
top of image to
wall plate (b)
Image
width
(W)
Image
height
(H)
Distance from
top of image to
wall plate (b)
Image
width
(W)
Image
height
(H)
Distance from
top of image to
wall plate (b)
10
Page 11
Confirming the Projector Position
Once you have determined where to install the interactive module, you can determine whether the
projector’s position needs to be adjusted to avoid possible interference.
AVOID
Projector
You can mount the interactive module and then test the installation with your projector turned on. Or, you
can follow the steps below to calculate whether your projector’s position needs to be adjusted.
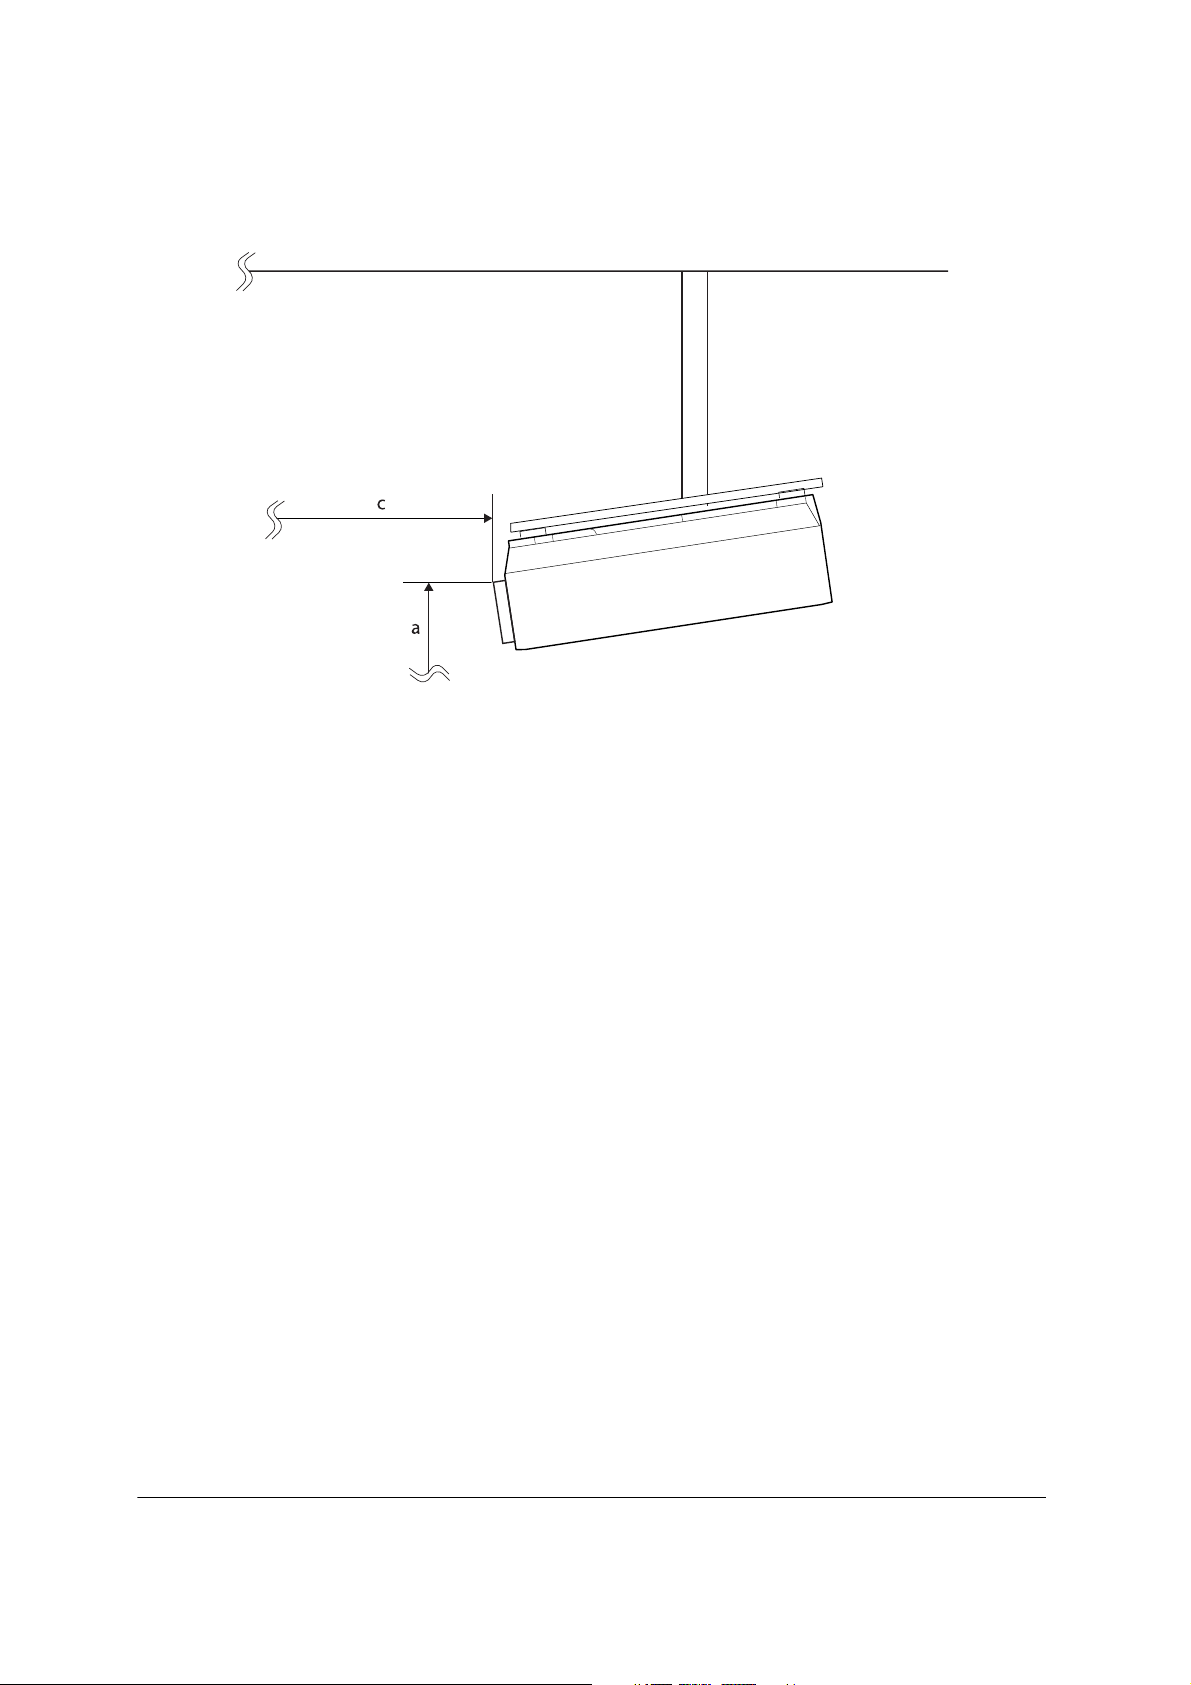
1 Measure the following projector distances:
English
• The distance from top of the projection area to the top edge of the projector’s lens (
• The distance from the wall to the top of the projector’s lens (
Arm length is 41.73 inches (1060 mm)
c)
a)
2 Make sure the distance from the top of the projector lens to the top of the image (a) is less than:
b –5.9 inches) × c/41.73 inches
(
b –150 mm) × c/1060 mm
or (
If the distance from the top of the projector lens to the top of the image (
a) is less than the calculated
value, the interactive module can be used without adjusting the projector position.
11
Page 12
If not, change the projector’s position so that the distance from the top of the projector lens to the top
of the image is less than the calculated value. For example, you may need to lower the projector or tilt
it down as shown:
Note
Consult a qualified projector specialist if you need to adjust your projector’s position.
Sample Calculation
For example, if your projector is mounted 10 feet (3 m) away from the wall (distance c) for a 96-inch
WXGA image, the interactive module would be mounted 15.6 inches (396 mm) above the image area
(distance
top of the image (
b), according to the table on page 9. The distance from the top of the projector lens to the
a) might be 30 inches (762 mm). You would calculate the following:
15.6 –5.9 inches × 120/41.73 inches = 27.9 inches.
or 396 –150 mm × 3048/1060 mm = 709 mm.
a distance (30 inches or 762 mm) is more than 27.9 inches (709 mm). You would need to lower
The
the projector by 2.1 inches (53 mm).
12
Page 13

Installing the Interactive Module
Make sure you follow the steps in this section to install the wall plate, mount the interactive module, attach
the cover, and center the interactive module.
Caution
Make sure you use the appropriate hardware to support the combined weight of the interactive module and wall
plate (approximately 5.08 lb/2.3 kg).
Installing the Wall Plate
You can use either the short wall plate (single-stud) or the long wall plate (double-stud), depending on the
requirements of your building. The illustrations in this section show the long wall plate (double-stud).
If you use the short wall plate, make sure you center it horizontally above the projection area. If you use the
long wall plate, you can adjust the horizontal position after installation, as shown below.
English
1 Confirm the required distance between the top of the image area and the bottom of the wall plate (
b).
Make a line on the wall at this location above the whiteboard or projection area.
Distance from the top of the projection
surface to the bottom of the wall plate (
Top of the projection surface
b)
2 Determine the location of the studs within the wall. Align the wall plate with the line on the wall and
make sure the holes (either
A or B) in the wall plate align with the studs. Mark the position of the
mounting holes on the wall.
3 Drill holes in the wall at the required locations.
4 Using commercially available anchors or lag bolts, mount the wall plate on the wall.
13
Page 14

Mounting the Interactive Module
Before you mount the interactive module, note the serial number on the arm. Write it down on page 18 of
this guide so you can refer to it in case you need product support.
1 Attach the interactive module onto the wall plate and position the USB cable as shown. You can pass
the cable through the left or right side. Make sure the cable doesn’t get trapped when you mount the
module on the wall plate.
2 Secure the interactive module to the wall plate with the two included bolts, using the included
hexagonal wrench. Do not tighten the bolts completely until you center the interactive module over
your image area.
3 If you installed the long wall plate, slide the arm horizontally to position the interactive module above
the center of the projection area or whiteboard.
4 Tighten the bolts using the included hexagonal wrench.
14
Page 15

5 Slide the cover over the wall plate as shown.
Note
Make sure you route the USB cable around the whiteboard or image area. An optional cable management
system is available from Epson (part # ELPCK01).
6 To attach the bracket plate cover, follow the instructions that came with the cover.
7 For convenient pen storage and security, attach the pen tray to your whiteboard or wall (bolts not
included).
Using the Interactive Module
Once the interactive module is installed on the wall, you can connect the USB cable to your computer and
begin using the interactive pens. For detailed instructions and troubleshooting tips, see your on-screen
ELPIU01 User’s Guide.
English
Follow these steps to get ready:
1 Install the Easy Interactive Driver software on your computer from the CD labeled
Software for Easy Interactive Function
.
Epson Projector
You can also install TeamBoard Draw annotation software.
2 Install the pen batteries as shown. You can use either the alkaline batteries or the rechargeable batteries;
do not mix the two battery types.
3 Connect your computer to your projector and display an image.
15
Page 16
Note
If you are using a whiteboard, the image may not fill the entire board, depending on its size and aspect ratio.
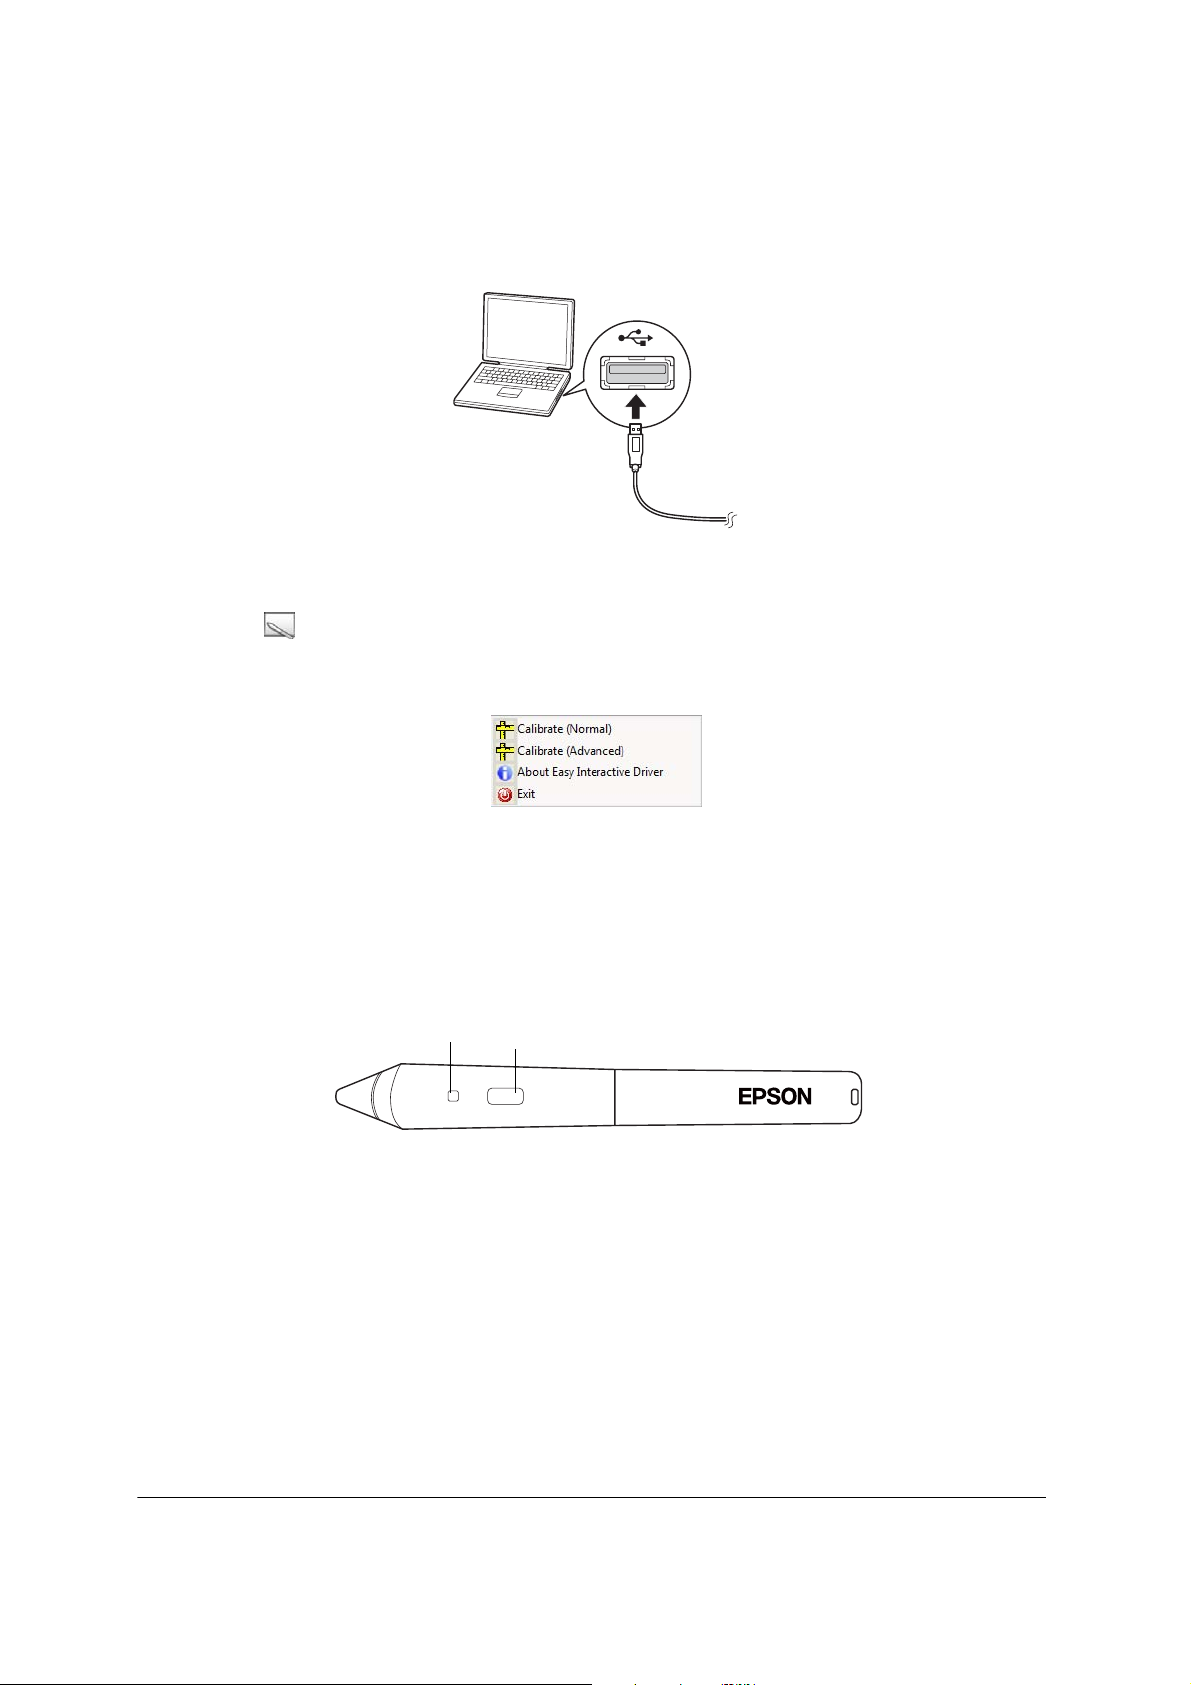
4 Connect your computer to the interactive module using the USB cable. If the cable is not long enough
to reach your computer, you may need to use a USB extension cable (not included).
5 Launch the Easy Interactive Driver.
Click the icon in the lower right corner of your screen (Windows
6 Select
Calibrate (Normal) or Calibrate (Advanced).
®
) or in the Dock (Mac OS®).
Normal calibration is faster and appropriate for most situations (unless you plan to work with very
detailed images).
7 Follow the instructions on the screen to calibrate. Make sure you touch each dot as it appears.
8 Use the pen as a mouse by tapping it on the projected image.
Battery indicator
light
Button
• For best performance, hold the pen at an angle (like a normal pen), rather than perpendicular to
the board.
• To left-click, tap on the board. Tap twice to double-click.
• To right-click, tap while pressing the button on the pen.
• To click and drag, tap and drag with the pen.
16
Page 17

Solving Problems
Check the following section for solutions to common problems. For additional information, see the onscreen ELPIU01 User’s Guide.
Interactive Pen Problems
• Make sure the USB cable is securely connected to the interactive module and computer. Try
disconnecting and reconnecting the cable to your computer.
• If you don’t see the pen icon on your taskbar (Windows) or in the dock (Mac OS), do one of the
following:
English
Windows: Select
Driver
.
Mac OS: Open the
• If you see a red
Try removing and reconnecting the USB cable.
• Make sure the pen batteries have enough power. If the light on the pen doesn’t turn green when you
press the button, you need to replace the batteries.
• Make sure nothing is blocking the signal between the pen and the interactive module. Even if you are
casting a shadow on the projected image, you should still be able to use the interactive pen.
• If the pen skips or is difficult to use, try moving to the side to avoid blocking the signal to the
interactive module.
• Dim the room lights and turn off any fluorescent lights. Make sure the projection surface and the
interactive module are not in direct sunlight or other sources of bright lighting.
• For easier operation, hold the pen tip at an upward angle to the projection surface.
• If the pen position is not accurate, you may need to recalibrate (see the on-screen ELPIU01User’s
Guide for details).
or Start > All Programs or Programs > EPSON Projector > Easy Interactive
Application folder, then select the Easy Interactive Driver icon.
X on the pen icon, the computer and interactive module are not connected correctly.
Battery Problems
• If the lights on the battery charger do not turn on or flash when you plug it in, make sure you removed
the cardboard strip from the charger and inserted the batteries correctly. See the instruction sheet
included with the battery charger.
17
Page 18

Where to Get Help
Epson provides these technical support services:
Internet Support
Visit Epson’s support website at www.epson.com/support (U.S.) or www.epson.ca/support (Canada) and
select your product for solutions to common problems. You can download software and documentation,
get FAQs and troubleshooting advice, or e-mail Epson with your questions.
Speak to a Support Representative
To use the Epson PrivateLine Support service, call (800) 637-7661 and enter the PIN on the included
Epson PrivateLine Support card. This is the fastest way of speaking to a live representative, and it’s free.
This service is available 6
warranty period.
You may also speak with a projector support specialist by dialing one of these numbers:
■ U.S.: (562) 276-4394, 6 AM to 6 PM, Pacific Time, Monday through Friday.
■ Canada: (905) 709-3839, 6 AM to 6 PM, Pacific Time, Monday through Friday.
Days and hours of support are subject to change without notice. Toll or long distance charges may apply.
AM to 6 PM, Pacific Time, Monday through Friday, for the duration of your
Before you call for support, please have the following information ready:
■ Product name (IU-01 BrightLink Solo Interactive Module)
■ Product serial number (on the arm of the interactive module)
■ Proof of purchase and date of purchase
■ Computer or video configuration
■ Description of the problem
Software Technical Support
• If you need help with TeamBoard Draw software, contact Epson as described above. For more
information about TeamBoard software and products, visit the following website:
www.teamboard.com
• If your interactive module included RM Easiteach and you need help, call (866) 728-6758 or visit the
following support websites:
www.rmeducation.com/support/et or www.rmeducation.com/easiteach
• For Easy Interactive Driver issues, please contact Epson as described above.
Purchase Supplies and Accessories
You can purchase accessories from an Epson authorized reseller. To find the nearest reseller, call 800-GOEPSON (800-463-7766). Or you can purchase online at www.epsonstore.com (U.S. sales) or
www.epson.ca (Canadian sales).
18
Page 19

Limited Warranty
What Is Covered: Epson America, Inc. (“Epson”) warrants to the original retail purchaser of the Epson
product enclosed with this limited warranty statement that the product, if purchased new and operated in
the United States, Canada, or Puerto Rico will be free from defects in workmanship and materials for a
period of two (2) years from the date of original purchase. For warranty service, you must provide proof of
the date of original purchase.
What Epson Will Do To Correct Problems: If your product requires service during the limited warranty
period, please call Epson at the number on the bottom of this statement and be prepared to provide the
model, serial number, and date of original purchase. Epson will, at its option, repair or replace the defective
unit, without charge for parts or labor. When warranty service involves the exchange of the product or of a
part, the item replaced becomes Epson property. The exchanged product or part may be new or refurbished
to the Epson standard of quality, and at Epson's option, the replacement may be another model of like kind
and quality. Epson's liability for replacement of the covered product will not exceed the original retail
selling price of the covered product. Exchange or replacement products or parts assume the remaining
warranty period of the product covered by this limited warranty.
What This Warranty Does Not Cover: This warranty covers only normal use in the United States, Canada or
Puerto Rico. Twenty-four hours per day or other excessive continual use is not considered normal use. This
warranty does not cover consumables. This warranty is not transferable. Epson is not responsible for
warranty service should the Epson label or logo or the rating label or serial number be removed. Epson is
not responsible for warranty service should the product fail to be properly maintained or fail to function
properly as a result of misuse, abuse, improper installation, neglect, improper shipping, damage caused by
disasters such as fire, flood, and lightning, improper electrical current, software problems, interaction with
non-Epson products, or service other than by Epson or an Epson Authorized Servicer. Postage, insurance,
or shipping costs incurred in presenting your Epson product for carry-in warranty service are your
responsibility. Epson will pay for all freight charges if you choose to send your unit to Epson for repair. If a
claimed defect cannot be identified or reproduced in service, you will be held responsible for costs incurred.
English
THE WARRANTY AND REMEDY PROVIDED ABOVE ARE EXCLUSIVE AND IN LIEU OF ALL
OTHER EXPRESS OR IMPLIED WARRANTIES INCLUDING, BUT NOT LIMITED TO, THE
IMPLIED WARRANTIES OF MERCHANTABILITY OR FITNESS FOR A PARTICULAR
PURPOSE. SOME LAWS DO NOT ALLOW THE EXCLUSION OF IMPLIED WARRANTIES. IF
THESE LAWS APPLY, THEN ALL EXPRESS AND IMPLIED WARRANTIES ARE LIMITED TO
THE WARRANTY PERIOD IDENTIFIED ABOVE. UNLESS STATED HEREIN, ANY
STATEMENTS OR REPRESENTATIONS MADE BY ANY OTHER PERSON OR FIRM ARE
VOID. IN THE EVENT THE REMEDIES ABOVE FAIL, EPSON'S ENTIRE LIABILITY SHALL BE
LIMITED TO A REFUND OF THE PRICE PAID FOR THE EPSON PRODUCT COVERED BY
THIS LIMITED WARRANTY. EXCEPT AS PROVIDED IN THIS WRITTEN WARRANTY,
NEITHER EPSON AMERICA, INC. NOR ITS AFFILIATES SHALL BE LIABLE FOR ANY LOSS,
INCONVENIENCE, OR DAMAGE, INCLUDING DIRECT, SPECIAL, INCIDENTAL, OR
CONSEQUENTIAL DAMAGES, RESULTING FROM THE USE OR INABILITY TO USE THE
EPSON PRODUCT, WHETHER RESULTING FROM BREACH OF WARRANTY OR ANY
OTHER LEGAL THEORY.
In Canada, warranties include both warranties and conditions.
Some jurisdictions do not allow limitations on how long an implied warranty lasts and some jurisdictions
do not allow the exclusion or limitation of incidental or consequential damages, so the above limitations
and exclusions may not apply to you. This warranty gives you specific legal rights, and you may also have
other rights, which vary from jurisdiction to jurisdiction.
19
Page 20

To find the Epson Authorized Reseller nearest you, please visit our website at: www.epson.com.
To find the Epson Customer Care Center nearest you, please visit www.epson.com/support.
SM
To contact the Epson Connection
and (905) 709-3839 in Canada or write to Epson America, Inc., P.O. Box 93012, Long Beach, CA 90809-
3012.
, please call (800) 637-7661 + PIN or (562) 276-4394 in the U.S.
Copyright Notice
All rights reserved. No part of this publication may be reproduced, stored in a retrieval system, or
transmitted in any form or by any means, electronic, mechanical, photocopying, recording, or otherwise,
without the prior written permission of Seiko Epson Corporation. The information contained herein is
designed only for use with this Epson product. Epson is not responsible for any use of this information as
applied to other products.
Neither Seiko Epson Corporation nor its affiliates shall be liable to the purchaser of this product or third
parties for damages, losses, costs, or expenses incurred by purchaser or third parties as a result of: accident,
misuse, or abuse of this product or unauthorized modifications, repairs, or alterations to this product, or
(excluding the U.S.) failure to strictly comply with Seiko Epson Corporation’s operating and maintenance
instructions.
Seiko Epson Corporation shall not be liable for any damages or problems arising from the use of any
options or any consumable products other than those designated as Original Epson Products or Epson
Approved Products by Seiko Epson Corporation.
Trademarks
Epson is a registered trademark, and Epson Exceed Your Vision is a registered logomark of Seiko Epson
Corporation.
BrightLink Solo is a trademark of Epson America, Inc.
General Notice: Other product names used herein are for identification purposes only and may be
trademarks of their respective owners. Epson disclaims any and all rights in those marks.
This information is subject to change without notice.
© 2010 Epson America Inc. 9/10
20
Page 21

Consignes de sécurité
• L’installation du produit au mur doit être effectuée par des techniciens qualifiés en utilisant
uniquement l’équipement de montage approuvé.
• L’installation incomplète ou inadéquate peut entraîner la chute du produit, des blessures et/ou des
dégâts matériels.
• Si vous appliquez un adhésif pour que les vis ne se desserrent pas ou si vous utilisez des lubrifiants ou
des huiles sur la plaque murale, le boîtier peut se fissurer et entraîner la chute du produit, des blessures
et/ou des dégâts matériels.
• Manipulez le câble USB avec soin pour éviter tout incendie ou toute décharge électrique. Observez les
consignes suivantes quand vous manipulez le câble :
Ne manipulez pas le câble avec des mains humides.
N’utilisez pas un câble endommagé ou altéré.
Ne tirez pas trop fort sur le câble pendant son acheminement ou son raccordement à un ordinateur.
• Ne vous accrochez pas au bras ou n’accrochez pas d’objet lourd sur celui-ci.
• La chute du produit ou de la plaque murale peut entraîner des blessures et/ou des dégâts matériels.
• Lorsque le produit est monté au mur en utilisant la plaque murale, le mur doit être assez solide pour
soutenir le produit et la plaque murale. Confirmez le poids du produit et de la plaque murale avant
l’installation, ainsi que la solidité du mur. Si le mur n’est pas assez solide, renforcez-le avant
l’installation.
Français
• N’installez pas le produit dans un emplacement où il y a de l’humidité ou de la poussière excessive, près
d’appareils de cuisson ou de chauffage ou encore dans un emplacement exposé à la fumée ou à la
vapeur, au risque de provoquer un incendie ou une décharge électrique.
• N’installez pas le produit dans un emplacement où il peut être soumis à des vibrations ou des chocs, car
ceux-ci peuvent endommager le produit ou sa surface de montage. Ils peuvent aussi entraîner la chute
du produit, des blessures et/ou des dégâts matériels.
• Serrez fermement toutes les vis après l’ajustement. Sinon, cela peut entraîner la chute du produit ou de
la plaque murale, ainsi que des blessures et/ou des dégâts matériels.
• Ne desserrez jamais des boulons et les écrous après l’installation.
• Confirmez régulièrement que les vis ne sont pas desserrées. Serrez fermement toute vis desserrée.
Sinon, cela peut entraîner la chute du produit ou de la plaque murale, ainsi que des blessures et/ou des
dégâts matériels.
• Observez les directives du présent guide pour l’installation de la plaque murale. Sinon, cela peut
entraîner la chute de la plaque murale, ainsi que des blessures et/ou des dégâts matériels.
• N’exercez pas de force excessive pendant l’ajustement du produit. Sinon, le produit peut causer des
blessures.
21
Page 22

Table des matières
Consignes de sécurité. . . . . . . . . . . . . . . . . . . . . . . . . . . . . . . . . . . . . . . . . . . . . . . . . . . . . . . . . . 21
Table des matières . . . . . . . . . . . . . . . . . . . . . . . . . . . . . . . . . . . . . . . . . . . . . . . . . . . . . . . . . . . . 22
Déballage . . . . . . . . . . . . . . . . . . . . . . . . . . . . . . . . . . . . . . . . . . . . . . . . . . . . . . . . . . . . . . . . . . . . . 23
Spécifications . . . . . . . . . . . . . . . . . . . . . . . . . . . . . . . . . . . . . . . . . . . . . . . . . . . . . . . . . . . . . . . . . 23
Dimensions de la plaque murale longue . . . . . . . . . . . . . . . . . . . . . . . . . . . . . . . . . . . . . . . . . . 23
Dimensions de la plaque murale courte . . . . . . . . . . . . . . . . . . . . . . . . . . . . . . . . . . . . . . . . . . 23
Dimensions du module interactif . . . . . . . . . . . . . . . . . . . . . . . . . . . . . . . . . . . . . . . . . . . . . . . 24
Positionnement du module interactif . . . . . . . . . . . . . . . . . . . . . . . . . . . . . . . . . . . . . . . . . . . . 24
Tailles d’images prises en charge. . . . . . . . . . . . . . . . . . . . . . . . . . . . . . . . . . . . . . . . . . . . . . . . 24
Position du projecteur . . . . . . . . . . . . . . . . . . . . . . . . . . . . . . . . . . . . . . . . . . . . . . . . . . . . . . . 25
Surface de projection . . . . . . . . . . . . . . . . . . . . . . . . . . . . . . . . . . . . . . . . . . . . . . . . . . . . . . . . 26
Angle de projection pour les projecteurs montés au plafond. . . . . . . . . . . . . . . . . . . . . . . . . . . 26
Détermination de la hauteur de positionnement du module interactif . . . . . . . . . . . . . . . . . . . 26
Mesures d’installation en pouces . . . . . . . . . . . . . . . . . . . . . . . . . . . . . . . . . . . . . . . . . . . . . . . 28
Mesures d’installation en millimètres . . . . . . . . . . . . . . . . . . . . . . . . . . . . . . . . . . . . . . . . . . . . 29
Confirmation de la position du projecteur . . . . . . . . . . . . . . . . . . . . . . . . . . . . . . . . . . . . . . . . 30
Installation du module interactif . . . . . . . . . . . . . . . . . . . . . . . . . . . . . . . . . . . . . . . . . . . . . . . . 32
Installation de la plaque murale . . . . . . . . . . . . . . . . . . . . . . . . . . . . . . . . . . . . . . . . . . . . . . . . 32
Montage du module interactif . . . . . . . . . . . . . . . . . . . . . . . . . . . . . . . . . . . . . . . . . . . . . . . . . 33
Utilisation du module interactif . . . . . . . . . . . . . . . . . . . . . . . . . . . . . . . . . . . . . . . . . . . . . . . . . 34
Résolution des problèmes. . . . . . . . . . . . . . . . . . . . . . . . . . . . . . . . . . . . . . . . . . . . . . . . . . . . . . 36
Problèmes avec les crayons interactifs . . . . . . . . . . . . . . . . . . . . . . . . . . . . . . . . . . . . . . . . . . . . 36
Problèmes de piles . . . . . . . . . . . . . . . . . . . . . . . . . . . . . . . . . . . . . . . . . . . . . . . . . . . . . . . . . . 36
Comment obtenir de l’aide . . . . . . . . . . . . . . . . . . . . . . . . . . . . . . . . . . . . . . . . . . . . . . . . . . . . . 37
Sur Internet . . . . . . . . . . . . . . . . . . . . . . . . . . . . . . . . . . . . . . . . . . . . . . . . . . . . . . . . . . . . . . . 37
Pour parler à un représentant du soutien technique . . . . . . . . . . . . . . . . . . . . . . . . . . . . . . . . . 37
Soutien technique pour les logiciels . . . . . . . . . . . . . . . . . . . . . . . . . . . . . . . . . . . . . . . . . . . . . 37
Achat de fournitures et d’accessoires. . . . . . . . . . . . . . . . . . . . . . . . . . . . . . . . . . . . . . . . . . . . . 37
Garantie limitée . . . . . . . . . . . . . . . . . . . . . . . . . . . . . . . . . . . . . . . . . . . . . . . . . . . . . . . . . . . . . . . 38
Avis sur les droits d’auteur . . . . . . . . . . . . . . . . . . . . . . . . . . . . . . . . . . . . . . . . . . . . . . . . . . . . . 39
22
Page 23

Déballage
Rangement pour
Module interactif avec câble USB
Plaque murale
Plaque murale
longue
(montant double)
Clé hexagonale
courte
(montant
simple)
Boulons
crayons
CD « Epson Projector
Software for Easy
Interactive Function »
CD « TeamBoard Draw »
Spécifications
Dimensions de la plaque murale longue
19,0 po (482,6 mm)
Crayons interactifs
CD des documents
Chargeur de piles avec
4 piles rechargeables AAA
4 piles
alcalines AAA
Français
0,33 po (8,5 mm)
1,0 po (25,4 mm)
2,0 po (50,8 mm)
11,0 po (279,4 mm)
14,4 po (365,1 mm)
Dimensions de la plaque murale courte
4,8 po (120,8 mm)
0,2 po
(5 mm)
0,3 po
(8,5 mm)
2,8 po (70 mm)
2,81 po
(71,5 mm)
1,0 po (25,4 mm)
2,0 po (50,8 mm)
1,3 po
(33,9 mm)
2,8 po
(71,5 mm)
23
Page 24

Dimensions du module interactif
41,4 po (1051 mm)
3,5 po
(88 mm)
Positionnement du module interactif
Le module interactif s’installe au mur et fonctionne avec les images projetées sur un tableau blanc
préinstallé ou directement sur le mur. Les images doivent être projetées sur une surface dure plutôt qu’un
écran pour réaliser une utilisation interactive.
Remarque
Si vous projetez habituellement sur un écran, vous devez le déplacer ou le fermer pour projeter directement sur le mur
ou sur un tableau blanc préinstallé; par contre, cela peut nécessiter un ajustement de la mise au point de l’image du
projecteur.
L’image projetée doit être de 58 po à 102 po (de 147 cm à 259 cm), mesurée diagonalement. Il peut être
nécessaire d’ajuster la taille de l’image (en utilisant la fonction zoom du projecteur) pour utiliser le module
interactif. Si vous projetez sur un tableau blanc, l’image peut ne pas remplir toute la surface du tableau, en
fonction de sa taille et de son rapport hauteur/largeur.
Tailles d’images prises en charge
Largeur et hauteur
• Largeur : de 50,4 po à 81,6 po (de 1280 à 2 073 mm)
• Hauteur : de 28,4 po à 61,2 po (de 722 mm à 1 555 mm)
Diagonale
• WXGA 16:10 : de 60 po à 96 po (de 152 cm à 244 cm)
• XGA 4:3 : de 63 po à 102 po (de 160 cm à 259 cm)
24
Page 25

• Panoramique 16:9 : de 58 po à 93 po (de 147 cm à 236 cm)
g
Taille diagonale maximale
(XGA) de 102 po (259 cm)
Hauteur de la zone
d’image (h)
de 28,4 po à 61,2 po
(de 722 mm à 1555 mm)
Taille diagonale minimale
(16:9) de 58 po (147 cm)
Lar
eur de la zone d’image (l) de 50,4 po à 81,6 po (de 1280 mm à 2073 mm)
Remarque
L’interactivité ne peut être garantie si la taille de l’image projetée est inférieure à 58 po (147 cm) mesurée
diagonalement (taille d’image minimale pour panoramique 16:9).
Position du projecteur
Le module interactif est conçu pour convenir à un projecteur monté au plafond. Cependant, il peut
également être utilisé avec un projecteur portatif installé sur une table ou un chariot.
Avec tout type de projecteur, vous devrez recalibrer si vous modifiez la taille, la position ou la résolution de
l’image. Cela peut être requis plus fréquemment si vous utilisez un projecteur portatif.
Français
Si vous utilisez le module interactif avec un projecteur portatif, veuillez noter ce qui suit :
• vous devez connaître la taille, la position et l’emplacement de l’image projetée avant de choisir l’endroit
où sera monté le module interactif. Epson recommande de déterminer le meilleur emplacement pour
votre projecteur, et de marquer cet emplacement sur la table ou le plancher afin de pouvoir toujours
installer le projecteur au même endroit;
• la réflexion de la lumière du projecteur peut provoquer une défaillance du module interactif;
• Epson recommande de positionner le module interactif pour la taille d’image la plus grande possible
pour votre projecteur portatif;
• la personne interagissant avec l’image doit éviter de regarder dans l’objectif du projecteur.
Avertissement
Ne regardez jamais dans l’objectif du projecteur lorsque la lampe est allumée; la lumière intense peut causer
des lésions oculaires.
25
Page 26

Surface de projection
• Les images doivent être projetées sur une surface dure plutôt qu’un
écran.
• Si vous projetez sur un tableau monté au mur, assurez-vous que la
distance entre le mur et ce tableau est de moins de 6 po (150 mm).
Tableau blanc
• Que vous projetiez sur un tableau monté au mur ou sur un mur
ordinaire, veillez à ce que le mur soit plat et sans obstruction, bosse
ou protrusion.
Angle de projection pour les projecteurs montés au plafond
Assurez-vous que le projecteur est positionné de façon à ce que le module
interactif n’interfère pas avec l’image projetée. Il peut être nécessaire de repositionner le projecteur pour
éviter toute interférence possible.
Consultez le tableau de la page 28 ou de la page 29, ainsi que les formules de la page 30 pour déterminer si
vous devez repositionner le projecteur monté au plafond. Pour obtenir des outils supplémentaires et de
l’information, visitez le site Web www.epson.ca.
Moins de 6 po (150 mm)
ÉVITER
Projecteur
Remarque
Peu importe l’endroit où le module interactif et le projecteur sont placés, la personne utilisant le crayon fera une
ombre sur la surface de projection. L’ombre ne nuira pas à la fonction d’interactivité, aussi longtemps que le signal
n’est pas bloqué.
Détermination de la hauteur de positionnement du module interactif
Vous devez déterminer la distance requise entre le haut de la zone d’image et le bas de la plaque murale, en
fonction de la taille d’image diagonale et du rapport hauteur/largeur. Cette distance indique à quelle
hauteur au mur il faut monter le module interactif.
1 Déterminez le rapport hauteur/largeur (le format) du tableau blanc ou de l’image projetée. Pour les
nouveaux projecteurs et ordinateurs, il sera probablement WXGA (16:10). Pour l’équipement plus
ancien, il s’agira probablement de XGA (4:3).
26
Page 27

Si vous prévoyez effectuer une projection sur un tableau blanc, consultez les mesures à la page 28 ou à
la page 29, puis sélectionnez la taille d’image la plus proche de la taille du tableau blanc. Si la taille et le
rapport hauteur/largeur du tableau ne correspondent pas aux dimensions listées, l’image peut ne pas
remplir toute la surface du tableau.
2 Mesurez la taille de la zone de projection, notamment la hauteur (
Plaque murale pour le module interactif
Distance requise depuis le haut de la
Hauteur de la
zone d’image (
zone d’image à la plaque murale (
h)
Largeur de la zone d’image (
b)
Taille d’image
diagonale (
3 Déterminez la distance requise depuis le haut de la zone d’image à la plaque murale (
h), la largeur (l) et la diagonale (d).
d)
l)
b), en utilisant les
mesures de rapport hauteur/largeur et de taille d’image des tableaux présentées dans les pages suivantes.
Français
Remarque
Les valeurs indiquées dans les tableaux des pages 28 et 29 concernent les projecteurs montés au plafond.
27
Page 28

Mesures d’installation en pouces
WXGA 16:10 XGA 4:3 Panoramique 16:9
Taille
d’image
diagonale
(d)
58 po
59 po
60 po
61 po
62 po
63 po
64 po
65 po
66 po
67 po
68 po
69 po
70 po
71 po
72 po
73 po
74 po
75 po
76 po
77 po
78 po
79 po
80 po
81 po
82 po
83 po
84 po
85 po
86 po
87 po
88 po
89 po
90 po
91 po
92 po
93 po
94 po
95 po
96 po
97 po
98 po
99 po
100 po
101 po
102 po
Largeur
d’image
(l)
— — — — — — 50,6 28,4 26,8
— — — — — — 51,4 28,9 26,6
50,9 31,8 25,1 — — — 52,3 29,4 26,3
51,7 32,3 24,9 — — — 53,2 29,9 26,1
52,6 32,9 24,6 — — — 54,0 30,4 25,8
53,4 33,4 24,3 50,4 37,8 22,1 54,9 30,9 25,6
54,3 33,9 24,1 51,2 38,4 21,8 55,8 31,4 25,3
55,1 34,4 23,8 52,0 39,0 21,5 56,7 31,9 25,1
56,0 35,0 23,5 52,8 39,6 21,2 57,5 32,4 24,8
56,8 35,5 23,3 53,6 40,2 20,9 58,4 32,8 24,6
57,7 36,0 23,0 54,4 40,8 20,6 59,3 33,3 24,4
58,5 36,6 22,7 55,2 41,4 20,3 60,1 33,8 24,1
59,4 37,1 22,5 56,0 42,0 20,0 61,0 34,3 23,9
60,2 37,6 22,2 56,8 42,6 19,7 61,9 34,8 23,6
61,1 38,2 22,0 57,6 43,2 19,4 62,8 35,3 23,4
61,9 38,7 21,7 58,4 43,8 19,1 63,6 35,8 23,1
62,8 39,2 21,4 59,2 44,4 18,8 64,5 36,3 22,9
63,6 39,7 21,2 60,0 45,0 18,5 65,4 36,8 22,6
64,4 40,3 20,9 60,8 45,6 18,2 66,2 37,3 22,4
64,3 40,8 20,6 61,6 46,2 17,9 67,1 37,8 22,2
66,1 41,3 20,4 62,4 46,8 17,6 68,0 38,2 21,9
67,0 41,9 20,1 63,2 47,4 17,3 68,9 38,7 21,7
67,8 42,4 19,8 64,0 48,0 17,0 69,7 39,2 21,4
68,7 42,9 19,6 64,8 48,6 16,7 70,6 39,7 21,2
69,5 43,5 19,3 65,6 49,2 16,4 71,5 40,2 20,9
70,4 44,0 19,0 66,4 49,8 16,1 72,3 40,7 20,7
71,2 44,5 18,8 67,2 50,4 15,8 73,2 41,2 20,4
72,1 45,0 18,5 68,0 51,0 15,5 74,1 41,7 20,2
72,9 45,6 18,2 68,8 51,6 15,2 75,0 42,2 19,9
73,8 46,1 18,0 69,6 52,2 14,9 75,8 42,7 19,7
74,6 46,6 17,7 70,4 52,8 14,6 76,7 43,1 19,5
75,5 47,2 17,4 71,2 53,4 14,3 77,6 43,6 19,2
76,3 47,7 17,2 72,0 54,0 14,0 78,4 44,1 19,0
77,2 48,2 16,9 72,8 54,6 13,7 79,3 44,6 18,7
78,0 48,8 16,7 73,6 55,2 13,4 80,2 45,1 18,5
78,9 49,3 16,4 74,4 55,8 13,1 81,1 45,6 18,2
79,7 49,8 16,1 75,2 56,4 12,8 — — —
80,6 50,3 15,9 76,0 57,0 12,5 — — —
81,4 50,9 15,6 76,8 57,6 12,2 — — —
— — — 77,6 58,2 11,9 — — —
— — — 78,4 58,8 11,6 — — —
— — — 79,2 59,4 11,3 — — —
— — — 80,0 60,0 11,0 — — —
— — — 80,8 60,6 10,7 — — —
— — — 81,6 61,2 10,4 — — —
Hauteur
d’image
(h)
Distance
depuis le haut
de l’image à la
plaque murale
(b)
Largeur
d’image
(l)
Hauteur
d’image
(h)
Distance depuis
le haut de
l’image à la
plaque murale
(b)
Largeur
d’image
(l)
Hauteur
d’image
(h)
Distance
depuis le haut
de l’image à la
plaque murale
(b)
28
Page 29

Mesures d’installation en millimètres
WXGA 16:10 XGA 4:3 Panoramique 16:9
Taille
d’image
diagonale
(d)
58 po
59 po
60 po
61 po
62 po
63 po
64 po
65 po
66 po
67 po
68 po
69 po
70 po
71 po
72 po
73 po
74 po
75 po
76 po
77 po
78 po
79 po
80 po
81 po
82 po
83 po
84 po
85 po
86 po
87 po
88 po
89 po
90 po
91 po
92 po
93 po
94 po
95 po
96 po
97 po
98 po
99 po
100 po
101 po
102 po
Largeur
d’image
(l)
— — — — — — 1284 722 558
— — — — — — 1306 735 550
1292 808 558 — — — 1328 747 542
1314 821 550 — — — 1350 760 535
1335 835 542 — — — 1373 772 527
1357 848 535 1280 960 565 1395 785 519
1379 862 527 1300 975 558 1417 797 512
1400 875 519 1321 991 550 1439 809 504
1422 888 512 1341 1006 542 1461 822 497
1443 902 497 1361 1021 535 1483 834 489
1465 915 489 1382 1036 527 1505 847 474
1486 929 481 1402 1052 519 1528 859 466
1508 942 474 1422 1067 512 1550 872 459
1529 956 466 1443 1082 504 1572 884 451
1551 969 459 1463 1097 497 1594 897 443
1572 983 451 1483 1113 489 1616 909 436
1594 996 443 1504 1128 481 1638 921 428
1615 1010 436 1524 1143 474 1660 934 420
1637 1023 428 1544 1158 466 1682 946 413
1659 1037 420 1565 1173 459 1705 959 405
1680 1050 413 1585 1189 451 1727 971 398
1702 1063 405 1605 1204 443 1749 984 382
1723 1077 398 1626 1219 436 1771 996 375
1745 1090 390 1646 1234 428 1793 1009 367
1766 1104 382 1666 1250 420 1815 1021 359
1788 1117 375 1687 1265 413 1837 1034 352
1809 1131 359 1707 1280 405 1860 1046 344
1831 1144 352 1727 1295 398 1882 1058 337
1852 1158 344 1748 1311 390 1904 1071 329
1874 1171 337 1768 1326 382 1926 1083 321
1895 1185 329 1788 1341 375 1948 1096 314
1917 1198 321 1809 1356 367 1970 1108 306
1939 1212 314 1829 1372 359 1992 1121 291
1960 1225 306 1849 1387 352 2015 1133 283
1982 1239 298 1869 1402 344 2037 1146 276
2003 1252 291 1890 1417 337 2059 1158 268
2025 1265 283 1910 1433 329 — — —
2046 1279 276 1930 1448 321 — — —
2068 1292 268 1951 1463 314 — — —
— — — 1971 1478 306 — — —
— — — 1991 1494 298 — — —
— — — 2018 1509 291 — — —
— — — 2032 1524 283 — — —
— — — 2052 1539 276 — — —
— — — 2073 1555 268 — — —
Hauteur
d’image
(h)
Distance
depuis le haut
de l’image à la
plaque murale
(b)
Largeur
d’image
(l)
Hauteur
d’image
(h)
Distance
depuis le haut
de l’image à
la plaque
murale (b)
Largeur
d’image
(l)
Hauteur
d’image
(h)
Distance
depuis le haut
de l’image à
la plaque
murale (b)
Français
29
Page 30

Confirmation de la position du projecteur
Une fois l’emplacement d’installation du module interactif déterminé, vous pourrez alors déterminer s’il
faut repositionner le projecteur pour éviter toute interférence possible.
ÉVITER
Projecteur
Vous pouvez monter le module interactif et faire l’essai de l’installation avec votre projecteur en marche.
Vous pouvez aussi suivre les étapes ci-dessous pour calculer et déterminer si le projecteur doit être
repositionné.
1 Mesurez les distances de projection suivantes :
• distance depuis le haut de la zone de projection jusqu’au bord de l’objectif du projecteur (
• distance depuis le mur au dessus de l’objectif du projecteur (
La longueur du bras est de 41,73 po (1 060 mm)
c)
a)
2 Assurez-vous que la distance depuis le dessus de l’objectif du projecteur au haut de l’image (a) est de
moins de :
b – 5,9 po) × c/41,73 po
(
b – 150 mm) × c/1 060 mm
ou (
30
Page 31

Si la distance depuis le dessus de l’objectif du projecteur au haut de l’image (a) est inférieure à la valeur
calculée, le module interactif peut alors être utilisé sans avoir à repositionner le projecteur.
Dans la négative, repositionnez le projecteur pour que la distance depuis le dessus de l’objectif du
projecteur au haut de l’image soit inférieure à la valeur calculée. Par exemple, il peut être nécessaire
d’abaisser le projecteur ou de l’incliner comme montré :
Français
Remarque
Consultez un spécialiste des projecteurs qualifié si vous devez repositionner votre projecteur.
Exemple de calcul
Par exemple, si votre projecteur est monté à 10 pi (3 m) du mur (distance c) pour une image WXGA
de 96 po (2 438 mm), le module interactif doit être monté à 15,6 po (396 mm) au-dessus de l’image
projetée (distance
projecteur au haut de l’image (
b), selon le tableau de la page 28. La distance depuis le dessus de l’objectif du
a) devrait être de 30 po (762 mm). Le calcul se ferait comme suit :
15,6 po – 5,9 po × 120/41,73 po = 27,9 po
ou 396 mm – 150 mm × 3 048/1 060 mm = 709 mm
La distance
a (30 po [762 mm]) est supérieure à 27,9 po (709 mm). Vous devriez alors abaisser le
projecteur de 2,1 po (53 mm).
31
Page 32

Installation du module interactif
Observez les étapes de la présente section pour installer la plaque murale, monter le module interactif, poser
le couvercle et centrer le module interactif.
Mise en garde
Assurez-vous d’utiliser le matériel approprié pour soutenir le poids combiné du module interactif et de la plaque
murale (environ 5,08 lb/2,3 kg).
Installation de la plaque murale
Vous pouvez utiliser la plaque murale courte (montant simple) ou la plaque murale longue (montant
double), selon les exigences de votre édifice. Les illustrations de la présente section montrent la plaque
murale longue (montant double).
Si vous utilisez la plaque murale courte, veillez à la centrer sur l’horizontale, au-dessus de la zone de
projection. Si vous utilisez la plaque longue, vous pouvez la repositionner sur l’horizontale après
l’installation, comme montré ci-dessous.
1 Confirmez la distance requise entre le haut de la zone d’image et le bas de la plaque murale (
b). Tracez
une ligne sur le mur à cet emplacement, au-dessus du tableau blanc ou de la surface de projection.
Distance depuis le haut de la surface de
projection au bas de la plaque murale (
Haut de la surface de projection
b)
2 Déterminez l’emplacement des goujons à l’intérieur du mur. Alignez la plaque murale avec la ligne
tracée sur le mur et assurez-vous d’aligner les trous (
A ou B) de la plaque murale avec les goujons.
Marquez la position des trous de montage sur le mur.
32
Page 33

3 Percez des trous dans le mur aux emplacements requis.
4 En utilisant des ancrages ou des vis à bois à tête carrée offerts dans le commerce, montez la plaque
murale au mur.
Montage du module interactif
Avant de monter le module interactif, notez le numéro de série indiqué sur le bras. Inscrivez-le à la page 37
du présent guide pour y référer en cas de besoin d’assistance technique.
1 Montez le module interactif sur la plaque murale et positionnez le câble USB comme montré. Vous
pouvez acheminer le câble à gauche ou à droite. Veillez à ne pas coincer le câble pendant le montage du
module sur la plaque murale.
Français
2 Fixez le module interactif à la plaque murale en utilisant les deux boulons et la clé hexagonale fournis.
Ne serrez pas les boulons avant d’avoir centré le module interactif avec la zone d’image.
3 Si vous avez installé la plaque murale longue, déplacez le bras sur l’horizontale pour positionner le
module interactif au-dessus du centre de la zone de projection ou du tableau blanc.
4 Serrez les boulons en utilisant la clé hexagonale fournie.
33
Page 34

5 Coulissez le couvercle sur la plaque murale, comme montré.
Remarque
Veillez à acheminer le câble USB autour du tableau blanc ou de la zone d’image. Un système de gestion des
câbles en option est disponible auprès d’Epson (n° de pièce ELPCK01).
6 Pour fixer le couvercle de plaque de support, suivez les directives fournies avec le couvercle.
7 Pour un rangement pratique et sécuritaire des crayons, fixez le rangement pour crayons au tableau
blanc ou au mur (boulons non fournis).
Utilisation du module interactif
Une fois le module interactif monté au mur, vous pouvez raccorder le câble USB à votre ordinateur et
utiliser les crayons interactifs. Pour des directives détaillées et des conseils de dépannage, consultez le Guide
de l’utilisateur ELPIU01 électronique.
Avant de pouvoir utiliser le module interactif, observez les étapes suivantes :
1 Installez le pilote Easy Interactive Driver sur votre ordinateur avec le CD
for Easy Interactive Function
.
Epson Projector Software
Vous pouvez aussi installer le logiciel d’annotation TeamBoard Draw.
2 Installez les piles dans les crayons, comme montré. Vous pouvez utiliser des piles alcalines ou des piles
rechargeables; ne mélangez pas les deux types de pile.
3 Raccordez votre ordinateur au projecteur et projetez une image.
34
Page 35

Remarque
Si vous projetez sur un tableau blanc, l’image peut ne pas remplir toute la surface du tableau, en fonction de sa taille
et de son rapport hauteur/largeur.
4 Raccordez votre ordinateur au module interactif en utilisant le câble USB. Si le câble n’est pas assez
long pour atteindre votre ordinateur, vous aurez besoin d’un câble de rallonge USB (non fourni).
5 Lancez le pilote Easy Interactive.
®
Cliquez sur l’icône dans le coin inférieur droit de l’écran (Windows
) ou sur le Dock (Mac OS®).
Français
6 Sélectionnez
Calibrer (normale) ou Calibrer (avancé).
Le calibrage normal est plus rapide et convient à la plupart des situations (à moins que vous prévoyiez
travailler avec des images très détaillées).
7 Suivez les directives à l’écran pour effectuer le calibrage. Veillez à toucher chaque point dès son
affichage.
8 Utilisez le crayon comme une souris en le tapant sur l’image projetée.
Témoin de pile
Bouton
• Pour une performance optimale, tenez le crayon à un angle (comme un crayon normal), plutôt que
perpendiculairement par rapport au tableau.
• Pour un clic gauche, tapez le tableau. Tapez deux fois pour double-cliquer.
• Pour un clic droit, tapez tout en appuyant sur le bouton de crayon.
• Pour cliquer et glisser, tapez et glissez avec le crayon.
35
Page 36

Résolution des problèmes
Consultez les sections suivantes pour obtenir des solutions à des problèmes courants. Consultez le Guide de
l’utilisateur ELPIU01 électronique pour obtenir plus d’information.
Problèmes avec les crayons interactifs
• Assurez-vous que le câble USB est bien raccordé au module interactif et à l’ordinateur. Déconnectez
puis reconnectez le câble dans votre ordinateur.
• Si vous ne voyez pas l’icône de crayon sur votre barre des tâches (Windows) ou sur le Dock (Mac
OS), procédez comme suit :
Windows : Sélectionnez
Projector
Mac OS : Ouvrez le dossier
•Si un
correctement. Retirez et reconnectez le câble USB.
• Assurez-vous que les piles du crayon sont suffisamment chargées. Si le témoin du crayon ne passe pas
au vert lorsque vous appuyez sur le bouton, vous devez remplacer les piles.
• Assurez-vous que rien ne bloque le signal entre le crayon et le module interactif. Même si vous créez
une ombre sur l’image projetée, vous devriez tout de même être en mesure d’utiliser le crayon
interactif.
• Si le crayon présente des à-coups ou est difficile à utiliser, déplacez-vous sur le côté pour éviter de
bloquer le signal au module interactif.
• Réduisez l’éclairage de la pièce et éteignez les lampes fluorescentes. Assurez-vous que la surface de
projection et le module interactif ne sont pas exposés à la lumière directe du soleil ou à d’autres sources
d’éclairage intense.
• Pour une utilisation plus facile, tenez le crayon à un angle par rapport à la surface de projection.
• Si la position du crayon n’est pas précise, il peut être nécessaire de le recalibrer (consultez le Guide de
l’utilisateur ELPIU01 électronique pour de plus ample information).
> Easy Interactive Driver.
X rouge apparaît sur l’icône du crayon, l’ordinateur et le module interactif ne sont pas connectés
ou Démarrer > Tous les programmes ou Programmes > EPSON
Applications, puis sélectionnez l’icône Easy Interactive Driver.
Problèmes de piles
• Si les témoins du chargeur de piles ne s’allument pas ni ne clignotent lorsque vous le branchez, assurezvous d’avoir retiré la bande en carton du chargeur et inséré les batteries correctement. Consultez la
feuille de directives fournies avec le chargeur de piles.
36
Page 37

Comment obtenir de l’aide
Epson offre les services de soutien technique suivants :
Sur Internet
Visitez le site Web de soutien d’Epson au www.epson.ca/support et sélectionner votre produit pour obtenir
des solutions à des problèmes courants. Vous pouvez y télécharger des logiciels et de la documentation en
français, consulter une foire aux questions et des conseils de dépannage, ou envoyer vos questions par
courriel à Epson.
Pour parler à un représentant du soutien technique
Pour utiliser l’assistance technique Epson PrivateLine, composez le 1 800 637-7661 et entrez le NIP
indiqué sur votre carte Epson PrivateLine. Il s’agit du moyen le plus rapide de parler directement à un
représentant Epson. Ce service est offert gratuitement de 6 h à 18 h, heure du Pacifique, du lundi au
vendredi, pendant toute la durée de votre garantie.
Vous pouvez également parler à un spécialiste en matière de projecteurs en composant le numéro suivant :
(905) 709-3839, de 6 h à 18 h, heure du Pacifique, du lundi au vendredi.
Les jours et les heures de soutien peuvent être modifiés sans préavis. Des frais d’nterurbain peuvent s’appliquer.
Avant de communiquer avec Epson, ayez les informations suivantes sous la main:
Français
■ Nom du produit (Module interactif IU-01 BrightLink Solo)
■ Numéro de série du produit (sur le bras du module interactif)
■ Preuve d’achat et date d’achat
■ Configuration informatique ou vidéo
■ Description du problème
Soutien technique pour les logiciels
• Si vous avez besoin d’aide pour le logiciel TeamBoard Draw, communiquez avec Epson tel que décrit
ci-avant. Plus plus d’information sur le logiciel TeamBoard et les produits, visitez le site Web suivant :
www.teamboard.com
• Si votre module interactif inclut RM Easiteach et que vous avez besoin d’aide, composez le
1 866 728-6758 ou visitez l’un des sites Web de soutien suivants :
www.rmeducation.com/support/et ou www.rmeducation.com/easiteach
• Pour les problèmes avec le pilote Easy Interactive Driver, veuillez communiquer avec Epson tel que
décrit ci-avant.
Achat de fournitures et d’accessoires
Vous pouvez vous procurer des accessoires auprès d’un revendeur agréé Epson. Composez le
1 800 463-7766 pour les coordonnées du revendeur le plus proche. Vous pouvez acheter en ligne à
www.epson.ca.
37
Page 38

Garantie limitée
Éléments couverts par la garantie : Epson America, Inc. (« Epson ») garantit à l’acheteur original du produit
Epson couvert par la présente garantie limitée, que le produit, s’il est acheté à l’état neuf et utilisé au
Canada, aux États-Unis ou au Puerto Rico, sera exempt de défaut de fabrication et de vice de matériau
pendant une durée de deux (2) ans à compter de la date d’achat d’origine. Pour toute intervention au titre
de la garantie, vous devez fournir la preuve de la date d’achat d’origine.
Intervention d’Epson pour remédier aux problèmes : Si votre produit Epson a besoin d’être réparé au cours de
la période de garantie limitée, veuillez communiquer avec Epson au numéro de téléphone indiqué à la fin
de la présente déclaration et ayez sous la main le modèle, le numéro de série et la date d’achat d’origine.
Epson pourra, à son choix, réparer ou remplacer l’appareil défectueux sans frais de pièces ou de main
d’œuvre. Lorsqu’une intervention au titre de la garantie nécessite l’échange du produit ou d’une pièce,
l’article remplacé devient propriété d’Epson. Le produit ou la pièce de rechange pourront être neufs ou
remis à neuf selon les normes de qualité d’Epson et, au choix d’Epson, le produit de remplacement peut
être un autre modèle de type et de qualité semblables. La responsabilité d’Epson pour le remplacement du
produit couvert par la présente garantie ne peut dépasser le prix de vente d’origine du produit couvert. Les
produits et pièces de rechange sont couverts pour la période de garantie restante du produit couvert par la
présente garantie limitée.
Ce qui n’est pas couvert par cette garantie : Cette garantie ne s’applique qu’aux États-Unis, au Canada et au
Puerto Rico dans le contexte d’une utilisation normale. Une utilisation vingt-quatre heures sur vingt-quatre
ou toute autre utilisation continue ou excessive n’est pas considérée comme une utilisation normale. Cette
garantie ne couvre pas les consommables. La présente garantie n’est pas transférable. Epson ne sera pas
tenue d’effectuer d’intervention au titre de la garantie lorsque l’étiquette ou le logo Epson, le numéro de
série ou la plaque signalétique ont été enlevés de l’appareil. Epson ne sera pas tenue d’effectuer
d’intervention au titre de la garantie si le produit n’est pas correctement entretenu ou ne fonctionne pas
correctement en raison d’une mauvaise utilisation, d’une utilisation abusive, d’une installation incorrecte,
d’une négligence, d’avaries lors du transport, de dommages causés par un incendie, une inondation, la
foudre, une surtension électrique, des problèmes logiciels, une interaction avec des produits de marque
autre qu’Epson ou d’une intervention effectuée par un tiers autre qu’Epson ou un prestataire de service
Epson agréé. Les frais d’affranchissement, d’assurance ou d’expédition engagés pour faire réparer votre
produit Epson au titre de la garantie avec retour en atelier seront à votre charge. Epson défraiera tous les
frais de transport si vous choisissez d’envoyer votre appareil à Epson pour effectuer les réparations. Si une
anomalie déclarée ne peut être identifiée ou reproduite, les frais engagés seront à votre charge.
CE QUI PRÉCÈDE CONSTITUE LA SEULE GARANTIE ET EXCLUT TOUTE AUTRE
GARANTIE, EXPRESSE OU IMPLICITE, Y COMPRIS, MAIS SANS S’Y LIMITER, TOUTE
GARANTIE IMPLICITE DE QUALITÉ MARCHANDE, DE NON-VIOLATION OU
D’APTITUDE À UNE FIN PARTICULIÈRE. CERTAINES LOIS N’AUTORISENT PAS
L’EXCLUSION DES GARANTIES IMPLICITES. SI CES LOIS S’APPLIQUENT À VOUS, TOUTES
LES GARANTIES EXPRESSES OU IMPLICITES SE LIMITENT À LA PÉRIODE DE GARANTIE
DÉFINIE CI-DESSUS. SAUF DISPOSITIONS CONTRAIRES, TOUTE DÉCLARATION OU
GARANTIE FAITE PAR UNE AUTRE PERSONNE OU SOCIÉTÉ EST NULLE. EN CAS
D’ÉCHEC DU RECOURS CI-DESSUS, LA SEULE RESPONSABILITÉ D’EPSON SERA LIMITÉE
À UN REMBOURSEMENT DU PRIX PAYÉ POUR LE PRODUIT EPSON COUVERT PAR LA
PRÉSENTE GARANTIE LIMITÉE. SAUF DISPOSITIONS CONTRAIRES DANS CETTE
GARANTIE ÉCRITE, NI EPSON AMERICA, INC. NI SES FILIALES NE POURRONT ÊTRE
TENUES RESPONSABLES EN CAS DE PERTE, INCONVÉNIENTS OU DOMMAGES, Y
COMPRIS LES DOMMAGES DIRECTS, SPÉCIAUX, ACCESSOIRES OU INDIRECTS
DÉCOULANT DE L’UTILISATION OU DE L’IMPOSSIBILITÉ D’UTILISATION DU PRODUIT
38
Page 39

EPSON, QUE CE SOIT À LA SUITE DU NON-RESPECT DE LA GARANTIE OU D’UNE AUTRE
THÉORIE JURIDIQUE.
Au Canada, les garanties englobent les garanties et les conditions.
Certains territoires n’autorisant pas les limitations qui s’appliquent à la durée d’une garantie implicite et
d’autres n’autorisant pas l’exclusion ou la limitation des dommages accessoires ou indirects, il est possible
que les limitations et exclusions ci-dessus ne s’appliquent pas à vous. La présente garantie vous donne des
droits juridiques spéciaux auxquels peuvent s’ajouter d’autres droits pouvant varier d’un territoire à l’autre.
Pour trouver le revendeur Epson autorisé le plus près, visitez notre site Web à www.epson.ca.
Pour obtenir les coordonnées du centre de service agréé Epson le plus près de vous, veuillez visiter le site
Web www.epson.ca/support.
MS
Pour contacter Epson Connection
et le (905) 709-3839 au Canada ou écrivez à Epson America, Inc., P.O. Box 93012, Long Beach, CA
90809-3012.
, composez le 1 800 637-7661 + NIP ou (562) 276-4394 aux É.-U.
Avis sur les droits d’auteur
Tous droits réservés. Il est interdit de reproduire, de conserver dans un système central ou de transmettre le
contenu de cette publication sous quelque forme et par quelque moyen que ce soit – reproduction
électronique ou mécanique, photocopie, enregistrement ou autre – sans la permission écrite préalable de
Seiko Epson Corporation. Les renseignements contenus dans le présent guide concernent uniquement ce
produit Epson. Epson ne peut être tenue responsable de l’utilisation de ces renseignements pour faire
fonctionner d’autres équipements.
Français
Ni Seiko Epson Corporation ni ses filiales ne sont responsables vis-à-vis de l’acheteur de ce produit ou de
tierces parties en cas de dommages, de pertes, de frais ou de dépenses engagées par l’acheteur ou les tierces
parties par suite : d’un accident ou d’une mauvaise utilisation de ce produit ou de modifications,
réparations ou altérations non autorisées de ce produit ou (sauf pour les États-Unis) du non-respect des
directives de fonctionnement et d’entretien fournies par Seiko Epson Corporation.
Seiko Epson Corporation décline toute responsabilité en cas de dommages ou de problèmes découlant de
l’utilisation d’options ou de produits consommables autres que les produits désignés comme produits
Epson d’origine ou comme produits approuvés pour Epson par Seiko Epson Corporation.
Marques de commerce
Epson est une marque déposée et Epson Exceed Your Vision est un logo déposé de Seiko Epson
Corporation.
BrightLink Solo est une marque de commerce d’Epson America, Inc.
Avis général : Les autres noms de produit figurant dans le présent document ne sont cités qu’à titre
d’identification et peuvent être des marques de commerce de leurs propriétaires respectifs. Epson renonce à
tous les droits associés à ces marques.
L’information contenue dans ce guide peut être modifiée sans préavis.
© 2010 Epson America Inc. 9/10
39
Page 40

CPD-28137
Printed in USA
Imprimé aux États-Unis
 Loading...