

Epson BrightLink 475Wi, BrightLink 536Wi, BrightLink 575Wi, BrightLink 585Wi, BrightLink 595Wi Operation Guide
...Page 1

EasyMP Network Updater
Operation Guide
Page 2

Page 3

Contents
Introduction to EasyMP Network Updater................................................................................................. 5
Setting Up EasyMP Network Updater for the First Time .......................................................................... 6
Updating Firmware and Copying Menu Settings.................................................................................... 16
Using Additional Functions...................................................................................................................... 23
EasyMP Network Updater Features..................................................................................................... 5
Installing the Software.......................................................................................................................... 6
System Requirements..................................................................................................................... 6
Installing EasyMP Network Updater................................................................................................ 8
Selecting Projector Network Settings................................................................................................... 8
Setting Up a Projector to Connect in Advanced Connection Mode (Wired)..................................... 8
Making a Projector List......................................................................................................................... 9
Projector List.................................................................................................................................. 10
Editing a Projector List................................................................................................................... 10
Editing a Projector List Automatically........................................................................................ 10
Editing a Projector List Manually............................................................................................... 13
Updating the Firmware....................................................................................................................... 16
Copying Projector Menu Settings Using Batch Setup ........................................................................ 19
Managing an Update Schedule.......................................................................................................... 23
Changing an Update Schedule...................................................................................................... 23
Canceling an Update Schedule..................................................................................................... 24
Deleting an Update Schedule........................................................................................................ 25
Managing the Projector List................................................................................................................ 25
Changing the Projector Information............................................................................................... 25
Exporting a Projector List............................................................................................................... 27
Importing a Projector List............................................................................................................... 27
Making Security Settings.................................................................................................................... 28
Setting the Password..................................................................................................................... 28
Restricting the Use of the Application............................................................................................ 29
Solving Problems...................................................................................................................................... 31
Solving Network Connection Problems.............................................................................................. 31
3
Page 4

Solutions When You Cannot Find Connected Projectors (Wired).................................................. 31
Solving Problems When Updating...................................................................................................... 32
Solutions When You Cannot Update Firmware or Copy Menu Settings........................................ 32
Error Messages List ........................................................................................................................... 33
Error Messages When Starting EasyMP Network Updater............................................................ 33
Error Messages When Setting Up an Update Schedule................................................................ 34
Error Messages When Editing Projector List................................................................................. 35
Error Messages When Using Batch Setup .................................................................................... 36
Error Status........................................................................................................................................ 37
Screen Summary....................................................................................................................................... 38
EasyMP Network Updater Main Screen............................................................................................. 38
Add Schedule/Change Schedule Screen........................................................................................... 40
Settings Screen.................................................................................................................................. 41
Edit Projector List Screen................................................................................................................... 42
Create new projector (auto registration) screen............................................................................. 44
Create new projector (auto registration)/Create new projector (manual registration)/Edit Projector
screen............................................................................................................................................ 45
Appendix.................................................................................................................................................... 47
Updating and Uninstalling the Software ............................................................................................. 47
Uninstalling EasyMP Network Updater (Windows XP/Windows Vista/Windows 7)....................... 47
Uninstalling EasyMP Network Updater (Windows 8)..................................................................... 48
Notices............................................................................................................................................... 48
Copyright Notice............................................................................................................................ 48
About Notations............................................................................................................................. 49
General Notice............................................................................................................................... 49
Copyright Attribution ................................................................................................................. 50
4
Page 5

Introduction to EasyMP Network Updater
See the information here to learn more about EasyMP Network Updater software.
EasyMP Network Updater Features
EasyMP Network Updater Features
EasyMP Network Updater is an application that allows you to update firmware for a projector over a
wired LAN. You can also schedule when the firmware updates will take place.
Once you select a projector's menu settings, you can use EasyMP Network Updater to copy the settings
to multiple projectors of the same type in a batch setup operation.
To enhance security, you can prevent unauthorized access to EasyMP Network Updater by locking the
application and applying a security password.
Parent topic: Introduction to EasyMP Network Updater
5
Page 6

Setting Up EasyMP Network Updater for the First Time
Follow these instructions to prepare to update the firmware or copy the projector's menu settings.
Installing the Software
Selecting Projector Network Settings
Making a Projector List
Installing the Software
Check the system requirements necessary to run the software, and then install the software.
Note:
• If the language selected for the installation differs from the language of the operating system being
used, the screens may not be displayed correctly.
System Requirements
Installing EasyMP Network Updater
Parent topic: Setting Up EasyMP Network Updater for the First Time
System Requirements
This application supports the following operating systems, and is compatible with computers that meet
the following system requirements.
6
Page 7

Operating Systems Windows XP Service Pack 3
• Professional (32-bit)
• Home Edition (32-bit)
• Tablet PC Edition (32-bit)
Windows Vista
• Ultimate (32-bit)
• Enterprise (32-bit)
• Business (32-bit)
• Home Premium (32-bit)
• Home Basic (32-bit)
Windows 7
• Ultimate (32- and 64-bit)
• Enterprise (32- and 64-bit)
• Professional (32- and 64-bit)
• Home Premium (32- and 64-bit)
• Home Basic (32-bit)
Windows 8
• Windows 8 (32- and 64-bit)
• Windows 8 Pro (32- and 64-bit)
• Windows 8 Enterprise (32- and 64-bit)
Windows 8.1
• Windows 8.1 (32- and 64-bit)
• Windows 8.1 Pro (32- and 64-bit)
• Windows 8.1 Enterprise (32- and 64-bit)
CPU Pentium M 1.6 GHz or faster
(Core2Duo 1.2 GHz or faster recommended)
Memory 512 MB or more
(1 GB or more recommended)
7
Page 8

Minimum Display Resolution XGA 16 bit color
Parent topic: Installing the Software
Installing EasyMP Network Updater
Download and install EasyMP Network Updater on your computer.
Note: You need administrator authority to install EasyMP Network Updater.
1. Download the latest version of EasyMP Network Updater from the Epson website.
2. Double-click Setup.exe to start the installer.
3. Follow the on-screen instructions.
Parent topic: Installing the Software
Selecting Projector Network Settings
If the projector you want to update is not connected to your network, select the necessary settings to
connect it to your network. Connect the projector using a wired network system. Firmware cannot be
updated and projector menu settings cannot be copied over a wireless LAN.
Setting Up a Projector to Connect in Advanced Connection Mode (Wired)
Parent topic: Setting Up EasyMP Network Updater for the First Time
Setting Up a Projector to Connect in Advanced Connection Mode (Wired)
To connect a computer to the projector using a wired LAN, you need to select network settings on the
computer and the projector.
1. Contact your network administrator and check that DHCP is available under the current network
environment.
Note: If DHCP is not available, write down the following values that are available for your projector.
• IP Address
• Subnet Mask
• Gateway Address
8
Page 9
2. Connect the computer to the network.
Note: To set up a network connection, if necessary, see the documentation supplied with your
computer or network adapter.
3. Connect a LAN cable to the projector.
4. Turn on the projector.
5. Press the Menu button on the remote control or the control panel, select the Network menu, and
select Network Configuration.
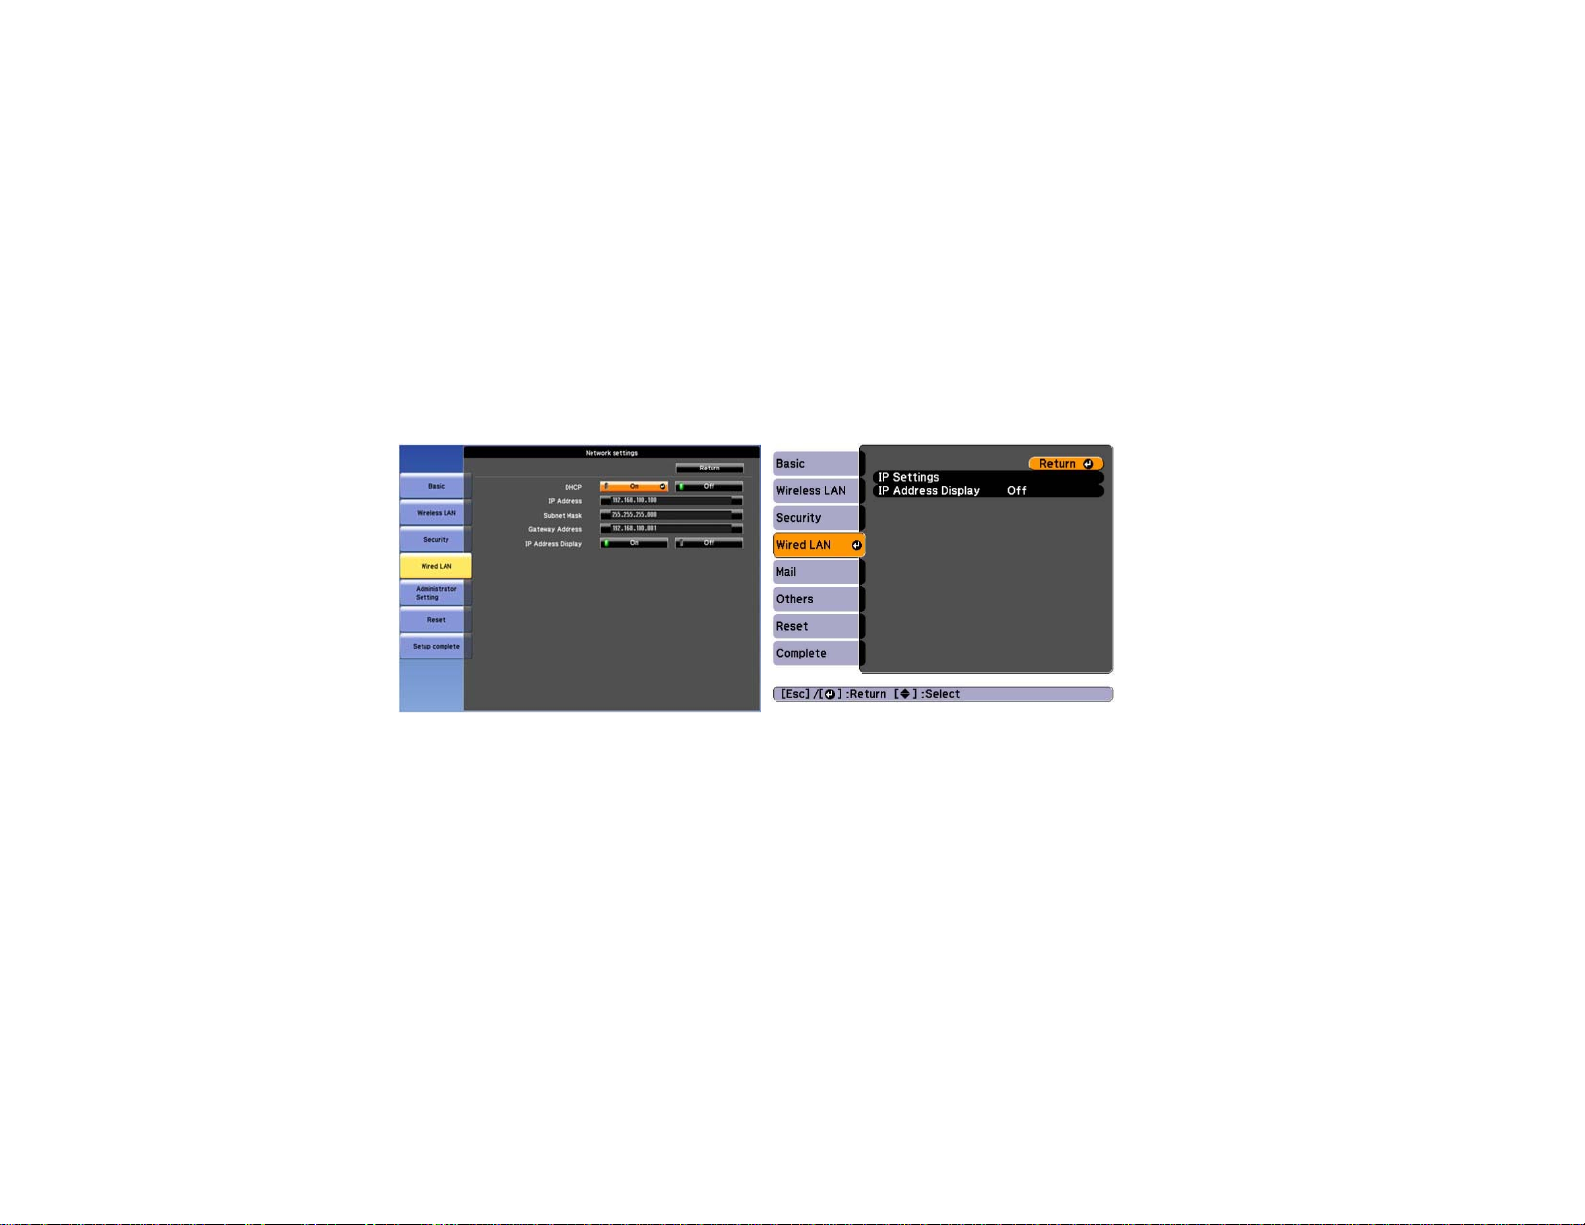
6. Select Wired LAN.
A screen like one of the following is displayed.
7. Select IP settings as necessary.
• DHCP is available: Set DHCP to On.
• DHCP is not available: Set DHCP to Off and enter the projector's IP Address, Subnet Mask, and
Gateway Address values as necessary.
8. When you have finished making settings, select Setup Complete or Complete, and follow the onscreen instructions to save your settings and exit the menus.
Parent topic: Selecting Projector Network Settings
Making a Projector List
You can make a list of projectors for which you want to update the firmware or copy the menu settings
using EasyMP Network Updater.
9
Page 10

Projector List
Editing a Projector List
Parent topic: Setting Up EasyMP Network Updater for the First Time
Projector List
The projector list function allows you to create a list of projectors on your network. You can then use this
list to update the firmware or copy the menu settings for each projector.
To create a projector list, you can search for the projectors on your network automatically or manually, or
you can import a list that has been exported from EasyMP Network Updater or EasyMP Monitor.
Parent topic: Making a Projector List
Related tasks
Importing a Projector List
Related topics
Editing a Projector List
Editing a Projector List
You can create and edit a projector list in EasyMP Network Updater using a variety of methods. When
you search for a projector that is located on the same segment as the computer with EasyMP Network
Updater installed, you can use an automatic search. To search for projectors on other segments, enter a
range of IP addresses or perform a manual search.
Note: You can also import a projector list that has been exported from EasyMP Network Updater or
EasyMP Monitor.
Editing a Projector List Automatically
Editing a Projector List Manually
Parent topic: Making a Projector List
Related tasks
Importing a Projector List
Editing a Projector List Automatically
You can create a projector list by searching for projectors on the same segment automatically, as well as
searching for projectors by specifying a range of IP addresses.
10
Page 11

1. Start EasyMP Network Updater.
• Windows XP, Windows Vista, and Windows 7: Click Start, select Programs (or All Programs),
EPSON Projector, EasyMP Network Updater, and then click EasyMP Network Updater
Ver.X.XX.
• Windows 8.x: Navigate to the Apps screenand select EasyMP Network Updater Ver.X.XX.
EasyMP Network Updater starts.
2. Open the Edit menu, and then click Edit Projector List.
The Edit Projector List screen is displayed.
3. Click Automatic search.
The Create new projector (auto registration) screen is displayed.
4. Perform one of the following operations.
• Setting an IP address range: Select Specify an address range and search. Enter an IP address
in Start address and End address, and then click Search.
• Without setting an IP address range: Click Search.
11
Page 12

The application displays a list of network projectors that allow firmware updates or copying of menu
settings using EasyMP Network Updater. If the projector you want is not displayed in the list, edit the
projector list manually.
5. Select the projector that you want to register, and then click Edit.
6. Select the necessary settings for each projector.
1 Enter the name of the projector. This name is displayed in the projector list. You can enter up
to 32 characters.
2 Displays the name that has been registered to the projector.
3 Displays the projector's IP address.
4 If a password has been set for the projector, enter the password here. If you do not enter the
correct password, you cannot update the projector's firmware or copy the menu settings, even
after registering the projector. For more information about passwords, see the User's Guide
supplied with the projector.
12
Page 13
5 Enter notes about the projector, such as its location, if necessary. Notes entered here are
displayed in Description on the Edit Projector List screen.
7. Click Register.
To register additional projectors, repeat steps 5 to 7.
8. Close the Create new projector (auto registration) screen after you have registered all necessary
projectors.
The registered projectors are displayed on the Edit Projector List screen.
Parent topic: Editing a Projector List
Related tasks
Editing a Projector List Manually
Editing a Projector List Manually
You can create a projector list manually.
1. Start EasyMP Network Updater.
• Windows XP, Windows Vista, and Windows 7: Click Start, select Programs (or All Programs),
EPSON Projector, EasyMP Network Updater, and then click EasyMP Network Updater
Ver.X.XX.
• Windows 8.x: Navigate to the Apps screenand select EasyMP Network Updater Ver.X.XX.
EasyMP Network Updater starts.
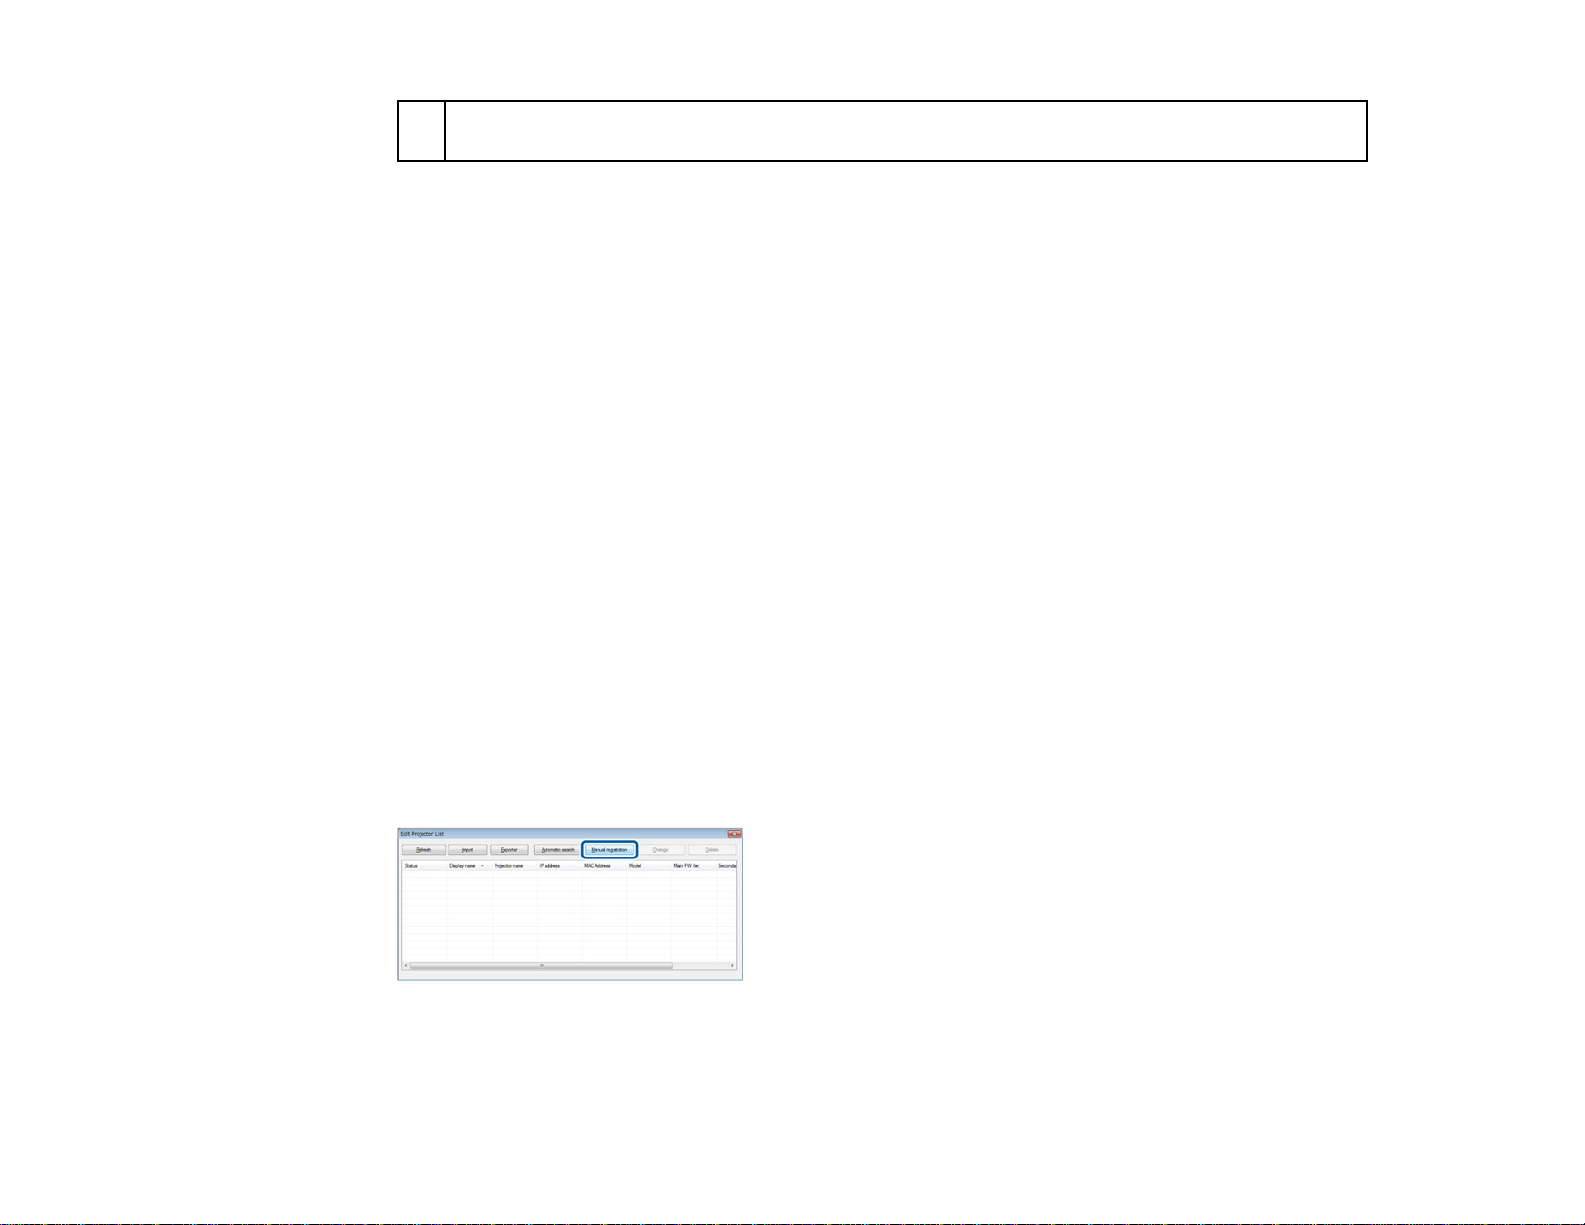
2. Open the Edit menu, and then click Edit Projector List.
The Edit Projector List screen is displayed.
3. Click Manual registration.
The Create new projector (manual registration) screen is displayed.
13
Page 14
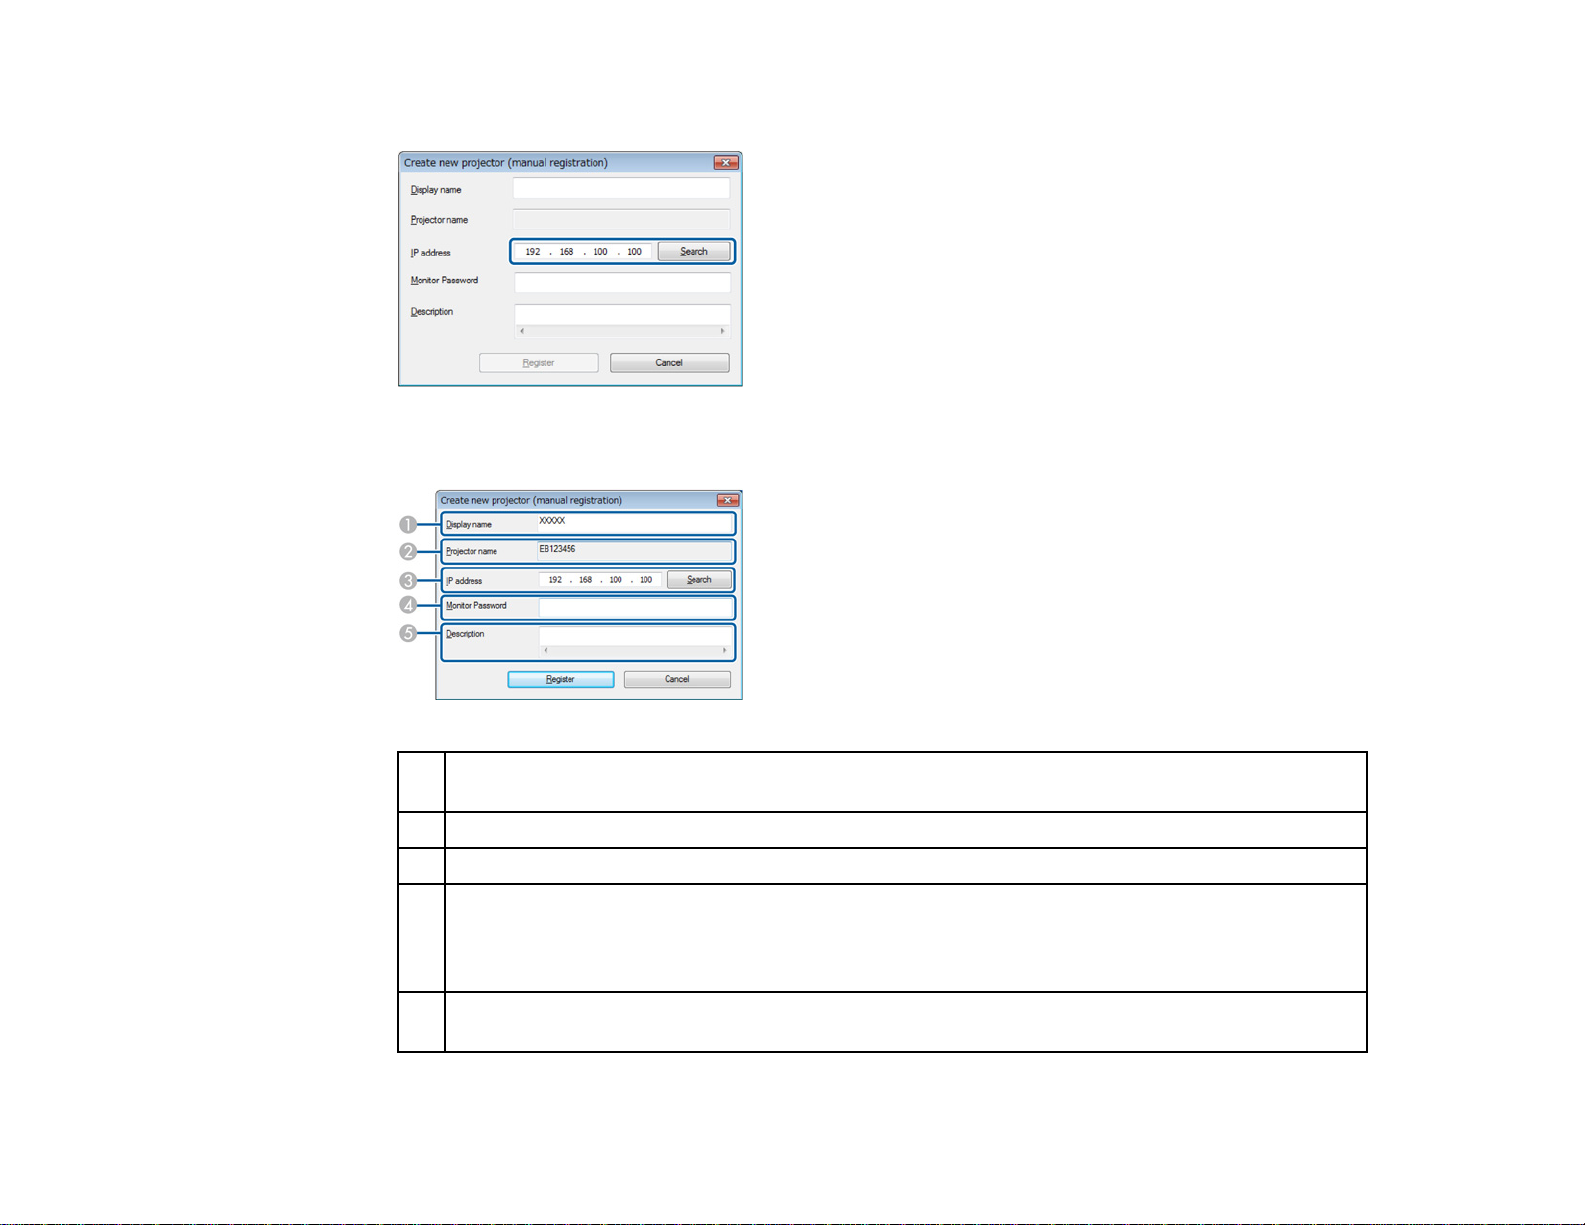
4. Enter the IP address and click Search.
5. Select the necessary settings for each projector.
1 Enter the name of the projector. This name is displayed in the projector list. You can enter up
to 32 characters.
2 Displays the name that has been registered to the projector.
3 Displays the IP address that you entered in step 4.
4 If a password has been set for the projector, enter the password here. If you do not enter the
correct password, you cannot update the projector's firmware or copy the menu settings, even
after registering the projector. For more information about passwords, see the User's Guide
supplied with the projector.
5 Enter notes about the projector, such as its location, if necessary. Notes entered here are
displayed in Description on the Edit Projector List screen.
14
Page 15

6. Click Register.
The projector is registered to the projector list.
Parent topic: Editing a Projector List
15
Page 16

Updating Firmware and Copying Menu Settings
Follow the instructions here to update your projectors to use the latest firmware or copy the projector's
menu settings.
Updating the Firmware
Copying Projector Menu Settings Using Batch Setup
Updating the Firmware
You can update the firmware right away or schedule a time for the firmware update.
Contact your nearest Epson support center for more information on acquiring your projector firmware.
When you update the firmware, make sure the projector is on or the projector's Standby Mode is set to
Communication On.
Caution: Do not unplug the projector's power cord while updating the firmware. If the projector is
unexpectedly shut down while updating, the firmware may not be written correctly which could cause the
projector to malfunction. Epson takes no responsibility for firmware update failures and associated repair
costs due to power outages, communication errors, or other problems that may cause such failures.
1. Start EasyMP Network Updater.
• Windows XP, Windows Vista, and Windows 7: Click Start, select Programs (or All Programs),
EPSON Projector, EasyMP Network Updater, and then click EasyMP Network Updater
Ver.X.XX.
• Windows 8.x: Navigate to the Apps screenand select EasyMP Network Updater Ver.X.XX.
EasyMP Network Updater starts.
2. Click Add on the main screen.
16
Page 17

The Add Schedule screen is displayed.
3. Click Browse, and then select the firmware file you want to use to update the projectors.
Note: The extension for projector firmware files is .bin. Do not select any other file type.
17
Page 18

4. Click Show.
The firmware information is displayed in File Information, and then a list of the projectors that
support the selected firmware is displayed.
5. Do one of the following.
• Select all projectors: Click Select all.
• Specify the projectors you want to update: Select the projector's checkbox.
6. Select one of the following methods to update the firmware.
• Schedule the update: Select Set the Time to set the date and time you want to perform the
firmware update, and then click Register.
• Update immediately: Clear the Set the Time checkbox, and then click Start Now to start the
firmware update immediately.
The firmware is updated at the date and time you set, and the LED indicator on the projector turns on.
When the firmware update is complete, the projector turns off and it enters standby mode. While
updating, you can check the firmware update status on the EasyMP Network Updater main screen.
18
Page 19

Note:
• If you try to close the application while updating the firmware, a message is displayed asking if you
want to cancel the update. If you select Yes, the update is canceled.
• If you try to close the application when there is a scheduled update standing by, a confirmation
message is displayed. If you choose to close the application, make sure you restart EasyMP Network
Updater before the scheduled update begins. If the application is closed when an update is scheduled
to begin, the update is canceled.
Parent topic: Updating Firmware and Copying Menu Settings
Copying Projector Menu Settings Using Batch Setup
You can copy the menu settings from one projector to one or more other projectors of the same model.
This allows you to quickly duplicate projector menu settings in a batch setup operation.
You can copy menu settings in a batch setup operation right away or schedule a time to copy them.
Note: You must add all the projectors that you will update to the projector list in the EasyMP Network
Updater software before using the batch setup feature.
When you copy the menu settings, make sure the projector is on or the projector's Standby Mode is set
to Communication On.
Not all menu settings are copied to another projector, such as following.
• Network menu settings (except for the Mail menu and the Others menu)
• Lamp Hours andStatus from the Info menu
Note: Perform the batch setup operation before adjusting the image settings such as Keystone. Image
adjustment values are also applied to other projectors and adjustments you made before performing the
batch setup operation are overwritten.
When you copy the menu settings from one projector to another, the user's logo is also copied. Do not
register any information that you do not want to share between multiple projectors as a user's logo.
Caution: Do not unplug the projector's power cord while copying the menu settings. If the projector is
unexpectedly shut down while copying, the configuration may not be written correctly which could cause
the projector to malfunction. Epson takes no responsibility for batch setup failures and associated repair
costs due to power outages, communication errors, or other problems that may cause such failures.
19
Page 20

1. Start EasyMP Network Updater.
• Windows XP, Windows Vista, and Windows 7: Click Start, select Programs (or All Programs),
EPSON Projector, EasyMP Network Updater, and then click EasyMP Network Updater
Ver.X.XX.
• Windows 8 or Windows 8.1: Navigate to the Apps screen and select EasyMP Network Updater
Ver.X.XX.
EasyMP Network Updater starts.
2. Open the Tool menu and select Projector configuration data acquisition.
The Projector configuration data acquisition screen is displayed.
3. Select the projector from which you want to copy the menu settings and click Acquire.
Note: If you do not see the projector, make sure the projector is on and click Refresh.
The Save As screen appears.
4. Name the projector menu setting configuration file and click Save to save it on your computer.
20
Page 21

You see a message asking if you want to apply the menu settings to another projector.
5. Click Yes.
The Add Schedule screen is displayed.
6. Click Browse, and then select the saved configuration file.
Note: The extension for menu setting configuration files is .bin. Do not select any other file type.
7. Click Show.
The configuration information is displayed in File Information, and then a list of the projectors that
support the configuration is displayed.
8. Do one of the following.
• Select all projectors: Click Select all.
• Specify the projectors you want to update: Select the projector's checkbox.
9. Select one of the following methods to copy the menu settings.
• Schedule the update: Select Set the Time to set the date and time you want to copy the menu
settings, and then click Register.
21
Page 22

• Update immediately: Clear the Set the Time checkbox, and then click Start Now to copy the
menu settings immediately.
The menu settings are copied at the date and time you set, and the LED indicator on the projector turns
on. When the process is complete, the projector turns off and it enters standby mode. While copying, you
can check the menu copying status on the EasyMP Network Updater main screen.
Note:
• If you try to close the application while copying the menu settings, a message is displayed asking if
you want to cancel the process. If you select Yes, the update is canceled.
• If you try to close the application when there is a scheduled update standing by, a confirmation
message is displayed. If you choose to close the application, make sure you restart EasyMP Network
Updater before the scheduled update begins. If the application is closed when an update is scheduled
to begin, the update is canceled.
Parent topic: Updating Firmware and Copying Menu Settings
22
Page 23

Using Additional Functions
Follow the instructions here to use the additional functions available with EasyMP Network Updater.
Managing an Update Schedule
Managing the Projector List
Making Security Settings
Managing an Update Schedule
You can change, cancel, or delete firmware update or projector menu copying schedules that you have
registered in EasyMP Network Updater.
Changing an Update Schedule
Canceling an Update Schedule
Deleting an Update Schedule
Parent topic: Using Additional Functions
Changing an Update Schedule
You can change a schedule that has already been registered.
1. Select the schedule that you want to change on the main screen, and then click Change.
23
Page 24

2. Select the projectors you want to update, and then change the update schedule.
3. Click Change.
The schedule is changed and registered again.
Parent topic: Managing an Update Schedule
Canceling an Update Schedule
You can cancel updates for projectors that are in Waiting or Executing status. When canceling a
scheduled update that is currently Executing, you can only cancel updates for projectors that have not
yet been started.
1. Select the schedule that you want to cancel on the main screen, and then click Cancel.
24
Page 25

2. When the confirmation dialog box is displayed, click Yes.
The selected schedule is canceled. After canceling the schedule, it remains in the list. You can restart it
at another time.
Parent topic: Managing an Update Schedule
Deleting an Update Schedule
You can delete a schedule that has already been registered. You cannot delete schedules that have
already started updating.
1. Select the schedule that you want to delete on the main screen, and then click Delete.
2. When the confirmation dialog box is displayed, click Yes.
The selected schedule is deleted from the Schedule List.
Parent topic: Managing an Update Schedule
Managing the Projector List
You can change the information for a projector that has already been registered in the projector list. You
can also create a backup file of registered projectors by exporting the projector list. You can then import
the exported list to quickly set up firmware updates or copy projector menu settings on another
computer.
Changing the Projector Information
Exporting a Projector List
Importing a Projector List
Parent topic: Using Additional Functions
Changing the Projector Information
You can change the display name and description of a projector in the projector list.
25
Page 26

1. Open the Edit menu, and then click Edit Projector List.
The Edit Projector List screen is displayed.
2. Select the projector that you want to change, and then click Change.
The Edit Projector screen is displayed.
3. Change the information as necessary.
1 Enter the name of the projector. This name is displayed in the projector list. You can enter up
to 32 characters.
2 Displays the name that has been registered to the projector.
3 Displays the projector's IP address.
4 If a password has been set for the projector, enter the password here. If you do not enter the
correct password, you cannot update the projector's firmware or copy menu settings, even
after registering the projector. For more information about passwords, see the User's Guide
supplied with the projector.
5 Enter notes about the projector, such as its location, if necessary. Notes entered here are
displayed in Description on the Edit Projector List screen.
26
Page 27

4. Click Change.
Your changes are saved and the Edit Projector screen closes.
Parent topic: Managing the Projector List
Exporting a Projector List
You can export the projector list to create a backup of the registered projectors.
1. Open the Edit menu, and then click Edit Projector List.
The Edit Projector List screen is displayed.
2. Click Export.
3. Enter a name for the export file, and then select the location where you want to save the file.
4. Click Save.
The projector list is exported.
Parent topic: Managing the Projector List
Importing a Projector List
You can import a projector list that was previously exported from EasyMP Network Updater or EasyMP
Monitor. Projectors that do not support EasyMP Network Updater cannot be imported to the projector
list.
Note: The projector list created using EasyMP Monitor (EMP Monitor.dat) can be found at the following
location.
• Windows 2000/Windows XP:
C:\Program Files\EPSON Projector\EasyMP (or EMP) Monitor Ver. X.XX (Ver. X.XX represents the
software version)
• Windows Vista/Windows 7/Windows 8/Windows 8.1:
27
Page 28

C:\Users\(User Name)\AppData\Local\VirtualStore\Program Files\EPSON Projector\EasyMP (or
EMP) Monitor Ver. X.XX (Ver. X.XX represents the software version)
See EasyMP Monitor Operation Guide for more information.
1. Open the Edit menu, and then click Edit Projector List.
The Edit Projector List screen is displayed.
2. Click Import.
3. Select the file you want to import, and then click Open.
The projector list is imported, and the projectors are displayed in the projector list.
Parent topic: Managing the Projector List
Making Security Settings
You can improve EasyMP Network Updater security by restricting access to the application and
preventing anyone from changing its settings.
Setting the Password
Restricting the Use of the Application
Parent topic: Using Additional Functions
Setting the Password
You can set a password that must be entered when the application is started or when the application
lock function is enabled.
1. Open the Tool menu, and then select Settings.
The Settings screen is displayed.
28
Page 29

2. Select Change the application password.
3. Do one of the following.
• Create a password for the first time: Leave the Old password field blank.
• Change an old password: Enter the existing password in the Old password field.
4. Enter a new password in the New password field. The password can be up to 16 alphanumeric
characters.
5. Enter the same password again in the New password (confirm) field.
6. Click OK.
The password is saved.
Parent topic: Making Security Settings
Related tasks
Restricting the Use of the Application
Restricting the Use of the Application
You can lock the EasyMP Network Updater functions so that they cannot be accessed by a third party.
Note: When you set a password, you need to enter the password to release the application lock. Using a
password improves the EasyMP Network Updater security.
Open the Tool menu, and then select Application lock.
The application is locked and no operations are available except for opening and closing EasyMP
Network Updater and disabling the application lock.
To unlock the application, open the Tool menu, and then select Application unlock. If no password has
been set, you can leave these fields blank and just click OK in the window to enter the password.
29
Page 30

Parent topic: Making Security Settings
30
Page 31

Solving Problems
See the following sections to check for solutions to problems you may have using EasyMP Network
Updater.
Solving Network Connection Problems
Solving Problems When Updating
Error Messages List
Error Status
Solving Network Connection Problems
Try these solutions depending on your network environment.
Solutions When You Cannot Find Connected Projectors (Wired)
Parent topic: Solving Problems
Solutions When You Cannot Find Connected Projectors (Wired)
When you cannot connect the projector over a network using a wired connection, try the following
solutions. If you cannot resolve the problem, contact your network administrator.
• Check the status of the external devices used for the network connection or the projector's setting
environment.
• Connect the network cable securely.
Note:
• Use a commercially available 100BASE-TX or 10BASE-T LAN cable.
• To prevent malfunctions, use a category 5 or higher shielded LAN cable.
• Check the projector's network settings.
• Set DHCP to Off. When DHCP is set to On, it may take some time to enter LAN standby status if an
available DHCP server is not found.
Go to Network > Network Configuration > Wired LAN > DHCP or Network > Network
Configuration > Wired LAN > IP Settings > DHCP.
• Set the IP address, the subnet mask, and the gateway address for the projector correctly.
• Close network settings on the projector, and then return to the LAN standby screen.
31
Page 32

• Check the computer's network settings.
• Enable LAN settings on your computer.
Check Control Panel > System > Hardware > Device Manager.
Parent topic: Solving Network Connection Problems
Solving Problems When Updating
See the following section for solutions to problems that may occur when updating.
Solutions When You Cannot Update Firmware or Copy Menu Settings
Parent topic: Solving Problems
Solutions When You Cannot Update Firmware or Copy Menu Settings
• Check that the computer is connected to the network.
• Check that EasyMP Network Updater was running at the scheduled update time.
• If the projector's Standby Mode is set to Communication Off and the projector is off, the firmware
cannot be updated and the menu settings cannot be copied. Change the Standby Mode to
Communication On.
Go to Extended > Standby Mode or ECO > Standby Mode.
• The firmware or configuration file may be corrupted. Download the firmware or copy the menu settings
again, and then try again.
• If the update is not performed at the specified time, check that the schedule has not been canceled.
Canceled schedules remain in the Schedule List and their status reads Finish.
• Start Now is unavailable when Set the Time is selected. Clear the Set the Time checkbox.
• If the network settings are changed after creating a projector list, the firmware cannot be updated and
menu settings cannot be copied because the information for the projectors registered to the projector
list and the projector's actual settings differ. Click Refresh on the Projector List Edit screen to update
the projector information.
• On a DHCP network, if the time taken to assign network information is too short, the projector's
network information may change during update and you may not be able to update the firmware or
copy menu settings. When updating the firmware or copying menu settings, try a longer time setting.
• When the Windows Security Alert appears to confirm the Firewall setting while searching for the
projectors, allow access to the EasyMP Network Updater.
Parent topic: Solving Problems When Updating
32
Page 33

Related references
Edit Projector List Screen
Error Messages List
When an error occurs, an error message is displayed on your computer screen. Check for your message
and follow the instructions here to clear the error.
Error Messages When Starting EasyMP Network Updater
Error Messages When Setting Up an Update Schedule
Error Messages When Editing Projector List
Error Messages When Using Batch Setup
Parent topic: Solving Problems
Error Messages When Starting EasyMP Network Updater
Error Messages Remedy
Failed to start the application. Restart EasyMP Network Updater, and then input
the correct password again. If the message is still
displayed, uninstall and then reinstall EasyMP
Network Updater.
Cannot start this application because other Close EasyMP Monitor and then start EasyMP
EPSON Projector software (EasyMP Monitor) is Network Updater.
already running.
This application will not run on your current Confirm the system requirements and upgrade
version of OS. Upgrade your OS. your OS as necessary.
Cannot find the required file necessary to run RestartEasyMP Network Updater. If the message
EasyMP Network Updater. Please reinstall is still displayed, uninstall and then reinstall
EasyMP Network Updater. EasyMP Network Updater.
Failed to read the projector list. This Restart EasyMP Network Updater.
application will close.
Failed to read the schedule information. This Restart EasyMP Network Updater.
application will close.
Failed to unlock the application. Restart EasyMP Network Updater, and then input
the correct password again.
33
Page 34

Parent topic: Error Messages List
Related references
System Requirements
Related tasks
Installing EasyMP Network Updater
Related topics
Updating and Uninstalling the Software
Error Messages When Setting Up an Update Schedule
Error Messages Remedy
The selected file is not projector firmware, or Select the correct projector firmware or
the file may be corrupt. configuration file, or download the firmware or
copy the menu settings again.
Contact your nearest Epson support center for
more information on acquiring your projector
firmware.
Cannot find the projector to be updated. Import There are no projectors in the projector list that
a projector list or register a projector. support the selected firmware or configuration.
Import a projector list or register a projector, and
then try again.
Cannot execute because another schedule is When the other schedule is complete, try running
running. the schedule again or set another date and time.
There is already a schedule at the specified You can only register one schedule at a specific
time. Change the time, and then try again. time. Change the date and/or time, and then
register again.
For the update start time, enter a time later Make sure you do not set the date and time in the
than the current time. past. Enter a time later than the current time.
There are already XX schedules has been You can register up to 50 schedules. Delete a
registered. Delete a schedule and then add the schedule and then add the new schedule.
new schedule.
Cannot delete because the selected schedule Cancel the schedule first, and then delete it.
is running.
34
Page 35

Error Messages Remedy
Start the schedule. If the time you set arrives while you are still setting
Parent topic: Error Messages List
Related tasks
Updating the Firmware
Copying Projector Menu Settings Using Batch Setup
Changing an Update Schedule
Canceling an Update Schedule
Error Messages When Editing Projector List
Error Messages Remedy
Please input the correct password again. Input the correct password again.
Updates are not supported for this projector. The projector cannot be updated with EasyMP
The maximum of 1024 projectors has been You can register up to 1024 projectors. Delete a
registered. Delete a projector and then add the projector and then add the new projector.
new projector.
the schedule, the schedule starts. If you need to
set the schedule again, cancel the schedule first,
and then make the settings again.
Network Updater.
The EasyMP Monitor information setup file is Copy the EasyMP Monitor information setup file
incorrect. again, and then try again.
The EasyMP Network Updater information Export the projector list from EasyMP Network
setup file is incorrect. Updater again, and then try again.
Cannot import. Format not supported by this Copy the EasyMP Monitor information setup file
application. again, and then try again.
The maximum of 1024 items have been You can register up to 1024 projectors. Delete a
registered. Cannot add any more items. projector and then import the projector.
Cannot export to the specified location. Specify another location and then try again.
Specify another location and then try again.
35
Page 36
Error Messages Remedy
Failed to update the projector information. Check the network settings for your computer and
The projector cannot be found. Check the network settings for your computer and
Parent topic: Error Messages List
Related references
Solutions When You Cannot Update Firmware or Copy Menu Settings
Related tasks
Canceling an Update Schedule
Updating the Firmware
Copying Projector Menu Settings Using Batch Setup
Error Messages When Using Batch Setup
Error Messages Remedy
The projector is being updated. Try again after Wait until the update is completed before using
the update is completed. any EasyMP Network Updater features.
Failed to apply projector settings. Make sure the projector is on or the projector's
the projector, and then try again.
the projector, and then try again.
Standby Mode is set to Communication On. Also
make sure you select the correct projector, and
then apply the settings again.
Failed to read projector settings from the Make sure the projector is on or the projector's
selected projector. Standby Mode is set to Communication On, then
click Refresh on the Edit Projector List screen.
Then copy the menu settings again.
Parent topic: Error Messages List
Related tasks
Copying Projector Menu Settings Using Batch Setup
36
Page 37

Error Status
When an error occurs while updating the projector firmware or configuration, the schedule status
displays the error status.
Check the type of error and then follow the instructions here to clear the error. If you cannot solve the
problem, contact your network administrator.
Types of Error Remedy
Error (The projector is not responding.) Make sure the projector is on or the projector's
Error (The network connection has been lost.) Check the network settings on the computer and
Error (An error occurred when reading the Selectthe correct projector firmware or
data.) configuration file, or download the firmware or
Error (An error occurred when writing the Makesure you select the correct projector
data.) firmware or configuration and that the projector
Error (Projector Internal Error) Restart the projector and try updating again.
Error (Monitor Password Authentication Error) Checkthe Monitor Password setting is correct.
Standy Mode is set to Communication On.
the network settings on the projector. Make sure
the projector network setting has not been
changed due to the DHCP server settings.
copy the menu settings again.
settings are correct, and then try updating again.
Error (Other) If restarting the projector or EasyMP Network
Updater does not solve the problem, contact
Epson as described in your projector User's Guide.
Parent topic: Solving Problems
37
Page 38

Screen Summary
See these sections for more information about the EasyMP Network Updater screens.
EasyMP Network Updater Main Screen
Add Schedule/Change Schedule Screen
Settings Screen
Edit Projector List Screen
EasyMP Network Updater Main Screen
When you start EasyMP Network Updater, the main screen is displayed.
1 File menu Click to select Exit to close the application.
Edit menu Click to select Edit Projector List.
Tool menu Click to select Projector configuration data aquisition,
Application lock, Application unlock, or Settings.
Help menu Click to select Version information.
2 Schedule List Displays a list of the current update schedules.
3 File name Displaysthe name of the firmware or configuration file that will be
used for the update.
4 Model Displays the projector's model name.
38
Page 39

5 Main FW Ver. Displays the projector's main system firmware version.
6 Secondary FW Ver. Displays the subsystem firmware versions that are included in the
firmware file. (If the projector does not support the subsystem
firmware update function, Secondary FW Ver. remains blank.)
Secondary FW Ver. lists the versions for several subsystems
separated by "_" (underscore). If the firmware does not include a
specific subsystem, the inapplicable subsystem version appears as
"---" (three hyphens).
7 Progress Displays the progress when a schedule is running.
8 Show/Hide Shows/hides information for projectors that have been registered to
the selected schedule.
9 Start Time Displays the scheduled start time for the update.
10 End Time (Estimate time) While the firmware or configuration update is in Waiting status, the
estimated completion time is displayed in parenthesis. After the
update is finished, the actual completion time is displayed. Because
the estimated time differs depending on the network environment,
there may be a difference between the estimated completion time
and the actual completion time.
11 Status Displays the status of the schedule.
Waiting: An update schedule has been registered.
Executing: The firmware or configuration is being updated.
Finish: The firmware or configuration has finished updating.
Error: An error occurred during the update and the firmware or
configuration could not be updated.
12 Delete Click to delete an update schedule.
13 Cancel Click to cancel an update schedule.
14 Change Click to change an update schedule.
15 Add Click to display the Add Schedule screen.
Parent topic: Screen Summary
Related references
Error Status
39
Page 40

Related tasks
Restricting the Use of the Application
Setting the Password
Updating the Firmware
Copying Projector Menu Settings Using Batch Setup
Changing an Update Schedule
Canceling an Update Schedule
Deleting an Update Schedule
Related topics
Making a Projector List
Add Schedule/Change Schedule Screen
You can display these screens by performing one of the following operations.
• To display the Add Schedule screen, click Add on the main screen.
• To display the Change Schedule screen, click Change on the main screen.
The screenshots used in this section are for the Add Schedule screen, however the screens are the
same for the other procedures.
40
Page 41

1 Browse Click to select the firmware file you downloaded or the projector
configuration file you created.
2 File Information Displays information about the selected firmware or configuration
file after clicking Show.
3 Show Select to show all of the projectors registered to the projector list
that support the selected firmware or configuration.
4 Clear all Click to clear all selected projectors.
5 Select all Click to select all of the projectors.
6 Set the Time Select to set the date and time for the update.
7 Start Now Click to start the update immediately. If this button is unavailable,
clear the Set the Time checkbox.
8 Register Click to register the update schedule when using the Set the Time
function.
Change Click to change the update schedule.
9 Cancel Click to close the Add Schedule/Change Schedule screen without
registering/changing a schedule.
Parent topic: Screen Summary
Related tasks
Updating the Firmware
Copying Projector Menu Settings Using Batch Setup
Changing an Update Schedule
Settings Screen
This screen is displayed when you click Settings from the Tool menu on the main screen.
41
Page 42

1 Change the application Select to set up or change the application password.
password
2 Old password Enter the current password when you want to create a new
3 New password Enter the new password. The password can be up to 16
4 New password (confirm) Enter the new password again.
5 OK Click to close the Settings screen and save the new password.
6 Cancel Click to close the Settings screen without saving the password.
Parent topic: Screen Summary
Related tasks
Setting the Password
Edit Projector List Screen
This screen is displayed when you click Edit Projector List from the Edit menu on the main screen.
password. If you are creating a password for the first time, you can
leave this blank.
alphanumeric characters.
1 Refresh Updates the projector list.
2 Import Click to import a projector list.
3 Export Clickto export a projector list.
4 Automatic search Click to open the Create new projector (auto registration)
screen.
42
Page 43

5 Manual registration Click to open the Create new projector (manual registration)
screen.
6 Change This is only available when a projector is selected from the projector
list. Click to change the information for the selected projector.
7 Delete This is only available when a projector is selected from the projector
list. Click to delete the selected projector.
8 Status Displays the projector's status.
9 Display name Displays the projector's name that is specified when you register
the projector to the projector list.
10 Projector name Displays the projector's name that is specified on the projector's
Network menu.
11 IP address Displays the projector's IP address.
12 MAC address Displays the projector's MAC address.
13 Model Displays the projector's model name.
14 Main FW Ver. Displaysthe projector's main system firmware version.
15 Secondary FW Ver. Displaysthe projector's subsystem firmware versions. (If the
projector does not support the subsystem firmware update function,
Secondary FW Ver. remains blank.)
Secondary FW Ver. lists the versions for several subsystems
separated by "_" (underscore).
Description Displays notes about the projector.
Create new projector (auto registration) screen
Create new projector (auto registration)/Create new projector (manual registration)/Edit Projector screen
Parent topic: Screen Summary
Related tasks
Importing a Projector List
Exporting a Projector List
Editing a Projector List Automatically
Editing a Projector List Manually
43
Page 44

Create new projector (auto registration) screen
This screen is displayed when you click Automatic Search on the Edit Projector List screen.
1 — Displays the search results.
2 Specify an address Select to enter a range of IP addresses in the Start address and
range and search End address fields.
3 Start address Enter the first IP address in the range of addresses that you want to
search.
4 Search Searches for projectors on the network automatically, or searches
within a range of IP addresses when using the Specify an address
range and search function.
5 Edit This is only available when a projector is selected after performing a
search. Click to edit the information for the selected projector.
6 Cancel Click to close the Create new projector (auto registration) screen
without registering the projector information.
7 End address Enter the last IP address in the range of addresses that you want to
search.
Parent topic: Edit Projector List Screen
Related tasks
Editing a Projector List Automatically
44
Page 45

Create new projector (auto registration)/Create new projector (manual registration)/Edit Projector screen
You can display these screens by performing one of the following operations.
• To display the Create new projector (manual registration) screen,click Manual Registration on
the Edit Projector List screen.
• To display the Create new projector (auto registration) screen, select a projector that was found
using Auto Registration on the Edit Projector List screen, and then click Edit.
• To display the Edit Projector screen, select a projector on the Edit Projector List screen, and then
click Change.
The screenshots used in this section are for the Create new projector (manual registration) screen,
however the screens are the same for the other procedures.
1 Display name Enter the name of the projector. This name is displayed in the
projector list. You can enter up to 32 characters.
2 Projector name Displays the name that has been registered to the projector.
3 IP address Enter the projector's IP address when searching for a projector
manually. You cannot enter an IP address when editing or changing
information for a projector that has already been registered.
4 Monitor Password If a password has been set for the projector, enter the password
here. If you do not enter the correct password, you cannot update
the projector's firmware or copy the menu settings, even after
registering the projector. For more information about passwords,
see the User's Guide supplied with the projector.
45
Page 46

5 Description Enter notes about the projector, such as its location, if necessary.
Notes entered here are displayed in Description on the Edit
Projector List screen.
6 Register/Change Click to register the projector to the projector list or to save changes
made to the projector information.
7 Cancel Click to close the Create new projector (auto
registration)/Create new projector (manual registration)/Edit
Projector screens without registering a projector.
8 Search Searches for projectors on the network based on the IP address
you entered.
Parent topic: Edit Projector List Screen
Related tasks
Editing a Projector List Automatically
Editing a Projector List Manually
46
Page 47

Appendix
See these sections to learn more about EasyMP Network Updater software.
Updating and Uninstalling the Software
Notices
Updating and Uninstalling the Software
Follow these instructions to uninstall EasyMP Network Updater.
Uninstalling EasyMP Network Updater (Windows XP/Windows Vista/Windows 7)
Uninstalling EasyMP Network Updater (Windows 8)
Parent topic: Appendix
Uninstalling EasyMP Network Updater (Windows XP/Windows Vista/Windows 7)
For Windows XP, Windows Vista, and Windows 7, follow the instructions below to uninstall EasyMP
Network Updater.
Note: You need administrator authority to uninstall the software.
1. Turn on your computer.
2. Make sure all running applications are closed.
3. Click Start,and then click Control Panel.
4. Do one of the following.
• Windows XP: Double-click Add or Remove Programs.
• Windows Vista andWindows 7: Click Uninstall a program from the Programs category.
5. Select EasyMP Network Updater, and then do one of the following.
• Windows XP: Click Change/Remove.
• Windows Vista andWindows 7: Click Uninstall/Change.
6. Follow the on-screen instructions.
Parent topic: Updating and Uninstalling the Software
47
Page 48

Uninstalling EasyMP Network Updater (Windows 8)
For Windows 8.x, follow the steps here to uninstall EasyMP Network Updater.
Note: You need administrator authority to uninstall EasyMP Network Updater.
1. Turn on your computer.
2. Make sure all running applications are closed.
3. Navigate to the Apps screen, and then right-click (press and hold) EasyMP Network Updater
Ver.X.XX.
4. Select Uninstall from the app bar.
5. Select EasyMP Network Updater, and then select Uninstall.
6. Follow the on-screen instructions.
Parent topic: Updating and Uninstalling the Software
Notices
Check these sections for important notices about your projector.
Copyright Notice
About Notations
General Notice
Parent topic: Appendix
Copyright Notice
All rights reserved. No part of this publication may be reproduced, stored in a retrieval system, or
transmitted in any form or by any means, electronic, mechanical, photocopying, recording, or otherwise,
without the prior written permission of Seiko Epson Corporation. No patent liability is assumed with
respect to the use of the information contained herein. Neither is any liability assumed for damages
resulting from the use of the information contained herein.
Neither Seiko Epson Corporation nor its affiliates shall be liable to the purchaser of this product or third
parties for damages, losses, costs, or expenses incurred by the purchaser or third parties as a result of:
accident, misuse, or abuse of this product or unauthorized modifications, repairs, or alterations to this
product, or (excluding the U.S.) failure to strictly comply with Seiko Epson Corporation's operating and
maintenance instructions.
48
Page 49

Seiko Epson Corporation shall not be liable against any damages or problems arising from the use of
any options or any consumable products other than those designated as Original Epson Products or
Epson Approved Products by Seiko Epson Corporation.
The contents of this guide may be changed or updated without further notice.
Illustrations in this guide and the actual projector may differ.
Parent topic: Notices
About Notations
• Microsoft®Windows®XP Professional operating system
• Microsoft®Windows®XP Home Edition operating system
• Microsoft®Windows Vista®operating system
• Microsoft®Windows®7 operating system
• Microsoft®Windows®8 operating system
• Microsoft®Windows®8.1 operating system
In this guide, the operating systems above are referred to as "Windows XP," "Windows Vista," "Windows
7," "Windows 8", and "Windows 8.1." Furthermore, the collective term Windows may be used to refer to
Windows XP, Windows Vista, Windows 7, Windows 8, Windows 8.1, and multiple versions of Windows
may be referred to as, for example, Windows XP/Vista, with the Windows notation omitted.
Parent topic: Notices
General Notice
IBM, DOS/V, and XGA are trademarks or registered trademarks of International Business Machines
Corporation.
Microsoft, Windows, Windows NT, Windows Vista, PowerPoint, and Windows logo are trademarks or
registered trademarks of Microsoft Corporation in the United States and/or other countries.
Other product names used herein are also for identification purposes only and may be trademarks of
their respective owners. Epson disclaims any and all rights in those marks.
Software Copyright: This product uses free software as well as software to which this company holds the
rights.
© 2014 Epson America, Inc.
Copyright Attribution
Parent topic: Notices
49
Page 50

Copyright Attribution
5/14
CPD-40964
Parent topic: General Notice
50
 Loading...