

Page 1

EPSON® USB/Parallel Adapter
User’s Guide
EPSON Stylus® COLOR 440 EPSON Stylus COLOR 1520
EPSON Stylus COLOR 600 EPSON Stylus COLOR 3000
EPSON Stylus COLOR 640 EPSON Stylus Photo 700
EPSON Stylus COLOR 660 EPSON Stylus Photo EX
EPSON Stylus COLOR 800 EPSON Stylus Pro 5000
EPSON Stylus COLOR 850 EPSON Stylus Pro 9000
CPD-7424R2
®
Page 2

EPSON and EPSON Stylus are registered trademarks of SEIKO EPSON
CORPORATION.
Gener al Notice: Other product names used herein are for identification purposes only
and may be trademarks of their respective owners. EPSON disclaims any and all rights
in those marks.
Copyright © 1999 by Epson America, Inc. 10/99
ii
Page 3

FCC Compliance Statement
For United States Users
This e quip men t has be en t este d an d f o un d t o c omply w ith t h e l im its for a Cla ss B d ig ita l
device, pursuant to Part 15 of the FCC Rules. These limits are designed to provide
reason able prote c tio n against har m fu l in ter fere nc e in a res id en tia l in stallatio n. Thi s
equipment generates, uses, and can radiate radio frequency energy and, if not installed
and used in accordance with the instructions, may cause harmful interference to radio
or tel e v is ion r e ce ptio n. Ho w e ver , t he re i s n o gua ra nt ee tha t int er f er enc e w i ll n ot o ccur in
a particular installation. If this equipment does cause interference to radio and
television reception, which can be determined b y turning the equipment of f and on, the
user is encouraged to try to correct the interference by one or more of the following
measures.
◗ Reorient or relocate the receiving antenna.
◗ Increase the separation between the equipment and receiver.
◗ Connect the equipment into an outlet on a circuit different from that to which the
receiver is con ne cted.
◗ Consult the dealer or an experienced radio/TV technician for help.
iii
Page 4

WARNING
The connection of a non-shielded equipment interface cable to this equipment will
invalidate the FCC Certification of this device an d may cause interference levels which
exceed the limits established by the FCC for this equipment. It is the responsibility of
the user to obtain and use a shielded equipment interface cable with this device. If this
equipment has more than one interface connector, do not leave cables connected to
unused interfaces. Changes or modifications not expressly approved by the
manufacturer could void the user’s authority to operate the equipment.
For Canadian Users
This Class B digital apparatus meets all requirements of the Canadian InterferenceCausing Equipment Regulations.
Cet appareil numérique de la classe B respecte toutes les exigences du Règlement sur
le materiel brouilleur du Canada.
iv
Page 5

Contents
Introduction 1
Getting Started on a Macintosh 2
Setting Up the Computer 2
Setting Up the Printer 3
Connecting the Cable 3
Installing the USB Printer Software 7
Installing Your Creative Software and Electronic Manual 10
Getting Started on a Windows 98 System 11
Setting Up the Computer 11
Setting Up the Printer 15
Connecting the Cable 15
Installing the USB Printer Software 18
Enabling Windows Print Manager 22
Checking Your Installation 24
Installing Your Creative Software and Electronic Manual 25
Appendix 27
USB/Parallel Adapter Specifications 27
System Requirements 28
v
Page 6

Introduction
The EPSON USB/P arallel Adapter Kit lets you use smart cable tech nology to
connect your EPSON printer to an Apple
Microsoft
®
Wind ow s® 98 computer. It supports the following printers:
®
iMac,™ Power Macintosh® G3, or
◗ EPSON Stylus COLOR 440 ◗ EPSON Stylus COLOR 1520
◗ EPSON Stylus COLOR 600 ◗ EPSON Stylus COLOR 3000
◗ EPSON Stylus COLOR 640 ◗ EPSON Stylus Phot o 700
◗ EPSON Stylus COLOR 660 ◗ EPSON Stylus Photo EX
◗ EPSON Stylus COLOR 800 ◗ EPSON Stylus Pro 5000*
◗ EPSON Stylus COLOR 850 ◗ EPSON Stylus Pro 9000*
* The software in this kit supports these two printers for Windows 98 only. To
connect one of them to an iMac or G3 using your EPSON USB/Para ll el
Adapter, you have to install the software that came with your prin ter. See
your printer’s setup instructions.
To install the EPSON USB/ParallelAdapter, turn to one of these sections:
◗ “Getting Started on a Macin tosh” on page 2
◗ “Getting Started on a Windo ws 98 System” on page 11
1
Page 7

If you have any problems installing the cable or software, contact your
EPSON dealer or EPSON technical support as described in the Where to
Get Help section of your printer documenta ti on.
Get ting Sta r ted on a Ma cinto sh
The instructions on the next few pages explain how to connect the USB/
Par allel Adapter cable to your iMac or G3 and how to inst all the printer
software that ca me on the USB Printer Software CD-ROM.
IMPORTANT:
To connect an EPSON Stylus Pro 5000 or 9000 to your Macintosh using the
adapter, install the software that came with y our printer instead of the
software i ncluded in this kit. See your printer’s setup instructions .
For all other printers, you must use the USB Printer Software CD-ROM
included in this kit. Follow the instructions below.
Setti ng Up the C o mputer
If you have an iMac, you may need to update your system before installing
the EPSON USB/Par allel Adapter.
◗ If y our iMac is runni ng OS 8.1, y ou mu st ins tall Appl e’s iMac Upd ate 1.0 .
◗ If y our iMac is running OS 8.5 or 8.5.1, Apple recommends that you
install iMac Update 1.1.
2
Page 8

Download the update for your system at http://swupdates.info.apple.com.
Contact Apple if you have problems installin g the update.
To find out which operating system your iMac is running, select
Computer
in the Apple menu.
About This
Setti n g Up the Print e r
If you’ve been using your EPSON printer with your computer, the printer is
probably s et up alre ady. If so, turn off y our syst em and discon nect the printer
from the computer. Then go to “Connecting the Cable” below to attach t he
USB/Parallel Adapter cable to your system.
If you’re setting up a new printer, see the documentation that came with your
printer f or instructions on unpacking it, installing ink cartridges, and loading
paper. Then return to this booklet for instructions on con necting the cable
and installing your printer software.
Connecting the Cable
You can connect the USB/Parallel Adapter directly to a USB port on your
Macintosh or to a USB hub connected to a port on the Macintosh. If you
hav e any printing problems when the printer is connected via a USB hub, try
connecting the print er di rectly to a USB port on the computer instead.
3
Page 9
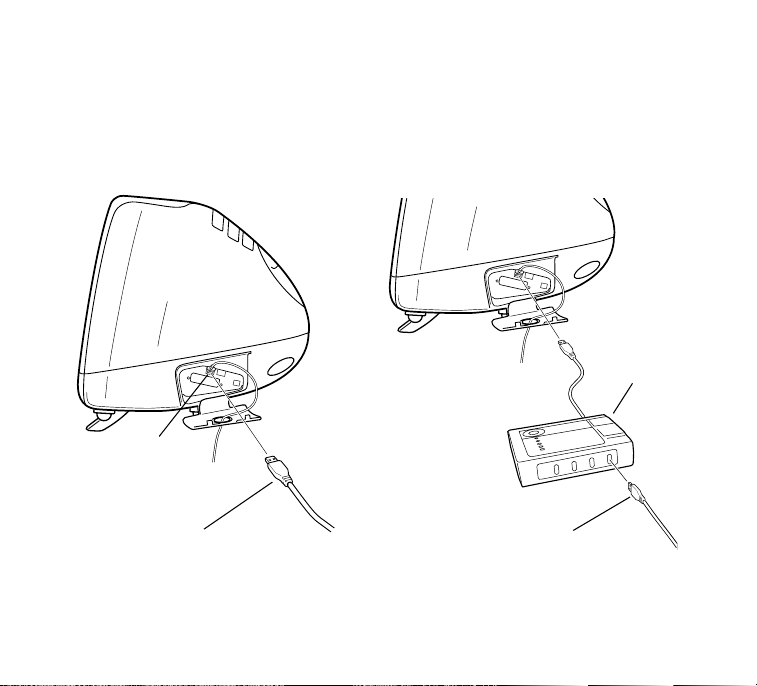
1 Connect the adapter to an available USB port on the side of you r iMac
as shown, or to a USB port on the back of your G3. If you’r e using a
USB hub, plug i t i nto an available USB port on your iMac or G3, then
plug the adapter int o a USB port on the hub . If you have more than one
hub, connect the adapter to the first hub.
optional
USB hub
USB port
USB/Parallel Adapter
OR
USB/Parallel Adapte r
4
Page 10
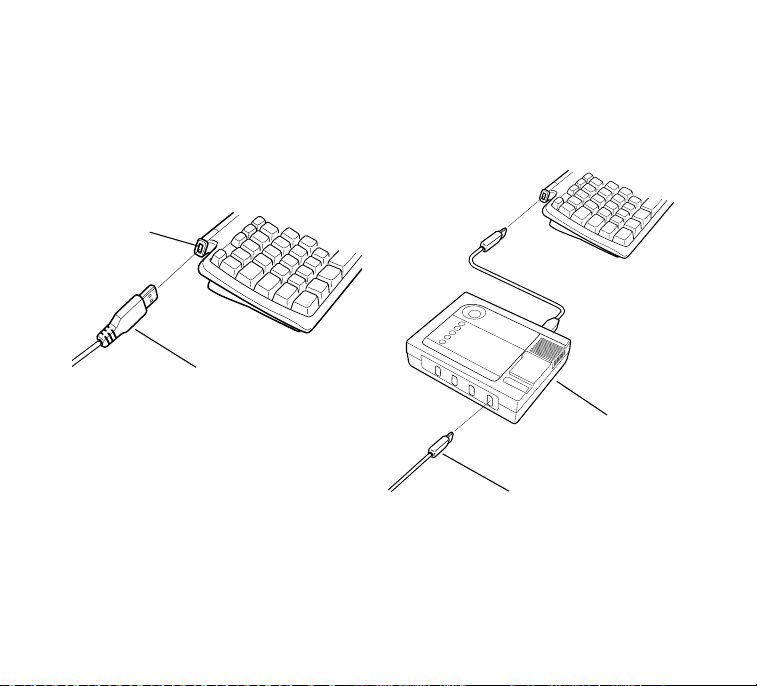
You can also connect the adapter to one of the USB ports on your
Macintosh k e yboar d. If y ou’re using a USB hub, plug it into the USB port
on the keyboard, then plug the adapter into a USB port on the hub. If
you ha ve more than one hub, connect the adapter to the first hub.
USB port
USB/Parallel Adapter
OR
optiona l U SB hub
USB/Parallel Adapte r
5
Page 11
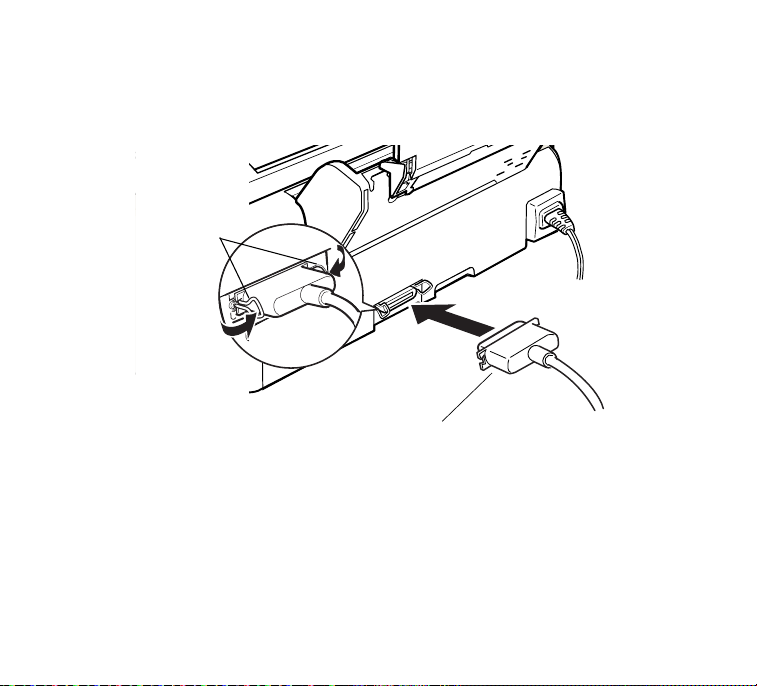
2 Connect the adapter’s parallel connector to the parallel port on the back
of the printer, then secure it with the wire clips.
wire clips
parallel connector
Fol low the instructions in the next section to install the printer software from
the USB Printer Software CD-R OM.
6
Page 12

Installing the USB Printer Softwar e
Follow these steps to install the USB printer driver software:
1 Make sure your printer and computer are connected and turned off.
2 Make sure your USB hub is powered on (if you’re using one). Turn on
your computer and wait until you see the desktop icons . Then turn on
your EPSON printer.
3 Insert the USB Printer Software CD-ROM.
4 Wait for the EPSON window to appear, then double-click your printer ’s
folder to open it.
5 Double-click the
6 Click
7 After installation is complete, click
8 After your Macin tosh restarts, open the Chooser from the Apple menu.
Install
driver and uti li ties, and select a default paper size if asked.
Installer
and follow the on-s creen instructions to install the print er
icon for your printer, then click
Restart
to restart your Macintosh.
7
Continue
.
Page 13

9 Click the printer icon for your printer. Printer icons are labeled as
follows:
SC 440
SC 600
SC 640
SC 660
SC 800
SC 850
SC 1520
SC 3000
SP 700
SP EX
If you don’t see your printer icon in the Chooser, make sure your cable
connections ar e secure and your printer is tu rned on.
EPSON Stylus COLOR 440
EPSON Stylus COLOR 600
EPSON Stylus COLOR 640
EPSON Stylus COLOR 660
EPSON Stylus COLOR 800
EPSON Stylus COLOR 850
EPSON Stylus COLOR 1520
EPSON Stylus COLOR 3000
EPSON Stylus Photo 700
EPSON Stylus Photo EX
8
Page 14

10 Click the
USB Port
icon (if you’ve connected more than one printer of
the same model, the port is numbered).
11 Turn on background pri nting if you want, then close the Chooser.
Note:
The printer software you just installed may include a utility called Monitor3.
This is an upgraded version of Monitor2 and may differ slightly from the
printer software documented in your user’s guide.
If you have an EPSON Stylus COLOR 440 or EPSON Stylus COLOR 640,
you’ll find additional information about your printer software in the Printer
Software Guide for Macintos h located in the Manual direct ory on your USB
Printer Softwar e CD-ROM. View it using Adobe
®
Acrobat® Reader 3.01 or
later. (If you don’t have Acrobat Reader on your computer, you can install it
using the Acrobat Reader Installer on your USB Printer Software CD-ROM.)
Continue on to the next sectio n to install any creative software that came
with your printer, or to view your printer’s electronic manual, if it has one.
9
Page 15

Installing Your Creative Software and Electronic Manual
If you’ve been using your EPSON printer with your computer, you’ve
probably already installed your creative software and electronic manual, if
your printe r came wit h them. Otherwise, che ck your printer’s setup
instructi ons to find out about any software that came with your printer, and
follow those instructions to install it. (The setup instructions may be called
Start Here, Getting Started
Caution:
Don’t double-click your printer software’s installer icon, even if you see a
message telling y ou t o do so , or yo u’ll install it ov er t he USB printer soft ware .
If you see a screen like the fol lowing, you’ve double-clicked the wrong i con.
Click Continue and then click Quit to cancel the installation.
, or
Quick S etup.
)
10
Page 16

Get ting Started on a Windo ws 98 System
The instructions on the next few pages explain how to connect the USB/
Par allel Adapter cable to your Windows 98 system and how to install the
printer software that came on the USB Printer Software CD-ROM.
IMPORTANT:
The printer software that came with your printer won’t work with your USB/
Parallel Adapter. You must use the USB Printer Software CD-ROM included
in this kit.
If you’ ve a lr eady in stall ed y our printer sof t ware on y our sys tem, you’ ll h a ve t o
remove it as described in the next section.
11
Page 17

Setti ng Up the C o mputer
If you’ve been using your EPSON printer with your computer, then you’v e
already inst all ed y our prin ter dri ver on y our system. You must remo ve the old
printer driver and its INF file as described belo w before you can i nstall the
new USB printer driver.
Note:
Once you’ ve installed the USB printer sof tware, you can still print to your
printer through the parallel port, if you want. Reconnect the parallel cable to
your printer, and click Start, then Settings, then Printer s. Right-click your
printer icon and select Properties. Under “Print to the follow ing port” on the
Details ta b, sel ect LPT1 and click OK. Then restart your system.
Removin g the IN F Fi le
1 Click
2 Open the Windows folder. If you see an Inf folder, go to step5.
3 From the Windows Explorer View menu, select
4 Click the View tab. Under Hidden files, select
Start
, point to
Otherwise, cont inue with step 3.
Folder Options dialog box opens.
Apply
to save the setti ng, then click OK to close the Folder Options
dialog box.
Programs
, and select
12
Windows Explorer
Folder Options
Show all files
. Click
.
. The
Page 18

5 Open the Inf folde r, then open the folder labeled Other . Locate and
select the INF fil e corresponding to the print er driver you’re removin g:
EPSON Stylus COLOR 440
EPSON Stylus COLOR 600
EPSON Stylus COLOR 640
EPSON Stylus COLOR 660
EPSON Stylus COLOR 800
EPSON Stylus COLOR 850
EPSON Stylus COLOR 1520
EPSON Stylus COLOR 3000
EPSON Stylus Photo 700
EPSON Stylus Photo EX
EPSON Stylus Pro 5000
EPSON Stylus Pro 9000
6 Click
7 Close Windows Explorer.
Delete
to delete the old prin ter driver’s INF file.
EPSONEPIIFE3P.INF
EPSONEPS600.INF
EPSONEPIIFE3O.INF
EPSONEPIIFE4A.INF
EPSONEPS800.INF
EPSONEPIIFE2M.INF
EPSONEPS152.INF
EPSONEPS3K.INF
EPSONEPIIFE3K.INF
EPSONEPIIFE2J.INF
EPSONEPIIFE2H.INF
EPSONJIFE3A.INF
13
Page 19

Removing the Printer Driver
Follow the steps below to remove the old printer driver:
1 Click
2 Double-click
3 Select
4 Click the
5 If EPSON Status Monitor 2 is installed, you’ll need to uninstall it too.
Start
, point to
EPSON Printer Software
Add/Remove
uninstall your software.
First, ri ght-click the icon in the bottom-right cor ner of the t askbar and
Stop monitoring now
select
follow steps 3 and 4 again. In st ep 3, select
in the program list to uninstall it.
Note:
If the Status Monito r does n’t uninst all, hold down Ctrl and Alt and press
Delete. In the Clos e Program window, select Ebrr and click End Task.
Then try uninstalling the Status Monitor again.
6 If you’ve previousl y installed your EPSON printer using the USB/Para llel
Adapter, you’ll need to uninstall the USB driver softwar e too. Follow
steps 3 and 4 again. In step 3, select
EPSON USB Conver sion Devices
(or
Confirm Reboot scr een asking if you want to reboot your computer,
select No.
Settings
Add/Remove Prog rams
, then click
in the program list.
button. Follow the instructions on screen to
to turn off background monitoring. Then
14
Control Panel
.
EPSON Status Monitor 2
EPSON USB Printer Devices
) in the list. When you see t he
.
Page 20

7 Close the Add/Remove Programs Properties window, close the Control
Panel, and then shut down the computer.
Setti n g Up the Print e r
If you’ve been using your EPSON printer with your computer, the printer is
probably set up already. If so, make sure your system is turned off and
disconnect th e print er from the computer . Also, make sure the printer
software has been deleted, as described above. Then go to “Connectin g the
Cable” in the next section to attach the cable to your system.
If you’re setting up a new printer, see the documentation that came with your
printer f or instructions on unpacking it, installing ink cartridges, and loading
paper. Then return to this booklet for instructions on con necting the cable
and installing your printer software.
Connecting the Cable
You can connect the USB/Parallel Adapter directly to a USB port on your
computer, or you can connect it to a USB hub connected to a port on your
computer. If you have any printing pro blems when the printer is connect ed
via a USB hub, try connecti ng your printer direct ly to the USB port on the
computer instead.
15
Page 21

1 Connect the adapter to an available USB port on the back of your
computer, as shown below. If you’re using a USB hub, plug it into an
available USB port on your computer, then plug the adapter into a USB
port on the hub. If you have more than one hub, plug the adapter in to
the first hub.
optional
USB hub
OR
USB ports
USB/Parallel Adapte r
USB/Parallel Adapt er
16
Page 22

2 Connect the adapter’s parallel connector to the parallel port on the back
of the printer, then secure it with the wire clips.
wire clips
parallel connector
Follow the instructions in the next section to inst all the USB printer software.
17
Page 23

Installing the USB Printer Softwar e
Follow these steps to install the USB printer driver software:
1 Make sure your printer and computer are connected and turned off.
2 Make sure yo ur USB hub is powered on ( if you’re using one). Then turn
on your computer and pri nter, and wait until you see the Add New
Hardware Wizard screen.
3 Insert the USB Printer Software CD-ROM in your CD-ROM drive.
4 Click
your device
Next
. At the next screen, selec t
and click
Next
.
Search for the best driver for
18
Page 24

5 Select
Specify a location
software. The software is located in your printer’s folder on the EPSON
CD-ROM.
, then click
Browse
to locate the USB printer
19
Page 25

6 Click
7 Click
Next
. The Add New Hardware Wizard finds the EPSON
USB/Parallel Print er Adapt er software.
Next
. The Add New Hardware Wizard copies the driver files to
your hard drive and fin ishes installing the soft ware.
20
Page 26

8 At the final screen, click
Windows 98 detects your printer and displays a screen similar to the
following:
Finish
.
9 Click
Next
to install your printer driver. At the next screen, select
Search for the best dri ver for your device
21
and click
Next
.
Page 27

10 Make sure your printer’s folder is sel ected under
Then click
printer driver and the Status Monitor 2 utility, if your printer uses it.
Next
and follow the on-screen i nstructions to install your
Specify a location
.
Note:
If you’re setting up an EPSON Stylus Pro 5000 or 9000 and Status
Monitor 2 does not install automatically, double-click the
My Computer icon on your desktop. Then double-click the
EPSON CD-ROM icon and open the St m2 folder. Double-cl ick
Stmsetup.exe.
11 When setup is complete, remove the CD-ROM, select
restart my computer now
If you installed printer software for the EPSON Stylus COLOR 600,
EPSON Stylus COLOR 800, EPSON Stylus Color 1520, or EPSON Stylus
COLOR 3000, you need to se t up y ou r syst em t o use W indo ws Print Manager
as described in the next section.
Otherwise, continue with “Checking Your Installation” on page 24.
, and click
Finish
.
Yes, I want to
Enabling Windows Print Manager
The EPSON Stylus COLOR 600, EPSON Stylus COLOR 800, EPSON Stylus
Color 1520, and EPSON Stylus COLOR 3000 printers require your system to
use Windows Print Manager when using the USB/Parallel Adapter.
22
Page 28

Follow these steps to enable Windows Print Manager:
1 Click
2 In the EPSON Spool Manager window, select the icon for your printer.
3 From the
4 Select
5 Close the Spool Manager window.
Continue on to the next section to check your installation.
Start
, point to
Queue
appears.
Use Print Manager
dialog box.
Programs, Epson
menu, select
, then click OK to close the Queue Setup
, and select
Setup
. The Queue Setup dialog box
Spool Manager4
23
.
Page 29

Checking Your Installation
To verify that your printer software installed prop erly, open an applicat ion and
try printing to your print er. If the printe r doesn’t work correctly, fully uninstall
your printe r software as described in “Setting Up th e Compu ter” on page 12
of this guide. Then reinstall the USB printer sof tware as described in
“Installing the USB Printer Software” on page18.
If you still have probl ems, contact your EPSON dealer or EPSON technical
support as described in the Where to Get Help section of your printer
documentation.
Note:
The printer software you just installed may differ slightly from the printer
software doc umented in your user’s manual. If you set up an EPSON Stylus
COLOR 600, EPSON Stylus COLOR 800, EPSON Stylus COLOR 1520, or
EPSON Stylus COLOR 3000, your printer software does not include the
Status Monitor uti lity.
Continue on to the next section to install any creative software that came wit h
your printer, or to view your printer’s electronic manual, if it has one.
24
Page 30

Installing Your Creative Software and Electronic Manual
If you’ ve been using your EPSON printer with your computer, you’ve probably
already installed your creative software and electronic manual, if your printer
came with them. Otherwise, check your printer’s setup instructions to find out
about any software that came with your printer. (The setup instructions ma y
be called
install your software:
1 Follow the s etup i nstruc tions to begi n i nstal lation of your pr inter soft ware.
Start Here, Getting Started
When you see a screen similar to the following, click
the printer driver installation.
, or
Quick Setup.
) Follow these steps to
25
Cancel
to cancel
Page 31

Caution:
The installati on programs for the EPSON Stylus Photo EX and EPSON
Stylus Photo 700 in stall the creativ e software before they prompt you to
install the printer driver software. Be sure to cancel the printer driver
software instal lat ion whenever y o u see th e scr een sho wn o n t he pre v ious
page. If you don’t, you’ll install the old printer driver over the USB printer
driver.
2 Follow the instructions on screen to finish installing your creative
software or view your printer’s electronic manual. See your printer’s
setup documentation for details.
26
Page 32

Appendix
USB/Parallel Adapter Specifications
USB connector: USB series A; compliant with USB Specificatio n
Revision 1.0
Parallel connector: IEEE-1284-B (b idirectional); Compat ibility, Nibble, and
ECP mode supported
Cable: 2-meter, 5-conductor, insulated, shielded, USB
compliant
Temperature: Operating: 32 to 158 °F
(0 to 70 °C)
Non-operati ng: –4 to 212 °F
(–20 to 100 °C)
Storage: –67 to 257 °F
(–55 to 125 °C)
Operating humidity: 10 to 80% relative humidity, no condensation
Input vol tage: 4.40 to 5.25 V
Current consumption: During operation: 38 mA
During suspend mode: 550 µA
Weight : 5 ounces (140 gram s)
27
Page 33

System Requiremen ts
Macintosh
Computer: Apple iMac or USB-ready Power Maci ntosh G3
Operating system: Macintosh OS 8.5 or later, or Macintosh OS 8.1 with
iMac Update 1.0 or later
Memory: 32MB of RAM
Storage: At least 50MB of free hard disk space for storing
images (100MB or more recomm ended)
Display: 13-inch RGB display or better
CD-ROM drive: Double-speed CD-ROM drive (quad-speed or fast er
recommended) for installing the printer software
Printer cable: EPSON USB/Parallel Adapter cable
28
Page 34

Windows
Computer: An IBM® compatible PC with at least a 486/ 66 MH z
processor (Pentium
USB port built in
Operating system: Windows 98
Memory: At least 16MB of RAM (32MB rec om mended)
Storage: At least 50MB of free hard disk space for storing
images (100MB recommended)
Display: VGA, Supe r VGA, or better display adapter and
monitor
CD-ROM drive: Double-speed CD-ROM drive (quad-speed or fast er
recommended) for installing the printer software
Printer cable: EPSON USB/Parallel Adapter cable
®
processor recommended) with
29
 Loading...