

Page 1

IMAGEPRINT
Quick Start Guide
Windows 2000/XP Edition
© Colorbyte Software 2003
Page 2

This Quick Start Guide is designed to assist in the basic
installation and setup of
IMAGEPRINT
manual is provided in PDF format on the
IMAGEPRINT
. The complete
enclosed CD-ROM. Please read the manual for a comprehensive
explanation of
IMAGEPRINT
and its powerful toolset. You are
also encouraged to run the Interactive Tutorial which is included
on the CD.
IMAGEPRINT
includes:
IMAGEPRINT
IMAGEPRINT
Interactive Tutorial
User’s Manual
One USB security dongle
Server Windows 2000/XP Edition
Client Macintosh OSX Edition
System Requirements:
Windows 2000 or XP
Pentium III or higher - 400 MHz
128 MB RAM
1 GB Free Hard Drive Space
These are the minimum hardware requirements for acceptable
operation. RIP software by its very nature is processor and
bandwidth intensive. Slower, less powerful computers can
contribute to the inability of a printer to operate at its intended
speed. This is independent of the interface used to communicate
with the printer, and is often related to disk drive speed, data
bus speeds, and other factors associated with slower computer
systems.
Page 3
INSTALLING
IMAGEPRINT
IMPORTANT: DO NOT INSERT THE USB DONGLE
UNTIL INSTRUCTED TO DO SO. THE SOFTWARE
WILL NOT INSTALL PROPERLY IF THE STEPS ARE
NOT FOLLOWED IN THE ORDER PRESENTED .
Before installing
IMAGEPRINT,
verify that the printer is
operating properly and that there is proper communication with
the computer.
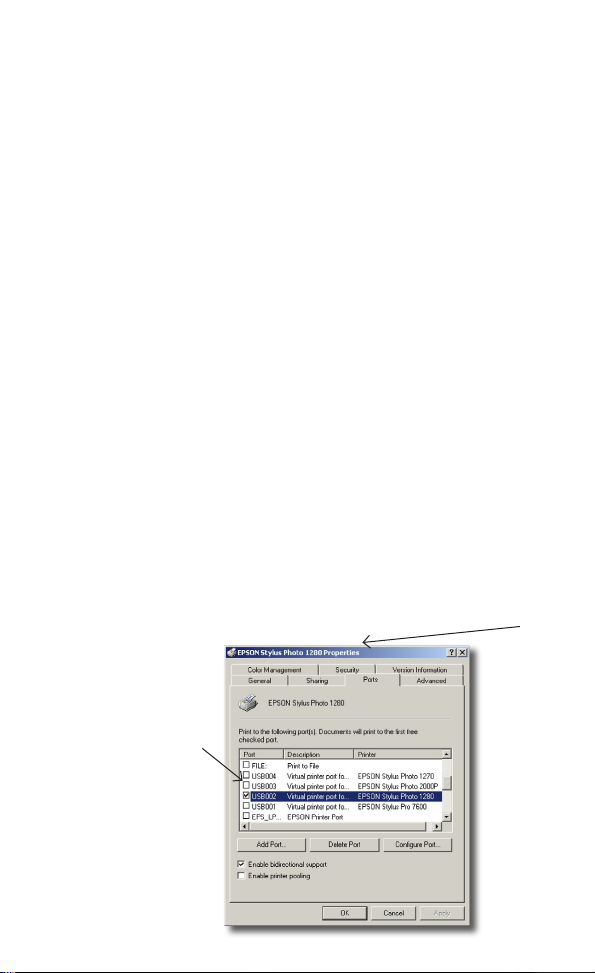
LOCATE THE PROPER PORT NAME
Skip this step if installing a Fuji Pictrography or a printer
connected via ethernet.
Go to the Windows Start Menu and locate the Printers folder in
the control panel.
Right Click on the printer that you are going to use with
IMAGEPRINT
Choose Properties and Click on the Port tab. The Window
should look similar to the one shown below.
Locate the box with a
check mark in it. In this
example, the Windows
operating system has
assigned the port
“USB002” to our Epson
1280. Your printer port
may be dirfferent. Be
sure to write down the
port name for your
printer in the space
below then Click Cancel.
.
In this example the printer is an Epson 1280.
Conrm that your printer name appears here.
Record your Port Name
for later use.
Page 4
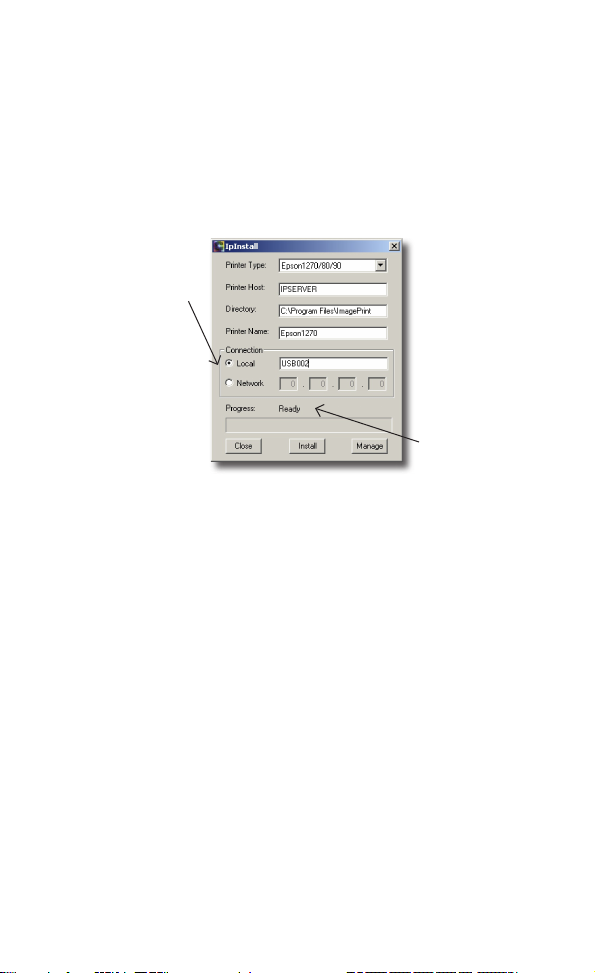
Insert the
IMAGEPRINT
CD into your CD-ROM drive. The
autoplay disc will launch the Installer program. Follow the onscreen instructions until the IPInstall window appears.
If you’re using one computer and one printer, do not change the Printer Host.
If you have multiple printers and computers you should refer to the complete
User’s manual for detailed instructions.
1. For parallel, USB
or Firewire port
connections Click
Local. In this example
we’re using USB002.
You should enter the
Port Name you wrote
down earlier.
For ethernet
connections only,
Click Network and
enter your printer’s IP
address.
2. Choose your
Printer Type from the
drop-down menu.
3. In the Directory box you may enter the name of the folder where you’d
like to install
IMAGEPRINT
, or use the default location shown
4. Click Install.
Please be patient.
This process
may take up
to 5 minutes to
complete.
5. When the
Progress line
has changed
from “Installation
Started” to
“Installation
Complete” Click
Close.
Continue following the on-screen instructions. Be sure to reboot
your computer before proceeding to the next step.
INSTALLING DONGLE DRIVERS
After reboot, insert the enclosed dongle to any free USB port.
Windows should automatically detect and install the proper
drivers. The dongle must be attached to your computer whenever
you use
the printed area.
IMAGEPRINT
or a DEMO watermark will appear across
Page 5

THE IPMANAGE WINDOW
You will now use the IPManage utility to enter the encryption
code that will enable you to print using
launching IPManage, you will need to get your encryption. The
fastest way is via the internet and your email address. Enter the
complete address
www.colorbytesoftware.com/getcode.php into your
browser. You will be asked to enter the Login ID and dongle
number printed on the back of your
After you receive your encryption, go to your desktop and
double-click on the IPInstall icon. When the IPInstall window
opens, Click the Manage button. The IPManage window will
appear.
IMAGEPRINT. Before
IMAGEPRINT
package.
The Host ID eld is lled automatically by
will match the number printed on your dongle. If no number appears, the
dongle has not been properly installed. Make sure the dongle is plugged
in to an active USB port.
1. In the Printer Name box, make sure that the printer choice is correct.
In this example we’ve chosen Epson 1280. You should choose your
printer type from the drop-down list.
IMAGEPRINT.
2. Type your encryption
number in the eld provided.
Click the Enable button.
3. The encryption has been
successfully installed when
the word “Disabled” changes
to “Enabled” in the window
title bar. If it does not you
may have mistyped the code
and should re-enter it and
Click Enable again.
4. Click Close.
Your number
Page 6
IMAGEPRINT
the
IMAGEPRINT
is now installed. You may now double-click on
icon to launch the application.
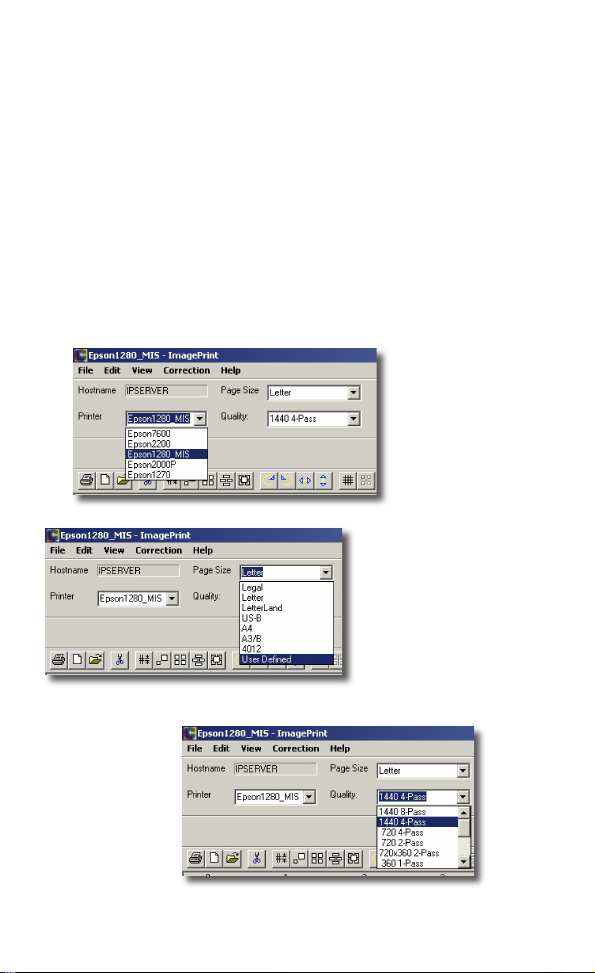
MAKING YOUR FIRST PRINT
There are just a few key settings that need to be adjusted before
a print is made. It helps to have a reference image open for both
viewing on screen, and to make a test print. We recommend
using one of the sample images that are automatically installed
with ImagePrint. To locate a sample image open the ImagePrint
folder, then open the Test Images folder. Select “Sample Land-
scape” as the test image.
Verify that the
correct printer is
selected.
For this example, a letter
size page is selected. This
setting is used to dene
the size of the physical
paper loaded in the printer.
ImagePrint works with the
dened area of the paper.
The quality setting
adjusts the printer
resolution. For
this example,
choose one of the
1440 qualities.
Page 7

COLOR MANAGEMENT SETTINGS
To access the Color Management settings Choose Edit from
the menu at the top of the toolbar. Scroll down to Color
Management and the dialog box will open.
The System Tab
Set the monitor prole. Monitor 2.2
D93 should be used if there is no
custom display prole available.
Choose an appropriate ICC output
prole for the model of printer that is
installed. See below for assistance
with selecting the proper prole.
About Proles
Each prole is created for a specic printer, paper, inkset, and
resolution. Always choose an appropriate color prole for the
printer, paper, resolution, and viewing environment. Proles
that are included with ImagePrint are named in a specic
manner. For example, the prole ep1280_luster_1440_eday
is a prole for the Epson 1280 printer (ep1280), on Premium
Luster paper (luster), printed at 1440 dpi resolution, and color
balanced for daylight viewing conditions (eday).
IMAGEPRINT
provides 5 types of color balanced proles.
Each prole is balanced for specic lighting conditions. See
chart below for details.
EDAY Balanced for daylight
ECWF Balanced for cool-white uorescent lighting
ECWF2 Balanced for skin tones in portrait work
ETUNG Balanced for tungsten light
GREY Exclusively for the grey scale workow available only with 7-color
Ultrachrome inks.
Page 8

Epson 2200, 7600, 9600 Ultrachrome printer owners should
refer to the end of this guide for additional information on
printing greyscale images.
The Bitmap Tab
Moving to the Bitmap tab of color management reveals more settings. In
this example “Adobe RGB 1998” is chosen as the RGB source space in the
“RGB” box. This setting should generally coincide with the settings used in
programs such as Photoshop so that all applications are synchronized.
Because the test
image in use is RGB,
the CMYK settings
will have no effect on
this image. Typically it
will be set to whatever
is best suited to
the user’s specic
workow.
Set the Embedded box
to “Apply”, this will use
the embedded prole
(if one is present) in an
image le and override
the RGB source space
setting.
The settings for the
Gray prole should
be set to whatever
is currently used in
Photoshop, typically
Gray Gamma 2.2.
In the rendering Intent
box to the right of
Embedded, choose
Relative Colorimetric
or Perceptual. Either
one will work for the
purpose of this setup.
The Vector tab is where color management settings are specied
for vector elements of a le. For the purpose of printing the
sample image, there are no vector settings that need to be made,
therefore the settings can remain at “NONE”.
Close the Color Management window.
PRINTER SETTINGS
Along the top of the screen, choose File. Scroll down to Print.
The Print Dialog Window will appear.
Page 9

Click the Setup Button.
The Printer Setup window is where Ink set, number of Copies,
and paper cutting options are set. NOTE: The ink, quality, and
resolution are set automatically when using
IMAGEPRINT
proles for all Epson Ultrachrome printers. If you’re using
your own ICC proles, refer to “Choosing Your Ink Set
Manually”. For all other printers please consult the
PRINT
manual for details selecting the proper inkset.
IMAGE-
Click OK to close the Print Setup window.
Click Apply in the Print Dialog window to start the print.
CHECK THE STATUS OF YOUR PRINT JOBS
Now let’s check the status of your test print.
Open the
Open the Spool Folder.
Double-click the Spool Face icon.
IMAGEPRINT Folder.
The Spool Face window will appear. Check the printer status in
the lower portion of the window. Verify that it reads Enabled.
About Spool Face
From the Spool Face window you can view the status of
all your print jobs. It will warn you if there is a problem
connecting to the printer that requires your attention.
You may want to drag the icon to your Macintosh dock for
future reference. You should review the Spool Face section
Page 10

of the
IMAGEPRINT
powerful tool.
manual to learn more about this
CHOOSING YOUR INK SET MANUALLY
If you’re using your own ICC proles you will need to select
the proper ink set from the Printer Settings window. Select your
proper ink set according to the chart below.
KCMYcm Pigment
(color printing)
KMCMYcm Pigment
(color printing)
K Pigment Not currently supported.
K Matte Pigment Not currently supported.
Gray Pigment
(B & W printing)
Gray Matte Pigment
(B & W printing)
KCMYcm Dye Epson printers using Dye ink.
Epson printers with pigment/CF/archival inks
and Ultrachrome printers using Photo Black .
Ultrachrome printers using Matte Black.
Ultrachrome printers using Photo Black.
Ultrachrome printers using Matte Black.
EPSON ULTRACHROME PRINTERS
AND THE TINT PICKER
IMAGEPRINT
and grayscale images using the 7-color Ultrachrome inks
found standard on the 2200, 7600 and 9600 Epson printers. To
make best use of this capability the proper prole is essential.
Most important the prole must match the type of black ink
- Photo Black or Matte Black that is loaded in your printer.
This mismatch is the typical culprit in unsatisfactory results.
Additional sample proles are provided below to better acquant
allows you to produce both high-quality color
Page 11

you with our naming convention.
Example 1: ep2200 luster_1440_eday
This prole is for the Epson 2200 (ep2200), using standard
Photo Black ink, Luster paper (luster), 1440 dpi (1440), and
daylight balanced viewing environment (eday).
Example 2: ep2200MK Velvet_1440_ECWF
This prole is for the Epson 2200, using Matte Black ink (MK),
Epson Velvet paper (Velvet), 1440 dpi, and color balanced for
cool white uorescent lighting conditions.
Example 3: ep2200_grey_luster_1440
This prole is made for greyscale printing (grey) on the Epson
2200, using the Photo Black ink, on Luster paper, at 1440 dpi.
To enable the TINT PICKER, you must select a prole with
“grey” in the name.
Example 4: ep2200MK_grey_EnhMatte_1440
This prole is made for greyscale printing on the Epson 2200,
using Matte Black ink, on Enhanced Matte paper, at 1440 dpi.
 Loading...