

Page 1

EPSON TWAIN
User’s Guide
Page 2

Copyright Notice
All rights reserved. No part of this publication may be reproduced, stored in a retrieval system, or transmitted
in any form or by any means, electronic, mechanical, photocopying, recording, or otherwise, without the prior
written permission of SEIKO EPSON CORPORATION. The information contained herein is designed only for
use with this EPSO N scanner. EPSON is not responsible for any use of this information as applied to other
scanners.
Neither SEIKO EPSON CORPORATION nor its af filiates shall be liable to the purchaser of this product or
third parties for damages, losses, costs, or expenses incurred by purchaser or third parties as a result of:
accident, misuse, or abuse of this product or unauthorized modifications, repairs, or alterations to this product,
or (excluding the U.S.) failure to strictly comply with SEIKO EPSON CORPORATION’s operating and
maintenance instructions.
SEIKO EPSON CORPO RATIO N and its affiliates shall not be liable for any damages or problems arising from
the use of any options or any consumable products other than those designated as Original EPSON Products
or EPSON Approved Products by SEIKO EPSON CORPORATION.
A Note Concerning Responsible Use of Copyrighted Materials
Digital cameras and scanners, like photocopiers and conventional cameras, can be misused by improper
copying of copyrighted material. While some countries’ laws permit limited copying of copyrighted material in
certain circumstances, those circumstances may not be as broad as some people assume. EPSON
encourages each user to be responsible and respectful of copyright laws when using digital cameras and
scanners.
Page 2
Page 3

Trademarks
EPSON is a registered trademark of SEIKO EPSON CORPORATION. Perfec tion and EPSON FaxAdvice are
trademarks and EPSON SoundAdvice is a service mark of Epson America, Inc.
General Notice: Other product names used herein are for identification purposes only and may be
trademarks of their respective companies.
Copyright © 1999 by Epson America, Inc., Torrance, California, USA ET0899-00
08/99
Page 3
Page 4

Contents
Introduction
System Requirements 10
Windows System Requirements 10
Macintosh System Requirements 11
How to Use This Manual 11
Cautions, Notes, and Tips 12
Using Electronic Links 12
Basic Scanning
Starting EPSON TWAIN 14
Selecting Basic Settings 16
Previewing Your Scan 20
Using Marquees 21
Advanced Scanning
Scanning Transparencies 24
13
23
8
Scanning with the Auto Document Feeder 28
Page 4
Page 5

Customizing Image Types 33
Customizing Destination Set tings 36
Adjusting Source and Target Image Sizes 38
Scaling the Image 39
Using Automatic Adjustment Features 39
Using Auto Exposure 40
Using Auto Locate 40
Adjusting Image Controls 42
Using the Color Buttons 44
Using Tone Correction 44
Customizing Tone Correction Settings 45
Using Color Adjustments 46
Changing the Gray Balance Intensity 47
Changing the Saturation 47
Saving Custom Settings 48
Batch Scanning 49
Configuring Preview and Color Options 50
Page 5
Page 6

Using the EPSON TWAIN Utilities
Using the Scanner Monitoring Utility 52
Using the EPSON Screen Calibration Utility 53
Calibrating the Screen with Windows 53
Calibrating the Macintosh Screen 55
Using EPSON Scan! II 56
Scanning with EPSON Scan! II 56
Exporting Images with EPSON Scan! II 59
Using Other EPSON Scan! II Features 62
52
Using the Start Button
Preparing to Use the Start Button 64
Enabling Scanner Monitoring 65
Setting Up PageManager for Start Button Scanning 70
Scanning with the Start Button 78
64
Page 6
Page 7

Troubleshooting
Problems Using EPSON TWAIN 84
Problems Using the Start Button 88
Problems with Image Quality 90
Where To Get Help 95
84
Glossary
Index
97
99
Page 7
Page 8

Introduction
EPSON® TWAIN is the interface program between yo ur application
software and scanner that lets you scan images into your software. It is
the ideal int erface for pr oducing pro f es s ional qua lit y im ages, scanning
text into optical character recognition (OCR) programs, and managing
text pages in NewSoft™ Presto!™ PageManager™.
EPSON T W AI N includes m any feature s fo r previewin g and modify ing
your imag es f or t he perfect sc an:
◗ Captures all kinds of image types, from black and white text to 36-bit
color imag es
◗ Automa tically locate s and exposes th e im age
◗ Opens a preview image allowing you to change settings and view their
effects before you scan
◗ Provides a helpful marquee feature so you ca n f rame the exa c t im age
borders or only portions of it for scanning
◗ Uses EPSON’s Auto Area Segmentat ion
Technology fea tu res to impro ve te x t re c ognition an d provide c lear
separation from graphic areas when you scan images with text
◗ Gives you predefine d s et t ings for a vari et y of im age types and output
destinations and lets y ou customiz e y our own set ti ngs
Introduction Page 8
and Text Enhancement
Page 9
1
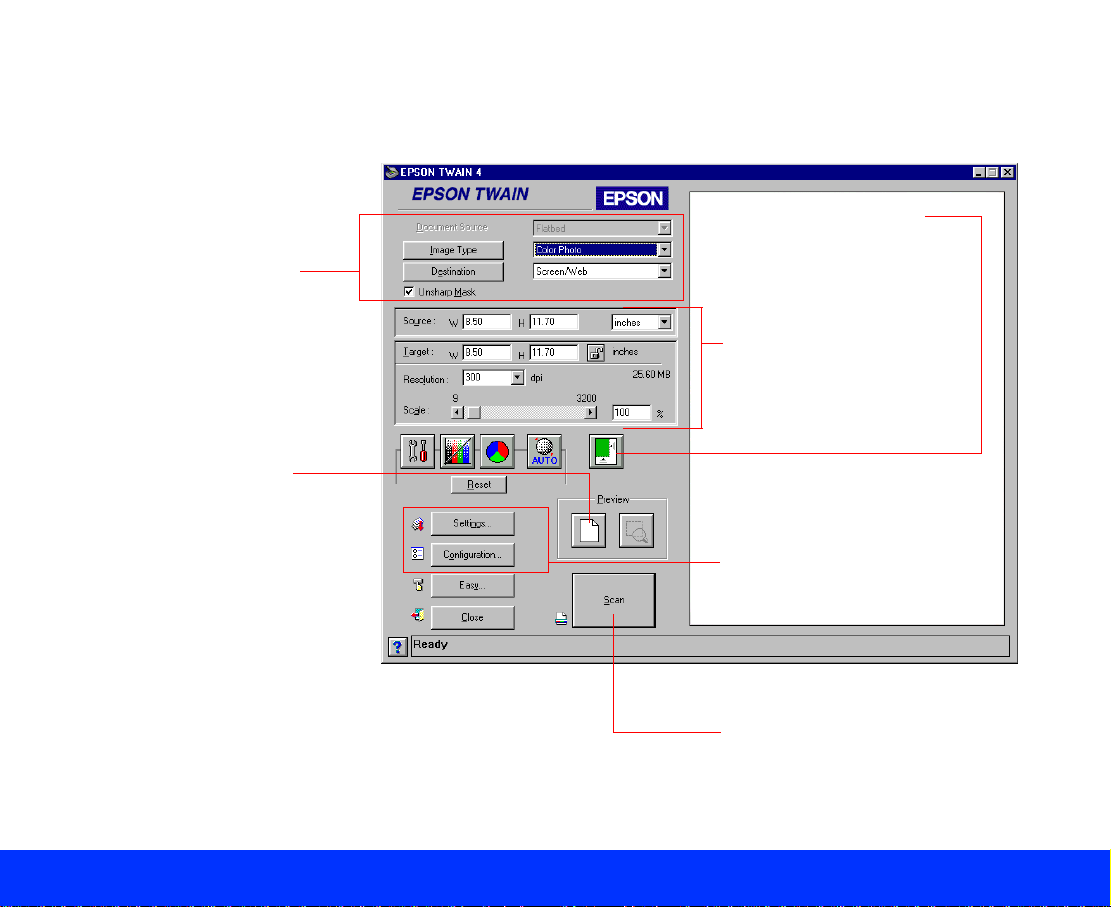
Select the basic settings:
Document Source
Image Type
Destination
Resolution
2
Preview your image
Here is a bri ef ov erv iew of scanning steps us ing the EPSON TWA I N
Advanced window (the Windows
®
interface is s hown; the Mac intosh®
steps are t he s ame):
3
Auto Locate the
image to crop it
4
Size or scale the image
(don’t forget to increase
the Resolution if you
increase the size or
scale
5
Save your Setti ngs, select
your preview Configuration,
and use color management
6
Scan the image into
your application
Introduction Page 9
Page 10

EPSON TWAIN also comes with these utilities:
◗ EPSON Sc anner Mo nit or (Macinto s h) or Scan Ev ents (Wind ow s )
utilities th at let yo u s c an with Pres to ! PageMana ger using th e Start
button
◗ EPSON Sc reen Calib ration utility t o c alibrate your screen to yo ur
scanner fo r ac c urate preview s
◗ EPSON Scan! II (Macintosh only), a TWAIN-compliant application you
can use for basic sca nning and ex porting of im ages (if you d on’t have
a TWAIN- c om pliant image editing application)
System Requirements
Before ins ta lling the scann er s oftware, make sure your system meets the
following requireme nt s .
Color and to ne
reproduct ion depend
on the display
capabiliti es of yo ur
computer system,
including t he v ideo
controller , monitor,
and software.
Introduction Page 10
Windows System Req uir emen t s
◗ Microsoft Windows NT® 4.0, Window s 95, or Window s 98 preinstalled
(USB sup port require s W indows 98)
◗ PC with an av ailable built -in USB po rt o r hub connect ion or a PCI sl ot
for the SCSI c ard (include d w it h t he Perfect ion™ 1200S)
◗ VGA or hig her standard monitor w it h 640 × 480 re so lution (800 × 600
or higher re c om m ended) and 256 colo rs (65,000 colors or mor e
recommended)
Page 11

Macintosh System Requirements
If you’re us ing Mac
OS 8.1 on your iMac,
you must install the
iMac Update 1.0,
available f rom the
Apple web s it e,
before installing your
scanner so ftw are. If
you’re using Mac OS
8.5 or later, check the
Apple web site for
any updates.
EPSON TWAIN supports the Apple® ColorSync™2 color management
system and QuickTime.
◗ Apple Mac intosh computer run ning syste m 8. 1 or later
◗ Available iMac or G3 s ta ndard USB int erface or h ub connect ion,
(Perfection 1200U ), or M ac intosh standard SC SI Port (Perfe c t ion
1200S)
◗ Color mon it or w it h 640 × 480 res olution (80 0 × 600 or higher
recommended) and 256 colors (32,000 colors or more recommended)
™
How to Use This Manual
For instruc t ions on insta lling EPSON T W AIN, see the
book. This
EPSON T W AI N and use the T W AIN utilities .
Basic Scanning
previewi ng of your ima ges.
Advance d Scanning
such as scanning with the optional transparency unit and auto document
feeder, cus t om izing image type and destination settings, adjusting im age
size and sc ale, using im age controls , to ne correc tio n, and color
adjustments, saving custom setting groups, and configuring TWAIN.
User’s Guide
gives ste p-by-step in s tr uc t ions for basi c sc anning a nd
tells you w hat you need t o k now to scan w it h
describes advanc ed EPSON TWAIN pro c edures,
Scanner Basics
Using the EPSON TW AIN Utilitie s
the scanner monitor ut ilities, and EPSON Screen Calibration (Macintosh
only).
Introduction Page 11
tells you how to use EPSON Scan! II,
Page 12
Using the Start Button
using you r s ca nner’s Start button for on e-t ouch scanning.
gives step- by -s t ep instructions on setting up an d
Troubles hooting
At the end, y ou’ll find a Glo s s ary
provides so lut ions to problems you may encounter.
and an Index.
Cautions, Notes, and Tip s
You’ll find t his informatio n t hroughout y our manual:
Cautions must be observed to avoid damage to your equipment.
Notes con t ain important informatio n about your s c anner.
Tips conta in addition al hints for bett er scanni ng.
Using Ele ctro nic Links
Blue underlined text indicates a link (cross-reference) to other parts of this
guide. Click on the link text with the mouse pointer to view the referenced
information.
Introduction Page 12
Page 13

Basic Scanning
EPSON Sc an! II
(Macintos h only) is a
TWAIN-compliant
applicati on s upplied
with EPSON TWAIN
in case you don’t have
a TWAIN-compliant
program f or s c anning.
For best results,
use one of the
TWAIN-compliant
applications that came
with the scanner
instead. See Using
EPSON Sc an! II for
instructions on
scanning with
EPSON Scan! II.
Before scanning, make su re you’ve i nstalled th e EPSON TWAIN software
(as described in the
that supports EPSON TWAIN, such as Adobe® PhotoD eluxe® or Presto!
PageManager.
This chapter gives you instructions on:
◗ Starting EPSON TWAIN
◗ Selecting Basic Settings
◗ Preview ing Your Sca n
If you’re scanning with the optional transparency u nit or auto docum ent
feeder, see these se ctions for bas ic scanning ins t ruc t ions:
◗ Scanning Transparencies
◗ Scanning with the Auto Document Feeder
Scanner Basics
book) and t he application software
Basic Sca nning Page 13
Page 14
Starting EPSON TWAIN
Follow the steps in this section to start EPSON TWAIN from your
application softw are. The steps may vary, depending on you r applicatio n.
If you start your
applicat ion software
before turning on your
scanner, the software
may not work
properly.
The steps in this
section cover
scanning with
common
TWAIN-compliant
applications. Other
applicat ions, such as
PhotoD eluxe, use
diff erent sc anning
steps. See your
Scanner Basics
for instruc t ions on
scanning with
PhotoDeluxe; see
your application’s
docum ent ation for
additional details on
scannin g.
book
1 Make sure you set up and turned on the scanner. Then place the
docume nt yo u w ant to scan on the docum ent table. S ee the
Basics
2 Start your application software by select ing the prog ram ic on in its
program f older.
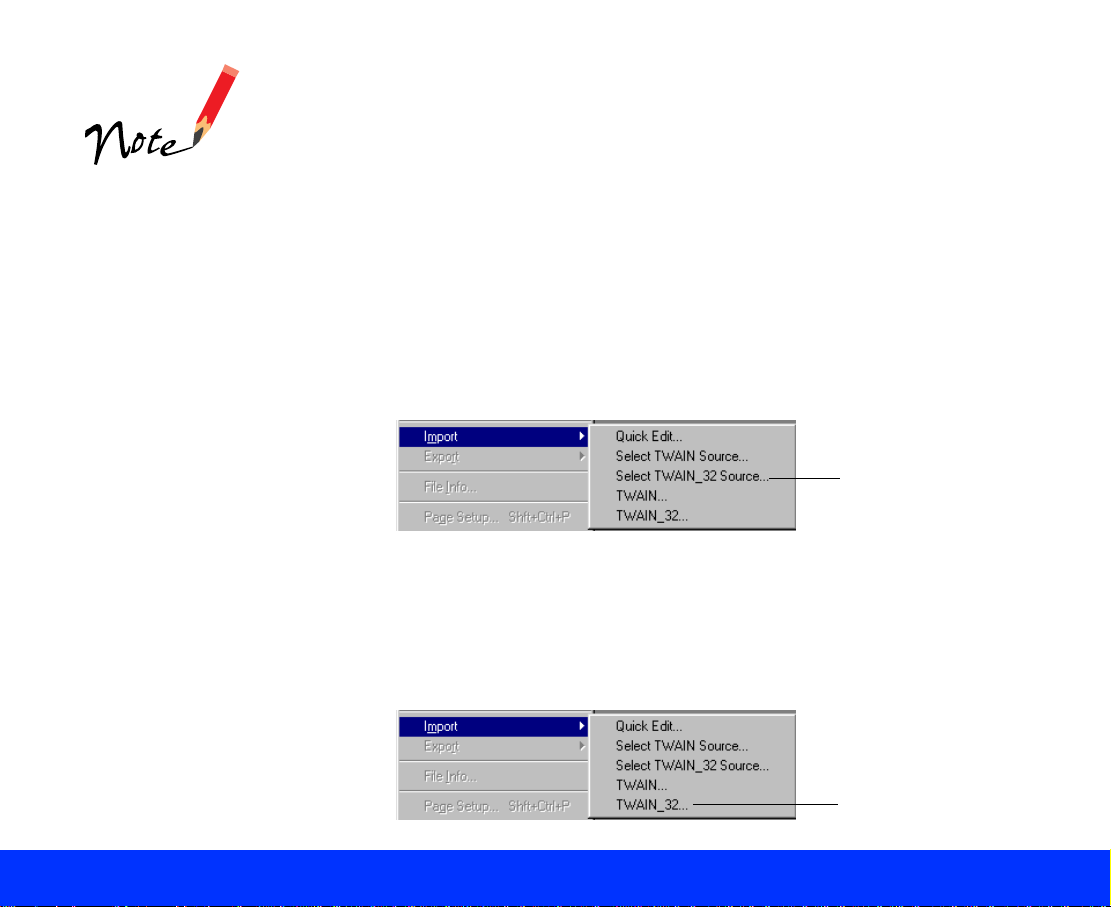
3 Select the s c anner sour c e. Open the File m enu and ch oose Import,
Acquire, or Select Source, and then select eit her Select TWAIN_32
Source (Windows ) or TWAIN Select (Macintosh).
4 Select either EPSON TWAIN 4 (32-bit) (Windows) or EPSON
TWAIN 4 (Macintosh) and click Select.
5 Start EPSON TWAIN for scanning. Open the File menu and choose
Import or Acquire and then select eit her TWAIN_32 (Windows) or
TWAIN Acquire (Macintosh).
book for instructions.
Click to select
the scanner
source
Click to open
EPSON TWAIN
Scanner
Basic Sca nning Page 14
Page 15
Easy window
The screen examples
in this book are from
EPSON TWAIN for
Windows. The
screens for
Macintos h look a bit
different, but th ey
contain the s ame
options. Any
exceptions are noted
in the text.
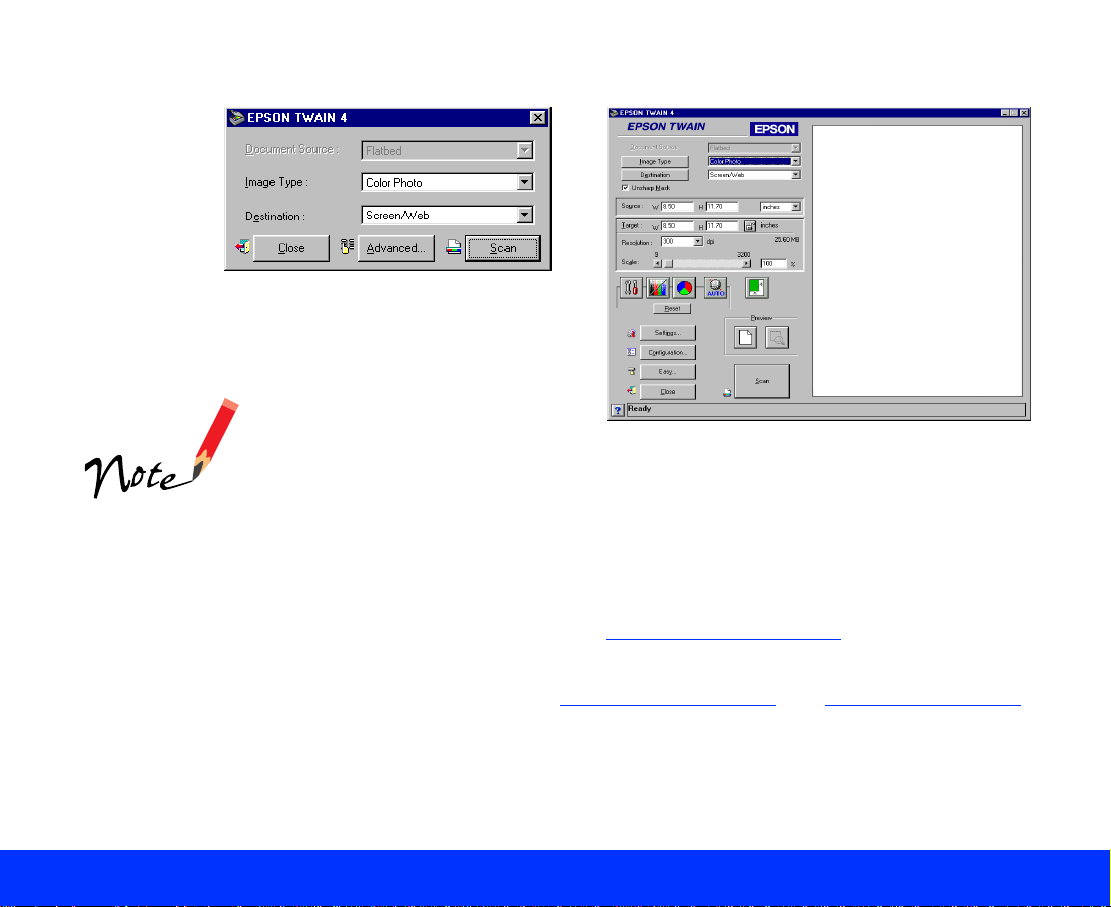
One of the EPSON TWA I N w indows appears.
Advanced window
The first time you start EPSON TWAIN, you see the Easy window. After
that, you’ll see the window that was open the last time you closed EPSON
TWAIN. To switch between the windows, click the Easy or Advanced
button.
Both the E as y and Advanced windows contain the basic se ttings you
need to scan an image . See Selecting Basic Set t ings
for details.
The Adva nc ed window lets you pre v iew y our image a nd s elect many
advanced settings. See Previewing Your Scan
and Advanced Scanning
for details.
Basic Sca nning Page 15
Page 16

Document Source
settings fo r optional
equipment appea r in
the list only when that
option is ins t alled.
If you’re s ca nning
positive, reflective
origina ls (su c h as a
photograph) with t he
optional transparency
unit installed, be sure
to turn off the
transparency unit.
Then select Flatbed
as the Document
Source option.
Selecting Basic Settings
For most scans, you need to check four basic settings: Document
Source, Image Type, Destination, an d Resolut ion (Advanced window
only).
1 You only need to change the Doc um ent Source setting if yo u’ve
installed an opt ional transparency unit (TPU) or auto docume nt fe eder
(ADF) on your scanner.
If you’re scanning a document from the scanner’s document table,
select Flatbed (default) as the Document Source setting. If you’ve
installed th e optional au to document fe eder or trans parency unit on
your scanner, selec t o ne of the following optio ns in t he Document
Source lis t:
Setting Type of document source
ADF (Windows)
Auto Document Feeder
(Macintosh)
TPU for neg. Film For scanning negative film w ith th e
TPU for pos. Film For scanning positive film with the
For scanning sing le-sided do c um ents up to
legal siz e (8.5 × 14 inches) using the auto
document feeder
transp arency unit , suc h as negativ e film strips
transparency unit, such as slides
For detailed steps in scanning with the optional transparency unit or
auto document feeder, see Scanning Transparencies or Scanning with
the Auto Document Feeder.
Basic Sca nning Page 16
Page 17

2 You must select the correct Image Type setting each time you scan.
These image types automatical ly se lec t oth er TWAIN sett ings that are
the best fo r yo ur type of image and set th e ranges fo r y our Image
Controls. Select one of th e f ollowing op ti ons :
To view the def ault
settings for the Image
Type you selected,
click the Image Type
button.
You can also change
the settings for these
options or save your
own custo m Image
Types. See
Customizing Image
Types for more
information.
Setting Type of image (positive or negative)
Color Photo For colo r photograp hs
Color Photo
De-screening
For colo r im ages scan ned from pre-printed
materi al
Black & W hit e Photo For blac k and white phot ographs
Line Art For bla c k line drawing s
OCR For black text that will be input into an OCR
(Optic al C haracter R ec ognition) applicatio n;
optionally uses the Text Enhancement
Technology feature
Copy & Fa x For text and graph ic ima ges in a document that
you inte nd to copy or fax ; us es t he Auto Ar ea
Segmentation feature
Basic Sca nning Page 17
Page 18
3 Now selec t th e output dev ic e w here you want to displa y o r print your
scanned im age from the D es t ination list. T hese destin at ions
automatic ally select resolution and sharp ness settings appro priate for
the outpu t d ev ic e. Select one of t he f ollowing op t ions:
To view the def ault
settings for the
Destination you
selected, click the
Destination button.
You can also change
the settings for these
options o r sa v e
your own custom
destinations. See
Customizing
Destination Settings
for more in fo rm ation.
Setting Type of output device
Screen/ W eb For viewing on a mo nit or screen or w it hin a
web page
EPSO N printer For print ing on your E PSON ink jet printer
Laser Printer For print ing on a laser printer
Fax For sending to a fax machine or fax/modem
OCR Fo r s ending to an OC R (Optical Ch aracter
Recog nit ion) applic at ion
Basic Sca nning Page 18
Page 19

With applications that
let you select ICM,
sRGB, or C olorSync
profiles fo r yo ur
printer, you’ll get
great print ed output
when yo u s c an
using ICM/sRGB
(Window s 98) or
ColorSy nc
(Macintosh). See
Configu ring Previe w
and Color Options fo r
details.
4 The Image Type and Destination settings you choose automatically
select the correct Resolution setting for your image.
If you need to change the resolution, click Advanced to open the
Advanced window, if necessary. Then select a new setting from the
Resolution list. The av ailable res olutions range from 50 t o 9600 dpi
(dots per in c h). You can also t y pe in a specif ic Resolution setting,
such as 1600 or 2400 dpi for enlarg ements, if it’s not in the list.
If you enlarge your target image size by scaling or by selecting a larger
Target siz e, be sure to incr ease the Re so lut ion setting by the same
proportion to retain y our image qu ality. See Ad jus t ing Source and
Target Im age Sizes fo r m ore informat ion.
For additi onal informat ion on sele cting scanning resolution, see yo ur
Scanner Basics
5 It’ s a good idea t o prev iew your image bef ore yo u actually scan s o you
can make any necessary changes. To preview your image, click
Advanced to open the Advanced window, if necessary. Then see
Preview ing Your Sca n
See Advanced Scanning
settings in the window.
6 When you’re ready t o scan, click the Scan button. The scanned image
appears in your appl ic at ion window.
book.
for preview instruct ions.
for information on the rest of the TWAIN
7 Click the Close button to close the EPSON TWAIN window and return
to your app lic at ion.
To modify or s av e your scan ned image u s ing your appl ic at ion
software, see your software documentation.
Basic Sca nning Page 19
Page 20
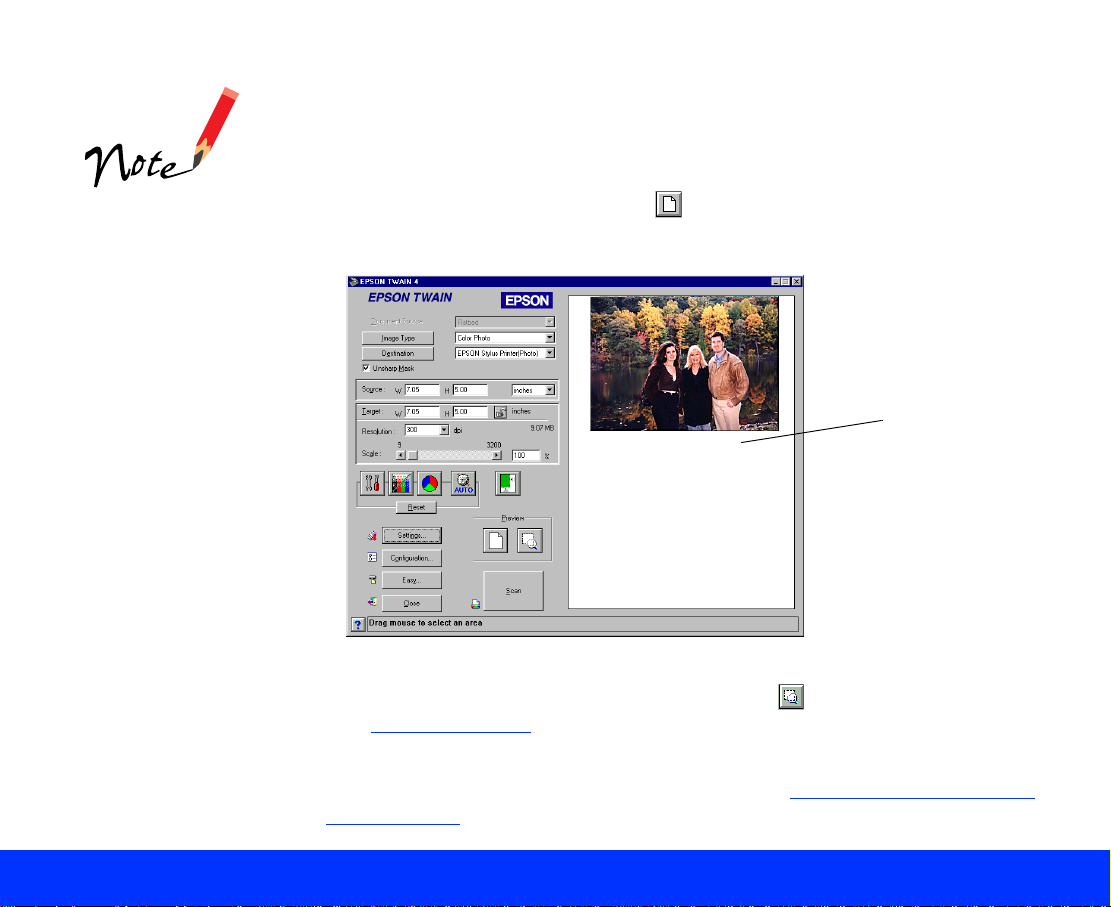
Previewing Your Scan
You can preview your image in th e Advanced window to see th e effects of
your settin gs before sca nning. Previewing also allows yo u t o determine
the width and height o f the scanned image and the final fi le s iz e.
You cannot preview
an image t hat
exceeds your
system’s available
memory or disk
space.
Although the preview
image ch anges when
you modify settings,
the settin gs don’t
affect the im age until
you scan it.
In the Advanced window, click the Preview button to preview the entire
image area.
preview
image area
If you want to crop the image, you can preview and use a marquee. Then
you can zoom into the cropped area using the Zoom Preview button.
See Us ing Marque es
If you want to save your preview image and settings after closing EPSON
TWAIN, or select other previewing options, see Configuring Preview and
Color Opt ions for instructions.
for instruc t ions.
Basic Sca nning Page 20
Page 21
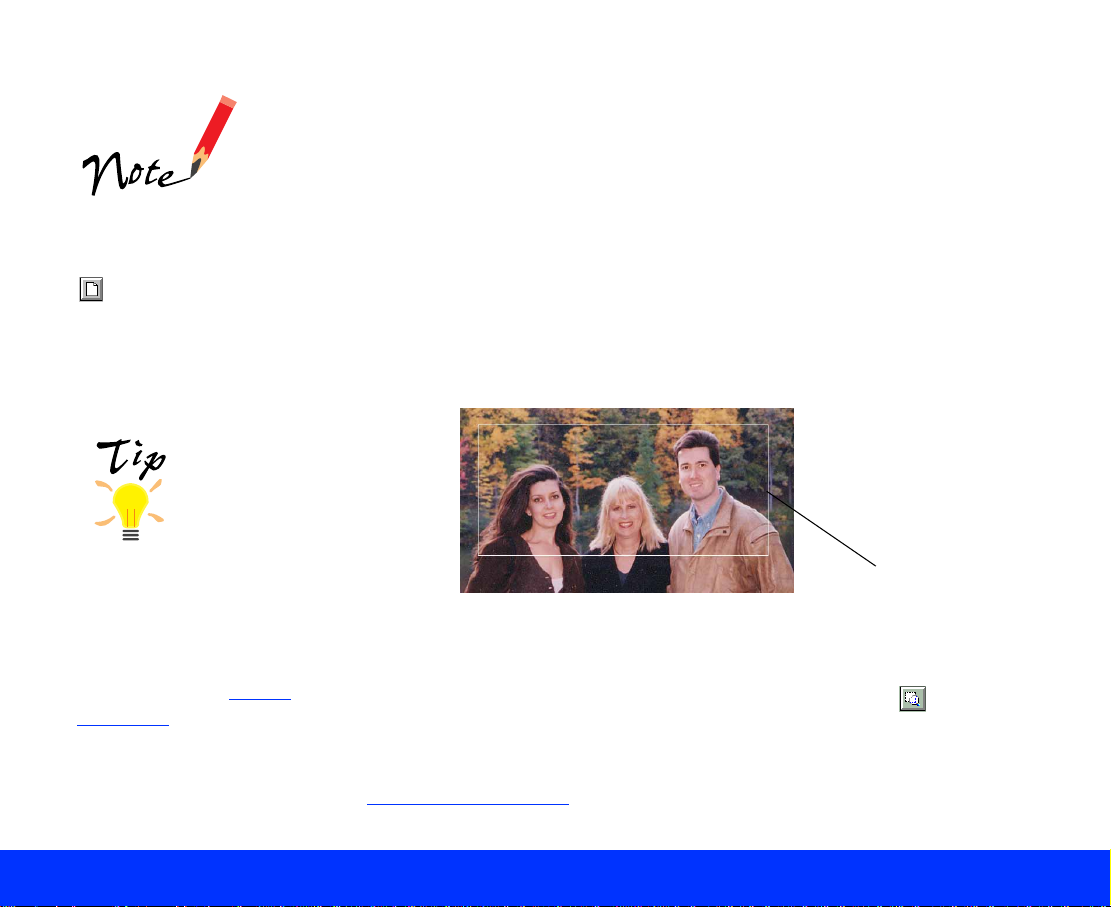
Using Marquees
A marquee is a frame around an entire image, or a portion of an image so
you can sc an only the mo s t important part. To cre at e a marque e, fo llow
these steps:
If the mou s e pointer
doesn’t ch ange to a
cross hair, click the
Preview button
again.
You can save
different sets of
settings fo r y our
marquee and then
batch scan all the
variatio ns . See Batch
Scanning for details .
1 Move the mou s e pointer over the prev iew image; the pointer bec om es
a cross hair.
2 Position th e pointer in the c orner of the area you w ant to select and
press the m ouse butto n.
3 Hold down the mouse button as you drag the mouse across the image,
creating a m arquee.
marque e
4 Release th e button whe n t he marquee c ont ains the ima ge area you
want.
5 To enlarge the preview of the new image are a, cl ic k the Zoom
Preview button.
If you need to adjust the marquee size or position, or delete the marquee,
see Adjusting a Marquee
.
Basic Sca nning Page 21
Page 22
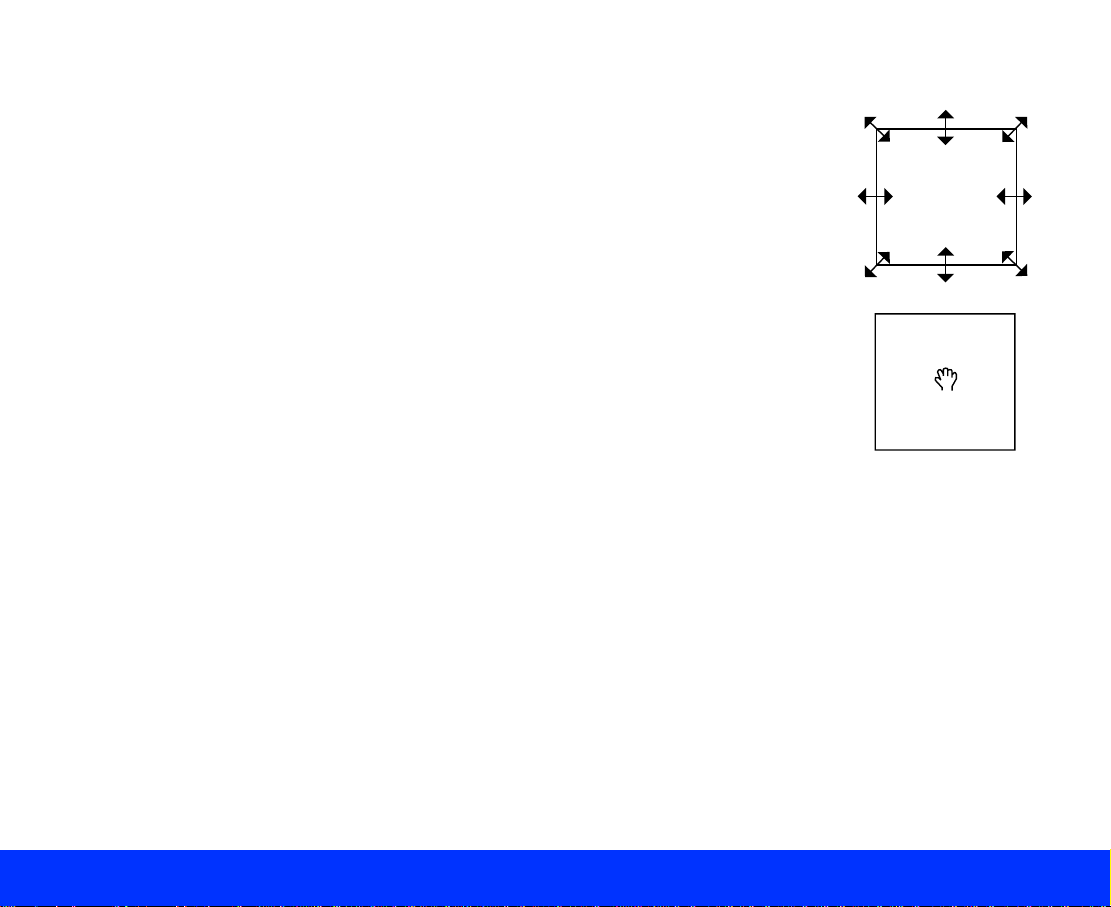
Adjusting a Marquee
To resize a m arquee, pl ac e t he mouse pointer ov er
its edge; th e pointer changes to a double-headed
arrow. Clic k th e m ouse butto n and drag th e box up,
down, sideways, or diagonally to the size you want.
To resize a marquee and retain its width-to-height
proportions, hold down the Shift key as you drag the
edge of the m arquee.
To move a marquee, place the mouse pointer
anywhe re in the marquee image area; the point er
changes to a hand. Click the mouse button and drag
the entire ma rquee to mov e it where yo u w ant it.
To delete a m arquee, do uble-click an y w here in the
preview image area.
Basic Sca nning Page 22
Page 23

Advanced Scanning
The instructions in this chapter tell you how to perform these advanced
scannin g operation s:
◗ Scanning Transparencies
◗ Scanning with the Auto Document Feeder
◗ Customizing Image Types
The screen ex am ples
in this book are from
EPSON TWAIN for
Windows. The
screens for Macintosh
look a bit di fferent,
but they contain the
same options. Any
exceptions are
noted in the text.
Advanced Scanning Page 23
◗ Customizing Destination Settings
◗ Adjustin g Source and T arget Image Siz es and scaling
◗ Using Automatic Adjustment Features
Exposure
◗ Adjusting Image Controls
shadow s
◗ Using Tone Correct ion
◗ Using Color Adjustments, such as saturation
◗ Saving C us t om Settings
◗ Configu ring Preview and Color Opt ions
, such as the exposure, highligh t s , an d
and Batch Scanning
, such as Auto Locate and Auto
Page 24
If you’re s ca nning
positive, reflective
origina ls (su c h as a
photograph) with t he
optional transparency
unit installed, be
sure to turn off the
transparency unit.
Then select Flatbed
as the Document
Source option; see
Selecti ng Basic
Setting s for
instructions.
Maximum
transparency area is
4 × 5 inches.
Scanni ng T ra n sp a r encies
When you scan with the optional transparency unit (TPU) installed, you
need to se lec t th e c orrect basic s et t ings in EPSO N T W AIN. Bef ore you
begin, ma k e s ure you’ve ins t alled and tu rned on the transparency unit,
then plac e y our transparent origin al in the unit. S ee y our
book for in structions.
For most scans, you need to check four basic settings: Document
Source, Image Type, Destination, an d Resolut ion (Advanced window
only). Follow these st eps:
1 Select one of the following options in the Document Source list,
dependi ng on the type of tra ns parency y ou’re scanning:
Setting Type of document source
TPU for neg. Film For scanning negative film w ith th e
transp arency unit , suc h as negativ e film strips
TPU for pos. Film For scanning positive film with the
transparency unit, such as slides
Scanner Basics
Advanced Scanning Page 24
Page 25

2 You must select the correct Image Type setting each time you scan.
These image types automatical ly se lec t oth er TWAIN sett ings that are
the best fo r yo ur type of image and set th e ranges fo r y our Image
Controls. Select one of th e f ollowing op ti ons :
To view the def ault
settings for the Image
Type you selected,
click the Image Type
button.
You can also change
the settings for these
options or save your
own custo m Image
Types. See
Customizing Image
Types for more
information.
Setting Type of image (positive or negative)
Color Photo For colo r photograp hs
Color Photo
De-screening
For colo r im ages scan ned from pre-printed
materi al
Black & W hit e Photo For blac k and white phot ographs
Line Art For bla c k line drawing s
OCR For black text that will be input into an OCR
(Optic al C haracter R ec ognition) applicatio n;
optionally uses the Text Enhancement
Technology feature
Copy & Fa x For text and graphic im age in one doc um ent
that you intend to copy or fax; uses the Auto
Area Segmentation feature
Advanced Scanning Page 25
Page 26

3 Now selec t th e output dev ic e w here you want to displa y o r print your
scanned im age from the D es t ination list. T hese destin at ions
automatic ally select resolution and sharp ness settings appro priate for
the outpu t d ev ic e. Select one of t he f ollowing op t ions:
To view the def ault
settings for the
Destination you
selected, click the
Destination button.
You can also change
the settings for these
options o r sa v e
your own custom
destinations. See
Customizing
Destination Settings
for more in fo rm ation.
Setting Type of output device
Screen/ W eb For viewing on a mo nit or screen or w eb page
EPSO N printer For print ing on your E PSON ink jet printer
Laser Printer For print ing on a laser printer
Fax For sending to a fax machine or fax/modem
OCR Fo r s ending to an OC R (Optical Ch aracter
Recog nit ion) applic at ion
The default resolution setting set by the Destination you choose is
based on the Image Type you selected in step 2
.
Advanced Scanning Page 26
Page 27

With appli ca t ions that
let you select ICM,
sRGB, or C olorSync
profiles for y our
printer, you’ll get great
printed output when
you scan us ing
ICM/sRGB
(Window s 9 8), or
ColorSyn c
(Macintosh). See
Configuring Preview
and Color Options for
details.
4 The Image Type and Destination settings you choose automatically
select the correct Resolution setting for your image.
If you need to change the resolution, click Advanced to open the
Advanced window, if necessary. Then select a new setting from the
Resolution list. The av ailable res olutions range from 50 t o 9600 dpi.
You can als o t y pe in a specifi c Re s olution setting, such as 1600 or
2400 dpi for enlargem ents, if it’s not in t he list.
If you enlarge your target image size by scaling or by selecting a larger
Target siz e, be sure to incr ease the Re so lut ion setting by the same
proportion to retain y our image qu ality. See Ad jus t ing Source and
Target Im age Sizes fo r m ore informat ion.
For additi onal informat ion on sele cting resolu ti on, s ee your
Basics
5 It’ s a good idea t o prev iew your image bef ore yo u actually scan s o you
can make any necessary changes. To preview your image, click
Advanced to open the Advanced window, if necessary. Then see
Preview ing Your Sca n
book.
for preview instruct ions.
Scanner
See Advanced Scanning
settings in the window.
6 When you’re ready t o scan, click the Scan button. The scanned image
appears in your appl ic at ion window.
7 Click the Close button to close the EPSON TWAIN window and return
to your app lic at ion.
To modify or s av e your scan ned image u s ing your appl ic at ion softw are,
see your software documentation.
Advanced Scanning Page 27
for information on the rest of the TWAIN
Page 28

The maximum page
size using the ADF is
Legal size(8.5 × 11
inches).
The minimum size is
3.35 × 5 inches.
Scanning with the Auto Document Feeder
When you scan with the opt ional auto doc ument feeder (ADF) installed,
you need to select the correct basic settings in EPSON TWAIN. Before
you begin, make sure you’ve installed the ADF and loaded your single- or
multi-pa ge document into it, as sho w n below. Se e y our
book for more details.
Follow these steps to scan with the ADF and EPSON TWAIN:
1 Select the ADF (W indows) or Auto Document Feeder (Macintosh)
option in the Document Source list. You see a message telling you to
make sure t here is no do cu m ent on the scanner’s do c um ent tabl e.
Ensure th ere is no docum ent on the document ta ble and clic k OK.
Scanner Basics
Advanced Scanning Page 28
Page 29

2 Select the correct Image Type setting for your document as described
in the table below. For example, if you’ll be usin g an OCR (O pt ic al
Character Recognit ion) applic at ion to proc es s yo ur scanned
document, select the OCR setting.
If you’re s c anning
an origin al on the
scanner’s document
table with the optional
auto document feeder
installe d, s elect
Flatbed as the
Document Source
option; see Selecting
Basic Settings for
instructions.
For more inf ormation
on the Image Type
setting, se e
Customizing Image
Types.
Setting Type of image
Color Phot o For colo r photograp hs
256 Colors For 256 c olor image s, s uc h as present at ion
graph ic s you’ll be disp lay ing on a computer
monitor
Black & White Photo For blac k and white phot ographs
Line Art For bla c k line drawing s
OCR For black text that will be input into an OCR
applicat ion; optionally uses the Text
Enhancement Technology feature
Copy & Fax For text and graphic images in a document that
you inte nd to copy or fax ; us es t he Auto Ar ea
Segmentation feature
Advanced Scanning Page 29
Page 30
3 Now selec t th e output dev ic e w here you want to displa y o r print your
scanned im age from the D es t ination list. T hese destin at ions
automatic ally select resolution and sharp ness settings appro priate for
the outpu t d ev ic e. Select one of t he f ollowing op t ions:
For more inf ormation
on the Destination
setting, se e
Custom iz ing
Destinat ion Settings.
Setting Type of output device
Screen For v iew ing on a monitor scre en
Screen Vivid For viewing on a mo nit or screen w ith added
sharpness
EPSO N printer For print ing on your E PSON ink jet printer
Laser Printer For print ing on a laser printer
Fax For sending to a fax machine or fax/modem
OCR Fo r s ending to an OC R applicat ion
4 The Image Type and Destination settings you choose automatically
select the correct Resolution setting for your document. If you set
these options to OCR, the Resolution is set t o 300 dpi; change the
Resolution setting to 400 dpi for best results .
Advanced Scanning Page 30
Page 31

If you need to change the resolution, click Advanced to open the
Advanced window, if necessary. Then select a new setting from the
Resolution list. The av ailable res olutions range from 50 t o 9600 dpi.
You can also type in a specific Resolution setting, if it’s not in the list.
With appli ca t ions that
let you select ICM,
sRGB, or C olorSync
profiles for y our
printer, you’ll get great
printed output when
you scan us ing
ICM/sRGB
(Window s 9 8) or
ColorSyn c
(Macintosh) mode.
See Configuring
Preview a nd C olor
Options for details.
For additi onal informat ion on scanning reso lut ion, see your
Basics
5 You must preview the fi rs t p age of your doc ument a nd s et the corre ct
page size. To preview your image, click Advanced to open the
Advanced window, if necessary. Then click the Preview button.
The scanner feeds th e f irs t (or only) page of yo ur docum ent into the
ADF and p res c ans it. The prescanned image ap pears in the EPSON
TWAIN pr ev iew image area. Wh en t he ADF ejec ts t he first (or on ly )
page, reload it in the AD F on t op of your doc ument.
6 To set the page size for your document and crop out the rest of the
document table, click the Auto Locate button. A marquee appears
around the page ima ge and the Target width and height are set
automatically. See Adjusting Source and Ta rget Image Siz es
details.
book.
Scanner
for
Advanced Scanning Page 31
Page 32

7 Click the Scan button. You see this dialog box:
Click Single Page (to scan a s ingle page) or All Pages (to s c an a
multi-pa ge document ). T hen click OK.
8 EPSON TWAIN scans the document. If you’re scanning a multi-page
document, it scans and loads one page at a time. When scanning is
finished , clos e the EPS ON T W AIN windo w . A scanned im age of each
(or your only ) page appears in your applicat ion window.
9 Now you ca n f ollow the ins tr uc t ions in your applicatio n document ation
to process your files as necessary.
Advanced Scanning Page 32
Page 33

Customizing Image Types
You can ch ange the set ti ngs for the pre defined Image Type options in
EPSON TWAIN or add new image types. Click the Image Type button in
the Advan c ed window. You see the Image Type dialog bo x :
predefined
image types
settings
To chang e t he s ettings of one of the predefined im age types , select it
from the Image Type Name list, change the settings, and click Save.
To create a new image type, select a predefined type with similar settings
from the Image Type Name list. Then type a name for your new image
type in the box at the top of the list. Change the settings as necessary and
click Save.
To delete an image type, select it in the Image Type Name list and click
Delete.
Advanced Scanning Page 33
Page 34

The table below describes the Image Type settings.
Image Type setting Options Description
Pixel De pt h 24-bit C olor For 24-bit color ima ges
8-bit Gray For 8 bits/pixel images in 256 gray shades
Black & W hit e For 1 bit/pixel black and white ima ges
Halftone* None Lets the data forma t of yo ur im age
determ ine the tone
Mode A (H ard tone) Conve rt s th e im age into a ha rd t oned
distinct im age of 1 and 2 bit s /p ix el/ c olor
Mode B (Soft tone) Conve rt s th e im age into a sof t er t one for
images w it h large areas of si m ilar tones
(1 bit/pi xe l/ c olor)
Mode C (N et Sc reen) Repr es ents images in net screen, simil ar
to newspaper phot ographs
(1 bit/pi xe l/ c olor)
Dither A (4 × 4 Bayer) Represen t s images in a 4 × 4 Ba yer di the r
pattern
Dither B (4 × 4 Spiral) Represents images in a 4 × 4 spiral dither
pattern
Dither C (4 × 4 Net screen) Represents image s in a 4 × 4 net screen
dither pattern
Dither D (8 × 4 Net screen) Represents images in an 8 × 4 net screen
dither pattern
Advanced Scanning Page 34
Page 35

Image Type setting Options Description
Dropout** None
Incl udes all color values in a monochrome
scan
Red Scans red areas as white so they don’t
appea r in a m onochro m e s c an
Green Scans green areas as white so they don’t
appea r in a m onochro m e s c an
Blue Scans blue areas as w hite so they don’t
appea r in a m onochro m e s c an
Scanning Draft Scans faster at a lower resolution for drafts
Best Scans at the highest quality
De-screening On Automatically removes printing patterns
from pri nt ed materal
Off —
B/W Op ti on* (W indows)
Black a nd W hite
Options* (Macintosh)
None
Text Enhancement
Technology
Selects no black and white scanning options
Improves text recognition accuracy and
removes the document background when
performing OCR (Optical Character
Recog nit ion) scanning
Auto Area Segmentation
Separates text from graphics when scanning
pages containing text and grayscale images
for more accura te text recognition
* Available only when the Pixel Depth setting is set to Black & Wh ite.
** Availabl e only when the Pixel Depth setting is set to 8-bit Gray or Black & White.
Advanced Scanning Page 35
Page 36

Customizing Destination Settings
You can ch ange the set ti ngs for the pre defined D es t ination (ou tp ut
device) op t ions available in EPSON T W AIN or ad d new Destination
options o f your own.
Click the Destination button in th e EPSON TW AI N w indow. You s ee the
Destination dialog box:
predefined
destinations
To chang e t he s ettings of one of the predefined destinatio ns , s elect it
from the Destination Name list, change the settings, and click Save.
To create a new destination, type a name fo r it i n the box at the to p of th e
list. Change the settings as necessary and click Save.
To delete a destination, select it in the Destination Name list and click
Delete.
Advanced Scanning Page 36
settings
Page 37

You can ch ange the
Resolution setting on
the EPSON TWAIN
main wind ow if y ou
don’t wan t to us e the
default re so lution set
by the Des tin at ion
option.
The resol ut ion and shar pness settin gs f or each of the predefin ed
Destinat ion options are listed in th e t able below:
Drawing/Halftone
Destination options
Resolution Photo Resolution
Screen/Web 96 96
EPSON ink jet printe r 360 to 720 150 to 360
Laser Printer 600 200
Fax 200 200
OCR 300 300
The default resolution settings set by the Destination option are based on
the Image Type you select:
◗ If you selected Color Photo or Black & White Photo as the Image
Type setting, the res olution liste d in t he Photo Res olution c olumn is
used
◗ If you selected Line Art, OCR, or Copy & Fax as the Image Type
setting, the resolution listed in the Drawing/Halftone Resolution column
is used.
Advanced Scanning Page 37
Page 38

Sometimes the
values you select
may be rounded up or
down to retain the
proportions of your
image or marquee.
The width and height
settings are ignored if
you scan without first
previewing the image.
If you enlarge your
target image size by
scaling o r s electing a
larger Target size, be
sure to increase the
Resolution setting by
the same proportio n
to retain your image
quality. See Selecting
Basic Se ttings for
instructions on
changing the
Resolution setting .
Adjusting Source and Target Image Sizes
The Sourc e w idth and he ight fields ind ic at e the size of th e entire prev iew
image or of th e m arquee. Yo u c an type in a new w idth and height to
specify exactly how much of the image you want to scan.
measurement units
To change the unit of measurement used for the Source and Target width
and heigh t fie lds , se lect inches, pixels, or cm (centimete rs ) from the
measurement units list.
The Targe t wi dt h and height fie lds indicate th e s iz e of y our scanned
image usi ng the current s et t ings. The values in thes e fi elds chan ge as
you modify s et t ings. You ca n als o type in a sp ec if ic w idt h and height to
specify the target image size exactly.
file sizelock icon
To retain the Target w idt h and height no matter ho w yo u s iz e t he source
image, clic k the loc k ic on. C lic k it aga in to unlock the values . The file size
indicato r sh ow s t he approximate size of t he scanne d im age in KB or M B,
based on t he im age’s siz e and selecte d resolution.
Advanced Scanning Page 38
Page 39

The range of the
possible s ca le v alues
depend s on t he
Resolution setting .
If you enlarge your
target image size
by scaling it, be sure
to increase the
Resolution setting by
the same proportio n
to retain your image
quality. See Selecting
Basic Se ttings for
instructions on
changing the
Resolution setting .
Scaling the Im age
The Scale fie ld indicates th e amount by w hic h an image is enlarged or
reduced during scanning.
You can adjust the scale by moving the slider box, clicking the left or right
arrow, or ty ping a perce nt age in the Scale field.
Using Automatic Adjustment Features
EPSON TWAIN includes two automatic adjustment features to help you
quickly prepare you r preview ima ge for scanning, as des c ribed in these
sections:
◗ Using Au to Ex posure
◗ Using Au to Loc ate
Advanced Scanning Page 39
Page 40

Auto Exp os ure is
automatically enabled
when you scan from
the Easy window.
Auto Loca t e is
automatically enabled
if you click th e Sc an
button without
previewing the image,
unless you’re
scannin g w it h t he
ADF and Text
Enhancement
Technol ogy is t urned
on (see Customizing
Image Ty pes for
details on th e T ex t
Enhancement
Technology feature).
Using Auto Exposure
Click the Auto Exp os ure button in the Advanc ed windo w to
automatic ally adjust th e im age exposure. Auto Ex posure s et s th e
Exposure, Highlight, Gamma, and Shadow settings in the Image Controls
dialog bo x a ut om atically. See Adjusting Image C ontrols
for detail s.
Using Auto Locate
After previewing your image, cl ic k the Auto Lo c at e button in th e
Advanced window to crop out everything on the document table except
your imag e.
Auto Locate button
Advanced Scanning Page 40
Page 41

If the document table contains more than one image, select the target
image by dragging the mouse pointer across it to create a rough marquee
(see Using Marquees
for instructions). Then click the Auto Locate
button. Th e m arquee is plac ed exactly around the ta rget image borders
automatically.
target image
Auto Locate button
Advanced Scanning Page 41
Page 42

Auto Exposure
overrides any Image
Control s setting you
select.
Adjusting Image Cont rols
Use the Image Controls to adjust the following settings:
◗ Exposure
◗ Gamma
◗ Highlight
◗ Shadow
You can’t us e t he
Image Controls when
Text Enhancement
Techno logy is turned
on (see Cu stomizing
Image Types for
details).
◗ Threshold
Click the Imag e C ontrols bu t to n in the Advanc ed windo w to dis play
the Image C ontrols dialog box:
setting fields
color
buttons
To change the Image Controls, move the slider for the setting, click the
left or right arrows, or type a value in the field on the right. See Using the
Color But to ns f or instructions on using t he color butt ons.
and sliders
Advanced Scanning Page 42
Page 43

The Image Controls se t tin gs are described in the ta ble below.
Image Controls* Description
Exposure Sets the intensity of light in the image as determined
by a combination of the
Highlight
and
Shadow
settings from –10 (darkest) to 20 (brightest )
Gamma Sets the am ount of contrast in your im age from
50 (lowest) t o 500 (high es t )
Highlight Se ts t he amount of det ail visible in t he brightest
areas of the image from 61 (lightest) to 490 (darkest)
Shadow Sets the amount of detail visible in the darkest areas
of your image from 0 (lightest) to 60 (darkest)
Threshol d Sets the point at which t he gray image areas are
scanned as eit her black or w hit e f rom 0 (lightes t ) t o
255 (darkes t )
* The Threshold setting is available only when the Pixel Depth setting is set to
Black & White
setting is active, the rest of the Image Controls are not available.
and the Halftone setting is set to
None
. When the Threshold
Advanced Scanning Page 43
Page 44

You can’t us e T one
Correction when the
Pixel Depth is set to
Black & White,
Halftone is set to
None, or Text
Enhancement
Techno logy is turned
on (see Cu stomizing
Image Types for
details).
Using the Color Buttons
You can use the Highlight and Shadow color buttons to select particular
colors in the image for us e as the highlight and s hadow colors. Click a
color button and move the mous e pointer over the prev iew im age; the
pointer ch anges to an ey edropper ic on. Then cl ic k o n a c olor that you
want to use as th e highlight or s hadow color f or t he entire im age. The
color box b eneath the s et t ing turns to that c olor.
Using Tone Correction
You can us e T one Correct ion to change the pixel brightnes s in t he
midtone s, highlights, and shado w s o f a n im age. This p roduces more
detail in the im age without dramatica lly c hanging it. Click the T one
Correction button in the Advanced window to display the Tone Correction
dialog bo x.
tone curve
Channels
buttons
Output
checkboxes
and fields
tone correction
types list
Advanced Scanning Page 44
Page 45

Each point on the tone cu rv e represen t s the Output checkbox
characteristic to its right. For exam ple, the top point on the cu rv e
represent s th e H ighlight characteris t ic .
In additio n, th e C hannels ra dio buttons indicate the color(s) th at th e t one
curve will m odify: red, green, blue , o r all t hree colors.
Once you’ve selected the color you want to modify using the Channels
buttons, use these methods to change the tones:
◗ Drag point s on t he tone curv e t o adjust the tone value.
◗ Select a predefined group of settings from the tone correction type list.
Select Linear, Lighten, Darken, Flat Contrast, High Contrast, or
Open Shad o w. You can also create your own custom tone correction
settings , as described below.
◗ Type a value in th e fie ld f or an Output setti ng (the range of acceptable
values varies for eac h s et t ing). To lock a s et t ing in place so it ’s
unaffected by changes in other se ttings, click its checkbo x. The setting
will not change unles s yo u drag its point on the tone cu rv e.
Customizin g Tone Cor rection Settings
To save a custom tone correction setting, first make the changes on the
Tone Correction dialog box. The tone correction setting in the list changes
to User Defined. Change the name in the list box to the one you want to
use for your custom setting. Then click Save.
To delete a se t tin g, s elect its nam e in t he tone correction list and click
Delete.
Advanced Scanning Page 45
Page 46

Using Color Adjustments
You can adjust the Gray Balance Intensity and Saturation of colors in a
color image using the Color Adjustment tools.
Color Adjustment
settings are disable d
if you click the Scan
button without
preview ing the image.
You can’t us e Color
Adjustment if the Pi x el
Depth is set to 8-bit
Gray or Black & White
(see Customizing
Image Types for
details ).
Click the C olor Adju s tment butto n in t he Advanced window t o display
the Color A djustment dialog box :
Advanced Scanning Page 46
Page 47

Changing the Gr ay Balance Int ensity
The Gray Balance Intensity setting adjusts the gray tones in the image
to appear m ore neutra l. You may need to adjus t this s et t ing if the three
colors that are mixed to get her to form the neutral gray are unbalanced.
For example, if a photograph has an undesirable green color cast caused
by fluoresc ent lighting, y ou can selec t a greenish are a in the phot o and
adjust the intensity to ac hieve the co rrect colors.
To change the Gray Balance Intensity, follow these steps:
1 First click the eyedro pper button and move th e m ouse pointer onto
your prev iew im age. The m ouse pointer changes to an eye dropper
icon.
2 Select a color that you want removed from the neutral gray tones in the
preview image. The original and corrected colors appear in the box es
beside th e ey edropper button.
3 Adjust the gray level (from 0 to 100) by moving the slider, clicking the
left or right arrow, or typing a value in th e f ield on the right.
Changing the Saturation
Changing the satur at ion level of co lors increas es or decreases t he
amount o f color in each hue. Less sat urated colors are more pale, while
saturated colors are ric her.
Adjust the s at uration level from –100 (less sat urated) to 100 (more
saturated) by movin g th e s lider, clicking the left or right arrow, or t y ping a
value in the fi eld on the righ t.
Advanced Scanning Page 47
Page 48

Saving Custom Settings
You can save a custom set of all the EPSON TWAIN settings for your
scan so yo u c an easily sel ec t it when you pe rfo rm a s im ilar scan lat er.
You can even save different set ti ngs for the same image or marque e and
scan all of th em at once; see Batch Scanning for details .
Click the Settings button in the Advanced window to display the Settings
dialog bo x:
User defined
settings lis t
current
settings
The curre nt ly s elected EPSON TWA IN s et t ings are lis te d on the right.
To create a c us t om settin g group, type a name for the group to repl ac e
the name Us er Defined at the top of the list. Then click Save.
Whenever you want to use the setting group for a scan, click Settings,
select its name, and cl ic k OK.
To delete a custom setting group, click its name in the list; then click
Delete.
Advanced Scanning Page 48
Page 49

Batch Scanning
To quickly scan one image or marquee with a variety of different settings,
you can perform a batch scan. Follow these steps:
Some applications
don’t su pport batch
scanning or must
have mu lt iple image
support tu rned on to
support batch
scanning. Check
your application
documentation to see
if it support s batch
scanning before using
this feature.
1 Create and save each group of settings you want to scan with, giving
each a unique name , as described in Saving Custom Settings
.
2 In the Settings dialog box, highlight all the settings you want to include
in the batch s c an using the Shift or Ctrl (Windows only) keys.
highlight
settings for the
batch scan
click the Bat ch
Scan button
3 Click the Batch Scan b utton.
TWAIN sc ans the imag e once for eac h s et t ing group and loads the
scanned im ages separately into yo ur application softwa re.
Advanced Scanning Page 49
Page 50

Configuring Preview and Color Options
You can co nf igure EPSON TWAIN ’s preview a nd color options so they
work the way you want whenever you use the program. Click the
Configuration button to display th e C onfiguration dialog box:
Windows
To automatically save the preview image and all the scanning settings
when you preview, scan, or close TWAIN, click the Save Preview Image
and Settings checkbox.
Click the Fast Preview checkbox to enable hig h-speed lo ading of the
preview image in draf t mo de (the quality will not be as good as a normal
preview) .
To automatically preview an image whenever you start EPSON TWAIN,
click the Automatic Preview checkbox.
Advanced Scanning Page 50
Macintosh
Page 51

To successfully scan
with ICM/sRGB or
ColorSync, you must
also set up that color
management system
for your monitor and
printer. S ee your
operating system
docume nt at ion for
instructi ons. You
should als o use
devices and software
compatible with your
color man agement
system.
To automatically adjust the exposure each time you preview, click the
Auto Exposure on Preview checkbox. See Using Auto Exposure
for
details. If you select the ICM/sRGB (Windows 98/NT 4.0) or ColorSync
(Macintosh) checkbox, you can’t change the current Auto Exposure on
Preview setting.
If you’re us ing applications that le t you select color management profiles
for your printer, you’ll get great printed output when you scan your images
using eith er ICM/sRGB (Windows 98/NT 4.0) or ColorSync (Macintosh)
to reproduc e colors mo re closely. (T o use ICM/sRGB, the Pix el D epth
setting of your selected Image Type must be 24-bit Color; see
Customizing Image Types
for details. )
With ColorSync select either Perceptual (for photographs ), Col orim etric
(for spot co lor images), or S aturation (for ch arts and graphs).
Advanced Scanning Page 51
Page 52

Using the EPSON TWAIN
Utilities
These sec t ions give ins tr uc t ions for using th e ut ilities inst alled along w it h
EPSON T W AI N t o help you sca n and calibr at e y our system:
◗ Using the Sc anner Mo nit oring Utility
◗ Using the EPSON Screen Calib ration Utilit y
◗ Using EP SON Scan! II
Using the Scanner Monitoring Utility
When you installed EPSON TWAIN on your system, the installer
automatic ally install ed one of thes e s c anner mon ito ring utilitie s :
◗ Scan Eve nt s m onitor in the Sc anners an d C am eras Cont rol Panel
(Windows 98)
◗ EPSON Sc anner Mo nit or (Macinto s h)
The scanner monitoring utilities let you use one-touch scanning with the
scanner ’s St art button and t he Presto! P ageManager software. If you
installed PageMana ger when you installed y our scann er software, s ee
Using the Start Button
utility.
Using the EPSON TWAIN Utilities Page 52
for instructions on using your scan ner monit oring
Page 53

Using the EPSON Screen Calibration Utility
When you installed EPSON TWAIN on your system, you calibrated y our
screen at t he end of the ins t allation sequence. If yo u ever cha nge your
monitor o r w ant to re-calib rate your screen, you c an run the EPS ON
Screen C alibration utility again. C alibrating y our screen im proves the
accuracy of yo ur preview im ages in EPS ON TWAI N .
Follow the instructions for your operating s y stem in these se c t ions:
◗ Calibrating the Screen with Windows
◗ Calibrati ng the Macin to s h Screen
Calibrating the Screen with Windows
Follow thes e steps to ca librate your s c reen:
1 Click Start, point to Settings, and click the Control Panel icon.
2 Click the Scanners and Cameras (Wind ow s 98) or EPSON TWAIN 4
(Windows 95/NT) icon. Wind ow s 95/NT users s hould skip ahead to
step 5; Win dows 98 use rs s ee t his dialog box :
Devices tab
scanner name
Properties button
Using the EPSON TWAIN Utilities Page 53
Page 54

View the screen from
a short distance when
you calib rate it. The
gray stripes won’t
blend pe rf ec t ly
together; however, try
to make them match
as closely as
possible.
3 If necessary, click the Devices tab. Click your scanner name in the
box, then click the Properties button.
4 On the next screen, click the Utility tab. You see th is dialog box:
Utility tab
Screen Calibration
Utility button
5 Click the Screen Calibration Uti lit y button. You see th e f ollowing:
before calibration after calibration
Using the EPSON TWAIN Utilities Page 54
Page 55

View the screen from
a short distance when
you calib rate it. The
gray stripes won’t
blend pe rf ec t ly
together; however,
try to make them
match as closely as
possible.
6 Click and drag the slider box or clic k the left or rig ht sl ider arrows until
the shade s of th e gray stripes m atch as clos ely as possibl e.
7 Click OK. The profile is saved as the Screen Destination setting in
EPSON TWAIN.
8 Click OK at all the open windo w s to cl os e t hem and return to the
Control P anel.
Calibrat ing the Mac intosh Screen
Follow thes e steps to ca librate your s c reen:
1 Open the EPSON Scanner fold er and selec t EP SON Screen
Calibration. You see the following dialog box:
before calibration after calibration
2 Click and drag the slider box or clic k the left or rig ht sl ider arrows until
the shade s of th e gray stripes m atch as clos ely as possibl e.
3 Click OK. The profile is saved as the Screen Destination setting in
EPSON TWAIN.
Using the EPSON TWAIN Utilities Page 55
Page 56

Using EPSON Scan! II
EPSON Sc an! II is a TWAI N -c omplian t ap plication su pplied with EPSON
TWAIN (Macintosh only) in case yo u c hoose not to ins t all Presto!
PageManager, Ad obe PhotoDeluxe, or another TW AI N -c omplian t
program f or s c anning. For best resul ts, however , sc an with one of th e
TWAIN-compliant applications that came with your scanner instead of
EPSON Sc an! II.
Before scanning, make su re you’ve i nstalled th e EPSON TWAIN software
(as described in the
These sections tell you how to use EPSON Scan! II:
◗ Scanning with EPSON Scan! II
◗ Exportin g I m ages with EP SON Scan! II
Scanning with EPSON Scan! II
Scanner Basics
book).
If you start EPSON
Scan! II before turning
on your scanner, the
software may not
work properly.
Using the EPSON TWAIN Utilities Page 56
Follow the steps in this section to scan using EPSON TWAIN with
EPSON Scan! II.
1 Make sure y ou’ve set up and turned on t he scanner, and placed t he
docume nt yo u w ant to scan on the docum ent table. S ee the
Basics
2 To start EPSON Scan! II, select the EPSON Scan! II icon in the
EPSON Scanner f older.
book for instructions.
Scanner
Page 57

You usually need to
perfo rm s te ps 3 and 4
only onc e, w hen you
use yo ur scanner and
EPSON Scan! II for
the first time.
3 Select your scanner s ource. Open the File menu and c hoose Select
Source.
Click to select the
scanner source
4 Select EPSON TWAIN 4 an d c lic k Select.
5 Open EP SON TWAIN fo r s c anning. Choose Acquire from the File
menu.
Using the EPSON TWAIN Utilities Page 57
Page 58

Easy window
One of the EPSON TWA I N w indows appears.
Advanced window
For instructions on selecting EPSON TWAIN settings, see Selecting
Basic Settings and Advance d Sc anning.
6 When you’re ready t o scan, click the Scan button. The scanned image
appears in your EPS ON Scan! II win dow.
7 Click the Close button to close the EPSON TWAIN window to return to
EPSON Sc an! II.
8 To export y our image in a fo rm at your ima ge-editing application can
read, see Exporting Images with EPSON Sc an! II
.
To use any ot her program f eatures, see Using Ot her EPSON Sc an! II
Features.
Using the EPSON TWAIN Utilities Page 58
Page 59

Exporting Images with EPSON Scan! II
EPSON Scan! II can save your scanned images in two ways:
◗ saved in its original format that cannot be opened by other applications
You can open only
EPSON Sc an! II
original format files in
EPSON Scan! II; you
cannot op en any
other file formats.
Export file format Description
TIFF 5.0 (*.TIF) Standard Tagged Image File Format version 5.0; for exporting
EPS (*. EPS) Encaps ulated Post Sc ript format
TIFF 6.0 (JPEG) (*.TIF) Tagged Image File Format version 6.0; for exporting 16-million
JPEG (* . JP G) Joint Photograp hic Ex perts Gr oup format; f or ex porting 16 -m illion
PICT Standard QuickDraw
◗ exported int o one of a variety of stand ard formats t hat can be o pened
by other ap plications
Most of the t im e, y ou’ll want to e x port any imag es y ou scan wit h EPSON
Scan! II so y ou can open th em in an image -editing or de s ktop publishing
program for use in your documents. If you save them in EPSON Scan! II’s
original format, you c an open them with EPS ON Scan! II only .
You can ex port images int o any of the formats des c ribed in the table
below.
black and w hit e im ages with G3 compres s ion
color or 256-gray level images w it h J PEG com pression
color or 256-gray level images w it h data compression
™
picture form at; for export ing black and
white images with G 3 c om pression and 16-mil lion color or
256-gra y lev el im ages with JP EG compres s ion
Using the EPSON TWAIN Utilities Page 59
Page 60

You can ex port an image you alrea dy s c anned into E PSON Sca n! I I or
you can use the Acquire and Exp ort option, whi ch let s yo u s c an and
export in one step. See the instructions in these sections:
◗ Exportin g Sc anned Images
◗ Acquiring and Exporting
Exporting Scanned Images
1 Start EPS ON Scan! II and scan your im age as des c ribed in Scanning
with EPSON Scan! II.
2 In the EPSON Scan! II wi ndow, sele ct E xpor t from the File menu. You
see the Export dialog box .
3 Select the drive and folder to whic h y ou want to ex port the file .
4 Select the f ormat you want to use in the Ex port File Format list.
5 Type a name for the file in th e Export ima ge as list.
6 Click Export. The image is exp ort ed and you ret urn to the EPSON
Scan! II window.
Using the EPSON TWAIN Utilities Page 60
Page 61

Acquiring and Exporting
To scan and export an im age in one operation , follow these steps:
1 Start EPSON Scan! II as described in Scanning with EPSON Sc an! II
2 Select Acquire & Export from the File menu. You see one of the
EPSON TWAIN windows. For instructions on selecting EPSON
TWAIN settings, see Selecting Basic Settings
Scanning.
3 When you’re ready to scan, click the Scan but to n. You see the Ex port
dialog bo x.
4 Select the drive and folder in which you wan t to e x port the file.
5 Select the f ormat you want to use in the Ex port File Format list.
6 Type a name for the file in th e Export ima ge as list.
7 Click Export. EPSON Scan! II scans and then exports the image.
8 Close the EPSON TW AIN windo w and return t o th e EPSON S c an! I I
window.
and Advanc ed
.
Using the EPSON TWAIN Utilities Page 61
Page 62

Using Other EPSON Scan! II Features
EPSON Sc an! II also provides fea tu res for view ing images and copying
them into ot her applica t ions, as desc ribed in the s ec t ions below.
Using the View Feature s
To modify th e v iew of your ima ge in the EPSO N Sc an! II window , open
the View menu.
Select the All Dots[1:1] option if you wan t eac h dot (pixel) in your image
represent ed by one do t on y our screen. Th e higher the resolution of your
image, the larger it app ears on the s cr een.
Select the Fit in Window option if you want to adjust the view of the
image so it f its into the EPSON Scan! II w indow. The smaller t he w indow
size, the sm aller the image appears . Th is opt ion cente rs th e im age in the
window if th e w indow is larger than the s c anned ima ge.
Using the EPSON TWAIN Utilities Page 62
Page 63

Copying Images
You can co py all or a portion of a s c anned imag e in EPSON S c an! II and
then paste it into anot her application. Follo w th es e steps:
1 To select the ent ire image a rea for copyi ng, open the Edit menu and
choose Select All. You see a dotted line around the image.
To select a portion of the im age, click in th e im age and drag a box
around the area you want to copy. You see a dott ed line aro und the
area you s elected.
(To delete th e box, click an y w here in the image.)
2 Open the Edit menu and select Copy.
3 Open the application program you want to pas te yo ur im age into, the n
open the document in w hic h you want th e im age to appe ar.
4 Select Paste (or anothe r c omma nd as nec ess ary ). Th e im age ap pear s
in your doc um ent.
Using the EPSON TWAIN Utilities Page 63
Page 64

Using the Start Button
The scanner’s Start button lets you set up your system for one-touch
scannin g w it h Presto! Pa geManage r and a scan ner monitoring utility.
With one-touch scanni ng, you can load a docum ent in the scan ner, press
the Start but t on, and wat ch w hile PageM anager start s and then opens
EPSON T W AI N automati ca lly . You can even s et up PageManage r t o
automatic ally load your scanned document into an ot her applica ti on—
such as Phot oDeluxe—or send it to ano t her device—such as yo ur
printer.
Preparing to Use the Start Button
To use the St art button, y ou must have installe d PageMan ager (see the
Scanner Basics
can also use other pro grams that s upport link ing to scann er ev ents with
the Start button, such as Photoshop 5.0 and Windows Imaging. Then you
must enable scanner monitoring and configure PageManager (or another
complian t application) t o handle yo ur s c anned ima ges .
Follow the instructions in these se c ti ons t o s et up Start bu tton scanning:
book for installation instructions). With Windows 98, you
◗ Enabling Sc anner Mon it oring
◗ Setting Up PageMa nager for Start Button Scannin g
When you’re ready to use the Start button, follow the instructions in
Scanning with the Start Button
Using the Start Button Page 64
.
Page 65

Enabling Scanner Monitoring
When you installed EPSON TWAIN on your system, the installer
automatic ally install ed the TWAIN ut ilities, inc luding these scanner
monitori ng utilities:
◗ Scan Eve nt s m onitor in the Sc anners an d C am eras Cont rol Panel
(Windows 98)
◗ EPSON Sc anner Mo nit or (Window s 95 and NT 4. 0)
◗ EPSON Sc anner Mo nit or (Macinto s h)
These utilit ies let your sc anner’s Start button commun ic at e w it h your
operating system and open PageManager (or another Windows 98 Start
button com pliant pro gram).
Follow the s t eps in these se c tio ns t o enable scanner mon ito ring:
◗ Setting Up Monitoring for Windows 98
◗ Setting Up Monitoring for Windows 95 an d W indows NT 4.0
◗ Setting Up Monitoring for Macin t os h
Using the Start Button Page 65
Page 66

Setting Up Monitoring for Windows 98
The Scan Events monitor installed into the Windows Scanners and
Camera s Control Pan el is automa ti ca lly enabled and ready to s ca n t o
PageManager (and any other St art button co m patible programs) w hen
you press the Start button.
If you ever want to disable (or enable) Start button scanning, follow these
steps:
1 Click Start, point to Settings, and click the Control Panel icon.
2 Click the Scanners and Cameras icon. You s ee t his dialog bo x :
Devices tab
scanner name
Properties button
3 If necessary, click the Devices tab. Click your scanner name in the
box, then click the Properties button.
Using the Start Button Page 66
Page 67

4 Click the Events tab. You s ee this dialog box:
Disable device
events checkbox
5 To
disable
Start button scanning, click the Disable de vi ce events
checkbox ; a c heck appears in the che c kb ox .
To
enable
Start button scanning, click the Disable device events
checkbox t o uncheck it. Th en click the ch ec k box for each applicati on
you’d like to be able to use with the Start button. If you select more
than one application, you’ll be prompted for the application you want to
use when you press the Start button.
6 Click OK.
Using the Start Button Page 67
Page 68

To stop EPSON
Scanner Monitor from
loading every time you
start Windows,
remove the EPSON
Scanner Monitor icon
from your Startup
folder in the Start
menu.
Setting Up Monitori ng for Wi ndows 95 and Windows NT 4. 0
The EPSON Scanner Monitor installed w it h EPSON T W AI N on the PC is
automatically enabled and set up to scan with PageManager when you
press the St art button.
If you want t o dis able the EP SON Scanner Monit or for the cur rent
computing session, do the following:
1 Right-mouse-click the green EPSON Scanner Monitor icon from
the Windo w s T as k bar (located next to the c loc k ).
2 Choose Close from the pop-up menu.
To enable m onitoring , d o t he f ollowing:
1 From the Windows desktop, click Start > Programs > EPSON
Scanner > EPSON Scanner Monitor.
You may see a dialog box momen t arily appear as EPSO N Sc anner
Monitor e stablishes c om m unication with the sc anner.
2 The EPSON Scanner Moni tor icon ap pear s o n t he W ind ows Ta skb ar ,
next to the clock.
Using the Start Button Page 68
Page 69

Setting Up Monitoring for Macintos h
The EPSON Scanner Monitor installed w it h EPSON T W AI N on the
Macintosh is automatica lly enabled an d set up to scan with PageManager
when you press the Start button.
If you ever want to disab le t he EPSON S ca nner Monit or, do the foll ow ing:
1 Select EPSON Scanner Monitor Setup from the Apple menu; you see
the EPSON Scanner Mo nitor dialog box .
2 Click the Enable Monitoring checkbox to uncheck it.
3 Click OK.
To enable m onitoring , d o t he f ollowing:
1 Select EPSON Scanner Monitor Setup from the Apple menu; you see
the EPSON Scanner Mo nitor dialog box .
2 Click the Enable Monitoring checkbox to check it.
3 Click OK.
Using the Start Button Page 69
Page 70

To set up ot her Start
button com pliant
applicat ions in
Window s, s ee
the applic at ion
docume nt at ion for
instructions.
The PageManag er
program ic on on the
Macintos h is dif f erent;
it is shaped like a
desktop inbox. See
PageManager online
help for det ails.
Setting Up PageManager for Start Button Scanning
To use PageManager with your scanner’s Start button, you must set up
PageManager’s S c an Buttons p alette and as s ign a destin at ion program
or device to the Start button. For example, if you want the images you
scan to be sent directly to your image editing program, you can assign the
Start butt on t o PhotoDeluxe (or ano t her image editing pro gram).
The Scan Buttons palette appears on the screen whenever PageManager
is running s o y ou can selec t th e destinatio n program or device fo r yo ur
scanned im ages. (If it doe s n’t appear, op en the View m enu and clic k th e
Scan Butto n s option.)
PageManager program
icon with the Start button
assigned to it
The icon that contains the
scanned using the Start button will be sent. (You can select
PageManager as the des ti nat ion program for your scanned ima ges if you
don’t wan t them to load int o a different program.)
] Start button icon indicates where image s
Follow the instructions in these sections to set up the Scan Buttons:
◗ Assignin g a D estinatio n t o th e Start Button
◗ Adding a Destinatio n t o t he Scan Butt ons Palette
◗ Reassigning Desti nations on th e Scan Butto ns Palette
◗ Selectin g Sc an Button Settings
Using the Start Button Page 70
Page 71

If you select a
program or device fo r
which you suppressed
the TWAI N int erf ace,
be sure to set
PageManager’s sc an
settings before you
press the Start button.
See Selecting Scan
Button Se t tin gs f or
details.
Assigning a Destination to the Start Button
PageManager is the default des t ination pro gram for the Start button. To
assign an ot her destinat ion to the Sta rt but t on, follow these steps :
1 Open the F ile menu and s elect Scan Buttons Setting. You see the
Scan But to ns Setting dialog box. Cli ck t he Start Button Settings tab.
select the icon for the
program or device you
want to assign to the
Start button
2 To change the program or device assigned to the Start button, click its
icon in the S elect target application box.
3 If you want to automatically launch EPSON TWAIN within
PageManager wh en y ou press th e St art button, m ak e sure the
Execute Scan Butt o n au to matically checkbox is checked.
If you want to launch PageManager and display only the Scan Buttons
palette when you press the Start button, click the Execute Scan
Button automatically checkbox to uncheck it. You’ll then need to click
a button in the Sc an Buttons palette to continue w ith yo ur scan.
4 Click OK.
Using the Start Button Page 71
Page 72

Adding a Destination to the Scan Buttons Palette
If you want to add program or device icons to the Scan Buttons palette,
follow thes e s t eps:
1 Open the F ile menu and s elect Scan Buttons Setting. You see the
Scan But to ns Setting dialog box. Cli ck t he Properties tab, if
necessary.
Properties
tab
Scan to
setting list
Add button
2 Click the Add button. On the Macintosh, you see the Add scan button
dialog bo x.
3 Click the arrow in th e Scan to (Windows) or Scan to Ap p (Macintosh)
setting box. The Scan to setting lists the programs and devices on your
system th at PageMan ager can send your scanned file to. Select the
program or device yo u w ant to add. A n ic on for it app ears in the scroll
bar on the lef t (W indows only ).
Using the Start Button Page 72
Page 73

For the best results,
don’t su ppress the
EPSON TWAI N
interface when
scanning with the
Start button. This lets
you prev iew and
adjust your image
settings th e w ay you
want them before you
scan. You’ll also ge t
a wider variety of
setting choices than
if you suppress
TWAIN and use the
PageManager scan
settings .
4 Type a name for the icon in the Name field. On a Macintosh, click OK
to close the Add scan but t on dialog box .
5 If the Suppress TWAIN User Interface checkbox is active, you can
select wh et her you want PageMan ager to open the EPSO N T W AI N
dialog bo x when you pr es s th e St art button .
If you don’t check the checkbox, the EPSON TWAIN dialog box
appears af t er you press th e St art button a nd PageManager opens.
Then you can preview, select settings, and click Scan when you’re
ready.
If you check the checkbox, PageManager suppresses the EPSON
TWAIN di alog box and us es t he settings describe d in step 6.
6 If you checked the Suppress TWAIN User Interface checkbox in
step 5, the PageManager scan settings become active.
active PageManager
scan settings
Using the Start Button Page 73
Page 74

If you want t o delete
an icon from the Scan
Buttons palette,
select the icon in the
scroll bar o n t he left
of the dialo g box and
click the Remove
button.
If these settings are active, select the scan settings you want to use
whenever you press the program or device icon; see Selecting Scan
Button Se t tin gs f or details.
7 If you want t o as s ign a new de stination pro gram or dev ic e to the Star t
button, see Assigning a Destination to the Start Button
for instruc t ions.
8 When you ’re finished adding programs o r dev ices, click OK.
Reassigning Destinations on the Scan Buttons Palette
You may want to reassign an exist ing icon to a dif f erent progra m or
device, or just change its settings. For example, if you use more than one
printer, you may wan t to reassign th e printer ic on to each print er as you
need it.
1 Open the F ile menu and s elect Scan Buttons Setting; then click the
Properties tab, if necessary .
Properties tab
click the icon for the
program or device you
want to reassign
2 Click the icon for the program or de v ic e y ou want to rea s s ign in the
scroll bar o n t he left of the dialog box. Th e c urrent properties fo r th e
icon appear to the right.
Scan to
setting list
Using the Start Button Page 74
Page 75

3 To select a different program or device for the icon, choose it from the
Scan to (Windows) or t he Scan to A p p (Macintosh) setting list.
4 If you checked the Suppress TWAIN User Interface checkbox,
change any of the active PageManager scan settings as necessary;
see Selecting Scan Button Settings
5 If you want to assign a new program or device to the Start button, see
Assignin g a D estinatio n t o th e Start Button
6 When you ’re finished reassigning destin at ions, click OK.
for details.
for instructions.
Selecting Scan Button Settings
If you select a d evice o r pro gra m fo r which yo u’ve ch ecked th e S uppre ss
TWAIN User Interface checkbox, the PageManager scan settings
become active. If they’re active, select the options you want to use
whenever you press the destination icon in the Scan Buttons palette or
assign the Start button to the icon .
active PageManager
scan settings
Using the Start Button Page 75
Page 76

The table below descr ibes the setti ngs and their av ailable opt ions.
Setting Options Descr iption
Document Type
(Window s only)
Scan Mode Color
Scan Siz e Legal 8.5 × 14 inches
Magazin e (T ext and Pic t ure)
Magazin e (Picture)
Photograph
Document
Letter
Business Card
Others
Gray
Black an d W hite
Letter 8.5 × 11 inches
A4 210 × 29 7 m m
B5 182 × 25 7 m m
A5 148 × 21 0 m m
Custom (Windows only)
3 × 5 (Lands c ape) [Ma c int os h only]
3 × 5 (Portr ait ) [ M ac intosh only ]
4 × 6 (Landsc ape) [Ma c int os h only]
4 × 6 (Portr ait ) [ M ac intosh only ]
5 × 7 (Portr ait ) [ M ac intosh only ]
5 × 7 (Landsc ape) [Ma c int os h only]
Busines s Ca rd (Macinto s h only)
Select the type of original you’re
scann ing so PageManager c an
choose the best default options
for the rest of the settings.
Select Others to customize a
different document type.
Select th e c olor specification of
the original you’re scanning.
Select the size of the area you
want to s c an. W hen you select
Custom (Windows only), you
see a Cu s to m iz e Size dialo g
box; select the meas uremen t
unit, type in the Width and
Height va lues, and th en c lic k
OK.
Using the Start Button Page 76
Page 77

Setting Options Descr iption
Resolution 72 300
100 360
150 400
Select th e s c anning reso lut ion
you want to use. You can’t type
in a custom resolut ion.
200 600
240 800
Enable Document
Feeder
On
Off
If you’re scanning with the
optional auto document feeder,
check the checkbox to turn this
featur e on.
Brightnes s –100 to 100 Adjust th e brightness of th e
scan as necessary. This setting
appea rs only when th e Sc an
Mode is set to Color or Gray.
Contrast –100 to 100 Adjust the contrast of the scan
as necessary.
Thresho ld 0 to 255 Adjust th e t hreshold for t he
highlig ht s and shadows of t he
scan as necessary. This setting
appea rs only when th e Sc an
Mode is set to Black and White
and rep lac es the Bright ness
setting.
Using the Start Button Page 77
Page 78

Scanning with the Start Button
Once you ’v e s et up your scan ner monitoring utility a nd c onfigured
PageManager to ha ndle your sc anned imag es t he way you w ant, you’re
ready to scan with the Start button.
The sequ ence of steps v aries (as note d in the text ), d epending on
whether you’ve elected to suppress the TWAIN interface or not, and
whether you’ve set up PageManager to send your scanned images to
another application or not. For details on these selections, see Setting Up
PageManager for S ta rt Button Sca nning.
Because St art button sc anning is mos t us ef ul for scanning text
docume nt s int o an OCR application, the s e s t eps use OCR sc anning as
an example. If you’re scanning photographs or other types of documents,
see Selecting Basic Setti n gs
TWAIN settings you may want to select.
and Advanced Scanning for details on other
Using the Start Button Page 78
Page 79

Follow these steps to scan with the Start button:
1 If you’re scanning a si ngle page on t he scanner’s docume nt ta ble,
place the document face down and align its horizontal and vertical
edges with the scale s o n t he t op and right sid e of t he document table.
If you’re us ing the auto document fe eder to scan a multi-pag e
document, load your document face up with the first page on top of the
document. Make sure the top of the page faces into the feeder.
scanning single pages
scanning multiple pages
with ADF in s ta lle d
2 Press the s c anner’s Start button.
Start button
Using the Start Button Page 79
Page 80

For instructions on
changing the
applicat ions available
for use with the Start
button, see Enabling
Scanner Monitoring.
3 In Windows, if you’ve selected more than one application to use with
the Start but t on in the Scan Events utility, you se e th is dialog box:
Click Presto! Page M an ager for EPSON and click OK. (If the dialog
box disap pears before you selec t an application, press t he s c anner’s
Start butt on again.)
If you suppressed the
TWAIN interface, you
must have set the
correct scan settings
in the PageManag er
4 If PageManager wa s n’t running wh en y ou pressed the Star t b ut to n,
PageManager starts on your system.
If you supp res s ed the TWA I N int erf ace, the sc anner beg ins s c anning
your document. Go to step 10
.
Scan But t on Settings
dialog b ox to scan
successfully. See
Setting Up
PageManager fo r
Start Bu tton
Scanning for details .
Using the Start Button Page 80
Page 81

If you didn’t suppress the TWAIN interface, the EPSON TWAIN Easy
or Advanc ed window opens in Pa geManage r, along with th e Sc an
Buttons bar. Go to step 5.
Easy window
Advanced window
5 To scan a doc ument for an OCR applic ation, select the follow ing
settings in EPSON TWAIN:
Document Source:
Select Flatbed to scan a document on the document table.
Select ADF (W indows) or Auto Document Feeder (M ac intosh) to
scan a document from the ADF.
Image Type and Destination:
Select OCR for both settings.
Resolution:
Select 400 dpi for the best OCR results.
(If you’re scanning a dif f erent type o f do c um ent, select th e s et t ings for
it as necessary. See Selecting Basic Settings
for more information. )
Using the Start Button Page 81
Page 82

6 Click the Preview but t on to presca n t he image. (If y ou’re using th e
Easy window, click Advanced to open the Advanced window.)
If you’re scanning from the document table, EPSON TWAIN prescans
the page.
If you’re using the ADF, EPSON TWAIN loads the first page and
prescans it. When the ADF ejects t he firs t page, reload i t in the ADF on
top of your document with the top edge facing into the feeder.
7 Click the Auto Locate button to set the page size for your scan and
crop out the rest of the document table.
8 Click the Scan button to scan your document. If you’re scanning from
the document table, go t o s t ep 10.
9 If you’re scanning with the ADF, you see this dialog box:
Click Single Page (to scan a single page) or All Pages (to scan a
multi-pa ge document ). T hen click OK.
10 EPSON TWAIN scans the document. If you’re scanning a multi-page
document, it scans and loads one page at a time. When scanning is
finished, click the Close button to close the EPSON TWAIN win dow. (I f
you supp res s ed the TWA IN interface , the EPSON T W AI N w indow
doesn’t a ppear.)
Using the Start Button Page 82
Page 83

11 If you set up t he Start button to load y our scanned images int o
PageManager, clic k th e Inbox icon to view the im ages in
PageManager. (S ee y our PageM anager doc umenta ti on f or
instructions on processing images.)
If you set up the Start button to load the scanned images into your
OCR application (or another application), PageManager processes the
images a nd opens the application. After a mom ent, the s c anned
images a ppear in your se lec t ed applica ti on w indow.
12 Now you ca n f ollow the ins tr uc t ions in the d oc umentatio n f or your
application or for PageManager to process your images as necessary.
Using the Start Button Page 83
Page 84

Troubleshooting
If you encounter any problems using EPSON TWAIN, try the solutions in
these sections:
◗ Problems U s ing EPSON T W AI N
◗ Problems U s ing the Start But t on
◗ Problems with Image Quality
If the information her e doesn’t help you solve the probl em , ch ec k w it h
your dealer or contact EPSON. See Where To Get Help for contact
information.
Problems Using EPSON TWAIN
The rows in the Screen Calibration dialog box never seem to match closely enough.
Problem Solution
You’re view ing the
screen too c losely.
Your monit or
adjustments may be
off.
Troubleshooting Page 84
View the sc reen from a s hort distance when yo u c alibrate it. The gray
stripes won’t blend perfectly together; however, try to make them match
as closely as pos s ible.
Try adjust ing your monitor’s bright ness an d c ont rast settin gs .
Page 85

When you select a TWAIN source, EPSON TWAIN isn’t listed.
Problem Solution
EPSON TWAIN wasn’t
installed or it wa s n’t
installed correctl y.
Reinstall t he software f ollowing the instruct ions in the
book.
EPSON TWAIN doesn’t start.
Problem Solution
The scanner isn’t
ready.
Your system doesn’t
meet the minimum
requirements.
EPSON T W AI N needs
more memory.
EPSON T W AI N is not
selected as your
TWAIN source.
Make sure your scanner is turned on and the cables are connected
properly. Also make sure you turned on your scanner before starting
EPSON TWAIN. If you started EPSON TWAIN first, exit the program,
turn off your scanner, turn it on again, and reboot your system.
Make sure your computer, scanner, and software are compatible and
meet the s pec if ic ations under System Requirements.
Make sure EPSON TWAIN can access enough system memory. See
the sectio n on memory allocation in y our comput er manual.
EPSON TWAIN may not be selected as the TWAIN source in your
applicat ion. See Starting EPSON TWAIN
Scanner Basics
for instr uc t ions on selec ti ng it.
Troubleshooting Page 85
Page 86

Problem Solution
A system error has
occurred.
An error condition may have caus ed your appl ic at ion or the TWAIN
source to stop working correctly. Save any documents in process, close
any open applications, and restart Windows: then start your application
and try aga in.
Sometimes an error condition may cause the computer to display a
message telling you that your scanner is not recognized. If this happens,
turn the scanner off and then on again; then restart your computer and
try again.
The scanner does not start scanning.
Problem Solution
The scanner isn’t
ready.
You’re scanning a large
image and running out
of system memory.
Check if the s c anner’s op erate light is on. If not, press th e
button. Then restart your computer and try scanning again.
If the image you’re scanning is too large or if your system has a
minimum amount of memory installed, you may run out of memory when
you scan. You’ll usuall y get an error mess age or your system locks up
when this happens. R educe the im age size or res olution and try
scanning again. If you still can’t scan the image, add more system
memory.
If you’ve ju st s c anned a large image in your applica t ion and then
immedia te ly s ca nned anot her, the applic ation ma y not have released
the memory allocate d f or the first image. Clos e y our applica ti on, restart
it, and try scanning again. If restarting your application doesn’t solve the
problem, you may need to reboot your computer.
P operate
Troubleshooting Page 86
Page 87

You have trouble batch scanning.
Problem Solution
Your app lic at ion
program doesn’t
support batch scanni ng
or you don’t have
enough system
memory.
Some applications don’t support batch scanning. Wh en you try to bat c h
scan or use the optional auto document feeder with this type of program,
you get an error message or the system locks up. Check the program
docume nt at ion and, if nec es s ary, use an ot her progr am f or batch
scannin g.
You also may not have enough system memory for the batch scan. Try
reducing t he document size, scanning fewer pages at once, or adding
more system memory.
You cannot scan images at all or only a few dots appear in the scanned image.
Problem Solution
You may have selected
incorrec t sc an settings.
Select diff erent EPSO N T W AIN setting s . You may ha ve se lected an
incorrec t Im age Type or D es t ination set ti ng, or the Exp os ure, Highlight,
and Tone C orrection s et t ings may be in appropri at e f or y our image . S ee
Advance d Scanning
for details.
Troubleshooting Page 87
Page 88

Problems Using the Start Button
You see the message “No Push button scanner detected.”
Problem Solution
Scanner m onitoring
doesn’t d et ec t th e
scanner .
The EPSON Scanner Monitor periodically checks on the status of your
scanner to make sure it’s ready. Sometimes the scanner check occurs
when your system is pr ocessing other informat ion and the sca nner is not
detected during tha t p art ic ular check . (Y ou may see thi s message
anytime, not just when you press the Start button.)
If you see this message, make sure your scanner cable is securely
connected. Then open and clo s e th e s c anner mon it oring utility t o
manually c hec k f or t he scanner. See Enabling Scann er M onitoring
instructions. If you still see the message, turn off your scanner, then turn
it on again and restart your system.
When you press the Start button, nothing happens.
Problem Solution
Scanner m onitoring is
not enabled.
Scanner m onitoring m us t be enabled fo r th e Start butt on to work. See
Enabling Sc anner Mon it oring for instructions.
for
Troubleshooting Page 88
Page 89

Problem Solution
PageManager is no t
installed or the scanner
monitor isn’t pointing
to it.
Make sure y ou installed PageMa nager corre c t ly , as describ ed in the
Scanner Basics
points to PageMana ger as the tar get applic at ion for Start b ut to n
scanning. See Enabling Scanner Monitoring for instr uc t ions.
If PageManager starts, but you don’t see the EPSON TWAIN window,
make sure the destination program or device you assigned to the Start
button does not suppress the EPSON TWAIN interface. See Assigning a
Destination to the Start Button for details.
book. Also m ake sure th e s c anner moni to ring utility s ti ll
When you press the Start button, your system opens programs and scans slowly.
Problem Solution
You assig ned anothe r
destination program t o
the Start but t on in
PageManager.
When you set up PageManager to automatically send files scanned with
the Start button to another application, scanning may take longer. This is
because your system must use extra resources to open PageManager
and EPSON TWAIN, and then scan your image, process it, and send it
to anothe r application.
Troubleshooting Page 89
Page 90

Problems with Image Quality
Images are very dark and without details.
Problem Solution
Some EPSON TWAIN
settings may be set
incorrectly.
Make sure the Destination (output device) setting is set to Screen/Web.
If you select ed a printer as th e D es t ination set tin g, t he im age may m ore
closely m at c h t he original wh en printed, but not when displayed on the
screen.
Change t he Exposure, Tone Co rrec t ion, and Sh adow sett ings to lighte r
values an d s c an the image again. See Advanced Sc anning
instructio ns on changin g t hese settings.
The image is distorted or blurred.
Problem Solution
The document isn’t
position ed c orrectly on
the document table.
Make sure t hat the docu m ent is place d fl at against the d oc ument table
and that no part of the orig inal is wrinkle d or warped.
You may have moved the document during scanning. Check the position
of the docum ent.
Make sure t he scanner is n’t tilted or p lac ed on an uns ta ble surface.
for
Troubleshooting Page 90
Page 91

Color is pat chy or distorted at the edges of the document.
Problem Solution
The document isn’t
placed co rrectly on the
document table.
If the original is very thic k or w arped at the edges, the edges of th e
image ma y be discolored. Cover the edges of th e original with opaque
paper to av oid interference from out s ide light.
If part of the original is ou t si de t he document table , the edge may be
discolore d. C hange the pos it ion of the original.
The image is faint or out of focus.
Problem Solution
The document isn’t
position ed c orrectly on
the document table.
Some EPSON TWAIN
settings may be set
incorrectly.
Your monit or isn’t
calibrate d or isn’t
adjusted co rrectly.
Make sure the document is placed flat on the document table.
Check yo ur T one Corre ction setting and/or selec t a darker Exp os ure
setting. See Advanced Scan ning for ins t ruc t ions on changing these
settings.
Make sure y ou have calibrated your monitor t o y our scann er as
describe d in Using the EPSON Screen Calibr at ion Utility. Also check
your monitor’s brightness and contrast settings. Make sure the
Destination (output device) setting is set to Screen/Web in EPSON
TWAIN.
Troubleshooting Page 91
Page 92

The colors on the monitor seem different than the original image or printed image.
Problem Solution
Your monit or may not
be calibrat ed correctl y .
Some EPSON TWAIN
settings may be set
incorrectly.
You may need to use a
color corr ec t ion mode.
Depending on your mo nit or, its resolution/color setting s , a nd your
EPSON TWAIN settings, the screen colors may be different from the
original colors. This may be normal, especially if the colors in the printed
image mo re c losely matc h t he original. M ak e s ure you have correc tl y
calibrated the screen as described in Using the EPSON Screen
Calibration Utility.
Check your Image Type and Destination settings to make sure they are
correct fo r th e t y pe of image yo u’re scanning and for t he output dev ic e
you’re us ing. See Sele c ti ng Basic Set tin gs f or instructions on changing
these settings.
The colors in the printed image may not match the original image exactly
because the scanning and printing proces se s use two different color
interpreting technologies. Use the ICM/sRGB (Windows 98) or ColorSync
(Macintosh) settings in EPSON TWAIN to more closely match the colors.
See Configuring Preview and Col or Optio ns
for instructions.
The printed image is larger or smaller than the size of the original.
Problem Solution
You may have changed
the T arget image size
or used the Zo om
Preview feature.
Check the im age size sett ings in your application and EPS ON TWAIN;
see Adjusting Source and Target Image Sizes for details. D on’t use the
size of the image on yo ur m onitor to judge the printed size; y ou may
have used the Zoom Preview feature, which only affects the preview
image size. Also, som e applications display high resolution images on
lower reso lution monit ors so they appear lar ger than their original size.
Troubleshooting Page 92
Page 93

The printer can’t print the image, or the printout is garbled or isn’t an image.
Problem Solution
Your printer and
computer may not be
securely connected.
Your softw are is not
installed co rrectly for
your print er.
Check tha t th e printer is properly connected to t he c omputer and is
correctly se t up; se e y our printer ma nual.
Check tha t yo ur application software is properl y in s ta lled and set up for
your print er; s ee your appl ic at ion software manual.
The quality of an enlarged image is worse than when it’s scanned at its original size.
Problem Solution
You didn’ t in c rease
your Resolution setting
to compens ate for the
image enlargemen t .
If you enlarge your target image s iz e by s c aling or by selecting a la rger
Target siz e, be sure to incr ease the Re so lut ion setting by the same
proportion to retain y our image qu ality. For exa m ple, if you se lect
300 dpi as th e resolution setting for an image sc anned at 100% of its
original siz e and then sc ale the image 200%, you should increase (in
this case, double) the res olution to 600 dpi to ret ain the sam e im age
quality. See Selecting Basic Settings
Resolution setting .
For additi onal informat ion on sele cting scanning resolution, see yo ur
Scanner Basics
book.
for instructions on changing the
Troubleshooting Page 93
Page 94

Moiré (crosshatch) patterns appear in the scanned image.
Problem Solution
You have s c anned a
document with halftone
patterns.
To minimize moiré patterns, try the following:
◗ Place a transparent sheet between the document and the document
table to slightly unfocus the imag e.
◗ Move or angle the do c um ent slight ly .
◗ Adjust the Sharpness setting to a lower value to unfocus the image.
See Customizing Destination Settings
◗ Change the Target image si z e s et t ing slightly.
◗ Make sure De-screening is turned on in the Image Type dialog box.
See Customizing Image Types
for details.
Character recognition is inaccurate after OCR scanning.
Problem Solution
You scan ned the
document using
incorrect Image Type
and Destination
settings.
Scan the d oc ument again using OCR as the Image Type and
Destination settings in EPSON TWAIN. This automatically turns on the
Text Enhancement T ec hnology set t ing that elim inates back ground
docume nt noise. See Selecting Basic Settings for details.
If character recogni tio n is s t ill to o inaccurat e, c hange the I m age Type
setting by selecting None for the B/W (Bl ac k & W hite) option setting.
Then adjus t th e Th reshold set ti ng in the Image Co nt rols dialog bo x ; see
Adjusting Image Controls
for details. T ry s ca nning again.
for more information.
Troubleshooting Page 94
Page 95

Where To Get Help
EPSON provides technical assistance through electronic support services
and autom ated telephone servic es 24 hours a day. The f ollowing tables
list the contact information:
Electron ic su pport services
Service Access
World W ide Web From the Internet, you can reach EP SON’s Home Page at
http://www.epson.com.
EPSO N In te rnet FTP Site I f you have Int ernet FTP capability, u se yo ur Web brow s er
(or other s of tware for F TP download ing) to log onto
ftp.epson.com with the user name anonymous and your
e-mail address as the password.
®
EPSON Forum on CompuServe
Members of CompuServe can type GO EPSON at the menu
prompt to reach the Epson America Foru m . Fo r a f ree
introduc t ory C om puServe m em bership, c all (800) 848-8199
and ask for represen t at iv e #529.
Troubleshooting Page 95
Page 96

Automa te d t elephone s erv ic es
S
Service Access
EPSO N SoundAdv ic e For pre-recorded answers to c om m only aske d question s
M
about EPSON pro ducts 24 ho urs a day, seven days a week,
call (800) 922-8911.
EPSON FaxAdvice
™
Access EPSON’s t ec hnical inform ation libra ry by c alling
(800) 922-8911. You must provide a return fax number to
use this service.
EPSO N Re f erral Service Fo r t he location of yo ur nearest Authorized EPSON Re s eller
or Customer Care C enter, call (800 ) 922-891 1.
To speak to a technical support representative, dial (310) 974-1970 (U.S.)
or (905) 709-3839 (Canada), 6
to 8PM, Pacific Time, Monday t hrough
AM
Friday. To ll or long distance charges may apply.
If you need help usin g
another manufacturer’s
software with an
EPSON product, see
the doc um entation f or
that software for
techni ca l s upport
inform at ion.
Before yo u c all, please have the follo w ing informat ion ready:
◗ Product nam e (EPSON Perfection 1200)
◗ Product serial number (located on the back of the scanner)
◗ Computer configuration
◗ Descript ion of the problem
You can purchase opt ional equipment, m anuals, and accessories from
EPSON Ac c essories at (8 00) 873-7 766 or visit ou r w eb site at
www.epsonsupplies.com (U.S. sales only). In Canada, please call
(800) 873-7766 for dealer referral.
Troubleshooting Page 96
Page 97

Glossary
bit Sh ort fo r binary digit. The smallest unit of data in com put er process ing. A
bit can represent two values, on and off, or 1 and 0.
bit/pixel The unit t hat indica te s th e number of bit s allocated fo r a pix el. The larger
the value , the more detail a pixel can represen t.
color correction A meth od of adjusti ng the color im age data for a particular t y pe of device
so that the reproduction results c om e close to the original c olors.
default A set of v alues used w hen no othe r se lections ha v e been made .
dither A process in which software or an output device simulates continuous
tones with groups of dots.
dpi Dots per inch. A unit of measurement for resolution. The higher the value,
the higher t he resolution.
Dropout An EPSON TW AI N option that le t s you select a color for the s ca nner to
ignore.
Halftone A me th od of using dot patterns to represen t an im age.
marquee A siz eable an d m ov eable frame on a prev iew im age that identifies th e
part of it sele c te d f or scanning.
Glossary Page 97
Page 98

monochrome Black and w hit e im ages, or im ages repre s ent ed only by th e intensity of
luminosi ty.
pixel Short f or picture e lem ent. Ever y image is com posed of a num ber of
pixels. Pix els are also counted in uni ts of dots.
resolution Indication of how finely an image is resolved into pixels. Measured in dots
per inch (dpi), pixels p er inch (ppi), or s amples per inch (spi).
scan An operation performed by the sensor and the carriage of a scanner. The
sensor “re ads” the colo rs in an image, and sends t he c olor inform ation to
the computer as digit al data.
Threshold An EPSON TW AI N option that sets the poin t at which gray v alues in an
image are represen te d as either black or white.
Glossary Page 98
Page 99

Index
A
Accessories, 96
Advance d s c anning, 23 to 51
Advanced window, 15, 19, 27, 31, 58
Auto Area Segmen ta ti on, 8, 17, 25, 29, 35
Auto docu m ent feeder
Document Source setting, 16
scanning with, 28 to 32
scannin g w it h St art button, 78 to 83
Auto Exposure, 39to 42, 50 to 51
Auto Locate, 31, 39 to 41
Automa tic adjustme nt fe at ures, 39 to 41
B
B/W (Black and White) options, 35 , 94
Basic scanning, 9, 13 to 22
Batc h scanni n g, 21, 48 to 49, 87
C
Calibration
problems, 84
utility, 10, 53
, 91 to 92
Color Adjustment settings, 46 to 47
Color buttons, 42 to 44
Color co rrection opt ions, 50 to 51, 92
ColorSy nc, 11, 27, 31, 50 to 51, 92
Configuration settings, 50 to 51
Copyin g im ages, EPSON Scan! II, 63
Custom settings
destinations, 36
image types, 33 to 35
saving, 48to 49
tone correction, 45
to 37
D
De-screening se tting, 35
Destinat ion setting
ADF settings, 30
basic settings, 16, 18to 19
problems, 87, 90
transparency settings, 24, 26 to 27
Destinations for Start button, 70 to 75
Destinations, customizing, 36 to 37, 94
Document position problems, 90 to 91
Document Source setting, 16, 24, 28 to 29
to 31
Index Page 99
Page 100

Dropout setting, 35
E
Easy window, 15, 58
EPSON
Accessories, 96
help, 95 to 96
EPSON Sc an! II
copy feature, 63
exportin g im ages with, 59 to 61
scanning with, 56 to 58
using, 56 to 63
view features, 62
Exportin g im ages, EPSON Scan! II,
59
to 61
Exposure setting, 42 to 43, 87, 90
G
Gamma setting, 42 to 43
Gray Balance Intensity setting, 46to 47
H
Halftone setting, 34 to 35, 43 to 44
Help, 95 to 96
Highlight se t ti ng, 42 to 43, 87
I
Image Color Matching (ICM), 19, 27, 31,
50
to 51, 92
Image Controls settings, 42 to 44
Image quality problems, 90 to 94
Image size, adjustin g, 38 to 39, 92
Image Type setting
ADF settings, 28
basic settings, 16 to 19
problems, 87
transparency settings, 24 to 27
Image types, customizing, 33 to 35
Introduction, 8 to 12
to 31
M
Manual, how to use, 11 to 12
Marquees, 21 to 22, 40 to 41
Memory problems, 85, 86 to 87
Moiré patterns, 94
Monitor
calibrating, 10
Macintosh, 11
Windows, 10
Monito ring utilities , 10, 52, 65 to 67,
88
to 89
, 53, 84, 91 to 92
Index Page 100
 Loading...