

Page 1

Floor standing loudspeaker
Page 2
Page 2
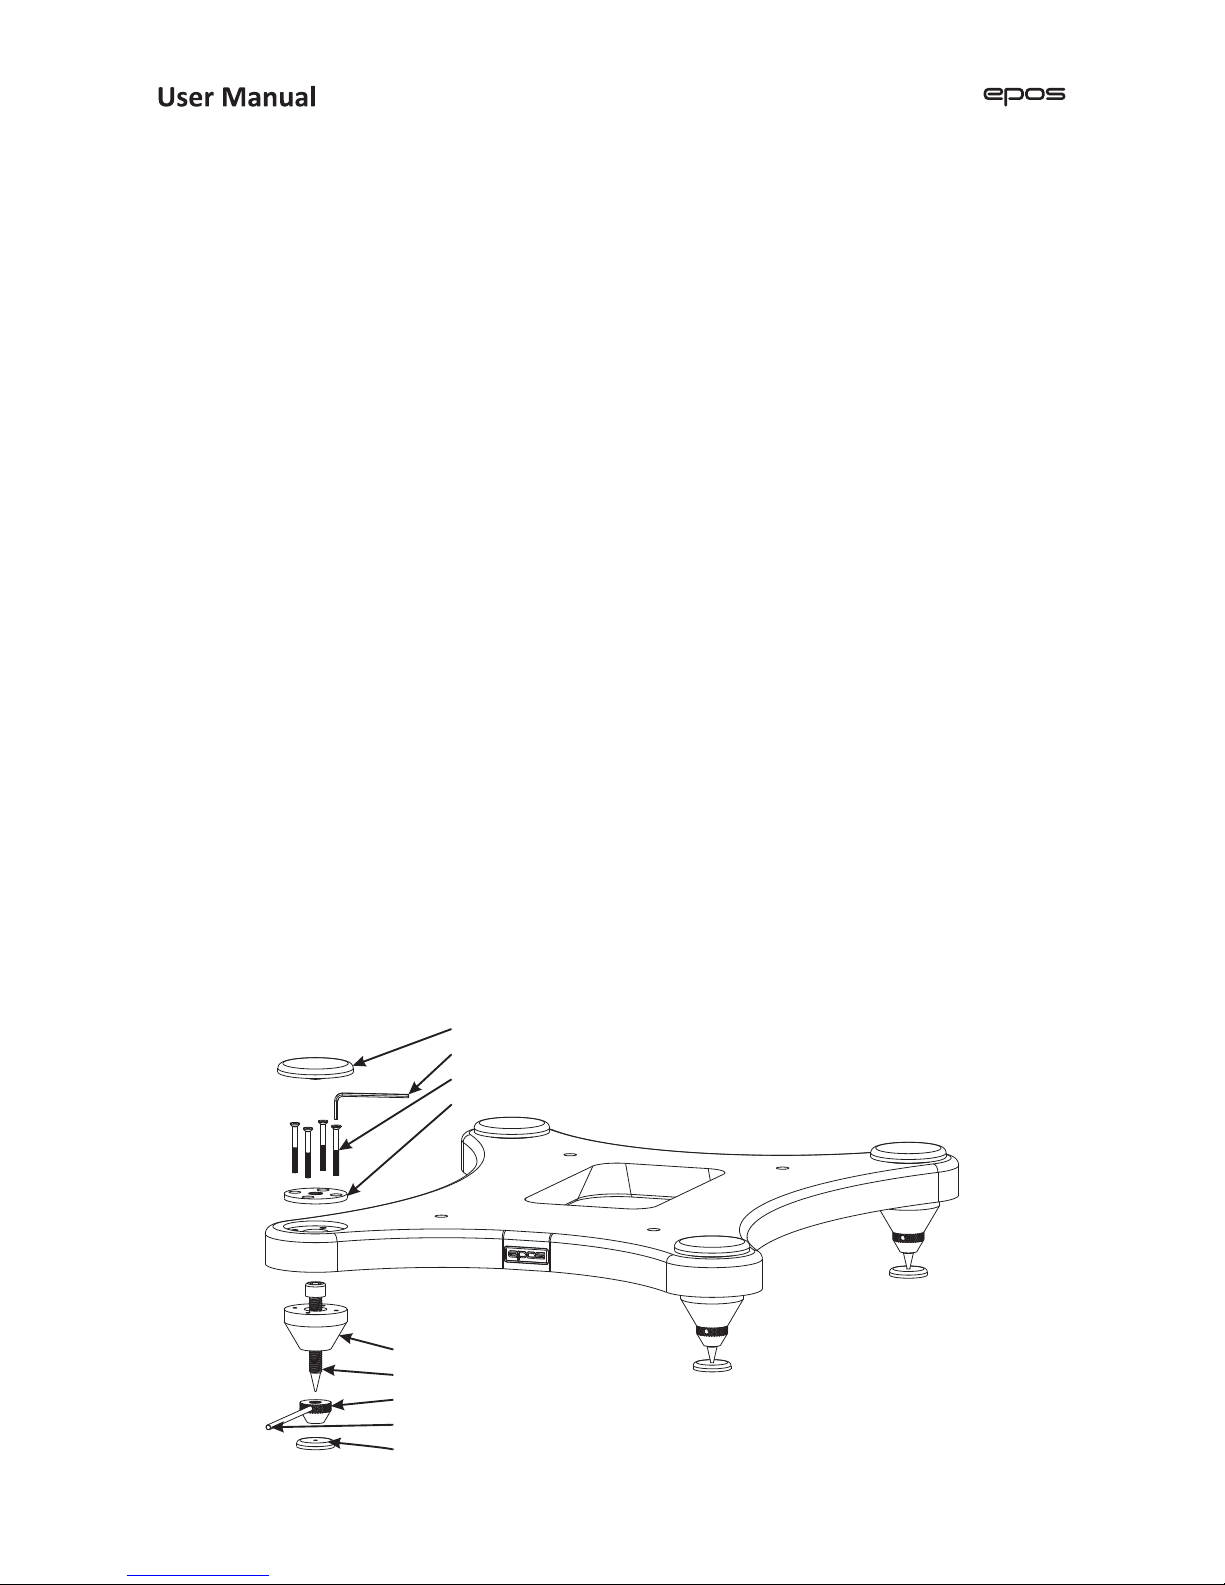
Flat washer x 4
4mm Diameter bolts x 16
Allen key
Large disc x 4
Large conical metal foot x 4
Small conical locking device x 4
Tommy bar
Floor protection disc x 4
Spike x 4
UNPACKING
If you are reading this, you must have already removed the outer carton and split the tape that holds the
main carton together. You have found this instruction manual at the top and hopefully you have not tried to
assemble the speaker before reading this manual. Epos strongly advises you to read it first, before
attempting to assemble the speakers, for your safety and the reliability of the product. Assembling the
speaker is really a two-person job. It is advisable not to start until you have help.
Remove the separate polystyrene packaging and carton boxes from around the speaker, together with the
gift-box that contains the metal feet and bolts. Stand the carton, containing the speaker, on its end. If you
can first discover which end is the bottom, then stand the speaker on its head so the bottom is facing
upwards. Note that the speaker terminal on the rear is at the bottom of the speaker. With the flaps of the
carton open, walk the speaker out of the carton, a little bit at a time, by twisting the speaker from side to
side and pulling it out onto the floor. When it is away from the carton, move the carton away to provide
more space. Lift the top EPE cap from the speaker, untie the cord holding the fabric sleeve and roll it down
to reveal the cabinet. The next step is to fit the plinth.
PLINTH
The Encore 50 floor standing loudspeaker is supplied with a support plinth that serves several purposes.
First, it spreads the footprint of the speaker to reduce the risk of it being accidentally knocked over.
Secondly, the metal feet attached to the plinth help to decouple vibrations and resonances in the speaker
cabinet, when it is working, and dissipate them harmlessly into the floor. It is surprising how much better
loudspeakers sound when properly decoupled to the floor through spiked feet.
The plinth is packed separately in the main carton. Remove the plinth from the packing frames. At this
point you can fit the feet to the plinth. It is advisable to rest the plinth on top of the speaker.
SPIKES
Epos has designed some unique spiked feet for mounting this large loudspeaker that allow a wide range of
adjustment in height and angle. Depending on floor surface (carpet, tiles, wood) the height may be set to
suit the listener and angled up or down, depending on the chosen listening position. It is highly
recommended that you use the feet and the plinth to achieve the maximum performance and flexibility from
the Encore 50 loudspeakers.
ASSEMBLING the PLINTH and SPIKES
Page 3

Page 3
10mm diameter
fixing Bolt x 4
10mm Washer x 4
Allen key
The plinth should be sitting on the speaker with the Epos logo facing the right way up. Take the metal feet
from the packaging one by one and disassemble them. Place the flat washer into the recess in the top and
pass each of the 4mm diameter bolts through the 4 holes so they exit under the plinth. Take a large conical
metal foot and screw the 4 screws into the foot, one at a time, until it is necessary to use the small ALLEN
key to tighten them completely. This creates a sandwich with the plinth as the filling. Now screw the smaller
conical locking device to the bottom of the spike. Do this to each of the four feet. At this point, the spike
should be as far inside the foot as possible, with only the pointed end sticking out below the locking device.
Repeat this until all four feet are secured to the plinth. Be careful not to scratch yourself on the sharp
spikes. The large discs cover the hole in the top of the washer. They can be fitted at the end of the set-up.
FITTING the PLINTH to the LOUDSPEAKER
Turn the plinth over, so that the feet point upwards. Locate the EPOS logo at the front of the speaker. Four
10mm diameter fixing bolts and washers are supplied in the presentation carton packed within the main
carton. Pass each of the four bolts through the washer and then into the plinth. Line up the four bolts with
the screw inserts in the bottom of the cabinet. Tighten the bolts, using the ALLEN key supplied until the
plinth is tightly secured to the base of the speaker.
SPEAKER LOCATION
It is now time to turn the loudspeakers the correct way up. Take care not to damage your back, the floor, or
the speaker cabinet when inverting it. Remember that you should have some help to do this. It is not a one
person job. Move to approximately the position you want the speakers to be used in, or place them directly
onto the assembled Skateboard.
Page 4
Page 4
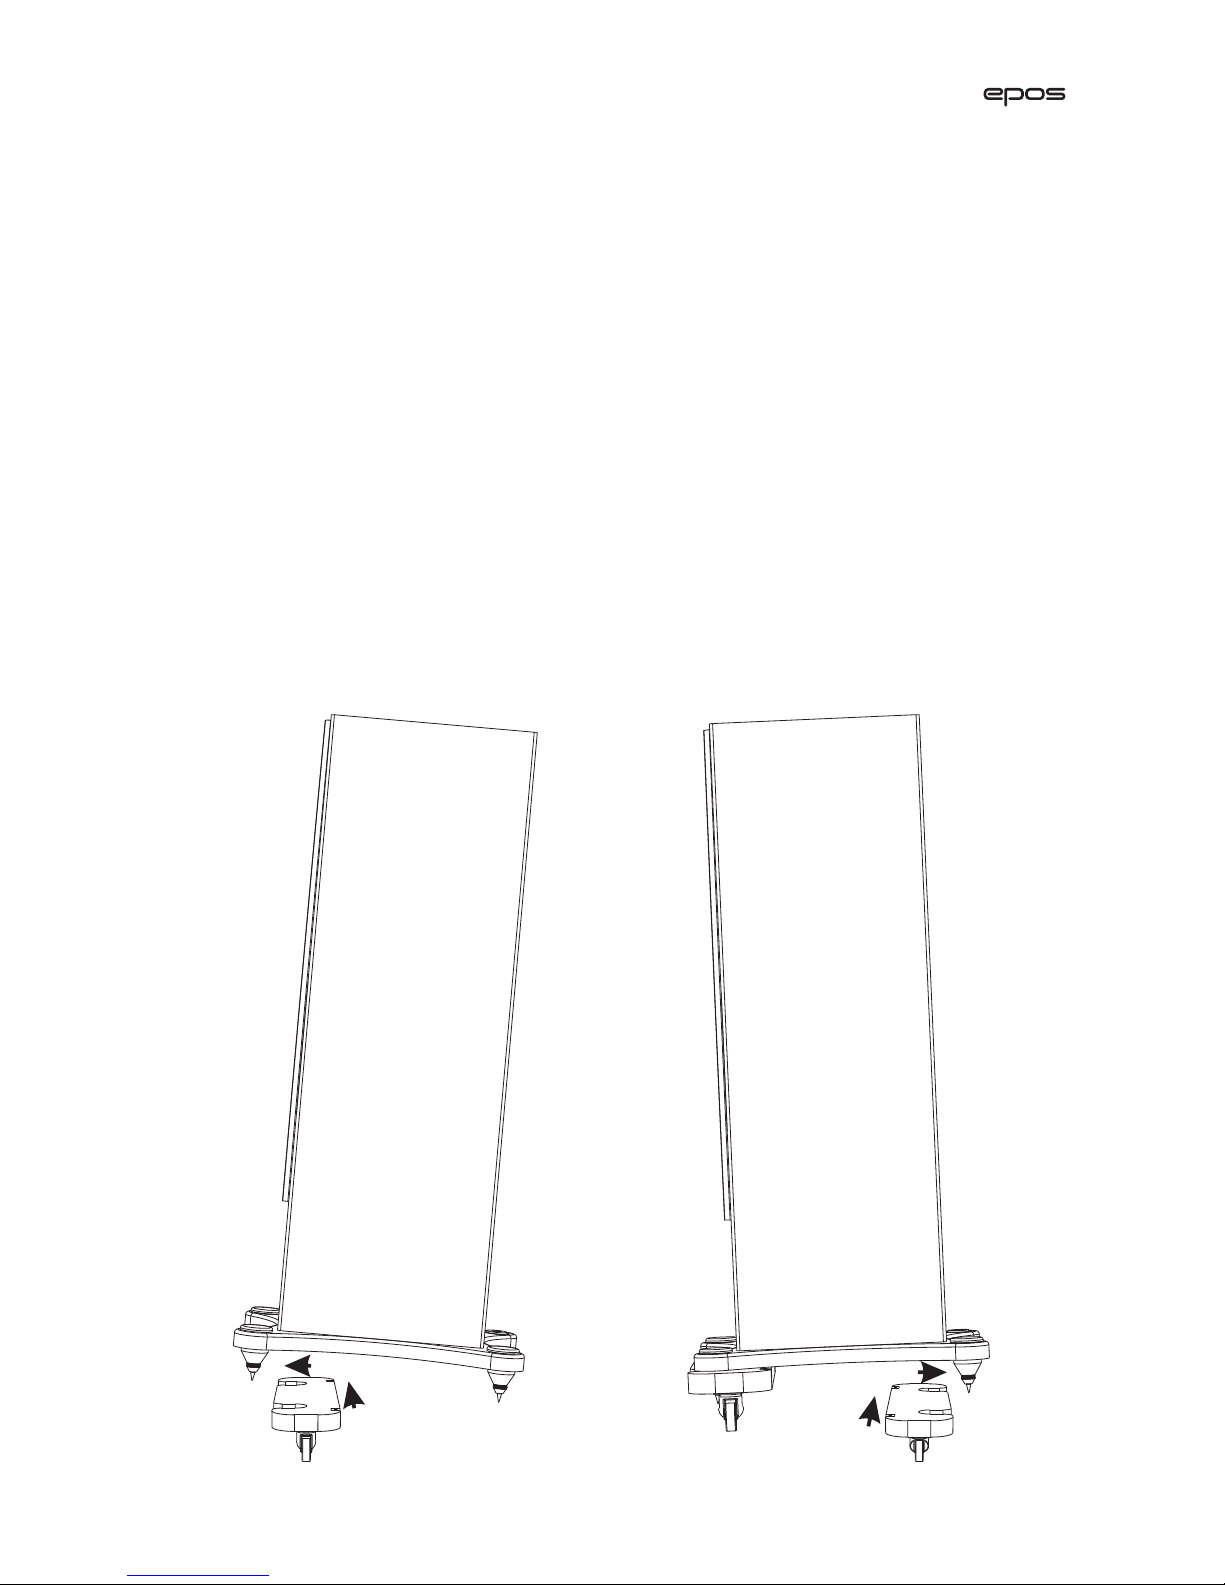
1
2
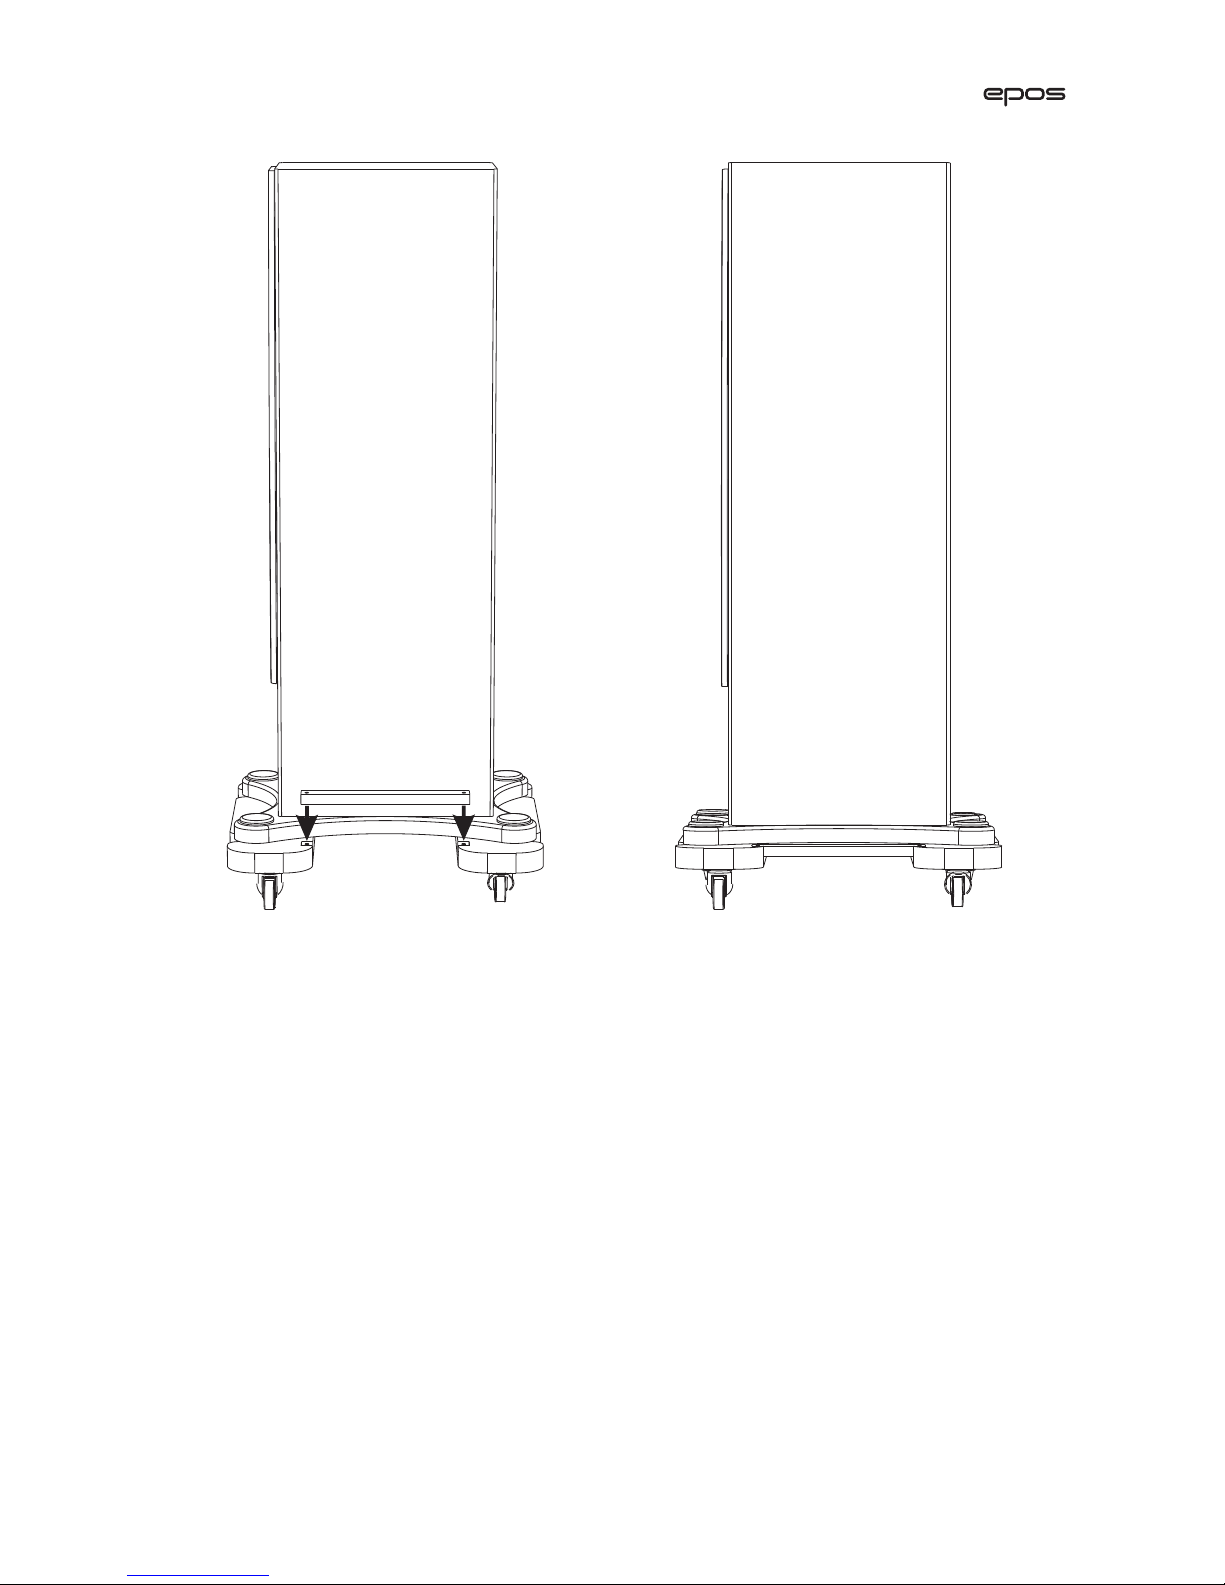
1
2
SKATEBOARD
To avoid lifting these extremely heavy loudspeakers, Epos has developed a useful Skateboard to transport
them around the room, prior to settling on the final listening position. There is only one Skateboard
provided for a pair of speakers. If you require a second Skateboard please check with your dealer or Epos
Ltd. The Skateboard is made from very strong plywood and has four wheels to allow it to travel smoothly
over carpet, tiles or wooden floors, without damaging either the floor covering or the speaker. The
Skateboard comes in a semi knocked-down form, in two halves. If you want to move the speaker to a
different location, it is necessary to have another person to help you.
Contact your dealer if you require help installing your speakers.
Firstly tilt the front of the speaker away from you, at the top, to allow one half of the Skateboard to be fitted
under the front of the plinth. See the diagram. Secondly, lift up the back of the speaker cabinet, with
someone holding the front of the Skateboard, to stop it moving forward. Be careful not to damage the
finish of the cabinet and plinth. Move the second half of the Skateboard under the back of the plinth and
plug the side bars into the locating holes on each side of the front and rear halves of the Skateboard to joint
it together. See the diagram. The speaker can now be moved without the spikes touching or scratching the
floor. Once in the new location remove the side bars and with help, tilt the front of the speaker towards you
and remove the rear Skateboard. Gently lower the back of the speaker to the floor. Use the floor protection
washers if required. Tilt the speaker backwards and remove the front half of the Skateboard. Now lower the
front into position. Remember to use the protection washers if mounted on wood or ceramic flooring.
Locate the spike into the small central hole which stops it from sliding off.
Page 5
Page 5
Side bar
POSITIONING
All Epos loudspeakers are designed to be positioned away from the wall. Space should be left behind the
loudspeakers to allow proper operation of rear firing reflex ports and to ensure establishment of good stereo
image depth. Some experimentation may be necessary to establish the ideal position within your listening
room.
Begin by placing the loudspeakers about 1 metre from the rear wall and avoid placing the loudspeakers in
corners, because this will cause a doubling of low frequency output. Try to leave more than a 1 metre space
between each loudspeaker and the nearest side wall if possible.
The optimum stereo performance will be achieved when the speakers are positioned up to 2.5 metres apart
and greater than 2.5 metres from the listener. This will depend on room size and height. It is not an exact
science and it depends on the size of your listening room. Turning the speakers in, to face the listener,
instead of facing straight ahead, often helps to stabilise the stereo image and provide the right high
frequency balance to the listener. Gradually move them in, or out, a little at a time until you achieve the
best balance between bass weight and definition. There is no absolute right or wrong; if it sounds good, it is
good.
Page 6

Page 6
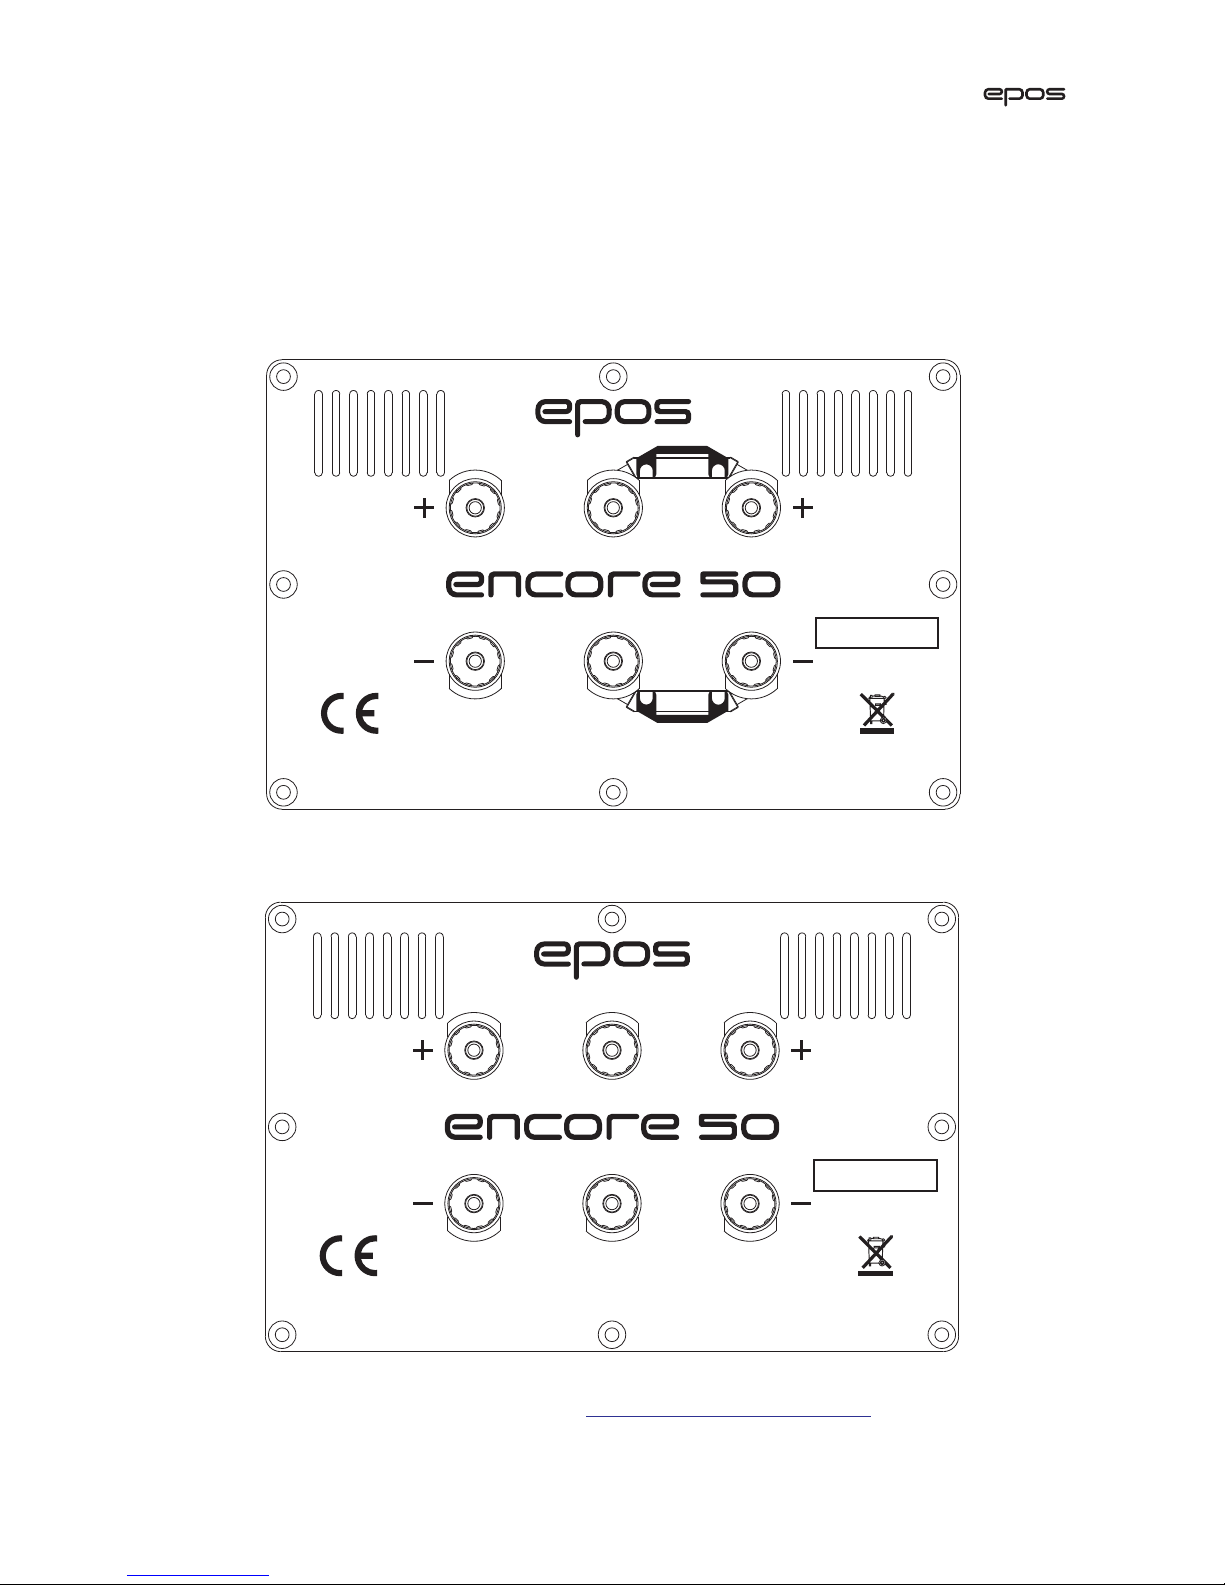
Maximum amplifier power 500W Impedance 4Ù
Tweeter
Mid-Range
Bass
Designed and Engineered in Great Britain
www.epos-acoustics.com
Passive Operation
The Encore 50 is factory set
for passive use
For connections refer
to Owner’s Manual
To Bi-wire
remove Bass links (A)
To Tri-wire
Remove links (A & B)
Link A Link B
Link A Link B
Active Operation
Internal changes required
Refer to Owner’s Manual
or Epos website FAQs
Use only as instructed
Serial No
Insert the large hexagonal ALLEN key supplied and turn it in one or other direction to raise or lower the
spikes. Check the speaker is level with a spirit level. Adjust the spikes to avoid any wobbling. When the
position, height and level are approximately set, put the Tommy bar into the cross-hole in the small conical
locking device at the bottom and turn it anti-clockwise. Turn the Allen key in the top of the spike clockwise
at the same time and this will tighten the whole assembly and lock the spike in position. Do this to each
corner in turn. When you feel the position is right, fit the cosmetic discs to the top of the washers on each
corner of the plinth. Twist them by hand until finger tight. If you need to adjust the height or change the
angle of the loudspeakers again, remove all the cosmetic discs to reveal the hexagonal sockets at the top of
the spikes again.
CONNECTION
Ensure that your amplifier is switched off before you make, or break, any connections, because damage may
occur to your amplifier if shorted.
Your Epos loudspeakers are equipped with high quality insulated binding posts, with excellent electrical
contact and current specification. The posts are connected to the individual drivers as denoted on the rear
panel label.
The metal links between the terminals join the bass, midrange and treble drive units together enabling
conventional wiring, with a single high-quality speaker cable if required. Bi-wiring and bi-amping, tri-wiring
and tri-amping is possible. These techniques often bring benefits, in terms of increased clarity and
definition. Use only high grade speaker cables. For the best results, keep the cables no longer than
required.
CONVENTIONAL CONNECTION (Single high quality speaker cable)
Page 7
Page 7
Maximum amplifier power 500W Impedance 4Ù
Tweeter
Mid-Range
Bass
Designed and Engineered in Great Britain
www.epos-acoustics.com
Passive Operation
The Encore 50 is factory set
for passive use
For connections refer
to Owner’s Manual
To Bi-wire
remove Bass links (A)
To Tri-wire
Remove links (A & B)
Link B
REMOVE
Active Operation
Internal changes required
Refer to Owner’s Manual
or Epos website FAQs
Use only as instructed
Serial No
Link A
REMOVE
Link B
REMOVE
Link A
REMOVE
Maximum amplifier power 500W Impedance 4Ù
Tweeter
Mid-Range
Bass
Designed and Engineered in Great Britain
www.epos-acoustics.com
Passive Operation
The Encore 50 is factory set
for passive use
For connections refer
to Owner’s Manual
To Bi-wire
remove Bass links (A)
To Tri-wire
Remove links (A & B)
Link B
Link B
Active Operation
Internal changes required
Refer to Owner’s Manual
or Epos website FAQs
Use only as instructed
Serial No
Link A
REMOVE
Link A
REMOVE
BI-WIRING and TRI-WIRING
Bi-wiring involves the use of two pairs of speaker cables between your loudspeakers and amplifier. Triwiring requires three pairs of speaker cables. If you wish to bi-wire, or tri-wire your speakers it is essential
that you first unscrew all the binding posts and remove the metal links that join them together. Store them
safely for possible future use. Once the links are removed, the drive units will be electrically separate and
should be connected to the driving amplifier or amplifiers with individual high quality cables.
BI-WIRE CONNECTION or BI-AMPLIFIER CONNECTION (2 high quality speaker cables)
TRI-WIRE CONNECTION or TRI-AMPLIFIER CONNECTION (3 high quality speaker cables)
If you are in any doubt consult your dealer or visit: www.epos-acoustics.com/faq.php
Page 8

Page 8
CABLE TERMINATION
A set of screw-on 4mm plugs is supplied which will allow you to terminate your loudspeaker cables. These
plugs have been selected to provide a good electrical connection. To terminate your cables simply remove
enough insulation to allow the plastic shroud on the plug provided to fit over the end of your cable. Then
make a connection to the plug and screw the shroud fully over the plug until no bare plug is evident. Once
again, if you are in doubt consult your Epos dealer. Better plugs can be used but try to avoid ones that have
a large bare metal finish as they can accidentally short-out the amplifier and must really be touch proof in
operation. A big amplifier driving these speakers can produce a large voltage potential that can give the
user an electrical shock, if not careful. It cannot kill but it will certainly shock.
Residents of the European Union may wish to use spade lugs into the terminal posts, as 4mm plugs have
been outlawed. If bare wires are used, take care to avoid stray strands which can 'short circuit' the power
amplifier. Spade type connectors may also be used. Check with your hi-fi retailer.
WARNING
The red sockets on the loudspeaker marked + should be connected to the red (or positive) output terminals
on your amplifier, while the black sockets should be connected to the negative (or ground) output terminals
on your amplifier.
Use good quality cable to connect your loudspeakers to the amplifier. Ensure that the cables from each
speaker are of roughly equal length and that any surplus is gathered in a loose hank. Do not coil the surplus
tightly.
PHASE
If the cables are not connected to the left and right speaker in exactly the same way, the effect may produce
an out of phase signal. This will cause the bass to be cancelled and the stereo image to spread from the
middle to a position outside the two speakers, leaving a ‘hole in the middle’ sound.
Correctly wiring the polarity of the speakers will restore the image to between the speakers and provide
proper bass. Most speaker cables have a polarising mark, such as a bump or writing on the positive wire.
LISTENING
Switch on the amplifier and play a signal with the volume turned down low. Check that sound is coming
from bass, middle and treble speaker drivers on both speakers. If not, switch off and check the
connections. Once you are satisfied everything is working OK, you can turn the music up and sit and listen
to you new speakers.
LEVEL ADJUSTMENT
When fitting the plinth to the bottom of the cabinet, you were sure to see the panel at the bottom which
had eight 4mm sockets and two cables with 4mm instrument plugs fitted to the ends. These two cables are
necessary to complete the circuit in the crossover that drives the Mid-range and Tweeter.
The sockets at the edge marked with 0 next to the words Mid-Range and Tweeter must not be unplugged.
However, the factory setting for the other end is in the 4mm socket marked 0dB. This sets the frequency
balance at the nominal level. If after listening for a while, you find the level could be usefully changed to
either make the treble brighter or duller, or the mid-range more forward or laid back, please disconnect the
amplifier first and then unplug the link from the 0 dB in the middle and move it to either (+) or (–) setting. If
more or less bass is required, it is also possible to move both mid-range and treble together to lift or lower
the bass, relative to the other frequencies. Once you know where the plugs and sockets are, it is possible to
move these plugs from underneath, without too much effort. If you have to tilt the speaker backwards, to
make the change, please get help to prevent it from falling over.
Page 9

Page 9
Mid Range
Tweeter
Level
Adjustment
Refer to Owner’s Manual
0dB 0dB
0
0
POWER REQUIREMENTS
Amplifiers with power outputs between those noted in the loudspeaker specifications will generally be
adequate, although more powerful amplifiers can be used if care is taken to avoid over-driving the
loudspeakers. This is unlikely, but anything is possible. The Encore 50 speakers are quite sensitive by normal
standards, but do require an amplifier that can source high current. That is why using two or three
amplifiers, instead of one puts less strain on each amplifier and usually results in a better sound.
Always use the volume control with discretion, and reduce the level immediately should the loudspeakers
begin to distort. However, by the time the speakers distort you may notice that your ears may be ringing, so
be careful not to listen at high volume for too long. Nerve damage is irreparable.
Amplifiers capable of less than 100 Watts per channel output into 4 Ohms are best avoided because they
will restrict the dynamic range. Such amplifiers may also cause damage to the tweeters if they are driven
beyond their capability in an attempt to obtain high volume levels.
The clipping distortion produced when an amplifier is driven beyond its normal output capability can be
very destructive. A powerful amplifier operating well inside its capability will generally be less likely to
damage your loudspeakers than a lower powered amplifier operating beyond its capacity.
NOTE: Do not make or break the loudspeaker connections to the amplifier when it is turned on.
ALWAYS REMEMBER
Lower the volume before making any adjustments to the system (e.g. switching amplifier inputs or raising or
lowering pickup arm on a turntable).
Switch off the amplifier before checking or making any changes to any connections in the system.
NEVER
Overdrive your system with an amplifier that isn’t as powerful as the capability of the loudspeaker.
Bi-amp or tri-amp the speakers with the jumper links still joined. This will short one amp to another causing
damage to the amplifiers.
SAFETY DISCLAIMER
The 4mm plugs used on modern hi-fi speaker cables should never be inserted into round pin European
mains sockets, even though they may fit. Needless to say, it is pointless and can be fatal if tried. Make sure
that young members of the family are prevented from ever doing this.
Page 10

Page 10
RUNNING IN
Epos loudspeakers require a little gentle use to allow their working components to settle into their proper
working routine.
Do not be concerned if your new speakers sound a little aggressive and lacking in low-frequency authority
when you first begin to use them. Things will quickly improve.
Allow between twenty four and forty eight hours overall use, before your new loudspeakers perform to
their full capability. Hi-fi is not a religion, so please do not take this too seriously. Enjoy the music.
PROTECTIVE GRILLES
Encore 50 loudspeakers are supplied with protective black fabric grilles.
The use of grilles is entirely optional and many owners prefer the appearance of the loudspeakers without
them. A small reduction in clarity may be apparent with the grilles on. Do remember that young children
and pets have an affinity for shining tweeter domes and woofer cones!
If you wish to use the grilles, simply push them into the holes provided on the front panel, or pull them off
to remove them. Be careful to store them in a safe place when not used, as they are fragile.
ACTIVE OPERATION
The Encore 50 loudspeaker is the first in a line of speakers from EPOS that can support being used in either
active or passive mode. Active mode means that the crossover filter that separates the frequencies for
each drive unit is located outside the loudspeaker, in front of the amplifier. This means that a separate
amplifier is required to drive each speaker driver and a separate active crossover filter is required to feed
each amplifier before it is connected to the loudspeaker. Epos is developing a unique DSP filter (in the
digital domain) for the Encore 50 which can be used as part of a hi-fi system. To enable active operation,
the wiring inside the loudspeaker must be changed to by-pass the internal passive crossover. The rear panel
must be unscrewed to access the drive unit patch board inside. A separate instruction manual about active
operation will be supplied if required to do this. This information is current at the beginning of 2010.
Contact your dealer or view the Epos website for more information.
NATURAL WOOD
This product has been finished with carefully selected and book-matched real wood veneers. We select the
best and ensure that they are finished to the highest practical standards.
Even though Epos speakers have hand matched veneers, no two trees are alike and each pair of speakers
may be slightly different in grain, colour and shading. These pleasing variations are your guarantee of the
unique and warm charm of your Epos speaker system.
Each Epos cabinet is finished with a special lacquer, which ensures a maintenance free life. Furniture polish
may be used to remove finger marks and dust. Do not use any kind of spirit to clean them.
Page 11

Page 11
TECHNICAL SPECIFICATION
Design 3 way, floor standing, reflex port loaded, with user adjustable crossover.
Frequency Range 28 Hz - 30 kHz. -6dB
Impedance 4 Ohm nominal (2.8 ohm minimum).
Sensitivity 89dB @ 2.83V/1m.
Amplifier Power (Max) 500W/4 ohm (unclipped speech and music).
Amplifier Power (Min) 100W/4 ohm (recommended to avoid clipping).
Finish Cherry real wood veneer.
2 x 220mm diameter on an aluminium chassis, 38.5mm voice coil with +/- 8mm
Woofers excursion Light weight, Kevlar/carbon fibre/pulp cone piston material, with
inverted dust cap.
Mid-range 1 x 158mm with 25mm voice coil and +/- 3.5mm excursion. Light weight,
Kevlar/carbon fibre/pulp cone piston material, with inverted dust cap.
1 x 25mm metal dome, Ferro-fluid cooled and custom Epos suspension.
Tweeter Centre pole vented to felt damped rear chamber.
Ferrite magnet system.
300Hz and 3.2kHz. High-grade, glass fibre PCB’s with 2 ounce copper tracks, on
vibration-isolation mountings.
Gold plated 4mm plugs and sockets for user configuration.
Crossover Separate PCB for Bass filter to isolate it inductively from Mid-range and tweeter
filters.
Mid and tweeter sections incorporate custom-made Epos polypropylene
capacitors, with copper lead out wires.
Optional Passive or Active operation requires a separate custom crossover. Check with your dealer or
Active configuration
Size Speaker W x D x H 265 x 385 x 1230 mm includes plinth and spikes.
Plinth maximum footprint W x D 410 x 540 mm.
Packaged 1 loudspeaker and 1 plinth per carton. Skateboard packed separately.
Net per single speaker 45 kg.
Weight Gross per single speaker 56 kg.
Net skateboard 3.5 kg.
Gross skateboard 5 kg.
www.epos-acoustics.com
Page 12

Part no: EPOS 1049-2
WARRANTY WITHIN U.K.
Your Epos Encore 50 loudspeakers have been built to very high standards and should give many years of
trouble free service.
If, within five years of purchase, they prove to be defective for any reason other than accident, misuse,
neglect, unauthorized modification or fair wear and tear, we will repair the defect or, at our option, replace
the faulty speakers without charge for parts, labour or return carriage.
If you convert your Encore 50 loudspeakers to an active mode at a later date, the electronics are guaranteed
for a period of 2 years.
Your purchase receipt should be retained as it may be required in the event that you need to claim warranty
attention.
This warranty is applicable in the United Kingdom only and given in addition to your statutory rights.
WARRANTY OUTSIDE U.K.
Service enquiries in countries other than the United Kingdom should be addressed to the local Epos agent
or distributor. Warranties granted in these countries are entirely at the discretion of the agent or distributor.
Epos speaker systems are sold in more than 45 countries worldwide. Please see the Epos website for the
complete list of international distributors together with all contact details.
Detailed information on all Epos products and ancillary items can be found by visiting the Epos website.
Epos loudspeakers work well in combination with Creek Audio electronics.
Epos Limited reserves the right to change the specification of any of its speakers without notice.
www.epos-acoustics.com/distributors.php
www.epos-acoustics.com
www.creekaudio.com
 Loading...