

Page 1
Instruction Sheet
POWERFUL SOLUTIONS. GLOBAL FORCE.
WHC, WMC, and WHR
Hydraulic Cutters
L1106 Rev. B 08/12
IMPORTANT RECEIVING INSTRUCTIONS: Visually inspect all components for shipping damage. Shipping damage is not covered
by warranty. If shipping damage is found, notify carrier at once. The carrier is responsible for all repair and replacement costs resulting
from damage in shipment.
SAFETY FIRST
Carefully plan your system by selecting components designed to perform the intended operation and which will
adequately perform with existing equipment. Always check the product limitations regarding pressure ranges, load
capacities and set-up requirements. The system operating pressure must not exceed the pressure rating of the lowest
rated component in the system. Read all CAUTIONS, WARNINGS, and INSTRUCTIONS included with, or attached to, each product.
Follow all safety precautions to avoid personal injury or property damage during the system operation. ENERPAC CANNOT BE
RESPONSIBLE FOR DAMAGE OR INJURY RESULTING FROM UNSAFE USE OF PRODUCT, LACK OF MAINTENANCE, OR
INCORRECT PRODUCT AND SYSTEM APPLICATION. Contact Enerpac when in doubt as to safety precautions or applications.
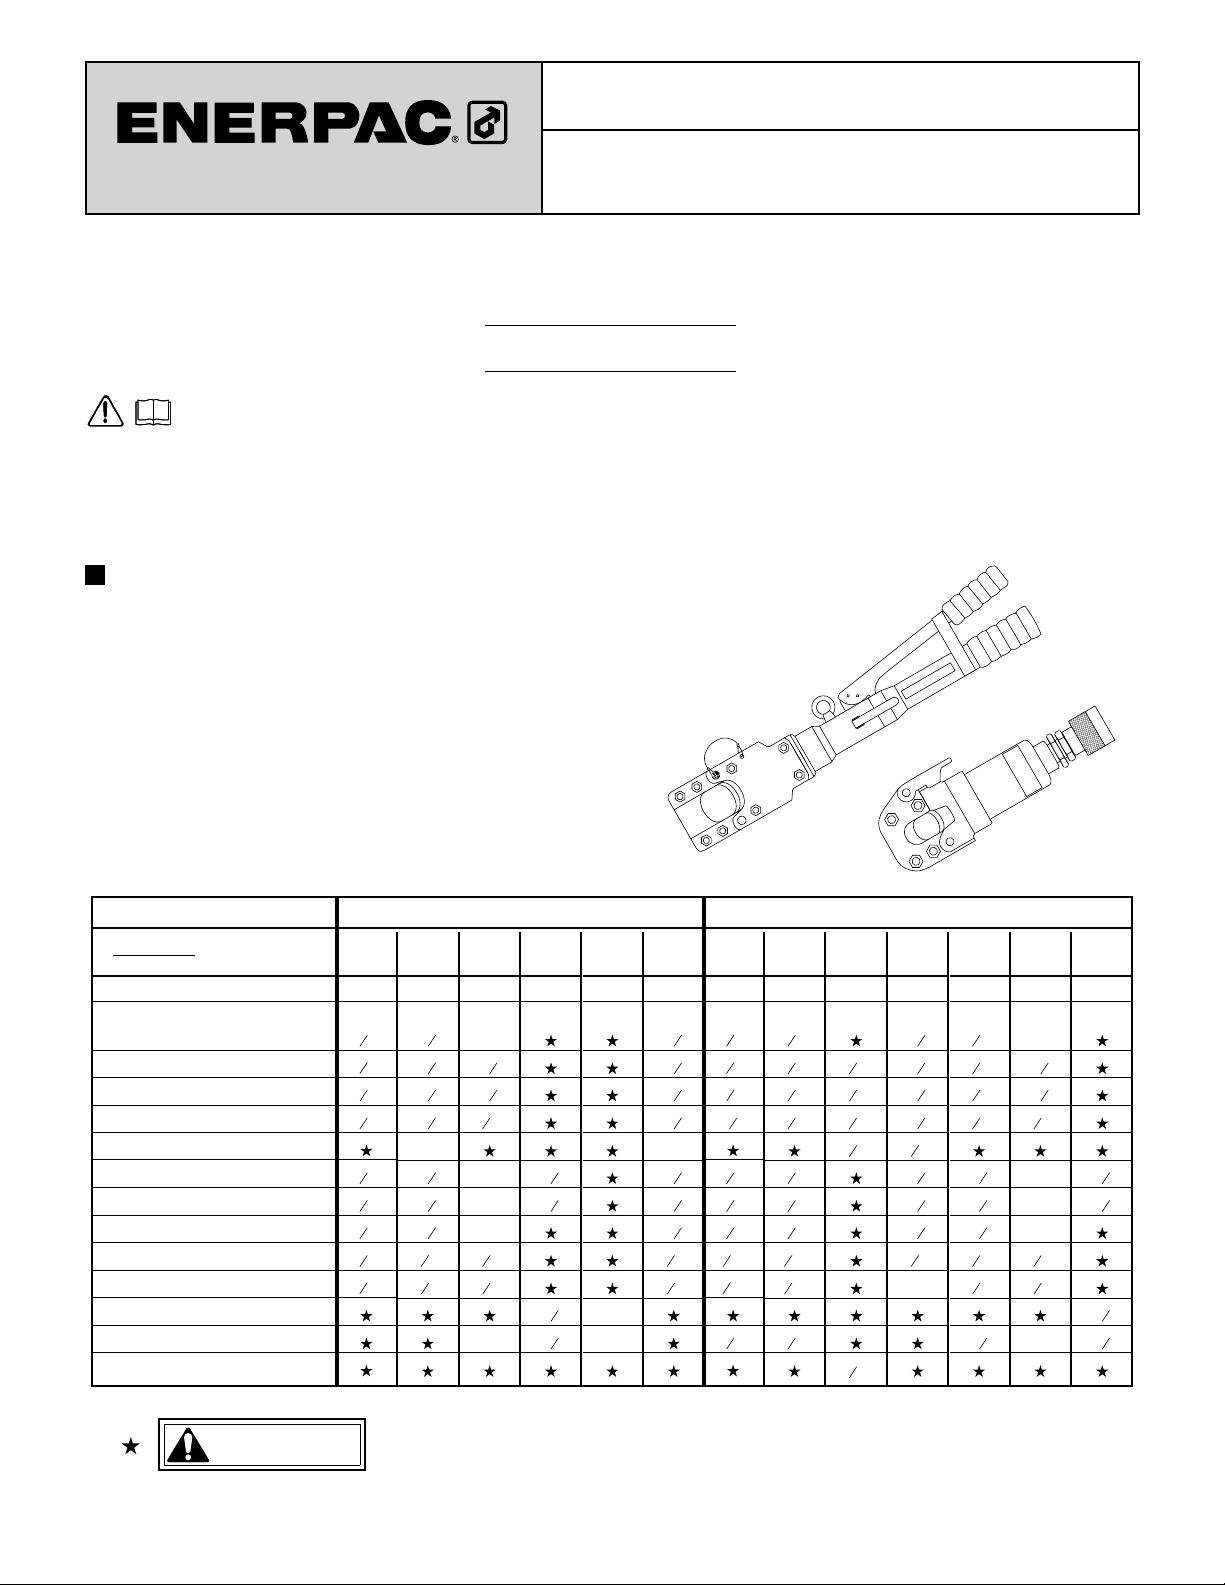
DESCRIPTION
Enerpac cutters can be used for a variety of cutting operations.
The table below lists the size and type of material your tool is
capable of cutting.
Self-contained hydraulic cutters (WMC models) are extremely
portable. Hydraulic cutterheads (WHC & WHR models)
require 10,000 psi hydraulic pumps and are recommended for
applications where many cuts must be made in a short amount
of time.
WMC-2000
Cutting Capacity Chart
MAXIMUM
MATERIAL (inches)
Capacity (tons)
Steel Wire Rope 6x7, 6x12,
6x19 Hempcore or IWRC
Copper Wire or Bar
Aluminum Wire or Bar
Soft Steel Bolts
Reinforcing Bar
Bare Copper Wire Strand
Bare Aluminum Wire Strand
ACSR Wire Strand
Guy Steel Wire Strands 1x7
Guy Steel Wire Strand 1x19
Telephone Cable
Underground Cable (Power)
Grade 70 or 80 Alloy Chain
DIAM
ETER OF
WARNING
WHC
-750
4
11
16
11
16
11
16
11
16
3
4
3
4
3
4
5
8
5
8
Hydraulic Cutterheads
WHC
-1250
"
"
"
"
"
"
"
"
"
WHC
-2000
20
1
1
"
4
1
1
"
8
1
1
"
4
1
1
"
8
WHC
-3380
13
1"
1
1
"
4
1
1
"
4
7
"
8
1"
1
1
"
2"
4
1
1
"
4
1
1
"
4
7
"
8
7
"
8
1
2"
1
2"
3
"
4
3
"
4
3
2"
3
WHC
-4000
3
WHR
WMC
-1250
8
-580
20
1
1
1
1
4
1
5
"
"
4
8
5
1
1
1
"
"
8
8
5
"
"
8
4
5
"
8
8
1"
5
"
8
11
"
16
3
"
4"
8
3
"
4"
8
1
1
1
1
5
"
"
4
8
1
5
"
"
4
8
1
5
"
"
8
4
7
9
"
8
7
"
8
"
16
9
"
16
5
"
8
Self-Contained Cutters
WMC
-750
4
3
11
11
11
3
3
3
9
16
9
16
11
WMC
-1000
20
"
4
3
"
16
16
16
"
4
"
4
"
4
"
4
3
"
"
4
3
"
"
4
3
"
4
"
"
"
16
1
"
2
Unit is not designed to cut this size or type of material.
Any attempt to do so will result in personal injury and/or
damage to the unit and will void the warranty.
WMC
-1250
20
1
1
1
1
1
1
1
1
7
8
1
1
1
1
1
1
7
8
1"
WHC-750
WMC
-1580
"
4
"
8
"
4
"
4
WMC
-2000
6
3
"
4
3
"
4
3
"
4
3
"
4
WMC
-3380
13
3
1"
1
1
"
4
1
1
"
4
7
"
8
"
1
"
1
"
4
"
1
4
"
1
4
5
"
5
1
2"
2
5
"
2"
8
5
"
2"
8
3
"
8
3
"
8
5
"
2"
8
5
1
"
8
11
1
"
16
"
4
"
4
3
3
"
8
3
3
"
8
Page 2

OPERATION
PRELIMINARY INFORMATION: Be sure to observe safe operating procedures. Follow the warnings listed below and all
other safety information contained in this document or decals attached to cutter. Failure to do so will result in personal injury
and/or equipment damage.
WARNING
CUTTING HAZARD: Keep
hands away from cutter
blades. Only one person
should operate cutter. Do
not have one person working
WARNING
Never use the cutter on
electrically active or "hot" wire
or cable. Be sure power has
been turned o before working
on electrical wire or cable.
near the blades while another
person controls the pump.
1. WHC and WHR models: Couple pump hose to cutter. Turn
collar on coupler fi nger tight only. No tools are needed to make
this connection.
2. Select material to be cut. When cutting short pieces of wire
rope, clamp or tape it fi rst to help prevent wires from jamming
between the blade and head.
3. Inspect blade and cutting head. Cutting case hardened steel
will dent blades and cutting heads. The blades will eventually
fatigue and crack. Replace cracked blades immediately. DO
NOT operate tool with cracked or chipped blades.
4. Unlatch cutter head.
5. Place material between blade and head shear.
6. IMPORTANT: Securely latch the cutter head.
WARNING
When working with wire rope or
cable, wrap section being cut to
prevent pieces from fl ying loose
as they are cut.
Cutter Head
Latch Pin
Head
Shear
Release
Blade
9. If the material being cut (usually wire rope or soft cables)
seems to be cut but does not break free of the tool, the blade
is hung up on something and needs to be removed. See
"Troubleshooting" on page 3.
10. Lift release lever or shift pump to release position to retract
blade. If blade does not retract, see "Troubleshooting" on
page 3.
Lever
CAUTION
Most broken blades are the result of not latching the cutter
head. When the blade is advanced, it pushes on the cutter
head. As the cutter head is pushed open, a diagonal force
causes the blade to break, and, in some cases, the cutter
head may crack.
7. On self-contained units, push release lever in toward cutter
body. For hydraulic cutterheads, close or shift valve on pump to
advance position.
8. Operate handle or pump until blade is fully advanced. DO
NOT exceed maximum cutting limits printed on tool decal.
11. Return tool to carrying case to protect from dirt and
corrosion. Always keep a spare blade on hand.
NOTE: Do not operate an empty cutter. The new blade
and cutter head shear edges will "roll" slightly with the
fi rst material cut, creating a burr. This burr falls o as
the cut takes place. Extending the blade prior to the
fi rst material cut will also raise a burr on the blade. With
no material present to knock the burr o , the blade and
head shear edges may lock together and the cutter will
not retract. To correct this situation, the blade must be
removed. Remove blade screw and blade. Unlatch cutter
head.
Use a sharpening stone to remove burr from blade. Run
the stone across the blade on the fl at side (not the knife
edge side). Keep the stone fl at and parallel to the blade.
Take care not to create a gap between the blade and
head shear.
2
Page 3

TROUBLESHOOTING
Problem
Blade will not advance.
Blade will not retract.
Unit leaks oil.
Cause
Low oil level.
Loose coupler
connection.
(WHC & WHR models)
Debris caught between
cutter head shear and
blade.
Fluid release lever not
working.
Seal damage caused by
overloading cutter or by
normal use of cutter
over a period of time.
Solution
Be sure reservoir is filled with Enerpac oil.
Be sure all coupler connections are complete. Loose
or incomplete coupler connections will cause complete
or partial blockage of oil flow.
Remove blade screw from piston to release pressure.
Remove cutter head latch pin or spring latch to free
blade.
Clean the blade and blade track. Hone the blade. See
Maintenance step 6 on page 4. Lubricate the blade
and track with silicone spray.
See illustration below. Place wooden wedge against
the release pin and lightly strike wedge with a
hammer. The lever should release forward to by-pass
and relieve pressure.
The blade should retract. If debris is caught between
the blade and cutter head, disassemble and clean as
described above.
Replace seals. Seals are available as part of the
Repair Kit for your cutter. An Authorized Enerpac
Service Center can perform the repairs for you.
Place wooden wedge
behind release lever.
Use wood or other
soft material to avoid
damaging cutter body.
Open cutter
Blade
head to
remove blade.
Blade Screw
Lighty strike wedge
with a hammer.
3
Page 4

MAINTENANCE
Perform maintenance regularly to keep your hydraulic cutter in good operating condition.
1. Clean dirt from cutter using grease solvent.
2. Lubricate the head and blade with silicone spray rather than
oil. Oil attracts dirt, silicone does not.
3. Keep reservoir full of clean oil. Drain all oil and refi ll with
clean Enerpac oil every 12 months. Change oil more often
under dirty environmental conditions.
Dispose of used oil properly.
4. If cutter has been used under water or in severe conditions,
wash the cutter and lubricate immediately. Remove and clean
the handle cylinder.
5. Repaint unit as necessary. If cutter is used in water regularly,
repaint it with light colored corrosive resistant paint.
6. Keep blade and cutter head shear sharp. Hone blade by
rubbing a sharpening stone across the blade on the fl at side
(not the knife edge side).
Keep the stone fl at and parallel to the blade. Keep back bevel
to a minimum, or blades will separate and break.
Discard cracked or chipped blades. New blades can be
purchased separately.
7. Fluid leakage is usually the result of overloading the cutter
and damaging the seals. Repair kits are available. Repair kits
include piston seals, latch spring or pin, and blade screws.
Contact your local Authorized Enerpac Service Center if your
cutter needs to be repaired.
TO PROTECT YOUR WARRANTY, USE ONLY ENERPAC HYDRAULIC OIL.
Enerpac Worldwide Locations e-mail: info@enerpac.com internet: www.enerpac.com
Australia and New Zealand
Actuant Australia Ltd.
Block V Unit 3
Regents Park Estate
391 Park Road
Regents Park NSW 2143
(P.O. Box 261) Australia
T +61 (0)2 9743 8988
F +61 (0)2 9743 8648
sales-au@enerpac.com
Brazil
Power Packer do Brasil Ltda.
Rua dos Inocentes, 587
04764-050 - Sao Paulo (SP)
T +55 11 5687 2211
F +55 11 5686 5583
Toll Free: 0800 891 5770
vendasbrasil@enerpac.com
Canada
Actuant Canada Corporation
6615 Ordan Drive, Unit 14-15
Mississauga, Ontario L5T 1X2
T +1 905 564 5749
F +1 905 564 0305
Toll Free:
T +1 800 268 4987
F +1 800 461 2456
customer.service@actuant.com
China
Actuant (China) Industries Co. Ltd.
No. 6 Nanjing East Road,
Taicang Economic Dep Zone
Jiangsu, China
T +86 0512 5328 7500
F +86 0512 5335 9690
Toll Free: +86 400 885 0369
sales-cn@enerpac.com
France, Switzerland, North Africa
and French speaking African
countries
ENERPAC
Une division d’ACTUANT France S.A.
ZA de Courtaboeuf
32, avenue de la Baltique
91140 VILLEBON /YVETTE
France
T +33 1 60 13 68 68
F +33 1 69 20 37 50
sales-fr@enerpac.com
Germany and Austria
ENERPAC GmbH
P.O. Box 300113
D-40401 Düsseldorf
Willstätterstrasse 13
D-40549 Düsseldorf, Germany
T +49 211 471 490
F +49 211 471 49 28
sales-de@enerpac.com
India
ENERPAC Hydraulics Pvt. Ltd.
No. 1A, Peenya Industrial Area
IInd Phase, Bangalore, 560 058, India
T +91 80 40 792 777
F +91 80 40 792 792
sales-in@enerpac.com
Italy
ENERPAC S.p.A.
Via Canova 4
20094 Corsico (Milano)
T +39 02 4861 111
F +39 02 4860 1288
sales-it@enerpac.com
Japan
Applied Power Japan LTD KK
Besshocho 85-7
Kita-ku, Saitama-shi 331-0821, Japan
T +81 48 662 4911
F +81 48 662 4955
sales-jp@enerpac.com
Middle East, Egypt and Libya
ENERPAC Middle East FZE
Oce 423, LOB 15
P.O. Box 18004, Jebel Ali, Dubai
United Arab Emirates
T +971 (0)4 8872686
F +971 (0)4 8872687
sales-ua@enerpac.com
Russia
Rep. oce Enerpac
Russian Federation
Admirala Makarova
125212 Moscow, Russia
T +7 495 98090 91
F +7 495 98090 92
sales-ru@enerpac.com
Singapore
Actuant Asia Pte Ltd.
83 Joo Koon Circle
Singapore 629109
T +65 68 63 0611
F +65 64 84 5669
Toll Free: +1800 363 7722
sales-sg@enerpac.com
Street 8
South Korea
Actuant Korea Ltd.
3Ba 717, Shihwa Industrial Complex
Jungwang-Dong, Shihung-Shi,
Kyunggi-Do
Republic of Korea 429-450
T +82 31 434 4506
F +82 31 434 4507
sales-kr@enerpac.com
Spain and Portugal
ENERPAC SPAIN, S.L.
Avda. Los Frailes, 40 – Nave C & D
Pol. Ind. Los Frailes
28814 Daganzo de Arriba
(Madrid) Spain
T +34 91 884 86 06
F +34 91 884 86 11
sales-es@enerpac.com
Sweden, Denmark, Norway, Finland
and Iceland
Enerpac Scandinavia AB
Fabriksgatan 7
412 50 Gothenburg
Sweden
T +46 (0) 31 799 0281
F +46 (0) 31 799 0010
scandinavianinquiries@enerpac.com
The Netherlands, Belgium,
Luxembourg,
Central and Eastern Europe,
Baltic States, Greece, Turkey
and CIS countries
ENERPAC B.V.
Galvanistraat 115
6716 AE Ede
P.O. Box 8097
6710 AB Ede
The Netherlands
T +31 318 535 911
F +31 318 535 848
sales-nl@enerpac.com
Enerpac Integrated Solutions B.V.
Opaalstraat 44
7554 TS Hengelo
P. O. Bo x 42 1
7550 AK Hengelo
The Netherlands
T +31 74 242 20 45
F +31 74 243 03 38
integratedsolutions@enerpac.com
4
4
South Africa and other English
speaking African countries
Enerpac Africa Pty Ltd.
No. 5 Bauhinia Avenue
Cambridge Oce Park
Block E
Highveld Techno Park
Centurion 0157
South Africa
T: +27 12 940 0656
United Kingdom and Ireland
ENERPAC Ltd.,
Bentley Road South
Darlaston, West Midlands
WS10 8LQ
England
T +44 (0)121 50 50 787
F +44 (0)121 50 50 799
sales-uk@enerpac.com
USA, Latin America and Caribbean
ENERPAC
P.O. Box 3241
Milwaukee WI 53201 USA
T +1 262 293 1600
F +1 262 293 7036
User inquiries:
T +1 800 433 2766
Distributor inquiries/orders:
T +1 800 558 0530
F +1 800 628 0490
Technical inquiries:
techservices@enerpac.com
sales-us@enerpac.com
All Enerpac products are guaranteed
against defects in workmanship and
materials for as long as you own them.
For the location of your nearest authorized
Enerpac Service Center, visit us at
www.enerpac.com
101711
 Loading...