

Page 1
OWNERS MANUAL
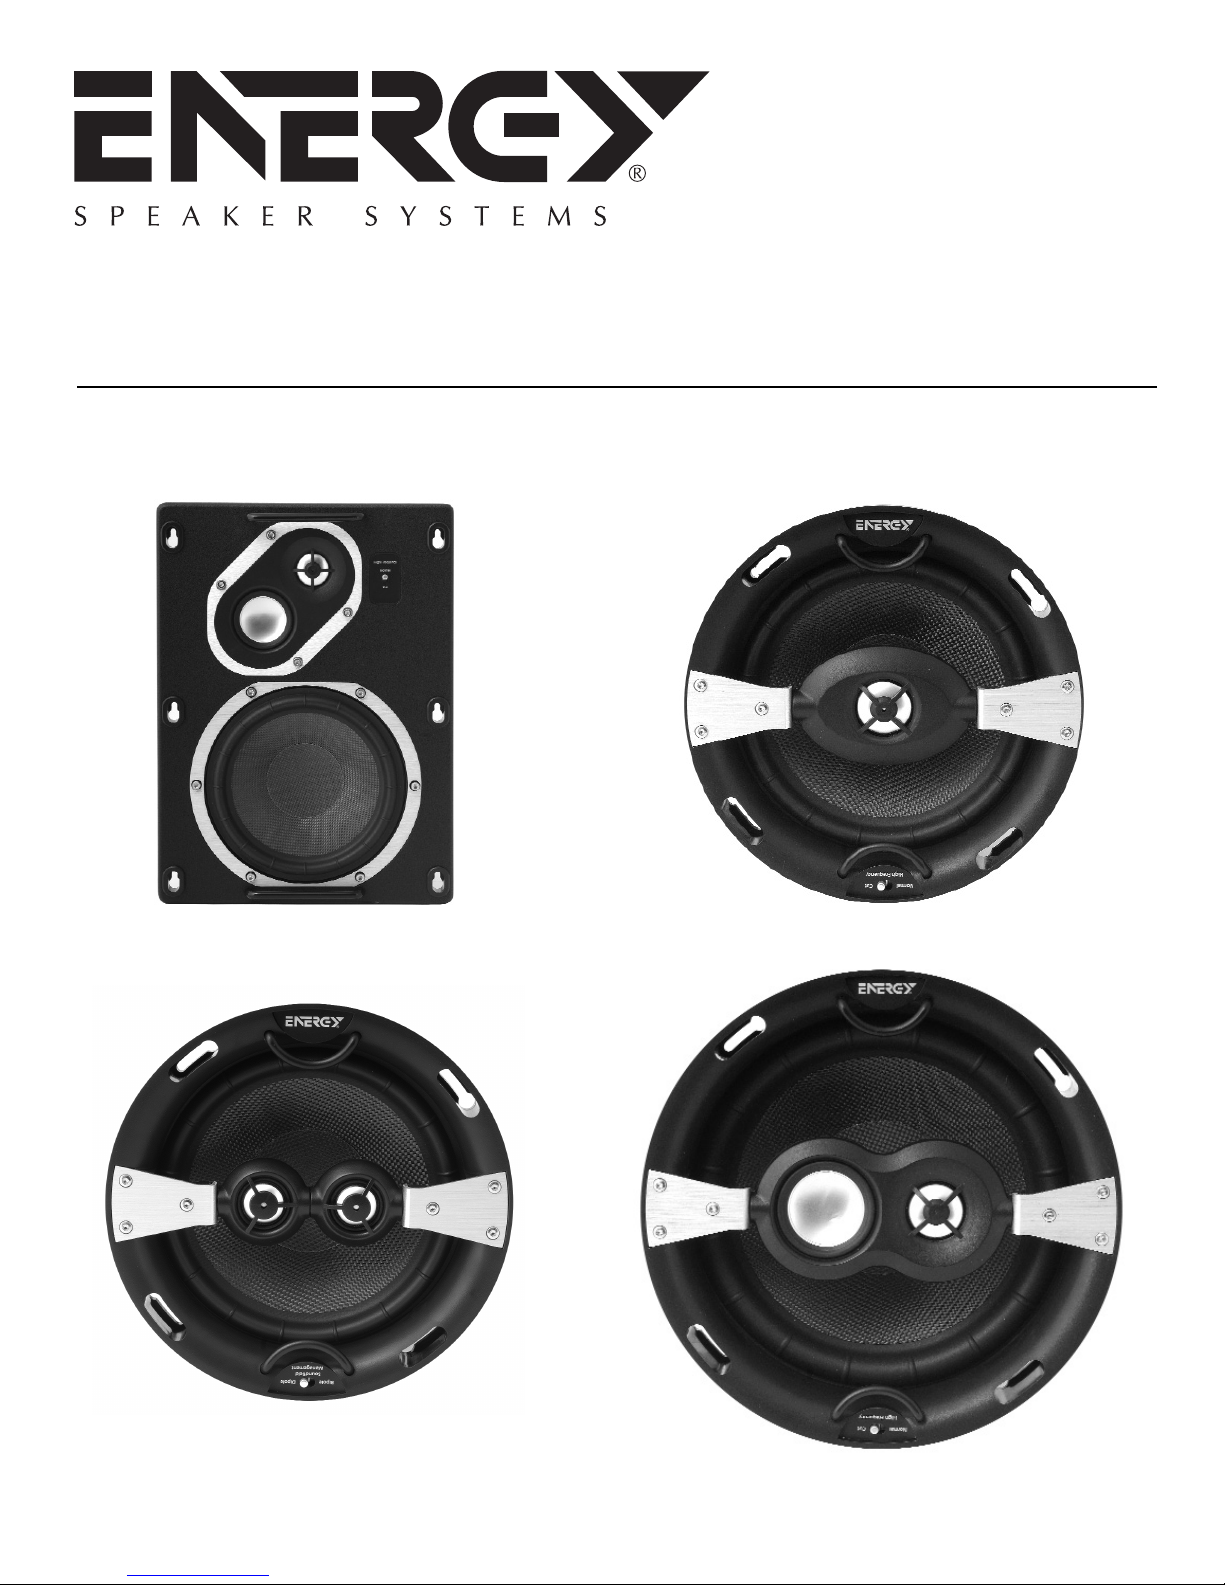
RC-6C, RC-6Cst
RC-8C, RC-6W
Page 2
IMPORTANT SAFETY
owners manual
INSTRUCTIONS –
READ CAREFULLY!
We are proud to welcome you as an owner of ENERGY®Speaker
Systems' Reference Connoisseur Custom Series. ENERGY
are the result of extensive research into accurate sonic reproduction
and represent the leading edge in speaker design and
performance. The finest components and cabinet materials,
combined with sophisticated manufacturing and quality control
procedures, ensure many years of exceptional performance and
listening pleasure.
Please take time to read all of the instructions contained in this
manual to make certain your system is properly installed and set up
for optimal sound reproduction. Be sure to unpack your system
carefully. Retain the carton and all packing material for future use.
UNPACKING
Using a knife carefully cut the tape to open the package. Fold the
carton flaps back and slide the speaker and packaging from the
box. Remove all inner packaging and parts.
CONTENTS:
1 - Bezel Kit
1 - Speaker
1 - Grille
1 - Paint Mask and Cut-out Template
BREAK-IN PROCEDURES
It is VITAL that your new Reference Connoisseur Custom speakers
be allowed to break-in properly before you perform any precise set
up procedures, system adjustments, and before you play them at
higher volume levels. The best method of performing the break-in
is to play a full range musical passage at a moderate level as long
as possible. Utilizing the repeat function on your CD or DVD player
can assist greatly. Optimum sound will not be achieved until
approximately 100 hours of playing time. After break-in, the
volume level can be increased. Do not play the speakers at high
levels until the break-in process has been completed. The
transducers need to “loosen up”, and until this occurs, damage
can result to the transducers.
RC-6C RC-6Cst RC-8C RC-6W
Cut-out Dimensions
(inches)
Cut-out Dimensions
(cm)
Overall Dimensions
(inches)
Overall Dimensions
(cm)
Installed Depth
(inches)
8-1/8” 8-1/8” 9-1/2” 13 x 9-3/4”
20.6375 20.6375 24.13 33.02 x 24.13
9-1/2” 9-1/2” 11” 14-1/2 x 11”
24.13 24.13 27.94 36.83 x 27.94
5” 5” 6” 3.5”
®
Speakers
POSITIONING AND INSTALLING
YOUR SPEAKERS
LEFT AND RIGHT MAIN SPEAKERS
(RC-6W, RC-6C, RC-8C)
The main speakers are usually placed in the front of the room, on
either side of the TV or video projector. They should be placed a
minimum of 6 feet apart. To calculate the best placement, measure
the distance between the speakers themselves and the listening
position. Your distance from the speakers should be roughly 1.5
times the distance the speakers are apart from each other. For
example: If the distance between each speaker and the listening
position is 9 feet, then the speakers should be 6 feet apart from
one another. This will provide excellent stereo separation and
imaging for music playback. Keeping the speakers a foot or two
away from the corner of the room will help significantly with the
overall sound quality. Remember, this is just a starting point, the
room's acoustics and furniture placement will vary the placement
of the speaker, as well as joists or wall studs. Use your best
judgment, as these guidelines are sometimes difficult to maintain
when installing in-wall and in-ceiling speakers, and therefore
should only be used as a general principles. Energy’s wide
dispersion design will allow you significant advantages over most
other in-wall or in-ceiling designs and can overcome “difficult”
rooms.
RC-6W
The RC-6W is designed to be used as a front left or right speaker,
center channel or as a rear channel speaker. The diagonally
oriented tweeter/midrange module allows the speaker to be
installed in either a horizontal or vertical orientation, depending on
the installation. This flexible design is unique in that no matter the
orientation the dispersion of the speaker is maintained, meaning
no matter how it is installed, it will always sound the same. This
guarantees that if 3 RC-6Ws are used as front left, center and
right, they will sound identical to one another.
RC-6C AND RC-8C
The RC-6C and RC-8C are designed to be used as front left or
right speaker, center channel, rear channel or distributed audio
speakers. Both models offer adjustable tweeter/midrange modules
that can be oriented to suit the particular installation. Energy’s
wide dispersion design ensures that even if the ideal installation
location cannot be utilized, the speaker will still deliver impressive
performance. Adjusting the tweeter/midrange angle can also assist
with this. When installing the RC-6C and RC-8C, try and locate the
speaker 2 or more feet from wall boundaries. This will help reduce
any midrange and mid bass coloration.
RC-6Cst
The RC-6Cst is a unique speaker, in that it can be used in a
multitude of configurations. When used as a stereo speaker, it is
ideal to try and install the speaker as close to the middle of the
room as possible. This will allow the left and right signals to
propagate throughout the room as much as possible, while
creating as large of a stereo image and separation as possible.
When in dipole or bipole mode, in a home theater system, the RC6Cst should be kept along the room boundaries, either in line with
the seating position or behind it. This will create the greatest sense
of ambiance and space, as is required from a rear channel speaker.
See the “Connecting the RC-6Cst Speaker” section for details on
how to install and connect this unique speaker.
2
Page 3
owners manual
OPTIONAL NEW CONSTRUCTION
BRACKETS (NOT INCLUDED,
AVAILABLE AS AN ACCESSORY)
The NCB is never installed when fitting a speaker into an existing
ceiling. It MAY be installed during a remodel or the construction of
a new house, while the structural joists and studs are exposed, but
is NOT required. Typically, the wire is placed now, to avoid electrical
wires (they can cause hum). The NCB is simply nailed between the
studs and locked into position with screws. The installed NCB
forces the wallboard installer to cut the hole for the speaker, thus
avoiding potential dust and mess. Additionally, it provides a tie
down to the speaker wire and clearly shows everyone where the
speaker will be installed, avoiding misunderstandings.
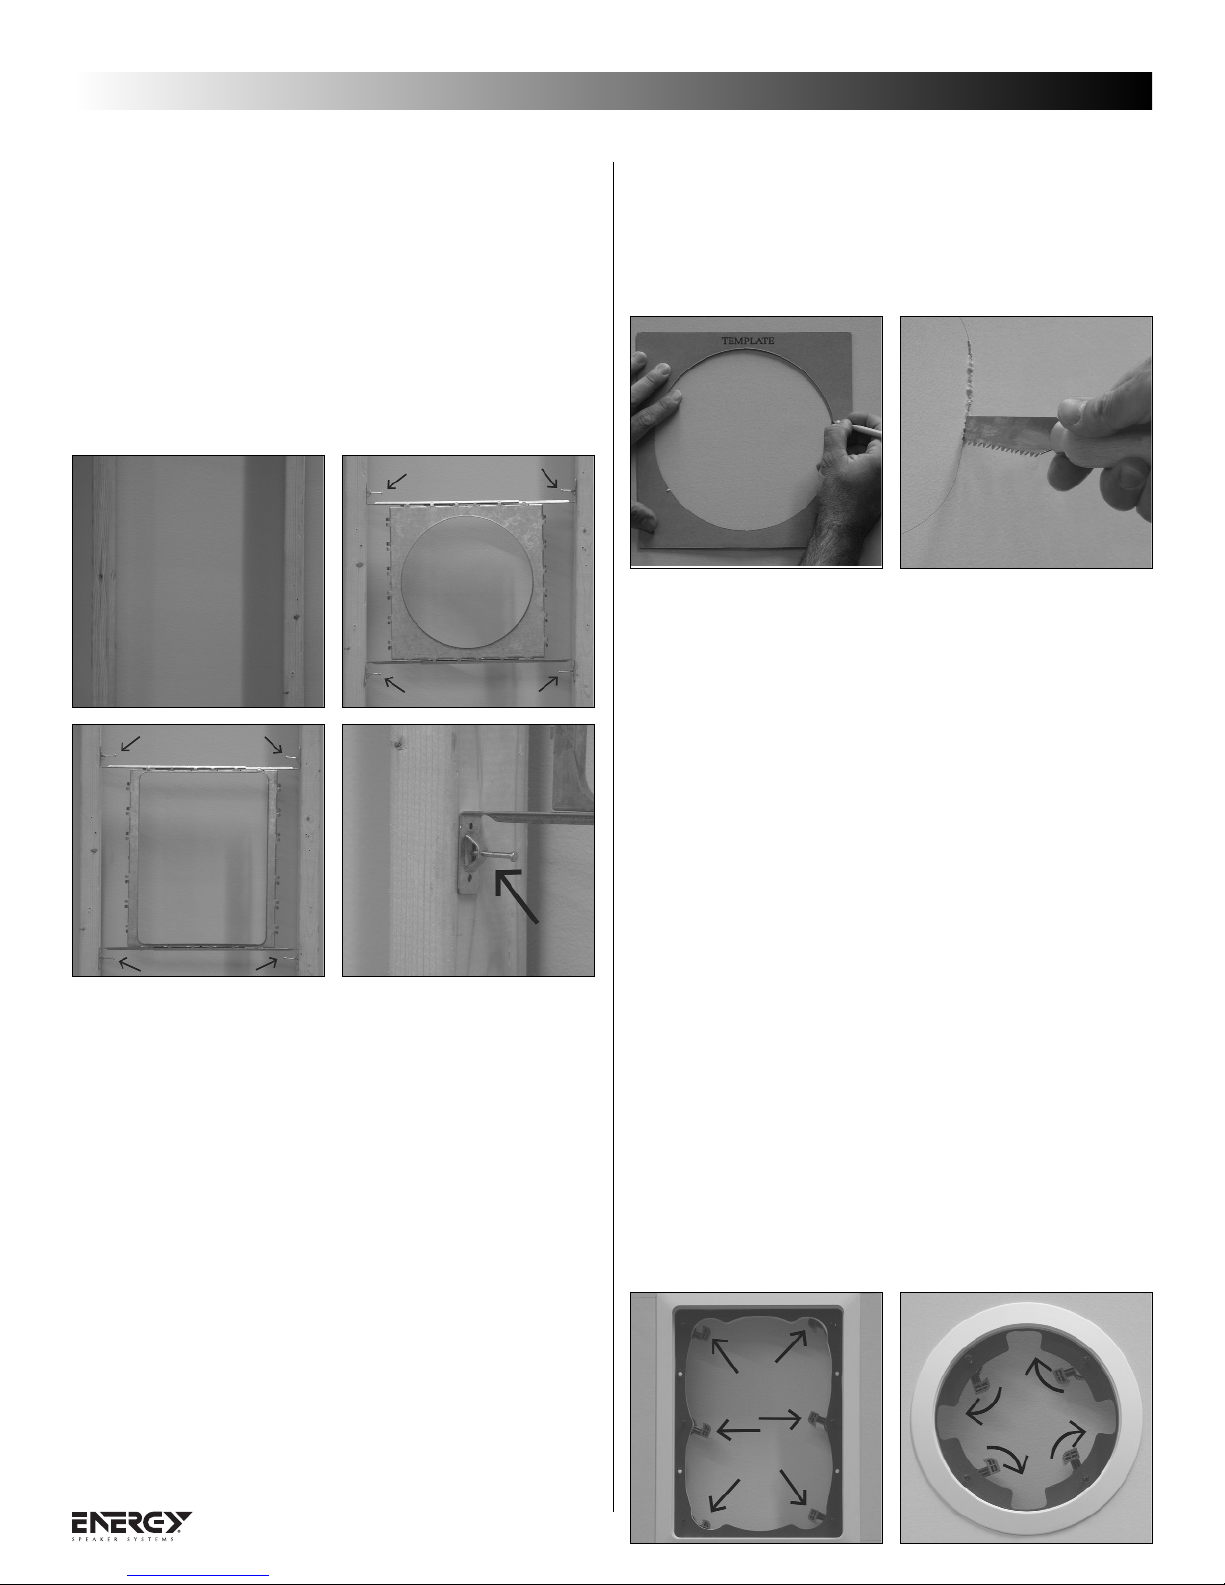
CUTTING THE HOLE IN DRYWALL
5a Use your drill to make a starting point inside the bezel outline
drawn on the drywall. The hole should be large enough to
insert a drywall saw.
6a With a drywall saw, carefully cut the entire speaker opening.
Cut with the saw at a 45 degree so that the drywall section
can easily be patched if there is a hidden obstruction.
CUTTING THE HOLE IN LATH AND PLASTER
5b. Use masking tape to surround the pencil drawn bezel
opening. Use your drill to make a starting point inside the
speaker opening. Then use a sharp razor knife to carefully
score around the entire speaker opening. Use a chisel to
remove all of the plaster and expose the lath.
6b. Tin snips will enable you to slowly "nip" the lathes away. If
you use a jigsaw/saber saw, attach a metal cutting blade to
slowly and carefully cut the lath. Beware, if the blade sticks,
the lath can rattle its entire length, knocking out plaster
elsewhere!
RETROFIT INSTALLATIONS
VERIFYING THAT THE WALL OR CEILING CAVITY
IS UNOBSTRUCTED
1. Use a stud finder to locate any joists or wall studs. If a stud
finder is not available, with your knuckle, knock on the ceiling
and listen to the sound as you move from side to side. When
the sound changes, you have located the stud or joist.
Carefully drill a small exploratory hole about 5.5” below the
top edge of the desired speaker location. Use a 1/8" drill bit.
Do not drill beyond the depth of the drywall (typically 1/2" to
5/8") so that you do not damage any existing wires, plumbing
or structure.
2. Cut a coat hanger so that you have an "L" shape. One end of
the "L" needs to be 5 1/2" long, the other at least 7".
3. Poke the short end of the "L" into the hole in the wall and
rotate the 7 inch end. If you feel any obstruction, patch the
hole and try again in another location. If you do not feel any
obstruction drill a new hole and repeat about 5.5” above the
bottom edge of the desired speaker location and repeat.
4. Use the enclosed cutout template to draw the bezel outline,
to aid you identify the outline of the hole to be cut.
BEZEL KIT INSTALLATION
Push the bezel into the hole you have just cut. Next, the spring
loaded dogs should be rotated into place. Now the bezel is ready
for the speaker to be installed.
INSTALLATION - STEP BY STEP
1. Verify that all of the Mounting Kit dogs are rotated into place.
The installed mounting kit bezel should be firmly secured to
the wall.
2. Verify that all of the dog screws are extend OUT into the
room. If the screws have been mistakenly tightened, loosen
them so that the screw head is at least an inch away from the
bezel. That way the speaker baffle will easily slide onto the
screw heads via the unique keyhole slots.
3. Do not pick the speaker up by the tweeter/ midrange pod!
Use the installation bars to hold the speaker. Connect the
speaker wire to the speaker terminals, observing the correct
polarity. Observe the keyholes on the speaker baffle.
4. Connect the speaker wire to the back of the speaker. All of
the models in the Reference Connoisseur Custom Series have
the same high quality gold plated binding post connectors, so
connection to each channel offers the same options.
Page 4

5. Push the speaker up into the bezel, slipping the bezel's dog
screws through the large part of the speaker keyholes.
6. Twist the speaker (ceiling mount version) or slide the speaker
(wall mount version) so that the dog screw is positioned in the
small part of the speaker keyhole. Tighten the dog screws
until the speaker is tight against the bezel. Do not over
tighten. If the dog screws are too tight, the bezel will be
warped and the grille will not fit.
7. For ceiling models, orient the tweeter toward the listener.
Adjust the speaker settings as follows:
owners manual
You should utilize high quality speaker cables, up to 12 gauge
(AWG). The Reference Connoisseur Custom series will accept a
variety of connector types including banana jacks, or pin type
connectors. Audiophiles and novices alike have preferences as to
which connector type they favor, speak with your Authorized
ENERGY retailer as to which is the best for your Audio Video
System. Rest assured, plain speaker wire is more than acceptable,
you can always upgrade your wires and/or connectors later on.
To connect your speaker system: Start at one speaker, and
connect one channel at a time, starting with the front speakers.
Always ensure that the entire A/V system is powered OFF before
performing any connections. The positive and negative (red and
black) sides of the speaker terminals MUST match the positive and
negative (red and black) terminals of the receiver or amplifier. If
they do not match, abnormal sound and a lack of bass response
will result. After connecting the front speakers, connect the rest of
the speakers to their appropriate channels of the receiver or
amplifier. The three connection methods and their explanations
include:
4
Page 5

CONNECTING THE RC-6Cst
The RC-6Cst is a unique speaker, in that is it able to be used in
many different ways, including stereo or a dipole/bipole speaker.
When used as a Stereo speaker, it is required that TWO speaker
wires are run to each RC-6Cst speaker, one speaker wire for the
left channel and one speaker wire for the right channel. Connect
the left positive and negative wires to the left positive and negative
inputs on the RC-6Cst, and then repeat for the right channel.
Orient the individually adjustable tweeters to opposite ends of the
room, as this will create the largest stereo image possible.
When used as a Dipole/Bipole speaker, only one set of wires needs
to be run to the speaker. Install the included “jumper” to the
jumper connections, and then connect.
Orient the individually adjustable tweeters to create the image you
desire. The further the angle of the speakers, the larger the
soundstage created.
owners manual
FINE TUNING
Before beginning any fine tuning, please ensure all connections are
properly made and your speakers have had the chance to break-in
for a minimum of 100 hours. This will ensure the proper results are
achieved. Your listening room is the final component of your audio
system and will be the difference between mediocre sound and
high quality sound. Reflections, which are a part of every recording
and music playback, will have a major effect on your system's
performance. If your room is too “live”, meaning there are many
bare surfaces like glass windows, hard floors and thin furnishings,
you might find the sound overly bright. If your room is “dead”,
meaning there is thick pile carpeting, heavy furniture and a lot of
wall coverings, you might find the sound lacks dynamic energy. To
remedy these issues, small changes to your room should be
considered as they generally lead to large improvements in sound
quality. Most listening rooms must balance aesthetics and sound,
but patience and small adjustments can pay huge acoustic
dividends.
When installing a surround sound system, all the above holds true.
Calibration of your speaker distances, adjusting delays and
balancing your levels with an SPL meter are necessary to extract
the most out of your system.
5
Page 6

owners manual
BOUNDARY COMPENSATION
DIPOLE/BIPOLE
In the BIPOLE position the two side firing drivers are engaged and
are operating in phase with each other. In the DIPOLE position the
side drivers are active, but are wired out of phase from each other.
The resulting sound field is even more expansive, and can create an
even larger effect than the bi-pole mode.
HIGH FREQUENCY EQUALIZATION
In rooms without carpets and drapes, the CUT position will
improve the sound.
PAINTING THE BEZEL AND THE GRILLEE
Note: The inner section of the cardboard cutout template
acts as a paint mask if you choose to paint the grille while it
is installed.
The grille incorporates a scrim cloth to hide the domes and cones
of the loudspeaker components when installed. This scrim-cloth
must be removed before painting. It is tacked into place in the four
corners of the grille. To remove, gently peel from each corner in
turn. Reserve the scrim-cloth until the grille is painted and dry.
If you are using a spray gun, set it for the most diffused spray and
try two very thin coats. If you are using a brush, thin the paint so
that the grille holes will not be blocked.
After the paint is dry, apply four or five small, thin spots of spray
adhesive (similar to 3M Super 77) around the edge of the scrim
cloth. Starting with one edge, work the scrim-cloth back into
place, making sure that the cloth is stretched flat behind the grille.
6
INSTALLING THE GRILLE
8. Fit the grille into the bezel gradually. Work in a circular
fashion, gradually fitting the grille into the bezel. If you have
any trouble fitting the grille in, check the dog screws. If they
are too tight, they can warp the bezel. Once fully installed, the
grille is absolutely flush with the bezel.
Page 7

WARRANTY
GARANTIE
GARANTIE
LIMITED WARRANTY POLICY
IN THE UNITED STATES AND CANADA
ENERGY®warrants this product to the retail purchaser against any failure
resulting from original manufacturing defects in workmanship or
materials. The warranty is in effect for a period of: Speaker Section-five
(5) years, Subwoofer Section-one (1) year from date of purchase from an
authorized ENERGY
®
dealer and is valid only if the original dated bill of
sale is presented when service is required.
The warranty does not cover damage caused during shipment, by
accident, misuse, abuse, neglect, unauthorized product modification,
failure to follow the instructions outlined in the owner’s manual, failure
to perform routine maintenance, damage resulting from unauthorized
repairs or claims based upon misrepresentations of the warranty by the
seller.
WARRANTY SERVICE
If you require service for your ENERGY®speaker(s) at any time during the
warranty period, please contact:
1) the dealer from whom you purchased the product(s),
2) ENERGY NATIONAL SERVICE, 203 Eggert Road, Buffalo, N.Y. 14215
Tel: 716-896-9801 or
®
3) ENERGY
McNicoll Avenue, Toronto, Ontario, Canada, M1X 1G5,
Tel: 416-321-1800.
4) Additional service centers can be found by checking the ENERGY
website: www.energy-speakers.com or, by calling either of the
above numbers.
You will be responsible for transporting the speakers in adequate
packaging to protect them from damage in transit and for the shipping
costs to an authorized ENERGY
product is returned for repair to ENERGY
costs of the return shipment to you will be paid by ENERGY
the repairs concerned fall within the Limited Warranty. The ENERGY
Warranty is limited to repair or replacement of ENERGY®products. It
does not cover any incidental or consequential damage of any kind. If the
provisions in any advertisement, packing cartons or literature differ from
those specified in this warranty, the terms of the Limited Warranty
prevail.
, a division of Audio Products International Corp., 3641
®
service center or to ENERGY®. If the
®
in Toronto or Buffalo, the
®
, provided
®
®
GARANTIE AUX
ÉTATS-UNIS ET AU CANADA
La société ENERGY®garantit cet appareil contre toute défectuosité
attribuable aux pièces d’origine et à la main-d’oeuvre. Cette garantie est
valide pendant une période de cinq (5) ans (enceinte) et d’un (1) an
(extreme graves) à partir de la date d’achat auprès d’un revendeur
ENERGY
®
agréé ; la garantie ne sera honorée que sur présentation d’une
pièce justificative de la date d’achat.
La garantie ne couvre aucun dommage subi pendant le transport ou
imputable à un accident, à une utilisation impropre ou abusive, à la
négligence, à une modification non autorisée, à la non-observance des
instructions décrites dans le manuel de l’utilisateur ou des directives
d’entretien, ni aucun dommage subi par suite de réparations non
autorisées ou de réclamations fondées sur une mauvaise interprétation
des conditions de la présente garantie par le revendeur.
SERVICE SOUS GARANTIE
Dans l’éventualité où une réparation deviendrait nécessaire
pendant la période de couverture de la garantie, communiquez avec :
1) le revendeur auprès de qui l’appareil a été acheté,
2) ENERGY National Service, 203, Eggert Road, Buffalo, N.Y. 14215,
tél. : 716-896-9801 ou
®
3) ENERGY
1G5, tél. : 416-321-1800.
4) Pour connaître l'adresse de tous nos centres de service, consultez le
site Web de ENERGY
des numéros indiqués plus haut.
Le propriétaire de l’appareil est responsable de son emballage et de tous
frais d’expédition à un centre de service ENERGY
Si l’appareil est expédié à ENERGY
réparation, les frais de réexpédition seront assumés par ENERGY
condition que les réparations effectuées soient couvertes par la garantie.
La garantie est limitée à la réparation ou au remplacement des appareils
fabriqués et distribués par ENERGY
indirect ou consécutif de quelque nature que ce soit. Si les conditions
accompagnant toute publicité, emballage ou documentation divergent
de celles de la présente garantie, les conditions de la présente garantie
prévaudront.
, 3641, avenue McNicoll, Toronto (Ontario), Canada, M1X
®
à www.energy-speakers.com ou composez l’un
®
®
à Toronto ou à Buffalo aux fins de
®
. Elle ne couvre aucun dommage
agréé ou à ENERGY®.
®
à la
 Loading...