

Energy RC-6C, RC-6Cst, RC-8C, RC-6W Owner's Manual
OWNERS MANUAL
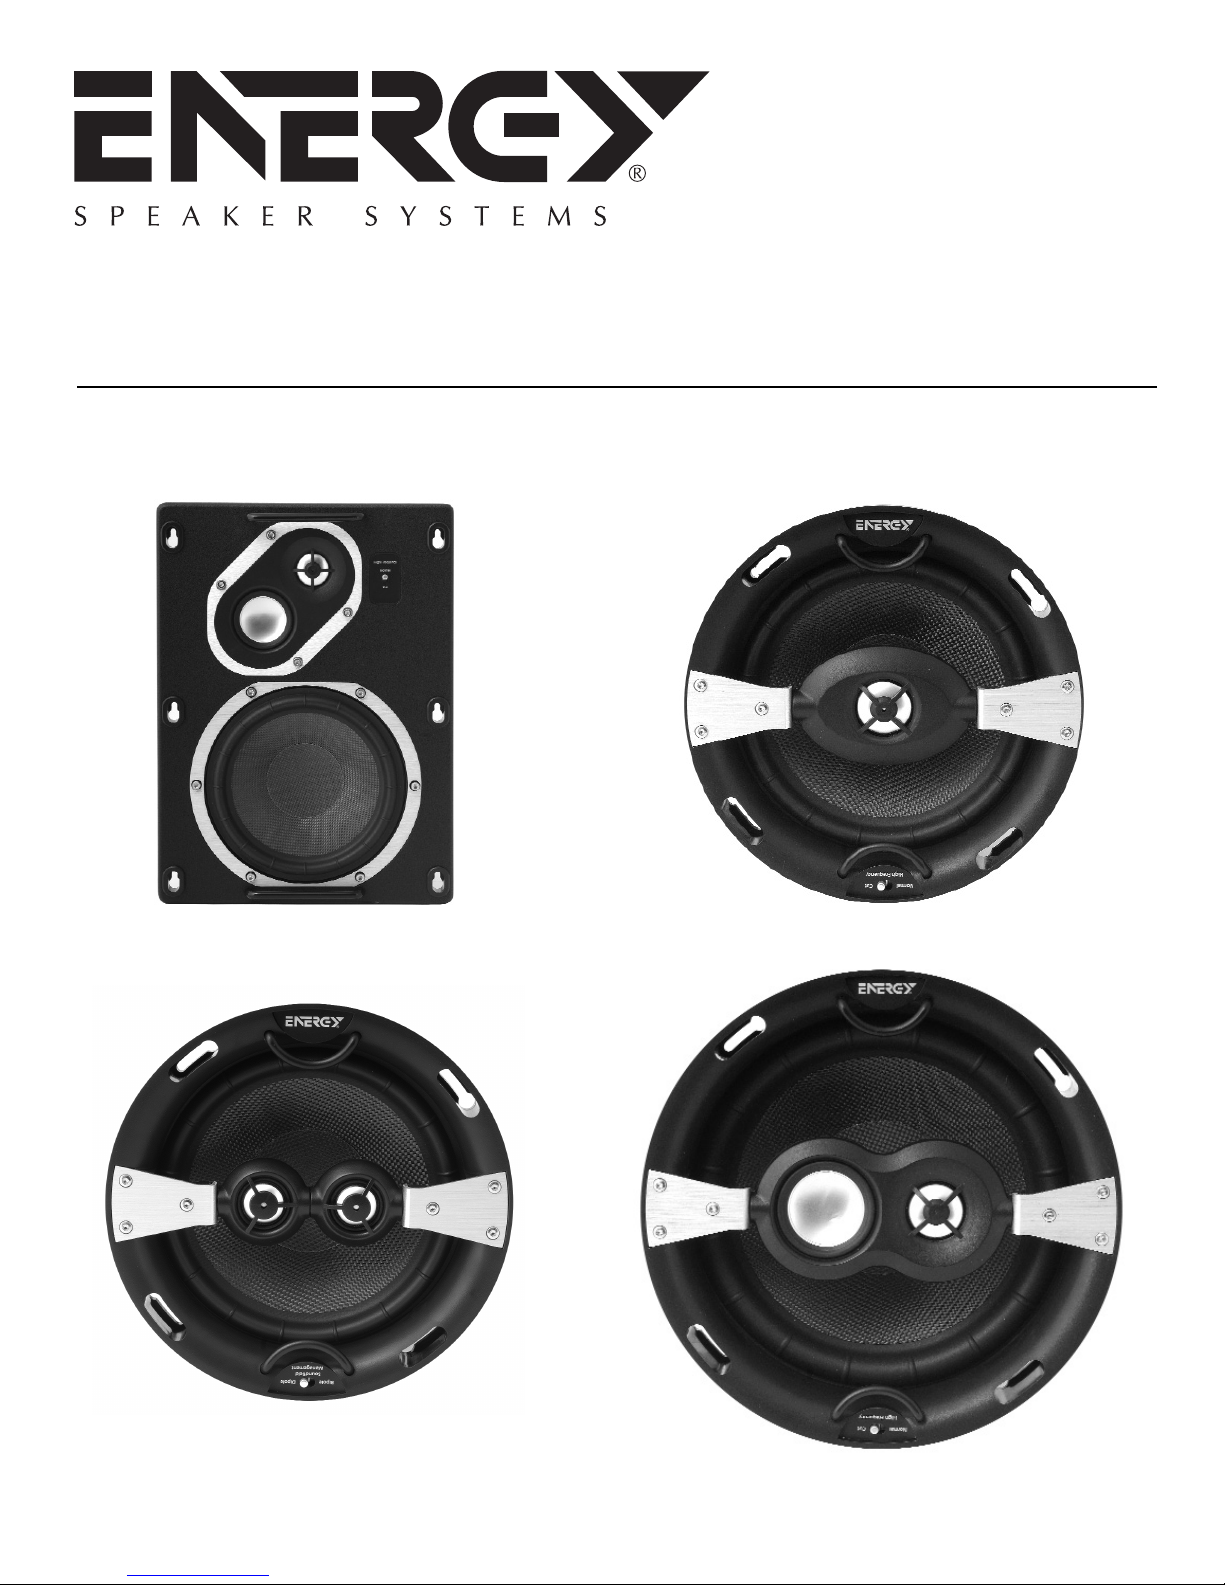
RC-6C, RC-6Cst
RC-8C, RC-6W
IMPORTANT SAFETY
owners manual
INSTRUCTIONS –
READ CAREFULLY!
We are proud to welcome you as an owner of ENERGY®Speaker
Systems' Reference Connoisseur Custom Series. ENERGY
are the result of extensive research into accurate sonic reproduction
and represent the leading edge in speaker design and
performance. The finest components and cabinet materials,
combined with sophisticated manufacturing and quality control
procedures, ensure many years of exceptional performance and
listening pleasure.
Please take time to read all of the instructions contained in this
manual to make certain your system is properly installed and set up
for optimal sound reproduction. Be sure to unpack your system
carefully. Retain the carton and all packing material for future use.
UNPACKING
Using a knife carefully cut the tape to open the package. Fold the
carton flaps back and slide the speaker and packaging from the
box. Remove all inner packaging and parts.
CONTENTS:
1 - Bezel Kit
1 - Speaker
1 - Grille
1 - Paint Mask and Cut-out Template
BREAK-IN PROCEDURES
It is VITAL that your new Reference Connoisseur Custom speakers
be allowed to break-in properly before you perform any precise set
up procedures, system adjustments, and before you play them at
higher volume levels. The best method of performing the break-in
is to play a full range musical passage at a moderate level as long
as possible. Utilizing the repeat function on your CD or DVD player
can assist greatly. Optimum sound will not be achieved until
approximately 100 hours of playing time. After break-in, the
volume level can be increased. Do not play the speakers at high
levels until the break-in process has been completed. The
transducers need to “loosen up”, and until this occurs, damage
can result to the transducers.
RC-6C RC-6Cst RC-8C RC-6W
Cut-out Dimensions
(inches)
Cut-out Dimensions
(cm)
Overall Dimensions
(inches)
Overall Dimensions
(cm)
Installed Depth
(inches)
8-1/8” 8-1/8” 9-1/2” 13 x 9-3/4”
20.6375 20.6375 24.13 33.02 x 24.13
9-1/2” 9-1/2” 11” 14-1/2 x 11”
24.13 24.13 27.94 36.83 x 27.94
5” 5” 6” 3.5”
®
Speakers
POSITIONING AND INSTALLING
YOUR SPEAKERS
LEFT AND RIGHT MAIN SPEAKERS
(RC-6W, RC-6C, RC-8C)
The main speakers are usually placed in the front of the room, on
either side of the TV or video projector. They should be placed a
minimum of 6 feet apart. To calculate the best placement, measure
the distance between the speakers themselves and the listening
position. Your distance from the speakers should be roughly 1.5
times the distance the speakers are apart from each other. For
example: If the distance between each speaker and the listening
position is 9 feet, then the speakers should be 6 feet apart from
one another. This will provide excellent stereo separation and
imaging for music playback. Keeping the speakers a foot or two
away from the corner of the room will help significantly with the
overall sound quality. Remember, this is just a starting point, the
room's acoustics and furniture placement will vary the placement
of the speaker, as well as joists or wall studs. Use your best
judgment, as these guidelines are sometimes difficult to maintain
when installing in-wall and in-ceiling speakers, and therefore
should only be used as a general principles. Energy’s wide
dispersion design will allow you significant advantages over most
other in-wall or in-ceiling designs and can overcome “difficult”
rooms.
RC-6W
The RC-6W is designed to be used as a front left or right speaker,
center channel or as a rear channel speaker. The diagonally
oriented tweeter/midrange module allows the speaker to be
installed in either a horizontal or vertical orientation, depending on
the installation. This flexible design is unique in that no matter the
orientation the dispersion of the speaker is maintained, meaning
no matter how it is installed, it will always sound the same. This
guarantees that if 3 RC-6Ws are used as front left, center and
right, they will sound identical to one another.
RC-6C AND RC-8C
The RC-6C and RC-8C are designed to be used as front left or
right speaker, center channel, rear channel or distributed audio
speakers. Both models offer adjustable tweeter/midrange modules
that can be oriented to suit the particular installation. Energy’s
wide dispersion design ensures that even if the ideal installation
location cannot be utilized, the speaker will still deliver impressive
performance. Adjusting the tweeter/midrange angle can also assist
with this. When installing the RC-6C and RC-8C, try and locate the
speaker 2 or more feet from wall boundaries. This will help reduce
any midrange and mid bass coloration.
RC-6Cst
The RC-6Cst is a unique speaker, in that it can be used in a
multitude of configurations. When used as a stereo speaker, it is
ideal to try and install the speaker as close to the middle of the
room as possible. This will allow the left and right signals to
propagate throughout the room as much as possible, while
creating as large of a stereo image and separation as possible.
When in dipole or bipole mode, in a home theater system, the RC6Cst should be kept along the room boundaries, either in line with
the seating position or behind it. This will create the greatest sense
of ambiance and space, as is required from a rear channel speaker.
See the “Connecting the RC-6Cst Speaker” section for details on
how to install and connect this unique speaker.
2
owners manual
OPTIONAL NEW CONSTRUCTION
BRACKETS (NOT INCLUDED,
AVAILABLE AS AN ACCESSORY)
The NCB is never installed when fitting a speaker into an existing
ceiling. It MAY be installed during a remodel or the construction of
a new house, while the structural joists and studs are exposed, but
is NOT required. Typically, the wire is placed now, to avoid electrical
wires (they can cause hum). The NCB is simply nailed between the
studs and locked into position with screws. The installed NCB
forces the wallboard installer to cut the hole for the speaker, thus
avoiding potential dust and mess. Additionally, it provides a tie
down to the speaker wire and clearly shows everyone where the
speaker will be installed, avoiding misunderstandings.
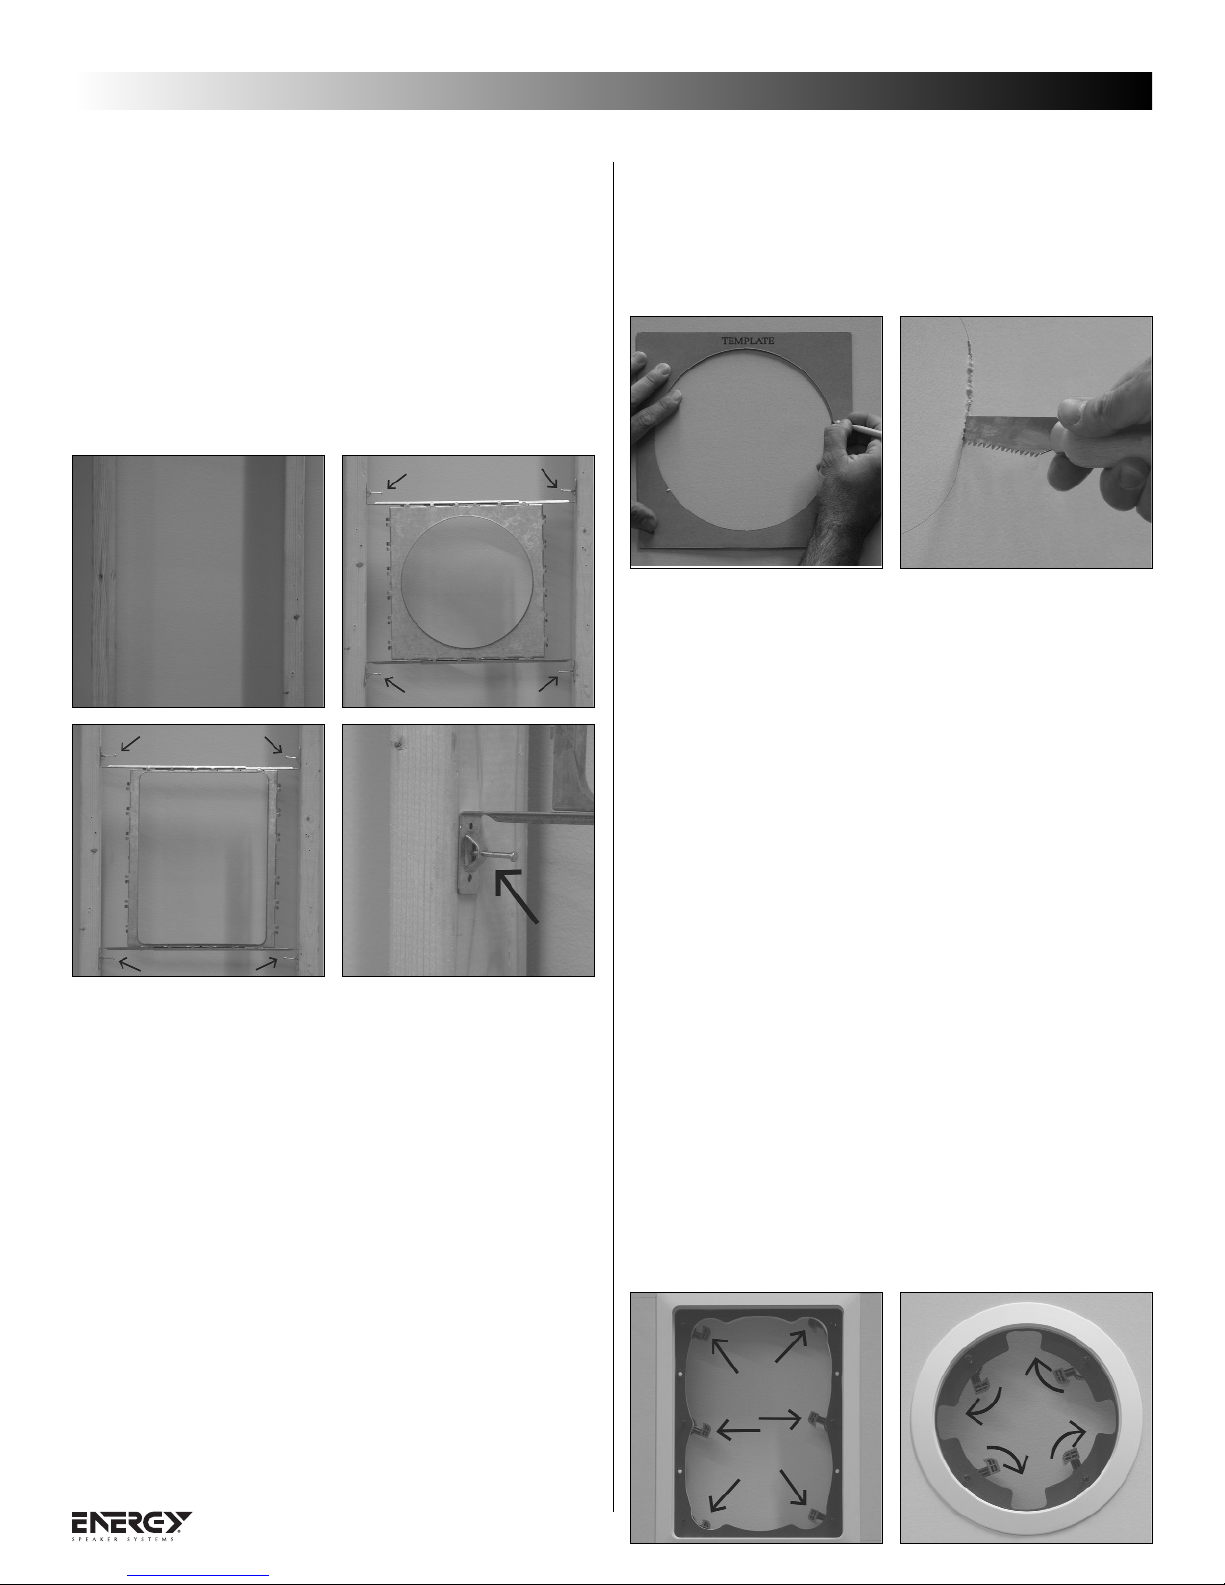
CUTTING THE HOLE IN DRYWALL
5a Use your drill to make a starting point inside the bezel outline
drawn on the drywall. The hole should be large enough to
insert a drywall saw.
6a With a drywall saw, carefully cut the entire speaker opening.
Cut with the saw at a 45 degree so that the drywall section
can easily be patched if there is a hidden obstruction.
CUTTING THE HOLE IN LATH AND PLASTER
5b. Use masking tape to surround the pencil drawn bezel
opening. Use your drill to make a starting point inside the
speaker opening. Then use a sharp razor knife to carefully
score around the entire speaker opening. Use a chisel to
remove all of the plaster and expose the lath.
6b. Tin snips will enable you to slowly "nip" the lathes away. If
you use a jigsaw/saber saw, attach a metal cutting blade to
slowly and carefully cut the lath. Beware, if the blade sticks,
the lath can rattle its entire length, knocking out plaster
elsewhere!
RETROFIT INSTALLATIONS
VERIFYING THAT THE WALL OR CEILING CAVITY
IS UNOBSTRUCTED
1. Use a stud finder to locate any joists or wall studs. If a stud
finder is not available, with your knuckle, knock on the ceiling
and listen to the sound as you move from side to side. When
the sound changes, you have located the stud or joist.
Carefully drill a small exploratory hole about 5.5” below the
top edge of the desired speaker location. Use a 1/8" drill bit.
Do not drill beyond the depth of the drywall (typically 1/2" to
5/8") so that you do not damage any existing wires, plumbing
or structure.
2. Cut a coat hanger so that you have an "L" shape. One end of
the "L" needs to be 5 1/2" long, the other at least 7".
3. Poke the short end of the "L" into the hole in the wall and
rotate the 7 inch end. If you feel any obstruction, patch the
hole and try again in another location. If you do not feel any
obstruction drill a new hole and repeat about 5.5” above the
bottom edge of the desired speaker location and repeat.
4. Use the enclosed cutout template to draw the bezel outline,
to aid you identify the outline of the hole to be cut.
BEZEL KIT INSTALLATION
Push the bezel into the hole you have just cut. Next, the spring
loaded dogs should be rotated into place. Now the bezel is ready
for the speaker to be installed.
INSTALLATION - STEP BY STEP
1. Verify that all of the Mounting Kit dogs are rotated into place.
The installed mounting kit bezel should be firmly secured to
the wall.
2. Verify that all of the dog screws are extend OUT into the
room. If the screws have been mistakenly tightened, loosen
them so that the screw head is at least an inch away from the
bezel. That way the speaker baffle will easily slide onto the
screw heads via the unique keyhole slots.
3. Do not pick the speaker up by the tweeter/ midrange pod!
Use the installation bars to hold the speaker. Connect the
speaker wire to the speaker terminals, observing the correct
polarity. Observe the keyholes on the speaker baffle.
4. Connect the speaker wire to the back of the speaker. All of
the models in the Reference Connoisseur Custom Series have
the same high quality gold plated binding post connectors, so
connection to each channel offers the same options.
 Loading...