

Eneo VM-17PD, VM-19PD, VM-22PD User Manual

EN
DE
FR
User Manual
17”/19”/22” LCD/TFT Monitor,
3D-Comb Filter, HDMI
VM-17PD
VM-19PD
VM-22PD

2
Safety instructions
General safety instructions
• Before switching on and operating the system, rst read this safety advice and the operating instructions.
• Keep the operating instructions in a safe place for later use.
• Installation, commissioning and maintenance of the system may only be carried out by authorised
individuals and in accordance with the installation instructions - ensuring that all applicable standards and
guidelines are followed.
• Protect the devices from water penetration and humidity, since these can cause lasting damage.
• Should moisture nevertheless enter the system, under no circumstance switch on the devices under these
conditions, instead send them for examination to an authorised specialist workshop.
• The system must never be used outside of the technical specications, since this can destroy it.
• The device must be protected from excesses of heat, dust, humidity and vibration.
• When separating the system from the voltage supply, only ever use the plug to pull out the cable. Never
pull directly on the cable itself.
• Lay the connecting cables carefully and check that they are not mechanically stressed, kinked or damaged
and that no humidity can penetrate into them.
• In the event of a malfunction, please inform your supplier.
• Maintenance and repairs may only be carried out by authorised specialist personnel.
• The system must be isolated from the power supply before opening the housing.
• The device may only be opened by qualied service personnel. Unauthorised access invalidates any
warranty claim.
• Connection cables should always be exchanged through Videor E. Hartig GmbH.
• Use only original spare parts and accessories from Videor E. Hartig GmbH.
• The housing should only be cleaned using a mild domestic cleaning agent. Never use solvents or petrol as
these can permanently damage the surface.
• During installation, it is essential to ensure that the seals provided are correctly installed and that they are
not displaced during installation. Damaged seals must not be installed and will invalidate any warranty.
• The installer is responsible for the maintenance of the enclosure as per the technical data, e.g. by sealing
the cable outlets with silicone.
• Wire end ferrules should be used when shortening the exible connection cables.
• The devices may only be operated in the temperature range indicated in the data sheet and within the
dened air humidity range.
Product - Specic Safety Instructions
• The monitor generates only a small amount of heat during operation; this heat must nevertheless be dissipated and sucient fresh air supplied.
• To prevent a build-up of heat, never cover the ventilation slits.
• To guarantee the air circulation, maintain a sucient distance from other devices and walls. A build-up of
heat reduces the lifespan of the devices and can, in extreme cases, lead to re.
• For operation in closed shelving units, it is absolutely essential to maintain sucient separations.
• If the monitor is brought from a cold into a warm environment, the operator must wait until the ambient
temperature has been reached.
• Do not place the monitor in direct sunlight or near a window. Humidity and direct sunlight can cause
severe damage.
• Never poke metallic or other items through the ventilation slits; these can cause permanent damage.
• Do not place any large weights on the device.
• Do not exert any pressure on the LCD monitor. Excessive pressure can cause lasting damage to the display.
• The system must be isolated from the power supply before opening the housing.
• It is the responsibility of the user of this system to ensure that he is informed of local regulations and of
state and national laws and regulations concerning recording and monitoring of audio signals and to
comply with these regulations.
3
EN
Note on screen burn eects with TFT monitors
• Normally the image on an LCD monitor cannot burn itself in, in the way that occurs with tube-based
monitors.
• However, a “Memory Eect” can occur, usually becoming visible after several hours displaying the same
image. With unchanging images, the liquid-crystal molecules align themselves in a certain way and can
eventually become so inert that they no longer regenerate completely.
• If this results in an after-image, it can be corrected by means of a generatorproduced white signal.
• The eect should not be seen as a defect; rather it is a result of the nature and function of LCD panels.
• No warranty claim may be made based on this eect. Details on request.
WEEE (Waste Electronical & Electronic Equipment)
Correct Disposal of This Product (Applicable in the European Union and other European countries with separate
collection systems).
This marking shown on the product or its literature, indicates that it should not be disposed with
other household wastes at the end of its working life. To prevent possible harm to the environment
or human health from uncontrolled waste disposal, please separate this from other types of wastes
and recycle it responsibly to promote the sustainable reuse of material resources. Household users
should contact either the retailer where they purchased this product, or their local government
oce, for details of where and how they can take this item for environmentally safe recycling.
Business users should contact their supplier and check the terms and conditions of the purchase
contract. This product should not be mixed with other commercial wastes for disposal.
Graphical symbols
Please pay attention to the safety instructions, and carefully read through this instruction guide before initial
operation.
Important points of warning are marked with a caution symbol.
i
Important points of advice are marked with a notice symbol.

4
Table of content
Introduction ..................................................................................................................6
Features .........................................................................................................................7
Assembling the monitor ...............................................................................................8
To assemble the monitor ................................................................................................................................................ 8
To disassemble the monitor .......................................................................................................................................... 8
Wall hanging standard ....................................................................................................................................................9
The function of the interface .....................................................................................10
Front panel controls ...................................................................................................11
Control panel ................................................................................................................................................................... 11
Changing a monitor parameter ........................................................................................................................... 12
Hot keys ........................................................................................................................................................................ 12
OSD Function ..............................................................................................................13
VGA menu ........................................................................................................................................................................ 13
Video ............................................................................................................................................................................. 13
Sound ............................................................................................................................................................................ 15
Setting ........................................................................................................................................................................... 16
Child Lock ..................................................................................................................................................................... 17
Cam menu ......................................................................................................................................................................... 18
Video .............................................................................................................................................................................. 18
Audio ............................................................................................................................................................................. 19
Setting ........................................................................................................................................................................... 20
Child Lock ..................................................................................................................................................................... 22
HDMI menu ...................................................................................................................................................................... 23
Video .............................................................................................................................................................................. 23
Audio ............................................................................................................................................................................. 24
Setting ........................................................................................................................................................................... 25
Child Lock ..................................................................................................................................................................... 27
Self Diagnosis ................................................................................................................................................................ 27

5
EN
Trouble shooting ........................................................................................................29
Specications ...............................................................................................................30
Dimensions ..................................................................................................................31
VM-17PD ........................................................................................................................................................................... 31
VM-19PD ........................................................................................................................................................................... 31
VM-22PD ........................................................................................................................................................................... 32
Further information ....................................................................................................32

6
Introduction
This manual explains how to correctly install, operate and get the best performance from
your monitor. Please read this user manual carefully before installing your monitor then
keep it near your monitor for quick reference. First, please check that the contents of the
box correspond with the following checklist:
• LCD monitor
• Power cord
• Audio cord
• VGA cable
• AC adaptor
• User manual

7
EN
Features
• The monitor is designed for use in a small work area or for those who need more
work space on the desk.
• The convenient and user-friendly onscreen display allows for easy and accurate
adjustments of screen size, position and screen color.
• The monitor complies with the VESA Display Data Channel (DDC) specication for
Plug and Play compatibility. Advanced microcircuitry makes setup and conguration fast and eortless.
• The monitor features Advanced Color Controls for ne-tuning to meet your own
personal tastes or application requirements. Use the on-screen controls to adjust
the color temperature,
• RGB gain value for the best possible screen color and intensity.
• Press the Menu button and activate the Self-Diagnosis menu to determine whether
your monitor is functioning normally, not receiving a signal or is receiving a signal
that is out of scanning range.
• Activate the higher refresh rates of the monitor to stabilize the screen and eliminate
the annoying icker that contributes to eye-strain and headaches.
• The monitor supports the optimal display performance with 1280x1024 @ 60 Hz
(VM-17PD/VM-19PD Model) and 1920x1080 @ 60 Hz (VM-22PD Model)
• The monitor can be connected to various types of video devices with supporting
video input signals such as Composite video (CVBS), and Separate video.
• The internal stereo speakers produce a good quality audio sound.

8
Assembling the monitor
The monitors are designed for use on a desktop. The arm of the monitor stand is shipped
preinstalled on the monitor.
To assemble the monitor
1. Put a smooth pad or cloth on a level surface. Place the monitor on it facing
downwards.
2. Insert the arm of the monitor stand of the monitor into the pedestal foot provided. See gures below.
To disassemble the monitor
1. Put a smooth pad or cloth on a level surface. Place the monitor on it facing
downwards.
2. Shrapnel with ngers or similar objects hold the base below , carefully detach the
supporting arm from the foot by pressing the groove on the back of the supporting arm. (Note that the xation point can be broken if too much force is applied).
See gures below.
9
EN
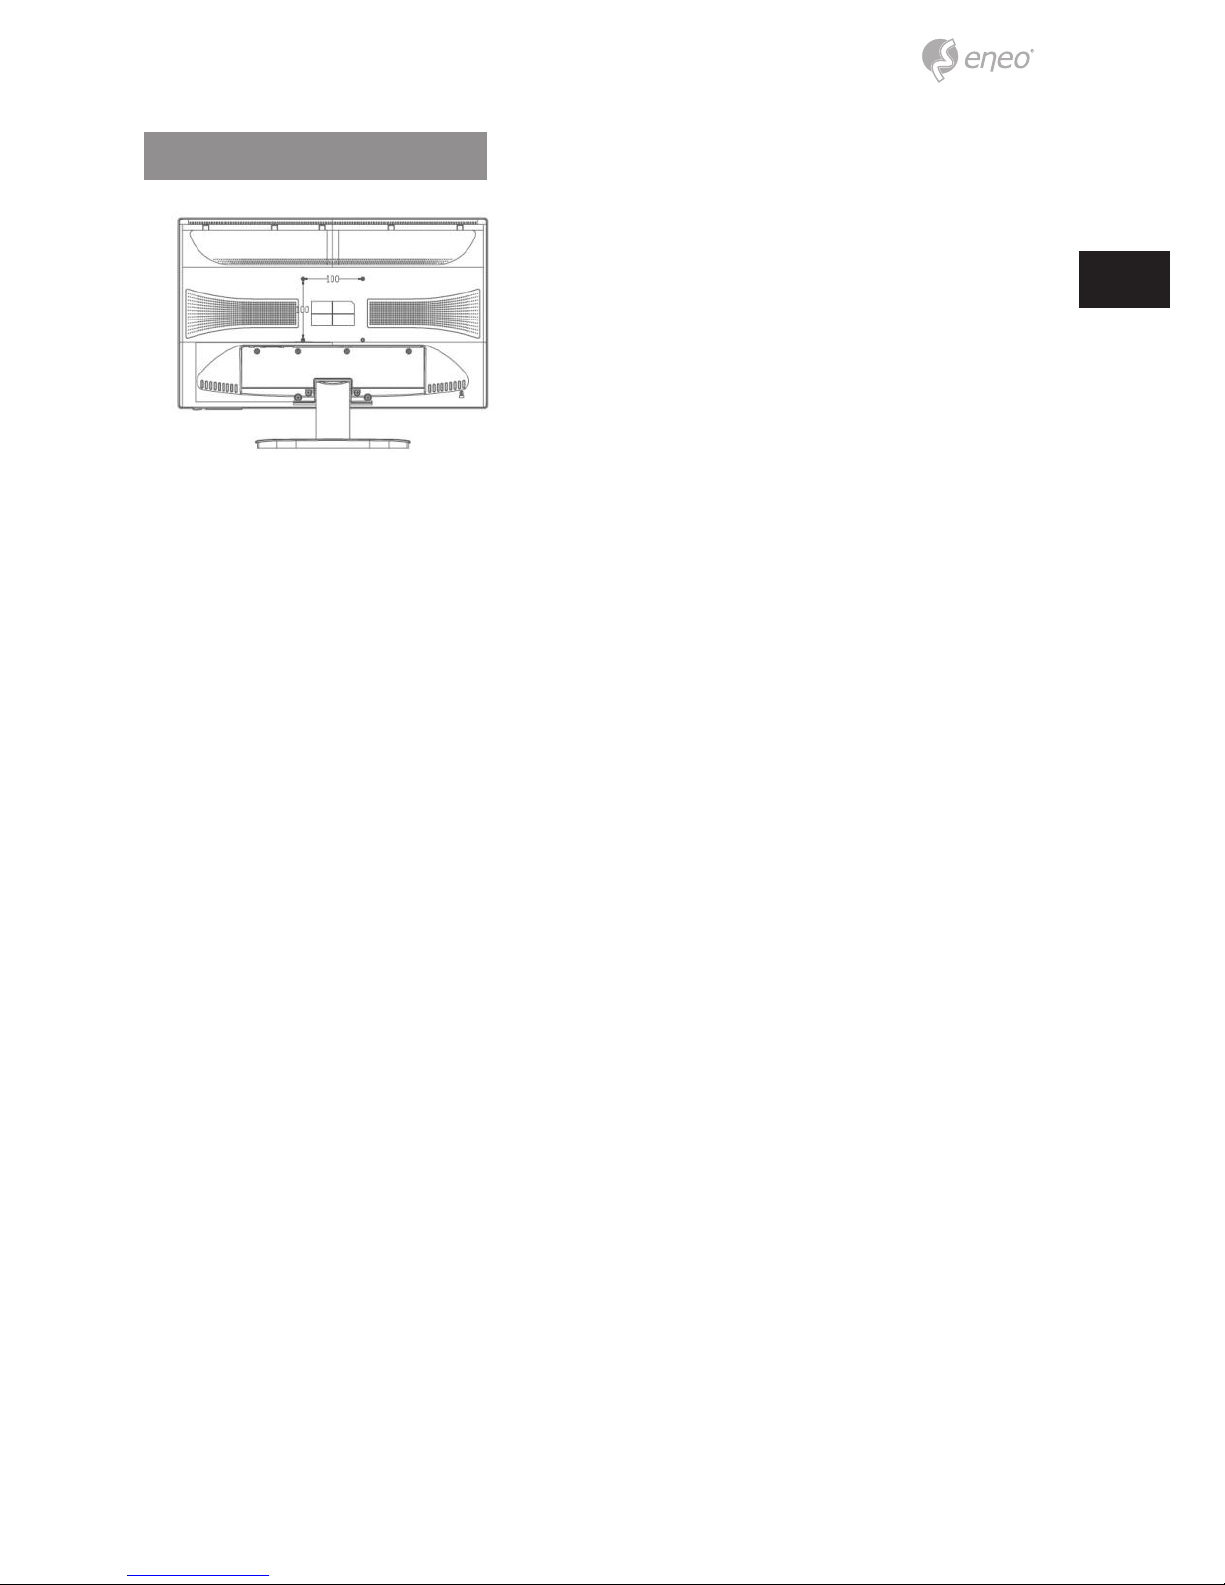
Wall hanging standard
The monitor’s installtion surface is compatible with other types of VESA standard stands.
Hole spacing: 100 x 100 mm Screw length: 8 to12 mm
10
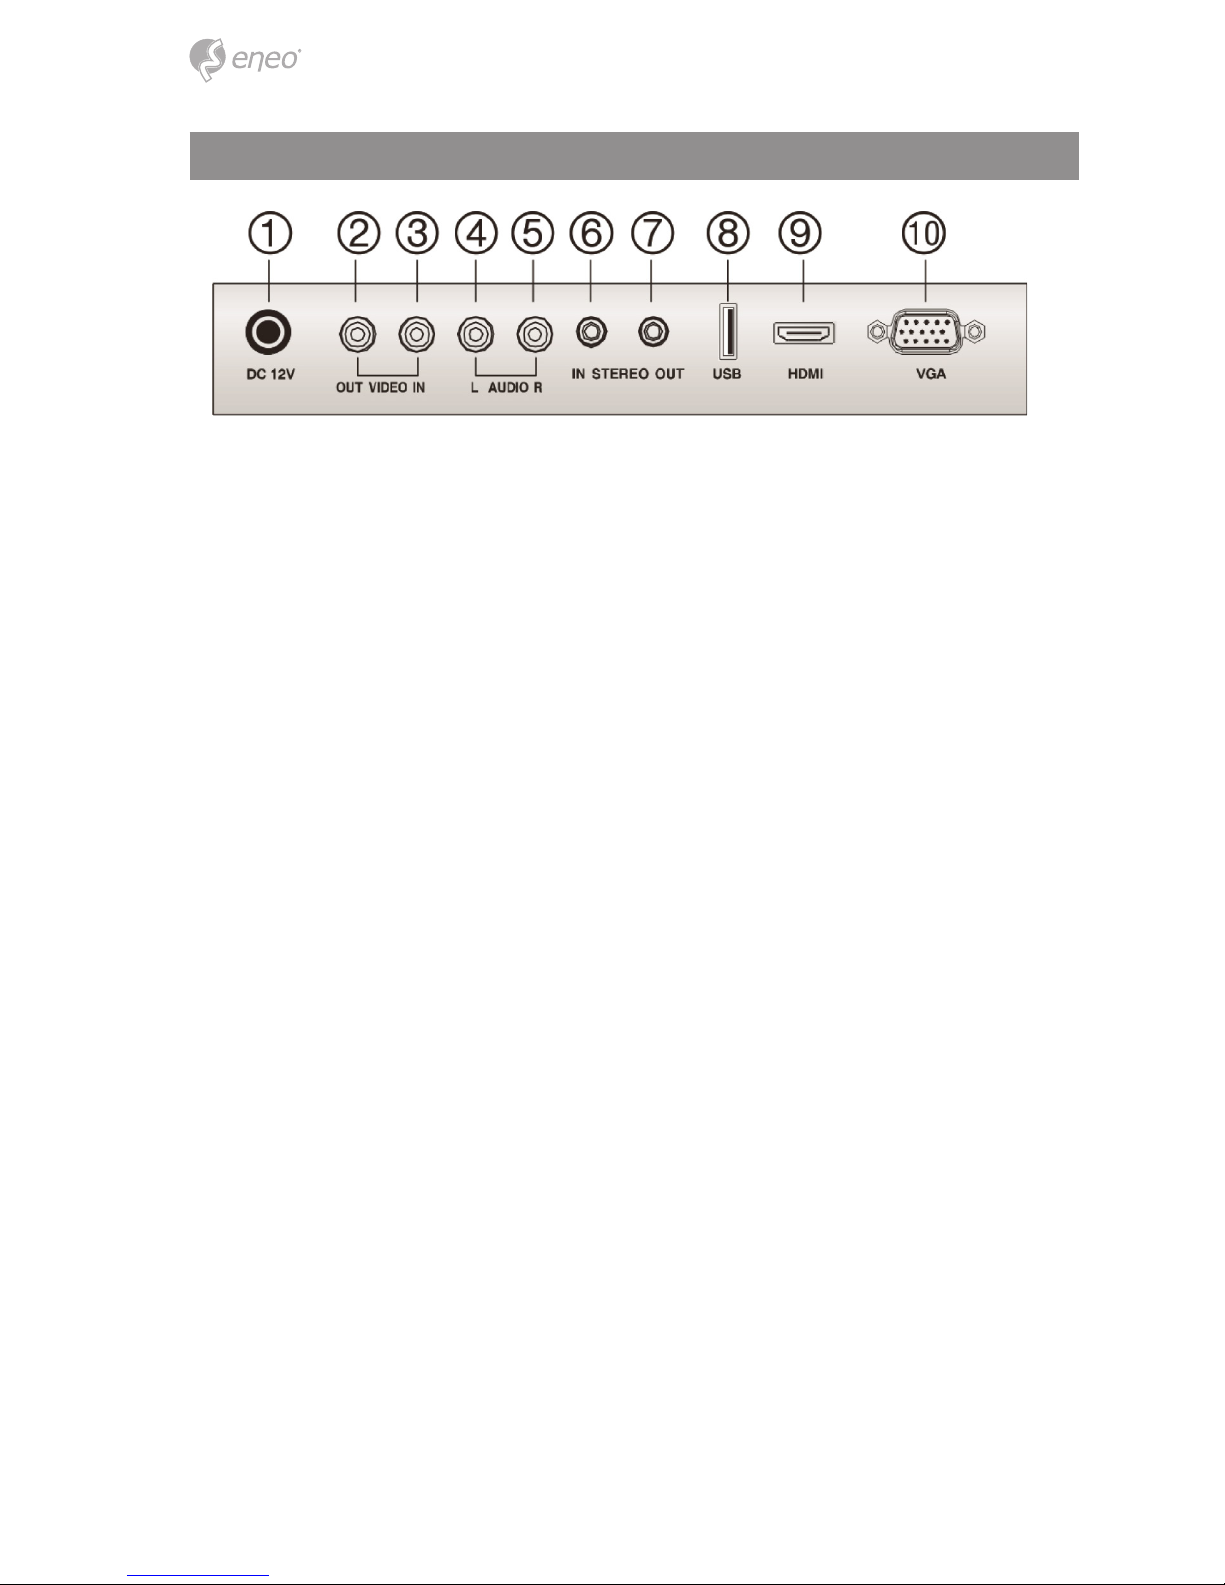
The function of the interface
① DC 12V Input
② VIDEO OUT: VIDEO signal output
③ VIDEO IN: VIDEO signal Input
④ RCA AUDIO L: AUDIO signal input left
⑤ RCA AUDIO R: AUDIO signal out Right
⑥ STEREO Input: AUDIO signal input
⑦ STEREO Out: AUDIO signal out
⑧ USB: Service port
⑨ HDMI: HDMI signal input
⑩ VGA: RGB signal input
11
EN
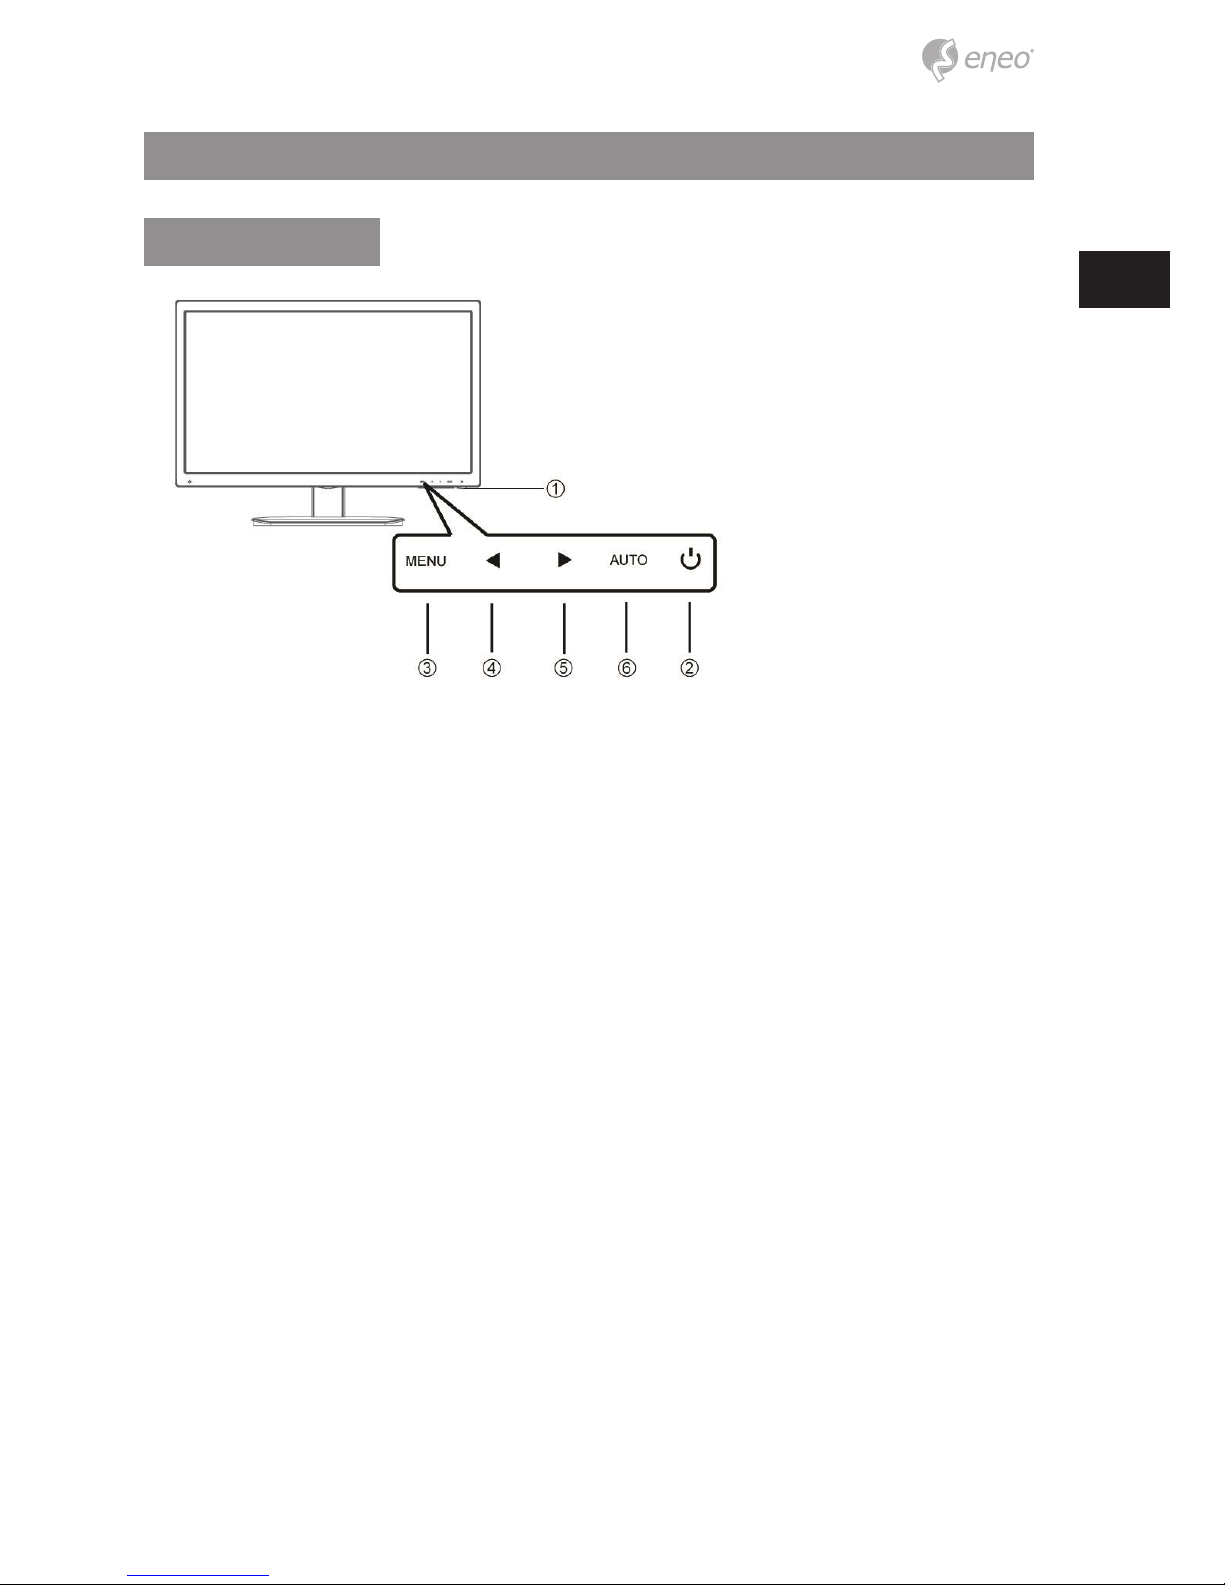
Front panel controls
Control panel
① POWER indicator
Show both normal operation and power management status with power LED
② POWER
Switch the monitor on and o.
③ MENU
Turn the OSD window on.
Secondary Function: Turns the OSD window o and moves from sub menu to top menu
in the OSD window.
④ ◄ (Left Arrow (*))
Primary Function: Used to adjust the volume.
Secondary Function: Moves cursor to the down in the OSD window and decreases the
value of any selected menu.
⑤ ► (Right Arrow (*))
Primary Function: Used to select from dierent input source.
12
Secondary Function: Moves cursor to the up in the OSD (On-Screen Display) window and
increases the value of any selected menu.
⑥ AUTO (*)
Primary Function: Automatically adjusts the display to the most optimal setting possible.
(VGA mode only)
Secondary Function: Selects sub menu.
Changing a monitor parameter
1. Press the MENU button on the front panel to obtain the OSD menu screen.
2. Use Left - Right buttons to select the menu.
3. Use AUTO button to select the submenus.
4. Use Left- Right buttons to select a submenu function.
5. Press AUTO button, then using left-right buttons you can make adjustments as
necessary.
6. To exit, press MENU.
Hot keys
► Right Arrow When there is no OSD, to select input signal source. CAM-VGA-HDMI
◄ Left Arrow When there is no OSD, you can adjust the volume directly.
AUTO Automatically choose the correct horizontal and vertical position and the size of the screen image (VGA only).
13
EN
OSD Function
Congure the monitor using the on-screen display (OSD) menus and submenus. Changes
are immediately saved and implemented.
VGA menu
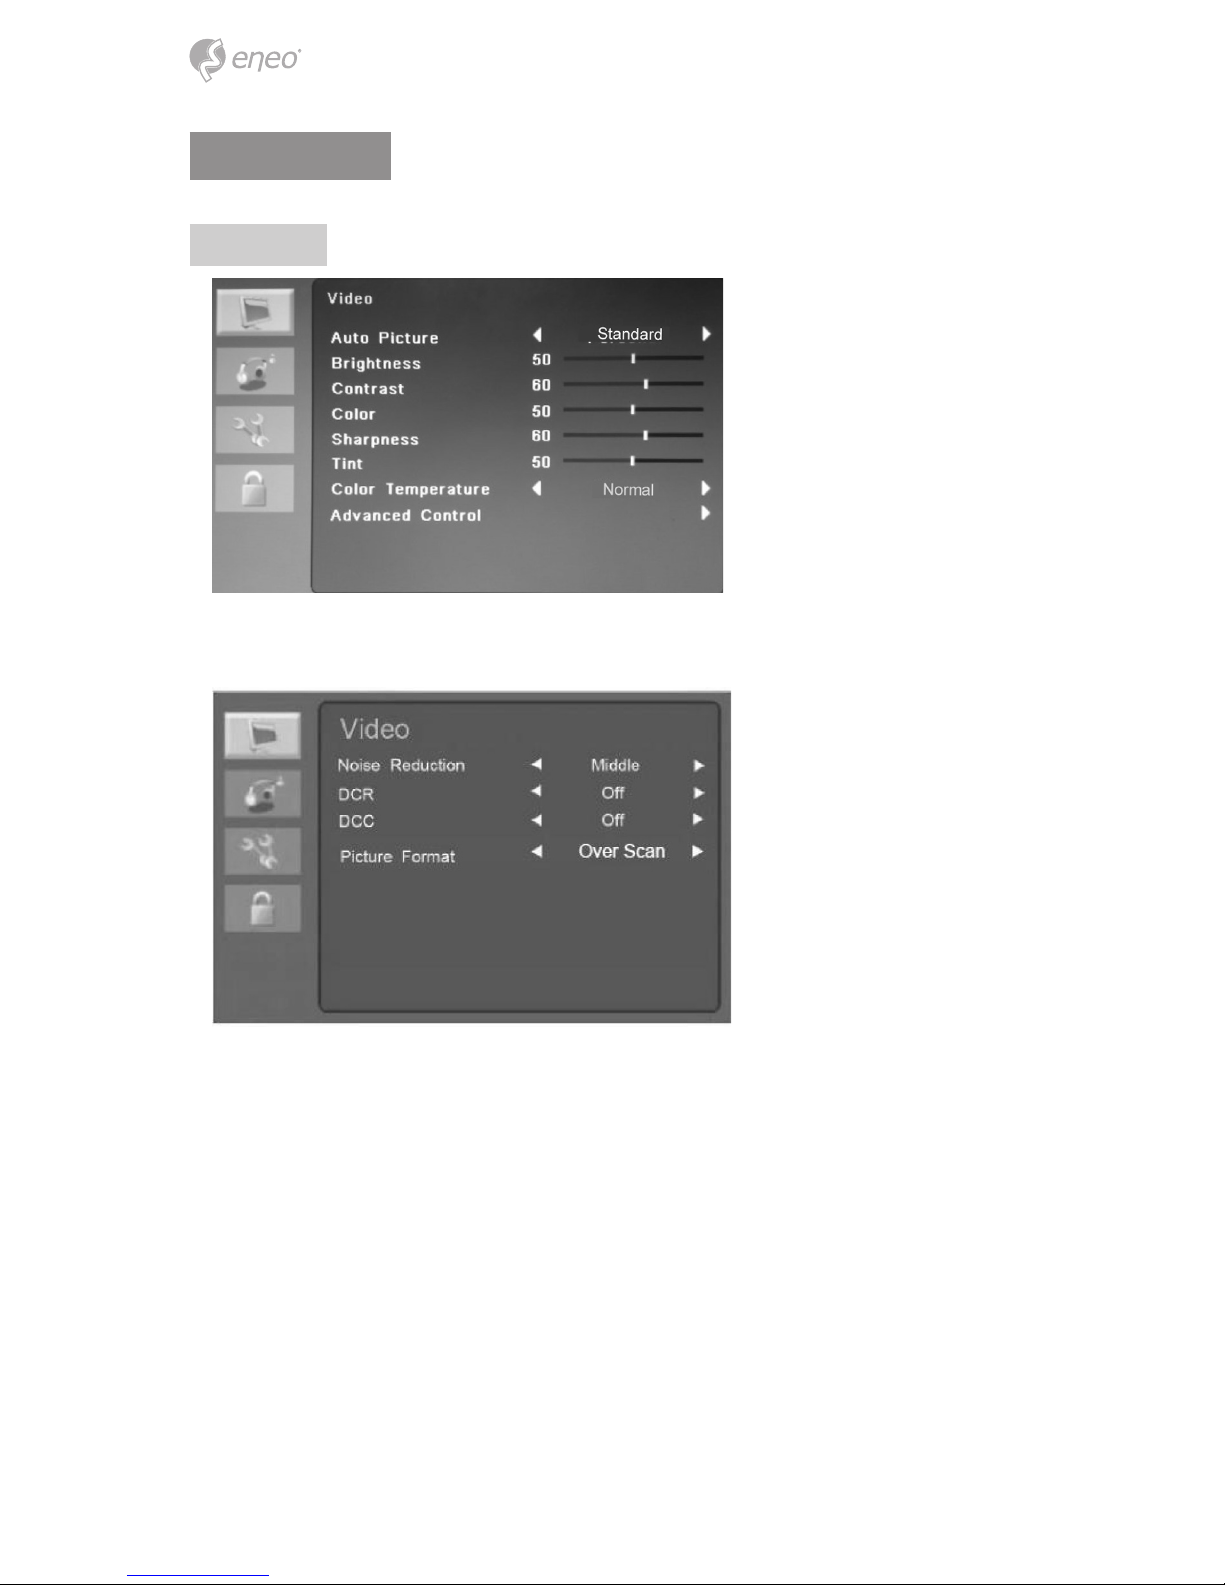
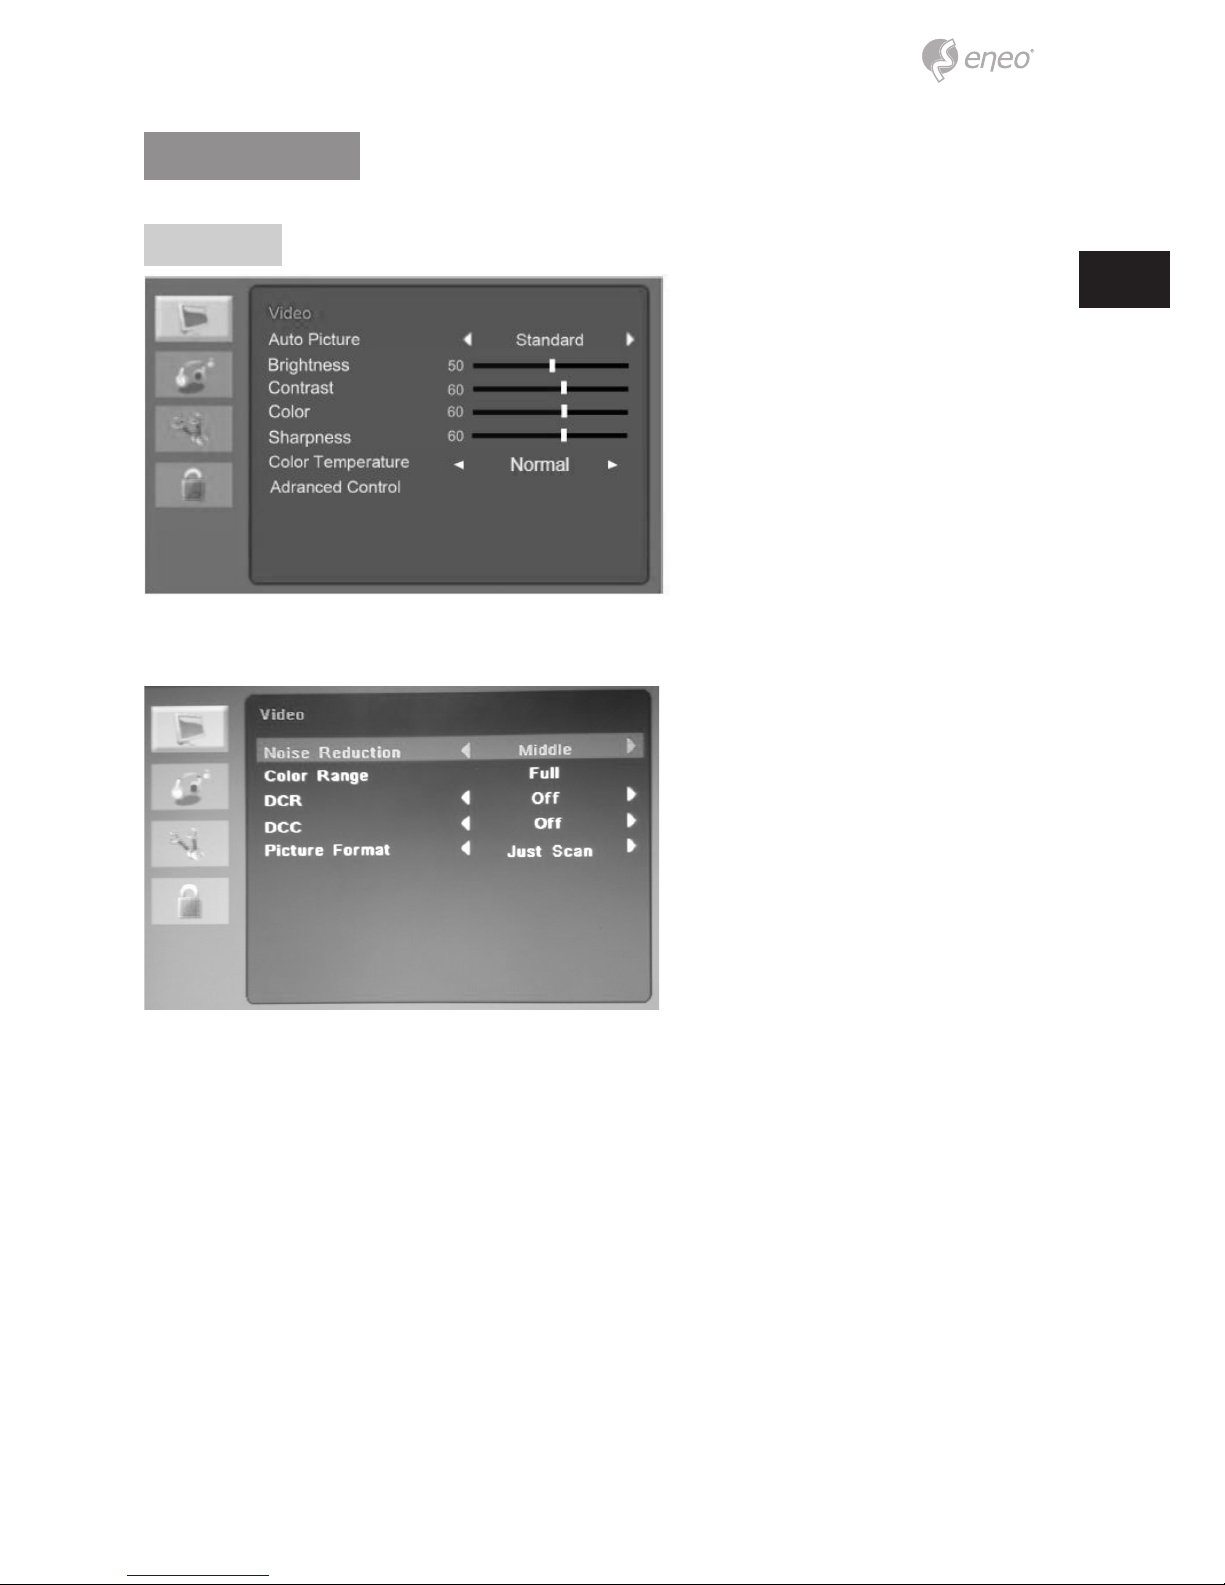
Video
Advanced Control :
14
Auto Cong :
Brightness
Adjust the brightness of the image.
Contrast
Adjust the contrast of the image, the dierence between light and dark areas on the
screen.
Color Temperature
Choose a dierent preset color temperature or set your own customized color parameters
(Normal/ Warm/ Cool/ User).
Advanced Setting
• Noise Reduction
• DCR (not supported)
• DCC (not supported)
Auto Cong
• Auto adjust: Automatically choose the correct horizontal position and vertical position and size of the screen image.
• H-Position: Adjust the position of the display horizontally (left or right).
• V-Position: Adjust the position of the display vertically (up or down).
• Phase: Remove any horizontal noise and clear or sharpen the image of the
characters.
• Clock: Adjust the width (horizontal size) of the screen image.
15
EN
Auto Color
Operate the white balance and automatically adjust the color settings. (Available only
during VGA input source signal)
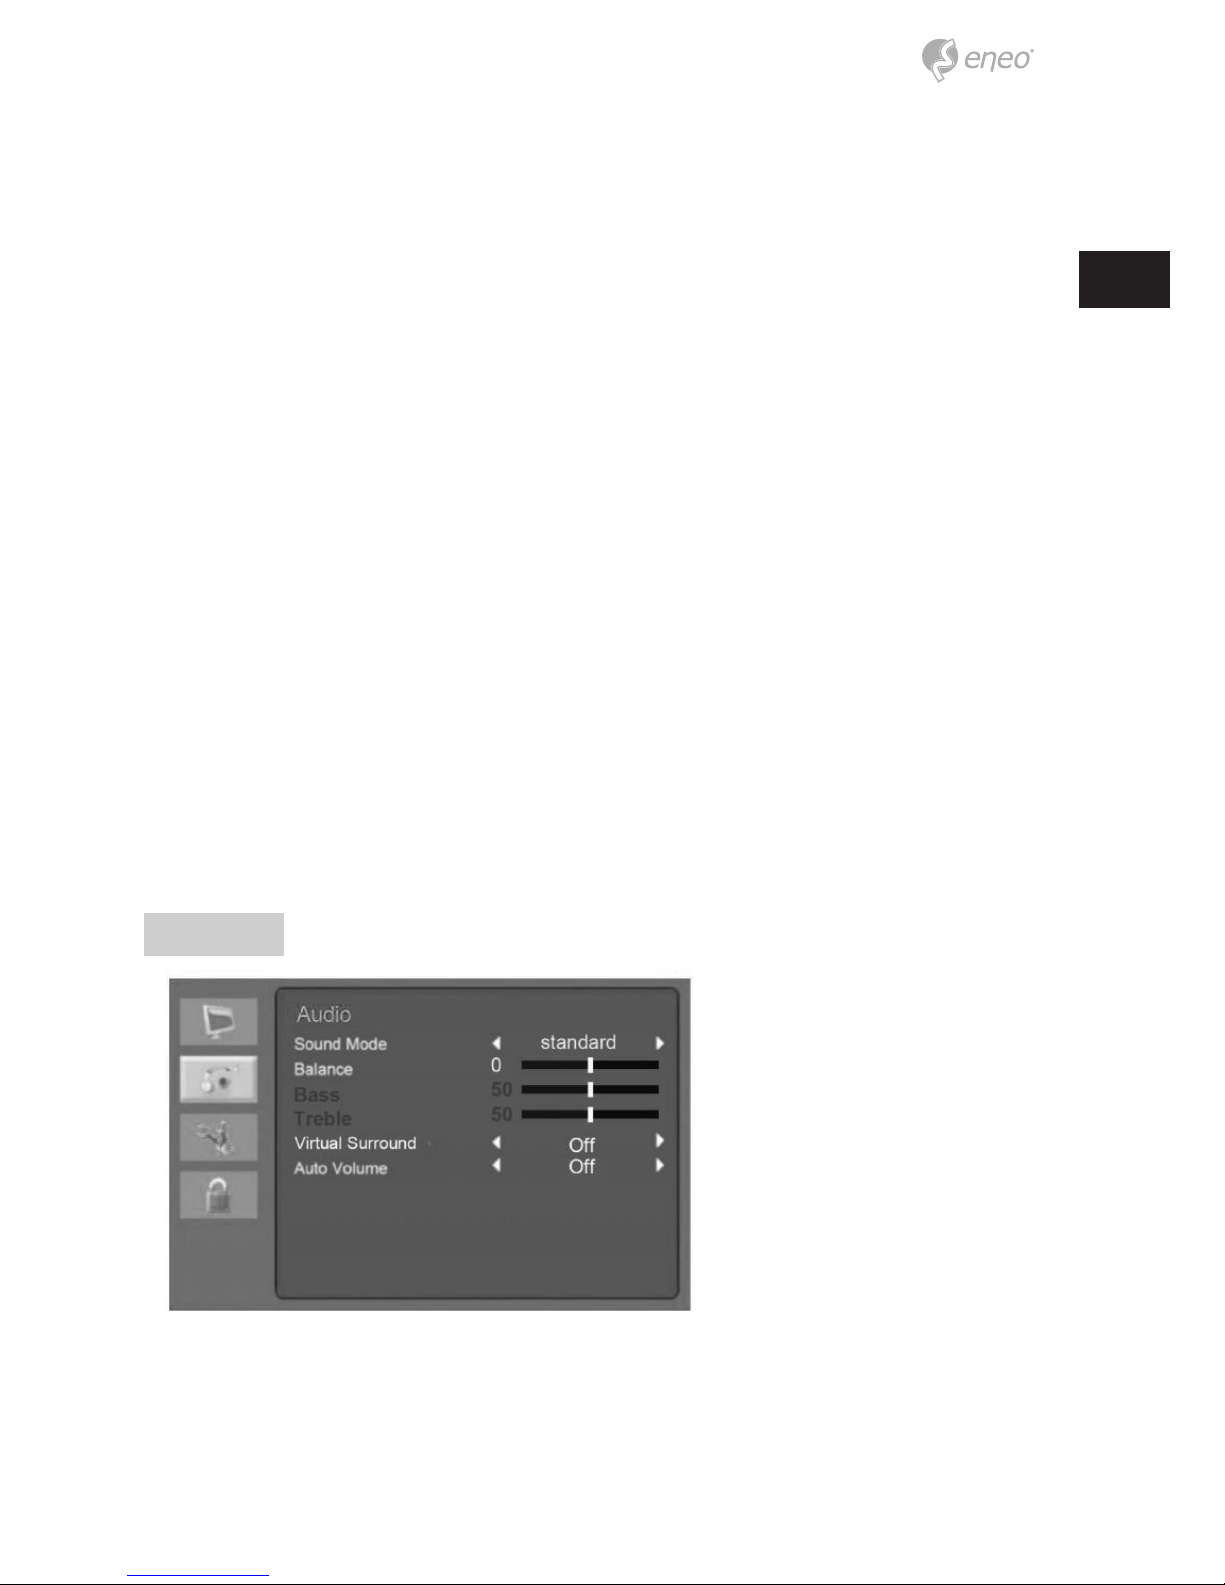
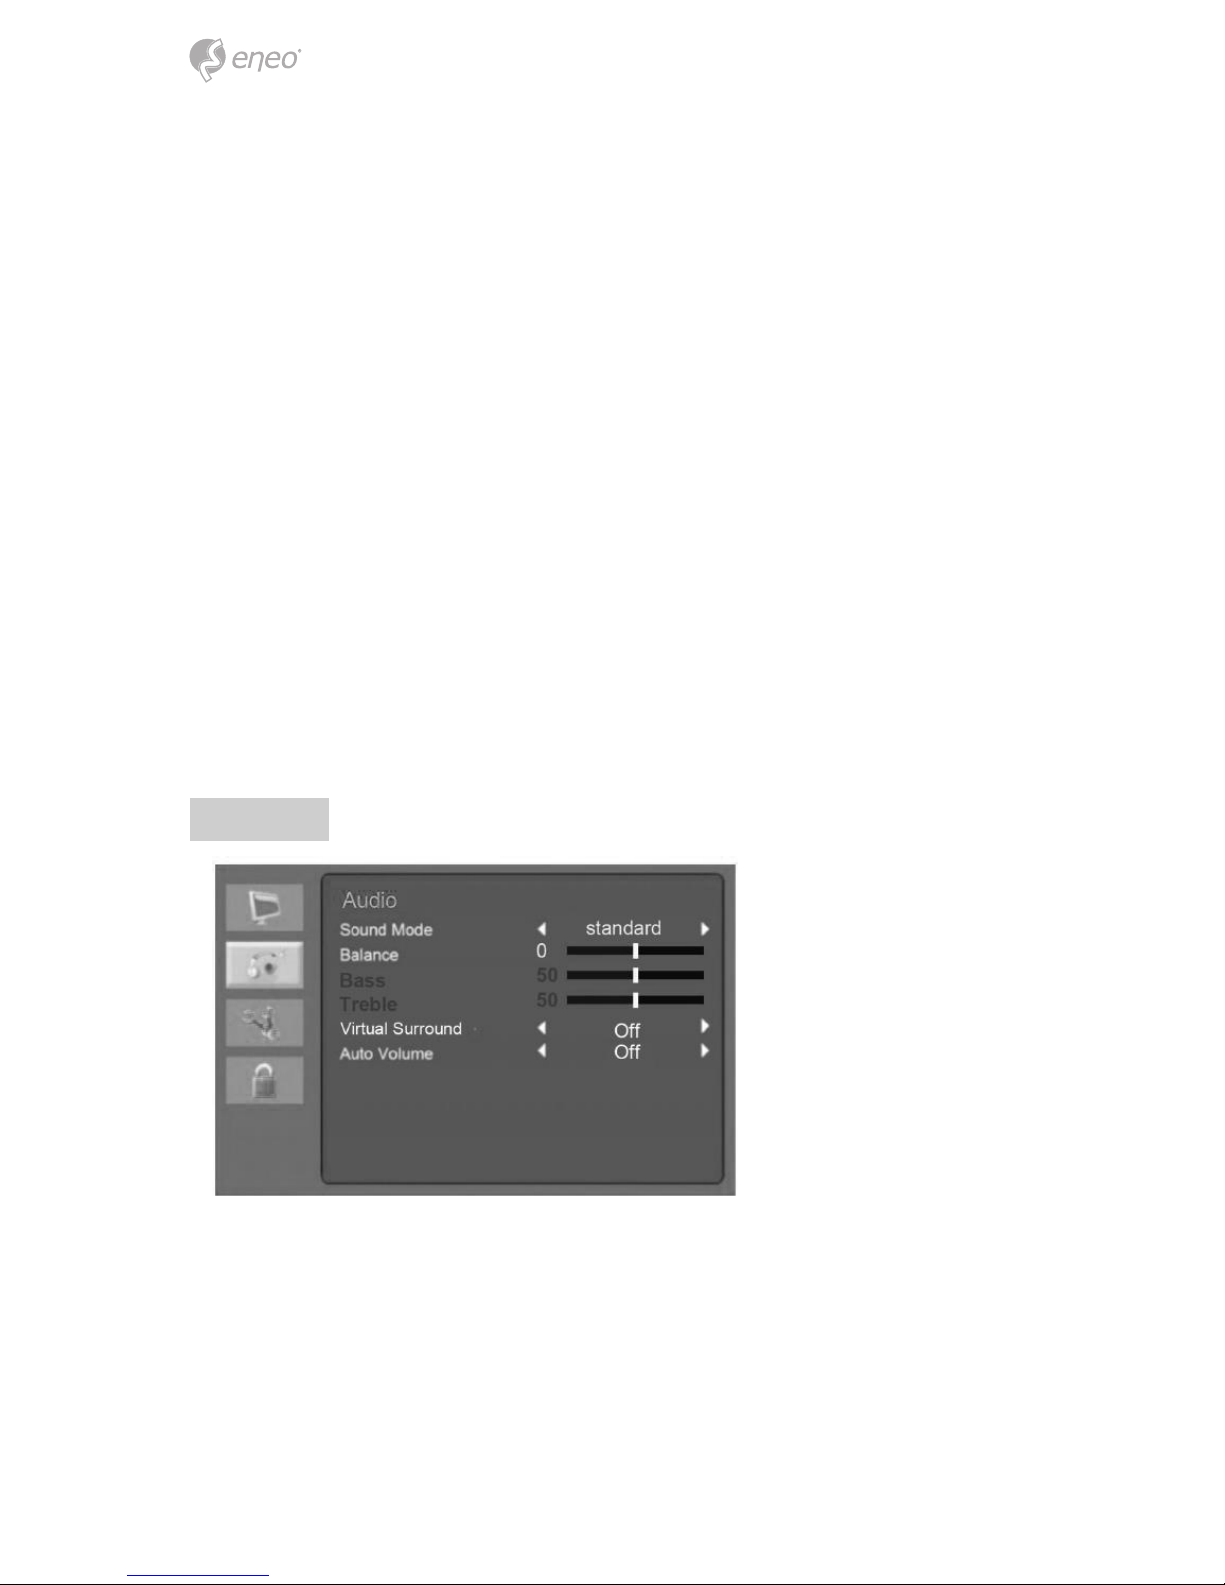
Sound
Sound Mode
Choose a dierent preset sound mode or your own customized sound. (Standard/
Speech/ Music/ Personal)
Balance
Adjust the sound balance of the left and right speakers.
Bass
When you select User mode, adjust the bass sound.
Treble
When you select the user mode, adjust the treble sound.
Virtual Surround
Provide an enhanced listening experience.
Auto Volume
Automatically remains at the same volume level if you change the program.
16
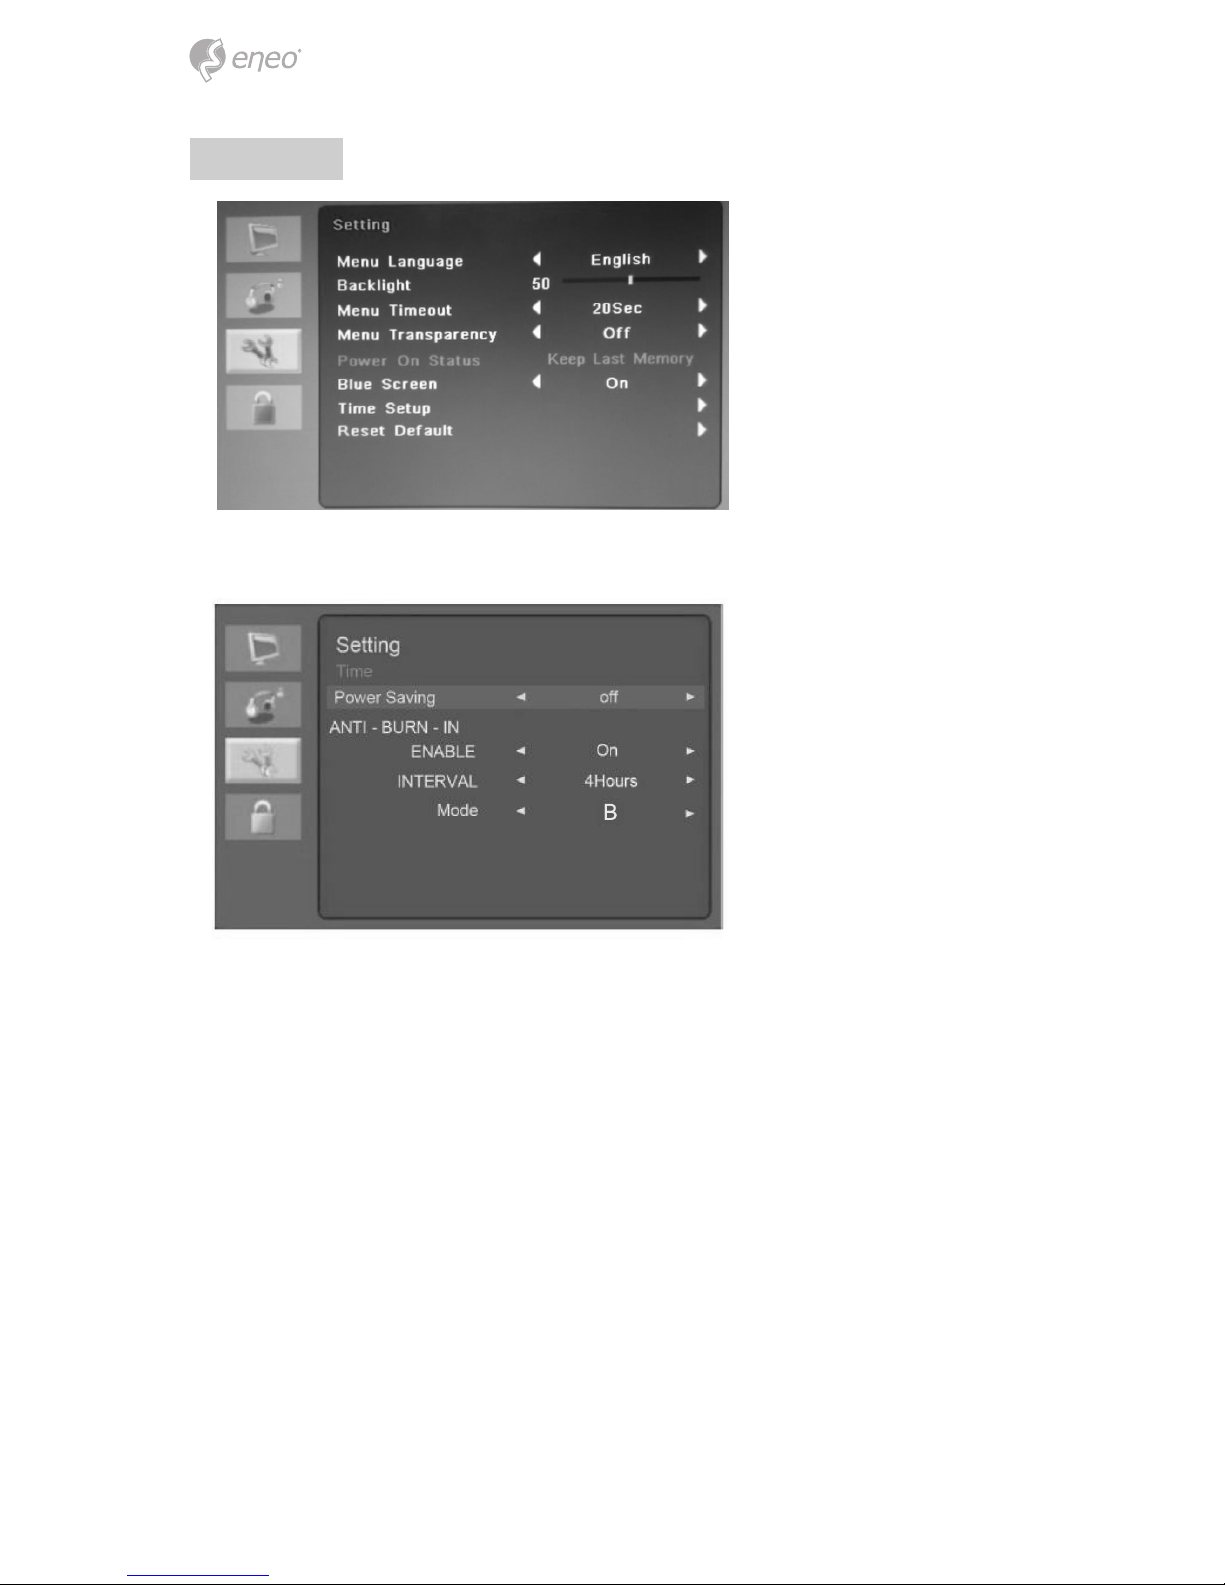
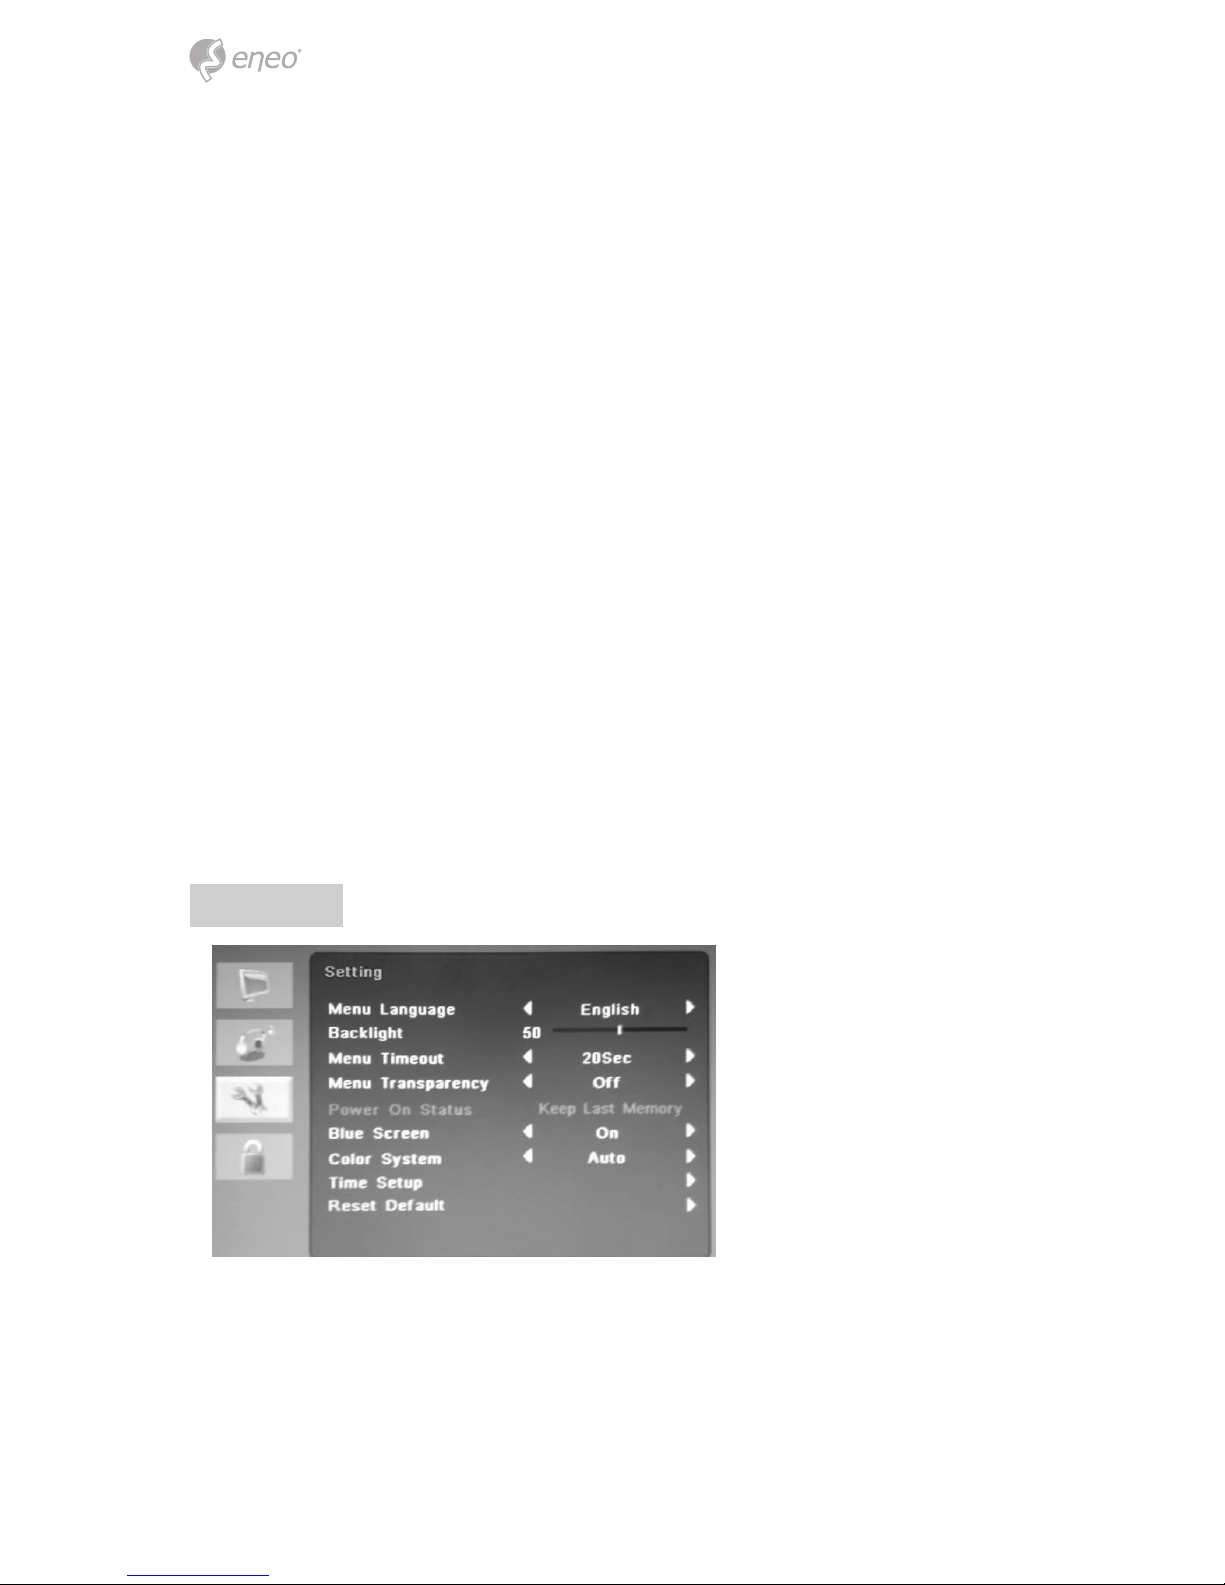
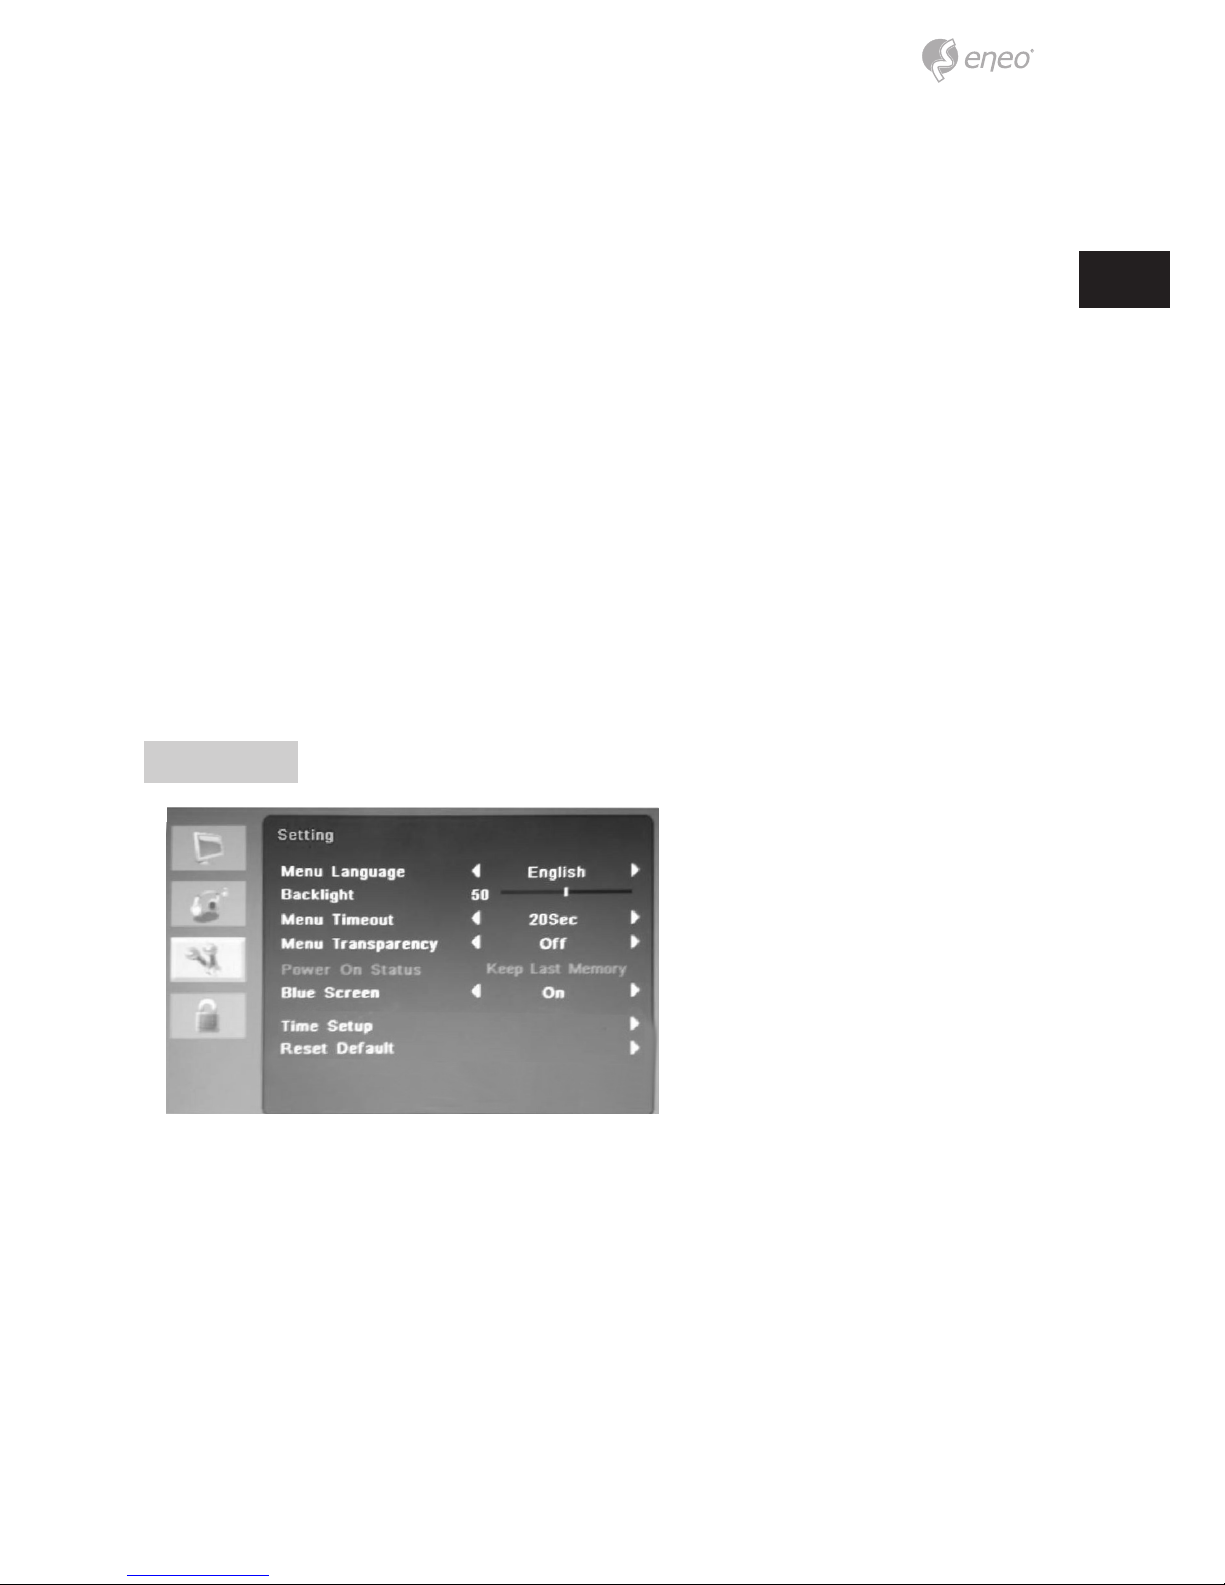
Setting
Time setting:
Menu Language
Select language for the OSD.
Backlight
Adjust the brightness of the image.
Menu Time out
Adjust the display of the OSD menu (20 to 60 seconds).
Menu Transparency
Adjust the OSD transparency.
17
EN
Power On Status (Not used)
Blue Screen
When there is no signal input, select the blue background color.
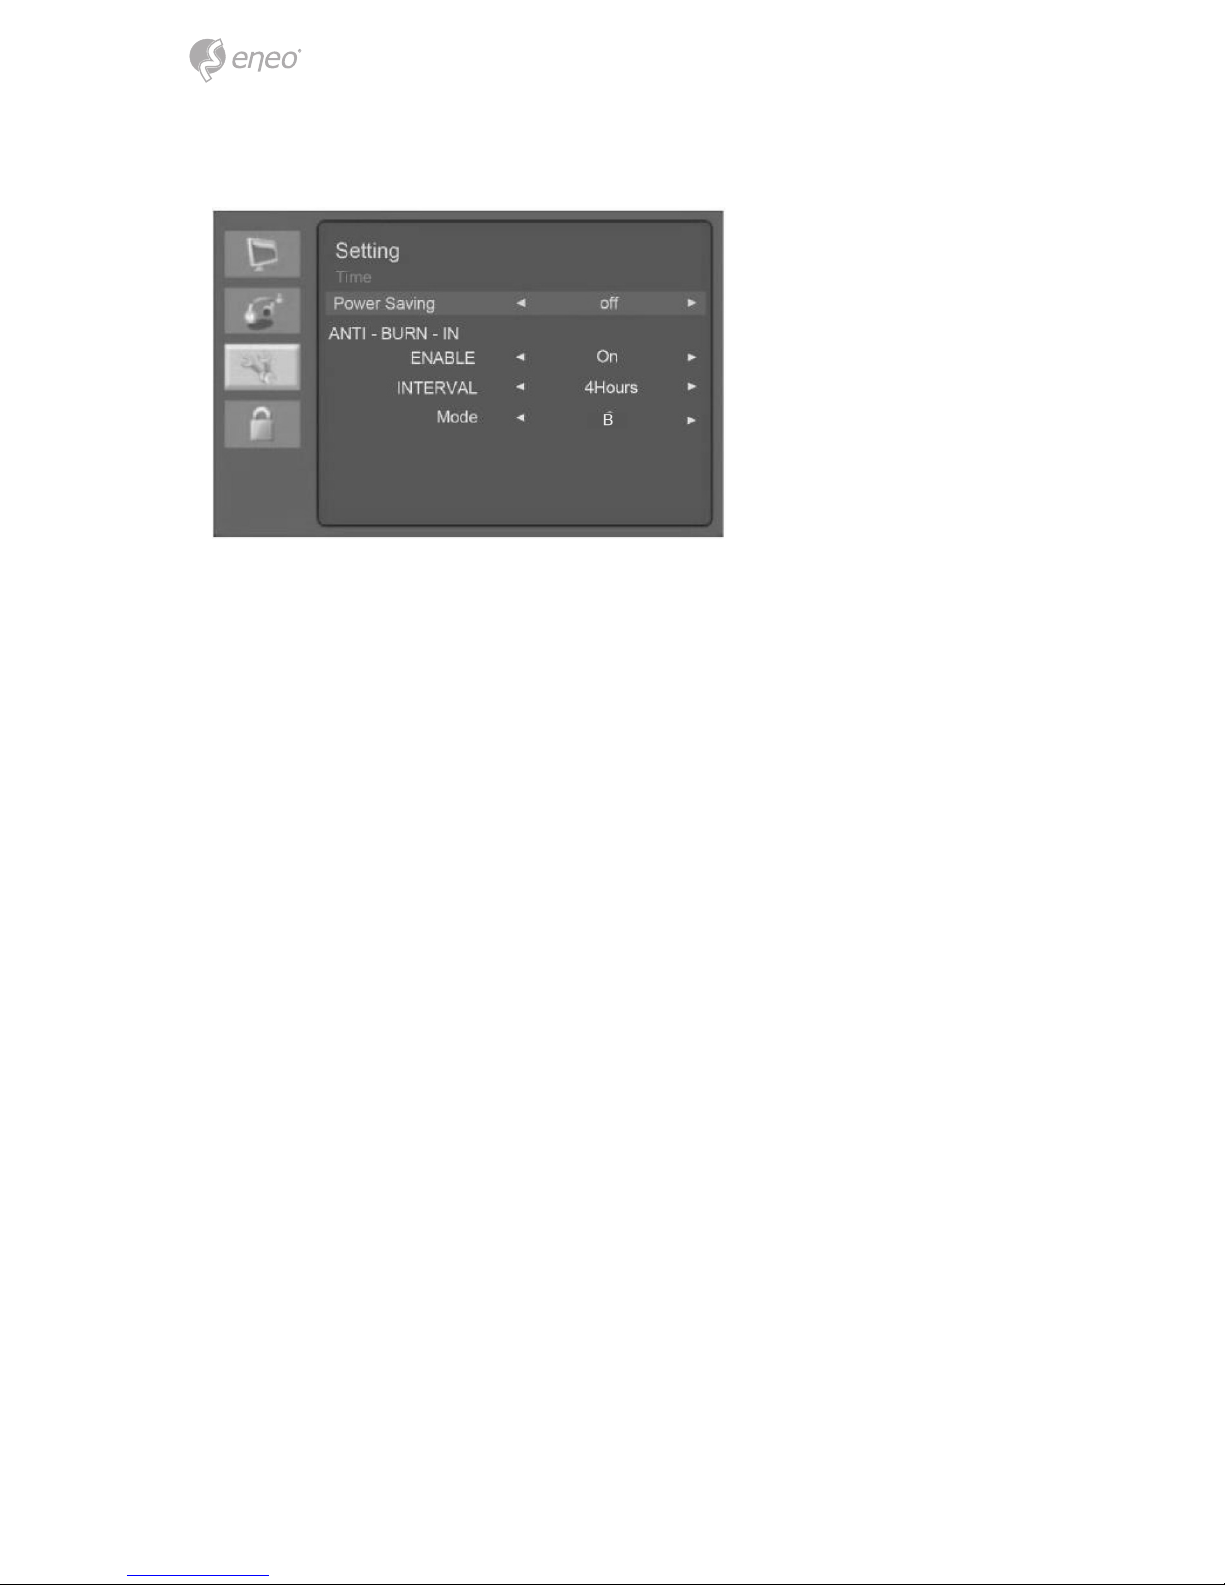
Time Setting
• Time: Not used.
• Power Saving (ON/OFF): Set Power Saving ON/OFF.
• ANTI-BURN-IN
• ENABLE(ON/OFF): Anti Burn In Switch ON/OFF
• INTERVAL: Anti Burn In Time (4Hours/ 5Hours/ 6Hours/ 8Hours)
• Anti Burn Type (A/B/C)
Reset Default
Reset the screen to the factory preset display settings.
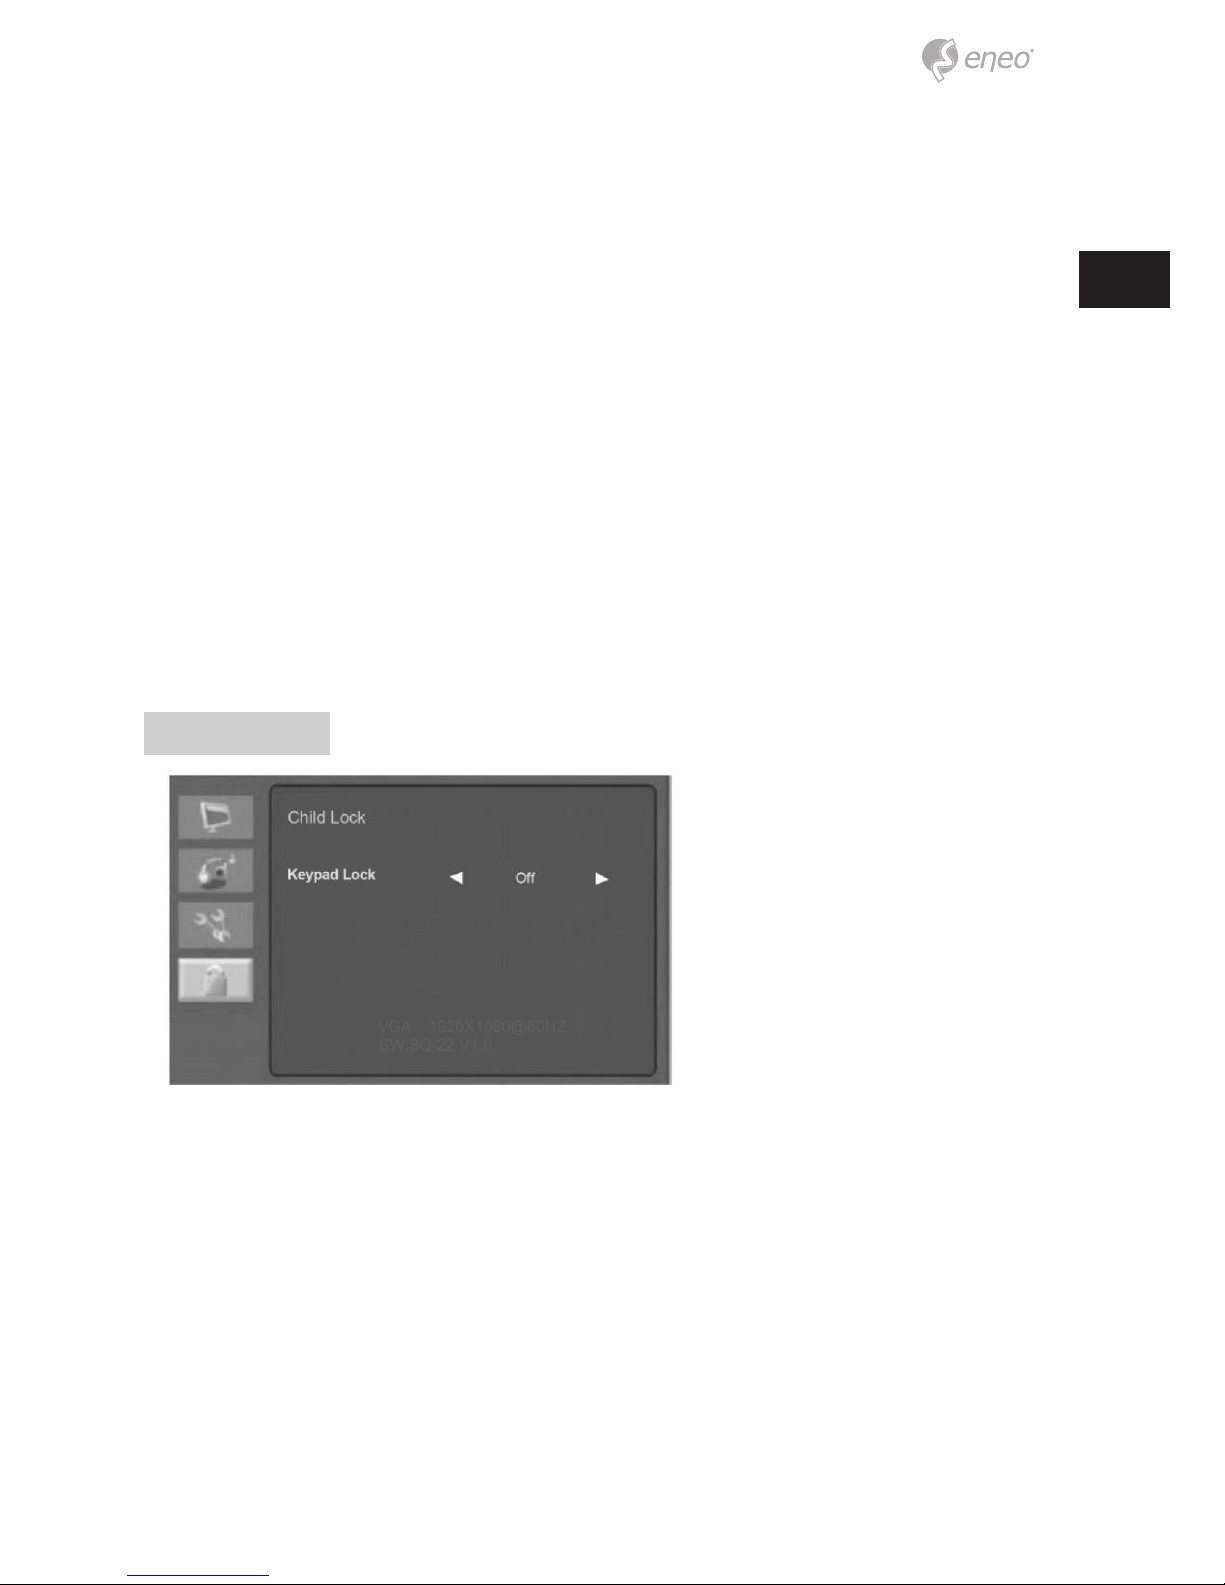
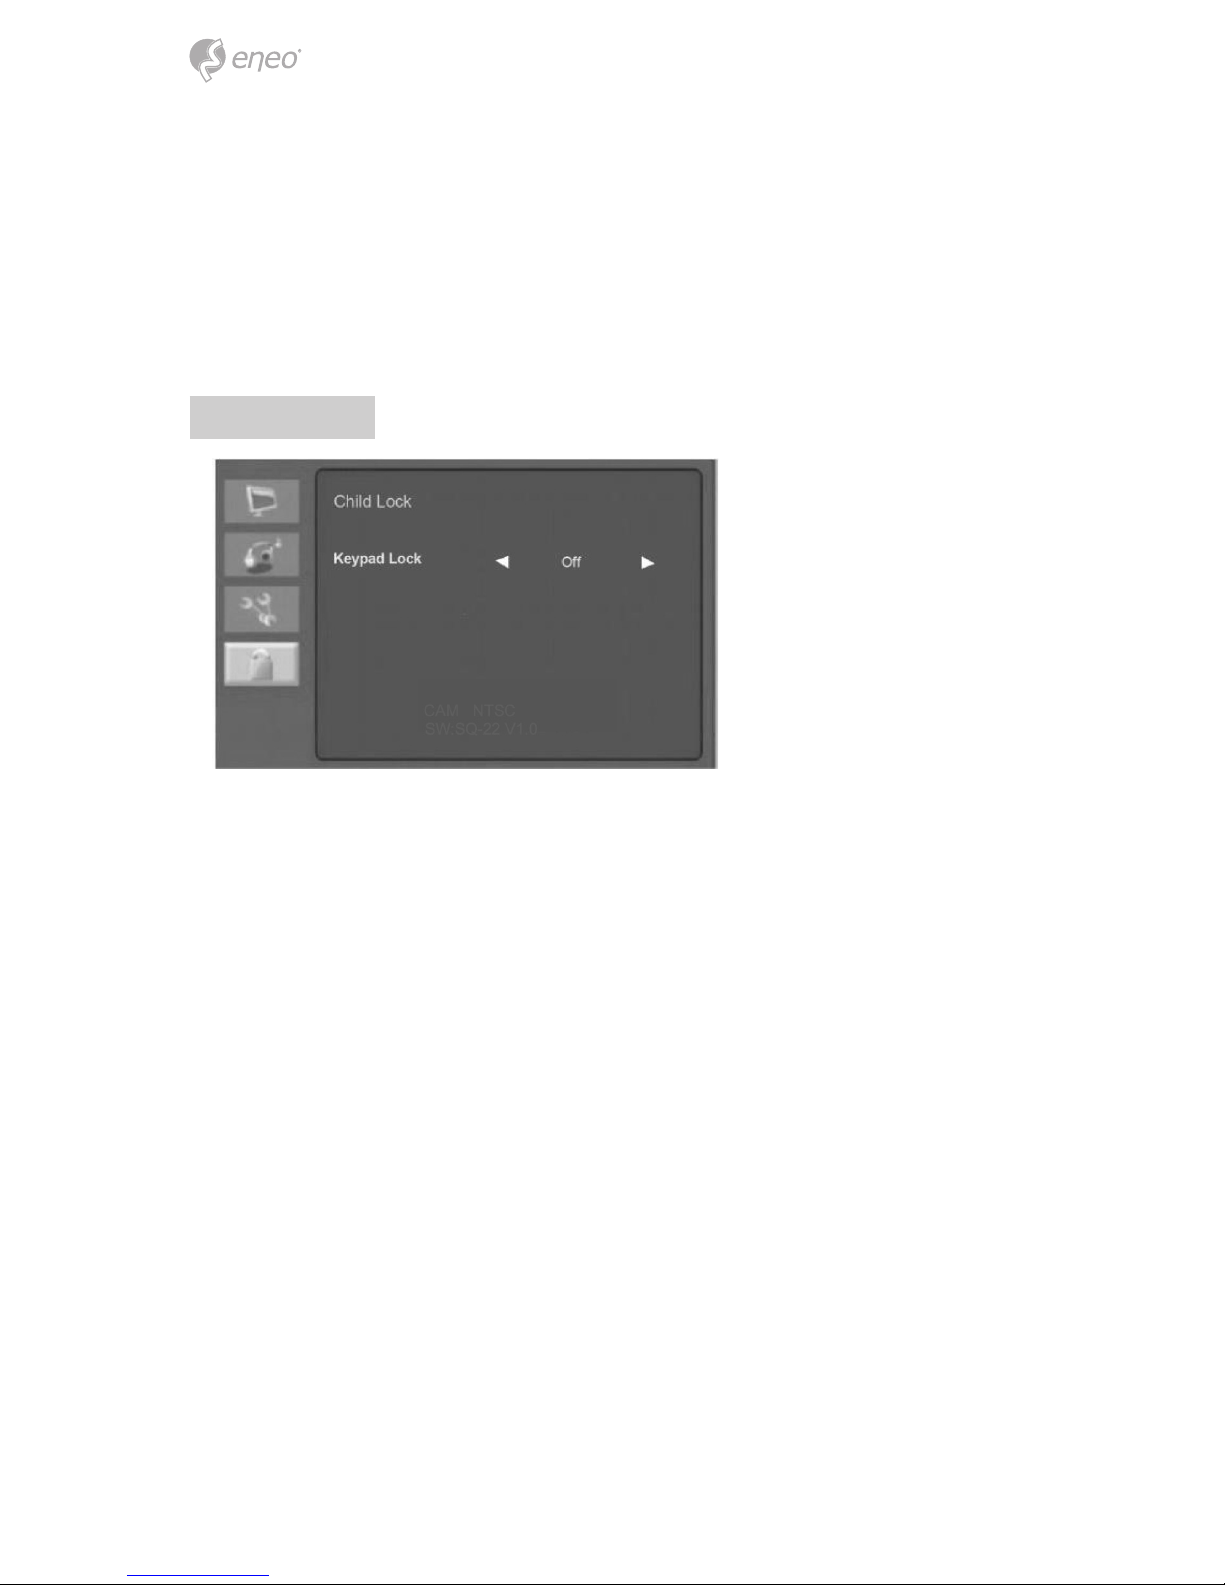
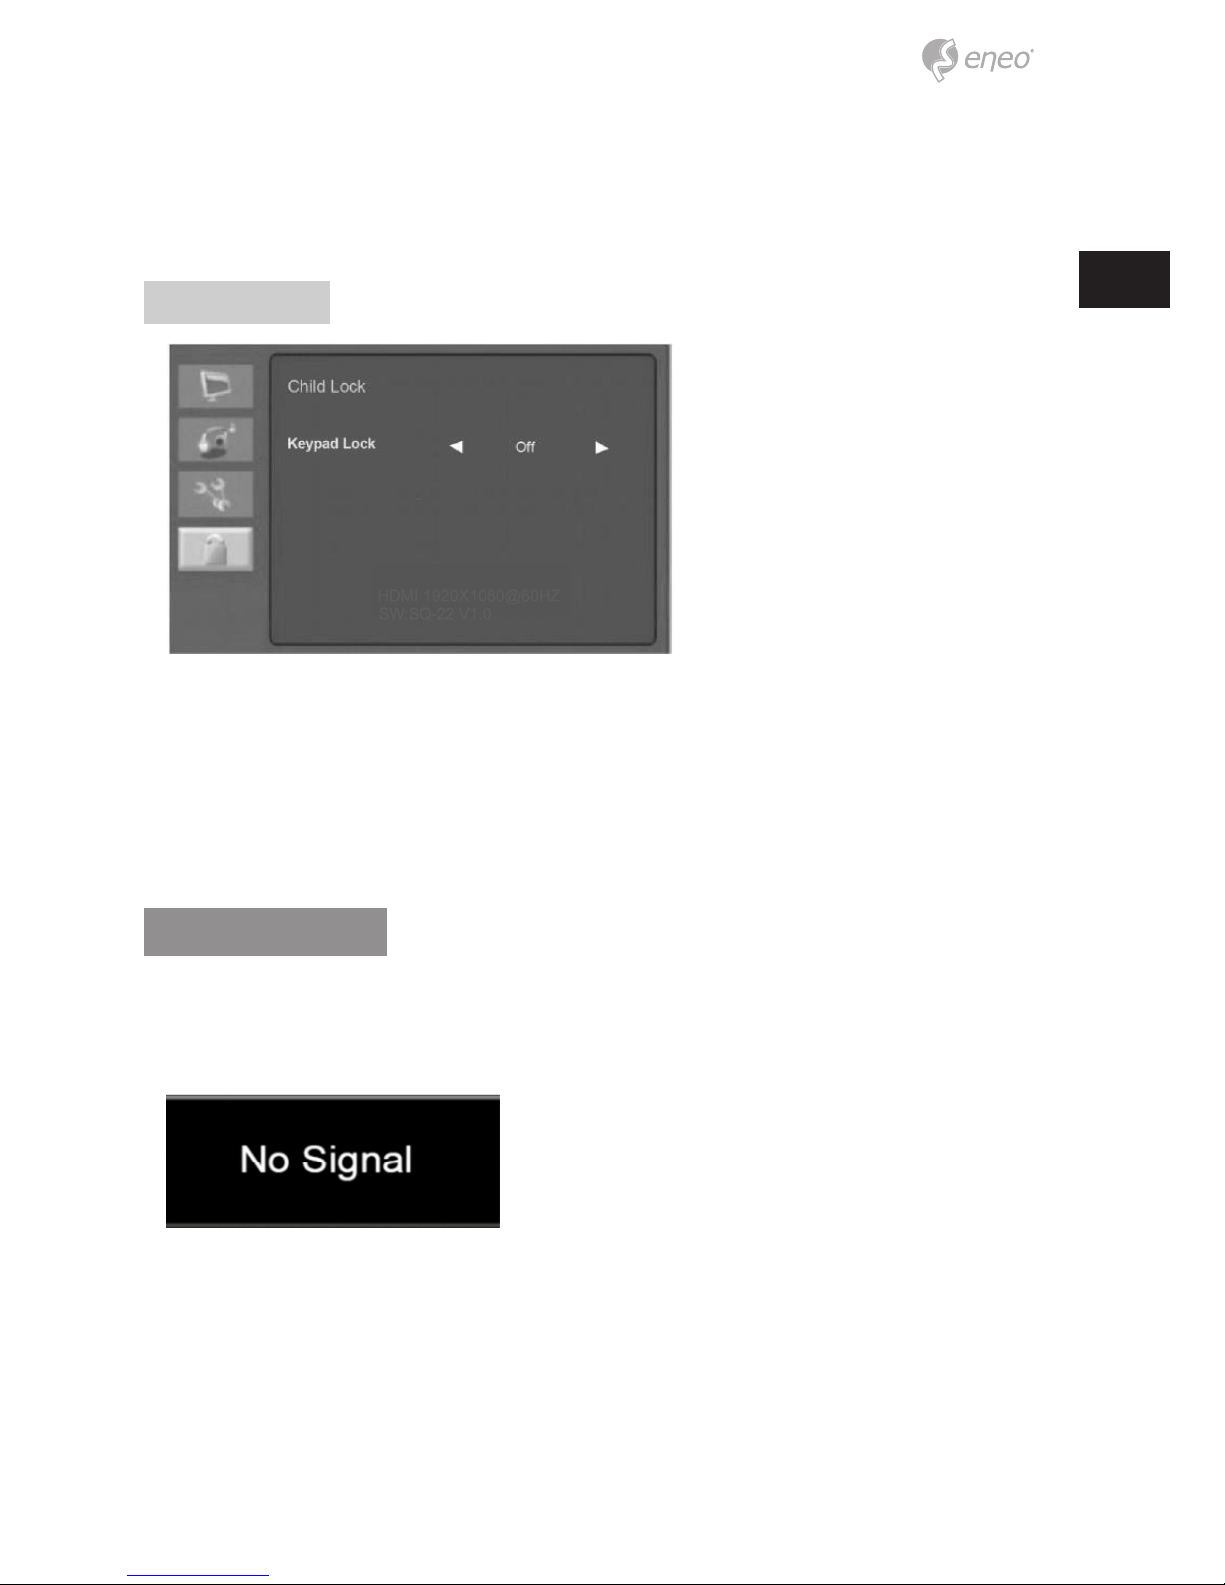
Child Lock
Keypad Lock
Turn the keypad lock on or o. Keyboard lock unlock method:Long press “MENU” key for
about 8 seconds, can be unlocked.
18
Cam menu
Video
Advanced Control:
Auto Picture
Select the picture mode (Standard/Movie/ECO/Personal/ Vivid).
Brightness
Adjust the brightness of the image.
Contrast
Adjust the contrast of the image, the dierence between light and dark areas on the
screen.
19
EN
Color
Adjust the color of the image.
Sharpness
Adjust the display image quality (if the screen proceeds to scaling up).
Tint
Adjust tint of the image. Only for NTSC signal.
Color Temperature
Choose a dierent preset color temperature or set your own customized color parameters
(Normal/ Warm/ Cool/ User).
Advanced Control
• Noise Reduction: Reduce the noise in the picture due to poor reception or poor
picture quality. (Middle/ High/O/ Low)
• DCR: Turn DCR on or o.
• DCC: Turn DCC on or o.
• Picture Format: Select the aspect ratio (VM-22PD: Over Scan/4:3/Underscan) ( VM17PD/19 Underscan/Over Scan)
Audio
20
Sound Mode
Choose a dierent preset sound mode or your own customized sound. (Standard/ Music/
Speech/ Personal)
Balance
Adjust the sound balance of the left and right speakers.
Bass
When you select Personal mode, adjust the bass sound.
Treble
When you select the Personal mode, adjust the treble sound.
Virtual Surround
Provide an enhanced listening experience.
Auto Volume
Automatically remains at the same volume level if you change the program.
Setting
21
EN
Time Setting:
Menu Language
Select the OSD language.
Backlight
Adjust the brightness of the image.
Menu Time Out
Adjust the display time of the OSD menu (20 to 60 seconds).
Menu Transparency
Adjust the OSD transparency.
Power On Status (Not Used)
Blue Screen
When there is no signal input, select the blue background color.
Color System
Select the input signal system Auto or PAL, PAL-60, NTSC, NTSN_44, SECAM.
Time Setting
• Time: Not Used
• ANTI- BURN-IN
22
• ENABLE (ON/OFF)
• INTERVAL: Anti Burn In Time (4Hours/ 5Hours/ 6Hours/ 8Hours)
• Anti Burn Type (A/B/C)
Reset Default
Reset the screen to the factory preset display settings.
Child Lock
Keypad Lock
Turn the keypad lock on or o.
Keyboard lock unlock method:Long press “MENU” key for about 8 seconds, can be
unlocked.
23
EN
HDMI menu
Video
Advanced Control:
Auto Picture
Select the picture mode (Standard/Movie/ECO/Personal/ Vivid).
Brightness
Adjust the brightness of the image.
Contrast
Adjust the contrast of the image, the dierence between light and dark areas on the
screen.
24
Color
Adjust the color of the image.
Sharpness
Adjust the display image quality (if the screen proceeds to scaling up).
Color Temperature
Choose a dierent preset color temperature or set your own customized color parameters
(Normal/ Warm/ Cool/ User).
Advanced Control
• Noise Reduction: Reduce the noise in the picture due to poor reception or poor
picture quality.(O/ Low/ Middle/ High).
• Color Range: Select the color format (Full/Limit).
• DCR: Turn DCR on or o.
• DCC: Turn DCC on or o.
• Picture Format: Select the aspect ratio (Just Scan/ Over Scan)
Audio
Sound Mode
Choose a dierent preset sound mode or your own customized sound. (Music/ Speech/
Personal/ Standard)
25
EN
Balance
Adjust the sound balance of the left and right speakers.
Bass
When you select Personal mode, adjust the bass sound.
Treble
When you select the Personal mode, adjust the treble sound.
Virtual Surround
Provide an enhanced listening experience.
Auto Volume
Automatically remains at the same volume level if you change the program.
Setting
26
Time Setting:
Menu Language
Select the OSD language.
Backlight
Adjust the brightness of the image.
Menu Time Out
Adjust the display time of the OSD menu (20 to 60 seconds).
Menu Transparency
Adjust the OSD transparency.
Power On Status (Not Used)
Blue Screen
When there is no signal input, select the blue background color.
Time Setting
• Time: Not Used
• Power Saving (ON/OFF): Set Power Saving ON/OFF
• ANTI-BURN-IN
• ENABLE (ON/OFF)
• INTERVAL:Anti Burn In Time (4Hours/ 5Hours/ 6Hours/ 8Hours)
• Anti Burn Type (A/B/C)
27
EN
Reset Default
Reset the screen to the factory preset display settings.
Child Lock
Keypad Lock
Turn the keypad lock on or o.
Keyboard lock unlock method: Long press “MENU” key for about 8 seconds, can be
unlocked.
Self Diagnosis
If there is no image, the Self-Diagnosis screen will be displayed. The self-diagnosis
function checks if the status of the monitor screen is No Signal, Out of Range or None
Supported.
The No Signal screen is displayed when the D-Sub signal connector is connected but the
status of the monitor is on DPMS mode.

28
The Out of Range screen is displayed when the applied frequency is under or over normal
range.
Normal range (Non-interlaced mode only):
• H: 30 to 80 kHz
• V: 50 to 76 Hz
29
EN
Trouble shooting
Symptom Check
Picture is jittery
Adjust Clock to set the screen position and adjust the Clock value carefully until there is no noise
displayed.
No picture
Check if the power switch and computer power switch are in the On position.
Check if the signal cable is correctly connected to the video card.
Check if the pins of D-sub connector are not bent.
Check if the computer is in the power- saving mode.
POWER LED is not lit Check if the power switch is in the On position. Check if the power cord is correctly connected.
Image is unstable Check if the signal cable is suitable to the video card.
Picture bounces or a wave pattern is present
in the picture
Keep the devices that may cause electrical interference away from the monitor.
See the FCC information at the front cover of the manual.
Picture is blurred Adjust Contrast and Brightness.
No sound
Check the audio cables are correctly connected to the computer.
Adjust the volume after checking the sound is muted.
Check the audio system in the computer.
Low sound
Adjust the volume on the OSD menu.
Adjust the volume of the sound card in the computer.
VIDEO screen cannot be seen
Check if PICTURE mode has been set.
Check if the video terminal is properly connected.
No video
Check if the video cable is correctly connected to the computer and set to Functions on the OSD picture
menu.
Poor color in the video Adjust the Color or Tint values on the OSD Picture menu.
Grainy picture in the video Adjust the Sharpness on the OSD Picture menu.
 Loading...