

Page 1
BA00430C/07/EN/14.19
71453974
2019-01-07
Products Solutions Services
Operating Instructions
Flexdip CYH112
Holder for water and wastewater assemblies
Page 2

Page 3

Flexdip CYH112 Table of contents
Table of contents
1 About this document ................ 4
1.1 Warnings ............................ 4
1.2 Symbols used .......................... 4
2 Basic safety instructions ............ 5
2.1 Requirements for the personnel ............ 5
2.2 Designated use ........................ 5
2.3 Workplace safety ....................... 5
2.4 Operational safety ...................... 6
2.5 Product safety ......................... 6
3 Product description ................. 7
3.1 Product design ......................... 7
4 Incoming acceptance and product
identification ....................... 9
4.1 Incoming acceptance .................... 9
4.2 Product identification ................... 10
4.3 Scope of delivery ...................... 10
4.4 Certificates and approvals ............... 11
5 Installation ....................... 12
5.1 Installation conditions .................. 12
5.2 Mounting the holder ................... 13
5.3 Mounting options ..................... 25
5.4 Post-installation check .................. 29
6 Operation options ................. 30
6.1 Operating the pendulum holder ........... 30
7 Maintenance ...................... 31
7.1 Maintenance tasks ..................... 31
8 Repair ............................ 34
8.1 Return .............................. 34
8.2 Disposal ............................ 34
9 Accessories ....................... 35
10 Technical data .................... 40
10.1 Environment ......................... 40
10.2 Mechanical construction ................ 40
Index .................................. 44
Endress+Hauser 3
Page 4
About this document Flexdip CYH112
1 About this document
1.1 Warnings
Structure of information Meaning
DANGER
L
Causes (/consequences)
If necessary, Consequences of
non-compliance (if applicable)
Corrective action
‣
WARNING
L
Causes (/consequences)
If necessary, Consequences of
non-compliance (if applicable)
Corrective action
‣
CAUTION
L
Causes (/consequences)
If necessary, Consequences of
non-compliance (if applicable)
Corrective action
‣
NOTICE
Cause/situation
If necessary, Consequences of
non-compliance (if applicable)
Action/note
‣
This symbol alerts you to a dangerous situation.
Failure to avoid the dangerous situation will result in a fatal or serious
injury.
This symbol alerts you to a dangerous situation.
Failure to avoid the dangerous situation can result in a fatal or serious
injury.
This symbol alerts you to a dangerous situation.
Failure to avoid this situation can result in minor or more serious injuries.
This symbol alerts you to situations which may result in damage to
property.
1.2 Symbols used
Symbol Meaning
Additional information, tips
Permitted or recommended
Not permitted or not recommended
Reference to device documentation
Reference to page
Reference to graphic
Result of a step
1.2.1 Symbols on the device
Symbol Meaning
Reference to device documentation
4 Endress+Hauser
Page 5

Flexdip CYH112 Basic safety instructions
2 Basic safety instructions
2.1 Requirements for the personnel
• Installation, commissioning, operation and maintenance of the measuring system may
be carried out only by specially trained technical personnel.
• The technical personnel must be authorized by the plant operator to carry out the
specified activities.
• The electrical connection may be performed only by an electrical technician.
• The technical personnel must have read and understood these Operating Instructions
and must follow the instructions contained therein.
• Faults at the measuring point may only be rectified by authorized and specially trained
personnel.
Repairs not described in the Operating Instructions provided must be carried out only
directly at the manufacturer's site or by the service organization.
2.2 Designated use
The assembly holder has been developed for use in the wastewater sector. CYH112 is
designed as a modular holder system for sensors and assemblies in open basins, channels
and tanks.
Use of the device for any purpose other than that described, poses a threat to the safety of
people and of the entire measuring system and is therefore not permitted.
The manufacturer is not liable for damage caused by improper or non-designated use.
NOTICE
Applications outside specifications!
Incorrect measurements, malfunctions and even measuring point failure could result
Use the product only in accordance with the specifications.
‣
Pay attention to the technical data on the nameplate.
‣
2.3 Workplace safety
As the user, you are responsible for complying with the following safety conditions:
• Installation guidelines
• Local standards and regulations
• Regulations for explosion protection
Endress+Hauser 5
Page 6

Basic safety instructions Flexdip CYH112
2.4 Operational safety
Before commissioning the entire measuring point:
1. Verify that all connections are correct.
2. Ensure that electrical cables and hose connections are undamaged.
3. Do not operate damaged products, and protect them against unintentional operation.
4. Label damaged products as defective.
During operation:
If faults cannot be rectified:
‣
products must be taken out of service and protected against unintentional operation.
2.5 Product safety
2.5.1 State-of-the-art technology
The product is designed to meet state-of-the-art safety requirements, has been tested, and
left the factory in a condition in which it is safe to operate. The relevant regulations and
international standards have been observed.
6 Endress+Hauser
Page 7

Flexdip CYH112 Product description
1
2
3
4
5
6
3 Product description
3.1 Product design
A0037898
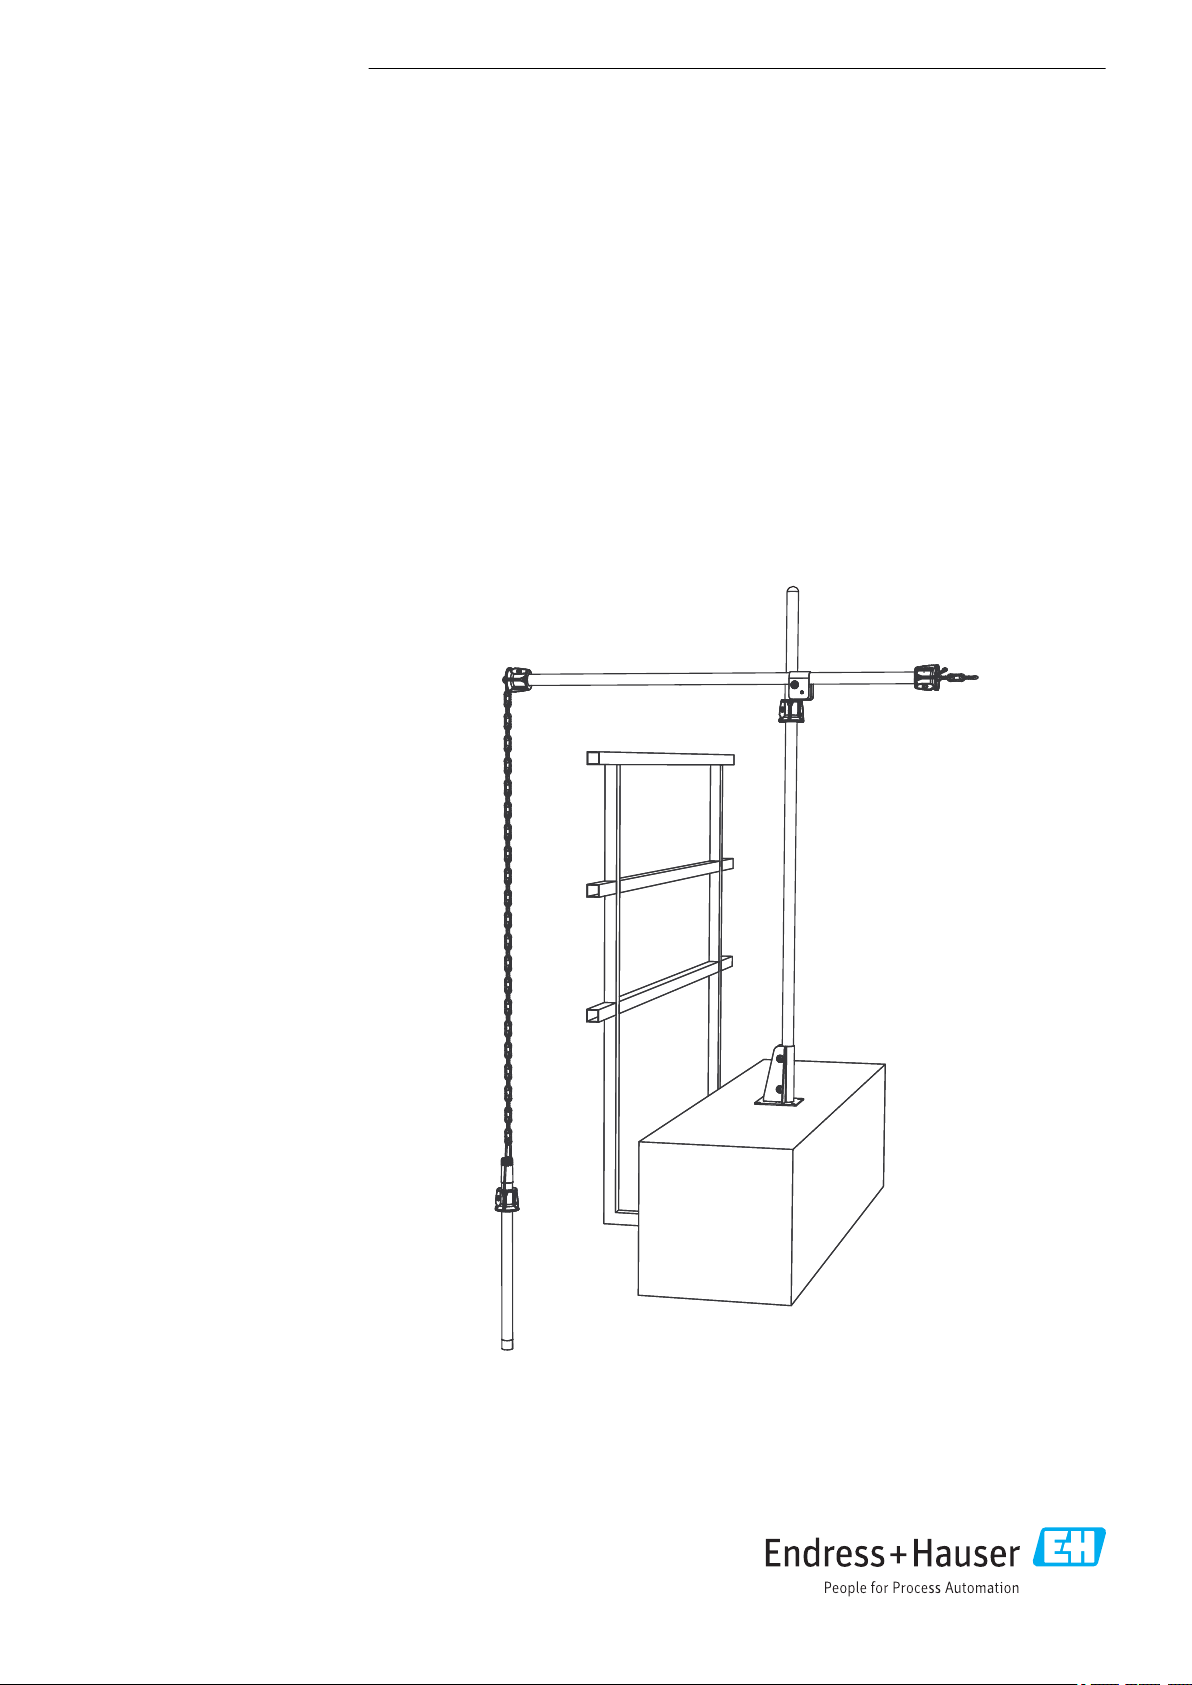
1 Example of mounted CYH112 holder
1 Base
2 Main pipe
3 Multifunctional clamp ring
4 Transverse pipe
5 Cross clamp
6 Immersion pipe of the CYA112 assembly
Endress+Hauser 7
Page 8

Product description Flexdip CYH112
1
2
3
4
4
5
6
7
A0037909
2 Example of mounted CYH112 holder with chain
1 Base
2 Main pipe
3 Chain
4 Multifunctional clamp ring
5 Cross clamp
6 Transverse pipe
7 Immersion pipe of the CYA112 assembly
Always hook the bracket of the assembly through the last link in the chain.
Attach the holder depending on the ambient conditions.
8 Endress+Hauser
Page 9

Flexdip CYH112 Incoming acceptance and product identification
4 Incoming acceptance and product
identification
4.1 Incoming acceptance
1. Verify that the packaging is undamaged.
Notify the supplier of any damage to the packaging.
Keep the damaged packaging until the issue has been resolved.
2. Verify that the contents are undamaged.
Notify the supplier of any damage to the delivery contents.
Keep the damaged goods until the issue has been resolved.
3. Check that the delivery is complete and nothing is missing.
Compare the shipping documents with your order.
4. Pack the product for storage and transportation in such a way that it is protected
against impact and moisture.
The original packaging offers the best protection.
Make sure to comply with the permitted ambient conditions.
If you have any questions, please contact your supplier or your local Sales Center.
Endress+Hauser 9
Page 10

Incoming acceptance and product identification Flexdip CYH112
4.2 Product identification
4.2.1 Nameplate
The nameplate provides you with the following information on your device:
• Manufacturer identification
• Order code
• Extended order code
• Serial number
• Ambient and process conditions
• Safety information and warnings
Compare the information on the nameplate with the order.
‣
4.2.2 Identifying the product
Product page
www.endress.com/cyh112
Interpreting the order code
The order code and serial number of your product can be found in the following locations:
• On the nameplate
• In the delivery papers
Obtaining information on the product
1. Go to www.endress.com.
2. Call up the site search (magnifying glass).
3. Enter a valid serial number.
4. Search.
The product structure is displayed in a popup window.
5. Click on the product image in the popup window.
A new window (Device Viewer) opens. All of the information relating to your
device is displayed in this window as well as the product documentation.
4.2.3 Manufacturer's address
Endress+Hauser Conducta GmbH+Co. KG
Dieselstraße 24
D-70839 Gerlingen
4.3 Scope of delivery
The delivery comprises:
• Ordered version of assembly holder
• Operating Instructions
If you have any queries:
‣
Please contact your supplier or local sales center.
10 Endress+Hauser
Page 11

Flexdip CYH112 Incoming acceptance and product identification
4.4 Certificates and approvals
Explosion protection
The CYH112 holder may also be used in hazardous areas in Zone 1 and 2.
The holder does not fall within the scope of ATEX Directive 2014/34/EU as it does not
have a potential source of ignition of its own. Consequently, the holder does not bear
ATEX identification marking. Potential equalization must be implemented as described in
the "Installation conditions" section.
Endress+Hauser 11
Page 12

Installation Flexdip CYH112
kg
10
1200
1000
lbs
22
39.4
47.2
5
4
0
11
8.8
mm
inch
500
19.7
0
6.5
14.3
750
29.5
5 Installation
5.1 Installation conditions
5.1.1 Mounting instructions
The maximum extension depends on the suspended load (weight of immersion pipe,
assembly and cable). See the following diagram for this purpose:
A0010837
3 Extension as a function of the suspended load
The maximum permitted load when mounting on a rail and using a pendulum holder with
a pendulum adapter is 5 kg (11 lb). Potential equalization must be implemented at the
place of installation. All electrically conductive parts must be interconnected.
Cable
The cable to the sensor is routed outside along the pipe. Hook-and-loop cable ties can be
ordered as accessories to secure the cable.
Cable routing for the power supply must be implemented by the customer onsite.
12 Endress+Hauser
Page 13

Flexdip CYH112 Installation
1200 (47.2)
1200 (47.2)
5.1.2 Dimensions
A0010838
4 Dimensions with maximum extension. Dimensions: mm (in)
The values indicated are valid for floor, wall and rail mounting.
5.2 Mounting the holder
For more information on mounting the assembly with the holder, see Operating
Instructions BA00432
5.2.1 Measuring system
A complete measuring system consists of:
• CYH112 holder
• Assembly, e.g. CYA112
• Transmitter, e.g. Liquiline CM44
• Sensor, e.g. CUS71D
Endress+Hauser 13
Page 14

Installation Flexdip CYH112
1
2
3
4
6
7
5
A0010865
5 Measuring system with CYH112 holder
1 Main pipe secured to floor
2 Transmitter
3 Protective cover
4 Transverse pipe with fastening elements
5 Hook-and-loop cable ties
6 Chain
7 CPA111 assembly
5.2.2 Mounting the base
Use the M10 chemical anchor to mount the base on a concrete floor.
1. Set the base in position (the open part faces the basin rim).
The minimum distance between the bores and the basin rim is 40 mm (1.57 in).
2. Mark the securing holes for the base on the floor.
3. Drill the securing holes with a 12 mm drill.
4. Install the 4 chemical anchors.
5. Firmly screw down the base.
6. Ground the base with a ground cable (≥ 4 mm² (≥ 12 AWG)).
14 Endress+Hauser
Page 15

Flexdip CYH112 Installation
1
2
1
2
3
5.2.3 Mounting the main pipe
A0038457
6 Multifunctional clamp ring
1 Slot in the multifunctional clamp ring
2 Multifunctional clamp ring, funnel-shaped side
1. Attach the multifunctional clamp ring to the main pipe, with the funnel-shaped side
pointing downwards.
2. Firmly tighten the multifunctional clamp ring.
The distance between the upper edge of the multifunctional clamp ring and the base
plate may not exceed 1 100 mm (43.3 in). The multifunctional clamp ring acts as an
anti-slip lock here.
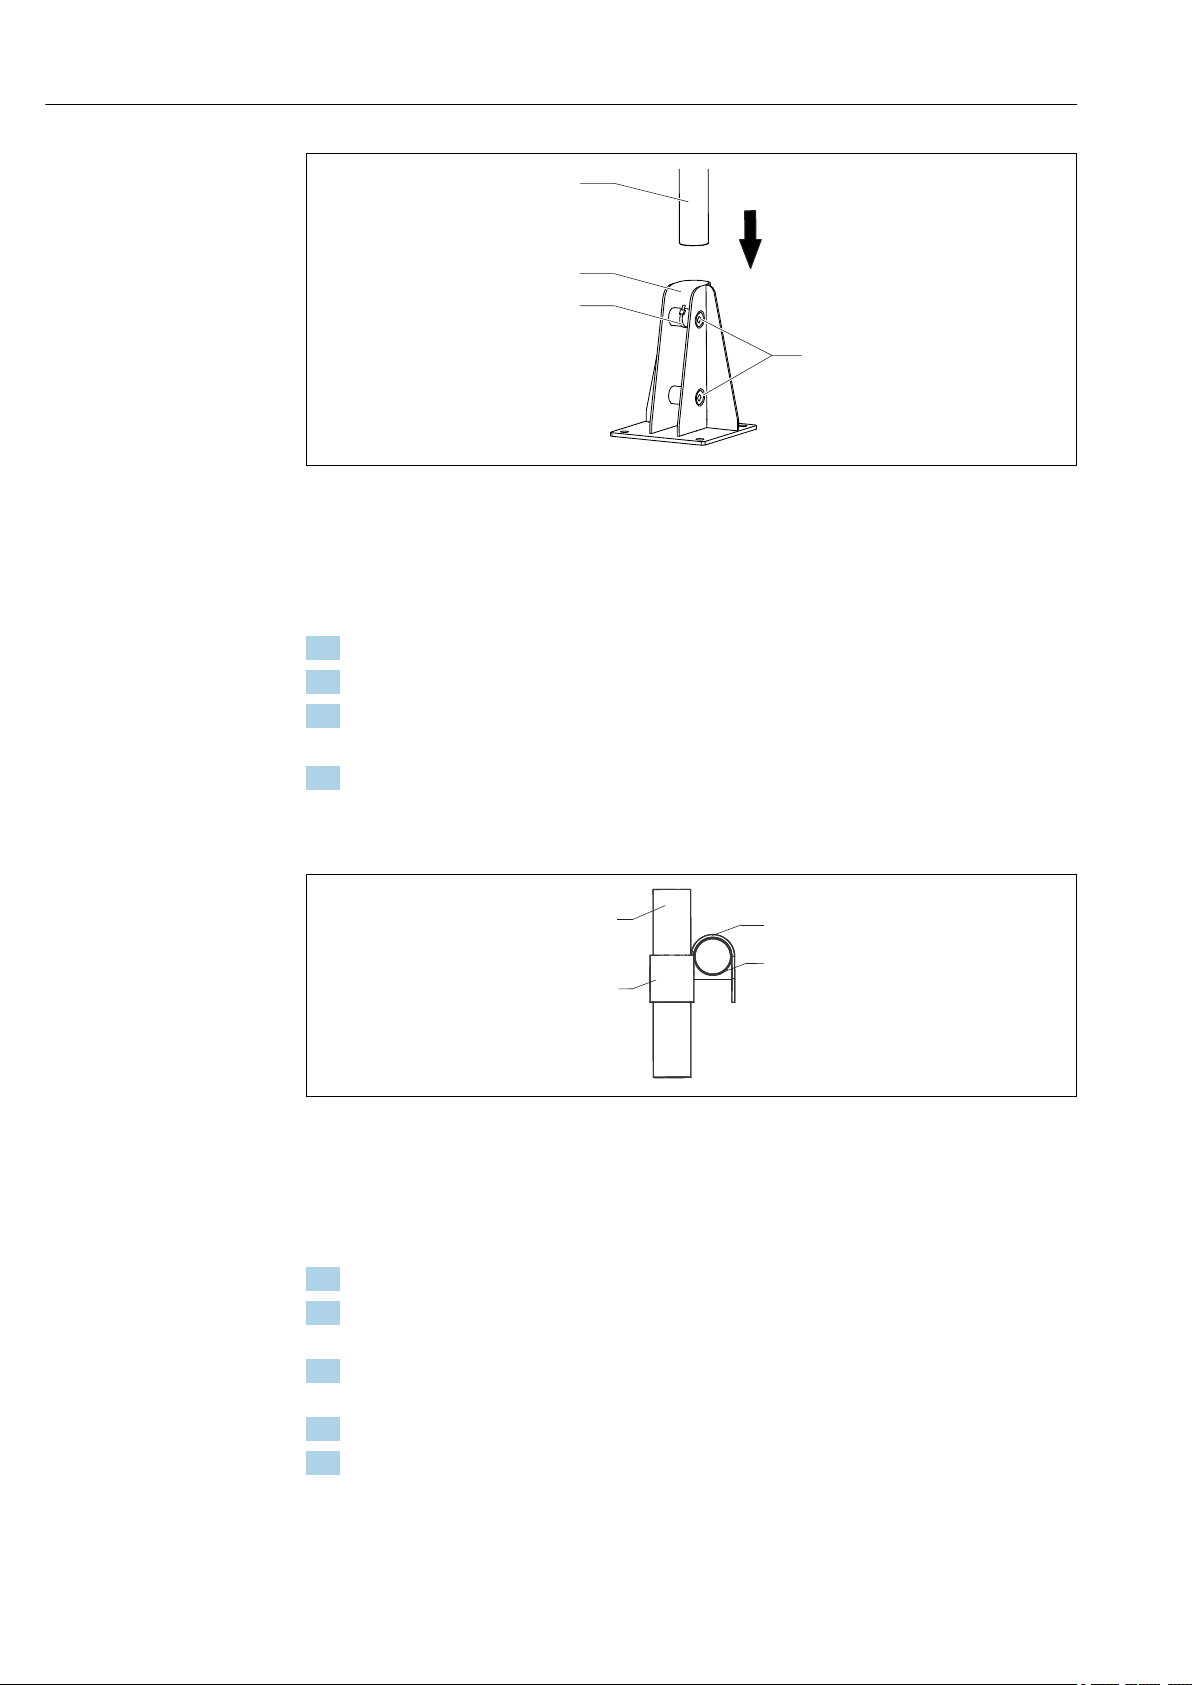
7 Adjusting the clamps
1 Pipe
2 Clamps
3 Clamp screw
A0038382
Endress+Hauser 15
Page 16
Installation Flexdip CYH112
1
2
3
4
3
4
A0038385
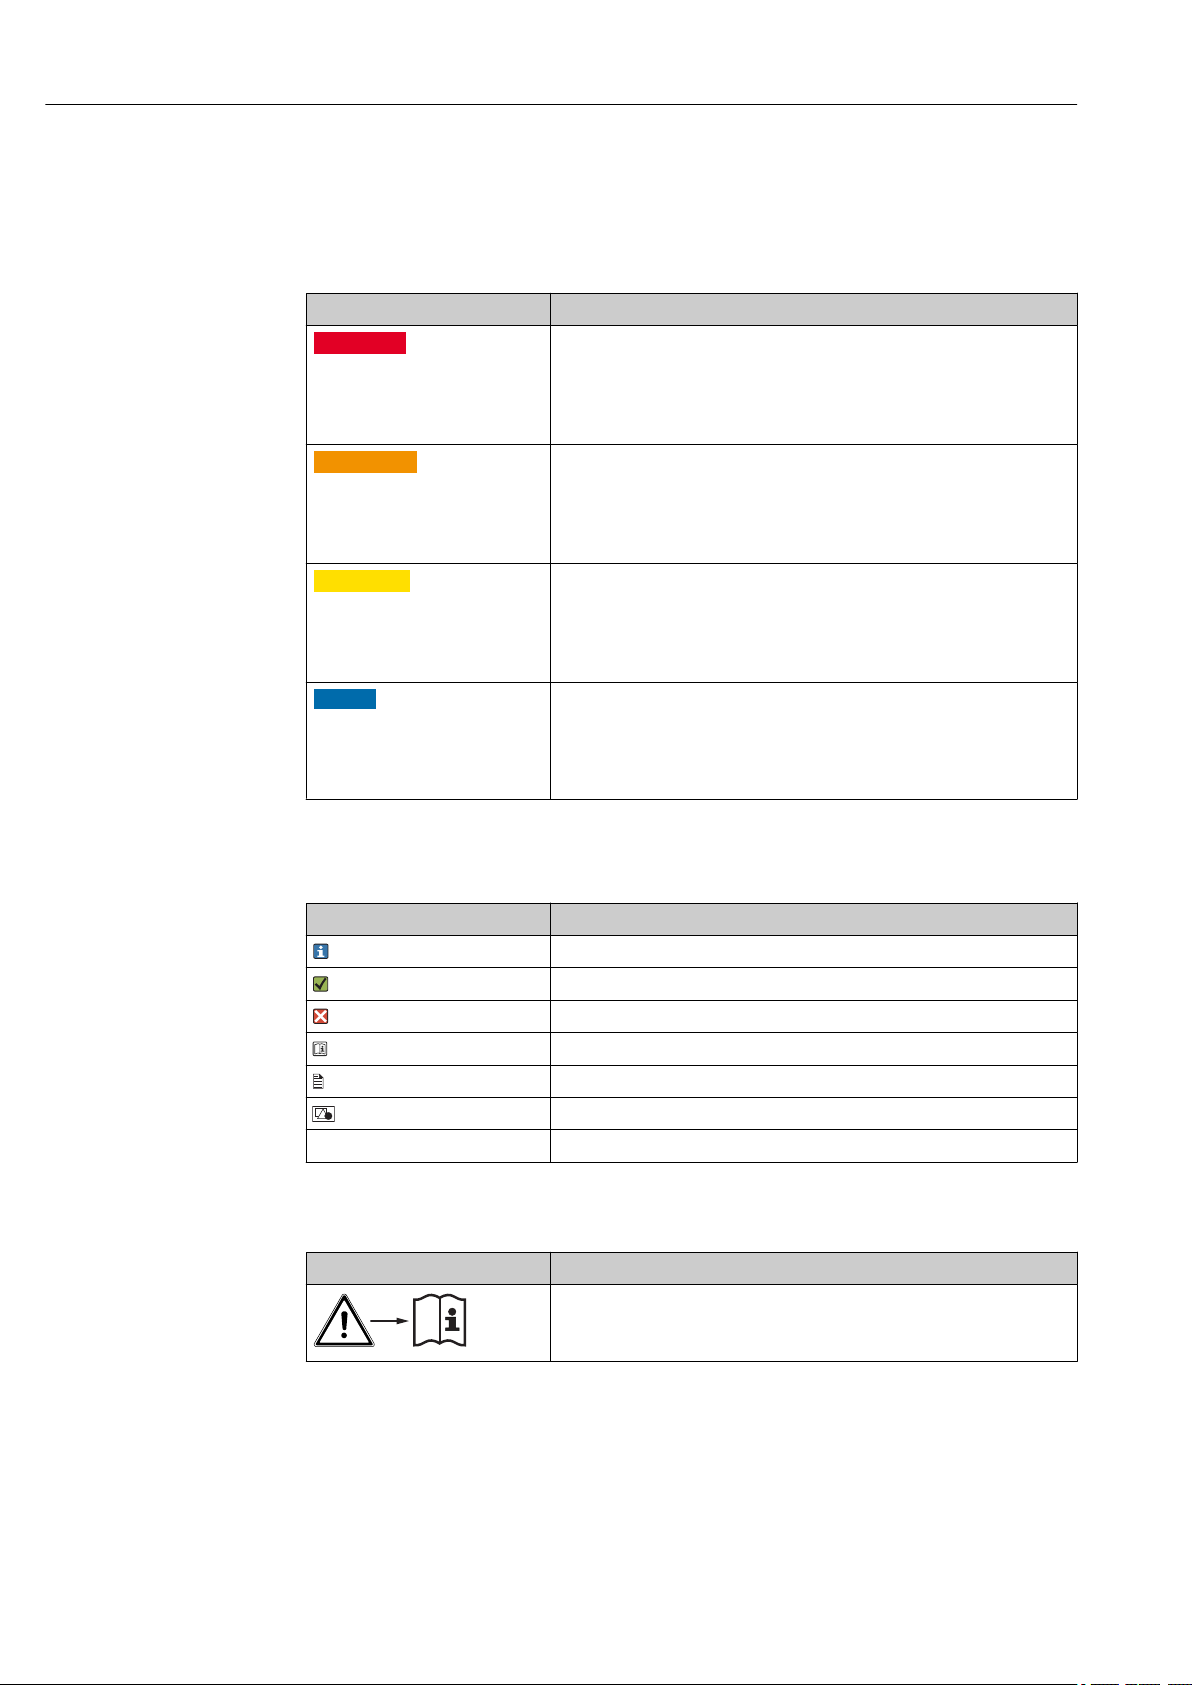
8 Base with main pipe
1 Main pipe
2 Base
3 Hook-and-loop cable ties
4 Clamps with clamp screws
1. Set the clamps in the base in position → 7, 15.
2. Insert the main pipe into the base → 8, 16.
3. Lift the main pipe approx. 5 mm (0.2 in) and fasten it.
No backwater can form in the main pipe.
4. Fit the protection cap on the top end of the main pipe.
5.2.4 Mounting the transverse pipe for fixed-installation assemblies
A0011292
9 Mounting the cross clamp
1 Main pipe
2 Cross clamp, closed side facing the basin
3 Cross clamp, closed side facing upwards
4 Holder transverse pipe
1. Adjust the clamps on the cross clamp → 7, 15.
2. Slide the cross clamp over the transverse pipe, making sure that the closed side of the
cross clamp is located at the top.
3. Attach the cross clamp, along with the transverse pipe, to the main pipe. Make sure
that the closed side of the cross clamp faces the basin.
4. Align the holder.
5. Tighten the clamping screws.
16 Endress+Hauser
Page 17
Flexdip CYH112 Installation
2
3
4
5
5.2.5 Mounting the flange clamp
A0038901
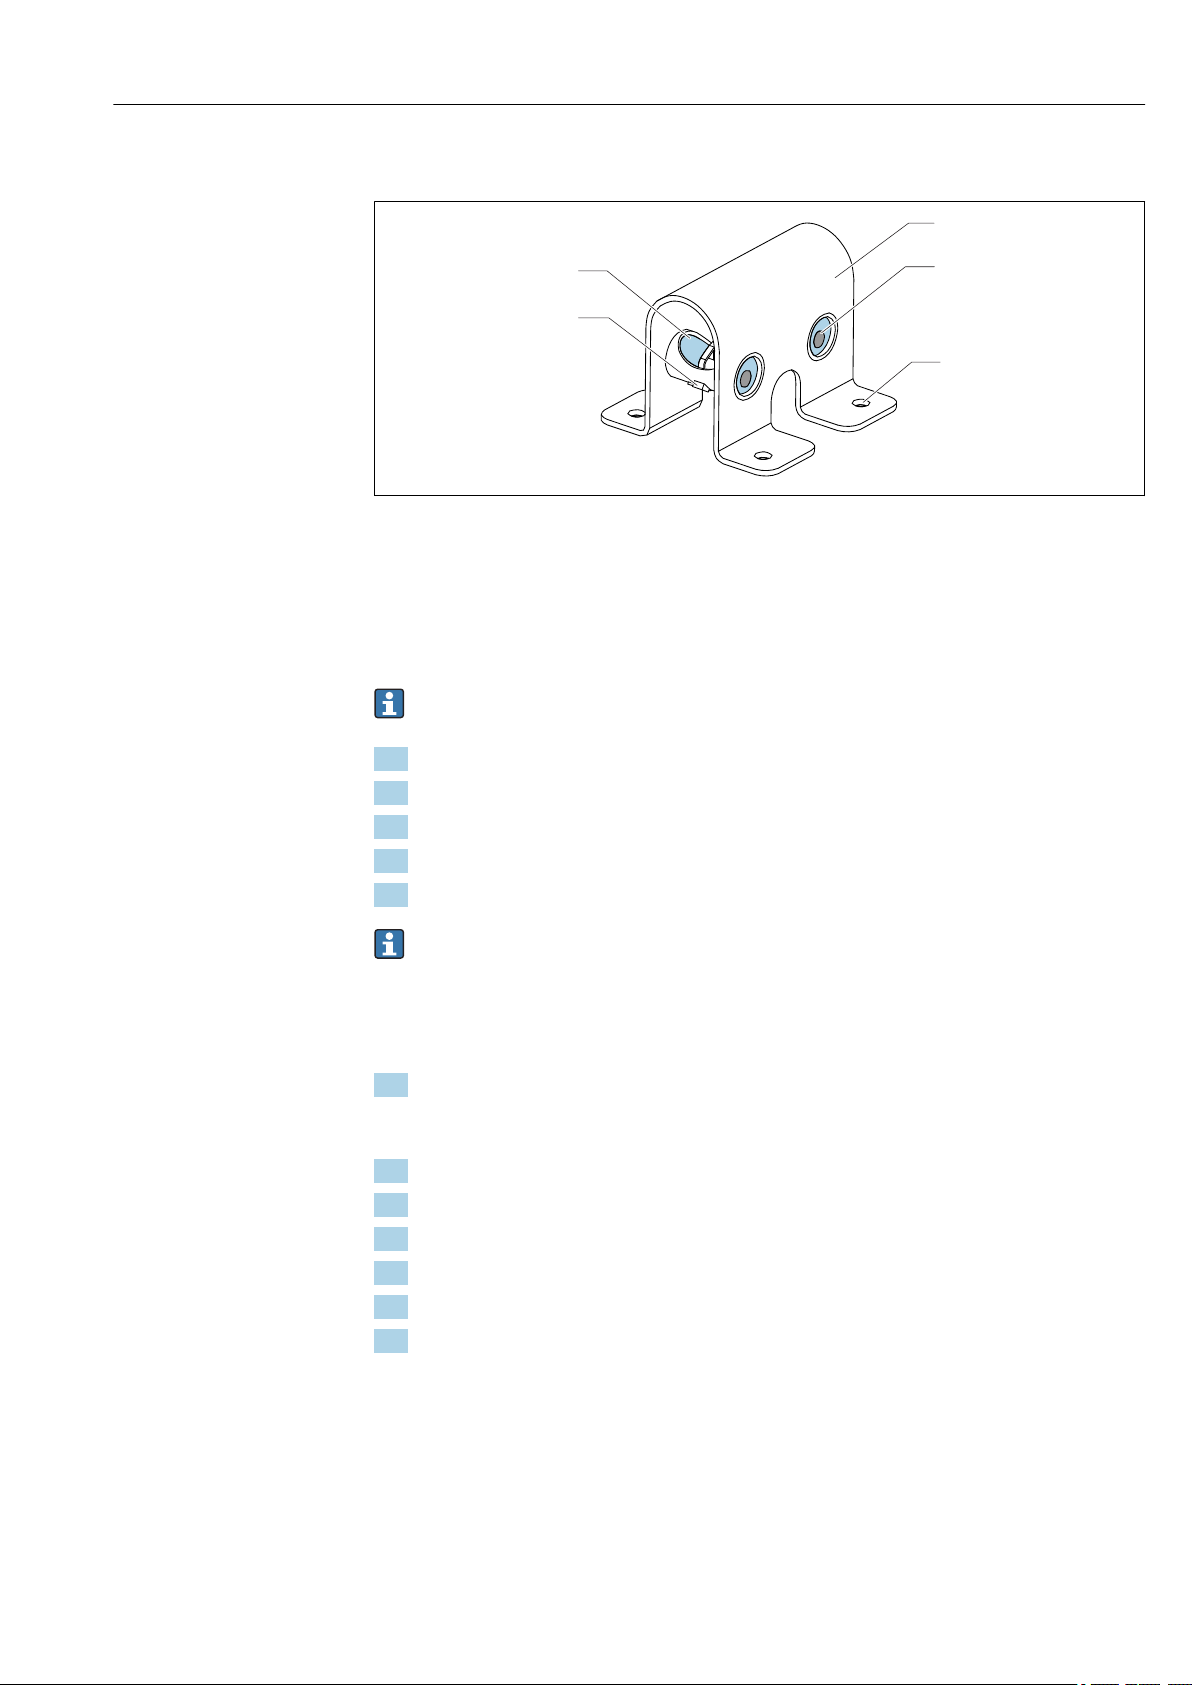
10 Flange clamp
1 Clamps
2 Hook-and-loop cable ties
3 Flange clamp
4 Clamp screw
5 Fastening holes on flange clamp
Use M8 chemical anchors to mount on a concrete floor or a concrete wall.
1. Mark the securing holes on the concrete.
2. Drill the securing holes with a 10 mm drill.
3. Install the chemical anchors.
4. Firmly tighten the flange clamp.
5. Ground the flange clamp with a ground cable (≥ 4 mm² (≥ 12 AWG)).
If mounting on a wall with two wall fasteners, initially only screw on the flange
clamps so that they sit loosely. This makes it easier to mount the main pipe on an
uneven wall.
5.2.6 Mounting the main pipe on the flange clamp
1. Attach the multifunctional clamp ring to the main pipe, with the funnel-shaped side
pointing downwards → 6, 15.
The multifunctional clamp ring acts as an anti-slip lock here.
2. Firmly tighten the multifunctional clamp ring.
3. Adjust the clamps on the flange clamp → 15.
4. Insert the main pipe through the flange clamp.
5. Align the main pipe.
6. Tighten the clamping screws.
7. Fit the protection cap on the top end of the main pipe.
Endress+Hauser 17
Page 18

Installation Flexdip CYH112
1
2
3
2
3
4
1
3
4
5
5.2.7 Installing the rail mounting, pendulum holder or immersion pipe tray
11 Rail mounting
1 Retaining screw in clamping jaw
2 Clamping jaw
3 Retaining screw
13 Pendulum holder with pendulum adapter
1 Clamping jaw
2 Retaining screw
3 Retaining screw in clamping jaw
4 Pendulum adapter
5 Pendulum holder
A0038906
A0038908
12 Immersion pipe tray
1 Clamping jaw
2 Retaining screw in clamping jaw
3 Retaining screw
4 Tray for the immersion pipe
A0038907
The rail mounting → 11, 18, the pendulum holder with pendulum adapter
→ 13, 18 or the immersion pipe tray → 12, 18 must each be fitted on a
support (square or circular).
Mount the holder in the desired position on the support using a clamping jaw and 2
‣
retaining screws.
18 Endress+Hauser
Page 19

Flexdip CYH112 Installation
1
2
3
4
3
4
A0011312
14 Fitting the holder on the support
1 Mounting on a square support
2 Mounting on a circular support
3 Retaining screw
4 Retaining screw in clamping jaw
In the case of square supports, mount the clamping jaw with the V-notch facing
outwards; in the case of circular supports, mount with the V-notch facing inwards.
Mounting the holder:
1. Screw in the retaining screws so that they sit loosely.
2. Press the clamping jaw against the support, ensuring that the clamping jaw is parallel
to the holder.
3. Tighten the retaining screw (item 4).
4. Position the retaining screw (item 3) close to the support.
5. Tighten the retaining screw (item 3).
5.2.8 Mounting the transverse pipe on rails or a coping stone for fixed-installation assemblies
1. Adjust the clamps on the cross clamp and the flange clamp → 15.
2. Mount the cross clamp for the assembly on the transverse pipe. Ensure that the
closed sides point upwards and towards the basin → 16.
3. Slide the transverse pipe through the flange clamp.
4. Align the holder.
5. Tighten the clamping screws.
Endress+Hauser 19
Page 20
Installation Flexdip CYH112
1
2
1
2
4
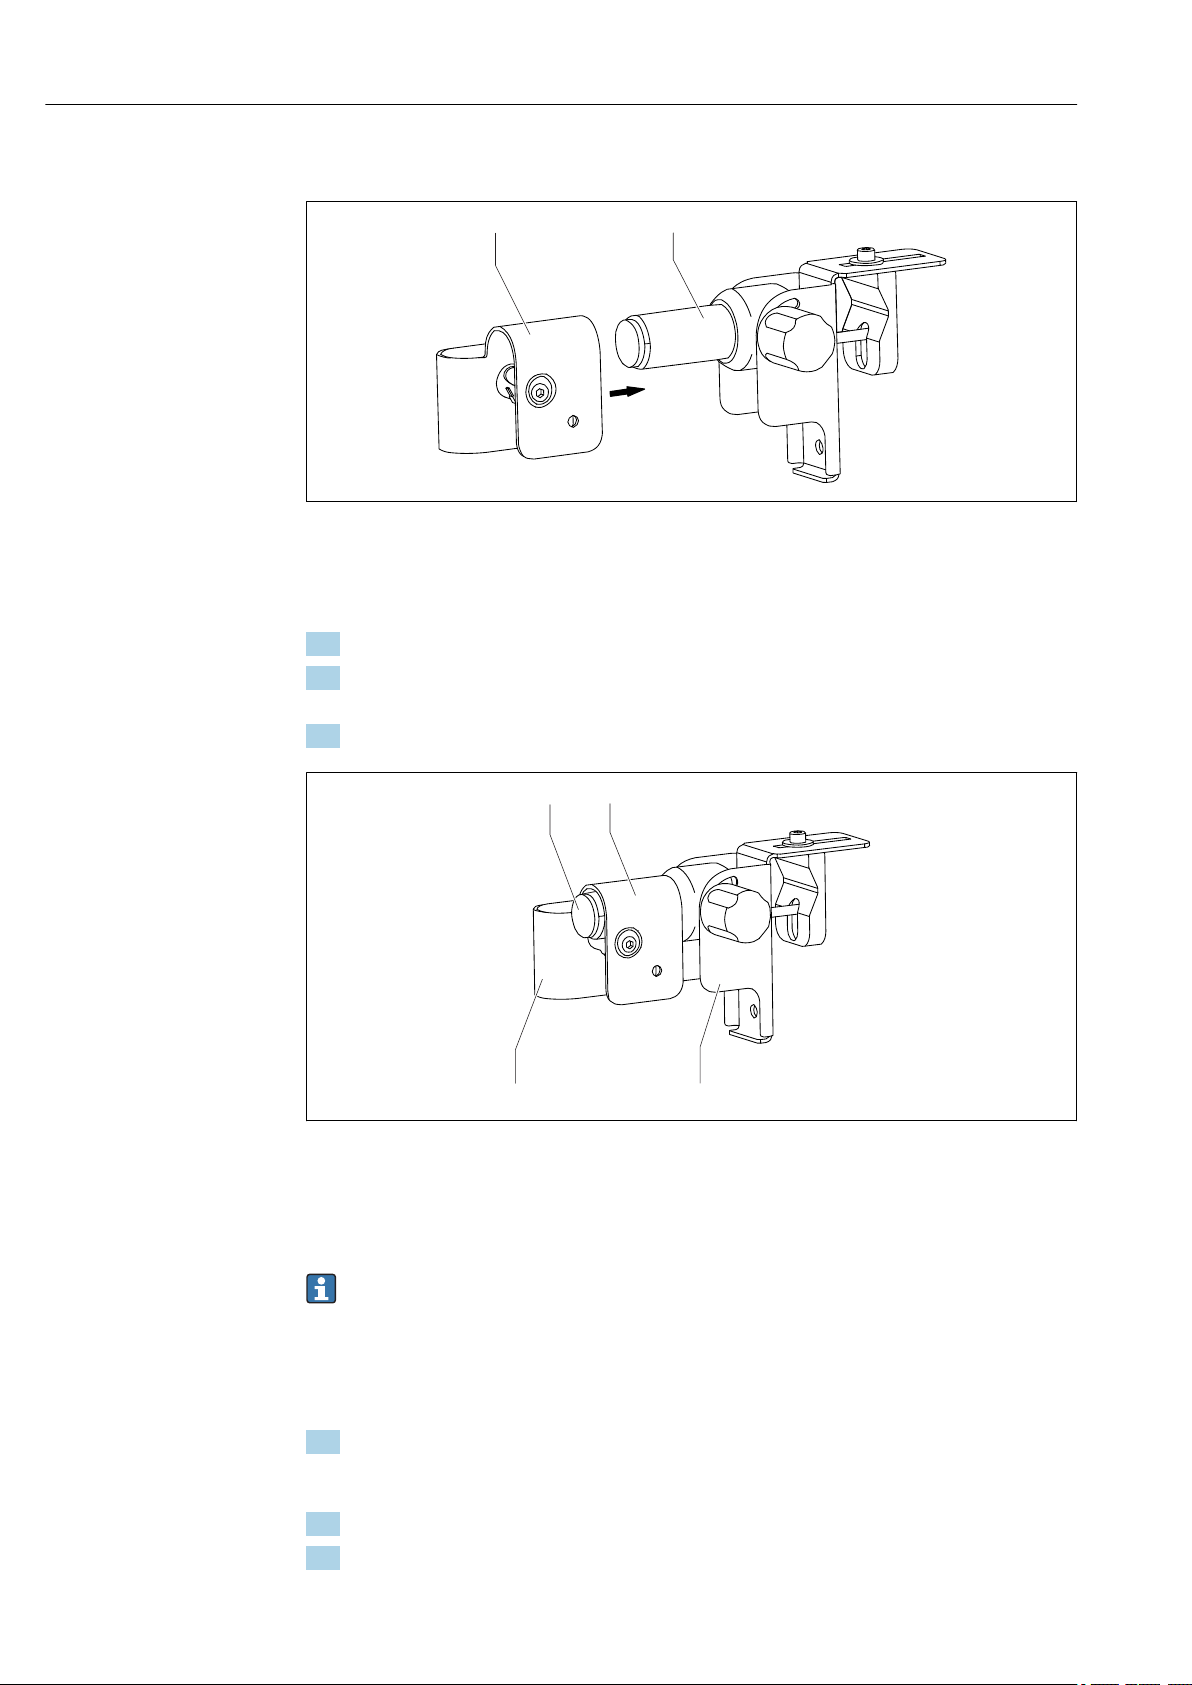
5.2.9 Mounting the cross clamp on the pendulum holder
A0038914
15 Mounting the cross clamp on the pendulum holder
1 Cross clamp
2 Pendulum holder with pendulum adapter
1. Adjust the clamps on the cross clamp → 15.
2. Slide the cross clamp onto the pendulum holder. Ensure that the closed sides point
upwards and to the basin.
3. Tighten the clamping screws.
A0035831
16 Cross clamp with pendulum holder
1 Pendulum holder
2 Cross clamp, closed side facing upwards
3 Cross clamp, closed side facing the basin
For information on the operation of the pendulum holder → 30
5.2.10 Mounting the transverse pipe for assembly chain retainer
Preparing the main pipe for mounting the transverse pipe:
1. Attach the multifunctional clamp ring to the main pipe, with the funnel-shaped side
pointing downwards. The distance between the upper edge of the multifunctional
clamp ring and the base plate may not exceed 1 100 mm (43.3 in).
2. Firmly tighten the multifunctional clamp ring.
3. Fit the protection cap on the top end of the main pipe.
20 Endress+Hauser
Page 21

Flexdip CYH112 Installation
1
3
2
4
A0035832
17 Mounting the multifunctional clamp rings on the transverse pipe
1 Triangular carabiner as anti-slip lock for the chain
2 Multifunctional clamp ring (stand side), slot facing downwards
3 Multifunctional clamp ring (basin side), slot facing upwards
4 Slot in the multifunctional clamp ring
Mounting the transverse pipe:
1. Adjust the clamps on the cross clamp → 15.
2. Slide the cross clamp over the transverse pipe. Ensure that the closed sides of the
cross clamp point upwards and towards the basin.
3. Mount a multifunctional clamp ring on each end of the transverse pipe (funnelshaped sides towards the outside → 6, 15).
4. Adjust the multifunctional clamp rings.
5. On the stand side, position the slot of the multifunctional clamp ring so that it is
pointing downwards, and on the basin side position the slot so that it is pointing
upwards.
6. Guide the chain through the transverse pipe.
7. Fit the chain into the slot of the multifunctional clamp ring (stand side).
8. Secure the chain with the triangular carabiner on both sides.
9. Attach the cross clamp, along with the transverse pipe, to the main pipe.
10. Align the holder.
11. Tighten the clamping screws.
Endress+Hauser 21
Page 22

Installation Flexdip CYH112
1
2
3
6
7
5.2.11 Mounting the transverse pipe for assembly chain retainer without a main pipe
A0035833
18 Installation on coping stone
1 Flange clamp
2 Transverse pipe
3 Multifunctional clamp ring (basin side), slot facing upwards
4 Multifunctional clamp ring (stand side), slot facing downwards
5 Chain
6 Triangular carabiner
7 Slot in the multifunctional clamp ring
1. Adjust the clamps on the flange clamp → 15.
2. Mount the multifunctional clamp ring on one end of the transverse pipe with the
funnel-shaped side facing towards the outside → 6, 15.
3. Slide the transverse pipe through the flange clamp.
4. Mount the second multifunctional clamp ring on the other end of the transverse pipe
with the funnel-shaped side facing towards the outside.
5. Guide the chain through the transverse pipe.
6. Secure the chain with the triangular carabiner.
7. Align the transverse pipe.
8. Ensure that the slot of the multifunctional clamp ring is pointing upwards on the
basin side, and is pointing downwards on the stand side.
9. Tighten the clamping screws.
22 Endress+Hauser
Page 23

Flexdip CYH112 Installation
1
2
3
4
4
5.2.12 Mounting the pendulum holder on the coping stone
A0038917
19 Mounting the pendulum adapter on a coping stone
Use M10 chemical anchors to mount the pendulum holder on a coping stone.
1. Mark the securing points for the pendulum holder on the floor.
2. Drill the securing holes with a 12 mm drill.
3. Install the 2 chemical anchors.
4. Firmly tighten the pendulum holder.
5. Ground the pendulum holder with a ground cable (≥ 4 mm² (≥12 AWG)).
5.2.13 Mounting the quick-action clamp
20 Cross clamp
1 Cross clamp
2 Clamps
3 Clamp screw
4 Hook-and-loop cable ties
A0038430
Endress+Hauser 23
Page 24

Installation Flexdip CYH112
1
2
3
A0011403
21 Mounting the quick-action clamp on the cross clamp
1 Quick-action clamp
2 Clamps
3 Clamp screw
1. Cut off the hook-and-loop cable ties used to secure the existing clamps.
2. Remove the clamping unit (clamps and clamping screw).
3. Insert the quick-action clamp.
4. Adjust the clamps.
5. Secure the quick-action clamp with a cable tie.
6. Mount the second quick-action clamp on the opposite side in the same way.
5.2.14 Mounting the anti-slip lock
A0011371
22 Anti-slip lock for rail mounting
1 Multifunctional clamp ring
24 Endress+Hauser
Page 25

Flexdip CYH112 Installation
In the case of rail mounting, the multifunctional clamp ring acts as an anti-slip lock.
Multifunctional clamp ring → 35
Mount the multifunctional clamp ring at the desired height.
‣
5.3 Mounting options
5.3.1 Floor mounting
23 Mounting on the floor with main pipe and transverse pipe
A0037664
A0037665
24 Mounting on the floor with main pipe, transverse pipe and chain
Endress+Hauser 25
Page 26

Installation Flexdip CYH112
5.3.2 Wall mounting
25 Mounting on a wall with main pipe and transverse pipe
26 Mounting on a wall with transverse pipe
A0037897
A0037899
26 Endress+Hauser
Page 27

Flexdip CYH112 Installation
27 Mounting on a wall with main pipe, transverse pipe and chain
28 Mounting on a wall with transverse pipe and chain
A0037901
A0037902
Endress+Hauser 27
Page 28

Installation Flexdip CYH112
5.3.3 Rail mounting
29 Mounting on a rail with main pipe and transverse pipe
30 Mounting on a rail with transverse pipe
A0037904
A0037906
28 Endress+Hauser
Page 29

Flexdip CYH112 Installation
31 Mounting on a rail with main pipe, transverse pipe and chain
32 Mounting on a rail with transverse pipe and chain
A0037907
A0037908
5.4 Post-installation check
• After mounting, check that all the screws are securely tightened.
• When fastening via the pendulum holder, check that the assembly can move freely.
Endress+Hauser 29
Page 30

Operation options Flexdip CYH112
1
2
3
4
6 Operation options
WARNING
L
Wastewater
There is a risk of infection when working with wastewater!
Wear protective gloves, protective goggles and protective clothing.
‣
6.1 Operating the pendulum holder
33 Specifying the swing axis
1 Swing axis with rotating sleeve blocked
2 Swing axis with rotating sleeve not blocked
3 Rotating sleeve
4 Blocking screw for rotating sleeve
At the pendulum holder, determine the swinging direction (swing axis):
Block the rotating sleeve (item 1) or do not block the rotating sleeve (item 2).
‣
Specifying swinging direction 1:
1. Unscrew the cross clamp from the pendulum holder.
2. Unscrew the blocking screw (item 4) slightly until the rotating sleeve can no longer
rotate.
3. Reattach the cross clamp to the pendulum holder and screw it tight.
4. Release the locking lever.
5. Press the locking button to release the square-headed bolt on the opposite side.
Specifying swinging direction 2:
1. Unscrew the cross clamp from the pendulum holder.
2. Screw the blocking screw into the plastic body until the rotating sleeve can rotate
slightly.
3. Reattach the cross clamp to the pendulum holder.
4. Firmly tighten the cross clamp.
5. Tighten the locking lever.
A0011366
30 Endress+Hauser
Page 31

Flexdip CYH112 Maintenance
1
7 Maintenance
WARNING
L
Wastewater
There is a risk of infection when working with wastewater!
Wear protective gloves, protective goggles and protective clothing.
‣
7.1 Maintenance tasks
A0011372
34 Immersion pipe tray for assembly maintenance position
1 Immersion pipe tray
The immersion pipe tray makes it easier to perform maintenance tasks with rail mounting
involving a pendulum holder and cross clamp.
Endress+Hauser 31
Page 32

Maintenance Flexdip CYH112
2
7.1.1 Setting the assembly to the service position (fixed installation)
A0037661
35 Setting the assembly to the service position
1 Rotational movement 1
2 Rotational movement 2
1. Release the clamp screws on the cross clamp.
2. Move the transverse pipe with the assembly to the stand side (rotational movement
2).
3. Turn the transverse pipe 90° (rotational movement 1).
The assembly tilts upwards.
4. Move the transverse pipe over the basin rim and the railing.
5. Move the transverse pipe back until the desired maintenance position is reached.
32 Endress+Hauser
Page 33

Flexdip CYH112 Maintenance
A
B
7.1.2 Setting the assembly to the service position (chain retainer)
A0037663
36 Setting the assembly to the service position
A Measuring position
B Service position
1. Pull up the assembly by the chain as far as possible.
2. Suspend the chain from the multifunctional clamp ring and secure the chain with the
triangular carabiner.
3. Release the clamp screws on the cross clamp.
4. Move the transverse pipe with the assembly towards the stand side to the desired
maintenance position. If necessary, lift the assembly over the railing.
7.1.3 Clamps and threads
Lubricate the clamps and threads at regular intervals.
1. Clean the clamps and threads with soapy water.
2. Dry the clamps and threads.
3. Apply a thin film of lubricant to the cleaned parts (e.g. Syntheso Glep1).
Endress+Hauser 33
Page 34

Repair Flexdip CYH112
8 Repair
8.1 Return
The product must be returned if repairs or a factory calibration are required, or if the
wrong product was ordered or delivered. As an ISO-certified company and also due to legal
regulations, Endress+Hauser is obliged to follow certain procedures when handling any
returned products that have been in contact with medium.
To ensure the swift, safe and professional return of the device:
Refer to the website www.endress.com/support/return-material for information on the
‣
procedure and conditions for returning devices.
8.2 Disposal
Please observe local regulations!
‣
34 Endress+Hauser
Page 35

Flexdip CYH112 Accessories
9 Accessories
The following are the most important accessories available at the time this documentation
was issued.
For accessories not listed here, please contact your Service or Sales Center.
‣
Dipfit CLA111
• Immersion assembly for open and closed vessels with flange DN 100
• Product Configurator on the product page: www.products.endress.com/cla111
Technical Information TI00135C
Dipfit CPA111
• Immersion and installation assembly made of plastic for open and closed vessels
• Product Configurator on the product page: www.endress.com/cpa111
Technical Information TI00112C
Flexdip CYA112
• Immersion assembly for water and wastewater
• Modular assembly system for sensors in open basins, channels and tanks
• Material: PVC or stainless steel
• Product Configurator on the product page: www.endress.com/cya112
Technical Information TI00432C
Multifunctional clamp ring
• In the case of a chain retainer, the rear multifunctional clamp ring keeps the chain fixed
in place.
• In the case of the main pipe and transverse pipe, adjust the working height on the main
pipe with the multifunctional clamp ring.
• The multifunctional clamp ring acts as an anti-slip lock on transverse pipes, main pipes
and on assemblies.
• Material: POM - GF
• Order number: 71092049
Endress+Hauser 35
Page 36

Accessories Flexdip CYH112
B
B
B-B
Ø 86 (3.39)
Ø 80 (3.15)
100°
60 (2.36)
76.8
(3.02)
Ø 71.45
(2.81)
8 (0.31)
Ø 8 (031)
Ø 86 (3.39)
Ø 50 (1.97)
Ø 40 (1.57)
5 (0.2)
15 (0.59)
42
(1.65)
24.1
(0.95)
11.2 (0.44)
25
(0.98)
41.5
(1.63)
35
(1.83)
60 (2.36)
29.5
(1.16)
A0035699
37 Multifunctional clamp ring. Dimensions: mm (in)
Immersion pipe tray
• Is used to hold the immersion pipe during maintenance work
• Material: stainless steel 1.4404 (AISI 316L)
• Order number: 71092054
36 Endress+Hauser
Page 37

Flexdip CYH112 Accessories
47 (1.85)
73.5
(2.89)
10 (0.39)
31
(1.22
)
3
(0.12)
65 (2.56)
93.5 (3.68)
100
(3.94)
48 (1.89)
A A-A
A
89.5 (3.52)
23 (0.91)
9.1
(0.36)
B
B
B-B
9
(0.35)
55 (2.17)
79.9 (3.15)
9 (0.35)
M8
6 (0.24)
15
(0.59)
12
(0.47)
16 (0.63)
7
(0.28)
66.4 (2.61)
38 Immersion pipe tray. Dimensions: mm (in)
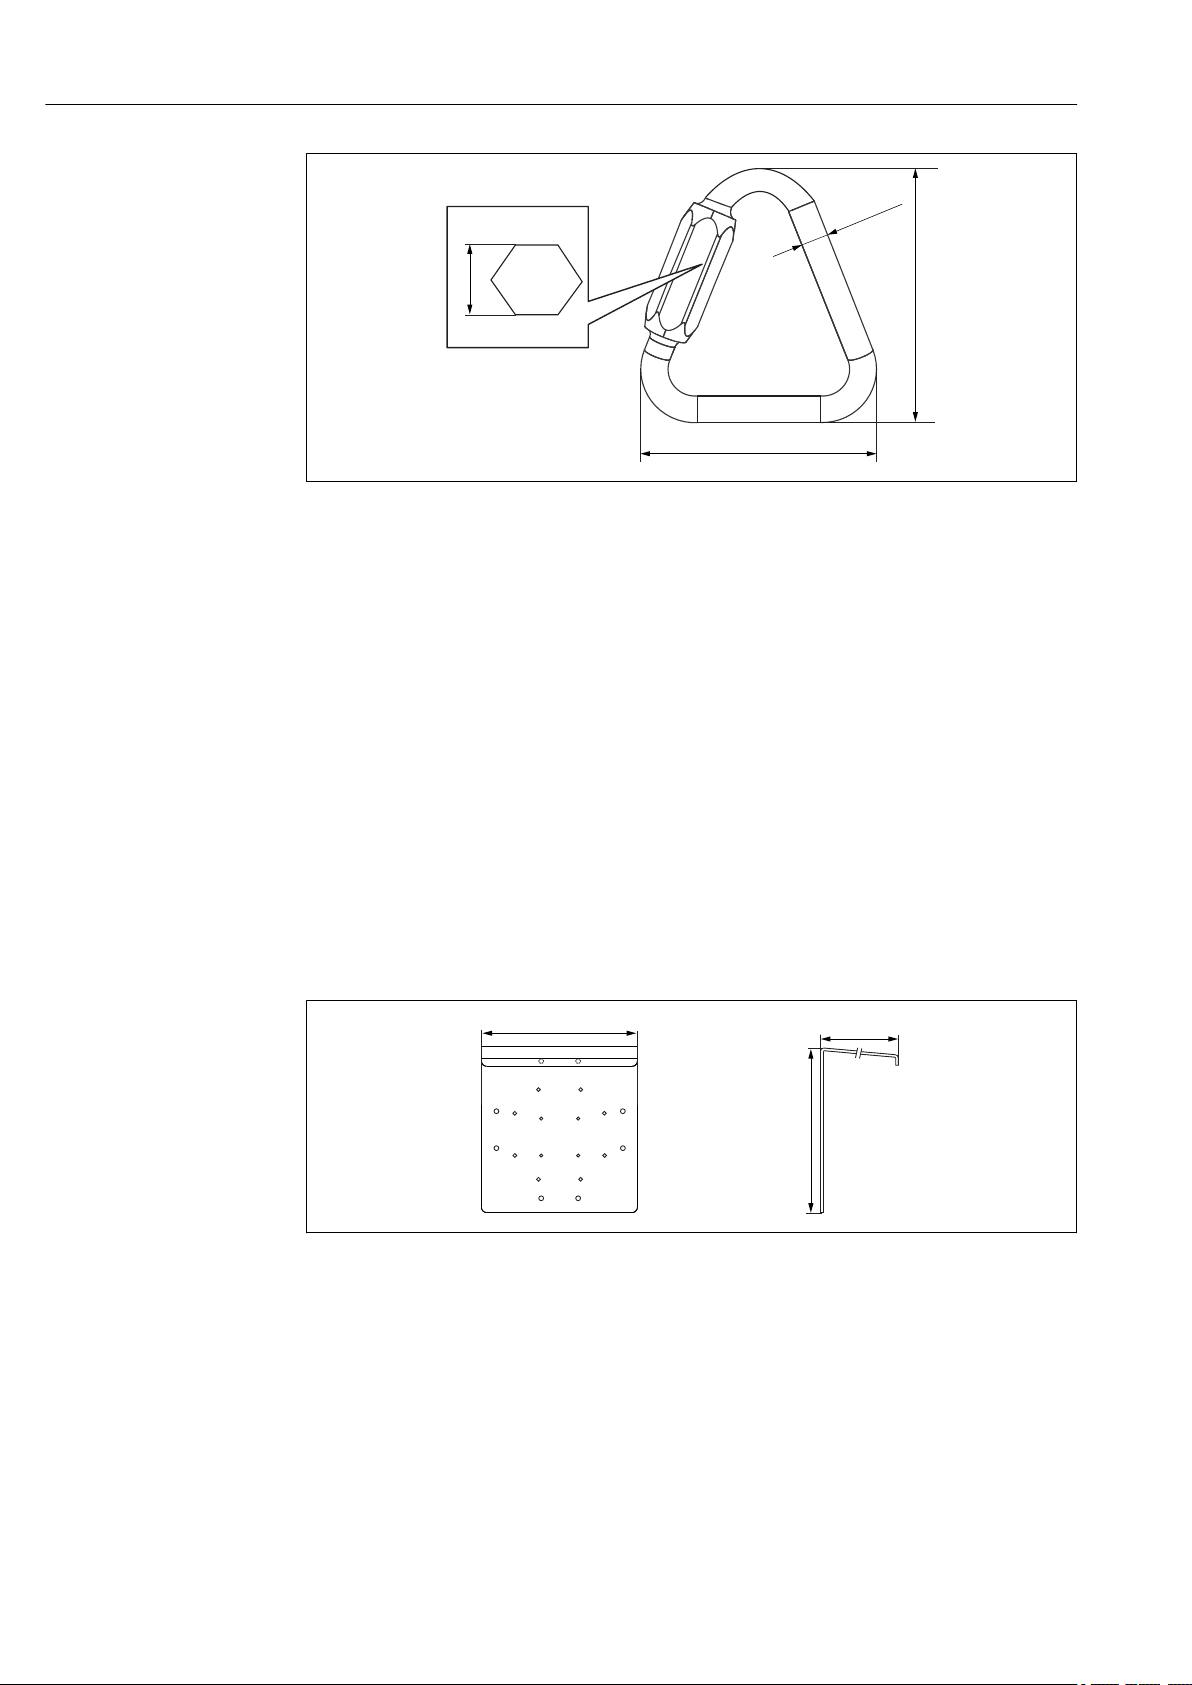
Triangular carabiner
• Is used to secure the chain
• Material: stainless steel, quality V4A
• Order number: 71092052
A0035703
Endress+Hauser 37
Page 38
Accessories Flexdip CYH112
58 (2.28)
46 (1.81)
Ø
6
(0.24)
10.9
(0.43)
320 (12.6)
270 (10.6)
300 (11.8)
A0035705
39 Triangular carabiner. Dimensions: mm (in)
Hook-and-loop cable ties (set of 4)
• Is used to secure the cables
• Material: PE/PA (polyethylene/polyamide)
• Order number: 71092051
Allen key
• Across flats: AF 6
• Order number: 71092057
Pipe protection cap
• Material: PE (polyethylene)
• Order number: 71092053
Weather protection cover CYY101 for field devices
• Absolutely essential for field installation
• Material: stainless steel 1.4301 (AISI 304)
• Order number CYY101-A
• Mounting kit to secure the CYY101 weather protection cover on vertical or horizontal
pipes with a diameter of up to 62 mm (2.44 in) Order No. 50062121
40 Weather protection cover for field devices. Dimensions: mm (in)
38 Endress+Hauser
A0035834
Page 39

Flexdip CYH112 Accessories
M6
55
(2.17)
66
(2.60)
70 (2.76)
(0.31)
30
(1.18)
90 (3.54)
A0005091
41 Circular post mounting for CYY101. Dimensions: mm (in)
Overvoltage protection
HAW56X surge arrester and associated installation material
Quick-action clamp
Order number: 71092050
Nylon chain
• Minimum length 5 m (16.4 ft)
• Order number: 71130145
Endress+Hauser 39
Page 40

Technical data Flexdip CYH112
150(5.91)
150
(5.91)
120
(4.72)
120(4.72)
12(0.47)
48.7
(1.92)
5 (0.2)
200
(7.87)
42.1(1.66)
41.5(1.63)
42(1.65)
50(1.97)
160
(6.30)
>
40
(1.57)
10 Technical data
10.1 Environment
Ambient temperature
-20 to 60 °C (-4 to 140 °F)
range
10.2 Mechanical construction
Design, dimensions Main pipe: Ø 40 mm (1.57 in), length: 500, 1000 and 1800 mm (19.7, 39.4 and
70.9 in)
Transverse pipe:Ø 40 mm (1.57 in), length: 500, 1000 and 1500 mm (19.7, 39.4 and 59
in)
Chain: 5 m (16.4 ft)
Dimensions Base
42 Dimensions of the base. Dimensions: mm (in)
A0035830
40 Endress+Hauser
Page 41

Flexdip CYH112 Technical data
111 (4.37)
47 (1.85)
110 (4.33)
3 (0.12)
85 (3.35)
Ø 40
(1.57)
25 (0.98)
43
(1.69)
60 (2.36)
37.5 (1.48)
80 (3.15)
80 (3.15)
Ø 9 (0.35)
Flange clamp
A0035771
43 Dimensions of the flange clamp. Dimensions: mm (in)
44 Dimensions of the boreholes of the flange clamp. Dimensions: mm (in)
A0010885
Endress+Hauser 41
Page 42

Technical data Flexdip CYH112
79 (3.11)
50 (1.97)
12 (0.47)
12 (0.47)
Pendulum adapter
45 Dimensions of the pendulum adapter. Dimensions: mm (in)
Weight • Main pipe
• Length 500 mm (19.7 in): 0.7 kg (1.5 lb)
• Length 1 000 mm (39.4 in): 1.5 kg (3.3 lb)
• Length 1 800 mm (70.9 in): 2.6 kg (5.7 lb)
• Transverse pipe
• Length 500 mm (19.7 in): 0.7 kg (1.5 lb)
• Length 1 000 mm (39.4 in): 1.5 kg (3.3 lb)
• Length 1 500 mm (59 in): 2.2 kg (4.9 lb)
• Flange clamp: 0.7 kg (1.5 lb)
• Cross clamp: 0.7 kg (1.5 lb)
• Base clamping element: 1.75 kg (3.86 lb)
• Pendulum holder: 1.1 kg (2.4 lb)
• Chain (synthetic): 0.7 kg (1.5 lb)
• Chain (stainless steel): 2.15 kg (4.7 lb)
• Multifunctional clamp ring: 0.15 kg (0.33 lb)
Materials
Main pipe: Stainless steel 1.4404 (AISI 316 L)
Transverse pipe: Stainless steel 1.4404 (AISI 316 L)
Flange clamp: Stainless steel 1.4404 (AISI 316 L) *
A0011252
Cross clamp: Stainless steel 1.4404 (AISI 316 L) *
Base clamping element: Stainless steel 1.4404 (AISI 316 L) *
Pendulum holder: Stainless steel 1.4404 (AISI 316 L) */POM/thermoplastic
Chain (synthetic): PA (polyamide) UV-resistant, tensile-tested
Chain (stainless steel): Stainless steel 1.4401 (AISI 316)
Multifunctional clamp ring: POM - GF
Cap for pipe end: PE
Quick-action clamp handle: PA
42 Endress+Hauser
Page 43

Flexdip CYH112 Technical data
* The flange clamp, cross clamp and base clamping element are made from the material
indicated with the exception of the clamps in the clamping device, which are made from
stainless steel 1.4301 or 1.4305 (AISI 304). The pendulum holder is made from the
material indicated with the exception of the shaft and the clamps in the clamping device,
which are made from stainless steel 1.4301 or 1.4305 (AISI 304).
Endress+Hauser 43
Page 44

Index Flexdip CYH112
Index
A
Accessories ................................ 35
Approvals ................................. 11
C
Certificates ................................ 11
D
Designated use .............................. 5
Disposal .................................. 34
I
Incoming acceptance .......................... 9
Installation ................................ 12
Installation conditions ........................ 12
M
Maintenance ...............................31
Mounting conditions ......................... 12
N
Nameplate ................................ 10
P
Post-installation check ....................... 29
Product identification ......................... 9
R
Repair ....................................34
S
Safety instructions ............................5
Scope of delivery ............................ 10
Symbols ................................... 4
U
Use .......................................5
W
Warnings .................................. 4
44 Endress+Hauser
Page 45

Page 46

Page 47

Page 48

*71453974*
71453974
www.addresses.endress.com
 Loading...