


English
TALKsmart
Wi-Fi
connection
or mobile
data tariff
required
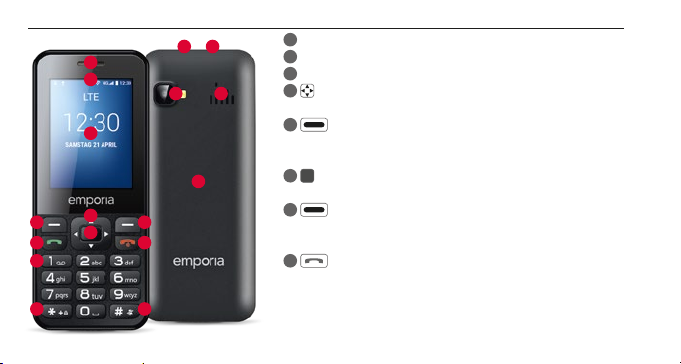
› YOUR MOBILE PHONE AT A GLANCE
13
1
2
3
4
5 7
6
8
10
9
14
15 16
17
1
Loudspeaker
2
Message line
3
Display (screen)
4
Navigation ring
• For navigation in menu and lists
5
Left function key
• Press this to select the option shown in the bottom
left-hand corner of the screen (e.g. Menu, OK, …)
6
Selection key
• To conrm selections
7
Right-hand function key
• Press this to select the option shown in the bottom
right-hand corner of the screen (e.g. Name, Back , …)
8
Green key
• Start or accept a call
11 12
• Standby: Open numeric input for call

9
Red key
• Standby: Lock phone
• When in a call: End
• In menu: Back to standby mode
• Press and hold: Switch phone on/o
10
1 key (voicemail)
11
key (unlock keypad)
12
key (MUTE)
13
Headset port
14
Port for USB charging cable
15
Camera lens and ash
16
Loudspeaker
17
Battery cover
› Icons in the message line
Network signal strength
Roaming (abroad)
Battery scale
Missed call
Call redirect
New message
Prole: Mute
Prole: Outdoor
Prole: Meeting
Alarm on
Bluetooth activated
Bluetooth connected
USB connection
Upload/download
Wi-Fi
WhatsApp
Radio

1. GETTING STARTED
› Inserting a SIM card
Lift o the battery cover–
start with the recess at the
bottom left corner of the
battery cover.
Slide the SIM card into the
SIM card holder with the gold
contacts facing down.
Slide your data card into the
card holder with the gold
contacts facing down.
Press the locking tab down
to remove the SIM card or
data card.
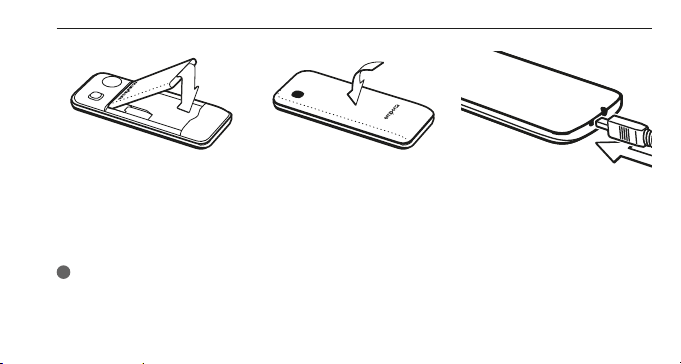
› Inserting and charging the battery
• Insert the battery, making
sure that the battery
contacts touch the phone's
gold contacts.
• Put on the battery cover–
press the battery cover
down onto the phone until
it clicks into place on each
• Plug the charging cable
into the USB port on the
top of the phone.
side.
!
Attentio n: Charge the bat tery for at least four hours b efore you use it for the rst time.
Only use batteries and chargers tha t are permitted for use with this specic model.

› Turning on the phone
• Pressing the
key for at least two
seconds switches the phone on.
• To turn the phone o, press the
for two seconds again.
key
› Using a new SIM card for the first time:
Enter the four-digit PIN code (personal
identication number) _Press the left
function key for OK to conrm.
!
The PIN cod e is a four-digit number that is
intended to prevent som ebody else from
being able to switch on your mobile phon e.
You have a maximum of three at tempts to
enter the correct number. If you enter the
wrong number thre e times in a row, you will
only be able to unb lock the SIM card with
the PUK code. You will nd the PIN code a nd
PUK code in the docume nts supplied by your
network operator.
2. USING THE PHONE
After starting, the phone is in standby
mode.
In standby mode the phone is on, but is
not running any applications (calls, SMS
messages, etc.). One of three menu pages
is displayed.
› Menu items: Contacts, Camera,
WhatsApp, SMS/MMS, History,
Browser, Calendar, Gallery, Radio,
Clock, Settings, Google Video, Music,
Cleaner, Tools, App Folder
› Unlocking the phone:
Press the
unlock the screen.
Changing the screen lock: Settings
_ Security _ Screen lock
key for at least two sec. to
› Using the menu
• Press
menu pages.
Three dots at the bottom edge of the
screen show the menu page you are
viewing.
• Navigate through the menu items with
the
The selection is highlighted with a white
border.
• Press the selection key
selected menu item.
• Options which you can select with
the function keys are shown at the
bottom of the screen.
• To return to the main menu,
press the red
to toggle between the main
.
to open the
key.

› Saving energy
1
If a few seconds pass without the phone
receiving any input from you, the screen
will go blank to save energy. In the event
of an incoming call or you pressing any
key, the screen will automatically light
up again.
• Change the duration before switching to
Phone idle:
Settings _Display _Phone idle
› Dual-function keys
Some keys have additional functions if
they are pressed and held down for a few
seconds:
key: Listen to your voicemail
•
Changing the voice mail settings:
_Options
_Settings
_Name of provider
_Voicemail or call forwarding
key: Unlock keypad
•
key: Silent mode on/o
•
key: Switch phone on/o
•
left function key: Open message
•
line

4ghi
2abc
5jkl
5jkl
6mno
› How to write text
Use the
key to toggle between
numeric and text input (language).
• Pressing the number key multiple times
displays a list of letters; upper case letters
follow the lower case letters.
g h i G H I 4
• To input text, press the a number key
, 1x
multiple times (e.g. 2x
, 3 x
3x
, 3 x
for Hallo)
,
• Non-standard characters:
Press the
key to open the menu for
non-standard characters,
to select the navigation ring, and
press
selection key to apply.
then
• The symbols available vary according to
which language you are using.
› Using the mouse pointer
Navigation in WhatsApp and in the
browser relies on the mouse pointer and
selection key:
the
• Use the
navigation ring to move the
mouse pointer (cursor) to the position
you want to click
• Now press the
• Use
selection key
left function key to change from
an arrow display to a scroll display in
mouse mode
• Press
right-hand function key to go
back

3. CALLS
› Incoming call
• Accept the call with the
it with the
• Press the
and send a tex t message in response
› Connecting:
• Dialling: Enter the number you want to
dial using the keypad
• Open contact: Open Contacts in the
main menu, select the desired contact
from the list
• Redialling: Open History in the main
menu, select the contact from the list
_Start the call with the
it with the
key
selection key to reject the call
key.
key or reject
key and end
› During a call:
Use the left function key to open the
Options:
Loudspeaker/Headset earpiece,
Mute/Unmute, Hold/Resume, Add call,
Send message
• Use the
in-call volume
• Press the
end the call
navigation ring to change the
right-hand function key to

4. CONTAC TS
› Saving contacts
(name and number)
Open Contacts in the main menu
_Press the
theOptions
_Press the
to open Add contact
_Select the storage location for the
contact
_Enter the name and number;
press the
numeric and text input
_Options _Save
!
Always s ave names and numbers with the
international dialling code,
e.g. +41 for Switzerland, + 43 for Austria and
+49 for Germany.
left function key to open
selection key
key to toggle between
› Searching for contacts:
In the main menu open Contacts
_Use the
the entries, or use the keypad to type the
rst letter of the entry you are looking for
in the search box.
_The selected contact is highlighted
in blue
_Press the
_Press the
contact
navigation ring to browse
key to start the call
selection key to open the

5. CAMERA 6. WHATSAPP
› Taking a photo or filming
Open Camera in the main menu
_The camera mode currently used
(photo
centre.
• Use the selection key to take a photo or
start/stop a video recording
• Use the
photo or video camera or gallery
• Depending on the mode, you can select
camera settings
or video ) is shown at the
navigation ring to change to
or ash settings
Open WhatsApp in the main menu
› Navigation
Navigation in WhatsApp relies on the
mouse pointer and the
See Section 2 »Using the phone«
› Setting up WhatsApp
You need to set up WhatsApp before you
can use it for the rst time:
• Enter your own phone number
• WhatsApp sends a text message to verif y
the input
• Enter a user name of your own choice
!
In Whats App only contacts that you have
saved in Contacts and th at are additionally
registered with WhatsApp are displayed.
selection key:

› Receiving a WhatsApp message
A new message is indicated by the
WhatsApp icon in the message bar, and
by a red circle
1
in the menu eld.
7. SMS/MMS
› Opening a message
Open SMS/MMS in the main menu
• Use the
entry from the message list, and press the
• Press the left function key to open
theOptions:
New message, Settings, Delete thread,
Cell Broadcasts, Messages in SIM
navigation ring to select an
selection key to open it

› Composing a new message
Open SMS/MMS in the main menu
_Options _New message
• Use the keypad to enter text, press the
key to toggle between numeric and
text input
• Entering the recipient:
Type the rst letter to search for the
contact, or press
to go to Contacts
• Entering text:
See Section 2 »Using the phone«
• Sending a message:
Press the left function key to open
theOptions _press the
selection key
to select Send
› Receiving a message
An incoming text message is indicated
by an acoustic signal, a sign in the lock
screen and a red circle marker
1
in the
menu eld. The unread message is
highlighted in blue in the list of messages.

8. CALL HISTORY
› Opening call history
Open History in the main menu
• Menu items: All, missed, outgoing,
incoming
• Press the
list, and select an entr y in the list
• The selected contact is highlighted in
blue
• Press the green
• A missed call is indicated by a red circle
marker
navigation ring to select the
key to start the call
1
in the menu eld.
› Viewing call details
• Use the
the clock icon
• Press the
such as the call duration and call time
• Options: Add to contacts, remove from
call log, edit number before call
› Deleting calls
Use Options to delete a call or
the whole list
navigation ring to change to
selection key to view details

9. BROWSER 10. CALENDAR
Open Browser in the main menu
› Navigation
Navigation in WhatsApp relies on the
mouse pointer and the
See Section 2 »Using the phone«
selection key:
Open Calendar in the main menu
› Open the day view
• Use the
calendar, press the
to change months
• Use Option _View to view the
appointments for the selected day
navigation ring to browse the
key and key

11. GALLERY
Photos are grouped in albums if they come
from the same source. This means there is
one album for camera photos, and another
for WhatsApp photos, etc.
› Viewing a photo or video
Open Gallery in the main menu
• Press the
album; use the
switch between images
• Press the
image
• Options: Share, Delete, Slideshow,
Rotate left, Rotate right, Set picture
as wallpaper/WhatsApp prole image,
Details
selection key to open the
navigation ring to
selection key to display an
!
You can connect your phone to a PC
using the USB data cable and transfe r
your photos. Af ter establishing the USB
connection, activate Connect as media
device.
You can use a data card to increase the
storage capacit y of your mobile phone.
You can purchase these cards from
electronics stores.

12. RADIO
› Using the radio
Open Radio in the main menu
• Options: Auto search, Radio list,
Headphones, Start recording,
Recording le list
• Adjusting the volume:
Use the
• Turning the radio on and o:
Press the
› Searching for a radio station
• Selecting a frequency:
Use the
• Automatic station search
Options _Auto Search
• Selecting a station from the list:
Options _Radio list
navigation ring up, down
selection key
navigation ring left, right
› Recording the radio signal
• Recording:
While the radio station is broadcasting
press Options _Start recording
• Stopping recording:
Press the
• Playing back a recording:
Options _Recording le list _Select
detail and press the
selection key
selection key

13. ALARM CLOCK
Open Clock in the main menu
• Menu items: Alarm, World Time, Timer,
Stopwatch
› Setting the alarm clock
_Press the
an entry from the list
_The selected entry is highlighted in
blue
_Press the
edit the Settings
navigation ring to select
selection key to open and
• Enable/disable wake-up time
• Enter a label
• Dene the repeat behaviour:
Every day, Workdays, Single
• Dene the ringtone
• Enable/disable vibration
• Mute: Dene duration
• Deleting

14. SETTINGS 14.1 Wi-Fi connectivity
› Menu items
• Popular
Wi-Fi, Bluetooth, Proles, Display,
Data usage
• User
Location, Security, Date & Time,
Language and input,
Scheduled power on and off, More
• System
Storage, Batter y, Mouse control, Apps,
Backup & Reset, About your phone
To set up a Wi-Fi connection, you need
the name of the Wi-Fi network and the
matching password.
!
If you alre ady have a Wi-Fi network at
home, you can usuall y nd this information
on the underside of the Wi-Fi router.
In the main menu, open Settings
_Wi-Fi:
• The slider at the top of the screen is
highlighted in blue
• Press the
the Wi-Fi function on the device;
the slider turns green
selection key to switch on

• Below it, a list of available Wi-Fi network
is displayed
• Use the
network to connect to
• Type the password for the Wi-Fi network
in the input eld
• Select Connect
• Connected appears under the name of
• Entering text: See chapter 2 »Use«
navigation ring and
selection key to selec t the wireless
the Wi-Fi network in the list of available
networks.
14. 2 Bluetooth connectivity
In the main menu, open Settings
_Bluetooth:
• Use the slider to switch on the Bluetooth
function on the device
• Make your phone visible so that it can
connect to a Bluetooth device.
• Select the device you want to pair the
phone with from the list
• Pairing in progress
• Conrm a connection that has been
found
!
Devices that have been paire d before will be
identied and automatically paired.

14. 3 Audio proles
In the main menu, open Settings
_Proles
• Select one of the predened audio
proles (General, Mute, Vibration,
Outdoor)
• In the General prole you can edit
settings for vibration, volume, ringtone,
standard message tone, key dial tones,
touch tones, screen lock sound
• Under Option you can create user dened
audio proles
14. 4 Screen
In the main menu, open Settings
_Display
Congure Brightness, Wallpaper,
Phone idle and Font size
14. 5 Data usage
In the main menu, open Settings
_Data usage
• Selecting a network provider or
Wi-Fi network
• Read o the data usage or
switch mobile data on or o

14.6 Location
In the main menu, open Settings
_Location
Use the slider to switch on the Location
function on the device
!
Location d etection can only be used in
Battery s aving mode
14.7 Safety
In the main menu, open Settings
_Security
To prevent your phone from being
misused by other people, you can set a
screen lock and a SIM card lock here. You
can also specify how your phone will be
protected when apps are installed.
14. 8 Master reset
In the main menu, open Settings
_Backup & reset
You can restore all the factory settings on
your phone.
14. 9 System update
In the main menu, open Settings
_About your phone _System update
If an update for the device software
exists, update notices are displayed.
Select Download; once the download has
been completed, select Update now.

15. INTERNET CONNECTIVITY
Opening an internet connection
• Long press on the
the main menu
• Use the
to Switch
› Internet connection with mobile data
Use the
or disable mobile data on the device
!
If you use the mobile data connecti on,
your network tari must have a mobile data
volume. Ask your de aler or your network
provider for more information.
navigation ring to change
navigation ring to select
Data, use the selection key to enable
left function key in
› Internet connection with Wi-Fi
Use the
or disable Wi-Fi on the device.
To use a Wi-Fi network, you need to open
a connection once only (see section 4.1).
After this, your phone identies the Wi-Fi
network and automatically opens the
connection.
!
Wi- Fi is restricted to a spe cic location! If
you leave the wireless range of the Wi-Fi
network, the device will lose its internet
connection.
navigation ring to select
Wi-Fi, use the selection key to enable

16. GUARANTEE AND SERVICE
• Manufacturer: em poria telecom GmbH + Co KG
Industrie zeile 36, 4020 Linz, Austria
• Importer: emporia telecom G mbH + Co KG
• Contact: Eveline Pupeter ·
+43 (0)732 777717 446 · ww w.emporia.eu
• Brand nam e: emporia
• Model: emporiaTALKsmart(V800)
› Scope of delivery
• Mobile phone: emporiaTALKsmar t(V800)
• Battery: AK-V800
• USB cabl e
• AC adapter: trave l charger article no.: RL-V800
• Germany: +49 · (0) 800 · 400 4711
• Austria: +43 · (0) 732 · 77 77 17 · 446
• Switzerland: +41 · (0) 8484 · 50004
• This guarante e is only valid if the original bat teries
• Mobile phone: 24 months
• Batter y: 6 months
› Support
Emporia Service Centre
Industrie zeile 36 · 4020 Linz · Austria
customercare@emporia.at
www.emporia.eu
Mon - Thu, 8.3 0 am - 5.00 pm · Fri 8.30 am -1.00 pm
› Guarantee
supplied by emp oria have been used.

› Technical data
• Dimensions: 122 x 50 x 12 mm
• Weight: 102 g
• Battery: Li-ion 3.7 V, 1400 mAh, 5.2 Wh
(replaceable)
• AC adapter: input: 100 - 240V AC, 50/60 Hz,
200 mA; output : D C 5.0 V, 800 mA
• Standby tim e: 140 hr s*
• Call time: 380 min *
(*Depending on network coverage and activated
applicatio ns the battery life can b e reduced.)
• Internal antenna:
SAR body: SAR 1.17 W/kg (bo dy),
SAR head: SAR 0.65 W/kg (head)
• Operating temperature: -10 to 40° C
• Bluetooth: V 4.0
• Operating system: MocorDor id V 4.4.4
› Frequencies
• BT: 2402 MHz ~ 2480 MHz
Transmitter power: < 0.8 8 dBm
• FM: 87.6 MHz - 107.8 MH z
• E-GSM 900/GPRS900/EGPRS900:
TX: 880 - 915 MHz, RX: 925 - 96 0 MHz
Transmitter power: < 32.62 dBm
• E- GSM 18 00/G PRS180 0/EG PRS180 0:
TX: 1710 - 1785 MHz , R X: 1805 - 1880 MHz
Transmitter power:< 29.17 dB m
• WCDMA Band I :
TX: 1920 MHz ~ 1980 MHz; R X: 2110 - 2170 MHz
Transmitter power: < 22.89 d Bm
• WCDMA Band VIII:
TX: 880 MHz ~ 915 MHz; RX: 925 - 960 MH z
Transmitter power: < 22.93 dBm

• LTE Band I:
TX:1920 - 1980 MHz, RX:2110 - 2170 MHz
Transmitter power: < 23.16 dBm
• LTE Band III:
TX:1710 - 1785 MHz, RX:1805 - 1880 MHz
Transmitter power: < 23.49 dBm
• LTE Band VII:
TX:1920 MHz ~ 1980 MHz; RX: 2110 - 2170 MHz
Transmitter power: < 23.09 d Bm
• LTE Band VIII:
TX: 880 MHz ~ 915 MHz; RX: 925 - 960 MH z
Transmitter power: < 23.15 dBm
• LTE Band XX:
TX: 832 MHz ~ 862 MHz; RX: 791 - 821 MHz
Transmitter power: < 22.92 dBm
› Safety information
• Turn off the phone in hospitals and whenever
you are near medi cal equipment. There shou ld
always be a dist ance of at least 20cm betwe en
pacemakers and the phone when it is on.
• Never tr y to control a vehicle while holding t he
phone in your han d. Always comply with releva nt
national laws and traffic regulations.
• Turn off the ph one whenever you are travelling in
an aeroplane.
• The phone must be switched off whenever it is
near a petrol s tation or other places with e xplosive
substances.
• Never shine th e LED torch in the eyes of people or
animals! (Protec tion class 3)
• To prevent hearing impai rments, do not use the
phone on a high sp eaker volume for

extende d periods of time. Do not ho ld the phone
to your ear when the han ds-free mode is acti vated
or the emergenc y button has been pre ssed.
• Using a headset o n a high volume can cause
hearing impair ments. Check the volume o f the
headset you are usi ng.
• The phone and the accessories may contain small
parts . Keep the phone out of the reac h of young
children.
• As a precaution, we recommend disconnecting the
phone from the charger during thunderstorms.
• The mains adap ter serves as a separator b etween
the produc t and your mains supply. The mains
supply must b e close to the device and easily
accessible.
• This device ha s been tested for typ ical applications
where the devi ce is carried on the body. To meet
the RF expo sure requirements, the minimum
distance bet ween the body, in parti cular the user's
head, and the han dset including antenna must
be 0 cm. Belt cli ps, holsters and similar accesso ries
from third par ties used with this dev ice must not
contain metallic components.

Accessories ca rried on the body that do n ot meet
these require ments may not meet the RF ex posure
requirements a nd should be avoided.
Use only the dev ice's built-in antenna or an
approved antenna.
• This device com plies with the essential
requirements a nd other relevant provisions of
Direc tive 2014/53/EU.
All impor tant radio test cases were ca rried out.
• Caution: Risk o f explosion if the bat tery is replaced
by the wrong t ype. Dispose of the used b atteries
according to the instructions.
• The device co mplies with RF specifi cations when
the device is 5 mm from the bod y.
› Intended use
• This phone is r obust and designed for mo bile use.
However, it still ne eds to be protected from m oisture
(rain, bathroom wate r, etc.) and heavy impa cts.
• Only for European network standards
(AT, BE, CZ, DE, D K, ES, FI, FR, GB, HR, HU, IE, IT, NL,
NO, PL, PT, SE, SI, SK, SZ, TR).
• Do not leave it dire ctly exposed to th e sun.
• Using the phon e for any purpose other than that
describe d above will result in damage to the
product . Doing this also entails hazards su ch as
fire, elec tric shocks, etc. This p roduct must not be
changed or mo dified, and the casing mus t not be
opened.
• The adapter is o nly suitable for use in conjunc tion
with a stand ard household mains socket th at is
connecte d to your electrical gri d and uses 100240 volts, 50/60 Hz (10/16 A) of alternating voltage.

› Waste Management
• Disposing of the packaging
The packaging and packaging aids are
recyclable and should be recycled.
• Disposi ng of the battery
Batterie s should never be disposed o f as
domestic re fuse! As a consumer you are
legally requi red to return used batteri es.
They can be ha nded in at one of your communit y's
local colle ction points or at spec ialised stores.
• Disposi ng of the device
If this produc t ever wears out, please
don't dispose of i t as domestic refuse.
Be environmentally friendly! Take the
device to a collec tion station or rec ycling
centre where used d evices are processed for
recycling in an environmentally friendly mann er.

› DECLARATION OF CONFORMITY (DOC)
emporia te lecom GmbH + Co KG
(Industrie zeile36, 4020Linz, Austria),
hereby declare s that the
emporiaTALKsmart (V800)
telecommunication or radio device complies with
Direc tive 2014/53/EU.
The full tex t of the EU conformity de claration can
be viewed on t his web page:
http://www.emporia.eu/doc
Eveline Pupeter
CEO, emporia Telecom
15/08/2018, Linz, Austri a

EN Subjec t to mistakes, printing er rors and technical changes .
Part no.: V80 0_GuideBook-V3_ ENG-55608 | 201812
 Loading...