

Emporia Smart 3 Mini Installation Manual

Wi-Fi
connection or
mobile data tariff
required
Congratulations on the purchase of
your emporiaSMART.3mini!
The emporiaSMART.3mini was developed in cooperation with
ourcustomers. You will have lots of fun with it, because it not
onlyenables you to make phone calls and send text messages,
butalso discover the Internet and the world of apps.
It's the perfect smartphone for beginners!
To help you learn how to use the new facilities on your
smartphone, emporia has written a handbook to assist you as you
try them out and practise using them. This handbook comes with
the phone by the way, so we hope you enjoy it!
SMART.3
mini
Installation manual
In addition, detailed step-by-step instructions are provided on
our website www.emporia.eu for a wide range of tasks such as
creating a WhatsApp group.
We hope your emporiaSMART.3mini brings you plenty of joy.
Sincerely,
Eveline Pupeter
emporia Telecom

Your mobile phone at a glance
› YOUR MOBILE PHONE AT A GLANCE
1
Headset port
2
USB port
3
LED
4
Front-facing camera lens
5
Loudspeaker (receiver)
The navigation bar containing the items Menu,
Home and Back will appear when you swipe up
from the bottom of the screen.
6
Touchscreen
7
Menu button
8
Home button
9
Back button
1 2
3 4
5
10
11
6
12
13
14
15
8 9 7
16

Your mobile phone at a glance
Volume buttons
10
On/o button
11
(see page 14)
Camera lens
12
Torch/ash
13
Emergency button (optional)
14
(see page 38)
Battery cover
15
(Two versions: one with the emergency button and one
without it)
Loudspeaker
16
Notes on this user guide
• This guide contains helpful notes and tips, which are indicated as such by
this symbol:
• Warnings are indicated as such by this symbol:
03

Contents
YOUR MOBILE PHONE AT A GLANCE 02
1. Preparation 06
1.1 Scope of delivery........................................06
1.2 Inserting a SIM card, a memory card and the battery .....08
2. Putting the phone into operation 12
2.1 Charging the battery ....................................12
2.2 Turning on the phone ...................................14
2.3 Entering a PIN code .....................................15
3. Using the phone for the rst time 16
3.1 Basic Android and Google settings.......................16
3.2 Installing the emporiaapp...............................22
3.3 Setting up the home screen and favourites...............24
3.4 Creating contacts .......................................25
3.5 Linking personal contacts ...............................27
3.6 Setting up the emporia keyboard ........................28
4. Establishing connections 29
4.1 Setting up a Wi-Fi connection ...........................29
4.2 Setting up a mobile data connection ....................31
4.3 Setting up an email account .............................32
4.4 Bluetooth ..............................................33
4.5 Connecting to a PC to transfer data ......................35
4.6 Software updates .......................................36
4.7 Downloading apps ......................................37
04

Contents
5. Emergency call function 38
6. Quick Settings 44
6.1 Sleep mode and locking the screen ......................44
6.2 Audio proles ...........................................45
6.3 Wallpaper ...............................................46
6.4 Other settings in the emporiaapp .......................47
7. Safety information 50
7.1 Warranty................................................50
7.2 Support .................................................50
7.3 Declaration of conformity (DOC) .........................51
7.4 Technical product details ................................51
7.5 Frequencies .............................................52
7.6 Safety information ......................................53
7.7 Disposal ................................................55
05
Preparation
1. PR EPARATIO N
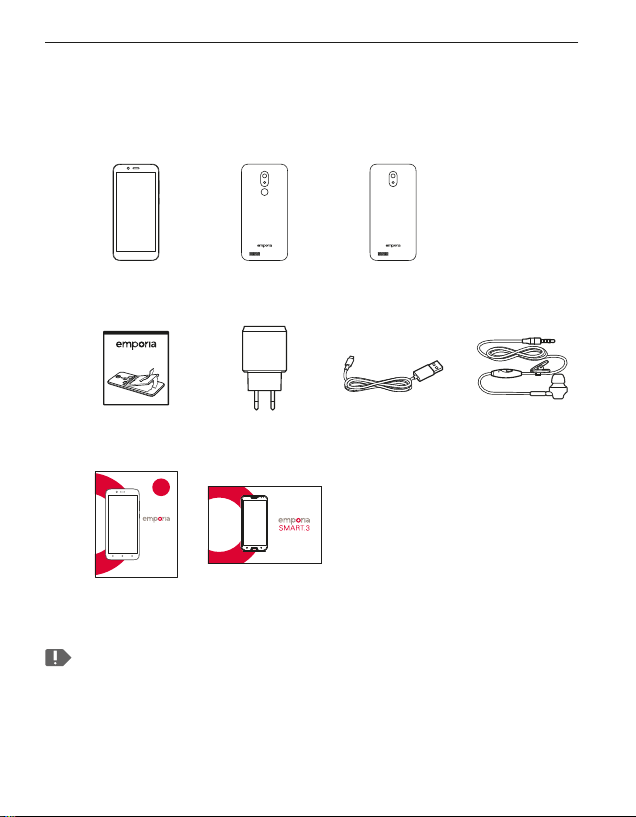
1.1 Scope of delivery
Smartphone Battery cover Battery cover without
Batter y Mains plug USB charging
WiFiVerbindung
oder mobiler
Datentarif
notwendig
SMART.3
mini
Installationsanleitung
Installation
manual
Handbook
an emergency button
cable
Handbook
The contents of this package are not suitable for young children
and include small parts that can be swallowed.
06
Headset

Preparation
› Not included in the scope of delivery
• SIM card
The SIM card is a chip card that you need to insert into the
phone. You will only be able to place calls once you have done
this. Your network operator will provide you with the card
and the codes belonging to it (PIN and PUK) when you buy
a mobile contract. You can also purchase a prepaid SIM card
from specialist retailers.
• Data card
A data card is a chip card that will increase your smartphone's
storage space. Inserting one will enable you to store more
photos and install more apps. You can purchase these cards
from electronics stores.
› What to do if a part is defective or missing
Please call the emporia hotline
on +43 · 732 · 77 77 17 · 4 46.
07
Preparation
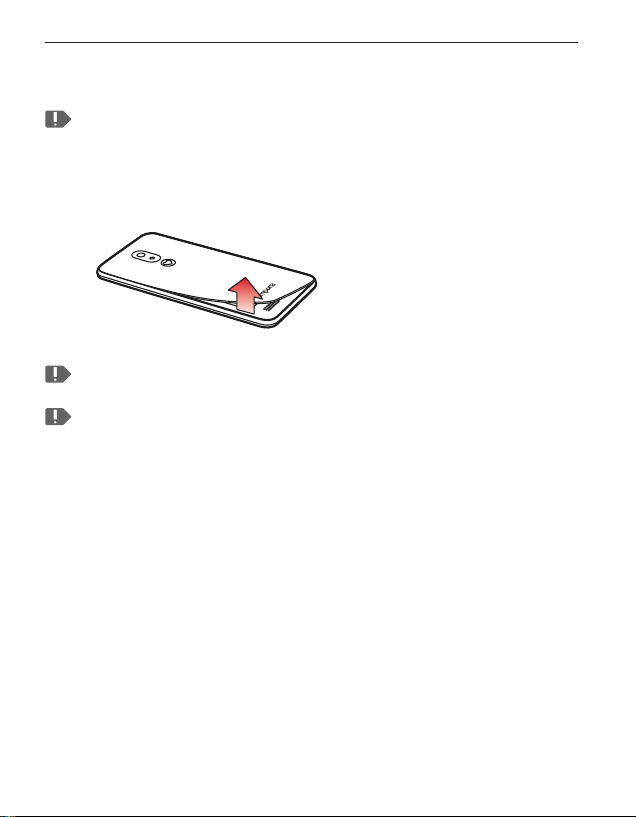
1.2 Inserting a SIM card, a memory card and the battery
Always disconnect the phone from the charger and turn the
phone o before removing the battery cover.
› Take off the battery cover.
Begin with the recess in
thebottom left-hand corner
of the cover.
Watch your ngernails when removing the battery cover.
Avoid bending the cover too much, as doing that can damage it.
08
Preparation
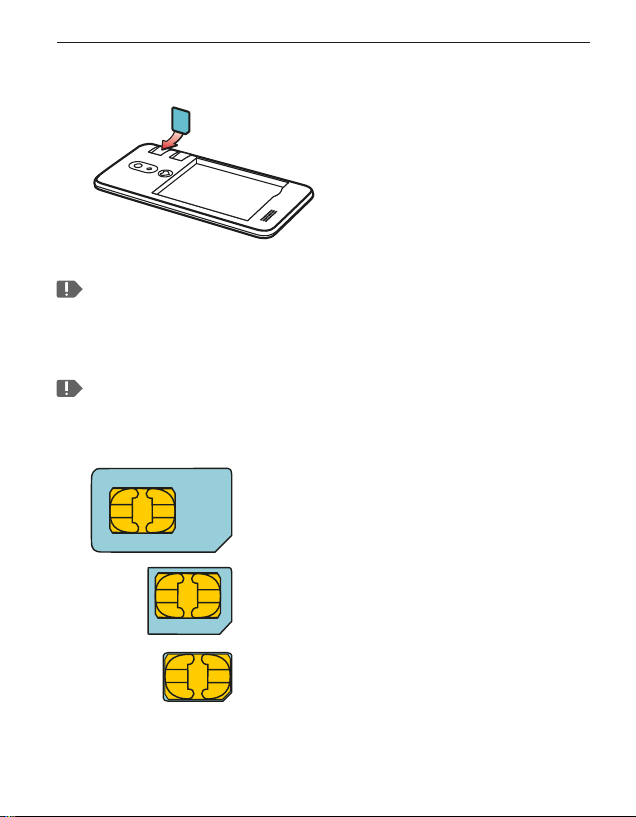
› Insert the SIM card.
The SIM card slot is on the right
above the battery cavity.
Slide the card in with the
contacts facing down.
Always use a tari with a data package when using a smartphone.
This will save you additional costs when transferring data while
using the Internet.
Only use micro SIM cards for this phone. If your SIM card is a
dierent size, your network operator can exchange it for you or
you can buy an adapter from a specialist retailer.
Standard Mini SIM
15mm x 25mm, unsuitable
Micro SIM
12mm x 15mm, suitable
Nano SIM
8.8mm x 12.3mm, unsuitable
09

Preparation
› Insert a data card (optional).
The memory card slot is on the
right above the battery cavity.
Slide your data card into the
slot with the gold contact
facing down.
Only use a memory card that is compatible with this phone, such
as a microSD® or a microSDHC® card.
If you use an incompatible SIM card or memory card, the phone,
the card or the data on the card can be damaged.
10

Preparation
› Insert the battery.
Insert the battery, making sure
the gold contacts of the battery
and the phone are touching
each other.
Press the battery cover down
onto the phone until it clicks
into place on each side.
Only use batteries, chargers and accessories that are permitted for
this phone. If you don't, the warranty for the phone will no longer
be valid.
Before changing the SIM card or data card, always disconnect the
charger and turn the phone o.
11

Putting the phone into operation
2. PUTTING THE PHONE INTO OPERATION
2.1 Charging the battery
Before you use the phone for the rst time, charge the battery for
at least four hours. If you don't charge the phone for this period of
time, the battery life could be reduced.
Never connect the phone to the charger or a PC if a battery has
not been inserted. Do not attempt to operate the phone without a
battery inserted. Doing this can damage the phone.
› Using the charging cable
• Insert the USB plug into the USB port on the top of thephone.
• Then plug the cable's mains plug into a wall socket
To avoid contact faults with the USB connector, only use the
charging cable supplied with the phone for charging.
Do not attempt to plug a charging cable with a jack plug into the
headset port. Doing this can damage the phone.
12

Putting the phone into operation
› Using a computer
• Plug the phone into a USB port on your computer. If necessary,
disconnect the USB cable from the mains plug to do this.
Charging your phone via a computer will take longer than
charging it with the charging cable.
› Battery indicators on the phone
• When the battery is empty:
The phone will beep and a warning will appear on the screen.
The battery icon is red and the LED ashes.
• When the battery is being charged:
The battery icon is shown lling up and the LED is red.
• When the battery is fully charged:
The battery icon is full and the LED is green.
You can now disconnect the charging cable from the phone
and then unplug the cable from the wall socket.
In Settings – Battery, you can view the remaining battery life and
current charge level, and can close applications to extend the
battery life.
13

Putting the phone into operation
2.2 Turning on the phone
• Before you use your phone for the rst time, remove the
protective lm from the screen.
• Press and hold the on/obutton for at least two seconds.
• The emporia logotype will appear on the screen and you will
hear a short melody.
When you turn your phone on the rst time, the start-up process
can take up to two minutes. The emporia logo will be on the
screen when this is happening. Please do not interrupt this process.
14

Putting the phone into operation
2.3 Entering a PIN code
Enter the four-digit PIN code for your SIM card when asked to
do so and conrm the code.
Your PIN code (personal identication number) will be a four-digit
number combination and is intended to protect your SIM card and
therefore your phone from misuse. It is your secret number and
will prevent others from being able to turn your phone on. You can
change or turn o your PIN code in Settings– Security– Set up
SIM card lock.
You can make a note of your personal PIN code here: __________
You have a maximum of three attempts to enter your PIN code
correctly. If you enter the wrong number three times in a row, you
will only be able to unblock your SIM card with your PUK code. You
will nd your PIN code and PUK code in the documents supplied
with your SIM card by your network operator.
15

Using the phone for the rst time
100%
3. USING THE PHONE FOR THE FIRST TIME
3.1 Basic Android and Google settings
When you use your smartphone for the rst time,
you need to select a number of settings.
› Selecting a language
English has been preselected as the
standard system language. If you would
prefer to use a dierent language to operate
your smartphone, proceed as follows:
• Tap on the preselected language (ENGLISH).
• A list showing all the available system
languages will then appear.
• Select the language you want to use to
operate your smartphone.
• Your chosen language will be displayed on
the screen.
› Starting Android settings
• Now tap on START to dene a few required settings for the
Android operating system.
Hello
ENGLISH (GREAT BRITAIN)
START
Emergency calls Display settings
16

Using the phone for the rst time
100%
› Connecting to a Wi-Fi network
If possible, establish a Wi-Fi connection,
sothat future updates and downloads
don'tuse your mobile data.
• A list will display all the available Wi-Fi
networks.
• Tap on the name of the network you want
toconnect your phone to.
Connecting to a Wi-Fi network
Connect to a network in order to download
apps or copy data.
MyWi-Fi
MyWi-Fi Guest
Show all Wi-Fi networks
If your network does not appear in the list, it
SKIP
is not within range of the smartphone. Ensure
that the phone is within range of the network,
so that a connection can be established.
• Now enter the password for the selected Wi-Fi network. You'll
nd the wireless key in the documents for your Wi-Fi network.
• If you want to switch to the numeric keypad, tap on the grey
123 button. If you want to switch to uppercase letters, tap on
the grey button with the arrow.
17
 Loading...