


Mobiler Daten-
tarif notwendig
Mobile data tariff
required
ACTIVE
glam
Deutsch (Seite 02)
Vielen Dank, dass Sie sich für ein emporia Produkt entschieden haben!
Bitte lesen Sie die Bedienungsanleitung durch, bevor Sie das Telefon
in Betrieb nehmen. Achtung: MobilerDatentarif notwendig!
English (page 24)
Thank you for purchasing an emporia product!
Please read this user guide before attempting to use your phone.
Attention: Mobile data tariff required!
Français (page 46)
Nous vous remercions d'avoir choisi un produit emporia!
Veuillez lire le mode d'emploi avant de mettre le téléphone en marche.
Attention: Nécessite un forfait de données mobiles!
Italiano (pagina 68)
Grazie per aver acquistato un prodotto emporia!
Leggere il manuale d'uso prima di utilizzare il telefono.
Attenzione: È necessario un piano dati mobili!
Nederlands (pagina 90)
Hartelijk dank dat u een product van emporia hebt aangeschaft!
Lees de gebruiksaanwijzing door voordat u de telefoon in gebruik neemt.
Let op: Mobiel internet-abonnement nodig!
Deutsch
English
Italiano
Francais
Nederlands
V221-4G_GuideBook-V2_56002-001.indb 1V221-4G_GuideBook-V2_56002-001.indb 1 18.09.20 12:1018.09.20 12:10
Eveline Pupeter, emporia Telecom
www.emporia.eu
1
2
3 4 10
7 6 6
8
9
14
13
15
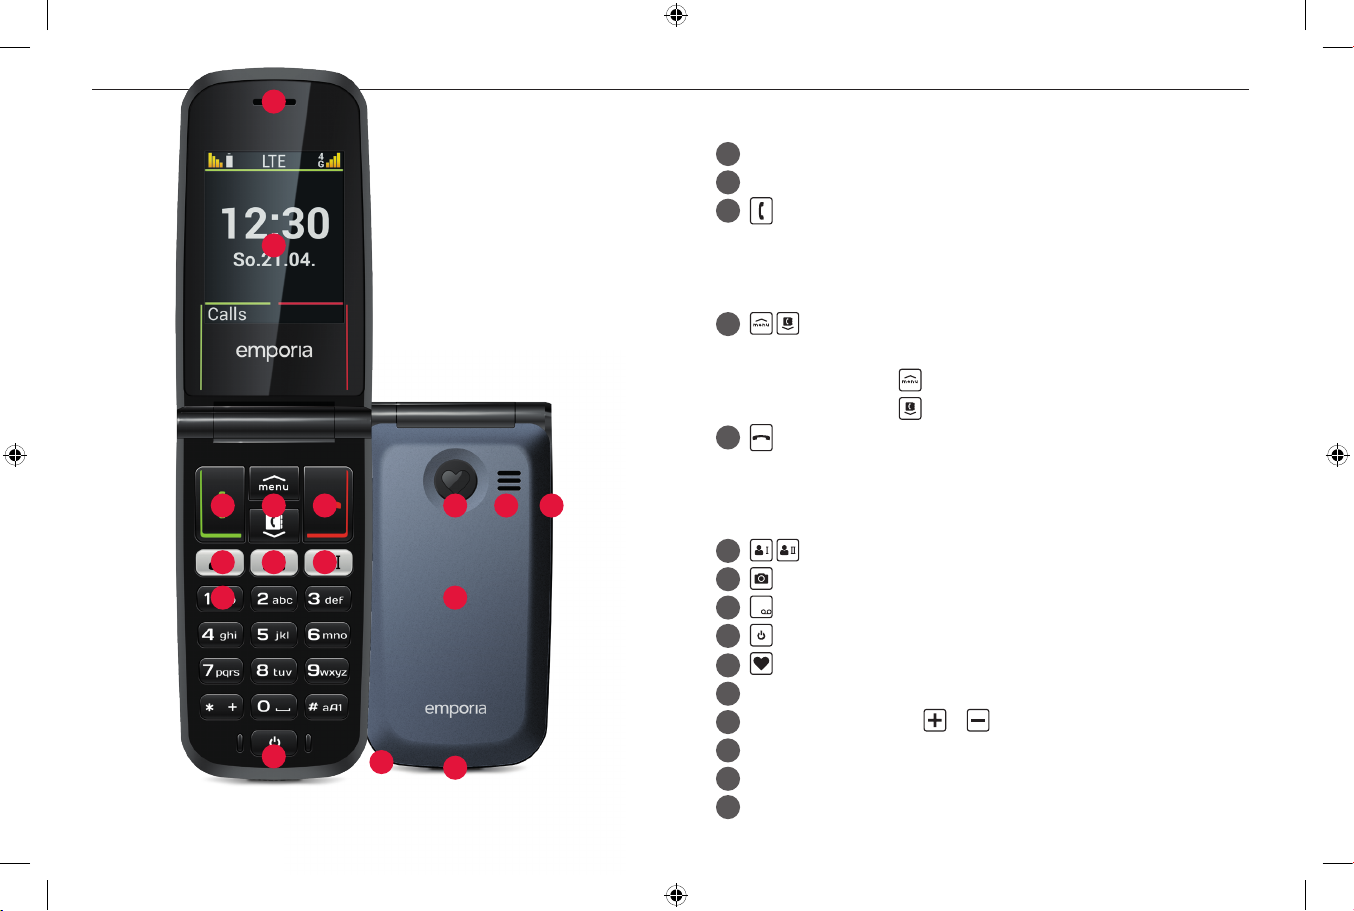
› IHR MOBILTELEFON IM ÜBERBLICK
1
Lautsprecher
2
Display (Bildschirm)
3
GrüneTaste
• Anruf beginnen bzw. Gespräch annehmen
• Im Menü: Auswahl bestätigen
• In Bereitschaft: Anruiste aufrufen
4
Pfeiltasten
• Blättern in Kontakte und Menü
• In Bereitschaft mit
• In Bereitschaft mit
5
RoteTaste
• Im Gespräch: Beenden
11 12 5
• Im Menü: Einen Schritt zurück
• Bei Ziern- bzw. Buchstabeneingabe: Löschen
6
Kurzwahltasten
7
Kamera-Taste
8
1 -Ta st e (Anrufbeantworter)
9
Ein/Aus-Taste
Notru f-Taste (optional)
10
Lautsprecher
11
Lautstärkeregelung &
12
Akkudeckel (zwei Versionen: mit und ohne Notruf-Taste)
13
Ausnehmung zum Abnehmen des Akkudeckels
14
Buchse für USB-Ladekabel
15
das Menü aufrufen
die Kontakte aufrufen
V221-4G_GuideBook-V2_56002-001.indb 2V221-4G_GuideBook-V2_56002-001.indb 2 18.09.20 12:1018.09.20 12:10

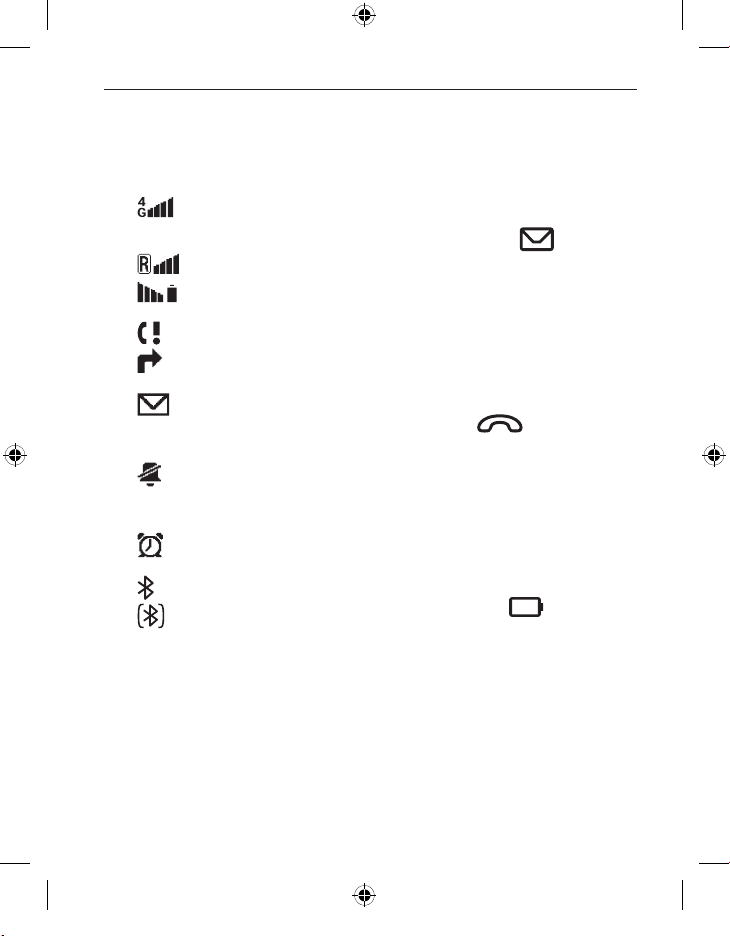
› Symbole am Display
Netz-Signalstärke
Roaming (Ausland)
Akkuanzeige
Versäumter Anruf
Rufumleitung
Neue SMS Nachricht
Prol: Lautlos/Schlafen
Wecker eingeschaltet
Bluetooth
eingeschaltet
Bluetooth verbunden
› Symbole am Außendisplay
Nachrichten LED
• Blinkt bei neuen Nachrichten
• Erlischt sobald die
empfangene Nachricht
gelesen wurde
Anruf LED
• Blinkt bei versäumten
Anrufen
• Erlischt sobald Anruiste
angesehen wurden
Akku LED
• Blinkt langsam:
Akku wird geladen
• Leuchtet dauerhaft:
Akku ist fertig geladen
• Blinkt schnell:
Akku ist leer
V221-4G_GuideBook-V2_56002-001.indb 3V221-4G_GuideBook-V2_56002-001.indb 3 18.09.20 12:1018.09.20 12:10

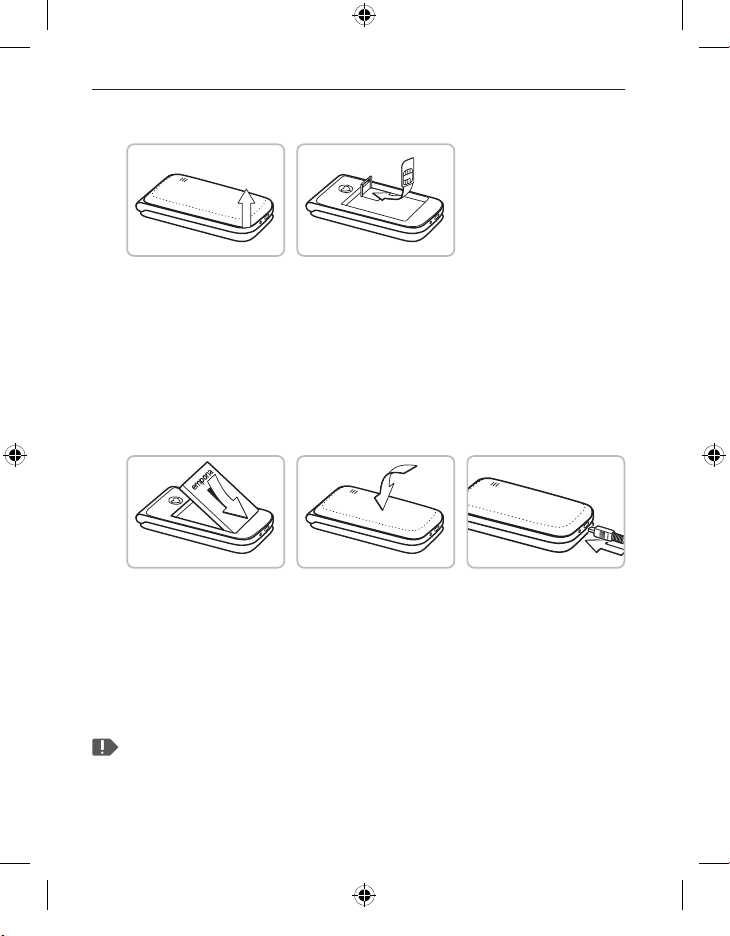
1. INBETRIEBNAHME
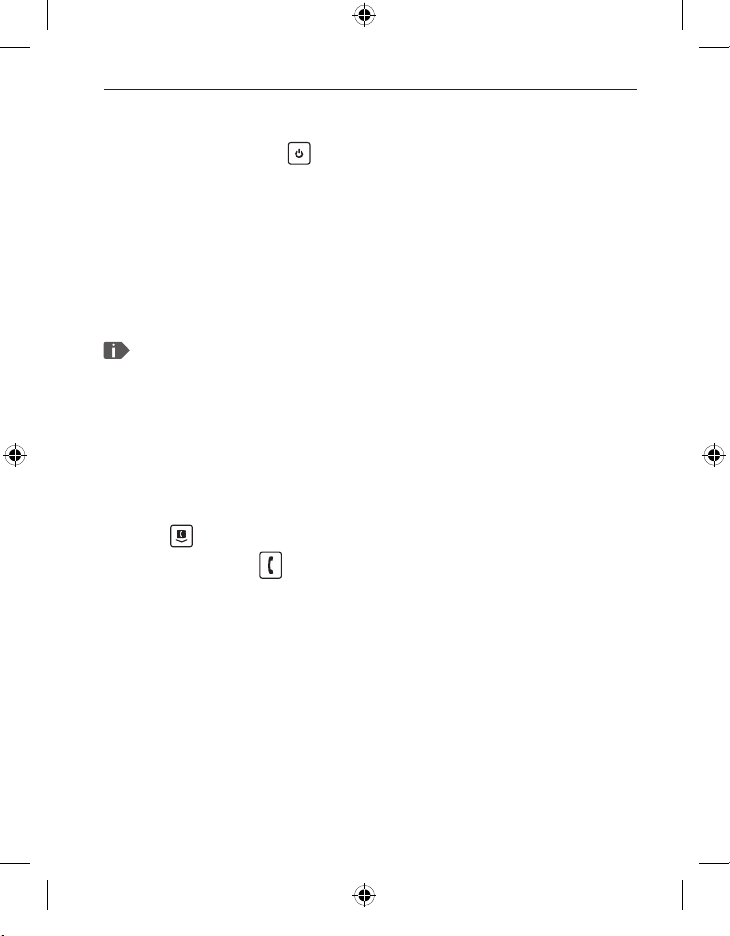
1.1 SIM - Karte einlegen
1. Entfernen Sie den Akku-Deckel (Ausnehmung links unten).
2. Entriegeln Sie die SIM-Kartenhalterung (verschieben
undhochklappen).
3. Legen Sie die SIM-Karte mit den Goldkontakten nach unten ein
und verriegeln Sie die Klappe.
1.2 Akku einlegen und laden
1. Legen Sie den Akku so ein, dass die Akku-Kontakte
diegoldfarbenen Kontakte des Mobiltelefons berühren.
2. Setzen Sie den Akkudeckel auf und drücken ihn fest.
3. Stecken Sie das Ladekabel in die USB-Buchse des Telefons
undden Netzstecker an das Stromnetz.
Laden Sie den Akku vor Inbetriebnahme mindestens 4Stunden.
Verwenden Sie nur Akkus und Ladegeräte, die für den Gebrauch
mit diesem speziellen Modell zugelassen sind.
DEUTSCH–04
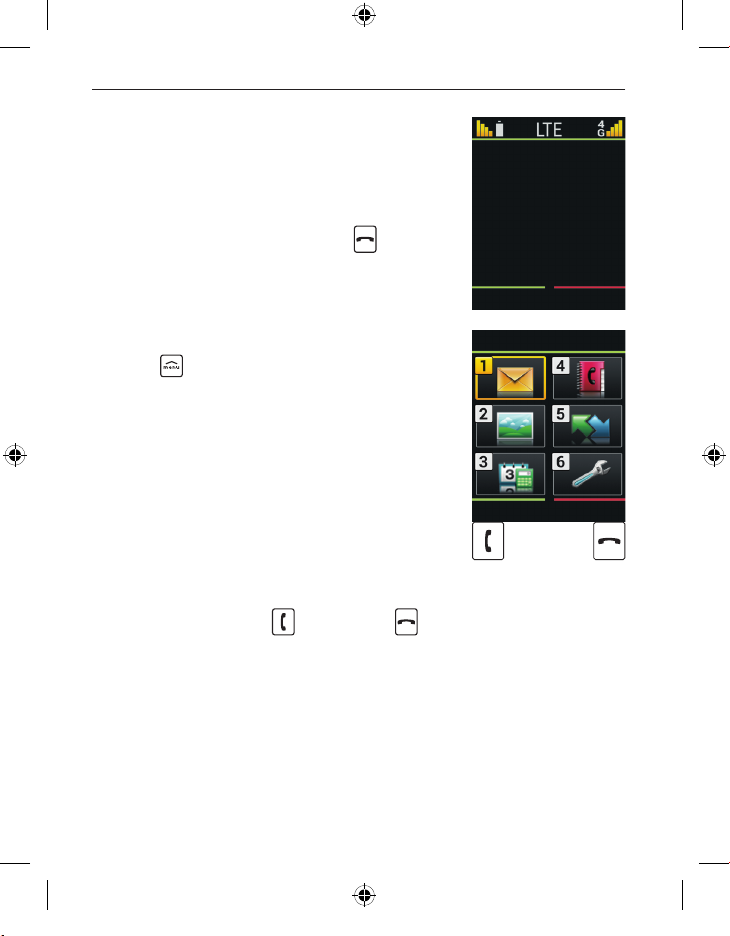
1.3 Telefon einschalten
• Drücken Sie die -Taste für mindestens 2Sekunden bis
das emporia Logo erscheint. Es dauert einige Sekunden bis
derStartbildschirm angezeigt wird.
1.4 PIN-Code eingeben
Geben Sie den 4-stelligen PIN-Code Ihrer SIM-Karte ein, wenn
Sie dazu aufgefordert werden und bestätigen Sie die Eingabe.
Sie haben maximal drei Eingabeversuche, nach der dritten
Fehleingabe kann die SIM Karte nur mehr mit dem PUK-Code
entsperrt werden. Sie nden den PIN-Code und PUK-Code in
denUnterlagen, die Sie vom Netzbetreiber erhalten haben.
1.5 Sprache, Zeit und Datum einstellen
1. Wählen Sie mit eine Sprache aus, bestätigen Sie mit OK .
2. Stellen Sie Zeit und Datum ein und speichern Sie.
1.6 Energiesparen
Erfolgt einige Sekunden keine Eingabe, schaltet sich der
Bildschirm ab, um Energie zu sparen. Bei einem eingehenden
Anruf oder durch Drücken einer beliebigen Taste schaltet sich
der Bildschirm wieder ein.
DEUTSCH–05
V221-4G_GuideBook-V2_56002-001.indb 5V221-4G_GuideBook-V2_56002-001.indb 5 18.09.20 12:1018.09.20 12:10

2. BEDIENUNG
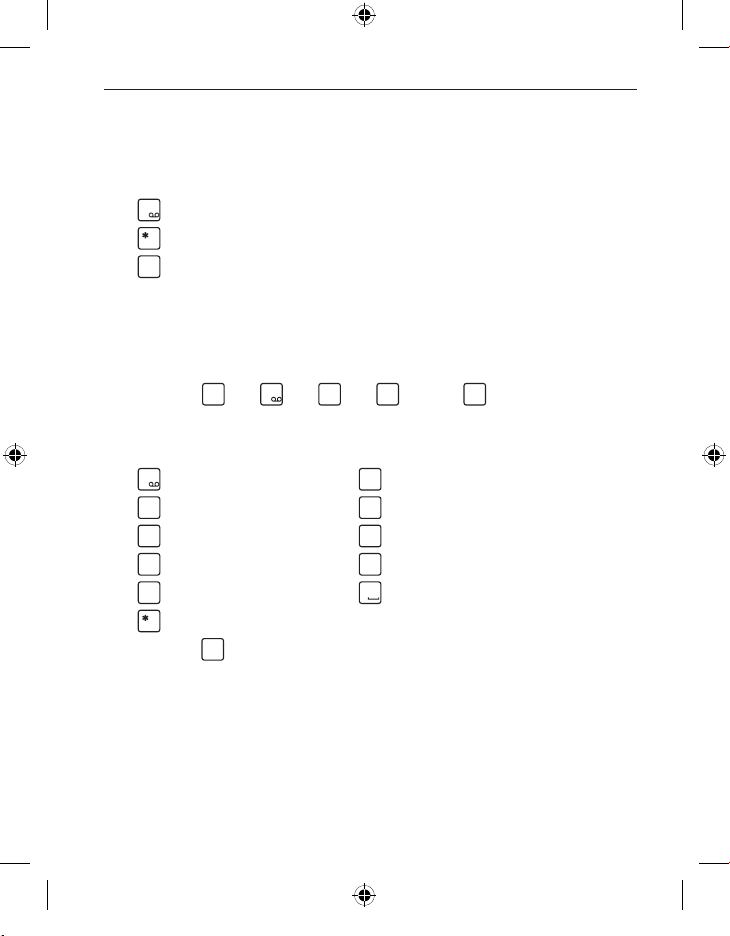
2.1 Startbildschirm
Wenn Ihr Telefon eingeschaltet ist
aberkeine Funktion verwendet wird,
bendet es sich am Startbildschirm.
Sie können jederzeit zum Startbildschirm
zurück gelangen, indem Sie wiederholt
dieroteTaste
drücken.
12:30
21.04.2020
Anruiste
2.2 Menü
Mit der -Taste rufen Sie das Menü auf.
Das Menü ist ein Verzeichnis, in dem Sie
die Funktionen Ihres Telefons verwalten
und das Telefon an Ihre Bedürfnisse
anpassen können.
• Mit den Pfeil-Tasten blättern Sie imMenü.
• Verfügbare Menüpunkte sind:
Nachrichten, Fotoalbum, Werkzeuge,
Kontakte, Anruiste, Einstellungen
• Mit der grünenTaste
desBildschirms können Sie die Auswahl bestätigen oder
zumStartbildschirm zurück gelangen.
DEUTSCH–06
und der rotenTaste unterhalb
OK Zurück
Nachrichten
2.3 Doppelfunktion von Tasten
1
+
#
aA1
4
ghi
5
jkl
5
jkl
6
mno
1
2
abc
3
def
4
ghi
5
jkl
6
mno
7
pqrs
8
tuv
9
wxyz
0
+
#
aA1
Manche Tasten haben zusätzliche Funktionen,
wenn man sie lange drückt:
-Tast e: Anrufbeantworter abhören
-Tast e: + für Ländercode, z.B. +49 für Deutschland
-Tast e: Lautlos/Schlafen einschalten
2.4 Bedienung beim Textschreiben
Die Texteingabe erfolgt über die Zierntastatur.
• Für die Texteingabe drücken Sie eine Zierntaste mehrmals
(z. B. 2 ×
, 1 ×1 , 3 ×
• Sonderzeichen und Symbole sind den Tasten zugeordnet,
können in manchen Sprachen aber abweichen:
. , - ? ! 1 ' @ : ; ( ) *
d e f 3 ë é è ê € đ ē
j k l 5 £
p q r s 7 ß $ ş
w x y z 9 ŵ ý ÿ
. , ? ! ' " ( ) @ \ / : _ ; + - * = % & < > ₤ $ ¥ § € ¤ [ ] { } ~ #
• Mit der
-Taste wechseln Sie zwischen den Eingabe-
methoden abc, ABC, Abc und 123.
, 3 ×
, 3 ×
für Hallo)
a b c 2 ä á ç å â ā æ ć
g h i 4 î ï í ì ğ ι
m n o 6 ö ñ ô œ ó ò
t u v 8 ü ù û ú
Leerzeichen 0
DEUTSCH–07
V221-4G_GuideBook-V2_56002-001.indb 7V221-4G_GuideBook-V2_56002-001.indb 7 18.09.20 12:1018.09.20 12:10
3. TELEFONIEREN
3.1 Telefonat annehmen, ablehnen oder beenden
• Abheben: Klappen Sie das Telefon auf und drücken
SieAnnehmen.
• Ablehnen oder Auegen: Drücken Sie die rote Taste
oderklappen Sie dasTelefon zu.
• Um den Klingelton vorübergehend stumm zu schalten,
drücken Sie die
Die Anrufannahme beim Aufklappen des Telefons ist werkseitig
ausgeschaltet und aktivierbar unter Menü _Einstellungen
_Aufklappen für Anrufannahme _ein.
-Taste der Lautstärkeregelung.
3.2 Jemanden anrufen
› Eine Nummer wählen
1. Geben Sie über die Zierntastatur die Telefonnummer
(inkl.Ortsvorwahl) ein.
2. Starten Sie den Anruf mit
› Die Wahlwiederholung verwenden
1. Drücken Sie am Startbildschirm die grüne Taste
DieAnruiste wird angezeigt.
2. Wählen Sie mit den Pfeiltasten
3. Starten Sie den Anruf mit
.
.
eine Nummer aus.
.
Zum Freisprechen können Sie während eines Gesprächs
dieOptionen önen und den Lautsprecher einschalten.
DEUTSCH–08
4. NACHRICHTENSMS
› Menüpunkte: Nachricht schreiben, Verlauf,
Nachrichteneinstellungen
4.1 Nachricht schreiben und versenden
1. Önen Sie Menü _Nachrichten.
2. Wählen Sie Nachricht schreiben.
3. Geben Sie über die Tastatur den Text ein.
4. Um einen Empfänger für die SMS festzulegen,
önenSiedieOptionen und wählen Sie Senden.
5. Sie können nun einen Kontakt im Telefonbuch auswählen,
eine Telefonnummer über die Tastatur eingeben oder
eineNummer aus Letzte Anrufe wählen.
4.2 Nachricht lesen
1. Wenn Sie eine neue Nachricht erhalten, erscheint ein Symbol
am Startbildschirm.
2. Drücken Sie die grüneTaste
umdieNachrichtsofort zu lesen.
3. Später nden Sie die SMS unter Menü
_Verlauf.
4. Zum Lesen tippen Sie auf die Nachricht.
für Zeigen,
_Nachrichten
DEUTSCH–09
V221-4G_GuideBook-V2_56002-001.indb 9V221-4G_GuideBook-V2_56002-001.indb 9 18.09.20 12:1018.09.20 12:10
5. KAMERA UND FOTOALBUM
5.1 Foto aufnehmen
1. Drücken Sie am Startbildschirm die Kamerataste oder
önenSie Menü
• Mit der Pfeiltaste
(Selbstauslöser,Bildgröße).
2. Mit der Pfeiltaste
3. Das aufgenommene Foto wird direkt im Fotoalbum
gespeichert. Mit der grünenTaste
vonder Kamera in das Fotoalbum.
_Werkzeuge _Kamera.
önen Sie die Optionen
nehmen Sie ein Foto auf.
wechseln Sie direkt
5.2 Fotos ansehen
• Alle aufgenommenen Fotos werden chronologisch sortiert.
1. Önen Sie Menü
2. Blättern Sie mit den Pfeiltasten
3. Mit der grünenTaste
zumausgewählten Bild.
_Fotoalbum.
zwischen denFotos.
önen Sie die Optionen
5.3 Fotos am PC sichern
1. Stecken Sie das mitgelieferte USB-Kabel am PC und
andasGerät an.
2. Wählen Sie aus der Liste Dateien übertragen.
3. Der PC erkennt nun Ihr Telefon und stellt den internen
Speicher des Geräts dar.
4. Nun können Dateien ausgewählt und auf den PC
kopiertwerden.
DEUTSCH–10
6. WERKZEUGE
› Menüpunkte: Wecker, Geburtstagserinnerung, Kalender,
Rechner, Kamera, Bluetooth, Systemaktualisierung
6.1 Wecker
1. Önen Sie Zeit einstellen.
2. Geben Sie die gewünschte Weckzeit ein und Speichern Sie.
3. Der Wecker ist aktiviert und läutet nun täglich
zureingegebenen Zeit.
4. Schalten Sie den läutenden Wecker mit der rotenTaste
oder mit der grünenTaste
5. Wählen Sie Aus, um den Wecker dauerhaft zu deaktivieren.
Wenn Sie das Telefon ausschalten, ist auch der Wecker
ausgeschaltet. Der Wecker läutet in diesem Fall nicht.
6.2 Bluetooth
1. Schalten Sie die Bluetooth-Funktion ein.
2. Tippen Sie auf Verbinden und auf Neue Geräte suchen.
EineListe verfügbarer Geräte wird angezeigt.
3. Wählen Sie das gewünschte Gerät aus, mit dem das Telefon
gekoppelt werden soll.
4. Folgen Sie den Anweisungen zum Koppeln der Geräte.
in die Schlummerfunktion.
ab
Gekoppelte Geräte werden erkannt und automatisch verbunden.
DEU TSC H–11
V221-4G_GuideBook-V2_56002-001.indb 11V221-4G_GuideBook-V2_56002-001.indb 11 18.09.20 12:1018.09.20 12:10

6.3 Systemaktualisierung
Sie können selbst die neueste Software für das Telefon
herunterladen, das System damit aktualisieren und
Anwendungen verbessern.
Führen Sie das Update nur dann aus, wenn Sie über einen Tarif
mitmobilen Daten verfügen!
1. Überprüfen Sie, ob der Akku über mindestens 30 % Ladekapazität verfügt, sonst kann der Download nicht starten.
2. Önen Sie Menü
_Systemaktualisierung.
3. Tippen Sie auf Überprüfen.
4. Sie werden informiert, ob eine aktualisierte Software
zurVerfügung steht. Wenn das der Fall ist, wählen Sie
Download und starten den Updateprozess.
5. Wenn der Download abgeschlossen ist, wählen Sie
Jetzt aktualisieren. Sie werden informiert, dass Sie während
der Aktualisierung das Telefon nicht verwenden können.
Drücken Sie nicht die Ein/Aus-Taste während der Aktualisierung
und bedienen Sie Ihr Telefon erst wieder nach der Information
Die Installation war erfolgreich.
_Werkzeuge
DEUTSCH–12
7. KONTAKTE
› Menüpunkte: Name suchen, Neuer Kontakt,
Kontakt ändern, Löschen, Import/Export, Meine Nummer,
Kurzwahltasten, Notrufkontakte, Kontakteeinstellungen
7.1 Kontakt im Telefonbuch suchen
1. Drücken Sie am Startbildschirm die Telefonbuch-Taste oder
önen Sie Menü
2. Blättern Sie mit den Pfeiltasten
geben Sie über die Zierntastatur den Anfangsbuchstaben
desgesuchten Kontakts ein.
3. Starten Sie den Anruf mit der grünenTaste
7.2 Kontakt hinzufügen
1. Önen Sie Menü _Kontakte _Kontakt hinzufügen.
2. Geben Sie die Telefonnummer ein und den zugehörigen
Namen der Person ein und Speichern Sie.
Namen und Nummern immer mit internationaler Vorwahl,
z. B. Schweiz +41, Österreich +43 und Deutschland +49 speichern.
_Kontakte _Name suchen.
durch dieEinträge oder
.
DEUTSCH–13
V221-4G_GuideBook-V2_56002-001.indb 13V221-4G_GuideBook-V2_56002-001.indb 13 18.09.20 12:1018.09.20 12:10
7.3 Kurzwahltasten
› Kurzwahl speichern
1. Drücken Sie eine der beiden unbelegten Kurzwahltasten.
2. Geben Sie Name und Nummer ein oder Suchen Sie
einenKontakt im Telefonbuch.
› Kurzwahltaste ändern oder löschen
1. Önen Sie Menü
2. Wählen Sie eine freie Position aus der Liste.
3. Geben Sie Name und Nummer ein oder Suchen Sie
einenKontakt im Telefonbuch.
4. Zum Ändern der Kurzwahl wählen Sie eine Position aus
derListe und ändern oder löschen Sie die Verknüpfung.
_Kontakte _Einstellungen.
DEUTSCH–14
8. EINSTELLUNGEN
› Menüpunkte: Mobilfunknetz, Wi-Fi hotspot,
Lautlos/Schlafen, Töne & Signale, Hörerlautstärke,
Freisprechlautstärke, Bildschirm & Beleuchtung,
Zeit & Datum, Sprache, Kameraeinstellung,
Aufklappen für Anrufannahme, Anklopfen, Rufumleitung,
Nr. Anrufbeantworter, Notrufnummer, Notruftaste,
Sicherheitseinstellungen, Kontakteinstellungen,
0000 für Einstellungen, Rücksetzen
8.1 Mobilfunknetz
• Mobile Daten: ein/aus (werkseitig auf ein)
• Datenroaming: ein/aus (werkseitig auf aus)
8.2 Wi-Fi hotspot
Sie können ihre mobile Datenverbindung nutzen, um anderen
digitalen Geräten die Verbindung ins Internet zu ermöglichen.
Dieses Gerät kann keine Internetverbindung mit Wi-Fi (WLAN)
herstellen!
8.3 Lautlos/Schlafen
Ein eingehender Anruf wird nur optisch angezeigt,
Klingeltonund Vibration sind ausgeschaltet.
DEUTSCH–15
V221-4G_GuideBook-V2_56002-001.indb 15V221-4G_GuideBook-V2_56002-001.indb 15 18.09.20 12:1018.09.20 12:10

8.4 Töne & Signale
Sie können persönliche Einstellungen zu Tönen, Signalen
und Vibration vornehmen oder Voreinstellungen (Prole)
auswählen.
› Menüpunkte: Klingelmelodie, Weckmelodie,
Klingellautstärke, Lautlos/Schlafen, Vibra bei Anruf,
Vibra bei Wecker, Tastentöne, Nachrichtenton, Vibra
bei Nachrichten, Hörerlautstärke, Freisprech lautstärke,
Bestätigungston, Notrufton
8.5 Nr. Anrufbeantworter
Geben Sie die Nummer Ihres Anrufbeantworters ein. Sie nden
diese Nummer in den Unterlagen Ihres Netzanbieters.
8.6 Sicherheitseinstellungen
• PIN: PIN-Abfrage ein/aus, PIN ändern
• Telefoncode: ein/aus, ändern (Werkseitig 1234)
8.7 0000 für Einstellungen
Aktivieren Sie diesen Sicherheitsmodus, um unbeabsichtigte
Änderungen der Einstellungen zu vermeiden.
8.8 Rücksetzen
Sie können Ihr Telefon auf die Werkseinstellungen
zurücksetzen (Telefoncode werkseitig 1234).
DEUTSCH–16

9. EMPORIA NOTRUFFUNKTION
Wenn Sie den Akkudeckel mit der integrierten Notruftaste
verwenden, können Sie die Notruunktion aktivieren.
Lesen Sie die Anweisungen sorgfältig durch und stellen Sie
dieNotruunktion auf Ihre Bedürfnisse ein.
Sie können bis zu 5Notrufkontakte (Familie, Freunde,
ozielleInstitutionen) speichern.
• In einem Notfall drücken und halten Sie die Notruftaste auf
der Telefonrückseite. (Funktioniert auch, wenn das Telefon
zugeklappt ist.)
• Die 5voreingestellten Nummern werden, in der von Ihnen
vorher gespeicherten Reihenfolge, automatisch angerufen.
Wird die erste Nummer nicht erreicht,
wird automatisch die zweite Nummer angerufen.
Wird die zweite Nummer nicht erreicht,
wird automatisch die dritte Nummer angerufen,
usw. (max. 3Durchgänge mit 5Nummern).
• Parallel zum Notruf wird eine Nachricht (SMS) gesendet:
»Sie erhalten einen Notruf. Bitte 3 × die Taste 0 drücken,
damit die Verbindung hergestellt wird.«
Der Angerufene muss innerhalb von 60 Sekunden die 0-Taste
3 ×drücken, sonst wird der nächste Notrufkontakt angerufen.
Damit wird verhindert, dass der Notruf auf einer Mailbox landet.
DEU TSCH–17
V221-4G_GuideBook-V2_56002-001.indb 17V221-4G_GuideBook-V2_56002-001.indb 17 18.09.20 12:1018.09.20 12:10
• Nach dem Starten des Notrufs nimmt Ihr emporia Telefon
eine Stunde lang jeden eingehenden Anruf automatisch an.
Um diese Funktion zu deaktivieren, drücken Sie die
ca3 Sek. lange oder schalten Sie Ihr Gerät mit
vollständig
ab und wieder an.
Taste
• Zum Abbrechen des Notrufs drücken und halten Sie
• Während des Notrufs ertönt kontinuierlich ein Warnton, der
Ihre Umgebung und den Angerufenen zusätzlich alarmiert.
• Ist kein Notrufkontakt gespeichert, das Guthaben auf Ihrer
Wertkarte abgelaufen oder sind Sie unerlaubt in einem
Fremdnetz (z. B. Roaming nicht freigeschalten),
so wird beim Drücken der Notruftaste 112 gewählt.
Wenn Sie ozielle Institutionen (Polizei, Feuerwehr, etc.) als
Notrufkontakt speichern möchten, müssen Sie dies mit den
jeweiligen Institutionen klären. Es wird keine Haftung für mögliche
Kosten übernommen, wenn Sie diese versehentlich anrufen.
DEUTSCH–18
.
› Speichern/Bearbeiten von Notrufkontakten
Im Menü Einstellungen _Notruftaste
_Notrufkontakt speichern
_wählen Sie einen Eintrag (z. B. Notrufkontakt 1) mit
_wählen Sie Ok mit
_wählen ob Privat oder Hilfsorganisation
_wählen Sie einen Kontakt
› Einschalten der Notruftaste
Im Menü Einstellungen
_Notruftaste
_Ein/Aus
› Voralarm
Der Voralarm ist ein Warnton, der für 10Sekunden ertönt
und Ihre Umgebung auf den Notfall aufmerksam macht.
Danach startet die Notrufsequenz.
Im Menü Einstellungen
_Notruftaste
_Notrufnummer
_Ein/Aus
DEUTSCH–19
V221-4G_GuideBook-V2_56002-001.indb 19V221-4G_GuideBook-V2_56002-001.indb 19 18.09.20 12:1018.09.20 12:10

›GARANTIE UND SERVICE
Hersteller: emporia telecom GmbH + CoKG
Industriezeile 36, 4020 Linz, Austria
Importeur: emporia telecom GmbH + CoKG
Kontakt: Eveline Pupeter · +43 (0)732 777717 446 · www.emporia.eu
Markenname: emporia
Modell: V221-4G / emporiaACTIVEglam
› Lieferumfang
• Mobiltelefon: V221-4G /
emporiaACTIVEglam
• Zusätzlicher Akkudeckel ohne
Notruftaste
• Akku: Ak-V221-4G
• USB Kabel
• AC-Adapter: RL-C150-USB
• Tischladestation: TL-V221-4G
› Unterstützung
• Emporia Service Centre
Industriezeile 36 · 4020 Linz · Austria
customercare@emporia.at
www.emporia.eu
• Mo.- Do. 08:30-17:00 · Fr. 08:30-13:00
• Deutschland: +49 · (0) 800 · 400 4711
• Österreich: +43 · (0) 732 · 77 77 17 · 446
• Schweiz: +41 · (0) 8484 · 50004
› Garantie
• Diese Garantie gilt nur, wenn Originalakkus von emporia verwendet wurden.
• Mobiltelefon: 24 Monate
• Akku: 6 Monate
› Technische Daten
• Abmessungen: 96.5 × 50.5 × 17.75 mm
• Gewicht: 85.0 g
• Akku: Li-ion 3.8 V, 1150 mAh, 4.27 Wh
(austauschbar)
• AC-Adapter:
input: 100 - 240V AC, 50/60 Hz, 200 mA;
output: DC 5.0 V, 500 mA
• Tischladestation:
input/output:
• Standby-Zeit: 140 h*
• Sprechzeit: 320 min*
(*Abhängig von Netz abdeckung und
aktivierten Anwendungen kann sich die
Betriebszeit verkürzen.)
• Interne Antenne:
SAR-Körper: 0.98 W/kg
SAR-Kopf: 0.89 W/kg
• Betriebstemperatur: -10° –40° C
• Hörgerätetauglich: M4/T4
• Bluetooth: V 4.0
› Frequenzen
• BT: 2402 MHz - 2480 MHz
Sendeleistung: < 0.0018 W
• FM: 87.6 MHz - 107.9 MHz
• E-GSM 900/GPRS 900/EGPRS 900:
TX: 880 - 915MHz; RX: 925 - 960 MHz
Sendeleistung: < 2.138 W
• E-GSM 1800/GPRS 1800/EGPRS 1800:
TX: 1710 - 1785 MHz; RX: 1805 - 1880 MHz
Sendeleistung: < 1.1482 W
• WCDMA Band I:
TX:1920 - 1980 MHz; RX: 2110 - 2170 MHz
Sendeleistung: < 0.1811 W
• WCDMA Band VIII:
TX: 880 - 915 MHz; RX: 925 - 960 MHz
Sendeleistung: < 0.1652 W
• LTE Band I:
TX:1920 - 1980 MHz, RX:2110 - 2170 MHz
Sendeleistung: < 0.1841 W
• LTE Band III:
TX:1710 - 1785 MHz, RX:1805 - 1880 MHz
Sendeleistung: < 0.2042 W
• LTE Band VII:
TX:2500 - 2570 MHz; RX: 2620 - 2690 MHz
Sendeleistung: < 0.2704 W
• LTE Band VIII:
TX: 880 - 915 MHz; RX: 925 - 960 MHz
Sendeleistung: < 0.3516 W
• LTE Band XX:
TX: 832 - 862 MHz; RX: 791 - 821 MHz
Sendeleistung: < 0.2618 W
› Sicherheitshinweise
• Mobiltelefon in Krankenhäusern bzw.
in der Nähe von medizinischen Geräten
ausschalten. Es sollte ein Mindestabstand
von 20 cm zwischen Herzschrittmacher
und eingeschaltetem Mobiltelefon eingehalten werden.
• Lenken Sie nie gleichzeitig ein Fahrzeug,
während Sie das Mobiltelefon in der
Hand halten. Beachten Sie die jeweiligen
nationalen Gesetze und Verkehrsordnungen.
• Während Sie sich im Flugzeug aufhalten
ist das Mobiltelefon auszuschalten.
• In der Nähe von Tankstellen und anderen
Orten mit explosiven Gütern ist das Mobiltelefon auszuschalten.
• Mit der LED-Taschenlampe niemals Menschen oder Tieren in die Augen leuchten!
(Schutzklasse 3)
•
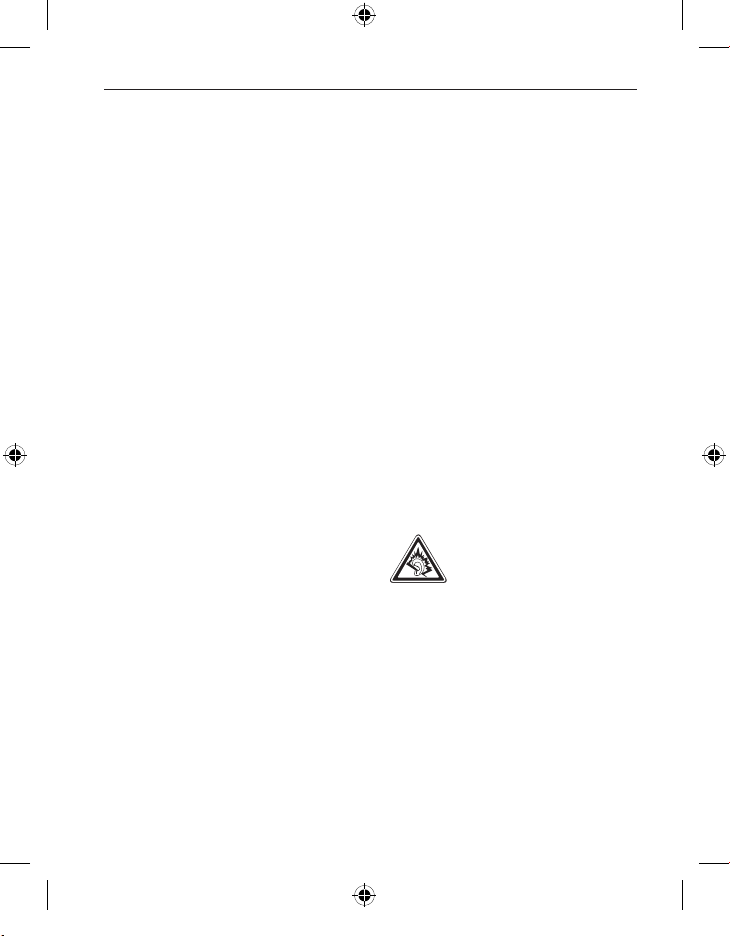
• Die Verwendung von Headsets mit hoher
• Das Mobiltelefon und das Zubehör kön-
Um mögliche Hörschäden zu
vermeiden, nicht mit hoher
Lautstärke über einen längeren Zeitraum verwenden. Halten Sie das
Mobiltelefon nicht ans Ohr, wenn der
Freisprechmodus aktiviert ist oder die
Notruf Taste gedrückt wurde.
Lautstärke kann zu Hörschäden führen.
Prüfen Sie die Lautstärke des verwendeten Headsets.
nen Kleinteile enthalten. Bewahren Sie
V221-4G_GuideBook-V2_56002-001.indb 21V221-4G_GuideBook-V2_56002-001.indb 21 18.09.20 12:1018.09.20 12:10

das Mobiltelefon außerhalb der Reichweite von Kleinkindern auf.
• Zur Vorsicht empfehlen wir, das Ladegerät während eines Gewitters vom Mobiltelefon zu trennen.
• Das Netzteil dient als Trennvorrichtung
zwischen Produkt und Netzanschluss.
Der Netz anschluss muss sich in unmittelbarer Nähe des Geräts befi nden und gut
zugänglich sein.
• Dieses Gerät wurde auf typische Anwendungen getestet, bei denen das Gerät
am Körper getragen wird. Um die Anforderungen in Bezug auf die RF-Belastung
zu erfüllen, muss der Mindestabstand
zwischen dem Körper, insbesondere dem
Kopf des Benutzers und dem Mobilteil
einschließlich Antenne 0 cm betragen.
Gürtelclips, Holster und ähnliches Zubehör von Drittanbietern, die mit diesem
Gerät verwendet werden, dürfen keine
metallischen Komponenten enthalten.
Zubehör, das am Körper getragen wird
und nicht diese Anforderungen erfüllt,
entspricht möglicherweise nicht den Anforderungen der RF-Belastung und sollte
vermieden werden. Verwenden Sie nur
die im Gerät integrierte oder eine zugelassene Antenne.
• Dieses Gerät entspricht den grundlegenden Anforderungen und anderen
relevanten Bestimmungen der Richtlinie
2014/53/EU. Alle wichtigen Radio-Testfälle wurden durchgeführt.
• Vorsicht: Explosionsgefahr, wenn die
Batterie durch einen falschen Typ ersetzt
wird. Entsorgen sie die verwendeten Batterien entsprechend den Anweisungen.
• Das Gerät entspricht den RF-Spezifi kationen, wenn das Gerät 5 mm vom Körper
entfernt ist.
› Bestimmungsgemässe
Verwendung
• Dieses Mobiltelefon ist robust und für
den mobilen Einsatz vorgesehen. Es ist
dennoch vor Feuchtigkeit (Regen, Badezimmer,…) und Stößen zu schützen.
• Nur für europäische Netzwerkstandards
(AT, BE, CZ, DE, DK, ES, FI, FR, GB, HR, HU,
IE, IT, NL, NO, PL, PT, SE, SI, SK, SZ, TR).
• Setzen Sie es nicht direkter Sonneneinstrahlung aus.
• Eine andere Verwendung als zuvor beschrieben, führt zur Beschädigung des
Produktes. Darüber hinaus ist dies mit
Gefahren, wie z. B. elektrischem Schlag,
Brand etc. verbunden. Das Produkt darf
nicht geändert, umgebaut oder das Gehäuse geöff net werden.
• Das Steckernetzteil ist nur für den Betrieb
an einer haushaltsüblichen Netzsteckdose des öff entlichen Stromnetzes mit
100-240 Volt, 50/60 Hz (10/16 A) Wechselspannung geeignet.
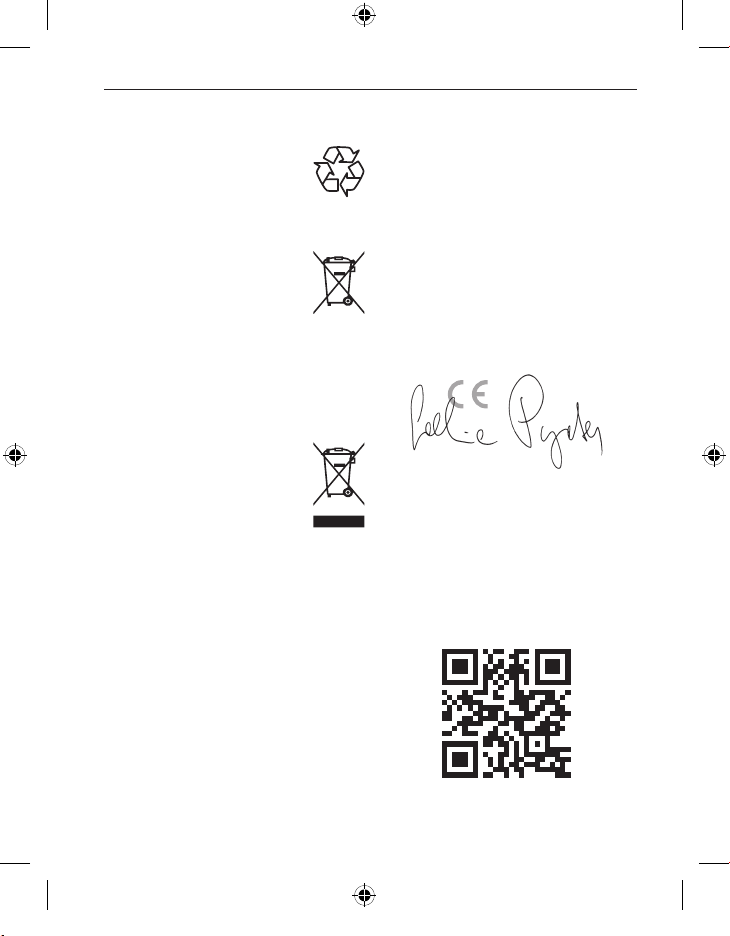
› Entsorgung
• Entsorgung der Verpackung
Verpackungen und Pack hilfsmittel sind recyclingfähig und
sollen der Wiederverwendung
zugeführt werden.
• Entsorgung von Akkus
Akkus und Batterien gehören
nicht in den Hausmüll! Als Verbraucher sind Sie gesetzlich
verpfl ichtet, verbrauchte Akkus
und Batterien zurückzugeben. Diese
können Sie bei den örtlichen Sammelstellen Ihrer Gemeinde oder im Fachhandel abgeben.
• Entsorgung des Gerätes
Wenn dieses Produkt eines Tages ausgedient hat, werfen Sie
es bitte nicht in den Hausmüll.
Bringen Sie es der Umwelt zuliebe zu einem Werkstoff - oder
Recyclinghof, wo Altgeräte angenommen und einer umweltgerechten Verwertung zugeführt werden.
› Konformitätserklärung (DOC)
Hiermit erklärt
emporia telecom GmbH + CoKG
(Industriezeile36, 4020Linz, Austria),
dass die Funkanlage/Telekommunikations einrichtung
V221-4G / emporiaACTIVEglam
der Richtlinie 2014/53/EU entspricht.
Der vollständige Wortlaut der EU-Konformitätserklärung steht unter folgender
Internetadresse zur Verfügung:
https://www.emporia.eu/doc
Eveline Pupeter
CEO, emporia Telecom
31. 05. 2020, Linz/Austria
https://www.emporia.eu/doc
V221-4G_GuideBook-V2_56002-001.indb 23V221-4G_GuideBook-V2_56002-001.indb 23 18.09.20 12:1018.09.20 12:10
› YOUR MOBILE PHONE AT A GLANCE
1
Speaker
2
Display (screen)
3
Green key
• Start or accept a call
• In the menu: Conrm selection
• On standby: Access Call history
4
Arrow keys
• Use these to ick through your Contacts and the Menu.
• When the phone is on standby, press
• When the phone is on standby, press
5
Red key
• When in a call: End
• When in the menu: One step back
• When entering digits or letters: Delete
6
Speed dial keys
7
Camera key
8
1 key (voicemail)
9
On/O key
Emergency button (optional)
10
Speaker
11
Handset volume controls &
12
Battery cover (two versions: one with the emergency button
13
and one without it)
Opening for removing the battery cover
14
Port for USB charging cable
15
to call up the Menu.
to access Contacts.
› Symbols on the screen
Network signal
strength
Roaming (abroad)
Battery indicator
Missed call
Call forwarding
New text (SMS)
message
Prole: Silent/Sleep
mode
Alarm on
Bluetooth activated
Bluetooth connected
› Symbols on the
external display
Message LED
• Flashes when a new message
is received
• Stops ashing as soon as
thereceived message has
been read
Call LED
• Flashes when there is a
missed call
• Stops ashing as soon as
your Call history has been
viewed
Battery LED
• Slow ashing: Battery
ischarging
• On constantly: Battery is
fullycharged
• Rapid ashing: Battery is out
of charge
ENGLISH–25
V221-4G_GuideBook-V2_56002-001.indb 25V221-4G_GuideBook-V2_56002-001.indb 25 18.09.20 12:1018.09.20 12:10
1. PUTTING THE PHONE INTO OPERATION
1.1 Inserting a SIM card
1. Remove the battery cover (opening in the bottom
left-hand corner).
2. Open the SIM card holder (slide and lift up the ap).
3. Insert the SIM card into the SIM card holder with the gold
contacts facing down and lock the ap back into place.
1.2 Inserting and charging the battery
1. Insert the battery, making sure that the battery contacts touch
the phone's gold contacts.
2. Place the battery cover over the battery and click it into place.
3. Insert the charging cable into the USB port of the phone and
the power plug into a mains outlet.
Charge the battery for at least 4 hours before the rst time you use
it. Only use batteries and chargers that are permitted for use with
this specic model.
ENGLISH–26
1.3 Turning on the phone
• Press and hold the key for at least two seconds until
theemporia logo appears. It will take a few seconds for
thehome screen to be displayed.
1.4 Entering a PIN code
Enter the four-digit PIN code for your SIM card when asked to
do so and conrm the entry.
You have a maximum of three attempts to enter the correct
number. If you enter the wrong number three times in a row, you
will only be able to unblock the SIM card with the PUK code. You
will nd your original PIN code and PUK code in the documents
supplied with your SIM card by your network operator.
1.5 Setting the language, time and date
1. Use to select a language and then conrm your selection
bypressing OK
.
2. Set the time and date and then save these settings.
1.6 Saving battery power
After a few seconds of inactivity, the display will turn o to
save battery power. In the event of an incoming call or you
pressing any key, the screen will light up again.
ENGLISH–27
V221-4G_GuideBook-V2_56002-001.indb 27V221-4G_GuideBook-V2_56002-001.indb 27 18.09.20 12:1018.09.20 12:10
2. USING THE PHONE
2.1 Home screen
If your phone is on but not using a
function, it will display the home screen.
You can return to the home screen any
time by pressing the redkey
times.
several
12:30
21.04.2020
Call history
2.2 Menu
The keywill display the menu. The
menu is a list that enables you to manage
the phone's various functions and adapt
the phone to your needs.
• Use the arrow keys to scroll through the
menu.
• The items available in the menu are
Messages, Photo album, Tools,
Contacts, Call history and Settings.
• Use the green key
conrm your selection or to return to the home screen.
ENGLISH–28
and red key beneath the screen to
OK Back
Messages
2.3 Dual-function keys
1
+
#
aA1
4
ghi
5
jkl
5
jkl
6
mno
1
2
abc
3
def
4
ghi
5
jkl
6
mno
7
pqrs
8
tuv
9
wxyz
0
+
#
aA1
Some keys have additional functions if they are pressed
andheld down for a few seconds:
key: Listen to your voicemail
key: + for country codes, e.g. +49 for Germany
key: Turn on Silent/Sleep mode
2.4 Writing text
You enter text using the keypad.
• To input text, press a number key multiple times
(e.g. 2 ×
, 1 ×1, 3 ×
• Special characters and symbols have been assigned to the
various keys, but can dier in some languages:
. , - ? ! 1 ' @ : ; ( ) *
d e f 3 ë é è ê € đ ē
j k l 5 £
p q r s 7 ß $ ş
w x y z 9 ŵ ý ÿ
. , ? ! ' " ( ) @ \ / : _ ; + - * = % & < > ₤ $ ¥ § € ¤ [ ] { } ~ #
• Use the
key to switch between the abc, ABC, Abc and
123input methods.
, 3 ×
and 3 ×
for Hallo)
a b c 2 ä á ç å â ā æ ć
g h i 4 î ï í ì ğ ι
m n o 6 ö ñ ô œ ó ò
t u v 8 ü ù û ú
Space 0
ENGLISH–29
V221-4G_GuideBook-V2_56002-001.indb 29V221-4G_GuideBook-V2_56002-001.indb 29 18.09.20 12:1018.09.20 12:10
3. CALLS
3.1 Accepting, rejecting or ending a call
• To answer: Open the phone and press Accept.
• To reject or end a call: Press the red button
close the phone.
• To mute the ringtone temporarily,
press the
The open-to-answer-calls function is preset to be o, but can be
enabled in Menu _Settings _Open to answer calls _On.
volume control button.
or
3.2 Calling someone
› Dialling a number
1. Enter the phone number you want to dial (incl. the area code)
using the keypad.
2. Start the call by pressing
› Using the redial function
1. When on the home screen, press the green key
Your call history will be displayed.
2. Use the arrow keys
3. Start the call by pressing
.
.
and to select a number.
.
To go hands-free during a call, open Options and turn on
thespeaker.
ENGLISH–30

4. MESSAGES SMS
› Menu items available: Write message, History and
Message settings
4.1 Writing and sending a message
1. Open Menu _Messages.
2. Select Write message.
3. Enter the text using the keypad.
4. To specify a recipient for the SMS, open Options and
select Send.
5. You can now select a Contact from the phone book,
type in a Phone number using the keypad or
select a number from your Recent calls list.
4.2 Reading a message
1. When you receive a new message, a symbol will appear
on the home screen.
2. Press the greenkey
the message immediately.
3. You can nd the text message again later on in Menu
_Messages _ History.
4. To read a message, tap on it.
for View to read
ENGLISH–31
V221-4G_GuideBook-V2_56002-001.indb 31V221-4G_GuideBook-V2_56002-001.indb 31 18.09.20 12:1018.09.20 12:10

5. CAMERA AND PHOTO ALBUM
5.1 Taking a photo
1. When on the home screen, press the camera key or
open Menu
• The
2. Press the
3. The photo you've taken will immediately be stored in
arrow key will open Options (Self-timer and Size).
thePhoto album. Press the green key
fromthe camera to the Photo album.
_Tools _Camera.
arrow key to take a photo.
to go straight
5.2 Viewing photos
• All the photos you take will be sorted chronologically.
1. Open Menu
2. Use the arrow keys
3. Pressing the green key
selectedpicture.
_Photo album.
and to scroll through the photos.
will open Options for the
5.3 Backing up photos on your PC
1. Plug the USB connector end of the USB cable supplied with
thephone into your PC and the other end into your phone.
2. Select Transfer les from the list displayed.
3. The PC will now detect your phone and display the phone's
internal memory.
4. You can then select les and copy them onto the PC.
ENGLISH–32

6. TOOLS
› Menu items: Alarm, Birthday reminder, Calendar,
Calculator, Camera, Bluetooth and System updates
6.1 Alarm
1. Open Set time.
2. Enter your desired Alarm time and then Save it.
3. The alarm is now activated and will go o at the time you have
set every day.
4. When the alarm is ringing, you can press the red key
it o or the green key
5. Select Off to deactivate the alarm permanently.
If the phone is turned o, the alarm is turned o as well. The alarm
will therefore not go o when the phone is o.
to activate the snooze function.
6.2 Bluetooth
1. Turn the Bluetooth function On.
2. Tap on Connect and on Search for new devices.
A list of available devices will be displayed.
3. Select the device you want to pair the phone with from the list.
4. Follow the instructions to pair the devices.
to turn
Devices that have been connected before will be recognised and
connected automatically.
ENGLISH–33
V221-4G_GuideBook-V2_56002-001.indb 33V221-4G_GuideBook-V2_56002-001.indb 33 18.09.20 12:1018.09.20 12:10

6.3 System updates
You can download the latest software for thephone
yourself and therefore update thesystem and improve
applications yourself.
However, only perform updates if your tari includes mobile data!
1. Check that the battery is at least 30% charged. If it isn't, the
download cannot start.
2. Open Menu
3. Tap on Check.
4. A message will appear telling you whether or not there is any
new software available. If there is, select Download to start
theupdate process.
5. Once the download has been completed, select Update now.
You will be informed that you cannot use the phone during
the update process.
Do not press the on/okey during the update process and do not
start using your phone again until this message has appeared:
The installation was successful.
_Tools _System updates.
ENGLISH–34

7. CONTACTS
› Menu items: Search for name, Add contact, Edit contact,
Delete, Import/Export, My number, Speed dial keys,
Emergency contacts and Contact settings
7.1 Searching for a contact in the phone book
1. When on the home screen, press the phone book key or
open Menu
2. Use the arrow keys
use the keypad to type the rst letter of the contact you are
looking for.
3. Start the call by pressing the green key
7.2 Adding a contact
1. Open Menu _Contacts _Add contact.
2. Enter the phone number and the person's name and
then Save them.
Always save names and numbers with the international dialling
code, e.g. +41 for Switzerland, +43 for Austria and +49 for Germany.
_Contacts _Search for name.
and to scroll through the entries or
.
ENGLISH–35
V221-4G_GuideBook-V2_56002-001.indb 35V221-4G_GuideBook-V2_56002-001.indb 35 18.09.20 12:1018.09.20 12:10

7.3 Speed dial keys
› Saving a speed dial key
1. Press one of the two free speed dial keys.
2. Enter a Name and Number or Search for a contact in
thephone book.
› Changing or deleting a speed dial key
1. Open Menu
2. Select a vacant position from the list.
3. Enter a Name and Number or Search for a contact in the
phone book.
4. To change a speed dial key, select a position from the list
and change or delete its link to the contact it's currently
associated with.
_Contacts _Settings.
ENGLISH–36

8. SETTINGS
› Menu items: Mobile network, Wi-Fi hotspot, Silent/
Sleep mode, Sounds and alerts, Handset volume, Handsfree volume, Display and lights, Time and date, Language,
Camera settings, Open to answer calls, Call waiting, Call
forwarding, Voicemail number, Emergency numbers,
Emergency button, Security settings, Contact settings,
0000 to enter settings and Master reset
8.1 Mobile network
• Mobile data: on/o (preset to be on)
• Data roaming: on/o (preset to be o)
8.2 Wi-Fi hotspot
You can use your mobile data connection to enable other
digital devices to connect to the Internet.
This device is not able to establish a connection to the Internet
viaWi-Fi!
8.3 Silent/Sleep mode
In this mode, incoming calls will only be indicated by a visual
alert. The phone's ringtone and vibration are turned o.
ENGLISH–37
V221-4G_GuideBook-V2_56002-001.indb 37V221-4G_GuideBook-V2_56002-001.indb 37 18.09.20 12:1018.09.20 12:10

8.4 Sounds and alerts
You can personalise the settings for tones, alerts and vibration
or select a set of predened settings (prole).
› Menu items: Ringtone, Alarm melody, Ringer volume,
Silent/Sleep mode, Vibra for calls, Vibra for alarm clock,
Key tones, Message tone, Vibra for messages, Handset
volume, Hands-free volume, Conrmation tone and
Emergency tone
8.5 Voicemail number
Enter the number for your voicemail. You will nd this number
in the documents supplied by your network provider.
8.6 Security settings
• PIN: PIN request on/o, change PIN
• Phone code: on/o, change (factory preset code: 1234)
8.7 0000 to enter settings
Activate this safety mode to prevent changes being made to
settings unintentionally.
8.8 Master reset
You can restore all the factory settings on your phone
(factory preset code: 1234).
ENGLISH–38

9. EMPORIA EMERGENCY CALL FUNCTION
If you use the battery cover with the integrated emergency
button, you can enable the phone's emergency call function.
Read the instructions carefully and set the emergency function
according to your needs. You can save up to ve emergency
contacts (family members, friends and ocial institutions).
• In an emergency, press and hold the emergency button on the
back of the phone. (This works even when the phone is closed.)
• The ve preset numbers will be dialled automatically in the
order in which you have saved them.
If it is not possible to get through to anyone on the rst
number, the second number will automatically be dialled.
If it is not possible to get through to anyone on the second
number, the third number will automatically be dialled, and
so on. (The phone will go through a list of ve numbers a
maximum of three times.)
• At the same time as each emergency call, a text message (SMS)
will be sent to the contact, saying: "You are about to receive
an emergency call. Please press the 0 key three times to
establish the connection."
The contact must press the 0 key three times within 60 seconds
or the next emergency contact will be called. This prevents the
emergency call from going through to a contact's voicemail or
answerphone.
ENGLISH–39
V221-4G_GuideBook-V2_56002-001.indb 39V221-4G_GuideBook-V2_56002-001.indb 39 18.09.20 12:1018.09.20 12:10

• From the moment you make an emergency call, your emporia
phone will automatically answer any incoming calls for one
hour. To disable this function, press and hold the
button for
approx. three seconds or turn your device o completely using
button and then turn it on again.
the
• To cancel the emergency call, press and hold
.
• During the emergency call, a warning tone will sound
continuously to alert anyone nearby and the person
beingcalled.
• If you do not have any emergency contacts saved, have no
credit on your prepaid phone card or are connected to another
network without permission (e.g. roaming is not activated),
112will be dialled when you press the emergency button.
If you want to add the number of an ocial institution such as the
police or re brigade as an emergency contact, you must check
that this is okay with the respective institution beforehand. We
do not assume liability for any costs incurred through you calling
such an institution by mistake.
ENGLISH–40

› Adding/editing emergency contacts
In the Settings menu _Emergency button
_Add emergency contact
_Select an entry (e.g. Emergency contact 1)
by pressing
_Select OK by pressing
_Select Private or Help organisation
_Select a contact
› Enabling the emergency button
In the Settings menu _Emergency button _On/Off
› Pre-alarm
The pre-alarm is a warning tone that sounds for 10seconds
and alerts anyone nearby to the emergency call.
After this, the emergency call sequence starts.
In the Settings menu _Emergency button
_Emergency numbers _On/Off
ENGLISH–41
V221-4G_GuideBook-V2_56002-001.indb 41V221-4G_GuideBook-V2_56002-001.indb 41 18.09.20 12:1018.09.20 12:10

› GUARANTEE AND SERVICE
Manufacturer: emporia telecom GmbH + CoKG
Industriezeile 36, 4020 Linz, Austria
Importer: Emporia UK and Ireland Limited ·
Contact: www.emporiatelecom.co.uk or www.emporiatelecom.ie
Brand name: emporia
Model: V221-4G / emporiaACTIVEglam
› Scope of delivery
• Mobile phone: V221-4G /
emporiaACTIVEglam
• Extra battery cover without an
emergency button
• Battery: Ak-V221-4G
• USB cabel
• AC adapter: RL-C150-USB
• Table charging unit: TL-V221-4G
› Support
• Emporia Service Centre
Mon.-Thu. 9:00-4:00 · Fri. 9:00-1:00
service@emporiatelecom.co.uk
• UK-Hotline: +44 · 1923 · 947778
www.emporiatelecom.co.uk/service
• IE-Hotline: +353 · 1 592 6339
www.emporiatelecom.ie/service
› Guarantee
• This guarantee is only valid if original
batteries supplied by emporia have been
used.
• Mobile phone: 12 months
• Battery: 6 months
st
Floor, Building 2 Croxley Business Park, Watford, England
1
› Technical details
• Dimensions: 96.5 × 50.5 × 17.75 mm
• Weight: 85.0 g
• Battery: Li-ion 3.8 V, 1150 mAh, 4.27 Wh
(replaceable)
• AC adapter:
input: 100 - 240V AC, 50/60 Hz, 200 mA;
output: DC 5.0 V, 500 mA
• Table charging unit:
input/output:
• Standby time: 140 h*
• Talk time: 320 min*
(*The battery life can be reduced
depending on network coverage and
active applications.)
• Internal antenna:
SAR body: 0.98 W/kg
SAR head: 0.89 W/kg
• Operating temperature range:
-10° –40° C
• Hearing Aid Compatible: M4/T4
• Bluetooth: V 4.0

› Frequencies
• BT: 2402 MHz - 2480 MHz
Transmitter power: < 0.0018 W
• FM: 87.6 MHz - 107.9 MHz
• E-GSM 900/GPRS 900/EGPRS 900:
TX: 880 - 915MHz; RX: 925 - 960 MHz
Transmitter power: < 2.138 W
• E-GSM 1800/GPRS 1800/EGPRS 1800:
TX: 1710 - 1785 MHz; RX: 1805 - 1880 MHz
Transmitter power: < 1.1482 W
• WCDMA Band I:
TX:1920 - 1980 MHz; RX: 2110 - 2170 MHz
Transmitter power: < 0.1811 W
• WCDMA Band VIII:
TX: 880 - 915 MHz; RX: 925 - 960 MHz
Transmitter power: < 0.1652 W
• LTE Band I:
TX:1920 - 1980 MHz, RX:2110 - 2170 MHz
Transmitter power: < 0.1841 W
• LTE Band III:
TX:1710 - 1785 MHz, RX:1805 - 1880 MHz
Transmitter power: < 0.2042 W
• LTE Band VII:
TX:2500 - 2570 MHz; RX: 2620 - 2690 MHz
Transmitter power: < 0.2704 W
• LTE Band VIII:
TX: 880 - 915 MHz; RX: 925 - 960 MHz
Transmitter power: < 0.3516 W
• LTE Band XX:
TX: 832 - 862 MHz; RX: 791 - 821 MHz
Transmitter power: < 0.2618 W
› Safety information
• Turn off your phone in hospitals and
whenever you are near medical equipment. There should always be a distance
of at least 20 cm between a pacemaker
and the phone when it is on.
• Never try to control a vehicle while holding the phone in your hand. Always comply with relevant national laws and traffi c
regulations.
• Turn off the phone whenever you are
travelling in an aeroplane.
• The phone must be switched off whenever it is near a petrol station or other places
with explosive substances.
• Never shine the LED torch in the eyes of
people or animals! (Protection class 3)
•
• Using a headset on a high volume can
• The phone and the accessories may con-
• As a precaution, we recommend discon-
To prevent hearing impair-
ments, do not use the phone
on a high speaker volume for
extended periods of time. Do not hold the
phone to your ear when hands-free mode
is activated or the emergency button has
been pressed.
cause hearing impairments. Check the
volume of the headset you are using.
tain small parts. Keep the phone out of
the reach of young children.
necting the phone from the charger during thunderstorms.
V221-4G_GuideBook-V2_56002-001.indb 43V221-4G_GuideBook-V2_56002-001.indb 43 18.09.20 12:1018.09.20 12:10

• The mains adapter serves as a separator
between the product and your mains
supply. The mains supply must be close
to the device and easily accessible.
• This device has been tested for typical
applications where the device is carried
on the body. To meet the RF exposure
requirements, the minimum distance
between the body, in particular the user’s head, and the handset including the
antenna must be 0 cm. Belt clips, holsters
and similar accessories from third parties
used with this device must not contain
metallic components. Accessories carried on the body that do not meet these
requirements may not meet the RF exposure requirements and should be avoided. Only use the device’s built-in antenna
or an approved antenna.
• This device complies with the essential requirements and other relevant provisions
of Directive 2014/53/EU. All the important radio test cases have been written.
• Caution: Risk of explosion if the battery
is replaced by the wrong type. Dispose
of the used batteries according to the
instructions.
• The device complies with RF specifi cations when the device is 5mm from the
body.
› Intended use
• This phone is robust and designed for
mobile use. However, it still needs to be
protected from moisture (rain, bathroom
water, etc.) and heavy impacts.
• It is only designed for European network
standards (AT, BE, CZ, DE, DK, ES, FI, FR,
GB, HR, HU, IE, IT, NL, NO, PL, PT, SE, SI, SK,
SZ and TR).
• Do not leave it where it will be directly
exposed to the sun.
• Using it for any purpose other than that
described above will result in damage to
the product. Doing this also entails hazards such as fi re, electric shocks, etc. This
product must not be changed or modifi ed, and the casing must not be opened.
• The adapter is only suitable for use in
conjunction with a standard household
mains socket that is connected to your
electrical grid and uses 100-240 volts,
50/60Hz (10/16A), of alternating voltage.

› Disposal
• Disposing of the packaging
The packaging and packaging
aids are recyclable and should
be recycled.
• Disposing of the battery
Batteries should never be disposed of as domestic refuse!
As a consumer you are legally
required to return used batteries. They can be handed in at one of your
community’s local collection points or at
specialist stores.
• Disposing of the device
If this product ever wears out,
please don’t dispose of it as
domestic refuse. To ensure you
don’t cause damage to the
environment, take it to a collection or recycling centre where used
devices are processed for recycling in an
environmentally friendly manner.
› Declaration of conformity (DOC)
emporia telecom GmbH + CoKG
(Industriezeile36, 4020Linz, Austria),
hereby declares that the
V221-4G / emporiaACTIVEglam
telecommunication or radio device
complies with Directive 2014/53/EU.
The full text of the EU declaration of
conformity can be viewed on this web
page:
https://www.emporia.eu/doc
Eveline Pupeter
CEO, emporia Telecom
31/ 05/ 2020, Linz/Austria
https://www.emporia.eu/doc
V221-4G_GuideBook-V2_56002-001.indb 45V221-4G_GuideBook-V2_56002-001.indb 45 18.09.20 12:1018.09.20 12:10

› APERÇU DE VOTRE TÉLÉPHONE PORTABLE
1
Haut-parleur
2
Écran
3
Toucheverte
• Déclencher ou accepter un appel
• Dans le menu : conrmer la sélection
• Sur l’écran d’accueil : accéder aux Appels
4
Touches échées
• Faire déler les Contacts et le Menu
• Appeler le Menu sur l'écran d'accueil avec
• Appeler les Contacts sur l’écran d’accueil avec
5
Toucherouge
• Pendant l'appel : raccrocher
• Dans un menu : retour à l'étape précédente
• Lors de la saisie de chires ou de lettres : supprimer
6
Boutons d'appel abrégé
7
Touche de l'appareil photo
8
Touche 1 (répondeur)
9
Touche Marche/Arrêt
Touche d'appel d'urgence (en option)
10
Haut-parleur
11
Réglage du volume sonore &
12
Couvercles de batterie (deuxversions : avec et sans bouton
13
d'appel d'urgence)
Évidement pour soulever le couvercle de la batterie
14
Prise pour câble de charge USB
15

› Symboles sur l'écran
Force du signal réseau
Itinérance (à l'étranger)
État de la batterie
Appel manqué
Transfert d'appel
Nouveau message SMS
Mode : Silencieux/
Veille
Alarme activée
Bluetooth activé
Bluetooth connecté
› Symboles sur
l'écran externe
LED des messages
• Clignote en cas de
nouveauxmessages
• Disparaît dès que le message
reçu a été lu
LED d'appel
• Clignote en cas d'appel
enabsence
• Disparaît dès que Appels
aété consulté
LED de la batterie
• Clignotement lent :
chargement batterie
encours
• Allumé en continu :
labatterie est chargée
• Clignotement rapide :
labatterie est déchargée
FRANÇAIS–47
V221-4G_GuideBook-V2_56002-001.indb 47V221-4G_GuideBook-V2_56002-001.indb 47 18.09.20 12:1018.09.20 12:10

1. MISE EN SERVICE
1.1 Insérer la carte SIM
1. Retirez le couvercle de la batterie (évidement en bas à gauche).
2. Déverrouillez le support de la carte SIM (pousser et rabattre).
3. Insérez la carte SIM avec les contacts dorés vers le bas et
verrouillez le clapet.
1.2 Insérer et charger la batterie
1. Insérez la batteriede sorte que les contacts de la batterie
touchent les contacts dorés du téléphone portable.
2. Posez le couvercle de la batterie et appuyez dessus
pourl'enclencher.
3. Insérez le câble de charge dans la prise USB du téléphone et
lache secteur dans la prise secteur.
Chargez la batterie au moins 4heures avant la mise en service.
Utilisez uniquement des batteries et des chargeurs autorisés pour
ce modèle spécique.
FRANÇAIS–48

1.3 Allumer le téléphone
• Appuyez sur la touche pendant au moins 2 secondes
jusqu'à ce que le logo emporia apparaisse. Il faut quelques
secondes pour que l'écran d'accueil s'ache.
1.4 Saisir le code PIN
Saisissez le code PIN à quatre chires de votre carte SIM
lorsque la demande est faite et conrmez la saisie.
Vous avez maximum trois tentatives de saisie, au bout de trois
entrées erronées, la carte SIM peut uniquement être déverrouillée
à l'aide du code PUK. Vous trouverez le code PIN et le code PUK
dans les documents fournis par votre opérateur téléphonique.
1.5 Régler la langue, la date et l'heure
1. Sélectionnez une langue avec et conrmez avec OK .
2. Réglez heure et date et enregistrez-les.
1.6 Économie de batterie
En cas d'absence de saisie pendant quelques secondes, l'écran
s'éteint pour économiser la batterie. En cas d'appel entrant ou
en appuyant sur une touche au choix, l'écran se rallume.
FRANÇAIS–49
V221-4G_GuideBook-V2_56002-001.indb 49V221-4G_GuideBook-V2_56002-001.indb 49 18.09.20 12:1018.09.20 12:10

2. UTILISATION
2.1 Écran de démarrage
Lorsque votre téléphone est allumé mais
qu'aucune fonction n'est utilisée, l'écran
dedémarrage est aché.
Vous pouvez à tout moment revenir sur
l'écran de démarrage en appuyant de
manière répétée sur la toucherouge
.
Appels
12:30
21/04/2020
2.2 Menu
La touche permet d'accéder au menu.
Le menu est un répertoire dans lequel
vous pouvez gérer les fonctions de votre
téléphone et l'adapter à vos besoins.
• Faites déler le menu avec les touches
échées.
• Les points de menu disponibles sont
les suivants : Messages, Album photo,
Outils, Contacts, Appels, Réglages
• La toucheverte
permettent de conrmer la sélection ou de revenir à l'écran
dedémarrage.
FRANÇAIS–50
et la toucherouge sous l'écran vous
Messages
OK Retour

2.3 Double fonction des touches
1
+
#
aA1
4
ghi
5
jkl
5
jkl
6
mno
1
2
abc
3
def
4
ghi
5
jkl
6
mno
7
pqrs
8
tuv
9
wxyz
0
+
#
aA1
Certaines touches déclenchent des fonctions supplémentaires
lorsque l'on appuie dessus plus longtemps :
Touche
Touche
Touche
: appeler la messagerie vocale
: + pour l'indicatif, par ex. +33 pour la France
: activer Mode Silencieux/Veille
2.4 Utilisation de la saisie de texte
La saisie de texte s'eectue sur le clavier numérique.
• Pour saisir le texte, appuyez plusieurs fois sur une touche
chirée (p.ex. 2 ×
, 1 ×1 , 3 ×
• Des caractères spéciaux et des symboles sont attribués aux
touches, mais peuvent diérer dans certaines langues :
. , - ? ! 1 ' @ : ; ( ) *
d e f 3 ë é è ê € đ ē
j k l 5 £
p q r s 7 ß $ ş
w x y z 9 ŵ ý ÿ
. , ? ! ' " ( ) @ \ / : _ ; + - * = % & < > ₤ $ ¥ § € ¤ [ ] { } ~ #
• La touche
vous permet de changer la méthode de
saisieabc, ABC, Abc et 123.
, 3 ×
, 3 ×
pour Hallo)
a b c 2 ä á ç å â ā æ ć
g h i 4 î ï í ì ğ ι
m n o 6 ö ñ ô œ ó ò
t u v 8 ü ù û ú
Espace 0
FRANÇAIS–51
V221-4G_GuideBook-V2_56002-001.indb 51V221-4G_GuideBook-V2_56002-001.indb 51 18.09.20 12:1018.09.20 12:10

3. PASSER UN APPEL
3.1 Accepter, refuser ou terminer un appel
• Décrocher : ouvrez le clapet du téléphone et appuyez
surAccepter.
• Refuser ou raccrocher : Appuyez sur la touche rouge
fermez le clapet du téléphone.
• Pour mettre la sonnerie temporairement en silencieux,
appuyez sur la touche
L'acceptation des appels par l'ouverture du clapet est désactivée
en usine et peut être activée sous Menu _Réglages
_ Ouvrir pour accepter l'appel _actif.
du réglage du volume sonore.
3.2 Appeler un correspondant
› Composer le numéro
1. Saisissez le numéro de téléphone (y compris l'indicatif)
à l'aide des touches numériques.
2. Lancez l'appel avec
› Utiliser le rappel
1. Appuyez sur l'écran d'accueil sur la touche verte
L'historique des appels est aché.
2. Choisissez un numéro avec les touches échées
3. Lancez l'appel avec
.
.
.
.
ou
Pour activer la fonction mains libres pendant une conversation,
ouvrir Options et activer le haut-parleur.
FRANÇAIS–52

4. MESSAGESSMS
› Points de menu : Écrire un message, Historique,
Paramètres du message
4.1 Écrire et envoyer un message
1. Ouvrez Menu _ Messages.
2. Sélectionnez Écrire un message.
3. Saisissez le texte au moyen du clavier.
4. Pour dénir un destinataire pour le message,
ouvrez les Options et sélectionnez Envoyer.
5. Vous pouvez alors sélectionner un Contact dans le répertoire,
saisir un Numéro de téléphone avec le clavier ou sélectionner
un numéro dans Appels récents.
4.2 Lire un message
1. Lorsque vous recevez un nouveau message,
un symbole
2. Appuyez sur la touche verte
an de lire le message de suite.
3. Vous trouverez les SMS ultérieurement sous Menu
_Messages _Historique.
4. Pour les lire, appuyez sur le message.
s'ache sur l'écran de démarrage.
pour Voir,
FRANÇAIS–53
V221-4G_GuideBook-V2_56002-001.indb 53V221-4G_GuideBook-V2_56002-001.indb 53 18.09.20 12:1018.09.20 12:10

5. APPAREIL PHOTO ET ALBUM PHOTO
5.1 Prendre une photo
1. Appuyez sur l'écran de démarrage sur la touche Appareil
photo ou ouvrez Menu
• Utilisez la touche échée
(Déclencheur automatique, Taille de l'image).
2. Utilisez la touche échée
3. La photo prise est enregistrée directement dans l'Album
photo. Appuyez sur le boutonvert
de l'appareil photo à l'Album photo.
_Outils _Appareil photo.
pour ouvrir les Options
pour prendre une photo.
pour passer directement
5.2 Voir les photos
• Toutes les photos prises sont triées chronologiquement.
1. Ouvrez Menu
2. Faites déler les photos à l'aide des touches échées
3. Appuyez sur la toucheverte
l'image sélectionnée.
_ Album photo.
pour accédez aux Options de
5.3 Sauvegarder des photos sur un ordinateur
1. Branchez le câble USB fourni à l'appareil et à l'ordinateur.
2. Sélectionnez dans la liste Transférer données.
3. L'ordinateur reconnaît maintenant votre téléphone et
ache la mémoire de stockage interne.
4. Les chiers peuvent maintenant être sélectionnés et
copiés sur l'ordinateur.
FRANÇAIS–54
.

6. OUTILS
› Menus : Alarme, Rappel d'anniversaire,
Calendrier, Calculatrice, Appareil photo,
Bluetooth, Mise à jour du système
6.1 Alarme
1. Ouvrez Régler l'heure.
2. Saisissez l'Heure de l'alarme souhaitée et Enregistrez.
3. L'alarme est activée et retentit à présent tous les jours
à l'heure indiquée.
4. Désactivez la sonnerie de l'alarme avec le boutonrouge
passez en fonction snooze avec le boutonvert
5. Sélectionnez Inactif pour désactiver l'alarme de
manièrepermanente.
Lorsque vous éteignez votre téléphone, l'alarme est également
désactivée. L'alarme ne sonne pas.
6.2 Bluetooth
1. Réglez la fonction Bluetooth sur actif.
2. Appuyez sur Connecter et sur Rechercher nouveaux
appareils. Une liste des appareils disponibles s'ache.
3. Sélectionnez l'appareil souhaité avec lequel le
téléphone doit être apparié.
4. Suivez les instructions pour apparier les appareils.
.
ou
Les appareils appariés sont reconnus et
automatiquementconnectés.
FRANÇAIS–55
V221-4G_GuideBook-V2_56002-001.indb 55V221-4G_GuideBook-V2_56002-001.indb 55 18.09.20 12:1018.09.20 12:10

6.3 Mise à jour du système
Vous pouvez vous-même télécharger les derniers logiciels
pour le téléphone, mettre ainsi le système à jour et améliorer
les applications.
N'eectuez la mise à jour que si vous disposez d'un forfait
avecdonnées mobiles!
1. Vériez que la batterie est à au moins 30% de charge ;
sinon le téléchargement ne démarre pas.
2. Ouvrez Menu
3. Appuyez sur Vérier.
4. Vous êtes informé de la disponibilité d'une nouvelle mise à
jour. Dans ce cas, sélectionnez Téléchargement et démarrez
la procédure de mise à jour.
5. Lorsque le téléchargement est terminé, sélectionnez Mettre à
jour maintenant. Vous êtes informé que vous ne pouvez pas
utiliser votre téléphone pendant la mise à jour.
N'appuyez pas sur la touche Marche/Arrêt pendant la mise à
jour et n'utilisez votre téléphone que lorsque vous recevez la
notication Installation réussie.
_ Outils _ Mise à jour du système.
FRANÇAIS–56

7. CONTACTS
› Menus : Rechercher nom, Nouveau contact,
Modier contact, Supprimer, Import/Export, Mon numéro,
Boutons d'appel abrégé, Contacts d'appel d'urgence,
Réglages Contacts
7.1 Chercher un contact dans le répertoire
1. Appuyez sur l'écran de démarrage sur la touche Répertoire
ou ouvrez Menu
2. Faites déler les entrées avec les touches échées
saisissez la première lettre du contact recherché à l’aide du
clavier numérique.
3. Lancez l'appel avec la touche verte
7.2 Ajouter un contact
1. Ouvrez Menu _Contacts _ Ajouter un contact.
2. Saisissez le numéro de téléphone et le nom correspondant
à la personne et Enregistrez.
Enregistrer les noms et les numéros, toujours avec l’indicatif
international, par ex. +41 pour la Suisse, +43 pour l'Autriche
et +49 pour l'Allemagne.
_ Contacts _Rechercher nom.
ou
.
FRANÇAIS–57
V221-4G_GuideBook-V2_56002-001.indb 57V221-4G_GuideBook-V2_56002-001.indb 57 18.09.20 12:1018.09.20 12:10

7.3 Boutons d'appel abrégé
› Programmer le bouton d'appel abrégé
1. Appuyez sur l'un des deux boutons d'appel abrégé
qui ne sont pas aectés.
2. Saisissez le Nom et le Numéro ou Recherchez un
contact dans le répertoire.
› Modifier ou supprimer l'affectation d'un bouton
d'appel abrégé
1. Ouvrez Menu
2. Sélectionnez une position libre dans la liste.
3. Saisissez le Nom et le Numéro ou Recherchez un
contactdans le répertoire.
4. Pour modier la programmation d'un bouton d'appel
abrégé, sélectionnez une position dans la liste et modiez
ousupprimez l'aectation.
_ Contacts _ Réglages.
FRANÇAIS–58

8. RÉGLAGES
› Points de menu : Réseau mobile, Hotspot WiFi, Mode
Silencieux/Veille, Sons et alertes, Volume du récepteur,
Volume mains-libres, Afchage et éclairage, Date et
heure, Langue, Paramètres de l'appareil photo, Ouvrir
pour accepter l'appel, Appel en attente, Transfert d'appel,
N° messagerie, Numéro d'urgence, Bouton d'appel
d'urgence, Paramètres de sécurité, Réglages Contacts,
0000 pour réglages, Réinitialiser
8.1 Réseau mobile
• Données mobiles : actif/inactif (actif par défaut)
• Itinérance des données : actif/inactif (inactif par défaut)
8.2 Hotspot WiFi
Vous pouvez utiliser votre connexion de données mobiles
pour permettre à d'autres appareils numériques de se
connecter à l'Internet.
Cet appareil ne peut pas établir une connexion Internet via WiFi!
8.3 Mode Silencieux/Veille
Un appel entrant n'est indiqué que visuellement, la sonnerie et
le vibreur sont désactivées.
FRANÇAIS–59
V221-4G_GuideBook-V2_56002-001.indb 59V221-4G_GuideBook-V2_56002-001.indb 59 18.09.20 12:1018.09.20 12:10

8.4 Sons et alertes
Vous pouvez paramétrer vos préférences personnelles
de sons, alertes et vibration ou choisir entre les préréglages
(modes du téléphone).
› Menus : Sonnerie, Sonnerie de l'alarme, Volume sonnerie,
Mode Silencieux/Veille, Vibreur pour appel,
Vibreur pour alarme, Son des touches,
Sonnerie de message, Vibreur pour messages,
Volume du récepteur, Volume mains-libres,
Sonnerie de conrmation, Sonnerie d'appel d'urgence
8.5 N° messagerie
Entrez le numéro de votre messagerie vocale. Vous trouverez ce
numéro dans les documents de votre opérateur téléphonique.
8.6 Paramètres de sécurité
• PIN : demande de PIN active/inactive, modier PIN
• Code du téléphone : actif/inactif, modier (1234 par défaut)
8.7 0000 pour réglages
Activez ce mode de sécurité pour éviter toute modication
involontaire des réglages.
8.8 Réinitialiser
Vous pouvez rétablir les réglages d'usine de votre téléphone
(code de téléphone par défaut 1234).
FRANÇAIS–60

9. FONCTION D'APPEL D'URGENCE EMPORIA
Si vous utilisez le couvercle de batterie avec le bouton d'appel
d'urgence intégré, vous pouvez activer la fonction d'appel
d'urgence.
Veuillez lire soigneusement les instructions, puis congurez la
fonction d'appel d'urgence en fonction de vos besoins.
Vous pouvez enregistrer jusqu'à 5 contacts d'appel d'urgence
(famille, amis, institutions ocielles).
• En cas d'urgence, appuyez sur le bouton d'appel d'urgence sur
l'arrière du téléphone et maintenez-le enfoncé. (Fonctionne
aussi si le clapet du téléphone est fermé.)
• Les 5 numéros prédénis sont appelés automatiquement dans
l'ordre d'enregistrement.
Si le premier numéro ne répond pas, le deuxième numéro est
appelé automatiquement.
Si le deuxième numéro ne répond pas, le troisième numéro
est appelé automatiquement etc. (max. 3 passages pour les
5numéros).
• En parallèle de l'appel d'urgence, un message (SMS) est
envoyé : « Vous recevez un appel d'urgence. Veuillez
appuyer 3 fois sur la touche 0 pour établir la connexion. »
La personne appelée doit appuyer 3 fois sur la touche 0 en l'espace
de 60s, sinon le contact d'appel d'urgence suivant est appelé. Cela
permet d'éviter que l'appel d'urgence n'arrive sur un répondeur.
FRANÇAIS–61
V221-4G_GuideBook-V2_56002-001.indb 61V221-4G_GuideBook-V2_56002-001.indb 61 18.09.20 12:1018.09.20 12:10

• Après le démarrage de l'appel d'urgence, votre téléphone
emporia décroche automatiquement en cas d'appel entrant
pendant l'heure qui suit. Pour désactiver cette fonction,
appuyez sur la touche
pendant env. 3secondes ou éteignez
complètement et rallumez votre appareil en appuyant sur
.
• Pour annuler l'appel d'urgence, appuyez sur
et maintenez
enfoncé.
• Pendant l'appel d'urgence, un signal d'avertissement retentit
en continu, ce qui alarme votre environnement et la personne
appelée.
• Si aucun contact d'appel d'urgence n'est enregistré, que
le crédit de votre carte est épuisé ou que vous n'êtes pas
autorisé à appeler sur un réseau étranger (par ex. itinérance
non autorisée), le 112 est appelé lors de l'appui sur le bouton
d'appel d'urgence.
Si vous souhaitez enregistrer des institutions ocielles (police,
pompiers, etc.) comme contact d'appel d'urgence, vous devez
consulter au préalable les institutions concernées. Nous déclinons
toute responsabilité en cas de coûts éventuels liés à un appel
involontaire.
FRANÇAIS–62

› Enregistrement / Modification des contacts d'appel d'urgence
Dans le menu Réglages _Bouton d'appel d'urgence
_Enregistrer le contact d'appel d'urgence
_Sélectionnez une entrée (par ex. Contact d'appel
d'urgence n° 1) avec
_Sélectionnez OK avec
_Sélectionnez Privé ou Organisation d'assistance
_Sélectionnez un contact
› Activation du bouton d'appel d'urgence
Dans le menu Réglages _ Bouton d'appel d'urgence
_ Actif/Inactif
› Pré-alarme
La pré-alarme est un avertissement qui retentit pendant
10secondes et attire l'attention de votre environnement
sur le cas d'urgence.
La séquence des appels d'urgence démarre ensuite.
Dans le menu Réglages _ Bouton d'appel d'urgence
_ Numéro d'urgence _ Actif/Inactif
FRANÇAIS–63
V221-4G_GuideBook-V2_56002-001.indb 63V221-4G_GuideBook-V2_56002-001.indb 63 18.09.20 12:1018.09.20 12:10

› GARANTIE ET SAV
Fabricant : emporia telecom GmbH + CoKG
Industriezeile 36, 4020 Linz, Autriche
Importateur : emporia telecom GmbH + CoKG
Contact : Eveline Pupeter · +43 (0)732 777717 446 · www.emporia.eu
Nom de marque : emporia
Modèle : V221-4G / emporiaACTIVEglam
› Étendue de la livraison
• Téléphone portable : V221-4G /
emporiaACTIVEglam
• Couvercle de batterie supplémentaire
sans touche d’appel d’urgence
• Batterie : Ak-V221-4G
• Câble USB
• Adaptateur CA : RL-C150-USB
• Station de charge : TL-V221-4G
› Assistance
• Emporia Service Centre
Industriezeile 36 · 4020 Linz · Autriche
customercare@emporia.at
www.emporia.eu
• Lun.-jeu. 08 :30-17 :00 · Ven. 08 :30-13 :00
• Allemagne : +49 · (0) 800 · 400 4711
• Autriche : +43 · (0) 732 · 77 77 17 · 446
• Suisse : +41 · (0) 8484 · 50004
› Garantie
• Cette garantie n’est valable que si les batteries d’origine emporia sont utilisées.
• Téléphone portable : 24 mois
• Batterie : 6 mois
› Caractéristiques techniques
• Dimensions : 96.5 × 50.5 × 17.75 mm
• Poids : 85.0 g
• Batterie : Li-ion 3.8 V, 1150 mAh, 4.27 Wh
(remplaçable)
• Adaptateur CA :
entrée : 100 - 240V AC, 50/60 Hz, 200 mA;
sortie : DC 5.0 V, 500 mA
• Station de charge :
entrée/sortie :
• Temps de veille : 140 h*
• Temps de communication : 320 min*
(*En fonction de la couverture réseau et
des applications activées, le temps de
communication peut être réduit.)
• Antenne interne :
SAR corps : 0.98 W/kg
SAR tête : 0.89 W/kg
• Température de service : -10° –40° C
• La compatibilité avec les prothèses
auditives : M4/T4
• Bluetooth : V 4.0

› Fréquences
• BT : 2402 MHz - 2480 MHz
Puissance d'émission : < 0.0018 W
• FM : 87.6 MHz - 107.9 MHz
• E-GSM 900/GPRS 900/EGPRS 900 :
TX : 880 - 915MHz; RX : 925 - 960 MHz
Puissance d'émission : < 2.138 W
• E-GSM 1800/GPRS 1800/EGPRS 1800 :
TX : 1710 - 1785 MHz; RX :
1805 - 1880 MHz
Puissance d'émission : < 1.1482 W
• WCDMA Band I :
TX :1920 - 1980 MHz; RX : 2110 - 2170 MHz
Puissance d'émission : < 0.1811 W
• WCDMA Band VIII :
TX : 880 - 915 MHz; RX : 925 - 960 MHz
Puissance d'émission : < 0.1652 W
• LTE Band I :
TX :1920 - 1980 MHz, RX :2110 - 2170 MHz
Puissance d'émission : < 0.1841 W
• LTE Band III :
TX :1710 - 1785 MHz, RX :1805 - 1880 MHz
Puissance d'émission : < 0.2042 W
• LTE Band VII :
TX :2500 - 2570 MHz; RX : 2620 - 2690 MHz
Puissance d'émission : < 0.2704 W
• LTE Band VIII :
TX : 880 - 915 MHz; RX : 925 - 960 MHz
Puissance d'émission : < 0.3516 W
• LTE Band XX :
TX : 832 - 862 MHz; RX : 791 - 821 MHz
Puissance d'émission : < 0.2618 W
› Consignes de sécurité
• Désactiver le téléphone portable dans les
hôpitaux ou à proximité d‘appareils médicaux. Une distance minimale de 20 cm doit
être respectée entre un téléphone portable activé et un stimulateur cardiaque.
• Ne tenez jamais votre téléphone portable
à la main en conduisant. Observez les lois
et décrets de circulation nationaux en vigueur.
• Éteignez le téléphone portable lorsque
vous êtes en avion.
• Éteignez le téléphone portable à proximité de stations service et autres sites
dans lesquels des produits explosifs sont
présents.
• Ne dirigez jamais le faisceau lumineux
de la lampe de poche à DEL vers les yeux
des humains ou des animaux ! (classe de
protection 3)
•
• L’utilisation d’un casque à un volume so-
Pour éviter les dommages audi-
tifs potentiels, n’utilisez pas à
un volume sonore élevé pendant une durée prolongée. Ne portez pas
le téléphone portable à votre oreille
lorsque le haut-parleur est activé ou
lorsque le bouton d’appel d’urgence est
actionnée.
nore élevé peut causer des dommages auditifs. Vérifi ez le volume du casque utilisé.
V221-4G_GuideBook-V2_56002-001.indb 65V221-4G_GuideBook-V2_56002-001.indb 65 18.09.20 12:1018.09.20 12:10

• Le téléphone portable et ses accessoires
peuvent contenir de petits composants.
Conservez le téléphone portable hors de
portée des enfants.
• Par prudence, nous recommandons de
séparer le chargeur du téléphone portable en cas d’orage.
• L’alimentation en énergie sert de dispositif de mise hors tension entre le produit et
le raccordement réseau. Le raccordement
au réseau doit se trouver à proximité de
l’appareil et être facilement accessible.
• Cet appareil a été testé dans des conditions d’utilisation typiques à des fi ns de
transport sur soi. Afi n de satisfaire aux
exigences de charge RF, la distance minimale entre le corps, en particulier la tête
de l’utilisateur et le combiné, y compris
l’antenne, doit être de 0 cm. Les pinces
pour ceinture, étuis et accessoires similaires fournis par des tiers et utilisés avec
cet appareil ne doivent contenir aucune
pièce métallique. Les accessoires portés
au niveau du corps sans respect de ces
exigences peuvent ne pas être conformes
aux limites d’exposition aux RF et ne
doivent pas être utilisés. Utilisez exclusivement l’antenne intégrée à l’appareil ou
une antenne autorisée.
• Cet appareil est conforme aux exigences
essentielles et aux autres dispositions
applicables de la directive 2014/53/UE.
Toutes les séries d’essais radio ont été réalisées.
• Attention : Risque d’explosion en cas
de remplacement de la batterie par un
type de batterie inapproprié. Éliminez
les batteries usagées conformément aux
instructions.
• L’appareil est conforme aux exigences en
matière d’exposition aux radiofréquences
lorsqu’il est maintenu à une distance de
5 mm du corps.
› Utilisation conforme
• Ce téléphone portable est robuste et
prévu pour une utilisation mobile. Il doit
cependant être protégé de l’humidité
(pluie, salle de bain, etc.) et des chocs.
• Uniquement pour les normes de réseau
européennes (AT, BE, CZ, DE, DK, ES, FI, FR,
GB, HR, HU, IE, IT, NL, NO, PL, PT, SE, SI, SK,
SZ, TR).
• Ne l’exposez pas aux rayons directs du
soleil.
• Toute utilisation non décrite ci-dessus entraîne un endommagement du produit.
De plus, cela peut entraîner des risques
de choc électrique, d’incendie, etc. Le
produit ne doit pas être modifi é ou transformé et le boîtier ne doit pas être ouvert.
• L’alimentation est adaptée uniquement
à une utilisation sur une prise électrique
domestique du réseau public 100-240 V,
50-60 Hz (10/16 A) à courant alternatif.

› Mise au rebut
• Mise au rebut de l'emballage
Les emballages et les accessoires d’emballage sont recyclables et doivent être triés.
• Mise au rebut des batteries
Les batteries et les accumulateurs ne doivent pas être jetés
avec les ordures ménagères! En
tant que consommateur, vous
avez le devoir de rapporter les batteries
et les accumulateurs au bon endroit.
Ceux-ci peuvent être remis aux organismes de collecte locaux de votre commune ou à un magasin spécialisé.
• Mise au rebut de l'appareil
Une fois que ce produit est arrivé en fi n de vie, ne le jetez pas
avec les ordures ménagères.
Pour le bien de l’environnement, rapportez-le dans un
point de collecte des appareils usagés
pour qu’il soit recyclé.
› Déclaration de conformité (DOC)
emporia telecom GmbH + CoKG
(Industriezeile36, 4020Linz, Autriche),
déclare par la présente que l’équipement
radioélectrique/de télécommunications
V221-4G / emporiaACTIVEglam
est conforme à la directive2014/53/UE.
Le texte intégral de la déclarationUE
de conformité est disponible à l’adresse
Internet suivante :
https ://www.emporia.eu/doc
Eveline Pupeter
CEO, emporia Telecom
31/ 05/ 2020, Linz/Autriche
https ://www.emporia.eu/doc
V221-4G_GuideBook-V2_56002-001.indb 67V221-4G_GuideBook-V2_56002-001.indb 67 18.09.20 12:1018.09.20 12:10

› PANORAMICA DEL CELLULARE
1
Altoparlante
2
Display (schermo)
3
Tastoverde
• Avviare o rispondere a una chiamata
• Nel menu: confermare la selezione
• Durante lo stand-by: aprire l'elenco delle chiamate
4
Frecce
• Spostarsi tra i Contatti e nel Menu
• Durante lo stand-by, aprire il Menu con
• Durante lo stand-by, aprire i contatti con
5
Tastorosso
• Durante la chiamata: terminare
• Nel menu: tornare indietro
• Durante l'immissione di numeri o lettere: eliminare
6
Pulsanti di selezione rapida
7
Pulsante fotocamera
8
Tasto 1 (segreteria telefonica)
9
Tasto di accensione/spegnimento
Pulsante di emergenza (opzionale)
10
Altoparlante
11
Regolazione del volume e
12
Coperchio batteria (due versioni: con pulsante
13
di emergenza e senza)
Incavo per la rimozione del coperchio batteria
14
Presa per cavo di caricamento USB
15

› Simboli sul display
Potenza segnale di rete
Roaming (estero)
Stato batteria
Chiamata persa
Trasferimento di
chiamata
Nuovo messaggio SMS
Prolo: Modo
silenzioso/sleep
Allarme attivato
Bluetooth attivato
Bluetooth connesso
› Simboli sul display esterno
LED messaggi
• Lampeggia in presenza
dinuovi messaggi
• Scompare non appena
il messaggio ricevuto è
statoletto
LED chiamata
• Lampeggia in caso di
chiamate perse
• Scompare non appena
viene visualizzata la
Cronologia chiamate
LED batteria
• Lampeggiamento lento:
caricamento in corso
• Luce ssa: batteria
completamente carica
• Lampeggiamento rapido:
batteria scarica
ITALIANO–69
V221-4G_GuideBook-V2_56002-001.indb 69V221-4G_GuideBook-V2_56002-001.indb 69 18.09.20 12:1018.09.20 12:10

1. MESSA IN FUNZIONE
1.1 Inserire la scheda SIM
1. Rimuovere il coperchio batteria (alloggiamento in basso a sinistra).
2. Sbloccare l'alloggiamento della scheda SIM (spostare e sollevare).
3. Inserire la scheda SIM con i contatti dorati rivolti verso il basso
e bloccare il coperchio.
1.2 Inserire e caricare la batteria
1. Inserire la batteria in modo che i contatti della batteria
tocchino i contatti dorati del cellulare.
2. Applicare il coperchio batteria e premerlo con forza.
3. Inserire il cavo di caricamento nella presa USB del telefono e
collegare la spina di alimentazione alla rete elettrica.
Prima di mettere l'apparecchio in funzione, lasciare la batteria
in carica per almeno 4ore. Utilizzare esclusivamente batterie e
caricabatterie previsti per l'utilizzo con questo modello specico.
ITALIANO–70

1.3 Accendere il telefono
• Premere il tasto per almeno 2 secondi no a quando
appare il logo emporia. Ci vogliono alcuni secondi prima che
venga visualizzata la schermata Home.
1.4 Immettere il PIN
Quando richiesto, immettere il PIN di 4 cifre della scheda SIM in
uso e confermare l'immissione.
Possono essere eettuati al massimo tre tentativi. Dopo il terzo
tentativo fallito sarà possibile sbloccare la scheda SIM unicamente
con il codice PUK. Il codice PIN e il codice PUK sono reperibili
neidocumenti ricevuti dal proprio operatore di rete.
1.5 Impostare la lingua, la data e l'ora
1. Selezionare una lingua con , confermare con OK .
2. Impostare l'ora e la data e salvare.
1.6 Risparmio energetico
Se non viene immesso alcunché per alcuni secondi, lo schermo
si spegne in modo da risparmiare energia. In caso di chiamata
in arrivo o premendo un tasto qualsiasi, lo schermo si riattiva.
ITALIANO–71
V221-4G_GuideBook-V2_56002-001.indb 71V221-4G_GuideBook-V2_56002-001.indb 71 18.09.20 12:1018.09.20 12:10

2. UTILIZZO
2.1 Schermata iniziale
Se il telefono è acceso ma non viene
utilizzata alcuna funzione, si trova nella
schermata iniziale.
È possibile tornare alla schermata
iniziale in qualsiasi momento premendo
ripetutamente il tasto rosso
12:30
21/04/2020
.
Chiamate
2.2 Menu
Il tasto consente di aprire il menu. Il
menu è un elenco che consente di gestire
le funzionalità del telefono e di adattare lo
stesso alle proprie necessità.
• È possibile spostarsi fra le varie voci del
menu mediante i tasti freccia.
• Le voci disponibili sono: Messaggi,
Immagini, Strumenti, Contatti,
Cronologia chiamate, Impostazioni
• Utilizzando il tasto verde
schermo, è possibile confermare la selezione o tornare alla
schermata iniziale.
ITALIANO–72
e il tasto rosso sotto lo
OK Indietro
Messaggi

2.3 Doppia funzione dei tasti
1
+
#
aA1
4
ghi
5
jkl
5
jkl
6
mno
1
2
abc
3
def
4
ghi
5
jkl
6
mno
7
pqrs
8
tuv
9
wxyz
0
+
#
aA1
Alcuni tasti hanno funzioni aggiuntive se vengono premuti
alungo:
Tasto
Tasto
Tasto
: ascoltare la segreteria telefonica
: + per il presso, ad es. +39 per l'Italia
: attivare Modo silenzioso/sleep
2.4 Utilizzo durante la scrittura
L'immissione del testo avviene tramite la tastiera numerica.
• Per l'inserimento di testo premere più volte un tasto numerico
(ad es. 2 ×
, 1 ×1 , 3 ×
• I caratteri speciali e i simboli sono assegnati ai tasti, ma
possono dierire in alcune lingue:
. , - ? ! 1 ' @ : ; ( ) *
d e f 3 ë é è ê € đ ē
j k l 5 £
p q r s 7 ß $ ş
w x y z 9 ŵ ý ÿ
. , ? ! ' " ( ) @ \ / : _ ; + - * = % & < > ₤ $ ¥ § € ¤ [ ] { } ~ #
• Con il tasto
si commuta tra i metodi di inserimento abc,
ABC, Abc e 123.
, 3 ×
, 3 ×
per Hallo)
a b c 2 ä á ç å â ā æ ć
g h i 4 î ï í ì ğ ι
m n o 6 ö ñ ô œ ó ò
t u v 8 ü ù û ú
Spazio 0
ITALIANO–73
V221-4G_GuideBook-V2_56002-001.indb 73V221-4G_GuideBook-V2_56002-001.indb 73 18.09.20 12:1018.09.20 12:10

3. EFFETTUARE CHIAMATE
3.1 Accettare, riutare o terminare una chiamata
• Rispondere: aprire il telefono e premereAccetta.
• Riutare o terminare: premere il tasto rosso
chiudere il telefono.
• Per disattivare temporaneamente la suoneria,
premere il tasto
Per impostazione predenita, l'accettazione della chiamata
all'apertura del telefono è disattivata e può essere attivata alla
voce Menu _Impostazioni _Aprire per l'accettazione
della chiamata _on.
della regolazione del volume.
o
3.2 Chiamare un numero
› Comporre un numero
1. Immettere il numero di telefono (incl. il presso interurbano)
mediante la tastiera.
2. Avviare la chiamata con
› Utilizzare la ricomposizione del numero
1. Sulla schermata Home, premere il tasto verde
Viene visualizzata la cronologia chiamate.
2. Selezionare un numero con i tasti freccia
3. Avviare la chiamata con
.
.
.
.
Per parlare a viva voce, è possibile aprire le Opzioni durante una
conversazione e attivare l'altoparlante.
ITALIANO–74

4. MESSAGGISMS
› Voci di menu: Scrivi messaggio, Cronologia,
Impostazioni messaggi
4.1 Scrivere e inviare un messaggio
1. Aprire Menu _ Messaggi.
2. Selezionare Scrivi messaggio.
3. Immettere il testo tramite la tastiera.
4. Per stabilire un destinatario per l'SMS,
aprire leOpzioni e selezionare Invia.
5. Ora è possibile selezionare un Contatto nella rubrica,
inserire un Numero di telefono tramite la tastiera o
selezionare un numero da Chiamate recenti.
4.2 Leggere un messaggio
1. Se si riceve un nuovo messaggio, sulla schermata iniziale
appare un simbolo
2. Premere il tasto verde
immediatamente il messaggio.
3. In seguito si potrà ritrovare l'SMS in Menu
_ Messaggi _Cronologia.
4. Per leggere, toccare il messaggio.
.
per Mostra per leggere
ITALIANO–75
V221-4G_GuideBook-V2_56002-001.indb 75V221-4G_GuideBook-V2_56002-001.indb 75 18.09.20 12:1018.09.20 12:10

5. FOTOCAMERA E IMMAGINI
5.1 Scattare una foto
1. Sulla schermata iniziale, premere il tasto Fotocamera oppure
aprire Menu
• Con il tasto freccia
Dimensioni).
2. Con il tasto freccia
3. La foto scattata viene salvata direttamente nelle Immagini.
Con il tasto verde
alle Immagini.
_ Strumenti _ Fotocamera.
si aprono le Opzioni (Autoscatto,
si scatta una foto.
si passa direttamente dalla fotocamera
5.2 Visualizzare le foto
• Tutte le foto scattate vengono ordinate cronologicamente.
1. Aprire Menu
2. Con i tasti freccia
3. Con il tasto verde
all'immagine selezionata.
_Immagini.
è possibile sfogliare le foto.
è possibile aprire le Opzioni relative
5.3 Salvare foto sul computer
1. Inserire il cavo USB in dotazione nel computer e nel dispositivo.
2. Dall'elenco, selezionare Trasferire le.
3. Il computer riconosce ora il telefono e
rappresenta la memoria interna del dispositivo.
4. A questo punto i le possono essere selezionati e
copiati sul computer.
ITALIANO–76

6. STRUMENTI
› Voci di menu: Allarme, Promemoria di compleanno,
Agenda, Calcolatrice, Fotocamera, Bluetooth,
Aggiornamento rmware
6.1 Allarme
1. Aprire Imposta ora.
2. Inserire l'Orario allarme desiderato e premere Salva.
3. L'allarme è attivo e suonerà quotidianamente all'ora indicata.
4. Spegnere l'allarme con il tasto rosso
alla funzione snooze con il tasto verde
5. Selezionare Off per disattivare l'allarme in modo permanente.
Se si spegne il telefono, si disattiva anche l'allarme. In tal caso
l'allarme non suona.
6.2 Bluetooth
1. Attivare la funzione Bluetooth.
2. Toccare Connetti e Cerca nuovi dispositivi. Viene
visualizzato un elenco dei dispositivi disponibili.
3. Selezionare il dispositivo desiderato con il quale il telefono
deve essere accoppiato.
4. Seguire le indicazioni per accoppiare i dispositivi.
oppure commutarlo
.
I dispositivi accoppiati verranno riconosciuti e
connessiautomaticamente.
ITALIANO–77
V221-4G_GuideBook-V2_56002-001.indb 77V221-4G_GuideBook-V2_56002-001.indb 77 18.09.20 12:1018.09.20 12:10

6.3 Aggiornamento del sistema
È possibile scaricare il software più recente disponibile per
il telefono e con questo aggiornare il sistema e migliorare
leapplicazioni.
Eseguire l'aggiornamento solo se si dispone di un piano
datimobili!
1. Controllare che la batteria disponga almeno del 30 % della
capacità di carica; in caso contrario il download non si avvierà.
2. Aprire Menu
3. Toccare Verica.
4. Se è disponibile un aggiornamento del rmware, si verrà
informati. In tal caso selezionare Download e avviare il
processo di aggiornamento.
5. Quando il download è terminato, selezionare Aggiorna
adesso. Si verrà informati che durante l'aggiornamento non è
possibile utilizzare il telefono.
Durante l'aggiornamento non premere il tasto On/O e riprendere
a utilizzare il telefono solo dopo la comparsa dell'informazione
L'installazione è stata completata correttamente.
_Strumenti _Aggiornamento rmware.
ITALIANO–78

7. CONTATTI
› Voci di menu: Cerca nome, Nuovo contatto,
Modica contatto, Elimina, Importa/Esporta,
Numero personale, Pulsanti di selezione rapida,
Contatti di emergenza, Impostazioni contatti.
7.1 Cercare un contatto nella rubrica
1. Sulla schermata iniziale, premere il tasto Rubrica telefonica
oppure aprire Menu
2. Con i tasti freccia
la tastiera, immettere la lettera iniziale del contatto cercato.
3. Avviare la chiamata con il tasto verde
7.2 Aggiungere un contatto
1. Aprire Menu _Contatti _Aggiungi contatto.
2. Immettere il numero di telefono e il nome della persona e
premere Salva.
Salvare nomi e numeri sempre con il presso internazionale,
ad es. Svizzera +41, Austria +43 e Germania +49.
_Contatti _Cerca nome.
, sfogliare le varie voci oppure, tramite
.
ITALIANO–79
V221-4G_GuideBook-V2_56002-001.indb 79V221-4G_GuideBook-V2_56002-001.indb 79 18.09.20 12:1018.09.20 12:10

7.3 Pulsanti di selezione rapida
› Salvataggio per selezione rapida
1. Premere uno dei pulsanti di selezione rapida non assegnati.
2. Immettere il Nome e il Numero oppure Cercare un contatto
nella rubrica telefonica.
› Modificare o eliminare pulsanti di selezione rapida
1. Aprire Menu
2. Selezionare una posizione libera dall'elenco.
3. Immettere il Nome e il Numero oppure Cercare uncontatto
nella rubrica telefonica.
4. Per modicare la selezione rapida, selezionare una posizione
dall'elenco e modicare o cancellare il collegamento.
_Contatti _Impostazioni.
ITALIANO–80

8. IMPOSTAZIONI
› Voci di menu: Rete di telefonia mobile, Hotspot
Wi-Fi, Modo silenzioso/sleep, Suonerie e avvisi,
Volume ricevitore, Volume viva voce, Display e
luce, Data e ora, Lingua, Impostazioni fotocamera,
Aprire per l'accettazione della chiamata, Avviso di
chiamata, Trasferimento di chiamata, N. casella
vocale, Numero di emergenza, Pulsante di emergenza,
Impostazioni di sicurezza, Impostazioni contatti,
0000 per impostazioni, Ripristina
8.1 Rete di telefonia mobile
• Dati mobili: on/o (per impostazione predenita su on)
• Roaming dati: on/o (per impostazione predenita su o)
8.2 Hotspot Wi-Fi
È possibile utilizzare la propria connessione dati mobili per
consentire ad altri dispositivi digitali di collegarsi a Internet.
Questo dispositivo non è in grado di connettersi a Internet con Wi-Fi!
8.3 Modo silenzioso/sleep
Una chiamata in arrivo è indicata solo visivamente, la suoneria
e la vibrazione sono disattivate.
ITALIANO–81
V221-4G_GuideBook-V2_56002-001.indb 81V221-4G_GuideBook-V2_56002-001.indb 81 18.09.20 12:1018.09.20 12:10

8.4 Suonerie e avvisi
È possibile eettuare impostazioni personalizzate
relativamente alle suonerie, agli avvisi e alla vibrazione oppure
selezionare impostazioni predenite (proli).
› Voci di menu: Suoneria, Suoneria allarme, Volume
suoneria, Modo silenzioso/sleep, Vibra per chiamata,
Vibra per allarme, Tono tasti, Tono messaggio, Vibra per
messaggi, Volume ricevitore, Volume viva voce, Tono di
conferma, Tono chiamata di emergenza
8.5 N. casella vocale
Immettere il numero della propria segreteria telefonica. Il
numero è indicato nei documenti forniti dal proprio operatore
di telefonia mobile.
8.6 Impostazioni di sicurezza
• PIN: attivare/disattivare richiesta PIN, modicare PIN
• Codice telefono: attivare/disattivare, modicare
(impostazione predenita: 1234)
8.7 0000 per impostazioni
Attivare questo modo di sicurezza per evitare modiche
involontarie delle impostazioni.
8.8 Ripristina
È possibile ripristinare le impostazioni predenite del telefono
(codice telefono predenito: 1234).
ITALIANO–82

9. FUNZIONE CHIAMATA DI EMERGENZA EMPORIA
Se si utilizza il coperchio batteria con il pulsante di emergenza
integrato, è possibile attivare la funzione di chiamata di
emergenza. Leggere attentamente le istruzioni e impostare
lafunzione di chiamata di emergenza in base alle proprie
esigenze. È possibile salvare no a 5contatti di emergenza
(famiglia, amici, istituzioni).
• In caso di emergenza, tenere premuto il pulsante
diemergenza posto sul retro del telefono.
(Funziona anche se il frontalino del telefono è chiuso.)
• I 5 numeri preimpostati vengono chiamati automaticamente
nell'ordine con cui sono stati salvati.
Se il primo numero non è raggiungibile,
viene chiamato automaticamente il secondo.
Se il secondo numero non viene raggiunto,
viene chiamato automaticamente il terzo e
così via (al massimo 3ripetizioni di 5numeri).
• Oltre ad eettuare la chiamata di emergenza viene inviato
il messaggio (SMS): «Chiamata di emergenza in arrivo.
Premere 3 volte il tasto 0 per stabilire il collegamento.»
L'utente chiamato deve premere il tasto 0 per 3 volte entro
60secondi, altrimenti verrà chiamato il contatto di emergenza
seguente. In questo modo viene impedito che la chiamata di
emergenza vada a nire in una casella di posta elettronica.
ITALIANO–83
V221-4G_GuideBook-V2_56002-001.indb 83V221-4G_GuideBook-V2_56002-001.indb 83 18.09.20 12:1018.09.20 12:10

• Dopo l'avvio della chiamata di emergenza, per un'ora
iltelefono emporia risponderà automaticamente a
ognichiamata in arrivo. Per disattivare tale funzione,
premere il pulsante
completamente ilcellulare e riaccenderlo con
per circa 3 secondi o spegnere
.
• Per interrompere la chiamata di emergenza,
tenere premuto ilpulsante
.
• Durante la chiamata di emergenza risuonerà continuamente
un segnale di avviso avente lo scopo di allarmare
ulteriormente l'ambiente circostante e l'utente chiamato.
• Se non è stato salvato alcun contatto di emergenza,
se il credito sulla propria carta prepagata è esaurito o
se si è connessi senza autorizzazione a una rete estera
(ad es. roaming non abilitato), premendo il pulsante di
emergenza verrà chiamato il 112.
Se si desidera salvare istituzioni (polizia, vigili del fuoco ecc.) come
contatti di emergenza, è necessario accordarsi prima con le stesse.
Non ci assumiamo alcuna responsabilità per i costi che potrebbero
insorgere chiamando inavvertitamente tali numeri.
ITALIANO–84

› Salvare/modificare i contatti di emergenza
Nel menu Impostazioni _Pulsante di emergenza
_Salva contatto di emergenza
_ Selezionare una voce (ad es. Contatto di emergenza 1)
con
_ Selezionare OK con
_ Scegliere se Privato o Organizzazione di soccorso
_ Selezionare un contatto
› Attivare il pulsante di emergenza
Nel menu Impostazioni _Pulsante di emergenza _On/Off
› Preallarme
Il preallarme è un segnale di avviso che risuonerà per
10secondi con lo scopo di allarmare l'ambiente circostante
incaso di emergenza.
Dopodiché avrà inizio la sequenza di chiamate di emergenza.
Nel menu Impostazioni _Pulsante di emergenza
_Numero di emergenza _On/Off
ITALIANO–85
V221-4G_GuideBook-V2_56002-001.indb 85V221-4G_GuideBook-V2_56002-001.indb 85 18.09.20 12:1018.09.20 12:10

› GARANZIA E ASSISTENZA
Produttore: emporia telecom GmbH + CoKG
Industriezeile 36, 4020 Linz, Austria
Importatore: emporia telecom GmbH + CoKG
Contatto: Eveline Pupeter · +43 (0)732 777717 446 · www.emporia.eu
Marchio: emporia
Modello: V221-4G / emporiaACTIVEglam
› Dotazione
• Cellulare: V221-4G /
emporiaACTIVEglam
• Coperchio supplementare per il vano
batteria senza pulsante di emergenza
• Batteria: Ak-V221-4G
• Cavo USB
• Adattatore CA: RL-C150-USB
• Docking station: TL-V221-4G
› Assistenza
• Emporia Service Centre
Industriezeile 36 · 4020 Linz · Austria
customercare@emporia.at
www.emporia.eu
• Lun.-Gio. 08:30-17:00 · Ven. 08:30-13:00
• Germania: +49 · (0) 800 · 400 4711
• Austria: +43 · (0) 732 · 77 77 17 · 446
• Svizzera: +41 · (0) 8484 · 50004
› Garanzia
• La presente garanzia è valida solo se si utilizzano batterie emporia originali.
• Cellulare: 24 mesi
• Batteria: 6 mesi
› Dati tecnici
• Dimensioni: 96.5 × 50.5 × 17.75 mm
• Peso: 85.0 g
• Batteria: Li-ion 3.8 V, 1150 mAh, 4.27 Wh
(sostituibile)
• Adattatore CA:
input: 100 - 240V AC, 50/60 Hz, 200 mA;
output: DC 5.0 V, 500 mA
• Docking station:
input/output:
• Durata in stand-by: 140 ore*
• Durata in chiamata: 320 min*
(*La durata in chiamata può ridursi a
seconda della copertura di rete e delle
applicazioni attivate.)
• Antenna interna:
SAR Corpo: 0.98 W/kg
SAR Testa: 0.89 W/kg
• Temperatura di funzionamento:
-10° –40° C
• Compatibilità con gli apparecchi
acustici: M4/T4
• Bluetooth: V 4.0

› Frequenze
• BT: 2402 MHz - 2480 MHz
Potenza di trasmissione: < 0.0018 W
• FM: 87.6 MHz - 107.9 MHz
• E-GSM 900/GPRS 900/EGPRS 900:
TX: 880 - 915MHz; RX: 925 - 960 MHz
Potenza di trasmissione: < 2.138 W
• E-GSM 1800/GPRS 1800/EGPRS 1800:
TX: 1710 - 1785 MHz; RX: 1805 - 1880 MHz
Potenza di trasmissione: < 1.1482 W
• WCDMA Band I:
TX:1920 - 1980 MHz; RX: 2110 - 2170 MHz
Potenza di trasmissione: < 0.1811 W
• WCDMA Band VIII:
TX: 880 - 915 MHz; RX: 925 - 960 MHz
Potenza di trasmissione: < 0.1652 W
• LTE Band I:
TX:1920 - 1980 MHz, RX:2110 - 2170 MHz
Potenza di trasmissione: < 0.1841 W
• LTE Band III:
TX:1710 - 1785 MHz, RX:1805 - 1880 MHz
Potenza di trasmissione: < 0.2042 W
• LTE Band VII:
TX:2500 - 2570 MHz; RX: 2620 - 2690 MHz
Potenza di trasmissione: < 0.2704 W
• LTE Band VIII:
TX: 880 - 915 MHz; RX: 925 - 960 MHz
Potenza di trasmissione: < 0.3516 W
• LTE Band XX:
TX: 832 - 862 MHz; RX: 791 - 821 MHz
Potenza di trasmissione: < 0.2618 W
› Avvertenze di sicurezza
• Spegnere il telefono cellulare all‘interno
degli ospedali o in prossimità di apparecchiature mediche. Se il cellulare è acceso,
tenerlo a una distanza minima di 20 cm
da pacemaker.
• Non guidare mai un veicolo tenendo allo
stesso tempo il cellulare in mano. Rispettare le leggi nazionali e le norme di circolazione.
• Spegnere sempre il telefono cellulare
all‘interno degli aerei.
• È obbligatorio spegnere il telefono cellulare in prossimità di stazioni di rifornimento o altri luoghi dove sono presenti
materiali esplosivi.
• Non puntare mai la torcia elettrica LED
direttamente negli occhi di persone o
animali! (classe di protezione 3)
•
• L‘utilizzo delle cuffi e a volume elevato
• Il cellulare e gli accessori possono conte-
Per evitare eventuali danni all‘u-
dito, non utilizzare il telefono
cellulare a volume alto per
periodi di tempo prolungati. Non tenere il
cellulare vicino all‘orecchio se è attiva la
modalità vivavoce o se è stato premuto il
pulsante di emergenza.
può causare danni all‘udito. Controllare il
volume delle cuffi e utilizzate.
nere componenti di piccole dimensioni.
Tenere il cellulare al di fuori della portata
dei bambini piccoli.
V221-4G_GuideBook-V2_56002-001.indb 87V221-4G_GuideBook-V2_56002-001.indb 87 18.09.20 12:1018.09.20 12:10

• Come precauzione, si consiglia di scollegare il caricabatterie dal cellulare durante
i temporali.
• L‘alimentatore agisce da interruttore tra il
prodotto e l‘alimentazione elettrica. Il collegamento alla rete elettrica deve trovarsi
nelle immediate vicinanze dell‘apparecchio
e deve essere facilmente raggiungibile.
• Il presente dispositivo è stato testato per
applicazioni tipiche che richiedono che
il dispositivo venga portato a contatto
con il corpo. Per soddisfare i requisiti in
materia di esposizione all‘inquinamento
elettromagnetico, la distanza minima tra
il corpo, in particolare la testa dell‘utente,
e il telefono cellulare compresa l‘antenna
è pari a 0 cm. Clip per fi ssaggio alla cintura, marsupi e accessori simili di altre marche, utilizzati con questo dispositivo, non
devono contenere componenti metallici.
Gli accessori che vengono portati a
contatto con il corpo e non soddisfano questi requisiti, probabilmente non
sono conformi ai requisiti per l‘esposizione RF e se ne dovrebbe evitare l‘uso.
Utilizzare esclusivamente l‘antenna integrata nel dispositivo o un‘antenna approvata.
• Il presente dispositivo è conforme ai requisiti essenziali e ad altre disposizioni rilevanti contenute nella direttiva 2014/53/UE.
Sono state eseguite tutte le casistiche di
test importanti per le emissioni radiate.
• Attenzione: rischio di esplosione se la batteria viene sostituita con un tipo errato.
Smaltire le batterie esauste attenendosi
alle istruzioni.
• Il dispositivo è conforme alle specifi che
RF se è distante 5 mm dal corpo.
› Destinazione d'uso
• Questo cellulare è robusto e progettato
per l’utilizzo in mobilità. Tuttavia, deve
essere protetto dall’umidità (pioggia, bagno ecc.) e dagli urti.
• Solo per standard di rete europei (AT, BE,
CZ, DE, DK, ES, FI, FR, GB, HR, HU, IE, IT, NL,
NO, PL, PT, SE, SI, SK, SZ, TR).
• Non esporlo ai raggi diretti del sole.
• Un uso non conforme a quanto indicato
può causare danni al prodotto. Inoltre
ciò può comportare pericoli come ad
esempio scossa elettrica, incendio ecc.
Il prodotto non deve essere modifi cato,
smontato o aperto.
• L’alimentatore è adatto unicamente all’utilizzo con una presa di corrente domestica allacciata alla rete pubblica da 100-240
Volt, 50-60 Hz (10/16 A) in CA.

› Smaltimento
• Smaltimento della confezione
Le confezioni e i materiali di
imballaggio sono riciclabili e
devono essere conferiti negli
appositi contenitori della raccolta diff erenziata.
• Smaltimento delle batterie
Le batterie non devono essere
smaltite insieme ai rifi uti domestici! L’utente è tenuto a conferire le batterie usate nei modi
previsti dalla legge, ad esempio presso
i centri di raccolta locali o negli esercizi
commerciali.
• Smaltimento dell'apparecchio
Qualora in futuro il prodotto
dovesse divenire obsoleto,
non smaltirlo insieme ai rifi uti
domestici. Per proteggere l’ambiente, conferirlo a un centro di
riciclaggio o di raccolta dei materiali in
cui i rifi uti vengano raccolti e trattati in
modo ecologicamente responsabile.
› Dichiarazione di
conformità (DOC)
Hiermit erklärt
emporia telecom GmbH + CoKG
(Industriezeile36, 4020Linz, Austria),
dichiara con la presente che l’apparecchiatura radio/terminale di telecomunicazione
V221-4G / emporiaACTIVEglam
è conforme ai requisiti della direttiva
europea 2014/53/UE.
Il testo completo della dichiarazione di
conformità UE è disponibile al seguente
indirizzo Internet:
https://www.emporia.eu/doc
Eveline Pupeter
CEO, emporia Telecom
31/ 05/ 2020, Linz/Austria
https://www.emporia.eu/doc
V221-4G_GuideBook-V2_56002-001.indb 89V221-4G_GuideBook-V2_56002-001.indb 89 18.09.20 12:1018.09.20 12:10

› OVERZICHT VAN UW MOBIELE TELEFOON
1
Luidspreker
2
Display (beeldscherm)
3
Groene toets
• Oproep beginnen of gesprek aannemen
• In het menu: selectie bevestigen
• In stand-by: Alle oproepen opvragen
4
Pijltjestoetsen
• Bladeren door de Contacten en het Menu
• In de stand-bymodus met
• In de stand-bymodus met
5
Rodetoets
• Tijdens het gesprek: beëindigen
• In het menu: een stap terug
• Bij het invoeren van cijfers of letters: wissen
6
Snelkeuzeknoppen
7
Camera-toets
8
1 -toets (voicemail)
9
Aan/Uit - toet s
Noodoproepknop (optioneel)
10
Luidspreker
11
Volumeregeling &
12
Deksel van het accuvak (twee versies: met en zonder
13
noodoproepknop)
Uitsparing om het deksel van het accuvak te verwijderen
14
Aansluiting voor USB-laadkabel
15
het Menu oproepen
de Contacten oproepen

› Symbolen op het scherm
Signaalsterkte netwerk
Roaming (buitenland)
Accustatus
Gemiste oproep
Doorschakelen
Nieuw sms-bericht
Proel: Stil/slaapmodus
Alarm ingeschakeld
Bluetooth ingeschakeld
Bluetooth verbonden
› Symbolen op het
buitendisplay
LED berichten
• Knippert bij
nieuweberichten
• Gaat uit, zodra het
ontvangen bericht
werdgelezen
LED oproep
• Knippert bij
gemisteoproepen
• Gaat uit, zodra alle
oproepen werden bekeken
LED accu
• Knippert langzaam: accu
wordt opgeladen
• Brandt continu: accu
isopgeladen
• Knippert snel: accu is leeg
NEDERLANDS–91
V221-4G_GuideBook-V2_56002-001.indb 91V221-4G_GuideBook-V2_56002-001.indb 91 18.09.20 12:1018.09.20 12:10

1. INGEBRUIKNAME
1.1 Simkaart plaatsen
1. Verwijder het deksel van het accuvak (uitsparing linksonder).
2. Ontgrendel de simkaarthouder (verschuiven
enomhoogklappen).
3. Plaats de simkaart met de gouden contactpunten naar
beneden en vergrendel de klep.
1.2 Accu plaatsen en opladen
1. Plaats de accu zodanig dat de contactpunten van de accu de
goudkleurige contactpunten van de mobiele telefoon raken.
2. Plaats het deksel van het accuvak terug en druk dit vast.
3. Steek de laadkabel in de USB-aansluiting van de telefoon en
destekker in een stopcontact.
Laad de accu vóór ingebruikname ten minste 4uur op.
Gebruik alleen accu's en laders die voor het gebruik met
ditspeciale model zijn goedgekeurd.
NEDERLANDS–92

1.3 Telefoon inschakelen
• Druk minimaal 2seconden op de -toets totdat het emporialogo verschijnt. Het duurt enkele seconden voordat het
startscherm wordt weergegeven.
1.4 Pincode invoeren
Voer, wanneer u hierom wordt gevraagd, de pincode van
4 cijfers van uw simkaart in en bevestig de ingevoerde
gegevens.
U hebt maximaal drie pogingen om de pincode in te voeren. Na de
derde foutieve poging kan de simkaart alleen nog maar worden
gedeblokkeerd met de pukcode. U vindt de pincode en de pukcode
in de papieren die u van de netbeheerder hebt ontvangen.
1.5 Taal, tijd en datum instellen
1. Selecteer een taal met en bevestig met OK .
2. Stel de tijd en datum in en sla deze op.
1.6 Energie besparen
Wanneer er gedurende enkele seconden geen toetsen worden
ingedrukt, wordt het scherm uitgeschakeld om energie te
besparen. Bij een inkomende oproep of door een willekeurige
toets in te drukken, wordt het scherm weer ingeschakeld.
NEDERLANDS–93
V221-4G_GuideBook-V2_56002-001.indb 93V221-4G_GuideBook-V2_56002-001.indb 93 18.09.20 12:1018.09.20 12:10

2. BEDIENING
2.1 Startscherm
Wanneer uw telefoon ingeschakeld is maar
er geen functie wordt gebruikt, wordt het
startscherm getoond.
U kunt te allen tijde naar het startscherm
terugkeren door meerdere keren op de
rode toets
te drukken.
12:30
21-04-2020
Alle oproepen
2.2 Menu
Met de toets roept u het menu op.
Het menu is een register waarin u de
functies van uw telefoon kunt beheren en
de telefoon kunt aanpassen aan uw eigen
behoeften.
• Met de pijltjestoetsen bladert u door
hetmenu.
• Beschikbare menupunten zijn: Berichten,
Fotoalbum, Hulpmiddelen, Contacten, Alle oproepen,
Instellingen
• Met de groene toets
het scherm kunt u een selectie bevestigen of naar het
startschermterugkeren.
NEDERLANDS–94
en de rode toets onderaan
OK Terug
Berichten

2.3 Toetsen met dubbele functies
1
+
#
aA1
4
ghi
5
jkl
5
jkl
6
mno
1
2
abc
3
def
4
ghi
5
jkl
6
mno
7
pqrs
8
tuv
9
wxyz
0
+
#
aA1
Sommige toetsen hebben extra functies,
wanneer er lang op wordt gedrukt:
-toets: voicemail beluisteren
-toets: + voor landcode, bijv. +49 voor Duitsland
-Toets: Stil/slaapmodus inschakelen
2.4 Bediening bij het schrijven van teksten
De tekst kan met behulp van de cijfertoetsen
wordeningevoerd.
• Voor het invoeren van tekst drukt u meerdere keren op een
cijfertoets (bijv. 2 ×
, 1 ×1 , 3 ×
• Speciale tekens en symbolen zijn aan de toetsen toegewezen,
maar kunnen in sommige talen afwijken:
. , - ? ! 1 ' @ : ; ( ) *
d e f 3 ë é è ê € đ ē
j k l 5 £
p q r s 7 ß $ ş
w x y z 9 ŵ ý ÿ
. , ? ! ' " ( ) @ \ / : _ ; + - * = % & < > ₤ $ ¥ § € ¤ [ ] { } ~ #
• Met de
-toets schakelt u tussen de invoermethoden abc,
ABC, Abc en 123.
, 3 ×
, 3 ×
voor Hallo)
a b c 2 ä á ç å â ā æ ć
g h i 4 î ï í ì ğ ι
m n o 6 ö ñ ô œ ó ò
t u v 8 ü ù û ú
Spatie 0
NEDERLANDS–95
V221-4G_GuideBook-V2_56002-001.indb 95V221-4G_GuideBook-V2_56002-001.indb 95 18.09.20 12:1018.09.20 12:10

3. BELLEN
3.1 Oproep aannemen, weigeren of beëindigen
• Aannemen: Klap de telefoon open en druk op Aannemen.
• Weigeren of beëindigen: Druk op de rode toets
detelefoon dicht.
• Om het belsignaal tijdelijk uit te schakelen,
drukt u op de
Het aannemen van een oproep bij het openklappen van de
telefoon is standaard uitgeschakelden kan worden geactiveerd
onder Menu _Instellingen _Openklappen om oproep
aan te nemen _aan.
-toets van de volumeregeling.
3.2 Iemand bellen
› Een nummer kiezen
1. Voer het telefoonnummer (incl. kengetal) met
de cijfertoetsen in.
2. Start het kiezen met
› 'Opnieuw kiezen' gebruiken
1. Druk onder het startscherm op de groene toets
Alle oproepen worden weergegeven.
2. Selecteer een nummer met de pijltjestoetsen
3. Start het kiezen met
.
.
.
.
ofklap
Om handenvrij te bellen kunt u tijdens een gesprek de Opties
openen en de luidspreker inschakelen.
NEDERLANDS–96

4. BERICHTENSMS
› Menupunten: Schrijf bericht, Geschiedenis,
Berichtinstellingen
4.1 Bericht schrijven en verzenden
1. Open Menu Berichten.
2. Selecteer Schrijf bericht.
3. Voer de tekst met de toetsen in.
4. Om een ontvanger voor het sms-bericht vast te leggen,
opent u de Opties en selecteert u Verzenden.
5. Vervolgens kunt u een Contact in het telefoonboek
selecteren, een Telefoonnummer via de cijfertoetsen
invoeren of eennummer selecteren in de Recente oproepen.
4.2 Bericht lezen
1. Wanneer u een nieuw bericht ontvangt,
verschijnt er een symbool
2. Druk op de groene toets
omhet bericht direct te lezen.
3. Later vindt u het sms-bericht onder Menu
_Berichten _Geschiedenis.
4. Om een bericht te lezen, tipt u op het bericht.
op het startscherm.
voor Tonen,
NEDERLANDS–97
V221-4G_GuideBook-V2_56002-001.indb 97V221-4G_GuideBook-V2_56002-001.indb 97 18.09.20 12:1018.09.20 12:10

5. CAMERA EN FOTOALBUM
5.1 Foto maken
1. Druk onder het startscherm op de cameratoets of
open Menu
• Met de pijltjestoets
(Zelfontspanner,Fotoformaat).
2. Met de pijltjestoets
3. De gemaakte foto wordt direct in het Fotoalbum opgeslagen.
Met de groene toets
Fotoalbum terecht.
_ Hulpmiddelen _ Camera.
opent u de Opties
maakt u een foto.
komt u direct van de camera in het
5.2 Foto's bekijken
• Alle gemaakte foto's worden chronologisch gesorteerd.
1. Open Menu
2. Blader met de pijltjestoetsen
3. Met de groene toets
geselecteerde foto.
_Fotoalbum.
door de foto's.
opent u de Opties voor de
5.3 Foto's op een pc opslaan
1. Sluit de meegeleverde USB-kabel op een pc en op het
apparaat aan.
2. Selecteer in de lijst Bestanden overdragen.
3. Nu herkent de pc uw telefoon en geeft het interne geheugen
van het apparaat weer.
4. Nu kunnen bestanden worden geselecteerd en naar de pc
worden gekopieerd.
NEDERLANDS–98

6. HULPMIDDELEN
› Menu-opties: Alarm, Verjaardagsherinnering, Kalender,
Rekenmachine, Camera, Bluetooth, Systeemupdates
6.1 Alarm
1. Open Tijd instellen.
2. Voer de gewenste Alarmtijd in en sla deze op met Opslaan.
3. Het alarm is geactiveerd en gaat nu elke dag op de ingevoerde
tijd af.
4. Schakel het alarm dat klinkt uit met de rode toets
in de sluimerfunctie met de groene toets
5. Selecteer Uit om het alarm permanent uit te schakelen.
Wanneer u de telefoon uitschakelt, is ook het alarm uitgeschakeld.
In dat geval klinkt het alarm niet.
.
6.2 Bluetooth
1. Zet de Bluetooth-functie aan.
2. Tik op Verbinden en op Nieuwe apparaten zoeken.
Er wordt een lijst met beschikbare apparaten getoond.
3. Selecteer het gewenste apparaat waaraan de telefoon moet
worden gekoppeld.
4. Volg de aanwijzingen voor het koppelen van de apparaten.
of zet het
Gekoppelde apparaten worden herkend en
automatischverbonden.
NEDERLANDS–99
V221-4G_GuideBook-V2_56002-001.indb 99V221-4G_GuideBook-V2_56002-001.indb 99 18.09.20 12:1018.09.20 12:10

6.3 Systeemupdates
U kunt zelf de nieuwste software voor de telefoon
downloaden, het systeem hiermee bijwerken en toepassingen
verbeteren.
Voer de update alleen uit, wanneer u beschikt over een
abonnement met mobiele gegevens!
1. Controleer of de accu over minimaal 30% laadcapaciteit
beschikt, anders kan het downloaden niet starten.
2. Open Menu
3. Tip op Controleren.
4. U wordt geïnformeerd of er geactualiseerde software
beschikbaar is. Is dit het geval, selecteer dan Download en
start de update-procedure.
5. Wanneer het downloaden is voltooid, selecteert u
Nu bijwerken. U krijgt een melding dat u
de telefoon niet kunt gebruiken tijdens het bijwerken.
Druk niet op de Aan/Uit-toets tijdens het bijwerken en bedien
uw telefoon pas weer na het verschijnen van de informatie
De installatie is gelukt.
_Hulpmiddelen _ Systeemupdates.
NEDERLANDS–100
 Loading...