

Page 1
Loudspeaker Series
User Manual
Page 2

Page 3

Emotiva X-Ref Series premium loudspeakers
Contents
Introduction .........................................................................................3
About This Manual ..............................................................................4
Features .............................................................................................5
Unpacking...........................................................................................6
The Emotiva X-Ref Series loudspeaker .............................................7
Quick Start ..........................................................................................8
Preparation .........................................................................................9
Speaker Placement ..........................................................................11
Connections......................................................................................16
Conguration ....................................................................................19
Care and Maintenance .....................................................................20
Specications ...................................................................................21
Troubleshooting ................................................................................25
Emotiva Audio Corporation Limited Warranty ...................................26
Contact Information ..........................................................................27
Accessories ......................................................................................28
Notes ................................................................................................29
Page 1
Page 4

Page 2
Page 5

Introduction
Thank you for purchasing Emotiva X-Ref Series premium loudspeakers.
The X-Ref Series, designed in cooperation with renowned loudspeaker designer Vance
Dickason, represents the culmination of years of research into optimized loudspeaker
design. With the X-Ref Series, you are getting advanced design, premium features,
quality construction, and superb sound. All of the members of the X-Ref Series share
the same basic features, including our exclusive low-resonance 1” silk dome tweeter for
crystalline highs, proprietary blended-pulp cone mid/woofers for smooth midrange and bass
performance, and sophisticated multi-pole asymmetrical crossover to ensure a seamless
transition between elements. Critically braced MDF enclosures, dressed in our furniture-
grade, 6-layer, black satin lacquer nish, with an attractive removable grill complete the
picture. The X-Ref Series currently consists of ten models, all voiced to work perfectly
together in a stereo or home theater setup that will sound far better than you ever imagined
possible for such a modest price. We trust you’ll be as impressed with our achievement as
we are - and hope you enjoy listening to these as much as we enjoyed designing them and
bringing them to you.
The X-Ref Series of loudspeakers are designed to provide satisfying full-range sound.
If, however, you decide you need more powerful and even more extended bass response,
Emotiva offers the X-Ref series of DSP Powered Subwoofers. The X-Ref subs are
optimized to perfectly complement the X-Ref family of speakers, blending seamlessly with
them and delivering the nal lowest octaves effortlessly and with absolute authority and
precise control.
Of course we also humbly suggest that you consider pairing your Emotiva X-Ref Series
loudspeakers with a set of our exceptional sounding, yet reasonably priced, source
components and power amps.
Happy listening!
The Emotiva Team
Page 3
Page 6

About This Manual
This manual will provide you with all the information you need to achieve great
performance, accurate sound, and many years of reliable service from your X-Ref Series
speakers.
We suggest that you read through the entire manual; we kept things as short and direct as
possible. Even if you’re an expert user, you will probably nd some interesting information
and useful suggestions.
If you’re really in a hurry to get started, please read the Quick Start section (on page 8); you
may then read the remainder of the manual at your leisure.
You may wish to record serial numbers or other purchase information on the Notes page at
the back of this manual.
Page 4
Page 7

Features
The Emotiva X-Ref Series of loudspeakers were designed to deliver premium performance
and superior sound at a reasonable price. All members of the X-Ref Series are voiced to
work perfectly together and share similar features, including:
• OurExclusivelow-resonance1”silkdometweeter for crystal clear highs and
perfectly integrated midrange
• Emotiva’sspeciallydesignedlongthrowconemid/woofers; with proprietary
blended-pulp cones, die-cast frames, butyl rubber surrounds, at progressive-rate
spiders, vented, copper-capped pole pieces, and aluminum shorting rings to ensure
smooth low-distortion midrange and extended bass performance
• Asophisticatedmulti-poleasymmetricalcrossover, which ensures a seamless
transition between drivers and awless performance in the critical midrange area
• Premiumparts,includinglowdistortionaircoreinductors,precisionmetallized
lmcapacitors,andoxygen-freecopperwire are used throughout for minimum
distortion and coloration - even at high listening levels
• Optimizedvoicing.All Emotiva X-Ref models have been carefully voiced to not only
sound superb as separate speakers, but to match perfectly and blend seamlessly with
each other in any combination for both stereo and multi-channel congurations. (If you
decide to add one or more subwoofers, the X-Ref DSP Powered Subwoofers have also
been optimized to work awlessly with the X-Ref Series of loudspeakers.)
• AcriticallybracedMDFenclosure for minimum coloration, so all you hear is the music
(1” MDF on front and rear panels of larger models, full 3/4” everywhere else)
• Afurnituregrade6-layerblacksatinlacquernish that ts well with any room decor
and resists ngerprints
• Removablegrills for driver protection and great looks
• Emotiva’susualcombination of superlative engineering, high quality parts and
manufacturing, excellent support, and a 5 year transferable warranty, along with our
commitment to deliver great products at reasonable prices
Additional features of specic members of the X-Ref Series include:
• Porteddesignforextendedlow-frequencyresponse
• Integraldecorativebases, add visual appeal and improve stability. Detachable carpet
spikes are included for us on soft surfaces.
• NestedArray™driveralignment for enhanced off-axis frequency response and
minimal lobing
• Separateterminalsforbi-ampingorbi-wiring
You can nd more information about Emotiva’s X-Ref Series on our Web site at
http://www.emotiva.com
Page 5
Page 8

Unpacking
Your X-Ref Series loudspeakers were carefully packed and should reach you in perfect
condition. If you notice any shipping damage or other issues when you unpack them, please
contact Emotiva immediately.
Gently remove your X-Ref loudspeakers from the packing carton and remove all wrappings
and shipping material. Avoid pressing directly on the front of the drivers or dropping any bits
of packing material into the port opening.
It is important to save the box and all packing materials in case your X-Ref speakers ever
need to be moved or shipped back to the factory for service.
Please keep your sales receipt in a safe place. It is the easiest way to verify your purchase
date for warranty purposes, and may also be required if you ever have to le an insurance
claim.
We truly value customer feedback and would like to hear from you.
Page 6
Page 9
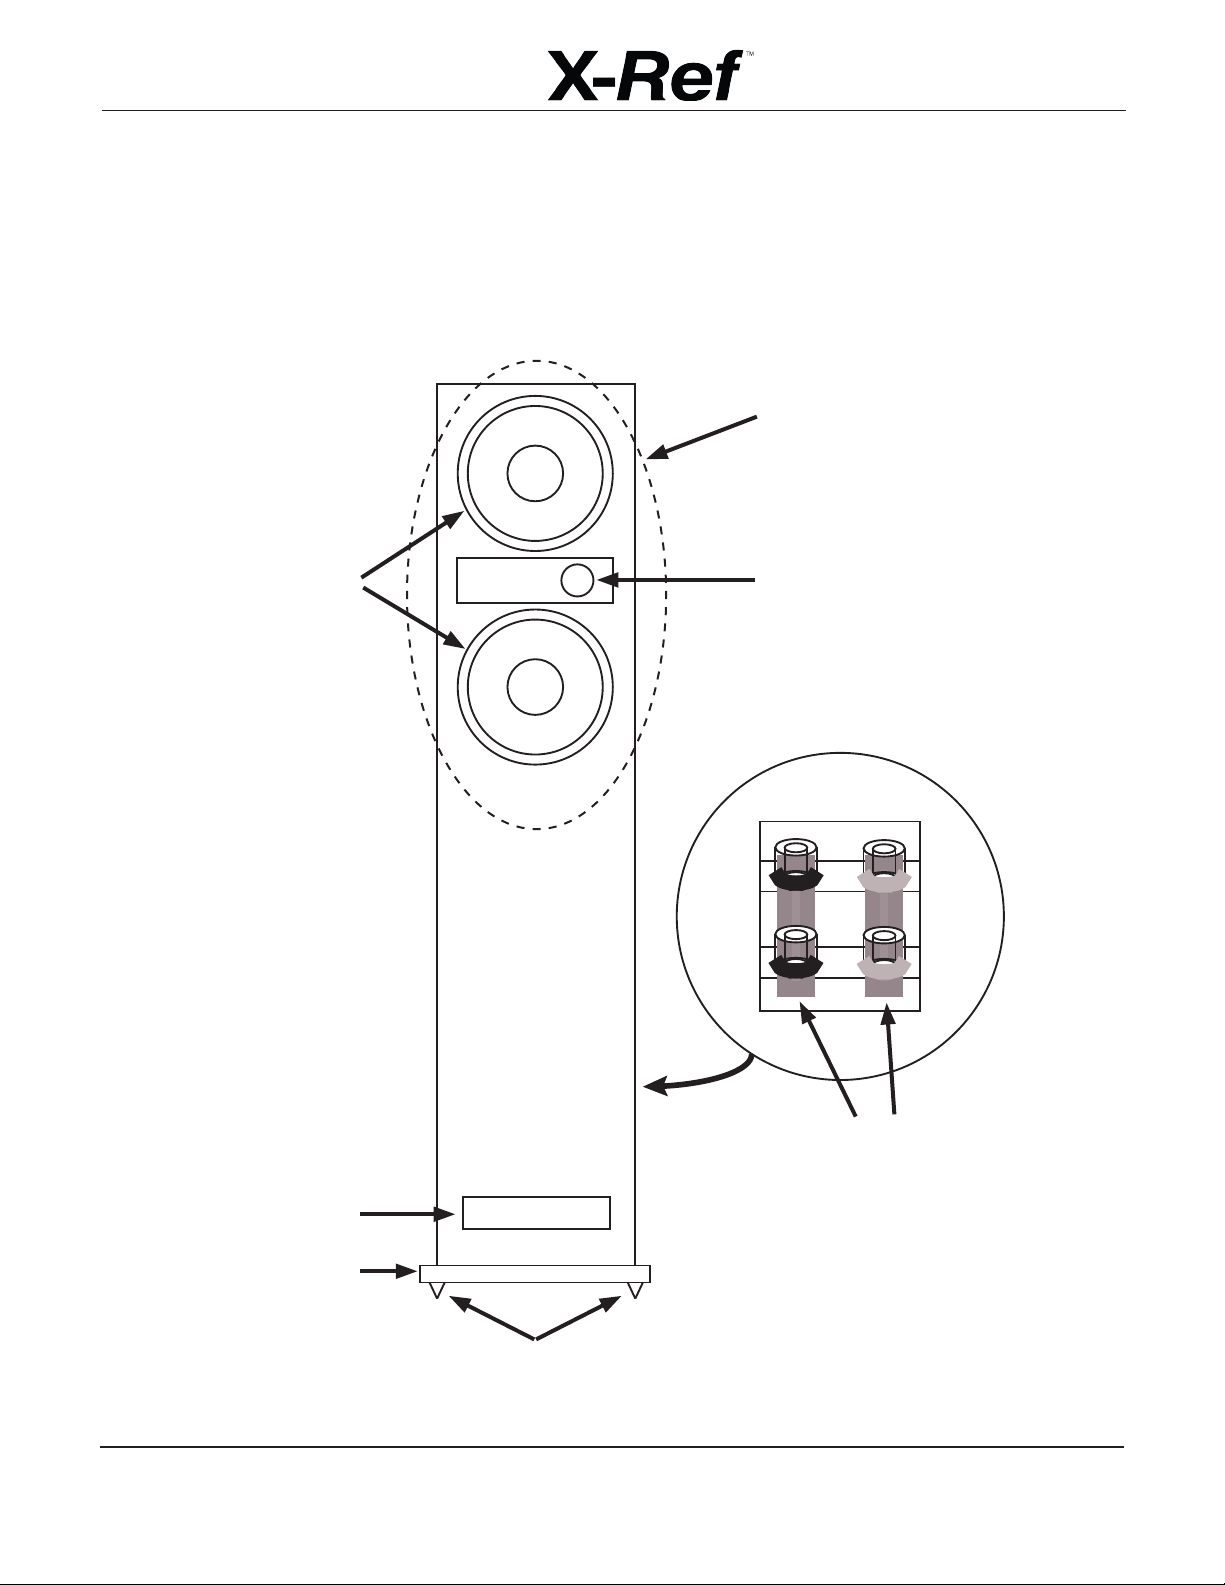
The X-Ref Series Loudspeaker
(model shown is the XRT-6.2 Tower)
Nested Array™ driver
alignment
Proprietary
blended-pulp cone
long throw
mid/woofer
Low-diffraction
slot-loaded port
Exclusive lowresonance
1” silk dome tweeter
Rear Panel
Bi-amp
terminal
links
Base
Carpet spikes
Page 7
Page 10

Quick Start
To get the most from your X-Ref loudspeakers, we urge you to read the entire manual. If
you just can’t wait to hear how great your X-Ref loudspeakers sound, this section will cover
the basics you need to get started.
• Find a secure location for your X-Ref loudspeakers.
• Before using the X-Ref Tower models, attach the base plates with the included screws.
If you’re using them on a soft surface (like carpet), we strongly suggest using the carpet
points (also included).
• If you’re using the X-Ref Center/LCR Monitors vertically (as monitors or mains), place
them on speaker stands, strong shelves, or other secure locations. Consider using
decoupling pads to reduce vibration and prevent slipping.
• If you’re using your X-Ref Center/LCR Monitors as Centers, we suggest using the
(optional) center stands offered by Emotiva. The stands are attractive, include foam
pads to provide a secure non-slip base and protect against damage to the nish, and
offer the option of tilting the speaker slightly up or down.
• Place the X-Ref Monitors on speaker stands or shelves, or attach them to mounting
brackets of proper capacity.
• XRS Surrounds are typically placed on shelves or attached to rear or side walls (using
the included mounting plates).
• Connect your X-Ref Series speakers to your power amp or receiver using good quality
speaker cables.
• Find some music you really like to listen to.
• Enjoy!
While you’re enjoying your X-Ref speakers, it would be a great time to read the rest of the
manual to learn more about them.
Page 8
Page 11

Preparation
Attaching the base (XRT Tower models only)
Each X-Ref Tower model ships with an attractive base. The base is not only decorative,
but makes the X-Ref Towers much more difcult to tip over, and provides a mounting place
for the included carpet spikes if you choose to use them. We strongly urge all X-Ref Tower
owners to use the bases.
Position the base with the raised center area facing the speaker (with the side of the
base with the countersunk holes away from the speaker); insert and tighten the four bolts
(included).
If your X-Ref speakers are to be placed on a hard level surface (like a wood oor), use only
the bases. (You may add felt or rubber stick-on feet at the corners if you prefer).
If your X-Ref loudspeakers are to be placed on a soft surface (like carpet), or an irregular
surface (like rough concrete), the included carpet spikes should be inserted into the four
holes near the corners of the base. The spikes provide additional stability on soft surfaces
and can be adjusted and locked (using the locking nut) to level the speaker on irregular
surfaces.
Note: The carpet spikes should NOT be used on nished ooring (like hardwood or
linoleum) as they may damage the surface. If you wish to use the spikes for levelling
on such a surface, you can purchase small metal “foot plates” on which to sit the
spikes, or replace the spikes with special feet intended for delicate oors.
Page 9
Bottom of
X-Ref Tower
Base
Bolt
Carpet spike
(with nut)
Page 12

Attaching the mounting plate (XRS Surrounds only)
The X-Ref Surrounds can be wall-mounted using the convenient (and included) mounting
plate. The mounting plate is attached to the wall with screws or drywall fasteners; two
screws are then inserted into the back of the XRS Surround. Do NOT screw the screws fully
into the back of the speaker; the screw heads must remain raised to engage the keyways
in the plate. You then simply press the XRS against the mounting plate (so the screw heads
on the XRS engage the keyway holes in the plate) and seat it downwards, locking the
screws securely into the keyways.
Attach the mounting plate as shown in the gure below, with the raised side of the keyways
and the foam pads away from the wall (and towards you).
You MUST leave at least 3/4” clearance above the speaker to allow the keyway to engage
7-5/16”
13/16”
2-3/4”
7-1/2”
Mounting Plate
13-7/16”
Mounting dimensions for XRS-4.1
XRS-4.1
Page 10
Page 13

Speaker Placement
Speaker placement is often a compromise between optimum performance, personal
preference, and site requirements. The following guidelines will serve as a starting point to
help you decide where to place your X-Ref speakers to get the best sound. Remember that
the “best” location is the one that works best for you, with your music, in your home. We
suggest you read both of the following sections; advice about stereo speaker placement
also applies to multi-channel systems and vice versa.
Positioning your X-Ref Series speakers for stereo operation
The X-Ref Tower models are intended to stand directly on the oor (with the included bases
and carpet feet), and should not be placed on top of other objects, stands, or furniture.
The X-Ref Center/LCR Monitors, when used in stereo applications, should be placed
vertically and symmetrically (with both tweeters offset either towards or away from the
center). Ideally they should be mounted on stands, with the tweeter at approximately the
ear height of the listener. (When mounted vertically, the XRC’s should not be tilted forward
or backward.)
Listener
Positioning speakers for stereo operation
Page 11
Page 14

The X-Ref Monitors usually work best when placed on stands or strong shelves at a height
which places the listener’s ear level with the center of the speaker (between the tweeter
and woofer). If your X-Ref Monitors are to be placed lower or higher than ear height, they
may sound better if tilted slightly up or down. If placed above head height, you may achieve
better results by mounting them upside down (tweeter towards the bottom).
The X-Ref Surrounds are intended to be used as surround speakers in home-theater
congurations, but may also be used (probably in multiples) to provide background music to
large areas. The X-Ref Surrounds may be placed on a shelf or attached to a wall using the
(included) mounting plate.
All X-Ref Series speakers offer a smooth off-axis response, thus will sound good whether
they are positioned to directly face the listener or to face directly forward. One option
which often produces good results is shown in the gure on the previous page; place the
speakers so that they form an equilateral triangle with the listener (the distance between
the speakers is equal to the distance between each speaker and the listener), with both
speakers facing directly forward, and with both tweeters offset towards the center.
The following are a few tips that might help you choose the perfect location for your
speakers:
• For good imaging, always try to place speaker pairs in symmetrical locations
(equidistant from side and back walls)
• Facing the speakers directly forward will tend to produce a wide sound stage; adding
toe-in (so that the speakers directly face the listening position) will make the sound
stage more focused
• Moving the speakers further apart, or positioning the tweeters towards the outside, will
make the sound stage wider; positioning the tweeters towards the center will make the
sound stage more focused
• Placing the speakers at least a few feet from front and side walls will usually improve
imaging and smooth frequency response
• Placing speakers close to room corners will usually boost bass, but often at the cost of
making the bass more boomy and less smooth
• If possible, try to make the room acoustically symmetrical from side to side; doing so
will usually signicantly improve imaging. (If you have something reective, like a large
window, on one side, have a large picture or bare wall on the other. If you have a large
absorptive couch on one side wall, balance it with a tapestry on the opposite wall.)
If your setup includes an X-Ref DSP Powered Subwoofer (or a pair), please refer to the
subwoofer’s manual for suggestions about placement and conguration.
As we said before, there is no right or wrong, so experiment and nd out what placement
works best for you.
Page 12
Page 15

Positioning your X-Ref Series speakers for home theater use
Although the goal is always to achieve the best overall listening experience, because more
speakers are required for home-theater than for stereo, you are more likely to encounter
practical constraints on where they can be located. Various surround-sound systems and
standards also recommend slightly different speaker placement for optimum performance.
When listening to most music, the surround speakers are primarily used for ambience
information. In most movies, important and highly-localized information is present in the Left
Front, Right Front, and Center (front) channels. The sound quality, voicing, and optimum
placement of those speakers is, therefore, the most critical. While surround speakers must
still be of good quality and must match the voicing of the main speakers to maintain proper
imaging and a cohesive sound stage, there is much more latitude in terms of the type of
speakers used for surrounds and how they are placed and congured.
In this section we will give you some suggestions for which speakers to use for each job,
and where to place them. Please take these suggestions as starting points and try different
variations to determine what works best for you. Neither our advice (nor anybody else’s)
should ever prevent you from doing what sounds best to you.
The X-Ref Tower models are intended to stand directly on the oor (with the included bases
and carpet points), and should not be placed on top of other objects, stands, or furniture.
They make great main Left Front and Right Front speakers.
The X-Ref Series Center/LCR Monitors are designed to work well both as Front Center
speakers in a large system (with X-Ref Towers as front mains), or as Left Front, Center
Front, and Right Front main speakers in a system where stand or shelf mounting are
preferred. If you are using them as Left Front and Right Front main speakers, they
should be placed vertically and symmetrically (with both tweeters offset either towards
or away from the center). Ideally they should be mounted on stands, with the tweeter at
approximately the ear height of the listener. (When mounted vertically, the XRC’s should not
be tilted forward or backward).
If you are using one XRC as a Center Front speaker, then it will probably be mounted
horizontally either above or below your screen. Emotiva offers a high quality stand for
supporting the XRC Center/LCR Monitors when they are mounted horizontally, which
includes a foam pad to prevent damage to your XRC’s nish, and applies a slight vertical
tilt to the speaker. We suggest offsetting the tweeter upwards and tilting the XRC upwards
when you position it below your screen, and offsetting the tweeter downwards and tilting the
speaker downwards when mounting it above your screen.
The XRC’s can also be used as surrounds, in which case they can be mounter either
vertically or horizontally. (If you mount them horizontally, try mounting them on shelves
above head height. You can use the optional stands to point them down towards the listener
for a more focused presentation, or up towards the ceiling for a more diffused ambience
effect).
Page 13
Page 16

The X-Ref Monitors are typically placed on stands or strong shelves, at a height which
places the listener’s ear level with the center of the speaker (between the tweeter and
woofer), and can be used as mains in a smaller system or as surrounds in a larger system.
If your X-Ref Monitors are to be placed above or below ear height, they may sound better
if tilted slightly up or down. If placed above head height, you may achieve better results by
mounting them upside down.
The X-Ref Surrounds are intended to be used as surround speakers in home-theater
congurations, but may also be used (probably in multiples) to provide background music to
large areas. The X-Ref Surrounds may be placed on shelves or attached to a wall using the
(included) mounting plate.
If your setup includes an X-Ref DSP Powered Subwoofer (or a pair), please refer to the
subwoofer’s manual for suggestions about placement and conguration.
As we said before, there is no right or wrong, so experiment and nd out what placement
works best for you.
Left Front
(XRT-6.2)
Left Side
Surround
(XRS-4.2)
Subwoofer
(X-Ref 12)
Center
(XRC-6.2)
Listener
Listener
Subwoofer
(X-Ref 12)
Display
Right Front
(XRT-6.2)
Right Side
Surround
(XRS-4.2)
Left Rear
Surround
(XRS-4.2)
Right Rear
Surround
(XRS-4.2)
Positioning speakers for home-theater use
Page 14
Page 17

The gure on the previous page shows one suggested conguration for a fantastic
surround-sound system. X-Ref XRT-6.2 Towers are used for the Front Left and Front Right
speakers, positioned approximately in an equilateral triangle with the listening position, with
the tweeters offset towards the center. An XRC-6.2 is used for the Front Center channel,
placed on a stand on the shelf below the center of the screen, tilted upwards, with the
tweeter offset towards the top. The Towers are positioned slightly forward of the center so
the three front speakers form an arc with the listening position. XRS-4.1 Surrounds are used
for all surround speakers. The Side Surrounds are wall-mounted to the sides of the listening
position, and the Rear Surrounds are mounted near the sides along the back wall. All of
the speakers are approximately the same distance from the listening position, which makes
setup easier and often produces astounding results. We also added a pair of X-Ref 12 DSP
Powered Subwoofers (the XRT-6.2’s don’t need subs, but they do make for an even more
impressive home theater experience).
Page 15
Page 18

Connections
Connecting your X-Ref Series speakers to a power amp or receiver
Although the X-Ref Series speakers have no special connection requirements, the following
suggestions may be helpful:
• Always use high-quality speaker wire of reasonable gauge (16 gauge or heavier)
• If you must use thinner wire, try to keep the length as short as possible
• Be careful to wire both (or all) speakers “in phase” (the plus/red terminal on each
speaker to the plus/red terminal on your amp)
• Try to use wires of equal length and gauge for symmetrical pairs of speakers
(don’t use a long 16 gauge wire for your Left Front and a short 10 gauge wire
for the Right Front)
• If you use stranded cables, use care to avoid short circuits (from stray strands touching)
• Emotiva offers very high quality pre-made speaker cables at reasonable prices
(you will nd them in the Interconnects section of our website at www.emotiva.com)
Passive Bi-Amped Speaker
Connection
AMPLIFIER 1
Bi-amp terminal
links REMOVED
Both amplier inputs
are connected to the
same preamp output
signal
SPEAKER
X-Ref Series terminal plate
(on rear panel) showing bi-amp terminal links
(REMOVE these links for
bi-wiring or bi-amping)
Standard Speaker
Connection
AMPLIFIER
SPEAKER
Bi-amp terminal
links CONNECTED
Bi-Wired Speaker
Connection
AMPLIFIER
SPEAKER
Bi-amp terminal
links REMOVED
Various types of common speaker connections (one channel shown)
AMPLIFIER 2
Page 16
Page 19

Bi-wiring and passive bi-amping
Most X-Ref loudspeakers offer removable bi-amp terminal links. By removing these links,
you can access the high-frequency and low-frequency sections of the speaker separately
and take advantage of the improvements in sound quality offered by bi-wiring or passive
bi-amping. Bi-wiring is when you use a single amplier channel for each speaker, but run
separate speaker wires from the amplier to the high-frequency and low-frequency sections
of the speaker. Bi-amping is when you use separate ampliers to power the high-frequency
and low-frequency section of each loudspeaker. Passive bi-amping means that the passive
crossover for each section of the speaker remains in-circuit, and no line-level crossover is
required between the preamp and power amps.
Bi-wiring your X-Ref Series speakers
Many listeners hear an improvement in sound quality when bi-wiring their loudspeakers.
This improvement is likely to be more signicant when long or thin speaker wires are
required, and is more noticeable with some speakers and ampliers than with others.
In a normally connected loudspeaker, a relatively large amount of current ows into each
section of the speaker (usually much more to the low-frequency section). Since this current
all shares a single wire from the amplier to the speaker, and speaker wire has a low but
nite resistance, the current owing to each section of the speaker produces a measurable
voltage drop in the wire, which in turn modulates the overall signal in the wire. So, when
there’s a lot of loud bass, it may modulate or distort the treble, and vice versa. Since the
low-frequency portion of the speaker typically operates at much higher current levels than
the high-frequency portion, yet distortion in the mid and high frequencies is typically more
audible, the most common result is a noticeable muddying and blurring of critical midrange
and high frequencies during heavy bass passages.
By providing separate paths for current ow from the amplier to the high-frequency and
low-frequency portions of the speaker, bi-wiring eliminates this interaction and the distortion
it causes. While the differences may be subtle, bi-wiring is something that can be tried quite
easily - and at minimal cost (as long as your speakers support it, all you need is a second
set of speaker wires).
To bi-wire the X-Ref speakers, remove the bi-amp terminal links from the input plate on
each speaker (shown in the gures on pages 7 and 16). Connect two sets of speaker wires
to each amplier output terminal, then connect one set to each pair of input terminals on the
X-Ref speaker. Be sure that both sets of wires are connected “in phase” (the wires from the
plus/red terminal on the amp to the plus/red terminals on both inputs of the speaker).
Note: Be sure to remove the bi-amp terminal links from the input terminals of the
speakers when using your X-Ref speakers in a bi-wired conguration. Failure to do
so will negate any positive effects of bi-wiring, and may cause damage to one or both
ampliers if hooked up incorrectly.
Page 17
Page 20

Passive bi-amping your X-Ref speakers
Bi-amping is when you use separate ampliers to power the high-frequency and
low-frequency section of each loudspeaker. Most listeners agree that bi-amping produces
a signicant improvement in sound quality. Because the load on each amplier is reduced,
and both the amplication and the high-current signal paths for the high-frequencies and
low-frequencies are kept entirely separate, the result is cleaner sound. The X-Ref series
speakers permit passive bi-amping, which means that the passive crossover for each
section of the speaker remains in-circuit, and no line-level crossover is required between
the preamp and power amps.
Implementing passive bi-amping for one pair of X-Ref speakers requires either two stereo
ampliers or four mono-block amps. For each loudspeaker, remove the
bi-amp terminal links on the input plate (shown in the gures on pages 7 and 16), connect
one power amp channel to the high-frequency section, and another to the low-frequency
section. Connect both power amp channels for each speaker to the same audio input signal
(if the preamp doesn’t have dual outputs, a simple passive splitter can be used).
If four separate mono-block power amps are used, or if two stereo amps are used, it is
generally recommended that they all be the same. Other congurations (some using
different amps) are possible, but they are beyond the scope of this manual. If you have
specic questions about various options, Emotiva Technical Support will be glad to help
you.
Caution: Be sure to remove the bi-amp terminal links from the input terminals of the
speakers when using your X-Ref speakers in a bi-amplied conguration. Failure to
do so will PROBABLY result in damage to one or both ampliers.
Note: When implementing passive bi-amping on a system with bass management,
DO NOT use the bass management feature of your preamp or pre/processor to divide
the audio spectrum between your bi-amp power amps; both power amps for each
speaker should receive THE SAME AUDIO SIGNAL.
(In a system without a subwoofer, both amps should receive the same full-range
signal; in a system with bass management that includes a subwoofer, the subwoofer
will receive the low-pass ltered output and BOTH power amp channels for each
speaker will receive the same high-pass ltered signal intended for the “main”
speaker for that channel).
Page 18
Page 21

Configuration
All of the X-Ref Tower and Center/LCR Monitor speakers are designed to be used full-range
(although smaller members are limited in their maximum low-frequency output). The X-Ref
Surrounds are, obviously, intended to be used mainly as surround speakers in a multichannel system.
If using your X-Ref loudspeakers in a stereo system with bass management and one or
more subwoofers, choose a crossover point that works well in your room.
If using your X-Ref loudspeakers in a multi-channel home theater system, the Tower models
should be set as “large” and the X-Ref Surrounds should be set as “small”. For the other
models you should try “large” or “medium” and see which works best for you (if prompted,
the X-Ref Surrounds are bipoles).
Page 19
Page 22

Care and Maintenance
Periodic Maintenance
Your X-Ref loudspeakers require no periodic maintenance or calibration.
Cleaning the Cabinet and Baffle
• The cabinets of the X-Ref loudspeakers should normally be cleaned with a rag
dampened with plain water. DONOT spray water directly onto or into the speaker and
DONOT use abrasive or chemical cleaners. Gently dry the surface with a clean soft rag
after cleaning.
• If necessary, use a mild detergent, wipe the surface with a rag dampened with plain
water afterwards to rinse it, and then gently dry the surface with a clean soft rag.
• If something nasty does get on the sides or top of your X-Ref speaker, use a rag
dampened with a weak solution of dish detergent or other mild cleaning liquid, followed
by a rag dampened with plain water, and then dry with a clean rag.
Cleaning the Grill Cloth
• If necessary, the grill cloth may be carefully vacuumed to remove dust or hair.
• Animal hair may be removed by using a “tape” type lint remover or soft brush. Avoid
using brushes with stiff bristles that may pull or damage the grill cloth.
Note: DO NOT use any sort of liquid or wet cloth on the mid/woofer cone, and avoid
touching the tweeter dome with either your ngers or any sort of cleaning cloth or
brush. DO NOT use a vacuum to clean the mid/woofer cone or tweeter dome.
Page 20
Page 23

Specifications
X-Ref XRT-6.2 Tower
Frequency response:
40 Hz to 22 kHz +/- 2.5 dB
Efficiency / Impedance:
88 dB/2.83V/1m; 4 ohms
Input connectors:
5-way binding posts (gold plated with clear insulating covers)
(two sets connected with terminal links - removable for bi-wiring or bi-amping)
Driver complement:
Two 6.5” blended-pulp cone mid/woofers
One 1” silk dome tweeter
Bass alignment:
Single front-oriented low-diffraction slot-loaded port
Crossover:
Crossover type: Multi-pole, asymmetrical
Crossover frequency: 2700 Hz
Size and weight:
Size (each): 40” high x 8.5” wide x 15” deep (41.75” x 10.5” x 17” with base)
Size (each; packaged): 49” high x 23” wide x 18.5” deep
Weight (each;net): 55.2 lbs
Weight (each;packaged): 71.9 lbs
X-Ref XRT-5.2 Tower
Frequency response:
49 Hz to 22 kHz +/- 2.5 dB
Efficiency / Impedance:
86 dB/2.83V/1m; 4 ohms
Input connectors:
5-way binding posts (gold plated with clear insulating covers)
(two sets connected with terminal links - removable for bi-wiring or bi-amping)
Driver complement:
Two 5.25” blended-pulp cone mid/woofers
One 1” silk dome tweeter
Bass alignment:
Single, front-oriented, low-diffraction slot-loaded port
Crossover:
Crossover type: Multi-pole, asymmetrical
Crossover frequency: 2700 Hz
Size and weight:
Size (each): 36.5” high x 6.5” wide x 9.5” deep (38.5” x 8.5” x 9.5” with base)
Size (each; packaged): 45.25” high x 15.5” wide x 17.5” deep
Weight (each;net): 31 lbs
Weight (each;packaged): 45.6 lbs
Page 21
Page 24

X-Ref XRC-6.2 Center/LCR Monitor
Frequency response:
45 Hz to 22 kHz +/- 2.5 dB
Efficiency / Impedance:
87 dB/2.83V/1m; 4 ohms
Input connectors:
5-way binding posts (gold plated with clear insulating covers)
(two sets connected with terminal links - removable for bi-wiring or bi-amping)
Driver complement:
Two 6.5” blended pulp cone mid/woofers
One 1” silk dome tweeter
Bass alignment:
Dual, front-oriented, low-diffraction slot-loaded ports
Crossover:
Crossover type: Multi-pole, asymmetrical
Crossover frequency: 2700 Hz
Size and weight:
Size (each): 8” high x 22” wide x 13” deep
Size (each; packaged): 14” high x 26.75” wide x 19” deep
Weight (each;net): 33 lbs
Weight (each;packaged): 40.2 lbs
X-Ref XRC-5.2 Center/LCR Monitor
Frequency response:
74 Hz to 22 kHz +/- 2.5 dB
Efficiency / Impedance:
87 dB/2.83V/1m; 4 ohms
Input connectors:
5-way binding posts (gold plated with clear insulating covers)
(two sets connected with terminal links - removable for bi-wiring or bi-amping)
Driver complement:
Two 5.25” blended-pulp cone mid/woofers
One 1” silk dome tweeter
Bass alignment:
Sealed acoustic suspension
Crossover:
Crossover type: Multi-pole, asymmetrical
Crossover frequency: 2700 Hz
Size and weight:
Size (each): 6.5” high x 19.5” wide x 8.5” deep
Size (each; packaged): 11.75” high x 23.25” wide x 12.75” deep
Weight (each;net): 17.4 lbs
Weight (each;packaged): 21.2 lbs
Page 22
Page 25

X-Ref XRM-6.1 Monitor
Frequency response:
63 Hz to 22 kHz +/- 2.5 dB
Efficiency / Impedance:
86 dB/2.83V/1m; 4 ohms
Input connectors:
5-way binding posts (gold plated with clear insulating covers)
Driver complement:
One 6.5” blended pulp cone mid/woofer
One 1” silk dome tweeter
Bass alignment:
Single, front-oriented, low-diffraction slot-loaded port
Crossover:
Crossover type: Multi-pole, asymmetrical
Crossover frequency: 3000 Hz
Size and weight:
Size (each): 14.75” high x 8” wide x 10.5” deep
Size (pair; packaged): 20.5” high x 16.5” wide x 23” deep
Weight (each;net): 19.6 lbs
Weight (pair;packaged): 47.7 lbs
X-Ref XRM-4.1 Monitor
Frequency response:
100 Hz to 20 kHz +/- 3 dB
Efficiency / Impedance:
85 dB/2.83V/1m; 5 ohms
Input connectors:
5-way binding posts (gold plated with clear insulating covers)
Driver complement:
One 4” blended pulp cone mid/woofer
One 1” silk dome tweeter
Bass alignment:
Single, front-oriented, low-diffraction slot-loaded port
Crossover:
Crossover type: Multi-pole, asymmetrical
Crossover frequency: 3000 Hz
Size and weight:
Size (each): 8.75” high x 5.5” wide x 6.5” deep
Weight (each;net): 7 lbs
Page 23
Page 26

X-Ref XRS-4.1 Surround
Frequency response:
100 Hz to 18 kHz +/- 3 dB
Efficiency / Impedance:
85 dB/2.83V/1m; 5 ohms
Input connectors:
5-way binding posts (gold plated with clear insulating covers)
Driver complement:
One 4” blended pulp cone mid/woofer
One 1” silk dome tweeter
Bass alignment:
Single, front-oriented port
Surround type:
Bipole
Crossover:
Crossover type: Multi-pole, asymmetrical
Crossover frequency: 3000 Hz
Size and weight:
Size (each): 7.25” high x 13.5” wide x 7” deep
Size (pair; packaged): 12” high x 18” wide x 17” deep
Weight (each;net): 7.4 lbs
Weight (pair;packaged): 20.6 lbs
Page 24
Page 27

Troubleshooting
The X-Ref loudspeakers are carefully designed and manufactured using only high-quality
precision components to ensure years of trouble-free operation. It’s unlikely you’ll ever have
any problems with your X-Ref loudspeakers, but if you do, here are a few things you should
try:
Problem: No output at all from one speaker
• Verify that your speaker cable hasn’t become disconnected or shorted
• Verify that your source is working (by connecting the speaker to a different channel)
• Remember that, with surround-sound systems, not all speakers will play in certain
decoder modes and with certain types of content
Problem: Very little bass or very poor imaging
(usually from front speakers)
• Verify that all speakers are connected in proper phase (red/plus terminal from each
speaker should be connected to red/plus terminal on each power amp channel). If one
or more speakers are connected in incorrect phase, the most obvious result will usually
be poor imaging and loss of bass. Surround speakers may be deliberately connected
out of phase with other speakers, but Left Front, Center Front, and Right Front speakers
should always be in phase with each other. Pairs of surrounds (both side surrounds or
both rear surrounds) should be in phase with each other even if they are out of phase
with other speakers.
Problem: Intermittent sound or odd sound from one speaker
• Verify that the speaker cable isn’t frayed, shorted, or loose
• If your speaker cables have banana plugs, verify that they are fully inserted and t
tightly in the connector.
• Verify that your source is working (by connecting the speaker to a different channel)
Problem: No sound or intermittent sound from one driver
(mid/woofer or tweeter) in one speaker
• Verify that your source is working (by connecting the speaker to a different channel)
If the problem persists, please contact Emotiva Technical Support (where a real live human
will be glad to help you) at:
615-790-6754|877-EMO-TECH(877-366-8324)
MondaythroughFriday8am-5pm(CentralStandardTime)
Page 25
Page 28

Emotiva Audio Corporation Limited Warranty
Emotiva Audio Corporation guarantees its products to be free from defective materials
and/or workmanship and will replace defective parts and repair malfunctioning products
under this warranty when the defect occurs under normal operation and use. For warranty
service, the unit must be returned to our headquarters via pre-paid transportation with a
copy of proof of purchase (i.e.: sales receipt). This warranty provides that the examination
of the return product must indicate, in our judgment, a manufacturing defect. This warranty
does not extend to any product which has been subjected to misuse, neglect, accident,
improper installation, or where the serial number has been removed or defaced. Emotiva
shall not be liable for incidental and/or consequential damages. This warranty gives
you specic legal rights. This limited warranty is freely transferable during the term of
the warranty period. The warranty on Emotiva products is not valid if the original factory
serial number has been removed, defaced, or replaced in any way. Damage to, or loss
of any software or data residing on the product, is not covered. When providing repair or
replacement service, Emotiva, where applicable, will use reasonable efforts to reinstall
the product’s original software conguration and subsequent update releases, but will not
provide any recovery or transfer of software or data contained on the serviced unit not
originally included in the product.
Customers may have additional rights, which vary from state to state or from country
to country. In the event that a provision of this limited warranty is void, prohibited, or
superseded by local laws, the remaining provisions shall remain in effect. TheEmotiva
AudioCorporationlimitedwarrantyisvalidforaperiodofve(5)yearsfromdateof
purchaseinallcountries.
For any questions regarding the Emotiva Warranty, please contact Emotiva Audio
Corporation at:
Emotiva Audio Corporation
135 SE Parkway Court
Franklin, Tennessee
37064
(615) 790-6754
customerservice@emotiva.com
www.emotiva.com
Note: The Emotiva Shipping Department WILL NOT accept equipment for service or
repair without a valid Return Merchandise Authorization (RMA) number. Please call
(615) 790-6754 to obtain an (RMA) number.
Page 26
Page 29

Contact Information
Emotiva Phone Numbers
615-790-6754|877-EMO-TECH(877-366-8324)
MondaythroughFriday8am-5pm(CentralStandardTime)
Emotiva e-mail addresses
Onlinesales,productinformation,andgeneralquestions:
sales@emotiva.com
Customerservicerelatedinquires:
customerservice@emotiva.com
Technicalsupportorserviceissues:
support@emotiva.com
Emotivawebsite
www.emotiva.com
Emotiva Shipping Address
EmotivaAudioCorporation
Attn:CustomerService
135SoutheastParkwayCourt
Franklin,TN37064
Note: To return items purchased through Emotiva for repair, warranty work, or
refund you MUST call us at 1-877-EMO-TECH to obtain a Returned Merchandise
Authorization (RMA) number.
Our Shipping Department will NOT accept packages unless they have a valid RMA number
clearly indicated on the outside of the package. ALL returns must be in original packing
materials (we’ll send you new ones if you’ve lost or discarded yours), and should be
addressed to “attn: Customer Service RMA xxxx” at the address above. You will nd more
details about the return process on our website (www.emotivapro.com), and our Technical
Support department will be glad to help you.
Page 27
Page 30

Accessories
Speaker cables
Using high-quality speaker cables will ensure that you get the best sound quality and
maximum reliability from your X-Ref loudspeakers. Emotiva Audio offers high-quality
speaker cables that feature solid engineering, premium build quality, excellent performance,
and reasonable cost (you will nd them in the Interconnects section of our website at www.
emotiva.com).
Center Stands for horizontal positioning
Emotiva offers a high quality stand for supporting the X-Ref Center/LCR Monitors when
they are mounted horizontally, which includes a foam pad to prevent damage to your
XRC’s nish, and applies a slight vertical tilt to the speaker. The stands are nished in black
lacquer and match the X-Ref Speakers perfectly.
Page 28
Page 31

Notes
Page 29
Page 32

Page 33

 Loading...