

Page 1

Reference Manual
00809-0100-4828, Rev EA
November 2007
Rosemount 1595 Conditioning Orifice Plate
www.rosemount.com
Page 2

Page 3
Reference Manual
NOTICE
00809-0100-4828, Rev EA
November 2007
Rosemount 1595
Rosemount 1595 Conditioning
Orifice Plate
Read this manual before working with the product. For personal and system safety, and for
optimum product performance, make sure you thoroughly understand the contents before
installing, using, or maintaining this product.
The United States has two toll-free assistance numbers and one International number.
Customer Central
1-800-999-9307 (7:00 a.m. to 7:00 P.M. CST)
International
1-(952) 906-8888
National Response Center
1-800-654-7768 (24 hours a day)
Equipment service needs
The products described in this document are NOT designed for nuclear-qualified
applications. Using non-nuclear qualified products in applications that require
nuclear-qualified hardware or products may cause inaccurate readings.
For information on Rosemount nuclear-qualified products, contact your local Emerson
Process Management Representative.
www.rosemount.com
Page 4

Page 5

Reference Manual
00809-0100-4828, Rev EA
November 2007
Rosemount 1595
Table of Contents
SECTION 1
Introduction
SECTION 2
Installation
APPENDIX A
Reference Data
APPENDIX B
Installation
Drawings
Using This Manual . . . . . . . . . . . . . . . . . . . . . . . . . . . . . . . . . . . . . . . 1-1
Receiving and Inspection . . . . . . . . . . . . . . . . . . . . . . . . . . . . . . . . . . 1-1
Returning the Product. . . . . . . . . . . . . . . . . . . . . . . . . . . . . . . . . . . . . 1-1
Safety Messages . . . . . . . . . . . . . . . . . . . . . . . . . . . . . . . . . . . . . . . . 2-1
Checklist . . . . . . . . . . . . . . . . . . . . . . . . . . . . . . . . . . . . . . . . . . . . 2-1
Location and Orientation. . . . . . . . . . . . . . . . . . . . . . . . . . . . . . . . . . . 2-2
Horizontal Pipe Installation . . . . . . . . . . . . . . . . . . . . . . . . . . . . . . 2-2
Vertical Pipe Installation . . . . . . . . . . . . . . . . . . . . . . . . . . . . . . . . 2-3
1595 Straight Pipe Requirements . . . . . . . . . . . . . . . . . . . . . . . . . 2-4
Installation. . . . . . . . . . . . . . . . . . . . . . . . . . . . . . . . . . . . . . . . . . . . . . 2-5
Rosemount 1595 Types: . . . . . . . . . . . . . . . . . . . . . . . . . . . . . . . . 2-5
Rosemount 1496 Types: . . . . . . . . . . . . . . . . . . . . . . . . . . . . . . . . 2-8
Rosemount 1497 Types: . . . . . . . . . . . . . . . . . . . . . . . . . . . . . . . . 2-9
Specifications . . . . . . . . . . . . . . . . . . . . . . . . . . . . . . . . . . . . . . . . . . . A-1
Performance Specifications. . . . . . . . . . . . . . . . . . . . . . . . . . . . . . A-1
Functional Specifications. . . . . . . . . . . . . . . . . . . . . . . . . . . . . . . . A-2
Physical Specifications . . . . . . . . . . . . . . . . . . . . . . . . . . . . . . . . . A-2
Dimensional Drawings . . . . . . . . . . . . . . . . . . . . . . . . . . . . . . . . . . A-4
Ordering Information. . . . . . . . . . . . . . . . . . . . . . . . . . . . . . . . . . . . . . A-7
Installation Drawings . . . . . . . . . . . . . . . . . . . . . . . . . . . . . . . . . . . B-1
TOC-1
Page 6

Rosemount 1595
Reference Manual
00809-0100-4828, Rev EA
November 2007
TOC-2
Page 7

Reference Manual
00809-0100-4828, Rev EA
November 2007
Rosemount 1595
Section 1 Introduction
Using This Manual . . . . . . . . . . . . . . . . . . . . . . . . . . . . . . . page 1-1
Receiving and Inspection . . . . . . . . . . . . . . . . . . . . . . . . . page 1-1
Returning the Product . . . . . . . . . . . . . . . . . . . . . . . . . . . . page 1-1
USING THIS MANUAL This product manual provides installation, configuration, calibration,
troubleshooting, and maintenance instructions for the Rosemount 1595
Conditioning Orifice Plate.
Section 2: Installation
Appendix A: Reference Data
Appendix B: Installation Drawings
RECEIVING
AND INSPECTION
RETURNING THE
PRODUCT
Flowmeters are available in different models and with different options, so it is
important to inspect and verify that the appropriate model was delivered
before installation.
Upon receipt of the shipment, check the packing list against the material
received and the purchase order. All items are tagged with a model number,
serial number, and customer tag number. Report any damage to the carrier.
To expedite the return process, call the Rosemount National Response
Center toll-free at 800-654-7768. This center, available 24 hours a day, will
assist you with any needed information or materials.
The center will ask for the following information:
• Product model
• Serial numbers
• The last process material to which the product was exposed
The center will provide
• A Return Material Authorization (RMA) number
• Instructions and procedures that are necessary to return goods that
were exposed to hazardous substances
NOTE
If a hazardous substance is identified, a Material Safety Data Sheet (MSDS),
required by law to be available to people exposed to specific hazardous
substances, must be included with the returned materials.
www.rosemount.com
Page 8

Rosemount 1595
Reference Manual
00809-0100-4828, Rev EA
November 2007
1-2
Page 9

Reference Manual
00809-0100-4828, Rev EA
November 2007
Rosemount 1595
Section 2 Installation
Safety Messages . . . . . . . . . . . . . . . . . . . . . . . . . . . . . . . . . page 2-1
Location and Orientation . . . . . . . . . . . . . . . . . . . . . . . . . . page 2-2
Installation . . . . . . . . . . . . . . . . . . . . . . . . . . . . . . . . . . . . . . page 2-5
SAFETY MESSAGES Instructions and procedures in this section may require special precautions to
ensure the safety of the personnel performing the operations. Please refer to
the following safety messages before performing any operation in this section.
Failure to follow these installation guidelines could result in death or serious injury:
• Make sure only qualified personnel perform the installation.
• Remove pressure and drain the pipe assembly prior to installing or removing the
orifice plate.
• If the process fluid is caustic or otherwise hazardous, follow the instruction closely
to prevent mishap.
Checklist The following is a summary of the steps required to complete a 1595
installation.
If this is a new installation, begin with step 1.
If the mounting is already in place, verify that the orifice flange size and rating
match the recommended specification and begin with step 5.
1. Determine where the 1595 is to be place within the piping system.
2. Establish the proper orientation as determined by the intended
service for the orifice plate.
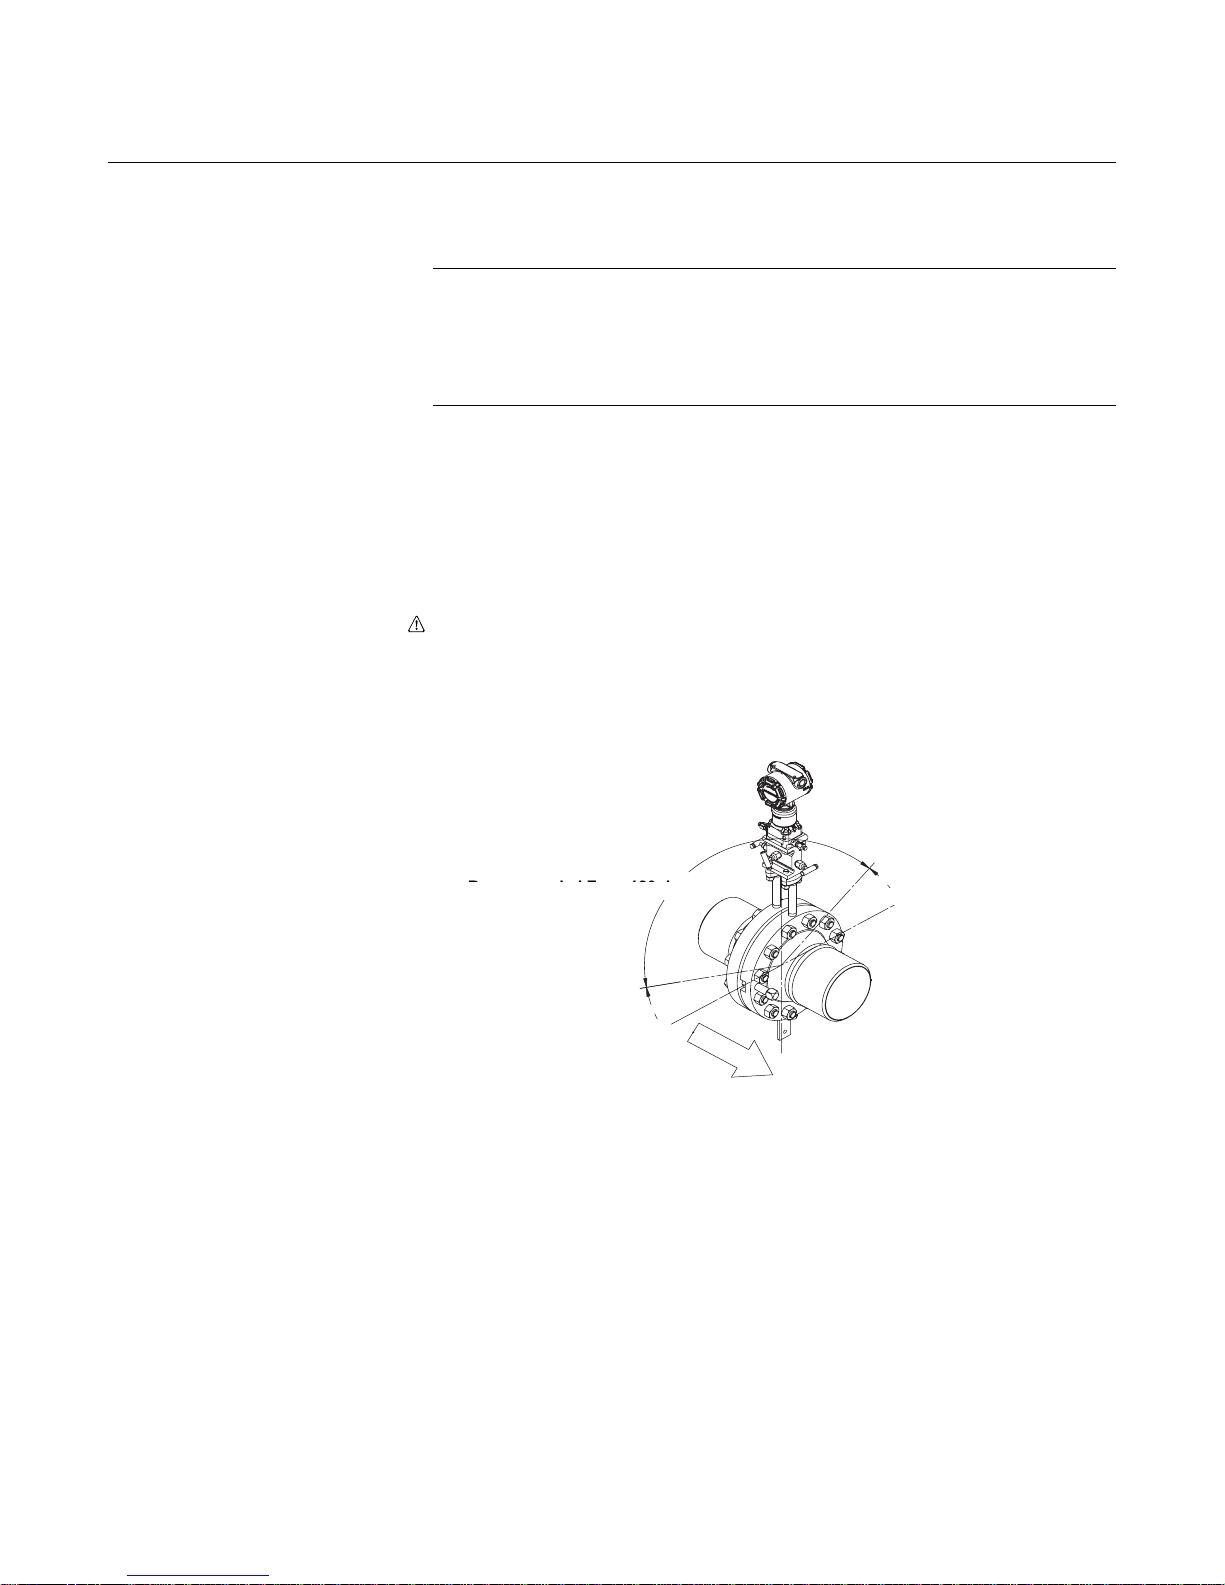
3. Orient the 1595 Conditioning Orifice Plate so the pressure taps are
centered between any two (of four) orifice bore holes. In addition, the
pressure taps should be located at 90° to the plane of the last elbow.
4. Review “Location and Orientation” on page 2-2.
5. Confirm the 1595 configuration.
6. Measure the pipe’s internal diameter (I.D.), preferably at 1 x I.D. from
the orifice flange (upstream or downstream).
NOTE
Providing the pipe’s I.D. at the time of purchasing the 1595 is necessary to
maintain published orifice plate accuracy.
7. Install the orifice plate.
8. Check for leaks.
9. Commission the orifice plate.
www.rosemount.com
Page 10
Rosemount 1595
30°
Recommended Zone 120 degrees
30 °
F
l
o
w
Recommended Zone 120°
Reference Manual
00809-0100-4828, Rev EA
November 2007
LOCATION AND
ORIENTATION
Horizontal Pipe
Installation
Figure 2-1. Gas in Horizontal
Pipes
The orifice plate electronics must be installed in the proper orientation relative
to the pipe and the fluid measured.
OPERATING TEMPERATURE LIMITS
For line sizes 2-in. (50 mm) to 24-in. (600mm)
Temperature Range: -320 to 1200°F (-196 to 649°C)
-320 to 800°F (-196 to 427°C) and differential pressure up to 800 inH
O.
2
800 to 1200°F (427 to 649°C) and differential pressure up to 400 inH2O.
Pressure Tap Orientation
Orient the 1595 Conditioning Orifice Plate so that the pressure taps are
centered between any 2 (of 4) orifice bore holes. In addition, the pressure
taps should be located at 90° to the plane of the last elbow.
The following figures show paddle style conditioning orifice plate, but
orientation pertains to both paddle and universal plate styles.
Gas in Horizontal Pipes
The electronics should be mounted above the pipe to ensure that condensate
does not collect on the transmitter sensing diaphragms. Orient the unit within
the 120° recommended zone as shown in Figure 2-1.
2-2
FLOW
Page 11

Reference Manual
Flow
00809-0100-4828, Rev EA
November 2007
Figure 2-2. Liquid and Steam in
Horizontal Pipes
Rosemount 1595
Liquid or Steam in Horizontal Pipes
The electronics should be mounted below the pipe to ensure that gases do
not collect on the transmitter sensing diaphragms.
Vertical Pipe Installation Gas in Vertical Pipes
Mount the electronics above the pipe with the instrument lines sloping down.
Figure 2-3. Gas in Vertical Pipes
FLOW
2-3
Page 12

Rosemount 1595
FLOW
Figure 2-4. Liquid and Steam in
Vertical Pipes
Reference Manual
00809-0100-4828, Rev EA
November 2007
Liquid or Steam in Vertical Pipes
Mount the transmitter below the pipe with the instrument lines sloping up.
1595 Straight Pipe
Requirements
Use the appropriate lengths of straight pipe upstream and downstream of the
1595 to minimize the effects of moderate flow disturbances in the pipe.
Table 2-1. 1595 Straight Pipe Requirements
Beta 0.20 0.40 0.65
Single 90° bend or tee 2 2 2
Two or more 90 ° bends in the same plane 2 2 2
Two or more 90° bends in different plane 2 2 2
Up to 10° of swirl
Reducer (1 line size)
side of primary
Upstream (inlet)
Butterfly valve (75% to 100% open)
Downstream (outlet) side of primary
(1) Consult an Emerson Process Management representative if the type of disturance is not listed.
(2) Not applicable in line sizes greater than 24-in. (600 mm).
(2)
(2)
(2)
(1)
2 2 2
222
2 2 N/A
222
Pressure Tap Orientation
Orient the 1595 Conditioning Orifice Plate so that the pressure taps are
centered between any 2 (of 4) orifice bore holes. In addition, the pressure
taps should be located at 90° to the plane of the last elbow.
Centering Requirements
The 1595 should be installed so that it is centered in the pipes as
recommended by ISO-5167.
NOTE
The Rosemount 1595 can be used with Rosemount 1496 Orifice Flange
Unions and Rosemount 1497 Meter Sections. For product offering see
document number 00813-0100-4792.
2-4
Page 13

Reference Manual
00809-0100-4828, Rev EA
November 2007
INSTALLATION
Rosemount 1595 Types:
Rosemount 1595
Rosemount 1595P Rosemount 1595U with Plate Holder (PH)
NOTE
For 1496 Flange Union or 1497 Meter Section installation, refer to the
Rosemount 1595 Conditioning Orifice Plate reference manual (document
number 00809-0100-4828).
Use the following steps to install the 1595 conditioning orifice plate
(paddle or universal plate style).
1. Determine Location and Orientation (see page 2-2).
2. Install the Orifice Plate
a. Depressurize the line using site-specific requirements.
b. Loosen all studs and nuts.
c. Remove the studs in one-half of the flange union.
d. Spread flange union by turning jackscrews clockwise.
e. For line sizes > 24-in (600 mm), refer to Figure 2-7 and instructions
using alignment tool.
f. Install the new plate or remove the existing plate for replacement
or inspection.
g. Install the new gaskets when installing the plate. It is
recommended that new gaskets be installed each time the orifice
flange union is separated.
h. Center the plate in the pipe I.D.
i. Release the flange union by turning the jackscrews
counter-clockwise.
j. Replace the studs.
k. Tighten studs in a star pattern.
NOTE
Standard
Using other gaskets could potentially affect the measurement.
1
/16-in. thick fiber gaskets are recommended for use with the 1595.
2-5
Page 14

Rosemount 1595
Nuts
Transmitter
Pipe
Section
1595
(1)
Jackscrew (2)
Plug (2)
Nut
Gasket (2)
Jackscrew
Nut
F
lo
w
(1) The installation drawings applies when using the Rosemount 3051S, Rosemount 3051C,
and Rosemount 3095MV transmitter. See the following documents for quick installation instruction of
the transmitters.
Rosemount 3051S: document number 00825-0100-4801
Rosemount 3051C: document number 00825-0100-4001
Rosemount 3095MV: document number 00825-0100-4716
Jackscrew
Nut
Stud
Nuts
Transmitter
Stud
Pipe
Section
Nuts
Jackscrew
Nut
(1) The installation drawings applies when using the Rosemount 3051S, Rosemount 3051C,
and Rosemount 3095MV transmitter. See the following documents for quick installation instruction of
the transmitters.
Rosemount 3051S: document number 00825-0100-4801
Rosemount 3051C: document number 00825-0100-4001
Rosemount 3095MV: document number 00825-0100-4716
Jackscrew
1595
(1)
Figure 2-5. Rosemount 1595P
Installation
Reference Manual
00809-0100-4828, Rev EA
November 2007
Figure 2-6. Rosemount 1595U
with Plate Holder (PH)
Installation
NOTE
For 1595U Universal Conditioning Orifice Plate style, refer to manufacturer’s
orifice fitting installation manual for installation details.
2-6
Page 15

Reference Manual
Nuts
Jackscrew
Nut
Jackscrew
Nuts
Pipe
Section
Jackscrew
Jackscrew
Nut
Gasket (2)
1595
(1)
Stud
Transmitter
Alignment Tools
“A”
DETAIL “A”
1595
(1)
Alignment Tools
Gasket (2)
00809-0100-4828, Rev EA
November 2007
Figure 2-7. Rosemount 1595P
(sizes > 24-in (600 mm))
installation
Rosemount 1595
For sizes > 24-in. (600 mm) and use with alignment tool.
1. When an alignment tool is provided, install the alignment tool on the
flange studs shown in Figure 2-7.
2. For Horizontal installation, use the horizontal lift hole (stamped HLH
on paddle) to lift the conditioning orifice plate from a horizontal
position and guide into location between the flanges.
3. For Vertical installation, first use the horizontal lift hole (HLH) to lift the
conditioning orifice plate from a horizontal position to vertical, then
use the vertical lift hole (stamped VLH on paddle) to lift the
conditioning orifice plate vertically and guide into location between
the flanges.
(1) The installation drawings applies when using the Rosemount 3051S, Rosemount 3051C,
and Rosemount 3095MV transmitter. See the following documents for quick installation instruction of
the transmitters.
Rosemount 3051S: document number 00825-0100-4801
Rosemount 3051C: document number 00825-0100-4001
Rosemount 3095MV: document number 00825-0100-4716
2-7
Page 16

Rosemount 1595
Rosemount 1496 Types:
1496 WN
1496 SO
1496 RJ
Reference Manual
00809-0100-4828, Rev EA
November 2007
NOTE
To ensure the best possible flow measurement accuracy, Emerson provides
an Official DP Calculation Sheet with every 1595 Conditioning Orifice Plate.
The Official DP Calculation sheet uses the calibration factor which is unique to
that device and is also stamped on the orifice plate. The Official DP
Calculation Sheet displays the expected full scale flow value and the
calculated full scale DP value and is corrected for the unique calibration factor
which is also displayed on the sheet. This full scale DP value should be used
to range a DP transmitter for the referenced application. Or, the calibration
factor should be used as a correction factor when configuring a flow computer
for the Rosemount Conditioning Orifice Plate.
Step 1: Determine the Proper Orientation
See “Location and Orientation” on page 2-2.
Step 2: Weld the Flange Union.
Follow these steps to weld the orifice flanges to the pipe.
1. Depressurize the line using site-specific requirements
2. Prepare the pipe ends.
a. For flanged models, ensure the pipe mounting flange is the same
size or rating.
b. For threaded models, ensure the pipe union or coupling is the
same size pipe thread as the meter section
3. Ensure that the pipe mounting flange is the correct size and rating.
4. Ensure that the flange taps are aligned and level.
5. Weld the orifice flange to the pipe. To avoid serious burns, allow the
orifice flanges to cool before continuing.
2-8
Page 17

Reference Manual
00809-0100-4828, Rev EA
November 2007
Rosemount 1497 Types:
1497 WN
1497 RJ
1497SO
Rosemount 1595
Step 1: Determine the Proper Orientation
See “Location and Orientation” on page 2-2.
Step 2: Install the Meter Section
Follow these steps to weld the orifice flanges to the pipe.
1. Depressurize the line using site-specific requirements
2. Remove the section of pipe that will be replaced by the meter section
using site-specific requirements
3. Ensure that the pipe mounting flange is the correct size and rating
a. For flanged models, ensure the pipe mounting flange is the same
size or rating.
b. For threaded models, ensure the pipe union or coupling is the
same size pipe thread as the meter section
4. Orient the assembly appropriately for the type of service (liquid, gas,
or steam).
5. Ensure that the I.D. of the meter section and the I.D. of the pipe are
concentric.
6. Complete assembly to the appropriate connections. To avoid serious
burns, allow the orifice flanges to cool before continuing.
For commissioning, operation and maintenance, refer to the appropriate
transmitter reference manual
• Rosemount 3051C Pressure Transmitter Reference Manual
(document number 00809-0100-4001)
• Rosemount 3051S Series Pressure Transmitter Reference Manual
(document number 00809-0100-4801)
• Rosemount 3095M Mass Flow Transmitter Reference Manual
(document number 00809-0100-4716)
2-9
Page 18

Rosemount 1595
Reference Manual
00809-0100-4828, Rev EA
November 2007
2-10
Page 19

Rosemount 1595
Reference Manual
00809-0100-4828, Rev EA
November 2007
2-11
Page 20

Rosemount 1595
Reference Manual
00809-0100-4828, Rev EA
November 2007
2-12
Page 21

Reference Manual
00809-0100-4828, Rev EA
November 2007
Rosemount 1595
Appendix A Reference Data
Specifications . . . . . . . . . . . . . . . . . . . . . . . . . . . . . . . . . . . page A-1
Dimensional Drawings . . . . . . . . . . . . . . . . . . . . . . . . . . . . page A-4
Ordering Information . . . . . . . . . . . . . . . . . . . . . . . . . . . . . page A-7
SPECIFICATIONS The Rosemount 1595 can be used with Rosemount 1496 Orifice Flange
Unions and Rosemount 1497 Meter Sections. For product offering see
document number 00813-0100-4792.
Performance
Specifications
Flow Coefficient Uncertainty
Table A-1. Discharge Coefficient Uncertainty
Beta Ratio
β = 0.20 ±0.50%
β = 0.40 ±0.50%
β = 0.65 ±1.00%
(1) For 0.65 beta and ReD< 10,000 add an additional 0.5% to the
(1)
Discharge Coefficient Uncertainty.
Cd Uncertainty
Sizing
™
Perform a flow calculation using the Instrument Toolkit
software package.
Alternatively, contact an Emerson Process Management representative. The
“Configuration Data Sheet (CDS)” is required prior to order for application
verification.
Straight Pipe Requirement
Use the appropriate lengths of straight pipe upstream and downstream of the
1595 to minimize the effects of moderate flow disturbances in the pipe.
Table A-2 lists recommended lengths of straight pipe.
Table A-2. 1595 Straight Pipe Requirements
Beta 0.20 0.40 0.65
Single 90° bend or tee 2 2 2
Two or more 90 ° bends in the same plane 2 2 2
Two or more 90° bends in different plane 2 2 2
Up to 10° of swirl
Reducer (1 line size)
side of primary
Upstream (inlet)
Butterfly valve (75% to 100% open)
Downstream (outlet) side of primary
(1) Consult an Emerson Process Management representative if disturbance is not listed.
(2) Not applicable in line sizes greater than 24-in. (600 mm).
(2)
(2)
(2)
(1)
2 2 2
222
2 2 N/A
222
www.rosemount.com
Pressure Tap Orientation
Orient the 1595 Conditioning Orifice Plate so that the pressure taps are
centered between any 2 (of 4) orifice bore holes. In addition, the pressure
taps should be located at 90° to the plane of the last elbow.
Page 22

Rosemount 1595
Reference Manual
00809-0100-4828, Rev EA
November 2007
Centering Requirements
The 1595 should be installed so that it is centered in the pipes as
recommended by ISO-5167.
Functional
Specifications
Service and Flow Range
Liquid, gas or vapor turbulent flow, for pipe Reynold’s Numbers greater than
5,000. For pipe Reynold's Numbers less than 10,000 add an additional +0.5%
uncertainty to the discharge coefficient uncertainty.
Pipe Sizes
2 to 24-in. (50 to 600 mm). Contact Emerson Process Management for other pipe sizes.
Operating Limits
For line sizes 2-in. (50 mm) to 24-in. (600 mm)
Temperature Range: –320 to 1200 °F (–196 to 649 °C)
• – 320 to 800 °F (–196 to 427 °C) and differential pressure up to 800 inH
• 800 to 1200 °F (427 to 649 °C) and differential pressure up to 400 inH
Maximum Working Pressure
• Flange rating per ANSI B16.5 and DIN EN 1092-1.
Physical Specifications Materials of Construction
Orifice Plate
Table A-3.
Code Description ASTM UNS DIN (W.-Nr.)
S 316/316L SST A240 Gr 316/316L S31600 / S31603 1.4401/1.4404
L 304/304L SST A240 Gr 304/304L S30400 / S30403 1.4301 / 1.4306
H Hastelloy C-276 B575 Gr N10376 N10276 2.4819
M Monel 400 B127 Gr N04400 N04400 2.4360
(1.4436/1.4435)
0
2
0
2
A-2
Flange Mounting Hardware
• The 1595 can be tailored for use in conjunction with the Rosemount 1496
Flange Union and, if required, the Rosemount 1497 Meter Section. See
Product Data Sheet 00813-0100-4792 for more information regarding the
Rosemount 1496 and 1497.
Page 23

Reference Manual
00809-0100-4828, Rev EA
November 2007
Rosemount 1595
Typical Orifice Hole Sizes
Beta is calculated by: (β) = d
typical orifice hole size (d
the four typical orifice holes.
Table A-4. Typical Orifice Hole Sizes
Line Size Pipe ID
2-in (50.8 mm) 2.067-in. (52.502 mm) 0.207 (5.26) 0.413 (10.49) 0.620 (15.75)
3-in. (76.2 mm) 3.068-in. (77.927 mm) 0.307 (7.80) 0.614 (15.60) 0.997 (25.32)
4-in. (101.6 mm) 4.026-in. (102.26 mm) 0.403 (10.25) 0.805 (20.45) 1.308 (32.22)
6-in. (152.4 mm) 6.065-in. (154.051 mm) 0.607 (15.42) 1.213 (30.81) 1.971 (50.06)
8-in. (203.2 mm) 7.981-in. (202.717 mm) 0.798 (20.27) 1.596 (40.54) 2.594 (65.89)
10-in. (254.0 mm) 10.02-in. (254.508 mm) 1.002 (25.45) 2.004 (50.90) 3.257 (82.73)
12-in. (304.8 mm) 12.00-in. (304.8 mm) 1.200 (30.48) 2.400 (60.96) 3.900 (99.06)
14-in. (355.6 mm) 13.124-in. ( 333.35 mm) 1.312 (33.32) 2.625 (66.68) 4.265 (108.33)
16-in. (406.4 mm) 15.000-in. (381.00 mm) 1.500 (38.10) 3.000 (76.20) 4.875 (123.83)
18-in. (457.2 mm) 16.876-in. (428.65 mm) 1.688 (42.88) 3.375 (85.73) 5.485 (139.32)
20-in. (508.0 mm) 18.812-in. (477.82 mm) 1.881 (47.78) 3.762 (95.55) 6.114 (155.30)
24-in. (609.6 mm) 22.624-in. (574.65 mm) 2.262 (57.45) 4.525 (114.94) 7.353 (186.77)
(1) For 2-in. (50.8 mm) line size, the beta (β) is 0.60.
/ Pipe ID, where the calculated bore is equal to 2 x
C
= 2d). The table below shows the diameter of each of
C
Beta (β) = 0.20dBeta (β) = 0.40dBeta (β) = 0.65
d
(1)
Orifice Type
• Paddle, square-edge, concentric
• Universal, square-edge, concentric
A-3
Page 24

Rosemount 1595
Paddle Width
Paddle
Length
Diameter
DIMENSIONAL DRAWINGS
Rosemount 1595 Conditioning Orifice Plate
Reference Manual
00809-0100-4828, Rev EA
November 2007
(ANSI, Paddle, Square edged, Concentric)
Table A-5. Orifice Plate Dimensions in inches (millimeters)
Diameter for Paddle Type
Line Size
2 -in.
(50.8 mm)
3-in.
(76.2 mm)
4-in.
(101.6 mm)
6-in.
(152.4 mm)
8-in.
(203.2 mm)
10-in.
(254.0 mm)
12-in.
(304.8 mm)
14-in.
(355.6 mm)
16-in
(406.4 mm)
18-in.
(457.2 mm)
20-in.
(580.0 mm)
24-in.
(609.6 mm)
NOTE: Consult factory for availability of line sizes and flange ratings not shown in the above table.
4.125
(104.78)
5.375
(136.53)
6.875
(174.63)
8.750
(222.25)
11. 000
(279.4)
13.375
(339.725)
16.125
(409.58)
17.750
(450.85)
20.250
(514.35)
21.500
(546.1)
23.750
(603.25)
28.125
(714.375)
4.375.
(111.13)
5.875
(149.23)
7.125
(180.98)
9.875
(250.83)
12.125
(307.98)
14.250
(361.95)
16.625
(422.26)
19.125
(485.78)
21.250
(539.75)
23.375
(593.725)
25.625
(650.875)
30.375
(771.525)
4.375
(111 .13)
5.875
(149.23)
7.625
(193.68)
10.500
(266.7)
12.625
(320.675)
15.750
(400.05)
18.000
(457.2)
19.375
(492.125)
22.250
(565.15)
24.000
(609.6)
26.750
(679.45)
31.000
(787.4)
5.625
(142.875)
6.625
(168.275)
8.125
(206.35)
11. 375
(288.925)
14.125
(358.775)
17.125
(434.975)
19.625
(498.475)
5.625
(142.875)
6.875
(174.625)
8.250
(209.550)
11.125
(282.575)
13.875
(352.425)
17.125
(434.975)
20.500
(520.7)
5.750
(146.050)
7.750
(196.85)
9.250
(234.95)
12.500
(317.50)
15.250
(387.350)
18.750
(476.25)
21.625
(549.275)
Paddle Length Paddle Width 150# 300# 600# 900# 1500# 2500#
4.0
(101.6)
4.0
(101.6)
4.0
(101.6)
4.0
(101.6)
6.0
(152.4)
6.0
(152.4)
6.0
(152.4)
6.0
(152.4)
6.0
(152.4)
6.0
(152.4)
6.0
(152.4)
6.0
(152.4)
1.0
(25.4)
1.0
(25.4)
1.0
(25.4)
1.0
(25.4)
1.5
(38.1)
1.5
(38.1)
1.5
(38.1)
1.5
(38.1)
1.5
(38.1)
1.5
(38.1)
1.5
(38.1)
1.5
(38.1)
A-4
Page 25

Reference Manual
1595U Orifice Universal Type
(Universal, Square edged, Concentric
Diameter
Table A-6. Orifice Plate Dimensions in inches (millimeters)
Line Size Diameter for Universal Type
2-in. 2.437-in. (61.8998 mm)
3-in. 3.437-in. (87.2998 mm)
4-in. 4.406-in. (111.912 mm)
6-in. 6.437-in. (163.5 mm)
8-in. 8.437-in. (214.3 mm)
10-in. 10.687-in. (271.45 mm)
12-in. 12.593-in. (319.862 mm)
NOTE: Consult Factory for availability of line sizes not shown in the above table.
Paddle Width
Paddle
Length
Diameter
00809-0100-4828, Rev EA
November 2007
Rosemount 1595
Rosemount 1595 Conditioning Orifice Plate
(DIN, Paddle, Square edged, Concentric)
Table A-7. Orifice Plate Dimensions in millimeters (inches)
Line Size
PN 10 PN 16 PN 25 PN 40 PN 63/64 PN 100
DN 50 (2-in.) 107 (4.21) 107 (4.21) 107 (4.21) 107 (4.21) 113 (4.45) 119 (4.69) 101.6 (4.0) 25.4 (1.0)
DN 80 (3-in.) 142 (5.60) 142 (5.60) 142 (5.60) 142 (5.60) 148 (5.82) 154 (6.06) 101.6 (4.0) 25.4 (1.0)
DN 100 (4-in.) 162 (6.38) 162 (6.38) 168 (6.61) 168 (6.61) 174 (6.85) 180 (7.09) 101.6 (4.0) 25.4 (1.0)
DN 150 (6-in.) 218 (8.58) 218 (8.58) 224 (8.82) 224 (8.82) 247 (9.72) 257 (10.12) 101.6 (4.0) 25.4 (1.0)
DN 200 (8-in.) 273 (10.74) 273 (10.74) 284 (11.18) 290 (11.42) 309 (12.17) 324 (12.76) 152.4 (6.0) 38.1 (1.5)
DN 250 (10-in.) 328 (12.91) 329 (12.95) 340 (13.39) 352 (13.86) 364 (14.33) 391 (15.39) 152.4 (6.0) 38.1 (1.5)
DN 300 (12-in.) 378 (14.88) 384 (15.12) 400 (15.75) 417 (16.42) 424 (16.69) 458 (18.03) 152.4 (6.0) 38.1 (1.5)
DN 350 (14-in) 438 (17.244) 444 (17.48) 457 (17.99) 474 (18.66) 486 (19.13) 512 (20.16) 152.4 (6.0) 38.1 (1.5)
DN 400 (16-in.) 489 (19.252) 495 (19.49) 514 (20.24) 546 (21.50) 543 (21.38) 572 (22.52) 152.4 (6.0) 38.1 (1.5)
DN 450 (18-in.) 538.9 (21.220) 555 (21.85) N/A 571 (22.48) N/A N/A 152.4 (6.0) 38.1 (1.5)
DN 500 (20-in.) 594 (23.386) 617 (24.29) 624 (24.57) 628 (24.72) 657 (25.87) 704 (27.72) 152.4 (6.0) 38.1 (1.5)
DN 600 (24-in.) 694.9 (27.36) 734 (28.90) 731 (28.78) 747 (29.41) 7641 (30.08) 813 (32.01) 152.4 (6.0) 38.1 (1.5)
NOTE: Consult factory for availability of line sizes and flange ratings not shown in the above table.
Diameter (max) – by flange rating
Paddle
Length
Paddle
Width
A-5
Page 26

Reference Manual
00809-0100-4828, Rev EA
Rosemount 1595
Table A-8. A.P.I Ring No.’s and Rating
Line Size A.P.I Ring No. Rating (lbs.) Line Size A.P.I Ring No. Rating (lbs.)
02 R-23 300-600 08 R-49 300-600 & 900
02 R-24 900-1500 08 R-50 1500
02 R-26 2500 08 R-51 2500
03 R-31 300-600 & 900 10 R-53 300-600 & 900
03 R-32 2500 10 R-54 1500
03 R-35 1500 10 R-55 2500
04 R-37 300-600 & 900 12 R-57 300-600 & 900
04 R-38 2500 12 R-58 1500
04 R-39 1500 12 R-59 2500
06 R-45 300-600 & 900
06 R-46 1500
06 R-47 2500
NOTE
Refer to Table 5 for line size and pressure rating availability.
November 2007
Table A-9. Available Beta Ratio (β)
The table below shows the available Beta Ratio (β) for line size vs. pipe schedule.
Pipe
Line Size
2 ≤ 80 0.20, 0.40, 0.60 14 ≤ 80 0.20, 0.40, 0.65
2 160 0.20 14 100 0.20, 0.40
2 XXS 0.20 14 120 0.20, 0.40
3 ≤ 80 0.20, 0.40, 0.65 14 140 0.20, 0.40
3 160 0.20, 0.40 14 160 0.20, 0.40
3 XXS 0.20 14 XXS 0.20, 0.40
4 ≤ 80 0.20, 0.40, 0.65 16 ≤ 80 0.20, 0.40, 0.65
4 120 0.20, 0.40 16 100 0.20, 0.40
4 160 0.20, 0.40 16 120 0.20, 0.40
4 XXS 0.20 16 140 0.20, 0.40
6 ≤ 80 0.20, 0.40, 0.65 16 160 0.20, 0.40
6 120 0.20, 0.40 16 XXS 0.20, 0.40
6 160 0.20, 0.40 18 ≤ 80 0.20, 0.40, 0.65
6 XXS 0.20 18 100 0.20, 0.40, 0.65
8 ≤ 80 0.20, 0.40, 0.65 18 120 0.20, 0.40
8 100 0.20, 0.40, 0.65 18 140 0.20, 0.40
8 120 0.20, 0.40 18 160 0.20, 0.40
8 140 0.20, 0.40 18 XXS 0.20, 0.40
8 160 0.20, 0.40 20 ≤ 80 0.20, 0.40, 0.65
8 XXS 0.20, 0.40 20 100 0.20, 0.40, 0.65
10 ≤ 80 0.20, 0.40, 0.65 20 120 0.20, 0.40
10 100 0.20, 0.40, 0.65 20 140 0.20, 0.40
10 120 0.20, 0.40 20 160 0.20, 0.40
10 140 0.20, 0.40 20 XXS 0.20, 0.40
10 160 0.20, 0.40 24 ≤ 80 0.20, 0.40, 0.65
10 XXS 0.20, 0.40 24 100 0.20, 0.40
12 ≤ 80 0.20, 0.40, 0.65 24 120 0.20, 0.40
12 100 0.20, 0.40 24 140 0.20, 0.40
12 120 0.20, 0.40 24 160 0.20, 0.40
12 140 0.20, 0.40 24 XXS 0.20, 0.40
12 160 0.20, 0.40
12 XXS 0.20, 0.40
Schedule
Beta (β) Available Line Size
Pipe
Schedule
Beta (β) Available
A-6
Page 27

Reference Manual
00809-0100-4828, Rev EA
November 2007
Rosemount 1595
ORDERING INFORMATION
Rosemount 1595 Orifice Plate Ordering Table
Model Product Description
1595 Conditioning Orifice Plate
Code Plate Type
P Paddle, Square Edged
(1)
U
Code Line Size
020 2-in. (50 mm)
030 3-in. (76 mm)
040 4-in. (100 mm)
060 6-in. (150 mm)
080 8-in. (200 mm)
100 10-in. (250 mm)
120 12-in. (300 mm)
140 14-in. (350 mm)
160 16-in. (400 mm)
180 18-in. (450 mm)
200 20-in. (500 mm)
(2)
240
Code Flange Rating
A1 ANSI Class 150 Raised Face (Note: Not compatible with standard ASME B16.36 Orifice Flanges)
A3 ANSI Class 300 Raised Face
A6 ANSI Class 600 Raised Face
A9 ANSI Class 900 Raised Face
AF ANSI Class 1500 Raised Face
AT ANSI Class 2500 Raised Face
D1 DIN PN 10 (only available with Plate Type P)
D2 DIN PN 16 (only available with Plate Type P)
D3 DIN PN 25 (only available with Plate Type P)
D4 DIN PN40 (only available with Plate Type P)
(3)
D5
D6 DIN PN 100 (only available with Plate Type P)
(1)
R3
(1)
R6
(1)
R9
(1)
RF
(1)
RT
Code Material Type
S 316/316L Stainless Steel
L 304/304L Stainless Steel
M Monel
H Hastelloy® C-276
Code Orifice Plate Thickness Plate Type T Plate Type U
A 0.125-in. Line Sizes 2 to 4-in. (50 to 100 mm) Line size 2 to 6-in. (50 to 150 mm)
B 0.250-in. Line Sizes 6 to 12-in. (150 to 300 mm) Line size 8 to 12-in. (200 to 300 mm)
C 0.375-in. Line Sizes 14 to 20-in. (350 to 500 mm See footnote
D 0.500-in. Line Size 24-in. (600 mm) See footnote
Code Beta Ratio
020 0.20 Beta Ratio
040 0.40 Beta Ratio
065 0.65 Beta Ratio (0.60 beta ratio for Line Size option 020 only)
Universal, Square Edge
24-in. (600 mm)
DIN PN 63 (only available with Plate Type P)
ANSI Class 300 Ring Joint (only available with Orifice Plate Type code U and requires Plate Holder code PH)
ANSI Class 600 Ring Joint (only available with Orifice Plate Type code U and requires Plate Holder code PH)
ANSI Class 900 Ring Joint (only available with Orifice Plate Type code U and requires Plate Holder code PH)
ANSI Class 1500 Ring Joint (only available with Orifice Plate Type code U and requires Plate Holder code PH)
ANSI Class 2500 Ring Joint (only available with Orifice Plate Type code U and requires Plate Holder code PH)
®
(2)
(2)
A-7
Page 28

Reference Manual
00809-0100-4828, Rev EA
Rosemount 1595
Rosemount 1595 Orifice Plate Ordering Table
Code Options
Flow Calibration
WC Discharge Coefficient Verification (3 points)
WD Discharge Coefficient Verification (10 points)
Plate Holder
PH Plate Holder for Universal Type Orifice Plate for use with RTJ flange or section
Special Cleaning
P2 Cleaning for special processes
Special Inspection
QC1 Visual and dimensional Inspection with certification
QC7 Inspection and performance certificate
Material Traceability Certification
Q8 Material Certification per ISO 10474 3.1-B and EN 10204 3.1
Code Conformance
(4)
J5
Country Certification
J1 Canadian Registration
Typical Model
Number: 1595 P 060 A3 S A 040
(1) Currently available up to 12-in. (300 mm) line size.
(2) Consult factory for availability of line sizes, flange ratings and plate thicknesses not shown.
(3) Previously PN64.
(4) Materials of Construction comply with metallurgical requirements within NACE MR0175/ISO for sour oil field production environments. Environmental limits
apply to certain materials. Consult latest standard for details. Selected materials also conform to NACE MR0103 for sour refining environments.
NACE MR-0175 / ISO 15156
November 2007
A-8
Page 29

Reference Manual
00809-0100-4828, Rev EA
November 2007
Rosemount 1595
Appendix B Installation Drawings
Installation Drawings See the appropriate reference manual for 1496 Flange Unions and 1497
Meter sections being used in the assembly.
• Rosemount 1495 Orifice Plates (document number 00809-0100-4792)
www.rosemount.com
Page 30

Rosemount 1595
Reference Manual
00809-0100-4828, Rev EA
November 2007
B-2
Page 31

Page 32

Reference Manual
00809-0100-4828, Rev EA
November 2007
Standard Terms and Conditions of Sale can be found at www.rosemount.com\terms_of_sale
The Emerson logo is a trade mark and service mark of Emerson Electric Co.
Rosemount and the Rosemount logotype are registered trademarks of Rosemount Inc.
PlantWeb is a registered trademark of one of the Emerson Process Management group of companies.
All other marks are the property of their respective owners.
Emerson Process Management
Rosemount Divison
8200 Market Boulevard
Chanhassen, MN 55317 USA
T (U.S.) 1-800-999-9307
T (International) (952) 906-8888
F (952) 949-7001
www.rosemount.com
Emerson Process
Management GmbH & Co.
Argelsrieder Feld 3
82234 Wessling
Germany
Tel 49 (8153) 9390
Fax 49 (8153) 939172
¢00809-0100-4828t¤
© 2007 Rosemount Inc. All rights reserved.
Emerson Process Management Asia
Pacific Private Limited
1 Pandan Crescent
Singapore 128461
T (65) 6777 8211
F (65) 6777 0947
Enquiries@AP.EmersonProcess.com
 Loading...