

Page 1
1
Thank you
For purchasing the “CD Cruiser
TM
” Portable CD audio system from Emerson. This uniquely designed
product has a built-in CD player with programmable memory and repeat playback. It also features a great
sounding AM/FM stereo radio and a stereo cassette player/recorder that will allow you to make direct
recordings from either the radio or the CD player. It has two full-range dynamic speakers and a stereo-wide
function that provides expanded stereo separation at the touch of a button.
We are sure that the “CD Cruiser
TM
” will provide you with many years of exceptional performance with a
minimum of care and maintenance. Please review the contents of this instruction manual completely and
carefully before operating your unit, to make sure that you understand all functions and operations and get
the maximum benefit out of all the great features included in this product. If you should encounter any
problems with the set-up or operation of this product, please contact the Emerson Radio Corporation
Customer Service hot line, toll free, at 1-800-898-9020.
The serial number of your unit can be found on a label on the bottom of the cabinet. We suggest that you
record the serial number in the space provided below in case this information is ever needed at a future
date.
Model Number: PD6528
Serial Number _______________________________________
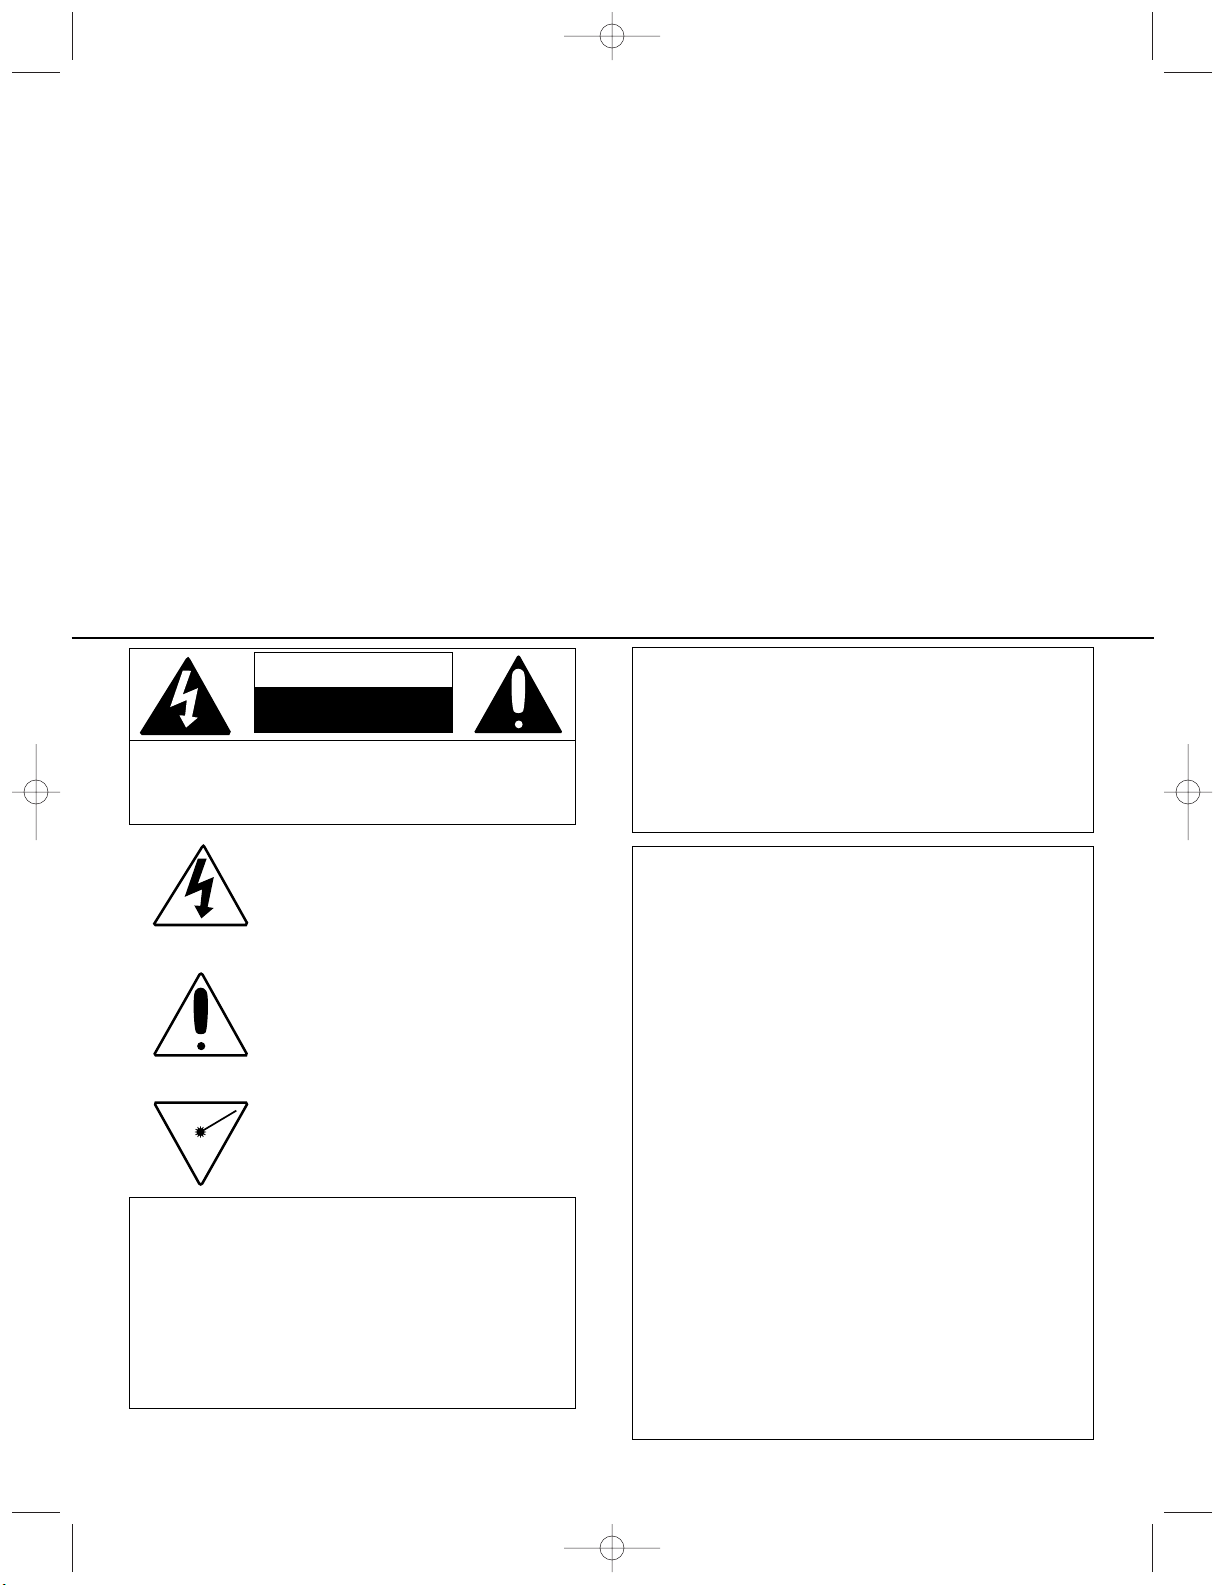
CAUTION:
TO REDUCE THE RISK OF ELECTRIC
SHOCK,
DO NOT REMOVE COVER (OR BACK). NO
USER-SERVICEABLE PARTS INSIDE. REFER
SERVICING TO QUALIFIED SERVICE PERSONNEL.
CAUTION
RISK OF ELECTRIC SHOCK
DO NOT OPEN
DANGEROUS VOLTAGE
The lightning flash with arrowhead symbol,
within an equilateral triangle is intended to alert
the user to the presence of uninsulated
dangerous voltage within the product’s
enclosure that may be of sufficient magnitude to
constitute a risk of electric shock to persons.
ATTENTION
The exclamation point within an equilateral
triangle is intended to alert the user to the
presence of important operating and
maintenance (servicing) instructions in the
literature accompanying the appliance.
DANGER:
Invisible and hazardous laser radiation when
open and interlock failed or defeated. Avoid
direct exposure to beam.
FCC WARNING:
This equipment may generate or use radio
frequency energy. Changes or modifications to
this equipment may cause harmful interference
unless the modifications are expressly approved
in the instruction manual. The user could lose
the authority to operate this equipment if an
unauthorized change or modification is made.
LASER SAFETY: This unit employs a laser. Only
qualified service personnel should attempt to
service this device due to possible eye injury.
CAUTION: USE OF CONTROLS,
ADJUSTMENTS OR PERFORMANCE
PROCEDURE HEREIN MAY RESULT IN
HAZARDOUS RADIATION EXPOSURE.
INFORMATION
This equipment has been tested and found to comply
with the limits for a Class B digital device, pursuant to
Part 15 of the FCC Rules. These limits are designed
to provide reasonable protection against harmful
interference in a residential installation. This
equipment generates, uses, and can radiate radio
frequency energy and, if not installed and used in
accordance with the instructions, may cause harmful
interference to radio communications. However,
there is no guarantee that interference will not occur
in a particular installation. If this equipment does
cause harmful interference to radio or television
reception, which can be determined by turning the
equipment off and on, the user is encouraged to try to
correct the interference by one or more of the
following measures:
• Reorient or relocate the receiving antenna.
• Increase the separation between the equipment
and receiver.
• Connect the equipment into an outlet on a circuit
different from that to which the receiver is connected.
• Consult the dealer or an experienced radio/TV
technician for help.
PD6528 O/M.QXD 1/16/01 3:50 PM Page 1
Page 2
2
PREPARATION FOR USE
Unpacking and Setup
• Carefully remove the unit from the display carton and remove all packing material from the unit itself.
• Remove any descriptive labels that may be found on either the front or top cabinet of the unit. Do not
remove any labels located on either the back or bottom cabinet of the unit.
• The detachable AC power cord is packed in the carton separately from the unit. Make sure that the AC
power cord is not accidentally discarded with the carton or packing material.
• Press the CD Door OPEN Button to open the CD compartment door. There is a white card in the CD
compartment which is intended to prevent the CD pickup from moving during shipment of the product.
Remove this card from the CD compartment before use.
Power Sources
This portable audio system is designed to operate on either 110-120V AC 60Hz house current or 12V DC,
using 8 ‘C’ batteries (UM-2), not included. Attempting to operate this unit from any other power source may
cause damage to the unit, which is not covered by your warranty.
AC Operation
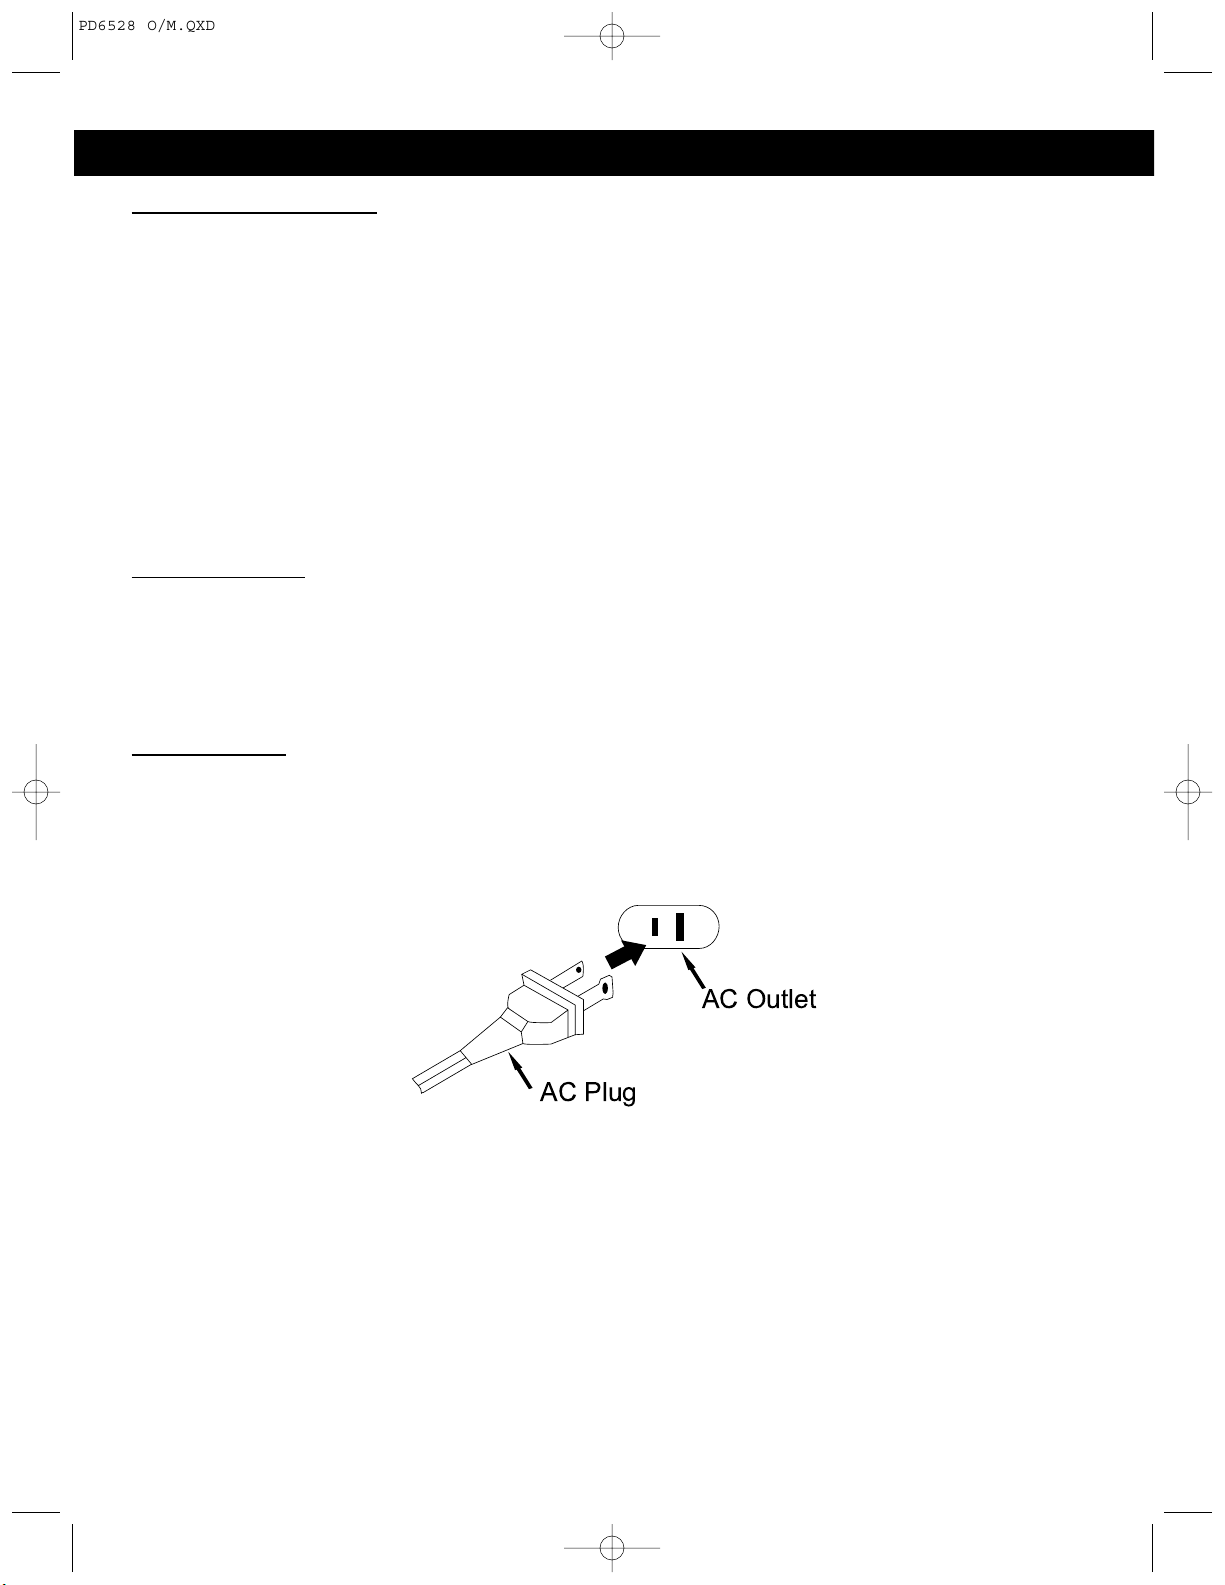
Unwind the AC cord and extend it to its full length. Insert the small end of the AC cord into the AC socket on
the back cabinet of the unit. Insert the other end of the AC cord into any convenient 110-120V 60 Hz
household outlet.
Please note that this unit is equipped with a polarized AC plug which has one blade wider than the other.
This is a safety feature to reduce the likelihood of electric shock. This polarized AC plug will only fit in a
polarized AC outlet. If you find that you cannot insert this plug into your outlet, you may have an obsolete
non-polarized outlet. Please do not try to defeat this safety feature by using a non-polarized adapter or by
filing the wider blade to make it fit into your outlet. If this plug does not fit into your outlet, you should contact
a qualified licensed electrician to replace your obsolete outlet.
PD6528 O/M.QXD 1/16/01 3:50 PM Page 2
AC Outlet
AC Plug
Page 3
Battery Operation
The battery compartment is located on the back of the cabinet.
• Remove the battery compartment door by pressing downward on the two tabs as shown in figure 1 below.
• Insert 8 ‘C’ size (UM-2) batteries into the battery compartment as shown in figure 2 below. Be sure to
observe the polarity markings which are engraved inside the battery compartment. If the batteries are
inserted incorrectly, the unit will not operate.
• Replace the battery compartment door.
NOTE: The AC power cord must be disconnected from the AC socket on the back of the unit in order for the
unit to operate on battery power.
3
BATTERY PRECAUTIONS
Follow these precautions when using batteries in this device:
1. Use only the size and type of batteries specified.
2. Be sure to follow the correct polarity when installing the batteries as indicated in the battery compartment.
Reversed batteries may cause damage to the device.
3. Do not mix different types of batteries together (e.g. Alkaline and Carbon-zinc) or old batteries with fresh
ones.
4. If the device is not to be used for a long period of time, remove the batteries to prevent damage or injury
from possible battery leakage.
5. Do not try to recharge batteries not intended to be recharged; they can overheat and rupture.
(Follow battery manufacturer’s directions.)
Figure 1
Figure 2
PD6528 O/M.QXD 1/16/01 3:50 PM Page 3
++
++
-
-
-
-
+
-
+
-
-
-
+
+
Page 4
4
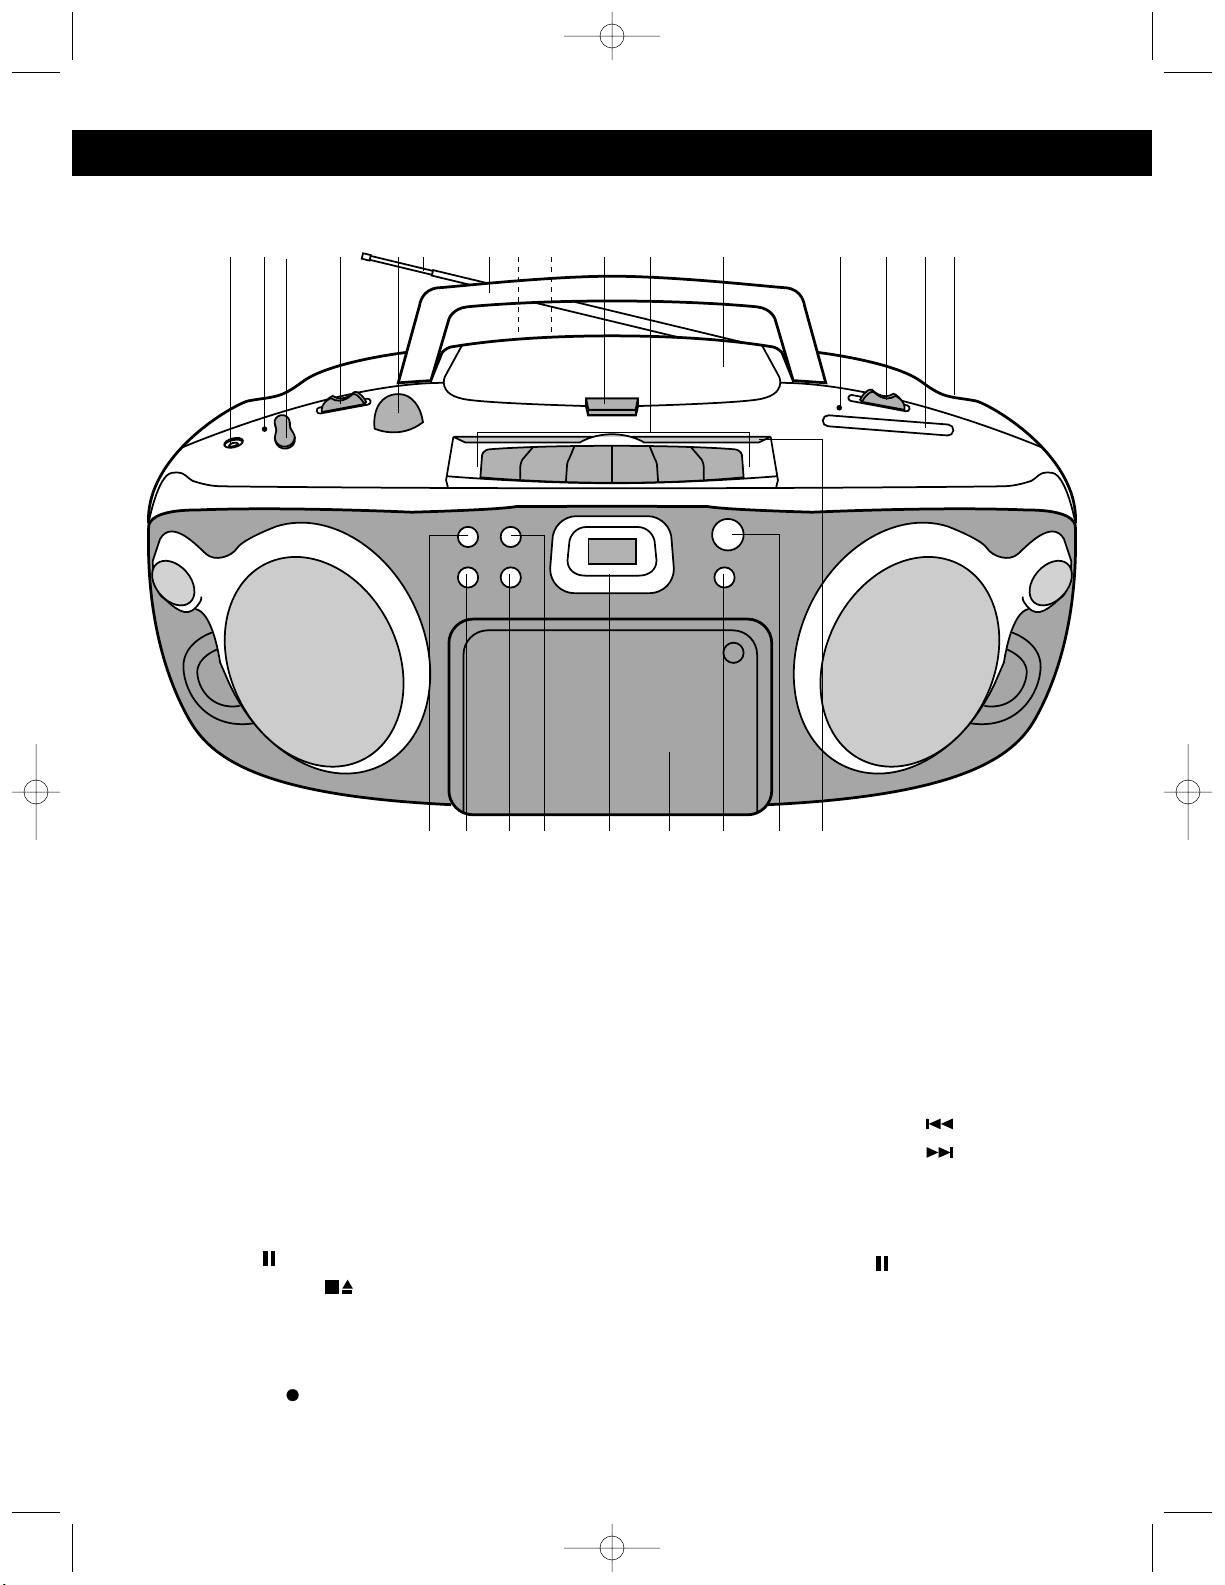
LOCATION OF CONTROLS AND INDICATORS
1. Stereo Headphone Jack
2. STEREO-WIDE Indicator
3. STEREO-WIDE Button
4. FUNCTION Switch (TAPE (Off)/RADIO/CD)
5. VOLUME Control
6. FM Rod Antenna
7. Carrying Handle
8. AC Socket (Rear of Unit)
9. Battery Compartment (Rear of Unit)
10. CD Door OPEN Button
11. Cassette Buttons (under control cover):
PAUSE ( )
STOP/EJECT ( )
FAST FORWARD (➛➛)
REWIND (❿❿)
PLAY (➛)
RECORD
()
12. CD Compartment Door
13. FM STEREO LED Indicator
14. BAND Switch (AM/FM/FM STEREO)
15. Tuning Dial
16. TUNING Control
17. CD PROGRAM Button
18. CD REPEAT Playback Button
19. CD Skip/Search Reverse ( ) Button
20. CD Skip/Search Forward ( ) Button
21. CD Track Display
22. Cassette Door
23. CD STOP (■) Button
24. CD PLAY/PAUSE (❿ ) Button
25. Cassette Control Cover
PD6528 O/M.QXD 1/16/01 3:50 PM Page 4
1 2 3184 5 6 7 1098 11 12 13 14 15 16
19 20 21 2322 24 2517
Page 5
5
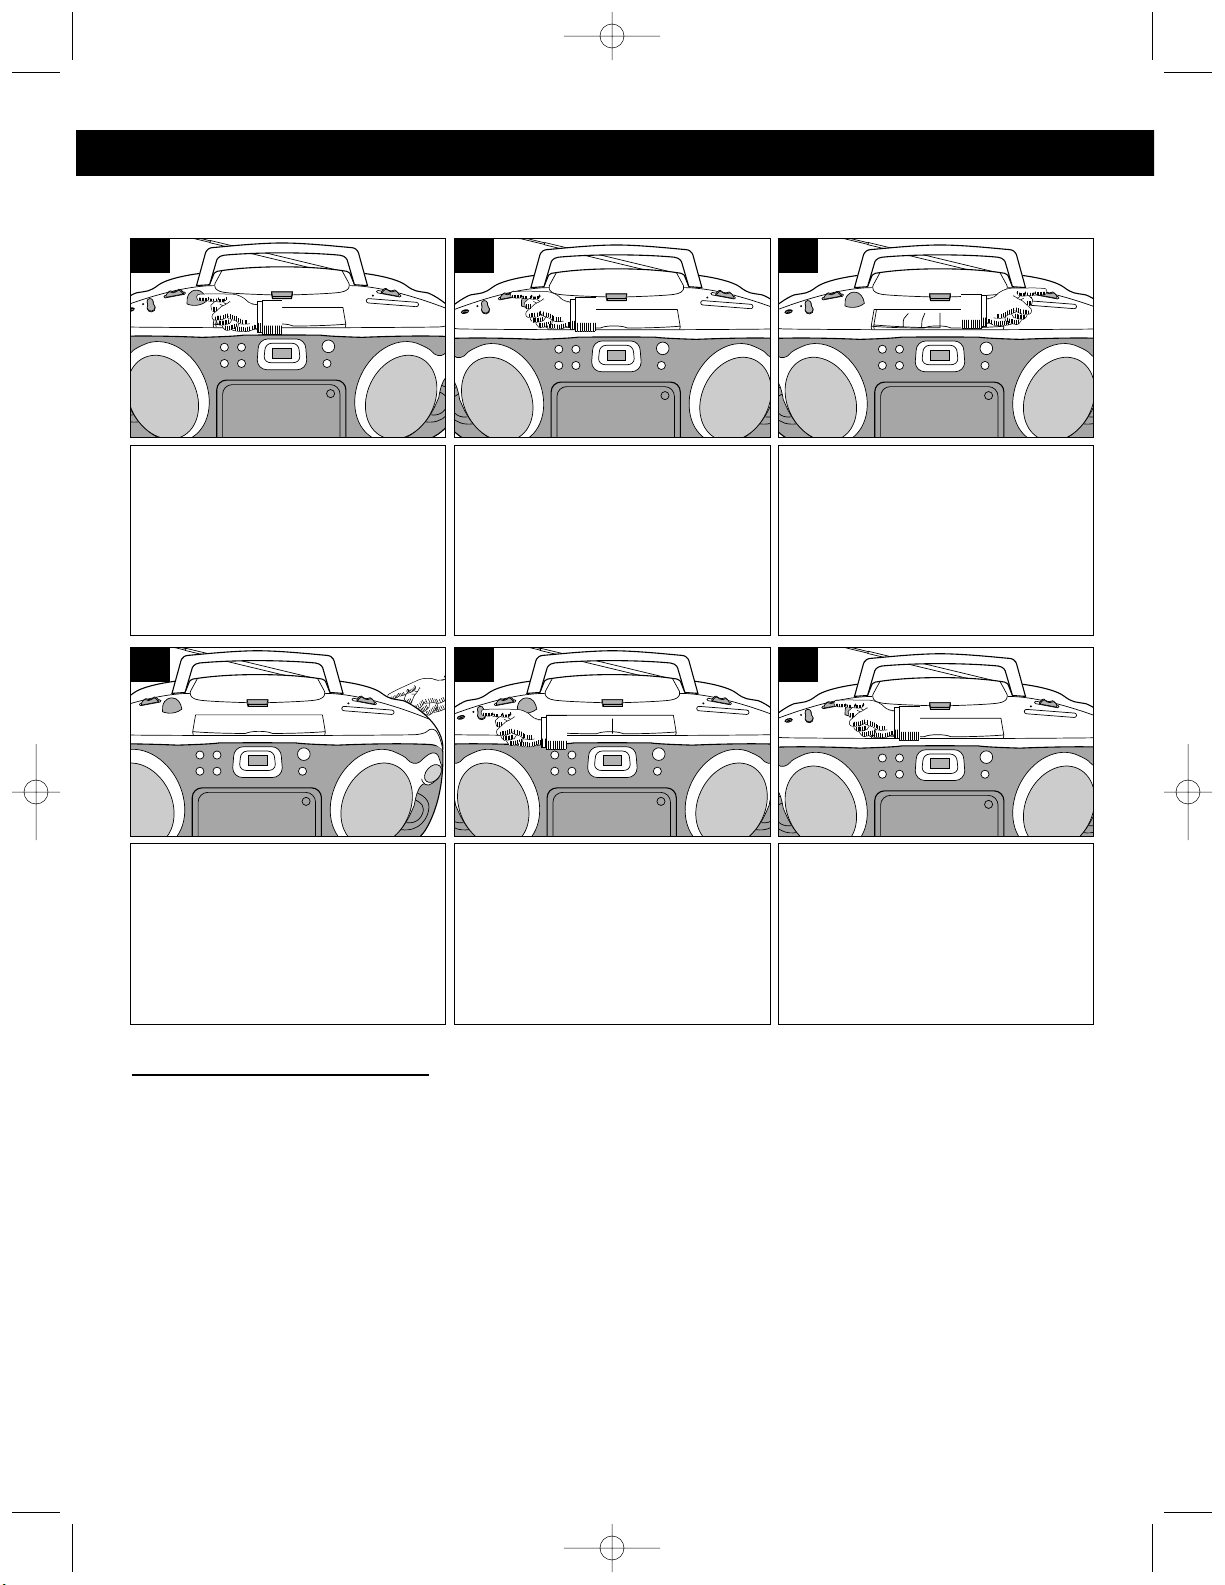
OPERATING INSTRUCTIONS
Set the VOLUME Control to a low
setting.
1
Rotate the TUNING Control to find
the desired station.
NOTE: If the BAND Switch is set to
the FM STEREO position and you
have tuned to an FM Stereo station,
the FM STEREO LED Indicator will
light.
4
Slide the BAND Switch to a
desired setting – AM, FM, or FM
STEREO.
NOTE: If you select either the FM
or FM Stereo bands, be sure to
raise the FM rod antenna and
extend it to its full length.
3
Slide the FUNCTION Switch to
the RADIO position.
2
If you would like to experience
expanded stereo separation,
press the STEREO-WIDE Button.
The STEREO-WIDE Indicator
illuminates and the sound will
seem to expand as if the speakers
have moved further apart.
5
When you have finished listening,
slide the FUNCTION Switch to
the TAPE (Off) position to shut
the power off.
6
Hints for Better Reception
FM - Make sure that the telescopic FM Rod Antenna is raised and extended to its full length. You may have
to vary the direction of the antenna to find the strongest signal for each FM station. If you are listening to a
weak or distant FM Stereo station and reception is unsatisfactory, slide the BAND Switch to the FM (Mono)
position. This will normally provide an improvement in reception, although the sound will no longer be in
stereo.
AM - The AM ferrite bar antenna is located inside the cabinet. It may be necessary to turn the unit slightly so
that the internal antenna is pointing in the direction of the AM transmitter. You may have to experiment to
find the position that provides the strongest reception for each of your favorite AM stations.
LISTENING TO THE RADIO
PD6528 O/M.QXD 1/16/01 3:50 PM Page 5
Page 6
6
Set the VOLUME Control to a low
setting.
1
Place a CD on the center spindle,
with the printed label side facing
up. Close the CD compartment
door.
4
Press the CD Door OPEN Button
to open the CD compartment door.
NOTE: If you have not already
done so, remove the white CD
transit lock card from the CD
compartment now and discard it.
3
Slide the FUNCTION Switch to
the CD position.
2
The CD player will read the table
of contents on the disc and the
total number of tracks on the disc
will appear on the CD Track
Display.
5
Press the CD PLAY/PAUSE (❿ )
Button to begin playback on
Track 1.
6
Adjust the VOLUME ❶ and
STEREO-WIDE ❷ Controls, as
desired.
Playback will continue until all the
tracks on the disc have been
played.
7
To stop playback before the disc
ends, press the CD STOP (■)
Button. The disc will stop and the
display will show the total number
of tracks on the disc.
8
After the last track has been played,
the disc stops automatically and the
display shows the total number of
tracks on the disc. If you are finished
listening, press the CD Door OPEN
Button ❶ to open the CD Compartment door. Remove your disc, close
the CD Compartment door and slide
the FUNCTION Switch ❷ to the
TAPE( Off) position.
9
PLAYING COMPACT DISCS
NORMAL PLAYBACK
PD6528 O/M.QXD 1/16/01 3:50 PM Page 6
1
2
2
Page 7

7
During CD playback, if you wish to
Pause the disc momentarily, press
the CD PLAY/PAUSE (❿ ) Button
again. Playback stops but the disc
continues to spin and the track
number flashes in the CD Display.
1
Press the CD PLAY/PAUSE (❿ )
Button again to release Pause
and resume normal CD playback.
The sound returns and the CD
Track Display stops flashing.
2
After you insert the disc into the
CD player and the total number of
tracks appear on the display, you
may press either the Skip/Forward
( ) or Skip/Reverse ( )
Buttons to select a specific track
for playback.
1
When the desired track number
appears in the display, press the
CD PLAY/PAUSE (❿ ) Button.
Playback will begin on the track
you selected.
2
CD PAUSE CONTROL
TO BEGIN PLAYBACK FROM A SPECIFIC TRACK
During playback, depress and
hold either the Skip/Forward ( )
or Skip/Reverse ( ) Buttons to
move the player forward or
backward within a track to locate
a specific musical passage. The
player will move forward or
backward at high speed as long
as the buttons are depressed.
When you release the
Skip/Forward ( ) or Skip/
Reverse ( ) Button, normal
playback will resume at that point.
During playback, press the
Skip/Forward ( ) Button once to
advance the player to the
beginning of the next track. Press
the Skip/Forward ( ) Button
repeatedly to advance the player
to higher number tracks.
1 3
During playback, press the
Skip/Reverse ( ) Button once to
move the player back to the
beginning of the previous track.
Press the Skip/Reverse ( ) Button
repeatedly to move the player back
to lower-numbered tracks.
2
FORWARD/REVERSE SKIP TRACK AND HIGH-SPEED MUSIC SEARCH ( / )
PD6528 O/M.QXD 1/16/01 3:50 PM Page 7
Page 8

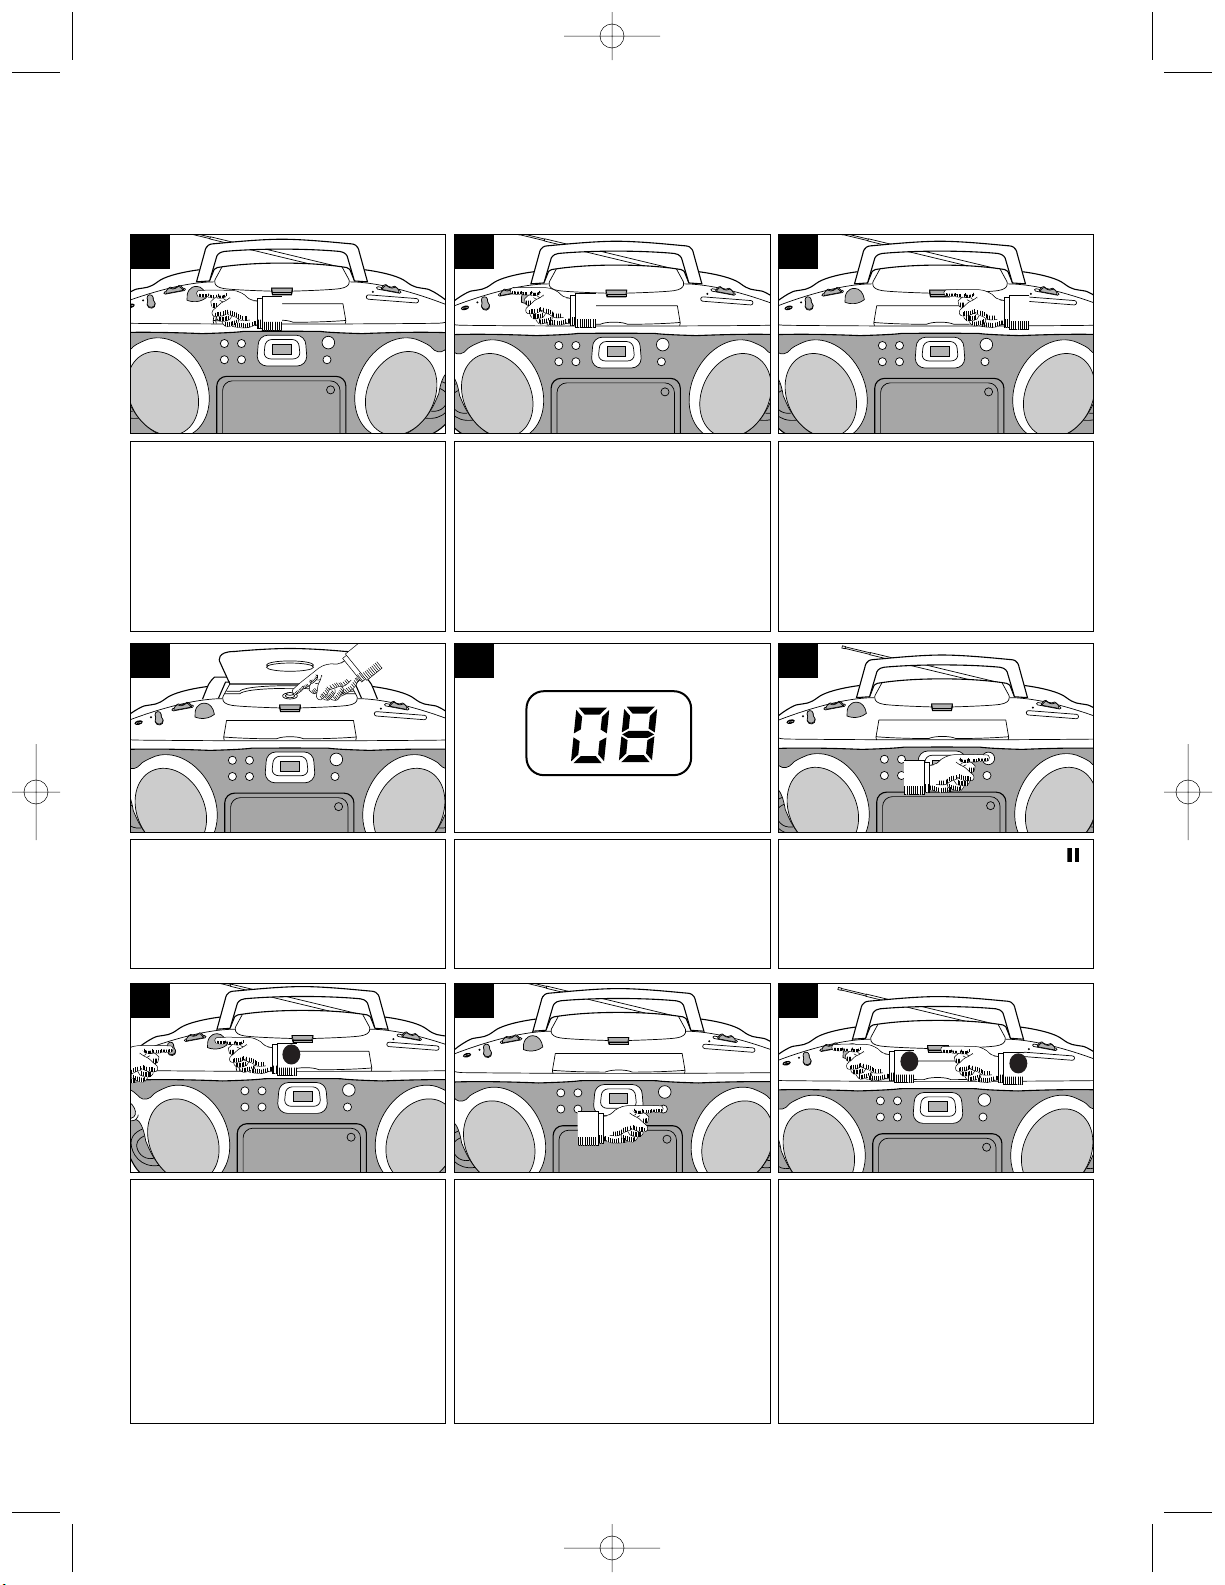
8
To repeat all of the tracks on a
disc continuously, press the
REPEAT Button ❶ once. The
Repeat indicator appears in the
display. Press the CD
PLAY/PAUSE (❿ ) Button ❷ to
begin all tracks repeat.
1
To cancel Repeat Playback,
press the REPEAT Button ❶ until
the Repeat indicator disappears
from the display. You can also
cancel Repeat Playback by
pressing the CD STOP (■) Button
❷ or by setting the FUNCTION
Switch ❸ to the TAPE(Off)
position.
3
To repeat a single track, press the
REPEAT Button ❶ twice. The
Repeat 1 indicator will appear in
the display. Press the Skip/
Forward ( ) or Skip/Reverse
( ) Buttons ❷ to select the
specific track that you wish to
repeat. When the desired track
number appears in the display,
press the CD PLAY/PAUSE (❿ )
Button ❸ to begin playback. The
specific track you selected will be
repeated continuously.
2
REPEAT PLAYBACK
Set the FUNCTION Switch to the
CD position.
1
Press the CD PROGRAM Button.
The Program indicator appears in
the display and the Program
Memory #1 flashes.
3
Open the CD Compartment door
and insert your disc in the CD
player. Close the CD compartment
door. Wait for the CD player to read
the table of contents and display the
total number of tracks on the disc.
2
PROGRAMMED PLAYBACK
The CD player in this unit has a 20-track programmable memory that allows you to program up to 20 tracks
on any disc for playback in any desired order. You may program 20 different tracks or you may also program
certain tracks to play more than once.
To perform programmed playback, proceed as follows:
PROGRAMMED PLAYBACK SECTION CONTINUED ON NEXT PAGE.
PD6528 O/M.QXD 1/16/01 3:50 PM Page 8
1
2
2
1
2
3
3
1
2
Page 9

9
Press the Skip/Forward ( ) or
Skip/Reverse ( ) Buttons ❶ to
select the first track that you wish to
program. Example: Track 5. When
the desired track number (Example:
Track 5) is flashing in the display,
press the CD PROGRAM Button ❷
again. The display will briefly show
Program Memory #1 and then your
desired track number (Example:
Track 5) will resume flashing. This
confirms that Track 5 has been
entered into CD Program Memory #1.
4
Press either the Skip/Forward
( ) or Skip/Reverse ( )
Buttons ❶ to select the next track
you wish to program (Example:
Track 8). When Track 8 is
flashing in the display, press the
PROGRAM Button
❷ again. The
display will briefly show Program
Memory #2 and then Track 8 will
resume flashing. This confirms
that Track 8 has been entered
into CD Program Memory #2.
5
Repeat step 5, selecting a
different track each time, until you
have programmed up to 20 track
numbers into the CD Program
Memory.
6
After programming up to 20 tracks in the CD Program Memory, press the CD
PLAY/PAUSE (❿ ) Button ❶ to begin programmed playback. The Program
indicator will begin flashing in the display and playback will begin on the first
track that you programmed. The player will continue to play all of the tracks that
you programmed in the order in which you programmed them. When the last
programmed track has been played, the player will stop and the display will
again show the total number of tracks on the disc. The Program indicator
remains in the display and the program is still active. If you press the Program
button and then press the CD PLAY/PAUSE button ❶ again, playback will start
on the first track you programmed and will continue until all the programmed
tracks have been played.To cancel the Programmed Playback mode, press the
CD Door OPEN Button ❷ to open the CD Compartment Door or set the
FUNCTION Switch ❸ to the RADIO or TAPE(Off) positions.
7
It is also possible to use the
Program and Repeat functions
together to repeat a specific
program indefinitely. First, program
the tracks you wish to hear in the
order you wish to hear them, as
described above. Then, press the
REPEAT Button once. Both the
Program and Repeat indicators will
appear in the display.
1
Press the CD PLAY/PAUSE (❿ )
Button to begin programmed
repeat playback. The player will
play the tracks you selected in the
order in which you programmed
them. When the last track in the
program has been played, the
entire program will begin again.
2
Program Repeat operation will
continue indefinitely until you
press the CD STOP (■) Button ❶,
open the CD door or set the
FUNCTION Switch ❷ to the
RADIO or TAPE (Off) position.
3
PROGRAMMED REPEAT
PD6528 O/M.QXD 1/16/01 3:50 PM Page 9
2
1
1
3
2
1
1
2
2
1
1
1
2
1
Page 10

10
Set the VOLUME Control to a low
setting.
1
Insert a pre-recorded cassette into
the slots in the Cassette Door with
the open end facing up and the full
reel on the right side. Close the
cassette door.
4
Open the Cassette Control Cover
to expose the cassette controls
and press the Stop/Eject ( )
Button to open the Cassette Door.
3
Slide the FUNCTION Switch to
the TAPE position.
2
To pause playback momentarily,
press the cassette Pause ( )
Button. The tape movement stops
but the tape motor is still running.
Press the cassette Pause ( )
Button again to release Pause
and resume normal playback.
7
When the tape reaches the end,
the auto-stop mechanism
activates, the tape PLAY Button is
released and the tape motor
shuts off. Press the Stop/Eject
( ) Button to open the
Cassette Door and remove the
tape.
9
To stop playback before the tape
ends, press the Stop/Eject ( )
Button, The PLAY Button is
released and the tape motor
shuts off.
8
Press the cassette Play (➛)
Button ❶ to begin playback.
Adjust the VOLUME ❷ and
STEREO-WIDE ❸ Controls as
desired.
5
To advance or rewind the tape
rapidly, press either the cassette
Fast Forward (➛➛) ❶ or Rewind
(❿❿) ❷ buttons. When you reach
the desired point, press the
cassette Play (➛) Button ❸ to
resume normal playback.
6
PLAYING CASSETTE TAPES
PD6528 O/M.QXD 1/16/01 3:50 PM Page 10
Open surface side
Emptiest reel
3
2
2
1
1
3
Page 11

11
Open the Cassette Door and
insert a good quality blank
cassette tape into the slots on the
door, with the open end facing up
and the full reel on the right-hand
side. Close the Cassette Door.
1
When you are ready to begin
recording, press the cassette
Record
() B
utton. The cassette
Play (➛) Button will also engage.
The tape will begin moving and all
of the material from your selected
source will be recorded on the tape.
3
Select the function you wish to
record, either radio or CD, and
operate that function according to its
own instructions.
2
MAKING A TAPE RECORDING
The tape recorder in this system allows you to make direct recordings from the radio or CD player to a blank
cassette in the tape compartment. An automatic recording volume level control (ALC) circuit will automatically
control the volume level of your recordings to prevent distortion. You may change the settings of the volume
or the Stereo-Wide controls during a tape recording, as these controls have no effect on the material being
recorded onto the tape.
To make a tape recording, proceed as follows:
HEADPHONE JACK
Connect a pair of stereo headphones (not included) to this jack for private listening without disturbing others.
The built-in speakers are shut off when headphones are connected to the headphone jack.
To avoid recording unwanted
material, such as radio
commercials, use the Pause ( )
Button to stop the recording
temporarily. Release the Pause
( ) Button to begin recording
again.
4
If you wish to listen to your
recording immediately, press the
cassette Rewind (❿❿) Button ❶
until the tape rewinds to the
beginning, then press the
Stop/Eject ( ) Button ❷. Set
the FUNCTION Switch ❸ to the
TAPE position and press the
cassette Play (➛) Button ❹ to
begin playback.
6
When you are finished recording,
press the Stop/Eject ( )
Button to stop the tape.
5
PD6528 O/M.QXD 1/16/01 3:50 PM Page 11
Open surface side
Emptiest reel
3
2
1
4
Page 12

SAFEGUARD AGAINST ACCIDENTAL ERASURE
When a new recording is made, any program
material previously recorded is automatically
erased and only the new recording remains. To
safeguard valuable recordings from being erased
accidentally, the cassette and the deck are
equipped with a special device.
On the back of the cassette there is an erase
prevention tab on each side. To prevent
accidental erasing, break out these tabs with a
screwdriver. If only one side of the tape is to be
protected, break out the tab on the left side with
the side desired facing you.
To record on a tape in which the tab has been
broken, place a piece of adhesive tape over that
area.
NOTE: When a tab is broken out, the record
button cannot be depressed.
CASSETTE TAPE RECOMMENDATIONS
Standard tape lengths have 15 (C-30), 30 (C-60) and 45 (C-90) minutes of recording time on each side.
Longer length tapes of 60 (C-120) minutes of recording time on each side are not recommended. Use only
high quality tapes. If a problem develops, check the unit first with another cassette to determine if the
problem is with the cassette, and not with the unit.
If there is any slack in the tape in the cassette, it should be removed before inserting the cassette. Place a
pencil in one of the hubs and rotate toward the outside of the cassette until all slack is taken up.
12
CARE AND MAINTENANCE
PD6528 O/M.QXD 1/16/01 3:50 PM Page 12
Tab for side 2
SIDE 1
Tab for side 1
Tab
Break out the tab
Cover with tape
Page 13

Caring for Compact Discs
• Treat the disc carefully. Handle the disc only by its edges.
Never allow your fingers to come in contact with the shiny,
unprinted side of the disc.
• Do not attach adhesive tape, stickers, etc. to the disc label.
• Clean the disc periodically with a soft, lint-free, dry cloth.
Never use detergents or abrasive cleaners to clean the
disc. If necessary, use a CD cleaning kit.
• If a disc skips or gets stuck on a section of the disc, it is probably dirty or damaged (scratched).
• When cleaning the disc, wipe in straight lines from the center of the disc to the outer edge of the disc.
Never wipe in circular motions.
• This unit is designed to play only compact discs bearing the identification logo as shown here.
Other discs may not conform to the CD standard and may not play properly.
• Compact Discs should be stored in their cases after each use to avoid damage.
• Do not expose compact discs to direct sunlight, high humidity, high temperatures, or dust, etc. Prolonged
exposure or extreme temperatures can warp the disc.
• Do not stick or write anything on either side of the disc. Sharp writing instruments, or the ink may damage
the surface.
Cleaning the unit
• To prevent fire or shock hazard, disconnect your unit from the AC power source when cleaning.
• The finish on your unit may be cleaned with a dust cloth and cared for as other furniture. Use caution
when cleaning and wiping the plastic parts.
• Mild soap and a damp cloth may be used on the front panel.
• Periodic cleaning of the tape heads, capstan and pinch roller is necessary to maintain good sound
reproduction. Clean them after every 100 hours of use or less if playback has deteriorated. Use a cotton
swab moistened with head cleaning solution or isopropyl alcohol, then wipe dry with another swab.
NOTE: Never use metal objects on or near the tape heads. Do not allow and cleaning material to fall into the
tape assembly.
13
CARE AND MAINTENANCE
PD6528 O/M.QXD 1/16/01 3:50 PM Page 13
C
L
R
E
E
A
B
E
E
N
N
E
Z
N
DIGITAL AUDIO
R/P
HeadPinch Roller
Erase
Head
Capstan
Cotton Swab
COMPACT
Page 14

14
Symptom Possible Cause Solution
Radio
Noise or sound distorted Station not tuned properly for Retune the AM or FM broadcast
on radio broadcasts. AM or FM. station.
FM: Telescopic antenna is not Reorient FM telescopic antenna.
properly adjusted.
AM: Unit is not positioned Rotate unit until best reception is
correctly. obtained.
FM STEREO indicator Poor FM signal being received or Retune station, try another station or
does not light. BAND switch is not set to FM STEREO. set BAND switch to FM STEREO.
Station is not broadcasting in stereo. Change stations.
AM or FM, no sound. FUNCTION switch is not set to the Slide the FUNCTION switch to the
RADIO position. RADIO position.
Volume at minimum. Increase Volume.
Cassette Player
No sound. FUNCTION switch is not set to the Slide the FUNCTION switch to the
TAPE position. TAPE position.
Volume at minimum. Increase Volume.
Sound distorted. Dirty head. Clean the head.
Speed varies. Tape old or worn. Replace the tape.
Batteries are low. Replace the batteries.
Cassette Recorder
Will not record. Erase prevention tab removed. Cover hole with adhesive tape.
Distorted sound Defective tape or dirty tape head. Replace tape or clean tape head.
on playback.
Compact Disc Player
CD Player will not play. FUNCTION switch is not set to the Slide the FUNCTION switch to the
CD position. CD position.
CD is not installed or installed Insert CD with label side up.
upside-down.
CD skips while playing. Disc is dirty or scratched. Wipe disc with cloth or use
another disc.
General
No Sound. Headphones connected into the Remove the Headphones from
Headphones jack. the Headphones jack.
Should this unit exhibit a problem, check the following before seeking service.
TROUBLESHOOTING GUIDE
PD6528 O/M.QXD 1/16/01 3:50 PM Page 14
Page 15

15
PD6528 O/M.QXD 1/16/01 3:50 PM Page 15
TO FIND THE LOCATION AND
PHONE NUMBER OF YOUR
¨
NEAREST AUTHORIZED
AUTHORIZED SERVICE
SERVICE CENTER...
CALL TOLL FREE: 1-800-695-0098
FOR ADDITIONAL SET-UP OR OPERATING ASSISTANCE
PLEASE CALL:
1-800-898-9020
FOR CUSTOMER SERVICE, PLEASE WRITE TO:
Emerson Radio Corp.
Consumer Affairs Dept.
1901 Diplomat Drive
Farmers Branch, TX 75234
Page 16

16
EMERSON RADIO CORP.
LIMITED WARRANTY
What does this warranty cover?
Any manufacturing defects in original material, including original parts and workmanship, under normal use and
conditions.
For how long?
For a period of ninety (90) days from the date of original purchase in the U.S.
What will we do?
If you need service under this Warranty, and you provide us with the dated proof of purchase, we will provide repair
service at no charge for labor and parts at an authorized Depot Repair Facility, or replace the product in our
discretion.
How do you make your warranty claim?
If it becomes necessary to repair your unit, you can obtain the name and mailing location of a Depot Repair Facility by
dialing 1-800-695-0098. You should pack your unit in a well-padded heavy corrugated box, enclose your check or
money order payable to the Depot Repair Facility in the amount of $9.00 to cover the return shipping and handling
costs, and enclose a copy of your proof of purchase (warranty service will not be provided without a dated proof of
purchase). Finally, you should ship the unit prepaid via UPS or parcel post (insured).
What does your warranty not cover?
Your warranty does not cover the following :
• Damage from negligence, misuse, abuse, accident, or failure to follow operating instructions.
• Use of product in a commercial application or rentals.
• Changes or repairs by anyone other than an authorized Depot Repair Facility.
• Damage because your unit is improperly connected to the equipment of other manufacturers.
• Unit on which the serial number has been defaced, modified or removed.
• Damage to equipment not properly connected to the product.
• Cost incurred in shipping your unit to and from an authorized Depot Repair Facility.
• Ordinary adjustments which you can perform as outlined in the owner’s manual.
• Signal reception problems caused by external antenna or cable systems.
• Products purchased, used, serviced, or damaged outside of the United States.
• Damage to compact discs or cassettes.
What other limitations apply to your warranty ?
THIS WARRANTY IS NON-TRANSFERABLE AND APPLIES ONLY TO THE ORIGINAL PURCHASER AND DOES
NOT EXTEND TO SUBSEQUENT OWNERS OF THE PRODUCT. THIS WARRANTY IS VALID ONLY IN THE
UNITED STATES OF AMERICA. ANY APPLICABLE IMPLIED WARRANTIES, INCLUDING THE WARRANTY OF
MERCHANTABILITY, ARE LIMITED IN DURATION TO A PERIOD OF THE EXPRESSED WARRANTY AS
PROVIDED ABOVE BEGINNING WITH THE DATE OF ORIGINAL PURCHASE AT RETAIL AND NO WARRANTIES,
WHETHER EXPRESSED OR IMPLIED, SHALL APPLY TO THE PRODUCT THEREAFTER. WE MAKE NO
WARRANTY AS TO THE FITNESS OF THE PRODUCT FOR ANY PARTICULAR PURPOSE OR USE.
THE EXTENT OF OUR LIABILITY UNDER THIS LIMITED WARRANTY IS THE REPAIR OR REPLACEMENT
PROVIDED ABOVE AND IN NO EVENT WILL OUR LIABILITY EXCEED THE PURCHASE PRICE PAID BY THE
PURCHASER OF THE PRODUCT. UNDER NO CIRCUMSTANCES WILL WE BE LIABLE FOR ANY LOSS,
DIRECT, INDIRECT, INCIDENTAL, SPECIAL, OR CONSEQUENTIAL DAMAGE ARISING OUT OF OR IN
CONNECTION WITH THE USE OF THIS PRODUCT.
How does state law apply to your warranty ?
THIS WARRANTY GIVES YOU SPECIFIC LEGAL RIGHTS, BUT YOU MAY ALSO HAVE OTHER RIGHTS WHICH
VARY FROM STATE TO STATE. SOME STATES DO NOT ALLOW LIMITATIONS ON IMPLIED WARRANTIES OR
EXCLUSION OR LIMITATION OF INCIDENTAL OR CONSEQUENTIAL DAMAGE, SO THESE RESTRICTIONS
MAY NOT APPLY TO YOU.
AU898F
PD6528 O/M.QXD 1/16/01 3:50 PM Page 16
Page 17

TM
PORTABLE CD PLAYER
STEREO CASSETTE RECORDER
AM/FM STEREO RADIO
OWNER’S MANUAL
PD6528
Visit our web site at www.emersonradio.com
PD6528 O/M.QXD 1/16/01 3:50 PM Page 17
®
Page 18

EMERSON
PART NO.: 16-2808
011-01 Printed in China
PD6528 O/M.QXD 1/16/01 3:50 PM Page 18
®
 Loading...