

Page 1

PCM-22
Rotary Knife Controller
Information furnished by EMERSON Motion Control is believed to be accurate and reliable. However,
no responsibility is assumed by EMERSON Motion Control for its use. EMERSON Motion Control
reserves the right to change the design or operation of the equipment described herein and any
associated motion products without notice. EMERSON Motion Control also assumes no responsibility
for any errors that may appear in this document. Information in this document is the property of
EMERSON Motion Control and is subject to change without notice.
P/N 400274-01
Rev.: A2
Date: December 7, 1998
© 1998 EMERSON Motion Control. All Rights Reserved.
Page 2

PCM-22 Rotary Knife Controller
© 1998 EMERSON Motion Control. All Rights Reserved.
Document Number: 400274-01
No part of this manual may be reproduced by any means without the written permission of EMERSON Motion
Control.
EMERSON Motion Control is a registered trademark of EMERSON ELECTRIC.
Printed in U.S.A.
December, 1998 Revision A2
This document has been prepared to conform to the current release version of the PCM-22 Rotary Knife
Controller. Because of our extensive developments and our desire to further improve and enhance the product,
inconsistencies may exist between the product and documentation in some instances. Call your customer
support representative if you encounter an inconsistency.
ii © EMERSON Motion Control
Page 3

Customer Services
EMERSON Motion Control offers a wide range of services to support our
customers’ needs. Listed below are some of these services.
Application Engineering (612) 474-1116
E-Mail: applengr@emersonemc.com
An experienced staff of factory application engineers provide complete
customer support for tough or complex applications. Our engineers offer
you a broad base of experience and knowledge of electronic motion
control applications.
EMERSON BBS (612) 474-8835
EMERSON Motion Control maintains a electronic Bulletin Board
System which provides you access to software updates, technical
information and services.
Communications protocol: 300 - 28,800 Baud, N, 8, 1.
FAX (612) 474-8711
Internet Access www.emersonemc.com
Order / Repair Status (612) 474-1116
Sales (800) FX-SERVO
E-Mail: sales@emersonemc.com
Service Support (612) 474-8833
E-Mail: service@emersonemc.com
EMERSON Motion Control’s products are backed by a team of
professionals who will service your installation wherever it may be. Our
customer service center in Minneapolis Minnesota is ready to help you
solve those occasional problems over the telephone. Our customer service
center is available 24 hours a day for emergency service to help speed
any problem solving. Also, hardware replacement parts, should they ever
be needed, are available through our customer service organization.
Need on-site help? EMERSON Motion Control provides on-site service,
in most cases, the next day. Just call EMERSON’s customer service
center when on-site service or maintenance is required.
See Service Support Check List on the following page.
Training Services (612) 474-1116
EMERSON Motion Control maintains a highly trained staff of
instructors to familiarize customers with EMERSON Motion Control
products and their applications. A number of courses are offered, many
of which can be taught in your plant upon request.
P/N 400274-01 Revision A7 iii
Page 4

PCM-22 Rotary Knife Controller
Service Support Check List
To ensure the most timely and efficient support possible, please have the
following items ready before calling for Service Support.
1. The model and serial number(s) of your FX Amplifier(s) and
manual(s).
2. The model and serial number(s) of your PCM(s).
3. The result (using Terminal Mode) of ID?; 0ID? (zero ID?) if axis ID’s
are used.
4. The result (using Terminal Mode) of ID1?; 0ID1? (zero ID1?) if axis
ID’s are used.
5. A description of the symptom(s) or issue(s) observed including any
fault status codes displayed on the LED Diagnostic Display.
6. Copies of the current uploaded program(s) that are in each of your
PCM(s).
7. The gear ratio, model number and type of reducer(s) used.
8. This manual.
iv © EMERSON Motion Control
Page 5

Table Of Contents
Introduction 1
Description ................................................................................................................... 1
Features ........................................................................................................................3
Terminology ................................................................................................................. 4
Master Cycle Length .............................................................................................. 4
Follower Cycle Length ........................................................................................... 4
Working Segment .................................................................................................. 5
Cycle Point............................................................................................................. 5
Working Offset....................................................................................................... 5
Variable Segment................................................................................................... 6
Cycle Drop Out Position.........................................................................................7
Working Ratio........................................................................................................ 7
Phase...................................................................................................................... 8
Average Length...................................................................................................... 8
Theory of Operation 11
General Running......................................................................................................... 11
Master Cycle Defined By Sensor Mode................................................................. 12
Master Cycle Not Defined By Sensor Mode.......................................................... 12
Resetting the Master Cycle Processing ........................................................................ 13
How the Master Cycle is Defined.......................................................................... 13
Automatically Resetting the Master Processing..................................................... 13
Manually Resetting the Master Processing............................................................ 14
Starting A Follower Cycle........................................................................................... 15
Homes and the Follower Zero Position ........................................................................ 16
Indexes and the Follower Zero Position....................................................................... 16
Cycle Inter-Relationships............................................................................................ 17
Operational Timing..................................................................................................... 18
Maximum Master Velocity.......................................................................................... 19
Sensors ....................................................................................................................... 20
Selection .............................................................................................................. 20
Sensors: When, Where and Why .......................................................................... 21
Installation Guidelines 23
Attaching the PCM-22 Module ................................................................................... 23
I/O Wiring.................................................................................................................. 23
P/N 400274-01 Revision A7 v
Input Wiring ........................................................................................................ 23
Output Wiring...................................................................................................... 23
Page 6

PCM-22 Rotary Knife Controller
PCM-22 Software Setup 25
Programming the PCM-22...........................................................................................25
Master Axis .................................................................................................................29
Master Cycles ..............................................................................................................37
Follower Cycles ...........................................................................................................42
Input Functions............................................................................................................52
Output Functions .........................................................................................................58
Programming ...............................................................................................................63
Description ...........................................................................................................29
Master Axis Setup.................................................................................................31
Master Cycle Number............................................................................................37
Master Cycle Length.............................................................................................37
Master Phase Distance ..........................................................................................40
Master Cycle Defined By Sensor ...........................................................................40
Cycle Number.......................................................................................................43
Follower Cycle Length..........................................................................................43
Cycle Defined by Registration Sensor....................................................................46
Phase Correction Limit .........................................................................................47
Phase Distance Error Limit (+) .............................................................................47
Phase Distance Error Limit (-) ..............................................................................47
Phase Correction Deadband...................................................................................48
Length Change Increment.....................................................................................48
Master Cycle Number............................................................................................48
Batch Count..........................................................................................................48
Cycle Count ..........................................................................................................49
Working Segment Width.......................................................................................49
Offset/Phase Fine Increment..................................................................................51
Offset/Phase Coarse Increment..............................................................................51
Description of Input Functions..............................................................................53
Typical Input Assignments....................................................................................57
Description Of Output Functions...........................................................................58
Recommended Output Assignments......................................................................62
Additional programming functions........................................................................63
Example program..................................................................................................64
Example Applications 67
Rotary Knife ................................................................................................................67
Seal and Cut Off Packages...........................................................................................68
Flexible Bag Maker......................................................................................................69
Pick and Place..............................................................................................................70
Imprinter .....................................................................................................................71
Maximizing Profile Performance 73
Commands Referenced.................................................................................................74
Minimizing Length Variation......................................................................................74
Minimizing Phase Variation........................................................................................76
vi © EMERSON Motion Control
Page 7

Tips and Troubleshooting 80
General Issues............................................................................................................. 80
Product Ranges and Limits.......................................................................................... 80
Follower Cycle Will Not Start ..................................................................................... 81
Verifying the Working Segment Position .................................................................... 81
Issues Maintaining Phase............................................................................................ 82
System Calibration Issues............................................................................................ 83
Synchronization Source Issues .................................................................................... 83
Running Into a Length Limit....................................................................................... 84
Missing Sensor Issues ................................................................................................. 85
Extra Sensor Issues ..................................................................................................... 86
Common Operation Issues........................................................................................... 87
Appendix A - Serial Commands 88
CI2 - Executing Master Cycle ..................................................................................... 88
CQ - Cycle Status Query ............................................................................................. 88
FF - Follower Cycle Flags........................................................................................... 91
FM7 - Master Phase Variation In User Units............................................................... 92
FM8 - Follower Phase Variation In User Units............................................................ 92
FM9 - Master Length Variation In Sync. Counts......................................................... 92
FM10 - Follower Length Variation In Resolver Counts ............................................... 93
FM11 - Master Axis Velocity...................................................................................... 93
FM12 - Average Master Length In User Units............................................................. 93
FM13 - Average Follower Length In User Units.......................................................... 93
FM14 - Computed Starting Master Distance In Master Steps ...................................... 93
FN1 - Follower Cycles Per Follower Sensor................................................................. 94
KC4 - Total Cycle Count............................................................................................. 94
MF - Master Cycle Flags............................................................................................. 94
ML11 - Current Master Length In Master Steps .......................................................... 95
PH4 - Minimum Master Velocity For I/O Profile Adjustments .................................... 95
TC5 - Working Ratio Change Increment..................................................................... 95
Appendix B - PCX Cycle Screens to FX Command Cross
Reference 96
PCM-22 Master Cycles Screen.................................................................................... 96
PCM-22 Follower Cycles Screen................................................................................. 97
Appendix C - Master Signal Components 98
Encoder Operation...................................................................................................... 98
Encoder to Drive Cables.............................................................................................. 99
Drive to Drive Cables.................................................................................................. 99
Index 100
P/N 400274-01 Revision A7 vii
Page 8

Page 9
This manual provides setup and programming information for the
PCM-22 Rotary Knife Controller Application Module.
It is important that you become familiar with the 230V FX Drives Setup
and Programming Operator's Manual (P/N 400282-00), 460V FX Drives
Setup and Programming Operator's Manual (P/N 400310-00) or 525
Programmable Motion Controller Installation and Operation Manual
(P/N 400276-01) as appropriate.
This manual should be read completely before installing the
PCM-22. It provides the background information needed to setup and
configure the PCM-22/FX amplifier combination using PCX 7.x software.
Description
The PCM-22 Rotary Knife Controller is an application module that
attaches to any EMERSON Motion Control FX positioning servo drive.
The PCM-22 enables a FX drive to automatically calculate and create
motion profiles using sensor information and/or user-defined parameters.
The PCM-22 is designed to maintain a phased relationship between the
motor axis (referred to as the Follower axis) and the motion of an
independent axis (referred to as the Master axis).
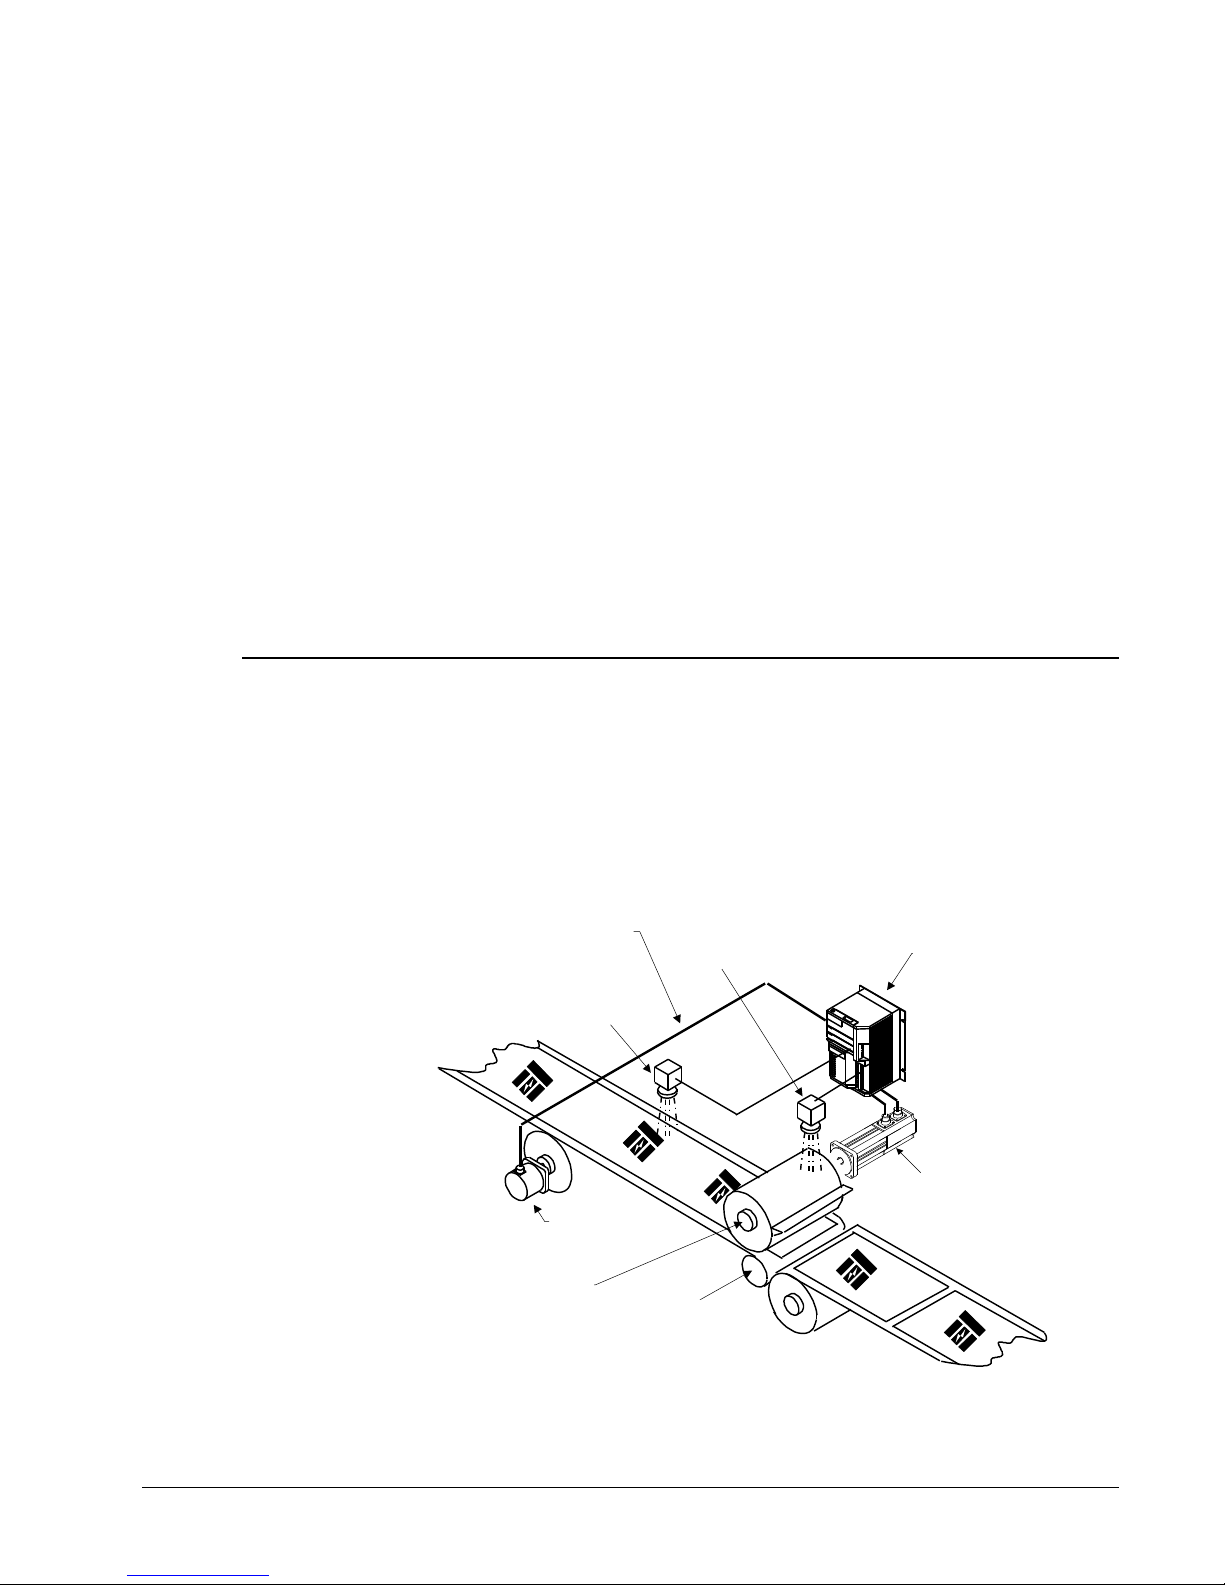
Introduction
MSC
CABLE
MASTER REGISTRATION
SENSOR
FOLLOWER
SENSOR
FX AMPLIFIER
WITH PCM-22
P/N 400274-01 Revision A7 1
SCS-4
ENCODER
KNIFE
AXIS
Figure 1 Typical Application - Rotary Cut-Off.
ANVIL
MOTOR
Page 10

PCM-22 Rotary Knife Controller
The PCM-22 accepts application data relating to the mechanical
dimensions of the system entered using PCX Software. These parameters
along with sensor and synchronization information allow the PCM-22 to
calculate the motion profile necessary to meet the user specified
positioning requirements of the application.
Many parameters relating to the PCM-22 application can be changed
using hardware inputs, PCX software or serial commands. Using these
new parameters, the PCM-22 will calculate the new motion
automatically, without stopping, to maintain continuous machine
operation.
If an axis uses a registration sensor, the PCM-22 can automatically
adjust parameters based on sensor information about that axis. It will,
within user-defined limits, automatically compensate for length changes
and detected mechanical inaccuracies.
For example:
If the distance between registration sensor inputs on the Follower axis
indicate that the length is 8.25 inches and not 8.30 inches as entered
using PCX. The PCM-22 will automatically make adjustments to
compensate for the difference in length.
These capabilities allow the PCM-22 to produce one or more cycles of
motion for every individual cycle of motion produced by the Master axis.
The PCM-22 will position the Follower axis to a corresponding position
and velocity relative to the Master axis while it is executing a cycle.
This type of motion profile is commonly used in cutting, sealing, printing
and perforating applications.
2 © EMERSON Motion Control
Page 11

Features
Introduction
The features of the PCM-22 Rotary Knife Controller include:
• Set up with easy-to-use PCX software.
• Works with all FX series drive products and 525 PMC products.
• Allows an FX drive to accurately position and match speed based on
data received from a Master axis.
• Drive setup parameters are stored in the PCM-22 module. This
allows the PCM-22 to be transferred to another FX drive of the same
size without losing any setup parameters.
• Calculates cycle profiles based on user-defined parameters
automatically.
• All parameters are in user-defined units.
• Most parameters can be changed automatically, without stopping.
• Two internal counters for each cycle: product cycle counter and
product batch counter.
• 100 programs (with a maximum of 512 steps total for all programs).
• 16 Master axis and 16 Follower axis motion profile definitions.
• 98 user-assignable I/O functions.
• 64 indexes.
• 2 homes.
• Expands I/O line capacity of FX drive with an additional eight
optically isolated input lines and four optically isolated output lines.
• Interactive cycle diagnostic capabilities.
• Always uses linear ramps for Homes, Indexes, Jogs and Follower
cycles for increased accuracy.
Note: Not all of the features available with the PCM-22 will be used in
every application.
For example:
There are 15 programming functions available with the PCM-22
however, a typical rotary knife program will use only a few of
them.
P/N 400274-01 Revision A7 3
Page 12

PCM-22 Rotary Knife Controller
Terminology
Master Cycle Length
The Master Cycle Length (also called the Master Length) is the
particular distance, in user units, that the Master axis (encoder or
upstream drive) moves during each Master cycle. It is the distance
between two Master Cycle zero positions. See Figures 2 and 3.
If the Master Cycle Defined By Sensor is “Yes”; when the Zero Master
Cycle sensor detects a target on the Master axis, that is the Master zero
position. The distance between two Zero Master Cycle positions is the
Master Cycle Length.
If the Master Cycle Defined By Sensor is “No”; when the first Zero
Master Cycle input is received, that is the initial Master zero position.
This will be the only Zero Master Cycle input required for all Master
cycles following. When the Master axis has moved the user entered
Master Cycle Length, it has moved the distance between two Master zero
positions.
CIRCUMFERENCE OF
ROTARY KNIFE EQUALS
FOLLOWER LENGTH
WORKING SEGMENT
PRODUCT
MOVEMENT
Figure 2 Typical Rotary Knife System Component Locations
Follower Cycle Length
The Follower Cycle Length (also called the Follower Length) is the
distance, in user units, that the Follower axis (PCM-22/FX drive) moves
during each Follower cycle. It is the distance between two Follower cycle
zero positions. See Figures 2 and 3.
If the Follower Cycle Defined By Sensor is “Yes”; when the Zero Follower
Cycle sensor detects a target on the Follower axis, that is the Follower
zero position. The distance between two Zero Follower Cycle positions is
the Follower Cycle Length.
ZERO
MASTER
SENSOR
MASTER PHASE
DISTANCE
PHASE
MASTER
LENGTH
ZERO
FOLLOWER
T
A
O
T
I
R
O
N
CYCLE
POINT
SENSOR
WORKING
OFFSET
4 © EMERSON Motion Control
Page 13

Introduction
FOLLOWER LENGTH
ONE
CYCLE
MASTER LENGTH
ONE TO ONE RELATIONSHIP (IGNORING SCALE) BETWEEN
MASTER LENGTH AND FOLLOWER LENGTH.
Figure 3 Relationship Between the Master Cycle Length and the Follower Cycle Length
If the Follower Cycle Defined By Sensor is “No”; when the Follower cycle
starts, it is at the Follower zero position. When the Follower axis has
moved the user entered Follower Cycle Length, it has moved the distance
between two Follower zero positions. See Homes and the Follower Zero
Position.
Working Segment
This is called Working Segment Width on the Follower Cycles screen. It
is the constant velocity portion of the cycle, usually when the Follower is
in contact with the product. The Follower moves at the Working Ratio
velocity relative to the Master velocity during this distance. See Figures
4, 5, and Cycle Inter-Relationships, Maximum Product Velocity and
Variable Segment.
Note: The Master Length also has a Working Segment. It is not
directly user adjustable, it is computed from the Follower
Cycles Working Segment divided by the Working Ratio. See
Figure 6.
Cycle Point
The Cycle Point is at the center of the Working Segment. It is the
beginning and the end of every cycle. See Operational Timing.
Working Offset
The Working Offset is the distance from the Cycle Point to the Follower
zero position, in the direction of Follower rotation. The Follower zero
position is the same position as the Zero Follower Sensor if used. See
Figures 4, 5, Cycle Inter-Relationships, Homes and the Follower Zero
Position.
P/N 400274-01 Revision A7 5
Page 14

PCM-22 Rotary Knife Controller
CYCLE POINT
WORKING
SEGMENT
WORKING OFFSET
FOLLOWER
ZERO POSITION
VARIABLE SEGMENT
ONE
CYCLE
ONE TO ONE RELATIONSHIP (IGNORING SCALE) BETWEEN
MASTER LENGTH AND FOLLOWER LENGTH.
Figure 4 Follower Terminology Relationships
B
G
A
FOLLOWER
LENGTH
MASTER
LENGTH
DIRECTION
D
FOLLOWER
ROTATION
C
Figure 5 Circular View of Follower Terminology Relationships
Variable Segment
This is a computed parameter. It is the Follower Cycle Length minus the
Working Segment. This is where all cycle adjustments occur. See Figures
4, 5, 6 and Cycle Inter-Relationships.
When designing a PCM-22 system, the peak acceleration and the peak
velocity required during the Variable Segment must be calculated at
the maximum process speed with the shortest Master Length
spacing. This is necessary to determine the required motor size.
See Maximum Product Velocity.
OF
F
A: FOLLOWER CYCLE LENGTH
B: FOLLOWER ZERO POSITION
C: WORKING SEGMENT
D: VARIABLE SEGMENT
E: WORKING OFFSET
E
F: CYCLE POINT
(CENTER OF WORKING SEGMENT)
G: CYCLE DROPOUT POSITION
WARNING!
6 © EMERSON Motion Control
Page 15
Cycle Drop Out Position
The Cycle Drop Out Position is the position exactly opposite the Cycle
Point. While Cycle Drop Out input function is active, the Follower will
complete its current cycle and decelerate to this position and hold there.
See Figure 5, the Cycle Drop Out input function, Cycle
Inter-Relationships, Homes and the Follower Zero Position.
Working Ratio
The Working Ratio defines the relationship between the Follower
velocity and the Master velocity during the Working Segment.
For example:
If the Follower is to move the same speed as the Master during the
Working Segment, then the Working Ratio would be 1.00000. This is
common in many applications.
If the Follower is to move 5 percent faster than the Master velocity
during the Working Segment, then the Working Ratio would be 1.05000.
The range is from 0 to 9.99999.
CYCLE POINT
WORKING OFFSET
FOLLOWER
ZERO POSITION
Introduction
WORKING
SEGMENT
VARIABLE SEGMENT
FOLLOWER
ONE
CYCLE
WORKING SEGMENT
WORKING RATIO
ONE TO ONE RELATIONSHIP (IGNORING SCALE) BETWEEN
MASTER LENGTH AND FOLLOWER LENGTH.
VARIABLE SEGMENT
COMPUTED RATIO
Figure 6 Follower Component Relationships to the Master Cycle Length
MASTER
LENGTH
LENGTH
P/N 400274-01 Revision A7 7
Page 16

PCM-22 Rotary Knife Controller
(
Phase
A repeating pattern is called a cycle. When two repeating patterns are
synchronized there is an inherent position relationship between the two
patterns called phase. See Figure 7.
This means that:
There is a one-to-one positional profile relationship between the
two lengths (ignoring scale) and every point within the two
lengths.
CYCLE POINT
WORKING OFFSET
FOLLOWER
ZERO POSITION
WORKING
SEGMENT
PHASE
Figure 7 Phase Relationship Between Master and Follower Cycle Lengths
The PCM-22 maintains the phase relationship by automatically making
adjustments based on sensor inputs and applying user-defined
parameters. Figures 3, 4 and 6 show a phase relationship of zero.
Average Length
The PCM-22 uses continuous averaging when an axis is defined by
sensor. Continuous averaging provides increased stability by
incorporating every length into the average, starting from the initial
Follower Cycle Length or Initial Master Length. Average lengths are
generated from the following equation for the Master and the Follower
axes:
WORKING SEGMENT
WORKING RATIO
VARIABLE SEGMENT
ONE
CYCLE
VARIABLE SEGMENT
COMPUTED RATIO
FOLLOWER
LENGTH
MASTER
LENGTH
8 © EMERSON Motion Control
Average Length
=
Averaging
Current is equal to the current average length.
New is equal to the new measured length.
Averaging is entered by the user from 1-8.
Current *(Averaging - 1)) + New
Page 17

Introduction
(
For example:
If eight is entered here the new average Follower Length calculated by
the PCM would be:
Average Length
It takes at least three times the averaging number of cycles on an axis to
“learn” a change in length (e.g. if the averaging is set to eight, the PCM
will need to sense at least 24 cycles to completely adjust for the new
length). See Follower Length Correction Limit and Master Length
Correction Limit.
Therefore, the lower the average the faster length errors are corrected.
However, too low a value adversely affect the drive’s ability to quickly
correct for phase errors by causing overcompensation and instability. See
Maximizing Profile Performance and Theory of Operation.
The Average Master Cycle Length and the Average Follower Cycle
Length are the learned lengths which are used only when defined by
registration sensor.
Current *7) + New
=
Averaging
P/N 400274-01 Revision A7 9
Page 18

PCM-22 Rotary Knife Controller
10 © EMERSON Motion Control
Page 19

Theory of Operation
The operation of the PCM-22 is explained in the following sections.
This manual should be read completely before installing the
PCM-22.
General Running
The Master axis position is monitored by the PCM-22 using
synchronization signals. These signals, which come from an incremental
encoder driven by the Master axis or an upstream FX drive, provide the
positioning data to the PCM-22.
In order to maintain the proper phase relationship between the two axes,
the PCM-22 monitors the Zero Master Cycle and Zero Follower Cycle
sensors of both the Master and the Follower axes.
If the Follower axis does not use a sensor then the PCM-22 will use the
Follower Cycle Length parameter entered and only correct for Following
Error. Following Error is the difference between the motor’s
commanded position and it' actual position. No automatic length or
phase adjustments will be made for the Follower axis.
If the Master axis does not use a sensor, no corrections to the Follower
axis’ motion profile will be made for product differences or encoder
slippage.
If the Follower axis is not in phase synchronization with the Master axis,
the PCM-22 computes a correction which is applied in the next Follower
cycle. The Follower axis will speed up or slow down depending on what is
required for the length or phase correction. If both the Follower and the
Master axes are in phase synchronization, no correction is made.
The portion of the motion profile called the Variable Segment is where
all user changes or profile adjustments occur for each individual Master
Length. The remainder of the motion profile is called the Working
Segment. The Working Ratio will always be maintained during the
Working Segment.
Any changes made before the Cycle Point will take place during the next
cycle. If parameters are entered that cannot be accommodated while in
cycle, the Cycle Limit Reached (output function 41), if assigned, will be
activated until the cycle can be executed as defined. See Operational
Timing.
Product (master) positions are continuously tracked whether a Follower
cycle is executing or not. At power-up the PCM-22 is executing the
Master Cycle zero (0) definition. See the MF serial command.
P/N 400274-01 Revision A7 11
Page 20

PCM-22 Rotary Knife Controller
Master Cycle Defined By Sensor Mode
The PCM-22 handles the Master position information differently
depending on whether a product registration (master) sensor is used or
not. Each of the two ways of handling the Master position information
have different applications but operate similarly in the respect that
Mater position information is continuously tracked whether a Follower
Cycle is executing or not.
When a Zero Master Cycle sensor input occurs, the distance traveled
from the last product position will be checked to see if it is between the
Master Length Upper Limit and the Master Length Lower Limit. This
measured distance is factored into the Average Master Length starting
from the user entered Master Cycle Length. Any necessary corrections
will be made to the next Follower axis motion profile. See Average
Length, Master Cycles screen and Operational Timing.
FX AMPLIFIER WITH PCM-22
FOLLOWER
SENSOR
FOLLOWER
AXIS
MASTER AXIS (SYNC ENCODER)
REGISTRATION
MARKS
MASTER SENSOR
ROTARY KNIFE
Figure 8 PCM-22 Rotary Knife System Example
Master Cycle Not Defined By Sensor Mode
If the Master is Not Defined By Sensor, the user entered Master Cycle
Length will be used by the PCM-22. No corrections to the Follower axis’
motion profile will be made for product or encoder slippage in this mode.
12 © EMERSON Motion Control
Page 21

Theory of Operation
Resetting the Master Cycle Processing
Resetting the Master Cycle Processing on the PCM-22 involves reloading
the user-defined Master Cycle parameters. This overwrites all learned
and user-defined Master information currently in use. When the Master
processing is reset, the Master Cycle Defined output function is
deactivated until the Master Cycle is redefined. Resetting the Master
Cycle Processing usually happens automatically but may be induced. See
Automatically Resetting the Master Processing and Manually Resetting
the Master Processing.
Note: Resetting the Master Cycle Processing will only occur when a
Follower Cycle is not executing and the Follower axis is not
moving.
How the Master Cycle is Defined
After Resetting the Master Cycle Processing the Master cycle is
undefined and must be redefined before a Follower cycle may begin.
Master Cycle Defined By Sensor Mode
When the first Zero Master Cycle sensor input is received, the product is
at the initial Master zero position. When the second Zero Master Cycle
sensor input is received, the Master Cycle Length will be defined and the
Master Cycle Defined output function will activate.
Master Cycle Not Defined By Sensor Mode
When the first Zero Master Cycle input is received, the product is at the
initial Master zero position. The Master Cycle Length will be defined at
this point and the Master Cycle Defined output function will activate.
This will be the only Zero Master Cycle sensor input required for all
master cycles following.
Note: For situations where there is no need for any master axis
alignment, you can wire the Follower Cycle Defined output to
the Zero Master Cycle input to define the Master Cycle position
automatically.
Automatically Resetting the Master Processing
• If the PCM-22 has been powered-up but has not yet executed a
Follower cycle, it is executing the Master Cycle 0 data definition. The
first time after power-up the Y Execute Follower Cycle program step
is executed in a PCX program, the Master processing will be reset.
See the MF serial command.
• When the Y Execute Follower Cycle program step is executed in a
PCX program and the Master Cycle definition specified in the
Follower Cycle screen, is not the same as the currently executing
Master Cycle definition then the Master processing will be reset. See
the CI2 serial command.
P/N 400274-01 Revision A7 13
Page 22

PCM-22 Rotary Knife Controller
Manually Resetting the Master Processing
• Setting the Force Reset Master Processing bit using the FF serial
command will automatically cause a Reset of the Master processing
every time a Y Execute Follower Cycle program step is executed in a
PCX program. See Starting A Follower Cycle.
Manually Resetting the Master Cycle Processing is particularly useful for
troubleshooting product handling (slippage or registration) issues.
The PCM-22 provides two ways for resetting the Master processing
manually by:
• Writing the MF serial command.
• Reset Master input function 115.
These methods allow the user to reset the Master processing as the
application requires. The result is the same as selecting a different
Master Cycle definition for the same Follower cycle on demand.
14 © EMERSON Motion Control
Page 23

Starting A Follower Cycle
An initial Home or Index is required to move the Follower axis to the
Follower zero position before the Y Execute Follower Cycle statement is
executed. This will determine, using the Working Offset, the position of
the Cycle Point on the product. When the Y Execute Follower Cycle
statement is executed, the Follower Cycle Defined output function will
activate and if the Master cycle is defined, the Follower cycle will start.
When the PCM-22 axis starts moving from the Follower zero position,
Home position or the Cycle Drop Out Position, a linear acceleration is
used to get to the correct velocity at the beginning of the Working
Segment. The PCM-22 checks the first product’s (Cycle Point) position to
see if it can reach the correct velocity (Working Ratio * Master velocity)
in the distance it would travel from the Follower zero position to the
beginning of the first product’s Working Segment. If this is not possible
(i.e., the start-up distance is longer than the first product position), the
PCM-22 will check the second product position. If it can not make the
second product position, it will check the third and so on, until the
PCM-22 finds a product position that will allow the Follower axis to
reach the product’s Working Ratio velocity at the beginning of its
Working Segment. The Follower axis is not moving while it is
determining which product position to try for. See Figure 9 and Master
Phase Distance.
Theory of Operation
DIRECTION OF FOLLOWER ROTATION
ZERO
MASTER
SENSOR
MASTER PHASE DISTANCE
PRODUCT MOVEMENT
Figure 9 PCM-22 Starting Cycle Ramp
WS
ZERO FOLLOWER
SENSOR
WORKING
OFFSET
When the Follower has passed the first Cycle Point after the Master has
moved the Master Phase Distance, the In Phase output function will
activate.
In Master Cycle Defined By Sensor mode, it is possible for the start-up
distance to be greater than the Master Phase Distance. If this is the case
it will generate product positions to target before the sensor using the
Average Master Length. Please note that the entered Master Cycle
Length is only equal to the Average Master Length just after the Master
processing is reset.
The Follower will start executing the computed starting ramp distance to
the targeted product position. Any products that pass the Cycle Point
before the Follower has completed the initial acceleration will be ignored.
See Figure 10, Average Length, and Resetting the Master Processing.
P/N 400274-01 Revision A7 15
Page 24

PCM-22 Rotary Knife Controller
DIRECTION
ZERO MASTER
SENSOR
CAN
MAKE
IT
AVERAGE
MASTER
LENGTH
Figure 10 When the Follower Start-up Ramp Exceeds the Master Sensor Distance
CAN NOT
MAKE IT
PRODUCT MOVEMENT
OF ROTATION
ZERO FOLLOWER
WORKING
WS
OFFSET
SENSOR
Homes and the Follower Zero Position
In order to obtain the highest accuracy, certain types of homes are
recommended for use with the PCM-22: Resolver Offset and
Feed On/Off. Make sure the “On” move is in the direction of travel and
the “Off” move is much slower in the opposite direction. The goal of this
is to have the Follower’s starting position be the same as the Follower
zero position when the cycle is running. A reducer’s backlash is minimal
compared to an inaccurate initial reference position during the first
several cycles.
Ensuring a correct starting position goes far in eliminating length and
phase variations when the Follower is executing its first several cycles
and learning its length the fastest.
It is not recommended, but it is possible, once the home is completed, to
move to a different location which will be the Follower zero position. It is
from this point that the Follower cycle will start. If this is not the actual
Follower zero position and the Follower cycle is defined by sensor, the
PCM-22 will perceive this as an error and correct for it.
Indexes and the Follower Zero Position
An index may be used instead of a home to move the Follower axis to
the Follower zero reference position. It behaves the same as a home but
there are more options for positioning the Follower axis before actually
starting the cycle.
For example:
• A Registration index.
• A Feed to Sensor index.
• A home followed by an Incremental index.
The index must not be compounded and must finish before the Follower
cycle begins.
Ensuring a correct starting position goes far in eliminating length and
phase variations when the Follower is executing its first several cycles
and learning its length the fastest.
16 © EMERSON Motion Control
Page 25

Cycle Inter-Relationships
Every cycle has certain relationships pertaining to the Working Segment.
These relationships must be maintained for the PCM-22 to execute the
motion profile required by the Follower axis for each product on the
Master axis. Please refer to the Terminology section for clarification of
terms.
The following relationships are considered the rules for cycle
operation.
1) The Working Segment must be less than the Follower Cycle Length.
2) The Working Segment divided by the Working Ratio must be less
than Master Length Lower Limit.
3) The Working Segment must be less than the Upper Working Segment
Limit.
4) The Working Segment must be greater than the Lower Working
Segment Limit.
5) The Working Segment must not overlap the Follower Zero Position.
A) The Working Offset must be less than the Follower Cycle Length
minus one half of the Working Segment.
B) The Working Offset must be greater than one half of the
Working Segment.
This means that the follower sensor must not be inside the Working
Segment.
The above Cycle Inter-Relationship cross-checks are performed against
the following cycle parameters every time a cycle is started and every
time one of these parameters is changed while the Follower is in cycle:
• Working Segment.
• Working Offset.
• Follower Cycle Length.
• Master Length Lower Limit.
If the profile is determined invalid due to one of these cross-checks when
the cycle is started, the cycle will exit and Cycle Error (output
function 66) will be activated. The Follower Cycle will not start and the
CQ serial command will have flags set indicating where the problem is.
If the profile is determined invalid due to one of these cross-checks while
the cycle is running due to a user change, the requested change will be
ignored. The CQ serial command will have flags set indicating where the
problem is and Cycle Limit (output function 41) will be activated.
If the Working Segment flag is set within the CQ serial command
response then additional flags will be set indicating where the conflict is:
Working Offset, Follower Cycle Length or Master Cycle Length.
Theory of Operation
P/N 400274-01 Revision A7 17
Page 26
PCM-22 Rotary Knife Controller
Operational Timing
FOLLOWER VELOCITY
For every cycle, there is a one-to-one positional profile
relationship (ignoring scale) between the Master cycle and the
Follower cycle.
The PCM-22 may adjust the motion profile because of:
• User requested changes using I/O or serial commands.
• Learned length and/or phase variation changes if an axis is defined
by sensor.
MACHINE CYCLE
WORKING SEGMENTWORKING SEGMENT
WORKING
RATIO
VELOCITY
ZERO
VARIABLE SEGMENT
CALCULATED BY
CYCLE POINT
THE PCM
CYCLE POINT
MASTER
POSITION
MASTER CYCLE
FOLLOWER CYCLE
Figure 11 PCM-22 Motion Profile
In both cases, all motion profile changes (user requested changes,
learned length and/or phase variations) occurring before the Cycle Point
will be applied when the PCM-22 calculates the next Working Segment
location.
When the Follower reaches the end of the current Working Segment, the
new motion profile is used to move to the next Working Segment. See
Figure 11. This new motion profile is the typical machine cycle which
starts when the Follower axis leaves the Working Segment and gets clear
of the product (e.g. the rotary knife comes out of the product).
18 © EMERSON Motion Control
Page 27
Maximum Master Velocity
For every set of Master and Follower cycle parameters, the user must
limit the maximum velocity of the Master so that the maximum velocity
of the Follower is not exceeded. This is critical for product lengths
shorter than the Follower Cycle Length.
Theory of Operation
Maximum Master Velocity
=
FVS / MVS *2 - WR
( )
MAV
Where:
MAV =Maximum Allowable Velocity of the Follower from the Limits
screen.
WR = Working Ratio.
FVS = Follower Variable Segment =
Follower Cycle Length - Working Segment.
MVS = Master Variable Segment =
Master Cycle Length - (Working Segment / Working Ratio).
Note: The above equation reflects ideal conditions and the user must
reduce the calculated Maximum Master Velocity due to the
effects of inertia, friction, encoder slippage, sensor, mechanical
issues to allow enough velocity headroom for any motion
corrections. Usually, this velocity reduction needs to be
approximately 20 percent.
V
-
V
Peak
V
Peak
T
Peak
Follower Acceleration =
Working Ratio
-
T
Working Segment End
Velocity
VARIABLE
SEGMENT
V
Working Ratio
WORKING
SEGMENT
WORKING
SEGMENT
0
T
Working Segment End
Figure 12 Variable Segment Acceleration
At the Maximum Master Velocity, VPeak = MAV.
T
Peak
Time
WARNING!
When sizing a system, keep in mind the velocity and acceleration of
the Follower during the variable segment for the shortest product
length because the Follower acceleration and deceleration rates are
not controlled by PCX Limits.
P/N 400274-01 Revision A7 19
Page 28

PCM-22 Rotary Knife Controller
Sensors
Selection
In a typical rotary knife system, the rotary knife will be designated as
the Follower axis and the product or material conveyor as the Master
axis. A sensor on the knife (or Follower axis) is strongly recommended
since the exact position of the blade typically changes due to mechanical
imperfections.
The Zero Master Cycle and Zero Follower Cycle, input functions
45 and 46 respectively, must be assigned to separate FX drive high
speed inputs 1 and 2.
The PCM-22 reacts to learned sensor information by adjusting the
motion of the Follower to match the Master axis. If the sensor
information is inaccurate or not consistent, it will be reflected in the
accuracy of the Follower positioning.
The general guidelines when selecting a sensor are related to machine
issues such as the type of material being detected and the rate of input
occurrences.
The sensor type is dependent on what the sensor detects, called the
target. The surface area of the target should be as large as the sensing
face of the sensor to minimize hysteresis effects as defined by the sensor
type. This determines how consistently the sensor can be activated by
the target.
For a target larger than the sensor moving at a constant velocity, the
sensor should be selected be selected so the following equation is true:
Response Time
As the target becomes smaller approaching the size of the sensors’
detection field, at a constant velocity, the sensor should be selected be
selected so the following equation is true:
Response Time
The response time of a sensor is defined as the elapsed time from when
the target is detected until the signal appears on the sensor output. The
response time of the sensor will have a direct impact on the system
performance and accuracy. The response time of the sensor is part of the
switching frequency of the sensor.
The switching frequency is the minimum time from when a sensor is
triggered until it can be triggered again. Which is the time between
successive sensor triggers. Both of these parameters should be fast
enough for the application.
Width of target - Detection field size
≤
Width of target
≤
Velocity of target
Velocity of target
WARNING!
If the sensor switching frequency or response time is too slow for
the application, poor system performance will result and can cause
the Follower axis’ position to appear to shift phase as the system
speed is increased (i.e. the Cycle Point is in the wrong position).
20 © EMERSON Motion Control
Page 29

For example:
The target is moving at 48 inches/second and is 0.1 inches wide. The
detection field of the sensor is 0.062 inches wide. The response time of
the sensor would need to be faster than 1264 Hz.
Sensors selected, should have a directed detection field such as a D.C.
shielded inductive proximity sensor or a focused contrast/registration
photo sensor.
Note: Electrostatic Discharge (ESD) sensors, such as spark gap
sensors, should never be used with FX products because the
intense electrical noise they generate can affect the electronics
in the FX amplifier.
Refer to manufacturer’s information concerning sensor selection,
application and installation.
Sensors: When, Where and Why
Master Sensor
A Master sensor should be used for any of the following situations:
• When the products are randomly spaced and an average product
length is desired.
• When we need to stay in phase with registration marks or products
outside of a Follower cycle.
The Master sensor, ideally, should be positioned between one and two
Average Master Lengths away from the Cycle Point to minimize the
effects of product slippage and to allow the PCM-22 to correct for any
phase variation on that product. See Operational Timing.
Follower Sensor
A Follower sensor must be used if the Follower Cycle Length is not an
exact number of motor steps (i.e., no fractions of steps). If the Follower
Length is not an exact number of steps, the Follower can drift out of
position due to rounding. The precision of the data entered in the PCX
software is the most common cause of drifting.
The recommended solution is to use a Follower sensor to let the PCM-22
determine the real Follower Length and allow it to compensate for any
discrepancies.
Stable sensor characteristics are especially important for the Follower
axis because the Follower sensor is in the Variable Segment which is
always accelerating or decelerating.
The Follower sensor should be positioned so that it does not interfere
with machine operation and so that the acceleration/deceleration is
minimal. See Maintaining Phase Issues. Ideally, the sensor should be
placed so it would be activated at areas of the Variable Segment where
the change in velocity is low (i.e., the beginning or middle of the Variable
Segment).
Theory of Operation
P/N 400274-01 Revision A7 21
Note: Typically, if the Master cycle is defined by sensor then the
Follower should also be defined by sensor for the greatest
accuracy.
Page 30

PCM-22 Rotary Knife Controller
For example:
The Follower axis is moving at a specific acceleration and its sensor has
a response time (R.T.) of 1000 Hz (0.001 seconds). The acceleration and
response time effects on sensor accuracy are shown in the following
table.
Working
Segment
Velocity
(W.S.V.)
10 in/sec 0 in/sec
10 in/sec 10 in/sec
10 in/sec 20 in/sec
Follower
Acceleration
(F.A.)
See Figure 12
Time
Factor
(T.F.)
= W.S.V.
F.A.
2
2
2
0 sec 0.010 in
1 sec 0.020 in
2 sec 0.030 in
Sensor Accuracy
W.S.V.
= * T.F. + 1
( )
R.T.
22 © EMERSON Motion Control
Page 31

Installation
Guidelines
Attaching the PCM-22 Module
PCM modules attach to the front of any FX amplifier with two locking
arms. All electrical connections (except I/O) are made using the 48 pin
connector.
All PCM modules are equipped with eight input lines and four output
lines, doubling the I/O capability of the standard FX drive. All inputs
and outputs are optically isolated for +10.5 to +30 VDC operation. Each
input and output line has two screw terminals associated with it to
provide for either current sinking or current sourcing operation.
The first eight pairs of terminals (numbered 13 - 20) are inputs and the
last four pairs of terminals (numbered 21 - 24) are outputs. The outputs
are capable of sinking or sourcing 200 mA. You must limit the output
current to 200 mA per output or less.
Installation Guidelines
I/O Wiring
Input Wiring
Inputs require an external voltage source for operation. This voltage
source must be in the range of 10.5 to 30 VDC. The negative (-) lead of
the external power supply must be connected to the enclosure or safety
ground. See Figure 13.
Output Wiring
Outputs are similar to inputs in that they can be connected to either
sinking or sourcing type loads. Outputs require an external isolated
supply voltage, usually the same supply as the inputs. Each output can
sink or source 0.2 amps DC. The negative (-) lead of the external power
supply must be connected to enclosure or safety ground. See Figure 13.
P/N 400274-01 Revision A7 23
Page 32

PCM-22 Rotary Knife Controller
EXAMPLE A: SOURCING INPUT
EXTERNAL
SUPPLY(10.5 to
POWER
30)VDC
+
INPUT
SWITCH
-
EXAMPLE B: SINKING INPUT
EXTERNAL
SUPPLY(10.5 to
POWER
30)VDC
+
-
INPUT
SWITCH
EXAMPLE A: SOURCING OUTPUT
EXTERNAL
SUPPLY(10.5 to
POWER
30)VDC
+
LOA
D
-
EXAMPLE B: SINKING OUTPUT
EXTERNAL
SUPPLY(10.5 to
POWER
30)VDC
EXAMPLE C: SINKING OUTPUT WITH INDUCTIVE LOAD
EXTERNAL
SUPPLY(10.5 to
POWER
30)VDC
LOA
+
-
+
-
D
DIODE
SUPPRESSOR
Figure 13 Installing the PCM Module
INPUTS
OUTPUTS
PCM MODULE
INPUTS/OUTPUTS
13
14
15
16
17
18
19
20
21
22
23
24
WARNING!
48 PIN CONNECTOR
FX DRIVE WITH AN
PCM APPLICATION MODULE
Do not install or remove the PCM module when there is power
applied to the FX drive or 525 PMC because damage will occur to
one or both.
24 © EMERSON Motion Control
Page 33

PCM-22
Software Setup
This manual should be read completely before installing the
PCM-22. It provides the background information needed to setup and
configure the PCM-22/FX amplifier combination using PCX 7.x software.
Programming the PCM-22
The first step in programming your FX drive with a PCM-22 is to
configure the drive using the 5 (7 for 525 PMC) menu options in the
Drive Configuration screen. The Drive Parameters, Limits, Inputs and
Outputs screens are explained in the Software Setup and Operation
section of the 230V FX Drives Setup and Programming Operator’s
Manual, 460V FX Drives Setup and Programming Operator’s Manual or
525 Programmable Motion Controller Installation and Operation manual
as appropriate.
The Master Axis screen is where you identify the signal source of the
Master axis and set up synchronization parameters.
The next step is to define the motion parameters in the Define Motion
screen. The first three menu selections; Jog, Homes and Indexes, are
explained in the Software Setup and Operation section of the 230V/460V
FX Drives Setup and Programming Operator’s Manual or 525
Programmable Motion Controller Installation and Operation manual as
appropriate. The next two selections, Master Cycles and Follower Cycles,
define the relationship between the Master and Follower axes.
The last step is to create a program (or programs) that use the
Y Execute Follower Cycle command with other programming functions
as logical steps within a program.
The shaded boxes in the PCX menu hierarchy charts, in Figures 14 and
15, show the menus in the that are added or changed in PCX 7 software
when a PCM-22 module is employed with an FX drive or 525 PMC.
P/N 400274-01 Revision A7 25
Page 34

PCM-22 Rotary Knife Controller
Drive
Setup
Define
Motion
Programming
Jog
Homes
Indexes
Master
Cycles
Follower
Cycles
Suspend
Figure 14 PCX Hierarchy Diagram #1
Initialize
Memory
Operations
Drive
Configuration
Drive
Parameters
Master
Axis
Limits
Input
Functions
Output
Functions
Entire
Memory
Program
Data
Index Data
Input/Output
Data
Gain Setup
Analog
Setup
Limit Setup
Cycle/Infeed
Data
Figure 15 PCX Hierarchy Diagram #2
26 © EMERSON Motion Control
Page 35

PCM-22 Software Setup
The PCX features necessary to run a Cycle Profile are listed below in the
order in which they should be addressed. Each feature listed must be set
up before you use them in a Cycle Profile application.
Individual setup information for each feature is covered on the following
pages and in the 230V/460V FX Drives Setup and Programming
Operator’s Manual or 525 Programmable Motion Controller Installation
and Operation manual as appropriate.
1. Drive Parameters:
The first step in setting up the PCM-22 is to define the parameters in
the Drive Parameters screen. A description of the parameters in this
screen can be found in the Software Setup and Operation section of
the 230V/460V FX Drives Setup and Programming Operator’s
Manual or 525 Programmable Motion Controller Installation and
Operation manual as appropriate. The Drive Parameters screen can
be found by selecting Drive Setup, Drive Configuration then Drive
Parameters from the PCX menu.
2. Master Axis (Signal Source):
Specify the signal source of the Master axis. In this screen, only the
following parameters are used by the PCM-22 when running Cycle
Profiles:
Signal Source
Encoder Count Per Revolution
User Distance Per Revolution
Signal Polarity
Signal Interpretation
Sync Output Signal from
In addition to running Cycle Profiles, the PCM-22 also has the ability
to run synchronized Indexes and Homes. This is what the remaining
parameters on this screen are used for. The Master Axis screen is
found by selecting Drive Setup, Drive Configuration then Master
Axis from the PCX menu.
3. Master Cycle:
Define the parameters of the Master Cycle screen. The Master Cycles
screen is found by selecting Drive Setup, Define Motion then Master
Cycles from the PCX menu.
4. Follower Cycle:
Define the parameters of the Follower Cycle screen. The Follower
Cycles screen is found by selecting Drive Setup, Define Motion then
Follower Cycles from the PCX menu.
5. Input and Output lines:
Assign the input and output functions to the I/O lines on the FX
amplifier and the PCM-22 module. There are several input and
output functions used specifically for Cycle Profiles. The Input and
Output Function screens can be found by selecting Drive Setup,
Drive Configuration then either Input Functions or Output
Functions from the PCX menu. For a list of basic I/O functions see
Input and Output functions in your FX drive or 525 PMC manual.
See Typical Input Assignments and Recommended Output
Assignments.
P/N 400274-01 Revision A7 27
Page 36

PCM-22 Rotary Knife Controller
6. Homes and Indexes:
Determine the type of Home or Index reference move and other
motion operations as needed. See Homes and the Follower Zero
Position and Homes and the Follower Zero Position.. The Homes and
Indexes screens are found by selecting Drive Setup then Define
Motion from the PCX menu.
7. Cycle Profile Programs:
Create a program using the “Y Execute Cycle Profile” programming
function. The program typically contains motion statements before
and after the Y Execute Follower Cycle statement.
28 © EMERSON Motion Control
Page 37

Master Axis
Description
With synchronized moves, an external Master axis becomes the time
base for the motion of the Follower axis (your FX drive equipped with a
PCM-22). Operation is determined by the relationship of the Master axis
signal source (encoder or upstream drive) to the Follower axis motor.
The Master axis is typically an EMERSON SCS series encoder, upstream
drive, EMERSON Master Frequency Generator or a customer supplied
encoder of any line density yielding the appropriate steps per revolution.
In this screen, only the following parameters are used by the PCM-22
when running cycle profiles:
In addition to running Cycle Profiles, the PCM-22 also has the ability to
run synchronized Homes, Indexes and Jogs. The remaining parameters
on this screen are listed below and used for these synchronized
operations.
PCM-22 Software Setup
Signal Source
Encoder Count Per Revolution
User Distance Per Revolution
Signal Polarity
Signal Interpretation
Sync Output Signal from
Master Maximum Velocity
Sync Velocity User Units
Sync Velocity Scaling
External Mode Override.
Encoder selection should be based-on the accuracy desired for the
application.
For example:
If your encoder delivers 12,000 counts per revolution and the distance
per revolution is 12.000 inches, then the distance per count is 0.001
inches.
For highest system performance and accuracy, the number of resolver
steps per Follower Cycle Length should ideally be no more than two
times the number of synchronization steps for the shortest Master Cycle
Length.
For example:
If the Follower Cycle Length is 20,480 resolver steps long, then the
shortest a Master Cycle Length should be is 10,240 synchronization
steps.
Note: If a high mismatch between Follower and Master steps exist, it
will cause poor system performance and may cause machine
damage.
WARNING!
P/N 400274-01 Revision A7 29
Page 38

PCM-22 Rotary Knife Controller
WARNING!
The maximum Master axis frequency into the PCM-22 module must
not exceed 210 kHz (210,000 steps/second).
30 © EMERSON Motion Control
Page 39

Master Axis Setup
To set up a relationship between the Master axis and the Follower axis,
select the Master Axis option from the Drive Configuration screen.
Signal Source
Select the origin of the synchronization (also referred to as “sync”) signal
(Drive or Encoder) used for Master axis positional information. When
Drive is selected, the Follower axis (PCM-22) is receiving its
synchronization source from a FX/DX upstream drive, the Counts Per
Revolution becomes 4096 counts per revolution.
If you select Drive for your signal source, the Encoder Counts Per
Revolution parameter will not appear (shown below).
PCM-22 Software Setup
Figure 16 Master Axis Screen for an Upstream Drive
If your Master axis is an Encoder, there will be up to seven parameters
that you need to set up that pertain to the signal source (see Master Axis
screen below).
P/N 400274-01 Revision A7 31
Page 40

PCM-22 Rotary Knife Controller
Figure 17 Master Axis Screen for an Encoder
32 © EMERSON Motion Control
Page 41

PCM-22 Software Setup
Encoder Counts Per Revolution
This parameter is not available if the Signal Source is set to Drive.
The Encoder Counts Per Revolution parameter sets the number of
encoder steps per revolution of the synchronization encoder. The default
value is 4000 steps per revolution. The minimum value is 1 and
maximum value is 65,535.
User Distance Per Revolution
The default value for this parameter is 4000 "user units" per revolution
of the sync source. See definition of user units in the PCX section of the
230V and 460V FX Drives Setup and Programming Operator’s Manual
or 525 Programmable Motion Controller Installation and Operation
manual as appropriate. The minimum value is 1 and maximum value is
65,535.
Signal Polarity
This feature defines the direction of the synchronization source that
corresponds to a positive Master axis position change. Clockwise is
indicated with a (+); counterclockwise is indicated with a (-). CW and
CCW motion of the Master axis is defined while facing the encoder shaft.
WARNING!
The Signal Source must count upwards for cycle operation. If the
count is going the wrong way, change the signal polarity in PCX to
correct this.
Figure 18 CW Encoder Rotation.
Signal Interpretation
The signal interpretation feature allows you to define how the Follower
reacts to clockwise and counterclockwise motion of the synchronization
source.
P/N 400274-01 Revision A7 33
WARNING!
The COMP+ mode must be used when running Follower Cycles on
the PCM-22.
Page 42

PCM-22 Rotary Knife Controller
Maximum Velocity
The following signal interpretation modes apply to all the
synchronization modes of operation.
Mode 1 (+ and -): When the Master axis moves either CW or CCW, the
Follower axis will move in its commanded direction. If the Master axis
changes direction the Follower axis will continue in the original
commanded direction. The Follower axis will not reverse direction.
Mode 2 (+): The Follower will only react to synchronization pulses when
the Master axis runs in the CW direction. CCW Master axis pulses are
ignored.
Mode 3 (-): The Follower will only react to synchronization pulses when
the Master axis runs in the CCW direction. CW Master axis pulses are
ignored.
Mode 4 (COMP +): The Follower will only react to synchronization pulses
when the Master axis runs in the CW direction. The drive counts the
pulses received in the CCW direction and ignores that exact number of
CW pulses before Follower motion in the CW direction occurs.
This feature compensates for Master axis motion in the opposite (CCW)
direction. For example, the Master stops, then inadvertently backs up
due to conveyer slack, etc.
Mode 5 (COMP -): The Follower axis will only react to synchronization
pulses when the Master axis runs in the CCW direction. The drive
counts the pulses received in the CW direction and ignores that exact
number of CCW pulses before Follower motion in the CCW direction
occurs. This feature compensates for Master axis motion in the opposite
(CW) direction.
The Master maximum velocity is the maximum frequency that the
Master axis signal source is expected to produce when running at its’ full
speed. To calculate the Master maximum velocity, use the following
formula:
MV MS
Master MaxVelocity
MV = Master Axis Maximum Velocity (RPM's)
MS = Master Steps/Rev
If encoder is master: MS = (Encoder Line Density)*(4)
If drive is master: MS = 4096
For example: The Master axis is a 1000 line encoder and rotates at a
maximum speed of 3000 rpm, and, when quadratured, produces 4000
steps per revolution. Then:
( )(
3000 4000
RPM Steps
Re )
v
60
This value is the Master encoder velocity at which synchronized time
base and real time base are equal. This parameter is used to calculate
actual Follower velocity while running in synchronized time base.
/
Sec Min
( )( )
=
Sec Min
,
200 000
/60
StepsPer Second=
34 © EMERSON Motion Control
Page 43

PCM-22 Software Setup
WARNING!
The maximum frequency into the PCM-22 module must not exceed
210 kHz (210,000 steps/second).
Sync Velocity User Units
This parameter sets the units to be associated with all sync velocities.
User units can be any three letter combination, such as IPS (inches per
second), RPM (revolutions per minute), FPM (feet per minute), etc.
Sync Velocity Scaling (Max RPM Equals)
This parameter sets the sync velocity entry that will produce maximum
velocity of the drive when the Master axis signal source is at maximum
velocity. For example, when an Index is running in sync time base, the
velocity is specified in user units.
The default value is 1.000. In this case a setting of 0.500 in an Index
velocity when in synchronized time means the drive will accel to half of
maximum velocity.
Sync Output Signal from
If you select Motor, your FX drive will output the sync signal to the next
FX drive based on the motion of its own motor. If you select Upstream
Drive, your FX drive will output the signal that comes from the
preceding PCM/Drive. The Signal Source of the next FX drive and PCM22 in the synchronization chain must be set to Drive in order to operate
with this signal.
Encoder pulses are passed to all amplifiers in the synchronization signal
chain. How you answer this question has no effect on the integrity of the
encoder signal.
External Mode Override
External mode override works in conjunction with input function 38 to
override the current mode of operation. When input function 38 is
assigned and active, the drive will exit its current operating mode and
default to the mode selected with this parameter. This is operable
outside of a program only.
There are three modes of operation: Analog Velocity, Analog Torque and
Bipolar Sync.
Analog Velocity/Torque
When set to analog velocity or torque mode, the drive will respond to a
conventional 10 VDC signal. In either of the two analog modes a 10 VDC
signal is equated to either (CW) or (CCW) maximum programmed
velocity or maximum full peak torque rating.
If there is no physical resistance to the torque at the motor shaft, the
motor will very quickly accelerate to maximum speed.
If you enable analog torque mode and apply a voltage between 0 and 10
VDC to the command connector, the FX drive will attempt to produce
torque equal to:
WARNING!
P/N 400274-01 Revision A7 35
Page 44

PCM-22 Rotary Knife Controller
Actual Torque Max Torque=
Applied Voltage
10 VDC
Bipolar Sync
When set to Bipolar Sync, this parameter allows for direct movement of
the FX drive motor ratioed to the sync encoder. This mode moves the
motor shaft in direct response to encoder or drive signals. This means
immediate velocity without ramping in your FX drive. If the Master axis
accelerates very quickly, your FX drive (Follower axis) will try to follow
just as quickly. Too fast an acceleration by the Master axis could result
in “F” (Following Error) faults for the Follower axis.
Bipolar Sync Ratio(Motor)
This parameter is the relationship of the Follower axis position to the
Master axis position.
For example:
If you set it to three, for every revolution of the Master axis there will be
three revolutions of the Follower axis. Thus, the bipolar sync ratio would
be 3:1.
36 © EMERSON Motion Control
Page 45

Master Cycles
A Master Cycle Length is defined as the distance between successive
Master zero positions. The FX drive, with the PCM-22 acting as the
Follower axis, will produce one or more cycles of motion for every cycle
produced by an independent (Master) axis while maintaining a phase
relationship. All values are in user units of the amplifier as defined in
the Drive Parameters screen (i.e., inch, millimeters, etc.) from the PCX
menu.
PCM-22 Software Setup
Figure 19 Master Cycles Screen.
The Master Cycles screen is found by selecting Drive Setup, Define
Motion then Master Cycles from the PCX menu.
Note: The Master Cycle must be defined before a Follower Cycle may
start. See Resetting the Master Cycle Processing for details on
Master Cycle definition.
Master Cycle Number
This parameter identifies the Master Cycle currently being defined. Up
to 16 different Master cycles can be defined (0 to 15). Any Master Cycle
can be used with any Follower cycle.
Master Cycle Length
The Master Cycle Length is used when the Master processing is reset. It
is the product length that is used when the Master Cycle Is Not Defined
by Sensor.
When the Master Cycle Is Defined by Sensor, the Master Cycle Length is
used until a valid Master sensor input is received and averaged. The
value entered should be the average product length. See Average Length,
Resetting The Master Processing and the FM12 serial command.
P/N 400274-01 Revision A7 37
Page 46

PCM-22 Rotary Knife Controller
Master Length Upper Limit
Missing Master Sensors
NEXT EXPECTED SENSOR
LOCATION ONE AVERAGE
LENGTH AWAY
LAST REAL SENSOR POSITION
MASTER LENGTH
LOWER LIMIT USED
IN THIS REGION
MASTER LENGTH
LOWER LIMIT
MASTER LENGTH UPPER LIMIT
PRE-SENSOR
VALID ZONE
INPUT
DEACTIVATED
POST-SENSOR
VALID ZONE
MASTER LENGTH
UPPER LIMIT USED
IN THIS REGION
PRE-SENSOR
VALID ZONE
DEACTIVATED
MASTER
SENSOR
POST-SENSOR
VALID ZONE
INPUT
DIRECTION OF TRAVEL
Figure 20 Master Length Upper Limit, Master Length Lower Limit and Master
Sensor Valid Zone Operation
The Master Length Upper Limit performs several functions:
11.. IItt ssppeecciiffiieess tthhee llaarrggeesstt pprroodduucctt lleennggtthh tthhaatt iiss aacccceeppttaabblle
22.. WWhheenn tthhee MMaasstteerr ccyyccllee iiss nnoott ddeeffiinneedd bbyy sseennssoorr,, iitt lliimmiittss tthhee uuppppeer
rraannggee ooff II//OO aanndd sseerriiaall aaddjjuussttmmeennttss.
.
33.. WWhheenn tthhee MMaasstteerr ccyyccllee iiss ddeeffiinneedd bbyy sseennssoorr,, iiff tthhee ddiissttaannccee ttrraavveelleed
ssiinnccee tthhee llaasstt ZZeerroo MMaasstteerr CCyyccllee sseennssoorr iinnppuutt eexxcceeeeddss tthhee MMaasstteer
e
r
d
r
LLeennggtthh UUppppeerr LLiimmiitt,, tthhee lleennggtthh iiss ccoonnssiiddeerreedd iinnvvaalliidd aanndd iiss rreeppllaacceed
bbyy tthhee MMaasstteerr LLeennggtthh UUppppeerr LLiimmiitt vvaalluuee wwhhiicchh wwiillll bbee aavveerraaggeedd.. TThhe
CCyyccllee LLiimmiitt RReeaacchheedd ((oouuttppuutt ffuunnccttiioonn 4411)) iiss aaccttiivvaatteedd uunnttiill aa vvaalliid
d
sseennssoorr iinnppuutt iiss rreecceeiivveedd.. SSeeee FFiigguurree 2200,, MMaasstteerr LLeennggtthh LLoowweerr LLiimmiitt,
MMaasstteerr SSeennssoorr VVaalliidd ZZoonnee aanndd tthhee CCQQ sseerriiaall ccoommmmaanndd.
.
The Master Length Upper Limit must be within the Master
Sensor Valid Zone for proper operation.
When the Master Cycle is Defined by Sensor and the distance from the
last Zero Master Cycle sensor input is greater than the 150 percent of
Average Master Length, the PCM-22 will assume that the Master axis
target was missed. If so, the sync position from the last sensor plus the
Average Master Length will be used. The Master Sensor Missing (output
function 25) and Cycle Error (output function 66) will be activated while
the condition is occurring. See the Master Sensor Missing output
function, Figure 21 and the CQ serial command.
d
e
,
Master Sensor Missing operation is independent of the Master Sensor
Valid Zone. When this condition occurs, it is possible to get into a
situation that sensor targets occur continuously outside the Master
Sensor Valid Zone and the system will not return to the correct phase.
38 © EMERSON Motion Control
WARNING!
Page 47

MASTER
SENSOR
MASTER SENSOR MISSING AT 150%
PRE-SENSOR
VALID ZONE
DEACTIVATED
AVERAGE LENGTH
INPUT
POST-SENSOR
VALID ZONE
DIRECTION OF TRAVEL
Figure 21 Master Sensor Missing Operation
Master Length Lower Limit
The Master Length Lower Limit performs several functions:
1. It specifies the shortest product that is acceptable.
22.. WWhheenn tthhee MMaasstteerr ccyyccllee iiss nnoott ddeeffiinneedd bbyy sseennssoorr,, iitt lliimmiittss tthhee lloowweer
rraannggee ooff II//OO aanndd sseerriiaall aaddjjuussttmmeennttss.
3. This parameter defines a length which is used to determine that an
“extra” sensor has occurred. If a new sensor input measured from the
previous input indicates a length less than the Master Length Lower
Limit, the sensor input is considered invalid and is replaced by the
Master Length Lower Limit value which will be averaged. The Extra
Master Sensor (output function 47) and Cycle Limit Reached (output
function 41) is activated until a valid sensor input is received. See
Figure 20, Master Sensor Valid Zone and the CQ serial command.
4. It limits the largest Working Segment allowed to maintain the Cycle
Inter-Relationships.
NEXT EXPECTED
SENSOR LOCATION
LAST REAL
SENSOR POSITION
OF AVERAGE LENGTH
PRE-SENSOR
VALID ZONE
INPUT
DEACTIVATED
AVERAGE LENGTH
.
PCM-22 Software Setup
POST-SENSOR
VALID ZONE
r
WARNING!
The Master Length Lower Limit must be large enough for the PCM-22
Follower axis to be able to perform the next cycle. The PCM-22 needs
to be able to reach the velocity required to handle this short product
length. See Operational Timing and Maximum Master Velocity.
The Master Length Lower Limit must be within the Master
Sensor Valid Zone for proper operation.
See Cycle Inter-Relationships, Operational Timing and Maximum
Master Velocity.
Note: The Master Length Lower Limit is checked against the Working
Segment only when:
• The Follower cycle is starting.
• The Working Segment is adjusted while the Follower cycle is
running.
P/N 400274-01 Revision A7 39
Page 48

PCM-22 Rotary Knife Controller
Master Phase Distance
Master Phase Distance Adjustment
The Master Phase Distance is the distance that determines how far the
Master zero position lags behind the Master Cycle Point. If the Master
Phase Distance is longer than the Average Master Length, the Average
Master Length distance will be subtracted from the Master Phase
Distance until the remaining distance is between zero and the Average
Master Length. This remaining distance is used as the phase
relationship between the Master and Follower axes. The minimum
Master Phase Distance is zero. See Terminology and FM12 serial
command.
If the desired Cycle Point is at a position other than the registration
mark, the Master Phase Distance parameter is used to move the Cycle
Point . Increase the Master Sensor Distance to move the Cycle Point
before the start of the product; decrease the Master Sensor Distance to
move the Cycle Point after the product registration mark.
The Master Phase Distance may be adjusted serially or by using Sensor
Dist. Increment and Sensor Dist. Decrement (input functions 72 and 73
respectively) while in cycle.
Master Cycle Defined By Sensor
This parameter determines if the product position is defined by a sensor
input “Yes”, or if not defined by a sensor “No”.
Master Cycle Defined By Sensor - “No”
If “No” is entered, the Master Cycle Length entered using PCX will be
executed. The Zero Master Cycle input must be activated once to define
the Master zero position. Once the Master zero position has been set the
master axis length is determined by encoder counts only.
Master Cycle Defined By Sensor - “Yes”
If “Yes” is entered, the Master cycle will be defined by a sensor on the
Zero Master Cycle input line. The sensor will then be used to determine
the beginning of each Master cycle. The synchronization source will
provide positional information of the Master Cycle Length along with the
sensor input to compensate for length and phase variations. See Average
Length and Maximizing Profile Performance.
Note: Typically if the Master cycle is defined by sensor then the
Follower should also be defined by sensor for the greatest
accuracy.
Cycle Length Averaging
This parameter determines how much the new measured length affects
the current operational Master Length. The lower the average, the faster
length errors are corrected for. The higher the Cycle Length Averaging
value, the more it will filter out sensor and machine anomalies.
40 © EMERSON Motion Control
Page 49

PCM-22 Software Setup
Setting this value lower will adversely affect the drives ability to quickly
correct for phase errors. If it is too low, it will cause the system to over
compensate and “hunt” or wander around the Cycle Point. If the
averaging is set too high, it will cause the Follower motion to be sluggish
in response to changes in the Master axis.
The Master Sensor Averaging should never be less than two except for
diagnostic reasons. The range is from 1 to 8. See Average Length, the
FM12 serial command and Maximizing Profile Performance.
Master Sensor Valid Zone
This parameter defines a window ( + or - ) around the expected Master
zero position. It is only within the Master Sensor Valid Zone range that
a Zero Master Cycle sensor input signal is considered valid.
This is useful in applications where registration marks are printed in the
same path as other printing (such as advertising, logos, instructions,
etc.). The amplifier will ignore all inputs except those which appear
within the Master Sensor Valid Zone. See Figures 20, 21 and the CQ
serial command.
The Master Sensor Valid Zone must encompass both the Master
Length Upper Limit and the Master Length Lower Limit
positions for proper operation.
For example:
If the user enters ±10 mm here, any input signal which occurs > 10
mm before or after the expected Zero Master Cycle sensor input will be
ignored.
Master Length Correction Limit
The Master Length Correction Limit is used to reduce the amount of
Master Length Variation corrected during each Master cycle.
When an input is received from the Zero Master Cycle sensor input and a
difference is found to exist between the Current Average Master Length
and the length determined by the new sensor input, the PCM-22 corrects
for a percentage of that difference in the next Master cycle.
Length Variation = (New Average Length - Current Average Length) * Length Correction Limit
P/N 400274-01 Revision A7 41
This parameter does not filter the length changes due to sensor inputs. It
only limits the rate at which length errors are corrected for, similar to a
gain. When operating at high line speeds, rapid corrections for length
errors may be undesirable especially with high inertial loads. This
parameter would be used to slow the rate of correction of the length
errors and allow smoother operation. Small amounts of variation are
normal. The effects of adjusting this parameter are more noticeable at
higher speeds. The range is from 0 to 100 percent. See Average Length,
the FM9 serial command and Maximizing Profile Performance.
For example:
If you entered 90 percent here, and the variation was 0.010 inch between
consecutive Master cycles, the PCM would correct 90 percent (or 0.009
inches) of the variation to correct the Master Length in the next Master
cycle.
Page 50

PCM-22 Rotary Knife Controller
Follower Cycles
A Follower Cycle Length is the distance between successive Follower zero
positions. The PCM-22 allows the drive to position and maintain a phase
relationship of its motor to an independent axis. The FX drive, with the
PCM-22 acting as the Follower axis, will produce one or more cycles of
motion for every cycle produced by the Master axis.
FX AMPLIFIER WITH PCM-22
MASTER AXIS
(SYNC ENCODER)
REGISTRATION
MARKS
MASTER SENSOR
1 = MASTER CYCLE LENGTH (5 INCHES)
2 = MASTER PHASE DISTANCE (9 INCHES)
FOLLOWER
SENSOR
CIRCUMFERENCE = 6.28
1
2
FOLLOWER
AXIS
ROTARY KNIFE
INCHES
Figure 22 System Example
The system example above shows a flat product (such as paper or plastic)
that moves through a set of pinch rollers which feeds back Master axis
positional information to the PCM-22 using an encoder. The Master
(registration) sensor allows the PCM-22 to reference the registration
marks on the product in relation to the Cycle Point. Similarly the
Follower sensor provides reference information for the Follower axis
using a registration mark on the rotary knife and the motor provides
feedback information of the Follower axis’ position. In this example, the
Cycle Point will be directly on the registration mark and there would be
one Follower cycle completed for every Master cycle.
Note: Typically, the Zero Follower Cycle sensor would also be used
42 © EMERSON Motion Control
as a Home Sensor (0 or 1) for the Follower axis. These input
functions (15 or 40 and 45) would be assigned to the same FX
input line (1 or 2).
Page 51

PCM-22 Software Setup
Figure 23 Follower Cycles Screen up to Length Change Increment
The Follower Cycles screen is found by selecting Drive Setup, Define
Motion then Follower Cycles from the PCX menu. In this screen
additional parameters appear when you reach the bottom of the screen
using the down arrow, page down or Enter keys.
All values are in the user units of the amplifier (i.e., inch, millimeters,
etc.) unless noted differently.
Cycle Number
This parameter identifies the Follower Cycle currently being defined. Up
to 16 different Follower cycles can be defined (0 to 15).
Follower Cycle Length
The Follower Cycle Length (also called the Follower Length) is the
distance in user units that the Follower axis moves in order to complete
one cycle of motion.
Follower Length Correction Limit
This parameter only applies if the Follower cycle is defined by sensor.
The Follower Length Correction Limit is used to reduce the amount of
Follower Length Variation corrected during each Follower cycle.
When an input is received from the Zero Follower Cycle sensor input and
a difference is found to exist between the current average Follower
length and the length determined by the new sensor input, the PCM-22
corrects for a percentage of that difference in the next Follower cycle.
Length Variation = (New Average Length - Current Average Length) * Length Correction Limit
This parameter does not filter the length changes due to sensor inputs. It
only limits the rate at which length errors are corrected for, similar to a
gain. When operating at high line speeds rapid corrections for length
errors may be undesirable especially with high inertial loads. This
parameter would be used to slow the rate of correction of the length
P/N 400274-01 Revision A7 43
Page 52

PCM-22 Rotary Knife Controller
errors and allow smoother operation. Small amounts of variation are
normal. The effects of adjusting this parameter are more noticeable at
higher speeds. The range is from 0 to 100 percent. See Average Length,
the FM10 serial command and Maximizing Profile Performance.
For example:
If you entered 90 percent here, and the variation was 0.010 inch between
consecutive Follower cycles, the PCM would correct 90 percent (or 0.009
inches) of the variation to correct the Follower Length in the next
Follower cycle.
NEXT EXPECTED SENSOR
LOCATION ONE AVERAGE
LENGTH AWAY
LAST REAL SENSOR POSITION
FOLLOWER LENGTH
LOWER LIMIT USED IN
THIS REGION
FOLLOWER
LENGTH
LOWER LIMIT
FOLLOWER LENGTH UPPER LIMIT
PRE-SENSOR
VALID ZONE
INPUT
DEACTIVATED
POST-SENSOR
VALID ZONE
FOLLOWER LENGTH
UPPER LIMIT USED
IN THIS REGION
PRE-SENSOR
VALID ZONE
DEACTIVATED
INPUT
FOLLOWER
SENSOR
POST-SENSOR
VALID ZONE
DIRECTION OF TRAVEL
Figure 24 Follower Length Upper Limit, Follower Length Lower Limit and Follower
Sensor Valid Zone Operation
Follower Length Upper Limit
The Follower Length Upper Limit performs several functions:
11.. IItt ssppeecciiffiieess tthhee llaarrggeesstt pprroodduucctt lleennggtthh tthhaatt iiss aacccceeppttaabbllee.
22.. WWhheenn tthhee FFoolllloowweerr ccyyccllee iiss nnoott DDeeffiinneedd BByy aa RReeggiissttrraattiioonn SSeennssoorr,, iit
lliimmiittss tthhee uuppppeerr rraannggee ooff II//OO aanndd sseerriiaall aaddjjuussttmmeennttss.
33.. WWhheenn tthhee FFoolllloowweerr ccyyccllee iiss DDeeffiinneedd BByy aa RReeggiissttrraattiioonn SSeennssoorr,, iiff tthhe
ddiissttaannccee ttrraavveelleedd ssiinnccee tthhee llaasstt ZZeerroo FFoolllloowweerr CCyyccllee sseennssoorr iinnppuut
eexxcceeeeddss tthhee FFoolllloowweerr LLeennggtthh UUppppeerr LLiimmiitt,, tthhee lleennggtthh iiss ccoonnssiiddeerreed
iinnvvaalliidd aanndd iiss rreeppllaacceedd bbyy tthhee FFoolllloowweerr LLeennggtthh UUppppeerr LLiimmiitt vvaalluue
wwhhiicchh wwiillll bbee aavveerraaggeedd.. TThhee CCyyccllee LLiimmiitt RReeaacchheedd ((oouuttppuutt ffuunnccttiioon
4411)) iiss aaccttiivvaatteedd uunnttiill aa vvaalliidd sseennssoorr iinnppuutt iiss rreecceeiivveedd.. SSeeee FFiigguurree 2244,
FFoolllloowweerr LLeennggtthh LLoowweerr LLiimmiitt,, FFoolllloowweerr SSeennssoorr VVaalliidd ZZoonnee aanndd tthhe
CCQQ sseerriiaall ccoommmmaanndd.
Note: The Follower Length Upper Limit must be within the Follower
Sensor Valid Zone for proper operation.
Missing Follower Sensors
When the Follower Cycle is Defined By a Registration Sensor and the
distance from the last Zero Follower Cycle sensor input is greater than
the 150 percent of Average Follower Length, the PCM-22 will assume
that the Follower axis target was missed. If so, the sync position from the
last sensor plus the Average Follower Length will be used. The Follower
Sensor Missing (output function 26) and Cycle Error (output function 66)
.
.
t
.
e
t
d
e
n
,
e
44 © EMERSON Motion Control
Page 53

PCM-22 Software Setup
will be activated while the condition is occurring. See the Follower
Sensor Missing output function, Figure 25 and the CQ serial command.
WARNING!
Follower Sensor Missing operation is independent of the Follower
Sensor Valid Zone. When this condition occurs, it is possible to get
into a situation that sensor targets occur continuously outside the
Follower Sensor Valid Zone and the system will not return to the
correct phase.
NEXT EXPECTED
FOLLOWER
SENSOR
SENSOR LOCATION
LAST REAL
SENSOR POSITION
FOLLOWER SENSOR MISSING AT 150%
PRE-SENSOR
VALID ZONE
DEACTIVATED
AVERAGE LENGTH
POST-SENSOR
INPUT
VALID ZONE
DIRECTION OF TRAVEL
Figure 25 Follower Sensor Missing Operation
Follower Length Lower Limit
The Follower Length Lower Limit performs several functions:
11.. IItt ssppeecciiffiieess tthhee ssmmaalllleesstt pprroodduucctt lleennggtthh tthhaatt iiss aacccceeppttaabbllee.
22.. WWhheenn tthhee FFoolllloowweerr ccyyccllee iiss nnoott DDeeffiinneedd BByy aa RReeggiissttrraattiioonn SSeennssoorr,, iit
lliimmiittss tthhee lloowweerr rraannggee ooff II//OO aanndd sseerriiaall aaddjjuussttmmeennttss.
33.. WWhheenn tthhee FFoolllloowweerr ccyyccllee iiss DDeeffiinneedd BByy aa RReeggiissttrraattiioonn SSeennssoorr,, iiff tthhe
ddiissttaannccee ttrraavveelleedd ssiinnccee tthhee llaasstt ZZeerroo FFoolllloowweerr CCyyccllee sseennssoorr iinnppuutt iis
lleessss tthhaann tthhee FFoolllloowweerr LLeennggtthh LLoowweerr LLiimmiitt,, tthhee lleennggtthh iiss ccoonnssiiddeerreed
iinnvvaalliidd aanndd iiss rreeppllaacceedd bbyy tthhee FFoolllloowweerr LLeennggtthh LLoowweerr LLiimmiitt vvaalluue
wwhhiicchh wwiillll bbee aavveerraaggeedd.. TThhee CCyyccllee LLiimmiitt RReeaacchheedd ((oouuttppuutt ffuunnccttiioon
4411)) iiss aaccttiivvaatteedd uunnttiill aa vvaalliidd sseennssoorr iinnppuutt iiss rreecceeiivveedd.. SSeeee FFiigguurree 2244,
FFoolllloowweerr LLeennggtthh UUppppeerr LLiimmiitt,, FFoolllloowweerr SSeennssoorr VVaalliidd ZZoonnee aanndd tthhe
CCQQ sseerriiaall ccoommmmaanndd.
.
OF AVERAGE LENGTH
PRE-SENSOR
VALID ZONE
INPUT
DEACTIVATED
AVERAGE LENGTH
POST-SENSOR
VALID ZONE
.
.
t
e
s
d
e
n
,
e
P/N 400274-01 Revision A7 45
Note: The Follower Length Lower Limit must be within the Follower
Sensor Valid Zone for proper operation.
If a Zero Follower Cycle input occurs early within the Follower Sensor
Valid Zone, and the distance traveled since the last sensor is less than 50
percent of the Average Follower Length, the sensor input is considered
invalid and is ignored. See Figure 24, Average Length and the CQ serial
command.
Page 54

PCM-22 Rotary Knife Controller
Cycle Defined By a Registration Sensor
Cycle Defined By a Registration Sensor - No
Cycle Defined By a Registration Sensor - Yes
Follower Sensor Valid Zone (+/-)
This parameter determines if the Follower Length and position are
defined by Zero Follower Cycle sensor inputs “Yes”, or if not Defined By a
Registration sensor “No”.
If “No” is selected, the Follower zero position reference must be set once
before starting the cycle by executing an Index or Home move.
If “Yes” is selected, the Follower zero position will constantly be updated
by an external sensor using the Zero Follower Cycle input function 46.
The following parameter fields will be used to control how the Follower
cycle motion is adjusted by the sensor information.
Note: The Follower must be at the Zero Follower Cycle input position
before starting the cycle by executing an Index or Home move.
This parameter defines a window ( + or - ) around the expected Follower
zero position. It is only within the Follower Sensor Valid Zone range that
a Zero Follower Cycle sensor input signal is considered valid.
This is useful in applications where the follower sensor may detect
something other than the target on the Follower axis such as another
portion of the machine. The amplifier will ignore all inputs except those
which appear within the Follower Sensor Valid Zone. See Figure 24 and
the CQ serial command.
Note: The Follower Sensor Valid Zone must encompass both the
Follower Length Upper Limit and the Follower Length Lower
Limit positions for proper operation.
For example:
If the user enters ±10 mm here, any input signal which occurs > 10
mm before or after the expected Zero Follower Cycle sensor input will be
ignored.
Follower Cycles Per Master Cycle
This parameter sets the number of Follower cycles which occur between
two successive Master zero positions. The Follower Cycle Length entered
should be the average distance between Follower sensor inputs. The
average Master Cycle Length is divided by this value for the running
Master Cycle Length. The Working Segment and Working Offset use the
Average Follower Cycle Length.
This value may be changed only outside of a cycle. The range is from 1 to
127. See Cycle Inter-Relationships, FM12, FM13, FN1 serial commands
and Terminology.
46 © EMERSON Motion Control
Page 55

Follower Sensor Averaging
This parameter determines how much the new measured length affects
the current operational Follower Length. The lower the average, the
faster length errors are corrected for. It will also filter out sensor and
machine anomalies.
Setting this value lower will adversely affect the drives ability to quickly
correct for phase errors. If it is too low, it will cause the system to over
compensate and “hunt” or wander around the Cycle Point. If the
averaging is set too high, it will cause the Follower motion to be sluggish
in response to changes in the Follower axis.
The Follower Sensor Averaging should never be less than two except for
diagnostic reasons. The range is from 1 to 8. See Average Length, the
FM13 serial command and Maximizing Profile Performance.
Phase Correction Limit
This parameter only applies if the Master Cycle and / or Follower Cycle is
Defined By a Registration Sensor.
When an input is received from either the Zero Master Cycle or Zero
Follower Cycle sensor and a difference is found to exist between the
corresponding Average Length and the length determined by the new
Zero Master Cycle or Zero Follower Cycle sensor input (i.e., the measured
length). The PCM-22 uses a percentage of that difference to correct for
the phase variation in the next corresponding Master or Follower cycle.
The Phase Correction Limit is used to limit the rate at which phase
variations are corrected for in the next cycle and allow for smoother
operation. It is similar to a gain and is used to slow the rate of correction
for Follower phase variations and allow smoother operation. Small
amounts of Follower phase variation are normal.
Phase Variation = (Measured Length - Average Length) * Phase Correction Limit
PCM-22 Software Setup
The effects of adjusting this parameter are more noticeable at higher
speeds. When operating at high line speeds, rapid corrections for phase
variation are usually undesirable especially with high inertial loads.
The range is from 0 to 100 percent. See Maximizing Profile Performance.
Phase Distance Error Limit (+)
This parameter designates a maximum positive phase variation from the
Cycle Point. The total phase variation is the sum of Master phase
variation and Follower phase variation. When the total phase variation
is above this value, the Phase Distance Error Limit output function 44
will activate and it’s complement, the In Phase output function 24, will
deactivate. Exceeding this limit will not stop the Follower axis, however,
you may employ this output with outside logic to generate an
appropriate action. See Maximizing Profile Performance, the FM7 and
FM8 serial commands.
Phase Distance Error Limit (-)
This parameter is identical to phase distance error limit (+), except that
it detects a negative deviation from the Master Phase Distance or
Working Offset. See Maximizing Profile Performance, the FM7 and FM8
serial commands.
P/N 400274-01 Revision A7 47
Page 56

PCM-22 Rotary Knife Controller
Phase Correction Deadband
This is a +/- value. If the phase variation is outside this range, it will be
corrected for. The phase variation will be ignored if it is within this
range.
This is important because even small corrections can affect consistency
at higher speeds. See Phase Correction Limits, Maximum Master
Velocity, and Maximizing Profile Performance.
Figure 26 Remaining Follower Cycles Screen Parameters
Length Change Increment
This parameter selects the amount of distance incremented or
decremented when the Follower Length Increment or Follower Length
Decrement, input functions 66 and 67 respectively, are toggled. The
Length Change Increment is also the value used when Working Segment
Increase or Working Segment Decrease, input functions 70 and 71
respectively, are toggled.
This parameter is only valid when the Follower cycle is not defined by a
registration sensor.
Master Cycle Number
Designates which Master Cycle this Follower Cycle will be associated
with. Each Follower Cycle requires a Master Cycle to be selected. Any
Master Cycle may be used with any Follower Cycle. The same Master
Cycle can be used for all 16 Follower Cycles. See Resetting the Master
Processing.
Batch Count
This parameter is used in conjunction with the Batch Count Reached
output function 43. The Batch Count Reached output becomes active
when the programmed Batch Count is reached.
The batch count is incremented automatically when the cycle counter
reaches the programmed cycle count.
48 © EMERSON Motion Control
Page 57

When the batch counter reaches the programmed batch count, the Batch
Count Reached output is activated and the batch counter is cleared. The
output will be de-activated automatically on the next Cycle Count. The
batch counter may also be cleared by the Reset Batch Counter input
function 75. The range is 0 to 2,147,483,648.
Cycle Count
This parameter is used in conjunction with the Cycle Count Reached
output function 42. See Batch Count.
The cycle counter is incremented each time a cycle is completed unless
the Cycle Counter Hold input function 76 is active. When the cycle
counter reaches the programmed cycle count, the batch counter is
incremented and the cycle counter is cleared. The Cycle Count Reached
output is cleared when the next cycle is completed. The cycle counter
and Cycle Count Reached output may also be cleared by the Reset Cycle
Counter input function 74. The range is 0 to 2,147,483,648. See the FF
and KC4 serial commands.
Working Segment Width
This is also called the Working Segment. This parameter is the distance
that the Follower moves at the Working Ratio. The position of this
segment is centered around the Cycle Point which is determined by the
Working Offset. See Figure 27.
CIRCUMFERENCE OF
ROTARY KNIFE EQUALS
FOLLOWER LENGTH
WORKING SEGMENT
PRODUCT
MOVEMENT
ZERO
MASTER
SENSOR
PCM-22 Software Setup
ZERO
FOLLOWER
T
A
O
T
I
R
O
N
SENSOR
WORKING
OFFSET
P/N 400274-01 Revision A7 49
PHASE
MASTER
LENGTH
MASTER PHASE
DISTANCE
Figure 27 Typical Rotary Knife System Component Locations
CYCLE
POINT
A good starting point is to set the Working Segment at 30 percent of the
shorter of the Master length or Follower length.
It should be kept between 15 percent and 65 percent of the shorter of the
Master or Follower length.
For example:
The Master length is 10 inches and the Follower length is 5 inches. The
Follower axis is in contact with the material for 0.5 inches. This may be
too short of a Working Segment for many systems to perform a good
operation on the material. A better choice to start at would be 30 percent
of the Follower length, which is 1.5 inches, for a Working Segment.
Page 58

PCM-22 Rotary Knife Controller
The largest Working Segment value allowed is:
See Figures 4, 5 and Cycle Inter-Relationships.
Note: The Working Segment may need to be reduced, the product
speed reduced or the Working Ratio may need to be increased
if there is a significant inertial load mismatch on the motor.
Working Ratio
This parameter is the Follower velocity to Master velocity ratio during
the Working Segment. The range is 0 to 9.99999.
For example:
If the Follower axis is to move the same speed as the material while it is
in the Working Segment and in contact with the material, then the
Working Ratio would be 1.00000. This is common in many applications.
If the Follower axis is to move 1.5 percent faster than the material
during the Working Segment to increase the efficiency of the cut, then
the Working Ratio would be 1.01500.
See Cycle Inter-Relationships and Figures 6 and 27.
Working Offset
Working Segment
≥
Master Length Lower Limit
Working Ratio
This parameter sets the distance from the Cycle Point to the Follower
zero position. When the Follower cycle is started, the Follower is
assumed to be at the Follower zero position.
If the Follower zero position falls within the programmed Working
Segment, the cycle will not execute.
See Starting a Follower Cycle, Homes and the Follower Zero Position,
Cycle Inter-Relationships and Figures 6 and 27.
Upper Working Segment Limit Width
This parameter determines the maximum length of the Working
Segment.
Lower Working Segment Limit Width
This parameter determines the minimum length of the Working
Segment.
Upper Working Ratio Limit
This parameter determines the maximum Working Ratio.
Lower Working Ratio Limit
This parameter determines the minimum Working Ratio.
50 © EMERSON Motion Control
Page 59

Offset/Phase Fine Increment
This parameter is the amount of adjustment which occurs in the next
cycle when the Working Offset Increment / Working Offset Decrement or
Master Phase Increment / Master Phase Decrement, input functions 68,
69, 72 and 73 respectively, are toggled while the Phase Fine Inc Select
input function 77 is active.
Offset/Phase Coarse Increment
This parameter is the amount of adjustment which occurs in the next
cycle when the Working Offset Increment / Working Offset Decrement or
Master Phase Increment / Master Phase Decrement, input functions 68,
69, 72 and 73 respectively, are toggled while the Phase Fine Inc Select
input function 77 is not active.
PCM-22 Software Setup
P/N 400274-01 Revision A7 51
Page 60

PCM-22 Rotary Knife Controller
Input Functions
On the Input Functions screen, the left-hand column (Input
Assignments) of numbers corresponds directly to the input lines on the
drive. The next column (Function) lists all of the input functions
available and shows which input line each function is assigned to on the
drive. Any functions assigned to Line Zero are inactive. In cases where
two or more functions are assigned to the same input line, those
functions will appear on the same line in the left column.
Most of the input functions are discussed in the 230V FX Drives Setup
and Programming Operator's Manual (P/N 400282-00), 460V FX Drives
Setup and Programming Operator's Manual (P/N 400310-00) or 525
Programmable Motion Controller Installation and Operation Manual
(P/N 400276-01) as appropriate. The input functions which are specific to
the PCM-22 are discussed in this section.
Figure 28 Input Functions Screen
To assign an input function, use the up/down arrows to move the cursor
to the desired input function, type in the desired line number and then
press Enter. The left hand window will then show the function beside
the selected input line. If you wish to access a function that is off the
screen, press the up/down arrow key or page down until the cursor is on
the desired function. The screen will scroll as needed.
When an input line is activated, the corresponding input line on the PCX
screen will be highlighted. This may be useful when setting up or testing
the drive inputs.
Inputs require an external voltage source for operation. This voltage
source must be in the range of 10.5 to 30 VDC.
52 © EMERSON Motion Control
Page 61

Description of Input Functions
(
)
45 Zero Master Cycle
This edge triggered input function is used to establish the executing
Master cycle’s zero position. If the Master Cycle is Defined By Sensor, it
allows the PCM-22 to sense and refine the Master Cycle Length and
phase position. See Master Length Upper Limit, Master Length Lower
Limit and Master Sensor Valid Zone.
Note: 1) This input must be assigned to one of the high speed input
lines (1 or 2) and not the same input line as the Zero Follower
Cycle.
2) Do not assign filtering to this function.
46 Zero Follower Cycle
This edge triggered input function is used only if the Follower cycle is
Defined By Registration Sensor. It establishes the executing Follower
cycles’ zero position. It also allows the PCM-22 to sense and refine the
Follower Cycle Length and phase position. See Follower Length Upper
Limit, Follower Length Lower Limit and Follower Sensor Valid Zone.
PCM-22 Software Setup
Note: 1) This input must be assigned to one of the high speed input
lines (1 or 2) and not the same input line as the Zero Master
Cycle.
2) Do not assign filtering to this function.
49 Cycle Drop Out
When this input function is activated before the Cycle Point, the
Follower will complete the current Working Segment then decelerate at a
calculated rate until it’s stopped at the Cycle Drop Out Position. If the
Master axis stops before this occurs the Follower axis will also stop.
When Cycle Drop Out is used, the Master axis will travel approximately
the following distance before the Follower is stopped:
Average Master Length +
If the Cycle Drop Out input function is deactivated before the Follower
has reached the Cycle Drop Out Position, then the Follower will begin to
accelerate to the next Cycle Point, similar to starting a cycle. See
Starting A Follower Cycle.
If the Cycle Drop Out input function is active when a Follower cycle is
started, the Follower axis will not move until the input is deactivated.
Since the Follower cycle did not start, it is not at the Cycle Drop Out
position, therefore the Cycle Dropped Out output function 71 will not
activate.
Follower Cycle Length / 2
Working Ratio
P/N 400274-01 Revision A7 53
Page 62

PCM-22 Rotary Knife Controller
64 Master Length Increment
65 Master Length Decrement
66 Follower Length Increment
This edge triggered input function increments the Master Cycle Length
by the Length Change Increment value each time an input signal is
received. It is checked against the Master Length Upper Limit and the
Cycle Inter-Relationships. It is not functional if the Master cycle is
defined by sensor. See Cycle Inter-Relationships, Master Cycles screen
and the PH4 serial command.
This edge triggered input function decrements the Master Cycle Length
by the Length Change Increment value each time an input signal is
received. It is checked against the Master Length Lower Limit and the
Cycle Inter-Relationships. It is not functional if the Master cycle is
defined by sensor. See Cycle Inter-Relationships, Master Cycles screen
and the PH4 serial command.
This edge triggered input function increments the Follower Cycle Length
by the Length Change Increment value each time an input signal is
received. It is checked against the Follower Length Upper Limit and the
Cycle Inter-Relationships. It is not functional if the Follower cycle is
Defined By a Registration Sensor. See Cycle Inter-Relationships,
Follower Cycles screen and the PH4 serial command.
67 Follower Length Decrement
This edge triggered input function decrements the Follower Cycle Length
by the Length Change Increment value each time an input signal is
received. It is checked against the Follower Length Lower Limit and the
Cycle Inter-Relationships. It is not functional if the Follower cycle is
Defined By a Registration Sensor. See Cycle Inter-Relationships,
Follower Cycles screen and the PH4 serial command.
68 Working Offset Increment
This edge triggered input function increments the Working Segment
Offset value by the Offset/Phase Coarse Increment or Offset/Phase Fine
Increment value as appropriate each time an input signal is received.
It is checked against the Cycle Inter-Relationships. See Cycle
Inter-Relationships, Follower Cycles screen and the PH4 serial
command.
69 Working Offset Decrement
This edge triggered input function decrements the Working Segment
Offset value by the Offset/Phase Coarse Increment or Offset/Phase Fine
Increment value as appropriate each time an input signal is received.
It is checked against the Cycle Inter-Relationships. See Cycle
Inter-Relationships, Follower Cycles screen and the PH4 serial
command.
54 © EMERSON Motion Control
Page 63

PCM-22 Software Setup
70 Working Segment Increase
This edge triggered input function increments the Working Segment
value by the Length Change Increment value each time an input signal
is received. It is checked against the Upper Working Segment Limit and
the Cycle Inter-Relationships. See Cycle Inter-Relationships, Follower
Cycles screen and the PH4 serial command.
71 Working Segment Decrease
This edge triggered input function decrements the Working Segment
value by the Length Change Increment value each time an input signal
is received. It is checked against the Lower Working Segment Limit and
the Cycle Inter-Relationships. See Cycle Inter-Relationships, Follower
Cycles screen and the PH4 serial command.
72 Master Phase Increment
This edge triggered input function increments the Master Phase
Distance value by the Offset/Phase Coarse Increment or Offset/Phase
Fine Increment value as appropriate each time an input signal is
received. It is only functional when in a cycle. See the Master Cycles
screen, the Follower Cycles screen and PH4 serial command.
73 Master Phase Decrement
This edge triggered input function decrements the Master Phase
Distance by the Offset/Phase Coarse Increment or Offset/Phase Fine
Increment value as appropriate each time an input signal is received. It
is only functional when in a cycle. See the Master Cycles screen, the
Follower Cycles screen and PH4 serial command.
74 Reset Cycle Counter
This input is used to reset the cycle counter. It is only functional when in
a cycle. See the Follower Cycles screen.
75 Reset Batch Counter
This input is used to reset the batch counter. It is only functional when in a
cycle. See the Follower Cycles screen.
76 Cycle Counter Hold
This input is used to temporarily stop the cycle counter from counting. It is
only functional when in a cycle. See the Follower Cycles screen.
77 Phase Fine Inc Select
This input is used to toggle between fine and coarse increment settings.
When this input is active all adjustments made to the Master Phase
Distance and the Working Offset using inputs will be made using the
Offset/Phase Fine Increment value. When not active, the Offset/Phase
Coarse Increment value will be used. It is only functional when a cycle a
cycle is operating. See the Master Cycles screen, the Follower Cycles
screen and the PH4 serial command.
P/N 400274-01 Revision A7 55
Page 64

PCM-22 Rotary Knife Controller
115 Reset Master
116 Cycle Exit
Performs the same function as the Force Reset Master Processing flag
described in the FF command. It is intended for troubleshooting
purposes.
Note: Resetting the Master Cycle Processing will only occur when a
Follower Cycle is not executing and the Follower axis is not
moving.
Upon activation of this input function, the Follower will complete the
current cycle. When it has reached the end of the Working Segment, the
cycle will exit at the Working Segment velocity (see Working Ratio) and
execute the next step in the PCX program. After exiting the cycle, all
program steps are allowed except Dwell immediately following the Y
Execute Follower Cycle statement. Dwell requires that the Follower axis
be at zero velocity. If there are additional motion statements, the
Working Ratio velocity at the end of the Working Segment will serve as
the initial velocity for them. This is similar to compounded Indexes but
also works with Homes as well. If there are no more motion statements,
the Stop/Hold Decel Time from the Limits screen will be used after the
completion of the Working Segment.
This input is a latching type function. This means that the input need
only be pulsed once. It is cleared when the cycle is exited.
WARNING!
The next motion statement following the Y Execute Follower Cycle
statement should not be an Absolute Index because the Follower axis
might reverse direction.
When used in conjunction with the Cycle Drop Out input function, the
following behaviors will be observed.
Please note that a machine cycle is viewed as going from the end of one
Working Segment to the end of the next Working Segment. This input
function is only functional when in a cycle. See Figure 11.
• If the Cycle Drop Out input function is active and the Cycle Exit
input function is activated, the Follower will complete the Cycle Drop
Out and then exit the cycle at the Cycle Drop Out Position.
• If the Cycle Exit input function is active and the Cycle Drop Out
input function is activated, the Cycle Drop Out input function is
ignored and the Follower will exit the cycle at the end of the current
Working Segment.
• If the Cycle Exit input function and the Cycle Drop Out input
function are activated simultaneously, the Cycle Drop Out input
function is ignored and the Follower will exit the cycle at the end of
the current Working Segment.
56 © EMERSON Motion Control
Page 65

PCM-22 Software Setup
• If the Cycle Drop Out input function is active, then the Cycle Exit
input function is activated, and the Cycle Drop Out input function is
deactivated, then the Follower will exit the cycle at the end of the
current Working Segment. If the Follower is past the end of the
current Working Segment and is decelerating when the Cycle Drop
Out input function is deactivated, then the Cycle Drop Out input
function will not complete and it will exit at the end of the next
Working Segment.
118 Working Ratio Increment
This edge triggered input is used to increment the Working Ratio by the
Working Ratio Change Increment value. It is only functional when in a
cycle. It must be assigned using the IF serial command. It is uploaded
and downloaded by PCX. See the TC5 serial command.
119 Working Ratio Decrement
This edge triggered input is used to decrement the Working Ratio by the
Working Ratio Change Increment value. It is only functional when in a
cycle. It must be assigned using the IF serial command. It is uploaded
and downloaded by PCX. See the TC5 serial command.
Typical Input Assignments
The following input assignments handle most customer needs.
Input Function Notes
1 45-Zero Master Cycle Active at all times, if the Master
2 15-Home Sensor (0)
46-Zero Follower Cycle
3 11-Stop Motion
21-Reset Fault
4 29-Initiate Program Only active outside of a program.
5 1-Home (0) Initiate
116-Cycle Exit
6 49-Cycle Drop Out Only active in a cycle.
7 72-Master Phase Increment Only active in a cycle.
8 73-Master Phase Decrement Only active in a cycle.
13 115-Reset Master Only active outside of a cycle.
is defined by sensor.
Only active outside of a cycle or
index.
Only active in a cycle.
Active at all times.
Only active when faulted.
Only active outside of a program.
Only active in a cycle.
P/N 400274-01 Revision A7 57
Page 66

PCM-22 Rotary Knife Controller
Output Functions
On the Output Functions screen, the left-hand column of numbers
(Function Assignments) corresponds directly to the output lines on the
drive. The next column (Function) lists all of the output functions
available and shows which output line each function is assigned to on
the drive. Output functions assigned to line 0 are inactive.
Use the up/down arrow keys to move the cursor to the desired output
function, type in the desired line number and press Enter. The output
function number will now appear beside the correct line number in the
left window. The drive will accept multiple output assignments on any
output line.
Most of the output functions are discussed in the 230V FX Drives Setup
and Programming Operator's Manual (P/N 400282-00), 460V FX Drives
Setup and Programming Operator's Manual (P/N 400310-00) or 525
Programmable Motion Controller Installation and Operation Manual
(P/N 400276-01) as appropriate. The output functions which are specific
to the PCM-22 are discussed in this section.
Figure 29 Output Functions Screen
Outputs require an external isolated supply voltage, usually the same
supply as the inputs. Each output can sink or source 0.2 amps DC.
Description Of Output Functions
17 At Sync
Activates when the Follower axis is in sync with the Master axis (i.e. the
acceleration portion of the Index is complete). This is not used during
PCM-22 Follower Cycles, it is only used for synchronized Indexes.
58 © EMERSON Motion Control
Page 67

For example:
In a flying cut-off system, the cut-off can not be made until the Follower
and Master are in sync. This output would signal the cut-off mechanism
that the Follower axis is in sync with Master axis. It must be assigned by
OF serial command. It is uploaded and downloaded by PCX.
18 Sync Fault/Fly Cut-off
Indicates that the programmed length reached a count that should have
initiated another flying cutoff but the FX drive was not in position to
initiate the flying cutoff operation. This is not used during PCM-22
Follower Cycles, it is only used for synchronized Indexes.
21 Master Cycle Defined
When the Master Cycle is not Defined By Sensor, one Zero Master Cycle
input is required for the Master Cycle Defined output function to
activate.
When the Master Cycle is Defined By Sensor, two Zero Master Cycle
inputs are required for the Master Cycle Defined output function to
activate.
It is always functional.
PCM-22 Software Setup
22 Follower Cycle Defined
Activated when a Follower cycle is initiated and a reference Home or
Index was completed. It is only functional in a cycle.
24 In Phase
Activates when the total phase variation is between Phase Distance
Error Limit(+) and Phase Distance Error Limit(-). It will not activate
until the Follower has completed its phase correction. It is the
compliment of the Phase Distance Error Limit output function 44. It may
be active in a cycle and is always deactivated outside of a cycle. When
the Follower cycle is starting, it will be inactive until the start of the first
Working Segment is reached.
It is useful for monitoring system performance and diagnostic purposes.
See Follower Cycles screen and Maximizing Profile Performance.
25 Master Sensor Missing
Activates if the Master distance traveled from the last Zero Master Cycle
sensor input is greater than 1½ times (default) the average Master Cycle
Length. The Master Sensor Missing output is deactivated when a valid
Master sensor input is received. It is always functional.
During a missing Master sensor condition, the Cycle Error output
function will be active and the CQ serial command will return 0x810.
The Master Sensor Missing activation distance is controlled by the SM
serial command. It is entered in degrees from 0 to 360 with a default of
180, this is 50 percent longer than the Average Master Cycle Length.
See Average Length, Master Sensor Valid Zone, the ML11 and FM12
serial commands.
P/N 400274-01 Revision A7 59
Page 68

PCM-22 Rotary Knife Controller
26 Follower Sensor Missing
41 Cycle Limit Reached
Activates if the Follower distance traveled from the last Zero Follower
Cycle sensor input is greater than 1½ times (default) the average
Follower Cycle Length. The Follower Sensor Missing output is
deactivated when a valid Follower sensor input is received. It is only
functional in a cycle.
During a missing Follower sensor condition, the Cycle Error output
function will be active and the CQ serial command will return 0x820.
The Follower Sensor Missing activation distance is controlled by the SF
serial command. It is entered in degrees from 0 to 360 with a default of
180, this is 50 percent longer than the Average Follower Cycle Length.
See Average Length, Follower Sensor Valid Zone, the FL11 and FM13
serial commands.
Activates when one of the cycle limit flags is set and deactivates when
the condition is eliminated. Under certain conditions, it may stay active
after the cycle has ended. See the CQ serial command and the Cycle
Error output function.
42 Cycle Count Reached
Active when the Cycle Count number (set in the Follower Cycles screen)
is reached. It may stay active after the cycle has ended.
This output function may be deactivated by activating the Reset Cycle
Counter input function #74 or by changing the value of the Cycle Count
which will clear the current Cycle Count. See the FF and KC4 serial
commands.
43 Batch Count Reached
Active when the Batch Count number (set in the Follower Cycles screen)
is reached. It may stay active after the cycle has ended.
This output function may be deactivated by activating the Reset Batch
Counter input function #75 or by changing the value of the Batch Count
which will clear the current Batch Count.
44 Phase Distance Error Limit
Active any time the Follower Phase Variation exceeds the Phase
Distance Error Limits. It is the compliment of In Phase described earlier.
It may be activated when in a cycle and is always deactivated when
outside of a cycle.
47 Extra Master Sensor
This output function is primarily for diagnostic purposes. It is activated
when a Zero Master Cycle input occurs when the distance traveled by
the Master axis is less than the Master Length Lower Limit. The output
will deactivate when a valid Master Length is detected. When this
condition occurs the Cycle Limit Reached output will also be activated. It
60 © EMERSON Motion Control
Page 69

is always functional. See Master Length Lower Limit and the CQ serial
command.
66 Cycle Error
This output function activates in situations where a serious profile error
was detected and it is not possible for the PCM-22 to execute the
specified profile.
1) Activates when a cycle is started without executing a Home or Index
reference move first. In this case, a F External Distance Error fault
will occur and the CQ serial command will return zero. See Homes
and the Follower Zero Position.
2) Activates when a cycle is starting if a Cycle Inter-Relationship
problem is detected. In this case the PCM-22 will stop the cycle
without initiating motion. The CQ serial command will have flags set
indicating where the problem is.
3) Activates when excessive Follower Phase Variation, Master Phase
Variation, Follower Length or Master Length change is detected. This
causes the next Master Length, next Follower Length or the next
Cycle Point to become less than the corresponding Master/Follower
Length Lower Limit. In order to attempt to control the situation, the
average length will be used and the phase will be temporarily
changed. The output will be latched active even if the situation was
controlled. It is up to the user to decide how to handle this error
condition when a cycle is executing. The CQ serial command will have
flags set indicating where the problem is. Other than user changes,
the primary causes of this would be too small of a Working Segment
for the Follower velocity required, encoder slippage, mechanical
failure, noisy sensors or low averaging in the Follower profile.
4) Activates when a Missing Master Sensor or Missing Follower Sensor
condition is detected. The serial command CQ will return 0x810 or
0x820, respectively, indicating this. The output will be deactivated if
the situation was corrected.
5) Activates when a cycle is stopping and an active cycle limit flag is
detected. The CQ serial command will have flags set indicating where
the problem is.
It may be active after the cycle has ended. See Cycle Limit Reached and
Maximum Master Velocity.
PCM-22 Software Setup
71 Cycle Dropped Out
P/N 400274-01 Revision A7 61
Activates after the Cycle Drop Out input was activated and the Follower
axis has arrived at the Cycle Drop Out Position. Please note that if the
Master sync source stops while the Cycle Drop Out input is activated,
but before the dropout position is reached, the output will not activate. It
may be active after the cycle has ended if used in conjunction with Cycle
Exit.
Page 70

PCM-22 Rotary Knife Controller
Recommended Output Assignments
It has been found that the following output arrangement allows the
greatest diagnostic and system control capability. The output functions
should be assigned but do not all need to be wired to the panel outputs.
Output Function Notes
9 66-Cycle Error
Machine needs to be stopped soon
and checked. There is a serious
issue in progress.
Check CQ serial command for
reason.
26-Follower Sensor Missing
10 41-Cycle Limit Reached
47-Extra Master Sensor
11 25-Master Sensor Missing Only active in a cycle if the Master
12 6-Hardware Fault
7-Travel Limit Fault
8-Position Error Fault
21 Unassigned
22 21-Master Cycle Defined Must be active before Follower
23 22-Follower Cycle Defined Only active in a cycle. Will not
24 24-In Phase Only active in a cycle. Complement
Only active in a cycle if the
Follower Cycle is defined by sensor.
Possible sensor failure or Follower
Sensor Valid Zone issue.
There is an issue in progress,
usually the last user adjustment
exceeded a limit.
Check CQ serial command for
reason.
If the Master Cycle is defined by
sensor see Lower Master Length
Limits.
Cycle is defined by sensor. Possible
sensor failure or Master Sensor
Valid Zone issue. See CQ serial
command.
Check FS serial command for
reason.
Cycle can begin.
activate until a reference move is
performed.
of 44-Phase Dist Error Limit.
62 © EMERSON Motion Control
Page 71

Programming
Motion Programs are a series of Homes, Indexes and other operations
that have been previously set up that you combine with other
programming steps to create a motion profile. Each motion program
provides a series of movements in conjunction with other machine
functions.
Multiple programs can be created using PCX software and stored in the
PCM-22, each designed for a different machine function. The PCM-22 is
capable of storing up to 16 (0 to 15) Master cycle definitions, 16 (0 to 15)
Follower cycle definitions, 64 (0 to 63) Indexes, 2 Homes, 100 motion
programs (0 to 99), and a maximum of 512 program steps in the nonvolatile memory.
The number of available programs and average number of steps per
program are directly related to each other. The memory is set up such
that if you require 100 programs (maximum), each program can have an
average of 5 program steps each. If the number of programs is reduced to
a minimum, you could have as many as 255 steps in a single program.
Please refer to your FX Drives manual for a complete description of the
programming capabilities available.
PCM-22 Software Setup
Additional programming functions
The PCM-22 has additional programming capabilities available. Each
program function has a designated single or double letter function code
that is used when creating a program. This section describes the unique
PCM-22 functions. Please refer to your FX Drives manual for a complete
description of all other programming functions.
R Wait For Counter
An R function code allows you to wait for the number of counts you enter
before continuing to the next program line. Enter the desired number of
counts in the data field. Counting is determined by the CW(+) and
CCW(-) rotation of the sync encoder as viewed from the shaft end of the
sync encoder. The count originates from the last Start External Counter
S or Wait For Counter R function code.
WARNING!
The Master processing must be reset after using this command
before executing a Y Execute Follower Cycle function code.
S Start Counter
An S function code resets and starts the internal counter for counting
the external encoder pulses.
P/N 400274-01 Revision A7 63
WARNING!
The Master processing must be reset after using this command
before executing a Y Execute Follower Cycle function code.
Page 72

PCM-22 Rotary Knife Controller
T Time Base
Y Execute Follower Cycle
Example program
This code determines whether the Time Base for any programming
function placed after the Time Base function code in a program
(including Dwells) is Synchronized (sync encoder), Real Time (normal) or
Analog. It is important to remember that if you want a limited number of
program steps done in Synchronized mode, you must restore the Time
Base to Real Time after those program steps.
Note: Follower cycles do not execute in synchronized time but are
synchronized in position.
When the program reaches the Y Execute Follower Cycle function code
the designated Follower Cycle will begin.
No program steps after the Y Execute Follower Cycle function code will
be executed unless the Cycle Exit input function 116, is activated. If a
stop motion command is issued the program will end.
Typically the first step in the program moves the Follower axis to some
valid start point or home.
The Home function is executed prior to the Y Execute Follower Cycle
function code to establish a Follower zero position. See Homes and the
Follower Zero Position.
Figure 30 Program Example
The Follower first moves to the Home 0 position and begins accelerating
to be in phase with the Master Axis at the start of the first possible
Working Segment. The Follower will continue executing the cycle until a
Stop Motion or Cycle Exit is issued. If Cycle Exit is activated, the
Follower cycle is exited at the end of the Working Segment at the
Working Ratio velocity. The programmable output pattern is activated
64 © EMERSON Motion Control
Page 73

and could be fed to the stop motion input of the material feed (master)
axis. The exiting Follower axis velocity will automatically become the
starting velocity of the next motion command, a real time, incremental
Index in this example. See Cycle Exit.
P/N 400274-01 Revision A7 65
Page 74

PCM-22 Rotary Knife Controller
66 © EMERSON Motion Control
Page 75

Rotary Knife
Example
Applications
MSC
CABLE
MASTER REGISTRATION
SENSOR
SCS-4
ENCODER
KNIFE
AXIS
Objective
Cut off sheets of material at a specific distance from the leading edge of a
printed image.
Solution
FX positioning drive with a PCM-22 Rotary Knife Controller using a
sync. encoder measuring the movement of the conveyor belt, a master
registration (product) sensor on the conveyor belt (Master axis) and a
follower (proximity) sensor on the knife axis (Follower axis).
Operation
As the leading edge of the printed image is sensed, the distance from the
last image is computed. This allows the PCM-22 to compute a correction
necessary to compensate for any phase or length variation on the next
cycle. When the product reaches the correct position, the PCM-22 will
have positioned the leading edge of the knife assembly at the correct
position and will be matching the speed of the product.
Results
High degree of flexibility and accuracy in the size of the product.
ANVIL
FOLLOWER
SENSOR
FX AMPLIFIER
WITH PCM-22
MOTOR
P/N 400274-01 Revision A7 67
Page 76

PCM-22 Rotary Knife Controller
Seal and Cut Off Packages
Objective
Solution
Operation
Results
FX AMPLIFIER WITH PCM-22
FOLLOWER
SENSOR
FOLLOWER
AXIS
MASTER REGISTRATION
SENSOR
REGISTRATION
MARKS
MASTER AXIS
(SYNC ENCODER)
SEALER
ASSEMBLY
Seal and cut off packages at a specific distance from the leading edge of a
registration mark on wrapping film.
FX positioning drive with a PCM-22 Rotary Knife Controller using a
sync. encoder measuring the movement of the conveyor belt, a master
registration (product) sensor on the conveyor belt (Master axis) and a
follower (proximity) sensor on the seal/cut head (Follower axis).
As the leading edge of the registration mark is sensed, the distance from
the last registration mark is computed. This allows the PCM-22 to
compute a correction necessary to compensate for any phase or length
variation on the next cycle. When the product reaches the correct
position, the PCM-22 will have positioned the leading edge of the seal/cut
assembly at the correct position and will be matching the speed of the
product.
High degree of flexibility and accuracy in the size of the sealed product.
68 © EMERSON Motion Control
Page 77

Flexible Bag Maker
Example Applications
SSC
CABLE
MOTOR
FOLLOWER
SENSOR
FX AMPLIFIERS
WITH PCM-22's
MOTOR
MSC
CABLE
ENCODER
SEALER
FOLLOWER
SENSOR
SCS-4
AXIS
MASTER
REGISTRATION
SENSOR
DIE
AXIS
Objective
To accurately place a die cut out and perforation in relationship to a pair
of seals on a continuous tube of material while easily being able to
change the size of the product without physical changes to the machine.
The product length can be changed easily by selecting one of up to 16
previously setup products serial commands or by Master Length
increment/decrement inputs switches.
Solution
Two FX Positioning Drives with PCM-22 Rotary Knife Controllers using
an encoder on the material tension roll (Master axis), a position sensor
on the seal head (1st Follower axis), a product seal position sensor
(Master axis) and the rolling die position sensor (2nd Follower axis).
Operation
When the desired amount of material has passed, the first PCM-22 will
have positioned the seal bar at the correct position relative to the last
seal. The seal functions as a registration mark for the rolling die
operation. When the seal reaches the correct position for punching, the
second PCM-22 will have positioned the edge of the die at the correct
position relative to the seal. This is done automatically by speeding up or
slowing down the sealer axis while it is not in contact with the material.
The die axis tracks the seal positions and automatically by speeds up or
slows down to punch at the correct position relative to the seal position.
The PCM-22’s will match the speed of the product while they are in
contact with it.
Results
High degree of flexibility in product size and great accuracy in the
length, placement of the seal and punching of the product.
P/N 400274-01 Revision A7 69
Page 78

PCM-22 Rotary Knife Controller
Pick and Place
MSC
CABLE
SCS-4
ENCODER
CONTINUOUS
MOLD
FX AMPLIFIER
WITH PCM-22
MASTER
PROXIMITY
SENSOR
MOTOR
FOLLOWER
AXIS
TAKE AWAY
CONVEYOR
FOLLOWER
PROXIMITY
SENSOR
Objective
To move delicate parts from a continuous molding process while
handling the sequencing requirements of the molding process.
Conventional pick and place approaches were not suitable because the
mold does not stop moving and the products were still soft.
Solution
A FX positioning drive with a PCM-22 Rotary Knife Controller using an
SCS-4 encoder measuring the movement of the molding process, a
master registration (product) sensor on the process (Master axis) and a
follower proximity sensor on the vacuum pick up take away assembly
(Follower axis).
Operation
The PCM-22s’ Working Segment is positioned so as the mold is opening,
it matches the speed of the mold. The vacuum pick up lifts the part from
the mold and gets it clear before the mold closes again.
As the Working Segment occurs to pick up the product from the mold,
the product that was previously picked up is deposited on to the take
away conveyor at the same speed as the mold due to the mechanical
linkage of the vacuum pick ups.
An additional benefit to the kind of motion profiles the PCM-22 provides,
is that the smoothness of the velocity transitions may be adjusted by
changing software parameters.
Results
A flexible system capable of moving parts from one process to another
easily without any mechanical changeover for a large range of products
sizes.
70 © EMERSON Motion Control
Page 79

Imprinter
MASTER REGISTRATION
SENSOR
Example Applications
FX AMPLIFIER WITH PCM-22
FOLLOWER
SENSOR
FOLLOWER
AXIS
MOTOR
MASTER AXIS
(SYNC ENCODER)
IMPRINT
ASSEMBLY
Objective
A flexible way to way to imprint products at a specific distance from the
leading edge of the product which are difficult due to their size or shape.
Solution
A FX positioning drive with PCM-22 Rotary Knife Controller, a master
axis synchronization encoder, a master (product) registration sensor and
a proximity follower sensor for the imprint (Follower) axis.
Operation
The union of the reciprocating eccentric imprint mechanism with the
PCM-22 Rotary Knife Controller allows the motion profile to be changed.
FOLLOWER VELOCITY
MACHINE CYCLE
WORKING SEGMENTWORKING SEGMENT
WORKING
RATIO
VELOCITY
ZERO
CYCLE POINT
VARIABLE SEGMENT
CALCULATED BY
THE PCM
MASTER CYCLE
FOLLOWER CYCLE
CYCLE POINT
MASTER
POSITION
Results
P/N 400274-01 Revision A7 71
The motion may be adjusted from the standard elliptical motion to a
more circular or egg shaped motion profile by changing software
parameters in the PCM-22. This allows control over where the imprint
occurs along with the speed and duration of the imprint while the
product is moving.
Page 80

PCM-22 Rotary Knife Controller
A flexible system capable of precise placement and control over an
imprint.
72 © EMERSON Motion Control
Page 81

Maximizing Profile
Performance
This process only applies when at least one axis is defined by sensor.
To achieve maximum performance, the PCM-22 motion profile needs to
be adjusted before production use.
IMPORTANT!
The performance of the PCM-22 will only be as good as the
information it gets from the registration sensor(s) and
synchronization source.
Before the system can be adjusted for performance, it is critical that
the sensors are producing a strong, distinct signal and that the
encoder is riding on the product without slipping or vibrating.
This adjustment process is done in two stages:
1. The Average Master and Average Follower Length Variations are
minimized.
2. The Master and Follower Phase Variations are minimized.
The process will take the longest the first time and successive profile
styles will only need minor adjustments to account for profile variation.
Following is a detailed explanation of how to perform the adjustment
process. A large part of this is learning to use and interpret the
information from the various drive commands that are available.
Note: It is normal to have small amounts of variation even after
profile adjustment due to machine and material issues such as
gear reducer backlash, web material which stretches and other
mechanical issues.
P/N 400274-01 Revision A7 73
Page 82

PCM-22 Rotary Knife Controller
Commands Referenced
New Commands
Existing Commands
The following commands will be referenced during the tuning process.
PCM-22 Firmware, P/N: 401167-01, version A6 and higher is required to
support all of these commands.
FM7: Master Phase Variation - user units
FM8: Follower Phase Variation - user units
FM9: Master Length Variation - synchronization steps
FM10: Follower Length Variation - resolver steps
FL11: Average Follower length - resolver steps.
ML11: Average Master Length - synchronization steps.
PH1: Phase Correction Limit - 0 to 100 percent.
PH2: Follower Cycle Length Correction Limit - 0 to 100 percent.
PH3: Master Cycle Length Correction Limit - 0 to 100 percent.
Note: A tool called MON.EXE may be used to read and write the serial
commands described in the following sections; Minimizing
Length Variation and Minimizing Phase Variation. Usage
instructions for MON.EXE are in the README.TXT file.
A sample script file, PCM22.MON, for MON.EXE has been
provided to be used when performing the procedures
described in Minimizing Length Variation and Minimizing
Phase Variation.
MON.EXE, PCM22.MON and README.TXT files are located on
the PCX diskette. They may also may be obtained from the
EMERSON Motion Control BBS or the Internet web page.
Minimizing Length Variation
1) Start with the following parameters at the default settings:
• The Master Cycle Length Correction Limit at 100 percent.
• The Master Sensor Averaging to 8 cycles.
• The Follower Cycle Length Correction Limit at 100 percent
• The Follower Phase Correction Limit at 100 percent.
• The Follower Sensor Averaging to 8 cycles.
If you have MON.EXE available, start it and load the PCM22.MON
file. MON.EXE will do all of the querying for you during the
adjustments and allow user to more effectively monitor the machines
performance.
2) Start the machine and let it run at least 24 cycles so it can “learn”
the mechanical variations of the Master Length (products) and the
Follower Length.
74 © EMERSON Motion Control
Page 83

Maximizing Profile Performance
3) Query FM9 and FM10 serial commands, the Master Length
Variation and Follower Length Variation respectively. Each are
updated once per cycle.
4) Choose the larger value of the two and query ML11 for FM9 or FL11
for FM10 . The Average (running) Master and Follower Lengths are
updated once per cycle and will help determine when the lengths are
stable.
5) In order to track as tightly as possible, the amount of length
variation must be reduced. Cycle Length Correction Limit reductions
should be done in 5 percent or smaller increments.
• If FM9 is larger than FM10, reduce the Master Cycle Length
Correction Limit (PH3 serial command) using PCX software.
• If FM10 is larger than FM9, reduce the Follower Cycle Length
Correction Limit (PH2 serial command) using PCX software.
6) Let the machine run at least three times the larger of the Master or
Follower Length Averaging number of cycles so the average lengths
can adjust with the new length correction limit.
7) Repeat steps 3 through 6 until the length variation is minimal for
the Master and the Follower axes. After several passes you should
see a trend towards stability when querying ML11 and FL11 that
will verify that the lengths are becoming more regular. This will be
easy to see if you are using MON.EXE.
Notes: If the length variations do not stabilize to an acceptable level or
if the either Master or Follower Length Correction Limit is
below 35 percent something is wrong mechanically with the
system. It will be necessary to do the following on the
appropriate axis.
1) If this fails to improve the Master length variation, check the
following:
• The Zero Master Cycle sensor is producing a strong,
distinct signal.
• The encoder is riding on the product without slipping or
vibrating.
• Examine the Master axis material control/tensioning
system.
2) If this fails to improve the Follower length variation, check
the following:
• The Zero Follower Cycle sensor is producing a strong,
distinct signal.
• Examine the Follower axis mechanics for looseness, sensor
functionality and mounting.
3) It is sometimes necessary to reduce the Master or Follower
Length Averaging and increase the Master or Follower
Length Correction Limit as appropriate to make the system
more responsive in order to track tighter. This should be
done carefully so as not to miss the point where the length
variations are as small as possible. Otherwise the
P/N 400274-01 Revision A7 75
Page 84

PCM-22 Rotary Knife Controller
Minimizing Phase Variation
responsiveness of the system will over compensate and
make the length variations worse.
Once the Master and Follower length variation are minimized, you may
start adjusting the Phase Correction Limit (PH1 serial command).
It is normal to have small amounts of phase variation. However, large
errors should not occur during normal cycle operation. Large variations
at high speed could cause undesirable acceleration rates. Lowering the
Phase Correction Limit value will reduce the size of the phase variations
on the system.
Note: The total phase variation is the sum of the detected Master
phase variation (FM7 serial command ) and Follower phase
variation (FM8 serial command).
The FM7 and FM8 serial commands are accessed individually. They
are each updated once per cycle and are in user units without
decimal points. The information gained from the commands is used
as a indication of general system performance and is not accurate
during user-induced phase changes using I/O or serial.
If you have MON.EXE available, start it and load the PCM22.MON
file. MON.EXE will do all of the querying for you during the
adjustments and allow user to more effectively monitor the machines
performance.
1) Query FM7 and FM8. Add them to obtain the total phase variation.
2) Query FL11 and ML11, the average Follower and Master Lengths
respectively. The average lengths should stabilize further as the
adjustment process continues.
3) For the system to track as tightly as possible, you need to reduce the
Phase Correction Limit (PH1 serial command), which is applied to
both the Master and Follower phase variation. This adjustment
should be done in 5 percent or smaller increments.
4) Repeat steps 1, 2, and 3 until the phase variation is minimal i.e. until
the amount of Master and Follower phase variation is within
application tolerances and stable. After several passes you should see
a trend towards stability when querying ML11 and FL11 that will
verify that the lengths are becoming more regular. This will be easy
to see if you are using MON.EXE.
Note: If the phase variations do not stabilize to an acceptable level or
76 © EMERSON Motion Control
if the Phase Correction Limit is below 40 percent something is
wrong with the system. It will be necessary to do one of the
following (one at a time) in order:
1) Examine the Master axis material control tensioning
system, encoder mounting, sensor functionality and
mounting.
2) Examine the Follower axis mechanics for looseness, sensor
functionality and mounting.
Page 85

Maximizing Profile Performance
3) Perform the process for Minimizing Length Variation again.
4) Adjust the Working Segment wider or narrower by 5
percent.
5) Adjust the EG gain by increments of 0x10, upwards first.
P/N 400274-01 Revision A7 77
Page 86

PCM-22 Rotary Knife Controller
6) Decrease the DG gain by increments of 0x1.
The length and phase variation should be re-checked after any
of the six possible adjustments above.
Once the total phase variation is reduced as much as possible, the final
adjustment if desired, is the Phase Correction Dead Band (PH0 serial
command). See Follower Cycles
Once this is accomplished, Phase Correction Limit, does not need to
change unless there are large Follower Length or sensor position
changes due to a machine or product change.
Note: The value of FM7 plus FM8 is tested against the Phase Distance
Error Limit (+) and Phase Distance Error Limit (-) to activate the
In Phase output. An alternate way of minimizing phase
variation is to monitor the In Phase, output function 24 and
adjust Phase Correction Limit slowly while reducing the Phase
Distance Error Limit(+) and Phase Distance Error Limit(-) to the
performance desired. This is a better approach for high speed
applications because of the inherent latency of serial
commands.
See Issues Maintaining Phase in Tips and Troubleshooting.
78 © EMERSON Motion Control
Page 87

P/N 400274-01 Revision A7 79
Page 88

Tips and
Troubleshooting
General Issues
If an odd behavior is seen (e.g., the In Phase output is deactivated or is
blinking, a Cycle Error/Cycle Limit Reached error output is active) go
online and query the CQ, FM7, FM8, FM9 and FM10 serial commands.
This should indicate what the issue is.
Once a user adjustment change occurs the system can take up to two
cycles to complete the change depending on when the change is
requested in the cycle. See Operational Timing.
Product Ranges and Limits
The behavior of the PCM-22 is controlled by the limits/parameters
entered. They must match the product for correct operation. This is why
it is a not a good idea to attempt a “one size fits all” approach (i.e., one
set of product parameters for a wide range of product lengths).
There are three solutions to this situation:
1. The simplest approach is to setup several Master Cycle definitions
and have each called from identical Follower cycle definitions. Each
Master Cycle definition would cover a smaller product range. Each
Follower cycle could then be called from separate programs. This
may be accomplished with program select lines.
2. Setup several smaller product ranges in separate Master Cycle
definitions and only use one Follower cycle definition. This can be
accomplished by using the FT serial command and a T-21 Data
Entry Panel.
For example:
CY = 1 Select Follower Cycle 1 to edit.
FT = 15 Select Master Cycle 15 to use with Follower Cycle 1.
The next time Follower Cycle 1 is started, the Master processing will
be reset and Master Cycle 15 definition will be used. The CI2 serial
command returns the current Master cycle.
3. Using only one Master Cycle and one Follower Cycle definition, a T21 or T-60/T-61 could be programmed to change the Master Length
Upper Limit, Master Length Lower Limit, Follower Length Upper
Limit or Master Length Upper Limit or Master Length Lower Limit
Length Lower Limit
P/N 400274-01 Revision A7 80
Page 89

Follower Cycle Will Not Start
Symptom
When the Y Execute Follower Cycle function code is reached in the PCX
program an F External Distance Error fault occurs and the Cycle Error
output function 66 is activated.
Cause
1) The Working Segment is overlapping the Follower zero position. The
Working Segment Offset or Working Segment needs to be adjusted.
See Cycle Inter-Relationships.
2) A reference Home or Index motion was not performed to move the
Follower axis to the Follower zero position before executing the
Y Execute Follower Cycle PCX function code.
Symptom
When the Y Execute Follower Cycle function code is reached in the PCX
program, the drive displays an E and the Cycle Error output function 66
is activated.
Cause
One or more of the Cycle Inter-Relationships is invalid. Check the CQ
serial command for what the issue(s) are. See Cycle Inter-Relationships.
Tips and Troubleshooting
Symptom
The Follower is in cycle with P on the display but no motion is occurring.
Cause
1) Check to make sure that the drive is receiving sync. pulses from the
encoder or up stream drive and that the sync. polarity and
compensation are correct. See Master Axis.
Note: The synchronization source must count in a positive direction
for proper operation.
2) The Master cycle is not defined. See How the Master Cycle is
Defined.
3) The Cycle Drop Out input function 49 is active.
Verifying the Working Segment Position
Where the center of the Working Segment/Cycle Point is in relationship
to the product can impact the quality of the operation (cutting, printing,
etc.). Verifying the Cycle Point and the Working Offset may be done two
ways:
1. Activate the Cycle Drop Out input function. Where the Follower axis
stops will be exactly opposite the Cycle Point.
2. Enter a long, not defined by sensor Master Product at least twice as
large as the Follower Length. The Follower axis will stop in the
middle of the Variable Segment. This position will be exactly opposite
the Cycle Point.
P/N 400274-01 Revision A7 81
Page 90

PCM-22 Rotary Knife Controller
Issues Maintaining Phase
Phase issues may be caused by a number of different reasons:
1) Master / Product control issues.
2) Master phase variations are primarily a combination of product
slippage, encoder slippage, material stretch and sensor latency. This
will become worse as the system speed increases if not compensated
for by the Follower and/or mechanical adjustments. This would also
be seen if the Master distance per revolution does not match the
distance traveled. The Master sensor position should be at least the
computed minimum Master Sensor Distance from the center of the
Working Segment so that the effects of material stretch are
minimized.
3) Follower phase variations are primarily Following Error and will
become worse as the system speed increases if not compensated for.
4) Follower length variations are primarily differences between the
individual Follower lengths which can be controlled by adjusting the
Follower Length Correction Limit or Follower Sensor Averaging. If
the Follower distance per revolution does not match the gear ratio
then it will first be perceived as length variation and then as phase
variation once the Follower Upper/Lower Length Limit is reached.
5) If the Master phase variation / Follower phase variation is positive
due to a late sensor from a short length or potential noise, a positive
phase variation is added to the of the next Cycle Point. Inversely, the
Master phase variation / Follower phase variation may be negative
due to an early sensor and is subtracted from the Follower/Master
position on the next cycle.
6) A Master axis that is running too fast for the profile. Too narrow or
wide of Master or Follower Length Upper/Lower Limits.
7) Too narrow or wide of a Follower Sensor Valid Zone.
8) Extra or missing sensors.
See Maximizing Profile Performance, Master Cycles and Follower Cycles
screens.
82 © EMERSON Motion Control
Page 91

System Calibration Issues
Symptom
The measured Master Length or Follower length does not match the
values returned by the PCM-22 using the FM12 or FM13 serial
commands which return the average Master Length or Follower Length
in user units respectively.
Causes
The User Distance Per Motor Revolution on the PCX Drive Parameters
screen or User Distance Per Revolution on the PCX Master Axis screen
needs to be adjusted in the direction of the measured length. If not done,
this will cause other issues as the speed is increased and the machine is
fine tuned.
For example:
A “not defined by sensor” Product Length measures 9.875”; FM12 and
the entered Product Length is 9.800”. The User Distance Per Revolution
on the PCX Master Axis screen needs to be multiplied by (9.875 / 9.800)
to calibrate the PCM-22 data to the mechanical data.
Tips and Troubleshooting
Synchronization Source Issues
Symptom
The Follower motion is jumpy or coarse.
Possible Causes
A) The PCM-22 is synchronized with the encoder (Master) position. Any
slippage or bounce of the encoder to the product will be reflected in
the position and motion of the Follower. Chain & sprocket coupling
to the encoder such as should not be used.
B) The number of sync steps per Master Length is much less than the
number of resolver steps per Follower length. See Maximum Product
Velocity and Master Axis.
Symptom
The Cycle Point appears to “walk” as the speed is increased.
Possible Causes
A) The Master encoder should be as close as possible to the Follower
and not be allowed to vibrate or slip relative to the product. If
product slippage is occurring it, will usually appear as Master Phase
Variation.
Note: Encoder selection should be based on the accuracy desired in
the operation.
For example, If your encoder delivers 12,000 counts per
revolution and the distance per revolution is 12.000 inches then
the distance per count is 0.001 inches. The PCM-22 will attempt
to track the Master to +/- 0.001 inches as this is the highest
accuracy possible.
P/N 400274-01 Revision A7 83
Page 92

PCM-22 Rotary Knife Controller
Running Into a Length Limit
B) The Follower Cycle Length entered is wrong when the Follower cycle
is not defined by sensor.
C) One or more of the following are set incorrectly: Master Cycle Length
Correction Limit, Follower Cycle Length Correction Limit and Phase
Correction Limit. See Maximizing Profile Performance.
D) Sensor response time is too slow for the application’s speed. See
Sensors.
Symptoms
One or more of the following symptoms would be observed:
1. The In Phase output function will be blinking.
2. The Cycle Limit Reached output function 41 is active.
3. The CQ serial command returns 0x10 or 0x20.
4. The Extra Master Sensor output function 47 is active.
5. Follower cycles occur with no products or between products.
6. Products are being skipped (i.e., no Follower cycle occurs).
7. A constant Master Phase Variation (FM7) equal to the difference in
what was measured between Master sensor inputs (ML1-8, ML11 or
FM12) and one of the Master Length Limits.
8. A constant Follower Phase Variation (FM8) equal to the difference in
what was measured between Follower sensor inputs (FL1-8, FL11 or
FM13) and one of the Follower Length Limits.
9. The product length appears to oscillate long, short, long, short.
10. The Follower motion will become aggressive or erratic.
Possible Causes
If an input occurs inside the Master Sensor Valid Zone or Follower
Sensor Valid Zone but is less than the Follower Length Lower Limit, the
Follower Length Lower Limit is used. Similarly, if an input occurs inside
the Follower Sensor Valid Zone but is greater than the Follower Length
Upper Limit, the Follower Length Upper Limit is used. See the Follower
Cycles screen, Missing Sensor Issues, Extra Sensor Issues and the CQ
serial command.
84 © EMERSON Motion Control
Page 93

Missing Sensor Issues
Symptoms
One or more of the following symptoms would be observed:
1. The Master Sensor Missing output function 25 is active.
2. The Follower Sensor Missing output function 26 is active.
3. The Cycle Error output function 66 is active. and the CQ serial
command returns 0x810 or 0x820.
4. Several ML1-8 values are the same and that value is the Master
Length Upper Limit in sync. steps.
5. Several FL1-8 values are the same and that value is the Follower
Length Upper Limit in resolver steps.
6. Follower cycles occur with no products or between products.
7. Products are being skipped (i.e., no Follower cycle occurs).
Possible Causes
1) Check the functionality of the sensor using IO0 (IO zero) serial
command. It returns a hexadecimal mask of the active inputs.
2) Electrical noise can be picked up on the sensor leads and cause false
triggering.
Follower Axis
1) Make sure you are getting the Follower sensor input when you
are supposed to by widening the Follower Sensor Valid Zone.
This can be checked by querying serial command IO0 (IO zero)
while monitoring the position of the Follower axis and the
Follower Sensor Missing output function.
2) Make sure that the Follower Length Upper Limit is within the
Follower Sensor Valid Zone is close to the tolerances of the
application.
Master Axis
1) Make sure you are getting the Master sensor input when you are
supposed to by widening the Master Sensor Valid Zone. This can
be checked by querying serial command IO0 (IO zero) while
monitoring the position of the Master axis and the Master Sensor
Missing output function.
2) Make sure that the Master Length Upper Limit is within the
Master Sensor Valid Zone is close to the tolerances of the
application.
See the CQ serial command, Follower Cycles and Master Cycles screens.
Tips and Troubleshooting
P/N 400274-01 Revision A7 85
Page 94

PCM-22 Rotary Knife Controller
Extra Sensor Issues
Symptoms
One or more of the following symptoms would be observed:
1. The Cycle Limit Reached output function 41 is active.
2. The CQ serial command returns 0x10 or 0x20.
3. The Extra Master Sensor output function 47 is active.
4. Follower cycles occur with no products or between products.
5. Products are being skipped (i.e., no Follower cycle occurs).
6. Several ML1-8 values are the same value and that value is the
Master Length Lower Limit in sync. steps.
7. Several FL1-8 values are the same and that value is the Follower
Length Lower Limit in resolver steps.
Possible Causes
Check the position of the sensor, the wiring, and that the sensor is
functional. The IO0 (IO zero) serial command returns a hexadecimal
mask of the active inputs.
Follower Axis
1) Make sure you are not getting extra Follower sensors when you
are not supposed to by narrowing the Follower Sensor Valid
Zone. This can be checked by querying IO0 (IO zero) serial
command while monitoring the position of the Follower axis as
appropriate.
2) Make sure that the Follower Length Lower Limit is within the
Follower Sensor Valid Zone and Follower Length Lower Limit is
close to the tolerances of the application.
Master Axis
1) Make sure you are not getting extra Master sensors when you
are not supposed to by narrowing the appropriate Master Sensor
Valid Zone. This can be checked by querying IO0 (IO zero) serial
command while monitoring the position of the Master axis and
the Extra Master Sensor output function.
2) Make sure that the Master Length Lower Limit is within the
Master Sensor Valid Zone and Master Length Lower Limit is
close to the tolerances of the application.
See the CQ serial command, Follower Cycles and Master Cycles screens.
86 © EMERSON Motion Control
Page 95

Common Operation Issues
Symptom
Drive displays an E but motion can not be initiated and the motor shaft
has torque in both directions.
Possible Causes
• A Home Lock is active.
• A Jog Lock is active.
• The Stop input function 11 is active.
• Input switch or wiring is faulty.
• Serial control is active (the decimal point of the LED display, on the
front of the drive, is lit).
Symptoms
Drive displays a H, J or P but motor does not move and the motor shaft
has no torque in either direction.
Possible Causes
• The FX drive is inhibited by Inhibit Drive input function 12 or by the
BR serial command.
• The Hold input function 3 is active.
Symptom
Drive will not Suspend.
Possible Causes
• It is already suspended. The FX drive can only be suspended once.
• Serial control is active (the decimal point of the LED display on the
front of the drive is lit).
• Input switch or wiring is faulty.
P/N 400274-01 Revision A7 87
Page 96

Appendix A
Serial Commands
The following sections explain the new and enhanced serial commands
since the FX Drives Serial Commands Manual P/N: 400255-00 was last
revised.
CI2 - Executing Master Cycle
The CI2 command returns the Master Cycle definition that is currently
executing. The command is query only. See FT serial command.
CQ - Cycle Status Query
The PCM-22 will detect and prevent learned and user changes which
would invalidate the Cycle Inter-Relationships. The cycle limit flags are
set when a condition occurs. The flags indicate what the error condition
is. The flag will clear when the condition is eliminated. More than one
flag may be set as the flags are additive.
These eight flags will cause the Cycle Limit Reached output (function 41)
to activate. The Cycle Error output (function 66) will activate if one of
these conditions exist when the cycle is exited.
Ratio Limit 0x01 Not able to make ratio change at the current
Velocity Limit 0x02 The Maximum Allowable Velocity of the
Working Segment Limit 0x04
P/N 400274-01 Revision A7 88
Master velocity. The Working Ratio will be
changed temporarily to get through the
problem; i.e., the Master Length or Working
Ratio is changing too quickly to track fully.
Follower will be exceeded in the next cycle;
i.e., the Master is going too fast to track. The
Master Length will be changed temporarily
to get through the problem.
User tried to adjust past the Working
Segment Limits. It may set be in conjunction
with Master Length Limit,
Follower Length Limit or Working Offset
Limit to indicate which inter-relationship the
requested change violated.
Page 97

Serial Commands
CQ- Cycle Status Query Continued
User Ratio Limit 0x08 User tried to adjust past the Working Ratio
limits.
Master Length Limit 0x10 User tried to adjust the Master Cycle Length
past the Master Length Limits.
If the Master Cycle is Defined By a
Registration Sensor:
1) Master Length Limit is encountered.
2) Set in conjunction with Missing Sensor
when the Master sensor is missing.
Follower Length Limit 0x20 User tried to adjust past the Follower Length
Upper or Lower Limit.
If the Follower Cycle is Defined By a
Registration Sensor:
1) A Follower Length Limit is encountered.
2) Set in conjunction with Missing Sensor
when the Follower sensor is missing.
Phase Distance Limit 0x40 User tried to decrease the Master Phase
Distance below zero.
Working Offset Limit 0x80 User tried to adjust the Working Offset so
that the working segment would be
overlapping the Follower zero position.
The following four flags will cause the Cycle Error output (function 66) to
activate and stay on until the cycle is stopped and restarted. They
usually indicate a mechanical failure, sensor failure or invalid profile in
the corresponding system.
Master Profile Error 0x100 Profile data for the next Master cycle
indicates a serious problem will occur or is
in progress. The average length is used to
attempt to get through the problem.
Follower Profile Error 0x200 Profile data for the next Follower cycle
indicates a serious problem will occur or is
in progress. The average length is used to
attempt to get through the problem.
Phase Change Error 0x400 Not able to make the phase change required
(the variable segment is too short for
Follower velocity required).
Missing Sensor 0x800 If the Master or Follower Cycle is Defined
By a Registration Sensor and the
corresponding sensor input is missing.
Master Length Limit or Follower
Length Limit bits will be set to indicate
which sensor is missing. If the condition is
eliminated, the Cycle Error output will
deactivate.
P/N 400274-01 Revision A7 89
Page 98

PCM-22 Rotary Knife Controller
Reading CQ Flags
Starting issues
Adjusting the Working Segment
Following are some typical examples of various issues, diagnostic codes
and their definitions.
Example: CQ = 0x84
The Working Offset is too short or too long for the size of the Working
Segment which is overlapping the Follower zero position.
One of two items: Working Offset or Working Segment, needs to be
changed.
Example 1: CQ = 14
The user tried to adjust the Working Segment larger than the Master
Length Lower Limit, which would violate the Cycle Inter-Relationships.
See Working Segment and Cycle Inter-Relationships.
Example 2: CQ = 84
The user tried to adjust the Working Segment larger than the Cycle
Inter-Relationships will allow.
Adjusting the Master Phase Distance
Example: CQ = 40
The Master Phase Distance requested is less than zero.
Sensor Issues and Length Limits
Example 1: CQ = 810
The Master Sensor is missing. See Missing Sensors.
Example 2: CQ = 20
If the Follower Cycle is Defined By a Registration Sensor and the learned
Follower length has reached the Follower Length Upper Limit or
Follower Length Lower Limit.
If the Follower Cycle is not Defined By a Registration Sensor, the user
has attempted to adjust the Follower Cycle Length past either the
Follower Length Upper Limit or Follower Length Lower Limit.
See Running Into A Length Limit.
90 © EMERSON Motion Control
Page 99

FF - Follower Cycle Flags
The Follower Cycle Flags are a bit map in hexadecimal containing
selections for the control of operational and starting modes on a cycle by
cycle basis. More than one flag may be set or cleared at a time as the
flags are additive. It is on a individual cycle basis. The Follower Cycle
Flags are uploaded and downloaded by PCX.
Follower Defined By Sensor 0x01
Disable Cycle Counter Reset 0x08
Force Reset Master Processing 0x20
Disable Master Processing Reset Upon Fault 0x40
Following is an example of changing an operational flag:
CY = 5 Select the cycle five to edit.
FF? Query the Follower flags on cycle 5 and PCX returns the
FF = 1 current flags for cycle 5:
The Follower cycle is defined by sensor.
The Master processing will be reset upon fault clearing.
Force Reset Master Processing mode is disabled.
FF = 21 Adding 0x20 to the current value will enable Force Reset
Master Processing before starting on cycle 5.
Serial Commands
Follower Cycle Defined By Sensor 0x01
This command specifies if this Follower cycle definition is defined by
sensor. It is available from PCX on the Follower Cycles screen.
Disable Cycle Counter Reset 0x08
This command allows the user to disable clearing the Cycle Counter
when the Follower cycle is started. When active, the Cycle Counter will
be reset when the Master processing is reset. The default is disabled. See
KC4 serial command.
Force Reset Master Processing 0x20
This command allows the user to empty/reset the Master processing as if
a new Master Cycle definition was selected for the same Follower cycle.
This will occur every time the cycle is run. This causes the Master Cycle
information to be loaded, thus overwriting the “learned” information
when a cycle starts.
Note: This is only supported in Master defined by sensor mode.
The default setting for the Force Reset Master Processing flag is disabled
for all cycles.
P/N 400274-01 Revision A7 91
Page 100

PCM-22 Rotary Knife Controller
Disable Master Processing Reset Upon Fault 0x40
FM7 - Master Phase Variation In User
Units
This command allows the user to disable resetting the Master processing
upon clearing a fault.
Note: This should be used for diagnostic purposes only.
The default setting for the Disable Master Processing Reset Upon Fault
flag is zero for all cycles by default, because the Master and Follower
relationships are lost when a fault occurs.
This is the amount of Master Phase Variation in user units between
sensors. This should be used in conjunction with FM8. The sum of FM7
and FM8 is the total phase variation for that cycle. This command is
used for Maximizing Profile Performance and diagnosis. It is only
supported in Master defined by sensor mode and is query only. See
Maximizing Profile Performance.
FM8 - Follower Phase Variation In User
Units
This is the amount Follower Phase Variation in user units from the
measured distance between sensors to the average length. This should be
used in conjunction with FM7. The sum of FM7 and FM8 is the total
phase variation for that cycle. This command is used for Maximizing
Profile Performance and diagnosis. It is only supported in Master defined
by sensor mode and is query only. See Phase Correction Limit and
Maximizing Profile Performance.
FM9 - Master Length Variation In Sync.
Counts
This is the difference from the current Average Master Length to the
new Average Master Length. This command is used for Maximizing
Profile Performance and diagnosis. It is only supported in Master defined
by sensor mode and is query only. See Master Length Correction Limit
and Maximizing Profile Performance.
92 © EMERSON Motion Control
 Loading...