

Page 1
Liebert® NXL™ Maintenance Bypass Cabinet
Installation Manual – 250-400kVA, 60Hz
AC Power
For Business-Critical Continuity™
Page 2

CONTACTING LIEBERT FOR SUPPORT
To contact Emerson Network Power Liebert Services for information or repair service in the United
States, call 1-800-LIEBERT (1-800-543-2378). Liebert Services offers a complete range of start-up
services, repair services, preventive maintenance plans and service contracts.
For repair or maintenance service outside the 48 contiguous United States, contact Liebert Services,
if available in your area. For areas not covered by Liebert Services, the authorized distributor is
responsible for providing qualified, factory-authorized service.
For Liebert Services to assist you promptly, have the following information available:
Part Numbers: ________________________________________________________________
Serial Numbers: _______________________________________________________________
kVA Rating: __________________________________________________________________
Date Purchased: _______________________________________________________________
Date Installed: ________________________________________________________________
Location: _____________________________________________________________________
Input Voltage/Frequency: ______________________________________________________
Output Voltage/Frequency: _____________________________________________________
Product Warranty Registration
To register for warranty protection, visit the Service and Support section of our Web site at:
www.liebert.com
Click on Product Registration and fill out the form.
Page 3

TABLE OF CONTENTS
IMPORTANT SAFETY INSTRUCTIONS . . . . . . . . . . . . . . . . . . . . . . . . . . . . . . . . . . . . . . . . . . . . . . . . 1
1.0 SINGLE-MODULE MECHANICAL INSTALLATION. . . . . . . . . . . . . . . . . . . . . . . . . . . . . . . . . . .2
1.1 Introduction . . . . . . . . . . . . . . . . . . . . . . . . . . . . . . . . . . . . . . . . . . . . . . . . . . . . . . . . . . . . . . . . 2
1.2 Preliminary Checks . . . . . . . . . . . . . . . . . . . . . . . . . . . . . . . . . . . . . . . . . . . . . . . . . . . . . . . . . . 2
1.3 Environmental Considerations . . . . . . . . . . . . . . . . . . . . . . . . . . . . . . . . . . . . . . . . . . . . . . . . . 2
1.3.1 Room . . . . . . . . . . . . . . . . . . . . . . . . . . . . . . . . . . . . . . . . . . . . . . . . . . . . . . . . . . . . . . . . . . . . . . . 2
1.3.2 Storage . . . . . . . . . . . . . . . . . . . . . . . . . . . . . . . . . . . . . . . . . . . . . . . . . . . . . . . . . . . . . . . . . . . . . 3
1.4 Positioning . . . . . . . . . . . . . . . . . . . . . . . . . . . . . . . . . . . . . . . . . . . . . . . . . . . . . . . . . . . . . . . . . 3
1.4.1 Moving the Cabinets. . . . . . . . . . . . . . . . . . . . . . . . . . . . . . . . . . . . . . . . . . . . . . . . . . . . . . . . . . . 3
1.4.2 Clearances. . . . . . . . . . . . . . . . . . . . . . . . . . . . . . . . . . . . . . . . . . . . . . . . . . . . . . . . . . . . . . . . . . . 3
1.4.3 Floor Installation/Anchoring . . . . . . . . . . . . . . . . . . . . . . . . . . . . . . . . . . . . . . . . . . . . . . . . . . . . 3
1.5 Cable Entry. . . . . . . . . . . . . . . . . . . . . . . . . . . . . . . . . . . . . . . . . . . . . . . . . . . . . . . . . . . . . . . . . 3
1.6 Power Cables . . . . . . . . . . . . . . . . . . . . . . . . . . . . . . . . . . . . . . . . . . . . . . . . . . . . . . . . . . . . . . . 4
1.6.1 Power Cable Connection Procedure. . . . . . . . . . . . . . . . . . . . . . . . . . . . . . . . . . . . . . . . . . . . . . . 5
2.0 INSTALLATION DRAWINGS. . . . . . . . . . . . . . . . . . . . . . . . . . . . . . . . . . . . . . . . . . . . . . . . . . 7
3.0 SPECIFICATIONS. . . . . . . . . . . . . . . . . . . . . . . . . . . . . . . . . . . . . . . . . . . . . . . . . . . . . . . .26
i
Page 4

FIGURES
Figure 1 Cabinet arrangement—Liebert NXL UPS, battery cabinets, maintenance bypass cabinet. . . . . . 4
Figure 2 Two-Breaker Maintenance Bypass Cabinet, one-input, attached . . . . . . . . . . . . . . . . . . . . . . . . . . 7
Figure 3 Two-Breaker Maintenance Bypass Cabinet, two-input, attached . . . . . . . . . . . . . . . . . . . . . . . . . . 8
Figure 4 Two-Breaker Maintenance Bypass Cabinet, three-input, attached or detached . . . . . . . . . . . . . . 8
Figure 5 Liebert NXL Maintenance Bypass Cabinet—250 and 300kVA main component location . . . . . . . 9
Figure 6 Liebert NXL Maintenance Bypass Cabinet—400kVA main component location . . . . . . . . . . . . . 10
Figure 7 Liebert NXL Maintenance Bypass Cabinet—250 and 300kVA outline drawing . . . . . . . . . . . . . 11
Figure 8 Liebert NXL Maintenance Bypass Cabinet—400kVA outline drawing. . . . . . . . . . . . . . . . . . . . . 12
Figure 9 Liebert NXL Maintenance Bypass Cabinet—250 and 300kVA terminal details . . . . . . . . . . . . . 13
Figure 10 Liebert NXL Maintenance Bypass Cabinet—400Kva terminal details . . . . . . . . . . . . . . . . . . . . . 14
Figure 11 Cable routing . . . . . . . . . . . . . . . . . . . . . . . . . . . . . . . . . . . . . . . . . . . . . . . . . . . . . . . . . . . . . . . . . . . 15
Figure 12 Liebert NXL Maintenance Bypass Cabinet, one-input system, point-to-point wiring
to UPS . . . . . . . . . . . . . . . . . . . . . . . . . . . . . . . . . . . . . . . . . . . . . . . . . . . . . . . . . . . . . . . . . . . . . . . . 16
Figure 13 Liebert NXL Maintenance Bypass Cabinet, two-input system, point-to-point wiring
to UPS. . . . . . . . . . . . . . . . . . . . . . . . . . . . . . . . . . . . . . . . . . . . . . . . . . . . . . . . . . . . . . . . . . . . . . . . 18
Figure 14 Liebert NXL Maintenance Bypass Cabinet, three-input system, point-to-point wiring
to UPS. . . . . . . . . . . . . . . . . . . . . . . . . . . . . . . . . . . . . . . . . . . . . . . . . . . . . . . . . . . . . . . . . . . . . . . . 20
Figure 15 Liebert NXL Maintenance Bypass Cabinet Control wire diagram without interlock . . . . . . . . . 22
Figure 16 Liebert NXL Maintenance Bypass Cabinet control wire diagram with interlock. . . . . . . . . . . . . 23
Figure 17 Liebert NXL Maintenance Bypass Cabinet control wire routing. . . . . . . . . . . . . . . . . . . . . . . . . . 24
Figure 18 Ground strap location for connected cabinets . . . . . . . . . . . . . . . . . . . . . . . . . . . . . . . . . . . . . . . . . 25
TABLES
Table 1 Liebert-supplied interconnect wiring for one-input Liebert NXL Maintenance
Bypass Cabinet . . . . . . . . . . . . . . . . . . . . . . . . . . . . . . . . . . . . . . . . . . . . . . . . . . . . . . . . . . . . . . . . . 17
Table 2 Liebert-supplied interconnect wiring for two-input Liebert NXL Maintenance
Bypass Cabinet. . . . . . . . . . . . . . . . . . . . . . . . . . . . . . . . . . . . . . . . . . . . . . . . . . . . . . . . . . . . . . . . . 19
Table 3 Liebert-supplied interconnect wiring for three-input Liebert NXL Maintenance
Bypass Cabinet. . . . . . . . . . . . . . . . . . . . . . . . . . . . . . . . . . . . . . . . . . . . . . . . . . . . . . . . . . . . . . . . . 21
Table 4 Control wiring connections without interlock . . . . . . . . . . . . . . . . . . . . . . . . . . . . . . . . . . . . . . . . . 22
Table 5 Control wiring connections with interlock. . . . . . . . . . . . . . . . . . . . . . . . . . . . . . . . . . . . . . . . . . . . 23
Table 6 Liebert NXL Maintenance Bypass Cabinet specifications . . . . . . . . . . . . . . . . . . . . . . . . . . . . . . . 26
Table 7 Liebert NXL Maintenance Bypass Cabinet current ratings—System Input . . . . . . . . . . . . . . . . 27
Table 8 Liebert NXL Maintenance Bypass Cabinet current ratings—System Output . . . . . . . . . . . . . . . 27
Table 9 Recommended conduit and cable sizes—Maintenance Bypass Input . . . . . . . . . . . . . . . . . . . . . . 27
Table 10 Recommended conduit and cable sizes—Rectifier Input (1-Input System) . . . . . . . . . . . . . . . . . . 27
Table 11 Recommended conduit and cable sizes—Module Bypass Input . . . . . . . . . . . . . . . . . . . . . . . . . . . 28
Table 12 Recommended conduit and cable sizes—Module Output . . . . . . . . . . . . . . . . . . . . . . . . . . . . . . . . 28
Table 13 Recommended conduit and cable sizes—Load Output . . . . . . . . . . . . . . . . . . . . . . . . . . . . . . . . . . 28
Table 14 Recommended conduit and cable sizes—Load Bank Output . . . . . . . . . . . . . . . . . . . . . . . . . . . . . 28
Table 15 Recommended lug sizes . . . . . . . . . . . . . . . . . . . . . . . . . . . . . . . . . . . . . . . . . . . . . . . . . . . . . . . . . . 29
ii
Page 5
IMPORTANT SAFETY INSTRUCTIONS
SAVE THESE INSTRUCTIONS
This manual contains important instructions that should be followed during installation of your
Liebert NXL
!
Read this manual thoroughly before working with the maintenance bypass cabinet. Retain this manual for use by installing personnel.
!
™
Maintenance Bypass Cabinet.
WARNING
Exercise extreme care when handling cabinets to avoid equipment damage or injury to
personnel. The Liebert NXL Maintenance Bypass Cabinet weight ranges from 700 to 900 lb
(317 to 409kg).
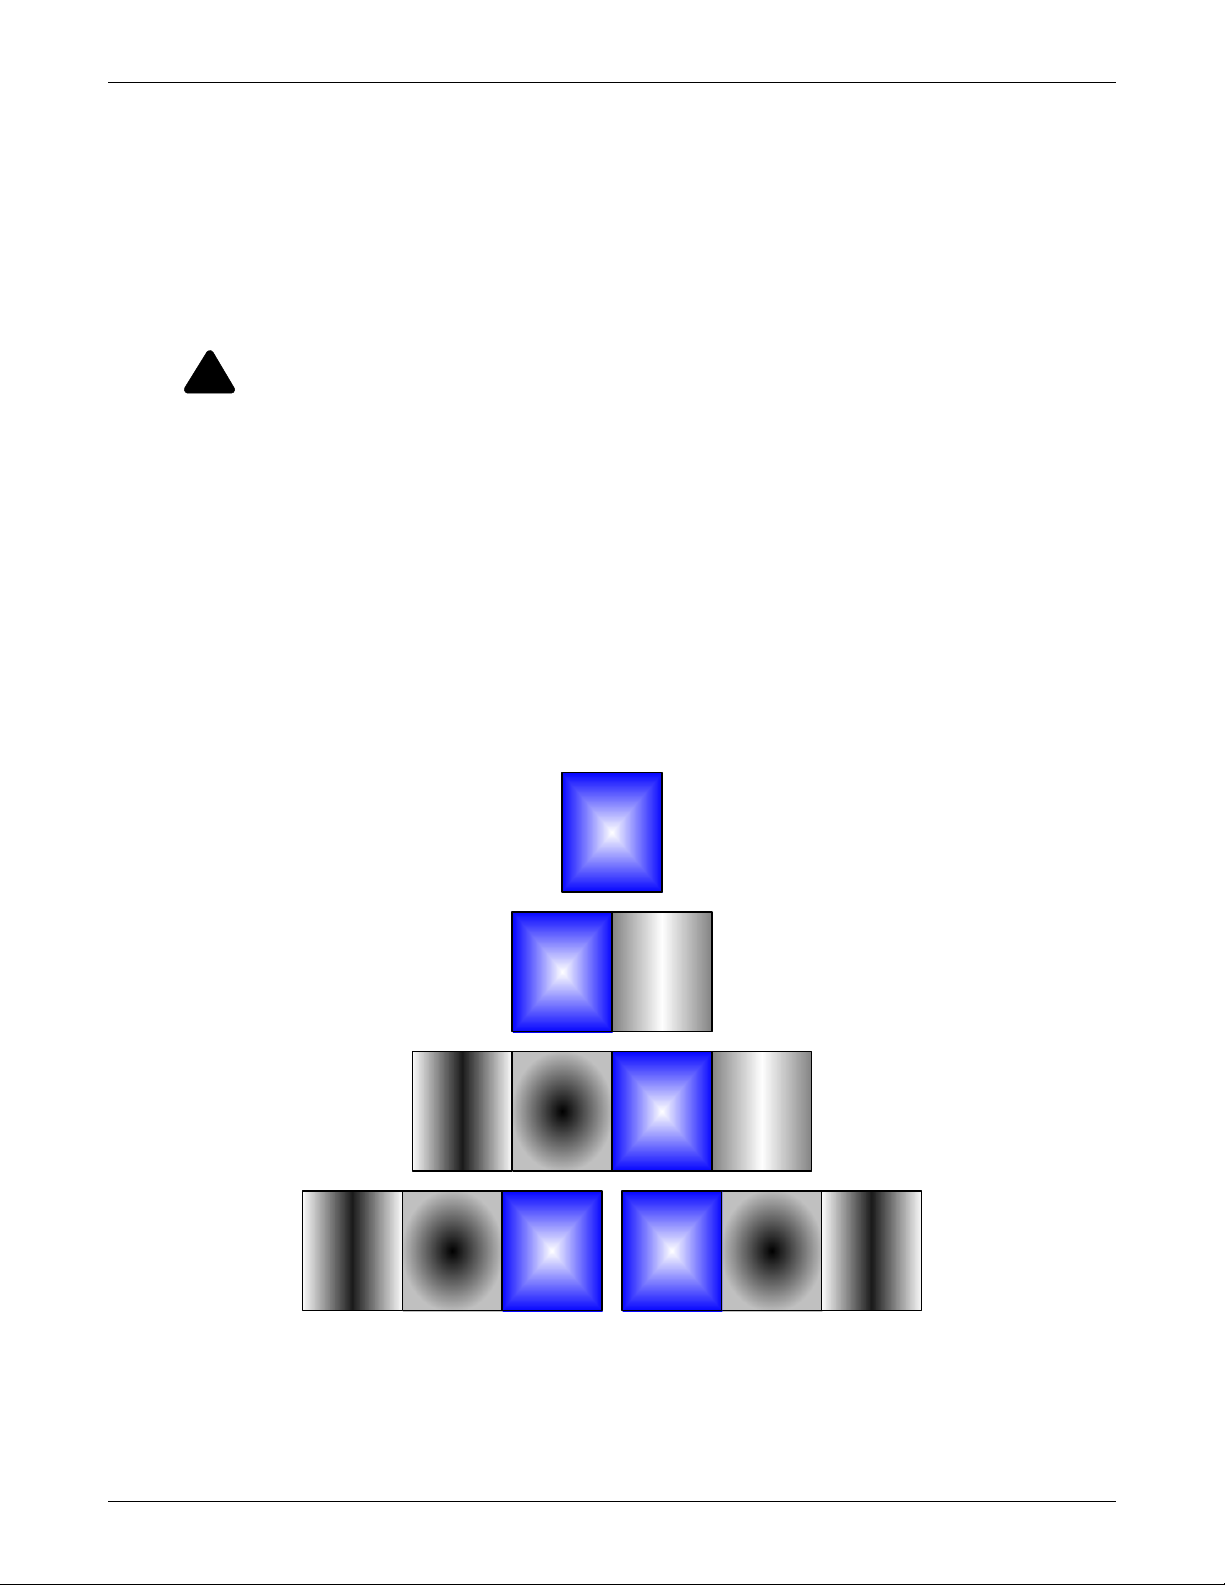
Locate center of gravity symbols and determine unit weight before handling each
cabinet. Test lift and balance the cabinets before transporting. Maintain minimum tilt from
vertical at all times.
Slots at the base of the cabinets are intended for forklift use. Base slots will support the unit
only if the forks are completely beneath the unit.
In case of fire involving electrical equipment, use only carbon dioxide fire extinguishers or
those approved for use in fighting electrical fires.
Extreme caution is required when performing maintenance.
Be constantly aware that the system contains high DC as well as AC voltages.
Check for voltage with both AC and DC voltmeters prior to making contact.
WARNING
Under typical operation and with all doors closed, only normal safety precautions are
necessary. The area around the system should be kept free of puddles of water, excess
moisture and debris.
Special safety precautions are required for procedures involving handling, installation and
maintenance of the Maintenance Bypass Cabinet. Observe all safety precautions in this
manual before handling or installing the Maintenance Bypass Cabinet. Observe all
precautions in the Operation and Maintenance Manual, before as well as during performance
of all maintenance procedures.
This equipment contains circuits that are energized with high voltage. Only test equipment
designed for troubleshooting should be used. This is particularly true for oscilloscopes. Always
check with an AC and DC voltmeter to ensure safety before making contact or using tools.
Even when the power is turned Off, dangerously high potential electric charges may exist.
All power and control wiring should be installed by a qualified electrician. All power and
control wiring must comply with the NEC and applicable local codes.
ONLY properly trained and qualified personnel should perform maintenance on the Maintenance
Bypass Cabinet. When performing maintenance with any part of the equipment under power,
service personnel and test equipment should be standing on rubber mats. The service personnel
should wear insulating shoes for isolation from direct contact with the floor ground.
One person should never work alone, even if all power is removed from the equipment. A
second person should be standing by to assist and summon help in case of an accident.
CAUTION
!
This unit complies with the limits for a Class A digital device, pursuant to Part 15 Subpart J
of the FCC rules. These limits provide reasonable protection against harmful interference in a
commercial environment. This unit generates, uses and radiates radio frequency energy and,
if not installed and used in accordance with this instruction manual, may cause harmful
interference to radio communications. Operation of this unit in a residential area may cause
harmful interference that the user must correct at his own expense.
NOTE
Liebert Corporation neither recommends nor knowingly sells this product for use with life
support or other FDA-designated “critical” devices.
1
Page 6

1.0 SINGLE-MODULE MECHANICAL INSTALLATION
1.1 Introduction
This section describes the requirements that must be taken into account when planning the positioning and cabling of the Liebert NXL Maintenance Bypass Cabinet.
This chapter is a guide to general procedures and practices that should be observed by the installing
engineer. The particular conditions of each site will determine the applicability of such procedures.
WARNING
!
Do not apply electrical power to the UPS equipment before the arrival of the commissioning
engineer.
WARNING
!
The Maintenance Bypass Cabinet should be installed by a qualified engineer in accordance
with the information contained in this chapter and all equipment not referred to this manual
is shipped with details of its own mechanical and electrical installation.
WARNING
!
Eye protection should be worn to prevent injury from accidental electrical arcs. Remove rings,
watches and all metal objects. Only use tools with insulated handles. Wear rubber gloves.
Single-Module Mechanical Installation
NOTICE
Three-phase input supply required.
The standard Liebert NXL UPS is suitable for connection to three-phase, four-wire (+ Earth)
TN-C, TN-S, IT-G, IT-IG or three-phase, three-wire plus ground, IT-UG.
If using the Liebert NXL UPS with an IT Power system, a four-pole disconnect device must be
included as part of building installation.
1.2 Preliminary Checks
Before installing the Maintenance Bypass Cabinet, carry out the following preliminary checks:
• Visually examine the equipment for transit damage, both internally and externally. Report any
damage to the shipper immediately.
• Verify that the correct equipment is being installed. The equipment supplied has an identification
tag on the back of the main door reporting: the type, size and main calibration parameters of the
UPS.
• Verify that the room satisfies the environmental conditions stipulated in the equipment specifications, paying particular attention to the ambient temperature and air exchange system.
1.3 Environmental Considerations
1.3.1 Room
The Maintenance Bypass Cabinet is intended for indoor installation and should be located in a cool,
dry, clean-air environment with adequate ventilation to keep the ambient temperature within the
specified operating range (see 3.0 - Specifications).
All models of the Liebert NXL Maintenance Bypass Cabinet are convection-cooled. To permit air to
enter and exit and prevent overheating or malfunctioning, do not cover the ventilation openings.
When bottom entry is used, the conduit plate can be removed and punched and replaced. The bottom
conduit plate must be replaced for proper airflow. If necessary to cool the room, install a system of
room extractor fans.
NOTE
The Maintenance Bypass Cabinet is suitable for mounting on concrete or other noncombustible surface only.
2
Page 7

1.3.2 Storage
Should the equipment not be installed immediately, it must be stored in a room for protection against
excessive humidity and or heat sources (see Table 6).
1.4 Positioning
The cabinet is structurally designed to handle lifting from the base.
Access to the power terminals, auxiliary terminals blocks and power switches is from the front.
The top and front removable panels are secured to the chassis by screws. The door can be opened to
give access to the power connections bars, auxiliary terminal blocks and power isolators. Front door
can be opened at 180° for better Service and more flexibility in installations.
1.4.1 Moving the Cabinets
The route to be travelled between the point of arrival and the unit’s position must be planned to make
sure that all passages are wide enough for the unit and that floors are capable of supporting its
weight (for instance, check that doorways, lifts, ramps, etc. are adequate and that there are no
impassable corners or changes in the level of corridors).
Ensure that the cabinet weight is within the designated surface weight loading (kg/cm
dling equipment. See Table 6 for weight.
Ensure that any lifting equipment used in moving the cabinet has sufficient lifting capacity.
Single-Module Mechanical Installation
2
) of any han-
The Maintenance Bypass Cabinet can be handled by means of a fork lift or similar equipment. For
operations with a fork lift, refer to installation drawings in 2.0 - Installation Drawings.
Because the weight distribution in the cabinet is uneven, use extreme care during handling and
transporting.
When moving the unit by forklift, care must be taken to protect the panels. Do not exceed a 15-degree
tilt with the forklift. Bottom structure will support the unit only if the forks are completely beneath
the unit.
Handling the unit with straps is not authorized.
CAUTION
!
Take extreme care when handling Maintenance Bypass Cabinets to avoid equipment damage
or injury to personnel.
1.4.2 Clearances
Liebert NXL Maintenance Bypass Cabinets have no ventilation grilles at either side or at the rear.
Clearance around the front of the equipment should be sufficient to enable free passage of personnel
with the doors fully opened. It is important to leave a distance of 24" (610mm) between the top of the
cabinet and any overhead obstacles to permit adequate circulation of air coming out of the unit.
1.4.3 Floor Installation/Anchoring
The installation diagrams in 2.0 - Installation Drawings of this manual identify the location of the
holes in the base plate through which the equipment can be bolted to the floor. If the equipment is to
be located on a raised floor it should be mounted on a pedestal suitably designed to accept the equipment point loading. Refer to the base view to design this pedestal.
1.5 Cable Entry
Cables can enter the Maintenance Bypass Cabinet from the bottom or top.
3
Page 8
1.6 Power Cables
The Maintenance Bypass Cabinet requires both power and control cabling once it has been mechanically installed. All control cables must be separate from the power cables. Run control cables in metal
conduits or metal ducts that are electrically bonded to the cabinets they are connected to.
The cable design must comply with the voltages and currents provided in Tables 7 and 8, follow local
wiring practices and take into consideration the environmental conditions (temperature and physical
support media).
For cable entry terminal, refer to Figure 9.
WARNING
!
Before cabling up the cabinet, ensure that you are aware of the location and operation of the
external isolators that connect the input/bypass supply.
Check that these supplies are electrically isolated, and post any necessary warning signs to
prevent their inadvertent operation.
The following are guidelines only and superseded by local regulations and codes of practice where
applicable:
• Take special care when determining the size of the neutral cable (grounded conductor), because
current circulating on the neutral cable may be greater than nominal current in the case of nonlinear loads. Refer to Tables 7 and 8.
• The grounding conductor should be sized according to the fault rating, cable lengths, type of protection, etc. The grounding cable connecting the UPS to the main ground system must follow the
most direct route possible.
• Consider using smaller, paralleled cables for heavy currents as a way of easing installation.
Single-Module Mechanical Installation
Figure 1 Cabinet arrangement—Liebert NXL UPS, battery cabinets, maintenance bypass cabinet
Liebert
NXL
UPS
Note: If a ma intenan ce bypas s
cabinet is used, it must be
installed on the right side of
the Liebert NXL UPS
Maintenance
Bypass
Cabinet
Battery
Cabinet
Additional
Battery
Cabinet(s)
Additional
Battery
Cabinet(s)
Additional
Battery
Cabinet(s)
Battery
Cabinet
Liebert
NXL
UPS
Battery
Cabinet
Liebert
NXL
UPS
Maintenance
Bypass
Cabinet
Liebert
NXL
UPS
Liebert
NXL
UPS
4
Page 9

1.6.1 Power Cable Connection Procedure
The system input, UPS bypass, UPS output and system output cables (all require lug type terminations) are connected to busbars situated behind the power isolator switches as shown in 2.0 - Instal-
lation Drawings. These are accessible when the power compartment door is opened.
Equipment Ground
The equipment ground busbar is located near the input and output power supply connections as
shown in 2.0 - Installation Drawings. The grounding conductor must be connected to the ground
busbar.
All cabinets and cable trunking should be grounded in accordance with local regulations.
WARNING
!
Failure to follow adequate grounding procedures can result in electric shock hazard to
personnel, or the risk of fire, should an ground fault occur.
WARNING
!
The operations described in this section must be performed by authorized electricians or
qualified technical personnel. If you have any difficulties, do not hesitate to contact Emerson
Network Power Liebert Services. See the back page of this manual for contact information.
NOTE
Proper grounding considerably reduces problems in systems caused by electromagnetic
interference.
Single-Module Mechanical Installation
5
Page 10

Single-Module Mechanical Installation
Once the equipment has been finally positioned and secured, connect the power cables as described in
the following procedure.
Refer to the appropriate cable connection drawing in 2.0 - Installation Drawings.
1. Verify that the bypass equipment is isolated from its external power source and all the power
isolators are open. Check that these supplies are electrically isolated and post any necessary
warning signs to prevent their inadvertent operation.
2. Open the door to the cabinet and remove the interior panels.
3. Connect the ground and any necessary main bonding jumper to the equipment ground busbar.
NOTE
The grounding and neutral bonding arrangement must be in accordance with local and
national codes of practice.
NOTE
Care must be taken when routing power cable. Ensure that cables do not touch other busbars
(see Figure 11).
NOTE
Do not double-stack lugs: do not layer two lugs on the same side of the busbar (see Figure 11).
4. Connect the AC input supply cables between the power distribution panel and the bypass input
supply busbars (A-B-C or A-B-C-N terminals) and tighten the connections to the proper torque.
Ensure correct phase rotation!
5. If system is one- or two-input, connect the AC input supply cables between the maintenance
bypass cabinet and the UPS bypass input supply busbars (A-B-C or A-B-C-N terminals) and
tighten the connections to the proper torque.
Ensure correct phase rotation!
6. If system is single-input, connect AC jumper connectors between UPS bypass input supply
busbars and UPS rectifier input supply busbars (A-B-C terminals) and tighten the connections to
the proper torque.
Ensure correct phase rotation!
7. Connect the system output power cables between the Maintenance Bypass Cabinet output (A-B-C
or A-B-C-N terminals) and the critical load and tighten the connections to the proper torque.
Ensure correct phase rotation!
8. Connect the auxiliary cables of any external interface/signals to the respective connections of the
output auxiliary terminal block (X4) (see2.0 - Installation Drawings).
9. Replace interior panels and close door.
6
Page 11

2.0 INSTALLATION DRAWINGS
Figure 2 Two-Breaker Maintenance Bypass Cabinet, one-input, attached
Two Breaker Maintenance Bypass Cabinet
FBO
MBB
Installation Drawings
Critical
Load
Main Input
Switchgear
UPS Module
Battery
System
BFB
DC Bus
MBD
I
CB2CB1
N
MBJ
EG
MIB - Maintenance Isolation Breaker
MBB - Maintenance Bypass Breaker
FBO – Furnished By Others
N – Neutral
EG – Equipment Ground
MBJ – Main Bonding Jumper (3-wire systems only)
- Option Interlock
I
MIB
Load Bank
(FBO)
7
Page 12

Figure 3 Two-Breaker Maintenance Bypass Cabinet, two-input, attached
Two Breaker Maintenance Bypass Cabinet
MBB
FBO
I
BFB
Installation Drawings
Critical
Load
MIB
Load Bank
(FBO)
FBO
Main Input
Switchgear
UPS Module
Battery
System
MBD
DC Bus
MBJ
MIB - Maintenance Isolation Breaker
BIB - Bypass Input Breaker
MBB - Maintenance Bypass Breaker
FBO – Furnished By Others
N – Neutral
EG – Equipment Ground
MBJ – Main Bonding Jumper (3-wire systems only)
I
- Option Interlock
CB2CB1
N
EG
Figure 4 Two-Breaker Maintenance Bypass Cabinet, three-input, attached or detached
Two Breaker Maintenance Bypass Cabinet
BFB
MBB
I
MIB
FBO
Critical
Load
Load Bank
(FBO)
FBO
FBO
Main Input
Switchgear
UPS Module
Battery
System
MBD
DC Bus
CB2CB1
N
MBJ
EG
MIB - Maintenance Isolation Breaker
BIB - Bypass Input Breaker
MBB - Maintenance Bypass Breaker
FBO – Furnished By Others
N – Neutral
EG – Equipment Ground
MBJ – Main Bonding Jumper (3-wire systems only)
- Option Interlock
I
8
Page 13

Installation Drawings
Figure 5 Liebert NXL Maintenance Bypass Cabinet—250 and 300kVA main component location
A
GROUND
INPUT
PHASE C
INPUT
PHASE A
INPUT
PHASE B
OUTPUT
PHASE A
NEUTRAL
BUSBAR DETAIL B
OUTPUT
PHASE C
BREAKER REMOVED
FOR CLARITY
OUTPUT
PHASE B
OPTIONAL
SOLENOID
INTERLOCK
MAINTENANCE
ISOLATION
BREAKER
(MIB)
A
FRONT
B
MAINTENANCE
BYPASS
BREAKER
(MBB)
CONTROL WIRING
TERMINAL BLOCK
(TB1)
SECTION A-A
9
Page 14
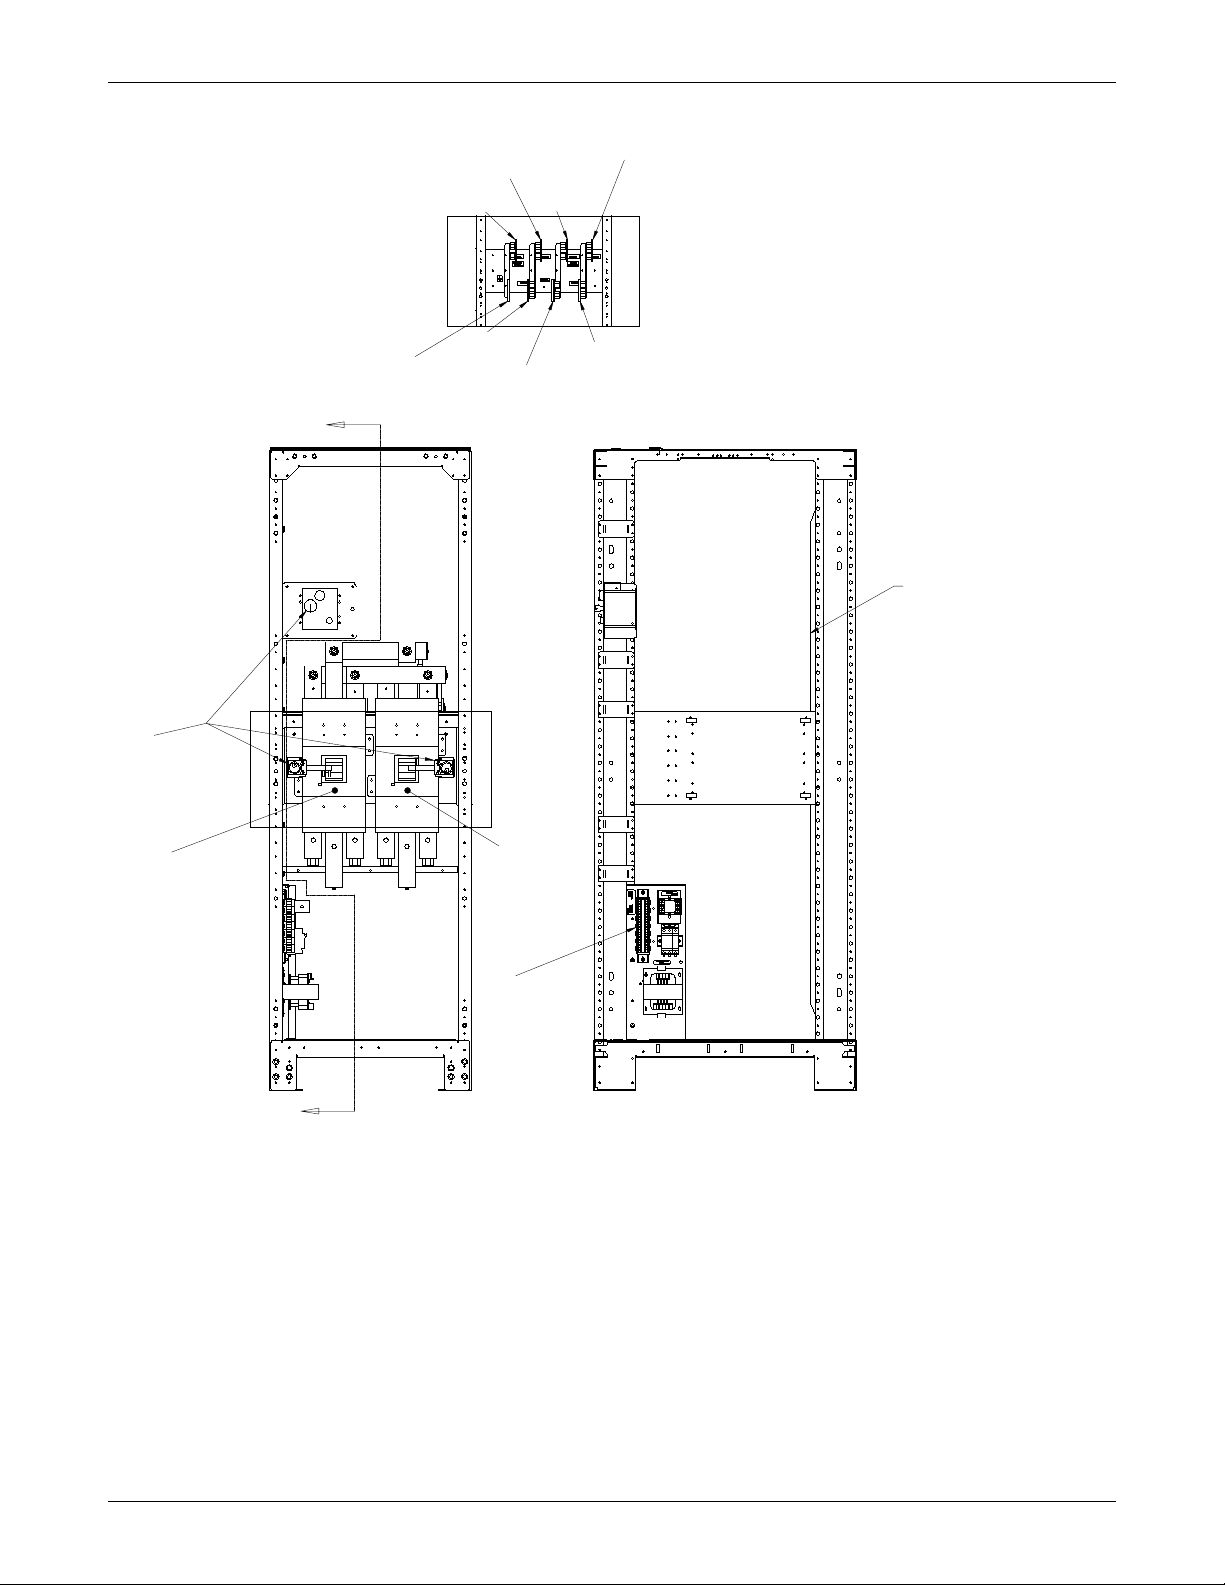
Figure 6 Liebert NXL Maintenance Bypass Cabinet—400kVA main component location
Installation Drawings
GROUND
INPUT
PHASE A
INPUT
PHASE B
INPUT
PHASE C
NEUTRAL
OUTPUT
PHASE A
OUTPUT
PHASE C
OUTPUT
PHASE B
BREAKER REMOVED FOR CLARITY
BUSBAR DETAIL B
A
NEUTRAL BUSBAR
LOCATED IN REAR CORNER
FOR ADDITIONAL LANDING SPACE
OPTIONAL
SOLENOID
INTERLOCK
MAINTENANCE
ISOLATION
BREAKER
(MIB)
B
MAINTENANCE
BYPASS
BREAKER
(MBB)
CONTROL WIRING
TERMINAL BLOCK
(TB1)
A
FRONT
SECTION A-A
10
Page 15

Figure 7 Liebert NXL Maintenance Bypass Cabinet—250 and 300kVA outline drawing
31.3
(795)
4.9
(124)
TYP
24.8
(630)
24.0
(610)
CONDUIT
LANDING
AREA
Installation Drawings
KNOCK-OUT FOR
CONTROL WIRING
O 1"
3 PLCS
TOP VIEW (DOOR OPEN)
76.8
(1951)
CG
38.5
(979)
56.8
(1442)
21.1
(535)
BOTTOM VIEW (FOOTPRINT)
CG
38.5
(979)
3.9
(100)
TYP
12.2
NOTES:
24.2
(615)
(309)
33.5
(850)
1. All dimensions are in inches (mm).
2. 24" minimum clearance above unit required for air exhaust.
3. Keep cabinet within 15 degrees of vertical while handling.
4. Top and bottom cable entry available through removable
access plates. Remove, punch to suit conduit size and replace.
5. Unit bottom is structurally adequate for forklift handling.
6. Includes side panel. Side panels are removed between
KNOCK-OUT FOR
CONTROL WIRING
O 1"
2 PLCS
adjacent units which are bolted togethe r.
7. Control wiring and power wiring must be run in separate conduits.
8. Aluminum and copper-clad aluminum cables are not recommended.
9. All wiring is to be in accordance with national and local electrical codes.
10. Widths are without side panels. The width is 25.6" (650mm) with side panels.
11. The depth dimension includes the front door and rear panel.
11
22.7
(578)
21.9
(555)
BOTTOM CONDUIT PLATES
16.1
(410)
CONDUIT
LANDING
AREA
Page 16

Figure 8 Liebert NXL Maintenance Bypass Cabinet—400kVA outline drawing
37.3
(947)
24.0
(610)
30.8
(782 )
Conduit
Landing
Area
Installation Drawings
4.9
(12 4)
TYP
Knock-out for control
wiring O 1.0" (25.4mm)
3 Places
TOP VIEW (DOOR OPEN)
76.8
(1950)
CG
38.5
(979)
62.8
(1595)
21.1
(535)
BOTTOM VIEW (FOOTPRINT)
CG
38.5
(979)
3.9
(100)
TYP
12.2
(309 )
FRONT
24.2
(615)
See Note 10
39.4
(1000)
See Note 11
NOTES:
1. All dimensions are in inches (mm).
2. 24" minimum clearance above unit required for air exhaust.
3. Keep cabinet within 15 degrees of vertical while handling.
4. Top and bottom cable entry available through removable
access plates. Remove, punch to suit conduit size and replace.
5. Unit bottom is structurally adequate for forklift handling.
6. Includes side panel. Side panels are removed between
adjacent units which are bolted together.
Knock-out for control
wiring O 1.0" (25.4mm)
2 Places
7. Control wiring and power wiring must be run in separate conduits.
8. Aluminum and copper-clad aluminum cables are not recommended.
9. All wiring is to be in accordance with national and local electrical codes.
10. Widths are without side panels. The width is 25.6" (650mm) with side panels.
11. The depth dimension includes the front door and rear panel.
12
28.2
( 716 )
SIDE VIEW
BOTTOM CONDUIT PLATES
21.9
(556)
Conduit
Landing
Area
16.1
(410)
Page 17

Figure 9 Liebert NXL Maintenance Bypass Cabinet—250 and 300kVA terminal details
N
A
(65)
1.6
(40)
2.6
2.6
(65)
NOTE:
ALL DIMENSIONS ARE IN inches (mm).
Installation Drawings
TOP VIEW
2.0
(51)
1.8
(45)
4.8
(123)
TYP
BUS BAR DETAIL A
BREAKER REMOVED FOR CLARITY
2.0
(51)
.6
O
(14 )
8 PLACES
TYP
1.8
(45)
BUS TERMINATION DETAIL
CUSTOMER
CONNECTIO
1.8
(44)
FRONT VIEW
SIDE VIEW
13
Page 18
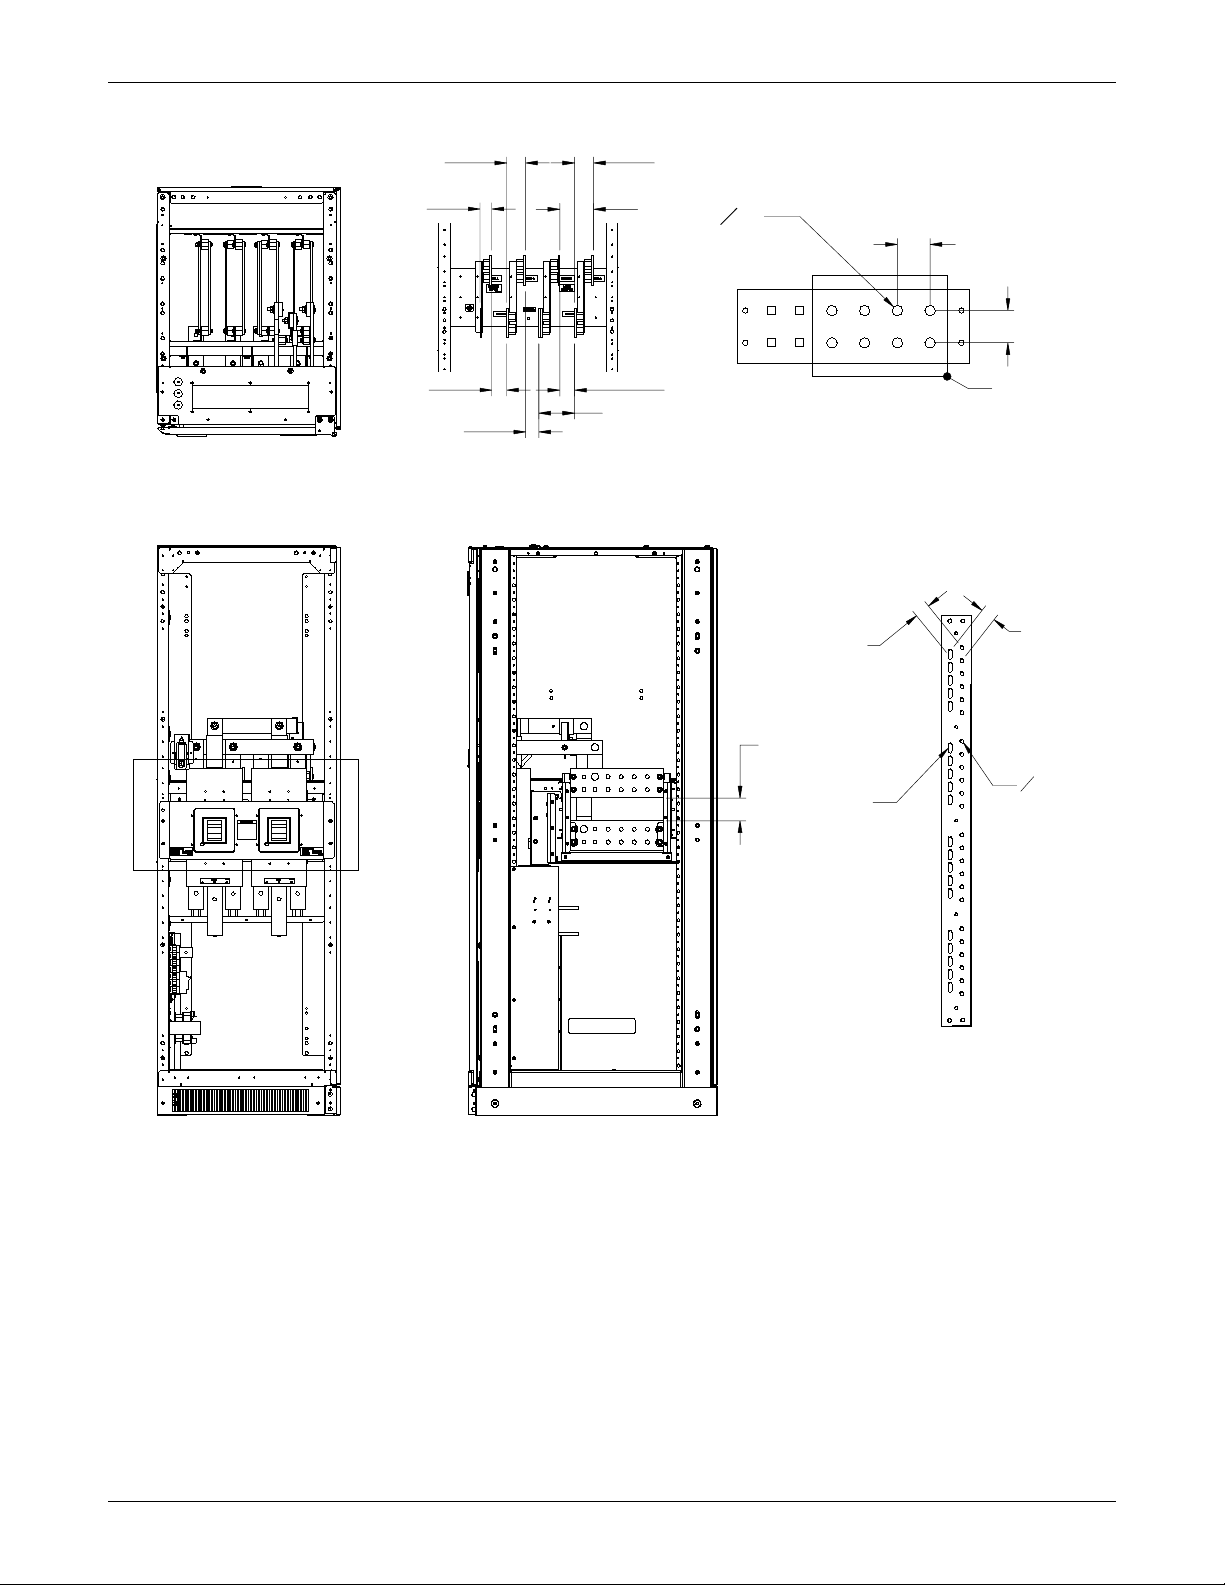
Figure 10 Liebert NXL Maintenance Bypass Cabinet—400Kva terminal details
A
L
Installation Drawings
TOP VIEW
2.57
(65)
1.59
(40)
2.00
(51)
1.78
(45)
4.84
(123)
BUSBAR DETAIL A
BREAKERS REMOVED FOR CLARITY
(65)
4.59
(117)
TYP
2.57
.56
O
(
)
14
8 PLACES
TYP
2.00
(51)
BUS TERMINATION DETAIL
(
1.75
(BOTTOM
TYP
ENTRY)
1.75
(44)
1.75
(44)
CUSTOMER
CONNECTION
AREA
1.75
)
44
(44)
TYP
(TOP
ENTRY)
3.1
(79)
1.37 X .56 SLOT
TYPICAL
(20 PLACES)
O .56
(14)
TYPICAL
(24 PLACES)
AUX NEUTRAL BUS DETAI
NOTE:
ALL DIMENSIONSARE IN inches (mm).
SIDE VIEWFRONT VIEW
14
Page 19

Figure 11 Cable routing
.
TOP ENTRY NOTES:
1. Cables from lower busbars must be routed and
tied to the aligning holes on the the cable landing
bar directly above (see figure below). Installation
method is to prevent cables from lower busbars
from contacting the upper busbars.
2. Cables from upper busbars can be optionally tied
also, as shown in top entry view.
3. The UPS output phase cables must be run
on the left side of cabinet, outside of the ground bus.
Installation Drawings
BOTTOM ENTRY NOTES:
1. Cables from upper busbars must be routed so that
they run clear of lower busbars.
Input
Ground
UPS
Output
Phases
Neutral
Output
Phase B
Input
Phase C
Input
Phase A
Maintenance
Isolation Breaker
(MIB) Busbar
Output
Phase A
Output
Phase C
CB1-3
CB1-3
DO NOT DOUBLE-STACK LUGS (PUT
TWO LUGS ON SAME SIDE OF BUSBAR)
THIS IS TO PREVENT THE CABLES
FROM COMING INTO CONTACT WITH
OTHER BUSBARS.
TOP CABLE ENTRY ROUTING
BREAKERS REMOVED FOR CLARITY
BOTTOM CABLE ENTRY ROUTING
15
Page 20

Installation Drawings
Figure 12 Liebert NXL Maintenance Bypass Cabinet, one-input system, point-to-point wiring to UPS
S
MIB
FRONT
MBB
Q
R
C
H
T
D
L
V
R
E
A
F
B
G
E
U
M
A
R
V
L
H
G
F
J
I
O
N
BYPASS
NEUTRAL
K
J
I
K
P
M
A
A
OUTPUT
NEUTRAL
(+)
(-)
C
B
A
C
B
C
B
P
N
O
UPS
16
Page 21

Installation Drawings
Table 1 Liebert-supplied interconnect wiring for one-input Liebert NXL Maintenance Bypass
Cabinet
Run To From Conductor
A Utility AC - Phase A MBC Bypass AC - Phase A Maintenance Bypass AC - Phase A
B Utility AC - Phase B MBC Bypass AC - Phase B Maintenance Bypass AC - Phase B
C Utility AC - Phase C MBC Bypass AC - Phase C Maintenance Bypass AC - Phase C
D Utility Neutral MBC Neutral System Input Neutral
E Utility Ground MBC Ground System Ground
F MBC Bypass AC - Phase A UPS Bypass AC - Phase A UPS Bypass Input - Phase A
G MBC Bypass AC - Phase B UPS Bypass AC - Phase B UPS Bypass Input - Phase B
H MBC Bypass AC - Phase C UPS Bypass AC - Phase C UPS Bypass Input - Phase C
I UPS Bypass AC - Phase A UPS Rectifier AC - Phase A UPS Rectifier Input - Phase A
J UPS Bypass AC - Phase B UPS Rectifier AC - Phase B UPS Rectifier Input - Phase B
K UPS Bypass AC - Phase C UPS Rectifier AC - Phase C UPS Rectifier Input - Phase C
L MBC Neutral UPS Bypass Neutral UPS Neutral
M* MBC Ground UPS Equipment Ground UPS Ground
N UPS Output AC - Phase A MBC Output AC - Phase A UPS Output - Phase A
O UPS Output AC - Phase B MBC Output AC - Phase B UPS Output - Phase B
P UPS Output AC - Phase C MBC Output AC - Phase C UPS Output - Phase C
Q MBC Output AC - Phase A Load AC - Phase A Load AC Input - Phase A
R MBC Output AC - Phase B Load AC - Phase B Load AC Input - Phase B
S MBC Output AC - Phase C Load AC - Phase C Load AC Input - Phase C
T MBC Neutral Load Neutral Load Neutral
U MBC Ground Load Ground Load Equipment Ground
V MBC Terminal Strip UPS External Interface Board Control Wiring
* For detached units only
17
Page 22

Installation Drawings
L
Figure 13 Liebert NXL Maintenance Bypass Cabinet, two-input system, point-to-point wiring to UPS
S
MIB
FRONT
MBB
V
BYPASS
NEUTRA
L
H
G
K
J
P
O
M
P
N
O
Q
R
C
H
T
D
L
V
R
A
F
B
G
E
U
M
E
A
R
(+)
(-)
C
A
C
A
C
A
F
B
I
B
N
B
UPS
18
OUTPUT
NEUTRAL
Page 23

Installation Drawings
Table 2 Liebert-supplied interconnect wiring for two-input Liebert NXL Maintenance Bypass
Cabinet
Run To From Conductor
A Utility AC - Phase A MBC Bypass AC - Phase A Maintenance Bypass AC - Phase A
B Utility AC - Phase B MBC Bypass AC - Phase B Maintenance Bypass AC - Phase B
C Utility AC - Phase C MBC Bypass AC - Phase C Maintenance Bypass AC - Phase C
D Utility Neutral MBC Neutral System Input Neutral
E Utility Ground MBC Ground System Ground
F MBC Bypass AC - Phase A UPS Bypass AC - Phase A UPS Bypass Input - Phase A
G MBC Bypass AC - Phase B UPS Bypass AC - Phase B UPS Bypass Input - Phase B
H MBC Bypass AC - Phase C UPS Bypass AC - Phase C UPS Bypass Input - Phase C
I Utility Bypass AC - Phase A UPS Rectifier AC - Phase A UPS Rectifier Input - Phase A
J Utility Bypass AC - Phase B UPS Rectifier AC - Phase B UPS Rectifier Input - Phase B
K Utility Bypass AC - Phase C UPS Rectifier AC - Phase C UPS Rectifier Input - Phase C
L MBC Neutral UPS Bypass Neutral UPS Neutral
M* MBC Ground UPS Equipment Ground UPS Ground
N UPS Output AC - Phase A MBC Output AC - Phase A UPS Output - Phase A
O UPS Output AC - Phase B MBC Output AC - Phase B UPS Output - Phase B
P UPS Output AC - Phase C MBC Output AC - Phase C UPS Output - Phase C
Q MBC Output AC - Phase A Load AC - Phase A Load AC Input - Phase A
R MBC Output AC - Phase B Load AC - Phase B Load AC Input - Phase B
S MBC Output AC - Phase C Load AC - Phase C Load AC Input - Phase C
T MBC Neutral Load Neutral Load Neutral
U MBC Ground Load Ground Load Equipment Ground
V MBC Terminal Strip UPS External Interface Board Control Wiring
* For detached units only
19
Page 24

Installation Drawings
Figure 14 Liebert NXL Maintenance Bypass Cabinet, three-input system, point-to-point wiring to UPS
S
MIB
FRONT
MBB
P
Q
R
C
A
T
D
P1
V
R
B
E
U
M
E
A
R
V
N
O
UPS
20
OUTPUT
NEUTRAL
(+)
BYPASS
NEUTRAL
(-)
C
A
C
A
C
A
L
H
G
F
B
B
B
K
J
I
P
O
N
M
P1
Page 25

Installation Drawings
Table 3 Liebert-supplied interconnect wiring for three-input Liebert NXL Maintenance Bypass
Cabinet
Run To From Conductor
A Utility AC - Phase A MBC Bypass AC - Phase A Maintenance Bypass AC - Phase A
B Utility AC - Phase B MBC Bypass AC - Phase B Maintenance Bypass AC - Phase B
C Utility AC - Phase C MBC Bypass AC - Phase C Maintenance Bypass AC - Phase C
D Utility Neutral MBC Neutral System Input Neutral
E Utility Ground MBC Ground System Ground
F Utility AC - Phase A UPS Bypass AC - Phase A UPS Bypass Input - Phase A
G Utility AC - Phase B UPS Bypass AC - Phase B UPS Bypass Input - Phase B
H Utility AC - Phase C UPS Bypass AC - Phase C UPS Bypass Input - Phase C
I Utility AC - Phase A UPS Rectifier AC - Phase A UPS Rectifier Input - Phase A
J Utility AC - Phase B UPS Rectifier AC - Phase B UPS Rectifier Input - Phase B
K Utility AC - Phase C UPS Rectifier AC - Phase C UPS Rectifier Input - Phase C
L Utility Neutral UPS Neutral UPS Neutral
M* MBC Ground UPS Equipment Ground UPS Ground
N UPS Output AC - Phase A MBC Output AC - Phase A UPS Output - Phase A
O UPS Output AC - Phase B MBC Output AC - Phase B UPS Output - Phase B
P UPS Output AC - Phase C MBC Output AC - Phase C UPS Output - Phase C
P1 UPS Output Neutral MBC Neutral UPS Neutral
Q MBC Output AC - Phase A Load AC - Phase A Load AC Input - Phase A
R MBC Output AC - Phase B Load AC - Phase B Load AC Input - Phase B
S MBC Output AC - Phase C Load AC - Phase C Load AC Input - Phase C
T MBC Neutral Load Neutral Load Neutral
U MBC Ground Load Ground Load Equipment Ground
V MBC Terminal Strip UPS External Interface Board Control Wiring
* For detached units only
21
Page 26

Installation Drawings
Figure 15 Liebert NXL Maintenance Bypass Cabinet Control wire diagram without interlock
Connections at UPS External
Interface Board (EIB)
3
1
02-806708
TB0821
TB0811
3
1
LOW VOLTAGE
TERMINAL STRIP
- TB1 -
21
20
19
18
17
16
15
14
TB1-13
13
12
11
10
9
8
7
6
5
4
3
2
1
TB1-12
TB1-11
TB1-10
TB1-9
TB1-8
TB1-7
TB1-6
TB1-5
TB1-4
TB1-3
TB1-2
TB1-1
TB0813
TB0811
TB0823
TB0821
EPO PB SW
WIRE DIAGRAM WITHOUT INTERLOCK
3
1
TB0813
3
1
TB0824
Table 4 Control wiring connections without
interlock
From To Purpose
TB1-1
TB1-2
TB1-3 TB0821-2
TB1-4 TB0821-1
TB1-5 TB0824-3
TB1-7 TB0824-1
TB1-8 TB0811-3
TB1-10 TB0811-1
TB1-11 TB0813-3
TB1-13 TB0813-1
Customer EPO
Push Button Switch
Customer EPO
Push Button Switch
EPO Signal
Maint. Bypass Enable
Contacts
UPS REPO ContactsTB1-6 TB0824-2
MIB ContactsTB1-9 TB0811-2
MBB ContactsTB1-12 TB0813-2
22
Page 27

Figure 16 Liebert NXL Maintenance Bypass Cabinet control wire diagram with interlock
Connections at UPS External
Interface Board (EIB)
3
1
TB0821
02-806708
TB0811
3
1
TB0813
3
1
3
1
Installation Drawings
LOW VOLTAGE
TERMINAL STRIP
- TB1 -
21
20
19
18
17
TB1-16
16
15
14
13
12
11
10
9
8
7
6
5
4
3
2
1
TB1-15
TB1-14
TB1-13
TB1-12
TB1-11
TB1-10
TB1-9
TB1-8
TB1-7
TB1-6
TB1-5
TB1-4
TB1-3
TB1-2
TB0820
TB0813
TB0811
TB0824
TB0821
EPO PB SW
TB1-1
WIRE DIAGRAM WITH INTERLOCK
TB0824
TB0820
13
Table 5 Control wiring connections with interlock
From To Purpose
TB1-1
TB1-2
TB1-3 TB0821-2
TB1-4 TB0821-1
TB1-5 TB0824-3
TB1-7 TB0824-1
TB1-8 TB0811-3
TB1-10 TB0811-1
TB1-11 TB0813-3
TB1-13 TB0813-1
TB1-14 TB0820-2
TB1-16 TB0820-3
Customer EPO
Push Button Switch
Customer EPO
Push Button Switch
EPO Signal
Maintenance Bypass
Enable Contacts
UPS REPO ContactsTB1-6 TB0824-2
MIB ContactsTB1-9 TB0811-2
MBB ContactsTB1-12 TB0813-2
EPO Status ContactsTB1-15 TB0820-1
23
Page 28

Figure 17 Liebert NXL Maintenance Bypass Cabinet control wire routing
CONDUIT KNOCK-OUTS
FOR CONTROL WIRING
INTERNAL ROUTING
FOR CONTROL WIRING
Installation Drawings
A
INTERNAL ROUNTING
FOR CONTROL WIRING
CONDUIT KNOCK-OUTS
FOR CONTROL WIRING
SECTION A-A
A
FRONT VIEW
24
Page 29

Figure 18 Ground strap location for connected cabinets
FRONT SIDE OF
UNITS
A
DETAIL A
Installation Drawings
Reference of corner post
of connected cabinets
Typical Ground Strap Installation
(Use for all connected units except Battery Cabinet)
Cabinet-to-Cabinet
Bolting Instructions
25
Page 30

3.0 SPECIFICATIONS
Table 6 Liebert NXL Maintenance Bypass Cabinet specifications
Model Size 250 300 400
Input Parameters
Input Voltage to Bypass, VAC 480V 3-phase, 3-wire or 4-wire
Permissible Input Voltage Range, VAC +10% to -30%
Permissible Input Frequency Range, Hz 55 to 65
Output Parameters
Output Voltage, VAC 480V 3-ph, 4-w
Output Frequency, Hz 60
Physical Parameters & Standards, in (mm)
without side panels attached
Front Door Opening (for serviceability) More than 180°
Degree of Protection for UPS Enclosure IP 20 (with and without front door open)
Standards and Conformities
Minimum clearance, Top, in (mm) 24 (610)
Minimum clearance, Back, in (mm) 0
Minimum clearance, Sides, in (mm) 0
Location of cable entrance Top or Bottom
Environmental Parameters
Storage Temperature Range, °F (°C) -13 to 158 (-25 to 70)
Input Frequency, Hz 60
Neutral Current 1.7 times full phase current
Inverter Type IGBT-based Sine-Sine PWM Controlled
Output Power, kW 225 270 360
Width in. (mm)
24.2 (615)
Depth in. (mm) 33.5 (850) 33.5 (850) 39.4 (1000)
Height in. (mm) 76.8 (1950)
Weight, lb (kg) 755 (342.5)
Color Charcoal (ZP-0420)
UL 1778
CSA 22.2 107.3
FCC Part 15, Class A
ISTA Procedure 1H
WEEE
Specifications
Operating Temperature Range, °F (°C) 0 to 40 (UPS)
Relative Humidity
Maximum 95% Non-Condensing
(Operating and Non-Operating)
4920 (1500) (as per IEC 62040/3) -
Maximum Altitude above MSL, ft (m)
1% maximum kW derate / 328 rise between 4921-9843
(100 rise between 1500-3000)
26
Page 31

Table 7 Liebert NXL Maintenance Bypass Cabinet current ratings—System Input
UPS Rating Voltage (VAC) System Input
kVA kW Input Bypass Output
Nominal
Current
10 Minute
Overload
External Breaker
Trip,
Amps
250 225 480 480 480 301 376 400
300 270 480 480 480 361 451 500
400 360 480 480 480 481 601 700
Table 8 Liebert NXL Maintenance Bypass Cabinet current ratings—System Output
UPS Rating Voltage, VAC System Output
kVA kW Input Bypass Output
Nominal
Current
10 Minute
Overload
External Breaker
Trip,
Amps
250 225 480 480 480 301 376 400
300 270 480 480 480 361 451 500
400 360 480 480 480 481 601 700
Table 9 Recommended conduit and cable sizes—Maintenance Bypass Input
Maintenance Bypass Input
UPS Rating System Input Voltage (VAC)
Maint
Byp Output
250 225 480 480 480 480
300 270 480 480 480 480
400 360 480 480 480 480
500 450 480 480 480 480
Top Cable Entry
Wire & Conduit
Ph, N, G THW / FMC
(2) 3C 3-250kcmil,
2-250kcmil, #1/0AWG
(2) 3.5C 3-350kcmil,
2-350kcmil, #1/0AWG
(2) 4C 3-500kcmil,
2-500kcmil, #1/0AWG
(3) 3.5C 3-500kcmil,
2-250kcmil , #1/0AWG
Nominal Selection Alternate Selection
Bottom Cable Entry
Wire & Conduit
Ph, N, G THW / RNC
(2) 3C 3-250kcmil,
2-250kcmil, #1/0AWG
(2) 3.5C 3-350kcmil,
2-350kcmil, #1/0AWG
(2) 4C 3-500kcmil,
2-500kcmil, #1/0AWG
(3) 4C 3-500kcmil,
2-250kcmil , #1/0AWG
Top Cable Entry
Wire & Conduit
Ph, N, G THW / FMC
(3) 2C 3-#2/0AWG,
2-#2/0AWG, #1/0AWG
(3) 3C 3-#4/0AWG,
2-#4/0AWG, #1/0AWG
(3) 3C 3-250kcmil,
2-250kcmil, #1/0AWG
(4) 3C 3-250kcmil,
2-#4/0AWG, #1/0AWG
Bottom Cable Entry
Ph, N, G THW / RNCkVA kW Rectifier Bypass
(3) 2.5C 3-#2/0AWG,
2-#2/0AWG, #1/0AWG
2-#4/0AWG, #1/0AWG
2-250kcmil, #1/0AWG
2-#4/0AWG, #1/0AWG
Specifications
Wire & Conduit
(3) 3C 3-#4/0AWG,
(3) 3C 3-250kcmil,
(4) 3C 3-250kcmil,
Table 10 Recommended conduit and cable sizes—Rectifier Input (1-Input System)
Rectifier Input (1-Input System)
UPS Rating System Input Voltage (VAC)
kVA kW Rectifier Bypass
250 225 480 480 480 480
300 270 480 480 480 480
400 360 480 480 480 480
500 450 480 480 480 480
Maint
Byp Output
Top Cable Entry
Wire & Conduit
Ph, N, G, THW / FMC
(2) 2.5C 3-250kcmil,
(2) 3C 3-350kcmil,
(2) 3C 3-500kcmil,
(3) 3C 3-500kcmil,
Nominal Selection Alternate Selection
#1/0AWG
#1/0AWG
#1/0AWG
#2/0AWG
Bottom Cable Entry
Wire & Conduit
Ph, N, G THW / RNC
(2) 2.5C 3-250kcmil,
#1/0AWG
(2) 3C 3-350kcmil,
#1/0AWG
(2) 3.5C 3-500kcmil,
#1/0AWG
(3) 3.5C 3-500kcmil,
#2/0AWG
Top Cable Entry
Wire & Conduit
Ph, N, G THW / FMC
(3) 2C 3-#2/0AWG,
#1/0AWG
(3) 2.5C 3-#4/0AWG,
#1/0AWG
(3) 2.5C 3-250kcmil,
#1/0AWG
(4) 2.5C 3-250kcmil,
#2/0AWG
Bottom Cable Entry
Wire & Conduit
Ph, N, G THW / RNC
(3) 2C 3-#2/0AWG,
#1/0AWG
(3) 2.5C 3-#4/0AWG,
#1/0AWG
(3) 2.5C 3-250kcmil,
#1/0AWG
(4) 3C 3-250kcmil,
#2/0AWG
27
Page 32

Table 11 Recommended conduit and cable sizes—Module Bypass Input
UPS
Rating System Input Voltage (VAC)
kVA kW Rectifier Bypass
250 225 480 480 480 480
300 270 480 480 480 480
400 360 480 480 480 480
500 450 480 480 480 480
Maint
Byp Output
Nominal Selection Alternate Selection
Top Cable Entry
Wire & Conduit
Ph, N, G,THW / FMC
(2) 3C 3-250kcmil,
2-250kcmil, #1/0AWG
(2) 3.5C 3-350kcmil,
2-350kcmil, #1/0AWG
(2) 4C 3-500kcmil,
2-500kcmil, #1/0AWG
(3) 3.5C 3-500kcmil,
2-250kcmil , #1/0AWG
Bottom Cable Entry
Ph, N, G, THW / RNC
(2) 3C 3-250kcmil,
2-250kcmil, #1/0AWG
(2) 3.5C 3-350kcmil,
2-350kcmil, #1/0AWG
(2) 4C 3-500kcmil,
2-500kcmil, #1/0AWG
(3) 4C 3-500kcmil,
2-250kcmil , #1/0AWG
Module Bypass Input
Wire & Conduit
Top Cable Entry
Wire & Conduit
Ph, N, G, THW / FMC
(3) 2C 3-#2/0AWG,
2-#2/0AWG, #1/0AWG
(3) 3C 3-#4/0AWG,
2-#4/0AWG, #1/0AWG
(3) 3C 3-250kcmil,
2-250kcmil, #1/0AWG
(4) 3C 3-250kcmil,
2-#4/0AWG, #1/0AWG
Table 12 Recommended conduit and cable sizes—Module Output
UPS
Rating
kVA kW Rectifier Bypass
250 225 480 480 480 480
300 270 480 480 480 480
400 360 480 480 480 480
500 450 480 480 480 480
System
Input Voltage (VAC)
Maint
Byp Output
Nominal Selection Alternate Selection
Top Cable Entry
Wire & Conduit
Ph, N, G THW / FMC
(2) 3C 3-250kcmil,
2-250kcmil, #1/0AWG
(2) 3.5C 3-350kcmil,
2-350kcmil, #1/0AWG
(2) 4C 3-500kcmil,
2-500kcmil, #1/0AWG
(3) 3.5C 3-500kcmil,
2-250kcmil , #1/0AWG
Bottom Cable Entry
Wire & Conduit
Ph, N, G THW / RNC
(2) 3C 3-250kcmil,
2-250kcmil, #1/0AWG
(2) 3.5C 3-350kcmil,
2-350kcmil, #1/0AWG
(2) 4C 3-500kcmil,
2-500kcmil, #1/0AWG
(3) 4C 3-500kcmil,
2-250kcmil , #1/0AWG
Module Output
Top Cable Entry
Wire & Conduit
Ph, N, G THW / FMC
(3) 2C 3-#2/0AWG,
2-#2/0AWG, #1/0AWG
(3) 3C 3-#4/0AWG,
2-#4/0AWG, #1/0AWG
(3) 3C 3-250kcmil,
2-250kcmil, #1/0AWG
(4) 3C 3-250kcmil,
2-#4/0AWG, #1/0AWG
Specifications
Bottom Cable Entry
Wire & Conduit
Ph, N, G THW / RNC
(3) 2.5C 3-#2/0AWG,
2-#2/0AWG, #1/0AWG
(3) 3C 3-#4/0AWG,
2-#4/0AWG, #1/0AWG
(3) 3C 3-250kcmil,
2-250kcmil, #1/0AWG
(3) 3C 3-250kcmil,
2-#4/0AWG, #1/0AWG
Bottom Cable Entry
Wire & Conduit
Ph, N, G THW / RNC
(3) 2.5C 3-#2/0AWG,
2-#2/0AWG, #1/0AWG
(3) 3C 3-#4/0AWG,
2-#4/0AWG, #1/0AWG
(3) 3C 3-250kcmil,
2-250kcmil, #1/0AWG
(4) 3C 3-250kcmil,
2-#4/0AWG, #1/0AWG
Table 13 Recommended conduit and cable sizes—Load Output
Load Output
UPS Rating System Input Voltage (VAC)
kVA kW Rectifier Bypass
250 225 480 480 480 480
300 270 480 480 480 480
400 360 480 480 480 480
500 450 480 480 480 480
Maint
Byp Output
Top Cable Entry
Wire & Conduit
Ph, N, G THW / FMC
(2) 3C 3-250kcmil,
2-250kcmil, #1/0AWG
(2) 3.5C 3-350kcmil,
2-350kcmil, #1/0AWG
(2) 4C 3-500kcmil,
2-500kcmil, #1/0AWG
(3) 3.5C 3-500kcmil,
2-250kcmil , #1/0AWG
Nominal Selection Alternate Selection
Bottom Cable Entry
Wire & Conduit
Ph, N, G THW / FMC
(2) 3C 3-250kcmil,
2-250kcmil, #1/0AWG
(2) 3.5C 3-350kcmil,
2-350kcmil, #1/0AWG
(2) 4C 3-500kcmil,
2-500kcmil, #1/0AWG
(3) 4C 3-500kcmil,
2-250kcmil , #1/0AWG
Top Cable Entry
Wire & Conduit
Ph, N, G THW / FMC
(3) 2C 3-#2/0AWG,
2-#2/0AWG, #1/0AWG
(3) 3C 3-#4/0AWG,
2-#4/0AWG, #1/0AWG
(3) 3C 3-250kcmil,
2-250kcmil, #1/0AWG
(4) 3C 3-250kcmil,
2-#4/0AWG, #1/0AWG
Table 14 Recommended conduit and cable sizes—Load Bank Output
UPS Rating System Input Voltage, VAC Load Bank Output
Nominal Selection
kVA kW Rectifier Bypass Maint Byp Output
250 225 480 480 480 480 (1) 3-500kcmil, #1/0AWG
300 270 480 480 480 480 (2) 3-#4/0AWG, #1/0AWG
400 360 480 480 480 480 (2) 3-350kcmil, #1/0AWG
500 450 480 480 480 480 (2) 3-500kcmil, #1/0AWG
Front Cable Entry
Wire-3W + GND
Bottom Cable Entry
Wire & Conduit
Ph, N, G THW / FMC
(3) 2.5C 3-#2/0AWG,
2-#2/0AWG, #1/0AWG
(3) 3C 3-#4/0AWG,
2-#4/0AWG, #1/0AWG
(3) 3C 3-250kcmil,
2-250kcmil, #1/0AWG
(4) 3C 3-250kcmil,
2-#4/0AWG, #1/0AWG
28
Page 33

Specifications
Notes
See the Liebert NXL UPS installation manual, SL-25420, for UPS rectifier, UPS bypass and UPS output sizes. The manual is available at the Liebert Web site: www.liebert.com
These are guidelines only and are superseded by local regulations and codes of practice where applicable.
• Take special care when determining the size of the neutral cable, as current circulating on the
neutral cable may be greater than nominal current in the case of non-linear loads. Refer to the
values given in the Tables 7 and 8.
• The ground conductor should be sized according to the fault rating, cable lengths, type of protection, etc. The ground cable connecting the UPS to the main ground system must follow the most
direct route possible.
• Consideration should be given to the use of smaller, paralleled cables for heavy currents, as a way
to ease installation.
• In most installations, the load equipment is connected to a distribution network of individually
protected busbars fed by the maintenance bypass cabinet output rather than being connected
directly to the Maintenance bypass cabinet itself. Where this is the case, the maintenance bypass
cabinet output cables can be rated to suit the individual distribution network demands rather
than being fully load-rated.
• When laying the power cables, do not form coils to avoid increasing formation of electromagnetic
interference.
Table 15 Recommended lug sizes
Cable Size T&B Series 54000
Two Hole
#8 AWG 54850BE
#6 AWG 256-30695-868
#4 AWG 256-30695-733
#2-3 AWG 54811BE
#1 AWG 54857BE
#1/0 AWG 256-30695-593
#2/0 AWG 54862BE
#3/0 AWG 54864BE
#4/0 AWG 54866BE
250kcmil 54868BE
300kcmil 54870BE
350kcmil 54872BE
400kcmil 54874BE
500kcmil 54876BE
600kcmil 54878BE
750kcmil 54880BE
Use the T&B crimping tools recommended for these types of lugs.
29
Page 34

Specifications
30
Page 35

Page 36

Ensuring The High Availability
Of Mission-Critical Data And Applications.
Emerson Network Power, the global leader in enabling business-critical
continuity, ensures network resiliency and adaptability through
a family of technologies—including Liebert power and cooling
technologies—that protect and support business-critical systems.
Liebert solutions employ an adaptive architecture that responds
to changes in criticality, density and capacity. Enterprises benefit
from greater IT system availability, operational flexibility and
reduced capital equipment and operating costs.
While every precaution has been taken to ensure the accuracy
and completeness of this literature, Liebert Corporation assumes no
responsibility and disclaims all liability for damages resulting from use of
this information or for any errors or omissions.
© 2008 Liebert Corporation
All rights reserved throughout the world. Specifications subject to change
without notice.
® Liebert is a registered trademark of Liebert Corporation.
All names referred to are trademarks
or registered trademarks of their respective owners.
Technical Support / Service
Web Site
www.liebert.com
Monitoring
800-222-5877
monitoring@emersonnetworkpower.com
Outside the US: 614-841-6755
Single-Phase UPS
800-222-5877
upstech@emersonnetworkpower.com
Outside the US: 614-841-6755
Three-Phase UPS
800-543-2378
powertech@emersonnetworkpower.com
Environmental Systems
800-543-2778
Outside the United States
614-888-0246
Locations
United States
1050 Dearborn Drive
P.O. Box 29186
Columbus, OH 43229
Europe
Via Leonardo Da Vinci 8
Zona Industriale Tognana
35028 Piove Di Sacco (PD) Italy
+39 049 9719 111
Fax: +39 049 5841 257
Asia
7/F, Dah Sing Financial Centre
108 Gloucester Road, Wanchai
Hong Kong
852 2572220
Fax: 852 28029250
SL-25432_REV01_06-08
Emerson Network Power.
The global leader in enabling Business-Critical Continuity.
AC Power
Connectivity
DC Power
Business-Critical Continuity, Emerson Network Power and the Emerson Network Power logo are trademarks and service marks of Emerson Electric Co.
©2008 Emerson Electric Co.
Embedded Computing
Embedded Power Power Switching & Controls
Monitoring
Outside Plant
Precision Cooling
EmersonNetworkPower.com
Racks & Integrated Cabinets
Services
Surge Protection
 Loading...