


AM/FM Radio
AC Outlet
Model : NR30
Thank you…………for purchasing this Emerson high quality radio. We realize that many consumers enjoy listening to the
endless variety of music on their favorite radio stations rather than on CDs or tapes. That’s why we created this great
sounding, but economical and simple-to-use radio. We think you will be amazed by the quality of the sound produced by
this compact sized system.
We have taken great care during the manufacturing and testing of this product. Every component in this system was in
perfect working order when it left our factory. It has been designed to provide you with many years of musical enjoyment
and trouble free operation with an absolute minimum of care and maintenance. If you encounter any problems with the
set-up or operation of this system, please do not return it to the retail store. Please call the Emerson Customer Service Hot
Line, toll free, at 800-898-9020. One of our representatives will attempt to solve the problem for you. If it is not possible to
solve the problem by phone, you will be instructed on the procedure to obtain a replacement unit.
Once again, thanks for purchasing this Emerson audio product.
The serial number of your system is located on a label on the back panel of the main unit. Please take a moment now to
record the serial number in the space provided below. You may be asked to supply this number in the unlikely event that
you need to call our Customer Service Hot Line.
Model Number: NR30
Serial Number:
PREPARATION FOR USE
UNPACKING AND SET-UP
•Carefully remove the radio from the display carton and remove all packing materials from the radio.
•Unwind and fully extend the AC power cord and the FM wire antenna located on the back panel.
•Place the main unit on a stable, level surface such as a table, shelf, or stand, out of direct sunlight, and away from
sources of excess heat, dust, vibration, moisture, and humidity.
POWER SOURCE
This system is designed to operate on normal 120V/60Hz AC house current only. Attempting to operate this system on
any other power source could cause damage to the system, and such damage is not covered by your warranty.
Note:This unit has a polarized AC plug with one wide blade and one narrow
blade. This plug will only fit into a matching polarized AC outlet. This is a safety
feature to reduce the possibility of electric shock. If this plug will not fit in your AC
outlet, you probably have an outdated non-polarized outlet. You should have your
outdated outlet changed by a qualified, licensed electrician. Do not file the wide
blade on the plug, or use an adapter to make the plug fit into your outlet. This
defeats the safety feature and could expose you to electric shock.
PROTECT YOUR FURNITURE
This model is equipped with non-skid rubber 'feet' to prevent the product from moving when you operate the controls.
These 'feet' are made from non-migrating rubber material specially formulated to avoid leaving any marks or stains on
your furniture. However certain types of oil based furniture polishes, wood preservatives, or cleaning sprays may cause
the rubber 'feet' to soften, and leave marks or a rubber residue on the furniture. To prevent any damage to your furniture we
strongly recommend that you purchase small self-adhesive felt pads, available at hardware stores and home improvement
centers everywhere, and apply these pads to the bottom of the rubber 'feet' before you place the product on fine wooden
furniture.
AC Plug
Visit our web site at www.emersonradio.com
NR30_050304.p65 3/5/2004, 14:501
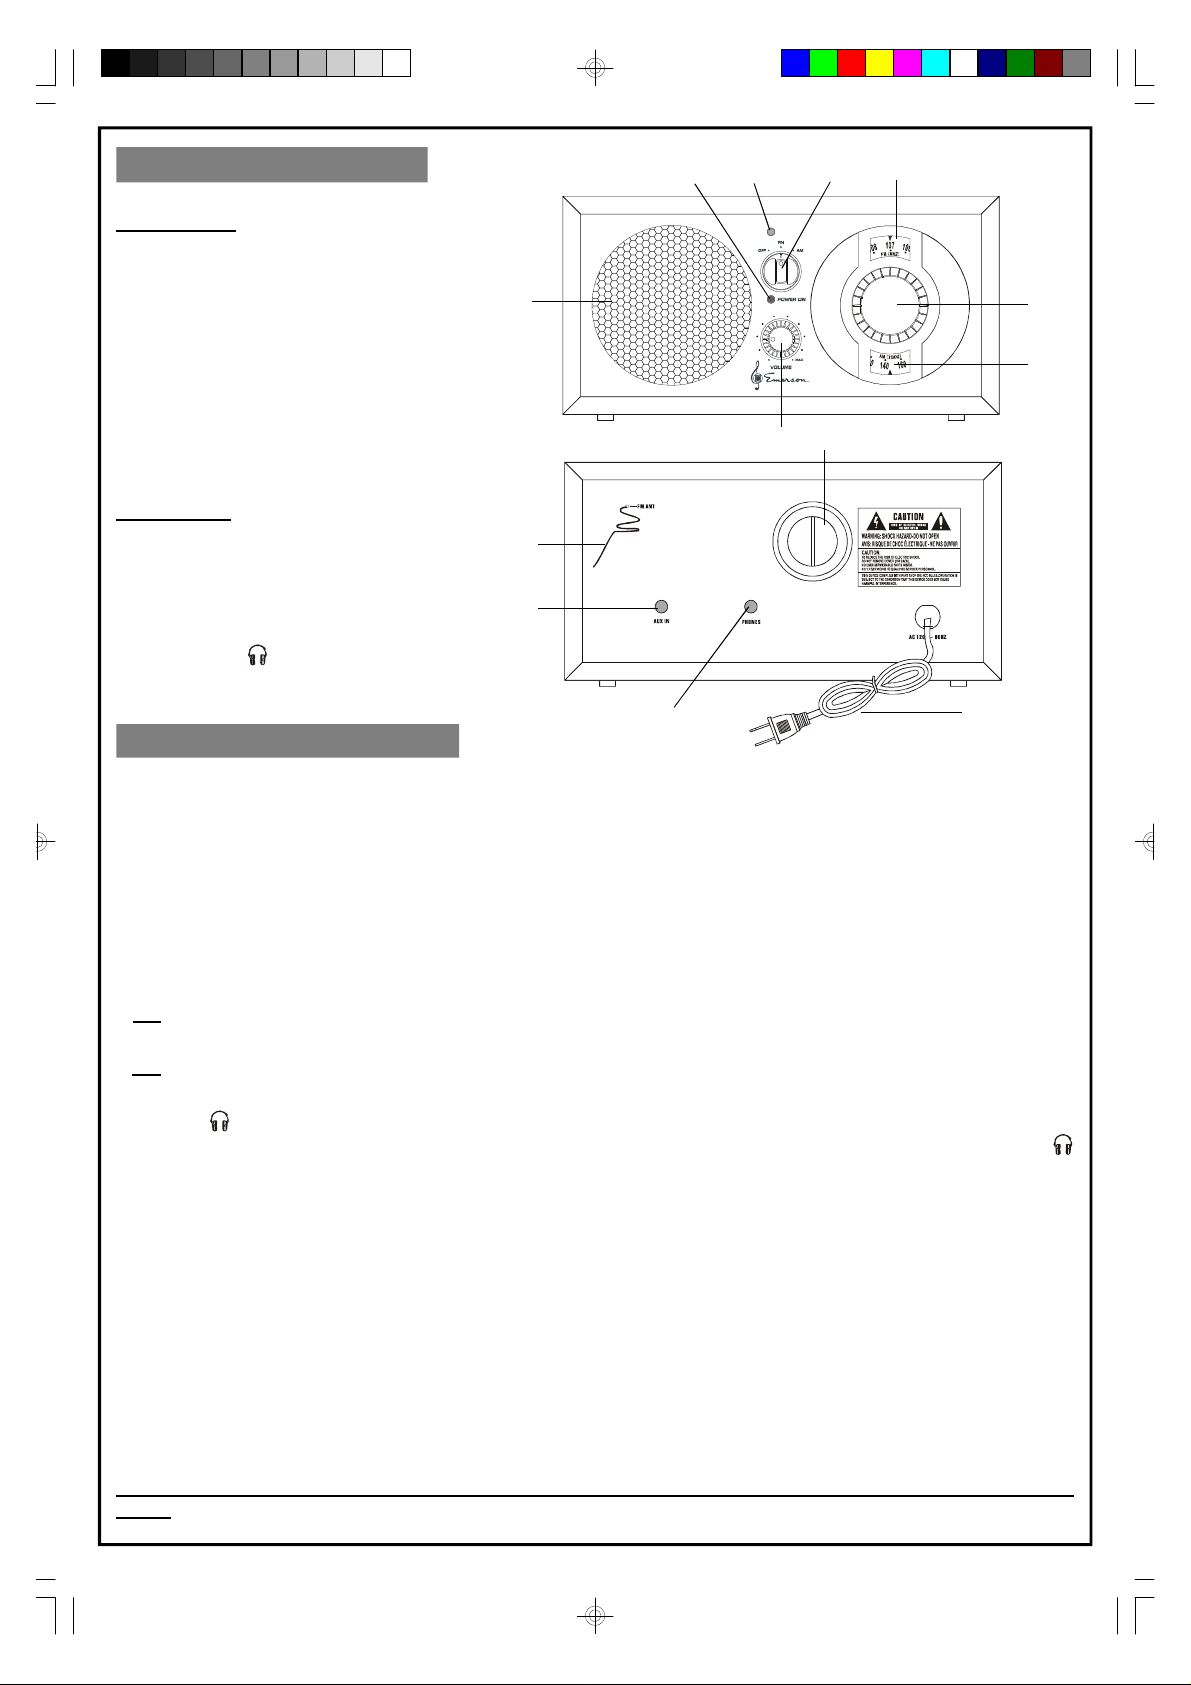
LOCATION OF CONTROLS
AUX
Front Panel
1.) Speaker.
2.) POWER ON Indicator.
3.) AUX Indicator.
4.) Power OFF / FM / AM Selector.
5.) FM Dial.
6.) Tuning Knob.
7.) AM Dial.
8.) VOLUME Control.
Back Panel
9.) AUX IN Jack.
10.) FM Wire Antenna.
11.) Speaker Port.
12.) AC Power Cord.
13.) PHONES Jack.
1
10
2 3
4
5
6
7
8
11
9
13
12
OPERATING INSTRUCTIONS
• Extend and position the FM Wire Antenna to its full length for best FM reception.
• Connect the AC power cord to your household AC outlet.
1.) Set the Power/Band selector to the FM or AM position. The POWER ON indicator light comes ‘On’.
2.) Rotate the Tuning knob to tune to the desired station.
3.) Adjust the VOLUME control to the desired level.
4.) When you are finished listening, set the Power/Band selector to the ‘OFF’ position. The POWER ON indicator
light goes ‘Off’.
Hints For Better Reception
If FM reception is noisy or weak, try changing the position and direction of the FM wire antenna until you find the
position that provides the best reception.
If AM reception is unsatisfactory, try repositioning the main unit slightly until the internal AM bar antenna picks up the
strongest signal.
PHONES Jack
For private listening without disturbing others connect a set of stereo headphones (not included) to the PHONES
jack on the back panel of the main unit. The headphones should have a 3.5mm mini plug. The speaker shuts off
automatically when headphones are connected.
To protect your hearing always set the VOLUME control to a low level before you connect the headphones. Then put
the headphones on and gradually increase the VOLUME control to a comfortable listening level.
AUX IN (Auxiliary Input) Jack
The Auxiliary Input jack allows you to listen to external audio devices, such as a personal CD player for example,
through the speaker of this system.
Connect your external device to the AUX IN jack on the back panel, (connection cables are not included). The AUX
LED indicator lights up.
Operate your external device as you would normally and adjust the VOLUME control of this system to the desired
level.
IMPORTANT NOTE:
You must disconnect your external device from the AUX IN jack of this system in order to listen to the radio
again.
NR30_050304.p65 3/5/2004, 14:502
 Loading...