

Page 1

Installation Sheet
Form 5876
December 2010
Position Monitor Bracket (PMB) Mounting Kit
Position Monitor Bracket (PMB) Mounting Kit
Introduction
This Installation Sheet covers the assembly and
installation instructions and parts list for Position
Monitor Bracket (PMB) Mounting Kit.
For more information on 4300 Series Wireless Position
Monitor and on regulators used with this product, refer
to full product literature:
Fisher® 4320 Wireless Position Monitor:
D103392X012
Type 63EG: D100315X012
Type 1098-EGR: D100339X012
Type 1190: D101644X012
Type 1290: D101645X012
Type EZR: D102600X012
The Position Monitor Bracket or PMB is the bracket
and hardware used to mount the 4300 Series Wireless
Position Monitors to the travel indicator of Types 63EG,
1098-EGR, 1190, 1290, and EZR regulators. The PMB
mounting kit is compatible with both Topworx 4310
(open/partially open/closed) and Fisher 4320 (open/
percent travel/closed) Wireless Position Monitors.
Specications
Construction Materials
Bracket: 304 Stainless steel
Hardware: 18-8 Stainless steel
Assembly and Installation
Read fully and understand the assembly and
installation instructions in this manual and the
nstruction manuals of the appropriate regulator type
and 4300 Series Wireless Position Monitor before
installing the Position Monitor Bracket Assembly.
The regulator cannot be in operation during the
assembly and installation of the position monitor and
the PMB assembly. Refer to the appropriate instruction
manual for proper shutdown of the system before
attempting to mount the position monitor.
For best results, the PMB Assembly should only be
installed on site.
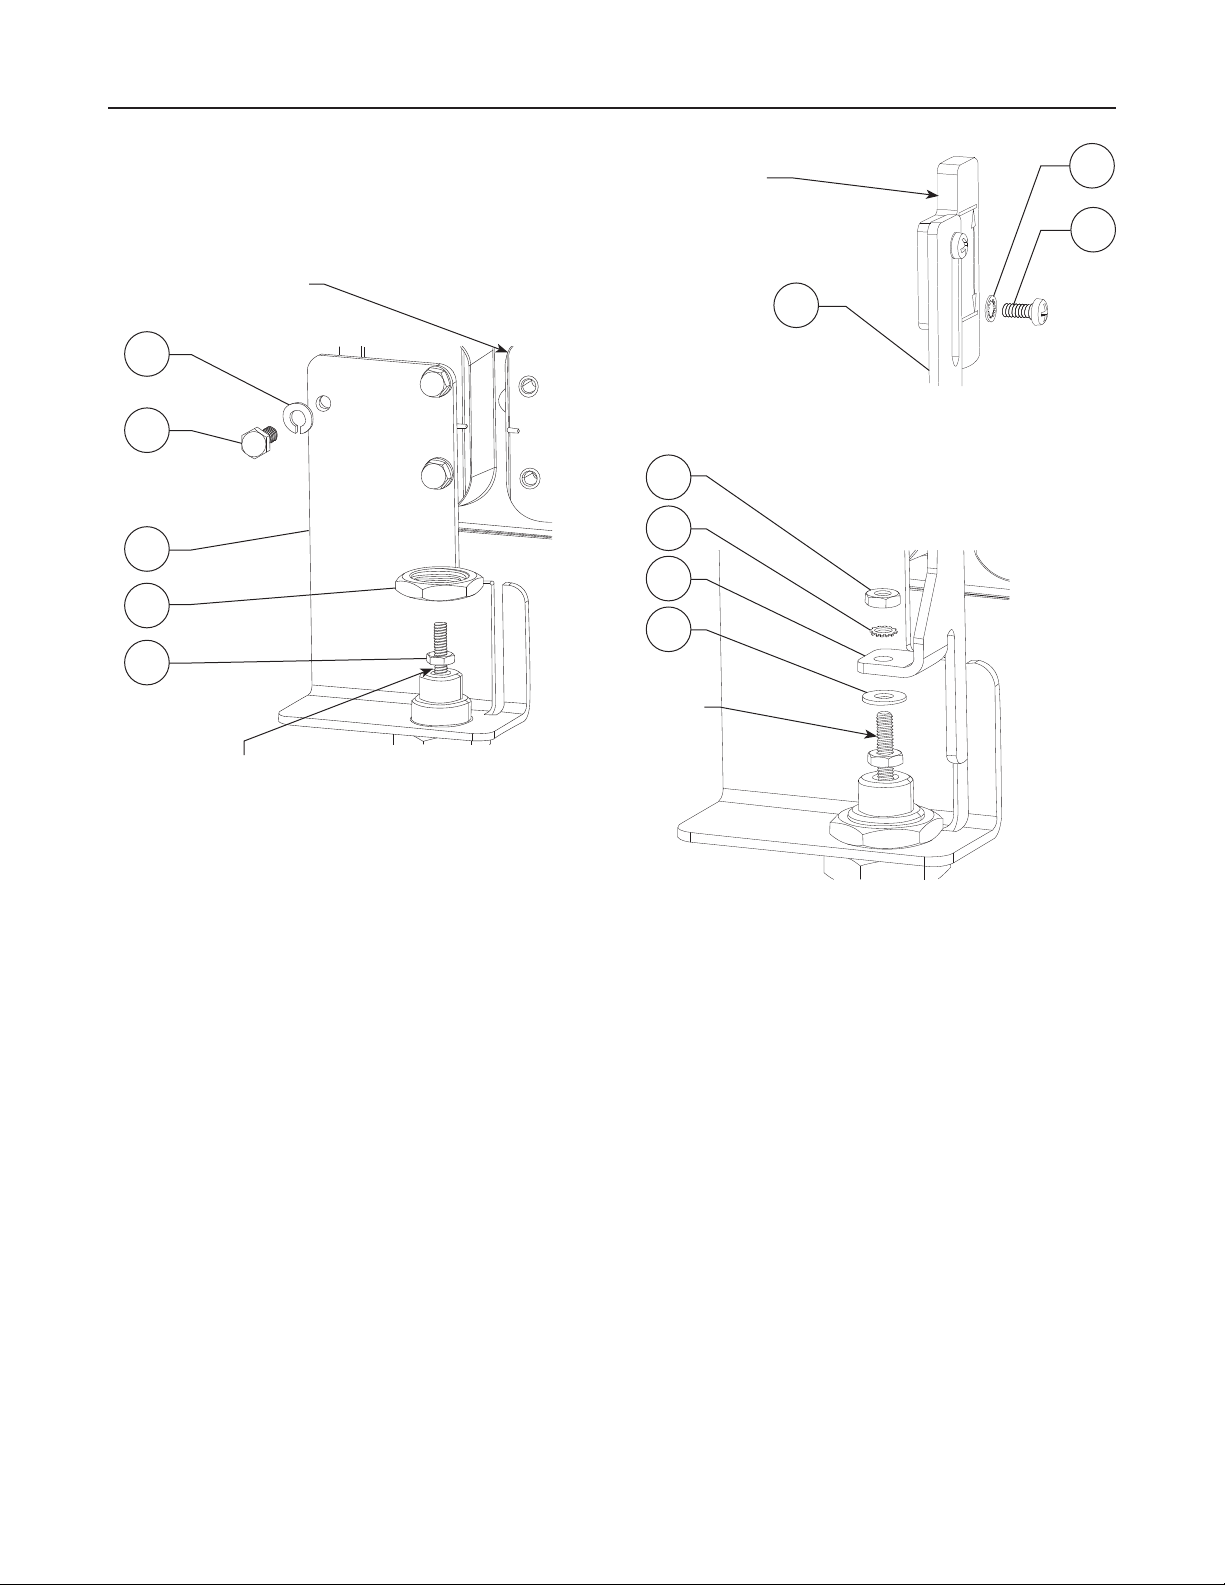
All key numbers are referenced in Figure 1.
1. If used, remove the protective cap covering the
regulator stem and travel indicator.
CAUTION
Securely grip the regulator stem when
removing attached parts and when
installing the hex nut (key 6) to prevent
the stem from potentially backing down
into the regulator.
Remove all parts attached to the regulator stem
and install a new hex nut (key 6).
2. Fasten the position monitor to the monitor bracket
(key 1) using three cap screws (key 4) and
three lock washers (key 5). Apply Threadlocker
adhesive (key 11, not shown) and securely torque
the cap screws to 100 inch-pounds / 11 N•m.
3. Install the monitor bracket and position monitor
setup (from step 3) to the regulator using the panel
nut (key 3). This joint allows the monitor bracket
(key 1) to slide back and forth and from side to side
for optimal adjustment. Finger tighten only until
nal adjustment.
Note
The PMB mounting kit is designed for
small but necessary adjustments at
most of the fastened joints. Because an
adhesive is required on all the fasteners
of the PMB assembly, all fasteners must
www.sherregulators.com
D103260X012
Page 2
Position Monitor Bracket (PMB) Mounting Kit
5
4
1
3
6
POSITION MONITOR
POSITION MONITOR
MAGNET
6
8
2
7
REGULATOR STEM
10
9
2
MONITOR MAGNET AND MAGNET ARRAY
BRACKET (KEY 2) PRE-ASSEMBLY (STEP 4)
REGULATOR STEM
INSTALLING THE BRACKET (KEY 1) TO THE POSITION MONITOR
AND REGULATOR STEM (STEPS 1 THROUGH 3)
Figure 1. PMB Mounting Kit Assembly and Installation
be nger tightened only until the position
monitor and bracket assembly have
been properly located. Apply
Threadlocker adhesive and fully tighten
the joints to the specied torque values
only during nal adjustment.
4. Pre-assemble the monitor magnet to the
magnet array bracket (key 2) using two machine
screws (key 9) and two external tooth star
washers (key 10). Finger tighten only until
nal adjustment.
Note
The mounting slot of the magnet array
bracket (key 2) is designed for multiple
regulators. The optimal location of the
array bracket is determined by the limits
INSTALLING THE PRE-ASSEMBLED MAGNET ARRAY BRACKET
(KEY 2) TO THE REGULATOR STEM (STEP 5)
of the regulator and the wireless position
monitor. Consult the appropriate
instruction manual to determine the
optimal location.
5. Fasten the pre-assembled magnet array bracket
(key 2) to the regulator stem using a at washer
(key 7), an external tooth star washer (key 8), and
a hex nut (key 6). Additional vertical adjustment of
the monitor magnet may be obtained through
this fastening joint. Finger tighten only until
nal adjustment.
6. Both the monitor bracket (key 1) and magnet
array bracket (key 2) are designed to allow
adjustments in the assembly so that the monitor
magnet array can be located properly as specied
by the wireless position monitor Instruction Manual.
2
Page 3

Position Monitor Bracket (PMB) Mounting Kit
4300 SERIES WIRELESS
POSITION MONITOR
45
1
3
9 10
2
REGULATOR TRAVEL INDICATOR
STEM ASSEMBLY
Figure 2. PMB Mounting Kit Assembly Drawing
After the monitor magnet array has been
properly located, perform nal adjustments
to all previously nger-tightened joints. Apply
Threadlocker adhesive and tighten the joints to
the following specications:
• From step 3, torque the panel nut (key 3) to
700 inch-pounds / 79 N•m.
• From step 5, torque the hex nut (key 6) to
15 inch-pounds / 1.7 N•m.
• From step 4, securely tighten the two
machine screws (key 9).
Startup and Adjustment
After mounting the wireless position monitor on the
regulator, the monitor should be calibrated before the
regulating system is turned back on.
A known method of locating the minimum and
maximum travel to calibrate the 4300 Series Wireless
6 7 8
Position Monitor is required before it can become
operational. Calibrate the wireless position monitor
based on the procedure found in the appropriate
instruction manual.
Follow all local procedures and refer to the appropriate
regulator instruction manual when restarting the
regulating system.
Parts List (Figure 2)
Key Description
1 Monitor Bracket ERAA00141A0
2* Magnet Array Bracket ERAA00142A0
3* Panel Nut ERAA00160A0
4* Cap Screw (3 required) ERAA00178A0
5 Lock Washer (3 required) ERAA00179A0
6* Hex Nut (2 required) ERAA00181A0
7* Flat Washer ERAA00161A0
8 External Tooth Star Washer ERAA00180A0
9* Pan Head Machine Screw (2 required) ERAA00182A0
10* External Tooth Star Washer (2 required) ERAA00183A0
11* Threadlocker (adhesive, not shown) ERAA00184A0
*Recommended spare part.
3
Page 4

Position Monitor Bracket (PMB) Mounting Kit
Industrial Regulators
Emerson Process Management
Regulator Technologies, Inc.
USA - Headquarters
McKinney, Texas 75069-1872, USA
Tel: +1 800 558 5853
Outside U.S. +1 972 548 3574
Asia-Pacic
Shanghai 201206, China
Tel: +86 21 2892 9000
Europe
Bologna 40013, Italy
Tel: +39 051 419 0611
Middle East and Africa
Dubai, United Arab Emirates
Tel: +971 4811 8100
For further information visit www.fisherregulators.com
The Emerson logo is a trademark and service mark of Emerson Electric Co. All other marks are the property of their prospective owners. Fisher is a mark owned by Fisher Controls International LLC,
a business of Emerson Process Management.
The contents of this publication are presented for informational purposes only, and while every effort has been made to ensure their accuracy, they are not to be construed as warranties or
guarantees, express or implied, regarding the products or services described herein or their use or applicability. We reserve the right to modify or improve the designs or specications of such
products at any time without notice.
Emerson Process Management Regulator Technologies, Inc. does not assume responsibility for the selection, use or maintenance of any product. Responsibility for proper selection, use and
maintenance of any Emerson Process Management Regulator Technologies, Inc. product remains solely with the purchaser.
Natural Gas Technologies
Emerson Process Management
Regulator Technologies, Inc.
USA - Headquarters
McKinney, Texas 75069-1872, USA
Tel: +1 800 558 5853
Outside U.S. +1 972 548 3574
Asia-Pacic
Singapore 128461, Singapore
Tel: +65 6770 8337
Europe
Bologna 40013, Italy
Tel: +39 051 419 0611
Chartres 28008, France
Tel: +33 2 37 33 47 00
TESCOM
Emerson Process Management
Tescom Corporation
USA - Headquarters
Elk River, Minnesota 55330-2445, USA
Tels: +1 763 241 3238
+1 800 447 1250
Europe
Selmsdorf 23923, Germany
Tel: +49 38823 31 287
Asia-Pacic
Shanghai 201206, China
Tel: +86 21 2892 9499
©Emerson Process Management Regulator Technologies, Inc., 2010; All Rights Reserved
 Loading...