

Page 1
Under
Cabinet
CD
Radio
OWNER'S
CKD|
Visit
our
web
site at www.emersonradio.com
61
2
fI/I
AA/UAL
Page 2

Page 3

TO PBEVENT
SION
FULLY
HAZARD,
CORD,
INSERTED
DO NOT EXPOSE THIS
FIRE OR SHOCK HAZARD, DO
RECEPTACLE OR OTHER
TO PREVENT BLADE EXPOSURE,
APPLIANCE TO RAIN OR MOISTURE.
NOT USE
OUTLET UNLESS
THIS
TO PREVENT FIRE OR SHOCK
PLUG WITH AN EXTEN.
THE BLADES
CAN BE
The lightning flash with arrowhead
symbol,
triangle
to
'dangerous
product's
sufficient magnitude to constitute
a risk of electric shock
The
Caution
is
presence
the
within
intended
enclosure
an equilateral
voltage' within
Marking maybe located
IM PORTANT
to alert the
of uninsulated
that
may be of
persons.
to
user
the
WARNING:
OF ELECTRIC
REMOVE
USEB SERVICEABLE
INSIDE
OUALIFIED
SAFETY
To
COVEB
REFEH
SERVICE PEFSONNEL.
at
1.) Read these instructions. Keep these
all warnings.
2.)
Before operating, make sure
the voltage
local voltage.
3.)
Do not use this
apparatus near water.
4.) Clean only with dry cloth.
5.)
Install in accordance with the
6.)
7.)
not install near any heat sources such
Do
other apparatus
not defeat the safety
Do
has
two blades
grounding prong.
third
provided plug
(including
with one
The wide blade or
does not fit into
purpose
wider
manufacturer's
amplifiers) that
the
clf
than the other. A
REDUCE
SHOCK
the
THE BISK
DO
(OF
BACK),
SERVICING
top
PARTS
enclosure
The
equilateral
NOT
to alert
NO
of important
m a
instructions
TO
accompanying
INSTRUCTIONS
instructions. Follow
requirement of the unit
instructions.
as radiators, heat
produce
polarized
or
grounding
the third
your
outlet, consult
heat.
grounding-type plug.
type
prong
is
point
exclamation
in t e n a n c e
triangle
the user to the
in the
the
of
operating
within
is
intended
presence
(se
rv ic in
literature
the appliance.
apparatus.
all instructions" Heed
matches
registers, stoves, or
polarized
A
plug
provided
two blades and a
has
your
for
safety.
an electrician for
an
and
g
)
your
plug
lf the
reolacement of the obsolete outlet.
8.)
Protect
the
power
cord from being
convenience receptacles, and
9.)
Only use attachments / accessories
10.)
Unplug this
apparatus during lightning storms
of time.
11.)
Disconnect the
onto the unit or
being checked
12.)
Do not open
your
eyes. Any
plug
as soon
it
an object enters
by experts.
the cabin6t. Lasers used in
servicing
should
walked on
point
the
specified
where
by the manufacturer.
or when unused
as immediately
the unit.
unplug the unit if liquid
The unit should not
rays employed by
be done by
qualified
pinched particularly
or
they exit from
the apparatus.
for long
be used until
the unit may
service
personnel.
plugs,
at
periods
spills into
or
damage
Page 4
Befer
13.)
apparatus
damaged,
apparatus
has
This
14.)
filled
Use
15.)
the
When a cart is
combination
Do not overload
16.)
17.)
Use
18.)
The
1e.)
Upon
to
all servicing
has
liquid has
has been exposed to rain or moisture, does not operate normally, or
been dropped.
appliance
with liquids
only with the cart,
manufacturer, or
to avoid
replacement
product
completion of any
perform
may be mounted
safety checks.
20.) Power Sources
indicated
on the marking
home, consult
operate from batter
21 .) Object
and Liquid Entry - Never
to
been damaged in any way, such as
shall not
such
sold
used, use
injury
wall outlet.
parts
-
This
your product
power,
openings asthey may touch
result in a fire or electric shock.
22.) Damage Requiring
servicing to
a) When the
qualified
power-supply
b) lf liquid has been
c) lf the
lf the
d)
product
product
Service
service
spilled,
has been exposed
does not
only those controls that
adjustment of other
work by a
e) lf the
f
)When
need
product
for service.
qualified
product
the
has been
qualified
been
be
as
vases shall be
stand,
with the apparatus.
caution
as specified by
service
product
label. lf
service
spilled
exposed to dripping
tripod, bracket,
when
tip-over.
from
Use only
to a wall
or
should be operated only f rom the type of
you
dealer or local
personnel.
Servicing is
power-supply
or
objects have
placed
or table specified by
moving
power
the manufacturer.
only if recommended
repairs
source
this
to
are not sure
power
fallen
or
splashing water
on the
the cart/apparatus
as indicated.
product,
of the
company. For
required when the
the apparatus, the
into
apparatus.
by the
the service
ask
type of
power
products
cord or
no object
and
manufacturer.
technician
power
supply to
intended to
or other sources, refer to the operating instruction.
push
objects of
dangerous voltage
Never spill liquid
-
Unplug this
personnel
cord or
plug
product
under
is
damaged,
any
kind into this
points
of any
or short-out
kind on the
from the wall outlet and refer
the following
or objects have fallen into the
to rain
or
water,
operate normally by tollowing the
conditions.
product,
operating instructions. Adjust
product
parts
that
product.
are covered by the operating instructions as an improper
controls may result in damage and
technician to restore
dropped or damaged in any
exhibits
a distinct change in
product
the
way, and
performance
will often require
to its normal operation.
-
this rndicates a
extensive
plug
is
source
your
through
could
2
Page 5
BEFORE
WE BEGIN
Thank
your
is
Our
product
sure
This
you
assurance of
engineers
. Please be sure to
you
are
product
standards of
perfect
in
be
purchasing
for
quality, performance
have included many useful and convenient
getting
the maximum
was manufactured
workmanship. lt was
working order before
the chance that some
shipment to the
lf,
after
reading this Manual,
product, please
Manual.
Emerson
retail
refer
store or to the final consumer.
to
and
this Emerson audio
read
this Owner's
benefit
using
tested
the
by
it left our factory.
problem
you
may occur because
experience any
the instructions for
Emerson retailers
and
product,
value.
The Emerson
Manual completely to make
from each feature.
highest
Emerson
quality
components and
inspectors
However, there
of rough
problems
with
the operation
obtaining service at
committed to
are
your
brand
features in this
found to
and
is
always
handling
during
of this
the end of this
satisfaction.
Once again, thanks
for
purchasing
this
Emerson audio
product.
3
Page 6
CLASS
1
LASER
PRODUCT
CLASS 1
APPAREIL
PRODUCTO
This
Avoid
exposed
heat
electric
equipment
places
areas,
vibration
Operate
described
Before
certain
properly
When
disconnect
cords
Do
not leave,
places
in
cold,
LASER
A LASER
product
installing
to
direct
radiating
heaters,
that radiates
lacking
places
ancl/or humid
controls
in
turning
that the
installed.
moving
the
connected to
which
dusty,
PRODUCT
DE
CLASSE 1
LASER DE
CLASE 1
contains a low
this unit in
sunlight
appliances
ofi top of other
too
ventilation
subject
or moist
and
switches
the manual.
on the
AC
the
set, be
power
power,
power
cord and remove
other equipment.
mount
or use the
are extremely
humid.
o[
places
or
close
such
stereo
much
or
dusty
to
constant
areas.
make
cord is
sure to
I NVISIBLE LASER
WHEN
AVOID
power
to
as
heat,
as
first
unit
hot,
CAUTION
RADIATION
OPEN
AND INTERLOCKS
DEFEATED.
EXPOSURE TO
BEAM
Laser Device.
Allow
prevent
not
near materials
blankets,
block the ventilation
When
is
or condensation
CD
condensation
adequate
internal
place
the
curtains,
air circulation to
heat
uriit
(a
build-up. Do
on a surface or
curtain ex.
which
etc.)
holes.
left
in a
heated
room
where
warm and damp, water droplets
inside
player.
inside
may form
When there is
the unit, the unit
may not function normally. Let it
stand
the
for 1
power
room up
When
unit
you
for a long
disconnect the
ta
on, or
and
are
2 hours
gradually
dry the
not
unit before use.
going
period
power
before turning
heat
to use the
of
cord.
rugs,
might
it
the
the
time,
4
Page 7
FCC
This equipment has
digital
provide
installation.
and,
interference to radio communications.
interference will not
harmful
turning
interference
I
o
a
INFORMATION
been
Device,
pursuant
reasonable
This
equipment
if not installed
and
occur in a
interference
the
equipment
by one
Reorient
Increase
or relocate
the
Connect the
receiver is
connected.
separation
equipment into an
or more of the following measures:
Consult the dealer
tested
part
to
protection
generates,
used in
and found to
'15
of the
against
FCC Rules. These limits
harmful
uses,
accordance with the instructions,
However, there is no
to radio
particular
or television reception, which can
installation. lf this
off and on, the user is encouraged to try to
thd receiving
antenna.
between the equipment
outlet on a
or an experienced radioiTV
comply
and can
with the
limits for
are
interference
radiate
radio frequency
in
a class B
designed to
a residential
energy
may cause harmful
guarantee
equipment does
determined
be
that
cause
correct the
receiver.
and
circuit different from that to which the
technician for help.
by
This device
following two
(1)
This
(2)
This
complies with
conditions:
device
may not cause harmful
device must accept
that
may
cause undesired operation.
Changes or modifications
compliance
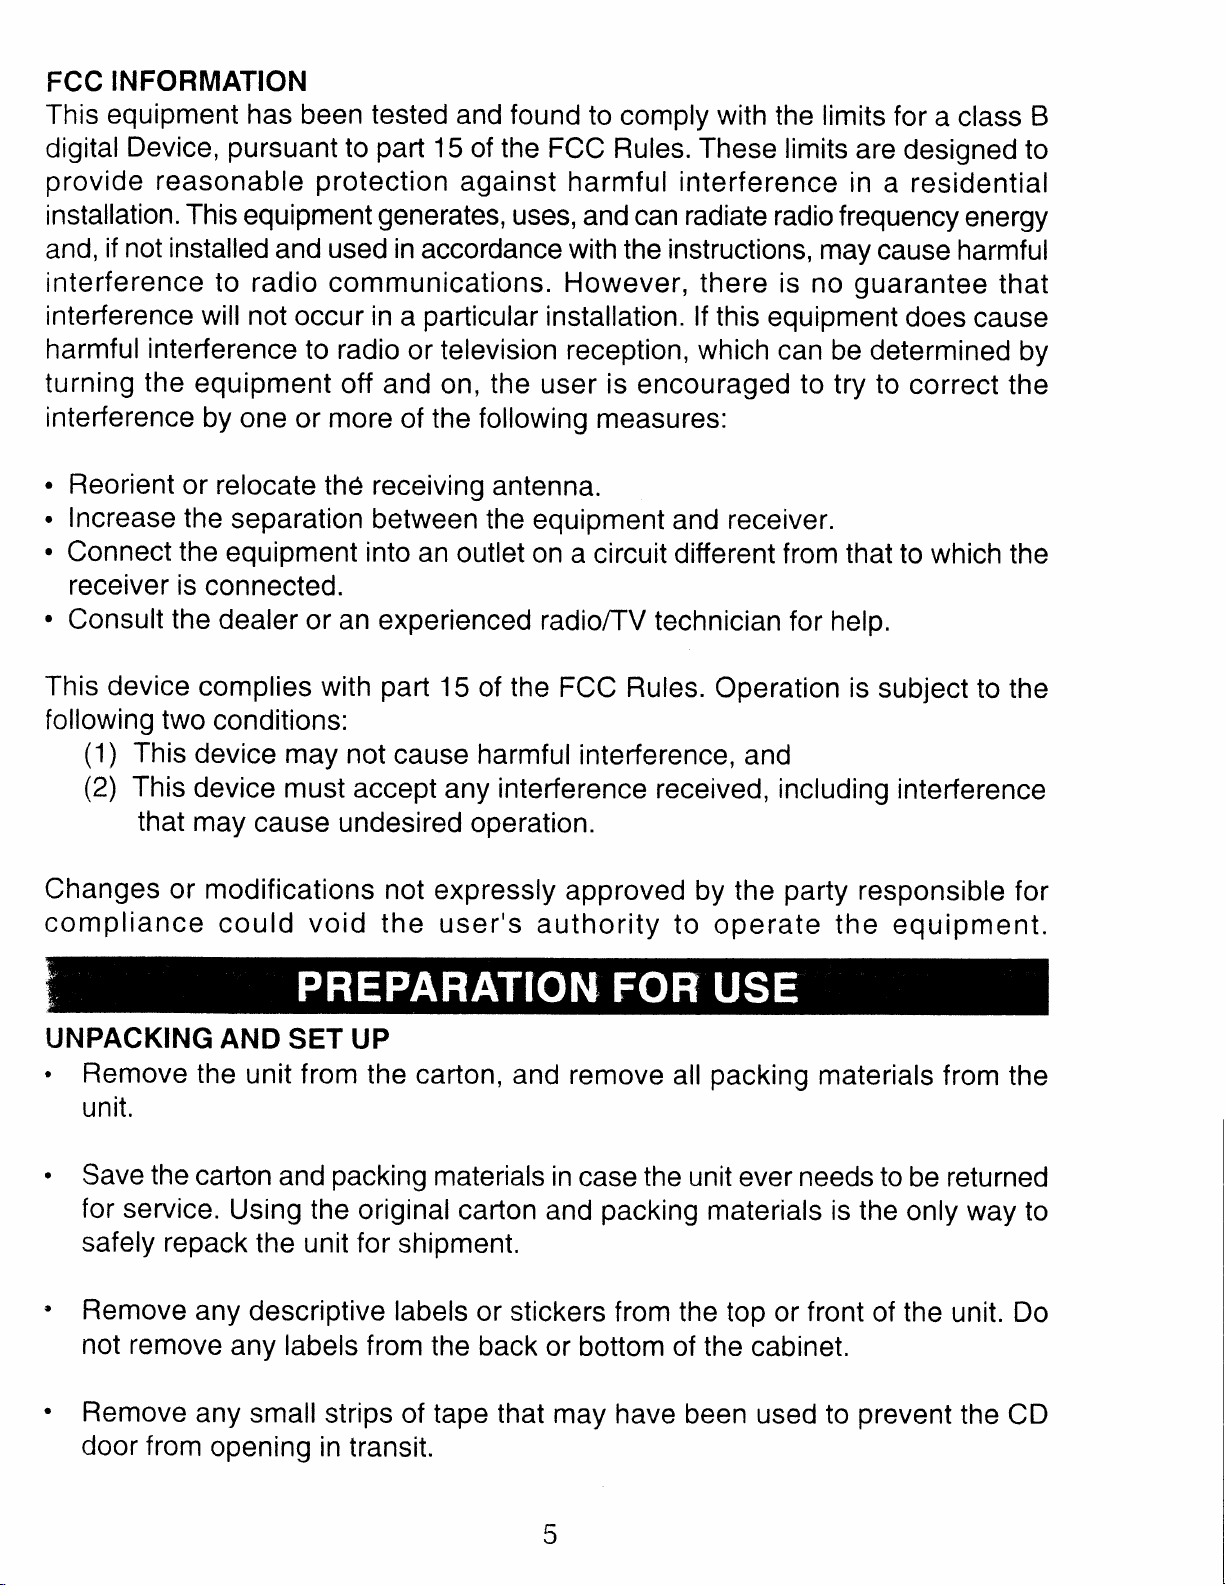
UNPACKING
.
Remove the
could void the user's
AND SET UP
unit from the
part
not expressly
unit.
Save the
for
service.
safely repack
carton
Using
the unit for
packing
and
the
original
shipment.
15 of the FCC Rules.
interference, and
interference
any
received, including
approved by the
authority to operate the equipment.
carton, and remove all
materials in
carton
and
case
the
unit ever
packing
Operation is subject
interference
party
packing
materials
responsible
materials
needs
to
is the
be returned
only
from the
way
to the
for
to
Remove
not remove
Remove
door from
any
any
any
opening in
descriptive
labels
small
strips of tape that
labels
from
transit.
or stickers
the back
5
from the top or front
or bottom of the
may have
been used to
cabinet.
the
of
prevent
unit.
the
Do
CD
Page 8
Note
space
the
the Serial
provided
Number on the bottom of
on the
warranty
page
your
of
radio and
this manual.
write
this number
in
Unwind
Place
and
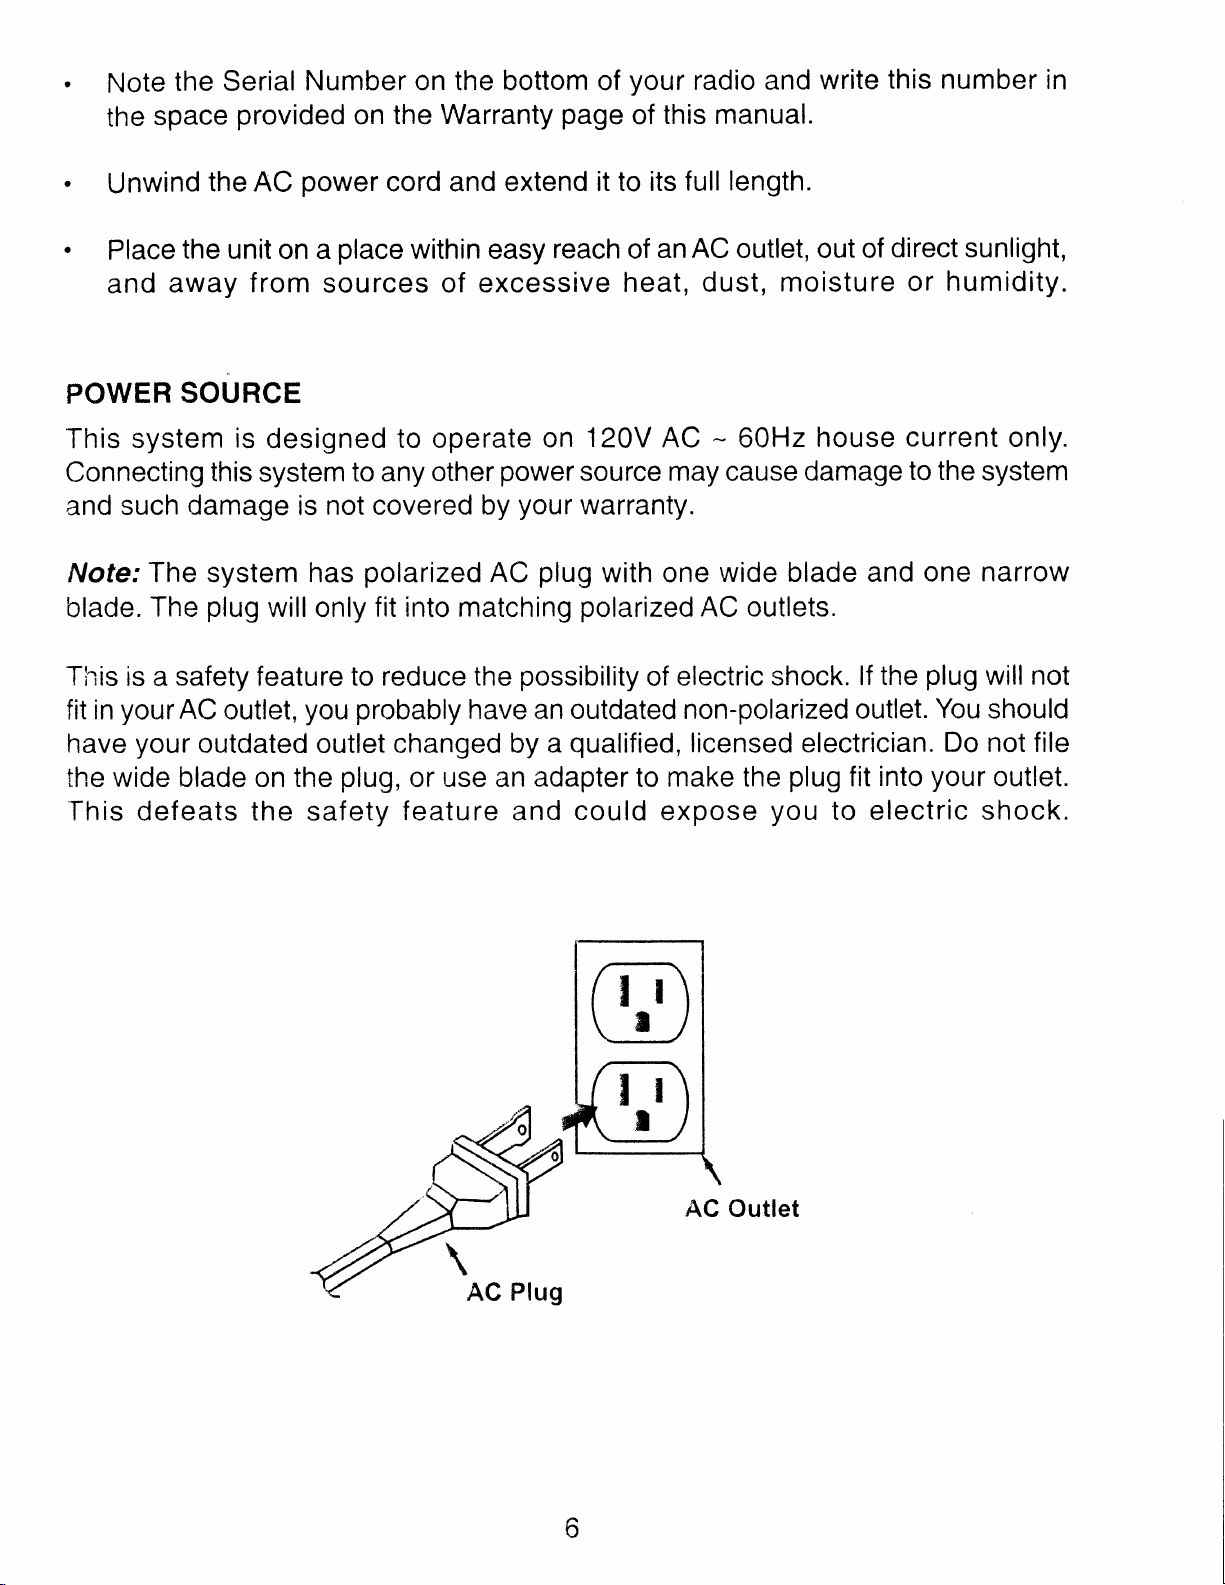
POWER
This system
Connecting
the AC
the unit
away
SOURCE
is
this
and such damage is not
Nofe; The system has
plug
blade.
The
This is a safety feature to reduce the
yourAC
fit in
have
your
outlet,
outdated outlet changed by a
the wide blade on the
power
a
on
from
sources of excessive
designed to operate
system
cord and extend
place
within easy
to any other
power
covered by
polarized
AC
reach
on
your
plug
will only fit into matching
possibility
probably
you
plug,
have an outdated non-polarized outlet.
or use an adapter to make the
This defeats the safety feature and
length.
it
to
120V
source
full
its
AC
an
of
heat,
outlet, out of
dust, moisture
AC - 60Hz
may
cause
house current only.
damage
warranty.
with one wide blade and
polarized
AC outlets.
of electric shock.
qualified,
could
licensed electrician. Do not file
plug
fit into
expose
you
to electric shock.
direct sunlight,
humidity.
or
to the
system
one narrow
lf the
plug
You
your
will
should
outlet.
not
Outlet
b
Page 9

(1)-Main
A.
%oo"cto"oooto"q
(1)-Mounting
[ililil0ilil00[il
Template
aulcx
M. hd b
r
.12PhIFGSlddffi*
.
CKDl
rouxTll{o
h*d&
orl irr
€rdlc
Srt
tkr
!FI
.
fad*E
d h
c{
pro
.
rb.rtri.n
n
m
- W-tt-lt
tbp
t
.
not-
onr ur,r'
<h
tm'.
1/4'FloL
wo'wwdrd
|s:
ca
.mt rnt in
to.g
Y'dtd*hgi td
'
Rffihitnpf
3b9l
-
fogt
tl tffi
ScX
rddJtrdwdbtqthbhllrdrL
.
ln*i dr tq d-trd
et,$
na".
toua
tt"
'
ffi
rqllh t
",,
''?
-ro
*"nn,
Il
pow.a"w*.
sc?vd/iw
-
hEt obst&kfrt
ll yos
6bt9t
oat the cgnospotutg
cd
IF
YOUR CABTNEI
PLEASE
MOUNTII{G.
2
61
tl{aTtucTlottt
.ff
il
1/a'
ddab
t
i-gfi
-..oli
(ffi I o'
h tftDt
wo4h
Figm D
y4s m s
M
{ ldfoata
* tr
nd h
tt
ffFrHri*tig
whd
s*|
s(
a Uta
MNii
u",*e
dKt haad.light.n
IS wlTH
REFER
MOUNTING
d hd
hdb
dlfi
h
F{
hdb
n h d.rtd
Flgm
dm
l
i
fi*.
yd bgtl
b'b"
(;d
rff
h
go
orqlrlcrt
wrl
hdt
lt@Oh r*n
pM h uod drlo tm
ffi h.9.6,
d
F'*R
ff
d
*l do
to
vout
*tu6
b l4)hbn lh.
@L^f
il wM
ntklo
lafrplsb.
on lhc
@o
OVERHA}IG.
TO USER
TEMPLATE
nY*_'tMti4
ffi h
'dblYt
l) Us
ffir etiln
r nd dF*d@
fr{
dndog
6@gn
)er
h*t' o' tt
itm tr
'b m ol
oPF
t'o'*
utt
*o
d
usa
"tevc
pnwol
lou
NOT cul
blt h
OR FOR TORE
"MOUIiTING
MANUAL
.*
@
tffi
ttp' b
h Fm
qtml h
wil
f Hr
bh
dMd
ss
h un(
o'n t
uring
ltm
dl d lhreo|]'
TNFORMATION
qtjlr'
d
d
A
to h ltnd&
ndd
trut'
b
d
c'dd
Firo
<s-
ts btu
'
l"n!'
:
'/''1i
N Ion'PtaF
INSTNUCNON'-
@
I
Fhu'
)
t
1/4'
lDrlll
ff
r ml
ffi
il
d
'l
Pdvs
m
3>
Fi€uc
luFt
hF
OF
lHole
Herc
Figure
3
(1)-Remote
C.
Control
iV::---::::-',1
,,'s
ii
ts,S'
i,
,.jil
O
I
$
,S|-'&
i0
.$
"'A
r$
. ,4)
-:>----.==/
I
l
ifi
.$
ii
,l
7
Page 10

(4)-1.06"
D.
(4)-.56"
E.
(27mm)
i"'l
''-'
(14mm)
i''l
(4)-.31" (Smm)
F.
spacers
spacers
spacers
(4)-#
G.
(4)-#
H.
l.
User Ma
M
5X70mm screws
Y
il
I
M
X 40mm
5
T
I
nual
screws
:'.c)
CAUTION
To reduce the
unit.
Ask
and
friend
a
quicker.
Tools Required
.
Electric
.
#2
Philips
.
Safety
Glasses
Step 1
-
Cut out the
-
Place
of the
the
fix
{Note:
the
cabinet
front
the template.
lf
template
thickness
'ruith
<See
folded
Figure 1>)
risk of fire
to
help
Drill with
or
114"
Slotted
Mounting
Mounting
(location
edge of the
your
along
of
cabinet
the
your
cabinet
portion
do not
,
out.
An
place
extra hand
B,t
Screwdriver
Template
Template
A
or B
cabinet.
is
in
of
Use adhesive tape
with
guideline
overhang,
flush
up
J.
Color ln
any heating
hold
to
along the
the
desired
Figure
cut-line.
location
"l
flush
),
overhang, fold
that is
against the
closest to
tape
the
template
cabinet.
or
cooking
the
unit
with
to
the
the
sert Sheet
product
makes
mounting
beneath
this
easier
i:it.;r:fe I
Step 2
-
Drill
bottom
four
cabinet in
Here". <See
Note:
awl,
hole
drilling.
We
a nail,
in
each of the
This
and keep
-
Remove
114" holes
Figu re
recommend
or similar
through
the
locations
2>
that
device
4 locations
prevent
will
the hole
in
the template
the
the
correct
when
the
template and
marked
you
use
to make
"Drill
an
a small starter
before
drill bit from
location.
you
finish
I
the
1l4"
Hole
pick,
ice
you
an
begin
'wandering'
drilling.
Page 11

Step
-
3
Select
the screw
through
3lB"
(Note:
the
of
your
lf
provided
your
thread
cabinet is
accommodate
-
Insert
from
four
(and
the screws.
-
Partially
at opposite
<See
Do
been
are
the four
inside
the
holes of the
spacers
if
<See
tighten
corners
figure 4>.
not fully tighten
started. Gently
firmly holding the unit
length
cabinet bottom,
to
spacers
various
selected
of the
unit
your
cabinet
Figure
each
the
which
and
screw into
with
overhang,
to
form
cabinet
overhang
screws through
cabinet
with
going
the
screws,
is with overhang)
3>
screw
of the
tighten
manually, start screwing
unit for
screw
until all of them
each screw until
place.
in
go
will
the
longer spacers
completely
provide
at
main
put
together
least
unit.
to
thickness.)
each
down.
push
hole
Align
the
the unit
onto
better support
have
they
Figure
4
TIP
-
prevent
To
damage to
your
to tighten the screws.
-
your
lf
cut out
cabinet has obstructions
the
corresponding
the screw holes.
-
3 sets of spacers
provided
are
-
Clean
the bottom of the
together with
pcs/set)
(4
mounting.
-
Place
into
-ro
-
the
in a clean,
unit
the ventilation slots.
reduce splintering,please
Sefore drilling.
-
Before
-
Drill from
-
Hold
-
Clear wood shavings.
you
decide where
the bottom upwards if
your
drill firmly at
set do not use
Use a
manual
inside it
area
on the template, but
and 2
sets
your
electric drill or
a
screwdriver and hand-tighten
which
prevent
you
from
do NOT cut out or through
pcs/set)
of screws
(4
the unit.
cabinet surface and also empty
safe
place
a small
how to
and
when drilling to avoid wood
piece
place your
you
do not have enough room inside the cabinet.
masking
of
unit, try
tape over each hole location
your
following
the
90" with the cabinet bottom and drill
power
screwdriver
only.
using
the
template,
of various lengths
cabinet before
shavings
dropping
connections.
holes
at
low
speed.
Connect the AC
Tip: To
cord
prevent
obstruction or danger, use the
so that excess cord
power
cord to the wall socket.
power
does not hano down.
cord
posts
to wrap the
power
Page 12
10
Page 13

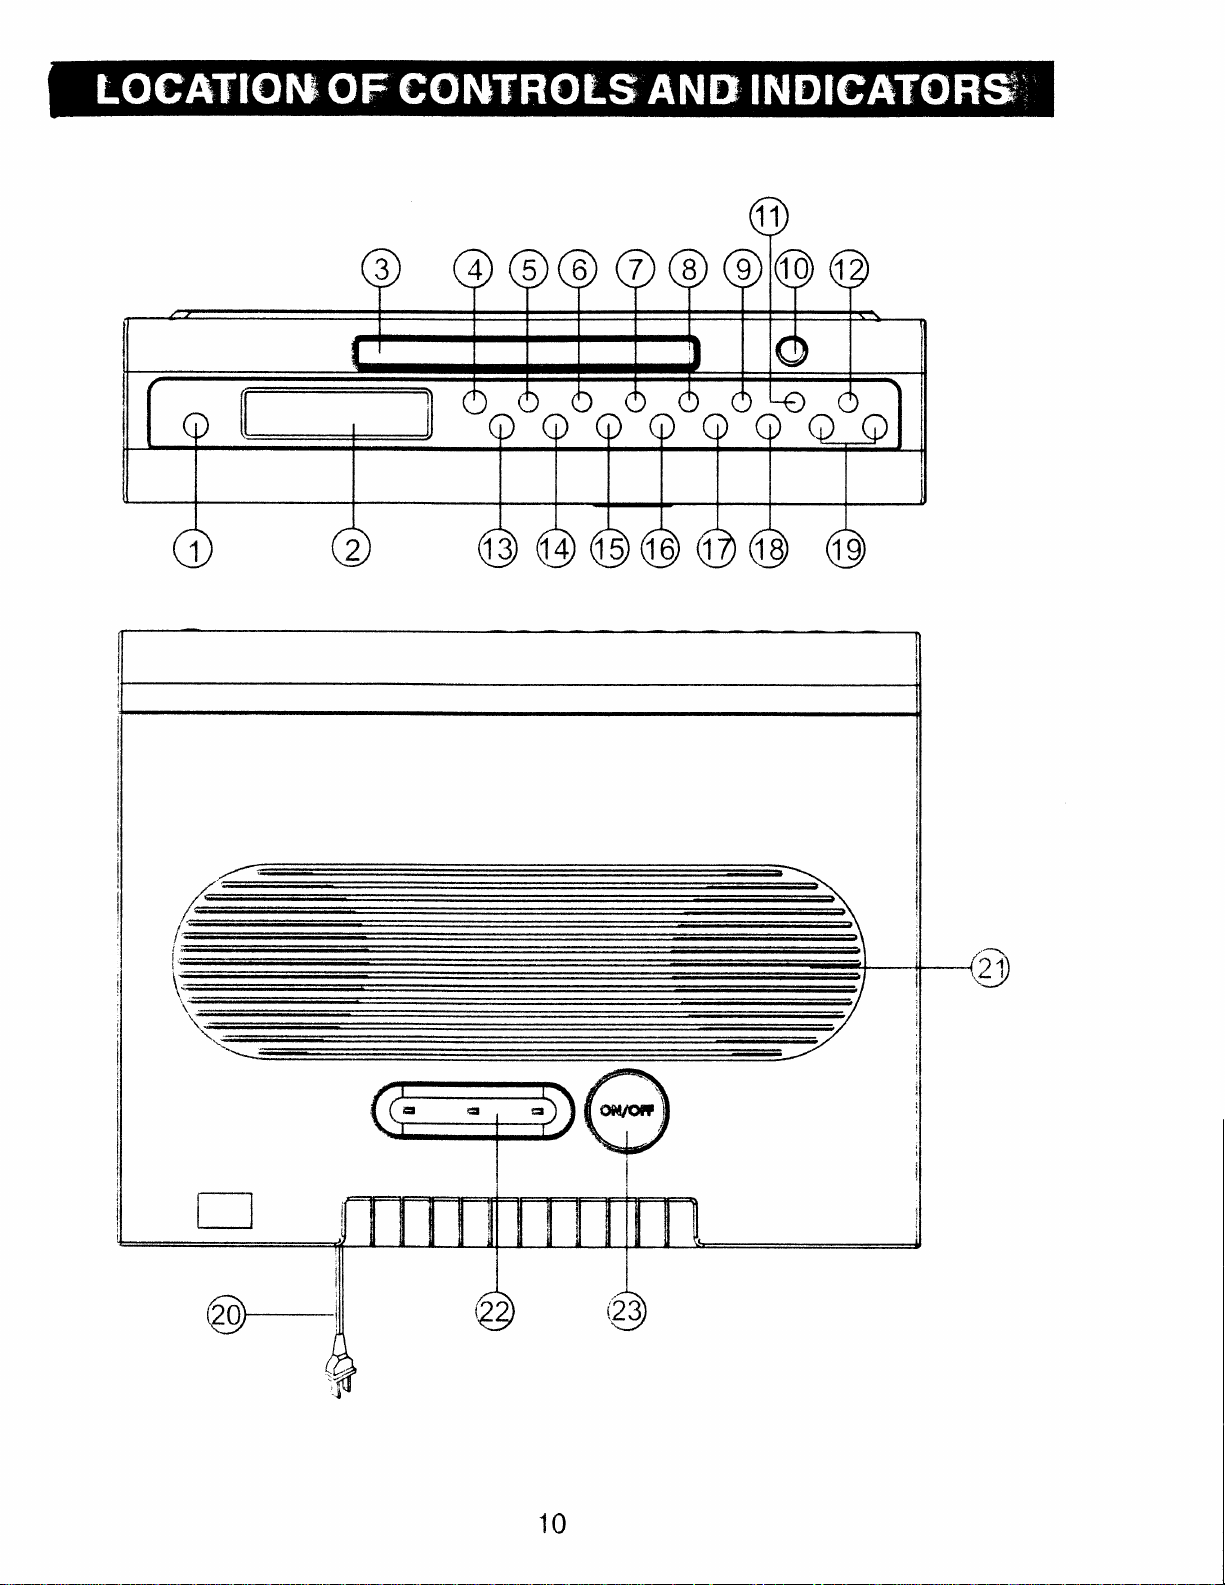
MAIN
UNIT
1. ON I OFF
LCD
2.
CD
3.
Remote
4.
Cooking Timer
5.
Cooking Tirner +1
6.
Preset-button
7.
Preset
B.
M
9.
display
compartment
(Memory)
10. Open
11. Stereo
12 Random
13
Function
1,L
Stop
button
Sensor
+
button
Close
/
Mono / Repeat
/
button
(CD
button
n
+10
Set
I
button
Tuner)
/
(min)
(min)
button
button
switch
/ Cooking
Timer
button
Off button
15. Play
i,l<
1A
17.
13.
19.
$.
,l'1.
2
.3
Tuning-
>>l
Tuning+
XBASS
Volume
Power
$peaker
Oounter
Counter
Pause
I
button
-l+
AC
cord
Top
Top
button I
>il
I
CD
Skip
I CD Skip
Eand
Reverse
Forward
button
Lighting
Lighting ON/OFF
switch
Search button
Search button
switch
11
Page 14

REMOTE
CONTROL
H11
H3
H12
H13
H14
H15
'h
'3__
'p
,s
t'1
\
.r'
-
{
s--
-Ef
b
'Y
H2
H5
-H4
H6
-HB
he
/r'
a
q-
f
H7
H16
Power
lJ 1 .
A2.Random
ll3. Repeat
L)l
ll4.
Search
It5.
ifi
Search
Volurne +
H6.
A7. M-UP
iiB. Function
ON/OFF button
button
Stereo
I
Tuning+
I CD Skip
button
Tuning-
CD Skip
I
button
button
(memory
(CD/Tuner)
i i9. Open I Close
H17
H1B
Mono
/
Forward
Reverse
up) button
switch
button
button
H9
H10
H10. Cooking
H11.
H12.
H13.
Mute button
MEMO
Play I
Timer
(lVlemory)
Pause
switch
H 1 4.
H15.
H
Stop
M-DN
1
Volurne - button
6.
button
i
(memory
H17. XBASS button
H1B.
Cooking
Timer
Tirner
button
Off
(min)
+1
Set button
/
button
>tl
down)
(min)
+10
button
Band
I
button
Cooking
12
Page 15

USING
.
Point
'
when there
THE
the Remote
REMOTE
'
recommended
The
ATTENTION
MAGNET
A
THAT IT
'
Remove
remote
'
when
of
CAN
the
the
Remote
the
control.
to replace
1. Turn
lnsert
2.
'
Dispose
and
over
one
of
regulations.
REMOTE
CONTROL
Control at
is
a strong ambient
may
be degraded,
effective distance
IS
BUILT
BE
battery
battery
Control is
it
as follow:
the remote
CR2025
INTO
ATTACHED
insulation
becomes
greatly
and
(3V)
used batteries
CORRECTLY
the REMOTE
light
causing
source,
unreliable
for
THE
REMOTE
TO YOUR
tab
before
weak,
the
operating
reduced
open the
battery
size lithium
in
accordance
SENSOR
the
located on the
performance
operation.
remote
CONTROL
operation is
SO
about
REFRIGERATOR.
operating
the
distance
you
and
will need
door.
battery.
with
local
laws
unit.
of the infrared
13 feet
.tt
lij
1-*A v
:-
'!'
(4m).
.\--.---/-'-
r
WARNING:
REPLACED,
DANAGER
REPLACE
DISPLAY
D1.
D2. TUNER
D3.
D4.
D5.
D6. RDM
D;'. MEMORY
D8. FM
Stereo
indicator
indicator
indicator
CD
RPT
XBASS
indicator
indicator
indicator (random)
indicator
indicator
D9. AM indicator
D10. PM indicator
D1
1. Frequency
/ Clock I Track
indicator
D12
D1;3.
D14.
D15.
Play
MUTE
Volume
Cooking
indicator
indicator
indicator
Timer indicator
OF EXPLOSION
ONLY WITH THE
(repeat)
i'
iil
SAME
rD
lF BATTERY
lS TNCORRECTLY
OR EQUIVALENT
(o
-;\
rJ/
itl!
RPT
XBASS i.|EItIORY
.,;\ r;\
rg7
- I _
I
TYPE.
A
\g
L,
|
i_
ROII
I
_
-1
lrI
-j-@
u!!J
13
Page 16

COUNTER
countertop
fhe
Press
ON/OFF
TOP
LIGHT
light
switch to
and
its ON/OFF
turn the LIGHT
switch
on
located
are
and off.
the bottom
on
of
the
unit
SETTING
To set
Press
1 .)
Press K{
2.)
press
Press
3.)
to set
position
4.) Press
the clock start.
Note:
seconds
LISTENING
Tuning
1.) Press
? ) Press the
fUNER
Press the tsAND
3.
)
+
Press
)
THE
the clock time, make sure the unit
the M
or
M
/ Set
the
ifi
2:00 PM),
blinks for
the K<
The clock
during
TO
to
a station manually
the POWER
FUNCTION
is
the
CLOCK
plugged
is
"12H"
Set button
/
to set
}H
to
confirm.
or
or >, to set the current minute,
will be started automatically
setting.
THE RADIO
displayed.
i{{
/
to
>H
press
setting.
button to turn on
switch to select AM or FM.
>H
buttons to tune to a desiredstation.
until
your
Hour
set
(CD/Tuner)
desired clock
position
the current
M / Set
"24H"
or
blinks
hour(for
to
confirm. Minute
the unit.
switch until
in and
blinks.
format and
for setting.
example
press
if no
button
i'.
in
standby
Pi,
M
/ Set
is
q"ilnnril
i{sT))
13
mode.
\/
-tallil
t\
\.,
,l[]il
to confirm. And
pressed
l5
within 10
,l,.
i
quickly
..r
Press
release.
Io turn off the radio
?r'ess
iurn the unit off.
i: improve
1;r FM.
and
the
search for a station
hold
The tuner
FUNCTION
radio reception
extend and adiust the AC
K<
the
will stoo on the
>N
/
button until the tuner starts searching
next well received
(CD/Tuner)
switch to CD or
oower
cord.
14
station.
press
for a station, then
the POWER button to
Page 17

SETTING
unit can slore
The
allows
Tune to
1.
)
Press
2.)
blinks and
"01"
Or
3.)
button on
remote control
station number.
Press
4.)
Repeat step 1.)
5.)
A PRESET
you
to tune in
your
the M/Set
is the
you
may
the
totally 40
desired
button until
"01"
order
Front
M/Set
appears in the display. The
of the
press
Panel
to
to 4.) for
RADIO
to a station
radio
the Preset v or
select
button to store the
STATION
stations in memory
directly.
station
the
preset
or M-UP
your
preset
the
(see
"MEMORY"
station
r(+
M-DN
or
desire
Tuning
(1-20).
-)
or
on
preset
station.
stations.
(20
FM, 20 AM). Presetting
to a station manually).
filrn:n|
Fil
fl15
iflIrrdil
F"
3P.',{
-t*rrorr'-
_'n
nHr
sHr
LJ
UEXORY
ffs
,-
I
Helpful hints: lt
the 1st
TO LISTEN TO A PRESET
'1.
)
2.) Press the BAND
3.
)
PLAYING
1.) Press
2.) Press the Function (CD
3.)
4.)
5.)Adjust volume
l/ote: Do not
preset
Press the FUNCTION
Press the PRESET
control unit to
COMPACT DISCS
the ON/OFF
Press
the
to close it. The
displayed.
Press the ,l PLAY/PAUSE
appears in the display.
the l OPEN/CLOSE
CD tray with
you
store more than 20 FM
stations.
button to select AM/FM.
select the
the label side up and then
CD will
pressing
by
push
the
RADIO
(CD/Tuner)
-
+ or
button to turn ON the unit.
CD drawer to close
stations, the new stations will replace
STATION
switch until TUNER is
button on
preset
Tuner)
/
button to open the
be scanned and the total number of tracks
button
the VOLUME
Front
station.
switch to select
to
Panel or M-DN / M-UP
press
start
playing
+/- buttons.
it.
playing
CD drawer. Place a CD
the a OPEN/CLOSE button
the
displayed.
in
CD.
mode.
CD
The current
remote
on
will be
onto
track
pause
Io
l.)
Press the X PLAY/PAUSE
2.)To
To stop
Press
To
skip to different
1.) To
2.) To
3.) To
playback
resume
playback
STOP button,
I
SKIP to the beginning
SKIP
SKIP to any later
playback,
to
any earlier track,
press
total track number appears,
track
track,
button, >
>ll
the
of the current track,
press
press
indicator
PLAY/PAUSE
press
i(
the
the
15
>,
button certain times to reach.
button
blinks, and
button again.
playback
and
the i{<
certain
times
playback
stops.
button once.
to
is
reach.
paused.
Page 18

forward or
fast
To
To scan
1.)
the desired
To scan
2.)
the desired
particular
fast reverse
foruvard at high speed,
to
press
point.
backward at high speed,
point.
point
and hold the >N
press
and
hold
button
the
i<<button
and
and
release
release
it at
it at
Repeat
This
1) To
'
Press
track
.
Select
the
To
2l
'
Press
be
To cancel
3)
'
Press
CD
This function
lVote.'Random
Press the RANDOM button
1)
order,
press
have been
shows
Io
2)
playback
function
repeating
the
will
be
desired different
a
>N /
t{<
repeat
the REPEAT button
played
the REPEAT button
random
"RDM"
>tl
the total
cancel
tracks,
"RDM"
will allow
the
REPEAT
played
a single
current
button
repeatedly.
button.
the
entire
repeatedly.
repeat
play
playback
will allow to
playback
indicator appears
button,
random
played,
tracks.
Random
playback, press
indicator disappears
CD
can only
the
track or
track
until
track to
until
"RPT"
until
play
the CD
be selected
play
to
playback
player
entire CD
the
"RPT"
be
"RPT"
blinks,
repeated
alight.
All tracks
disappears.
in randomly order.
while the
the tracks
in the
starts.
stops and
When all
STOP
from
the display.
the display
il
to be
played
the current
pressing
by
will
player
in random
display,
tracks
button,
the
repeatedly.
Fr;l
'F
EDI
IF
is in the stop
m
display
shows
_RPT-
RPT
mode.
RDr
total
programmable
CD
; ) To
A
a.
program
program
of
When the
is
CD
STOPPED.
unit
Press the M/Set
the
display.
Press the
For example,
like
look
this:
playback
as desired
to 20 tracks can
up
is
ON
and
button.
I
to
*
buttons
play
track
;{<
in the
"0"
and
to select
NO .2
programmed
be
MODE,
CD
"MEMORY"
the desired
first,
the display
i0
to
make
sure
will
play
the
blink
in
track.
would
in a
preset
n'
;t
order.
.,,
/
n
-u-
\/
-,1
-
-
{ETORY
\./
-
HETORY
/\
Page 19

Press
c.
To
d.
e.
add additional tracks,
tracks).
To
start
the
M/Set
playback,
button
press
to
the
store
repeat
the
steps
PLAY/PAUSE
>t
track
b&c
in memory.
(up
to
20
button.
','o\/
-u-
n
\,/
-
UEHORY
/\
2) To
.
3)
.
4) To change
.
5)
.
.
iVote.'You
check the
After setting,
K</
>lbuttons
button repeatedly
To
add additionaltracks
Press
track
Press the M/Set
press
the newly
To
Press the
Open the
the M/Set
appears and repeat
the
erase the whole
press
the
l(
/
programmed
STOP t button,
CD compartment
can use REPEAT
program
the >it PLAY/PAUSE
to
check the
to check
button repeatedly
programmed
button repeatedly
>>|
buttons to
program,
programmed
programmed
the
during
steps b
tracks during
alter the track. Press the M/Set
track
into memory.
do one of
or
pressing
by
function during PROGRAM PLAY.
button to
tracks;
tracks.
program
until the
to
d above.
to select the number
mode:
number
program
the following:
the l OPEN/CLOSE
start
or in
STOP mode,
ptaying,
of the last
mode:
of the
then
program,
button to register
button.
press
press
programmed
the
M/Set
then
XBASS FUNCTION
Press XBASS
appears on the
SETTING THE
l.)
Press
your
TIMER
2.)
Wtren the
sound.
CANCELLATION
you
if
-
When it's
-
When
button.
button
the
desired time
indicator
want to
the
Otherwise
is
to activate XBASS
display.
COOKING
TIMER
blinks.
preset
cancel the
counting down,
preset
pressed.
time
OF COOKING
time
TIMER
(+10
from
the
or +1)
1-99
elapses,
preset
elapses,
ALARM
function during
buttons to
minutes.CooKlNG
the ALARM
TIMER
COOKING
press
will automaticallv turn off
hold
and
the Alarm is ringing,
and
select
TIMER:
Timer Off button for 2
will
playing.
l.W
i'.
"XBASS"
B
just
after 60 minutes if no
1.5
seconds.
press
indicator
uHr
lD#,i
Timer
I
Off
17
Page 20

MUTE
To
indicator
and
FUNTION
off
cut
appears
restore
the sound
the sound
from speaker
the display. Press
on
temporarily,
from speaker.
press
MUTE button
again to cancel
the
MUTE
button,
mute
MUTE
function
COMPACT
.
remove a disc
To
and
Fingerprints
with a
to collect
remove
the
reproduction
DISC CARE
lift the disc
soft cloth.
most
disc. Srnall
from its storage case,
out, holding it carefully
dust should be
and
Unlike conventional
dust and
particles.
dust
quality.
by
carefully
records,
microscopic debris,
Wipe
particles
in a straight
and
so
light
stains
press
wiped
down
the edges.
off
compact
gently
line
wiping
from
have absolutely
will
on the
the disc's
the
center
recorded
discs
a soft
with
inside
of the
surface
grooves
have
to
no
cloth
the outside
effect
no
case
should
of
on
'
Clean
or abrasive
.
Never
CAUTION
Never allow any
To
reduce the
unit.
CLEANING
.
Do not
cloth.
.
Keep the CD
the disc
cleaners
write on or
risk of
THE UNIT
volatile chemicals on
use
Drawer
periodically
to clean
labels
affix
water or
fire, do not
other liquids
closed to
with a soft,
the disc.
the surface
to
to
place
any
unit. Clean
this
keep dust
18
lint-free,
lf necessary,
get
inside
heating
out of
dry cloth.
compact
of
the
or cooking
by
the unit.
Never use
a CD
use
discs.
unit while cleaning.
product
lightly wiping
detergents
cleaning
beneath
a dry soft
with
kit.
this
Page 21

HANDLING THE
.
Only
.
Do
anything
touch the
not
stick
on the underside of the
CD on the edge
paper
CD LENS CARE
.
When
quality.
instructions
the CD lens
your
CD
To
clean the lens
on cleaning the
cleaner.
CD
or tape on the
gets
lens
dirty it can also cause the
to avoid finger
underside
disc.
you
will need to
lens, refer to the instructions
CD
prints
of the
on the underside
CD,
unit to output
purchase
and
do not write
a
CD
lens
of the
poor
cleaner.
CD.
sound
For
accompanying
Should
this
"
appears
NO
SOUND.
The
system
buttons are
Remote
unit exhibit
on
the display. No disc inserted.
does not react when
pressed.
control
does not work. Remove
problem,
a
check the
following
Replace/clean
CD-R(W)
Moisture has
disc
evaporates.
Check
Make
press
Check
to the lowest level.
CD-ROM disc inserted/CD
Use CD Audio discs
Remove
on the
remote
Reduce
the set.
Replace the
Point the remote
sensor.
before seeking
CD.
is
blank or disc is not
condensed in the
leave the
and
whether the
sure the set is not in the
MUTE
system again.
to turn
whether
and reconnect
protective
the
control.
the distance
battery.
service.
Insert
player power-on
set is connected
on
the volume on the
lf it has, turn
only.
between the
control directly towards the remote
a suitable disc.
finalized.
player.
MUTE mode. lf
the
speaker.
up
contains non-audio files.
the AC
plastic
power
tab
Remove
until the moisture
securely.
set has been
the volume.
plug
and
before
remote control
using
the
it is,
set
switch
the
and
fladio
Ihe
Clock
reception
is
setting is
poor.
erased. Power has
The FM
FM reception
direction of the
signal.
been disconnected. Reset the
19
antenna is
been interrupted
built
is weak
power
cord
in to
the
AC
try varying
you
until
or the
clock.
power
position
the
find
the
power
cord
.lf
and
strongest
has
cord
Page 22

There
are
user serviceable
no
parts
inside
this
radio.
please
Care
refer all
Of Cabinets
lf the cabinet
Never use dusting
lf the
a
cabinet
soft cloth that has been
Always disconnect
never allow any
Ymer,ron,
m
SERVICE
service
becomes
sprays
becomes
the
liquid
problems
dusty
dirty
the exterior
polishes
or
or smudged
slightly
power
AC
get
to
inside
TO FIND
NUMBER
CENTER
WARRANTY...
to a
qualified
with
the cabinet.
on
with
dampened
cord
the
with a
from the
cabinet.
THE
OF
PERMITTED
service
a soft dust
fingerprints
mild soap
AC outlet
LOCATION
YOUR
NEAREST
TO
facility.
cloth only.
it may be
water solution.
and
before
AND
cleaning,
PHONE
SERVICE
PERFORM
wiped with
and
CALL
FOR
ADDITIONAL
FOR CUSTOMER
TOLL
Consumer
5101
FREE:
SET.UP
PLEASE CALL:
1-800-B9B-9020
SERVICE,
Emerson
Statesman
lrving, TX
1-800-695-0098
OR OPERATING
Radio
Affairs
75063.
PLEASE
Corp.,
Dept.,
Drive,
WRITE
ASSISTANCE
TO:
20
Page 23

LIVttTET}
WARRAN{TY
Emerson
original
ninety
proof
at an
For
money
by
Califbrnia
your
of
Tlris warranty
Radio
parts
(90)
of
authorized
repair
orderpayable
proof
md workmznship,
days
purchase.
replacement,
or
residents)
of
does not
Cotp. warrants
fiorn
Depot
purchase.
the date
rve will
Repair Facility,
to
E,rnerson
to
cover damage fiom
matufbcturing
provide
pack
cover
Send
f:merson
l0l
5
under
of original
your
Radio
shipping
your
lrving,
normal
purchase
repair service
or replace the
in
unit
Co.p.in the amount of
and handling
unit to:
Radio
Statesffran Drive,
TX
75063.
negligence,
defbcts
and
use
at no
padded
a
Corp.,
in
original
conditions,
the
in
charge
product
box, enclose
costs,, iurd cnclose a
misuse,
material.
fbr
U.S. With
fbr labor and
in
our discretion.
your
$9.00
(not
abuse, accident,
inclucling
period
a
yolrr
dated
parts
check or
required
copy
of
l-ailure
unauthorized
of
"TT{IS
..\LSO
The
Please
You
to fbllow
the
united
Wz\RRANTYCIVES
L{,{VE
Serial
may
Number
take
a moment
be
Model No:
Serial
Number:
operating
facility,
States.
O'IIIER
of this unit
products
or
RIGHTS
now
asked for this
CKD1612
instructions,
purchased,
YOU
to write
number
SPECIFIC
WFIIC:H
is located
this
when
Lrofflmercial Llse, rental,
used, serviced
LECAL RIGHTS"
VARY
on the label
Serial Number
calling
I]RON{
on
for
service
STATE TO S'IATE.
the
back of the
in the
assistance.
repairs
or
damaged outside
ANDYOU NIAY
,\
U 898 NI
cabinet.
space
provided
by an
below.
21
Page 24

@ Wer,ton,
cKD1612
801-02
Printed
in China
 Loading...