

Page 1
Emerson Blue Wireless Comfort Interface - Homeowner User Guide
HOMEOWNER USER GUIDE
1F98EZ-1621
EMERSON
®
BLUE
™
Wireless Comfor t Inter face
Page 2

Message to Homeowners
Congratulations on choosing the Emerson Blue Wireless Control System!
This system features an intuitive Comfort Interface that utilizes wireless
technology for precise and reliable temperature control found in all
Emerson products.
The Emerson Blue Wireless Control System consists of a Comfort
Interface, Equipment Control Module, Return Air Sensor and optional
Indoor/Outdoor Remote Sensors (F145RF-1600). The Comfort Interface
provides a large, uncluttered display for adjustments to your home’s
temperature, humidity, and system conguration. Powered with batteries,
it communicates wirelessly to the Equipment Control Module and
Return Air Sensor (located near your furnace and air handler). For added
performance, this system can be congured to work with up to 3 indoor
and 1 outdoor Remote Sensor(s) (sold separately).
When “Change
” appears in the display, a new set of premium brand
AA alkaline batteries should be installed. If the house will be unoccupied
for an extended period, it is recommended that new batteries be installed
before leaving.
Need Help? For assistance with this product, please call 800-284-2925.
Table of Contents
Overview ............................................... 3
Quick Start Guide ................................... 6
Set Current Time and Day ...................... 6
Energy Saving Pre-Program ................... 8
Programming Your Comfort Interface ...... 9
Planning Your Program .......................... 9
Programming Tips – Copy Program ........ 9
Heating and Cooling Worksheets ........... 10
Enter Heating Program ..........................11
Enter A/C Program .................................. 15
Using Your Comfort Interface .................. 16
Operating Your System ..........................16
Operating Your Fan ................................16
Page
Page
Temporary Program Override ................ 17
Permanent Temperature Hold ................ 17
Auxiliary Heating ................................... 18
Dual Fuel Setpoint .................................18
Averaging with Indoor Remote Sensor ... 18
System Diagnostics ............................... 18
Humidication and Dehumidication
Control .............................................. 18
Humidity and Outdoor Temperature
Display .............................................. 19
Replacing Batteries ................................20
Conguration Menu Options ................... 23
Homeowner Help Line ............................ 28
Page 3

Overview
Menu Button
Comfort Interface Display
Wireless
Icon
Battery Status
Full charge
Half capacity
Change = Replace
Batteries
System
Indicator
Time of Day
Heat Button
Room
Temperature
A/C
Button
Fan
Button
Day
of Week
Setting
Temperature
Setting
Up/Down
Run Button
Fan
Indicator
OFF Button
Other Display Icons
16
17
18
19
20
21
22
1
15
13
14
2
3
12
4
11
10
9
8
7
6
5
3Emerson Blue Wireless Comfort Interface - Homeowner User Guide
Page 4

Overview
“Heat”, “A/C”, “Fan”, and “O” button labels. When lled, indicates system
1.
mode selected.
“Connect”, “Time”, Schedule”, and “Next Day” additional button labels in
2.
additional display modes.
“Aux” indicates congured for Heat Pump. “Aux” indicates Auxiliary
3.
(Emergency) stage selected.
“Auto” indicates auto changeover mode can be selected. “Auto” indicates
4.
System is in Auto changeover mode.
“Run” identies button to begin running the program, “Hold” identies button
5.
to press to hold temperature.
“Menu” identies button to press for menus. “Copy” identies button to copy
6.
program in Schedule mode.
“°C” indicates temperature displayed in Celsius.
7.
“Limit” indicates temperature is adjusted to the limit set in the conguration
8.
menu.
“Set” indicates desired temperature.
9.
“Temp Hold” indicates temperature is changed for temporary length of time
10.
and will return to program temperature, “Hold” indicates temperature will be
maintained until “Run” is pressed.
4 Emerson Blue Wireless Comfort Interface - Homeowner User Guide
Page 5

11.
“ ” indicates that Comfort Interface is in either partial or full keypad lock.
12.
13.
14.
15.
16.
17.
18.
19.
20.
21.
Indicates program period, “Morn” “Day” “Eve” or “Night”.
“Wireless Setup” appears when in the wireless set up mode.
“Humidity” indicates Humidity is being displayed instead of current time.
“Outdoor” indicates display is showing outdoor temperature (if outdoor
sensor is installed) instead of time.
Indicates afternoon (PM). No indication for Morning (AM).
“%” display is showing Humidity setting instead of Time of Day.
“Month” “Year” “Date” displays when setting time and date.
“Call for Service” displays when a fault occurs in the system.
“Change Filter” “Change Pad” displays if lter timer or humidier timer is set
and time has expired.
“Searching” in Wireless Setup appears when searching for components,
22.
“Connected” displays to show connected to wireless component or “Failed”
appears to indicate loss of communication.
Dehumidication/Humidication indicator.
5Emerson Blue Wireless Comfort Interface - Homeowner User Guide
Page 6
Quick Start Guide
Set Current Time and Day
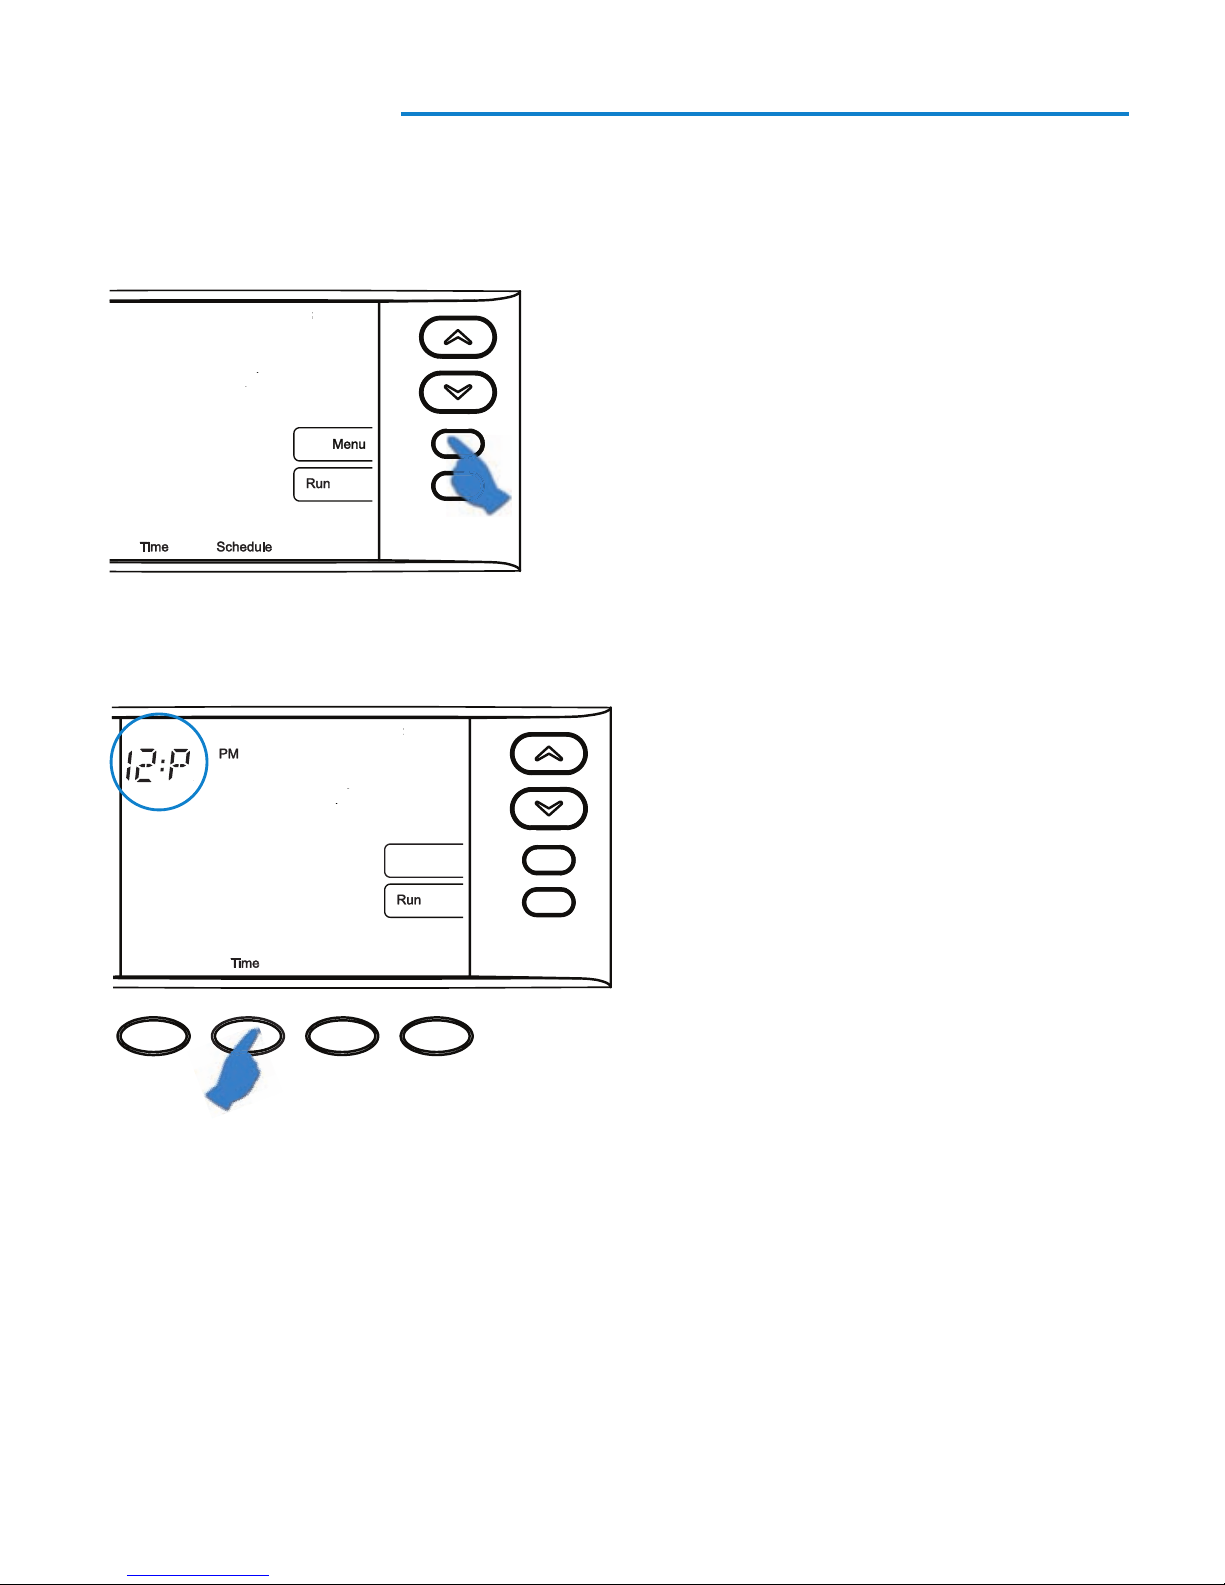
1. On the Home screen, press Menu button to display additional selections.
2. Press the Time button to display hour and “A” (AM) or “P” (PM) in the clock display.
6 Emerson Blue Wireless Comfort Interface - Homeowner User Guide
Page 7
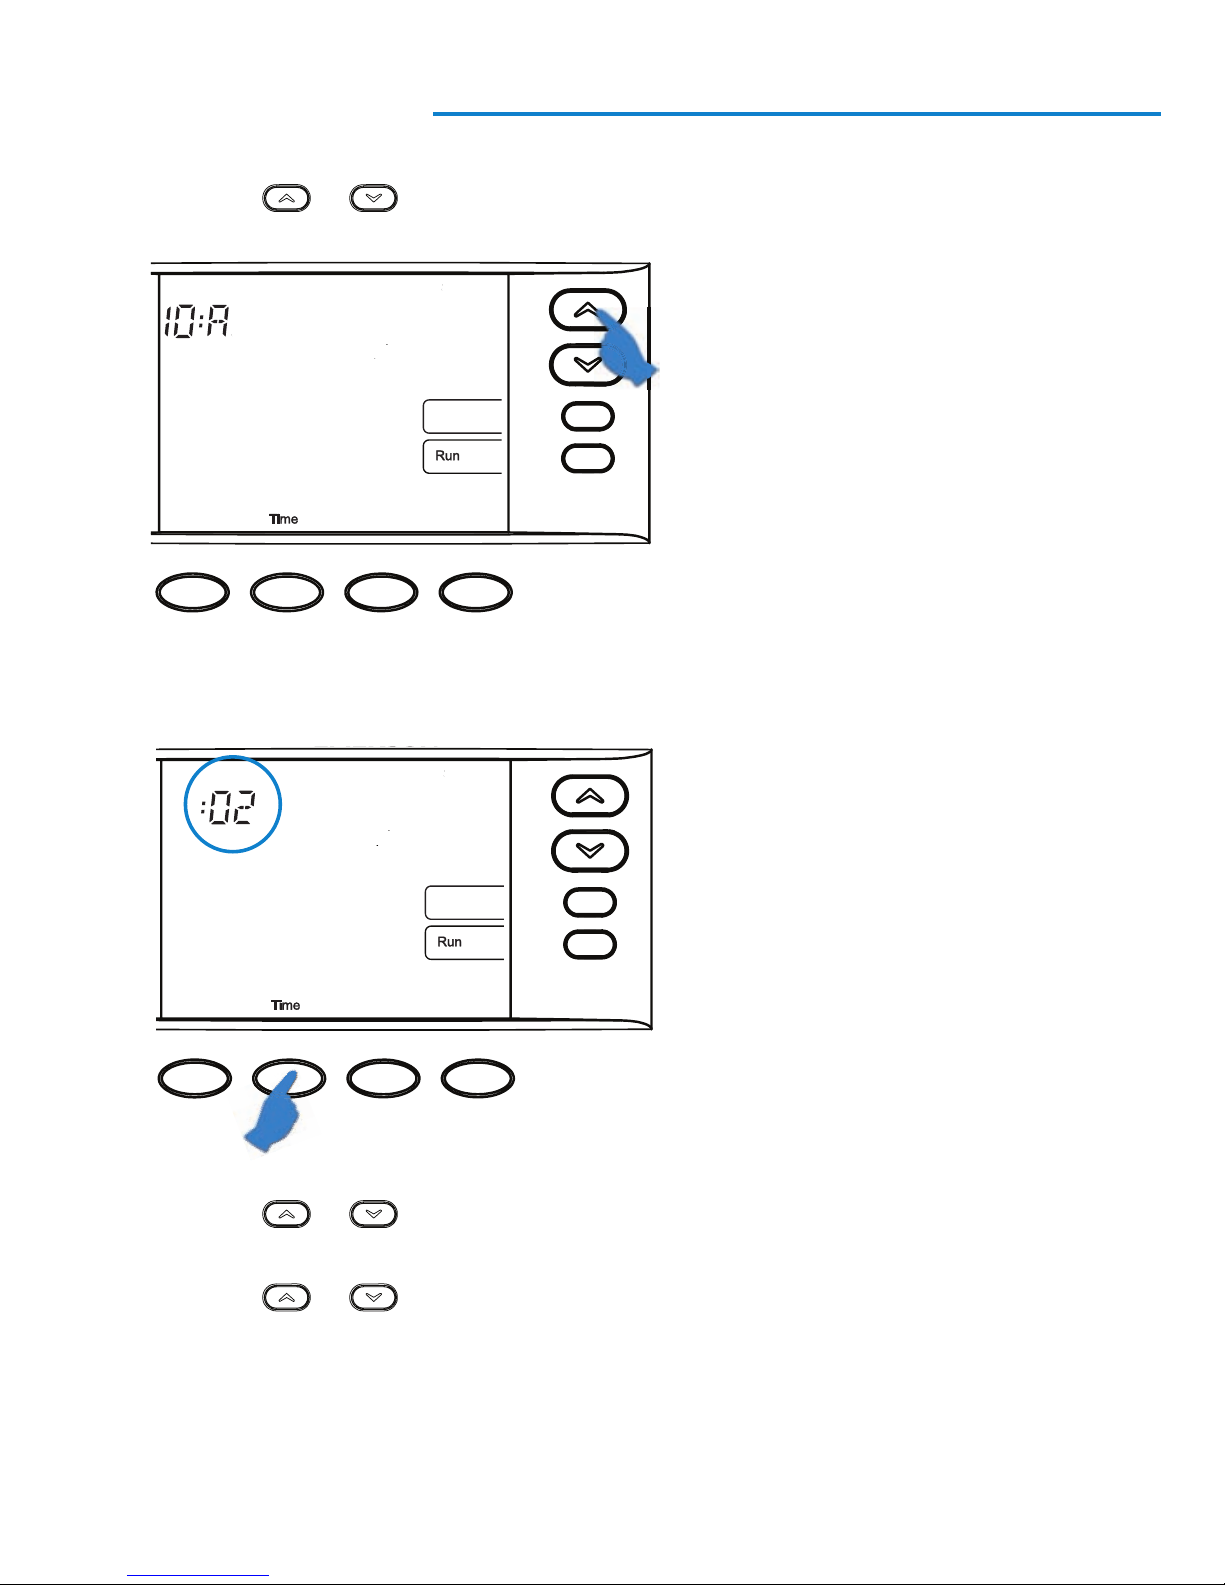
3. Press the or button to adjust the hour and “A” (AM) or “P” (PM).
4. Press Time to display the minutes.
5. Press the
or button to adjust the minutes.
6. Press Time to display the year, month, and day of week.
7. Press the
or button to adjust.
8. Press Run to return to home screen.
7Emerson Blue Wireless Comfort Interface - Homeowner User Guide
Page 8

Quick Start Guide
Energy Saving Pre-Program
This Comfort Interface is set up for 7 independent day programming with 4 time/
temperature periods per day. If the factory programming meets your needs, skip to
the “Using Your Comfort Interface” section, page 15. If you wish to change the heat-
ing or A/C schedules, please proceed to the “Programming Your Comfort Interface”
section on next page.
Factory Pre-Programmed schedule for four periods per day, all days of the week
Wake Up
(Morning)
Leave For
Work (Day)
Return Home
(Evening)
Go To Bed
(Night)
Heating
6:00 AM 70°F 8:00 AM 62°F 5:00 PM 70°F 10:00 PM 62°F
Program
A/C
6:00 AM 75°F 8:00 AM 83°F 5:00 PM 75°F 10:00 PM 78°F
Program
Factory Pre-Programmed schedule for two period Day / Night programs
Day Night
Heating Program
A/C Program
6:00 AM 70°F 10:00 PM 62°F
6:00 AM 75°F 10:00 PM 78°F
If you prefer your Comfort Interface to be non-programmable, refer to the
“Conguration Menu Options”, menu # 03, page 20.
8 Emerson Blue Wireless Comfort Interface - Homeowner User Guide
Page 9

Programming Your Comfort Interface
Planning Your Program
The Worksheet on page 10 allows you to pencil in your own program times and tem-
peratures. Factory settings are listed on Monday (for Monday thru Friday), Saturday
and Sunday.
If you are re-programming all 7 days, ll in all lines with the times and temperatures
you want. Use this worksheet as a guide to reprogram the Comfort Interface. Keep
the following guidelines in mind when planning your program.
> In Heating, lower temperatures will save energy.
> In A/C, higher temperatures will save energy.
Programming Tips - Copy Program
When programming your Comfort Interface,you may copy the program from one
day to another day. To copy a program:
1. In Schedule mode, enter the program for the day.
2. Press Copy. The copied day will be solid and the ashing day(s) identies where
the copied program will be saved.
3. Press Next Day to change the day(s) where the copied program will be saved.
4. Press Copy. The program is now copied to the new day(s).
9Emerson Blue Wireless Comfort Interface - Homeowner User Guide
Page 10

Programming Your Comfort Interface
Fill in the blank worksheet with your desired times and temperatures:
Worksheet for Re-Programming 7-Day Program
Heating
Program
MON
TUE
WED
THU
FRI
SAT
SUN
Wake Up
(Morning)
6:00 AM 70°F 8:00 AM 62°F 5:00 PM 70°F 10:00 PM 62°F
6:00 AM 70°F 8:00 AM 70°F 5:00 PM 70°F 10:00 PM 62°F
6:00 AM 70°F 8:00 AM 70°F 5:00 PM 70°F 10:00 PM 62°F
Leave For Work
(Day)
Return Home
(Evening)
Go To Bed
(Night)
A/C
Program
MON
TUE
WED
THU
FRI
SAT
SUN
Wake Up
(Morning)
6:00 AM 75°F 8:00 AM 83°F 5:00 PM 75°F 10:00 PM 78°F
6:00 AM 75°F 8:00 AM 75°F 5:00 PM 75°F 10:00 PM 78°F
6:00 AM 75°F 8:00 AM 75°F 5:00 PM 75°F 10:00 PM 78°F
Leave For Work
(Day)
Return Home
(Evening)
Go To Bed
(Night)
10 Emerson Blue Wireless Comfort Interface - Homeowner User Guide
Page 11

Programming Your Comfort Interface
Enter Heating Program
1. In Heat mode, press the Menu button to display additional button selections.
2. Press Schedule button. The display will show the day and period being
programmed with the time and temperature. The temperature will be ashing to
indicate it can be adjusted.
Program Time
System Mode
Program Period
Program
Temperature
Flashing
11Emerson Blue Wireless Comfort Interface - Homeowner User Guide
Page 12

Programming Your Comfort Interface
3. Press the or button to set the temperature for that period.
Temperature
Setting
4. Press the Time button and use the
or button to change the period’s start
time in 15 minute increments.
Note: If indoor remote sensors are installed proceed to step 5, otherwise skip to step 6.
Program Time
Flashing
12 Emerson Blue Wireless Comfort Interface - Homeowner User Guide
Page 13

Programming Your Comfort Interface
5
. FOR INDOOR REMOTE SENSORS ONLY: Press Time again and use the
or button to deactivate or activate the Comfort Interface’s internal
temperature sensor. A display showing dashes (--) indicates it has been
deactivated. This setting makes your system rely upon the temperature from
the remote sensor(s) to control temperature.
Current Temperature
Flashing
Indicates Internal
Sensor is On
Indicates Internal
Sensor is O
13Emerson Blue Wireless Comfort Interface - Homeowner User Guide
Page 14

Programming Your Comfort Interface
6
. Press Schedule to advance to the next period. Using the Time and
or
buttons, program the remaining periods for that day.
Note: Use the Copy button to copy the currents day’s program to any other day
(see page 9).
7. Press Next Day and repeat the previous steps to program the remaining days.
14 Emerson Blue Wireless Comfort Interface - Homeowner User Guide
Page 15

Programming Your Comfort Interface
8. Press Run to exit programming.
Enter A/C Program
Press A/C to place Comfort Interface in air conditioning mode. Set the A/C program
following the previous steps for heating.
15Emerson Blue Wireless Comfort Interface - Homeowner User Guide
Page 16

Using Your Comfort Interface
Operating Your System
Press Heat or A/C button to select Heating or Cooling. Press O to turn Heating or
A/C o .
Operating Your Fan
The Fan will run automatically with Heat or Cool. To run the fan continuously, press
Fan button.
16 Emerson Blue Wireless Comfort Interface - Homeowner User Guide
Page 17

Using Your Comfort Interface
Temporary Program Override
This feature overrides the program temperature setting for a two hour period. Press
or button to adjust the temperature. The display will show “Temp Hold” to
the left of the desired temperature. To cancel the temporary setting and return to the
program, press Run. Example: If you turn up the heat during the morning program, it
will automatically return to the programmed temperature two hours later.
Permanent Temperature Hold
The Permanent Temperature Hold feature bypasses the program and holds the
temperature inde nitely.
Press the Hold button once. The display will show “Hold” to the left of the
temperature setting. Press
To cancel the permanent hold setting at any time and return to the program, press
Run button.
or button to adjust the temperature you want.
Displays after
pressing Hold
17Emerson Blue Wireless Comfort Interface - Homeowner User Guide
Page 18

Using Your Comfort Interface
Auxiliary Heating
If your heating system is a heat pump, the system activates Auxiliary Heating when
the outside temperature is too cold for the heat pump to eciently heat the home.
You can manually activate the auxiliary heating and bypass the heat pump by
pressing and holding the Heat button until Aux changes to Aux. To resume heat
pump operation without auxiliary press the Heat button again.
Dual Fuel Setpoint (requires the outdoor remote sensor and a heat
pump with aux gas heat)
This feature turns on auxiliary gas heat and turns o the heat pump when the
outdoor temperature falls below the user dened “Dual Fuel Setpoint”. To
change the “Dual Fuel Setpoint”, see further instructions in “Conguration Menu
Options”, menu # 21, page 23.
Averaging with Indoor Remote Sensor(s)
The Comfort Interface displays the average of the local sensor and any indoor remote
sensors unless a device has been deactivated.
System Diagnostics
“Call for Service” will be displayed if your heating or air conditioning system needs a
qualied service technician to service the equipment.
Humidication and Dehumidication Control
This feature controls the humidity level inside your home. To change the
humidication and dehumidication setpoints, see further instructions in
“Conguration Menu Options”, menu #s 07 and 08, page 21.
18 Emerson Blue Wireless Comfort Interface - Homeowner User Guide
Page 19

Using Your Comfort Interface
Humidity and Outdoor Temperature Display
The Comfort Interface can be congured to display the current humidity inside your
home and/or the current outdoor temperature (if outdoor sensor is installed). When
turned on, the display will cycle time, humidity, and/or outdoor temperature. See
“Conguration Menu Options”, menu #s 11 and 12, page 21.
19Emerson Blue Wireless Comfort Interface - Homeowner User Guide
Page 20

Using Your Comfort Interface
Replacing Batteries
Replace batteries when “Change ” is
Pull interface o base
displayed.
+
+
Rear view of Comfort Interface
--+
+
-
-
4 “AA” Batteries
Optional Indoor/Outdoor Remote Sensors
If a sensor is not communicating or the batteries are dead and need to be replaced,
the Comfort Interface display will alternately ash time/temperature and remote
sensor number (RS1, RS2, RS3 or ORS)/two dashes (--).
20 Emerson Blue Wireless Comfort Interface - Homeowner User Guide
Page 21

Using Your Comfort Interface
Remove cover by holding Remote Sensor base and pressing the tab at the bottom
while sliding the cover toward the top.
Slide cover
o of base
2 “AA” batteries
To Check Battery Status for Sensors:
1. Press the Menu button once on the Comfort Interface and release.
2. Press the Connect button once and release. Comfort Interface display will
indicate “Searching” until, (CTL) control is found.
21Emerson Blue Wireless Comfort Interface - Homeowner User Guide
Page 22

Using Your Comfort Interface
3. Continue pressing and releasing the Next button to view the battery icon for all
remote sensors (RS1, RS2, RS3 or ORS). If battery needs to be replaced the word
“Change” will be displayed for the remote sensor listed on the screen.
22 Emerson Blue Wireless Comfort Interface - Homeowner User Guide
Page 23

Conguration Menu Options
To enter the menu: Press and hold the Menu button for 5 seconds or more. Press the
or button to change an options’s setting. Press the Next button to advance to the
next menu number. Press the Menu button to return to menu # 01.
Menu
Number
Displayed
(Factory
Press
to select options
Default)
01
02
(OFF) P (partial), L
Lockout Code
(000)
03 P7 P0
or
(total lockout)
0 - 999
Descriptions
Select keypad lockout
OFF (default)
P (partial) - Locks all keys except
and
L (total lockout) - Locks all keys so settings
and programs can not be changed without
the code.
Selects Keypad Lockout Combination (active
only if keypad lockout P (partial)
or L (total lockout) is selected).
Program per week
P7 = 7 days
P0 = non-programmable
04 (P4)
Morn Day
Eve Night
05
(99)
Heat Limit
06
(45)
A/C Limit
P2
Program periods per day
P4 = Morning, Day, Evening and Night
P2 = Day, Night (2 is also used for commercial
applications).
62° - 99° Dene a maximum heang setpoint
o
o
Options: 62
- 99
45° - 82° Dene a minimum cooling setpoint
Options: 45o - 82
o
23Emerson Blue Wireless Comfort Interface - Homeowner User Guide
Page 24

Conguration Menu Options
Menu
Number
07
08
Displayed
(Factory
Default)
(OFF)
Hum Setpoint
(OFF)
DeHum
Setpoint
Press
to select options
or
20 - 60%
40 - 95%
Descriptions
Humidies in heat mode.
OFF (default) cancels option.
Select Rh setting 20% - 60% to turn on the
humidier if the humidity level is below the
humidication setting.
Dehumidies in cool mode on call for cool.
OFF (default) cancels option.
Select Rh setting 40% - 95%. When room
humidity is above the selected setting the
DHM terminal(s) will de-energize to lower
the fan speed whenever there is a call for
cool. Air speed reduction across the cooling
coil allows it to condense removing more
09
10
11
12
(OFF)
Change Filter
(OFF)
Change Pad
Hum
Humidity
(OFF)
Outdoor
(OFF)
humidity.
1 - 12 months
1 - 12 months
ON/OFF Select humidity display on screen On/OFF
ON/OFF Only if outdoor sensor is available. Turns on
Displays reminder to change lter after a
selected number of months.
Displays reminder to change humidier pad
after a selected number of months.
or o the home screen outdoor temperature
display
24 Emerson Blue Wireless Comfort Interface - Homeowner User Guide
Page 25

Conguration Menu Options
Menu
Number
13
14
15 0
Displayed
(Factory
Default)
(OFF)
OF
(ON)
E
Press
to select options
1 hr - 3 hr
or
Occupancy Fan
This feature is used in light commercial
applications and will turn on the fan 1, 2 or 3
hours before the Day schedule begins and will
keep the fan on during the Day schedule. This
item appears only when program periods per
day is set to P2 (see menu item 4).
ON/OFF Selects Energy Management Recovery
On or O (not available if set as NonProgrammable). ON Starts program earlier
than the program time. OFF cancels feature
± 5°
Adjusts the temperature displayed on the
Descriptions
(Temperature)
16
17
18
19
20 0% -20% to + 20%
(ON)
LS
(OFF)
b
(ON)
dL
(°F) °F/°C Selects display temperature units in °F
ON/OFF "OFF” turns the sensor in the Comfort
ON/OFF "ON" beeps when any button is pushed.
ON/OFF "ON" will turn the backlight on momentarily
Comfort Interface by an o set.
Interface o. The room temperature display
will come from the remote sensor(s) only. If
no wireless remotes are installed, this step is
skipped.
"OFF" cancels the beep.
after any key is pressed. "OFF" cancels backlight.
(Fahrenheit) or °C (Celsius)
Displays the room humidity with an oset
default 0%. The setting can be changed from
-20 LO to 20 HI. The displayed humidity will
change as the oset is changed.
25Emerson Blue Wireless Comfort Interface - Homeowner User Guide
Page 26

Conguration Menu Options
Menu
Number
21
22 L 5
Displayed
(Factory
Default)
Outdoor OFF
(dF)
dF
Press
to select options
or
5° - 50° Selecting an outdoor temperature from 5°
to 50° turns on the Dual Fuel setpoint. As
long as the outside temperature is above the
setpoint, the compressor will operate. When
the temperature drops below the setting, the
Comfort Interface will start the gas heat and
turn o the compressor. This item appears
only if HP1 or HP2 is selected and outdoor
sensor is installed and enabled.
0 - 9 Select a number 1 - 9 to activate the “logic”
heat pump Dual Fuel option (no outdoor
remote sensor required). This causes the
Comfort Interface to turn o the heat pump
shortly after the furnace res. Five (5) is the
factory recommended average setting. A
lower number slightly increases the delay
between heat pump and furnace stages. A
higher number slightly decreases the delay
between heat pump and furnace stages.
Note: This setting is not minutes or degrees.
It is a numeric setting that will inuence the
internal Comfort Interface calculation for
staging.
Descriptions
23 (80)
AO
Press Run to exit menu
26 Emerson Blue Wireless Comfort Interface - Homeowner User Guide
35° - 80°
Selects Auxiliary Heat Cut out temperature.
If the outdoor temperature is above the
selected setting, the auxiliary heat will not
turn on. This item appears only if HP1 or HP2
is selected and outdoor sensor is installed
and enabled.
Page 27

NOTES
Page 28

Homeowner Help Line
In North America: 800-284-2925
En Espanõl: 888-725-9797
In Australia:1800 057 587
Hours of Operation
North America (CST) U.S., Canada & Mexico
7 am to 1 am Monday – Friday
7 am to 4 pm Saturday – Sunday
Australia (Eastern Standard Time)
9 pm to 3 pm Monday – Friday
9 pm to 6 am Saturday – Sunday
Additional Product information can be viewed at
http://www.emersonclimate.com/en-US/products/thermostats/Pages/thermostats.aspx
or http://www.white-rodgers.com
White-Rodgers is a division
of Emerson Electric Co.
The Emerson logo is a
trademark and service mark
of Emerson Electric Co.
Part No. 37-7236A
1127
www.white-rodgers.com
www.emersonclimate.com
 Loading...