


User’s Guide
©2003 eMachines, Inc.
©2003 Aesbus Knowledge Solutions
This publication contains proprietary content and is protected by copyright. No part of this document may be reproduced, copied, or translated into other languages without prior written consent from eMachines, Inc. and Aesbus Knowledge Solutions.
eMachines, Inc. and Aesbus Knowledge Solutions shall not be liable for technical or editorial errors or omissions contained herein; nor for incidental or consequential damage resulting from the furnishing, performance, or use of this material.
The information in this user’s guide is subject to change without notice.
The eMachines, Inc. stylized “e” and figure logo are trademarks of eMachines, Inc. in the United States and/or other countries.
Windows XP is the trademark of Microsoft Corporation.
All other product and brand names are trademarks of their respective owners.
5000 series notebook user’s guide Part number: AACR53700001K4

first things first
thank you for purchasing our notebook!
You’ve made an excellent decision choosing eMachines. We’re sure that you’ll be pleased with the outstanding quality, reliability, and performance of your new notebook. Each and every eMachines notebook uses the latest technology and passes through the most stringent quality control tests to ensure that you are provided with the best product possible.
Please read this manual carefully to familiarize yourself with our range of services and support. We’ve highlighted some basic care and safety information to help you keep your notebook in good operating condition.
eMachines stands behind our value proposition to our customers — to provide best-of-class service and support in addition to high-quality, brand-name components at affordable prices. If you ever have a problem, our knowledgeable, dedicated customer service department will provide you with fast, considerate service.
We sincerely hope that you will receive the utmost satisfaction and enjoyment from your new eMachines notebook for years to come.
Thanks again, from all of us at eMachines.
3

eMachines Customer Care
eMachines is committed to delivering a great computer experience — not only with an exciting line of affordable performance products, but with friendly and knowledgeable people who stand behind them.
We work hard to make your eMachines experience easy. And that means giving you great choices, making products simple
to set up and operate right out of the box, and being there to support you whenever you need us.
Your new eMachines notebook is protected by a warranty that’s effective from the date of purchase. Details about your warranty are included in the box your notebook was shipped in. Our warranty includes:
guarantee on parts and labor
technical support through our website, email, and telephone If you have a question about your notebook, just ask us!
before you contact us
Please have the following information ready before you contact us:
product model name and number, and serial number
You can find this information on the Customer Care label located on the bottom of your notebook.
exact text of any applicable error messages
Please copy down the exact text of your error messages. This will help us diagnose and solve your problem.
operating system type and version
To find this information, click Start, right-click My Computer, and then select
Properties.
4

first things first
how to contact us
When you need help or information, or want to get in touch with us, first try our website. If you don’t find what you need on the Web, just give us a call!
on the Web
To begin with, you may want to go to our home page at http://www.emachines.com. On our home page, you can learn about eMachines as a company, learn about the other products that we make, and navigate to our primary Customer Care support page.
To go directly to our service and support Web page, go to one of the following addresses:
In North America: |
http://www.emachines.com/support/tech_support.html |
In the United Kingdom: |
http://www.pcservicecall.co.uk |
Our customer service websites include the following help options:
frequently asked questions
Sometimes what seems like a big problem can be resolved quickly and easily with a few helpful tips. Look up the topic that most likely applies to your concern, and get answers to the most Frequently Asked Questions that relate to that subject. Solving your issue could very well be just a click away
Ask your question via e-mail! You can email your question to us by clicking Be sure to include the model number of your eMachines notebook. The more specific you can be with the details of your concern and the information you supply, the better we can assist you!
5

by telephone
Our call center team is highly trained and ready to help answer your questions, troubleshoot any problems, or direct you to other service options if necessary. Our goal is to solve your problem on the first call, so you can get back to enjoying your eMachines notebook.
To speak with a support representative, call the phone number for your country:
United States: |
1-801-401-1419 |
6 a.m. to 10 p.m (PST), |
|
|
seven days a week |
|
|
|
Canada: |
1-604-637-1419 |
6 a.m. to 10 p.m (PST), |
|
|
seven days a week |
United Kingdom |
0870-901-3000 |
24 hours a day, |
|
|
seven days a week |
|
|
|
Please note that calls are charged at national call rates.
6
first things first
help tools
We’ve developed this book and its companion poster to help you learn about your notebook and how to use it, but other tools are also available.
The provided quick setup poster includes all of the steps you need to get started.
This user’s guide provides detailed information about your notebook and basic instructions for its use and care.
Online help is included in the software preloaded on your notebook.
You can find the latest information about your notebook and get help on the following websites:
eMachines home page: http://www.emachines.com
North America support page:
http://www.emachines.com/support/tech_support.html
United Kingdom support page: http://www.pcservicecall.co.uk
In North America, our telephone help desk is staffed from 6 a.m. to 10 p.m. (PST), seven days a week. In the United States, call us at 1-801-401-1419. In Canada, call us at
1-604-637-1419. (Depending on your location, your call may be subject to long distance charges.)
In the United Kingdom, our telephone help desk is staffed 24 hours a day, 365 days a year. Call us at 0870-901-3000. (Calls are charged at national call rates.)
7

basic care and safety
Your notebook is designed and tested to meet the latest standards for information technology equipment safety.
To ensure safe use of your notebook:
Read and follow all safety instructions marked on the notebook and in this guide before you use your notebook.
Retain this information for future use.
Always set your notebook on a stable work surface.
Do not use your notebook near water or heat sources.
Avoid exposing your notebook to extreme temperature changes.
When using AC power:
—Use only the AC adapter and power cord that comes with your notebook.
—Verify the voltage of the power source and use only the type indicated on the rating label.
The AC adapter can accept a line voltage ranging from 100 V to 240 V and is compatible with most international power sources. If you are unsure whether your power source is compatible, please contact your local dealer.
—Do not allow anything to rest on the power cord.
—Do not locate the cord where people will walk on or trip over the cord.
—Do not use the power cord if it is damaged or frayed.
—Disconnect your notebook from AC power during long periods of inactivity to avoid damage from power spikes.
8

first things first
Do not obstruct the air vents on the notebook or use it on a bed, sofa, rug, or other similar surface.
The air vents are necessary for proper airflow and cooling of your notebook. If these air vents are blocked, your notebook may overheat.
Do not work for long periods with the notebook resting on your lap.
The air vents may become blocked, causing the temperature of the notebook to increase to a point where it may be harmful to your skin.
Keep your computer a safe distance away from sources of magnetic fields, such as cellular phones and external speakers.
Magnetic fields can disrupt the information on hard drives.
Use only a soft cloth, moistened with water, to clean your notebook.
Do not use household chemicals to clean your notebook; they may damage it.
Use only recommended upgrade or replacement parts and accessories.
Other than the indicated user-replaceable components, your notebook should be serviced by an authorized technician.
When using your modem:
—Use only Number 26 AWG or larger telecommunication line cord.
—During an electrical storm, disconnect modem/telephone cables and do not use your modem. There is a remote risk of electric shock from lightning.
—Never install modem/telephone jacks in wet locations unless the jacks are specifically designed for wet locations.
—Never touch uninsulated modem/telephone wires or terminals unless the modem/telephone line has been disconnected at the network interface.
9

This notebook contains an internal, lithium battery-powered, real-time clock. Only an authorized service technician should replace this internal battery.
There is a risk of explosion and injury if the battery is incorrectly replaced or handled.
Do not disassemble, crush or puncture the battery, short its external contacts, immerse it in water, or dispose of it in fire.
If any of the following situations occur, contact an authorized technician:
—The power cord or plug is frayed or damaged.
—Liquid has been spilled on the notebook.
—The notebook has been exposed to excessive moisture.
—The notebook has been exposed to excessive hot or cold temperatures.
—The equipment has been dropped or is damaged.
Do the following to work comfortably and protect yourself from repetitive-stress injury:
—Sit in a comfortable position, with your shoulders relaxed and each arm at a right angle to the keyboard and touchpad.
—Position each hand so that your wrist is straight and your hand is in a straight line with your forearm.
—Change hand and body positions frequently to avoid fatigue.
—If you experience discomfort in your hands, wrists, arms, shoulders, or back, you need to take more rest breaks and correct your posture and positioning.
—If this discomfort continues, consult your doctor.
10
contents
first things first . . . . . . . . . . . . . . . . . . . . . . . . . . . . . 3
eMachines Customer Care . . . . . . . . . . . . . . . . . . . . . . . . . . . . . . . . . . . . . . . 4 before you contact us . . . . . . . . . . . . . . . . . . . . . . . . . . . . . . . . . . . . . . . . 4 how to contact us . . . . . . . . . . . . . . . . . . . . . . . . . . . . . . . . . . . . . . . . . . . 5 help tools . . . . . . . . . . . . . . . . . . . . . . . . . . . . . . . . . . . . . . . . . . . . . . . . . . . 7 basic care and safety . . . . . . . . . . . . . . . . . . . . . . . . . . . . . . . . . . . . . . . . . . . . 8
contents. . . . . . . . . . . . . . . . . . . . . . . . . . . . . . . . . 11 getting started. . . . . . . . . . . . . . . . . . . . . . . . . . . . 13
quick tour . . . . . . . . . . . . . . . . . . . . . . . . . . . . . . . 19
open. . . . . . . . . . . . . . . . . . . . . . . . . . . . . . . . . . . . . . . . . . . . . . . . . . . . . . . . . . 20 left side. . . . . . . . . . . . . . . . . . . . . . . . . . . . . . . . . . . . . . . . . . . . . . . . . . . . . . . . 21 right side. . . . . . . . . . . . . . . . . . . . . . . . . . . . . . . . . . . . . . . . . . . . . . . . . . . . . . . 22 back . . . . . . . . . . . . . . . . . . . . . . . . . . . . . . . . . . . . . . . . . . . . . . . . . . . . . . . . . . 23 bottom . . . . . . . . . . . . . . . . . . . . . . . . . . . . . . . . . . . . . . . . . . . . . . . . . . . . . . . . 24
using your notebook . . . . . . . . . . . . . . . . . . . . . . 25
using the power button . . . . . . . . . . . . . . . . . . . . . . . . . . . . . . . . . . . . . . . . . . 26 changing power button settings . . . . . . . . . . . . . . . . . . . . . . . . . . . . . . 26 using the touchpad . . . . . . . . . . . . . . . . . . . . . . . . . . . . . . . . . . . . . . . . . . . . . 27 clicking. . . . . . . . . . . . . . . . . . . . . . . . . . . . . . . . . . . . . . . . . . . . . . . . . . . . 27 scrolling . . . . . . . . . . . . . . . . . . . . . . . . . . . . . . . . . . . . . . . . . . . . . . . . . . . 28 tapping . . . . . . . . . . . . . . . . . . . . . . . . . . . . . . . . . . . . . . . . . . . . . . . . . . . 28 changing touchpad settings . . . . . . . . . . . . . . . . . . . . . . . . . . . . . . . . . 28 using the keyboard. . . . . . . . . . . . . . . . . . . . . . . . . . . . . . . . . . . . . . . . . . . . . . 29 special function keys . . . . . . . . . . . . . . . . . . . . . . . . . . . . . . . . . . . . . . . . 29 numeric keypad . . . . . . . . . . . . . . . . . . . . . . . . . . . . . . . . . . . . . . . . . . . . 31 using quick action buttons . . . . . . . . . . . . . . . . . . . . . . . . . . . . . . . . . . . . . . . 32 interpreting status lights . . . . . . . . . . . . . . . . . . . . . . . . . . . . . . . . . . . . . . . . . . 33 using the display . . . . . . . . . . . . . . . . . . . . . . . . . . . . . . . . . . . . . . . . . . . . . . . . 34 cleaning the display. . . . . . . . . . . . . . . . . . . . . . . . . . . . . . . . . . . . . . . . . 34 adjusting the brightness . . . . . . . . . . . . . . . . . . . . . . . . . . . . . . . . . . . . . . 34 adjusting the resolution . . . . . . . . . . . . . . . . . . . . . . . . . . . . . . . . . . . . . . 35 enabling TV output. . . . . . . . . . . . . . . . . . . . . . . . . . . . . . . . . . . . . . . . . . 35 using CDs and DVDs. . . . . . . . . . . . . . . . . . . . . . . . . . . . . . . . . . . . . . . . . . . . . 37 caring for and handling discs . . . . . . . . . . . . . . . . . . . . . . . . . . . . . . . . . 38 listening to audio CDs . . . . . . . . . . . . . . . . . . . . . . . . . . . . . . . . . . . . . . . 39 viewing DVDs . . . . . . . . . . . . . . . . . . . . . . . . . . . . . . . . . . . . . . . . . . . . . . 40 creating CDs . . . . . . . . . . . . . . . . . . . . . . . . . . . . . . . . . . . . . . . . . . . . . . . 41
11

battery . . . . . . . . . . . . . . . . . . . . . . . . . . . . . . . . . . 47
charging your battery . . . . . . . . . . . . . . . . . . . . . . . . . . . . . . . . . . . . . . . . . . . 48 initial charge . . . . . . . . . . . . . . . . . . . . . . . . . . . . . . . . . . . . . . . . . . . . . . . 48 subsequent charges. . . . . . . . . . . . . . . . . . . . . . . . . . . . . . . . . . . . . . . . . 48 managing your battery consumption . . . . . . . . . . . . . . . . . . . . . . . . . . . . . . 49 monitoring the battery charge . . . . . . . . . . . . . . . . . . . . . . . . . . . . . . . . 49 changing your power-related settings . . . . . . . . . . . . . . . . . . . . . . . . . 51 recalibrating your battery . . . . . . . . . . . . . . . . . . . . . . . . . . . . . . . . . . . . . . . . 53 disposing of your battery . . . . . . . . . . . . . . . . . . . . . . . . . . . . . . . . . . . . . . . . . 54
upgrades and replacements . . . . . . . . . . . . . . . 55
battery . . . . . . . . . . . . . . . . . . . . . . . . . . . . . . . . . . . . . . . . . . . . . . . . . . . . . . . . 56 memory . . . . . . . . . . . . . . . . . . . . . . . . . . . . . . . . . . . . . . . . . . . . . . . . . . . . . . . 58 hard drive assembly . . . . . . . . . . . . . . . . . . . . . . . . . . . . . . . . . . . . . . . . . . . . . 61
system restore . . . . . . . . . . . . . . . . . . . . . . . . . . . . 63
troubleshooting. . . . . . . . . . . . . . . . . . . . . . . . . . . 65
battery and power . . . . . . . . . . . . . . . . . . . . . . . . . . . . . . . . . . . . . . . . . . . . . . 66 keyboard and touchpad . . . . . . . . . . . . . . . . . . . . . . . . . . . . . . . . . . . . . . . . 67 display brightness and resolution . . . . . . . . . . . . . . . . . . . . . . . . . . . . . . . . . . 69 sound and volume . . . . . . . . . . . . . . . . . . . . . . . . . . . . . . . . . . . . . . . . . . . . . . 70 CDs and DVDs. . . . . . . . . . . . . . . . . . . . . . . . . . . . . . . . . . . . . . . . . . . . . . . . . . 70 printer . . . . . . . . . . . . . . . . . . . . . . . . . . . . . . . . . . . . . . . . . . . . . . . . . . . . . . . . . 71 error messages . . . . . . . . . . . . . . . . . . . . . . . . . . . . . . . . . . . . . . . . . . . . . . . . . 71
notices and specifications. . . . . . . . . . . . . . . . . . 73
United States Federal Communications Commission Notice . . . . . . . . . . . 73 modifications. . . . . . . . . . . . . . . . . . . . . . . . . . . . . . . . . . . . . . . . . . . . . . . 73 cables . . . . . . . . . . . . . . . . . . . . . . . . . . . . . . . . . . . . . . . . . . . . . . . . . . . . 73 wireless communications. . . . . . . . . . . . . . . . . . . . . . . . . . . . . . . . . . . . . 74 Declaration of Conformity — United States . . . . . . . . . . . . . . . . . . . . . 74
European Notice. . . . . . . . . . . . . . . . . . . . . . . . . . . . . . . . . . . . . . . . . . . . . . . . 75 Declaration of Conformity — European Union . . . . . . . . . . . . . . . . . . . 75 U.S. Regulations Governing the Use of Modems. . . . . . . . . . . . . . . . . . . . . . 77 U.K. Modem Compliance Information . . . . . . . . . . . . . . . . . . . . . . . . . . . . . . 78 Japanese Modem Notice . . . . . . . . . . . . . . . . . . . . . . . . . . . . . . . . . . . . . . . . 79 notebook specifications . . . . . . . . . . . . . . . . . . . . . . . . . . . . . . . . . . . . . . . . . 80
12
getting started 1
Your eMachines notebook has been designed so that you can set it up quickly and start using it right away.
We’re going to walk you through each of the following steps as you use your notebook for the first time:
installing the included battery pack
connecting the power adapter
opening the notebook
turning it on!
These start-up procedures are described in detail on the quick setup poster, but for your convenience, the basic steps are repeated here.
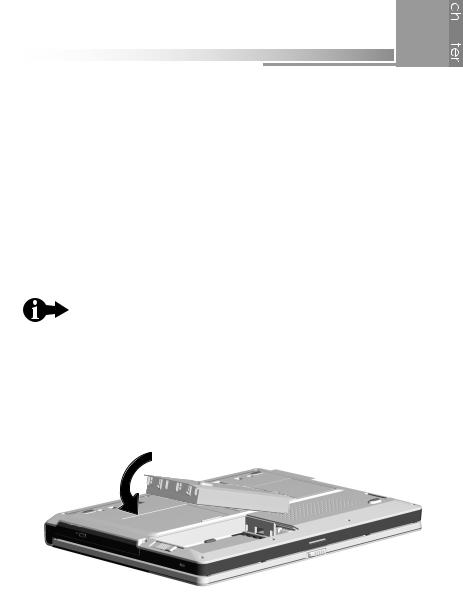
1.Install your battery by first placing your notebook upside down on a stable surface.
Hold the battery pack label-side down and slide it into the open battery compartment until the battery pack clicks into place.
13
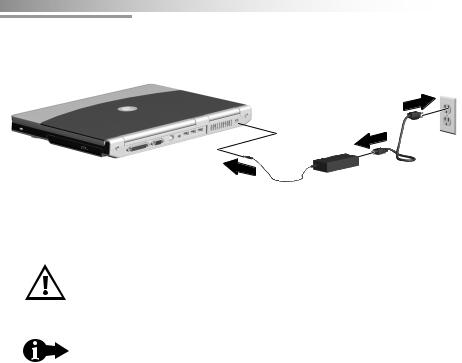
2.Turn your notebook right-side up and connect the AC power adapter to the notebook and a wall outlet.
A yellow status light on the front-center of your notebook will light up, indicating that the battery is being charged. For more information about status lights, see chapter 3, “using your notebook.”
Use only the AC adapter and power cord that were shipped with your notebook. Using a different AC adapter or power cord may result in fire or damage to your notebook.
Important: When using your notebook for the first time, leave the AC adapter connected to your notebook until the yellow battery status light on the front-center of the notebook goes off. When the battery status light goes off, your battery is fully charged. This may take 2 to 3 hours.
14
getting started
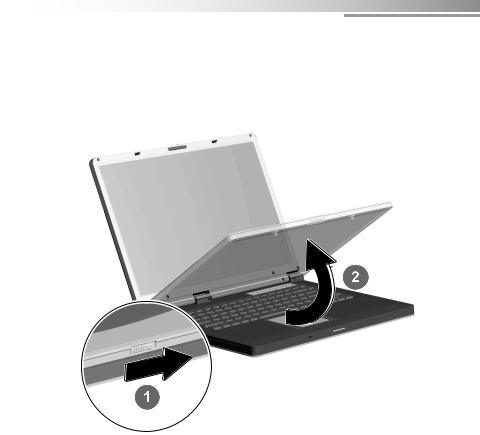
3.Open your notebook:
Slide the latch on the front of the notebook to the right 1 and, at the same time, lift the top panel 2.
Adjust the position of the display to a comfortable viewing angle.
15
4.Press the power button at the top right of the keyboard area to turn on your notebook.
A blue light bar to the right of the power button lights up, showing you that your notebook is on.
As your notebook starts up, you’ll see the eMachines logo.
When you turn on your notebook for the first time, you will be prompted to enter some setup information. The process is simple. Just read the questions on the screen and follow the prompts. If you need some help, see the quick setup poster and the Windows XP startup information that are included in the box. If you’ve misplaced these documents, you can find them on our website at http://www.emachines.com.
After you complete the setup procedures, the Microsoft Windows XP desktop is displayed.
16

getting started
5.To turn off your notebook, do the following: a. Exit all programs you may have opened.
Important: Always save open documents and files before turning off your notebook.
b.From the Windows desktop, click Start 1 > Turn Off Computer 2.
c.At the prompt, click Turn Off 3.
When the blue power bar goes off, your notebook is completely powered down.
17
quick tour 2
Before you begin using your eMachines notebook, let’s look at it from different views and tour its basic features.
This chapter looks at your notebook from the following views:
open
left side
right side
back
bottom
This chapter provides a quick overview of the external features on your notebook. As you begin using your notebook, refer to chapter 3, “using your notebook,” for more detailed information on these features.
19
open
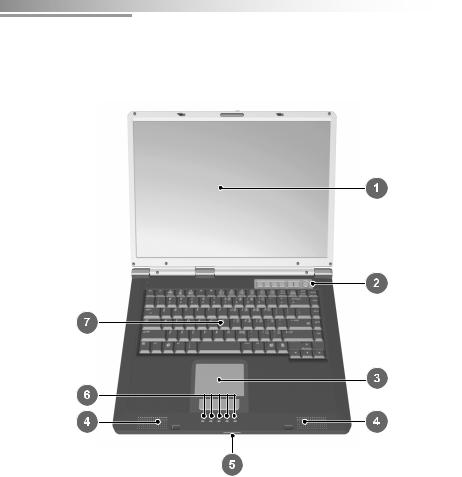
To begin with, look at your opened notebook and locate its main features.
1 |
display |
5 |
power and battery |
|
|
|
status lights |
|
|
|
|
2 |
quick action buttons and |
6 |
system status lights |
|
power button |
|
|
|
|
|
|
3 |
touchpad |
7 |
keyboard area |
|
|
|
|
4 |
speakers |
|
|
|
|
|
|
20
quick tour
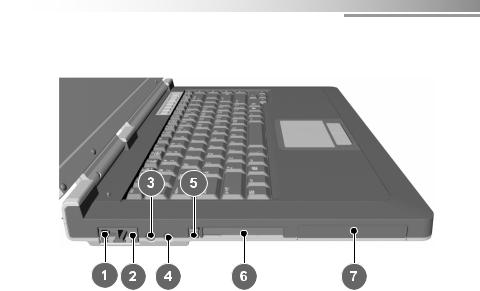
left side
1 |
modem port |
5 |
PC Card eject button |
2 |
Ethernet/network port |
6 |
PC Card slot |
|
|
|
|
3 |
microphone connector |
7 |
hard drive |
|
|
|
|
4 |
headphone connector |
|
|
|
|
|
|
21
right side
1 |
Kensington lock slot |
3 |
CD/DVD eject button |
2 |
CD/DVD drive |
4 |
CD/DVD manual eject |
|
|
|
button |
|
|
|
|
22
quick tour
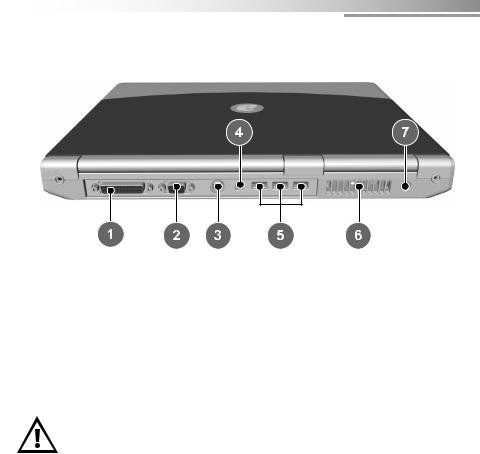
back
1 |
printer port |
5 |
USB ports (3) |
2 |
external monitor (VGA) |
6 |
air vents |
|
port |
|
|
|
|
|
|
3 |
S-Video (TV out) |
7 |
AC power connector |
|
|
|
|
4 |
FireWire (1394) port |
|
|
|
(on select models) |
|
|
|
|
|
|
Do not obstruct the air vents. They are necessary for proper airflow and cooling. If any of these vents are partially blocked or obscured, your notebook may overheat.
23
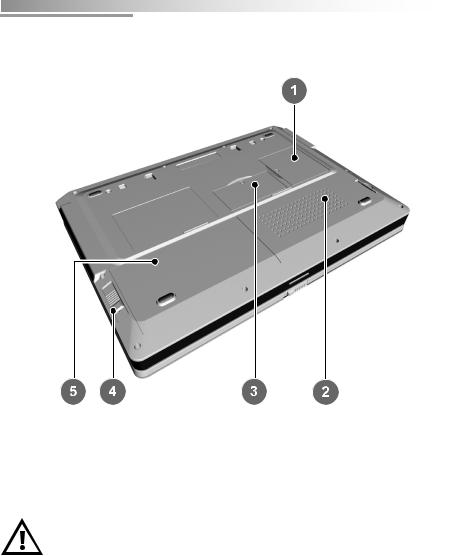
bottom
1 |
mini-PCI |
4 |
battery release button |
2 |
air vents |
5 |
battery |
|
|
|
|
3 |
memory |
|
|
|
|
|
|
Do not obstruct the air vents. They are necessary for proper airflow and cooling. If any of these vents are partially blocked or obscured, your notebook may overheat.
24

using your notebook 3
In this chapter, we’ll discuss all of the basics you need to know when using your notebook, including:
using the power button
using the touchpad
using the keyboard
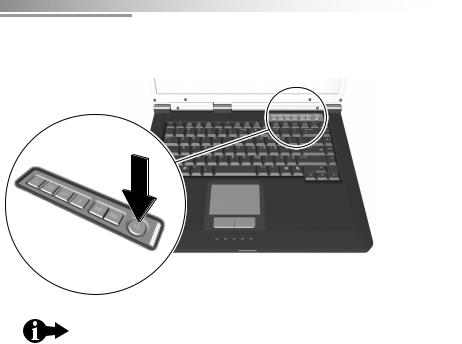
using quick action buttons
interpreting status lights
using the display
using CDs and DVDs
25
 Loading...