

Elvid RVM-7B-ALT User Manual

RIGVISION
RVM-7B-ALT
7" LIGHTWEIGHT ADVANCED
ON-CAMERA LCD MONITOR
USER
MANUAL

2

INTRODUCTION
Thank you for choosing Elvid. The Elvid RVM-7B-ALT RigVision is
a lightweight on-camera LCD monitor with advanced features to
help you optimize your image. The RigVision is equipped with an
HDMI input with loop-through, plus a composite video input for
exible connectivity. The 7″ LED panel’s native resolution is 1280
× 800, and you can set the aspect ratio to full screen (16:10),
16:9, 4:3, 1.85:1, or 2.35:1.
The RigVision incorporates onscreen tools including peaking to
ne-tune your focus, and zebra exposure indicator, false color
display, and histogram to provide visual guidance for achieving
precise exposure levels. There are also broadcast-specic features
like underscan, safety frame markers, and H/V delay.
There are a variety of options for personalizing the RigVision to
suit your specic needs. Choose from a palette of 19 functions
from which you can set each of the three function buttons to
provide shortcuts for enabling modes and onscreen tools. There’s
an integrated speaker and a 3.5 mm stereo headphone output for
live audio monitoring, plus an onscreen audio meter for checking
audio levels as you record.
The RigVision also allows remote shutter release, enabling you to
capture still photos via the monitor.
The RigVision contains a variety of power options so you won’t
have to scramble to power it. Available battery plates and an
included adapter plate let you mount common standard camera
batteries or, for longer run-times, 3-stud and V-mount batteries.
The RigVision also comes with a 12 V DC adapter for powering
the monitor via AC power.
3

PRECAUTIONS
• Please read and follow these
instructions and keep this manual in
a safe place.
• Exposure to high sound levels can
cause permanent hearing loss. Avoid
listening at high volumes for extended
periods of time.
• Keep this product away from water
and any ammable gases or liquids.
• Make sure this product is powered off
when plugging it into a power source.
• Use only the correct, recommended
voltage.
• Do not attempt to disassemble or
repair this product.
• Do not place or store the RigVision
facedown, since this can damage
the screen.
• Handle this product with care. Avoid
any unnecessary impacts to this
product.
• Do not block the vents in this product.
4
• Disconnect this product from its
power source before storage and
during electrical storms.
• Do not use chemical solutions to clean
this product. Clean it with only a soft,
dry cloth.
• Keep this product away from children.
• Make sure that this product is intact
and that there are no missing parts.
• To avoid damage to this product,
be careful not to overtighten or
improperly thread any of the threaded
ttings.
• All photos are for illustrative purposes
only.
• This device complies with Part 15 of
the FCC Rules. Operation is subject
to the following two conditions: (1)
this device may not cause harmful
interference, and (2) this device must
accept any interference received,
including interference that may cause
undesired operation.

TABLE OF
CONTENTS
Product Contents ................................................................... 6
Overview ................................................................................7.8
Powering On and Off ........................................................9-12
Using the RVM-7B-ALT .................................................. 13-14
The Sunshade .........................................................................15
The Menu ................................................................................16
Video Settings ...................................................................17-18
Features Menu ................................................................ 19-20
Settings Menu ..................................................................21-23
System Menu ........................................................................24
Function Buttons .................................................................25
Shutter Release .....................................................................26
Specications ..................................................................27-28
Supported Resolutions and Frame Rates ..................29-32
Troubleshooting ..............................................................33-35
Warranty ................................................................... 36 (Back)
5
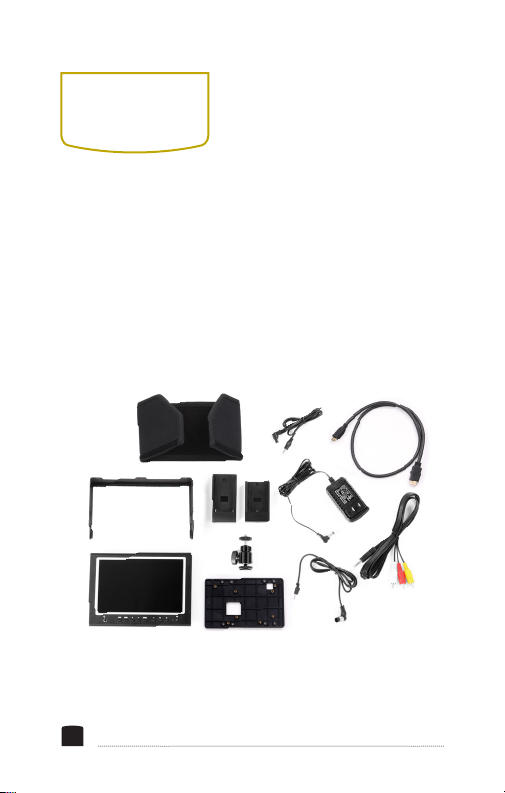
PRODUCT
CONTENTS
· 7" Field Monitor
· Sun shade cover
· Sun shade bracket
· Battery plates (MBP-
F970/ MBP-LPE6)
NOTE: Additional battery plates and/or battery
adapters compatible with other popular brands can
be purchased by visiting www.elvidcinema.com
6
· HDMI cable
· Shoe-mount adapter
· 12 V DC adapter
· Adapter panel
· User manual
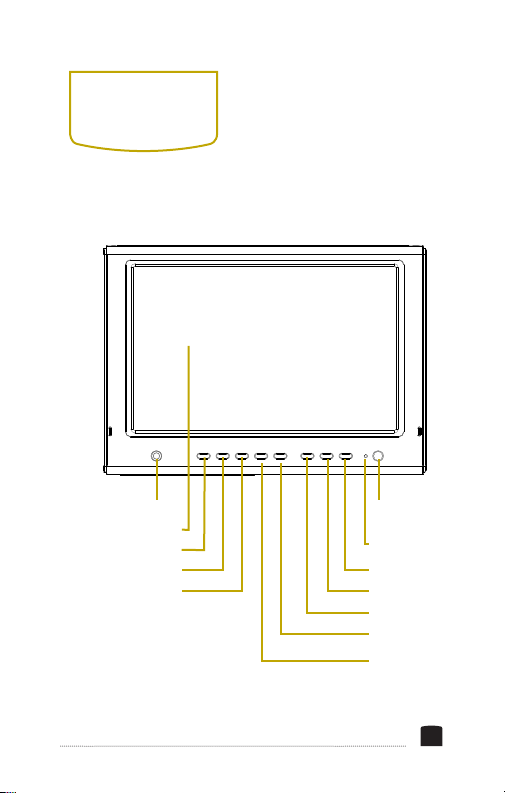
OVERVIEW
Headphone jack
Screen
Input button
Menu button
Left Nav (Brightness down)
Shutter release
button
Power indicator
light
F3 (Histogram)
F2 (Exposure)
F1 (Peaking)
Enter button
Right Nav
(Brightness Up)
7
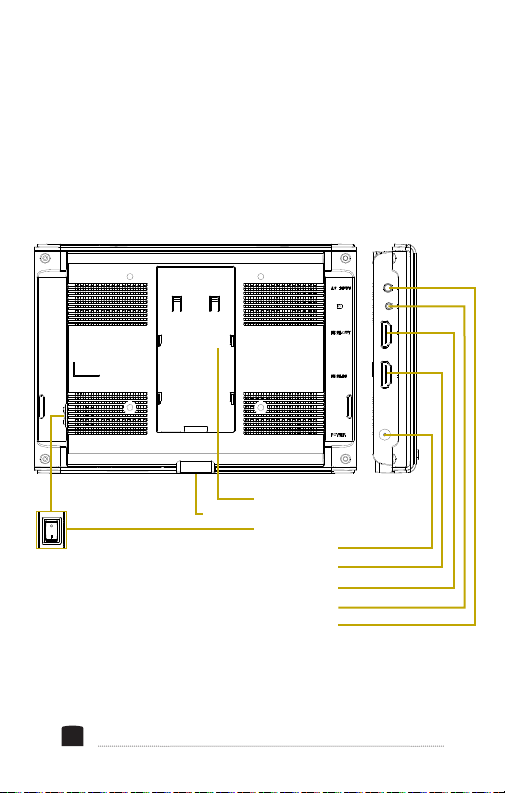
Battery plate mount
1/4″-20 Threaded socket
Power switch
DC power input
HDMI input
HDMI output
Shutter release port
Composite video input
8

POWERING
ON & OFF
There are three ways to power the RigVision: AC power,
a standard camera battery (see Specications on page 28
for compatible battery types), and a 3-stud or a V-mount
battery.
AC POWER
To power the RigVision via AC power, use the included 12
V DC adapter to connect the RigVision’s DC power input to
your AC power source.
To turn on the RigVision, press the power switch to the On
position.
CAMERA BATTERY
The RigVision has a built-in mount for available battery
plates, which accommodate a variety of standard camera
batteries. This allows you to power the RigVision with
readily-available batteries that you may already own. For
more information on compatible battery types, refer to
Specications on page 28. To install a battery plate and a
compatible battery, follow these steps:
9

1. Place the battery plate in
the RigVision’s battery
plate mount. Make sure the
plate’s bottom contacts are
aligned with the contacts
in the plate mount.
2. Slide the plate forward
until it locks into place.
3. Place a compatible battery
in the battery plate. Make
sure the battery’s bottom
contacts are aligned with
the contacts in the battery
plate.
4. Slide the battery forward
until it locks into place.
To turn on the RigVision,
press the power switch to the
On position.
10

POWERING
ON & OFF
3
-STUD OR V-MOUNT
The RigVision comes with an adapter panel that lets you
mount a 3-stud or a V-mount battery plate onto the back
of the monitor. These more powerful batteries provide
longer run-time than camera batteries, so you can work
for longer periods without having to recharge or change
your battery. To install the large battery adapter panel,
follow these steps:
1. With the smooth side of the adapter panel facing up,
place the panel on the back of the monitor. Depending
on preference, it can be tted horizontally or vertically.
Align the leftmost screw holes of the adapter panel
with the corresponding screw holes in the back of the
monitor. Make sure all four of the monitor’s screw holes
are aligned with the panel’s screw holes. The adapter
panel should be seated completely on the monitor and
not hanging off to one side.
11
 Loading...