

Page 1

LYNX
USB FOCUS
CONTROLLER
USER
MANUAL
USB-FC-110
Page 2
2
Page 3

INTRODUCTION
Thank you for choosing the Elvid Lynx USB Focus
Controller. The Elvid Lynx gives you remote control
over focus and exposure (including shutter speed,
aperture, ISO, and exposure compensation) for
compatible cameras and lenses.
This handheld battery-powered remote is compact
and easy to use. Through a USB cable, the device is
able to control focus and exposure functions for both
still photography and video. Seven handy buttons
and a center control wheel allow you to make all of
the necessary adjustments on your camera.
You can also turn the Live View display on your
camera on or off remotely with the Lynx, and access
the Lynx's digital zoom function.
The Elvid Lynx allows you to precisely control
focus and exposure while shooting video or stills
without accidentally bumping the camera or causing
vibrations that might detract from the sharpness
of an image, the exactness of your frame or the
smoothness of a video.
3
Page 4

CONTENTS
INTRODUCTION .................................................................................3
KE Y FE ATURES .................................................................................5
BOX CONTENTS ................................................................................6
OVERVIEW .........................................................................................7
GETTING STARTED ......................................................................... 8
INSTALLING BATTERIES ............................................................... 8
DIAGNOSTIC TEST ...........................................................................9
HOW THE BUTTONS WORK .......................................................10
FOCUS WHEEL ................................................................................13
FOCUS STEP SIZE .......................................................................... 14
FOCUS COMMAND SEND RATE ................................................ 15
FUNCTIONS ......................................................................................16
CONTROLLER OPERATION .........................................................17
USING RIG MOUNTS .....................................................................22
TROUBLESHOOTING .................................................................... 23
COMPATIBILITY ............................................................................. 25
SPECIFICATIONS ............................................................................25
WARNINGS ......................................................................................26
WARRANTY.....................................................................................27
4
Page 5

KEY
FEATURES
• Mode-switching USB focus controlling device
• Complete exposure control: shutter, aperture, ISO,
and exposure compensation
• Live View control
• LCD display for adjustment settings
• Multiple focus options in still mode
• Four focus point presets in video mode
• Two USB ports for ergonomic exibility
• Simple operation and easy portability
5
Page 6
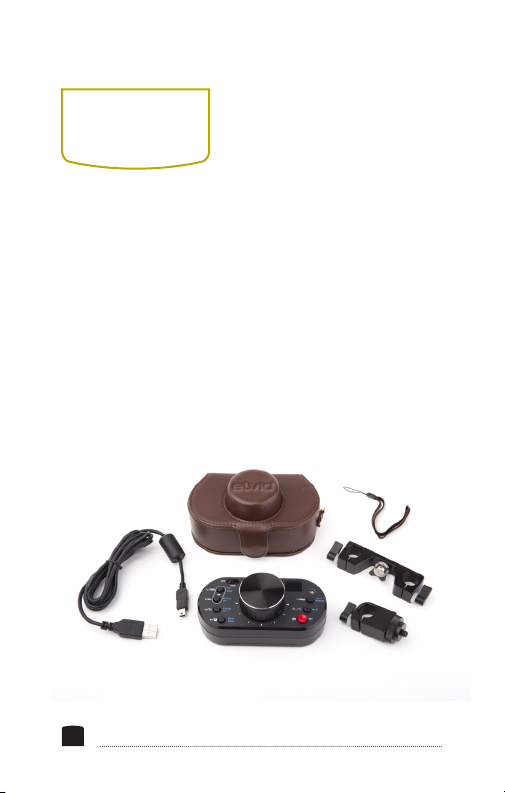
BOX
CONTENTS
• Elvid Lynx USB Focus
Controller
• Dual Pipe Rig Mount
• Single Pipe Rig Mount
• USB Cable – 5 ft.
(152.4 cm)
6
• 2 × AA Batteries
• Retro Leather Case
• Wrist Strap (for case)
• User Instruction Manual
• One-Year Limited
Warranty
Page 7
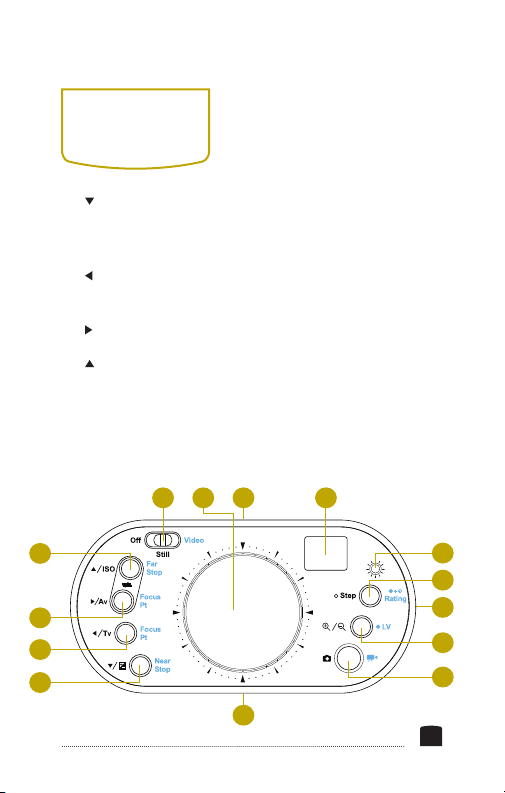
OVERVIEW
1. / Exposure
Compensation /
Near Stop
2. / Shutter Speed /
Focus Pt.
3. / Aperture / Focus Pt.
4. / ISO / Far Stop
5. Off / Still / Video
6. Center Focus Wheel
7. LCD Display
5 6 7
4
3
2
1
8. Indicator Bulb
9. Focus Step Size / Focus
Command Send Rate
10. Digital Zoom /
Live-View On-Off
11. Autofocus / Shutter
Release / Start-Stop Video
12. USB Ports
13. Battery Cover/Battery
Compartment
12
8
9
12
10
11
12
7
Page 8

GETTING
STARTED
Do not remove the Elvid Lynx controller from its case by
pulling on the wheel; open the case, turn it over with one
hand, and allow the controller to slide into your other hand.
This will reduce wear and tear on the focusing wheel.
The Elvid Lynx works with compatible cameras (see
Compatibility section below). You may use an autofocus
or manual focus lens. However, if you use a manual focus
lens, you won't be able to control focus or use the focus
point functions.
INSTALLING
BATTERIES
1. Open the battery cover by pressing down and sliding the
cover off.
2. Insert two fresh AA batteries in the battery
compartment, being careful to place them in the correct
orientation according to the diagrams inside the battery
compartment.
3. Replace the battery cover by inserting the edge of the
battery cover with the tabs into the slots and pressing
down on the opposite edge so that it snaps into place.
8
Page 9
DIAGNOSTIC
TEST
A diagnostic mode allows you to test the buttons
on the Lynx. Before you connect it to a camera,
turn the switch from Off to Still or Video. Push
each button briey, and the indicator bulb will blink
green if the button is functioning correctly. Or press
and hold any button and the indicator bulb will turn
red if the button is functioning correctly.
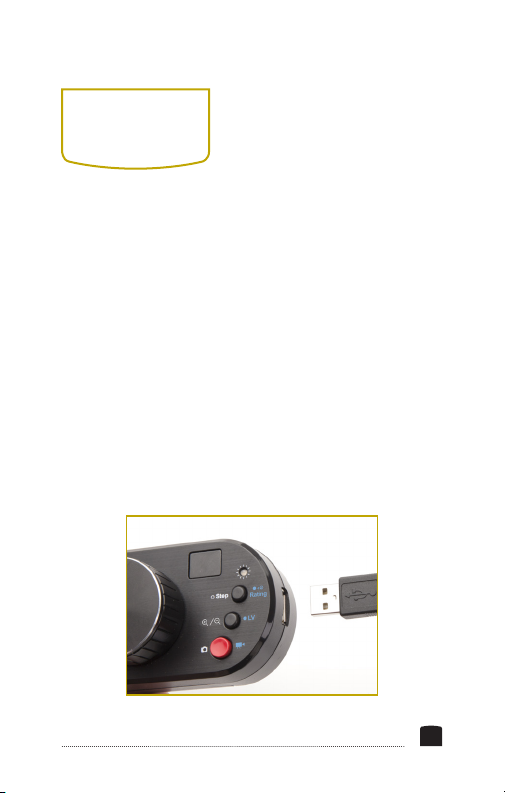
After testing the buttons, connect the Lynx to the
camera by inserting one end of the USB cable into
either one of the USB ports on the Lynx and the
other end into the USB port on the camera.
Note: Only one Lynx USB port works at a time.
9
Page 10

HOW THE
BUTTONS
WORK
All of the buttons on the Lynx have multiple
functions. These are accessed by giving the button a
short press, a long press, or by keeping your nger
on the function button while moving the center
wheel. The functions for each button are listed
below.
Still Mode
1. Autofocus/shutter release
a. Half-press: Autofocus
b. Full-press: Shutter release
2. Digital zoom/Live-View on-off
a. Short-press: Toggle digital zoom – 1x/5x/10x
b. Long-press: Live View on/off
3. Focus step size/focus command send rate
a. Short-press: Focus step size
b. Long-press: Focus command send rate
10
Page 11

4. ISO [ ]
a. Short-press: Move focus point up
b. Long-press: ISO
5. Aperture [ ]
a. Short-press: Move focus point right
b. Long-press: Aperture
6. Shutter speed [ ]
a. Short-press: Move focus point left
b. Long-press: Shutter speed
7. Exposure compensation [ ]
a. Short-press: Move focus point down
b. Long-press: Exposure compensation
In Still Mode, the Focus Wheel is used for Focus and
for Parameter Adjustment.
11
Page 12

Video Mode
1. Autofocus/start-stop video
a. Half-press: Autofocus
b. Long-press: Start/stop video
2. Digital zoom/Live-View on-off
a. Short-press: Toggle digital zoom – 1x/5x/10x
b. Long-press: Live View on/off
3. Focus step size/focus command send rate
a. Short-press: Focus step size
b. Long-press: Focus command send rate
4. Far Stop
a. Short press to save programmed Far Stop
b. Long press to delete programmed Far Stop
5. Focus Point
a. Short press to save programmed 2nd Stop
b. Long press to delete programmed 2nd Stop
6. Focus Point
a. Short press to save programmed 3rd Stop
b. Long press to delete programmed 3rd Stop
7. Near Stop
a. Short press to save programmed Near Stop
b. Long press to delete programmed Near Stop
12
Page 13
FOCUS
WHEEL
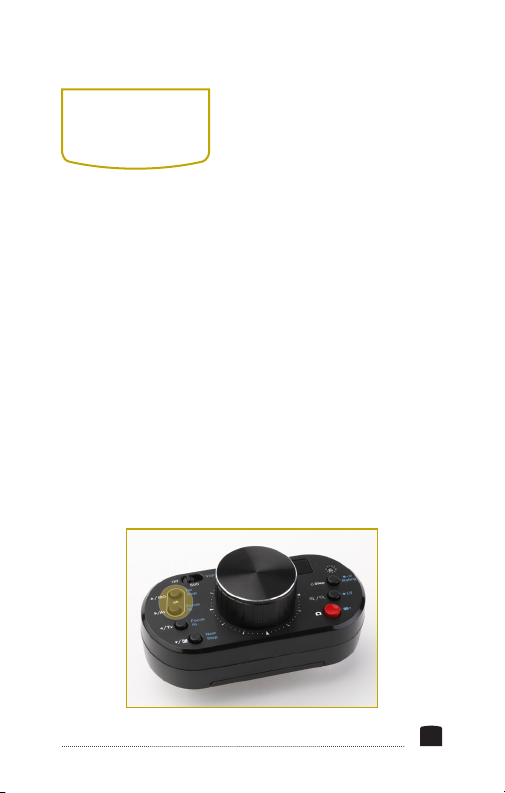
You have a choice of the direction in which the Focus
Wheel turns. To change the rotation direction of the wheel,
the Lynx Focus Controller must be turned on, and the
camera must be turned off or disconnected from the Lynx.
1. To reverse the direction
of the wheel, press and
hold the ISO/Far stop and
the Av/Focus Pt buttons
at the same time. The LED
will begin blinking green
and red, then turn a steady
green.
2. When the LED is green
for 2 seconds, the wheel's
rotational direction has
been reversed.
13
Page 14

FOCUS
STEP SIZE
There are three focus step sizes available when controlling
a camera. The bigger the step size, the quicker the focus
moves. Focus step size is saved automatically, so you don't
need to reset it each time you turn the Lynx on.
1. With the Lynx connected
to the camera using a USB
cable and both devices
turned on, use the focus
step size button to choose
the focus step size by
short-pressing the button.
2. Number "1" in the LED
display represents the
smallest step size; "2" the
middle step size; and "3" is
the largest step size.
14
Note: Do not change the
focus step size after focus
points have been saved—
you will lose focus point
accuracy.
Page 15

FOCUS COMMAND
SEND RATE
Focus command send rate is one of the most important
settings on the Lynx Focus Controller. It determines
how quickly focus is adjusted and allows accurate and
repeatable saved focus points.
1. When the Lynx is in Still
or Video Mode, long-press
the focus command send
rate button while rotating
the wheel to adjust the
focus command send
rate. The LCD will display
numbers from "1" to "9".
2. The Lynx works best
when the focus command
send rate is between "4"
and "7".
3. The focus command send
rate is saved automatically,
so you don't need to reset
it each time you turn the
Lynx on.
Note: Do not change the
focus command send rate
after focus points have
been saved—you will lose
focus point accuracy.
15
Page 16

FUNCTIONS
Live View On/Off
Long-press the Live-View [ ] button to turn the Live
View display on and off.
Note: The Canon EOS 7D and 500D/T1i cameras ignore Live
View "On" commands while in video mode. You will need to
manually activate Live View on the camera in these cases.
Digital Zoom
When Live View is enabled, you can cycle through 1x, 5x,
and 10x digital zoom by short-pressing the Digital zoom
[ ] button. This can be used as an aid to focusing.
Note: Digital zoom does not work while recording is
activated.
Focus Control
You can adjust the focus by using the center focus wheel
when Live View is turned on. By default, turning the wheel
clockwise will move the focus area closer, and turning
the wheel counterclockwise will move it towards innity.
It's also possible to reverse the direction of the wheel, as
described previously.
16
Page 17

CONTROLLER
OPERATION
Still Mode
The Still Mode is used for taking still photographs. The
functions in white text accompanied by arrows will only
work in Still mode, not in Video mode.
1. Switch the Lynx to Still Mode.
2. Long-press the [ ] button.
3. Choose the focus area by short-pressing the
appropriate button for each individual move,
to shift the point of focus up, down, to the right, or
to the left.
4. If you used the focus points previously, you can
return to the center of the image by pressing the
[ ] and [ ] buttons at the same time. This
will only work when you rst turn on the Lynx.
Note: Don't use both the camera's and the Lynx's focus
points at the same time.
5. Exposure adjustments can be made by holding down
the Exposure compensation, Shutter speed, Aperture,
or ISO buttons, and rotating the center wheel to
adjust each of those settings. Stop when the new
setting displays on the camera.
17
Page 18
Note: Adjust ISO, aperture and shutter speed when
the camera is in M/AV/TV/P mode. Adjust Exposure
compensation when the camera is in AV/TV/P mode.
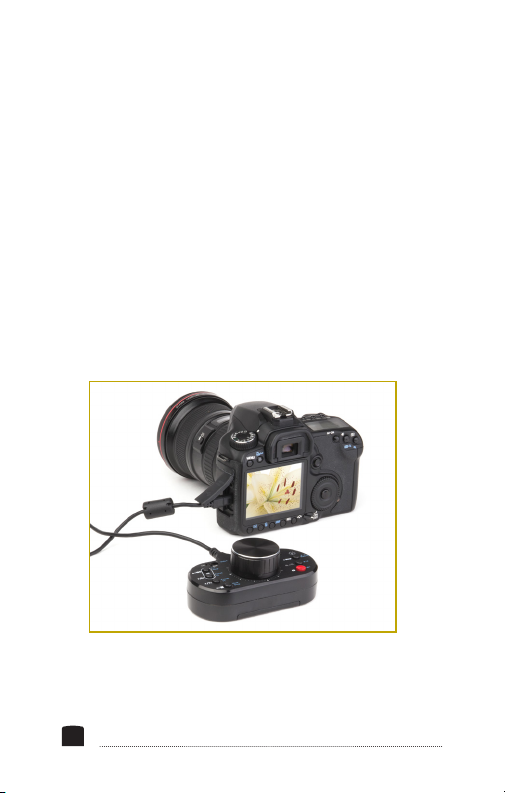
6. To use Autofocus and image capture, half-press the
red Autofocus/shutter release button to autofocus.
The LED will turn from red to green. Fully press the
button to release the shutter.
Note: The lens on the camera has to be set to autofocus for
the autofocus functions on the Lynx to operate.
18
Page 19

Video Mode
Begin by switching both the Lynx and the camera to video
mode. Long-press the [ ] button to enter Live View. The
names of buttons below refer to the blue-colored labels
to the right of the buttons, which are used for the Video
mode.
Programming Focus Points
1. Turn the focusing wheel to set the focus at the
desired focusing area that is the greatest distance
from the camera. Long press the Far Stop button
until the green light blinks once—this indicates that
this focus area has been saved by the Lynx.
2. Turn the focusing wheel to set the focus at the
desired focusing area that is closest to the camera.
Long press the Near Stop button until the green
light blinks once, indicating that this focus area has
been saved.
3. You can set two more focus areas, if you wish,
between the Far and the Near points. Set a focus
area anywhere between the Far and Near focus
areas in the same way, using one of the buttons
labeled "Focus Pt" in blue type. Set another focus
area between the Far and Near focus areas, using
the other button labeled "Focus Pt" in blue type.
19
Page 20

4. To move to any of these focus areas after you've
set them, simply short press the button for the
focus area you want to use.
5. To delete a focus area, long press the button for the
focus area you wish to delete until the green light
blinks twice.
Note: Focus points can only be saved or deleted when Live
View is turned on and video recording is not activated.
Saving and switching focus points is dependent on the
command send rate. If the rate is too high, it will interfere
with focus precision.
Note: If you have saved focus points, the following
conditions can cause you to lose your programmed focus
point accuracy:
1. Manually turning the focusing ring on the lens (see
Note below).
2. Changing the focus step size or focus command
send rate.
3. Setting the focus command send rate at too fast
a rate.
4. Changing the focal length of the lens if using a
zoom lens.
20
Page 21

5. Initiating autofocus through the camera.
6. Continuing to turn the wheel or holding a
directional focus button down after the focus
reaches the end of the focus range.
7. Using a lens model with varying focus increments,
resulting in focus point shift.
Note: Some lenses have a focus point shift. If the distance
the lens ring rotates while focusing towards innity is
different from the distance it rotates when near focusing,
you won't be able to use focus points reliably. To test if a
lens has this condition, save two focus points and change
the focus back and forth between the two points several
times, checking to see if the focus remains accurate.
• To start or stop video recording, long-press the red
start/stop button. You can also record video by
pressing "Record" on the camera.
Note: Some cameras will not focus by half-pressing the
shutter release button. Refer to your camera's instruction
manual for information about this feature.
21
Page 22
USING RIG
MOUNTS
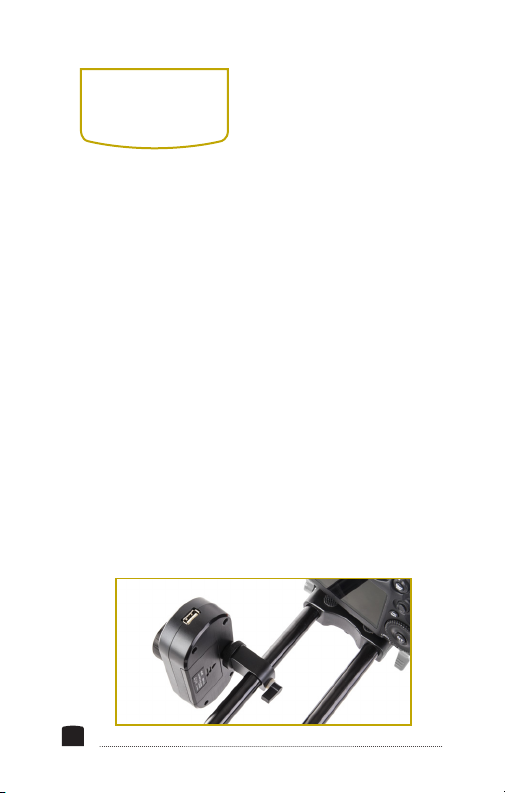
The Lynx can be mounted in many congurations. A
Single Pipe Rig Mount and a Double Pipe Rig Mount are
included with the Lynx. Both mounts are designed for
use with standard 15 mm rods.
To use the Single Pipe Rig Mount, attach the mount
to the bottom of the Lynx using the 1/4"-20 mounting
screw. Then, loosen the tightening lever on the mount
until the mount is able to slip onto the 15 mm rod. Slide
the mount to the desired position, adjust the position of
the Lynx and the mount, and turn the tightening lever so
that it’s secure.
To use the Double Pipe Rig Mount, attach the mount
to the bottom of the Lynx using the 1/4"-20 mounting
screw. Then loosen both tightening levers on the mount
until you're able to slip the mount onto the dual 15 mm
rods. Slide the mount to the desired position and tighten
the levers securely.
22
Page 23

TROUBLE-
SHOOTING
Problem: Controller does not
turn on.
· Insert fresh batteries.
· Make sure the batteries
are in the correct
orientation.
· Move the Mode switch to
"Still" or "Video" mode.
Problem: Controller does not
recognize when camera is
connected.
· Be sure that the camera is
compatible with the Lynx.
· Check that the USB cable
is securely plugged into
both the Lynx and the
camera.
· Insert fresh batteries into
the controller.
· Make certain that the
mode switch is set
appropriately.
Problem: Camera displays
error or is not responsive.
· Check that the camera is
compatible with the Lynx.
· Make sure the batteries
have power and that
the mode switch is set
correctly.
· Disconnect the camera
from the Lynx and turn
both off. Remove the
battery from the camera
and wait 10 seconds, then
put the battery back into
the camera. Reconnect
the camera to the Lynx,
then turn the camera on,
followed by the Lynx.
Problem: LED continuously
blinks green or red when
the Lynx is turned on.
· One of the switches is
stuck. Press/release each
one to nd the stuck
switch.
23
Page 24

Problem: Button presses
seem difcult.
· Executing specic
functions that require
you to hold a button
don't always work. This
indicates a stuck or
defective button insert.
Once you have found the
defective button, please
contact the manufacturer.
Problem: Programmed focus
points are not accurate
· Make sure that the focus
command send rate is not
too fast. Changing the
command send rate, focus
step size, or focal length
after saving focus points
can affect accuracy.
· Some lenses have slightly
different increments if the
focus moves from near
to innity versus innity
to near.
· It will not be accurate
regardless of the Lynx
settings—this is a
limitation of the specic
lens.
Problem: Focus occasionally
pauses or moves unevenly.
· Make sure the focus
command send rate is not
too fast for the specic
combination of lens,
focus step size, and focal
length. If the command
send rate is too fast,
some focus commands
are dropped because the
camera is busy executing
the previous command.
This gap before the next
command is received
causes the focus to move
unevenly. You should keep
the focus command send
rate between "4" and "7"
commands per second.
Note: Turning the center
focus wheel after a lens has
reached the end of its focus
range may cause excessive
wear on the autofocus motor.
Do not rotate the wheel
when you've reached the
limit of the lens.
Note: Don't switch modes too
frequently–this may cause
focusing problems.
24
Page 25

COMPATIBILITY
Compatible cameras:
Canon EOS Rebel T3,
T1i (500D),
T2i (550D),
T3i (600D),
EOS 60D,
7D,
5D Mark II,
5D Mark III,
and 1D Mark IV
SPECIFICATIONS
USB FOCUS
CONTROLLER
Power Supply: 2 × AA batteries
Current: < 50mA
Dimensions: (L×W×H) 4.52˝ × 2.26˝ × 1.94˝
(11.4 × 5.7 × 4.9 cm)
Weight with
batteries:
6.1 oz. (173 g)
25
Page 26

WARNINGS
• Please read and follow
these instructions.
• Do not remove the
controller from the case
by pulling on the wheel;
open the case, turn it
over with one hand, and
allow the controller to
slide into your other
hand.
• Keep this unit away from
water and any ammable
gases or liquids.
• Make sure the unit
is powered off when
plugging it into a power
source.
• Do not attempt to
disassemble or repair
the equipment—doing so
will void the warranty,
and Elvid will not be
26
responsible for any
damage.
• Do not expose unit to
high temperatures.
• Observe caution when
handling batteries.
• Handle the unit with
care.
• Clean the unit with a
soft, dry cloth.
• Keep this unit away from
children.
• Use only parts provided
by the manufacturer.
• Make sure the item is
intact and that there are
no missing parts.
• All photos are for
illustrative purposes
only.
Page 27

ONE-YEAR LIMITED WARRANTY
Elvid provides a limited warranty to the original purchaser that this
product is free from defects in materials and workmanship under
normal consumer use for a period of one (1) year from the original
purchase date or thirty (30) days after replacement, whichever
occurs later. Elvid’s responsibility with respect to this limited
warranty shall be limited solely to repair or replacement, at Elvid’s
discretion, of any product that fails during normal consumer use.
Inoperability of the product or part(s) shall be determined by Elvid.
If the product has been discontinued, we reserve the right to replace
it with a model of equivalent quality and function. To obtain warranty
coverage, contact Elvid to obtain a return merchandise authorization
(“RMA”) number, and return the defective product to Elvid, along with the
RMA number and proof of purchase. Shipment of the defective product
is at the purchaser’s own risk. This warranty does not cover damage or
defect caused by misuse, neglect, accident, alteration, abuse, improper
installation or maintenance. EXCEPT AS PROVIDED HEREIN, ELVID
MAKES NEITHER ANY EXPRESS WARRANTIES NOR ANY IMPLIED
WARRANTIES, INCLUDING BUT NOT LIMITED TO ANY IMPLIED
WARRANTY OF MERCHANTABILITY OR FITNESS FOR A PARTICULAR
PURPOSE. This warranty provides you with specic legal rights, and you
may also have additional rights that vary from state to state.
www.elvidcinema.com © Copyright 2013 Gradus Group
27
Page 28

www.elvidcinema.com
 Loading...