

Page 1
Instruction Manual
HT-153 DVD-Receiver
Page 2

Page 3
PRECAUTIONS
A lightning bolt with an arrowhead symbol within
an equilateral triangle is intended to alert the
user to the presence of uninsulated "dangerous
voltage" within the product's enclosure that may
be of sufficient magnitude to constitute a risk of
electric shock to persons.
The exclamation point within an equilateral
triangle is intended to alert the user to the
presence of important operating and main-
tenance (servicing) instructions in the literature
accompanying the appliance.
WARNING:
OR ELECTRIC SHOCK, DO NOT EXPOSE THIS
APPLIANCE TO RAIN OR MOISTURE. NEVER
OPEN THE CABINET, AS DANGEROUS HIGH
VOLTAGES ARE CONTAINED INSIDE. ONLY
A QUALIFIED SERVICE TECHNICIAN SHOULD
ATTEMPT TO OPEN THE CABINET.
CAUTION:
MATCH WI DE BLADE OF PLUG TO WIDE
SLOT, AND FULLY INSERT INTO ELECTRICAL
SOCKET.
TO AVOID THE DANGER OF FIRE
TO PREVENT ELECTRIC SHOCK,
PROTECT YOURSELF!
Record the model and serial numbers for this
unit while it is easy to see them. These numbers
are located on the back of the unit's cabinet.
Retain this information for future reference.
Model No. _________________________
Serial No. _________________________
Retain this information for future reference.
WARNING
RISK OF ELECTRICSHOCK
DO NOT OPEN
CAUTION
RISK OF ELECTRIC SHOCK DO NOT OPEN
CAUTION:
ELECTRIC SHOCK, DO NOT REMOVE COVER
(OR BACK). THERE IS NO USER SERVICE
ABLE PART INSI DE. REF ER SERVICIN G TO
QUALIFIED SERVICE PERSONNEL.
TO REDUCE THE RISK OF
CAUTION:
a laser system. To prevent di rect ex posure to
the laser beam, do not open t he encl osure.
Visible laser radiation is present when enclosure is open. DO NOT STARE INTO BEAM.
Additionally, the use of controls or adjustments
or performance of procedures other than those
specified herein may result in hazardous radiation exposure.
To ensure proper use of this product, please
read this owner's manual carefully and retain
for future reference. Should the unit require
maintenance, contact an authorized service
location, or contact ELTAX A/S .
This DVD receiver unit employs
3
Page 4

IMPORTANT--
SAFETY INFORMATION
4
CAUTION: Is it important that you read and follow all of
the instructions in this booklet and any marked on the
unit itself. Retain this booklet for future reference.
Accessories--- Never place this product on an unstable
platform, stand, cart, wall mount, shelf, or
table. The product may fall, causing serious personal
injury to persons and pets, as well as seriously
damaging the product. Use only with a stable platform,
stand, cart, wall mount, shelf, or table that has been
recommended by ELTAX A/S or sold with the product .
Any mounting of the product should follow the
manufacturer's instructions, and use a mounting
accessory recommended by the manufacturer.
This unit while positioned on some type of cart must
be move d with c are. Quic k stop s, excess ive force,
and uneven surfaces may cause the product and
cart combination to overturn.
Attachments---Use only attachment srecommended by ELTAX A/S , as t hey may cau se
hazards.
Cleaning--- Always unplug this unit from the wall
electrical outlet before cleaning. Do not use liquid or
aerosol cleaners; use a damp cloth for cleaning.
Lightning--- For added product protection during
a lightning storm or when it is left unattended and
unused for long periods of time, unplug it from the
wall outlet and/or disconnect the antenna or cable
system. This will prevent damage to the product due
to lightning and power-line surges.
Object and Liquid Entry--- Never push objects of
any kind into this product through openings as they
may touch dangerous voltage points or short-out
parts that could result in a fire or electric shock.
Never spill liquid of any kind on or into the product.
Outdoor Antenna Grounding--- If an outside
antenna or cable system is connected to the product,
be sure the antenna or cable system is grounded so
as to provide protection against voltage surges and
built-up static charges. Article 810 of the National
Electrical Code,ANSI/NFPA 70, provides information
with regard to proper grounding of the mast and supporting structure, grounding of the lead-in wire to an
antenna discharge unit, size or grounding conductors,
location of antenna-discharge unit, connection to
grounding electrodes, and requirements for the
grounding electrode.
Overloading---Do not overload wall outlets, extension cords, or integral convenience receptacles, as
this may result in a fire or electric shock.
Power - Cord Protection - Power - supply cords
should be routed so that they are not likely to be
walked on or pinched by items placed upon or against
them, paying particular attention to cords at plugs,
convenience receptacles, and the point where they
exit from the product.
Power Lines---An outside antenna system should
not be located in the vicinity of overhead power lines
or other electric light or power circuits, or where it
can fall into such power lines or circuits. When
installing an outside antenna system, extreme care
should be taken to keep from touching such power
lines or circuits as contact with them might be fatal.
Power Sources---This product should be operated
only from the type of power source indicated on the
marking label. If you are not sure of the type of power
supply to your home, consult your product dealer or
local power company. For products intended to
operate from battery power or other sources, refer to
the operating instructions. This DVD home theater
operates on 230V AC/50Hz. Do not turn off unit
immediately after turning on; wait at least 10 seconds.
Replacement Parts--- If replacement parts are
required, be sure the service technician has used
replacement parts specified by ELTAX or have
the same characteristics as the original part.
Unauthorized substitutions may result in fire, electric
shock, or other hazards.
Safety Check---Upon completion of any service
or repairs to this product, ask the service technician
to perf orm sa fety chec ks to determine t hat the
product is in proper operating condition.
Servicing--- Do not attempt to service this product
yourself as opening or removing covers may expose
you to dangerous voltage or other hazards. Refer all
servicing to qualified service personnel.
TV System---This unit is compatible with television
sets featuring either the NTSC or PAL color system.
Ventilation---Slots and openings in the cabinet
are provided for ventilation and to ensure reliable
operation and protection from overheating. These
openings should never be blocked by placing the
product on a bed, sofa, rug, or other similar surface.
This product should not be placed in a built-in installation such as a bookcase or rack unless proper
ventilation is provided. Never place this product near
a heat source, such as heat registers, stoves,
radiators, or any other product that produces heat.
Water and Moisture---Do not use this product near
sources of water and moisture, such as bath tub, wash
bowl, kitchen sink, or wash machine; in a wet, damp
basement; or near a swimming pool or similar
locations. If moisture condensation occurs, remove
any disc, connect the unit's power cord to a wall outlet,
turn the unit on, and leave it on for two to three hours.
By then, the unit will have warmed up and evaporated
any moisture.
Page 5

TABLE OF CONTENTS
Precaution 3
Safety Information 4
Table of Contents 5
About Your DVD Player 6
Best Location 6
To Obtain a Clear Picture 6
Playable Discs 6
Digital Audio Output 6
Laser-Head Over-Current Protection System 6
Use of Disc 7
Handling 7
Cleaning 7
Storing 7
Front and Back panels 8
Back Panel 8
Front Panel 8
Remote Control 9
Operating the remote control 10
Connecting Devices 11
Speakers 12
Arrangement of speakers 12
Connecting speakers 13
Connecting antenna 14
Connecting power supply 15
Playing the radio 16
Basic DVD operation 17
Functions 18
General Steps In The Setup Menu 21
1 System Setup 22
1.1 System Setup 22
1.1.1 Source 22
1.1.2 Tv System 22
1.1.3 Video 22
1.1.4 Tv Type 22
1.1.5 Password 22
1.1.6 Rating 22
1.1.7 Default 23
1.2 Language Setup 23
1.2.1 Osd Language 23
1.2.2 Audio Lang 23
1.2.3 Subtitle Lang 23
1.2.4 Menu Language 23
1.3 Audio Setup 24
1.3.1 Audio Out 24
1.3.2 Lpcm Output 24
1.3.3 Prologic 24
1.4 Video Setup 24
1.4.1 Brightness 24
1.4.2 Contrast 24
1.4.3 Hue 24
1.4.4 Saturation 25
1.5 Speaker Setup 25
1.5.1 Downmix 25
1.5.2 Center Delay 25
1.5.3 Rear Delay 25
1.6 Digital Setup 25
1.6.1 Dynamic Range 25
1.6.2 Dual Mono (left + Right) 25
Mp3 & Mpeg Function 27
5
Jpeg Files 28
Usb Input 29
Troubleshooting 30
Specifications 31
Page 6

ABOUT YOUR
DVD PLAYER
The following will help you get the most enjoyment from your DVD receiver system.
BEST LOCATION
The unit should be placed on a firm, flat surface, away from VCRs, stereos, radios, or large
speakers, as the magnetic flux from these devices may cause distortion in the sound and a poor
picture. If placed in a cabinet, be sure there is at least 1 of free space completely around the unit
for proper ventilation.
TO OBTAIN A CLEAR PICTURE
A DVD receiver is a precision device. If the optical pick-up lens and disc drive parts become dirty
or worn down, picture quality will become poor. To obtain a clear picture, regular inspection and
maintenance are recommended every 1,000 hours of use, depending on the operating environment.
Contact dealer for details.
PLAYABLE DISCS
This ELTAX DVD receiver system will play the following types of discs: DVD, MP3, CD, CD-R,
and CD-RW with super-error correction ability. It is also capable of displaying picture CDs and digital
photo albums. It supports eight languages, up to 32 subtitles, and multi-angle viewing. It features
easy setup and operation with on-screen menus. It has full function CPU up grade able capability.
DIGITAL AUDIO OUTPUT
The unit's coaxial output capability enables you to connect an external six-channel AV amplifier
and processor with built-in Dolby Digital code and MPEG modulating capacity with just one
cord. This enables you to conveniently enjoy different DVD, CD, and Mp3 discs.
"
6
ANALOG AUDIO OUTPUT
Speaker system plug-and-play convenience through the built-in six-channel power amplifier
eliminates the use of an external power amplifier.
LASER-HEAD OVER-CURRENT
PROTECTION SYSTEM
To extend the service life of the laser head, the unit includes a unique laser-head over-current
protection system, ensuring a constant laser current.
Page 7

USE OF DISCS
This page contains valuable information regarding the handling, cleaning, and storage of discs
played in this unit.
Handling
Do not touch the playback side of the disc.
Do not attach paper or tape to discs.
Do not stick or write anything on the surface. Protect against fingerprints.
Always hold a disc by the center and edge portions.
Cleaning
Fingerprints and dirt on the disc may cause picture and/or sound deterioration. Wipe the disc from
the center outward with a soft cloth. Always keep the disc clean.
If you cannot wipe the dirt off, lightly use a slightly moistened soft cloth and finish with a dry cloth.
Do not use any type of solvent such as: Paint thinner, benzene, commercially available cleaners or
anti-static spray for vinyl LPs.
Storing
Do not store discs in places subject to direct sunlight or near heat sources.
Do not store discs in places subject to moisture and dust.
Store discs vertically in a case. Stacking or placing objects on discs outside of their case may
cause warping.
NOTE:
ELTAX A/S is not responsible for damage that may occur to any disc that is operated
in this unit or not handled, cleaned, or stored as suggested above.
7
Page 8
FRONT AND
BACK PANELS
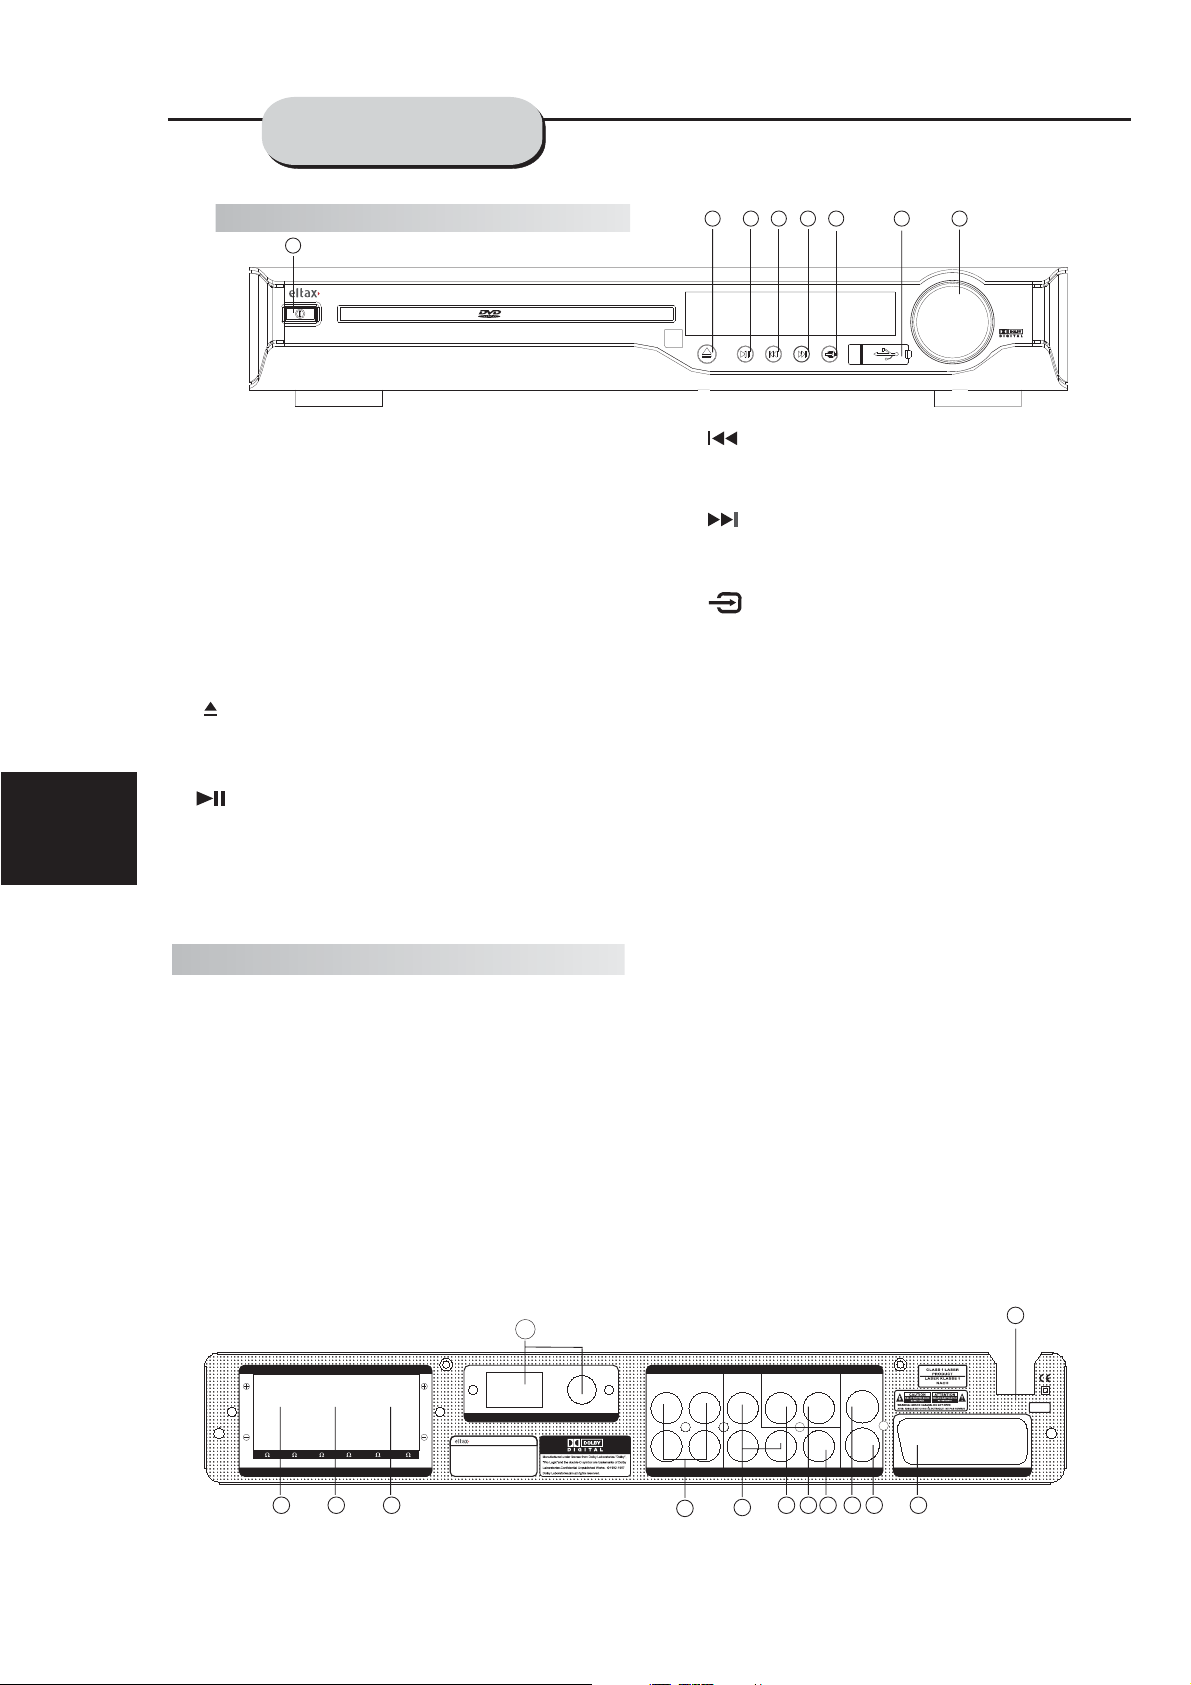
Front Panel Functions
1
HT-153HOME THEATRE RECEIVER
1. POWER
Before plugging the power cord into the AC
outlet, check to make sure all of the connections
have been properly completed. When they have
been, carefully plug power cord into outlet.
Press the POWER button on the front panel
to power the unit.
When the unit is initially powered, a brief surge
of electricity may cause interference with other
electronic equipment on the same circuit. If this
occurs, connect the unit to an outlet on a
different circuit.
2. OPEN/CLOSE
Use this button to open and close the disc tray
while in DVD mode.
6 8
5
4
3
2
7
VOLUME
4. PREV
While in the DVD status, you may press this
button for previous track.
5. NEXT
While in the DVD status, you may press this
button for next track.
6.
INPUT SIGNAL SOURCE
.
Use this button to select the proper input signal
source. (Note: The selected input will correspond to
the selected input terminal on the rear panel.)
7. USB CONNECT
Readonly USB input.
8
3. PLAY /
PAUSE
Use this button to begin play function while in
DVD mode.
Use this button to pause play function while in
DVD mode.
Back Panel Functions
1. ANTENNA
Use to connect the provided indoor FM and
AM loop antennas.
2. AUX INPUT
Use to connect input for both auxiliary 1 and 2
music sources.
3. AUDIO OUT
Use to connect both the right and left channel
line outputs as well as subwoofer output.
4. VIDEO INPUT FOR AUX 1
5. VIDEO INPUT FOR AUX 2
6. COAXIAL DIGITAL AUDIO OUTPUT
7. VIDEO OUTPUT
8. S-VIDEO OUTPUT
9.
SCART IN/OUT
SR SL FR FL CEN SW
4 4444 8
SPEAKER OUTPUT
MODEL:
POWERSOURCE:
POWERCONSUMPTION:
ITEMNO.:
SERIALNO.:
1
AM ANTENNA FM
DVD-RECEIVER
HT-153
90-240V50~60Hz
130W
11036.01
XXXXXXXXXXXXXX
8. VOLUME
Use this button to control the unit's volume. It
controls all six channels simultaneously.
10. REAR
Use to connect the four terminals of the left
and right surround sound speakers.
11. FRONT/MAIN
Use to connect the four terminals of the left
and right front or main speakers.
12. CENTER/SUBWOOFER
Use to connect the four terminals of the center
and subwoofer speakers.
13. AC 90V-240V 50/60H
Z
This unit comes with an AC power cord. Be
sure its prongs are dry before plugging it into an
electrical outlet. Take caution not to overextend
the cord or walk on it.
13
AUDIO INPUT
LRLRL
AUX 1 AUX 2
VIDEO INPUT
AUDIO OUTPUT
VIDEO 1 VIDEO 2
R
PRE OUT SW COAXIAL
VIDEO OUTPUT
VIDEO
S-VIDEO
SCART IN/OUT
90-240V
50~60Hz
5
4
3
2
6 7 8 910 11 12
Page 9
REMOTE
CONTROLLER
10
12
13
14
15
16
17
18
19
20
21
22
1
2
3
TUNER
DVD
12
4
5
SCART
MUTE
AUX1/2
3
6
23
24
25
26
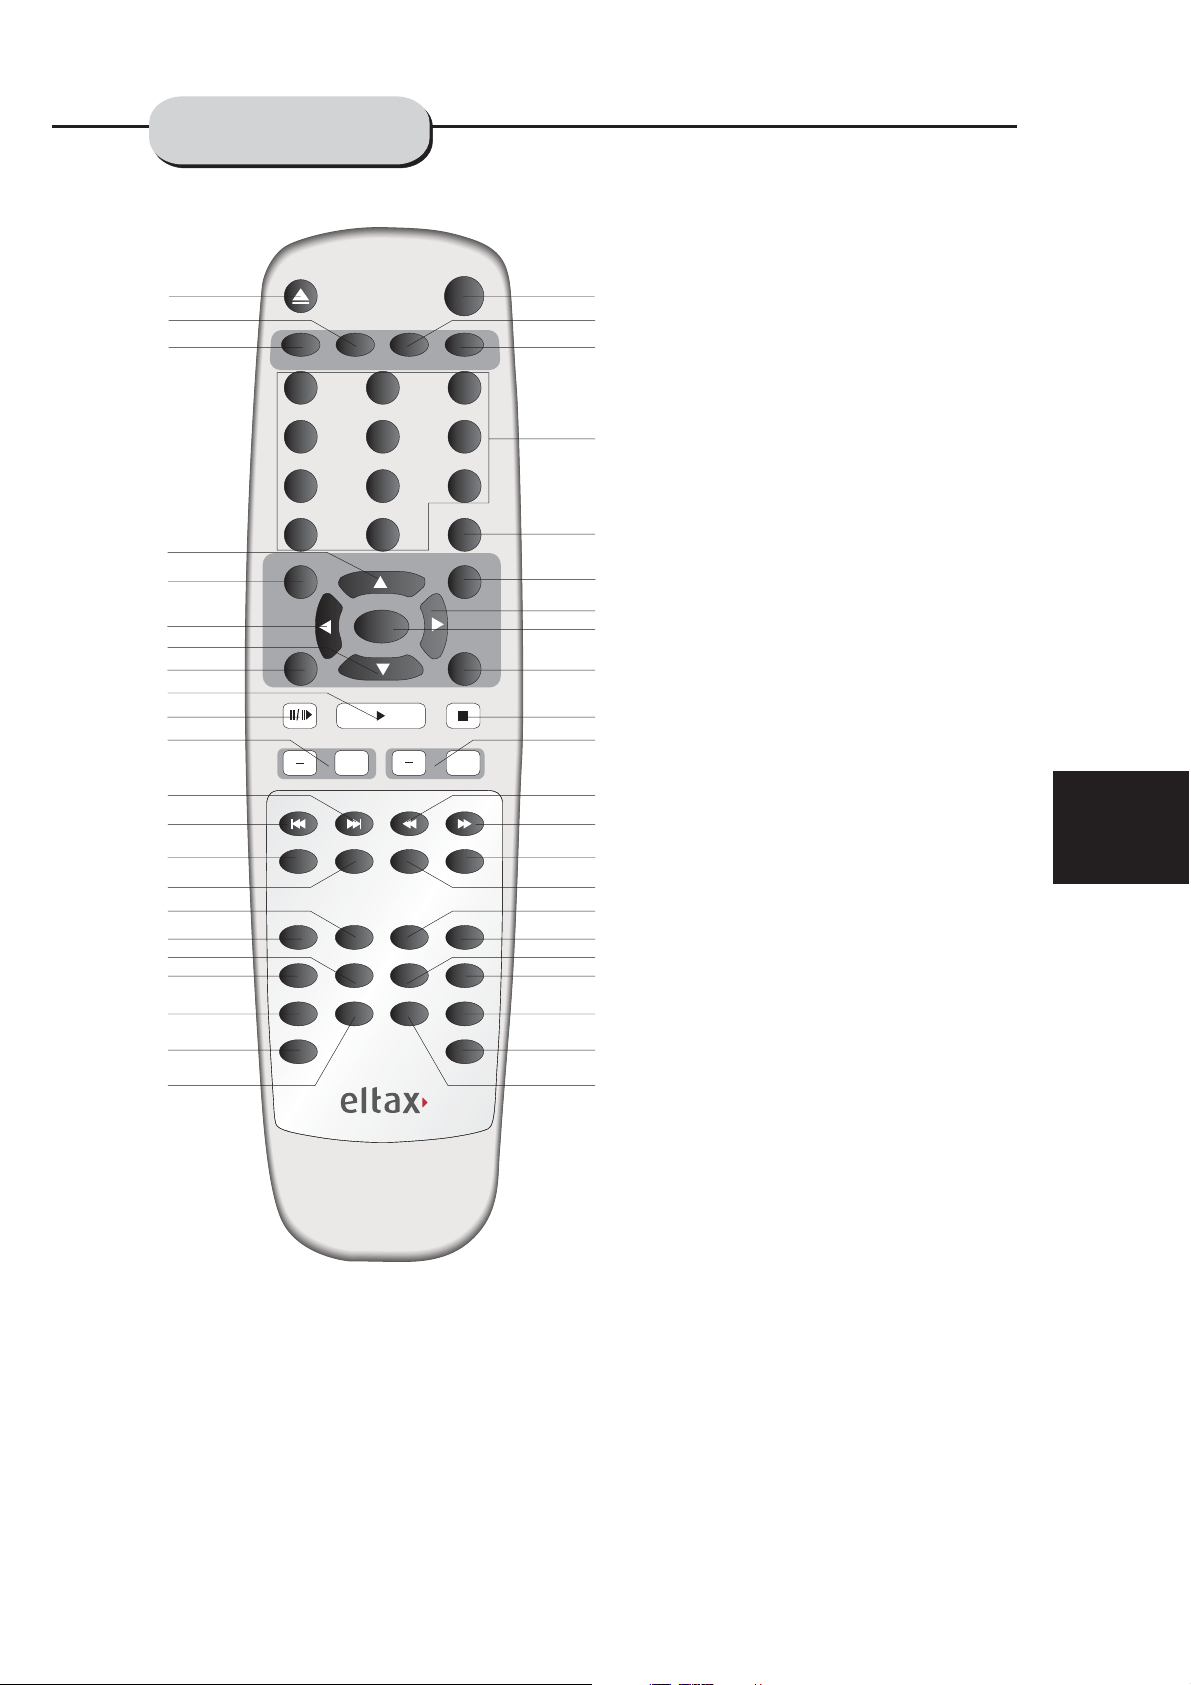
1. Open/Close
2. Tuner
3. DVD
4. Scroll Up
5. FM Mode
6. Scroll Left
7. Scroll Down
8. Memo
9. Play
789
SETUP
4
5
6
7
8
9
11
0
FM MODE
MEMO
PAUSE/STEP
ZOOM PROG
GOTO TITLE
SUBTITLE
RESUME
RETURN
VOL
+
N/P
REPEAT
+10
ENTER
PLAY
SLOW
MENU
AUDIO ANGLE
R/L
PRE/TUN
AUTO
STOP
CH
+
A-B
DISPLAY
CH.SET
PROLOGIC
27
28
29
30
31
32
33
34
35
36
37
38
39
40
41
42
43
44
10. Pause/Step
11. Volume Up and Down
12. Next
13. Previous
14. Zoom
15. Program
16. Title
17. Goto
18. N/P
19. Subtitle
20. Resume
21. Return
22. Repeat
23. Mute
24. Scart input
25. AUX 1 / AUX 2
26. 0-10+ Digits
27. Setup
28. Preset/Tuning
29. Scroll Right
30. Enter
31. Auto tuning
32. Stop
33. Channel Up and Down
34. Fast Reverse
35. Fast Forward
36. A - B Repeat
37. Slow
9
38. Menu
39. Diplay
40. Audio
41. Angle
42. CH.SEL
43. Pro Logic
44. R/L
Page 10

OPERATING THE
REMOTE CONTROL
10
Battery Installation
1. Push down and out on the battery Compartment cover to remove it.
2. Insert the two AAA batteries into the battery
compartment of the remote control, making
sure the + and - signs on the batteries and
inside the battery compartment match up.
3. Replace the battery compartment cover.
Notes:
Do not mix batteries from different manufacturers, nor old ones with new.
If the remote control will not be used for an
extended period of time, remove the
batteries to prevent damage-causing
corrosion.
Remove dead batteries immediately to
prevent damage-causing corrosion.
If battery leakage occurs, wipe the battery
liquid from the battery compartment, then
replace both batteries.
Always replace both batteries at the same
time, using new, fully charged batteries.
Life expectancy of batt eries m ay vary
depending on amount of use.
""
Notes:
Do not direct the remote sensor toward
any light source, such as direct sunlight or
a strong fluorescent light, as it may cause
the unit to not operate correctly.
When other remote contr ols are u sed
nearby or when the remote is used near
equipment using infrared rays, interference
may occur.
Placing an object on the remote control
may cause it to inadvertently depress a
button, changing a function and shortening
battery life.
Do not glaze the front of the DVD receiver
with colored glass, as it may cause
interference with normal operation of the
controller.
Make sure there is no barrier between the
remote control and remo te sens or, as it
could prevent the unit from receiving the
signal.
Do not spill water or put wet items on the
remote control.
Never disassemble remote control.
Using the Remote Control
Point the remote control at the remote sensor
on the DVD receiver. When the signal is
received from the remote, the unit will function
accordingly. The remote will operate to
approximately 16' from the remote sensor at an
angle of around 30 each direction.
BATTERIES
INCORRECT USE OF BATTERIES MAY
CAUSE THEM TO LEAK, CORRODE OR EXP
LODE.
Page 11

CONNECTING
DEVICES
CD/DVD AUX PLAYER 1
CD/DVD AUX PLAYER 2
SR SL FR FL CEN SW
AM ANTENNA FM
DVD-RECEIVER
4 4444 8
SPEAKER OUTPUT
MODEL:
POWERSOURCE:
POWERCONSUMPTION:
ITEMNO.:
SERIALNO.:
90-240V50~60Hz
11036.01
XXXXXXXXXXXXXX
HT-153
130W
POWER AMPLIFIER
Connection terminals for this DVD receiver
are found on the rear panel. Read carefully
and follow the manufacturers' instructions
of any video and audio device being
connected to this unit.
Do not connect the power until all connections
have been properly completed.
AUDIO INPUT
LRLRL
AUX 1 AUX 2
AUDIO OUTPUT
VIDEO INPUT
VIDEO 1 VIDEO 2
R
PRE OUT SW COAXIAL
VIDEO OUTPUT
VIDEO
S-VIDEO
SCART IN/OUT
ACTIVE
SUBWOOFER (OPTIONAL)
DIGITAL RECEIVER
Red terminal (marked R) is for connecting the
right channel. The white terminal (marked L)
is for connecting the left channel. The yellow
terminal is for video connection. Make sure
all connections are securely made. Improper
connections may cause noise, poor performance, or cause damage to the equipment.
Do not tie the AV cord with any oth er cord s,
such as the power cord or speaker wires, as
it may result in poor picture and/or sound
quality.
90-240V
50~60Hz
11
Page 12

SPEAKERS
ARRANGEMENT
OF SPEAKERS
12
The configuration and arrangement of a
surround sound system's speakers is critical.
For maximum listening enjoyment, refer to the
Arrangement of Speakers section in this manual
prior to connecting speakers.
Surround Sound Speakers
Front or main right and left speakers;
center speaker
These three speakers provide extensive
sound imaging and augment the dynamic effect
of the audio. A movie's principal dialogue comes
through these speakers.
Rear or surround sound speakers
These two speakers provide 3-D dynamic
sound effects, and create an enveloping
atmosphere, as they add background sounds.
.
Subwoofer speaker
Provides rich and powerful bass, adding a
powerful dimension of realism.
: Audio recorded for the center speaker and
Note
subwoofer will be assigned to the front and 3-D
rear speakers to obtain the optimum 3-D
surround sound effect.
The ideal surround sound speaker configuration may vary according to room size and wall
material. The figure below illustrates a typical
arrangement.
Hints:
Front or main speakers and central speaker
should be placed at the same level and in a way
that sound is oriented toward the listener's ears.
3D surround sound or rear speakers should
be placed 3' higher than the height of listener's
ears.
Subwoofer speaker may be placed anywhere
within the room, as its location produces little
effect on a listener's sensation to sound. To
obtain the optimum bass effect, a subwoofer is
recommended in home theater systems.
1
2
3
67
4
5
1.TV set or screen
2. Front or main left speaker
3.Subwoofer
4.Center speaker
5.Front or main right speaker
6.3-D surround sound left speaker
7.3-D surround sound right speaker
8.Viewer's location
Page 13

CONNECTING
SPEAKERS
This well-designed DVD receiver provides
optimum sound quality when the speakers used
are within the range of their rated impedance.
Important
The minimum impedance of the five speaker
terminals is 4 ohm; for the subwoofer, it is
8 ohm.
If you want to use only one speaker or listen
to monophonic music, do not parallel connect
individual speakers to the left and right
channel terminals. See the figure on the left
below.
Connecting Speaker Cables
1.Peel off approximately of cable
1/ 2"
insulation
2.Tighten the wire end (#2 below)
3.Open cable terminal by pressing back on
tab
4.Insert wire end into terminal
5.Release tab; make sure wire is in terminal
securely
Note:
To prevent damage to the circuit, care
should be taken to prevent short circuiting from
occurring at the positive and negative poles of
the speaker cord.
12
34
5
Surround speaker
Subwoofer speaker
Surround speaker
SR SL FR FL CEN SW
4 4444 8
SPEAKER OUTPUT
Center speaker
AM ANTENNA FM
DVD-RECEIVER
90-240V50~60Hz
11036.01
XXXXXXXXXXXXXX
HT-153
130W
MODEL:
POWERSOURCE:
POWERCONSUMPTION:
ITEMNO.:
SERIALNO.:
AUDIO INPUT
LRLRL
AUX 1 AUX 2
AUDIO
AUDIO OUTPUT
VIDEO INPUT
VIDEO 1 VIDEO 2
R
PRE OUT SW COAXIAL
VIDEO
VIDEO OUTPUT
VIDEO
S-VIDEO
S-video
SCART
SCART IN/OUT
90-240V
50~60Hz
13
Main speaker Main speaker
Page 14

CONNECTING
ANTENNA
Radio signals may be difficult to receive in
some buildings and under certain conditions.
The provided antennas will help in their reception.
They are intended for indoor use only.
AM Loop Antenna
The placement of the AM loop antenna should
be in a direction that provides the clearest
reception. Keep as far as possible from DVD
receiver, TV set, and speaker and power cords.
If reception remains poor, an outdoor antenna
may be necessary.
FM Indoor Antenna
The FM antenna should be fully extended
and in a direction that provides the clearest
signal. Secure the antenna ends in a location
where distortion is a minimum. If reception
remains poor, an outdoor antenna may be
necessary.
14
To connect the AM loop antenna:
1.Hold down handle
2.Insert wire end into hole
3.Release handle
Position for best reception
1
2
AM
FM
3
Outdoor AM antenna
Coaxial cable(75 ohm)
FM
Coaxial cable (75 ohm)
Outdoor FM antenna
Page 15

POWER
CONNECTING
POWER SUPPLY
HT-153HOME THEATRE RECEIVER
Before plugging the power cord into the AC outlet, check to make sure all of the connections
have been properly completed. When they have been, carefully plug power cord into outlet.
Press the POWER button on the front panel to power the unit. The display panel will light.
When the unit is initially powered, a brief surge of electricity may cause interference with other
electronic equipment on the same circuit. If this occurs, connect the unit to an outlet on a different
circuit.
VOLUME
15
BASIC OPERATION
Selecting Sound Source
1. Press any function button (DVD, TUNER,
TV
, AUX1/2) to select the desired sound source.
The appropriate symbol will appear in the display.
2. When the TUNER button is pressed,
the last station listened to will play.
Note:
unless it and the selected signal button coincide
with the active program source signal input.
The desired program source will not play
Volume Control
The volume may be adjusted by either turning
the large volume knob on the front panel or
using the appropriate volume button on the
remote control.
Mute
Pressing the MUTE button temporarily mutes
every speaker. To resume audio, press MUTE
button again.
Page 16

PLAYING THE RADIO
HT-153HOME THEATRE RECEIVER
Tuner button
Number button
VOLUME
DVD
12
4
789
0
FM MODE
MEMO
PAUSE/STEP
VOL
ZOOM PROG
GOTO TITLE
SUBTITLE
RESUME
RETURN
TUNER
REPEAT
+
N/P
5
+10
ENTER
PLAY
SCART
PRE/TUN
CH
SLOW
MENU
DISPLAY
AUDIO ANGLE
R/L
PROLOGIC
MUTE
AUX1/2
3
6
SETUP
AUTO
STOP
+
A-B
CH.SET
16
Positioning
1.Press TUNER button to select desired wave
band (AM or FM).
2.Press UP or DOWN button to find a station.
The frequency will change with each press.
When a station's signal is received, it will
appear in the display.
3.To lock onto a station quickly, hold the UP
or DOWN button for two seconds. The unit
will start automatic tuning. When a station
is found, automatic tuning stops.
To add a stati on to mem ory, press the MEMO
4.
button. The memory storage number will
blink for four seconds in the display. Press
MEMO again to store the station.
Memory number
Wave band
5.
To reduce noise when an FM-stereo program
Station frequency
has been received, press the MONO button.
The word STEREO will disappear from the
display.
The program is now heard in
monographic form, reducing the noise. To
resume stereo play, press the MONO button
again.
Automatic Tuning
This unit will store up to 40 individual AM or
50 individual FM radio stations in its memory.
1.Press the >> button. The wordAUTO
will appear in the display and the automatic
tuning mode is activated.
2.Stations will be stored in ascending order
until 50 stations of that particular wave band
have been saved. When a station is stored,
the
memory storage number, as well as the
station's frequency, will flash for four
seconds in the display.
3.When the total number of stations reaches
40, in a particular wave's (AM or FM)
memory,
no further station in that wave band will
be saved.
To Play Preset Stations
1.Press the TUNER button to select the
desired wave band.
2.Press the PRE/TUN button.
3.Press any of the numbere d butto ns to
select the desired station's memory number.
For example, to play the station at memory
#5, simply press the 5 butt on; for m emory
#17, press the 1 button followed by the 7
button.
4.Stations in the memory function may also
be accessed by pressing the UP or DOWN
button.
Page 17

BASIC DVD
OPERATION
Once the unit is connected to a television
set and any other accessory equipment, you
are ready to enjoy the excitement of DVD videos
or your favorite CDs and MP3 files.
To play a DV D video disc:
Turn on the TV and select theA/V mode. If
the set features an SCART connection, be sure
the SCART mode is selected from the TV menu.
Turn on amplifier, if connected. Select AC-3 or
DVD mode.
To play an audio disc:
Turn on the audio system and choose the
input source that is connected to the DVD player.
Set the SPDIF OUTPUT to SPDIF OFF from the
SETUP MENU display if you don't have the
proper equipment for Dolby Digital surround
sound.
1. Press the POWER key on front panel.
DISC LOADING appears on screen.
Once it has read the disc, the unit automatically will begin playback. When playing a DVD,
the DVD title menu will appear. CD tracks are
or
played in sequence.
Note:
It is possible to damage a disc if it is not
placed correctly on the guides in the disc tray.
This may also cause the DVD player t o
malfunction. Do not force or place anything
other than a 5 DVD or CD onto the disc tray.
"
Never move the DVD player during playback
as this may cause damage to the disc as well as
the player. To open and close the disc tray, only
use the OPEN/CLOSE key found on both the
remote control and on the unit's front panel.
PLAY
REMOTE CONTROL
PLAY
FRONT PANEL
,
POWER
LOADING
If there is no disc, NO DISC shown on screen:
NO DISC
2. Press the OPEN/CLOSE k ey. The disc
tray will open.
OPEN/CLOSE
FRONT PANEL
OPEN/CLOSE
REMOTE CONTROL
OPEN
Press PAUSE key:
PAU SE
REMOTE CONTROL
PAUSE
FRONT PANEL
5. PREV/NEXT playback
Press key or key , play previous or next
track. To resume normal playback, press PLAY key.
Press PREV key:
REMOTE CONTROL
Press NEXT key:
REMOTE CONTROL
17
3. Place the disc on the disc t ray. Be sure
play side is face down on the tray.
4. Press OPEN/CLOSE key to close tray.
The disc tray will close. The disc type will
appear in the upper-left-hand corner of the
screen.
6.Fast Forward/Reverse Playback
The unit features both fast forward and fast
reverse playback. Either mode will speed up:
2x,4x,8x,16x.
Page 18

BASIC DVD
OPERATION
FUNCTIONS
18
2X
2X
To activate either function, simply press the
key or key on the remote control. The
speed changes each time the key is pressed.
To resume normal playback, press the PLAY key.
Memory Playback
This unit allows the viewer to stop playback,
then later continue playback from that exact disc
location. Press the STOP key to halt playback.
The unit then will memorize the location where
playback was stopped. To resume watching,
press the PLAY key and the unit will
resume playback from the exact location where
playback was stopped. (
Exclude Mp3 DISC)
When you play DVD discs, press MENU or
TITLE key return menu and title, the unit then
will memorize the location, To resume watching
press the PLAY key and the unit will resume
playback from the exact location.
PLAY
Screen Display
While a disc is playing, the status of various
functions may be checked, such as the tile, track
number, and several time categories.
1. Press the DISPLAY ke y once and the title
appears along with the chapter and how much
time has played.
TT 01/02 CH 02/ 28
DISP
00:21:05
2. Press the DISPLAY key again and the
remaining time for that particular title appears.
TITLE REMAIN
01 44 34ㄩㄩ
3. Press the DISPLAY key again and the total
elapsed time for that particular chapter appears.
CHAPTER ELAPSED
00 05 29ㄩㄩ
4. Press the DISPLAY key again and the
total remaining time for that particular chapter
appears.
CHAPTER REMAIN
00 07 36ㄩㄩ
Slow Motion
This DVD receiver has the ability to play
discs in slow motion in either forward or reverse
direction. Each time the SLOW key is pressed,
the speed will slow from forward slow speed1/ 2,
to 1/ 4, to 1/ 8, to 1/ 16 to reverse slow speed
to 1/ 4, to 1/ 8, to 1/ 16, to normal speed.
1/ 2,
To
resume normal playback, press the PLAY key.
SLOW
5. Press the DISPLAY key again and the
display turns off.
Page 19

FUNCTIONS
N/P
This DVD receiver supports video
various systems, including auto, NTSC,
output of
and PAL.
The picture will blink and become colourless
when the wrong system is selected. (NTSC for
North America, PAL for Europe). For more
information on output format, refer to the TV
set's manufacturer's instructions.
Subtitles
The unit has the capability to display subtitles
in any of 32 different languages.
1. Press the SUBTITLE key. The subtitle
menu will appear. Select the desired language
by pressing the SUBTITLE key.
SUBTITLE 02/08 ENGLISH
SUBTITLE
2. To remove the subtitles from view, press
the SUBTITLE key until they disappear.
Language
The unit has the capability to show movies in
one of eight languages.
1. Press the AUDIO key. The language
menu will appear. Select the desired language
by pressing the AUDIO key.
AUDIO
AUDIO 1/8 AC-3 2CH ENGLISH
Note: The disc being played must be multi-language encoded.
LOCATING A TITLE
DVD discs are normally divided into titles,
which are then sub-divided into chapters. A
specific title can be easily found with this unit.
Specific titles can be found using either the title
menu function, if the DVD disc contains a title
menu, or through its unique title number.
19
SUBTITLE OFF
Note: The disc being played must be multi-
subtitle encoded.
Camera Angle
The ability to change the camera angle allows
viewer to play director and watch a movie from
different perspectives.
1. Press the ANGLE key on the remote control.
With each press, the camera angle changes.
2. The ke y may be pressed only when the
flashing angle icon appears in the unit's display
panel.
ANGLE
1/4
Title Menu Function
1. Press the TITLE key. The title menu will
appear on the TV screen.
2. Press the appropriate scroll key to select
the desired title. A title may also be located by
pressing its assigned number with the number
buttons.
3. Press the ENTER key . This will sta rt
playback from chapter 1 of the selected title.
Note:
Some discs do not respond to this function. If
different instructions appear on the TV screen,
follow those instructions. The Instructions given
here describe the basic procedure. Procedures
may vary depending on the content of the DVD
disc. When playing a VCD2.0 disc, TITLE key
can be used to return to menu.
Note: Camera angle may be changed only in
discs with multi-angle capability encoded
into them.
Page 20

FUNCTIONS
20
Time
This DVD receiver can display various data
regarding the disc being played. Press the
DISP button for the following.
1. Press once, the number o f title s and
chapters in each title appears
DISP
TITLE 01/02 CHAPTER 06/28
.
2. Press again, the time of a selected title
appears.
DISP
TITLE 01/02 TIME : :ㄜㄜ ㄜㄜ ㄜㄜ
MENU: MENU/PBC
With the PBC function on, choosing a song
on a CD can only be done when at th e main
menu. With the PBC function off, song selections
can be made by entering the relevant number
keys. The menu content of the disc will appear
when the MENU button is pressed while a DVD
disc is playing.
REPEAT
TITLE
The repeat mode changes each time the
REPEAT key is pressed (i.e., from title repeat
to chapter repeat, all repeat , to repeat off.)
REPEAT
ALL
AMP Volume up/down Adjustment
Press the CH.SEL button on the remote control, TV
OSD appears:
VOL_L +00db
Press CH.SEL twice, OSD Appears:
AUDIO
MENU
SUBTITLES
PLAY
Repeat Play
This DVD receiver allows repeated playback
of specific titles, chapters/tracks, or segment.
It even allows switching between two items that
are being repeated.
1. Select the item to repeat.
2. Press the REPEAT key.
REPEAT
CHAPTER
VOL_R +00db
Press CH.SEL thrice to seven times the OSD
converts in turn of RF, LS, RS, CN and SW;
VOL_RS +00db
VOL_LS +00db
VOL_C +00db
VOL_SW +00db
Press CH.SEL continually it goes in cycle.
Press the VOL+ or VOL- button on the remote
control to change the Volume value of ALL, LF, RF,
LS, RS, CN or SW separately.
MONO/
CH.SEL
VOL_L +00db
Page 21

Zoom
A picture may be enlarged up to four times
during either playback or slow motion through
the unit's zoom function. Press the ZOOM key
once and it enlarges the image 2x, press a
second time and the image enlarges 3x. A
third press enlarges the image 4x. A forth
press the image 1/2x, a fif th pres s the image
1/3x, a sixth press the image 1/4x . To
return to normal-size playback, press the
ZOOM
key a seventh time. Enlargement takes place
in the center of the picture.
SYSTEM SETUPFUNCTIONS
1. General Steps in the setup menu
A) Press the setup button , the mai n setup menu
appears.
SYSTEM SETUP
TV SYSTEM
VIDEO
TV TYPE
PASSWORD
RATING
DEFAULT
EXIT SETUP
Volume and Mute
The volume on this DVD receiver is easily
controlled with the remote control by
either the VOL + key to raise the volume
VOL- key to lower it. By pressing the
key, no audio will be heard. To rein state
pressing
or the
MUTE
the audio,
press the MUTE key again.
Program
Allows you to program specific tracks in a
desired order of play. Press PROG key program
menu well appear on the screen, set up the
program play in number key. The scroll to the
START, Press ENTER key to program play. To
exit the Programmed play mode, press the
PROG button again.
B) Press the Left and Right arrow buttons to
highlight the icon of the desired page, then
press the Down or Right arrow button to
activate that page; For example, if you want to
setup the video page, press Right to highlight
the video icon, the video page will be
displayed on the screen.
VIDEO SETUP
BRIGHTNESS
CONTRAST
HUE
SATURATION
EXIT SETUP
C) Press the Down arrow button to highlight
the desired option. Press Enter or press Right
to select. The choices of that option appear on
the right; For example, press the Down arrow
button to highlight the BRIGHTNESS option,
the press Enter to select, the brightness
choices appear on the right.
21
VIDEO SETUP
BRIGHTNESS
CONTRAST
HUE
SATURATION
EXIT SETUP
12
10
8
6
4
2
0
A) Press the Arrow buttons to highlight the Exit
Setup option,then press Enter or Setup again
to exit Setup Menu.
Page 22

SYSTEM SETUP
22
1 SYSTEM SETUP
1.1 SYSTEM SETUP
The system setup options are illustrated
below:
1.1.1 SOURCE
There are 2 kinds of sources illustrated
below.
SYSTEM SETUP
SOURCE
TV SYSTEM
VIDEO
TV TYPE
PASSWORD
RATING
DEFAULT
EXIT SETUP
1.1.2 TV SYSTEM
According to the Color System of the TV, you
can choose the TV System.
Note:
NTSC is primarily used in the United States
SYSTEM SETUP
SOURCE
TV SYSTEM
VIDEO
TV TYPE
PASSWORD
RATING
DEFAULT
EXIT SETUP
DISC
USB
PAL
NTSC
AUTO
1.1.4 TV TYPE
According to the TV type,you can choose
16:9,4:3LB or 4:3PS.
SYSTEM SETUP
SOURCE
TV SYSTEM
VIDEO
TV TYPE
PASSWORD
RATING
DEFAULT
EXIT SETUP
4:3PS
4:3LB
16:9
1.1.5 PASSWORD
The password option is initialized locked, and
you can not set the ratings limit or change the
password. In order for the Ratings feature to
work, the password mode must be turned on.
If you want to set the ratings limit , you will
need to enter the default password. Which is
6666, then press Enter to confirm. To change
the password , you will be prompted for the
old password , then be prompted for anew.
Enter a 4-digit number ( this is you
password). Press remember your
PASSWORD, as the DEFAULT setting will
revert everything.But the PASSWORD to the
factory defaults.
1.1.3 VIDEO
According to the output jack of TV set, you can
choose S-VIDEO and RGB.
SYSTEM SETUP
SOURCE
TV SYSTEM
VIDEO
TV TYPE
PASSWORD
RATING
DEFAULT
EXIT SETUP
RGB
S-VIDEO
SYSTEM SETUP
SOURCE
TV SYSTEM
VIDEO
TV TYPE
PASSWORD
RATING
DEFAULT
EXIT SETUP
----
1.1.6 RATING
The Rating feature is a rating limit system,
like movie ratings. It works with DVD discs
that have been assigned a rating. This helps
you control the types for DVDs that your
family watches.
Page 23

SYSTEM SETUP
SYSTEM SETUP
SOURCE
TV SYSTEM
VIDEO
TV TYPE
PASSWORD
RATING
DEFAULT
EXIT SETUP
1.1.7 DEFAULT
The DEFAULT setup options are RESTORE
factory setup. Let your player work on best
state.
SYSTEM SETUP
TV SYSTEM
VIDEO
TV TYPE
PASSWORD
RATING
DEFAULT
1 G
2
3 PG
4 PG13
5
6 R
7 NC-17
8
RESTORE
Highlight the AUDIO LANG option,and press
the Arrow buttons to choose the audio
language you prefer.Press Enter to confirm.If
the disc you are playing has that language
available,it will output that language.
LANGUAGE SETUP
OSD LANGUAGE
AUDIO LANG
SUBTITLE LANG
MENU LANG
EXIT SETUP
ENGLISH
GERMAN
SPANISH
FRENCH
DUTCH
ITALIAN
DANISH
PORTUGUESE
1.2.3 SUBTITLE LANGUAGE
Highlight the SUBTITLE LANG option, and
press the Arrow buttons to choose the subtitle
language you prefer. Press Enter to confirm. If
the disc you are playing has that language
available, it will displays subtitles in that
language.
EXIT SETUP
When your unit does not work properly, it may
probably result from some wrong settings.Please
try the Restore Factory Setting function to see if
thr unit can restore to its normal working status.
1.2 LANGUAGE SETUP
The language setup options are illustrated
below:
1.2.1 OSD LANGUAGE
Highlight the OSD LANGUAGE option, and
press the Arrow buttons to choose the OSD
language you prefer. Press Enter to confirm,
and it will display OSD in that language.
LANGUAGE SETUP
OSD LANGUAGE
AUDIO LANG
SUBTITLE LANG
MENU LANG
EXIT SETUP
ENGLISH
GERMAN
SPANISH
FRENCH
DUTCH
DANISH
LANGUAGE SETUP
OSD LANGUAGE
AUDIO LANG
SUBTITLE LANG
MENU LANG
EXIT SETUP
ENGLISH
GERMAN
SPANISH
FRENCH
DUTCH
ITALIAN
DANISH
OFF
1.2.4 MENU LANGUAGE
Highlight the MENU LANG option, and press
the Arrow buttons to choose the menu
languageyou prefer. Press Enter to confirm. If
the disc you are playing has that Language,
Availabel.It will display the menu in the
language.
LANGUAGE SETUP
OSD LANGUAGE
AUDIO LANG
SUBTITLE LANG
MENU LANG
EXIT SETUP
ENGLISH
GERMAN
SPANISH
FRENCH
DUTCH
ITALIAN
DANISH
PORTUGUESE
23
1.2.2 AUDIO LANGUAGE
Notes:
If your preferred language is not availabel, the
disc s default language will be played.
Page 24

SYSTEM SETUP
24
1.3 AUDIO SETUP
The audio setup options are illustrated below:
1.3.1 AUDIO OUT
Highlight the AUDIO OUT option, and press
the Arrow buttons to choose the audiooutput
mode you prefer. Press ENter to confirm;
There are 3 optional audio outputmodes:
SPDIF/OFF, SPDIF / RAW, and SPDIF/ PCM.
AUDIO SETUP
AUDIO OUT
LPCM OUT
PRO LOGIC
EXIT SETUP
1.3.2 LPCM OUTPUT
Use the Up and Down arrow button to move the
scroll and adjust the sampling rate of the
digital output.
SPDIF OFF
SPDIF RAW
SPDIF PCM
1.4 VIDEO SETUP
The video setup options are illustrated below:
VIDEO SETUP
BRIGHTNESS
CONTRAST
HUE
SATURATION
EXIT SETUP
1.4.1 BRIGHTNESS
Use the Up and Down arrow buttons to move
the scroll and adjust the brightness
VIDEO SETUP
BRIGHTNESS
CONTRAST
HUE
SATURATION
EXIT SETUP
12
10
8
6
4
2
0
AUDIO SETUP
AUDIO OUT
LPCM OUT
PRO LOGIC
EXIT SETUP
48 K
96 K
192 K
1.3.3 PROLOGIC
There are 3 optional PROLOGIC: MOVIE
MODE, MUSIC MODE, OFF.
AUDIO SETUP
AUDIO OUT
LPCM OUT
PRO LOGIC
EXIT SETUP
OFF
MOVIE MODE
MUSIC MODE
1.4.2 CONTRAST
Use the Up and Down arrow buttons to move
the scroll and adjust the
contrast.
VIDEO SETUP
BRIGHTNESS
CONTRAST
HUE
SATURATION
EXIT SETUP
12
10
8
6
4
2
0
1.4.3 HUE
Use the Up and Down arrow buttons to move
the scroll and adjust the hue.
VIDEO SETUP
BRIGHTNESS
CONTRAST
HUE
SATURATION
EXIT SETUP
+6
+4
+2
0
-2
-4
-6
Page 25

SYSTEM SETUP
1.4.4 SATURATION
Use the Up and Down arrow buttons to move the
scroll and adjust the
saturation.
VIDEO SETUP
BRIGHTNESS
CONTRAST
HUE
SATURATION
EXIT SETUP
12
10
8
6
4
2
0
1.5 SPEAKER SETUP
The speaker setup options are illustrated below:
1.5.1 DOWNMIX
A) LT / RT Choose this setting when you are
connected to a 2 Channel Analog Audio Input.
B) STEREO Choose this setting when the DVD
player is connected only to a TVset.
D) 5.1CH Choose this setting when the DVD
player is connected to a 5.1 speaker set.
1.5.3 REAR DELAY
You can adjust the Center and the Rear delay
by using the Up and
Down buttons to move the scroll bar.
SPEAKER SETUP
DOWNMIX
CENTER DELAY
REAR DELAY
EXIT SETUP
12 MS
6 MS
0 MS
+
1.6 DIGITAL SETUP
The DIGITAL SETUP options are illustrated
below:
1.6.1 DYNAMIC RANGE:
To avoid disturbing the neighbours at night,
you can use this function to reduce the sound
effects volume without changing the original
tone.
25
SPEAKER SETUP
DOWNMIX
CENTER DELAY
REAR DELAY
EXIT SETUP
LT / RT
STEREO
5.1
1.5.2 CENTER DELAY
You can adjust the center by using the Up and
Down buttons to move the scroll
the scroll bar.
SPEAKER SETUP
DOWNMIX
CENTER DELAY
REAR DELAY
4 MS
2 MS
0 MS
+
DIGITAL SETUP
DYNAMIC RANGE
DUAL MONO
EXIT SETUP
FULL
3/4
1/2
1/4
OFF
1.6.2 DUAL MONO (LEFT + RIGHT)
Choose to setup the L and R mono output
mode. There are four
modes in this option: STEREO, MONO L,
MONO R,and MIX MONO.
DIGITAL SETUP
DYNAMIC RANGE
DUAL MONO
STEREO
MONO L
MONO R
MIXED MONO
EXIT SETUP
EXIT SETUP
Page 26

SYSTEM SETUP
REFERENCE:
1. To protect your DVD player, the interval between turning the unit on and off, via the Main
Power button, should be more than 30 seconds.
2. If the unit will not be used for an extended period of time, please disconnect the power plug
from the outlet.
3. The player should only be operated with the correct power supply that corresponds to the
marking label. The incorrect power supply could damage the unit.
4.The player may not be compatible with some encrypted discs.
5. If the player stops during playback, eject the disc and power off the unit. Wait 10 minutes
and power the unit back on.
26
Page 27

Mp3 & MPEG
FUNCTION
When a MPEG and a Mp3 disc is loaded, the screen will display as follows:
Current
directory
name
The playing file
is a Mp3 audio
file.
Current
directory
name
Current MP3/JPEG file
name. If a JPEG file is
playing, the name should
have a JPEG extension.
File Switch Region: Displays
the file typa of the playing
and the switching.
The playing file is
a JPEG picture file.
Current MP3 file name.
If a JPEG file is playing,
the name should have a
JPEG extension.
27
The playing file
is a Mp3 audio
file.
File Switch Region: Displays
the file typa of the playing
and the switching.
The playing file is
a JPEG picture file.
Press to select the file when the cursor appears in the file window.Press select
to play the current file select by the cursor.
Press to switch between the directory window and the file window.
Note:
During Mp3 playback, Forward Scan and Reverse Scan are not available.
Note:
The player will not identify or play a MP3 disc under the following conditions: the
recording format is not supported(make sure the files are in MP3 format),the disc is
badly scratched, damaged or dirty, the disc is not finalized.
Page 28

28
JPEG FILES
JPEG files contain picture information which can be encoded by micro computer software and transmitted to the
TV screen via a video output interface. This function is useful in many contexts. For example teachers can
change pictures to be shown in the classroom to JPG files by means of a digital camera or a scanner which are
often used within the IT world and transfer the pictures to CD-R discs. This will make things easier for the pupils
when the teachers play the discs via a TV set or other types of equipment in the classroom. It reduces the
repetitive work for the teachers, and the discs are easy to store (informationon discs can be stored for more than
100 years). By means of a digital camera or scanner, families can transfer pictures to CD-R discs. If, for example,
a picture requires 100K bytes, one disc will hold about 6000 pictures. Manufacturers can show their customers
pictures of their products one by one.
Note: The actual contents vary from one type of disc to the other.
1. When a JPEG disc is loaded in the DVD-player, an automaticslide show will belaunched.
Each picture will be displayed and scaled to fit the screen. Press STOP to enter the file
library. Use the SCROLL key to navigate the pictures, and press PLAY to display a picture.
When the a picture has been chosen, the slide show will resume with the next picturein
the library.
2. Press SCROLL to rotate the picture. These operations are allowed only when a picture
is being displayed normally and will be cancelled automatically when a new picture is
displayed.
3. Press ZOOM to execute the zoom function and select the zoom enlarging scale with I<<
and >>I. In zoom mode, press the SCROLL buttons to move the picture on the screen.
With zoom mode off, the next picture will be scaled to fit the screen.
Press PLAY to cancel the zoom mode and resume the slide show.
JPEG limitations
- JPEG files containing CMYK colors is not supported by this DVD-player.
- The range of pixels should not be exceeding 3840 X 3840 pixels, in order to achieve the
best Performance.
Page 29

USB INPUT
This unit have a USB jack,when no disc in the player, you can insert a
USB DISC or a Mp3 Player with USB Interface to play the Mp3 music or
MPEG4 movie and JPEG files. All the function is the same to play a MPEG4 disc or Mp3
disc.
See the instructions on page 27
29
Page 30

TROUBLESHOOTING
This troubleshooting guide may help you find a possible cause of and solution to a problem. If there are still
problems, please contact the local service centre or distributor.
PROBLEMS AND POSSIBLE SOLUTIONS
Common sympton Possible cause Remedy
No function Mains power is not connected Connect to mains power outlet
Power is OFF Turn the power ON.
No playback No disc is inserted Insert a disc.
("no disc" will be shown on screen).
Disc is upside down. Reload disc.
("no disc" will be shown on screen). The label side should face
upward.
Dirty disc Clean disc surface.
Deformed/scratched disc Replace disc.
Condensation in unit Turn power on for 1-2 hours
before using the unit.
No sound Wrong audio output setting Check audio output setting
Sound in one or more Poor or missing cable connection Check connections
Speaker(s) is missing
30
No sound in centre/ Downmix settings are wrong Change downmix settings
surround speakers Disc or TV program is recorded Set prologic II on.
i
n stereo
Sound on scart connecter Sound in scart connecter is Volume Turn the volume up to max..
is very weak or missing regulated. (Can only be used without
speakers connected)
No picture Disconnection of video equipment Check video connections
Wrong output setting of video output Check video output setting of
Video output in general setup
Our DVD players support both burned and original discs, however we reserve the right to refuse faults,
which concern the use of burned discs.
There are some general things, which we recommend you to check before you return your product for
service.
1. Use only discs of high quality.
There is a large range of bad quality discs on the market.
Low quality discs can cause faults during the action of burning a CD or DVD-disc,
which will affect the replay of the disc.
2. Make sure the disc is clean and in no way damaged (also apply for original discs).
3. Check if the burning was done correctly – perhaps burn a new disc at low burning speed (x.1)
4. Check if your product support the disc-format (ex. DVD-R or DVD+R) or file-format (ex. DivX), which you
Use.
Page 31

SPECIFICATIONS
DVD Player
TV System NTSC/PAL
Compatible Discs DVD, CD, Mp3, JPEG,CD-R, CD-RW
Resolution Ratio Greater Than 500 lines
Video S/N Ratio 65dB
Frequency Response fs (96KHz/24bit)
4Hz - 44KHz:+/-2dB
Audio S/N Ratio 95dB
Degree of Distortion <0.01%
D/A Converter 192KHz/24bit
Video Out 1Vp-p
S-Video Out
Audio Out , 5.1 Channel,
Digital Audio Output
Connections SCART,CV S -Video, Channel Output
FM Tuner
Tuning Range 87.5-108MHz
S/N Ratio
Monophonic
Stereo
Selectance 50dB
THD
Monophonic 2%
Stereo 3%
Frequency Response 30Hz-10kHz +/- 1dB
Stereo Resolution 35dB (1kHz)
B, USBS 5.1
30dB (100Hz-10kHz)
Y: 1Vp-p(75 )
C: 0.3Vp-p(75 );
2.0V
Coaxial
>46dB
>46dB
>50dB (DIN)
31
AM Tuner
Tuning Range 522-1620KHz
S/N Ratio 35dB
THD 3%
Remote Control
Transmitter Infrared Ray
Signal Range Approximately 5m
Power Source 2 AAA Batteries
General
Power Supply AC 90-240~50/60Hz
Consumed Power 120W
Because its products are subject to continuous
modify product design and/or specifications without notice and without incurring any
obligations.
improvement, We reserves the right to
""
Page 32

For further information please visit our website:
www.eltax.com
Item no. 40182
 Loading...