

Elkay DSESR127223 Installation manual

DAYTON UNIVERSAL MOUNT
STAINLESS STEEL SINK
NOTE: THE SINK PROVIDED IS CONSIDERED A UNIVERSAL MOUNT SINK - IT CAN EITHER BE INSTALLED
AS AN UNDERMOUNT WITH 1/2” COUNTERTOP REVEAL OR A TRADITIONAL TOP MOUNT. THE
TEMPLATE ILLUSTRATES THE APPROPRIATE COUNTERTOP CUTOUT FOR AN UNDERMOUNT
INSTALLATION - DO NOT USE THE TEMPLATE FOR TOP MOUNT INSTALLATIONS.
FOR UNDERMOUNT INSTALLATIONS, FOLLOW SECTION I. FOR TOP MOUNT INSTALLATIONS, FOLLOW
SECTION II.
I. UNDERMOUNT INSTALLATION
ATTENTION INSTALLER:
1) ELKAY RECOMMENDS THAT UNDERMOUNT SINKS SHOULD BE INSTALLED BY A PROFESSIONAL
EXPERIENCED INSTALLER.
2) WARNING: THE CUTOUT TEMPLATE WILL CREATE A REVEAL OF APPROXIMATELY 1/2” (13mm).
THE ELECTRONIC DXF TEMPLATE FILE CAN BE DOWNLOADED FROM WWW.ELKAYUSA.COM.
IT IS RECOMMEND THAT YOU DISCUSS THIS WITH YOUR CUSTOMER AND AGREE THAT THIS
FINISHED APPEARANCE IS THE DESIRED EFFECT. ELKAY IS NOT RESPONSIBLE FOR IMPROPER SINK
OR COUNTERTOP INSTALLATIONS. DUE TO THE AESTHETIC QUALITIES OF THE CONVERGING BOWL
RADII, THE TEMPLATE PROVIDES THE ONLY OPENING RECOMMENDED FOR INSTALLATION.
SEE ILLUSTRATION BELOW.
3) ELKAY UNDERMOUNT SINKS SHOULD ONLY BE FASTENED TO A SOLID SURFACE COUNTERTOP
(I.E. GRANITE/CORIAN
4) ELKAY IS NOT RESPONSIBLE FOR SINK OR COUNTERTOP IF DAMAGED DURING INSTALLATIONS.
5) METAL EDGES MAY BE SHARP - USE CAUTION WHEN HANDLING.
6) FOLLOW ALL LOCAL PLUMBING AND BUILDING CODES.
7) INSPECT SINK FOR DAMAGE PRIOR TO BEGINNING INSTALLATION.
®
/SILESTONE®).
INSTALLATION
1. Position template on countertop. Locate the template
front to rear, so sink will not interfere with the cabinet.
2. Trace a line around the template. Cut along the inside
of this line to provide opening.
3. Locate and drill the mounting holes (following the
countertop manufacturer’s instructions). Holes should
allow even spacing of mounting brackets around the
sink. Type of fasteners to be as recommended by
countertop supplier.
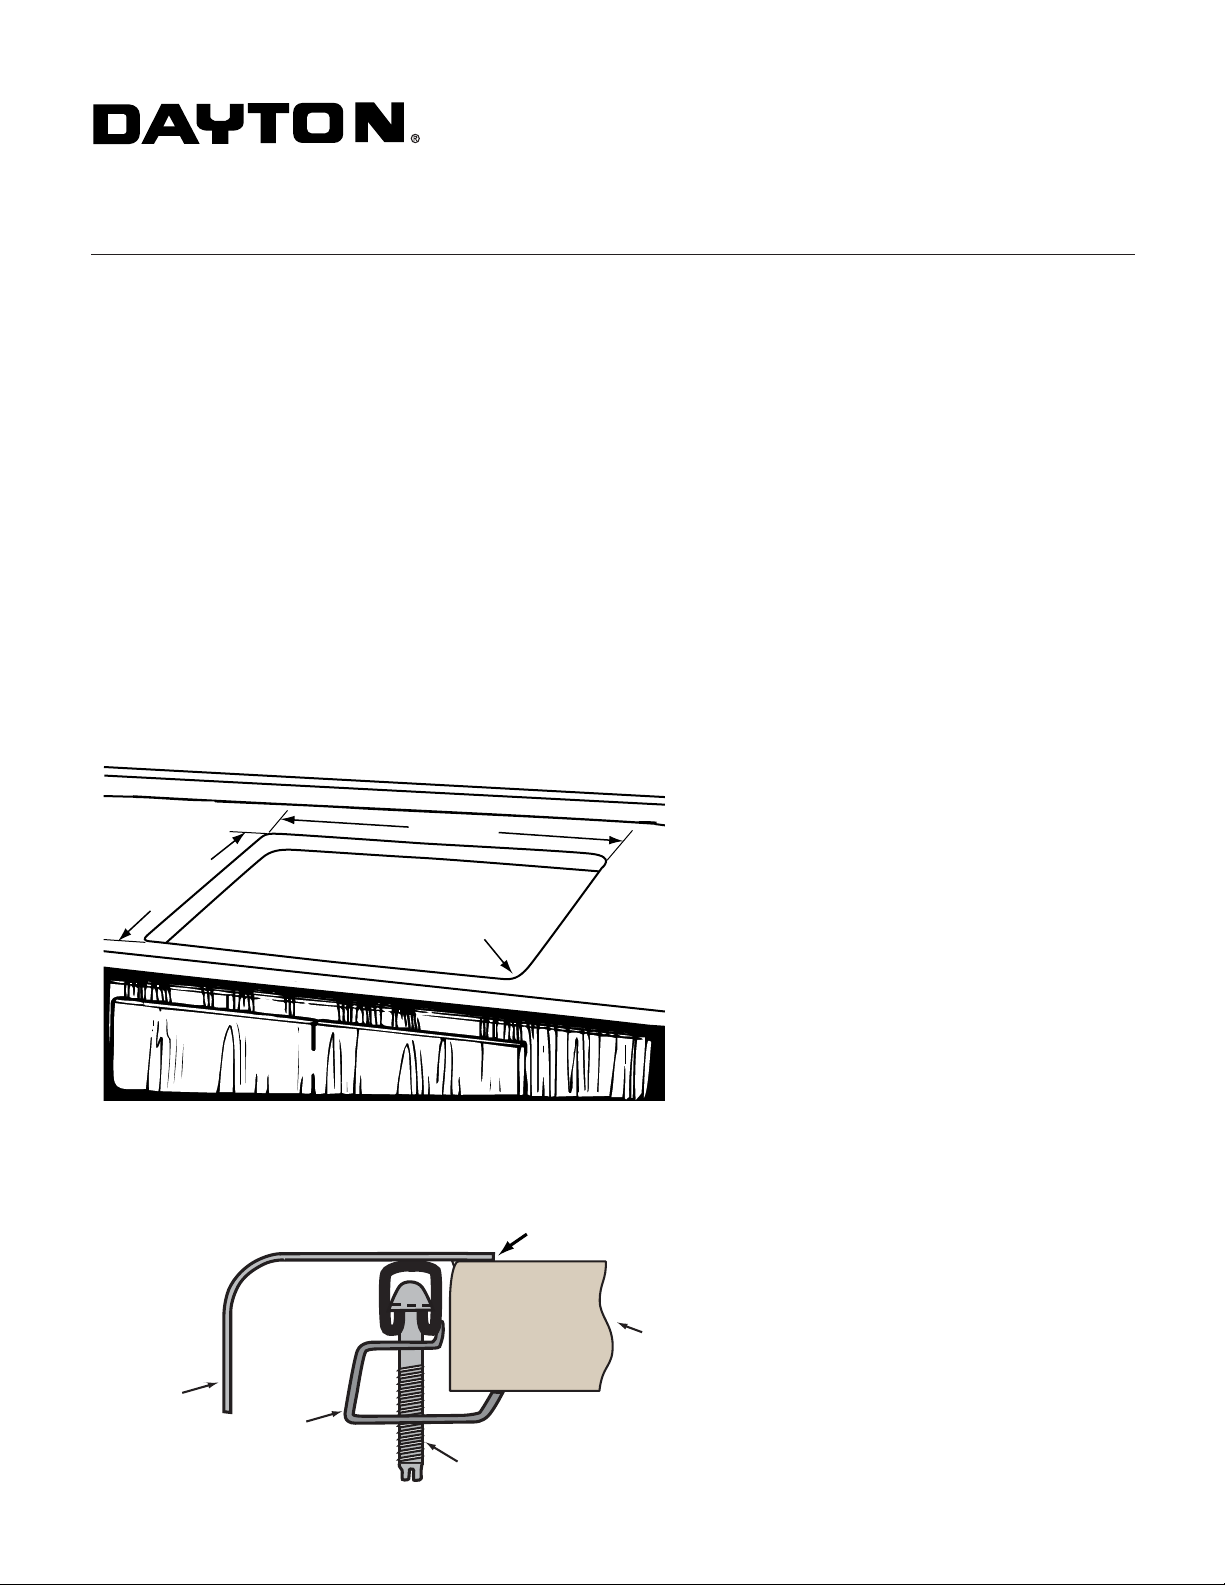
Installation Profile
1/2"(13mm) Reveal
1/2" (13mm)
Silicone Caulk
Countertop
Mounting
Clip: LKUCLIP8
(Not Furnished)
1-1/8"
(29mm)
Fastener
(Not Furnished)
(Not Furnished)
Sink
4. Fasten mounting brackets (optional accessory LKUCLIP8) to countertop loosely.
5. Using a good quality silicone caulk, apply a bead
evenly all around the top of the sink flanges.
6. Position and align sink over the countertop opening.
Press silicone onto countertop.
7. Tighten fasteners until mounting clips are
snug against the sink.
8. Check alignment of sink to countertop opening.
9. Tighten down fasteners evenly. Be careful not to
overtighten. Remove excess silicone.
(DOWNLOAD DXF FILE FROM www.elkayusa.com)
DAYTON UNIVERSAL MOUNT
STAINLESS STEEL SINK
II. TOP MOUNT INSTALLATION
INSTALLATION
1.
Place sink upside down on countertop surface. Place sink in exact position for installation and trace completely
around sink to create a sink outline.
2.
Scribe actual opening 5/16" inside the sink outline, all the way around.
3.
Cut out on inside of this line (following the manufacturer’s instructions). Install faucet to sink and tighten.
4.
Apply a silicone caulk around entire perimeter of opening. Set bowl into opening.
5.
From underside of sink, place one clamp near center, tighten by hand enough to hold sink in place. This applies to
all four sides. Fasten balance of clamps in position and hand tighten. (Usually 3 clamps on end, balance divided
equally front and back). Space clamps as equally as possible. For countertops thicker than 3/4” up to 1-1/2”, Elkay
recommends using LK364.
6.
From the top side, check seal between rim and countertop. Adjust clamps to high spot if necessary.
7.
Tighten clamp evenly with screwdriver or socket wrench in rotation until sink is seated with countertop.
Caution: Do not over-tighten clamps.
WIDTH
Sink
LENGTH
1/4" RADIUS ON
ALL4CORNERS
Installation Profile
Silicone Caulk
(Not Furnished)
Countertop
Clip
Screw
(Optional: LK364)
 Loading...