

Page 1

■ chapter 2 bios setup and security feature
CHAPTER▼ TWO
BIOS SETUP AND SECURITY FEATURE
In this chapter, you will learn how to enter the BIOS Setup Menu and manipulate various hardware control settings. You will also learn how to use the built-in security features.
2-1
Page 2

■ chapter 2 bios setup and security feature
The Setup Utility is a hardware configuration program built into
your computer’s BIOS (Basic Input/Output System). It runs and
maintains a variety of hardware functions. It is a menu-driven
software, which allows you to easily configure and change the
settings.
The BIOS contains manufacture’s default settings for the
computer’s standard operations. However, there are occasions
when you may be required to modify the default settings in the
BIOS. For example, you may need to configure the BIOS power
management (APM) settings if you are using DOS, or
non-Windows operating system.
The BIOS allows you to set up passwords to limit access to users.
This is an important feature because a great deal of vital
information is carried within the computer nowadays. Unauthorized
access can be prevented. Later in this chapter, you will learn how to
use this security feature.
2-2
Page 3
■ chapter 2 bios setup and security feature
Entering the BIOS Setup Screen
First turn on the power. When the BIOS performs the POST
(Power-On Self Test), press F2 key quickly to activate the AMI
BIOS Setup Utility.
Note:
You may need to press F2 key fairly quickly. Once the system begins to load
Windows, you may have to retry by cycle-power on again
Leaving the BIOS Setup Screen
When you have finished modifying the BIOS settings, exit the BIOS.
It takes a few seconds to record changes in the CMOS.
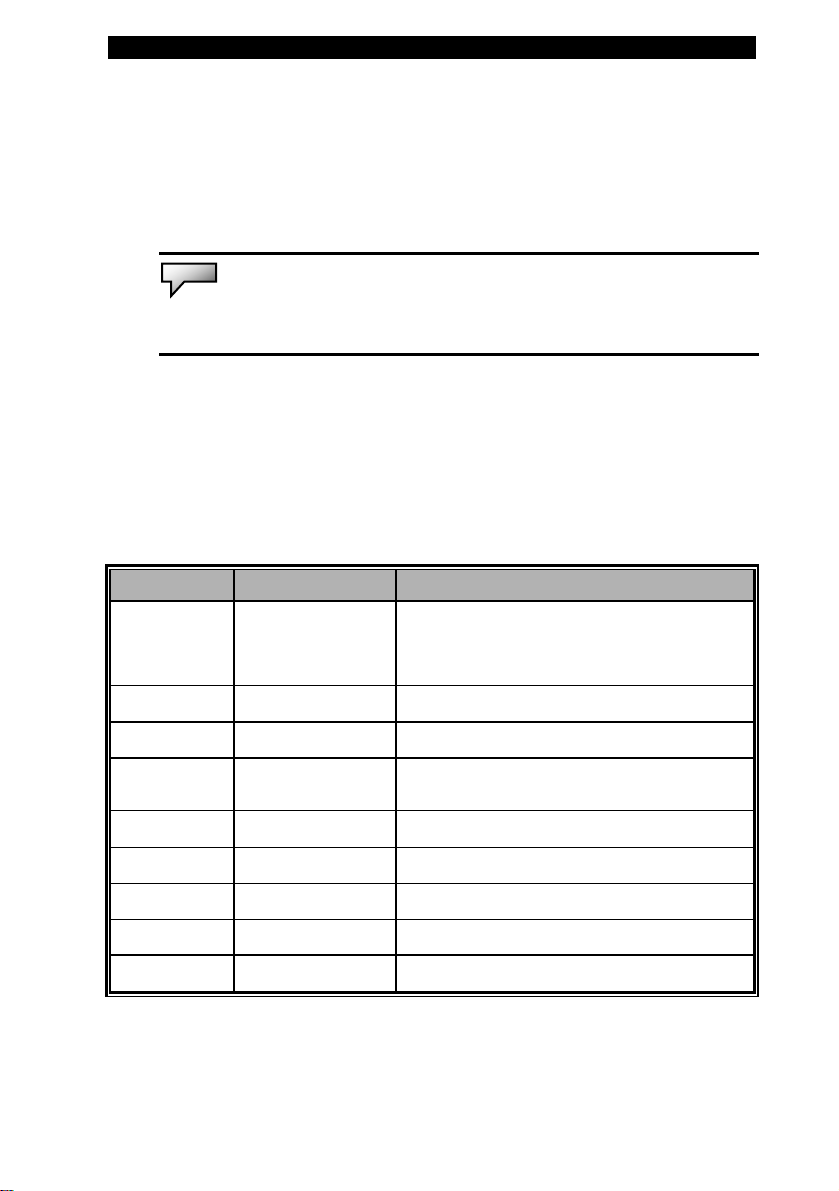
BIOS Action Keys
Function Key Command Description
Leaves a sub-menu to return to the
ESC Exit
previous menu OR exits the BIOS setup
while saving changes.
Enter Go to Sub Screen Shows the Sub Menu
F1 General Help Shows the Help Screen
F10 Save and Exit
<Tab> Select a field Selects the next field.
↑ Select an item Selects the next upper item.
↓ Select an item Selects the next lower item.
- Lower value Selects the next value within a field.
+ Higher value Selects the next value within a field.
Saves changes and reboots the
computer.
2-3
Page 4

■ chapter 2 bios setup and security feature
Modifying the BIOS Settings
The AMIBIOS setup main menu is subdivided into sub-menus.
Each menu item is described in this section.
Main Setup
Under this menu, you may change time/date and view basic
processor and system memory information.
Item Selections /
Sub-menu
Date N/A Type in the current date, in MM/DD/YY
Time N/A Type in the current date, in HH:MM:SS
Description
format.
format.
Advanced Setup
►IDE Configuration
Item Selections /
Sub-menu
Primary
IDE
Master
Secondary
IDE
Master
Hard Disk Primary Master is where BIOS tries to
ATAPI CDROM The secondary master controls the
Description
boot from first. The primary master
controls the hard drive.
ATAPI CD-ROM drive.
Note: The sub-menu is not selectable. Press enter to view information of the
2-4
Page 5

■ chapter 2 bios setup and security feature
storage device.
Item Selections /
Description
Sub-menu
TouchPad
Support
Enable
Disable
Enable or disable the built-in touch pad.
Normally, Auto is selected.
Security Setup
►Boot Settings Configuration
Item Selections /
Sub-menu
Change
N/A Install or Change the Password
Supervisor
Password
Change
N/A Install or Change the Password
User
Password
Clear User
N/A Install or Change the Password
Password
Description
Using Password Protection
Two Levels of Password Protection are available. The BIOS
provides both a Supervisor and a User password. If you try to
activate both passwords, the Supervisor password must be set first.
The passwords activate two different levels of protection:
1. System always asks for password every time it is powered on.
2. System asks for password only when you attempt to enter
2-5
Page 6

■ chapter 2 bios setup and security feature
BIOS utility.
The passwords are encrypted and stored in NVRAM. Make sure
you write them down or memorize them. If you lost the passwords,
the computer may need to be sent back to the factory or to an
authorized service dealer to reset the passwords.
Power Setup
Item Selections /
Sub-menu
Power Button
Mode
On/Off
Suspend
Description
[On/Off]: When the power button is
pressed, the system is turned off.
[Suspend]: When the power button is
pressed, the system enters the suspend
mode.
Note: The Suspend Mode selection in BIOS only applies to older Windows version
(such as Windows 3.1 or Windows 95 or NT4) or non-Windows operating system. In
Windows ME / 98SE / 2000 / XP, suspend mode and settings are determined by
settings in the Power Options Properties (Start > Control Panel > Power Options).
2-6
Page 7

■ chapter 2 bios setup and security feature
Boot Setup
Item Selections /
Sub-menu
Quiet Boot Disabled
Enabled
►Boot Device Priority
Item Selections /
Sub-menu
1st Boot
Device
Removable Dev.
CD/DVD
Hard Drive
Realtek Boot
Agent
Disabled
2nd Boot
Device
3rd Boot
Device
4th Boot
Device
Description
When Enabled, the system will display
OEM logo instead of the POST
messages.
When Disabled, the system will display
POST messages (i.e. devices
information.)
Description
Set the type of device for the 1st drive
BIOS attempts to boot from. If Realtek
Boot Agent is selected, system will
attempt to load boot sector from the
Ethernet port.
Set the type of device for the 2nd drive
BIOS attempts to boot from.
Set the type of device for the 3rd drive
BIOS attempts to boot from.
Set the type of device for the 4th drive
BIOS attempts to boot from.
Note: If you select Realtek Boot Agent, the system will attempt to boot from the
network.
Note: When the BIOS performs POST, you may also press F12 Key to enable the
Boot Device selection menu. You may choose CD/DVD, Hard Drive, or Realtek Boot
Agent as the first storage device to boot from. If you have already connected a USB
Floppy Disk Drive before powering up, it will appear as a Removable Device in the
Boot Device selection menu
2-7
Page 8

■ chapter 2 bios setup and security feature
Exit Setup
Item Selections /
Sub-menu
Saves
N/A After you have completed the BIOS
Changes and
Exit
Discard
N/A Discards changes done so far to any of
Changes
Load Optimal
N/A Load Optimal Default value for all the
Defaults
Description
settings, select this item to save all
settings, exit BIOS Setup utility, and
reboot. New system settings will take
effect on next power-up. F10 key can be
used for this operation.
the setup questions.
setup questions. F9 key can be used for
this operation.
2-8
 Loading...