

Page 1

Introduction:
Thank you for purchasing this new high-performance EZ-Buddie 2 series product. The EZ-Buddie 2 is, despite its’
compactness, a combination of a computer and personal entertaining unit. Some of the great features are:
EZ-Cinema and remote control
The EZ-Buddie 2 series comes with an operating mode called “EZ-Cinema”. This makes your EZ-Buddie 2 not only a
mini-sized computer but also an entertaining unit. The ready-to-go feature of the EZ-Cinema spares you the long wait
for the Windows booting, and allows you to directly play your favorite music, movies, pictures (optional), and even TV
programs (optional), a pleasure to get a easier digital life. Your EZ-Buddie2 comes with an ultra-thin remote control.
Using this remote control you can remotely choose to play a song or movie. As for the usage of the controls, the
simplified user’s interface delivers the instant familiarization. Furthermore, you can switch between the EZ-Cinema
mode and your Windows desktop any time – work when you need to, ease whe n you want to. As a special of fer, a copy
of WIN-Cinema is also bundled, and you can also control it with the remote control.
FM Radio
This FM Radio feature provided by your EZ-Buddie 2 is a special designed one. It only required you to power on the
system and speaker to play your favorite radio station, and you don’t even need to boot up the system. This feature
facilitates you performing an auto-search, tuning–in to a radio station using the remote control, and setting six memory
channels for your favorite radio stations. This will keep you on the latest news and trends all the time. When the FM
Radio feature is off, the present time will be shown instead of radio frequency. Furthermore, a radio-alarm function is
provided. You can set the EZ-Buddie 2 to start playing a FM radio st ation at your pre set time. Can you imagine wake up
listening to your favorite radio station every morning? Let the EZ-Buddie 2 make your dream come true.
EZ-Watcher providing real-time hardware detecting
Thanks to the unique EZ-Watcher technology the EZ-Buddie 2 series becomes the first computer has the ability to
self-diagnosis. The EZ-Watcher can perform pre-boot hardware testing to make sure the hardware is ready for normal
operation, and provide an easy way for you to debug. After booting into Windows, the EZ-Watcher will monitor the
temperature of the CPU and system. When detecting CPU overheat or system overheats, it will warn you in time for you
to take proper measure to prevent a system crash and data lo ss.
Magic Tuner
The EZ-Watcher comes with a “Magic Tuner”. Using this tuner, you can adjust the CPU processing rate to suit your
need. One push on the tuner allows you to adjust the processing rate for better performance, and another push to lock
the adjusted rate. Then, the system will apply the locked processing rate after every boot unless another adjustment is
made. The tuner is a very efficient tool for adjusting the system performance. However, the variety of the hardware
specification restricts such adjustment. Theor etically, a n Intel CPU system can tol erate ±10% variation in performance,
and an AMD and VIA system ±5%. The hardware requirement of installed software may further restrict, even reject
such adjustment. When this happens, you should restore the default processing-rate to ensure the normal operation.
However, neither increasing the rate nor decreasing is recommended. The performance with the processing rate being
adjusted is not guaranteed, and you shall cautiously test and utilize such adjustment.
Plugs and Card slots
On the sides of the front panel, you can find USB/ IEEE1394/ Earphone/ Microphone plugs, as well as card slots
supporting CFI/CFII, SD, SM, MS, and MMC. These plugs and slots allow you to upload and download files from all
kinds of peripheral devices such as digital cameras, DVs, and MP3 players.
Compact and silent
The dimensions of the EZ-Buddie 2 are space-saving 18x22x31cm (W x L x H). You can easily put your EZ-Budddie 2
on your desk. Such compactness is made possible by an advanced heat sink design consisting of heat-pipe, a
technology originally designed for notebooks, and one smart fan. This design delivers efficient and quiet cooling. The
external power source design of the EZ-Buddie 2 series also help to reducing the operating noise and stabilizing the
system.
Expandability
The advanced design of the EZ-Budddie 2 not only provides best performance and stability but also the expandability,
including one AGP slot and one PCI slot for future upgrading.
Thus, you will find your digital life getting more free and comfortable with the EZ-Buddie 2.
Before operating your EZ-Buddie 2, you should read through this manual and keep this man ual in hand for future
reference.
1
Page 2
Features
Speaking of features,this EZ-Buddie 2 series is the innovative combination of a powerful processing computer and
personal entertaining unit, distinguishing itself from the others. The innovations provided by the EZ-Buddie 2 series will be
discussed in two scopes - the first scope is about the status viewer, panel controls, and remote control, and the second is
about the usage of the FM Radio/Clock feature. For the EZ-Cinema feature, it is exclusively discussed in the EZ-Cinema
user’s book, the quickest and easiest way to familiar with this unique feature.
Status viewer, front-panel controls, and remote control
Status viewer
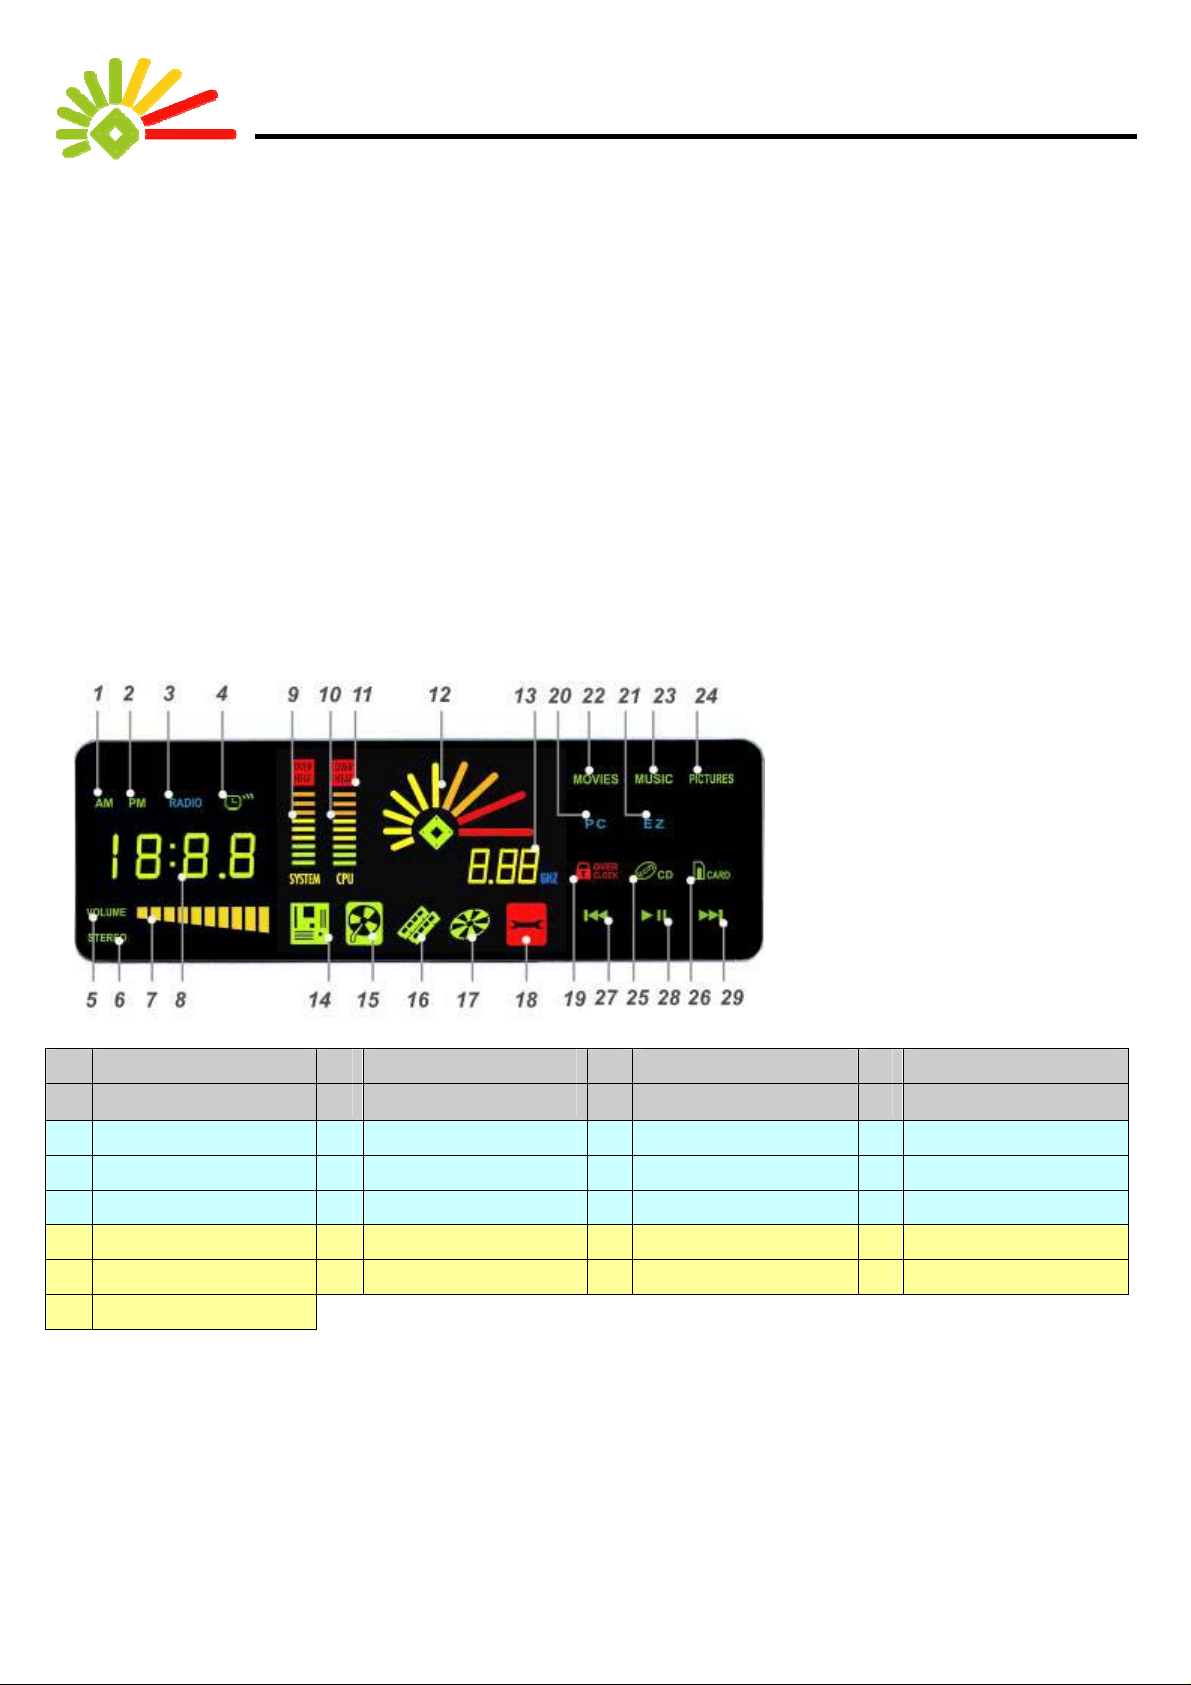
First, let yourself familiar with the LED icons shown in the status viewer, the EZ-Wat cher. You can refer to Fig.1 and List 1.
Fig.1 The LED icons shown in the
EZ-Watcher
1 AM 2 PM 3 Radio 4 Alarm
5 Volume 6 Stereo 7 FM Volume status 8
9 System temp. status 10 CPU temp. status 11 Overheating Display 12 Light Stick
13 CPU operating speed 14 Mainbo ard icon 15 Hard Drive icon 16 Memory icon
17 ODD icon 18 Repair Needed icon 19 Over clock Lock 20 PC mode
21 EZ-Cinema mode 22 Movies mode 23 Music mode 24 Pictures mode
25 Media from ODD 26 Media from Card 27 Previous 28 Play / Pause
29 Next
List1. The function of each LED icon shown in the EZ-Watcher
2
Channel / Time
Page 3
A
f
t
f
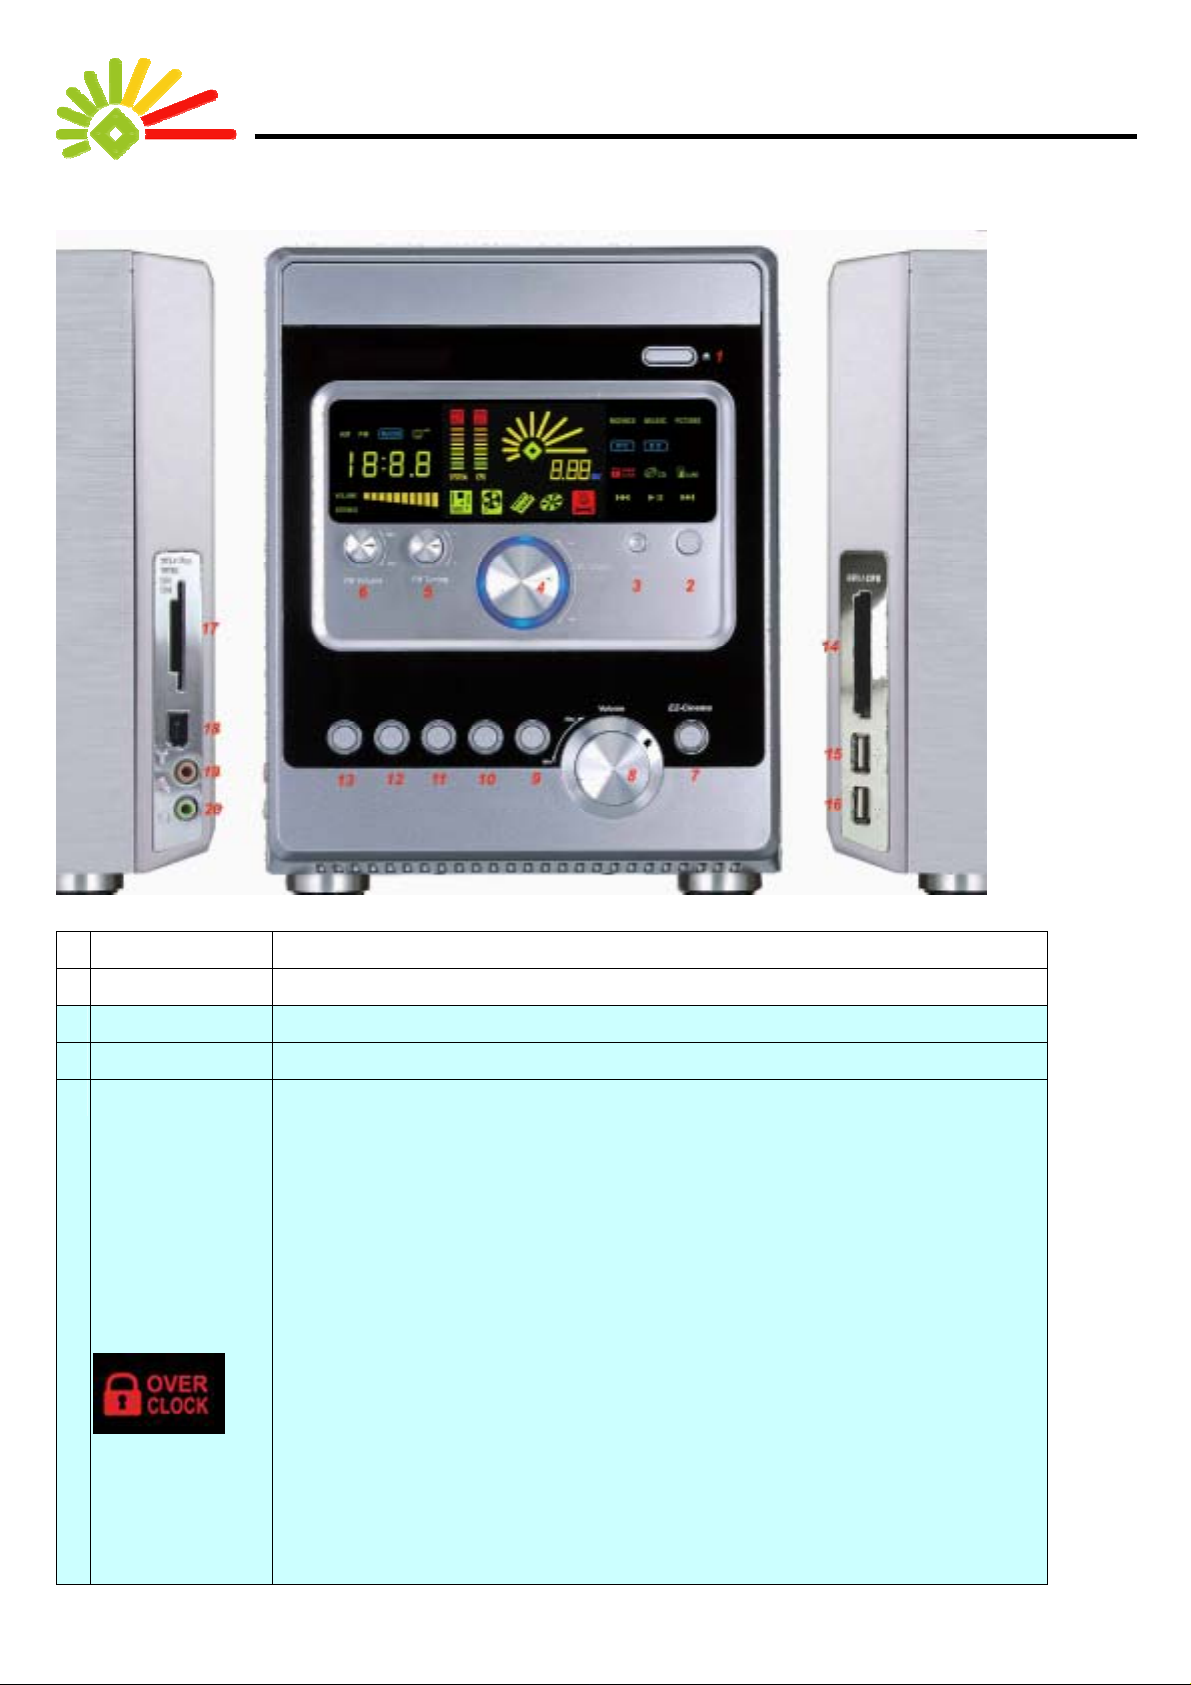
Front-panel controls
Fig. 2 The functions of the front-panel controls
Control name Function
1 ODD Eject Button Pushing this button will eject the ODD Track tray, and pushing again will retract it.
2 PC Power Button Pushing this button will start the PC mode (boot into Windows).
3 Reset Button In the PC/EZ-Cinema mode pushing this button will reboot the system into PC mode.
4 Magic Tuner
unique tuner feature provided by the EZ-Buddie 2 for adjusting the volume and CPU
requency. The factory default of the tuner is for adjusting volume - turn clockwise to
increase the volume, and counterclockwise to decrease. When you want to adjust the
CPU frequency, just push the Magic Tuner once, which unlock the “LOCK” status, and
hen you can turn the tuner clockwise to increase the frequency (overclock) and
counterclockwise to decrease (downclock).(For the upper and lower limit of this
requency adjusting, please refer to following sections.)
How to overclock/downclock
1. Lightly push the Magic Tuner once.
2. Make sure the [EZ-Watcher clock adju st] of the [PC Health S t atus] item in the BIOS is
set to [Enabled] (default is [Disabled].).
3. Turn the tuner clockwise to increase the CPU FSB frequency, and counterclockwise
to decrease.
4. Push the tuner again to lock the resulted frequency. The lock will be confirmed by the
3
Page 4

appearance of a red ”OVER CLOCK” icon on the upper right of the shown freque ncy
value. Af ter this, the tuner will be again set for adjusting volume.
5. Reboot the system with the frequency locked will allow the system operates in that
frequency after booting up, otherwise in default frequency.
6. If you want to adjust the frequency, just push the tuner again.
FM Radio Tu ning FM channel manual setting: each notch clockwise will increase 1KHz, and
5
counterclockwise will decrease 1KHz.
FM channel auto search: this function can be started by pushing the tuner, and will
pause at a channel where a radio station is detected. Turning
the tuner can interrupt this function and resume to manual
mode.
Alarm Setting 1. In the Clock mode you can use this tuner to set the alarm by:
First, push once to enter the ”hour” setting mode. The hour digit shall be blinking.
Turn the tuner to adjust the number and push the tuner once to conf irm it. Then, shall
be in the ”minute” setting mode, in which the minute digit is blinking. Turn the tuner to
adjust the number and push the tuner once to confirm it. Then, shall be back to the
normal Clock mode with a green ”Alarm” icon indicating the alarm is activated.
2. At the alarm time the system will automatically switch to the FM Radio mode and start
to play the radio station that was set last time before switching to the Clock mode.
FM Radio Volume FM volume adjusting (adjusting the FM Radio signal level): turn the tuner clockwise to
6
increase the volume, and counterclockwise to decrease.
Clock/ Radio Switch Push it to switch to or from the Clock mode.
Note:
a. The FM channel factory default is set using the jumpers on the back of the PCB of the Front Display Board FM
Module side.
b. There are four kinds of the jumper setting for matching with your zone (shipping area):
Jumper Setting Country Frequency Range Default Step
4
Page 5

Euro 87.5 MHz --- 108.0 MHz 87.5 MHz 0.1MHz
USA 87.5 MHz --- 108.0 MHz 87.5 MHz 0.1MHz
China
Japan
88.1 MHz --- 107.9 MHz
76.0 MHz --- 108.0 MHz
88.1 MHz
76.0 MHz
0.2MHz
0.1MHz
c. When you power on the system, the FM Module will be ready (5V S tandby). Make sure the signal cable and
power cord are connected to the speakers, otherwise the speakers will make no sound.
The FM Radio default channels are as above mentioned factory default.
The FM Radio signal output level is set to 5.
d. When this system is connected to the power source and not booted up yet, pushing the Clock/ Radio Switch
button will not switch the system to show you the clock-time, but instead can turn off the volume.
After booting up the system, pressing the Clock/ Radio Switch button will display the clock time ba sed o n the
RTC (Real Time Clock) of the mainboard.
The clock time can be adjusted from BIOS and the operating system.
e. FM Volume control button can adjust only the FM Radio signal output level (1-10); The actual sound volume
can be adjusted using the Main Volume knob and the one on the speaker.
f. You can setup six FM radio memory channels using the remote controller. The detail of the setup can be found
in the section about the remote controller.
7 EZ Cinema Start
Button
Pushing this button can start using the EZ-Cinema feature.
When there is no Windows installed, pushing this button can activ ate the EZ-Cinema.
When there is a copy of Windows ME, 2000, or XP installe d, you need to open the
[Power option properties] dialog and activate the Hibernate option. This will then
allow you using this button to switch to the EZ-Cinema mode, otherwise the system
will refuse to switch. Windows98 does not support this button.
8 Main Volume Control
Turn clockwise to increase the volume, counterclockwise to decrease.
Knob
9 Media key In the EZ-Cinema mode, you can use this key to choose from the Enabled media
source, which in sequence are CDROM, CF, SD, MS, and SM.
10 Play / Pause In the EZ-Cinema mode, pushing this button will start playing, and again to pause.
11 Stop In the EZ-Cinema mode, pushing this button will stop playing.
12 Next In the EZ-Cinema mode, pushing this button will jump to next track.
13 Previous In the EZ-Cinema mode, pushing this button will return to previous track.
5
Page 6

14 Card reader slot 1 Supports CF I / CFII
15 USB port USB 2.0
16 USB port USB 2.0
17 Card reader slot 2 Supports MS/MMC/SD/SM
18 IEEE 1394 port
19 Earphone
20 Microphone
List 2. The functions of the front-panel controls
Remote Control
For switching
.
among the
EZ-Cinema/
PC/FM Radio
mode
.
In the EZ-Cinema mode for switching among
the Picture/Movie/Music applications.
Control keys
In the mute/FM mode, you can switch between the FM
Radio and Clock mode
Up/down and
left/right arrow
buttons
For volume adjusting
6
Page 7

How to use the FM Radio/Clock features
After the installation of your EZ-Buddie2 is completed, you just one power-plug away from listening to any radio station you
like.
Image Description Corresponding
controls
Before start the FM Radio mode, make sure the antenna is connected
to the EZ-Buddie2. After power on the EZ-Buddie 2, you will be able to
listen to any FM radio station and a blue LED ”RADIO” will light up.
1. You can push the left/right arrow buttons to tune in. The frequency
will be increased/decreased 1KHz per push button.
2. You can push the volume buttons to adjust the FM radio volume.
3. Push the key #0 on the remote control or the FM Tuning button, the
system will start to search a radio station automatically.
4. EZ-Buddie 2 provides you a way to setup six memory channels:
First tune in on a station, press key #9(Record), press one of the
keys from #1 to #6., and then you have a memory channel.
This FM Radio feature is also a radio alarm. First, you need to press
the FM button or FM Volume key to swi tch to the Clock mode。
The displayed time under this mode is based on the RTC of the
mainboard and adjustable from the BIOS.
In the figure right, the time is eight o’clock. The green LED ”AM” shows
the present time is in the morning.
In the figure right, the time is also eight o’clock, but The green
LED ”PM” shows the present time is in the afternoon.
In the figure right, it shows the alarm is set at 8 AM.
1. Set the alarm time in the Clock mode:
First, push the tuner once. The hour digit shall be blinking and ready to
be adjusted. Turn the tuner to adjust the digit and push the tuner once
to confirm it. Then, the minute digit shall be blinking. Turn the tuner to
adjust the digit and push the tuner once to confirm it. Then, the present
time shall be displayed with the green ”Alarm” icon indicating the alarm
is activated.
2. At the alarm time the system will automatically switch to FM Radio
mode and start to play the radio station that was set before switching to
the Clock mode.
7
 Loading...