

Page 1

LCD TV SERVICE MANUAL
Elenberg CTV-1540, Elenberg CTV-2065
Model list
KLC-TM1508
KLC-TM2018
KONKA GROUP CO,LTD.
Digital Flat Display Division
Page 2

IMPORTANT SERVICE SAFETY INFORMATION
Operating the receiver outside of its cabinet or with its back removed involves a shock hazard. Work on these
models should only be performed by those who are thoroughly familiar with precautions necessary when working on
high voltage equipment.
Exercise care when servicing this chassis with power applied. if carelessly contacted, can cause serious shock or
result in damage to the chassis. Maintain interconnecting ground lead connections between chassis, escutcheon, picture
tube dag and tuner when operating chassis.
When it is necessary to make measurements or tests with AC power applied to the receiver chassis, an Isolation
Transformer must be used as a safety precaution and to prevent possible damage to transistors. The Isolation
Transformer should be connected between the TV line cord plug and the AC power outlet.
It is important to maintain specified values of all components and anywhere else in the received that could cause
a rise in operating supply voltages. No changes should be made to the original design of the receiver.
Components shown in the shaded areas on the schematic diagram and/or identified by in the replacement parts
list should be replaced only with exact factory recommended replacement parts. The use of unauthorized substitute
parts man creates may create shock, fire, or other hazards.
Before returning the receiver to the user, perform the following safety checks:
1. Inspect all lead dress to make certain that leads are not pinched or that hardware is not lodged between the chassis
and other metal parts in the receiver.
2. Replace all protective devices such as non-metallic control knobs, insulating fish papers, cabinet backs, adjustment
and compartment covers of shields, isolation resistor-capacitor networks, mechanical insulators etc.
3. To be sure that not shock hazard exists, a check for the presence of leakage current should be made at each exposed
metal part having a return path to the chassis (antenna, cabinet metal, screw heads knobs and/or shafts, escutcheon,
etc.) in the following manner.
Plug the AC line cord directly into a 110V/220V/240V, AC receptacle. (Do not use an Isolation Transformer
during these checks.) All checks must be repeated with the AC line cord plug connection reversed. (If necessary, a
non-polarized adapter plug must be used only for the purpose of completing these checks.)
PLEASE READ BEFORE ATTEMPTING SERVICE
1. Use an Isolation Transformer when performing any service on this chassis.
2. Never disconnect any leads while receiver is in operation.
3. Disconnect all power before attempting any repairs.
4. Do not short any position of the circuit while the power is on.
5. For safety reasons, replace components any with identical replacement parts (SEE PARTS LIST).
6. Before alignment, warm up the TV for at least 30 minutes.
7. When removing a PCB or related component, after unfastening or changing a wire, be sure to put the
wire back in its original position.
8. Inferior silicon grease can damage IC's and transistors. When replacing IC's and transistors, use only
specified silicon grease. Remove all old silicon when applying new silicon.
Page 3

9. Before removing the anode cap, discharge eletricity because it contains high voltage.
A. SPECIFICATION
System : Colour System:PAL,SECAM
Sound System:DK/BG/I/M
Audio output power 10%THD 1W X 2KLC-TM1508
10%THD 2W X 2KLC-TM2018
Antenna Impedance 75(Unbalance)
Power Consumption 48WKLC-TM1508
60WKLC-TM2018
Power Supply : AC~100-240V,50/60Hz (Adapter)-----KLC-TM1508
DC12V 4ATV------------------KLC-TM1508
AC~100-240V,50/60HzTV -------KLC-TM2018
item Port list KLC-TM1508
1 RF cable
2 Video and Audio
3 S-Video
4 Headphone audio output
5 VGA
5 DC 12V input
item Port list KLC-TM2018
1 RF cable
2 Y Pb /Cb Pr /Cr
Audio2(YPb/CbPr/Cr and PC Audio
3
input)
4 VGA
6 Video and Audio1
7 S-Video
8 Headphone audio output
9 AC Power input
1.Preface
1.1 Applicable area
Page 4

This test manual is applicable for KLC-TM1508.
1.2 Test notes
1.2.1 Please follow the pointed test steps and choose the proper test equipment to
conduct adjustment, otherwise good effect of TV set could not be obtained. Pointed bias
voltage value should be ensured during test to get satisfied test result.
1.2.2 Be sure that you have the static electricity –protective glove in before test.
2 Test environment
1Temperature15~35°C
2Relative humidity 45 ~ 75%
3Air pressure: 86 ~ 106kPa
3 Test equipment
1) Computer 1
2) Oscilloscope100MHz 1
3) Multimeter (VICTOR VC9801) 1
4) DC Voltmeter 1
5) Oscilloscope Tektronix2232 1
6) :PR-602A 1
7) : Tektronix TCP300 1A TCP312W 1
8) :Tektronix ! P6015A(1000 1)
1
9) "#$%Agilent! 34401A&' FLUKE 187/189 1
4 T he item and method of debugging
4.1 Adjustment manual book of LCD panel Four-CCFL inverter
(PCB Board P/N:35007175)
4.1.1 Test method
4.1.1.1 While mesureing the inverter ,we usually connect the high voltage probe to the
output,but this will change the original path value called load effect. Most
high voltage probes have 3PF capacitacne such as Tektronix P6015A,when we
measure the Four-CCFL inverter,in order to balance the load effect of two
sides ,we advise using two high voltage probes to measure two side outputs.
3P Tektronix
P6015A
CS
CP
CCFL
CCFL
3P Tektronix
P6015A
CS
OutL
CP
L
OutR
L
Page 5

4.1.1.2 For MP1018 project,the outputs have the capacitance divider ,see figure as
below,when we measure the output voltage,we may measure the parallel connection
voltage value of the C722 and C730 or C724 and C731,then according to theformula
Vout1=Vc1*(C722//C730)/C721,Vout2=Vc2*(C724//C731)/C723,we m ay get the output
voltage value(Vc1,Vc2 means the parallel connection voltage value of the C722
and C730 or C724 and C731). At the same time ,we should pay attention to the
followings : First,observe the output voltage waveform is distort or
not.Second ,observe t he output waveform fr equency is between 40 kHz and 60kHz or
not.Third,disconnecting any output ,observe the start-up voltage and start-up
time is right or not.
4.1.1.3 Because the a ctual impedance and t heoretical impedance of the LCD panel's l amps
have a little tolerance,we pay more attention to the output current in actual
measurement.The LCD panel's lamps need a constant current s ource to maintain
the brightness,so we may make a high frequency amperemeter in series with the
Page 6

low-voltage output of XS702,XS703,XS704,XS705,then adjust the input voltage
equals 12V,as long as the current meets the requirement of the
specification(5.5--6.5mA),it can keep the brightness of the lamps.
4.1.1.4 Force 0-5V voltage to the input port that is the third pin of XS701.
Confirm if it will shut down at 0V and start at 5V.
4.2 Digital signal part
KLC-TM1508 start order
Turn on the
power 12V
N404 RESET and
IO port initialize
Other IC electrify,
reset, initialize
Turn on LCD Panel
Supply Power
Turn on back light
lamp,Successful start
4.2.1 After turning on the power, if blank screen appears (no back light lamp), just
press POWER button several times, if blank screen still there,
4.2.1.1 Check if the voltage of every power supply is normal.
4.2.1.2 Check if the crystal oscillator Z402 (14.318180MHz), Z301 (24.576MHz)
oscillate or not, and oscillate frequency is right or not.
4.2.1.3 Back light control signal (BKLON) of PIN 3 of XS514 has high level (about 5V)
or not, if not, chec k whether fault sold ered or short circui t happened to
Q504,R580,R588.
4.2.2 If back light lamp lights but no screen displays,check N404 reset circuit
and crystal oscillator output to make sure CPU is under work, if CPU is
under work, then check signal channel. Signal channel is composed of two
parts: Video channel (including antenna, AV, S-terminal input) and RGB
channel for PC. If no picture displays or bad code displays when input
either of these two channel signal in turn, control signal maybe wrong,
then use oscilloscope to check waveforms at test points DEN, DVS, DHS
and DCLK are normal or not following the rule from back to front.
4.2.3 If just picture color has problem, then shift input to RGB input, and output
R,G,Bmono signal from computer to find the wrong color, then use oscilloscope
to test XS504 pin to find the wrong data cable following the same order.
4.2.4 If just video channel has problem, check N301 signal output VCLK,V-Hs,
V-Vs(TEST POINT), control signal -DVS DHS DCLK and DEN output from
movement compensation N404have waveform or not to find the problem.
4.3 IF Channel adjustment
4.3.1 Preparation steps
4.3.1.1 Connect (+) of RF of TV signal generator PM5518 to Pin 11 of RF TUNER
N1000, (-) to Pin 3 of RF TUNER N1000.
4.3.1.2 Set TV signal generator PM5518 RF output to the maximum.
4.3.1.3 Set TV signal generator PM5518 RF Output to 38.0MHz, and set video
output signal of this signal generator to gray scale.
Page 7
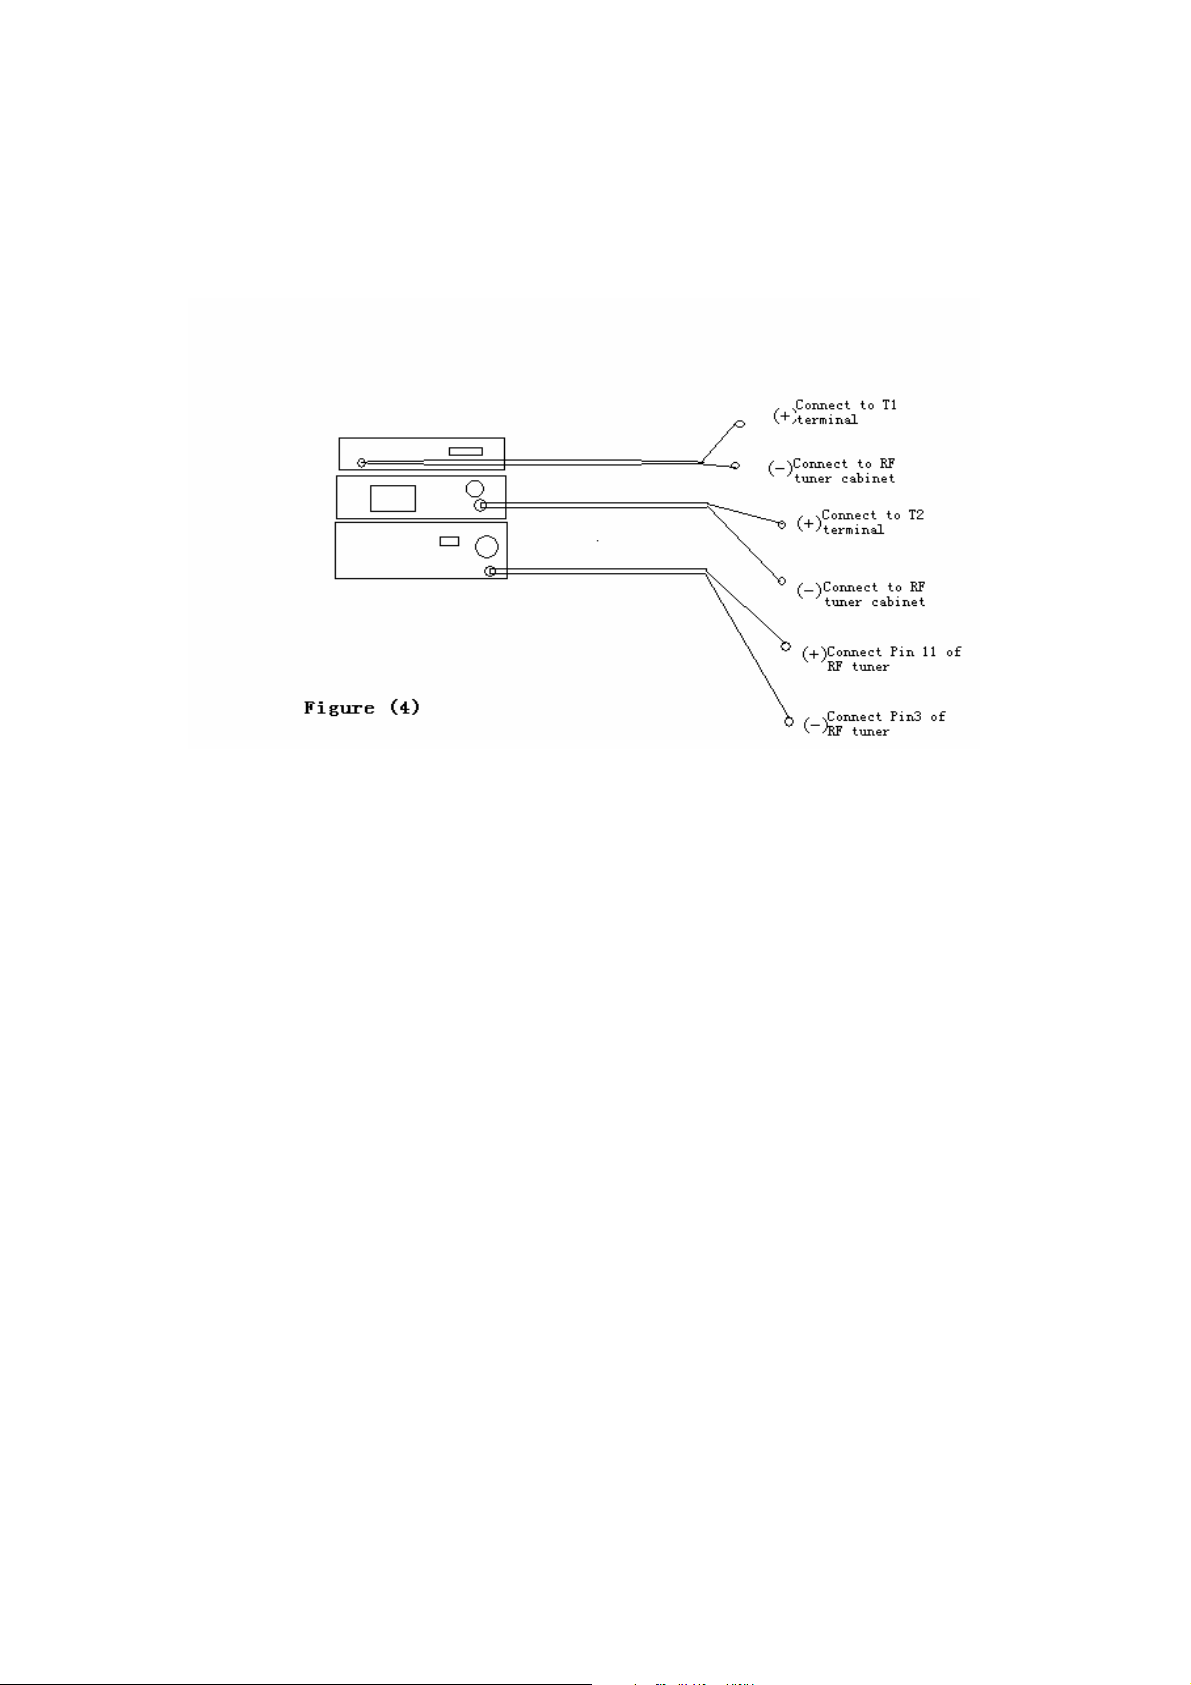
4.3.1.4 Connect DC Voltmeter “+” to Pin 8 of N1000, - to RF TUNER cabinet.
4.3.1.5 Connect oscilloscope probe + to Pin 10 of XP6010, - to RF TUNER
cabinet, then set oscilloscope to 50mV/div Time/div TV-H( s), and set
to TV-H simultaneously.
4.3.1.6 Connection between TV board and TESTER is shown as the following
figure (4).
4.3.2 Adjustment steps
4.3.2.1 Plug the power cord.
4.3.2.2 Turn T1000 magnetic core with ceramic aligner screwdriver so that
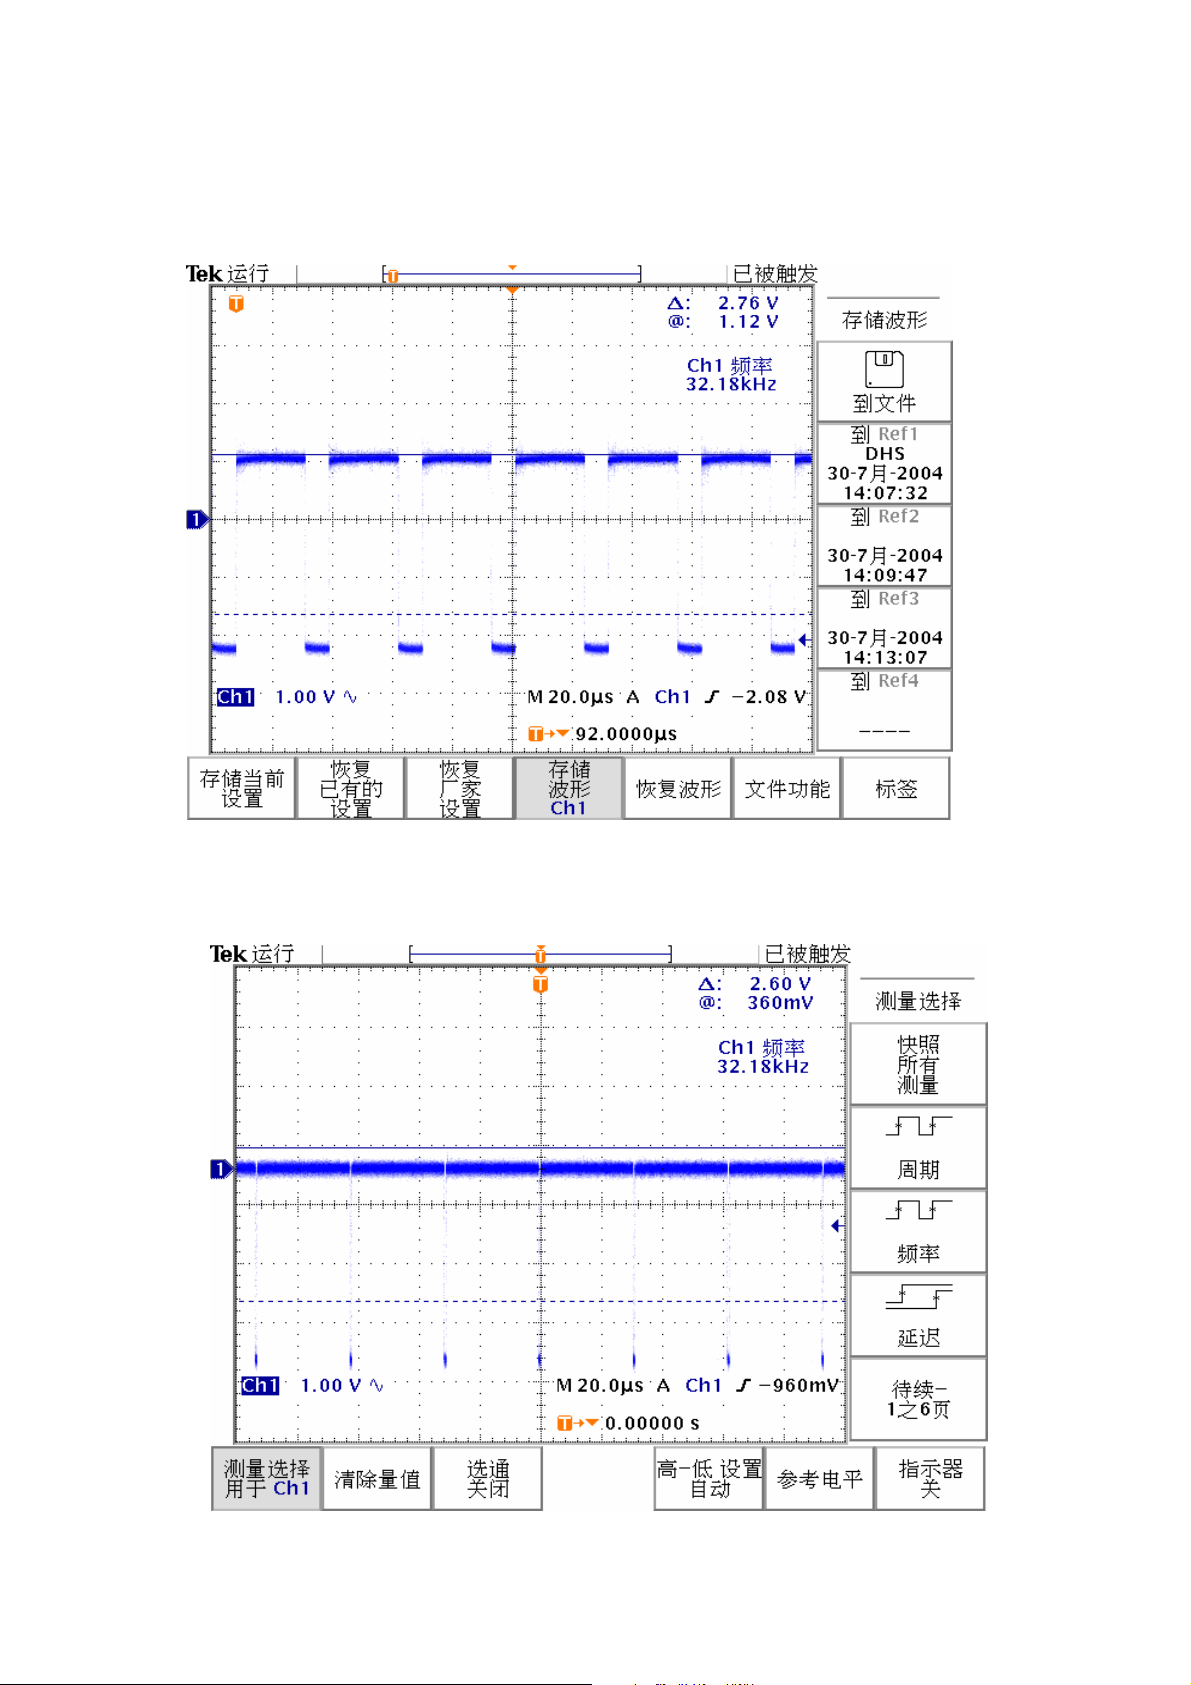
reading on DC Voltmeter is 2.5V 0.2V.
4.3.2.3 Waveform of T2 on the oscilloscope can be observed as the
figure (5) shown.
4.4 AGC adjustment
4.4.1 Preparation steps
4.4.1.1 Connect TV board whose IF has been adjusted to Power board and
motherboard (Do not install TV board into the back cabinet).
4.4.1.2 Set TV signal generator to 56 channel (855.25MHz), apply RF 62dB 3dB
half color bar signal and input to ANTENNA INPUT of RF TUNER.
4.4.1.3 Connect (+) end of DC Voltmeter to Pin 1 of N1000 of RF TUNER, (-) end to
Pin 3 of RF TUNER.
4.4.2 Adjust steps
Page 8

4.2.2.1 Check if connections connect well, start automatic searching.
4.2.2.2 Press PROG. / button to display the channel you hav e received on the scre en
after automatic searching finishing.
4.2.2.3 Adjust VR1000 with small screwdriver so that DC Voltmeter is within 2.0V –
2.5V(maximum),then reverse VR1000 and just make c onfusi onal of noi se
disappear on the picture.
4.5 White calibration adjustment
1 Receive black or white signal under AV or PC mode, adjusting brightness and contrast to set
the brightness to 15Nit in dark area and 90 Nit in bright area.
2 Adjust white balance.Press(MENU”button once, then press “PRE.CH”five times to enter
factory menu, select “Temp” Menu,
Adjust Red 0-100
Green 0-100
Blue 0-100
3 Adjusting chromaticity coordinates of black and white to fit the requirement (X=0.313,
Y=0.329), or plug automatic calibration system to adjust white calibration automatically.
KLC-TM2018
1.Preface
1.1 Applicable area
This test manual is applicable for KLC-TM2018.
1.2 Test notes
1.2.1 Please follow the pointed test steps and choose the proper test equipment to
conduct adjustment, otherwise good effect of TV set could not be obtained. Pointed bias
voltage value should be ensured during test to get satisfied test result.
1.2.2 Be sure that you have the static electricity –protective glove in before test.
2 Test environment
1Temperature15~35°C
2Relative humidity 45 ~ 75%
3Air pressure: 86 ~ 106kPa
Page 9
3 Test equipment
1) Computer 1
2) Oscilloscope100MHz 1
3)Multimeter (VICTOR VC9801) 1
4)DC Voltmeter 1
5)Oscilloscope Tektronix2232 1
6)Cem
7)Test Clamp 1
8TV signal generator 1
4 .T est i tem a nd met ho d
4.1 Power Supply Board
4.1.1 The input and output characteristic test of power
4.1.2 Intention of test: Check input and output to find if short circuit.
4.2 checking method:
ent Resistance 1
use Multimeter (VICTOR VC9801) of resistor to check
Number Item Test Point Standard
1 The resistor of AC
input
2 The resistor of V12
output
3 The resistor of V12
assistant power output
Please check short circuit point on the PCB board if you find short circuit.
4.2.1 Test after supply AC 220V
4.2.2 Intention of test:
4.2.3 Supply AC 220V step by step,then the circuit start to work
4.2.4 Test the voltage of output
4.2.5 Short output test
4.2.6 The Peak-Peak value yawp test of the power output
4.2.7 The test of turning on and off TV
4.2.8 Checking method
4.2.9 Test the empty loading output of power supply Fix the power supply board on Test
clamp unconnecting the load then input 220VAC and turn on power switch to test the output
voltage by multimeter
AC Input Connector XS901 No short
circuit
V12 output of connector XS902 No short
circuit
Between the pins of C908 No short
circuit
Number Ietm Test point Empty loading Standard
1 V12 voltage Output of V12 0.0A 12.0V 0.48
Listen if there is deviant noise at the same time.
Page 10

4.2.10 Test the rated load output voltage Turn off the power then connecting the load
on output and turn on the power to test the output voltage by multimeter Rated load
output voltage / current are as follows:
Number Item Current standard Voltage standard
1 V12 s rated load 5A 12.0V 0.48
Listen if there is deviant noise at the same time.
4.2.11 Test of V12 s shorting-output protect
Make the output shorted in 3 seconds the output voltage should be 0V.after relieving
the short ,turn off the power and discharge the input filter capacitor C904 10 seconds
by discharge resistance (cement resistance 2-5W510 ),then supply the power again
using multimeter to test the output of power The output voltage should come back
normally 12.0V 0.48
4.2.12 The test of powers peak-peak value yawp output Under the rated load
Initialize the oscill oscope 50mV per unit and parallel-connect 0.1UF and 10UF capaci tor
on probe to see the output ripple is OK or not.
Number Item Test point Standard
1 12V output V12 output 150mV
4.2.13 The fully loading and empty loading experiment of turning on/off TV
Turn on/off TV per 5 times every 5 seconds under the two states .Make sure if the ou tput
is OK or not.
4.2.14 The standard of power aging experiment
Every product should aging 8 hours under rated load and 45 C Make sure the output
voltage is in regular range.
4.3 Digital signal part
4.3.1 Digital signal board power part
Page 11

4.3.2 Verify the state of TV set
Please switch the TV on by “Power on/off” switch,then verify the LED color of touch
button.If it is red(standby state),the back-end power has been shut off(the voltage
of N802 No.5 pin is 0V),the supply power for IC-chip has been shut off except N803
normally working.Please test the voltage of D616 is 5V to verif y the power of N803 no rmal
on standby state.
4.3.3 Checking Supply Power.
If the color of LED is green,the power supply for signal board(Test the Number
5,6,7,8 pin of N802 v oltage is 12V).N801 supply 5V power(Test the anode of C853).N 810
N811 supply 3.3V(Tes t the No.2 pin),N812 N813 supply 1.8V(T est the No.2 pin)for main
IC N407,N305.
4.3.4 D
igital signal part
KLC-TM2018 start order
Turn on the
power
N407 RESET and
IO port initialize
Other IC electrify,
reset, initialize
Turn on back
light lamp
Successful start
and LOGO display
4.3.5 After turning on the power, if blank screen appears (no back light lamp), just
press POWER button several times, if blank screen still there
Page 12

4.3.6 Check if the voltage of every power supply is normal.
4.3.7 Check if the cr ystal oscillator Z4. 1(14.318MHz)oscillate or not, and oscilla te
frequency is right or not.
4.3.8 Back light control signal (BKLON) of PIN 3 of XS512 has high level (above 3.5V)
or not, if not, check whether fault solder ed or short circuit h appened to V507, R559 ,
R560,R561
4.3.9 If back light lamp is on while there is no display,check N407’s reset circuit
and the output of the oscillator to confirm the CPU is working or not.If CPU is
working ,then checking the signal channel. Signal channel has been divided into two
parts, general video channel(including antenna, AV, S-terminal input, Y, Cb, Cr) and
HDTV channel (Includi ng Y Pb Pr and RGB). I f no any picture disp lays or bad code disp lays
when switching between these two channels, control signal may be wrong. Please use
oscilloscope to check test point DEN, DVS, DHS and DCLK from end to front to find
whether waveform displayed on the oscilloscope or not, if not, check if fault solder
or short circuit happ ened.If just picture color has problem, sw itch INPUT to RGB inp ut,
then input R, G, B mon ochrome signal separately from computer to find the problem col ors.
Check data line of XS504 with oscilloscope according to the above form to find it’s
problem.
DCLK Waveform
Page 13
DEN Waveform
DHS Waveform
Page 14

DVS Waveform
4.3.10 If only one channel has problem check the signal of this channel normal or
not.AV1,AV2,S-Video,Y,Cb,Cr are inputted from analog signal board to digital signal
board RGB Y Pb Pr(digital signal board)are input N407 by N603.Using oscilloscope
to check ICN1003’s output signal TV-Y,TV-Cb,TV-Cr,TV-HS,TV-VS(1 3 5 7 8pin of
XP1005),to verify the waveform is right or not.If not ,check whether fault soldered
or short circuit are happened Else ,check the 5V supply voltage of N601,N603 on digital
signal board As the Above order we may find the problem of RGB Y Pb Pr video signal
Output a color bar signal to AV1 by signal generator PM5518,check the waveform
if normal or not with oscilloscope.
Page 15

CVBS color bar Wave form
TV_Y Waveform XP 10 05 ’s1Pin
Page 16

TV_ Cb Waveform XP1005’s3Pin
T V_ Cr Waveform X P10 05 ’s5 Pin
Page 17

TV _H s Waveform X P10 05 ’s 7 Pin
T V_V s Wavrform XP1005’s6Pin
4.4 Analog signal board
4.4.1 Analog signal board power part
Analog signal board is supplied by 12V transformed to 5V by N1101,N1815 After
Page 18

connecting the power ,check the voltage of N1101’s 2 pin with multimeter to see if
the voltage of C1809 ‘s anode is right(about 5V) or not This is the back-end IC’s
normal power supply.
4.4.2 IF channel AFC adjustment on analog signal board
Input a 38MHz IF Signal generated from TV signal generator to
RF TUNER according IF cable whose one side to 11 pin of RF TUNER and the other to 3 pin
of RF TUNER(GND). IF channel AFC of LC-TM2018 has been adjusted automatically by software
which may check the power supply of IF IC is normal or not See if the anode voltage
of C2224 is 5V or no t and check N1006 s 21 pin voltage is 2 .5 0.2V If not check
whether fault soldered or short circuit happened to R2029,R2030.
4.4.3 AGC adjustment on analog signal board
4.4.4 Preparation steps
4.4.5 Connect TV board whose IF has been adjusted to Power board and motherboard .
4.4.6 Set TV signal g enerator to 56 channel (855.25MHz), apply RF 62dB 3Db half color
bar signal and input it to ANTENNA INPUT of RF TUNER.
4.4.7 Adjust steps
Page 19

4.4.8 Check if connections connect well, start automatic searching.
4.4.9 Press PROG.-/. button to display the channel you have received on the screen
after automatic searching finishing.
4.4.10 Press factory menu button to display factory menu on TV and select
TB1274 ,press PROG +/- button to select the tda9885 AGC item of sub-menu ,then
press volume +/- but ton to adjust the val ue until the snows ar e disappear The value
after adjusting is about 12-16 and the tuner voltage of first pin is about 2.0
0.2V.
4.5 White calibration adjustment
4.5.1 Receive black or white signal under AV or PC mode, adjusting brightness and contrast to set the
brightness to 5 Nit in dark area and 90 Nit in bright area.
4.5.2 Adjust white balance. Enter factory menu, select cal. Menu, and swap color temp item to user.
Adjust Red 0-255
Green 0-255
Blue 0-255
4.5.3 Adjust black balance. Enter factory menu, and select TB1274 Menu.
Adjust Red offset 0-127
Blue offset 0-127
4.5.4 Adjusting chromaticity coordinates of black and white to fit the requirement (X=0.304, Y=0.325),
or plug automatic calibration system to adjust white calibration automatically.
Page 20

Trouble Shooting
Key IC listKLC-TM1508
Item Type Maker Package Circuit No. Qty.
1 PQ05RD11 Sharp N1001 1
2
4 74LVC541APW PHILIPS TSSOP-20 N514 1
5 74LVC32A D PHILIPS SO-14 N608 1
AM29LV800DT-70EC-AMD/# AMD6
MX26LV800BTC-55-3/# MXIC
7
8
MP1410ES-LF-SOIC-8-MPS MPS SOIC-8 N815
9
10 PW130-10Q PIXELWORKS208PQFP N404 1
11
12
14
TDA1517P PHILIPS HDIP18 N2001 1
24LC16B/SN MICROCHIP3
AT24C16AN-10SI-2.7 ATMEL
1117-1.8V 1117 serial SOT223 N810*N811
1117-3.3V 1117 serial SOT223 N812*N817
SAA7114H PHILIPS LQFP100 N301
TDA9808T PHILIPS SO20 N1010 1
MSP3463G MICRONAS PMQFP64 N2000 1
BA033FP-ROHM ROHM N818 1
M385 LVDS MRT TSSOP-56 N502 1
MP1018EM MPS TSSOP28 N701 1
Tuner-AFT1/6000 Qingjia N1000 1
SOIC-8 N309 1
TSOP-48 N307 1
2
2
1
1
Key IC listKLC-TM2018
Item Type Maker Package Circuit No. Qty.
1 PQ05RD11 Sharp N1101 1
2
4 74LVC541APW PHILIPS TSSOP-20 N508 1
TDA1517 PHILIPS SIL9MPF N2001 1
24LC16B/SN MICROCHIP3
AT24C16AN-10SI-2.7 ATMEL
SOIC-8 N306 1
Page 21

PIC12F629 MICROCHIP SOIC-8 N803 1
5 74LVC273A PHILIPS TSSOP-20 N509 1
AM29LV800DT-70EC-AMD/# AMD6
AM29LV800BB-90EI-AMD/# AMD
TSOP-48 N305 1
7
8
MP1410ES-LF-SOIC-8-MPS MPS SOIC-8 N1815*N801
9 TB1274AF TOSHIBA QFP48-10
10
11 PW1306 PIXELWORKS208PQFP N407
12
14
1117-1.8V 1117 serial SOT223 N813*N812
1117-3.3V 1117 serial SOT223 N810*N811
N1003 1
14-0.8
SOP16-P-
TC90A69F TOSHIBA
TDA9885T PHILIPS SO24 N1006 1
MSP3463G MICRONAS PMQFP64 N2000 1
74HC4052D PHILIPS SO16 N602 1
74LVC14A PHILIPS SO14 N629 1
FSAV330 FAIRCHILD TSSOP16
PI5V330 PERICOM QSOP16
E3DS01 INFINEON N901 1
PC817B Sharp N902 1
KA431Z FAIRCHILD N903 1
Tuner-AFT1/6000 Qingjia N1000 1
300-1.27 N1004
N603
N601
2
2
2
1
1
2
Page 22

Page 23

Page 24

654321
to PW130-55pin
KLC-TM1508 Digital
Board schematic circuit
diagram
D
XS303
S
XS302
CON10
C
Vedio-Input
B
TV-INPUT
YC
1
2
3
4
5
6
XS301
10
11
12
13
CON13
XS311
5
1
2
3
4
5
6
7
8
9
34
12
AV
SDA
SCL
AUX5V(5V)
TV_IN
L3043.3uH
C
Y
RESETn
L3013.3uH
3.3VADC
FB
L306
3.3VADCV33A
C333
0.1uF
FB
L307
C337
0.1uF
C311
100PF
R314
18
video in
R31218
R309
18
R306
18
R30756R30856R31156R310
L302
FB
C303
100PF
R302
2.2K
C334
22uF_10V_T
V33D
C338
22uF_10V_T
56
V33D
R301
4.7K
C320
C316
0.1uF
C307
0.1uF
C310
0.1uF
C319
0.01uF
R317
0
C301
1uF_6V_T
0.1uF
10
12
14
16
13
18
20
19
C315
0.01uF
D301
IN4148
C309
0.1uF
AI24
AI23
AI22
AI21
AI2D
AI12
AI11
AI1D
C306
0.1uF
98
C302
0.1uF
V33A
C314
0.1uF
V33A
23
2
3
97
TDI
TMS99TCK
TDO
TRST
CE27Vssa024Vssa115Vssa29AGND21Vssde126Vssde250Vssde376Vssde4
C324
0.1uF
V33D
C313
0.1uF
75
VDDDE3
33
Vddde4
R315*
3.3K
C328
0.1uF
SAA7114H
R316*
3.3K
V33D
8
Vdddi693Vdddi583Vdddi468Vdddi358Vdddi243Vdddi1
C332
0.1uF
51
1
Vdda211Vdda117Vdda0
Vddde225Vddde1
Vssx5Vssdi388Vssdi263Vssdi138LLC28LLC229RES30RTCO36RTS135RTS034TEST044TEST173TEST274XPD781XPD682XPD584XPD485XPD386XPD287XPD189XPD090XRH92XRV91XRDY96XDQ95XCLK94XTRI80XTOUT
100
C305
0.1uF
Vddx
R303
3.3K
C321
0.1uF
HPD072HPD171HPD270HPD369HPD467HPD566HPD665HPD7
C327
0.1uF
C326
C323
0.1uF
0.1uF
64
79
31
32
SCL
TEST377TEST478TEST5
C304
0.1uF
R305100
R304100
C322
22PF
7
6
22
SDA
AOUT
XTALI
XTALO
AMCLK
ALRCLK
AMXCLK
IPD7
IPD6
IPD5
IPD4
IPD3
IPD2
IPD1
IPD0
ITRDY
ICLK
IDQ
ITRI
IGP0
IGP1
IGPV
IGPH
ASCLK
Z301
24.576MHz
N301
SAA7114H
4
V-VS
V-HS
RP304*
C329
22PF
54
55
56
57
59
60
61
62
42
45
46
47
48
49
52
53
37
39
40
41
V-VS1TP
V-HS1TP
RP303*33x4
R318
0
33x4
RP30133x4
R313
V656-0
V656-1
V656-2
V656-3
V656-4
V656-5
V656-6
V656-7
30
SCL
SDA
RP302
R319
0
V656-7
V656-6
V656-5
V656-4
V656-3
V656-2
V656-1
V656-0
33x4
R321*
30
D
C
V656-[0..7]
TP1
B
VCLK
RCA-8
A
1 2 3 4 56
V656-[0..7]
LCDON
Title
DYNAX ELECTRONICS(HK)LTD.
NumberRevisionSize
Orcad B
Date:29-Mar-2005Sheet of
File:E:\EE\LC-TM1580P\原理图\decoder1.schDrawn By:
A
Page 25

V33
4321
DRE[0..7]
D
DGE[0..7]
DBE[0..7]
C
DRO[0..7]
DGO[0..7]
B
DBO[0..7]
DHS
DVS
DEN
DCLK
DHS
DVS
DEN
DCLK
DRE0
DRE1
DRE2
DRE3
DRE4
DRE5
DRE6
DRE7
DGE0
DGE1
DGE2
DGE3
DGE4
DGE5
DGE6
DGE7
DBE0
DBE1
DBE2
DBE3
DBE4
DBE5
DBE6
DBE7
DRO0
DRO1
DRO2
DRO3
DRO4
DRO5
DRO6
DRO7
DGO0
DGO1
DGO2
DGO3
DGO4
DGO5
DGO6
DGO7
DBO0
DBO1
DBO2
DBO3
DBO4
DBO5
DBO6
DBO7
V33
GND
V33
51
R0
52
R1
54
R2
55
R3
56
R4
3
R5
50
R6
2
R7
4
G0
6
G1
7
G2
11
G3
12
G4
14
G5
8
G6
10
G7
15
B0
19
B1
20
B2
22
B3
23
B4
24
B5
16
B6
18
B7
27
HSYNC
28
VSYNC
30
ENABLE
25
CNTRL
31
CLOCK
VCC1VCC9VCC
N502
DS90C383A
R/F
R880
R879
V33
51
R0
52
R1
54
R2
55
R3
56
R4
3
R5
50
R6
2
R7
4
G0
6
G1
7
G2
11
G3
12
G4
14
G5
8
G6
10
G7
15
B0
19
B1
20
B2
22
B3
23
B4
24
B5
16
B6
18
B7
27
HSYNC
28
VSYNC
30
ENABLE
25
CNTRL
31
CLOCK
5
17
VCC1VCC9VCC
N503
DS90C383A
GND
R/F
R876
R877
26
32
PWDN
OUT0
OUT0
OUT1
OUT1
OUT2
OUT2
OUT3
OUT3
CLKOUT
CLKOUT
47
48
45
46
41
42
37
38
39
40
LCDON
TXE0P
TXE0M
TXE1P
TXE1M
TXE2P
TXE2M
TXE3P
TXE3M
TXECP
TXECM
VPANEL
L516FB
C557
100uF_6V_T
C570
0.1uF
TXE3P
TXECP
TXE2P
TXE1P
TXE0P
TXO3P
TXOCP
TXO2P
TXO1P
TXO0P
XS504
LVDS
1 2
3 4
5 6
7 8
9 10
11 12
13 14
15 16
17 18
19 20
21 22
23 24
25 26
27 28
29 30
31 32
GND GND
TXE3M
TXECM
TXE2M
TXE1M
TXE0M
TXO3M
TXOCM
TXO2M
TXO1M
TXO0M
D
VOO
44
36
43
49
VNN
GND
34
33
35
10uF_6V_T
V33 V33
C565
VOO VNN
L515FBL514FB
C542
C525
0.1uF
0.1uF
C518
0.1uF
C539
0.1uF
C
GND53GND29GND21GND13GND
LVDSVC
LVDSGD
LVDSGD
LVDSGD
PLLVCC
PLLGND
PLLGND
V33
GND
R878
R879
26
32
PWDN
OUT0
OUT0
OUT1
OUT1
OUT2
OUT2
OUT3
OUT3
CLKOUT
CLKOUT
47
48
45
46
41
42
37
38
39
40
LCDON
TXO0P
TXO0M
TXO1P
TXO1M
TXO2P
TXO2M
TXO3P
TXO3M
TXOCP
TXOCM
V33
Bypass caps for U14
VOO is 3.3V LVDS power for U13 and U14.
GND GND
C543
C531
C540
C517
0.1uF
0.1uF
0.1uF
0.1uF
C512
0.1uF
GND
C558
0.1uF
C535
0.1uF
C536
0.1uF
B
VOO
LVDSVC
LVDSGD
LVDSGD
LVDSGD
PLLVCC
PLLGND
PLLGND
44
36
43
49
VNN
GND
34
33
35
GND53GND29GND21GND13GND
A
1 2 34
17
GND
5
GND
A
GND
Title
DS90C383.SCH
NumberRevisionSize
B
Date:29-Mar-2005Sheet of
File:E:\EE\LC-TM1580P\原理图\Ds90c3831.SCHDrawn By:
Page 26

654321
D
C
V_DDC_5V
R668
0
VCC
10
5
9
4
8
3
7
2
6
1
D609
DIODE
D610
DIODE
DDC_CLK
DDC_DAT
XS607
DB15-VGA
15
14
13
12
11
R667
R666
DDC_CLK
VSYNC1
HSYNC1
DDC_DAT
R629*
10K
RXD
TXD
2
1
3
D606*
BAV99L
2
1
0
0
3
D605*
BAV99L
V33 V33 V33
BAV99L
D603
3
2
1
BAV99L
D604
3
2
BAV99L
D602
1
VGA_R
VGA_G
VGA_B
2
1
R627*
OPEN
R628*
OPEN
R632*
10K
R9U2
7
6
5
R630*
10K
N605*
VCLK
SCL
SDA
24LC21A
3
L60940OHM@100MHZ
L61140OHM@100MHZ
L61340OHM@100MHZ
VCC
NC1
NC2
NC3
GND
L618
L617
TXD
RXD
D
8
1
2
3
C675*
0.1uF
4
VSYNC1
HSYNC1
V33
R635
NC
R63475
R641
2.2K
74LVC32
1
2
VSYNCRTN
HSYNCRTN
R64275
R636
NC
4
5
V33
R640
2.2K
V33
C693
0.1uF
C682
56pF
3
N608A
7 14
C67856pF
10
9
6N608B
74LVC32
IT NEED 3.3V POWER
L60840OHM@100MHZ
L61040OHM@100MHZ
L61240OHM@100MHZ
U1C1
74LVC32
AVSYNC
AHSYNC
8N608C
C
RAIN
GAIN
BAIN
B
V_DDC_5V
A
1 2 3 4 56
XS606
1
2
3
4
5
6
7
8
9
10
11
12
13
14
DB15-VGA
VGA-Input
HSYNC1
VSYNC1
DDC_DAT
DDC_CLK
VGA_B
VGA_G
VGA_R
RXD
TXD
R626
75
R625
75
R623
75
Title
C661
12P
C656
12P
GRAPHICSIN.SCH
C652
12P
NumberRevisionSize
Orcad B
Date:29-Mar-2005Sheet of
File:E:\EE\LC-TM1580P\原理图\GRAPHICSIN1.SCHDrawn By:
B
A
Page 27

654321
ROMOEn
ROMWEn
RESETn
D
R349
100K
R346
0
V33
C
U3WPn
A1
A2
A3
A4
A5
A6
A7
A8
A9
A10
A11
A12
A13
A14
A15
A16
A17
A18
A19
R343
3.3K
V33V33
N307
26
CE
28
OE
11
WE
12
RP
14
WP
47
BYTE
25
A0
24
A1
23
A2
22
A3
21
A4
20
A5
19
A6
18
A7
8
A8
7
A9
6
A10
5
A11
4
A12
3
A13
2
A14
1
A15
48
A16
17
A17
16
A18
Flash_8M
ROM
GND1
GND2
FCEn
VPP
VCC
D1
D2
D3
D4
D5
D6
D7
D8
D9
D10
D11
D12
D13
D14
D15
D16
13
37
C388
0.1uF
29
D0
31
D1
33
D2
35
D3
38
D4
40
D5
42
D6
44
D7
30
D8
32
D9
34
D10
36
D11
39
D12
41
D13
43
D14
45
D15
46
27
V33
C383
0.1uF
R347
100K
D[0..15]
V33
100uF
C390
4 3
V33
C391
0.1uF
XS309
R345
0
V33
D[0..15]
SDA
SCL
NMI Pushbutton
V33
V33
R356
3.3K
12
N309
6
SCL
5
SDA
1
NC0
2
NC1
3
NC2
VCC
WP
GND
8
7
C396
0.1uF
4
C397
0.1uF
R351
30K
4 3
v33
XS310
NMI
12
D
C
24C16
NVRAM
V33
A[1..19]
B
A
1 2 3 4 56
GND
V33
A2
A4
A6
A9
A11
A12
A14
A17
A19
ROMOEn
D15
D14
D4
D3
D2
D9
D8
XS313
1 2
3 4
5 6
7 8
9 10
11 12
13 14
15 16
17 18
19 20
21 22
23 24
25 26
27 28
29 30
31 32
33 34
35 36
37 38
39 40
41 42
43 44
45 46
47 48
49 50
51 52
53 54
55 56
57 58
59 60
HEADER 30X2
A1
A3
A5
A7
A8
A10
IRPn
ICEn
A13
A15
A16
A18
IA20
IA21
ROMWEn
D7
D6
D13
D12D5
D11
D10
D1
D0
V33
R360
3.3K
R357
3.3K
R359
3.3K
V33
RESETn
R352
3.3K
C398
18PF
Title
MEMORY.SCH
NumberRevisionSize
Orcad B
Date:29-Mar-2005Sheet of
File:E:\EE\LC-TM1580P\原理图\Memory1.SCHDrawn By:
B
A
Page 28

654321
D
XS611
8 HEADER
1
2
3
4
5
TO KEYBOARD
6
7
8
VCC
STB
1
2
3
4
5
TO IRRCVR
6
XS615
HEADER 6
C695
0.22uF
C
LCD 4.5W @ 12V +Backlight Requirement
XS815
12V
1
2
3
4
POWER INPUT
XS816
2.75W @ 12V max.
Sleep Mode 200mW @ 12V max.
B
D2006-4A
XS817
AUDIO POWER
D2006-4A
12V
1
2
3
4
F801
5A
F801
L802
FB1206
5A
R665
4.7K
L826
FB1206
L801
FB1206
V33
IRRCVR
PANEL-LED2(GRE)
TO VPENAL
V12
C820
470uF_16V_T
V33 V33
R5053
470
PANEL-LED1(RED)
Q501
BC847
C817
10nF
C818
0.22uF
D808
FM5820
A K
R562
470
1
2
3
4
Q502
BC847
N815
BS
IN
SW
GND
MP1410ES
L827
15uH
R561
10K
N/C
EN
COMP
FB
R554
10K
8
7
6
5
V33V33V33 V33
R566
10K
R870
30K
R871
1.5K
V33 V33 V33
R567
10K
R872
390K
C811
R875
10K 1%
700ma max.
C809
1000uF_16V_T
R569
10K
180PF
R558
R555
470
VCC
R574
10K
C812
3.3nF
C810
0.22uF
470
VCC
R568
10K
V33 V33
R563
10K
L825
FB
R564
10K
RP501
33x4
RP502
33x4
C813
0.1uF
GND
1
19
2
KEY_0
3
KEY_1
4
KEY_2
5
KEY_3
6
KEY_4
7
KEY_5
8
KEY_6
9
N817
LM1117-3.3V
N514
OE1
OE2
I0
I1
I2
I3
I4
I5
I6
I7
74LVC541A_PW
Input Buffer
4
Vo4
ADJ1Vo22Vin
VCC
O0
O1
O2
O3
O4
O5
O6
O7
GND
3
C805
0.1uF
20
18
D8
17
D10
16
D12
15
D14
14
D9
13
D11
12
D13
11
D15
10
GND
4
ADJ1Vo22Vin
V33
V33
C807
100uF_6V_T
Vo4
3
V33
C508
0.1uF
GND
AUX5V
N812
LM1117-3.3V
C830
0.1uF
C804
22uF_6V_T
3.3VADC
C806
0.1uF
V18
4.7uH(OPEN)
4
Vo4
ADJ1Vo22Vin
L824*
C801
0.1uF
N810
LM1117-1.8
3
C800
0.1uF
XS605
C899
22uF_6V_T
4
3
2
1
V18A
VCC
GND
4
Vo4
ADJ1Vo22Vin
CS0n
RDn
D[0..15]
LED1
LED2
TXD
RXD
N811
LM1117-1.8
3
3.3VADC
D
C
B
A
1 2 3 4 56
Title
MISC
NumberRevisionSize
Orcad B
Date:29-Mar-2005Sheet of
File:E:\EE\LC-TM1580P\原理图\Misc11.SCHDrawn By:
A
Page 29

PV1
C473
3.9nF
D
GFILT
RAIN
GAIN
C45147nF
IRED
C45547nF
C4541nF
BAIN
C46047nF
IBLUE
AVSYNC
AHSYNC
C
V656-[0..7]
V656-0
V656-1
V656-2
V656-3
V656-4
V656-5
V656-6
V656-7
R439
430
TP1
VCLK
C441
22P
B
C447
0.1uF
C445
0.1uF
C471
0.1uF
C476
0.1uF
3.3VADC 3.3VADC 3.3VADC 3.3VADC 3.3VADC3.3VADC
IGREEN
ISOG
TP1
TP
R431
3.3K
R28C11
C474
39nF
23
37
43
44
50
64
65
10
11
13
14
16
17
63
62
61
60
59
58
57
56
55
72
C487
0.1uF
654321
R422*
100_NS(OPEN)
R433
V33V33V33 V33
193
A1
A10
A11
A12
A13
A14
A15
A16
A17
A18
A19
D10
D11
D12
D13
D14
D15
RD
WR
CS0
CS1
A2
A3
A4
A5
A6
A7
A8
A9
D0
D1
D2
D3
D4
D5
D6
D7
D8
D9
LV1
192
191
190
189
188
183
182
181
180
179
178
177
176
175
164
163
162
161
160
159
158
157
156
155
154
153
152
151
150
149
148
145
144
143
196
195
197
198
199
200
R418
3.3K
R419
3.3K
R450
3.3K
R448
3.3K
TESTEN
TESTEN
137
FILTER
L419
FB
DPV1
MPV1
132
53
54
208
207
206
205
204
203
202
201
142
141
140
139
138
194
169
170
C492
30PF
L420
FB
RESETB
RXD
TXD
PORTA0
PORTA1
PORTA2
PORTA3
PORTA4
PORTA5
PORTA6
PORTA7
TRST
TCK
TMS
TDI
TDO
NMI
XI
XO
L421
FB
PW135
DV1
L423
FB
PW131Misc
N404C
V18A
ROMOE
ROMWE
L422
FB
RED
GREEN
SOG
BLUE
VS
HS
7
RX2P
8
RX2M
RX1P
RX1M
PW130
RX0P
RX0M
RCP
RCM
5
RTERM
V656_0
V656_1
V656_2
V656_3
V656_4
V656_5
V656_6
V656_7
N404A
Graphics andVideo Port
VPEN
VCLK
V18V18 V18 V18V18 V18
C480
0.1uF
3.3VADC
350ma max.90ma max.
RESETn
RXD
TXD
SDA
SCL
LCDON
BKLON
LED1
IRRCVR
LED2
PWMOUT
NMI
Sleep Mode 9ma max.
V33
0.1uF
40ma max.
C485
3.3VDVI
C484
C494
30PF
0.1uF
1.5M
R444
XTAL14.31818
Z402
X607 X608
V18
175ma max.40ma max.Sleep Mode 35ma
A1
A2
A3
A4
A5
A6
A7
A8
A9
A10
A11
A12
A13
A14
A15
A16
A17
A18
A19
D0
D1
D2
D3
D4
D5
D6
D7
D8
D9
D10
D11
D12
D13
D14
D15
A1..19]
D[0..15]
ROMOEn
ROMWEn
RDn
CS0n
Display Port
PW130
PVDDPV1
DCLKNEG
N404B
DCLK
DGR0
DGR1
DGR2
DGR3
DGR4
DGR5
DGR6
DGR7
DGG0
DGG1
DGG2
DGG3
DGG4
DGG5
DGG6
DGG7
DGB0
DGB1
DGB2
DGB3
DGB4
DGB5
DGB6
DGB7
0
DVS
DHS
DEN
DR0
DR1
DR2
DR3
DR4
DR5
DR6
DR7
DG0
DG1
DG2
DG3
DG4
DG5
DG6
DG7
DB0
DB1
DB2
DB3
DB4
DB5
DB6
DB7
106
107
101
102
103
98
97
94
93
92
91
90
89
88
87
86
85
82
81
80
79
78
77
74
73
71
70
67
66
131
130
129
128
127
126
125
124
121
120
119
118
117
116
115
114
113
112
111
110
109
108
100
99
R424
33
R420*33
R41733
R41633
R41533
RP40533x4
RP40633x4
RP407
RP40833x4
RP40933x4
RP41033x4
RP41633x4
RP41533x4
RP414
33x4
RP413
33x4
RP412
33x4
RP411
33x4
33x4
DCLK
DCLKn
DVS
DHS
DEN
DRE0
DRE1
DRE2
DRE3
DRE4
DRE5
DRE6
DRE7
DGE0
DGE1
DGE2
DGE3
DGE4
DGE5
DGE6
DGE7
DBE0
DBE1
DBE2
DBE3
DBE4
DBE5
DBE6
DBE7
DRO0
DRO1
DRO2
DRO3
DRO4
DRO5
DRO6
DRO7
DGO0
DGO1
DGO2
DGO3
DGO4
DGO5
DGO6
DGO7
DBO0
DBO1
DBO2
DBO3
DBO4
DBO5
DBO6
DBO7
DRE[0..7]
D
DGE[0..7]
DBE[0..7]
C
DRO[0..7]
DGO[0..7]
DBO[0..7]
B
C463
0.1uF
C464
0.1uF
C459
0.1uF
C453
0.1uF
V33V33 V33V33V33 V33V33
C448
0.1uF
C446
0.1uF
C444
0.1uF
C462
0.1uF
C468
0.1uF
A
1 2 3 4 56
C450
0.1uF
C486
0.1uF
C479
0.1uF
C449
0.1uF
AVDD3132AVDD3233AVDD3336AVDD3439AVDD3541AVDD3646AVDD3748AVDD38
C481
0.1uF
3.3VADC3.3VADC
C477
0.1uF
AGND3134AGND3235AGND3338AGND3440AGND3542AGND3645AGND3747AGND3849AGND39
52
VDDQ3168VDDQ3283VDDQ33
104
122
133
171
VDDQ34
VDDQ35
VDDQ36
N404DPW130
VSSQ3169VSSQ3284VSSQ33
VSSQ34
VSSQ35
VSSQ36
51
105
123
134
172
18
186
DVDD316DVDD32
VDDQ37
Power and Ground
DGND319DGND3212DGND33
VSSQ37
187
135
146
173
184
165
VDD1175VDD1295VDD13
VDD14
VDD15
VDD16
DPLLVDD1
VSS1176VSS1296VSS13
VSS14
VSS15
VSS16
DPLLVSS1
15
136
147
174
185
166
20
26
167
PVD1122PVD1224PVD13
DVDD111DVDD123DVDD13
MPLLVDD1
DGND112DGND124DGND13
MPLLVSS1
168
PGND1121PGND1225PGND13
19
29
C466
0.1uF
C469
0.1uF
C467
0.1uF
C489
0.1uF
C472
0.1uF
ALVDD1128ALVDD12
ALGND1130ALGND12
27
31
Title
PW135.SCH
A
NumberRevisionSize
Orcad B
Date:29-Mar-2005Sheet of
File:E:\EE\LC-TM1580P\原理图\Pw135-1.SCHDrawn By:
Page 30

54321
6
D
Q506
BC847(SOT-23)
DGND
DGND
V12
AUX5V
R575
300
D507
LED
Number RevisionSize
VCC
R583
NC
BRIGHT
R584
1K
L816
FB
ON/OFF
V33PANEL
C823
10uF/10V
L526
FB
C516
C515
100uF_16V_T
0.1uF
AUX5V
OPTIONAL FOR 3.3V DRIVE PANEL
4
N818
LM1117-3.3V
Vo4
ADJ1Vo22Vin
3
AUX5V
҂ᑺ
XS514
D2006-6A
1
2
3
4
5
6
1
2
3
4
5
XS517
D2006-5A
PWMOUT
LCDON
BKLON
R581
10K
C519
DBO[0..7]
DGO[0..7]
DRO[0..7]
DRE[0..7]
C521
100uF_16V_T
V33PENAL
V12
FROM L826
L828
FB
C530
0.1uF
C523
0.1uF
VCC
R586
3.3K
R577
10K
R572
0
R573
NC
R571
NC
VCC
DGE[0..7]
C
DBE[0..7]
Display Output
XS504
39 40
DCLK
37 38
35 36
DRE1
33 34
DRE3
31 32
DRE5
29 30
DRE7
27 28
25 26
DGE1
23 24
DGE3
21 22
DGE5
19 20
DGE7
17 18
15 16
DBE1
13 14
DBE3
11 12
DBE5 DBE4
9 10
DBE7
7 8
5 6
B
3 4
1 2
HEADER 20X2
C509
100uF_16V_T
C510
0.1uF
DHSDVS
DEN
DRE0
DRE2
DRE4
DRE6
DGE0
DGE2
DGE4
DGE6
DBE0
DBE2
DBE6
L503
XS506
31 32
DRO1
29 30
DRO3
27 28
DRO5 DRO4
25 26
DRO7
23 24
21 22
DGO1
19 20
DGO3
17 18
DGO5
15 16
DGO7
13 14
11 12
DBO1
9 10
DBO3
7 8
DBO5
5 6
DBO7
3 4
1 2
DRO0
DRO2
DRO6
DGO0
DGO2
DGO4
DGO6
DBO0
DBO2
DBO4
DBO6
HEADER 16X2
FB
VPANEL
R585
10K
R588
10K
C561
0.1uF
VCC
R578
10K
C522
0.22uF
R580
4.7K
C513
0.1uF
R576
4.7K
Q503
BC847(SOT-23)
Q504
BC847(SOT-23)
C562
0.1uF
N516
1
2
3
4 5
9435A
N517
1
2
3
4 5
9435A
0.1uF
8
7
C520
6
0.1uF
8
7
6
R579
10K
R582
10K
R582
10K
U805
BA033FP(TO252-3)
1 3
Vi
Vo
GND
2
DGND
L527
FB
10uF/10V
C563
0.1uF
0.1uF
C530
C524
V5V
VPANEL VCC
R573
0
R572
0
R571
A
0
OPTIONAL FOR 5V DRIVE PANEL
V33PANEL
OPTIONAL FOR 3.3V DRIVE PANEL
V12
OPTIONAL FOR 12V DRIVE PANEL
C560
0.1uF
Q505
BC847(SOT-23)
V3.3 is the 3.3V power supply for PW113
Title
DISPLAY.SCH
Orcad B
D
C
TO INVERTER
TO INVERTER
B
A
Date: 1-Aug-2003 Sheet of
1 2 3 4 56
Page 31

KLC-TM1508
Analog Board
schematic circuit diagram
Page 32

87654321
KLC-TM1508
inverter•PCB P/N•35007175• schematic
circuit
D
R701
100k
C
C702
C727
0.22uF
C704
1uF
R730300k
C725
0.1uF
10nF
C701
2.2nF
XS701
6
5
4
3
B
2
1
R705
300k
R727
N/A
R70368ohm
R729
75ohm
V703
MMBT3904
D
R720300k
R72156k
C709
0.47uF
IS
R716
R731
24k
10K
C703
10nF
R706
10k
C708
1uF
R726
0ohm
IL
R707
30k
R708
20k
REFVL
1
Ref
2
Comp
3
FT
4
VL
5
IS
6
AGnd
7
Byp
8
NC
9
ABrt
10
NC
11
IL
12
BOsc
13
DBrt
14
En
N701
MP1018EM
PGL
LLG
DrvL
OutL
ULG
BtL
PRL
PGR
LRG
DrvR
OutR
URG
BtR
PRR
28
27
C710
26
22nF
25
24
C711
23
22nF
22
21
20
C712
19
22nF
18
17
C713
16
22nF
15
V701A
SI9926BDY
V701B
SI9926BDY
V702A
SI9926BDY
V702B
SI9926BDY
1
C722
4.7nF
C724
4.7nF
REFREF
R714
51K
C730
4.7nF
R715
51K
C731
4.7nF
T703
2
1
200mH
1
T704
2
200mH
3
4
4
3
IL
IL
2
7.8
3
5.6
1
7.8
3
5.6
C714
1uF/25v
C715
1uF/25v
4
2
4
R7091K
C7161uF/25V
C7361uF/25V
R7171k
C7331uF/25V
C7371uF/25V
R728
3.3k
2 11
5
D702
1N4148
2 11
5
D701
1N4148
T701
EPC-19
ISIS
T702
EPC-19
8
C718
470pF
R711
300K
8
C717470pF
R710
300K
R713
2K
R712
2K
C720
0.1uF
C719
0.1uF
C728
N/A
C729
N/A
C721
22pF/3kV
D703
1N4148
VL
C723
22pF/3kV
D704
1N4148
XS702
1
2
XS703
1
2
XS704
1
2
XS705
1
2
C
B
R702
10k
A
R704
100k
F701
4A
C707
0.1uF
+
C705
220uF/25V
1 2 3 4 5 6 78
C735
0.1uF/16V
D705
IL
1N4148
C734
IS
R718
100K
R719
100K
0.1uF/16V
Title
A3
Date:9-Oct-2004 Sheet of
NumberRevisionSize
INV-MP1018
1
11
Drawn By:
A
A
Page 33

KLC-TM1508
Digital Board Top layer
Page 34

KLC-TM1508
Digital Board Bottom
layer
Page 35

KLC-TM1508 Analog Board Toplayer
Page 36

KLC-TM1508 Analog Board Bottomlayer
Page 37

CUSTOMER:
Emax
KLC-TM1508
inverter•P/N•34002054•
Specification
LCD PANEL DC TO AC INVERTER
PLCD0317403 REV:0APR. / 24 / 2003
DIMENSION MEASURE:(UNIT:mm)
25
52.0
£X 4.0*2
5.0
1of 3
10MAX
2.0MAX
92.0
Tolerance:¡Ó0.15mm
184
6.0
52.0
1.6
Page 38

CUSTOMER:
Emax
Specification
LCD PANEL DC TO AC INVERTER
PLCD0317403 REV:0
TEST CIRCUIT:
VT
2 3
of
APR. / 24 / 2003
£[
VT
LOAD
100£[
100
LOAD
LOAD
100
£[
VT
LOAD
£[100
VT
Page 39

CUSTOMER:
Emax
Specification
LCD PANEL DC TO AC INVERTER
PLCD0317403 REV:0
LAYOUT DRAWING:
3of 3
APR. / 24 / 2003
Page 40

CUSTOMER:____________________________________
Specification
Emax
Part Name:
Model No: PLCD0317403
LCD PANEL DC TO AC INVERTER
Page:
Date:
1of2
APR. 24 2003
MAKER UL No.
22uF/16V(FP1451 or TL1451 or
C20
C5,C9,C14,C15,C1
6,C17,C18,C21,C25
,C32,C33,C35,C37
C3,C4 154/250V 2
C6,C10,C27,C28 105/16V,0603 4 TDK,PHILIPS
C34,C36 102/50V,0603 2 TDK,PHILIPS
C8 470/50V,0603 1 TDK,PHILIPS
C19,C26 150uF/25V 2 SANYO,HER MEI,TEAPO
C1,C2,C29,C30 22pF/3KV,DIP 4 TDK,PHILIPS
CN1
CN2,CN3,CN4,CN
5
D12,D13,D14,D15,
D16,D17,D18,D19
D9,D11 SK24 or 2A/40V 2 ROHM,YING,TS,MMC
D7,D8 ZENER 13V 2 ROHM,YING,TS,MMC
R1,R2
R6
R28,R29
R3
R11,R12
R19,R21
R16,R17,R18,R20
R34,R35
R13,R45
R4,R30,R31,R51,R
52,R55,R56
R5
2.2uF/50V(BA9741 or
AT1741S)
104/50V,0603 13 TDK,PHILIPS
2001J-06-RT(ORICH)
S6B-PH-KL(JST)
JH2-22-0648
SM02B-BHSS- 1-TB(JST)
87210-0208(ACES)
W01-01100-0228
RLS4148 4 ROHM,YING,TS,MMC
1K ,1206, 1%
100K ,0603
75K ,0603
3.6K ,0603
11K ,0603, 1%
510 ,0603
20K ,0603
560 ,1206
1.5K ,0603, 1%
1M ,0603
56K ,0805
1
1 ORICH,JST,FCN
4 JST,ACES,FCN
2
1
2
1
2
2
4
2
2
7
1
TEAPO,SANYO,HER
MEI,FUHJYYU
ARCOTRONICS,TAI
YANG(7Q)(7C)
YAGEO,SYNTON-TECH,
LIKET,EVER OHMS,TA-I
YAGEO,SYNTON-TECH,
LIKET,EVER OHMS,TA-I
YAGEO,SYNTON-TECH,
LIKET,EVER OHMS,TA-I
YAGEO,SYNTON-TECH,
LIKET,EVER OHMS,TA-I
YAGEO,SYNTON-TECH,
LIKET,EVER OHMS,TA-I
YAGEO,SYNTON-TECH,
LIKET,EVER OHMS,TA-I
YAGEO,SYNTON-TECH,
LIKET,EVER OHMS,TA-I
YAGEO,SYNTON-TECH,
LIKET,EVER OHMS,TA-I
YAGEO,SYNTON-TECH,
LIKET,EVER OHMS,TA-I
YAGEO,SYNTON-TECH,
LIKET,EVER OHMS,TA-I
YAGEO,SYNTON-TECH,
LIKET,EVER OHMS,TA-I
E201214
E60389
E41871
E60389
E205655
E201214
Approved Cheched Design Draw
Page 41

CUSTOMER:____________________________________
Specification
Emax
Part Name:
Model No: PLCD0317403
LCD PANEL DC TO AC INVERTER
Page:
Date:
2of2
APR 24 2003
MAKER UL No.
R32,R33 1.2K ,0805 2
R41,R42 5.1K ,0603, 1% 2
R25,R27 30K ,0603 2
R54,R58 47K ,0603 2
R40,R46 36K ,0603, 1% 2
R53,R57 5.1M ,0603 2
R14
R47,R48,R49,R50 910 ,1206 4
Q1,Q2,Q15,Q16 SST2222A 4 ROHM,AUK
Q3,Q4,Q5,Q6 2SC4672 4 ROHM,AUK
Q7,Q8
Q9,Q10,Q11 SST2907A 3 ROHM,AUK
Q12 RK7002 1 ROHM,AUK
L1,L2 EDI0005 2 EMAX
L3,L4 ELF0002 2 EMAX
F1
U1
PCB
PT1,PT2 EST0015,EPC-19 2 EMAX
MYLAR MLTG184*104*0.188mT 1 GARWARE,TORAY
10K ,0603(FP1451 or TL1451)or
13K ,0603(BA9741 or AT1741S)
NDS9435A or AO4403 or
SDM9435A or AP9435M
429003(Littelfuse)
3216FF-3A(Bussmann)
1206FA3A(SkyGate)
KE32(Daito)
BA100-3A(SAVE)
BA9741 or FP1451 or TL1451 or
AT1741S
CPC1151R6176
PLCD1717408
1
2
1
1
1
YAGEO,SYNTON-TECH,
LIKET,EVER OHMS,TA-1
YAGEO,SYNTON-TECH,
LIKET,EVER OHMS,TA-1
YAGEO,SYNTON-TECH,
LIKET,EVER OHMS,TA-1
YAGEO,SYNTON-TECH,
LIKET,EVER OHMS,TA-1
YAGEO,SYNTON-TECH,
LIKET,EVER OHMS,TA-1
YAGEO,SYNTON-TECH,
LIKET,EVER OHMS,TA-1
YAGEO,SYNTON-TECH,
LIKET,EVER OHMS,TA-1
YAGEO,SYNTON-TECH,
LIKET,EVER OHMS,TA-1
CET,AO,SMC,Advanced
Power.
LITTEL,BUSSMANN,
SKY GATE, Daito,SAVE
ROHM,FEELING,TI,AIMT
RON
CHIAN YOU,HANT GIST,
YUMMON,TONG JIANG,
CENTURY,WAN ZHENG
,EISO, TUNG TA
E10480
E19180(N)
E195833
E59783
E146895
E112804(S)
E177794
E168218(S)
E201363
E189010(M)
E211670
E162061(S)
E162886
E110983(M)
E86511(M)
EVA EVA 10*13*2mm 2 GARWARE,TORAY
Approved Cheched Design Draw
Page 42

87654321
KLC-TM1508 P/N•34002054
PLCD0317403
D9
SK24
D11
SK24
L1
EDI0005
R25
30K
D7
RLZ13V
R28
75K
L2
EDI0005
R27
30K
C7
NC
C27
105/16V
R47
910R
NC
R7
NC
R8
R48
910R
Q15
2 3
5.1K
R41
NC
R9
R49 910R
NC
R10
R50 910R
SST2222A
1
R54
47K
Q3
2SC4672
Q4
2SC4672
R53
5.1M
C35
1.5K 11K
C6
105/16V
Q5
2SC4672
Q6
2SC4672
C3
154/250V
D17
1N4148
C34
102/50V104/50V
C5
104/50V
C4
154/250V
1N4148
D16
PT1
EST0015
2
3
4
5
1
R511M
R52
1M
R11R13
PT2 EST0015
2
3
4
5
1
C1
22P/3KV
8
C29
22P/3KV
12
1
23
L3
ELF0002
4
D13D12
1N4148 1N4148
C2
22P/3KV
8
C30
22P/3KV
12
CN2
SM02B-BHSS-1-TB
1
2
1
2
CN3
SM02B-BHSS-1-TB
R1
1.0K
CN4
SM02B-BHSS-1-TB
1
2
1
2
CN5
SM02B-BHSS-1-TB
D
C
B
F1
CN1
D
1
2
3
4
5
6
W20R-6PIN-90
R22
NC
R44
R20
C13
C
C18
B
104/50V
NC
NC
R17
20K 20K
R16
20K 22uF/16V
R18
20K
1 2
16
15
+
C20
R43
R23
NC
NC
3.0A/125V
150uF/25V
+
C19
C25
R3
3.6K
1
R4
1M
R21
510R
13
C16
104/50V FP1451
REF
(2)IN-
SCP
(1)IN-
4
C15
104/50V
R19
510R
C12
NC 36K
R6
100K
R5
56K
23
Q12
RK7002
C17
104/50V
12
(2)FB
(1)FB
5
C14
104/50V
C21
104/50V
(1)CT
1
470pF/50V
R40
R46
36K
R36
30R
1.2K 1M
Q10
SST2907A
R35
560R
C32
104/50V
11
10
9
U1
VCC
(1)RT
2
R14
10K
C8
3
(1)IN+
6
(2)OUT
(1)DTC
7
(2)DTC
(1)OUT
(2)IN+
GND
8
14
C26
150uF/25V
R34
560R
Q1
SST2222A
Q9
SST2907A
1.2K
Q2
SST2222A
Q11
SST2907A
R30R32
R31R33
1M
Q7
NDS9435A
4
Q8
NDS9435A
4
81
81
A
PLCD0317403
1 2 3 4 5 6 7 8
C33
104/50V
D8
RLZ13V
R29
75K
C11
NC
SST2222A
Q16
1
R58
47K
2 3
5.1K
R42
C28
105/16V
D19
1N4148
R57
5.1M
C37
1N4148
C36
D18
R55 1M
R56
1M
23
102/50V104/50V
C9
104/50V
R12
11K
1N4148 1N4148
R45
C10
1.5K
105/16V
Title
Number RevisionSize
A3
Date: 29-Apr-2003 Sheet of
Drawn By:
1
L4
ELF0002
4
D15D14
R2
1.0K
A
Page 43

1
KLC-TM2018 Digital
Schematic
L611FB
C614
0.1uF
L603
L605
L607
C625
10uF
TV_Cr
D613
1N4148
V330
R650
10K
R651
20K
RGB SEL1
10uF
C624
BA
00 TV
01 VGA
10 YUV
11 VGA(SOG) NO_USED
C610
12pF
C611
12pF
C612
12pF
R603
75
5V5V
C622
10uF
12
14
15
11
1
5
2
4
6
10
9
7
D611
BAV99L
3
TV_VS
XS603
1
2
3
4
5
6
7
8
9
10
11
12
XS601
DB15HD
A A
5V
D607
BAV99L
XS604
FROM XP301
1
1
2
2
3
3
4
4
5
5
6
6
7
7
8
8
9
9
XS602
1
1
2
2
3
3
4
4
5
5
6
6
7
7
8
8
9
9
FROM XP1002
6
1
11
7
2
12
8
3
13
9
4
14
10
5
15
D608
BAV99L
3
3
5V
GHSI
GVSI
GBIN
GGIN
GRIN
RGSA
RGSL
GHSI
GVSI
RGSL
R608
220
TV_Y
TV_Cb
TV_Cr
TV_VS
TV_HS
RGSA
R609
220
AIN-L
AIN_R
PR_Cr
PR_Cb
HD_Y
CONNECTOR1X7
5V
R60710K
R610
3.3K
R6200
XS606
1
2
3
4
5
6
7
D603
BAV99L
3
GRIN
GGIN
GBIN
R611
3.3K
GSCL
GSDA
R6190
5V
7
VCLK
6
SCL
5
SDA
RXD1
TXD1
Y
Cb
Cr
AV/TV/SCART
D604
BAV99L
3
N604
24LC21A
PR_Cb
HD_Y
5V
VCC
NC1
NC2
NC3
GND
PR_CR
TV_VSOUT
TV_HS
TV_HSOUT
INPUT SW0
INPUT SW1
D605
BAV99L
3
D606
BAV70
2 1
8
1
2
3
4
C607
0.1uF
40_OHM@100MHz
R614
75
40_OHM@100MHz
R616
75
40_OHM@100MHz
R617
75
40_OHM@100MHz
40_OHM@100MHz
40_OHM@100MHz
5V
L602
L604
L606
L615
L614
L616
D610
BAV99L
3
C621
10uF
C601
0.1uF
X0
X1
X2
X3
Y0
Y1
Y2
Y3
INH
A
B
VEE
R604
75
5VT
R605
75
5V
C623
10uF
L610
FB
N602
74HC4052D
13
X
3
Y
C627
10UF/16V-5
40_OHM@100MHz
40_OHM@100MHz
40_OHM@100MHz
TV_Cb
TV_Y
D612
BAV99L
3
R60175
R60275
C618
10uF
10uF
C626
5V
1 2
9 8
V33
R630
10K
R631
20K
V330
R648
10K
R647
20K
R652
10K
R653
20K
V33
V33
N629D
C604
12pF
PI5V330
2
3
5
6
14
13
11
10
1
15
C628
10UF/16V-5
N629A
74HC14/SO
74HC14/SO
V3.3
C619
10uF
5V
C609
0.1uF
N601
S1A
S2A
DA
S1B
S2B
DB
S1C
S2C
DC
S1D
S2D
DD
IN
/EN
C615
0.1uF
V33
3 4
V33
N629E
11 10
R632
C620
10K
10uF
R633
20K
C605
RGB SEL0
12pF
L608
FB
C608
10UF/16V-5
4
7
12
9
L612
FB
TP1
VS
N629B
74HC14/SO
TP2
HS
74HC14/SO
R634
10K
R635
C606
12pF
20K
V33V330
Y_1883
AVSYNC
AHSYNC
5V
N603
PI5V330
2
S1A
3
S2A
5
S1B
6
S2B
14
S1C
13
S2C
11
S1D
10
S2D
1
IN
15
/EN
L613
FB
V33
N629C
5 6
74HC14/SO
V33
N629F
13 12
74HC14/SO
DA
DB
DC
DD
C602
0.1uF
4
7
12
9
R622
22K
1
R621
10K
R624
22K
1
R625
10K
R627
22K
1
R628
10K
KONKA
Title
V601
BC847
R623
1K
V602
BC847
R626
1K
V603
BC847
R629
1K
C603
10UF/16V-5
RAIN
GAIN
BAIN
TP3
TP4
TP5
RIN
GIN
BIN
C617
10UF/16V-5
5VB
5VB
5VB
L609FB
C613
0.1uF
Cb
Y
Cr
5V
ш¼·¹·¬¿´ нлррйннлч
RGB,H/V SYNC&EDID
SizeDocument NumberRev
A3
Date:Sheet of
900-0XXX-00
211Thursday, September 16, 2004
A
1
Page 44

ROMOEn
ROMWEn
RESETn
V33
R36110K
R364
0
5
ROMWEn
FWPn
D D
A1
A2
A3
A4
A5
A6
A7
A8
A9
A10
A11
A12
A13
A14
A15
A16
A17
A18
A19
V33
R315
10K
N305
26
CE
28
OE
11
WE
12
RP
14
WP
47
BYTE
25
A0
24
A1
23
A2
22
A3
21
A4
20
A5
19
A6
18
A7
8
A8
7
A9
6
A10
5
A11
4
A12
3
A13
2
A14
1
A15
48
A16
17
A17
16
A18
15
A19
AM29LV800BT-90EC
Flash_8M TSOP48
VPP
VCC
D10
D11
D12
D13
D14
D15
D16
GND1
GND2
13
37
29
D1
31
D2
33
D3
35
D4
38
D5
40
D6
42
D7
44
D8
30
D9
32
34
36
39
41
43
45
46
27
V33
D0
D1
D2
D3
D4
D5
D6
D7
D8
D9
D10
D11
D12
D13
D14
D15
4
FVPP
R362
10K
D[15:0]
FCEn
ICEn
R363
0
JP303
HDR_2X2
1 2
3 4
V33
SCL
SDA
V33
3
V33
N306
24C16
6
SCL
5
SDA
1
NC0
2
NC1
3
NC2
NVRAM
ROMWEn
VCC
GND
8
7
WP
4
C367
0.1uF
NMI Pushbutton
JP302
HDR_2X2
1 2
3 4
V33
2
SW
1
C360
0.1uF
2
V33
SW301
R314
10K
1
D[15:0]
NMI
C C
RESETn
A[19:1]
A2
A4
A6
A9
A11
A12
A14
A17
A19
ROMOEn
D15
D14
B B
D5
D4
D3
D2
D9
D8
XS304
1 2
3 4
5 6
7 8
9 10
11 12
13 14
15 16
17 18
19 20
21 22
23 24
25 26
27 28
29 30
31 32
33 34
35 36
37 38
39 40
41 42
43 44
45 46
47 48
49 50
51 52
53 54
55 56
57 58
59 60
HDR_30X2
V33V33
IRPn
R3173.3K
ICEn
R3183.3K
IA20
R3213.3K
IA21
R3223.3K
V33
ROMWEn
D7
D6
D13
D12
D11
D10
D1
D0
A1
A3
A5
A7
A8
A10
A13
A15
A16
A18
V33
C363
0.1uF
C390
100UF
V33
R31910K
R32010K
R32310K
TCK
TMS
TDI
R316
3.3K
C361
18pF
2
SW302
SW
Reset Pushbutton
1
A A
KONKA
Title
ш¼·¹·¬¿´ нлррйннлч
Mermory,Promice,NMI,Reset
SizeDocument NumberRev
A3
Date:Sheet of
900-0XXX-00
311Thursday, September 16, 2004
A
Page 45

5
PV1
R426
3.3K
C412
3.9nF
C413
39nF
R433
430 NC
V18
C424
0.1uF
C430
0.1uF
GFILT
IRED
IGREEN
ISOG
IBLUE
V18
C425
0.1uF
3.3VADC3.3VADC3.3VADC
C431
0.1uF
D D
RAIN
GAIN
BAIN
AVSYNC
AHSYNC
C C
B B
LCDON
BKLON
PW1306_56
V18 V18
C422
0.1uF
C428
0.1uF
C41447nF
C41547nF
C4161nF
C41747nF
V18
C423
0.1uF
3.3VADC 3.3VADC
C429
0.1uF
V18
C426
0.1uF
3.3VADC
C432
0.1uF
23
FILTER
37
RED
43
GREEN
44
SOG
50
BLUE
64
VS
65
HS
5
RTERM
PW1306
Graphics and
Video Port
63
V656_0
62
V656_1
61
V656_2
60
V656_3
59
V656_4
58
V656_5
57
V656_6
56
V656_7
55
VPEN
72
VCLK
C427
0.1uF
3.3VADC
C433
0.1uF
RESETn
RXD
TXD
SDA
SCL
STB
PORTA3
AV/TV1
IRRCVR
AV/TV0
PWMOUT
TCK
TMS
TDI
N407A
NMI
Sleep Mode 9ma max.
350ma max.90ma max.
V33
4
0.1UF
NMI
C411
V33
R424
TP13
R432100
C4200.1uF
C4210.1uF
0
TESTEN
TP10
TP12
R4211K
R4311.5M
Z401
XTAL14.31818
X607
C418
33pF
V18
175ma max.
3
PV1
C436
0.1uF
A[19:1]
D[15:0]
RDn
ROMOEn
ROMWEn
CS0n
CS1n
C437
0.1uF
N407B
PW1306
Display Port
PVDD
PQFP208
C438
0.1uF
193
A1
137
TESTEN
TP11
132
RESETB
53
RXD
54
TXD
208
PORTA0
207
PORTA1
206
PORTA2
205
PORTA3
204
PORTA4
203
PORTA5
202
PORTA6
201
PORTA7
142
TRST
141
TCK
140
TMS
139
TDI
138
TDO
194
NMI
169
XI
170
XO
X608 DGO0
C419
33pF
L412
L408
FB
FB
Sleep Mode 35ma
L409
FB
N407C
PW1306
Misc
PW1306
L410
FB
V18A
ROMOE
ROMWE
192
A2
191
A3
190
A4
189
A5
188
A6
183
A7
182
A8
181
A9
180
A10
179
A11
178
A12
177
A13
176
A14
175
A15
164
A16
163
A17
162
A18
161
A19
160
D0
159
D1
158
D2
157
D3
156
D4
155
D5
154
D6
153
D7
152
D8
151
D9
150
D10
149
D11
148
D12
145
D13
144
D14
143
D15
196
RD
195
WR
197
198
199
CS0
200
CS1
40ma max.
L411
FB
LV1
A1
A2
A3
A4
A5
A6
A7
A8
A9
A10
A11
A12
A13
A14
A15
A16
A17
A18
A19
D0
D1
D2
D3
D4
D5
D6
D7
D8
D9
D10
D11
D12
D13
D14
D15
WRN
C434
0.1uF
TP15
WRn
C435
0.1uF
DCLKNEG
DCLK
DEN
DHS
DVS
DR0
DR1
DR2
DR3
DR4
DR5
DR6
DR7
DG0
DG1
DG2
DG3
DG4
DG5
DG6
DG7
DB0
DB1
DB2
DB3
DB4
DB5
DB6
DB7
DGR0
DGR1
DGR2
DGR3
DGR4
DGR5
DGR6
DGR7
DGG0
DGG1
DGG2
DGG3
DGG4
DGG5
DGG6
DGG7
DGB0
DGB1
DGB2
DGB3
DGB4
DGB5
DGB6
DGB7
2
R425100_NC
107
106
103
102
101
98
97
94
93
92
91
90
89
88
87
86
85
82
81
80
79
78
77
74
73
71
70
67
66
131
130
129
128
127
126
125
124
121
120
119
118
117
116
115
114
113
112
111
110
109
108
100
99
R42347 NC
1 8
2 7
3 6
4 5
1 8
2 7
3 6
4 5
1 8
2 7
3 6
4 5
1 8
2 7
3 6
4 5
1 8
2 7
3 6
4 5
1 8
2 7
3 6
4 5
1 8
2 7
3 6
4 5
1 8
2 7
3 6
4 5
1 8
2 7
3 6
4 5
1 8
2 7
3 6
4 5
1 8
2 7
3 6
4 5
1 8
2 7
3 6
4 5
1 8
2 7
3 6
4 5
TP6
DCLK
RN401
47_RN
RN402
47_RN
RN403
47_RN
RN404
47_RN
RN405
47_RN
RN406
47_RN
RN407
47_RN
RN408
47_RN
RN409
47_RN
RN410
47_RN
RN411
47_RN
RN412
47_RN
RN413
47_RN
TP7
DEN
TP8
DHS
DRE0
DRE1
DRE2
DRE3
DRE4
DRE5
DRE6
DRE7
DGE0
DGE1
DGE2
DGE3
DGE4
DGE5
DGE6
DGE7
DBE0
DBE1
DBE2
DBE3
DBE4
DBE5
DBE6
DBE7
DRO0
DRO1
DRO2
DRO3
DRO4
DRO5
DRO6
DRO7
DGO1
DGO2
DGO3
DGO4
DGO5
DGO6
DGO7
DBO0
DBO1
DBO2
DBO3
DBO4
DBO5
DBO6
DBO7
TP9
DVS
C448
0.1uF
DRE[7:0]
DGE[7:0]
DBE[7:0]
DRO[7:0]
DGO[7:0]
DBO[7:0]
DCLKn
DCLK
DEN
DHS
DVS
1
C444
0.1uF
3.3VADC
C446
0.1uF
V33V33V33
C445
0.1uF
C447
0.1uF
N407DPW1306
Power and Ground
V33
C439
0.1uF
V33
C440
0.1uF
V33 V33
C441
C442
0.1uF
0.1uF
C443
0.1uF
3.3VADC
A A
KONKA
Title
ш¼·¹·¬¿´ нлррйннлч
PW1306
SizeDocument NumberRev
A3
Date:Sheet of
900-0XXX-00
411Thursday, September 16, 2004
A
Page 46

D614
BAV99L
C858
3.3nF
L816
FB
C879
10uF
C875
0.1uF
A3
5V
R644
100
R645
100
3.3VADC
3
LCDCON
C862
47uF/16V
C870
47uF/16V
D615
BAV99L
3
MUTE OUT
V18
N812
LM1117MPX-1.8V
C863
0.1uF
N810
LM1117MPX-3.3V
5V
RESETn
SDA
SCL
AIN_L
AIN_R
L801
FB
5V
5V
C875
0.1uF
XS605
1
2
3
4
1
L815
FB
5V
R8782.2K
C869
C877
47uF/16V
0.1uF
C876
C860
0.1uF
47uF/16V
ш¼·¹·¬¿´ нлррйннлч
Keypad input,3.3V&1.8V Reg
900-0XXX-00
511Tuesday, October 26, 2004
+12V
FROM XP1001
FROM XP3002
C880
10uF
XS802
1
2
3
4
XS301
1
2
3
4
5
6
7
8
9
10
11
12
V18A
N813
LM1117MPX-1.8V
C868
0.1uF
V33
N811
LM1117MPX-3.3V
C861
0.1uF
A
5V
5V
5
CH+
V33
R533
10K
R534
10K
CH-
V33 V33
R535
10K
V33
R536
10K
R537
10K
V-
V+MENUAV/TV
V33
V33 V33
R539
R532
10K
10K
D D
XS611
C C
B B
STANDBY
IRRCVR
Red LED
Green LED
V12 V5
A A
V+
8
V-
7
CH+
6
CH-
5
MENU
4
AV/TV
3
GND
2
STANDBY
1
To Key Board
XS816
1
2
3
4
GND
XS817
1
2
3
4
GND
XS615
To IR Board
1
+5V
2
3
GND
4
5
6
STANDBYn
5A_1206
F801
L817
FB
V5
R6431K
C878
10uF
47uF/16V
POWERDOWN
STANDBYn
STANDBYn
IRRCVR
R675510
R679430
C677
L814FB
C851
470uF/16V
V5
5V
V12
POWER ON
R674
1
V606
BC847
D616
STZ5.1
POWERDOWN
GND
470uF/16V
1K
GND
V605
BC847
R649
10K
IRRCVR
R642100
R646100
C854
0.22uF
C653
1
RDn
CS0n
V33
R538
10K
RN501
47_RN
1 8
2 7
3 6
4 5
1 8
2 7
3 6
4 5
RN502
47_RN
C8640.1uF
R867
10K
GND
R67810K
R868
10K
C659
0.1uF
1
V862
BC847
Y_1883
N803
1
VDD
2
GP5
3
GP4
4
GP3
PIC12F629
R654100
4
1
19
2
3
4
5
6
7
8
9
N802
1
S1
2
S2
3
S3
4
G2
9435
SYNCOUT
SYNC SEL
D617
BZV55-B/3V0
VSS
GP0
GP1
COUT
V607
BC847
V33
C548
0.1uF
N508
OE1
OE2
I0
I1
I2
I3
I4
I5
I6
I7
74LVC541A_PW
VCC
GND
O0
O1
O2
O3
O4
O5
O6
O7
Input Buffer
5
D1a
6
D1b
7
D2a
8
D2b
R6601K
C6670.1uF/16V
R66910K
5V
8
7
6
5
1
20
D15
18
D14
17
D13
16
D12
15
D11
14
D10
13
D9
12
D8
11
10
C867
0.1uF
1
V662
BC847
C678
0.22uF
POWER ON
SYNCSEL
SYNCOUT
R655100
D[15:8]
V33
CS1n
RESETn
+12V
N606
1
SYNCOUT
2
3
4
CVBSIN
VSYNCOUT
GND
EL1883
R661
680K
HSYNCOUT
BPOUT
R662
680K
NOTE: RSET must be at 1%
resistor.
PW1306_56
VDD
RSET
D8
D9
D10
D11
D12
D13
D14
D15
C866
470uF/16V
5VT
8
7
6
5
C661
0.1uF
AV/TV/SCART
3
C549
0.1uF
N509
3
1D
4
2D
7
3D
8
4D
13
5D
14
6D
17
7D
18
8D
11
CLK
1
CLR
74LV273A
Output Latch
+12V
C865
0.22uF
C6620.1uF
R66856K
R846
1.5K
V33
2
1Q
5
2Q
6
3Q
9
4Q
12
5Q
15
6Q
16
7Q
19
8Q
10
GND
D810
FM5820
GND
R665
10K
5VT
+12V 5V
R66433 C874
R666
5VT
R845
4.7K
3
2
5
6
R847
1K
C855
10nF
GND
L81315uH
R66333
10K
8
+
-
4
8
+
-
4
RGB SEL0
RGB SEL1
INPUT SW0
INPUT SW1
MUTE OUT
N801
1
BS
2
IN
3
SW
4
GND
TV_HSOUT
C872
0.1uF
N804A
1
LM358_SO8
N804B
7
LM358_SO8
MP1410
TV_VSOUT
AV/TV1
COMP
NC
EN
FB
8
7
6
5
AV/TV0
2
R843
30K
R841
1K
C853
470uF/16V
GND
TXD
RXD
TXD1
RXD1
R839390K
C850180pF
R842
10K
GND
0.22uF
GND
GND
5V
C859
0.1uF
KONKA
Title
SizeDocument NumberRev
Date:Sheet of
Page 47

5
V33
4
3
2
1
VNN
VOO
DCLK
DRE[7:0]
D D
DGE[7:0]
DBE[7:0]
DHS
DVS
V33
DEN
V33
C C
R545220 NC
R546220 NC
LCDON
DS90C383AMTD 56SSOP Package
DRE0
DRE1
DRE2
DRE3
DRE4
DRE5
DRE6
DRE7
DGE0
DGE1
DGE2
DGE3
DGE4
DGE5
DGE6
DGE7
DBE0
DBE1
DBE2
DBE3
DBE4
DBE5
DBE6
DBE7
R5420
R5430 NC
31
51
52
54
55
56
3
50
2
4
6
7
11
12
14
8
10
15
19
20
22
23
24
16
18
27
28
30
25
17
32
PWDN
CLKIN
TXIN0
TXIN1
TXIN2
TXIN3
TXIN4
TXIN6
TXIN27
TXIN5
TXIN7
TXIN8
TXIN9
TXIN12
TXIN13
TXIN14
TXIN10
TXIN11
TXIN15
TXIN18
TXIN19
TXIN20
TXIN21
TXIN22
TXIN16
TXIN17
TXIN24
TXIN25
TXIN26
TXIN23
R_F
PWRDN
N516 NC
DS90C385AMTD
VOO
V33
TXOUT0
TXOUT0
TXOUT1
TXOUT1
TXOUT2
TXOUT2
TXOUT3
TXOUT3
TXCOUT
TXCOUT
VNN
TXE0p
47
TXE0m
48
TXE1p TXE1P
45
TXE1m
46
41
TXE2m
42
TXE3p
37
TXE3m
38
TXECKp
39
TXECKm
40
DCLK
VPANEL
C559
100pF NC
R544
100 NC
L514FB NC
C573
100UF/16V-5 NC
C574
0.1uF NC
V33
C552
10uF NC
TXE3PTXE3P
TXECP
TXE2P
TXE0P
TXO3P
TXOCP
TXO2P
TXO1P
TXO0P
L513FB NC
VOO
C553
0.1uF NC
C555
0.1uF NC
XS506 NC
1 2
3 4
5 6
7 8
9 10
11 12
13 14
15 16
17 18
19 20
21 22
23 24
25 26
27 28
29 30
31 32
connector16X2
V33
L515FB NC
C556
10uF NC
VNN
TXE3M
TXECM
TXE2M
TXE1M
TXE0M
TXO3PTXE2p
TXOCP
TXO2P
TXO1P
TXO0P
C557
0.1uF NC
C558
0.1uF NC
DCLK
DRO[7:0]
DGO[7:0]
B B
DBO[7:0]
DHS
DVS
V33
DEN
DRO0
DRO1
DRO2
DRO3
DRO4
DRO5
DRO6
DRO7
DGO0
DGO1
DGO2
DGO3
DGO4
DGO5
DGO6
DGO7
DBO0
DBO1
DBO2
DBO3
DBO4
DBO5
DBO6
DBO7
R5470 NC
R5480 NC
PWDN
31
CLKIN
51
TXIN0
52
TXIN1
54
TXIN2
55
TXIN3
56
TXIN4
3
TXIN6
50
TXIN27
2
TXIN5
4
TXIN7
6
TXIN8
7
TXIN9
11
TXIN12
12
TXIN13
14
TXIN14
8
TXIN10
10
TXIN11
15
TXIN15
19
TXIN18
20
TXIN19
22
TXIN20
23
TXIN21
24
TXIN22
16
TXIN16
18
TXIN17
27
TXIN24
28
TXIN25
30
TXIN26
25
TXIN23
17
R_F
32
PWRDN
N517 NC
DS90C385AMTD
TXOUT0
TXOUT0
TXOUT1
TXOUT1
TXOUT2
TXOUT2
TXOUT3
TXOUT3
TXCOUT
TXCOUT
47
48
45
46
41
42
37
38
39
40
TXO0p
TXO0m
TXO1p
TXO1m
TXO2p
TXO2m
TXO3p
TXO3m
TXOCKp
TXOCKm
V33
C576
0.1uF NC
C577
0.1uF NC
C578
0.1uF NC
C579
0.1uF NC
C580
0.1uF NC
C581
0.1uF NC
C575
0.1uF NC
C572
0.1uF NC
A A
KONKA
Title
ш¼·¹·¬¿´ нлррйннлч
LVDS Transmitters
SizeDocument NumberRev
A3
Date:Sheet of
900-0XXX-00
611Thursday, September 16, 2004
A
Page 48

5
DRE[7:0]
DGE[7:0]
DBE[7:0]
4
3
2
1
Display
Output
L502
XS504
D D
DRE7
DRE5
DRE3
DRE1
DGE7
DGE5
DGE3
DGE1
DBE7
DBE5
DBE3
DBE1
DCLK
DVS
C587
0.1uF
DBO[7:0]
C C
DGO[7:0]
DRO[7:0]
DRO1
DRO3
DRO5
DRO7
DGO1
DGO3
DGO5
DGO7
DBO1
DBO3
DBO5
DBO7
1 2
3 4
5 6
7 8
9 10
11 12
13 14
15 16
17 18
19 20
21 22
23 24
25 26
27 28
29 30
31 32
33 34
35 36
header18X2
XS505
31 32
29 30
27 28
25 26
23 24
21 22
19 20
17 18
15 16
13 14
11 12
9 10
7 8
5 6
3 4
1 2
head16X2
C589
100uF_16V_T
DRE6
DRE4
DRE2
DRE0
DGE6
DGE4
DGE2
DGE0
DBE6
DBE4
DBE2
DBE0
L504
FB
DRO2
DRO4
DRO6
DRO8
DGO2
DGO4
DGO6
DGO8
DBO2
DBO4
DBO6
DBO8
VPENAL
DEN
DHS
+12V
5V
L505FB NC
LCDON
PWMOUT
BKLON
FB
R5530
R552NC
R55610K
R563
5.1K
C551
0.1uF
R55910K
5V
R564
4.7K
1
V509
BC847
R554
10K
R555
0
1
C584
0.1uF
R565
1K
C582
0.1uF
V506
BC847
R561
10K
C592
100uF_16V_T
R560
10K
1
5V
V507
BC847
N503
1
2
3
4 5
9435
ON/OFF
Bright
8
7
6
R562
NC
+12V
C586
0.1uF
L503
100uF_16V_T
C588
100uF_16V_T
FOR 3.3V PANEL
R557
330
D501
LED
LCD Control Output
FB
C590
C591
0.1uF
C561
0.1uF
R5660
R567NC
N518
BA033FP
TO INVERTER
XS512
1
2
3
4
5
6
VPENAL
C560
47uF/16V
B B
A A
KONKA
Title
ш¼·¹·¬¿´ нлррйннлч
Output Connector
SizeDocument NumberRev
A3
Date:Sheet of
900-0XXX-00
711Thursday, September 16, 2004
A
Page 49

654321
KLC-TM2018 Analog
Board Schematic
D
CVBS_OUT
C
DACM_L
B
A
DACM_R
1 2 3 4 56
CVBS_OUT
R1076
820
DACM_L
C1073
10uF/16V
R1078
10k
R1077
10k
R1079
470
5V2-CD
5V2-CD
V1008
BC847
R1080
150
L1013100uH
L1014100uH
R2094
R2093
R2080
STB
1.5K
1.5K
C1096
3300p
10K
C1074
0.1uF
0.1uF
+12V
L1012
100uH
C1085
5V2-CD
47uF/10V
VSS
L2107
47uH
VOL_R1DACM_R
C1076
100uF/10V
C1075
0.47uF/50V
C1086
C2100
0.1uF
C1097
3300p
V12A2
V12A2
R2095
10K
R2097
10K
V2010
BC847
C1087
0.1uF
C20980.1uFVOL_L1
C20990.1uF
R2096
10K
C2106
470uF/16V
V12A2
R2100
10K
C1077
C1078
C1079
C1080
C1088
47uF/10V
+
C2101
100uF/16V
+
0.01uF
0.01uF
0.01uF
0.01uF
R2099
10K
1
2
3
4
5
6
7
8
9
10
11
12
13
14
R2083
10K
N1004
TC90A69F
BIAS
VRT
VDD1
TESTI1
VSS2
VRB
YCIN
TEST
KILLER
TESTI2
VDD3
VSS3
VDD2
TESTI3
VSS
V2011
BC847
R2098
0
mute
TESTOUT
MODE1
C2104
100uF/16V
MUTEn
AUR_IN
R2084
10K
28
VB1
COUT
YOUT
VDD4
27
26
VSS1
25
24
VB2
23
PD
22
FIL
21
VSS4
20
19
FSC
18
17
16
SDA
15
SCL
AUL_IN
1
2
SGND
3
+
R2085
10K
SVRR
4
OUT1
5
PGND
6
OUT2
7
VP
8
M/STB
9 10
IN2
V2012
BC847
R2086
10K
C1089
0.01uF
C1081
0.01uF
C1082
0.01uF
R1081
330
C1083
680pF
R1086
R1087
N2001
TDA1517A
V2013
BC857
R2088
10K
100
100
GND
GND
GND
GND
GND
GND
GND
GND
GND
C1084
0.1uF
C1090
100uF/10V
SDA
SCL
18IN1
17
16
15
14
13
12
11
R2087
10K
L1015
100uH
SDA
SCL
D2002
1N4148
C2015
+
470uF/16V
R1082
0
R1083
0
5V2-CD
C1091
0.01uF
V1009
BC847
R2089
10K
R1084
NC
C2093
0.22U
V12A2
R1085
NC
R1088
1K
R2090
1K
V1010
BC847
C2102
C2103
COMB_C
COMB_Y
5V2-CD
470uF/16V
+
470uF/16V
+
R2091
1K
C2094
0.22U
R1089
2K
R1090
1K
OUT_L
OUT_R
Comb_C_out
Comb_Y_out
R1091
12K
R1092
5.6K
C1094
C1092
0.01uF
R1093
1.5K
L1212
27uH
C1093
10pF
pixelworks
Title:
File:
COMBFILTER.sch
Eng.Appr.:
15pF
R1094
510
C1095
33pF
1
XS2003
R
2
CON2
1
XS2002
L
2
CON2
1
1
2
2
3
3
4
4
5
5
XS2001
see the future
XP2004
CON5
CON5
TM
A-2205World Trade Plaza, Futian District
Shenzhen P.R.China, 518033
FSC_OUT
Sheet of
48
FSC_OUT
XS2006
EARPHONE
Phone: 86-755-83679633
Fax: 86-755-83690623
Brawn:Date:
Kong
9-Mar-2005
Printed Date/Time:
16:46:05
D
C
B
A
Size:Revision:Number:
B
Page 50

D
N1000
tuner
R1100
24K 1/16W
5V1
SAW_SW
R1102
0
R1101
1K 1/16W NC
V1101
BC847
L1101
1UH
C1101
1000p
R1104
24K 1/16W
R1103
24K 1/16W
+5V
R1105
100 1/16W
R1107
1K 1/16W
C1102
1500p
V1102
BC847
R1011
33
D1101
MA858
1
2
Z2001
M3953M
1
2
654321
R2207
20K NC
SDA
C2210
C2005
10nF
5
5
4
4
3
3
C2209
2
3
C2211
390p
10nF
C2212
5.6K
R2213
10nF
4
5
470n
R2215
R2214
6
7
8
9
100
100
10
11
12
SCL
TV_SIF
R2216
2.2K
SDA
SCL
D
TV_SIF
AGC1NC2NC3SCL4SDA5NC6+5V7NC8VT9NC10IF
C
R1019
+12V
TAGC
+
C1015
100uF/10V
0
L1801
10uH
L1802
10uH
SCL
SDA
5V1
+
R1017100
R1018100
L1004
10uH
C1014
0.1uF
F1000
FUSE2
SCL
SDA
C1013
100uF/16V
B
XS1001
CON4
1
2
3
4
A
V5TUNER
C1016
0.1uF
C1158
47uF/16V
+
TO TDA1517
N1101
7805
1IN2
OUT3GND4CTRL
C1160
0.1uF
AFC
RF_AGC
47uF/16V
11
C1159
IF_IN
STB
AFC
RF_AGC
R1007
220 NC
5V1
+
5V1
R1021
75
C1161
0.1uF
L1008
R1022
0
C1006
0.1uF
C1019
10000p
C1820
470uF_16V_T
R1009
5.6K
C1020
10000p
R1023
1.2K
C1818
0.22uF
L1003
1uH
R1224
1.2K
C1817
10nF
R1225
33
R1010
470
C102110000p
V1002
C388A
D1808
FM5820
A K
+
1
2
3
4
C1008
47uF/16V
IF_AMF
N1815
BS
IN
SW
GND
MP1410ES
L182715uH
R1106
0
COMP
N/C
8
7
EN
6
5
FB
R1870
30K
R1871
1.5K
C1809
1000uF_16V_T
MA858
D1102
R1226
33
1
2
C1812
R1872
3.3nF
390K
C1811
180PF
R1875
10K 1%
700ma max.
5V2
C1810
0.22uF
OP1
VIF11VIF2
Z2002
M9370D
1
2
3
AFC RF_AGC
N817
LM1117-3.3V
L1825*
FB
5
4
3
AFC
ADJ1Vo22Vin
5
4
SAW_SW
C2223
10nF
4
Vo4
R2028
C805
0.1uF
3
1K
R2029
22K
24
3.3V
C807
100uF_6V_T
R2030
22K
C2224
47uF/16V
AFD
DEEM
FMPLL
220n
C2227
1n5
C2225
C2226
10nF
VP
+
L2005
10uH
5V1
DGND
R2031 330
TOP
AUD
C2228
470n
Z2000
4.0MHZ
R2032
22K
R2036
22K
R2038
220
N817
LM1117-2.5V
SCL
SAD
C2229
10pFRF_AGC
C2230
47uF/16V
5V1
4
Vo4
ADJ1Vo22Vin
SIOMAD
NC13TAGC14REF15VAGC16CVBS17AGND18VPLL19Vp20AFC21OP222SIF123SIF2
+
R2033
47
R2037
220
3
R2035
V2003
BC847
C805
0.1uF
N1006
TDA9886
R2034
5V1
12k
+
C2222
47uF/16V
2.5V
100K
RF_AGC
C2231
0.1uF
TV_CVBS_OUT
TV_CVBS_OUT
C807
100uF_6V_T
C
B
A
Title
TVK-1 TA - Audio Amplifier
Size:Number:
B
9-Mar-200516:46:05
Date:
Tuner.sch
File:
1 2 3 4 56
00220021115A
Revision:
SheetofTime:
Pixelworks Shenzhen Office
A2205,WorldTradePlaza Shennan Road
Shenzhen
China
2
8
M. Huang
Pixelworks
Page 51

1
2
3
XS1005
CONNECTOR-9
D
XS1007
CONNECTOR-7
XS1003
CON13
4
5
6
7
8
9
1
2
3
4
5
6
7
C
7
6
5
SVideo Input Port
Y
XS1006*
B
XS1006*
XS1006*
AV2
AV2
AV2
C1098
10uF/10V
TV_Y
GND
TV_Cb
GND
TV_Cr
GND
TV_VS
TV_Hs
GND
Y
GND
Cb
GND
Cr
GND
AV/TV
RSTn
1
GND
2
SDA
3
SCL
4
GND
5
STB
6
MUTE
7
+5V
8
GND
9
CVBS
10
11
GND
AIN-L
12
AIN-R
13
EXT_C
2
XS1004
SVIDEO
1
3 4
EXT_Y
+
R1042
75
TV_CVBS_OUT
C1044
10uF/10V
+
C1061
10uF/10V
5V3
5V3
+
R1055
1K
SCIR1
SCIL1
EXT_V
XS1006
AV1
R1071
0
EXT_V
10uF/10V
Video Input Port
XS1006
AV1
R1072
75
A
XS1006
AV1
1 2 3 4 56
R1043
22K
R1044
10K
R1045
22K
R1056
10K
C1071
+
TV_CVBS_OUT
L1016100uH
V1005
BC847
R1047
47
R1046
1K
V1006
BC847
R1059
R1058
1K
5V3
R1237
22K
R1073
10K
AV_RIN
AV_LIN
R1038
EXT_CIN
47
EXT_YIN
V1007
BC847
R1075
47
R1074
1K
TV_CVBS_OUT
100
5V2
C1062
470uF/10V
C1058
0.1uF
EXT_VIN
5V2
VIDEO_OUT
CVBS_OUT
COMB_Y_OUT
TV-VS
COMB_C_OUT
5V2-CD
R10616.8K
TV-HS
5V2-CD
SCL
SDA
L1208100uH
VIDEO_OUT
CVBS_OUT
COMB_Y
TV-VS
COMB_C
TV-HS
L1011330uH
SCL
SDA
V1004
BC847
R1048
75
5V-CD
R1128
2.7K
5V2-CD
R1049
100
L1009
100uH
R1061100
C1064
0.01uF
R1050
470
DEC_VS
C1045
0.1uF
DEC_HS
220uF/10V
R1039
10k
R1051
10k
C1065
C1036
10uF/16V
+
R1062
R1063
C1037
C1038
C1039
C1040
C1046
47uF/10V
0.1uF
0.01uF
0.1uF
0.1uF
C1041
0.022uF
R1052
C1047
C1048
100
100
100
R1040
3.9K
C1049
2.2uF/50V
0.1uF
0.1uF
C1050
0.1uF
Cr
Cb
Y
CVBS/Y_2
SVIDEO_C3
CVBS/Y_3
CVBS/Y_1
1
CVBS/Y1-IN
2
SYNC-IN
3
CVBS-OUT
4
Vs
5
COMB Y-IN
6
D-VDD
7
COMB C-IN/FORCED-S
8
D-GND
9
Hs
10
SCP
11
Yvi-out
12
Sync-Vcc
13
SCL
14
SDA
C1244
82pF
40
41
42
43
44
45
47
48
C1-IN
Fsc-OUT46AFC-FIL
C2-IN
COMB SYS
CVBS2/Y2-IN
APC-FIL
ADDRESS
CVBS/Y3-IN
YS2/YM(RGB2-in)
YS3(RGB1-in)15Sync-GND16Cr1-in17Cb1-in18Y1-in19CLP-fil20Y-out21Cb-out22Cr-out23YS1(YCbCr2-in)
0.1uF
0.1uF
0.1uF
C1066
C1067
C1072
C1068
4.7uF/10V
39
C3-IN
X'TAL
FIL
R2-in
G2-in
B2-in
Y/CVcc
Y2-in
Cb2-in
Cr2-in
Y/C GND
R1-in
G1-in
B1-in
24
TV-Cr-OUT
TV-Cb-OUT
TV-Y-OUT
N1003
TB1274AF
TV_CVBS_OUT
FSC_OUT
Z1002
16.200MHZ
38
C1052
37
36
35
34
33
32
31
30
29
C1051
0.01uF
28
27
26
25
R1064100
R1065100
R1066100
pixelworks
see the future
Title:
File:
ColorDecoder.sch
Eng.Appr.:
R1041
27K
C1042
0.01uF
C1043
0.47uF/50V
10pF
R1053
0
C1054
0.1uF
C1055
0.1uF
C1056
0.1uF
0
R1070
470
5V2-CD
C1060
0.1uF
C1069
0.1uF
C1070
0.1uF
Sheet of
38
L1010100uH
C1053
47uF/10V
R1069
R1067
R1068
470
470
TM
A-2205World Trade Plaza, Futian District
Shenzhen P.R.China, 518033
654321
TV_OUT
FSC_OUT
TEXT_FS
TEXT_R
TEXT_G
TEXT_B
SCART_R
SCART_G
SCART_B
SCART_FS
Brawn:Date:
Kong
TV-Cr
TV-Cb
TV-Y
Phone: 86-755-83679633
Fax: 86-755-83690623
TEXT_FS
TEXT_R
TEXT_G
TEXT_B
RIN
GIN
BIN
FBLIN
TV-Cr
TV-Cb
TV-Y
9-Mar-2005
Printed Date/Time:
16:46:06
D
C
B
A
Size:Revision:Number:
B
Page 52

5V2-VCHIP
654321
D
C
CVBS_OUT
TV-VS
TV-HS
SDA
SCL
CVBS_OUT
R1108
470
TV-VS
TV-HS
SDA
SCL
R1111
22K
R1112
22K
R1109100
R1110100
R1117100
R1118100
VS2
HS2
SDA2
SCL2
R1113
47
V1012
BC847
R1114
470
C1141
0.1uF
C1142
0.1uF
R1115
470
DEC_VIN
R1119
10K
C1143
NC
13
14
15
10
7
5
6
1
L1019
47uH
5V2
VideoIN
VIN/INTRO
HIN
SDA
SCL
RREF
SMS
I2CSEL
V3.3
5V2-VCHIP
12
N1008
Z86229
VCC
RED
BLUE
BOX
LPF
4
18
2
3
17
8
9
SerialEN
GREEN
CSYNC
VSS A
11
C1146
0.1uF
C1144
0.1uF
R1120
6.8K
C1147
6800p
C1145
+
47uF/10V
C1148
0.068uF
OSD_R
OSD_G
OSD_B
OSD_FB
R11162.2K
R11212.2K
R11222.2K
R11231.5K
C1149
10PF
TEXT_R
TEXT_G
TEXT_B
TEXT_FS
R1124
2.2K
C1150
10PF
R1125
330
C1151
10PF
R1126
330
C1152
10PF
R1127
330
TEXT_R
TEXT_G
TEXT_B
TEXT_FS
D
C
B
A
1 2 3 4 56
C1153*
0.1uF
R1128*
22K
Z1004*
12MHz
C1154*
18pF
C1156*
10uF/16V
C1155*
18pF
V3.3
31
39
44
49
SCL
50
SDA
37
VSYNC
36
HSYNC
23
CVBS0
24
CVBS1
25
FILT
26
IREF
42
XO
41
XI
40
XGND
43
RESET
28
TEST
+
9
ADC0
10
ADC1
11
ADC2
12
ADC3
VDDP
VDDA
VDD C
GND C
GNDA
GND P
13
22
38
VDS
RED
GREEN
BLUE
PWM
PWM7
PWM6
PWM5
PWM4
PWM3
PWM2
PWM1
PWM0
P0_7
P0_6
P0_5
P0_4
P0_3
P0_2
P1_5
P1_4
P1_3
P1_2
P1_1
P1_0
COR
FRAME
SDA_NV
SCL_NV
N1009*
SAA5264
35
34
33
32
1
30
8
7
6
5
4
3
2
21
V3.3 V3.3
20
19
18
17
16
52
51
48
47
46
45
29
27
15
14
R1129*
10K
V3.3 V3.3
R1130*
10K
DSCL
DSDA
7
6
5
N1010*
24LC21A
VCLK
SCL
SDA
8
VCC
1
NC
2
NC
3
NC
4
GND
Title
TVK-1TA - VideoOverlay
Size:Number:
B
9-Mar-200516:46:06
Date:
VideoOverlay.sch
File:
00220021115A
C1157*
0.1uF
C1158*
0.1uF
Revision:
7
SheetofTime:
N1011*
LT1117-3.3V
VIN3VOUT
AD J
1
PixelworksShenzhenOffice
A2205,World TradePlazaShennanRoad
Shenzhen
China
M.Huang8
2
V3.35V-VCHIP
C1159*
+
47uF/16V
C1160*
0.1uF
Pixelworks
B
A
Page 53

PC
PC_LIN
PC_RIN
D
AV2
SCIL1
SCIR1
AV_LIN
AV1
AV_RIN
R2000
R2001
R2002
R2003
R2004
R2005
5V5 5V2-AU
L2018
C
XS2015
CON15
47uH
1
2
3
4
5
6
7
8
9
10
11
12
13
14
15
SCOR1
SCIR1
SCOL1
SCIL1
BIN
STATAV1
GIN
RIN
FBLIN
CVBSO_2
Video_out
B
1K
1K
1K
1K
1K
1K
R2006
47K
C2030
0.1uF
R2007
47K
R2008
47K
TV_SIF
5V-AU
R2009
47K
R2010
47K
L2009
2.2uH
C2007
47uF/10V
R2011
47K
C2001
100p
+
C2002
100p
C2008
0.01u
12pF
C2003
100p
C2009
330
5V2-AU
C2004
100p
Z2003
18.432MC2013
C2000
C2036
10uF/16V
C2006
100p
C20100.01u
C20110.01u
C20120.01u
R2012
1K
100p
C2014
12pF
C20600.47u
C20610.47u
C20620.47u
C20630.47u
C20640.47u
C20650.47u
+
49
50
51
52
53
54
55
56
57
58
59
60
61
62
63
C2053
64
0.1u
C2035
0.1U
ANA_IN1+
ANA_IN-
ANA_IN2+
TESTEN
XTAL_IN
XTAL_OUT
TP
AUD_CL_OUT
NC
NC
D_CTR_OUT1
D_CTR_OUT0
ADR_SEL
STANDBYQ
NC
33
34
35
36
37
38
39
40
41
42
43
44
45
46
47
48
CAPL_MAVSUP
AVSS
MONO_IN
ASG1
VREFTOPSC1_IN_RSC1_IN_L
ASG2
SC2_IN_RSC2_IN_L
ASG4
SC3_IN_RSC3_IN_L
AGNDC
SC4_IN_RSC4_IN_L
AHVSS
AHVSUP
CAPL_A
SC1_OUT_L
SC1_OUT_R
SC2_OUT_L
SC2_OUT_R
DACM_SUB
DACM_L
DACM_R
DACA_L
DACA_R
SCLSDAI2S_CLI2S_WSI2S_DA_OUTI2S_DA_IN1ADR_DAADR_WSADR_CLDVSUPDVSSI2S_DA_IN2NCNCNCRESETQ
1
2
3
4
5
6
7
8
9
10
11
12
13
14
15
16
VREF1
VREF2
NC
NC
C2028
3.3uF
N2000
MSP3420G
654321
D
5V2-AU
C2029
+
0.1U
R2054
C2024
+
10u/10V
C2023
+
10u/10V
1K
32
31
30
29
28
R2055
27
1K
C2025
330
C2031
C2032
+
+
L2008
2.2uH
C2026
0.01U
10U/16V
10U/16V
+
C2027
47uF/10V
C
SCOL1
SCOR1
26
25
24
23
22
21
20
19
18
C2019
1000
C2022
+
+
C2021
C2020
1000
10U/16V
10U/16V
R2015
R2016
1K
1K
DACML
DACMR
B
17
A
1 2 3 4 56
SCL
SDA
RStn
R2041
10k
R2106
R2105
V2001
BC847
100
100
R2042
10K
R2043
10K
5V2-AU
R2044
2.2k
L2001
V2002
BC857
C2215
330
C2016
0.01U
+
C2017
47uF/10V
R2013
1K
D2001
IN4148
C2018
+
1u/10V
Title
NumberRevisionSize
B
Date:9-Mar-2005Sheet of
File:Y:\ \ \tunner7336sch.DDBDrawn By:
A
Page 54

Page 55

BD901
KLC-TM2018 POWER Board
Schematic
T4SB80
R901
5(NTC)
!
1
C911400Vac/470p
!
D904
MBR20100
1
!
!
- +
C904
400V/150u
C908
50V/47u
C905
400V/22n
!
C906
1KV/4700p
R903
2W/100
D903
BAV21
R902
2W/47k
D902
BAV21
3
6
5
T901
L27_V12
!
8,9
11,12
1
2
3
1
2
3
D905
MBR20100
C912
1kV/390p
C913
50Vac/0.1u
C914
16V/1000u
L902
8u/6A
C915
16V/1000u
16V/1000u
C916
C917
50Vac/0.1u
XS902
4
3
2
1
!
C902
400Vac/470p
L901
LCL-F112
AA
!
C901
250Vac/0.22u
!
!
L
1 3
XS901
!
C903
400Vac/470p
F901
2A/250Vac
N
!
VD901
1/2W/18V
1/4W/100
C909
50V/1u
C910
50V/0.47u
R908
VccHV
SS
1
ICE3DS01G-D
GNDIS
8
7
N901
FB
2
R907
1/4W/470
!
4
HV
GATE
3
5
6
J904
1/2W 100K
R909
1/4W/27
SPP7N60C3
R905
2W/0.68
D901
1N4007
V901
!
R906
2W/0.68
C920
400Vac/470p
!
!
R915
R910
1/4W/1.5k
43
12
32
N902
PC817
N903
TL431
1
R911
1/4W/1.5k
C919
50V/1000p
R912
1/4W/4.7k
C918
50V/0.22u
1/4W/1.5k
R914
1/4W/10k
R913
1/4W/3k
Title
SizeDocument NumberRev
1
Date:Sheet of
<Title> (power : 35007445)
<Doc>
A4
1
11Tuesday, March 08, 2005
Page 56

2
KLC-TM2018
Panel Convert
Board Schematic
1
VCC
VCC
C592
VCC
B7
B5
B3
B1
G7
G5
B B
G3
G1
R7
R5
R3
R1
DCLK
DVS
B7
B5
B3
B1
G7
G5
G3
G1
R7
R5
R3
R1
DCLK
DVS
XS507
HEADER18X2
B6
B4
B2
B0
G6
G4
G2
G0
R6
R4
R2
R0
DEN
DHS
10uF
B6
B4
B2
B0
G6
G4
G2
G0
R6
R4
R2
R0
DEN
DHS
DEN
DCLK
R7
R6
R5
R4
R3
R2
R1
R0
G7
G6
G5
G4
G3
G2
G1
G0
B7
B6
B5
B4
B3
B2
B1
B0
DEN
DCLK
R7
R6
R5
R4
R3
R2
R1
R0
G7
G6
G5
G4
G3
G2
G1
G0
B7
B6
B5
B4
B3
B2
B1
B0
XS508
HEADER 50X1
A A
Title
<Title> (screen connect : 35007495)
SizeDocument NumberRev
<Doc><RevCode>
A3
Date:Sheet of
11Monday, May 31, 2004
Page 57

2
KLC-TM2018
Panel Convert
Board Schematic
XS507
1
2
3
4
5
6
7
8
9
10
11
12
13
14
15
16
17
18
19
BB
HEADER 45X1
20
21
22
23
24
25
26
27
28
29
30
31
32
33
34
35
36
37
38
39
40
41
42
43
44
45
R4
R5
R6
R7
G0
G1
G2
G3
G4
G5
G6
G7
B0
B1
B2
B3
B4
B5
B6
B7
DHS
DVS
DEN
DCLK
VCC
R0
R1
R2
R3
R4
R5
R6
R7
G0
G1
G2
G3
G4
G5
G6
G7
B0
B1
B2
B3
B4
B5
B6
B7
DHS
DVS
DEN
DCLK
VCC VCC
B7
B5
B3
B1
G7
G5
G3
G1
R7
R5
R3
R1
DCLK
DVS
B7
B5
B3
B1
G7
G5
G3
G1
R7
R5
R3
R1
DCLK
DVS
XS509
12
34
56
78
910
1112
1314
1516
17
18
1920
2122
2324
2526
2728
2930
3132
3334
3536
HEADER18X2
B6
B4
B2
B0
G6
G4
G2
G0
R6
R4
R2
R0
DEN
DHS
B6
B4
B2
B0
G6
G4
G2
G0
R6
R4
R2
R0
DEN
DHS
1
AA
Title
<Title> (screen connect : 35008225)
SizeDocumentNumberRev
<Doc><RevCode>
A3
2
Date:Sheet of
1
11Wednesday,December 29, 2004
Page 58

KLC-TM2018
Analog Board Toplayer
Page 59

KLC-TM2018
Analog Board Bottom layer
Page 60

KLC-TM2018
Digital Board
Toplayer
Page 61

KLC-TM2018
Digital Board
Bottom layer
 Loading...