

Electrolux ZKS5653 User Manual

User manual
Dishwasher
ZKS5653

Thank you for selecting our
appliance
We wish you lots of enjoyment with your new
appliance and we hope that you will consider
our brand again when purchasing household
appliances.
Please read this user manual carefully and
keep it throughout the product life cycle as a
reference document. The user manual should
be passed on to any future owner of the
appliance.
Contents
Safety information _ _ _ _ _ _ _ _ _ _ _ _ _ 3
Control panel _ _ _ _ _ _ _ _ _ _ _ _ _ _ _ 4
Washing programmes _ _ _ _ _ _ _ _ _ _ _ 6
First use _ _ _ _ _ _ _ _ _ _ _ _ _ _ _ _ _ _ 7
Set the water softener _ _ _ _ _ _ _ _ _ _ _ 7
Filling with dishwasher salt _ _ _ _ _ _ _ _ 9
Filling with rinse aid _ _ _ _ _ _ _ _ _ _ _ 10
Adjusting the dosage of rinse aid _ _ _ _ 11
Loading cutlery and dishes _ _ _ _ _ _ _ 11
Use of detergent _ _ _ _ _ _ _ _ _ _ _ _ _ 13
Unloading the dishwasher _ _ _ _ _ _ _ _ 14
Care and cleaning _ _ _ _ _ _ _ _ _ _ _ _ 15
Environmental concerns _ _ _ _ _ _ _ _ _ 16
Something not working _ _ _ _ _ _ _ _ _ 17
Technical data _ _ _ _ _ _ _ _ _ _ _ _ _ _ 19
Consumption values _ _ _ _ _ _ _ _ _ _ _ 20
Hints for test institutes _ _ _ _ _ _ _ _ _ _ 20
Installation _ _ _ _ _ _ _ _ _ _ _ _ _ _ _ _ 21
2

Safety information
In the interest of your safety and to ensure the
correct use, before installing and first using the
appliance, read this user manual carefully, including its hints and warnings. To avoid
unnecessary mistakes and accidents, it is important to ensure that all people using the
appliance are thoroughly familiar with its operation and safety features. Save these instructions and make sure that they remain with the
appliance if it is moved or sold, so that everyone
using it through its life will be properly informed
on appliance use and safety.
Correct use
• This dishwasher is only intended for washing
household utensils suitable for machine
washing.
• Do not put any solvents in the dishwasher.
This could cause an explosion.
• Knives and other items with sharp points
must be loaded in the cutlery basket with
their points down or placed in a horizontal
position in the upper basket.
• Only use products (detergent, salt and rinse
aid) suitable for dishwashers.
• Avoid opening the door whilst the appliance
is in operation, hot steam may escape.
• Do not take any dishes out of the dishwasher
before the end of the dishwashing cycle.
• After use, isolate the appliance from the
power supply and turn off the water supply.
• This product should be serviced only by an
authorised service engineer, and only genuine spare parts should be used.
• Under no circumstances should you attempt
to repair the machine yourself. Repairs car-
ried out by inexperienced persons will cause
injury or serious malfunctioning. Contact
your local Service Force Centre. Always insist on genuine spare parts.
General safety
• Dishwasher detergents can cause chemical
burns to eyes, mouth and throat. Could endanger life! Comply with the safety instructions of the dishwasher detergent
manufacturer.
• The water in your dishwasher is not for drinking. Detergent residues may still be present
in your machine.
• Ensure that the door of the dishwasher is
always closed when it is not being loaded or
unloaded. In this way you will avoid anybody
tripping over the open door and hurting
themselves.
• Do not sit or stand on the open door.
Child safety
• This appliance is designed to be operated
by adults. Don’t allow children to use the
dishwasher unsupervised.
• Keep all packaging well away from children.
There is risk of suffocation.
• Keep all detergents in a safe place out of
children’s reach.
• Keep children well away from the
dishwasher when the door is open.
3

Installation
• Check your dishwasher for any transport
damage. Never connect a damaged machine. If your dishwasher is damaged contact your supplier.
• All packaging must be removed before use.
• Any electrical and plumbing work required to
install this appliance must be carried out by
a qualified and competent person.
• For safety reasons it is dangerous to alter
the specifications or attempt to modify this
product in any way.
• Never use the dishwasher if the electrical
supply cable and water hoses are damaged;
Control panel
or if the control panel, work top or plinth area
are damaged such that the inside of the appliance is freely accessible. Contact your
local Service Force centre, in order to avoid
hazard.
• All sides of the dishwasher must never be
drilled to prevent damage to hydraulic and
electric components.
WARNING!
For electrical and water connection carefully
follow the instructions given in specific paragraphs.
1
Programme selector dial and On/Off switch
2 Start/cancel button
3
Indicator lights
4
Programme selector indicator light
4
4
1
2
3

Programme selector dial and On/Off switch
Start/cancel button
Programme selector indicator light
• when in this position, the machine is switched off
(corresponding light off),
• when the marker on the dial corresponds with a
programme, the machine is swi tched on and a programme is selected (programme selector indicator
light on)
•
Starting the washing programme:
1. Select a washing programme.
2. Press the Start/Cancel button (corresponding
light on).
IMPORTANT!
Once the programme has started, if you want to
change the selection made you must cancel the washing programme in progress.
•
Cancel the washing programme in progress:
1. Press and hold the Start/Cancel button until the
corresponding light turns off.
2. Release the Start/Cancel button.
3. Turn the programme selector dial t o the Off po-
sition or select a new washing programme
(check that there is detergent in the detergent
dispenser.
Illuminates when the washing programme is selected
Wash indicator light
Dry indicator light
End of programme indicator light
Indicator lights
Illuminates when the washing and rinsing phases are
running.
Illuminates when the drying phase is running.
Illuminates when the was hing pr ogramm e has en ded.
Switch off the dishwasher by returning the programme
selector dial to the Off position. The On/Off indicator
light turns off.
It also has added functions of visual signalling as:
– the setting of the water softener,
– intervention of an ala rm due to the malfunction of
the machine.
5

Indicator lights
Salt refilling indicator light
Illuminates when special salt needs to be filled.
It can remain illuminated several hours after the salt
has been filled.
Washing programmes
Programme Degree of soil Type of load Programme description
A
Intensive 70°
B
Normal 65°
C
Eat - load - run
1)
30 min.
Heavy soil Crockery, cutlery, pots
and pans
Normal soil Crockery, cutlery, pots
and pans
Light soil Crockery and cutlery Main wash
Prewash
Main wash
2 intermediate rinses
Final rinse
Drying
Prewash
Main wash
2 intermediate rinses
Final rinse
Drying
Final rinse
D
Bio 50°
2)
E
Rinse and Hold
1) Ideal for washing a partially loaded dishwasher. This is perfect daily programme, made to meet the needs of a family of 4
persons who only wish to load breakfast and dinner crockery and cutlery.
2) Test programme for test institutes.
Normal soil Crockery and cutlery Prewash
Main wash
1 intermediate rinse
Final rinse
Drying
Any.
Partial load (to be completed later in the day).
1 cold rinse (to avoid food
scraps from sticking
together).
This programme does not
require the use of detergent.
6

First use
Before using your dishwasher for the first time:
• Ensure that the electrical and water connec-
tions comply with the installation instructions
• Remove all packaging from inside the appli-
ance
• Set the water softener
• Pour 1 litre of water inside the salt container
and then fill with dishwasher salt
• Fill the rinse aid dispenser
When using tablets that
integrate rinse aid and
detergent:
there is no need to fill up with rinse aid
– set the water softener
– add special (dishwasher) salt
When using tablets that
integrate rinse aid, detergent,
salt function and other
additives:
Check whether these detergents are suitable
for your water hardness. Follow the manufacturers instructions.
– Set the water hardness to level 1.
IMPORTANT!
If the drying results are not satisfactory we recommend that you:
1. Fill up the rinse aid dispenser with rinse aid.
2. Set the rinse aid dosage to position 2.
If you decide in future to use separated deter-
gents, we advise that you:
– Fill up the salt and rinse aid container.
– Adjust the water hardness setting to the
highest level and perform 1 normal washing
programme without loading any dishes.
– Adjust the water hardness setting according
to the hardness of the water in your area.
– Adjust the rinse aid dosage
there is no need to fill up with special salt or
rinse aid.
Set the water softener
The dishwasher is equipped with a water
softener designed to remove minerals and salts
from the water supply, which would have a det-
rimental or adverse effect on the operation of
the appliance.
The higher the content of these minerals and
salts, the harder your water is. Water hardness
7
is measured in equivalent scales, German degrees (°dH), French degrees (°TH) and mmol/
l (millimol per litre - international unit for the
hardness of water).
The softener should be adjusted according to
the hardness of the water in your area. Your
local Water Authority can advise you on the
hardness of the water in your area.
Water hardness Adjusting the water hardness
setting
°dH °TH mmol/l manually electronically
51 - 70 91 - 125 9,1 - 12,5 2 level 10 yes
43 - 50 76 - 90 7,6 - 8,9 2 level 9 yes
37 - 42 65 - 75 6,5 - 7,5 2 level 8 yes
29 - 36 51 - 64 5,1 - 6,4 2 level 7 yes
23 - 28 40 - 50 4,0 - 5,0 2 level 6 yes
19 - 22 33 - 39 3,3 - 3,9 2 level 5 yes
15 - 18 26 - 32 2,6 - 3,2 1 level 4 yes
11 - 14 19 - 25 1,9 - 2,5 1 level 3 yes
4 - 10 7 - 18 0,7 - 1,8 1 level 2 yes
< 4 < 7 < 0,7 1 level 1 no
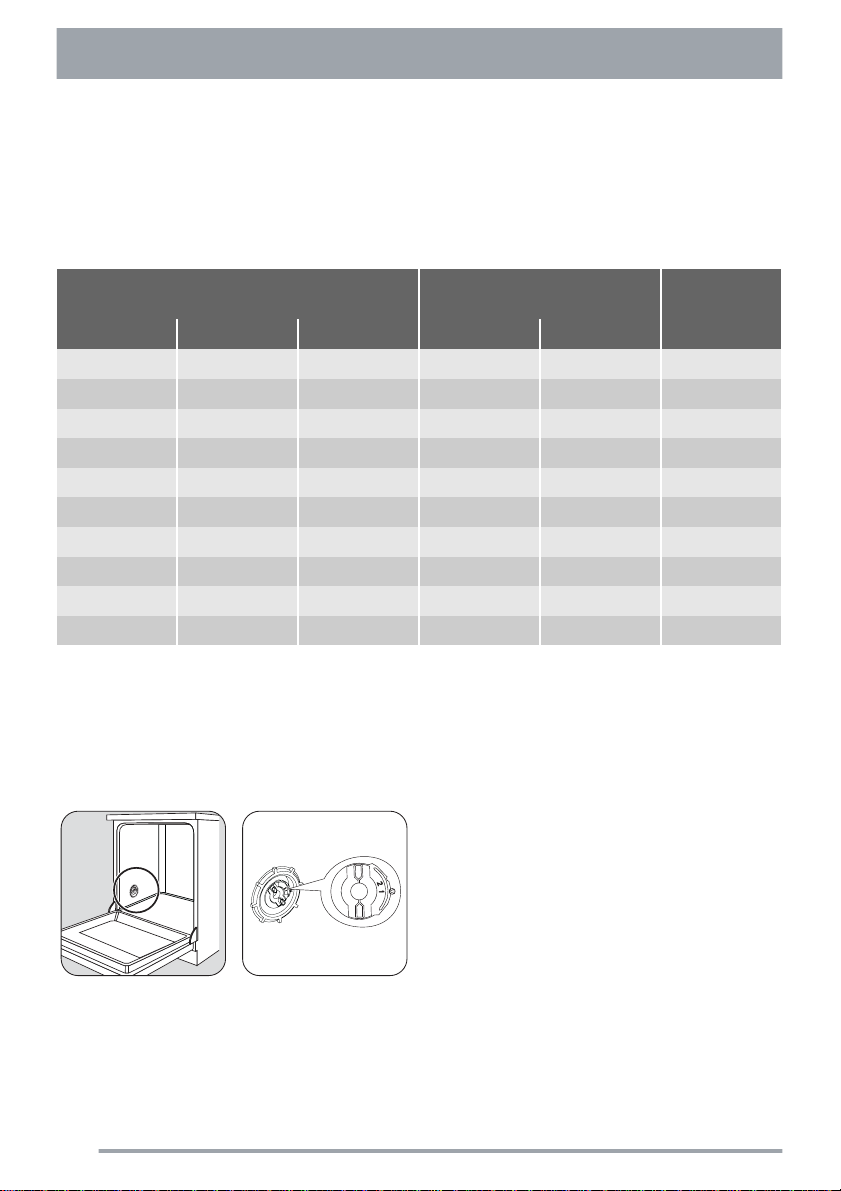
The water softener must be set in both ways:
manually, using the water hardness dial and
electronically.
Setting the water softener manually (see table)
The water softener is factory set at position 2.
Use of salt
Set switch to position 1 or
2
8
 Loading...