

Electrolux HANDLEIDING HG 50OLI 50, HANDLEIDING HG 65 HC 60, HANDLEIDING HG 63 TIVTIVOLI 65, HANDLEIDING TIVTIVOLI 50, HANDLEIDING PH 6HC 60 User Manual
...Page 1
The Electrolux Group. The world’s No.1 choice.
Electrolux Outdoor Products
Via Como 72
23868 Valmadrera (Lecco)
ITALIA
Phone +39 0341 203111 - Fax +39 0341 581671
Our policy of continuous improvement means that the specification of products may be altered from time to time without prior notice.
Electrolux Outdoor Products manufacture products for a number of well known brands under various registered patents, designs and
trademarks in several countries.
© Electrolux Outdoor Products Italy
The Electrolux Group is the world’s largest producer of powered appliances for kitchen, cleaning and outdoor use. More than 55 million
Electrolux Group products (such as refrigerators, cookers, washing machines, vacuum cleaners, chain saws and lawn mowers) are
sold each year to a value of approx. USD 14 billion in more than 150 countries around the world.
PN 249350 REV. 00 (11/03)
TIV
TIV
OLI 50 / HG 50
OLI 50 / HG 50
TIV
TIV
OLI 63 / HG 63
OLI 63 / HG 63
TIV
TIV
OLI 65 / HG 65
OLI 65 / HG 65
HC 60/70 / PH 6
HC 60/70 / PH 611
HANDLEIDING
BELANGRIJKE IMPORTANTS: Lees deze handleiding aandachtig en zorg dat u ailes begrijpt alvorens de kettingzaag te
gebrulken en be-waar ze voor toekomstige raadpleging.
BRUKERHÅNDBOK
VIKTIG INFORMASJON: Les disse anvisningene nøye
og forsikre deg om at du forstår dem før du bruker
enheten og oppbevar dem for sen-ere bruk.
BRUKSANVISNING
VIKTIG INFORMATION: Läs instruktionerna noggrant och
försäkra dig om att du förstår dem innan du använder
utrustningen och spara dem för framtida behov.
BRUGERHÅNDBOG
VIGTIGE OPLYSNINGER: Læs instruktionerne
omhyggeligt, før du bruger enheden og gemme til senere
henvisning.
LIBRETTO D’ISTRUZIONI
INFORMAZIONI IMPORTANTI: Leggere le istruzioni
attentamente e capirle bene prima di usare l’utensile.
Conservare per ulteriore consultazione.
MANUAL DO OPERADOR
INFORMAÇÕES IMPORTANTES: Queira ler cuidadosamente estas instruções e tenha certeza de entendë las
antes de usar a serra e guarde para consulta futura.
EΓXEIPI∆IO XEIPIΣMOE
ΣHMANTIKEΣ
ΠΛHPOΦOPIEΣ: ∆ιαβάστε πρoσεxτιxά αvτές τις οδηγίες
xαι Φρovτίστε vα τις xαταvoήσετε αvτ& τo µηχάvηµα xαι
Φuλάξτε το για vα το σuµβοuλεύεστε στο µέλλοv.
OHJEKIRJA
TÄRKEÄÄ TIETOA: Lue nämä ohjeet huolellisesti ja
varmista, että olet ymmärtänyt ne, ennen kuin alat käyttää
tätä laitetta ja säilytä myöhempää tarvetta varten.
HASZNÁLATI ÚTMUTATÓ
Jótállást vállalni csak rendeltetésszerüen használatba vett
gépekre tudunk. Kérj ü hogy a gép használatba vétele elött
gondosan olvassa el a kezelési utasításokat.
GB
FI
NO
PT
GR
HU
IT
FR
DE
ES
NL
SE
DK
INSTRUCTION MANUAL
IMPORTANT INFORMATION: Please read these instructions carefully and make sure you understand them before using this unit.
Retain these instructions for future reference.
MANUEL D’INSTRUCTIONS
RENSEIGNEMENTS
IMPORTANTS: Avant d’utiliser cet appareil, veuillez lire atentivement les instructions et assurez-vous de les avoir comprises. Conservez les instructions pour référence ultérieure.
BETRIEBSANWEISUNG WICHTIGE INFORMATION:
Lesen Sie diese Hinweise zur Handha-bung des Geräts aufmerksam durch. Verwenden Sie es erst, wenn Sie sicher sind, daß Sie
alle Anweisungen verstanden haben und gut aufbewahren.
MANUAL DE INSTRUCCIONES
INFORMACIÓN IMPORTANTE: Lea atentamente las instrucciones y asegúrese de entenderlas antes de utilizar esta aparato. Conserve las instrucciones para la referencia en el futuro.
ИНCTPYKЦИИ
BAЖHЫE CBEДEHИЯ:
Bнимaтeльнo пpoчитать инстрyкции и хрoщo их
пoнять, пepeд тeм как пoльзoвaтьcя блoкoм.
Хpaнить инcтpyкции для дaльнейшиx кoнcyльтаций.
KASUTUSJUHEND
TÂHTIS INFORMATSIOON: Lugege kasutusjuhend enne
seadme kasutamist kindlasti põhjalikult läbi ning veenduge,
et olete kõigest täpselt aru saanud.
CZ
EE
SK
PL
RU
NÁVOD NA OBSLUHU Dôleæitá informácia: Pred
pouæitím stroja si starostlivo preËítajte tento návod na
obsluhu a uistite sa æe ste mu dôkladne porozumeli.
Návod starostlivo uschovajte pre potrebu v budúcnosti.
INSTRUKCJA OBS≥UGI
Gwarancja traci waΩnoß∫ w przypadku uΩywania
urzådzenia do celów innych niΩ wymienione w instrukcji
obs≤ugi. Prosimy o uwaΩne przeczytanie instrukcji oraz o
stoowanie si™ do zalece~ i wskazówek w niej zawartych.
18
19
6
18
19
6
19
20
20
20
A
B1
B2
B3
B4
C
B5
Page 2
C
D
1 ltr
25 cm
3
5 100
10 200
15 300
20 400
50:1
2%
2 Strokes
Engine totally
sintetyc oil
1 ltr
25 cm
3
4 100
5 125
10 250
20 500
40:1
2,5%
McCulloch
oil
E
E
E
TIVOLI 65 / HG 65
C
D
F1 F2
F3
C
F4
F4
F5 F6
Page 3
H1 H2
H3
H5
G
H4
Page 4

GB
Due to a constant product improvement programme, the factory reserves the right to
modify technical details mentioned in this manual without prior notice.
DE
Im Sinne des Fortschritts behält sich der Hersteller das Recht vor, technische
Änderungen ohne vorherigen Hinweis durchzuführen.
FR
La Maison se réserve la possibilité de changer des caractéristiques et des données de
ce manuel à n’importe quel moment et sans préavis.
NL
Door konstante produkt ontwikkeling behoud de fabrikant zich het recht voor om rechnische specificaties zoals vermeld in deze handleiding te veranderen zonder biervan
vooraf bericht te geven.
NO
Produsenten forbeholder seg all rett og mulighet til å forandre tekniske detaljer i denne
manualen uten forhåndsvarsel.
FI
Jatkuvan tuotteen parannusohjelman tähden valmistaja pidättää oikeuden vaihtaa
ilman ennakkovaroitusta tässä ohjekirjasessa mainittuja teknisiä yksityiskohtia.
SE
Tilverkaren reserverar sig rätten att ändra fakta och uppgifter ur handboken utan förvarning.
DK
Producenten forbeholder sig ret til ændringer, hvad angår karakteristika og data i
nærværende instruktion, når som helst og uden varsel.
ES
La firma productora se reserva la posibilidad de cambiar las características y datos del
presente manual en cualquier momento y sin previo aviso.
PT
A casa productora se reserva a possibilidade de variar características e dados do presente manual em qualquer momento e sen aviso prévio.
IT
La casa produttrice si riserva la possibilità di variare caratteristiche e dati del presente
manuale in qualunque momento e senza preavviso.
HU
A gyártó cég fenntartja a jogot arra, hogy a használati utasitásban megadott adatokon
és technikai tulajdonságokon bármikor és elözetes bejelentés nélkül változtasson.
GR
Λγω προγράµµατος συνεχούς βελτίωσης προϊντων, το εργοστάσιο
επιφυλάσσεται του δικαιώµατος να τροποποιεί τις τεχνικές λεπτοµέρειες
που αναφέρονται στο εγχειρίδιο αυτ χωρίς προηγούµενη ειδοποίηση.
Vzhledem k pokraËujícím inovacím si vyrobce vyhrazuje právo mìnit technické hodnoty uvedené
v této príruËce bez predchozího upozornení.
W zwiåzku z programem ciåg≤ego ulepszania swoich wyrobów, producent zastrzega sobie prawo do
wprowadzania zmian w szczegó≤ach technicznych wymienionych w tej instrukcji bez uprzedniego
zawiadomienia. Instrukcja jest cz™ßciå wyposaΩenia wykaszarki.
PL
RUS
Фиpмa E.O.P.I. нeпpepывнo paбoтaeт нaд ycoвepшeнcтвoвaниeм cвoиx издeлeлий. Пoэтoму мы
coxpaняем за coбoй пpaвo нa внeceниe измeнeний в тexничecкиe дeтaли, yпoмянутыe в дaннoй
инcтpyкции пo экcплyaтaции, бeз пpeдyпpeждeния oб этoм.
CZ
ˇ
ˇ
ˇ
´
Page 5

ENGLISH - 1
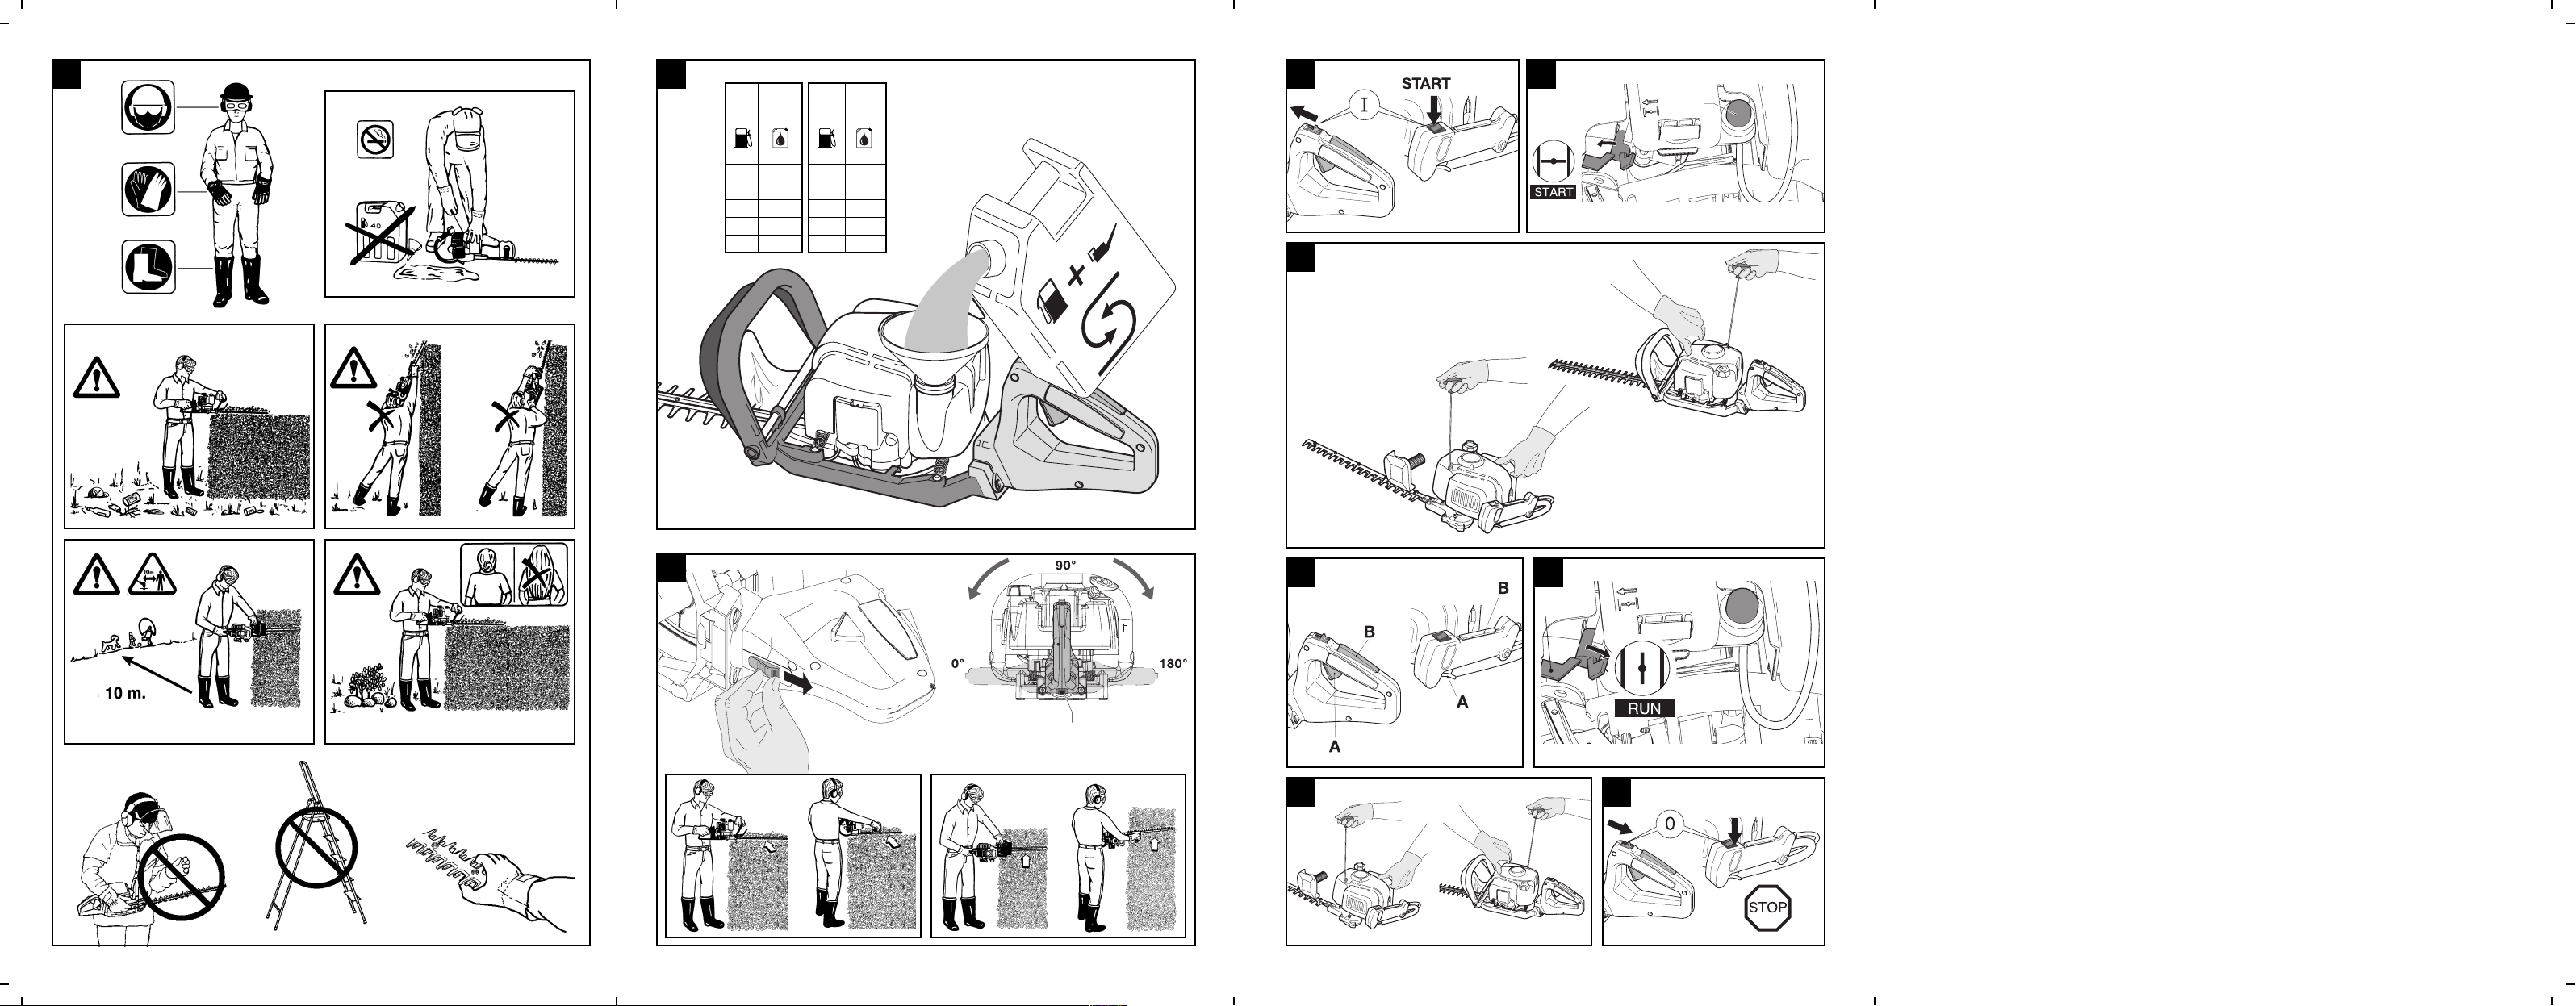
Safety apparel:
Approved protective goggles or
visor, approved hard hat and
hearing protection
Safety apparel:
Approved gloves
CAUTION!
• Use the hedge trimmer properly in order to avoid injuries.
• Follow the instructions and precautions for reasonably safe, efficient use
of the product.
• It is the responsibility of the user to follow the instructions and precautions provided in the manual supplied with the product.
Note the illustrations at the beginning of the manual. Every section of the
text in the manual refers to the illustration bearing the same letter
Warning
Read the instructions for the user
carefully and make sure you
understand how all the controls
work.
Key to symbols
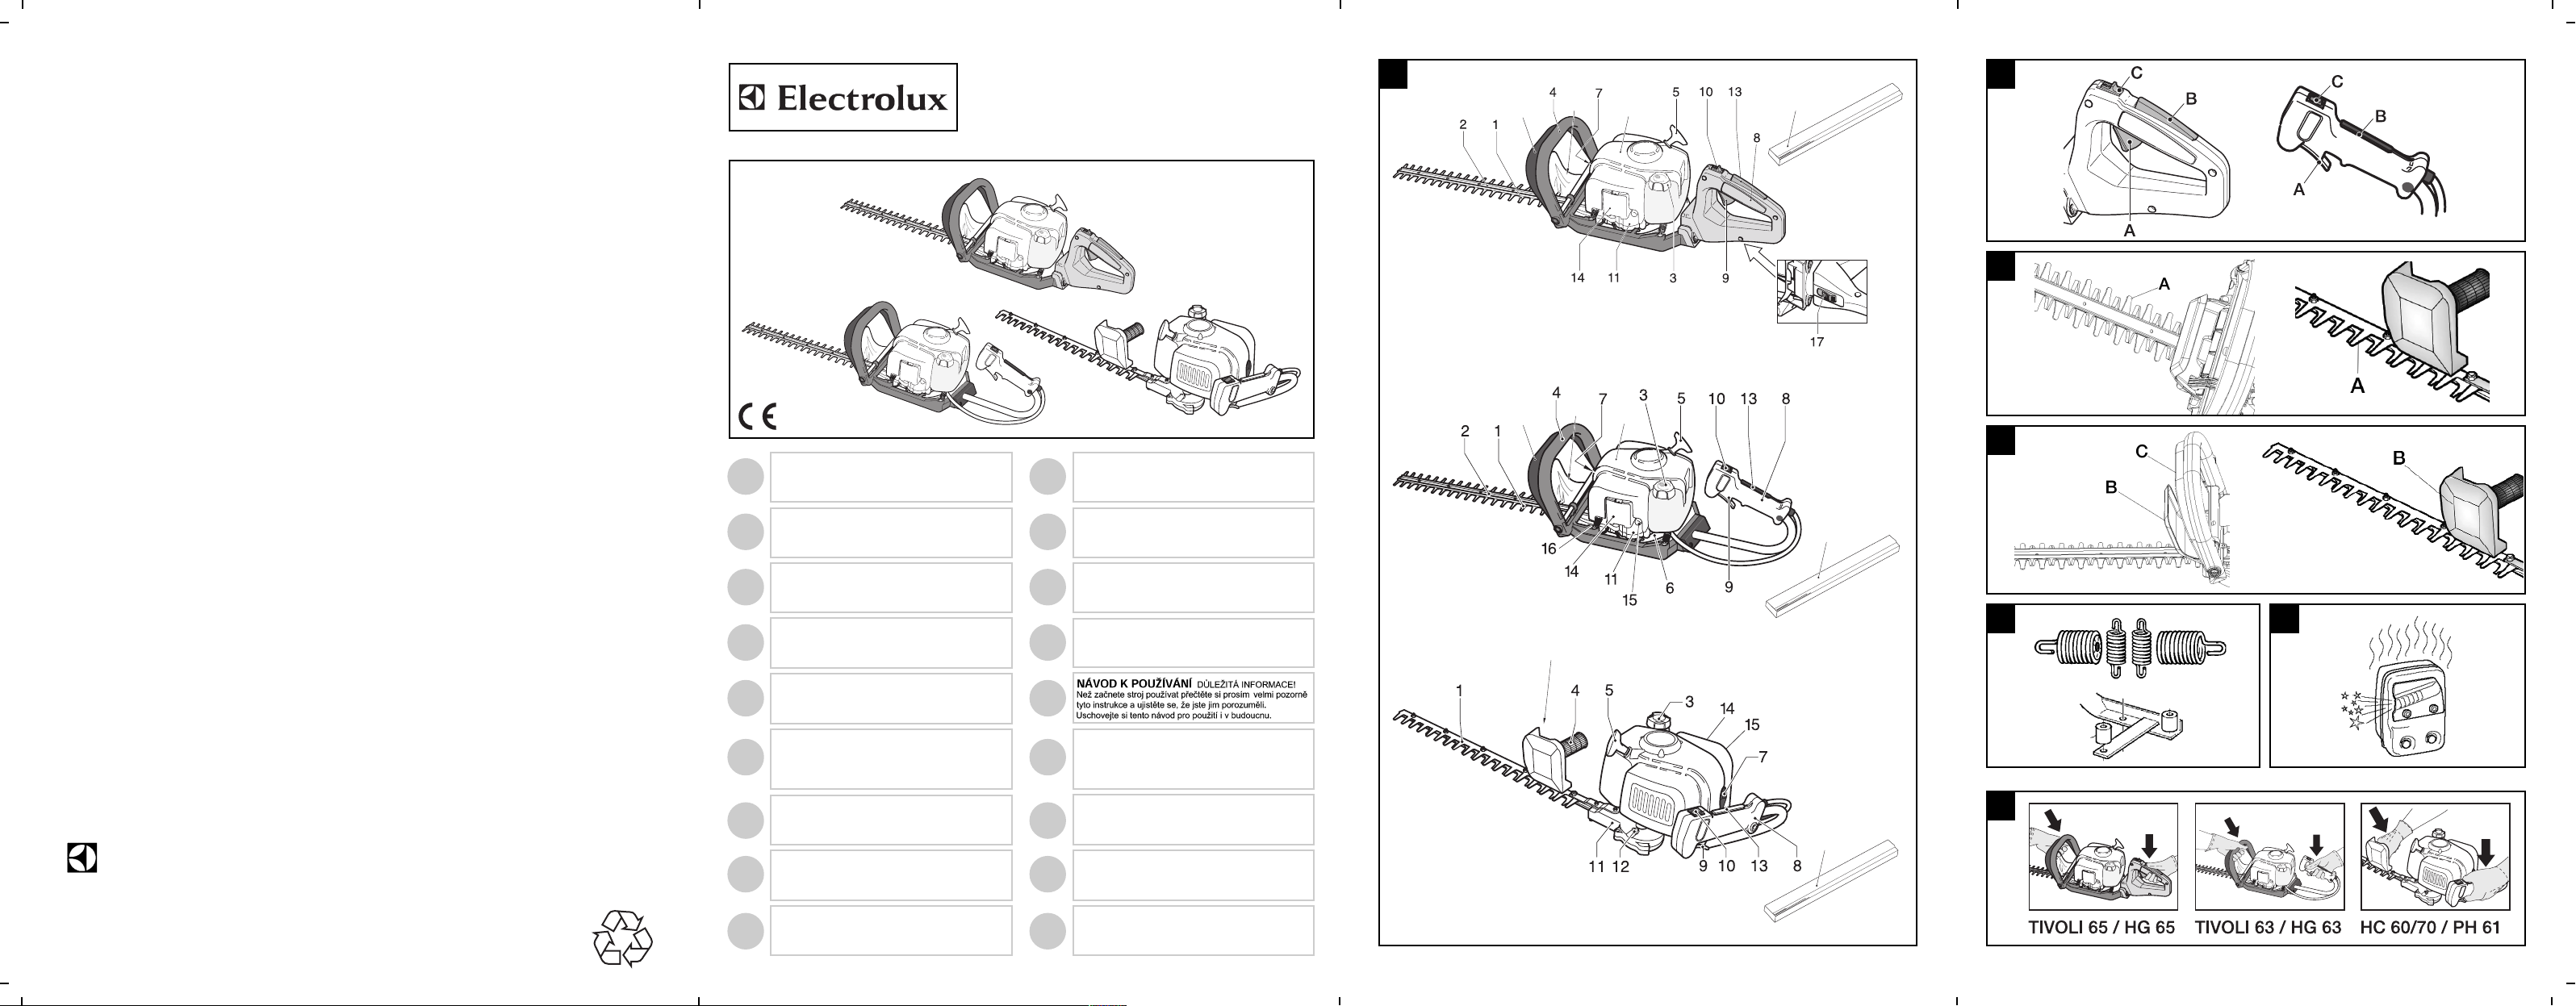
1) BLADES
2) BLADE GUIDE
3) FUEL CAP
4) FRONT HANDLE
5) STARTER HANDLE
6) CYLINDER COVER
7) SPARK PLUG
8) HANDLE
9) THROTTLE CONTROL TRIGGER
10) STOP SWITCH
11) GEAR BOX
12) GREASE GUN
13) SAFETY LEVER
14) AIR FILTER
15) CHOKE CONTROL
16) FUEL ENRICHMENT LEVER
17) HANDLE LOCK KNOB
18) FRONT HANDLE LOCK LEVER
19) HAND GUARD
20) TRANSPORT GUARD
A. General Description
Safety precautions
LEGEND:
1) Guaranteed noise level according to
directive 2000/14/EC
2) Manufacturer's name and address
3) Year of manufacture (last two figures;
e.g. 03=2003)
4) Product code
5) Serial no.
6) Model/type
7) CE seal of conformity
PRODUCT IDENTIFICATION LABEL
Page 6

ENGLISH - 2
• This section describes the safety devices
installed on the machine, the controls and
maintenance to perform to keep them in perfect
working order.
• The general description section will help you to
identify the parts described in this section.
• The risk of accidents is greatly increased if
maintenance is not performed regularly or is not
performed professionally. In case of doubts,
contact an authorized service center.
B1 Safety lever
• This device was developed to prevent accidental pressing of the throttle control trigger A. The
trigger A only works if it is pressed at the same
time as the safety lever B. When the handle is
released, two separate springs return the throttle trigger A and the safety lever B automatically
to their original positions.
B1 Stop button
• When the Stop button C is pressed in the direction indicated by the symbol, the engine shuts
down.
• To check correct operation, start the engine and
make sure it shuts down when the Stop button
C is switched to the Stop position.
B2 Blade guide
• The blade guide (A) is an important device
developed to prevent accidental contact
between parts of the body and the blades.
• Periodically, check the conditions of the device
and have it replaced, if necessary, by an authorized service center.
B3 Hand guard
• The hand guard (B) prevents any accidental
contact of the hands with the blade unit.
• Periodically, and always after any violent impact
to the guard, check its conditions.
B3 Safety lever on front handle
• This hedge trimmer is equipped with a safety
device (C) that greatly reduces the risk of accidents, because if the machine is not gripped
with both hands, this safety device prevents the
engine from racing even if the accelerator is
pressed all the way down, and holds the blades
locked.
• To check correct operation of this important
device, try to press the accelerator all the way
down without gripping the front handle.
Normally, the engine should not race and the
blades should not move, otherwise the device
is not working correctly and the machine should
be taken promptly to a service center.
B4 Vibration damping system
• The vibration damping system reduces the
transfer of vibrations by means of springs and
shock absorbers in rubber located between the
engine/blades and the handles on the machine.
• Check regularly that the springs and rubber
shock absorbers are properly mounted and do
not exhibit any cracks or distortion.
B5 Muffler
• The muffler is designed to keep noise levels to a
minimum and to direct the engine exhaust
fumes away from the user.
• Comply with the following procedures for safe
use of the hedge trimmer.
• CAUTION! The muffler can get very hot
during use and remain so for some time after
stopping. Contact of the area around the
muffler can result in burns to the skin.
Do not smoke when
refueling or using the
machine
Choke closed
(Hot ignition)
Safety apparel:
Approved boots
WARNING! Never use the machine for any reason with its safety devices out of order
Choke open
(Cold ignition)
B - Description of the safety devices on the machine, Controls and
maintenance necessary to ensure safe conditions
Page 7

ENGLISH - 3
C. SAFETY INSTRUCTIONS
General precautions
• Use the product only for the purpose for which
it was designed.
• Do not use this machine for any other purpose
than trimming or edging shrubs, hedges or
bushes.
• Always grip the machine firmly with both hands.
• Make sure you know how to stop the engine
and blades if necessary (see section on starting
and stopping the engine).
• CAUTION! The blades of the hedge trimmer
continue to move due to inertia even after the
engine has been switched off, so be very careful of your hands as there is a real danger of
amputation of the fingers.
• Inspect the machine carefully prior to using it.
• Make sure there are no loose screws, damaged
parts or fuel leakage.
• THE ENGINE EXHAUST FUMES ARE POISONOUS TO BREATHE AND MAY CAUSE ASFIXIATION AND DEATH
• Never allow children to use this machine.
• Never allow children or persons who are not
familiar with these instructions and sufficiently
trained to use the hedge trimmer. Local regulations may indicate age limits for use.
• Anyone who uses the machine should be familiar with the instructions for safe use of it as
described in this manual, and should be
instructed in the proper cutting techniques to
use, possibly by practical demonstration.
• Keep this manual with the machine when selling
or lending it to others so that the future users
can familiarize themselves with the product and
the instructions for safe use.
• Wear properly fitting protective working clothes
of approved type. Wear non-slip footwear,
gloves, glasses and hearing protection.
• Do not wear loose clothing and jewelry that
could catch in the moving parts of the machine.
• Keep hair fastened or gathered so that is does
not hang below shoulder level.
• Examine the work area and be careful of any
hazards (such as roads, driveways, power lines,
hanging tree limbs, etc.).
• Remove any rubbish or refuse from the work
area such as cans, bottles, rocks, etc.
• Any contact of the blades with other objects
could cause serious injury to the operator, other
people or animals in the vicinity and the
machine.
• Never try to use a machine with any of its parts
missing or after any alterations have been made
to it by persons other than authorized service
personnel.
• The operator or user is liable for any accidents
or damages to third parties or property, and for
the dangers to which they may be exposed.
• Take account of any hazard that may not be
perceived because of the noise of the machine.
• Make sure there is someone in the vicinity within safe calling distance in case of any accidents.
• Never use the machine when you are tired or
under the influence of any substances like
drugs or alcohol that could affect your physical
conditions.
• When you transport the hedge trimmer in a
motor vehicle, place it in a stable fixed position
so that no fuel leaks out.
• During transportation or storage of the machine
always fit the blade guard on the blades to prevent accidental injury.
• ALWAYS USE ORIGINAL REPLACEMENTS
AND ACCESSORIES.
Precautions for safe use of the machine
• Make sure any other persons or animals in the
vicinity are at a safe distance (at least 10
meters). If necessary, use warning signals to
keep persons and animals at a safe distance.
• If any fuel is spilled on the machine, make sure
the engine is completely dry before starting it.
• Keep the grips clean and dry
• Never start the machine if the blades are damaged or badly worn
• If you wear the McCulloch safety visor, make
sure to remove the transparent protective film, if
any.
• Remember the risk of fire. Make sure
the muffler is always correctly fastened to
the machine. Never use the machine with a
defective or damaged muffler.
• CAUTION! Engine exhaust fumes contain carbon monoxide which can cause poisoning. For this reason, you should not use
the machine indoors.
• CAUTION! Engine exhaust fumes can
get very hot and may contain sparks. Do not
use it near inflammable material
Page 8

ENGLISH - 4
• Keep all parts of the body and clothing away
from the blades during startup and while the
engine is running.
• Always work from a stable position on your feet.
• Do not use the hedge trimmer while standing
on a ladder or other unstable support.
• When trimming tall hedges or bushes, use a
stable, safe platform and stand in a stable position without the risk of losing your balance.
• If you strike an object accidentally, switch off the
engine immediately and examine the machine.
• Make sure the grip and hand guard are in place
during use of the machine.
• When trimming or edging, keep the engine running at high speed; these operations should not
be carried out with the motor running at low
speed.
• Never lift the hedge trimmer above shoulder
height when using it.
• Always wait for the motor to idle before moving
the machine from one section of the shrub or
hedge to another.
• Stop the engine when changing to another
place or before examining the blades.
• Before starting to cut again make sure your
position is correct.
• To reduce the fire hazard keep the engine and
muffler free of twigs, leaves or excess lubricant.
• Watch out for the sharp edges and hot part of
the machine.
• Prolonged use of the machine or other equipment expose the operator to vibrations that can
cause the White Finger Syndrome (Syndrome of
Raynaud). This could reduce the sensitivity of
the hands in distinguishing different temperatures and cause a general numbness. The
operator should therefore check the conditions
of the hands and fingers if the machine is used
continuously or regularly. If one of the symptoms should appear, consult a doctor immediately.
CAUTION!
Do not smoke while refueling!
• Open the cap on the tank by loosening it
slowly.
• Fill the tank in the open, far from flames or
sparks.
• Never add fuel in the tank when the engine
is running or hot, (let the engine cool off
before filling the tank) to avoid the risk of
fire.
• Avoid contact of the oil and fuel with the
skin and eyes.
• Fill the tank in a well-ventilated place.
• Do not inhale the fumes of the fuel mixture.
It is toxic.
• Store the fuel mixture in suitable fuel containers only.
PREPARATION OF THE MIXTURE
CAUTION!
• Do not use any other type of fuel than the
type recommended in this manual.
• This machine is equipped with a two-stroke
engine and should therefore be fueled with a
mixture of unleaded gasoline (with a minimum octane rating = 90) and fully synthetic
oil specific for two-speed engines that use
unleaded gasoline in the proportions indicated in the table on the cover, fig. (D)
CAUTION! Control the specifications of
the oil shown on the package; the use of
oil lacking the specifications expressly indicated in this manual could cause serious damage
to the engine!
• To obtain the best mixture, pour the oil into an
approved container first, followed by the gasoline, and shake the container well (every time
you take fuel out of it).
• Be careful not to spill the gasoline.
• The characteristics of the mixture tend to deteri-
orate in time, so you should only prepare as
much mixture as you are going to need.
FILLING THE TANK
CAUTION! The following precautions
should be taken to reduce the fire hazard:
• Always ensure there is adequate ventilation.
• Do not smoke or take sources of heat or
sparks near the fuel.
• Refuel with the engine off.
• Open the cap on the tank carefully to elimi-
nate any excess pressure.
• Do not take the cap off the tank with the
engine running.
• After fueling, close the cap tightly.
• Fill the tank in a well-ventilated place.
• Place the machine on a solid flat surface so that
it cannot tip over, with the cap on the tank facing upward.
D. Fuel Mixture
Page 9

ENGLISH - 5
CAUTION! Wear heavy gloves of the
approved type!
There are two possible cutting procedures with
this machine:
1 Horizontal
2 Vertical
ONLY FOR MODELS WITH ADJUSTABLE
HANDLE
• The rear grip can only be adjusted in one of the
3 fixed positions: 0°, 90°, 180°.
• Adjust the rear grip depending on the type of
cutting (horizontal or vertical) that you have to
do so as to have full control of the hedge trim-
mer and an ergonomically correct position for
any cutting conditions.
• To adjust the grip, pull the release knob (E) all
the way in the direction of the arrow.
• Turn the grip slightly in the desired direction and
let go of the release knob (E).
• Complete rotation to the desired position (0°,
90° or 180° degrees), you will hear a click when
the grip is in place, and the release knob
returns automatically to its original position.
• To ascertain that the grip is correctly locked in
place, try to turn it and make sure it stays
locked in the position in which you have set it. If
it moves, repeat the operation of adjustment
and locking again.
CAUTION! Do not start the machine for
any reason without the certainty that the
release knob (E), has returned to its original
position with the grip correctly locked.
CAUTION! Before using the machine,
make sure the rear grip is firmly locked in
one of the proper positions so as to prevent
accidents.
CAUTION! If the grip does not remain
locked in one of the three positions, take
the machine to an Authorized Service Center.
1 The horizontal cutting position is used to even
the tops of bushes, shrubs and hedges.
• Always cut from right to left.
• Never use the hedge trimmer above shoulder
height.
2 The vertical cutting procedure is used to trim
the sides of shrubs, bushes and hedges.
• Always cut upward from the bottom.
• Hold the machine with both hands.
• Press the trigger of the butterfly valve all the
way during cutting operations.
• When you have finished, release the trigger on
the butterfly valve and wait for the engine to
idle; the blade should stop.
• Move on to the next section.
• After reaching the next section and taking a sta-
ble standing position, resume working by pressing the trigger on the butterfly valve all the way
down.
E. Cutting procedure
• Clean the area around the fuel cap before
removing it, to prevent any impurities from contaminating the fuel.
• Take the cap off the fuel container carefully.
Unscrew the cap on the fuel tank and fill it with
the necessary quality, using a funnel.
• Take care not to spill any fuel.
• After filling the tank, screw the cap on tightly.
CAUTION! If you spill any fuel, wipe it off
the machine. If you have spilt it on yourself, change your clothes at once. Avoid contact with the skin or eyes.
CAUTION! The muffler gets very hot dur-
ing use and remains hot for some time
after switching off the engine. This also
applies at idle speed. Take every precaution to
reduce the fire hazard, especially in the presence of inflammable materials or gas.
FUEL STORAGE
• Gasoline is highly inflammable.
• Before going near any type of fuel, put out your
cigarette, pipe or cigar.
• Store the fuel in a cool, well-ventilated place, in
an approved fuel storage container.
• Never store the engine with fuel in the tank in a
poorly ventilated place where the fumes produced by the gasoline could propagate and
reach a fire, candle, burner or furnace pilot light,
water heater, dryer, etc.
• The fumes produced by the fuel can cause an
explosion or fire.
• Never store excessive quantities of fuel.
• To prevent problems in starting the engine
again, we recommend that you never let the
machine run completely out of fuel.
Page 10

ENGLISH - 6
CAUTION!
Your machine can be equipped with a low
emission carburetor. We recommend that carburetor adjustment be done, if necessary,
exclusively by authorized service centers,
which have the appropriate equipment to
ensure optimum performance with lower emissions.
• The correct engine setting at idle speed is 2800
rpm as indicated in the technical specifications
of this manual and should not be modified
unless by an authorized service center
• If the engine does not hold the idle speed, turn
the screw T clockwise to increase the rpm and
counterclockwise reduce the rpm.
CAUTION! ALL THE ABOVE SETTINGS
SHOULD BE MADE WITH THE CUTTING
ATTACHMENTS PROPERLY INSTALLED.
G. Carburetor adjustment
CAUTION!
• Before starting the machine read this manual in its entirety, with special attention to the
safety devices and recommended personal
protection equipment.
• Before starting the machine make sure it is
in perfect conditions and that all the safety
devices are correctly installed and in perfect
working order. Inspect the blades carefully
and do not use the machine with worn or
damaged blades, or if they exhibit noticeable cracks.
• Make sure all the covers are correctly
installed
• Make sure the parts of the gear box and its
lit are correctly mounted. Starting a machine
without mounting these parts correctly
could cause serious personal injury
CAUTION!
To start the machine correctly and safely, use
the following procedure:
• Place the machine on the ground in a flat,
stable position
• Grasp the starter knob with one hand and
use the other to hold the machine steady on
the ground (Note: do not wind the starter
cord around your hand) and pull gently until
you feel some resistance, then pull the cord
sharply and forcefully (to start the engine
when warm or cold see the instructions
below.
CAUTION!
Do not pull the starter cord all the way to the
limit and do not let it snap back against the
machine as this could damage it.
COLD ENGINE
1 Place the stop switch on "I" or "START"
2 Turn the choke control to the START position.
Pump by squeezing the bulb (C) several times
until you see the fuel flow back into the tank
through the hose (D).
3 Grasp the starter knob properly and pull the
start cord until you the engine starts to catch.
4 Press the accelerator trigger (A), and safety
lever (B) all the way, the choke control (C) auto-
matically returns to its original position.
5 Pull the cord until the engine starts.
6 To stop the engine press the stop switch to
bring it to the "0" or "STOP" position.
WARM ENGINE
1 Place the stop switch on "I" or "START"
4 Make sure the choke lever is in the "RUN" posi-
tion. Pump by squeezing the bulb (C) until you
see the fuel flow back through the hose (D).
5 Pull the cord until the engine starts.
6 To stop the engine press the stop switch to
bring it to the "0" or "STOP" position.
F. Starting and stopping the engine
Page 11

ENGLISH - 7
CAUTION!
• Do not make any repairs or adjustments on
the machine that are not described in this
manual.
• Contact an authorized service center if you
have any questions about the repairs to
make.
• The warranty may be invalidated in case of
improper adjustments made by unauthorized persons not employed by authorized
service centers.
• Place the Stop Switch (10) in the STOP position before making any adjustments on the
machine
• always inspect the machine carefully before
use.
1 BLADES
• Before starting the machine check the state of
wear and conservation. In case of excessive
wear take the unit to a service center for
replacement.
• Caution: the blades are sharp and dangerous
even with the engine off. Handle with care and
use suitable protective gloves.
2 CLEANING OF AIR FILTER (At least every 25
hours of use).
• Use a screwdriver to lift and remove the air filter
from its housing (see figure).
• Clean the filter with gasoline.
• Dry the filter with air.
• Reassemble the filter in its housing.
NOTE: Replace the filter if torn or damaged.
3 GREASING GEARBOX
(Only for specific models)
• Every 50 hours of operation add grease to the
gearbox for the high speed gears, through the
inlet (C).
4 SPARKPLUG
• Periodically (at least once every 50 hours) disassemble and clean the sparkplug and adjust the
spacing between the electrodes (0.5 – 0.6 mm).
• Replace if excessively worn or, in any case,
after 100 hours of use.
• In case of excessive encrustation, check the
carburetor adjustment, the proper percentage
of oil in the fuel mixture and make sure the oil is
high quality two-stroke engine motor oil.
5 FUEL FILTER
• For cleaning or replacement, remove the cap on
the tank and extract the filter using a hook or
long-nosed pliers.
• Periodically, at the beginning of the season,
take the machine to your service center for
general maintenance and cleaning of the internal parts.
• This will reduce the risk of unexpected problems and will guarantee the long life and good
working order of your machine.
REGULARLY:
• Important, to avoid overheating the engine,
clean off any dust and dirt from the vents on
the cylindrical cover and fins on the cylinder
using a wooden scraper.
PROLONGED DISUSE:
Empty the fuel tank and run the engine
until all the residual fuel is consumed.
H. Routine Maintenance
Page 12

ENGLISH - 8
The engine
does not
start
The engine stutters
or loses power
The machine
starts but does
not cut properly
•
••
••
••
•
•
•
•
The engine continues to have problems: contact your authorized supplier.
Make sure the STOP switch is on I.
Make sure that the fuel tank is at least 25%
full.
Make sure the air filter is clean.
Remove the sparkplug, dry and clean it,
then return it to its place. If necessary,
replace it.
Check and if necessary adjust the screws
on the carburetor
Change the fuel filter. Contact your supplier.
Follow the correct procedure for assembly
of the cutting accessories.
Make sure the metal accessories are sharp,
and contact your supplier if necessary.
Troubleshooting table
This section contains information useful for maintaining the characteristics of eco-compatibility
included in the origin design of the machine, and
as regards proper use and disposal of oil and
fuel.
1. DESIGN
In the design stage, care was taken to develop an
engine with reduced consumption and low emissions of noise and pollutant exhaust fumes.
2. USE OF MACHINE
The operations of filling the tank with the fuel mixture should be carried out in such a way as to
avoid spilling fuel and contaminating the soil and
environment.
3. PERIODS OF PROLONGED DISUSE
Always empty the fuel tank with the same precautions used in filling it.
4. DISPOSAL
Do not dispose inappropriately of the machine
when it is no longer usable. Deliver it to an
authorized organization for proper disposal in
compliance with the regulations in force.
Environmental information
Page 13

ENGLISH - 9
Technical specifications
25
35
26
0,7
2150
8500
2800
5,4
360
95,6
108
109
6,6
13,4
5,7
360
95,6
107
108
3,1
2,5
5,7
360
95,6
107
108
3,1
2,5
5,4
360
95,6
107
108
3,1
2,5
Tivoli 50/60
Tivoli 63 HG 63
HC 60/70 PH 61
Tivoli 65 HG 65
Cylinder displacement (cm3) ....................................................................................................................
Cylinder bore (mm) ........................................................................................................................................
Stroke (mm) .....................................................................................................................................................
Power (kW) .......................................................................................................................................................
Max cutting frequency (min-1) ..................................................................................................................
Max engine output (min-1) .........................................................................................................................
Idle speed (min-1) ..........................................................................................................................................
Dry weight (kg)
........................................................................................................................
Fuel tank capacity (cm3) ........................................................................................................
Noise level perceived by operator LpAav (dBA) (ISO 11201)..........................
Measured noise level L
wAav (dBA) (ISO 3744)
................................................................
Guaranteed noise level LwAav (dBA) (ISO 3744) ...........................................................
Vibrations on rear grip (m/s2) (ISO 5349) ........................................................................
Vibrations on front grip (m/s2) (ISO 5349) ........................................................................
Conformity certificate
The undersigned, authorized by E.O.P., declares that the following products model /TYPE: Tivoli 65
/ HG 65, Tivoli 63 HG 63, : Tivoli 50 / HG 50, HC 60/70 / PH 61 starting from the serial numbers
produced from 2003 on, manufactured by E.O.P., Valmadrera, Italia, comply with European Directive:
98/37/EEC (Machine Directive), 93/68/EEC (EEC Marking Directive) & 89/336/EEC (Electromagnetic
Compatibility Directive), directive 2000/14/EEC (Enclosure V).
Valmadrera, 15.12.01
Giuseppe Todero (Technical Manager)
Electrolux Outdoor Products
Via Como 72, 23868 Valmadrera (Lecco) ITALY
 Loading...