

Page 1

user manual
Упатство за ракување
Инструкция по
эксплуатации
Washing Machine
Машина за перење
Стиральная машина
EWF 106410 W
EWF 126410 W
EWF 146410 W
Page 2
2 electrolux
Electrolux. Thinking of you.
Share more of our thinking at www.electrolux.com
CONTENTS
Safety information 2
Product description 4
Control panel 5
First use 8
Personalisation 8
Daily use 8
Helpful hints and tips 11
Washing programmes 13
SAFETY INFORMATION
Important! Read carefully & keep for future
reference.
• The safety of Your appliance complies
with the industry standards and with legal
requirements on the safety of appliances.
However, as manufacturers, we feel it is
our duty to provide the following safety
notes.
• It is most important that this instruction
book should be retained with the appliance for future reference. Should the appliance be sold or transferred to another
owner, or should you move house and
leave the appliance, always ensure that
the book is supplied with the appliance in
order that the new owner can get to
know the functioning of the appliance
and the relevant warnings.
• You MUST read them carefully before installing or using the appliance.
• Before first starting up, check the appliance for any damage incurred during
transport. Never connect up a damaged
appliance . If parts are damaged, contact
your supplier.
• If the appliance is delivered in the winter
months when there are minus temperatures. Store it at room temperature for 24
hours before using for the first time.
General safety
• It is dangerous to alter the specifications
or attempt to modify this product in any
way.
Care and cleaning 15
What to do if... 19
Technical data 22
Consumption values 22
Installation 23
Electrical connection 26
Environment concerns 26
Subject to change without notice
• During high temperature wash programmes the door glass may get hot. Do
not touch it!
• Make sure that small pets and children
do not climb into the drum. To avoid this,
please check into the drum before using.
• Any objects such as coins, safety pins,
nails, screws, stones or any other hard,
sharp material can cause extensive damage and must not be placed into the machine.
• Only use the advised quantities of fabric
softener and detergent. Damage to the
fabric can ensue if you over-fill. Refer to
the manufacturer’s recommendations of
quantities.
• Wash small items such as socks, laces,
washable belts etc in a washing bag or pillow case as it is possible for such items
to slip down between the tub and the inner drum.
• Do not use your washing machine to
wash articles with whalebones, material
without hems or torn material.
• Always unplug the appliance and turn off
the water supply after use, cleaning and
maintenance.
• Under no circumstances should you attempt to repair the machine yourself. Repairs carried out by inexperienced people
may cause injury or serious malfunctioning. Contact your local Service Centre. Always insist on genuine spare parts.
Installation
• This appliance is heavy. Care should be
taken when moving it.
Page 3
electrolux 3
• When unpacking the appliance, check
that it is not damaged. If in doubt, do not
use it and contact the Service Centre.
• All packing and transit bolts must be removed before use. Serious damage can
occur to the product and to property if
this is not adhered to. See relevant section in the user manual.
• After having installed the appliance,
check that it is not standing on the inlet
and drain hose and the worktop is not
pressing the electrical supply cable
against the wall.
• If the machine is situated on a carpeted
floor, please adjust the feet in order to allow air to circulate freely under the appliance.
• Always be sure, that there is no water leakage from hoses and their connections after the installation.
• If the appliance is installed in a location
subject to frost, please read the “dangers
of freezing” chapter.
• Any plumbing work required to install this
appliance should be carried out by a qualified plumber or competent person.
• Any electrical work required to install this
appliance should be carried out by a qualified electrician or competent person.
Use
• This appliance is designed for domestic
use. It must not be used for purposes other than those for which it was designed.
• Only wash fabrics which are designed to
be machine washed. Follow the instructions on each garment label.
• Do not overload the appliance. See the
Washing Programme Table.
• Before washing, ensure that all pockets
are empty and buttons and zips are fastened. Avoid washing frayed or torn articles and treat stains such as paint, ink,
rust, and grass before washing. Underwired bras must NOT be machine washed.
• Garments which have been in contact
with volatile petroleum products should
not be machine washed. If volatile cleaning fluids are used, care should be taken
to ensure that the fluid is removed from
the garment before placing in the machine.
• Never pull the power supply cable to remove the plug from the socket; always
take hold of the plug itself.
• Never use the appliance if the power supply cable, the control panel, the working
surface or the base are damaged so that
the inside of the washing machine is accessible.
Child safety
• This appliance is not intended for use by
person (including children) with reduced
physical sensory or mental capabilities or
lack of experience and knowledge unless
they have been given supervision or instruction concerning use of the appliance
by a person responsible for their safety.
• Children should be supervised to ensure
that they do not play with the appliance.
• The packaging components (e.g. plastic
film, polystyrene) can be dangerous to children - danger of suffocation! Keep them
out of children’s reach.
• Keep all detergents in a safe place out of
children’s reach.
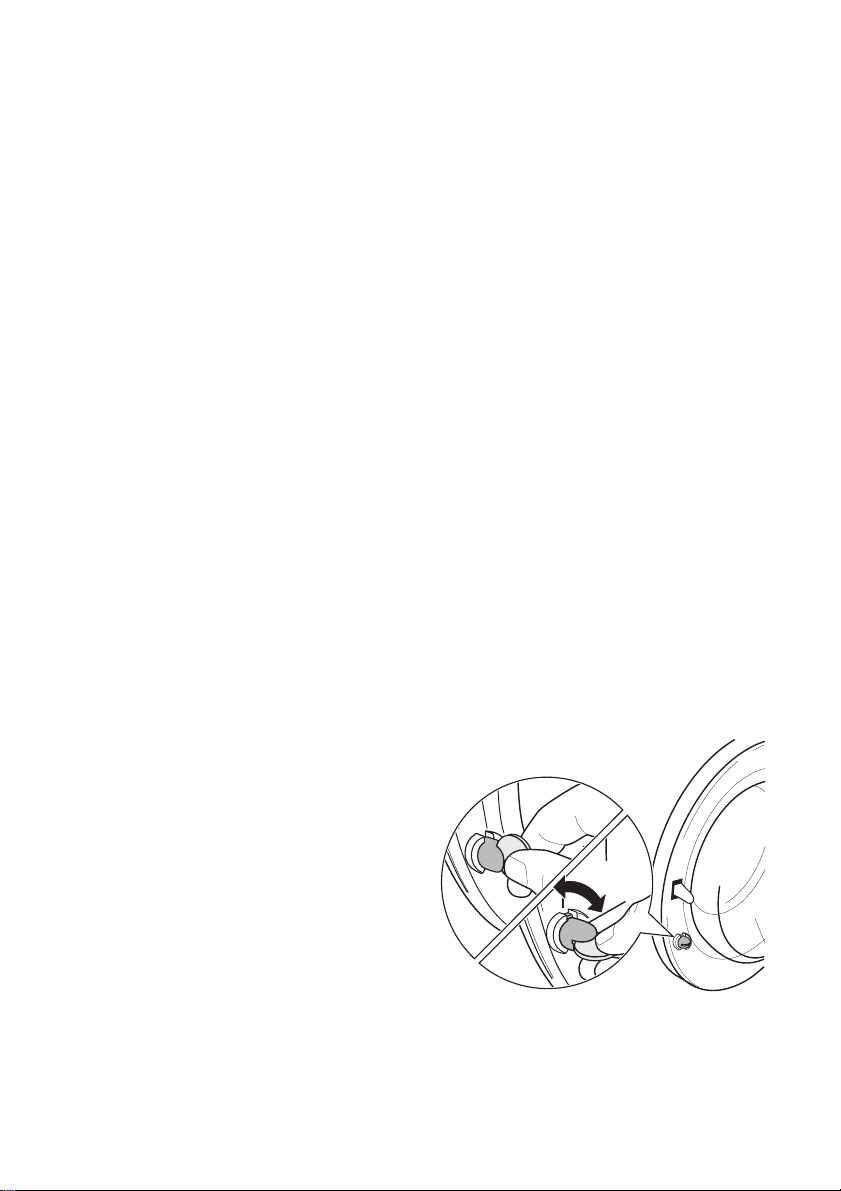
• Make sure that children or pets do not
climb into the drum. To prevent children
and pets becoming trapped inside the
drum the machine incorporates a special
feature. To activate this device, rotate the
button (without pressing it) inside the
door clockwise until the groove is horizontal. If necessary use a coin.
To disable this device and restore the possibility of closing the door, rotate the button counterclockwise until the groove is
vertical.
Page 4

4 electrolux
PRODUCT DESCRIPTION
Your new appliance meets all modern requirements for effective treatment of laundry
with low water, energy and detergent consumption. Its new washing system allows total use of detergent and reduces water consumption so saving energy.
1 2
3
4
5
6
1 Detergent dispenser drawer
2 Control panel
3 Door opening handle
Detergent dispenser drawer
Compartment for detergent used for prewash and soak phase or for stain remover
used during the stain action phase (if available). The prewash and soak detergent is
added at the beginning of the wash programme. The stain remover is added during the stain action phase.
Compartment for powder or liquid detergent used for main wash. If using liquid detergent pour it just before starting the programme.
Compartment for liquid additives (fabric
softener, starch).
Follow the product manufacturer’s recommendations on quantities to use and do not
exceed the «MAX» mark in the detergent
dispenser drawer. Any fabric softener or
starching additives must be poured into the
compartment before starting the wash programme.
4 Rating Plate
5 Drain pump
6 Adjustable feet
Page 5
electrolux 5
Programme guide
The programme guide is on the front side of
the detergent dispenser drawer.
Other programme guides in different lan-
To replace the programme guide:
1. Pull it out from the right side and remove it.
2. Put in the new programme guide.
guages are in the user manual bag. (Not all
appliances have more than one programme
guide).
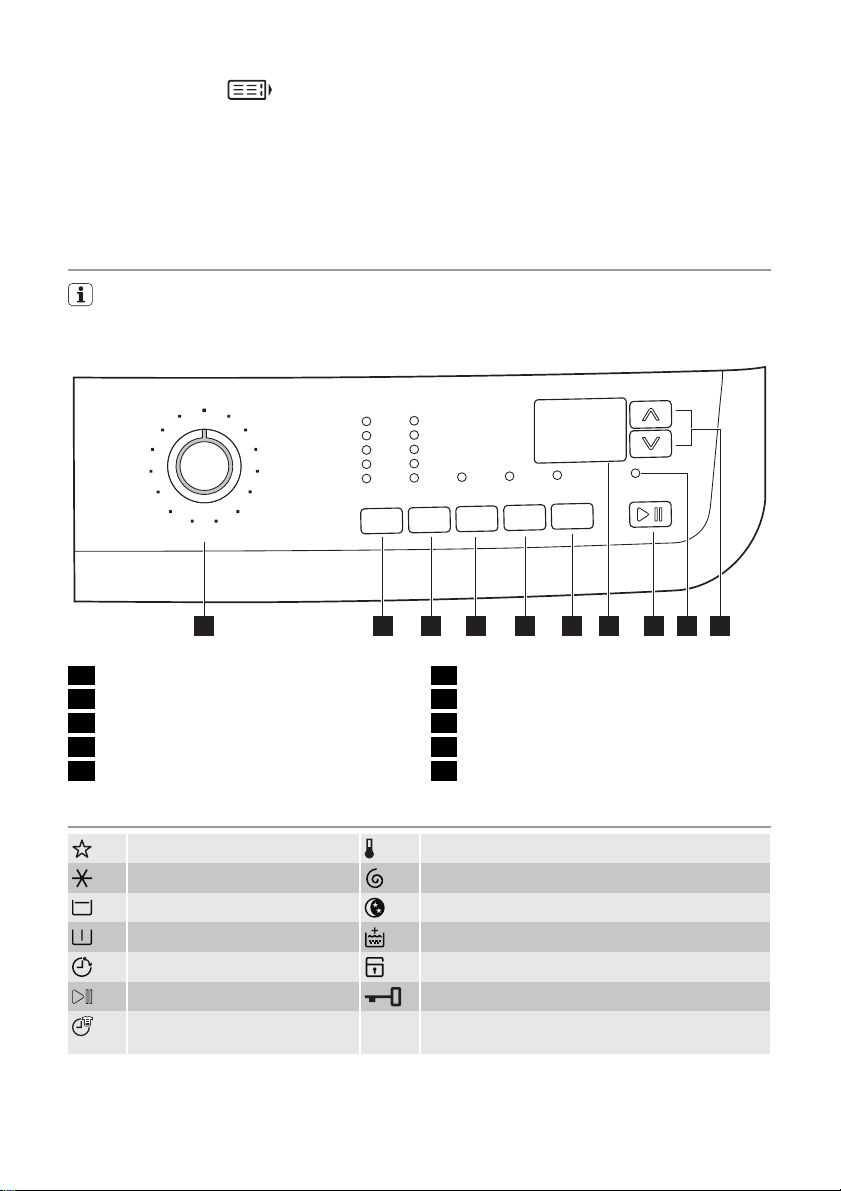
CONTROL PANEL
Below is a picture of the control panel. It shows the programme selector dial as well as
the buttons, pilot light and the display. These are presented by relevant numbers on
the following pages.
1 2 4 6 7
3 5
9
8
10
1
Programme selector dial
2 TEMPERATURE button
3 SPIN reduction button
4 PREWASH button
5
EXTRA RINSE button
TABLE OF SYMBOLS
= Special programmes = Temperature
= Cold wash = Spin reduction
= Rinse hold = Night cycle
= Prewash = Extra Rinse
= Delay Start = Child lock
= Start/Pause = Door locked
= Time Manager (Time Manag-
er)
6
DELAY START button
7 Display
8 START/PAUSE button
9 DOOR LOCKED pilot light
10
TIME MANAGER buttons
Page 6

6 electrolux
Programme Selector Dial
It allows you to switch the appliance on/off
and/or to select a programme.
Temperature
This button allows you to increase or decrease the washing temperature.
Spin speed Reduction
By pressing this button you can reduce the
maximum spin speed allowed for the selected programme or to select the available option(s).
Rinse hold
By selecting this function the water of the
last rinse is not emptied out to prevent the
fabrics from creasing. Before opening the
door it will be necessary to empty out the
water. To empty out the water, please read
the paragraph «At the end of the programme».
Night Cycle
By selecting this function the machine will
not drain the water of the last rinse and all
spinning phases will be suppressed, so as
not to wrinkle the laundry. This washing cycle is very quiet and it can be selected at
night or in times with a more economical
power rate. On some programmes the rinses will be performed with more water. Before opening the door it will be necessary to
empty out the water. To empty out the water, please read the paragraph «At the end
of the programme».
Prewash
By selecting this option the machine performs a prewash cycle before the main
wash phase. The washing time will be prolonged. This option is recommended for
heavily soiled laundry.
Extra Rinse
This appliance is designed to save energy.
If it necessary to rinse the laundry using an
extra quantity of water (extra rinse), select
this option. Some additional rinses will be
performed. This option is recommended for
people who are allergic to detergents, and
in areas where the water is very soft.
Delay Start
The programme can be delayed from 30
min - 60 min - 90 min, 2 hours and then by
1 hour up to a maximum of 20 hours by
means of this button.
Start Pause
This button allows you to start or to interrupt the selected programme.
Time Manager (Time Manager)
These buttons let you to change the programme duration automatically proposed
by the appliance.
Door locked pilot light
The pilot light 9 illuminates when the programme starts and indicates if the door can
be opened:
• light on: the door cannot be opened. The
machine in working or has stopped with
water left in the tub.
• light off: the door can be opened. The pro-
gramme is finished or the water has been
emptied out.
• light flashing: the door is opening
Page 7
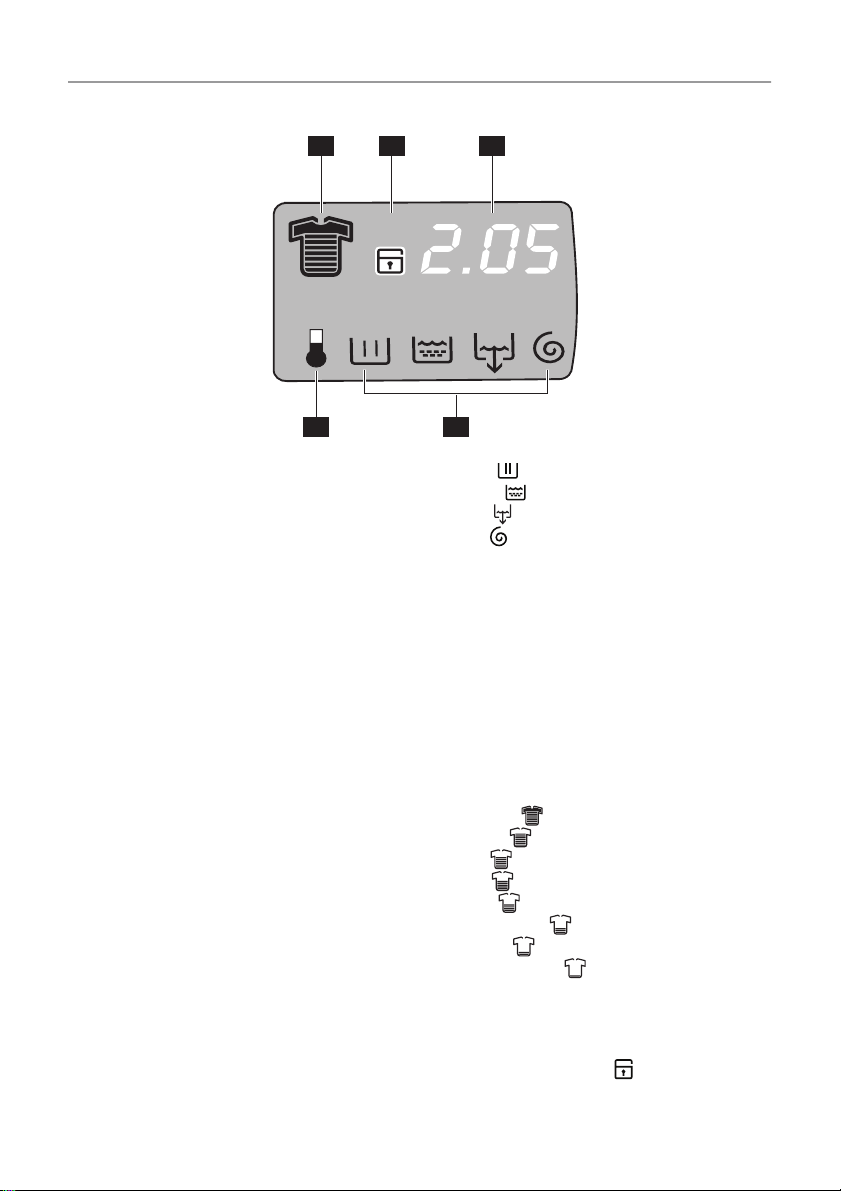
Display
electrolux 7
7.4 7.5 7.1
7.27.3
The display shows the following information:
7.1:
• Duration of the selected programme
After selecting a programme, the duration
is displayed in hours and minutes (for example 2.05 ). The duration is calculated
automatically on the basis of the maximum recommended load for each type of
fabric. After the programme has started,
the time remaining is updated every minute.
• Delayed start
The Selected delay set by pressing the relevant button appears on the display for
few seconds, then the duration of the selected programme is displayed again.
• Alarm codes
In the event of operating problems, some
alarm codes can be displayed, for example E20 (see paragraph «What to do if...»).
•
Incorrect option selection
If an option which is not compatible with
the set wash programme is selected, the
message Err is displayed at the bottom
of the display for a few seconds and the
integrated red light of button 8 start flashing.
• End of programme
When the programme has finished three
flashing zeros are displayed, the pilot light
9 and the pilot light of button 8 go out
and the door can be opened.
7.2: Washing programme phase icons
•
Wash
•
Rinses
•
Drain
•
Spin
By selecting the wash programme, the
washing programme phase icons corresponding to the various phases making up
the programme are shown in the bottom
part of the display. After having pressed button 8 only the icon of the running phase
stays on.
7.3: Heating phase
During the washing cycle the display shows
a temperature icon indicating that the appliance has started the heating phase of the
water in the tub.
7.4: Soil degree icons
•
Intensive
•
Normal
•
Daily
•
Light
•
Quick
•
Super Quick
•
Refresh
•
Super Refresh
When selecting a programme on the display appears an icon indicating the degree
of soiling automatically proposed by the machine.
7.5: Child safety lock
(see «Child Safe-
ty Lock» paragraph).
Page 8

8 electrolux
FIRST USE
• Ensure that the electrical and water
connections comply with the installation instructions.
• Remove the polystyrene block and
any material from the drum.
• Pour 2 litres of water into the main
wash compartment
gent drawer in order to activate the
of the deter-
PERSONALISATION
Acoustic signals
The machine is provided with an acoustic
device, which sounds in the following cases:
• at the end of the cycle
• if there is a fault.
By pressing the 4 and 5 buttons simultaneously for about 6 seconds , the acoustic
signal is deactivated (except if there is a
fault). By pressing these 2 buttons again,
the acoustic signal is reactivated.
Child safety lock
This device permits you to leave the appliance unattended and not to worry that children might be injured by or cause damage
ECO valve. Then run a cotton cycle
at the highest temperature without
any laundry in the machine, to remove any manufacturing residue
from the drum and tub. Pour 1/2 a
measure of detergent into the main
wash compartment and start the machine.
to the appliance. This function remains enabled also when the washing machine is not
working.
There are two different ways to set this option:
1.
Before pressing button 8 : it will be impossible to start the machine.
2. After pressing button 8 : it will be impos-
sible to change any other programme or
option.
To enable or disable this option press simultaneously for about 6 seconds buttons 5
and 6 until on the display, the icon
pears or disappears.
ap-
DAILY USE
Load the laundry
Open the door by carefully pulling the door
handle outwards. Place the laundry in the
drum, one item at a time, shaking them out
as much as possible. Close the door.
Measure out the detergent and the fabric softener
Pull out the dispenser drawer until it stops.
Measure out the amount of detergent required, pour it into the main wash compart-
ment
if the selected programme/option it requires
(see more details in «Detergent dispenser
drawer»).
or in the appropriate compartment
Page 9

electrolux 9
If required, pour fabric softener into the compartment marked
(the amount used
must not exceed the «MAX» mark in the
drawer). Close the drawer gently.
Select the required programme by
turning the programme selector dial (1)
Turn the programme selector dial to the required programme. The washing machine
will propose a temperature and automatically select the maximum spin value provided
for the programme you have chosen. You
can change these values by operating the
corresponding buttons. The green pilot
light of the button 8 starts to flash.
The selector dial can be turned either clockwise or counterclockwise. Turn to position
to reset programme/Switching the ma-
chine off.
At the end of the programme the selector dial must be turned to position
,
to switch the machine off.
Caution! If you turn the programme
selector dial to another programme
when the machine is working, the red
pilot light of button 8 will blink 3 times
and the message Err is displayed to
indicate a wrong selection. The
machine will not perform the new
selected programme.
Programme Option buttons
Depending on the programme, different
functions can be combined. These must be
selected after choosing the desired programme and before pressing the button 8 .
Select the temperature by pressing
button 2
By selecting a programme, the appliance
proposes automatically a default temperature.
Press this button repeatedly to increase or
decrease the temperature, if you want your
laundry to be washed at a different temperature.
Reduce the spin speed by pressing
button 3
By selecting a programme, the appliance
proposes automatically the maximum spin
speed provided for that programme.
Press button 3 repeatedly to change the
spin speed, if you want your laundry to be
spun at a different speed. The relevant light
illuminates.
Select the available option by pressing
buttons 3, 4 and 5
Depending on the selected programme, different functions can be combined before
pressing the button 8 . By selecting an option the relevant pilot light illuminates.
If an incorrect option is selected, the integrated red pilot light of the button 8 flashes 3
times and the Err message appears on the
display for few seconds.
For compatibility among the washing
programmes and the options see chapter «Washing Programmes».
Select the Delay Start by pressing
button 6
Before you start the programme, if you wish
to delay the start, press the button 6 repeatedly, to select the desired delay. The relevant pilot light goes on.
The selected delay time value (up to 20
hours) will appear on the display a few seconds, then the duration of the programme
will appear again.
You must select this option after you have
set the programme and before you press
button 8 .
You can cancel or modify the delay time at
any moment, before you press button 8 .
Selecting the delayed start:
1. Select the programme and the required
options.
Page 10

10 electrolux
2. Select the delay start by pressing the but-
ton 6 .
3. Press button 8 :
– the machine starts its hourly count-
down.
– The programme will start after the se-
lected delay has expired.
Cancelling the delayed start after having
pressed button 8 :
1. Set the washing machine to PAUSE by
pressing button 8 .
2.
Press button 6 once until the symbol 0’
is displayed
3. Press button 8 again to start the pro-
gramme.
Important! The selected delay can be
changed only after selecting the washing
programme again.
The Delay Start can not be selected with
DRAIN programme.
Start the programme by pressing
button 8
To start the selected programme, press the
button 8 , the green pilot light of the button
8 stops blinking.
To interrupt a programme which is running,
press the button 8 : the green pilot light
starts blinking.
To restart the programme from the point at
which it was interrupted, press the button 8
again . If you have chosen a delayed start,
the machine will begin the countdown. If an
incorrect option is selected, the red pilot
light of the button 8 blinks for 3 times the
message Err is displayed for a few seconds.
Select the Time Manager option by
pressing buttons 10
By pressing these buttons repeatedly, the
duration of the washing cycle can be increased or decreased. The soil level icon
will appear on the display to indicate the
chosen degree of soil. This option is available only with Cotton , Synthetic and Deli-
cate programmes.
Soil Level Icon Type of fabric
Intensive For heavy soiled
Normal For normal soiled
Daily For daily soiled items
items
items
Soil Level Icon Type of fabric
Light For slightly soiled
Quick For very slightly
Super Quick
Refresh
Super Refresh
1) We recommend you to reduce the load sizes (see
Washing programmes table).
2) When you select this option the relevant icon appears
just for a while and then it disappears immediately.
1)
1)
1)
items
soiled items
For items used or
worn for a short time
2)
For refreshing items
only
2)
For refreshing a very
few items only
Altering an option or a running
programme
It is possible to change some options before the programme carries them out .
Before you make any change, you must
PAUSE the appliance by pressing the button 8 (if you wish to change the Time Manager option, you must cancel the running
programme and make your selection again).
Changing a running programme is possible
only by resetting it. Turn the programme se-
lector dial to
and then to the new pro-
gramme position. Start the new programme
by pressing the button 8 again. The washing water in the tub will be not emptied out.
Interrupting a programme
Press the button 8 to interrupt a programme which is running, the corresponding green pilot light starts blinking.
Press the button again to restart the programme.
Cancelling a programme
Turn the selector dial to
to cancel a programme which is running.
You can select now a new programme.
Opening the door
After the programme has started (or during
the delay time) the door is locked, if you
need to open it, set first the machine to
PAUSE by pressing the button 8 .
After a few minutes the pilot light 9 goes
out and it is possible to open the door.
If this pilot light remains lit, this means that
the machine is already heating or that the
Page 11

electrolux 11
water level is too high. In any case, do not
try to force the door!
If you cannot open the door but you need
to open it you have to switch the machine
off by turning the selector dial to O . After a
few minutes the door can be opened (pay
attention to the water level and temperature!) .
After closing the door, it is necessary to select the programme and options again and
to press button 8 .
At the end of the programme
The machine stops automatically. Three
blinking 0.00 appear on the display and the
pilot light of button 8 goes off. Some acoustic signals sound.
If a programme or an option that ends with
water left in the tub has been selected, the
door remains locked to indicate that the water must be emptied out before opening the
door.
Stand by : once the programme has finished after a few minutes the energy saving system will be enabled. The brightness of the
HELPFUL HINTS AND TIPS
Sorting out the laundry
Follow the wash code symbols on each garment label and the manufacturer’s washing
instructions. Sort the laundry as follows:
whites, coloureds, synthetics, delicates,
woollens.
Before loading the laundry
Never wash whites and coloureds together.
Whites may lose their «whiteness» in the
wash.
New coloured items may run in the first
wash; they should therefore be washed separately the first time.
Button up pillowcases, close zip fasteners,
hooks and poppers. Tie any belts or long
tapes.
Remove persistent stains before washing.
Rub particularly soiled areas with a special
detergent or detergent paste.
Treat curtains with special care. Remove
hooks or tie them up in a bag or net.
Follow the below instructions to empty out
the water:
1. Turn the programme selector dial to O .
2. Select the draining or spinning pro-
gramme.
3. Reduce the spin speed if needed, by
pressing the relevant button.
4. Press button 8 .
At the end of the programme, the door is released and can be opened. Turn the programme selector dial to O to switch the machine off.
Remove the laundry from the drum and carefully check that the drum is empty. If you do
not intend to carry out another wash, close
the water tap. Leave the door open to prevent the formation of mildew and unpleasant smells.
display is reduced. By pressing any button
the appliance will come out of the energy
saving status.
Removing stains
Stubborn stains may not be removed by
just water and detergent. It is therefore advisable to treat them prior to washing.
Blood: treat fresh stains with cold water.
For dried stains, soak overnight in water
with a special detergent then rub in the
soap and water.
Oil based paint: moisten with benzine
stain remover, lay the garment on a soft
cloth and dab the stain; treat several times.
Dried grease stains: moisten with turpentine, lay the garment on a soft surface and
dab the stain with the fingertips and a cotton cloth.
Rust: oxalic acid dissolved in hot water or a
rust removing product used cold. Be careful
with rust stains which are not recent since
the cellulose structure will already have
been damaged and the fabric tends to hole.
Mould stains: treat with bleach, rinse well
(whites and fast coloureds only).
Grass: soap lightly and treat with bleach
(whites and fast coloureds only).
Page 12

12 electrolux
Ball point pen and glue: moisten with ace-
1)
, lay the garment on a soft cloth and
tone
dab the stain.
Lipstick: moisten with acetone as above,
then treat stains with methylated spirits.
Treat any residual marks with bleach.
Red wine: soak in water and detergent,
rinse and treat with acetic or citric acid,
then rinse. Treat any residual marks with
bleach.
Ink: depending on the type of ink, moisten
the fabric first with acetone
1)
, then with acetic acid; treat any residual marks on white
fabrics with bleach and then rinse thoroughly.
Tar stains: first treat with stain remover, methylated spirits or benzine, then rub with detergent paste.
Detergents and additives
Good washing results also depend on the
choice of detergent and use of the correct
quantities to avoid waste and protect the environment.
Although biodegradable, detergents contain
substances which, in large quantities, can
upset the delicate balance of nature.
The choice of detergent will depend on the
type of fabric (delicates, woollens, cottons,
etc.), the colour, washing temperature and
degree of soiling.
All commonly available washing machine detergents may be used in this appliance:
• powder detergents for all types of fabric
• powder detergents for delicate fabrics
(60°C max) and woollens
• liquid detergents, preferably for low tem-
perature wash programmes (60°C max)
for all types of fabric, or special for woollens only.
The detergent and any additives must be
placed in the appropriate compartments of
the dispenser drawer before starting the
wash programme.
If using liquid detergents, a programme
without prewash must be selected.
Your appliance incorporates a recirculation
system which allows an optimal use of the
concentrated detergent.
Follow the product manufacturer’s recommendations on quantities to use and do
not exceed the «MAX» mark in the detergent dispenser drawer .
Quantity of detergent to be used
The type and quantity of detergent will depend on the type of fabric, load size, degree of soiling and hardness of the water
used.
Follow the product manufacturers’ instructions on quantities to use.
Use less detergent if:
• you are washing a small load
• the laundry is lightly soiled
• large amounts of foam form during washing.
Degrees of water hardness
Water hardness is classified in so-called “degrees” of hardness. Information on hardness of the water in your area can be obtained from the relevant water supply company, or from your local authority. If the water hardness degree is medium or high we
suggest you to add a water softener following always the manufacturer’s instructions.
When the degree of hardness is soft, readjust the quantity of the detergent.
1) do not use acetone on artificial silk
Page 13
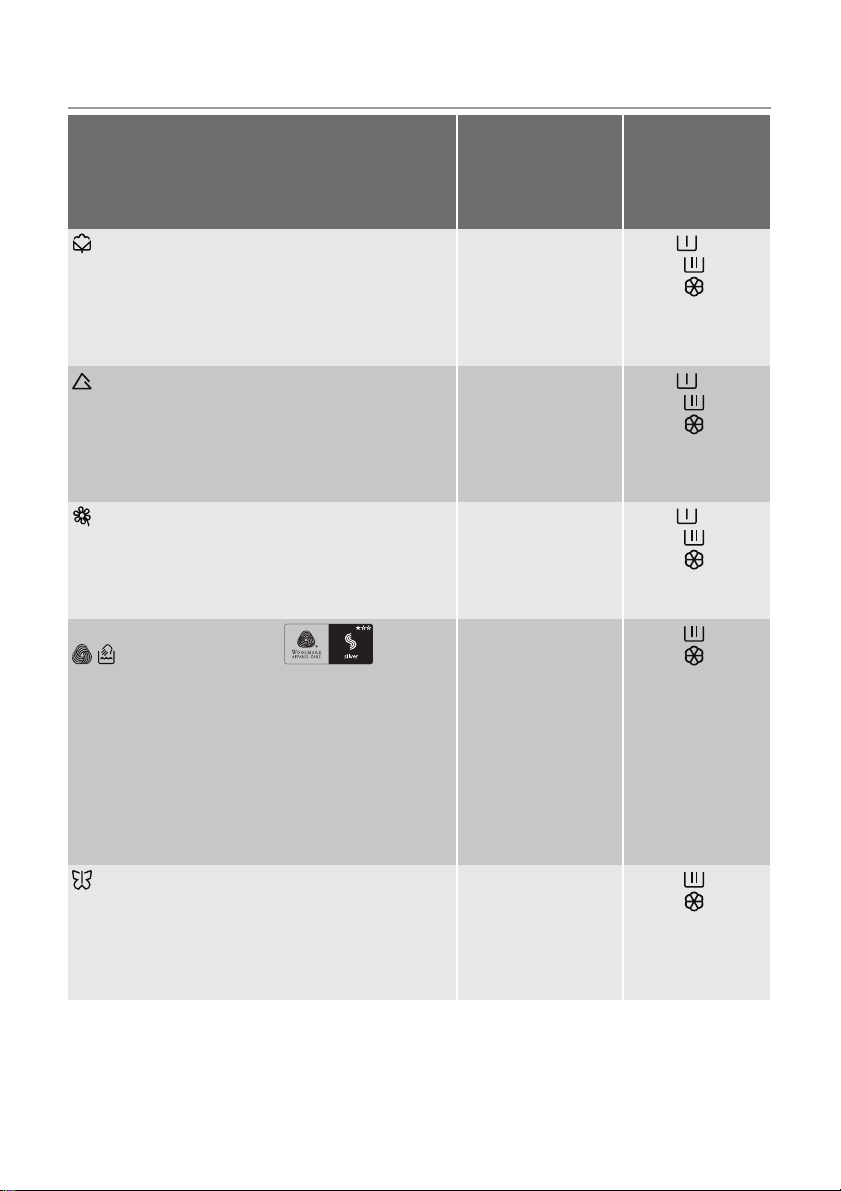
WASHING PROGRAMMES
Programme
Maximum and Minimum Temperature
Cycle Description
Maximum Spin Speed
Maximum Fabrics Load
Type of Laundry
COTTONS
95°- Cold
Main wash - Rinses
Maximum spin speed 1000/1200/1400 rpm
Max. load 6 kg - Reduced load 3 kg
For white and coloured cotton (normally soiled
items).
SYNTHETICS
60°- Cold
Main wash - Rinses
Maximum spin speed 900 rpm
Max. load 3 kg - Reduced load 1,5 kg
Synthetic or mixed fabrics: underwear, coloured garments, non-shrink shirts, blouses.
DELICATES
40°- Cold
Main wash - Rinses
Maximum spin speed 700 rpm
Max. load 3 kg - Reduced load 1,5 kg
Delicate fabrics: acrylics, viscose, polyester.
WOOL/ HANDWASH
40°- Cold
Main wash - Rinses
Maximum spin speed 900/1000 rpm
Max. load 2 kg
Washing programme for machine washable wool as
well as for hand washable woollens and delicate fabrics with «hand washing» care symbol. Note : A single or bulky item may cause imbalance. If the appliance doesn’t perform the final spin phase, add more
items, redistribute the load manually and then select
the spinning programme.
SILK
30°- Cold
Main wash - Rinses
Maximum spin speed 700 rpm
Max. load 1 kg
Delicate washing programme suitable for silk and
mixed synthetic items.
1)
1)
Options
SPIN REDUCTION,
RINSE HOLD ,
NIGHT CYCLE , PRE-
WASH , EXTRA
RINSE , TIME MAN-
AGER
2)
SPIN REDUCTION,
RINSE HOLD ,
NIGHT CYCLE , PRE-
WASH, EXTRA
RINSE , TIME MAN-
AGER
2)
RINSE HOLD ,
NIGHT CYCLE , PRE-
WASH, EXTRA
RINSE , TIME MAN-
AGER
2)
SPIN REDUCTION,
RINSE HOLD ,
NIGHT CYCLE
RINSE HOLD ,
NIGHT CYCLE
electrolux 13
Detergent
Compartment
3)
3)
3)
Page 14
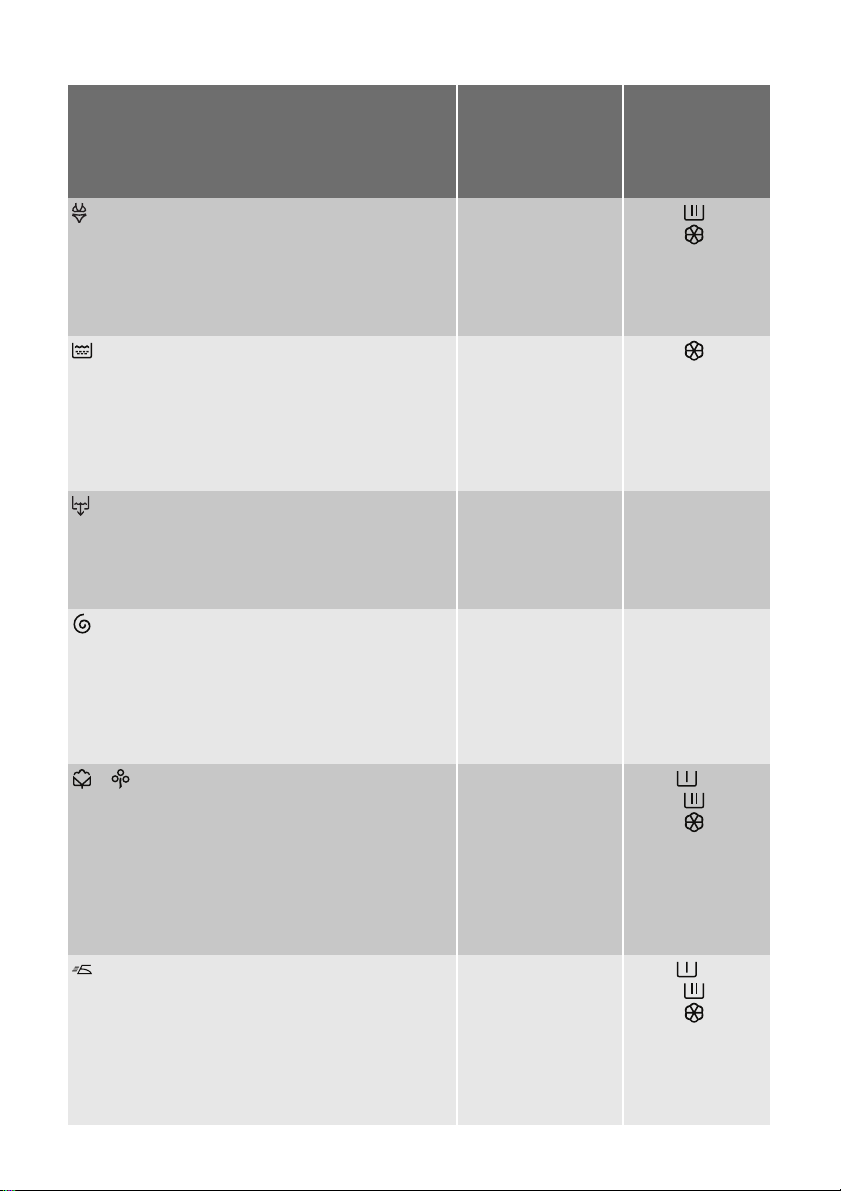
14 electrolux
Programme
Maximum and Minimum Temperature
Cycle Description
Maximum Spin Speed
Maximum Fabrics Load
Type of Laundry
LINGERIE
40°- Cold
Main wash - Rinses
Maximum spin speed 900/1000 rpm
1)
Max. load 1 kg
This programme is suitable for very delicate items
such a lingerie, bras and underwear.
RINSE
Rinse - Long spin
Maximum spin speed 1000/1200/1400 rpm
1)
Max. load 6 kg
With this programme it is possible to rinse and spin cotton garments which have been washed by hand. To intensify the rinsing action, select the option EXTRA
RINSE. The appliance will add some additional rinses.
DRAIN
Draining of water
Max. load 6 kg
For emptying out the water of the last rinse in programmes with the Rinse Hold and Night Cycle option
selected.
SPIN
Drain and long spin
Maximum spin speed 1000/1200/1400 rpm
1)
Max. load 6 kg
Separate spin for hand washed garments and after programmes with the Rinse Hold and Night Cycle option
selected. You can choose the spin speed by pressing
the relevant button to adapt it to the fabrics to be spun.
+ COTTONS ECONOMY
95° -40°
Main wash - Rinses
Maximum spin speed 1000/1200/1400 rpm
1)
Max. load 6 kg
White and fast coloured cotton
This programme can be selected for slightly or normally soiled cotton items. The temperature will decrease
and the washing time will be extended. This allows to
obtain a good washing efficiency so saving energy.
EASY IRON
60°- Cold
Main wash - Rinses
Maximum spin speed 900 rpm
Max. load 1 kg
Selecting this programme the laundry is gently washed and spun to avoid any creasing. In this way ironing
is easier. Furthermore the machine will perform additional rinses.
Options
Detergent
Compartment
SPIN REDUCTION,
RINSE HOLD ,
NIGHT CYCLE
SPIN REDUCTION,
RINSE HOLD ,
NIGHT CYCLE , EX-
TRA RINSE
SPIN REDUCTION
SPIN REDUCTION,
RINSE HOLD, NIGHT
CYCLE , PREWASH,
EXTRA RINSE
SPIN REDUCTION,
RINSE HOLD, PRE-
WASH, EXTRA RINSE
3)
3)
Page 15
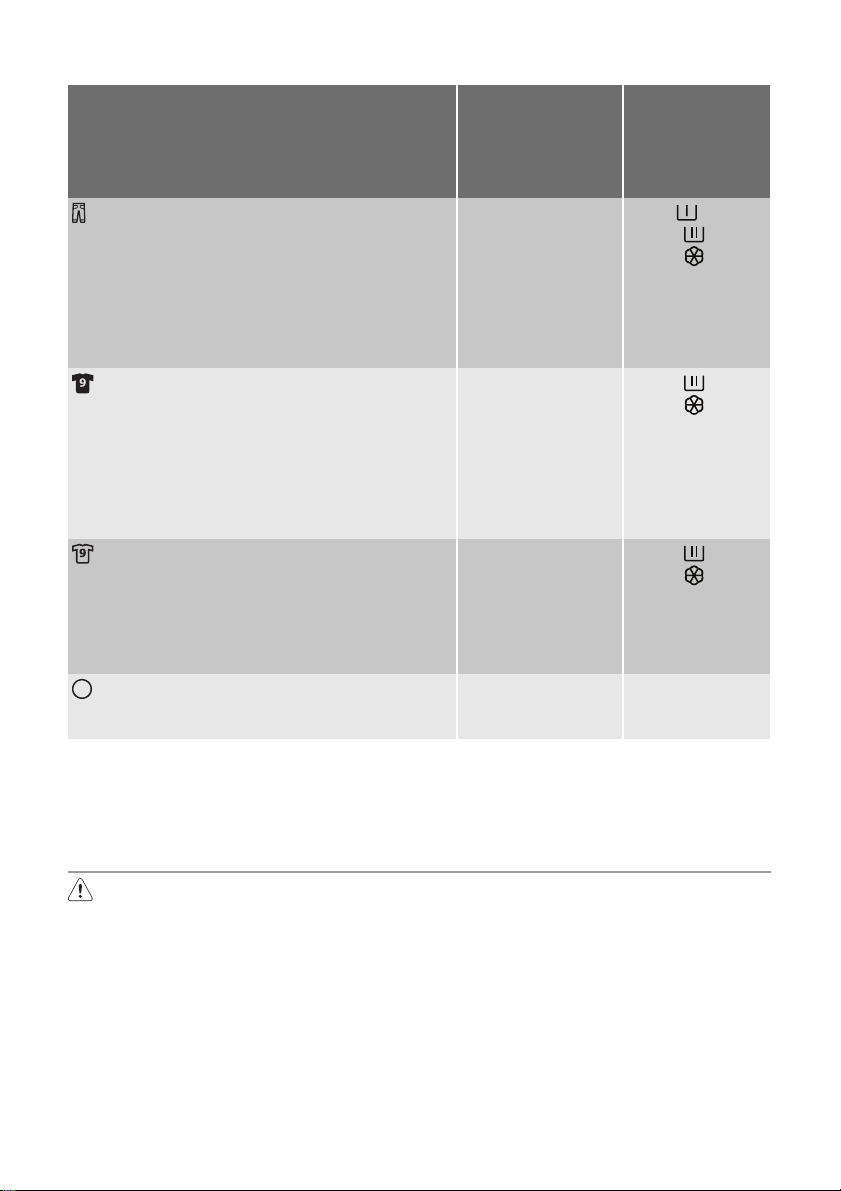
electrolux 15
Programme
Maximum and Minimum Temperature
Cycle Description
Maximum Spin Speed
Maximum Fabrics Load
Type of Laundry
JEANS
60°- Cold
Main wash - Rinses
Maximum spin speed 900/1000/1200 rpm
Max. load 3 kg
With this programme it is possible to wash items like
pants, shirts or jackets in denim and also jersey realized with hi-tech materials (the Extra Rinse option will
be activated automatically).
SPORT INTENSIVE
40°- Cold
Prewash - Main wash - Rinses
Maximum spin speed 900 rpm
Max. load 2,5 kg
This programme is suitable for washing heavily soiled
sport items. The machine will add automatically a prewash phase without detergent before the main wash
to eliminate mud stains.
SPORT LIGHT
30°
Main wash - Rinses
Maximum spin speed 700 rpm
Max. load 2,5 kg
Short programme for lightly soiled mixed fabric sports
clothes.
/OFF
For cancelling the programme which is running or to
switch the machine off .
1) depending on a model
2) If you select the Quick or Super Quick option by pressing button 10 , we recommend that you reduce the
maximum load as indicated. Full loading is possible however with somewhat reduced cleaning results. If you
select the Refresh or Super Refresh option, we recommend that you reduce the load even more.
3) If using liquid detergents, a programme without PREWASH must be selected.
Options
SPIN REDUCTION,
RINSE HOLD ,
NIGHT CYCLE, PRE-
WASH
SPIN REDUCTION,
RINSE HOLD ,
NIGHT CYCLE , EX-
TRA RINSE
Detergent
Compartment
3)
CARE AND CLEANING
Warning! You must disconnect the
appliance from the electricity supply,
before you can carry out any cleaning
or maintenance work.
Descaling
The water we use normally contains lime. It
is a good idea to periodically use a water
softening powder in the machine. Do this
separately from any laundry washing, and
according to the softening powder manufacturer's instructions. This will help to prevent
the formation of lime deposits.
After each wash
Leave the door open for a while. This helps
to prevent mould and stagnant smells forming inside the appliance. Keeping the door
open after a wash will also help to preserve
the door seal.
Maintenance wash
With the use of low temperature washes it
is possible to get a build up of residues inside the drum.
We recommend that a maintenance wash
be performed on a regular basis.
Page 16
16 electrolux
To run a maintenance wash:
• The drum should be empty of laundry.
• Select the hottest cotton wash pro-
gramme.
• Use a normal measure of detergent,
must be a powder with biological properties.
External cleaning
Clean the exterior cabinet of the appliance
with soap and water only, and then dry thoroughly.
Important! Do not use methylated spirits,
solvents or similar products to clean the
cabinet.
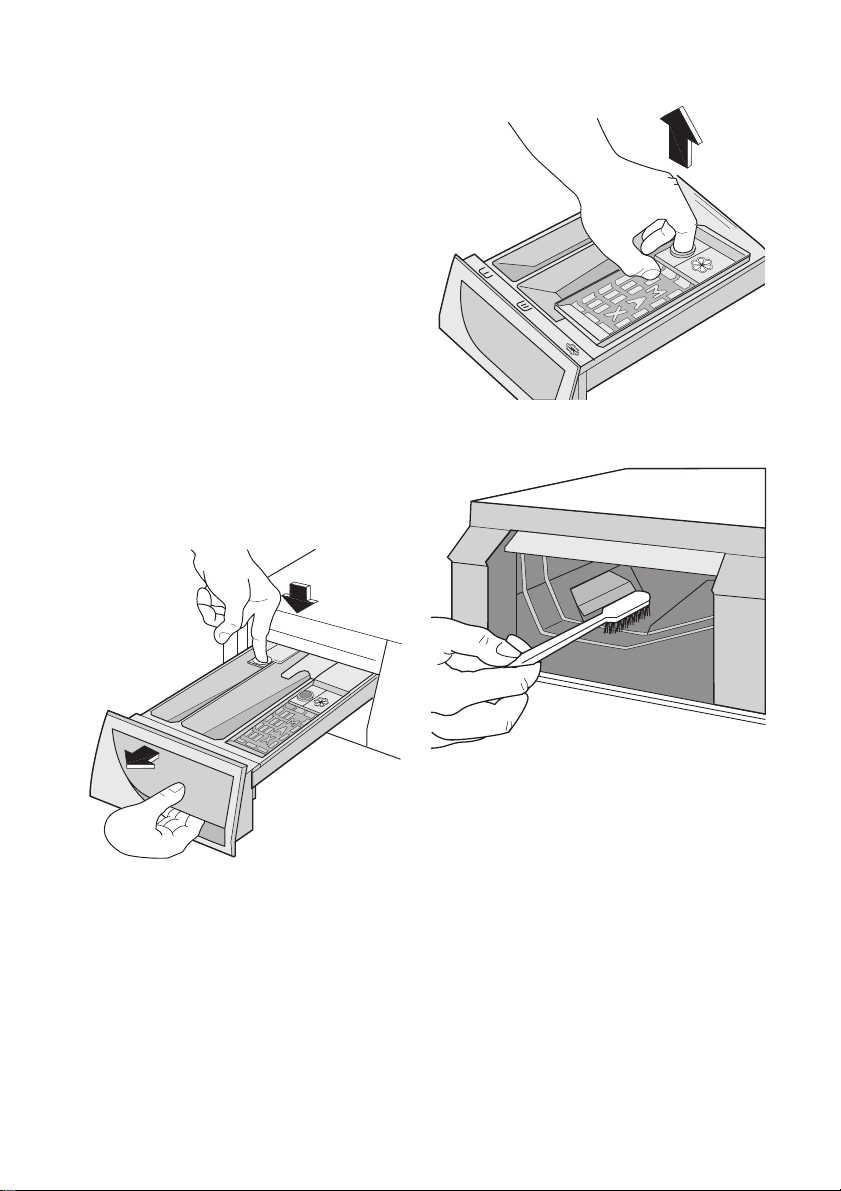
Cleaning the dispenser drawer
The detergent dispenser drawer should be
cleaned regularly.
The washing powder and additive dispenser drawer should be cleaned regularly.
Remove the drawer by pressing the catch
downwards and by pulling it out.
Clean the chamber of dispenser drawer
with a brush.
Flush it out under a tap, to remove any
traces of accumulated powder.
To aid cleaning, the top part of the additive
compartment should be removed. Clean all
parts with water.
Washing drum
Rust deposits in the drum may occur due
to rusting foreign bodies in the washing or
tap water containing iron.
Important! Do not clean the drum with
acidic descaling agents, scouring agents
containing chlorine or iron or steel wool.
1. Remove any rust deposits on the drum
with a cleaning agent for stainless steel.
2. Run a washing cycle without any washing to clean off any cleaning agent residues.
Programme: Short Cotton Programme
at maximum temperature and add approx. 1/4 measuring cup of detergent.
Page 17

Door seal
Check from time to time the door seal and
eliminate eventual possible objects that
could be trapped in the fold.
Drain pump
The pump should be inspected regularly
and particularly if:
• the appliance does not empty and/or spin;
• the appliance makes an unusual noise during draining due to objects such as safety
pins, coins etc. blocking the pump.
• a problem with water draining is detected
(see chapter “What to do if...” for more details).
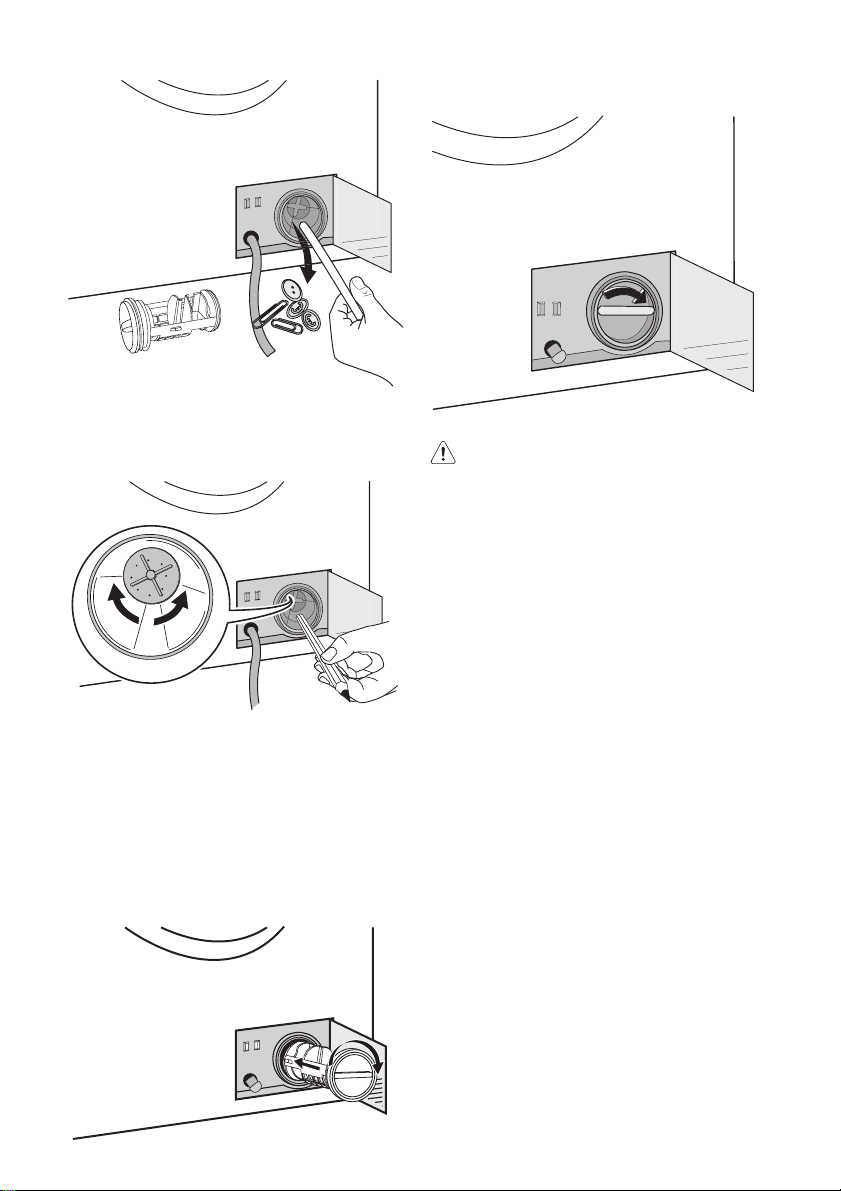
Warning! Before opening the pump
door, switch the appliance off and
remove the mains plug from the socket.
Proceed as follows:
1. Unplug the appliance.
2. If it is necessary, wait until the water
has cooled down.
3. Open the pump door.
electrolux 17
4. Place a container close to the pump to
collect any spillage.
5. Pull out the emergency emptying hose,
place it in the container and remove its
cap.
6. When no more water comes out, unscrew the pump cover by turning it anticlockwise and remove the filter. Use pliers, if necessary. Always keep a rag
nearby to dry up any water spillages
when removing the cover.
Clean the filter under a tap, to remove
any traces of fluff.
7. Remove foreign bodies and fluff from
the filter seat and from the pump impeller.
Page 18
18 electrolux
8. Check carefully whether the pump impeller rotates (it rotates jerkily). If it
doesn’t rotate, please contact your
Service Centre.
9. Put the cap back on the emergency
emptying hose and place the latter
back in its seat.
10. Replace the filter into the pump by inserting it correctly into the special
guides. Screw the pump cover firmly by
turning it clockwise.
11. Close the pump door.
Warning!
When the appliance is in use and depending on the programme selected there can
be hot water in the pump.
Never remove the pump cover during a
wash cycle, always wait until the appliance
has finished the cycle, and is empty. When
refitting the pump cover, ensure it is securely re-tightened so as to stop leaks and
young children being able to remove it.
Cleaning the water inlet filters
If you notice that the machine is taking longer to fill, check that the filter in the water inlet hose is not blocked.
1. Turn off the water tap.
2. Unscrew the water inlet hose.
3. Clean the filter in the hose using a hard
bristle brush.
Page 19
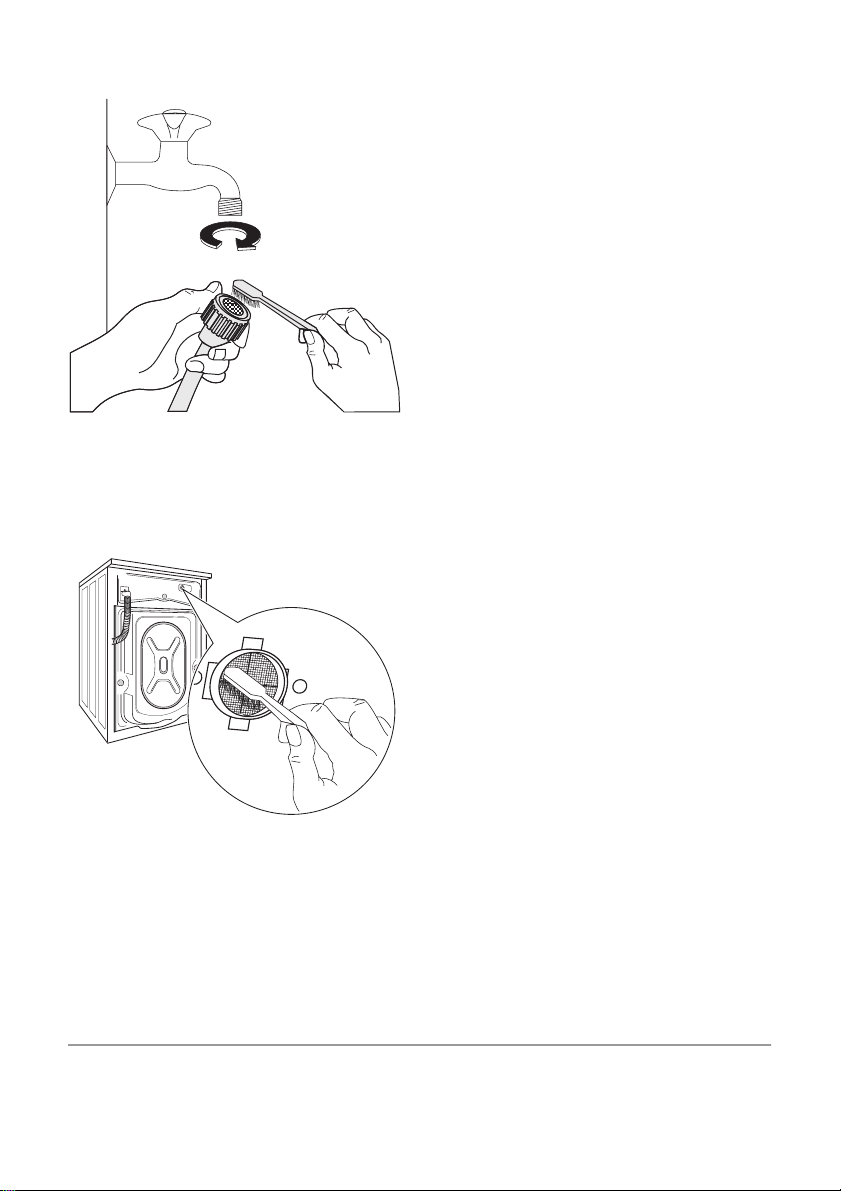
4. Screw the hose back onto the tap.
5. Unscrew the hose from the machine.
Keep a rug nearby because some water
may flow.
6. Clean the filter in the valve with a stiff
brush or with the piece of cloth.
7. Screw the hose back to the machine
and make sure the connection is tight.
8. Turn on the water tap.
Emergency emptying out
If the water is not discharged, proceed as
follows to empty out the machine:
1. pull out the plug from the power socket;
2. close the water tap;
electrolux 19
3. if necessary, wait until the water has
cooled down;
4. open the pump door;
5. place a bowl on the floor and place the
end of the emergency emptying hose into the bowl. Remove its cap. The water
should drain by gravity into the bowl.
When the bowl is full, put the cap back
on the hose. Empty the bowl. Repeat
the procedure until water stops flowing
out;
6. clean the pump if necessary as previously described;
7. replace the emergency emptying hose
in its seat after having plugged it;
8. screw the pump again and close the
door.
Frost precautions
If the machine is installed in a place where
the temperature could drop below 0°C, proceed as follows:
1. close the water tap and unscrew the water inlet hose from the tap;
2. place the end of the emergency emptying hose and that of the inlet hose in a
bowl placed on the floor and let water
drain out;
3. screw the water inlet hose back on and
reposition the emergency emptying
hose after having put the cap on again.
By doing this, any water remaining in the machine is removed, avoiding ice forming and
consequently damage to the appliance.
When you use the machine again, make
sure that the ambient temperature is above
0°C.
Important! Every time you drain the water
through the emergency emptying hose you
must pour 2 litres of water into the main
wash compartment of the detergent drawer
and then run the drain programme. This will
activate the ECO Valve device avoiding
that part of the detergent remains unused
at next washing.
WHAT TO DO IF...
Certain problems are due to lack of simple
maintenance or oversights, which can be
solved easily without calling out an engineer. Before contacting your local Service
Centre, please carry out the checks listed
below.
During machine operation it is possible that
the red pilot light of button 8 blinks, one of
Page 20

20 electrolux
the following alarm codes appears on the
display and some acoustic signals sound every 20 seconds to indicate that the machine
is not working:
•
: problem with the water supply.
•
: problem with the water draining.
Problem Possible cause/Solution
The washing machine does not start:
The machine does not fill:
The machine fills then empties immediately:
The machine does not empty and/or does
not spin:
•
: door open.
Once the problem has been eliminated,
press the button 8 to restart the programme. If after all checks, the problem persists, contact your local Service Centre.
The door has not been closed.
• Close firmly the door.
The plug is not properly inserted in the power
socket.
• Insert the plug into the power socket.
There is no power at the socket.
• Please check your domestic electrical installation.
The main fuse has blown.
• Replace the fuse.
The selector dial is not correctly positioned and
the button 8 has not been pressed.
• Please turn the selector dial and press the button 8 again.
The delay start has been selected.
• If the laundry is to be washed immediately,
cancel the delay start.
The CHILD SAFETY LOCK has been activated.
• Deactivate this device.
The water tap is closed.
• Open the water tap.
The inlet hose is squashed or kinked.
• Check the inlet hose connection.
The filter in the inlet hose or the inlet valve filter
are blocked.
• Clean the water inlet filters (See "Cleaning the
water inlet filters" for more details).
The door is not properly closed.
• Close firmly the door.
The end of the drain hose is too low.
• Refer to relevant paragraph in «Water drainage» section.
The drain hose is squashed or kinked.
• Check the drain hose connection.
The drain filter is clogged.
• Clean the drain filter.
An option or a programme that ends with the water still in the tub or a that eliminates all the spinning phases has been selected.
• Disable the option.
• Select the draining or the spinning programme.
The laundry is not evenly distributed in the drum.
• Redistribute the laundry.
Page 21

Problem Possible cause/Solution
There is water on the floor:
Unsatisfactory washing results:
The door will not open:
The machine vibrates or is noisy:
Spinning starts late or the machine does not
spin:
electrolux 21
Too much detergent or unsuitable detergent (creates too much foam) has been used.
• Reduce the detergent quantity or use another
one.
Check whether there are any leaks from one of
the inlet hose fittings. It is not always easy to
see this as the water runs down the hose;
check to see if it is damp.
• Check the water inlet hose connection.
The drain hose is damaged.
• Change it with a new one.
The cap on the emergency emptying hose has
not been replaced or the filter has not been properly screwed in after cleaning action.
• Refit the cap on the emergency emptying
hose or screw the filter fully in.
Too little detergent or unsuitable detergent has
been used.
• Increase the detergent quantity or use another one.
Stubborn stains have not been treated prior to
washing.
• Use commercial products to treat the stubborn stains.
The correct temperature was not selected.
• Check if you have selected the correct temperature.
Excessive laundry load.
• Introduce into the drum less laundry.
The programme is still running.
• Wait the end of washing cycle.
The door lock has not been released.
• Wait until the pilot light 9 has gone off.
There is water in the drum.
• Select drain or spin programme to empty out
the water.
The transit bolts and packing have not been removed.
• Check the correct installation of the appliance.
The support feet have not been adjusted
• Check the correct levelling of the appliance.
The laundry is not evenly distributed in the drum.
• Redistribute the laundry.
Maybe there is very little laundry in the drum.
• Load more laundry.
The electronic unbalance detection device has
cut in because the laundry is not evenly distributed in the drum. The laundry is redistributed by
reverse rotation of the drum. This may happen
several times before the unbalance disappears
and normal spinning can resume. If, after some
minutes, the laundry is still not evenly distributed
in the drum, the machine will not spin.
• Redistribute the laundry.
Page 22
22 electrolux
Problem Possible cause/Solution
The machine makes an unusual noise:
No water is visible in the drum:
If you are unable to identify or solve the problem, contact our service centre. Before telephoning, make a note of the model, serial
number and purchase date of your machine: the Service Centre will require this information.
The machine is fitted with a type of motor which
makes an unusual noise compared with other
traditional motors. This new motor ensures a softer start and more even distribution of the laundry in the drum when spinning, as well as increased stability of the machine.
Machines based on modern technology operate
very economically using very little water without
affecting performance.
..
.
.
.
.
.
. ..
o
N
r.
.
e
.
S
..
...
.
.
.
..
..
.
.
o
..
.
N
d
.
o
d
M
ro
P
Mod. ... ... ...
Prod. No. ... ... ...
Ser. No. ... ... ...
TECHNICAL DATA
Dimensions Width
Height
Depth
Electrical connection Information on the electrical connection is given on the rating
plate, on the inner edge of the appliance door.
Water supply pressure Minimum
Maximum
Maximum Load Cotton 6 kg
Spin Speed Maximum 1000 rpm (EWF 106410W )
60 cm
85 cm
63 cm
0,05 MPa
0,8 MPa
1200 rpm (EWF 126410W)
1400 rpm (EWF 146410W)
CONSUMPTION VALUES
Programme Energy consumption
(KWh)
White Cottons 95° 2 61
Cottons 60° 1.3 58
Cotton ECO 60°
1)
1.02 46
Cottons 40° 0.7 58
Synthetics 40° 0.5 50
Water consumption
(litres)
Programme duration
(Minutes)
For the duration of
the programmes,
please refer to the
display on the con-
trol panel.
Page 23
electrolux 23
Programme Energy consumption
Delicates 40° 0.55 60
Wool 30° 0.25 53
1) «Cottons Eco» at 60°C with a load of 6 kg is the reference programme for the data entered in the energy label, in
compliance with EEC 92/75 standards.
(KWh)
The consumption data shown on this
chart is to be considered purely indicative, as it may vary depending on the
Water consumption
(litres)
Programme duration
(Minutes)
quantity and type of laundry, on the inlet water temperature and on the ambient temperature.
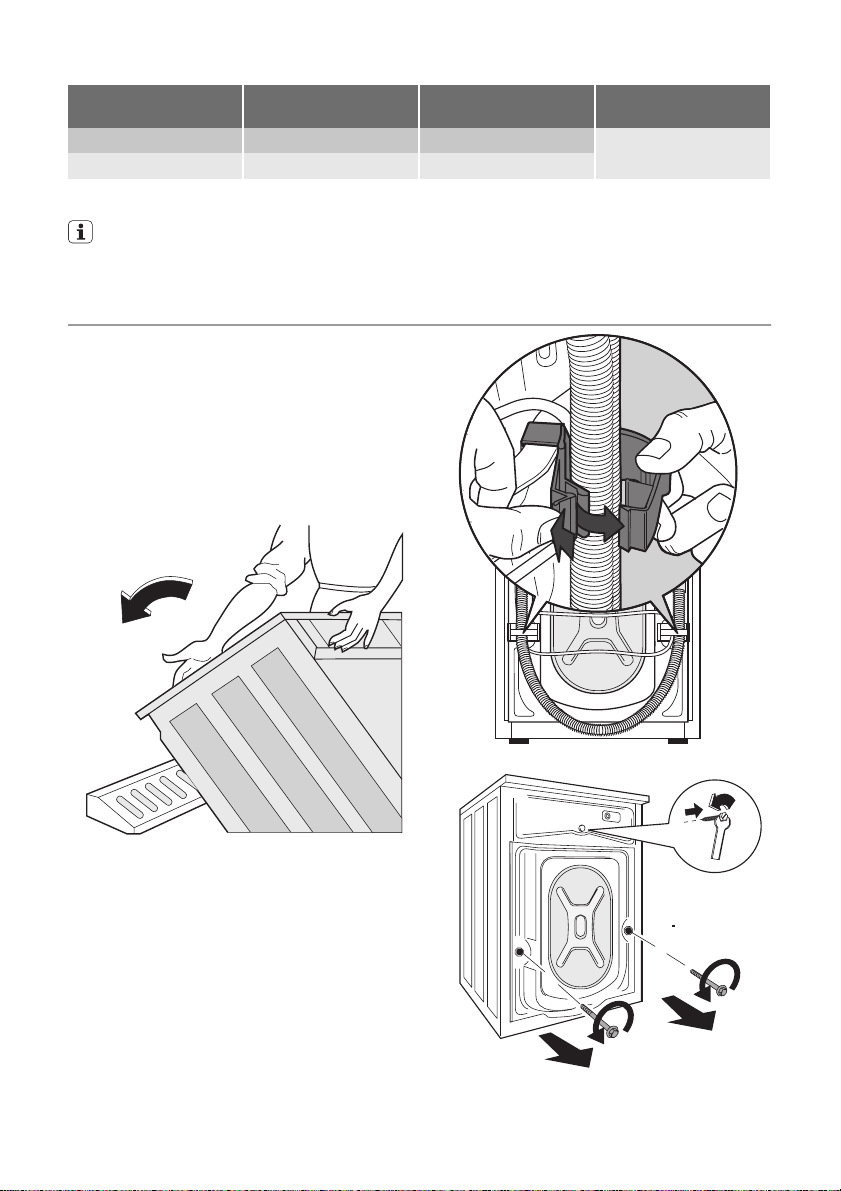
INSTALLATION
Unpacking
All transit bolts and packing must be removed before using the appliance.
You are advised to keep all transit devices
so that they can be refitted if the machine
ever has to be transported again.
1. After removing all the packaging, careful-
ly lay machine on it’s back to remove
the polystyrene base from the bottom.
2. Remove the power supply cable and the
draining and inlet hose from the hose
holders on the rear of the appliance.
3. Unscrew the three bolts.
4. Slide out the relevant plastic spacers.
Page 24

24 electrolux
5. Open the porthole and remove the poly-
styrene block fitted on the door seal.
6. Fill the smaller upper hole and the two
large ones with the corresponding plastic plug caps supplied in the bag containing the instruction booklet.
Positioning
Install the machine on a flat hard floor.
Make sure that air circulation around the machine is not impeded by carpets, rugs etc.
Check that the machine does not touch the
wall or other kitchen units. Level the washing machine by raising or lowering the feet.
The feet may be tight to adjust as they incorporate a self locking nut, but the machine
MUST be level and stable. If necessary,
check the setting with a spirit level. Any necessary adjustment can be made with a spanner. Accurate levelling prevents vibration,
noise and displacement of the machine during operation.
Caution! Never place cardboard,
wood or similar materials under the
machine to compensate for any
unevenness in the floor.
Page 25

electrolux 25
Water inlet
Warning! This appliance must be
connected to a cold water supply.
1. Connect the water inlet hose supplied
with the machine to a tap with a 3/4"
thread. Always use the hose supplied
with the appliance.
Important! Do not use the hose from
your previous machine to connect to
the water supply.
2. The other end of the inlet hose which
connects to the machine can be turned
as showed in the picture.
Do not place the inlet hose downwards.
Angle the hose to the left or right depending on the position of your water tap.
the tap, you will have to purchase a new,
longer hose specially designed for this type
of use.
Important! Before connecting up the
machine to new pipework or to pipework
that has not been used for some time, run
off a reasonable amount of water to flush
out any debris that may have collected in
the pipes.
Water drainage
The end of the drain hose can be positioned in three ways.
• Hooked over the edge of a sink using
the plastic hose guide supplied with the
machine. In this case, make sure the end
cannot come unhooked when the machine is emptying. This could be done by
tying it to the tap with a piece of string or
attaching it to the wall.
3. Set the hose correctly by loosening the
ring nut. After positioning the inlet hose,
be sure to tighten the ring nut again to
prevent leaks.
The inlet hose must not be lengthened. If it
is too short and you do not wish to move
• In a sink drain pipe branch. This
branch must be above the trap so that
the bend is at least 60 cm above the
ground.
•
Directly into a drain pipe at a height of
not less than 60 cm and not more than
90 cm. The end of the drain hose must always be ventilated, i.e. the inside diameter of the drain pipe must be larger than
the outside diameter of the drain hose.
The drain hose must not be kinked.
Page 26

26 electrolux
The drain hose may be extended to a maximum of 4 metres. An additional drain hose
and joining piece is available from your local Service Centre.
ELECTRICAL CONNECTION
Information on the electrical connection is
given on the rating plate on the inner edge
of the appliance door.
Check that your domestic electrical installation can take the maximum load required, also taking into account any other appliances
in use.
Connect the machine to an earthed
socket.
The manufacturer does not accept
any responsibility for damage or
injury through failure to comply
with the above safety precaution.
The power supply cable must be
easily accessible after installing the
machine.
Should the appliance power supply
cable need to be replaced, this
must be carried out by a Service
Centre.
ENVIRONMENT CONCERNS
The symbol on the product or on its
packaging indicates that this product may
not be treated as household waste. Instead
it should be taken to the appropriate
collection point for the recycling of electrical
and electronic equipment. By ensuring this
product is disposed of correctly, you will
help prevent potential negative
consequences for the environment and
human health, which could otherwise be
caused by inappropriate waste handling of
this product. For more detailed information
about recycling of this product, please
contact your local council, your household
waste disposal service or the shop where
you purchased the product.
Packaging materials
The materials marked with the symbol
are recyclable.
>PE<=polyethylene
>PS<=polystyrene
>PP<=polypropylene
This means that they can be recycled by disposing of them properly in appropriate collection containers.
Ecological hints
To save water, energy and to help protect
the environment, we recommend that you
follow these tips:
• Normally soiled laundry may be washed
without prewashing in order to save detergent, water and time (the environment is
protected too!).
• The machine works more economically if
it is fully loaded.
• With adequate pre-treatment, stains and
limited soiling can be removed; the laun-
Page 27

electrolux 27
dry can then be washed at a lower temperature.
• Measure out detergent according to the
water hardness, the degree of soiling and
the quantity of laundry being washed.
Page 28

28 electrolux
Electrolux. Thinking of you.
Видете повеќе како размислуваме на www.electrolux.com
СОДРЖИНА
Безбедносни информации 28
Опис на производот 30
Контролна табла 31
Прва употреба 34
Персонализација 35
Секојдневна употреба 35
Помошни напомени и совети 38
Програми за перење 40
БЕЗБЕДНОСНИ ИНФОРМАЦИИ
ВАЖНО Внимателно прочитајте и
чувајте за идни потреби.
• Безбедноста на вашиот уред
одговара на индустриските
стандарди и на законските барања за
безбедноста на уредите. Сепак, како
производители, сметаме дека наша
должност е да ги дадеме следниве
безбедносни напомнувања.
• Многу е важно, ова упатство да
остане заедно со уредот за идни
потреби. Доколку уредот се продаде
или пренесе на друг сопственик или
се преселите и го оставите уредот,
внимавајте упатството секогаш да
биде со него, за да може новиот
сопственик да се запознае со
функциите и со важните
предупредувања.
• МОРА да ги прочитате внимателно
пред да го инсталирате или
користите уредот.
• Пред првото пуштање, проверете да
не дошло до оштетување на
машината во текот на транспортот.
Никогаш не поврзувајте оштетена
машина. Доколку има оштетени
делови, обратете се кај Вашиот
продавач.
• Ако уредот се испорачува во
зимските месеци, кога температурите
се под нулата: чувајте ја машината за
перење 24 часа на собна
температура, пред првпат да ја
користите.
Нега и чистење 44
Што да сторите ако... 48
Технички податоци 52
Потрошувачки вредности 52
Монтажа 53
Поврзување на струјата 56
Еколошки прашања 57
Можноста за промени е задржана
Општа безбедност
• Опасно е да ги менувате
спецификациите или да се обидувате
да го модификувате овој производ на
кој било начин.
• Во текот на програмите за миење со
високи температури, стаклото од
вратата може да стане жешко. Не
допирајте го!
• Уверете се дека мали миленичиња и
деца нема да се качат во барабанот.
За да го избегнете ова, проверете го
барабанот пред употреба.
• Секакви предмети, како парички,
безопасни, шајки, шрафови, камење
или друг тврд, остар материјал, може
да предизвикаат големо оштетување
и не смеат да се ставаат во машината.
• Користете само препорачани
количини омекнувач и детергент. Со
преполнување можете да
предизвикате оштетување на
ткаенината. Погледнете ги
количините, кои ги препорачува
производителот.
• Перете ги малите предмети, како
чорапи, врвки, колани итн., во
вреќичка за перење или во навлака
за перница, бидејќи е можно тие да
се протнат помеѓу коритото и
внатрешниот барабан.
• Не користете ја машината за перење
на предмети со фишбајн, непорабен
или искинат материјал.
• По користење, при чистење и
одржување, секогаш исклучувајте го
Page 29

electrolux 29
уредот од напојувањето со струја и
затворете го доводот на вода.
• Во никој случај не треба да се
обидувате самите да ја поправате
машината. Поправките изведени од
страна на неискусен материјал може
да предизвикаат повреда или
сериозни грешки во работењето.
Обратете се во локалниот сервисен
центар. Секогаш инсистирајте на
оригинални резервни делови.
Инсталирање
• Овој уред е тежок. Бидете
внимателни кога го преместувате.
• При распакување, проверете дали
уредот е оштетен. Не користете го
доколку се сомневате и обратете се
во сервисниот центар.
• Сета амбалажа и транспортните
клинови мора да се отстранат пред
употребата. Доколку не се
придржувате кон ова може да дојде
до сериозно оштетување на уредот.
Погледнете го соодветното поглавје
во прирачникот.
• По монтажата, проверете уредот да
не стои врз доводното или одводното
црево и капакот да не го притиска
кабелот за напојување со струја бо
ѕидот.
• Доколку машината е поставена на
обложен под, регулирајте ги
ногалките за да се овозможи
слободно струење на воздухот под
уредот.
• По монтажата, секогаш проверете
дали цревата и спојките добро
дихтуваат.
• Доколку уредот се монтира на место,
кое е изложено на мраз, прочитајте го
поглавјето "опасности од
замрзнување".
• Водоводџиските работи, потребни за
монтажа на овој уред, мора да ги
изведува квалификуван водоводџија
или стручно лице.
• Електричните работи, потребни за
монтажа на овој уред, мора да ги
изведува квалификуван електричар
или стручно лице.
Користење
• Уредот е конструиран за користење
во домаќинството. Не смее да се
користи за други цели, освен оние за
кои е наменет.
• Перете само ткаенини, кои се
наменети за перење во машина.
Следете ги упатствата на етикетата
на секое парче од облеката.
• Не преполнувајте го уредот.
Погледнете ја табелата со програми
за перење.
• Пред перењето, проверете дали
џебовите се празни и дали патентите
се затворени. Избегнувајте перење
на изресени или искинати предмети,
и третирајте го дамките од боја,
мастило, рѓа и трева пред перењето.
Градниците со жица НЕ смеат да се
перат во машина.
• Деловите од облеката, кои биле во
допир со производи од испарлива
нафта, не треба да се перат во
машина. Доколку користите
испарливи течности за чистење,
треба да внимавате да ја отстраните
течноста од делот од облеката пред
да го ставите во машината.
• Никогаш не влечете го кабелот за да
го извлечете штекерот од
приклучницата; секогаш фаќајте го
самиот штекер.
• Никогаш не користете го уредот ако
кабелот за струја, контролната табла,
работната површина или основата се
оштетени на начин, кој овозможува
слободен пристап во внатрешноста
на уредот.
Заклучување заради безбедност на
децата
• Овој апарат не е наменет да го
користат лица (вклучувајќи ги и
децата) со намалени физички,
сензорски или ментални способности,
или лица без искуство и знаење,
освен ако немаат надзор и упатување
во користење на апаратот од страна
на лицето, кое е одговорно за
нивната безбедност.
• Децата треба да се под надзор за да
не си играат со апаратот.
Page 30

30 electrolux
• Компонентите од амбалажата (на пр.
пластична фолија, стиропор) може да
бидат опасни за децата – опасност од
задушување! Чувајте ги надвор од
дофатот на децата.
• Чувајте ги сите детергенти на
безбедно место, надвор од дофат на
децата.
• Уверете се дека децата или
миленичињата нема да се качат во
барабанот. За да спречите децата и
миленичињата да се затворат во
барабанот, машината е опремена со
специјален додаток. За да го
активирате овој уред, вртете го (без
притискање) копчето во
внатрешноста на вратата во десно,
додека жлебот не стои хоризонтално.
Ако е потребно, употребете паричка.
За да го дезактивирате овој уред, и
да ја вратите можноста за
заклучување на вратата, вртете го
(без притискање) копчето во
внатрешноста на вратата во лево,
додека жлебот не стои вертикално.
ОПИС НА ПРОИЗВОДОТ
Вашиот нов уред ги задоволува сите современи барања за ефикасен третман
на алиштата со мала потрошувачка на вода, струја и детергент. Неговиот
систем за перење овозможува целосно искористување на детергентот и ја
намалува потрошувачката на вода, со што штеди струја.
1 2
1 Фиока на дозерот за детергент
2 Контролна табла
3 Рачка за отворање на вратата
3
4
5
6
4 Плочка со спецификации
5 Одводна пумпа
6 Ногарки за нивелирање
Page 31

Фиока за детергент
Преграда за детергент, што се
користи во фазата на претперење или
киснење, или за средство за
отстранување дамки, во фазата на
дејство против дамките (доколку ја
има). Детергентот за претперење и
киснење се додава на почетокот од
програмата за перење. Средството за
отстранување дамки се додава во
текот на фазата на дејство против
дамките.
Преградата за детергент во прав
или за течен детергент се користи за
главното перење. Aко користите течен
детергент налејте го пред самото
стартување на програмата.
Преграда за течни додатоци
(омекнувач, штирак).
Следете ги препораките на
производителот за количините што
треба да се користат и не
пречекорувајте ја ознаката „MAX“ во
фиоката на дозерот за детергент. Сите
омекнувачи или адитиви за штиркање
мора да се налеат во преградата пред
самото стартување на програмата за
перење.
Водич на програмите
Водичот на програмите се наоѓа на
предниот дел од фиоката за детергент.
Други водичи на програми на различни
јазици се наоѓаат во торбата со
прирачникот за корисници. (Не мора да
electrolux 31
значи дека сите уреди имаат повеќе од
еден водич за програми).
За да го замените водичот за програми:
1. Повлечете го соодветната страна и
извадете го.
2. Ставете го новиот водич за програми.
КОНТРОЛНА ТАБЛА
Подолу е слика на контролната табла. На неа се прикажани тркалцето на
програматорот, како и копчињата, контролната сијаличка и екранот. Тие се
претставени со соодветните броеви на следните страници.
Page 32

32 electrolux
1 2 4 6 7
1 Селектор на програми
2 Копче за ТЕМПЕРАТУРА
3 Копче за намалување на
ЦЕНТРИФУГАТА
4 Копче за ПРЕТПЕРЕЊЕ
5 Копче за ДОПОЛНИТЕЛНО
ПЛАКНЕЊЕ
ТАБЕЛА НА СИМБОЛИ
= Специјални програми = Температура
= Студено перење = Намалување на центрифугата
= Без плакнење = Ноќен циклус
= Претперење = Дополнително плакнење
= Одложен почеток = Блокада за деца
= Старт/пауза = Вратата е заклучена
= Временски
управувач(Time Manager)
Тркалце на програматорот
Овозможува вклучување и исклучување
на апаратот, како и одбирање програми.
Температура
Ова копче ви овозможува да ја
зголемите или намалите температурата
на перење.
Намалување на брзината на
центрифугата
Со притискање на ова копче можете да
ја намалите брзината на центрифугата
за избраната програма или да ја
изберете некоја од достапните опции.
3 5
9
8
10
6 Копче за ОДЛОЖЕН ПОЧЕТОК
7 Екран
8 Копче СТАРТ/ПАУЗА
9 Контролна сијаличка за
ЗАКЛУЧЕНА ВРАТА
10 Копчиња на ВРЕМЕНСКИОТ
УПРАВУВАЧ
Задржано плакнење
Со одбирање на оваа функција водата
од последното плакнење не се црпи за
да се спречи туткање на ткаенините.
Пред да ја отворите вратата, неопходно
е да се испушти водата. За да ја
испуштите водата, прочитајте го
поглавјето "Кога ќе заврши програма".
Ноќен циклус
Со одбирање на оваа функција
машината нема да ја испушти водата
од последното плакнење и сите фази за
центрифугирање се исклучени за да не
Page 33

electrolux 33
се истуткаат алиштата. Овој циклус за
перење е многу тивок и може да се
одбере за навечер или за периоди со
поевтина струја. За некои програми
плакнењата ќе се извршат со повеќе
вода. Пред да ја отворите вратата,
неопходно е да се испушти водата. За
да ја испуштите водата, прочитајте го
поглавјето "Кога ќе заврши програма".
Претперење
Со одбирање на оваа опција машината
врши претперење пред главното
перење. Времето за перење ќе биде
подолго. Оваа опција се препорачува за
многу извалкани алишта.
Дополнително плакнење
Апаратот е конструиран да штеди
енергија. Ако е потребно плакнење на
алиштата со дополнително количество
вода (дополнително плакнење),
изберете ја таа опција. Ќе се извршат
неколку дополнителни плакнења. Оваа
опција се препорачува за лица
алергични на детергенти, како и за
подрачја со многу мека вода.
Одложен старт
Со ова копче, програмата може да се
одложи за 30 мин - 60 мин - 90 мин, 2
часа, па потоа по 1 час се до максимум
од 20 часа.
Старт пауза
Ова копче ви овозможува да ја
стартувате или да ја прекинете
избраната програма.
Временски управувач (Time Manager)
Овие копчиња ви овозможуваат
менување на времетраењето на
програмата автоматски по предлог на
апаратот.
Контролна сијалица за заклучена врата
Контролната сијалица 9 се пали кога ќе
стартува програмата и укажува дали
вратата може да се отвори:
• свети: вратата не може да се отвори.
Машината работи или престанала да
работи, но има вода во кадата.
• не свети: вратата може да се отвори.
Програмата завршила или водата е
исцрпена.
• светлото трепка: вратата се отвора
Екран
7.4 7.5 7.1
Екранот ги прикажува следните
информации:
7.1:
7.27.3
• Траење на избраната програма
По одбирањето програма,
времетраењето се прикажува во
Page 34

34 electrolux
часови и минути (на пример 2.05 ).
Траењето се пресметува автоматски
врз база на максималното
препорачано полнење за секој вид на
материјал. Откако програмата ќе
стартува, преостанатото време се
ажурира секоја минута.
• Одложен почеток
Избраното одложување, нагодено со
притискање на соодветното копче, се
појавува на екранот во траење од
неколку секунди, па потоа повторно
се прикажува траењето на избраната
програма.
• Шифри за тревога
Во случај на проблеми во
работењето, може да се прикажат
некои шифри за тревога, на пример
E20 (погледнете го пасусот „Што да
сторите ако...“).
• Неправилно одбирање на опција
Доколку некоја опција не е
компатибилна со нагодената
програма за перење, во долниот дел
од екранот на неколку секунди ќе се
прикаже пораката Err , а вградената
црвена сијалица на копчето 8 ќе
почне да трепка.
• Крај на програмата
Кога ќе заврши програма, се
прикажуваат три нули што трепкаат,
контролната сијаличка 9 и
контролната сијаличка на копчето 8
се гаснат и вратата може да се отвори.
7.2: Икони за фазите на програмата за
перење
•
Перење
•
Плакнења
•
Цедење
•
Центрифугирање
Со бирање на програма за перење,во
долниот дел од екранот се прикажуваат
иконите за фазите од програмата,
соодветни на разни фази од
програмата. Откако ќе го притиснете
копчето 8 , останува вклучена само
иконата за тековната фаза.
7.3: Фаза на загревање
За време на циклусот за перење, на
екранот се прикажува икона за
температура што покажува дека
апаратот почнал со греењето на водата
во кадата.
7.4: Икони за степен на валканост
•
Интензивно
•
Нормално
•
Секојдневно
•
Лесно
•
Брзо
•
Супер брзо
•
Освежување
•
Супер брзо
Кога ќе се одбере програма, на екранот
се појавува икона што го прикажува
степенот на извалканост што машината
го предлага автоматски.
7.5: Безбедносно заклучување за деца
(видете пасус „Безбедносно
заклучување за деца“).
ПРВА УПОТРЕБА
• Проверете дали електричните и
водоводните поврзувања се
согласни со упатствата за
местење.
• Отстранете ги блокот од
стиропор и сиот останат
материјал од барабанот.
• Истурете 2 литри вода во
главната преграда за перење
на фиоката на дозерот за да се
активира вентилот ECO . Потоа
вклучете циклус за памук на
највисока температура, без
алишта во машината, за да ги
отстраните производните
остатоци од барабанот и кадата.
Турете 1/2 мерка детергент во
фиоката за главно перење на
дозерот и вклучете ја машината.
Page 35

ПЕРСОНАЛИЗАЦИЈА
Звучни сигнали
Машината е опремена со звучен уред
кој се огласува во следните случаи:
• на крајот од циклусот
• ако има дефект.
Откако истовремено ќе ги притискате
копчињата 4 и 5 околу 6 секунди ,
звучниот сигнал се исклучува (освен во
случај на дефект). Со повторно
притискање на овие 2 копчиња,
звучните сигнали повторно се
вклучуваат.
Безбедносна блокада за децата
Овој уред Ви дозволува да го оставите
апаратот без надгледување и да не се
грижите за тоа дека децата може да се
СЕКОЈДНЕВНА УПОТРЕБА
Полнење на алиштата
Отворете ја вратата со внимателно
влечење на рачката кон надвор.
Ставете ги алиштата во барабанот,
едно по едно, протресувајќи ги што е
можно повеќе. Затворете ја вратата.
electrolux 35
повредат или да го оштетат. Оваа
функција останува вклучена и кога
машината не работи.
Има два начина да се нагоди оваа
опција:
1. Пред да го притиснете копчето 8 :
стартувањето на машината е
невозможно.
2. Откако да го притиснете копчето 8 :
менувањето на која било друга
програма или опција е невозможно.
За активирање или дезактивирање на
оваа опција притискајте ги истовремено
околу 6 секунди копчињата 5 и 6 ,
додека иконата
изгуби од екранот.
не се појави или
Измерете детергент и омекнувач
Извлечете ја фиоката од дозерот
додека не застане. Измерете ја
количината потребен детергент,
всипете ја во главната преграда
во соодветната преграда, ако тоа го
бара избраната програма/опција
(повеќе детали ќе најдете во "Фиока на
дозерт за детергент").
или
Доколку е потребно, всипете омекнувач
во преградата означена со
(количината не смее да ја надмине
ознаката "MAX" во фиоката). Полека
затворете ја вратата.
Page 36

36 electrolux
Изберете ја потребната програма со
вртење на бирачот на програми (1)
Завртете го бирачот на програми на
потребната програма. Машината за
перење ќе предложи температура и
автоматски ќе избере максимална
вредност на центрифугирање, достапна
за избраната програма. Овие вредности
можете да ги промените со притискање
на соодветните копчиња. Зелената
контролна сијалица од копчето 8
почнува да трепка.
Програматорот може да се врти в десно
или в лево. Свртете го во положба
за ресетирање на програмата/
исклучување на машината.
На крајот на програмата,
програматорот мора да биде свртен во
положба
, за да ја исклучите
машината.
ВНИМАНИЕ Ако го завртите
бирачот на некоја друга програма,
додека машината работи, црвената
контролна сијалица од копчето 8 ќе
трепне 3-пати и ќе се прикаже
пораката за грешка Err за да укаже
на погрешното бирање. Машината
нема да ја изведува новата избрана
програма.
Копчиња за опциите на програмите
Зависно од програмата, може да се
комбинираат различни функции. Тие
мора да се избираат по одбирање на
саканата програма и пред притискање
на копчето 8 .
Изберете ја температурата со
притискање на копчето 2
Со бирање на програма, уредот
автоматски прелага зададена
температура.
Доколку сакате да ги перете алиштата
на друга температура, притискајте го
ова копче повеќепати за да ја
зголемите или намалите температурата.
Намалете ја брзината на центрифугата
со притискање на копчето 3
Кога ќе се одбере програма, апаратот
автоматски ја предлага максималната
брзина за центрифугирање овозможена
за таа програма.
Притискајте го копчето 3 повеќепати за
менување на брзината на центрифугата
ако сакате алиштата да се вртат со
друга брзина. Светнува соодветната
сијаличка.
Одберете ги достапните опции
притискајќи ги копчињата 3, 4 и 5
Зависно од одбраната програмата,
може да се комбинираат различни
функции пред да се притисне копчето
8 . По одбирањето опција, се пали
соодветната контролна сијаличка.
Ако се одбере неправилна опција,
вградената црвена сијаличка на
копчето 8 трепнува 3 пати и пораката
Err се појавува на екранот неколку
секунди.
За компатибилноста на програмите
за перење и за опциите, погледнете
го поглавјето „Програми за перење“.
Одберете го одложеното почнување
притискајќи го копчето 6
Пред да почнете програма, ако сакате
да го одложите почнувањето,
притискајте го копчето 6 повеќепати за
да го одберете саканото одложување.
Се пали соодветната сијаличка.
Одбраната вредност на времето за
одложување (до 20 часови) ќе се појави
на екранот неколку секунди, а потоа
повторно ќе се појави времетраењето
на програмата.
Мора да ја одберете оваа опција откако
сте ја поставиле програмата и пред да
го притиснете копчето 8 .
Page 37

electrolux 37
Може да го откажете или смените
времето на одложување кога било пред
да го притиснете копчето 8 .
Одбирање на одложеното почнување:
1. Одберете ги програмата и
потребните опции.
2. Одберете го одложеното почнување
притискајќи го копчето 6 .
3. Притиснете го копчето 8 :
– машината почнува со
одбројувањето часови.
– Програмата ќе почне по
истекувањето на одбраното
одложување.
Откажување на одложеното почнување
откако ќе се притисне копчето 8 :
1. Поставете ја машината за перење
на ПАУЗА притискајќи го копчето 8 .
2. Притиснете го копчето 6 еднаш за
да се прикаже симболот 0'
3. Притиснете го копчето 8 повторно за
да ја почнете програмата.
ВАЖНО Одбраното одложување може
да се смени само после повторно
одбирање на програма за перење.
Одложеното почнување не може да се
одбере со програмата Црпење .
Стартувајте ја програмата со
притискање на копчето 8
За да ја стартувате избраната
програма, притиснете го копчето 8 ,
зелената контролна сијалица од
копчето 8 престанува да трепка.
За да ја прекинете програмата што е во
тек, притиснете го копчето 8 : зелената
контролна сијалица почнува да трепка.
За да ја продолжите програмата од
точката каде што била прекината,
притиснете го копчето 8 . Ако сте
избрале одложен старт, машината ќе
почне да одбројува. Ако сте избрале
погрешна опција, црвената контролна
сијалица од копчето 8 ќе трепне 3-пати
и во траење од неколку секунди ќе се
прикаже пораката за грешка Err .
Изберете ја опцијата Временски
управувач со притискање на копчето 10
Со повторено притискање на ова копче,
траењето на циклусот на перење се
зголемува или се намалува. Иконата за
нивото на извалканост ќе се појави на
екранот за да го прикаже одбраното
ниво на извалканост. Оваа опција е
достапна само со програмите Памук ,
Синтетика и Чувствителни .
Ниво на
валканост
Интензивно За многу валкани
Нормално За нормално
Секојдневно За секојдневно
Лесно За малку валкани
Брзо За многу малку
Супер брзо
Освежување
1)
Супер
1)
брзо
1) Препорачуваме да ја намалите количината на
полнење (погледнете ја табелата Програми за
перење).
2) Кога ќе ја изберете оваа опција, соодветната
икона ќе се појави само на кратко, а потоа
веднаш се губи.
Икона Вид на ткаенина
алишта
валкани алишта
валкани алишта
алишта
валкани алишта
1)
За предмети, кои
се користени или
носени кратко
време
2)
Само за
освежување
алишта
2)
Само за
освежување многу
малку алишта
Менување опција или пуштање
програма
Менувањето на некои опции е можно
пред извршување на програмата.
Пред да извршите каква било промена,
мора да го ПАУЗИРАТЕ апаратот
притискајќи го копчето 8 (ако сакате да
ја смените опцијата Одредување на
времето, мора да ја откажете
програмата во тек и повторно да
одберете програма).
Менувањето на програма во тек е
можно само со нејзино ресетирање.
Свртете го програматорот на
, а
потоа на новата програмска положба.
Почнете ја новата програма притискајќи
го копчето 8 повторно. Водата за
перење во кадата нема да се испразни.
Page 38

38 electrolux
Прекинување на програма
Повторно притиснете го копчето 8 за да
ја прекинете програмата, која е во тек,
соодветната зелена контролна сијалица
ќе почне да трепка.
Повторно притиснете го копчето за да
ја одново да ја стартувате програмата.
Откажување програма
Свртете го тркалцето на програматорот
на
за да ја откажете пуштената
програма.
Сега можете да изберете нова програма.
Отворање на вратата
Откако програмата ќе стартува (или во
текот на одложеното време) вратата е
заклучена, ако сакате да ја отворите,
прво ставете ја машината на ПАУЗА со
притискање на копчето 8 .
По неколку минути контролната
сијалица 9 се гаси и вратата може да се
отвора.
Ако контролната сијалица остане
запалена, тоа значи дека машината
веќе се загрева или дека нивото на
водата е превисоко. Како и да е, не
обидувајте се да ја отворите вратата на
сила!
Ако не можете да ја отворите вратата, а
ви треба да ја отворите, ќе мора да ја
исклучите машината со вртење на
бирачот на O . По неколку минути
вратата може да се отвори (обратете
внимание на нивото и температурата
на водата!) .
Откако ќе ја затворите вратата, одново
ќе треба да ги нагодите програмата и
другите опции и да го притиснете
копчето 8 .
Kога ќе заврши програмата
Машината запира автоматски. Три 0.00
кои трепкаат се појавуваат на екранот,
а контролната сијалица на копчето 8 се
гасне. Се огласуваат звучни сигнали.
Ако е одбрана програма или опција што
завршува со вода во кадата, вратата
останува заклучена како показател дека
водата мора да се испушти пред да се
отвори вратата.
Постапете на следниов начин за да ја
испуштите водата:
1. Завртете го програматорот на O .
2. Одберете програма за испуштање
водата или за центрифугирање.
3. Доколку е потребно, намалете ја
брзината на центрифугирање
притискајќи го соодветното копче.
4. Повторно притиснете го копчето 8 .
На крајот на програмата, вратата се
ослободува и може да се отвори.
Завртете го програматорот на O за да
ја исклучите машината.
Извадете ги алиштата од барабанот и
внимателно проверете дали барабанот
е празен. Доколку немате намера да
изведувате друго перење, затворете ја
славината. Оставете ја вратата
подотворена за да спречите создавање
на мувла и непријатни миризби.
Подготвеност : штом ќе заврши
програмата, по неколку минути ќе се
вклучи системот за штедење енергија.
Осветленоста на екранот се намалува.
Апаратот ќе излезе од состојбата за
штедење енергија со притискање на
кое било копче.
ПОМОШНИ НАПОМЕНИ И СОВЕТИ
Сортирање на алиштата
Следете ги шифрираните симболи за
перење на секој дел од облеката и
упатствата на производителот за
перење. Сортирајте ги алиштата на
следниот начин: бели, во боја,
синтетика, чувствителни, волнени.
Пред ставање на алиштата
Никогаш не перете заедно бели и
шарени алишта. Белите би можеле да
ја изгубат својата "белина" при
перењето.
Новите шарени алишта може да
испуштат боја при првото перење;
затоа треба да се перат одвоено
првиот пат.
Page 39

electrolux 39
Закопчајте ги навлаките за перници,
патентите, куките и дрикерите.
Заврзете ги ремените или долгите
ленти.
Отстранете ги тврдокорните дамки пред
перење.
Истријте ги особено извалканите места
со специјален детергент или паста.
Третирајте ги завесите со посебна
грижа. Извадете ги куките за
закачување или заврзете ги во вреќа
или мрежа.
Отстранување дамки
Можно е, тврдокорните дамки да не
излезат само со вода и детергент.
Оттаму, препорачуваме да ги третирате
пред перењето.
Крв: третирајте ги свежите дамки со
студена вода. Кај исушените дамки,
натопете преку ноќ во вода со
специјален детергент, па потоа истријте
со сапун и вода.
Боја на база на масло: натопете со
бензински отстранувач на дамки,
положете го делот од облеката на мека
крпа и тапкајте ја дамката; повторете
повеќепати.
Исушени дамки од маст: натопете со
терпентин, положете го делот од
облеката на мека подлога и тапкајте ја
дамката со памучна крпа на врвовите
од прстите.
Рѓа: оксална киселина, растворена во
жешка вода или производ за
отстранување рѓа, кој се користи
студен. Внимавајте кај старите дамки
од рѓа, бидејќи целулозната структура
веќе е оштетена и ткаенината може да
се продупчи.
Дамки од мувла: третирајте ги со
белило и добро исплакнете (само за
бели алишта и алишта со трајни бои).
Трева: насапунете малку и третирајте
со белило (само за бели алишта и
алишта со трајни бои).
Пенкало и лепило: натопете со ацетон
2)
, положете го делот од облеката на
мека крпа и тапкајте ја дамката.
Кармин: натопете со ацетон, како што е
опишано погоре, па потоа третирајте ги
дамките со метилни алкохоли.
2) не употребувајте ацетон на вештачка свила
Третирајте ги сите преостанати трагови
со белило.
Црвено вино: натопете во вода и
детергент, исплакнете и третирајте со
ацетатна или лимонска киселина, па
потоа исплакнете. Третирајте ги сите
преостанати трагови со белило.
Мастило: зависно од типот на
мастилото, прво натопете ја ткаенината
со ацетон
2)
, па потоа со ацетатна
киселина; третирајте ги сите
преостанати трагови на белите алишта
со белило, па потоа добро исплакнете ги.
Дамки од катран: прво третирајте со
отстранувач на дамки, метилни
алкохоли или бензин, па потоа истријте
со детергент во паста.
Детергенти и адитиви
Добрите резултати на перењето
зависат и од изборот на детергент и од
користењето на правилните количества
за да се избегне непотребно трошење и
да се заштити животната средина.
Иако биолошки се разградуваат,
детергентите содржат материи што во
големи количества можат да ја
разнишаат чувствителната рамнотежа
на природата.
Изборот на детергентот ќе зависи од
типот на ткаенината (чувствителна,
волнена, памучна итн.), бојата,
температурата на перење и степенот
на валканост.
Со овој апарат може да се користат
сите вообичаено достапни детергенти
за машини за перење:
• прашоци за перење за сите видови
ткаенини
• прашоци за перење за чувствителни
ткаенини (до 60°C) и волна
• течни детергенти, претежно за
програми за перење на ниски
температури (до 60°C) за сите видови
ткаенини или специјални само за
волна.
Детергентот и адитивите мора да се
ставаат во соодветните прегради на
фиоката на дозерот пред почнување на
програмата за перење.
Ако користите течни детергенти, мора
да се одбере програма без претперење.
Page 40

40 electrolux
Вашиот апарат е опремен со систем за
кружење што овозможува оптимално
трошење на концентрираниот
детергент.
Почитувајте ги препораките на
произведувачот за количествата што
треба да се употребуваат и не ставајте
повеќе од ознаката "MAX" на фиоката
на дозерот за детергент .
Количество детергент што треба да се
користи
Видот и количеството детергент зависи
од видот ткаенина, полнењето,
степенот на извалканост и тврдоста на
водата што се користи.
Следете ги упатствата на
производителот на производот за
количествата што треба да се користат.
Користете помалку детергент ако:
ПРОГРАМИ ЗА ПЕРЕЊЕ
Програма
Максимална и минимална температура
Опис на циклусот
Максимална брзина на центрифугирање
Максимално полнење со алишта
Вид на алишта
ПАМУЧНИ
95°-Студено
Главно перење - Плакнења
Максимална брзина на центрифугата
1000/1200/1400 врт./мин.
Макс. полнење 6 kg – Намалено полнење 3 kg
За бел и обоен памук (нормално валкани алишта).
СИНТЕТИКА
60°- Студено
Главно перење - Плакнења
Максимална брзина на центрифугата 900 врт./
мин.
Макс. полнење 3 kg – Намалено полнење 1,5 kg
Синтетички или мешани ткаенини: долна облека,
шарена облека, кошули што не се туткаат, блузи.
1)
• перете помалку алишта,
• алиштата не се многу извалкани,
• во текот на перењето се создаваат
големи количества пена.
Степени на тврдост на водата
Тврдоста на водата е класификувана во
таканаречени "степени" на тврдост.
Информациите за тврдоста на водата
во вашето подрачје можете да ги
добиете од одговорното претпријатие
за водоснабдување или од локалните
служби. Ако степенот на тврдоста на
водата е среден или висок,
препорачуваме да додадете омекнувач
на вода секогаш следејќи ги упатствата
на производителот. Кога степенот на
тврдост е низок, приспособете го
количеството детергент.
Опции
НАМАЛУВАЊЕ НА
ЦЕНТРИФУГАТА,
ЗАДРЖАНО
ПЛАКНЕЊЕ,
НОЌЕН ЦИКЛУС,
ПРЕДПЕРЕЊЕ,
ДОПОЛНИТЕЛНО
ПЛАКНЕЊЕ,
ВРЕМЕНСКИ
УПРАВУВАЧ
НАМАЛУВАЊЕ НА
ЦЕНТРИФУГАТА,
ЗАДРЖАНО
ПЛАКНЕЊЕ,
НОЌЕН ЦИКЛУС,
ПРЕДПЕРЕЊЕ,
ДОПОЛНИТЕЛНО
ПЛАКНЕЊЕ,
ВРЕМЕНСКИ
УПРАВУВАЧ
2)
2)
Детергент
Преграда
3)
3)
Page 41

Програма
Максимална и минимална температура
Опис на циклусот
Максимална брзина на центрифугирање
Максимално полнење со алишта
Вид на алишта
ЧУВСТВИТЕЛНИ
40°- Студено
Главно перење - Плакнења
Максимална брзина на центрифугата 700 врт./
мин.
Макс. полнење 3 kg – Намалено полнење 1,5 kg
Нежни ткаенини: акрил, вискоза, полиестер.
ВОЛНА / РАЧНО ПЕРЕЊЕ
40°- Студено
Главно перење - Плакнења
Максимална брзина на центрифугата 900/1000
врт./мин.
1)
Макс. полнење 2 kg
Програма за перење, за волна што може да се
пере во машина, како и за волнени и
чувствителни ткаенини што се перат на рака, кои
го носат симболот „рачно перење“. Забелешка :
Поединечен или масивен предмет може да
предизвика неврамнотеженост. Ако не се
вклучува последната центрифуга, додадете уште
алишта, прераспределете го товарот рачно, а
потоа одберете ја програмата за
центрифугирање.
СВИЛА
30°- Студено
Главно перење - Плакнења
Максимална брзина на центрифугата 700 врт./
мин.
Макс. полнење 1 kg
Нежна програма за перење погодна за свила и
мешана синтетика.
ДОЛНА ОБЛЕКА
40°- Студено
Главно перење - Плакнења
Максимална брзина на центрифугата 900/1000
врт./мин.
1)
Макс. полнење 1 kg
Оваа програма одговара за многу чувствителни
предмети, како дамска долна облека, градници и
долна облека.
Опции
ЗАДРЖАНО
ПЛАКНЕЊЕ,
НОЌЕН ЦИКЛУС,
ПРЕДПЕРЕЊЕ,
ДОПОЛНИТЕЛНО
ПЛАКНЕЊЕ,
УПРАВУВАЊЕ СО
ВРЕМЕТО
2)
НАМАЛУВАЊЕ НА
ЦЕНТРИФУГАТА,
ЗАДРЖАНО
ПЛАКНЕЊЕ,
НОЌЕН ЦИКЛУС
ЗАДРЖАНО
ПЛАКНЕЊЕ,
НОЌЕН ЦИКЛУС
НАМАЛУВАЊЕ НА
ЦЕНТРИФУГАТА,
ЗАДРЖАНО
ПЛАКНЕЊЕ,
НОЌЕН ЦИКЛУС
electrolux 41
Детергент
Преграда
3)
Page 42

42 electrolux
Програма
Максимална и минимална температура
Опис на циклусот
Максимална брзина на центрифугирање
Максимално полнење со алишта
Вид на алишта
ПЛАКНЕЊЕ
Плакнење – Долго центрифугирање
Максимална брзина на центрифугата
1000/1200/1400 врт./мин.
1)
Макс. полнење 6 kg
Со оваа програма е можно да се плакнат и да се
центрифугираат памучни делови од облеката кои
се испрани на рака. За поинтензивно плакнење,
изберете ја опцијата ДОПОЛНИТЕЛНО
ПЛАКНЕЊЕ. Апаратот ќе изведе неколку
дополнителни плакнења.
ЦЕДЕЊЕ
Црпење на водата
Макс. полнење 6 kg
За празнење на последната вода од плакнењето
во програмите со избрани опции Без плакнење и
Ноќен циклус.
ЦЕНТРИФУГИРАЊЕ
Црпење и долго центрифугирање
Максимална брзина на центрифугата
1000/1200/1400 врт./мин.
1)
Макс. полнење 6 kg
Посебна центрифуга за рачно испрани алишта и
после програмите со избрани опции Без
плакнење и Ноќен циклус. Брзината може да ја
изберете со притискање на соодветното копче за
да се прилагоди за ткаенините што треба да се
центрифугираат.
+ ПАМУК ШТЕДЛИВО
90° -40°
Главно перење - Плакнења
Максимална брзина на центрифугата
1000/1200/1400 врт./мин.
1)
Макс. полнење 6 kg
Бели и трајно обоени памучни алишта
Оваа програма може да се избере за малку или
нормално валкани алишта. Температурата ќе се
намали, а времето на перење ќе се продолжи.
Ова овозможува подобра ефикасност во
перењето но и штедење на енергија.
Опции
НАМАЛУВАЊЕ НА
ЦЕНТРИФУГАТА,
ЗАДРЖАНО
ПЛАКНЕЊЕ,
НОЌЕН ЦИКЛУС,
ДОПОЛНИТЕЛНО
ПЛАКНЕЊЕ
ЗАБАВЕНО
ЦЕНТРИФУГИРАЊ
Е
НАМАЛУВАЊЕ НА
ЦЕНТРИФУГАТА,
ЗАДРЖАНО
ПЛАКНЕЊЕ,
НОЌЕН ЦИКЛУС,
ПРЕДПЕРЕЊЕ,
ДОПОЛНИТЕЛНО
ПЛАКНЕЊЕ
Детергент
Преграда
3)
Page 43

electrolux 43
Програма
Максимална и минимална температура
Опис на циклусот
Максимална брзина на центрифугирање
Опции
Детергент
Преграда
Максимално полнење со алишта
Вид на алишта
ЛЕСНО ПЕГЛАЊЕ
60°- Студено
Главно перење - Плакнења
Максимална брзина на центрифугата 900 врт./
мин.
Макс. полнење 1 kg
Со избирање на оваа програма, алиштата се
НАМАЛУВАЊЕ
ЦЕНТРИФУГА,
ЗАПИРАЊЕ
ПЛАКНЕЊЕ,
ПРЕТПЕРЕЊЕ,
ДОПОЛНИТЕЛНО
ПЛАКНЕЊЕ
3)
перат и се центрифугираат нежно за да се
избегне туткање. На тој начин пеглањето е
полесно. Покрај тоа, машината ќе изведе и
неколку дополнителни плакнења.
ТЕКСАС
60°- Студено
Главно перење - Плакнења
Максимална брзина на центрифугата
900/1000/1200 врт./мин.
Макс. полнење 3 kg
НАМАЛУВАЊЕ НА
ЦЕНТРИФУГАТА,
ЗАДРЖАНО
ПЛАКНЕЊЕ,
НОЌЕН ЦИКЛУС,
ПРЕДПЕРЕЊЕ
3)
Со оваа програма може да се перат панталони,
кошули или јакни од џинс, како и жерсе
направено од високотехнолошки материјали
(опцијата Дополнително плакнење се активира
автоматски).
ИНТЕНЗИВНО, СПОРТСКА ОПРЕМА
40°- Студено
Предперење - Главно перење - Плакнења
Максимална брзина на центрифугата 900 врт./
мин.
Макс. полнење 2,5 kg
Оваа програма е погодна за перење многу
НАМАЛУВАЊЕ НА
ЦЕНТРИФУГАТА,
ЗАДРЖАНО
ПЛАКНЕЊЕ,
НОЌЕН ЦИКЛУС,
ДОПОЛНИТЕЛНО
ПЛАКНЕЊЕ
извалкана спортска опрема. Машината
автоматски ќе додаде претперење без детергент
пред главното перење за да се исперат дамките
од кал.
СПОРТСКА ОПРЕМА, БЛАГО
30°
Главно перење - Плакнења
Максимална брзина на центрифугата 700 врт./
мин.
Макс. полнење 2,5 kg
Кратка програма за малку валкана спортска
облека од мешана ткаенина.
/ИСКЛУЧЕНО
За откажување на програмата што е во тек, или
за исклучување на машината.
1) зависно од моделот
2) Ако ја изберете опцијата Брзо или Супер брзо со притискање на копчето 10 , препорачуваме да го
намалите максималното полнење како што е наведено. Можно е и целосно полнење, но со послаби
резултати на перење. Ако ги изберете опциите Освежување или Супер освежување, препорачуваме
уште повеќе да го намалите полнењето.
3) Ако користите течни детергенти, мора да одберете програма без ПРЕДПЕРЕЊЕ.
Page 44

44 electrolux
НЕГА И ЧИСТЕЊЕ
ПРЕДУПРЕДУВАЊЕ Пред да
изведувате какви било работи на
одржување или чистење, уредот
мора да го исклучите од струја.
Отстранување бигор
Водата што ја користиме обично
содржи бигор. Препорачливо е, во
машината повремено да користите прав
за омекнување на водата. Правете го
ова посебно од перењето на алиштата
и според упатствата на производителот
на омекнувачот на водата. Тоа ќе
помогне во спречување на таложење на
бигорот.
По секое перење
Оставете ја вратата отворена некое
време. Ова помага во уредот да се
спречи создавање на миризба на мувла
и на застоено. Со тоа што ќе ја
оставате вратата отворена по
перењето ќе го сочувате и дихтунгот.
Перење за одржување
Со користење на перења со ниски
температури, можно е да дојде до
таложење на остатоци во внатрешноста
на барабанот.
Препорачуваме редовно да изведувате
перење за одржување.
За да изведете перење за одржување:
• во барабанот не треба да има алишта.
• изберете ја најжешката програма за
перење памучни алишта.
• употребете вообичаена количина
детергент, кој мора да биде во прав и
да има биолошки својства.
Чистење однадвор
Чистете го надворешниот дел од
куќиштето на уредот само со сапуница,
а потоа исушете го темелно.
ВАЖНО Немојте за чистење на
кабинетот да користете метилирани
алкохоли, растворувачи или слични
производи.
Чистење на фиоката на дозерот
Фиоката на дозерот за детергент треба
да се чисти редовно.
Фиоката на дозерот за прашок за
перење и за омекнувач треба да се
чисти редовно.
Извадете ја фиоката така што резето ќе
го притиснете надолу и ќе ја извлечете.
Исплакнете ја под чешма за да
отстранете секакви трагови од
наталожен прашок.
За полесно чистење, горниот дел на
преградата за омекнувач треба да се
извади. Исчистете ги сите делови со
вода.
Исчистете ја комората на фиоката на
дозерот со четка.
Page 45

Барабан за перење
Поради рѓосување на туѓи тела во
перењето или поради тоа што водата
од водоводот содржи железо, во
барабанот може да се јават наслаги од
рѓа.
ВАЖНО Не чистете го барабанот со
средства против бигор што содржат
киселина, детергенти за стружење со
хлор или со железна или челична жица.
1. Отстранете ги наслагите од рѓа со
средство за чистење за челик што
не рѓосува.
2. Пуштете циклус на перење без
алишта, за да ги исчистите сите
остатоци од средствата за чистење.
Програма: куса програма за памук
при максимална температура, со
прибл. 1/4 мерник детергент.
Дихтунг на вратата
Повремено проверувајте го дихтунгот
од вратата и отстранете ги евентуално
заглавените предмети во
превиткувањето.
electrolux 45
Одводна пумпа
Пумпата треба редовно да се
проверува и тоа особено ако:
• апаратот не испушта и/или не
центрифугира;
• апаратот испушта невообичаени
звуци за време на цедењето поради
предмети, како на пр., безопасни,
парички итн., кои ја блокираат
пумпата.
• се открие проблем кај системот за
испуштање на водата (за повеќе
детали, погледнете го поглавјето
„Што да сторите ако...“).
ПРЕДУПРЕДУВАЊЕ Пред да ја
отворате вратата од пумпата,
исклучете го апаратот и извадете го
штекерот од приклучокот за струја.
Постапете вака:
1. Извлечете го штекерот на апаратот.
2. Доколку е потребно, почекајте
додека водата не се излади.
3. Отворете ја вратата од пумпата.
Page 46

46 electrolux
4. Ставете сад до пумпата за да се
собере истуреното.
5. Извлечете го цревото за итно
испуштање, ставете го во садот и
извадете му го капачето.
6. Откако водата ќе престане да тече,
одвртете го капакот на пумпата
вртејќи го во лево и извадете го
филтерот. Користете клешти, ако е
потребно. Секогаш држете некаква
крпа во близина за да ја соберете
истурената вода кога го вадите
капакот.
Исчистете го филтерот под млаз
вода за да ги отстраните сите
влакненца.
7. Отстранете ги страните тела и
влакненцата од лежиштето на
филтерот и роторот на пумпата.
8. Внимателно проверете дали
роторот на пумпата се врти (се врти
со прекини). Ако не се врти,
обратете се во локалниот сервисен
центар.
9. Вратете го капакот од цревото за
итно празнење на место и вратете
го цревото во неговото лежиште.
10. Вратете го филтерот во пумпата
вметнувајќи го правилно во
специјалните водилки. Зашрафете
го капакот од пумпата со вртење во
десно.
Page 47

11. Затворете ја вратата од пумпата.
electrolux 47
4. Зашрафете го цревото на славината.
5. Отшрафете го цревото од
машината. Подгответе крпа, бидејќи
може да истече вода.
6. Исчистете го филтерот во вентилот
со тврда четка или со парче крпа.
ПРЕДУПРЕДУВАЊЕ
Доколку апаратот работел, а зависно од
избраната програма, во пумпата може
да има жешка вода.
Никогаш не вадете го капакот од
пумпата за време на циклус на перење,
секогаш почекајте апаратот да го
заврши циклусот и да биде празен. Кога
го враќате капакот на пумпата на место,
проверете дали е цврсто затегнат за да
спречите протекување и можност деца
да го одвртат.
Чистење на доводните филтри за вода
Ако забележите дека на машината и'
треба подолго време да се наполни,
проверете да не е затнат филтерот во
цревото за довод на вода.
1. затворете ја славината.
2. Одвртете го доводното црево.
3. Исчистете го филтерот во цревото
со помош на четка со тврди влакна.
7. Зашрафете го цревото на машината
и уверете се дека е цврсто
приклучено.
8. Отворете ја славината.
Итно празнење
Доколку водата не е испуштена,
постапете на следниот начин за да ја
испразните машината:
1. извлечете ја приклучницата од
штекерот;
2. затворете ја славината;
3. доколку е потребно, почекајте
водата да се излади;
4. Отворете ја вратичката на пумпата;
Page 48

48 electrolux
5. ставете длабок сад на подот и
ставете го крајот од цревото за итно
празнење во него. Извадете го
капачето од него. Водата треба да
се исцеди во садот по слободен пад.
Откако садот ќе се наполни, вратете
го капачето на цревото. Испразнете
го садот. Повторувајте ја постапката
додека водата не престане да тече;
6. доколку е потребно, исчистете ја
пумпата на погоре опишаниот начин;
7. откако ќе го затворите со капачето,
вратете го цревото за итно
празнење на место;
8. повторно зашрафете ја пумпата и
затворете ја вратичката.
Спречување смрзнување
Ако машината е ставена на место каде
што температурата може да падне под
0°C, постапете вака:
1. затворете ја славината и отшрафете
го цревото за довод на вода до
славината;
ШТО ДА СТОРИТЕ АКО...
Можни се одредени проблеми поради
несоодветно одржување или превиди,
што може лесно да се решат без
викање сервисер. Пред да се обратите
во вашиот локален сервисен центар,
прво изведете ги следните проверки.
Додека машината работи, можно е
црвената контролна сијалица од
копчето 8 да трепка, на екранот да се
појави некоја од следните шифри за
тревога и на секои 20 секунди да се
огласува звучен сигнал, за да укажат
дека машината не работи:
2. Ставете го крајот од цревото за итно
празнење и на доводното црево во
длабок сад на подот и пуштете ја
водата да истече;
3. повторно зашрафете го доводното
црево и вратете го на место цревото
за итно празнење откако ќе му го
ставите капачето.
Така се празни сета вода од машината,
со што се избегнува формирање мраз и
евентуално нејзино оштетување.
Кога ќе сакате повторно да ја користите
машината, проверете дали
температура во просторијата е над 0°C.
ВАЖНО Секогаш кога ќе ја испуштите
водата со цревото за итно празнење
мора да истурите 2 литра вода во
главната преграда на фиоката за
детергент, а потоа да ја пуштите
програмата за црпење. Тоа ќе го
активира уредот со вентил ECO што
спречува дел од детергентот да остане
неупотребен при следното перење.
•
: проблем со доводот на вода.
•
: проблем со испуштањето вода.
•
: вратата е отворена.
Откако ќе го решите проблемот,
притиснете го копчето 8 за да ја
стартувате програмата одново. Ако и по
сиве овие проверки проблемот
останува, контактирајте со својот
локален сервисен центар.
Page 49

Пречка Веројатна причина/Решение
Машината за перење не стартува:
Машината не зема вода:
Машината зема вода и веднаш ја испушта:
electrolux 49
Вратата не е затворена.
• Цврсто затворете ја вратата.
Штекерот не е правилно вметнат во
приклучницата.
• Вметнете го штекерот во приклучницата.
Во приклучницата нема струја.
• Проверете ја домашната електрична
инсталација.
Избил главниот осигурувач.
• Заменете го осигурувачот.
Програматорот не е правилно поставен, а
копчето 8 не е притиснато.
• Завртете го програматорот и повторно
притиснете го копчето 8 .
Избрано е одложено почнување.
• Доколку алиштата треба да се перат
веднаш, откажете го одложениот старт.
Активирана е БЕЗБЕДНОСНАТА БЛОКАДА
ЗА ДЕЦА.
• Исклучете го уредот.
Славината за вода е затворена.
• Отворете ја славината.
Доводното црево е згмечено или
превиткано.
• Проверете го приклучокот на доводното
црево.
Филтрите во доводното црево или во
доводниот вентил се затнати.
• Исчистете ги филтрите на доводот на
вода (повеќе детали ќе најдете во
„Чистење на филтрите на доводот на
вода“).
Вратата не е правилно затворена.
• Цврсто затворете ја вратата.
Крајот на одводното црево е поставен
премногу ниско.
• Погледнете го соодветниот пасус во
поглавјето „Испуштање вода“.
Page 50

50 electrolux
Пречка Веројатна причина/Решение
Машината не испушта и/или не
центрифугира:
На подот има вода:
Лоши резултати на перење:
Одводното црево е згмечено или
превиткано.
• Проверете го приклучокот на одводното
црево.
Филтерот за испуштање вода е
затнат.
• Исчистете го филтерот.
Одбрана е опција или програма што
завршува со вода во кадата или која ги
елиминира сите избрани фази на
центрифугирање.
• Исклучете ја таа опција.
• Изберете ја програмата за цедење или
центрифугирање.
Алиштата во барабанот не се рамномерно
распоредени.
• Одново распоредете ги алиштата.
Сте употребиле премногу или несоодветен
детергент (создава премногу пена).
• Намалете ја количината на детергент или
употребете друг.
Проверете дали протекува од некој од
приклучоците на доводното црево.
Понекогаш е тешко да се забележи дека по
цревото тече вода; проверете дали е
влажно.
• Проверете го приклучокот за вода на
доводното црево.
Одводното црево е оштетено.
• Заменете го со ново.
Капачето на цревото за итно празнење не
било вратено на место или филтерот не
бил правилно зашрафен по чистењето.
• Одново ставете го капакот на цревото за
итно празнење или докрај зашрафете го
филтерот.
Сте употребиле премалку детергент или
детергент што не одговара.
• Зголемете ја количината на детергентот
или употребете некој друг.
Не сте ги третирале тврдокорните дамки
пред перењето.
• Користете комерцијални производи за
третирање на тврдокорните дамки.
Не е избрана соодветна температура.
• Проверете дали сте ја избрале
соодветната температура.
Премногу алишта.
• Ставајте помалку алишта во барабанот.
Page 51

Пречка Веројатна причина/Решение
Вратата не се отвора:
Машината вибрира или е премногу бучна:
Центрифугирањето започнува доцна или
машината не центрифугира:
Машината прави невообичаени звуци:
Во барабанот не се гледа вода:
electrolux 51
Програмата уште работи.
• Почекајте до крајот на циклусот на
перење.
Бравата од вратата не е отклучена.
• Почекајте додека контролната сијалица 9
не се изгасне.
Во барабанот има вода.
• Изберете програма за цедење или
центрифугирање за да ја испуштите
водата.
Транспортните клинови и амбалажата не се
отстранети.
• Проверете дали апаратот е правилно
монтиран.
Потпорните ногалки не се регулирани
• Проверете дали апаратот е правилно
нивелиран.
Алиштата во барабанот не се рамномерно
распоредени.
• Одново распоредете ги алиштата.
Можеби има премалку алишта во барабанот.
• Ставете повеќе алишта.
Се активирал електронскиот уред за
откривање на неврамнотеженост бидејќи
алиштата не се рамномерно распоредени
во барабанот. Алиштата се
прераспоредуваат со вртење на барабанот.
Ова може да се повтори неколкупати
додека неврамнотеженоста не исчезне за
да може да се продолжи со нормално
центрифугирање. Доколку и по неколку
минути алиштата не се рамномерно
распоредени во барабанот, машината нема
да центрифугира.
• Одново распоредете ги алиштата.
Машината е опремена со тип на мотор кој
прави невообичаени звуци во однос на
традиционалните мотори. Овој нов мотор
овозможува помеко стартување и
порамномерно распределување на
алиштата во барабанот во текот на
центрифугирањето, како и зголемена
стабилност на машината.
Машините, базирани на модерна
технологија, работат многу економично,
користејќи многу малку вода, без да се
намалат перформансите.
Page 52

52 electrolux
Доколку не можете да го утврдите или
решите проблемот, обратете се во
нашиот сервисен центар Пред да се
јавите на телефон, запишете ги
моделот, серискиот број и датумот на
набавка на вашата машина:
сервисниот центар ќе ги бара овие
податоци.
..
.
.
..
.
. ..
o
N
r.
.
e
.
.
S
..
..
.
.
..
..
.
.
.
o
..
.
N
d
.
o
d
M
ro
P
Mod. ... ... ...
Prod. No. ... ... ...
Ser. No. ... ... ...
ТЕХНИЧКИ ПОДАТОЦИ
Димензии Ширина
Висина
Длабочина
Поврзување на електриката Информации за поврзувањето на електриката се дадени на
плочката од внатрешната страна на вратата на уредот.
Притисок на доводот за вода Минимум
Максимум
Максимално полнење Памук 6kg
Брзина на центрифугирање Максимум 1000 врт./мин (EWF
60cm
85cm
63cm
0,05 MPa
0,8 MPa
106410W )
1200 врт./мин (EWF
126410W)
1400 врт./мин (EWF
146410W)
ПОТРОШУВАЧКИ ВРЕДНОСТИ
Програма Потрошувачка на
струја (kWh)
Бели памучни
2 61
алишта 95°
Памучни 60° 1.3 58
Памучни
ЕКОНОМИЧНО 60°
1)
1.02 46
Памучни 40° 0.7 58
Синтетика 40° 0.5 50
Нежни 40° 0.55 60
Волна 30° 0.25 53
1) Програмата „Памучни Eко“ на 60°C со полнење од 6 kg е референтна програма за податоците внесени
на енергетската етикета, во согласност со стандардите од EEC 92/75.
Податоците за потрошувачката
прикажани во табелата се сметаат
Потрошувачка на
вода (литри)
Траење на
програмата (минути)
За времетраењето
на програмите ве
молиме погледенте
на екранот од
контролната табла.
за чисто ориентациски, бидејќи
може да варираат зависно од
Page 53

electrolux 53
количеството и видот на алиштата,
од влезната температура на
МОНТАЖА
Распакување
Сите транспортни клинови и сета
амбалажа мора да се отстранат пред
користење на уредот.
Ви советуваме да ја чувате сета
транспортна опрема, така што таа ќе
може одново да се монтира, доколку
уредот некогаш повторно ќе се
транспортира.
1. Откако ќе ја отстраните сета
амбалажа, внимателно положете ја
машината на задната страна и
отстранете го стиропорот одоздола.
водата, како и од температурата на
околината.
3. Одвртете ги трите клина.
2. Симнете ги кабелот за струја и
одводното и доводното црево од
држачите на задната страна од
уредот.
4. Извлечете ги соодветните
пластични разделници.
Page 54

54 electrolux
5. Отворете го прозорецот и извадете
го блокот од стиропор, монтиран на
дихтунгот од вратата.
6. Затворете ги помалата горна дупка
и двете поголеми со соодветните
пластични затки, испорачани во
вреќичката со упатството.
Поставување во положба
Монтирајте ја машината на рамен, тврд
под. Уверете се дека струењето на
воздухот околу машината не е
попречено од теписи, черги итн.
Проверете дали машината ги допира
ѕидот или кујнските елементи.
Нивелирајте ја машината за перење со
подигање или спуштање на ногалките.
Можно е, регулирањето на ногалките да
оди тешко, бидејќи имаат навртка за
само-заклучување, но машината МОРА
да биде нивелирана и стабилна. Ако е
потребно, проверете го поставувањето
со помош на либела. Сите потребни
нагодувања може да се изведуваат со
клуч за одвртување. Точното
нивелирање спречува вибрации, бучава
и поместување на машината во текот
на работата.
ВНИМАНИЕ Никогаш не ставајте
картон, дрво или сличен материјал
под машината за да ги израмните
нерамнините на подот.
Page 55

electrolux 55
нагодете го аголот на цревото кон
лево или кон десно, зависно од
положбата на славината за вода.
Довод за вода
ПРЕДУПРЕДУВАЊЕ Апаратот мора
да се приклучи на довод за студена
вода.
1. Приклучете го доводното црево,
испорачано со машината, на
славина со навој од 3/4". Секогаш
користете го цревото испорачано со
уредот.
ВАЖНО Не употребувајте го цревото од
старата машина за да ја поврзете на
доводот на вода.
2. другиот крај од доводното црево, кој
се приклучува во машината, може
да се заврти како што е прикажано
на сликата.
Не поставувајте го доводното црево
надолу.
3. Правилно наместете го цревото со
олабавување на прстенестата
навртка. Откако ќе го поставите
доводното црево, проверете дали
прстенестата навртка е добро
прицврстена за да избегнете
протекување.
Доводното црево не смее да се
продолжува. Ако е премногу кратко и
ако не сакате да ја преместувате
славината, ќе треба да купите ново,
подолго црево, специјално наменето за
овој тип на примена.
ВАЖНО Пред да приклучувате
машината на нова водоводна мрежа
или на мрежа која не е користена
повеќе време, пуштете да истече некоја
разумна количина вода, за да се
исперат сите талози што се собрале во
цевките.
Одвод за вода
Крајот од одводното црево може да се
постави на три начини.
• Закачено преку работ на мијалникот ,
со помош на пластичната водилка за
црево, испорачана со машината. Во
овој случај, уверете се дека крајот
нема да се откачи при празнење на
машината. Ова може да се постигна
со негово врзување на славината или
со закачување на ѕидот.
Page 56

56 electrolux
• Во огранок од одводната цевка на
мијалникот. Овој огранок мора да
биде над јамката, така што кривината
ќе биде најмалку 60 cm над подот.
• Директно во одводна цевка , на
висина не помала од 60 cm и не
повеќе од 90 cm. Крајот на одводното
црево секогаш мора да биде
вентилирано, т.е. внатрешниот
пречник на одводната цевка мора да
биде поголем од надворешниот
дијаметар на одводното црево.
Одводното црево не смее да биде
превиткано.
Одводното црево може да се продолжува до максимум 4 метри. Дополнително
одводно црево и елемент за поврзување можете да набавите во вашиот локален
сервисен центар.
ПОВРЗУВАЊЕ НА СТРУЈАТА
Информации за поврзувањето на
електриката се дадени на плочката од
внатрешната страна на вратата на
уредот.
Проверете дали вашата домашна
електрична инсталација може да го
носи потребното максимално
оптоварување, притоа земајќи ги
предвид и останатите користени уреди.
Поврзете ја машината на заземјена
приклучница.
Производителот не прифаќа
никаква одговорност за
оштетувања или повреди,
настанати поради непочитување на
горенаведените безбедносни мерки.
По монтажата на машината,
кабелот за струја мора да биде
лесно достапен.
Доколку кабелот за струја на
апаратот мора да се замени, тоа
мора да го направи сервисен
центар.
Page 57

ЕКОЛОШКИ ПРАШАЊА
Отстранете го Вашиот истрошен уред
според прописите кои важат во Вашето
место на живеење.
Амбалажа
Материјалите означени со симболот
можат да се рециклираат.
>PE<=полиетилен
>PS<=полистирен
>PP<=полипропилен
Ова значи дека тие може да се
рециклираат со нивно отстранување во
соодветни собирни контејнери.
Еколошки практични совети
За да заштедите вода, струја и да
помогнете во заштита на животната
средина, препорачуваме да ги следите
овие практични совети:
electrolux 57
• За да се заштеди детергент, вода и
време, нормално валканите алишта
можат да се перат и без претперење
(со тоа се штити и животната
средина!).
• Машината работи поекономично ако
е целосно наполнета.
• Со соодветно претходно третирање
може да се отстранат дамките и
валканоста на одредени места;
алиштата тогаш може да се перат на
пониска температура.
• Измерете го детергентот според
тврдостa на водата, степенот на
валканост и количината на алишта,
што ќе се пере.
Page 58

58 electrolux
Electrolux. Thinking of you.
Обменяйтесь с нами своими мыслями на
www.electrolux.com
СОДЕРЖАНИЕ
Сведения по технике безопасности
Описание изделия 60
Панель управления 61
Первое использование 64
Персонализация 65
Ежедневное использование 65
Полезные советы 68
Программы стирки 70
Уход и очистка 73
58
Что делать, если ... 78
Технические данные 81
Показатели потребления 82
Установка 82
Подключение к электросети 86
Охрана окружающей среды 86
Право на изменения сохраняется
СВЕДЕНИЯ ПО ТЕХНИКЕ БЕЗОПАСНОСТИ
ВАЖНО! Внимательно прочитайте и
сохраните для консультаций в будущем.
• Безопасность Вашего прибора соот‐
ветствует действующим промышлен‐
ным стандартам и требованиям зако‐
нодательства в отношении безо‐
пасности приборов. Тем не менее, как
изготовители, мы считаем своим дол‐
гом дать следующие указания по безо‐
пасности.
• Очень важно, чтобы настоящее руко‐
водство хранилось у пользователя ма‐
шины для консультаций в будущем. В
случае продажи или передачи данно‐
го электробытового прибора другому
лицу или, если при переезде на новое
место жительства прибор остается по
старому адресу, обеспечьте переда‐
чу руководства вместе с прибором
его новому владельцу с тем, чтобы
он мог ознакомиться с правилами его
эксплуатации и соответствующими
предупреждениями.
• НЕОБХОДИМО внимательно ознако‐
миться с ними перед тем, как присту‐
пить к установке и эксплуатации ма‐
шины.
• Перед первым включением стираль‐
ной машины проверьте ее на отсут‐
ствие повреждений, вызванных транс‐
портировкой. Никогда не подключай‐
те к инженерным сетям поврежден‐
ную машину. При обнаружении какихлибо повреждений обращайтесь к по‐
ставщику.
• Если доставка машины произведена
зимой при отрицательных температу‐
рах: Перед первым включением сти‐
ральной машины дайте ей постоять
при комнатной температуре в тече‐
ние 24 часов.
Общие правила техники безопасности
• Опасно изменять технические харак‐
теристики изделия или каким-либо об‐
разом модифицировать его.
• При стирке с высокой температурой
стекло дверцы может сильно нагре‐
ваться. Не касайтесь его!
• Следите за тем, чтобы домашние жи‐
вотные и дети не забирались в бара‐
бан. Во избежание этого проверяйте
барабан перед использованием маши‐
ны.
• Не допускайте попадания в машину
твердых острых предметов, таких как
монеты, булавки, заколки, винтики,
камни и т.д., так как они могут приве‐
сти к ее серьезному повреждению.
• Используйте только рекомендован‐
ное количество смягчителя тканей и
моющего средства. При применении
чрезмерного количества моющего
средства возможно повреждение тка‐
ни. См. рекомендации изготовителя
относительно количества моющих
средств.
• Мелкие предметы, такие как носки, но‐
совые платки, пояса и т.д., следует по‐
мещать в специальные мешки для
стирки или наволочку, иначе во вре‐
Page 59

electrolux 59
мя стирки они могут застрять между
баком и барабаном.
• Не стирайте в машине изделия с пла‐
стинами из китового уса, одежду с не‐
обработанными краями и рваную оде‐
жду.
• После использования и перед чист‐
кой и техобслуживанием машины все‐
гда отключайте ее от электросети и за‐
крывайте кран подачи воды.
• Ни при каких обстоятельствах не пы‐
тайтесь отремонтировать машину са‐
мостоятельно. Ремонт, выполненный
неопытными лицами, может привести
к серьезной неисправности или трав‐
ме. Обращайтесь в местный сервис‐
ный центр. Всегда настаивайте на ис‐
пользовании оригинальных запчас‐
тей.
Установка
• Этот прибор тяжелый. Будьте осто‐
рожны при его перемещении.
• При распаковке прибора убедитесь в
том, что он не поврежден. В случае
сомнений не пользуйтесь им, а обрат‐
итесь в сервисный центр.
• Перед началом эксплуатации маши‐
ны следует удалить всю упаковку и
снять транспортировочные болты. В
противном случае возможно серьез‐
ное повреждение изделия и другого
имущества. См. соответствующий раз‐
дел в руководстве пользователя.
• После установки прибора убедитесь,
что он не стоит на сливном или налив‐
ном шланге и что верхняя крышка не
прижимает сетевой шнур к стене.
• Если машина устанавливается на ко‐
вровом покрытии, необходимо отрегу‐
лировать ножки таким образом, что‐
бы обеспечить свободную циркуля‐
цию воздуха под машиной.
• После установки обязательно убеди‐
тесь в отсутствии утечки воды из
шлангов и соединительных элемен‐
тов.
• Если прибор установлен в помеще‐
нии, температура в котором может
опускаться ниже нуля, ознакомьтесь с
разделом "Опасность замерзания".
• Все сантехнические работы, необхо‐
димые для установки данного прибо‐
ра, должны выполняться квалифици‐
рованным сантехником или компе‐
тентным специалистом.
• Все работы по электрическому под‐
ключению, необходимые для установ‐
ки данного прибора, должны выпол‐
няться квалифицированным электри‐
ком или компетентным специалистом.
Эксплуатация
• Данный прибор предназначен только
для бытового применения. Он не дол‐
жен использоваться в целях, отлич‐
ных от тех, для которых он предназна‐
чен.
• Стирайте только те изделия, которые
предназначены для машинной стир‐
ки. Следуйте инструкциям, указанным
на этикетке каждой вещи.
• Не перегружайте прибор. См. табли‐
цу программ стирки.
• Перед стиркой проверьте, чтобы все
пуговицы и застежки-молнии на одеж‐
де были застегнуты, а в карманах ни‐
чего не было. Не стирайте в машине
сильно поношенную или рваную оде‐
жду; удаляйте пятна краски, чернил,
ржавчины и травы перед стиркой. НЕ‐
ЛЬЗЯ стирать в машине бюстгальте‐
ры с проволочным каркасом.
• Не следует стирать в машине вещи,
испачканные летучими жидкостями
наподобие бензина. Если такие лету‐
чие жидкости использовались для
чистки одежды, необходимо полно‐
стью удалить их с нее перед тем, как
класть вещи в машину.
• Никогда не тяните за кабель, чтобы
вынуть сетевой шнур из розетки; все‐
гда беритесь за саму вилку.
• Ни в коем случае не эксплуатируйте
прибор в случае повреждения сетево‐
го шнура или таких повреждений па‐
нели управления, рабочего стола или
основания, которые открывают до‐
ступ во внутреннюю часть стираль‐
ной машины.
Защита от детей
• Данное устройство не предназначено
для эксплуатации лицами (включая
детей) с ограниченными физически‐
ми, сенсорными или умственными спо‐
Page 60

60 electrolux
собностями, а также не обладающи‐
ми достаточным опытом или знания‐
ми без присмотра или под руковод‐
ством лица, отвечающего за их без‐
опасность.
• Необходимо присматривать за деть‐
ми и не разрешать им играть с дан‐
ным устройством.
• Упаковочные материалы (например,
полиэтиленовая пленка, пенопласт)
могут быть опасными для детей - они
могут стать причиной удушения при
попадании в дыхательные пути! Дер‐
жите их вне досягаемости детей.
• Храните все моющие средства в на‐
дежном месте, недоступном для де‐
тей.
• Следите за тем, чтобы дети и домаш‐
ние животные не забирались в бара‐
бан. Во избежание запирания внутри
барабана детей или домашних живот‐
ных, в машине предусмотрено спе‐
циальное устройство. Для включения
этого устройства поверните по часо‐
вой стрелке расположенную на внут‐
ренней стороне дверцы кнопку, не на‐
жимая ее, так, чтобы паз оказался в
горизонтальном положении. При необ‐
ходимости, используйте для этого мо‐
нету.
Для отключения этого устройства, что‐
бы снова можно было закрыть двер‐
цу, поверните кнопку против часовой
стрелки так, чтобы паз оказался в вер‐
тикальном положении.
ОПИСАНИЕ ИЗДЕЛИЯ
Ваш новый прибор удовлетворяет всем современным требованиям, предъя‐
вляемым к эффективной стирке белья, при низком расходе воды, энергии и
моющих средств. Новая система стирки обеспечивает полное использование
моющего средства и уменьшает потребление воды, способствуя экономии энер‐
гии.
1 2
6
3
4
5
Page 61

electrolux 61
1 Дозатор моющих средств
2 Панель управления
3 Ручка для открывания дверцы
Дозатор моющих средств
Отделение для моющего средства,
используемого при предварительной
стирке и вымачивании, или для пятно‐
выводителя, используемого на этапе
выведения пятен (если имеется). Мою‐
щее средство для предварительной
стирки и вымачивания добавляется в
начале выполнения программы стирки.
Пятновыводитель добавляется на эта‐
пе выведения пятен.
От де ле ние дл я п оро шк ов ог о и ли жи д‐
кого моющего средства, используемого
при основной стирке. При использова‐
нии жидкого моющего средства нали‐
вайте его непосредственно перед запу‐
ском программы.
Отделение для жидких добавок (смяг‐
чителя тканей, крахмала).
При дозировке моющих средств и доба‐
вок руководствуйтесь указаниями изго‐
товителя и не превышайте отмет‐
ку "MAX" на стенке дозатора. Смягчи‐
тель тканей или крахмальные добавки
необходимо заливать в отделение доза‐
тора перед запуском программы стирки.
Справочник по программам
Справочник по программам находится
на передней стороне дозатора моющих
средств.
Другие справочники по программам на
разных языках находятся в пакете с ру‐
ководством пользователя. (Не ко всем
4 Табличка технических данных
5 Фильтр сливного насоса
6 Регулируемые ножки
приборам прилагается несколько спра‐
вочников по программам).
Чтобы заменить справочник по програм‐
мам:
1. Вытащите его и уберите.
2. Вставьте новый справочник.
ПАНЕЛЬ УПРАВЛЕНИЯ
На нижеприведенном рисунке показана панель управления. На нем предста‐
влены селектор программ, различные кнопки, индикатор и дисплей На дальней‐
ших страницах они обозначаются соответствующими цифрами.
Page 62

62 electrolux
1 2 4 6 7
1 Селектор программ
2 Кнопка "ТЕМПЕРАТУРА"
3 Кнопка "СНИЖЕНИЕ СКОРОСТИ
ОТЖИМА"
4 Кнопка "ПРЕДВАРИТЕЛЬНАЯ
СТИРКА"
5 Кнопка "ДОПОЛНИТЕЛЬНОЕ ПО‐
ЛОСКАНИЕ"
УСЛОВНЫЕ ОБОЗНАЧЕНИЯ
= Специальные программы = Температура
= Стирка в холодной воде = Снижение скорости отжима
= Остановка с водой в баке = Ночной цикл
= Предварительная стирка = Дополнительное полоскание
= Задержка пуска = Защита детей
= Пуск / Пауза = Дверца заблокирована
= Менеджер времени (Time
Manager)
Селектор программ
Селектор программ позволяет выби‐
рать нужную программу, а также вклю‐
чать и выключать машину.
Температура
С помощью этой кнопки можно увеличи‐
вать или уменьшать температуру стирки.
Снижение скорости отжима
Нажимая эту кнопку, можно уменьшить
скорость отжима в выбранной програм‐
ме, либо задать дополнительную функ‐
цию (функции).
3 5
9
8
10
6 Кнопка "ЗАДЕРЖКА ПУСКА"
7 Дисплей
8 Кнопка "ПУСК/ПАУЗА"
9 Индикатор "ДВЕРЦА ЗАБЛОКИРО‐
ВАНА"
10 Кнопки "МЕНЕДЖЕРА ВРЕМЕНИ"
Остановка с водой в баке
При выборе этой функции вода после по‐
следнего полоскания не сливается для
предотвращения образования складок
на белье. Перед открыванием дверцы
необходимо слить воду из барабана.
Для осуществления слива воды выпол‐
ните указания, приведенные в разделе
"Конец программы".
Ночной цикл
При выборе этой функции вода после по‐
следнего полоскания не сливается, а
Page 63

electrolux 63
все стадии отжима отменяются для
предотвращения образования складок
на белье. Этот цикл стирки - совсем бес‐
шумный и может использоваться
ночью, когда действует более низкий та‐
риф на электроэнергию. В некоторых
программах при полосканиях будет ис‐
пользовано большее количество воды.
Перед открыванием дверцы необходи‐
мо слить воду из барабана. Для осущест‐
вления слива воды выполните указа‐
ния, приведенные в разделе "Конец про‐
граммы".
Предварительная стирка
При выборе этой функции машина вы‐
полняет предварительную стирку перед
тем, как приступать к основной стирке.
Время стирки будет увеличено. Эта
функция рекомендуется для стирки
сильно загрязненного белья.
Дополнительное полоскание
Данный прибор специально разработан
для обеспечения экономии энергии.
Если необходимо прополоскать белье
дополнительным количеством воды (до‐
полнительное полоскание), выберите
эту функцию. Будет выполнено несколь‐
ко дополнительных полосканий. Эта
функция рекомендуется для людей,
страдающих аллергией на моющие
средства, а также в местностях с очень
мягкой водой.
Отсрочка старта
Эта кнопка позволяет задержать запуск
программы на 30, 60, 90 минут, 2 часа,
а затем с шагом в 1 час до 20 часов.
Старт/Пауза
С помощью этой кнопки можно запу‐
стить или прервать выполнение выбран‐
ной программы.
Менеджер времени (Time Manager)
Эти кнопки позволяют изменить продол‐
жительность программы, автоматиче‐
ски предложенную машиной.
Индикатор блокировки дверцы
Индикатор 9 загорается, когда запу‐
скается программа, и указывает, можно
ли открыть дверцу:
• индикатор светится: дверцу открыть
нельзя. Машина работает или остано‐
вилась с водой в баке.
• индикатор не светится: дверцу можно
открыть. Программа закончена, или
вода из бака слита.
• индикатор мигает: дверца открывает‐
ся
Дисплей
7.4 7.5 7.1
На дисплей выводится следующая ин‐
формация:
7.27.3
7.1:
Page 64

64 electrolux
• Продолжительность выбранной про‐
граммы
После выбора программы на дисплей
выводится ее продолжительность в
часах и минутах (например, 2.05 ).
Продолжительность выбранной про‐
граммы стирки рассчитывается авто‐
матически на основании максималь‐
ной загрузки, рекомендованной для
каждого типа ткани. После начала вы‐
полнения программы оставшееся до
ее окончания время обновляется еже‐
минутно.
• Задержка пуска
Выбранное значение задержки пуска,
заданное с помощью соответствую‐
щей кнопки, будет высвечиваться на
дисплее в течение нескольких секунд,
затем дисплей вернется в режим ин‐
дикации продолжительности ранее
выбранной программы.
• Коды неисправностей
В случае возникновения неисправнос‐
тей во время работы на дисплей мо‐
гут выводиться их коды, например:
E20 (см. раздел "Что делать если...").
• Неправильный выбор дополнитель‐
ной функции
В случае выбора функции, несовме‐
стимой с выбранной программой стир‐
ки, на дисплее высвечивается сооб‐
щение Err в течение нескольких се‐
кунд, и красный индикатор, встроен‐
ный в кнопку 8 , включается в мигаю‐
щем режиме.
• Окончание программы
По окончании программы на дисплее
высвечиваются три мигающих нуля, а
индикатор кнопки 9 и индикатор кноп‐
ки 8 выключаются; дверцу можно от‐
крывать.
7.2: Символы этапов программы стирки
•
Стирка
•
Полоскания
•
Слив
•
Отжим
При выборе программы стирки в ниж‐
ней части дисплея появляются симво‐
лы, соответствующие ее различным эта‐
пам. После нажатия кнопки 8 отобра‐
жается только символ выполняемого
этапа стирки.
7.3: Этап нагрева
Во время цикла стирки на дисплее вы‐
свечивается символ температуры, ука‐
зывающий на то, что машина произво‐
дит нагрев воды в баке.
7.4: Символы степени загрязненности
белья
•
Сильная загрязненность
•
Обычная загрязненность
•
Ежедневная стирка
•
Слабая загрязненность
•
Быстрая стирка
•
Очень быстрая стирка
•
Свежесть
•
Супер свежесть
После выбора программы стирки на дис‐
плее высвечивается символ степени за‐
грязненности, автоматически предла‐
гаемый машиной.
7.5: Защита от детей
щита от детей").
(см. раздел "За‐
ПЕРВОЕ ИСПОЛЬЗОВАНИЕ
•Убедитесь в том, что подключе‐
ние машины к электросети, водо‐
проводу и канализации выполне‐
но в соответствии с инструкциями
по установке.
• Достаньте из барабана полисти‐
роловый блок и другие предметы.
• Чтобы включить ЭКО- клапан, на‐
лейте 2 литра воды в отсек основ‐
ной стирки
средств. Затем, чтобы очистить
бак и барабан от остатков произ‐
водства, запустите (без белья)
цикл стирки изделий из хлопка
при максимальной температуре.
Насыпьте половину мерки моюще‐
го средства в дозатор для основ‐
ной стирки и запустите машину.
дозатора моющих
Page 65

ПЕРСОНАЛИЗАЦИЯ
Звуковая сигнализация
Машина оборудована устройством зву‐
ковой сигнализации, срабатывающим в
следующих случаях:
• по окончании цикла;
• при неисправности.
При одновременном нажатии кнопок 4 и
5 примерно на 6 секунд устройство зву‐
ковой сигнализации отключается (звуко‐
вой сигнал будет подаваться только в
случае неисправности). Если нажать
эти 2 кнопки повторно, звуковая сигна‐
лизация снова включается.
Защита от детей
Это устройство позволяет оставлять ма‐
шину без присмотра, не беспокоясь о
том, что дети могут ее повредить или са‐
ми получить травму. Эта функция ос‐
тается включенной, даже когда стираль‐
ная машина не работает.
Существует два различных способа ус‐
тановки этой дополнительной функции:
1. До нажатия кнопки 8 : при этом за‐
2. После нажатия кнопки 8 : при этом
Для включения или отключения этой до‐
полнительной функции одновременно
нажмите и удерживайте в течение при‐
мерно 6 секунд кнопки 5 и 6 до тех пор,
пока на дисплее не загорится или не ис‐
чезнет символ
ЕЖЕДНЕВНОЕ ИСПОЛЬЗОВАНИЕ
Загрузка белья
Откройте дверцу, осторожно потянув ее
за ручку. Кладите белье в барабан по од‐
ной вещи, стараясь максимально раз‐
вернуть каждую. Закройте дверцу.
тельная функция (более подробную ин‐
формацию см. в разделе "Дозатор мою‐
щих средств").
electrolux 65
пуск машины будет невозможен.
станет невозможным изменение ка‐
кой-либо программы или дополни‐
тельной функции.
.
Дозирование моющего средства и смяг‐
чителя тканей
Вытяните до упора дозатор моющих
средств. Отмерьте необходимое количе‐
ство моющего средства, поместите его
в отделение дозатора, предназначен‐
ное для основной стирки
ветствующее отделение, если этого тре‐
бует выбранная программа/дополни‐
или в соот‐
При наличии такой необходимости по‐
местите смягчитель ткани в отделение
дозатора, помеченное символом
превышая отметку "MAX"). Осторожно
закройте дозатор моющих средств.
(не
Page 66

66 electrolux
Выбор нужной программы с помощью
селектора программ (1)
Поверните селектор программ на нуж‐
ную программу. Стиральная машина
предложит температуру воды и автома‐
тически выберет максимальную ско‐
рость отжима, соответствующую задан‐
ной программе. Эти значения можно из‐
менить, нажимая на соответствующие
кнопки. Затем начнет мигать зеленый
индикатор кнопки 8 .
Селектор программ можно поворачи‐
вать как по часовой, так и против часо‐
вой стрелки. Чтобы отменить програм‐
му/выключить машину, поверните селек‐
тор программ в положение
.
По окончании программы селектор про‐
грамм следует повернуть в положение
, чтобы выключить машину.
ПРЕДУПРЕЖДЕНИЕ! Если во
время работы машины установить
селектор программ в положение,
соответствующее другой
программе, красный индикатор
кнопки 8 мигнет 3 раза, а на
дисплее появится сообщение Err ,
указывающее на неправильный
выбор. При этом машина не будет
выполнять вновь выбранную
программу.
Кнопки дополнительных функций
В зависимости от программы возможно
сочетание различных функций. Их сле‐
дует выбирать после выбора нужной
программы и до нажатия кнопки 8 .
Выбор температуры с помощью кнопки 2
При выборе программы прибор автома‐
тически предлагает температуру по
умолчанию.
При необходимости постирать белье
при другой температуре нажимайте эту
кнопку необходимое количество раз для
увеличения или уменьшения температу‐
ры стирки.
Скорость отжима можно уменьшить,
нажимая кнопку 3
При выборе той или иной программы ма‐
шина автоматически предлагает макси‐
мальную скорость отжима, доступную
для этой программы.
Если вы хотите установить другую ско‐
рость отжима, несколько раз нажмите
кнопку 3 . При этом загорится соответ‐
ствующий индикатор.
Выберите требуемые дополнительные
функции, нажимая кнопки 3, 4 и 5.
В зависимости от выбранной програм‐
мы перед нажатием кнопки 8 можно вы‐
брать сочетание различных дополни‐
тельных функций. При выборе той или
иной функции загорается соответствую‐
щий индикатор.
В случае выбора неверной функции
красный индикатор кнопки 8 мигнет 3
раза, а на дисплее в течение несколь‐
ких секунд будет высвечиваться сооб‐
щение Err (Ошибка).
О совместимости программ стирки
с различными дополнительными
функциями см. в разделе "Програм‐
мы стирки".
Выбор дополнительной функции
"Отсрочка пуска" с помощью кнопки 6
Перед тем как запустить программу,
если вы хотите задать задержку пуска,
нажимайте кнопку 6 до тех пор, пока на
диспл ее не высв етит ся ну жное врем я за‐
держки. При этом загорится соответ‐
ствующий индикатор.
Значение выбранной отсрочки (макси‐
мум 20 часов) будет высвечиваться на
дисплее в течение нескольких секунд,
после чего на нем снова появится про‐
должительность выбранной программы.
Page 67

electrolux 67
Вы должны выбирать эту функцию по‐
сле установки программы, но до того,
как вы нажали кнопку 8 .
Вы можете изменить время отсрочки
старта или вообще отменить ее в лю‐
бой момент до нажатия кнопки 8 .
Выбор отсрочки пуска:
1. Выберите программу и нужные до‐
полнительные функции.
2. Выберите дополнительную функцию
"Отсрочка пуска" с помощью кнопки
6 .
3. Нажмите кнопку 8 :
– машина начнет обратный отчет с
шагом индикации в один час.
– Пуск программы начнется по исте‐
чении выбранного времени отсроч‐
ки.
Отмена отсрочки пуска после нажатия
кнопки 8 :
1. установите машину в ПАУЗУ, нажав
кнопку 8 .
2. нажмите и не отпускайте кнопку 6 до
тех пор, пока на дисплее не высве‐
тится символ 0' .
3. Снова нажмите кнопку 8 для начала
выполнения программы.
ВАЖНО! Заданное значение отсрочки
пуска можно изменить только после
повторного выбора программы стирки.
Выбрать функцию "Отсрочка пуска" не‐
льзя, если задана программа "Слив" .
Запустите программу, нажав кнопку 8
Чтобы начать выполнение выбранной
программы, нажмите кнопку 8 , зеленый
индикатор кнопки 8 перестанет мигать.
Чтобы прервать выполняющуюся про‐
грамму, нажмите кнопку 8 : при этом за‐
мигает зеленый индикатор.
Для возобновления работы программы
с той точки, в которой она была прерва‐
на, снова нажмите кнопку 8 . Если вы‐
брана отсрочка старта, стиральная ма‐
шина начнет обратный отсчет времени,
остающегося до запуска программы. В
случае выбора неверной функции крас‐
ный индикатор, встроенный в кнопку 8 ,
мигнет 3 раза, а на дисплее в течение
нескольких секунд будет высвечиваться
сообщение Err .
Выбор дополнительной функции
"Менеджер времени" с помощью кнопок
10
Нажимая эти кнопки, можно увеличи‐
вать или уменьшать продолжитель‐
ность цикла стирки. Выбранная степень
загрязненности отображается на дис‐
плее соответствующим символом. Эта
функция доступна только для программ
Хлопок , Синтетика и Ткани, требую‐
щие бережного обращения .
Степень за‐
грязненно‐
сти белья
Сильная за‐
грязнен‐
ность
Обычная за‐
грязнен‐
ность
Ежедневная
стирка
Слабая за‐
грязнен‐
ность
Быстрая
стирка
Очень бы‐
страя стир‐
1)
ка
Свежесть
Супер све‐
1)
жесть
1) Мы рекомендуем в этом случае уменьшать
загрузку (см. таблицу "Программы стирки")
2) При выборе данной функции на короткое время
появляется и исчезнет соответствующий символ.
Сим‐
вол
1)
2)
2)
Тип ткани
Для стирки сильно
загрязненных ве‐
щей
Для стирки вещей
с обычной сте‐
пенью загрязнен‐
ности
Для стирки вещей,
ношенных один
день
Для стирки слабоз‐
агрязненных ве‐
щей
Для стирки слегка
загрязненных ве‐
щей
Для стирки слабоз‐
агрязненных и ма‐
лоношеных вещей
Чтобы просто ос‐
вежить предметы
одежды
Чтобы просто ос‐
вежить очень не‐
большое число
предметов одежды
Изменение дополнительной функции
или текущей программы
Некоторые функции можно изменить до
того, как программа приступила к их вы‐
полнению.
Перед тем, как изменить какую-либо на‐
стройку, переведите прибор в паузу, на‐
жав кнопку 8 (если требуется изменить
Page 68

68 electrolux
функцию Менеджера времени, следует
отменить выполняемую программу и
снова сделать выбор).
Изменить текущую программу можно
только путем ее отмены. Для этого по‐
верните селектор программ на
тем - на новую программу. Запустите
эту программу, снова нажав кнопку 8 .
При этом вода из бака сливаться не бу‐
дет.
Прерывание программы
Для прерывания выполняемой програм‐
мы нажмите кнопку 8 , при этом начнет
мигать соответствующий зеленый инди‐
катор.
Для возобновления выполнения про‐
граммы нажмите эту кнопку повторно.
Отмена программы
Поверните селектор программ в положе‐
ние
для отмены выполняемой про‐
граммы.
Теперь можно выбрать новую програм‐
му.
Открывание дверцы
После запуска программы (или в тече‐
ние времени задержки пуска) дверца
блокируется; если Вам требуется ее от‐
крыть, вначале переведите машину в
паузу, нажав кнопку 8 .
Через несколько минут индикатор 9 по‐
гаснет, и дверцу можно будет открыть.
Если этот индикатор продолжает го‐
реть, а дверца остается заблокирован‐
ной, это означает, что машина уже на‐
гревает воду, или уровень воды в маши‐
не уже слишком велик. В любом случае
не пытайтесь открывать дверцу с силой!
Если Вы не можете открыть дверцу, но
сделать это необходимо, Вам следует
выключить машину, повернув селектор
, а за‐
программ в положение O . Через не‐
сколько минут дверцу можно будет от‐
крыть (при этом обращайте внимание
на уровень воды и температуру!) .
После закрытия дверцы необходимо
снова выбрать программу стирки и до‐
полнительные функции и нажать кнопку
8 .
По окончании программы
Стиральная машина останавливается
автоматически. На дисплее появляются
три мигающих символа 0.00 , и индика‐
тор кнопки 8 гаснет. Подается звуковой
сигнал.
В случае выбора программы или допол‐
нительной функции, по окончании кото‐
рых в баке остается вода, дверца ос‐
тается заблокированной, указывая на
то, что перед ее открытием необходимо
слить воду.
Чтобы слить воду, следуйте приведен‐
ным ниже указаниям:
1. Установите селектор программ в по‐
ложение O .
2. Выберите программу «Слив» или
«Отжим».
3. При необходимости, уменьшите ско‐
рость отжима с помощью соответ‐
ствующей кнопки.
4. Нажмите кнопку 8 .
По окончании этой программы дверца
будет разблокирована, и ее можно бу‐
дет открыть. Установите селектор про‐
грамм в положение O , чтобы выклю‐
чить машину.
Достаньте белье из барабана и убеди‐
тесь, что барабан пуст. Если вы больше
не будете стирать, закройте кран пода‐
чи воды. Оставьте дверцу открытой для
предотвращения образования плесени
и неприятных запахов.
Режим ожидания : Спустя несколько ми‐
нут после окончания программы вклю‐
чается режим экономии энергии. Сни‐
ПОЛЕЗНЫЕ СОВЕТЫ
Сортировка белья
Руководствуйтесь символами на этикет‐
ке каждой вещи и инструкциями по стир‐
ке, данными изготовителями. Рассорти‐
руйте белье следующим образом: бе‐
жается яркость дисплея. При нажатии
любой кнопки прибор выходит из режи‐
ма экономии энергии.
лое белье, цветное белье, синтетика, де‐
ликатное белье, изделия из шерсти.
Page 69

electrolux 69
Перед загрузкой белья
Никогда не стирайте вместе белое и
цветное белье. Во время стирки белое
белье может потерять свою белизну.
Новое цветное белье может полинять
при первой стирке; поэтому в первый
раз его следует стирать отдельно.
Застегните наволочки и молнии, крючки
и кнопки. Завяжите ремешки или длин‐
ные ленты.
Перед стиркой удалите стойкие пятна.
Протрите особо загрязненные участки
специальным моющим средством или
чистящей пастой.
С особой осторожностью обращайтесь
с занавесями. Снимите крючки или зав‐
яжите их в мешок или сетку.
Выведение пятен
Некоторые пятна могут не отстираться
только водой и моющим средством. По‐
этому рекомендуется обработать их пе‐
ред стиркой.
Кровь: промойте свежие пятна холод‐
ной водой. Засохшие пятна следует за‐
мочить на ночь со специальным мою‐
щим средством, затем потереть их в
мыльном растворе.
Масляные краски: смочите пятновыво‐
дителем на бензиновой основе, положи‐
те вещь на мягкую подстилку и промо‐
кните пятно; выполните обработку не‐
сколько раз.
Засохшие жирные пятна: смочите скипи‐
даром, положите вещь на мягкую под‐
стилку и кончиками пальцев промокните
пятно с помощью хлопчатобумажного
тампона.
Ржавчина: используйте растворенную в
горячей воде щавелевую кислоту или
специальное средство для выведения
пятен ржавчины в холодном виде. Будь‐
те осторожны со старыми пятнами ржав‐
чины, так как структура целлюлозы под
ними повреждена, и ткань может по‐
рваться.
Пятна плесени: обработайте отбелива‐
телем и тщательно сполосните (только
для белого и цветного белья, устойчиво‐
го к хлору).
Травяные пятна: слегка обработайте
мылом, а затем отбеливателем (только
3) не используйте ацетон для чистки изделий из искусственного шелка
для белого и цветного белья, устойчиво‐
го к хлору).
Шариковая ручка и клей: смочите ацето‐
3)
ном
положите вещь на мягкую подстил‐
ку и промокните пятно.
Губная помада: смочите ацетоном, как
указано выше, затем обработайте пят‐
но денатуратом. Обработайте остав‐
шиеся следы отбеливателем.
Красное вино: замочите с моющим сред‐
ством, прополощите и обработайте ук‐
сусной или лимонной кислотой, затем
еще раз прополощите. Обработайте ос‐
тавшиеся следы отбеливателем.
Чернила: в зависимости от состава чер‐
нил сначала смочите пятно ацетоном
3)
, затем уксусной кислотой; обработай‐
те оставшиеся на белой ткани следы с
помощью отбеливателя, а затем тща‐
тельно прополощите ее.
Пятна смолы: сначала обработайте пят‐
новыводителем, денатуратом или бен‐
зином, затем потрите, используя чистя‐
щую пасту.
Моющие средства и добавки
Хорошие результаты стирки также зави‐
сят от выбора моющего средства и пра‐
вильности его дозировки, это способ‐
ствует предотвращению излишнего за‐
грязнения окружающей среды.
Несмотря на свою биоразлагаемость,
моющие средства содержат вещества,
которые при попадании в окружающую
среду в большом количестве могут на‐
рушить хрупкое равновесие в природе.
Выбор моющего средства зависит от ти‐
па ткани (тонкие деликатные ткани,
шерсть, хлопок и т.д.), цвета, температу‐
ры стирки и степени загрязненности.
В данной стиральной машине можно ис‐
пользовать все обычно имеющиеся в
продаже моющие средства для машин‐
ной стирки:
• стиральные порошки для всех типов
тканей
• стиральные порошки для изделий из
деликатных тканей (макс. температу‐
ра 60°C) и шерсти
• жидкие моющие средства, предпочти‐
тельные для низкотемпературных
программ стирки (макс. температура
Page 70

70 electrolux
60°C) для всех типов тканей или спе‐
циально предназначенные для стирки
шерстяных изделий.
Моющие средства и добавки следует по‐
мещать в соответствующие отделения
дозатора моющих средств перед нача‐
лом выполнения программы стирки.
При использовании жидких моющих
средств необходимо выбирать програм‐
му без предварительной стирки.
Стиральная машина оборудована систе‐
мой рециркуляции, обеспечивающей оп‐
тимальное использование концентриро‐
ванных моющих средств.
При дозировке моющих средств и доба‐
вок руководствуйтесь указаниями изго‐
товителя и не превышайте отметку
"MAX" на стенке дозатора .
Количество используемого моющего
средства
Тип и количество моющего средства за‐
висят от типа ткани, величины загрузки,
степени загрязненности белья и жестко‐
сти используемой воды.
ПРОГРАММЫ СТИРКИ
Программа
Максимальная и минимальная температура
Описание цикла
Максимальная скорость отжима
Максимальная загрузка белья
Тип белья
ХЛОПОК
95° - стирка в холодной воде
Основная стирка – полоскания
Макс. скорость отжима 1000/1200/1400 об/мин
Макс. загрузка 6 кг – пониж. загрузка 3 кг
Белый и цветной хлопок (обычной степени загряз‐
нения).
СИНТЕТИКА
60° – Стирка в холодной воде
Основная стирка – полоскания
Макс. скорость отжима 900 об/мин
Макс. загрузка 3 кг – пониж. загрузка 1,5 кг
Изделия из синтетических или смешанных тка‐
ней: нижнее белье, цветное белье, не садящиеся
рубашки и блузки.
Следуйте указаниям изготовителя мою‐
щего средства по дозировке.
Используйте меньшее количество мою‐
щего средства, если:
• вы стираете небольшое количество
белья
• белье слабо загрязнено
• во время стирки образуется много пе‐
ны.
Степень жесткости воды
Жесткость воды измеряется в так назы‐
ваемых градусах жесткости. Информа‐
цию о жесткости воды в вашем районе
можно получить в службе водоснабже‐
ния или от местных органов власти.
Если степень жесткости воды средняя
или высокая, мы предлагаем вам доба‐
влять смягчитель воды, следуя рекомен‐
дациям производителя. Если по степе‐
ни жесткости вода мягкая, пересмотри‐
те количество используемого моющего
средства.
Функции
СНИЖЕНИЕ СКО‐
РОСТИ ОТЖИМА,
ОСТАНОВКА С ВО‐
ДОЙ В БАКЕ, НОЧ‐
1)
НОЙ ЦИКЛ, ПРЕД‐
ВАРИТЕЛЬНАЯ
СТИРКА, ДОПОЛ‐
НИТЕЛЬНОЕ ПО‐
ЛОСКАНИЕ, МЕ‐
НЕДЖЕР ВРЕМЕ‐
СНИЖЕНИЕ СКО‐
РОСТИ ОТЖИМА,
ОСТАНОВКА С ВО‐
ДОЙ В БАКЕ, НОЧ‐
НОЙ ЦИКЛ, ПРЕД‐
ВАРИТЕЛЬНАЯ
СТИРКА, ДОПОЛ‐
НИТЕЛЬНОЕ ПО‐
ЛОСКАНИЕ, МЕ‐
НЕДЖЕР ВРЕМЕ‐
НИ
НИ
2)
2)
Отделение
для моющего
средства
3)
3)
Page 71

Программа
Максимальная и минимальная температура
Описание цикла
Максимальная скорость отжима
Максимальная загрузка белья
Тип белья
ДЕЛИКАТНЫЕ ТКАНИ
40° – Стирка в холодной воде
Основная стирка – полоскания
Макс. скорость отжима 700 об/мин
Макс. загрузка 3 кг – пониж. загрузка 1,5 кг
Изделия из деликатных тканей: акрила, вискозы,
полиэстера.
ШЕРСТЬ / РУЧНАЯ СТИРКА
40° – Стирка в холодной воде
Основная стирка – полоскания
Макс. скорость отжима 900/1000 об/мин
1)
Макс. загрузка 2 кг
Программа стирки для шерстяных изделий, при‐
годных для машинной стирки, а также шерстяных
изделий, подлежащих ручной стирке и изделий
из деликатных тканей, имеющих на этикетке сим‐
вол "ручная стирка". Примечание: Стирка одной
или объемной вещи может вызвать дисбаланс.
Если прибор не выполняет заключительный от‐
жим, добавьте белья, перераспределите белье в
барабане вручную и задайте программу «Отжим».
ШЕЛК
30° – Стирка в холодной воде
Основная стирка – полоскания
Макс. скорость отжима 700 об/мин
Макс. загрузка 1 кг
Программа бережной стирки для изделий из шел‐
ковых и смесовых синтетических тканей.
ДАМСКОЕ БЕЛЬЕ
40° – Стирка в холодной воде
Основная стирка – полоскания
Макс. скорость отжима 900/1000 об/мин
1)
Макс. загрузка 1 кг
Эта программа предназначается для стирки ве‐
щей, требующих очень бережного к себе отноше‐
ния, таких как дамское белье, бюстгальтеры и дру‐
гое нижнее белье.
Функции
ОСТАНОВКА С ВО‐
ДОЙ В БАКЕ, НОЧ‐
НОЙ ЦИКЛ, ПРЕД‐
ВАРИТЕЛЬНАЯ
СТИРКА, ДОПОЛ‐
НИТЕЛЬНОЕ ПО‐
ЛОСКАНИЕ, МЕ‐
НЕДЖЕР ВРЕМЕ‐
НИ
2)
СНИЖЕНИЕ СКО‐
РОСТИ ОТЖИМА,
ОСТАНОВКА С ВО‐
ДОЙ В БАКЕ, НОЧ‐
НОЙ ЦИКЛ
ОСТАНОВКА С ВО‐
ДОЙ В БАКЕ, НОЧ‐
НОЙ ЦИКЛ
СНИЖЕНИЕ СКО‐
РОСТИ ОТЖИМА,
ОСТАНОВКА С ВО‐
ДОЙ В БАКЕ, НОЧ‐
НОЙ ЦИКЛ
electrolux 71
Отделение
для моющего
средства
3)
Page 72

72 electrolux
Программа
Максимальная и минимальная температура
Описание цикла
Максимальная скорость отжима
Максимальная загрузка белья
Тип белья
ПОЛОСКАНИЕ
Полоскание – продолжительный отжим
Макс. скорость отжима 1000/1200/1400 об/мин
Макс. загрузка 6 кг
Эта программа позволяет полоскать и отжимать
изделия из хлопчатобумажных тканей, выстиран‐
ных вручную. Для усиления эффекта полоскания
выберите "ДОПОЛНИТЕЛЬНОЕ ПОЛОСКАНИЕ".
Прибор добавит к циклу стирки дополнительные
полоскания.
СЛИВ
Слив воды
Макс. загрузка 6 кг
Для слива воды после последнего полоскания в
программах с функциями "Остановка с водой в ба‐
ке" и "Ночной цикл".
ОТЖИМ
Слив воды и продолжительный отжим
Макс. скорость отжима 1000/1200/1400 об/мин
Макс. загрузка 6 кг
Отдельный отжим, выполняемый для белья, вы‐
стиранного вручную, и по окончании программ с
функциями «Остановка с водой в баке» и «Ноч‐
ной цикл». Соответствующей кнопкой можно вы‐
брать скорость отжима в зависимости от типа бе‐
лья.
+ ХЛОПОК, ЭКОНОМИЧНЫЙ РЕЖИМ
95° -40°
Основная стирка – полоскания
Макс. скорость отжима 1000/1200/1400 об/мин
Макс. загрузка 6 кг
Белое и нелиняющее цветное хлопчатобумажное
белье
Программу можно использовать для стирки изде‐
лий из хлопчатобумажных тканей обычной или
слабой степени загрязненности. Время стирки бу‐
дет увеличено, а температура стирки понижена.
Это позволит получить хороший результат при
экономии энергии.
ЛЕГКОЕ ГЛАЖЕНИЕ
60° – Стирка в холодной воде
Основная стирка – полоскания
Макс. скорость отжима 900 об/мин
Макс. загрузка 1 кг
При использовании этой программы белье сти‐
рается и отжимается очень бережно, чтобы избе‐
жать образования складок. Это облегчает глаже‐
ние. Кроме того, машина выполняет дополнитель‐
ные полоскания.
Функции
СНИЖЕНИЕ СКО‐
РОСТИ ОТЖИМА,
ОСТАНОВКА С ВО‐
1)
ДОЙ В БАКЕ, НОЧ‐
НОЙ ЦИКЛ, ДО‐
ПОЛНИТЕЛЬНОЕ
ПОЛОСКАНИЕ
СНИЖЕНИЕ СКО‐
РОСТИ ОТЖИМА
1)
СНИЖЕНИЕ СКО‐
РОСТИ ОТЖИМА,
ОСТАНОВКА С ВО‐
ДОЙ В БАКЕ, НОЧ‐
1)
НОЙ ЦИКЛ, ПРЕД‐
ВАРИТЕЛЬНАЯ
СТИРКА, ДОПОЛ‐
НИТЕЛЬНОЕ ПО‐
ЛОСКАНИЕ
СНИЖЕНИЕ СКО‐
РОСТИ ОТЖИМА,
ОСТАНОВКА С ВО‐
ДОЙ В БАКЕ, ПРЕД‐
ВАРИТЕЛЬНАЯ
СТИРКА, ДОПОЛ‐
НИТЕЛЬНОЕ ПО‐
ЛОСКАНИЕ
Отделение
для моющего
средства
3)
3)
Page 73

electrolux 73
Программа
Максимальная и минимальная температура
Описание цикла
Максимальная скорость отжима
Максимальная загрузка белья
Тип белья
ДЖИНСЫ
60° – Стирка в холодной воде
Основная стирка – полоскания
Макс. скорость отжима 900/1000/1200 об/мин
Макс. загрузка 3 кг
С помощью этой программы можно стирать такие
вещи, как брюки, рубашки или куртки из джинсо‐
вой ткани, а также трикотажные изделия, изгото‐
вленные из современных высокотехнологичных
материалов (функция "Дополнительное полоска‐
ние" включится автоматически).
СПОРТ ИНТЕНСИВНАЯ
40° – Стирка в холодной воде
Предварительная стирка - основная стирка - по‐
лоскания
Макс. скорость отжима 900 об/мин
Макс. загрузка 2,5 кг
Программа пригодна для стирки сильно загряз‐
ненной спортивной одежды. Перед основной стир‐
кой машина автоматически выполнит предвари‐
тельную стирку для удаления пятен грязи.
СПОРТ ЛЕГКАЯ
30°
Основная стирка – полоскания
Макс. скорость отжима 700 об/мин
Макс. загрузка 2,5 кг
Короткая программа для слабозагрязненной спор‐
тивной одежды из смесовых тканей.
/ВЫКЛ
Для отмены текущей программы или выключения
машины.
1) в зависимости от модели
2) При выборе дополнительной функции "Быстрая стирка" или "Супербыстрая стирка" с помощью кнопки
10 рекомендуется уменьшить максимальную загрузку в соответствии с приведенными указаниями. В
этом случае возможна также стирка при максимальной загрузке, но ее результаты будут несколько
хуже. При выборе функции "Свежесть" или "Супер свежесть" рекомендуется еще более уменьшить
загрузку.
3) При использовании жидких моющих средств необходимо выбирать программу без
ПРЕДВАРИТЕЛЬНОЙ СТИРКИ.
Функции
СНИЖЕНИЕ СКО‐
РОСТИ ОТЖИМА,
ОСТАНОВКА С ВО‐
ДОЙ В БАКЕ, НОЧ‐
НОЙ ЦИКЛ, ПРЕД‐
ВАРИТЕЛЬНАЯ
СТИРКА
СНИЖЕНИЕ СКО‐
РОСТИ ОТЖИМА,
ОСТАНОВКА С ВО‐
ДОЙ В БАКЕ, НОЧ‐
НОЙ ЦИКЛ, ДО‐
ПОЛНИТЕЛЬНОЕ
ПОЛОСКАНИЕ
Отделение
для моющего
средства
3)
УХОД И ОЧИСТКА
ВНИМАНИЕ! Прежде чем
приступать к каким-либо операциям
по чистке или уходу, отключите
машину от электрической сети.
Удаление накипи
Используемая нами вода обычно содер‐
жит соли кальция. Поэтому рекомен‐
дуется периодически использовать в ма‐
шине порошок для смягчения воды. Вы‐
полняйте такую операцию не во время
стирки и в соответствии с указаниями из‐
готовителя смягчающего порошка. Это
поможет предотвратить образование из‐
вестковых отложений.
Page 74

74 electrolux
После каждой стирки
Оставляйте дверцу открытой на некото‐
рое время. Это поможет предотвратить
образование плесени и затхлого запаха
внутри машины. Если дверца после
стирки остается открытой, это способ‐
ствует также увеличению срока службы
прокладки дверцы.
Профилактическая стирка
Выполнение стирки с низкой температу‐
рой может привести к скоплению остат‐
ков внутри барабана.
Мы рекомендуем регулярно выполнять
так называемую профилактическую
стирку.
При выполнении профилактической
стирки:
• В барабане не должно быть белья.
• Выберите программу стирки хлопка с
наиболее высокой температурой.
• Используйте обычное количество
моющего средства; им должен быть
стиральный порошок с биологически‐
ми свойствами.
Чистка снаружи
Мойте корпус прибора снаружи только
водой с мылом, затем насухо протрите
его.
ВАЖНО! не используйте для чистки
корпуса машины метиловый спирт,
растворители или другие подобные
средства.
Чистка дозатора моющих средств
Дозатор моющих средств следует регу‐
лярно чистить.
Дозатор моющих средств и добавок сле‐
дует регулярно чистить.
Извлеките дозатор, отжав вниз защелку
и потянув его на себя.
Промойте его проточной водой, чтобы
удалить все остатки скопившегося поро‐
шка.
Для облегчения чистки можно снять
верхнюю часть отделения для добавок.
Промойте водой все детали дозатора.
Почистите отсек дозатора щеткой.
Page 75

Чистка барабана
Отложения ржавчины в барабане могут
образоваться вследствие попадания в
барабан вместе с бельем ржавых посто‐
ронних предметов или вследствие высо‐
кого содержания железа в водопровод‐
ной воде.
ВАЖНО! Не используйте для чистки
барабана чистящие средства,
имеющую кислотную основу или
содержащие хлор, а также
металлические губки.
1. Удаляйте следы ржавчины на стен‐
ках барабана с помощью средства
для чистки изделий из нержавеющей
стали.
2. Выполните цикл стирки без белья
для удаления остатков чистящих
средств.
Программа: Короткая программа
стирки хлопка с добавлением при‐
мерно. 1/4 мерного стакана моюще‐
го средства.
Прокладка дверцы
Периодически проверяйте уплотнение
дверцы и удаляйте посторонние пред‐
меты, которые могут в ней застрять.
electrolux 75
Сливной насос
Сливной насос следует проверять регу‐
лярно, особенно, если
• машина не выполняет слив и/или от‐
жим;
• при сливе машина издает странный
шум, вызванный попаданием в слив‐
ной насос таких предметов, как булав‐
ки, монеты и т.д.
• имеются проблемы, связанные со сли‐
вом воды (см. раздел "Что делать,
если...").
ВНИМАНИЕ! Перед тем как открыть
дверцу сливного насоса выключите
прибор и извлеките вилку шнура
питания из розетки.
Выполните следующие действия:
1. Извлеките вилку шнура питания ус‐
тройства из розетки.
2. При необходимости, подождите, по‐
ка вода остынет.
3. Откройте дверцу насоса.
Page 76

76 electrolux
4. Поставьте рядом с насосом емкость
на случай утечки воды.
5. Извлеките шланг аварийного слива,
поместите его конец в поставлен‐
ный тазик и снимите с него заглушку.
6. Когда вода перестанет литься, от‐
винтите крышку насоса, повернув
ее против часовой стрелки, и извле‐
ките фильтр. При необходимости,
используйте плоскогубцы. Всегда
держите под рукой тряпку, чтобы вы‐
тереть воду, которая может пролить‐
ся при снятии фильтра.
Очистите фильтр сливной трубки от
следов ворса.
7. Извлеките инородные предметы и
ворс из корпуса и крыльчатки насо‐
са.
8. Убедитесь, что крыльчатка насоса
вращается без помех (при враще‐
ни и возможны рывки — это нормаль ‐
но). Если она не вращается, обрат‐
итесь в сервисный центр.
9. Вставьте заглушку в шланг аварий‐
ного слива и установите его на ме‐
сто.
10. Установите фильтр на место в насо‐
се, аккуратно вставив его по направ‐
ляющим. Плотно закрутите крышку
насоса, вращая ее по часовой стрел‐
ке.
Page 77

11. Закройте дверцу сливного насоса.
electrolux 77
4. Снова прикрутите наливной шланг к
крану.
5. Отвинтите шланг от машины. Держи‐
те рядом тряпку, т.к. часть воды мо‐
жет вытечь.
6. Прочистите фильтр в шланге жест‐
кой щеткой или тряпкой.
ВНИМАНИЕ!
Вовремя работы устройства в зависимо‐
сти от выбранной программы в сливном
насосе может быть горячая вода.
Никогда не снимайте крышку сливного
насоса во время стирки, всегда дожи‐
дайтесь завершения машиной цикла и
слива воды. При установке крышки на
место убедитесь, что она плотно затяну‐
та во избе жание у течек и сняти я ее де ть‐
ми.
Чистка фильтров наливного шланга
Если вы заметили, что на заполнение
машины уходит больше времени, чем
раньше, проверьте, не забит ли фильтр
наливного шланга.
1. Закройте кран подачи воды.
2. Открутите наливной шланг.
3. Прочистите фильтр в шланге жест‐
кой щеткой.
7. Снова прикрутите шланг к машине,
проверив, чтобы он был туго затянут.
8. Откройте кран подачи воды.
Аварийный слив
Если вода не сливается, для осущест‐
вления слива действуйте следующим
образом:
1. Выньте вилку сетевого шнура маши‐
ны из розетки;
2. Закройте кран подачи воды;
3. При необходимости подождите, что‐
бы вода остыла;
Page 78

78 electrolux
4. откройте дверцу фильтра сливного
шланга;
5. Поставьте на пол тазик и поместите
в него конец шланга аварийного сли‐
ва. Снимите крышку шланга. Под дей‐
ствием силы тяжести вода станет
стекать в тазик. Когда тазик напол‐
нится, снова наденьте крышку на
шланг. Вылейте воду из тазика. По‐
вторяйте эту процедуру до оконча‐
ния слива воды;
6. при необходимости прочистите
фильтр, как описано выше;
7. Закройте шланг крышкой и установи‐
те его на место;
8. Снова прикрутите фильтр и закройте
дверцу.
Предотвращение замерзания
Если машина установлена в помеще‐
нии, температура в котором может опу‐
скаться ниже 0°C, действуйте следую‐
щим образом:
1. Закройте кран подачи воды и откру‐
тите от него наливной шланг;
2. Поставьте на пол тазик, поместите в
него концы наливного шланга и шлан‐
ЧТО ДЕЛАТЬ, ЕСЛИ ...
Некоторые неисправности, вызванные
отсутствием простого ухода или недо‐
смотром, можно легко устранить самим,
не обращаясь в сервисный центр. Пе‐
ред тем, как обращаться в местный ав‐
торизованный сервисный центр, пожа‐
луйста, выполните указанные ниже про‐
верки.
Во время работы машины может зами‐
гать красный индикатор, встроенный в
кнопку 8 , при этом каждые 20 секунд бу‐
дет подаваться звуковой сигнал, указы‐
вающий, что машина не работает, а на
га аварийного слива и дайте воде
полностью стечь;
3. Снова прикрутите к крану наливной
шланг и установите на свое место
шланг аварийного слива, вновь на‐
дев на него крышку.
При выполнении вышеописанных опера‐
ций, оставшаяся в машине вода будет
слита, что предотвратит образование
льда и, следовательно, поломку компо‐
нентов машины.
При следующем включении машины
убедитесь, что температура окружаю‐
щей среды выше 0°C.
ВАЖНО! Каждый раз при сливе воды с
помощью шланга аварийного слива
необходимо наливать 2 литра воды в
отделение основной стирки дозатора
моющих средств, а затем выполнять
программу слива. Это приведет в
действие ЭКO-клапан , предотвратив
ситуацию, когда остатки моющего
средства остаются неиспользованными
при следующей стирке.
дисплее появится один из следующих
кодов неисправности:
•
: неисправность подачи воды.
•
: Неисправность слива воды:
•
: открыта дверца.
Устранив причину неисправности, на‐
жмите кнопку 8 для возобновления вы‐
полнения программы. Если после всех
проверок неисправность остается, об‐
ратитесь в авторизованный сервисный
центр.
Page 79

Неисправность Возможная причина/Способ устранения
Стиральная машина не запускается:
Машина не наполняется водой:
Машина наполняется водой, и сразу же про‐
изводится слив :
Машина не выполняет слив и/или отжим:
electrolux 79
Дверца не закрыта.
• Плотно закройте дверцу.
Вилка вставлена в розетку неверно.
• Вставьте вилку в розетку.
В розетке отсутствует напряжение.
• Проверьте свою домашнюю электриче‐
скую сеть.
Перегорел предохранитель на главном рас‐
пределительном щите.
• Замените предохранитель.
Неправильно установлен селектор про‐
грамм и не нажата кнопка 8 .
• Поверните селектор программ и снова на‐
жмите кнопку 8 .
Выбрана отсрочка пуска.
• Если вы хотите, чтобы стирка белья нача‐
лась немедленно, отмените отсрочку пус‐
ка.
Включена функция "Замок от детей".
• Отключите функцию "Замок от детей".
Закрыт водопроводный вентиль.
• Откройте водопроводный вентиль.
Наливной шланг передавлен или сильно пе‐
регнут.
• Проверьте подсоединение наливного
шланга.
Забит фильтр в наливном шланге.
• Прочистите фильтры наливного шланга
(см. раздел "Чистка фильтров наливного
шланга").
Неплотно закрыта дверца.
• Плотно закройте дверцу.
Конец сливного шланга расположен слиш‐
ком низко.
• См. соответствующий параграф в разде‐
ле "Подключение к канализации".
Сливной шланг передавлен или сильно пе‐
регнут.
• Проверьте правильность подсоединения
сливного шланга.
Забит фильтр сливного насоса.
• Прочистите фильтр сливного насоса.
Выбрана программа или дополнительная
функция, по окончании которой в баке ос‐
тается вода или в которой исключена фаза
отжима.
• Отключите соответствующую дополни‐
тельную функцию.
• Выберите программу "Слив" или "Отжим".
Белье неравномерно распределено в бара‐
бане.
• Перераспределите белье в барабане.
Page 80

80 electrolux
Неисправность Возможная причина/Способ устранения
Вода на полу:
Неудовлетворительные результаты стирки:
Дверца не открывается:
Машина вибрирует или шумит:
Использовано слишком много моющего
средства или средство неправильного типа
(вызывающее избыточное пенообразова‐
ние).
• Уменьшите количество моющего сред‐
ства или используйте моющее средство
другого типа.
Проверьте, нет ли утечек в соединительных
деталях наливного шланга. Утечка воды из
шланга не всегда заметна визуально; поэто‐
му проверьте, не мокрый ли он.
• Проверьте подсоединение наливного
шланга.
Поврежден сливной или наливной шланг.
• Замените его новым.
После выполнения чистки фильтра его кры‐
шка не установлена на место, или сам
фильтр не закручен должным образом.
• Вставьте заглушку в шланг аварийного
слива или полностью ввинтите фильтр.
Слишком мало моющего средства или не‐
подходящее моющее средство.
• Увеличьте количество моющего средства
или используйте моющее средство друго‐
го типа.
Стойкие пятна не были обработаны перед
стиркой.
• Используйте имеющиеся в продаже сред‐
ства для выведения стойких пятен.
Задана неподходящая температура.
• Проверьте, правильно ли задана темпера‐
тура.
Слишком большая загрузка белья.
• Следует уменьшить количество загружае‐
мого белья.
Выполнение программы не закончено.
• Дождитесь завершения цикла стирки.
Не сработала система разблокировки двер‐
цы.
• Дождитесь, чтобы погас символ 9
Вода в барабане.
• Выберите программу слива или отжима,
чтобы слить воду.
Не удалены транспортировочные болты и
элементы упаковки.
• Проверьте правильность установки прибо‐
ра.
Не отрегулирована высота ножек
• Проверьте правильность выравнивания
прибора.
Белье неравномерно распределено в бара‐
бане.
• Перераспределите белье в барабане.
Возможно, в барабане слишком мало белья.
• Загрузите больше белья.
Page 81

Неисправность Возможная причина/Способ устранения
Отжим начинается с опозданием или не вы‐
полняется:
Машина издает необычный шум:
В машине не видна вода:
Если определить или устранить причи‐
ну неисправности самостоятельно не
удалось, обращайтесь в наш сервис‐
ный центр Перед тем, как звонить туда,
запишите для себя модель, серийный
номер и дату приобретения машины
эти сведения потребуются специали‐
стам сервисного центра
electrolux 81
Электронное устройство контроля дисба‐
ланса сработало из-за неравномерного рас‐
пределения белья в барабане. Белье будет
перераспределено равномерно за счет из‐
менения направления вращения барабана.
Это может происходить несколько раз до
тех пор, пока дисбаланс не исчезнет, и не
установится нормальный отжим. Если в те‐
чение нескольких минут белье в барабане
не распределится равномерно, машина не
будет выполнять отжим.
• Перераспределите белье в барабане.
Машина оборудована двигателем, издаю‐
щим необычный шум по сравнению с двига‐
те лям и др угих тип ов. Нов ый д вигател ь об ес‐
печивает плавный пуск и более равномер‐
ное распределение белья в барабане при
отжиме, а также большую устойчивость ма‐
шины.
Машины, разработанные с использованием
современных технологий, работают очень
экономично и потребляют мало воды без
снижения качества стирки.
..
.
.
..
.
. ..
o
N
r.
.
e
.
S
..
...
.
.
.
..
.
.
.
.
o
..
.
N
d
.
o
d
M
ro
P
Mod. ... ... ...
Prod. No. ... ... ...
Ser. No. ... ... ...
ТЕХНИЧЕСКИЕ ДАННЫЕ
Габариты Ширина
Высота
Глубина
Подключение к электросети Информация по электрическому подключению представле‐
на на табличке технических данных, расположенной на внут‐
ренней стороне дверцы машины.
Давление в водопроводной
системе
Минимум
Максимум
Максимальная загрузка Хлопок 6 кг
60 см
85 см
63 см
0,05 МПа
0,8 МПа
Page 82

82 electrolux
Скорость отжима Максимум 1000 об/мин (EWF 106410W )
1200 об/мин (EWF 126410W)
1400 об/мин (EWF 146410W)
ПОКАЗАТЕЛИ ПОТРЕБЛЕНИЯ
Программа Потребление энер‐
Белый хлопок 95° 2 61
Хлопок 60° 1.3 58
Хлопок ЭКО 60°
Хлопок 40° 0.7 58
Синтетика 40° 0.5 50
Деликатные ткани
40°
Шерсть 30° 0.25 53
1) Хлопок Эко" при 60°C и загрузке 6 кг является эталонной программой для расчета данных, указанных
на табличке энергопотребления, в соответствии со стандартом EEC 92/75.
1)
гии (кВтч)
1.02 46
0.55 60
Приведенные в данной таблице дан‐
ные по расходу являются исключи‐
тельно ориентировочными, так как
они могут изменяться в зависимо‐
Потребление воды
(литры)
Продолжительность
программы (минуты)
Продолжительность
программ высвечи‐
вается на дисплее
на панели управле‐
ния.
сти от количества и типа белья, тем‐
пературы водопроводной воды и
температуры окружающей среды.
УСТАНОВКА
Распаковка
Все транспортировочные болты и эле‐
менты упаковки должны быть сняты пе‐
ред началом эксплуатации машины.
Рекомендуем сохранить все транспорти‐
ровочные приспособления для того, что‐
бы их можно было снова использовать
в случае новой транспортировки маши‐
ны.
1. После снятия всей упаковки положи‐
те машину на заднюю панель, чтобы
вынуть полистироловую прокладку
из ее основания.
2. Отсоедините шнур питания, сливной
и наливной шланг от разъемов на
задней панели прибора.
Page 83

3. Вывинтите три болта.
electrolux 83
5. Откройте дверцу машины и снимите
полистироловую вставку, прикре‐
пленную к прокладке дверцы.
4. Выньте соответствующие пластмас‐
совые шайбы.
6. Вставьте в меньшее верхнее и в два
большие отверстия соответствую‐
щие пластиковые заглушки, находя‐
щиеся в одном пакете с руковод‐
ством пользователя.
Page 84

84 electrolux
Размещение
Установите машину на ровный твердый
пол. Убедитесь, что ковры, дорожки и
т.д. не препятствуют циркуляции возду‐
ха вокруг машины. Убедитесь, что маши‐
на не касается стен или других кухон‐
ных приборов. Выровняйте машину, под‐
нимая или опуская ножки. Ножки могут
регулироваться с трудом, т.к. на них ус‐
тановлены самозатягивающиеся гайки,
однако Вы ДОЛЖНЫ отрегулировать их
высоту так, чтобы машина стояла ровно
и устойчиво. При необходимости про‐
верьте точность выравнивания с по‐
мощью спиртового уровня. Необходи‐
мые регулировки можно выполнять с по‐
мощью гаечного ключа. Тщательное вы‐
равнивание предотвращает вибрацию,
шум и перемещение машины во время
работы.
ПРЕДУПРЕЖДЕНИЕ! Никогда не
подкладывайте картон, куски
дерева или подобные материалы
для компенсации неровностей пола.
Подсоединение к водопроводу
ВНИМАНИЕ! Данный прибор
следует подсоединять к крану
подачи холодной воды.
1. Подсоедините шланг подачи воды к
водопроводному крану с резьбой
3/4". Всегда используйте шланг, по‐
ставляемый вместе со стиральной
машиной.
ВАЖНО! Не используйте для
подключения к водопроводу шланг от
старой машины.
2. Другой конец наливного шланга, под‐
соединенный к машине, может быть
развернут в любом направлении, как
показано на рисунке.
Не размещайте наливной шланг ни‐
же машины.
Разверните шланг влево или вправо
в зависимости от расположения во‐
Page 85

electrolux 85
допроводного крана относительно
машины.
3. Отрегулируйте положение шланга,
ослабив зажимную гайку. Отрегули‐
ровав положение шланга, не забудь‐
те плотно затянуть зажимную гайку
для предотвращения утечек.
Наливной шланг не подлежит удлине‐
нию. Если он слишком короткий, а Вы
не хотите перемещать водопроводный
кран, придется купить новый, более
длинный шланг, специально предназна‐
ченный для данной цели.
ВАЖНО! Перед подсоединением
машины к новой водопроводной трубе
или к трубе, не использовавшейся в
течение определенного времени,
спустите достаточное количество воды
для того, чтобы удалить загрязнения,
которые могут собираться в трубах.
Слив воды
Конец сливного шланга можно устанав‐
ливать тремя способами.
• Подвесив над краем раковины с по‐
мощью пластмассовой направляю‐
щей, входящей в комплект поставки
машины. В этом случае удостоверь‐
тесь, что шланг не соскочит во время
слива воды. Для этого шланг можно
привязать к крану куском бечевки или
прикрепить к стене.
• Подсоединив к патрубку сливной тру‐
бы раковины. Этот патрубок должен
находиться над сифоном раковины с
тем, чтобы высота места сгиба шлан‐
га от пола составляла не менее 60 см.
• Подсоединив непосредственно к слив‐
ной трубе на высоте не менее 60 см,
но не более 90 см. Конец сливного
шланга всегда должен вентилировать‐
ся, т.е. внутренний диаметр сливной
трубы должен быть шире внешнего
диаметра сливного шланга. Сливной
шланг не должен иметь перегибов.
Page 86

86 electrolux
Максимальная длина сливного шланга не должна быть более 4 метров. Дополни‐
тельный сливной шланг и соединительный элемент можно приобрести в автори‐
зованном сервисном центре.
ПОДКЛЮЧЕНИЕ К ЭЛЕКТРОСЕТИ
Информация по электрическому под‐
ключению представлена на табличке
технических данных, расположенной на
внутренней стороне дверцы машины.
Убедитесь, что электрическая сеть у
Вас дома в состоянии выдержать макси‐
мальную мощность, потребляемую ма‐
шиной, при этом следует учесть и дру‐
гие эксплуатируемые электроприборы.
Включайте машину в заземленную
розетку.
Изготовитель не несет какой-либо
ответственности за ущерб или
травмы, причиненные в результате
несоблюдения вышеприведенных
указаний по безопасности.
После установки машины к шнуру
питания должен иметься
свободный доступ.
В случае необходимости замены
шнура питания, она должна быть
выполнена авторизованным
сервисным центром.
ОХРАНА ОКРУЖАЮЩЕЙ СРЕДЫ
Символ на изделии или на его
упаковке указывает, что оно не
подлежит утилизации в качестве
бытовых отходов. Вместо этого его
следует сдать в соответствующий пункт
приемки электронного и
электрооборудования для
последующей утилизации. Соблюдая
правила утилизации изделия, Вы
поможете предотвратить причинение
окружающей среде и здоровью людей
потенциального ущерба, который
возможен в противном случае,
вследствие неподобающего обращения
с подобными отходами. За более
подробной информацией об утилизации
этого изделия просьба обращаться к
местным властям, в службу по вывозу и
утилизации отходов или в магазин, в
котором Вы приобрели изделие.
Упаковочные материалы
Материалы, помеченные символом
пригодны для повторной переработки.
>PE<=полиэтилен
>PS<=полистирол
>PP<=полипропилен
Это означает, что они могут быть под‐
вергнуты вторичной переработке при ус‐
ловии, что при их утилизации они будут
помещены в специальные контейнеры
для сбора таких отходов.
Экологические рекомендации
Для экономии воды, энергии и с целью
бережного отношения к окружающей
среде придерживайтесь следующих ре‐
комендаций:
• Белье обычной степени загрязненно‐
сти можно стирать без предваритель‐
ной стирки для экономии моющих
средств, воды и времени (это озна‐
чает и меньшее загрязнение окружаю‐
щей среды!).
• Наиболее экономично машина рабо‐
тает при полной загрузке.
• При должной обработке пятна и не‐
большие загрязнения могут быть уда‐
лены перед стиркой; тогда белье мож‐
но стирать при более низкой темпера‐
туре.
• Отмеряйте моющее средство в зави‐
,
симости от жесткости воды, степени
загрязненности и количества стирае‐
мого белья.
Page 87

electrolux 87
Page 88

www.electrolux.com/shop
192992651-00-202010
 Loading...