

Page 1
Page 2
- 2 -
Sisällys
Käyttäjälle
Pakkauksen purkaminen 3
-Vauriot
-Konetta nostettaessa
-Kuljetustuet
-Materiaalimerkintä
Turvallisuustiedot 4
Tuotekuvaus 5-6
-Etu- ja takaosa
-Ohjauspaneeli
Käyttö 7
-Pyykin laittaminen koneeseen
-Pesu- ja huuhteluaineen annostelu
-Koneen käynnistäminen
Ohjelmataulukko 8-9
Hoito 10
-Runko
-Pesuainekotelo
-Kotelon sisäosa
-Pesukoneen puhdistaminen
-Suojeltava jäätymiseltä
-Kalkinpoisto
Yleistä pyykinpesusta 11
-Pesu- ja huuhteluaineet
-Pesumerkinnät
Jos kone ei toimi 12
Huolto 13
-Huolto ja varaosat
-Kuluttajaneuvonta
-Takuu
Asentajalle
Tekniset tiedot 13
Asennus 14-15
-Asennus vaakasuoraan
-Vedentulo
-Vedenpoisto
-Sähköliitäntä
Rukowodstwo po \kspluatacii 16
Instruction book 30
Laite täyttää seuraavat EU - määräykset:
- 73/23/EEC 19.02.1973 - määräys alijännitteestä.
- 89/336/EEC 03.05.1989 (sekä muutosmääräys 92/31/EEC)
EMV - määräys.
Page 3
- 3 -
1
2
3
4
822 90 14-98
Pakkauksen purkaminen
Vauriot
Ilmoita mahdollisista kuljetusvaurioista välittömästi sille,
joka vastasi kuljetuksesta. Tarkista, että pesukone on ehjä.
Ilmoita mahdollisista vaurioista, vioista tai puuttuvista osista
välittömästi laitteen myyjälle.
Älä koskaan jätä pakkausmateriaaleja lasten käsiin.
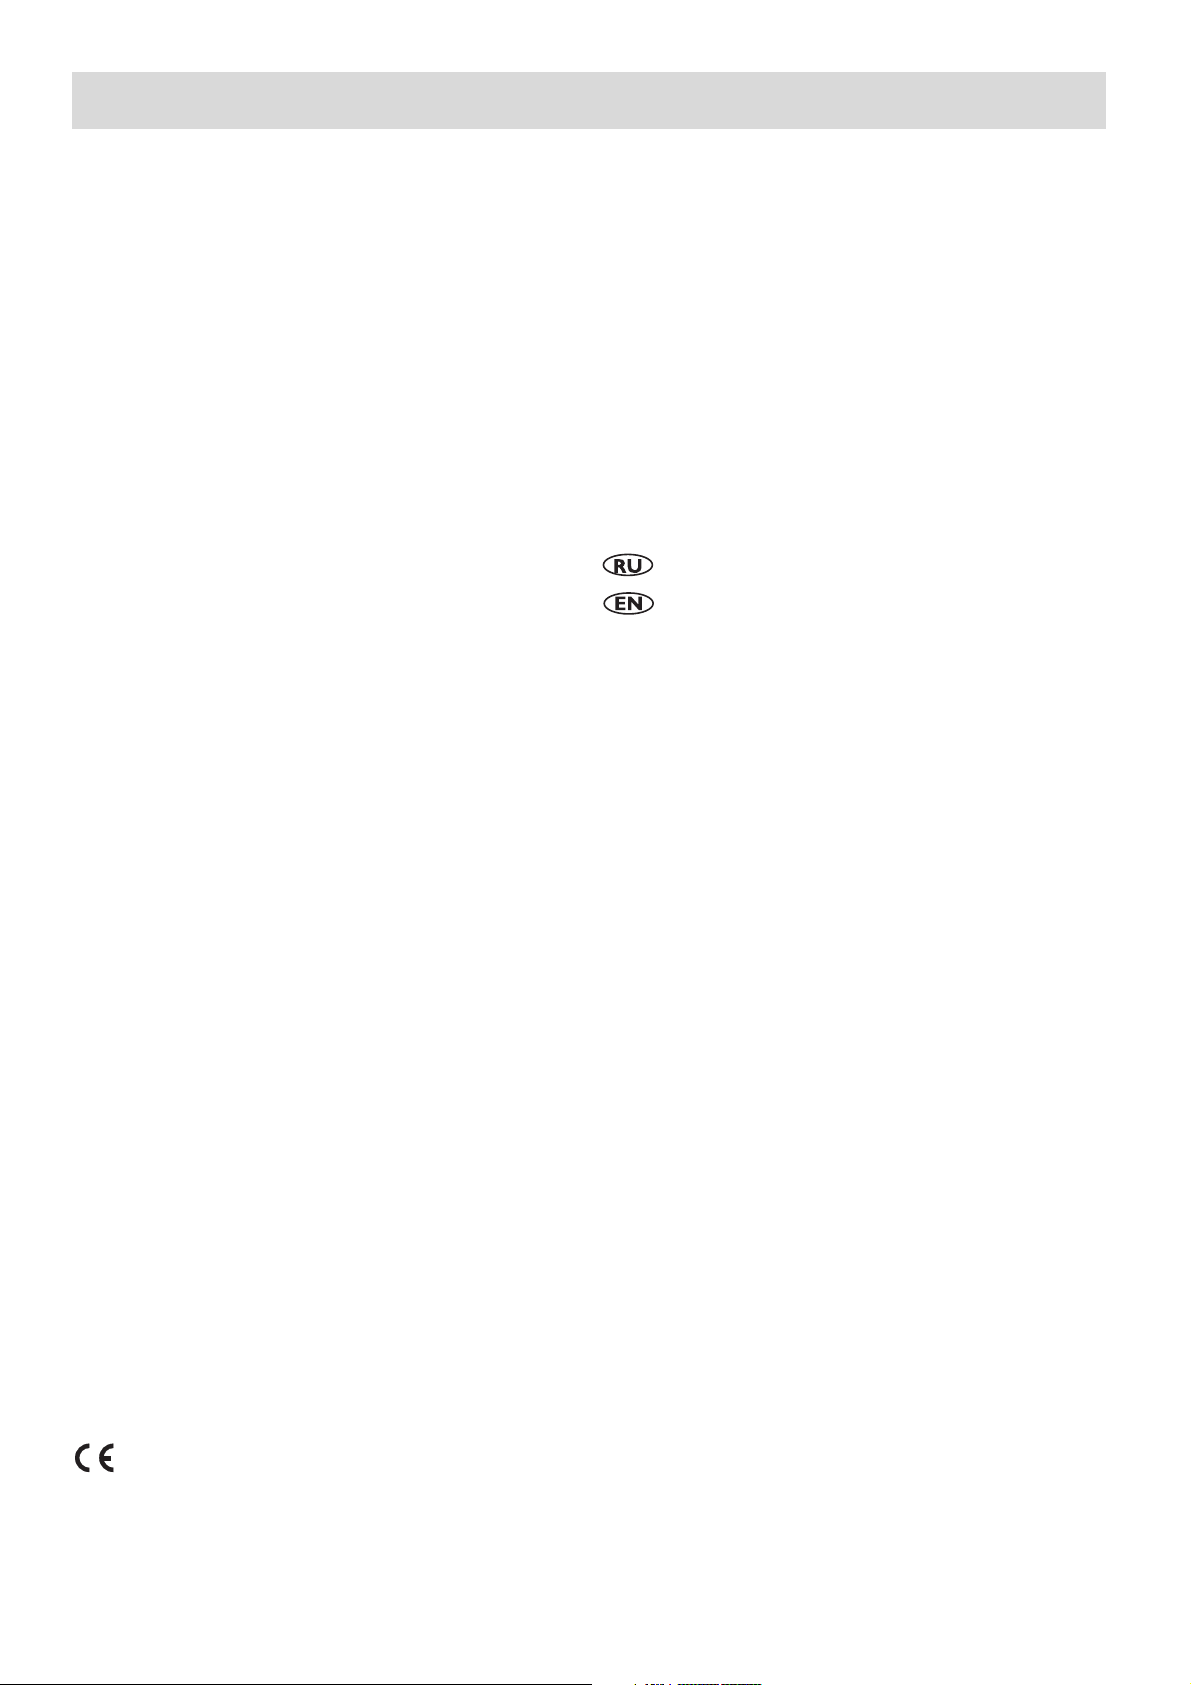
Konetta nostettaessa
Noudata varovaisuutta nostaessasi konetta. Virheellinen
nostotapa saattaa aiheuttaa henkilövahinkoja ja koneen
vaurioitumisen. Avaa luukku ja tartu aukon yläreunaan.
Myös kansilevyn takareunasta voi nostaa. Älä koskaan
nosta konetta ohjauspaneelista, luukusta tai pesuainekotelosta (kuva 1).
Kuljetustuet
Moottorin ja rummun kuljetusvaurioiden välttämiseksi pesukoneessa on kuljetustuet. Ne täytyy poistaa ennen koneen
asennusta.
Aseta koneen taakse polystyreenipakkauksen osia ja laske
kone niiden varaan takaseinä lattiaa kohti. Tarkista, etteivät
letkut joudu puristuksiin (kuva 2).
Irrota polystyreenialusta koneen alta. Nosta kone jälleen
pystyyn ja irrota takalevystä 3 ruuvia ja niihin kuuluvat
välitulpat (kuva 3).
Nämä reiät on tukittava mukana seuraavilla muovitulpilla,
jotka on pakattu rummussa olevaan muovipussiin (kuva 4).
Materiaalimerkintä
Kaikki pakkausmateriaalit ovat ympäristöystävällisiä.
Eri muovilaadut on merkittyä kierrätettävää muovia:
• PE tarkoittaa polyeteeniä, josta on valmistettu pesukonetta ympäröivä pussi ja käyttöohjeen pussi.
• PS tarkoittaa muotoon puristettua polystyreeniä, josta
on valmistettu pakkauksen iskuja vaimentavat osat.
Kartonkiosat on valmistettu kierrätettävästä paperista, ja
voidaan jättää paperinkeräykseen.
Koneessa on muovista ja kumista valmistettuja komponentteja. Niissä on koneen hävittämistä ja materiaalin
kierrätystä mahdollistavat materiaalimerkinnät. Merkinnät
ovat kansainvälisen standardin mukaisia.
Page 4

- 4 -
Lue käyttöohje kaikkine ohjeineen, neuvoineen ja varoituksineen ennen kuin pesukone asennetaan ja otetaan
käyttöön. Tällöin kone toimii oikein ja saat siitä suurimman
hyödyn. Kaikkien konetta käyttävien on tunnettava käyttöön ja turvallisuuteen liittyvät yksityiskohdat hyvin.
Säilytä käyttöohje ja huolehdi siitä, että se seuraa konetta
muutossa tai omistajan vaihtuessa niin, että koneen
käyttäjä voi tutustua koneen toimintoihin ja turvallisuusohjeisiin.
❐ Kaikki pakkausmateriaalit ja kuljetustuet on poistettava
ennen ensimmäistä käyttöä. Muuten sekä kone että
muu omaisuus saattaa vaurioitua.
Katso luku Kuljetustuet.
❐ Kaikki asennus- ja muut työt on jätettävä pätevän
ammattihenkilön suoritettavaksi. Riittämättömin tiedoin
tehty työ saattaa heikentää tuotteen toimintaa ja
aiheuttaa henkilö- ja omaisuusvahinkoja.
❐ Kone on raskas, ole varovainen siirtäessäsi sitä.
Älä koskaan nosta konetta ohjauspaneelista, luukusta
tai pesuainekotelosta.
❐ Huolehdi siitä, ettei kone seiso liitäntäkaapelin päällä
ja etteivät letkut ole puristuksissa tai taittuneet.
❐ Vältä koneen asentamista tilaan, jossa ei ole lattia-
kaivoa.
❐ Pesukone on tarkoitettu ainoastaan normaalissa
kotitalouskäytössä olevien vaatteiden pesuun tämän
käyttöohjeen mukaisesti. Muu käyttö saattaa aiheuttaa
henkilö- tai omaisuusvahinkoja.
❐ Pesukoneen käyttäjän tulee olla aikuinen. Älä anna
lasten käyttää konetta leikkeihinsä tai koskettaa sen
säätimiä tai siirrettäviä tai liikkuvia osia.
❐ Pese ainoastaan koneelliseen pesuun tarkoitettuja
tekstiilejä. Ota epävarmoissa tapauksissa yhteyttä
vaatteen valmistajaan tai vaatteen myyneeseen
liikkeeseen.
❐ Noudata vaatteiden pesumerkintöjä ja huolehdi siitä,
että vetoketjut ovat kiinni ja napit napitettu ennen pesua.
❐ Kolikot, hakaneulat, naulat, ruuvit tai muut kovat esi-
neet saattavat aiheuttaa vakavia vaurioita koneeseen.
Huolehdi siitä, että kaikki taskut ovat tyhjiä ennen
pesua.
❐ Poista ruoste-, väri-, muste- ja ruohotahrat ennen
pesua.
❐ Älä pese rispaantuneita tai hyvin kuluneita vaatteita.
❐ Pese ohuet sukat, nyörit, pitsit jne. pesupussissa,
koska muuten ne voivat joutua sisä- ja ulkorummun
väliin.
❐ Kemikaalien kuten tahranpoistoaineiden, juoksevien
puhdistusaineiden ja muiden sellaisten kanssa kosketuksissa olleita vaatteita ei pidä pestä koneessa
ennen kuin ne on huuhdeltu huolellisesti.
❐ Koneessa pestävät kaariliivit on laitettava pesupussiin.
❐ Noudata aina pesu- ja huuhteluaineen valmistajan
annosteluohjeita. Yliannostus saattaa vaurioittaa
pestäviä tekstiilejä.
❐ Tarkista ennen pyykin laittamista koneeseen, ettei
rummussa ole vieraita esineitä tai lemmikkieläimiä.
❐ Älä täytä rumpua liikaa. Se huonontaa pesutulosta
ja pestävät tekstiilit voivat vaurioitua.
❐ Pesun aikana lasiluukku kuumenee, eikä sitä pidä
koskettaa. Huolehdi siitä, etteivät lapset oleskele
koneen lähettyvillä sen käydessä.
❐ Tarkista aina lasiluukun läpi, että vesi on pumpattu
pois ennen kuin avaat luukun.
❐ Älä jätä konetta ilman valvontaa sen käydessä.
❐ Katkaise sähkön ja veden tulo pesukoneelle aina
käytön jälkeen. Vedä pistokkeesta, älä johdosta.
❐ Anna luukun olla raollaan, kun konetta ei käytetä.
Tämä estää ummehtuneen hajun.
❐ Huolehdi, ettei kone ole kytketty sähköverkkoon
puhdistuksen tai huollon aikana.
❐ Huollot ja mahdolliset korjaukset on annettava Ab
Huoltoluxin tai sen valtuuttaman huoltoliikkeen
tehtäväksi. Käytä vain heidän toimittamiaan varaosia.
Älä koskaan yritä korjata konetta itse.
❐ Kun kone sitten aiotaan romuttaa, irrota pistotulppa
pistorasiasta ja katkaise liitosjohto laitteen puoleisesta
päästä. Älä anna lasten leikkiä irtonaisella liitäntäjohdolla.
Turvallisuustiedot
Page 5
- 5 -
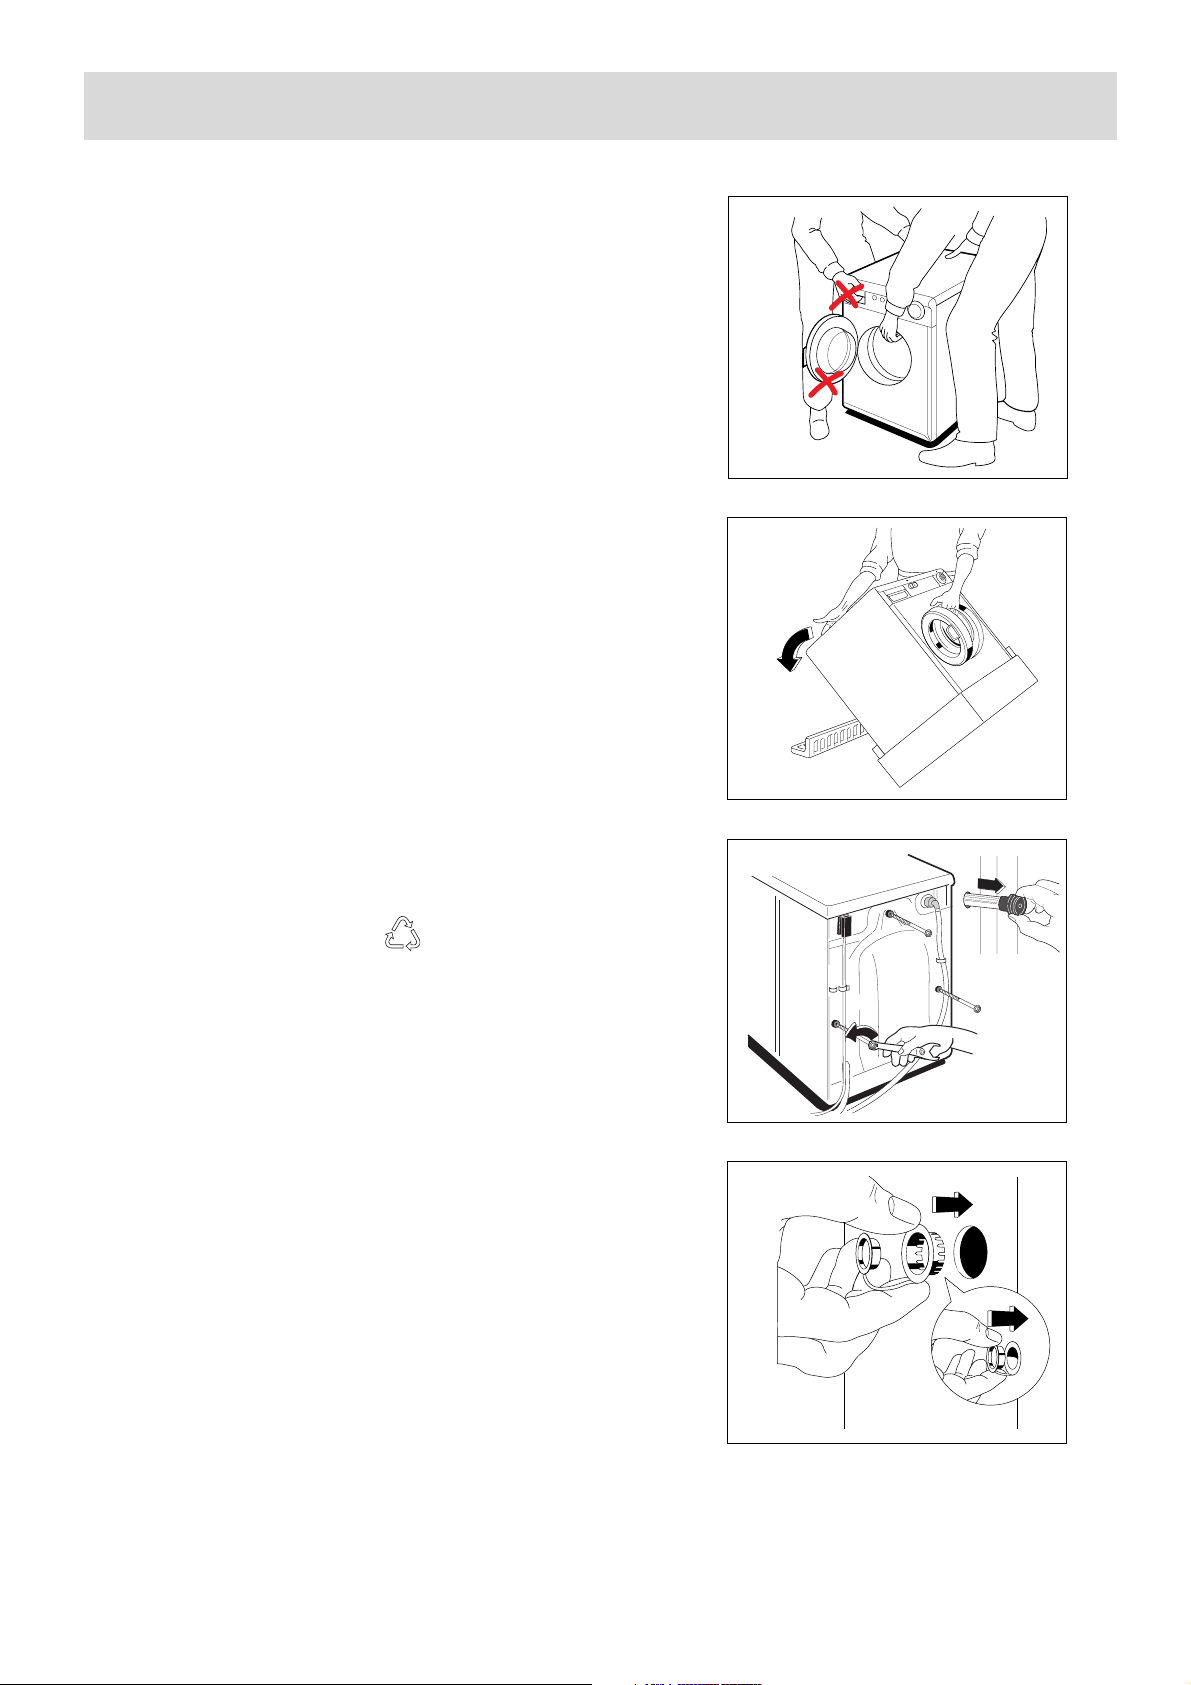
Etuosa
Tuotekuvaus
1 Ohjauspaneeli
2 Luukku
3 Luukun kahva
4 Neljä säädettävää jalkaa
1
2
4
3
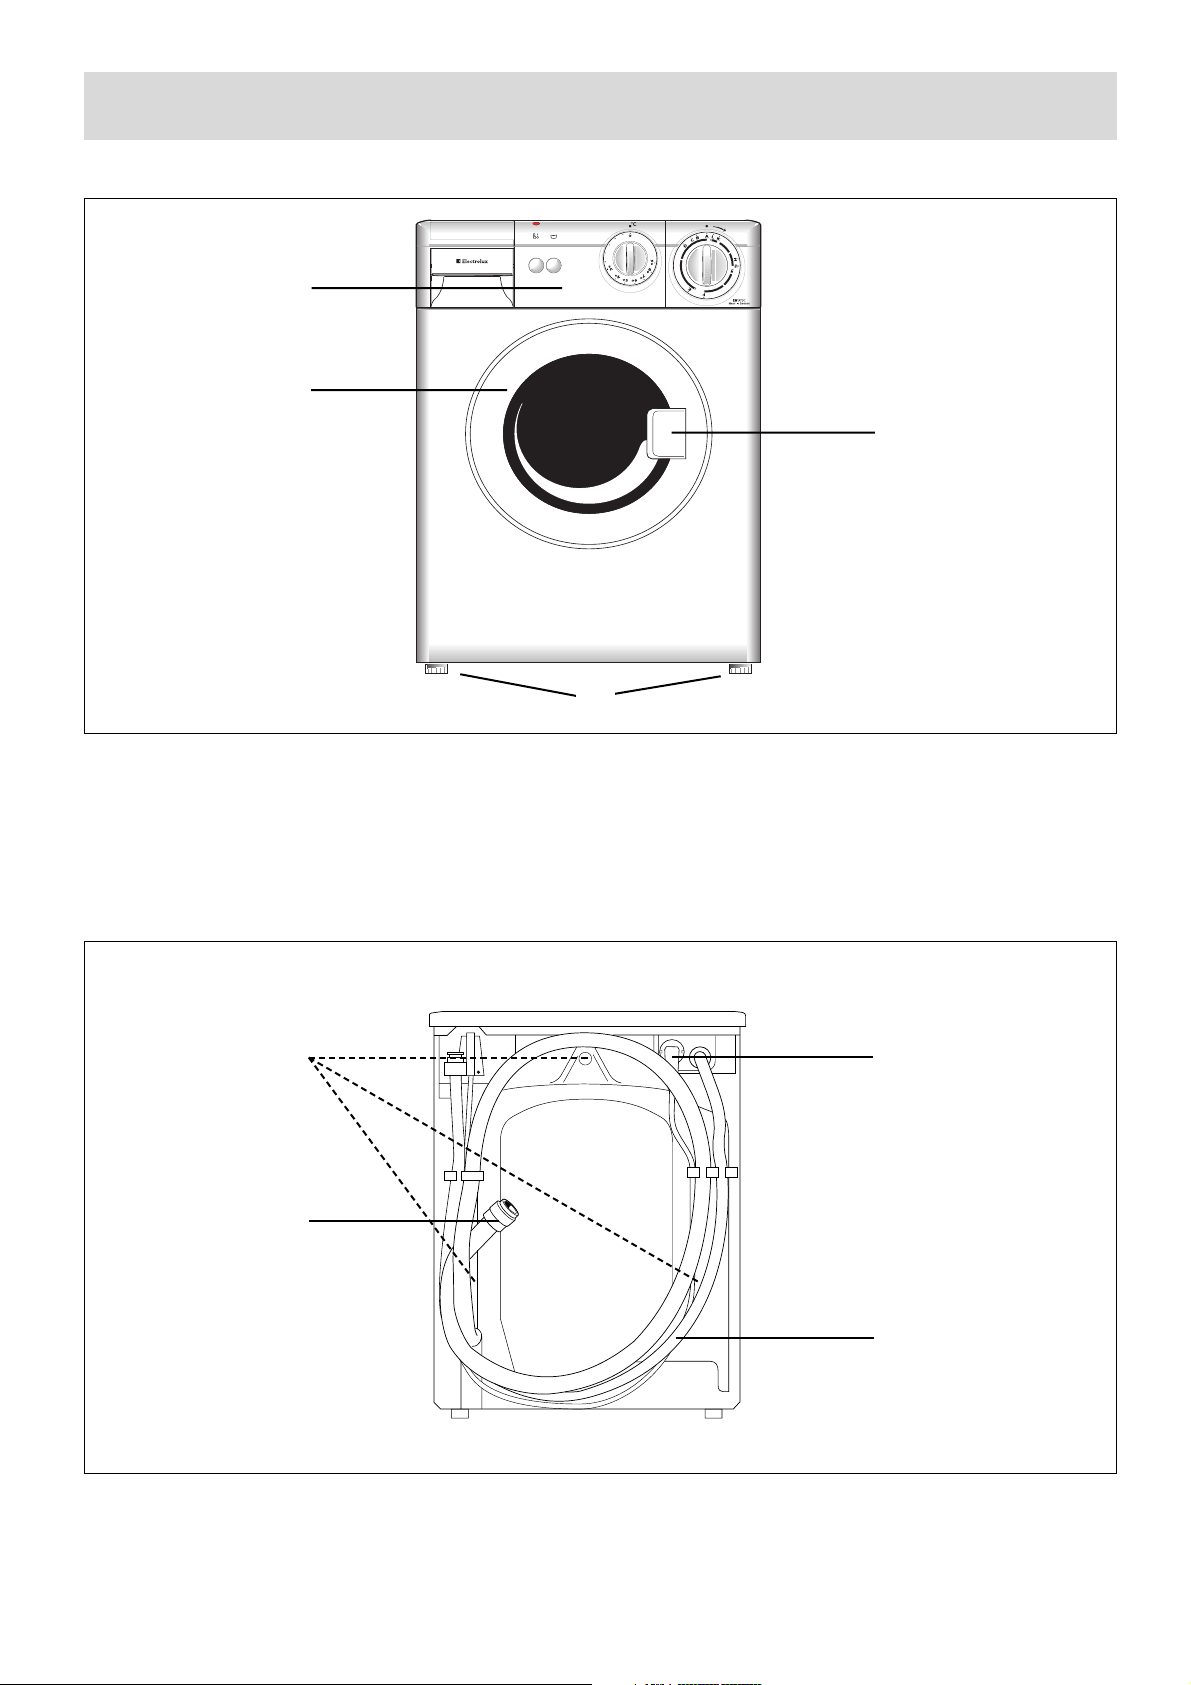
Takaosa
6
7
5
5
Täyttöletku
6 Poistoletku
7 Liitäntäjohto
8 Tila kuljetustukia varten
8
Page 6
- 6 -
Tuotekuvaus
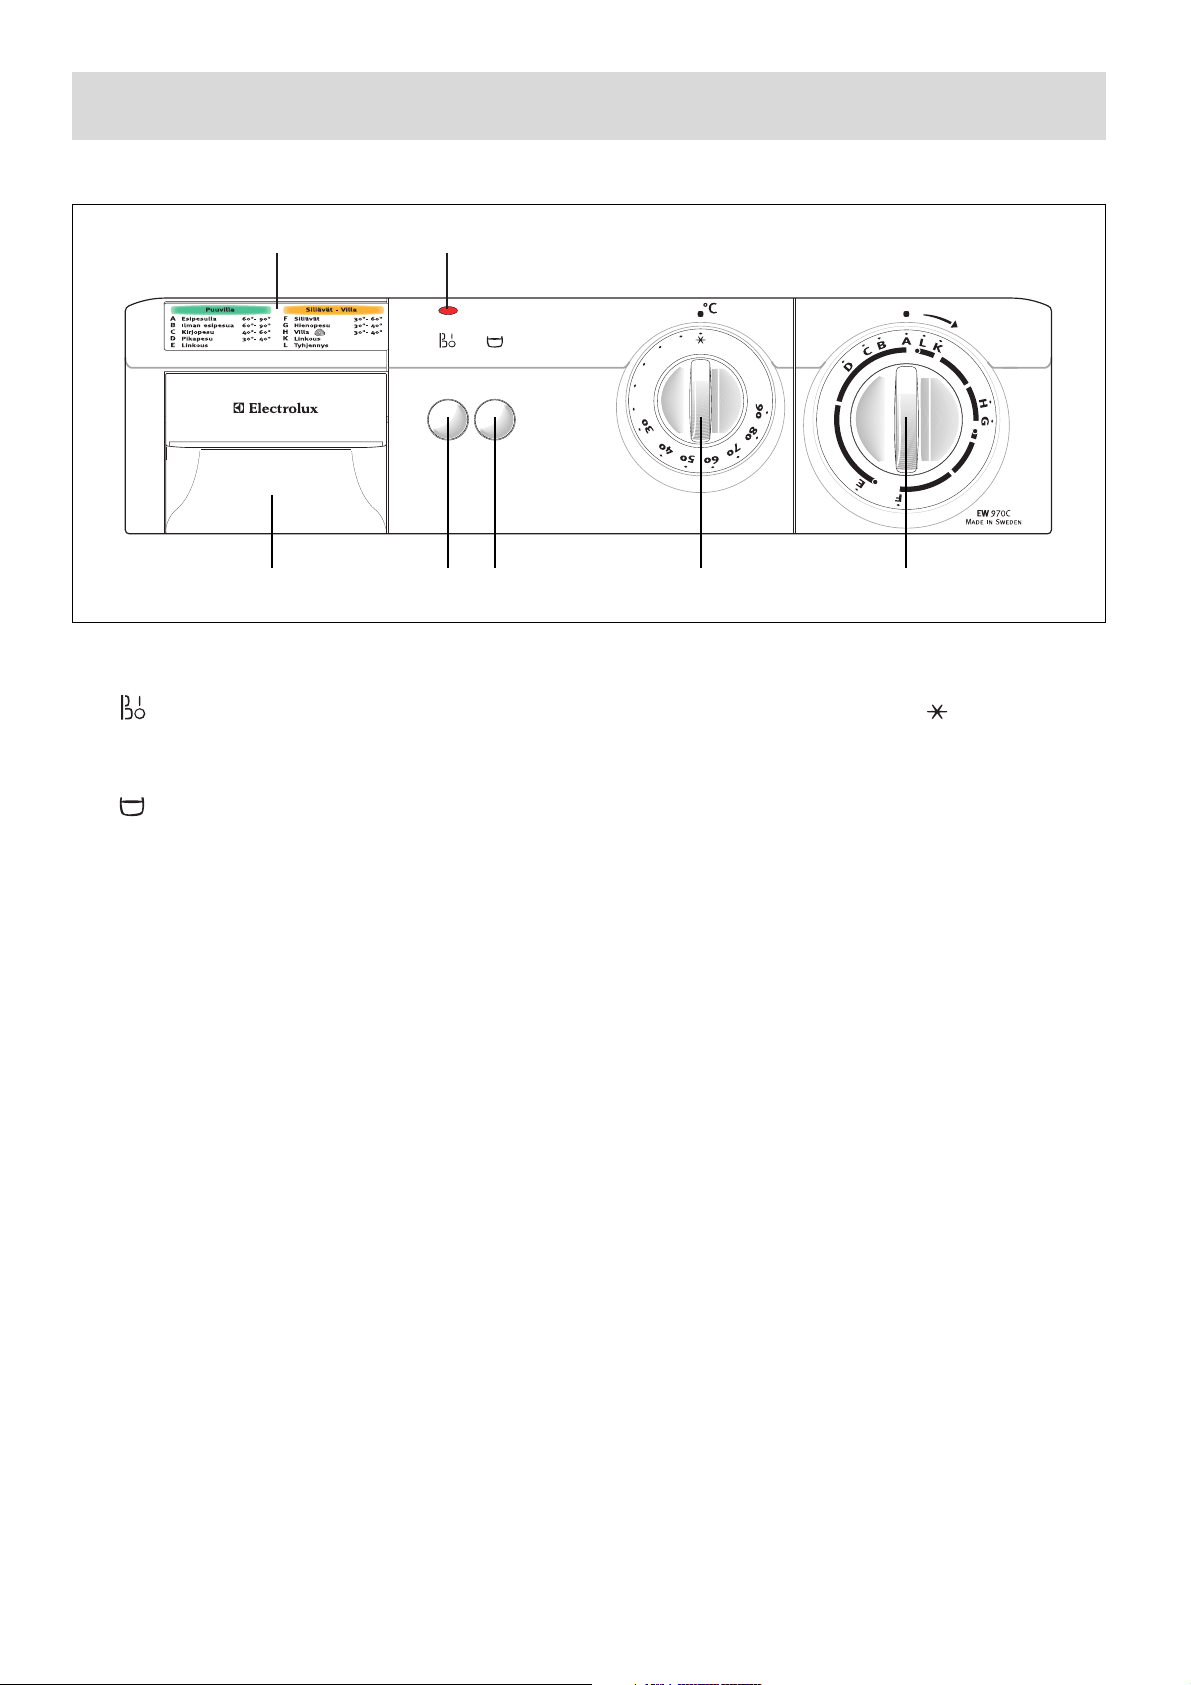
Ohjauspaneeli
Painikkeet
– Kone käynnistetään painamalla painike alas,
kun ensin on valittu pesuohjelma ja lämpötila.
(Katso myös kohta Merkkivalo.)
– Kun tämä valinnaistoiminto on valittuna pesuohjelma pysähtyy, kun pestävä materiaali on viimeisessä huuhteluvedessä. Toiminto minimoi keinokuitujen rypistymisen keinokuitu-, hieno- ja villapesuohjelmien yhteydessä.
Huuhtelun pito pesuohjelma saatetaan loppuun
painamalla valintapainike ulkoasentoon. Ohjelma
suorittaa silloin linkouksen ja huuhteluveden tyhjennyksen. Jos halutaan vain tyhjentää huuhteluvesi,
ohjelmanvalitsin on käännettävä käsin ohjelmaasentoon L. Käynnistyspainike on suositeltavaa olla
ulkoasennossa, kun ohjelmanvalitsinta käännetään.
Kun uusi ohjelma-asento on valittu, painetaan käynnistyspainiketta uudestaan ja ohjelma suoritetaan
loppuun.
Valitsimet ja pesuainekotelo
Lämpötilanvalitsin- Asetus - 90 °, noudata
tekstiilien pesumerkintöjä.
Ohjelmanvalitsin- Käännetään myötäpäivään
halutun ohjelman kohdalle.
Katso ohjelmien selostukset s. 8 - 9.
Pesuainekotelo - Jaettu kahteen lokeroon, pesu-
aineelle ja huuhteluaineelle. Esipesuaine annostellaan suoraan rumpuun.
Merkkivalo - Syttyy n. 5 sekunnin kuluttua käyn-
nistyspainikkeen painamisesta, samalla luukku
lukittuu sähköisesti ja kone käynnistyy.
Koneen suoritettua ohjelman loppuun, voit turvallisuussyistä avata luukun vasta, kun valo on sammunut noin 2 - 3 minuutin kuluttua.
Paikka ohjelmakaaviolle (Tarra)
5
1
2
3
4
5
6
7
1 2 3 4
67
Page 7
- 7 -
1
2
3
4
Ennen kuin kone otetaan käyttöön, tulisi suorittaa pesuohjelma ilman pyykkiä, koneessa mahdollisesti olevien
tuotannon aiheuttamien epäpuhtauksien poistamiseksi.
Kaada rumpuun n. 1 dl pesuainetta ja käynnistä ohjelma
G, 40° C. Ohjelman päätyttyä kone on valmiina käyttöön.
Pyykin laittaminen koneeseen
Avaa luukku vetämällä kevyesti kahvasta. Täytä rumpu
tasaisesti pyykillä, sekoita isoja ja pieniä tekstiilejä
keskenään. Pyri aina täyttämään rumpu täyteen, katso
enimmäismäärät ohjelmataulukosta. Pyykin määrää
pienennetään vain hyvin likaista pyykkiä tai arkoja
tekstiilejä pestäessä.
Helppo tapa täyttää rumpu oikein on täyttää se kokonaan
kuivalla pyykillä, sullomatta. Toinen tapa on punnita pyykit
aluksi ja näin hankkia kokemusta. Sulje luukku.
Pesu- ja huuhteluaineen
annostelu
Hyvä pesutulos riippuu osittain pesuaineen annostuksesta.
Sekä yli- että aliannostus voivat huonontaa pesutulosta.
Koneeseen saa täyttää vain konepesuun tarkoitettua
pesuainetta. Annostele pakkauksen ohjeiden mukaan.
Lisää pesuaineen määrää, jos pyykki on kovin likaista
tai vesi kovaa. Annostele vähemmän, jos pyykki on vain
hieman likaista tai jos et pese täyttä koneellista.
Voimakas vaahtoaminen saattaa johtua yliannostuksesta.
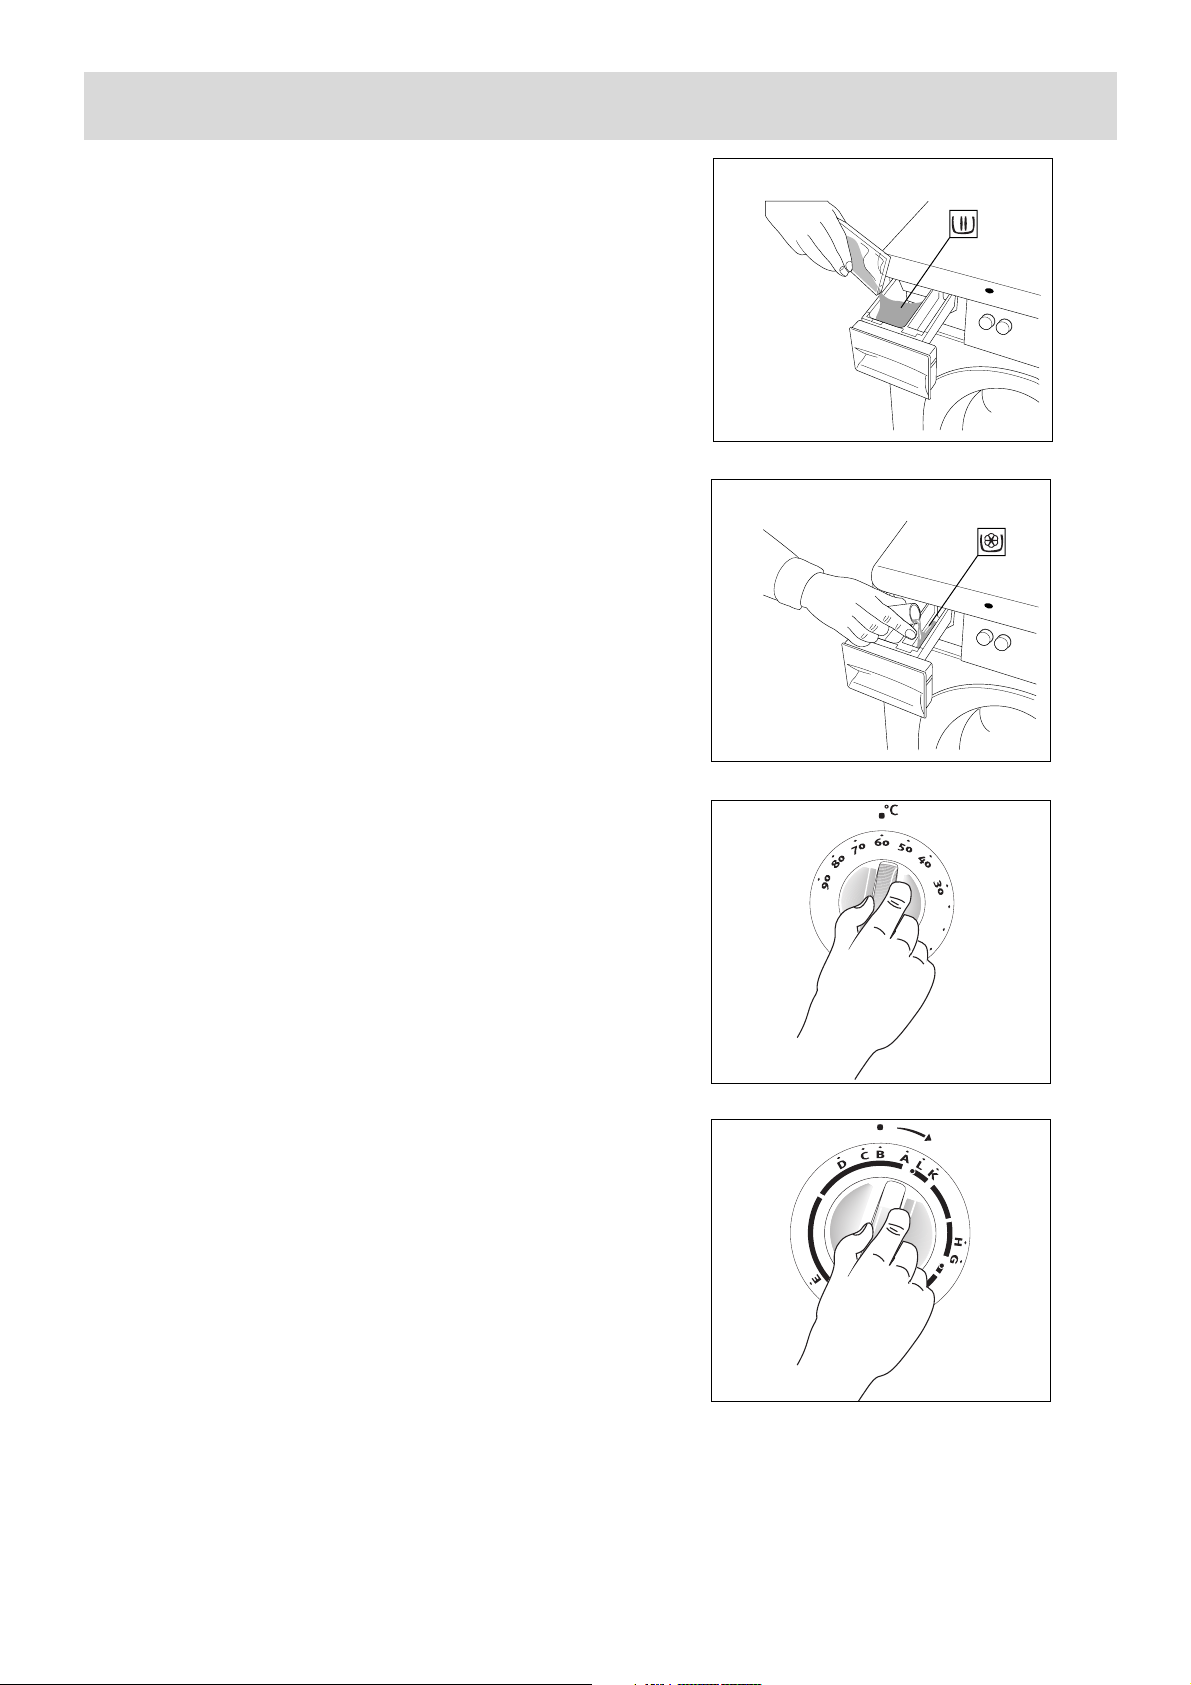
Pesu- ja huuhteluaine annostellaan lokeroihinsa.
Pesuaine kaadetaan suurempaan, vasemmanpuoleiseen
lokeroon (kuva 1) ja huuhteluaine pienempään, oikeanpuoleiseen lokeroon (kuva 2).
Älä koskaan täytä huuhteluainetta yli lokeroon merkityn
enimmäistason. Mahdollinen esipesuaine annostellaan
suoraan pesurumpuun.
Koneen käynnistäminen
Tarkista ennen käynnistystä, että
- luukku on kiinni
- kone on liitetty sähköverkkoon
- vesihana on auki
Valitse lämpötila (kuva 3), ohjelma (kuva 4) ja
mahdollinen lisätoiminto ennen kuin käynnistät koneen
painamalla käynnistyspainiketta. Merkkivalo syttyy n. 5
sekunnin kuluttua, samalla luukku lukittuu sähköisesti ja
kone käynnistyy.
Käyttö
Page 8

- 8 -
Ohjelmataulukko
Valko- Kirjopesu (3,0 kg kuivaa pyykkiä)
Pyykki
Valkopesu
Valkopesu
Kirjopesu
Kirjopesu
Pikapesu
Linkous
Tyhjennys
Hyvin likainen
Tavanomaisen
likainen
Tavanomaisen
likainen
Tavanomaisen
likainen
Kevyesti
likainen
A
B
B
C
D
E
L
90
90
60
40
30-40
n. 147
n. 135
n. 135
n. 110
n. 91
n. 8
n. 2
Pesuohjelma 90° C
esipesulla.
3 huuhtelua ja linkous
950 k/min.
Pesuohjelma 60° C
ilman esipesua.
3 huuhtelua ja linkous
950 k/min.
Pesuohjelma 90° C
ilman esipesua.
3 huuhtelua ja linkous
950 k/min.
Pesuohjelma 40° C
ilman esipesua.
3 huuhtelua ja linkous
950 k/min.
Pesuohjelma 30° C40° C ilman esipesua.
3 huuhtelua ja linkous
950 k/min.
Tyhjennys ja linkous
950 k/min.
Tyhjennys
Likaisuus-
aste
Lämpötilan
valinta (C)
Ohjelman
valinta
Suoritus-
aika (min.)
Ohjelman
sisältö
Page 9
- 9 -
Ohjelmataulukko
Huuhtelun pito - Keinokuitu-, hieno- ja villapesuohjelmassa voidaan valita huuhtelun pito toiminto.
Valinta tehdään painamalla pesukoneen ohjauspaneelin valintapainiketta. Valinnaistoiminto pysäyttää
pesuohjelman, kun pestävä materiaali on viimeisessä huuhteluvedessä. Tämä minimoi synteettisten
kuitujen rypistymisen.
Huuhtelun pito ohjelma saatetaan loppuun painamalla valintapainike ulkoasentoon. Ohjelma suorittaa
silloin linkouksen ja huuhteluveden tyhjennyksen.
Jos halutaan vain tyhjentää huuhteluvesi, ohjelmavalitsin on kierrettävä käsin ohjelma-asentoon L.
Käynnistyspainike on suositeltavaa olla ulkoasennossa, kun ohjelmanvalitsinta kierretään. Kun uusi
ohjelma-asento on valittu, käynnistyspainiketta painetaan uudestaan ja ohjelma suoritetaan loppuun.
Keinokuitupesu ja Hellävarainen pesu (1,5 kg kuivaa pyykkiä)
Villapesu (1,0 kg kuivaa pyykkiä)
Linkous
Pyykki
Siliävät
Siliävät
Hienopesu
Villapesu
Tyhjennys
Tavanomaisen
likainen
Kevyesti
likainen
Tavanomaisen
likainen
Kevyesti
likainen
F
G
F
H
K
L
60
40
30-40
- 40
n. 74
n. 74
n. 56
n. 50
n. 8
n. 2
Pesuohjelma 60° C
ilman esipesua.
3 huuhtelua ja linkous
600 k/min.
Pesuohjelma 30° C40° C ilman esipesua.
3 huuhtelua ja linkous
600 k/min.
Pesuohjelma 40° C
ilman esipesua.
3 huuhtelua ja linkous
600 k/min.
Pesuohjelma 40° C ilman esipesua.
3 huuhtelua ja linkous
600 k/min.
Tyhjennys ja linkous
600 k/min.
Tyhjennys
Likaisuus-
aste
Lämpötilan
valinta (C)
Ohjelman
valinta
Suoritus-
aika (min.)
Ohjelman
sisältö
Page 10
- 10 -
Runko
Pesukone puhdistetaan ulkopuolisesti miedolla puhdistusaineella. Kuivaa kostealla rievulla.
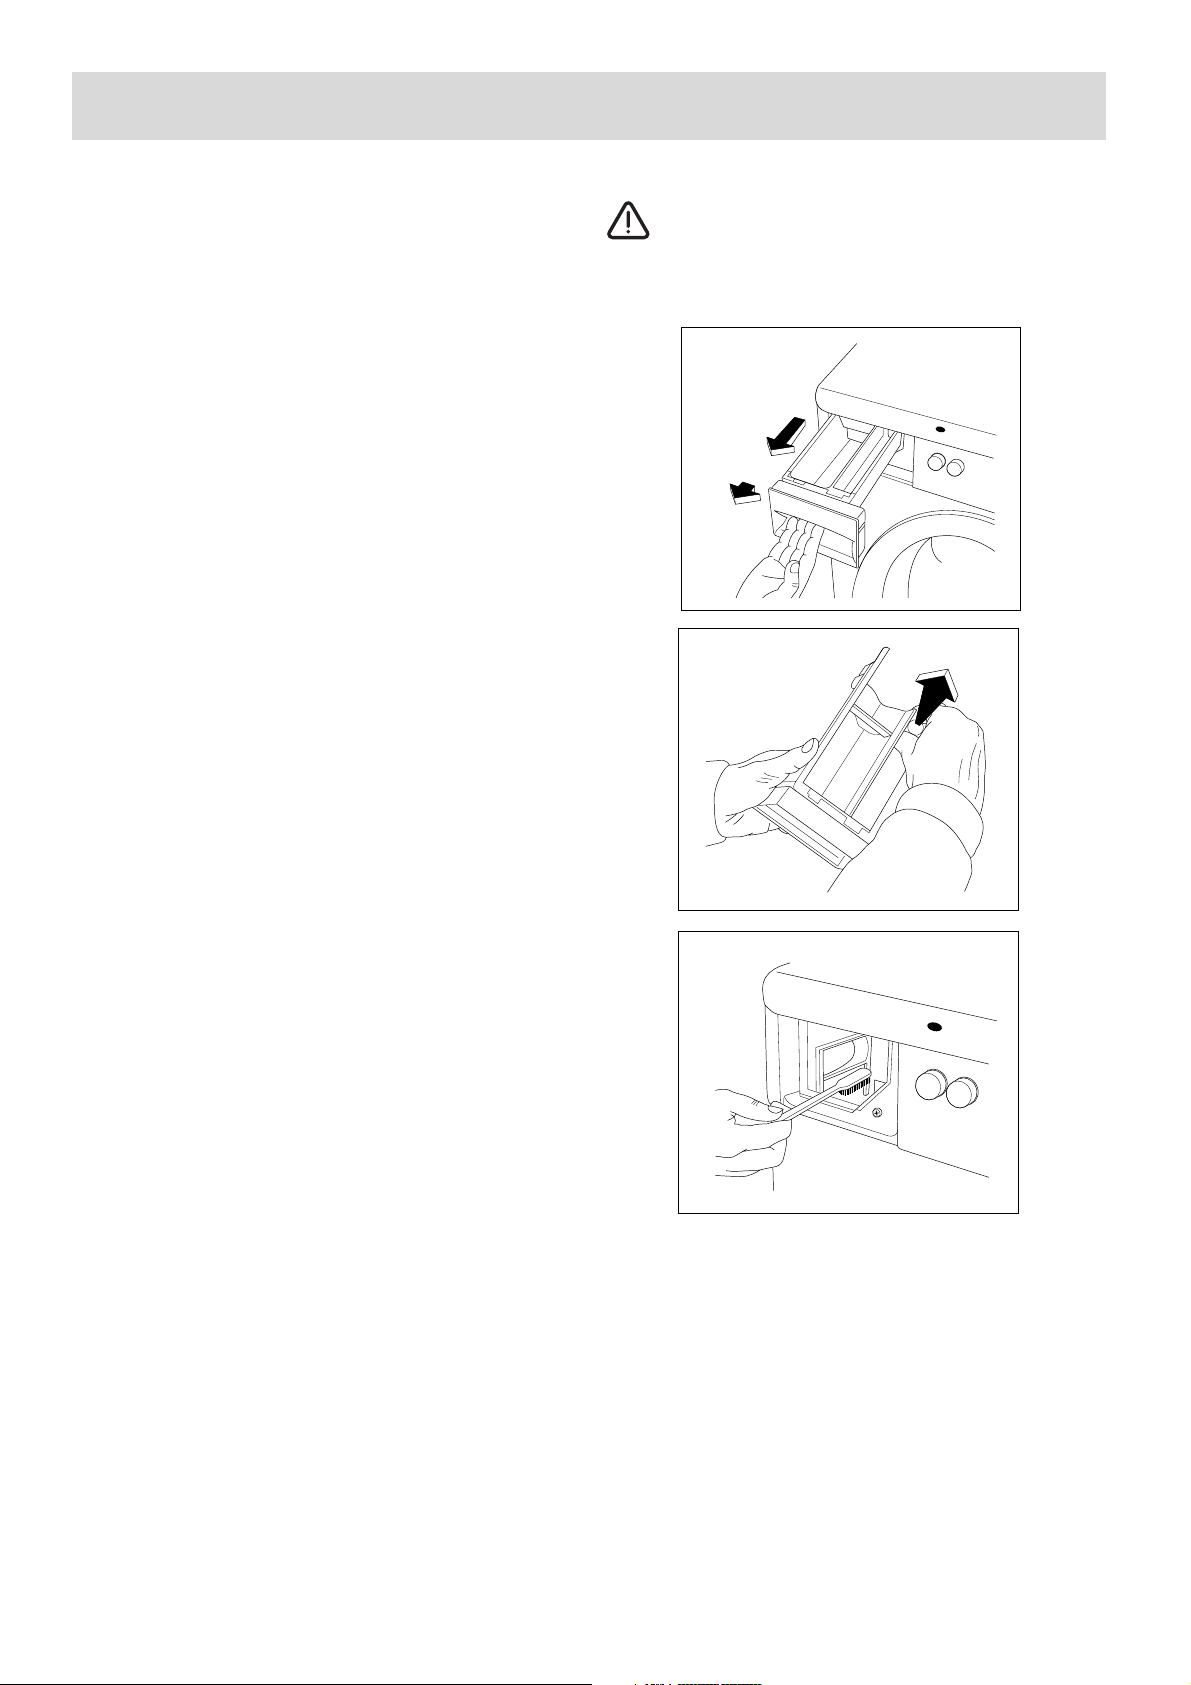
Pesuainekotelo
Ajan myötä koteloon muodostuu pesu- ja huuhteluainekerrostumia. Kotelo on siksi syytä puhdistaa ajoittain vesihuuhtelulla. Kotelon voi tarvittaessa irrottaa vetämällä
kotelo salvan ohi (kuva 1).
Kotelon etureunassa olevan ruiskutussuuttimen voi
poistaa painamalla suutinta sisäänpäin samalla nostaen
ylöspäin (kuva 2). Asennettaessa suutinta se painetaan
alaspäin, kunnes kuuluu selvä naksahdus.
Kotelon sisäosa
Myös kotelon sisäosaan voi jäädä pesuainekerrostuma.
Puhdista esim. vanhalla hammasharjalla (kuva 3).
Puhdistuksen jälkeen suoritetaan huuhteluohjelma ilman
pyykkiä.
Pesukoneen puhdistaminen
Jos pesu tapahtuu usein matalissa lämpötiloissa ja/tai
käytetään pieniä määriä pesuainetta, on syytä puhdistaa
kone sisäpuolelta muutaman kerran kuukaudessa.
Tämä estää homeen ja epämiellyttävän hajun syntymisen.
Annostele normaali määrä pesuainetta ja suorita jokin
pesuohjelma ilman pyykkiä mahdollisimman korkeassa
lämpötilassa.
Suojeltava jäätymiseltä
Jos pesukone on asennettu paikkaan, jonka lämpötila
saattaa laskea alle 0° C, suorita seuraavat toimenpiteet
koneessa olevan veden jäätymisen ja siitä seuraavien
vaurioiden estämiseksi:
• Sulje vesihana ja irrota vedentuloletku hanasta.
• Valitse pesuohjelma, käynnistä kone ja anna ohjelman
käydä hetki.
• Laske vedentuloletku lattialle. Sijoita letkun alle astia,
johon vesi voi valua.
• Käännä ohjelmanvalitsin tyhjennysohjelman kohdalle,
käynnistä kone ja anna ohjelman käydä hetki.
• Irrota poistoletku koneen takaseinässä olevasta pidikkeestä. Aseta letku lattialle lattiakaivon viereen.
Huolehdi, ettei letku joudu lattiakaivon veden pinnan
alapuolelle.
Kun pesukone jälleen otetaan käyttöön vedentulo- ja
poistoletkut on asennettava uudelleen.
Ennen ensimmäistä käyttöä on koneen ja huonetilan
lämmettävä ja kuivuttava vastaamaan normaaleja käyttöolosuhteita. Tarkista ensimmäisten käyttökertojen aikana,
ettei koneeseen ole varotoimista huolimatta syntynyt vesivuotoja aiheuttavia jäätymisvaurioita.
HUOM! Kone on tarkoitettu käytettäväksi ja säilytettäväksi
normaalissa huonelämpötilassa.
Valmistaja ei vastaa jäätymisvaurioista.
Kalkinpoisto
Jos veden kovuusaste on suurempi kuin 7 °dH,
pesukoneesta tulee poistaa kalkki vähintään 4 kertaa
vuodessa. Annostele pesuaineen sijasta 1,5 dl
sitruunahappoa ja suorita pesuohjelma ilman pyykkiä
mahdollisimman korkeassa lämpötilassa. Esim.
lämmitysvastuksiin tarttunut kalkkikerrostuma lyhentää
niiden käyttöikää. (Suomessa vesi on yleensä pehmeää,
n. 3 °dH ja allekin. Lisätietoja veden kovuudesta saat
kuntasi vesilaitokselta.)
Hoito
1
2
3
Alkoholipitoisia puhdistusaineita, ohenninta tai
vastaavaa ei saa käyttää.
Page 11
- 11 -
Pesu- ja huuhteluaineet
Pesutulos riippuu mm. käytettävästä pesuaineesta ja sen
annostuksesta. Liian suuren määrän käyttö on turhaa ja
kuormittaa ympäristöä. Myös biologisesti hajoavat pesuaineet sisältävät aineita, jotka suurina pitoisuuksina horjuttavat ekologista tasapainoa.
Käytä vain hyvälaatuisia, konepesuun tarkoitettuja
pesuaineita.
Noudata pesuaineen valmistajan ohjeita ja annostele
pesuaine pyykin määrän, likaisuuden ja veden kovuuden
mukaan. Ellet tiedä veden kovuutta, paikallinen vesilaitos
antaa siitä tietoa.
Pesuaineet
Pesuaine kaadetaan pesuainekotelon vasemmanpuoleiseen lokeroon ennen ohjelman käynnistämistä.
Kirjopesuun, hellävaraiseen pesuun ja villapesuun on eri
pesuaineet.
Nestemäiset pesuaineet
Alhaisen tai keskikorkean lämpötilan ohjelmaa käytettäessä voidaan pesujauhe korvata sopivalla nestemäisellä
pesuaineella. Tällöin on valittava ohjelma ilman esipesua.
Kaada nestemäinen pesuaine pesuainelokeroon juuri
ennen kuin käynnistät ohjelman.
Huuhteluaineet
Mahdollinen huuhteluaine kaadetaan pesuainekotelon
oikeanpuoleiseen lokeroon. Huuhteluaineen lisääminen
on eduksi etenkin, jos pyykki kuivataan kuivausrummussa,
koska huuhteluaine poistaa staattisen sähkön vaatteista.
Yleistä pyykinpesusta
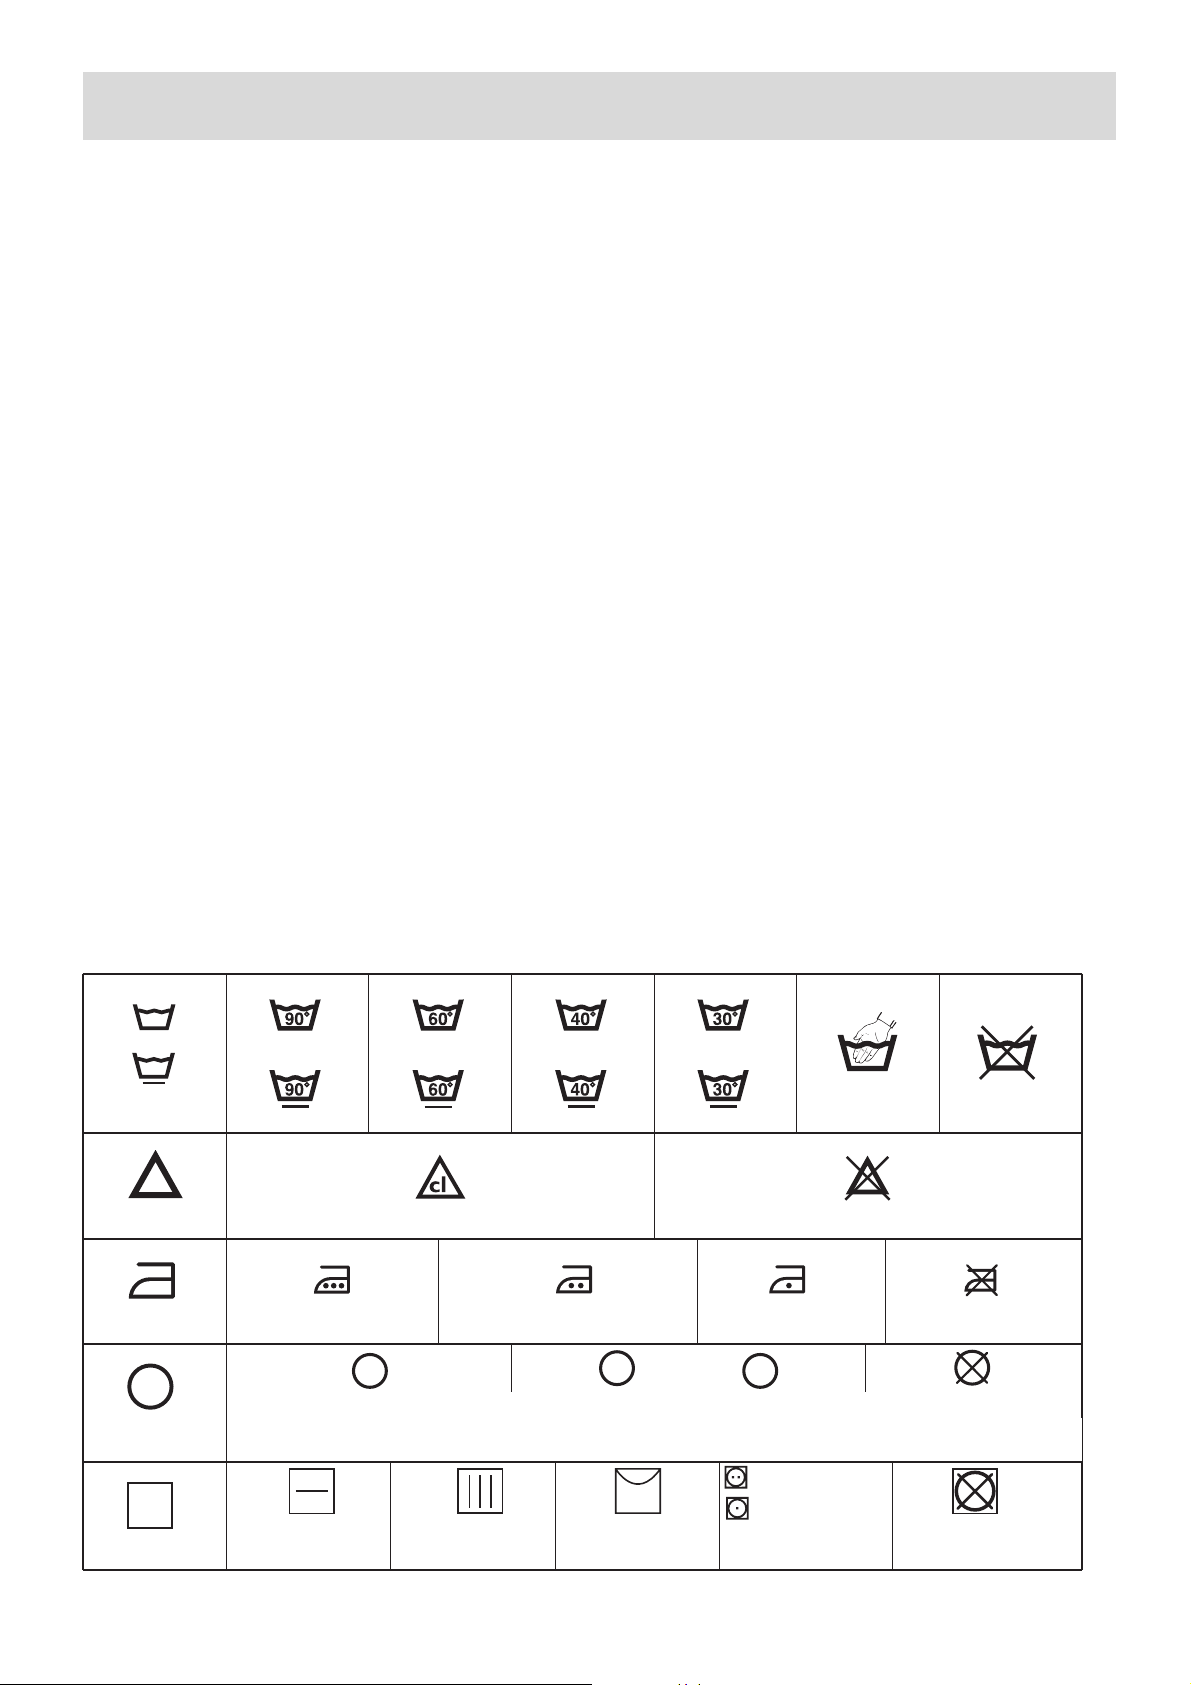
Pesumerkinnät
Alla yleisimmät pesumerkinnät selityksineen.
normaali ohjelma
PESU
hellävarainen
ohjelma
käsinpesu vesipesu kielletty
vesipesu 90°
VALKAISU
SILITYS
KUIVAPESU
KUIVAUS
valkaisu sallittu valkaisu kielletty
silitys kosteana
enintään 200°C
normaali kuivapesu
Erikoiskuivapesu
P
F
kuivapesu kielletty
silitys kosteana tai kostean
liinan läpi enintään 150°C
silitys kuivana
enintään 100°C
silitys kielletty
kuivaus tasaisella
alustalla kuivaus ripustamalla
kuivaus
vaateripustimessa
rumpukuivaus
kielletty
voidaan kuivata
kuivausrummussa
vesipesu 60° vesipesu 40° vesipesu 30°
normaali rumpukuiv.
mieto rumpukuiv.
Kirjaimet symboolien sisällä ovat pesulaa varten. Ne kertovat miten tekstiilit tulee puhdistaa
ja mitä liuotinainetta voidaan käyttää.
A
Page 12

- 12 -
■
Vika
❏ Tarkista
Jos kone ei toimi
■ Kone ei käynnisty.
■ Kone ei ota vettä.
■ Kone tyhjentää ja täyttyy samanaikai-
sesti?
■ Kone ei tyhjennä eikä linkoa.
■ Kone vuotaa vettä tai tulvii.
■ Kone värähtelee ja on meluisa.
■ Koneen luukku ei aukea.
❏ Onko käynnistyspainike sisäänpainettuna?
❏ Onko pistoke kytketty pistorasiaan?
❏ Onko sulake palanut?
❏ Onko luukku kunnolla kiinni?
❏ Onko ohjelmanvalitsin oikeassa asennossa?
❏ Onko vesihana auki?
❏ Onko poistoletku asennettu liian alas?
(Katso Asennus)
❏ Onko poistoletkun pään ja seinäputken välissä
ilmarako? (Katso Asennus)
Jos kone on tyhjennettävä käsin:
Irrota poistoletku koneen takaseinässä olevasta
pidikkeestä. Aseta letku lattialle suu lattiakaivon
viereen. Huolehdi siitä, ettei letkun suu joudu
lattiakaivon veden pinnan alapuolelle.
❏ Onko valittu ohjelma, johon ei kuulu tyhjennystä ja
linkousta?
❏ Onko poistoletku puristuksissa tai mutkalla?
❏ Onko letkun jatkaminen suoritettu oikein?
(katso Asennus)
❏ Onko pesuainetta annosteltu liikaa?
❏ Onko pesuaine tarkoitettu konepesuun?
❏ Onko letkut asennettu oikein? (katso Asennus)
❏ Onko pesuainekotelo tukossa?
❏ Onko kaikki kuljetustuet poistettu?
❏ Onko asennus oikein tehty ja kone vaakasuorassa?
❏ Onko kone asennettu niin, että se koskettaa seinää?
❏ Seisooko kone kaikkien neljän jalan varassa?
❏ Onko ohjelman suorituksesta kulunut 2-3 minuuttia
ja merkkivalo sammunut?
Lue kohdasta Pyykin laittaminen koneeseen miten
luukku avataan.
Älä koskaan yritä avata luukkua väkisin.
Ota yhteys huoltoon.
❏ Onko vesihana auki?
❏ Onko vedentulo kiinteistöön tilapäisesti poikki?
❏ Onko vedentuloletku taipunut tai mutkalla?
❏ Onko vedentuloletkun suodatin tukossa?
❏ Onko veden paine alhainen?
Page 13

- 13 -
Mitat Korkeus 67 cm
Leveys 49,5 cm
Syvyys 51,5 cm
Paino (netto) 54 kg
Suositeltu Puuvilla 3,0 kg
täyttömäärä Keinokuitu/hellävarainen 1,5 kg
kuivaa pyykkiä Villa 1,0 kg
Veden paine Vähintään 5 N/cm
2
(0,5 kp/cm2)
Enintään 100 N/cm
2
(10 kp/cm2)
Rummun tilavuus 27 litraa
Linkous Suurin nopeus 950 k/min
Sähköliitäntä Jännite 230 V / 50 Hz
Liitäntäteho 1900 W
Sulake 10 A
Tekniset tiedot
Huolto ja varaosat
Tarkista kohdasta, Jos kone ei toimi, pystytkö itse selvittämään syyn ja vian. Jos kutsut huollon paikalle, vaikka
vian ratkaisu löytyy näiltä sivuilta, saatat itse joutua
maksamaan kustannukset. Näin käy myös jos käytät
pesukonetta muuhun tarkoitukseen kuin se on sovellettu.*)
Huollot ja mahdolliset korjaukset on annettava valtuutetun
huoltoliikkeen tehtäväksi. Varmistaaksesi laitteesi moitteettoman toiminnan vaadi aina käytettäväksi sopivinta,
siis alkuperäistä varaosaa.
Lähimmän valtuutetun huoltoliikkeen numeron löydät
soittamalla numeroon 0200-2662 (0,95 mk/min + pvm).
Huollosta ja varaosien myynnistä vastaa Oy Electrolux
Kotitalouskoneet Ab - HUOLTOLUX Porissa, Puh. (02)
622 3300.
Mainitse soittaessasi tuotteen malli ja tuotenumero, jotka
ovat tietokilvessä ja voidaan merkitä alla olevaan
kohtaan, mistä ne löytyvät helposti tarvittaessa.
TYPE.........................................................................
MOD..........................................................................
PROD.NO...................................................................
SER.NO.....................................................................
Ostopäivä................................................................
Kuluttajaneuvonta
Tuotettasi tai sen käyttöä koskeviin kysymyksiin saat
vastauksen kuluttajaneuvonnastamme soittamalla
numeroon 0200-2662 (0,95 mk/min + pvm).
Takuu
Tuotteella on kahden (2) vuoden takuu. Takuuehdot noudattavat alan yleisiä ehtoja ja niitä on saatavissa myyntiliikkeestä tai maahantuojalta. Ostokuitti säilytetään, koska
takuun alkaminen määritetään ostopäivän mukaan.
Korvaus huollosta voidaan periä myös takuuaikana:
* aiheettomasta valituksesta
* ellei käyttöohjetta ole noudatettu
Huolto
Page 14
- 14 -
3
2
1
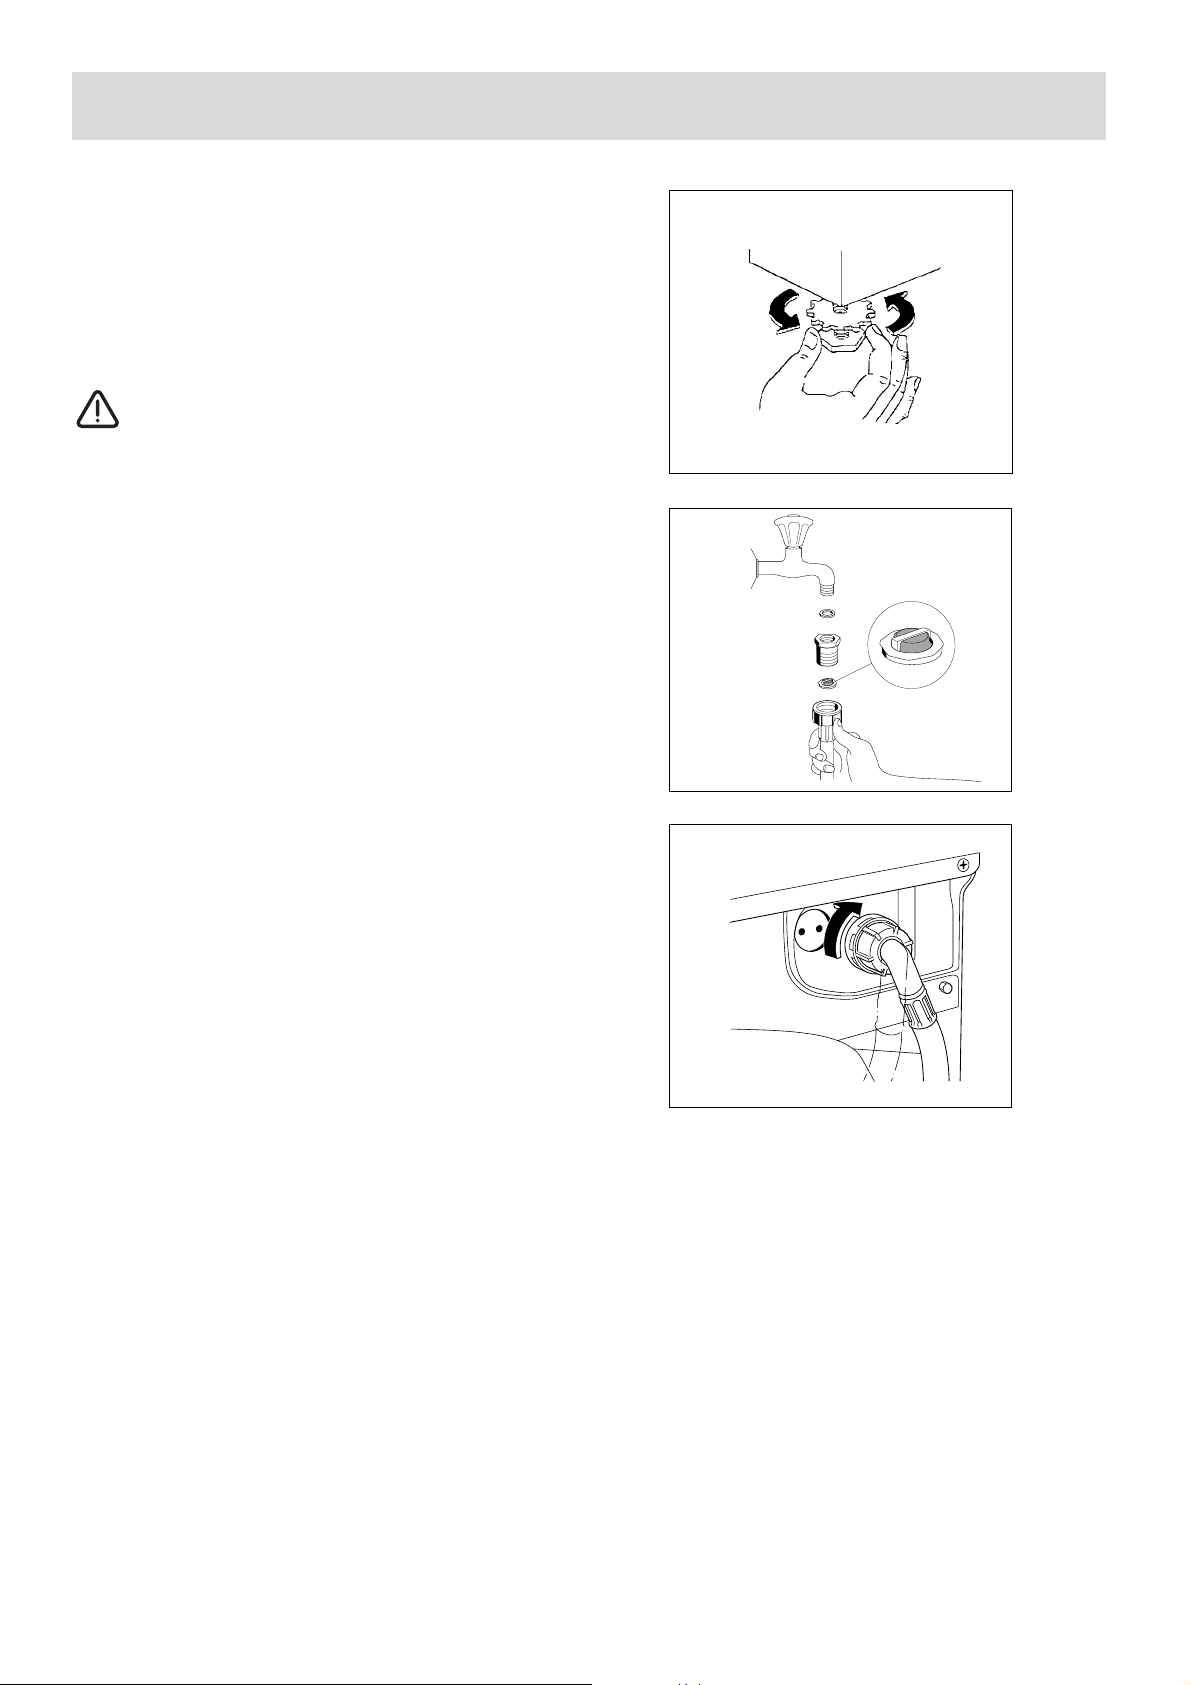
Asennus vaakasuoraan
Koneen on seistävä vaakasuorassa kiinteällä ja tukevalla
alustalla, eikä se saa ottaa vastaan huonekaluihin tai
seiniin. Säädä jalat niin, että kone seisoo kaikilla neljällä
jalallaan. Lukitse jalat säädön jälkeen lukitusmuttereiden
avulla (kuva 1).
Lingotessa kone värähtelee. Tämä on normaalia, eikä sitä
voi välttää, erityisesti jos kone on joustavalla alustalla.
Jos kone sijoitetaan matolle, huolehdi ettei ilmanvirtaus koneen alla tukkiudu.
Vedentulo
Aseta kumitiiviste-suodatinyhdistelmä vedentuloletkuun
ja liitä letku hanaan, jossa on 3/4" putkikierre. Käytä
tarvittaessa mukana toimitettua supistuskappaletta
(1/2") (kuva 2).
Vedentuloletkua ei saa liittää jatkoletkuun. Jos letku on
liian lyhyt on koko letku vaihdettava pitempään, tätä
tarkoitusta varten olevaan erikoisvalmisteiseen letkuun.
Vedentuloletkun toinen, koneeseen liitetty pää on kierrettävissä molempiin suuntiin. Löysää kiinnitysmutteria,
kierrä letku ja tiukkaa mutteria uudelleen (kuva 3).
Asennus
Page 15

- 15 -
2
3
1
ON/OF ECO
Electrolux
EV 100C
4
Vedenpoisto
Koneen poistoletku voidaan sijoittaa kolmella tavalla:
Pesualtaan reunan yli:
Tällöin poistoletku kiinnitetään koukulla seinään tai
kiinnitetään vesihanaan pätkällä narua (kuva 1) niin,
ettei letku pääse liikkumaan koneen tyhjentyessä.
Suoraan vesilukkoon:
Poistoletku liitetään suoraan pesu- tai tiskialtaan vesilukon yläpuolelle. Tällöin poistoletkun jonkin kohdan
on oltava kiinnitettynä pesualtaan yläreunan korkeudelle (kuva 2).
Suoraan viemäriin:
Tässä tapauksessa letku on liitettävä pystysuoraan
putkeen, jonka korkeuden on oltava 450 - 800 mm
lattiasta.
Poistoletkun ja putken väliin on jäätävä ilmarako.
Tämän takia putken sisähalkaisijan on oltava letkun
ulkohalkaisijaa suurempi (kuva 3).
Letkua saa työntää vain 50 mm putken sisään ja on
kiinnitettävä tähän asentoon mukana seuraavan poistoletkun kaaren avulla.
Poistoletkun voi jatkaa enintään kokonaisuudessaan
3,5 metriin. Jatkoletkun sisähalkaisijan on oltava vähintään sama kuin alkuperäisen letkun.
Käytä sopivaa liitoskappaletta. Letkua on vedettävä
lattiaa pitkin ja ainoastaan sen pää nostetaan ylös
poistoputken kohdalla (kuva 4).
Sähköliitäntä
Pesukoneessa on pistokkeella varustettu liitäntäjohto,
joka kytketään 230 V, 10 A maadoitettuun pistorasiaan.
Jos pesukone sijoitetaan kylpyhuoneeseen eikä kiinteää sähköasennusta tehdä, on käytettävä maasulkukatkaisinta.
Pesukoneen kiinteä sähköasennus täytyy
jättää valtuutetun sähköasentajan tehtäväksi.
Asennus
450-800 mm
40 mm
450-800 mm
Page 16

- 16 -
SODERVANIE
Dlq polxzowatelq
RASPAKOWKA STIRALXNOJ MA{INY 17
-Esli stiralxnaq ma[ina powrevdena
-Perenoska stiralxnoj ma[iny
-Stopornye transportirowo^nye ustrojstwa
-Identifikaciq materialow
RUKOWODSTWO PO TEHNIKE
BEZOPASNOSTI 18
DETALI I |LEMENTY SISTEMY
STIRALXNOJ MA{INY 19-20
-Stiralxnaq ma[ina (wid speredi)
-Stiralxnaq ma[ina (wid szadi)
-Panelx uprawleniq
PORQDOK |KSPLUATACII
STIRALXNOJ MA{INY 21
-Zagruzka stiralxnoj ma[iny
-Zagruzka mo@]ego sredstwa i kondicionera
dlq tkani
-Zapusk programmy stiralxnoj ma[iny
TABLICY PROGRAMM 22-23
TEHNI~ESKOE OBSLUVIWANIE 24
-Korpus stiralxnoj ma[iny
-Lotok dlq zagruzki mo@]ego sredstwa
-Gnezdo dlq lotka
-O^istka wnutrennih powerhnostej stiralxnoj
ma[iny
-Za]ita stiralxnoj ma[iny ot zamerzaniq
-Udalenie nakipi
OB}AQ INFORMACIQ O STIRKE 25
-Mo@]ee sredstwo i kondicioner dlq tkani
-Uslownye obozna^eniq na \tiketkah tekstilxnyh
izdelij
ESLI STIRALXNAQ MA{INA NE
RABOTAET
26
TEHNI~ESKOE OBSLUVIWANIE 27
-Tehni^eskoe obsluviwanie i zapasnye ^asti
Dlq specialista po ustanowke
TEHNI~ESKIE HARAKTERISTIKI 27
USTANOWKA STIRALXNOJ
MA{INY
28-29
-Wyrawniwanie stiralxnoj ma[iny
-Poda^a wody
-Sliw wody
-Poda^a \lektro\nergii
Page 17

1
2
4
RASPAKOWKA STIRALXNOJ MA{INY
- 17 -
3
Esli stiralxnaq ma[ina powrevdena
Esli stiralxnaq ma[ina byla powrevdena wo wremq
transportirowki, neobhodimo nemedlenno uwedomitx ob \tom
kompani@, otwetstwennu@ za dostawku. Prowerxte, ne powrevdena
li ma[ina. Esli wy obnaruvili kakie-libo powrevdeniq,
neisprawnosti ili otsutstwie kakih-libo detalej, nemedlenno
soob]ite ob \tom w torgowoe predpriqtie, prodaw[ee stiralxnu@
ma[inu. ZAPRE}AETSQ ostawlqtx upakowo^nyj material w
mestah, dostupnyh detqm.
Perenoska stiralxnoj ma[iny
Budxte ostorovny, pripodnimaq stiralxnu@ ma[inu. W slu^ae
neprawilxnoj perenoski movno ne tolxko polu^itx trawmy, no i
powreditx ma[inu. Otkrojte dwercu i uderviwajte ma[inu za
wnutrenn@@ powerhnostx zagruzo^nogo l@ka. Dlq perenoski ma[iny
movno ispolxzowatx takve wystupa@]u@ ^astx werhnej kry[ki
ma[iny. ZAPRE}AETSQ pripodnimatx ma[inu, dervasx za panelx
uprawleniq, dwercu ili lotok dlq mo@]ego sredstwa (ris. 1).
Stopornye transportirowo^nye
ustrojstwa
Dlq predotwra]eniq powrevdeniq barabana i \lektrodwigatelq
wo wremq transportirowki stiralxnu@ ma[inu snabva@t rqdom
stopornyh ustrojstw/upakowo^nyh detalej. Pered ustanowkoj
ma[iny ih NEOBHODIMO udalitx.
Raspredelite ^astx polistirolxnogo upakowo^nogo materiala na
polu pozadi ma[iny i zatem ostorovno polovite na nego ma[inu
zadnej storonoj. Ubeditesx w tom, ^to pri \tom ne byli smqty
[langi (ris. 2).
Snimite polistirolxnoe osnowanie, na kotorom byla dostawlena
ma[ina. Wernite ma[inu w normalxnoe wertikalxnoe polovenie
i wywernite tri winta szadi (ris. 3).
W otkryw[iesq otwerstiq NEOBHODIMO wwernutx plastmassowye
probki, dostawlennye wmeste s ma[inoj (w plastikowom pakete
wnutri barabana) (ris. 4).
Identifikaciq materialow
Wse materialy, primenennye dlq upakowki ma[iny, \kologi^eski
bezopasny. Razli^nye ispolxzowannye plastiki identificirowany
i mogut podwergatxsq powtornoj obrabotke.
• PE - bukwy, obozna^a@]ie poli\tilen, kotoryj primenen dlq
obertywaniq ma[iny, i futlqra dlq nastoq]ego rukowodstwa.
• PS - bukwy, obozna^a@]ie polistirol (w dannom slu^ae
formowannyj), iz kotorogo izgotowleny detali dlq
amortizacii udarow pri transportirowke.
Kartonnye detali upakowki izgotowleny iz bumagi, prigodnoj dlq
wtori^noj pererabotki, i dolvny bytx sdany w sootwetstwu@]ie
priemnye punkty.
Ma[ina sodervit plastmassowye i rezinowye detali. Wse oni
ime@t markirowku, ukazywa@]u@ tip materiala, po\tomu mogut
bytx powtorno pererabotany ili utilizowany po iste^enii sroka
sluvby ma[iny. Markirowka wypolnena w sootwetstwii s
mevdunarodnymi standartami.
Page 18

Pered ustanowkoj i na^alom \kspluatacii stiralxnoj
ma[iny wnimatelxno pro^itajte nastoq]ee rukowodstwo,
w tom ^isle wse ukazaniq i preduprevdeniq. |to obespe^it
wam besperebojnu@ rabotu ma[iny s maksimalxnoj
\ffektiwnostx@. Wse, kto polxzuetsq \toj stiralxnoj
ma[inoj dolvny bytx oznakomleny s instrukciqmi po
\kspluatacii ma[iny i tehnike bezopasnosti.
❐ Pered na^alom \kspluatacii stiralxnoj ma[iny
neobhodimo udalitx wesx upakowo^nyj material i
stopornye transportirowo^nye ustrojstwa.
Newypolnenie \togo trebowaniq movet priwesti k
powrevdeni@ ma[iny i drugogo imu]estwa.
Sm. podrazdel “Stopornye transportirowo^nye
ustrojstwa”.
❐ Wse raboty po ustanowke ma[iny i drugie raboty po
naladke i remontu dolvny bytx wypolneny
kwalificirowannym mehanikom. Raboty, wypolnennye
nekompetentnymi licami, mogut priwesti k naru[eni@
prawilxnogo funkcionirowaniq ma[iny, a takve k
trawmam l@dej i powrevdeni@ ma[iny.
❐ Ma[ina tqvelaq, po\tomu budxte ostorovny, kogda
ee pripodnimaete. ZAPRE}AETSQ podnimatx ma[inu,
dervasx za panelx uprawleniq, dwercu ili lotok dlq
mo@]ego sredstwa.
❐ Ubeditesx w tom, ^to ma[ina ne stoit na \lektri^eskom
[nure i, ^to na [langah net mest svatiq ili peregibow.
❐ Izbegajte ustanowki ma[iny w pome]enii, gde net
wodostoka w polu.
❐ Ma[ina prednazna^ena tolxko dlq oby^noj stirki
w doma[nih uslowiqh i tolxko w sootwetstwii s
instrukciqmi, priwedennymi w nastoq]em rukowodstwe.
Ispolxzowatx ma[inu w drugih celqh riskowano, tak
kak wozmovny trawmy l@dej i powrevdenie ma[iny
i drugogo imu]estwa.
❐ Stiralxnoj ma[inoj dolvny polxzowatxsq tolxko
wzroslye l@di. Ne pozwolqjte detqm igratx s ma[inoj
ili trogatx organy uprawleniq i dwivu]iesq/
podwivnye detali.
❐ W ma[ine movno stiratx tolxko izdeliq, prigodnye
dlq ma[innoj stirki. Esli woznikli somneniq,
swqvitesx s firmoj-izgotowitelem ili prodawcom
\toj we]i.
❐ Sledujte rekomendaciqm na \tiketkah, prikreplennyh
k tekstilxnym izdeliqm, i pered stirkoj ubeditesx,
^to karmany pusty, a pugowicy i zastevki-molnii
zastegnuty.
❐ Twerdye predmety, takie kak monety, bulawki, gwozdi,
winty i dr., mogut wyzwatx serxeznye powrevdeniq
ma[iny. Pered zagruzkoj odevdy w ma[inu ubeditesx
w tom, ^to karmany pusty.
❐ Pered ma[innoj stirkoj udalite pqtna rvaw^iny,
^ernil, kraski i trawy.
❐ Ne stirajte w ma[ine porwannoe ili silxno
izno[ennoe belxe.
❐ Ne ostawlqjte rabota@]u@ ma[inu bez prismotra.
❐ We]i, obrabotannye, naprimer, himikatami dlq
udaleniq rvaw^iny, vidkimi sredstwami bytowoj
himii i dr., pered stirkoj w ma[ine sleduet
t]atelxno propoloskatx wru^nu@.
❐ Stirajte melkie we]i, naprimer tonkie noski,
galstuki, kruvewnye worotniki i izdeliq, w set^atyh
me[kah dlq belxq, ^toby predotwratitx ih popadanie
mevdu wnutrennim i naruvnym barabanami.
❐ Pri stirke w stiralxnoj ma[ine b@stgalxterow s
kosto^kami, oni dolvny nahoditxsq w set^atyh
me[kah dlq belxq.
❐ Wsegda sledujte rekomendaciqm izgotowitelej mo@]ego
sredstwa i kondicionera tkani pri opredelenii
koli^estwa \tih we]estw dlq ispolxzowaniq. Sli[kom
bolx[oe koli^estwo movet isportitx wa[e belxe.
❐ Pered zagruzkoj ma[iny ubeditesx, ^to w barabane
net postoronnih predmetow ili doma[nih viwotnyh.
❐ Ne peregruvajte ma[inu. Pri peregruzke uhud[aetsq
harakteristika raboty ma[iny i wozmovno
powrevdenie belxq.
❐ Pri rabote ma[iny steklo dwercy nagrewaetsq,
po\tomu ne prikasajtesx k nemu. Ne dopuskajte detej
k rabota@]ej ma[ine.
❐ Prevde ^em otkrytx dwercu ma[iny ubeditesx, ^to
woda polnostx@ otka^ana.
❐ Po okon^anii raboty otkl@^ite ma[inu ot isto^nikow
wodosnabveniq i \lektro\nergii. Wynimaq wilku [nura
iz rozetki \lektroseti, dervitesx za wilku, a ne za
[nur.
❐ Kogda ma[ina ne ispolxzuetsq, dervite dwercu
neplotno zakrytoj dlq predotwra]eniq zathlogo
zapaha.
❐ Pered o^istkoj ma[iny, prowedeniem rabot po
tehni^eskomu obsluviwani@ ubeditesx, ^to ma[ina
otkl@^ena ot \lektroseti.
❐ Tehni^eskoe obsluviwanie i remont dolvno
prowoditx remontnoe predpriqtie, upolnomo^ennoe
postaw]ikom. Polxzujtesx tolxko temi zap^astqmi,
kotorye predlaga@t takie predpriqtiq. Nikogda ne
pytajtesx otremontirowatx ma[inu samostoqtelxno.
❐ Posle zawer[eniq sroka sluvby ma[iny otsoedinite
ee ot \lektroseti, zatem otrevxte \lektri^eskij
[nur w tom meste, gde on whodit w ma[inu. Primite
mery, ^toby deti ne smogli ispolxzowatx dlq igry
otrezannyj [nur s wilkoj.
RUKOWODSTWO PO TEHNIKE BEZOPASNOSTI
- 18 -
Page 19

STIRALXNAQ MA[INA (WID SPEREDI)
DETALI I |LEMENTY SISTEMY STIRALXNOJ MA{INY
1 Panelx uprawleniq
2 Dwerca
3 Zamok dwercy
4 4 reguliruemyh po wysote novki
s fiksatorami
- 19 -
1
2
4
3
STIRALXNAQ MA[INA (WID SZADI)
6
7
5
5
Naliwnoj [lang
6 Sliwnoj [lang
7 |lektri^eskij [nur
8 Transportirowo^nye stopornye
ustrojstwa
8
Page 20

DETALI I |LEMENTY SISTEMY STIRALXNOJ MA{INY
PANELX UPRAWLENIQ
KNOPO^NYE WYKL@^ATELI:
(Wkl./Wykl.) – Posle wybora programmy stirki
i temperatury navmite na \tu knopku dlq zapuska
ma[iny (Sm. takve 8-indikator).
- Dopolnitelxnaq funkciq. Pri navatii \toj
knopki programma budet ostanawliwatxsq w konce
poslednej operacii poloskaniq, i woda, kotoraq
ispolxzowalasx dlq poloskaniq. budet uderviwatxsq
w ma[ine. |ta funkciq movet ispolxzowatxsq w
programmah dlq stirki sintetiki, delikatnyh tkanej i
[ersti dlq togo, ^toby umenx[itx smqtie sinteti^eskih
wolokon.
Posle togo, kak programma byla ostanowlena na
pozicii poloskanie-ostanow bez sliwa wody, dlq
zawer[eniq stirki posredstwom sliwa wody i otvima
s pomo]x@ wra]eniq barabana navmite e]e raz
knopku \toj funkcii dlq togo, ^toby knopka wysko^ila
naruvu. Esli wy hotite zakon^itx stirku putem sliwa
wody bez wra]eniq barabana, to nuvno peremestitx
ru^ku ustanowki programmy wru^nu@ na ozici@
programmy L. Pered wypolneniem pereme]eniq
ru^ki ustanowki programmy wru^nu@ rekomenduetsq
sna^ala wykl@^itx ma[inu s pomo]x@ navatiq
knopki Wkl./Wykl. (kopka wyskakiwaet naruvu).
Posle togo, kak ru^ka ustanowki programmy ustanowlena
na pozici@ L, snowa navmite knopku Wkl./Wykl.
(knopka ostaetsq w utoplennom polovenii) dlq
zawer[eniq programmy.
RU^KI UPRAWLENIQ I RAZDATO^NYJ LOTOK
DLQ MO@]EGO SREDSTWA:
Termoregulqtor dlq ustanowki temperatury mevdu
-90° C. Sobl@dajte rekomendacii,
ukazannye na \tiketke, prikreplennoj k tkani.
Wybor programmy - dlq ustanowki tipa
programmy. Sm. str. 22-23 “Tablica programm”.
Lotok dlq mo@]ego sredstwa - s otdelxnymi
otsekami dlq mo@]ego sredstwa i kondicionera
tkani. Mo@]ee sredstwo dlq predwaritelxnoj
stirki movet bytx dobawleno neposredstwenno
w baraban.
Indikator zagoraetsq primerno ^erez 5 s posle
navatiq na knopo^nyj wykl@^atelx Wkl./Wykl., kogda
dwerca blokiruetsq, i ma[ina na^ala rabotatx.
Indikator prodolvaet swetitxsq okolo 2-3 min.
posle zawer[eniq programmy i otpiraniq dwercy.
Mesto dlq shemy programm (samokleq]aqsq \tiketka)
- 20 -
5
1
2
3
4
5
6
7
1 2 3 4
6
7
Page 21

Pered na^alom \kspluatacii ma[iny sleduet prognatx
programmu stirki bez zagruzki belxq w baraban dlq udaleniq
l@byh ostatkow, popaw[ih w baraban w processe proizwodstwa.
Zagruzite primerno 100 ml mo@]ego sredstwa neposredstwenno
w baraban i progonite programmu G, 40° C. Posle zawer[eniq
programmy ma[ina budet gotowa k rabote.
ZAGRUZKA STIRALXNOJ MA[INY
Ostorovno potqnite za]elku, ^toby otkrytx dwercu
zagruzo^nogo l@ka ma[iny. Zagruzite grqznoe belxe w
baraban. Otdelxnye we]i mogut bytx krupnymi i melkimi.
Wsegda ispolxzujte polnu@ zagruzku: maksimalxnu@ massu
zagruvennogo belxq sm. w tablicah programm. Massu movno
umenx[itx tolxko w slu^ae silxno zagrqznennyh we]ej i
izdelij, trebu@]ih ostorovnogo obra]eniq. Odin iz
sposobow dostiveniq maksimalxnoj zagruzki sostoit w
zapolnenii barabana suhim belxem polnostx@, no neplotno.
Po drugomu sposobu wzwe[iwa@t perwye partii belxq, ^toby
prawilxno wybiratx massu zagruvaemogo belxq w dalxnej[em.
Zakrojte dwercu zagruzo^nogo l@ka.
ZAGRUZKA MO@]EGO SREDSTWA I
KONDICIONERA DLQ TKANI
Koli^estwo mo@]ego sredstwa okazywaet wliqnie na ka^estwo
raboty l@boj stiralxnoj ma[iny. Kak sli[kom bolx[oe
koli^estwo, tak i sli[kom maloe mogut wyzywatx problemy.
Primenqjte mo@]ie sredstwa, prednazna^ennye tolxko dlq
awtomati^eskih stiralxnyh ma[in i sobl@dajte instrukcii
ih izgotowitelej pri izmerenii koli^estwa.
Esli wodoprowodnaq woda vestkaq ili we]i silxno zagrqzneny,
koli^estwo mo@]ego sredstwa sleduet uweli^itx. Esli ve
we]i slabo zagrqzneny ili zagruzka nepolnaq, koli^estwo
mo@]ego sredstwa sleduet umenx[itx. Silxnoe penoobrazowanie movet ukazywatx na izbytok mo@]ego sredstwa.
Lotok ispolxzuetsq kak dlq mo@]ego sredstwa dlq osnownoj
stirki, tak i dlq kondicionera. Zagruzite mo@]ee sredstwo
w bolx[ij otsek slewa (ris. 1), a kondicioner - w menx[ij
otsek sprawa, no ne wy[e otmetki maksimalxnogo urownq
(ris. 2). Esli primenqetsq predwaritelxnaq stirka, to
mo@]ee sredstwo zagruvaetsq neposredstwenno w baraban.
ZAPUSK PROGRAMMY STIRALXNOJ MA[INY
Pered zapuskom programmy ubeditesx:
– zakryta li dwerca;
– podsoedinena li ma[ina k wodoprowodu i k \lektroseti;
– wkl@^ena li poda^a wody.
Ustanowite temperaturu (ris. 3), wyberite programmu (ris. 4)
i navmite na knopki wariantow programmy, kotorye wam
potrebu@tsq. Zatem navmite na knopku Wkl./Wykl. dlq na^ala
stirki. Indikator zagoritsq primerno ^erez 5 s posle
zapiraniq (blokirowki) dwercy (\lektri^eskim priwodom) i
na^ala raboty ma[iny.
PORQDOK |KSPLUATACII STIRALXNOJ MA{INY
- 21 -
1
2
3
4
Page 22

- 22 -
TABLICY PROGRAMM
Hlop^atobumavnye i lxnqnye izdeliq (massa suhoj zagruzki 3,0 kg)
Belye
izdeliq
Belye
izdeliq
Cwetnye
izdeliq
Cwetnye
izdeliq
Bystraq
stirka
Otvim
Sliw
Silxnoe
zagrqznenie
Normalxnoe
zagrqznenie
Normalxnoe
zagrqznenie
Normalxnoe
zagrqznenie
Legkoe
zagrqznenie
A
B
B
C
D
E
L
90
90
60
40
30 - 40
n. 147
n. 135
n. 135
n. 110
n. 91
n. 8
n. 2
Stirka pri 90° C
predwaritelxnoj
stirkoj, 3 operacii
poloskaniq i otvim
pri 950 ob/min.
Stirka pri 60° C bez
predwaritelxnoj
stirki, 3 operacii
poloskaniq i otvim
pri 950 ob/min.
Stirka pri 90° C bez
predwaritelxnoj
stirki, 3 operacii
poloskaniq i otvim
pri 950 ob/min.
Stirka pri 40° C bez
predwaritelxnoj
stirki, 3 operacii
poloskaniq i otvim
pri 950 ob/min.
Bystraq stirka pri 30°-
40° C bez predwaritelxnoj stirki, 3
operacii poloskaniq i
otvim pri 950 b/min.
Sliw i otvim pri
950 ob/min.
Sliw
Stepenx
zagrqzneniq
Ustanowka
temp.
Wybor
programmy
Prodolvit.
programmy,
min.
Sodervanie
programmy
Page 23

30 - 40
Stirka pri 30° C - 40° C
bez predwaritelxnoj
stirki, 3 operacii
poloskaniq i otvim
pri 600 ob/min.
- 40
- 23 -
TABLICY PROGRAMM
Sinteti^eskie izdeliq i izdeliq iz tonkoj tkani (massa suhoj
zagruzki 1.5 kg)
{erstx (massa suhoj zagruzki 1,0 kg)
Poloskanie-ostanow bez sliwa wody - Poloskanie-ostanow bez sliwa wody - \to dopolnitelxnaq
funkciq, kotoraq movet ispolxzowatxsq w programmah dlq stirki sintetiki, delikatnyh tkanej i [ersti.
Dlq wybora funkcii poloskanie-ostanow bez sliwa wody navmite sootwetstwu@]u@ knopku dopolnitelxnoj
funkcii, raspolovennu@ na paneli uprawleniq stiralxnoj ma[iny. Poloskanie-ostanow bez sliwa wody
ozna^aet, ^to programma ostanawliwaetsq, i woda, kotoraq ispolxzowalasx w poslednem poloskanii,
uderviwaetsq w ma[ine dlq umenx[eniq smqtiq sinteti^eskih wolokon.
Posle togo, kak programma byla ostanowlena na pozicii poloskanie-ostanow bez sliwa wody, dlq zawer[eniq
stirki posredstwom sliwa wody i otvima s pomo]x@ wra]eniq barabana navmite e]e raz knopku \toj
funkcii dlq togo, ^toby knopka wysko^ila naruvu. Esli wy hotite zakon^itx stirku putem sliwa wody bez
wra]eniq barabana, to nuvno peremestitx ru^ku ustanowki programmy wru^nu@ na pozici@ programmy L.
Pered wypolneniem pereme]eniq ru^ki ustanowki programmy wru^nu@ rekomenduetsq sna^ala wykl@^itx
ma[inu s pomo]x@ navatiq knopki Wkl./Wykl. (kopka wyskakiwaet naruvu). Posle togo, kak ru^ka ustanowki
programmy ustanowlena na pozici@ L, snowa navmite knopku Wkl./Wykl. (knopka ostaetsq w utoplennom
polovenii) dlq zawer[eniq programmy.
Otvim
Sintetika
Sintetika
Izdeliq,
trebu@]ie
ostorovnogo
obra]eniq
{erstqnye
izdeliq
Sliw
Normalxnoe
zagrqznenie
Legkoe
zagrqznenie
Normalxnoe
zagrqznenie
Legkoe
zagrqznenie
F
G
F
H
K
L
60
40
n. 74
n. 74
n. 56
n. 50
n. 8
n. 2
Stirka pri 60° C bez
predwaritelxnoj
stirki, 3 operacii
poloskaniq i otvim
pri 600 ob/min.
Stirka pri 40° C bez
predwaritelxnoj
stirki, 3 operacii
poloskaniq i otvim
pri 600 ob/min.
Stirka pri - 40° C
bez predwaritelxnoj
stirki, 3 operacii
poloskaniq i otvim
pri 600 ob/min.
Sliw i otvim pri
600 ob/min.
Sliw
Stepenx
zagrqzneniq
Ustanowka
temp.
Wybor
programmy
Prodolvit.
programmy,
min.
Sodervanie
programmy
Page 24

KORPUS STIRALXNOJ MA[INY
O^i]ajte naruvnye powerhnosti ma[iny s pomo]x@
nejtralxnyh (neabraziwnyh) bytowyh ^istq]ih sredstw.
Posle \togo udalite ostaw[iesq sledy wlavnoj trqpkoj.
LOTOK DLQ ZAGRUZKI MO@]EGO SREDSTWA
So wremenem wnutri lotka nakapliwa@tsq otloveniq
mo@]ego sredstwa i kondicionera tkanej. Ih sleduet
regulqrno udalqtx struej wody. Pri neobhodimosti
o^istki, lotok movet bytx izwle^en iz ma[iny celikom.
Dlq \togo nuvno wytqnutx ego naruvu, ^toby oswoboditx
ot stopora (ris. 1).
~toby udalitx dlq o^istki sifon (u wnutrennej kromki
lotka) neobhodimo privatx ego wnutrx i odnowremenno
wytqgiwatx wwerh (ris. 2). Pri obratnoj ustanowke lotka
privimajte ego wniz poka ne usly[ite ]el^ok.
GNEZDO DLQ LOTKA
Otloveniq mo@]ego sredstwa mogut nakapliwatxsq i w
gnezde, kuda wstawlqetsq lotok. Wy movete ispolxzowatx
staru@ zubnu@ ]etku dlq o^istki \toj zony (ris. 3).
Posle okon^aniq o^istki wstawxte obratno lotok i
promojte ma[inu, wkl@^iw korotku@ programmu bez
zagruzki belxq.
O^ISTKA WNUTRENNIH POWERHNOSTEJ
STIRALXNOJ MA
[INY
Esli ma[ina ispolxzuetsq w osnownom dlq nizkotemperaturnoj stirki i/ili s primeneniem o^enx malogo
koli^estwa mo@]ego sredstwa, dostato^no ^istitx
ma[inu iznutri primerno raz w mesqc. |to
predotwra]aet poqwlenie zathlogo zapaha. Dlq o^istki
ispolxzujte rekomendowannoe koli^estwo mo@]ego
sredstwa i zapustite programmu stirki pri naiwys[ej
temperature bez zagruzki barabana.
ZA]ITA STIRALXNOJ MA[INY OT
ZAMERZANIQ
Esli ma[ina ustanowlena w takom meste, gde temperatura inogda padaet nive 0° C, imeetsq risk zamerzaniq
nebolx[ogo koli^estwa wody, ostaw[ejsq wnutri ma[iny
posle normalxnogo ee ispolxzowaniq, ^to movet priwesti
k powrevdeni@ ma[iny. Wo izbevanie \togo neobhodimo
wypolnitx sledu@]ie operacii:
• otkl@^ite poda^u wody k ma[ine i otsoedinite
naliwnoj [lang ot podwodq]ego truboprowoda;
• wyberite programmu stirki, wkl@^ite ma[inu i
osu]estwite korotkij progon programmy;
• opustite konec naliwnogo [langa do urownq pola. Dlq
sbora wody, wyteka@]ej iz [langa ispolxzujte
podhodq]ij sosud;
• powernite ru^ku programmatora w polovenie
programmy sliwa, snowa wkl@^ite ma[inu i
osu]estwite korotkij progon programmy;
• oswobodite sliwnoj [lang ot plastmassowogo
homutika szadi ma[iny. Opustite konec sliwnogo
[langa gluboko w wodostok, prolovennyj pod polom
(w sliwnoe otwerstie pola), no sledite, ^toby konec
[langa ne opuskalsq nive urownq wody w wodostoke
(sliwnom otwerstii).
Pri dalxnej[em ispolxzowanii ma[iny sleduet snowa
podsoedinitx naliwnoj i sliwnoj [langi.olosuhteita.
UDALENIE NAKIPI
Esli wodoprowodnaq woda imeet vestkostx bolee 7° dH,
neobhodimo udalqtx nakipx iz ma[iny po menx[ej mere
odin raz kavdye tri mesqca. Dlq o^istki wmesto
mo@]ego sredstwa ispolxzujte primerno 150 ml
limonnoj kisloty i osu]estwite progon programmy
stirki pri naiwys[ej temperature bez zagruzki
barabana. Izwestkowyj osadok na takih detalqh ma[iny,
kak nagrewatelxnyj \lement, snivaet ih srok sluvby.
(Uznatx vestkostx wodoprowodnoj wody movno w mestnoj
organizacii po wodosnabveni@).
TEHNI~ESKOE OBSLUVIWANIE
- 24 -
1
2
3
Ne primenqjte ^istq]ie sredstwa, soderva]ie
spirt, rastworitelx i t.p.
Page 25

MO@]EE SREDSTWO I KONDICIONER DLQ TKANI
Kak tip, tak i koli^estwo mo@]ego sredstwa wliq@t na
rezulxtaty raboty stiralxnoj ma[iny. Primenqtx
^rezmernoe koli^estwo mo@]ego sredstwa net
neobhodimosti i, krome togo, \to okazywaet
nevelatelxnoe wliqnie na okruva@]u@ sredu. Dave
mo@]ie sredstwa s biodobawkami sodervat we]estwa,
kotorye mogut naru[itx balans okruva@]ej sredy.
Ispolxzujte tolxko wysokoka^estwennye mo@]ie
sredstwa, prednazna^ennye dlq primeneniq w
awtomati^eskih stiralxnyh ma[inah.
Dlq opredeleniq to^nogo koli^estwa mo@]ego sredstwa
sledujte rekomendaciqm ego izgotowitelq s u^etom massy
zagruvaemyh we]ej, stepeni ih zagrqzneniq i vestkosti
podawaemoj wody. To^nu@ weli^inu vestkosti wody movno
uznatx w mestnoj organizacii po wodosnabveni@.
Mo@]ee sredstwo
Pered puskom programmy zagruzite mo@]ee sredstwo w
lewyj otsek razdato^nogo lotka. Dlq cwetnyh, [erstqnyh
i tonkih tkanej proda@tsq mo@]ie sredstwa specialxnyh
tipow.
Koncentrirowannye mo@]ie sredstwa
Esli wy ispolxzuete koncentrirowannoe mo@]ee sredstwo,
to ego neobhodimo dobawlqtx neposredstwenno w baraban
pered zagruzkoj belxq w ma[inu. Sistema cirkulqcii
wody wstiralxnoj ma[ine obespe^iwaet maksimalxno
\ffektiwnoe ispolxzowanie stiralxnogo poro[ka.
Pri ispolxzowanii koncentrirowannyh mo@]ih
sredstw ne polxzujtesx programmami s
predwaritelxnoj stirkoj.
Vidkoe mo@]ee sredstwo
Programmy stirki pri nizkoj i srednej temperature movno
wypolnqtx s primeneniem vidkogo mo@]ego sredstwa
wmesto stiralxnogo poro[ka. W \tih slu^aqh nado wybiratx
programmu bez predwaritelxnoj stirki. Wliwatx vidkoe
mo@]ee sredstwo w lewyj otsek zagruzo^nogo lotka sleduet
neposredstwenno pered puskom programmy.
Kondicioner dlq tkani
Esli wy ispolxzuete kondicioner, zagruvajte ego w
prawyj otsek razdato^nogo lotka. Kondicioner osobenno
celesoobrazen w slu^aqh, kogda wystirannye izdeliq
budut su[itxsq w barabannoj su[ilke, tak kak on
nejtralizuet stati^eskoe \lektri^estwo.
OB}AQ INFORMACIQ O STIRKE
- 25 -
USLOWNYE OBOZNA^ENIQ NA \TIKETKAH TEKSTILXNYH IZDELIJ
Nive priwedeny ob]eprinqtye uslownye obozna^eniq, ukazywaemye na \tiketkah, prikreplennyh k odevde i drugim
tekstilxnym izdeliqm.
Oby^naq
STIRKA
Ostorovnaq
Tolxko ru^naq
stirka
Ne stiratx w wode
Stirka pri 90°
OTBELIWANIE
GLAVENIE
SUHAQ ~ISTKA
SU{KA
Movno otbeliwatx w holodnoj wode Ne otbeliwatx
Maks. 200°C
Kod dlq suhoj ^istki
(normalxnye rastworiteli)
A
Kody dlq suhoj ^istki
(specialxnye rastworiteli)
F
Ne podlevit
suhoj ^istke
Maks. 150°C Maks. 100°C
Ne gladitx
Su[itx w gorizon-
talxnom polovenii
Su[itx so
stekaniem wody
Su[itx w wertika-
lxnom polovenii
Ne podwergatx
barabannoj su[ke
Movno podwergatx
barabannoj su[ke
Stirka pri 60° Stirka pri 40° Stirka pri 30°
normalxn.temp.
nizkaq temp.
P
Bukwy wnutri kodow suhoj ^istki da@t informaci@ dlq prawilxnogo primeneniq rastworitelej i processow
^istki
Page 26

- 26 -
ESLI STIRALXNAQ MA{INA NE RABOTAET
■ Neisprawnostx
❏ Proweritx:
■ Ma[ina ne zapuskaetsq.
■ Ma[ina ne zapolnqetsq wodoj.
■ Wo wremq zapolneniq ma[iny wodoj
proishodit sliw.
■ Otsutstwuet sliw ili otvim.
■ Perepolnenie ma[iny, ute^ka.
■ Stiralxnaq ma[ina wibriruet ili
[umno rabotaet.
■ Dwerca stiralxnoj ma[iny ne
otkrywaetsq.
■ Navali li wy na knopku Wkl./Wykl.?
■ Wstawlena li wilka [nura w \lektrosetx?
■ Prowerxte plawkie predohraniteli?
■ Prawilxno li zakryta dwerca?
■ Prawilxno li wy ustanowili ru^ku programmatora?
■ Wkl@^en li kran poda^i wody k ma[ine?
■ Wkl@^en li kran poda^i wody k ma[ine?
■ Ne otkl@^ena li wremenno poda^a wody w wa[em dome?
■ Ne imeet li naliwnoj [lang peregibow ili zavatyh
mest?
■ Ne zabit li filxtr wnutri naliwnogo [langa?
■ Ne sli[kom li nizkoe dawlenie wody?
■ Ne opu]en li sli[kom nizko konec sliwnogo [langa?
(sm. razdel “Ustanowka stiralxnoj ma[iny”)
■ (Esli woda iz sliwnogo [langa stekaet neposredstwenno
w nastennyj stoqk). Imeetsq li nadleva]ij zazor
mevdu koncom sliwnogo [langa i stoqkom?
(sm. razdel “Ustanowka stiralxnoj ma[iny”)
Esli neobhodimo wru^nu@ udalitx iz ma[iny
ostaw[u@sq w nej wodu, oswobodite sliwnoj
[lang ot plastmassowogo homutika szadi
ma[iny. Opustite konec [langa do urownq
pola, ^toby woda stekala w wodostok (w sliwnoe
otwerstie pola).
■ Ne ispolxzowano li sli[kom mnogo mo@]ego sredstwa?
■ Primenen li prawilxnyj tip mo@]ego sredstwa
(dlq awtomati^eskih stiralxnyh ma[in)?
■ Prawilxno li podsoedineny [langi? (sm. razdel
“Ustanowka stiralxnoj ma[iny”).
■ Ne zasoren li lotok dlq mo@]ego sredstwa?
■ Snqty li wse transportirowo^nye stopornye
ustrojstwa?
■ Stoit li ma[ina na sootwetstwu@]ej powerhnosti i
wyrownena?
■ Ne upiraetsq li ma[ina w stenu?
■ Stoit li ma[ina na wseh ^etyreh novkah?
■ Podovdali li wy 2-3 minuty posle okon^aniq
programmy? Pogas li indikator?
Pro^itajte e]e raz podrazdel “Zagruzka
stiralxnoj ma[iny” w otno[enii otkrytiq
dwercy. Nikogda ne pytajtesx primenqtx silu
dlq otkrytiq dwercy. Swqvitesx s
sootwetstwu@]im remontnym predpriqtiem.
■ Ne navata li knopka rinse-hold? (sleduet wybratx
programmu sliwa ili otvima).
■ Ne imeet li sliwnoj [lang peregibow ili zavatyh
mest?
■ Esli [lang byl udlinen, sdelano li \to w sootwetstwii
s instrukciqmi? (sm. razdel “Ustanowka stiralxnoj
ma[iny”).
Page 27

Gabaritnye razmery Wysota 67 cm
{irina 49,5 cm
Glubina 51,5 cm
Massa (netto) 54 kg
Rekomenduemaq zagruzka Hlop^atobumavnye i 3,0 kg
(Massa suhogo belxq) Sinteti^eskie/Tonkie izdeliq 1,5 kg
{erstqnye izdeliq 1,0 kg
Dawlenie podawaemoj Minimum 5 N/cm
2
(0,5 kp/cm2)
wody Maksimum 100 N/cm
2
(10 kp/cm2)
Emkostx barabana 27 litrow
~astota wra]eniq
pri otvime Maksimum 950 ob/min.
|lektri^eskie Naprqvenie seti 230 W / 50 Gc
harakteristiki Nominalxnaq mo]nostx 1900 Wt
Predohranitelx 10 A
TEHNI~ESKIE HARAKTERISTIKI
- 27-
TEHNI^ESKOE OBSLUVIWANIE I ZAPASNYE ^ASTI
Esli poqwlqetsq neisprawnostx, prowerxte nelxzq li ee ustranitx,
ispolxzuq pere^enx neisprawnostej, priwedennyj w razdele
“Esli stiralxnaq ma[ina ne rabotaet”. Esli Wy wyzywaete
specialista iz serwisnogo centra, ^toby ustranitx odnu iz
neisprawnostej, priwedennyh w \tom pere^ne, Wam wozmovno
pridetsq zaplatitx za wyzow mastera. |to otnositsq takve k
powrevdeniqm, woznik[im pri ispolxzowanii ma[iny ne po
nazna^eni@. Tehni^eskoe obsluviwanie i remont dolvny
wypolnqtxsq serwisnoj organizaciej, upolnomo^ennoj
izgotowitelem. Pri obra]enii w serwisnyj centr wy dolvny
ukazatx modelx i zawodskoj nomer, wybitye na zawodskoj
tabli^ke ma[iny. Wy movete wypisatx \ti dannye nive:
TIP.........................................................................................
MODELX.................................................................................
ZAWODSKOJ NOMER.............................................................
NOMER SERII.......................................................................
DATA POKUPKI ....................................................................
TEHNI~ESKOE OBSLUVIWANIE
Page 28

WYRAWNIWANIE STIRALXNOJ MA[INY
Ma[ina dolvna ustanawliwatxsq na ustoj^iwoj i twerdoj
powerhnosti, i ona ne dolvna kasatxsq sten ili mebeli.
Wyrawniwanie ma[iny (po urown@) proizwoditsq putem
regulirowki novek. Ubeditesx, ^to ma[ina stoit na
wseh ^etyreh novkah. Posle wyrawniwaniq ma[iny
zafiksirujte novki putem zatqvki kruglyh gaek (ris. 1).
Dopuskaetsq nekotoraq wibraciq, kotoraq neizbevna
pri wra]enii zagruvennoj posudy, osobenno pri
otsutstwii betonnogo pola.
Pri ustanowke pribora na pol s kowrowym
pokrytiem neobhodimo prosleditx za tem, ^toby
nivnie wentilqcionnye otwerstiq ne byli zakryty.
PODA^A WODY
Ustanowite kombinirowannu@ detalx iz rezinowoj [ajby
i filxtra i podsoedinite wpusknoj [lang k patrubku s
trubnoj rezxboj 3/4". Pri neobhodimosti wospolxzujtesx
[tucerom (1/2") iz komplekta postawki (ris. 2).
Naliwnoj [lang nelxzq soedinqtx s udlinq@]im [langom
l@bogo wida. Esli [lang sli[kom korotkij, ego nado
zamenitx na bolee dlinnyj , specialxno prednazna^ennyj
dlq dannoj celi.
Konec naliwnogo [langa so storony ma[iny movno
powernutx w l@bom naprawlenii. Oslabxte zatqvku gajki,
powernite [lang, zatem snowa zatqnite gajku (ris. 3).
USTANOWKA STIRALXNOJ MA{INY
- 28 -
3
2
1
Page 29

SLIW WODY
Primenqtx sliwnoj [lang movno tremq razli^nymi
sposobami
Powerh kraq wanny ili rakowiny:
|tot sposob movno ispolxzowatx tolxko, esli wy
uwereny, ^to [lang ne smestitsq wo wremq sliwa wody
iz ma[iny. {lang movno zafiksirowatx na stene, na
kr@^ke ili priwqzatx k kranu [nurom (ris. 1).
Neposredstwenno w wodostok nad
wodozatworom:
Sliwnoj [lang movno neposredstwenno wwesti w trubu
(naprimer pod rakowinoj ili kuhonnoj mojkoj) nad
wodozatworom. Sliwnoj [lang nado prokladywatx tak,
^toby ^astx ego byla podnqta wwerh do urownq werhnego
kraq rakowiny i zafiksirowana tam (ris. 2).
Neposredstwenno w nastennyj stoqk:
Stoqk dolven bytx wertikalxnym. Wysota nad polom
dolvna sostawlqtx ot 450 do 800 mm.
Wokrug i nive konca sliwnogo [langa dolvny bytx
wozdu[nye zazory. |to ozna^aet, ^to wnutrennij
diametr stoqka dolven bytx bolx[e naruvnogo diametra
[langa (ris. 3). {lang ustanawliwaetsq w stoqk ne
glubve ^em na 50 mm i ego neobhodimo zafiksirowatx
w \tom polovenii.
Sliwnoj [lang movno udlinitx ne bolee ^em do 3,5 m.
W ka^estwe udlinitelxnogo [langa ispolxzujte [lang
s wnutrennim diametrom, ne menx[im diametra
sobstwennogo [langa ma[iny. Ispolxzujte podhodq]ij
soedinitelx [langow. {lang dolven bytx uloven na
urowne pola s pod_emom tolxko w meste "wstre^i" so
sliwnoj truboj (ris. 4).
PODA^A \LEKTRO\NERGII
Stiralxnaq ma[ina postawlqetsq s \lektri^eskim
[nurom i wilkoj dlq podkl@^eniq k zazemlennoj
nastennoj rozetke seti 230 W, 10 A. Esli ma[ina
ustanowlena w meste powy[ennoj wlavnosti (wannaq
komnata, pra^e^naq) bez postoqnnoj \lektroprowodki,
neobhodimo ee zazemlitx.
Esli dlq stiralxnoj ma[iny trebuetsq postoqnnaq
\lektroprowodka, to \tu rabotu dolven wypolnqtx
tolxko kwalificirowannyj \lektrik.
USTANOWKA STIRALXNOJ MA{INY
- 29 -
2
3
1
ON/OF ECO
Electrolux
EV 100C
4
450-800 mm
40 mm
450-800 mm
Page 30

- 30 -
Contents
For the User
Unpacking the machine 31
-If the machine is damaged
-When lifting the machine
-Transit locking devices
-Identification of materials
Safety information 32
Description of the appliance 33-34
-Machine front, Machine rear
-Control panel
Using your appliance 35
-Loading the machine
-Adding detergent and fabric conditioner
-Starting the machine
Programme chart 36-37
Maintenance 38
-The cabinet
-The detergent dispenser
-Inside the opening for the detergent dispenser
-Cleaning inside the machine
-Protecting the machine against freezing
-Descaling
General washing information 39
-Detergent and fabric conditioner
-Textile care labelling
If the machine is not working 40
Service 41
-Service and spare parts
For the Installer
Technical data 41
Installation 42-43
-Levelling the machine
-Water intake
-Water discharge
-Power supply
Page 31

If the machine is damaged
If the machine has been damaged during transportation,
you should immediately notify the company responsible for
delivering it. Check that the washing machine is undamaged.
If you discover any damage, faults or that anything is
missing, you should notify the seller immediately.
Never leave packaging material in a place where children
may play with it.
When lifting the machine
Take care when lifting the machine. Incorrect methods of
lifting can cause physical injuries, and also increase the
risk of damage to the machine. Open the door and take
hold of it inside the top of the door opening. You can also
grasp the rear overhang of the machine top to lift this
machine.
Never lift the machine by gripping its control panel, the
door itself, or its detergent dispenser (Fig. 1).
Transit locking devices
When supplied the washing machine is packed using a
number of locking devices/packing pieces to prevent
drum and motor from damage in transit. These must all
be removed before the washing machine is installed.
Spread some of the polystyrene packaging materials on
the floor behind the machine and then lay the machine
carefully rearside down on them. Make sure that no hoses
are crushed in the process (Fig. 2).
Remove the polystyrene base the machine was transported
on. Then return the machine to its normal upright position
and undo the three screws on its rear (Fig. 3).
The three holes must then be plugged with the plastic
plugs supplied with the machine (in the plastic bag inside
the drum) (Fig. 4).
Identification of materials
All materials used in packaging this machine are
environmentally-friendly. The various plastics used are
identified and can be recycled:
• PE stands for polyethylene, which is used for the bag
around the machine and the bag in which these
instructions were supplied.
• PS stands for polystyrene (in this case moulded
polystyrene), which is used for the sections of
packaging needed to cushion the machine in transit.
The cardboard components of the packaging are made
from recyclable paper and should be taken to a collection
point for recycling.
The machine contains plastic and rubber components.
These have identifying marks to show what they are
made from, so they can be recycled or disposed of
properly at the end of the machine's life. The materials
are identified according to international standards.
Unpacking the machine
- 31 -
4
2
1
3
Page 32

Before installing and first using the washing machine,
read the instruction booklet carefully, including its hints
and warnings. Doing so will ensure that your machine
will perform properly and to best advantage. Anyone
using the machine should be thoroughly familiar with its
instructions for use and safety features.
Save these instructions and make sure they remain with
the machine if it is moved or sold, so that everyone using
it through its life can be properly informed on appliance
use and safety.
❐ All packaging and transit locking devices must be
removed before the machine is first used. If they
are not, the result may be damage to the machine
or other property. See the section Transit locking
devices.
❐ All installation work and other work done on the product
must be carried out by a qualified technician. Work
performed by persons with inadequate knowledge
may adversely affect the satisfactory functioning of
the product and may cause personal injury or damage.
❐ The machine is heavy, so take care when lifting it.
Never lift the machine by gripping its control panel,
door, or detergent dispenser.
❐ Make sure that the machine is not left standing on
its electrical lead, and that its hoses do not get
crushed or kinked.
❐ Avoid installing the machine in a room where there
is no waste gully (floor drain) set into the floor.
❐ This machine is intended only for normal domestic
washing, and only in accordance with these instructions. If it is used for other purposes, there is a
risk that this may cause personal injury or damage
to property.
❐ The washing machine should be used by adults
only. Do not allow children to play with it or touch its
controls and moving/movable parts.
❐ Only machine-washable items should be washed in
the machine. If in doubt, contact the manufacturer or
retailer of the item.
❐ Follow the recommendations of the care label, and
make sure that pockets are empty and zips and
buttons are done up before washing.
❐ Objects such as coins, safety pins, nails, screws and
other hard objects can cause serious damage to the
machine. Make sure that all pockets have been
emptied before putting garments into the machine.
❐ Remove stains such as rust, dye, ink and grass
before machine-washing.
❐ Avoid washing clothes which are frayed or excess-
ively worn.
❐ Wash small items such as thin socks, garment ties/
laces, lace items etc. in a special laundry net to
prevent them from getting between the inner and
outer drums.
❐ Items which have been treated with chemicals such
as stain removal products, liquid domestic cleaning
products and similar must be rinsed thoroughly by
hand before they can be washed in the machine.
❐ Underwired bras, if washed in the machine at all,
should be washed in a laundry net.
❐ Always follow the recommendations of the manu-
facturers of detergent and fabric conditioner concerning the quantities of these products to use.
Using too much can damage your laundry items.
❐ Before loading the machine, check that there are no
foreign objects or pets inside the drum.
❐ Do not overload the drum. Overloading impairs the
machine's performance and can damage laundry
items.
❐ When the machine is operating, the door glass will
get hot, so it should not be touched. Keep children
away from the machine when it is operating.
❐ Before opening the door always check that the water
has been pumped out of the machine.
❐ Do not leave the premises while the machine is
operating.
❐ After using the machine, turn off its water supply and
disconnect it from the power supply. When removing
the electrical plug, grip the plug, not the lead.
❐ Leave the door ajar when the machine is not in use,
to prevent any stale odour.
❐ Make sure that the machine is disconnected from the
power supply during cleaning and maintenance work.
❐ Servicing and repairs must be carried out by a
service company authorised by the supplier. Use
only spare parts supplied by these. Never try to
repair the machine yourself.
❐ At the end of the machine's useful life, disconnect
the electrical plug from the power supply, then cut
the electrical lead at the point where it enters the
machine. Make quite sure that children will not be
able to play with the severed lead and plug.
Safety information
- 32 -
Page 33

Machine front
Description of the appliance
1 Control panel
2 Door
3 Door latch
4 All feet adjustable
1
2
4
3
Machine rear
6
7
5
5
Intake hose
6 Discharge hose
7 Electrical lead
8 For transit locking devices
- 33 -
8
Page 34

Description of the appliance
Control panel
Push-button switches
(ON/OFF) – After selecting the wash programme
and temperature, push this button in to start the
machine. (See 8, Indicator light).
– An optional function. When this button is
pressed in, the programme will halt at the end of
the last rinse, and the rinse water will be retained
in the machine. This function is available for the
Synthetics, Delicate and Wool programmes, to
minimise creasing in synthetic fibres.
Once the programme has halted on rinse-hold, if
you wish to end the wash with both emptying of
water and spinning of the load, press the option
button again so it pops out. If you wish to end the
wash by emptying the water without spinning, you
have to advance the programme control knob
manually, to programme setting L. Before you
advance the programme control knob manually, we
recommend that you first press the On/Off button to
switch the machine off (button pops out). Once the
programme control knob is set at L, press the
On/Off button again (button remains in) to complete
the programme.
Knob controls and detergent dispenser
Temperature control – For setting temperatures
between and 90°. Follow care label recommendations.
Programme control – For setting programme
type. See Programme Chart page. 36 - 37.
Detergent dispenser – With separate compart-
ments for detergent and fabric conditioner.
Pre-wash detergent is to be added straight
into the drum.
Indicator light – Comes on approx. 5 seconds
after the ON/OFF button is pressed, when the
door is locked electrically and the machine
starts. The light goes out approx. 2–3 minutes
after the end of the programme and the door
is unlocked.
Space for program chart (Self-adhesive label)
5
1
2
3
4
5
6
7
1 2 3 4
- 34 -
67
Page 35

The very first time that the machine is used you should run
a wash programme with no load in the drum, to clear any
residues which may have been left by the manufacturing
process. Pour approx. 100 ml of detergent straight into the
drum and run programme G, 40° C. When the programme
has ended the machine will be ready for use.
Loading the machine
Pull the door latch gently to open the door. Put the items to
be washed inside the drum. Large and small items can be
mixed. Try always to wash full loads: for maximum load
weights see the programme charts. You should only reduce
the load weight for heavily-soiled items and sensitive fabrics.
One way of achieving the maximum load size is to fill the
drum with dry items, but without forcing them in. Another
way is to weigh the first loads you wash, so you learn to
estimate the right load size. Close the machine door.
Adding detergent and fabric
conditioner
The amount of detergent you use has an impact on the
performance of any washing machine. Both too much and
too little can cause problems. Use only detergent for automatic washing machines, and follow the manufacturer's
instructions when measuring the quantity.
Increase the quantity of detergent if the load is heavily soiled
or if you have a hard water supply. Decrease the amount
for lightly soiled items or less than a full load. Excessive
foaming may indicate you have used too much detergent.
The detergent dispenser is used for fabric conditioner and
detergent for the main wash.
Put the detergent in the larger compartment on the left
(Fig 1) and the fabric conditioner in the smaller one on the
right (Fig. 2). Never fill the compartment for fabric conditioner
higher than the maximum level marked on it. If using prewash, add the detergent for this straight into the drum.
Starting the machine
Before starting the programme, check:
– that the door is closed
– that the machine is plugged in and switched on at the
wall socket
– that the machine's water supply is turned on
Set the temperature (Fig. 3), select the programme (Fig. 4)
and press any option buttons you require. Then press the
ON/OFF button to start the wash. The indicator light will
come on after 5 seconds when the door locks shut (electrically) and the machine starts working.
Using your appliance
1
2
3
4
- 35 -
Page 36

Programme chart
Cotton (dry load weight: 3.0 kg)
- 36 -
Load
type
White
articles
White
articles
Coloured
articles
Coloured
articles
Quick
wash
Spin
Drain
Heavily
soiled
Normally
soiled
Normally
soiled
Normally
soiled
Lightly
soiled
A
B
B
C
D
E
L
90
90
60
40
30-40
n. 147
n. 135
n. 135
n. 110
n. 91
n. 8
n. 2
90° C programme with
pre-wash.
3 rinses and spin at
950 rpm/min.
60° C programme
without pre-wash.
3 rinses and spin at
950 rpm/min.
90° C programme
without pre-wash.
3 rinses and spin at
950 rpm/min.
40° C programme
without pre-wash.
3 rinses and spin at
950 rpm/min.
30°-40° C quick wash
programme without
pre-wash. 3 rinses and
spin at 950 rpm/min.
Emptying and spin at
950 rpm/min.
Draining
Degree of
soiling
Temp.
setting (C)
Progr.
selection
Progr.
time (min.)
Programme
content
Page 37

Programme chart
Rinse-hold – Rinse-hold is an optional function available for the Synthetics, Delicate, and Wool
programmes. To select rinse-hold, press the option button on the machine control panel. Rinse-hold
means that the programme halts and the water from the last rinse is retained in the machine to minimise
creasing in synthetic fibres.
Once the programme has halted on rinse-hold, if you wish to end the wash with both emptying of water
and spinning of the load, press the option button again so it pops out. If you wish to end the wash by
emptying the water without spinning, you have to advance the programme control knob manually, to
programme setting L. Before you advance the programme control knob manually, we recommend that
you first press the On/Off button to switch the machine off (button pops out). Once the programme control
knob is set at L, press the On/Off button again (button remains in) to complete the programme.
Synthetics and Delicate (dry load weight: 1.5 kg)
Wool (dry load weight: 1.0 kg)
- 37 -
Spin
Load
type
Synthetics
Synthetics
Delicate
fabrics
Woollens
Drain
Normally
soiled
Lightly
soiled
Normally
soiled
Lightly
soiled
F
G
F
H
K
L
60
40
30-40
- 40
n. 74
n. 74
n. 56
n. 50
n. 8
n. 2
60° C programme
without pre-wash.
3 rinses and spin at
600 rpm/min.
30°- 40° C programme
without pre-wash.
3 rinses and spin at
600 rpm/min.
40° C programme
without pre-wash.
3 rinses and spin at
600 rpm/min.
-40° C programme
without pre-wash.
3 rinses and spin at
600 rpm/min.
Emptying and spin at
600 rpm/min.
Draining
Degree of
soiling
Temp.
setting (C)
Progr.
selection
Progr.
time (min.)
Programme
content
Page 38

The cabinet
Clean the outside surfaces of the machine using a mild
(non-abrasive) household cleaning product. Finish by removing remaining traces of the product with a damp cloth.
The detergent dispenser
In time, residues of detergent and fabric conditioner are
likely to build up inside the detergent dispenser. It should
be cleaned at regular intervals by flushing it out with water.
If necessary, the whole dispenser can be taken out of the
machine for cleaning. You need to pull it firmly outwards,
so that it comes free of a retaining stop (Fig. 1).
To remove the siphon (at the inside edge of the dispenser) for cleaning, you need to press it inwards and pull it
upwards at the same time (Fig. 2). When you put it back,
press it downwards until you hear a distinct click.
Inside the opening for the
detergent dispenser
Detergent residues can also build up inside the opening
for the detergent dispenser. You can use an old toothbrush for cleaning this area (Fig. 3).
When you have finished and put back the dispenser, run
a short programme with no wash load in the machine to
rinse it clean.
Cleaning inside the machine
If you mostly use your machine for low-temperature washes,
and/or if you use only very little detergent, you should clean
the inside of the machine about once a month. This will
prevent mould or stale odours from developing. Use the
full recommended quantity of detergent and run a wash
programme at the highest temperature with no wash load
in the machine.
Protecting the machine against
freezing
If the machine is kept in a place where the temperature
may sometimes fall below 0°C, there is a risk that the
small amount of water which remains inside parts of the
machine after normal use will freeze and damage it.
To prevent this you should:
• Turn off the water supply to the machine and disconnect the water intake hose from the supply pipe.
• Select a wash programme, start the machine and let
the programme run for a short time.
• Lower the tap end of the intake hose to floor level.
Use a container such as a bowl to catch water
running out of it.
• Turn the programme control knob to an Emptying programme, restart the machine and let that programme
run for a short time.
• Release the discharge hose from the plastic clip on the
machine rear. Put the end of the hose down low, into
the waste gully (floor drain) set into the floor, but make
sure that the end of the hose does not go below the
water level in the gully's (drain's) water trap.
When you begin using the machine again, you will need
to reconnect the water intake and discharge hoses.
Descaling
If your water supply is harder than 7° dH, you should descale your washing machine at least once every three
months. Use approx. 150 ml of citric acid instead of detergent and run a wash programme at the highest temperature with no wash load in the machine. Limescale
deposits on components such as the machine's heating
element will reduce their service life. (Contact your water
company to find out the hardness level of your local
water supply.)
Maintenance
1
2
- 38 -
3
Do not use cleaning products which contain
alcohol (spirits), thinners and similar substances.
Page 39

- 39 -
Detergent and fabric conditioner
The type and the quantity of detergent you use both have
an impact on the results you achieve with your washing
machine. Using too much detergent is unnecessary and
increases overall impact on the environment quite needlessly.
Even biodegradable detergents contain substances which
can disturb the balance of the environment.
Use only good-quality detergents which are intended
for use in automatic washing machines.
In determining exactly how much to use, follow the detergent manufacturer's recommendations, taking into account
the size of the wash load, the degree of soiling and the
hardness of your water supply. If you are unsure of exactly
how hard the water is in your area, the water company
should be able to tell you.
Detergent
Pour the detergent into the left-hand compartment of the
detergent dispenser before starting the programme.
Special types of detergent are available for coloureds,
delicates and wool.
Liquid detergent
A suitable liquid detergent can be used instead of powder
detergent for programmes with low or medium wash temperatures. In these cases you should select a programme
without pre-wash. Pour the liquid detergent into the
detergent compartment immediately before you start the
programme.
Fabric conditioner
If you are using fabric conditioner, pour it into the righthand compartment of the detergent dispenser. Fabric
conditioner is particularly useful if the load will later be
dried in a tumble dryer, as it counteracts static electricity.
General washing information
Textile care labelling
These are the commonest symbols used on garments and textiles, plus brief explanations.
Normal wash
WASHING
Delicate wash
hand wash only do not wash in water
90° wash
BLEACHING
IRONING
DRY-CLEAN
DRYING
May be bleached in cold water Do not bleach
Max. 200°C (“hot iron”)
Code for dry-cleaner (normal solvents)ACodes for dry-cleaner (special solvents)
P
F
Do not dry-clean
Max. 150°C (“medium iron”) Max. 100°C (“cool iron”) Do not iron
Dry flat Drip dry Hang-dry Do not tumble-dryCan be tumble-dried
60° wash 40° wash 30° wash
normal temp.
low temp.
The letters inside the dry-cleaning symbol provide information for the dry-cleaner, so that the correct
solvents and cleaning procedures can be used.
Page 40

■ Symptom
❏ Check
If the machine is not working
- 40 -
■ The machine will not start.
■ The machine is not filling with
water.
■ The machine is discharging water
at the same time as filling.
■ The machine will not empty or
spin.
■ The machine is leaking or
overflowing.
■ The machine is vibrating or noisy.
■ The machine door will not open.
❏ Is the machine's water tap turned on?
❏ Has your domestic water supply been cut off temporarily?
❏ Is the water intake hose kinked or constricted?
❏ Is the filter inside the intake hose blocked?
❏ Is the water pressure too low?
❏ Is the end of the discharge hose too low down?
(See Installation)
❏ (If discharge hose empties into wall standpipe:) is there
still a proper air gap between the end of the discharge
hose and the wall standpipe? (See Installation)
If the remaining water needs to be emptied
manually from the machine: release the discharge
hose from the plastic clip on the machine rear.
Lower the end of the hose to floor level, letting it
empty into a waste gully (floor drain).
❏ Have you removed all the transit locking devices?
❏ Has the machine been installed on a suitable surface
and levelled?
❏ Is the machine knocking against a wall?
❏ Is the machine standing firmly on all four feet?
❏ Did you wait 2-3 minutes after the end of the
programme? Has the indicator light gone out?
Reread the section Loading the machine on door
opening.
Never try to force the door open.
Contact the service.
❏ Have you pressed the ON/OFF button?
❏ Is the electrical plug plugged in and switched on?
❏ Has the fuse blown?
❏ Is the door closed properly?
❏ Have you set the programme control knob properly?
❏ Is the machine's water tap turned on?
❏ Is the programme one which pauses with rinse-hold?
❏ Is the discharge hose kinked or constricted?
❏ If the hose has been lengthened, has this been done
according to the instructions? (See Installation)
.
❏ Have you used too much detergent?
❏ Have you been using the right sort of detergent (for
automatic machines)?
❏ Are the hoses both correctly installed? (See Installation)
❏ Is the detergent compartment blocked?
Page 41

- 41 -
Service and spare parts
If a problem arises, first work through the check-list If the
machine is not working to make sure that the cause is not
something which you can put right yourself.
Servicing and repairs must be carried out by a service
company authorised by the supplier. Before contact with
Service you can note the details on the machine's data
plate here:
TYPE .......................................................................
MOD. .......................................................................
PROD. NO................................................................
SER. NO...................................................................
Date of purchase .....................................................
SAVE YOUR RECEIPT AS PROOF OF YOUR
GUARANTEE.
Service
Dimensions Height 67 cm
Width 49,5 cm
Depth 51,5 cm
Weight (net) 54 kg
Recommended Cotton 3,0 kg
capacity Synthetics/Delicate 1,5 kg
dry weight Wool 1,0 kg
Water pressures Minimum 5 N/cm
2
(0,5 kp/cm2)
Maximum 100 N/cm
2
(10 kp/cm2)
Drum volume 27 litres
Spin speed Maximum 950 rpm/min.
Electrical data Power supply 230 V / 50 Hz
Wattage/rating 1900 W
Fuse 10 A
Technical data
Page 42

Levelling the machine
The machine must be installed on a sound and firm
surface, and must not be touching walls or furniture.
Adjust the feet to level the machine. Make sure the
machine is standing on all four feet. After levelling
the machine, secure the feet by tightening the ring
nuts (Fig. 1).
Some vibration is normal and unavoidable when the
machine is spinning the load, particularly if the floor
is not a concrete one.
When the appliance location is on carpet floors,
attention must be paid so as to ensure that
there is no obstruction to the bottom vents.
Water intake
Insert the combination rubber washer/filter and
connect the intake hose to a tap with a 3/4" pipe
thread. If necessary, use the restrictor supplied
(1/2") (Fig. 2).
The intake hose must not be joined onto any form
of extension hose. If it is too short, the entire hose
must be replaced with a longer high-pressure hose,
specially designed for the purpose.
The machine end of this hose can be turned in any
direction. Loosen the retaining nut, turn the hose,
then retighten the nut (Fig. 3).
Installation
- 42 -
3
2
1
Page 43

Water discharge
These three alternatives are possible for the discharge hose:
Over the top edge of a washtub:
Use this option only if you can be sure that the hose will not
move when the machine is emptying. The hose can be fixed
to the wall on a hook or tied to a tap with string (Fig. 1).
Directly into a waste pipe with a trap:
The discharge pipe can be connected directly into the pipe
(e.g. one beneath a washtub or kitchen sink), above the
water trap. The discharge hose must be arranged so that
some part of its length is routed up to a level
corresponding to the top edge of the tub, and fixed in place
there (Fig. 2).
Directly into a wall standpipe:
This standpipe should be vertical. The height above the
floor should be between 450 and 800 mm.
There must be an air gap around and below the end of the
discharge hose. This means that the internal diameter of the
standpipe must be greater than the outer diameter of the
hose (Fig. 3). The hose must not be sticked into the standpipe
more than 50 mm and it has to be fixed in this position.
The discharge hose can be extended up to total 3,5 m.
For the extension piece use a hose with an internal
diameter at least as large as that of the machine's own
hose. Use a suitable hose connector. The hose should
always be routed at floor level, rising up only where it
meets the waste pipe (Fig. 4).
Power supply
The washing machine is supplied with a lead and electrical
plug for connection to a 230 V, 10 A earthed wall socket. If
the machine is installed in a "wet area" (bathroom, laundry)
but without fixed wiring to the electrical supply, an earth
leakage circuit breaker (or RCD) must be used.
If the washing machine is to have fixed wiring to the
electrical supply, this work may only be carried out
by a qualified electrician.
Installation
- 43 -
2
3
1
ON/OF ECO
Electrolux
EV 100C
4
450-800 mm
40 mm
450-800 mm
Page 44

 Loading...