

Page 1
STICK MIXER ESTM966
1
10
20
Page 2

1
WARNINGS
This appliance is intended to be used in
household and similar applications such as:
− staff kitchen areas in shops, offices and other
working environments;
− farm houses;
− by clients in hotels, motels and other
residential type environments;
− bed and breakfast type environments.
If the supply cord is damaged, it must be
replaced by the manufacturer, its service agent
or similarly qualified persons in order to avoid
a hazard.
This appliance shall not be used by children.
Keep the appliance and its cord out of reach of
children.
Regarding the operating times and speed
setting, refer to the section “Operation” on
pages 4-8 of the manual.
Care shall be taken when handling the sharp
cutting blades, emptying the bowl and during
cleaning.
Page 3

2
Always disconnect the appliance from the
supply if it is left unattended and before
assembling, disassembling or cleaning.
Regarding the instructions for cleaning
surfaces in contact with food, refer to the
section “Cleaning and Maintenance” on page 8
of the manual.
Switch off the appliance and disconnect from
supply before changing accessories or
approaching parts that move in use.
Appliances can be used by persons with
reduced physical, sensory or mental
capabilities or lack of experience and
knowledge if they have been given supervision
or instruction concerning use of the appliance
in a safe way and if they understand the
hazards involved.
Children shall not play with the appliance.
WARNING: Risks of injuries if you don't use
this appliance correctly.
WARNING: THE BLADE IS VERY SHARP, TAKE
GREAT CARE WHEN HANDLING THIS HAND
BLENDER AND ALWAYS UNPLUG FROM THE
Page 4
3
MAINS SUPPLY BEFORE CLEANING.
Be careful if hot liquid is poured into the food
processor or blender as it can be ejected out of
the appliance due to a sudden steaming.
IMPORTANT SAFETY INSTRUCTIONS
Read these instructions carefully before using the appliance and keep them for future
reference.
• Unplug the appliance from the mains socket when not in use, before assembling or disassembling parts,
and before cleaning.
• Never use this appliance to mix or stir anything other than foods.
• Avoid contacting moving parts.
• The use of attachments not recommended by the manufacturer may cause fire, electric shock or injury.
• Always ensure that the attachments are securely fitted onto the motor body before operation.
• Never let the cord touch hot surfaces or hang down where a child can grab it.
• Do not use outdoors.
• Do not use the appliance for anything other than its intended purpose.
• Do not blend hot liquids (hot oil).
PARTS
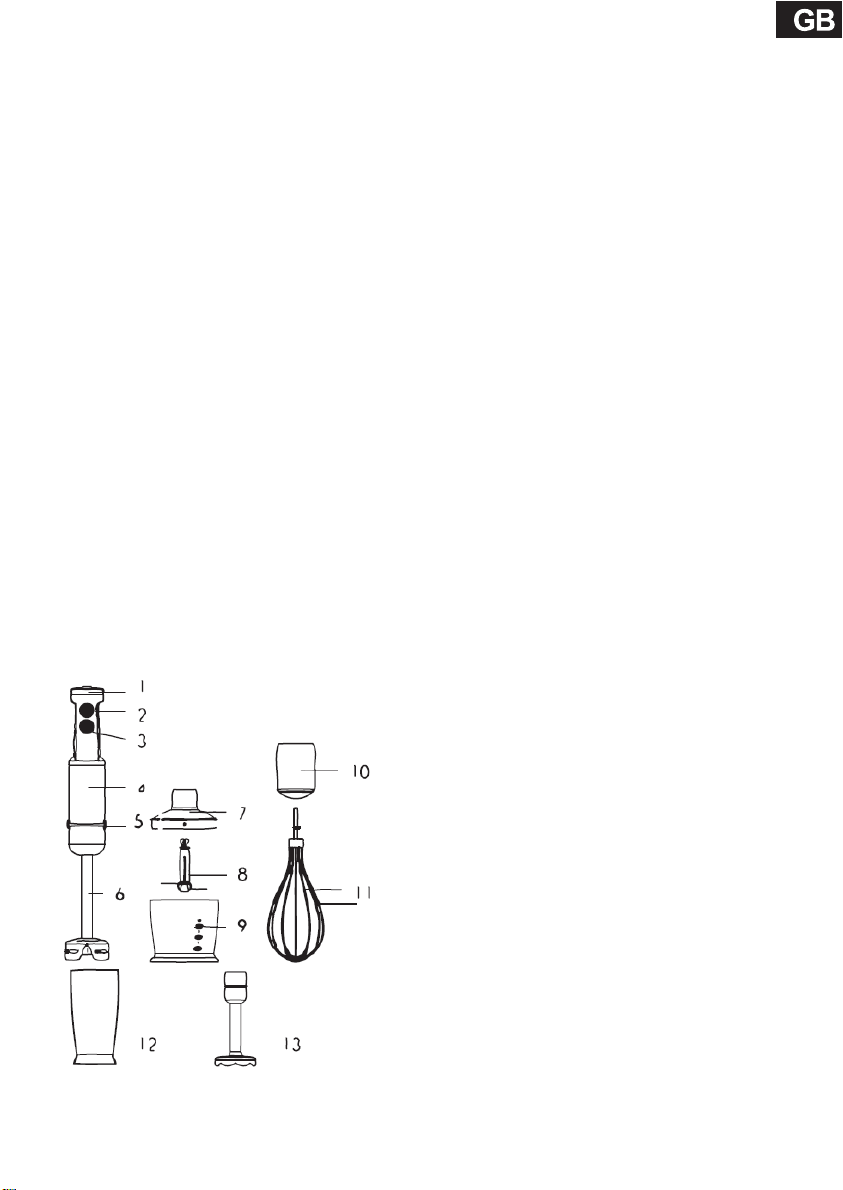
1. Variable speed dial
2. Speed button
3. Turbo button
4. Motor unit
5. Attachment release button (on each side
of the motor unit)
6. Removable blending attachment
7. Chopper bowl lid
8. Chopping blade
9. Chopper bowl
10. Whisk housing
11. Whisk attachment
12. Measuring cup
•
Allows for measuring and blending in
the same cup
13. Potato masher
Page 5

4
BEFORE FIRST USE
Before using the appliance for the first time, wash
the blending attachment, whisk attachment, chopper
attachment, potato masher and the measuring cup in
warm soapy water. Rinse and dry thoroughly.
BEWARE SHARP BLADES.
Wipe the motor unit with a slightly damp cloth. Do
not immerse it in water.
OPERATION
The hand blender is suitable for preparing sauces,
soups, mayonnaise or mixing ingredients.
WARNING: Do not operate this appliance for more
than 15 seconds without interruption. Allow it to cool
down to room temperature before continuing.
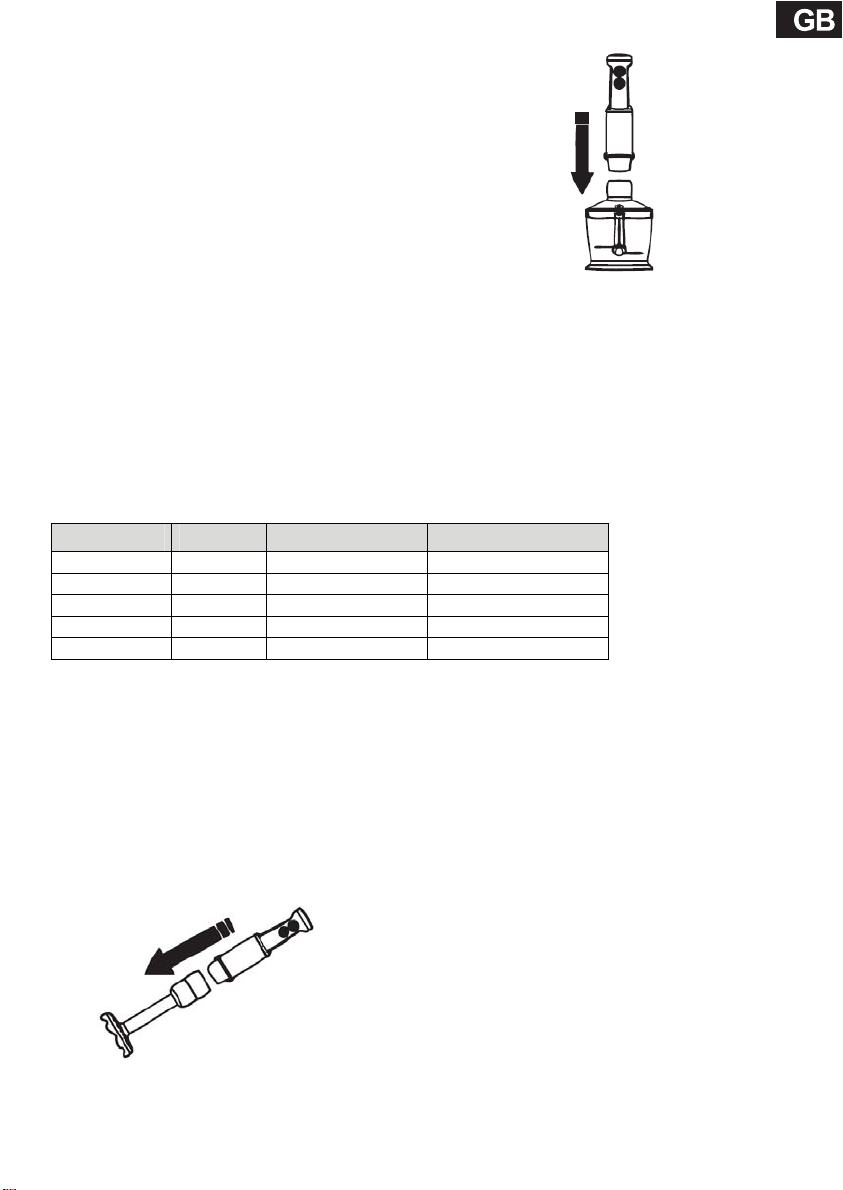
Using the Blending Attachment
T
he blending attachment is suitable for mixing drinks and milkshakes as well as preparing
dips, sauces, soups, mayonnaise and baby food.
1. Make sure the motor unit is unplugged.
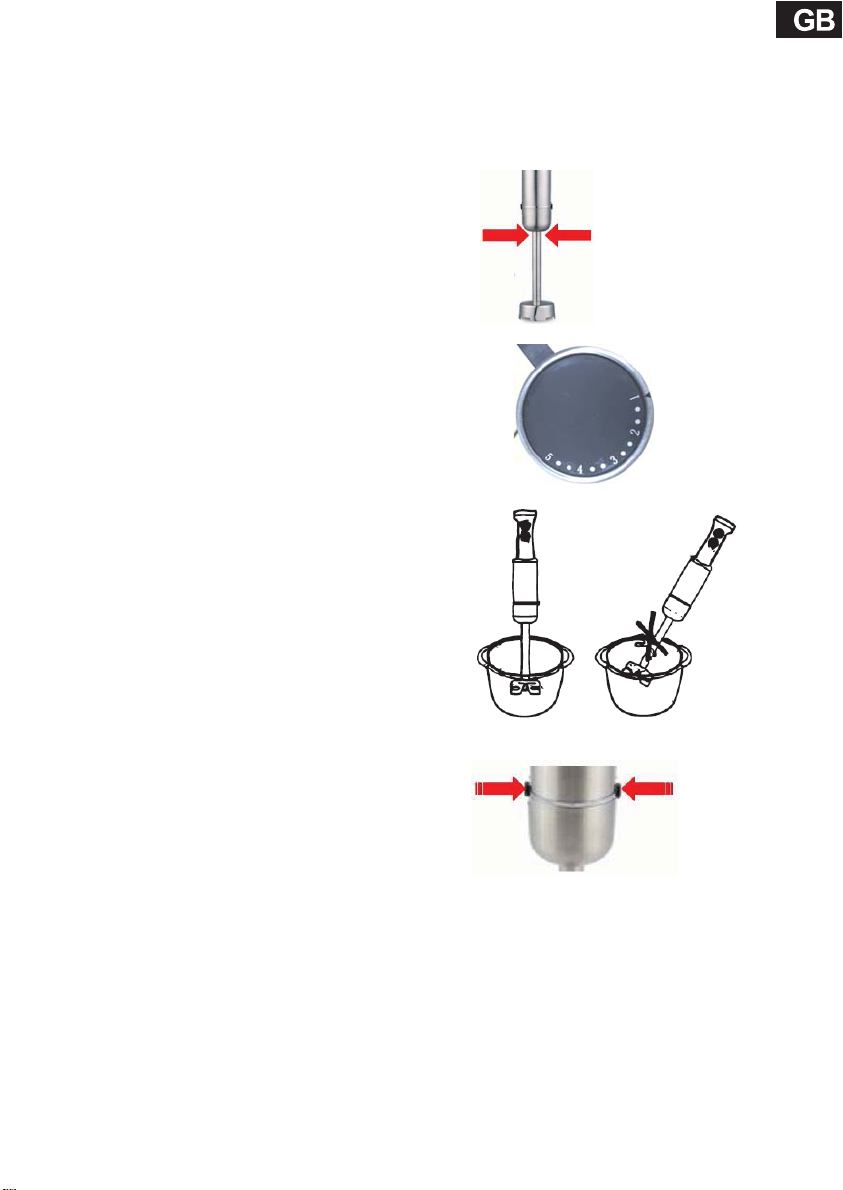
2.
A
ttach the motor unit to the blending attachment and push to lock
into place.
Page 6
5
3. Place ingredients into a tall container or the supplied measuring cup.
•
M
ake sure that the tall container or the measuring cup is placed on a stable, flat surface.
• Cut solid ingredients into small pieces for easier blending.
4. Plug the motor unit into the mains socket.
5. Immerse the blending attachment into the tall
container or the measuring cup.
• Ensure that the depth of the ingredients will not
exceed the top of the blending attachment.
6.
S
elect the desired speed by turning the variable speed
dial.
7. Turn on the motor unit by keeping the speed button
pressed.
•
I
t is recommended to start blending by using the
low speed (1) to avoid splashing.
• You can also press the Turbo button to run
the appliance for intermittent bursts.
8. Blend the ingredients by moving the appliance slowly
up and down and in circles.
•
T
o use the blending attachment in a saucepan, be
sure to remove the pan from the stove.
9. After you have completed blending, release the speed
button and unplug the motor unit from the mains
socket.
10.
P
ress the attachment release buttons and remove the
blending attachment from the motor unit for cleaning.
Page 7
6
Using the Whisk Attachment
T
he whisk attachment is suitable for whipping cream, beating egg whites, mixing sponges and ready-mix
desserts.
1. Make sure the motor unit is unplugged.
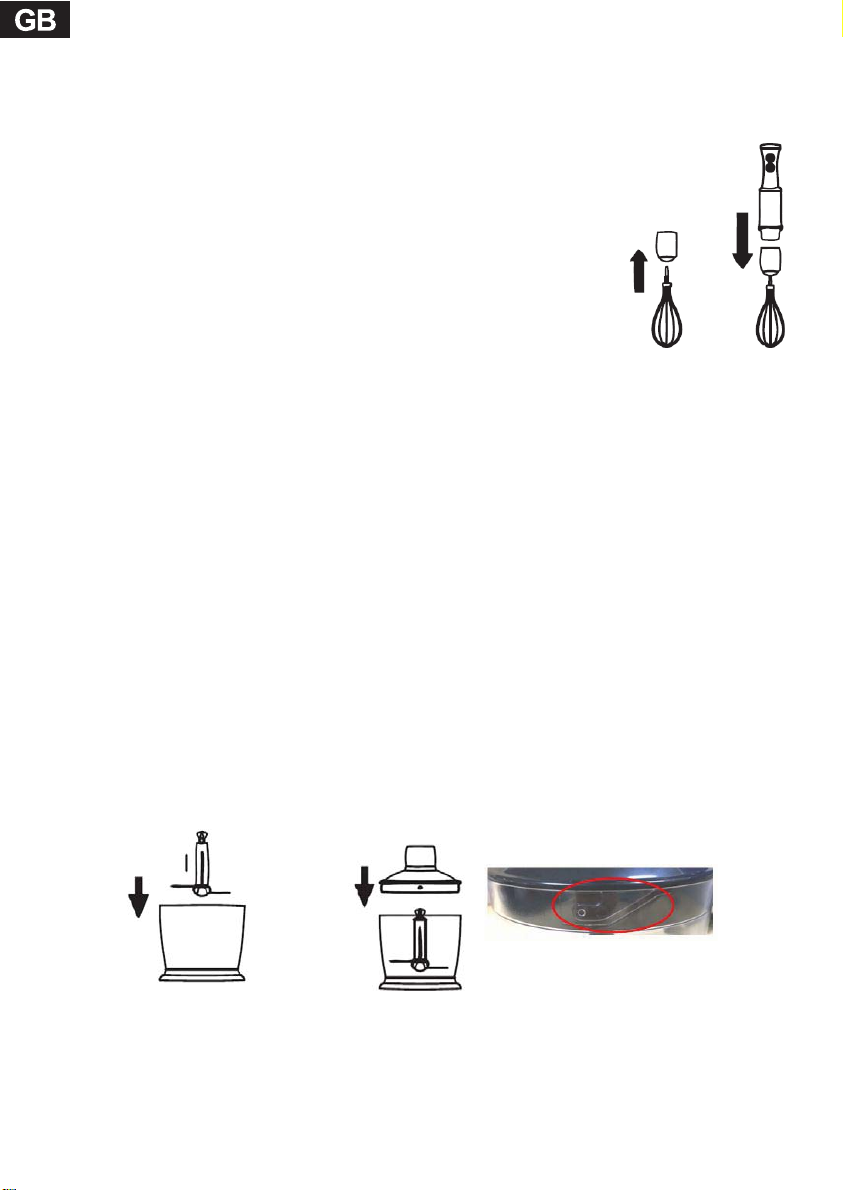
2.
I
nsert the metal end of the whisk into its housing.
3. Attach the motor unit to the whisk housing and
push to lock into place.
4. Place ingredients into a deep mixing bowl or container to prevent spattering.
5. Plug the motor unit into the mains socket.
6. Insert the whisk into the mixing bowl until the whisk touches the bottom.
7.
T
urn the variable speed dial to set the desired speed.
8. Turn on the motor unit by keeping the speed button pressed.
• You can also press the Turbo button to run the appliance for intermittent bursts.
9.
K
eep the motor unit in the upright position and slowly circulate the whisk around the mixing bowl.
10. After you have completed whisking, release the speed button and unplug the motor unit from the
mains socket.
11. Press the attachment release buttons and remove the whisk housing from the motor unit. The whisk
can be removed from its housing for cleaning by pulling on the base of the whisk.
Using the Chopper Attachment
T
he chopper attachment is suitable for chopping meat, cheese, onions, herbs, garlic, carrots, etc.
1. Make sure the motor unit is unplugged.
2. Carefully insert the chopper blade
over the pin at the centre of the
chopper bowl.
4.
A
ttach the motor unit into the attachment point on top of the
chopper lid and push to lock into place.
P
ut food into chopper bowl. Place lid on chopper
3.
bowl, fitting securely over pin at the centre.
clockwise until it locks into place.
T
urn the lid
A
lign the tabs on the lid and notches on
•
the bowl.
• If chopping meat, cut it into cubes before
putting into chopper bowl.
Page 8
5. Plug the motor unit into the mains socket.
7
6.
T
urn the variable speed dial to set the desired speed.
7. Hold the chopper bowl and turn on the motor unit by keeping
the speed button pressed.
•
R
unning the chopper continuously will yield smoother food
consistency while pulsing will yield chunkier results.
•
Y
ou can also press the Turbo button to run the appliance for
intermittent bursts.
8. When the desired food consistency has been reached, release
the speed button and unplug the motor unit from the mains
socket.
9.
P
ress the attachment release buttons and remove the chopper
lid from the motor unit.
10.
C
arefully lift out the chopper blade. Remove the food contents
from the chopper bowl.
Chopper processing guide
F
ood
Meat 250 g Cut into 2 cm cubes 15 seconds
Herbs 50 g Remove stalks 10 seconds
Almonds/Nuts 150 g Place in whole nuts 15 seconds
Cheese 100 g Cut into 1 cm cubes 10 seconds
Onions 150 g Cut into quarters 10 seconds
Q
uantity Preparation
A
pproximate Time
Using the Potato Smasher
T
he potato smasher is only suitable for mashing potatoes. It is not suitable for raw potatoes or any other
vegetables or foods.
1. Prepare your potatoes as normal, drain and place in a saucepan or flat bottom bowl.
• Add small amount of milk or butter as required.
2. Attach the motor unit to the potato smasher and push to lock into place.
Page 9
8
3. Plug the motor unit into the mains socket.
4.
T
urn the variable speed dial to set the desired speed.
5. Turn on the motor unit by keeping the speed button pressed.
• You can also press the Turbo button to run the appliance for intermittent bursts.
6. Plunge the head of the potato masher into the potatoes. Lift and repeat at a different place in the
pan/bowl.
7.
C
ontinue until all the potatoes are mashed to your liking. Then release the speed button and unplug the
motor unit from the mains socket.
8.
P
ress the attachment release buttons and remove the potato smasher from the motor unit.
CLEANING AND MAINTENANCE
W
arning: Always unplug the appliance before cleaning.
R
emove the attachment from the motor unit.
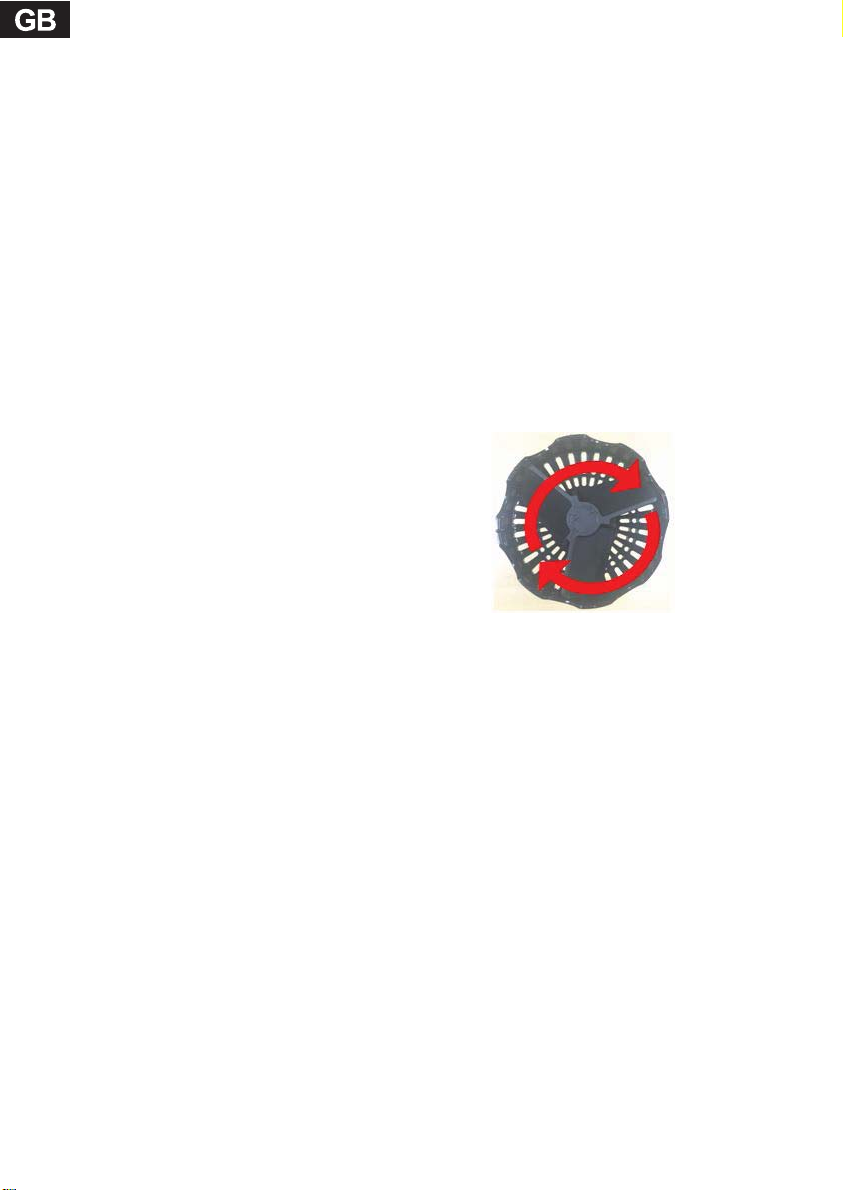
T
he paddle on the potato smasher can be removed for
cleaning.
T
o remove the paddle, grip the paddle and twist it
clockwise.
C
lean the motor unit with a slightly damp cloth. Never immerse it in water.
C
lean the blending attachment, whisk attachment, chopper attachment, potato smasher with paddle and
the measuring cup in warm soapy water. Rinse and dry thoroughly.
C
aution: The blades are very sharp. Handle with extreme care.
S
urfaces in contact with food should be cleaned regularly to avoid cross contamination from different types
of food, the use of warm clean water with a mild detergent is advisable when dealing with surfaces that
come into contact with food.
C
orrect food hygiene practises should always be followed at all times to avoid possibility of food poisoning
/cross contamination.
D
ry the entire appliance with a dry cloth before replacing.
D
o not use chemical cleaners or abrasives product for cleaning.
SPECIFICATIONS
Ratings: 220V-240V~ 50/60Hz
600W
Page 10

9
DISPOSAL
As a responsible retailer we care about the environment.
As such we urge you to follow the correct disposal procedure for the appliance and packaging materials.
This will help conserve natural resources and ensure that it is recycled in a manner that protects health and
the environment.
You must dispose of this appliance and its packaging according to local laws and regulations.
Because this appliance contains electronic components, the appliance and its accessories must be disposed
of separately from household waste when the appliance reaches its end of life.
Contact your local authority to learn about disposal and recycling.
The appliance should be taken to your local collection point for recycling. Some collection points accept
appliance free of charge.
We apologise for any inconvenience caused by minor inconsistencies in these instructions, which may occur
as a result of product improvement and development.
ELECTROLUX 22 / 04 / 2016
Page 11

10
ATTENTI ON
L'appareil est destiné à être utilisé dans des
applications domestiques et analogues telles
que:
- les coins cuisines réservés au personnel des
magasins, bureaux et autres
environnements professionnels;
- les fermes;
- l’utilisation par les clients des hôtels, motels
et autres environnements à caractère
résidentiel;
- les environnements de type chambres
d’hôtes.
Si le câble d'alimentation est endommagé, il
doit être remplacé par le fabricant, son
service après vente ou des personnes de
qualification similaire afin d'éviter un danger.
Cet appareil ne doit pas être utilisé par les
enfants. Conserver l'appareil et son câble hors
de portée des enfants.
En ce qui concerne les durées de
fonctionnement et les réglages de vitesse,
référez-vous à la section “UTILISATION ” en
Page 12

11
pages 14-17.
Des précautions doivent être prises lors de la
manipulation des couteaux affûtés, lorsqu’on
vide le bol et lors du nettoyage.
Toujours déconnecter l’appareil de
l’alimentation si on le laisse sans surveillance
et avant montage, démontage ou nettoyage.
En ce qui concerne les informations
détaillées sur la manière de nettoyer les
surfaces en contact avec les aliments,
référez-vous dans la section “NETTOYAGE ET
ENTRETIEN” en page 18.
Mettre l'appareil à l'arrêt et le déconnecter
de l’alimentation avant de changer les
accessoires ou d'approcher les parties qui
sont mobiles lors du fonctionnement.
Cet appareil peut être utilisé par des
personnes dont les capacités physiques,
sensorielles ou mentales sont réduites ou
dont l'expérience ou les connaissances ne
sont pas suffisantes, à condition qu'ils
bénéficient d'une surveillance ou qu'ils aient
reçu des instructions quant à l'utilisation de
Page 13

12
l'appareil en toute sécurité et dans la mesure
où ils en comprennent bien les dangers
potentiels.
Les enfants ne doivent pas utiliser l'appareil
comme un jouet.
MISE EN GARDE: Risques de blessures en cas
de mauvaise utilisation du produit.
AVERTISSEMENT: LES LAMES SONT
TRANCHANTES. FAITES TRES ATTENTION LORS
DE LEUR MANIPULATION ET DEBRANCHEZ
TOUJOURS LE CABLE DE LA PRISE MURALE
D’ALIMENTATION AVANT LE NETTOYAGE.
Être vigilant si un liquide chaud est versé
dans le préparateur culinaire ou le mélangeur
dans la mesure où il peut être éjecté de
l'appareil en raison d'une ébullition soudaine.
Page 14

13
MISES EN GARDE IMPORTANTES
Lisez attentivement le mode d'emploi dans son intégralité avant d'utiliser l'appareil et
gardez-le afin de pouvoir vous y référer ultérieurement.
• Débranchez l'appareil après usage, avant de monter ou de démonter les accessoires, et avant de le
nettoyer.
• N'utilisez jamais l'appareil pour mixer ou mélanger autre chose que des aliments.
• Évitez tout contact avec les pièces mobiles.
• L'utilisation d'accessoires autres que ceux recommandés par le fabricant peut être à l'origine d'un
incendie, de chocs électriques ou de blessures.
• Avant d'allumer l'appareil, vérifiez toujours que les accessoires sont bien fixés sur le bloc moteur.
• Ne laissez en aucun cas le câble toucher une surface brûlante ou pendre jusqu'à une hauteur où un
enfant pourrait l'attraper.
• Ne pas utiliser en extérieur.
• N
’
utilisez pas cet appareil à une finalité autre que celle pour laquelle il a été conçu.
• Évitez de mixer des liquides brûlants (huile chaude).
DESCRIPTION
1. Commande de vitesse variable
2. Bouton de vitesse
3. Bouton Turbo
4. Bloc moteur
5. Bouton de démontage d'accessoires (de
part et d'autre du bloc-moteur)
6. Porte-lame amovible
7. Couvercle du bol de hachage
8. Lame à hacher
9. Bol de hachage
10. Boîtier du fouet
11. Fouet
12. Verre doseur
•
Permet à la fois de doser et de mixer
13. Presse-purée
Page 15

14
AVANT LA PREMIÈRE UTILISATION
Avant d'utiliser l'appareil pour la première fois, lavez
le porte-lame, le fouet, le hachoir, le presse-purée et
le verre doseur dans de l'eau chaude savonneuse.
Rincez et séchez bien toutes les pièces. ATTENTION:
LAMES COUPANTES.
Frottez le bloc moteur avec un chiffon légèrement
imbibé d'eau. Ne le mettez jamais dans l'eau.
UTILISATION
ATTENTION: Ne faites pas fonctionner l'appareil
pendant plus de 15 secondes d'affilée. Laissez-le
refroidir à température ambiante avant de continuer.
Utilisation du porte-lame
Le porte-lame sert à mixer les boissons et les milk-shakes, et à préparer les sauces, les soupes, la
mayonnaise et les bouillies pour enfants.
1. Assurez-vous que le bloc moteur est débranché.
2. Emboîtez le bloc moteur dans le porte-lame et enfoncez-le jusqu'à
ce qu'il se verrouille.
3. Mettez les ingrédients dans un grand récipient ou dans le verre doseur fourni.
• Placez le grand récipient ou le verre doseur sur une surface plane et stable.
• Afin de faciliter le mixage, coupez les ingrédients solides en petits morceaux.
4. Branchez le bloc moteur sur la prise de courant.
Page 16

15
5. Plongez le porte-lame dans le récipient ou dans le verre
doseur.
• L'appareil ne doit pas être immergé au-delà du haut
du porte-lame.
6. Réglez la vitesse en tournant la commande de vitesse
variable.
7. Allumez le bloc moteur en maintenant enfoncé le
bouton de vitesse.
• Il est conseillé de commencer à mixer à la vitesse
lente (1) afin d'éviter les éclaboussures.
• Le bouton turbo sert à faire fonctionner l'appareil
par impulsions intermittentes.
8. Mixez les ingrédients en bougeant l'appareil vers le bas,
vers le haut et en cercles.
• Si vous souhaitez utiliser le porte-lame dans une
casserole, ôtez celle-ci du feu au préalable.
9. Quand vous avez fini, relâchez le bouton de vitesse et
débranchez le bloc moteur.
10. Appuyez sur les boutons de démontage des
accessoires puis enlevez le porte-lame du bloc moteur
pour le nettoyer.
Utilisation du fouet
Le fouet sert à fouetter la crème, battre les blancs en neige, mélanger la pâte et les desserts prêts à
déguster.
1. Assurez-vous que le bloc moteur est débranché.
2. Insérez l'extrémité métallique du fouet dans le
boîtier.
3. Emboîtez le bloc moteur dans le boîtier du fouet et
enfoncez-le jusqu'à ce qu'il se verrouille.
4. Mettez les ingrédients dans un récipient/saladier profond afin
d'éviter les éclaboussures.
5. Branchez le bloc moteur sur la prise de courant.
6. Plongez le fouet dans le saladier jusqu'à ce qu'il touche le fond.
Page 17

16
7. Réglez la vitesse à l'aide de la commande de vitesse variable.
8. Allumez le bloc moteur en maintenant enfoncé le bouton de vitesse.
• Le bouton turbo sert à faire fonctionner l'appareil par impulsions intermittentes.
9. Faites tourner lentement le fouet dans le saladier tout en gardant le bloc moteur à la verticale.
10. Quand vous avez fini, relâchez le bouton de vitesse et débranchez le bloc moteur de la prise électrique.
11. Appuyez sur les boutons de démontage des accessoires puis enlevez le boîtier du fouet du bloc moteur
pour le nettoyer. Afin de faciliter le nettoyage, détachez le fouet de son boîtier en tirant sur sa base.
Utilisation du hachoir
Le hachoir permet de hacher la viande, le fromage, les oignons, les herbes, l'ail, les carottes etc.
1. Assurez-vous que le bloc moteur est débranché.
2. Emboîtez délicatement la lame du
hachoir sur l'axe situé au centre du
bol de hachage.
3. Mettez les aliments dans le bol de hachage. Refermez le bol
avec son couvercle, en l'emboîtant bien sur l'axe central.
Tournez le couvercle dans le sens des aiguilles d'une montre
pour le verrouiller.
• Alignez les saillants du couvercle avec les
encoches du bol.
• Pour hacher de la viande, coupez-la en
dés avant de la mettre dans le bol.
4. Montez le bloc moteur sur le point de fixation situé en haut du
couvercle du hachoir, et enfoncez-le pour le verrouiller.
5. Branchez le bloc moteur sur la prise de courant.
6. Réglez la vitesse à l'aide de la commande de vitesse variable.
7. Tout en tenant le bol de hachage, allumez le bloc moteur en
maintenant enfoncé le bouton de vitesse.
• Faites fonctionner le hachoir en continu pour obtenir un
mélange onctueux, et par impulsions pour obtenir de gros
morceaux.
• Le bouton turbo sert à faire fonctionner l'appareil par
impulsions intermittentes.
8. Quand vous avez obtenu la texture souhaitée pour les aliments,
relâchez le bouton de vitesse et débranchez le bloc moteur.
9. Appuyez sur les boutons de démontage des accessoires puis
enlevez le couvercle du hachoir du bloc moteur pour le nettoyer.
10. Sortez délicatement la lame du hachoir. Videz le bol de son
contenu.
Page 18

Guide d'utilisation du hachoir
17
Aliment Quantité Préparation Durée approximative
Viande 250 g Couper en cubes de
2 cm
Herbes 50 g Enlever les queues 10 secondes
Amandes/noix 150 g Mettre des
amandes/noix
entières
Fromage 100 g Couper en cubes de
1 cm
Oignons 150 g Couper en quarts 10 secondes
15 secondes
15 secondes
10 secondes
Utilisation du presse-purée
Le presse-purée ne peut servir qu'à presser les pommes de terre. Il ne convient pas pour les pommes de
terre crues, ni pour aucun autre légume ou aliment en général.
1. Préparez vos pommes de terre de manière normale, puis égouttez l'eau et mettez-les dans une casserole
ou dans un saladier à fond plat.
• Ajoutez un peu de lait ou de beurre, selon le cas.
2. Emboîtez le bloc moteur dans le presse-purée et enfoncez-le jusqu'à ce qu'il se verrouille.
3. Branchez le bloc moteur sur la prise de courant.
4. Réglez la vitesse à l'aide de la commande de vitesse variable.
5. Allumez le bloc moteur en maintenant enfoncé le bouton de vitesse.
• Le bouton turbo sert à faire fonctionner l'appareil par impulsions intermittentes.
6. Plongez la tête du presse-purée dans les pommes de terre. Soulevez-le et répétez le mouvement à un
autre endroit de la casserole/du saladier.
7. Continuez jusqu'à obtenir la consistance souhaitée pour votre purée. Puis relâchez le bouton de vitesse
et débranchez le bloc moteur.
8. Appuyez sur les boutons de démontage des accessoires puis enlevez le presse-purée du bloc moteur
pour le nettoyer.
Page 19

18
NETTOYAGE ET ENTRETIEN
Attention: Débranchez toujours l’appareil avant de le nettoyer.
Enlevez les accessoires du bloc moteur.
La pale située sur le presse-purée peut s'enlever pour
un nettoyage plus facile.
Pour enlever cette pale, tournez-la dans le sens des
aiguilles d'une montre.
Nettoyez le bloc moteur avec un chiffon légèrement imbibé d'eau. Ne la mettez jamais dans l'eau.
Nettoyez le porte-lame, le fouet, le hachoir, le presse-purée, la pale et le verre doseur dans de l'eau chaude
savonneuse. Rincez soigneusement.
Attention: Les lames sont très coupantes. Manipulez-les avec la plus grande précaution.
Les surfaces en contact avec les aliments doivent faire l'objet d'un nettoyage régulier afin d'éviter tout
risque de contamination croisée entre les différents types d'aliments; les surfaces en contact avec les
aliments sont à nettoyer de préférence avec de l'eau chaude propre et un détergent doux.
Le maintien de bonnes pratiques en matière d'hygiène alimentaire permet d'éviter tout risque de
contamination croisée ou d'intoxication alimentaire.
Séchez tout l’appareil avec un chiffon sec avant de le remettre en place.
N'utilisez pas des produits de nettoyage chimiques ou abrasifs.
SPÉCIFICATIONS
Caractéristiques nominales: 220V-240V~ 50/60Hz
600W
Page 20

19
MISE AU REBUT
En tant que distributeur responsable, nous accordons une grande importance à la protection
de l’environnement.
Nous vous encourageons à respecter les procédures correctes de mise au rebut de votre appareil, des piles
et des éléments d’emballage. Cela aidera à préserver les ressources naturelles et à garantir qu’il soit recyclé
d’une manière respectueuse de la santé et de l’environnement.
Vous devez jeter ce produit et son emballage selon les lois et les règles locales.
Puisque ce produit contient des composants électroniques et parfois des piles, le produit et ses accessoires
doivent être jetés séparément des déchets domestiques lorsque le produit est en fin de vie.
Pour plus de renseignements sur les procédures de mise au rebut et de recyclage, contactez les autorités de
votre commune.
Apportez l’appareil à un point de collecte local pour qu’il soit recyclé. Certains centres acceptent les
produits gratuitement.
Hotline Darty France
Quels que soient votre panne et le lieu d'achat de votre produit en France, avant de vous déplacer en
magasin Darty, appelez le 0 978 970 970 (prix d'un appel local) 7j/7 et 24h/24.
Hotline Vanden Borre
Le service après-vente est joignable au +32 2 334 00 00, du lundi au vendredi de 8h à 18h et le samedi de
9h à 18h.
En raison des mises au point et améliorations constamment apportées à nos produits, de petites
incohérences peuvent apparaître dans ces instructions. Veuillez nous excuser pour la gêne occasionnée.
ELECTROLUX 22 / 04 / 2016
Page 21

20
WAARSCHUWINGEN
Dit apparaat is bedoeld voor gebruik in
huishoudelijke en gelijkaardige omgevingen,
zoals:
− in personeelskeukens van winkels, kantoren
en andere werkomgevingen
− in boerderijen
− door klanten in hotels, motels en andere
omgevingen van het residentiële type
− omgevingen van het type bed-en-breakfast.
Een beschadigd snoer mag uitsluitend
worden vervangen door de fabrikant, een
erkende reparatieservice of personen met
gelijkwaardige kwalificaties om gevaar te
voorkomen.
Dit apparaat mag niet worden gebruikt door
kinderen. Houd het apparaat buiten het bereik
van kinderen.
Verwijs naar het hoofdstuk “Bediening” op
pagina 24-27 van de handleiding voor meer
informatie over de gebruiksduur en
snelheidsstanden.
Page 22

21
Wees voorzichtig tijdens het hanteren van de
scherpe messen, het ledigen van de beker en
het reinigen van het apparaat.
Ontkoppel het apparaat altijd van de
netvoeding wanneer het onbeheerd
achterblijft en voor het monteren, demonteren
en reinigen.
Verwijs naar het hoofdstuk “Reinigen en
onderhoud” op pagina 27 van de handleiding
voor details betreffende het reinigen van
oppervlakken die in contact komen met
levensmiddelen.
Schakel het apparaat uit en haal de stekker
uit het stopcontact voordat u accessoires
vervangt of onderdelen benadert die tijdens de
werking bewegen.
Dit apparaat kan worden gebruikt door
personen met een beperkt lichamelijk,
geestelijk of zintuiglijk vermogen of een gebrek
aan kennis en ervaring als zij onder toezicht
staan of instructies betreffende het veilige
gebruik van dit apparaat hebben ontvangen en
zich bewust zijn van de gevaren die het gebruik
ervan inhoudt.
Page 23

22
Kinderen mogen niet met dit apparaat
spelen.
WAARSCHUWING: gevaar van verwonding als
dit apparaat niet correct wordt gebruikt.
WAARSCHUWING: HET MES IS UITERST
SCHERP. WEES ZEER VOORZICHTIG BIJ HET
HANTEREN VAN DEZE HANDMIXER EN HAAL
ALTIJD DE STEKKER UIT HET STOPCONTACT
VOORDAT U HET APPARAAT REINIGT.
Wees voorzichtig als u hete vloeistof in de
keukenrobot of mixer giet, omdat dit door
plotse stoomstoten uit het apparaat kan
worden gestoten.
BELANGRIJKE VEILIGHEIDSVOORZORGEN
Lees de volledige handleiding aandachtig voordat u dit apparaat in gebruik neemt en bewaar voor
toekomstig gebruik.
• Schakel het apparaat uit en haal de stekker uit het stopcontact wanneer het niet wordt gebruikt, voor het
monteren of demonteren van hulpstukken en voor het reinigen.
• Gebruik dit apparaat in geen geval voor het mixen of mengen van andere zaken dan levensmiddelen.
• Voorkom contact met bewegende onderdelen.
• Het gebruik van andere hulpstukken dan door de fabrikant aanbevolen kan leiden tot brand, elektrische
schokken en verwonding.
• Controleer voordat u het apparaat inschakelt altijd of de hulpstukken stevig op de motorstaaf zijn
bevestigd.
• Laat het snoer niet in aanraking komen met warme oppervlakken of over een aanrecht neerhangen waar
het door een kind kan worden gegrepen.
• Niet buitenhuis gebruiken.
• Gebruik dit apparaat voor geen enkel ander dan het beoogde doeleinde.
• Mix geen zeer warme vloeistof(hete olie)
Page 24

23
ONDERDELEN VAN HET APPARAAT
1. Snelheidswiel
2. Snelheidsknop
3. Turb o-kno p
4. Motorstaaf
5. Ontgrendelknop voor hulpstukken (aan
beide zijden van de motorstaaf)
6. Verwijderbaar hulpstuk met mixer
7. Deksel van hakpot
8. Hakmes
9. Hakpot
10. Tussenstuk voor klopper
11. Hulpstuk met klopper
12. Maatbeker
•
Zowel voor het afmeten als voor het
mixen
13. Aardappelpureerder
VOOR DE EERSTE INGEBRUIKNAME
Was de hulpstukken met de mixer, de klopper, het
hakmes en de maatbeker in een warm sopje voordat
u het apparaat voor het eerst in gebruik neemt. Spoel
en droog zorgvuldig. WEES VOORZICHTIG MET DE
SCHERPE MESSEN.
Veeg de motorstaaf schoon met een goed
uitgewrongen doek. Dompel dit niet onder in water.
Page 25

24
BEDIENING
Controleer of de motorstaaf van de netvoeding is
losgekoppeld voordat u met het monteren begint.
WAARSCHUWING: gebruik dit apparaat nooit langer
dan 15 seconden zonder onderbreking. Laat het
apparaat afkoelen tot kamertemperatuur voordat u
herbegint.
Het hulpstuk met mixer gebruiken
Het hulpstuk met mixer is geschikt voor het mixen van dranken en milkshakes, evenals voor het bereiden
van dips, sauzen, soep, mayonaise en babyvoeding.
1. Controleer of de stekker van de motorstaaf uit het stopcontact is
gehaald.
2. Bevestig de motorstaaf op het hulpstuk met mixer en druk om te
vergrendelen.
3. Doe de ingrediënten in een hoge houder of de meegeleverde maatbeker.
• Zorg ervoor dat de hoge houder of de maatbeker op een stabiele, vlakke ondergrond is neergezet.
• Snijd vaste ingrediënten in kleine stukjes voor efficiënter mixen.
4. Sluit de motorstaaf aan op een stopcontact.
5. Dompel het hulpstuk met mixer onder in de hoge
houder of maatbeker.
• Let erop dat de ingrediënten niet tot boven de
bovenkant van het hulpstuk met mixer reiken.
6. Selecteer de gewenste snelheid door het snelheidswiel
te draaien.
7. Schakel de motorstaaf in door de snelheidsknop
ingedrukt te houden.
• Het is raadzaam op de lage snelheidsstand (1) te
starten met mixen om te voorkomen dat
ingrediënten gaan opspatten.
Page 26

• U kunt ook op de Turbo-knop drukken om het
25
apparaat in korte stoten te gebruiken.
8. Mix de ingrediënten door het apparaat langzaam op en
neer en in het rond te bewegen.
• Om het hulpstuk met mixer in een pan te gebruiken
dient u de pan eerst van het fornuis te nemen.
9. Laat de snelheidsknop los wanneer u klaar bent met
mixen en haal de stekker van de motorstaaf uit het
stopcontact.
10. Druk op de ontgrendelknop voor hulpstukken en
verwijder het hulpstuk met mixer van de motorstaaf
om te reinigen.
Het hulpstuk met klopper gebruiken
Het
hulpstuk met klopper is geschikt voor het opkloppen van room, eiwit en het mixen van cakedeeg en
kant-en-klare dessertmengsels.
1. Controleer of de stekker van de motorstaaf uit het
stopcontact is gehaald.
2. Stop het metalen uiteinde van de klopper in het
tussenstuk.
3. Bevestig de motorstaaf op het tussenstuk voor de
klopper en druk om te vergrendelen.
4. Doe de ingrediënten in een diepe mengkom of houder om het opspatten van ingrediënten te
voorkomen.
5. Sluit de motorstaaf aan op een stopcontact.
6. Dompel de klopper onder in de mengkom tot de klopper de bodem raakt.
7. Draai het snelheidswiel naar de gewenste snelheidsstand.
8. Schakel de motorstaaf in door de snelheidsknop ingedrukt te houden.
• U kunt ook op de Turbo-knop drukken om het apparaat met korte stoten te gebruiken.
9. Houd de motorstaaf in verticale stand en beweeg de klopper langzaam rond in de mengkom.
10. Laat de snelheidsknop los wanneer u klaar bent met mixen en haal de stekker van de motorstaaf uit
het stopcontact.
11. Druk op de ontgrendelknop voor hulpstukken en verwijder het tussenstuk voor de klopper van de
motorstaaf. Voor het reinigen kan de klopper van het tussenstuk worden verwijderd door aan de
onderkant van de klopper te trekken.
Page 27

26
Het hulpstuk met hakmes gebruiken
Het hulpstuk met hakmes is geschikt voor het fijnhakken van vlees, kaas, uien, kruiden, look, wortelen enz.
1. Controleer of de stekker van de motorstaaf uit het stopcontact is gehaald.
2. Zet voorzichtig het hakmes bovenop
de pen in het midden van de
hakpot.
3. Doe de ingrediënten in de hakpot. Doe het deksel op de
hakpot door het stevig op de pen in het midden te
duwen. Draai het deksel rechtsom tot het vastklikt.
• Pas de lipjes op het deksel in de
uitsparingen van de hakpot.
• Snijd vlees in blokjes voordat u het in de
hakpot doet.
4. Bevestig de motorstaaf op het verbindingsstuk bovenaan het
deksel van de hakpot en druk om te vergrendelen.
5. Sluit de motorstaaf aan op een stopcontact.
6. Draai het snelheidswiel naar de gewenste snelheidsstand.
7. Houd de hakpot vast en schakel de motorstaaf in door de
snelheidsknop ingedrukt te houden.
• Laat het hakmes ononderbroken draaien voor een egalere
consistentie van de ingrediënten of laat het apparaat pulseren
voor een mengsel met brokjes.
• U kunt ook op de Turbo-knop drukken om het apparaat met
korte stoten te gebruiken.
8. Laat de snelheidsknop los wanneer de gewenste consistentie van
de ingrediënten is bereikt en haal de stekker van de motorstaaf
uit het stopcontact.
9. Druk op ontgrendelknop voor hulpstukken en verwijder het
deksel van de hakpot van de motorstaaf.
10. Til het hakmes voorzichtig uit de hakpot en verwijder daarna
het voedsel.
Tips voor het fijnhakken van voedsel
Voedsel Hoeveelheid Voorbereiding Approximatieve
duur
Vlees 250 g Snijd in blokjes van 2cm 15 seconden
Kruiden 50 g Verwijder stelen 10 seconden
Amandelen/noten 150 g Gebruik hele noten 15 seconden
Kaas 100 g Snijd in blokjes van 1 cm 10 seconden
Uien 150 g Snijd in vier parten 10 seconden
Page 28

27
De aardappelpureerder gebruiken
De aardappelpureerder is alleen geschikt voor het pureren van aardappelen. Hij is niet geschikt voor rauwe
aardappelen of andere groente of voedsel.
1. Kook aardappelen zoals u gewoon bent, laat uitlekken en doe in een pan of kom met platte bodem.
• Voeg naar wens een kleine hoeveelheid melk of boter toe.
2. Bevestig de motorstaaf op de aardappelpureerder en druk om te
vergrendelen.
3. Sluit de motorstaaf aan op een stopcontact.
4. Draai het snelheidswiel naar de gewenste snelheidsstand.
5. Schakel de motorstaaf in door de snelheidsknop ingedrukt te houden.
• U kunt ook op de Turbo-knop drukken om het apparaat met korte
stoten te gebruiken.
6. Dompel de kop van de aardappelpureerder onder in de aardappelen. Til op en herhaal op een andere
plaats in de pan/kom.
7. Ga zo verder tot alle aardappelen naar wens zijn gepureerd. Laat dan de snelheidsknop los en haal de
stekker van de motorstaaf uit het stopcontact.
8. Druk op de ontgrendelknop voor hulpstukken en verwijder de aardappelpureerder van de motorstaaf.
REINIGEN EN ONDERHOUD
Waarschuwing: haal voordat u het apparaat gaat reinigen altijd de stekker uit het stopcontact.
Verwijder het hulpstuk van de motorstaaf.
De peddel op de aardappelpureerder kan worden
verwijderd om hem te reinigen.
Neem de peddel vast en draai rechtsom om te
verwijderen.
Reinig de motorstaaf met een goed uitgewrongen doek.
Dompel deze nooit onder in water.
Reinig het hulpstuk met mixer, klopper, hakmes, aardappelpureerder met peddel en de maatbeker in een
lauw sopje. Spoel zorgvuldig.
Opgelet: de messen zijn uiterst scherp. Hanteer zeer voorzichtig.
Oppervlakken die in aanraking komen met levensmiddelen dienen regelmatig te worden gereinigd om
kruisbesmetting van verschillende soorten voedsel te voorkomen. Het gebruik van schoon lauw water met
een milde detergent is raadzaam voor het reinigen van oppervlakken die in aanraking komen met
levensmiddelen.
De correcte praktijken van voedselhygiëne dienen te allen tijde te worden gevolg om een risico van
voedselvergiftiging/kruisbesmetting te voorkomen.
Droog het volledige apparaat met een droge doek voordat u het wegbergt.
Gebruik geen enkele chemische of schurende reiniger op dit apparaat.
Page 29

28
TECHNISCHE GEGEVENS
Nominale waarden: 220V-240V~ 50/60Hz
600W
VERWIJDERING
Als verantwoordelijke handelaar dragen we zorg voor het milieu.
We moedigen u aan om de juiste verwijderingsprocedure voor uw apparaat en verpakkingsmateriaal te
volgen. Dit draagt bij tot het behoud van de natuurlijke rijkdommen door deze te recyclen zodat zowel de
menselijke gezondheid en het milieu worden beschermd.
Gooi dit apparaat en de verpakking weg in overeenstemming met de geldende wetgeving en voorschriften.
Aangezien dit apparaat elektronische componenten bevat moet het apparaat en toebehoren aan het einde
van hun levensduur afzonderlijk van het huisafval worden weggegooid.
Neem contact op met uw gemeente voor informatie over afdanking en recycling.
Lever het apparaat in bij het inzamelpunt van uw gemeente voor recycling. Bij sommige inzamelpunten
kunt u het apparaat gratis inleveren.
Hotline Vanden Borre
De dienst na verkoop is bereikbaar van maandag tot zaterdag op
+32 2 334 00 00
Hulplijn Nederland
Hiervoor kunt u contact opnemen met het BCC Service Center:
0900 0555 (lokaal tarief), geopend van maandag t/m vrijdag van
9.00 tot 17.00 uur.
We verontschuldigen ons voor enig ongemak veroorzaakt door kleine inconsistenties in deze
gebruikershandleiding, die kunnen ontstaan door productverbetering of –ontwikkeling.
ELECTROLUX 22 / 04 / 2016
Page 30

Share more of our thinking at
www.electrolux.com
 Loading...