

Page 1

user manual
Инструкция по
эксплуатации
Dishwasher
Посудомоечная машина
ESL63010
Page 2
2 electrolux
Electrolux. Thinking of you.
Share more of our thinking at www.electrolux.com
Contents
Safety information 2
Product description 3
Control panel 4
Use of the appliance 5
Setting the water softener 5
Use of dishwasher salt 6
Use of rinse aid 7
Loading cutlery and dishes 8
Use of detergent 10
Setting and starting a washing programme
Subject to change without notice
Washing programmes 12
Care and cleaning 12
What to do if… 14
Technical data 15
Installation 15
Water connection 16
Electrical connection 17
Environment concerns 17
11
Safety information
For your safety and correct operation of
the appliance, read this manual carefully
before installation and use. Always keep
these instructions with the appliance
even if you move or sell it. Users must
fully know the operation and safety features of the appliance.
Correct use
• The appliance is designed exclusively for
domestic use.
• Only use the appliance to clean household
utensils that are applicable for dishwashers.
• Do not put solvents in the appliance. Risk
of explosion.
• Put the knives and all items with sharp
points in the cutlery basket with their
points down. If not, put in a horizontal position in the upper basket.
• Use only branded products for dishwashers (detergent, salt, rinse aid).
• If you open the door while the appliance is
in operation, hot steam can escape. Risk
of skin burns.
•Do not remove dishes from the dishwasher
before the end of the washing programme.
• When the washing programme is completed, disconnect the mains plug from the
mains socket and close the water tap.
• Only an authorised service engineer can
repair this appliance. Use only original
spare parts.
• Do not do repairs yourself to prevent injury
and damage to the appliance. Always contact your local Service Force Centre.
General safety
• Persons (including children) with reduced
physical sensory, mental capabilities or
lack of experience and knowledge must
not use the appliance. They must have supervision or instruction for the operation of
the appliance by a person responsible for
their safety.
• Obey the safety instructions from the manufacturer of the dishwasher detergent to
prevent burns to eyes, mouth and throat.
• Do not drink the water from the dishwasher. Detergent residues can stay in your appliance.
• Always close the door when you do not
use the appliance to prevent injury and not
to stumble over the open door.
• Do not sit or stand on the open door.
Child safety
• Only adults can use this appliance. Children must get supervision to make sure
that they do not play with the appliance.
• Keep all the packaging away from children.
There is a risk of suffocation.
Page 3

electrolux 3
• Keep all detergents in a safe area. Do not
let children touch the detergents.
• Keep children away from the appliance
when the door is open.
Installation
• Make sure that the appliance is not damaged because of transport. Do not connect a damaged appliance. If necessary,
contact the supplier.
• Remove all packaging before first use.
• A qualified and competent person must do
the electrical installation.
• A qualified and competent person must do
the plumbing installation.
• Do not change the specifications or modify
this product. Risk of injury and damage to
the appliance.
Product description
• Do not use the appliance:
– if the mains cable or water hoses are
damaged,
– if the control panel, worktop or plinth
area are damaged, that you can get access to the inner side of the appliance.
Contact your local Service Force Centre.
• Do not drill into the sides of the appliance
to prevent damage to hydraulic and electrical components.
Warning! Carefully obey the
instructions for electrical and water
connections.
1 Upper basket
2 Water hardness dial
3 Salt container
4 Detergent dispenser
5 Rinse aid dispenser
6 Rating plate
7 Filters
8 Lower spray arm
9 Upper spray arm
Page 4

4 electrolux
Control panel
5 4
321
AB
1 On/off button
2 Delay start button
3 Programme selection/cancel button / (PROG. / CANCEL)
4 Indicator lights
5 Programme indicator lights
Indicator lights
Comes on when the washing programme is completed. Auxiliary functions:
• Level of the water softener.
• Activation/deactivation the audible signals.
• An alarm if the appliance has a malfunction.
Comes on when it is necessary to fill the rinse aid
1)
1)
1) When the salt and/or rinse aid containers are empty, the related indicator lights do not come on while
a washing programme operates.
Programme selection/cancel button
Use the programme selection/cancel button
for these operations:
• To set the washing programme. Refer to
the chapter 'Setting and starting a washing
programme'.
• To set the water softener. Refer to the
chapter 'Setting the water softener'.
• To deactivate/activate the audible signals.
Refer to the section 'Audible signals'.
• To cancel a washing programme in pro-
gress. Refer to the chapter 'Setting and
starting a washing programme'.
container. Refer to 'Use of rinse aid'.
Comes on when it is necessary to fill the salt container. Refer to 'Use of dishwasher salt'.
After you fill the container, the salt indicator light
can continue to stay on for some hours. This does
not have an unwanted effect on the operation of
the appliance.
Delay start button
Use the delay start button to delay the start
of the washing programme with an interval of
3 hours. Refer to the chapter 'Setting and
starting a washing programme'.
Setting mode
The appliance is in setting mode when all the
programme indicator lights are off and the
end indicator light flashes.
The appliance must be in setting mode for
these operations:
– To set a washing programme.
Page 5

electrolux 5
– To set the water softener level.
– To deactivate/activate the audible signals.
If a programme indicator light is on, cancel
the programme to go back to the setting
mode. Refer to the chapter "Setting and
starting a washing programme".
Programme indicator lights A and B
Apart the selection of the corresponding
washing programme, these lights have an
auxiliary functions:
• The ad justm ent o f the water softener level.
• Deactivation/activation of the audible sig-
nals.
Audible signals
You can hear an audible signal:
• At the end of the washing programme.
• When the appliance has a malfunction.
The activation of the audible signals is set at
the factory.
Do these steps to deactivate the audible signals:
1. Switch on the appliance.
2. Make sure that the appliance is in setting
mode.
Use of the appliance
Refer to the following instructions for each
step of procedure:
1. Make a check if the water softener level
is correct for the water hardness in your
area. If necessary set the water softener.
2. Fill the salt container with dishwasher salt.
3. Fill the rinse aid dispenser with rinse aid.
4. Load cutlery and dishes into the dish-
washer.
3. Press and hold the programme selection/
cancel button until programme indicator
light A flashes and programme indicator
light B comes on.
4. Press the programme selection/cancel
button again.
– Programme indicator light A comes on.
– Programme indicator light B starts to
flash.
5. Wait until programme indicator light A
goes off.
– Programme indicator light B continues
to flash.
– The end indicator light comes on.
The audible signals are activated.
6. Press the programme selection/cancel
button again.
– The end indicator light goes off.
The audible signals are deactivated.
7. Switch off the appliance to save the operation.
Do these steps to activate the audible signals:
1. Do the above procedure until the end indicator light comes on.
5. Set the correct washing programme for
the type of load and soil.
6. Fill the detergent dispenser with the correct quantity of detergent.
7. Start the washing programme.
If you use detergent tablets, refer to the
chapter 'Use of detergent'.
Setting the water softener
The water softener removes minerals and
salts from the water supply. Minerals and
salts can have bad effect on the operation of
the appliance.
Water hardness is measured in equivalent
scales:
• German degrees (dH°).
Water hardness Water hardness setting
°dH °TH mmol/l Clarke manually electronically
51 - 70 91 - 125 9,1 - 12,5 64 - 88 2 10
43 - 50 76 - 90 7,6 - 9,0 53 - 63 2 9
• French degrees (°TH).
• mmol/l (millimol per litre - international unit
for the hardness of water).
•Clarke.
Adjust the water softener to the water hardness in your area. If necessary, contact your
local water authority.
Page 6
6 electrolux
Water hardness Water hardness setting
°dH °TH mmol/l Clarke manually electronically
37 - 42 65 - 75 6,5 - 7,5 46 - 52 2 8
29 - 36 51 - 64 5,1 - 6,4 36 - 45 2 7
23 - 28 40 - 50 4,0 - 5,0 28 - 35 2 6
19 - 22 33 - 39 3,3 - 3,9 23 - 27 2 5
15 - 18 26 - 32 2,6 - 3,2 18 - 22 1 4
11 - 14 19 - 25 1,9 - 2,5 13 - 17 1 3
4 - 10 7 - 18 0,7 - 1,8 5 - 12 1 2
< 4 < 7 < 0,7 < 5
1) No use of salt required.
You must set the water softener manually and electronically.
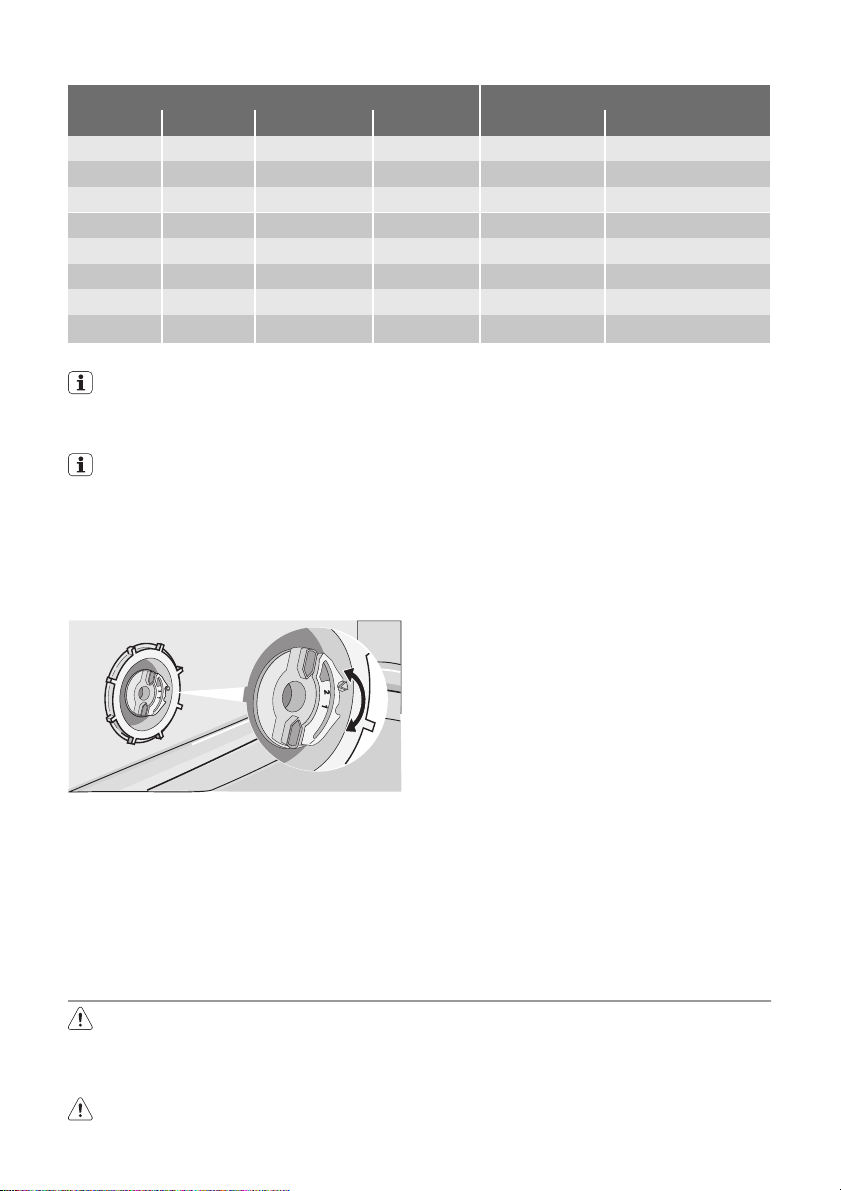
Manual adjustment
The appliance is set at the factory at position 2.
1. Open the door.
2. Remove the lower basket.
3. Turn the water hardness dial to position
1 or 2 (refer to the chart).
4. Install the lower basket.
3. Press and hold the programme selection/
cancel button.
4. Release the programme selection/cancel
button when programme indicator light A
starts to flash and programme indicator
light B comes on.
5. Wait until programme indicator light B
goes off.
– Programme indicator light A starts to
flash.
– The end indicator light starts to flash.
6. Press the programme selection/cancel
1)
1
button one time.
– Programme indicator light A starts to
flash.
– The setting function of the water soft-
ener is activated.
– The end indicator light flashes to show
the level of the water softener.
Example: 5 flashes, pause, 5 flashes,
pause, etc... = level 5.
5. Close the door.
Electronic adjustment
The water softener is set at the factory
at level 5.
7. Press the programme selection/cancel
button one time to increase the water
softener level by one step.
8. Press the on/off button to save the operation.
1. Switch on the appliance.
2. Make sure that the appliance is in setting
mode.
1)
1
Use of dishwasher salt
Caution! Only use dishwashers salt.
Types of salt that are not applicable for
dishwashers cause damage to the water
softener.
Caution! Grains of salt and salty water
on the bottom of the appliance can
cause corrosion. Fill the appliance with
salt before you start a washing
programme to prevent corrosion.
Do these steps to fill the salt container:
1. Turn the cap anticlockwise to open the
salt container.
2. Fill the salt container with 1 litre of water
(only the first operation).
Page 7
electrolux 7
3. Use the funnel to fill the salt container with
salt.
Use of rinse aid
Caution! Only use branded rinse aid for
dishwashers.
Do not fill the rinse aid dispenser with
other products (e.g. dishwasher cleaning agent, liquid detergent). This can
cause damage to the appliance.
Rinse aid makes it possible to dry the
dishes without streaks and stains.
Rinse aid is automatically added during
the last rinsing phase.
Do these steps to fill the rinse aid dispenser:
1. Press the release button (A) to open the
rinse aid dispenser.
4. Remove the salt around the opening of
the salt container.
5. Turn the cap clockwise to close the salt
container.
It is normal that water overflows from the
salt container when you fill it with salt.
When you set electronically the water softener to level 1, the salt indicator light does
not stay on.
3. Remove the spilled rinse aid with an absorbent cloth to prevent too much foam
during the subsequent washing programme.
4. Close the rinse aid dispenser.
Adjusting the rinse aid dosage
The rinse aid is set at the factory at position
4.
You can set the rinse aid dosage between
position 1 (lowest dosage) and position 6
(highest dosage).
2. Fill the rinse aid dispenser with rinse aid.
The mark 'max.' shows the maximum
level.
Page 8

8 electrolux
Loading cutlery and dishes
Helpful hints and tips
Caution! Only use the appliance for
household utensils that are applicable
for dishwashers.
Do not use the appliance to clean objects
that can absorb water (sponges, household
cloths, etc.).
• Before you load cutlery and dishes, do
these steps:
– Remove all food remainings and debris.
– Make burnt, remaining food in pans soft.
• While you load cutlery and dishes, do
these steps:
– Load hollow items (e.g. cups, glasses
and pans) with the opening down.
– Make sure that water does not collect in
the container or in a deep base.
– Make sure that cutlery and dishes do not
lie inside one another.
– Make sure that cutlery and dishes do not
cover other cutlery and dishes.
– Make sure that glasses do not touch
other glasses.
– Put small objects in the cutlery basket.
• Plastic items and pans with non-stick
coatings can keep water droplets. Plastic
items do not dry as well as porcelain and
steel items.
• Put light items in the upper basket. Make
sure that the items do not move.
Caution! Make sure that the spray arms
can move freely before you start a
washing programme.
1. Turn the rinse aid dial to increase or decrease the dosage.
– Increase the dosage if there are water
droplets or limescale on the dishes.
– Decrease the dosage if there are
streaks, whitish stains or bluish layers
on the dishes.
Warning! Always close the door after
you load or unload the appliance. An
open door can be dangerous.
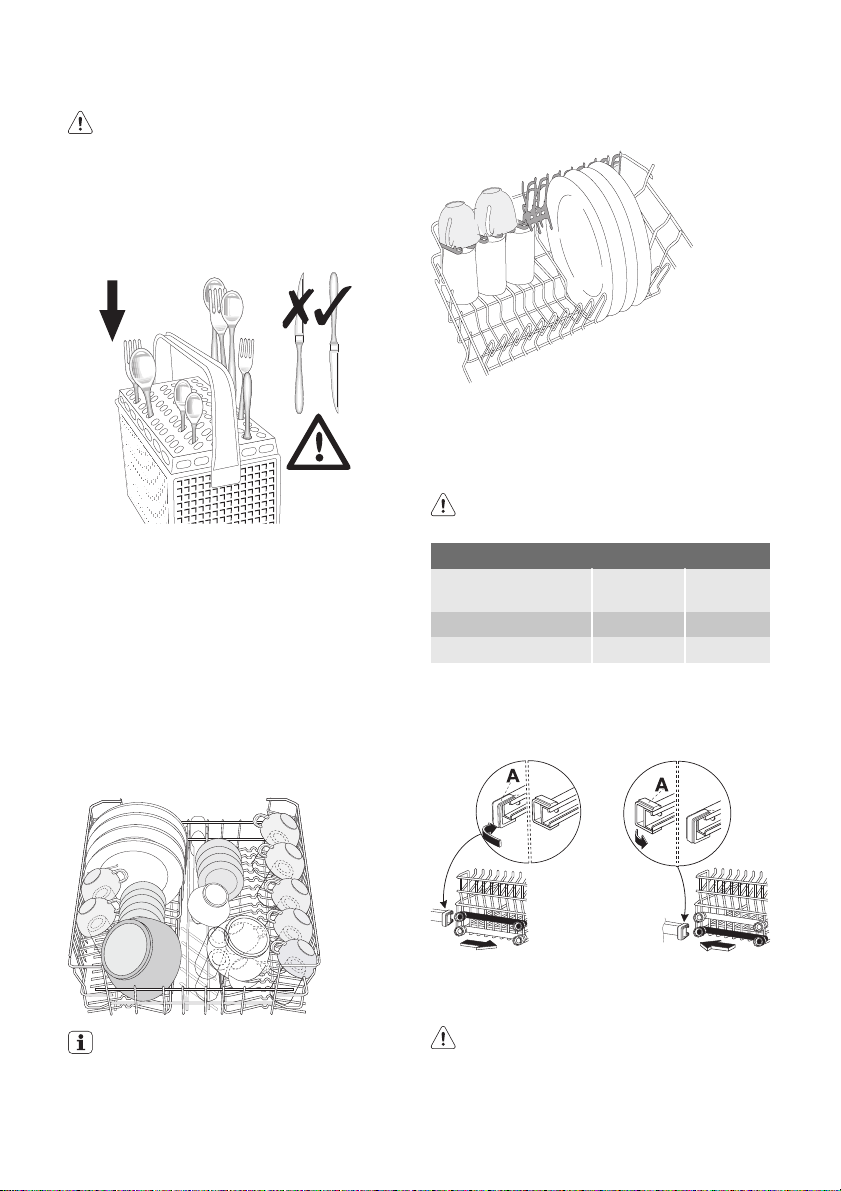
Lower basket
Put saucepans, lids, plates, salad bowls and
cutlery in the lower basket. Arrange service
dishes and large lids around the edge of the
basket.
Page 9
electrolux 9
Cutlery basket
Warning! Do not put long-bladed knives
in a vertical position. Arrange long and
sharp cutlery horizontally in the upper
basket. Be careful with sharp items.
Put forks and spoons with the handles down.
Put knives with the handles up.
Mix spoons with other cutlery to prevent
them to bond together.
Use the cutlery grid. If the dimensions of the
cutlery prevent the use of the cutlery grid, you
can remove it.
Upper basket
The upper basket is for plates (maximum 24
cm in diameter), saucers, salad bowls, cups,
glasses, pots and lids. Arrange the items to
let water touch all surfaces.
Put glasses with long stems in the cup racks
with the stems up. For longer items, fold the
cup racks up.
Adjustment of the height of the upper
basket
If you put large plates in the lower basket, first
move the upper basket to the upper position.
Caution! Adjust the height before you
load the upper basket.
Maximum height of the dishes
upper bas-
ket
Upper position 20 cm 31 cm
Lower position 24 cm 27 cm
lower
basket
Do these steps to move the upper basket to
the upper position:
1. Move the front runner stops (A) out.
2. Pull the basket out.
Prevent to put plates in the first three
sectors in the front part of the basket.
Make sure the plates tilt forward.
3. Put the basket in the upper position.
4. Put back the front runner stops (A) in their
initial position.
Caution! If the basket is in the upper
position, do not put cups on the cup
racks.
Page 10

10 electrolux
Use of detergent
Only use detergents (powder, liquid or
tablet) that are applicable for dishwashers.
Follow the data on the packaging:
• Dosage recommended by the manufacturer.
• Storage recommendations.
Do not use more than the correct quantity of detergent to save an environment.
Do these steps to fill the detergent dispenser:
1. Open the lid of the detergent dispenser.
2. Fill the detergent dispenser (A) with detergent. The marking shows the dosage:
20 = approximately 20 g of detergent
30 = approximately 30 g of detergent.
3. If you use a washing programme with
prewash phase, put more detergent in
the prewash detergent compartment (B).
A
B
4. If you use detergent tablets, put the detergent tablet in the detergent dispenser
(A).
5. Close the lid of the detergent dispenser.
Press the lid until it locks into position.
Use of detergent tablets
Put the detergent tablet in the detergent dispenser (A).
Detergent tablets contain:
• detergent
•rinse aid
• other cleaning agents.
Do these steps to use detergent tablets:
1. Make sure that the detergent tablets are
applicable for your water hardness. Refer
to the instructions from the manufacturer.
2. Set the lowest levels of water hardness
and rinse aid dosage.
It is not necessary to fill the salt container
and the rinse aid dispenser.
Do these steps when the drying results
are not satisfactory:
1. Fill the rinse aid dispenser with rinse aid.
2. Set the rinse aid dosage to position 2.
Do these steps to use the detergent
powder again:
1. Fill the salt container and the rinse aid
dispenser.
2. Set the water softener to the highest level.
3. Do a washing programme without
dishes.
4. Adjust the water softener. Refer to the
chapter 'Setting the water softener'.
5. Adjust the rinse aid dosage.
Page 11
electrolux 11
Different brands of detergent dissolve in
different times. Some detergent tablets
do not have the best cleaning results
during short washing programmes. Use
long washing programmes when you
use detergent tablets to fully remove the
detergent.
Setting and starting a washing programme
Set the washing programme with the
door ajar. The washing programme only
starts after you close the door. Until then
it is possible to modify the settings.
Do these steps to set and start a washing
programme:
1. Switch on the appliance.
2. Make sure that the appliance is in setting
mode.
3. Press the programme selection/cancel
button again and again to set the washing
programme. Refer to the chapter 'Washing programmes'.
– The programme indicator light comes
on.
4. Close the door.
– The washing programme starts auto-
matically.
When the washing programme operates, you cannot change the programme. Cancel the washing programme.
Warning! Only interrupt or cancel a
washing programme if necessary.
Caution! Open the door carefully. Hot
steam can come free.
Cancelling a washing programme
1. Press and hold the programme selection/
cancel button for approximately 3 seconds.
– The programme indicator light goes
off.
– The end indicator light starts to flash.
2. Release the programme selection/cancel
button to cancel the washing programme.
At this time you can do these steps:
1. Switch off the appliance.
2. Set a new washing programme.
Fill the detergent dispenser with detergent
before you set a new washing programme.
Interrupting a washing programme
Open the door.
• The programme stops.
Close the door.
• The programme continues from the point
of interruption.
Setting and starting a washing
programme with delay start
1. Press the on/off button.
2. Set a washing programme.
– The programme indicator light comes
on.
3. Press the delay start button.
– The delay start indicator light comes
on.
4. Close the door.
– The countdown of the delay start
starts.
– When the countdown is completed,
the washing programme starts automatically.
Do not open the door during the countdown to prevent interruption of the
countdown. When you close the door
again, the countdown continues from
the point of interruption.
Cancelling a delay start:
1. Open the door.
2. Press the delay start button.
– The delay start indicator light goes off.
3. Close the door.
– The programme starts immediately.
End of the washing programme
Switch off the appliance in these conditions:
• The appliance stops automatically.
• The audible signals for the end of the programme operate.
1. Open the door.
– The end indicator light comes on.
– The programme indicator light stays
on.
2. Press the on/off button.
Page 12
12 electrolux
3. For better drying results, keep the door
ajar for some minutes before you remove
the dishes.
Let the dishes cool down before you remove
them from the appliance. Hot dishes are
easily damaged.
Removing the load
• First remove items from the lower basket,
then from the upper basket.
• There can be water on the sides and door
of the appliance. Stainless steel becomes
cool more quickly than the dishes.
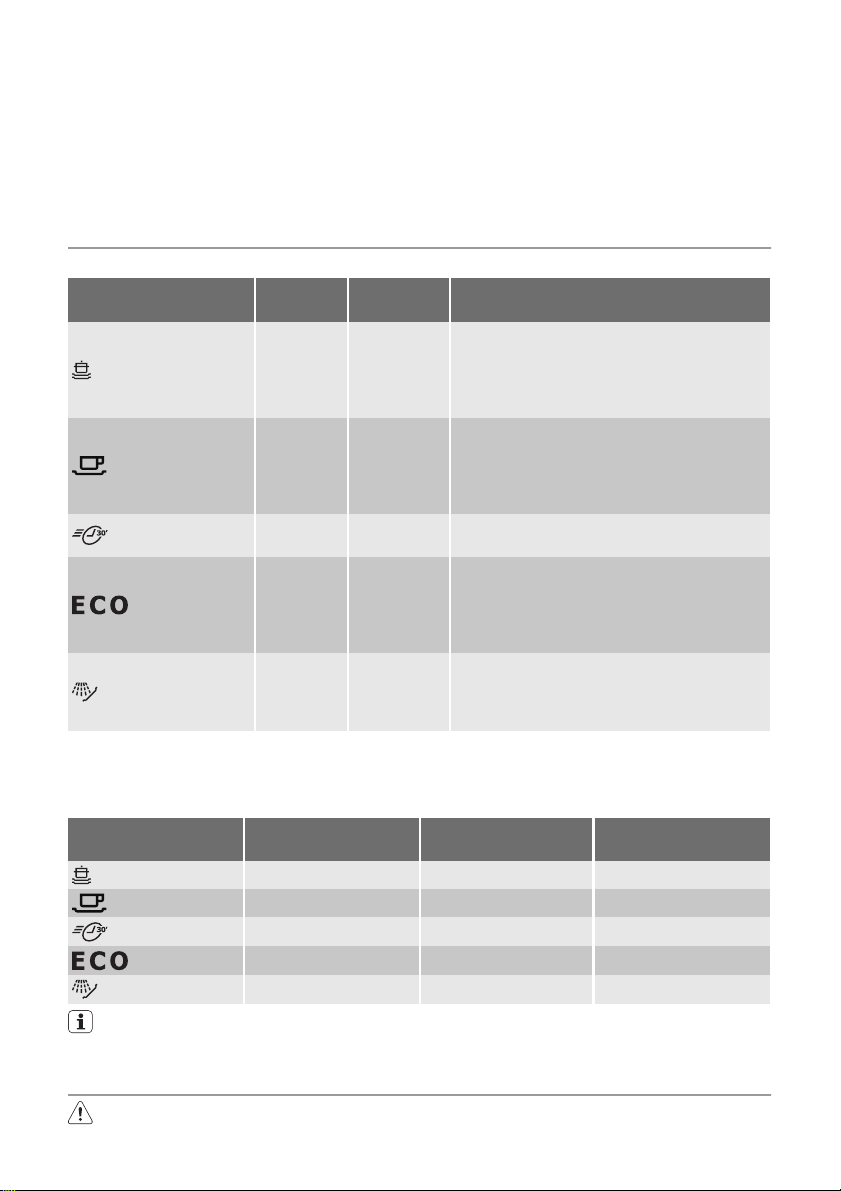
Washing programmes
Washing programmes
Programme
1)
2)
1) This is the perfect daily programme to clean a not fully load. Ideal for a family of 4 persons who only
want to load breakfast and dinner crockery and cutlery.
2) Test programme for test institutes. Please refer to separate leaflet supplied, for test data.
Degree of
soil
Heavy soil
Normal soil
Normal or
light soil
Normal soil
Any
Consumption values
Programme Programme duration
(in minutes)
85-95 1,8-2,0 22-25
105-115 1,5-1,7 23-25
30 0,9 9
130-140 1,0-1,2 14-16
12 0,1 5
The pressure and temperature of the
water, the variations of power supply
Type of
load
Crockery,
cutlery, pots
and pans
Crockery,
cutlery, pots
and pans
Crockery
and cutlery
Crockery
and cutlery
Partial load
(to be com-
pleted later
in the day)
Programme description
Prewash
Main wash up to 70°C
2 intermediate rinses
Final rinse
Drying
Prewash
Main wash up to 65°C
2 intermediate rinses
Final rinse
Drying
Main wash up to 60°C
Final rinse
Prewash
Main wash up to 50°C
1 intermediate rinse
Final rinse
Drying
1 cold rinse (to prevent food scraps to bond).
Detergent is not necessary with this programme.
Energy consumption
(in kWh)
Water consumption
(in litres)
and the quantity of dishes can change
these values.
Care and cleaning
Warning! Switch the appliance off
before you clean the filters.
Page 13

Cleaning the filters
Caution! Do not use the appliance
without the filters. Make sure that the
installation of the filters is correct.
Incorrect installation will cause
unsatisfactory washing results and
damage to the appliance.
If necessary, clean the filters. Dirty filters decrease the washing results.
The dishwasher has three filters:
1. coarse filter (A)
2. microfilter (B)
3. flat filter (C)
A
A
B
B
C
C
Do these steps to clean the filters:
1. Open the door.
2. Remove the lower basket.
3. To unlock the filter system, turn the han-
dle on the microfilter (B) approximately
1/4 anticlockwise.
electrolux 13
D
8. Clean the filters below running water.
9. Put the flat filter (C) in the bottom of the
appliance. Install the flat filter correctly
under the two guide (D).
10. Put the coarse filter (A) in the microfilter
(B) and push the filters together.
11. Put the filter system in position.
12. To lock the filter system, turn the handle
on the microfilter (B) clockwise until it
lock in position.
4. Remove the filter system.
5. Hold the coarse filter (A) by the handle
with the hole.
6. Remove the coarse filter (A) from the microfilter (B).
7. Remove the flat filter (C) from the bottom
of the appliance.
13. Install the lower basket.
14. Close the door.
Do not remove the spray arms.
If the holes in the spray arms become clogged, remove remaining parts of soil with a
cocktail stick.
External cleaning
Clean the external surfaces of the appliance
and control panel with a damp soft cloth.
Only use neutral detergents. Do not use
abrasive products, scouring pads or solvents
(acetone, trichloroethylene etc...).
Page 14

14 electrolux
Frost precautions
Caution! Do not install the appliance
where the temperature is below 0 °C.
The manufacturer is not responsible for
If not possible, empty the appliance and
close the door. Disconnect the water inlet
hose and remove water from the water inlet
hose.
damage because of frost.
What to do if…
The appliance does not start or stops during
operation.
If there is a fault, first try to find a solution to
the problem yourself. If you cannot find a solution to the problem yourself, contact the
Service Force Centre.
Fault code and malfunction Possible cause and solution
• continuous flash of the light of the
running programme
• intermittent audible signal
• 1 flash of the end indicator light
The appliance does not fill with water
.
• continuous flash of the light of the
running programme
• intermittent audible signal
• 2 flashes of the end indicator light
The appliance will not drain the water.
• continuous flash of the light of the
running programme
• intermittent audible signal
• 3 flashes of the end indicator light
Anti-flood device operates
The programme does not start • The appliance door is not closed.
• The water tap is blocked or furred with limescale.
Clean the water tap.
• The water tap is closed.
Open the water tap.
• The filter in the water inlet hose is blocked.
Clean the filter.
• The connection of the water inlet hose is not correct. The
hose can be kinked or squashed.
Make sure that the connection is correct.
• There is a blockage in the sink spigot.
Clean the sink spigot.
• The connection of the water drain hose is not correct. The
hose can be kinked or squashed.
Make sure that the connection is correct.
• Close the water tap and contact your local Service Force
Centre.
Close the door.
• Mains plug is not connected in.
Put in the mains.
• The fuse has blown out in the household fuse box.
Replace the fuse.
• Delay start is set.
Cancel the delay start to start the programme immediately.
After the check, switch on the appliance. The
programme continues from the point of interruption. If the malfunction shows again,
contact your Service Force Centre.
These data are necessary to help you quickly
and correctly:
•Model (Mod.)
Caution! Switch off the appliance
before you do the below suggested
corrective actions.
• Product number (PNC)
• Serial number (S.N.)
For these data, refer to the rating plate.
Write the necessary data here:
Model description : ..........
Product number : ..........
Serial number : ..........
Page 15

electrolux 15
The cleaning results are not satisfactory
The dishes are not clean • The selected washing programme is not applicable for the type of
Limescales particles on the
dishes
The dishes are wet and dull • No rinse aid has been used.
There are streaks, milky spots
or a bluish coating on glasses
and dishes
Dry water drop signs on
glasses and dishes
load and soil.
• The baskets are loaded incorrectly so that water cannot reach all
surfaces.
• Spray arms do not turn freely because of incorrect arrangement of
the load.
• The filters are dirty or not correctly installed.
• The quantity of detergent is too little or missing.
• The salt container is empty.
• The water softener is adjusted on a wrong level.
• The salt container cap is not closed correctly.
• The rinse aid dispenser is empty.
• Decrease the rinse aid dosage.
• Increase rinse aid dosage.
• The detergent can be the cause.
Technical data
Dimensions Width cm 59,6
Height cm 81,8-87,8
Depth cm 55,5
Electrical connection - Voltage Overall power - Fuse
Water supply pressure Minimum 0,5 bar (0,05 MPa)
Maximum 8 bar (0,8 MPa)
Capacity Place settings 12
Information on the electrical connection is given on the rating plate
on the inner edge of the dishwasher door.
Installation
Warning! Make sure that mains plug is
disconnected from the mains socket
during installation.
Important! Obey the instructions in the
enclosed template to:
• Build-in the appliance.
• Install the furniture panel.
• Connect to the water supply and drain.
Install the appliance under a counter (kitchen
worktop or sink).
If a repair is necessary, the appliance must
be easily accessible for the engineer.
Put the appliance adjacent to a water tap and
a drain.
For the venting of the dishwasher only water
fill, water drain and power supply cable openings are necessary.
The dishwasher has adjustable feet to allow
the adjustment of the height.
Make sure that the water inlet hose, the drain
hose and the supply cable are not kinked or
squashed, when you insert the machine.
Attaching the appliance to the adjacent
units
Make sure that the counter below which you
attach the appliance is a safe structure (adjacent kitchen units, cabinets, wall).
Adjusting the level of the appliance
Make sure that the appliance is level to close
and seal the door correctly. If the level of the
Page 16

16 electrolux
appliance is correct, the door does not catch
on the sides of the cabinet. If the door does
Water connection
Water inlet hose
Connected the appliance to a hot (max. 60°)
or cold water supply.
If the hot water comes from alternative sources of energy that are more environmentally
friendly (e.g. solar or photovoltaic panels and
aeolian), use a hot water supply to decrease
energy consumption.
Connect the inlet hose to a water tap with an
external thread of 3/4”.
Caution! Do not use connection hoses
from an old appliance.
The water pressure must be in the limits (refer
to 'Technical data'). Make sure that the local
water authority gives you the average mains
pressure in your area.
Make sure that there are no kinks in the water
inlet hose and that the water inlet hose is not
squashed or entangled.
Fit the locknut correctly to prevent water
leaks.
Caution! Do not connect the appliance
to new pipes or pipes that are not used
for a long time. Let the water run for
some minutes, then connect the inlet
hose.
Water drain hose
1. Connect the water drain hose to the sink
spigot and attach it under the work surface. This prevents that the waste water
from the sink goes back into the appliance.
2. Connect the water drain hose to a stand
pipe with vent-hole (minimum internal diameter 4 cm).
not close correctly, loosen or tighten the adjustable feet until the appliance is level.
Make sure that the drain hose is not bent or
squashed to prevent that the water drains
does not drain correctly.
Remove the sink plug when the appliance
drains the water to prevent that the water
goes back into the appliance.
A drain hose extension must not be longer
than 2 m. The internal diameter must not be
smaller than the diameter of the hose.
If you connect the water drain hose to a trap
spigot under the sink, remove the plastic
membrane (A). If you do not remove the
membrane, remaining food can cause a
blockage in the drain hose spigot
The appliance has a security feature to
prevent that dirty water goes back into
the appliance. If, the spigot of the sink
has a 'non-return valve', this valve can
cause the appliance to drain incorrectly.
Remove the non-return valve.
Caution! Make sure that the water
couplings are tight to prevent water
leakage.
max 85 cm
min 40 cm
max 400 cm
Page 17

Electrical connection
Warning! The manufacturer is not
responsible if you do not follow these
safety precautions.
This appliance needs to be earthed according to safety precautions.
Make sure that the rated voltage and
type of power on the rating plate agree
with the voltage and the power of the local power supply.
Always use a correctly installed shockproof socket.
Environment concerns
The symbol on the product or on its
packaging indicates that this product may
not be treated as household waste. Instead
it should be taken to the appropriate
collection point for the recycling of electrical
and electronic equipment. By ensuring this
product is disposed of correctly, you will help
prevent potential negative consequences for
the environment and human health, which
could otherwise be caused by inappropriate
waste handling of this product. For more
detailed information about recycling of this
product, please contact your local council,
your household waste disposal service or the
shop where you purchased the product.
The packaging materials are environmentally
friendly and can be recycled. The plastic
electrolux 17
Do not use multi-way plugs, connectors
and extension cables. There is a risk of
fire.
Do not replace the mains cable yourself.
Contact the Service Force Centre.
Make sure that the mains plug is accessible after installation.
Do not pull the mains cable to disconnect the appliance. Always pull the
mains plug.
components are identified by markings, e.g.
>PE<, >PS<, etc. Discard the packaging
materials in the applicable container at the
community waste disposal facilities.
Warning! To discard the appliance,
follow the procedure:
• Pull the mains plug out of the socket.
• Cut off the mains cable and mains
plug and discard them.
• Discard the door catch. This prevents
the children to close themselves inside the appliance and endanger their
lives.
Page 18

18 electrolux
Electrolux. Thinking of you.
Обменяйтесь с нами своими мыслями на
www.electrolux.com
Содержание
Сведения по технике безопасности
Описание изделия 20
Панель управления 20
Эксплуатация изделия 22
Установка смягчителя воды 22
Использование соли для
посудомоечных машин 24
Использование ополаскивателя 24
Загрузка столовых приборов и посуды
Право на изменения сохраняется
Использование моющих средств 27
Выбор и запуск программы мойки 29
18
Программы мойки 30
Уход и чистка 31
Что делать, если ... 32
Технические данные 34
Установка 34
Подключение к водопроводу 34
Подключение к электросети 35
Охрана окружающей среды 36
25
Сведения по технике безопасности
Для собственной безопасности и
правильной эксплуатации машины
перед ее установкой и использова‐
нием внимательно прочитайте на‐
стоящее руководство. Всегда храни‐
те настоящие инструкции вместе с
машиной, даже если передаете или
продаете ее. Пользователи должны
хорошо знать, как работает машина,
и правила безопасности при ее
эксплуатации.
Правильное применение
• Данный прибор предназначен только
для бытового применения.
• Используйте прибор только для мытья
бытовой посуды, пригодной для посу‐
домоечных машин.
• Не заливайте в прибор никаких рас‐
творителей. Опасность взрыва.
• Ножи и прочие заостренные предметы
кладите в корзину для столовых при‐
боров острием вниз. Если это невоз‐
можно, кладите их горизонтально в
верхнюю корзину.
• Используйте только фирменную про‐
дукцию для посудомоечных машин
(моющее средство, соль, ополаскива‐
тель).
• Если открыть дверцу прибора во вре‐
мя е го работы , из него м ожет выр в ать‐
ся горячий па р. Опасн ость о жога кожи .
• Не вынимайте посуду из посудомоеч‐
ной машины до завершения програм‐
мы мойки.
• Когда программа мойки закончится,
выньте вилку сетевого шнура из ро‐
зетки и закройте кран подачи воды.
• Ремонтировать этот прибор разре‐
шается только уполномоченному спе‐
циалисту. Применяйте только ориги‐
нальные запасные части.
• Не выполняйте ремонт самостоятель‐
но во избежание получения травм и
повреждения прибора. Всегда обра‐
щайтесь в местный сервисный центр.
Общие правила техники безопасности
• Лица (включая детей) с нарушенными
физическими сенсорными или ум‐
ственными способност ями или с недо‐
статком опыта или знаний не должны
пользоваться данным прибором. Они
должны находиться под присмотром
или получать инструкции от лица, от‐
ветственного за их безопасность.
• Соблюдайте инструкции по технике
безопасности от производителя мою‐
щего средства для посудомоечных ма‐
Page 19

electrolux 19
шин, чтобы предотвратить ожоги глаз,
рта и горла.
• Не пейте воду из посудомоечной ма‐
шины. В машине могут быть остатки
моющего средства.
• Чтобы предотвратить травмы и не
споткнуться об открытую дверцу, все‐
гда закрывайте ее, если не пользуе‐
тесь машиной.
• Не садитесь и не вставайте на откры‐
тую дверцу.
Безопасность детей
• Этим прибором могут пользоваться
только взрослые. Следите за тем, что‐
бы маленькие дети не играли с прибо‐
ром.
• Храните все упаковочные материалы
в недоступном для детей месте. Су‐
ществует риск смерти от удушения.
• Храните все моющие средства в без‐
опасном месте. Не позволяйте детям
прикасаться к моющим средствам.
• Не подпускайте детей к посудомоеч‐
ной машине, когда ее дверца открыта.
Установка
• Убедитесь, что машина не поврежде‐
на при транспортировке. Не подклю‐
чайте поврежденную машину. При не‐
обходимости свяжитесь с поставщи‐
ком.
• Перед тем, как приступать к
эксплуатации, удалите всю упаковку.
• Подключение к электросети должно
выполняться квалифицированным
компетентным лицом.
• Подключение к сети водоснабжения и
канализации должно выпол нятьс я ква ‐
лифицированным компетентным ли‐
цом.
• Не меняйте технические характери‐
стики или конструкцию этого изделия.
Риск получения травм или поврежде‐
ния изделия.
•Не включайте машину:
– если повреждены кабель электропи‐
тания или шланги для воды,
– если панель управления, рабочая
поверхность или цоколь поврежде‐
ны настолько, что стала доступной
внутренняя часть машины.
Обращайтесь в местный авторизован‐
ный сервисный центр.
• Не сверлите боковые стенки машины,
чтобы не повредить гидравлические
или электрические компоненты.
ВНИМАНИЕ! Строго
придерживайтесь инструкций по
подключению к сетям электро- и
водоснабжения.
Page 20

20 electrolux
Описание изделия
1 Верхняя корзина
2 Переключатель жесткости воды
3 Емкость для соли
4 Дозатор моющих средств
5 Дозатор ополаскивателя
Панель управления
6 Табличка технических данных
7 Фильтры
8 Нижний разбрызгиватель
9 Верхний разбрызгиватель
5 4
321
AB
Page 21

electrolux 21
1 Кнопка «Вкл/Выкл»
2 Кнопка «Отсрочка пуска»
3 Кнопка выбора/отмены программ / (PROG. / CANCEL)
4 Индикаторы
5 Световые индикаторы программ
Индикаторы
Загорается по окончании программы мойки.
Вспомогательные функции:
• Уровень в у стройстве дл я смягчения воды.
• Включение/выключение звуковых сигна‐
лов.
• Оповещение в случае неисправности при‐
бора.
Загорается, когда требуется наполнить доза‐
1)
1)
1) Индикаторы наличия соли и/или ополаскивателя не загораются во время выполнения
программы мойки, даже когда соответствующие контейнеры пусты.
Кнопка выбора/отмены программ
Кнопка выбора/отмены программ ис‐
пользуется для таких операций:
• Для установки программы мойки. См.
раздел "Выбор и запуск программы
мойки".
• Настройка устройства для смягчения
воды. См. раздел "Установка смягчи‐
теля воды".
• Для выключения/включения звуковых
сигналов. См. раздел "Звуковые сиг‐
налы".
• Для отмены выполняемой программы
мойки. См. раздел "Выбор и запуск
программы мойки".
Кнопка "Отсрочка пуска"
Используйте кнопку отсрочки пуска, что‐
бы отложить запуск программы мойки с
интервалом 3 часа. См. "Выбор и запуск
программы мойки".
Режим настройки
Прибор находится в режиме настройки,
когда не горят все программные индика‐
тор ополаскивателя. См. раздел «Использо‐
вание ополаскивателя».
Загорается, когда требуется наполнить ем‐
кость для соли. См. раздел «Использование
соли для посудомоечных машин».
После заполнения контейнера индикатор на‐
личия соли может гореть еще несколько ча‐
сов. Это не оказывает отрицательного влия‐
ния на работу прибора.
торы и мигает индикатор окончания про‐
граммы.
Прибор должен быть в режиме настрой‐
ки для выполнения следующих опера‐
ций:
– Для установки программы мойки.
– Для настройки уровня в устройстве
для смягчения воды.
– Для выключения/включения звуковых
сигналов.
Если горит программный индикатор, от‐
мените программу, чтобы вернуться в
режим настройки. См. раздел "Выбор и
запуск программы мойки".
Программные индикаторы A и B
Помимо индикации выбора соответ‐
ствующей программы мойки эти индика‐
торы имеют дополнительные функции:
• Регулировка уровня в устройстве для
смягчения воды.
• Выключение/включение звуковых сиг‐
налов.
Звуковые сигналы
Звуковой сигнал можно услышать:
• По окончании программы мойки.
Page 22

22 electrolux
• Когда прибор неисправен.
Включение звуковых сигналов настрое‐
но на заводе.
Для выключения звуковых сигналов вы‐
полните следующие действия:
1. Включите прибор.
2. Убедитесь, что прибор находится в
режиме настройки.
3. Нажмите и удерживайте кнопку выбо‐
ра/отмены программ до тех пор, пока
не начнет мигать программный инди‐
катор А и не загорится программный
индикатор В.
4. Нажмите кнопку выбора/отмены про‐
грамм еще раз.
– Загорается программный индика‐
тор А.
– Программный индикатор В начи‐
нает мигать.
Эксплуатация изделия
Следуйте инструкциям, приведенным
для каждого шага процедуры.
1. Проверьте, чтобы на устройстве
смягчения воды был установлен пра‐
вильный для вашей местности уро‐
вень жесткости воды. При необходи‐
мости настройте устройство смягче‐
ния воды.
2. Насыпьте соль для посудомоечных
машин в емкость для соли.
3. Залейте ополаскиватель в дозатор.
4. Загрузите в машину столовые прибо‐
ры и посуду.
5. Подождите, пока не погаснет про‐
граммный индикатор А.
– Программный индикатор В продол‐
жает мигать.
– Загорается индикатор окончания
программы.
Звуковые сигналы включены.
6. Нажмите кнопку выбора/отмены про‐
грамм еще раз.
– Индикатор окончания программы
гаснет.
Звуковые сигналы выключены.
7. Выключите прибор, чтобы сохранить
операцию.
Для включения звуковых сигналов вы‐
полните следующие действия:
1. Выполните вышеуказанную процеду‐
ру, пока не загорится индикатор окон‐
чания программы.
5. Выберите правильную программу
мойки в соответствии с типом посуды
и степенью ее загрязнения.
6. Заполните дозатор моющего сред‐
ства надлежащим количеством мою‐
щего средства.
7. Запустите программу мойки.
Если вы используете таблетирован‐
ные моющие средства, см. раздел
"Использование моющих средств".
Установка смягчителя воды
Устройство смягчения воды удаляет ми‐
неральные вещества и соли из водопро‐
водной воды, подаваемой в машину. Ми‐
неральные вещества и соли могут ока‐
зать вредное воздействие на работу ма‐
шины.
Жесткость воды измеряется в соответ‐
ствующих единицах:
• немецких градусах (dH°),
• французских градусах (°TH),
Жесткость воды Настройка жесткости воды
°dH (гра‐
дусы
жесткости
воды)
51 - 70 91 - 125 9,1 - 12,5 64 - 88 2 10
°TH (гра‐
дусы
жесткости
воды)
ммоль/л Кларк (шка‐
• ммоль/л (миллимолях на литр - меж‐
дународных единицах жесткости во‐
ды),
• градусах по шкале Кларка.
Установите на устройстве смягчения во‐
ды уровень, соответствующий жесткости
воды в вашей местности. При необходи‐
мости, обратитесь в местную организа‐
цию по водоснабжению.
вручную электронным спосо‐
ла жестко‐
сти воды)
бом
Page 23

Жесткость воды Настройка жесткости воды
°dH (гра‐
дусы
жесткости
воды)
43 - 50 76 - 90 7,6 - 9,0 53 - 63 2 9
37 - 42 65 - 75 6,5 - 7,5 46 - 52 2 8
29 - 36 51 - 64 5,1 - 6,4 36 - 45 2 7
23 - 28 40 - 50 4,0 - 5,0 28 - 35 2 6
19 - 22 33 - 39 3,3 - 3,9 23 - 27 2 5
15 - 18 26 - 32 2,6 - 3,2 18 - 22 1 4
11 - 14 19 - 25 1,9 - 2,5 13 - 17 1 3
4 - 10 7 - 18 0,7 - 1,8 5 - 12 1 2
< 4 < 7 < 0,7 < 5
1) Соль не требуется.
Устройство для смягчения воды не‐
обходимо отрегулировать вручную и
электронным способом.
Ручное регулирование
Заводская настройка прибора соот‐
ветствует положению 2.
1. Откройте дверцу.
2. Выньте нижнюю корзину.
3. Поверните переключатель жесткости
воды в положение 1 или 2 (см. табли‐
цу).
4. Установите на место нижнюю корзи‐
ну.
°TH (гра‐
дусы
жесткости
воды)
ммоль/л Кларк (шка‐
ла жестко‐
сти воды)
2. Убедитесь, что прибор находится в
3. Нажмите и удерживайте кнопку выбо‐
4. Отпустите кнопку выбора/отмены
5. Подождите, пока не погаснет про‐
6. Нажмите один раз кнопку выбора/от‐
вручную электронным спосо‐
1)
1
режиме настройки.
ра/отмены программ.
программ, когда программный инди‐
катор А начнет мигать и загорится
программный индикатор В.
граммный индикатор B.
– Программный индикатор A начи‐
нает мигать.
– Индикатор окончания программы
начинает мигать.
мены программ.
– Программный индикатор A начи‐
нает мигать.
– Функция настройки устройства для
смягчения воды включена.
– Мигает индикатор окончания про‐
граммы, указывая на уровень в ус‐
тройстве для смягчения воды.
Пример: 5 миганий, пауза, 5 мига‐
5. Закройте дверцу.
Электронное регулирование
На заводе устройство для смягчения во‐
ды посудомоечной машины установлено
на уровень 5.
1. Включите прибор.
ний, пауза, и т.д... = уровень 5.
7. Нажмите один раз кнопку выбора/от‐
мены программ, чтобы увеличить
уровень в устройстве для смягчения
воды на один шаг.
8. Нажмите кнопку Вкл/Выкл, чтобы со‐
хранить операцию.
electrolux 23
бом
1)
1
Page 24

24 electrolux
Использование соли для посудомоечных машин
ПРЕДУПРЕЖДЕНИЕ! Используйте
только соль для посудомоечных
машин. Соль, не предназначенная
для посудомоечных машин, может
повредить устройство для
смягчения воды.
ПРЕДУПРЕЖДЕНИЕ! Крупицы соли
или соленая вода на дне машины
могут вызвать коррозию. Чтобы
предотвратить коррозию, насыпайте
соль в машину до начала
выполнения программы мойки.
Чтобы наполнить емкость для соли, вы‐
полните следующие действия:
1. Поверните крышку против часовой
стрелки, чтобы открыть емкость для
соли.
2. Налейте в емкость для соли 1 л воды
(только перед первым использова‐
нием).
3. Чтобы засыпать в емкость соль, вос‐
пользуйтесь воронкой.
4. Уберите соль вокруг отверстия емко‐
сти для соли.
5. Поверните крышку по часовой стрел‐
ке, чтобы закрыть емкость для соли.
То, что вода выливается из емкости
для соли, когда насыпается соль,
нормально.
Если устройство для смягчения воды на‐
строить электронным способом на уро‐
вень 1, индикатор соли не будет гореть.
Использование ополаскивателя
ПРЕДУПРЕЖДЕНИЕ! Используйте
только специальный
ополаскиватель для посудомоечных
машин.
Не заполняйте дозатор ополаскива‐
теля другими составами (средство
для чистки посудомоечных машин,
жидкое моющее средство и т.п.). Это
может привести к повреждению ма‐
шины.
Ополаскиватель позволяет сушить
посуду без образования полос и пя‐
тен.
Машина автоматически добавляет
ополаскиватель во время последне‐
го цикла полоскания.
Чтобы наполнить дозатор ополаскивате‐
ля, выполните следующие действия:
1. Нажмите кнопку (А), чтобы открыть
дозатор ополаскивателя.
2. Залейте в дозатор ополаскиватель.
Отметка "max"." показывает макси‐
мальный уровень.
Page 25

3. Вытрите пролившийся ополаскива‐
тель салфеткой, хорошо впитываю‐
щей жидкость, во избежание избы‐
точного пенообразования при сле‐
дующей мойке.
4. Закройте дозатор ополаскивателя.
Регулировка дозировки ополаскивателя
На заводе регулятор ополаскивателя ус‐
тановлен в положение 4.
Дозировку ополаскивателя можно уста‐
новить в пределах от 1 (минимум) до 6
electrolux 25
(максимум), что соответствует 1-6 мл
ополаскивателя.
1. Для увеличения или снижения дози‐
ровки поверните селектор.
– Увеличьте дозировку, если на по‐
суде имеются капельки воды или
налет.
– Если на посуде остаются полосы,
беловатые пятна или голубоватая
пленка, уменьшите дозировку.
Загрузка столовых приборов и посуды
Полезные советы и рекомендации
ПРЕДУПРЕЖДЕНИЕ! Используйте
прибор только для мытья бытовой
посуды, пригодной для
посудомоечных машин.
Не используйте машину для мытья пред‐
метов, которые могут поглощать воду
(губки, кухонные салфетки и т.п.).
• Перед загрузкой столовых приборов и
посуды выполните такие действия:
– Удалите все остатки пищи и отходы .
– Размягчите пригоревшие остатки
пищи в сковородах.
• При загрузке столовых приборов и по‐
суды выполните такие действия:
– Полые предметы (например, чашки,
стаканы, сковороды) загружайте
вверх дном.
– Убедитесь, что вода не собирается
внутри или в углублении основания
посуды.
– Убедитесь, что столовые приборы и
посуда не лежат внутри друг друга.
– Убедитесь, что столовые приборы и
посуда не накрывают другие столо‐
вые приборы и посуду.
– Убедитесь, что стаканы не соприка‐
саются друг с другом.
– Мелкие предметы укладывайте в
корзину для столовых приборов.
• Пластиковые предметы и сковороды с
антипригарным покрытием могут
удерживать капли воды. Пластиковые
предметы не высыхают так же быстро,
как фарфоровые и стальные предме‐
ты.
• Легкие предметы укладывайте в верх‐
нюю корзину. Убедитесь, что предме‐
ты не передвигаются.
ПРЕДУПРЕЖДЕНИЕ! Убедитесь,
что разбрызгиватели могут
свободно вращаться, прежде чем
запускать программу мойки.
Page 26

26 electrolux
ВНИМАНИЕ! Всегда закрывайте
дверцу после загрузки или разгрузки
прибора. Открытая дверца может
быть опасной.
нижней корзине
Кастрюли, крышки, тарелки и салатницы
ставьте в нижнюю корзину. Размещайте
сервировочные блюда и большие кры‐
шки у краев корзины.
Чтобы исключить слипание столовых
приборов, размещайте ложки вперемеж‐
ку с другими приборами.
Используйте решетку для столовых при‐
боров. Если размер столовых приборов
не позволяет использовать решетку, ее
можно снять.
Верхняя корзина
Верхняя корзина предназначена для та‐
релок (диаметром не более 24 см), са‐
латниц, чашек, стаканов, кастрюль и их
крышек. Расположите предметы так,
чтобы вода попадала на все поверхно‐
сти.
Корзинка для столовых приборов
ВНИМАНИЕ! Не ставьте ножи с
длинными лезвиями вертикально.
Длинные и острые столовые
приборы укладывайте
горизонтально в верхнюю корзину.
Будьте осторожны с острыми
предметами.
Вилки и ложки ставьте ручками вниз.
Ножи ставьте ручками вверх.
Тарелки ставьте только в заднюю
часть верхней корзины. Наклоните
их вперед.
Бокалы с длинными ножками ставьте в
держатели для чашек ножками вверх.
Чтобы поставить длинные предметы,
сложите держатели для чашек вверх.
Page 27

Регулирование высоты верхней корзины
Ес ли вы ста вите боль шие таре лки в ни ж‐
нюю корзину, сначала передвиньте
верхнюю корзину в верхнее положение.
ПРЕДУПРЕЖДЕНИЕ!
Отрегулируйте высоту, прежде чем
загружать верхнюю корзину.
Максимальная высота посуды
верхняя
Верхнее положе‐
ние
корзина
20 см 31 см
нижняя
корзина
electrolux 27
Максимальная высота посуды
Нижнее положение 24 см 27 см
Чтобы передвинуть верхнюю корзину в
верхнее положение, проделайте сле‐
дующее:
1. Выдвиньте стопоры передней на‐
правляющей (А).
2. Вытяните корзину.
3. Поставьте корзину в верхнее положе‐
ние.
4. Верните стопоры передней направ‐
ля ющ ей (А) в и х ис хо дн ое п ол ож ен ие .
ПРЕДУПРЕЖДЕНИЕ! Если корзина
находится в верхнем положении, не
ставьте чашки на держатели для
чашек.
Использование моющих средств
Используйте только моющие сред‐
ства (порошковые, жидкие или в та‐
блетках), пригодные для посудо‐
моечных машин.
Следуйте указаниям, приведенным
на упаковке:
• рекомендациям производителя по
дозировке,
• рекомендациям по хранению.
Не превышайте указанную дозиров‐
ку моющего средства, чтобы умень‐
шить загрязнение окружающей сре‐
ды.
Чтобы заполнить дозатор моющим сред‐
ством, выполните следующее:
1. Откройте крышку дозатора моющего
средства.
2. Заполните дозатор моющего сред‐
ства ( A) моющим средством. Марки‐
ровка означает следующее:
20 = примерно 20 г моющего средства
30 = примерно 30 г моющего сред‐
ства.
Page 28

28 electrolux
3. Если используется программа с фа‐
зой предварительной мойки, запол‐
ните моющим средством отделение
дозатора для предварительной мой‐
ки ( B).
A
B
4. Если Вы пользуетесь моющим сред‐
ством в таблетках, положите такую
таблетку в дозатор моющего сред‐
ства ( A).
5. Закройте крышку дозатора моющего
средства. Надавите на крышку так,
чтобы она зафиксировалась в своем
положении.
Использование моющего средства в
таблетках
Положите таблетку моющего средства в
дозатор моющих средств ( A).
Таблетированные моющие средства со‐
держат:
• моющее средство,
• ополаскиватель,
• другие чистящие вещества.
Чтобы использовать таблетированное
моющее средство, выполните следую‐
щие действия:
1. Проверьте, чтобы таблетированное
моющее средство подходило для во‐
ды с соответствующей жесткостью.
См. инструкции изготовителя.
2. Не наполняйте емкость для соли и
дозатор ополаскивателя.
Заполнять емкость для соли и доза‐
тор ополаскивателя не требуется.
Если результаты сушки
неудовлетворительны, выполните
следующие действия:
1. Залейте в дозатор ополаскиватель.
2. Установите дозировку ополаскивате‐
ля в положение 2.
Чтобы снова использовать порошковое
моющее средство, выполните
следующие действия:
1. Наполните емкость для соли и доза‐
тор ополаскивателя.
2. Установите уровень жесткости воды
на максимальное значение.
3. Выполните программу мойки без по‐
суды.
4. Настройте устройство для смягчения
воды. См. "Установка смягчителя во‐
ды".
5. Отрегулируйте дозировку ополаски‐
вателя.
Различные моющиеся средства рас‐
творяются за разное время. Поэтому
некоторые таблетированные мою‐
щие средства не успевают полно‐
стью проявить свои чистящие свой‐
ства во время коротких программ
мойки. При использовании таблети‐
рованных моющих средств выбирай‐
те длинные программы мойки, чтобы
моющее средство полностью рас‐
творилось.
Page 29

Выбор и запуск программы мойки
Установите программу мойки, приот‐
крыв дверцу. Программа мойки за‐
пустится только после закрытия
дверцы. До этого момента настройки
можно изменять.
Для установки и запуска программы мой‐
ки выполните такие действия:
1. Включите прибор.
2. Убедитесь, что прибор находится в
режиме настройки.
3. Нажимайте кнопку выбора/отмены
программ, пока не выберите необхо‐
димую программу мойки. См. раздел
"Программы мойки".
– Загорается программный индика‐
тор.
4. Закройте дверцу.
– Программа мойки запустится авто‐
матически.
Программу мойки невозможно изме‐
нить, когда она выполняется. Отме‐
ните программу мойки.
ВНИМАНИЕ! Не прерывайте и не
отменяйте программу мойку без
необходимости.
ПРЕДУПРЕЖДЕНИЕ! Открывайте
дверцу осторожно. Может выходить
горячий пар.
Отмена программы мойки
1. Нажмите и удерживайте кнопку выбо‐
ра/отмены программ в течение при‐
близительно 3 секунд.
– Программный индикатор гаснет.
– Индикатор окончания программы
начинает мигать.
2. Отпустите кнопку выбора/отмены
программ, чтобы отменить програм‐
му мойки.
Теперь можно выполнить такие дей‐
ствия:
1. Выключите прибор.
2. Установите новую программу мойки.
Наполните моющим средством дозатор
моющих средств, прежде чем устанав‐
ливать новую программу мойки.
Прерывание программы мойки
Откройте дверцу.
electrolux 29
• Программа остановится.
Закройте дверцу.
• Выполнение программы продолжится
с той точки, в которой она была пре‐
рвана.
Установка и запуск программы мойки с
задержкой пуска
1. Нажмите кнопку Вкл/Выкл.
2. Установите программу мойки.
– Загорается индикатор программ.
3. Нажмите кнопку "Задержка пуска"
– При этом загорится индикатор за‐
держки пуска.
4. Закройте дверцу.
– Начинается обратный отсчет вре‐
мени, оставшегося до пуска.
– Когда обратный отсчет времени
завершается, программа мойки за‐
пускается автоматически.
Не открывайте дверцу во время об‐
ратного отсчета времени, чтобы не
прервать обратный отсчет времени.
Когда Вы снова закроете дверцу, об‐
ратный отсчет времени продолжит‐
ся с момента прерывания.
Отмена задержки пуска:
1. Откройте дверцу.
2. Нажмите кнопку "Задержка пуска"
– Индикатор "Задержка пуска" погас‐
нет.
3. Закройте дверцу.
– Сразу же начнется выполнение
программы.
Окончание программы мойки
Выключайте прибор при выполнении
следующих условий:
• Прибор останавливается автоматиче‐
ски.
• Подаются звуковые сигналы об окон‐
чании программы.
1. Откройте дверцу.
– Загорается индикатор окончания
программы.
– Программный индикатор продол‐
жает гореть.
2. Нажмите кнопку Вкл/Выкл.
3. Для получения лучших результатов
оставьте дверцу приоткрытой на не‐
Page 30

30 electrolux
сколько минут, прежде чем доставать
посуду.
Дайте посуде остыть, прежде чем доста‐
• На боковых стенках и дверце прибора
может быть вода. Нержавеющая сталь
охлаждается быстрее, чем посуда.
вать ее из прибора. Горячую посуду лег‐
ко повредить.
Разгрузка
• Снача ла вын имайте пре дметы из ниж ‐
ней корзины, а затем - из верхней.
Программы мойки
Программы мойки
Степень
Программа
1)
2)
1) Это прекрасная ежедневная программа для частичной загрузки. Идеальна для семьи из 4-
х человек, которые моют посуду и столовые приборы только после завтрака и обеда.
2) Проверочная программа для испытательных лабораторий. Тестовые данные представлены
в отдельном буклете, приложенном к Вашей машине.
загряз‐
ненности
Сильная
загряз‐
ненность
Обычная
загряз‐
ненность
Обычная
или сла‐
бая за‐
грязнен‐
ность
Обычная
загряз‐
ненность
Любая
Показатели потребления
Программа Продолжительность
программы (мин)
85-95 1,8-2,0 22-25
105-115 1,5-1,7 23-25
30 0,9 9
130-140 1,0-1,2 14-16
Тип загруз‐
ки
Фаянс, сто‐
ловые при‐
боры, ка‐
стрюли и
сковороды
Фаянс, сто‐
ловые при‐
боры, ка‐
стрюли и
сковороды
Фаянс и
столовые
приборы
Фаянс и
столовые
приборы
Частичная
загрузка
(для до‐
полнения в
течение
дня)
Описание программы
Предварительная мойка
Основная мойка при температуре 70°C
2 промежуточных ополаскивания
Заключительное ополаскивание
Сушка
Предварительная мойка
Основная мойка при температуре 65°C
2 промежуточных ополаскивания
Заключительное ополаскивание
Сушка
Основная мойка при температуре 60°C
Заключительное ополаскивание
Предварительная мойка
Основная мойка при температуре 50°C
1 промежуточное ополаскивание
Заключительное ополаскивание
Сушка
1 холодное ополаскивание (чтобы остат‐
ки пищи не слипались).
Использование моющего средства в этой
программе не является обязательным.
Потребление энер‐
гии (в кВтч)
Потребление воды (в
литрах)
Page 31

electrolux 31
Программа Продолжительность
программы (мин)
12 0,1 5
В результате колебаний давления и
температуры воды, а также напря‐
жения в сети и количества посуды,
Уход и чистка
ВНИМАНИЕ! Перед чисткой
фильтров отключите
электроприбор.
Очистка фильтров
ПРЕДУПРЕЖДЕНИЕ! Не
пользуйтесь машиной без фильтров.
Убедитесь, что фильтры
установлены правильно.
Неправильная установка приводит к
неудовлетворительным
результатам мойки и повреждению
прибора.
При необходимости почистите фильтры.
Грязные фильтры ухудшают результат
мойки.
В машине есть 3 фильтра:
1. фильтр грубой очистки (А)
2. микрофильтр (B)
3. плоский фильтр (С)
Потребление энер‐
гии (в кВтч)
приведенные значения могут ме‐
няться.
4. Снимите фильтрующую систему.
5. Возьмите фильтр грубой очистки (А)
за ручку с отверстием.
6. Снимите фильтр грубой очистки (A)
с микрофильтра (B).
7. Снимите плоский фильтр (С) со дна
прибора.
Потребление воды (в
литрах)
D
A
A
B
B
C
C
Чтобы почистить фильтры, проделайте
следующее:
1. Откройте дверцу.
2. Выньте нижнюю корзину.
3. Чтобы разблокировать систему
фильтров, поверните ручку микро‐
фильтра (В) примерно на четверть
оборота по часовой стрелке.
8. Вымойте фильтры под проточной во‐
дой.
9. Вставьте плоский фильтр (С) в дно
машины. Внимательно вставьте пло‐
ский фильтр в две направляющие
(D).
10. Установите фильтр грубой очистки
(A) в микрофильтр (B) и сожмите их
вместе.
11. Поставьте на место фильтрующую
систему.
Page 32

32 electrolux
12. Чтобы зафиксировать фильтрую‐
щую систему, поверните ручку на ми‐
крофильтре (В) по часовой стрелке,
пока она не зафиксируется.
Чистка машины снаружи
Протрите мягкой влажной тряпкой на‐
ружные поверхности и панель управле‐
ния машины. Используйте только не‐
йтральные моющие средства. Не ис‐
пользуйте абразивные материалы, ца‐
рапающие губки и растворители (ацетон,
трихлорэтилен и т.п.).
Меры защиты от замерзания
ПРЕДУПРЕЖДЕНИЕ! Не
устанавливайте машину в местах с
температурой ниже 0°C.
Производитель не несет
ответственность за повреждения,
вызванные воздействием мороза.
13. Установите на место нижнюю корзи‐
ну.
14. Закройте дверцу.
Если это невозможно, выньте все из ма‐
шины и закройте дверцу. Отсоедините
шланг для воды и слейте с него воду.
Не снимайте разбрызгиватели.
Если отверстия разбрызгивателей заку‐
порились, удалите грязь с помощью тон‐
кой палочки.
Что делать, если ...
Прибор не запускается, либо останавли‐
вается в процессе работы.
В случае неисправности сначала попы‐
тайтесь найти способ устранения про‐
блемы самостоятельно. Если самостоя‐
тельно найти решение не удалось, обра‐
щайтесь в сервисный центр.
Код ошибки и неисправность Возможная причина неисправности и ее устранение
• непрерывно мигает индикатор
текущей программы
• прерывистый звуковой сигнал
• 1 мигание индикатора конца
программы
В прибор не поступает вода
.
• непрерывно мигает индикатор
текущей программы
• прерывистый звуковой сигнал
• 2-кратное мигание индикатора
конца программы
Прибор не сливает воду.
• Водопроводный вентиль забит грязью или накипью.
Прочистите водопроводный вентиль.
• Закрыт водопроводный вентиль.
Откройте водопроводный вентиль.
• Засорен фильтр в наливном шланге.
Прочистите фильтр.
• Неправильное подключение наливного шланга. Шланг
может быть изогнут или передавлен.
Убедитесь в правильности подключения шланга.
• Забита сливная труба раковины.
Прочистите сливную трубу раковины.
• Неправильное подключение сливного шланга. Шланг
может быть изогнут или передавлен.
Убедитесь в правильности подключения шланга.
ПРЕДУПРЕЖДЕНИЕ! Выключите
прибор перед выполнением
следующих действий по
исправлению ситуации.
Page 33

electrolux 33
Код ошибки и неисправность Возможная причина неисправности и ее устранение
• непрерывно мигает индикатор
текущей программы
• прерывистый звуковой сигнал
• 3-кратное мигание индикатора
конца программы
Сработала система защиты от
перелива
Программа не запускается • Дверца прибора не закрыта.
После выполнения проверки включите
прибор. Выполнение программы про‐
должится с того момента, на котором она
была прервана. Если неисправность по‐
явится снова, обратитесь в местный ав‐
торизованный сервисный центр.
Чтобы быстро и правильно оказать по‐
мощь, необходимы следующие данные:
• Закройте водопроводный вентиль и обратитесь в мест‐
ный авторизованный сервисный центр.
Закройте дверцу.
• Вилка сетевого шнура не вставлена в розетку.
Вставьте вилку в розетку.
• Перегорел предохранитель на домашнем распредели‐
тельном щите.
Замените предохранитель.
• Установлена задержка пуска.
Чтобы немедленно начать выполнение программы, от‐
мените задержку пуска.
• Номер изделия (PNC)
• Серийный номер (S-No.)
Эта информация приведена на табличке
технических данных.
Запишите необходимые данные здесь:
Наименование модели : ..........
Номер изделия : ..........
Серийный номер : ..........
• Модель (Mod.)
Результаты мойки неудовлетворительны
Посуда остается грязной • Выбранная программа мойки не подходит для данного типа
Известковый налет на по‐
суде
Посуда мокрая и тусклая • Не использовался ополаскиватель.
На стеклянной и фаянсо‐
вой посуде видны полосы,
белесые пятна или голубо‐
ватая пленка
Сухие следы капель воды
на стеклянной и фаянсо‐
вой посуде
загрузки и загрязнения.
• Корзины загружены неправильно - вода не попадает на все
поверхности.
• Разбрызгиватели не могут свободно вращаться из-за непра‐
вильной укладки посуды.
• Фильтры засорены или неправильно установлены.
• Использовано слишком мало моющего средства, или оно не
применялось.
• Контейнер для соли пустой.
• Неправильно отрегулирован уровень в устройстве для смяг‐
чения воды.
• Неправильно завинчена крышка контейнера для соли.
• Дозатор ополаскивателя пуст.
• Уменьшите дозировку ополаскивателя.
• Увеличьте дозировку ополаскивателя.
• Причиной может быть качество моющего средства.
Page 34

34 electrolux
Технические данные
Габариты Ширина (см) 59,6
Высота (см) 81,8-87,8
Глубина (см) 55,5
Электрическое подключение
- Напряжение - Общая мощ‐
ность - Предохранитель
Давление в водопроводной
системе
Максимум 8 бар (0,8 МПа)
Вместительность Комплектов посуды 12
Информация по электрическому подключению представлена
на табличке с техническими данными, расположенной на
внутренней стороне дверцы посудомоечной машины.
Минимум 0,5 бар (0,05 МПа)
Установка
ВНИМАНИЕ! Убедитесь, что во
время установки вилка сетевого
шнура отсоединена от розетки.
ВАЖНО! Соблюдайте указания на
приложенном к машине шаблоне:
• По встраиванию.
• По установке в мебель.
• По подключению к водопроводу и ка‐
нализации.
Устанавливайте прибор под столешни‐
цей (кухонной рабочей поверхности или
раковины).
Если понадобится ремонт, к машине
должен обеспечиваться легкий доступ
для специалиста.
Поставьте машину рядом с водопровод‐
ным вентилем и канализационным сли‐
вом.
Для вентиляции посудомоечной машины
достаточно только отверстий для подачи
и слива воды, а также для кабеля пита‐
ния.
Посудомоечная машина имеет регули‐
руемые ножки для регулирования высо‐
ты.
При установке машины следите за тем,
чтобы не допустить перегибания или пе‐
редавливания наливного шланга, слив‐
ного шланга и кабеля питания.
Крепление прибора к прилегающей
мебели
Убедитесь, что столешница, под которой
устанавливается прибор, надежно при‐
креплена (к прилегающей кухонной ме‐
бели, корпусу приборов, стене).
Горизонтальное выравнивание машины
Проверьте, чтобы машина была хорошо
выровнена по горизонтали и дверца
плотно закрывалась. Если машина вы‐
ровнена надлежащим образом, дверца
не цепляется за стенки корпуса. Если
дверца закрывается неплотно, отвинти‐
те и ли зави н тите рег у лировочн у ю ножку ,
чтобы выровнять машину по горизонта‐
ли.
Подключение к водопроводу
Наливной шланг
Посудомоечную машину можно подклю‐
чить к горячей (макс. 60°) или холодной
воде.
Если горячая вода подается из системы,
использующей альтернативные источ‐
ники энергии, дружественные по отно‐
шению к окружающей среде (например,
солнечные или фотогальванические па‐
нели, ветрогенераторы), подключайте
машину к горячей воде, чтобы снизить
потребление энергии.
Подсоедините наливной шланг к водо‐
проводному вентилю с наружной резь‐
бой 3/4".
Page 35

electrolux 35
ПРЕДУПРЕЖДЕНИЕ! Не
используйте соединительные
шланги от старой машины.
Давление воды должно быть в указан‐
ных пределах (см. раздел "Технические
данные"). Убедитесь, что местная служ‐
ба водоснабжения обеспечивает сред‐
нее давление в водопроводе в районе
вашего проживания.
Убедитесь, что наливной шланг не изо‐
гнут, не передавлен и не перекручен.
Правильно закрепите контргайку, чтобы
не допустить утечки воды.
ПРЕДУПРЕЖДЕНИЕ! Не
подключайте прибор к новым трубам
или к трубам, которыми долго не
пользовались. Спускайте воду
несколько минут, затем
подключайте наливной шланг.
Сливной шланг
1. Подключите сливной шланг к сливной
трубе раковины, прикрепив его к сто‐
лешнице. Это исключит попадание
сточной воды из раковины обратно в
машину.
2. Подключите сливной шланг к канали‐
зационному стояку с вентиляцион‐
ным отверстием (мин. внутренний
диаметр 4 см).
max 85 cm
min 40 cm
max 400 cm
Убедитесь, что наливной шланг не изо‐
гнут и не передавлен, чтобы вода из ма‐
шины сливалась, как следует.
Извлекайте пробку из раковины, когда
машина сливает воду, чтобы не допу‐
стить попадания сточной воды обратно
в машину.
Не допускается удлинять сливной шланг
более чем на 2 м. Внутренний диаметр
удлинителя не должен быть меньше
диаметра шланга.
При подсоединении сливного шланга к
сливной трубе под раковиной снимите
пластиковую мембрану (A). Если не уда‐
лить мембрану, остатки пищи могут вы‐
звать засорение в месте соединения
трубы с наливным шлангом.
В машине имеется защитное устрой‐
ство, предотвращающее обратное
попадание в нее сточной воды. Если
в сливной трубе раковины имеется
встроенный обратный клапан, это
может помешать нормальному сли‐
ву воды из машины. Снимите обрат‐
ный клапан.
ПРЕДУПРЕЖДЕНИЕ! Во избежание
утечек воды проверьте
герметичность всех гидравлических
соединений.
Подключение к электросети
ВНИМАНИЕ! Производитель не
несет ответственности, если
пользователь не соблюдает эти
меры безопасности.
Заземлите машину в соответствии с
требованиями техники безо‐
пасности.
Проверьте, чтобы напряжение и тип
электропитания, указанные на та‐
бличке с техническими характери‐
стиками, соответствовали напряже‐
нию и типу электропитания в мест‐
ной электросети.
Page 36

36 electrolux
Пользуйтесь только правильно уста‐
новленной электробезопасной ро‐
зеткой.
Не пользуйтесь переходниками, сое‐
динителями и удлинителями. Суще‐
ствует риск возгорания.
Не заменяйте кабель электропита‐
ния самостоятельно. Обращайтесь в
авторизованный сервисный центр.
Охрана окружающей среды
Символ на изделии или на его
упаковке указывает, что оно не подлежит
утилизации в качестве бытовых отходов.
Вместо этого его следует сдать в
соответствующий пункт приемки
электронного и электрооборудования
для последующей утилизации.
Соблюдая правила утилизации изделия,
Вы поможете предотвратить
причинение окружающей среде и
здоровью людей потенциального
ущерба, который возможен в противном
случае, вследствие неподобающего
обращения с подобными отходами. За
более подробной информацией об
утилизации этого изделия просьба
обращаться к местным властям, в
службу по вывозу и утилизации отходов
или в магазин, в котором Вы приобрели
изделие.
Упаковка изготовлена из экологичных
материалов и может быть повторно пе‐
Проверьте, чтобы после установки
был обеспечен доступ к вилке сете‐
вого шнура.
Для отключения машины от электро‐
сети не тяните за кабель электропи‐
тания. Всегда беритесь за саму вил‐
ку.
реработана. На пластмассовых деталях
указан материал, из которого они изго‐
товлены, например, >PE<, (полиэтилен)
>PS< (полистирол) и т.д. Упаковочные
материалы следует складывать в соот‐
ветствующие контейнеры местных
служб по утилизации отходов.
ВНИМАНИЕ! Если машина больше
не нужна, выполните следующие
действия:
• Выньте вилку из розетки.
• Отрежьте кабель электропитания
и штепсельную вилку и выкиньте
их.
• Удалите дверной замок. Благода‐
ря этому дети не смогут оказаться
запертыми внутри машины, под‐
вергая свою жизнь опасности.
Page 37

electrolux 37
Page 38

38 electrolux
Page 39

electrolux 39
Page 40

www.electrolux.com
156986181-00-112009
 Loading...