

Page 1

ESF5201LOW
ESF5201LOX
EN DISHWASHER USER MANUAL 2
ET NÕUDEPESUMASIN KASUTUSJUHEND 18
FR LAVE-VAISSELLE NOTICE D'UTILISATION 34
Page 2

www.electrolux.com2
CONTENTS
1. SAFETY INFORMATION...................................................................................... 3
2. SAFETY INSTRUCTIONS.....................................................................................4
3. PRODUCT DESCRIPTION................................................................................... 6
4. CONTROL PANEL...............................................................................................7
5. PROGRAMMES...................................................................................................8
6. SETTINGS........................................................................................................... 8
7. BEFORE FIRST USE..........................................................................................10
8. DAILY USE........................................................................................................ 11
9. HINTS AND TIPS............................................................................................... 13
10. CARE AND CLEANING....................................................................................14
11. TROUBLESHOOTING......................................................................................15
12. TECHNICAL INFORMATION............................................................................17
WE’RE THINKING OF YOU
Thank you for purchasing an Electrolux appliance. You’ve chosen a product that
brings with it decades of professional experience and innovation. Ingenious and
stylish, it has been designed with you in mind. So whenever you use it, you can be
safe in the knowledge that you’ll get great results every time.
Welcome to Electrolux.
Visit our website for:
Get usage advice, brochures, trouble shooter, service information:
www.electrolux.com
Register your product for better service:
www.registerelectrolux.com
Buy Accessories, Consumables and Original spare parts for your appliance:
www.electrolux.com/shop
CUSTOMER CARE AND SERVICE
Always use original spare parts.
When contacting our Authorised Service Centre, ensure that you have the following
data available: Model, PNC, Serial Number.
The information can be found on the rating plate.
Warning / Caution-Safety information
General information and tips
Environmental information
Subject to change without notice.
Page 3

1. SAFETY INFORMATION
Before the installation and use of the appliance, carefully
read the supplied instructions. The manufacturer is not
responsible if an incorrect installation and use causes
injuries and damages. Always keep the instructions with
the appliance for future reference.
1.1 General Safety
• This appliance is intended to be used in household and
similar applications such as:
– farm houses; staff kitchen areas in shops, offices and
other working environments;
– by clients in hotels, motels, bed & breakfast and
other residential type environments.
• Do not change the specification of this appliance.
• The operating water pressure (minimum and maximum)
must be between 0.5 (0.05) / 8 (0.8) bar (Mpa)
Obey the maximum number of 13 place settings.
•
• If the supply cord is damaged, it must be replaced by
the manufacturer, its Authorised Service Centre or
similarly qualified persons in order to avoid a hazard.
• Put knives and cutlery with sharp points in the cutlery
basket with the points down or in a horizontal position.
• Do not keep the appliance door open without
supervision to prevent to fall on it.
• Before maintenance, deactivate the appliance and
disconnect the mains plug from the mains socket.
• Do not use water spray and steam to clean the
appliance.
• The ventilation openings in the base (if applicable) must
not be obstructed by a carpet.
• The appliance is to be connected to the water mains
using the new supplied hose-sets. Old hose sets must
not be reused.
ENGLISH
3
Page 4

www.electrolux.com4
1.2 Children and vulnerable people safety
• This appliance can be used by children aged from 8
years and above and persons with reduced physical,
sensory or mental capabilities or lack of experience and
knowledge if they have been given supervision or
instruction concerning use of the appliance in a safe
way and understand the hazards involved.
• Do not let children play with the appliance.
• Keep all detergents away from children.
• Keep children and pets away from the appliance door
when it is open.
• Cleaning and user maintenance shall not be made by
children without supervision.
2. SAFETY INSTRUCTIONS
2.1 Installation
• Remove all the packaging.
• Do not install or use a damaged
appliance.
• Do not install or use the appliance
where the temperature is less than 0
°C.
• Obey the installation instruction
supplied with the appliance.
• Make sure that the appliance is
installed below and adjacent to safe
structures.
2.2 Electrical connection
WARNING!
Risk of fire and electrical
shock.
• The appliance must be earthed.
• Make sure that the electrical
information on the rating plate agrees
with the power supply. If not, contact
an electrician.
• Always use a correctly installed
shockproof socket.
• Do not use multi-plug adapters and
extension cables.
• Make sure not to cause damage to the
mains plug and to the mains cable.
Should the mains cable need to be
replaced, this must be carried out by
our Authorised Service Centre.
• Connect the mains plug to the mains
socket only at the end of the
installation. Make sure that there is
access to the mains plug after the
installation.
• Do not pull the mains cable to
disconnect the appliance. Always pull
the mains plug.
• This appliance complies with the E.E.C.
Directives.
• Only for UK and Ireland. The appliance
has a 13 amp mains plug. If it is
necessary to change the fuse in the
mains plug, use fuse: 13 amp ASTA
(BS 1362).
2.3 Water connection
• Make sure not to cause damage to the
water hoses.
• Before you connect the appliance to
new pipes or pipes not used for a long
time, let the water flow until it is clean.
• The first time you use the appliance,
make sure that there is no leakage.
• The water inlet hose has a safety valve
and a sheath with an inner mains
cable.
Page 5
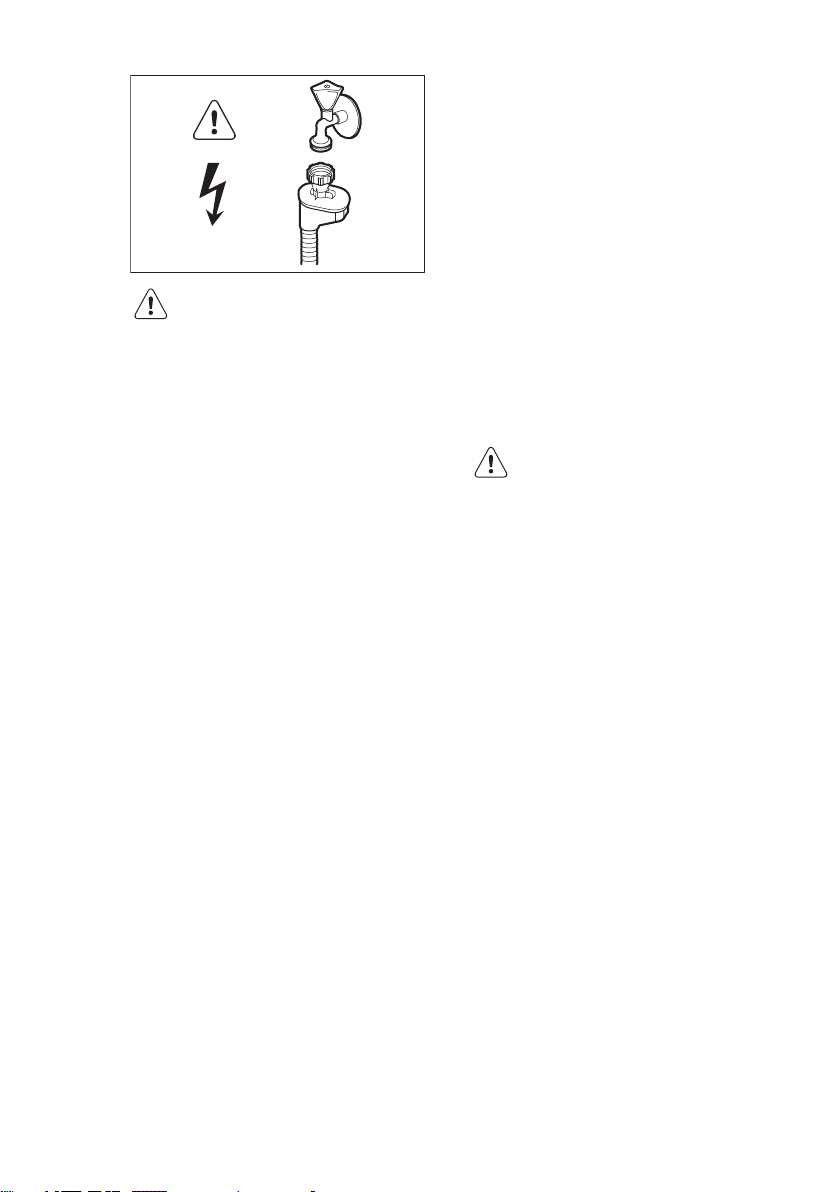
WARNING!
Dangerous voltage.
• If the water inlet hose is damaged,
immediately disconnect the mains plug
from the mains socket. Contact the
Authorised Service Centre to replace
the water inlet hose.
2.4 Use
• Do not sit or stand on the open door.
• Dishwasher detergents are dangerous.
Obey the safety instructions on the
detergent packaging.
• Do not drink and play with the water in
the appliance.
• Do not remove the dishes from the
appliance until the programme is
completed. There can be detergent on
the dishes.
• The appliance can release hot steam if
you open the door while a programme
operates.
ENGLISH
• Do not put flammable products or
items that are wet with flammable
products in, near or on the appliance.
2.5 Service
• Contact the Authorised Service Centre
to repair the appliance. We
recommend only the use of original
spare parts.
• When you contact the Authorised
Service Centre, ensure that you have
the following information that is
available on the rating plate.
Model :
PNC :
Serial Number :
2.6 Disposal
WARNING!
Risk of injury or suffocation.
• Disconnect the appliance from the
mains supply.
• Cut off the mains cable and discard it.
• Remove the door catch to prevent
children and pets to get closed in the
appliance.
5
Page 6
5
4
8
10
9
11
67
12
2
3
1
www.electrolux.com6
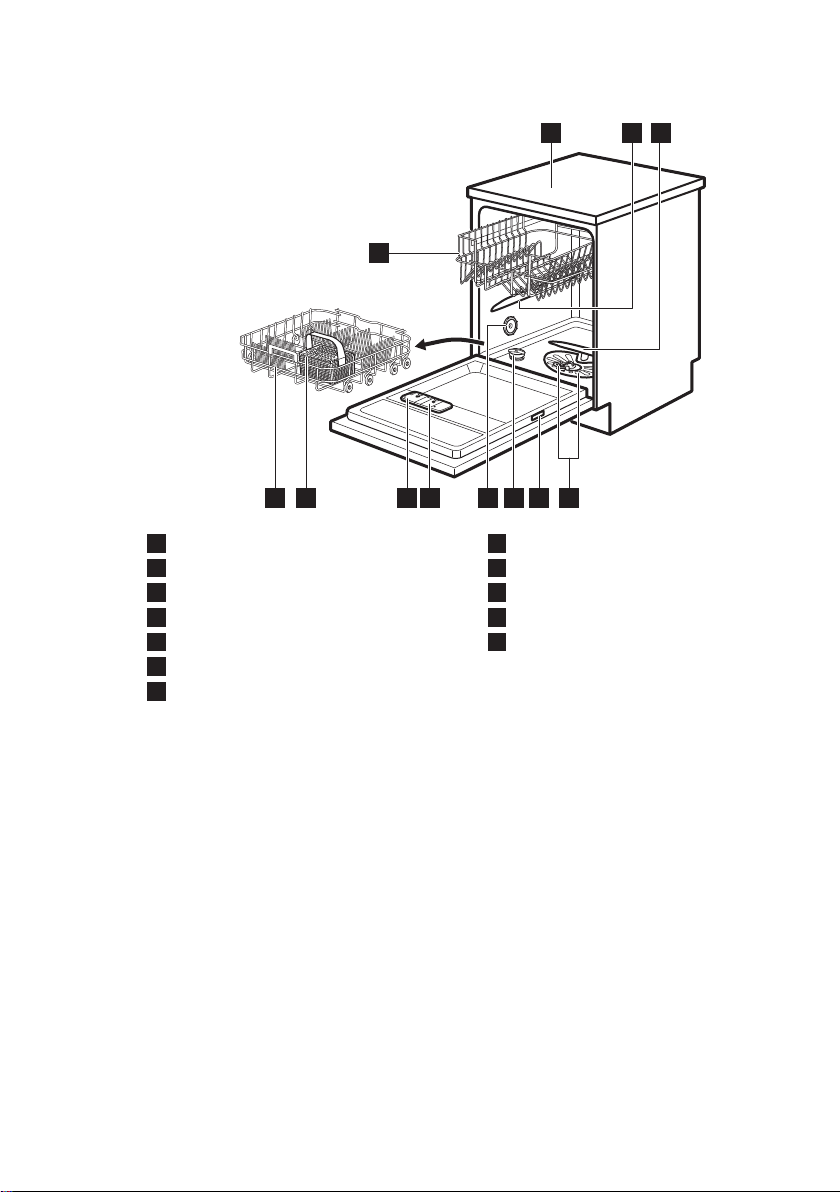
3. PRODUCT DESCRIPTION
Worktop
1
Upper spray arm
2
Lower spray arm
3
Filters
4
Rating plate
5
Salt container
6
Air vent
7
Rinse aid dispenser
8
Detergent dispenser
9
Cutlery basket
10
Lower basket
11
Upper basket
12
Page 7
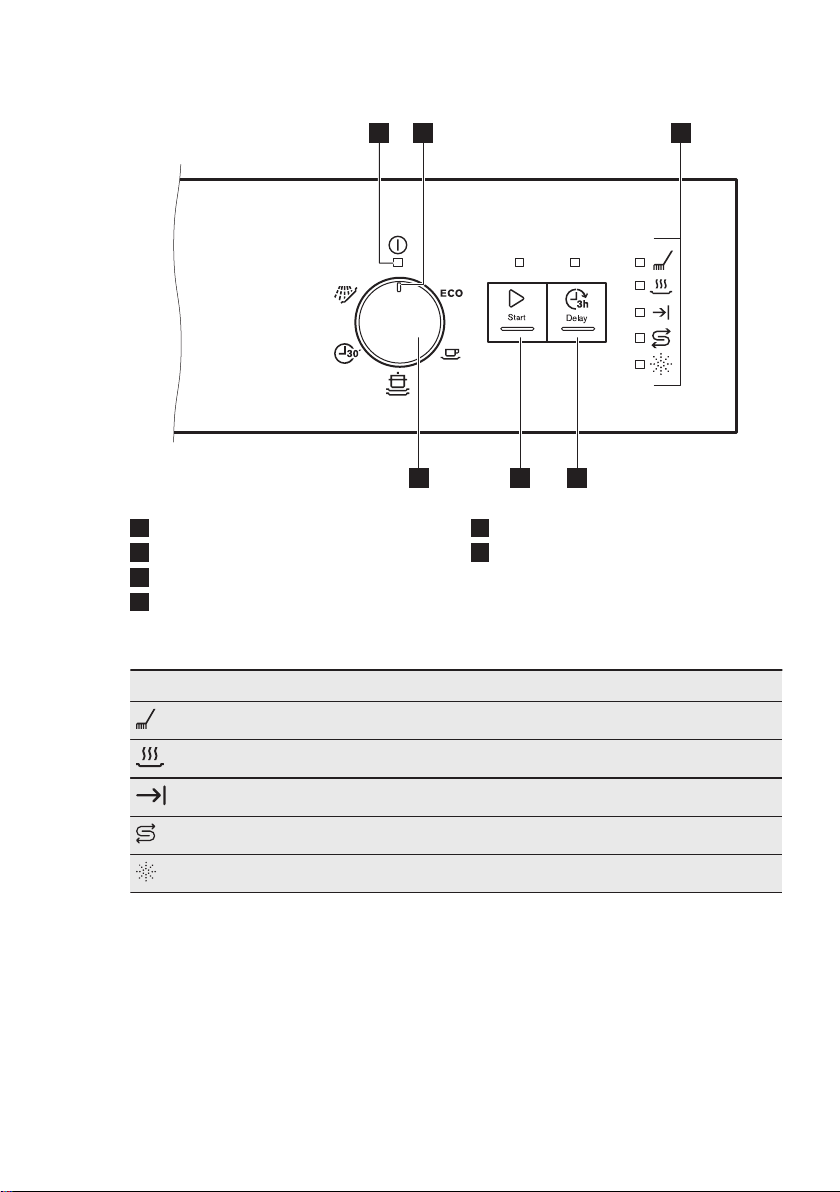
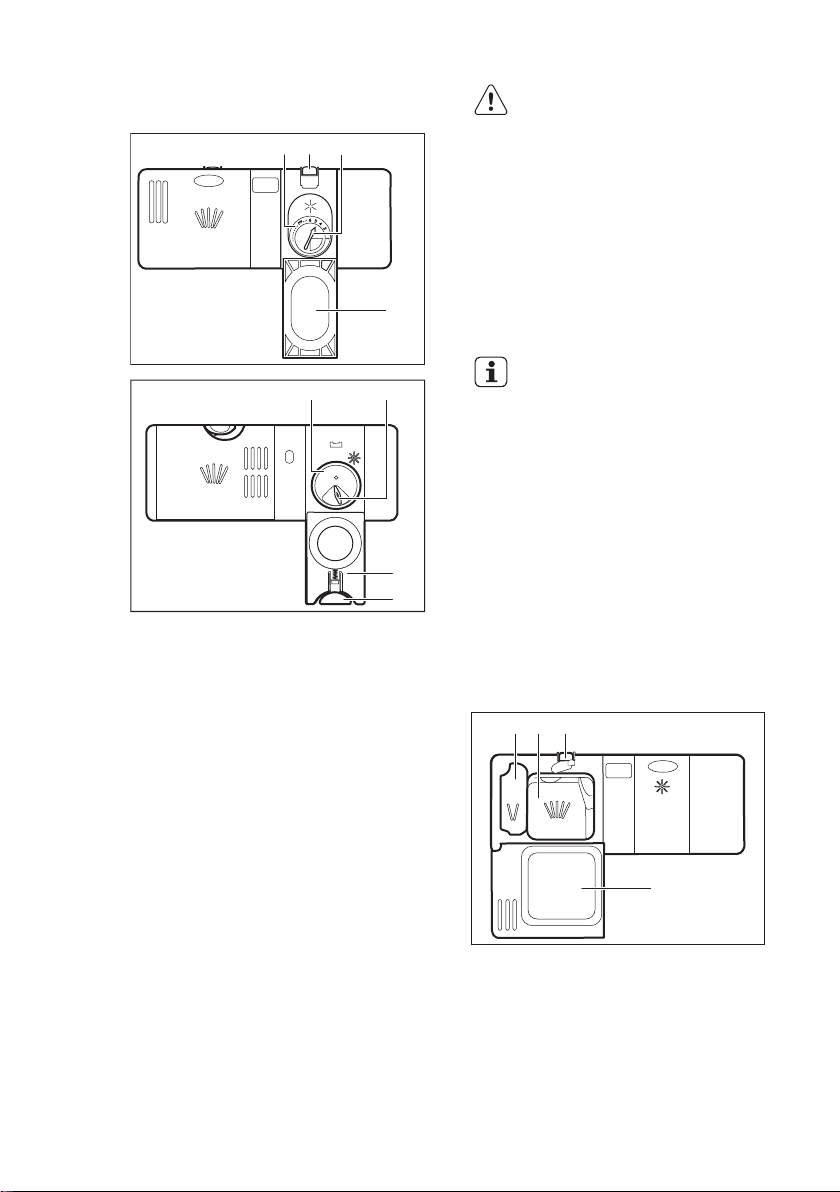
4. CONTROL PANEL
1 2 3
456
ENGLISH
7
On/off indicator
1
Programme marker
2
Indicators
3
Delay button
4
4.1 Indicators
Indicator Description
Washing phase. It comes on when the washing phase operates.
Drying phase. It comes on when the drying phase operates.
End indicator.
Salt indicator. It is always off while the programme operates.
Rinse aid indicator. It is always off while the programme operates.
Start button
5
Programme knob
6
Page 8
www.electrolux.com8
5. PROGRAMMES
Programme Degree of soil
2)
3)
4)
5)
1)
The pressure and the temperature of the water, the variations of the mains supply, the op-
tions and the quantity of dishes can change the values.
2)
With this programme you have the most efficient use of water and energy consumption for
crockery and cutlery with normal soil. (This is the standard programme for test institutes).
3)
This programme has a high temperature rising phase for better hygiene results. During the
rinsing phase, the temperature stays at 70 °C for at least 10 minutes.
4)
With this programme you can wash a load with fresh soil. It gives good washing results in a
short time.
5)
Use this programme to quickly rinse the dishes. this prevents the remaining food to bond on
the dishes and bad odours to come out from the appliance. Do not use detergent with this
programme.
Type of load
Normal soil
Crockery and
cutlery
Heavy soil
Crockery, cutlery, pots and
pans
Normal soil
Crockery and
cutlery
Fresh soil
Crockery and
cutlery
All • Prewash 14 0.1 4
Programme
phases
• Prewash
• Wash 50 °C
• Rinses
• Dry
• Prewash
• Wash 70 °C
• Rinses
• Dry
• Prewash
• Wash 65 °C
• Rinses
• Dry
• Wash 60 °C
or 65 °C
• Rinses
Consumption values
1)
Duration
(min)
195 1.039 11
140 - 160 1.3 - 1.5 13 - 15
100 - 120 1.2 - 1.5 15 - 17
30 0.9 9
Energy
(kWh)
Water
(l)
5.1 Information for test institutes
For all the necessary information for test
performance, send an email to:
info.test@dishwasher-production.com
6. SETTINGS
6.1 Programme selection mode
and user mode
When the appliance is in programme
selection mode it is possible to set a
programme and to enter the user mode.
Write down the product number (PNC)
that is on the rating plate.
In user mode, the following settings
can be changed:
• The level of the water softener
according to the water hardness.
These settings will be saved until you
change them again.
Page 9

How to set the programme selection mode
The appliance is in programme selection
mode when the on/off indicator comes on
and start indicator starts to flash.
When you activate the appliance, usually it
is in programme selection mode.
However, if this does not happen, you can
set the programme selection mode in the
following way:
Press and hold simultaneously Start and
Delay until the appliance is in programme
selection mode.
detrimental effect on the washing results
and on the appliance.
The higher the content of these minerals,
the harder your water is. Water hardness
is measured in equivalent scales.
The water softener should be adjusted
according to the hardness of the water in
your area. Your local water authority can
advise you on the hardness of the water in
your area. It is important to set the right
level of the water softener to assure good
washing results.
6.2 The water softener
The water softener removes minerals from
the water supply, which would have a
Water hardness
German de-
grees (°dH)
47 - 50 84 - 90 8.4 - 9.0 58 - 63 10
43 - 46 76 - 83 7.6 - 8.3 53 - 57 9
37 - 42 65 - 75 6.5 - 7.5 46 - 52 8
29 - 36 51 - 64 5.1 - 6.4 36 - 45 7
23 - 28 40 - 50 4.0 - 5.0 28 - 35 6
19 - 22 33 - 39 3.3 - 3.9 23 - 27
15 - 18 26 - 32 2.6 - 3.2 18 - 22 4
11 - 14 19 - 25 1.9 - 2.5 13 - 17 3
4 - 10 7 - 18 0.7 - 1.8 5 - 12 2
<4 <7 <0.7 < 5
1)
Factory setting.
2)
Do not use salt at this level.
French de-
grees (°fH)
mmol/l Clarke de-
grees
ENGLISH
Water softener
level
1)
5
2)
1
9
How to set the water softener level
The appliance must be in programme
selection mode.
1. Make sure that the programme marker
on the knob is aligned with the
indicator on/off .
2. To enter the user mode, press and
hold Delay. At the same time turn the
knob counterclockwise until the
programme marker is aligned with the
first programme. Release Delay when
the indicators Start and on/off start to
flash.
3. Press Delay.
Page 10
www.electrolux.com10
• The indicator starts to flash.
• The indicators Start and on/off
continues to flash.
• The intermittent flashing of
refers to the current set level, e.g.
5 flashes + pause + 5 flashes =
level 5.
7. BEFORE FIRST USE
1. Make sure that the current level of
the water softener agrees with the
hardness of the water supply. If
not, adjust the level of the water
softener.
2. Fill the salt container.
3. Fill the rinse aid dispenser.
4. Open the water tap.
5. Start a programme to remove any
processing residuals that can still be
inside the appliance. Do not use
detergent and do not load the
baskets.
When you start a programme, the
appliance can take up to 5 minutes to
recharge the resin in the water softener. It
seems that the appliance is not working.
The washing phase starts only after this
procedure is completed. The procedure
will be repeated periodically.
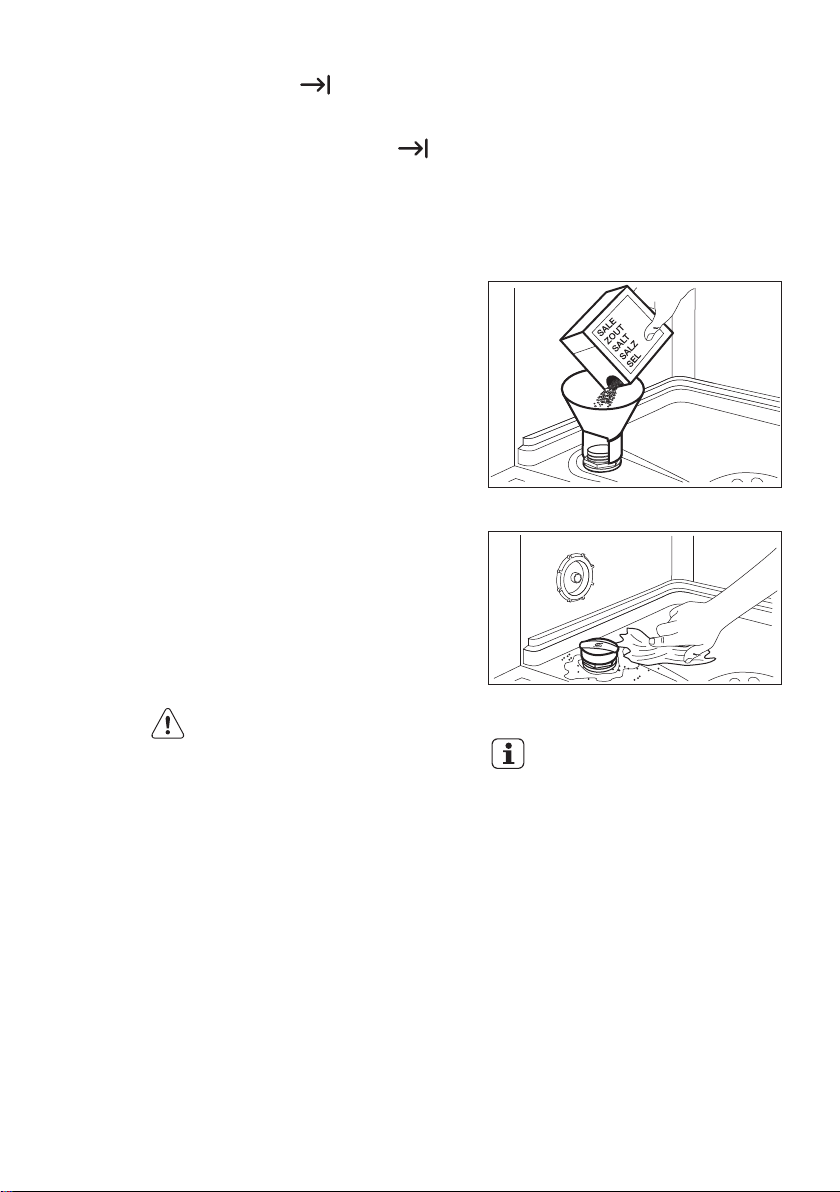
7.1 The salt container
CAUTION!
Only use salt specifically
designed for dishwashers.
The salt is used to recharge the resin in
the water softener and to assure good
washing results in the daily use.
4. Press Delay again and again to
change the setting. Each time you
press Delay the level number
increases. After level 10 you will start
again from level 1.
5. Turn knob to on/off position to confirm
the setting.
4. Remove the salt around the opening
of the salt container.
5. Turn the cap of the salt container
clockwise to close the salt container.
Water and salt can come out
from the salt container when
you fill it. Risk of corrosion. To
prevent it, after you fill the salt
container, start a programme.
How to fill the salt container
1. Turn the cap of the salt container
counterclockwise and remove it.
2. Put 1 litre of water in the salt container
(Only for the first time).
3. Fill the salt container with dishwasher
salt.
Page 11
A
B
D
C
M
A
X
1
2
3
4
+
-
A
B
D
C
30
20
A BD
C
ENGLISH
11
7.2 How to fill the rinse aid dispenser
8. DAILY USE
CAUTION!
Only use rinse aid specifically
designed for dishwashers.
1. Press the release button (D) to open
the lid (C).
2. Pour the rinse aid in the dispenser (A)
until the liquid reaches the fill level
'max'.
3. Remove the spilled rinse aid with an
absorbent cloth to prevent too much
foam.
4. Close the lid. Make sure that the
release button locks into position.
You can turn the selector of
the released quantity (B)
between position 1 (lowest
quantity) and position 4 or 6
(highest quantity).
1. Open the water tap.
2. Turn the knob until the programme
8.1 Using the detergent
marker is aligned with the programme
you want to set. Set the correct
programme for the type of load and
the degree of soil.
• If the salt indicators is on, fill the
salt container.
• If the rinse aid indicator is on, fill
the rinse aid dispenser.
3. Load the baskets.
4. Add the detergent.
5. Start the programme.
Page 12
20
30
B
A D
C
www.electrolux.com12
Starting a programme with delay start
1. Set the programme.
2. Press Delay to delay the start of the
programme of 3 hours.
The delay indicator comes on.
3. Press Start.
Start indicator comes on.
When the countdown is completed, the
programme starts.
1. Press the release button (B) to open
the lid (C).
2. Put the detergent, in powder or
tablets, in the compartment (A).
3. If the programme has a prewash
phase, put a small quantity of
detergent in the compartment (D).
4. Close the lid. Make sure that the
release button locks into position.
8.2 Using the multi-tablets
When you use tablets, that contain salt
and rinse aid, do not fill the salt container
and the rinse aid dispenser.
1. Adjust the water softener to the lowest
level.
2. Set the rinse aid dispenser to the
lowest position.
8.3 Setting and starting a
programme
Starting a programme
1. Open the water tap.
2. Close the appliance door.
3. Turn the knob until the programme
marker is aligned with the programme
you want to set.
• On/off indicator comes on.
• Start indicator starts to flash.
4. Press Start.
• The programme starts and the
indicator of the washing phase is
on.
• On/off indicator and start indicator
are on.
Opening the door while the appliance operates
If you open the door while a programme is
running, the appliance stops. When you
close the door, the appliance continues
from the point of interruption.
Cancelling the delay start while the countdown opearates
1. Press and hold Start and Delay until
the start indicator starts to flash.
2.
Press Start to start the programme.
Cancelling the programme
Press and hold Start and Delay until the
start indicator starts to flash.
Make sure that there is detergent in the
detergent dispenser before you start a
new programme.
End of the programme
When the programme is completed the
indicator is on. If you do not
deactivate the appliance within 5 minutes
all indicators goes off. This helps to
decrease energy consumption.
1. To deactivate the appliance, turn the
knob until the programme marker is
aligned with the on/off indicator.
2. Close the water tap.
Page 13

9. HINTS AND TIPS
ENGLISH
13
9.1 General
The following hints will ensure optimal
cleaning and drying results in daily use
and also help to protect the environment.
• Remove larger residues of food from
the dishes into the waste bin.
• Do not pre-rinse dishes by hand. When
needed, use the prewash programme
(if available) or select a programme with
a prewash phase.
• Always use the whole space of the
baskets.
• When loading the appliance, make
sure that the dishes can be completely
reached and washed by the water
released from the spray arm nozzles.
Make sure that items do not touch or
cover each other.
• You can use dishwasher detergent,
rinse aid and salt separately or you can
use the multi-tablets (e.g. ''3in1'',
''4in1'', ''All in 1''). Follow the
instructions written on the packaging.
• Select the programme according to the
type of load and degree of soil. With
the ECO programme you have the
most efficient use of water and energy
consumption for crockery and cutlery
with normal soil.
9.2 Using salt, rinse aid and
detergent
• Only use salt, rinse aid and detergent
for dishwasher. Other products can
cause damage to the appliance.
• Multi-tablets are usually suitable in
areas with a water hardness up to 21
°dH. In areas exceeding this limit, rinse
aid and salt must be used in addition to
the multi-tablets. However, in areas
with hard and very hard water we
recommend to use solo-detergent
(powder, gel, tablets without additional
functions), rinse aid and salt separately
for optimal cleaning and drying results.
• If you use multi-tablets you can select
the Multitab option (if available). This
option increases the cleaning and
drying results with the use of multitablets.
• Detergent tablets do not fully dissolve
with short programmes. To prevent
detergent residues on the tableware,
we recommend that you use the
tablets with long programmes.
• Do not use more than the correct
quantity of detergent. Refer to the
instructions on the detergent
packaging.
9.3 What to do if you want to
stop using multi-tablets
Before you start to use separately
detergent, salt and rinse aid do the
following procedure.
1. Set the highest level of the water
softener.
2. Make sure that the salt and rinse aid
containers are full.
3. Start the shortest programme with a
rinsing phase. Do not add detergent
and do not load the baskets.
4. When the programme is completed,
adjust the water softener according to
the water hardness in your area.
5.
Adjust the released quantity of rinse
aid.
9.4 Loading the baskets
• Only use the appliance to wash items
that are dishwasher-safe.
• Do not put in the appliance items made
of wood, horn, aluminium, pewter and
copper.
• Do not put in the appliance items that
can absorb water (sponges, household
cloths).
• Remove larger residues of food from
the dishes into the waste bin.
• Make soft the remaining burned food
on the items.
• Put hollow items (cups, glasses and
pans) with the opening down.
• Make sure that glasses do not touch
other glasses.
• Put cutlery and small items in the
cutlery basket.
• Put light items in the upper basket.
Make sure that the items do not move.
Page 14
C
B
A
www.electrolux.com14
• Make sure that the spray arms can
move freely before you start a
programme.
9.5 Before starting a programme
Make sure that:
• The filters are clean and correctly
installed.
• The cap of the salt container is tight.
• The spray arms are not clogged.
• There is dishwasher salt and rinse aid
(unless you use multi- tablets).
• The position of the items in the baskets
is correct.
• The programme is applicable for the
type of load and for the degree of soil.
10. CARE AND CLEANING
WARNING!
Before maintenance,
deactivate the appliance and
disconnect the mains plug
from the main socket.
Dirty filters and clogged spay
arms decrease the washing
results. Make a check
regularly and, if necessary,
clean them.
• The correct quantity of detergent is
used.
9.6 Unloading the baskets
1. Let the tableware cool down before
you remove it from the appliance. Hot
items can be easily damaged.
2. First remove items from the lower
basket, then from the upper basket.
At the end of the programme
water can still remain on the
sides and on the door of the
appliance.
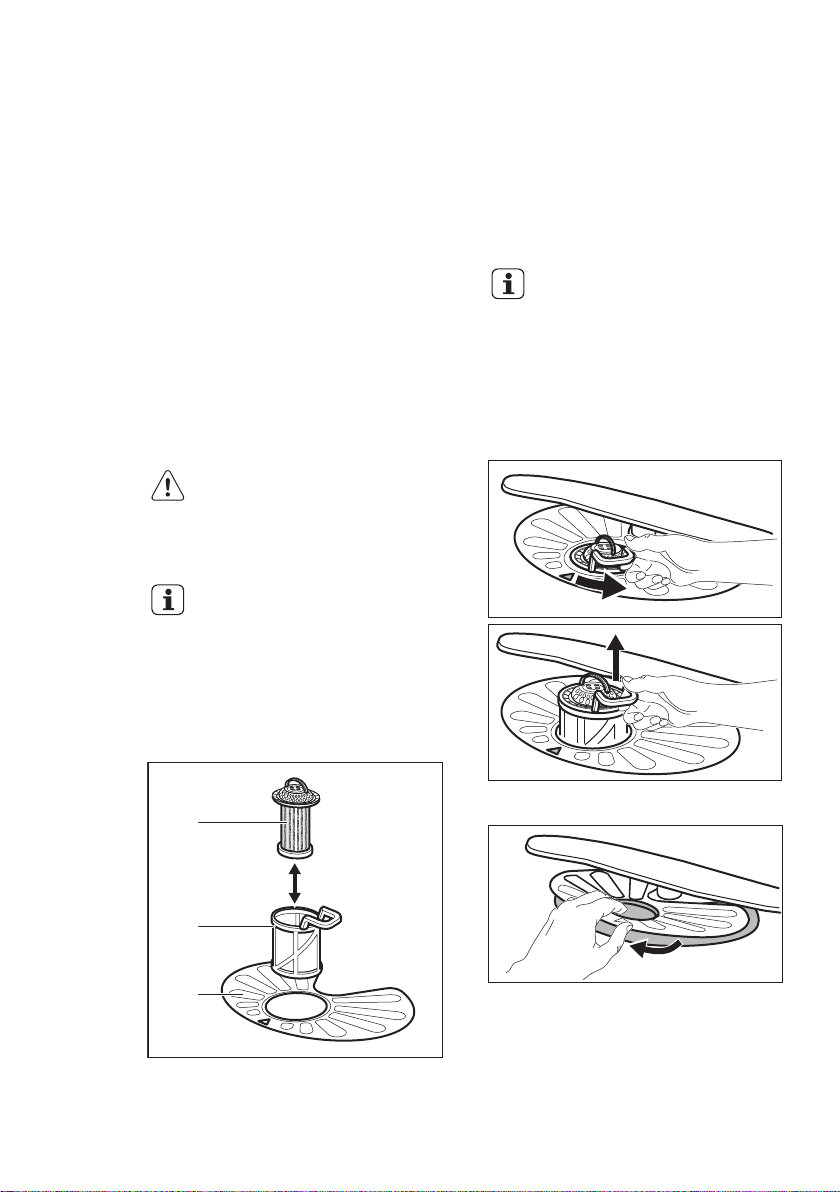
10.1 Cleaning the filters
The filter system is made of 3 parts.
2. Remove the filter (C) out of filter (B).
3. Remove the flat filter (A).
4. Wash the filters.
1. Turn the filter (B) counterclockwise
and remove it.
Page 15
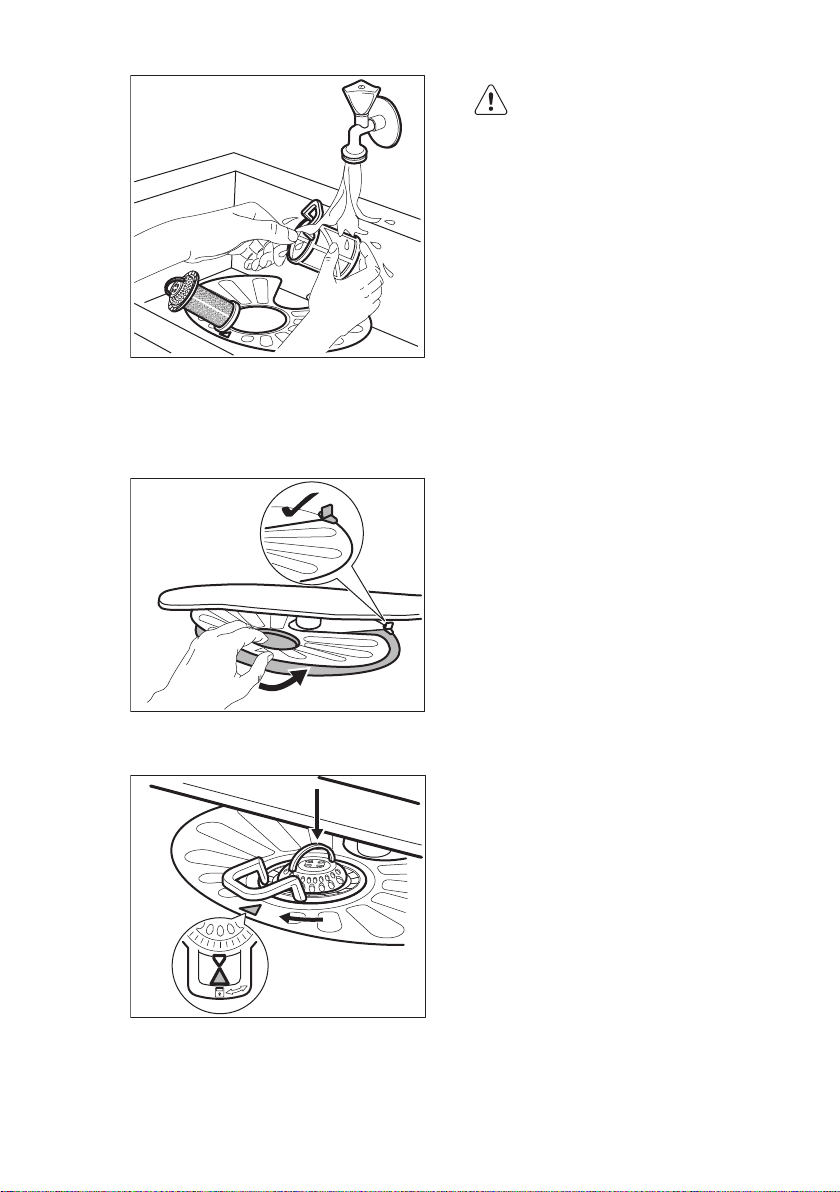
5. Make sure that there are no residues
of food or soil in or around the edge of
the sump.
6. Put back in place the flat filter (A).
Make sure that it is correctly
positioned under the 2 guides.
ENGLISH
CAUTION!
An incorrect position of the
filters can cause bad washing
results and damage to the
appliance.
10.2 Cleaning the spray arms
Do not remove the spray arms. If the holes
in the spray arms are clogged, remove
remaining parts of soil with a thin pointed
object.
10.3 External cleaning
• Clean the appliance with a moist soft
cloth.
• Only use neutral detergents.
• Do not use abrasive products, abrasive
cleaning pads or solvents.
10.4 Internal cleaning
• Carefully clean the appliance, including
the rubber gasket of the door, with a
soft moist cloth.
• If you regularly use short duration
programmes, these can leave deposits
of grease and limescale inside the
appliance. To prevent this, we
recommend to run long duration
programmes at least 2 times per
month.
15
7. Reassemble the filters (B) and (C).
8. Put back the filter (B) in the flat filter
(A). Turn it clockwise until it locks.
11. TROUBLESHOOTING
If the appliance does not start or it stops
during operation, before you contact an
Page 16

www.electrolux.com16
Authorised Service Centre, check if you
can solve the problem by yourself with the
help of the information in the table.
Problem and alarm code Possible solution
You cannot activate the appliance. • Make sure that the mains plug is connected
The programme does not start. • Make sure that the appliance door is closed.
The appliance does not fill with water.
• The end indicator flashes 1 time
intermittently.
• The Start indicator flashes continuously.
The appliance does not drain the water.
• The end indicator flashes 2 times
intermittently.
• The Start indicator flashes continuously.
The anti-flood device is on.
• The end indicator flashes 3 times
intermittently.
• The Start indicator flashes continuously.
With some problems the end indicator
flashes intermittently indicating a
malfunction.
to the mains socket.
• Make sure that there is no damaged fuse in
the fuse box.
• Press Start.
• If the delay start is set, cancel the setting or
wait for the end of the countdown.
• The appliance has started the procedure to
recharge the resin inside the water softener.
The duration of the procedure is approximately 5 minutes.
• Make sure that the water tap is open.
• Make sure that the pressure of the water
supply is not too low. For this information,
contact your local water authority.
• Make sure that the water tap is not clogged.
• Make sure that the filter in the inlet hose is
not clogged.
• Make sure that the inlet hose has no kinks or
bends.
• Make sure that the sink spigot is not clogged.
• Make sure that the drain hose has no kinks
or bends.
• Close the water tap and contact an Authorised Service Centre.
Once you have checked the appliance,
press Start. If the problem occurs again,
contact an Authorised Service Centre.
For alarm codes not described in the
table, contact an Authorised Service
Centre.
11.1 The washing and drying results are not satisfactory
Problem Possible solution
There are whitish streaks or
bluish layers on glasses and
dishes.
• The release quantity of rinse aid is too much. Adjust
the rinse aid selector to a lower position.
• The quantity of detergent is too much.
Page 17

Problem Possible solution
There are stains and dry water drops on glasses and
dishes.
The dishes are wet. • The programme does not have a drying phase or
Refer to "Hints and tips" for
other possible causes.
• The released quantity of rinse aid is not sufficient.
Adjust the rinse aid selector to a higher position.
• The quality of the rinse aid can be the cause.
has a drying phase with low temperature.
• The rinse aid dispenser is empty.
• The quality of the rinse aid can be the cause.
12. TECHNICAL INFORMATION
ENGLISH
17
Dimensions Width / height / depth
Electrical connection
Water supply pressure Min. / max. bar (MPa) 0.5 (0.05) / 8 (0.8)
Water supply
Capacity Place settings 13
Power consumption Left-on mode (W) 0.50
Power consumption Off-mode (W) 0.50
1)
Refer to the rating plate for other values.
2)
If the hot water comes from alternative source of energy, (e.g. solar panels, aeolian energy),
use the hot water supply to decrease energy consumption.
1)
(mm)
Voltage (V) 220 - 240
Frequency (Hz) 50
Cold water or hot water
13. ENVIRONMENT CONCERNS
Recycle the materials with the symbol .
Put the packaging in applicable containers
to recycle it. Help protect the environment
and human health and to recycle waste of
electrical and electronic appliances. Do
600 / 850 / 625
max 60 °C
2)
not dispose appliances marked with the
symbol with the household waste.
Return the product to your local recycling
facility or contact your municipal office.
Page 18

www.electrolux.com18
SISUKORD
1. OHUTUSINFO.................................................................................................. 19
2. OHUTUSJUHISED........................................................................................... 20
3. SEADME KIRJELDUS......................................................................................22
4. JUHTPANEEL.................................................................................................. 23
5. PROGRAMMID.................................................................................................24
6. SEADED........................................................................................................... 25
7. ENNE ESIMEST KASUTAMIST....................................................................... 26
8. IGAPÄEVANE KASUTAMINE.......................................................................... 27
9. VIHJEID JA NÄPUNÄITEID..............................................................................29
10. PUHASTUS JA HOOLDUS............................................................................ 30
11. VEAOTSING...................................................................................................32
12. TEHNILISED ANDMED.................................................................................. 33
SULLE MÕELDES
Täname teid selle Electroluxi seadme ostmise eest. Olete valinud toote, mille
loomisel on rakendatud pikaaegset asjatundlikku kogemust ja uuenduslikkust.
Nutika ja stiilse disaini kõrval ei ole unustatud ka teid. Ükskõik, millal te seda ka ei
kasuta – suurepärastes tulemustes võite te alati kindel olla.
Teretulemast Electroluxi.
Külastage meie veebisaiti:
Kasutusnõuanded, brošüürid, veaotsing, teave teeninduse kohta:
www.electrolux.com
Registreerige oma toode parema teeninduse saamiseks:
www.registerelectrolux.com
Ostke lisaseadmeid, tarvikuid ja originaalvaruosi:
www.electrolux.com/shop
KLIENDITEENINDUS
Soovitame alati kasutada originaalvaruosi.
Teenindusse pöördumisel peaksid teil olema varuks järgmised andmed. Mudel,
tootenumber (PNC), seerianumber.
Andmed leiate andmesildilt.
Hoiatus / oluline ohutusinfo
Üldine informatsioon ja nõuanded
Keskkonnateave
Jäetakse õigus teha muutusi.
Page 19

1. OHUTUSINFO
Enne seadme paigaldamist ja kasutamist lugege
kaasasolev juhend tähelepanelikult läbi. Tootja ei
vastuta vale paigaldamise või ebaõige kasutuse tõttu
tekkinud vigastuste ja kahjude eest. Hoidke juhend alles,
et saaksite seda ka edaspidi kasutada.
1.1 Üldine ohutus
• See seade on mõeldud kasutamiseks koduses
majapidamises või muudes sarnastes kohtades,
näiteks:
– talumajapidamistes, personalile mõeldud köökides
kauplustes, kontorites ja mujal;
– hotellides, motellides ja muudes majutuskohtades.
• Ärge muutke seadme tehnilisi omadusi.
• Kasutatava vee surve (minimaalne ja maksimaalne)
peab jääma vahemikku 0.5 (0.05) / 8 (0.8) baari (Mpa)
• Järgige kohalikku maksimaalset13 taset.
• Kui toitejuhe on vigastatud, laske see ohutuse mõttes
välja vahetada tootja, selle volitatud hooldekeskuses
või lihtsalt kvalifitseeritud isiku poolt.
• Pange noad ja teravate otsadega söögiriistad
söögiriistade korvi otsaga allapoole või
horisontaalasendisse.
• Ärge jätke seadme ust lahti; vastasel korral võib keegi
selle otsa komistada.
• Enne hooldust lülitage seade välja ja ühendage
toitepistik pistikupesast lahti.
• Ärge kasutage seadme puhastamiseks vee- või
aurupihustit.
• Põhjal olevaid ventilatsiooniavasid (kui need on
olemas) ei tohi vaipkattega tõkestada.
• Seade tuleb veevarustusega ühendada kaasasolevate
uute voolikukomplektide abil. Vanu voolikukomplekte
kasutada ei tohi.
EESTI 19
Page 20

www.electrolux.com20
1.2 Laste ja ohustatud inimeste turvalisus
• Seda seadet võivad kasutada vähemalt 8-aastased
lapsed ning füüsilise, sensoorse või vaimse puudega
inimesed või kogemuste ja teadmisteta isikud juhul,
kui nende tegevuse üle on järelvalve ja neid
juhendatakse seadme turvalise kasutamise osas ning
nad mõistavad seadme kasutamisega kaasnevaid
ohte.
• Ärge lubage lastel seadmega mängida.
• Hoidke pesuained lastele kättesaamatuna.
• Hoidke lapsed ja lemmikloomad seadme uksest
eemal, kui see on avatud.
• Ilma järelvalveta ei tohi lapsed seadet puhastada ega
hooldustoiminguid läbi viia.
2. OHUTUSJUHISED
2.1 Paigaldamine
• Eemaldage kõik pakkematerjalid.
• Kahjustatud seadet ei tohi paigaldada
ega kasutada.
• Ärge paigaldage seadet ruumi, mille
temperatuur on alla 0 °C.
• Järgige seadmega kaasas olevaid
paigaldusjuhiseid.
• Veenduge, et seade on paigaldatud
kindlate konstruktsioonide alla ja
kõrvale.
2.2 Elektriühendus
HOIATUS!
Tulekahju- ja elektrilöögioht!
• Seade peab olema maandatud.
• Kontrollige, kas andmesildil toodud
elektrilised parameetrid vastavad
vooluvõrgu näitajatele. Vastasel juhul
võtke ühendust elektrikuga.
• Kasutage alati nõuetekohaselt
paigaldatud ohutut pistikupesa.
• Ärge kasutage mitmikpistikuid ega
pikenduskaableid.
• Veenduge, et te ei vigastaks
toitepistikut ega -juhet. Kui seadme
toitekaabel tuleb välja vahetada, siis
pöörduge meie hoolduskeskusse.
• Ühendage toitepistik seinakontakti
alles pärast paigalduse lõpuleviimist.
Veenduge, et pärast paigaldamist
säilib juurdepääs toitepistikule.
• Seadet välja lülitades ärge tõmmake
toitekaablist. Hoidke alati kinni
toitepistikust.
• See seade vastab EÜ direktiividele.
• Ainult UK-s ja Iirimaal. Seadmel on
13-ampriline voolupistik. Kui peate
toitepistikus kaitset vahetama,
kasutage järgmist kaitset: 13 amp
ASTA (BS 1362).
2.3 Veeühendus
• Veenduge, et te veevoolikuid ei
vigastaks.
• Enne seadme ühendamist uute torude
või pikalt kasutamata torudega laske
neist vett läbi voolata, kuni vesi jääb
puhtaks.
• Seadme esmakordsel kasutamisel
veenduge, et kusagil ei oleks lekkeid.
• Vee sisselaskevoolikul on kaitseklapp
ja kattega sisemine toitejuhe.
Page 21

HOIATUS!
Ohtlik pinge.
• Kui vee sisselaskevoolik on
kahjustada saanud, eemaldage pistik
koheselt seinakontaktist. Vee
sisselaskevooliku asendamiseks
võtke ühendust hoolduskeskusega.
EESTI 21
• Ärge pange süttivaid või süttiva
ainega määrdunud esemeid
seadmesse, selle lähedusse või
peale.
2.5 Hooldus
• Seadme remontimiseks võtke
ühendust tootja volitatud
hoolduskeskusega. Soovitame alati
kasutada ainult originaalvaruosi.
• Hooldusesse pöördumisel veenduge,
et teil on olemas järgnev
andmeplaadil kirjas olev teave.
Mudel:
PNC:
Seerianumber:
2.6 Jäätmekäitlus
2.4 Kasutamine
• Ärge avatud uksel istuge ega seiske.
• Nõudepesumasina pesuained on
ohtlikud. Järgige pesuainepakendil
olevaid kasutusjuhiseid.
• Ärge jooge ega kasutage seadmes
olnud vett.
• Ärge eemaldage nõusid seadmest
enne, kui programm on lõppenud.
Nõudele võib olla jäänud pesuainet.
• Kui avate ukse pesuprogrammi
töötamise ajal, võib ukse vahelt välja
paiskuda kuuma auru.
HOIATUS!
Lämbumis- või vigastusoht!
• Eemaldage seade vooluvõrgust.
• Lõigake toitekaabel seadme küljest
lahti ja visake ära.
• Eemaldage seadme ukse fiksaator, et
vältida laste ja loomade seadmesse
lõksujäämist.
Page 22

5
4
8
10
9
11
67
12
2
3
1
www.electrolux.com22
3. SEADME KIRJELDUS
Tööpind
1
Ülemine pihustikonsool
2
Alumine pihustikonsool
3
Filtrid
4
Andmesilt
5
Soolamahuti
6
Ventilatsiooniava
7
Loputusvahendi jaotur
8
Pesuaine jaotur
9
Söögiriistade korv
10
Alumine korv
11
Ülemine korv
12
Page 23

4. JUHTPANEEL
1 2 3
456
EESTI 23
Sisse/välja-indikaator
1
Programmi tähis
2
Indikaatorid
3
Viitkäivituse nupp
4
4.1 Indikaatorid
Indikaator Kirjeldus
Pesufaas. Süttib pesufaasi ajal.
Kuivatusfaas. Süttib kuivatusfaasi ajal.
Lõpuindikaator.
Soolaindikaator. Programmi töötamise ajal on see indikaator alati väl‐
jas.
Loputusvahendi indikaator. Programmi töötamise ajal on see indikaa‐
tor alati väljas.
Käivitusnupp
5
Programminupp
6
Page 24

www.electrolux.com24
5. PROGRAMMID
Programm Määrdumi‐
saste
Programmi faa‐
sid
Tarbimisväärtused
1)
Nõude tüüp
Kestus
(min)
2)
Tavaline määr‐
dumine
Lauanõud ja
söögiriistad
3)
Tugev määr‐
dumine
Lauanõud,
söögiriistad,
• Eelpesu
• Pesu 50 °C
• Loputused
• Kuivatamine
• Eelpesu
• Pesu 70 °C
• Loputused
• Kuivatamine
195 1.039 11
140 - 160 1.3 - 1.5 13 - 15
Energia
(kWh)
Vesi
(l)
potid ja pannid
Tavaline määr‐
dumine
Lauanõud ja
söögiriistad
4)
Värske määr‐
dumine
Lauanõud ja
• Eelpesu
• Pesu 65 °C
• Loputused
• Kuivatamine
• Pesu 60 °C
või 65 °C
• Loputused
100 - 120 1.2 - 1.5 15 - 17
30 0.9 9
söögiriistad
5)
1)
Veesurve ja -temperatuur, elektripinge kõikumine, erinevad valikud ja nõude kogus või‐
vad tarbimisväärtusi mõjutada.
2)
Selle programmiga kasutate te tavalise määrdumisastmega lauanõude ja söögiriistade
pesemiseks vett ja energiat kõige efektiivsemalt. (See on standardprogramm testimisasu‐
tustele.)
3)
Selle programmi puhul kasutatakse paremate hügieeniliste tulemuste saavutamiseks lo‐
putamisel kõrget temperatuuri. Loputusfaasis püsib temperatuur 70 °C juures vähemalt 10
minutit.
4)
See programm sobib äsja kasutatud nõude pesemiseks. Seda kasutades saate head pe‐
sutulemused lühikese ajaga.
5)
Kasutage seda programmi nõude kiireks üleloputamiseks, et vältida toidujääkide kuiva‐
mist ja ebameeldiva lõhna tekkimist seadmes. Ärge kasutage selle programmi puhul pesuai‐
net.
Kõik • Eelpesu 14 0.1 4
5.1 Teave testimisasutustele
Kogu vajaliku teabe saamiseks testimise
kohta saatke meilisõnum aadressile:
info.test@dishwasher-production.com
Pange kirja tootenumber (PNC), mis
asub andmeplaadil.
Page 25

6. SEADED
EESTI 25
6.1 Programmi valiku režiim ja
kasutajarežiim
Kui seade on programmi valimise
režiimis, saab valida sobiva programmi ja
sisestada kasutajarežiimi.
Kasutajarežiimis saab muuta järgmisi
seadeid:
• Veepehmendaja taset vastavalt vee
karedusele.
Need seaded salvestatakse seniks,
kuni te neid uuesti muudate.
Programmi valimise režiimi valimine
Seade on programmi valimise režiimis,
kui sisse/välja-indikaator põleb ja
käivitusindikaator vilgub.
Kui te seadme sisse lülitate, on see
tavaliselt programmi valimise režiimis.
Vee karedus
Saksa kraadid
(°dH)
47 - 50 84 - 90 8.4 - 9.0 58 - 63 10
43 - 46 76 - 83 7.6 - 8.3 53 - 57 9
37 - 42 65 - 75 6.5 - 7.5 46 - 52 8
29 - 36 51 - 64 5.1 - 6.4 36 - 45 7
23 - 28 40 - 50 4.0 - 5.0 28 - 35 6
19 - 22 33 - 39 3.3 - 3.9 23 - 27
15 - 18 26 - 32 2.6 - 3.2 18 - 22 4
11 - 14 19 - 25 1.9 - 2.5 13 - 17 3
4 - 10 7 - 18 0.7 - 1.8 5 - 12 2
<4 <7 <0.7 < 5
1)
Tehaseseade.
2)
Selle taseme puhul ärge soola kasutage.
Prantsuse
kraadid (°fH)
Kui see nii aga pole, saate programmi
valimise režiimi sisse lülitada järgmiselt:
Vajutage ja hoidke samaaegselt Start ja
Delay, kuni seade jõuab programmi
valimise režiimi.
6.2 Veepehmendaja
Veepehmendaja eemaldab vees olevad
mineraalid, mis halvendavad nii
pesutulemust kui ka seadet ennast.
Mida kõrgem on mineraalide tase, seda
karedam on vesi. Vee karedust
mõõdetakse vastavate skaaladega.
Veepehmendajat tuleks reguleerida
vastavalt teie piirkonna vee karedusele.
Teavet oma piirkonna vee kareduse
kohta saate kohalikult vee-ettevõttelt.
Heade pesutulemuste saamiseks tuleb
kindlasti valida õige veepehmendaja
tase.
mmol/l Clarke'i
kraadid
Veepehmendaja
tase
1)
5
2)
1
Page 26

www.electrolux.com26
Veepehmendaja taseme valimine
Seade peab olema programmi valimise
režiimis.
1. Jälgige, et nupul olev programmi
tähis oleks kohakuti sisse/väljaindikaatoriga.
2. Kasutaja režiimi sisestamiseks
vajutage ja hoidke Delay. Samal ajal
keerake nuppu vastupäeva, kuni
programmi tähis on kohakuti esimese
programmiga. Laske Delay lahti, kui
Start ja sisse/välja-indikaator
hakkavad vilkuma.
7. ENNE ESIMEST KASUTAMIST
3. Vajutage Delay.
• Indikaator hakkab vilkuma.
• Start ja sisse/välja-indikaator
jäävad vilkuma.
• Lõpuindikaatori katkendlik
vilkumine näitab valitud taset, nt 5
vilkumist + paus + 5 vilkumist = 5.
tase.
4. Seade muutmiseks vajutage
korduvalt Delay-nuppu. Igakordsel
Delay vajutamisel taseme number
suureneb. Pärast 10. taset jõuate
tagasi 1. tasemele.
5. Seade kinnitamiseks keerake nupp
sisse/välja-asendisse.
1. Kontrollige, kas veepehmendaja
on reguleeritud vastavalt teie
piirkonna vee karedusele. Kui
mitte, reguleerige veepehmendaja
taset.
2. Täitke soolamahuti.
3. Täitke loputusvahendi jaotur.
4. Keerake veekraan lahti.
5. Käivitage programm, et eemaldada
kõik seadmes leiduda võivad
tootmisjäägid. Ärge kasutage
pesuainet ega pange midagi
korvidesse.
Programmi käivitamisel kulub seadmel
veepehmendajas sisalduva vaigu
aktiveerimiseks kuni 5 minutit. Võib jääda
mulje, et seade ei tööta. Pesutsükkel
käivitub alles pärast selle toimingu
lõppemist. Toimingut korratakse
perioodiliselt.
7.1 Soolamahuti
ETTEVAATUST!
Kasutage ainult
nõudepesumasinate jaoks
mõeldud soola.
Soola kasutatakse veepehmendaja vaigu
aktiveerimiseks ja igapäevases
kasutuses heade pesutulemuste
tagamiseks.
Soolamahuti täitmine
1. Keerake soolamahuti korki
vastupäeva ja võtke see välja.
2. Valage soolamahutisse 1 liiter vett
(ainult esimesel korral).
3. Täitke soolamahuti
nõudepesumasina soolaga.
4. Eemaldage sool soolamahuti avause
ümbert.
5. Soolamahuti sulgemiseks keerake
soolamahuti korki päripäeva.
Page 27

A
B
D
C
M
A
X
1
2
3
4
+
-
A
B
D
C
EESTI 27
Vesi ja sool võivad
soolamahutist täitmise ajal
välja tulla. Korrosioonioht!
Selle vältimiseks käivitage
pärast soolamahuti täitmist
programm.
7.2 Loputusvahendi jaoturi sisselülitamine
ETTEVAATUST!
Kasutage vaid
nõudepesumasina jaoks
mõeldud loputusvahendit.
1. Vajutage avamisnuppu (D), et avada
kaas (C).
2. Kallake loputusvahend jaoturisse (A),
kuni vedelik jõuab tasemeni "max".
3. Eemaldage mahaläinud
loputusvahend imava lapiga, et ei
tekiks liiga palju vahtu.
4. Sulgege kaas. Veenduge, et
vabastusnupp lukustub asendisse.
Aine eraldumiskogust
määravat valikunuppu (B)
saate keerata asendite 1
(väikseim kogus) ja 4 või 6
(suurim kogus) vahel.
8. IGAPÄEVANE KASUTAMINE
1. Keerake veekraan lahti.
2. Keerake nuppu, kuni programmitähis
on kohakuti soovitud programmiga.
Valige nõude tüübile ja
määrdumisastmele vastav
programm.
• Kui soolaindikaator põleb, täitke
soolamahuti.
• Kui loputusvahendi indikaator
põleb, täitke loputusvahendi
jaotur.
3. Pange nõud korvidesse.
4. Lisage pesuaine.
5. Käivitage programm.
Page 28

30
20
A BD
C
20
30
B
A D
C
www.electrolux.com28
8.1 Pesuaine kasutamine
1. Vajutage avamisnuppu (B), et avada
kaas (C).
2. Pange pesuaine (pulber või tabletid)
lahtrisse (A).
3. Kui programmil on eelpesutsükkel,
pange väike kogus pesuainet ka
lahtrisse (D).
4. Sulgege kaas. Veenduge, et
vabastusnupp lukustub asendisse.
8.2 Multitablettide kasutamine
Soola ja loputusvahendit sisaldavate
tablettide puhul jätke soolamahuti ja
loputusvahendi jaotur tühjaks.
1. Seadke veepehmendaja
madalaimale tasemele.
2. Seadke loputusvahendi jaotur
madalaimasse asendisse.
8.3 Programmi valimine ja käivitamine
Programmi käivitamine
1. Keerake veekraan lahti.
2. Sulgege seadme uks.
3. Keerake nuppu, kuni programmi tähis
on kohakuti soovitud programmiga.
• Sisse/välja indikaator süttib.
• Käivitusindikaator hakkab
vilkuma.
4. Vajutage Start.
• Programm käivitub ja põleb
käimasoleva pesufaasi indikaator.
• Sisse/välja-indikaator ja
käivitusindikaator põlevad.
Programmi käivitamine viitkäivitusega
1. Valige programm.
2. Vajutage Delay, et programmi
käivitusaeg 3 tundi edasi lükata.
Süttib viitkäivituse indikaator.
3. Vajutage Start.
Süttib käivitusindikaator.
Kui pöördloendus on lõppenud, käivitub
programm.
Ukse avamine seadme töö ajal
Kui avate ukse programmi töösoleku ajal,
peatub seadme töö. Kui panete ukse
uuesti kinni, jätkub seadme töö kohast,
kus see katkes.
Viitkäivituse tühistamine pöördloenduse ajal
1. Vajutage ja hoidke Start-nuppu ja
Delay-nuppu, kuni käivitusindikaator
hakkab vilkuma.
2. Vajutage Start, et programm
käivitada.
Programmi tühistamine
Vajutage ja hoidke Start-nuppu ja Delaynuppu, kuni käivitusindikaator hakkab
vilkuma.
Page 29

Enne uue programmi käivitamist
veenduge, et pesuaine jaoturis on
pesuainet.
Programmi lõpp
Kui programm on lõppenud, süttib
indikaator . Kui te seadet ise 5 minuti
9. VIHJEID JA NÄPUNÄITEID
EESTI 29
jooksul välja ei lülita, kustuvad kõik
indikaatorid. See vähendab
energiatarvet.
1. Seadme väljalülitamiseks keerake
nuppu, kuni programmi tähis on
kohakuti sisse/välja-indikaatoriga.
2. Sulgege veekraan.
9.1 Üldteave
Järgmisi näpunäiteid järgides saavutate
igapäevasel kasutamisel parimad pesuja kuivatustulemused ning aitate säästa
keskkonda.
• Enne masinasse panekut eemaldage
nõudelt suurem mustus.
• Ärge loputage nõusid eelnevalt
käsitsi. Vajadusel kasutage
eelpesuprogrammi (kui see on
olemas) või valige mõni eelpesuga
programm.
• Kasutage alati ära kogu korvide ruum.
• Seadme täitmisel veenduge, et kõik
nõud oleks paigutatud selliselt, et
pihustikonsoolidest eralduv vesi
pääseks neile juurde ja saaks neid
pesta. Kontrollige, et nõud ei puutu
üksteise vastu ega ole üksteise peal.
• Pesemisel võib kasutada eraldi
nõudepesumasina-pesuainet,
loputusvahendit ja -soola, või ka
multitablette (nt ''3in1'', ''4in1'', ''All in
1''). Järgige pakendil olevaid juhiseid.
• Valige nõude tüübile ja
määrdumisastmele vastav programm.
Programmiga ECOkasutate te
tavalise määrdumisastmega
lauanõude ja söögiriistade
pesemiseks vett ja energiat kõige
efektiivsemalt.
9.2 Soola, loputusvahendi ja
pesuaine kasutamine
• Kasutage ainult nõudepesumasina
jaoks mõeldud soola, loputusvahendit
ja pesuainet. Teised tooted võivad
seadet kahjustada.
• Multitablette sobib kasutada
piirkondades, mille veekaredus on
kuni 21 °dH. Piirkondades, kus see
tase on kõrgem, tuleks
multitablettidele lisaks kasutada ka
loputusvahendit ja soola.
Piirkondades, kus vesi on kare või
väga kare, on parima pesu- ja
kuivatustulemuse saamiseks
soovitatav kasutada eraldi nii
pesuainet (lisaomadusteta pulbrit,
geeli või tablette), loputusvahendit kui
ka soola.
• Multitablettide kasutamisel võite
valida funktsiooni Multitab (kui see on
olemas). Kui kasutate multitablette,
parandab see valik pesu- ja
kuivatustulemusi.
• Lühikeste programmidega ei jõua
pesuainetabletid täielikult lahustuda.
Et nõudele ei jääks pesuainejääke,
soovitatakse pesuainetablette
kasutada ainult pikkade
programmidega.
• Ärge kasutage pesuainet rohkem, kui
ette nähtud. Vt pesuaine pakendil
olevaid juhiseid.
9.3 Kuidas lõpetada
multitablettide kasutamine
Enne pesuaine, soola ja loputusvahendi
eraldi kasutamist tehke järgmist.
1. Valige kõrgeim veepehmendaja tase.
2. Veenduge, et soolamahuti ja
loputusvahendi jaotur on täis.
3. Käivitage lühim loputusfaasiga
programm. Ärge kasutage pesuainet
ega pange midagi korvidesse.
4. Kui pesuprogramm on lõppenud,
kohandage veepehmendaja vastavalt
oma piirkonna vee karedusele.
5. Reguleerige eraldatava
loputusvahendi kogust.
Page 30

C
B
A
www.electrolux.com30
9.4 Korvide täitmine
• Kasutage seadet ainult
nõudepesumasinakindlate nõude
pesemiseks.
• Ärge pange seadmesse puust,
sarvest, alumiiniumist, tinast ega
vasest esemeid.
• Ärge pange seadmesse vett imavaid
esemeid (käsnu või lappe).
• Enne masinasse panekut eemaldage
nõudelt suurem mustus.
• Enne pesemist leotage kõrbenud
kohad nõude küljest lahti.
• Asetage õõnsad esemed (tassid,
klaasid ja pannid) masinasse
avausega allapoole.
• Veenduge, et klaasid ei puutuks
omavahel kokku.
• Pange söögiriistad ja väiksemad
esemed söögiriistade korvi.
• Pange kerged esemed ülemisse korvi.
Veenduge, et esemed liikuma ei
pääseks.
• Enne programmi käivitamist
veenduge, et pihustikonsool saab
vabalt liikuda.
10. PUHASTUS JA HOOLDUS
HOIATUS!
Enne hooldust lülitage seade
välja ja eemaldage toitepistik
pistikupesast.
9.5 Enne programmi käivitamist
Veenduge järgmises:
• Filtrid on puhtad ja õigesti
paigaldatud.
• Soolamahuti kork on kindlalt kinni.
• Pihustuskonsoolid ei ole ummistunud.
• Nõudepesusool ja loputusvahend on
mahutites (juhul, kui te ei kasuta
multitablette).
• Esemete paigutus korvides on õige.
• Valitud programm sobib pestavate
esemete tüübi ja määrdumisastmega.
• Kasutatav pesuainekogus on õige.
9.6 Korvide tühjendamine
1. Enne seadmest väljavõtmist laske
nõudel jahtuda. Tulised nõud
purunevad kergesti.
2. Võtke kõigepealt välja esemed
alumisest korvist, seejärel ülemisest.
Programmi lõpus võib
seadme külgedel ja uksel
olla veel vett.
Mustad filtrid ja ummistunud
pihustikonsoolid
halvendavad
pesemistulemusi. Kontrollige
nende seisukorda
regulaarselt; vajadusel
puhastage.
10.1 Filtrite puhastamine
Filtrisüsteem koosneb kolmest osast.
1. Pöörake filtrit (B) vastupäeva ja võtke
välja.
Page 31

2. Eemaldage filter (C) filtrist (B).
3. Eemaldage lame filter (A).
4. Peske filtrid puhtaks.
EESTI 31
7. Pange uuesti kokku filtrid (B) ja (C).
8. Pange tagasi filter (B) lameda filtri
sees (A). Keerake päripäeva, kuni
see kohale lukustub.
5. Veenduge, ega settevanni äärte
ümber pole kogunenud toidujäätmeid
või mustust.
6. Asetage lame filter (A) tagasi.
Veenduge, et see paikneb õigesti
kahe juhiku all.
ETTEVAATUST!
Filtrite ebaõige asend võib
põhjustada kehva
pesutulemust ja kahjustada
seadet.
10.2 Pihustikonsoolide puhastamine
Ärge pihustikonsoole eemaldage. Kui
pihustikonsoolide avad on ummistunud,
eemaldage mustus peenikese
teravaotsalise esemega.
10.3 Välispinna puhastamine
• Puhastage seadet pehme niiske
lapiga.
• Kasutage ainult neutraalseid
pesuaineid.
• Ärge kasutage abrasiivseid tooteid,
küürimisšvamme ega lahusteid.
Page 32

www.electrolux.com32
10.4 Sisemuse puhastamine
• Puhastage seadet, sealhulgas ukse
kummist tihendit, pehme niisutatud
lapiga.
• Kui kasutate tihti lühikesi programme,
võib sellega kaasneda rasvajääkide ja
11. VEAOTSING
katlakivi kogunemine seadmesse.
Selle ärahoidmiseks on soovitatav
vähemalt kaks korda kuus kasutada
ka pikki programme.
Kui seade ei käivitu või kui see katkestab
töö, proovige enne volitatud teenindusse
pöördumist probleem alltoodud tabeli abil
ise lahendada.
Probleem ja veakood Võimalik lahendus
Seade ei käivitu. • Veenduge, et pistik on pistikupesasse ühen‐
Programm ei käivitu. • Veenduge, et seadme uks on suletud.
Seade ei täitu veega.
• Lõpuindikaator vilgub väikeste
vahede järel 1 kord.
• Start-indikaator vilgub pidevalt.
Seade ei tühjene veest.
• Lõpuindikaator vilgub väikeste
vahede järel 2 korda.
• Start-indikaator vilgub pidevalt.
Üleujutuse-vastane seade töötab.
• Lõpuindikaator vilgub väikeste
vahede järel 3 korda.
• Start-indikaator vilgub pidevalt.
Mõne probleemi puhul vilgub
lõpuindikaator katkendlikult, vihjates
rikkele.
datud.
• Veenduge, et kaitsmekapis ei ole kaitse läbi
läinud.
• Vajutage Start.
• Kui olete valinud viitkäivituse, siis tühistage
see või oodake pöördloenduse lõppemiseni.
• Seade on alustanud veepehmendajas oleva
vaigu aktiveerimist. Selle toimingu kestus
on umbes 5 minutit.
• Veenduge, et veekraan on lahti.
• Veenduge, et veevarustuse surve ei ole lii‐
ga väike. Selle teabe saamiseks pöörduge
kohaliku vee-ettevõtte poole.
• Veenduge, et veekraan ei ole ummistunud.
• Veenduge, et sisselaskevooliku filter ei ole
ummistunud.
• Veenduge, et sisselaskevoolik ei oleks mul‐
jutud ega väänatud.
• Veenduge, et valamu äravool ei ole ummis‐
tunud.
• Veenduge, et tühjendusvoolik ei ole mulju‐
tud ega väänatud.
• Sulgege veekraan ja pöörduge hoolduske‐
skusse.
Kui olete seadet kontrollinud, vajutage
Start . Kui rike ilmneb uuesti, pöörduge
hoolduskeskusse.
Tabelis mitte leiduvate veakoodide puhul
võtke ühendust hoolduskeskusega.
Page 33

11.1 Pesu- ja kuivatustulemused ei ole rahuldavad
Probleem Võimalik lahendus
Valged jooned ja plekid või
sinakas kiht klaasidel ja nõu‐
del.
Plekid ja kuivanud veetil‐
kade jäljed nõudel ja klaasi‐
del.
Nõud on märjad. • Programmil puudub kuivatusfaas või kasutatakse
Muude võimalike põhjuste
kohta vt "Vihjeid ja
näpunäiteid".
12. TEHNILISED ANDMED
EESTI 33
• Eraldatava loputusvahendi kogus on liiga suur.
Pange loputusvahendi jaotur madalamasse asen‐
disse.
• Pesuaine kogus on liiga suur
• Eraldatava loputusvahendi kogus on liiga väike.
Valige loputusvahendi jaoturi jaoks kõrgem tase.
• Põhjuseks võib olla loputusvahendi kvaliteet.
madala temperatuuriga kuivatust.
• Loputusvahendi jaotur on tühi.
• Põhjuseks võib olla loputusvahendi kvaliteet.
Mõõdud Laius / kõrgus / sügavus
Elektriühendus
Veesurve Min. / maks. bar (MPa) 0.5 (0.05) / 8 (0.8)
Veevarustus
Jõudlus Kohalikud seaded 13
Voolutarve Ooterežiim (W) 0.50
Voolutarve Väljas-režiim (W) 0.50
1)
Muud andmed leiate andmeplaadilt.
2)
Kui kuum vesi tuleb alternatiivsest energiaallikast (nt päikesepaneelid, tuuleenergia), ka‐
sutage energiakulu vähendamiseks neid kuumaveeallikaid.
1)
13. JÄÄTMEKÄITLUS
Sümboliga tähistatud materjalid võib
ringlusse suunata. Selleks viige pakendid
vastavatesse konteineritesse. Aidake
hoida keskkonda ja inimeste tervist ja
suunake elektri- ja elektroonilised
jäätmed ringlusse. Ärge visake
(mm)
Pinge (V) 220 - 240
Sagedus (Hz) 50
Külm või kuum vesi
2)
sümboliga tähistatud seadmeid muude
majapidamisjäätmete hulka. Viige seade
kohalikku ringluspunkti või pöörduge abi
saamiseks kohalikku omavalitsusse.
600 / 850 / 625
maks. 60 °C
Page 34

www.electrolux.com34
TABLE DES MATIÈRES
1. CONSIGNES DE SÉCURITÉ.............................................................................. 35
2. INSTRUCTIONS DE SÉCURITÉ......................................................................... 36
3. DESCRIPTION DE L'APPAREIL......................................................................... 38
4. BANDEAU DE COMMANDES............................................................................39
5. PROGRAMMES.................................................................................................40
6. RÉGLAGES....................................................................................................... 41
7. AVANT LA PREMIÈRE UTILISATION..................................................................42
8. UTILISATION QUOTIDIENNE............................................................................. 43
9. CONSEILS.........................................................................................................45
10. ENTRETIEN ET NETTOYAGE.......................................................................... 47
11. DÉPANNAGE...................................................................................................48
12. CARACTÉRISTIQUES TECHNIQUES...............................................................50
NOUS PENSONS À VOUS
Merci d'avoir choisi ce produit Electrolux. Avec ce produit, vous bénéficiez de
dizaines d'années d'expérience professionnelle et d'innovation. Ingénieux et
élégant, il a été conçu sur mesure pour vous. Grâce à cet appareil, vous savez que
chaque utilisation vous apportera satisfaction.
Bienvenue chez Electrolux.
Visitez notre site Internet pour :
Obtenir des conseils d'utilisation, des brochures, de l'aide, des informations :
www.electrolux.com
Enregistrer votre produit pour obtenir un meilleur service :
www.registerelectrolux.com
Acheter des accessoires, consommables et pièces de rechange d'origine pour
votre appareil :
www.electrolux.com/shop
SERVICE APRÈS-VENTE
N'utilisez que des pièces de rechange d'origine.
Avant de contacter le service, assurez-vous de disposer des informations
suivantes : Modèle, PNC, numéro de série.
Vous trouverez ces informations sur la plaque signalétique.
Avertissement/Attention : consignes de sécurité.
Informations générales et conseils.
Informations en matière de protection de l'environnement.
Sous réserve de modifications.
Page 35

1. CONSIGNES DE SÉCURITÉ
Avant d'installer et d'utiliser cet appareil, lisez
soigneusement les instructions fournies. Le fabricant ne
peut être tenu pour responsable des dommages et
blessures liés à une mauvaise installation ou utilisation.
Conservez toujours cette notice avec votre appareil pour
vous y référer ultérieurement.
1.1 Consignes générales de sécurité
• Cet appareil est conçu uniquement pour un usage
domestique et des utilisations telles que :
– bâtiments de ferme, cuisines réservées aux employés
dans les magasins, bureaux et autres lieux de travail ;
– pour une utilisation privée, par les clients, dans des
hôtels et autres lieux de séjour.
• Ne modifiez pas les caractéristiques de cet appareil.
• La pression de l'eau en fonctionnement (minimale et
maximale) doit se situer entre 0.5 (0.05) / 8 (0.8) bar
(Mpa)
• Respectez le nombre maximum de 13 couverts.
• Si le câble d'alimentation est endommagé, il doit être
remplacé par le fabricant, son service après-vente ou
des personnes de qualification similaire afin d'éviter un
danger.
• Placez les couteaux et les couverts avec des bouts
pointus dans le panier à couverts avec les pointes
tournées vers le bas ou en position horizontale.
• Ne laissez pas la porte de l'appareil ouverte sans
surveillance pour éviter tout risque de chute.
• Avant toute opération d'entretien, éteignez l'appareil et
débranchez la fiche de la prise secteur.
• Ne pulvérisez pas d'eau ni de vapeur pour nettoyer
l'appareil.
• Les orifices d'aération situés à la base (si présents) ne
doivent pas être obstrués par de la moquette.
• L'appareil doit être raccordé au réseau de distribution
d'eau en utilisant les ensembles de raccordement neufs
FRANÇAIS
35
Page 36

www.electrolux.com36
fournis avec l'appareil, il convient de ne pas réutiliser
des ensembles de raccordement usagés.
1.2 Sécurité des enfants et des personnes vulnérables
• Cet appareil peut être utilisé par des enfants âgés d'au
moins 8 ans et par des personnes ayant des capacités
physiques, sensorielles ou mentales réduites ou
dénuées d’expérience ou de connaissance, s’ils (si
elles) sont correctement surveillé(e)s ou si des
instructions relatives à l’utilisation de l'appareil en toute
sécurité leur ont été données et si les risques encourus
ont été appréhendées.
• Les enfants ne doivent pas jouer avec l’appareil.
• Ne laissez pas les détergents à la portée des enfants.
• Tenez les enfants et les animaux éloignés de la porte de
l'appareil lorsque celle-ci est ouverte.
• Le nettoyage et l’entretien par l'usager ne doivent pas
être effectués par des enfants sans surveillance.
2. INSTRUCTIONS DE SÉCURITÉ
2.1 Installation
• Retirez l'intégralité de l'emballage
• N'installez pas et ne branchez pas un
appareil endommagé.
• N'installez pas l'appareil ou ne l'utilisez
pas dans un endroit où la température
ambiante est inférieure à 0 °C.
• Suivez scrupuleusement les
instructions d'installation fournies avec
l'appareil.
• Vérifiez que l'appareil est installé sous
et à proximité de structures sûres.
2.2 Connexion électrique
AVERTISSEMENT!
Risque d'incendie ou
d'électrocution.
• L'appareil doit être relié à la terre.
• Vérifiez que les données électriques
figurant sur la plaque signalétique
correspondent à celles de votre
réseau. Si ce n'est pas le cas,
contactez un électricien.
• Utilisez toujours une prise de courant
de sécurité correctement installée.
• N'utilisez pas d'adaptateurs multiprises
ni de rallonges.
• Veillez à ne pas endommager la fiche
secteur ni le câble d'alimentation. Le
remplacement du cordon
d'alimentation de l'appareil doit être
effectué par notre service après-vente.
• Ne connectez la fiche d'alimentation
secteur à la prise de courant secteur
qu'à la fin de l'installation. Assurezvous que la fiche d'alimentation est
accessible une fois l'appareil installé.
• Ne tirez jamais sur le câble
d'alimentation électrique pour
débrancher l'appareil. Tirez toujours
sur la fiche.
• Cet appareil est conforme aux
directives CEE.
• Uniquement pour le R-U et l'Irlande.
L'appareil dispose d'une alimentation
Page 37

secteur de 13 A. S'il est nécessaire de
changer le fusible de la fiche électrique,
utilisez le fusible : 13 amp ASTA (BS
1362).
2.3 Raccordement à l'arrivée d'eau
• Veillez à ne pas endommager les
tuyaux de circulation d'eau.
• Avant de brancher l'appareil à des
tuyaux neufs ou n'ayant pas servi
depuis longtemps, laissez couler l'eau
jusqu'à ce qu'elle soit propre.
• Avant d'utiliser l'appareil pour la
première fois, assurez-vous de
l'absence de fuites.
• Le tuyau d'arrivée d'eau comporte une
vanne de sécurité et une gaine avec un
câble d'alimentation intérieur.
AVERTISSEMENT!
Tension dangereuse.
• Si le tuyau d'arrivée d'eau est
endommagé, débranchez
immédiatement la fiche de la prise
secteur. Contactez le service aprèsvente pour remplacer le tuyau d'arrivée
d'eau.
2.4 Utilisation
• Ne montez pas sur la porte ouverte de
votre appareil ; ne vous asseyez pas
dessus.
FRANÇAIS
• Les produits de lavage pour lavevaisselle sont dangereux. Suivez les
consignes de sécurité figurant sur
l'emballage du produit de lavage.
• Ne buvez pas l'eau de l'appareil ; ne
jouez pas avec.
• N'enlevez pas la vaisselle de l'appareil
avant la fin du programme. Il peut
rester du produit de lavage sur la
vaisselle.
• De la vapeur chaude peut s'échapper
de l'appareil si vous ouvrez la porte
pendant le déroulement d'un
programme.
• Ne placez pas de produits
inflammables ou d'éléments imbibés
de produits inflammables à l'intérieur
ou à proximité de l'appareil, ni sur
celui-ci.
2.5 Maintenance
• Contactez votre service après-vente
pour faire réparer l'appareil. N'utilisez
que des pièces de rechange d'origine.
• Avant de contacter le service, assurezvous de disposer des informations
suivantes (qui se trouvent sur la plaque
signalétique).
Modèle :
PNC :
Numéro de série :
2.6 Mise au rebut
AVERTISSEMENT!
Risque de blessure ou
d'asphyxie.
• Débranchez l'appareil de l'alimentation
électrique.
• Coupez le câble d'alimentation et
mettez-le au rebut.
• Retirez le dispositif de verrouillage de la
porte pour empêcher les enfants et les
animaux de s'enfermer dans l'appareil.
37
Page 38

5
4
8
10
9
11
67
12
2
3
1
www.electrolux.com38
3. DESCRIPTION DE L'APPAREIL
Plan de travail
1
Bras d'aspersion intermédiaire
2
Bras d'aspersion inférieur
3
Filtres
4
Plaque de calibrage
5
Réservoir de sel régénérant
6
Fente d'aération
7
Distributeur de liquide de rinçage
8
Distributeur de produit de lavage
9
Panier à couverts
10
Panier du bas
11
Panier du haut
12
Page 39

4. BANDEAU DE COMMANDES
1 2 3
456
FRANÇAIS
39
Voyant Marche/Arrêt
1
Indicateur de programme
2
Voyants
3
Touche Départ différé
4
4.1 Voyants
Voyant Description
Phase de lavage. Il s'allume au cours de la phase de lavage.
Phase de séchage. Il s'allume au cours de la phase de séchage.
Voyant de fin.
Voyant du réservoir de sel régénérant. Ce voyant est toujours éteint
pendant le déroulement du programme.
Voyant du réservoir de liquide de rinçage. Ce voyant est toujours éteint
pendant le déroulement du programme.
Touche Départ
5
Sélecteur de programme
6
Page 40

www.electrolux.com40
5. PROGRAMMES
Programme Degré de sal-
issure
Phases du programme
Valeurs de consommation
1)
Type de vaisselle
Durée
(min)
Consommation
Eau
(l)
électrique
(kWh)
2)
Normalement
sale
Vaisselle et
couverts
3)
Très sale
Vaisselle, couverts, plats et
casseroles
Normalement
sale
Vaisselle et
couverts
4)
Vaisselle
fraîchement salie
• Prélavage
• Lavage 50 °C
• Rinçages
• Séchage
• Prélavage
• Lavage 70 °C
• Rinçages
• Séchage
• Prélavage
• Lavage 65 °C
• Rinçages
• Séchage
• Lavage 60 °C
ou 65 °C
• Rinçages
195 1.039 11
140 - 160 1.3 - 1.5 13 - 15
100 - 120 1.2 - 1.5 15 - 17
30 0.9 9
Vaisselle et
couverts
5)
1)
Les valeurs de consommation peuvent changer en fonction de la pression et de la température de l'eau, des variations de l'alimentation électrique, de la quantité de vaisselle chargée
ainsi que des options sélectionnées.
2)
Ce programme vous permet d'optimiser votre consommation d'eau et d'énergie pour la
vaisselle et les couverts normalement sales. (Il s'agit du programme standard pour les instituts
de tests.)
3)
Ce programme comprend une phase de rinçage à haute température, pour des résultats
plus hygiéniques. Au cours de la phase de rinçage, la température reste à 70 °C pendant au
moins 10 minutes.
4)
Ce programme permet de laver une charge de vaisselle fraîchement salie. Il offre de bons
résultats de lavage en peu de temps.
5)
Ce programme permet de rincer rapidement la vaisselle. Cela empêche les restes de nourriture de coller sur la vaisselle et évite les mauvaises odeurs. N'utilisez pas de produit de lavage
avec ce programme.
Tous • Prélavage 14 0.1 4
5.1 Informations pour les instituts de test
Pour toute information relative aux
performances de test, envoyez un courrier
électronique à l'adresse :
info.test@dishwasher-production.com
Notez le numéro du produit (PNC) indiqué
sur la plaque signalétique.
Page 41

6. RÉGLAGES
FRANÇAIS
41
6.1 Mode Sélection de programme et mode utilisateur
Lorsque l'appareil est en mode Sélection
de programme, il est possible de régler un
programme et d'entrer en mode
utilisateur.
Dans le mode utilisateur, il est
possible de changer :
• Le niveau de l'adoucisseur d'eau en
fonction de la dureté de l'eau.
Ces réglages restent mémorisés tant
que vous ne les modifiez pas.
Comment accéder au mode de sélection du programme
L'appareil est en mode Programmation
lorsque le voyant Marche/Arrêt s'allume et
que le voyant Départ commence à
clignoter.
Lorsque vous allumez l'appareil, celui-ci se
trouve généralement en mode de
sélection du programme. Toutefois, si cela
Dureté de l'eau
Degrés alle-
mands (°dH)
47 - 50 84 - 90 8.4 - 9.0 58 - 63 10
43 - 46 76 - 83 7.6 - 8.3 53 - 57 9
37 - 42 65 - 75 6.5 - 7.5 46 - 52 8
29 - 36 51 - 64 5.1 - 6.4 36 - 45 7
23 - 28 40 - 50 4.0 - 5.0 28 - 35 6
19 - 22 33 - 39 3.3 - 3.9 23 - 27
15 - 18 26 - 32 2.6 - 3.2 18 - 22 4
11 - 14 19 - 25 1.9 - 2.5 13 - 17 3
4 - 10 7 - 18 0.7 - 1.8 5 - 12 2
<4 <7 <0.7 < 5
1)
Réglages d'usine.
2)
N'utilisez pas de sel à ce niveau.
Degrés fran-
çais (°fH)
n'est pas le cas, vous pouvez accéder au
mode de sélection du programme de la
façon suivante :
Appuyez simultanément sur les touches
Start et Delay et maintenez-les
enfoncées jusqu'à ce que l'appareil soit en
mode de sélection du programme.
6.2 Adoucisseur d'eau
L'adoucisseur d'eau élimine les minéraux
de l'arrivée d'eau qui pourraient avoir un
impact négatif sur les résultats de lavage
et sur l'appareil.
Plus la teneur en minéraux est élevée, plus
l'eau est dure. La dureté de l'eau est
mesurée en échelles d'équivalence.
L'adoucisseur doit être réglé en fonction
du degré de dureté de l'eau de votre
région. Votre compagnie des eaux peut
vous indiquer la dureté de l'eau dans votre
région. Il est important de régler
l'adoucisseur d'eau sur un niveau adéquat
pour vous garantir de bons résultats de
lavage.
mmol/l Degrés
Clarke
Réglage du ni-
veau de l'adou-
cisseur d'eau
1)
5
2)
1
Page 42

www.electrolux.com42
Réglage du niveau de l'adoucisseur d'eau
L'appareil doit être en mode
Programmation.
1. Assurez-vous que l'indicateur de
programme du sélecteur est aligné sur
le voyant Marche/Arrêt.
2. Pour entrer en mode utilisateur,
appuyez sur la touche Delay en la
maintenant enfoncée. Simultanément,
tournez le sélecteur vers la gauche
jusqu'à ce que l'indicateur de
programme soit aligné sur le premier
programme. Relâchez la touche
Delay lorsque les voyants Start et
Marche/Arrêt commencent à clignoter.
3. Appuyez sur la touche Delay.
4. Appuyez sur la touche Delay à
5. Tournez le sélecteur sur la position
7. AVANT LA PREMIÈRE UTILISATION
1. Assurez-vous que le réglage
actuel de l'adoucisseur d'eau est
compatible avec la dureté de
l'arrivée d'eau. Si ce n'est pas le
cas, réglez le niveau de
l'adoucisseur d'eau.
2. Remplissez le réservoir de sel
régénérant.
3. Remplissez le distributeur de liquide
de rinçage.
4. Ouvrez le robinet d'eau.
5. Lancez un programme pour éliminer
tous les résidus qui peuvent toujours
se trouver à l'intérieur de l'appareil.
N'utilisez pas de produit de lavage et
ne chargez pas les paniers.
Lorsque vous démarrez un programme,
l'appareil peut prendre 5 minutes pour
recharger la résine dans l'adoucisseur
d'eau. Pendant ce temps, l'appareil
semble ne pas fonctionner. La phase de
lavage ne démarre qu'une fois cette
procédure achevée. La procédure sera
répétée régulièrement.
7.1 Réservoir de sel régénérant
Le sel permet de recharger la résine dans
l'adoucisseur d'eau et de garantir de bons
résultats de lavage en utilisation
quotidienne.
Remplissage du réservoir de sel régénérant
1. Tournez le couvercle du réservoir de
2. Versez 1 litre d'eau dans le réservoir
3. Remplissez le réservoir avec du sel
• Le voyant commence à
clignoter.
• Les voyants Start et Marche/Arrêt
continuent à clignoter.
• Le nombre de clignotements de
indique le niveau actuellement
réglé. Par exemple,
5 clignotements + pause +
5 clignotements = niveau 5.
plusieurs reprises pour modifier le
réglage. Le niveau augmente à
chaque fois que vous appuyez sur la
touche Delay. Une fois le niveau 10
atteint, vous revenez au niveau 1.
Marche/Arrêt pour confirmer le
réglage.
sel régénérant vers la gauche et
retirez-le.
de sel régénérant (uniquement la
première fois).
régénérant.
ATTENTION!
Utilisez uniquement du sel
régénérant conçu pour les
lave-vaisselle.
4. Enlevez le sel qui se trouve autour de
l'ouverture du réservoir de sel
régénérant.
Page 43

5. Tournez le couvercle du réservoir de
A
B
D
C
M
A
X
1
2
3
4
+
-
A
B
D
C
sel régénérant vers la droite pour
refermer le réservoir.
De l'eau et du sel peuvent
sortir du réservoir de sel
régénérant lorsque vous le
remplissez. Risque de
corrosion. Afin d'éviter cela,
après avoir rempli le réservoir
de sel régénérant, démarrez
un programme.
7.2 Comment remplir le distributeur de liquide de rinçage
FRANÇAIS
ATTENTION!
Utilisez uniquement du liquide
de rinçage spécialement
conçu pour les lave-vaisselle.
1. Appuyez sur le bouton d'ouverture (D)
pour ouvrir le couvercle (C).
2. Versez le liquide de rinçage dans le
distributeur (A) jusqu'à ce qu'il
atteigne le niveau « max ».
3. Si le liquide de rinçage déborde,
épongez-le avec un chiffon absorbant
pour éviter tout excès de mousse.
4. Fermez le couvercle. Assurez-vous
que le bouton d'ouverture se verrouille
correctement.
Vous pouvez tourner le
sélecteur de quantité délivrée
(B) entre la position 1
(quantité minimale) et la
position 4 ou 6 (quantité
maximale).
43
8. UTILISATION QUOTIDIENNE
1. Ouvrez le robinet d'eau.
2. Tournez le sélecteur jusqu'à ce que
l'indicateur de programme soit aligné
sur le programme souhaité. Réglez le
programme adapté au type de
vaisselle et au degré de salissure.
• Si le voyant du réservoir de sel
régénérant est allumé, remplissez
le réservoir.
• Si le voyant du liquide de rinçage
est allumé, remplissez le
distributeur de liquide de rinçage.
3. Chargez les paniers.
4. Ajoutez le produit de lavage.
5. Lancez le programme.
Page 44

30
20
A BD
C
20
30
B
A D
C
www.electrolux.com44
8.1 Utilisation du produit de lavage
1. Appuyez sur le bouton d'ouverture (B)
pour ouvrir le couvercle (C).
2. Versez le produit de lavage, en poudre
ou en tablette, dans le compartiment
(A).
3. Si le programme comporte une phase
de prélavage, versez une petite
quantité de produit de lavage dans le
compartiment (D).
4. Fermez le couvercle. Assurez-vous
que le bouton d'ouverture se verrouille
correctement.
8.2 Utilisation de pastilles de
détergent multifonctions
Si vous utilisez des pastilles qui
contiennent du sel régénérant et du liquide
de rinçage, ne remplissez pas le réservoir
de sel régénérant ni le distributeur de
liquide de rinçage.
1. Réglez l'adoucisseur d'eau au niveau
minimal.
2. Réglez le distributeur de liquide de
rinçage sur le niveau le plus faible.
8.3 Réglage et départ d'un programme
Départ d'un programme
1. Ouvrez le robinet d'eau.
2. Fermez la porte de l'appareil.
3. Tournez le sélecteur jusqu'à ce que
l'indicateur de programme soit aligné
sur le programme souhaité.
• Le voyant Marche/Arrêt s'allume.
• Le voyant Départ commence à
clignoter.
4. Appuyez sur la touche Start.
• Le programme démarre et le
voyant de la phase de lavage
s'allume.
• Les voyants Marche/Arrêt et
Départ s'allument.
Démarrage d'un programme avec départ différé
1. Sélectionnez le programme.
2. Appuyez sur la touche Delay pour
retarder le début du programme de
3 heures.
Le voyant du départ différé s'allume.
3. Appuyez sur la touche Start.
Le voyant Départ s'allume.
Lorsque le décompte est terminé, le
programme démarre.
Ouverture de la porte au cours du fonctionnement de l'appareil
Si vous ouvrez la porte lorsqu'un
programme est en cours, l'appareil
s'arrête. Lorsque vous refermez la porte,
l'appareil reprend là où il a été interrompu.
Annulation du départ différé au cours du décompte
1. Appuyez sur les touches Start et
Delay en les maintenant enfoncées
jusqu'à ce que le voyant Départ
clignote.
2. Appuyez sur la touche Start pour
lancer le programme.
Page 45

Annulation du programme
Appuyez sur les touches Start et Delay
en les maintenant enfoncées jusqu'à ce
que le voyant Départ clignote.
Assurez-vous que le distributeur de
produit de lavage n'est pas vide avant de
démarrer un nouveau programme de
lavage.
Fin du programme
Lorsque le programme est terminé, le
voyant est allumé. Si vous n'éteignez
9. CONSEILS
FRANÇAIS
pas l'appareil au bout de 5 minutes, tous
les voyants s'éteignent. Cela permet de
diminuer la consommation d'énergie.
1. Pour éteindre l'appareil, tournez le
sélecteur jusqu'à ce que l'indicateur
de programme soit aligné sur le
voyant Marche/Arrêt.
2. Fermez le robinet d'eau.
45
9.1 Raccordement
Les conseils suivants vous garantissent
des résultats de lavage et de séchage
optimaux au quotidien, et vous aideront à
protéger l'environnement.
• Videz les plus gros résidus alimentaires
des plats dans une poubelle.
• Ne rincez pas vos plats à la main au
préalable. En cas de besoin, utilisez le
programme de prélavage (si disponible)
ou sélectionnez un programme avec
une phase de prélavage.
• Utilisez toujours tout l'espace des
paniers.
• Lorsque vous chargez l'appareil, veillez
à ce que l'eau libérée par les embouts
des bras d'aspersion puisse atteindre
parfaitement les plats pour qu'ils soient
parfaitement lavés. Vérifiez que les
plats ne se touchent pas ou ne se
recouvrent pas les uns les autres.
• Vous pouvez utiliser du détergent, du
liquide de rinçage et du sel régénérant
séparément, ou des pastilles tout en 1
(par ex. « 3 en 1 », « 4 en 1 » ou « tout
en 1 »). Suivez les instructions
indiquées sur l'emballage.
• Sélectionnez le programme en fonction
du type de vaisselle et du degré de
salissure. Le programme ECO vous
permet d'optimiser votre
consommation d'eau et d'énergie pour
la vaisselle et les couverts normalement
sales.
9.2 Utilisation de sel régénérant, de liquide de rinçage et de produit de lavage
• Utilisez uniquement du sel régénérant,
du liquide de rinçage et du produit de
lavage conçus pour les lave-vaisselle.
D'autres produits peuvent
endommager l'appareil.
• Les pastilles tout en 1 sont
généralement adaptées aux régions où
la dureté de l'eau est inférieure à
21 °dH. Dans les régions où la dureté
dépasse cette limite, du liquide de
rinçage et du sel régénérant doivent
être utilisés en complément des
pastilles tout en 1. Cependant, dans
les régions où l'eau est dure ou très
dure, nous recommandons l'utilisation
séparée d'un détergent simple
(poudre, gel, pastille, sans fonction
supplémentaire), de liquide de rinçage
et de sel régénérant pour des résultats
de lavage et de séchage optimaux.
• Si vous utilisez des pastille tout en 1,
vous pouvez sélectionner l'option
Multitab (si disponible). Cette option
améliore les résultats de lavage et de
séchage avec l'utilisation de pastilles
tout en 1.
• Les tablettes de détergent ne se
dissolvent pas complètement durant
les programmes courts. Pour éviter
que des résidus de produit de lavage
ne se déposent sur la vaisselle, nous
recommandons d'utiliser des pastilles
Page 46

www.electrolux.com46
de détergent avec des programmes
longs.
• N'utilisez que la quantité nécessaire de
produit de lavage. Reportez-vous aux
instructions figurant sur l'emballage du
produit de lavage.
9.3 Que faire si vous ne voulez
plus utiliser de pastilles de
détergent multifonctions
Avant de commencer à utiliser du produit
de lavage, du sel régénérant et du liquide
de rinçage séparément, effectuez la
procédure suivante :
1. Réglez l'adoucisseur d'eau au niveau
maximal.
2. Assurez-vous que le réservoir de sel
régénérant et le distributeur de liquide
de rinçage sont pleins.
3. Lancez le programme le plus court
avec une phase de rinçage. N'utilisez
pas de produit de lavage et ne
chargez pas les paniers.
4. Lorsque le programme de lavage est
terminé, réglez l'adoucisseur d'eau en
fonction de la dureté de l'eau dans
votre région.
5. Ajustez la quantité de liquide de
rinçage libérée.
9.4 Chargement des paniers
• Utilisez uniquement cet appareil pour
laver des articles qui peuvent passer au
lave-vaisselle.
• Ne mettez pas dans le lave-vaisselle
des articles en bois, en corne, en
aluminium, en étain et en cuivre.
• Ne placez pas dans l'appareil des
objets pouvant absorber l'eau
(éponges, chiffons de nettoyage).
• Retirez les gros résidus alimentaires
des plats et jetez-les à la poubelle.
• Laissez tremper les casseroles
contenant des restes d'aliments brûlés.
• Chargez les articles creux (tasses,
verres et casseroles) en les retournant.
• Vérifiez que les verres ne se touchent
pas pour éviter qu'ils ne se brisent.
• Placez les petits articles dans le panier
à couverts.
• Placez les objets légers dans le panier
supérieur. Disposez-les de façon à ce
qu'ils ne puissent pas se retourner.
• Assurez-vous que les bras d'aspersion
tournent librement avant de lancer un
programme.
9.5 Avant le démarrage d'un
programme
Assurez-vous que :
• Les filtres sont propres et correctement
installés.
• Le bouchon du réservoir de sel
régénérant est vissé.
• Les bras d'aspersion ne sont pas
obstrués.
• Vous avez utilisé du sel régénérant et
du liquide de rinçage (sauf si vous
utilisez des pastilles tout en 1).
• La vaisselle est bien positionnée dans
les paniers.
• Le programme est adapté au type de
vaisselle et au degré de salissure.
• Vous utilisez la bonne quantité de
produit de lavage.
9.6 Déchargement des paniers
1. Attendez que la vaisselle refroidisse
avant de la retirer du lave-vaisselle. La
vaisselle encore chaude est sensible
aux chocs.
2. Déchargez d'abord le panier inférieur,
puis le panier supérieur.
À la fin du programme, les
côtés et la porte de l'appareil
peuvent être mouillés.
Page 47

10. ENTRETIEN ET NETTOYAGE
C
B
A
AVERTISSEMENT!
Avant toute opération
d'entretien, éteignez l'appareil
et débranchez la fiche de la
prise secteur.
Les filtres sales et les bras
d'aspersion obstrués
diminuent les résultats de
lavage. Contrôlez-les
régulièrement et nettoyez-les
si nécessaire.
10.1 Nettoyage des filtres
Le système de filtres est composé de
3 parties.
FRANÇAIS
2. Retirez le filtre (C) du filtre (B).
3. Retirez le filtre plat (A).
4. Lavez les filtres.
47
1. Tournez le filtre (B) vers la gauche et
sortez-le.
5. Assurez-vous qu'il ne reste aucun
résidu alimentaire ni salissure à
l'intérieur ou autour du bord du
collecteur d'eau.
6. Remettez le filtre plat (A) en place.
Assurez-vous qu'il est correctement
positionné sous les 2 guides.
Page 48

www.electrolux.com48
7. Remontez les filtres (B) et (C).
8. Remettez le filtre (B) dans le filtre plat
(A). Tournez-le vers la droite jusqu'à la
butée.
10.2 Nettoyage des bras d'aspersion
Ne retirez pas les bras d’aspersion. Si des
résidus ont bouché les orifices des bras
d'aspersion, éliminez ceux-ci à l'aide d'un
objet fin et pointu.
10.3 Nettoyage extérieur
• Nettoyez l'appareil avec un chiffon
doux humide.
• Utilisez uniquement des produits de
lavage neutres.
• N'utilisez pas de produits abrasifs, de
tampons à récurer ni de solvants.
10.4 Nettoyage intérieur
• Nettoyez soigneusement l'appareil, y
compris le joint caoutchouc du hublot
avec un chiffon doux humide.
• Si vous utilisez régulièrement des
programmes de courte durée, des
dépôts de graisse et des dépôts
calcaires peuvent se former à l'intérieur
de l'appareil. Pour éviter cela, nous
recommandons de lancer un
programme long au moins 2 fois par
mois.
ATTENTION!
Une position incorrecte des
filtres peut donner de
mauvais résultats de lavage
et endommager l'appareil.
11. DÉPANNAGE
Si l'appareil ne démarre pas ou s'arrête en
cours de fonctionnement, avant de
contacter le service après-vente, vérifiez
d'abord si vous ne pouvez pas résoudre le
problème vous même à l'aide des
informations du tableau.
Problème et code d'alarme Solution possible
L'appareil ne s'allume pas. • Assurez-vous que la fiche du câble d'alimen-
Dans certains cas, le voyant de fin clignote
pour indiquer un dysfonctionnement.
tation est bien insérée dans la prise de courant.
• Assurez-vous qu'aucun fusible n'a disjoncté
dans la boîte à fusibles.
Page 49

FRANÇAIS
Problème et code d'alarme Solution possible
Le programme ne démarre pas. • Vérifiez que le hublot de l'appareil est fermé.
• Appuyez sur la touche Start.
• Si le départ différé est sélectionné, annulez la
sélection ou attendez la fin du décompte.
• L'appareil a lancé la procédure de rechargement de la résine dans l'adoucisseur d'eau.
La durée de cette procédure est d'environ
5 minutes.
L'appareil n'est pas approvisionné en
eau.
• Le voyant de fin clignote 1 fois, de
façon intermittente.
• Le voyant Start clignote de façon
continue.
• Assurez-vous que le robinet d'eau est ouvert.
• Assurez-vous que la pression de l'eau n'est
pas trop faible. Pour connaître cette information, contactez votre compagnie locale de
distribution des eaux.
• Assurez-vous que le robinet d'arrivée d'eau
n'est pas obstrué.
• Assurez-vous que le filtre du tuyau d'arrivée
d'eau n'est pas obstrué.
• Assurez-vous que le tuyau d'arrivée d'eau
n'est pas plié ou tordu.
L'appareil ne vidange pas.
• Le voyant de fin clignote 2 fois, de
façon intermittente.
• Le voyant Start clignote de façon
• Assurez-vous que le siphon de l'évier n'est
pas bouché.
• Assurez-vous que le tuyau de vidange n'est
pas tordu ni plié.
continue.
Le système de sécurité anti-débordement s'est déclenché.
• Fermez le robinet d'eau et contactez votre
service après vente.
• Le voyant de fin clignote 3 fois, de
façon intermittente.
• Le voyant Start clignote de façon
continue.
49
Une fois que vous avez contrôlé l'appareil,
appuyez sur Start. Si le problème
persiste, contactez le service après-vente.
Si des codes d'alarme non décrits dans le
tableau fourni s'affichent, contactez le
service après-vente.
11.1 Les résultats de lavage et de séchage ne sont pas satisfaisants
Problème Solution possible
Traînées blanchâtres ou pellicules bleuâtres sur les verres
et la vaisselle.
Taches et traces de gouttes
d'eau séchées sur les verres
et la vaisselle.
• La quantité de liquide de rinçage libérée est trop importante. Placez le sélecteur de dosage du liquide de
rinçage sur un niveau plus faible.
• La quantité de produit de lavage est excessive.
• La quantité de liquide de rinçage libérée n'est pas
suffisante. Placez le sélecteur de dosage du liquide
de rinçage sur un niveau plus élevé.
• Il se peut que la qualité du liquide de rinçage soit en
cause.
Page 50

www.electrolux.com50
Problème Solution possible
La vaisselle est mouillée. • Le programme ne comprend pas de phase de séch-
age ou inclut une phase de séchage à basse température.
• Le distributeur de liquide de rinçage est vide.
• Il se peut que la qualité du liquide de rinçage soit en
cause.
Pour trouver d'autres causes
possibles, reportez-vous au
chapitre « Conseils ».
12. CARACTÉRISTIQUES TECHNIQUES
Dimensions Largeur / hauteur / profon-
600 / 850 / 625
deur (mm)
Tension (V) 220 - 240
Branchement électrique
1)
Fréquence (Hz) 50
Pression de l'arrivée d'eau Min. / max. bar (MPa) 0.5 (0.05) / 8 (0.8)
Arrivée d'eau Eau froide ou eau
2)
chaude
max. 60 °C
Capacité Couverts 13
Consommation électrique Mode « Veille » (W) 0.50
Consommation électrique Mode « Éteint » (W) 0,50
1)
Reportez-vous à la plaque signalétique pour les autres valeurs.
2)
Si l'eau chaude est produite à partir de sources d'énergie respectueuses de l'environnement (par exemple, panneaux solaires ou énergie éolienne), utilisez une arrivée d'eau chaude
afin de réduire la consommation d'énergie.
13. EN MATIÈRE DE PROTECTION DE L'ENVIRONNEMENT
Recyclez les matériaux portant le symbole
. Déposez les emballages dans les
conteneurs prévus à cet effet. Contribuez
à la protection de l'environnement et à
votre sécurité, recyclez vos produits
électriques et électroniques. Ne jetez pas
les appareils portant le symbole avec
les ordures ménagères. Emmenez un tel
produit dans votre centre local de
recyclage ou contactez vos services
municipaux.
*
Page 51

FRANÇAIS
51
Page 52

www.electrolux.com/shop
100001330-A-352014
 Loading...