

Page 1
Page 2

- 2 -
Contents
For the User
Safety information 3
Description of the appliance 4
- Rinse conditioner dispenser
- Spray arm
- Coarse filter
- Fine filter
- Detergent dispenser
Controls and programme table 5
- Consumption
Loading 6
- How to load the dishes
- Instruction for test centres
Using the appliance 7
- Starting the programme
In the event of a fault 8
Service 9
- Service and spare parts
For the Installer
Technical specifications 9
Unpacking 10
- Damages
- Use
- Building-in
- Protecting the machine against freezing
Installation 11
- Positioning
- Water supply
- Discharge connection
- Electrical connection
Guide to use the instruction book
The following symbols will be found in the text to guide you throughout the instructions:
Safety instructions
Step by step instructions
Hints and tips
Environmental information
Page 3
- 3 -
822 61 11-43
Installation and servicing
● All installation and service work done on the product
must be carried out by a qualified technician. Work
performed by persons with inadequate knowledge may
adversely affect the satisfactory functioning of the
product and may cause personal injury or damage.
Before any work is carried out on the dishwasher, it must
be isolated from the electrical supply, by unplugging
the power cord or removing the fuse.
● Water connection shall be made via an easily accessible
stopcock.
● The power cord must be plugged into an earthed
socket, which need to be easily accessible. Permanent
installation must only be carried out by an authorised
electrician.
● If the power cord is damaged, it must be replaced
by a special cord or assembly available from the
manufacturer or its service agent.
● Make sure that the power cord is not nipped or otherwise
damaged and that the hoses do not get crushed or
kinked when moving the dishwasher in connection
with installation or cleaning etc.
● Our approved build-in kit must be used if the dishwasher
is to be built into the kitchen furnishings.
● Servicing and possible repairs must be carried out by
a service company authorised by the manufacturer.
Use only spare parts supplied by these. Never try to
repair the dishwasher yourself.
Child Safety
● The dishwasher should be used by adults only. Do not
let children play with the controls or other parts of it.
● Remember that the plastic bags included in the
packaging can be fatal playthings for small children.
● Keep all detergents in safe place out of children´s
reach.
● Prevent children from sitting, swinging or standing
on the open door.
During Use
● This dishwasher is designed solely for washing house-
hold utensils suitable for machine washing. Using it for
other purposes could lead to physical injury or damage
to property and invalidate the guarantee.
● Avoid opening the door while the dishwasher is running,
as hot steam may escape.
● Only use detergent specifically designed for use in
dishwashers.
● Do not place sharp knives with their points upwards.
It is much safer to lay them horizontally in the basket.
● Ensure that the door of the dishwasher is always closed
when it is not being loaded or unloaded. In this way you
will avoid anybody injuring themselves on the open
door, if the dishwasher is placed under the worktop.
● If you take any dishes out of the machine before the
end of the dishwashing cycle, it is extremely important
to rinse them thoroughly under running water to remove
any remaining detergent.
● In the event of flooding or leakage, shut off the water
supply immediately by closing the stopcock and disconnect the power supply by unplugging the power cord
or removing the fuse. When removing the electrical
plug, grip the plug, not the lead.
● There is always a certain risk of leakages in any machine
connected to a water supply, no matter what water safety
features it may have. Therefore it is advisable always to
turn off the water supply tap when the machine is not in use.
Disposal
- packaging:
All materials used in packaging this appliance are
environmentally-friendly. The various plastics used
are identified and can be recycled:
● PE stands for polyethylene, which is used for the
bag around the appliance and the bag in which these
instructions were supplied.
● PS stands for polystyrene (moulded), which is used
for the sections of packaging needed to cushion the
appliance.
The cardboard components of the packaging are made
from recyclable paper and should be taken to a collection
point for recycling.
- old apparatus:
The symbol on the product or on its packaging indicates
that this product may not be treated as household waste.
Instead it shall be handed over to the applicable collection
point for the recycling of electrical and electronic equipment.
By ensuring this product is disposed of correctly, you will
help prevent potential negative consequences for the
environment and human health, which could otherwise be
caused by inappropriate waste handling of this product.
For more detailed information about recycling of this product,
please contact your local city office, your household waste
disposal service or the shop where you purchased the
product.
Safety information
Before installing and first using the dishwasher, read this instruction booklet carefully, including its
hints and warnings. To avoid unnecessary mistakes and accidents, it is important to ensure that all
people using the dishwasher are thoroughly familiar with its operation and safety features.
Save these instructions and make sure they remain with the dishwasher if it is moved or sold, so
that everyone using it through its life can be properly informed on appliance use and safety.
Page 4
- 4 -
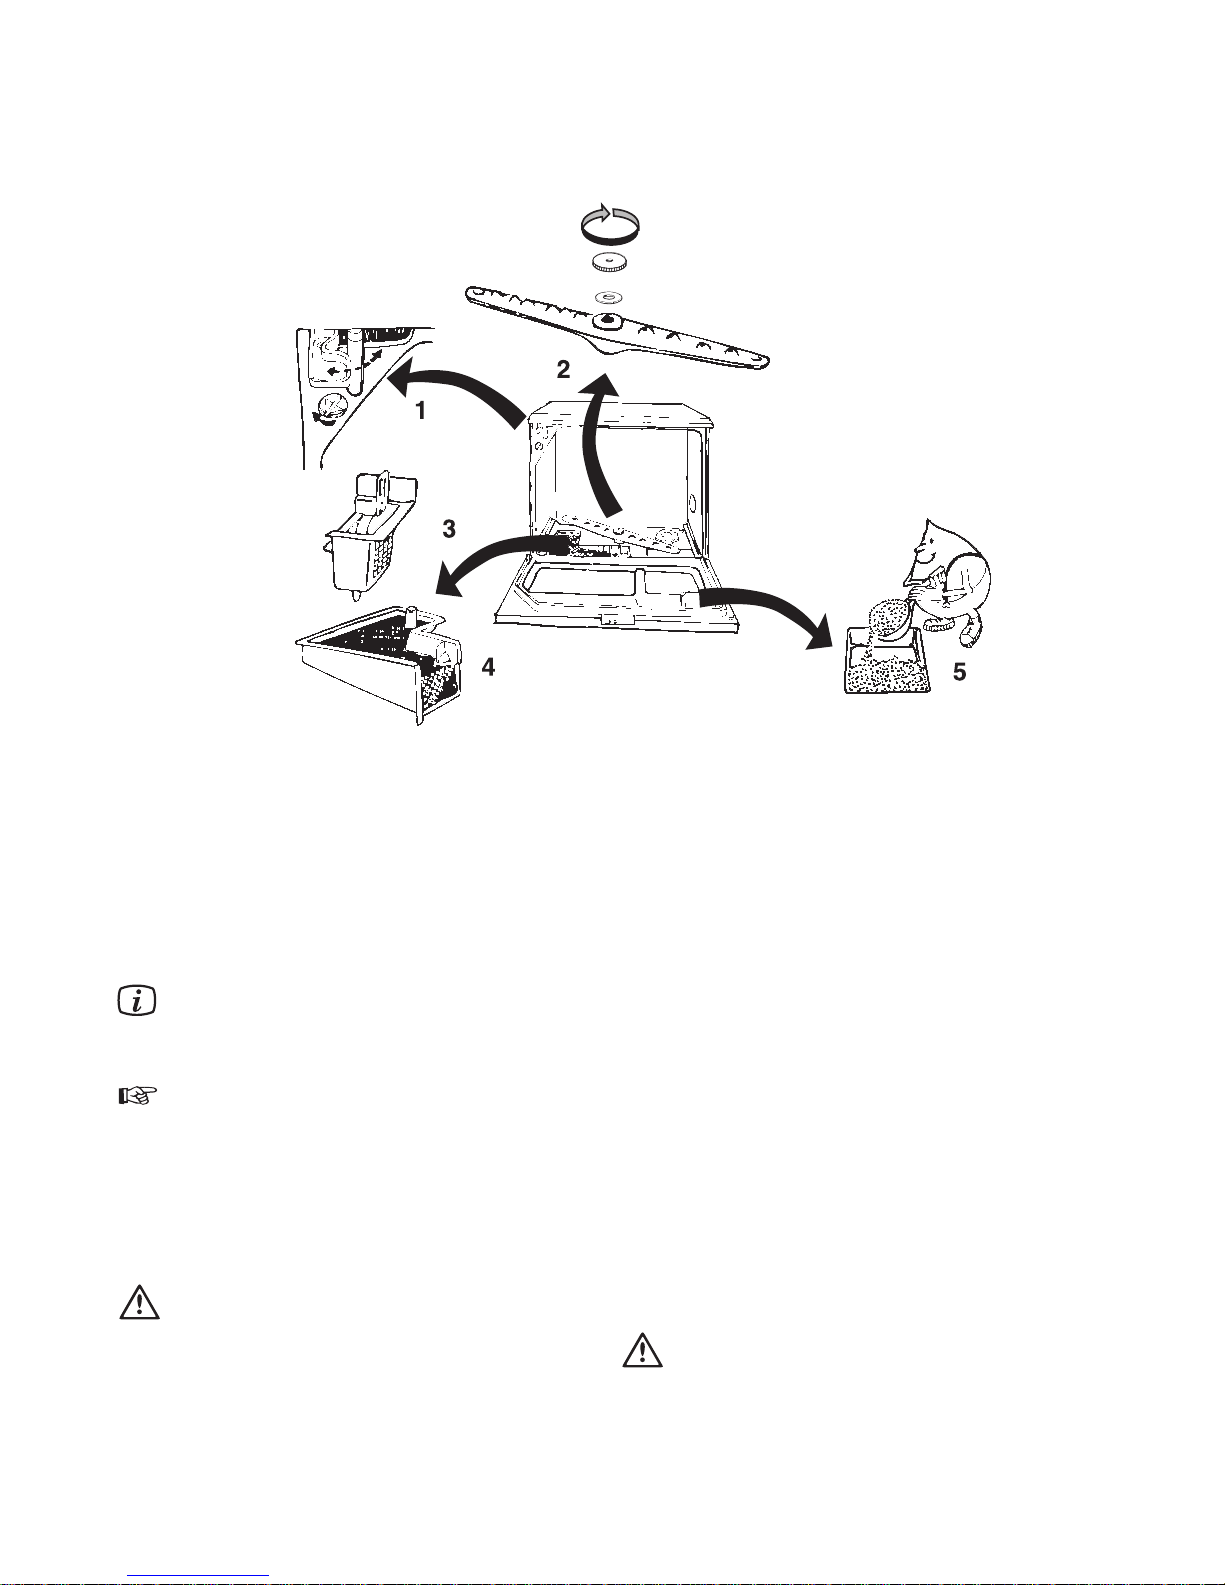
Rinse conditioner dispenser 1
Use of a rinse conditioner will result in cleaner and faster
drying of the load, since it helps water to run off. Too
much conditioner may result in streakiness, too little may
cause white spots. The dispenser holds about 140 ml. This
is enough for 40-70 wash cycles, depending on the dosage setting. When the rinse conditioner level is approaching the bottom of the scale it is time to refill the dispenser.
Adjust the dosage setting according to the hardness if the water. Begin with the lowest dosage
setting and increase as necessary by turning the
arrow clockwise.
1. Swivel out the filler trough.
2. Fill up with rinse conditioner until the level reaches
up to the red mark on the level indicator tube; do
not overfill.
3. Wipe off any spillage carefully to prevent excessive
foaming during the next wash programme.
4. Close the filler trough afterwards.
Do not fill the rinse aid dispenser with liquid
detergent.
Spray arm 2
It is important to keep all the holes in the spray arm clear.
A clogged hole can seriously affect washing efficiency. If
the spray arm needs cleaning, unscrew the nut clockwise,
remove the washer and lift off the spray arm. Clear the
holes and shake out any food remnants.
Coarse filter 3
The purpose of the coarse filter is to catch large objects
such as toothpicks and pieces of eggshell. Make sure that
the filter is always clean. Lift it out and rinse it under running water whenever necessary.
Fine filter 4
It is just as important to keep this filter clean. A dirty or
clogged filter will always impair washing efficiency. The
fine filter can easily be lifted out for cleaning when you
have removed the coarse filter.
Detergent dispenser 5
Pour the detergent into the compartment, for a normal load
about 1-2 tablespoons.
Only use detergents specially designed for
dishwashers.
Description of the appliance
Page 5
- 5 -
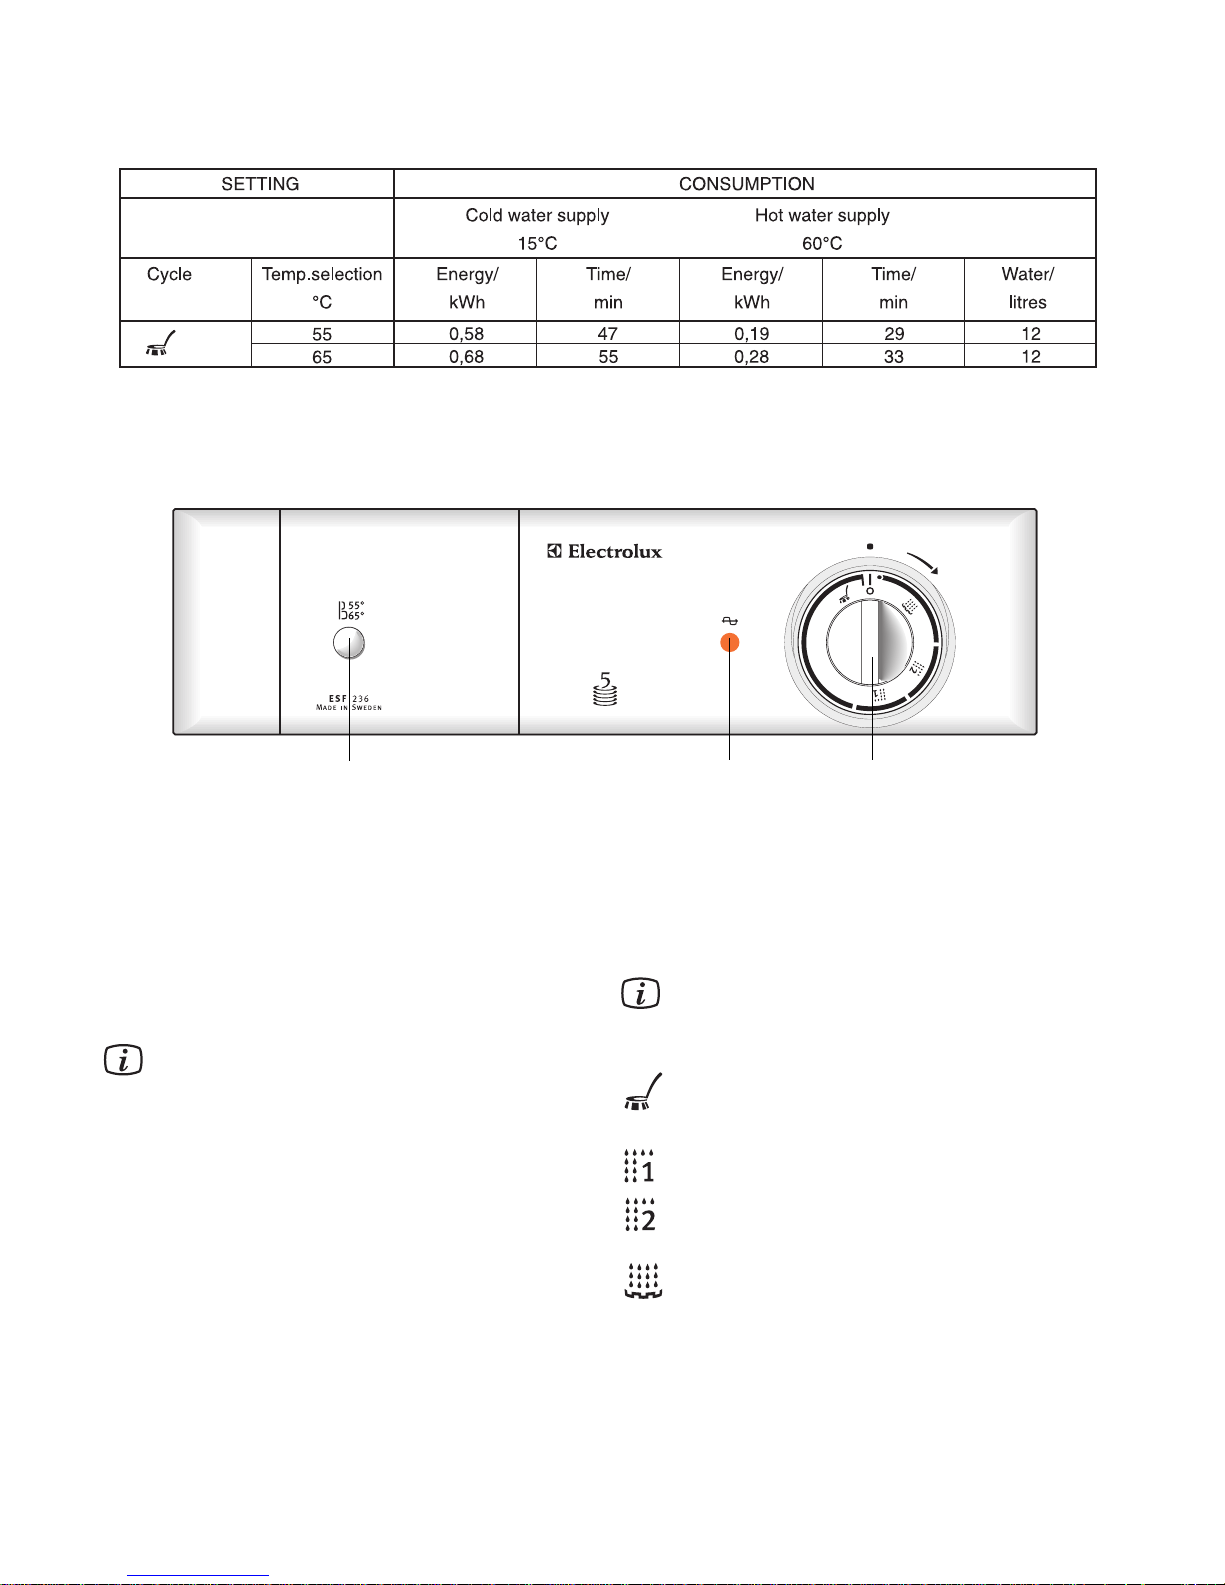
The control panel and programme table
1 Programme selector/On/off switch
To start the machine turn the selector knob to the
programme start. The ON/OFF switch is built into
the programme selector. To isolate the dishwasher
from the mains completely, unplug it from the wall
socket.
During the water heating process, the timer is
standing still.
2 Indicator lamp
The lamp indicates that the wash cycle is on and
goes out when the machine has completed the cycle.
4 Temperature selector
55° - Button in
65° - Button out
Door lock
Press the handle down and open the door. Avoid opening
the door while the machine is running.
If the door is opened and is put standing ajar after
a completed programme the dishes will dry faster.
Wash cycle
Rinses
Rinse with heat
- All figures are nominal and vary for example due to temperature variations on the inlet water.
- The figures apply to washing up 5 place settings according to test standard EN 50242.
21
3
Page 6
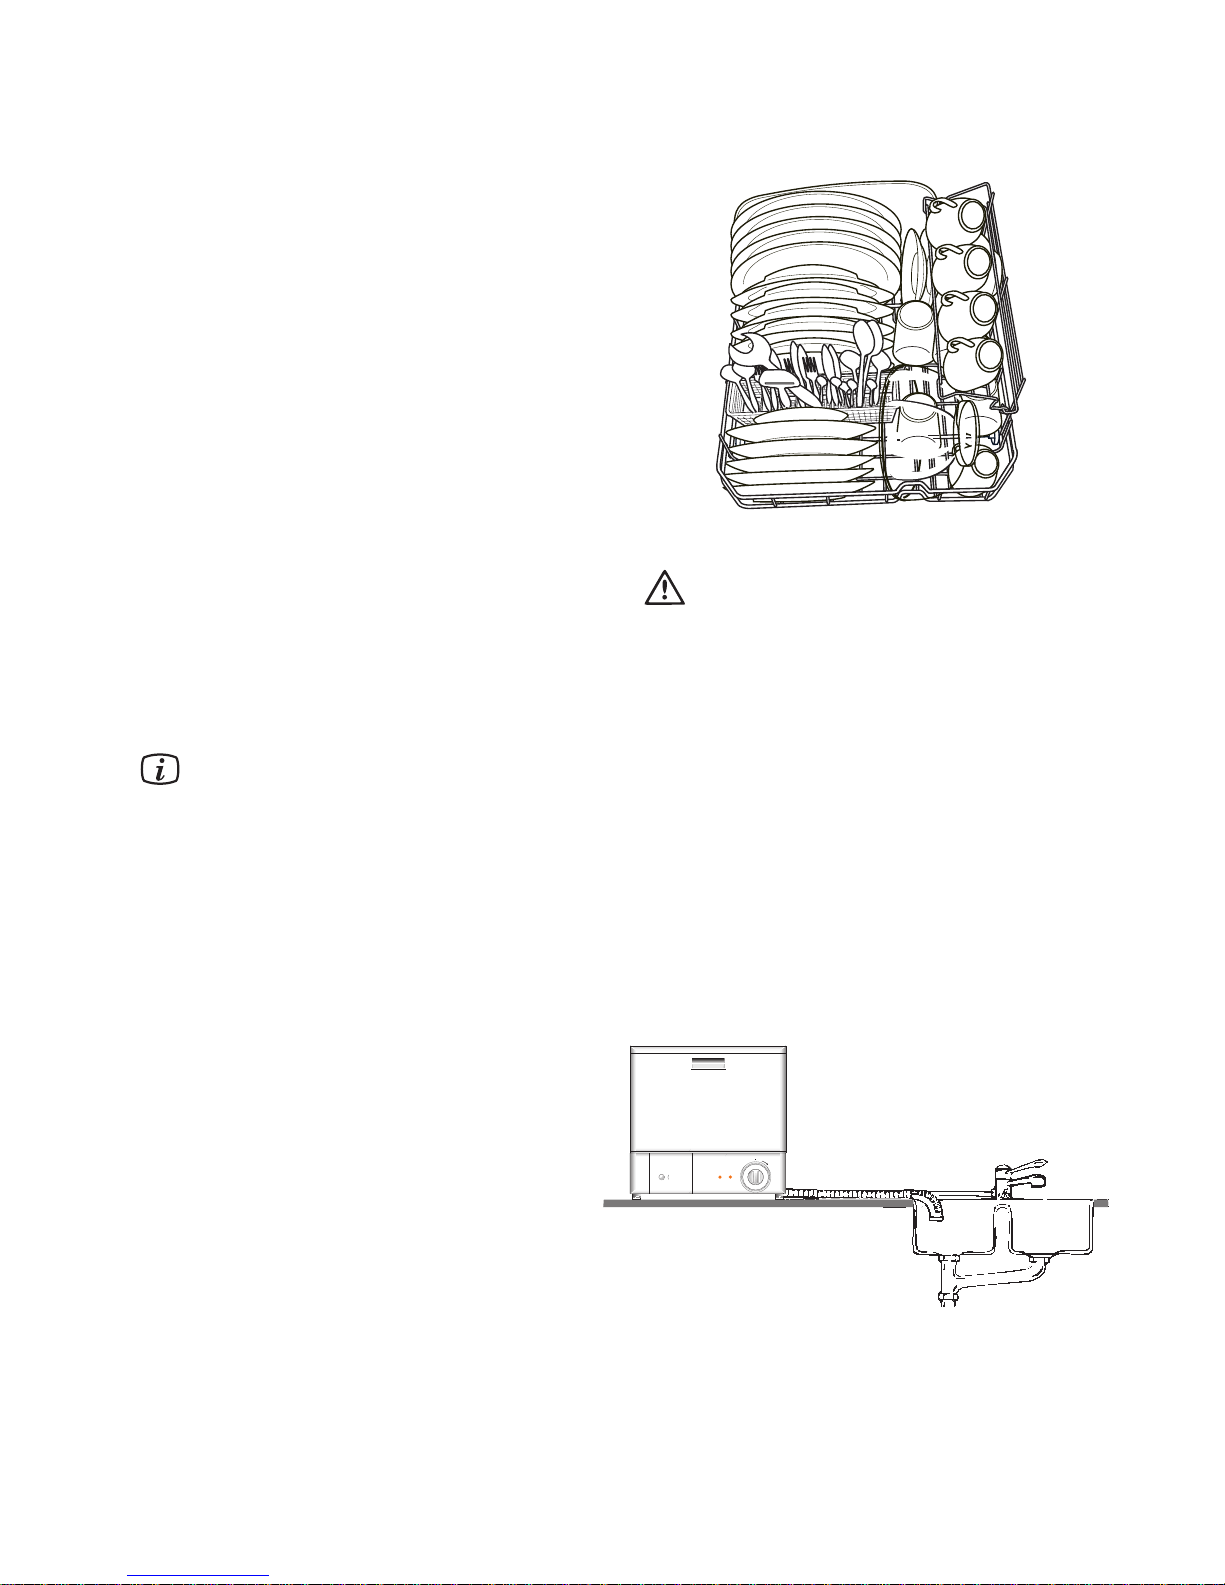
How to load the dishes
The illustration shows the dishwasher loaded with 5 place
settings. Your own dishes are not likely to be identical to
this load, but if you follow the advices below we are sure
you will be pleased with the result.
● Always place glasses, cups and bowls upside down.
● Incline deep dishes (soup plates etc.) so that the
water can run off when drying.
● Make sure that the dishes do not rest against each
other. This is particularly important in regard to the
cutlery basket - nested spoons, etc. simply cannot be
properly washed. The water must get at all the soiled
surfaces.
● Make sure that cutlery with slender handles and other
items do not protrude through the openings in the
basket and prevent the spray arm from rotating.
● Never put silver and stainless steel objects together.
When these metals come into contact with each other
a chemical reaction occurs which stains the silver.
● China with a pattern applied on top of the glaze may
not be suitable for machine washing as the colours
may fade and lose their lustre. The same applies to
cutlery with wooden or plastic handles.
Make sure you always buy articles that are dishwasher proof.
● Silver and aluminum items tend to be discolour when
washed. Food remnants from egg and mustard often
causes discolourations and stains on silver. Make sure
to rinse off and remove food remnants on silver if it is
not washed immediately after it has been used.
● Not all plastic articles are machine washable. If you
are in doubt as to whether your plasticware can be
machine washed, we suggest you check by washing
a single item or else wash them by hand.
● When washing delicate items, select the lower wash
temperature.
● Substances such as ketchup containing strong colouring
agents can cause temporary discolouration to the
interior of the dishwasher.
Do not place sharp knives with their points
upwards. It is much safer to lay them horizontally in the main basket.
- 6 -
Instruction for verification tests
Test standard: EN 50242
Rated capacity: 5 place settings
Loading of basket: see figure 1
Test program: dish programme 65° C
Detergent (IEC type B): 15 gram in the dispenser
Rinse aid (type III): setting medium
Feed water pressure: minimum 0,8 bar, maximum 10 bar
Waste water outlet: install according to figure 2
The salt container and rinse aid dispenser shall be filled in accordance with this instruction manual.
Before conducting the measurements the dishwasher shall be operated for one or two complete cycles using detergent
and a clean load.
1
Loading
2
Page 7
- 7 -
Using the appliance
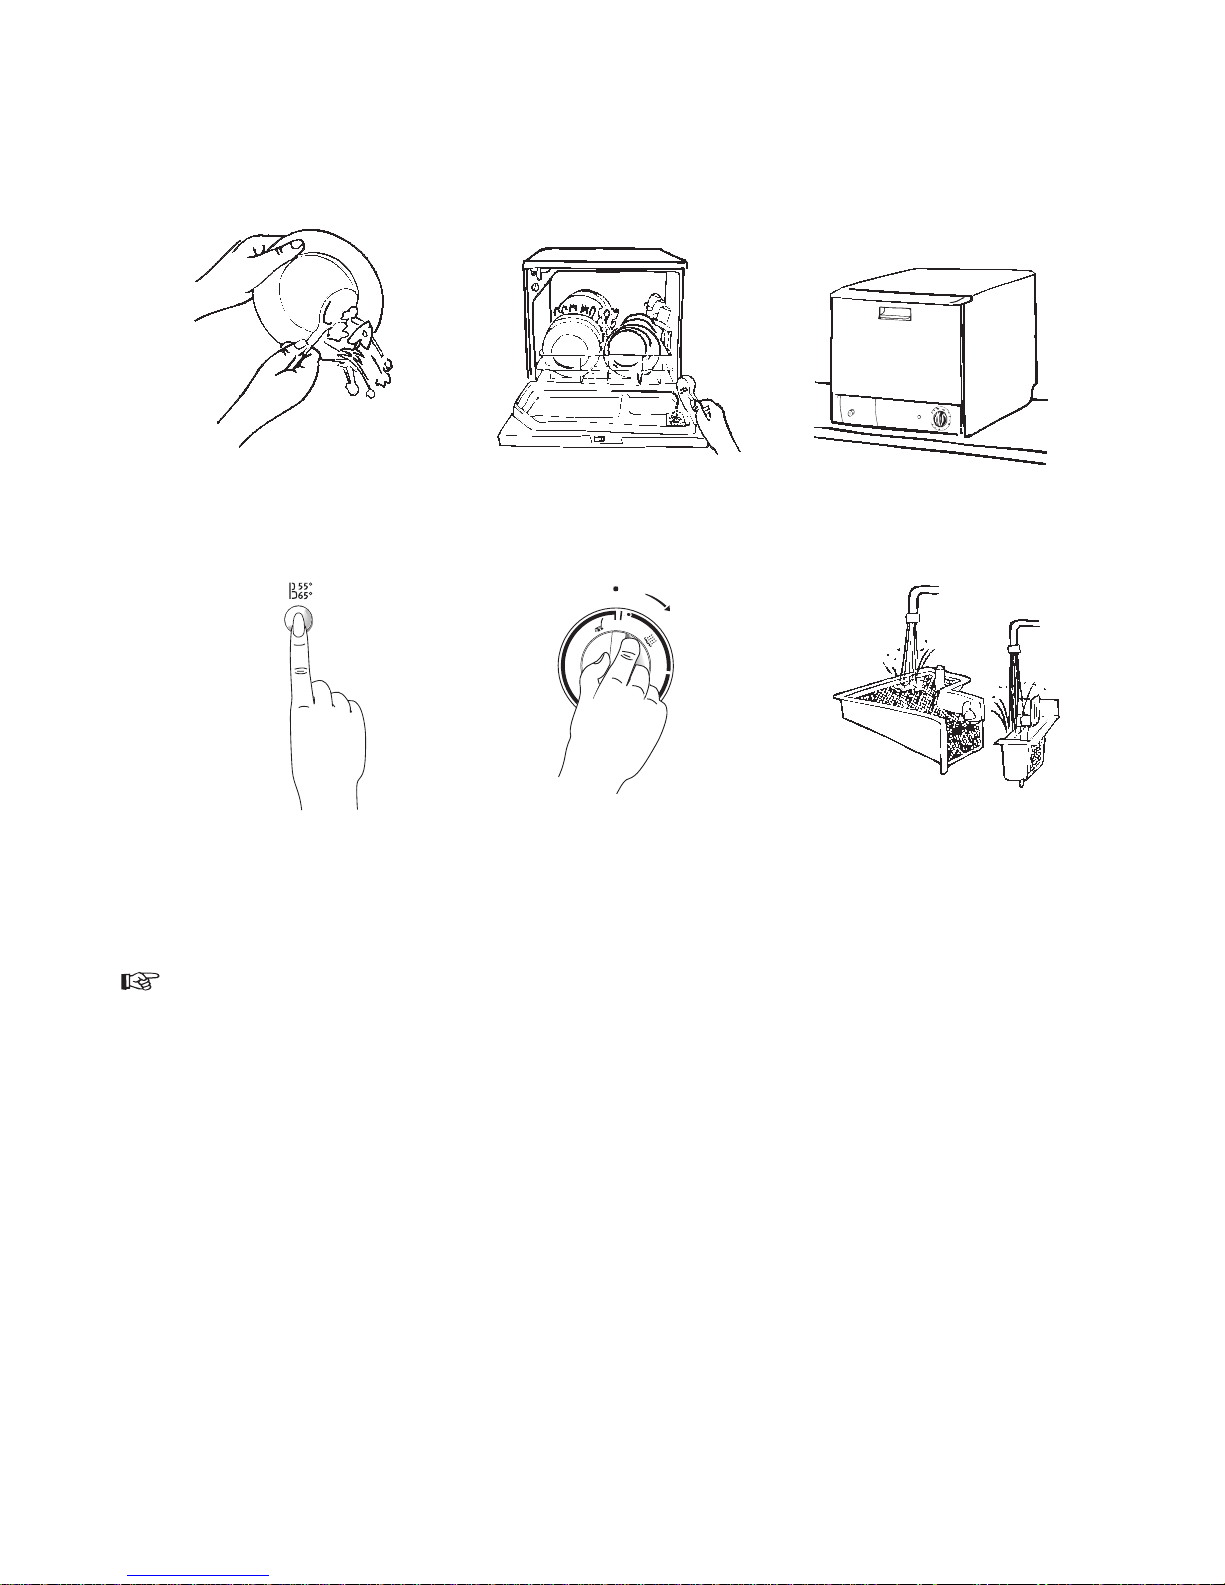
Starting the programme
1. Scrape or rinse off solid food remnants.
2. Load the dishwasher. (See the basket and loading).
Pour detergent into the detergent dispenser, about 1-2
tablespoons for a normal load.
3. Close the door.
4. Select the required temperature.
5. Start the dishwasher by turning the programme knob
to the start position.
6. Check the filters to see whether they need cleaning
when the dishwasher has finished the wash.
o
1
2
3
5
4
6
Page 8
• If water leaks from the machine • Turn off the water supply tap or stopcock
immediately and isolate the machine from the
electrical supply by removing the plug from the wall
socket.
• Check that all seals, seams and connections are
watertight.
There is always a certain risk of leakages in any machine connected to a water supply, no matter what water safety
features it may have. Therefore it is advisable always to turn off the water supply tap when the machine is not in use.
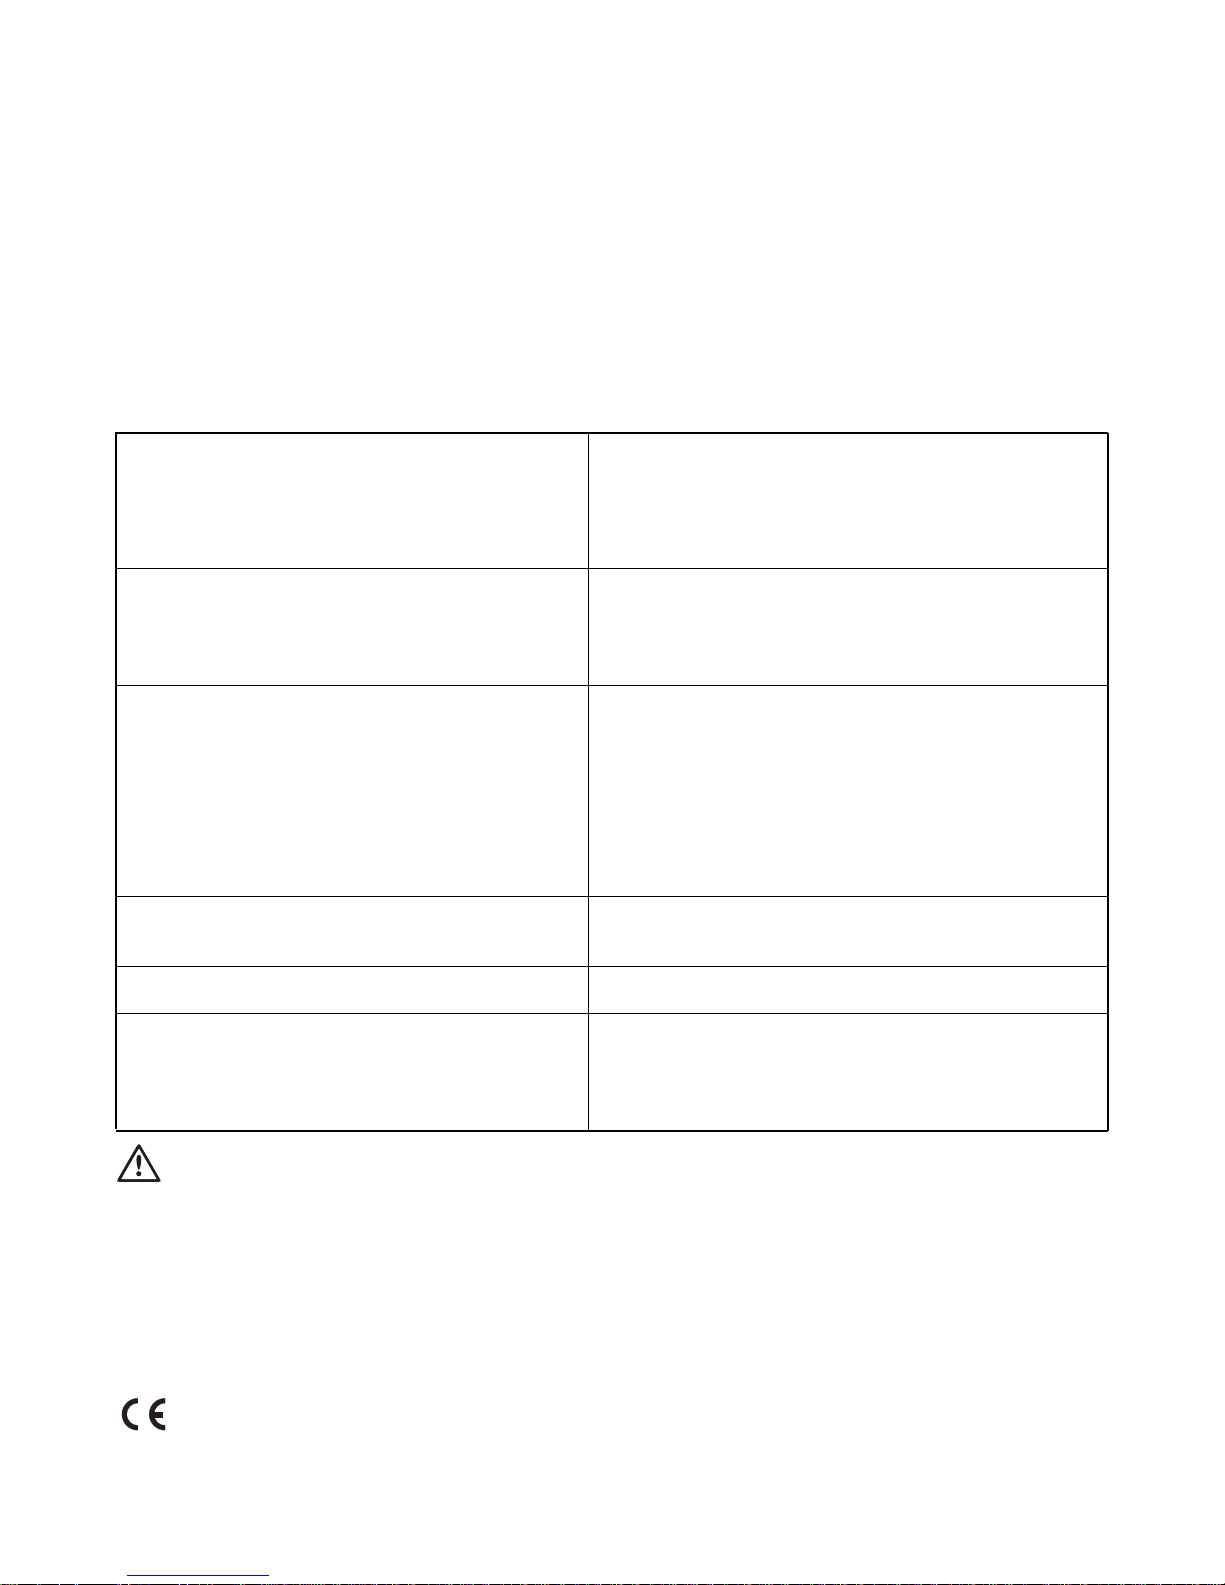
Check the following before calling a repairman:
• Dishwasher fails to start.
• Is the door properly closed?
• Have you set the programme knob properly?
• Is the water tap turned on?
• Is the dishwasher plugged in?
• Has the fuse blown?
• Water not discharged at end of cycle. • Did you open the door before the light went out
and the cycle ended?
• Are the filters clogged?
• Is the discharge hose blocked?
• Dishes not washed satisfactorily. • Has anything prevented the spray arm from rotating?
• Were the dishes packed too close together?
• Did you use enough detergent?
(Correct amount: about 1-2 tablespoons/load)
• Are the filters clogged?
• Is the rinse aid dispenser empty?
• Are the spray arm holes clogged?
• Are the filters fitted correctly?
• The dishwasher is noisy. • Are the dishes rattling against each other?
• Is the spray arm knocking against the dishes?
• The door is difficult to close. • Is the dishwasher level?
• Dishes dull or streaky. • Limescale from hard water has probably formed in the
machine and is being deposited on the dishes. Buy a
limescale remover and follow the instructions on the
package to descale the dishwasher.
- 8 -
This appliance complies with the following E.E.C. directives:
– 73/23/EEC, dated 19.02.1973 – low-voltage directive.
– 89/336/EEC, dated 03.05.1989 (incl. amendment
– 92/31/EEC) – directive on electromagnetic compatibility.
In the event of a fault
Never attempt to repair the dishwasher yourself.
Repairs carried out by unauthorised or inexperienced
persons can cause injury or serious malfunctioning.
Page 9
- 9 -
Service
Service and spare parts
Servicing and repairs must be carried out by a service
company authorised by the supplier. Use only spare parts
supplied by these.
Before calling service, use the trouble shooting table
”In the event of a fault” to try to attend to the fault yourself.
If service is called in to solve a problem that is in this list,
there is a risk that you will be responsible for the cost.
This is also true if you have used the appliance for a purpose other than it is intended for.
Note that electrical faults shall always be rectified by a
certified electrician.
State the appliance’s model designation, product- and
serial numbers according to the data plate affixed to the
rear of the dishwasher.
You can record these details here:
TYPE. ............................................................
MOD. ............................................................
PROD.NO. ............................................................
SER.NO. ............................................................
Purchase date: ..........................................................
Under what circumstances does the fault occur?
Installation instructions
Any electrical work required to install this
appliance, should be carried out by a qualified
electrician or competent person.
Any plumbing work required to install this
appliance, should be carried out by a qualified
plumber or competent person.
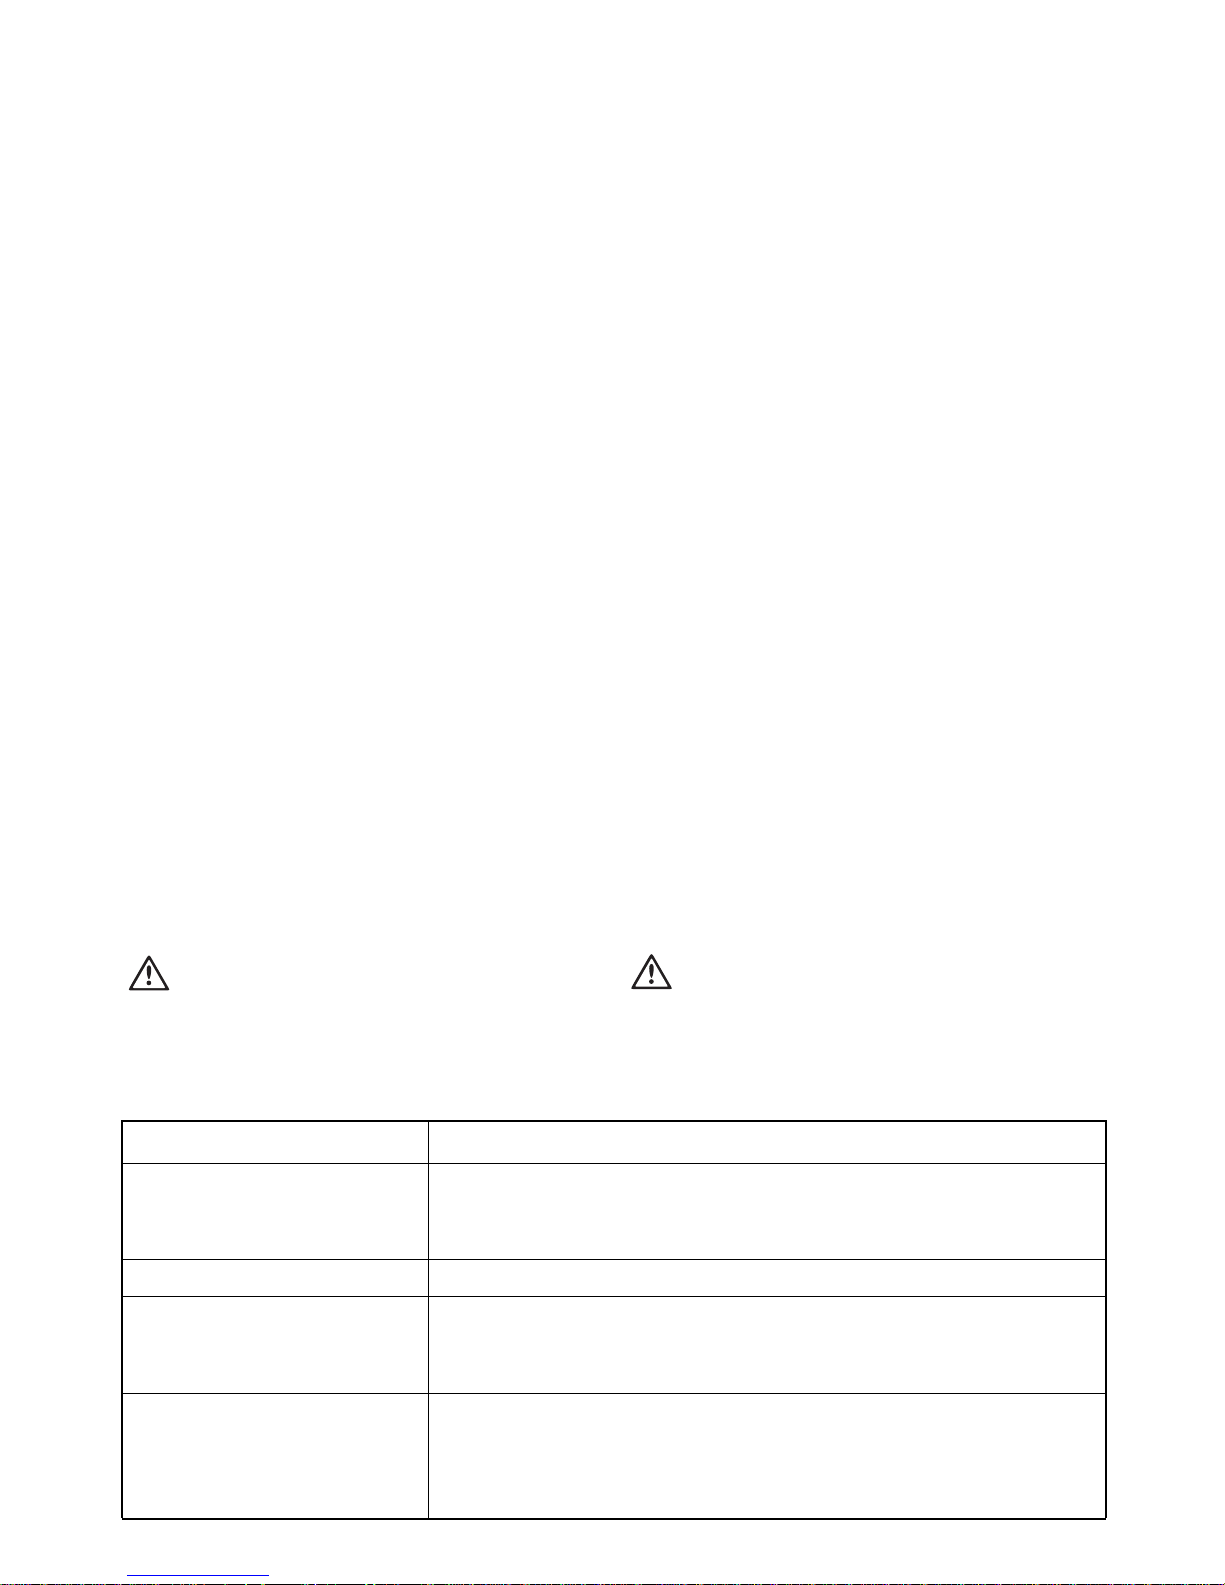
Technical specifications
Capacity: 5 place settings accordance EN 50242
Dimensions: Height 460 mm
Width 450 mm
Depth 480 mm
Weight: Net 17 kg
Water pressures: Minimum 50 kPa (0,5 bar)
Maximum 1000 kPa (10 bar)
Water temperature: Maximum 65° C
Electrical data: Power supply 230 V - 50 Hz
Fuse 10 A
Heating element 1200 W
Power rating 1280 W
Page 10
- 10 -
Damages
If the dishwasher has been damaged during transport,
you should immediately notify the company responsible
for delivering it.
Check that the dishwasher is undamaged. If you discover
any damage, faults or that anything is missing, you should
notify the dealer immediately.
Never leave packaging material in a place
where children may play with it.
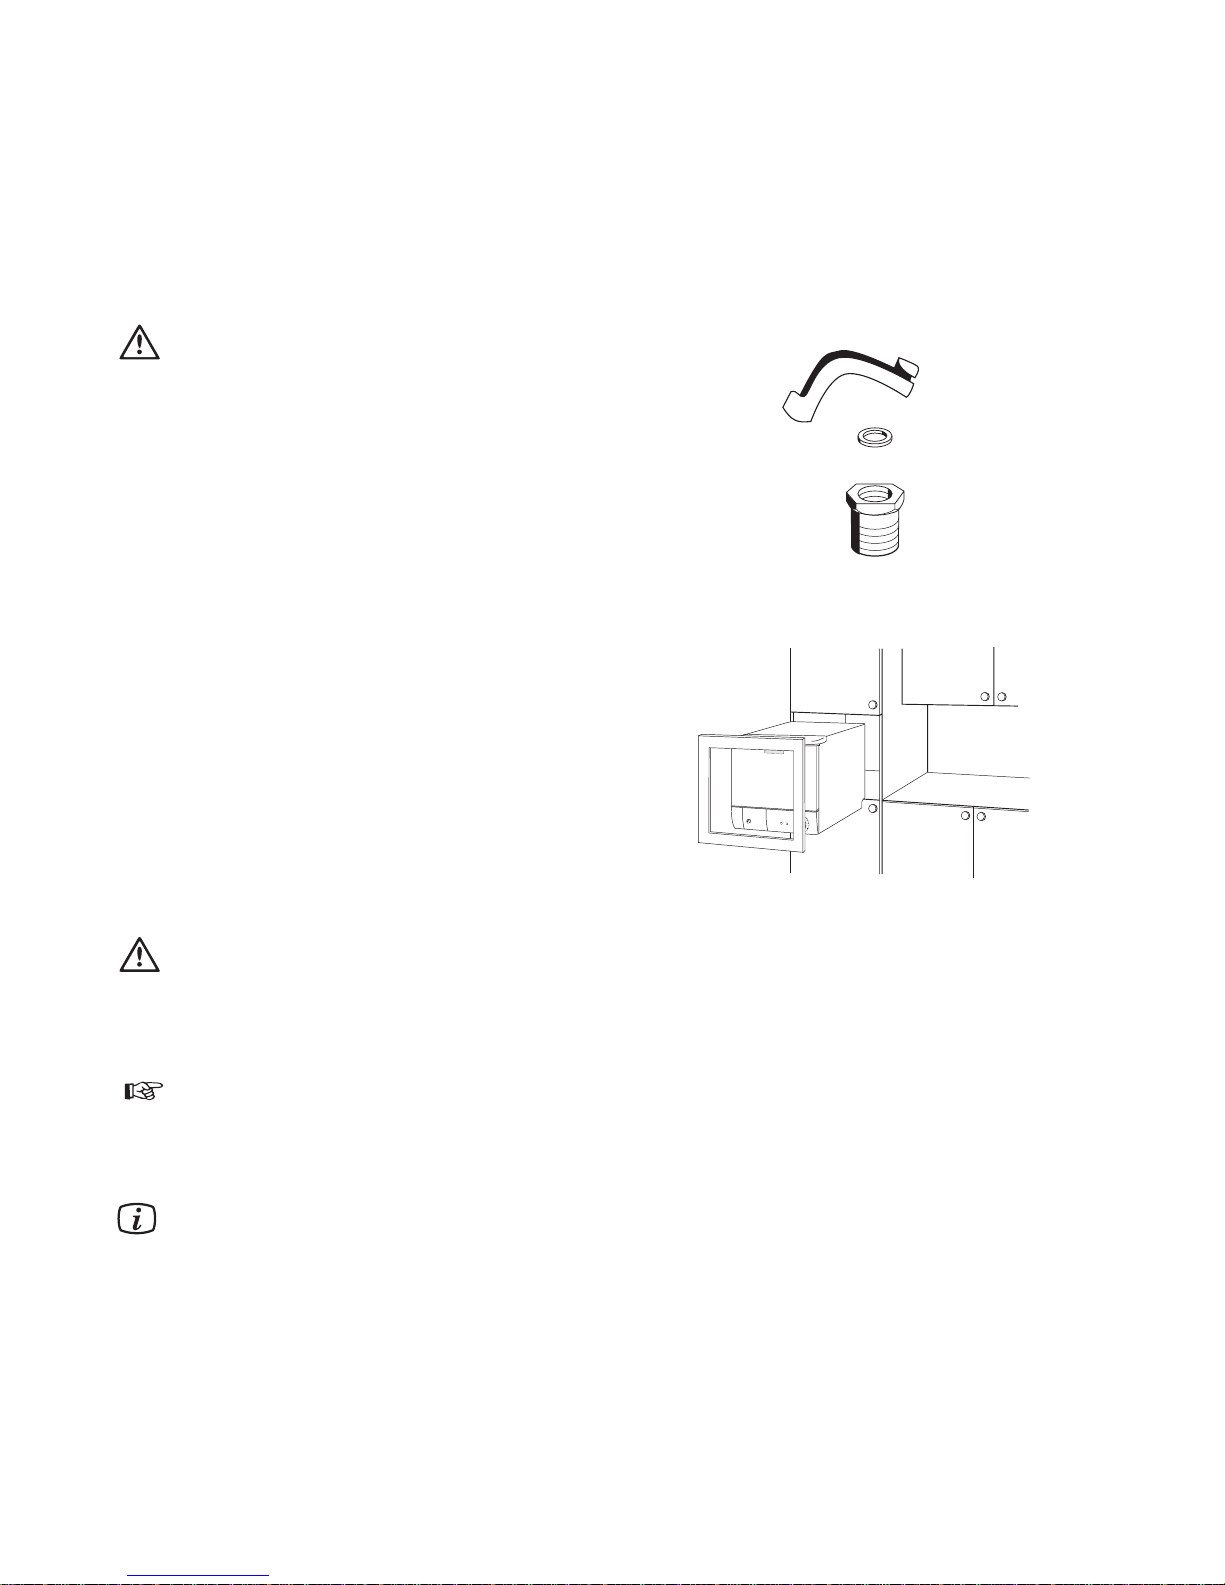
Check that the following accessories are supplied with the
dishwasher when you unpack it:
● Elbow for discharge hose (1)
● Rubber seal (2)
● Restrictor 1/2” (3)
Use
This dishwasher is designed solely for washing household
utensils suitable for washing in a dishwasher. Using it for
other purposes may damage it and invalidate the guarantee.
Building-in
If you want to build the dishwasher into your kitchen furniture, it is important to use our approved build-in kit. This
comes with the correct instructions needed to observe
all the relevant regulations.
You can obtain the build-in kit from the same place where
you bought the dishwasher.
Protecting the dishwasher against
freezing
If the dishwasher is placed in an environment
where the temperature sometimes fall below
0° C, there is a risk that the small amount of
water which remains inside the parts of the
dishwasher will freeze and damage it.
To prevent this you should:
1. Turn off the water supply to the dishwasher.
2. Drain the inlet and discharge hoses.
3. Select a wash programme and let the machine
run for a few seconds.
The appliance is only to be used and stored indoors
at normal room temperature. The manufacture is
not responsible for any frost damage.
Unpacking
1
2
3
Page 11
- 11 -
Installation
Positioning
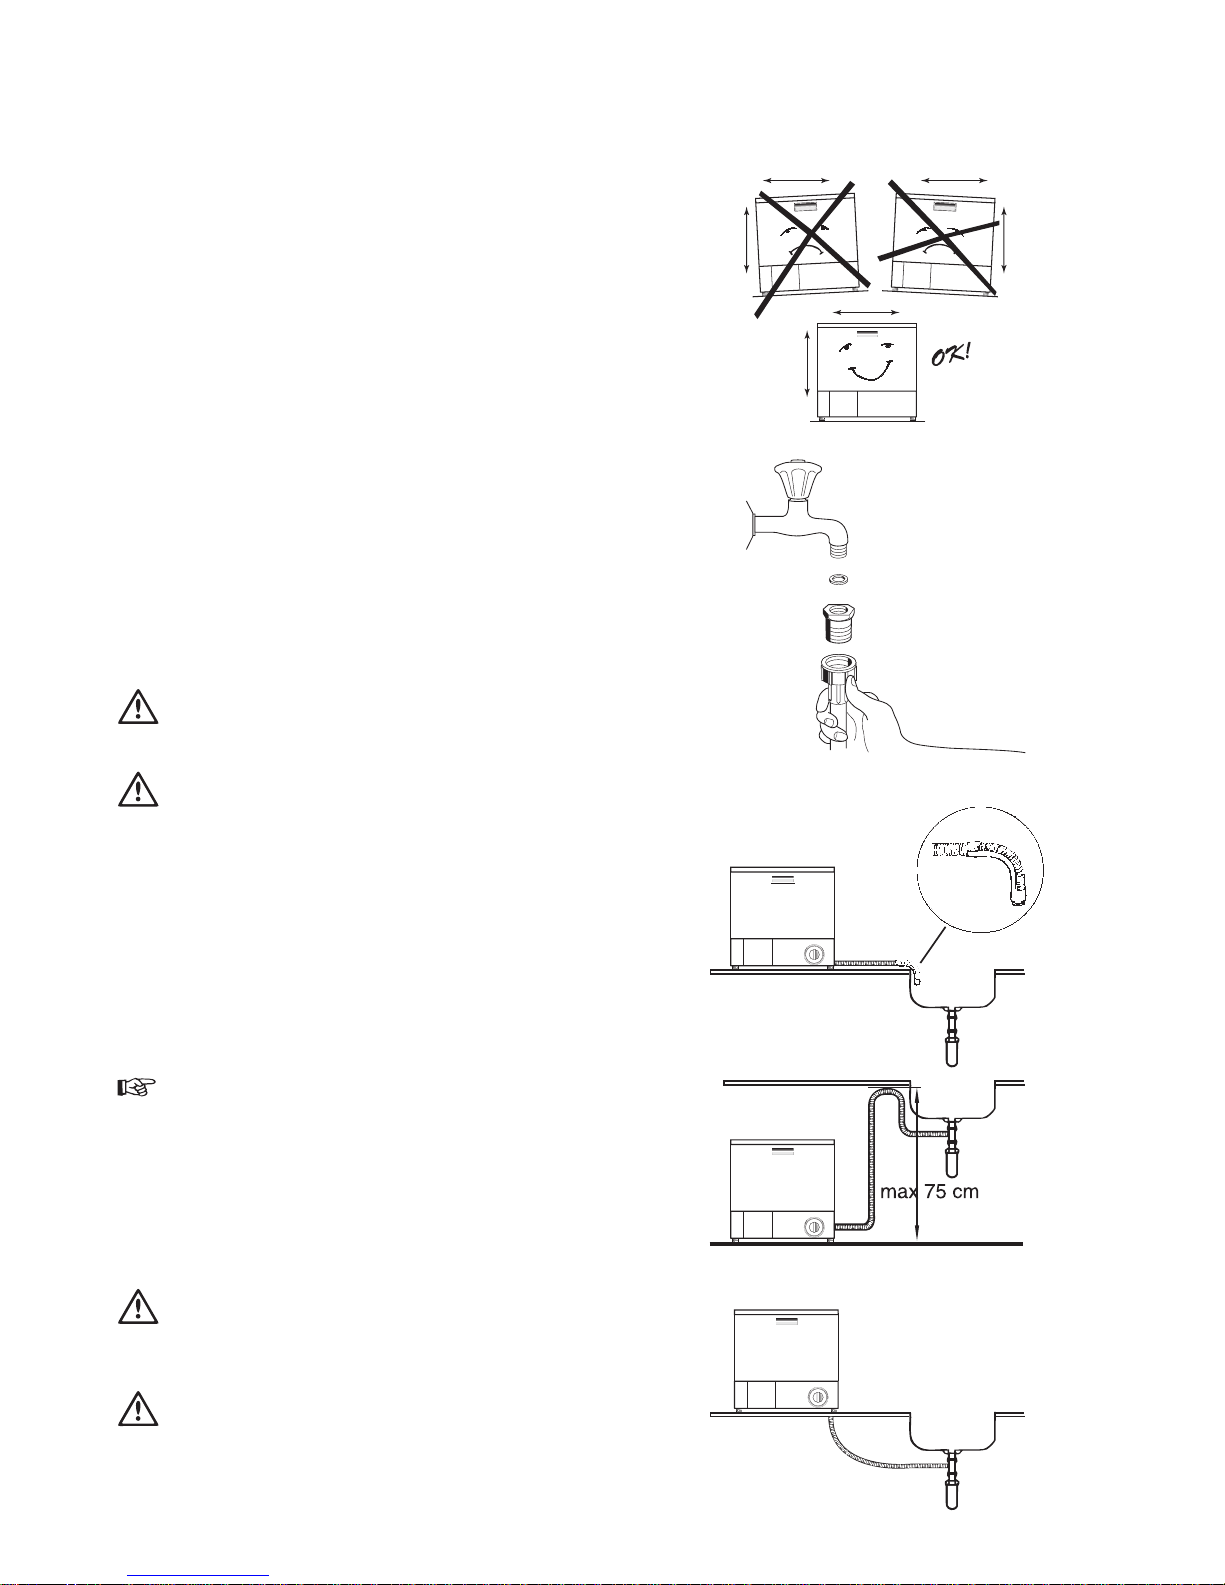
The dishwasher is intended to be installed on a kitchen
drainer or worktop. To function properly, make sure that
the appliance is level. Its height can be adjusted with the
adjustable feets (8 mm each).
Water inlet
The temperature of the water supply should not exceed
65° C and the pressure should be between 50-1000 kPa
(0,5 - 10 bar).
It is important to have a tap or stopcock, positioned close
to the dishwasher and with easy access. Special mixer
taps with dishwasher connections are available, as well as
adaptors for older mixer taps. Connect the inlet hose to a
tap with a 3/4" pipe thread. If necessary, use the restrictor (1/2") supplied.
The inlet hose must not be joined onto any form of extension
hose. If it is too short, the entire hose must be replaced
with a longer high-pressure hose, specially designed for
the purpose. The end of the hose, which is connected to
the dishwasher can be turned in any direction. Loosen the
retaining nut, turn the hose, then retighten the nut.
Check that the nut and all other connections
are tight before the machine is moved into
position.
Use only the inlet hose supplied to the dishwasher, do not reuse the old inlet hose.
Water drainage
Place the discharge hose over the sink as illustrated.
It must not at any point be higher up than 75 cm over the
surface which the dishwasher is standing on. If it runs higher, operation of the dishwasher might be impaired.
It is also important to ensure that the inside diameter of
the hose is not less than 13 mm at any point. If the
discharge hose is too long, it can easily be cut to the right
length.
1. Cut the hose to a suitable length, using a sharp
knife.
2. Fit the elbow supplied onto the end of the hose.
Electrical connection
The dishwasher is supplied with a lead and electrical plug
for connection to a 230 V earthed wall socket, which
should be easily accessible and protected by a 10 A fuse.
Before any work is carried out on the dishwasher, it must be isolated from the electric mains
supply, for example by removing the plug from
the wall socket.
Permanent electrical installation must be carried out by an authorised electrician or competent person.
Page 12

Technical changes possible
 Loading...